Embed Size (px)
Citation preview
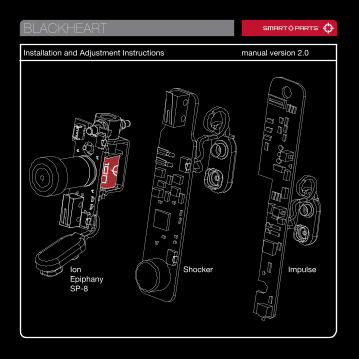
BLACKHEART
ImpulseShockerIon Epiphany SP-8
Installation and Adjustment Instructions manual version 2.0
TABLE OF CONTENTS
Installation 02
Shocker Operation/Adjustment 03-05
Ion Operation/Adjustment 06-08
Impulse Operation/Adjustment 09-11
Mode Descriptions 12-14
Tournament Settings 15
01800.922.2147 www.smartparts.com
The Blackheart circuit board upgrade is available for the Smart Parts Impulse, Ion, SP-8, Epiphany, Shocker SFT, Nerve and Shocker NXT. It provides a significant increase in electronic control, adjustment and ease of programming.
While every effort has been made to ensure that the information contained in this guide is accurate and complete, no liability can be accepted for errors or omissions. Smart Parts, Inc. reserves the right to change the specifications of the Blackheart at any time without prior notice. The latest version of this manual may be downloaded free of charge at www.SmartParts.com.

INSTALLAT ION
02800.922.2147 www.smartparts.com
BLACKHEARTSELECTIONThe Blackheart upgrade is in the form of a replacement for your marker’s stock circuit board. It is available in three versions for use with different Smart Parts markers. The Ion version is designed for use with Ion, SP-8 and Epiphany markers. The Shocker version is compatible with the Shocker NXT, Shocker SFT and Nerve. As its name implies, the Impulse Blackheart board works with the Impulse.
INSTALLINGTHEBLACKHEARTTo install the Blackheart, follow the disassembly instructions in your marker’s manual, remove the circuit board, and replace it with the Blackheart. It is recommended that you download the most recent manual for your marker at www.SmartParts.com.
OPTIMIZINGDWELLThe default Dwell settings of the Blackheart board are designed to provide reliable operation with your marker. Optimizing the dwell setting will maximize the gas ef-ficiency of your marker. Using the adjustment instructions in this manual, follow the dwell optimization procedure in your marker’s manual to achieve the ideal dwell set-ting for your particular marker configuration.
EPIPHANYNOTESIon Blackheart boards manufactured after the Fall of 2006 are equipped with hoses and a solenoid valve that are rated to operate in the pressure ranges utilized by the Epiphany as well as the Ion. These newer boards are easily identified by the protective wrapping on their solenoid coil. Epiphany certified Blackheart boards have a black Ion logo on a red background. Older Blackheart boards have a black wrap with a red logo, and should not be used in an Epiphany or Epiphany converted Ion or SP-8.
PLEASE READ CAREFULLY
SHOCKER OPERATION
03800.922.2147 www.smartparts.com
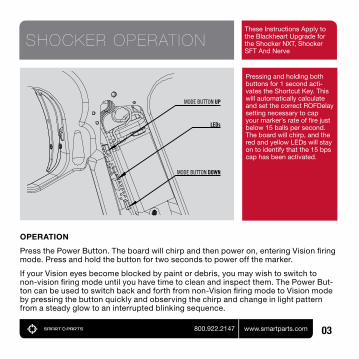
Pressing and holding both buttons for 1 second acti-vates the Shortcut Key. This will automatically calculate and set the correct ROFDelay setting necessary to cap your marker’s rate of fire just below 15 balls per second. The board will chirp, and the red and yellow LEDs will stay on to identify that the 15 bps cap has been activated.
OPERATION
Press the Power Button. The board will chirp and then power on, entering Vision firing mode. Press and hold the button for two seconds to power off the marker.
If your Vision eyes become blocked by paint or debris, you may wish to switch to non-vision firing mode until you have time to clean and inspect them. The Power But-ton can be used to switch back and forth from non-Vision firing mode to Vision mode by pressing the button quickly and observing the chirp and change in light pattern from a steady glow to an interrupted blinking sequence.
These Instructions Apply to the Blackheart Upgrade for the Shocker NXT, Shocker SFT And Nerve
SHOCKER ADJUSTMENT
04800.922.2147 www.smartparts.com
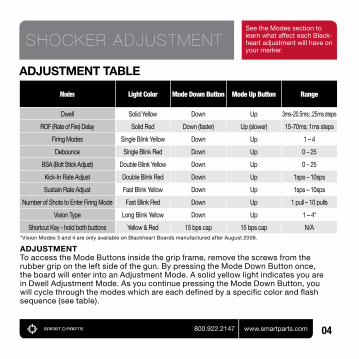
ADJUSTMENTTABLE
Modes Light Color Mode Down Button Mode Up Button Range
Dwell Solid Yellow Down Up 3ms-20.5ms; .25ms steps
ROF (Rate of Fire) Delay Solid Red Down (faster) Up (slower) 15-70ms; 1ms steps
Firing Modes Single Blink Yellow Down Up 1 – 4
Debounce Single Blink Red Down Up 0 – 25
BSA (Bolt Stick Adjust) Double Blink Yellow Down Up 0 – 25
Kick-In Rate Adjust Double Blink Red Down Up 1sps – 10sps
Sustain Rate Adjust Fast Blink Yellow Down Up 1sps – 10sps
Number of Shots to Enter Firing Mode Fast Blink Red Down Up 1 pull – 10 pulls
Vision Type Long Blink Yellow Down Up 1 – 4*
Shortcut Key - hold both buttons Yellow & Red 15 bps cap 15 bps cap N/A
ADJUSTMENT To access the Mode Buttons inside the grip frame, remove the screws from the rubber grip on the left side of the gun. By pressing the Mode Down Button once, the board will enter into an Adjustment Mode. A solid yellow light indicates you are in Dwell Adjustment Mode. As you continue pressing the Mode Down Button, you will cycle through the modes which are each defined by a specific color and flash sequence (see table).
*Vision Modes 3 and 4 are only available on Blackheart Boards manufactured after August 2006.
See the Modes section to learn what affect each Black-heart adjustment will have on your marker.

05800.922.2147 www.smartparts.com
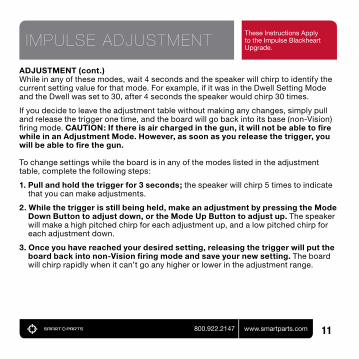
ADJUSTMENT(cont.)
While in any of these modes, wait 4 seconds and the speaker will chirp to identify the current setting value for that mode. For example, if it was in the Dwell Setting Mode and the Dwell was set to 30, after 4 seconds the speaker would chirp 30 times.
If you decide to leave the adjustment table without making any changes, simply pull and release the trigger one time, and the board will go back into its base (non-Vision) firing mode. CAUTION:Ifthereisairchargedinthegun,itwillnotbeabletofirewhileinanAdjustmentMode.However,assoonasyoureleasethetrigger,youwillbeabletofirethegun.
To change settings while the board is in any of the modes listed in the adjustment table, complete the following steps:
1.Pullandholdthetriggerfor3seconds; the speaker will chirp 5 times to indicate that you can make adjustments.
2.Whilethetriggerisstillbeingheld,makeanadjustmentbypressingtheModeDownButtontoadjustdown,ortheModeUpButtontoadjustup. The speaker will make a high pitched chirp for each adjustment up, and a low pitched chirp for each adjustment down.
3.Onceyouhavereachedyourdesiredsetting,releasingthetriggerwillputtheboardbackintonon-Visionfiringmodeandsaveyournewsetting. The board will chirp rapidly when it can’t go any higher or lower in the adjustment range.
SHOCKER ADJUSTMENTThese Instructions Apply to the Blackheart Upgrade for the Shocker NXT, Shocker SFT And Nerve

Pressing and holding both buttons for 1 second acti-vates the Shortcut Key. This will automatically calculate and set the correct ROFDelay setting necessary to cap your marker’s rate of fire just below 15 balls per second. The board will chirp, and the red and yellow LEDs will stay on to identify that the 15 bps cap has been activated.
ION OPERATION
06800.922.2147 www.smartparts.com
OPERATION
Press the Power Button. The board will chirp and then power on, entering Vision firing mode. Press and hold the button for two seconds to power off the marker.
If your Vision eyes become blocked by paint or debris, you may wish to switch to non-vision firing mode until you have time to clean and inspect them. The Power But-ton can be used to switch back and forth from non-Vision firing mode to Vision mode by pressing the button quickly and observing the chirp and change in light pattern
These Instructions Apply to the Blackheart Upgrade for the Ion, SP-8, and Epiphany
ION ADJUSTMENT
07800.922.2147 www.smartparts.com
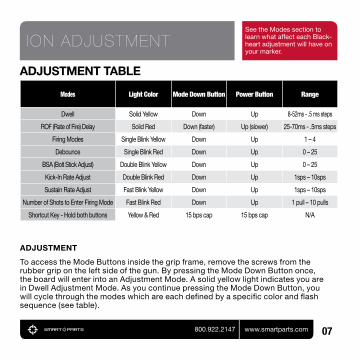
ADJUSTMENTTABLE
Modes Light Color Mode Down Button Power Button Range
Dwell Solid Yellow Down Up 8-52ms - .5 ms steps
ROF (Rate of Fire) Delay Solid Red Down (faster) Up (slower) 25-70ms - .5ms steps
Firing Modes Single Blink Yellow Down Up 1 – 4
Debounce Single Blink Red Down Up 0 – 25
BSA (Bolt Stick Adjust) Double Blink Yellow Down Up 0 – 25
Kick-In Rate Adjust Double Blink Red Down Up 1sps – 10sps
Sustain Rate Adjust Fast Blink Yellow Down Up 1sps – 10sps
Number of Shots to Enter Firing Mode Fast Blink Red Down Up 1 pull – 10 pulls
Shortcut Key - Hold both buttons Yellow & Red 15 bps cap 15 bps cap N/A
ADJUSTMENT
To access the Mode Buttons inside the grip frame, remove the screws from the rubber grip on the left side of the gun. By pressing the Mode Down Button once, the board will enter into an Adjustment Mode. A solid yellow light indicates you are in Dwell Adjustment Mode. As you continue pressing the Mode Down Button, you will cycle through the modes which are each defined by a specific color and flash sequence (see table).
See the Modes section to learn what affect each Black-heart adjustment will have on your marker.

ADJUSTMENT(cont.)While in any of these modes, wait 4 seconds and the speaker will chirp to identify the current setting value for that mode. For example, if it was in the Dwell Setting Mode and the Dwell was set to 30, after 4 seconds the speaker would chirp 30 times.
If you decide to leave the adjustment table without making any changes, simply pull and release the trigger one time, and the board will go back into its base (non-Vision) firing mode. CAUTION:Ifthereisairchargedinthegun,itwillnotbeabletofirewhileinanAdjustmentMode.However,assoonasyoureleasethetrigger,youwillbeabletofirethegun.
To change settings while the board is in any of the modes listed in the adjustment table, complete the following steps:
1.Pullandholdthetriggerfor3seconds; the speaker will chirp 5 times to indicate that you can make adjustments.
2.Whilethetriggerisstillbeingheld,makeanadjustmentbypressingtheModeDownButtontoadjustdown,ortheModeUpButtontoadjustup. The speaker will make a high pitched chirp for each adjustment up, and a low pitched chirp for each adjustment down.
3.Onceyouhavereachedyourdesiredsetting,releasingthetriggerwillputtheboardbackintonon-Visionfiringmodeandsaveyournewsetting. The board will chirp rapidly when it can’t go any higher or lower in the adjustment range.
These Instructions Apply to the Blackheart Upgrade for the Ion, SP-8, and Epiphany
08800.922.2147 www.smartparts.com
ION ADJUSTMENT

Pressing and holding both buttons for 1 second acti-vates the Shortcut Key. This will automatically calculate and set the correct ROFDelay setting necessary to cap your marker’s rate of fire just below 15 balls per second. The board will chirp, and the red and yellow LEDs will stay on to identify that the 15 bps cap has been activated.
IMPULSE OPERATION
09800.922.2147 www.smartparts.com
MODE DOWN BUTTONMODE UP BUTTON
OPERATIONPress the Power Button. The board will chirp and then power on, entering Vision firing mode. Press and hold the button for two seconds to power off the marker.If your Vision eyes become blocked by paint or debris, you may wish to switch to non-vision firing mode until you have time to clean and inspect them. The Power But-ton can be used to switch back and forth from non-Vision firing mode to Vision mode by pressing the button quickly and observing the chirp and change in light pattern from a steady glow to an interrupted blinking sequence.
These Instructions Apply to the Impulse Blackheart Upgrade.

See the Modes section to learn what affect each Black-heart adjustment will have on your marker.
IMPULSE ADJUSTMENT
10800.922.2147 www.smartparts.com
ADJUSTMENTTABLE
Modes Light Color Mode Down Button Mode Up Button Range
Dwell Solid Green Down Up 1-89
ROFDelay Solid Red Down (faster) Up (slower) 1-91
Firing Modes Single Blink Green Down Up 1 – 4
Debounce Single Blink Red Down Up 0 – 25
BSA (Bolt Stick Adjust) Double Blink Green Down Up 0 – 25
Kick-In Rate Adjust Double Blink Red Down Up 1sps – 10sps
Sustain Rate Adjust Fast Blink Green Down Up 1sps – 10sps
Number of Shots to Enter Firing Mode Fast Blink Red Down Up 1 pull – 10 pulls
Shortcut Key - Hold both buttons Green & Red 15 bps cap 15 bps cap N/A
ADJUSTMENT
To access the Mode Buttons inside the grip frame, remove the screws from the rubber grip on the left side of the gun. By pressing the Mode Down Button once, the board will enter into an Adjustment Mode. A solid yellow light indicates you are in Dwell Adjustment Mode. As you continue pressing the Mode Down Button, you will cycle through the modes which are each defined by a specific color and flash sequence (see chart).
ADJUSTMENT(cont.)While in any of these modes, wait 4 seconds and the speaker will chirp to identify the current setting value for that mode. For example, if it was in the Dwell Setting Mode and the Dwell was set to 30, after 4 seconds the speaker would chirp 30 times.
If you decide to leave the adjustment table without making any changes, simply pull and release the trigger one time, and the board will go back into its base (non-Vision) firing mode. CAUTION:Ifthereisairchargedinthegun,itwillnotbeabletofirewhileinanAdjustmentMode.However,assoonasyoureleasethetrigger,youwillbeabletofirethegun.
To change settings while the board is in any of the modes listed in the adjustment table, complete the following steps:
1.Pullandholdthetriggerfor3seconds; the speaker will chirp 5 times to indicate that you can make adjustments.
2.Whilethetriggerisstillbeingheld,makeanadjustmentbypressingtheModeDownButtontoadjustdown,ortheModeUpButtontoadjustup. The speaker will make a high pitched chirp for each adjustment up, and a low pitched chirp for each adjustment down.
3.Onceyouhavereachedyourdesiredsetting,releasingthetriggerwillputtheboardbackintonon-Visionfiringmodeandsaveyournewsetting. The board will chirp rapidly when it can’t go any higher or lower in the adjustment range.
11800.922.2147 www.smartparts.com
These Instructions Apply to the Impulse Blackheart Upgrade.
IMPULSE ADJUSTMENT

MODE DESCRIPT ION
12800.922.2147 www.smartparts.com
DWELLThis adjusts how long solenoid valve is activated for each shot, and how long the bolt stays forward on each firing cycle. Too low of a Dwell will not allow the marker to fire, or cause it to fire with inconsistent velocity. If the Dwell is set too high you will lose gas efficiency. Refer to your marker’s manual for instructions to optimize your Dwell value. ROFDELAYThis adjusts the minimum time the marker must wait between shots. Increasing the ROFDelay will raise the pause, slowing down how fast the marker can fire. Lowering the ROFDelay will decrease the pause, allowing the marker to shoot faster. FIRINGMODEThere are 4 different modes that you can cycle through while in the Firing Mode adjustment stage. Here are the different modes and their descriptions:1. [Semi-Auto] This mode is strictly semi-auto only. The kick-in rate and sustain rate are not applicable in this mode. Use this mode for playing in the NPPL Super 7 or any other field or event which doesn’t allow any ramping software. This mode is adjust-able with DEBOUNCE and ROF. 2. [3-Shot Burst] This firing mode is mostly for fun, and generally not legal at any tour-naments or most paintball fields. For each pull of the trigger the gun will fire 3 shots. This mode is adjustable with ROF. 3. [NXL Full-Auto] The name is just what it suggests, it fires one shot per trigger pull initially until a set number of trigger pulls have been completed, at which point holding down the trigger will result in repeated firing. If you happen to release the trigger, you have just under one second to pull it again and jump right back into Full Auto without the normally required kick-in shots. This mode is fully adjustable with KICK-IN RATE, NUMBER OF SHOTS TO ENTER FIRING MODE and ROF.
PLEASE READ CAREFULLY

MODE DESCRIPT ION
13800.922.2147 www.smartparts.com
4. [Rebound] This firing mode makes it much easier for any user to fire as fast as possible. It fires one shot per trigger pull at low rates of fire, but as the user pulls the trigger more frequently, Rebound responds by firing more rapidly. Rebound mode can be fully adjusted with KICK-IN RATE, SUSTAIN RATE, NUMBER OF SHOTS TO ENTER FIRING MODE and ROF. DEBOUNCEThis setting will affect all firing modes, although it is normally only effective in Semi-Auto Mode. The lower you set the Debounce, the more sensitive it makes the trigger. If you set the Debounce too low and pull the trigger slowly, the kick of the marker might make it shoot more than once, which is not allowed in some tournaments and paintball fields. If you set the Debounce to 0, a Full Auto condition will result, which is prohibited at many fields and tournaments. BSA(BoltStickAdjustment)This setting affects all firing modes and is used to help compensate for any first shot drop-off (FSDO.) FSDO is when a gun’s first shot is very low in velocity compared to the subsequent shots - usually due to the bolt sticking in place. After the gun sits for 10 seconds, the board will increase the Dwell setting to alleviate any first shot drop. The increase is based on the value of your BSA setting. If you do not experience any drop-off, then you should be at the lowest setting within the BSA to avoid the risk of hot gun penalties.KICK-INRATEThis setting affects REBOUND and NXL FULL AUTO; it refers to the shots per second you must reach by pulling the trigger before the board will “kick-in” to NXL Full Auto or Rebound. The higher the setting, the harder it will be to kick into either of the modes. The lower the setting, the easier it will be to kick in.
PLEASE READ CAREFULLY

MODE DESCRIPT ION
14800.922.2147 www.smartparts.com
SUSTAINRATEThis setting affects REBOUND; it refers to the shots per second you must sustain by pulling the trigger to keep the board “kicked in” to Rebound. The higher the setting, the faster you will have to pull the trigger to sustain the Rebound.NUMBEROFSHOTSTOENTERFIREMODEThis setting affects REBOUND and NXL FULL AUTO; it adjusts how many shots are needed to be pulled in order for it to kick into Full Auto or Rebound Modes. You can adjust it from 1–10 pulls. This means that if it is set to 10, you must pull the trigger 10 times before it will kick into the chosen mode.VISIONTYPE(ShockerVersionOnly)This setting tells the Blackheart what type of Vision eye it will use. Type 1 - Shocker SFT Reflective Vision. Type 2 - Nerve. Type 3 - Shocker NXT Breakbeam Vision. Type 4 - Shocker NXT Toggle Vision. Types 3 and 4 are only supported on Blackheart boards manufactured after August 2006. See the Shocker NXT manual for more information on Vision options.SHORTCUTKEYThis affects all firing modes and is a handy feature. The Shortcut key will read the Dwell value and automatically calculate and set the ROF value to cap your marker at a maximum of 14.7 balls per second, for use where tournaments allow a maximum of 15 balls per second. The Shortcut Key allows for a 0.3 bps margin of error. If you wish to bypass this margin of error and get as close as possible to a 15 ball per second cap as possible, adjust the ROFDely value manually.
PLEASE READ CAREFULLY

TOURNAMENT SETTINGS
15800.922.2147 www.smartparts.com
IDEALSETTINGSFORMAJORTOURNAMENTLEAGUES These settings are based on 2007 season rules. Check leagues for rule updates.
NXL Mode: NXL Kick-In Rate: 1 Number of Shots to Enter Firing Mode: 3 Use Shortcut Key to calculate and set ROFDelay for 15 bps limit
PSP Mode: Rebound Kick-In Rate: 1 Sustain Rate: 1 Use Shortcut Key to calculate and set ROFDelay for 15 bps limit Number of Shots to Enter Firing Mode: 3.
NPPL Mode: Semi-auto Rebound: As low as possible without causing the trigger to “bounce” ROFDelay:minimumvaluethatprovidesreliableoperation.
Millennium Mode: Rebound Series Kick-In Rate: 8 Sustain Rate: 8 Use Shortcut Key to set ROF Number of Shots to Enter Firing Mode: 3.
CFOA Mode: Rebound Kick-In Rate: 1 Sustain Rate: 1 Use Shortcut Key to calculate and set ROFDelay for 15 bps limit Number of Shots to Enter Firing Mode: 3
PLEASE READ CAREFULLY


![KULIAH TUMOR MARKER S.ppt [Read-Only] - ocw.usu.ac.idocw.usu.ac.id/.../elo173_slide_tumor_markers.pdf · TUMOR MARKER’S Prof. Adi Koesoema Aman . ... Klasifikasi Penanda Tumor](https://img.pdfslide.us/doc/110x75/5a77bc1f7f8b9a93088e0a67/kuliah-tumor-marker-sppt-read-only-ocwusuacidocwusuacidelo173slidetumor.jpg)