Embed Size (px)
Citation preview
“It is not the strongest or the most intelligent who will survive but those
who can best manage change.”
Charles Darwin, Biologist
Biology Plants & Photosynthesis
Support Documents

Plants & Photosynthesis – Support Documents
Contents
01 Introductory Activity - Different types of leaves Teacher notes
02 Introductory Activity - Images of Leaves
03 Demonstration 1.1 - Venus Fly Trap Pupil Sheet
04 Demonstration 1.1 - Insectivorous plants colouring pages
05 Investigation 2.1 - Holly leaf activity sheet
06 Demonstration 3.3 - Plenary Hotel Saguaro Cactus
07 Investigation 3.3 - Barrel Cactus support
08 Investigation 4.2 - Uptake - Evaporation in Leaves Preparation
09 Investigation 4.3 - Observing the transport system of plants Teacher notes
10 Investigation 4.3 - Observing the transport system of plants
11 Investigation 4.3 - Observing the transport system in plants (A)
12 Investigation 4.3 - Observing the transport system in plants (B)
13 Investigation 6.2 - Stomata Teacher notes
14 Investigation 6.2 - Stomata Pupil Sheet
15 Investigation 8.1 - Teachers Sheet - Investigating Seed Germination
16 Demonstration 9.2 - Plant Collection Teacher Notes
17 Demonstration 11.1 - Tree Growth Teachers Information
18 Demonstration 11.1 - Tree Role Play Activity
19 Microscope Recording Sheet
20 Homework Van Helmont
21 Plant products information cards
22 Exit Ticket

Plants & Photosynthesis - Introductory Activity – Teachers’ Notes
Different types of leaves
The dicotyledonous leaf
A typical leaf of a dicotyledonous plant consists of two main parts :
the blade
the petiole
The blade is thin and expanded and is supported by a network of veins while the petiole is slender and
connects the leaf to the stem.
The leaf blade
The leaf blade varies greatly in shape and there are numerous terms to describe its general shape.
These terms describe the leaf's
general shape, apex, base, margin, and veins
The leaf blade has two types of configuration. It may be in one unit, in which
case the leaf is called a simple leaf, or it may be divided into numerous small
parts that look like individual leaves and which form a compound leaf. It may be
difficult to tell whether one is looking at a simple leaf or the leaflet (pinna) of
a compound leaf. The distinction can be made by the fact that a leaf (simple or
compound) has an axial bud between the petiole and the stem.
The petiole
The petiole of a leaf may vary considerably and can be long, short,
rounded or flat. Some leaves have no petioles in which case they are
said to be sessile. At the base of the petiole in many leaves are small
leaf-like structures called stipules e.g. in peas, beans and roses.
Between the petiole and the stem is a bud of a potential branch (an
axial bud).

Plants & Photosynthesis - Introductory Activity – Teachers’ Notes
Leaves may be arranged on the stem in a variety of ways. The place on the stem from where the leaves
grow is called a node and the part between the nodes is the internode. If only one leaf arises at a node
the leaves are said to be alternate, if there are two leaves they are opposite and if there are more
than two they are whorled.
Alternate leaves Opposite leaves Leaves in whorls
The monocotyledonous leaf
Some plants and trees are monocotyledonous e.g. bamboo, bananas and palms.
The leaves of these plants do not have petioles like typical dicotyledonous leaves. Instead, their leaves
consist of a sheath and a blade.
The sheath is often nearly as large as the blade and completely surrounds
the stem, sometimes extending over the length of the internode.
The leaf blade is characterised by parallel venation . It is often necessary
to examine the blade carefully to see that the veins are indeed parallel.
Take a look at the leaves of bamboo which is related to grass, both being
members of the same plant family, the Poaceae.
Some monocotyledonous plants possess the largest leaves in the plant
kingdom. Trees belonging to the Palm family (the Aracaceae) have very large
leaves and the Raffia palm (genus Raphia) has the largest leaves of all,
which can attain a length of 18m. Other examples of large leaves are found
in the Musaceae, the banana family, and the Strelitziaceae, the bird-of-
paradise flower family.
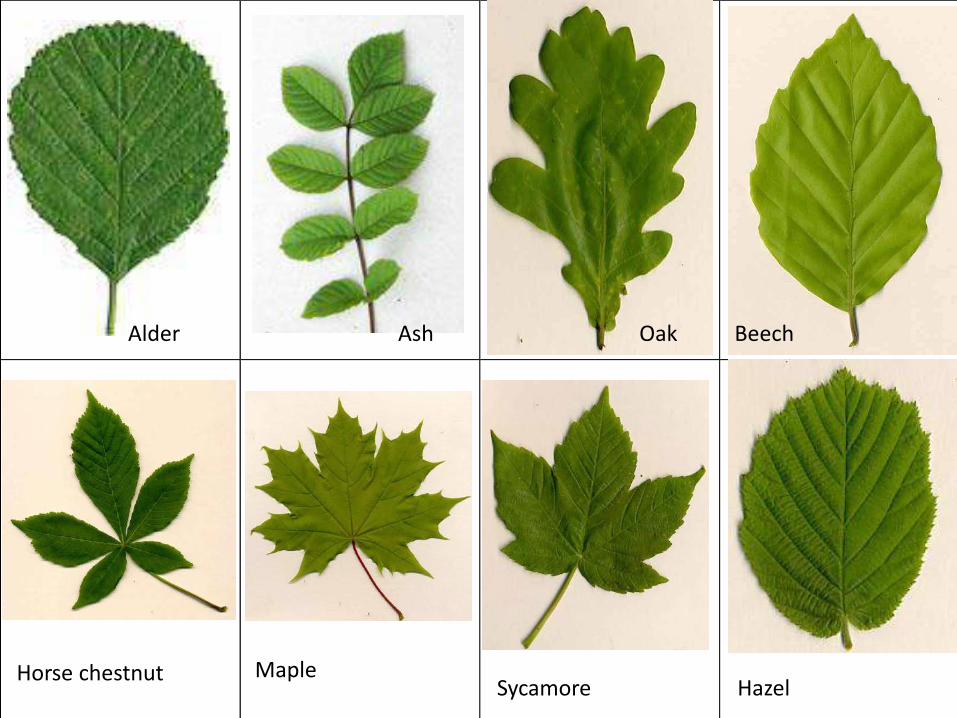
Alder Ash Oak Beech
HazelSycamoreMapleHorse chestnut

Birch AshHawthorn Rowan
Lady’s slipperHolly
Elder

Plants & Photosynthesis: Demonstration 1.1 Flesh Eaters
Investigation: Trigger Timing and Speed of Trap Closure in the Venus Flytrap
Name _______________________________ Date ___________________________
Purpose: To determine if trigger timing affects the speed of Venus Flytrap closure
Materials: Venus Flytrap plants, pencil, stopwatch
Procedure:
1. Examine a Venus Flytrap carefully and locate the trigger hairs on the trap.
2. You will be given a time interval to wait between touching a trigger hair twice. Touch one trigger
hair once, then wait the correct time and touch the trigger hair again. As soon as you touch the
trigger hair the second time, use a stopwatch to measure the time it takes the trap to close. Repeat
this with as many traps as possible. Record your results.
Trigger Time Delay: __________
Trial 1 2 3 4 5 6 7 8 9 10
Closing time
3. Find the average closing time from your results.
4. Collect the data from your classmates and make a class data table of Trigger Time versus closing
time.
Class Results
Trial 1 2 3 4 5 6 7 8 9 10
Closing time
5. Prepare a graph of the class results on the next page

Plants & Photosynthesis: Demonstration 1.1 Flesh Eaters
Graph:
Questions:
1. What relationship do you find between trigger time and closure time for Venus Flytraps?
Explain.
2. What is the trigger time for the fastest trap closing?
3. What survival advantages might this trigger time have for the Venus Flytrap?
4. Did you conduct a fair test? Explain.
5. Describe another question you could explore about a Venus Flytrap and how you could go
about testing it.


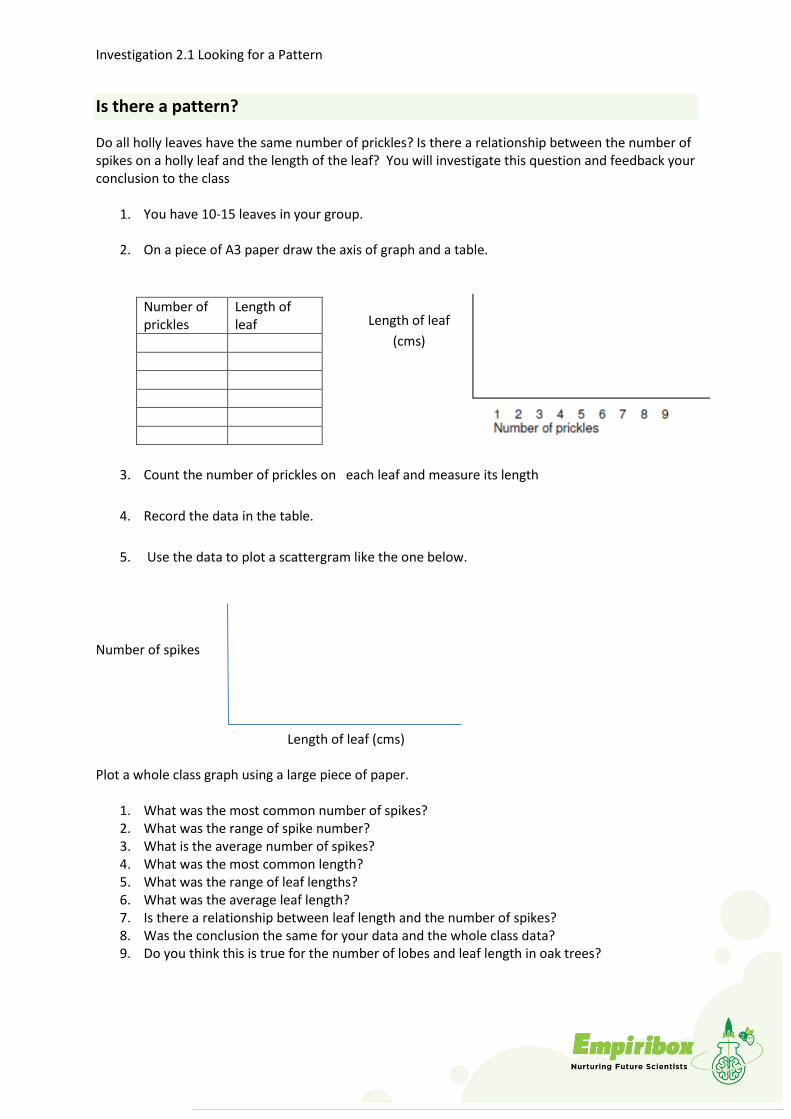
Investigation 2.1 Looking for a Pattern
Is there a pattern?
Do all holly leaves have the same number of prickles? Is there a relationship between the number of spikes on a holly leaf and the length of the leaf? You will investigate this question and feedback your conclusion to the class
1. You have 10-15 leaves in your group.
2. On a piece of A3 paper draw the axis of graph and a table.
Number of prickles
Length of leaf
3. Count the number of prickles on each leaf and measure its length
4. Record the data in the table.
5. Use the data to plot a scattergram like the one below.
Number of spikes
Length of leaf (cms)
Plot a whole class graph using a large piece of paper.
1. What was the most common number of spikes?2. What was the range of spike number?3. What is the average number of spikes?4. What was the most common length?5. What was the range of leaf lengths?6. What was the average leaf length?7. Is there a relationship between leaf length and the number of spikes?8. Was the conclusion the same for your data and the whole class data?9. Do you think this is true for the number of lobes and leaf length in oak trees?
Length of leaf
(cms)


• The Saguaroprovides homeand protection forbirds and othersmall animals.
• It provides foodfor its neighbours.
• It can store largeamounts of waterin its fleshy tissue
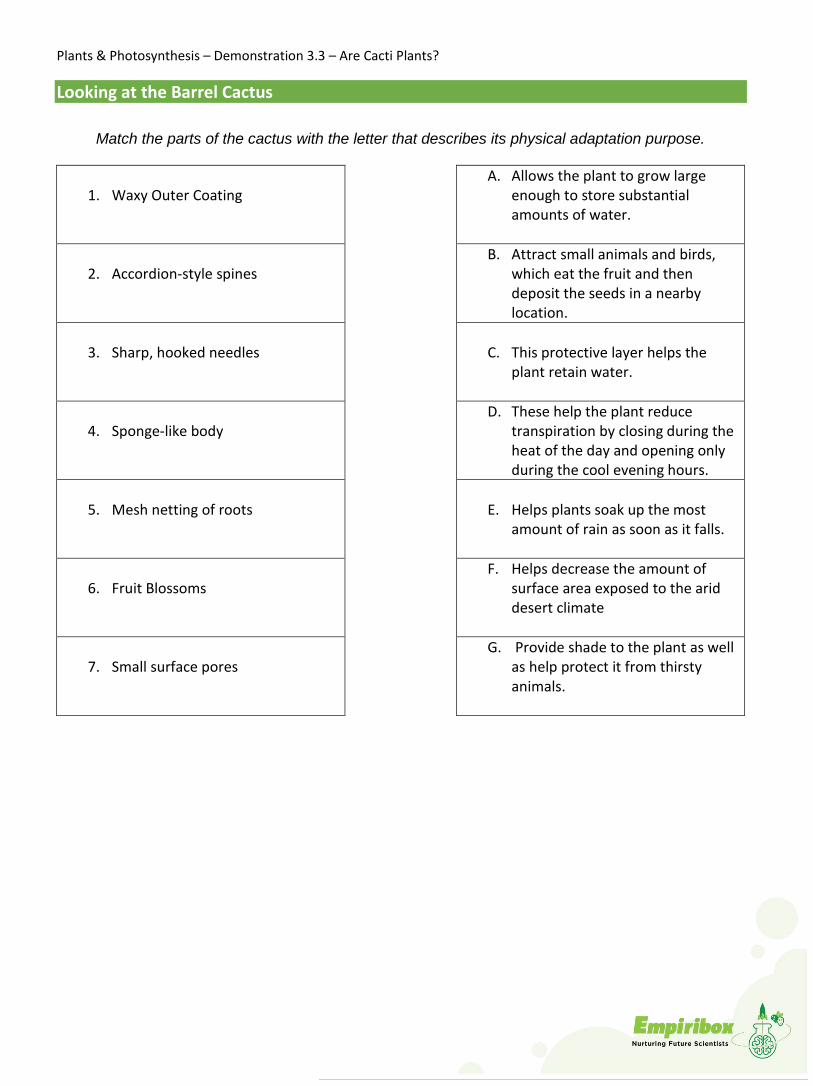
Plants & Photosynthesis – Demonstration 3.3 – Are Cacti Plants?
Looking at the Barrel Cactus
Match the parts of the cactus with the letter that describes its physical adaptation purpose.
1. Waxy Outer CoatingA. Allows the plant to grow large
enough to store substantial amounts of water.
2. Accordion-style spinesB. Attract small animals and birds,
which eat the fruit and then deposit the seeds in a nearby location.
3. Sharp, hooked needles C. This protective layer helps the plant retain water.
4. Sponge-like bodyD. These help the plant reduce
transpiration by closing during the heat of the day and opening only during the cool evening hours.
5. Mesh netting of roots E. Helps plants soak up the most amount of rain as soon as it falls.
6. Fruit BlossomsF. Helps decrease the amount of
surface area exposed to the arid desert climate
7. Small surface poresG. Provide shade to the plant as well
as help protect it from thirsty animals.

Plants & Photosynthesis – Investigation 4.2 – Where Does Water leave the Leaf?
P a g e | 1
Experiment 1: Uptake and evaporation in leaves - preparation
Outline: Single leaves have one, both or neither surface-coated with vaseline to restrict evaporation. Each leaf stalk is placed in a test-tube of water and the uptake measured after several days.
Prior knowledge: Some idea about evaporation; permeability of plant epidermis; presence of stomata (not essential).
Advance preparation and materials
Leaves: Pelargonium (geranium) and nasturtium leaves are suitable, having long petioles. Each experiment needs four leaves. Vaseline: White vaseline is softer and easier to smear than yellow. A teaspoonful in a watch glass or tin lid for each bench should be sufficient. Newspaper: Provide a folded sheet of newspaper for each experiment to prevent vaseline getting on the bench. Paper towels: (or clean rags) for the students to wipe their fingers on.
Apparatus-per group
test-tube rack and 4 test-tubes vaseline containers as above marker pen 2 cm3 plastic syringe paper towels, newspaper beaker or jar for water
NOTES:
(a) If the experiment is left for a week, it is best to place the tubes in a shady position so that little or no topping up is required. (b) If mid-week topping up is necessary there is no need to bring the water level up to the mark each time. The student simply adds 1 or 2 cm3 to keep the petiole covered and records this volume in the table. (c) Even if the leaves are carefully matched for size, there is still likely to be a wide variation in uptake compared with the small difference between tubes 2 and 3 (see Question 7). If the class results are combined, these variations will probably cancel out, leaving a clear overall trend.

Plants & Photosynthesis – Investigation 4.2 – Where Does Water leave the Leaf?
P a g e | 2
Experiment 1: Discussion
1 (a) In what way would you expect a layer of Vaseline to affect evaporation from a leaf surface? (b) How might the Vaseline produce this effect?
2 Which of the four leaves (a) took up least water, (b) evaporated least water? What assumptions are you making in your answer to (b)?
3 (a) What difference in water loss was there between leaves 2 and 3? (b) Suggest an explanation for this difference.
4 Would you expect the upper or lower surface of leaf number 1 to lose the greater amount of water? Explain your answer.
5 Water will evaporate directly from the exposed water surface in each tube. In what way will this affect the result?
6 Why was it necessary to use leaves of similar size?
7 Four leaves of similar size were placed in test-tubes A-D, exactly as described for this experiment, but no Vaseline was used on any of them. After one week the tubes had lost water as follows: A. 6.4, B. 5.6, C. 8.0, D. 6.0 cm3. How does this result affect the interpretation (a) of your own results, (b) of the combined class results?
fill the tube to the mark
the syringe has delivered 1.3 cm3
Fig. 1 Fig. 2
Plants & Photosynthesis – Investigation 4.2 – Where Does Water leave the Leaf?
P a g e | 3
Experiment 1: Discussion - answers
1 (a) A layer of Vaseline should reduce evaporation from a leaf surface. (b) The Vaseline could (i) make an impermeable layer over the epidermis and (ii) block up the stomata.
2 (a) Leaf number 4 should take up least water. (b) The same leaf may be assumed also to have lost the least water. The assumption is that the water taken up is proportional to the water lost. There is no need to assume that the uptake and loss are the same.
3 (a) It is expected that leaf number 2 will lose more water than leaf number 3 though the difference may be small. (b) If the lower epidermis is more permeable to water than the upper epidermis because of a thinner cuticle or more numerous stomata, covering it with Vaseline will reduce evaporation more drastically than covering the upper surface.
4 If the results with tubes 2 and 3 are as expected, it suggests that the lower surface loses the greater amount of water.
5 Direct evaporation from the tubes will cause a higher apparent uptake by the leaves than actually occurs. Provided this is more or less the same for each tube, it will not affect the comparative results.
6 The evaporation of water from large leaves will be greater than that from small leaves and so distort the differences ascribed to the Vaseline treatment.
7 The range of differences in these results with untreated leaves is probably as great as the differences seen in an individual experiment with vaselined leaves. (a) It suggests that the differences observed in the student's experiment could be attributed to chance variations between the leaves, irrespective of Vaseline treatment. (b) If the combined class results show a decreasing water loss from tube 1 to tube 4, it can be assumed that the innate variations are less significant than the variations which result from the Vaseline treatment.

Plants & Photosynthesis – Investigation 4.2 – Where Does Water leave the Leaf?
P a g e | 4
Experiment 1: Uptake and evaporation in leaves
(a) With a marker pen, label four test-tubes 1-4 and draw a line round each tube about 1 cm from the rim.
(b) Fill each tube up to the line with tap-water and place the tubes in a rack.
(c) Collect four leaves, as nearly as possible the same size.
(d) Place one of the leaves in tube 1 so that its leaf stalk is below the water level. (Fig. 1). Treat the other leaves with Vaseline as follows: -
(e) Place a leaf on a sheet of newspaper. Smear a thin layer of Vaseline all over the upper surface of the leaf. Place this leaf in tube 2.
(f) Repeat this procedure with leaf number 3 but smear the Vaseline on only the lower surface.
(g) Repeat this procedure with leaf number 4, but smear both surfaces with Vaseline.
(h) Place the rack of tubes and their leaves in a position where they will not receive direct sunlight, and leave them for a week.
(i) Copy the table below into your notebook.
(j) From time to time during the week, check that the water level does not fall below the leaf stalk. If necessary, top up the tubes with water from a 2 cm3 syringe and make a note in your table of the volume added.
(k) At the end of the week, use a 2 cm3 syringe to add water to each tube and bring the water level up to the mark. In your table write the volume of water added in each case. If you added water during the week as well, work out the total volume of water added.
NOTE. The reading on the syringe measures the amount of water left in the barrel. The volume of water added to the tube is this figure taken away from 2 (Fig. 2).
Date set up Volume of water added
1 2 3 4
Total

Plants & Photosynthesis – Investigation 4.3 – Transport in Plants
Observing The Transport System Of Plants
The transport system in plants is made up of
Vascular bundle: a strand of longitudinal conducting tissue within plants, consisting mainlyof xylem and phloem.
Xylem - tissue within plants which conducts water and mineral salts, absorbed by roots fromthe soil, throughout the plant. Xylem tissue consists of long continuous tubes formed fromcolumns of cells in which the horizontal cross-walls have disintegrated and the cell contentshave died. The vessels thus formed are strengthened by a compound called lignin, andultimately form the wood of the plant. Associated with xylem vessels, and providingadditional strength, are specialized fibrous cells called xylem fibres, some of which are usefulto humans, for example, flax. Thus xylem is commercially important as a source of wood andfibres.
Phloem - tissue within plants which transports carbohydrate from the leaves throughout theplant. Phloem consists of tubes which are formed from columns of living cells in which thehorizontal cross-walls have become perforated. This allows the carbohydrate in aqueoussolution to move from one phloem cell into the next and thus through the plant. Because oftheir structure, phloem tubes are also called "sieve" tubes.
Part (a)
To view the stem cross-section with a microscope the slice should be as thin as possible.
Given sufficient time to absorb the dye the leaves of the celery will become almost entirelyred.
Adding dyes of different colours to biological specimens is a common technique used by scientists to help them visualize the structures and processes which occur in various organisms. Observations and Conclusion 1. The images show the basic effects of dying the water red.2. As water is transported up the celery stem, the red dye highlights the location of the vascular
bundles.3. These specialized cells form part of a system responsible for getting water from the roots to the
leaves via the plant's stem.
Before After
The section through the celery should look like this:

Plants & Photosynthesis – Investigation 4.3 – Transport in Plants
Note: In research, scientists sometimes 'tag' molecules. In this activity, we are not tagging a water molecule; rather, we are adding a coloured molecule that is transported through the plant along with the water. These are more commonly referred as "tracers". To tag a water molecule we would actually have to modify the water molecule itself, perhaps by replacing the oxygen molecule with a radioactive isotope of oxygen. Nevertheless, the basic concept is the same, that is, to create an effect whereby we can observe the biological process(es) that we are interested in studying. Part (b) Observations and Conclusion 1. Pupils should notice that the flowers begin to form red "blobs" near the end of the petals
after only a few hours.2. After a few days, red lines delineating the vascular bundles in the petals begin to form.3. The vascular system in
plants seems to beextremely efficient withrespect to its petals. Afteronly a few hours waterwill have made its way tothe tips of the petals asseen in the image here.
4. After a few days the vascular system is well defined by red lines throughout the entire petal.
Vascular plants are plants that have special tissues for transporting food, minerals, and water. These vascular tissues are made up of bundles of tubes. Phloem tubes transport food made in the leaves to other parts of the plant. The movement of water from the roots to the leaves is in xylem tubes. This upward movement of water against the downward pull of gravity is the result of capillary action.
As the water evaporates from the plant, more water molecules are pulled in at the roots. This causes a continuous flow of water to enter the roots and rise in the xylem, bringing nutrients dissolved in the water to the plant. This movement is seen by the intensifying of the dye color in the leaves.
Before After

Plants & Photosynthesis – Investigation 4.3 – Transport in Plants
Observing the transport system in plants
Part (a) Materials Needed 1. A stalk of fresh celery2. A glass jar or bottle3. Red or blue food colouring4. A sharp knife5. Magnifying glass
Procedure Step 1 In this activity we will observe the transport of water upwards in celery. You will need a stalk
of fresh celery. Separate the stalk into individual celery stems. Using a sharp knife, make a clean slice across the bottom of the celery stems. You may leave
the leaves of the celery on the top of the stem Step 2 Set a few of the celery stalks into a beaker or jar of clean tap water. Place an ample amount of red food colour dye into the water so that it is tinted a deep red
colour. Set the beaker in a warm bright location and observe any changes in the
celery stalks and their leaves for a period of several days. Check your celery and record your results
* At the end of the lesson* At the end of lunch time* At the end of the day* Tomorrow morning
Step 3 Very carefully, and with a sharp knife, cut a thin slice from the lower
part of the coloured celery. Making a bias cut (diagonally) through the stem improves the visibility of
the veins that have become coloured red with dye. Using a magnifying glass, make a simple sketch of the stem's cross-
section showing the location of the veins in the stem.
Discussion
1. Examine the diagram that you have made of your celery stem. How does it compare to thepicture shown here?
2. Where, in relation to the ridges that run up and down outside of the celerystem, are the veins found?
3. Are the veins found nearest to the inside or outside of the stem? Can yousuggest a reason for this?
4. The vascular system of the plant transports water and the dissolved materialsit contains to cells throughout the plant. What do the living cells of thevascular system get in return from the rest of the plant?
Plants & Photosynthesis – Investigation 4.3 – Transport in Plants
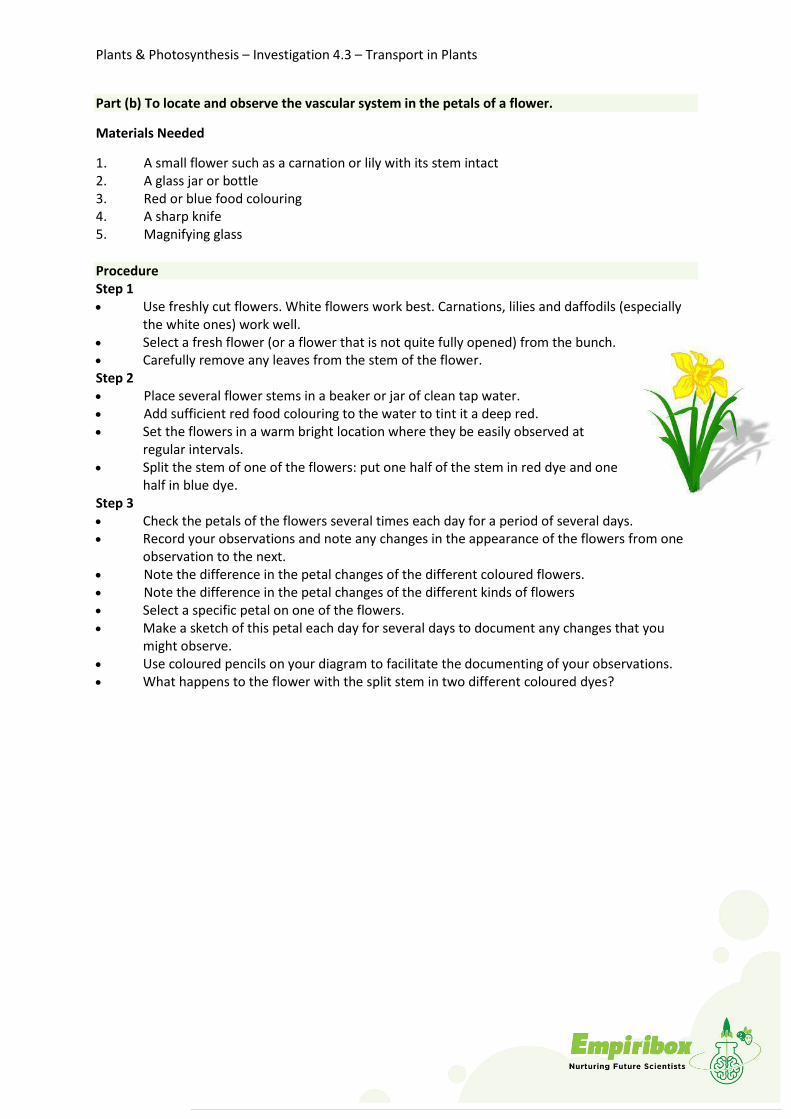
Part (b) To locate and observe the vascular system in the petals of a flower.
Materials Needed
1. A small flower such as a carnation or lily with its stem intact2. A glass jar or bottle3. Red or blue food colouring4. A sharp knife5. Magnifying glass
Procedure Step 1 Use freshly cut flowers. White flowers work best. Carnations, lilies and daffodils (especially
the white ones) work well. Select a fresh flower (or a flower that is not quite fully opened) from the bunch. Carefully remove any leaves from the stem of the flower. Step 2 Place several flower stems in a beaker or jar of clean tap water. Add sufficient red food colouring to the water to tint it a deep red. Set the flowers in a warm bright location where they be easily observed at
regular intervals. Split the stem of one of the flowers: put one half of the stem in red dye and one
half in blue dye. Step 3 Check the petals of the flowers several times each day for a period of several days. Record your observations and note any changes in the appearance of the flowers from one
observation to the next. Note the difference in the petal changes of the different coloured flowers. Note the difference in the petal changes of the different kinds of flowers Select a specific petal on one of the flowers. Make a sketch of this petal each day for several days to document any changes that you
might observe. Use coloured pencils on your diagram to facilitate the documenting of your observations. What happens to the flower with the split stem in two different coloured dyes?

Plants & Photosynthesis – Investigation 4.3 – Transport in Plants Using Celery
Observing the transport system in plants: Part (a).
Time (after set up) Observations Diagram
0
After minutes
After hours
After day
Section through the stalk
Plants & Photosynthesis – Transport in Plants using Flowers
Observing the transport system in plants: Part (b).
Time (after set up) Observations Diagram
0
after 2-3 hours
After 1 day
After 2 days
After 3 days
What happens to the flower with the split stem
in two different dyes?
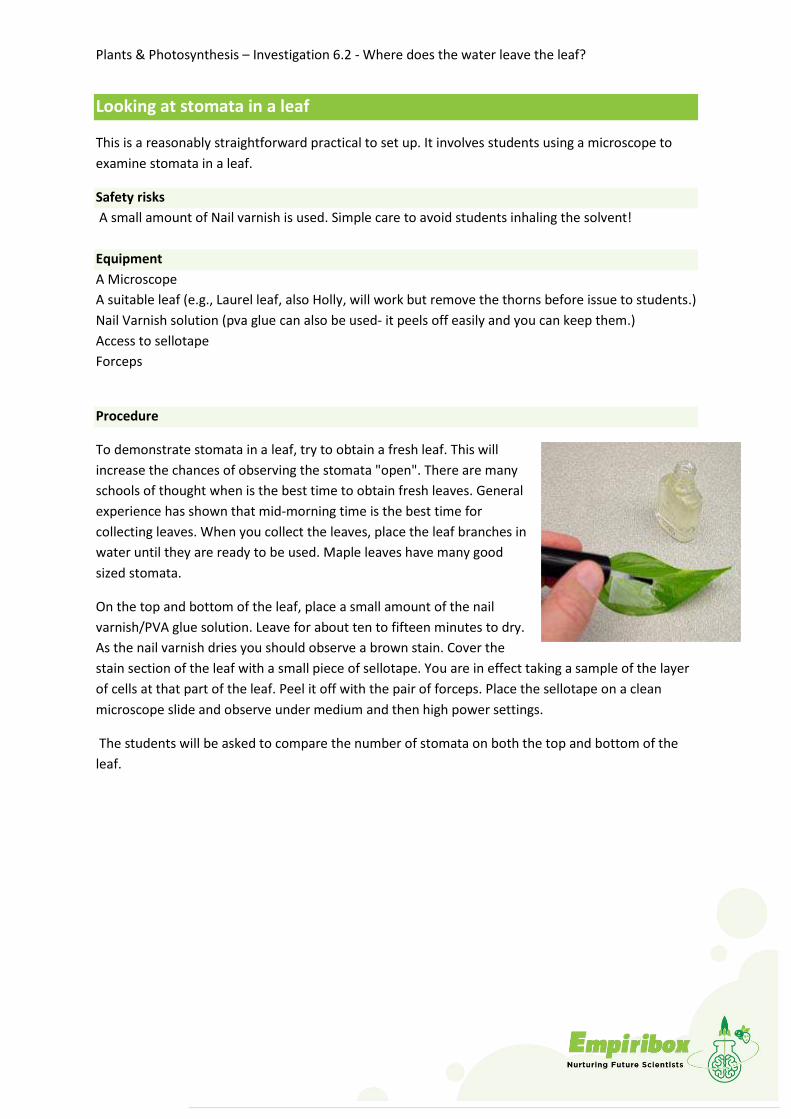
Plants & Photosynthesis – Investigation 6.2 - Where does the water leave the leaf?
Looking at stomata in a leaf
This is a reasonably straightforward practical to set up. It involves students using a microscope to
examine stomata in a leaf.
Safety risks
A small amount of Nail varnish is used. Simple care to avoid students inhaling the solvent!
Equipment
A Microscope
A suitable leaf (e.g., Laurel leaf, also Holly, will work but remove the thorns before issue to students.)
Nail Varnish solution (pva glue can also be used- it peels off easily and you can keep them.)
Access to sellotape
Forceps
Procedure
To demonstrate stomata in a leaf, try to obtain a fresh leaf. This will
increase the chances of observing the stomata "open". There are many
schools of thought when is the best time to obtain fresh leaves. General
experience has shown that mid-morning time is the best time for
collecting leaves. When you collect the leaves, place the leaf branches in
water until they are ready to be used. Maple leaves have many good
sized stomata.
On the top and bottom of the leaf, place a small amount of the nail
varnish/PVA glue solution. Leave for about ten to fifteen minutes to dry.
As the nail varnish dries you should observe a brown stain. Cover the
stain section of the leaf with a small piece of sellotape. You are in effect taking a sample of the layer
of cells at that part of the leaf. Peel it off with the pair of forceps. Place the sellotape on a clean
microscope slide and observe under medium and then high power settings.
The students will be asked to compare the number of stomata on both the top and bottom of the
leaf.
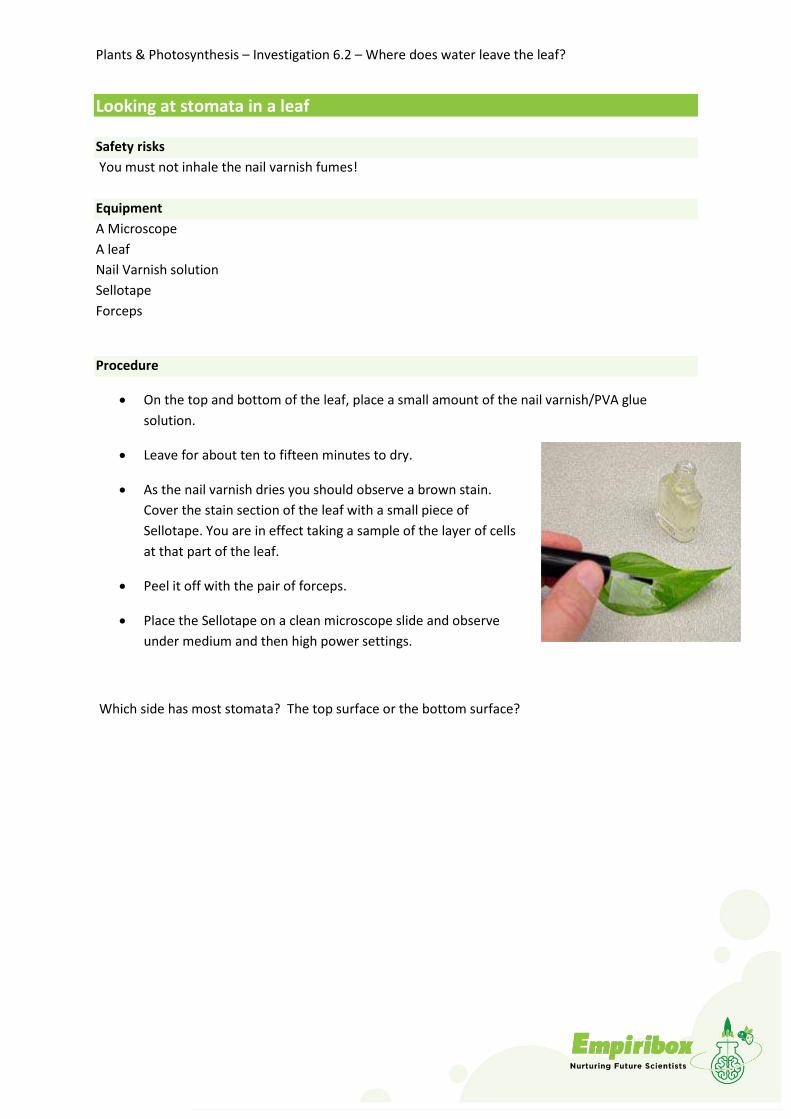
Plants & Photosynthesis – Investigation 6.2 – Where does water leave the leaf?
Looking at stomata in a leaf
Safety risks
You must not inhale the nail varnish fumes!
Equipment
A Microscope
A leaf
Nail Varnish solution
Sellotape
Forceps
Procedure
On the top and bottom of the leaf, place a small amount of the nail varnish/PVA glue
solution.
Leave for about ten to fifteen minutes to dry.
As the nail varnish dries you should observe a brown stain.
Cover the stain section of the leaf with a small piece of
Sellotape. You are in effect taking a sample of the layer of cells
at that part of the leaf.
Peel it off with the pair of forceps.
Place the Sellotape on a clean microscope slide and observe
under medium and then high power settings.
Which side has most stomata? The top surface or the bottom surface?

www.saps.org.uk
Investigating Seed Germination Technical and teaching notes
This is a simple way to investigate the germination of seeds.
Another way of doing this is the ‘Investigation Seed Germination on Hydrogel’ practical, also on our website.
Apparatus
A straight-sided 1.5 litre plastic bottle, with a diameter equal to that of your Petridishes
Card base
Bases from plastic bottles
Circular grids
Petri dishes
Filter paper or paper towel
Seeds
Water, or other solution depending on the nature of the investigation
Preparation of materials
To remove the label cleanly:
Fill the bottle with hot water (not too hot or it will buckle)
Screw the cap back on the bottle and in a short time the label should peel off.
Empty the water out of the bottle.
To prepare the bottle:
Use sharp scissors to cut the bottle as shown tocreate a reservoir which will support Petri disheslying on their sides.
If you leave a ragged cut edge it could cutfingers. You may wish to cover the cut edge withtape.
Make a cradle for the bottle - Use the card with double sided sticky tape.
Acknowledgements to: Dr Jerry Roberts, School of Agriculture, University of Nottingham


www.britishcouncil.org/darwin
TEACHER GUIDANCE SHEET
Plant Collectors
Charles Darwin’s work showed how plants, along with all other living things, are adapted to their environment. This is why certain plants are found in some places and not others.
Darwin famously composed his thoughts while walking on
his ‘Thinking Path’. He had a circular, sand-covered path
(the sandwalk) built in the garden behind Down House in
Kent, England. It winds through shady woodland and along
fields. Darwin walked this path every day. He had a pile of
flintstones at the start of the path, which he used to keep
track of his circuits, kicking one stone away each time he
completed a round. This walking routine assisted Darwin’s
thought processes.
This activity encourages students to observe and think as
they walk in a local habitat. It also asks them to collect plant
specimens from particular locations – making sure that they
also gather and record information about each location so
that they can link the plant’s type, size and shape. with the
position and conditions in which it grows.
The activity will take approximately three lessons, but you will
need to adapt the timing to your specific needs.
In the first lesson, read the story about Darwin’s early adult
life, look at the postcard from Richard the Plant Hunter, and
prepare student for the Thinking Walk. The walk should take
place during the second lesson – including the collection
of plant material, gathering information about the specific
location in which each plant is located and pressing the
plants on return to the classroom.
The third lesson is dedicated to learning about a herbarium
and using the pressed plant material to produce some
herbarium specimens.
AGE CATEGORY
PAGE 1 OF 6
Age 8-9
ART & DESIGN
SCIENCE
Based on the ‘Fitting in’ Activity, part of The Great Plant Hunt by The Royal Botanic Gardens, Kew for The Wellcome Trust. This activity should take two or three lessons.
Portrait of Darwin © The John Murray Collection© Brian Adducci

www.britishcouncil.org/darwin
TEACHER GUIDANCE SHEET
AGE CATEGORY
PAGE 2 OF 6
Concepts
Activity
Plants are found in particular habitats and are adapted to suit the environment in which they live.
Charles Darwin’s collection of plant (as well as animal) specimens allowed him to make observations and measurements that helped him develop his big idea about evolution.
Plant hunters have developed a special system for keeping records that means they can all easily refer to each other’s collections.
Plants are living things so that after they die, unless they are preserved, much of their material will decay.
1 Read aloud the following story about Charles Darwin, the collector, to your students:
Materials
• plants gathered on your Thinking Walk
• Richard the Plant Hunter’s postcard
from Australia
• the herbarium specimens (Darwin’s
and a modern version)
• several sheets of newspaper or
tissues
• pile of heavy books
• wood glue and brushes to stick the
specimen to display sheet
• sheets of paper to glue specimens
onto for display (ideally A4 size)
• labels or paper and glue to label
herbarium specimens
Instructions for pressing plants
To make your plant press use a large book and sheets of newspaper or tissues. Open the book and lay a piece of tissue on to the open page. Place the plant specimens face down on the tissue and place another piece of tissue on top of the plant. Close the book. Put something heavy on top of the book.
Age 8-9
Plant Collectors
www.britishcouncil.org/darwin
TEACHER GUIDANCE SHEET
AGE CATEGORY
PAGE 3 OF 6
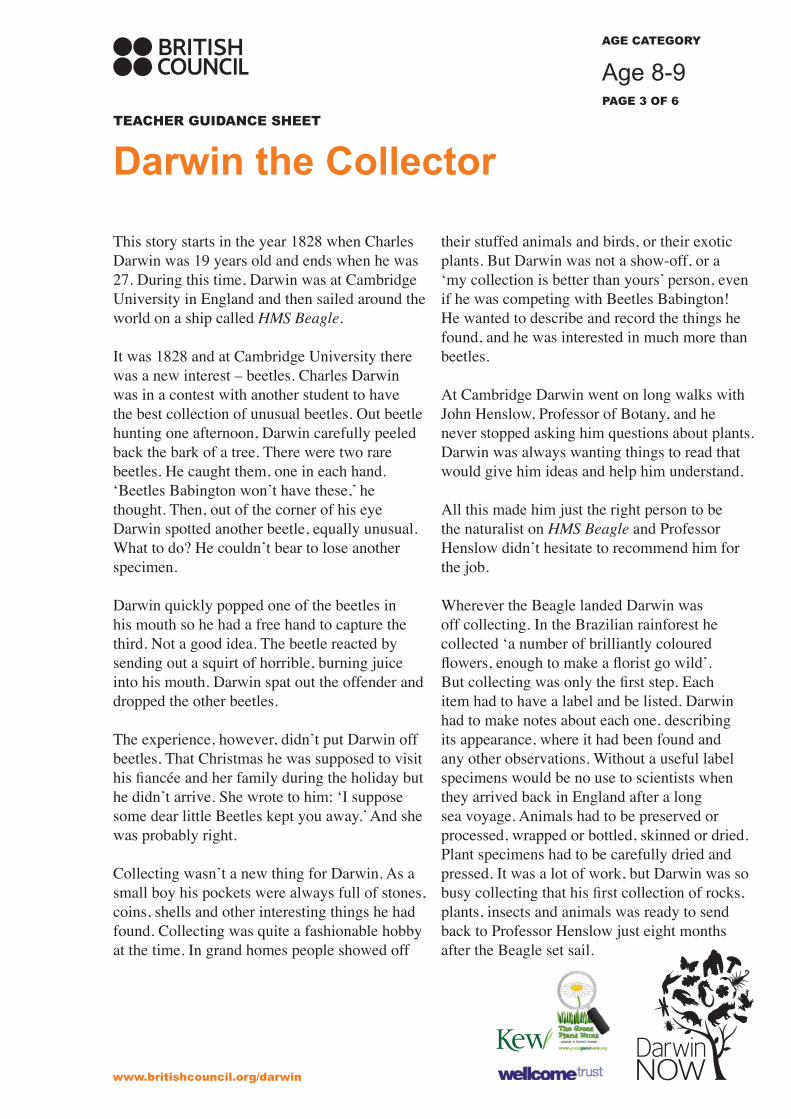
Darwin the Collector
This story starts in the year 1828 when Charles Darwin was 19 years old and ends when he was 27. During this time, Darwin was at CambridgeUniversity in England and then sailed around the world on a ship called HMS Beagle.
It was 1828 and at Cambridge University there was a new interest – beetles. Charles Darwin was in a contest with another student to have the best collection of unusual beetles. Out beetle hunting one afternoon, Darwin carefully peeled back the bark of a tree. There were two rare beetles. He caught them, one in each hand.‘Beetles Babington won’t have these,’ he thought. Then, out of the corner of his eye Darwin spotted another beetle, equally unusual. What to do? He couldn’t bear to lose another specimen.
Darwin quickly popped one of the beetles in his mouth so he had a free hand to capture the third. Not a good idea. The beetle reacted by sending out a squirt of horrible, burning juice into his mouth. Darwin spat out the offender and dropped the other beetles.
The experience, however, didn’t put Darwin off beetles. That Christmas he was supposed to visit his fiancée and her family during the holiday but he didn’t arrive. She wrote to him: ‘I suppose some dear little Beetles kept you away.’ And she was probably right.
Collecting wasn’t a new thing for Darwin. As a small boy his pockets were always full of stones, coins, shells and other interesting things he had found. Collecting was quite a fashionable hobby at the time. In grand homes people showed off
their stuffed animals and birds, or their exotic plants. But Darwin was not a show-off, or a ‘my collection is better than yours’ person, even if he was competing with Beetles Babington! He wanted to describe and record the things he found, and he was interested in much more than beetles.
At Cambridge Darwin went on long walks with John Henslow, Professor of Botany, and he never stopped asking him questions about plants. Darwin was always wanting things to read that would give him ideas and help him understand.
All this made him just the right person to be the naturalist on HMS Beagle and Professor Henslow didn’t hesitate to recommend him for the job.
Wherever the Beagle landed Darwin was off collecting. In the Brazilian rainforest he collected ‘a number of brilliantly coloured flowers, enough to make a florist go wild’. But collecting was only the first step. Each item had to have a label and be listed. Darwin had to make notes about each one, describing its appearance, where it had been found and any other observations. Without a useful label specimens would be no use to scientists when they arrived back in England after a long sea voyage. Animals had to be preserved or processed, wrapped or bottled, skinned or dried. Plant specimens had to be carefully dried and pressed. It was a lot of work, but Darwin was so busy collecting that his first collection of rocks, plants, insects and animals was ready to send back to Professor Henslow just eight months after the Beagle set sail.
Age 8-9

www.britishcouncil.org/darwin
TEACHER GUIDANCE SHEET
AGE CATEGORY
PAGE 4 OF 6
Darwin the Collector
Just over a year into the voyage one of the crew, Syms Covington, a 17-year-old who had been a cabin boy and the ship’s fiddler, became Darwin’s assistant. He worked as a secretary and hunter and also learned to stuff animals. Syms and Charles worked so hard and collected so much that the First Lieutenant of the ship complained about the amount of ‘rubbish’ that was piling up on the deck and the Captain described Darwin and Covington working so earnestly with their pickaxes to extract a huge fossil, which turned out to be the Megatherium, an elephant-sized ground sloth that lived two million to 8,000 years ago. Darwin was very careful about how he kept his notes. He had a zoological diary in which he kept observations about plants and animals and a geological diary, in which he kept notes about rocks and fossils.
Covington’s main job was helping to keep the catalogue of specimens – lists and notes of all the things they had collected. He also packed the barrels so more specimens could be sent to England.
When the specimens arrived in Cambridge they created lots of excitement and interest. Darwin’s friends also published extracts from his notes and diaries, so by the time he came back five years later, Darwin was something of a celebrity and treated as a serious scientist.
He went on working on the things he had collected on the Beagle. In some cases, he found that his recordings were not always perfect. On the Galapagos Islands he collected little birds. A scientist in England, John Gould, spotted that they were all finches, although they
had different-shaped beaks. Their beak shape depended on whether they ate seeds, cacti or insects. Gould thought that the different types of finch probably came from different islands so they had a different diet depending on their habitat. But he could not be sure as Darwin had not noted exactly where each bird had been found. Darwin immediately began contacting everyone who might have the information they needed about the birds, because this was a very exciting idea and he needed the evidence to prove it.
This kind of work and lots of new experiments that Darwin did to test what he was thinking were all part of his big and challenging idea that all living things must share a common origin.
Age 8-9

Plant Collectors
www.britishcouncil.org/darwin
TEACHER GUIDANCE SHEET
AGE CATEGORY
PAGE 5 OF 6
2 Now circulate the postcard from Richard the Plant Hunter. Ask some of your students to take turns to read to the class a paragraph each from the card.
3 You may wish to ask the following questions:
• What does Richard mean whenhe’s talking about a wallaby witha joey in its pouch?
• What are the pieces ofinformation that Richard writesdown for each specimen hecollects?
• Why is Richard worried aboutlosing his notebook?
• What has Richard noticedabout plants growing in differentplaces?
4 Take students on a Thinking Walk near your school (see separate Thinking Walk sheet). Plants collected on the Thinking Walk will be observed carefully, measured and recorded, then pressed to preserve them. If the same plant is found in the two different habitats, make a special note if they are different in any way.
Plan: in pairs, ask the students to look at the plants they have collected and choose at least two from different habitats to study in detail.
Compare and record: record and compare conditions found in the two different habitats, and features of the plant(s) found in each, such as height, leaf size, colour of leaves, whether they have flowers or fruits and the general health of the plant.
Think: compare the different conditions in the two habitats. Try to think of reasons for any differences you have found between the types of plants found there and any differences between the same type of plant growing in two places. Think about threats there might be to these habitats, like drying out in summer.
Process: follow the instructions on pressing plants to preserve the specimens collected. If any seeds or other extra plant parts are available, collect them in small paper packages so you can add them to your herbarium specimens–just like Darwin did.
Helpful hints:
• Press plants straight aftercollecting – before they wilt.
• Plants that grow in differentplaces often end up with verydifferent forms. For example,where small wild plants aregrowing in mown grass they maybe mainly flat rosettes, whilethose in flowerbeds are quite tall.Similarly a plant that is in a shadyspot might be long and lanky andone in a sunny spot, quite short.
• Some plants have specialised somuch that they succeed only inone spot. Plants with big leavesare happy in the shade where
Age 8-9

their leaves catch the little light there is, but in the sun they dry out too fast. Plants with tiny leaves stay moist in the sun but cannot catch enough light to live in the shade. Even plants have to make compromises.
5 Press plants using the instructions provided.
Discussion Points
Further Work
1 What is the importance of preserving plants and producing a herbarium? (We need to know what plants look like since some can be helpful to us and others can be dangerous such as poisonous plants).
2 Why is it more important than ever today to have a ‘library’ of local plants? (Climate change, influenced by human activity, is having an effect on all the living things on the planet. We need to know how things are changing and keeping records of where plants are growing, and how large they become is a good way of telling us how much our surroundings may be changing).
1 Ask your students to look at the photos of the two plant specimens. One was collected and pressed 170 years ago. The other is a recent example. Can they spot the differences between the sheets and describe them? How do they compare with the specimens they have collected and pressed?
• Herbarium specimens usuallyhave an official stamp such asthe round one shown. Ask yourstudents to design a new ‘stamp’for the pressed plant specimensthey have made at school.
Plant Collectors
www.britishcouncil.org/darwin
TEACHER GUIDANCE SHEET
AGE CATEGORY
PAGE 6 OF 6
Age 8-9
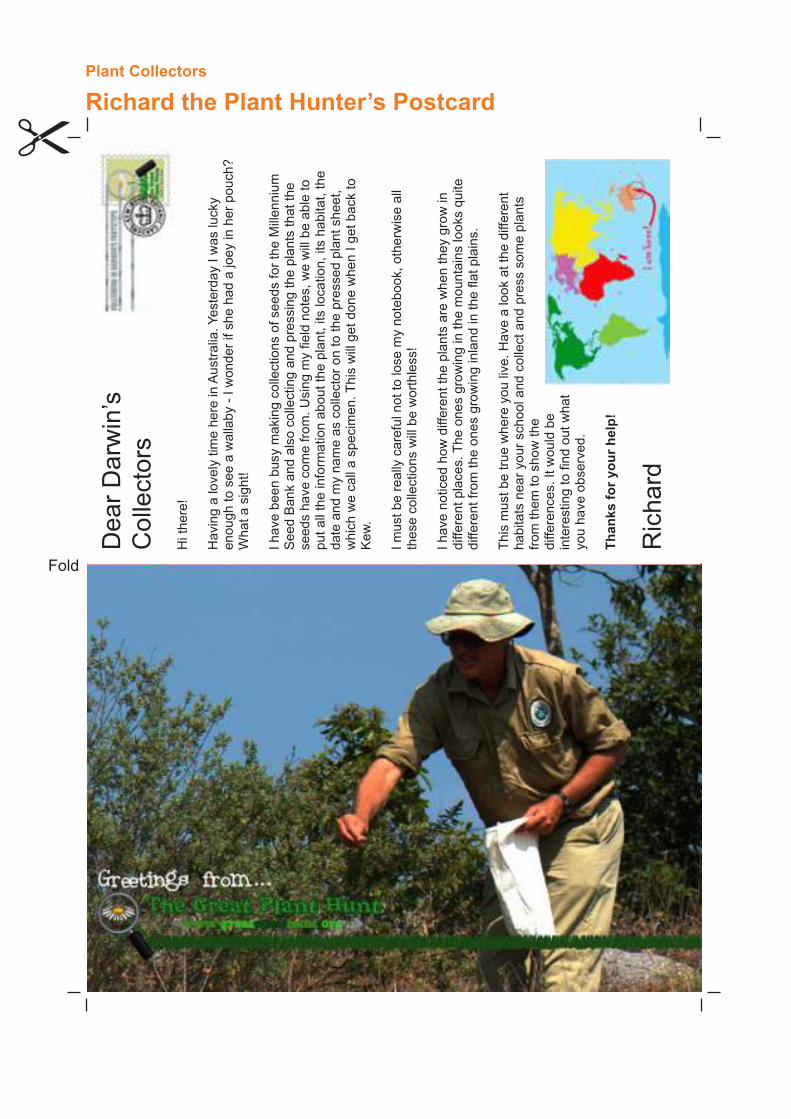
Dea
r D
arw
in’s
C
olle
ctor
s
Hi t
here
!
Hav
ing
a lo
vely
tim
e he
re in
Aus
tral
ia. Y
este
rday
I w
as lu
cky
enou
gh to
see
a w
alla
by -
I w
onde
r if
she
had
a jo
ey in
her
pou
ch?
Wha
t a s
ight
!
I hav
e be
en b
usy
mak
ing
colle
ctio
ns o
f see
ds fo
r th
e M
illen
nium
S
eed
Ban
k an
d al
so c
olle
ctin
g an
d pr
essi
ng th
e pl
ants
that
the
seed
s ha
ve c
ome
from
. Usi
ng m
y fie
ld n
otes
, we
will
be
able
to
put a
ll th
e in
form
atio
n ab
out t
he p
lant
, its
loca
tion,
its
habi
tat,
the
date
and
my
nam
e as
col
lect
or o
n to
the
pres
sed
plan
t she
et,
whi
ch w
e ca
ll a
spec
imen
. Thi
s w
ill g
et d
one
whe
n I g
et b
ack
to
Kew
.
I mus
t be
real
ly c
aref
ul n
ot to
lose
my
note
book
, oth
erw
ise
all
thes
e co
llect
ions
will
be
wor
thle
ss!
I hav
e no
ticed
how
diff
eren
t the
pla
nts
are
whe
n th
ey g
row
in
diffe
rent
pla
ces.
The
one
s gr
owin
g in
the
mou
ntai
ns lo
oks
quite
di
ffere
nt fr
om th
e on
es g
row
ing
inla
nd in
the
flat p
lain
s.
Thi
s m
ust b
e tr
ue w
here
you
live
. Hav
e a
look
at t
he d
iffer
ent
habi
tats
nea
r yo
ur s
choo
l and
col
lect
and
pre
ss s
ome
plan
ts
from
them
to s
how
the
diffe
renc
es. I
t wou
ld b
e in
tere
stin
g to
find
out
wha
t yo
u ha
ve o
bser
ved.
Th
anks
fo
r yo
ur
hel
p!
Ric
hard
Plant Collectors
Richard the Plant Hunter’s Postcard
Fold
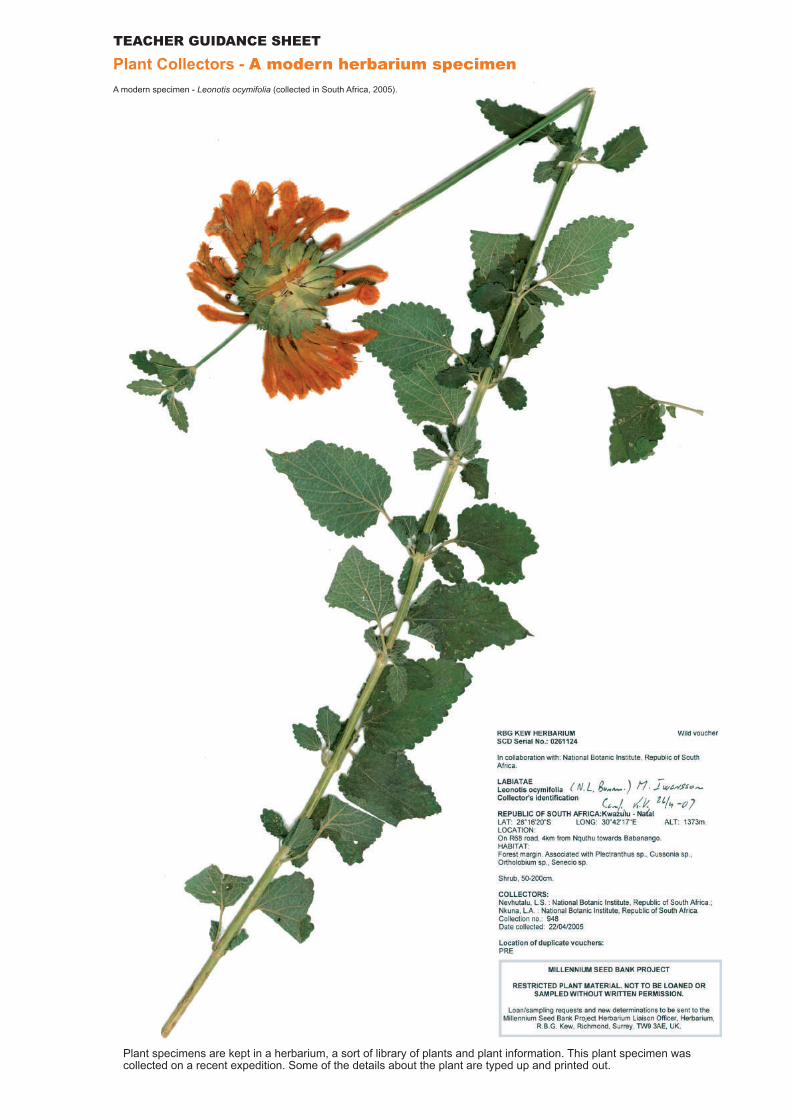
Plant Collectors - A modern herbarium specimen
Plant specimens are kept in a herbarium, a sort of library of plants and plant information. This plant specimen was collected on a recent expedition. Some of the details about the plant are typed up and printed out.
TEACHER GUIDANCE SHEET
A modern specimen - Leonotis ocymifolia (collected in South Africa, 2005).

A specimen of Darwin’s collected in Chile in 1834 and kept in Kew’s herbarium. It was identified by Darwin’s friend Joseph Hooker as Stachys chonotica (related to self heal). Old specimens in herbariums are still used by scientists today. They often have an official stamp like the round ones here.
Plant Collectors - A Darwin herbarium specimen
TEACHER GUIDANCE SHEET

www.britishcouncil.org/darwin
Collector’s Stamp:
Name of plant:
Where found:
Date collected:
Found by:
This specimen has:LeafStemFlowerSeedRoot
Plant Collectors - Herbarium specimen
STUDENT SHEET

Plants & Photosynthesis – Demonstration 11.1 – Tree Growth
Teachers Background Information
Cambium
A layer only one cell thick that completely encloses the entire trunk, limbs, and all the branches, is
where the tree grows and creates new cells. This layer is called the cambium. Some new cells formed
in the cambium move outward to become phloem cells. Others move inward to become xylem cells.
This layer creates new wood on one side of itself and new bark on the other. As it increases the
tree’s girth, the cambium moves outward, pushing the bark before it and leaving the wood behind.
Xylem
The cell layer inside the cambium is called xylem. Each spring and summer, the cambium makes new
xylem cells, adding new layers of wood around layers laid down in years past. This increases the
width of the tree. The wood formed in the spring grows fast and is lighter-coloured because it
consists of large cells created when there is plenty of moisture. The wood formed in summer grows
more slowly and is darker-coloured because there is less water so the cells are smaller and more
compact. When a tree is cut, the layers appear as alternating rings of light and dark wood. Count the
dark rings, and you know the tree’s age.
Dendrochronology is the study of a tree through its annual growth rings. Scientists not only use
these rings to determine the age of the tree, but they can also get information about the climate,
the spacing of trees, and the presence of fi re around the individual tree. A wide ring often indicates
that plenty of moisture was available that year. Rings that are very close together often suggest
there was a drought.
The xylem is the “up” system in the tree. The cells in the xylem layer fuse to form tubes that pass the
water and nutrients from the roots up through the trunk to the leaves. Water continually evaporates
out of the leaves. This water shortage in the leaves causes a huge pull on the water in the xylem
tubes causing the water to move up through the xylem into the leaves.
Heartwood
The centre of the tree is called the heartwood. Although it is non-living, it will remain strong and will
not decay as long as the outer layers of the trunk are intact. As a tree grows in diameter, the inner,
older xylem layers fill with gum and resin and harden providing support to the tree as it grows taller
and wider.
Phloem
The cell layer outside the cambium is called phloem. Phloem is the “down” transport system in the
tree. It is a few cells wide and it carries the jelly-like, sugar-food produced in the leaves to the rest of
the tree. Phloem cells are stacked one on top of the other. Their connecting cell wall is perforated
like a strainer. When one cell is full of the jelly-like food, the contents ooze slowly into the next.
Eventually the food finds its way down from the leaves to the roots. When phloem cells die they
become part of the outer protective layer of bark.

Plants & Photosynthesis – Demonstration 11.1 – Tree Growth
Bark
The outer layer of the trunk is covered with bark. Tree bark can be smooth, rough, or scaly. Although
bark may look different from tree to tree it serves the same purpose to protect the tree from injury
and disease. Often bark has bad-tasting chemicals, which discourage hungry insects or gnawing
rodents from harming the tree. Some trees have very thick bark, which prevents damage from fi re.
Every year the cambium layer produces new phloem cells that are squeezed between last year’s
phloem cells and the cambium. Outer bark is formed as old phloem cells die and are forced outward.
When smooth, tight-fitting young bark is unable to expand or stretch because of the addition of new
cells, the bark may crack, split, or be shed from the tree. Each tree species has a characteristic way of
expanding or breaking its bark forming patterns by which many trees can be identified.
Review leaves and photosynthesis
Seeds/Fruits
Most trees grow from seed. Many kinds of seeds exist but the function of seeds is always the
same…to produce a new plant. There is enough food stored in the seed to get the baby plant started
growing until it can make leaves and start to produce its own food through the process of
photosynthesis.

6 • National Arbor Day Foundation
Discover how trees grow and function
Step 1 BASIC ACTIVITY
Role-play the growth process of a tree
Concept #1: Trees benefi t people and the environ-ment in many ways.
Start the classroom discussion by reading Paragraph #1.
Paragraph #1Recently I read a story in the newspaper about a community that was experiencing environmental problems. The stream in the city was always brown from soil erosion after a heavy rain. The air was hazy because of the smog. The city s̓ buildings and pavements refl ected so much heat that the summer temperature was uncomfortably hot. The people in the city were concerned and were looking for some way to improve conditions in their community. A bright young student told the city leaders she had a solution to their problem. She had an invention that could clean the air, produce fresh oxygen, prevent soil erosion, cool the sidewalks, muffl e traffi c noise, and could last many years with just a little care. And, she added, it could operate on solar power from the sun.
Ask students: Do they think, with modern technology, such an invention is possible? Could there really be something that would clean and cool the air, make fresh oxygen, prevent soil erosion, and muffl e noise – all operated on solar energy? If so, what do they think something like this might cost? Allow students to respond without comment. After students have had an opportunity for input, continue by reading Paragraph #2.
Paragraph #2The young student went on to describe other features of the unique invention. She said that along with helping the environment, this creation would provide homes and food for birds and other animals, kids could climb on it, and it would make the community more attractive. If many of these things were available some could eventually be made into things people could use...like paper, houses, baseball bats, or even medicine. And when it was no longer useful,
Classroom Activity:• Students will role-play the growth
process of a young tree to becomefamiliar with the structural componentsand learn how these components helpthe tree function
Objectives:Students will be able to:• Identify structural components of the
tree and explain how these componentshelp the tree function
• Identify the major components in theprocess of photosynthesis
• Name several benefi ts or products thatcome from trees
Time Recommended:• One 60 minute class period
Materials Needed:• Overheads or copies of handouts on
pages 9 and 13• Small plant• One 20'-25' piece of brown yarn• Blue and green yarn• One or two examples of tree fruits/seed
(i.e. acorn, walnut, apple with seeds)• Microscope & slides or hand lens• Pencil and paper• Tree cross-section or picture of a cross-
section• Small cup of water, eyedropper, and
a penny (one of each for every fourstudents)
• Scarf
National Science Standard Correlation:Students will develop an understanding
of:• Structure and function in living systems• Populations and ecosystems
National Arbor Day Foundation • 7
this invention was biodegradable or could be used for fuel. She said this thing was not some new invention but something that had been around for years.
Ask students: Can you guess what “invention” this young student was referring to?
By now many students may have guessed that you have been describing a tree. If students are still mystifi ed, continue to give more clues (i.e. This invention is a living thing, it bears fruits and seeds, it grows, it provides shade, etc.) If students still do not realize you have been describing a tree, you may need to spend extra time as you introduce and go through each of the following concepts.
With student input, do a quick review of the benefi ts we receive from trees. List the benefi ts on the board. Students may wish to add additional benefi ts or tree products to the list.
Write the following questions on the board.• How does a tree use solar energy to make its own food?• How does a tree build a trunk that can live for
centuries – and hold the weight of many tons?• How can water absorbed by the tree roots travel all
the way up to leaves at the top of the tree?
Tell students that by the end of the period, they will know the answers to those questions.
Concept #2: A tree has a number of structural components (roots, trunk, cambium, xylem, phloem, bark, and leaves with chlorophyll) that are essential for the tree to grow and function.
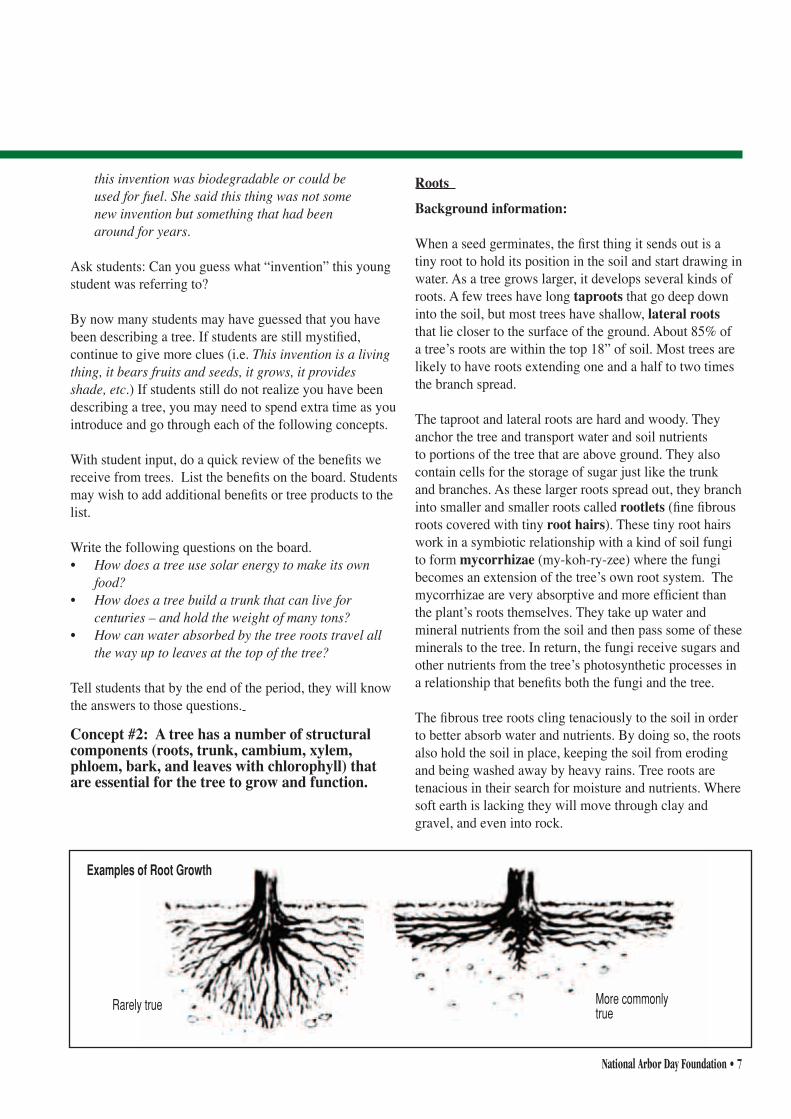
Roots
Background information:
When a seed germinates, the fi rst thing it sends out is a tiny root to hold its position in the soil and start drawing in water. As a tree grows larger, it develops several kinds of roots. A few trees have long taproots that go deep down into the soil, but most trees have shallow, lateral roots that lie closer to the surface of the ground. About 85% of a treeʼs roots are within the top 18” of soil. Most trees are likely to have roots extending one and a half to two times the branch spread.
The taproot and lateral roots are hard and woody. They anchor the tree and transport water and soil nutrients to portions of the tree that are above ground. They also contain cells for the storage of sugar just like the trunk and branches. As these larger roots spread out, they branch into smaller and smaller roots called rootlets (fi ne fi brous roots covered with tiny root hairs). These tiny root hairs work in a symbiotic relationship with a kind of soil fungi to form mycorrhizae (my-koh-ry-zee) where the fungi becomes an extension of the treeʼs own root system. The mycorrhizae are very absorptive and more effi cient than the plantʼs roots themselves. They take up water and mineral nutrients from the soil and then pass some of these minerals to the tree. In return, the fungi receive sugars and other nutrients from the treeʼs photosynthetic processes in a relationship that benefi ts both the fungi and the tree.
The fi brous tree roots cling tenaciously to the soil in order to better absorb water and nutrients. By doing so, the roots also hold the soil in place, keeping the soil from eroding and being washed away by heavy rains. Tree roots are tenacious in their search for moisture and nutrients. Where soft earth is lacking they will move through clay and gravel, and even into rock.
More commonly true
Rarely true
Examples of Root Growth

8 • National Arbor Day Foundation
Select a student to come forward or have students work in pairs and pretend to be a tree. Ask them to extend their arms like branches and stand on tiptoe. What do they think would happen if the wind came up? Simulate this by giving the student a very gentle push with one hand, while supporting them with the other hand. Explain a tree needs roots to keep them from falling over.
Repeat the demonstration with the student standing with legs slightly apart and feet fl at on the fl oor. Explain to students that in some ways tree roots are like your feet – spreading out to keep the tree stable. Further explainthat roots also have another very important function – they suck in water and nutrients from the soil thatthe tree needs to live. Make a quick sketch picture of a tree and its spreading root system on the board to give students a sense of the lateral, rather than downward, spread of the root system. (See example on page 7.)
Root Activity:
A fi rst hand observation of a root is important. Even though a smaller plant wonʼt have the same woody root structure as a tree, it is worth the time to study its roots.
Remove a small plant from the pot. Point out to students how the soil remains packed around the bottom of the plant. Ask them to speculate why that is so. (The roots are holding the soil in place.) Ask students to think of ways plants could be used to prevent soil erosion. Shake the soil off the roots. Break off sections of the root and allow children to make observations as they look at them with a hand lens or microscope, if available. Can they see the tiny root hairs? How are the plant roots like the tree roots just discussed? How are they different?
Ask students if they think the plant can survive without its roots. Put the plant and soil back in the pot, water it, and observe it over the next several days to see what happens.
As an extension activity, if time permits, take students on a walk and notice the above ground tree roots that may be visible, especially in an urban setting. Discuss their similarity to the branches on the same tree. Are the roots causing problems with the cement or ground around them? Observe small trees or plants rooting in cracks in the sidewalks. Have students make observations about the strength of roots.
Trunk Form and Function
Background information:
Every tree trunk resembles a cylinder whether long and slender or short and stout. The tall, stately trunk of the eastern white pine and the small, short trunk of the redbud both perform the same function.
A tree trunk is largely composed of a compact mass of tiny tubes made of cells. Great numbers of these hollow tubes serve as pipelines that conduct water and nutrients absorbed by the roots up to the leaves. These are called xylem cells, or sapwood, and they make up what we commonly refer to as the wood of the tree. Other cells, called phloem, or inner bark, carry the sugar-food made by the leaves back down to the living parts of the tree. Located between these two pipelines is the cambium, the growing layer of the tree. Deep in the center of more mature trees are old xylem cells that have become thick and solid, providing strength for the tree. This part of the tree is referred to as the heartwood. Surrounding the outside of the trunk and branches are old dead phloem cells commonly called outer bark that serve as a protective covering for the tree.
Copy the Tree Cross-Section Sheet on page 9 and use as an overhead or handout for your students as you discuss the parts of the trunk.
Cambium
Bark
Phloem
Annual Rings
Xylem (Sapwood)
Wood Ray
Heartwood

National Arbor Day Foundation • 9
The outer bark is the tree's protection from the outside world. Continu-ally renewed from within, it helps keep out moisture in the rain, and prevents the tree from losing moisture when the air is dry. It insulates against cold and heat and wards off insect enemies.
The inner bark, or "phloem" is the pipeline through which food is passed to the rest of the tree. It lives for only a short time, then dies and turns to cork to become part of the protective outer bark.
The cambium cell layer is the growing part of the trunk. It annually produces new bark and new wood.
Xylem is the tree's pipeline for water moving up to the leaves. Sapwood is new wood. As newer rings of sapwood are laid down, inner cells lose their vitality and turn to heartwood.
Heartwood is the central, supporting pillar of the tree. Although dead, it will not decay or lose strength while the outer layers are intact. It is in many ways as strong as steel. A piece 12" long and 1" by 2" in cross section, set vertically, can support a weight of twenty tons.
Artwork courtesy of International Paper
Tree Cross-Section Sheet

10 • National Arbor Day Foundation
CambiumBackground Information:
In a layer only one cell thick that completely encloses the entire trunk, limbs, and all the branches, rests the treeʼs ability to grow and create new cells. This layer is called the vascular cambium. Some new cells formed in the cambium move outward to become phloem cells. Others move inward to become xylem cells. Essentially this layer creates new wood on one side of itself and new bark on the other. As it increases the treeʼs girth, the cambium moves outward, pushing the bark before it and leaving the wood behind.
Cambium Activity:
Ask one student to come to the front of the room and extend arms perpendicular from the body, pretending to be a tree. Tie a scarf or ribbon around one of the studentʼs arms. Ask if the student were an actual tree and the arm a branch, would the scarf move upwards as the tree grew?
The answer is no. Trees grow in diameter from the inside out and height is added by new growth from the tips of the branches. Cells are not transported like building blocks; they are created where needed and stay there. Next tie the scarf fi rmly around the studentʼs waist. Ask if the student were a tree, would the scarf be affected by the annual growth? The answer is yes. New cells are formed by the cambium
inside the bark. These new cells push the bark outward which would cause the scarf to become tighter and tighter. If the scarf did not break, it might be forced into the bark as the tree grew around it. Should that happen, it might injure the food transportation system and eventually kill the tree.
Xylem
Background Information:
The cell layer interior to the cambium is called xylem, or sapwood. Each spring and summer, the cambium makes new xylem cells, adding new layers of wood around layers laid down in years past, thus increasing the width of the tree. The wood formed in the spring grows fast and is lighter-colored because it consists of large cells created when there is plenty of moisture. The wood formed in summer grows more slowly and is darker-colored because there is less available moisture so the cells are smaller and more compact. When a tree is cut, the layers appear as alternating rings of light and dark wood. Count the dark rings, and you know the treeʼs age.
Dendrochronology is the study of a tree through its annual growth rings. Scientists not only use these rings to determine the age of the tree, but they can also get information about the climate, the spacing of trees, and the presence of fi re around the individual tree. A wide ring often indicates that plenty of moisture was available that year. Rings that are very close together often suggest there was a drought.
The xylem is the “up” system in the tree. The cells in the xylem layer fuse to form uninterrupted tubes that conduct the moisture and nutrients from the roots up through the trunk to the leaves. Consider a 200-foot tree. Imagine the challenge of raising water that high without a giant pump, but trees have managed to adapt.
Because water molecules have a cohesiveness, or a tendency to stick together, there is a constant, continuous string of water in each tube of xylem cells. Water continually evaporates or is transpired out of the leaves. This water shortage in the leaves results in a tremendous pull on the water in the xylem tubes causing the water to move up through the xylem into the leaves.
Xylem Activity 1:Have students examine a stump or tree cross-section and fi gure the age of the tree when it was cut down. (The tree section on page 10 shows 62 years of growth.)
Artwork courtesy of International Paper
National Arbor Day Foundation • 11
Xylem Activity 2:A penny, an eyedropper, and water can demonstrate the cohesive nature of water, which is partially responsible for the way the xylem tubes work. Instruct students to predict how many drops of water they think they can place on the surface of a penny before it overfl ows. Explain that water sticks to itself because of molecular cohesion. Students should carefully place one drop of water at a time on a penny; counting how many drops it takes before it overfl ows.
Heartwood
The center, supporting pillar of the tree is called heartwood. Although it is non-living, it will remain strong and will not decay as long as the outer layers of the trunk are intact. As a tree grows in diameter, the inner, older xylem layers fi ll with gum and resin and harden providing support to the tree as it grows taller and wider. The vast majority of a living tree (99%) is non-living cells that provide structural support rather than active fl uid conduction.
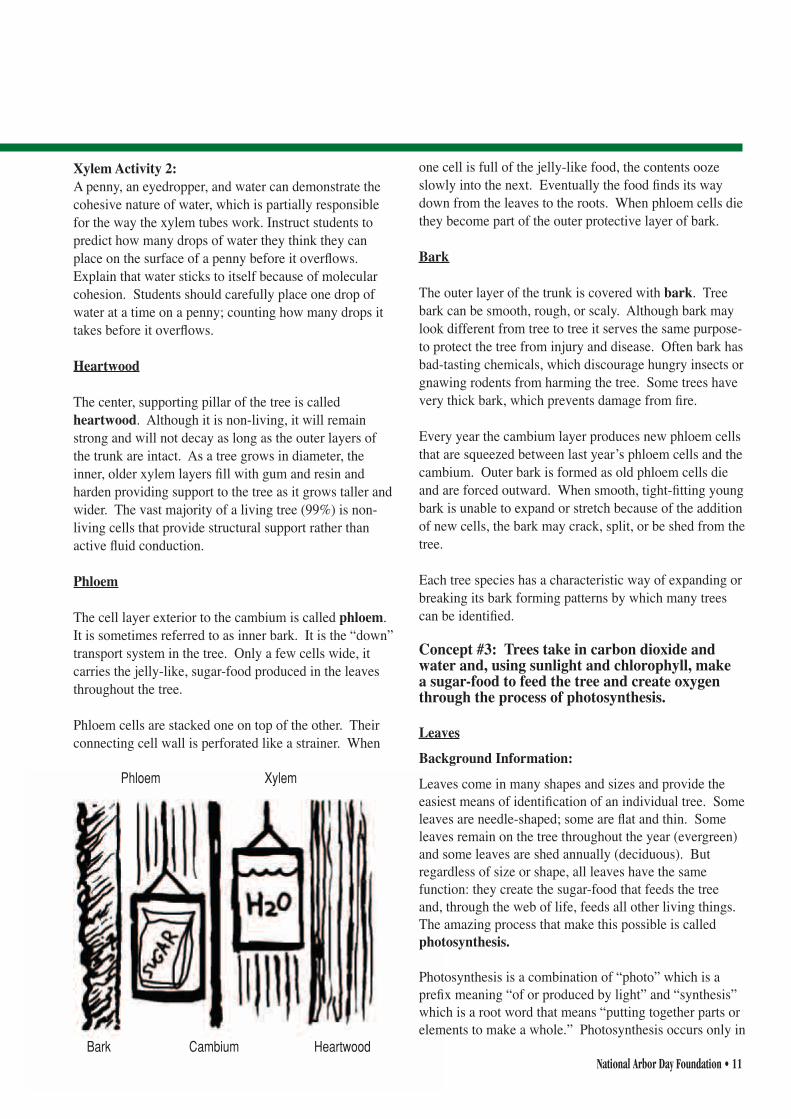
Phloem
The cell layer exterior to the cambium is called phloem. It is sometimes referred to as inner bark. It is the “down” transport system in the tree. Only a few cells wide, it carries the jelly-like, sugar-food produced in the leaves throughout the tree.
Phloem cells are stacked one on top of the other. Their connecting cell wall is perforated like a strainer. When
Bark Cambium Heartwood
one cell is full of the jelly-like food, the contents ooze slowly into the next. Eventually the food fi nds its way down from the leaves to the roots. When phloem cells die they become part of the outer protective layer of bark.
Bark
The outer layer of the trunk is covered with bark. Tree bark can be smooth, rough, or scaly. Although bark may look different from tree to tree it serves the same purpose- to protect the tree from injury and disease. Often bark has bad-tasting chemicals, which discourage hungry insects or gnawing rodents from harming the tree. Some trees have very thick bark, which prevents damage from fi re.
Every year the cambium layer produces new phloem cells that are squeezed between last yearʼs phloem cells and the cambium. Outer bark is formed as old phloem cells die and are forced outward. When smooth, tight-fi tting young bark is unable to expand or stretch because of the addition of new cells, the bark may crack, split, or be shed from the tree.
Each tree species has a characteristic way of expanding or breaking its bark forming patterns by which many trees can be identifi ed.
Concept #3: Trees take in carbon dioxide and water and, using sunlight and chlorophyll, make a sugar-food to feed the tree and create oxygen through the process of photosynthesis.
Leaves
Background Information:
Leaves come in many shapes and sizes and provide the easiest means of identifi cation of an individual tree. Some leaves are needle-shaped; some are fl at and thin. Some leaves remain on the tree throughout the year (evergreen) and some leaves are shed annually (deciduous). But regardless of size or shape, all leaves have the same function: they create the sugar-food that feeds the tree and, through the web of life, feeds all other living things. The amazing process that make this possible is called photosynthesis.
Photosynthesis is a combination of “photo” which is a prefi x meaning “of or produced by light” and “synthesis” which is a root word that means “putting together parts or elements to make a whole.” Photosynthesis occurs only in
Phloem Xylem
12 • National Arbor Day Foundation
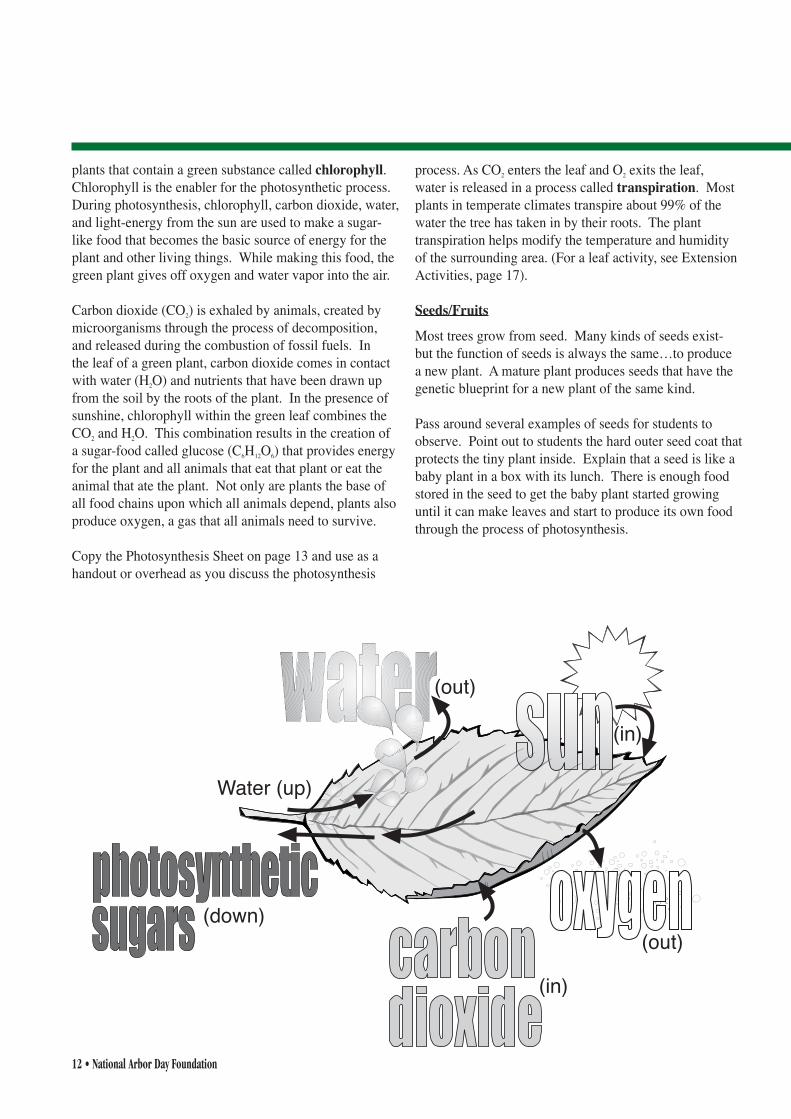
plants that contain a green substance called chlorophyll. Chlorophyll is the enabler for the photosynthetic process. During photosynthesis, chlorophyll, carbon dioxide, water, and light-energy from the sun are used to make a sugar-like food that becomes the basic source of energy for the plant and other living things. While making this food, the green plant gives off oxygen and water vapor into the air.
Carbon dioxide (CO2) is exhaled by animals, created by microorganisms through the process of decomposition, and released during the combustion of fossil fuels. In the leaf of a green plant, carbon dioxide comes in contact with water (H2O) and nutrients that have been drawn up from the soil by the roots of the plant. In the presence of sunshine, chlorophyll within the green leaf combines the CO2 and H2O. This combination results in the creation of a sugar-food called glucose (C6H12O6) that provides energy for the plant and all animals that eat that plant or eat the animal that ate the plant. Not only are plants the base of all food chains upon which all animals depend, plants also produce oxygen, a gas that all animals need to survive.
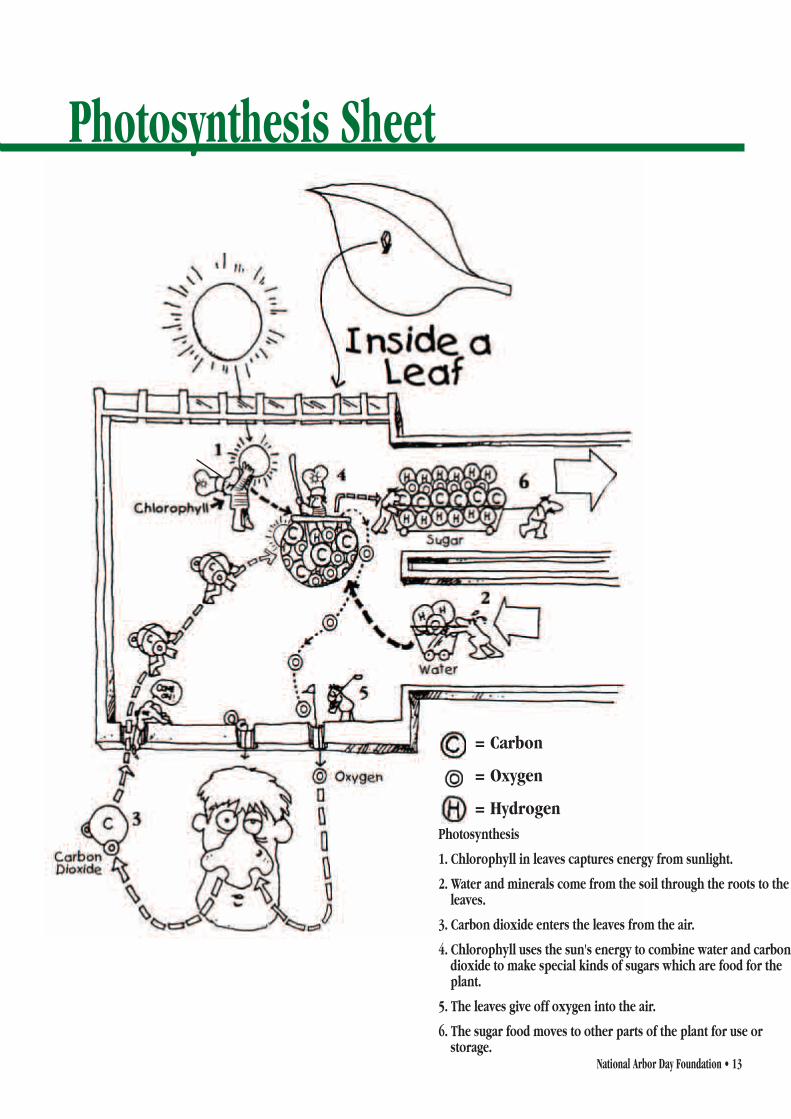
Copy the Photosynthesis Sheet on page 13 and use as a handout or overhead as you discuss the photosynthesis
process. As CO2 enters the leaf and O2 exits the leaf, water is released in a process called transpiration. Most plants in temperate climates transpire about 99% of the water the tree has taken in by their roots. The plant transpiration helps modify the temperature and humidity of the surrounding area. (For a leaf activity, see Extension Activities, page 17).
Seeds/Fruits
Most trees grow from seed. Many kinds of seeds exist-but the function of seeds is always the same…to produce a new plant. A mature plant produces seeds that have the genetic blueprint for a new plant of the same kind.
Pass around several examples of seeds for students to observe. Point out to students the hard outer seed coat that protects the tiny plant inside. Explain that a seed is like a baby plant in a box with its lunch. There is enough food stored in the seed to get the baby plant started growing until it can make leaves and start to produce its own food through the process of photosynthesis.
Water (up)
(out)
(in)
(out)
(in)
(down)
National Arbor Day Foundation • 13
= Carbon
= Oxygen
= Hydrogen Photosynthesis
1. Chlorophyll in leaves captures energy from sunlight.
2. Water and minerals come from the soil through the roots to theleaves.
3. Carbon dioxide enters the leaves from the air.
4. Chlorophyll uses the sun's energy to combine water and carbondioxide to make special kinds of sugars which are food for theplant.
5. The leaves give off oxygen into the air.
6. The sugar food moves to other parts of the plant for use orstorage.
Photosynthesis Sheet

14 • National Arbor Day Foundation
1. Explain to students that they are going to “build” a tree.Have students draw slips to determine the tree part they willplay. Students should write the name and number of theirtree part on a sticky label and attach it to their shirt.
2. Have the students playing Cambium (C) come to the frontof the room and stand about two feet apart, back to backin a circle. (With fewer than 15 students have the singleCambium stand near a wall- the wall representing the insideof the tree.) Tell the class these children represent thecambium layer of a young tree. Remind them the cambiumis the growing part of the tree. Explain that each year newcells formed in the cambium move outward to becomephloem cells. Others move inward to become xylem cells.
3. Have the Cambium pretend to make xylem cells. Have thefi rst year xylem, Xylem 1 (X
1), come up and stand behind
(inside) the Cambium (C) layer. Ask students to recall whatthe function of the xylem is. (Water transportation from theroots to the leaves.)
4. Have the Cambium pretend to make phloem cells. Have thefi rst year phloem, Phloem 1 (P
1) come up and stand in front
of (outside) the cambium (C) layer. Ask students to recallwhat the function of the phloem is. (Food transportationfrom the leaves to the roots.)
5. Have the Roots (R) come to the front of the class. Askstudents to recall the function of the roots. (Absorption ofwater and nutrients from the soil.) Give each Root one blueand one green piece of yarn. Explain that the blue yarnrepresents the water the xylem transports from the roots tothe leaves. The green yarn represents the food the phloemtransports from the leaves to the roots. Have each Roothand one end of their blue yarn to a Xylem 1 and one endof their green yarn to a Phloem 1. ( Xylem 1 and Phloem 1should hold all connections to Roots in their right hand.)
6. Have the Leaves (L) come to the front of the class. Askstudents to explain the function of the leaves. (Make food tofeed the tree. In making food, the leaves produce oxygen andclear carbon dioxide from the air.) Give each Leaf one blueand one green piece of yarn. Ask students to review whatthe blue yarn and the green yarn represent as described in#5. Each Leaf hands one end of their blue yarn to a Xylem 1and one end of their green yarn to a Phloem 1. (Xylem 1 and
Role-play the growth process of a tree to understand its form and function.
Activity Description: The purpose of this activity is to reinforce the understanding of how a tree grows and functions over several years. Each student will represent an important part of the tree. Building the tree will start with the cambium layer. The cambium layer produces wood (xylem cells) towards the inside of the tree and inner bark (phloem cells) towards the outside of the tree; these layers add to the girth of the tree. Each year the cambium adds new phloem and xylem cells. The old xylem cells eventually ‘hand over’ the job of transporting water to the new xylem cells and become heartwood, the supporting pillar of the tree. The old phloem cells ‘hand over’ the job of transporting food to new phloem cells and become outer bark, protecting the tree from damage. All the while, the leaves and roots are working to provide food and water to the tree. As layers are added to the tree each year, students will understand how the tree grows.
In Advance: Based on the number of students, write the names of tree parts needed for the activity (i.e. Phloem 2) on slips of paper. (The illustrations shown use 27 students - Adapt tree part numbers to best fi t the size of your class. See Chart A, page 16.) Cut as many blue and green 6’ pieces of yarn as you have leaves and roots. Labels for Heartwood and Outer Bark need to be made in advance by the teacher for use later in the activity. Write Heartwood on as many labels as you have Xylem 1s. Write Outer Bark on as many labels as you have Phloem 1s and Phloem 2s.
BASIC ACTIVITY

National Arbor Day Foundation • 15
Phloem 1 should hold all connections to Leaves in their left hand.)
(Note: Make sure each Xylem 1 connects to at least one Leaf and one Root and each Phloem 1 connects to at least one Leaf and one Root.) (See Illustration 1.)
7. Take the long piece of brown yarn and tie it loosely aroundthe group of students. Phloem 1s can hold it up in the crookof their arms. Explain this yarn represents the outside bark ofthe tree after one year of growth.
8. Explain to the students that this now makes up the main partsof a tree. As water is used in photosynthesis and transpiredout of the leaves, the leaves need more water. Have theLeaves pull on the blue yarn to signal to the Xylem morewater is needed. In turn, the Xylem pulls on the other pieceof blue yarn connected to the Roots to signal to the Rootsto pull in more water. After the Roots send water up, foodenergy is needed for the Roots to continue to seek out morewater. The Roots pull on the green yarn connected to thePhloem to signal food is needed. In turn the Phloem pulls ontheir other piece of green yarn connected to the Leaves tosend food down to “feed” the tree. As the Leaves make morefood through photosynthesis, the cycle continues. Go throughseveral cycles of moving water up and food down.
9. Imagine that another year has passed. It is spring and thecambium is making new xylem and phloem cells. Have theCambium (C) make room in front and behind itself for newcells to grow.
10. Have the second year xylem, Xylem 2 (X2), come up,
go under the brown yarn and stand directly behind theCambium (C) and in front of the Xylem 1 (X
1). Ask
students what this xylem layer would represent in atree cross-section (a new tree ring). Explain that thefi rst year xylem, Xylem 1, may still transport somewater, but most of the water is transported by the newxylem, Xylem 2. Xylem 1 students hand their endsof yarn to the Xylem 2 students who act as the newwater transport system.
11. Have the second year phloem, Phloem 2 (P2), come
up, go under the brown yarn and stand directly infront of the Cambium (C) and behind Phloem 1 (P
1).
Ask students what happens to old phloem (it getspushed outward to become outer bark). Phloem 1students hand their ends of yarn to the Phloem 2students. Phloem 2 becomes the new food transportsystem and Phloem 1, still holding the brown yarn,becomes part of the Outer Bark. Give every Phloem1 (P
1) an additional label for Outer Bark (B). The
brown yarn around the group will be tight now. (SeeIllustration 2.)
12. Once again have the students recreate the movementof water and food through the tree.
13. Imagine a third year has passed. Once again it isspring. The cambium makes new xylem and phloem
Illustration 1Year 1
Illustration 2Year 2

16 • National Arbor Day Foundation
cells. Have the Cambium (C) make room in front and behind itself for new cells to grow.
14. Have the third year xylem, Xylem 3 (X3), come up, go
under the brown yarn and stand directly behind (inside)the Cambium (C) and in front of the Xylem 2 (X
2)
.
Ask students what Xylem 3 would represent. (Anotherannual ring/ the new main water transport system forthe tree.) Xylem 3 now handles the main transportationof water. Have Xylem 2 students hand their ends ofyarn to the Xylem 3 students. Xylem 1 (X
1), still at the
center of the tree, hardens and becomes Heartwood. Askstudents if they recall what the heartwood does. (It is thestrong, supporting pillar of the tree.) Give every Xylem1 an additional label for heartwood.
15. Have the third year phloem, Phloem 3 (P3), come up, go
under the brown yarn, and stand directly in front of theCambium (C) and behind Phloem 2 (P
2). Ask students
what the Phloem 3 will do. (Food transportation systemfor the tree.) Ask what will happen to Phloem 2. (It willbecome part of the outer bark.) Have Phloem 2 studentshand their ends of green yarn to the Phloem 3 students.Give Phloem 2 (P
2) a label for Outer Bark (B). Phloem
1 (P1) is still holding the brown yarn, which by now will
be very tight. (See Illustration 3.) If the yarn is too tight,Phloem 1 students may “crack” and move to the outsideof the yarn. As bark, they soon will be shed from thetree.
16. Once again have the students recreate the movement of waterand food through the tree. This time encourage studentsto think about the function of their assigned tree part andcome up with a short word description and action for whattheir tree part does. Have each part of the tree say theirpart separately (i.e. We’re the leaves... we make food) andthen put the chant and the actions of the tree functions alltogether.
Assessment: Refer students back to the questions written on the board at the start of the period. Have students record the questions on a piece of paper. Students may answer the questions in a written narrative or create a diagram to illustrate the process.
• How does a tree use solar energy to make its own food?
• How does a tree build a trunk that can live for centuries-andhold the weight of many tons?
• How can water absorbed by the tree roots travel all the wayup to leaves at the top of the tree?
1
2
3
P 1
P 2
P 3
CLR
11111111 - 51 - 5
22222222 - 62 - 6
33333333 - 63 - 6
I llustrationSymbol
# of Students9 - 1 7 1 8 - 2 6 2 7 - 3 3
wA
LL
Make theradius ofthe tree
Make thediameterof the tree
Make 3radii of thetree
ylem 1ylem 2ylem 3
P hloem 1P hloem 2P hloem 3CambiumLeavesRoots
TreeP arts
Chart A
Illustration 3Year 3
National Arbor Day Foundation • 17
Step Discover how trees grow and function1The following are activities that further extend learning about the form and function of trees. These activities have the same objectives and national science standard correlations as the Basic Activity (listed on page 6).
Materials Needed:• Lettuce leaf• Iodine• Microscope• Slides and cover slip
Background Information: The exchange of oxygen and carbon dioxide in the process of photosynthesis and the release of water from the leaf into the air in the process of transpiration take place through tiny openings in the leaf called stoma. The stoma are opened and closed by surrounding guard cells, which contain chloroplasts (structures within a cell containing chlorophyll). Providing students the opportunity to see under the microscope some of the cells that play a major part in the process of photosynthesis helps them better grasp the process.
Stoma Activity Description:Place a drop of iodine on the center of a clean slide. Break a lettuce leaf at a vein on the underside of the leaf and tear off the thinnest layer of leaf epidermis possible. Carefully place the layer in the drop of iodine stain on the slide; making sure it is laid out fl at, not folded back. Place another drop of iodine on top of the lettuce leaf layer. Wait about 30 seconds and add a cover slip, then let the students start searching for stomas using the microscope. Guard cells that are open are easier to spot than guard cells that are closed. They will resemble two green jellybeans formed around an oval. Have students draw and label what they see under the microscope.
Searching for Stoma ActivityTime Recommended:• One class period
Leaf Transpiration Activity Description:To prove that leaves gives off moisture try this experiment. Have each student fi nd a leaf on a broadleaf tree that is in a sunny location. Cover the leaf with a plastic bag, securing the bag with a twist tie around the leaf stalk or the twig. Check the bag in 24 hours. Water vapor will gather on the inside of the bag due to the transpiration of moisture through the leaves. If broadleaf trees are not leafed out, this experiment can be done with a potted plant. Cover a healthy potted plant tightly with a transparent plastic bag. Do not cover the entire pot, just the plant. Leave the covered plant in the sunshine for a day or two. Note the water formation on the inside of the bag. Ask students to speculate what this might be from.
To prove that this moisture is coming from the soil, take the other plant and cover the pot and soil tightly with the transparent wrap (this limits the evaporation of moisture directly from the pot). Do not cover the plant. Weigh the potted plant when you begin the experiment and then set the plant in the sun. Ask students to predict what might happen. Weigh the potted plant everyday. The pot will get lighter as the moisture in the soil is used by the plant and given off into the surrounding air through transpiration.
Questions that could lead to additional experiments might include:
Does temperature affect the rate of transpiration?
Does the size of the leaf’s surface affect transpiration?
Does wind affect the rate of transpiration?
Do broadleaf trees transpire more moisture than conifers?
Leaf TranspirationTime Recommended:• One class period for the activity with follow up
observations over the next week
Materials Needed:• 1 clear plastic bag with a twist tie per student• 1 or 2 potted plants (5" pot or larger)• 1 or 2 large, transparent plastic bags with twist ties• Scale
More Great Activities...Additional activities that support these materials are available on-line at arborday.org/youthed. Download "Tree Ring-Around", a fast paced activity that reinforces vocabulary introduced in this Activity Guide. "Life of the Forest" offers students a visual image of how trees grow.

Plants & Photosynthesis – Microscope Activities
Date of sample:
Name of sample:
Collected from:
Observations:
Sketches
20x magnification 20x magnification
40x magnification 40x magnification

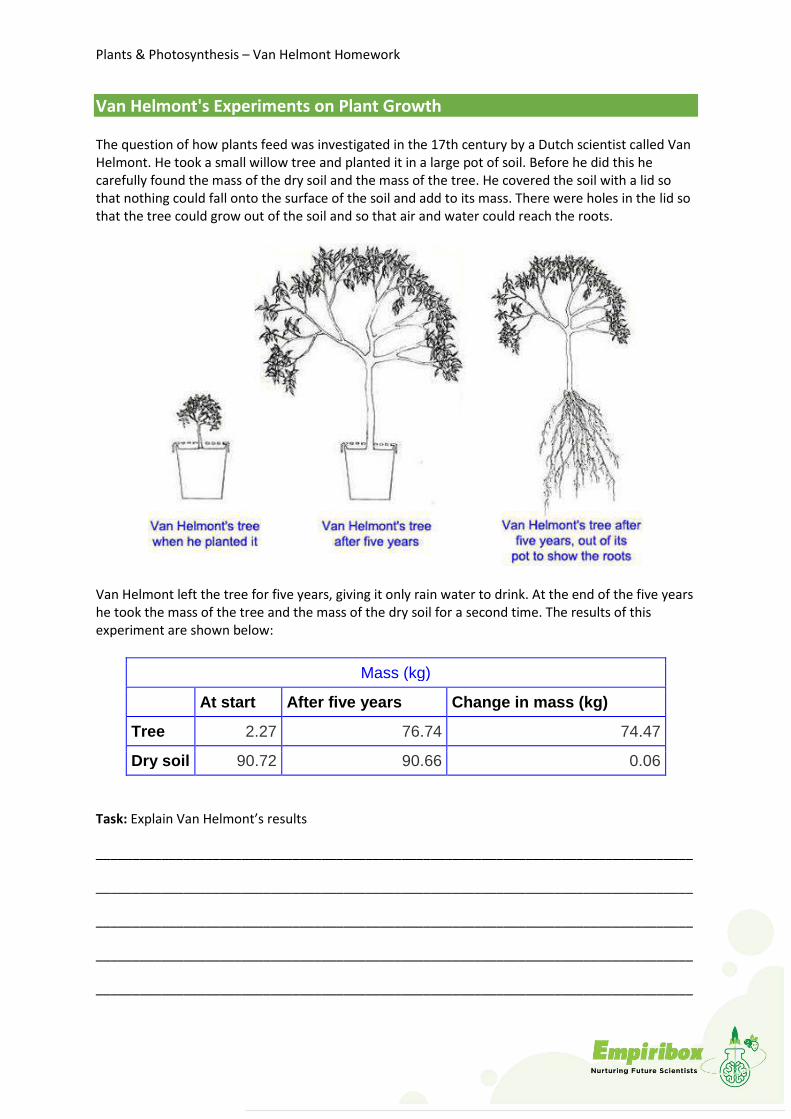
Plants & Photosynthesis – Van Helmont Homework
Van Helmont's Experiments on Plant Growth
The question of how plants feed was investigated in the 17th century by a Dutch scientist called Van Helmont. He took a small willow tree and planted it in a large pot of soil. Before he did this he carefully found the mass of the dry soil and the mass of the tree. He covered the soil with a lid so that nothing could fall onto the surface of the soil and add to its mass. There were holes in the lid so that the tree could grow out of the soil and so that air and water could reach the roots.
Van Helmont left the tree for five years, giving it only rain water to drink. At the end of the five years he took the mass of the tree and the mass of the dry soil for a second time. The results of this experiment are shown below:
Mass (kg)
At start After five years Change in mass (kg)
Tree 2.27 76.74 74.47
Dry soil 90.72 90.66 0.06
Task: Explain Van Helmont’s results
__________________________________________________________________________________
__________________________________________________________________________________
__________________________________________________________________________________
__________________________________________________________________________________
__________________________________________________________________________________


Corn
Corn, Zea mays L., (or “maize” at it is known throughout much of the world)
is a cereal crop, a member of the grass family. Corn is grown around the
world and is one of the globe's most widely used food staples; corn varieties
are directly used for food and animal feed or processed to make food and
feed ingredients (such as high fructose corn syrup, corn starch and lysine)
or industrial products such as ethanol and polylactic acid (PLA). Products
include corn oil, starch, ethanol, wall paper paste, re-cycled paper and glue.
Oils
Vegetable fats and oils are materials derived from plants. Oils are liquid at room temperature, and fats are solid. Although many plant parts may produce oil, it is usually extracted from seeds.
Vegetable fats and oils may or may not be edible. Examples of inedible vegetable fats and oils include linseed oil, tung oil, and castor oil used in lubricants, paints, cosmetics, pharmaceuticals, and other industrial applications. Many vegetable oils are consumed directly, or indirectly as ingredients in food.

Nuts
There are many different types of nuts. These are some examples of nut
products
Shea nuts - When crushed and processed, the nuts of the shea tree yield a
vegetable fat known as shea butter. It has long been a common ingredient
in local foods and soap, but its qualities also make it a valuable export, for
use in the manufacture of chocolate and cosmetics. The tree grows
throughout the semi-arid Sahel region of West Africa, but the largest
concentration is in Burkina Faso
Wild peanuts originated in Bolivia and northeastern Argentina. The
cultivated species, Arachis hypogaea, was grown by Indians in pre-
Columbian times. American botanist and inventor George Washington
Carver experimented with soybeans, sweet potatoes, and other crops,
eventually deriving 300 products from the peanut alone—among the most
notable was peanut butter
Coconut oil is used in the country as a cooking fat, hair oil, body oil and
industrial oil.
Macadamia nuts are produced by a sub-tropical evergreen native to
Australia. The macadamia is an oily sweet nut that is now grown as a
lucrative export crop in Australia, Hawaii, and parts of Africa, Latin America
and the Middle East. The nut is eaten raw and roasted, candied, or cooked
into recipes. The shells and husks are also valuable in agriculture and
manufacturing e.g. fuels and cosmetics.
Wheat
Wheat is a type of grass grown all over the world for its highly nutritious
and useful grain. It is one of the top three most produced crops in the world,
along with corn and rice. Wheat has been cultivated for over 10,000 years
and probably originates in the Fertile Crescent, along with other staple
crops. A wide range of wheat products are made by humans, including most
famously flour, which is made from the grain itself.
Wheat stalks are used in a variety of applications: mulch, construction
material, and animal bedding, for example. On organic farms, livestock are
often turned loose on the wheat field after harvest to clean up the leftovers.
Hard wheats are suitable for making pasta and bread, and soft wheats are
used for other wheat products that do not require a high gluten content.

Rice
Rice is an excellent source of energy, especially energy-giving carbohydrates, which are used in the body for brain performance, physical activity, bodily functions and everyday growth and repair.
After carbohydrate, protein is the second most abundant constituent of rice. When compared to that of other grains, rice protein is considered one of the highest quality proteins.
Rice is low in fat and cholesterol free.
Both white and brown varieties of rice contain essential vitamins and minerals. Brown rice contains more nutrients and fibre than white rice since it retains the bran and germ, where many of the vitamins and minerals are found.
Rice is gluten free and the most non-allergenic of all grains
Rice starch is used in making ice cream, custard powder, puddings, gel, distillation of potable alcohol, etc.
Rice bran is used in confectionery products like bread, snacks, cookies and biscuits. The defatted bran is also used as cattle feed, organic fertilizer (compost), and medicinal purpose and in wax making.
Rice bran oil is used as edible oil, in soap and fatty acids manufacturing. It is also used in cosmetics, synthetic fibres, detergents and emulsifiers. It is nutritionally superior and provides better protection to heart
Rice straw is mainly used as animal feed, fuel, mushroom bed, for mulching in horticultural crops and in preparation of paper and compost.
Soy bean
Soybeans are high in protein and are a major ingredient in livestock feed.
Most soybeans are processed for their oil and protein for the animal feed
industry. A smaller percentage is processed for human consumption and
made into products including soy milk, soy flour, soy protein, tofu and many
retail food products. Soybeans are also used in many non-food (industrial)
products
Soybean oil is used in cooking and frying foods. Margarine is a product made
from soybean oil. Salad dressings and mayonnaises are made with soybean
oil. Some foods are packed in soybean oil (tuna, sardines, etc.) Baked
breads, crackers, cakes, cookies and pies usually have soybean oil in them.
The high-protein fibre (that which remains after processing has removed
the oil) is toasted and prepared into animal feed for poultry, pork, cattle,
other farm animals and pets. Soy protein is increasingly found in fish food,
both for home aquariums and for the fish grown for eating. Biocomposites
are building materials made from recycled newspaper and soybeans. They
replace other products traditionally made from wood, such as furniture,
flooring, and worktops. Particleboard, laminated plywood and finger-
jointed lumber are made with soy-based wood adhesives. Soy products are
also found in many popular brands of home and commercial carpet, and in
auto upholstery applications. SOY-BASED FOAMS are currently being
developed for use in coolers, refrigerators, automotive interiors and even
footwear. Biodiesel fuel for diesel engines can be produced from soybean
oil.

Potatoes
The potato is a member of the same plant family as the tomato, pepper and eggplant. The potato family includes many species of plants often found in tropical America. The common potato is of South American origins, more specifically of the Andes Mountains region. It is believed that the ancient people of the Andes region began domesticating wild potato plants of the area over 7,000 years ago
Potatoes are most well known for their use in culinary dishes; potatoes can be baked, fried, mashed, boiled, roasted, made into potato soup and potato salads. However, the potato can also be used for:
animal fodder for cattle, sheep, pigs etc
starch in the food industry
processed foods such as potato chips, frozen French fries andpackaged food granules for mashed potatoes
processing of alcohol such as vodka.
The potato is one of the world's most useful and staple food sources; it is used worldwide on a similar consumption basis as rice, maize and wheat. The potato is made up of primarily water and starch but also contains fibre and protein; the potato is of great nutritional value and consequently there are many of varieties of potato species grown throughout the world today.
Mealy meal
Mealie meal, also known as corn meal, maize meal, grits or polenta, is a
reasonably balanced, nutritious food. In its unrefined, stone-milled form, it
is loaded with carbohydrates, protein, fibre, the B vitamins niacin, thiamin
and riboflavin, and minerals potassium, magnesium and iron, and it
contains very little fat and almost zero sodium.
It is used largely as animal feed in the land of its origin. It is far more popular
for human consumption in Africa, where it is a staple food.
Maize, corn or mealies can be enjoyed in different forms – corn on the cob,
whole or creamed sweet corn in a can, tortillas, corn bread, yellow or white
mealie meal (maize meal or corn meal), crushed maize known as samp,
mealie rice, or beverages. In Zimbabwe, cooked corn meal can be purchased
in a can under the name of sadza. You can also buy it as polenta, a partly
cooked maize meal.
Maize is probably most famous for corn flakes. Towards the end of the
nineteenth century, Dr. John Harvey Kelllogg, superintendent of Battle
Creek Sanitarium in Michigan, and his younger brother Will Keith Kellogg,
invented many foods to aid patients toward recovery. One of these
inventions was Kellogg’s Corn Flakes.
Corn starch is used for thickening sauces, and corn oil for cooking. In South
African it is made into mageu, a beverage made by boiling and then
fermenting sweetened mealie meal. Long-distance runners use corn syrup
as a great quick-release energy booster.
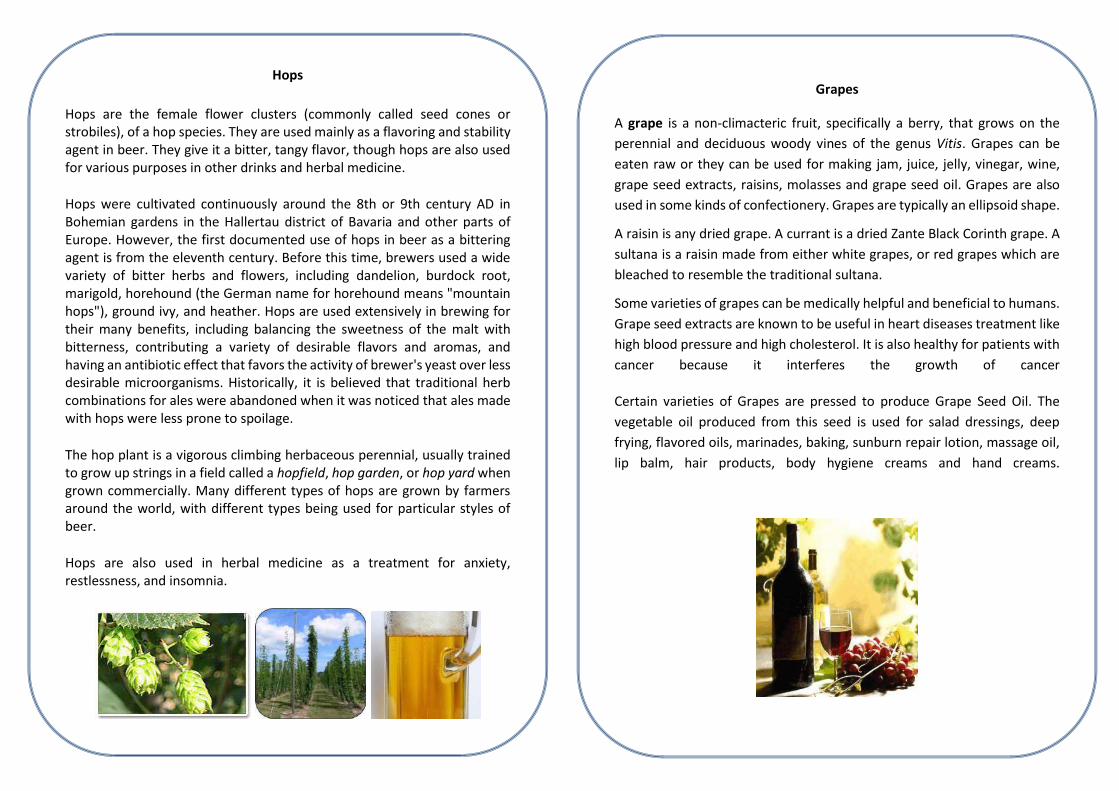
Hops
Hops are the female flower clusters (commonly called seed cones or strobiles), of a hop species. They are used mainly as a flavoring and stability agent in beer. They give it a bitter, tangy flavor, though hops are also used for various purposes in other drinks and herbal medicine.
Hops were cultivated continuously around the 8th or 9th century AD in Bohemian gardens in the Hallertau district of Bavaria and other parts of Europe. However, the first documented use of hops in beer as a bittering agent is from the eleventh century. Before this time, brewers used a wide variety of bitter herbs and flowers, including dandelion, burdock root, marigold, horehound (the German name for horehound means "mountain hops"), ground ivy, and heather. Hops are used extensively in brewing for their many benefits, including balancing the sweetness of the malt with bitterness, contributing a variety of desirable flavors and aromas, and having an antibiotic effect that favors the activity of brewer's yeast over less desirable microorganisms. Historically, it is believed that traditional herb combinations for ales were abandoned when it was noticed that ales made with hops were less prone to spoilage.
The hop plant is a vigorous climbing herbaceous perennial, usually trained to grow up strings in a field called a hopfield, hop garden, or hop yard when grown commercially. Many different types of hops are grown by farmers around the world, with different types being used for particular styles of beer.
Hops are also used in herbal medicine as a treatment for anxiety, restlessness, and insomnia.
Grapes
A grape is a non-climacteric fruit, specifically a berry, that grows on the
perennial and deciduous woody vines of the genus Vitis. Grapes can be
eaten raw or they can be used for making jam, juice, jelly, vinegar, wine,
grape seed extracts, raisins, molasses and grape seed oil. Grapes are also
used in some kinds of confectionery. Grapes are typically an ellipsoid shape.
A raisin is any dried grape. A currant is a dried Zante Black Corinth grape. A
sultana is a raisin made from either white grapes, or red grapes which are
bleached to resemble the traditional sultana.
Some varieties of grapes can be medically helpful and beneficial to humans.
Grape seed extracts are known to be useful in heart diseases treatment like
high blood pressure and high cholesterol. It is also healthy for patients with
cancer because it interferes the growth of cancer
Certain varieties of Grapes are pressed to produce Grape Seed Oil. The
vegetable oil produced from this seed is used for salad dressings, deep
frying, flavored oils, marinades, baking, sunburn repair lotion, massage oil,
lip balm, hair products, body hygiene creams and hand creams.

Maple syrup
Maple syrup is a syrup usually made from the xylem sap of sugar maple, red
maple, or black maple trees, although it can also be made from other maple
species such as the big leaf maple. In cold climates, these trees store starch
in their trunks and roots before the winter; the starch is then converted to
sugar that rises in the sap in the spring. Maple trees can be tapped by boring
holes into their trunks and collecting the exuded sap. The sap is processed
by heating to evaporate some of the water, leaving the concentrated syrup.
Quebec, Canada is by far the largest producer, making about three-quarters
of the world's output; Canada exports more than C$145 million worth of
maple syrup a year. Vermont is the largest producer in the United States,
and generates about 5.5 percent of the global supply.
The syrup is graded according to the Canada, United States, or Vermont
scales based on its density and translucency. Sucrose is the most prevalent
sugar in maple syrup. Syrups must be at least 66 percent sugar to qualify as
maple syrup in Canada. In the US, a syrup must be made almost entirely
from maple sap to be labeled as "maple". Maple syrup is often eaten with
waffles, pancakes, oatmeal (porridge), and French toast. It is also used as an
ingredient in baking, and as a sweetener and flavouring agent.
Rubber
The milky latex of Hevea brasiliensis, produced by a specialised secretory system in the phloem, is the raw material for natural rubber. The latex is a renewable resource that can be sustainably tapped without harming the tree. Rubber is water-resistant, does not conduct electricity, is durable and most importantly, is highly elastic. These useful properties are due to the large and complex molecular structure of rubber.
Rubber has been used for centuries, but its versatility was greatly improved by a process developed in the nineteenth century, vulcanisation, in which the rubber is treated with sulphur and heat. Natural rubber is used in thousands of ways, from bouncing balls, boots, balloons and latex gloves, to engineering and industrial applications. Natural rubber is more suitable than synthetic rubber for the tyres of aircraft and space shuttles.
Felled plantation trees are used for timber – rubberwood – which has important uses in the furniture industry. The seeds contain oil that can be used in making paints and soaps

Exit ticket
What I think about my learning today:
What have you learnt today?
What did you find difficult today?
Why was this difficult?
What is your target for next lesson?
Exit ticket
What I think about my learning today:
What have you learnt today?
What did you find difficult today?
Why was this difficult?
What is your target for next lesson?
Exit ticket
What I think about my learning today:
What have you learnt today?
What did you find difficult today?
Why was this difficult?
What is your target for next lesson?
Exit ticket
What I think about my learning today:
What have you learnt today?
What did you find difficult today?
Why was this difficult?
What is your target for next lesson?