Embed Size (px)
Citation preview
Service
e Manua
al
B
HR30-IIA
Biologica
A2•HR40
al Safety
-IIA2•HR
Haier M
y Cabine
R40-IIB2•
edical & L
et
HR60-IIA
Laboratory
FILE No
A2
y Product
: HMRSM
ts Co., Ltd
‐002‐01
.
2 / 98
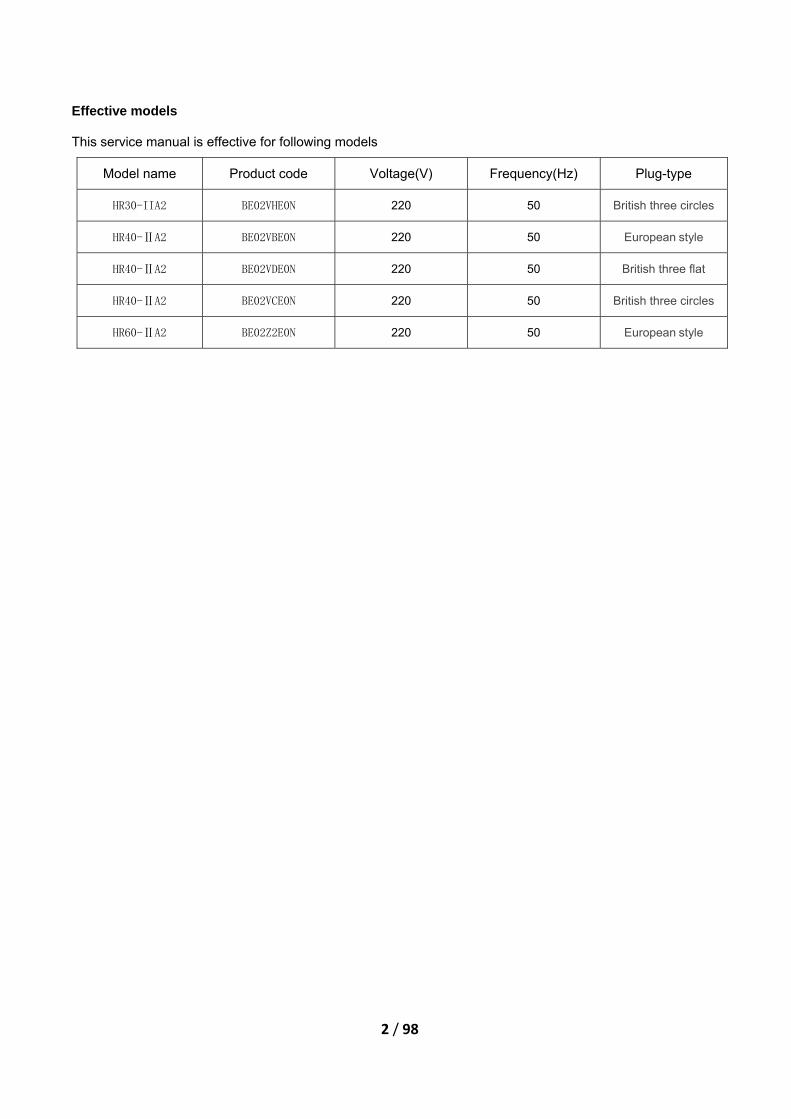
Effective models
This service manual is effective for following models
Model name Product code Voltage(V) Frequency(Hz) Plug-type
HR30-IIA2 BE02VHE0N 220 50 British three circles
HR40-ⅡA2 BE02VBE0N 220 50 European style
HR40-ⅡA2 BE02VDE0N 220 50 British three flat
HR40-ⅡA2 BE02VCE0N 220 50 British three circles
HR60-ⅡA2 BE02Z2E0N 220 50 European style
3 / 98
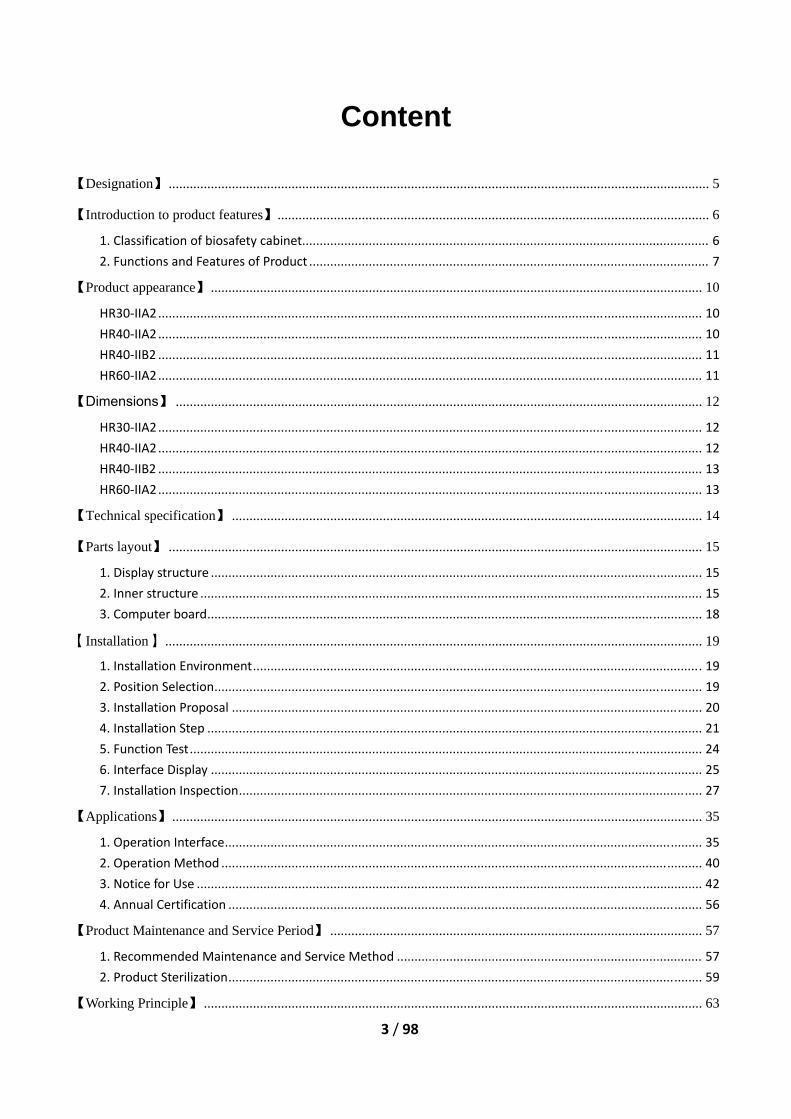
Content
【Designation】 .......................................................................................................................................................... 5
【Introduction to product features】 ........................................................................................................................... 6
1. Classification of biosafety cabinet.................................................................................................................... 6
2. Functions and Features of Product .................................................................................................................. 7
【Product appearance】 ............................................................................................................................................ 10
HR30‐IIA2 ........................................................................................................................................................... 10
HR40‐IIA2 ........................................................................................................................................................... 10
HR40‐IIB2 ........................................................................................................................................................... 11
HR60‐IIA2 ........................................................................................................................................................... 11
【Dimensions】 ...................................................................................................................................................... 12
HR30‐IIA2 ........................................................................................................................................................... 12
HR40‐IIA2 ........................................................................................................................................................... 12
HR40‐IIB2 ........................................................................................................................................................... 13
HR60‐IIA2 ........................................................................................................................................................... 13
【Technical specification】 ...................................................................................................................................... 14
【Parts layout】 ........................................................................................................................................................ 15
1. Display structure ............................................................................................................................................ 15
2. Inner structure ............................................................................................................................................... 15
3. Computer board ............................................................................................................................................. 18
【Installation】 ......................................................................................................................................................... 19
1. Installation Environment ................................................................................................................................ 19
2. Position Selection ........................................................................................................................................... 19
3. Installation Proposal ...................................................................................................................................... 20
4. Installation Step ............................................................................................................................................. 21
5. Function Test .................................................................................................................................................. 24
6. Interface Display ............................................................................................................................................ 25
7. Installation Inspection .................................................................................................................................... 27
【Applications】 ....................................................................................................................................................... 35
1. Operation Interface ........................................................................................................................................ 35
2. Operation Method ......................................................................................................................................... 40
3. Notice for Use ................................................................................................................................................ 42
4. Annual Certification ....................................................................................................................................... 56
【Product Maintenance and Service Period】 .......................................................................................................... 57
1. Recommended Maintenance and Service Method ....................................................................................... 57
2. Product Sterilization ....................................................................................................................................... 59
【Working Principle】 .............................................................................................................................................. 63
4 / 98
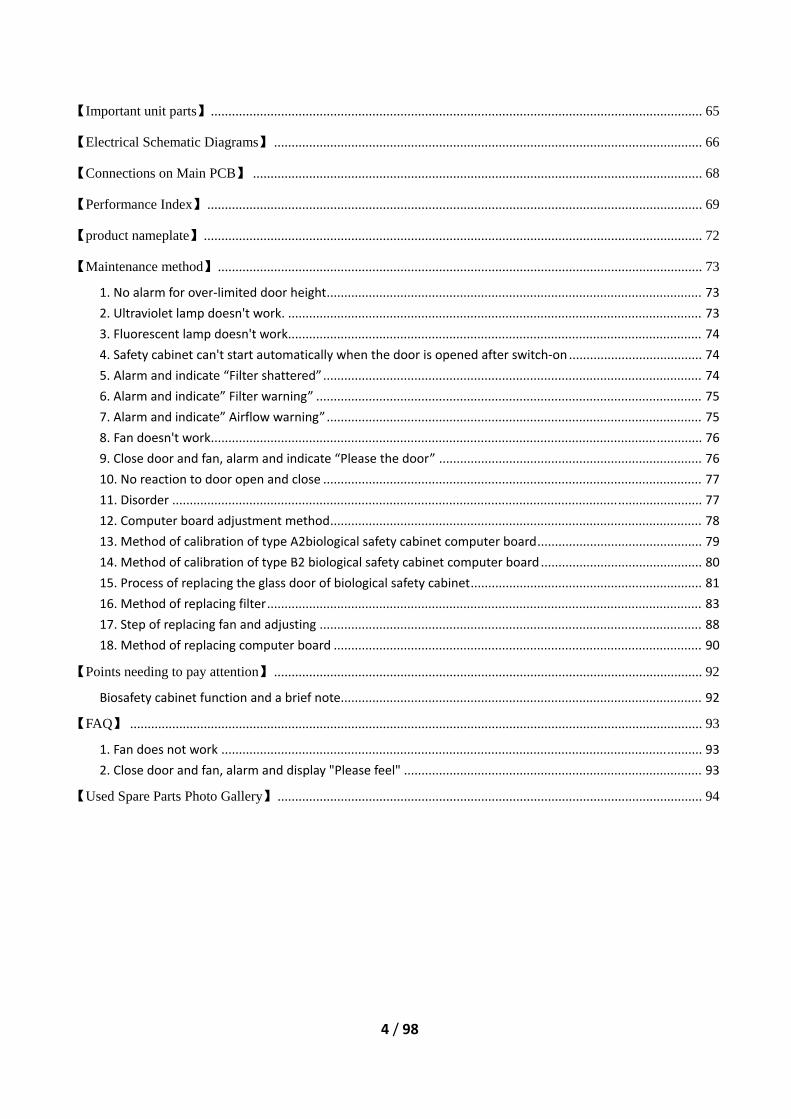
【Important unit parts】 ............................................................................................................................................ 65
【Electrical Schematic Diagrams】 .......................................................................................................................... 66
【Connections on Main PCB】 ................................................................................................................................ 68
【Performance Index】 ............................................................................................................................................. 69
【product nameplate】 .............................................................................................................................................. 72
【Maintenance method】 .......................................................................................................................................... 73
1. No alarm for over‐limited door height ........................................................................................................... 73
2. Ultraviolet lamp doesn't work. ...................................................................................................................... 73
3. Fluorescent lamp doesn't work...................................................................................................................... 74
4. Safety cabinet can't start automatically when the door is opened after switch‐on ...................................... 74
5. Alarm and indicate “Filter shattered” ............................................................................................................ 74
6. Alarm and indicate” Filter warning” .............................................................................................................. 75
7. Alarm and indicate” Airflow warning” ........................................................................................................... 75
8. Fan doesn't work ............................................................................................................................................ 76
9. Close door and fan, alarm and indicate “Please the door” ........................................................................... 76
10. No reaction to door open and close ............................................................................................................ 77
11. Disorder ....................................................................................................................................................... 77
12. Computer board adjustment method .......................................................................................................... 78
13. Method of calibration of type A2biological safety cabinet computer board ............................................... 79
14. Method of calibration of type B2 biological safety cabinet computer board .............................................. 80
15. Process of replacing the glass door of biological safety cabinet .................................................................. 81
16. Method of replacing filter ............................................................................................................................ 83
17. Step of replacing fan and adjusting ............................................................................................................. 88
18. Method of replacing computer board ......................................................................................................... 90
【Points needing to pay attention】 .......................................................................................................................... 92
Biosafety cabinet function and a brief note....................................................................................................... 92
【FAQ】 ................................................................................................................................................................... 93
1. Fan does not work ......................................................................................................................................... 93
2. Close door and fan, alarm and display "Please feel" ..................................................................................... 93
【Used Spare Parts Photo Gallery】 ......................................................................................................................... 94
5 / 98
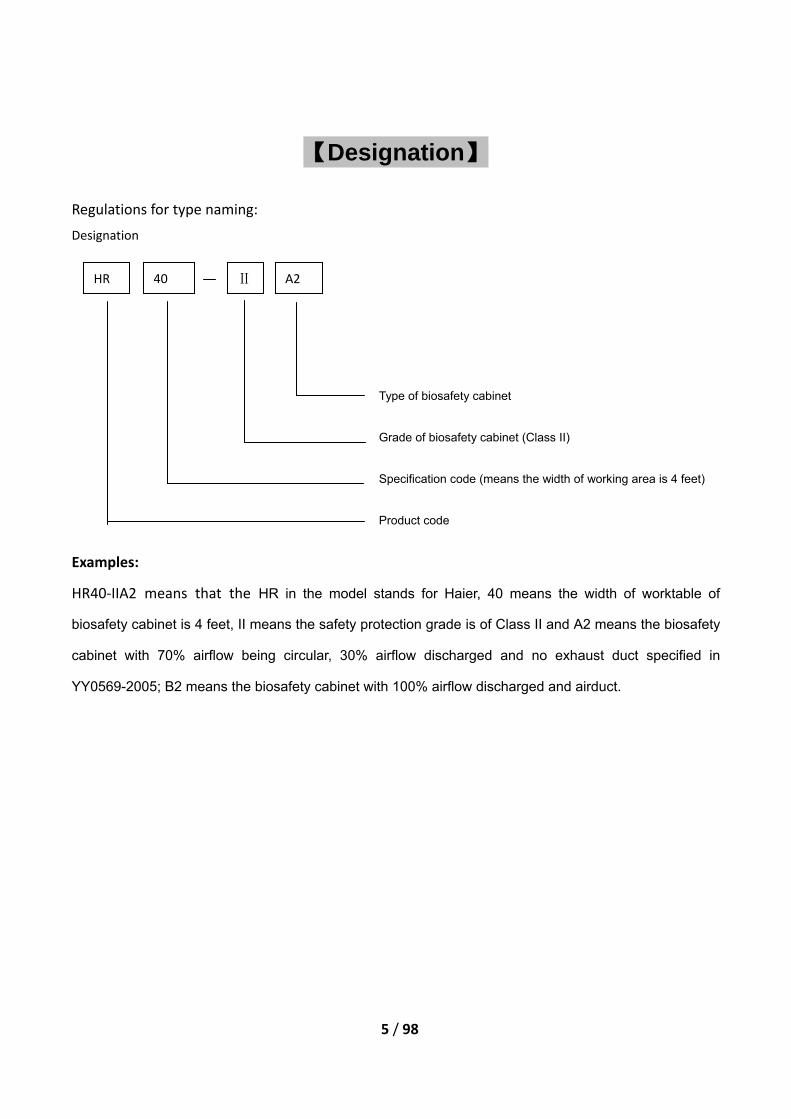
【Designation】
Regulations for type naming:
Designation
Type of biosafety cabinet
Grade of biosafety cabinet (Class II)
Specification code (means the width of working area is 4 feet)
Product code
Examples:
HR40‐IIA2 means that the HR in the model stands for Haier, 40 means the width of worktable of
biosafety cabinet is 4 feet, II means the safety protection grade is of Class II and A2 means the biosafety
cabinet with 70% airflow being circular, 30% airflow discharged and no exhaust duct specified in
YY0569-2005; B2 means the biosafety cabinet with 100% airflow discharged and airduct.
HR 40 A2 Ⅱ

6 / 98
【Introduction to product features】
Biosafety cabinet is a kind of safety device that can be used in the operation site that may produce
microbe aerosol, whose basic function is to protect the staff and working environment from biological
bacteria hazard.
1. Classification of biosafety cabinet
1.1 The product is of Class III medical equipments, but is not indicated with the category in medical
equipment classification directory that is implemented at present. However, we registered it as “6841
Device for Medical Assay and Basic Equipment”. In “Discussion Draft on Medical Equipment
Classification Directory” released by State Food and Drug Administration in 2005 which is not published,
the product is regarded as “6864 Medical Sanitary Material and Dressing”.
1.2 The product is divided into three grades as per the design structure of airflow and isolation barrier,
namely Class I, Class II and Class III. Moreover, the Class II biosafety cabinet is divided into four types as
per airflow proportion in total system flow and internal design structure, namely A1, A2, B1 and B2.
Class II A2 biosafety cabinet is designed with inward airflow for staff protection, vertical laminar flow
filtered by HEPA filter for experimental material protection and exhaust system with HEPA filter for
environmental protection.
Main features include followings:
A. With inward airflow that is no less than 0.5m/s at operation port
B. The downward-sent airflow filtered by HEPA filter is a part of the mixed gas of downward-sent
airflow from the same pressure exhaust system and inward airflow at operation port.
C. The air filtered by HEPA filter is discharged into the environment through exhaust hood.
D. The surroundings of operation area of biosafety cabinet are all in negative pressure state or
surrounded by negative pressure channel and negative-pressure exhaust system.
Class II B2 biosafety cabinet is suitable for microbiological study including a few of volatile toxic chemicals
7 / 98
or trace radionuclide, whose main features are as follows:
A. The average speed of inward airflow at operation port shall be kept at 0.5m/s;
B. Most downward-sent airflow through HEPA filter is the unpolluted circular indraft;
C. The polluted downward-sent airflow filtered by HEPA filter is discharged into the air via special
exhaust duct;
All the air ducts and pressure exhaust systems for biological contamination shall keep negative
pressure or be surrounded by negative-pressure air duct and pressure exhaust system.
1.3 The products we produce at present are all of Class II A2 or B2 type.
1.4 In our nation, medical equipment adopts registration certificate and cannot be sold without the
registration certificate. At present, the products of the same type that obtain the registration certificates
are all of Class II A2 or B2 type.
2. Functions and Features of Product
2.1 Functions:
Biosafety cabinet is used for microbiological operation and experiment and its functions are fully reflected
in safety protection to staff, operation object and environment. The negative-pressure air curtain at the
opening of biosanction. The vertical one-way airflow filtered by HEPA filter provides experimental
operation wifety cabinet is used to prevent polluted aerosol overflowing so as to realize the staff protection
futh clean airflow that is superior to Class 100 to protect the operation object. The discharged gas after
filtration by HEPA filter has been fully removed the microbes and dusts, which realizes the function of
environmental protection.
2.2 Features:
Exclusive digital display function:
Digital display of wind speed of downdraft;
Digital display of wind speed of inflow airflow;
8 / 98
Digital display of discharged wind volume;
Digital display of positive pressure in static pressure tank;
Digital display of negative pressure in negative pressure area;
Digital display of residual service life of filter;
Digital display of accumulated running time of ultraviolet lamp;
Digital display of accumulated running time of the fan;
Digital setup of the switch and running time of ultraviolet lamp.
Alarm functions:
Threshold level alarm;
Airflow fluctuation alarm;
Uptight alarm when closing the door of the fan;
Filter damage alarm;
Pre-alarm for service life of the filter that is less than 10%;
Alarm for end of service life of the filter.
Exclusive technical features:
The surroundings around front window all have anti-leakage design (exclusive patent design);
The hanging way of balancer at front window can not only avoid leakage owing to door opening
incurred by disoperation, but guarantee timely door closing for protection after power-off;
Design of power leakage protection for power line. Once the leakage current surpasses the
standard, all powers will be cut off to guarantee the safety of operators;
Exclusive wholly digital parameter display and exclusive digital information display in page
turning way on large screen are available for inquiring all the information on biosafety cabinet.
Structure design:

9 / 98
The concave worktable design is convenient for cleaning if liquids sprinkle during experiment
process;
Toughened glass structure can resist violent impact. If the common steel health ball falls at the
height of 1m to the glass laid in horizontal way, the glass will not be damaged;
The microbes for experiment will not accumulate owing to non-frame design for glass edge;
The filter resistance is monitored automatically and no pressured gauge is used. Sound and light
alarm will be given when abnormal state occurs, which is convenient for users to realize the
abnormality;
The ultraviolet lamp is laid on back wall of the working area, but not current sharing board, which
produces minimum interference to the airflow;
The completely smooth stainless steel is easy to be cleaned and will not accumulate bacteria
and its feet are adjustable.
10 / 98
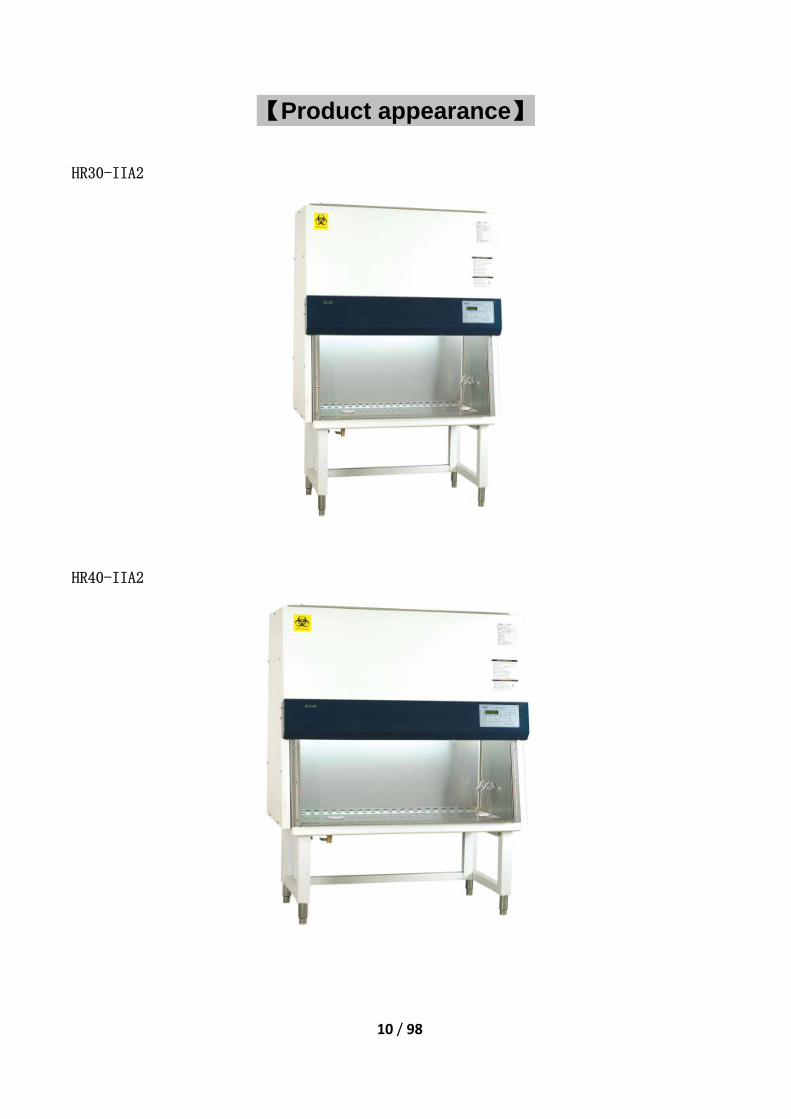
【Product appearance】
HR30-IIA2
HR40-IIA2
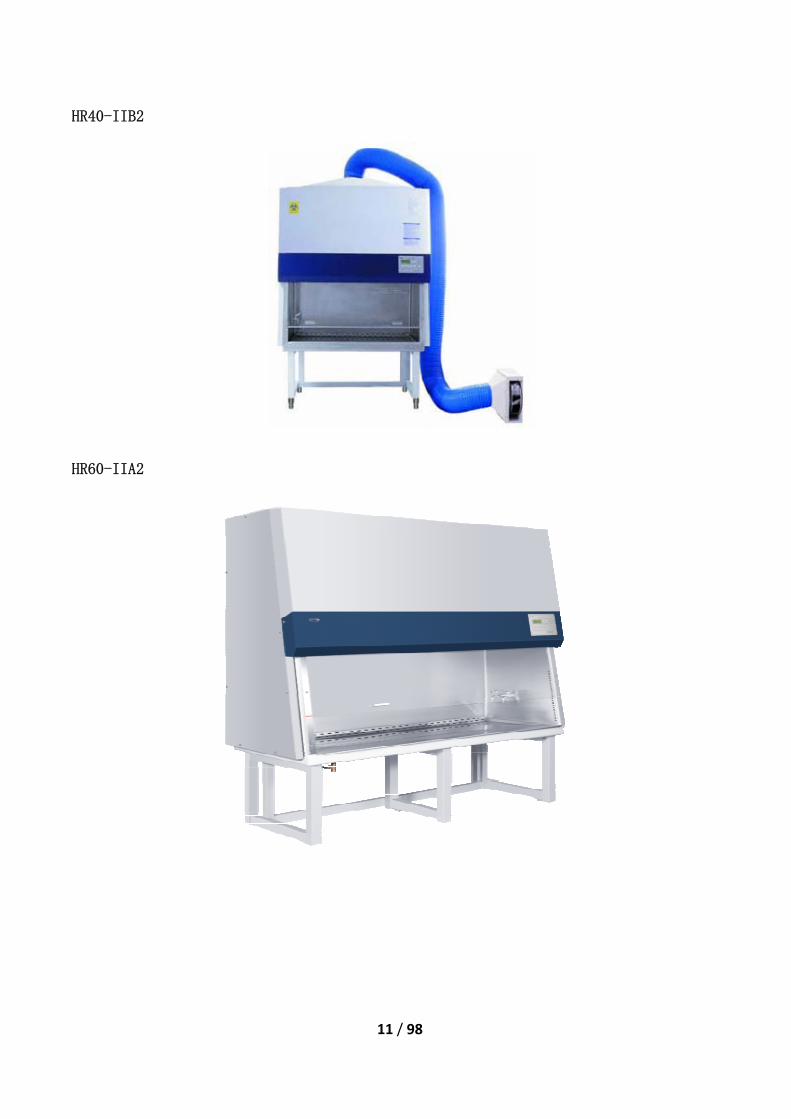
HR40-IIB2
HR60-IIA2
2
2
11 / 98
12 / 98
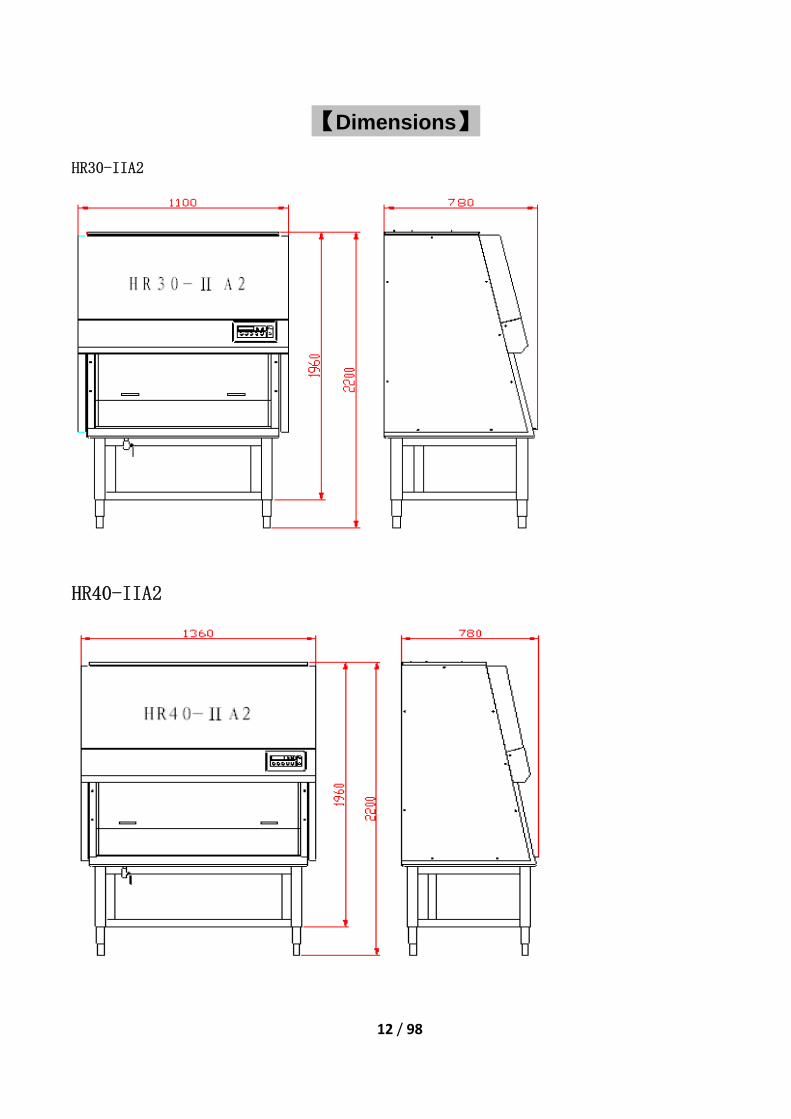
【Dimensions】
HR30-IIA2
HR40-IIA2

13 / 98
HR40-IIB2
HR60-IIA2
Model dimension(L×D×H)
HR30-ⅡA2 1100×780×2200
HR40-ⅡA2 1360×780×2200
HR60-ⅡA2 1960×780×2200
HR40-ⅡB2 1360×780×2400
14 / 98
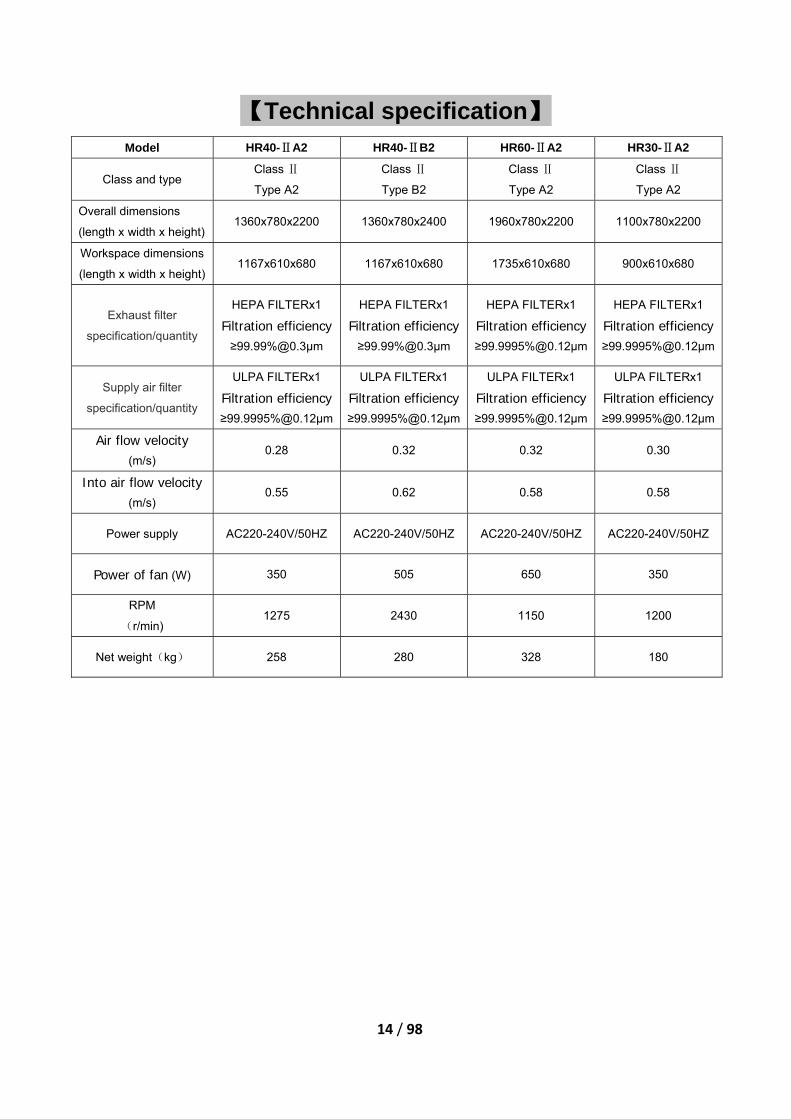
【Technical specification】 Model HR40-ⅡA2 HR40-ⅡB2 HR60-ⅡA2 HR30-ⅡA2
Class and type Class Ⅱ
Type A2
Class Ⅱ
Type B2
Class Ⅱ
Type A2
Class Ⅱ
Type A2
Overall dimensions
(length x width x height) 1360x780x2200 1360x780x2400 1960x780x2200 1100x780x2200
Workspace dimensions
(length x width x height) 1167x610x680 1167x610x680 1735x610x680 900x610x680
Exhaust filter
specification/quantity
HEPA FILTERx1
Filtration efficiency≥99.99%@0.3µm
HEPA FILTERx1
Filtration efficiency≥99.99%@0.3µm
HEPA FILTERx1
Filtration efficiency ≥99.9995%@0.12µm
HEPA FILTERx1
Filtration efficiency≥99.9995%@0.12µm
Supply air filter
specification/quantity
ULPA FILTERx1
Filtration efficiency≥99.9995%@0.12µm
ULPA FILTERx1
Filtration efficiency≥99.9995%@0.12µm
ULPA FILTERx1
Filtration efficiency ≥99.9995%@0.12µm
ULPA FILTERx1
Filtration efficiency≥99.9995%@0.12µm
Air flow velocity
(m/s) 0.28 0.32 0.32 0.30
Into air flow velocity
(m/s) 0.55 0.62 0.58 0.58
Power supply AC220-240V/50HZ AC220-240V/50HZ AC220-240V/50HZ AC220-240V/50HZ
Power of fan (W) 350 505 650 350
RPM
(r/min) 1275 2430 1150 1200
Net weight(kg) 258 280 328 180

1. Displa
2. Inner
ay structu
structure
Pressu
ure
e
ure conduct
【Pa
ting pipe
Electric
Ba
Ne
co
Posit
cond
15 / 98
rts layo
c bracket
alancer bracke
egative
nducting pipe
tive pressu
ducting pipe
out】
et
pressure
ure
Balaancer
Fixed
block
Mobile pulle
block
The ove
componen
called
pulley
ey
erall
t is

16 / 98
Upper travel switch
Travel switch
Fixed on front panel to
control the opening height
of the door and provide
signal for the close and
opening of fluorescent
lamp and sound and light
alarm
Lower travel switch For controlling the door
opening action and providing
the signal for door-opening fan,
running of fluorescent lamp
and close and opening of
ultraviolet lamp
Electric equipment
bracket

17 / 98
Position of balancer and front cover plate
High efficiency filter
Left balancer group
(with bracket)
Front cover plate
Right
balancer
group (with
bracket)
Filter
Notice the airflow
direction on label

18 / 98
3. Computer board
Travel switch
Regulating button
for wind speed
Negative-pre
ssure sensor Positive-pressu
re sensor
Regulator for calibration
of negative pressure
Regulator for circuit
calibration of
negative-pressure
sensor
ChipNegative
pressure
Positive
pressure
Regulator for circuit
calibration of
Regulator for calibration
of positive pressure
19 / 98
【Installation】
1. Installation Environment
Indoor application;
Ambient temperature: 5℃~40℃
Relative humidity: maximum relative humidity is 80% when the temperature is lower than 31℃;
Relative humidity falls 50% linearly when the temperature is 40℃;
Atmospheric pressure: 70 ~ 106kPa
Power supply connected: 220V±22V 50Hz±1 Hz
2. Position Selection
The biosafety cabinet shall not be laid in the channel and shall be far away from the room airflow that can
destroy the isolation layer produced by air barrier at working port. If the laboratory has windows, all shall
be in close state all the time. The biosafety cabinet shall not be laid at the air inlet to prevent the air
flowing through front operation port or toward exhaust filter.
If space is large enough, 30cm space shall be reserved at back and surroundings of the biosafety cabinet
for cleaning the cabinet. If space is not so large, at least 8cm shall be reserved at each side and 3.8cm
reserved at back for cleaning. The power socket for biosafety cabinet can be close to the cabinet so as to
be convenient for maintenance and electric safety test without moving the cabinet.
20 / 98
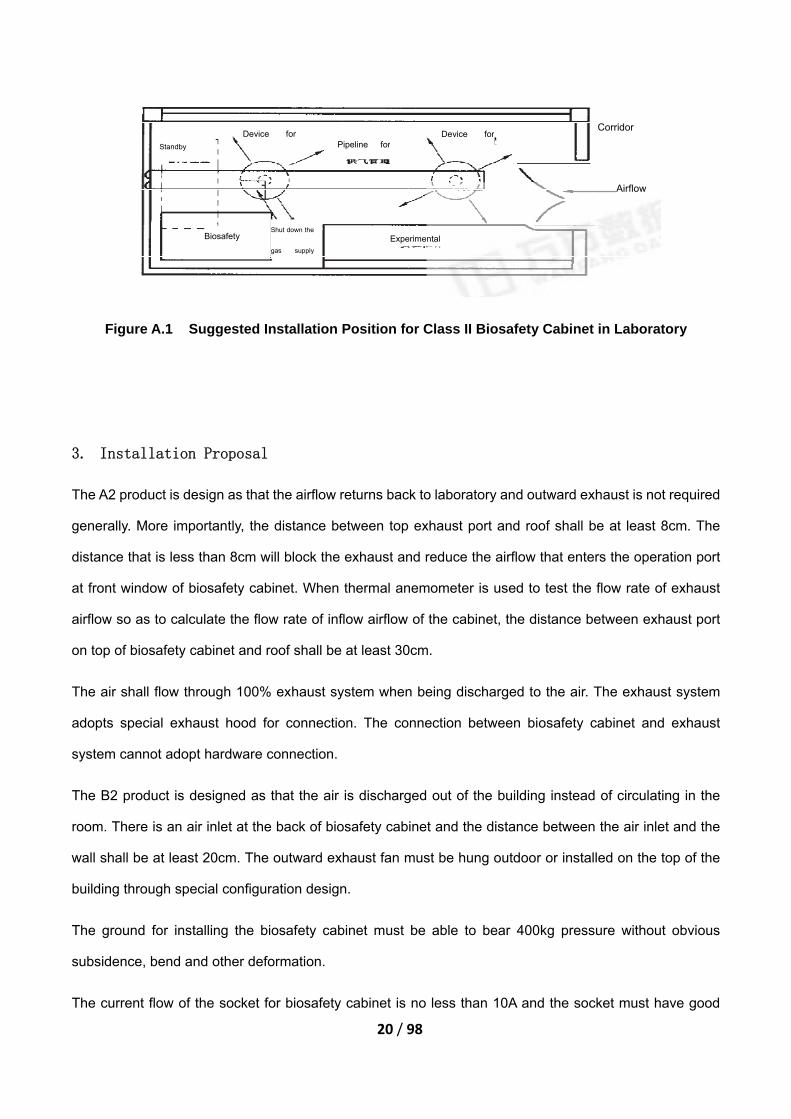
Figure A.1 Suggested Installation Position for Class II Biosafety Cabinet in Laboratory
3. Installation Proposal
The A2 product is design as that the airflow returns back to laboratory and outward exhaust is not required
generally. More importantly, the distance between top exhaust port and roof shall be at least 8cm. The
distance that is less than 8cm will block the exhaust and reduce the airflow that enters the operation port
at front window of biosafety cabinet. When thermal anemometer is used to test the flow rate of exhaust
airflow so as to calculate the flow rate of inflow airflow of the cabinet, the distance between exhaust port
on top of biosafety cabinet and roof shall be at least 30cm.
The air shall flow through 100% exhaust system when being discharged to the air. The exhaust system
adopts special exhaust hood for connection. The connection between biosafety cabinet and exhaust
system cannot adopt hardware connection.
The B2 product is designed as that the air is discharged out of the building instead of circulating in the
room. There is an air inlet at the back of biosafety cabinet and the distance between the air inlet and the
wall shall be at least 20cm. The outward exhaust fan must be hung outdoor or installed on the top of the
building through special configuration design.
The ground for installing the biosafety cabinet must be able to bear 400kg pressure without obvious
subsidence, bend and other deformation.
The current flow of the socket for biosafety cabinet is no less than 10A and the socket must have good
Standby
Device forPipeline for
Device forCorridor
Airflow
Experimental Shut down the
gas supply
Biosafety
21 / 98
grounding and cannot be shared with other equipments.
4. Installation Step
4.1 Installation step of A2 biosafety cabinet
4.1.1 Open the package and check the hardware equipment as per the packing list to ensure there is
no damage during transportation.
4.1.2 Place the biosafety cabinet at proper position in laboratory and then remove all the covers for
protection inside and outside the biosafety cabinet.
4.1.3 Take down the feet and hand-supporting frame from the base of biosafety cabinet and remove
the package;
4.1.4 Dismount the fixation plate for base with cross screwdriver and then move the biosafety cabinet
to the ground from wooden base
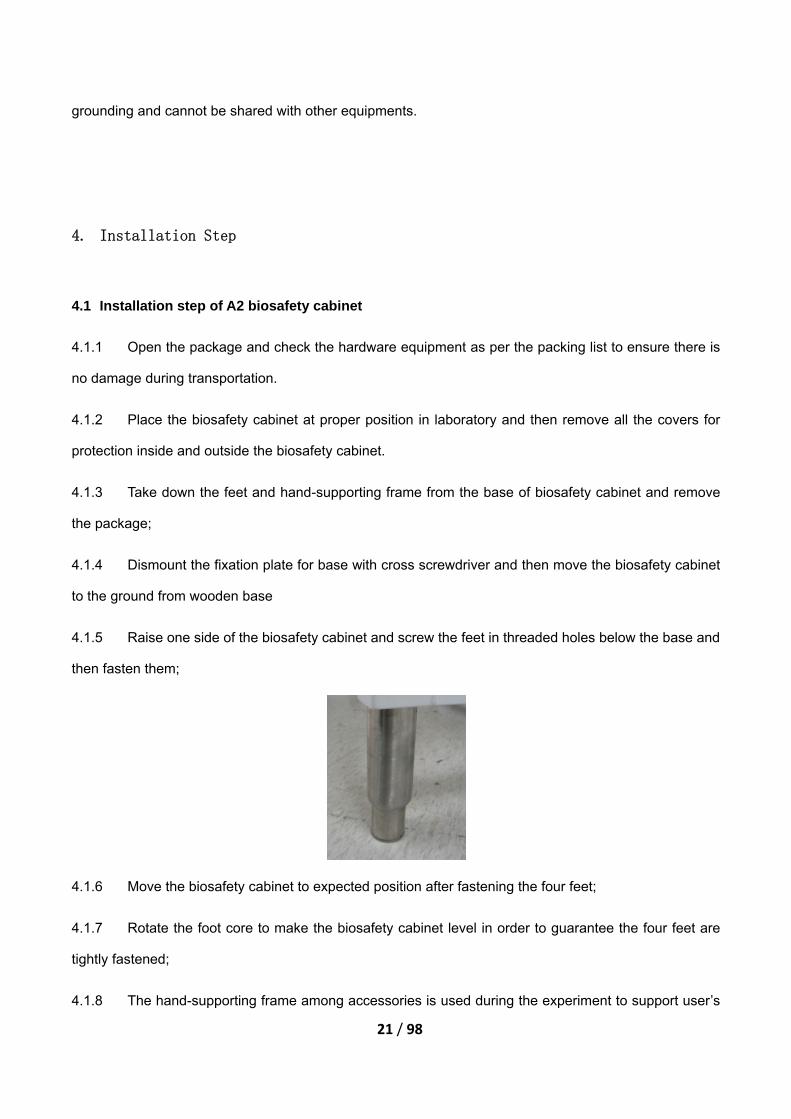
4.1.5 Raise one side of the biosafety cabinet and screw the feet in threaded holes below the base and
then fasten them;
4.1.6 Move the biosafety cabinet to expected position after fastening the four feet;
4.1.7 Rotate the foot core to make the biosafety cabinet level in order to guarantee the four feet are
tightly fastened;
4.1.8 The hand-supporting frame among accessories is used during the experiment to support user’s

22 / 98
arms to prevent tiredness and shake during the experiment.
4.1.9 Wipe the cabinet and lower bracket with cloth and water or neutral household detergent after
installation.
4.1.10 Note: the worktable and brackets for worktable must be taken out firstly if the biosafety cabinet
has to be carried to the room in side dumping way in order to prevent destroying the ultraviolet lamp;
4.2 Installation step of B2 biosafety cabinet
4.2.1 Former installation steps are the same to A2 biosafety cabinet;
4.2.2 Installation of outward exhaust fan
a. Cover the pipe clamp on one end of the outward exhaust pipe which is then covered at the exhaust port
on top of biosafety cabinet, then fasten the pipe clamp;
b. Keep the outward exhaust pipe level and determine the position of drilling on the wall;
c. Drill circular holes with diameter being 20cm at selected positions;
d. Open the attached packing box of outward exhaust fan and check the materials as per packing list;
e. Connect the fixation frames for outward exhaust fan as per following figures;
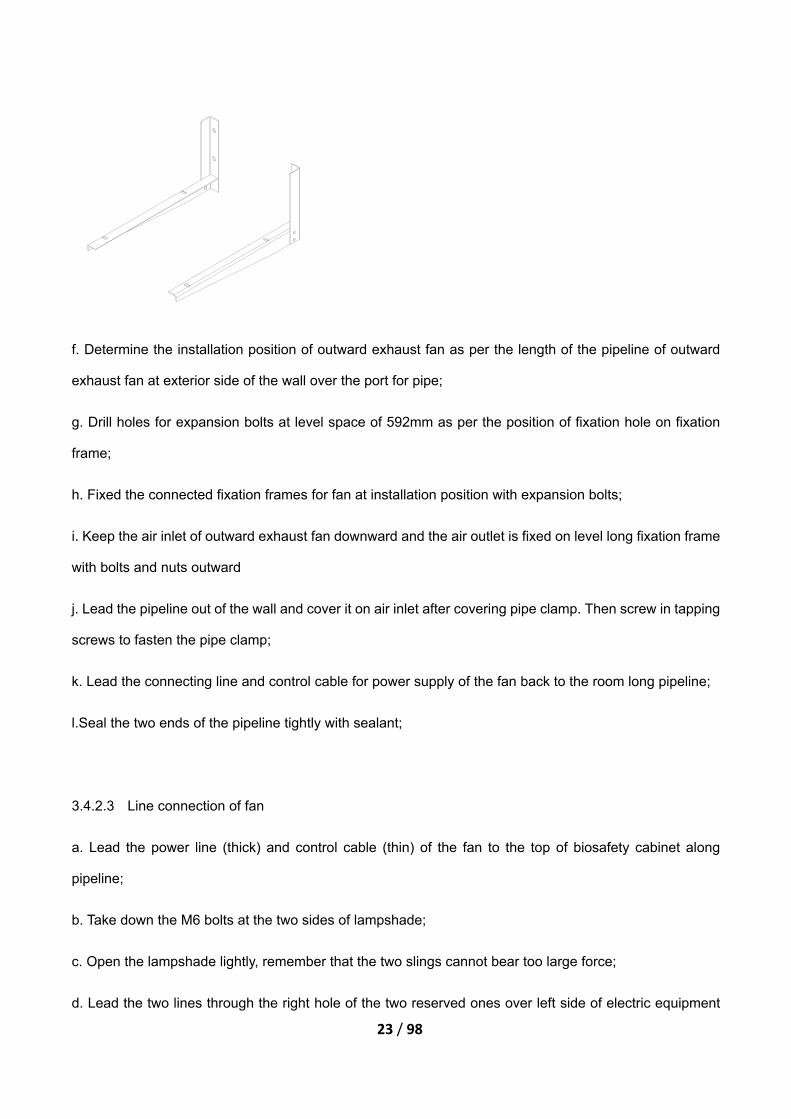
23 / 98
f. Determine the installation position of outward exhaust fan as per the length of the pipeline of outward
exhaust fan at exterior side of the wall over the port for pipe;
g. Drill holes for expansion bolts at level space of 592mm as per the position of fixation hole on fixation
frame;
h. Fixed the connected fixation frames for fan at installation position with expansion bolts;
i. Keep the air inlet of outward exhaust fan downward and the air outlet is fixed on level long fixation frame
with bolts and nuts outward
j. Lead the pipeline out of the wall and cover it on air inlet after covering pipe clamp. Then screw in tapping
screws to fasten the pipe clamp;
k. Lead the connecting line and control cable for power supply of the fan back to the room long pipeline;
l.Seal the two ends of the pipeline tightly with sealant;
3.4.2.3 Line connection of fan
a. Lead the power line (thick) and control cable (thin) of the fan to the top of biosafety cabinet along
pipeline;
b. Take down the M6 bolts at the two sides of lampshade;
c. Open the lampshade lightly, remember that the two slings cannot bear too large force;
d. Lead the two lines through the right hole of the two reserved ones over left side of electric equipment

24 / 98
bracket from reserved space on upper part of front panel along the route of power line;
e. Open the terminal box and connect the power line (thick) of the fan with the terminal box. The brown
wire is connected to the brown wires in terminal box, blue wire is connected to the blue wire and olivine
wire, as grounding wire, is connected to the wire in yellow and green in terminal box;
f. The control cable (thin) of the fan is connected to Pin CN3 on computer board;
g. If other lines come off, the smooth side of the line (the line that is led through the lightproof box for
screen is connected to right pin with black head) for film key shall be upward and the side with revealed
measure point is downward after reconnection;
h. If there is no problems, close the lampshade (never press lines) and screw in two M6 fastening bolts;
i. Clear up the wastes and adopt measures to remove the dust in the air, after which the biosafety cabinet
can be started for function verification;
j. During installation period, arrange users to read the instruction once carefully;
5. Function Test
5.1 Tests on Outward Exhaust Fan
a. Close the glass door completely and the outward exhaust fan stops running;
b. Open the glass door and the outward exhaust fan starts;
5.2 Close the glass door completely and connect the power supply. Then the ultraviolet lamp starts to run
by pressing Ultraviolet Lamp Key;
5.3 Raise the glass door with height no more than 19cm, at this time, the ultraviolet lamp shall be off
automatically and the fan and fluorescent lamp start to run in the meantime;
5.4 Raise the glass door with height more than 19cm, the sound and light alarm will be given and the
25 / 98
fluorescent lamp will be off automatically in the meantime.
5.5 Fall the glass door to the position with height less than 19cm, the sound and light alarm will disappear
and the fluorescent lamp will start automatically.
5.6 Press Socket Key continuously and then the indicator light will be on or off with the action
synchrously;
5.7 Press Ultraviolet Lamp Key, there is no response at this time;
5.8 Press Fluorescent Lamp Key and the fluorescent lamp will open or close with the action synchrously;
5.9 Press Fluorescent Lamp Key again, and then the fluorescent lamp starts with the action synchrously;
5.10 Press Fan Key, then the fan shall stop work and the sound and light alarm shall be given at the
same time;
5.11 Press Stop Key, the sound and light alarm will stop, but the alarm indicator light still shines;
5.12 Press Fluorescent Lamp Key again, the fluorescent lamp shall stop working at this time;
5.13 Press Fluorescent Lamp Key for thid time, the fluorescent lamp shall be unable to be started at
this time;
5.14 Press Fan Key, then the fan shall restart work and the alarm indictor light will be off;
5.15 Press Fluorescent Lamp Key again, the fluorescent lamp shall restart at this time;
6. Interface Display
6.1 Only time is display when the power supply is connected and the initial time is 12:00;
6.2 “Please wait” will be displayed when the fan runs;

26 / 98
6.3 Display after stable running of fan
a. Display “D-FLOW” that means “descending wind speed”;
b. Display “INFLOW” that means “inflow wind speed”;
c. Display “EXHAUST” that means “exhausted wind volume”;
6.4 Press “Up Key” and then the page will change display
a. Display “F-PRESSURE” that means “positive pressure value in static pressure tank”;
b. Display “A-PRESSURE” that means “negative pressure value in negative pressure channel”;
c. Display “FILTER” that means “residual service life of filter”;
6.5 Press Up Arrow again, the page will change the display again
a. Display “U.V AUTO MODE” that means “Auto Mode of ultraviolet lamp”;
Display “YES” that means “set successfully”,
Display “NO” that means “setup cancelled”;
b. “TIME1” stands for “countdown time for the opening of ultraviolet lamp”
c. “TIME2” stands for “running time of ultraviolet lamp”
d. “TIME3” stands for “next countdown time for the opening of ultraviolet lamp”
e. It’s available to carry out following operations after pressing “Setup” key in the page
It’s available to start or close the Auto Mode by pressing Up Key, corresponding to YES or NO.
YES, TIME1, TIME2 and TIME3 are available for setup;
NO, TIME1, TIME2 and TIME3 are unavailable for setup;
27 / 98
6.6 Press Up Key again and then the page will chang the display again
a. Display “FAN RUN-TIME” that stands for “accumulated running time of fan”;
b. Display “U.V RUN-TIME” that stands for “accumulated running time of ultraviolet lamp”;
c. Display “days” that means “number of day” display “hours” that means “number of hour”;
6.7 Alarm display
a. When the door opens, inlet fan closes and the alarm displays “Please close the door”;
b. When the inlet fan opens and the door height is overhigh, the alarm displays “Door height error” that
means “the door is overhigh”;
c. Alarm displays “Filter shattered” that means “filter is damaged”;
d. When alarm displays “Filter warning”, the filter has to be replaced;
e. Alarm dislays “Airflow warning” that means “airflow fluctuation alarm”;
7. Installation Inspection
7.1 Appearance
a.Requirements:
①The surface of the cabinet shall have no obvious scratch, rust and indentation and shall be bright and
clean, and the appearance shall be neat and regular.
②The words and graphic symbol marks for description shall be correct, clear, regular and firm.
③The welding shall be firm and the welding surface shall be smooth.
b. Detection method: detect based on eyesight and handle. The result shall comply with aforementioned
requirements.

28 / 98
c. Result: detection result shall comply with 3.7.1.1.
7.2 Completeness of high efficiency filter:
a.Requirement: it’s available to sweep the missing rate of filter at any point which is no more than 0.01%.
b.Reagent:
Dioctyl-phthalate (DOP) or equivalent liquid can produce the aerosol particulate liquid with the same
particulate size distribution to DOP aerosol, such as poly α-olefin (PAO), bis (-2ethylhexyl) sebacate,
polyethylene glycol and light mineral oil of drug grade.
c. Instruments:
Instruments for completeness test of high efficiency filter include:
Aerosol photometer with linear or logarithmic scale can mark most scattered aerosol particle in DOP
(or equivalent liquid) with concentration being 10μg/L in upstream airflow of filter as 100% and can
detect 0.001% same aerosol particle. The photometer shall be calibrated as per the instructions
provided by manufacturer; adjust the pressure of aerosol generator to minimum 140kPa and use
DOP or equivalent liquid to generate aerosol. The immersed depth of generator nozzle shall be no
more than 25mm. The maximum range of aerosol generator is 0-550kPa and the resolution and
precision is 7kPa. The pressure gauge for generator is calibrated by manufacturer or as per the
instructions provided by manufacturer.
d. Method:
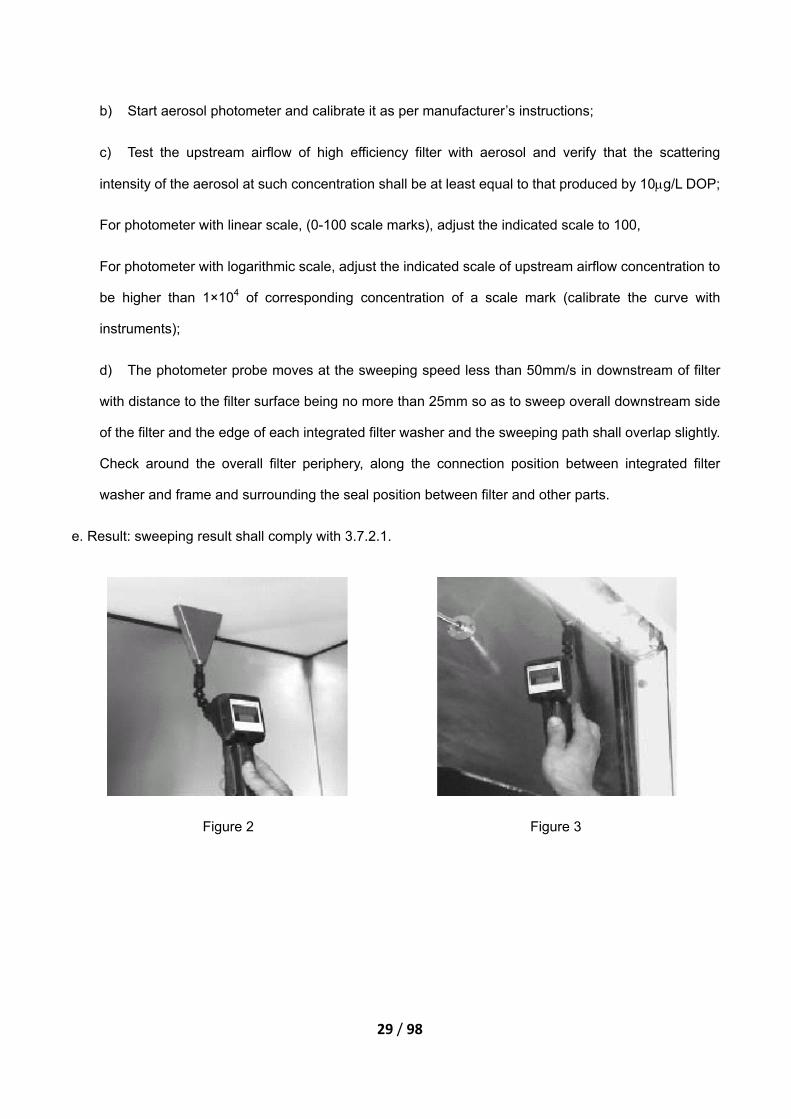
The detection to the filter for sweeping and detection is implemented as per following steps:
a) Run the fan and lamp of biosafety cabinet and remove the diffusing device and protective cover
(if there is) of the filter. Lay aerosol generator and import the aerosol to biosafety cabinet, after which
the upstream airflow of high efficiency filter with even distribution will be generated as per
manufacturer’s instructions. When manufacturer does not specify the import position of aerosol, the
import way of aerosol shall ensures even distribution of aerosol among the airflow in biosafety
cabinet;
29 / 98
b) Start aerosol photometer and calibrate it as per manufacturer’s instructions;
c) Test the upstream airflow of high efficiency filter with aerosol and verify that the scattering
intensity of the aerosol at such concentration shall be at least equal to that produced by 10g/L DOP;
For photometer with linear scale, (0-100 scale marks), adjust the indicated scale to 100,
For photometer with logarithmic scale, adjust the indicated scale of upstream airflow concentration to
be higher than 1×10⁴ of corresponding concentration of a scale mark (calibrate the curve with
instruments);
d) The photometer probe moves at the sweeping speed less than 50mm/s in downstream of filter
with distance to the filter surface being no more than 25mm so as to sweep overall downstream side
of the filter and the edge of each integrated filter washer and the sweeping path shall overlap slightly.
Check around the overall filter periphery, along the connection position between integrated filter
washer and frame and surrounding the seal position between filter and other parts.
e. Result: sweeping result shall comply with 3.7.2.1.
Figure 2
Figure 3
30 / 98
Figure 4
Figure 5
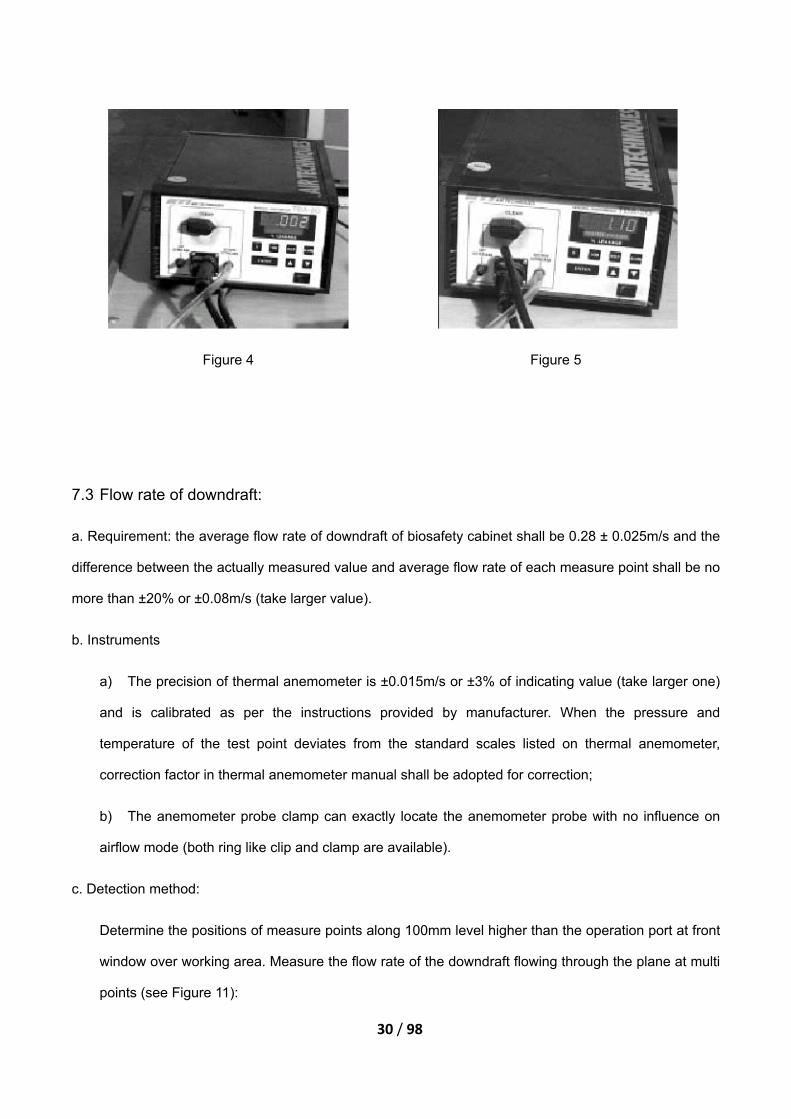
7.3 Flow rate of downdraft:
a. Requirement: the average flow rate of downdraft of biosafety cabinet shall be 0.28 ± 0.025m/s and the
difference between the actually measured value and average flow rate of each measure point shall be no
more than ±20% or ±0.08m/s (take larger value).
b. Instruments
a) The precision of thermal anemometer is ±0.015m/s or ±3% of indicating value (take larger one)
and is calibrated as per the instructions provided by manufacturer. When the pressure and
temperature of the test point deviates from the standard scales listed on thermal anemometer,
correction factor in thermal anemometer manual shall be adopted for correction;
b) The anemometer probe clamp can exactly locate the anemometer probe with no influence on
airflow mode (both ring like clip and clamp are available).
c. Detection method:
Determine the positions of measure points along 100mm level higher than the operation port at front
window over working area. Measure the flow rate of the downdraft flowing through the plane at multi
points (see Figure 11):
31 / 98
a) Measure points distribute at equal space and form square grid that is no more than 150
mm×150mm. There shall be at least three rows of test points and each row shall include at least 7
measure points;
b) The distance between the boundary of test area and inner wall of biosafety cabinet and
operation port at front window shall be 150mm.
Locate anemometer probe at each measure point exactly with clamp for measure. Record the
measure values of all measure points and calculate the average value as per the measure values.
d. Result: the measure result shall comply with 7.3.a
7.4 Flow rate of inflow airflow
a. Requirement: the average flow rate of inflow airflow of the biosafety cabinet shall be 0.55±0.025m/s.
The flow per meter in working area shall be no less than 0.1m3/s.
b. Instruments:
a) The precision of thermal anemometer is ±0.015m/s or ±3% of indicating value (take larger one)
b) The anemometer probe clamp can exactly locate the anemometer probe at measure point with
no influence on airflow mode (both ringlike clip and clamp are available).
c. Detection method:
a) Thermal anemometer is used to measure the flow rate of the airflow flowing through the surface
of exhaust filter at multi points and the measure points are the grid points that is no more than
100mm×100mm. The boundary point is about 100mm from the edge of the filter and the distance
between measure plane and filter surface is about 100mm (see Figure 12);
b) The effective open area of exhaust filter is 300mm×300mm and of exhaust port is
300mm×300mm as well.
c) Calculate the average value of exhaust flow rate of each measure point, that is, average exhaust

32 / 98
flow rate (m/s). Exhaust flow (m3/s) can be calculated through multiplying average exhaust flow rate
by exhaust area (m2);
d) Average flow rate of inflow airflow (m/s) can be calculated through dividing by the area of
operation port at front window (m2) from exhaust flow (m3/s);
e) Test report shall include the actually measured flow rate of exhaust airflow, average flow rate of
exhaust airflow, size and area of exhaust port, exhaust flow, size and area of operation port at front
window, flow rate of inflow airflow and the measures for measure and calculation of each measure
point.
d. Result: the measure result shall comply with 3.7.4.1.
7.5 Airflow mode
a. Requirement:
①The airflow in working area of biosafety cabinet shall be downward and not produce vortex or
upward airflow. Moreover, there shall be no dead point.
②The airflow shall not overflow from biosafety cabinet.
③The peripheral airflow of operation port at front window of the biosafety cabinet shall be inward and
will not overflow. The inflow airflow at operation port at front window shall not flow into the working
area.
b. Instrument: smoke generator and aerosol. It’s available to provide visible smoke.
c. Method and result:
①Downdraft test:
The smoke flows along the centerline of worktable at the height of100mm over the top of operation
port at front window from one end to the other. The result shall comply with 3.7.5.1.1.
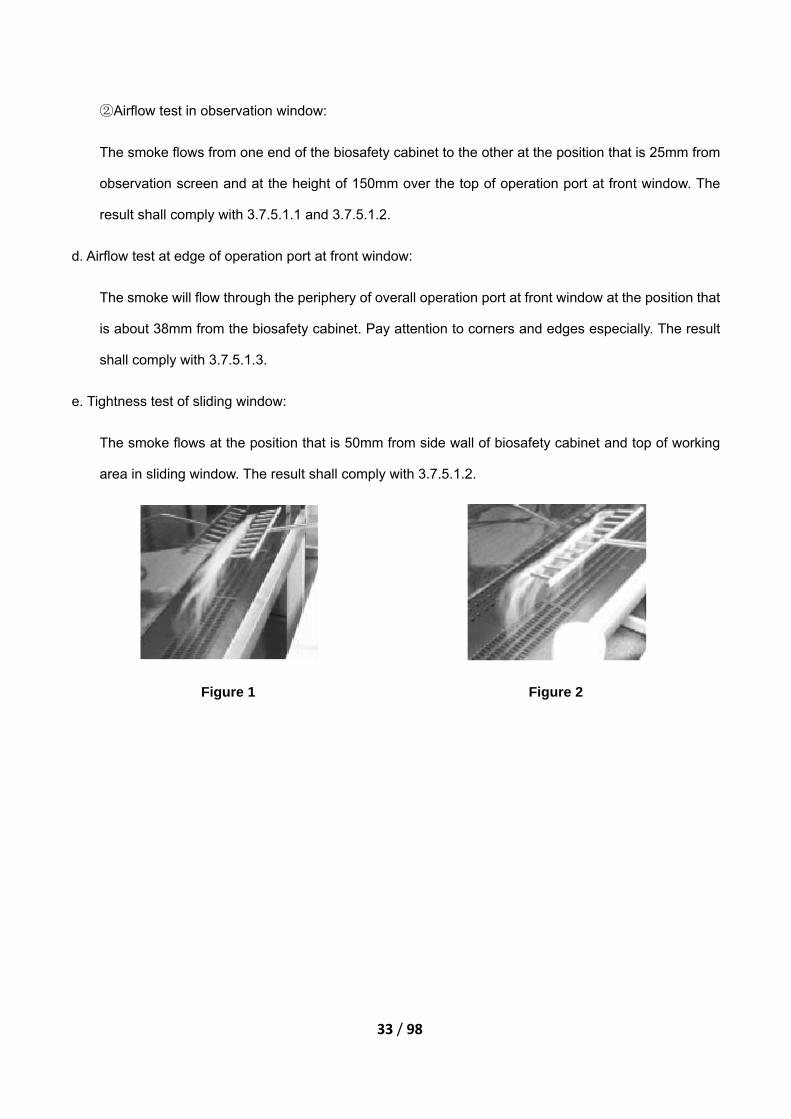
33 / 98
②Airflow test in observation window:
The smoke flows from one end of the biosafety cabinet to the other at the position that is 25mm from
observation screen and at the height of 150mm over the top of operation port at front window. The
result shall comply with 3.7.5.1.1 and 3.7.5.1.2.
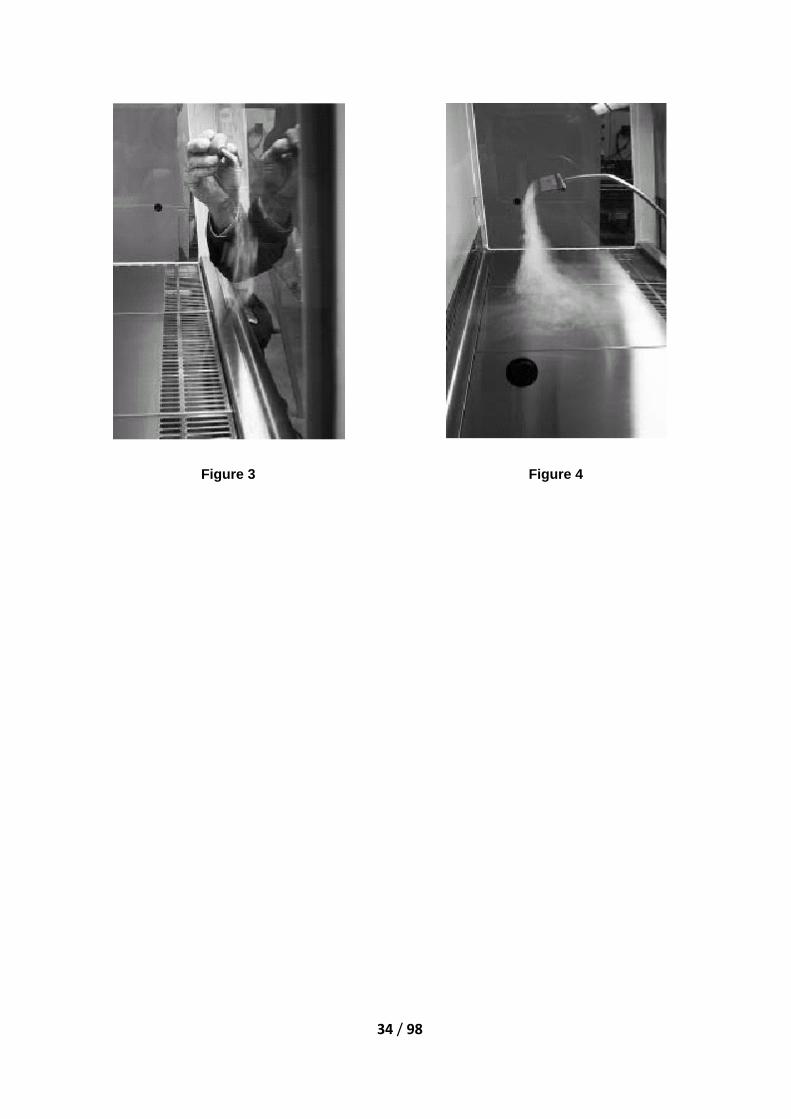
d. Airflow test at edge of operation port at front window:
The smoke will flow through the periphery of overall operation port at front window at the position that
is about 38mm from the biosafety cabinet. Pay attention to corners and edges especially. The result
shall comply with 3.7.5.1.3.
e. Tightness test of sliding window:
The smoke flows at the position that is 50mm from side wall of biosafety cabinet and top of working
area in sliding window. The result shall comply with 3.7.5.1.2.
Figure 1
Figure 2
34 / 98
Figure 3
Figure 4
35 / 98
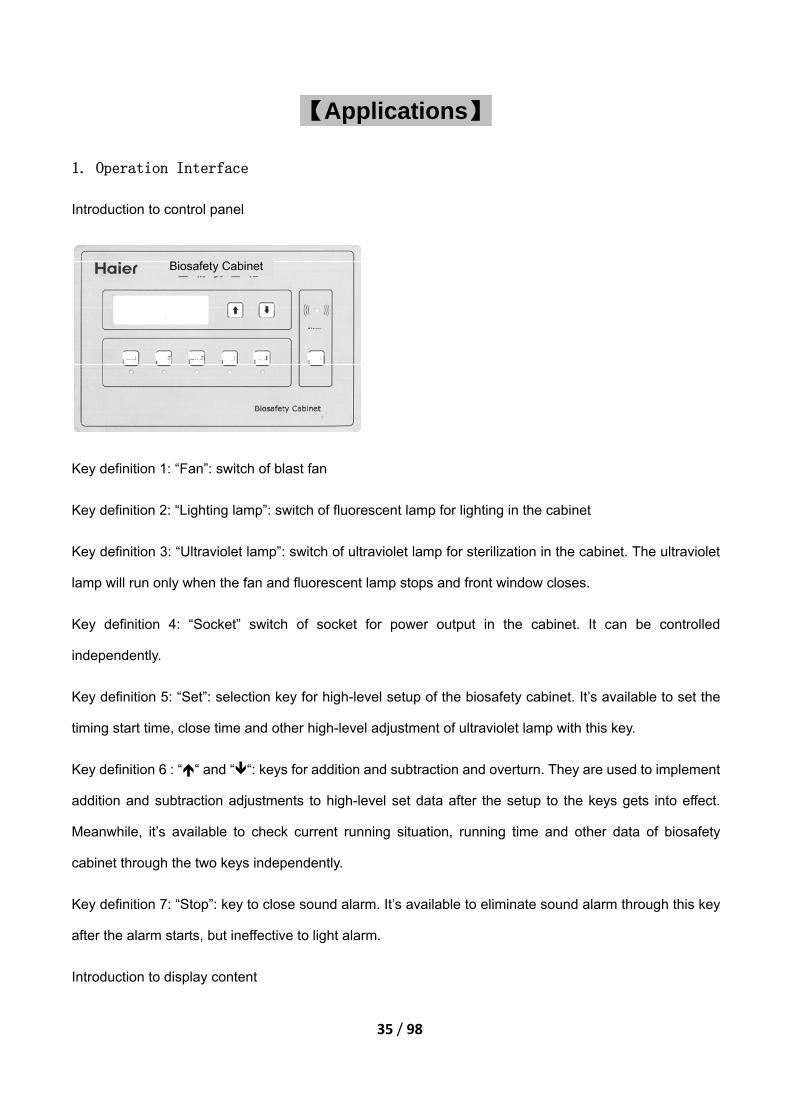
【Applications】
1. Operation Interface
Introduction to control panel
Key definition 1: “Fan”: switch of blast fan
Key definition 2: “Lighting lamp”: switch of fluorescent lamp for lighting in the cabinet
Key definition 3: “Ultraviolet lamp”: switch of ultraviolet lamp for sterilization in the cabinet. The ultraviolet
lamp will run only when the fan and fluorescent lamp stops and front window closes.
Key definition 4: “Socket” switch of socket for power output in the cabinet. It can be controlled
independently.
Key definition 5: “Set”: selection key for high-level setup of the biosafety cabinet. It’s available to set the
timing start time, close time and other high-level adjustment of ultraviolet lamp with this key.
Key definition 6 : ““ and ““: keys for addition and subtraction and overturn. They are used to implement
addition and subtraction adjustments to high-level set data after the setup to the keys gets into effect.
Meanwhile, it’s available to check current running situation, running time and other data of biosafety
cabinet through the two keys independently.
Key definition 7: “Stop”: key to close sound alarm. It’s available to eliminate sound alarm through this key
after the alarm starts, but ineffective to light alarm.
Introduction to display content
Biosafety Cabinet
Alarm

36 / 98
● Lattice liquid crystal display is adopted. The content is divided into four pages normally. The effect
drawing is as follows:
● Display interface of time and wind speed
1 2 : 0 0
D - F L O W : 0 . 3 2 m / s
I N F L O W : 0 . 6 2 m / s
E X H A U S T : 5 5 6 C F M
D-FLOW: Descending wind speed (National standard requires it to be between 0.25 and 0.50)
INFLOW: Inflow wind speed at front window port. (National standard specifies that it cannot be lower than
0.50)
EXHAUST: Exhaust air volume
● Display of pressure difference of filter
F - P R E S S U R E : 0 0 0 P a
A - P R E S S U R E : 0 0 0 P a
F I L T E R : 1 0 0 %
F-PRESSURE: Pressure value of static pressure tank, that is, positive pressure value. A-PRESSURE:
Pressure value of negative pressure, that is, negative pressure value.
FILTER: Service life of filter
● Selection of Auto Mode of ultraviolet lamp Press Setup Key to enter setting state in this page and
it’s available to select U.V AUTO MODE by pressing ↑ Key or ↓ Key.
U . V A U T O M O D E : Y E S
T I M E 1 : 1 5

37 / 98
T I M E 2 : 3 0
T I M E 3 : 1 2 : 0 0
U.V lamp means the ultraviolet lamp.
U.V AUTO MODE: YES means the ultraviolet lamp starts Auto Mode.
U.V AUTO MODE: NO means the ultraviolet lamp closes Auto Mode.
TIME1: Countdown time for the opening of ultraviolet lamp (default time is 1 minute. Setting range is
between 1 minute and 5 minutes)
TIME2: Running time of ultraviolet lamp (default time is 1 minute. Setting range is between 1 minute and
30 minutes)
TIME3: Next countdown time for the opening of ultraviolet lamp (default time is 1 minute. Setting range is
between 1 minute and 24 hours)
It’s available to implement following operations in this page:
Enter setup state.
It’s available to start or close Auto Mode with ↑ Key, corresponding to YES or NO.
YES, TIME1, TIME2 and TIME3 and available for setup.
NO, TIME1, TIME2 and TIME3 are unavailable for setup.
● Display of accumulated running time of ultraviolet lamp and fan
F A N R U N - T I M E :
9 9 9 9 9 D A Y S 2 3 H O U R S
U . V R U N - T I M E :
9 9 9 9 9 D A Y S 2 3 H O U R S
FAN RUN TIME: Running time of fan U.V RUN TIME: Running time of ultraviolet lamp.
DAYS: Number of day. HOURS: Number of hour.
38 / 98
Under setup state, press Fan or Ultraviolet Lamp Key for 3 seconds, then it’s available to reset the
running time of fan or ultraviolet lamp.
● Description on abnormal alarm state:
● Alarm when opening the door or closing the fan.
P l e a s e c l o s e
t h e d o o r
Please close the door
● Alarm when the fan starts or the opening height of the door exceeds the limit.
D o o r H e i g h t e r r o r
Door height error: Error in opening height of the door. Please reduce the height. The raising height of
the door shall be less than 19cm.
● Alarm when filter is abnormal.
F i l t E r s h a t t e r e d
Filter shattered: filter is abnormal. Please contact Haier.
39 / 98
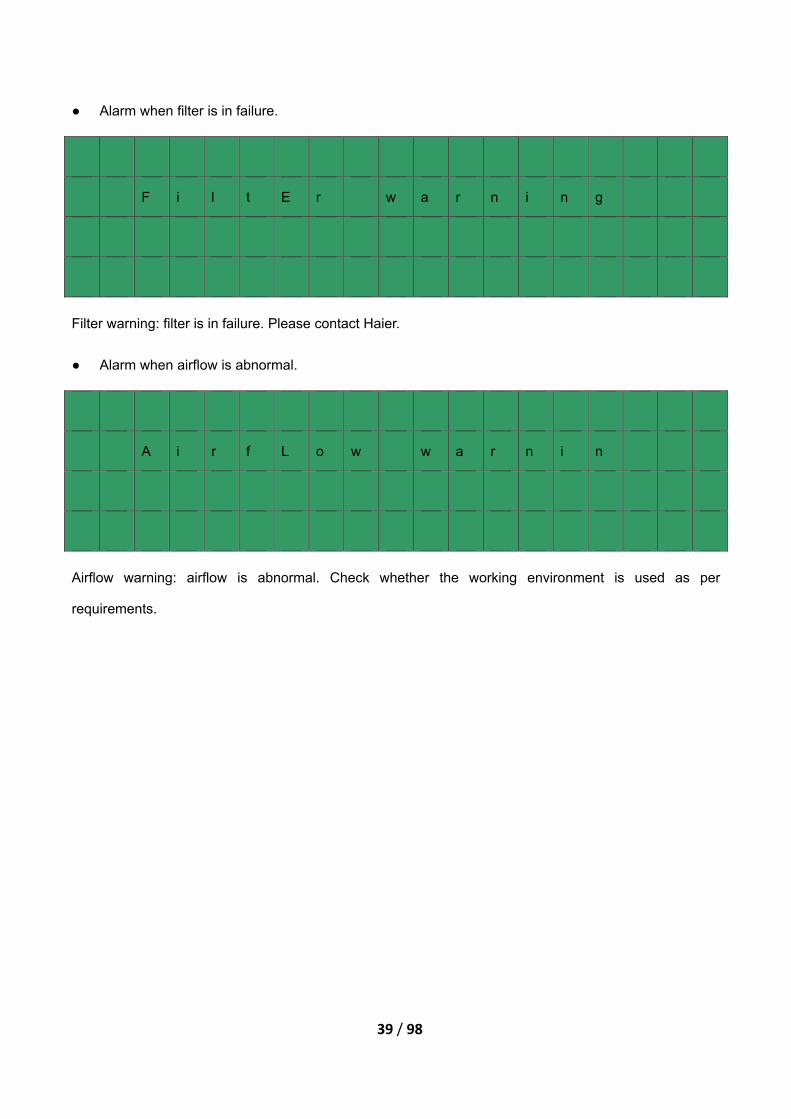
● Alarm when filter is in failure.
F i l t E r w a r n i n g
Filter warning: filter is in failure. Please contact Haier.
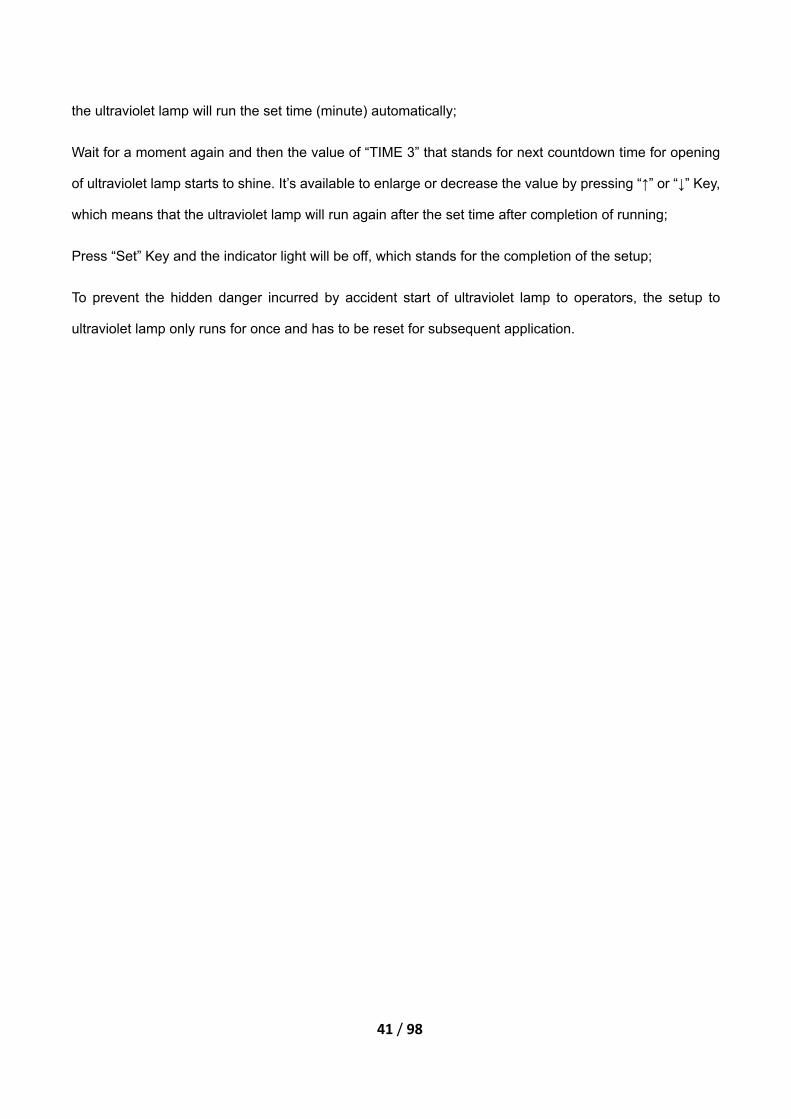
● Alarm when airflow is abnormal.
A i r f L o w w a r n i n
Airflow warning: airflow is abnormal. Check whether the working environment is used as per
requirements.

40 / 98
2. Operation Method
2.1 Operation step of start:
Connect power supply
Raise front window class to make the lower edge of glass door aim at marker line of door height;
The self-cleaning function of biosafety cabinet runs till “please wait” disappears;
Clean the worktable and inner wall of biosafety cabinet;
Experimental operation.
2.2 Operation step of close:
Take out all experimental materials;
The biosafety cabinet will run for 3 minutes automatically;
Clean the worktable and inner wall of biosafety cabinet;
Shut down front window class and pull the door to the bottom;
Cut off power supply.
2.3 Setting step of ultraviolet lamp:
Press “↑” Key or “↓” Key continuously till the setup page of ultraviolet lamp appears;
Press “Set” Key and the indicator lights will be on;
In “U.V AUTO MODE: NO”, Press “↑” or “↓” Key for shift when “NO” shines. “YES” displayed means the
Auto Mode of ultraviolet lamp has started;
Wait for a moment and then the value of “TIME 1” that stands for countdown time of ultraviolet lamp starts
to shine. It’s available to enlarge or decrease the value by pressing “↑” or “↓” Key, which means that the
ultraviolet lamp will run the set time (minute) automatically;
Wait for a moment and then the value of “TIME 2” that stands for next countdown time of ultraviolet lamp
starts to shine. It’s available to enlarge or decrease the value by pressing “↑” or “↓” Key, which means that
41 / 98
the ultraviolet lamp will run the set time (minute) automatically;
Wait for a moment again and then the value of “TIME 3” that stands for next countdown time for opening
of ultraviolet lamp starts to shine. It’s available to enlarge or decrease the value by pressing “↑” or “↓” Key,
which means that the ultraviolet lamp will run again after the set time after completion of running;
Press “Set” Key and the indicator light will be off, which stands for the completion of the setup;
To prevent the hidden danger incurred by accident start of ultraviolet lamp to operators, the setup to
ultraviolet lamp only runs for once and has to be reset for subsequent application.
42 / 98
3. Notice for Use
3.1 Preparation before application of biosafety cabinet
Before the work, the material list shall be made and the needed materials shall be placed in biosafety
cabinet to reduce the times that the arm passes through the fragile air curtain battier of the biosafety
cabinet. The action that staff’s arms pass through the biosafety cabinet rapidly by a wide margin will
disturb the air curtain and reduce the partial protection barrier provide by biosafety cabinet. To slow down
the moving speed of the arms and enter the port of biosafety cabinet in vertical way can reduce such
damage. The activities of other personnel in the room (i.e. rapid walk, opening and closing of door etc.)
may disturb the air curtain barrier of the biosafety cabinet as well.
The staffs shall wear the experimental uniforms with buttons out of their coats and wear latex gloves to
protection their hands. The protection effect of isolation garment with buttons at back is better than that of
traditional experimental uniform. The gloves shall be covered out of the sleeves of experimental uniform,
but not inside. The uniform with bracelet cuff can also protect operator’s wrist.
Before work, operators shall regulate the height of stools to ensure that their faces are over the front port.
The material operation can be started after the arms enter the biosafety cabinet for about 1min, which can
make biosafety cabinet restore to stable state and let the airflow “wash” the microbes stick to the surface
of arms and hands. When the arms of operators are laid on front grid statically, the room air may flow to
the working area directly instead of front grid, which can be remitted by raising the arms slightly. It’s
forbidden to block the front grid with experimental minute book, waste plastic packing materials and
sample absorber etc. All the operations shall be implemented on operation table within 10cm from front
grid.
The exhaust valve under worktable shall be shut down before work. In such way, when splashing occurs,
the pollutants will not overflow the biosafety cabinet.
The materials and equipments placed in biosafety cabinet can disturb the airflow in the cabinet, cause
disorder and may cause cross contamination and /or destroy the protection capacity. The excessive
experimental materials (such as excessive gloves, culture dish or flask and medium) shall be placed out
of biosafety cabinet. Only the materials and equipments that are directly needed by current work can be
43 / 98
placed in biosafety cabinet. The biosafety cabinet is designed as per the 24h running capacity per day. It’s
suggested to start the biosafety cabinet only when necessary and the room air balance shall be
concerned firstly especially when the biosafety cabinet is seldom used.
Before the work, the fan of the biosafety cabinet shall run for 3~5min in advance to purify the air in the
cabinet. The purification process can remove various particles in biosafety cabinet. The surface of
worktable and inner wall (excluding diffusion panel on blast filter) and inner surface of observation window
of the biosafety cabinet shall be wiped with 70% ethanol, household bleaching agent (i.e. 0.05% sodium
hypochlorite) diluted at the proportion of 1:100 or other disinfectant that is thought qualified. Sterile water
shall be adopted for wiping again subsequent to bleaching agent so as to remove the residual chlorine
(avoid the chlorine corroding the surface of stainless steel).
It’s suggested to wipe all the materials placed in biosafety cabinet and the surface of container with 70%
ethanol to avoid the entry of pollutant from external environment. Such simple step can reduce the
introduction of mold spores, which will reduce the contamination to culture. The method to further reduce
the microbes carried by the materials placed and applied in biosafety cabinet is to sterilize the incubator
and refrigerator regularly.
3.2 Placement of materials in biosafety cabinet
It’s available to put a water absorbing towel with plastic substrate on the worktable of biosafety cabinet
(but forbidden to place the towel at ventilation openings of front grid and back grid). The towel can be
used for daily cleaning and can reduce the generation of aerosol and splashing when liquid spills. After
the completion of the work, the towel shall be folded and put in biohazard sterilization packet for
high-temperature and high-pressure sterilization.
All the materials in the biosafety cabinet shall be placed far from front grid as far as possible and close to
back edge of operation table. Similarly, the equipments that are easy to produce aerosol (such as rotary
blender and desk centrifuge) shall be placed at back of the operation table in biosafety cabinet as well so
as to realize the airflow shunting. The actual operation shall be implemented as per the direction from
44 / 98
working plane to cleaning area to contamination area. The large-sized materials, such as biohazard
sterilization packet, tray for abandoned pipette and suction flask, shall be placed at one side of biosafety
cabinet.
Some routine work will obstruct the normal running of biosafety cabinet as well. The bag for collecting the
biohazard materials that has to be made high-temperature and high-pressure treatment shall not be taken
out of the external seal of biosafety cabinet. Upright pipette collecting container shall not be used in
biosafety cabinet and placed on the ground out of the cabinet. The frequent entry and leaving activities
owing to material placement to biosafety cabinet will destroy the completeness of the air barrier of
biosafety cabinet and decrease the protection capacity of biosafety cabinet to personnel and products.
Only the abandoned pipette collecting cup with appropriate chemical disinfectant laid in horizontal way
can be used in biosafety cabinet. In addition, the materials that might be polluted cannot be taken out of
the biosafety cabinet before surface sterilization. The polluted materials shall be put in an enclosed
container and then transferred to incubator, high-pressure sterilizer or other sterilization equipments.
3.3 Operation in biosafety cabinet
3.3.1 Laboratory hazard
Many operations in biosafety cabinet can produce aerosol and splashing. When working in biosafety
cabinet, standard microbe operation skills shall be adopted all the time, for example, the skills that can
produce splashing and the formation of aerosol can reduce the hidden danger for personnel to contact
infectious materials. In accordance with the design of Class II biosafety cabinet, the spores spurted
horizontally will be captured and removed by downward airflow within the transmission distance of
350mm, therefore, it’s available to reduce the hidden danger of cross contamination by placing the clean
materials 0.3m from the action area of aerosol as per general experience.
The workflow shall be arranged as per the direction “from clean area to contamination area” and the
experimental materials and equipments shall be laid in the principle of preventing unclean materials
polluting clean ones.
45 / 98
It’s available to adopt some measures to avoid cross contamination when working in biosafety cabinet.
The ringent test tubes and bottles shall not be placed vertically. The staffs shall cover the culture dish and
tissue culture plate with covers during experiment so as to reduce the impact from downdraft to the open
sterile surface. The bottle cap and cap of test tube shall not be put on the towel. The caps shall be
covered immediately after the completion of operation.
The biosafety cabinet provides an almost sterile environment and there is no need to adopt fire in it. On
open surface, the bottleneck of the culture flask burned can produce an instant upward airflow to prevent
the microbes falling back to the test tube or bottle. However, in biosafety cabinet, the open fire will cause
disorder to airflow and disturb the wind supply mode that clean airflow flows through the operation
worktable in biosafety cabinet. When it’s deemed necessary, it’s available to adopt a touchpad
micro-combustor with indicator lights to offer fire to reduce airflow disorder and heat gathering in biosafety
cabinet as far as possible. After completion of work, the combustor must be shut down. It’s better to use
mini electronic “furnace” for sterilization of microbe inoculating loop and inoculating needle in biosafety
cabinet than open fire, or it’s also available to use disposable sterile inoculating loop.
3.3.2 Basic operation steps
● Start of experiment
Consider the operation steps and needed equipments and make full preparation before work.
Reduce the movement in the room as far as possible to guarantee normal airflow.
Prepare disinfectant and the materials for dealing with overflow and splashing.
Turn off ultraviolet lamps, open front window to appropriate height and open the lights and fans in
biosafety cabinet.
Check whether there are barriers at air outlet or not and wait for 5min.
Wash hands and arms with disinfectant thoroughly, wear the uniform with long sleeves, gloves and
goggles.
● Sample adding before experiment
46 / 98
Only the materials for current experiment are placed in biosafety cabinet.
No barriers at tuyere.
Keep certain distance between large-sized materials.
Descend front window to appropriate height. Wait for 2~3min to sweep pollutants.
All materials are at least 5cm from front window.
All contaminative operations shall be far from the back part of working area as far as possible.
The clean and polluted materials shall be placed separately. The polluted materials shall not be taken to
clean area as far as possible and shall be placed at the back part of working area.
The materials and arms shall not pass through front window during operation.
● Operations during experiment
Avoid to use open fire (spirit lamp is available), adopt appropriate sterilization measures.
Avoid the experimental means that will disturb the laminar flow in biosafety cabinet during experimental
work.
For the overflow and splashing in application, all materials must be implemented with contamination
removal treatment before being taken away.
Only when biosafety cabinet is in operation state, can inner wall be sterilized thoroughly.
After completion of experiment, biosafety cabinet shall run for another 2~3min to sweep the pollutants in
working area.
● Operations when completion
Materials contacting pollutants must be implemented with surface contamination removal before being
taken out of biosafety cabinet.
Some trays or containers must be covered before being taken out of biosafety cabinet.
Throw away rubber gloves; wash the uniform properly and clean with disinfectant thoroughly.

47 / 98
● Cleaning when completion
Clean all inner walls with disinfectant and wait till they become dry.
Raise the working face to clean below area; wash the rag.
Shut down lamps, fan and front window, turn on ultraviolet lamps.
● Elimination of microbial contamination
Para formaldehyde of appropriate amount (paraformaldehyde with final concentration up to 0.8% in the air)
shall be put on electric hot plate or electro thermal fry plate (controlled out of biosafety cabinet) for
sterilization of Class I and II biosafety cabinet. Then place another plate with a cover that can move from
remote place (for example, connect a rope that can be pulled out of biosafety cabinet) in biosafety cabinet,
which is helpful to reduce the possibility that the ammonium bicarbonate will neutralize formaldehyde gas
in advance.
If relative humidity is lower than 70%, a ringent hot-water container shall be placed in biosafety cabinet
before sealing front sealing board with powerful adhesive tape (such as pipeline adhesive). If there is no
sealing board at front part, it’s available to cover front part with heavy standard plastic film to guarantee
the gas will not leak to the room.
Open the switch of paraformaldehyde plate and close it 1h later or after paraformaldehyde completely
evaporates. Put the biosafety cabinet statically for a night and then open the switch after removing the
cover on second plate to let ammonium bicarbonate volatilize. Then, close the switch and start biosafety
cabinet to make ammonium bicarbonate circulate for 1h. It’s available to use the biosafety cabinet after
removing the front sealing board (or plastic film).
Sterilization of biosafety cabinet shall be implemented under following situations.
Contamination shall be removed when it’s necessary to contact the contaminated part of biosafety cabinet
during maintenance, filter replacement and performance test to biosafety cabinet. The contamination on
all inner working faces and exposed on inner surfaces shall be removed with proper disinfectant before
certification test and gas sterilization.
The whole biosafety cabinet shall be implemented with gas sterilization before certification or test when
48 / 98
biotic factors of hazardous Group 2 are operated in biosafety cabinet.
The whole biosafety cabinet shall be implemented with gas sterilization when biotic factors of hazardous
Group 3 are operated in biosafety cabinet.
Contamination to the biosafety cabinet that might be contaminated by biotic factors shall be removed
before the cabinet is moved to another place.
The contaminated surface owing to overflow leakage or splashing of reagent shall be cleaned properly.
● Requirements and provisions on application
To ensure the security of laboratory, all the specimens carried to biosafety laboratory shall be treated as
contaminative substances. All the specimen treatments, specimen inoculating, wrappage or container
treatments or other contacts to the specimen or container with infectivity or potential infectivity must be
implemented in biosafety cabinet. Once specimen inoculating completes, the rest specimens will be
packed with plastic pipe sealed with cap and covered with small plastic bags again, and then marked and
put in the tank for liquid nitrogen. The specimens shall expose in the room temperature as shortly as
possible. However, the application of biosafety cabinet shall comply with following requirements:
The application and limit of the biosafety cabinet shall be explained to each operator through the manual
as per national standards and relevant literatures. Each operator shall be familiar with the operation and
safety manual. Hereby, what shall be especially pointed out is that the biosafety cabinet cannot protect
operators when leakage, damage or misoperation occurs.
The biosafety cabinet cannot be used unless it runs normally.
The alarm will start when glass window exceeds the safety height to prompt that the biosafety cabinet is
unsafe to human beings at this time during application of biosafety cabinet.
The devices and equipments in biosafety cabinet shall be reduced to minimum level. Back ventilation
cannot be obstructed definitely. It’s better to implement surface sterilization treatment to all the materials
before they are put into biosafety cabinet.
It’s forbidden to use Bunsen lamps in biosafety cabinet. The cause is that the heat produced by Bunsen
lamps will destroy airflow and damage filter to incur damage to filter paper of the high efficiency filter and

49 / 98
lead to leakage. It’s available to use electronic “furnace” and it’s better to use the sterile disposable
inoculating loop.
All operators shall implement the experiment in visible place at center or back of working area via glass
baffle.
Reduce the movement at back of operators as far as possible.
Operators shall not stretch their arms to biosafety cabinet frequently, otherwise, the airflow will be
disturbed.
The front airflow cannot be blocked by pipette or other materials, otherwise, the airflow will be disturbed,
which may cause contamination or operator infection.
Wipe the surface of biosafety cabinet with appropriate disinfectant for sterilization after completion of work
and off duty everyday.
The fan of biosafety cabinet shall run for another 5min at least before start and after completion.
● Other matters
The best method for operators to make their eyes comfortable is to turn the eyes out of the working area
of biosafety cabinet regularly for a rest and look at remote materials. Meanwhile, blink always to keep the
eyes easing in an easy state. Examine the eyes all the time and keep the front window and eyes clean.
Adjust light source to make the front window gentle and try to adjust the light source to the position that is
mostly suitable for the eyes.
Arrange the materials in common use of the experiment reasonably and try to put them beside hands.
Use the whole arms to take or move the materials, but not fingers or wrist.
The flame of blast burner will seriously influence the laminar flow in biosafety cabinet in running and may
essentially increase the diffusion of aerosol in working area. If the flame of blast burner is too large, the
excessive heat may melt the adhesive on filter membrane of HEPA filter, or even burn a hole on the filter
membrane to cause gas leakage and produce insecurity factors. In Class II A2 biosafety cabinet, the
leaked gas may reach explosion limit. If electric jacket or droppable heating ring is adopted with no
burning to the mouth of the container, it would be a much safer method.

50 / 98
The main purpose of biosafety cabinet is to protect operators, environment and samples from
infringement from biological hazardous substances. The biosafety cabinet and the filter membrane of its
HEPA filter shall adopt the materials that are inert to the common chemicals for bioresearch, which may
be possibly destroyed by common corrosive chemicals in exhaust cabinet.
Only under correct application situation can the biosafety cabinet protect operators and samples.
Therefore, the biosafety cabinet shall be sterilized timely after completion of experimental operation.
The ultraviolet lamps are just accessories for reducing the contamination in working area when biosafety
cabinet is idle. In fact, ultraviolet rays have no penetrability and will not kill the microbes protected by
dusts or organics. The best method to prevent contamination is to clean the working face before the start
and after completion of the work. It’s wrong that there is no need to clean the working area as there are
ultraviolet lamps.
The large-sized materials placed in working area of biosafety cabinet will obstruct the airflow and reduce
the efficiency of biosafety cabinet. For example, the electric equipments including centrifuge and blender
always have cooling fans, which will destroy the airflow in biosafety cabinet. The centrifuge had better to
adopt sealed safety cup for adding and laying samples in biosafety cabinet.
As for some applications, such as the study of biotoxin drugs, to prevent hazardous substances escaping,
it’s suggested to use the biosafety cabinet continuously. However, the constant application of biosafety
cabinet will reduce the service life of the filter membrane of HEPA filter.
Let biosafety cabinet run constantly. Supposing that the room is enclosed and has no ventilation systems
and activities, circular Category A biosafety cabinet may reduce air cleanliness to Class 100. It’s
impossible in fact that once operators enter the room for operation, the room air will be contaminated.
Meanwhile, only the service life of filter membrane of HEPA filter will be reduced in such way.
The filter membrane of HEPA filter shall be replaced when the pressure difference is large. The two
factors that determine the service life of filter membrane are the degree of air contamination in the room
and running time of biosafety cabinet. The placement of filter membrane as per schedule without
consideration of contamination degree may cause unnecessary waste.
51 / 98
3.4 Sterilization of biosafety cabinet
● Surface sterilization
After completion, all containers and equipments shall be implemented with surface sterilization and then
taken out of biosafety cabinet. After completion of the work of the whole day, final surface sterilization of
biosafety cabinet shall include wiping worktable surface, two sides in biosafety cabinet, back wall and
inside glass of observation window. If necessary, radioactivity monitoring and sterilization shall be
implemented to biosafety cabinet.
Avoid the glove and uniform undressing way that may make the contamination contact the skin or
produce aerosol. The final step of safe microbe operation procedure is to wash hands.
The a little splashing in biosafety cabinet shall be removed with water absorbing tissue immediately that
will be put in biohazard sterilization bag. The materials and surface of biosafety cabinet contacting the
splashing shall be soaked with the towel that is soaked in disinfectant. Replace gloves after working face
sterilization and then put the clean moisture absorbing towel in biosafety cabinet. The hands shall be
washed no matter when taking off gloves or replacing the gloves.
A large number of overflows may cause the overflowed liquid flows to front grid and back grid and much
wider sterilization is needed by now. All materials in biosafety cabinet shall be moved out of the cabinet
after surface sterilization. The disinfectant shall be poured on worktable surface so as to flow to the grid
and then reach drainage tray.
Generally, it can realize ideal sterilization effect through the contact with disinfectant for 20-30min. But,
the contact time differs owing to the type of disinfectant and microbe. Operation shall be made as per
manufacturer’s guidance. The liquid collected in drainage tray shall be poured in collecting bottle with
disinfectant. Connect a tube that shall have enough length to guarantee the other end soaks under the
level of disinfectant in collecting bottle to drainage valve to reduce the generation of aerosol. Then wash
the drainage tray with water and dismount the drainage pipe.
If the overflowed liquid includes radioactive substances, it shall be treated as per similar procedure.
Meanwhile, contact radiation safety personnel for professional guidance further.
● Air sterilization
52 / 98
The biosafety cabinet with infective material operations must be sterilized before replacement of HEPA
filter or inside maintenance. The pathogens operated in biosafety cabinet must be implemented with
hazard estimate before replacement of biosafety cabinet to decide whether to scrap the cabinet or not.
Though peroxide steam has been successfully applied to the sterilization of biosafety cabinet recently,
most common method is sterilization with formaldehyde steam. Such steam that is harmless to
environment can be used to sterilize HEPA filter, isolation room and accessories of centrifuge.
(Sterilization method can be referred in appendix)
4.3.4 Maintenance of biosafety cabinet
The design of biosafety cabinet allows 24h running per day. The constant running is helpful to control the
dust and particle level in laboratory, but will reduce the service life of filter. The biosafety cabinet shall run
for at least 5min to “purify” the cabinet before start and completion of work, which means to leave time for
biosafety cabinet to exhaust polluted air from the cabinet.
All the maintenance work of the biosafety cabinet shall be implemented by qualified professional
personnel. Any fault occurred during the operation to biosafety cabinet shall be reported and repaired
before reuse.
4.3.5 Cautions for use
● Ultraviolet lamp
Biosafety cabinet does not need ultraviolet lamps. If the ultraviolet lamps are used, the dust and dirt that
may influence the sterilization effect of ultraviolet lamp shall be removed per week. The strength of
ultraviolet rays shall be checked to ensure appropriate luminescence amount during recertification. The
ultraviolet lamps shall be turned off when there are persons in the room in order to prevent the injury to
eyes and skins owing to uncareful exposure.
53 / 98
● Open fire
Open fire shall be avoided in the environment formed in biosafety cabinet that hardly has microbes. Open
fire will influence the airflow and is dangerous when treating volatile and inflammable materials. It’s
available to use micro-combustor or electronic “furnace” for sterilization to inoculating loop, but not open
fire.
● Overflow and splashing
Operation specifications on disposal of overflow and splashing shall be pasted in laboratory and each
member to use the laboratory shall read and understand these specifications. Once overflow and
splashing of biological hazardous materials occur in biosafety cabinet, the overflow and splashing shall be
treated immediately when the biosafety cabinet is in working state. Effective disinfectant shall be adopted
and efforts shall be made to reduce the generation of aerosol during disposal process. All the materials
that contact the overflow and splashing shall be implemented with sterilization and high-temperature
disinfection.
● Cleaning and sterilization
As residual culture base can support the growth of microbes, all the materials in biosafety cabinet
including instruments and equipments shall be implemented with surface purification and moved out of
biosafety cabinet after completion of experiment.
The inner surface of biosafety cabinet shall be purified before and after per application. The worktable
surface and inner wall shall be wiped with disinfectant that shall be able to kill the possible microbes in
biosafety cabinet. At the end of the experiment per day, final surface purification shall include wiping
worktable surface, surroundings and inner side of glass etc. Bleaching agent or 70% alcohol can be
adopted if they are effective to target microbes. Sterile water shall be adopted for wiping again
subsequent to corrosive disinfectant such as bleaching agent.
It’s recommended to make biosafety cabinet in running state. The biosafety cabinet shall run for 5min to
purify inside gas before shutting down.
● Purification treatment
54 / 98
Purification shall be made before moving biosafety cabinet and replacing filter. The most common
purification method is fumigation with formaldehyde steam. The purification of biosafety cabinet shall be
implemented by qualified professional personnel.
● Alarm
The window-type alarm is installed on sliding window. The given alarm means that the sliding window has
moved to an inappropriate position. As for such alarm, it only needs to move the sliding window to
appropriate position.
3.6 Operator protection requirements
Personal protective clothing shall be worn when using biosafety cabinet. It’s ok to wear common
experimental uniform during the operation with biosafety protection level being Class I and Class II. The
experimental uniform with enforced front and opening at back has better protection effect and shall be
used during the operation with biosafety protection level being Class III and Class IV (except protective
clothing type laboratory). Gloves shall be covered out of isolation garment and the sleevelet with elastic
can be worn to protect researcher’s wrists. For some operations, mask and safety goggles may be
needed.
3.7 Principles for application
3.7.1 Principle of slow movement
To prevent the influence on normal airflow state, the hands shall move slowly as far as possible in
biosafety cabinet during operation.
3.7.2 Principle of parallel layout of materials
To prevent cross contamination between materials, the materials placed in biosafety cabinet shall be laid
55 / 98
in “one” shape horizontally as far as possible so as to avoid cross contamination during air return process.
Meanwhile, it can avoid blocking back air return grid to influence normal airflow.
3.7.3 Principle of avoiding vibration
Avoid the application of vibrating instruments (i.e. centrifuge and vortical oscillator etc.) in biosafety
cabinet. As vibration will make the particulate substances accumulated on filter membrane fall and the
inner cleanliness in operation room decrease. Meanwhile, if the balance on front operation surface fails,
contamination to operators will be led.
3.7.4 Principle of movement of different samples in biosafety cabinet
When two kinds or more materials have to be moved, the principle that the materials with low
contamination shall move to the materials with high contamination must be obeyed in order to avoid
large-area contamination to inside incurred by the materials with contamination during movement.
3.7.5 Application principle of open fire
Try to avoid open fire in biosafety cabinet! As open fire will produce tiny particulate impurities which will be
carried to filter membrane area during application, and these high-temperature impurities will damage the
filter membrane. Meanwhile, the flame will influence inside downdraft. When open fire must be used, it’s
optimal to use Bunsen lamp with low flame.
56 / 98
4.Annual Certification
Certification on overall running performance of per biosafety cabinet shall be made by qualified
professional personnel as per manufacturer’s instructions during installation and after regular period to
check whether the biosafety cabinet comply with national and international performance standards or not.
The evaluation on protection effect of biosafety cabinet shall include the test on entity of biosafety cabinet,
leakage of HEPA filter, downward flow speed of air, air speed at inlet, negative pressure/ventilation rate,
airflow stability, alarm and interlocking system. The test on electric leakage, illumination, intensity of
ultraviolet rays, noise level and vibration is optional. These tests must be implemented by qualified
professional testers who have received specialized training with special technology, instruments and
equipments. The measure method can be consulted to Technical Service Department of the company via
telephone.

57 / 98
【Product Maintenance and Service Period】
Biosafety cabinet shall be maintained per year, or per 1000 working hours and each restart.
Since the statistics of operation time will directly influence the judgment of maintenance demand, we
suggest preparing a detailed record on operation time for reference and inquiry when using the
equipment.
1. Recommended Maintenance and Service Method
Under general situations, only a few of household or commercial detergents for bowls and plates are
needed for cleaning. Dissolve the detergent in water and then directly wipe the equipment, which is
available to remove the dirt on equipment surface.
1.1 Daily or weekly cleaning during application process
After application, keep the biosafety cabinet running for 5-10min continuously to make the flying aerosol
completely stick to filter through gas circulation
Sterilize and wash working room with medical alcohol.
Sterilize and wash the operation panel with medical alcohol.
Wash external surface of the cabinet and glass with soft detergent or detergent dedicated for glass.
Check various functions of the equipment as per instruction.
1.2 Monthly cleaning
Remove the dust on all external surfaces with detergent.
Sterilize inside of the equipment.
Inspect equipment functions and check equipment safety during common application.
58 / 98
1.3 Yearly maintenance
Implement comprehensive check to equipment safety and maintain the equipment.
Check the tightness of the driver at front glass door.
Check ultraviolet lamp tube.
Record current maintenance.
59 / 98
2. Product Sterilization
Purification must be implemented when it’s necessary to implement daily maintenance to any
contaminated part of biosafety cabinet, replace filter and performance test etc. All inside working faces
and exposed external surfaces shall be sterilized with appropriate disinfectant before certification test and
gas purification. In addition, it’s reasonable to sterilize the whole biosafety cabinet with the reagent
assigned for Class II biosafety grade in gaseous manner before certification test. It’s recommended to use
reagent for sterilization assigned for Class III biosafety grade when biosafety cabinet has been used. The
biosafety cabinet with potential danger to be contaminated by biotic factors shall be firstly sterilized before
moving. In addition, the contaminated surface shall be sterilized properly after the reagent for experiment
overflows and splashes. Under the situation that most needs gas sterilization, the procedure mentioned
below adopts depolymerized paraformaldehyde as disinfectant. The cycle parameters and the
effectiveness of theses parameters of biosafety cabinet must be obeyed before sterilization with other
alternative methods. The compatibility of the material has something to do with the degradation and
absorption situation of standby detergent and is the critical factor for maintaining the completeness of
biosafety cabinet and time needed for sterilization. Some situations need theses alternative methods,
such as retarding disease virus. The method for purification is determined by users and certification
institution through negotiation. When paraformaldehyde is used for gas purification, the specified area,
selected gas mask, protection facilities, corresponding test, medical monitoring, hazard transmission and
training and record keeping shall be pointed out and implemented as per following steps (if manufacturer
provides instructions, automatic formaldehyde gas purification/neutralization method can substitute for
following steps):
Note: all hydrogen chlorides must be removed from biosafety cabinet before sterilization. The hydrogen
chloride will form carcinogen-bis-chloromethyl ether (BCME) when formaldehyde exists in ambient air.
a) Multiply height, width and depth to calculate the total volume of biosafety cabinet; about 3m3;
b) Multiply total volume of biosafety cabinet by 11g/m3 to determine the needed weight of
paraformaldehyde. Determine the amount of ammonium bicarbonate or its substitutes as per
stoichiometry and provide ammonia for neutralization reaction with formaldehyde. Weigh out excessive
10% ammonium bicarbonate to guarantee complete reaction;
60 / 98
Reagents used for once sterilization of the biosafety cabinet are as follows:
Dosage of paraformaldehyde: required concentration is 40%, dosage: 60ml
Dosage of ammonia: required concentration is 25%, dosage: 42ml
c) The exhaust pipeline for biosafety cabinet must be tight and its gas tightness can be realized at the end
of the pipeline. If the length of the exhaust pipeline is longer than 3m, the amount of paraformaldehyde
shall be added to compensate the increased volume. The connection between biosafety cabinet and
building systems is cut off for enclosing (available to use plastic film and plastic stripe) if the air exhausted
by biosafety cabinet enters the exhaust system of the building after circulation;
d) If the air exhausted by biosafety cabinet is released to the room, seal the exhaust port with plastic
tapes;
e) A tube can be put beside the biosafety cabinet in advance to discharge the formaldehyde emergently
and the residual formaldehyde after purification and neutralization. The tube shall be connected to
chemical fume hood or other exhaust devices that are suitable for discharging toxic gas;
f) Put the heating device, such as electrothermal frying pan that can be bought on the market, or
remote formaldehyde generator/neutralizer on worktable and set the temperature as 232-246℃. The
paraformaldehyde is evenly sprayed on the heating surfaces of heating devices;
Note: the autoignition temperature of paraformaldehyde is 300℃
g) Put the heating device for neutralizer on worktable as well. The neutralizer (ammonia bicarbonate or
equivalent substitutes) shall be isolated to the air in biosafety cabinet before application. Following shows
two examples to describe how to realize the isolation to the air:
- Example 1: the ammonia bicarbonate or its substitute is evenly sprayed on the heating surfaces of
heating devices and then covered with aluminum foil to prevent the ammonia bicarbonate or its substitute
reacting with formaldehyde during sterilization. The placement of aluminum foil shall enable the ammonia
to overflow during heating or prepare to remove the aluminum foil through remote control at the start of
neutralization stage. The technology for removing the aluminum foil disallows dangerous situation that
formaldehyde leaks from biosafety cabinet;
61 / 98
- Example 2: Seal the plastic film integral to gloves for biosafety cabinet. Ammonia bicarbonate or
equivalent substitute is placed in the container in biosafety cabinet and sealed. In neutralization stage, the
personnel for purification will stretch their arms to biosafety cabinet through the gloves without destruction
to sealing system and take ammonia bicarbonate or equivalent substitute out of the sealed container.
Then spray ammonia bicarbonate or equivalent substitute evenly on heating surface of the heating device
and connect the heating device with power supply. Then ammonia bicarbonate or its substitute is heated
to release ammonia;
h) Put heating plate, beaker with water and thermometer and hygrometer on worktable of biosafety
cabinet and never connect the wire to inner power supply of biosafety cabinet;
i) Seal the operation port at front window with thick plastic film and plastic tape. Seal all possible
leakage areas, such as wire outlet, surroundings of operation port and the connection position of plastic
film and biosafety cabinet;
j) Measure the temperature and humidity in biosafety cabinet;
k) The temperature shall be higher than 21℃ and the humidity shall be between 60% and 85%. Heat
the water in beaker with heating plate to obtain expected temperature and humidity;
l) Limit the entry to surrounding area or room of biosafety cabinet strictly as per relevant provisions and
safety measures before depolymerizing formaldehyde. The area with formaldehyde whose transmission
concentration in the air exceeds allowable exposure limit shall be deemed as control area as per the
requirements in principles of occupational contact to formaldehyde in Regulations on Occupational Safety
and Health and marked with symbols and signs. Only the personnel with appropriate training can enter
such area. Existing provisions must be reviewed and obeyed;
m) Plug the wire of heating device in the socket out of biosafety cabinet;
n) Start the fan of biosafety cabinet for 10-15s after 25% formaldehyde is depolymerized. Repeat
aforementioned steps after paraformaldehyde is depolymerized for 50%, 75% and 100%. In case the fan
of biosafety cabinet runs, promote the air circulation in biosafety cabinet with auxiliary fan or blower fan or
extend the sterilization time to exceed the suggested time in Item p);
o) Cut off the power supply to heating plate and heating device for paraformaldehyde;
62 / 98
p) Keep biosafety cabinet running for at least 6h, for one night best (2h);
q) Prepare neutralizer as per Step g) and connect the heating device with ammonia bicarbonate and fan
of biosafety cabinet with power supply till ammonia bicarbonate is completely discharged. Same to the
operation of paraformaldehyde, start the fan of biosafety cabinet for 10-15s after 25% ammonia
bicarbonate decomposes. In case the fan of biosafety cabinet fails, promote the air circulation in biosafety
cabinet with auxiliary fan or electric fan or extend the sterilization time to be 6h at least;
r) Open the sealing film after biosafety cabinet has run for 1h at least;
s) If tube is used to discharge the neutralized formaldehyde, tear the plastic cover on exhaust port of
biosafety cabinet, then connect the tube with the exhaust port and seal them. If the tube runs normally, the
plastic cover on front port of biosafety cabinet will be absorbed and cut one or two small openings (about
15×15cm) to enable the fresh air flow into the biosafety cabinet. The neutralized formaldehyde will be
discharged from the tube at exhaust port of biosafety cabinet;
Note: it’s available to use other methods to eliminate formaldehyde as long as they can effectively
eliminate formaldehyde gas.
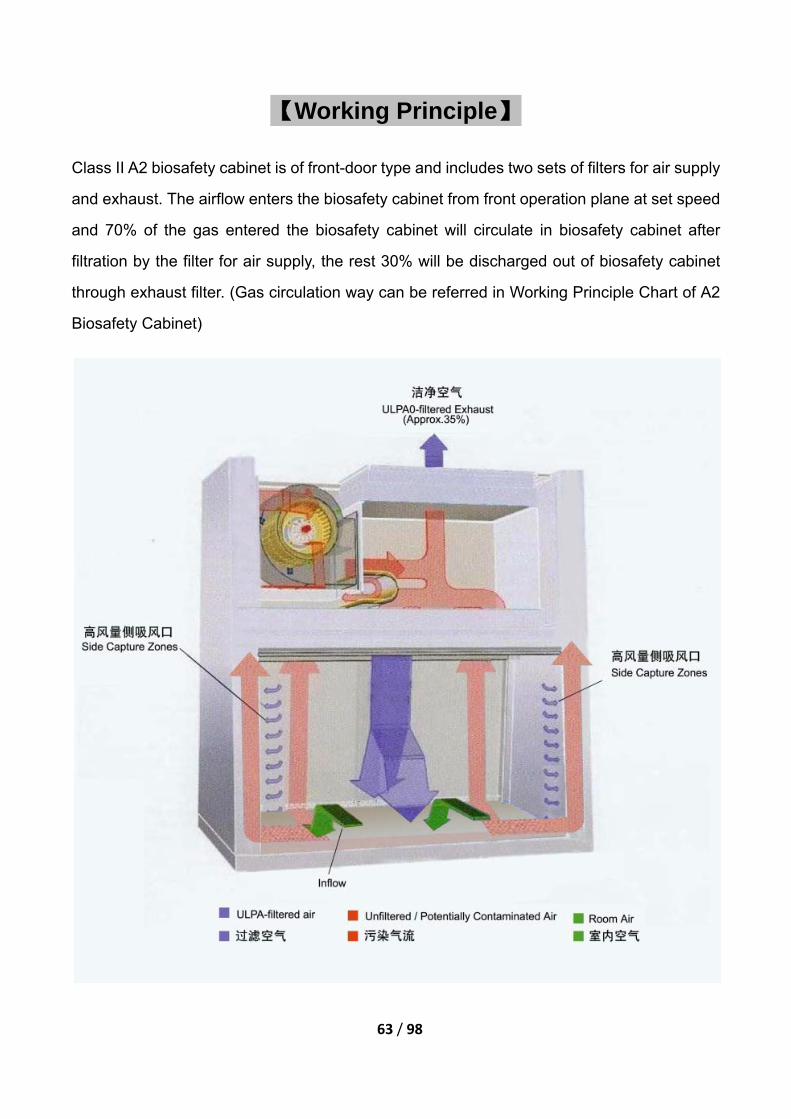
63 / 98
【Working Principle】
Class II A2 biosafety cabinet is of front-door type and includes two sets of filters for air supply
and exhaust. The airflow enters the biosafety cabinet from front operation plane at set speed
and 70% of the gas entered the biosafety cabinet will circulate in biosafety cabinet after
filtration by the filter for air supply, the rest 30% will be discharged out of biosafety cabinet
through exhaust filter. (Gas circulation way can be referred in Working Principle Chart of A2
Biosafety Cabinet)
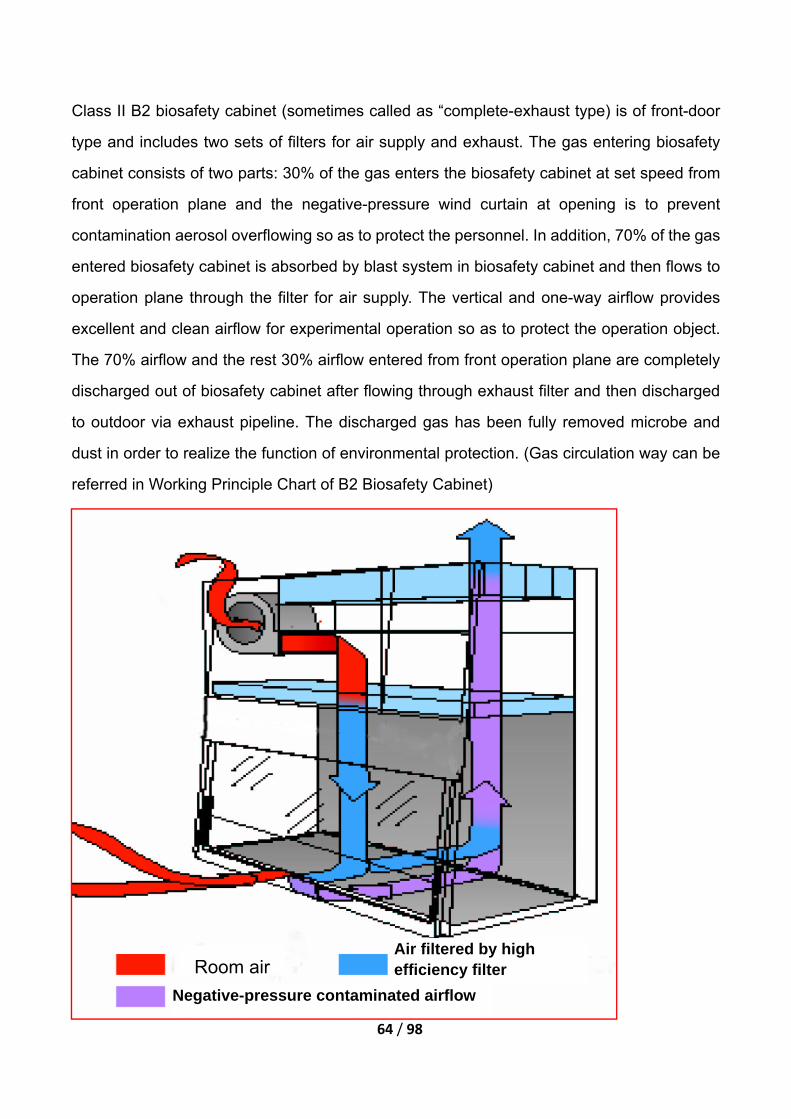
64 / 98
Class II B2 biosafety cabinet (sometimes called as “complete-exhaust type) is of front-door
type and includes two sets of filters for air supply and exhaust. The gas entering biosafety
cabinet consists of two parts: 30% of the gas enters the biosafety cabinet at set speed from
front operation plane and the negative-pressure wind curtain at opening is to prevent
contamination aerosol overflowing so as to protect the personnel. In addition, 70% of the gas
entered biosafety cabinet is absorbed by blast system in biosafety cabinet and then flows to
operation plane through the filter for air supply. The vertical and one-way airflow provides
excellent and clean airflow for experimental operation so as to protect the operation object.
The 70% airflow and the rest 30% airflow entered from front operation plane are completely
discharged out of biosafety cabinet after flowing through exhaust filter and then discharged
to outdoor via exhaust pipeline. The discharged gas has been fully removed microbe and
dust in order to realize the function of environmental protection. (Gas circulation way can be
referred in Working Principle Chart of B2 Biosafety Cabinet)
Air filtered by high efficiency filter Room air
Negative-pressure contaminated airflow
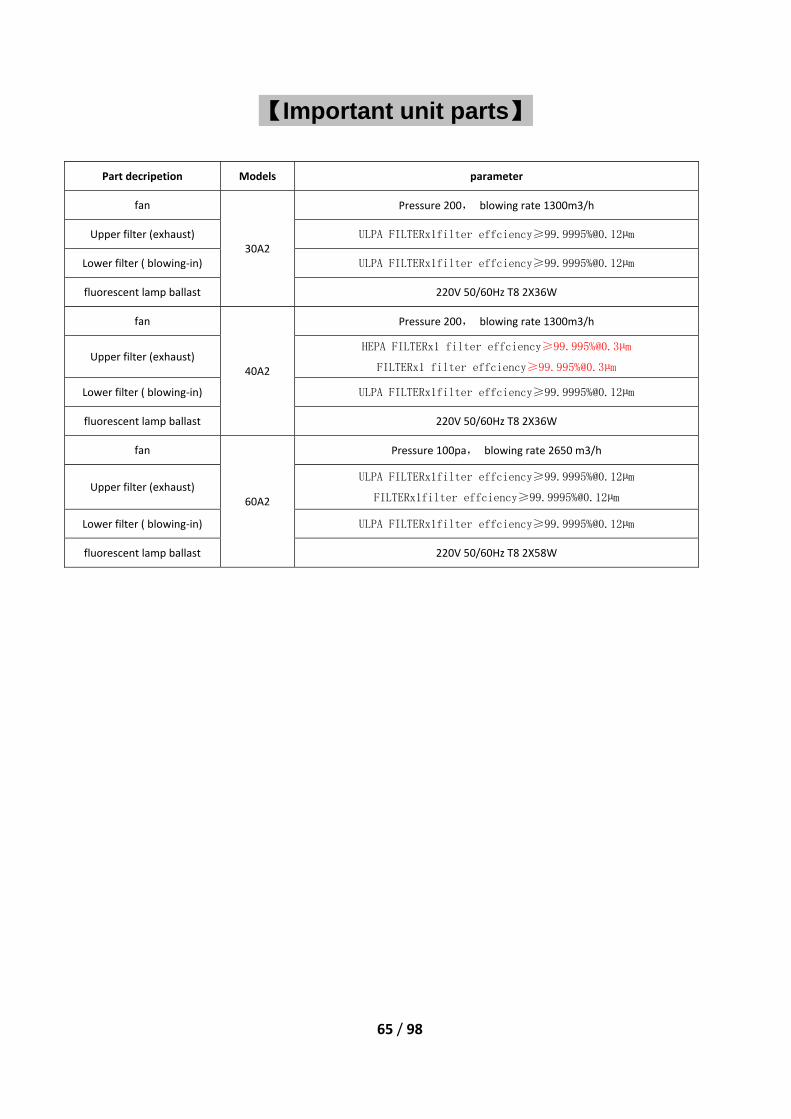
65 / 98
【Important unit parts】
Part decripetion Models parameter
fan
30A2
Pressure 200, blowing rate 1300m3/h
Upper filter (exhaust) ULPA FILTERx1filter effciency≥99.9995%@0.12µm
Lower filter ( blowing‐in) ULPA FILTERx1filter effciency≥99.9995%@0.12µm
fluorescent lamp ballast 220V 50/60Hz T8 2X36W
fan
40A2
Pressure 200, blowing rate 1300m3/h
Upper filter (exhaust) HEPA FILTERx1 filter effciency≥99.995%@0.3µm
FILTERx1 filter effciency≥99.995%@0.3µm
Lower filter ( blowing‐in) ULPA FILTERx1filter effciency≥99.9995%@0.12µm
fluorescent lamp ballast 220V 50/60Hz T8 2X36W
fan
60A2
Pressure 100pa, blowing rate 2650 m3/h
Upper filter (exhaust) ULPA FILTERx1filter effciency≥99.9995%@0.12µm
FILTERx1filter effciency≥99.9995%@0.12µm
Lower filter ( blowing‐in) ULPA FILTERx1filter effciency≥99.9995%@0.12µm
fluorescent lamp ballast 220V 50/60Hz T8 2X58W
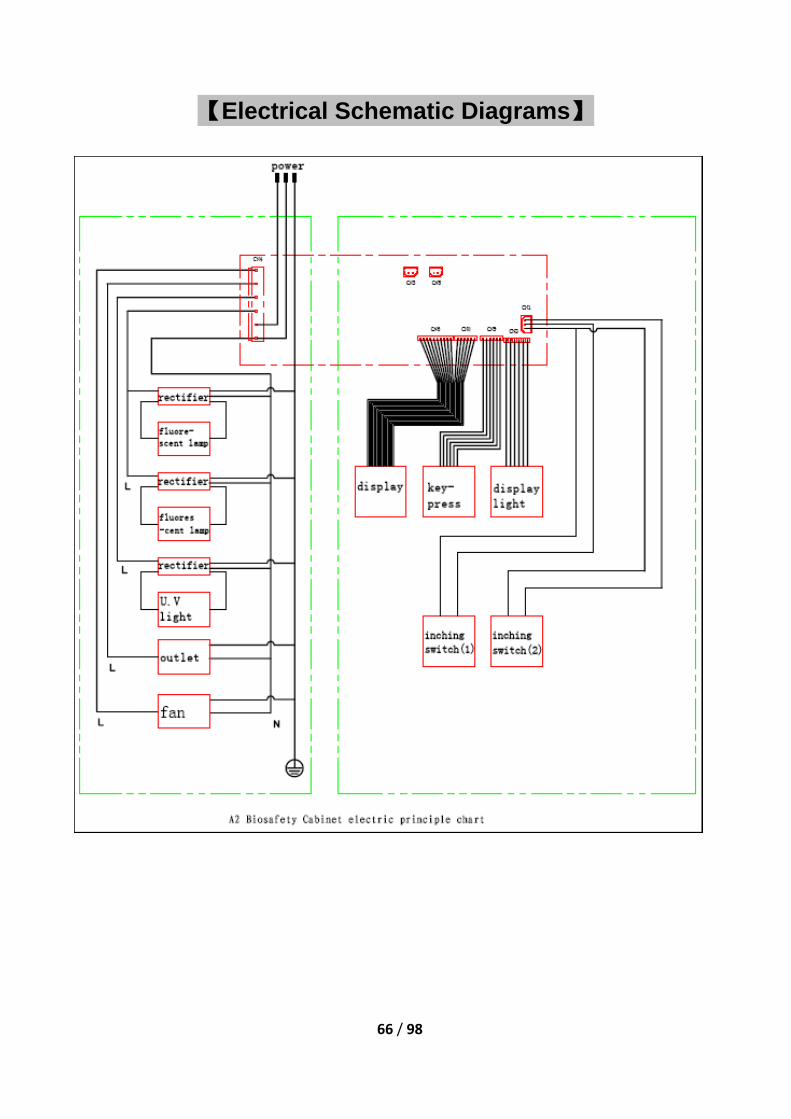
66 / 98
【Electrical Schematic Diagrams】
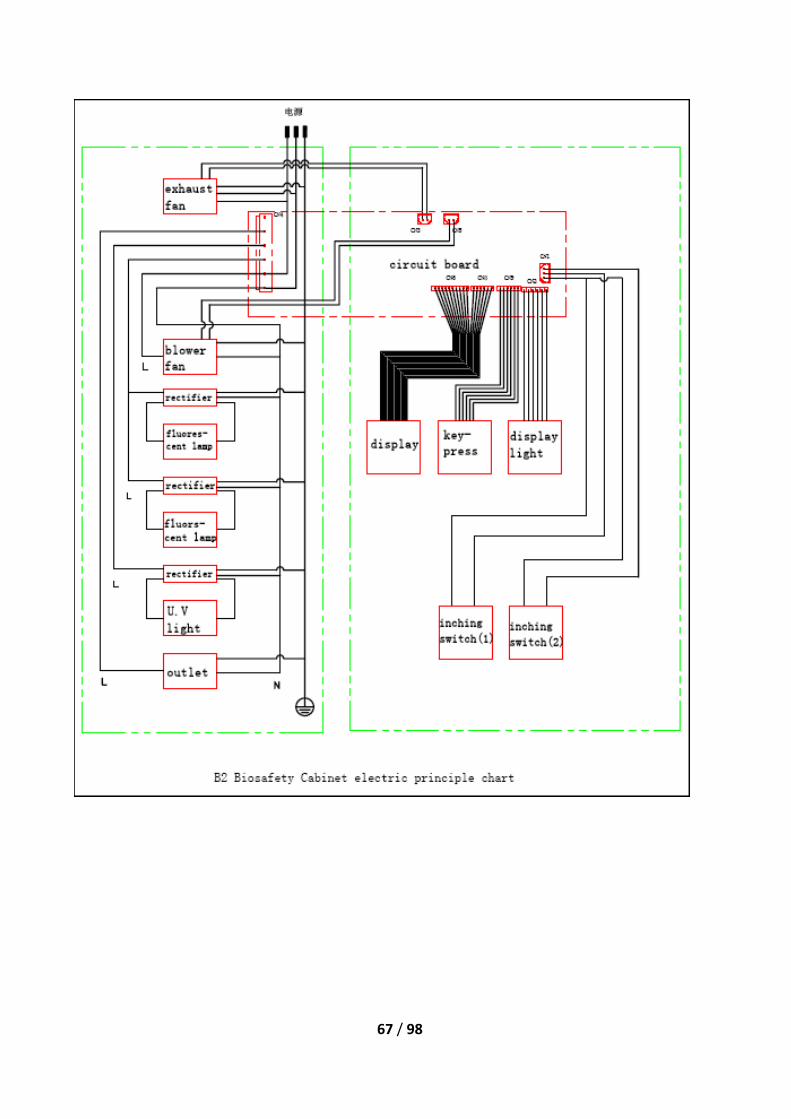
67 / 98
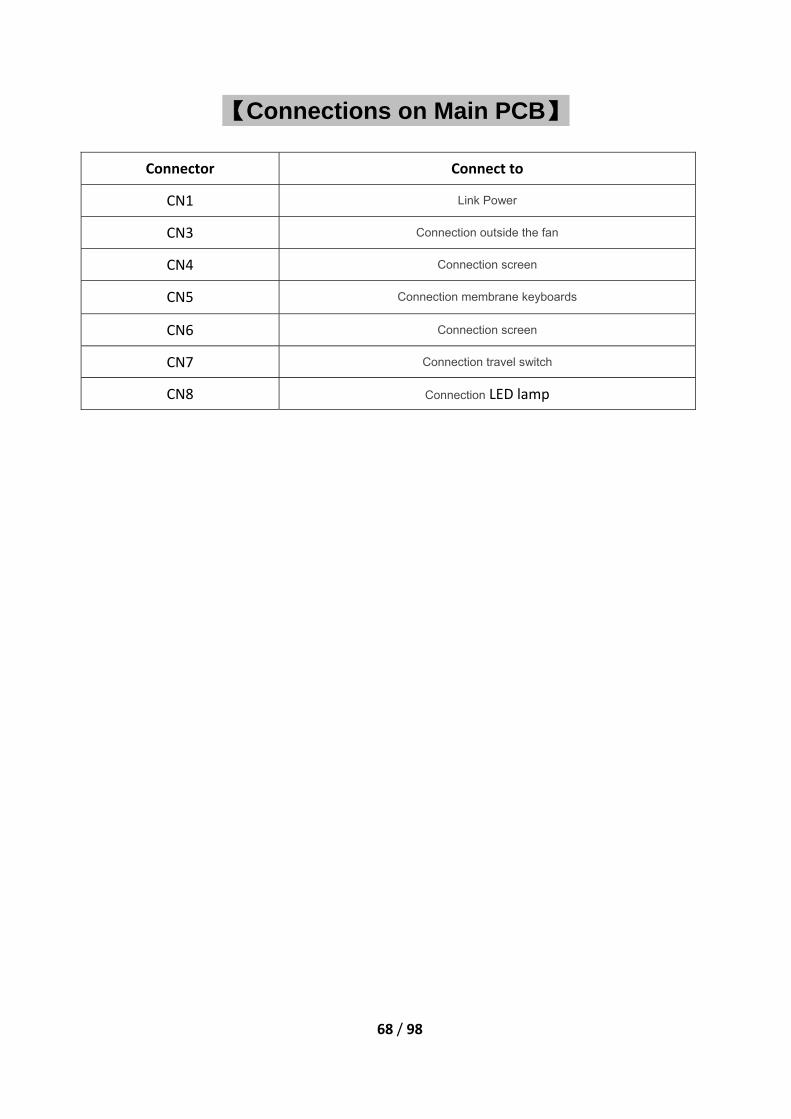
68 / 98
【Connections on Main PCB】
Connector Connect to
CN1 Link Power
CN3 Connection outside the fan
CN4 Connection screen
CN5 Connection membrane keyboards
CN6 Connection screen
CN7 Connection travel switch
CN8 Connection LED lamp
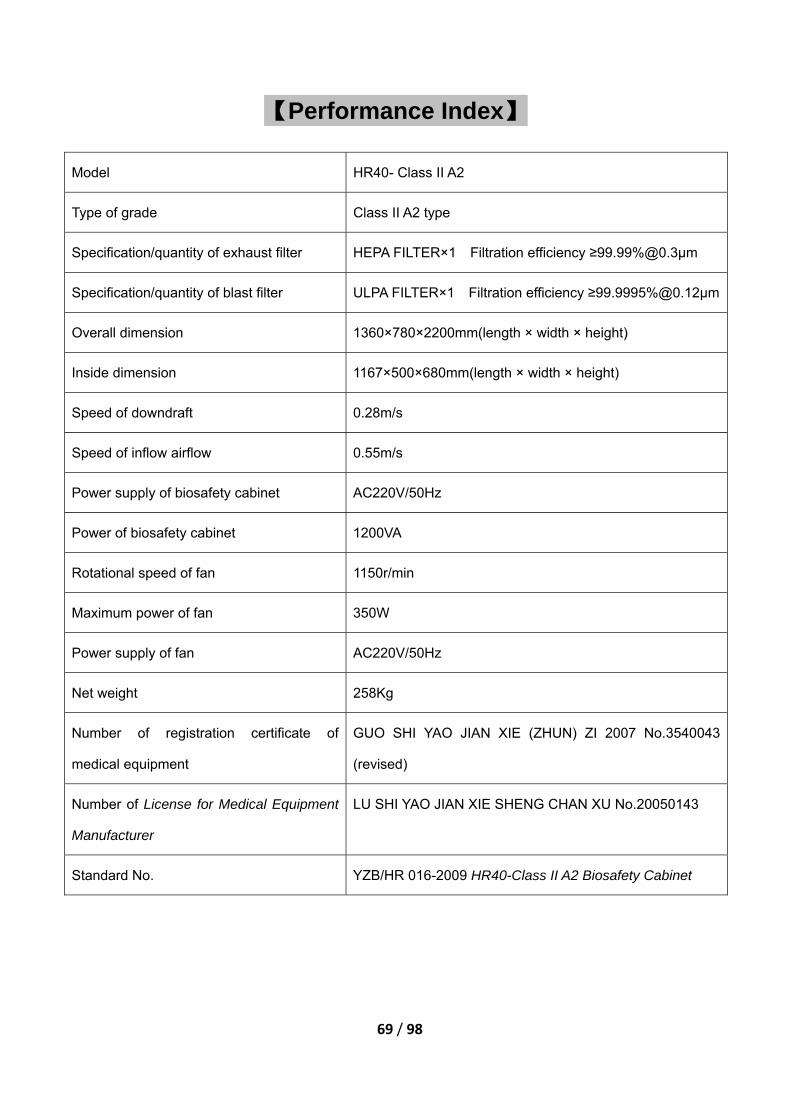
69 / 98
【Performance Index】
Model HR40- Class II A2
Type of grade Class II A2 type
Specification/quantity of exhaust filter HEPA FILTER×1 Filtration efficiency ≥99.99%@0.3μm
Specification/quantity of blast filter ULPA FILTER×1 Filtration efficiency ≥99.9995%@0.12μm
Overall dimension 1360×780×2200mm(length × width × height)
Inside dimension 1167×500×680mm(length × width × height)
Speed of downdraft 0.28m/s
Speed of inflow airflow 0.55m/s
Power supply of biosafety cabinet AC220V/50Hz
Power of biosafety cabinet 1200VA
Rotational speed of fan 1150r/min
Maximum power of fan 350W
Power supply of fan AC220V/50Hz
Net weight 258Kg
Number of registration certificate of
medical equipment
GUO SHI YAO JIAN XIE (ZHUN) ZI 2007 No.3540043
(revised)
Number of License for Medical Equipment
Manufacturer
LU SHI YAO JIAN XIE SHENG CHAN XU No.20050143
Standard No. YZB/HR 016-2009 HR40-Class II A2 Biosafety Cabinet
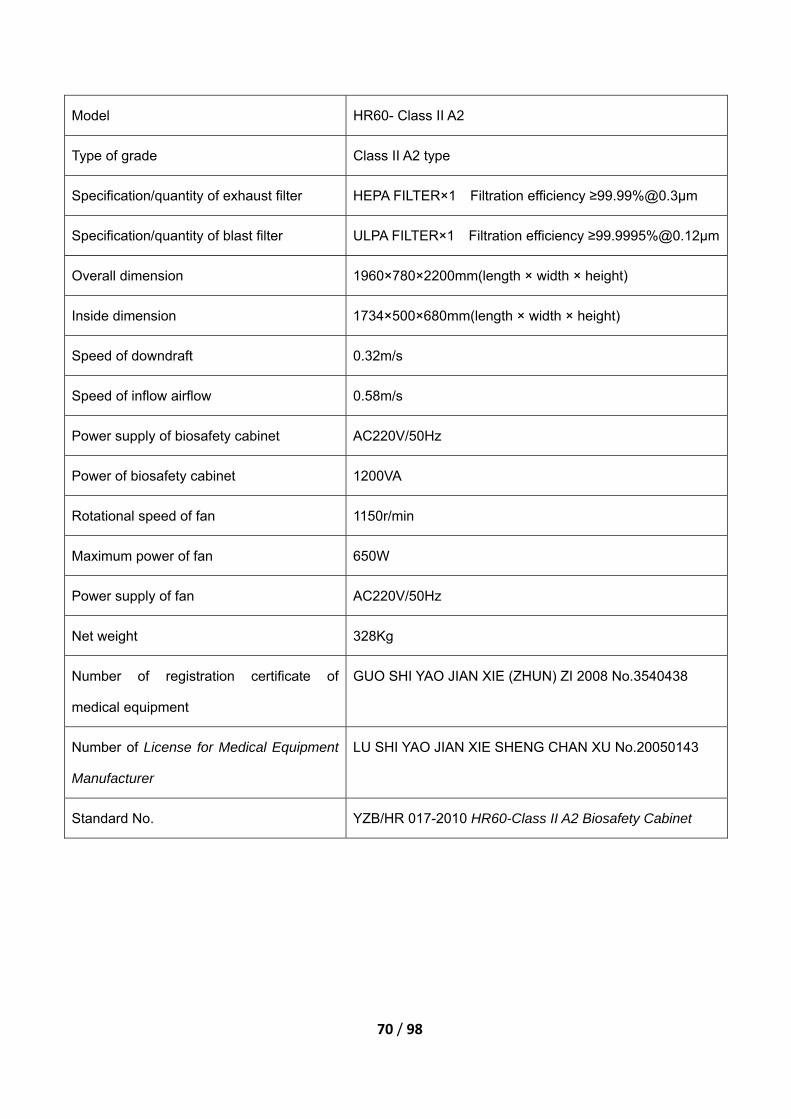
70 / 98
Model HR60- Class II A2
Type of grade Class II A2 type
Specification/quantity of exhaust filter HEPA FILTER×1 Filtration efficiency ≥99.99%@0.3μm
Specification/quantity of blast filter ULPA FILTER×1 Filtration efficiency ≥99.9995%@0.12μm
Overall dimension 1960×780×2200mm(length × width × height)
Inside dimension 1734×500×680mm(length × width × height)
Speed of downdraft 0.32m/s
Speed of inflow airflow 0.58m/s
Power supply of biosafety cabinet AC220V/50Hz
Power of biosafety cabinet 1200VA
Rotational speed of fan 1150r/min
Maximum power of fan 650W
Power supply of fan AC220V/50Hz
Net weight 328Kg
Number of registration certificate of
medical equipment
GUO SHI YAO JIAN XIE (ZHUN) ZI 2008 No.3540438
Number of License for Medical Equipment
Manufacturer
LU SHI YAO JIAN XIE SHENG CHAN XU No.20050143
Standard No. YZB/HR 017-2010 HR60-Class II A2 Biosafety Cabinet

71 / 98
Model HR40- Class II B2
Type of grade Class II B2 type
Specification/quantity of exhaust filter HEPA FILTER×1 Filtration efficiency ≥99.99%@0.3μm
Specification/quantity of blast filter ULPA FILTER×1 Filtration efficiency ≥99.9995%@0.12μm
Overall dimension 1360×780×2400mm(length × width × height)
Inside dimension 1167×500×680mm(length × width × height)
Speed of downdraft 0.32m/s
Speed of inflow airflow 0.62m/s
Power supply of biosafety cabinet AC220V/50Hz
Power of biosafety cabinet 1200VA
Rotational speed of fan 2590r/min
Maximum power of fan 505W
Power supply of fan AC220V/50Hz
Net weight 280Kg
Number of registration certificate of
medical equipment
GUO SHI YAO JIAN XIE (ZHUN) ZI 2007 No.3540752
Number of License for Medical Equipment
Manufacturer
LU SHI YAO JIAN XIE SHENG CHAN XU No.20050143
Standard No. YZB/HR 018-2009 HR40-Class II B2 Biosafety Cabinet

72 / 98
【product nameplate】
For example: HR40‐IIA2
73 / 98
【Maintenance method】
Many abnormal circumstances may occur during installation and commissioning, mainly including:
1. No alarm for over-limited door height
Over-limited door height alarm relies on the stroke switch installed at the back of front panel to sense the
signal. If over-limited door height, the top of glass door will touch the stroke switch, and the stroke switch
will give a signal to the computer board to alarm. If no normal alarm, firstly check whether the stroke
switch is misplaced or damaged, if misplaced, correct its position and if damaged, replace the stroke
switch. If stroke switch has no problem, check whether the line is normally connected to the computer
board.
2. Ultraviolet lamp doesn't work.
2.1 Firstly, check with multimeter whether the ultraviolet lamp holder can be switched on. If yes, prove the
ultraviolet lamp is damaged, so replace it.
2.2 If not, check whether the connection is damaged or there is bad contact.
2.3 Check whether the stroke switch on support of electric appliance is normal or not. Only when the door
is closed and fluorescent lamp switched off can the ultraviolet lamp be switched on. If the spring lever of
stroke switch can't be restored after the door is closed, the ultraviolet lamp can't be switched on, so stroke
switch should be replaced.
2.4 Check whether the ballast of ultraviolet lamp works normally and replace the ballast if damaged.
74 / 98
3. Fluorescent lamp doesn't work.
3.1 Check whether the fluorescent lamp is electrically connected. If yes, prove the fluorescent lamp is
damaged, so replace it.
3.2 Check whether the fluorescent lamp is normally connected; if not, replace the it.
3.3 Turn fluorescent lamp to check whether it is not in place.
3.3 Check whether the input and output voltage of the ballast is normal. If not, prove the ballast is
damaged, so replace it.
4. Safety cabinet can't start automatically when the door is opened after switch-on
Touch the stroke switch on support of electric appliance after the glass door is opened and give a signal of
door open to the computer board and automatically open fan and fluorescent lamp. If this trouble happens,
firstly check the stroke switch.
4.1 Check whether the stroke switch on support of electric appliance (down stroke switch) is misplaced or
damaged. If damaged, replace or repair.
4.2 Check whether the signal line of the stroke switch is misplaced or damaged. If yes, connect it in
place.
4.3 Check whether the fan signal line is connected to computer board in place. If not, it will affect the
input of fan signal, so connect it in place.
5. Alarm and indicate “Filter shattered”
Alarm shows damaged filter. There are the following possibilities:
The impulse tube and voltage sensor from the positive voltage box are connected abnormally. At this time,

75 / 98
fasten the impulse tube on the voltage sensor.
Computer board has trouble and calculate wrongly. It is required to replace the computer board.
The filter is damaged. Troubleshooting method: replace the filter.
6. Alarm and indicate” Filter warning”
The alarm is for higher positive voltage, which happens when the voltage of plenum chamber exceeds
certain value:
Dust shield is not opened. Always open the dust shield when the machine is operating.
There is foreign body in the plenum chamber to block the filter, so open the safety cabinet to clear away
the foreign body.
The computer board is abnormal. It is required to replace the computer board.
Filter is blocked. Replace the filter. (It is required to completely disinfect the safety cabinet before
changing the filter)
7. Alarm and indicate” Airflow warning”
The alarm is for abnormal air current.
Check whether the air intake grid is blocked by foreign body, and remove the foreign body, if yes;
Check whether the air outlet on the top of safety cabinet is open, and please completely open the dust
shield if not open or not completely open;
Check whether the air duct of voltage sensor is normally connected and please restore, if abnormal;
Check whether the indoor air flows abnormally. If the indoor air flows greatly, suspend using the safety
76 / 98
cabinet and use after the air flow becomes stable.
Check whether the computer board is abnormal.
8. Fan doesn't work
40A2 and 40B2 use DC frequency conversion fan, and 60A2 uses single-phase AC motor. DC fan is
directly powered by power supply and computer board supplies PWM square wave signal controls its
rotation speed. The following circumstances occur when DC fan stops:
1. AC power supply breaks;
2. Signal control cable breaks;
3. Trouble of computer board;
4. Trouble of fan.
When fan doesn't work, firstly check whether the machine is normally switched on. If yes, check whether
the power line of fan is connected normally; if also yes, check whether the signal control cable is normally
connected to computer board or breaks. If the connection is ok, replace the computer board and check
again. If the fan still doesn't work after the replacement of computer, replace the fan. Thoroughly disinfect
the inside computer before replacing the fan.
9. Close door and fan, alarm and indicate “Please the door”
The door close relies on the stroke switch sense on support of electric appliance. Spring lever of stroke
switch is in the initial position when the door is close and spring level is compressed when the door is
open. The alarm is caused by not complete restoration of spring level when the door is close. The
troubleshooting method is as follows:

77 / 98
a) Open the bolt on either side of lamp shade with 10mm spanner and put down the lamp shade lightly.
b) Repeatedly lift the glass door for a few times and observe whether the stroke switch can be restored to
its original place smoothly. If not, adjust the position of stroke switch in the support to make it restore to its
original place smoothly. If yes, replace the stroke switch.
c) If the stroke switch can be restored to its original place smoothly after replacement, but alarm is not
removed, observe whether the contact of signal line of stroke switch on the computer board is normal. If
the trouble is not removed, please contact the development department.
d) Close the lampshade after checking and repairing, and clear up the site.
10. No reaction to door open and close
10.1 Open the lamp shade to observe whether the stroke switch in the middle of support of electric
appliance operates with the open or close of the glass door;
10.2 If the switch doesn't operate, manually straighten the arm lever;
10.3 If the stroke switch operates, check the connection with multimeter.
11. Disorder:"please close the door" or "the door is opened higher" is not shown
according to the logical rules
11.1 Switch off the power supply and pull out the control cable of stroke switch from CN7 interface at
the right side of computer board'
11.2 Jump 1 and 3 with lead and switch on the power supply. At this time, the output of computer
board should be the same as the state of door close;
11.3 Disconnect the connected lead 1 and 3. At this time, the output of computer board should be the
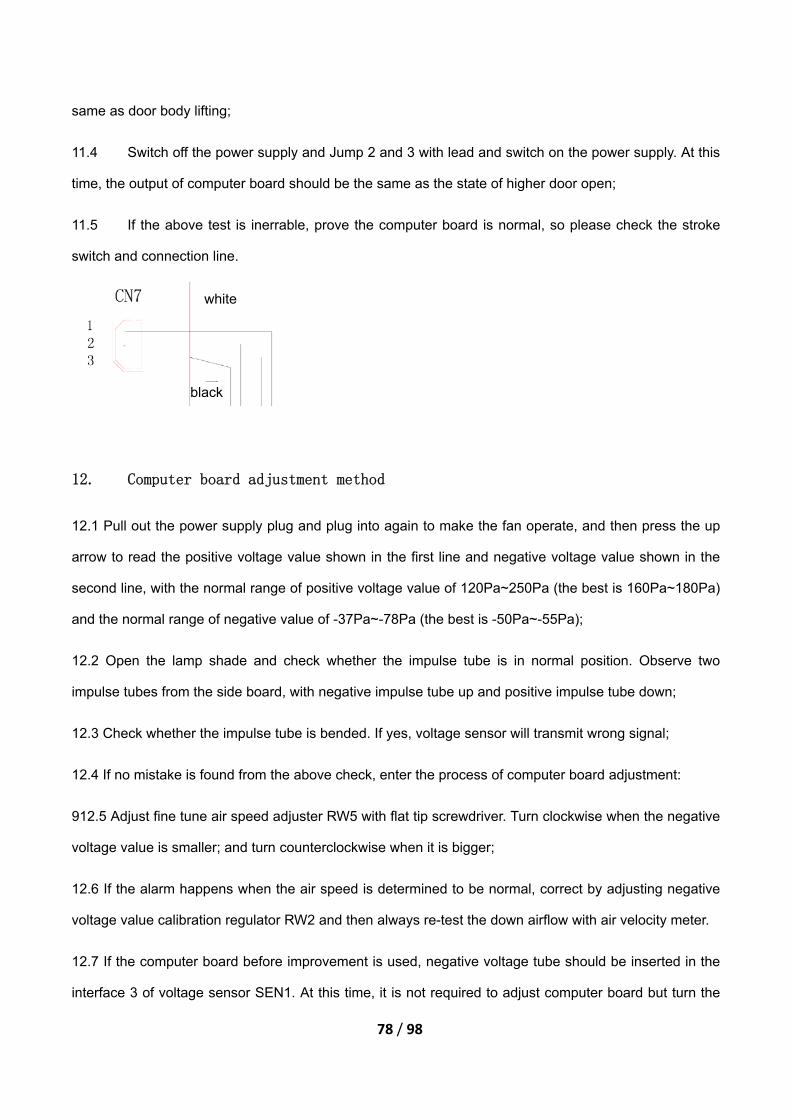
78 / 98
same as door body lifting;
11.4 Switch off the power supply and Jump 2 and 3 with lead and switch on the power supply. At this
time, the output of computer board should be the same as the state of higher door open;
11.5 If the above test is inerrable, prove the computer board is normal, so please check the stroke
switch and connection line.
12. Computer board adjustment method
12.1 Pull out the power supply plug and plug into again to make the fan operate, and then press the up
arrow to read the positive voltage value shown in the first line and negative voltage value shown in the
second line, with the normal range of positive voltage value of 120Pa~250Pa (the best is 160Pa~180Pa)
and the normal range of negative value of -37Pa~-78Pa (the best is -50Pa~-55Pa);
12.2 Open the lamp shade and check whether the impulse tube is in normal position. Observe two
impulse tubes from the side board, with negative impulse tube up and positive impulse tube down;
12.3 Check whether the impulse tube is bended. If yes, voltage sensor will transmit wrong signal;
12.4 If no mistake is found from the above check, enter the process of computer board adjustment:
912.5 Adjust fine tune air speed adjuster RW5 with flat tip screwdriver. Turn clockwise when the negative
voltage value is smaller; and turn counterclockwise when it is bigger;
12.6 If the alarm happens when the air speed is determined to be normal, correct by adjusting negative
voltage value calibration regulator RW2 and then always re-test the down airflow with air velocity meter.
12.7 If the computer board before improvement is used, negative voltage tube should be inserted in the
interface 3 of voltage sensor SEN1. At this time, it is not required to adjust computer board but turn the
white
black

79 / 98
knob of speed regulator in the middle of support of electric appliance and adjust the down airflow to above
0.3m/s.
12.8 If the computer board before improvement is used, and there is no speed regulator on the support
of electric appliance, please contact us and solve it by replacing chip.
Attached: Sketch map of adjustable components of computer board:
3SEN1 SEN2
RW2
RW1 RW3
RW4
RW5RW6
1、负压导压管插头
2、正压导压管插头
RW1、负压传感器电路校准调节器
RW2、负压值校准调节器
RW3、正压传感器电路校准调节器
RW4、正压值校准调节器
RW5、微调风速调节器
RW6、粗调风速调节器
21
13. Method of calibration of type A2biological safety cabinet computer board
13.1 Firstly pull out power supply plug, press two keys “↑” and “↓” on the control panel, and connect power
supply. At this time, all indicator lights are off; and display screen indicates: “F-voltage ×××Pa (positive
voltage)” .
“A-voltage ×××Pa (negative voltage)”
13.2 Zero position calibration:
a. Turn RW1 with a flat tip screwdriver till the display screen displays zero. When turning clockwise,
the figure of negative voltage of display screen increases gradually. When turning counterclockwise,
1.Negative voltage impulse tube plug
2.Positive voltage impulse tube plug
Circuit calibration adjuster of negative voltage sensor
Negative voltage value calibration adjuster
Circuit calibration adjuster of positive voltage sensor
Positive voltage value calibration adjuster
80 / 98
the figure of negative voltage of display screen decreases gradually.
b. When adjusting, firstly always adjust the negative voltage value to above zero and then adjust to
zero;
c. Also adjust RW3 and reset the positive voltage figure;
13.3 Voltage adjustment: press key “↑”, and the fan starts operating stably for 30s.
a. Turn RW2 with a flat tip screwdriver and adjust the negative voltage to 50~55Pa. When turning
counterclockwise, the figure will increase;
b. Also turn RW4, and adjust the positive voltage to 160~175Pa. When turning counterclockwise, the
figure will increase.
13.4 Turn on the fan again after the power supply is cut, the fan operating, and fluorescent lamp and
indicator light on. Observe the voltage of display screen, indicating:
a. The positive voltage between 160~175Pa is normal. If not within this range, adjust RW4. When
turning counterclockwise, the figure will increase;
b. The negative voltage between 50~55Pa is normal. If not within this range, adjust RW2. When
turning counterclockwise, the figure will increase;
14 Method of calibration of type B2 biological safety cabinet computer board
Premises: It is required the chip was separately written after March 24, 2011.
14.1 Firstly pull out the power supply plug and at the same time press the keys "stop" and “↓” on the
control panel, and connect power supply. At this time, the display screen indicates:
“>SET PWM1=×××/256” (wherein,”>“ indicates the current fan, and “PWM1” indicates built-in fan)
“ SET PWM2=×××/256” (“PWM2” is external exhaust fan)
14.2 Press “↑” key or “↓” key, adjust the speed of current fan, duty air“×××” increases or decreases with

81 / 98
the times of press;
14.3 Press "stop" key, “>“ means the current fan can switch between “PWM1” and “PWM2”;
14.4 Press "set" key to confirm after the value is set;
14.5 Connect power supply again after switching off and the fan will operate at the rotation speed of newly
set value;
14.6 After completion of set, always measure the descending air flow speed and inflow air flow speed with
anemoscope, which must meet the standard requirements. If not, always readjust the duty air of
corresponding fan;
14.7 As for new filter, refer to the set value of PWM1=100 when the descending air flow speed is 0.25, but
there would be great difference for different machines;
14.8 The reference value of PWM2 can't be determined due to the difference of resistance of exhaust
system, so determined according to actual commissioning condition;
15 Process of replacing the glass door of biological safety cabinet
Remove the M6 bolt on either side of lampshade;
Lightly open the lampshade and make sure the hang rope won't bear too much weight;
Lightly take off the wiring harness of lampshade connected to the computer board;
Take out the hang rope and take off the lampshade;
Loosen the four locknuts on the support of electric appliance;
Loosen the connection line on the stroke switch, pull out from the computer board and pull through the
hole of support of electric appliance;
Take off two M6 bolts on the top of front panel;
Lift upwards and lightly take off the front panel and pay attention not to pull the stroke switch line;
82 / 98
Pull out the fan control cable (if any) and two impulse tubes from the computer board;
Take off the right side of support of electric appliance, lightly turn and put it on the ground and pay
attention not to damage the left wire;
Lift the glass upwards and take it off;
Make clear the left and right of glass framework, i.e. make the handle outwards after assembly;
Hang on the glass and hang the wire rope on the hook of balancer;
Hang on the support of electric appliance, and put four bolts in four half slots respectively. Pay attention to
pull down the glass at this time and not to leave handle on the upside of support of electric appliance;
Hang the front panel, put the lugs on both sides into the back of support of electric appliance, adjust the
right and left gap evenly, pull the wire through the hole of support of electric appliance and fix two M6 bolts
on the top;
Fix the four locknuts on the support of electric appliance;
Insert the fan control cable (if any) and two impulse tubes on the computer board according to its original
position;
Insert the stroke switch line on the computer board and connect the other side to the stroke switch of
support of electric appliance. When the stroke switch line is connected, the black line connects to the
lower terminal (COM terminal) and while line connects to the upper terminal (NC terminal);
Hang the lampshade and pull the hook and washer in the front of hang rope through the hole of support of
electric appliance;
Insert the display screen line, lamp panel line and membrane key-press line on the computer board by
turns. When inserting the membrane key-press line (transparent thin connection line) on the computer
board, the smooth surface is upwards and and mark side downwards.
Check whether there is problem with the biological safety cabinet according to the inspection procedure
posted on the front panel;
If no, close the lampshade (pay attention not to press the line) and screw two M6 binding bolts;

83 / 98
Check again whether problem exists in the biological safety cabinet according to step 24;Wipe the cabinet
and clean the site.
16. Method of replacing filter
16.1 Disinfect:
a. Make the plastic bags of different sizes according to the model of safety cabinet. It is required to
seal the seam of plastic bag completely, with the thickness of 0.05 and lower opening. Each set is put
into two plastic bags with opening fastened;
Recommended size: series 40: 1600 (L) ×900 (W) ×3200 (H), lower opening;
60A2: 2050 (L) ×900(W) ×3200(H), lower opening;
b. Calculate the total volumes of safety cabinet according to the dimension of plastic bag;
Calculate cubage: Calculate series 40: 3 m3
60A2: 4 m3
c. Calculate the usage of Formalin: concentration should be 40%; and cubage per cubic meter 20ml:
Theatrical dosage: series 40: 60ml
60A2: 80ml
d. Calculate the usage of ammonia: concentration should be 25%; and cubage per cubic meter 14ml:
Theatrical dosage: series 40: 42ml
60A2: 56ml
e. Inject formalin into tank F of fumigator, inject ammonia into tank A of fumigator and cover with
metal ball of fumigator;
f. Put fumigator in the center of workbench of safety cabinet, turn on the control switch;
g. Lead out the power line of safety cabinet and fumigator and better to control outside the room;
h. Put the safety cabinet into two layers of plastic bag and fasten the opening of plastic bag. Check

84 / 98
each layer separately and seal the leaking part with adhesive tape;
i. Enter the process of fumigation. The fumigation mode includes automatic fumigation and manual
fumigation:
Automatic fumigation state:
Press key A on the remote control, then tank F of fumigator starts operating, and heat and suffocate
Formalin, then F indicator light turns green;
After the fumigation of Formalin, automatically switch off the heating power supply and F indicator
light turns red from green;
At this time, the delay indicator light in the middle of panel of fumigator turns yellow and enter the
phase of delay fumigation for 8 hours;
At the end of fumigation, the yellow light turns off automatically and enter the phase of neutralization;
Fumigator connects to tank A automatically, heat ammonia to neutralize the formalin gas and A
indicator light turns green;
After the ammonia is vaporized, A indicator light turns red. Cut off power supply, the whole process of
fumigation and disinfection end;
Manual fumigation state:
When pressing key B on the remote control, fumigator turns into manual operating state. If it is
required to turn into automatic state, just connect the power supply again;
When pressing key A on the remote control once, tank F of fumigator starts operating and when
heating and fumigating formalin, F indicator light turns green;
If you want to stop the work of tank F, just press key A on the remote control;
After the formalin is vaporized, cut off the power supply automatically and F indicator light turns to red
from green;
When pressing key B on the remote control once, tank A of fumigator starts operating and when
heating ammonia and neutralizing, A indicator light turns green;
85 / 98
If you want to stop the work of tank A, just press key B on the remote control;
After the ammonia is vaporized, cut off the power supply automatically and A indicator light turns to
red from green;
j. Remove the package bag and take away the fumigator;
k. After the completion of neutralization, produce urotropine, which does no harm to human body and
can be discharged from the exhaust system in the lab;
l. Caution: ambient temperature must not be lower than 21-degree Celsius;
m. During the process of fumigation and neutralisation, properly start and operate safety cabinet for
10 to 15 seconds to be more beneficial to fumigation and neutralisation;
16.2 Replace filter:
a. Loosen the set screw on both sides of lampshade and lightly open the lampshade;
b. Loosen 4 locknuts on the support of electric appliance, but don't screw off;
c. Loosen the control cable of lower stroke switch, take it off from the computer board and pull through the
lead-out bushing;
d. Take down the set bolt and spacer on the top of front panel and take down the front panel;
e. Pull out the impulse tube, take down the right side of support of electric appliance and put on the left
side of safety cabinet vertically;
f. Lift glass upwards and take it off lightly. Pay attention not to make the wire rope of balancer fall off the
outside of pulley;
g. Loosen the set bolt on the front cover board and take down the front cover board;
86 / 98
h. Loosen the hold-down bolt on both sides of exhaust-air filter and take out the upper filter;
i. Put the upper filter into the ready plastic bag;
j. Turn the hold-down bolt on both sides of lower wind box to lift the lower wind box upwards and take out
the lower filter;
k. Put the lower filter into the ready plastic bag;
l. Put the upper filter and screw tight the hold-down bolt;
m. Put the down filter and screw tight the hold-down bolt;
n. Check the press-fit of filter and neighboring stamping part and no seam is allowed;
o. Check the operating condition of the fan and block is prohibited;
p. Check whether there is foreign body and dust in the whole cabinet;
q. Install each part in the reverse order of disassembly;
r. Burn and bury the replaced filter.

87 / 98
16.3 Attached picture: appearance of fumigator and remote control
88 / 98
17 Step of replacing fan and adjusting
17.1 Loosen the set screw on both sides of lampshade and lightly open the lampshade;
17.2 Loosen 4 locknuts on the support of electric appliance, but don't screw off;
17.3 Loosen the control cable of lower stroke switch, take it off from the computer board and pull
through the right lead-out bushing;
17.4 Take down the set bolt and spacer on the top of front panel and take down the front panel;
17.5 Take down the connection line of display screen, lamp panel and membrane key-press from the
computer board;
17.6 Pull the safety rope on the lampshade through the mounting hole and take down the lampshade;
17.7 Open the junction box and take down the line connecting to leading-out control cable on the left
panel;
17.8 Pull out the impulse tube and take down the support of electric appliance;
17.9 Lift glass upwards and take it off lightly. Pay attention not to make the wire rope of balancer fall
off the outside of pulley;
17.10 Loosen the set bolt on the front cover board and take down the front cover board;
17.11 Loosen the hold-down bolt on both sides of exhaust-air filter and take out the upper filter;
17.12 Put the upper filter into the ready plastic bag;
17.13 Turn the hold-down bolt on both sides of lower wind box to lift the lower wind box upwards and
take out the lower filter;
17.14 Put the lower filter into the ready plastic bag;
17.15 Loosen the bolt fixing the upper and lower wind box;
17.16 Take out the upper and lower wind box from the cabinet, loosen all fasteners of fan and replace
the fan;
17.17 Assemble in the reverse order of the above-mentioned steps, and pay attention to check during
89 / 98
assembly:
17.18 Check the press-fit of filter and neighboring stamping part and no seam is allowed;
17.19 Check the operation of the fan and block is prohibitted;
17.20 Check whether there is foreign body and dust in the whole cabinet;
17.21 After completion of assembly, test the descending air flow speed and inflow air flow speed with
anemoscope;
17.22 Turn RW5 and RW6 on the computer board to make the descending air flow meet the
requirements (nominal 0.32m/s, required between 0.25 and 0.5);
17.23 Adjust the display of display screen according to the above-mentioned computer board after the
air speed is properly adjusted;

90 / 98
18. Method of replacing computer board
40A2 safety cabinets originally produced by us use DC fan and don't have the same computer board as
present ones, so please pay attention to the following issues when replacing:
Fan control cable (the only line led out from the right panel and connecting to the computer board) was
originally connected to the middle and upper part of the old computer board and connected to the right
and upper side after the computer board is replaced. The jack is also the only usable jack on the new
computer board and the quantity of down-lead of other jacks is different;
When the new computer board is used normally, the turning on and off of fan is controlled by computer,
but when new computer board is used to control DC fan, it is required to directly connect the power line of
fan to the junction box to guarantee continuous power supply.
The new computer board is longer and impulse tube faucet moves to the right, which will be crushed by
light shield box, so pay attention to put the impulse tube in the right place and better increase the process
turning to prevent the impulse tube from crushing and alarm.
Attached 1: old computer board
Attached 2: new computer board:
Fan control cable

91 / 98
Interface of fan
control cable
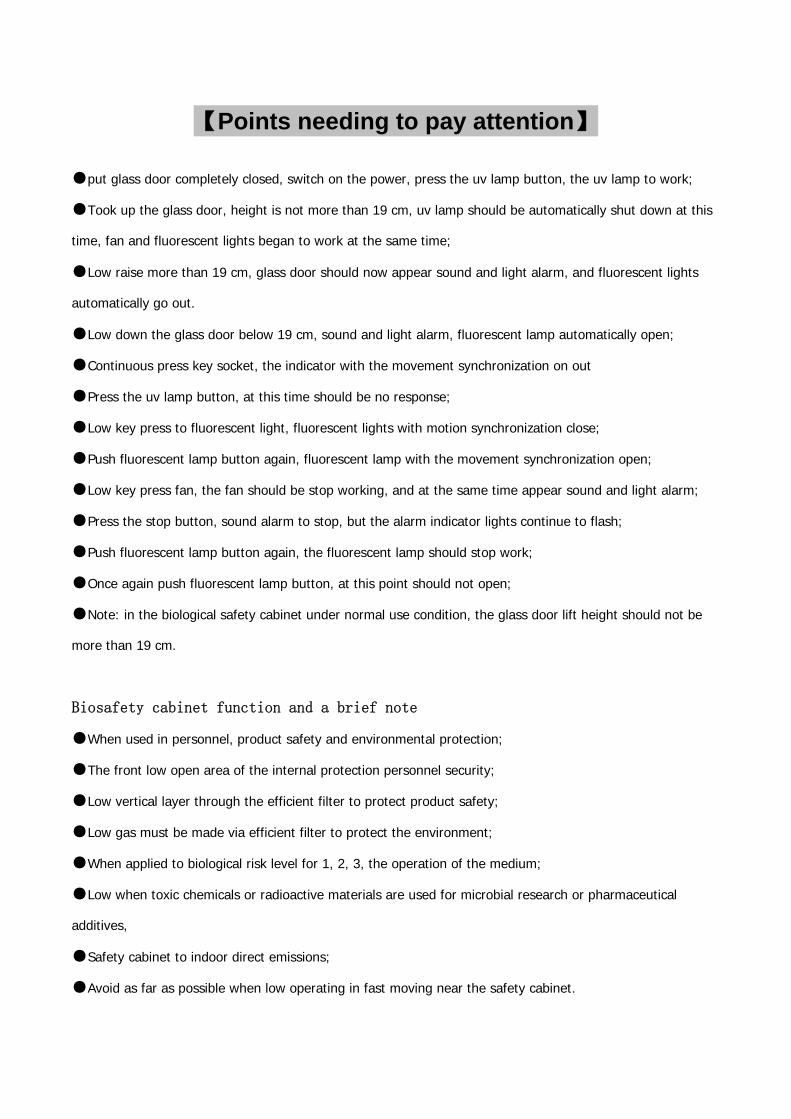
【Points needing to pay attention】
●put glass door completely closed, switch on the power, press the uv lamp button, the uv lamp to work;
●Took up the glass door, height is not more than 19 cm, uv lamp should be automatically shut down at this
time, fan and fluorescent lights began to work at the same time;
●Low raise more than 19 cm, glass door should now appear sound and light alarm, and fluorescent lights
automatically go out.
●Low down the glass door below 19 cm, sound and light alarm, fluorescent lamp automatically open;
●Continuous press key socket, the indicator with the movement synchronization on out
●Press the uv lamp button, at this time should be no response;
●Low key press to fluorescent light, fluorescent lights with motion synchronization close;
●Push fluorescent lamp button again, fluorescent lamp with the movement synchronization open;
●Low key press fan, the fan should be stop working, and at the same time appear sound and light alarm;
●Press the stop button, sound alarm to stop, but the alarm indicator lights continue to flash;
●Push fluorescent lamp button again, the fluorescent lamp should stop work;
●Once again push fluorescent lamp button, at this point should not open;
●Note: in the biological safety cabinet under normal use condition, the glass door lift height should not be
more than 19 cm.
Biosafety cabinet function and a brief note
●When used in personnel, product safety and environmental protection;
●The front low open area of the internal protection personnel security;
●Low vertical layer through the efficient filter to protect product safety;
●Low gas must be made via efficient filter to protect the environment;
●When applied to biological risk level for 1, 2, 3, the operation of the medium;
●Low when toxic chemicals or radioactive materials are used for microbial research or pharmaceutical
additives,
●Safety cabinet to indoor direct emissions;
●Avoid as far as possible when low operating in fast moving near the safety cabinet.

93 / 98
【FAQ】
1. Fan does not work
40 a2 and b2 fan used for dc frequency conversion fan, 60 a2 used for single-phase ac motor. Dc fan
directly by the power supply source, the computer board supply PWM square-wave signal control its
speed. When dc fan stall has the following several ways:
1, the ac power circuit;
2, signal control circuit;
3, computer fault;
4, fan fault.
Fan does not turn when a failure in the test the machine first yesno normal electricity, if normal electricity
check the power cord yesno fan normal connection; Under normal operation of the power cord to check
signal line yesno connected to the PC board is normal or yesno has open circuit phenomenon. If the
attachment no problem, replace the PC board to check. If the replacement still cannot be started after a
computer fan, replace the fan. In front of the replacement fan to sterilize inside the machine.
2. Close door and fan, alarm and display ”Please feel”
Door close rely on electrical stents on the perception of travel switch, door closing spring rod stroke
switches in the initial position, the compressed spring rod. When the door open This alarm forms should
be yes door closing spring rod not fully reset. Elimination method is as follows:
A) with 10 mm wrench open the bolt at the ends of the lamp shade, will gently put down the chimney.
B) will repeat lift door several times, travel switch yesno can successfully reset. If not successfully reset
mend the trip switch on the bracket position, make its can successfully reset. If can successfully reset,
replace the switch.
C) if change the travel switch, trip switch can be reset, but the alarm has not been ruled out, to examine
stroke switch signal in computer board plug yesno is normal. If still not troubleshooting, please contact the
department.
D) look after finishing and the chimney, finishing the scene.
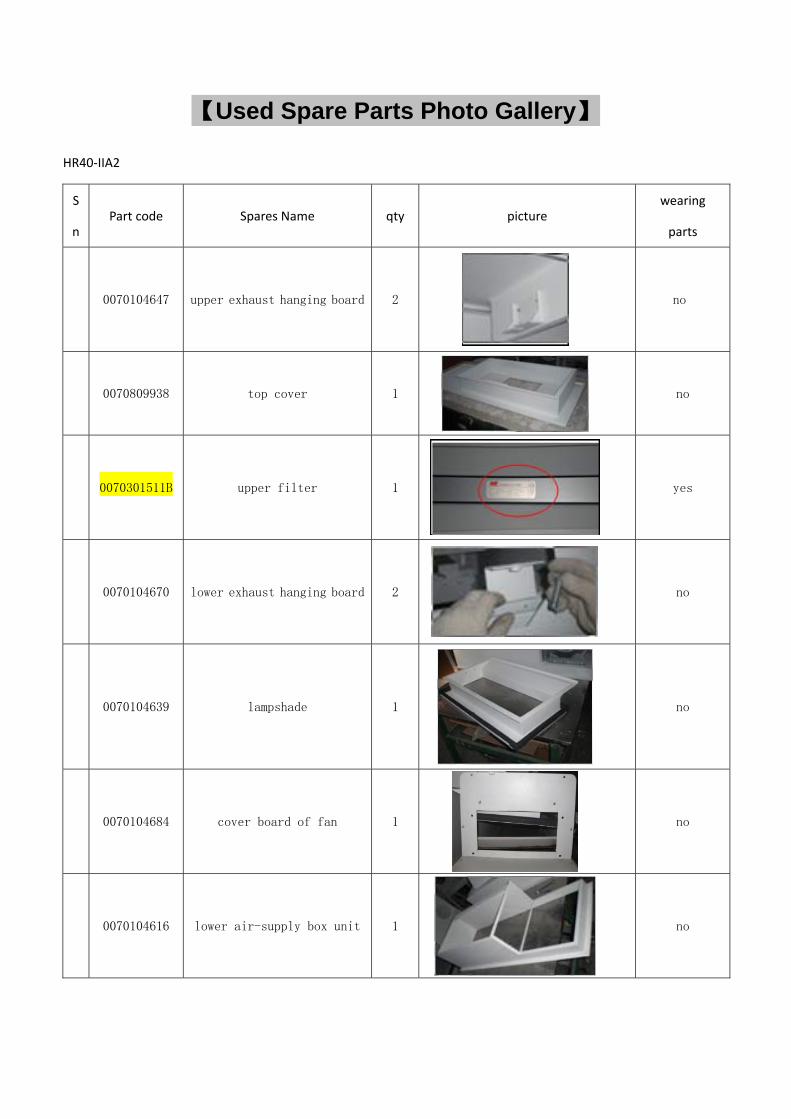
【Used Spare Parts Photo Gallery】
HR40‐IIA2
S
n Part code Spares Name qty picture
wearing
parts
0070104647 upper exhaust hanging board 2
no
0070809938 top cover 1
no
0070301511B upper filter 1
yes
0070104670 lower exhaust hanging board 2
no
0070104639 lampshade 1
no
0070104684 cover board of fan 1
no
0070104616 lower air-supply box unit 1
no
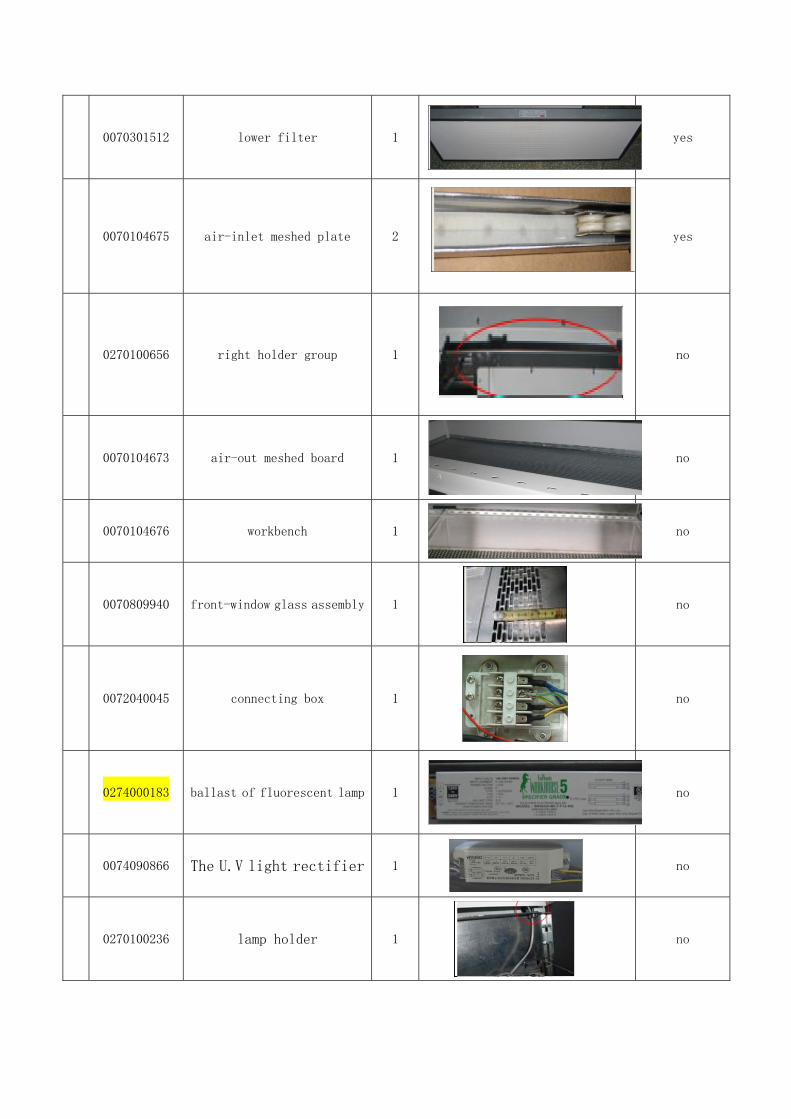
0070301512 lower filter 1 yes
0070104675 air-inlet meshed plate 2
yes
0270100656 right holder group 1
no
0070104673 air-out meshed board 1 no
0070104676 workbench 1 no
0070809940 front-window glass assembly 1
no
0072040045 connecting box 1
no
0274000183 ballast of fluorescent lamp 1 no
0074090866 The U.V light rectifier 1
no
0270100236 lamp holder 1
no
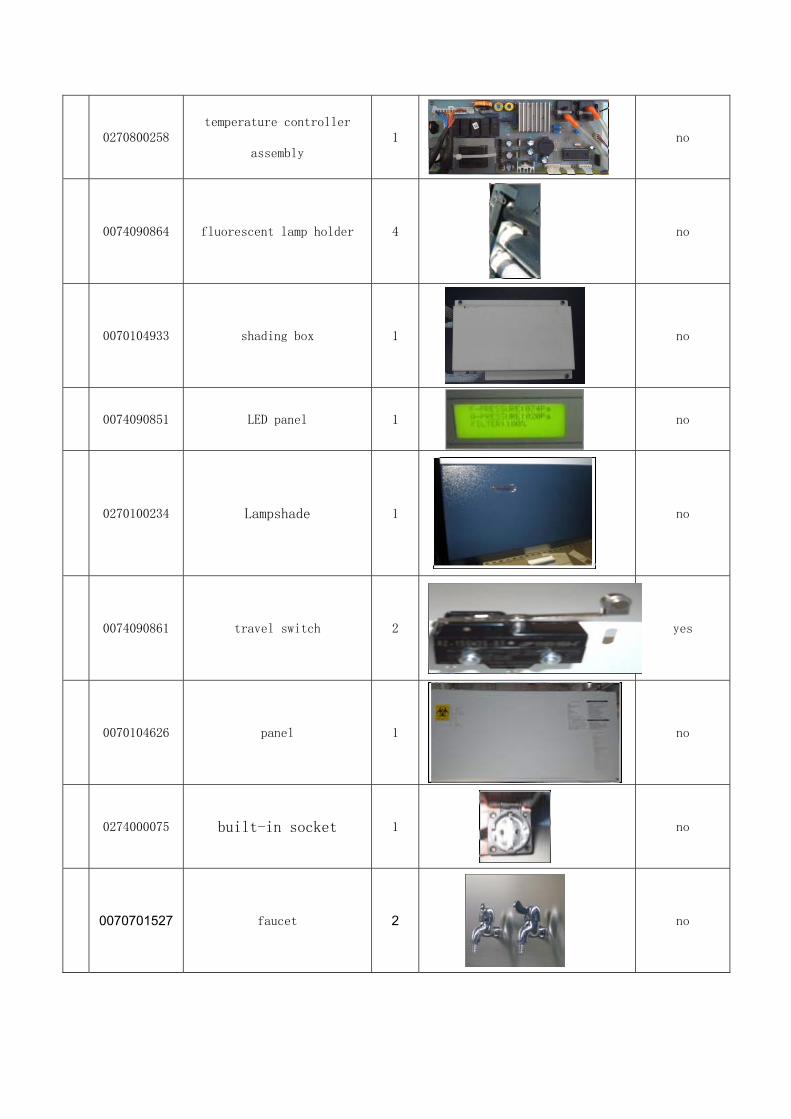
0270800258
temperature controller
assembly 1
no
0074090864 fluorescent lamp holder 4
no
0070104933 shading box 1
no
0074090851 LED panel 1
no
0270100234 Lampshade 1
no
0074090861 travel switch 2 yes
0070104626 panel 1
no
0274000075 built-in socket 1
no
0070701527 faucet 2
no

0070701516 connecting pipe 2
no
0070104648
upper left air-supply
hanging board
1 no
0074091198 HR40-IIA2 fan 风机 1
no
0070701536 drainage valve 1
0070107086 footing 4
0270100726 base-08 cold roll steel 1

Inspired living
Haier Medical & Laboratory Products Co., Ltd.
Room 403D, Brand Building, Haier Industrial Park, No.1 Haier Road
Qingdao China
Website: www.haiermedical.com