Embed Size (px)
Citation preview
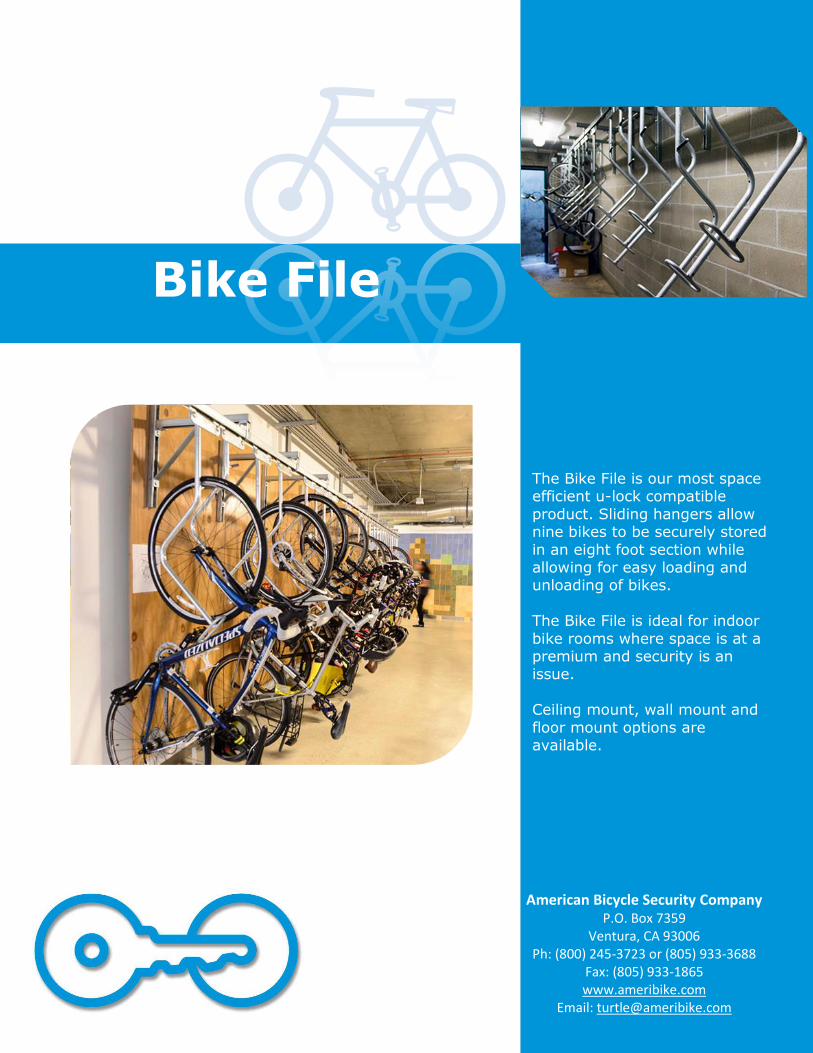
The Bike File is our most space efficient u-lock compatible
product. Sliding hangers allow nine bikes to be securely stored
in an eight foot section while allowing for easy loading and unloading of bikes.
The Bike File is ideal for indoor
bike rooms where space is at a premium and security is an issue.
Ceiling mount, wall mount and
floor mount options are available.
American Bicycle Security Company P.O. Box 7359
Ventura, CA 93006 Ph: (800) 245-3723 or (805) 933-3688
Fax: (805) 933-1865 www.ameribike.com
Email: [email protected]
Bike File
Page 1 of 7
Bike File
American Bicycle Security Company P.O. Box 7359
Ventura, CA 93006 Ph: (800) 245-3723 or (805) 933-3688
Fax: (805) 933-1865 www.ameribike.com
Email: [email protected]
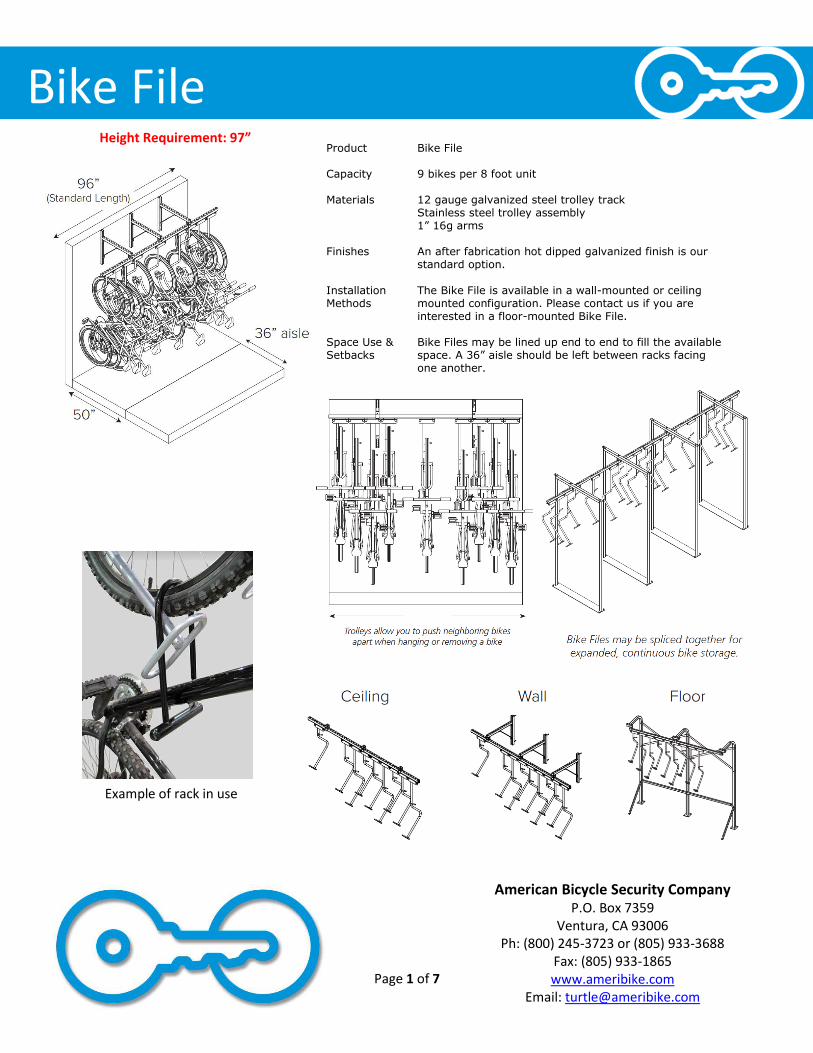
Product Bike File
Capacity 9 bikes per 8 foot unit
Materials 12 gauge galvanized steel trolley track
Stainless steel trolley assembly 1” 16g arms
Finishes An after fabrication hot dipped galvanized finish is our standard option.
Installation Methods
The Bike File is available in a wall-mounted or ceiling mounted configuration. Please contact us if you are interested in a floor-mounted Bike File.
Space Use & Setbacks
Bike Files may be lined up end to end to fill the available space. A 36” aisle should be left between racks facing one another.
Example of rack in use
Height Requirement: 97”
Page 2 of 7
Bike File
American Bicycle Security Company P.O. Box 7359
Ventura, CA 93006 Ph: (800) 245-3723 or (805) 933-3688
Fax: (805) 933-1865 www.ameribike.com
Email: [email protected]
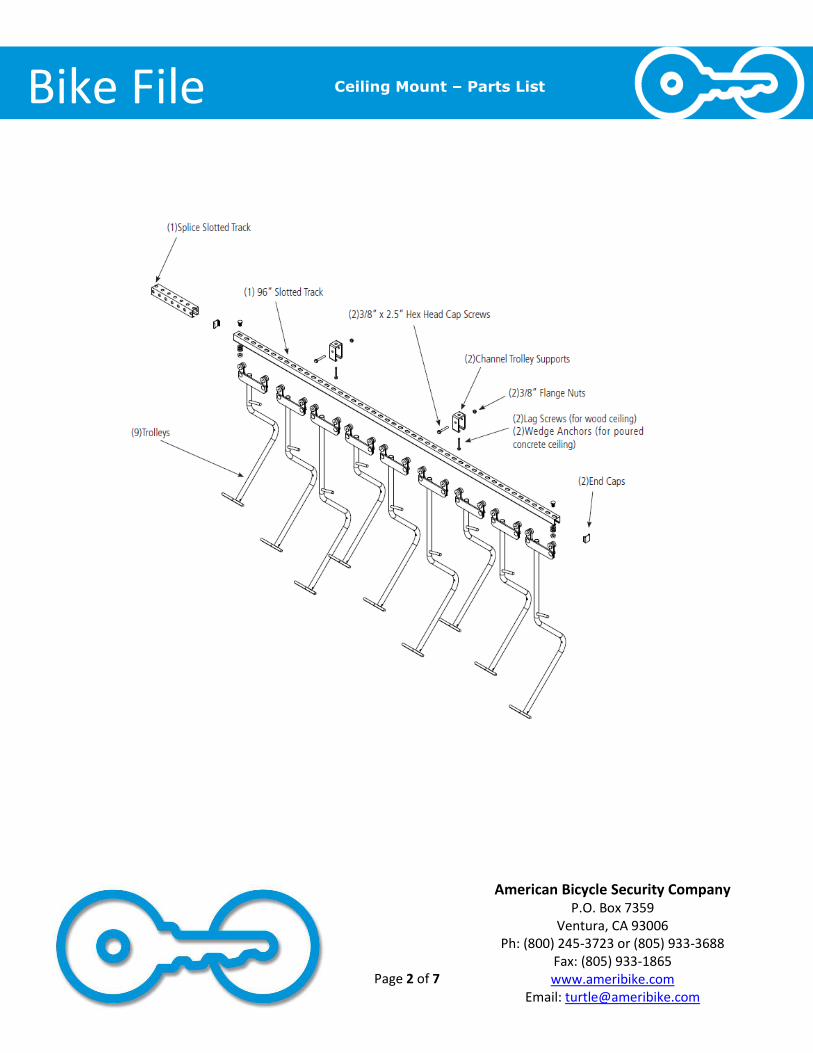
Ceiling Mount – Parts List

Page 3 of 7
Bike File
American Bicycle Security Company P.O. Box 7359
Ventura, CA 93006 Ph: (800) 245-3723 or (805) 933-3688
Fax: (805) 933-1865 www.ameribike.com
Email: [email protected]
*Tools Needed for Wall Mount Installation
9/16” Wrench/Socket
3/4” Wrench/Socket
1/4” Drill Bit or 3/8” Masonry Drill Bit (depending
on anchor type)
Tape Measure
Drill (Hammer Drill Recommended)
Hammer
Level
Saw for cutting track
1. Mount Channel Trolley Supports in ceiling with appropriate anchors so that the centers of the brackets are 2 feet from each end of the 96” Slotted Track and 4 feet apart from each other.
2. Slide 96” Slotted Track through the Channel Trolley Supports so that the centers of the brackets are 2 feet from the end of the Slotted Track.
3. Secure the Channel Trolley Supports onto the 96” Slotted Track by tightening the Hex Head Cap Screws and Flange Nuts through the holes in the Channel Trolley Supports.
4. Hammer an End Cap into one end of the 96” Slotted
Track.
5. Insert the Trolleys into the open end of the 96” Slotted Track.
6. If no more Bike Files are going to be spliced together,
hammer in another End Cap in the open end of the Slotted Track to close it up.
7. If splicing an additional length of track, slide the Splice Slotted Track over the last 6” of the 96” Slotted Track.
Ceiling Mount – Installation
Installation Steps:
Recommended Base Materials:
Note: if installing a ceiling mounted Bike File, continue with the
assembly by following the directions below. If installing a wall
mounted or floor mounted model, assemble those units
according to their instructions first.
Before installing, make sure the ceiling is strong enough to
accommodate the rack fully loaded with bikes. Compare parts
shipped with rack to the parts list on the previous page. Contact
us if any parts are missing. Make sure the 96” Slotted Track will
fit in your space. If necessary, cut the Slotted Track to the
required length.
1. 2.
3. 4.
6.
7.
5.
Page 4 of 7
Bike File
American Bicycle Security Company P.O. Box 7359
Ventura, CA 93006 Ph: (800) 245-3723 or (805) 933-3688
Fax: (805) 933-1865 www.ameribike.com
Email: [email protected]
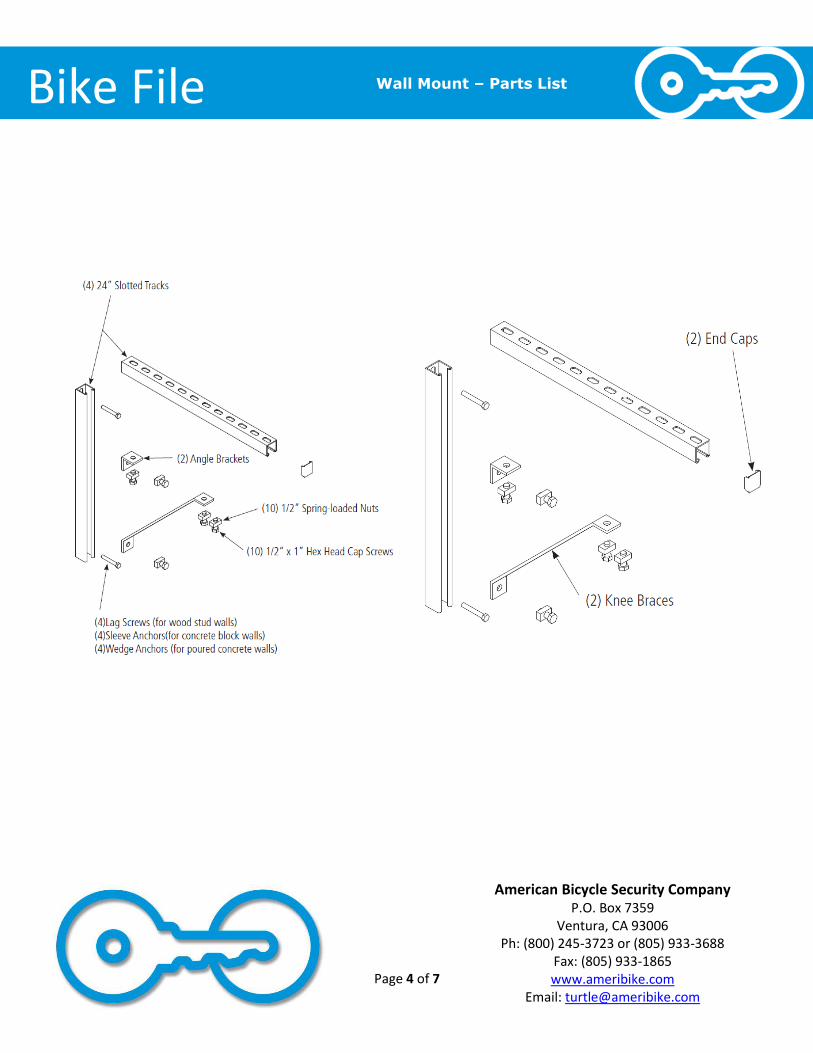
Wall Mount – Parts List
Page 5 of 7
Bike File
American Bicycle Security Company P.O. Box 7359
Ventura, CA 93006 Ph: (800) 245-3723 or (805) 933-3688
Fax: (805) 933-1865 www.ameribike.com
Email: [email protected]
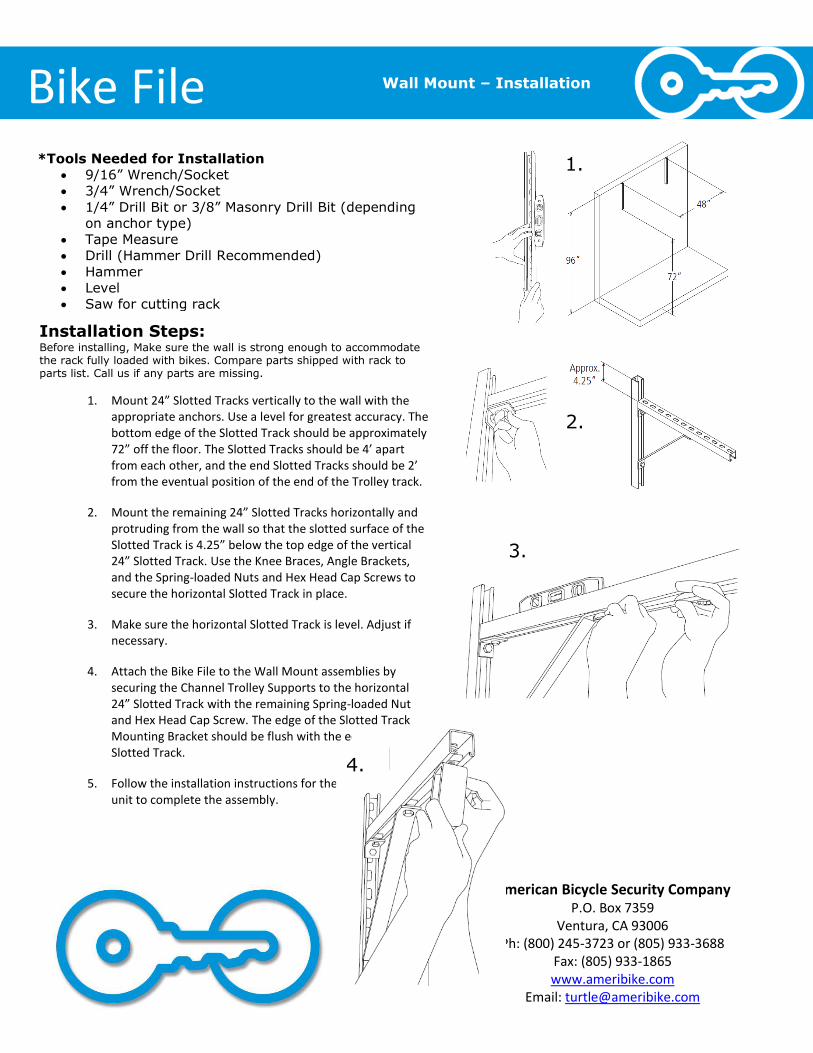
*Tools Needed for Installation
9/16” Wrench/Socket
3/4” Wrench/Socket
1/4” Drill Bit or 3/8” Masonry Drill Bit (depending
on anchor type)
Tape Measure
Drill (Hammer Drill Recommended)
Hammer
Level
Saw for cutting rack
Wall Mount – Installation
Installation Steps: Before installing, Make sure the wall is strong enough to accommodate the rack fully loaded with bikes. Compare parts shipped with rack to parts list. Call us if any parts are missing.
1. Mount 24” Slotted Tracks vertically to the wall with the appropriate anchors. Use a level for greatest accuracy. The bottom edge of the Slotted Track should be approximately 72” off the floor. The Slotted Tracks should be 4’ apart from each other, and the end Slotted Tracks should be 2’ from the eventual position of the end of the Trolley track.
2. Mount the remaining 24” Slotted Tracks horizontally and protruding from the wall so that the slotted surface of the Slotted Track is 4.25” below the top edge of the vertical 24” Slotted Track. Use the Knee Braces, Angle Brackets, and the Spring-loaded Nuts and Hex Head Cap Screws to secure the horizontal Slotted Track in place.
3. Make sure the horizontal Slotted Track is level. Adjust if necessary.
4. Attach the Bike File to the Wall Mount assemblies by securing the Channel Trolley Supports to the horizontal 24” Slotted Track with the remaining Spring-loaded Nut and Hex Head Cap Screw. The edge of the Slotted Track Mounting Bracket should be flush with the edge of the 24” Slotted Track.
5. Follow the installation instructions for the basic Bike File unit to complete the assembly.
1.
2.
3.
4.
Page 6 of 7
Bike File
American Bicycle Security Company P.O. Box 7359
Ventura, CA 93006 Ph: (800) 245-3723 or (805) 933-3688
Fax: (805) 933-1865 www.ameribike.com
Email: [email protected]
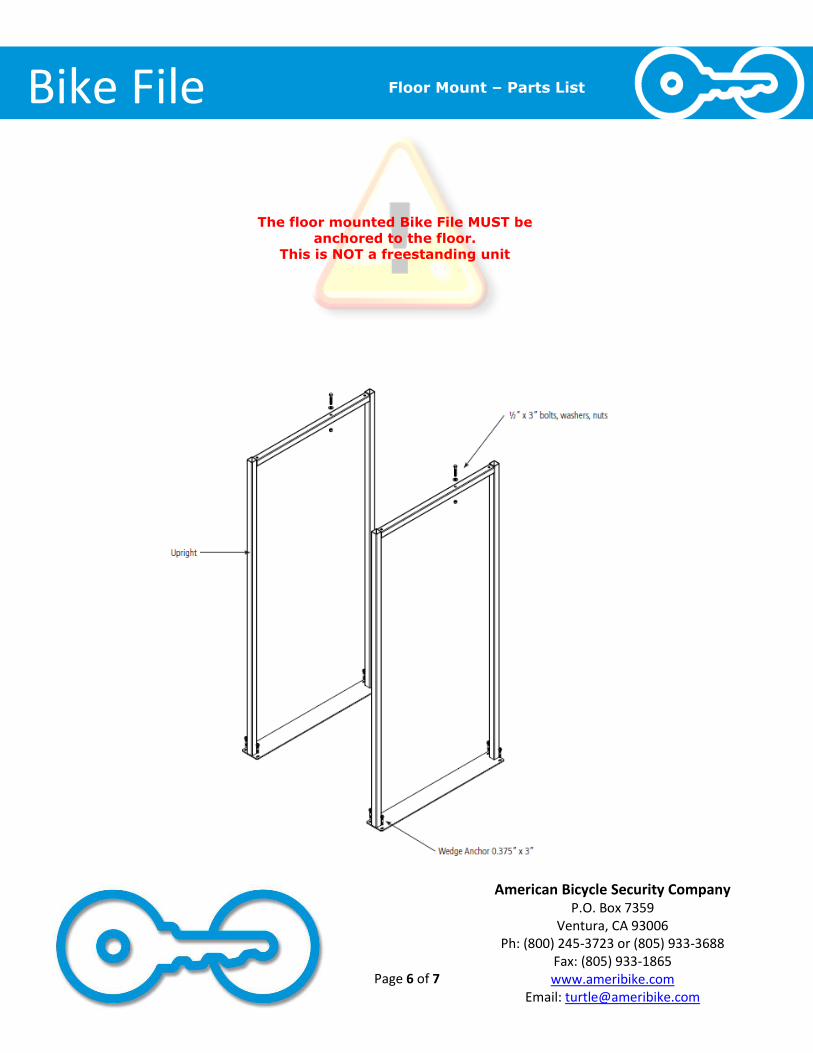
The floor mounted Bike File MUST be
anchored to the floor. This is NOT a freestanding unit
Floor Mount – Parts List
Page 7 of 7
Bike File
American Bicycle Security Company P.O. Box 7359
Ventura, CA 93006 Ph: (800) 245-3723 or (805) 933-3688
Fax: (805) 933-1865 www.ameribike.com
Email: [email protected]
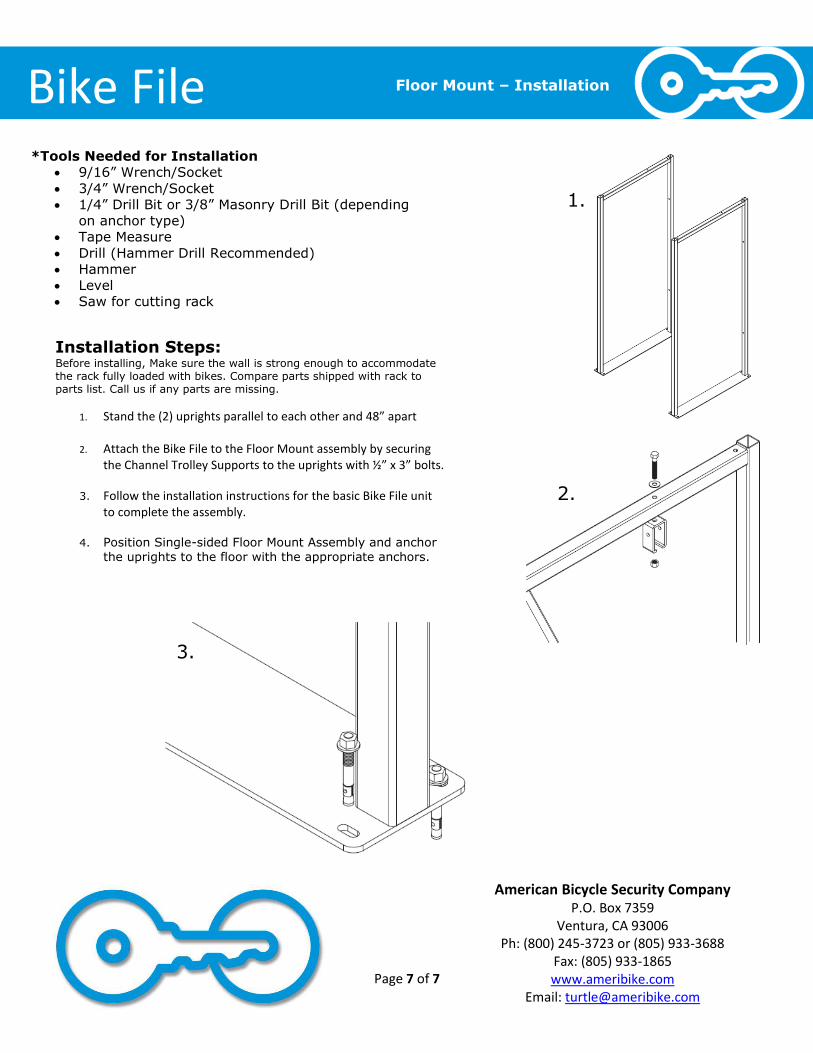
*Tools Needed for Installation
9/16” Wrench/Socket
3/4” Wrench/Socket
1/4” Drill Bit or 3/8” Masonry Drill Bit (depending
on anchor type)
Tape Measure
Drill (Hammer Drill Recommended)
Hammer
Level
Saw for cutting rack
Installation Steps:
Floor Mount – Installation
Installation Steps: Before installing, Make sure the wall is strong enough to accommodate the rack fully loaded with bikes. Compare parts shipped with rack to parts list. Call us if any parts are missing.
1. Stand the (2) uprights parallel to each other and 48” apart
2. Attach the Bike File to the Floor Mount assembly by securing the Channel Trolley Supports to the uprights with ½” x 3” bolts.
3. Follow the installation instructions for the basic Bike File unit to complete the assembly.
4. Position Single-sided Floor Mount Assembly and anchor the uprights to the floor with the appropriate anchors.
1.
2.
3.