Embed Size (px)
DESCRIPTION
varios
Citation preview
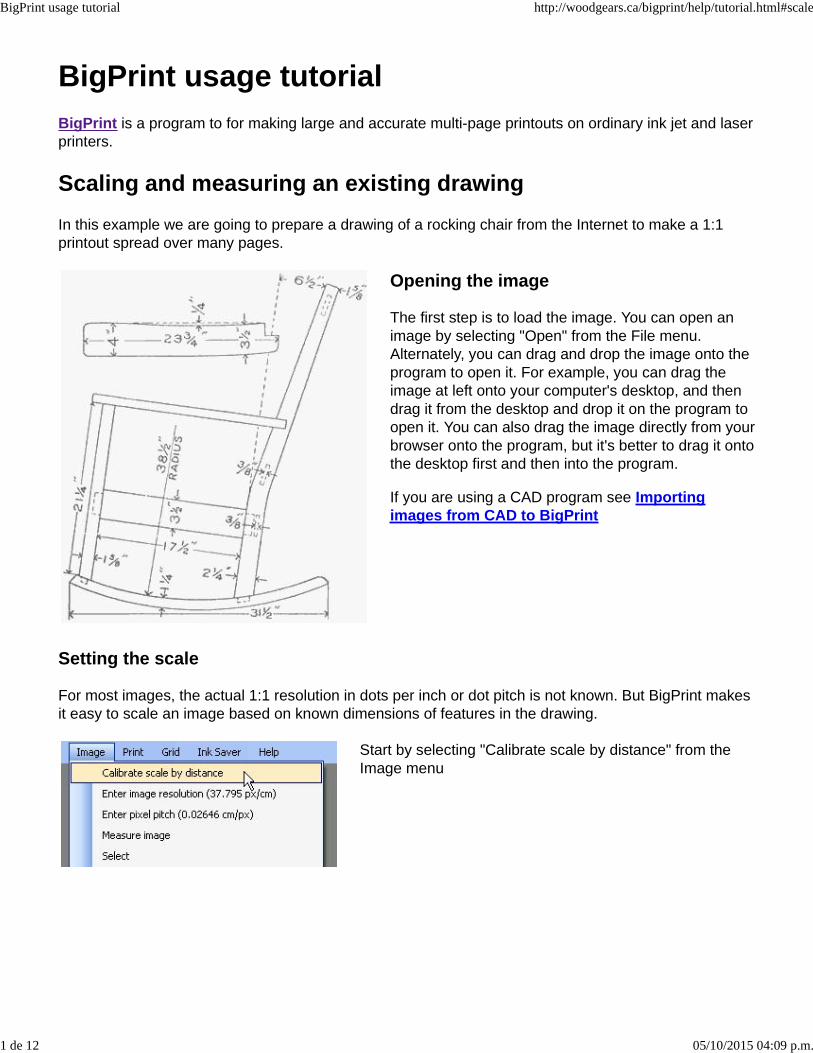
BigPrint usage tutorialBigPrint is a program to for making large and accurate multi-page printouts on ordinary ink jet and laserprinters.
Scaling and measuring an existing drawingIn this example we are going to prepare a drawing of a rocking chair from the Internet to make a 1:1printout spread over many pages.
Opening the image
The first step is to load the image. You can open animage by selecting "Open" from the File menu.Alternately, you can drag and drop the image onto theprogram to open it. For example, you can drag theimage at left onto your computer's desktop, and thendrag it from the desktop and drop it on the program toopen it. You can also drag the image directly from yourbrowser onto the program, but it's better to drag it ontothe desktop first and then into the program.
If you are using a CAD program see Importingimages from CAD to BigPrint
Setting the scale
For most images, the actual 1:1 resolution in dots per inch or dot pitch is not known. But BigPrint makesit easy to scale an image based on known dimensions of features in the drawing.
Start by selecting "Calibrate scale by distance" from theImage menu
BigPrint usage tutorial http://woodgears.ca/bigprint/help/tutorial.html#scale
1 de 12 05/10/2015 04:09 p.m.
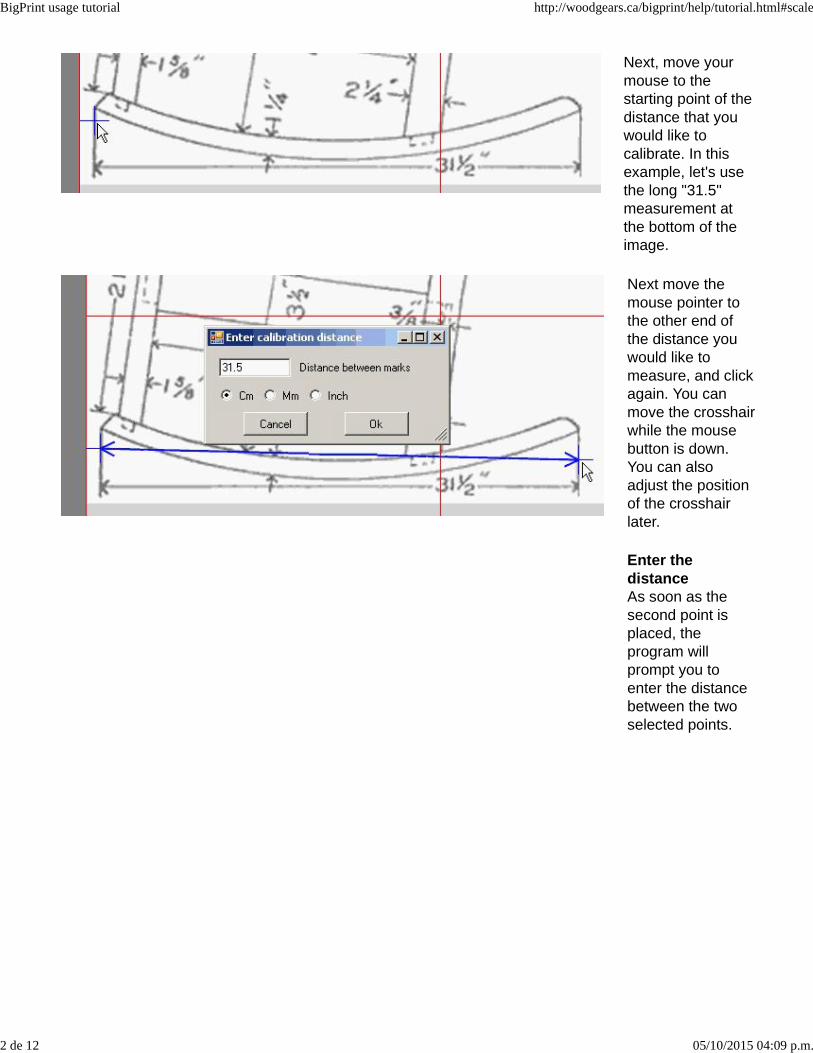
Next, move yourmouse to thestarting point of thedistance that youwould like tocalibrate. In thisexample, let's usethe long "31.5"measurement atthe bottom of theimage.
Next move themouse pointer tothe other end ofthe distance youwould like tomeasure, and clickagain. You canmove the crosshairwhile the mousebutton is down.You can alsoadjust the positionof the crosshairlater.
Enter thedistanceAs soon as thesecond point isplaced, theprogram willprompt you toenter the distancebetween the twoselected points.
BigPrint usage tutorial http://woodgears.ca/bigprint/help/tutorial.html#scale
2 de 12 05/10/2015 04:09 p.m.
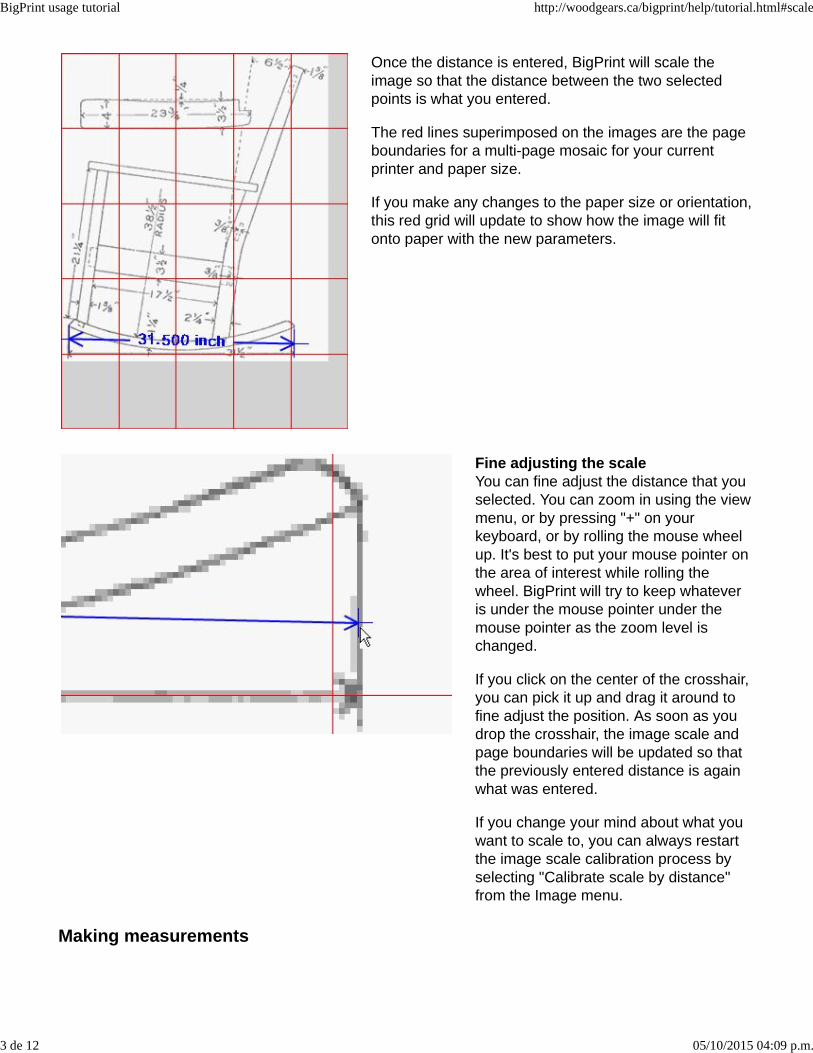
Once the distance is entered, BigPrint will scale theimage so that the distance between the two selectedpoints is what you entered.
The red lines superimposed on the images are the pageboundaries for a multi-page mosaic for your currentprinter and paper size.
If you make any changes to the paper size or orientation,this red grid will update to show how the image will fitonto paper with the new parameters.
Fine adjusting the scaleYou can fine adjust the distance that youselected. You can zoom in using the viewmenu, or by pressing "+" on yourkeyboard, or by rolling the mouse wheelup. It's best to put your mouse pointer onthe area of interest while rolling thewheel. BigPrint will try to keep whateveris under the mouse pointer under themouse pointer as the zoom level ischanged.
If you click on the center of the crosshair,you can pick it up and drag it around tofine adjust the position. As soon as youdrop the crosshair, the image scale andpage boundaries will be updated so thatthe previously entered distance is againwhat was entered.
If you change your mind about what youwant to scale to, you can always restartthe image scale calibration process byselecting "Calibrate scale by distance"from the Image menu.
Making measurements
BigPrint usage tutorial http://woodgears.ca/bigprint/help/tutorial.html#scale
3 de 12 05/10/2015 04:09 p.m.
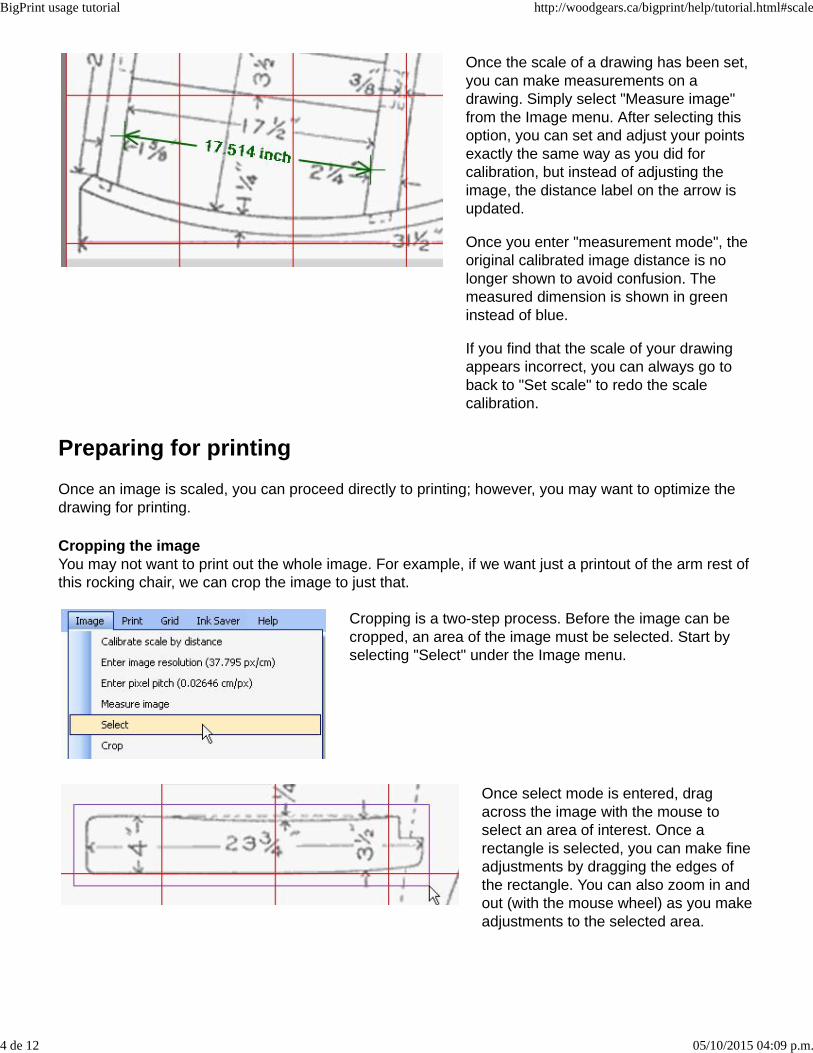
Once the scale of a drawing has been set,you can make measurements on adrawing. Simply select "Measure image"from the Image menu. After selecting thisoption, you can set and adjust your pointsexactly the same way as you did forcalibration, but instead of adjusting theimage, the distance label on the arrow isupdated.
Once you enter "measurement mode", theoriginal calibrated image distance is nolonger shown to avoid confusion. Themeasured dimension is shown in greeninstead of blue.
If you find that the scale of your drawingappears incorrect, you can always go toback to "Set scale" to redo the scalecalibration.
Preparing for printingOnce an image is scaled, you can proceed directly to printing; however, you may want to optimize thedrawing for printing.
Cropping the imageYou may not want to print out the whole image. For example, if we want just a printout of the arm rest ofthis rocking chair, we can crop the image to just that.
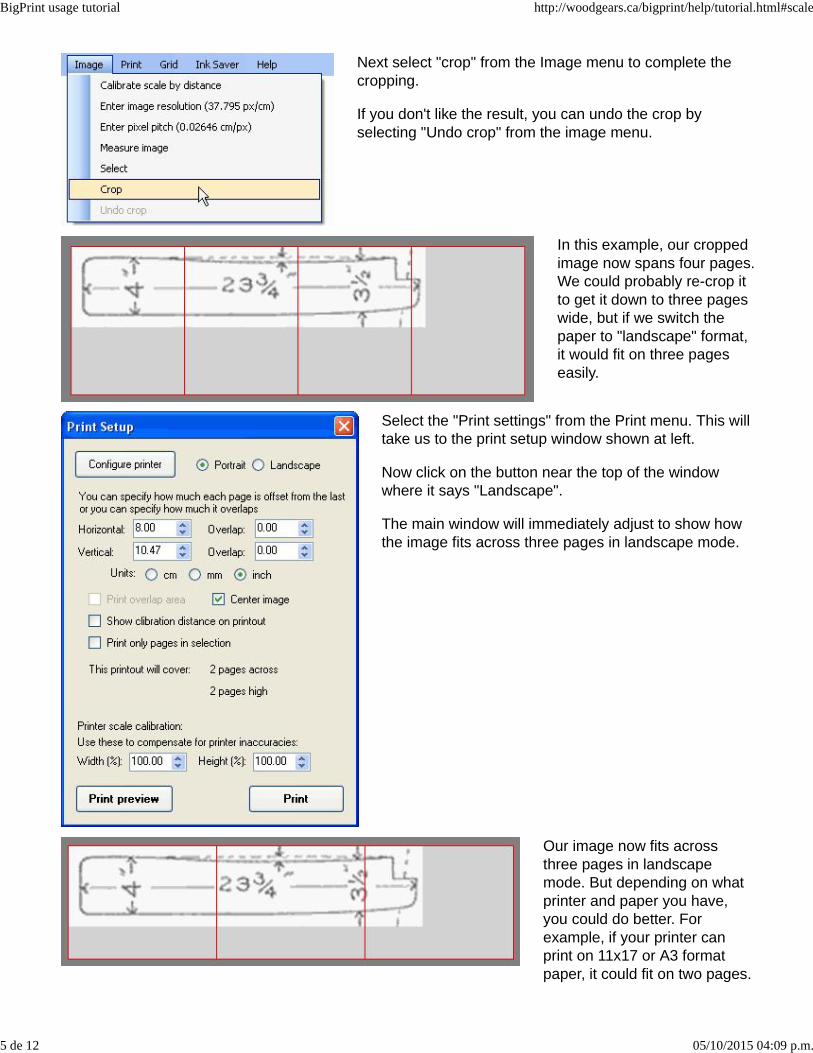
Cropping is a two-step process. Before the image can becropped, an area of the image must be selected. Start byselecting "Select" under the Image menu.
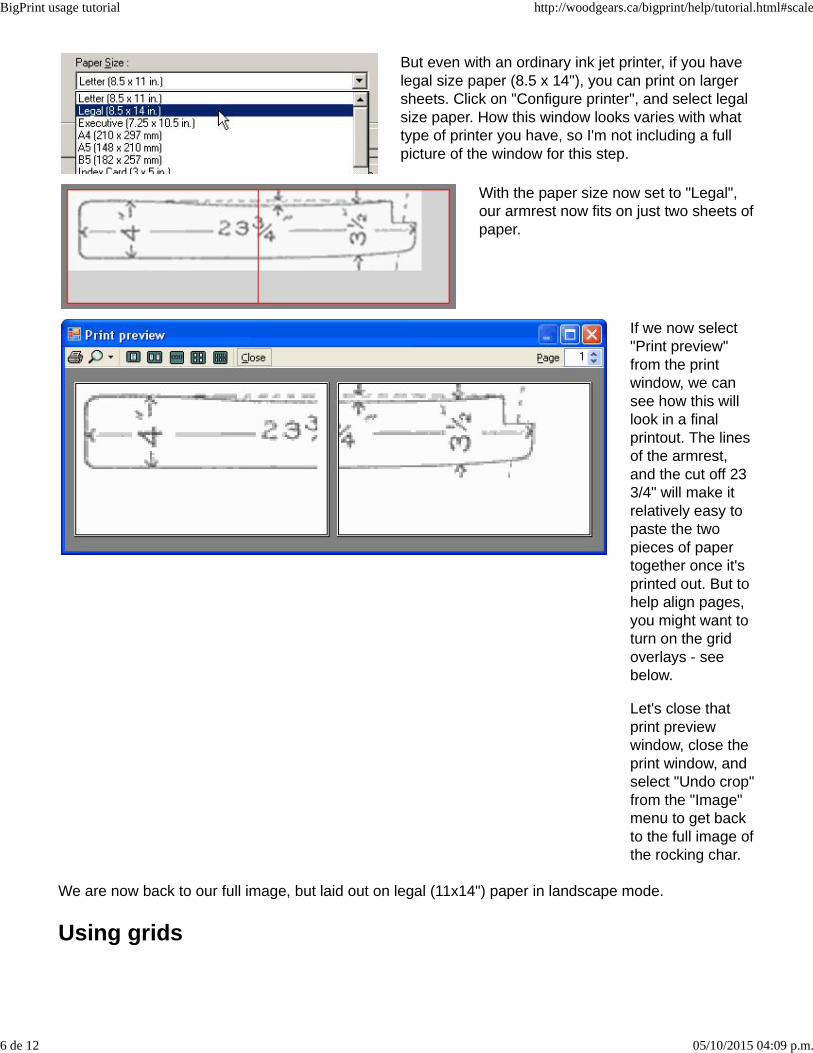
Once select mode is entered, dragacross the image with the mouse toselect an area of interest. Once arectangle is selected, you can make fineadjustments by dragging the edges ofthe rectangle. You can also zoom in andout (with the mouse wheel) as you makeadjustments to the selected area.
BigPrint usage tutorial http://woodgears.ca/bigprint/help/tutorial.html#scale
4 de 12 05/10/2015 04:09 p.m.
Next select "crop" from the Image menu to complete thecropping.
If you don't like the result, you can undo the crop byselecting "Undo crop" from the image menu.
In this example, our croppedimage now spans four pages.We could probably re-crop itto get it down to three pageswide, but if we switch thepaper to "landscape" format,it would fit on three pageseasily.
Select the "Print settings" from the Print menu. This willtake us to the print setup window shown at left.
Now click on the button near the top of the windowwhere it says "Landscape".
The main window will immediately adjust to show howthe image fits across three pages in landscape mode.
Our image now fits acrossthree pages in landscapemode. But depending on whatprinter and paper you have,you could do better. Forexample, if your printer canprint on 11x17 or A3 formatpaper, it could fit on two pages.
BigPrint usage tutorial http://woodgears.ca/bigprint/help/tutorial.html#scale
5 de 12 05/10/2015 04:09 p.m.
But even with an ordinary ink jet printer, if you havelegal size paper (8.5 x 14"), you can print on largersheets. Click on "Configure printer", and select legalsize paper. How this window looks varies with whattype of printer you have, so I'm not including a fullpicture of the window for this step.
With the paper size now set to "Legal",our armrest now fits on just two sheets ofpaper.
If we now select"Print preview"from the printwindow, we cansee how this willlook in a finalprintout. The linesof the armrest,and the cut off 233/4" will make itrelatively easy topaste the twopieces of papertogether once it'sprinted out. But tohelp align pages,you might want toturn on the gridoverlays - seebelow.
Let's close thatprint previewwindow, close theprint window, andselect "Undo crop"from the "Image"menu to get backto the full image ofthe rocking char.
We are now back to our full image, but laid out on legal (11x14") paper in landscape mode.
Using grids
BigPrint usage tutorial http://woodgears.ca/bigprint/help/tutorial.html#scale
6 de 12 05/10/2015 04:09 p.m.
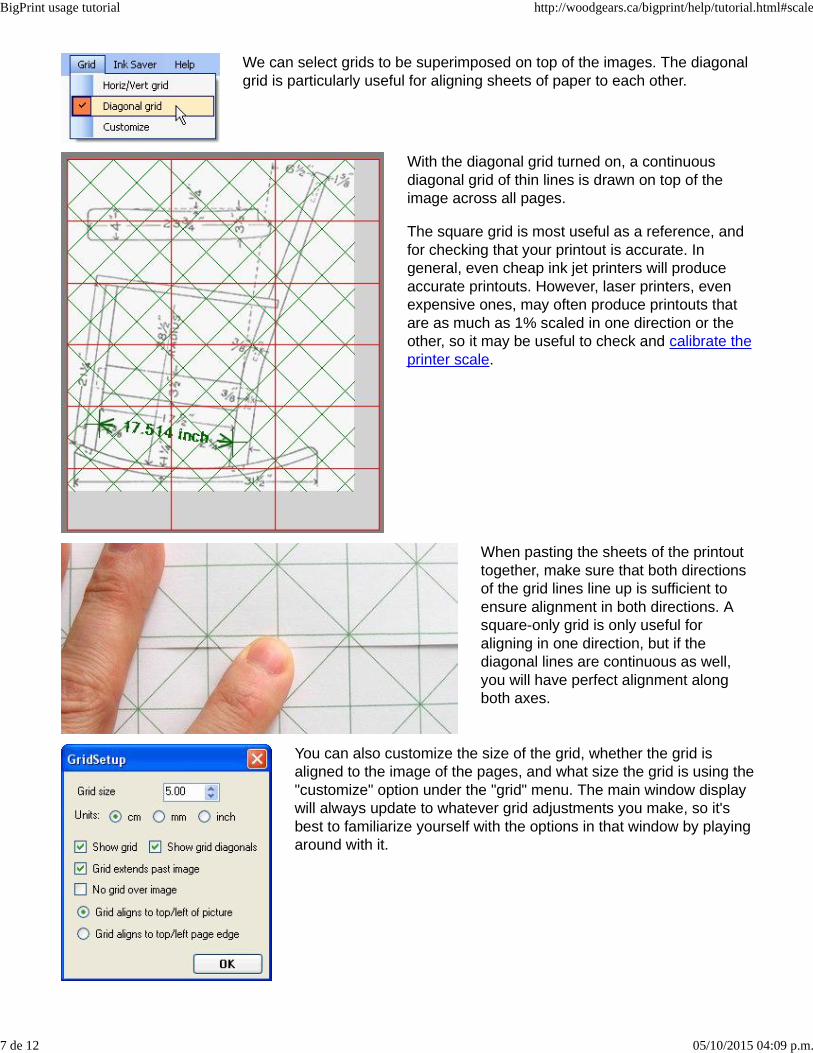
We can select grids to be superimposed on top of the images. The diagonalgrid is particularly useful for aligning sheets of paper to each other.
With the diagonal grid turned on, a continuousdiagonal grid of thin lines is drawn on top of theimage across all pages.
The square grid is most useful as a reference, andfor checking that your printout is accurate. Ingeneral, even cheap ink jet printers will produceaccurate printouts. However, laser printers, evenexpensive ones, may often produce printouts thatare as much as 1% scaled in one direction or theother, so it may be useful to check and calibrate theprinter scale.
When pasting the sheets of the printouttogether, make sure that both directionsof the grid lines line up is sufficient toensure alignment in both directions. Asquare-only grid is only useful foraligning in one direction, but if thediagonal lines are continuous as well,you will have perfect alignment alongboth axes.
You can also customize the size of the grid, whether the grid isaligned to the image of the pages, and what size the grid is using the"customize" option under the "grid" menu. The main window displaywill always update to whatever grid adjustments you make, so it'sbest to familiarize yourself with the options in that window by playingaround with it.
BigPrint usage tutorial http://woodgears.ca/bigprint/help/tutorial.html#scale
7 de 12 05/10/2015 04:09 p.m.
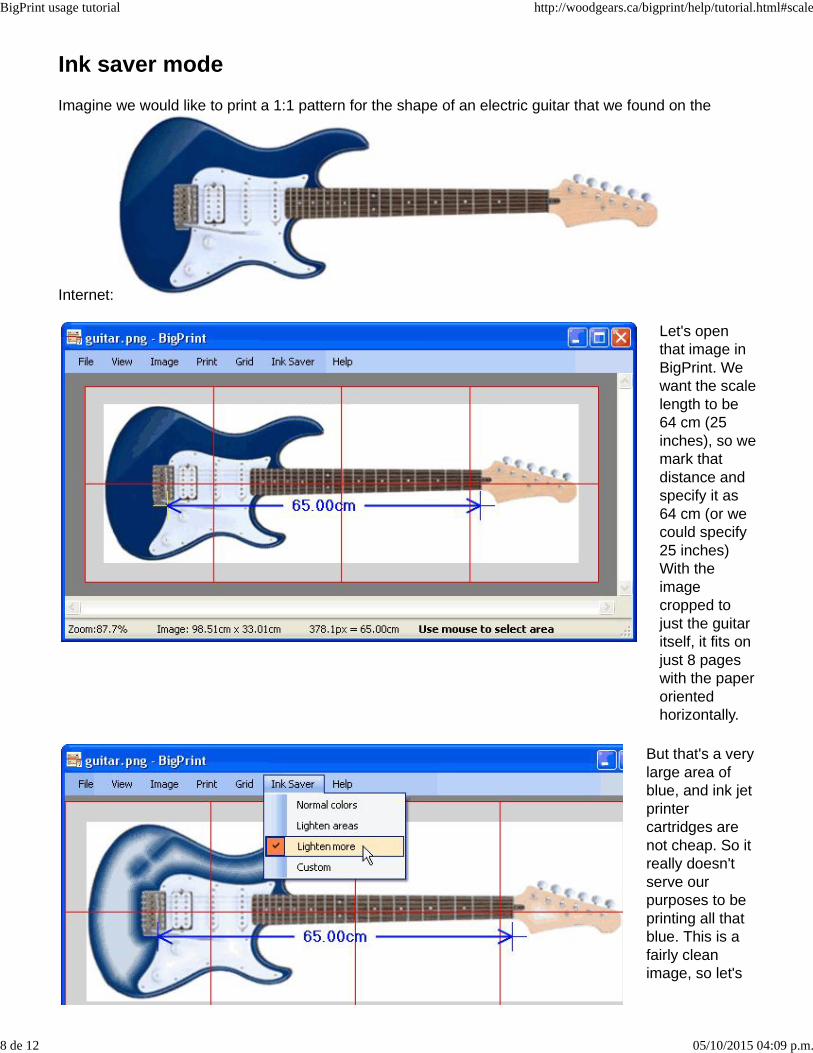
Ink saver modeImagine we would like to print a 1:1 pattern for the shape of an electric guitar that we found on the
Internet:
Let's openthat image inBigPrint. Wewant the scalelength to be64 cm (25inches), so wemark thatdistance andspecify it as64 cm (or wecould specify25 inches)With theimagecropped tojust the guitaritself, it fits onjust 8 pageswith the paperorientedhorizontally.
But that's a verylarge area ofblue, and ink jetprintercartridges arenot cheap. So itreally doesn'tserve ourpurposes to beprinting all thatblue. This is afairly cleanimage, so let's
BigPrint usage tutorial http://woodgears.ca/bigprint/help/tutorial.html#scale
8 de 12 05/10/2015 04:09 p.m.
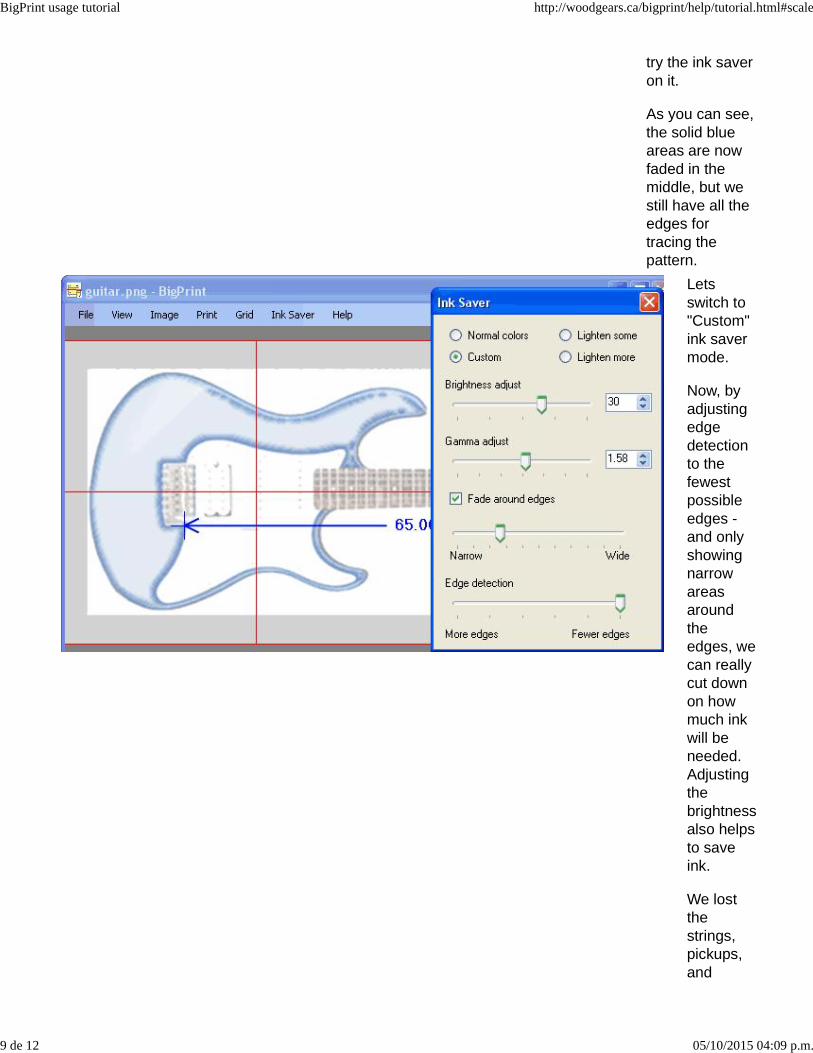
try the ink saveron it.
As you can see,the solid blueareas are nowfaded in themiddle, but westill have all theedges fortracing thepattern.
Letsswitch to"Custom"ink savermode.
Now, byadjustingedgedetectionto thefewestpossibleedges -and onlyshowingnarrowareasaroundtheedges, wecan reallycut downon howmuch inkwill beneeded.Adjustingthebrightnessalso helpsto saveink.
We lostthestrings,pickups,and
BigPrint usage tutorial http://woodgears.ca/bigprint/help/tutorial.html#scale
9 de 12 05/10/2015 04:09 p.m.
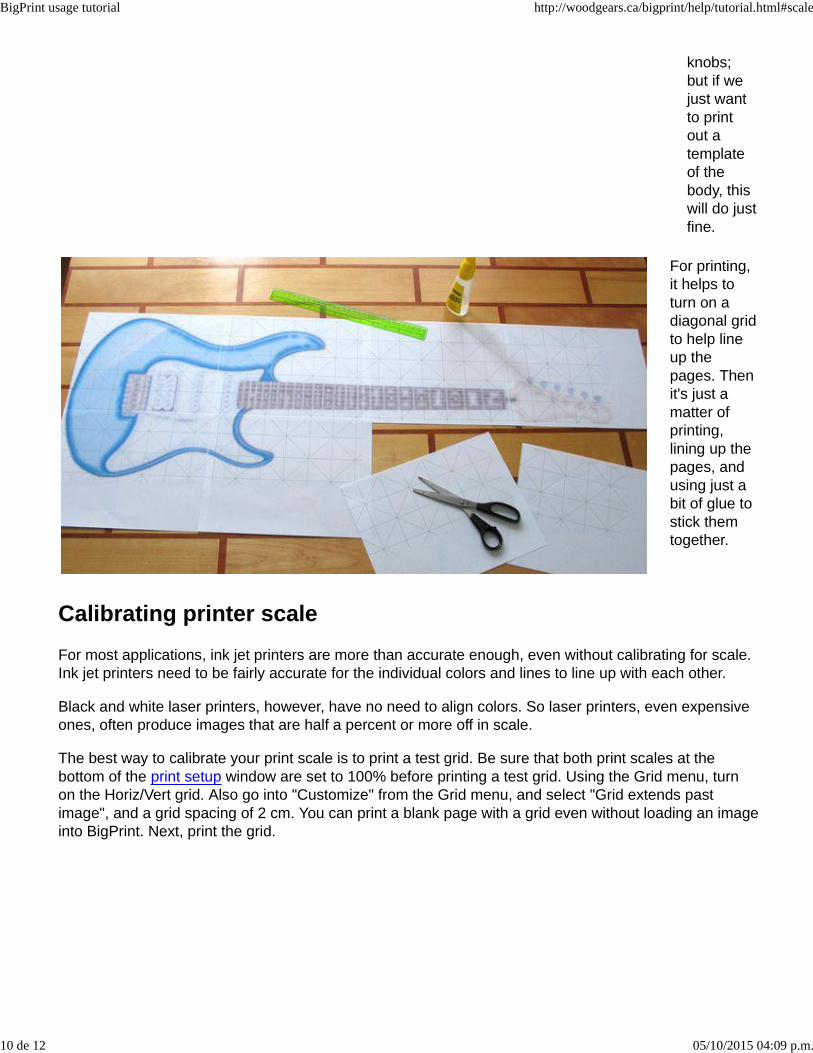
knobs;but if wejust wantto printout atemplateof thebody, thiswill do justfine.
For printing,it helps toturn on adiagonal gridto help lineup thepages. Thenit's just amatter ofprinting,lining up thepages, andusing just abit of glue tostick themtogether.
Calibrating printer scaleFor most applications, ink jet printers are more than accurate enough, even without calibrating for scale.Ink jet printers need to be fairly accurate for the individual colors and lines to line up with each other.
Black and white laser printers, however, have no need to align colors. So laser printers, even expensiveones, often produce images that are half a percent or more off in scale.
The best way to calibrate your print scale is to print a test grid. Be sure that both print scales at thebottom of the print setup window are set to 100% before printing a test grid. Using the Grid menu, turnon the Horiz/Vert grid. Also go into "Customize" from the Grid menu, and select "Grid extends pastimage", and a grid spacing of 2 cm. You can print a blank page with a grid even without loading an imageinto BigPrint. Next, print the grid.
BigPrint usage tutorial http://woodgears.ca/bigprint/help/tutorial.html#scale
10 de 12 05/10/2015 04:09 p.m.
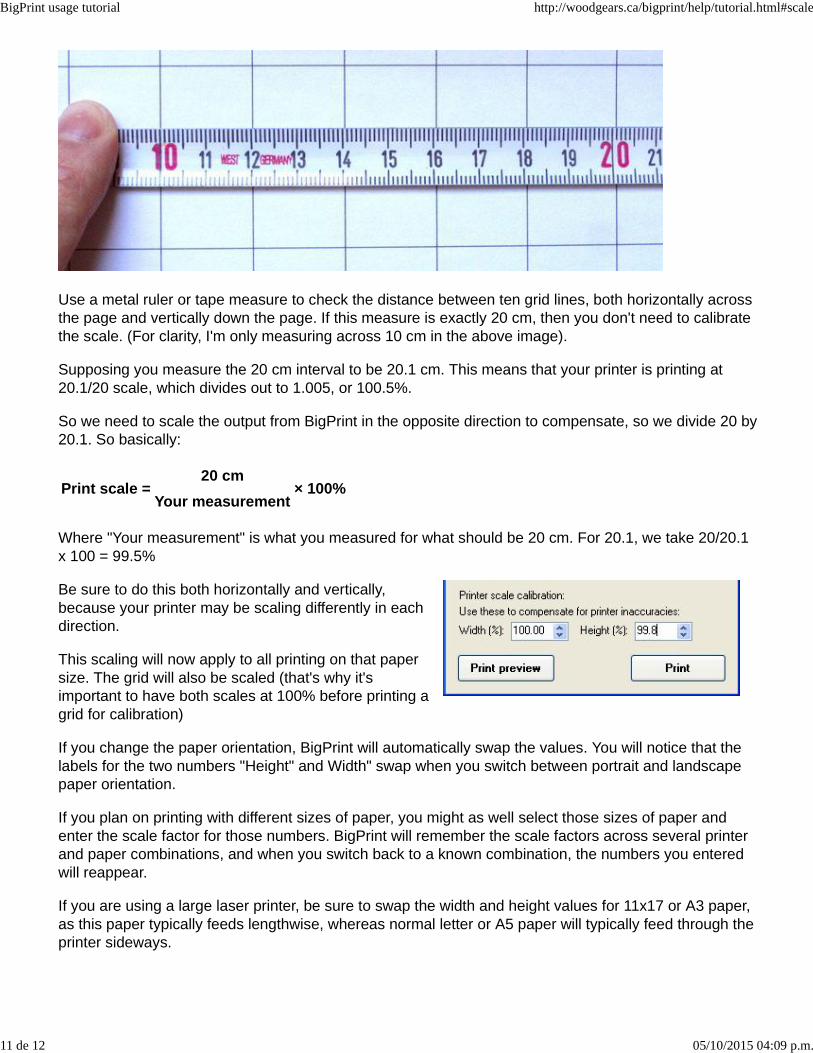
Use a metal ruler or tape measure to check the distance between ten grid lines, both horizontally acrossthe page and vertically down the page. If this measure is exactly 20 cm, then you don't need to calibratethe scale. (For clarity, I'm only measuring across 10 cm in the above image).
Supposing you measure the 20 cm interval to be 20.1 cm. This means that your printer is printing at20.1/20 scale, which divides out to 1.005, or 100.5%.
So we need to scale the output from BigPrint in the opposite direction to compensate, so we divide 20 by20.1. So basically:
Print scale =20 cm
× 100%Your measurement
Where "Your measurement" is what you measured for what should be 20 cm. For 20.1, we take 20/20.1x 100 = 99.5%
Be sure to do this both horizontally and vertically,because your printer may be scaling differently in eachdirection.
This scaling will now apply to all printing on that papersize. The grid will also be scaled (that's why it'simportant to have both scales at 100% before printing agrid for calibration)
If you change the paper orientation, BigPrint will automatically swap the values. You will notice that thelabels for the two numbers "Height" and Width" swap when you switch between portrait and landscapepaper orientation.
If you plan on printing with different sizes of paper, you might as well select those sizes of paper andenter the scale factor for those numbers. BigPrint will remember the scale factors across several printerand paper combinations, and when you switch back to a known combination, the numbers you enteredwill reappear.
If you are using a large laser printer, be sure to swap the width and height values for 11x17 or A3 paper,as this paper typically feeds lengthwise, whereas normal letter or A5 paper will typically feed through theprinter sideways.
BigPrint usage tutorial http://woodgears.ca/bigprint/help/tutorial.html#scale
11 de 12 05/10/2015 04:09 p.m.

See also:Cad export to BigPrint
BigPrint usage tutorial http://woodgears.ca/bigprint/help/tutorial.html#scale
12 de 12 05/10/2015 04:09 p.m.