Embed Size (px)
Citation preview

R:\Installation Instructions\Completed Instructions\Bi-Fold Track Instructions.doc REV. 09/29/08
NORMAN SHUTTERS
INSTALLATION INSTRUCTIONS
BI-FOLD TRACK
Getting Started
Recommended Tools: Nail Gun or Drill, Tape Measure, Torpedo Level, Box knife, Countersink Drill Bit,
#2 Phillips Head Drill Tip.
Make sure line number box label matches with panels box and frame box. Each window will have 1
box for shutter panels and 1 box for frames.
• Do not dispose of packaging until the shutters are operating appropriately.
• Use of a moving blanket or drop cloth is recommended.
• Find ample working space to assemble your frame. (Preferably in front of the window).
Check the diagram to make sure you have these parts indicated for the appropriate type of
installation.
Wheel carrier
Bolt
Lock Nut
Panel Bracket
Support/Bottom Bracket screwInstallation screw
Panel Stop
Support Bracket
Track Wrenches
Top Track Pivot
Top Panel Pivot
Bottom Panel Bracket
Bottom Leg Bracket

R:\Installation Instructions\Completed Instructions\Bi-Fold Track Instructions.doc REV. 09/29/08
Installation Steps
1. Carefully remove panels and boxout frames from the packaging. Do not mix panels or boxout
frames from other windows.
2. Set all frames on the floor face up.
Left Header Right Boxout NOTE: Track is pre-assembled to the Boxout
header at the factory if ordered within
specifications
Large notch on side Boxout faces up
Note: Make sure Top Track Pivot is installed in track before you COMPLETELY assemble the Boxout
Frame
3. Bring left and right side boxout frames together with header and (screw/nail) from the top of
the header into the side boxout.
WARNING
Wrong angle positioning
of nail gun may cause
the nail to shoot out the side of the frame.
Using Screws
Pre-drill from the top of the header
into the side boxout and then
drive the screws into place.
Using Nail Gun
Position the frames and nail
from the top of the header
into the side boxout.

R:\Installation Instructions\Completed Instructions\Bi-Fold Track Instructions.doc REV. 09/29/08
4. Place and position the assembled frame EVENLY around the window opening. Nail/screw
ONLY the upper left and right corners of the side boxout frame to the wall.
Assembled window evenly
In the window
5. After securing the upper left and right corners of the side boxout, make sure header is
STRAIGHT across the top of the window and then secure ALL support brackets onto the header
frame only. After all support brackets are secured to the header frame, ensure that the
header frame is STRAIGHT and secure support brackets to the wall.
Install Bracket onto Header Install into the Wall
6. Level the pivot leg of the boxout frame and secure to the wall.
Using Nail Gun Using Screws
Bottom
Pivot
Bracket
With PIVOT Leg Straight and With PIVOT Leg Straight and
LEVEL , Nail Leg to the Wall LEVEL, screw Leg to the Wall
Using Screws Using Nail Gun

R:\Installation Instructions\Completed Instructions\Bi-Fold Track Instructions.doc REV. 09/29/08
7. Ensure that the middle portion of the pivot leg is STRAIGHT. Then with the middle portion of the
pivot leg straight secure the pivot leg to the wall.
8. Measure in 1½” from the back of the Pivot leg fascia and install the bottom pivot bracket to
the pivot leg.
Back of the fascia Use 3 Small Screws to install Bracket Back of Bracket
1 ½” Between Back Bracket
And Back of
Fascia
NOTE: IMPOTANT: Fill all nail or screw holes in the pivot leg.
9. Install the pivot panel onto the bottom pivot bracket. (Note: PIVOT PANEL will be the only
panel with a pivot at the bottom of the panel ).
Bottom Pivot in Panel
Seats into Bottom Bracket
Bottom of the Panel

R:\Installation Instructions\Completed Instructions\Bi-Fold Track Instructions.doc REV. 09/29/08
10. Spring-load the top pivot (attached to the panel) into Top Pivot Bracket located in the track.
Spring Loaded Pivot
Fully Inserted
Spring Loaded Pivot
Top of Panel
11. Attach the panel/panels to each other with the hinge pins provided.
12. Attach the panel/panels with the Wheel Carrier Brackets (on top of the panel) to the Wheel
Carriers in the track. (Make sure to lock the Wheel Carrier Bracket onto the Wheel Carrier with
the hook-lock system).
Note: If multiple panels will be used, attach the remaining panel to the Pivot Panel with the hinge
pins provided. Then attach all of the panels together.
Insert Hinge Pins to join panels
Align lock nut at the
mark on the bolt
Insert into
panel bracket
Tighten
lock nut Slide bolt into wheel
carrier and secure
by turning the nylon
lock to the right
R:\Installation Instructions\Completed Instructions\Bi-Fold Track Instructions.doc REV. 09/29/08
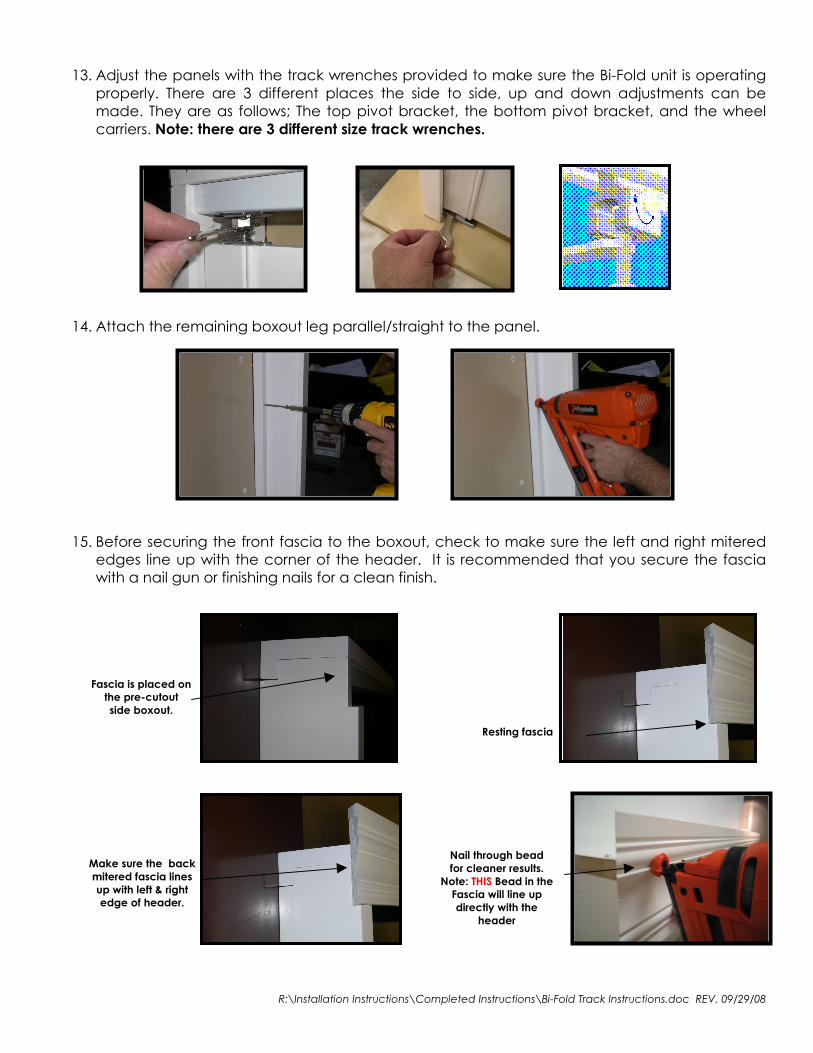
13. Adjust the panels with the track wrenches provided to make sure the Bi-Fold unit is operating
properly. There are 3 different places the side to side, up and down adjustments can be
made. They are as follows; The top pivot bracket, the bottom pivot bracket, and the wheel
carriers. Note: there are 3 different size track wrenches.
14. Attach the remaining boxout leg parallel/straight to the panel.
15. Before securing the front fascia to the boxout, check to make sure the left and right mitered
edges line up with the corner of the header. It is recommended that you secure the fascia
with a nail gun or finishing nails for a clean finish.
Fascia is placed on
the pre-cutout
side boxout.
Nail through bead
for cleaner results.
Note: THIS Bead in the
Fascia will line up
directly with the
header
Resting fascia
Make sure the back
mitered fascia lines
up with left & right
edge of header.

R:\Installation Instructions\Completed Instructions\Bi-Fold Track Instructions.doc REV. 09/29/08
16. Nail the left and right returns to the boxout using finishing nails provided.
17. Fill nail/screw holes and caulk sides if necessary.

R:\Installation Instructions\Completed Instructions\Bi-Fold Track Instructions.doc REV. 09/29/08