Embed Size (px)
Citation preview
Best Practices for Cloning ASM-based Databases
An Oracle White Paper July 2006
Best Practices for Cloning ASM-based Databases Page 2
Best Practices for Cloning ASM-based Databases
Introduction ....................................................................................................... 3
Duplicate in ASM Environments ................................................................... 4
Duplicate the database to a remote server ................................................ 4
Duplicate the database within the same ASM cluster (from one disk group to another) .......................................................................................... 8
Creating Clone Databases using DBMS_FILE_TRANSFER ................. 10
Overview...................................................................................................... 10
Preparation ....................................................................................................... 11
Standby or Clone Database Creation Procedure ................................... 17
Post Processing Cleanup Procedure ........................................................ 22
Creating Clone Databases using Enterprise Manager................................ 22
Conclusion........................................................................................................ 22
References ........................................................................................................ 23
Appendix A ...................................................................................................... 23
Appendix B ...................................................................................................... 23
Appendix C ...................................................................................................... 25
Best Practices for Cloning ASM-based Databases Page 3
Best Practices for Cloning ASM-based Databases
INTRODUCTION
Cloning and refreshing databases for testing and reporting purposes are a common
activity for most DBAs. This paper presents three techniques for cloning databases
which utilize Automatic Storage Management (ASM). Introduced in Oracle
Database 10g, ASM provides the database administrator with a simple storage
management interface that is consistent across all server and storage platforms. As
a vertically integrated file system and volume manager, purpose-built for Oracle
database files, ASM provides the performance of async I/O with the easy
management of a file system.
Choosing the appropriate cloning technique depends on availability of additional
disk space for a temporary copy of the database on the filesystem.
The cloning techniques are:
• Oracle Recovery Manager (RMAN) DUPLICATE command. Choose this
method if additional disk space can be made available for a temporary
filesystem copy of the database, including controlfile, datafiles, and
current archived logs. In addition, this copy must either be accessible by
the clone database server (e.g. via NFS) or copied to the clone database
filesystem.
• DBMS_FILE_TRANSFER package. Choose this method if there is no
disk space available for a temporary copy of the database on the source
and/or clone database filesystem. This method transfers all needed files
directly from the ASM cluster on the source database to the ASM cluster
on the clone database. Note that this procedure is more involved than
using DUPLICATE, as custom PL/SQL must be written to transfer the
files, and an additional ‘mover’ instance at the clone database server must
be setup to receive the transferred files, before associating them to the
clone database.
• Enterprise Manager’s Clone Database feature or Database Creation
Assistant (DBCA). Choose this method if Enterprise Manager is used
within your organization. The Clone Database feature transfers files one
Best Practices for Cloning ASM-based Databases Page 4
at a time, and thus, only requires ‘staging area’ space in the clone database
filesystem equal to the largest datafile. Alternatively, DBCA requires a
staging area equivalent to a backup of your entire database, but does not
require connection to the source database.
Note: The techniques discussed in this paper refer to creating a clone database or
standby database. A clone database is a copy of the primary database, functioning as
a completely separate database (i.e. different DBID), created from a backup of the
primary database files. A standby database (specifically, physical standby database as
used in this paper) is also a copy of the primary database, created from a backup of
the primary database files. However, it is only used in a Data Guard configuration
and is kept transactionally consistent with the primary database, meaning that redo
data from the primary database is automatically transferred and applied to the
standby database (managed recovery mode). A standby database has the same
DBID as primary database and a different DB_UNIQUE_NAME. More
information on Data Guard can be found in the Data Guard Concepts and
Administration Guide.
In the case of the EM Clone Database feature and DBMS_FILE_TRANSFER
methods, the actual primary database files, instead of backups, are used to create
the clone or standby database.
DUPLICATE IN ASM ENVIRONMENTS
There are two general scenarios where DUPLICATE is used in ASM
environments:
- Duplicate database to remote server
- Duplicate ASM database to second database, within same ASM cluster
(between disk groups)
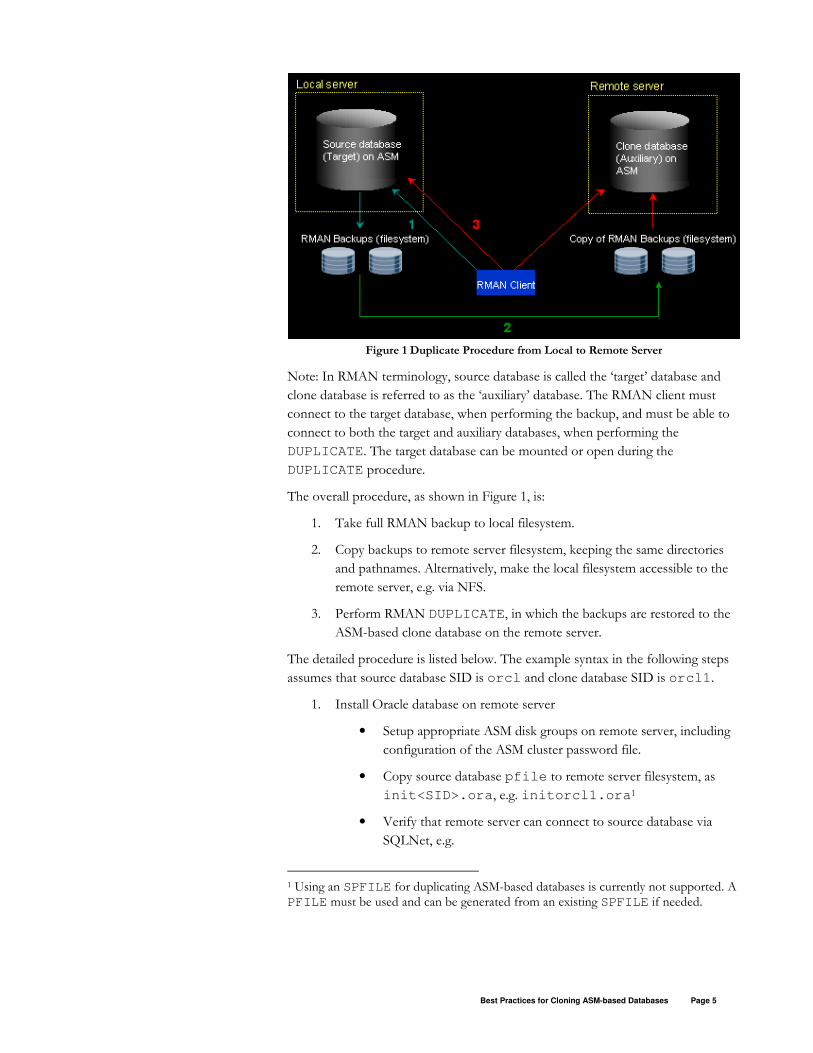
Duplicate the database to a remote server
A diagram of the overall DUPLICATE procedure is shown below.
Best Practices for Cloning ASM-based Databases Page 5
Figure 1 Duplicate Procedure from Local to Remote Server
Note: In RMAN terminology, source database is called the ‘target’ database and
clone database is referred to as the ‘auxiliary’ database. The RMAN client must
connect to the target database, when performing the backup, and must be able to
connect to both the target and auxiliary databases, when performing the
DUPLICATE. The target database can be mounted or open during the
DUPLICATE procedure.
The overall procedure, as shown in Figure 1, is:
1. Take full RMAN backup to local filesystem.
2. Copy backups to remote server filesystem, keeping the same directories
and pathnames. Alternatively, make the local filesystem accessible to the
remote server, e.g. via NFS.
3. Perform RMAN DUPLICATE, in which the backups are restored to the
ASM-based clone database on the remote server.
The detailed procedure is listed below. The example syntax in the following steps
assumes that source database SID is orcl and clone database SID is orcl1.
1. Install Oracle database on remote server
• Setup appropriate ASM disk groups on remote server, including
configuration of the ASM cluster password file.
• Copy source database pfile to remote server filesystem, as
init<SID>.ora, e.g. initorcl1.ora1
• Verify that remote server can connect to source database via
SQLNet, e.g.
1 Using an SPFILE for duplicating ASM-based databases is currently not supported. A PFILE must be used and can be generated from an existing SPFILE if needed.
Best Practices for Cloning ASM-based Databases Page 6
� sqlplus <orcl SYSDBA user>/<orcl
SYSDBA pwd>@orcl
2. Make changes to clone database’s initorcl1.ora.
Note: These changes are only specific to the DUPLICATE procedure.
Other changes may be needed for the clone database, e.g. archived log
destinations.
• On remote server, set control_files parameter to either a
complete pathname or disk group name, e.g.
*.control_files=’+data/orcl1/controlfiles/
control01.ctl’
or
*.control_files=’+data’
Note: In the second case, a system-generated control file name
will be generated by OMF during DUPLICATE, in the
‘+data/orcl1/controlfiles’ directory, e.g.
Current.289.585757677.
• Set db_create_file_dest parameter to appropriate disk
group where files will be duplicated, e.g.
*.db_create_file_dest=’+data’
Note: If clone database files are on non-ASM filesystem,
pathnames can just be standard directory pathnames, e.g.
*.db_create_file_dest=’/u02/orcl1’
• If the database version is 10.1.0.5 or higher, you can choose not to
set db_create_file_dest, but instead set the
db_file_name_convert and
log_file_name_convert parameters, if you require more
control over disk group naming. In the following example, each
data file in the ‘data source disk group will be stored in
+data_clone destination disk group, as will each redo log file
in +log source disk group be stored in +log_clone
destination disk group:
*.db_file_name_convert=’+data’,’+data_clone’
*.log_file_name_convert=’+log’,’+log_clone’
Note: As best practice, only use disk group names for the convert
parameter values (e.g. ‘+data’,‘+data_clone’). Using
full directory pathnames for convert values may ultimately yield a
different destination disk group pathname due to OMF.
Best Practices for Cloning ASM-based Databases Page 7
Note: Use either db_create_file_dest or the convert
parameters, but do not specify both.
• If duplicating for standby database, keep DB_NAME the same,
but change the DB_UNIQUE_NAME initialization parameter. Set
standby_file_management=AUTO. Set fal_client
to ‘<standby database SID>’ and fal_server to ‘<primary
database SID>’. Ensure that primary database SID is specified
in tnsnames.ora.
• If duplicating to clone (non-standby) database, change the value
of the DB_NAME initialization parameter, e.g. orcl1.
3. Take full backup of database to filesystem
RMAN> backup as copy format=’/u01/backups/%U’
database plus archivelog;
In addition, if duplicating for standby database:
RMAN> backup current controlfile for standby
format=’/u01/backups/%U’;
4. Copy backup files to clone host filesystem with same directory structure
as the backup files on the primary host (in this example,
’/u01/backups/’). Alternatively, make all backup files network-
accessible to remote server (e.g. NFS, CIFS).
5. On clone host, startup clone database instance in NOMOUNT mode.
6. On clone host, perform duplicate to clone database.
� > rman target <orcl SYSDBA user>/<orcl SYSDBA
pwd>@orcl auxiliary <orcl1 SYSDBA
user>/<orcl1 SYSDBA pwd>@orcl1 [catalog
<catalog user>/<catalog user pwd>@<catalog db
SID>]
� To duplicate for clone database:
o RMAN> duplicate target database to
‘orcl1’ [until sequence <log sequence
number>] pfile=’initorcl1.ora’;
o Note: Pfile (initorcl1.ora) must be accessible from
remote server.
o Note: Use until sequence for incomplete recovery, in
case the archive log backups cannot satisfy complete
recovery of clone database to the current time. Since only
backups are made available to the remote server in this
Best Practices for Cloning ASM-based Databases Page 8
procedure, DUPLICATE can only use backups that were
taken at or before the requested point-in-time.
� Or, to duplicate for standby database:
o RMAN> duplicate target database for
standby;
Once duplicate finishes successfully, the clone database is opened for use, or in the
case of a standby database, is started in MOUNT mode.
If the control_files parameter in the clone database pfile was specified as a
diskgroup name, replace this parameter with the complete pathname for the newly
created control file. The newly created control file pathname can be found using:
SQL> select * from v$controlfile;
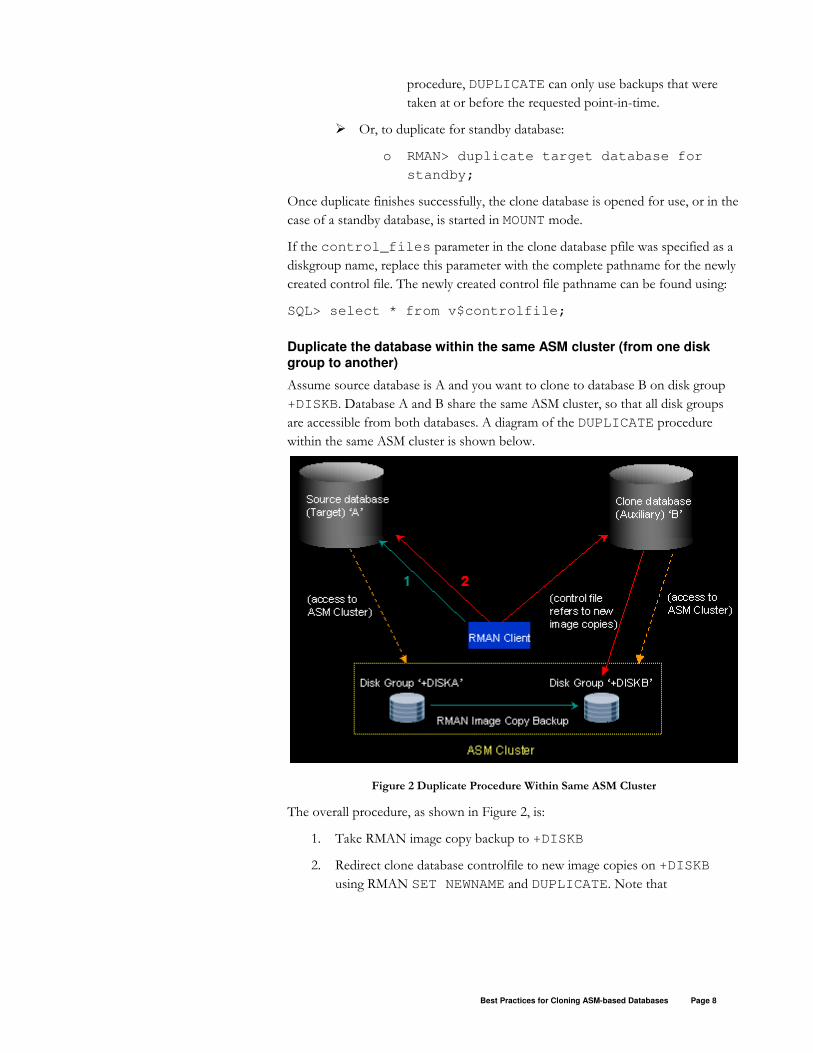
Duplicate the database within the same ASM cluster (from one disk
group to another)
Assume source database is A and you want to clone to database B on disk group
+DISKB. Database A and B share the same ASM cluster, so that all disk groups
are accessible from both databases. A diagram of the DUPLICATE procedure
within the same ASM cluster is shown below.
Figure 2 Duplicate Procedure Within Same ASM Cluster
The overall procedure, as shown in Figure 2, is:
1. Take RMAN image copy backup to +DISKB
2. Redirect clone database controlfile to new image copies on +DISKB
using RMAN SET NEWNAME and DUPLICATE. Note that
Best Practices for Cloning ASM-based Databases Page 9
DUPLICATE will not restore files from a backup -- the clone database
will just use the new image copies on +DISKB as its own data files.
The detailed procedure is:
1. Copy init.ora on source database to clone database filesystem as
init<sid>.ora, e.g. initB.ora.
2. Set all needed clone database pfile parameters. Refer to Step 2 in
“Duplicate Database for Remote Server” for details about setting these
parameters.
3. Backup source database, full database image copy to disk group +DISKB
> rman
RMAN> connect target sys/passwd@A;
RMAN> backup as copy database tag ‘clonecopy’
format '+DISKB/%d/datafile_%f.dbf';
RMAN> sql 'alter system archive log current';
At this point, we have created an image copy of all data files using format
+DISKB/<db_name>/datafile_<fileno>.dbf.
In addition, if duplicating for standby,
RMAN> backup current controlfile for standby;
4. Startup clone instance in NOMOUNT mode
5. Duplicate the source database to clone database
RMAN> connect target sys/passwd@A;
RMAN> connect auxiliary sys/passwd@B;
RMAN> run {
set newname for datafile 1 to
'+DISKB/<db_name>/datafile_1.dbf';
set newname for datafile 2 to
'+DISKB/<db_name>/datafile_2.dbf';
<repeat ‘set newname’ for all datafiles>2
...
duplicate target database to 'B'
pfile='initB.ora';3
2 Refer to Appendix A for SQL that can be used to generate the SET NEWNAME commands for all data files. 3 If duplicating for standby, use the following duplicate command instead:
Best Practices for Cloning ASM-based Databases Page 10
}
Because SET NEWNAME simply points each data file to the image copy
in +DISKB (clone database’s disk group), the duplicate will not actually
restore files, since they are already present. The image copy itself is now
used by database B. These changes are made in the clone database control
file.
At this point, database B is opened for use or if a standby database, is
started in MOUNT mode.
CREATING CLONE DATABASES USING DBMS_FILE_TRANSFER
Overview
The components involved in the creation of the standby or clone database include
the following:
o Primary server – This is the machine which hosts the primary database.
o Secondary server – This is the machine which hosts the standby or clone
database.
o Primary database – This is the production database with database files
that reside on ASM. The primary database exists on the Primary server.
In our example we will have a two-node RAC cluster. The procedures are
valid for RAC or non-RAC Primary databases.
o Mover database – This is a temporary seed database that exists on the
secondary server. The main purpose of this database is to assist in
transporting the primary (production) database datafiles into the Standby
server. This seed database utilizes ASM. The mover database is not
required to be a RAC enabled database.
For more information on migrating databases from filesystem to/from ASM, refer
to the following paper: Oracle Database 10g Migration to Automatic Storage
Management.
duplicate target database for standby;
Best Practices for Cloning ASM-based Databases Page 11
PREPARATION
The following steps describe the steps to stage and prepare the primary database,
mover database and the standby database. The DBMS_FILE_TRANSFER
package will be used to copy the production database files to the secondary server.
Primary Database Setup (on Primary Server)
o Create directory structures on the primary database. This directory should
point to the name of ASM diskgroup where the datafiles and controlfiles
reside. If you have more than one diskgroup that contains datafiles, then
create the additional directories.
Sql> create or replace directory
PRIMARY_DIR_PRDB as
'+DATA/PRDB_CHICAGO/datafile’;
Sql> create or replace directory
PRIMARY_CTL_DIR_PRDB as
'+DATA/PRDB_CHICAGO/controlfile’;
o If creating a standby database, create the standby control file:
Sql> alter database create standby controlfile
as
'+DATA/PRDB_CHICAGO/controlfile/standby_PRDB.c
tl';
o If creating a clone database, create a clone control file:
Sql> alter database backup controlfile to
‘+DATA/PRDB_CHICAGO/controlfile/clone_PRDB.ctl
’;
or
RMAN> backup as copy current controlfile
format
‘+DATA/PRDB_CHICAGO/controlfile/clone_PRDB.ctl
’;
o Modify tnsnames.ora to add alias for standby database.
o Specify the DataGuard (DG) metadata file location in all instances of a
RAC cluster. The file name must be a full path specification. The setting
must be the same on all nodes of the cluster. In our example we have two
nodes, and thus two file settings are needed. This DG file is used to
record the last known valid state of the configuration. For more
information on this use of this file, please refer to Oracle Data Guard
Best Practices for Cloning ASM-based Databases Page 12
Broker 10g Release 2 (10.2.0.2) documentation. This setting must be in
place before DataGuard broker is invoked.
Sql>Alter system set db_broker_start=false
scope=both sid='*';
Sql>Alter system set
dg_broker_config_file1='+DATA/PRDB_CHICAGO/dr1
prdb.dat' scope=both sid='*';
Sql>Alter system set
dg_broker_config_file2='+DATA/PRDB_CHICAGO/dr2
prdb.dat' scope=both sid='*';
Sql> Alter system set db_broker_start=true
scope=both sid='*';
o To improve file transfer and overall DataGuard performance, set the
appropriate values for Oracle SDU and TCP send/receive buffer sizes.
This white paper discusses the setting of these values.
o On Primary database, create the following stored procedure to enable the
tablespaces to be put in “hot backup” mode dynamically within the file
transfer loop script. Note that the stored procedure must be owned by
SYS.
CREATE or replace PROCEDURE alter_tblspce
(tablespace_name IN VARCHAR2, new_state in
varchar2) AS
cid INTEGER;
BEGIN
-- open new cursor and return cursor ID
cid := DBMS_SQL.OPEN_CURSOR;
-- parse and immediately execute dynamic
SQL statement
--built by concatenating tablespace name to
the alter
--end backup command
DBMS_SQL.PARSE(cid, 'alter tablespace ' ||
tablespace_name ||' '|| new_state || ' backup
', dbms_sql.v7);
-- close cursor
DBMS_SQL.CLOSE_CURSOR(cid);
EXCEPTION
-- if an exception is raised, close cursor
before exiting
WHEN OTHERS THEN
DBMS_SQL.CLOSE_CURSOR(cid);
-- reraise the exception
RAISE;

Best Practices for Cloning ASM-based Databases Page 13
End alter_tblspce;
/
grant execute on alter_tblspce to system;
Best Practices for Cloning ASM-based Databases Page 14
Mover Database Setup (on Secondary Server)
o Create ASM instance and diskgroups equal to those on the primary server
in size. Create an appropriately sized ASM diskgroup(s) that will house
the mover database as well as the standby or clone database files. Use
the same diskgroup name as primary database, in this case DATA.
o Using DBCA (or any other method), create the mover database on the
secondary server in the ASM diskgroup(s) specified above. Appendix B
has a sample init.ora that can be used for the mover database. Make
sure an SPFILE is created for this mover database. If DBCA was, then
SPFILE will be created by default. The mover database can be named
mover if desired.
If creating a standby database, the init.ora parameter
db_unique_name for the mover database must be set to the same
name as the standby database. Because of this, the mover and standby
database cannot be active at the same time. In our example,
db_unique_name will be set to PRDB_BOSTON.
Sql>alter system set db_unique_name=’PRDB_BOSTON’
scope=SPFILE;4
Note that setting db_unique_name is not required if creating a clone
database.
o Create a database link on the mover database to connect to the primary
database. Note, you must also update the tnsnames.ora file to
include the alias.
Sql>create database link PRDB_CHICAGO
CONNECT TO SYSTEM IDENTIFIED BY
PRDB_CHICAGO
USING 'PRDB_CHICAGO'
o On the ASM instance of the secondary server, create an ASM directory to
hold the aliases for the files to be copied over.
Sql> alter diskgroup DATA add directory
'+DATA/primary_files_PRDB';
o Create a database directory on mover database to reflect the ASM
directory created above. This directory will house the PRDB database
files.
4 This will require a restart of the database instance.

Best Practices for Cloning ASM-based Databases Page 15
Sql>create or replace directory
STANDBY_DIR_PRDB as
'+DATA/primary_files_PRDB';
o Create a database directory on mover database to reflect the ASM
directory that will house the standby or clone controlfile.
Sql>create or replace directory
STANDBY_CTL_DIR_PRDB as
'+DATA/PRDB_BOSTON/controlfile’;
Best Practices for Cloning ASM-based Databases Page 16
Standby or Clone Database Setup
o Setup the standby or clone database directory structures for bdump,
cdump, udump, and pfile.
o Create a password file for the standby or clone instance. For standby
database, copy the password file from primary to the secondary server.
This ensures that the SYS user password in the password file is the same
as the one on the primary database.
o For standby database creation, update the standby database init.ora
file with the correct LOG_ARCHIVE_DEST_N and controlfile location.
In the case of the controlfile setting, it should be set to the location of the
standby controlfile, i.e.
'+DATA/PRDB_BOSTON/controlfile/standby_PRDB.ct
l'. Refer to Appendix C for other parameters to set in a standby
database init.ora.
o For clone database creation, the clone database init.ora should be
set appropriately for db_name, db_create_file_dest,
db_recovery_file_dest, and control_files. The
control_files parameter should be set to the location of the
transferred controlfile, i.e.
'+DATA/PRDB_BOSTON/controlfile/clone_PRDB.ctl'.
o Create an SPFILE from the init.ora.
Best Practices for Cloning ASM-based Databases Page 17
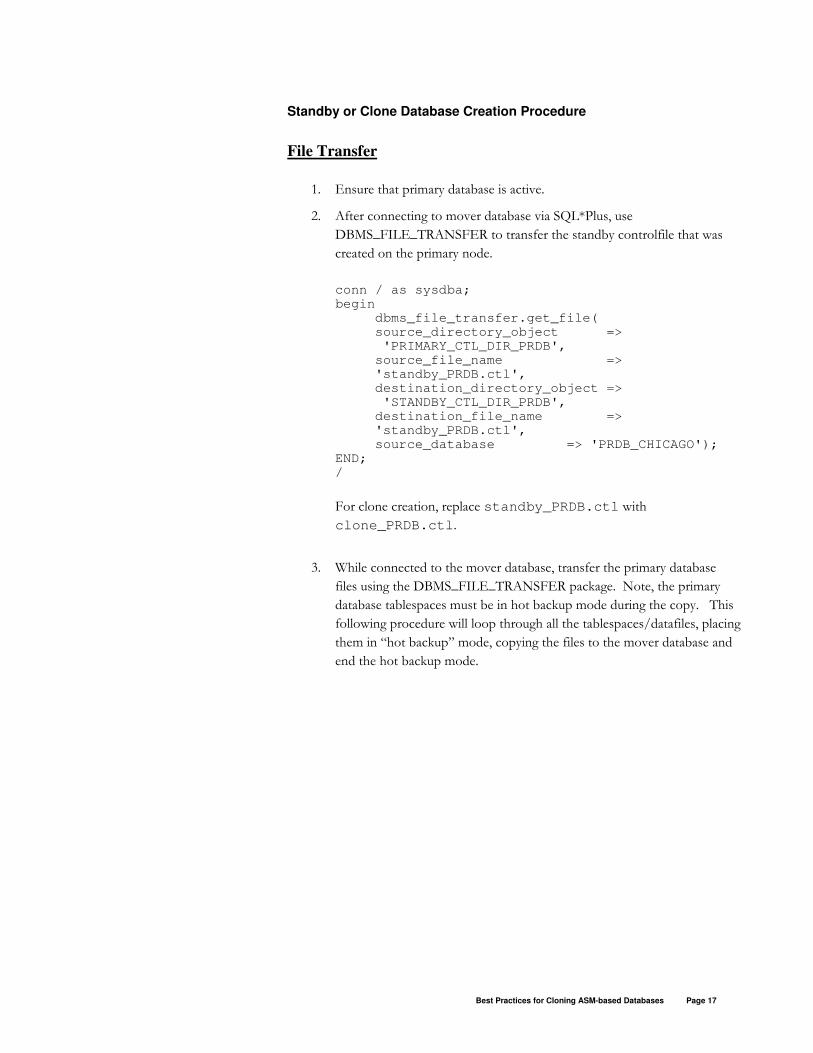
Standby or Clone Database Creation Procedure
File Transfer
1. Ensure that primary database is active.
2. After connecting to mover database via SQL*Plus, use
DBMS_FILE_TRANSFER to transfer the standby controlfile that was
created on the primary node.
conn / as sysdba; begin dbms_file_transfer.get_file( source_directory_object =>
'PRIMARY_CTL_DIR_PRDB', source_file_name => 'standby_PRDB.ctl',
destination_directory_object => 'STANDBY_CTL_DIR_PRDB',
destination_file_name => 'standby_PRDB.ctl',
source_database => 'PRDB_CHICAGO'); END; /
For clone creation, replace standby_PRDB.ctl with
clone_PRDB.ctl.
3. While connected to the mover database, transfer the primary database
files using the DBMS_FILE_TRANSFER package. Note, the primary
database tablespaces must be in hot backup mode during the copy. This
following procedure will loop through all the tablespaces/datafiles, placing
them in “hot backup” mode, copying the files to the mover database and
end the hot backup mode.
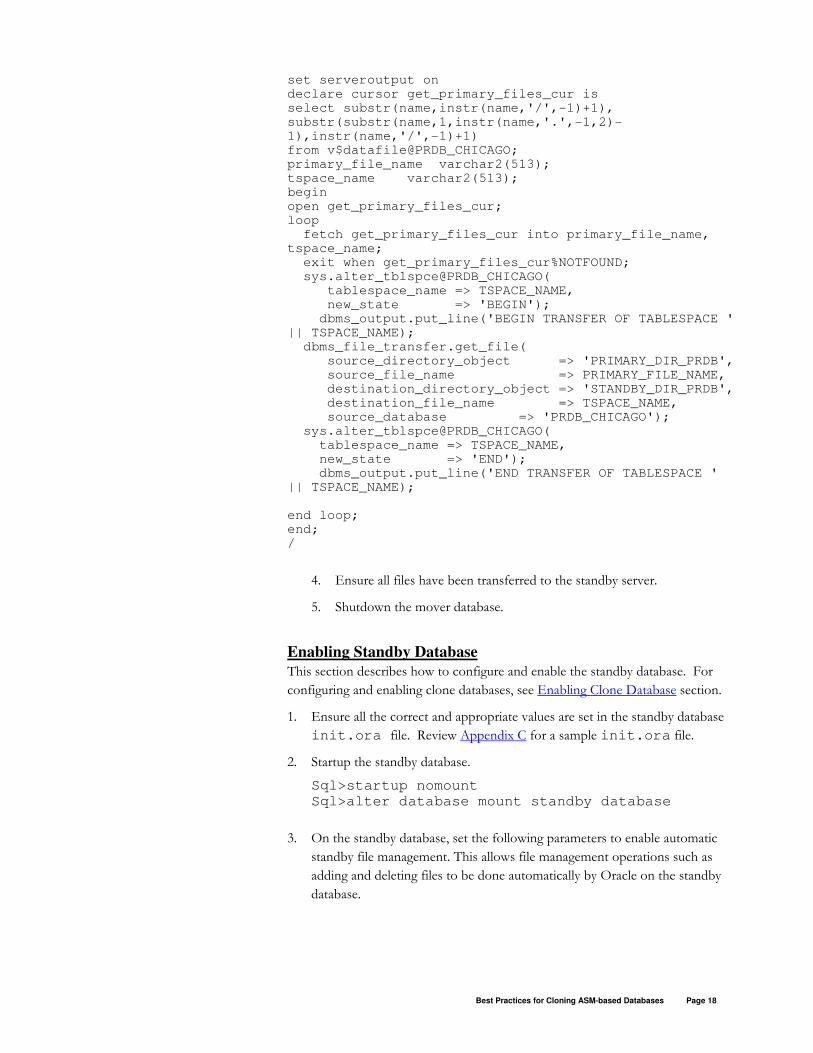
Best Practices for Cloning ASM-based Databases Page 18
set serveroutput on declare cursor get_primary_files_cur is select substr(name,instr(name,'/',-1)+1), substr(substr(name,1,instr(name,'.',-1,2)-1),instr(name,'/',-1)+1) from v$datafile@PRDB_CHICAGO; primary_file_name varchar2(513); tspace_name varchar2(513); begin open get_primary_files_cur; loop fetch get_primary_files_cur into primary_file_name, tspace_name; exit when get_primary_files_cur%NOTFOUND; sys.alter_tblspce@PRDB_CHICAGO( tablespace_name => TSPACE_NAME, new_state => 'BEGIN'); dbms_output.put_line('BEGIN TRANSFER OF TABLESPACE ' || TSPACE_NAME); dbms_file_transfer.get_file( source_directory_object => 'PRIMARY_DIR_PRDB', source_file_name => PRIMARY_FILE_NAME, destination_directory_object => 'STANDBY_DIR_PRDB', destination_file_name => TSPACE_NAME, source_database => 'PRDB_CHICAGO'); sys.alter_tblspce@PRDB_CHICAGO( tablespace_name => TSPACE_NAME, new_state => 'END'); dbms_output.put_line('END TRANSFER OF TABLESPACE ' || TSPACE_NAME); end loop; end; /
4. Ensure all files have been transferred to the standby server.
5. Shutdown the mover database.
Enabling Standby Database
This section describes how to configure and enable the standby database. For
configuring and enabling clone databases, see Enabling Clone Database section.
1. Ensure all the correct and appropriate values are set in the standby database
init.ora file. Review Appendix C for a sample init.ora file.
2. Startup the standby database.
Sql>startup nomount
Sql>alter database mount standby database
3. On the standby database, set the following parameters to enable automatic
standby file management. This allows file management operations such as
adding and deleting files to be done automatically by Oracle on the standby
database.
Best Practices for Cloning ASM-based Databases Page 19
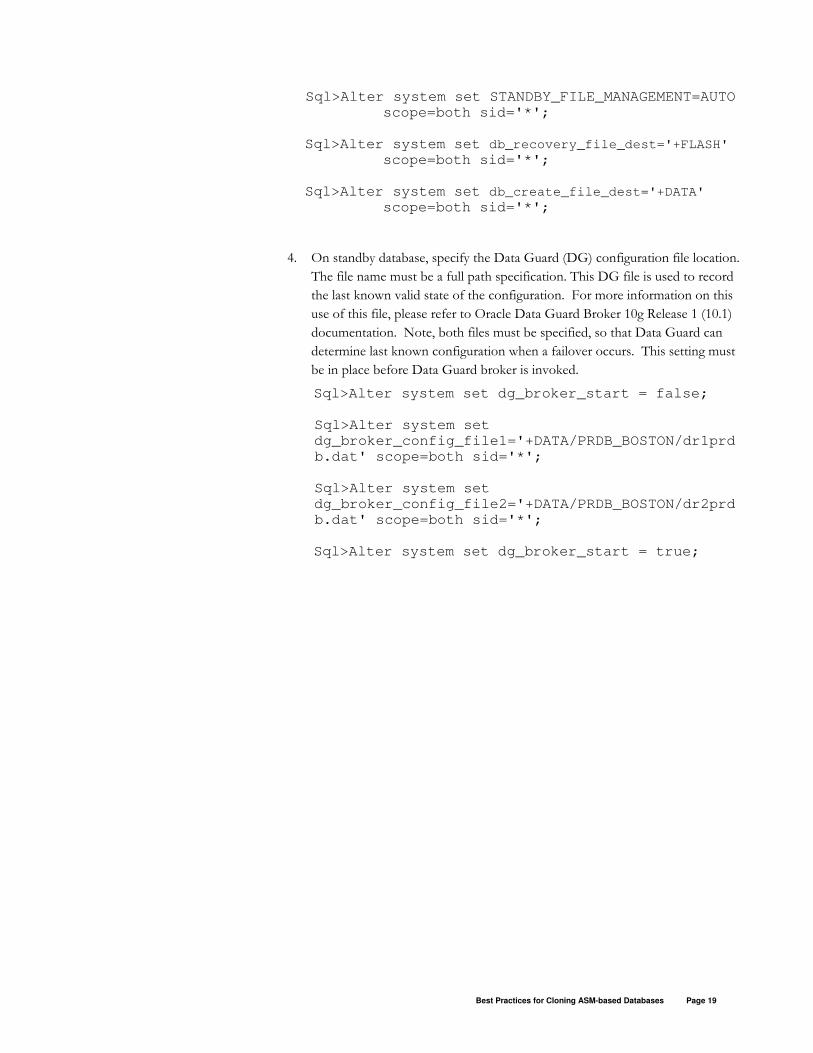
Sql>Alter system set STANDBY_FILE_MANAGEMENT=AUTO
scope=both sid='*';
Sql>Alter system set db_recovery_file_dest='+FLASH'
scope=both sid='*';
Sql>Alter system set db_create_file_dest='+DATA'
scope=both sid='*';
4. On standby database, specify the Data Guard (DG) configuration file location.
The file name must be a full path specification. This DG file is used to record
the last known valid state of the configuration. For more information on this
use of this file, please refer to Oracle Data Guard Broker 10g Release 1 (10.1)
documentation. Note, both files must be specified, so that Data Guard can
determine last known configuration when a failover occurs. This setting must
be in place before Data Guard broker is invoked.
Sql>Alter system set dg_broker_start = false;
Sql>Alter system set
dg_broker_config_file1='+DATA/PRDB_BOSTON/dr1prd
b.dat' scope=both sid='*';
Sql>Alter system set
dg_broker_config_file2='+DATA/PRDB_BOSTON/dr2prd
b.dat' scope=both sid='*';
Sql>Alter system set dg_broker_start = true;
Best Practices for Cloning ASM-based Databases Page 20
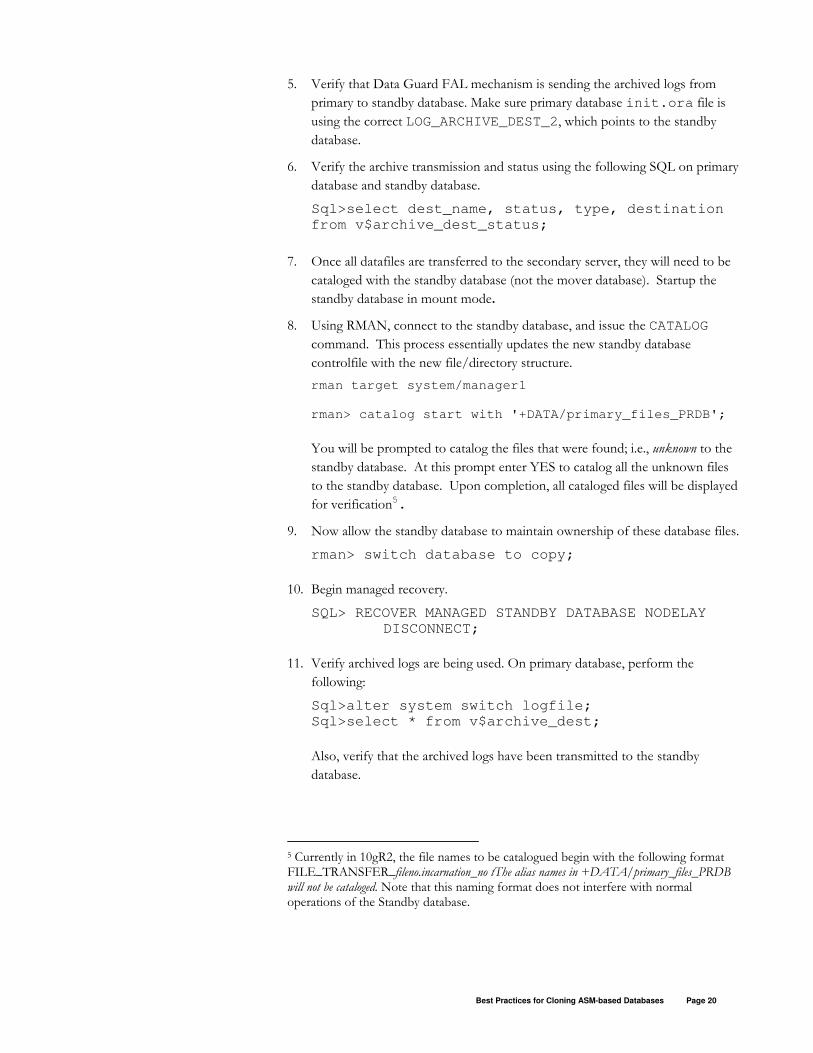
5. Verify that Data Guard FAL mechanism is sending the archived logs from
primary to standby database. Make sure primary database init.ora file is
using the correct LOG_ARCHIVE_DEST_2, which points to the standby
database.
6. Verify the archive transmission and status using the following SQL on primary
database and standby database.
Sql>select dest_name, status, type, destination
from v$archive_dest_status;
7. Once all datafiles are transferred to the secondary server, they will need to be
cataloged with the standby database (not the mover database). Startup the
standby database in mount mode.
8. Using RMAN, connect to the standby database, and issue the CATALOG
command. This process essentially updates the new standby database
controlfile with the new file/directory structure.
rman target system/manager1 rman> catalog start with '+DATA/primary_files_PRDB';
You will be prompted to catalog the files that were found; i.e., unknown to the
standby database. At this prompt enter YES to catalog all the unknown files
to the standby database. Upon completion, all cataloged files will be displayed
for verification5.
9. Now allow the standby database to maintain ownership of these database files.
rman> switch database to copy;
10. Begin managed recovery.
SQL> RECOVER MANAGED STANDBY DATABASE NODELAY
DISCONNECT;
11. Verify archived logs are being used. On primary database, perform the
following:
Sql>alter system switch logfile;
Sql>select * from v$archive_dest;
Also, verify that the archived logs have been transmitted to the standby
database.
5 Currently in 10gR2, the file names to be catalogued begin with the following format FILE_TRANSFER_fileno.incarnation_no tThe alias names in +DATA/primary_files_PRDB will not be cataloged. Note that this naming format does not interfere with normal operations of the Standby database.
Best Practices for Cloning ASM-based Databases Page 21
Enabling Clone Database
1. Ensure all the correct and appropriate values are set in the Clone database
init.ora file.
2. Transfer all archived logs, created after the database was put in hot backup
mode, to the secondary server. To transfer the archived logs, leverage the
same method used for transferring over the datafiles.
3. Ensure that all datafiles and archived logs are transferred to secondary server.
These files will need to be cataloged with the clone database (not the mover
database).
4. Startup the clone instance in nomount mode.
Sql>startup nomount
5. Using RMAN, connect to the Clone instance, and issue the catalog command.
This process essentially updates the new Clone controlfile with the new
file/directory structure.
rman target system/manager1 rman> catalog start with '+DATA/primary_files_PRDB';
You will be prompted to catalog the files that were found; i.e., unknown to the
standby database. At this prompt enter YES to catalog all the unknown files
to the standby database. Upon completion, all catalogued files will be
displayed for verification6.
6. Now allow the standby database to maintain ownership of these database files.
rman>switch database to copy;
7. Recover the clone database and open with resetlogs
SQL> RECOVER DATABASE; SQL> ALTER DATABASE OPEN RESETLOGS;
8. Finally, change clone database DBID
Shutdown consistently and startup in mount:
SQL> SHUTDOWN IMMEDIATE SQL> STARTUP MOUNT
Invoke DBNEWID utility, e.g.:
> nid TARGET=SYS/oracle@PRDB_BOSTON
Open database:
6 Currently in 10gR2, the file names to be catalogued begin with the following format FILE_TRANSFER_fileno.incarnation_n. The alias names in +DATA/primary_files_PRDB will not be cataloged. Note that this naming format does not interfere with normal operations of the clone database.

Best Practices for Cloning ASM-based Databases Page 22
Sql> ALTER DATABASE OPEN RESETLOGS;
Post Processing Cleanup Procedure
1. Drop the aliases created on the mover database. This needs to be done on the
ASM instance on the secondary server.
Sql> alter diskgroup DATA drop directory
‘+DATA/primary_files_PRDB force;
2. Drop the standby or clone controlfile on the primary database, e.g.
Sql> alter diskgroup DATA drop file '+DATA/PRDB_CHICAGO/controlfile/standby_PRDB.ctl’;
3. Shutdown the mover database, if not already shutdown. Note, the mover
database can be used again for future creations, and should not be deleted.
CREATING CLONE DATABASES USING ENTERPRISE MANAGER
EM Database Control supports ASM-based database cloning on the same server
through the Database Creation Assistant (DBCA) and Clone Database feature. If
cloning needs to be performed across servers, then EM Grid Control is required.
With DBCA, database clones can be created on the destination server, using a
‘clone staging area’, without requiring connection to the source database. For more
information on DBCA, refer to the Oracle Database 2-day DBA documentation
on DBCA and creating DBCA templates for cloning databases from an existing
database. With the Clone Database feature, staging area space on the destination
server is minimal, as files are transferred one at a time, so there only needs to be
enough space for the largest data file being transferred. For more information on
the Clone Database feature, refer to the Online Help on the Administration tab in
Database Control.
CONCLUSION
Several options exist to clone ASM-based databases:
• RMAN DUPLICATE can take advantage of an existing filesystem backup
for cloning to another server. Note: if destination server is remote, the
filesystem backup must be made accessible via NFS or other means, such
as copying backup files to temporary storage at the remote server.
• If duplicating a database within the same ASM cluster, an image copy
backup can be made to the clone database disk group, and then the clone
database control file redirected to use the image copies as its own data
files.
• If additional space cannot be allocated for a temporary filesystem backup,
the DBMS_FILE_TRANSFER package can be used to transfer the files
directly from the source to the destination database. Note that this
Best Practices for Cloning ASM-based Databases Page 23
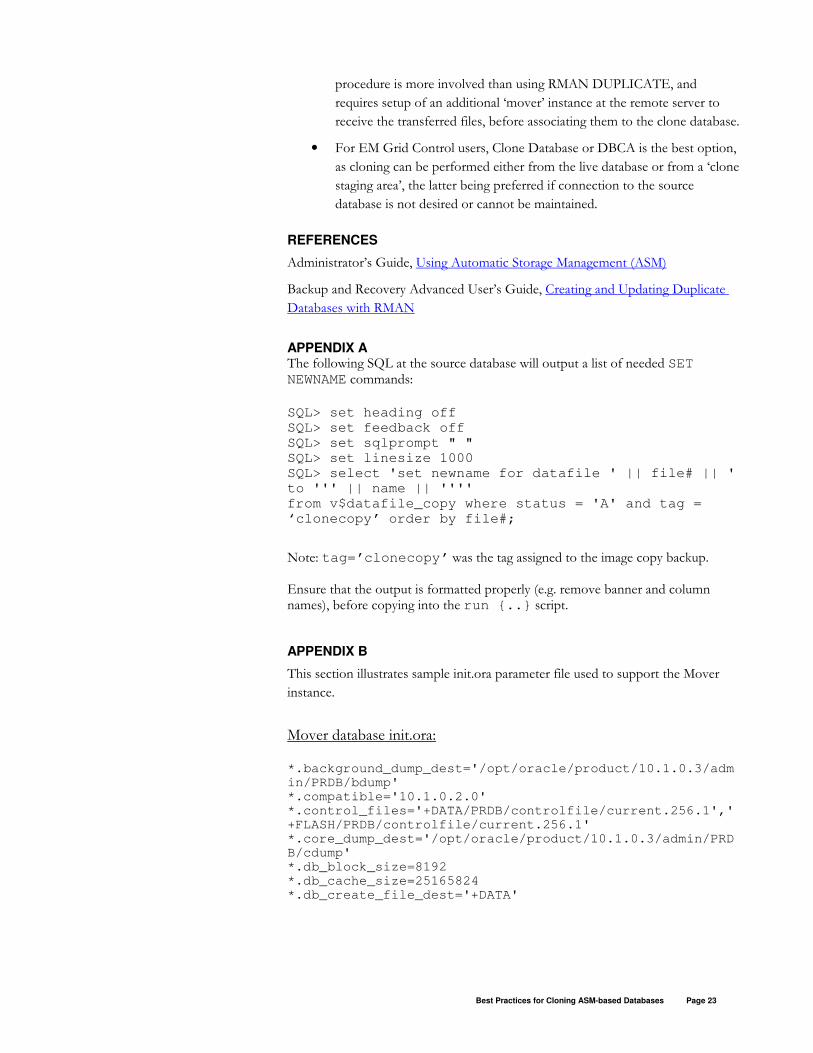
procedure is more involved than using RMAN DUPLICATE, and
requires setup of an additional ‘mover’ instance at the remote server to
receive the transferred files, before associating them to the clone database.
• For EM Grid Control users, Clone Database or DBCA is the best option,
as cloning can be performed either from the live database or from a ‘clone
staging area’, the latter being preferred if connection to the source
database is not desired or cannot be maintained.
REFERENCES
Administrator’s Guide, Using Automatic Storage Management (ASM)
Backup and Recovery Advanced User’s Guide, Creating and Updating Duplicate
Databases with RMAN
APPENDIX A The following SQL at the source database will output a list of needed SET NEWNAME commands:
SQL> set heading off
SQL> set feedback off
SQL> set sqlprompt " "
SQL> set linesize 1000
SQL> select 'set newname for datafile ' || file# || '
to ''' || name || ''''
from v$datafile_copy where status = 'A' and tag =
‘clonecopy’ order by file#; Note: tag=’clonecopy’ was the tag assigned to the image copy backup. Ensure that the output is formatted properly (e.g. remove banner and column names), before copying into the run {..} script.
APPENDIX B
This section illustrates sample init.ora parameter file used to support the Mover
instance.
Mover database init.ora: *.background_dump_dest='/opt/oracle/product/10.1.0.3/admin/PRDB/bdump' *.compatible='10.1.0.2.0' *.control_files='+DATA/PRDB/controlfile/current.256.1','+FLASH/PRDB/controlfile/current.256.1' *.core_dump_dest='/opt/oracle/product/10.1.0.3/admin/PRDB/cdump' *.db_block_size=8192 *.db_cache_size=25165824 *.db_create_file_dest='+DATA'

Best Practices for Cloning ASM-based Databases Page 24
*.db_domain='' *.db_file_multiblock_read_count=16 *.db_name='MOVER' *.db_unique_name='PRDB_BOSTON' *.db_recovery_file_dest_size=64424509 *.db_recovery_file_dest='+FLASH' *.java_pool_size=50331600 *.job_queue_processes=10 *.large_pool_size=8388608 *.open_cursors=300 *.pga_aggregate_target=25165824 *.processes=250 *.remote_login_passwordfile='exclusive' *.shared_pool_size=99614720 *.sort_area_size=65536 *.undo_management='AUTO' *.user_dump_dest='/opt/oracle/product/10.1.0.3/admin/PRDB/udump'
Best Practices for Cloning ASM-based Databases Page 25
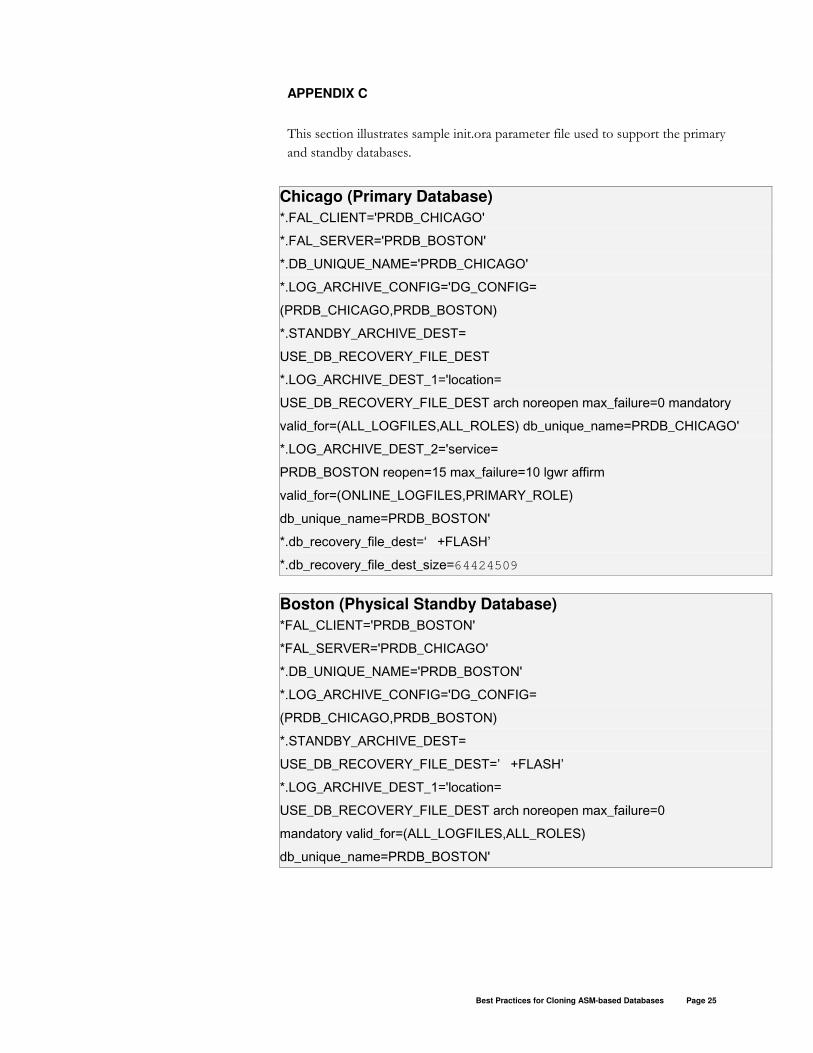
APPENDIX C
This section illustrates sample init.ora parameter file used to support the primary
and standby databases.
Chicago (Primary Database)
*.FAL_CLIENT='PRDB_CHICAGO'
*.FAL_SERVER='PRDB_BOSTON'
*.DB_UNIQUE_NAME='PRDB_CHICAGO'
*.LOG_ARCHIVE_CONFIG='DG_CONFIG=
(PRDB_CHICAGO,PRDB_BOSTON)
*.STANDBY_ARCHIVE_DEST=
USE_DB_RECOVERY_FILE_DEST
*.LOG_ARCHIVE_DEST_1='location=
USE_DB_RECOVERY_FILE_DEST arch noreopen max_failure=0 mandatory
valid_for=(ALL_LOGFILES,ALL_ROLES) db_unique_name=PRDB_CHICAGO'
*.LOG_ARCHIVE_DEST_2='service=
PRDB_BOSTON reopen=15 max_failure=10 lgwr affirm
valid_for=(ONLINE_LOGFILES,PRIMARY_ROLE)
db_unique_name=PRDB_BOSTON'
*.db_recovery_file_dest=‘ +FLASH’
*.db_recovery_file_dest_size=64424509
Boston (Physical Standby Database)
*FAL_CLIENT='PRDB_BOSTON'
*FAL_SERVER='PRDB_CHICAGO'
*.DB_UNIQUE_NAME='PRDB_BOSTON'
*.LOG_ARCHIVE_CONFIG='DG_CONFIG=
(PRDB_CHICAGO,PRDB_BOSTON)
*.STANDBY_ARCHIVE_DEST=
USE_DB_RECOVERY_FILE_DEST=’ +FLASH’
*.LOG_ARCHIVE_DEST_1='location=
USE_DB_RECOVERY_FILE_DEST arch noreopen max_failure=0
mandatory valid_for=(ALL_LOGFILES,ALL_ROLES)
db_unique_name=PRDB_BOSTON'

Best Practices for Cloning ASM-based Databases Page 26
*.LOG_ARCHIVE_DEST_2='service=PRDB_CHICAGO
reopen=15 max_failure=10 lgwr affirm
valid_for=(ONLINE_LOGFILES,PRIMARY_ROLE)
db_unique_name=PRDB_CHICAGO'
*.db_recovery_file_dest=‘ +FLASH’
*.db_recovery_file_dest_size=64424509
Best Practices for Cloning ASM-based Databases
July 2006
Authors: Timothy Chien, Nitin Vengurlekar, Muthu Olagappan
Contributing Authors:
Oracle Corporation
World Headquarters
500 Oracle Parkway
Redwood Shores, CA 94065
U.S.A.
Worldwide Inquiries:
Phone: +1.650.506.7000
Fax: +1.650.506.7200
oracle.com
Copyright © 2005, Oracle. All rights reserved.
This document is provided for information purposes only and the
contents hereof are subject to change without notice.
This document is not warranted to be error-free, nor subject to any
other warranties or conditions, whether expressed orally or implied
in law, including implied warranties and conditions of merchantability
or fitness for a particular purpose. We specifically disclaim any
liability with respect to this document and no contractual obligations
are formed either directly or indirectly by this document. This document
may not be reproduced or transmitted in any form or by any means,
electronic or mechanical, for any purpose, without our prior written permission.
Oracle, JD Edwards, and PeopleSoft are registered trademarks of
Oracle Corporation and/or its affiliates. Other names may be trademarks
of their respective owners.