Embed Size (px)
Citation preview

Bentley Historical Library Guidelines for the Manual Processing of
Born-Digital Materials
Prepared by Michael Shallcross, Assistant Archivist
Division of Digital Curation
Reviewed by Nancy Deromedi, Head
Division of Digital Curation
Version date: November 16, 2011
Please note that this manual is no longer employed by the Bentley Historical Library and is provided for reference use only.
This work is licensed under the Creative Commons Attribution-NonCommercial-
ShareAlike 3.0 Unported License. To view a copy of this license, visit http://creativecommons.org/licenses/by-nc-sa/3.0/.

NOTE: This document is intended solely for reference use. 11/16/2011 1
Bentley Historical Library Digital Processing Manual
Table of Contents
Introduction ............................................................................................................................... 3
Workflow: Overview ................................................................................................................ 4
Phase 1: Accessioning Digital Content .............................................................................. 7 1.A: Digital Components in Transfers to the Bentley Library ............................................. 7 1.B: Initial Assessment of Content for Processing and Long-Term Preservation ........ 8
1.B.i: TreeSize Professional—High-Level Analysis of Content and Structure ....................... 9 1.B.ii: Quick View Plus—Review Text-Based Documents and Images (as necessary) ... 10 1.B.iii: IrfanView: Review Raster Image Files (if necessary) ..................................................... 11 1.B.iv: Inkscape—Review Vector Images (as necessary) ........................................................... 12 1.B.v: VLC Media Player—Review Audio and Video Files (as necessary)............................ 13
1.C: Identification of Restricted Content ................................................................................. 14 1.D: Creating the Accession Record ........................................................................................... 14
Phase 2: The Migration of Content to the Interim Repository ............................... 16 2.A: Establishing Directories and Gaining Access to the Interim Repository ............ 16 2.B: Migration of Content from Removable Media ............................................................... 17
2.B.i: Option 1—Duke DataAccessioner ............................................................................................. 18 2.B.ii: Option 2—DirSyncPro .................................................................................................................. 21 2.B.iii: Handbrake—DVD Movies .......................................................................................................... 26 2.B.iv: Windows Media Player—Audio CDs ..................................................................................... 26
2.C: Photographing Removable Media ..................................................................................... 26 2.D: Migration of Content from Other Sources/Storage Environments ....................... 28
2.D.i: Tools ...................................................................................................................................................... 28 2.D.ii: Conventions ...................................................................................................................................... 28
Phase 3: Processing ............................................................................................................... 29 3.A: Microsoft Forefront Endpoint Protection—Perform a Virus Scan ........................ 29 3.B: Backup Content ........................................................................................................................ 30 3.C: ReNamer—Normalize File and Folder Names .............................................................. 31 3.D: Identity Finder—Scan for Sensitive / Personally Identifiable Information ...... 34 3.E: Appraisal .................................................................................................................................... 40
3.E.i: TreeSize Professional—Analyze Content and Structure ................................................. 40 3.E.ii: Quick View Plus—Review Text-Based Documents and Image Files ......................... 48 3.E.iii: IrfanView: Review Raster Image Files (if necessary) ..................................................... 49 1.B.iii: IrfanView: Review Raster Image Files (if necessary) ..................................................... 49 3.E.iv: Inkscape—Review Vector Images (as necessary) ........................................................... 50 3.E.v: VLC Media Player—Review Audio and Video Files .......................................................... 51
3.F: TriD—Add Extensions to Unidentified Files .................................................................. 51 3.G: Separations................................................................................................................................ 53
3.G.i: Removing One or More Folders to the Separations Directory ...................................... 53 3.G.ii: Removing Specific “File Group”s to the Separations Directory ................................... 56
3.H: Arrangement ............................................................................................................................ 57 3.I: File format conversion ........................................................................................................... 57 3.J: Package Materials for Deposit ............................................................................................. 61

NOTE: This document is intended solely for reference use. 11/16/2011 2
3.J.i: Normalization of Major Directory Names ............................................................................... 61 3.J.ii: Creation of ZIP Archive Files ....................................................................................................... 61
3.K: DROID—Extract Metadata and Characterize Content ............................................... 62
Phase IV: Deposit ................................................................................................................... 65 4.A: Move Content to Post-Processing Area ........................................................................... 65 4.B: Prepare Deep Blue Deposit Metadata .............................................................................. 66 4.C: Prepare Administrative and Descriptive Metadata XML File .................................. 66 4.D: Complete PREMIS Preservation Metadata Spreadsheet ........................................... 67 4.E: Additional Steps ....................................................................................................................... 67
Phase V: Description ............................................................................................................. 67 5A: Create or Update Finding Aid .............................................................................................. 67 5B: Create or Update MARC Record .......................................................................................... 67 5C: Update BEAL Record. .............................................................................................................. 67
Phase VI: Clean Up ................................................................................................................. 68 6A: Manage Separations ................................................................................................................ 68 6B: Delete additional copies of content ................................................................................... 68

NOTE: This document is intended solely for reference use. 11/16/2011 3
Introduction
This processing manual provides guidance and instructions for the processing of digital materials at the Bentley Historical Library (BHL). Procedures, tools, and the overall digital processing workflow are subject to change due to advances in professional best practices, the development of resources in the digital curation community, and the Bentley Library’s ongoing collaboration with the University of Michigan Library Information Technology division. In addition to revisions that take place as BHL Digital Curation Services implements digital processing procedures, this manual will be reviewed on an annual basis.
The BHL Digital Processing Manual details procedures that will take place from the initial transfer and appraisal of content to archival custody through the eventual deposit of material in a long-term digital repository. Digital Curation Services advocates a More Product, Less Process approach to handling digital records and emphatically notes that processing archivists and student processors will not be able to deal with content on an individual file level. The BHL digital processing workflow instead relies upon a number of micro-services that will perform batch operations on digital accessions. In addition to traditional archival procedures such as the appraisal, arrangement, separation, and description of content, digital processing for long-term preservation requires the following:
Migration of content from removable media Capture Virus scans Renaming File format conversion Personally-identifiable information scans Creation of ZIP archives File characterization Message digest calculation
The various steps in the digital processing workflow produce log files that will be preserved as metadata for the digital accession. It is of the utmost importance that the steps and procedures outlined in this manual—from file naming conventions for log files to settings used in application—be strictly followed by all BHL employees engaged in the processing of digital content. In addition, processing archivists and student processors will produce descriptive, administrative, and preservation metadata that will permit the Bentley Library to generate a Metadata Encoding and Transmission Standard (METS) document for each digital deposit.
Progress on each digital deposit will be tracked with the Bentley Historical Library Digital Processing Checklist, a document that will reside in the \Metadata\ folder.

NOTE: This document is intended solely for reference use. 11/16/2011 4
Workflow: Overview
The basic workflow for processing digital records will involve the following steps:
1. UARP/MHC reaches an agreement with a donor/creator regarding the transfer of digital content to the Bentley Historical Library.
2. Archivists are provided access to digital materials (either remotely or via removable storage media).
3. A preliminary review of the digital materials will be performed (if it has not taken place prior to the transfer agreement) to determine if they warrant additional processing and long-term preservation by the Bentley Historical Library. Archivists will also confirm the presence of sensitive materials that will require restrictions under applicable laws and/or BHL policies.
4. Create an accession record in BEAL. If some/all of the digital content will not be processed for long-term preservation, note these materials in the separations.
5. Digital Curation Services will manage the creation of and access to appropriate processing directories in the Interim Repository.
6. Content will be migrated to the appropriate processing directory in the Interim Repository.
a. Depending on the source/transfer method, archivists will use one of several tools identified and tested by Digital Curation Services.
b. Processing directory will include a \Metadata\ folder. c. Create a separations folder (titled: CollectionID_Name) in \bhl-
root\Separations\ d. Note the unprocessed location in BEAL and record the capture of
content in the PREMIS preservation event spreadsheet.
7. Following a More Product, Less Process approach, the archivist/student processor will conduct the following operations:
a. Change filename to the Deposit ID (the collection ID plus a four digit number, i.e. 87134_0001)
b. Virus scan (Save log file in the \Metadata\ folder and record event in the PREMIS preservation event spreadsheet.)
c. Backup of content d. Normalization of folder/file names (Save log file in the \Metadata\
folder and record event in the PREMIS preservation event spreadsheet.)
e. Scan for personally identifiable information (PII) (Save log file in the \Metadata\ folder and record event in the PREMIS preservation event spreadsheet.)

NOTE: This document is intended solely for reference use. 11/16/2011 5
f. Appraisal and analysis of content (If email is present, archivist may need to convert file format to MBOX to review messages in an MBOX viewer.)
g. Add file extensions to unidentified files with TRiD (Save log file in the \Metadata\ folder and record event in the PREMIS preservation event spreadsheet.)
h. Separation of unnecessary or superfluous content i. Use TreeSize to identify and move content to appropriate
folder in \bhl-root\Separations\ ii. Save log file in the Metadata folder and record event in the
PREMIS preservation event spreadsheet. i. Arrangement (only if needed) j. Run bhl_batch.bat to create preservation copies of material in at-risk
formats. i. Text/office documents: MS Word, Excel, and PowerPoint
documents will be migrated to 2010 Office Open XML; PDF documents will be converted to PDF/A.
ii. Raster Images: BMP, PSD, PCD, PCT, and TGA will be converted to TIFF.
iii. Raw Camera Images: 3FR, ARW, CR2, DCR, MRW, NEF, ORF, PEF, RAF, RAW, and X3F will be converted to JPEG (for access)
iv. Vector Images: AI, EMF, and WMF will be converted to SVG; PS and EPS will be converted to PDF/A.
v. Audio files: WMA, RA, SND, and AU will be converted to WAV. vi. Video files: FLV, WMV, RMVB, and RV will be converted to
MPEG4 (with H.264 encoding). vii. Email will be converted to MBOX.
viii. Database files: ACCDB, MDB, SQL Server and Oracle DB will be converted to SIARD open XML.
k. Create ZIP archive files (if necessary) and finalize packaging of content for deposit in a long-term preservation repository
l. Content characterization with DROID
8. Content will be transferred to a post-processing location a. Restricted content: \bhl-archive\ (“dark” storage location) b. Unrestricted content: \bhl-root\deepblue_deposits\ in the Interim
Repository
9. Complete metadata forms a. Deep Blue deposit spreadsheet b. PREMIS preservation event spreadsheet c. EAD descriptive and administrative metadata template
10. If the content is unrestricted, Digital Curation Services will coordinate its
deposit in Deep Blue.

NOTE: This document is intended solely for reference use. 11/16/2011 6
11. For unrestricted material, place a copy of the deposit (with \Metadata\ folder) in \bhl-archive\.
12. Description: a. Create/update finding aid b. Create/update catalog record c. Update BEAL record
13. Clean up:
a. Manage disposition of separations, per the transfer agreement. b. Delete backup copy c. Delete version from ‘Unprocessed’ and \deepblue_deposits\
directories (if applicable).

NOTE: This document is intended solely for reference use. 11/16/2011 7
Phase 1: Accessioning Digital Content
The transfer of digital content may be preceded by discussions with donors, an initial exploration of material, and the signing of a transfer agreement and/or deed of gift. Archivists may also learn of digital content in the course of routine operations or be approached by creators/donors who are interested in providing the Bentley Library with digital content of archival value.
Communications with new or existing donors in regards to the transfer of digital materials to the Bentley Historical Library should be conducted in the same fashion as those for paper or analog records and manuscripts. Digital Curation Services has created a matrix of interview questions for both MHC and UARP to utilize with donors. In addition to inquiring about digital materials, record-creating practices, and storage environment(s), archivists should also direct donors/creators to information regarding:
The library’s approach to digital curation and the extent of its responsibilities and obligations for ensuring the long-term preservation of and access to digital content.
Sustainable file formats, naming conventions, and transfer methods.
In addition, if a creator/donor has an existing transfer agreement, it will be important to update this agreement to reflect the Bentley Historical Library’s current policies regarding the transfer and accession of digital content. Transfer agreement and deed of gift documents will need to be reviewed on an annual basis to ensure that they accurately reflect the current state of the library’s policies, practices, and procedures.
1.A: Digital Components in Transfers to the Bentley Library
BHL archivists will receive digital content (or access to digital content) in a variety of manners. Generally speaking, the digital components of transfer to the Bentley Library will reflect one of the following pakages:
1. ‘Hybrid’ collections in which removable media (CD-ROMs, DVDs, floppy disks, USB drives, etc.) are interfiled in boxes with paper records/manuscripts. The presence and/or extent of this content may be unknown to the library at the time of the transfer.
2. ‘Hybrid’ collections in which digital content (on removable media, network shares, or other source) forms a separate and distinct component of an accession and is known to exist by the library.
3. Digital collections in which the library receives only digital content stored on removable media (including external hard drives, laptops, NAS boxes, etc.) or

NOTE: This document is intended solely for reference use. 11/16/2011 8
accessible via a network share or other online resource (including email accounts).
4. Digitization projects in which the Bentley Library or a third party has converted paper/analog materials to a digital format.
1.B: Initial Assessment of Content for Processing and Long-Term Preservation
Professional staff at the Bentley Historical Library will conduct the initial review and accession of digital transfers. Decisions at this stage will be important in determining if digital content warrants migration to the Interim Repository processing space and be prepared for long-term preservation.
1. If the contents and relative value of a digital transfer are already known (for example, as a result of a review conducted during negotiations with donor/creator), the archivist may proceed to create an accession record.
2. If the contents of the digital transfer are not known or are of unknown value, archivists must conduct a review to determine if time and resources should be expended to process the material. For removable media interfiled with paper materials in hybrid collections, MHC/UARP supervisors may need to help student processors reach an appraisal decision.
3. The decision as to whether or not content will be migrated to the Interim Repository and be processed should be based on the following criteria:
a. Traditional appraisal criteria such as collecting priorities, provenance, functional analysis, content analysis, etc.
b. Redundancy: is the informational/evidential content of the digital material available elsewhere in a reliable format or authoritative source? Will these alternative versions suffice for the needs of researchers and the Bentley Library?
c. Preservation issues such as data corruption, formatting problems, obsolete file types, etc. Archivists should consult with Digital Curation Services in regards to any questions or concerns about preservation issues.
Archivists will use TreeSize Professional to attain a high-level overview of the content and structure of a transfer’s digital components. Quick View Plus and VLC Media Player may then be used to view text/image files and audio/video files, respectively. At the conclusion of this review, the archivist should reach a determination as to whether all or part of the transfer will be migrated to the Interim Repository and be prepared for long-term digital preservation. To ensure accurate statistics, any portion of the transfer that will not be processed should still be included in the separation record.

NOTE: This document is intended solely for reference use. 11/16/2011 9
1.B.i: TreeSize Professional—High-Level Analysis of Content and Structure
The archivist must first gain a high level understanding of the structure and contents of the transfer. Files in an IFS drop box may require the archivist to download a copy to his/her local desktop. It may be possible to review content stored in other storage systems (such as SharePoint or CTools) in its native environment; refer questions/issues to Digital Curation Services. To review content on removable media, external drives, or a network share in an efficient manner, archivists will conduct a scan with TreeSize Professional.
1. Select the appropriate directory.
2. Review the directory structure; TreeSize allows you to expand the main directory to various sublevels (1-6) or to fully expand all subfolders.
3. Scroll through the directory tree. Folder names may identify the function and likely contents of folders and subfolders. The archivist should note directories that may be of interest, out-of-scope, or require additional review. Adjust the right and bottom boundaries of the window to expand the view.

NOTE: This document is intended solely for reference use. 11/16/2011 10
4. View the TreeSize file extension report to get an overview of the various formats present in the extension. TreeSize will automatically group content based upon file types (i.e. Audio Files, Video Files, Office Files, etc.). Archivists should identify the predominant file types in the accession (office documents, graphic images, video, audio, etc.) and see if there are large numbers of unfamiliar file formats present.
This step is intended as a high-level overview; archivists should not worry about identifying every extension. Consult with Digital Curation Services if you have any questions or visit http://www.fileinfo.com/ to look up specific file extensions.
1.B.ii: Quick View Plus—Review Text-Based Documents and Images (as necessary)
Quick View Plus may be used to examine a variety of text-based/document and image file formats. Please note that Microsoft Forefront Endpoint Protection will

NOTE: This document is intended solely for reference use. 11/16/2011 11
detect viruses and malware as files are accessed. It is very important that it is kept up to date and that real-time protection is turned on (under the Settings tab). The “Advanced” settings should also be adjusted so that Forefront Endpoint Protection will scan archive files and removable drives.
1. In the Folder Pane, use the mouse or arrow keys (right and left arrows may be used to expand/collapse subfolders) to navigate to the appropriate directory.
2. After a folder is selected in the Folder Pane, a list of its contents (both subfolders and files) will be displayed in the File Pane. Use the mouse or arrow keys to open a sampling of the files and verify their content/potential value. Content will be displayed on the right-hand side in the Viewing Environment.
1.B.iii: IrfanView: Review Raster Image Files (if necessary)
IrfanView is a freeware/shareware application that can be used to view over 70 different image formats.

NOTE: This document is intended solely for reference use. 11/16/2011 12
1. Start IrfanView; go to Files > Thumbnails to open the thumbnail browser.
2. Use the navigation tree on the right hand side, browse to the deposit directory, and select any folder that contains images.
3. Irfanview will automatically load thumbnail images of all image files into the viewing pane.
4. Click on a thumbnail to display a full-scale image if a closer look is required or use the navigation pane to browse to other folders.
1.B.iv: Inkscape—Review Vector Images (as necessary)
Inkscape is a free vector image editor and viewer that can be used to open individual files. To view PS and EPS files, Ghostscript must also be installed and both Ghostscript and the ps2pdf script must be included in the PATH environment variable. In addition, .AI and .WMF files may be associated with Inkscape (via the

NOTE: This document is intended solely for reference use. 11/16/2011 13
“Open with…” dialogue in the right-click context menu or by going to Control Panel > Programs > Default Programs > Associate a file type or protocol with a program).
Once Inkscape and its dependencies have been installed and the PC is properly configured, the archivist may either double-click on the vector image, or navigate to it by selecting the Open icon (or File > Open menu item).
1.B.v: VLC Media Player—Review Audio and Video Files (as necessary)
VLC Media Player is an open-source media player that supports a wide range of audio and video codecs and file formats.
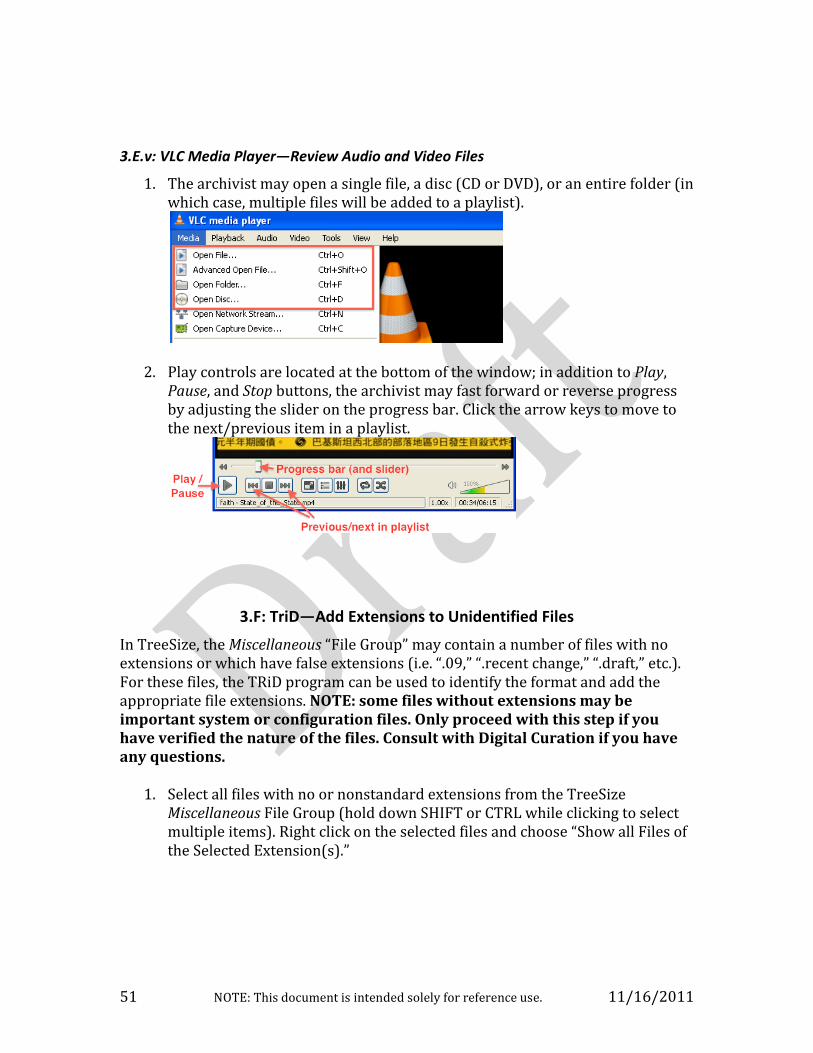
1. The archivist may open a single file, a disc (CD or DVD), or an entire folder (in which case, multiple files will be added to a playlist).
2. Play controls are located at the bottom of the window; in addition to Play, Pause, and Stop buttons, the archivist may fast forward or reverse progress by adjusting the slider on the progress bar. Click the arrow keys to move to the next/previous item in a playlist.

NOTE: This document is intended solely for reference use. 11/16/2011 14
1.C: Identification of Restricted Content
Information gained from the BHL Transfer Agreement and/or communication with the donor/records creator should identify sensitive content that should be restricted according to applicable laws (FERPA, HIPAA, etc.) and BHL policies. The initial review of material should confirm the presence of this restricted content and may uncover additional sensitive content.
1. Due to the impossibility of checking all files, restrictions will be broadly applied—i.e. all files in a directory will be restricted if any are found to contain sensitive content,
2. Be sure to note applicable restrictions in the BEAL accession record, metadata templates, and finding aid.
3. For collections that contain both restricted and unrestricted content, the
archivist may need to divide the collection into two separate deposits: one of which will be deposited in the public digital repository while the other will be deposited in the dark archive. Consult with Digital Curation Services for more information.
1.D: Creating the Accession Record
Accession records for hybrid/all-digital collections will be created according to the basic guidelines for paper and analog collections. As usual, archivists will note the unit (MHC or UARP), donor number and name, staff received, accession date, description, separations, gift agreement, and other fields. The archivist will also note the location of the unprocessed content in the Interim Repository.
As of October 2011, additional fields must be added to BEAL so that information on the size, extent, and initial appraisal of the transfer may be recorded. In a departure from prior procedures, the archivist will attempt a more accurate tally of the digital content’s extent. For removable media, this may entail counting the number of carriers (floppy disks, CDs, DVDs, etc.). For external hard drives, USB drives, network, shares, or other online sources, it may be possible to tally the number of files and volume (in bytes) for the transfer. The Separations section will also be modified so that archivists may record more accurately the extent of separated digital content may be recorded.

NOTE: This document is intended solely for reference use. 11/16/2011 15
In cases where archivists are aware of the contents (or value) of a digital transfer, it may be that the creation of the accession record will follow the migration of content to the Interim Repository.

NOTE: This document is intended solely for reference use. 11/16/2011 16
Phase 2: The Migration of Content to the Interim Repository
If content will be processed, archivists must notify DCSS of the incoming collection. To effectively allocate storage space within the Interim Repository space within ITS Mainstream storage, Digital Curation Services will manage the creation of directories as well as user access and permissions.
Digital Curation Services has identified various tools to migrate content into the Interim Repository. If any issues arise during the transfer of digital content, archivists should consult with Digital Curation Services. The following storage environments and carriers have been identified as common sources for transferred digital content:
Removable media (CD-ROMs, CDs, DVDs, floppy disks, ZIP disks, USB drives, external hard drives, etc.)
Network Attached Storage (NAS boxes, shared network storage, etc.) C-Tools websites SharePoint sites Web-based storage (file servers, drop boxes, FTP sites, etc.) Email accounts Other
Procedures and tools for migrating content from different sources will vary. In all cases, the following guidelines should be observed:
No changes should be made to the content and organization of digital files on the original media/storage location. Digital Curation Services will explore the purchase and use of hardware write blockers in the near future.
Every attempt will be made to preserve the original order of content (including directory structure) as it was saved on the original media/storage location by the creator/donor.
Original physical media provided to the BHL will be photographed and this digital image will be retained while the media is discarded.
2.A: Establishing Directories and Gaining Access to the Interim Repository
As content is migrated to the Interim Repository, it will be saved in an appropriate Collection Directory. There will be one directory for each record group and manuscript collection held by the BHL. These directories will be named according to the following convention: CollectionID_Name (where the ID is an official BHL Collection Identifier and the name is a short, human-readable adaptation of the collection title. Example: 87274_President).
If the Collection Directory does not exist, Digital Curation Services will create it and adjust folder permissions accordingly. If the Collection Directory already exists, Digital Curation Services will adjust permissions so that the processing archivist has
NOTE: This document is intended solely for reference use. 11/16/2011 17
full access. The University of Michigan ITS Windows Support team may assist Digital Curation Services in the management of user permissions.
In addition to the digital components of the transfer, each processing directory will contain a \Metadata\ folder into which the archivist will save log files and the following templates (available on the Digital Curation CTools site):
EAD XML template to record descriptive and administrative metadata for the entire digital deposit.
Deep Blue spreadsheet template to record descriptive metadata that will be used in the batch ingest of content into Deep Blue.
PREMIS Event spreadsheet template to document all preservation events performed by BHL.
Example of a Processing Directory:
Digital Curation Services will also establish a collection directory in the \bhl-root\Separations\ so that unnecessary/superfluous content may be removed (see section 3G for more information).
2.B: Migration of Content from Removable Media
The transfer of content from removable media (which includes, but is not limited to: CD-ROMs, CDs, DVDs, 3.5” floppy disks, ZIP disks, USB drives, and external hard drives) presents numerous challenges to the processing archivist.
Material in hybrid collections is particularly challenging because it requires the archivist to maintain the relationship between the content on removable media to the boxes in which the media was originally located. Furthermore, large collections of removable media may require the processor to arrange content (by constructing a directory hierarchy) as it is migrated from the physical media.
NOTE: This document is intended solely for reference use. 11/16/2011 18
Due to a lack of equipment, the Bentley Library is currently unable to process 5.25” and 8” floppy disks.
Upon the successful migration of content to the Archivists will record ‘unprocessed location’ in accession record.
In addition, the archivist will record the migration of content in the PREMIS Event spreadsheet in the \Metadata\ folder. The transfer of material into BHL custody corresponds to the “capture” PREMIS event (“the process whereby a repository actively obtains an object”). Information for this event will include:
Date Outcome (“passed”)
The Bentley Historical Library has identified two applications that may be used to migrate content from removable media (i.e. floppy disks, data CDs and DVDs, USB drives, external hard drives, etc.): the Duke DataAccessioner and DirSyncPro. Separate tools will be used to migrate content from audio CDs and movie DVDs.
2.B.i: Option 1—Duke DataAccessioner
The Duke DataAccessioner provides a simple graphical interface for the migration of content removable media to the Interim Repository. Because it was designed for a specific workflow in the Duke University Archives, the Bentley Library will not use it precisely as it was intended. Most significantly, the DataAccessioner has a tendency to create unwanted folders; archivists should consult with Digital Curation Services to ensure they are correctly completing metadata fields and selecting the appropriate destinations for migrated content.
NOTE: The DataAccessioner is unable to move files with some non-alphanumeric characters in their filenames. If this is the case, you will need to delete any content that was moved into the Interim Repository and run a complete migration with DirSyncPro.
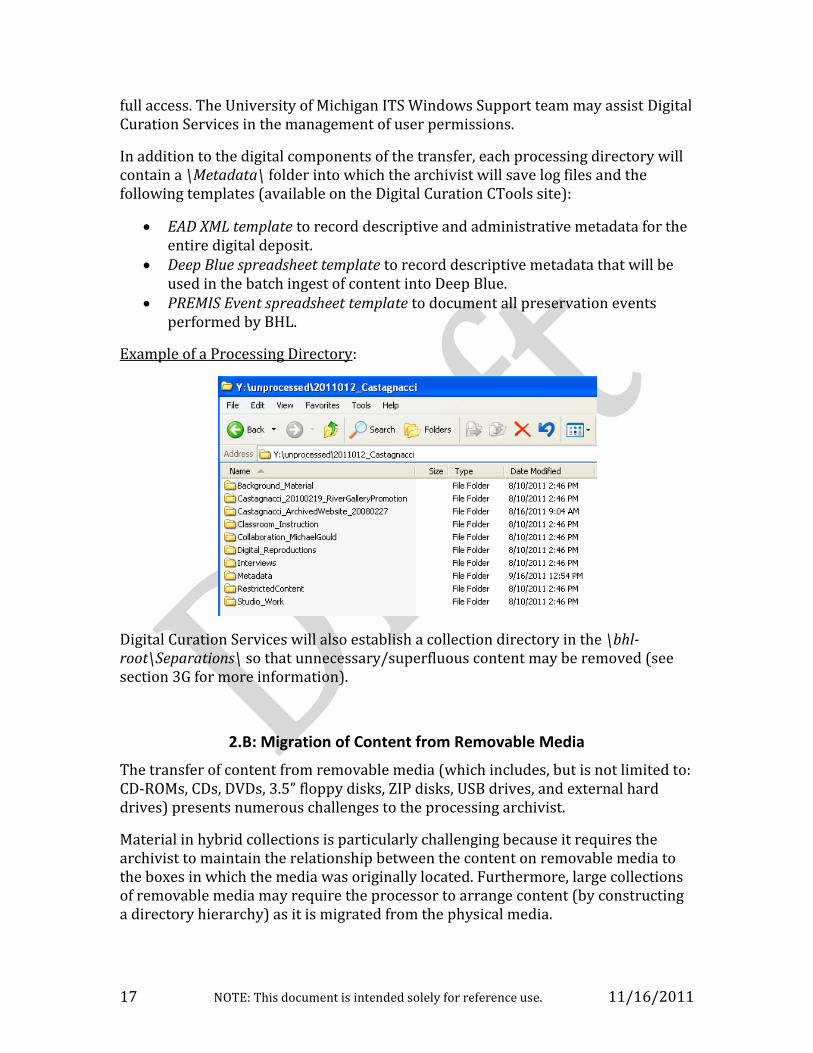
1. Open the DataAccessioner; you must complete the metadata field to run the program.
The DataAccessioner will create a folder that corresponds to the “Accession #” inside of the Accession Directory. This entry may be a number, text, or
NOTE: This document is intended solely for reference use. 11/16/2011 19
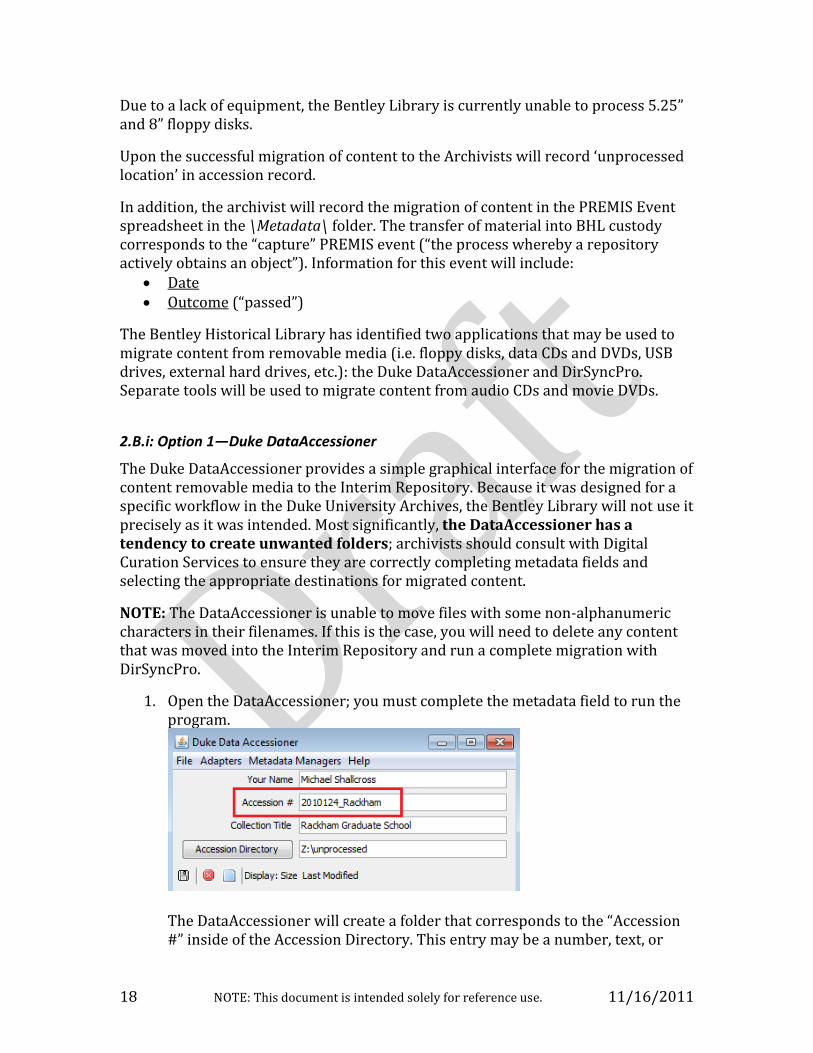
both. If a folder entitled “Accession #” already exists, the DataAccessioner will migrate content alongside the existing materials in that folder. You may use the same “Accession #” for multiple transfers. Depending on the nature of the collection, the archivist may need to migrate content to a subfolder of the main processing directory. Simply enter that subfolder’s name as the “Accession #” and use its parent folder as the Accession Directory. To select the Accession Directory, click on the eponymous button,
browse to the appropriate directory, and click Set as Accessions Directory.
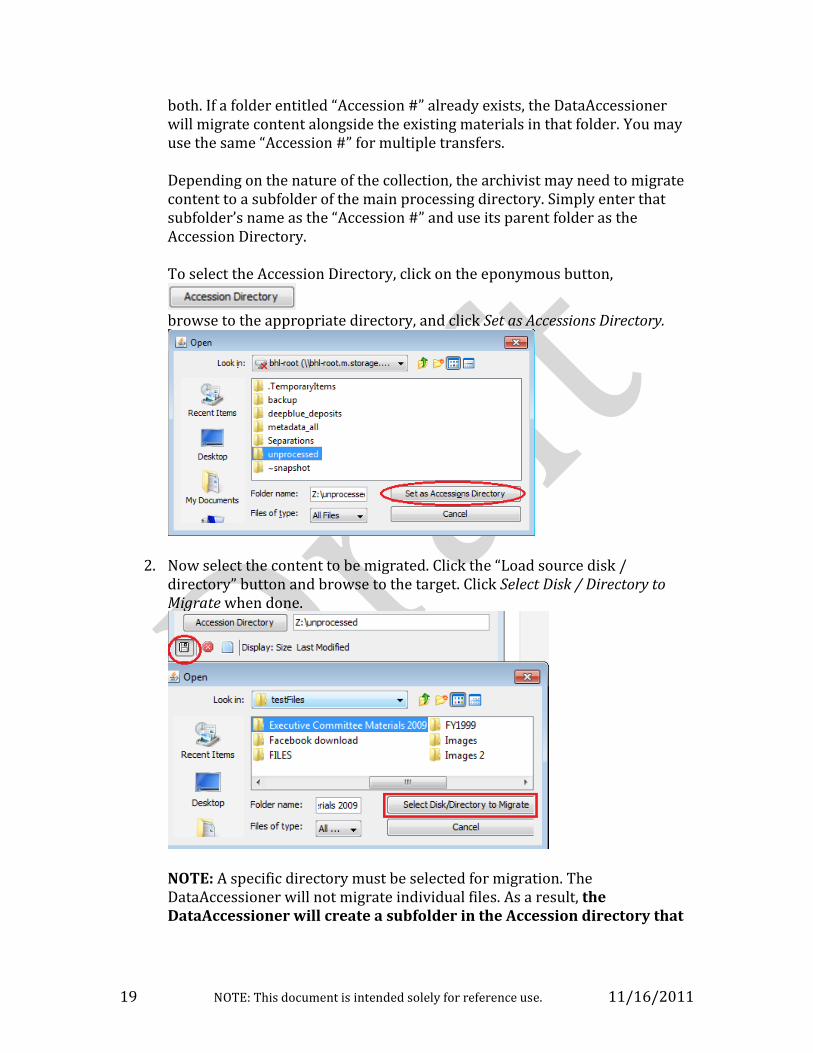
2. Now select the content to be migrated. Click the “Load source disk / directory” button and browse to the target. Click Select Disk / Directory to Migrate when done.
NOTE: A specific directory must be selected for migration. The DataAccessioner will not migrate individual files. As a result, the DataAccessioner will create a subfolder in the Accession directory that

NOTE: This document is intended solely for reference use. 11/16/2011 20
corresponds to this directory. Please take this into consideration when configuring the migration.
3. Archivists may include/exclude specific files and/or folders from the migration. All content is included by default; to exclude material, click on the file or folder name and then click the red “stop” button. If you select a folder, all files and subfolders therein will be excluded.
Click the blue icon to re-include a file or folder.
4. Archivists may also change the Disk (or Directory) Name for the subfolder containing the migrated files:
The Recommend Disk Name option will provide a simple identifier (“Disk 0001) for the folder title. Note that the DataAccessioner will not permit two directories with the same name to be migrated to the same accession directory.

NOTE: This document is intended solely for reference use. 11/16/2011 21
5. Click the Migrate button to proceed with the migration. A progress bar at the bottom will track the migration.
If any files are unable to be transferred, a warning will appear. In such a case, delete any content that was successfully transferred and perform a new migration with DirSyncPro.
6. The DataAccessioner will create an XML manifest in the destination directory; be sure to delete this file.
Note the directory structure of this newly migrated content; improper metadata entry can add several unnecessary levels of folder hierarchy. Z:\
Unprocessed\
2010124_Rackham\
Executive Meeting Minutes 2009\
Agendas\
Minutes\
Partnerships\
2.B.ii: Option 2—DirSyncPro
DirSyncPro is a freely available multi-platform application that can synchronize directories in two locations.
1. Open DirSyncPro; a new job (Job 1) should be present. If not, create a new job by selecting File > New from the main menu.
2. Select the new job (Job 1) and click edit.

NOTE: This document is intended solely for reference use. 11/16/2011 22
3. Enter label and path information: a. The Label should be CollectionID_Name (i.e. 2010124_Rackham). b. Dir A is the source directory (i.e. the content you want to move into
the Interim Repository); browse to the appropriate folder or drive letter.
c. Dir B is the target directory in the Interim Repository where content will be moved.
d. The ‘Include subfolders’ box should be checked.
4. Adjust the Sync Mode to Synchronize A -> B (custom). DOUBLE CHECK TO ENSURE YOU HAVE SELECTED THE APPROPRIATE MODE!
5. Adjust custom settings under the following tabs: a. Copy: check Always copy all files

NOTE: This document is intended solely for reference use. 11/16/2011 23
b. Deletion: uncheck boxes for After sync delete… Orphan files/dirs in the destination. There should be no boxes checked under this tab!
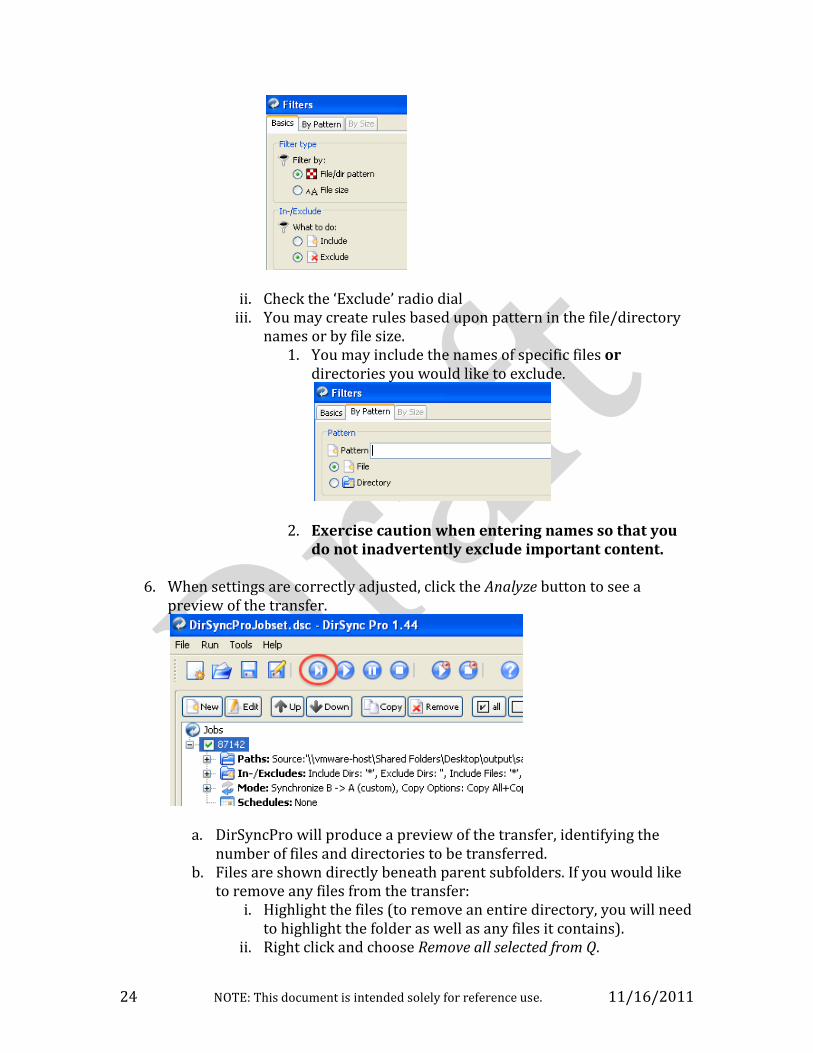
c. OPTIONAL: To exclude certain files or directories from the transfer, you may create exclusion rules under the Filters tab. (By default, all files and directories will be included.)
i. Click ‘New’ on the main Filters screen
NOTE: This document is intended solely for reference use. 11/16/2011 24
ii. Check the ‘Exclude’ radio dial iii. You may create rules based upon pattern in the file/directory
names or by file size. 1. You may include the names of specific files or
directories you would like to exclude.
2. Exercise caution when entering names so that you do not inadvertently exclude important content.
6. When settings are correctly adjusted, click the Analyze button to see a preview of the transfer.
a. DirSyncPro will produce a preview of the transfer, identifying the number of files and directories to be transferred.
b. Files are shown directly beneath parent subfolders. If you would like to remove any files from the transfer:
i. Highlight the files (to remove an entire directory, you will need to highlight the folder as well as any files it contains).
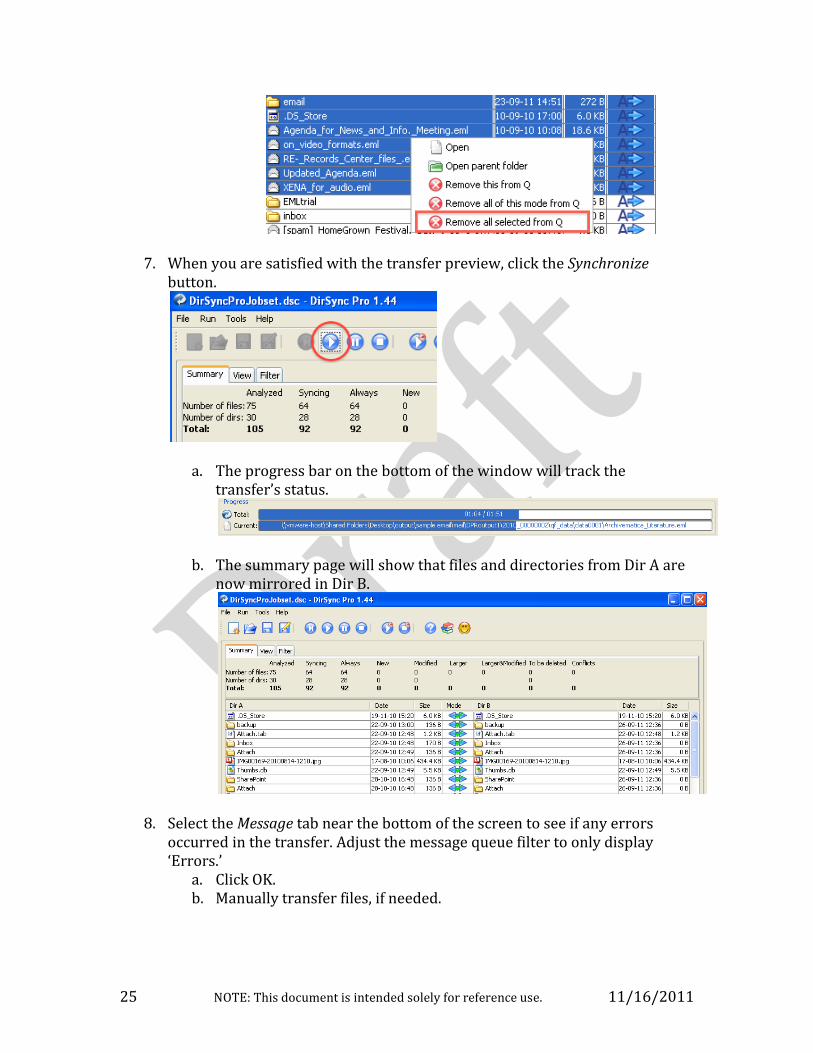
ii. Right click and choose Remove all selected from Q.
NOTE: This document is intended solely for reference use. 11/16/2011 25
7. When you are satisfied with the transfer preview, click the Synchronize button.
a. The progress bar on the bottom of the window will track the transfer’s status.
b. The summary page will show that files and directories from Dir A are now mirrored in Dir B.
8. Select the Message tab near the bottom of the screen to see if any errors occurred in the transfer. Adjust the message queue filter to only display ‘Errors.’
a. Click OK. b. Manually transfer files, if needed.

NOTE: This document is intended solely for reference use. 11/16/2011 26
c. When done, click Clean to clear all messages.
9. If a project requires multiple transfers from different sources, edit the job to
include the new source directory and repeat the above steps. Be sure that no options are selected under the Deletion tab
2.B.iii: Handbrake—DVD Movies
Use HandBrake to rip movies from DVD and convert to MPEG4 files (with H.264 encoding). In depth procedures are in progress.
1. Save to desktop and then transfer to ‘Unprocessed’ area.
2. Quality control: use VLC media player to verify that video file opens/plays.
2.B.iv: Windows Media Player—Audio CDs
Use Windows Media Player to rip audio tracks from CDs and convert to uncompressed WAV files. In-depth procedures are in progress.
1. Save to desktop and then transfer to ‘Unprocessed’ area.
2. Quality control: use VLC media player to verify that audio files open/play
2.C: Photographing Removable Media
The BHL will dispose of removable media except in extraordinary cases. To provide proof of content’s provenance and authenticity, all removable media will be photographed and this image (or images) will be preserved alongside the content.
1. Fill out Digital Media Photography Form with appropriate information for collection. Be sure to indicate the aspect (i.e. front, reverse, side, case) you are photographing.

NOTE: This document is intended solely for reference use. 11/16/2011 27
2. Take photograph(s). The Bentley Library currently has a Canon Powershot (available at the reference desk) that may be used to take pictures.
a. Be sure that the image captures metadata (i.e. writing, labels, etc.) on the removable media and/or its packaging.
b. There may be some glare on the form due to overhead lighting; try to capture as little glare as possible.
c. Repeat steps 2 and 3 as necessary for each aspect of the media (front, reverse, case, side) that has metadata.
3. Transfer contents of removable media to the interim repository with an
approved transport tool (see section 2.B above), being sure to preserve the original directory structure.
a. Each piece of removable media (floppy disk, DVD, CD, etc.) will be saved to its own folder in the processing directory. The organization of these folders may depend upon the nature of the collection. Discuss arrangement issues with Digital Curation Services.
b. Name the folder after the piece of media. i. If title on media/case differs from the title displayed in
Windows Explorer/Mac Finder (i.e. in the container’s metadata), use the most logical
ii. If no name is provided (or given name is inappropriate), the archivist should supply one based upon the series and content.
iii. Use under-scores (_) instead of spaces in folder names.
4. Attach the camera to the computer with USB cord. a. Navigate to the photo and open by double clicking. b. Inspect the image to make sure that the metadata is readable. c. Retake the photograph if necessary.
5. Save the image as a TIFF file.
a. Create a \media_image\ folder within the deposit’s \Metadata\ folder. b. Save as a TIFF file within this \media_image\ folder.
i. If only one photograph of the media is required, the photograph should be named identically to the media. (Ex: CMU_Public_Radio_2002.TIF)
ii. If there is more than one photograph of a disk, indicate the aspect photographed at the end of the filename. (Ex: CMU_Public_Radio_2002_FRONT.TIF).
iii. Example: 201012_0001
Metadata
media_image
CMU_Public_Radio_2002_CASE.TIF
CMU_Public_Radio_2002_FRONT.TIF

NOTE: This document is intended solely for reference use. 11/16/2011 28
2.D: Migration of Content from Other Sources/Storage Environments
Digital Curation Services will be responsible for transferring content from other sources.
Upon the successful migration of content to the Archivists will record ‘unprocessed location’ in accession record.
In addition, the archivist will record the migration of content in the PREMIS Event spreadsheet in the \Metadata\ folder. The transfer of material into BHL custody corresponds to the “capture” PREMIS event (“the process whereby a repository actively obtains an object”). Information for this event will include:
Date Outcome (“passed”)
The following tools and guidelines will apply to the migration of these materials.
2.D.i: Tools
1. Use DirSyncPro for content in networked storage or mounted drive. Follow guidelines for the transfer of content from removable media.
2. Use SFTP for content in IFS drop box
3. Use WebDAV client for content in CTools
4. Use Bamboo Bulk Export for content from SharePoint
5. For email: procedures TBD
6. For other content management systems: procedures TBD
2.D.ii: Conventions
1. Strive to preserve original order of content by maintaining directory structure/hierarchy of materials.
2. Preserve naming conventions for directories/folders. a. Upper-level folders may likely correspond to series or sub-series. b. If a major directory lacks an appropriate name (i.e. “Stuff”), the
archivist may supply a name in accordance with DACS.

NOTE: This document is intended solely for reference use. 11/16/2011 29
Phase 3: Processing
To prepare digital records for long-term preservation by the Bentley Historical Library, archivists will submit content to a series of batch processes in addition to traditional procedures such as arrangement and description. Given the potentially large volume of content that archivists must handle, the Bentley Historical Library will take a More Product, Less Process approach to digital processing so that solitary files are reviewed, arranged, and acted upon only when absolutely necessary. Aside from the review of content that is necessary for archival description, materials will be processed in batches.
As a preliminary step, be sure to change the processing directory name to the Deposit ID (provided by DCS). Example: 2010124_UUGD --> 2010124_0001.
3.A: Microsoft Forefront Endpoint Protection—Perform a Virus Scan
1. Map to \bhl-root\ so that it is mounted as a Z:\ (or other letter) drive.
2. Perform a ‘Custom’ scan and select the appropriate processing directory in the Interim Repository.
a. If clean: i. Take a screenshot of the MS Forefront result screen.
ii. Save image as virusscan_MS_v#-###-##_#_YYYYMMDD.jpg (or .png) in the \Metadata\ folder.
1. Example: virusscan_MSv1-113-61-0_20110922.log
2. Replace periods with hyphens in the version number. Find version under the Update tab.
b. If infected files are found: i. Perform recommended action. (NB: DCSS policy needs to be
articulated to determine if infected files will be cleaned or immediately deleted.)
ii. Save appropriate excerpt from log file (MPLog(…).log) as virusScan_YYYYMMDD.log
1. Example: virusScan_20110922.log
2. Replace periods in version number with hyphens. Find version under Update tab.
iii. Log file may be found at: 1. Windows XP: C:\Documents and Settings\All
Users\Application Data\Microsoft\Microsoft Antimalware\Support
2. Windows 7: C:\ProgramData\Microsoft\Microsoft Forefront\Client Security\Client\Antimalware\Support

NOTE: This document is intended solely for reference use. 11/16/2011 30
See example of log file below:
iv. After completion, perform recommended actions if infected files are found.
3. Record information in PREMIS event spreadsheet:
a. Date b. Outcome
i. Passed: No viruses or malware detected; if anything has been detected, MS Forefront safely cleaned file.
ii. Failed: Virus/malware detected and infected file(s) were deleted. List all files that were deleted in the ‘File’ column.
1. This list only needs to include the relative path of files. 2. Exclude path information specific to the interim
repository (i.e. \\xxxx\bhl-root\unprocessed\87142_0001\).
c. Software Version Number: the virus definition number may be found on the Update tab of MS Forefront.
3.B: Backup Content
The Bentley Library will make a backup of all digital deposits so that, in the event of inadvertent deletions or other unintended modifications, archivists may return to original versions of all content.
1. For collections under 20 GB (usually transferred via removable media, network shared drive, SFTP, WebDAV, etc.), create a backup directory in \bhl-root\backup\ using the DataAccessioner or DirSyncPro. (See sections 2.B.1 and 2.B.2 for directions on using these tools).
2. For collections over 20 GB (typically transferred on external hard drive or other removable media), files stored on the original media will constitute the

NOTE: This document is intended solely for reference use. 11/16/2011 31
backup. As of Novemeber 2011, the Bentley Library does not have sufficient resources to create a backup of all content in ITS Mainstream storage.
3.C: ReNamer—Normalize File and Folder Names
Use ReNamer to normalize file/folder names and thereby remove all non-alphanumeric characters (except _ and -).
1. Load the preset rule configuration file (“NormalizeNames_v2”).
2. Check settings: a. Under Settings > All Settings > Rename, be sure that the box marked
“Overwrite files with New Names” is unchecked. b. Under Settings > Filters, be sure that the following boxes are checked:
i. Add files within folders ii. Add folders as files
iii. Include subfolders
3. Click ‘Add Folders’ and browse to the appropriate processing directory in the Interim Repository.
4. BE SURE TO CLICK Options > Sort by path for renaming folders on the menu
bar in between the Rules and Files panes. This step will ensure that folders are renamed in an appropriate order.

NOTE: This document is intended solely for reference use. 11/16/2011 32
5. Click ‘Preview’ to see what will happen when the ReNamer rules are applied.
6. Remove files/folder that do not require normalization from the view.
a. On the menu bar in between the Rules and Files panes, click Files > Mark > Mark Only Changed (Inc. Case). This step will unmark all files and folders that do not require renaming.
b. On the same menu, click Files > Clear > Clear Not Marked to remove all files and folders from the list that do not require renaming.
7. If you are satisfied with the Preview results, click ‘Rename’ to normalize filenames. (Click ‘Continue’ when informed that parent folders must always appear below their contained items.)

NOTE: This document is intended solely for reference use. 11/16/2011 33
8. A pop-up window will confirm the operation’s success.
If any folders have failed to rename or if you notice any problems in the results, you can undo the operation in the main program menu under File > Undo.
9. Export a list of all new and original files names via the menu bar between the Rules and Files panes. Click on Export > Export file paths and undo paths.
10. Save the list to the \Metadata\ folder with filename nameNormalization_YYYYMMDD.csv. Example: nameNormalization_20110922.csv
11. Record the renaming procedure in the PREMIS Event spreadsheet. a. Date b. Outcome: Should always be passed

NOTE: This document is intended solely for reference use. 11/16/2011 34
c. Software version number: if different from template (find the version under Help > About).
3.D: Identity Finder—Scan for Sensitive / Personally Identifiable Information
Run Identity Finder to detect and redact personally identifiable information (PII: Social Security, credit card, and driver’s license numbers).
1. Start Identity Finder; the first time, the IF Wizard interface will open. Choose the “Open Advanced Interface” option. Custom scans of digital deposits will always require using the advanced interface.
2. Click the Identities tab to select the types of PII for which Identity Finder will scan. Select identifier-types by clicking on each icon. The Bentley Library will scan for:
a. Social Security numbers b. Credit card numbers c. Bank account numbers d. Driver license numbers

NOTE: This document is intended solely for reference use. 11/16/2011 35
3. Click the Locations tab to specify where and what content Identity Finder will scan. Under the Search Locations submenu (left side), choose “Files” and “Emails.” Under the Location Options submenu, select both “Compressed Files” and “E-mail Attachments.” Under the File Locations submenu, select “Custom Folders.” Click immediately below the icon and select the option to “Customize Folder List.”
4. A window to View and Manage the Custom Folder List will open; browse to the digital deposit’s directory in the Interim Repository and then click “OK.” NOTE: Identity Finder may only be used to scan content in \bhl-root\; using this software on another file server (such as \bhl-archive\) will violate the terms of the library’s software license.
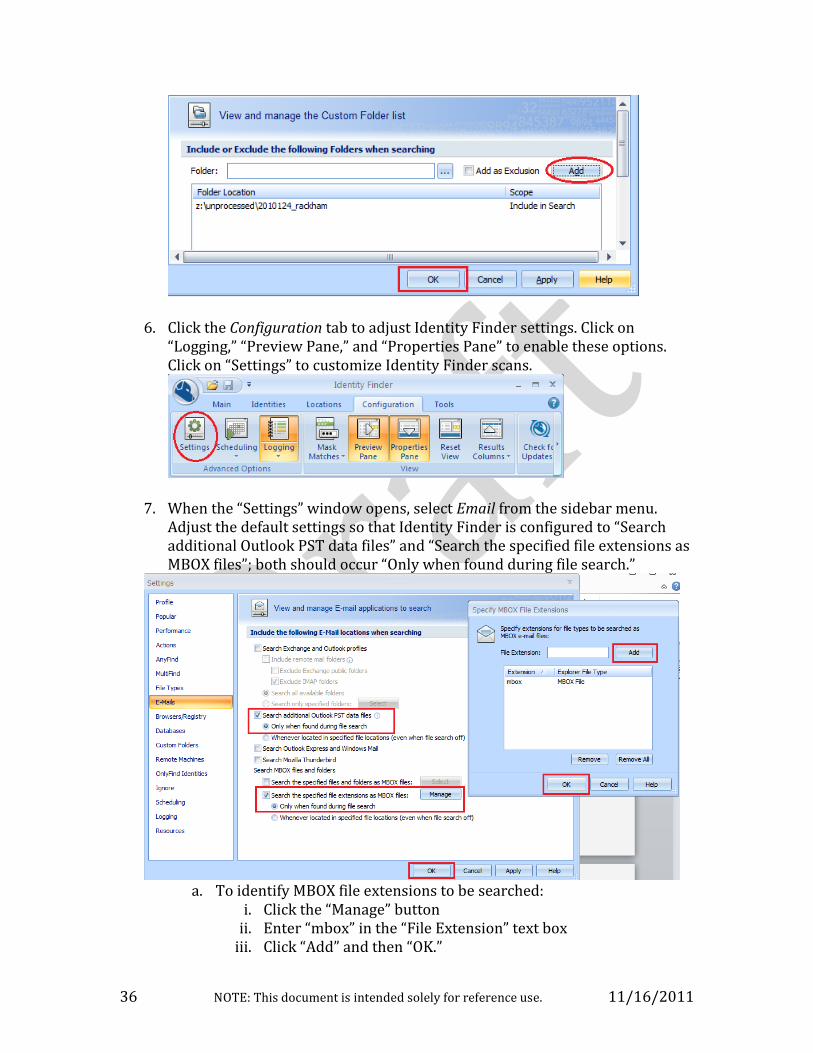
5. Once the appropriate folder has been selected, click the “Add” button. Then click “OK” at the bottom of the window to complete the custom folder selection.
NOTE: This document is intended solely for reference use. 11/16/2011 36
6. Click the Configuration tab to adjust Identity Finder settings. Click on “Logging,” “Preview Pane,” and “Properties Pane” to enable these options. Click on “Settings” to customize Identity Finder scans.
7. When the “Settings” window opens, select Email from the sidebar menu. Adjust the default settings so that Identity Finder is configured to “Search additional Outlook PST data files” and “Search the specified file extensions as MBOX files”; both should occur “Only when found during file search.”
a. To identify MBOX file extensions to be searched:
i. Click the “Manage” button ii. Enter “mbox” in the “File Extension” text box
iii. Click “Add” and then “OK.”

NOTE: This document is intended solely for reference use. 11/16/2011 37
b. NOTE: do not select options for “Exchange and Outlook profiles,” “Outlook Express and Windows Mail,” and “Mozilla Thunderbird”—these all refer to local folders on the desktop workstation, not content in the Interim Repository.
c. Be sure to click “OK” at the bottom of the screen in the main “Settings” windows to save all changes.
8. To initiate a scan, select the Main tab and click the “Start” button.
9. A status window will appear with information about the progress of the Identity Finder scan.
10. When the scan is completed, Identity Finder will present a scan summary; click the “Advanced” option.

NOTE: This document is intended solely for reference use. 11/16/2011 38
11. If any PII was found, the scan results will be displayed under the Main tab. Each line reflects a location where PII was found. The “identity Match” column will indicate if each file has one or multiple matches. Click on an item to see a preview of the PII in the Preview Pane (on the right-hand side). If it is necessary to view a complete version of a file, double click on an item to open it with an associated application.
12. Check each instance to verify if the PII is legitimate or a false positive. To ignore false positives, right-click on an item and select Ignore > This Item Location from the context menu OR check the box next to each item and click the “Ignore” icon.

NOTE: This document is intended solely for reference use. 11/16/2011 39
13. If a scan uncovers valid PII, the Bentley Library will “scrub” (i.e., redact) the information from the original file. This action will replace the numbers in the sensitive information with a string of X’s. To “scrub” PII from a file, either right-click and select Scrub from the context menu or check the box next to each item and click the “Scrub” icon.
Click “Yes” when asked if you are “sure you want to scrub the identity match information from this file?”
A window will open to announce the successful redaction of content.
14. After PII has been removed from the deposit, go to the Configurations tab, click on the “Logging” item and select “View current log.”

NOTE: This document is intended solely for reference use. 11/16/2011 40
The log file will open in Notepad; choose File > Save as… to store it in the deposit’s Metadata folder. The log files are generated with the pattern: IDF_YYYY-MM-DD_HH-MM-SS.log Add “piiScan_” to the file name (i.e. piiScan_IDF_2011-11-07-12-32-58.log). Include
15. Record PII scan in the PREMIS Event spreadsheet.
a. Date b. Outcome: should always be passed—either no PII was found or PII
was successfully redacted. c. Software version number: if different from template. To find the
version, click the Identity Finder button (very top left corner of window) and then click the “About” button.
16. If you will process another deposit, close the program so that a separate log file will be created. It is not necessary to save the scan results to file.
3.E: Appraisal
This step will involve a high-level assessment so that the archivist may arrange (only if necessary!) and describe the content. Unless working with a collection of extreme significance, archivists and student processors will avoid item-level appraisal and make decisions at the series/folder level. More Product, Less Process!
3.E.i: TreeSize Professional—Analyze Content and Structure
In this step, the use of TreeSize Professional will be more advanced and in-depth than the procedures used for the initial appraisal of content. NOTE: When using TreeSize, always be aware of what directory you are analyzing. If you select and examine a subfolder, you will have to choose the main collection directory in the Directory Tree in order to analyze or conduct a search on the contents of the entire deposit.

NOTE: This document is intended solely for reference use. 11/16/2011 41
1. Browse to the appropriate directory in the interim repository.
TreeSize Professional will immediately scan the directory.
2. The Directory Tree (located in the top left of the window) will provide a high level overview of the directory contents.
a. To view the subfolders within an individual folder, you may click on the + sign next to the folder’s name:
b. You may also expand all folders in the directory to a specific sublevel (i.e. open 1 to 6 levels of folders) or fully expand every folder in the directory.
c. You may view the size of each directory by selecting the Size toolbar item; be sure to select the Auto option so that the TreeSize will display the most appropriate units (kilobytes, megabytes, or gigabytes).

NOTE: This document is intended solely for reference use. 11/16/2011 42
d. Select the File toolbar item to view the number of files in the directory
and each subfolder.
e. To see a list of a particular folder’s contents (files as well as subfolders), click the ‘Details’ tab. You may sort the contents of this list (alphabetically, chronologically, or by size, depending on the filter) by clicking any of the items at the top of the list (Name, Size, Last Change Date, etc.).
3. Under the Chart tab, select the Tree Map item for a visual representation of the relative size of directories as well as significant concentrations of file formats. Use the mouse to hover over different segments and receive additional information (folder path, size, and number of files/folders).
4. Select the Age of Files tab to identify the date range of content. a. Scan settings may be adjusted under Tools > Options.

NOTE: This document is intended solely for reference use. 11/16/2011 43
On the Age of Files options, place a checkmark next to “Create Statistics for age of files” and select Last Change Date from the drop down menu. The BHL will use this setting because the “creation date” metadata may be reset to the date of the migration. In addition, the last change date reflects the moment in time at which the digital object acquired the structure and informational content that will be the subject of long-term digital preservation.
You may add or remove intervals for the Age of Files scan by clicking the “+” and “-” buttons. Intervals of 1, 3, 5, and 10 years will provide a useful overview of file ages. (Note: if you adjust these settings in the midst of a directory analysis, you will need to click the “Rescan” button at the bottom of the window for them to take effect.)

NOTE: This document is intended solely for reference use. 11/16/2011 44
b. After the Age of Files tab is selected, TreeSize will produce a bar graph to visually represent the date range of files (based on the date of last change). This view may be used to identify the Bulk Date Range that will be included in the deposit’s descriptive and administrative metadata.
c. To identify precisely the date range for materials, view a list of all files associated with the most recent (i.e. “1 Year”) and oldest (i.e. “> 10 Years”) intervals. (NOTE: the most recent and oldest intervals may vary, depending on your collection.)
i. Position the very tip of the mouse at the base of each column (where it meets the graph’s horizontal axis) and double-click. It may take several attempts to find the exact spot.
ii. TreeSize will then automatically conduct a search for all files with a “Last change date” that corresponds to the selected intervals. A custom search result window will open; click the Last Change column header to sort the file list from oldest to most recent. Click again and the list will be sorted from most recent to oldest.

NOTE: This document is intended solely for reference use. 11/16/2011 45
iii. These search operations will provide the Inclusive Date Range that will be included with the deposit’s descriptive and administrative metadata.
5. Use the ‘Extensions’ tab to review the various file formats in the collection. a. View by format groups (i.e. Graphic Files, Video Files, etc.); click the +
button next to the individual file groups to see a list of all associated extensions.
b. Click the Group item on the toolbar to see a unified list of all file formats.

NOTE: This document is intended solely for reference use. 11/16/2011 46
c. You may click the Size and Files column headers to sort the list and see
the largest file types by file size and number, respectively.
d. Be aware of any system, configuration, or miscellaneous file formats that do not merit long-term digital preservation and which should be separated from the final deposit.
6. Remove unnecessary content such as .DS_STORE and thumbs.db files as well
as Mac resource forks (files that begin with “._”). a. You may need to add “.ds_store,” “*thumbs.db,” and “._*” as custom
search terms in TreeSize. (Enter them one at a time in the text box on right side and then click “Add Pattern.”)
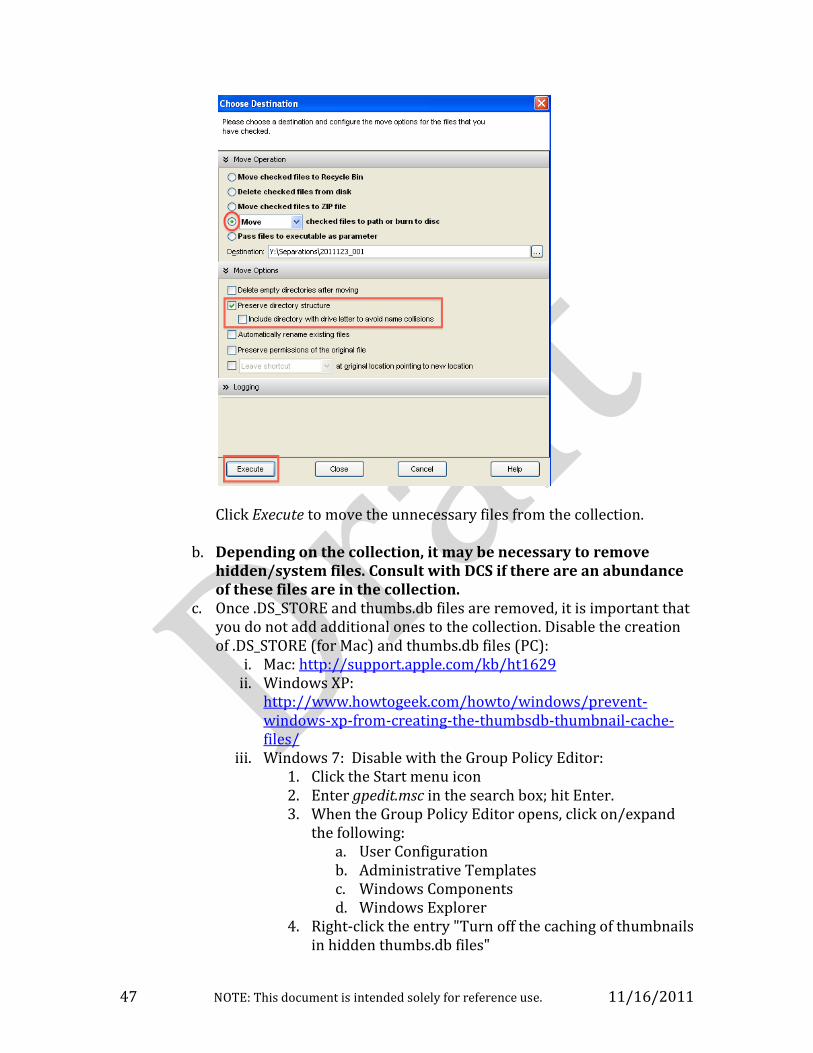
Be sure no other search parameters (i.e. Date, Size / Attributes, and Owner) are set. You will not receive accurate search results if they are! If any are found, select Move Checked on the right side of the search window. Choose the “Move checked files to path” option and then browse to the Separations directory in the Interim Repository in the Destination bar. Be sure to select the “Preserve directory structure” option (but do not select the option to include drive letters).
NOTE: This document is intended solely for reference use. 11/16/2011 47
Click Execute to move the unnecessary files from the collection.
b. Depending on the collection, it may be necessary to remove hidden/system files. Consult with DCS if there are an abundance of these files are in the collection.
c. Once .DS_STORE and thumbs.db files are removed, it is important that you do not add additional ones to the collection. Disable the creation of .DS_STORE (for Mac) and thumbs.db files (PC):
i. Mac: http://support.apple.com/kb/ht1629 ii. Windows XP:
http://www.howtogeek.com/howto/windows/prevent-windows-xp-from-creating-the-thumbsdb-thumbnail-cache-files/
iii. Windows 7: Disable with the Group Policy Editor: 1. Click the Start menu icon 2. Enter gpedit.msc in the search box; hit Enter. 3. When the Group Policy Editor opens, click on/expand
the following: a. User Configuration b. Administrative Templates c. Windows Components d. Windows Explorer
4. Right-click the entry "Turn off the caching of thumbnails in hidden thumbs.db files"

NOTE: This document is intended solely for reference use. 11/16/2011 48
5. Select Edit from the menu 6. Select the Enabled option and click OK.
7. Conduct a search for duplicate content.
a. Given the time required to manually review, identify, and verify ‘official’ versions of material, the Bentley Library will not deduplicate accessions by default.
b. At the same time, a duplicate search may reveal high concentrations of duplicate material in particular folders (which may be separated if the processor/supervisor determines that ‘official’ versions reside elsewhere in the collection.
i. Do not use the “Deduplicate” feature of TreeSize—it will insert .LNK files into the collection. The ‘Move Checked’ tag may be used instead, but it requires a careful review of all ‘checked’ items.
3.E.ii: Quick View Plus—Review Text-Based Documents and Image Files
Use Quick View Plus to conduct functional and content analyses of material. Quick View Plus should be used to ascertain the general nature of content in the digital deposit; it is neither necessary nor recommended to attempt viewing all files—especially in a large deposit. It may be useful for the archivist to identify specific directories/files for review with Quick View Plus view when conducting review with TreeSize Professional.
1. You can use arrow keys to navigate through content in the “Folder Pane” (top left panel of default view). The Interim Repository should be mounted as a network drive under the computer’s C:\ drive.
2. Use arrow keys to navigate through “File Pane.” a. Supported file formats will automatically load in the viewing
environment. b. Some formats may require additional applications to view/play.
Contact DCS if you are unable to access content. c. To view a single column of files in the File Pane, reduce this panel’s
width. 3. You may use the Find Text box to search for keywords in a single document.

NOTE: This document is intended solely for reference use. 11/16/2011 49
3.E.iii: IrfanView: Review Raster Image Files (if necessary)
IrfanView is a freeware/shareware application that can be used to view over 70 different image formats.
1.B.iii: IrfanView: Review Raster Image Files (if necessary)
IrfanView is a freeware/shareware application that can be used to view over 70 different image formats.
1. Start IrfanView; go to Files > Thumbnails to open the thumbnail browser.
2. Use the navigation tree on the right hand side, browse to the deposit directory, and select any folder that contains images.

NOTE: This document is intended solely for reference use. 11/16/2011 50
3. Irfanview will automatically load thumbnail images of all image files into the
viewing pane.
4. Click on a thumbnail to display a full-scale image if a closer look is required or use the navigation pane to browse to other folders.
3.E.iv: Inkscape—Review Vector Images (as necessary)
Inkscape is a free vector image editor and viewer that can be used to open individual files. To view PS and EPS files, Ghostscript must also be installed and both Ghostscript and the ps2pdf script must be included in the PATH environment variable. In addition, .AI and .WMF files may be associated with Inkscape (via Control Panel > Programs > Default Programs > Associate a file type or protocol with a program).
Once Inkscape and its dependencies have been installed and the PC is properly configured, the archivist may either double-click on the vector image, or navigate to it by selecting the Open icon (or File > Open menu item).
NOTE: This document is intended solely for reference use. 11/16/2011 51
3.E.v: VLC Media Player—Review Audio and Video Files
1. The archivist may open a single file, a disc (CD or DVD), or an entire folder (in which case, multiple files will be added to a playlist).
2. Play controls are located at the bottom of the window; in addition to Play, Pause, and Stop buttons, the archivist may fast forward or reverse progress by adjusting the slider on the progress bar. Click the arrow keys to move to the next/previous item in a playlist.
3.F: TriD—Add Extensions to Unidentified Files
In TreeSize, the Miscellaneous “File Group” may contain a number of files with no extensions or which have false extensions (i.e. “.09,” “.recent change,” “.draft,” etc.). For these files, the TRiD program can be used to identify the format and add the appropriate file extensions. NOTE: some files without extensions may be important system or configuration files. Only proceed with this step if you have verified the nature of the files. Consult with Digital Curation if you have any questions.
1. Select all files with no or nonstandard extensions from the TreeSize Miscellaneous File Group (hold down SHIFT or CTRL while clicking to select multiple items). Right click on the selected files and choose “Show all Files of the Selected Extension(s).”

NOTE: This document is intended solely for reference use. 11/16/2011 52
2. A search window will open; when the process is complete, click once on any file in the search results to mark it (the filename should be highlighted in blue). Now select File > Export Paths…
3. Save the file in this location: C:\BHL\TRID\fileList.txt. This file (fileList.txt) is a default file in a batch script; always replace it with new file information.
4. Open the file in Notepad; choose File > Save as… and save the file in ANSI encoding. (UTF-8 encoding produces a bug when TRiD is run.)
5. Open a command prompt (cmd.exe) and enter “tridBatch.bat” (do not include quotes).

NOTE: This document is intended solely for reference use. 11/16/2011 53
6. The script will run through the list of files and append extensions to all that
can be identified. 7.
a. Date b. Outcome: should always be passed—either no PII was found or PII
was successfully redacted.
3.G: Separations
As noted in section 2A, Digital Curation Services will create a folder in the Separations directory (\bhl-root\Separations) for each transfer of digital materials.
Archivists will remove superfluous or unnecessary content from digital accessions and place it in the appropriate Separations folder. Unless an accession is very small, separations will take place at the folder level. Do not worry about checking every single file in an accession!
If an archivist has identified a folder or specific group of files that are not appropriate for the collection, TreeSize Professional may be used to move this material to the Separations directory. TreeSize will maintain the original directory structure so that donors/creators may understand the context and organization of the separated materials if they are returned.
3.G.i: Removing One or More Folders to the Separations Directory
1. Open TreeSize and select File Search > Custom Search.
2. Under the Search Options tab, click on “Browse and Add Path.” Browse to the target directory and click “OK.” You may include as many folders as necessary.

NOTE: This document is intended solely for reference use. 11/16/2011 54
3. To remove a folder from the search, right click on it and select “Remove from List Permanently.” (It may be included in a Custom Search at a later point, if need be.)
4. To proceed, select the Custom Search tab. To include all files in the selected folder(s), select the “Name” menu item and add * in the text box on the right-hand side (* is a wildcard; this statement will include all files in the search). Files in any subfolders will be included if the “Search Subfolders” box is checked.
5. Click “Start Searching” to commence. When the search is complete, verify that the files you wish to separate are checked (on the left-hand side). To retain any files in the collection, uncheck the boxes. When you are satisfied, click “Move Checked.”

NOTE: This document is intended solely for reference use. 11/16/2011 55
6. In the window that next appears, select the following options: a. Move Operation:
i. Choose “Move checked files to path.” ii. Browse to the appropriate Separations folder for your
collection. b. Move options:
i. Choose “Delete empty directories after moving” ii. Choose “Preserve directory structure”
c. Logging i. Choose to “Log performed operations”
ii. Select the \Metadata\ folder in the processing directory as the destination for the log file. Save the file as separations_YYYYMMDD.txt (i.e. separations_20111020.txt).
7. Click “Execute”

NOTE: This document is intended solely for reference use. 11/16/2011 56
This operation may be repeated as many times as necessary. TreeSize will append additional log entries to the same log file.
3.G.ii: Removing Specific “File Group”s to the Separations Directory
The scan results under the TreeSize Extensions tab may reveal file groups that are inappropriate for long-term preservation. Such material may include Configuration Files, PC Virtualization Files, System Files, Temporary and Backup Files, and Miscellaneous Files. Because some configuration or system files may be essential components of a digital deposit, archivists should consult with Digital Curation Services before moving any of these files to the Separations directory.
1. If it is determined that a file group may be safely separated, conduct a fresh scan of the processing directory in TreeSize.
2. Select the Extensions tab. Right click on either the file group (i.e. “Temporary and Backup Files”) or the specific file extension (i.e. “.bak”). By holding CTRL while clicking, you may select multiple file groups and/or extensions. Then choose the right-click option to “Show all Files of the Selected Extension.” TreeSize will now launch a custom search for all the selected files.

NOTE: This document is intended solely for reference use. 11/16/2011 57
3. From this point, you may follow the instructions from step 6 onward in section 3.G.1.
As noted above, this operation may be repeated multiple times. TreeSize will append additional log entries to the same log file.
3.H: Arrangement
The BHL has adopted a More Product, Less Process philosophy for digital content. Processors should preserve original order/original directory structure.
1. Intellectual: identify series/logical groupings of content
2. ‘Physical’: processors will maintain the original order of material unless it is absolutely necessary should and then only after conferring with MHC/UARP supervisors and/or DCS. Any physical arrangement of files would be cited in the ‘Processing Note’ in the EAD template.
3. All content will be arranged/packaged as if it were going to be deposited in Deep Blue. This means that top-level folders in the processing directory should correspond to Items in Deep Blue.
4. In determining the final arrangement of files, discuss the composition of the
deposit package with DCS. a. A ‘deposit’ is an administrative unit that refers to a discrete group of
digital content produced by a single creator (individual or an organization)
b. The deposit package will consist of one or more files (including ZIP files) and an associated metadata folder
3.I: File format conversion
The BHL will employ file format conversion as a preservation strategy. The bhl_batch.bat Windows command line script will automatically search for and convert at-risk file formats to preservation-quality versions. The Bentley Library

NOTE: This document is intended solely for reference use. 11/16/2011 58
will retain these preservation copies (denoted by a –bhl_XXXXXXXX suffix) alongside the originals.
The batch conversion of files will utilize various open-source or freely available utilities. Digital Curation Services will oversee the installation and configuration of these applications on Bentley workstations.
Tier 1: Preservation of Sustainable Formats
Tier 2: Conversion Strategies for At-Risk Formats
Tier 3: Bit-Level Preservation
Raster Images
TIFF: Tagged Image Format File JPEG/JFIF: Joint Photographic
Experts Group JPEG Interchange Format File (lossy compression)
JPEG 2000: Joint Photographic Experts Group (lossless compression)
GIF: Graphic Interchange Format PNG: Portable Network Graphic
Convert the following to TIFF with ImageMagick:
BMP: Windows Bitmap PSD: Adobe Photoshop
Document PCD: Kodak Photo CD Image PCT: Apple Picture File TGA: Targa Graphic
All others
Raw Camera Images
Original raw digital camera images will be retained as preservation copies.
Convert the following to JPEG (for access) with ImageMagick:
RAW: Raw Image Data File CR2: Canon Raw Image File ARW: Sony Digital Camera
Image DCR: Kodak Raw Image File MRW: Minolta Raw Image
File NEF: Nikon Electronic
Format Raw Image File ORF: Olympus RAW File PEF: Pentax Electronic File 3FR: Hasselblad 3F Raw
Image X3F:SIGMA X3F Camera Raw
File

NOTE: This document is intended solely for reference use. 11/16/2011 59
Vector Images
SVG: Scalable Vector Graphics File Convert the following to SVG with Inkscape:
AI: Adobe Illustrator WMF: Windows Metafile EMF: Enhanced Metafile
Convert the following to PDF with Ghostscript:
PS: PostScript EPS: Encapsulated PostScript
All others
Audio Files
MIDI: Musical Instrument Digital Interface File
XMF: Extensible Music File WAV: Waveform Audio File Format AIFF: Audio Interchange File Format MP3: Moving Picture Experts Group
Layer 3 compression OGG: Ogg Vorbis Audio File FLAC: Free Lossless Audio Codec File
Convert the following to WAV:
WMA: Windows Media Audio RA/RM: Real Audio SND: Apple Sound File AU: Sun Audio File
All others
Video Files
MPEG-1/2: Moving Picture Experts Group
AVI: Audio Video Interleave File (uncompressed)
MOV: QuickTime Movie (uncompressed)
MP4: Moving Picture Experts Group (with H.264 encoding)
MJ2: Motion JPEG 2000 MXF: Material Exchange Format File
(uncompressed) DV: Digital Video File (non-
proprietary)
Convert the following to MP4 (with H.264 encoding):
FLV: Flash Video WMV: Windows Media Video RV/RM: Real Video
All others

NOTE: This document is intended solely for reference use. 11/16/2011 60
Tier 1: Preservation of Sustainable Formats
Tier 2: Conversion Strategies for At-Risk Formats
Tier 3: Bit-Level Preservation
Video Files
MPEG-1/2: Moving Picture Experts Group
AVI: Audio Video Interleave File (uncompressed)
MOV: QuickTime Movie (uncompressed)
MP4: Moving Picture Experts Group (with H.264 encoding)
MJ2: Motion JPEG 2000 MXF: Material Exchange Format File
(uncompressed) DV: Digital Video File (non-
proprietary)
Convert the following to MP4 (with H.264 encoding):
FLV: Flash Video WMV: Windows Media Video RV/RM: Real Video
All others
Office Documents and Text Files
DOCX: MS Word Open XML Document
XLSX: MS Excel Open XML Document PPTX: PowerPoint Open XML
Document PDF/A: Portable Document Format
(Archival) TXT: Plain Text File RTF: Rich Text Format File XML: Extensible Markup Language
Data File CSV: Comma Separated Values File TSV: Tab Separated Values File
Convert the following to Office Open XML with Microsoft Office File Converter (OFC):
DOC: MS Word Document XLS: MS Excel Document PPT: PowerPoint Document
Convert PDF to PDF/A with Ghostscript.
All others
MBOX: Mailbox File Convert the following to MBOX:
EML: Email Message PST: Outlook Personal
Information Store File Eudora mail, etc. (40 total)
All others

NOTE: This document is intended solely for reference use. 11/16/2011 61
Tier 1: Preservation of Sustainable Formats
Tier 2: Conversion Strategies for At-Risk Formats
Tier 3: Bit-Level Preservation
Databases
SIARD: Software Independent Archiving of Relational Databases (open XML format)
CSV: Comma Separated Values File MySQL SQL: Structured Query
Language file; MySQL is an open source relational database management system
Convert the following into SIARD:
ACCDB or MDB: MS Access SQL Server Oracle Database
All Others
3.J: Package Materials for Deposit
Archivists will need to package digital deposits in preparation for ingest into Deep Blue or the BHL dark archive (\bhl-archive\).
3.J.i: Normalization of Major Directory Names
As noted in earlier in this document, content will be placed in folders that correspond to “Items” in Deep Blue (consult with Digital Curation Services for guidance in identifying and structuring Items). In the Deep Blue DSpace repository, the ‘Item’ is a major unit of organization. Each collection in Deep Blue may have multiple Items, each of which may contain multiple files. In many cases these Items will be analogous to archival series or subseries.
While preparing content for deposit into Deep Blue, archivists should ensure that all files (ZIP and individual) are situated inside a folder that corresponds to a Deep Blue Item.
Looking forward to the time when the MLibrary LIT division will create METS files for all deposits, it is important that these folder names are identical with what the titles of Deep Blue Items. As a result, the major folders in the processing directory should have no underscores.
3.J.ii: Creation of ZIP Archive Files
It may be necessary to create ZIP files to “bundle” multiple files and/or entire directories. Work with DCS to identify appropriate packages for deposit.
1. Right click on the folder (or select the files and then right click)

NOTE: This document is intended solely for reference use. 11/16/2011 62
2. Choose: Send To > Compressed (zipped) Folder
3. Record the creation of ZIP files by the Bentley Library in the PREMIS preservation event spreadsheet:
a. Date b. Outcome: should always be passed c. Files: enter filenames of all ZIP files created; delimit entries with a
semicolon (;).
3.K: DROID—Extract Metadata and Characterize Content
Use DROID to characterize content and produce a listing of all files (including materials within ZIP archive files).
1. Go to Tools > Preferences. Under the “Profile Defaults,” check the box next to “Generate MD5 hash for each file.” Under “Export Defaults,” the CSV export option should be set to “One row per file.”
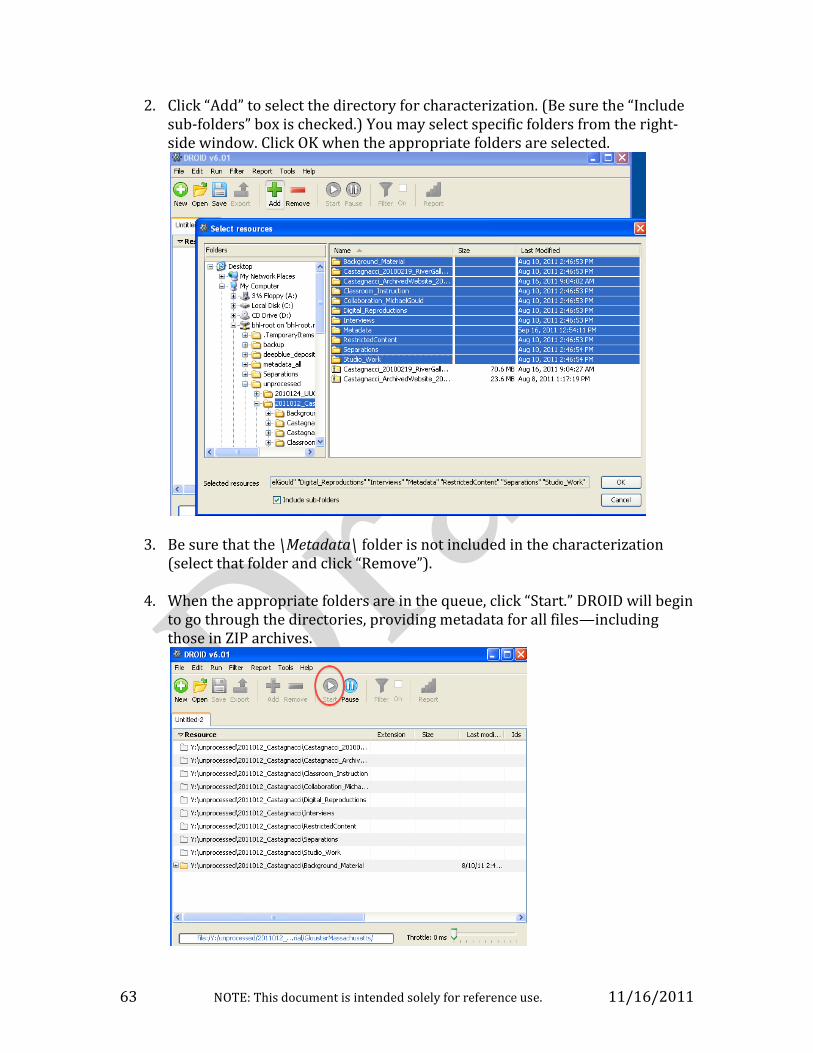
NOTE: This document is intended solely for reference use. 11/16/2011 63
2. Click “Add” to select the directory for characterization. (Be sure the “Include sub-folders” box is checked.) You may select specific folders from the right-side window. Click OK when the appropriate folders are selected.
3. Be sure that the \Metadata\ folder is not included in the characterization (select that folder and click “Remove”).
4. When the appropriate folders are in the queue, click “Start.” DROID will begin to go through the directories, providing metadata for all files—including those in ZIP archives.
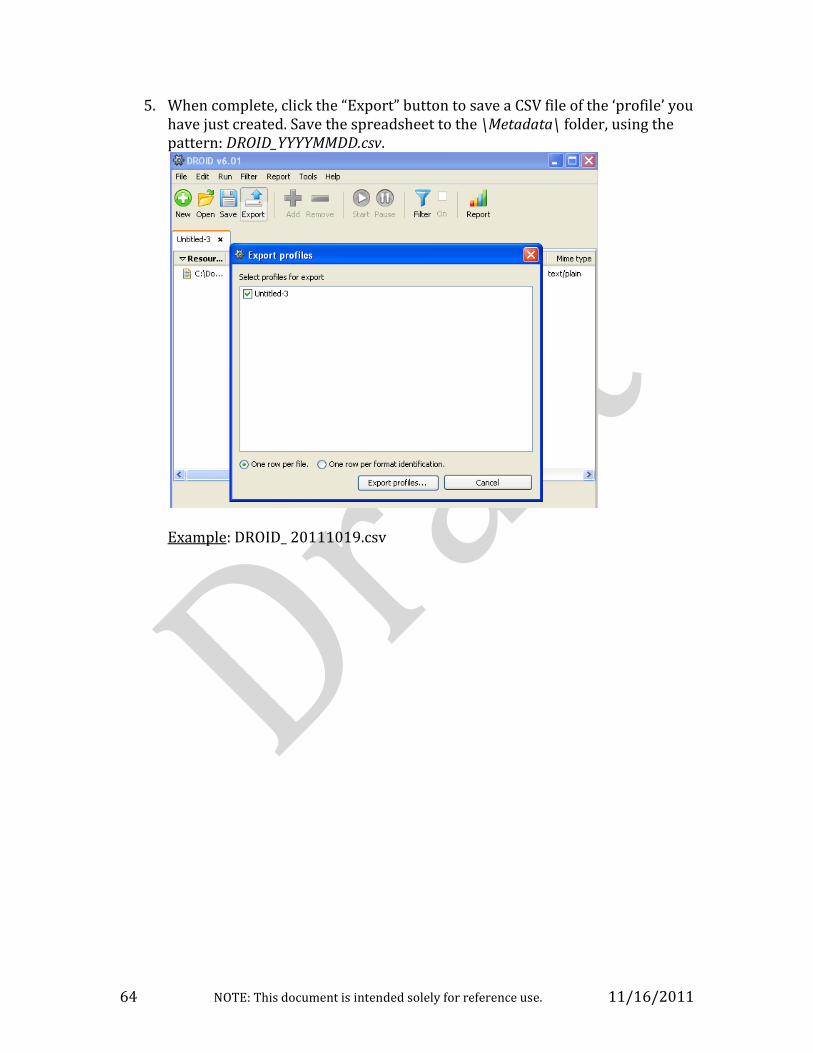
NOTE: This document is intended solely for reference use. 11/16/2011 64
5. When complete, click the “Export” button to save a CSV file of the ‘profile’ you have just created. Save the spreadsheet to the \Metadata\ folder, using the pattern: DROID_YYYYMMDD.csv.
Example: DROID_ 20111019.csv
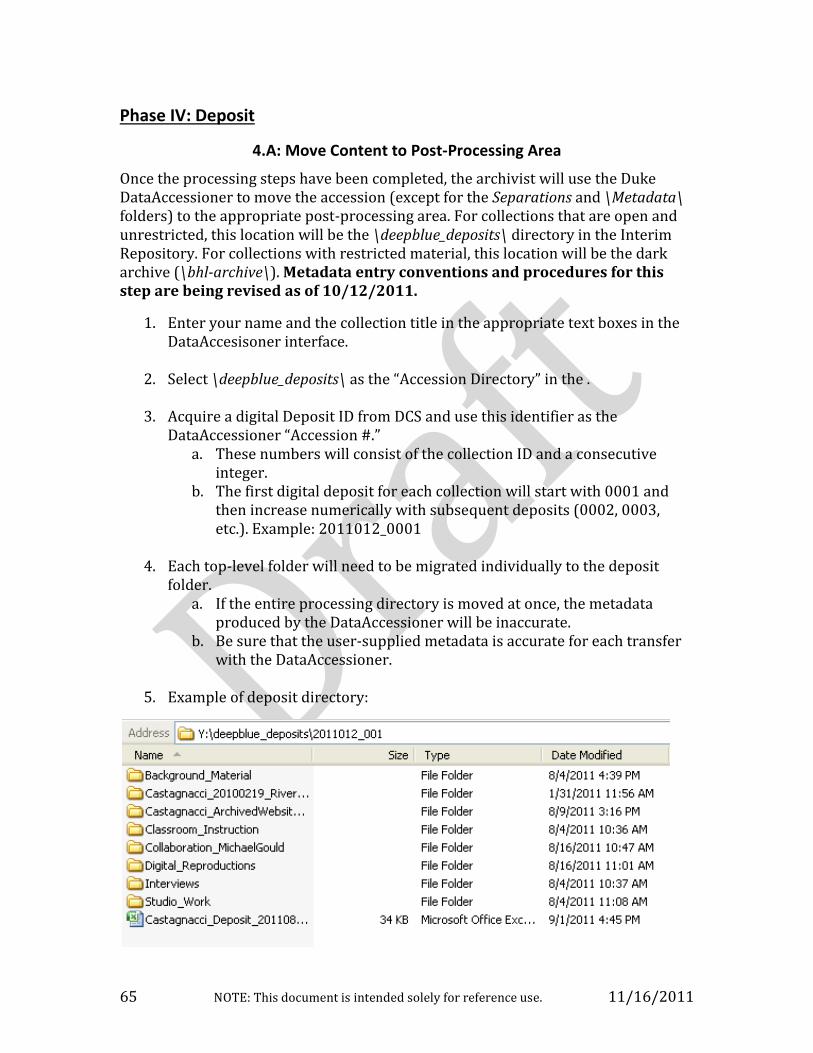
NOTE: This document is intended solely for reference use. 11/16/2011 65
Phase IV: Deposit
4.A: Move Content to Post-Processing Area
Once the processing steps have been completed, the archivist will use the Duke DataAccessioner to move the accession (except for the Separations and \Metadata\ folders) to the appropriate post-processing area. For collections that are open and unrestricted, this location will be the \deepblue_deposits\ directory in the Interim Repository. For collections with restricted material, this location will be the dark archive (\bhl-archive\). Metadata entry conventions and procedures for this step are being revised as of 10/12/2011.
1. Enter your name and the collection title in the appropriate text boxes in the DataAccesisoner interface.
2. Select \deepblue_deposits\ as the “Accession Directory” in the .
3. Acquire a digital Deposit ID from DCS and use this identifier as the
DataAccessioner “Accession #.” a. These numbers will consist of the collection ID and a consecutive
integer. b. The first digital deposit for each collection will start with 0001 and
then increase numerically with subsequent deposits (0002, 0003, etc.). Example: 2011012_0001
4. Each top-level folder will need to be migrated individually to the deposit folder.
a. If the entire processing directory is moved at once, the metadata produced by the DataAccessioner will be inaccurate.
b. Be sure that the user-supplied metadata is accurate for each transfer with the DataAccessioner.
5. Example of deposit directory:

NOTE: This document is intended solely for reference use. 11/16/2011 66
6. The DataAccessioner will create an XML manifest in the deposit directory. a. When the collection has been successfully moved, transfer this file to
the \Metadata\ folder in the processing directory. b. The filename should reflect the pattern: Manifest.xml
Example: Manifest_2011012_001.xml
4.B: Prepare Deep Blue Deposit Metadata
Create a metadata spreadsheet so that content may be batch-uploaded into Deep Blue. Work with DCS to correctly enter metadata. A complex deposit may require additional consultation with Jim Ottaviani to appropriately structure the collection in Deep Blue. NOTE: procedures are under review as of 10/11/2011.
1. Identify Deep Blue Items; enter appropriate “Item” metadata.
2. Enter metadata for files (ZIP and other formats) associated with each Item. a. If more than one file will be associated with an Item, you will have to
enter information on multiple files in one cell. b. Delimit entries with a semi-colon (;). c. For each file, the following metadata must be paralleled in their
respective cells: i. Filename
ii. Mimetype iii. Brief description
3. Save the Deep Blue metadata spreadsheet in the top level of the
collection’s deposit directory. i. Name file using pattern: deepBlue_DepositID.xlsx
ii. Example: deepBlue_2011012_0001.xlsx
4.C: Prepare Administrative and Descriptive Metadata XML File
The archivist will complete an EAD template with administrative and descriptive metadata that applies to the particular deposit. This XML document will provide basic descriptive and administrative metadata about the deposit and may be used in a future procedure to create METS files.
1. The template includes guides for entering information. Consult with DCS for help in completing the template.
2. Name file using pattern: EAD_DepositID.xml Example: EAD_2011012_0001.xml

NOTE: This document is intended solely for reference use. 11/16/2011 67
3. Save file in \Metadata\ folder. (For EMAIL deposits—pending discussion with LIT, the EAD template may need to be saved in the top level of the collection’s deposit directory.)
4.D: Complete PREMIS Preservation Metadata Spreadsheet
Review PREMIS preservation event spreadsheet to ensure required fields are included.
1. A template for this spreadsheet will provide guidance on how to enter metadata.
2. If a list of files will be included (for example, in the event a procedure fails), delimit the filenames using a semicolon (;).
3. Save as a CSV file. Name file using pattern: PREMIS_DepositID.csv Example: PREMIS_2011012_0001.csv
4.E: Additional Steps
1. Digital Curation Services will coordinate the deposit of material into Deep Blue (or other storage environment).
2. For unrestricted materials, an additional copy of the deposit (with \Metadata\ folder) will be saved in \bhl-archive\.
Phase V: Description
Digital Curation Services will receive notification of successful deposit as well as a spreadsheet of files and persistent URLs for content in Deep Blue.
5A: Create or Update Finding Aid
5B: Create or Update MARC Record
5C: Update BEAL Record.
1. Document separations and change status to ‘Processed’ 2. Create digital object record (for tracking content); attach manifest of object. 3. Update location of content in BEAL. Procedures TBD…

NOTE: This document is intended solely for reference use. 11/16/2011 68
Phase VI: Clean Up
6A: Manage Separations
Per the donor agreement, the Separations folder will be either deleted or returned to the donor by DCSS. Save the deposit’s separations in \bhl-root\Separations\. Title the folder with the Deposit ID. Content will be stored here for up to 60 days after the deposit, upon which time it will be either returned to the donor or deleted.
6B: Delete additional copies of content
Upon successful deposit, Digital Curation Services will delete material from ‘Backup’ and ‘Unprocessed’ directory.