Embed Size (px)
Citation preview
Bending Instructions
Instructions CS, CCS, MTS, FMS and CRS 28mm Bending Tool
A Bending Dye
B Tab
C Guide Wedge
D Handle
E Bending House
F Measurement Line
First, insert the two smaller bending strips into the track. Then, press the bigger bending strip into the slot of the track between the smaller ones.
Place the Guide-Wedge (C) as depicted on the foto.Slide the track in position and determine the requiredsize from the measurement line (F) to the end of thetrack. This will create the distance from the outside ofthe track to the wall.
Tighten the screw on the Guide-Wedge. Start bendingby turning the handle until the required angle is reached. For two curves in one track, measure from the outside of the track to the measurement line (F). This will create the distance from the outside of the track between the two curves.
Insert the track from the backside of the Bending tool,between the Bending Dye (A) and the Bending House(E). Place the handle (D).
Forest developed one Bending House for: CS/CCS/FMS,MTS and CRS 20 and 28 mm (0,8” and 1,1”).Depending on the type of track that has to be curved anAll-in Bending Wheel can be ordered.
Necessary items: Art.number:Contract Bending Tool Basic 2560000000MTS Bending Wheel all-in (incl 90cm strip) 4560000000CRS Bending Wheel 28 mm all-in (incl 90cm strip) 5860000028Extended Lever 9525000015To be used for bending of MTS and CRS 28 mm
CS/CCS/FMS Bending Wheel (excl strip!) 2561000000The Bending Strips have to be ordered separatelyCS Set Bending Strips 2560100000CCS Set Bending Strips 3060100000FMS/TCS Set Bending Strips 5160100000CRS Contract Bending Wheel 20 mm all-in 5860200020
Continuous curves can be made with the ElectricPowered Bender (not displayed here).
1
3
2
4
A
B
C
EF
D
FTurn the handle(see metalprotractor).If necessaryshorten track tothe size needed.
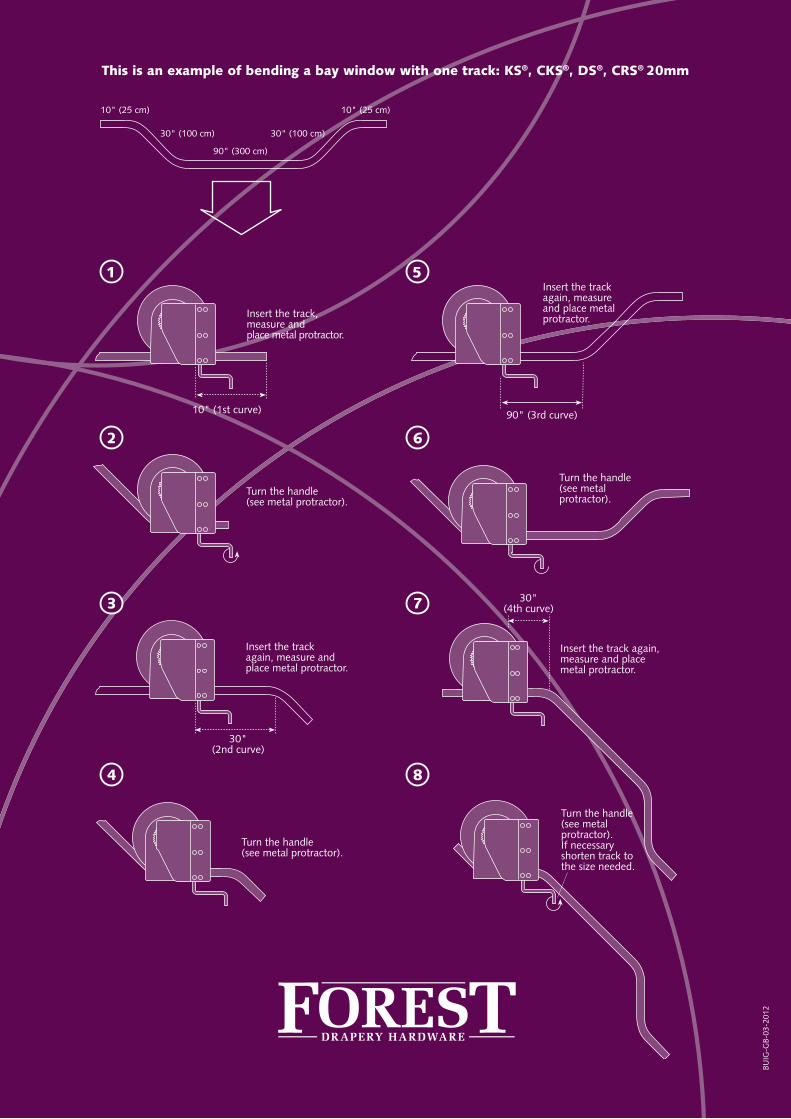
Turn the handle(see metal protractor).
30"(2nd curve)
Insert the trackagain, measure andplace metal protractor.
Turn the handle(see metalprotractor).
Turn the handle(see metal protractor).
90" (3rd curve)
Insert the trackagain, measureand place metalprotractor.
Examples
1
10" (1st curve)
Insert the track,measure andplace metal protractor.
2
3
4
90" (300 cm)
30" (100 cm)
10" (25 cm)
30" (100 cm)
10" (25 cm)
5
6
7
8
30"(4th curve)
Insert the track again,measure and placemetal protractor.
This is an example of bending a bay window with one track: KS®, CKS®, DS®, CRS® 20mm
BUIG
-GB-
03-2
012
Rear
Front
ED
C
K
F
L
G
H
A
B
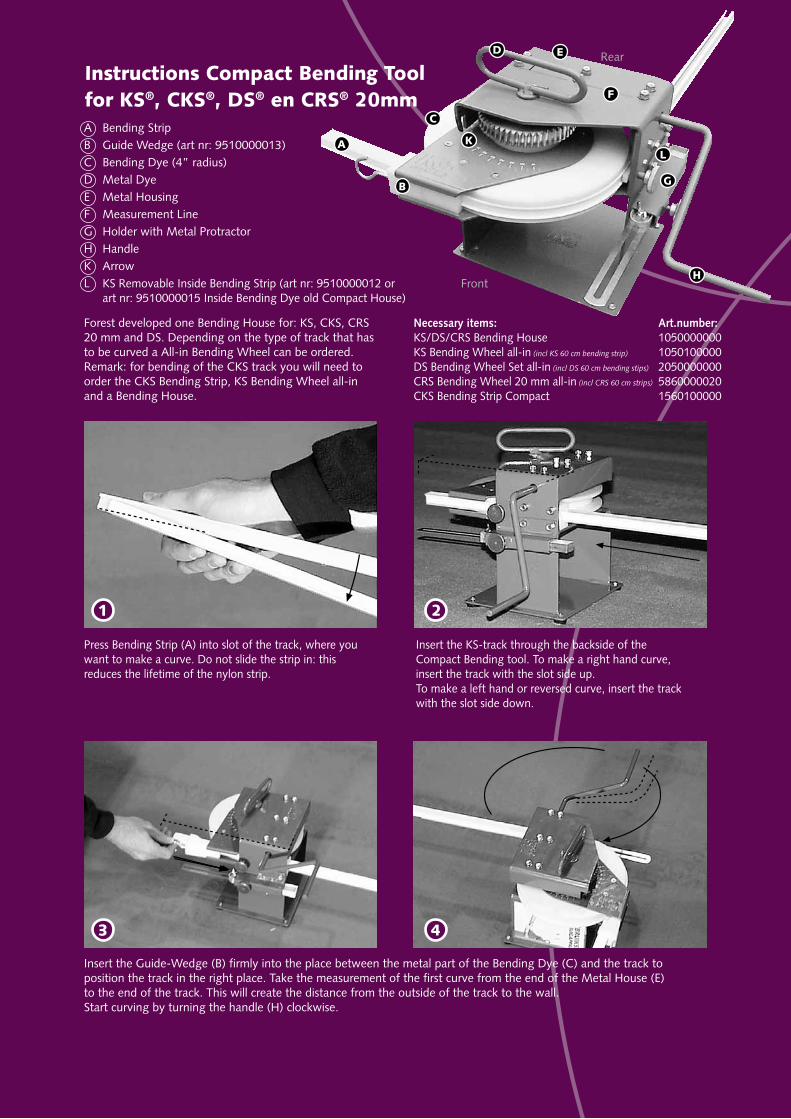
Instructions Compact Bending Toolfor KS®, CKS®, DS® en CRS® 20mm
Forest developed one Bending House for: KS, CKS, CRS20 mm and DS. Depending on the type of track that hasto be curved a All-in Bending Wheel can be ordered.Remark: for bending of the CKS track you will need toorder the CKS Bending Strip, KS Bending Wheel all-inand a Bending House.
Press Bending Strip (A) into slot of the track, where youwant to make a curve. Do not slide the strip in: thisreduces the lifetime of the nylon strip.
Insert the Guide-Wedge (B) firmly into the place between the metal part of the Bending Dye (C) and the track toposition the track in the right place. Take the measurement of the first curve from the end of the Metal House (E)to the end of the track. This will create the distance from the outside of the track to the wall.Start curving by turning the handle (H) clockwise.
Insert the KS-track through the backside of theCompact Bending tool. To make a right hand curve,insert the track with the slot side up.To make a left hand or reversed curve, insert the trackwith the slot side down.
Necessary items: Art.number: KS/DS/CRS Bending House 1050000000KS Bending Wheel all-in (incl KS 60 cm bending strip) 1050100000DS Bending Wheel Set all-in (incl DS 60 cm bending stips) 2050000000CRS Bending Wheel 20 mm all-in (incl CRS 60 cm strips) 5860000020CKS Bending Strip Compact 1560100000
1
3
2
4
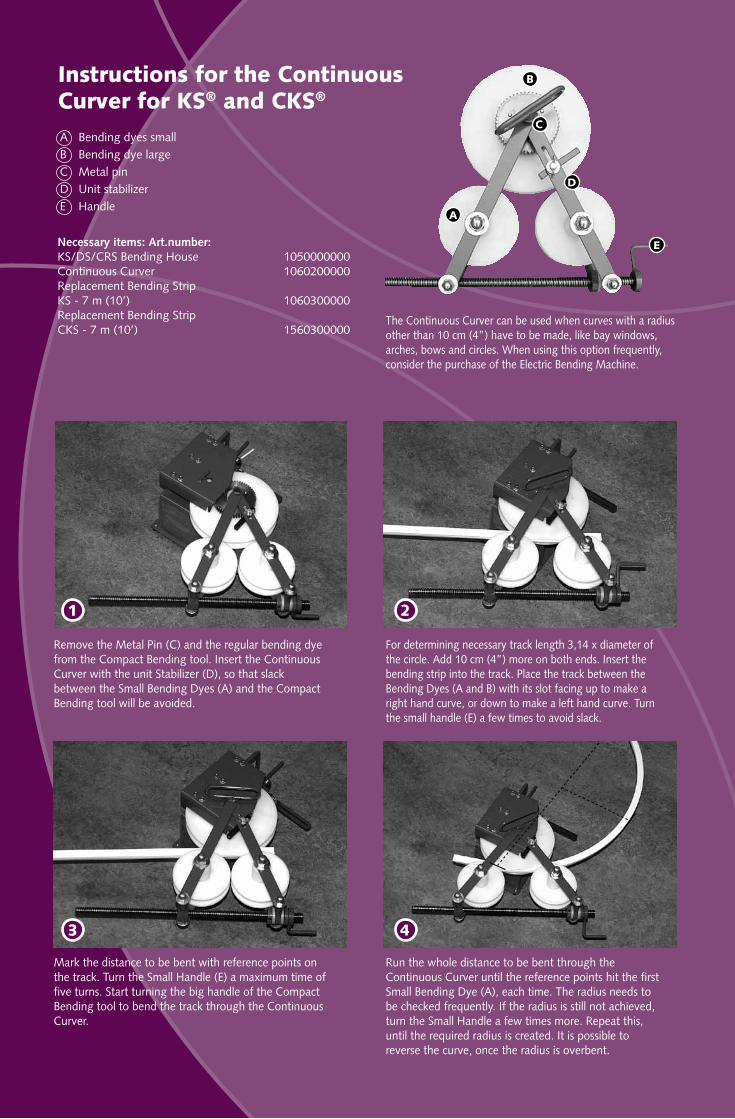
Instructions for the ContinuousCurver for KS® and CKS®
A Bending dyes smallB Bending dye largeC Metal pinD Unit stabilizerE Handle
Remove the Metal Pin (C) and the regular bending dyefrom the Compact Bending tool. Insert the ContinuousCurver with the unit Stabilizer (D), so that slackbetween the Small Bending Dyes (A) and the CompactBending tool will be avoided.
Mark the distance to be bent with reference points onthe track. Turn the Small Handle (E) a maximum time offive turns. Start turning the big handle of the CompactBending tool to bend the track through the ContinuousCurver.
For determining necessary track length 3,14 x diameter ofthe circle. Add 10 cm (4”) more on both ends. Insert thebending strip into the track. Place the track between theBending Dyes (A and B) with its slot facing up to make aright hand curve, or down to make a left hand curve. Turnthe small handle (E) a few times to avoid slack.
The Continuous Curver can be used when curves with a radius other than 10 cm (4”) have to be made, like bay windows, arches, bows and circles. When using this option frequently, consider the purchase of the Electric Bending Machine.
Run the whole distance to be bent through theContinuous Curver until the reference points hit the firstSmall Bending Dye (A), each time. The radius needs tobe checked frequently. If the radius is still not achieved,turn the Small Handle a few times more. Repeat this,until the required radius is created. It is possible toreverse the curve, once the radius is overbent.
1 2
3 4
Necessary items: Art.number: KS/DS/CRS Bending House 1050000000Continuous Curver 1060200000Replacement Bending StripKS - 7 m (10’) 1060300000Replacement Bending StripCKS - 7 m (10’) 1560300000
A
B
E
D
C
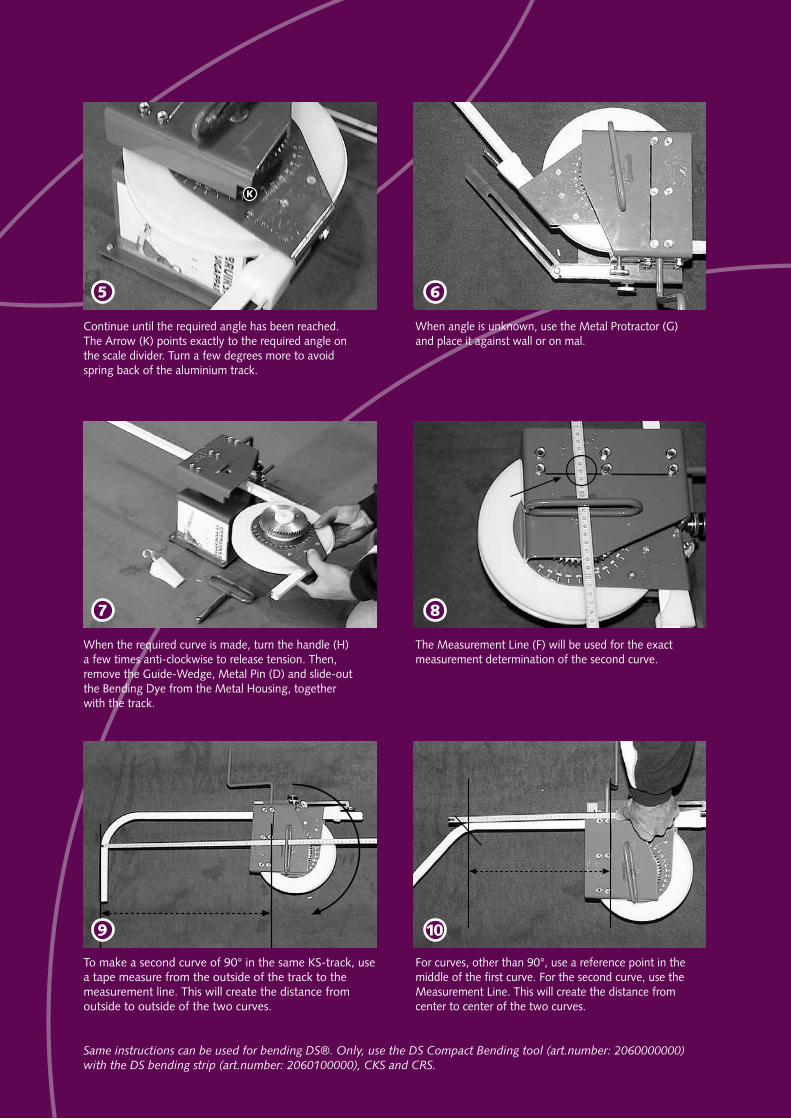
When the required curve is made, turn the handle (H)a few times anti-clockwise to release tension. Then,remove the Guide-Wedge, Metal Pin (D) and slide-outthe Bending Dye from the Metal Housing, togetherwith the track.
To make a second curve of 90° in the same KS-track, use a tape measure from the outside of the track to themeasurement line. This will create the distance fromoutside to outside of the two curves.
Same instructions can be used for bending DS®. Only, use the DS Compact Bending tool (art.number: 2060000000) with the DS bending strip (art.number: 2060100000), CKS and CRS.
Continue until the required angle has been reached.The Arrow (K) points exactly to the required angle onthe scale divider. Turn a few degrees more to avoidspring back of the aluminium track.
The Measurement Line (F) will be used for the exactmeasurement determination of the second curve.
For curves, other than 90°, use a reference point in themiddle of the first curve. For the second curve, use theMeasurement Line. This will create the distance fromcenter to center of the two curves.
When angle is unknown, use the Metal Protractor (G)and place it against wall or on mal.
7
5
8
6
10
K
9
A Bending StripB Guide Wedge (art nr: 9510000013)C Bending Dye (4” radius)D Metal DyeE Metal HousingF Measurement LineG Holder with Metal ProtractorH HandleK ArrowL KS Removable Inside Bending Strip (art nr: 9510000012 or
art nr: 9510000015 Inside Bending Dye old Compact House)
Rear
Front
ED
C
K
F
L
G
H
A
B
IInstructions Compact Bending Toolfor KS®, CKS®, DS® en CRS® 20mm
Forest developed one Bending House for: KS, CKS, CRS20 mm and DS. Depending on the type of track that hasto be curved a All-in Bending Wheel can be ordered.Remark: for bending of the CKS track you will need toorder the CKS Bending Strip, KS Bending Wheel all-inand a Bending House.
Press Bending Strip (A) into slot of the track, where youwant to make a curve. Do not slide the strip in: thisreduces the lifetime of the nylon strip.
Insert the Guide-Wedge (B) firmly into the place between the metal part of the Bending Dye (C) and the track toposition the track in the right place. Take the measurement of the first curve from the end of the Metal House (E)to the end of the track. This will create the distance from the outside of the track to the wall.Start curving by turning the handle (H) clockwise.
Insert the KS-track through the backside of theCompact Bending tool. To make a right hand curve,insert the track with the slot side up.To make a left hand or reversed curve, insert the trackwith the slot side down.
Necessary items: Art.number: KS/DS/CRS Bending House 1050000000KS Bending Wheel all-in (incl KS 60 cm bending strip) 1050100000DS Bending Wheel Set all-in (incl DS 60 cm bending stips) 2050000000CRS Bending Wheel 20 mm all-in (incl CRS 60 cm strips) 5860000020CKS Bending Strip Compact 1560100000
1
3
2
4
Instructions for the ContinuousCurver for KS® and CKS®
A Bending dyes smallB Bending dye largeC Metal pinD Unit stabilizerE Handle
Remove the Metal Pin (C) and the regular bending dyefrom the Compact Bending tool. Insert the ContinuousCurver with the unit Stabilizer (D), so that slackbetween the Small Bending Dyes (A) and the CompactBending tool will be avoided.
Mark the distance to be bent with reference points onthe track. Turn the Small Handle (E) a maximum time offive turns. Start turning the big handle of the CompactBending tool to bend the track through the ContinuousCurver.
For determining necessary track length 3,14 x diameter ofthe circle. Add 10 cm (4”) more on both ends. Insert thebending strip into the track. Place the track between theBending Dyes (A and B) with its slot facing up to make aright hand curve, or down to make a left hand curve. Turnthe small handle (E) a few times to avoid slack.
The Continuous Curver can be used when curves with a radius other than 10 cm (4”) have to be made, like bay windows, arches, bows and circles. When using this option frequently, consider the purchase of the Electric Bending Machine.
Run the whole distance to be bent through theContinuous Curver until the reference points hit the firstSmall Bending Dye (A), each time. The radius needs tobe checked frequently. If the radius is still not achieved,turn the Small Handle a few times more. Repeat this,until the required radius is created. It is possible toreverse the curve, once the radius is overbent.
1 2
3 4
Necessary items: Art.number: KS/DS/CRS Bending House 1050000000Continuous Curver 1060200000Replacement Bending StripKS - 7 m (10’) 1060300000Replacement Bending StripCKS - 7 m (10’) 1560300000
A
B
E
D
C
When the required curve is made, turn the handle (H)a few times anti-clockwise to release tension. Then,remove the Guide-Wedge, Metal Pin (D) and slide-outthe Bending Dye from the Metal Housing, togetherwith the track.
To make a second curve of 90° in the same KS-track, use a tape measure from the outside of the track to themeasurement line. This will create the distance fromoutside to outside of the two curves.
Same instructions can be used for bending DS®. Only, use the DS Compact Bending tool (art.number: 2060000000) with the DS bending strip (art.number: 2060100000), CKS and CRS.
Continue until the required angle has been reached.The Arrow (K) points exactly to the required angle onthe scale divider. Turn a few degrees more to avoidspring back of the aluminium track.
The Measurement Line (F) will be used for the exactmeasurement determination of the second curve.
For curves, other than 90°, use a reference point in themiddle of the first curve. For the second curve, use theMeasurement Line. This will create the distance fromcenter to center of the two curves.
When angle is unknown, use the Metal Protractor (G)and place it against wall or on mal.
7
5
8
6
10
K
9
A Bending StripB Guide Wedge (art nr: 9510000013)C Bending Dye (4” radius)D Metal DyeE Metal HousingF Measurement LineG Holder with Metal ProtractorH HandleK ArrowL KS Removable Inside Bending Strip (art nr: 9510000012 or
art nr: 9510000015 Inside Bending Dye old Compact House)

Bending Instructions
Instructions CS, CCS, MTS, FMS and CRS 28mm Bending Tool
A Bending Dye
B Tab
C Guide Wedge
D Handle
E Bending House
F Measurement Line
First, insert the two smaller bending strips into the track. Then, press the bigger bending strip into the slot of the track between the smaller ones.
Place the Guide-Wedge (C) as depicted on the foto.Slide the track in position and determine the requiredsize from the measurement line (F) to the end of thetrack. This will create the distance from the outside ofthe track to the wall.
Tighten the screw on the Guide-Wedge. Start bendingby turning the handle until the required angle is reached. For two curves in one track, measure from the outside of the track to the measurement line (F). This will create the distance from the outside of the track between the two curves.
Insert the track from the backside of the Bending tool,between the Bending Dye (A) and the Bending House(E). Place the handle (D).
Forest developed one Bending House for: CS/CCS/FMS,MTS and CRS 20 and 28 mm (0,8” and 1,1”).Depending on the type of track that has to be curved anAll-in Bending Wheel can be ordered.
Necessary items: Art.number:Contract Bending Tool Basic 2560000000MTS Bending Wheel all-in (incl 90cm strip) 4560000000CRS Bending Wheel 28 mm all-in (incl 90cm strip) 5860000028Extended Lever 9525000015To be used for bending of MTS and CRS 28 mm
CS/CCS/FMS Bending Wheel (excl strip!) 2561000000The Bending Strips have to be ordered separatelyCS Set Bending Strips 2560100000CCS Set Bending Strips 3060100000FMS/TCS Set Bending Strips 5160100000CRS Contract Bending Wheel 20 mm all-in 5860200020
Continuous curves can be made with the ElectricPowered Bender (not displayed here).
1
3
2
4
A
B
C
EF
D
FTurn the handle(see metalprotractor).If necessaryshorten track tothe size needed.
Turn the handle(see metal protractor).
30"(2nd curve)
Insert the trackagain, measure andplace metal protractor.
Turn the handle(see metalprotractor).
Turn the handle(see metal protractor).
90" (3rd curve)
Insert the trackagain, measureand place metalprotractor.
Examples
1
10" (1st curve)
Insert the track,measure andplace metal protractor.
2
3
4
90" (300 cm)
30" (100 cm)
10" (25 cm)
30" (100 cm)
10" (25 cm)
5
6
7
8
30"(4th curve)
Insert the track again,measure and placemetal protractor.
This is an example of bending a bay window with one track: KS®, CKS®, DS®, CRS® 20mm
BUIG
-GB-
03-2
012


![Web Crippling and Bending Moment Failure of Trapezoidal ... · iii Notation General variables F Actual concentrated load, can be in combination with bending moment [N]. k Stiffness](https://img.pdfslide.us/doc/110x75/5eb2139cf3202d168d76ddf5/web-crippling-and-bending-moment-failure-of-trapezoidal-iii-notation-general.jpg)