Embed Size (px)
Citation preview
Beginning SharePoint® 2007:
Building Team Solutions with MOSS 2007
Chapter 6: Working with Content Types
ISBN-10: 0-470-12449-0 ISBN-13: 978-0-470-12449-9
Copyright of Wiley Publishing, Inc. Posted with Permission
6Working with Content Types
Thus far, this book has discussed components that can help you organize information in aSharePoint site. You should now know how to create lists and libraries, and assign metadata val-ues to content items. You should also know how to associate business processes with lists andlibraries so that you can track, review, and approve items in a consistent and automatic manner.Using this functionality in your work environment means that you spend more time doing actualwork, rather than searching in disorganized filing systems.
This chapter takes the concepts discussed thus far and brings them together to create an informa-tion management package that ties to your content. It covers topics including:
❑ What a content type is and why it is such an important part of SharePoint 2007
❑ The various content types you can create
❑ Hands-on examples of creating the major content types
❑ Best practices for creating and managing content types for your organization
After reading this chapter, you should feel comfortable creating content types suitable for effi-ciently managing the information that is vital to your organization.
Content Types OverviewA content type represents a group of informational items in your organization that share commonproperties. You can define these properties, which include name, description, a grouping category,to meet your business needs. In addition, you can adjust the properties associated with templates,workflow, site columns, and policy management as well as the settings for the document informa-tion panel. You can change these properties at any time and optionally apply those changes toyour entire environment.
For more on the various content properties and what they do, see the section “The Anatomy of aContent Type.”
24499c06.qxd 5/1/07 12:00 PM Page 159
Excerpted from Beginning SharePoint(R) 2007: Building Team Solutions with MOSS 2007Wrox Press, www.wrox.com
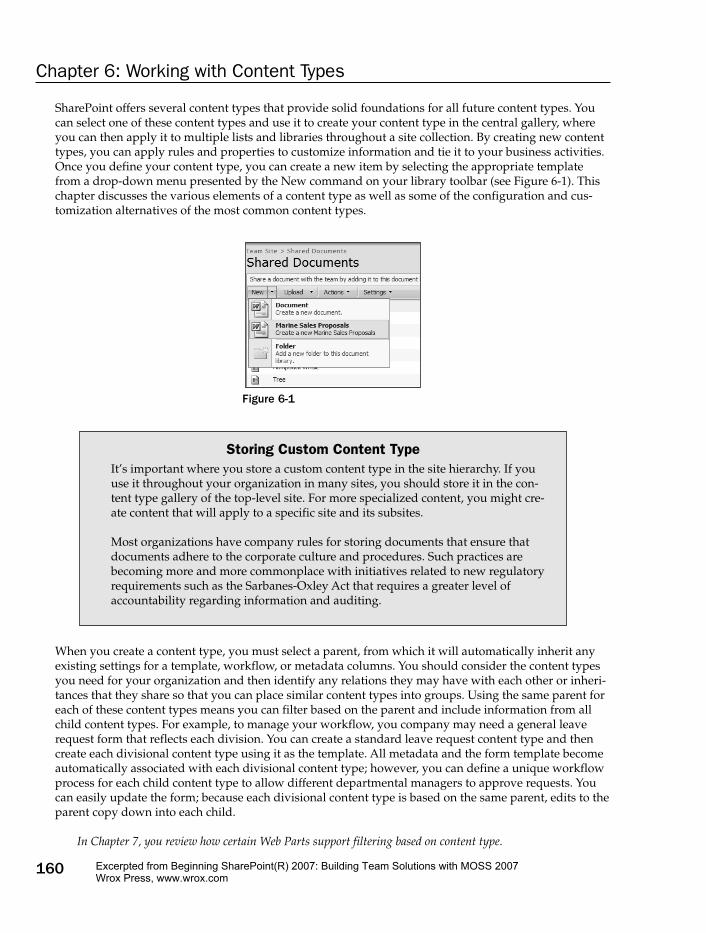
SharePoint offers several content types that provide solid foundations for all future content types. Youcan select one of these content types and use it to create your content type in the central gallery, whereyou can then apply it to multiple lists and libraries throughout a site collection. By creating new contenttypes, you can apply rules and properties to customize information and tie it to your business activities.Once you define your content type, you can create a new item by selecting the appropriate templatefrom a drop-down menu presented by the New command on your library toolbar (see Figure 6-1). Thischapter discusses the various elements of a content type as well as some of the configuration and cus-tomization alternatives of the most common content types.
Figure 6-1
When you create a content type, you must select a parent, from which it will automatically inherit anyexisting settings for a template, workflow, or metadata columns. You should consider the content typesyou need for your organization and then identify any relations they may have with each other or inheri-tances that they share so that you can place similar content types into groups. Using the same parent foreach of these content types means you can filter based on the parent and include information from allchild content types. For example, to manage your workflow, you company may need a general leaverequest form that reflects each division. You can create a standard leave request content type and thencreate each divisional content type using it as the template. All metadata and the form template becomeautomatically associated with each divisional content type; however, you can define a unique workflowprocess for each child content type to allow different departmental managers to approve requests. Youcan easily update the form; because each divisional content type is based on the same parent, edits to theparent copy down into each child.
In Chapter 7, you review how certain Web Parts support filtering based on content type.
Storing Custom Content TypeIt’s important where you store a custom content type in the site hierarchy. If youuse it throughout your organization in many sites, you should store it in the con-tent type gallery of the top-level site. For more specialized content, you might cre-ate content that will apply to a specific site and its subsites.
Most organizations have company rules for storing documents that ensure thatdocuments adhere to the corporate culture and procedures. Such practices arebecoming more and more commonplace with initiatives related to new regulatoryrequirements such as the Sarbanes-Oxley Act that requires a greater level ofaccountability regarding information and auditing.
160
Chapter 6: Working with Content Types
24499c06.qxd 5/1/07 12:00 PM Page 160
Excerpted from Beginning SharePoint(R) 2007: Building Team Solutions with MOSS 2007Wrox Press, www.wrox.com
To show you how to use content types, this section presents two Try It Outs. In the first, you see how tocreate a new content type, and in the second, you see how to edit one of the content types thatSharePoint has to offer to suit your needs.
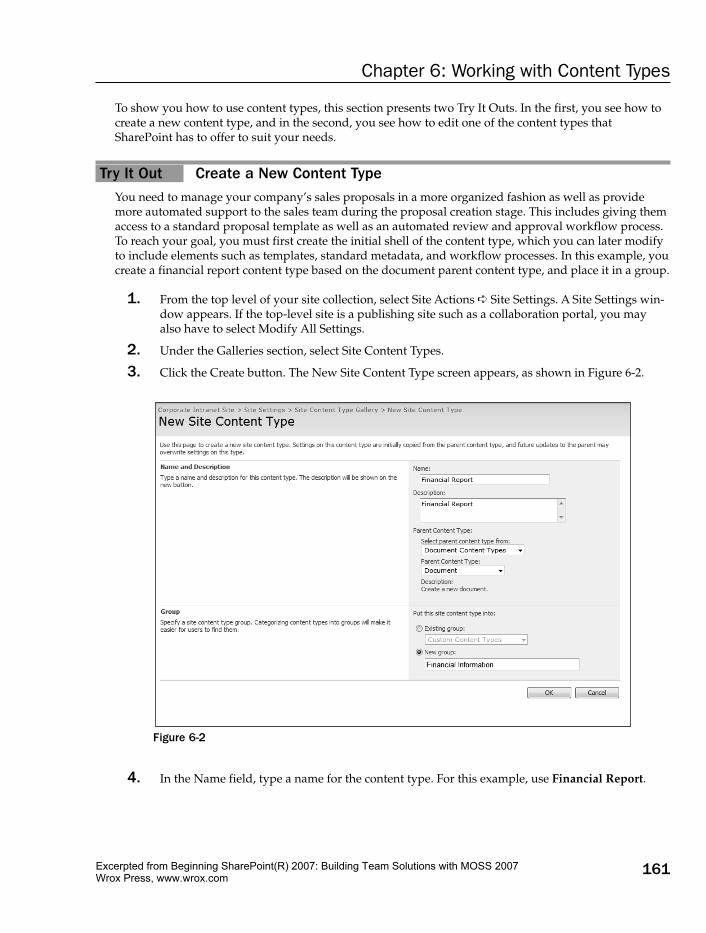
Try It Out Create a New Content TypeYou need to manage your company’s sales proposals in a more organized fashion as well as providemore automated support to the sales team during the proposal creation stage. This includes giving themaccess to a standard proposal template as well as an automated review and approval workflow process.To reach your goal, you must first create the initial shell of the content type, which you can later modifyto include elements such as templates, standard metadata, and workflow processes. In this example, youcreate a financial report content type based on the document parent content type, and place it in a group.
1. From the top level of your site collection, select Site Actions ➪ Site Settings. A Site Settings win-dow appears. If the top-level site is a publishing site such as a collaboration portal, you mayalso have to select Modify All Settings.
2. Under the Galleries section, select Site Content Types.
3. Click the Create button. The New Site Content Type screen appears, as shown in Figure 6-2.
Figure 6-2
4. In the Name field, type a name for the content type. For this example, use Financial Report.
161
Chapter 6: Working with Content Types
24499c06.qxd 5/1/07 12:00 PM Page 161
Excerpted from Beginning SharePoint(R) 2007: Building Team Solutions with MOSS 2007Wrox Press, www.wrox.com

5. In the Description field, type a description for the content type. For this example, use FinancialReport (Spreadsheet).
6. From the Select Parent Content Type From drop-down menu, select the group name for the con-tent type on which you are basing your new content type. For this example, select DocumentContent Types.
7. From the Parent Content Type drop-down menu, select the name of the content type on whichyou are basing your content type. All new content types must have a parent, so typically youwill select a parent that contains a similar template, a similar workflow process, or similar meta-data columns to the item you are creating. For this example, use the Document content type.
8. From the Put This Site Content Type Into section, select either an Existing Group or create aNew Group. In this example, use a new group name called Financial Information.
9. Click the OK button to create the custom content type.
How It WorksSite content types allow you to manage multiple document types and templates from a single location.Once you have created a content type and associated it with a group, it becomes available in your list ofsite content types, which can then be associated with a particular library. Your content type is then acces-sible via your library’s New drop-down menu (see Figure 6-1).
Try It Out Edit an Existing Content TypeSharePoint offers many site content types that are preconfigured to support a variety of business situa-tions. To save time, you can use one of these existing content types as a starting point and edit it to suityour own particular organizational needs. Editing an existing content type is easy. Just follow thesesteps:
In steps 6 through 14, you are creating a column to add to your content type. For more on creatingcolumns in SharePoint, see Chapter 4.
1. From the top level of your site collection, select Site Actions ➪ Site Settings.
2. Under the Galleries section, select Site Content Types.
3. From the Financial Information Types section, select Financial Report.
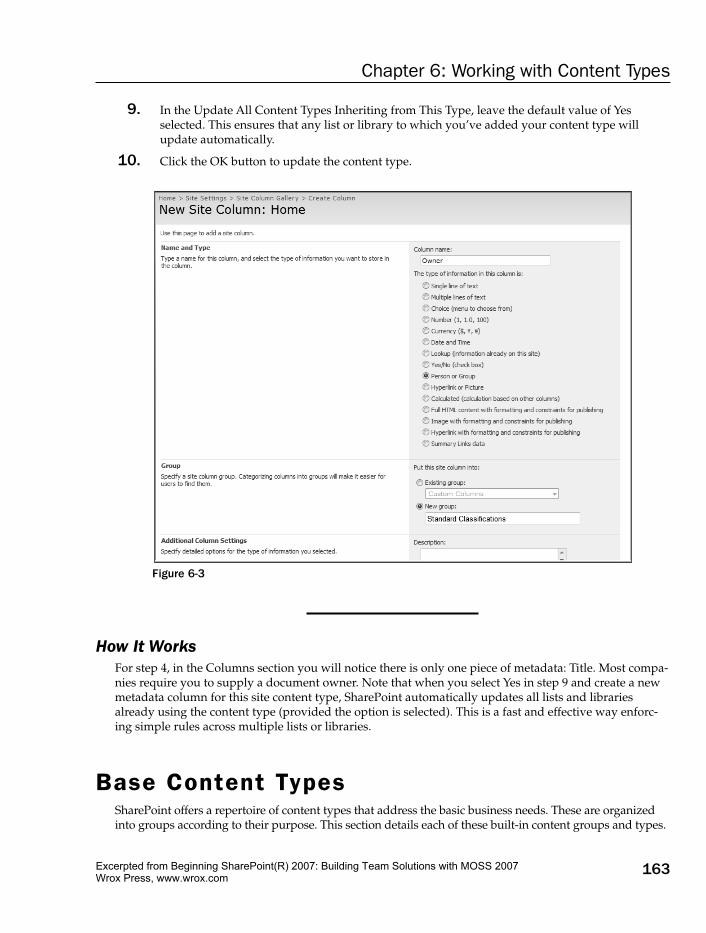
4. Select Add from new site column. The New Site Column window appears, as shown inFigure 6-3.
5. In the Column Name field, type Owner.
6. From the Type of Information in This Column section, select Person or Group.
7. Create a new group for site columns called “Standard Classifications.”
8. Select Yes for Require That This Column Contains Information.
162
Chapter 6: Working with Content Types
24499c06.qxd 5/1/07 12:00 PM Page 162
Excerpted from Beginning SharePoint(R) 2007: Building Team Solutions with MOSS 2007Wrox Press, www.wrox.com
9. In the Update All Content Types Inheriting from This Type, leave the default value of Yesselected. This ensures that any list or library to which you’ve added your content type willupdate automatically.
10. Click the OK button to update the content type.
Figure 6-3
How It WorksFor step 4, in the Columns section you will notice there is only one piece of metadata: Title. Most compa-nies require you to supply a document owner. Note that when you select Yes in step 9 and create a newmetadata column for this site content type, SharePoint automatically updates all lists and librariesalready using the content type (provided the option is selected). This is a fast and effective way enforc-ing simple rules across multiple lists or libraries.
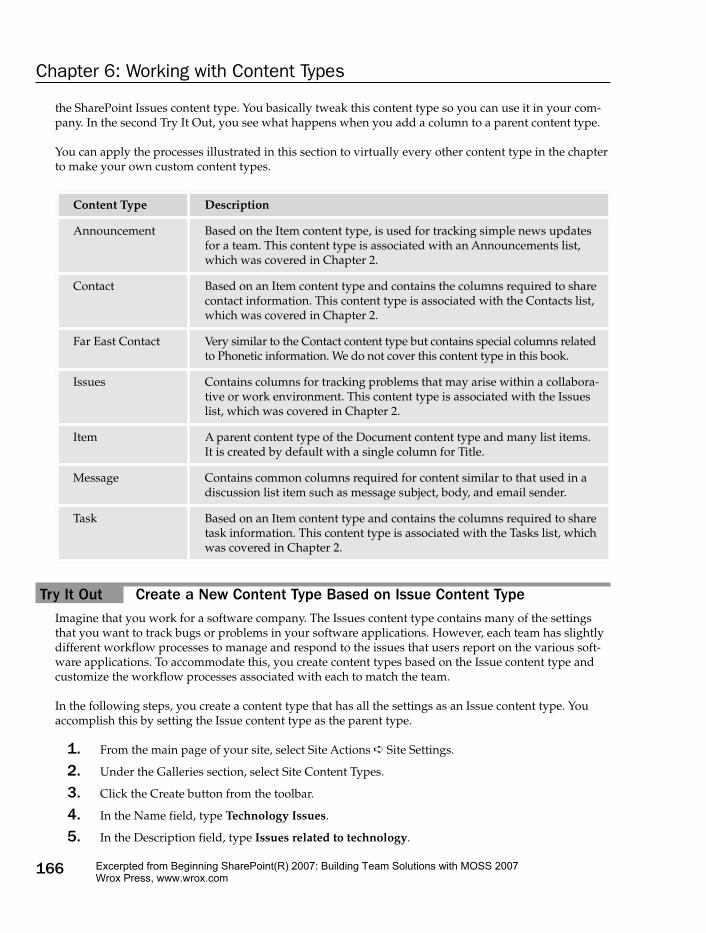
Base Content TypesSharePoint offers a repertoire of content types that address the basic business needs. These are organizedinto groups according to their purpose. This section details each of these built-in content groups and types.
163
Chapter 6: Working with Content Types
24499c06.qxd 5/1/07 12:00 PM Page 163
Excerpted from Beginning SharePoint(R) 2007: Building Team Solutions with MOSS 2007Wrox Press, www.wrox.com
Business Intelligence Content TypesSharePoint 2007 introduces powerful features that organize, track, and display data from a variety ofsources so you can monitor the status of your business. This section discusses the business intelligencecontent types, and Chapter 11 describes the useful set of business reporting tools included in this latestversion of SharePoint. The content types in the following table are available as part of the BusinessIntelligence group. The indicator types contain columns that collect business intelligence informationfrom a data source so it can be presented as a key performance indicator (KPI) or in a report. By creatinga new content type based on one of these base content types, you can augment the information that isgathered by default. You can also customize the dashboard and report types to meet your needs.
Document Content TypesYou’ll probably use the document types frequently in your SharePoint sites because the typical site func-tions as a document repository and viewing system for your team. The following document types arebuilt into SharePoint, some of which will be explored throughout this book:
Content Type Description
Basic Page A very simple web page containing a single rich text editor.
Document The parent content type for many other collaborative content types includ-ing basic page, Dublin core columns, form, and picture. Possibly one of themost common and popular content types.
Content Type Description
Dashboard A special type of web page geared toward the display ofbusiness intelligence reports. This content type can be cre-ated from a Reports library.
Indicator using data in Excel workbook
A key performance indicator based on information storedwithin an Excel workbook. This type of indicator can becreated from a KPI list.
Indicator using data in SQL Server2005 Analysis Services
A key performance indicator based on information storedwithin SQL Server 2005 Analysis Services. This type ofindicator can be created from a KPI list.
Indicator using data in SharePoint list
A key performance indicator based on information storedwithin a SharePoint list. This type of indicator can be cre-ated from a KPI list.
Indicator using manually enteredinformation
A key performance indicator based on information entereddirectly into an item in a KPI list.
Report An Excel document page for the browser-based display ofspreadsheet information. Content authors create content inthis type by uploading a spreadsheet to a reports library orcreating a new spreadsheet from the library.
164
Chapter 6: Working with Content Types
24499c06.qxd 5/1/07 12:00 PM Page 164
Excerpted from Beginning SharePoint(R) 2007: Building Team Solutions with MOSS 2007Wrox Press, www.wrox.com

Folder Content TypesYou use this type for folders and discussion boards in SharePoint. Because individual discussions inSharePoint are stored within folders, it is appropriate that the base content type is affiliated with theFolder Content Types group.
The following base content types are available as part of the Folder Content Types group:
List Content TypesAn important SharePoint 2007 feature is easily creating and storing information in lists. Lists can holdany information from a simple To-Do list, to a more complex resource tracking list. You can now take fulladvantage of content types by creating a base content type for each primary list template. Each contenttype in turn has a set of associated metadata columns that represent the information that will be storedin the list.
The following base content types are what SharePoint has to offer as part of the List Content Typesgroup. This section also presents two Try It Outs that show how to create a new content type based on
Content Type Description
Folder Expanded in SharePoint 2007 to support columns and metadata like any otherelement stored within a list or library. Unlike other content types, the folderdoes not support workflow or information management policies.
Discussion Based on the folder content type, supports workflow and information man-agement policy settings as well as custom metadata. This type of content typeis associated with a Discussion list, which was discussed in Chapter 2.
Content Type Description
Dublin CoreColumns
Based on the Document content type but contains many standard columnsto conform with the requirements for the popular classification systemknown as Dublin Core.
Form Based on the Document content type and is specifically designed to supportthe use of InfoPath. See Chapter 10 for more on forms.
Link to aDocument
In some cases, a document may be stored in one location and linked fromanother library. This content type helps support such scenarios by creating arecord or row in a document library that references the document located inthe other location.
Picture Based on the document content type and is the primary content type associ-ated with a Picture library.
Web Part Page A web page with a number of Web Part zones for the use of Web Parts.These web pages can come in a variety of layouts and templates.
165
Chapter 6: Working with Content Types
24499c06.qxd 5/1/07 12:00 PM Page 165
Excerpted from Beginning SharePoint(R) 2007: Building Team Solutions with MOSS 2007Wrox Press, www.wrox.com
the SharePoint Issues content type. You basically tweak this content type so you can use it in your com-pany. In the second Try It Out, you see what happens when you add a column to a parent content type.
You can apply the processes illustrated in this section to virtually every other content type in the chapterto make your own custom content types.
Try It Out Create a New Content Type Based on Issue Content TypeImagine that you work for a software company. The Issues content type contains many of the settingsthat you want to track bugs or problems in your software applications. However, each team has slightlydifferent workflow processes to manage and respond to the issues that users report on the various soft-ware applications. To accommodate this, you create content types based on the Issue content type andcustomize the workflow processes associated with each to match the team.
In the following steps, you create a content type that has all the settings as an Issue content type. Youaccomplish this by setting the Issue content type as the parent type.
1. From the main page of your site, select Site Actions ➪ Site Settings.
2. Under the Galleries section, select Site Content Types.
3. Click the Create button from the toolbar.
4. In the Name field, type Technology Issues.
5. In the Description field, type Issues related to technology.
Content Type Description
Announcement Based on the Item content type, is used for tracking simple news updatesfor a team. This content type is associated with an Announcements list,which was covered in Chapter 2.
Contact Based on an Item content type and contains the columns required to sharecontact information. This content type is associated with the Contacts list,which was covered in Chapter 2.
Far East Contact Very similar to the Contact content type but contains special columns relatedto Phonetic information. We do not cover this content type in this book.
Issues Contains columns for tracking problems that may arise within a collabora-tive or work environment. This content type is associated with the Issueslist, which was covered in Chapter 2.
Item A parent content type of the Document content type and many list items.It is created by default with a single column for Title.
Message Contains common columns required for content similar to that used in adiscussion list item such as message subject, body, and email sender.
Task Based on an Item content type and contains the columns required to sharetask information. This content type is associated with the Tasks list, whichwas covered in Chapter 2.
166
Chapter 6: Working with Content Types
24499c06.qxd 5/1/07 12:00 PM Page 166
Excerpted from Beginning SharePoint(R) 2007: Building Team Solutions with MOSS 2007Wrox Press, www.wrox.com
6. From the Select Parent Content Type From drop-down menu, select List Content Types.
7. From the Parent Content Type drop-down menu, select Issues.
8. From the Put This Site Content Type Into section, select New Group.
9. In the New Group field, type Divisional Issue Tracking.
10. Click the OK button to complete the creation of your new content type.
Try It Out Add a Column to a Parent Content TypeWhenever you select a content type as a parent of a new content type, all site columns are automaticallyadded to the new content type. Similarly, if you add a new custom column to the base Issues contenttype, you can optionally add that column to all content types inheriting from that type. For example, ifyou add a new column to the Issues content type for cost so that you can track what the expected costsof responding to the issue might be, you can also add that column to your Technology Issues contenttypes. In this example, you create a new column on the base issue content type called BillingInformation.
1. From the main page of your site, select Site Actions ➪ Site Settings.
2. Under the Galleries section, select Site Content Types.
3. From the List Content Types group, select Issues.
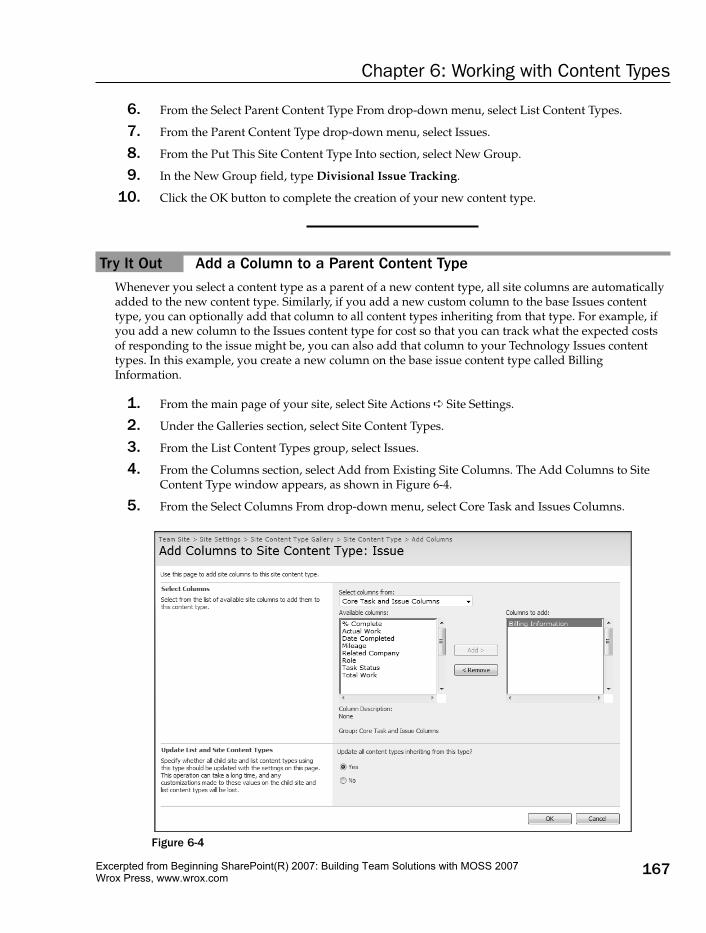
4. From the Columns section, select Add from Existing Site Columns. The Add Columns to SiteContent Type window appears, as shown in Figure 6-4.
5. From the Select Columns From drop-down menu, select Core Task and Issues Columns.
Figure 6-4
167
Chapter 6: Working with Content Types
24499c06.qxd 5/1/07 12:00 PM Page 167
Excerpted from Beginning SharePoint(R) 2007: Building Team Solutions with MOSS 2007Wrox Press, www.wrox.com
6. Select the Billing Information column from the Available columns field and click the Add button.
7. Ensure that Yes is selected for the Update All Content Types Inheriting from This Type value.
8. Click the OK button to complete the addition of the new column.
How It WorksThe Technologies Issues content type that you create in the “Create a New Content Type Based on IssueContent Type” Try It Out, updates to include the Billing Information field.
Page Layout Content TypesOne of the most significant advancements of SharePoint 2007 is the integration of Microsoft ContentManagement Server into the platform under the name Web Content Management (WCM). This great func-tionality allows users to create content for a site directly from the browser without having any specialweb development knowledge or skills.
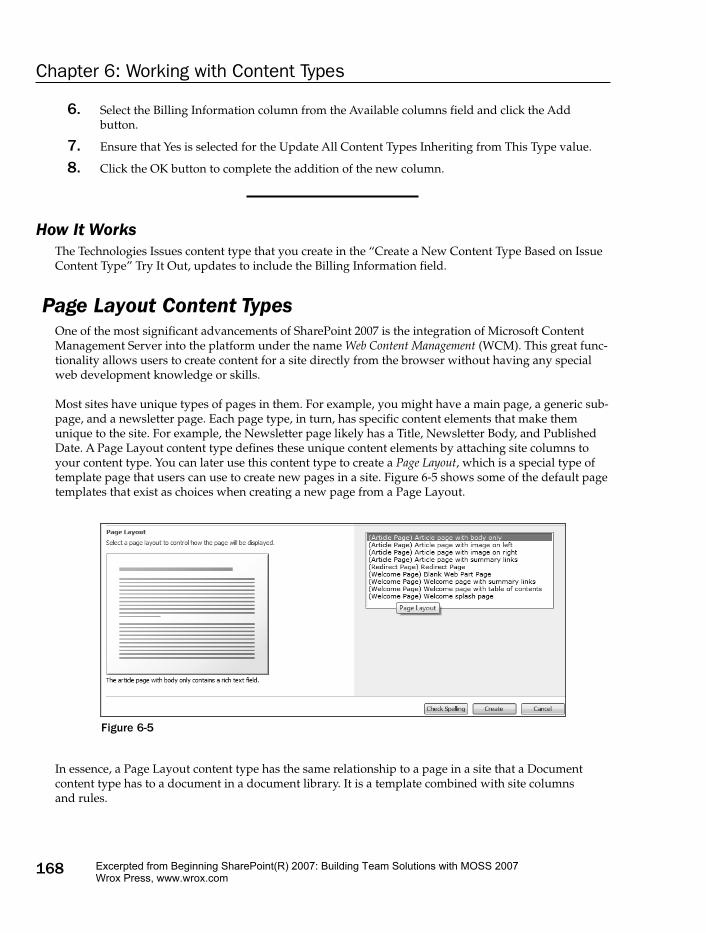
Most sites have unique types of pages in them. For example, you might have a main page, a generic sub-page, and a newsletter page. Each page type, in turn, has specific content elements that make themunique to the site. For example, the Newsletter page likely has a Title, Newsletter Body, and PublishedDate. A Page Layout content type defines these unique content elements by attaching site columns toyour content type. You can later use this content type to create a Page Layout, which is a special type oftemplate page that users can use to create new pages in a site. Figure 6-5 shows some of the default pagetemplates that exist as choices when creating a new page from a Page Layout.
Figure 6-5
In essence, a Page Layout content type has the same relationship to a page in a site that a Document content type has to a document in a document library. It is a template combined with site columns and rules.
168
Chapter 6: Working with Content Types
24499c06.qxd 5/1/07 12:00 PM Page 168
Excerpted from Beginning SharePoint(R) 2007: Building Team Solutions with MOSS 2007Wrox Press, www.wrox.com
The following base content types are available as part of the Page Layout Content Types group:
Chapter 13 discusses Page Layout content types in much greater detail, including how to make andmanage these special components.
Publishing Content TypesBesides offering a feature for content approval, WCM lets you publish information both automaticallyvia workflow and manually. Another WCM-related content type group in SharePoint 2007 is Publishingcontent types. The base publishing content types provide the structure for all major web publishing com-ponents. The following base content types are available as part of the Publishing Content Types group:
❑ Page: A system parent content type uses the page layout content types (see the section “PageLayout Content Types”) as a parent. This content type contains many columns related to the cre-ation of publishing content.
❑ Page Layout: A system parent content type used for publishing content in the site collection.
❑ Publishing Master Page: A system content type used for publishing content in the site collection.
Page layouts are template pages that are explored in Chapter 13, as are Master pages. Because Publishingcontent types are the key to creating websites using SharePoint 2007, Chapter 13 discusses them in muchgreater detail.
Special Content TypesThe content type group called Special content types allows users to upload documents regardless of con-tent type to a library. It offers no special customization characteristics and is intended for use in situa-tions where the content type is unknown or not important.
The Anatomy of a Content TypeThe magic of SharePoint is making its various pieces fit your business situation, and nowhere is thatmore evident than in content types. Content types all have properties, the basic ones being the name,description, and grouping category. In addition, you have properties associated with templates, work-flow, site columns, and policy management as well as settings for the document information panel. You
Content Type Description
Article Page Contains many of the common properties that a page should have, includ-ing elements used for publishing such as scheduling date and others thatare used for content display such as page content. As shown in Figure 6-5,several page layouts exist based on the Article Page template.
Redirect Page A page layout that is intended for the creation of pages that will redirectvisitors and readers to another location.
Welcome Page Contains a number of columns for the display and publishing of content.
169
Chapter 6: Working with Content Types
24499c06.qxd 5/1/07 12:00 PM Page 169
Excerpted from Beginning SharePoint(R) 2007: Building Team Solutions with MOSS 2007Wrox Press, www.wrox.com
can define and redefine these properties to fit your business situations, but to do that, you need anunderstanding of how to work with them. For example, you can change a content type name to reflect achange in process, but it’s important for you to make the name consistent and intuitive when you rede-fine it. In this section, you learn about the various content type properties and how to work with them.
Name and DescriptionBecause the name displays on all the buttons and labels associated with the content, you should assign aclear and descriptive name. For example, users should intuitively know what name to select when theyclick the button for creating a new item in a document library. You should consider who will work withthis content type and make sure that they understand exactly what they are creating when they select aname. This is especially critical when you work with the automated workflows, templates, and policies.For example, if your company sells multiple product lines related to aerospace and transportation, andyou create a content type that contains the proposal template, approval process, and metadata related toa specific marine product line, consider using a name that clearly defines. Naming it “sales document”or “marine product documents” would not be as appropriate as “marine sales proposal.”
As with all other SharePoint content elements, a good description helps communicate the purpose andintended use of a content type. By concisely stating what the content type is, users will more easily fill ininformation, modify settings, or select a content type for inclusion with a list or library.
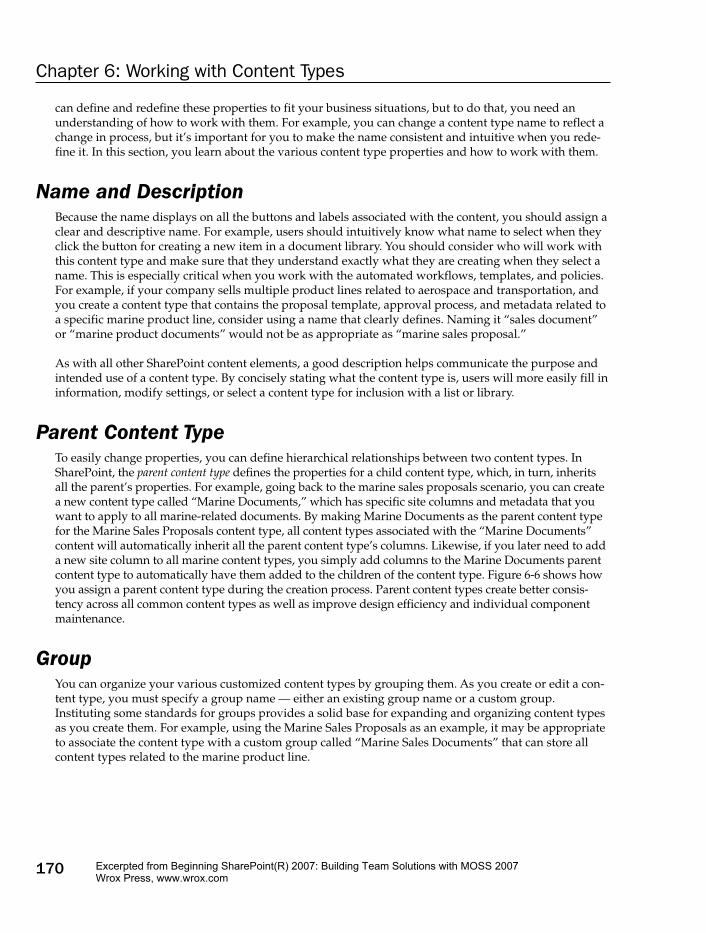
Parent Content TypeTo easily change properties, you can define hierarchical relationships between two content types. InSharePoint, the parent content type defines the properties for a child content type, which, in turn, inheritsall the parent’s properties. For example, going back to the marine sales proposals scenario, you can createa new content type called “Marine Documents,” which has specific site columns and metadata that youwant to apply to all marine-related documents. By making Marine Documents as the parent content typefor the Marine Sales Proposals content type, all content types associated with the “Marine Documents”content will automatically inherit all the parent content type’s columns. Likewise, if you later need to adda new site column to all marine content types, you simply add columns to the Marine Documents parentcontent type to automatically have them added to the children of the content type. Figure 6-6 shows howyou assign a parent content type during the creation process. Parent content types create better consis-tency across all common content types as well as improve design efficiency and individual componentmaintenance.
GroupYou can organize your various customized content types by grouping them. As you create or edit a con-tent type, you must specify a group name — either an existing group name or a custom group.Instituting some standards for groups provides a solid base for expanding and organizing content typesas you create them. For example, using the Marine Sales Proposals as an example, it may be appropriateto associate the content type with a custom group called “Marine Sales Documents” that can store allcontent types related to the marine product line.
170
Chapter 6: Working with Content Types
24499c06.qxd 5/1/07 12:00 PM Page 170
Excerpted from Beginning SharePoint(R) 2007: Building Team Solutions with MOSS 2007Wrox Press, www.wrox.com
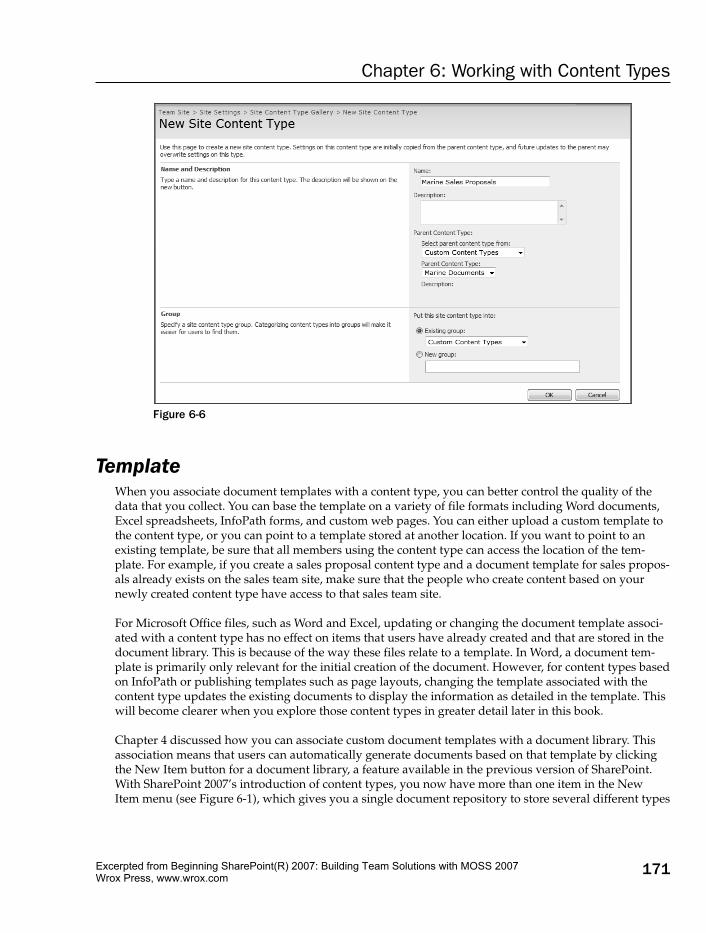
Figure 6-6
TemplateWhen you associate document templates with a content type, you can better control the quality of thedata that you collect. You can base the template on a variety of file formats including Word documents,Excel spreadsheets, InfoPath forms, and custom web pages. You can either upload a custom template tothe content type, or you can point to a template stored at another location. If you want to point to anexisting template, be sure that all members using the content type can access the location of the tem-plate. For example, if you create a sales proposal content type and a document template for sales propos-als already exists on the sales team site, make sure that the people who create content based on yournewly created content type have access to that sales team site.
For Microsoft Office files, such as Word and Excel, updating or changing the document template associ-ated with a content type has no effect on items that users have already created and that are stored in thedocument library. This is because of the way these files relate to a template. In Word, a document tem-plate is primarily only relevant for the initial creation of the document. However, for content types basedon InfoPath or publishing templates such as page layouts, changing the template associated with thecontent type updates the existing documents to display the information as detailed in the template. Thiswill become clearer when you explore those content types in greater detail later in this book.
Chapter 4 discussed how you can associate custom document templates with a document library. Thisassociation means that users can automatically generate documents based on that template by clickingthe New Item button for a document library, a feature available in the previous version of SharePoint.With SharePoint 2007’s introduction of content types, you now have more than one item in the NewItem menu (see Figure 6-1), which gives you a single document repository to store several different types
171
Chapter 6: Working with Content Types
24499c06.qxd 5/1/07 12:00 PM Page 171
Excerpted from Beginning SharePoint(R) 2007: Building Team Solutions with MOSS 2007Wrox Press, www.wrox.com
of information and simplify how people access materials. To do this with your process, see the followingTry It Out.
Try It Out Upload a Custom Template to a Content TypeIn this example, you go to the properties of an existing content type and upload a custom template.Users can then select this template using the New Item button from a document library that has the con-tent type associated with it.
1. From the main page of your site, select Site Actions ➪ Site Settings.
2. Under the Galleries section, select Site content types.
If your content type was created on a top-level site, you need to go to the top-level site settings to editthe content type directly.
3. Select your content type from the list. Use the Group Selection box on the right-hand side of thetoolbar to display only the group of which your content type is a member. This is helpful if youhave a large number of content types on your site. In this example, you select the FinancialReport content type that is part of the Financial Information group. The Site Content Type pagefor the content appears, as shown in Figure 6-7.
Figure 6-7
4. Select Advanced Settings from the Settings group.
5. Select Upload a New Document Template, and click the Browse button to locate your customtemplate. Please note that it is not necessary to have your document saved as a template file(.dotx or .dot).
6. When you have the appropriate file selected, click the Open button.
7. Click the OK button to complete the operation.
172
Chapter 6: Working with Content Types
24499c06.qxd 5/1/07 12:00 PM Page 172
Excerpted from Beginning SharePoint(R) 2007: Building Team Solutions with MOSS 2007Wrox Press, www.wrox.com
WorkflowCreating important documents often requires the creator to follow an equally important businessprocess. This process ensures that everyone involved in the collaboration activity is doing their part andcommunicating properly. When people follow processes without the aid of automated tools, they oftenencounter or create roadblocks because of distractions and other duties. For example, if a sales managercompletes an important sales proposal and sends it to a colleague or supervisor for feedback with anemail notification, that colleague may not immediately respond because of another task or emergencyand as a result, the request gets buried into an inbox or lost in the shuffle. This is a common situationbecause many people struggle to keep up with email and daily responsibilities. Unfortunately, thismeans missed deadlines, frustration between team members, missed opportunities, and it may ulti-mately impact the overall operations of the company.
By assigning a workflow template with a content type, you can define a realistic series of tasks withbuilt-in reminders for a specific business activity so that workers can focus on duties. For example, in theprevious scenario, whenever a salesperson creates a sales proposal, he can send it to the sales team or asupervisor for feedback with tasks and deadlines automatically created so that the request for feedbackis less likely to be lost. Even if the sales team supervisor does forget the task, the system will sendreminder messages to the supervisor until the task is complete. This means that the salesperson doesn’thave to follow up on the task.
Depending on the parent content type you select when you define your custom content type, you mayalready have workflows enabled. If these workflow processes do not apply, you can remove them, butbe careful not to remove a workflow that is important to the operations of a specific content type. Byupdating the workflow settings of a parent, you can optionally update any content types that are inher-ited from that content type.
Adding a custom workflow to a content type is a fairly simple process and similar to adding a workflowto a document library or list as described in Chapter 5. The advantage here, however, is that you typi-cally have to define the process only once and it is applied to multiple document libraries that utilizethat content type. If you add multiple content types to a single library, each content type can have itsown unique workflow or set of processes that are independent of the others.
Try It Out Define a Custom Workflow for a Content TypeAssigning a custom workflow with a content type is very similar to assigning a workflow to a documentlibrary. In the following example, you associate an approval workflow with an existing content type.
1. From the main page of your site, select Site Actions ➪ Site Settings.
2. Under the Galleries section, select Site Content Types.
If your content type was created on a top-level site, you need to go to the top-level site settings to editthe content type directly.
3. Select your content type from the list. Use the Group Selection box on the right-hand side of thetoolbar to filter the list to display only the group containing your content type. This is a helpfultip if you have a large number of content types on your site. In this example, use the FinancialReport content type that is part of the Financial Information group. The Site Content Type win-dow appears.
173
Chapter 6: Working with Content Types
24499c06.qxd 5/1/07 12:00 PM Page 173
Excerpted from Beginning SharePoint(R) 2007: Building Team Solutions with MOSS 2007Wrox Press, www.wrox.com
4. Under the Settings section, select Workflow settings.
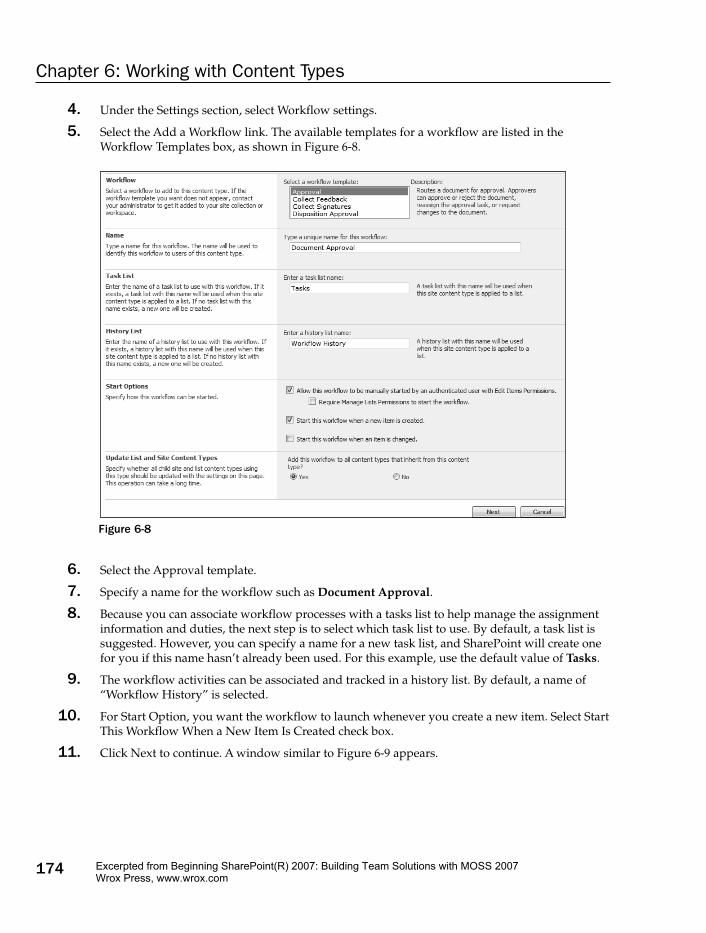
5. Select the Add a Workflow link. The available templates for a workflow are listed in theWorkflow Templates box, as shown in Figure 6-8.
Figure 6-8
6. Select the Approval template.
7. Specify a name for the workflow such as Document Approval.
8. Because you can associate workflow processes with a tasks list to help manage the assignmentinformation and duties, the next step is to select which task list to use. By default, a task list issuggested. However, you can specify a name for a new task list, and SharePoint will create onefor you if this name hasn’t already been used. For this example, use the default value of Tasks.
9. The workflow activities can be associated and tracked in a history list. By default, a name of“Workflow History” is selected.
10. For Start Option, you want the workflow to launch whenever you create a new item. Select StartThis Workflow When a New Item Is Created check box.
11. Click Next to continue. A window similar to Figure 6-9 appears.
174
Chapter 6: Working with Content Types
24499c06.qxd 5/1/07 12:00 PM Page 174
Excerpted from Beginning SharePoint(R) 2007: Building Team Solutions with MOSS 2007Wrox Press, www.wrox.com
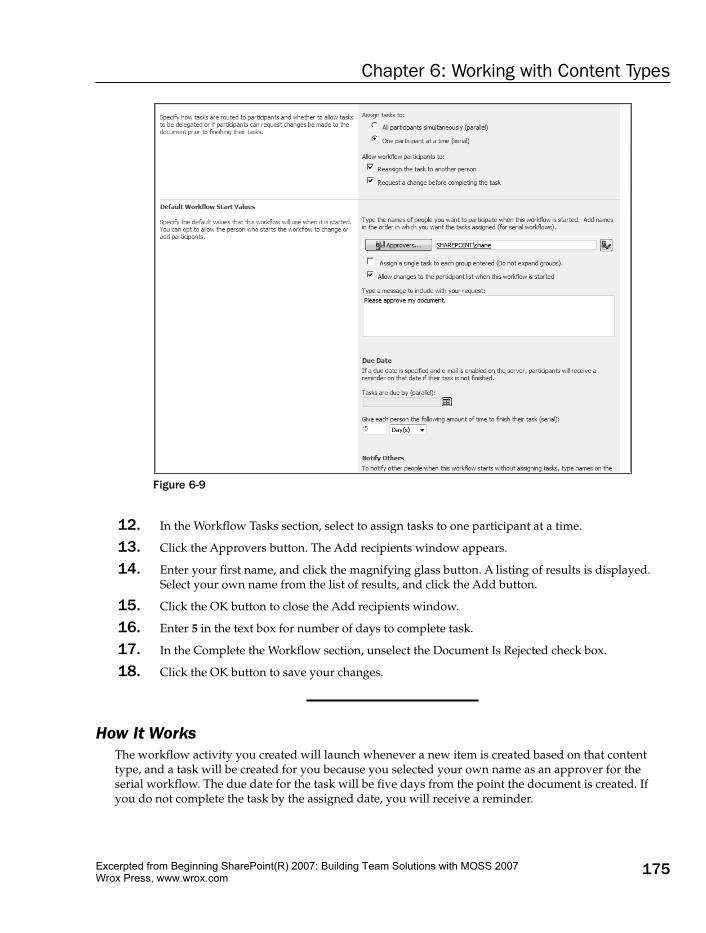
Figure 6-9
12. In the Workflow Tasks section, select to assign tasks to one participant at a time.
13. Click the Approvers button. The Add recipients window appears.
14. Enter your first name, and click the magnifying glass button. A listing of results is displayed.Select your own name from the list of results, and click the Add button.
15. Click the OK button to close the Add recipients window.
16. Enter 5 in the text box for number of days to complete task.
17. In the Complete the Workflow section, unselect the Document Is Rejected check box.
18. Click the OK button to save your changes.
How It WorksThe workflow activity you created will launch whenever a new item is created based on that contenttype, and a task will be created for you because you selected your own name as an approver for theserial workflow. The due date for the task will be five days from the point the document is created. Ifyou do not complete the task by the assigned date, you will receive a reminder.
175
Chapter 6: Working with Content Types
24499c06.qxd 5/1/07 12:00 PM Page 175
Excerpted from Beginning SharePoint(R) 2007: Building Team Solutions with MOSS 2007Wrox Press, www.wrox.com
Site ColumnsIn Chapter 4, you learned the importance of site columns when creating standard metadata propertiesfor lists and libraries. To recap, site columns are stored in a central gallery on each site, and any list orlibrary can use them on the same site or any site below it. Site columns provide standardization and easeof use when you want to share important information across multiple lists, libraries, or sites.
Site columns are also very important in content types. Because content types are created and stored in acentral gallery, all associated components must be centralized as well. Therefore, you can only associatesite columns with a content type. When you add a content type to a library, the required site columns areautomatically associated with that library for use by the content type. You can create custom views onthe columns, and Web Parts, such as the content query Web Part, and you can apply advanced filtering.
Web Parts are explained in Chapter 7.
Remember the following when working with site columns:
❑ When defining metadata for a content type, you can use existing site columns or create new sitecolumns directly from the content type Settings page. When you use existing site columns, youare redirected to a site column selection page.
❑ By using the Group Selection drop-down menu, you can filter the list of site columns to a moremanageable size. This is why group names are very important, and why you should make themintuitive when you create site columns (see the section “Name and Description” earlier in thechapter).
❑ Once you select the site columns you want, you click the Add button to move them from theleft-hand list box to the right-hand list box.
❑ You can remove an item you may have added accidentally by selecting it from the box on theright and clicking the Remove button.
❑ You can update all content types that inherit from the current content type with the newcolumns you selected. For example, if you have a content type “Human Resources Document”that is the parent to the other content types “Policies and Procedures” and “Leave RequestForm,” by selecting the Yes option in the Update List and Site Content Types section, a site col-umn for “Division” that is added to the Human Resources Document is also added to Policiesand Procedures and Leave Request Form content types.
You can also create a new site column as you create a content type. Even though you’re creating the sitecolumn from the administration interface of the specific content type, SharePoint still adds it to the cen-tral gallery of the site, making it available to other content types, lists and libraries on the current site,and sites below.
Document Information Panel SettingsWhenever you associate a document with a document library or content type, columns appear when thedocument is first saved or checked in. This is the document information panel, which asks you to completemetadata, as shown in Figure 6-10, and which is the subject of the next Try It Out.
For more on the Check In/Check Out process, see Chapter 3.
176
Chapter 6: Working with Content Types
24499c06.qxd 5/1/07 12:00 PM Page 176
Excerpted from Beginning SharePoint(R) 2007: Building Team Solutions with MOSS 2007Wrox Press, www.wrox.com
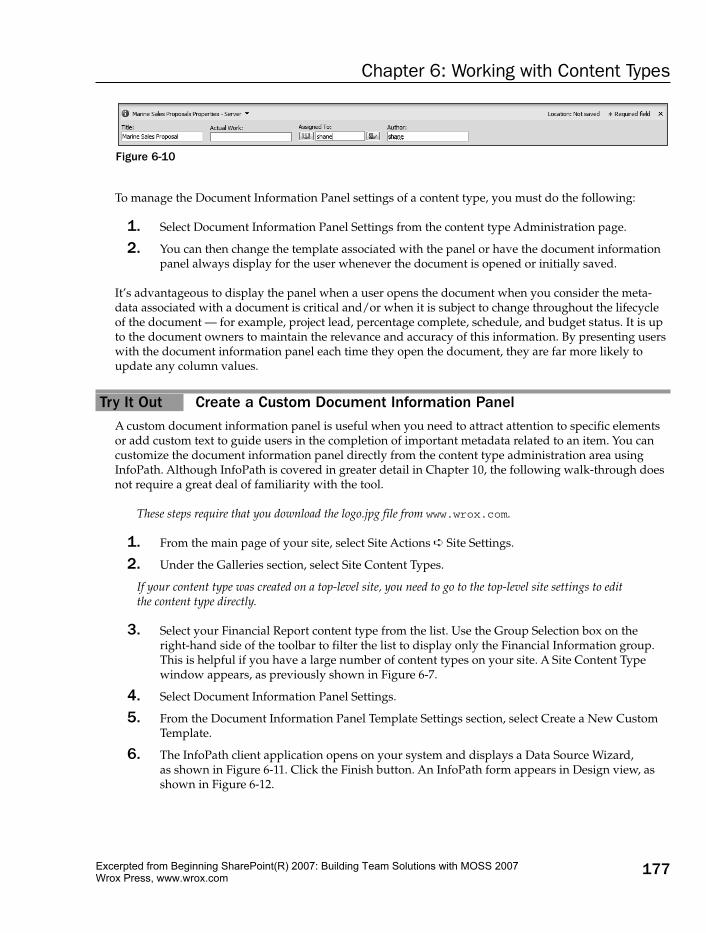
Figure 6-10
To manage the Document Information Panel settings of a content type, you must do the following:
1. Select Document Information Panel Settings from the content type Administration page.
2. You can then change the template associated with the panel or have the document informationpanel always display for the user whenever the document is opened or initially saved.
It’s advantageous to display the panel when a user opens the document when you consider the meta-data associated with a document is critical and/or when it is subject to change throughout the lifecycleof the document — for example, project lead, percentage complete, schedule, and budget status. It is upto the document owners to maintain the relevance and accuracy of this information. By presenting userswith the document information panel each time they open the document, they are far more likely toupdate any column values.
Try It Out Create a Custom Document Information PanelA custom document information panel is useful when you need to attract attention to specific elementsor add custom text to guide users in the completion of important metadata related to an item. You cancustomize the document information panel directly from the content type administration area usingInfoPath. Although InfoPath is covered in greater detail in Chapter 10, the following walk-through doesnot require a great deal of familiarity with the tool.
These steps require that you download the logo.jpg file from www.wrox.com.
1. From the main page of your site, select Site Actions ➪ Site Settings.
2. Under the Galleries section, select Site Content Types.
If your content type was created on a top-level site, you need to go to the top-level site settings to editthe content type directly.
3. Select your Financial Report content type from the list. Use the Group Selection box on theright-hand side of the toolbar to filter the list to display only the Financial Information group.This is helpful if you have a large number of content types on your site. A Site Content Typewindow appears, as previously shown in Figure 6-7.
4. Select Document Information Panel Settings.
5. From the Document Information Panel Template Settings section, select Create a New CustomTemplate.
6. The InfoPath client application opens on your system and displays a Data Source Wizard, as shown in Figure 6-11. Click the Finish button. An InfoPath form appears in Design view, asshown in Figure 6-12.
177
Chapter 6: Working with Content Types
24499c06.qxd 5/1/07 12:00 PM Page 177
Excerpted from Beginning SharePoint(R) 2007: Building Team Solutions with MOSS 2007Wrox Press, www.wrox.com
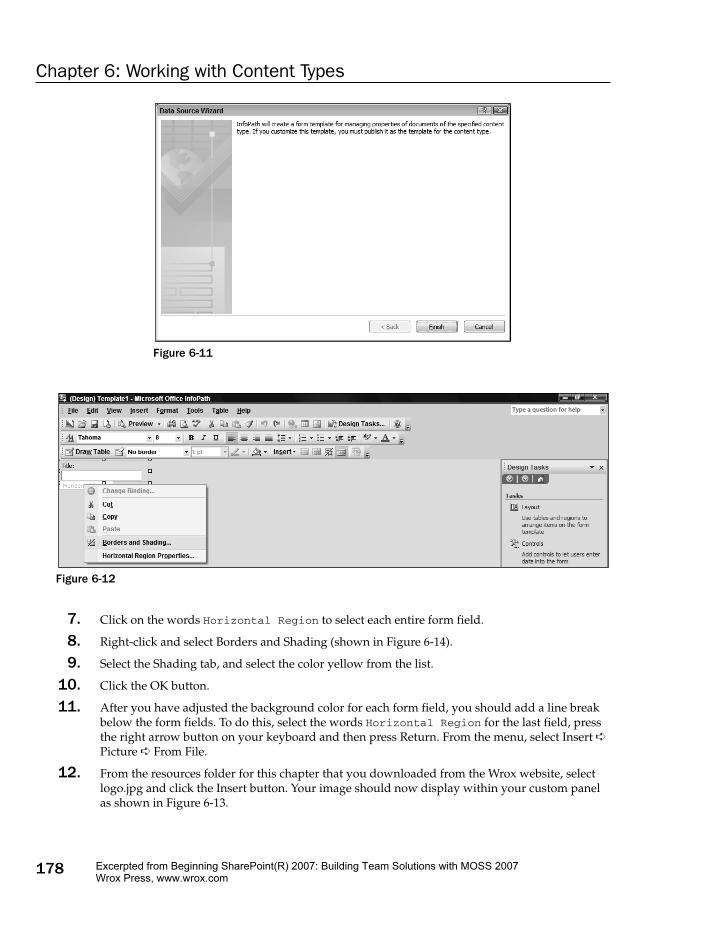
Figure 6-11
Figure 6-12
7. Click on the words Horizontal Region to select each entire form field.
8. Right-click and select Borders and Shading (shown in Figure 6-14).
9. Select the Shading tab, and select the color yellow from the list.
10. Click the OK button.
11. After you have adjusted the background color for each form field, you should add a line breakbelow the form fields. To do this, select the words Horizontal Region for the last field, pressthe right arrow button on your keyboard and then press Return. From the menu, select Insert ➪
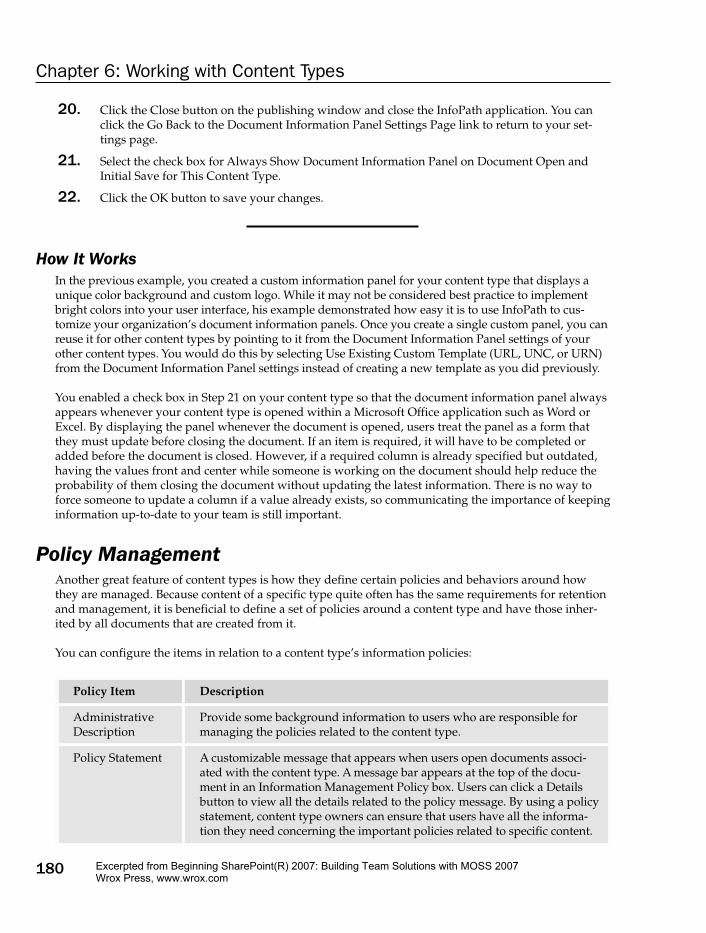
Picture ➪ From File.
12. From the resources folder for this chapter that you downloaded from the Wrox website, selectlogo.jpg and click the Insert button. Your image should now display within your custom panelas shown in Figure 6-13.
178
Chapter 6: Working with Content Types
24499c06.qxd 5/1/07 12:00 PM Page 178
Excerpted from Beginning SharePoint(R) 2007: Building Team Solutions with MOSS 2007Wrox Press, www.wrox.com
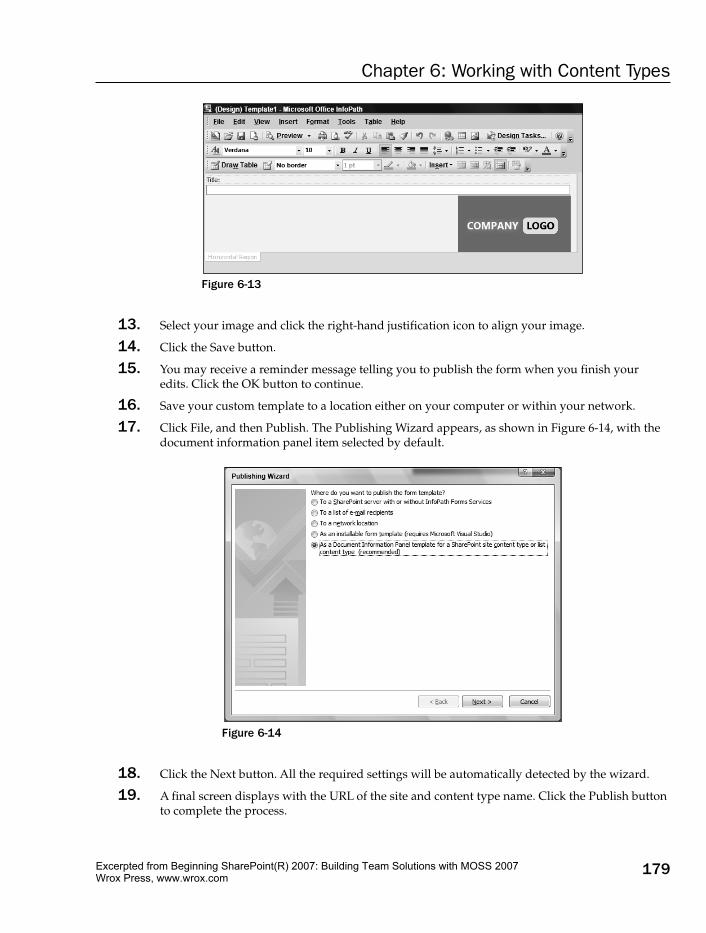
Figure 6-13
13. Select your image and click the right-hand justification icon to align your image.
14. Click the Save button.
15. You may receive a reminder message telling you to publish the form when you finish youredits. Click the OK button to continue.
16. Save your custom template to a location either on your computer or within your network.
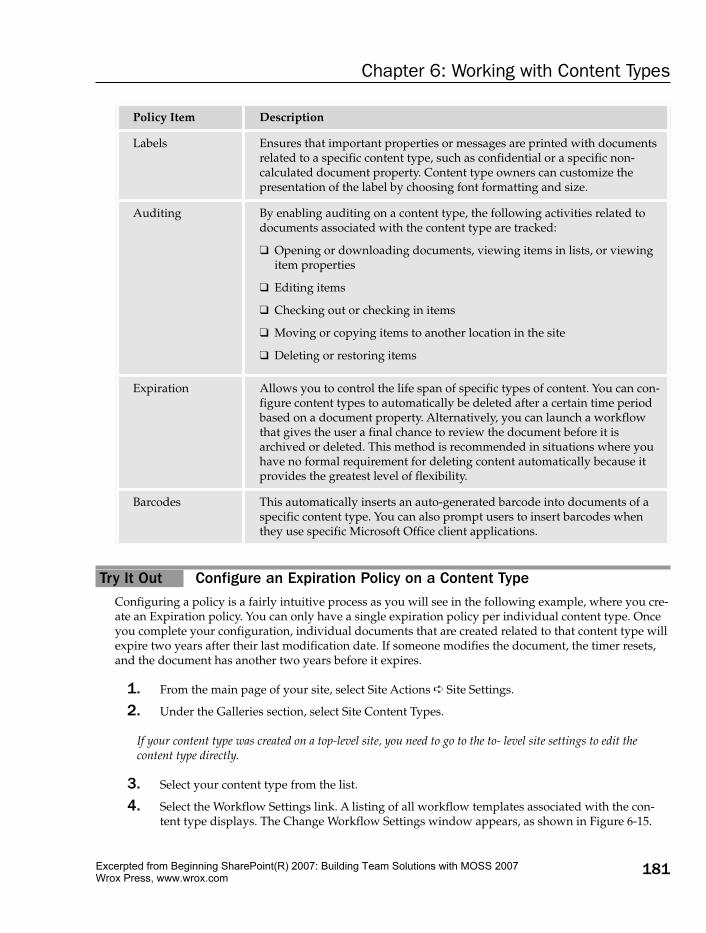
17. Click File, and then Publish. The Publishing Wizard appears, as shown in Figure 6-14, with thedocument information panel item selected by default.
Figure 6-14
18. Click the Next button. All the required settings will be automatically detected by the wizard.
19. A final screen displays with the URL of the site and content type name. Click the Publish buttonto complete the process.
179
Chapter 6: Working with Content Types
24499c06.qxd 5/1/07 12:00 PM Page 179
Excerpted from Beginning SharePoint(R) 2007: Building Team Solutions with MOSS 2007Wrox Press, www.wrox.com
20. Click the Close button on the publishing window and close the InfoPath application. You canclick the Go Back to the Document Information Panel Settings Page link to return to your set-tings page.
21. Select the check box for Always Show Document Information Panel on Document Open andInitial Save for This Content Type.
22. Click the OK button to save your changes.
How It WorksIn the previous example, you created a custom information panel for your content type that displays aunique color background and custom logo. While it may not be considered best practice to implementbright colors into your user interface, his example demonstrated how easy it is to use InfoPath to cus-tomize your organization’s document information panels. Once you create a single custom panel, you canreuse it for other content types by pointing to it from the Document Information Panel settings of yourother content types. You would do this by selecting Use Existing Custom Template (URL, UNC, or URN)from the Document Information Panel settings instead of creating a new template as you did previously.
You enabled a check box in Step 21 on your content type so that the document information panel alwaysappears whenever your content type is opened within a Microsoft Office application such as Word orExcel. By displaying the panel whenever the document is opened, users treat the panel as a form thatthey must update before closing the document. If an item is required, it will have to be completed oradded before the document is closed. However, if a required column is already specified but outdated,having the values front and center while someone is working on the document should help reduce theprobability of them closing the document without updating the latest information. There is no way toforce someone to update a column if a value already exists, so communicating the importance of keepinginformation up-to-date to your team is still important.
Policy ManagementAnother great feature of content types is how they define certain policies and behaviors around howthey are managed. Because content of a specific type quite often has the same requirements for retentionand management, it is beneficial to define a set of policies around a content type and have those inher-ited by all documents that are created from it.
You can configure the items in relation to a content type’s information policies:
Policy Item Description
AdministrativeDescription
Provide some background information to users who are responsible formanaging the policies related to the content type.
Policy Statement A customizable message that appears when users open documents associ-ated with the content type. A message bar appears at the top of the docu-ment in an Information Management Policy box. Users can click a Detailsbutton to view all the details related to the policy message. By using a policystatement, content type owners can ensure that users have all the informa-tion they need concerning the important policies related to specific content.
180
Chapter 6: Working with Content Types
24499c06.qxd 5/1/07 12:00 PM Page 180
Excerpted from Beginning SharePoint(R) 2007: Building Team Solutions with MOSS 2007Wrox Press, www.wrox.com
Try It Out Configure an Expiration Policy on a Content TypeConfiguring a policy is a fairly intuitive process as you will see in the following example, where you cre-ate an Expiration policy. You can only have a single expiration policy per individual content type. Onceyou complete your configuration, individual documents that are created related to that content type willexpire two years after their last modification date. If someone modifies the document, the timer resets,and the document has another two years before it expires.
1. From the main page of your site, select Site Actions ➪ Site Settings.
2. Under the Galleries section, select Site Content Types.
If your content type was created on a top-level site, you need to go to the to- level site settings to edit thecontent type directly.
3. Select your content type from the list.
4. Select the Workflow Settings link. A listing of all workflow templates associated with the con-tent type displays. The Change Workflow Settings window appears, as shown in Figure 6-15.
Policy Item Description
Labels Ensures that important properties or messages are printed with documentsrelated to a specific content type, such as confidential or a specific non-calculated document property. Content type owners can customize thepresentation of the label by choosing font formatting and size.
Auditing By enabling auditing on a content type, the following activities related todocuments associated with the content type are tracked:
❑ Opening or downloading documents, viewing items in lists, or viewingitem properties
❑ Editing items
❑ Checking out or checking in items
❑ Moving or copying items to another location in the site
❑ Deleting or restoring items
Expiration Allows you to control the life span of specific types of content. You can con-figure content types to automatically be deleted after a certain time periodbased on a document property. Alternatively, you can launch a workflowthat gives the user a final chance to review the document before it isarchived or deleted. This method is recommended in situations where youhave no formal requirement for deleting content automatically because itprovides the greatest level of flexibility.
Barcodes This automatically inserts an auto-generated barcode into documents of aspecific content type. You can also prompt users to insert barcodes whenthey use specific Microsoft Office client applications.
181
Chapter 6: Working with Content Types
24499c06.qxd 5/1/07 12:00 PM Page 181
Excerpted from Beginning SharePoint(R) 2007: Building Team Solutions with MOSS 2007Wrox Press, www.wrox.com
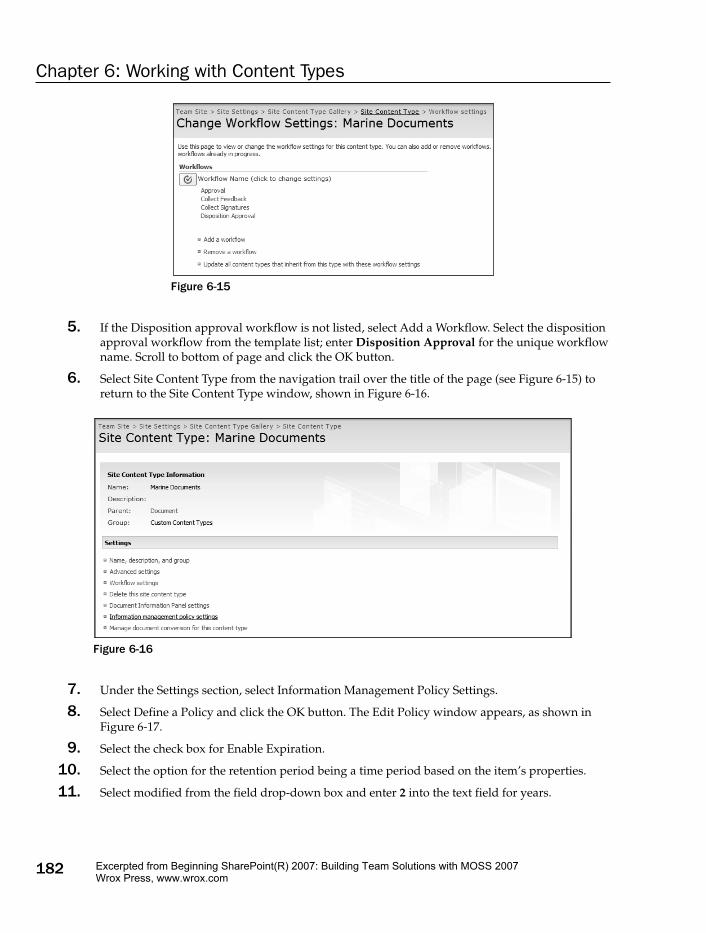
Figure 6-15
5. If the Disposition approval workflow is not listed, select Add a Workflow. Select the dispositionapproval workflow from the template list; enter Disposition Approval for the unique workflowname. Scroll to bottom of page and click the OK button.
6. Select Site Content Type from the navigation trail over the title of the page (see Figure 6-15) toreturn to the Site Content Type window, shown in Figure 6-16.
Figure 6-16
7. Under the Settings section, select Information Management Policy Settings.
8. Select Define a Policy and click the OK button. The Edit Policy window appears, as shown inFigure 6-17.
9. Select the check box for Enable Expiration.
10. Select the option for the retention period being a time period based on the item’s properties.
11. Select modified from the field drop-down box and enter 2 into the text field for years.
182
Chapter 6: Working with Content Types
24499c06.qxd 5/1/07 12:00 PM Page 182
Excerpted from Beginning SharePoint(R) 2007: Building Team Solutions with MOSS 2007Wrox Press, www.wrox.com
Figure 6-17
12. Select the Start This Workflow action and select the Disposition Approval workflow.
13. Click the OK button to complete the configuration of expiration settings.
How It WorksWhen a document reaches the time period for content expiration, you may not want your documents tobe automatically deleted. Instead, for this example, you created a rule that triggers a workflow process.When you specify that a workflow process should start, you must reference a configured workflow activ-ity. Because there was no content expiration type workflow associated with the content type already, youconfigured a disposition approval workflow on the content type before you started configuring the expi-ration policy. Only workflow activities that you have associated with the current content type display inthe list of available templates when you are configuring an expiration rule.
Managing Content TypesAn important aspect of managing a SharePoint site or environment is to understand how to combineand manage the information that a team or group shares. In this section, you discover some of the com-mon management tasks that ensure that users in your organization can easily share and use your con-tent types.
183
Chapter 6: Working with Content Types
24499c06.qxd 5/1/07 12:00 PM Page 183
Excerpted from Beginning SharePoint(R) 2007: Building Team Solutions with MOSS 2007Wrox Press, www.wrox.com
Enabling Content Type Management on a LibraryWhile many things have changed in the 2007 version of SharePoint Products and Technologies,Microsoft has maintained a consistent experience for users moving from one version to another. For thisreason, content types unavailable in previous versions are not enabled on a document library by default.Luckily, enabling content type management on a library is easy, as the next Try It Out demonstrates.
Try It Out Enable Content Type Management on a LibraryFor this example, you enable content management on a previously created document library. Once youdo so, you can manage multiple unique content types and their associated elements from the documentlibrary settings page. Until this feature is enabled on a document library, the functionality related to con-tent type management are hidden.
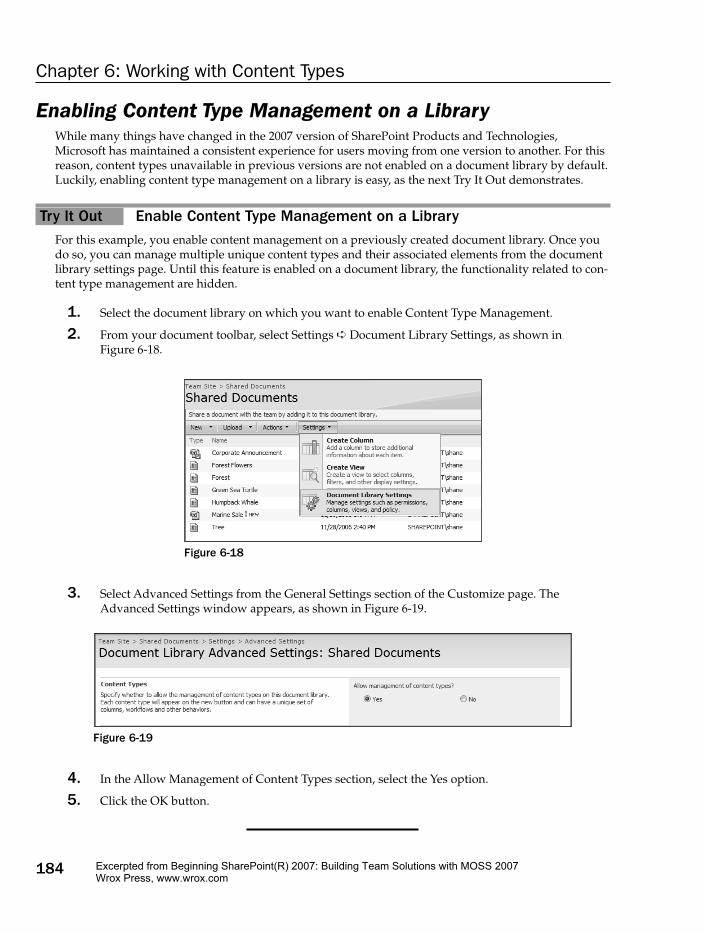
1. Select the document library on which you want to enable Content Type Management.
2. From your document toolbar, select Settings ➪ Document Library Settings, as shown inFigure 6-18.
Figure 6-18
3. Select Advanced Settings from the General Settings section of the Customize page. TheAdvanced Settings window appears, as shown in Figure 6-19.
Figure 6-19
4. In the Allow Management of Content Types section, select the Yes option.
5. Click the OK button.
184
Chapter 6: Working with Content Types
24499c06.qxd 5/1/07 12:00 PM Page 184
Excerpted from Beginning SharePoint(R) 2007: Building Team Solutions with MOSS 2007Wrox Press, www.wrox.com

How It WorksSharePoint supplies several default content types based on common business patterns such asannouncements, tasks, and issues. In addition, any Site content types that you have created on the cur-rent site or a parent site will also be available for you to add to your document library. See Figure 6-20for a view of the administrative page of a document library after content types have been enabled andadded to the library.
Figure 6-20
Managing Multiple Content Types in a LibraryToday’s technology requires working with various types of content, which means managing many docu-ment templates, business processes, and information policies. Previous versions of SharePoint Productsand Technologies meant you could only associate a single document template with a document library,so you had to have a large number of document libraries just to accommodate unique document tem-plates and classification requirements. By associating multiple content types with a document library inSharePoint 2007 (shown in the next Try It Out), however, you can freely manage all important informa-tion from a single location. These can be different types of templates using the same format, or com-pletely different applications such as Excel, InfoPath, PowerPoint, or Word. This means you can save atremendous amount of time because you can edit and share multiple types of documents from the samelocation.
Try It Out Associate Multiple Content Types with a LibraryYou can set up multiple content types on a single library by following these steps:
1. From the document library on which you want to enable multiple content types, selectSettings ➪ Document Library Settings.
185
Chapter 6: Working with Content Types
24499c06.qxd 5/1/07 12:00 PM Page 185
Excerpted from Beginning SharePoint(R) 2007: Building Team Solutions with MOSS 2007Wrox Press, www.wrox.com
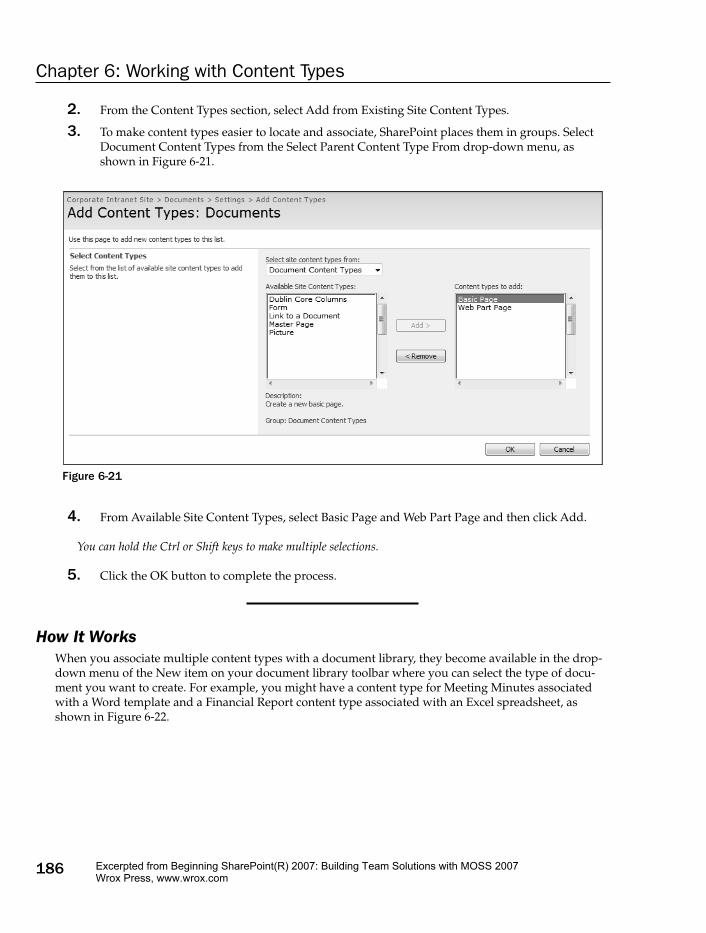
2. From the Content Types section, select Add from Existing Site Content Types.
3. To make content types easier to locate and associate, SharePoint places them in groups. SelectDocument Content Types from the Select Parent Content Type From drop-down menu, asshown in Figure 6-21.
Figure 6-21
4. From Available Site Content Types, select Basic Page and Web Part Page and then click Add.
You can hold the Ctrl or Shift keys to make multiple selections.
5. Click the OK button to complete the process.
How It WorksWhen you associate multiple content types with a document library, they become available in the drop-down menu of the New item on your document library toolbar where you can select the type of docu-ment you want to create. For example, you might have a content type for Meeting Minutes associatedwith a Word template and a Financial Report content type associated with an Excel spreadsheet, asshown in Figure 6-22.
186
Chapter 6: Working with Content Types
24499c06.qxd 5/1/07 12:00 PM Page 186
Excerpted from Beginning SharePoint(R) 2007: Building Team Solutions with MOSS 2007Wrox Press, www.wrox.com
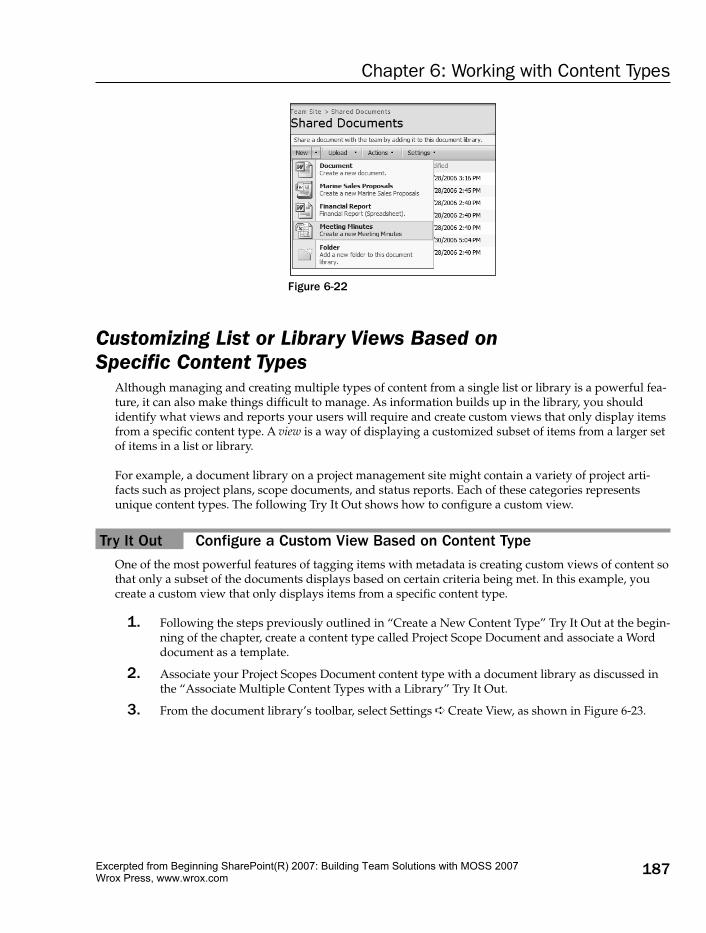
Figure 6-22
Customizing List or Library Views Based onSpecific Content Types
Although managing and creating multiple types of content from a single list or library is a powerful fea-ture, it can also make things difficult to manage. As information builds up in the library, you shouldidentify what views and reports your users will require and create custom views that only display itemsfrom a specific content type. A view is a way of displaying a customized subset of items from a larger setof items in a list or library.
For example, a document library on a project management site might contain a variety of project arti-facts such as project plans, scope documents, and status reports. Each of these categories representsunique content types. The following Try It Out shows how to configure a custom view.
Try It Out Configure a Custom View Based on Content TypeOne of the most powerful features of tagging items with metadata is creating custom views of content sothat only a subset of the documents displays based on certain criteria being met. In this example, youcreate a custom view that only displays items from a specific content type.
1. Following the steps previously outlined in “Create a New Content Type” Try It Out at the begin-ning of the chapter, create a content type called Project Scope Document and associate a Worddocument as a template.
2. Associate your Project Scopes Document content type with a document library as discussed inthe “Associate Multiple Content Types with a Library” Try It Out.
3. From the document library’s toolbar, select Settings ➪ Create View, as shown in Figure 6-23.
187
Chapter 6: Working with Content Types
24499c06.qxd 5/1/07 12:00 PM Page 187
Excerpted from Beginning SharePoint(R) 2007: Building Team Solutions with MOSS 2007Wrox Press, www.wrox.com
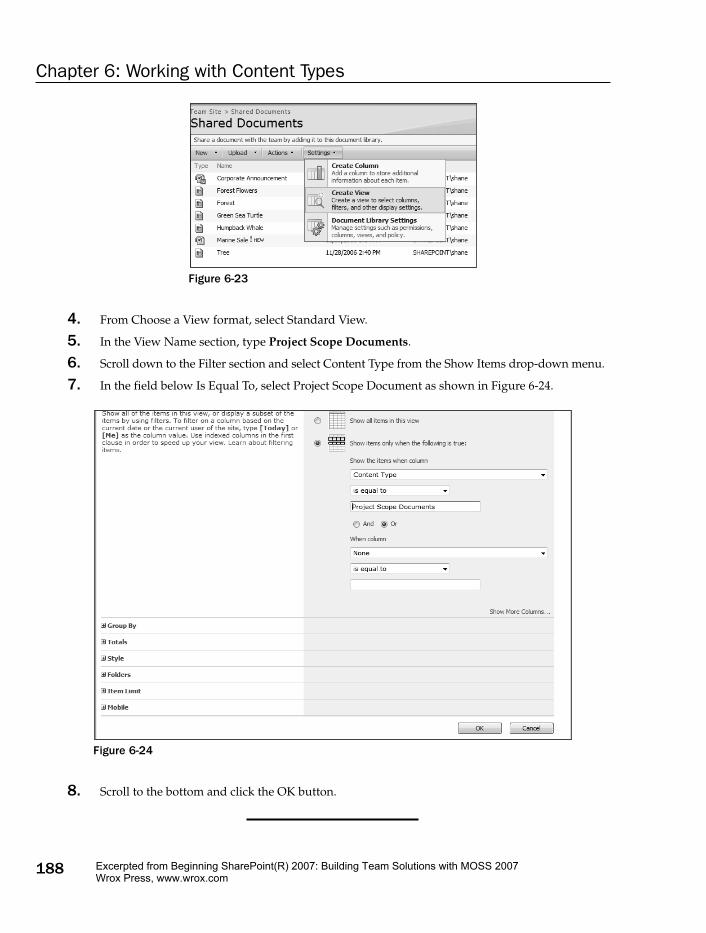
Figure 6-23
4. From Choose a View format, select Standard View.
5. In the View Name section, type Project Scope Documents.
6. Scroll down to the Filter section and select Content Type from the Show Items drop-down menu.
7. In the field below Is Equal To, select Project Scope Document as shown in Figure 6-24.
Figure 6-24
8. Scroll to the bottom and click the OK button.
188
Chapter 6: Working with Content Types
24499c06.qxd 5/1/07 12:00 PM Page 188
Excerpted from Beginning SharePoint(R) 2007: Building Team Solutions with MOSS 2007Wrox Press, www.wrox.com
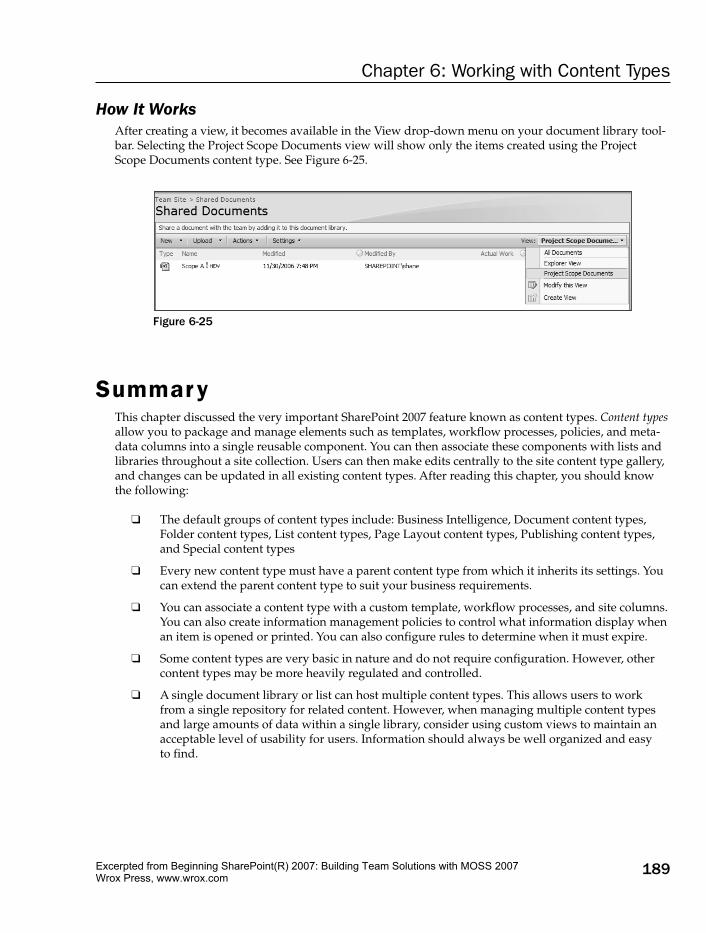
How It WorksAfter creating a view, it becomes available in the View drop-down menu on your document library tool-bar. Selecting the Project Scope Documents view will show only the items created using the ProjectScope Documents content type. See Figure 6-25.
Figure 6-25
SummaryThis chapter discussed the very important SharePoint 2007 feature known as content types. Content typesallow you to package and manage elements such as templates, workflow processes, policies, and meta-data columns into a single reusable component. You can then associate these components with lists andlibraries throughout a site collection. Users can then make edits centrally to the site content type gallery,and changes can be updated in all existing content types. After reading this chapter, you should knowthe following:
❑ The default groups of content types include: Business Intelligence, Document content types,Folder content types, List content types, Page Layout content types, Publishing content types,and Special content types
❑ Every new content type must have a parent content type from which it inherits its settings. Youcan extend the parent content type to suit your business requirements.
❑ You can associate a content type with a custom template, workflow processes, and site columns.You can also create information management policies to control what information display whenan item is opened or printed. You can also configure rules to determine when it must expire.
❑ Some content types are very basic in nature and do not require configuration. However, othercontent types may be more heavily regulated and controlled.
❑ A single document library or list can host multiple content types. This allows users to workfrom a single repository for related content. However, when managing multiple content typesand large amounts of data within a single library, consider using custom views to maintain anacceptable level of usability for users. Information should always be well organized and easy to find.
189
Chapter 6: Working with Content Types
24499c06.qxd 5/1/07 12:00 PM Page 189
Excerpted from Beginning SharePoint(R) 2007: Building Team Solutions with MOSS 2007Wrox Press, www.wrox.com
Exercises1. True or False. You can only associate one document template with a document library.
2. Imagine you are responsible for ensuring that all documents created and printed within yourorganization have the words Private and Confidential on them. What are your options for mak-ing this happen, and which would provide the best results?
3. People in your company have complained that recent job postings are being published on the corporate intranet website with typos and grammatical errors. Your management teamdemands a certain level of professionalism in any content that division posts. What are somesteps you can take to ensure that future job postings are reviewed prior to publishing?
190
Chapter 6: Working with Content Types
24499c06.qxd 5/1/07 12:00 PM Page 190
Excerpted from Beginning SharePoint(R) 2007: Building Team Solutions with MOSS 2007Wrox Press, www.wrox.com