Embed Size (px)
Citation preview

Document Number: BKWCTKUGRev. 2.1 07/2011
BeeKit Wireless Connectivity ToolkitUser’s Guide

How to Reach Us:
Home Page:www.freescale.com
E-mail:[email protected]
USA/Europe or Locations Not Listed:Freescale SemiconductorTechnical Information Center, CH3701300 N. Alma School RoadChandler, Arizona 85224+1-800-521-6274 or [email protected]
Europe, Middle East, and Africa:Freescale Halbleiter Deutschland GmbHTechnical Information CenterSchatzbogen 781829 Muenchen, Germany+44 1296 380 456 (English)+46 8 52200080 (English)+49 89 92103 559 (German)+33 1 69 35 48 48 (French)[email protected]
Japan:Freescale Semiconductor Japan Ltd.HeadquartersARCO Tower 15F1-8-1, Shimo-Meguro, Meguro-ku,Tokyo 153-0064, Japan0120 191014 or +81 3 5437 [email protected]
Asia/Pacific:Freescale Semiconductor Hong Kong Ltd.Technical Information Center2 Dai King StreetTai Po Industrial EstateTai Po, N.T., Hong Kong+800 2666 [email protected]
For Literature Requests Only:Freescale Semiconductor Literature Distribution CenterP.O. Box 5405Denver, Colorado 802171-800-521-6274 or 303-675-2140Fax: [email protected]
Information in this document is provided solely to enable system and software implementers to use Freescale Semiconductor products. There are no express or implied copyright licenses granted hereunder to design or fabricate any integrated circuits or integrated circuits based on the information in this document.Freescale Semiconductor reserves the right to make changes without further notice to any products herein. Freescale Semiconductor makes no warranty, representation or guarantee regarding the suitability of its products for any particular purpose, nor does Freescale Semiconductor assume any liability arising out of the application or use of any product or circuit, and specifically disclaims any and all liability, including without limitation consequential or incidental damages. “Typical” parameters that may be provided in Freescale Semiconductor data sheets and/or specifications can and do vary in different applications and actual performance may vary over time. All operating parameters, including “Typicals”, must be validated for each customer application by customer’s technical experts. Freescale Semiconductor does not convey any license under its patent rights nor the rights of others. Freescale Semiconductor products are not designed, intended, or authorized for use as components in systems intended for surgical implant into the body, or other applications intended to support or sustain life, or for any other application in which the failure of the Freescale Semiconductor product could create a situation where personal injury or death may occur. Should Buyer purchase or use Freescale Semiconductor products for any such unintended or unauthorized application, Buyer shall indemnify and hold Freescale Semiconductor and its officers, employees, subsidiaries, affiliates, and distributors harmless against all claims, costs, damages, and expenses, and reasonable attorney fees arising out of, directly or indirectly, any claim of personal injury or death associated with such unintended or unauthorized use, even if such claim alleges that Freescale Semiconductor was negligent regarding the design or manufacture of the part.ARM is the registered trademark of ARM Limited. ARM7TDMI-S is the trademark of ARM Limited.
Freescale™ and the Freescale logo are trademarks of Freescale Semiconductor, Inc. All other product or service names are the property of their respective owners.
© Freescale Semiconductor, Inc. 2006, 2007, 2008, 2009, 2010, 2011. All rights reserved.

BeeKit Wireless Connectivity Toolkit User’s Guide, Rev. 2.1
Freescale Semiconductor i
ContentsAbout This Book
Audience . . . . . . . . . . . . . . . . . . . . . . . . . . . . . . . . . . . . . . . . . . . . . . . . . . . . . . . . . . . . . . . . . . . . iiiOrganization . . . . . . . . . . . . . . . . . . . . . . . . . . . . . . . . . . . . . . . . . . . . . . . . . . . . . . . . . . . . . . . . . iiiRevision History . . . . . . . . . . . . . . . . . . . . . . . . . . . . . . . . . . . . . . . . . . . . . . . . . . . . . . . . . . . . . . iiiConventions . . . . . . . . . . . . . . . . . . . . . . . . . . . . . . . . . . . . . . . . . . . . . . . . . . . . . . . . . . . . . . . . . ivDefinitions, Acronyms, and Abbreviations . . . . . . . . . . . . . . . . . . . . . . . . . . . . . . . . . . . . . . . . . ivReferences. . . . . . . . . . . . . . . . . . . . . . . . . . . . . . . . . . . . . . . . . . . . . . . . . . . . . . . . . . . . . . . . . . . . v
Chapter 1 Introduction
1.1 BeeKit Features. . . . . . . . . . . . . . . . . . . . . . . . . . . . . . . . . . . . . . . . . . . . . . . . . . . . . . . . . . . . . . 1-11.2 Installing and Running BeeKit . . . . . . . . . . . . . . . . . . . . . . . . . . . . . . . . . . . . . . . . . . . . . . . . . . 1-21.3 Considerations for First Time Installations . . . . . . . . . . . . . . . . . . . . . . . . . . . . . . . . . . . . . . . . 1-31.3.1 Compiler/Debugger IDE Considerations . . . . . . . . . . . . . . . . . . . . . . . . . . . . . . . . . . . . . . . 1-31.3.2 Evaluation Boards Driver Considerations . . . . . . . . . . . . . . . . . . . . . . . . . . . . . . . . . . . . . . 1-41.4 Components and Basic Functionality . . . . . . . . . . . . . . . . . . . . . . . . . . . . . . . . . . . . . . . . . . . . . 1-41.5 Windows Based Components . . . . . . . . . . . . . . . . . . . . . . . . . . . . . . . . . . . . . . . . . . . . . . . . . . . 1-51.5.1 BeeKit GUI . . . . . . . . . . . . . . . . . . . . . . . . . . . . . . . . . . . . . . . . . . . . . . . . . . . . . . . . . . . . . . 1-51.5.2 Project Editor and Compiler . . . . . . . . . . . . . . . . . . . . . . . . . . . . . . . . . . . . . . . . . . . . . . . . . 1-51.5.3 Debugger. . . . . . . . . . . . . . . . . . . . . . . . . . . . . . . . . . . . . . . . . . . . . . . . . . . . . . . . . . . . . . . . 1-51.6 Embedded Components (Codebases) . . . . . . . . . . . . . . . . . . . . . . . . . . . . . . . . . . . . . . . . . . . . . 1-51.6.1 Codebases Summary. . . . . . . . . . . . . . . . . . . . . . . . . . . . . . . . . . . . . . . . . . . . . . . . . . . . . . . 1-51.6.2 Using Codebases in BeeKit . . . . . . . . . . . . . . . . . . . . . . . . . . . . . . . . . . . . . . . . . . . . . . . . . 1-61.7 Solution, Project, and Workspace Hierarchy . . . . . . . . . . . . . . . . . . . . . . . . . . . . . . . . . . . . . . . 1-61.7.1 Introducing the Solution Explorer . . . . . . . . . . . . . . . . . . . . . . . . . . . . . . . . . . . . . . . . . . . . 1-71.7.1.1 Hierarchical Display . . . . . . . . . . . . . . . . . . . . . . . . . . . . . . . . . . . . . . . . . . . . . . . . . . . . 1-71.7.1.2 Items and Containers . . . . . . . . . . . . . . . . . . . . . . . . . . . . . . . . . . . . . . . . . . . . . . . . . . . 1-81.8 Creating a Project . . . . . . . . . . . . . . . . . . . . . . . . . . . . . . . . . . . . . . . . . . . . . . . . . . . . . . . . . . . . 1-91.8.1 Adding Additional Projects . . . . . . . . . . . . . . . . . . . . . . . . . . . . . . . . . . . . . . . . . . . . . . . . 1-161.9 BeeKit Documentation Overview. . . . . . . . . . . . . . . . . . . . . . . . . . . . . . . . . . . . . . . . . . . . . . . 1-171.9.1 BeeKit Documentation Window. . . . . . . . . . . . . . . . . . . . . . . . . . . . . . . . . . . . . . . . . . . . . 1-17
Chapter 2 File Menu
2.1 BeeKit Codebase Selection. . . . . . . . . . . . . . . . . . . . . . . . . . . . . . . . . . . . . . . . . . . . . . . . . . . . . 2-12.1.1 Choosing a Different Codebase . . . . . . . . . . . . . . . . . . . . . . . . . . . . . . . . . . . . . . . . . . . . . . 2-12.1.2 Adding a New Codebase. . . . . . . . . . . . . . . . . . . . . . . . . . . . . . . . . . . . . . . . . . . . . . . . . . . . 2-22.1.3 Editing Codebase Name and Description . . . . . . . . . . . . . . . . . . . . . . . . . . . . . . . . . . . . . . . 2-32.1.4 Removing a Codebase . . . . . . . . . . . . . . . . . . . . . . . . . . . . . . . . . . . . . . . . . . . . . . . . . . . . . 2-32.2 Understanding New Projects . . . . . . . . . . . . . . . . . . . . . . . . . . . . . . . . . . . . . . . . . . . . . . . . . . . 2-42.3 Creating Solutions. . . . . . . . . . . . . . . . . . . . . . . . . . . . . . . . . . . . . . . . . . . . . . . . . . . . . . . . . . . . 2-42.4 Opening an Existing Solution . . . . . . . . . . . . . . . . . . . . . . . . . . . . . . . . . . . . . . . . . . . . . . . . . . . 2-52.5 Opening a Demonstration Solution. . . . . . . . . . . . . . . . . . . . . . . . . . . . . . . . . . . . . . . . . . . . . . . 2-6
BeeKit Wireless Connectivity Toolkit User’s Guide, Rev. 2.1
ii Freescale Semiconductor
2.6 Exporting the Solution . . . . . . . . . . . . . . . . . . . . . . . . . . . . . . . . . . . . . . . . . . . . . . . . . . . . . . . . 2-72.6.1 Exporting Multiple Projects . . . . . . . . . . . . . . . . . . . . . . . . . . . . . . . . . . . . . . . . . . . . . . . . . 2-72.7 Importing and Compiling Projects . . . . . . . . . . . . . . . . . . . . . . . . . . . . . . . . . . . . . . . . . . . . . . . 2-72.7.1 Importing and Compiling Projects in CodeWarrior IDE . . . . . . . . . . . . . . . . . . . . . . . . . . . 2-82.7.2 Opening and Compiling a Solution in IAR Embedded Workbench IDE . . . . . . . . . . . . . . . 2-92.8 Automatic IDE Importing . . . . . . . . . . . . . . . . . . . . . . . . . . . . . . . . . . . . . . . . . . . . . . . . . . . . . 2-102.9 Automatic Binary Firmware File Generation . . . . . . . . . . . . . . . . . . . . . . . . . . . . . . . . . . . . . . 2-112.10 Closing a Solution. . . . . . . . . . . . . . . . . . . . . . . . . . . . . . . . . . . . . . . . . . . . . . . . . . . . . . . . . . . 2-112.11 Saving Solutions . . . . . . . . . . . . . . . . . . . . . . . . . . . . . . . . . . . . . . . . . . . . . . . . . . . . . . . . . . . . 2-112.12 Exiting BeeKit . . . . . . . . . . . . . . . . . . . . . . . . . . . . . . . . . . . . . . . . . . . . . . . . . . . . . . . . . . . . . 2-12
Chapter 3 Solution Menu
3.1 Exporting a Solution . . . . . . . . . . . . . . . . . . . . . . . . . . . . . . . . . . . . . . . . . . . . . . . . . . . . . . . . . . 3-13.2 Exporting Properties . . . . . . . . . . . . . . . . . . . . . . . . . . . . . . . . . . . . . . . . . . . . . . . . . . . . . . . . . . 3-23.3 Importing Properties . . . . . . . . . . . . . . . . . . . . . . . . . . . . . . . . . . . . . . . . . . . . . . . . . . . . . . . . . . 3-33.4 Validating a Solution . . . . . . . . . . . . . . . . . . . . . . . . . . . . . . . . . . . . . . . . . . . . . . . . . . . . . . . . . 3-43.5 Upgrading a BeeKit Solution File . . . . . . . . . . . . . . . . . . . . . . . . . . . . . . . . . . . . . . . . . . . . . . . 3-53.6 Upgrading Exported BeeKit Project Files . . . . . . . . . . . . . . . . . . . . . . . . . . . . . . . . . . . . . . . . 3-103.7 Adding a Project to a Solution . . . . . . . . . . . . . . . . . . . . . . . . . . . . . . . . . . . . . . . . . . . . . . . . . 3-103.8 Importing a Project to a Solution . . . . . . . . . . . . . . . . . . . . . . . . . . . . . . . . . . . . . . . . . . . . . . . 3-123.9 Using the Properties List. . . . . . . . . . . . . . . . . . . . . . . . . . . . . . . . . . . . . . . . . . . . . . . . . . . . . . 3-133.9.1 Viewing Properties by Category. . . . . . . . . . . . . . . . . . . . . . . . . . . . . . . . . . . . . . . . . . . . . 3-143.9.2 Viewing Properties Alphabetically . . . . . . . . . . . . . . . . . . . . . . . . . . . . . . . . . . . . . . . . . . . 3-143.9.3 Searching for Properties . . . . . . . . . . . . . . . . . . . . . . . . . . . . . . . . . . . . . . . . . . . . . . . . . . . 3-153.10 Solution Properties . . . . . . . . . . . . . . . . . . . . . . . . . . . . . . . . . . . . . . . . . . . . . . . . . . . . . . . . . . 3-173.11 Project Properties . . . . . . . . . . . . . . . . . . . . . . . . . . . . . . . . . . . . . . . . . . . . . . . . . . . . . . . . . . . 3-183.12 Software Component Properties . . . . . . . . . . . . . . . . . . . . . . . . . . . . . . . . . . . . . . . . . . . . . . . . 3-18
Chapter 4 Project Menu
4.1 Validating a Project . . . . . . . . . . . . . . . . . . . . . . . . . . . . . . . . . . . . . . . . . . . . . . . . . . . . . . . . . . 4-14.2 Adding and Removing Software Components . . . . . . . . . . . . . . . . . . . . . . . . . . . . . . . . . . . . . . 4-24.3 Removing Projects . . . . . . . . . . . . . . . . . . . . . . . . . . . . . . . . . . . . . . . . . . . . . . . . . . . . . . . . . . . 4-3

BeeKit Wireless Connectivity Toolkit User’s Guide, Rev. 2.1
Freescale Semiconductor iii
About This BookThis guide describes how to use the Freescale BeeKit Wireless Connectivity Toolkit. The BeeKit Wireless Connectivity Toolkit allows users to create, modify, and update various Freescale wireless networking implementations including Simple Media Access Controller (SMAC), 802.15.4 MAC, SynkroRF, Freescale BeeStack (ZigBee) and Freescale BeeStack Consumer (RF4CE) applications.
For more information on using other Freescale ZigBee software and hardware refer to the Freescale ZigBee web site at:
www.freescale.com/zigbee
AudienceThis document is intended for ZigBee, 802.15.4 and custom software and application developers.
OrganizationThis document is organized into the following chapters:Chapter 1 Introduction — This chapter provides an introduction to BeeKit features and
guides users through creating a Solution and a adding a Project.Chapter 2 File Menu — This chapter describes how to create a new project, open, save, and
close solutions, and select a Codebase.Chapter 3 Solution Menu — This chapter explains how to Export a Solution, import and
export properties, validate and upgrade solutions, add and import projects and adjust properties.
Chapter 4 Project Menu — This chapter details how to validate a project, add and remove software components and remove a project.
Revision HistoryThe following table summarizes revisions to this document since the previous release (Rev 2.0).
Revision History
Location Revision
Entire document Added CW 10 info and various SW updates.

BeeKit Wireless Connectivity Toolkit User’s Guide, Rev. 2.1
iv Freescale Semiconductor
ConventionsThis document uses the following notational conventions:
• Courier monospaced type indicate commands, command parameters, code examples, expressions, datatypes, and directives.
• Italic type indicates replaceable command parameters.• All source code examples are in C.
Definitions, Acronyms, and AbbreviationsThe following list defines the abbreviations used in this document.ASP Application Support PackageCCA Clear Channel AssessmentCRC Cyclic Redundancy CheckFFD Full Function DeviceGPIO General Purpose Input/OutputGTS Guaranteed Time SlotISR Interrupt Service RoutineIRQ Interrupt RequestLNA Low Noise AmplifierMAC Medium Access ControlMCPS MAC Common Part SublayerMCU Micro Control UnitMLME MAC sub Layer Management EntityNWK NetworkPA Power AmplifierPAN Personal Area NetworkPHY PHYsical LayerPIB PAN Information BaseRAM Random Access MemoryRFD Reduced Function Device SAP Service Access PointSPI Serial Peripheral Interface

BeeKit Wireless Connectivity Toolkit User’s Guide, Rev. 2.1
Freescale Semiconductor v
ReferencesThe following documents are referenced in this guide.
1. IEEE™ 802.15.4 Standard, The Institute of Electrical and Electronics Engineers, Inc.2. 802.15.4 MAC/PHY Software Reference Manual (802154MPSUM)3. 802.15.4 MAC/PHY Software User's Guide (802154MPSUG)4. Simple Media Access Controller (SMAC) User’s Guide (SMACRM)5. Freescale BeeStack Documentation

BeeKit Wireless Connectivity Toolkit User’s Guide, Rev. 2.1
vi Freescale Semiconductor

BeeKit Wireless Connectivity Toolkit User’s Guide, Rev. 2.1
Freescale Semiconductor 1-1
Chapter 1 IntroductionThe Freescale BeeKit Wireless Connectivity Toolkit is a comprehensive package of wireless networking libraries, application templates, and sample applications. The BeeKit Graphical User Interface (GUI), part of the BeeKit Wireless Connectivity Toolkit, allows users to create, modify, and update various wireless networking implementations. This guide details the BeeKit GUI. Codebases are embedded software and are not described in detail in this guide.
1.1 BeeKit Features• Provides an extension to embedded application environments• Automated validation of solution/project configuration parameters• Generates workspace files that can be imported into an Integrated Development Environment
(IDE) for continued development and debugging through Extensible Markup Language (XML)• Scalable, supports new Codebases and functionality• Provides an IDE where Freescale wireless link and protocol configurations are easily managed• Complementary tool to traditional IDEs and not just a tool for static starter code generation• Supports Simple Media Access Controller (SMAC), IEEE 802.15.4 MAC, Freescale BeeStack,
BeeStack Consumer (RF4CE) and Freescale SynkroRF application development• The BeeStack interface uses Freescale’s 802.15.4 MAC messaging interface. Experience using one
interface helps users become familiar with the other• Applications are decoupled from the stack implementation to allow for easy code updates and code
reuse• Allows for simple integration of multiple Freescale architectures. HCS08 and ARM7 are currently
supported• Allows users to browse and search all currently available documentation
Introduction
BeeKit Wireless Connectivity Toolkit User’s Guide, Rev. 2.1
1-2 Freescale Semiconductor
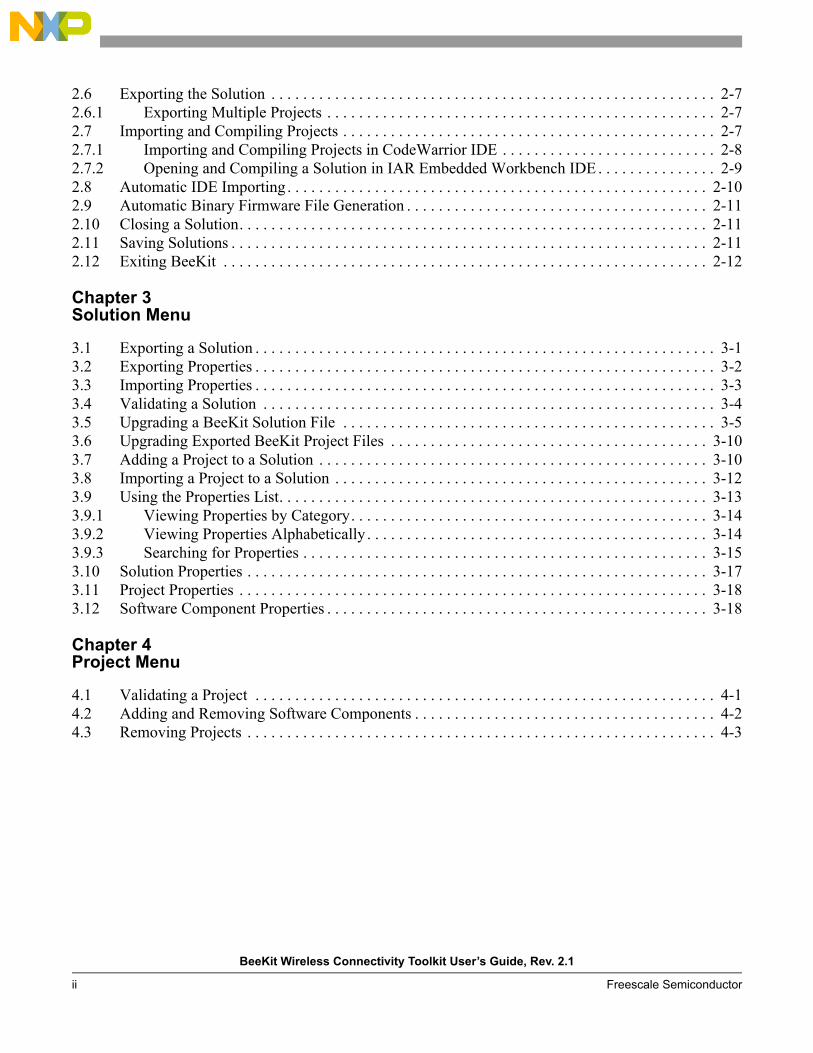
1.2 Installing and Running BeeKitTo install BeeKit:
1. Launch the BeeKit Wireless Connectivity Toolkit installer BeeKitSetup.exe downloaded from the Freescale web site or from the BeeKit CD-ROM and click on “Next” to begin the installation process.
Figure 1-1. Main Installer Window
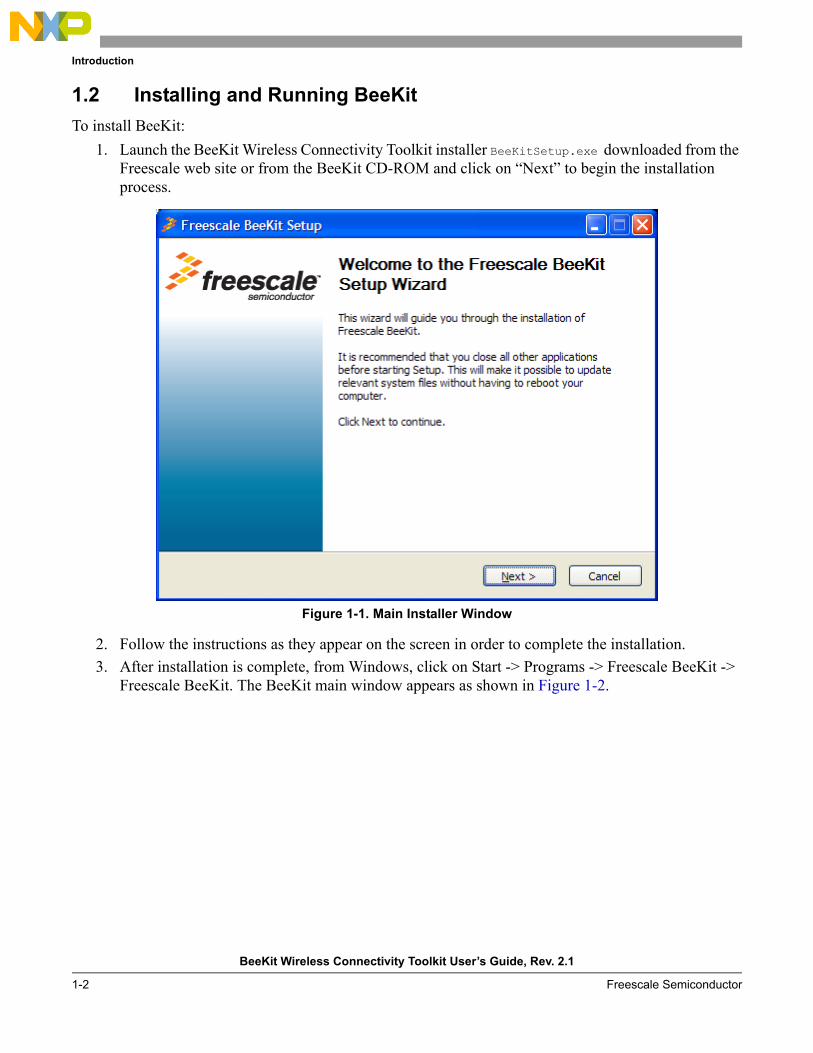
2. Follow the instructions as they appear on the screen in order to complete the installation.3. After installation is complete, from Windows, click on Start -> Programs -> Freescale BeeKit ->
Freescale BeeKit. The BeeKit main window appears as shown in Figure 1-2.
Introduction
BeeKit Wireless Connectivity Toolkit User’s Guide, Rev. 2.1
Freescale Semiconductor 1-3
Figure 1-2. BeeKit Main Window
1.3 Considerations for First Time Installations
1.3.1 Compiler/Debugger IDE ConsiderationsDepending on the platform chosen for development, either Freescale CodeWarrior or IAR Embedded Workbench IDEs must be installed before running BeeKit for the first time. The IDEs come on separate media with a Freescale Evaluation Kit or can be downloaded or purchased online at http://www.freescale.com/codewarrior or http://www.iar.com.

Introduction
BeeKit Wireless Connectivity Toolkit User’s Guide, Rev. 2.1
1-4 Freescale Semiconductor
1.3.2 Evaluation Boards Driver ConsiderationsBeeKit must be installed before plugging any development boards into the system. When users first plug a board into the system, they may be prompted to install drivers. If this occurs, do not allow Windows to automatically search for and install the drivers. Instead, select manual installation and steer Windows to the directory:C:\Program Files\Freescale\Drivers
If installing the BeeKit software package to another drive or directory, indicate the Drivers directory created by the installer in the custom location where BeeKit was installed.
Follow the instructions as they appear on the screen to complete driver installation.
After BeeKit and the hardware drivers are installed, Windows can then be allowed to automatically search for and install drivers when other Freescale boards are connected to the system.
1.4 Components and Basic FunctionalityAs shown in Figure 1-3, BeeKit contains Windows PC based software components and embedded software components also referred to as Codebases. These components are further broken down and described in Section 1.5, “Windows Based Components” and Section 1.6, “Embedded Components (Codebases)” respectively.
Figure 1-3. BeeKit Component Overview
Embedded SW components (Codebase)
Windows PC Based Components
BeeKit GUI Project Editor &Compiler Debugger
PlatformManagement
(PLM)BeeStack
IEEE 802.15.4 MAC/PHY 2.0
SMAC
BeeApps
Synkro

Introduction
BeeKit Wireless Connectivity Toolkit User’s Guide, Rev. 2.1
Freescale Semiconductor 1-5
1.5 Windows Based ComponentsThis section describes the windows based components of BeeKit shown in Figure 1-3.
1.5.1 BeeKit GUIThe BeeKit GUI allows users to create and manage a software workspace for application development. The user designs the workspace by selecting the target platform, type of device, an application framework, network configuration parameters, and other criteria as described later in this guide. The workspace is made up of all the files needed by CodeWarrior or Embedded Workbench to compile and where the user adds files to their application.
1.5.2 Project Editor and CompilerThe Project Editor tool allows users to edit source files and add extra files to the workspace. The Compiler generates the binary files for the target hardware.
1.5.3 DebuggerThe Debugger allows users to debug the target hardware through a standard in-circuit hardware debug interface.
1.6 Embedded Components (Codebases)This section summarizes the BeeKit Codebases shown in Figure 1-3. The BeeKit GUI draws its information from the BeeKit Codebases. A Codebase contains the necessary information to build a device application including the following:
• Software components• Source code• Libraries• Hardware platform definitions• Compiler and linker directives
BeeKit Codebases can be updated from the Freescale web site at the following URL:
www.freescale.com/zigbee
Refer to this web page often to obtain the latest BeeKit and Codebases releases.
1.6.1 Codebases SummaryA Codebase is a Freescale architecture specific database that contains comprehensive collections of wireless networking libraries, platform software, application templates, and sample applications based on either the SMAC, 802.15.4 MAC, Freescale BeeStack (ZigBee), or Freescale Entertainment Control Network. Codebases are embedded software and are not described in detail in this guide. Refer to the appropriate Freescale protocol implementation documentation for more information.

Introduction
BeeKit Wireless Connectivity Toolkit User’s Guide, Rev. 2.1
1-6 Freescale Semiconductor
1.6.2 Using Codebases in BeeKitBeeKit can use one Codebase at a time. The current Codebase is displayed under the BeeKit logo on the BeeKit Start Page tab as shown in Figure 1-4. When a solution is opened, the current Codebase is also displayed next to the solution name in the Solution Explorer on the right side of the BeeKit window as shown in Figure 1-5. The user can only create the type of solutions or use the components that are contained in the current Codebase. To create applications and solutions by selecting software components from another Codebase, users need to change the Codebase to the appropriate one using the BeeKit Codebase Selection window as detailed in Section 2.1.1, “Choosing a Different Codebase”.
Figure 1-4. Current Codebase Shown on the BeeKit Start Page Tab
1.7 Solution, Project, and Workspace HierarchyThis section provides an overview of the BeeKit hierarchy:
• Solutions — A Solution is a project container and consists of a grouping of related projects or applications. When using BeeKit, users are working with Solutions, even if the solution contains a single Project. It is possible to save Solutions in a solution file having the extension *.bksln and work on them later
• Projects — A Project consists of assembled Codebase components which are compiled into a single application
• Workspaces — A Workspace consists of all the files needed by CodeWarrior or IAR Embedded Workbench to compile the application. The Workspace is also where users add their own files
Introduction
BeeKit Wireless Connectivity Toolkit User’s Guide, Rev. 2.1
Freescale Semiconductor 1-7
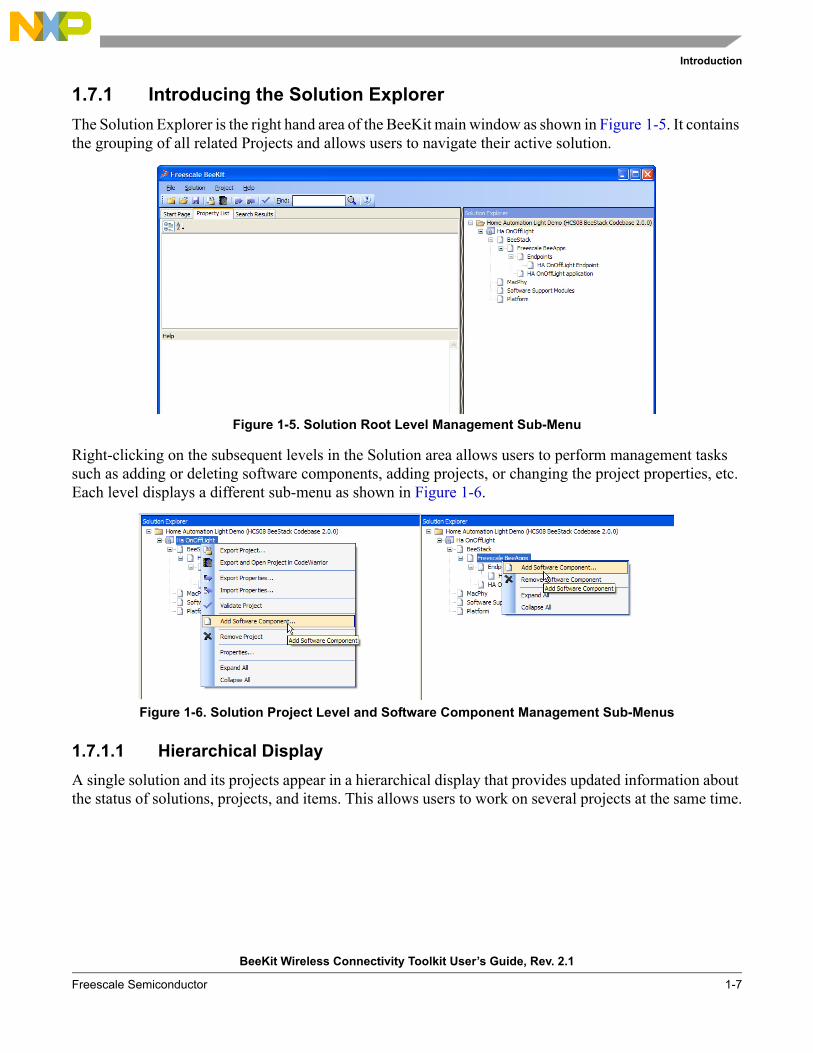
1.7.1 Introducing the Solution ExplorerThe Solution Explorer is the right hand area of the BeeKit main window as shown in Figure 1-5. It contains the grouping of all related Projects and allows users to navigate their active solution.
Figure 1-5. Solution Root Level Management Sub-Menu
Right-clicking on the subsequent levels in the Solution area allows users to perform management tasks such as adding or deleting software components, adding projects, or changing the project properties, etc. Each level displays a different sub-menu as shown in Figure 1-6.
Figure 1-6. Solution Project Level and Software Component Management Sub-Menus
1.7.1.1 Hierarchical DisplayA single solution and its projects appear in a hierarchical display that provides updated information about the status of solutions, projects, and items. This allows users to work on several projects at the same time.
Introduction
BeeKit Wireless Connectivity Toolkit User’s Guide, Rev. 2.1
1-8 Freescale Semiconductor
1.7.1.2 Items and ContainersThe management of items displayed in Solution Explorer is based on an item’s relationship with the project and solution containers. Items can be related in the following ways:
• As a Solution item, which appears in the root folder of the Solution Explorer• As Project items, which appear under the solution item in Solution Explorer• As Software Components, which appear under project items. Whenever a Software Component is
selected in the Solution Explorer, the Property List pane is updated with properties associated with the selected Software Component
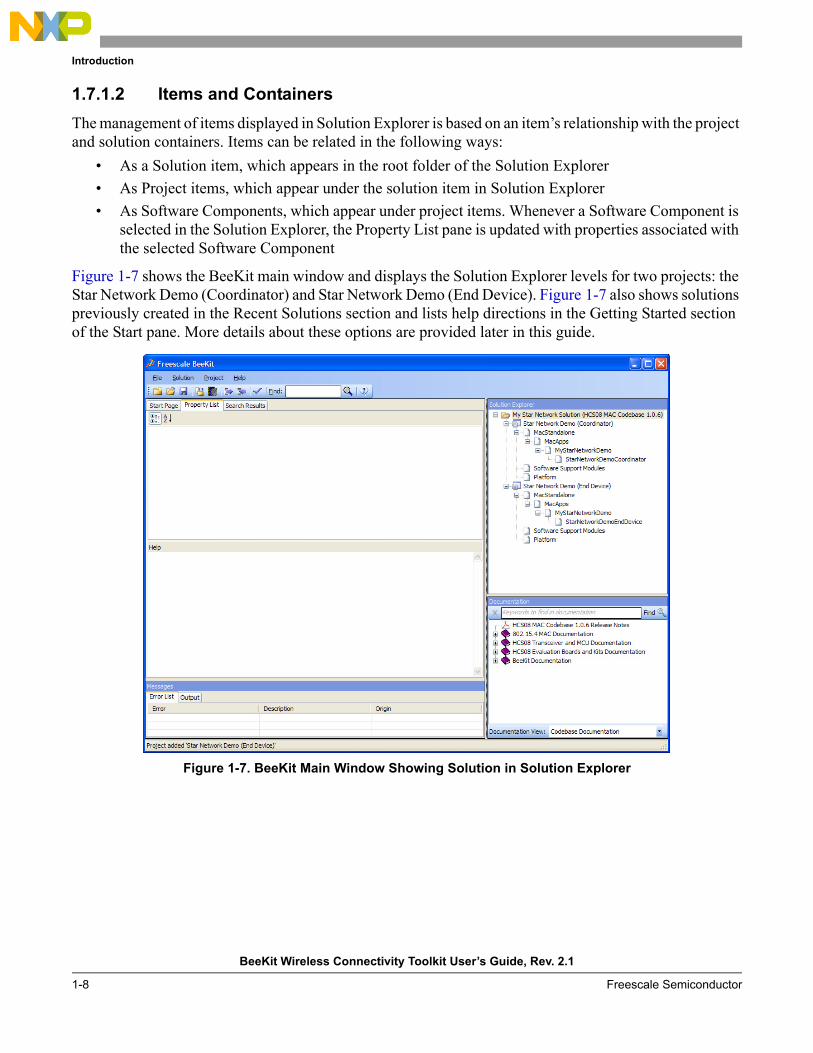
Figure 1-7 shows the BeeKit main window and displays the Solution Explorer levels for two projects: the Star Network Demo (Coordinator) and Star Network Demo (End Device). Figure 1-7 also shows solutions previously created in the Recent Solutions section and lists help directions in the Getting Started section of the Start pane. More details about these options are provided later in this guide.
Figure 1-7. BeeKit Main Window Showing Solution in Solution Explorer

Introduction
BeeKit Wireless Connectivity Toolkit User’s Guide, Rev. 2.1
Freescale Semiconductor 1-9
1.8 Creating a ProjectThis section briefly describes how to create a project. Detailed information about BeeKit is covered later in this guide. Before performing the steps in this section, user must ensure that the 802.15.4 MAC Codebase is selected as the current Codebase. If another Codebase is selected, see Section 2.1.1, “Choosing a Different Codebase” for more details on how to select another Codebase.
To create the new project perform the following steps:1. From the BeeKit main window (Figure 1-2), click on the New Project menu bar button or from the
menu bar, click on File -> New Project, and the New Project window appears as shown in Figure 1-8. A new project can also be created by selecting the New Project... link in the Start Page pane of the BeeKit main window.
Figure 1-8. New Project Window
2. For this example, the MAC Demo Applications are highlighted in the Project Types area of the New Project Window.
Introduction
BeeKit Wireless Connectivity Toolkit User’s Guide, Rev. 2.1
1-10 Freescale Semiconductor
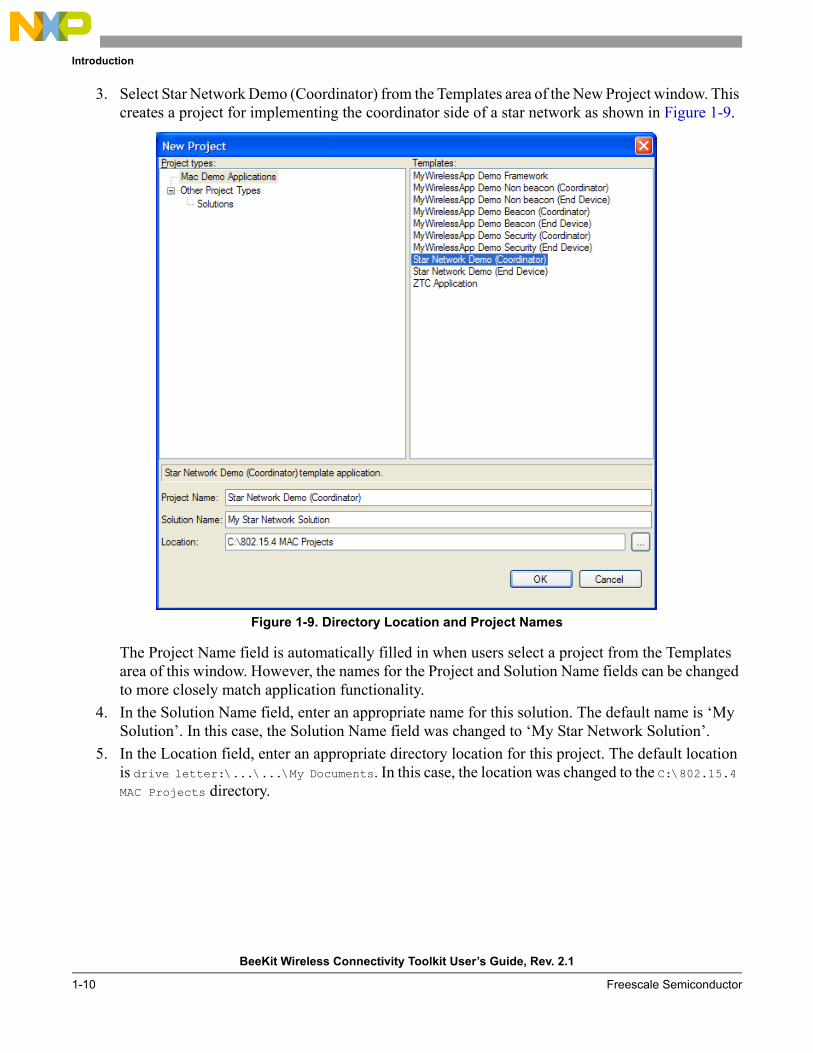
3. Select Star Network Demo (Coordinator) from the Templates area of the New Project window. This creates a project for implementing the coordinator side of a star network as shown in Figure 1-9.
Figure 1-9. Directory Location and Project Names
The Project Name field is automatically filled in when users select a project from the Templates area of this window. However, the names for the Project and Solution Name fields can be changed to more closely match application functionality.
4. In the Solution Name field, enter an appropriate name for this solution. The default name is ‘My Solution’. In this case, the Solution Name field was changed to ‘My Star Network Solution’.
5. In the Location field, enter an appropriate directory location for this project. The default location is drive letter:\...\...\My Documents. In this case, the location was changed to the C:\802.15.4 MAC Projects directory.
Introduction
BeeKit Wireless Connectivity Toolkit User’s Guide, Rev. 2.1
Freescale Semiconductor 1-11
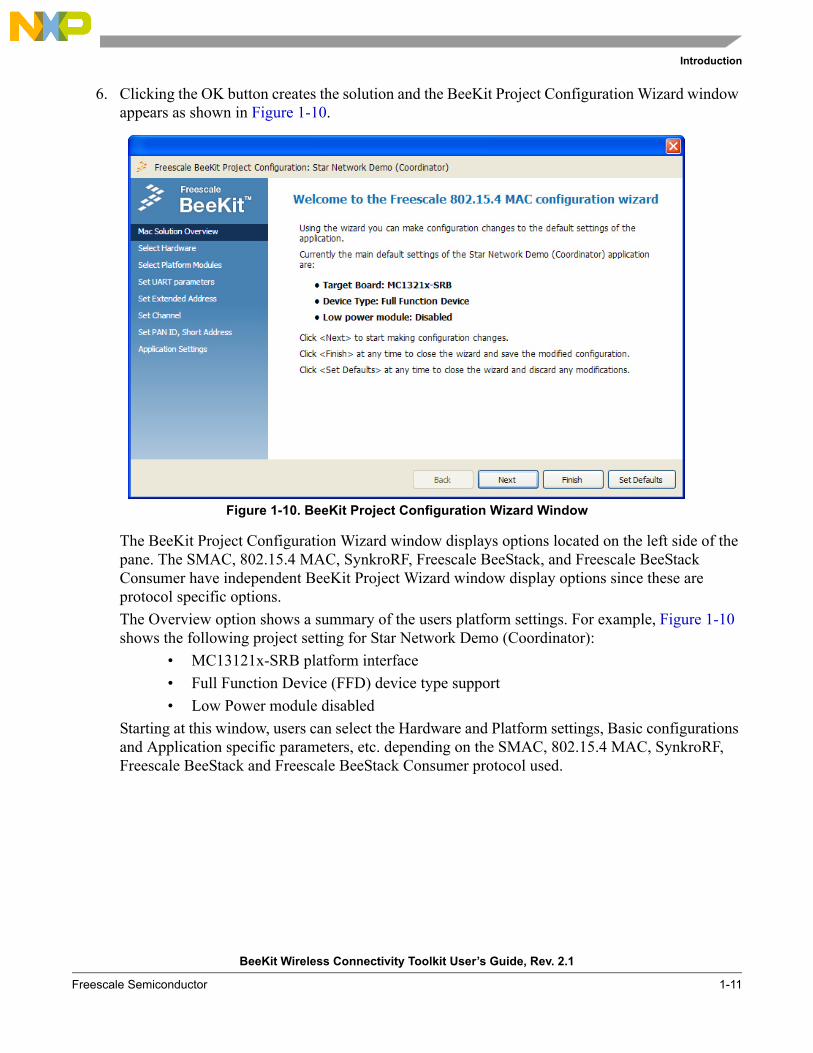
6. Clicking the OK button creates the solution and the BeeKit Project Configuration Wizard window appears as shown in Figure 1-10.
Figure 1-10. BeeKit Project Configuration Wizard Window
The BeeKit Project Configuration Wizard window displays options located on the left side of the pane. The SMAC, 802.15.4 MAC, SynkroRF, Freescale BeeStack, and Freescale BeeStack Consumer have independent BeeKit Project Wizard window display options since these are protocol specific options.The Overview option shows a summary of the users platform settings. For example, Figure 1-10 shows the following project setting for Star Network Demo (Coordinator):
• MC13121x-SRB platform interface• Full Function Device (FFD) device type support• Low Power module disabled
Starting at this window, users can select the Hardware and Platform settings, Basic configurations and Application specific parameters, etc. depending on the SMAC, 802.15.4 MAC, SynkroRF, Freescale BeeStack and Freescale BeeStack Consumer protocol used.
Introduction
BeeKit Wireless Connectivity Toolkit User’s Guide, Rev. 2.1
1-12 Freescale Semiconductor
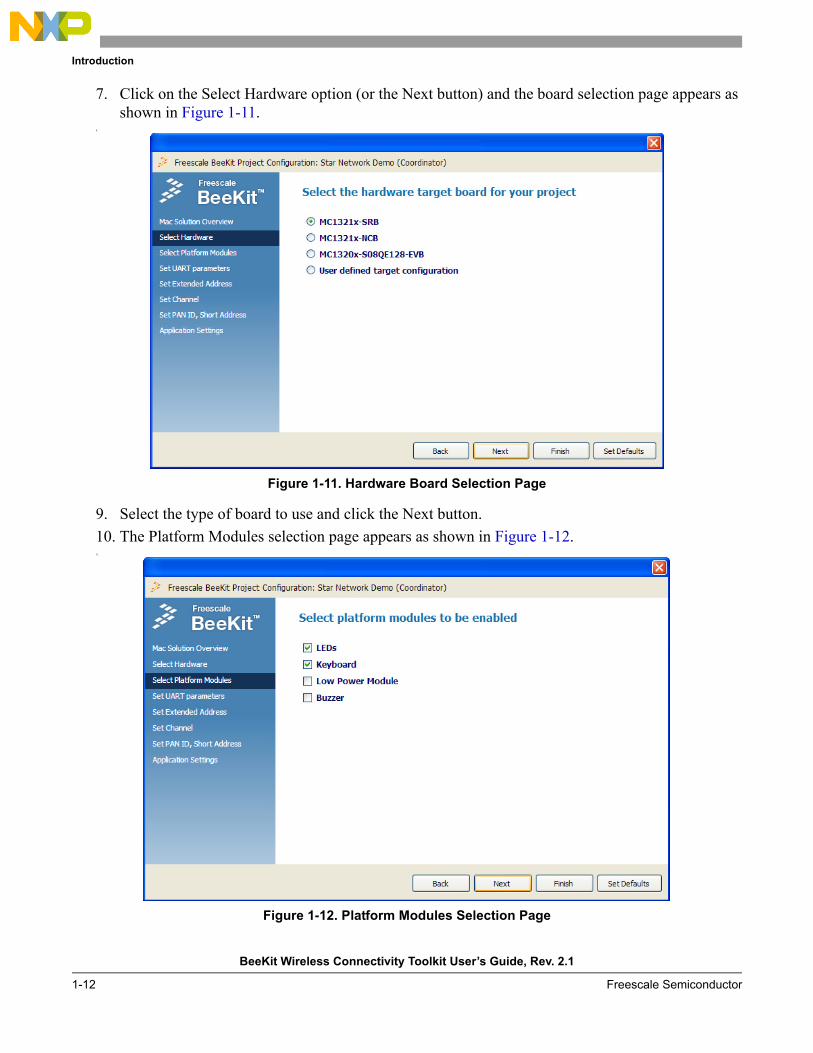
7. Click on the Select Hardware option (or the Next button) and the board selection page appears as shown in Figure 1-11.
8.
Figure 1-11. Hardware Board Selection Page
9. Select the type of board to use and click the Next button.10. The Platform Modules selection page appears as shown in Figure 1-12. 11.
Figure 1-12. Platform Modules Selection Page
Introduction
BeeKit Wireless Connectivity Toolkit User’s Guide, Rev. 2.1
Freescale Semiconductor 1-13
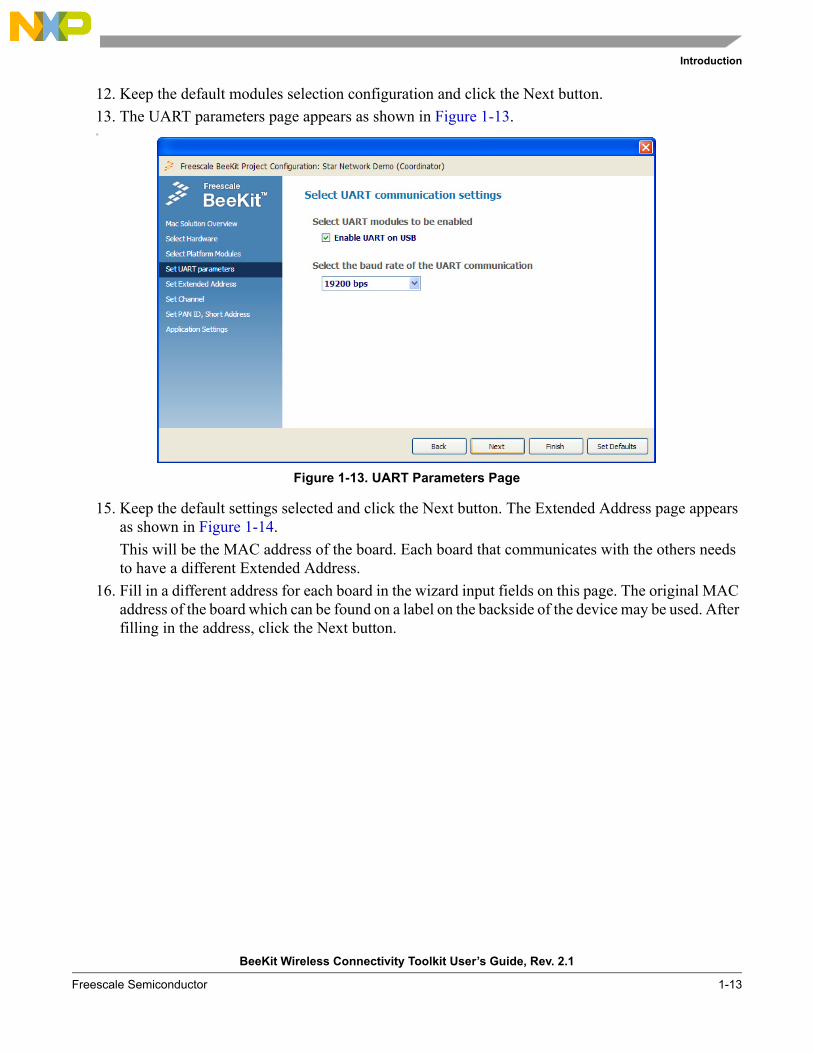
12. Keep the default modules selection configuration and click the Next button.13. The UART parameters page appears as shown in Figure 1-13.14.
Figure 1-13. UART Parameters Page
15. Keep the default settings selected and click the Next button. The Extended Address page appears as shown in Figure 1-14. This will be the MAC address of the board. Each board that communicates with the others needs to have a different Extended Address.
16. Fill in a different address for each board in the wizard input fields on this page. The original MAC address of the board which can be found on a label on the backside of the device may be used. After filling in the address, click the Next button.
Introduction
BeeKit Wireless Connectivity Toolkit User’s Guide, Rev. 2.1
1-14 Freescale Semiconductor
17.
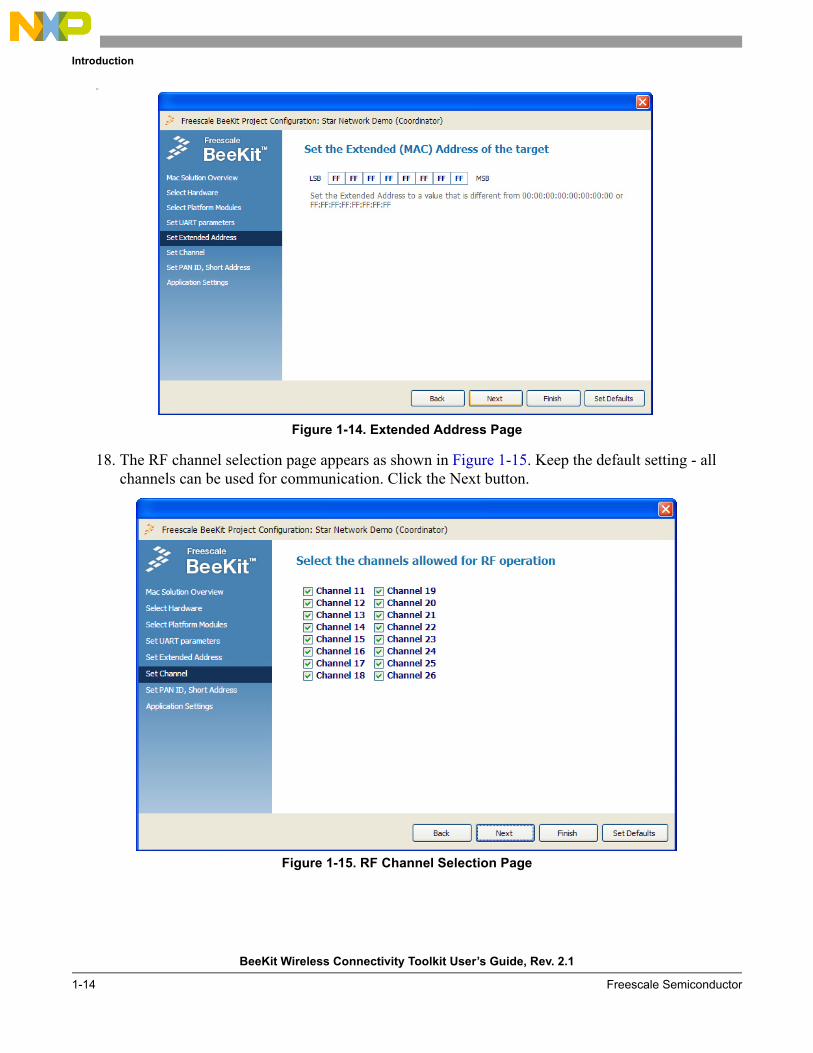
Figure 1-14. Extended Address Page
18. The RF channel selection page appears as shown in Figure 1-15. Keep the default setting - all channels can be used for communication. Click the Next button.
Figure 1-15. RF Channel Selection Page

Introduction
BeeKit Wireless Connectivity Toolkit User’s Guide, Rev. 2.1
Freescale Semiconductor 1-15
19. The PAN ID and Short Address page appears as shown in Figure 1-16. The PAN ID must be the same for all devices that need to communicate with each other. Customize the settings as appropriate and click the Next button.
Figure 1-16. PAN ID and Short Address Page
20. The Application Settings page appears as shown in Figure 1-17. This page will be different for the various application templates in the 802.15.4 MAC Codebase. Customize the settings as appropriate and click the Next button.
21.
Figure 1-17. Application Settings Page
Introduction
BeeKit Wireless Connectivity Toolkit User’s Guide, Rev. 2.1
1-16 Freescale Semiconductor
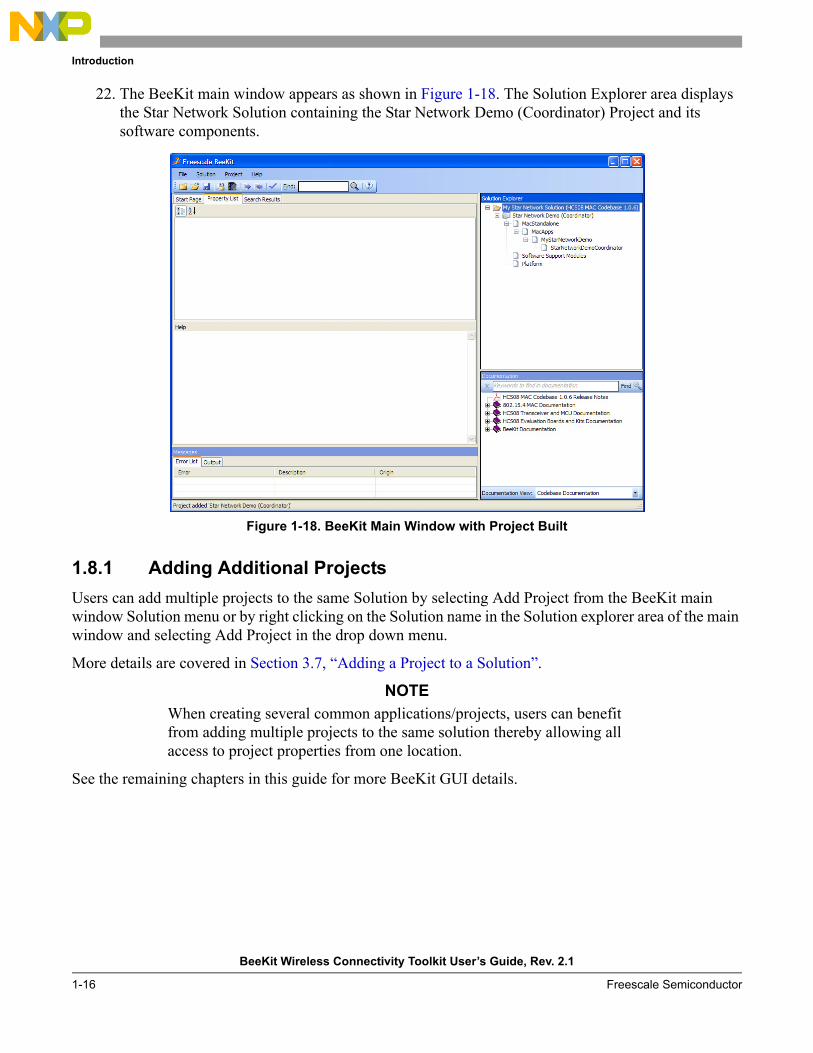
22. The BeeKit main window appears as shown in Figure 1-18. The Solution Explorer area displays the Star Network Solution containing the Star Network Demo (Coordinator) Project and its software components.
Figure 1-18. BeeKit Main Window with Project Built
1.8.1 Adding Additional ProjectsUsers can add multiple projects to the same Solution by selecting Add Project from the BeeKit main window Solution menu or by right clicking on the Solution name in the Solution explorer area of the main window and selecting Add Project in the drop down menu.
More details are covered in Section 3.7, “Adding a Project to a Solution”.
NOTEWhen creating several common applications/projects, users can benefit from adding multiple projects to the same solution thereby allowing all access to project properties from one location.
See the remaining chapters in this guide for more BeeKit GUI details.

Introduction
BeeKit Wireless Connectivity Toolkit User’s Guide, Rev. 2.1
Freescale Semiconductor 1-17
1.9 BeeKit Documentation OverviewThe BeeKit Wireless Connectivity ToolKit includes a comprehensive documentation library including the following documentation categories:
• Integrated Circuit (IC) (Freescale MCUs and wireless transceivers)• Development kits (Freescale development boards and evaluation kits)• Freescale IEEE 802.15.4 MAC implementation• SMAC• BeeStack (ZigBee) 2006• BeeStack (ZigBee) 2007/Pro• SynkroRF• BeeStack Consumer (RF4CE)• Test Tool• BeeKit GUI• Codebase and product versions release notes
Most of the documents are available as PDF files in several documentation category folders. By default, the documentation is installed in the following directory:C:\Program Files\Freescale\Documentation
1.9.1 BeeKit Documentation WindowThe BeeKit Documentation window is located in the lower right corner of the BeeKit main window and appears by default when BeeKit is launched.
The BeeKit Documentation window allows users to access and search the documentation library. For example, Figure 1-19 shows the HCS08 BeeStack Consumer Codebase specific documents.
Figure 1-19. Documentation Window

Introduction
BeeKit Wireless Connectivity Toolkit User’s Guide, Rev. 2.1
1-18 Freescale Semiconductor
Each time a codebase for a different product and/or architecture is selected, the Documentation window updates to show release notes, document categories and the documents that pertain to the active codebase. Expanding the document categories shows the individual document files. Double-clicking a document file launches the document in the default system PDF reader.
To show a specific documentation category, use the “Documentation View” drop-down selection list at the bottom of the documentation window as shown in Figure 1-20. To show all documentation categories, select “All Documents” from the drop-down list. To go back to showing only codebase specific documentation, select “Codebase Documentation” from the drop-down list.
Figure 1-20. Changing the Documentation View Option
To search for a keyword in all documentation, click the box at the top of the panel which by default displays the text “Keywords to find in documentation”. Type in the keyword and press Enter or click “Find”.
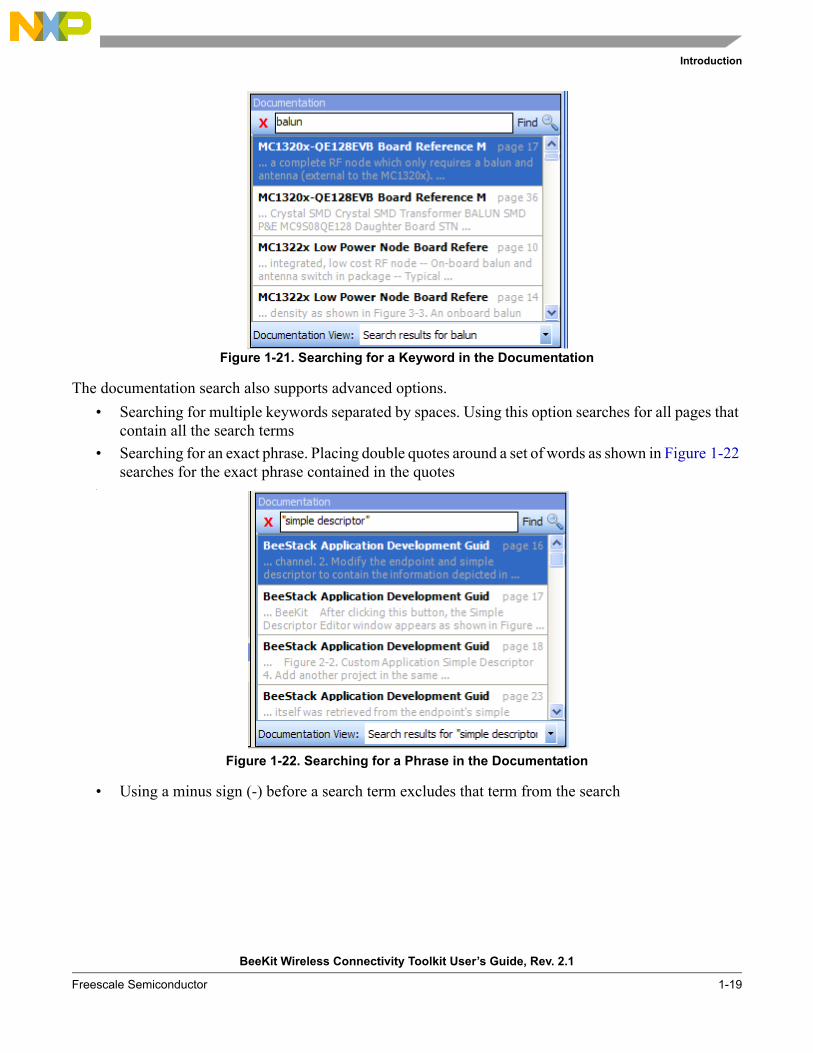
BeeKit searches for the keyword and displays all pages in the documents where the keyword was found as shown in Figure 1-21. Double click a search result to launch the document file and go to the specified page. Press the X sign on the left of the search box to return to the documentation categories and files list
Introduction
BeeKit Wireless Connectivity Toolkit User’s Guide, Rev. 2.1
Freescale Semiconductor 1-19
.
Figure 1-21. Searching for a Keyword in the Documentation
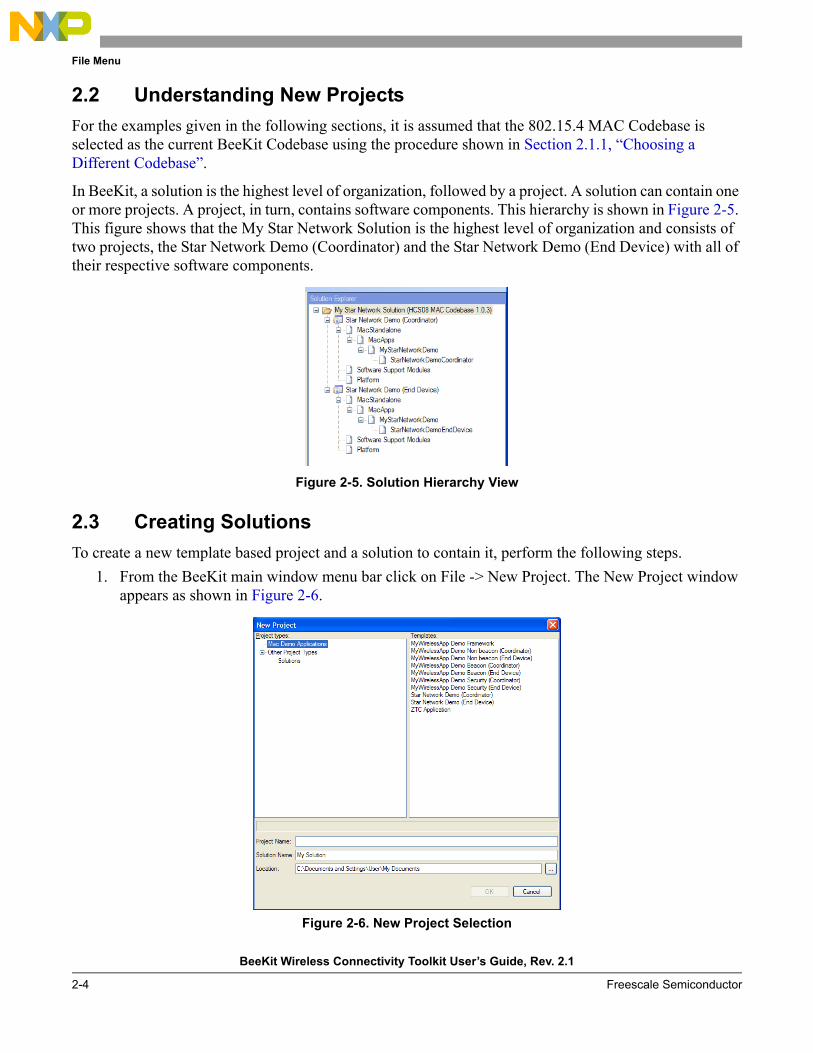
The documentation search also supports advanced options.• Searching for multiple keywords separated by spaces. Using this option searches for all pages that
contain all the search terms• Searching for an exact phrase. Placing double quotes around a set of words as shown in Figure 1-22
searches for the exact phrase contained in the quotes•
Figure 1-22. Searching for a Phrase in the Documentation
• Using a minus sign (-) before a search term excludes that term from the search

Introduction
BeeKit Wireless Connectivity Toolkit User’s Guide, Rev. 2.1
1-20 Freescale Semiconductor

BeeKit Wireless Connectivity Toolkit User’s Guide, Rev. 2.1
Freescale Semiconductor 2-1
Chapter 2 File MenuThis chapter describes how to select a Codebase and how to create a new project, open, save, and close solutions.
2.1 BeeKit Codebase SelectionAs specified in Section 1.6, “Embedded Components (Codebases)”, a Codebase is a collection of embedded software used to build different types of solutions in BeeKit. Freescale delivers various Codebases for its different wireless connectivity products and platforms: SMAC, 802.15.4 MAC, Freescale BeeStack, Freescale BeeStack Consumer and Freescale SynkroRF as well as for the supported hardware architectures: HCS08 or ARM7.
For example, the BeeKit HCS08 MAC Codebase allows users to create BeeKit solutions based on the 802.15.4 MAC Freescale implementation on HCS08 MCU based platforms. Freescale Codebases install by default in the following folder:
C:\Program Files\Freescale\Codebases\...
However, users can change the default installation location when installing the Codebases and BeeKit software.
2.1.1 Choosing a Different CodebaseBy default, the current Codebase selected in BeeKit is the latest installed on the PC. Users can choose to employ a different Codebase if needed. To select another Codebase, the current solution must first be closed. For example, to select the HCS08 802.15.4 MAC Codebase, perform the following steps:
1. Choose File->Select Codebase... from the BeeKit menu bar, or click on the “Select Other Codebase...” link on the BeeKit Start Page. The Select Codebase window appears as shown in Figure 2-1.
Figure 2-1. Codebase Selection Dialog

File Menu
BeeKit Wireless Connectivity Toolkit User’s Guide, Rev. 2.1
2-2 Freescale Semiconductor
2. Highlight the MAC Codebase in the BeeKit Codebase List and click “Set Active” or alternatively, double-click the Codebase in the list.
2.1.2 Adding a New CodebaseTo add a new Codebase to the BeeKit Codebase List perform the following steps:
1. Click the “Add Codebase Folder...” button on the BeeKit Codebase selection window shown in Figure 2-1. A folder selection window appears as shown in Figure 2-2.
Figure 2-2. Selecting a New Codebase Folder
2. Navigate to the folder containing the new Codebase, highlight it, then click the “OK” button.3. The new Codebase appears in the BeeKit Codebase List as shown in Figure 2-3.
Figure 2-3. New Codebase Added to the Codebase List

File Menu
BeeKit Wireless Connectivity Toolkit User’s Guide, Rev. 2.1
Freescale Semiconductor 2-3
2.1.3 Editing Codebase Name and DescriptionWhen a new Codebase is added to the BeeKit Codebase List it will have a name based on the name of its folder. To edit the Codebase name under which it appears in the BeeKit GUI as well as the Codebase Description, perform the following:
1. Highlight the Codebase to be edited on the BeeKit Codebase selection window shown in Figure 2-1.
2. Click the “Edit Codebase Info...” button. An Edit Codebase Information window appears as shown in Figure 2-4.
Figure 2-4. Codebase Information Dialog
3. Edit the Codebase name and description as needed.4. Click the “OK” button.
2.1.4 Removing a CodebaseTo remove a Codebase from the BeeKit Codebase List:
1. Highlight the Codebase to be removed on the BeeKit Codebase selection window shown in Figure 2-1.
1. Click the “Remove Codebase” button.The Codebase folder remains on the disk and can be added again to the Codebase List as shown in Section 2.1.2, “Adding a New Codebase”.
File Menu
BeeKit Wireless Connectivity Toolkit User’s Guide, Rev. 2.1
2-4 Freescale Semiconductor
2.2 Understanding New ProjectsFor the examples given in the following sections, it is assumed that the 802.15.4 MAC Codebase is selected as the current BeeKit Codebase using the procedure shown in Section 2.1.1, “Choosing a Different Codebase”.
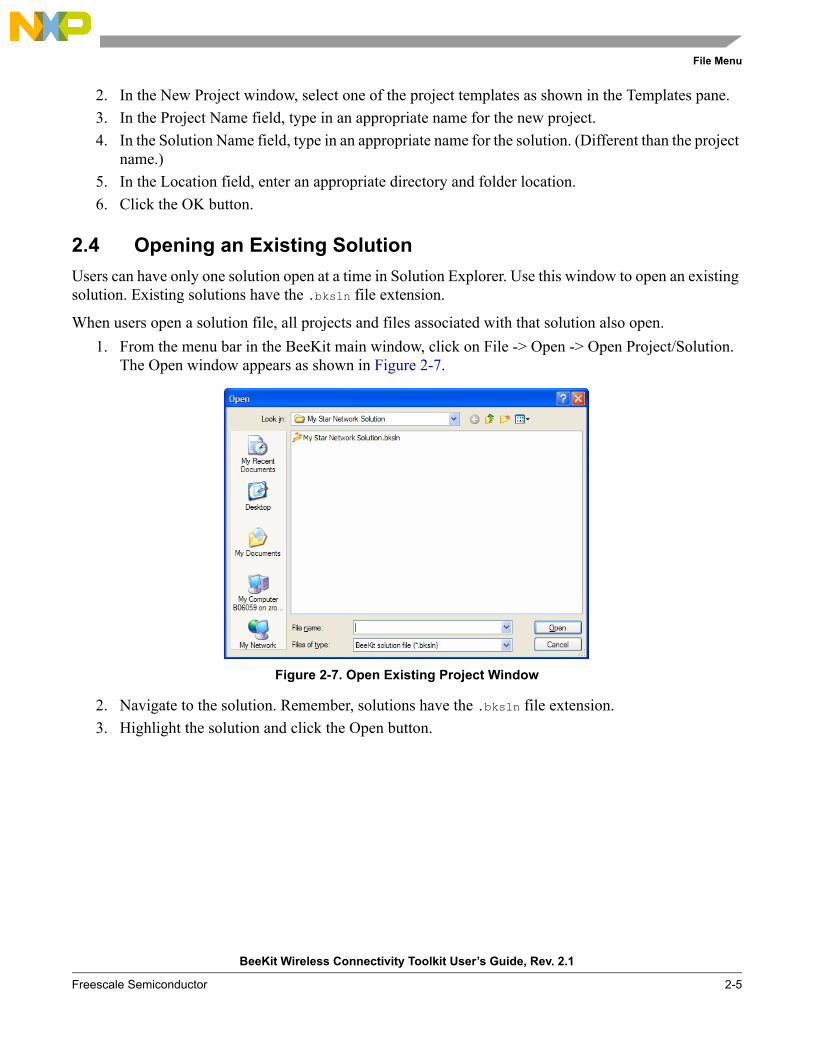
In BeeKit, a solution is the highest level of organization, followed by a project. A solution can contain one or more projects. A project, in turn, contains software components. This hierarchy is shown in Figure 2-5. This figure shows that the My Star Network Solution is the highest level of organization and consists of two projects, the Star Network Demo (Coordinator) and the Star Network Demo (End Device) with all of their respective software components.
Figure 2-5. Solution Hierarchy View
2.3 Creating SolutionsTo create a new template based project and a solution to contain it, perform the following steps.
1. From the BeeKit main window menu bar click on File -> New Project. The New Project window appears as shown in Figure 2-6.
Figure 2-6. New Project Selection
File Menu
BeeKit Wireless Connectivity Toolkit User’s Guide, Rev. 2.1
Freescale Semiconductor 2-5
2. In the New Project window, select one of the project templates as shown in the Templates pane.3. In the Project Name field, type in an appropriate name for the new project.4. In the Solution Name field, type in an appropriate name for the solution. (Different than the project
name.)5. In the Location field, enter an appropriate directory and folder location.6. Click the OK button.
2.4 Opening an Existing SolutionUsers can have only one solution open at a time in Solution Explorer. Use this window to open an existing solution. Existing solutions have the .bksln file extension.
When users open a solution file, all projects and files associated with that solution also open.1. From the menu bar in the BeeKit main window, click on File -> Open -> Open Project/Solution.
The Open window appears as shown in Figure 2-7.
Figure 2-7. Open Existing Project Window
2. Navigate to the solution. Remember, solutions have the .bksln file extension.3. Highlight the solution and click the Open button.
File Menu
BeeKit Wireless Connectivity Toolkit User’s Guide, Rev. 2.1
2-6 Freescale Semiconductor
2.5 Opening a Demonstration SolutionA Codebase can ship with demonstration applications allowing users to open, build, and export a solution ready to be compiled in CodeWarrior.
The BeeStack Codebase contains several preconfigured demonstration applications that can be deployed to various demonstration boards. User must select the BeeStack Codebase before selecting a demonstration solution.
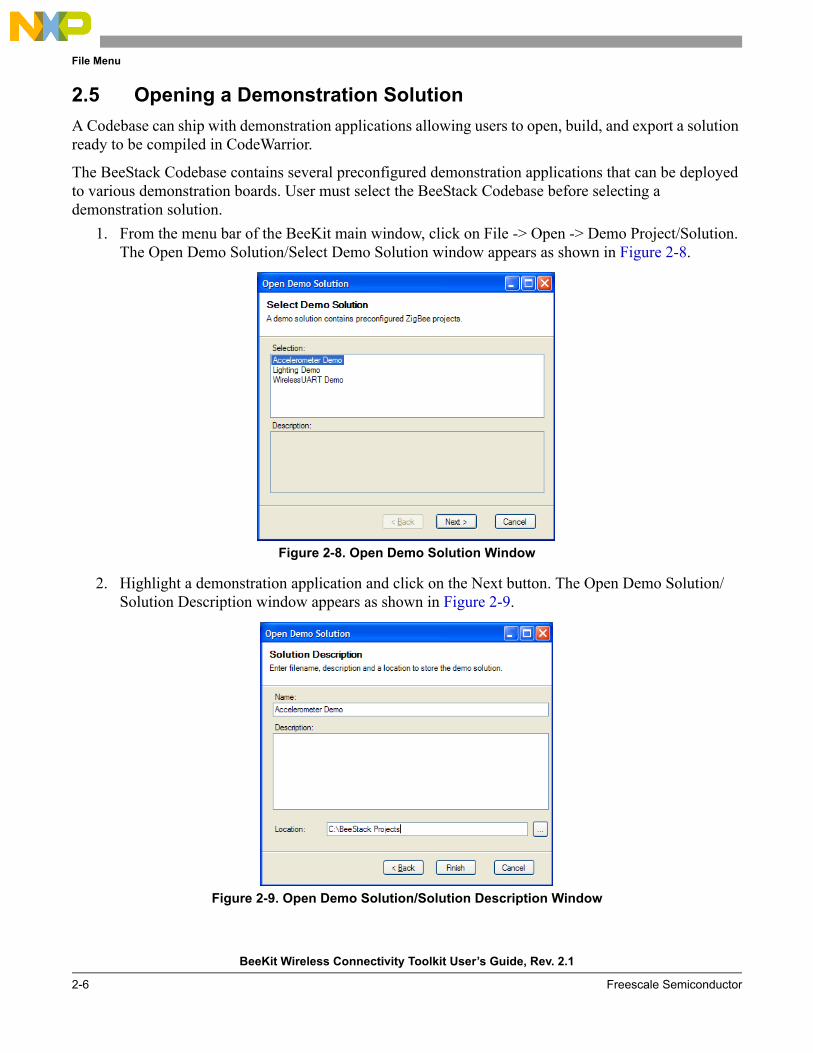
1. From the menu bar of the BeeKit main window, click on File -> Open -> Demo Project/Solution. The Open Demo Solution/Select Demo Solution window appears as shown in Figure 2-8.
Figure 2-8. Open Demo Solution Window
2. Highlight a demonstration application and click on the Next button. The Open Demo Solution/ Solution Description window appears as shown in Figure 2-9.
Figure 2-9. Open Demo Solution/Solution Description Window

File Menu
BeeKit Wireless Connectivity Toolkit User’s Guide, Rev. 2.1
Freescale Semiconductor 2-7
3. Enter a name, a description, and choose an appropriate file location.4. Click on the Finish button. The demo appears in the Solution Explorer pane of the BeeKit Main
window.
2.6 Exporting the SolutionOnce a solution is created, related projects are added to the solution and software components are defined in the projects. Users must export the solution for deployment in Freescale CodeWarrior or IAR Embedded Workbench to directly generate an embedded firmware image file. To export the solution, perform the following tasks:
1. From the menu bar of the BeeKit main window, click on Solution -> Export Solution. The Export Solution window appears as shown in Figure 2-10.
Figure 2-10. Export Solution Window
2. Highlight the Project to be exported and click on the OK button. In this case, two projects have been selected to be exported. Messages appear in the message display area of the BeeKit main window as the solution is exported.
2.6.1 Exporting Multiple ProjectsA Solution can contain more than one project. The Star Network Demo Solution containing two projects, Star Network Demo (Coordinator) and Star Network Demo (End Device), as its projects is exported as a single Solution of a collection of projects.
When one or more projects are exported, one or more project folders containing each of these project configurations will be created in the directory location originally specified. When importing projects manually, each project must be imported separately into the CodeWarrior IDE. Importing projects into CodeWarrior is described in Section 2.7, “Importing and Compiling Projects”.
2.7 Importing and Compiling ProjectsOnce a solution has been successfully created and exported from BeeKit, the projects can be utilized in different ways after importing and opening them in the IDE that corresponds to the platform. Use Freescale
File Menu
BeeKit Wireless Connectivity Toolkit User’s Guide, Rev. 2.1
2-8 Freescale Semiconductor
CodeWarrior for the HCS08 based platforms and IAR Embedded Workbench for ARM7 based platforms. One way is to simply use the project as defined in Beekit, compile and download to the user selected platform. Another way is to use the BeeKit imported project in the IDE as a template for more complex software development specific to user requirements.
2.7.1 Importing and Compiling Projects in CodeWarrior IDEEvery project included with the exported solution must be compiled and deployed separately so it can be used with the CodeWarrior IDE. To compile and deploy the project in the CodeWarrior IDE, perform the following steps:
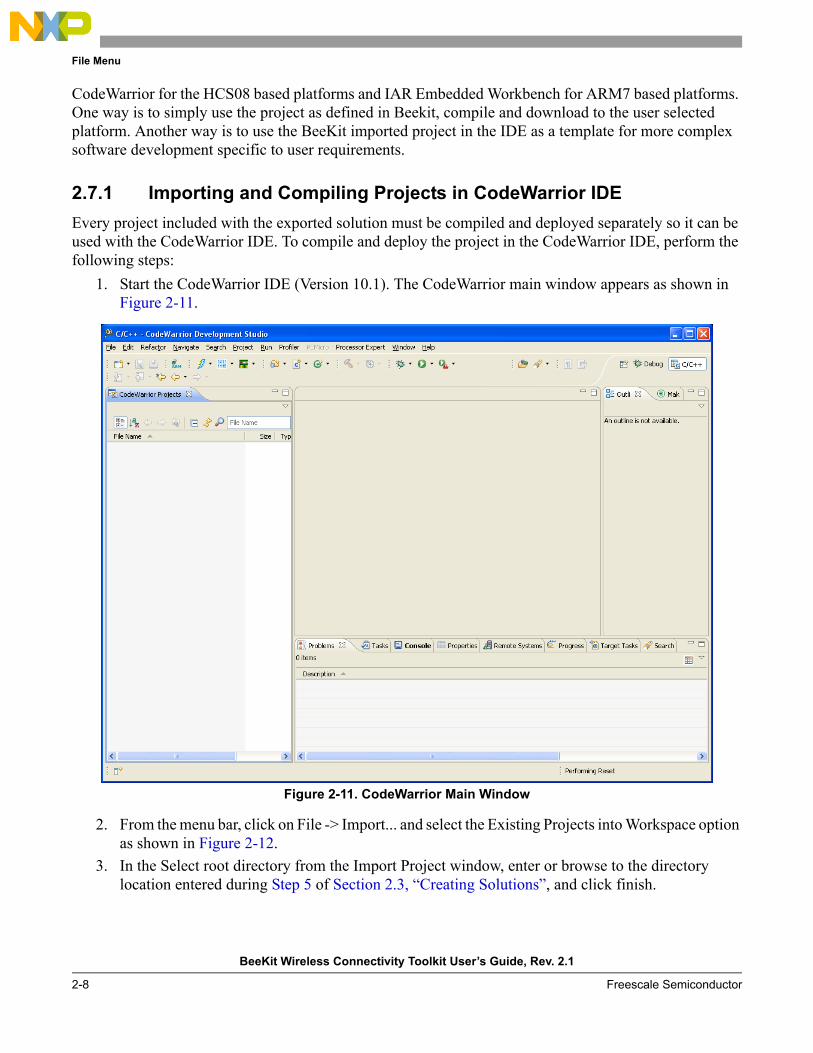
1. Start the CodeWarrior IDE (Version 10.1). The CodeWarrior main window appears as shown in Figure 2-11.
Figure 2-11. CodeWarrior Main Window
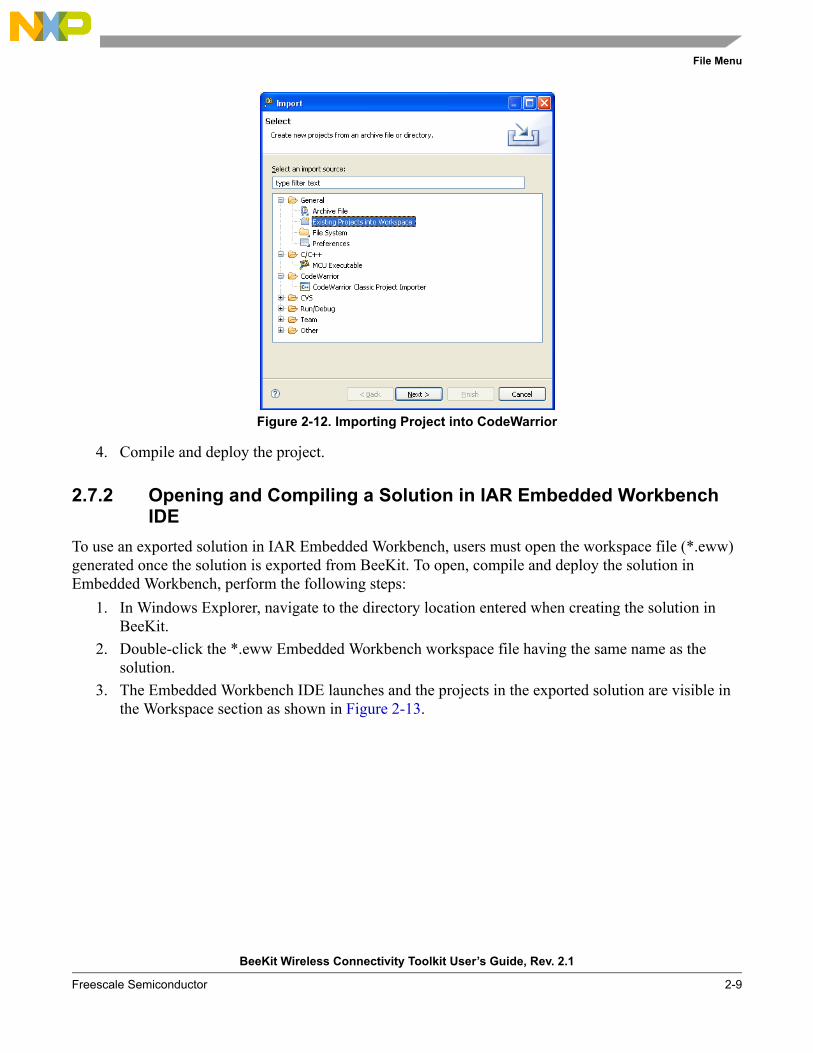
2. From the menu bar, click on File -> Import... and select the Existing Projects into Workspace option as shown in Figure 2-12.
3. In the Select root directory from the Import Project window, enter or browse to the directory location entered during Step 5 of Section 2.3, “Creating Solutions”, and click finish.
File Menu
BeeKit Wireless Connectivity Toolkit User’s Guide, Rev. 2.1
Freescale Semiconductor 2-9
Figure 2-12. Importing Project into CodeWarrior
4. Compile and deploy the project.
2.7.2 Opening and Compiling a Solution in IAR Embedded Workbench IDE
To use an exported solution in IAR Embedded Workbench, users must open the workspace file (*.eww) generated once the solution is exported from BeeKit. To open, compile and deploy the solution in Embedded Workbench, perform the following steps:
1. In Windows Explorer, navigate to the directory location entered when creating the solution in BeeKit.
2. Double-click the *.eww Embedded Workbench workspace file having the same name as the solution.
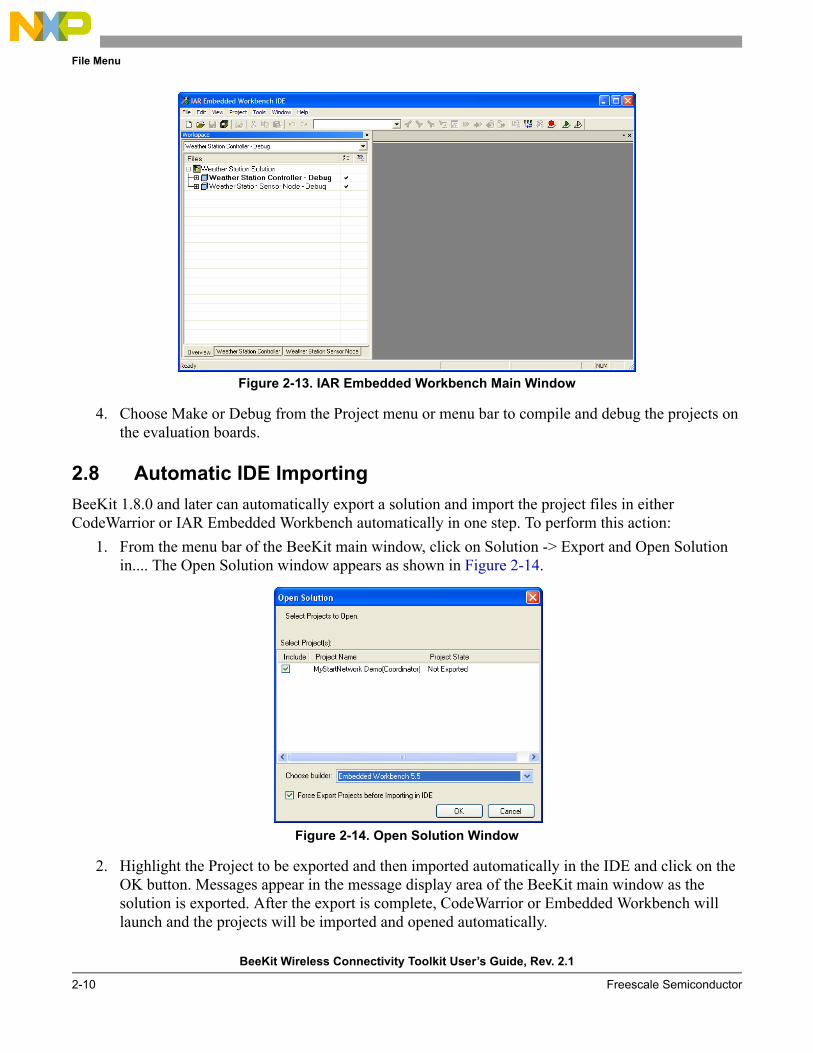
3. The Embedded Workbench IDE launches and the projects in the exported solution are visible in the Workspace section as shown in Figure 2-13.
File Menu
BeeKit Wireless Connectivity Toolkit User’s Guide, Rev. 2.1
2-10 Freescale Semiconductor
Figure 2-13. IAR Embedded Workbench Main Window
4. Choose Make or Debug from the Project menu or menu bar to compile and debug the projects on the evaluation boards.
2.8 Automatic IDE ImportingBeeKit 1.8.0 and later can automatically export a solution and import the project files in either CodeWarrior or IAR Embedded Workbench automatically in one step. To perform this action:
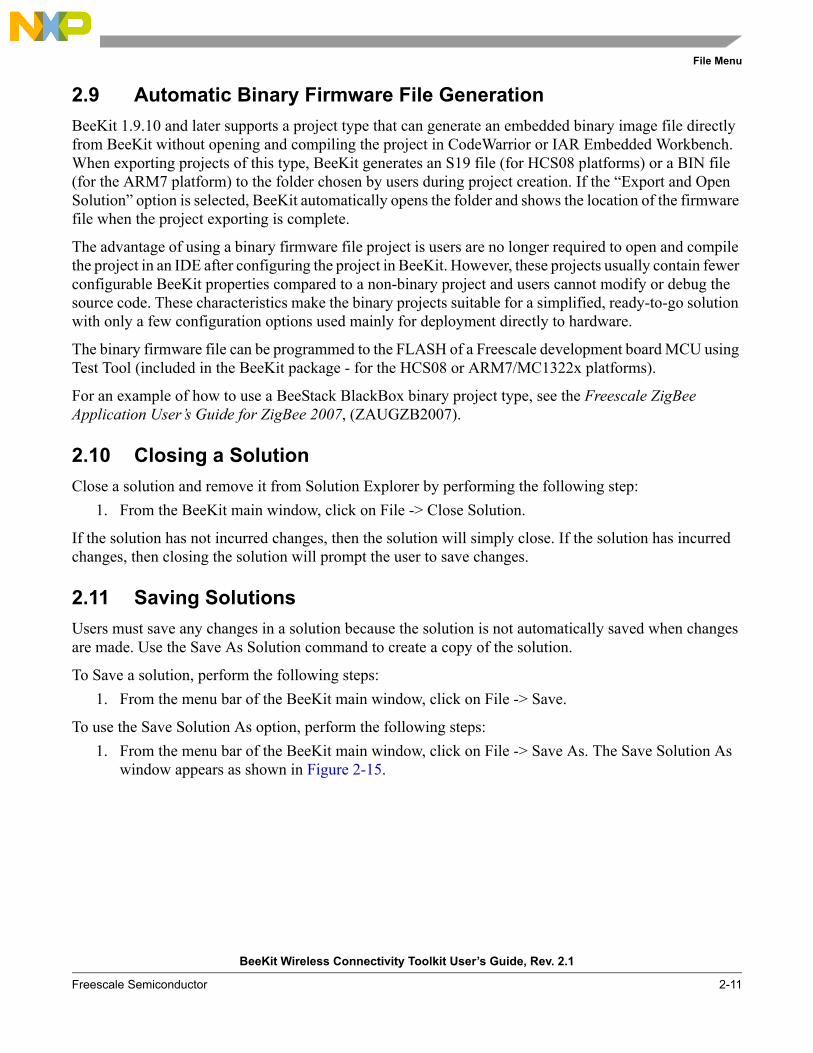
1. From the menu bar of the BeeKit main window, click on Solution -> Export and Open Solution in.... The Open Solution window appears as shown in Figure 2-14.
Figure 2-14. Open Solution Window
2. Highlight the Project to be exported and then imported automatically in the IDE and click on the OK button. Messages appear in the message display area of the BeeKit main window as the solution is exported. After the export is complete, CodeWarrior or Embedded Workbench will launch and the projects will be imported and opened automatically.
File Menu
BeeKit Wireless Connectivity Toolkit User’s Guide, Rev. 2.1
Freescale Semiconductor 2-11
2.9 Automatic Binary Firmware File GenerationBeeKit 1.9.10 and later supports a project type that can generate an embedded binary image file directly from BeeKit without opening and compiling the project in CodeWarrior or IAR Embedded Workbench. When exporting projects of this type, BeeKit generates an S19 file (for HCS08 platforms) or a BIN file (for the ARM7 platform) to the folder chosen by users during project creation. If the “Export and Open Solution” option is selected, BeeKit automatically opens the folder and shows the location of the firmware file when the project exporting is complete.
The advantage of using a binary firmware file project is users are no longer required to open and compile the project in an IDE after configuring the project in BeeKit. However, these projects usually contain fewer configurable BeeKit properties compared to a non-binary project and users cannot modify or debug the source code. These characteristics make the binary projects suitable for a simplified, ready-to-go solution with only a few configuration options used mainly for deployment directly to hardware.
The binary firmware file can be programmed to the FLASH of a Freescale development board MCU using Test Tool (included in the BeeKit package - for the HCS08 or ARM7/MC1322x platforms).
For an example of how to use a BeeStack BlackBox binary project type, see the Freescale ZigBee Application User’s Guide for ZigBee 2007, (ZAUGZB2007).
2.10 Closing a SolutionClose a solution and remove it from Solution Explorer by performing the following step:
1. From the BeeKit main window, click on File -> Close Solution.
If the solution has not incurred changes, then the solution will simply close. If the solution has incurred changes, then closing the solution will prompt the user to save changes.
2.11 Saving SolutionsUsers must save any changes in a solution because the solution is not automatically saved when changes are made. Use the Save As Solution command to create a copy of the solution.
To Save a solution, perform the following steps:1. From the menu bar of the BeeKit main window, click on File -> Save.
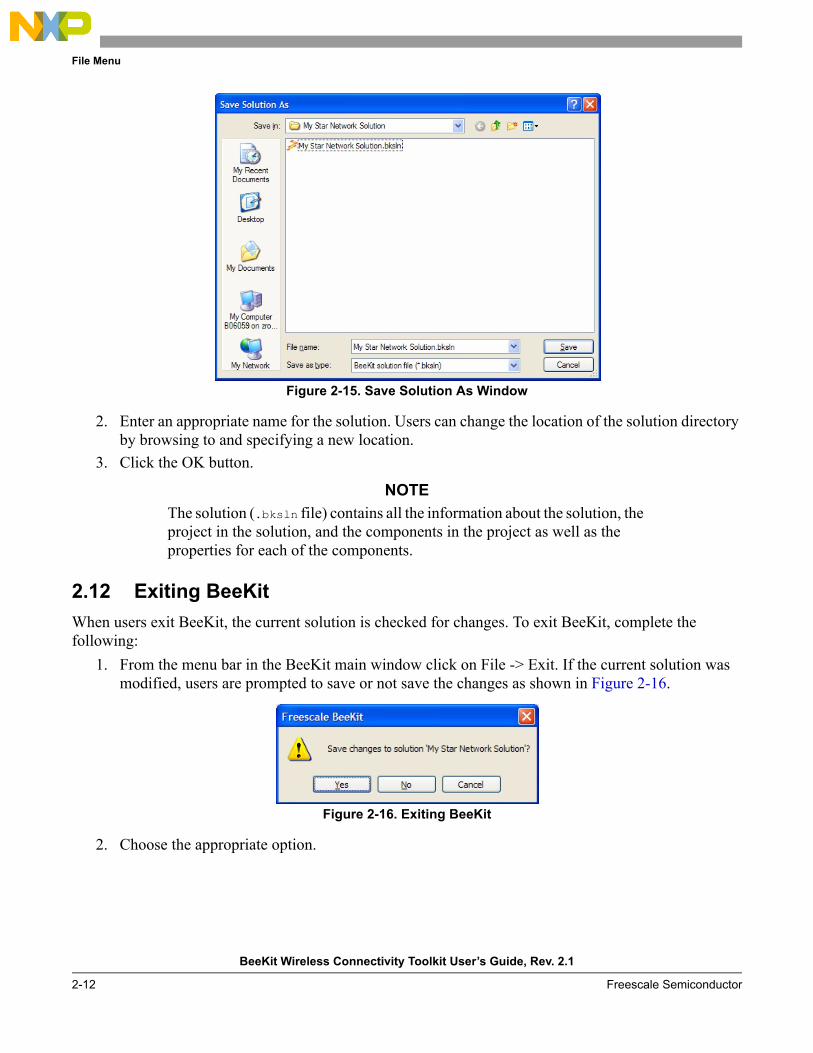
To use the Save Solution As option, perform the following steps:1. From the menu bar of the BeeKit main window, click on File -> Save As. The Save Solution As
window appears as shown in Figure 2-15.
File Menu
BeeKit Wireless Connectivity Toolkit User’s Guide, Rev. 2.1
2-12 Freescale Semiconductor
Figure 2-15. Save Solution As Window
2. Enter an appropriate name for the solution. Users can change the location of the solution directory by browsing to and specifying a new location.
3. Click the OK button.
NOTEThe solution (.bksln file) contains all the information about the solution, the project in the solution, and the components in the project as well as the properties for each of the components.
2.12 Exiting BeeKitWhen users exit BeeKit, the current solution is checked for changes. To exit BeeKit, complete the following:
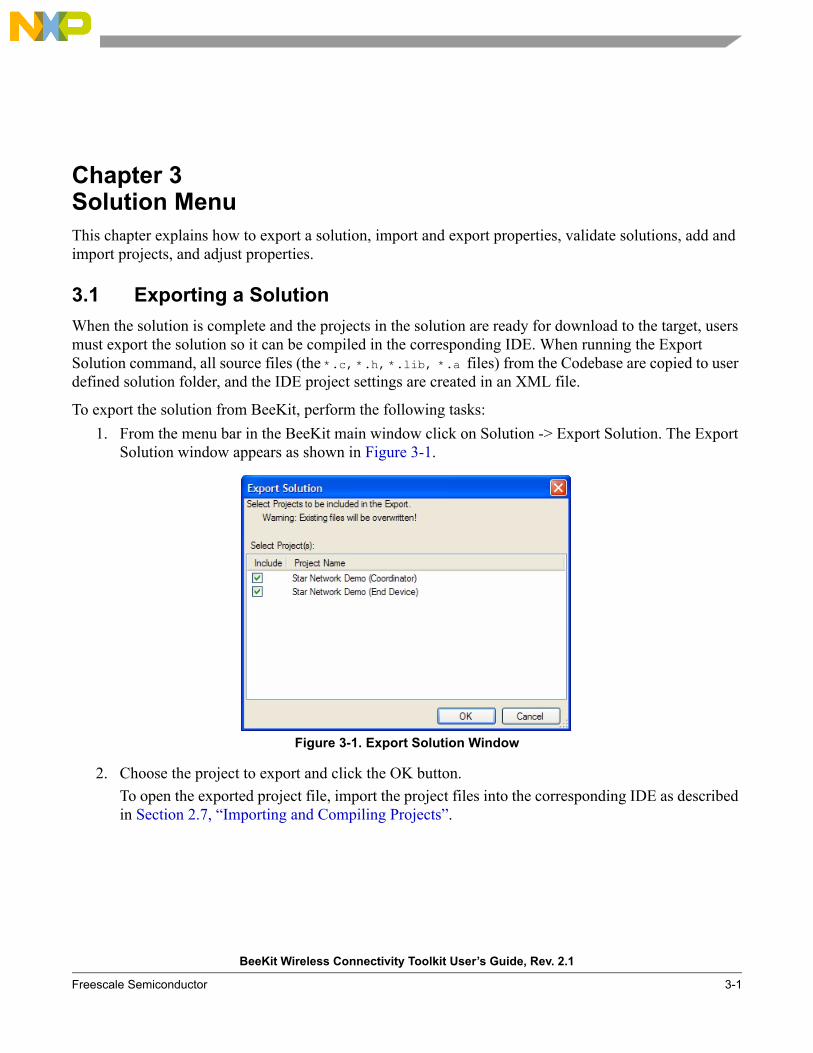
1. From the menu bar in the BeeKit main window click on File -> Exit. If the current solution was modified, users are prompted to save or not save the changes as shown in Figure 2-16.
Figure 2-16. Exiting BeeKit
2. Choose the appropriate option.
BeeKit Wireless Connectivity Toolkit User’s Guide, Rev. 2.1
Freescale Semiconductor 3-1
Chapter 3 Solution MenuThis chapter explains how to export a solution, import and export properties, validate solutions, add and import projects, and adjust properties.
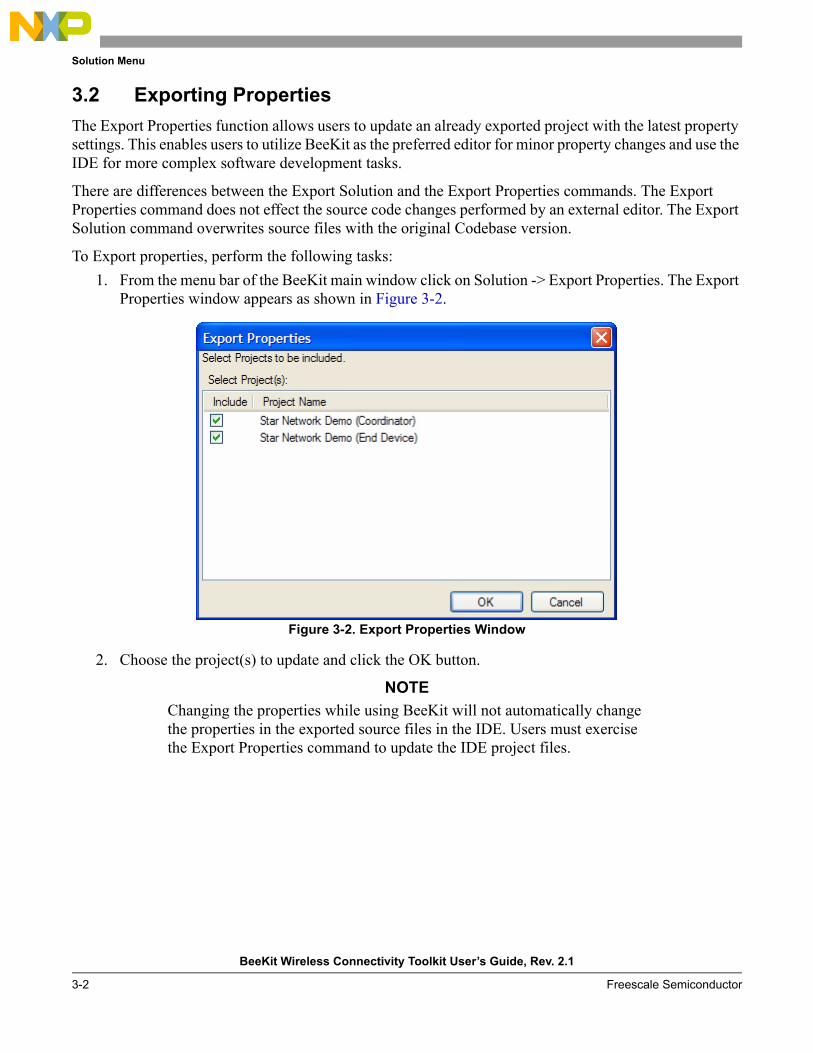
3.1 Exporting a SolutionWhen the solution is complete and the projects in the solution are ready for download to the target, users must export the solution so it can be compiled in the corresponding IDE. When running the Export Solution command, all source files (the *.c, *.h, *.lib, *.a files) from the Codebase are copied to user defined solution folder, and the IDE project settings are created in an XML file.
To export the solution from BeeKit, perform the following tasks:1. From the menu bar in the BeeKit main window click on Solution -> Export Solution. The Export
Solution window appears as shown in Figure 3-1.
Figure 3-1. Export Solution Window
2. Choose the project to export and click the OK button.To open the exported project file, import the project files into the corresponding IDE as described in Section 2.7, “Importing and Compiling Projects”.
Solution Menu
BeeKit Wireless Connectivity Toolkit User’s Guide, Rev. 2.1
3-2 Freescale Semiconductor
3.2 Exporting PropertiesThe Export Properties function allows users to update an already exported project with the latest property settings. This enables users to utilize BeeKit as the preferred editor for minor property changes and use the IDE for more complex software development tasks.
There are differences between the Export Solution and the Export Properties commands. The Export Properties command does not effect the source code changes performed by an external editor. The Export Solution command overwrites source files with the original Codebase version.
To Export properties, perform the following tasks:1. From the menu bar of the BeeKit main window click on Solution -> Export Properties. The Export
Properties window appears as shown in Figure 3-2.
Figure 3-2. Export Properties Window
2. Choose the project(s) to update and click the OK button.
NOTEChanging the properties while using BeeKit will not automatically change the properties in the exported source files in the IDE. Users must exercise the Export Properties command to update the IDE project files.

Solution Menu
BeeKit Wireless Connectivity Toolkit User’s Guide, Rev. 2.1
Freescale Semiconductor 3-3
3.3 Importing PropertiesThe Import Properties function allows users to edit properties in the IDE and import these property changes back into BeeKit. To synchronize properties changed outside of BeeKit with the current BeeKit solution, the Import Properties command is used.
To import properties, perform the following tasks:1. From the menu bar of the BeeKit main window click on Solution -> Import Properties. The Import
Properties window appears as shown in Figure 3-3.
Figure 3-3. Import Properties Window
2. Choose the project(s) to update and click the OK button.
NOTEWhen opening a BeeKit solution, BeeKit scans the exported source files for altered properties. If there are any altered properties, users are notified and offered the opportunity to import the properties from the source files.
Solution Menu
BeeKit Wireless Connectivity Toolkit User’s Guide, Rev. 2.1
3-4 Freescale Semiconductor
3.4 Validating a SolutionUsing the validate solution command checks if the solution is created with cohesive software components and property settings. The validate solution command is automatically executed when exporting a solution.
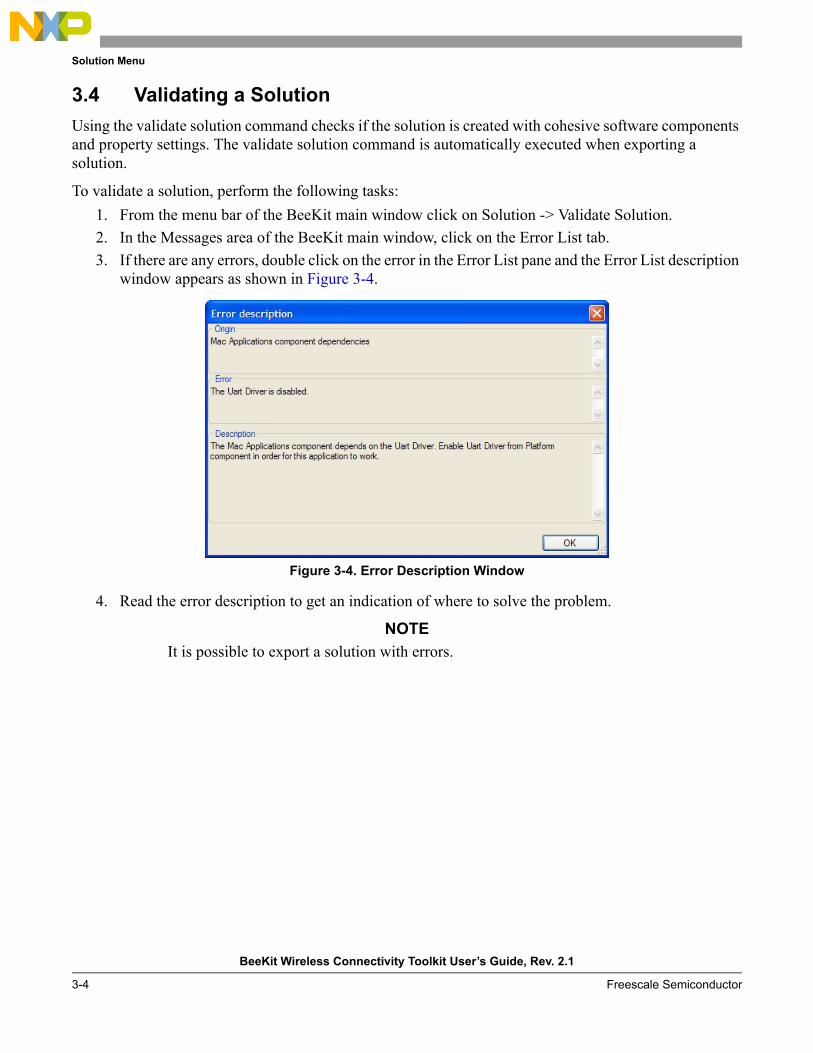
To validate a solution, perform the following tasks:1. From the menu bar of the BeeKit main window click on Solution -> Validate Solution.2. In the Messages area of the BeeKit main window, click on the Error List tab.3. If there are any errors, double click on the error in the Error List pane and the Error List description
window appears as shown in Figure 3-4.
Figure 3-4. Error Description Window
4. Read the error description to get an indication of where to solve the problem.
NOTEIt is possible to export a solution with errors.
Solution Menu
BeeKit Wireless Connectivity Toolkit User’s Guide, Rev. 2.1
Freescale Semiconductor 3-5
3.5 Upgrading a BeeKit Solution FileBeeKit 1.6.0 and later allows users to upgrade a BeeKit solution file from an older Codebase version to a newer Codebase version. When users export the upgraded solution file, the new exported projects will have the same configuration as in the original solution, but all files and protocol libraries will be updated to the newer Codebase.
The following example shows how to upgrade a BeeKit solution file containing an Ha OnOffLight application from HCS08 BeeStack Codebase 1.0.5 (upgrade source Codebase) to HCS08 BeeStack Codebase 2.0.0 (upgrade destination Codebase).
NOTEBefore performing the upgrade, users should backup their current BeeKit solution files and exported projects.
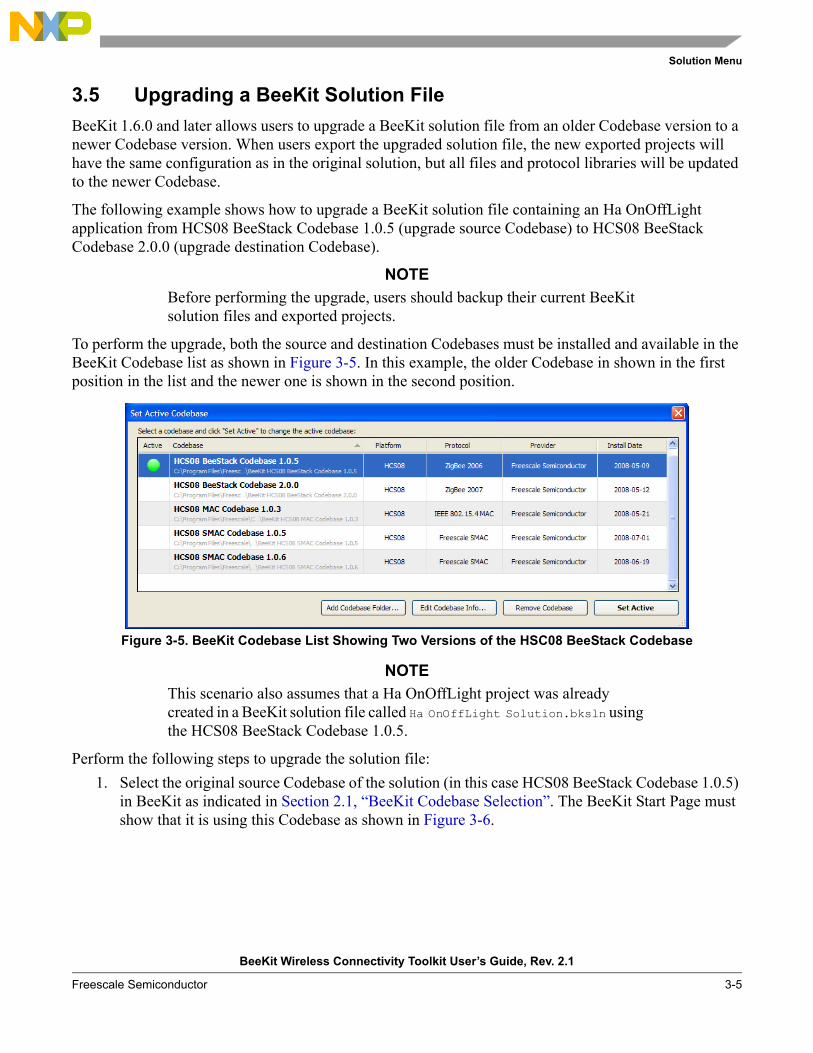
To perform the upgrade, both the source and destination Codebases must be installed and available in the BeeKit Codebase list as shown in Figure 3-5. In this example, the older Codebase in shown in the first position in the list and the newer one is shown in the second position.
Figure 3-5. BeeKit Codebase List Showing Two Versions of the HSC08 BeeStack Codebase
NOTEThis scenario also assumes that a Ha OnOffLight project was already created in a BeeKit solution file called Ha OnOffLight Solution.bksln using the HCS08 BeeStack Codebase 1.0.5.
Perform the following steps to upgrade the solution file:1. Select the original source Codebase of the solution (in this case HCS08 BeeStack Codebase 1.0.5)
in BeeKit as indicated in Section 2.1, “BeeKit Codebase Selection”. The BeeKit Start Page must show that it is using this Codebase as shown in Figure 3-6.
Solution Menu
BeeKit Wireless Connectivity Toolkit User’s Guide, Rev. 2.1
3-6 Freescale Semiconductor
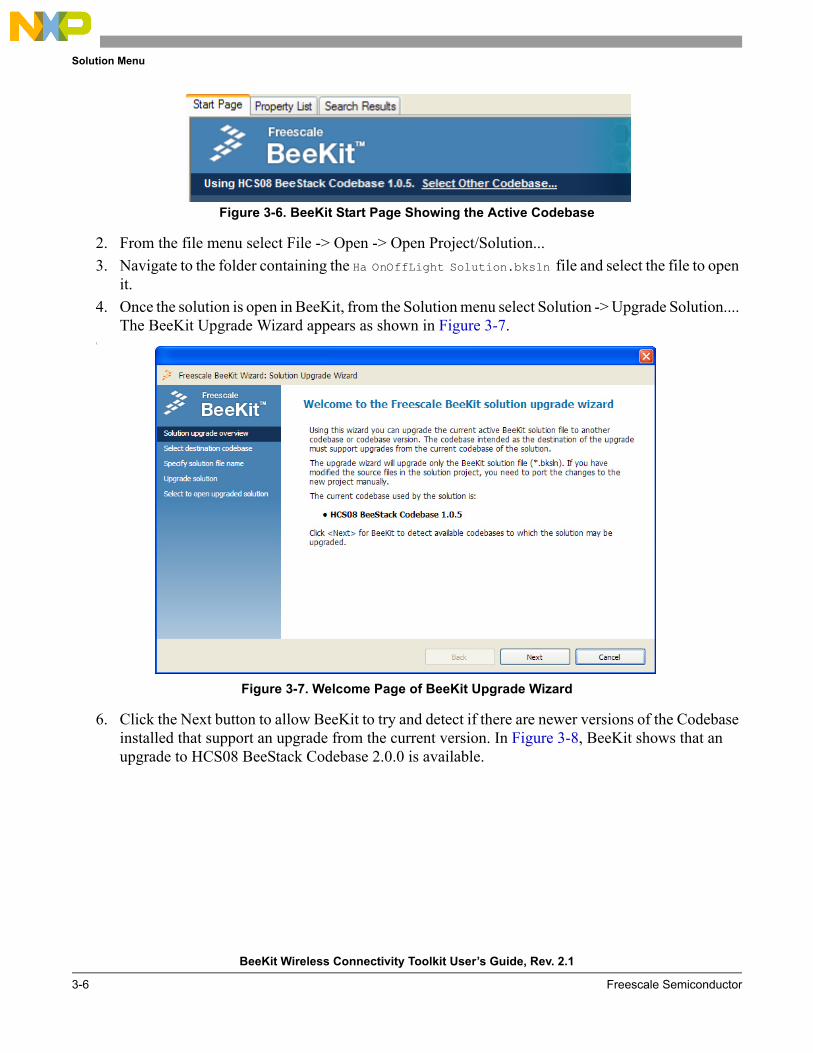
Figure 3-6. BeeKit Start Page Showing the Active Codebase
2. From the file menu select File -> Open -> Open Project/Solution...3. Navigate to the folder containing the Ha OnOffLight Solution.bksln file and select the file to open
it.4. Once the solution is open in BeeKit, from the Solution menu select Solution -> Upgrade Solution....
The BeeKit Upgrade Wizard appears as shown in Figure 3-7.5.
Figure 3-7. Welcome Page of BeeKit Upgrade Wizard
6. Click the Next button to allow BeeKit to try and detect if there are newer versions of the Codebase installed that support an upgrade from the current version. In Figure 3-8, BeeKit shows that an upgrade to HCS08 BeeStack Codebase 2.0.0 is available.

Solution Menu
BeeKit Wireless Connectivity Toolkit User’s Guide, Rev. 2.1
Freescale Semiconductor 3-7
Figure 3-8. BeeKit Upgrade Wizard Showing Available Upgrade Destination Codebases
7. From the list of available upgrades, choose the Codebase to upgrade and click the Next button. In the newly displayed page, users can choose a new name for the solution file as shown in Figure 3-9.
Figure 3-9. BeeKit Upgrade Wizard New Solution Name

Solution Menu
BeeKit Wireless Connectivity Toolkit User’s Guide, Rev. 2.1
3-8 Freescale Semiconductor
8. Click “Upgrade Now!” and BeeKit performs and reports on the upgrade process. If the upgrade is successful, the “Upgrade completed successfully.” message appears as shown in Figure 3-10.
Figure 3-10. BeeKit Upgrade Wizard Performing Upgrade
9. Click the Next button to go to the last page of the wizard as shown in Figure 3-11. Having the “Change active Codebase and open upgraded solution” option checked closes the current solution, switches the active Codebase to the destination one (HCS08 BeeStack Codebase 2.0.0) and opens the new upgraded solution file.
Figure 3-11. BeeKit Upgrade Wizard Completing Upgrade

Solution Menu
BeeKit Wireless Connectivity Toolkit User’s Guide, Rev. 2.1
Freescale Semiconductor 3-9
10. Click the Finish button to change the Codebase and open the upgraded solution as shown in Figure 3-12.
Figure 3-12. Upgraded Solution Using the Newer Codebase Version
11. Users can now export the solution using the new Codebase files.
WARNINGWhen exporting an upgraded solution, previously exported projects may be overwritten. Users are strongly recommended to backup their files before performing an upgrade.
NOTEFreescale can not guarantee that upgraded projects will compile without issues in all cases. It is possible that in certain configurations, the upgrade process will not be able to complete properly. In this case, users must recreate the projects for the new Codebase using the Create New Project option and make the necessary changes to the default solution properties to be similar to the older solution configuration.
Solution Menu
BeeKit Wireless Connectivity Toolkit User’s Guide, Rev. 2.1
3-10 Freescale Semiconductor
3.6 Upgrading Exported BeeKit Project FilesSome BeeKit codebases (such as SynkroRF codebases) have an option to update exported projects from solution files of a previous version of the same codebase type. To update an existing exported project:
1. Set the new version of the codebase as active.2. If upgrading an already exported solution is available for the codebase, the menu option “Upgrade
Exported Solution...” will be available in the “Solution” BeeKit menu. Select this option to launch the Upgrade Exported Solution Dialog.
3. Click Browse to select the folder of the *.xml project file of the previously exported solution.4. If the exported project is successfully detected, the original codebase name will be shown and the
Start Upgrade button will become available.5. Press Start Upgrade to begin upgrading project files.
WARNINGUsers are strongly recommended to backup their files before performing an upgrade of an exported solution.
3.7 Adding a Project to a SolutionIf users need to create or add a project to their solution, they can either add one of the predefined templates or import an existing project from another solution file.
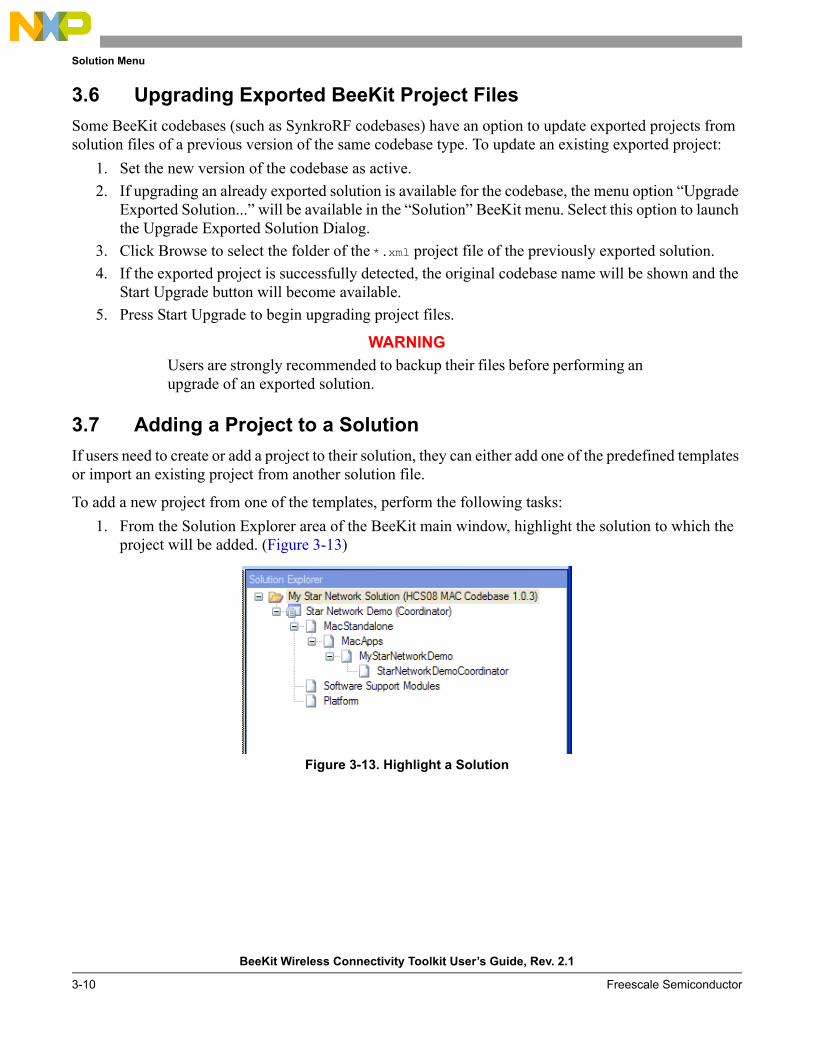
To add a new project from one of the templates, perform the following tasks:1. From the Solution Explorer area of the BeeKit main window, highlight the solution to which the
project will be added. (Figure 3-13)
Figure 3-13. Highlight a Solution

Solution Menu
BeeKit Wireless Connectivity Toolkit User’s Guide, Rev. 2.1
Freescale Semiconductor 3-11
2. From the menu bar of the BeeKit main window click on Solution -> Add Project... The Add Project window appears as shown in Figure 3-14.
Figure 3-14. Add Project Window
3. Highlight one of the project types from Project Types area of the Add Project window.4. Highlight one of the project templates from Templates area of the Add Project window.5. In the Project Name field, enter an appropriate Project Name.6. Click on the OK button to add the project to the solution.

Solution Menu
BeeKit Wireless Connectivity Toolkit User’s Guide, Rev. 2.1
3-12 Freescale Semiconductor
3.8 Importing a Project to a SolutionUsers can import an existing project from a previously built solution file.
To import an existing project from a solution file, perform the following tasks:1. From the Solution Explorer area of the BeeKit main window, highlight the solution to which the
project will be imported. (Figure 3-13)2. From the menu bar of the BeeKit main window, click on Solution -> Import Project...3. Navigate the file system solution directory to the *.bksln solution file desired and select Open
(Figure 3-16). The Import Project window appears with the imported projects listed in its display area.
Figure 3-15. Navigate to and Open the Solution
Solution Menu
BeeKit Wireless Connectivity Toolkit User’s Guide, Rev. 2.1
Freescale Semiconductor 3-13
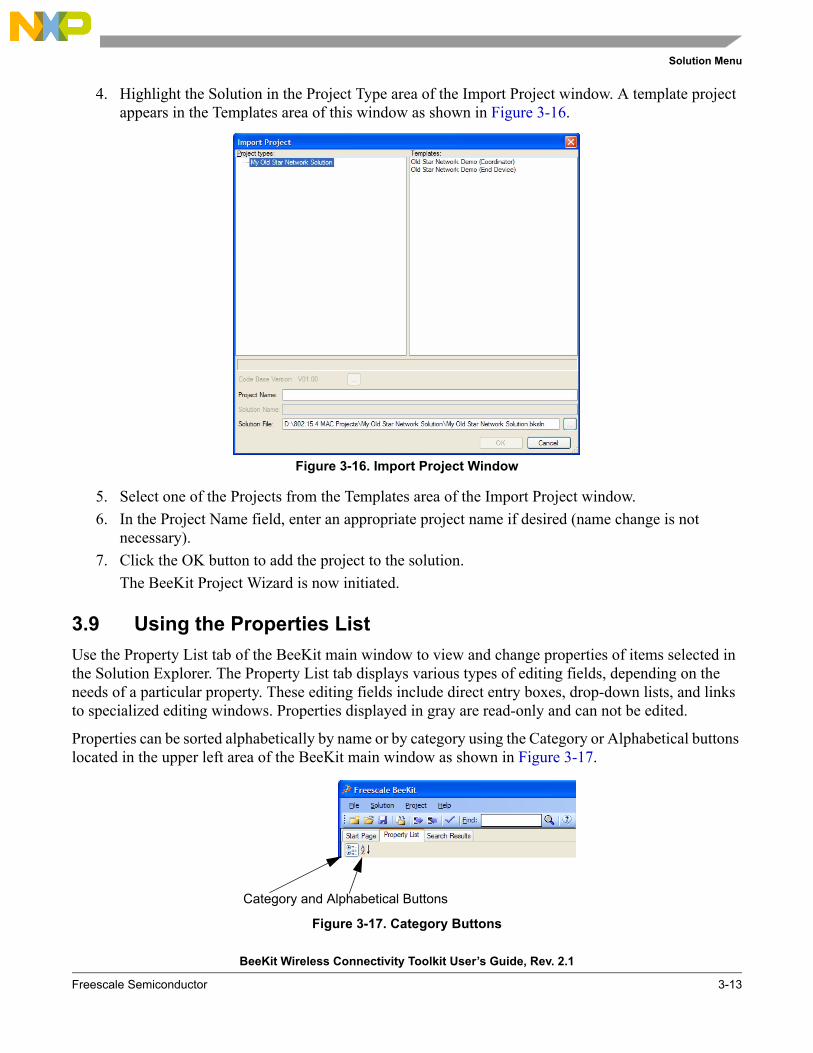
4. Highlight the Solution in the Project Type area of the Import Project window. A template project appears in the Templates area of this window as shown in Figure 3-16.
Figure 3-16. Import Project Window
5. Select one of the Projects from the Templates area of the Import Project window.6. In the Project Name field, enter an appropriate project name if desired (name change is not
necessary).7. Click the OK button to add the project to the solution.
The BeeKit Project Wizard is now initiated.
3.9 Using the Properties ListUse the Property List tab of the BeeKit main window to view and change properties of items selected in the Solution Explorer. The Property List tab displays various types of editing fields, depending on the needs of a particular property. These editing fields include direct entry boxes, drop-down lists, and links to specialized editing windows. Properties displayed in gray are read-only and can not be edited.
Properties can be sorted alphabetically by name or by category using the Category or Alphabetical buttons located in the upper left area of the BeeKit main window as shown in Figure 3-17.
Figure 3-17. Category Buttons
Category and Alphabetical Buttons
Solution Menu
BeeKit Wireless Connectivity Toolkit User’s Guide, Rev. 2.1
3-14 Freescale Semiconductor
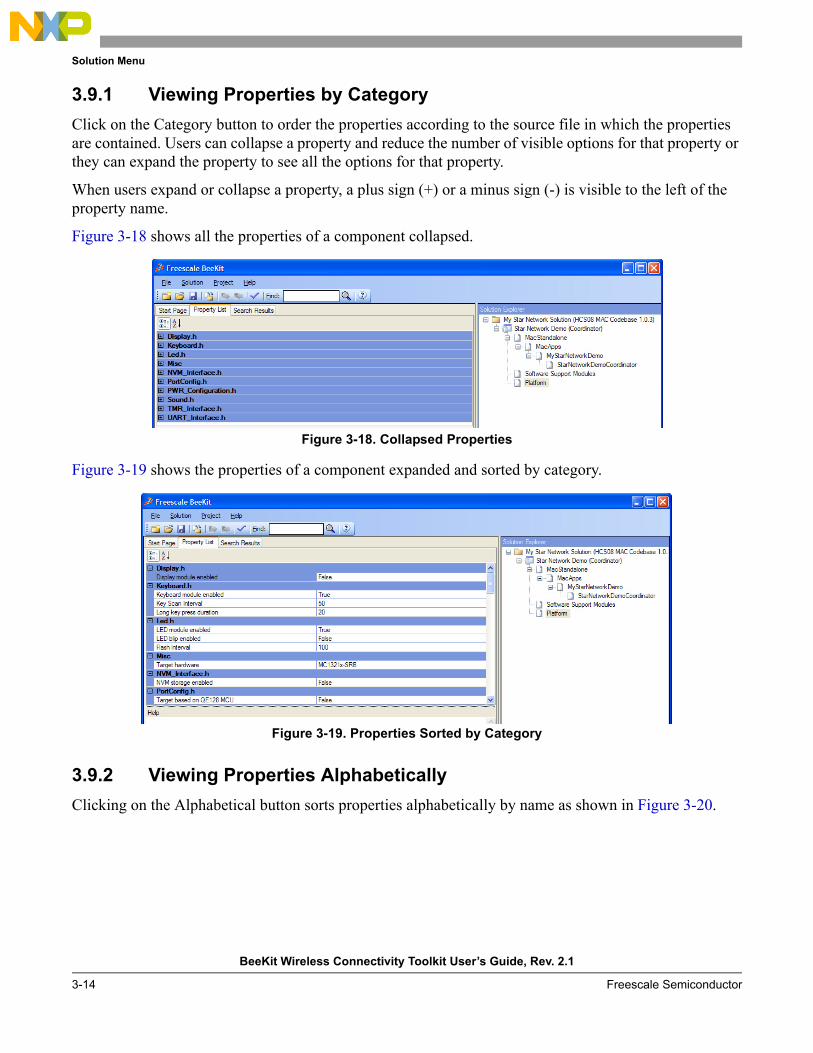
3.9.1 Viewing Properties by CategoryClick on the Category button to order the properties according to the source file in which the properties are contained. Users can collapse a property and reduce the number of visible options for that property or they can expand the property to see all the options for that property.
When users expand or collapse a property, a plus sign (+) or a minus sign (-) is visible to the left of the property name.
Figure 3-18 shows all the properties of a component collapsed.
Figure 3-18. Collapsed Properties
Figure 3-19 shows the properties of a component expanded and sorted by category.
Figure 3-19. Properties Sorted by Category
3.9.2 Viewing Properties AlphabeticallyClicking on the Alphabetical button sorts properties alphabetically by name as shown in Figure 3-20.

Solution Menu
BeeKit Wireless Connectivity Toolkit User’s Guide, Rev. 2.1
Freescale Semiconductor 3-15
Figure 3-20. Properties Sorted Alphabetically
3.9.3 Searching for PropertiesBeeKit GUI version 1.7.0 and later allows users to search for properties in a solution, a specific project or a specific software component. In order to find properties, users need to perform the following steps:
1. Choose the scope of the search by highlighting either the solution name, a project name or a component name in the Solution Explorer as shown in Figure 3-21. This enables searching for all properties in the solution, all properties in the highlighted project, or just the properties of the highlighted component respectively.
Figure 3-21. Setting Search Scope to the Entire Solution, a Project or a Component
2. Enter a search string in the “Find:” text box of the main BeeKit menu bar as shown in Figure 3-22.3.
Figure 3-22. Entering a Search String

Solution Menu
BeeKit Wireless Connectivity Toolkit User’s Guide, Rev. 2.1
3-16 Freescale Semiconductor
4. Click the “Find” button in the menu bar at the right of the search string or press “Enter”. 5. Search results are displayed in the “Search Results” tab as shown in Figure 3-23.6.
Figure 3-23. Displaying BeeKit Search Results
Use the following guidelines to adequately set the scope of the search:• Search the entire solution when users are required to see the value of a certain property for each
project. For example, the value of the Target Hardware (as shown in Figure 3-23) or the Device Type.
• Search the entire project when users are not sure where to locate a single property in a particular software component of a project.
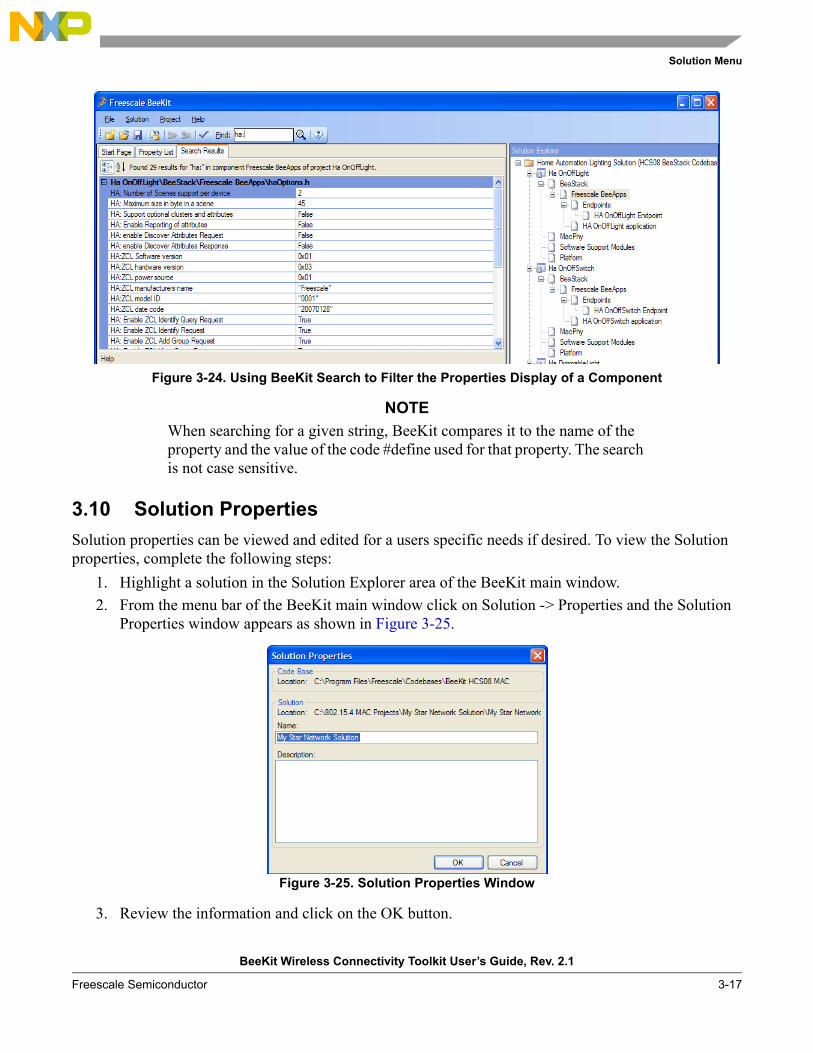
• Search the component level when users need to filter the properties in the component. For example, in Figure 3-24, only the Home Automation properties of the Freescale BeeApps component are shown by searching for the “HA:” string.
Solution Menu
BeeKit Wireless Connectivity Toolkit User’s Guide, Rev. 2.1
Freescale Semiconductor 3-17
•
Figure 3-24. Using BeeKit Search to Filter the Properties Display of a Component
NOTEWhen searching for a given string, BeeKit compares it to the name of the property and the value of the code #define used for that property. The search is not case sensitive.
3.10 Solution PropertiesSolution properties can be viewed and edited for a users specific needs if desired. To view the Solution properties, complete the following steps:
1. Highlight a solution in the Solution Explorer area of the BeeKit main window.2. From the menu bar of the BeeKit main window click on Solution -> Properties and the Solution
Properties window appears as shown in Figure 3-25.
Figure 3-25. Solution Properties Window
3. Review the information and click on the OK button.

Solution Menu
BeeKit Wireless Connectivity Toolkit User’s Guide, Rev. 2.1
3-18 Freescale Semiconductor
3.11 Project PropertiesProject properties can be viewed and edited for a users specific needs if desired. To view the project properties, complete the following steps:
1. Highlight a project in the Solution Explorer area of the BeeKit main window. 2. From the menu bar of the BeeKit main window click on Project -> Properties and the Project
Properties window appears as shown in Figure 3-26.
Figure 3-26. Project Properties Window
3. Review the information and click on the OK button.
3.12 Software Component PropertiesBeeKit users can edit Software Component properties based on their specific application or project needs. Every sub-heading below the project level are the software component property fields associated with each project in a solution. Some of these were described in Section 3.10, “Solution Properties” and Section 3.11, “Project Properties” and as shown in Figure 3-19 by clicking on the Platform software component for each project in the Solution.
Whenever a Software Component is selected in the Solution Explorer, the Property List pane is updated with properties associated with the selected Software Component.

BeeKit Wireless Connectivity Toolkit User’s Guide, Rev. 2.1
Freescale Semiconductor 4-1
Chapter 4 Project MenuThis chapter details how to validate a project, add and remove software components, and remove a project.
4.1 Validating a ProjectThe Validate Project command verifies if the project was created with the proper software components and property settings. It is similar to the Validate Solution command as described in Section 3.4, “Validating a Solution”, but validates at the individual project level within the solution.
To validate a project, perform the following tasks:1. From the Solution Explorer area of the BeeKit main window, highlight a project.2. From the menu bar of the BeeKit main window click on Project -> Validate Project. This can also
be performed by right clicking on the Project and selecting Validate Project as shown in Figure 4-1.
Figure 4-1. Solution Explorer Quick Menu View
3. In the messages area of the BeeKit main window, click on the Error List tab to view any errors as shown in Figure 4-2.
Figure 4-2. Error List Tab View Window

Project Menu
BeeKit Wireless Connectivity Toolkit User’s Guide, Rev. 2.1
4-2 Freescale Semiconductor
4. If there are any errors, click on the error in the Error List. The Error Description window appears as shown in Figure 4-3.
Figure 4-3. Error Description Window
5. Review the error description to better understand what the error is and where to resolve the issue.
NOTEIt is possible to export a solution with a project that contains errors.
4.2 Adding and Removing Software ComponentsA project is constructed by adding or removing software components. Many types of software components are available. Each software component has a number of associated source files. Properties for a Software Component can be changed using the Property List window as described in Section 3.9, “Using the Properties List”.
To add a software component to a project, perform the following tasks:1. From the Solution Explorer, highlight a project where the software component will be added.2. From the menu bar of the BeeKit main window click on Project -> Add Software Component. The
Add Software Component window appears as shown in Figure 4-4. This can also be performed by right clicking on the Project and selecting Add Software Component as shown in Figure 4-1.
Figure 4-4. Add Software Component Window

Project Menu
BeeKit Wireless Connectivity Toolkit User’s Guide, Rev. 2.1
Freescale Semiconductor 4-3
3. From the Selection area of the Add Software Component window, choose a software component to add and click OK.
Removing software components is performed under the project level in the Solution hierarchy since software components are one level below the project.
To remove a software component from a project, perform the following tasks:1. From the Solution Explorer area of the BeeKit main window, highlight the software component
that needs removed.2. From the menu bar of the BeeKit main window click on Project -> Remove Software Component.
The Remove Software Component confirmation window appears as shown in Figure 4-5. Click the OK button to confirm the removal. This can also be performed by right clicking on the Software Component and selecting Remove Software Component.
Figure 4-5. Remove Software Component Confirmation Window
4.3 Removing ProjectsEntire projects can also be removed from a Solution. To remove a project from a solution, perform the following tasks:
1. From the Solution Explorer, highlight the project that will be removed.2. From the menu bar of the BeeKit main window click on Project -> Remove Project. The Remove
Project confirmation window appears as shown in Figure 4-6. Click the OK button to confirm the removal. This can also be performed by right clicking on the Project and selecting Remove Project as shown in Figure 4-1.
Figure 4-6. Remove Project Confirmation Window

Project Menu
BeeKit Wireless Connectivity Toolkit User’s Guide, Rev. 2.1
4-4 Freescale Semiconductor