Embed Size (px)
Citation preview

Beamz® Studio Tutorial
© 2010 Beamz Interactive Inc.

© 2010 Beamz Interactive Inc.
Table of Contents................................................................................................................................... 1Beamz Studio
................................................................................................................................... 2Overview Of Beamz Studio
.......................................................................................................................................................... 2How composing interactive music differs from composing traditional music.
................................................................................................................................... 4Section 1 - Interactive Beamz Songs – 101
.......................................................................................................................................................... 4How interactive Beamz songs are mapped and how they they are played.
.......................................................................................................................................................... 8Triggers, Instruments, and Music Clips explained.
.......................................................................................................................................................... 10How Triggers, Instruments, Music Clips, and Sound Files are used together.
.......................................................................................................................................................... 12How Beamz songs are structured using Beamz Studio.
................................................................................................................................... 13Section 2 - Using Beamz Studio
.......................................................................................................................................................... 13Song Folders and Song Position Display explained.
.......................................................................................................................................................... 14The difference between Preset songs and User songs.
.......................................................................................................................................................... 14How to make a new song.
.......................................................................................................................................................... 14How make copies of a song and edit it.
.......................................................................................................................................................... 14How to delete a user song.
.......................................................................................................................................................... 15The Song Editor.
......................................................................................................................................................... 15How to open the Song Editor.
......................................................................................................................................................... 16How to use the Song Edit screen.
......................................................................................................................................................... 18Song properties.
......................................................................................................................................................... 19Working w ith Song Sections
......................................................................................................................................................... 21Notes on duplicate Section names.
......................................................................................................................................................... 21Beamz Tempo settings.
......................................................................................................................................................... 22Notes on using Pitch Locking.
......................................................................................................................................................... 22Notes on w orking w ith beamz Preset songs
......................................................................................................................................................... 24How to add video to a song.
.......................................................................................................................................................... 25The Instrument Editor
......................................................................................................................................................... 25How to use the Instrument Editor.
......................................................................................................................................................... 27Using the Sync property
......................................................................................................................................................... 28Using the Polyphony property
......................................................................................................................................................... 29Using the Start property
......................................................................................................................................................... 30Using the FreeWheel property
......................................................................................................................................................... 31Using Midi Looping.
.......................................................................................................................................................... 32The Music Clips Editor.
......................................................................................................................................................... 32How to use the Music Clips Editor.
......................................................................................................................................................... 33How to edit Music Clip Assignments and Properties.
......................................................................................................................................................... 34How to audition sound f iles.
......................................................................................................................................................... 34Notes on importing MP3 files.
......................................................................................................................................................... 34Sound Card Notes.
.......................................................................................................................................................... 35The Beam Assignments screen.
......................................................................................................................................................... 35How to assign Instruments to Beam Triggers.
......................................................................................................................................................... 36How to Mix the song.
......................................................................................................................................................... 36Using a structured approach to mixing.
......................................................................................................................................................... 38AutoPlay Trigger explained.
......................................................................................................................................................... 38How Beam Assignments are different from a Custom Layout.
................................................................................................................................... 39Section 3 - Using The Midi Features In Beamz Studio
.......................................................................................................................................................... 39How midi files play sounds in Beamz Studio
.......................................................................................................................................................... 40Midi Properties view.
.......................................................................................................................................................... 44How to play midi files w ith the Beamz internal synthesizer.
.......................................................................................................................................................... 44How to use the Step Play Interval w ith midi files.
.......................................................................................................................................................... 46Using embedded controllers contained in a midi file.
.......................................................................................................................................................... 48How to copy midi settings to other music clips.
.......................................................................................................................................................... 49How to record your own midi notes into a music clip.
.......................................................................................................................................................... 51How to play midi files using an external synthesizer.
.......................................................................................................................................................... 52How to trigger Beamz instruments w ith an external midi keyboard.

1
Course Overview
Next
This tutorial will teach you how to use Beamz Studio to compose and edit interactive
Beamz songs using samples, MP3's or midi files for content. It's not like a Users' Manual; it
has been structured to provide a progressive learning process. While it is possible to
gradually learn to use Beamz Studio through experimentation, composing interactive
music requires you to understand some foundations and fundamentals that may not have
been exposed to before.
Composing interactive music can be challenging at first, even for someone experienced
with electronically producing traditional music. New things must be learned and a new
perspective on composing music must be gained. Reading this tutorial from start to finish
before you start using the software really is the best way to understand the editing
screens and how they all work together when you start looking at them and trying to use
them productively. It really won't take much time to do this – just the discipline. You'll
get to the fun part of experimentation a lot quicker this way, and you'll be glad you did.
Here's a suggested way to read the tutorial for the first time.
1. In the help browser, click the button that hides the table of contents.
2. Expand the remaining topic window to full screen.
3. Read through each topic and click the next link on each page to proceed to the next
topic. If you click a related topic link use the browser's Back button to return to where
you were. Later on, when you need to look something up again, you can easily find it
with the table of contents.
Top Next

2
How composing interactive music differs from
composing traditional music.Top Previous Next
The Beamz Music System overall is an Interactive Music instrument and player that allows a
performer to play songs that were composed to be played interactively.
Beamz Studio is a software tool that can be used to compose interactive music, so being
able to compose music in the traditional sense is a good beginning to composing it
interactively, but is not required.
Beamz Studio allows you to edit and add your own sound files to a Beamz song, or to make
a completely new song based on your own sounds. As a prerequisite to using Beamz Studio,
you should already have the software and skills necessary to work with your own sounds in
midi, mp3, or .wav file format.
Traditional vs. Interactive Music
Interactive Music was not possible until recently when computers gained the ability to
produce it. Up until then, all other forms of music were traditional. Before software
based Interactive musical instruments became possible, music composition typically
occurred in a linear form, where songs are played from start to finish as a pre-determined
sequence of notes. Each note is written by the composer to play at a specific time and
place within the composition - always. The tempo/key/chord of the song provides the
composer with absolute control over how the song will sound when it is played in real-time
– moment by moment.
Traditional Music Composition
In a way, traditional music composition can be described as pre-composed script (pre
programming) which will be performed in real time by the pre-determined instruments,
each playing pre-composed parts. The underlying theory of traditional music composition is
the elimination of randomness as a way to avoid producing musical sounds that are
unsympathetic to the ear. If each instrument played notes randomly, it would sound
terrible, so traditional music strictly controls when each note will play. All notes are
composed to play at a precise moment during the performance, and they must agree
musically with all other notes that will be played by other instruments at that moment.
Interactive Music Composition
Whereas traditional music compositions consist only of pre-composed notes that will be
played, interactive music compositions consist of a pre-composed selection of notes that
could possibly be played at any moment during the performance. Like traditional songs,
interactive songs must be composed in advance and the musical parts must all agree in
musical terms (key, chords, etc.).

3
Composing interactive music can be challenging at first, even for someone experienced
with electronically producing traditional music. New things must be learned and a new
perspective on composing music must be gained.
This tutorial will cover how interactive Beamz songs are structured and how they work
when they are being played. We will cover how Beamz instruments are put together and
how they produce their sounds when a laser beam is triggered. Then we will get into detail
on how to use the editing screens in Beamz Studio to work with your own songs. When you
have completed this tutorial, you will have the knowledge necessary to begin using Beamz
Studio to produce your own Beamz songs.
Top Previous Next

4
How interactive Beamz songs are mapped and how
they they are played.Top Previous Next
Traditional musical songs are mapped out or arranged by sections.
A basic song arrangement could be: 1-Intro, 2-Verse, 3-Chorus, 4-Break, 5-Verse, 6-Chorus,
and 7-Ending.
Each section of the song is played for a specific length (bars of music), then the song
moves on to the next section. Since the chords & rhythms (music parts) often change
from section to section, each one has its own related instrumental parts.
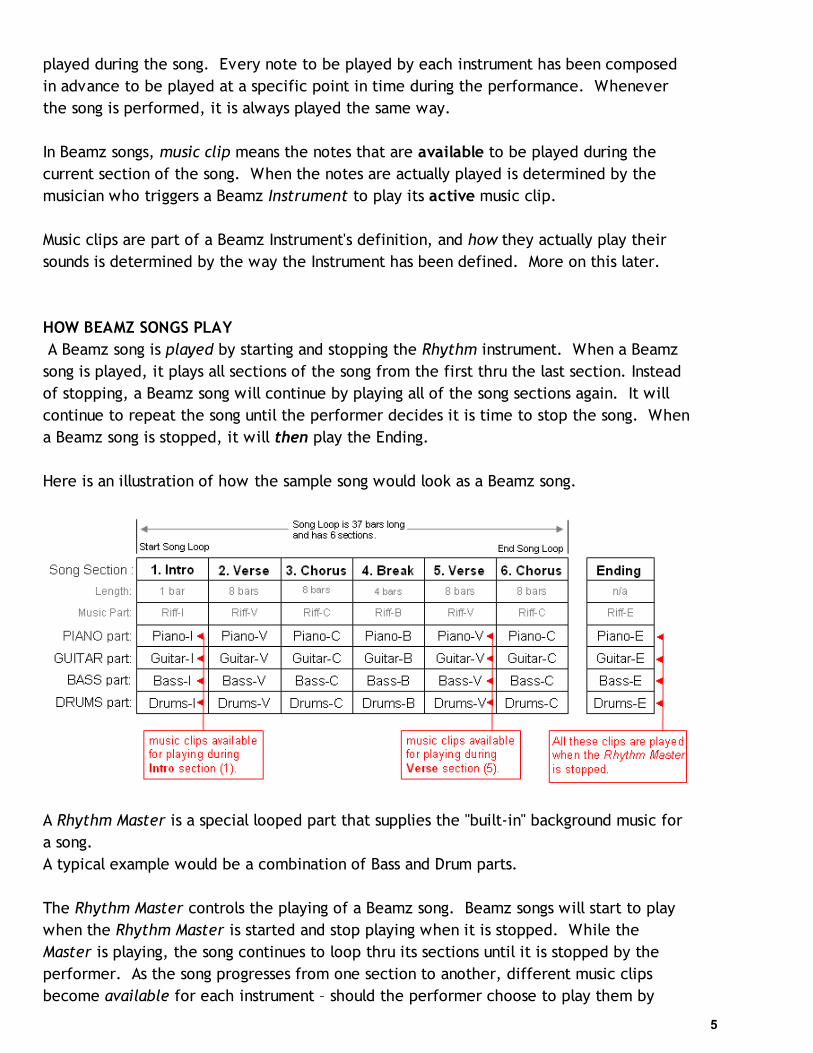
The sample song illustrated below is 39 bars long, has 7 sections. Each section of the song
has its own music part that will be played. When it is played, this song starts with the
Intro then plays all sections thru the Ending, then stops.
When more than one instrument plays a song, the music parts are shared by all of the
instruments that play during each section of the song, and each instrument has its own
part.
MUSIC CLIPS
The individual instrument parts that are played for each section of a song are called music
clips. Music Clip is the term for the pool of notes that each instrument will play during
one section of the song. All music clips for an instrument constitute the part it will play
during the entire song.
In traditional music, this means the notes that will be played and when they will be
5
played during the song. Every note to be played by each instrument has been composed
in advance to be played at a specific point in time during the performance. Whenever
the song is performed, it is always played the same way.
In Beamz songs, music clip means the notes that are available to be played during the
current section of the song. When the notes are actually played is determined by the
musician who triggers a Beamz Instrument to play its active music clip.
Music clips are part of a Beamz Instrument's definition, and how they actually play their
sounds is determined by the way the Instrument has been defined. More on this later.
HOW BEAMZ SONGS PLAY
A Beamz song is played by starting and stopping the Rhythm instrument. When a Beamz
song is played, it plays all sections of the song from the first thru the last section. Instead
of stopping, a Beamz song will continue by playing all of the song sections again. It will
continue to repeat the song until the performer decides it is time to stop the song. When
a Beamz song is stopped, it will then play the Ending.
Here is an illustration of how the sample song would look as a Beamz song.
A Rhythm Master is a special looped part that supplies the "built-in" background music for
a song.
A typical example would be a combination of Bass and Drum parts.
The Rhythm Master controls the playing of a Beamz song. Beamz songs will start to play
when the Rhythm Master is started and stop playing when it is stopped. While the
Master is playing, the song continues to loop thru its sections until it is stopped by the
performer. As the song progresses from one section to another, different music clips
become available for each instrument – should the performer choose to play them by

6
triggering a Beam Trigger that has been assigned to the instrument.
The Rhythm Master has a special property that makes it the Master controller for the
song. Not only does it start and stop the song, but it also serves as the master metronome
for the song as well. As the Rhythm Master plays thru each song section, it becomes the
official active section in the song's progress – controlling which music clips are available
on the other Instruments that are Slaved to it. When a Rhythm Master is stopped, all of
the Ending music clips play, and the song stops.
In Summary:
So far we have covered how each instrument has music clips for each song section, and
how they become available for playing while the Rhythm Master plays thru each section
of the song. We know that while it is running, the Master will repeat the song until it is
stopped. We also know that all of the Ending music clips will be played when the Master
is stopped.
But what about when the Rhythm Master is not actively playing?
FREE RUNNING SECTION
When a Beamz song is first loaded and the Rhythm Master has not yet been started, the
Beamz will still play notes for each instrument, even though the song hasn't been started.
All Beamz songs have a special section that is called the Free Running section.
The Free Running section is just what its name implies: a Free-Running set of music clips
available for each instrument whenever the song is not under the control of a running
Rhythm Master. The Free Running section is active when a song is loaded and remains
active indefinitely until the Rhythm Master is started and takes control of the song. Once
the Master is stopped the Free Running section becomes active again.
The Free Running section is actually a section that is a part of every Beamz song.
It is intended to play indefinitely when it is active, and has no specified length.
Volume is the only property that may be edited for the Free Running section.
It is active whenever there isn't a Rhythm Master playing.
It provides default Music Clips for each Instrument that can be played without the Rhythm
background.
No other song section may be named Free Running.
ENDING SECTION
When a Rhythm Master is stopped, an ending automatically plays
The Ending section is another section that is a part of every Beamz song.
It contains the music clips that will be played when the song ends.
No other song section may be named Ending.

7
When a Rhythm Master is stopped, the Free Running section becomes active and ALL the
music clips in the Ending section are automatically triggered to play without any input
from the performer.
In Summary:
So far, we have covered how Beamz songs are mapped out and played by starting and
stopping the Rhythm Master. We understand that, when triggered, the sound being
produced by each Instrument is contained in its music clip for the current (active) section
of the song. We also know that the Free Running section is active when no Master is
playing and, when a Master is stopped, all the music clips for the Ending section are
automatically played.Top Previous Next

8
Triggers, Instruments, and Music Clips explained. Top Previous Next
BEAM TRIGGERS
In Beamz terminology, the lasers on the consoles are called Beams and they work as
triggers – where breaking a beam of light turns a Trigger on. The trigger stays on as long
as the light beam remains broken. Pressing (and holding) the Right two large buttons on
the console has the same effect as breaking the light beam, so they are considered to be
Beam Triggers as well.
The Beamz System supports 3 Beamz units, each with 4 beams and 2 buttons that can be
used to trigger Beamz instruments.
More than one Instrument can be assigned to a single trigger enabling them all to be
triggered at once by the same Beam Trigger, so there are often more than 16 instruments
in a song.
BEAMZ INSTRUMENTS
All Beamz songs have their own collections of Beamz Instruments.
Beamz Instruments are setup as part of a song, and the Music Clips they play during the
song are setup as part of the Instrument.
A Beamz Instrument must be assigned to a Beam Trigger so it can be triggered by the
performer.
How an Instrument responds to a Beam Trigger is determined by which Trigger Type it
uses.
In essence, a Beamz Instrument is an interactive sound file player.
When an Instrument is triggered by its assigned beam, it plays a sound file from its active
music clip.
We've covered this pretty well so far, but now it's time to take this further.
What really happens is the Instrument plays an existing sound file that is assigned to its
active music clip.
The kinds of sound files in a music clip can vary, so the way an Instrument plays them can
vary as well.
For example, a sound could be played as a single note, or multiple notes that will be
streamed, or a complete musical phrase that will be repeated (looped). How each sound
will be played is determined by the Trigger Type that has been selected for the
Instrument.
We have already discussed how the Instrument "plays an existing sound file that is
assigned in its active music clip", and we have also defined an active music clip as being a
collection or pool of sounds that an Instrument dips into when it needs something to play.

9
Now it is time to get into Music Clips further.
MUSIC CLIPS
Each Beamz instrument has a Music Clip for every section of the song, (including Free
Running & Ending). When a new instrument is created, an empty Music Clip is created for
each song section. If a new section is added to a song, empty music clips for it will be
added to all instruments in the song. When a song section is removed, all of its associated
Music Clips are also removed.
A Music Clip is a pool of sound files that the instrument may play during the current song
section. More specifically, it is a list of sound files in the song folder that will be played
each time an instrument plays one.
The list is numbered from top to bottom and each sound file is played in the order
indicated by its number.
If there is only one file on the list, it will be played each time the instrument plays a
sound. When there are many sound files on the list, it steps thru them when it needs
something to play – each time playing the next one on the list. Then the list is repeated.
If the instrument is to be silent during a certain section, this list will be empty, and the
Music Clip will produce no sound if the instrument is triggered.
Top Previous Next

10
How Triggers, Instruments, Music Clips, and Sound
Files are used together.Top Previous Next
As we have previously said, there is a close relationship between the types of sound files
and the Trigger Type that will be used to play them back.
Trigger Types:
One Shot
Each time the Beam is triggered, it steps thru the list and plays one sound file from
beginning to end.
Pulsed
Each time the Beam is triggered, it plays the next sound file on the list from beginning to
end.
If the Beam trigger is held on, it will cycle thru the list playing each sound file in
succession.
The Sounds are streamed at a rate that corresponds to musical notes which is specified as
a Pulse Rate.
Start/Stop
When triggered, it will loop a single sound file on the list repeatedly until it is stopped by
another trigger.
Each time it starts, it plays the loop from the beginning.
Start/Pause
This works the same way as Start/Stop except when stopped, it stops in place (paused).
The next time it starts, it will loop from the place where it was last stopped.
Momentary/Stop
This works the same way as Start/Stop except it loops only while the Beam Trigger is held
on.

11
Momentary/Pause
This works the same way as Start/Pause except it loops only while the Beam Trigger is
held on.
Song Advance
Each time the Beam is triggered, it advances the song to the next Section.
Swap Sounds
Swaps the Beamz controller and the screen display to the alternate set of Beam Triggers.
Top Previous Next

12
How Beamz songs are structured using Beamz Studio. Top Previous Next
Before we get into the details of how to work with a song using Beamz Studio, we need
to take a different look at our sample song. This time from Beamz Studio's point of
view.
Building a new song in Beamz Studio would follow these basic steps:
1. Create and define the Song itself by using the Song editor.
2. Create the song Sections using the Section editor.
3. Create and configure the Instruments using the Instruments editor.
4. Assign sound files to the Music Clips for each Instrument/Section using the Music Clips
editor.
5. Link Beam Triggers to the Instruments using the Beam Assignment screen.
6. Mix all the volume levels for the song using the Beam Assignment screen.Top Previous Next

13
Song Folders and Song Position Display explained. Top Previous Next
Song Folders.
Before we get into how to use the editing screens, there is one more aspect of Beamz
Studio you should understand. When the Beamz System is installed, a master songs folder
is created on the hard disk.
(You can see the path to this folder in the Beamz Options screen in the Beamz Library
box.)
Within this folder, every Beamz song has its own individual folder which is used to store
the song's configuration files and all the sound files that are used by the song. When a
new song is created, a new folder is created for the song inside of the Beamz music
folder. Standard Beamz files needed by all Beamz songs are also copied into it at this
time.
It is important to know that in order for a sound file (or video) to be used by a Beamz
Song, it must reside in the song's folder before it can be imported into the song. If the
same sound file or video is used by several different songs, each song must have its own
personal copy of it within its own song folder.
Importing a new sound file in the music clips editor first offers a list of the files that are
already in the song's folder. Selecting a one from this list will immediately include it in
the music clip's list. If the desired sound file is not in the song folder, you can navigate to
it and select it where it resides. However, when you select one outside of the song
folder, a copy of it is placed into the song folder and it is included in the music clip's list.
The same thing applies when a video file is used by a song – a copy is made in the song
folder.
Before we move on to using the Song Editing screens, we need to cover a couple more
things.
Main Playing screen – Song Position display.
As an aid to composers, Beamz studio displays current song position information beneath
the song's name.
Top Previous Next

14
The difference between Preset songs and User songs. Top Previous Next
Preset songs and User songs.
The songs that came with the Beamz system are called Preset songs, and they cannot be
directly edited. A User copy of a Preset song is automatically created when the Song
Editor is opened for one of them. All User copies of a song are always placed in the same
song folder as the original song.
How to make a new song. Top Previous Next
Open the Tools menu and click on Create New Song. A new song will be created and the
Song Editor will open for it.
Building a new song in Beamz Studio would follow these basic steps:
1. Create and define the Song itself by using the Song editor.
2. Create the song Sections using the Section editor.
3. Create and configure the Instruments using the Instruments editor.
4. Assign sound files to the Music Clips for each Instrument/Section using the Music Clips
editor.
5. Link Beam Triggers to the Instruments using the Beam Assignment screen.
6. Mix all the volume levels for the song using the Beam Assignment screen.
How make copies of a song and edit it. Top Previous Next
There are two ways to begin editing a current song:
1. Click on the name of the song in Player's main view or click on any Beam – this enters
song edit with the Instrument selected.
2. Open the Tools menu and click on Edit Current Song – only available for User songs.
How to delete a user song. Top Previous Next
Open the Tools menu and click on Delete Current Song.
Note: This option is not available for preset songs.

15
How to open the Song Editor. Top Previous Next
There are 3 ways to open the Song Editor.

16
How to use the Song Edit screen. Top Previous Next
SONG EDIT Screen - see How to open the Song Editor.
The song editor allow you to easily edit any component of a song with a single mouse
click.
The Edit pane at the bottom changes depending on which component is selected in the
matrix, and each component has its own unique set of properties that can be edited.
Midi properties for the selection have their own View which can be seen via the midi
properties button.
For more information see Midi Properties view.
The Selection Matrix displays a view of the song similar to the sample song in previous
illustrations.
It shows all of the song components that can be edited individually.
Sections of the song are listed along the top as columns from left to right in the order
they will play.
Instruments are listed down the left as rows. They may be dragged up or down to any
order you choose.
Music Clips are shown across the Instrument's row under the appropriate Section column.
The display width of the section columns may be resized using the zoom slider which is
located above the Instruments side of the Matrix. Any column in the matrix may be
resized individually by clicking on its column boundary and dragging it.

17
How to Select a song component for editing.
Left Clicking on a Section, Instrument, or Music Clip will show its properties in the Edit
pane.
How to Add, Copy or Remove sections from the song.
Right Click on any Section name opens a menu with these selections.
How to Move a Section up or down the play order sequence.
Click on a Section name and drag it left or right on the Matrix.
Other sections will be shifted to accommodate the change.
How to Add, Copy or Remove Instruments from the song.
Right Click on any Instrument name opens a menu with these selections.
How to Copy a Music Clip.
Click on a Music Clip and Drag it to where you want the copy to be placed.
How to Remove a Music Clip from the Matrix.
Right Click on any Music Clip and select Remove to empty the selected Music Clip.
The Beam Assignments Button at the bottom opens the Beam Assignments screen where
Instruments are assigned to Beam Triggers and the final mix for the song is prepared.
The Midi Properties button toggles Midi Properties view on or off which displays the midi
controls for the current selection.
The Midi Note Record button opens a window where midi notes may be recorded into
the selected Music Clip.
For more information see How to record your own midi notes into a music clip.
The Apply button immediately applies edits without saving the song. It's helpful when
using the hardware controller during editing. Note: This does not save the song.Top Previous Next

18
Song properties. Top Previous Next
These properties for the song may be edited whenever the song edit screen is open.
Song Name – this text entry is displayed in the Master Song List and on the main Playing
screen.
Genre – this text entry is displayed in the Master Song List.
Artist – this text entry is not used anywhere else.
Time Signature – sets the music time signature for the song. Common value is 4/4.
Master Tempo – sets the default (reset) Tempo for the song in Beats Per Minute.
Custom Tempo – this control is linked to the Tempo setting on the Playing screen and
determines the play speed of the song.
- see Beamz Tempo settings.
Pitch Lock – Locks the pitch of all sounds to the tempo. see Notes on using Pitch
Locking.
Tempo Lock - Locks the tempo and prevents it from being changed in the Playing or
Custom Layout screens.
Master Volume – sets the playing Volume for the song. – can also be set in Beam
Assignments screen.
Video files – clicking this allows a video file to be assigned to the song. see How to add
video to a song.
Song Midi properties: see Midi Properties view.
Prog Out Auto-send midi program number.Top Previous Next

19
Working with Song Sections Top Previous Next
HOW TO EDIT A SONG SECTION.
Left click on any Section name in the matrix and an edit pane will open for it at the
bottom of the screen.
This Edit pane shows the 3 properties than can be edited for a song section:
1. Section Name – this text entry is displayed on the main Playing screen.
Notes:
a. Matching Music Clips in Sections with the same name are linked together as one when
they are edited.
b. Song sections cannot be named Free Running or Ending which are reserved names.
c. Free Running and Ending section names cannot be edited.
2. Section Length – (Bars:Beats), defines how long this section will be played by the
Rhythm Master.
Note: Free Running and Ending section lengths cannot be edited.
3. Volume – alters the master volume while the section is being played.
HOW TO MOVE A SONG SECTION TO A DIFFERENT SPOT IN THE PLAYING ORDER.
Working with the arrangement of a song involves mapping out the order that the song's
sections will be played. To the left of each song section's name is a number that indicates
its spot on the sequential play list of the sections that a Rhythm Master will follow when
the song is played. You can move a section up or down this list by dragging it left or right
to a different spot on the matrix, which will shift to accommodate the change.
Notes:
1. When you move a section to a new spot in the play list, its Music Clips are moved along
with it.
2. Free Running and Ending sections cannot be moved because they are not part of the
Rhythm Master's loop.
HOW TO CREATE A NEW SONG SECTION.
1. Right/Click on the name of any song section. Select New Section on the menu. A new
song section will be created and inserted in the matrix.

20
2. Edit the new section to name it and set its length in Bars: Beats. (4 Bars = 4:0)
All Music Clips for the new section will be empty.
HOW TO CLONE (COPY) A SONG SECTION.
1. Select the Section you want to copy (clone).
2. Right/Click on its name in the matrix and select Clone Section from the menu. Cloning
a Section inserts an identical copy of it into the matrix including all Music Clip
assignments.
All Music Clips for the new section are the same as the original (cloned) section, and are
linked together for editing as long as the section has the same name as the original (see
the next topic: Notes on duplicate Section names).
HOW TO DELETE A SONG SECTION FROM THE SONG.
1. Right/Click on the name of any song section.
2. Select Delete Section on the menu. The selected song section will be removed from
the matrix.
Top Previous Next

21
Notes on duplicate Section names Top Previous Next
When Song sections have the same name, their Music Clips are linked together and are
edited as one.
Edits made to Music Clips in any one of the sections sharing a name will affect the
corresponding Music Clip in the other linked sections. When you select a section that is
linked to others, the other sections having the same name will be highlighted to show the
link between them.
It is important to remember this when cloning a section.
If you want the clones to be linked, allow them to continue having the same name,
otherwise rename the section you want to be able to work on individually.
Composing tip about using linked sections to save time & work.
Songs often repeat sections throughout their course. This is illustrated by our sample song
which plays the verse and chorus sections twice in the overall song loop. Each time the
verse plays during the song loop, it plays the exact same notes. The same for both times
the chorus section plays. The song in the illustrations was composed by cloning the verse
& chorus sections in spots 2 & 3 and then dragging the clones to spots 5 & 6 on the list.
Since the copied sections play the same as the originals, they have kept the original
section names to make editing Music Clip assignments for them easier.
Top Previous Next
Beamz Tempo settings Top Previous Next
In the song edit screen, there are two tempo settings:
Master Tempo – sets the default Tempo for the song.
Custom Tempo – sets the speed that the song will actually play.
It is also displayed on the main Playing screen where clicking Reset sets the Custom Tempo
value to the Master Tempo.
Note: Checking Tempo Lock will disable the custom tempo controls in the Playing and
Custom Layout screens, preventing the performer from changing the tempo.
Using tempo controllers embedded in midi files.
If you are playing a midi file as your Master instrument, you also have the option of using
the tempo settings contained within the midi file instead of the tempo settings for the
song.

22
The option to do this is available in midi properties view for instruments that are defined
as master (sync) instruments.
The normal default for this is off, but in some cases you may want the song to follow the
tempo settings in the midi file being played.
Something you should know if you choose to use this feature.
As tempo changes are in encountered in the midi file during playback, they are used to
update (replace) the Master tempo setting for the song. Within the Beamz Studio
software, Custom Tempo is seen as an offset - or a deviation from - what has been set as
the Master tempo for the song. This is why you see the Custom tempo change as you
change the Master tempo is changed.
Top Previous Next
Notes on using Pitch Locking. Top Previous Next
If Pitch Lock is selected, the pitch of all sounds being played by the instrument will be
locked to the playing
tempo. Using the Custom Tempo setting – which is represented on the main playing
screen, the playback
speed of a song may be sped up or slowed down. Since some samples used in a song may
be dependent on
the original tempo to play properly, the song may fall apart when the tempo is adjusted.
Using Pitch Lock
adjusts the playback speed to accommodate the tempo change, which can be heard as a
rise or fall in pitch.
Midi files can easily accommodate a tempo change without locking the pitch, so it
shouldn't be used with them.
Pitch Lock is used mostly for sample based loops.
Notes on working with Beamz Preset songs Top Previous Next
Prior to the commercial release of the Beamz Studio software application, Beamz
composers used a proprietary composition application to create its interactive Beamz
songs; the special notes below are not applicable to songs that Beamz composers created
with Beamz Studio software.
The best way to determine if the Beamz preset song you desire to edit was created “pre-
Studio” is to look at the ending section of the song structure. If all the instruments are
silent in the ending section, you are working with a preset song composed “pre-Beamz

23
Studio” and the special notes below are applicable for making a copy of and editing that
preset song.
Endings
Preset songs handle endings by using a TAG instrument. A TAG instrument is a One-Shot
instrument that is also assigned to the same beam used to start & stop the Rhythm master.
Each time it is triggered, it steps thru a list of 2 Music Clip assignments to coincide with
the 2 triggers to start & stop the Master.
The first on the assignments list is silent and is only there as a place holder to
accommodate the "start" trigger.
The second assignment on the list contains the sound files that will be played as an ending,
which would be played the second time the TAG instrument is triggered – the one that
stops the Rhythm master from playing.
Autoplay Instruments In Preset Songs
AutoPlay Instruments are used by some Preset songs to establish a playing environment
needed by some of the sound files used by the song. When editing a copy of a preset
song, you might see an AutoPlay Instrument in the matrix.
Do not edit or remove the Autoplay instrument otherwise the song may not play
properly.
Silent AutoPlay Masters with their own DirectMusic DLS assignments
Some of the preset songs use a silent version of the Rhythm master that runs whenever
the FreeRun section is active (no Rhythm master is running). Its purpose is to provide a
song-pattern to the beams during FreeRun without the Rhythm background. You can spot
one of these songs if the song position display on the main screen advances thru the
sections before the Rhythm is started. Note: The AutoPlay instrument in this type of
song typically uses a DirectMusic authored .sgt file which has its own, internal DLS
assignments. They are used by all midi files within the song – even though the DLS
collections have not been "imported" into the song and cannot be seen in the Midi
Properties / DLS assignments for a midi based Music Clip. In Midi Properties, a GS Piano is
shown as the assigned instrument and the Play Bar in Music Clips editor also plays a piano
sound – even though the instrument plays the correct sound on the main screen and the
Beam Assignments screen as well. If you want to work with one of these Music Clips and
hear the right sound with the Play-Bar, import the appropriate DLS and assign its
instrument/patch in the Midi Properties for the Music Clip.
Looping Pulsed and One-Shot Instruments.
Some of the preset songs bring back a cool thing old drum boxes could do that has
disappeared in electronic music.
Looping instruments will record what you play for a number of bars, then play it back as
an on-going loop you can add to with other similar instruments – layering each loop on top
of the ones you have already built.

24
Songs that use this type of instrument are Loop de Jour, and all the songs whose names
mention loops.
If you decide to work on one of these songs, here is something to remember.
If you change anything at all in one of the looping instruments, you have to use the looping
properties for the instrument to setup the loop again. Otherwise looping capability will
stop working for the instrument. If your work does not involve changing any of these
instruments, they will continue to work without going through this step. For more
information read the chapter on Using Midi Looping.Top Previous Next
How to add video to a song. Top Previous Next
Clicking the Add Video button in the Song Edit pane and open the video file controls
window.
Click the Browse button navigate to the video you want to Open.
If you Open a video outside of the song's folder, a copy of it will be made there.
If there is a video opened for the song, it's name will be displayed.
Clicking Remove will remove the video from the song, but not delete the copy in the
song folder.
Videos are played along with the Rhythm Runner, and will begin playing at the moment
the Rhythm is started.
If it doesn't quite synchronize with the Rhythm, the Start value allows you to offset the
start time of the video by entering the offset in milliseconds.
25
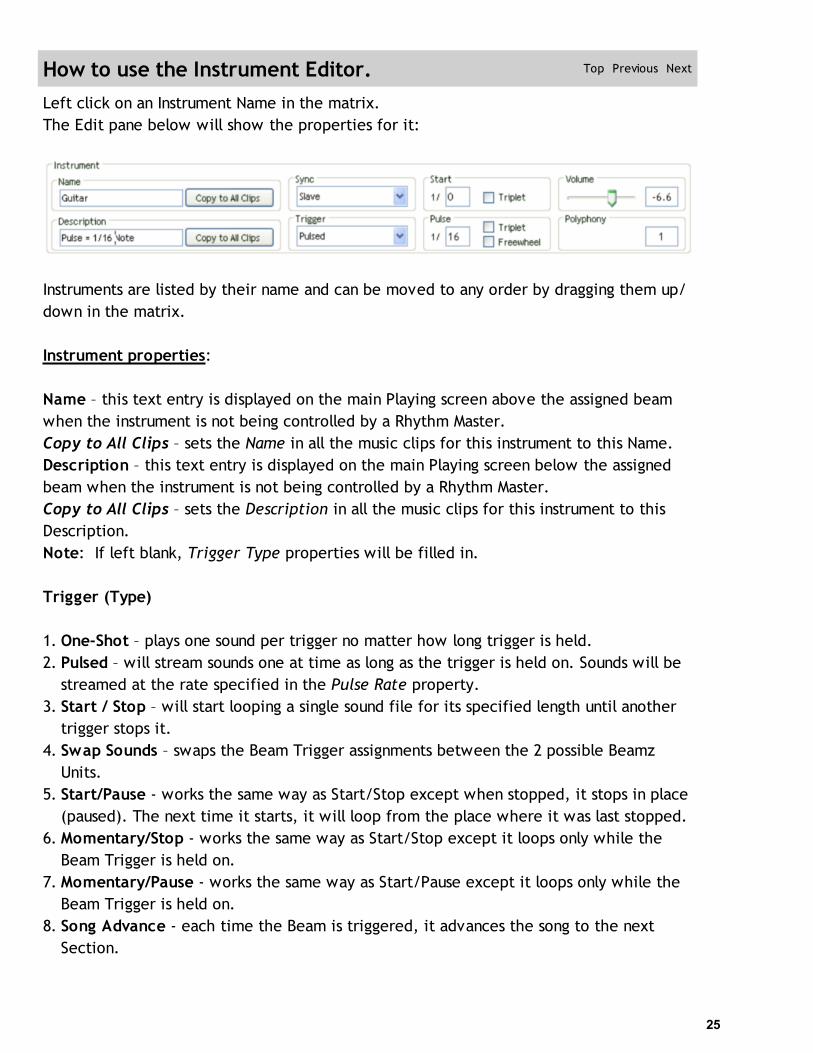
How to use the Instrument Editor. Top Previous Next
Left click on an Instrument Name in the matrix.
The Edit pane below will show the properties for it:
Instruments are listed by their name and can be moved to any order by dragging them up/
down in the matrix.
Instrument properties:
Name – this text entry is displayed on the main Playing screen above the assigned beam
when the instrument is not being controlled by a Rhythm Master.
Copy to All Clips – sets the Name in all the music clips for this instrument to this Name.
Description – this text entry is displayed on the main Playing screen below the assigned
beam when the instrument is not being controlled by a Rhythm Master.
Copy to All Clips – sets the Description in all the music clips for this instrument to this
Description.
Note: If left blank, Trigger Type properties will be filled in.
Trigger (Type)
1. One-Shot – plays one sound per trigger no matter how long trigger is held.
2. Pulsed – will stream sounds one at time as long as the trigger is held on. Sounds will be
streamed at the rate specified in the Pulse Rate property.
3. Start / Stop – will start looping a single sound file for its specified length until another
trigger stops it.
4. Swap Sounds – swaps the Beam Trigger assignments between the 2 possible Beamz
Units.
5. Start/Pause - works the same way as Start/Stop except when stopped, it stops in place
(paused). The next time it starts, it will loop from the place where it was last stopped.
6. Momentary/Stop - works the same way as Start/Stop except it loops only while the
Beam Trigger is held on.
7. Momentary/Pause - works the same way as Start/Pause except it loops only while the
Beam Trigger is held on.
8. Song Advance - each time the Beam is triggered, it advances the song to the next
Section.

26
Pulse (Rate) – sets the rate at which sounds are streamed when they are pulsed.
This only applies to trigger type Pulsed. This entry is specified as musical note values.
A setting of 1/1 would be one whole note. The illustration above is set for 1/16 notes.
FreeWheel – locks or unlocks pulsed notes to the Master Metronome.
This only applies to trigger type Pulsed. see Using the FreeWheel property
Start – sets a musical grid used to align or quantize triggers received by this instrument.
This entry is specified as musical note values. (same as Pulse Rate)
This property can be used for all trigger types. see Using the Start property
Sync – a pull down list with 3 choices:
1. Master – this instrument is the Rhythm Master – used only with Loop Start / Stop.
2. Slave – this instrument will follow the Rhythm Master thru the song sections.
3. None – this instrument is not affected by the Master.
It always plays its Free Running music clips. see Using the Sync property
Polyphony – specifies how many sounds can play at once when their playing overlaps.
see Using the Polyphony property
Volume – can be used to adjust the overall volume for the Instrument.
Instrument Midi properties: see Midi Properties view.
External Port –
Selects the output midi port to be used for sending midi to an external midi device.
Step Play Interval – Allows midi files to be stepped thru incrementally.
For more information please see How to use the Step Play Interval with midi files.
Embedded tempo - Tempo information in a midi file will be used instead of the tempo
setting for the song.
For more information please see Beamz Tempo settings.
Looping – Everything played is repeated back as a loop a specific number of times.
For more information please see Using Midi Looping.
Top Previous Next

27
Using the Sync property Top Previous Next
The Sync property sets the relationship between this Instrument and the Rhythm Master.
Instruments with Sync designated as None.
Some instruments are meant to play the same part throughout the entire song with no
regard to which section of the song is being played by the Rhythm Master. These
Instruments pay no attention to the Master at all. They always only play the Music Clips in
their Free Running section – even when the Rhythm Master is running. Since they will
never play the Music Clips in the song sections played by the rhythm master, those clips
should be empty.
Instruments with Sync designated as Master.
1. Since it will serve as a running metronome, an Instrument that has a Master Sync
property must be a loop that is started and stopped with the trigger type Start / Stop
otherwise, it wouldn't play thru the sections.
2. Since most Rhythm Masters provide the rhythm background (such as Bass & Drums) the
sound files for these parts must prepared to loop precisely at the same Master Tempo and
time signature as the song.
3. It is common in Beamz songs to have a Rhythm Master that is made up of more than one
Instrument. Our sample song has the bass and drums as a background Master. Each is a
separate Loop Start/Stop Instrument that plays a looping sample that matches the other.
Both Instruments are linked together by assigning them to the same Beam Trigger which
can be used to start and stop them both simultaneously. Since all Beamz songs use the
right console button for running masters, both of these instruments are usually assigned to
Beam Trigger 8.
NOTE: Only one of Instrument can be a Master instrument. All other Instruments linked to
a Rhythm Master should be Slaved to it.
Instruments with Sync designated as Slave.
Multiple Instruments can be Slaved to the Rhythm Master.
They will play the Music Clips in their Free Running section while no Master is running and
controlling the song. Once the Master is running, they will only play the Music Clips that
are made Active as the Master plays thru the song.
Top Previous Next

28
Using the Polyphony property Top Previous Next
Polyphony specifies how many notes can overlap or play at one time.
When a note is played on an acoustic instrument, it takes a takes a while for it to decay or
quiet down. Depending on the instrument, some notes can take a long time to end.
Samples of these notes are typically long enough to accommodate the entire note –
including its decay. Given the interactive nature of Beamz Instruments, it is possible to
trigger several notes on top of each other as they each decay.
The default setting for Polyphony is 1 – which is best for most uses.
In this case, if one note is still playing when another note is played on this Instrument, the
first one will be cut off and only the second note will play. If another note plays before
the second note finishes, it will be cut off and only the third note will be heard. For
example, lead guitar notes are very long and playing more than one of them at the same
time usually produces a musical train wreck. With a Polyphony setting of 1, these notes
can be streamed or pulsed. When the pulsing is stopped, the last note triggered will play
out to its long, long ending.
More experienced composers can use Polyphony to take advantage of the overlap by
composing notes that are complimentary with each other and can play well overlapped.
Polyphony allows you to choose how many of them will be playing together. An example
would be long sustained notes composed provide a chord texture to the song.
Top Previous Next

29
Using the Start property Top Previous Next
The Start property aligns the timing of triggers received by this Instrument to the
metronome count.
All Trigger Types can use the Start Property.
Normally, an Instrument responds at the precise moment a Trigger is received from its
assigned Beam.
The sound produced by the instrument will be in time with the music as much or as little
as the performer wants it to be – expressive timing. Most of the time, this is the way you
want it to be.
However, for some instruments, you may want them to play perfectly in time with the
Rhythm Master, which can be difficult without some practice, so the Start property was
provided to offer an easy way to do this.
The normal default Start value is None which provides immediate response when a Beam
is triggered.
If you choose to use them, the Start options are specified as musical note values. The
note value selected here becomes the start boundary for the instrument. When an
Instrument receives a Trigger from a Beam, it will wait until it is the next "right time" to
play a note of this kind as the Master metronome counts thru the song. Then, it will
respond to the trigger. This assures that all triggers align with the music as was specified
by the Start value that was selected. The best way to play a Beam with a specified Start
value is to either trigger the Beam at the proper time musically, which produces
immediate sound, or by triggering the Beam slightly ahead of time, in which case the
Instrument will wait until the correct time to play a note of the selected value.
The Start property only regulates the timing of the first note when a Beam is triggered.
If a trigger is held on for Pulsed Instruments, the timing of the pulsed notes is regulated by
the FreeWheel property, which is covered as the next topic.
Other ways to use the Start property.
For example, if the instrument is set up to play a part that is meant to be played on the
downbeat of a measure, a Start value of a Whole Note (1/1) could be used. The
performer can either play these parts directly at the proper moment, or pre-trigger them
by playing slightly ahead of the downbeat and they will play on the next downbeat the
metronome reaches. Common uses for this would be a One-Shot trigger type that plays
an orchestra hit, or a Start / Stop trigger that starts a loop that plays along with the
Rhythm Master.
Top Previous Next

30
Using the FreeWheel property Top Previous Next
FreeWheel allows pulsed notes to be pulsed "free" without locking them into the
metronome count.
Only Pulse Trigger Types can use the FreeWheel property.
If FreeWheel IS NOT selected, a pulsed Instrument will stream notes in perfect timing with
the Master metronome according to the note value selected as the Pulse Rate. The
moment the Instrument first responds to the trigger is not affected by this but all
subsequent pulsed notes are locked to the Master metronome on the Pulse Rate
boundaries.
For Example: A Start value of None with a Pulse Rate of 1/8.
Without FreeWheel, the instrument may be triggered out of time, but all subsequent
pulsed notes will be 1/8 notes that are in their proper note boundaries according to the
Master metronome.
If FreeWheel IS selected, a Pulsed Instrument will stream the notes at the intervals for the
note value selected as the Pulse Rate according to the Tempo of the song. In this case
the pulsed notes can freewheel from the Master metronome count and base their timing
against the moment an Instrument first responds to the Beam being triggered.
Freewheeled notes are all pulsed with the same timing imperfection (artistic expression)
as the first note produced by the trigger – which can be regulated by the Start property.
Top Previous Next

31
Using Midi Looping. Top Previous Next
Midi Looping brings back a cool feature that was once popular in early drum machines.
They worked by recording a loop over and over again. Anything played into the loop was
added to it and you could hear what you played the next time the loop repeated. With a
little skill you could build an impressive percussion line by layering in different drum parts
at the right moment during the loop. The loop would continue to repeat until you turn it
off.
Midi Looping in Beamz Studio works the same way except you can specify how many times
something will repeat before drops out of the loop.
As the name would imply Midi Looping only works when midi files are being played.
It will not work with samples -- even if it has been selected for the instrument.
Midi Looping is only available for pulsed and one-shot instruments.
If you open midi properties for one of these instruments you'll see these options.
To use it, turn it on, then set the loop length and the number of repeats.
Loop Length sets the length of the loop.
In this illustration the loop length is two bars long. (two whole notes)
Repeats sets the number of times something played will repeat.
In this illustration you would hear something a total of four times, once when it was first
played, and then repeated three times.
Tips for working with looping:
The shorter you make a loop, the more quickly it becomes cluttered.
The longer you make a loop, the longer it takes to layer in all the parts, and the longer it
takes for it to become cluttered.
Setting the repeats value lower causes the loop to start decaying quicker, which requires
more involvement to keep it going.
Setting the repeats value higher can give you time to improvise against the loop once
you've got it going.
If you're trying this for the first time use the settings in the illustration.
Note: Midi Looping will not work when the Step Play option is used.
Enabling Stepping will disable Looping for the instrument.
For more information on stepping see: How to use the Step Play Interval with midi files.Top Previous Next

32
How to use the Music Clips Editor. Top Previous Next
Left clicking on the name of any Music Clip will open this pane at the bottom of the
screen.
The Name and Description properties are both text entry fields that serve as labels for
this clip.
The Name is displayed on the matrix. Both labels are displayed on the main Playing
screen above and below the assigned Beam display while this clip is Active.
The Sound File Assignments Box in the center of the pane is a play-List of all the sounds
that have been assigned to this Music Clip. They are numbered in the order in which they
will be play as the Music Clip steps thru its Assignments. This list can be organized by
moving Assignments up or down the list.
HOW TO ADD A SOUND FILE ASSIGNMENT TO A MUSIC CLIP.
Sound file Assignments are added by clicking the Import button and opening the file to be
added.
HOW TO COPY AN ASSIGNMENT.
Clicking the Clone button will insert an exact clone of the selected Assignment into the
list below the original. This includes all of its properties. Volume, Transpose.
HOW TO REMOVE AN ASSIGNMENT FROM THE LIST.
Clicking the Remove button takes the selected Assignment off of the list.
HOW TO MOVE AN ASSIGNMENT UP OR DOWN THE LIST.
Clicking the Move Up or Down buttons moves the selected sound file Assignment up or
down the step-thru list.
To learn how to use the Midi Properties for a music clip see Midi Properties view.Top Previous Next

33
How to edit Music Clip Assignments and Properties. Top Previous Next
If in Midi Properties View, click the Midi Properties button to turn it off.
Select the Music Clip you want to work with.
Select the name of a sound file in the Assignments Box to edit its properties.
Volume Slider will adjust the playback volume for the selected sound file.
Transpose Slider will transpose the playback for the selected sound file musically.
Use the slider to transpose the selected Assignment up or down in musical steps called
semi-tones.
There are 12 semi-tones in one octave. When this slider is set to anything other than
zero, playback for the selected sound file assignment will be transposed by the amount
specified.
Composing Tip: Use this volume control and the Play All Bar to get an even volume
across all the assignments. This will save a lot of time later.
HOW TO EDIT MIDI PROPERTIES FOR A MUSIC CLIP.
Select the Music Clip you want to work with.
If not in Midi Properties View, click the Midi Properties button to turn it on.
For more information see Midi Properties view.
Top Previous Next

34
How to audition sound files. Top Previous Next
Hearing how a single sound file will play.
Select a single assignment and click the Play button to hear it.
Hearing how the Instrument will play all of the sounds in the Music Clip.
The red button along the top of the Assignments box works like a beam on the main
screen.
It can be used to hear how the Instrument will play the assignments in the box when it is
triggered.
It usually operates with a mouse-over like the beams on the main screen, however, if the
Instrument you are working with is a Start/Stop type, clicking on the bar will start the
loop, clicking it again will stop it.
Notes on importing MP3 files. Top Previous Next
The Microsoft Direct Music synthesizer can only use samples in .wav file format.
When a MP3 file is imported into a Music Clip, it is converted into a .wav file which is
then imported and placed into the song's folder.
Sound Card Notes. Top Previous Next
Beamz Studio relies on the Microsoft GS Synthesizer, which is a part of Windows. It
works only with the Microsoft WDM audio stream protocol, which is the Windows
standard. Practically all factory installed sound cards for Windows computers use the
protocol. However, some advanced add-on sound cards offer a selection of other
protocols that used. If you're someone who uses one of these cards, be aware that the
card used for Beamz playback must be using the WDM protocol.
35
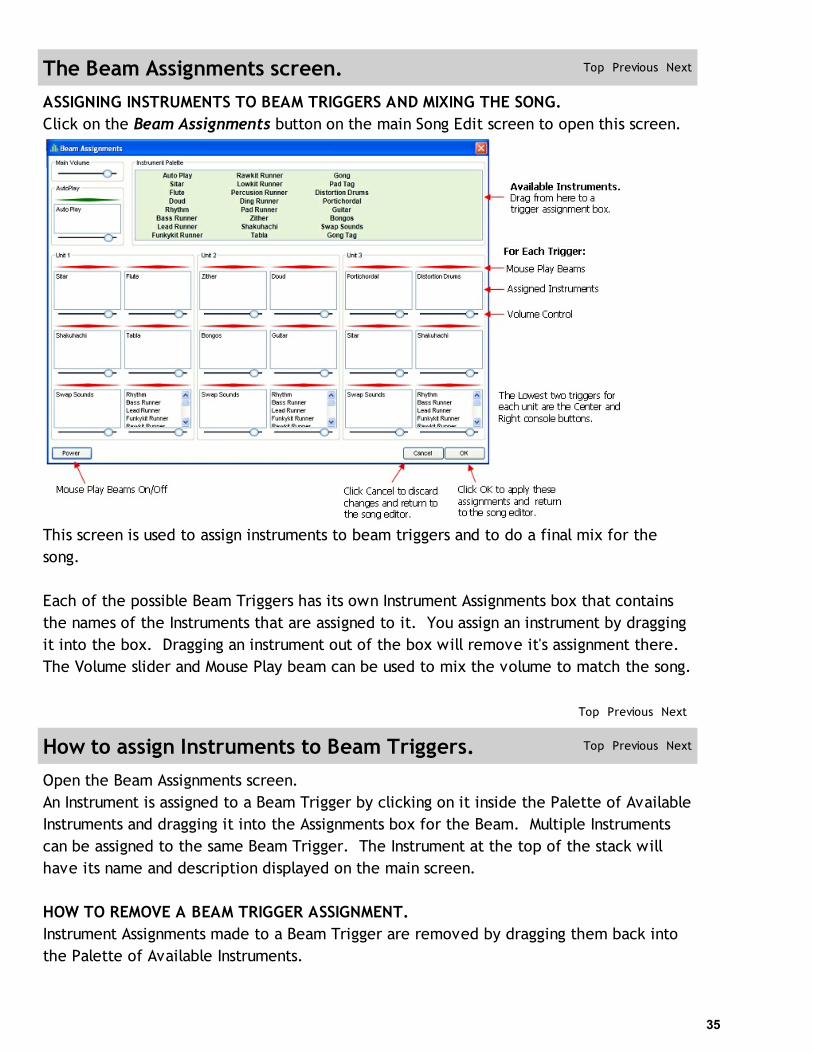
The Beam Assignments screen. Top Previous Next
ASSIGNING INSTRUMENTS TO BEAM TRIGGERS AND MIXING THE SONG.
Click on the Beam Assignments button on the main Song Edit screen to open this screen.
This screen is used to assign instruments to beam triggers and to do a final mix for the
song.
Each of the possible Beam Triggers has its own Instrument Assignments box that contains
the names of the Instruments that are assigned to it. You assign an instrument by dragging
it into the box. Dragging an instrument out of the box will remove it's assignment there.
The Volume slider and Mouse Play beam can be used to mix the volume to match the song.
Top Previous Next
How to assign Instruments to Beam Triggers. Top Previous Next
Open the Beam Assignments screen.
An Instrument is assigned to a Beam Trigger by clicking on it inside the Palette of Available
Instruments and dragging it into the Assignments box for the Beam. Multiple Instruments
can be assigned to the same Beam Trigger. The Instrument at the top of the stack will
have its name and description displayed on the main screen.
HOW TO REMOVE A BEAM TRIGGER ASSIGNMENT.
Instrument Assignments made to a Beam Trigger are removed by dragging them back into
the Palette of Available Instruments.

36
How to Mix the song. Top Previous Next
Open the Beam Assignments screen.
Each Beam Trigger has a Trigger Volume Slider that will adjust its volume.
Mouse Play beams are provided for all triggers so you can test the mix while you're
working on it.
The Master Volume Slider will adjust the volume of the song as a whole.
(This Volume Slider is also available in the Song Edit pane).
See the the next topic on Using a structured approach to mixing.
Using a structured approach to mixing. Top Previous Next
A Beamz song is a multitude of sounds that can possibly play together randomly as the
performer chooses. Getting them all to play at a consistent volume throughout an entire
song can be challenging.
When a sound file plays, the sound it produces begins along a path thru the Beamz
software and ultimately ends up at the final destination: the computer's sound card,
where it can be heard. As the sound travels along its path thru the Beamz software,
there are several places where its volume can be adjusted along the way.
The sound is adjusted at several places along its path to the sound card.
HOW BEAMZ VOLUME CONTROLS WORK.
All Volume sliders in Beamz Studio can only lower the volume, not boost it on its path to
the sound card.
This amount is displayed as a decibel value. (-3.0 would be reducing the volume by 3
decibels.)

37
HOW TO MIX A SONG.
1. Use the Volume Slider in the Music Clip edit pane to fine tune each sound's volume
across all sounds for each Instrument. They should all play at the same level.
1a. For Music Clips with midi properties, the volume and panning can also be adjusted
there.
2. Use Volume Slider in the Instrument edit pane to set a similar level for all Instruments in
the song.
3. Use the individual Volume Sliders in the Beam Assignments screen to tune the overall
mix for the song.
4. If certain song sections are to be quieter than others, use the Volume Slider in the
Section edit pane to adjust the master mix lower while the section is being played.
5. Use the Volume Slider in the Beam Assignments screen or the Song Edit pane to adjust
the Master volume to match other songs.
Composer’s Tip for getting a good mix in a Beamz song:
You can avoid ending up with a song that cannot play as loudly as other songs. A good
mixing target would be to end up with a Master Volume that needs to be lowered to
match other songs. If the volume needs to be boosted, there should be enough “head
room” to raise it easily. At each stage of the mixing process, try to avoid having the
volume controls maxed out. Always try for a mix that has a little room to be boosted at
each step in the path if this becomes necessary later.
Composer’s Tip for getting a good volume for samples you record yourself:
Ending up with a good overall mix for a song begins with the samples themselves.
Since Beamz Studio can only lower the volume, the overall volume of the samples should
be high enough to clearly be heard in the main mix. – if they're too high for the song,
they can be easily cut down. Much time and effort can be saved during the mixing
process if all the samples played by an instrument are at a consistent volume for the entire
song, and at strong volume levels.
Top Previous Next

38
AutoPlay Trigger explained. Top Previous Next
Beamz software has a special internal trigger called Autoplay that is automatically
triggered one time whenever the Free Run section becomes active. Instruments used
with the Autoplay trigger are either Start/Stop or One-Shot trigger types. Typically, an
Autoplay instrument is a silent loop that runs in the background to establish a metronome
for instruments set up to trigger on a specific Start value. Sound files can also be assigned
to an Autoplay instrument. An example would be an Autoplay instrument that plays Nature
sounds in the background for a Relaxation song.
How Beam Assignments are different from a Custom
Layout.Top Previous Next
The Custom Layout screen in the Tools menu is available to permit any user to rearrange
the beam assignments and make their own custom mix for a Preset song.
Custom Layout settings are saved as a separate file in the song folder and work as
temporary overrides for the permanent settings in the song's definition file. A Custom
Layout does not affect the song's definition file in any way.
NOTE: A song's Custom Layout is based on what is contained in its permanent song-
definition file.
It re-assigns or overrides the song’s defined settings. Making changes to a song's definition
file can have an adverse effect on its Custom Layout, so it is suggested that you "Reset" or
remove a Custom Layout before editing the definitions for a song.

39
How midi files play sounds in Beamz Studio Top Previous Next
A midi file is a collection on Notes that will be produced by a synthesizer when the midi
sequence is played. Each Instrument being "played" by the midi file will have its own
unique midi channel used for its notes, and the sound device intended to produce the
sound must have the appropriate (matching) Instrument assigned to the same midi
channel. Each instrument must have its own unique midi channel, and its up to the
composer to map the midi channels that are used in a song.
When Rhythm.mid is played, it sends notes to the synthesizer on 2 midi channels.
Midi synthesizers keep their internal collection of Instruments organized in Banks. Each
Bank contains the programming and samples to play a selection of different Instruments.
Most synthesizers have a special General Midi Bank which is a standardized collection of
all major Instruments.
Note: Channel 10 is recognized by General Midi Standards as being used for drums &
percussion sounds, which are treated differently by most synthesizers. Some synthesizers
display only a list of drum kits as Instrument choices for midi channel 10.
Beamz software uses the Microsoft DirectMusic synthesizer to play its midi files.
Instead of being contained in memory banks, the Instrument (patches) used by this
synthesizer are contained in DLS Collections which are files on the hard disk of your
computer.
The same midi sequence played in Beamz Studio would look like this:
Just as it is with any midi sound module, each midi channel used in the file being played
must be assigned to an Instrument or Patch within a DLS collection in order to produce
sound. The Microsoft DirectMusic synthesizer has its own DLS version of the General Midi
collection, which is uses as a default until something else is assigned.
Top Previous Next
40
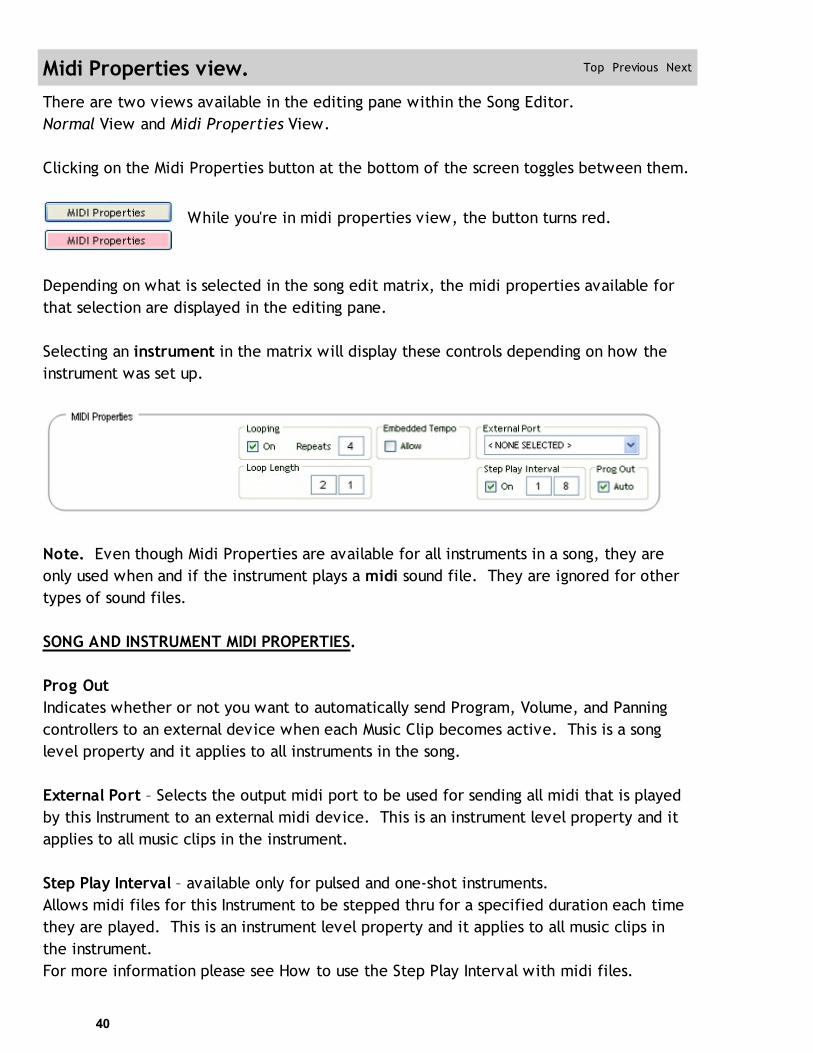
Midi Properties view. Top Previous Next
There are two views available in the editing pane within the Song Editor.
Normal View and Midi Properties View.
Clicking on the Midi Properties button at the bottom of the screen toggles between them.
While you're in midi properties view, the button turns red.
Depending on what is selected in the song edit matrix, the midi properties available for
that selection are displayed in the editing pane.
Selecting an instrument in the matrix will display these controls depending on how the
instrument was set up.
Note. Even though Midi Properties are available for all instruments in a song, they are
only used when and if the instrument plays a midi sound file. They are ignored for other
types of sound files.
SONG AND INSTRUMENT MIDI PROPERTIES.
Prog Out
Indicates whether or not you want to automatically send Program, Volume, and Panning
controllers to an external device when each Music Clip becomes active. This is a song
level property and it applies to all instruments in the song.
External Port – Selects the output midi port to be used for sending all midi that is played
by this Instrument to an external midi device. This is an instrument level property and it
applies to all music clips in the instrument.
Step Play Interval – available only for pulsed and one-shot instruments.
Allows midi files for this Instrument to be stepped thru for a specified duration each time
they are played. This is an instrument level property and it applies to all music clips in
the instrument.
For more information please see How to use the Step Play Interval with midi files.

41
Embedded tempo - available only for Master start/stop instruments.
If this option is checked, tempo information contained in the midi file being played will
be used instead of the tempo setting for the song. For more information please see Beamz
Tempo settings.
Looping – available only for pulsed and one-shot instruments.
When midi looping is turned on, everything played by the instrument is repeated back as a
loop a specific number of times. For more information please see Using Midi Looping.
42
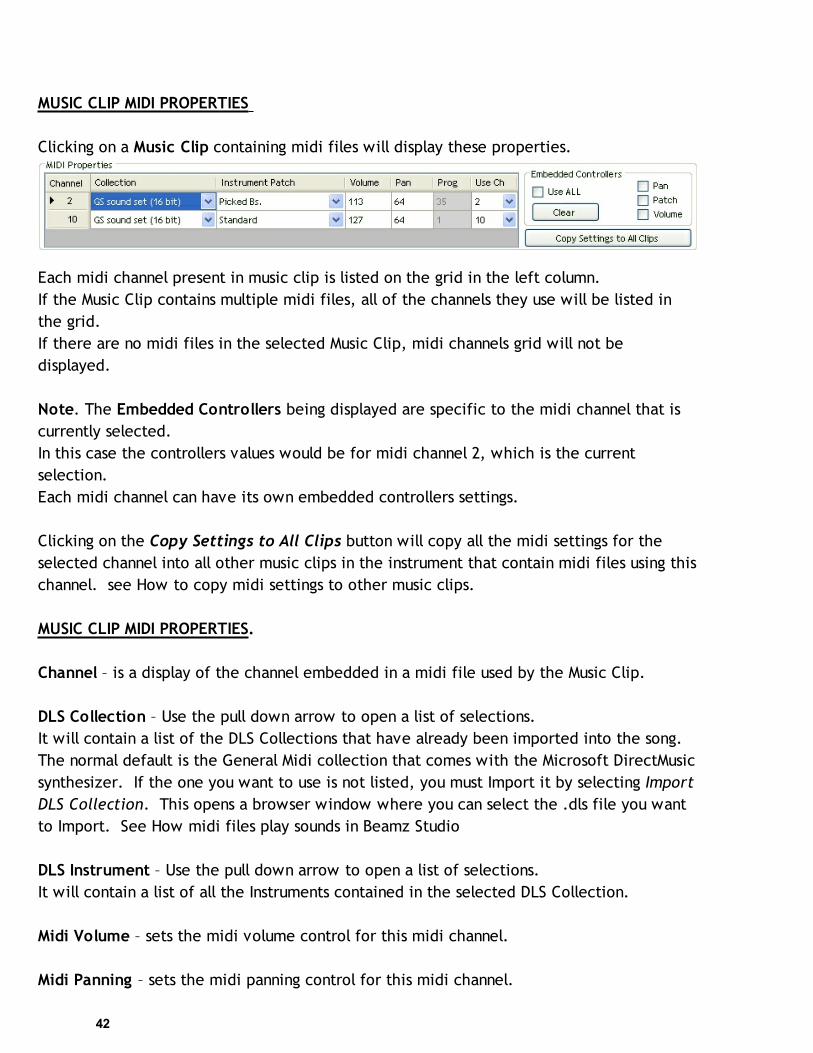
MUSIC CLIP MIDI PROPERTIES
Clicking on a Music Clip containing midi files will display these properties.
Each midi channel present in music clip is listed on the grid in the left column.
If the Music Clip contains multiple midi files, all of the channels they use will be listed in
the grid.
If there are no midi files in the selected Music Clip, midi channels grid will not be
displayed.
Note. The Embedded Controllers being displayed are specific to the midi channel that is
currently selected.
In this case the controllers values would be for midi channel 2, which is the current
selection.
Each midi channel can have its own embedded controllers settings.
Clicking on the Copy Settings to All Clips button will copy all the midi settings for the
selected channel into all other music clips in the instrument that contain midi files using this
channel. see How to copy midi settings to other music clips.
MUSIC CLIP MIDI PROPERTIES.
Channel – is a display of the channel embedded in a midi file used by the Music Clip.
DLS Collection – Use the pull down arrow to open a list of selections.
It will contain a list of the DLS Collections that have already been imported into the song.
The normal default is the General Midi collection that comes with the Microsoft DirectMusic
synthesizer. If the one you want to use is not listed, you must Import it by selecting Import
DLS Collection. This opens a browser window where you can select the .dls file you want
to Import. See How midi files play sounds in Beamz Studio
DLS Instrument – Use the pull down arrow to open a list of selections.
It will contain a list of all the Instruments contained in the selected DLS Collection.
Midi Volume – sets the midi volume control for this midi channel.
Midi Panning – sets the midi panning control for this midi channel.

43
Prog (number) – Sets a midi Program Change controller value to be sent to an external midi
device each time the Music Clip becomes active This is only available if a Midi Output Port
has been selected and the Auto-Send option is used.
Use ch – Sets an over-ride midi channel to be used instead of what's in the midi file itself.
The Channels listed at the left of the grid represent what's being used within the midi (.
mid media) for the selected Music Clip. This applies to not only the internal DLS
assignment, but it also applies to midi output being sent to external midi devices. If this
conflicts with another midi Instrument you have setup somewhere else in the song, it can
be changed by using the pull down to select a different channel. – See Special Note below.
Embedded Midi Controllers
Each channel can have its own midi controllers settings.
For more information please see Using embedded controllers contained in a midi file.
SPECIAL NOTE: Midi channel assignments within a song.
When you Import a midi file into a Music Clip, you must assign a dls instrument for each
midi channel it uses. Even though midi channels are assigned to DLS Instruments within a
single Music Clip, they apply to the song as a whole. Therefore, caution must be used when
assigning a midi channel to a DLS Instrument. If the same channel is used for a different
instrument somewhere else in the song, the proper sound may not play. Each midi
channel / DLS instrument assignment must be unique.
When importing midi files, use the Use ch over-ride to insure this is the case.Top Previous Next

44
How to play midi files with the Beamz internal
synthesizer.Top Previous Next
1. Import the MIDI file into a Music Clip and Select it. see How to use the Music Clips
Editor.
2. If needed, assign a Step Interval for the Instrument. see How to use the Step Play
Interval with midi files.
3. Select the Music Clip again. Open the MIDI properties view. see Midi Properties
view.
4. Select the DLS collection and Patch (Instrument) for each channel listed in the grid.
5. Close the MIDI properties view and use the play-bar in the Music Clips editor to hear
how it sounds. see How to audition sound files.
How to use the Step Play Interval with midi files. Top Previous Next
You already understand how the list of sound file assignments in a Music Clip is stepped
thru each time the Instrument plays a sound from the list. When Step Play is enabled for
an Instrument, it steps thru a midi file each time the Music Clip needs a sound to play.
(Instead of stepping thru the list of sound file assignments)
Assume you want to make a pattern of eight notes – each of them is sustained as a whole
note. If you prepared these notes as separate midi files for each note, the Sound File
Assignments box in the Music Clips pane might look like this:
Preparing a separate midi file for each of these notes would be a lot of work.
The Step Interval provides an easier way to prepare these midi notes.
If you prepare a midi file of the eight whole notes in the above illustration, here's what
the midi sequence would look like: This file was prepared to be played with a Step Play
Interval = 1 Bar. (1/1)
The Instrument steps thru the midi file playing one Bar of it each time, then stops in place
(pauses).
After Step 8 has been played, it begins with Step 1 again.
The Step Play Interval indicates how far it should "play" into the midi file each time it

45
advances.
The number on the left (3) is the multiplier.
The number on the right (1) is the note value (1 = whole; 16 = 16th note, etc.)
In this illustration the Step Play Interval would be 3 Bars.
Notes on using the Step Play feature:
The Step Play option is only available for Pulsed and One-Shot instrument types.
It only works with midi files – it is ignored for all other media types.
When this is selected, it applies to all midi files played by the Instrument.
If Stepping is used for an instrument, it cannot be used as a Looping instrument as well.
When Looping is enabled, the stepping option is turned off.
For more information on Looping see Using Midi Looping.
Top Previous Next

46
Using embedded controllers contained in a midi file. Top Previous Next
In addition to the notes to be played, midi files also contain other "events" that allow
control of other aspects of a musical performance. They can range from controls set the
tempo, to controls that alter how a note is being played, to those intended to be used with
midi capable lighting systems. The most common are controls for Volume, Panning, and
Patch (synthesizer program).
Beamz Studio allows the option to decide whether or not a Music Clip uses them when
playing midi files.
How to Use Embedded Midi Controllers.
Select the Music Clip containing the midi file and open Midi Properties View for it.
The Embedded Controllers being displayed are specific to the midi channel that is
currently selected.
Each midi channel can have its own embedded controllers settings.
Select the desired channel and then use the check-boxes to enable the the kind of
controllers you want to use from it.
Clicking on the Clear button clears all the check-boxes.
Beamz Studio breaks up all the possible midi controllers into four categories.
Pan controls, Patch changes, Volume controls, and ALL others.
In order to use all of the possible midi controllers, all of the boxes must be checked.
For convenience, when you check the Use ALL box, the Pan, Patch, and Volume boxes are
also checked.
It's important to remember that when you check the Use ALL box, you are selecting the
category "all controllers other than Pan, Patch, and Volume". These controllers are enabled
or disabled individually.
To use all controllers except Pan, Patch, and Volume.

47
To use only Pan, Patch, and Volume controllers.
Embedded Tempo Controls.
Beamz Studio also permits the use of embedded midi tempo controllers.
To learn more about how to do this, read the topic on Beamz Tempo settings.
Top Previous Next

48
How to copy midi settings to other music clips. Top Previous Next
Typically a midi part for an instrument is broken up into several different sections that span
across the song. In most cases each music clip contains different notes to be played on the
same midi instrument. Beamz Studio allows you to set up an instrument in one music clip
and then copy the settings into all other music clips that use the same instrument.
Here are some important things to remember when copying midi settings into other music
clips:
a. The settings will be copied only into music clips that already have midi content that uses
the same midi channel.
b. Only the settings for the currently selected midi channel will be copied into the other
music clips.
1. Import all of the associated midi files into their respective music clips across all sections
for the instrument.
2. Select any of these music clips and setup a midi channel the way you want it to be for all
music clips in the instrument.
3. Select the midi channel whose properties you want to copy.
4. Click the Copy Settings to All Clips button to copy all midi settings for the selected
channel to all other music clips in the instrument that use the same midi channel.
Top Previous Next

49
How to record your own midi notes into a music clip. Top Previous Next
Midi Note Record offers a convenient way to play simple midi notes directly into the
selected Music Clip from your midi keyboard without having to use sequencing software to
put them into a midi file first, then Import them.
Note: It does not work like Step Recording in midi sequencing software.
Every note on the list will have the selected note duration – no matter how quickly they
are played or how long they are sustained on the keyboard. When multiple notes are
played on the keyboard, they are all quantized together as a chord, and they are all listed
as one entry on the list.
When you click Add to Clip, each entry on the list becomes a separate midi file in the
Music Clip where they can easily be cloned, removed, or moved to a new spot on the
assignments list.
HOW TO RECORD YOUR OWN MIDI NOTES INTO A MUSIC CLIP.
1. Select the Music Clip where you want the notes to be placed.
2. Click the Midi Note Record button to open up this window and to begin a recording
session.
3. Set the Note Duration for the notes you intend to play into the Music Clip.
4. Play the notes individually on your midi keyboard (each note you play is added to the
box.)
5. When you are finished adding all your notes to the list, click Add To Clip
Composer's Tip: Assigning a dls instrument to an empty Music Clip for Midi Note
Record.
Assigning a dls to a Music Clip cannot be done until the Music Clip contains midi content,

50
which is not the case for empty music clips. Until you have a midi file in the Music Clip,
the only sound you can hear while using Midi Note Record is the GS Piano – which is the
default for the synthesizer. An easy way around this is to record one note (that will be
discarded later), add it to the clip and assign the appropriate dls instrument to it. Then
you can hear it while you record the notes you want to keep. When they've been added
to the Music Clip, remove the note that was used as a place-holder.
Top Previous Next

51
How to play midi files using an external synthesizer. Top Previous Next
1. Import the MIDI file into a Music Clip.
see How to use the Music Clips Editor.
2. Select the Instrument.
If needed, assign a Step Interval for the Instrument.
see How to use the Step Play Interval with midi files.
3. Select the midi port that has the external sound device connected to it.
4. Select the Music Clip and audition the sounds.
see How to audition sound files.
Note: If you do not want to use the midi channels that are listed, you can override them
and use a different midi channel by selecting it in the Use ch pull down selection.
Note: If you know the Patch/Program number of the Instrument you want to use on the
external device, enter it in the Prog box, and check the Prog Out box to auto-send it. If
you prefer to manually setup your synthesizer, leave this box unchecked.
Note: If you want to hear only the sounds produced by the external device, select <none
selected> for the internal dls collection.
Top Previous Next

52
How to trigger Beamz instruments with an external
midi keyboard.Top Previous
If you have a midi keyboard connected to a Midi Input port on your computer, you can
map Beamz Instruments to be triggered by selected keys (midi notes) on your keyboard.
When the selected note is played on the keyboard, the designated beam will be
triggered.
Open the Tools Menu and select Map MIDI Input to Beams. This window will open:
Use the pull-downs to select different notes of your choosing.
Note: Button 5 is the Center console button; Button 6 is the Right console button.
The Left console button cannot be mapped.
Top Previous