Embed Size (px)
Citation preview
Installation Guide
B E A e L i n k P l a t f o r m 1 . 2D o c u m e n t E d i t i o n 1 . 2
J a n u a r y 2 0 0 0
BEA eLink Platform
Copyright
Copyright © 2000 BEA Systems, Inc. All Rights Reserved.
Restricted Rights Legend
This software and documentation is subject to and made available only pursuant to the terms of the BEA Systems License Agreement and may be used or copied only in accordance with the terms of that agreement. It is against the law to copy the software except as specifically allowed in the agreement. This document may not, in whole or in part, be copied photocopied, reproduced, translated, or reduced to any electronic medium or machine readable form without prior consent, in writing, from BEA Systems, Inc.
Use, duplication or disclosure by the U.S. Government is subject to restrictions set forth in the BEA Systems License Agreement and in subparagraph (c)(1) of the Commercial Computer Software-Restricted Rights Clause at FAR 52.227-19; subparagraph (c)(1)(ii) of the Rights in Technical Data and Computer Software clause at DFARS 252.227-7013, subparagraph (d) of the Commercial Computer Software--Licensing clause at NASA FAR supplement 16-52.227-86; or their equivalent.
Information in this document is subject to change without notice and does not represent a commitment on the part of BEA Systems. THE SOFTWARE AND DOCUMENTATION ARE PROVIDED "AS IS" WITHOUT WARRANTY OF ANY KIND INCLUDING WITHOUT LIMITATION, ANY WARRANTY OF MERCHANTABILITY OR FITNESS FOR A PARTICULAR PURPOSE. FURTHER, BEA Systems DOES NOT WARRANT, GUARANTEE, OR MAKE ANY REPRESENTATIONS REGARDING THE USE, OR THE RESULTS OF THE USE, OF THE SOFTWARE OR WRITTEN MATERIAL IN TERMS OF CORRECTNESS, ACCURACY, RELIABILITY, OR OTHERWISE.
Trademarks or Service Marks
BEA, ObjectBroker, TOP END, and Tuxedo are registered trademarks of BEA Systems, Inc. BEA Builder, BEA Connect, BEA Manager, BEA MessageQ, BEA Jolt, M3, eSolutions, eLink, WebLogic, and WebLogic Enterprise are trademarks of BEA Systems, Inc.
All other company names may be trademarks of the respective companies with which they are associated.
Document Edition Part Number Date Software Version
1.2 870-001032-001 January 2000 BEA eLink Platform 1.2 Installation Guide
BEA eLink Platform Installation Guide iii
Contents
1. Before You BeginIntroduction ....................................................................................................... 1-1
Intended Audience............................................................................................. 1-1
Supported Hardware and O/S Platforms ........................................................... 1-2
Hardware and Software Prerequisites ............................................................... 1-2
For UNIX Systems ..................................................................................... 1-3
For Windows NT Systems ......................................................................... 1-3
Managing Files and Databases .......................................................................... 1-3
Assigning File Ownership on UNIX Systems............................................ 1-4
Allocating Space ........................................................................................ 1-4
The BEA Tuxedo System Disk Management Interface...................... 1-4
Arranging for Raw Disk Space ........................................................... 1-5
How the BEA Tuxedo File System Is Organized ............................... 1-5
Space for Queue Spaces (If You Are Using /Q) ................................. 1-7
Space for eLink (Adapter and Option) Servers................................... 1-7
Selecting Directories for BEA Tuxedo System Files................................. 1-7
For All Platforms ................................................................................ 1-8
For All Server Platforms Supporting the Web GUI............................ 1-8
Selecting an Administrative Password ..................................................... 1-10
Configuring UNIX for BEA Tuxedo............................................................... 1-11
Semaphores .............................................................................................. 1-11
Message Queues and Messages................................................................ 1-13
Shared Memory ........................................................................................ 1-16
Other Kernel Tunable Parameters ............................................................ 1-17
Calculating IPC Requirements ................................................................. 1-18

iv BEA eLink Platform Installation Guide
2. Installing the BEA eLink PlatformIntroduction ....................................................................................................... 2-1
Installing the BEA eLink Platform Software .................................................... 2-2
Installing the Software on UNIX Platforms ............................................... 2-2
Installing the Software on Windows NT Platforms ................................... 2-4
Installing BEA Web Administration Console GUI Documentation .......... 2-5
Installing Your Product License ........................................................................ 2-5
Verifying the Software Installation ................................................................... 2-5
Checking the Directory Structure after Installation.................................... 2-6
Running a Sample Application .......................................................................... 2-7
Uninstalling the BEA eLink Platform ............................................................. 2-10
3. Post-Installation IssuesIntroduction ....................................................................................................... 3-1
Setting Up Your Environment ........................................................................... 3-2
Creating a UBBCONFIG File ........................................................................... 3-3
Verifying IPC Requirements ............................................................................. 3-3
Creating the Universal Device List and TLOG ................................................. 3-4
Creating the UDL ....................................................................................... 3-5
Creating the TLOG..................................................................................... 3-5
Starting the Listener Process ............................................................................. 3-5
Using the TYPE Parameter in UBBCONFIG ................................................... 3-7
Threaded Access to Libraries ............................................................................ 3-8
BEA eLink Platform Installation Guide 1-1
CHAPTER
1 Before You Begin
This chapter provides instructions for preparing your system for installing the BEA eLink Platform. This includes the following topics.
n Supported Hardware and O/S Platforms
n Hardware and software prerequisites
n Managing Files and Databases
n Configuring UNIX for BEA Tuxedo
Intended Audience
Readers of this guide are assumed to be system administrators or application developers with a knowledge of the UNIX and/or Windows NT operating system and the platforms on which the BEA eLink Platform runs.
1 Before You Begin
1-2 BEA eLink Platform Installation Guide
Supported Hardware and O/S Platforms
For details about all of the hardware and operating system platforms supported in this release of eLink Platform, refer to the “Platform Data” in the BEA eLink Platform Release Notes. Each data sheet includes the following platform-specific information:
n A list of available eLink Platform packages
n Hardware, software, and disk space requirements
n Instructions for tuning the UNIX kernel and accessing the CD-ROM drive
Hardware and Software Prerequisites
The BEA Tuxedo system software must be installed on each machine that will participate in an eLink application integration environment.
Note: The sharing of BEA Tuxedo system executables across remote file systems is not recommended. This practice has proven to be unreliable in the past.
The BEA Web Administration Console GUI must be installed in a file system that supports long file names (that is, those containing more than 14 characters). Details about the hardware and software prerequisites for all platforms on which the BEA Tuxedo system is supported are given in “Platform Data” in the BEA eLink Platform Release Notes. Please check the data sheet for each platform on which you plan to install the BEA Tuxedo system.
Managing Files and Databases
BEA eLink Platform Installation Guide 1-3
For UNIX Systems
You need the following information and resources before installing BEA Tuxedo on a UNIX system.
n Your system must meet the hardware and software requirements described in the “Platform Data” in the BEA eLink Platform Release Notes.
n You must know the superuser password so that you can mount the CD-ROM as a file system.
n You must know the name of a file system with enough free space for the eLink Platform packages you wish to install. Disk space requirements are given in the “Platform Data” in the BEA eLink Platform Release Notes.
For Windows NT Systems
You need the following resources before installing the BEA Tuxedo software on a Windows NT system:
n Your system must meet the hardware and software requirements described in the “Platform Data” in the BEA eLink Platform Release Notes.
n Your system must contain enough disk space for the packages you wish to install. Disk space requirements are given in “Platform Data” in the BEA eLink Platform Release Notes.
Managing Files and Databases
This section explains how to assign ownership of the BEA Tuxedo system files to the responsible administrator, and how to set up your disk to accommodate those files.
1 Before You Begin
1-4 BEA eLink Platform Installation Guide
Assigning File Ownership on UNIX Systems
If you are installing the BEA Tuxedo system on a UNIX system, we strongly recommend that you create a separate user account for the eLink Platform administrator and give ownership of the BEA Tuxedo system files to that account.
Allocating Space
A running BEA Tuxedo system needs disk space for system files and for queues. It is important to plan for this before installing the software. To help explain what is involved here, we need to describe how the BEA Tuxedo system handles files.
The BEA Tuxedo System Disk Management Interface
The BEA Tuxedo system has a facility, the Disk Management Interface (DMI), that manages logical files within a single disk device or set of devices. Among other things, it stores binary configuration tables and the transaction log.
The BEA Tuxedo system disk management software supports the notion of a BEA Tuxedo file system distinct from any operating system file system. (For the remainder of this discussion, the term OS file system refers to “any operating system file system.”) Administrative access to the DMI to create, initialize, or destroy entries in the BEA Tuxedo file system is through tmadmin administrative commands. There are two ways the logical files managed by the DMI can be stored physically. Storage can be on an OS file system, or disk space outside the control of all OS file systems can be set aside for BEA Tuxedo; files reside in that disk space on device-specific files and are managed directly by the DMI. Disk space outside the OS file system is usually referred to as raw disk space. I/O is faster when done by system calls reading directly from and writing directly to device-specific files on raw disks. In addition, raw disk space is preferred when it is important to know for certain that a physical write() has been performed. With the OS file system, the precise moment that a write() is executed may be indeterminate. In the BEA Tuxedo system, accurate control of the write() operation is particularly important for entries in the transaction log. With multiple users, it is also an important element in assuring database consistency.
Managing Files and Databases
BEA eLink Platform Installation Guide 1-5
Arranging for Raw Disk Space
If you decide to use raw disk space for your BEA Tuxedo system application, you may find that the hard disk devices on your system are fully allocated to file systems such as / (the root file system), /usr, and other UNIX file systems. If that is the case, it is necessary to repartition your hard disk device in order to set aside some partitions that are not for an OS file system. Information on how to do this can be found in the system administration documentation for your particular platform.
Note: On NT platforms, the default behavior is unbuffered I/O; no special arrangements are needed.
How the BEA Tuxedo File System Is Organized
A BEA Tuxedo system file system has a Volume Table of Contents (VTOC) that lists files on a set of devices named in the Universal Device List (UDL). The UDL contains information about the location of the physical storage space for BEA Tuxedo system tables.
All System Tables on the Same Device?
In a BEA Tuxedo system application, all of the system files might be stored together on the same raw disk slice or OS file system file. While it is possible to use regular OS file system files for the configuration tables, it is strongly recommended that the transaction log, TLOG, be stored on a raw disk device. Since the TLOG seldom needs to be larger than 100 blocks and since disk partitions are always substantially larger than that, it may make sense to use the same device for everything. The path name of the device must be contained in both the TUXCONFIG and the FSCONFIG environment variables. Listing 1-1 shows approximately how the contents might appear.
Listing 1-1 VTOC and UDL Diagram
Output based on setting FSCONFIG=$TUXCONFIG, and invoking tmadmin:
No bulletin board exists. Entering boot mode.
> livtoc
Volume Table of Contents on /usr2/bank/tuxconfig:
0: VTOC: Device 0 Offset 0 Pages 7

1 Before You Begin
1-6 BEA eLink Platform Installation Guide
1: UDL: Device 0 Offset 7 Pages 28
2: _RESOURCE_SECT: Device 0 Offset 35 Pages 3
3: _MACHINES_SECT: Device 0 Offset 38 Pages 40
4: _GROUPS_SECT: Device 0 Offset 78 Pages 40
5: _SERVERS_SECT: Device 0 Offset 118 Pages 40
6: _SERVICES_SECT: Device 0 Offset 158 Pages 20
7: _ROUTING_SECT: Device 0 Offset 178 Pages 100
8: _NETWORK_SECT: Device 0 Offset 278 Pages 20
9: _MIBPERMS_SECT: Device 0 Offset 298 Pages 2
# If the TLOG is stored on the same device, there will be an
# entry something like:
9: TLOG1: Device 0 Offset 236 Pages 100
> q
The BEA Tuxedo system administrator must ensure that raw disk slices are available as needed on each node participating in an application. Table 1-1 shows the size of elements in the BEA Tuxedo system file system.
Table 1-1 Size of BEA Tuxedo System Tables
Entity 512-byte Pages
VTOC 1
TUXCONFIG 270
TLOG 100 (default)
UDL 28
TOTAL 399
Managing Files and Databases
BEA eLink Platform Installation Guide 1-7
The size for the TUXCONFIG file is larger if there are more entries in the configuration file, UBBCONFIG. The administrator is encouraged to allocate additional space for dynamic reconfiguration and for growth of the application. The default block size assumed by the crdl subcommand of tmadmin is 1000 blocks, which should be adequate for the initial installation.
Space for Queue Spaces (If You Are Using /Q)
If your eLink Platform integration is using /Q for store-and-forward queue management, your queue space can be listed in the same UDL and managed by the BEA Tuxedo system VTOC.
Space for eLink (Adapter and Option) Servers
As you are calculating the space requirements for the eLink Platform, you should also consider the requirements of the additional eLink servers you may be using. These requirements will be specified by the application integration scenarios, and they are over and above the requirements for BEA Tuxedo system itself (unless otherwise specified).
Selecting Directories for BEA Tuxedo System Files
During the installation process you will be prompted to make decisions about where, in your file system, a number of your BEA Tuxedo system directories and files will be installed. To help you plan for this part of the process, this section describes the directories and files about which you will be prompted to make a decision. The following provides a directory to the topics that may be relevant for your particular installation:
n “For All Platforms,” should be read by anyone installing BEA Tuxedo.
n “For All Server Platforms Supporting the Web GUI,” should be read by anyone installing the Web-based GUI for BEA Tuxedo system application administration.

1 Before You Begin
1-8 BEA eLink Platform Installation Guide
For All Platforms
You will be prompted for a path name for the base directory of your BEA Tuxedo system software. There is no restriction on the location of this directory, as long as it meets the following requirements:
n The directory must be empty.
n The directory must have read, write, and search (execute) permissions for the BEA Tuxedo system administrator.
Throughout the BEA Tuxedo system documentation this directory is referred to as TUXDIR.
For All Server Platforms Supporting the Web GUI
If (a) you are installing BEA Tuxedo on a server platform, and (b) you have purchased the Web-based graphical user interface (GUI) for application administration, you will be prompted during the installation process to accept or replace the default path names and file names used for the Web GUI components. These default path names and file names are based on the value of TUXDIR that you specify. If you are running a commercial web server, you may find the default settings inappropriate, especially if your server is handling requests from both the BEA Tuxedo system Web GUI and other Web programs on the same port. To accommodate this situation, BEA Tuxedo system lets you choose between accepting the defaults or assigning your own path names and file names. The rest of this section describes the choices you will be given.
n A path name for the HTML files
By default, the HTML files listed below are installed in the directory $TUXDIR/udataobj/webgui. You are prompted to supply your own paths for these files if you prefer to have them installed elsewhere.
n An HTML template file (webgui.html)
This is used by tuxadm as the basis for many screens displayed during a Web GUI session.
n An HTML file (webguitop.html)
This displays legal notices and warnings when the Web GUI is first brought up on the screen.
n The Web GUI documentation HTML files
Managing Files and Databases
BEA eLink Platform Installation Guide 1-9
These are installed in the directory $TUXDIR/doc.
Note: If you are installing BEA Tuxedo on an NT platform and the installation program detects an existing Web server, then a default directory appropriate for that Web server is used instead.
n A path name for the Java and image files
By default, the class files for the Java applet are installed in one of the directories listed below. You are prompted to supply your own paths for these files if you prefer to have them installed elsewhere.
l $TUXDIR/udataobj/webgui/java
Or:
l A subdirectory java in the HTML directory you specified above for the first item.
n A directory path name for the CGI program (tuxadm)
Specify one of the following (unless the exception described below applies):
l $TUXDIR/udataobj/webgui/cgi-bin
l A sub-directory called cgi-bin in the HTML directory you specified above for the first item.
Notes: If the installation program detects Microsoft’s Internet Information Server (IIS) in a standard directory, then tuxadm is installed in a sub-directory called scripts in the directory you specified as the path name for HTML files.
Do not specify $TUXDIR/bin as your CGI directory. If you do, you risk having some other BEA Tuxedo system programs executed accidentally by an uninformed user of the Web browser. You may also introduce a security risk.
n An alias for the directory path name for tuxadm
This is the path for the directory in which Web clients will expect to find tuxadm. The default is either /cgi-bin or /scripts.
n A path name for the documentation
By default, the documentation is installed in $TUXDIR/doc.

1 Before You Begin
1-10 BEA eLink Platform Installation Guide
Selecting an Administrative Password
The BEA Tuxedo system uses an administrative password to protect the machine on which it is installed from administrative requests and operations (such as tmboot) that are not authorized. Whenever administrative communications arrive on this machine through the tlisten and wlisten gateway processes, the BEA Tuxedo system authenticates them by means of the password.
You assign an administrative password during the installation process (to the machine on which the BEA Tuxedo system is being installed) by entering the password of your choice after the appropriate prompt. The password must be a string of alphanumeric characters in clear-text format. It may contain no more than 80 characters.
A common password is required for two machines in a BEA Tuxedo system domain to communicate successfully. For this reason, you must use the same password whenever you install the BEA Tuxedo system on multiple machines for a single domain. As described above, you will be prompted to provide the password during the BEA Tuxedo installation process. If, however, for some reason, you use a different password for one machine, you must add that password to the tlisten.pw file on each existing machine with which you want that machine to communicate. For these reasons, you may have more than one administrative password in your tlisten.pw
file. A single password file may contain no more than 20 passwords, with one password per line.
The administrative password that you enter during installation is collected by the installation script and stored in the following location:
$TUXDIR/udataobj/tlisten.pw
Make sure the permissions on your tlisten.pw file are set such that the file is readable only by the BEA Tuxedo system administrator.
Configuring UNIX for BEA Tuxedo
BEA eLink Platform Installation Guide 1-11
Configuring UNIX for BEA Tuxedo
The BEA Tuxedo System uses the UNIX operating system Interprocess Communication (IPC) resources.
Note: Equivalent services are available on operating systems other than the UNIX system. The BEA Tuxedo system provides an NT Service called the BEA Tuxedo IPC Helper, which facilitates inter-process communication.
IPC resources are configured by three sets of tunable parameters that control the amount of shared memory (prefix SHM), number of semaphores (prefix SEM), and size of message queues and messages (prefix MSG).
The settings for these parameters are application dependent. Most UNIX systems, however, are shipped with default values that are too low for a BEA Tuxedo system application.
The following sections describe the IPC parameters and provide guidelines for configuring them. Because these parameters vary across different versions of the UNIX system the descriptions below are generic. Check “Platform Data” in the BEA eLink Platform Release Notes for the exact parameter names and defaults for each platform and for information on how to change the parameters. If you change a parameter, you will need to rebuild the kernel and reboot the operating system using the standard administrative tools. Consult your operating system administrator or the system administrator’s guide for your platform for details.
If your BEA Tuxedo system application is distributed, the minimum IPC resources must be available on every UNIX platform participating in the application.
Semaphores
Every process that participates in a BEA Tuxedo system application requires a semaphore. When the application is booted, the number of semaphores configured in the operating system is checked, and the boot will fail if the configured number is not high enough.

1 Before You Begin
1-12 BEA eLink Platform Installation Guide
The following semaphore parameters may need to be adjusted:
n SEMMNS
Maximum number of semaphores in the system. The minimum requirement for SEMMNS is:
MAXACCESSERS - MAXWSCLIENTS + 13
where MAXACCESSERS is the maximum number of BEA Tuxedo system processes on a particular machine (including servers and native clients) and MAXWSCLIENTS is the maximum number of workstation clients.
Both of these parameters are specified in the application’s UBBCONFIG file. For more information about UBBCONFIG, see the BEA Tuxedo Administrator’s Guide or the ubbconfig(5) reference page.
n SEMMNI
Maximum number of active semaphore sets. See SEMMSL.
n SEMMSL
Maximum number of semaphores per semaphore set. SEMMNI and SEMMSL are commonly chosen so that their product equals SEMMNS. The BEA Tuxedo system does not perform semaphore operations on semaphore sets; however, it attempts to allocate as many semaphores per semaphore set as possible.
n SEMMAP
Size of the control map used to manage semaphore sets. SEMMAP should be equal to SEMMNI.
n SEMMNU
Number of undo structures in the system. Because an undo structure is needed for each process that can access the Bulletin Board, SEMMNU must be at least as large as SEMMNS.
n SEMUME
Maximum number of undo entries per undo structure. The value 1 suffices.
Configuring UNIX for BEA Tuxedo
BEA eLink Platform Installation Guide 1-13
Message Queues and Messages
The BEA Tuxedo system uses UNIX system messages and message queues for client/server communication. Examples of such messages are service requests, service replies, conversational messages, unsolicited notification messages, administrative messages, and transaction control messages.
Every MSSQ set (Multiple Servers, Single Queue) of servers and every individual server has a message queue for receiving requests. Every client has its own queue for receiving replies. Servers that specify the REPLYQ parameter also get individual reply queues.
The adjustment of kernel message parameters is important to the proper tuning of an application. Inappropriate values can lead to an inability to boot or severe performance degradation.
There are various message queue parameters. They limit various characteristics of the queue space including the total number of outstanding messages (MSGTQL), the total number of bytes that can be on one queue (MSGMNB), the size limit of an individual message (MSGMAX), the total number of message segments that can be outstanding at one time (MSGSEG), and the size of each segment (MSGSSZ).
Exceeding any of the above parameter limits results in what is known as a blocking condition. There is a special case for MSGMAX. Messages that exceed 3/4 of MSGMNB, or that are larger than MSGMAX, are placed in a UNIX file. A very small message with the file name in it is then sent to the recipient. This mode of operation is to be avoided, as it results in a severe reduction in performance.
An application deadlock can result if every process is blocked trying to send a message. For example, when clients fill up the message space with requests and servers are all blocked trying to send replies, since no server can read a message, there is a deadlock. Sometime, time-outs can break the deadlock, but no useful work will have been done.
Another problem is a client that sends its requests with the TPNOREPLY flag. In no time, this practice can fill up either individual queues or the system message space, depending on the size of the messages. Such applications may have to implement their own flow control to limit the number of outstanding messages.
1 Before You Begin
1-14 BEA eLink Platform Installation Guide
In summary, if clients or servers are blocking on their send operations (requesting services or sending replies), then there is potential for trouble. It is usually no problem, though, for a single server request queue to always be full, as long as there is space in the system for more messages on other queues.
There are performance implications to queue blocking conditions, both on the sending side and the receiving side. When waking up blocked processes, the UNIX operating system wakes up all the processes blocked on a particular event, even if only one can proceed. The other processes just go back to sleep. This process scheduling overhead can be expensive. For example, on an empty server request queue where there is more than one server (MSSQ), an arriving message wakes up all the idle (blocked) servers on that queue. In the case of a full server request queue, as each request is read by a server, the system wakes up all the blocked clients. Depending on the size of the messages, zero or more clients can place their messages in the queue. The rest must return to a sleep state. Since there may be hundreds of clients in the system, the mass wakeup of all of these clients every time a service request is processed can severely degrade performance. A properly tuned system rarely fills its queues. Enough slack should be left in the queues to handle the natural variability of the message flow. There are no absolute answers — tuning is very application dependent. The UNIX ipcs(1)
command provides a snapshot of the queues so you can determine if they are full. You can also use the TPNOBLOCK flag when sending requests. Clients can then determine when queues are full, and can slow down a bit. It might help to increase the scheduling priority of servers with full request queues.
The following message parameters may need to be adjusted:
n MSGMNI
Number of unique message queue identifiers. Each process participating in a BEA Tuxedo system application on a particular machine typically needs at least one message queue. This number is reduced if MSSQ sets are used, where multiple server processes share a single queue. For transaction processing, count an additional queue per server group for TMS processes. Thus, the minimum requirement for MSGMNI can be determined by this formula:
MSGMNI = MAXACCESSERS + 7
l + (number of servers with REPLYQ)
l + (number of MSSQ sets)
l - (number of servers in MSSQ sets)
Configuring UNIX for BEA Tuxedo
BEA eLink Platform Installation Guide 1-15
n MSGMAX
Maximum message size in bytes. MSGMAX must be big enough to handle any BEA Tuxedo system application running on this machine.
n MSGMNB
Maximum message queue length in bytes. This number must accommodate the total size of all messages that are on a queue and have not been taken off by the associated process(es). The minimum value for MSGMNB is MSGMAX. Messages longer than 75% of MSGMNB are sent to a file instead of to a message queue—a situation that should be avoided because it severely degrades performance.
n MSGMAP
Number of entries in the control map used to manage message segments. MSGMAP should be the same as the number of message segments (MSGSEG), which should be twice the size of MSGMNI.
n MSGSSZ
Size of a message segment in bytes. A message can consist of several such segments. The value of MSGSSZ should be such that a multiple of MSGSSZ is equal to the size (including the BEA Tuxedo system header) of the most commonly sent message. This practice will avoid wasting space.
n MSGSEG
Number of message segments in the system.
n MSGTQL
Total number of outstanding messages that can be stored by the kernel. This is the maximum number of unread messages at any given time.
1 Before You Begin
1-16 BEA eLink Platform Installation Guide
Shared Memory
In the BEA Tuxedo system environment shared memory is used for the Bulletin Board and for the control table of the workstation listener process (WSL). An application may also choose to use shared memory for its own purposes.
The following shared memory parameters may need to be adjusted:
n SHMMAX
Maximum shared memory segment size in bytes. This number represents the largest shared memory segment that can be allocated. A process can, however, attach to more than one segment of size SHMMAX.
n SHMSEG
Maximum number of shared memory segments per process. For a given configuration, the maximum amount of shared memory in bytes to which a process can attach is SHMMAX * SHMSEG. A value between 6 and 15 should be adequate.
n SHMMNI
Maximum number of shared memory identifiers in the system. BEA Tuxedo requires one identifier per Bulletin Board and an additional identifier if the workstation listener (WSL) is running.
n SHMMIN
Minimum shared memory segment size in bytes. This should always be set to 1.
Configuring UNIX for BEA Tuxedo
BEA eLink Platform Installation Guide 1-17
Other Kernel Tunable Parameters
Experience with the BEA Tuxedo system has shown that some other UNIX system tunable parameters may need to be set to higher values. These are very application dependent and do not apply to all applications. Refer to “Platform Data” in the BEA eLink Platform Release Notes for information on the defaults and how to change them.
n ULIMIT
Maximum file size. ULIMIT needs to be large enough so that you can install the BEA Tuxedo system and eLink servers. We recommend 4 megabytes.
n NOFILES
Maximum number of open files per process. A BEA Tuxedo system server requires a minimum of four file descriptors.
n MAXUP
Maximum number of processes per non-super user. The BEA Tuxedo system processes—servers and administrative processes—run with the UID specified in the application’s UBBCONFIG file. MAXUP needs to be large enough to allow all of these processes to run.
n NPROC
Maximum number of processes (system wide).
n NREGION
Number of region table entries to allocate. Most processes have three regions: text, data, and stack. Additional regions are needed for each shared memory segment and shared library (text and data) attached. However, the region table entry for the text of a “shared text” program is shared by all processes executing that program. Each shared memory segment attached to one or more processes uses another region table entry.
n NUMTIM
Maximum number of STREAMS modules that can be pushed by the Transport Layer Interface (TLI). A typical default value is 16; you should have it set to at least 256.
n NUMTRW
The number of TLI read/write structures to allocate in kernel data space. A typical default value is 16; you should have it set to at least 256.
1 Before You Begin
1-18 BEA eLink Platform Installation Guide
Calculating IPC Requirements
When the BEA Tuxedo system software has been installed and an application configuration file (UBBCONFIG file) is available, the tmloadcf command can be used to calculate the IPC resources needed to support the application. For more information, see the tmloadcf(1) reference page and Chapter 3, “Post-Installation Issues,”
BEA eLink Platform Installation Guide 2-1
CHAPTER
2 Installing the BEA eLink Platform
This chapter provides instructions for installing, verifying, and uninstalling the BEA eLink Platform software. A description of the directory structure after installation is also included. The following topics are covered:
n Installing the BEA eLink Platform Software
n Installing Your Product License
n Verifying the Software Installation
n Running a Sample Application
n Uninstalling the BEA eLink Platform
2 Installing the BEA eLink Platform
2-2 BEA eLink Platform Installation Guide
Installing the BEA eLink Platform Software
This section gives procedures for the following:
n Installing the Software on UNIX Platforms
n Installing the Software on Windows NT Platforms
n Installing BEA Web Administration Console GUI Documentation
Note: If you are planning to install the Web-based GUI for BEA eLink Platform administration, make sure you have decided whether or not you want the GUI-related files to be installed in their default directories and, if you do not, where you want them to be installed. For details, see Chapter 1.
Installing the Software on UNIX Platforms
To install the eLink Platform on a UNIX platform, complete the following procedures. Make sure you install the software in the file system in which the eLink Platform executables run.
Note: It will take approximately five minutes to install each package on a local disk; installation on a remote disk may require as much as 10 minutes.
1. Log in as the administrator of the eLink Platform.
2. Insert the CDROM into the reader.
3. Mount the CDROM as a file system. For platform-specific instructions about how to do this, refer to “Platform Data” in the BEA eLink Platform Release Notes. On most systems you will need to acquire super user privileges to perform the mount.
Installing the BEA eLink Platform Software
BEA eLink Platform Installation Guide 2-3
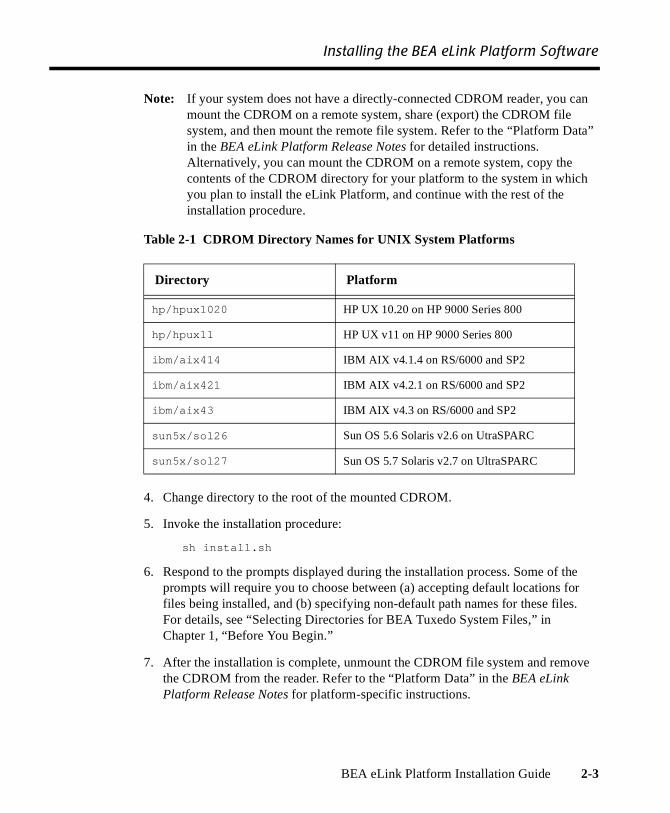
Note: If your system does not have a directly-connected CDROM reader, you can mount the CDROM on a remote system, share (export) the CDROM file system, and then mount the remote file system. Refer to the “Platform Data” in the BEA eLink Platform Release Notes for detailed instructions. Alternatively, you can mount the CDROM on a remote system, copy the contents of the CDROM directory for your platform to the system in which you plan to install the eLink Platform, and continue with the rest of the installation procedure.
Table 2-1 CDROM Directory Names for UNIX System Platforms
4. Change directory to the root of the mounted CDROM.
5. Invoke the installation procedure:
sh install.sh
6. Respond to the prompts displayed during the installation process. Some of the prompts will require you to choose between (a) accepting default locations for files being installed, and (b) specifying non-default path names for these files. For details, see “Selecting Directories for BEA Tuxedo System Files,” in Chapter 1, “Before You Begin.”
7. After the installation is complete, unmount the CDROM file system and remove the CDROM from the reader. Refer to the “Platform Data” in the BEA eLink Platform Release Notes for platform-specific instructions.
Directory Platform
hp/hpux1020 HP UX 10.20 on HP 9000 Series 800
hp/hpux11 HP UX v11 on HP 9000 Series 800
ibm/aix414 IBM AIX v4.1.4 on RS/6000 and SP2
ibm/aix421 IBM AIX v4.2.1 on RS/6000 and SP2
ibm/aix43 IBM AIX v4.3 on RS/6000 and SP2
sun5x/sol26 Sun OS 5.6 Solaris v2.6 on UtraSPARC
sun5x/sol27 Sun OS 5.7 Solaris v2.7 on UltraSPARC
2 Installing the BEA eLink Platform
2-4 BEA eLink Platform Installation Guide
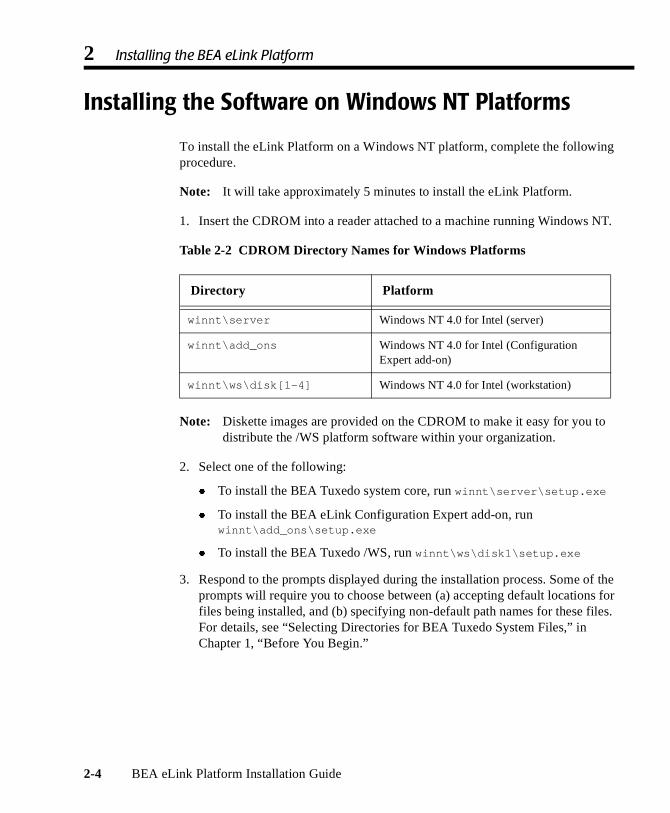
Installing the Software on Windows NT Platforms
To install the eLink Platform on a Windows NT platform, complete the following procedure.
Note: It will take approximately 5 minutes to install the eLink Platform.
1. Insert the CDROM into a reader attached to a machine running Windows NT.
Table 2-2 CDROM Directory Names for Windows Platforms
Note: Diskette images are provided on the CDROM to make it easy for you to distribute the /WS platform software within your organization.
2. Select one of the following:
l To install the BEA Tuxedo system core, run winnt\server\setup.exe
l To install the BEA eLink Configuration Expert add-on, run winnt\add_ons\setup.exe
l To install the BEA Tuxedo /WS, run winnt\ws\disk1\setup.exe
3. Respond to the prompts displayed during the installation process. Some of the prompts will require you to choose between (a) accepting default locations for files being installed, and (b) specifying non-default path names for these files. For details, see “Selecting Directories for BEA Tuxedo System Files,” in Chapter 1, “Before You Begin.”
Directory Platform
winnt\server Windows NT 4.0 for Intel (server)
winnt\add_ons Windows NT 4.0 for Intel (Configuration Expert add-on)
winnt\ws\disk[1-4] Windows NT 4.0 for Intel (workstation)
Installing Your Product License
BEA eLink Platform Installation Guide 2-5
Installing BEA Web Administration Console GUI Documentation
The BEA Tuxedo Administrator’s Guide to the Web-based GUI is installed (in the same directory) only when you install the Web-based GUI for eLink Platform administration.
Installing Your Product License
Your product license was delivered on the floppy diskette that you received with your product package. Install the contents of this file in the location $TUXDIR/udataobj/lic.txt. If a license file already exists from a previous Tuxedo software installation, replace that file with the eLink Platform license.
Note: The floppy diskette cannot be read on a computer running the UNIX system. If you are using a UNIX platform, read the floppy onto a Windows machine and transfer the license file to the UNIX machine. To verify that the UNIX system has accepted the file, run the tmadmin -v command.
Verifying the Software Installation
To verify that you have successfully installed the eLink Platform software on a server platform, check the directory structure added to your system for the eLink Platform files, and try configuring and executing the sample application provided. This section describes the directory structure and provides instructions for running the sample application.
2 Installing the BEA eLink Platform
2-6 BEA eLink Platform Installation Guide
Checking the Directory Structure after Installation
When the eLink Platform is installed, the directories listed below are created. This diagram reflects the directory structure after all packages in the eLink Platform environment have been installed.
The contents of each directory are described below. TUXDIR is the base directory for the eLink Platform software. TUXDIR must be an empty directory for which you have read, write, and search (execute) permissions.
n $TUXDIR/apps
Contains several subdirectories with sample applications.
n $TUXDIR/bin
Contains executable programs.
n $TUXDIR/cobinclude
Contains copylib entries for use in COBOL programs.
n $TUXDIR/doc
Contains the BEA Tuxedo document set (if installed).
n $TUXDIR/eLink
Contains the BEA eLink Platform add-ons (if installed).
n $TUXDIR/include
Contains the C language header files. May include subdirectories such as rpc, depending on the platform.
n $TUXDIR/lib
Contains compiled object files, including dynamic shared libraries (on platforms where the BEA Tuxedo system uses dynamic shared libraries) and other object files needed to build BEA Tuxedo system clients and servers.
n $TUXDIR/locale
Contains subdirectories to support the localization of system messages.
n $TUXDIR/locale/C$TUXDIR/locale/En_US
Contain message catalogs for the default locale (U.S. English). En_Us is a SCO alias for C.
Running a Sample Application
BEA eLink Platform Installation Guide 2-7
n $TUXDIR/locale/C/mask
Contains the default DES (Data Entry System) initial mask.
n $TUXDIR/locale/C/mask/vuform
Contains compiled data entry masks used by vuform(1).
n $TUXDIR/udataobj
Contains other files required by the BEA Tuxedo system.
Running a Sample Application
To verify that you have successfully installed the BEA Tuxedo system software on a server platform, you can try configuring and executing the sample application found in the directory $TUXDIR/apps/simpapp.
Note: Instructions for setting up and running a simpapp through the Web GUI are provided in the “Tutorial” section in Chapter 1 of the BEA Tuxedo Administrator’s Guide to the Web-based GUI.
The simpapp program is a non-distributed application consisting of a server, client, and configuration file. The server simpserv offers a single service called TOUPPER. The client simpcl is invoked with a single argument, which is a string to be converted to upper case. The server returns the converted string to the client, which prints it out. For example, the invocation:
simpcl “hello world”
results in the output:
Returned string is: HELLO WORLD
To configure and run simpapp , follow these steps. This procedure is also described in the README file in $TUXDIR/apps/simpapp .
1. Set up and export the environment variables used by the BEA Tuxedo system. The Bourne shell script $TUXDIR/tux.env shows you how to do this.
2. Copy the simpapp files to your own working directory, since the configuration file must be edited. Make sure that the client and server files are executable and that the configuration file is writable, for example:
2 Installing the BEA eLink Platform
2-8 BEA eLink Platform Installation Guide
MYDIR=/home/me/simpappmkdir $MYDIRcd $MYDIRcp $TUXDIR/apps/simpapp/* .chmod 755 simpserv simpclchmod 644 ubbsimple
3. Edit the sample configuration file ubbsimple to replace the bracketed items with values appropriate to your BEA Tuxedo system installation. Follow the comments in ubbsimple, which show you exactly how to customize the file. APPDIR (in the file) should be the same as MYDIR, and TUXCONFIG (in the file) should be set to the literal path name corresponding to $MYDIR/tuxconfig (in our example, /home/me/simpapp/tuxconfig). The machine name should be set to the name of your system. To determine the name of your system on a UNIX machine run the command:
uname -n
If you are using a Windows NT platform and you do not know the name of your system, see your system administrator.
4. Initialize and export the TUXCONFIG environment variable, which is used by several BEA Tuxedo system commands.
TUXCONFIG=$MYDIR/tuxconfigexport TUXCONFIG
5. Create the binary version of your edited configuration file by invoking tmloadcf(1), which produces a file named tuxconfig. This file, referenced by the TUXCONFIG environment variable, is used by the BEA Tuxedo system at runtime to describe the application configuration.
tmloadcf -y ubbsimple
6. Boot simpapp using the tmboot command:
tmboot -y
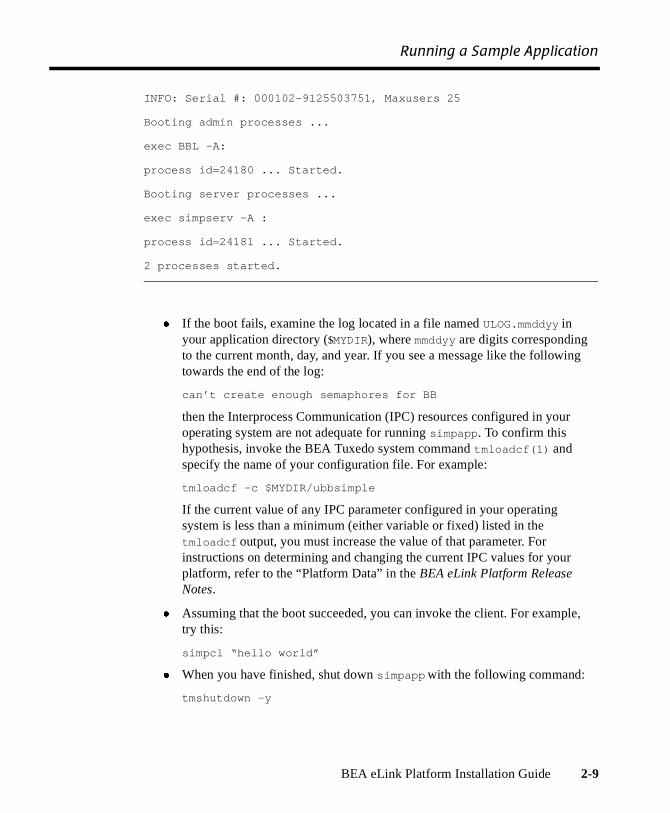
If the boot succeeds, you will see output such as the following:
Listing 2-1 Output produced by tmboot -y
Booting all admin and server processes in
/home/me/simpapp/tuxconfig
INFO: BEA TUXEDO(r) System Release 6.5
Running a Sample Application
BEA eLink Platform Installation Guide 2-9
INFO: Serial #: 000102-9125503751, Maxusers 25
Booting admin processes ...
exec BBL -A:
process id=24180 ... Started.
Booting server processes ...
exec simpserv -A :
process id=24181 ... Started.
2 processes started.
l If the boot fails, examine the log located in a file named ULOG.mmddyy in your application directory ($MYDIR), where mmddyy are digits corresponding to the current month, day, and year. If you see a message like the following towards the end of the log:
can’t create enough semaphores for BB
then the Interprocess Communication (IPC) resources configured in your operating system are not adequate for running simpapp . To confirm this hypothesis, invoke the BEA Tuxedo system command tmloadcf(1) and specify the name of your configuration file. For example:
tmloadcf -c $MYDIR/ubbsimple
If the current value of any IPC parameter configured in your operating system is less than a minimum (either variable or fixed) listed in the tmloadcf output, you must increase the value of that parameter. For instructions on determining and changing the current IPC values for your platform, refer to the “Platform Data” in the BEA eLink Platform Release Notes.
l Assuming that the boot succeeded, you can invoke the client. For example, try this:
simpcl “hello world”
l When you have finished, shut down simpapp with the following command:
tmshutdown -y
2 Installing the BEA eLink Platform
2-10 BEA eLink Platform Installation Guide
Uninstalling the BEA eLink Platform
To uninstall the eLink Platform, do the following, depending on your operating system:
n On a UNIX system:
a. Make sure that all BEA eLink applications are shut down.
b. Enter the following command
rm -rf $TUXDIR
where TUXDIR is set to the eLink Platform base directory.
n On a Windows NT platform:
Double-click on the Uninstall icon.

BEA eLink Platform Installation Guide 3-1
CHAPTER
3 Post-Installation Issues
Now that you have successfully installed BEA Tuxedo, you must set up your system and parts of the BEA Tuxedo system software to prepare for developing or installing your application. This chapter describes the required set-up tasks in the following sections:
n “Setting Up Your Environment” recommends settings for various environment variables.
n “Creating a UBBCONFIG File” refers you to BEA Foundation product documentation for information about using the Configuration Expert to create a UBBCONFIG file.
n “Verifying IPC Requirements” describes the commands that let you calculate the minimum IPC resources for an application, based on its UBBCONFIG file.
n “Creating the Universal Device List and TLOG” describes how to create a Universal Device List (UDL) and a transaction log for those applications that require them.
n “Starting the Listener Process” describes several methods for starting the tlisten(1) process, which provides remote service connections.
n “Using the TYPE Parameter in UBBCONFIG” calls special attention to how the TYPE parameter in the UBBCONFIG file can save you some grief.
n “Threaded Access to Libraries” provides some considerations about application program threads and BEA Tuxedo system libraries.
3 Post-Installation Issues
3-2 BEA eLink Platform Installation Guide
Setting Up Your Environment
Before you can invoke BEA Tuxedo system commands you need to set several environment variables. This section describes the environment variables that you must set and export on a UNIX system. If you are using an NT platform, see “Setting Environment Variables” in the BEA Tuxedo for Windows NT User’s Guide for instructions.
On a UNIX system you need to set and export several environment variables. The Bourne shell script tux.env, located in the base directory you specified at installation time, serves as a model for setting these variables.
All examples below assume that you are using the Bourne shell.
n TUXDIR contains the full path name of the directory in which you installed the BEA Tuxedo system software. For example, if you installed the BEA Tuxedo system in /var/opt/tuxedo, type this:
TUXDIR=/var/opt/tuxedo; export TUXDIR
n PATH is the search path for commands. You should include $TUXDIR/bin in your path. For example:
PATH=$PATH:$TUXDIR/bin; export PATH
n SHLIB_PATH (on HP-UX), LD_LIBRARY_PATH (on SVR4-based systems including Solaris), and LIBPATH (on AIX) name the search path for dynamic shared libraries. These environment variables are needed only on platforms that support dynamic shared libraries. You should append $TUXDIR/lib to your existing library path. For example, on HP-UX, execute this:
SHLIB_PATH=$TUXDIR/lib:$SHLIB_PATH; export SHLIB_PATH
n TUXCONFIG contains the full path name of the binary configuration file of a specific BEA Tuxedo system application. Several BEA Tuxedo system commands expect TUXCONFIG to be set appropriately. For example, if your application’s binary configuration file is located in /var/opt/tuxapp1/myapp.tux you should set and export TUXCONFIG as follows:
TUXCONFIG=/var/opt/tuxapp1/myapp.tux; export TUXCONFIG

Creating a UBBCONFIG File
BEA eLink Platform Installation Guide 3-3
Creating a UBBCONFIG File
Refer to the BEA Foundation product documentation for information about using the Configuration Expert to create a UBBCONFIG file.
Verifying IPC Requirements
The BEA Tuxedo system uses UNIX system Interprocess Communications (IPC) resources heavily. On many UNIX system platforms the default values for the parameters that control the size and quantity of the various IPC resources are below the minimums needed to run even a modest BEA Tuxedo system application, so it becomes necessary to reset some of the parameters. After editing your configuration file, the next step in determining how things stand with your application is to determine if the IPC resources suffice for the application.
To do this, invoke the tmloadcf(1) command, specifying your edited configuration file as input:
tmloadcf -c ubbconfig
An example of the output is shown below, based on the values in ubbsimple.
Listing 3-1 Output produced by tmloadcf -c
Ipc sizing (minimum /T values only)...
Fixed Minimums Per Processor
SHMMIN: 1
SHMALL: 1
SEMMAP: SEMMNI
Variable Minimums Per Processor
3 Post-Installation Issues
3-4 BEA eLink Platform Installation Guide
SEMUME, A SHMMAX
SEMMNU, * *
Node SEMMNS SEMMSL SEMMSL SEMMNI MSGMNI MSGMAP SHMSEG
------ ------ ------ ------ ------ ------ ------ ------
sftuxe 17 5 12 A + 1 13 26 75K
where 1 <= A <= 8.
The number of expected application clients per processor should be added to each
MSGMNI value.
This output indicates that to run simpapp, your UNIX system must have SEMUME, SEMMNU, and SEMMNS set to no less than 17. SEMMSL must be at least 5, and SEMMNI
and SEMMAP at least 4 (assuming A is 3). MSGMNI must be at least 13, and MSGMAP at least 26. Finally, the product of SHMMAX and SHMSEG must be at least 75K bytes.
Of course, the IPC values are application dependent, and the numbers in this example reflect a very small configuration. If other applications that use IPC resources are running on the same system with a BEA Tuxedo system application, then the requirements of both applications must be satisfied. Keep in mind also that every node participating in an application must have sufficient IPC resources available.
If the current IPC resources are inadequate, you must increase the values of the associated IPC parameters. For instructions on determining and changing the current IPC values for your platform, see the data sheet for your platform in Appendix A.
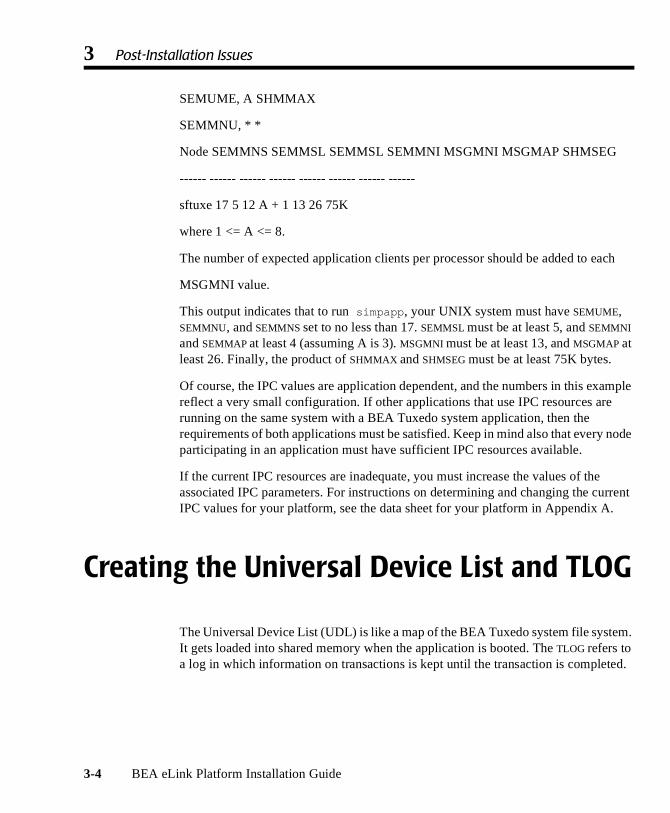
Creating the Universal Device List and TLOG
The Universal Device List (UDL) is like a map of the BEA Tuxedo system file system. It gets loaded into shared memory when the application is booted. The TLOG refers to a log in which information on transactions is kept until the transaction is completed.

Starting the Listener Process
BEA eLink Platform Installation Guide 3-5
Creating the UDL
To create the UDL, execute the following command before the application has been booted:
tmadmin -c
crdl -z config -b blocks
where:
-z config specifies the full path name for the device where the UDL should be created and -b specifies the number of blocks to be allocated on the device. The config parameter should match the value of the TLOGDEVICE parameter in the MACHINES
section of the UBBCONFIG file.
Creating the TLOG
Several parameters in the MACHINES section of the UBBCONFIG file are used to define a global transaction log (TLOG). The BEA Tuxedo system administrator must manually create the device list entry for the TLOGDEVICE on each machine where a TLOG is needed. This can be done either before or after TUXCONFIG has been loaded, but it must be done before the system is booted.
To create an entry in the UDL for the TLOG device, create the UDL as described above on each node that will be involved with global transactions. If the TLOGDEVICE is mirrored between two machines, it is not necessary to do this on the paired machine. The BBL then initializes and opens the TLOG during the boot process.
Starting the Listener Process
When used in a distributed environment, the BEA Tuxedo system requires the capability to start, shut down, and administer processes on remote nodes running BEA Tuxedo system servers. The tlisten(1) process provides this facility. Once tlisten is running, tmboot(1), for example, can start BEA Tuxedo system servers on remote nodes.

3 Post-Installation Issues
3-6 BEA eLink Platform Installation Guide
The tlisten process operates with either of the two network interfaces: Sockets or TLI. It runs as a daemon process, and there are several ways it can be started:
n By the UNIX system administrator as part of a UNIX initialization (boot) script
n By the BEA Tuxedo system administrator as a cron job
n By the BEA Tuxedo system administrator starting tlisten manually from the command line.
In all cases the same basic invocation syntax is used:
TUXDIR= tuxdir; export TUXDIR
SHLIB_PATH=$TUXDIR/lib:$SHLIB_PATH; export SHLIB_PATH
$TUXDIR/bin/tlisten -d devname -l nlsaddr -u appuid
Note: If your system uses an environment variable other than SHLIB_PATH for the shared library path, specify that variable, instead.
The -d and -l options are required. The value for -d represents the network provider.
The value for -l should be the same as that specified for the NLSADDR parameter in the NETWORK section of the configuration file. For information on determining the value of NLSADDR, see the ubbconfig(5) or tlisten(1) reference page, or the BEA Tuxedo Administrator’s Guide.
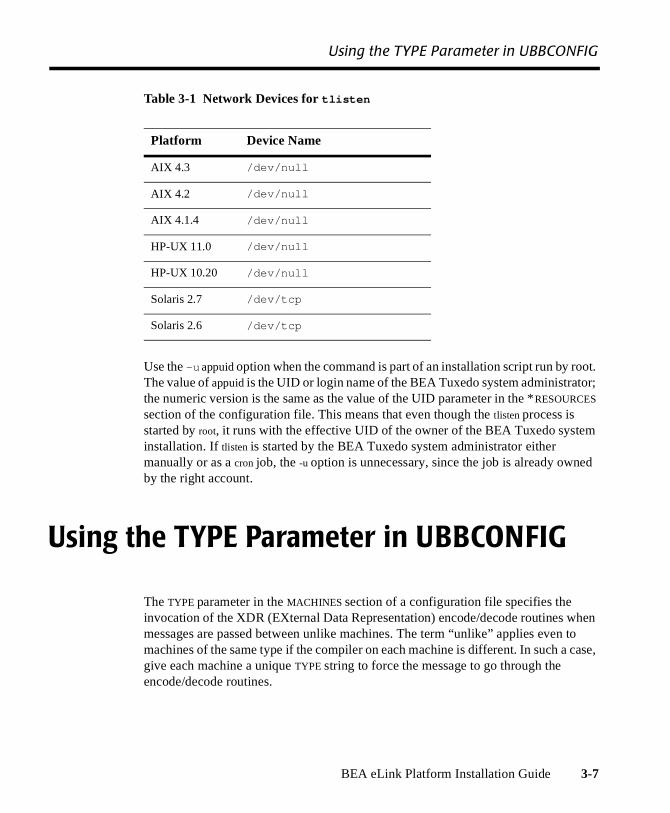
The correct values for various platforms are shown in Table 3-1.
Using the TYPE Parameter in UBBCONFIG
BEA eLink Platform Installation Guide 3-7
Table 3-1 Network Devices for tlisten
Use the -u appuid option when the command is part of an installation script run by root. The value of appuid is the UID or login name of the BEA Tuxedo system administrator; the numeric version is the same as the value of the UID parameter in the *RESOURCES
section of the configuration file. This means that even though the tlisten process is started by root, it runs with the effective UID of the owner of the BEA Tuxedo system installation. If tlisten is started by the BEA Tuxedo system administrator either manually or as a cron job, the -u option is unnecessary, since the job is already owned by the right account.
Using the TYPE Parameter in UBBCONFIG
The TYPE parameter in the MACHINES section of a configuration file specifies the invocation of the XDR (EXternal Data Representation) encode/decode routines when messages are passed between unlike machines. The term “unlike” applies even to machines of the same type if the compiler on each machine is different. In such a case, give each machine a unique TYPE string to force the message to go through the encode/decode routines.
Platform Device Name
AIX 4.3 /dev/null
AIX 4.2 /dev/null
AIX 4.1.4 /dev/null
HP-UX 11.0 /dev/null
HP-UX 10.20 /dev/null
Solaris 2.7 /dev/tcp
Solaris 2.6 /dev/tcp
3 Post-Installation Issues
3-8 BEA eLink Platform Installation Guide
Threaded Access to Libraries
The BEA Tuxedo system libraries are not thread-safe. This means that either:
n Applications should not use threads, or
n Applications must serialize threaded access through all BEA Tuxedo system calls (such as ATMI, FML, userlog(), and so on).