Embed Size (px)
Citation preview
BDM Hyperion Results & Table Basics
Contents of this Guide Page About Results 1 Results Menu Command Reference 2 About Tables 3 Table Menu Command Reference 3 Insert Menu Command Reference – Tables 4
R e s u l t s & T a b l e s The Parts 5
Selecting Columns, Rows & Titles 6 Move a Column 6 Sorting the Results & Table Data 6 Remove Columns 7 Applying Totals 7 Grand Totals 7 Inserting Break Totals 8 Remove a Break Total 10 Hide/Unhide Column 10
Formatting Results and Tables 11 Column Titles 11 Row Numbers 11 Text Wrap 11 Suppress Duplicates 12 Alignment/Justify 12 Gridlines 13 Border & Background 13 Spotlighter 14 Export Properties 16 Adding a Header & Footer 16
BDM Hyperion Results and Table Basics
BDM Hyperion Results & Table Basics Page 1 1/13/10
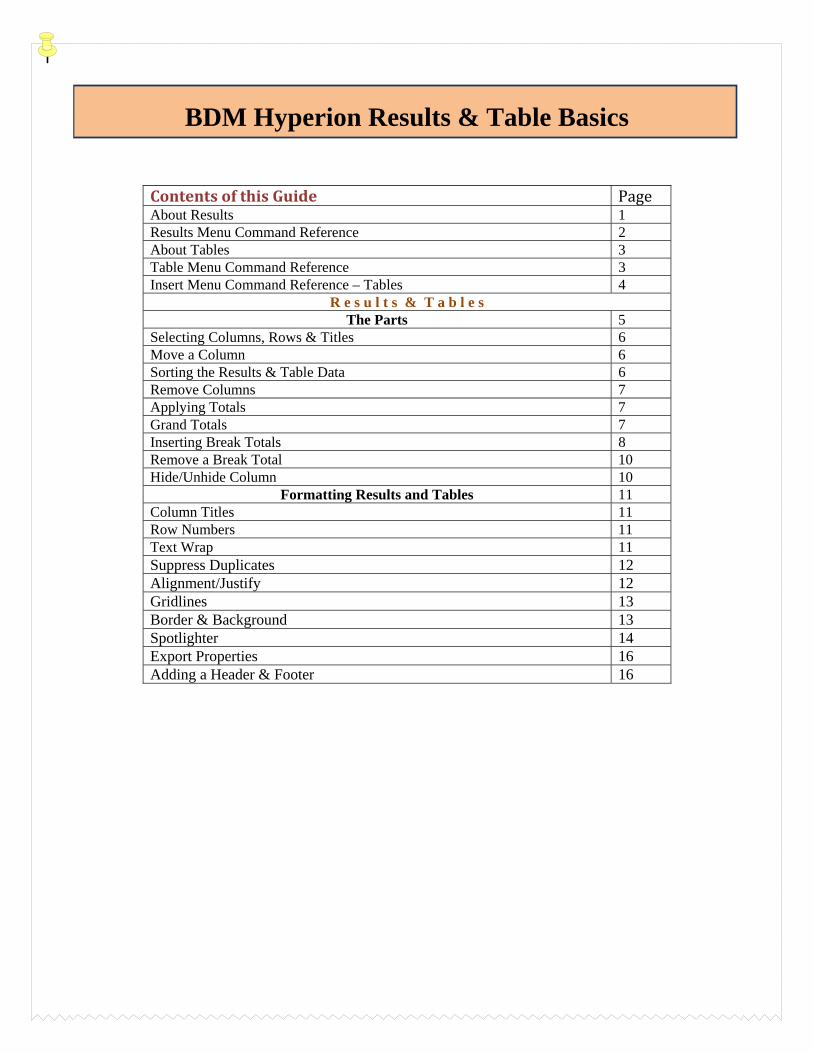
In a BDM Hyperion document the Filter dialog box is used in three sections.
1. Query 2. Results 3. Table
1. In the Query section you are filtering the data
from the warehouse. Warehouse Results 2. In the Results section you are filtering the data
you have retrieved from the warehouse. Warehouse Results Reports, Pivots, Charts 3. In the Table section you are filtering data from the
Results section.
About Results -
Important
Unless otherwise noted, this guide, images and
information will apply to both the Results and Table sections
When you process a query, Hyperion retrieves data to your desktop and displays it in the Results section as columns. The Results section displays your dataset as it might appear in the database. Although the query may have accessed several different database tables, the Results section is consolidated into a single table. Each requested item is found in a column field, and there is a row for each record returned from the database. All reports, including tables, pivots, charts, and those created using the Report Designer, are based on the data that is retrieved to the Results section.
The Results section is helpful in:
• verifying the accuracy of your query • verify the data retrieved meets your exact specifications • you can make changes and refine the data directly in the Results section
o setting filters o creating computed elements and grouped items
• it can be formatted for a quick report • add grand totals or subtotals • compute data functions • export to other applications • print the section
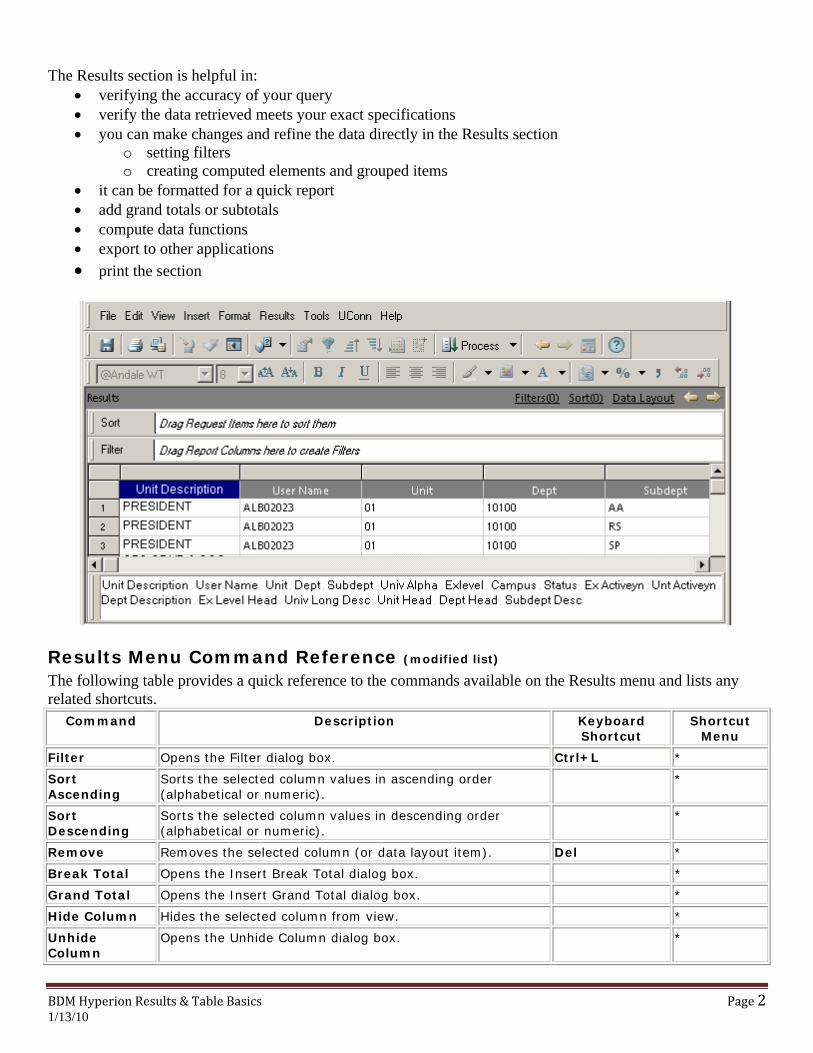
Results Menu Command Reference (modified list) The following table provides a quick reference to the commands available on the Results menu and lists any related shortcuts.
BDM Hyperion Results & Table Basics Page 2
Command Description Keyboard Shortcut
Shortcut Menu
Filter Opens the Filter dialog box. Ctrl+L *
Sort Ascending
Sorts the selected column values in ascending order (alphabetical or numeric).
*
Sort Descending
Sorts the selected column values in descending order (alphabetical or numeric).
*
Remove Removes the selected column (or data layout item). Del *
Break Total Opens the Insert Break Total dialog box. *
Grand Total Opens the Insert Grand Total dialog box. *
Hide Column Hides the selected column from view. *
Unhide Column
Opens the Unhide Column dialog box. *
1/13/10
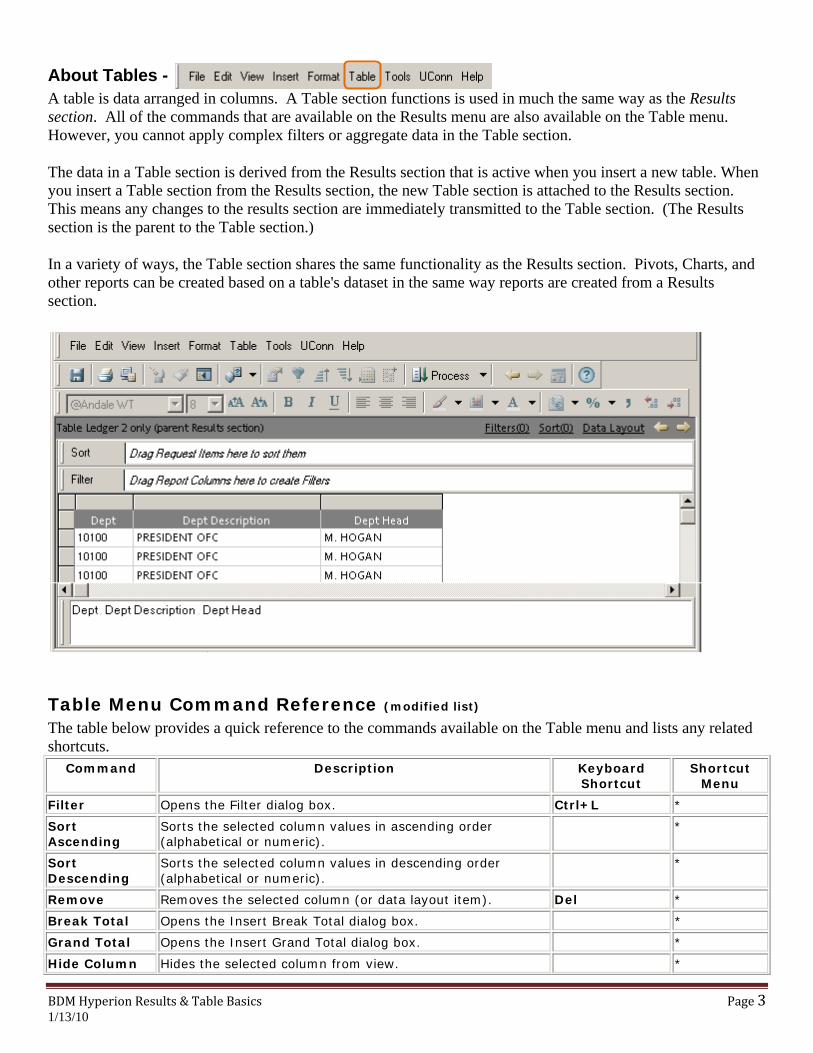
About Tables - A table is data arranged in columns. A Table section functions is used in much the same way as the Results section. All of the commands that are available on the Results menu are also available on the Table menu. However, you cannot apply complex filters or aggregate data in the Table section.
The data in a Table section is derived from the Results section that is active when you insert a new table. When you insert a Table section from the Results section, the new Table section is attached to the Results section. This means any changes to the results section are immediately transmitted to the Table section. (The Results section is the parent to the Table section.)
In a variety of ways, the Table section shares the same functionality as the Results section. Pivots, Charts, and other reports can be created based on a table's dataset in the same way reports are created from a Results section.
BDM Hyperion Results & Table Basics Page 3 1/13/10
Table Menu Command Reference (modified list) The table below provides a quick reference to the commands available on the Table menu and lists any related shortcuts.
Command Description Keyboard Shortcut
Shortcut Menu
Filter Opens the Filter dialog box. Ctrl+L *
Sort Ascending
Sorts the selected column values in ascending order (alphabetical or numeric).
*
Sort Descending
Sorts the selected column values in descending order (alphabetical or numeric).
*
Remove Removes the selected column (or data layout item). Del *
Break Total Opens the Insert Break Total dialog box. *
Grand Total Opens the Insert Grand Total dialog box. *
Hide Column Hides the selected column from view. *

BDM Hyperion Results & Table Basics Page 4 1/13/10
Command Description Keyboard Shortcut
Shortcut Menu
Unhide Column
Opens the Unhide Column dialog box. *
Insert Menu Command Reference – Tables (modified list) The following table provides a quick reference to the commands available on the Insert menu and list any related shortcut menus. The command listed is available in the Query and Results sections. Command Description
New Table Inserts a new Table section.
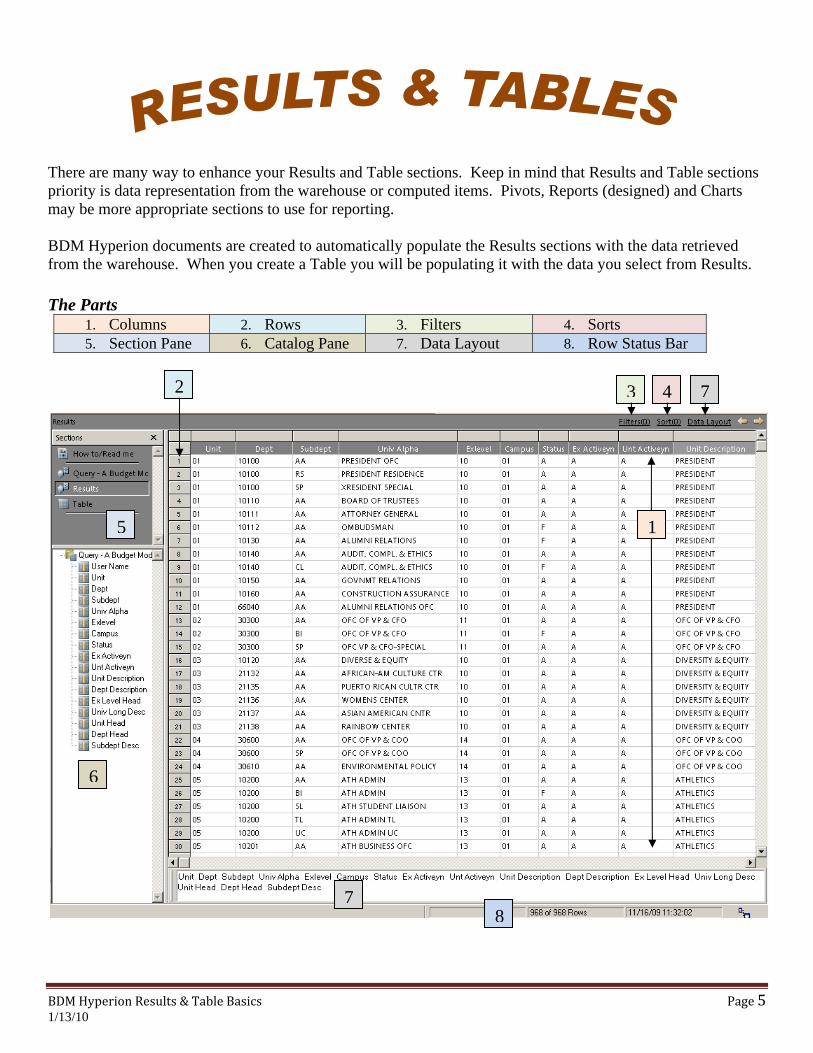
There are many way to enhance your Results and Table sections. Keep in mind that Results and Table sections priority is data representation from the warehouse or computed items. Pivots, Reports (designed) and Charts may be more appropriate sections to use for reporting. BDM Hyperion documents are created to automatically populate the Results sections with the data retrieved from the warehouse. When you create a Table you will be populating it with the data you select from Results. The Parts
1. Columns 2. Rows 3. Filters 4. Sorts 5. Section Pane 6. Catalog Pane 7. Data Layout 8. Row Status Bar
BDM Hyperion Results & Table Basics Page 5 1/13/10
1
2 3 4 7
8
5
6
7
Selecting Columns, Rows & Titles Select a Column - Click anywhere inside the column. Select a Row – Click to the left of the row. If you have row numbers turned on, click on the number. Select a Title – Click anywhere inside the Title cell.
Move a Column – There are two ways to move a column of data. 1. Click on the column and drag it to a new position. The corresponding Data Layout item shifts to reflect the
change. 2. You can also move a column by moving the element in the Data Layout. Click the element in the Data
Layout and drag it to a new position.
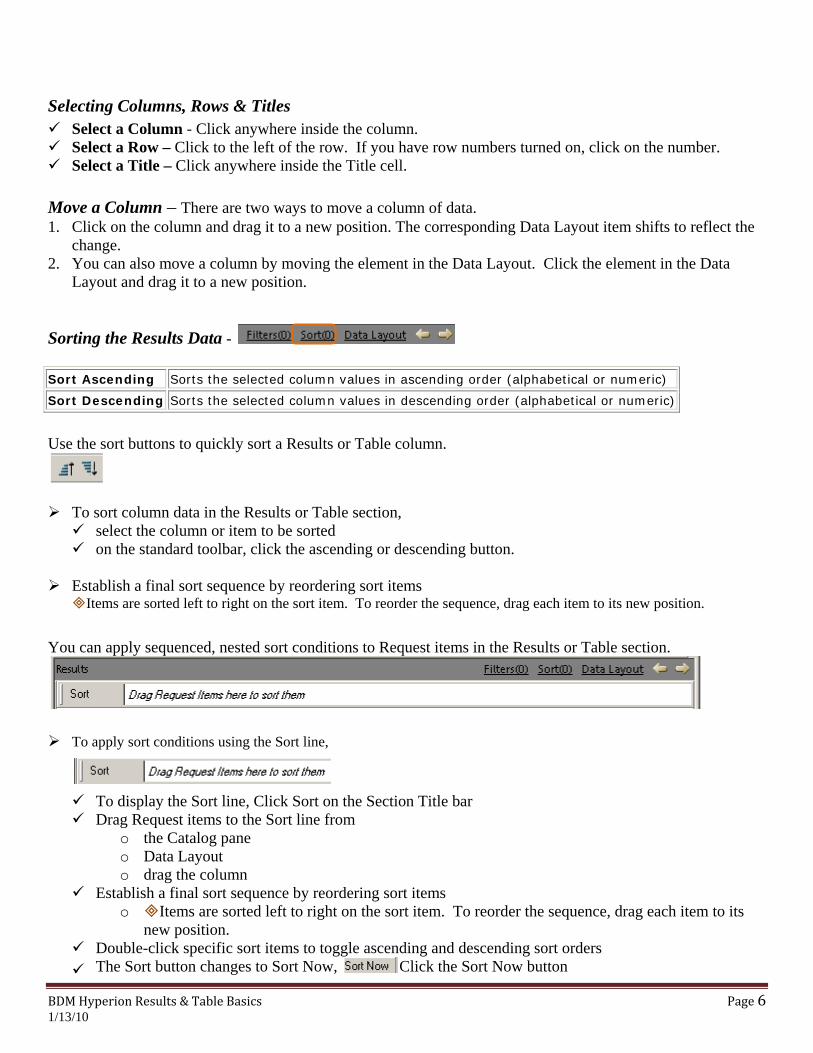
Sorting the Results Data -
Sort Ascending Sorts the selected column values in ascending order (alphabetical or numeric)
Sort Descending Sorts the selected column values in descending order (alphabetical or numeric)
Use the sort buttons to quickly sort a Results or Table column.
BDM Hyperion Results & Table Basics Page 6 1/13/10
To sort column data in the Results or Table section, select the column or item to be sorted on the standard toolbar, click the ascending or descending button.
Establish a final sort sequence by reordering sort items
Items are sorted left to right on the sort item. To reorder the sequence, drag each item to its new position.
You can apply sequenced, nested sort conditions to Request items in the Results or Table section.
To apply sort conditions using the Sort line,
To display the Sort line, Click Sort on the Section Title bar Drag Request items to the Sort line from
o the Catalog pane o Data Layout o drag the column
Establish a final sort sequence by reordering sort items o Items are sorted left to right on the sort item. To reorder the sequence, drag each item to its
new position. Double-click specific sort items to toggle ascending and descending sort orders The Sort button changes to Sort Now, Click the Sort Now button
To reverse the sort order for an item, select the item and click the ascending or descending sort icon on the Standard toolbar. Data is sorted in ascending (alphabetical or numerical) order by default.
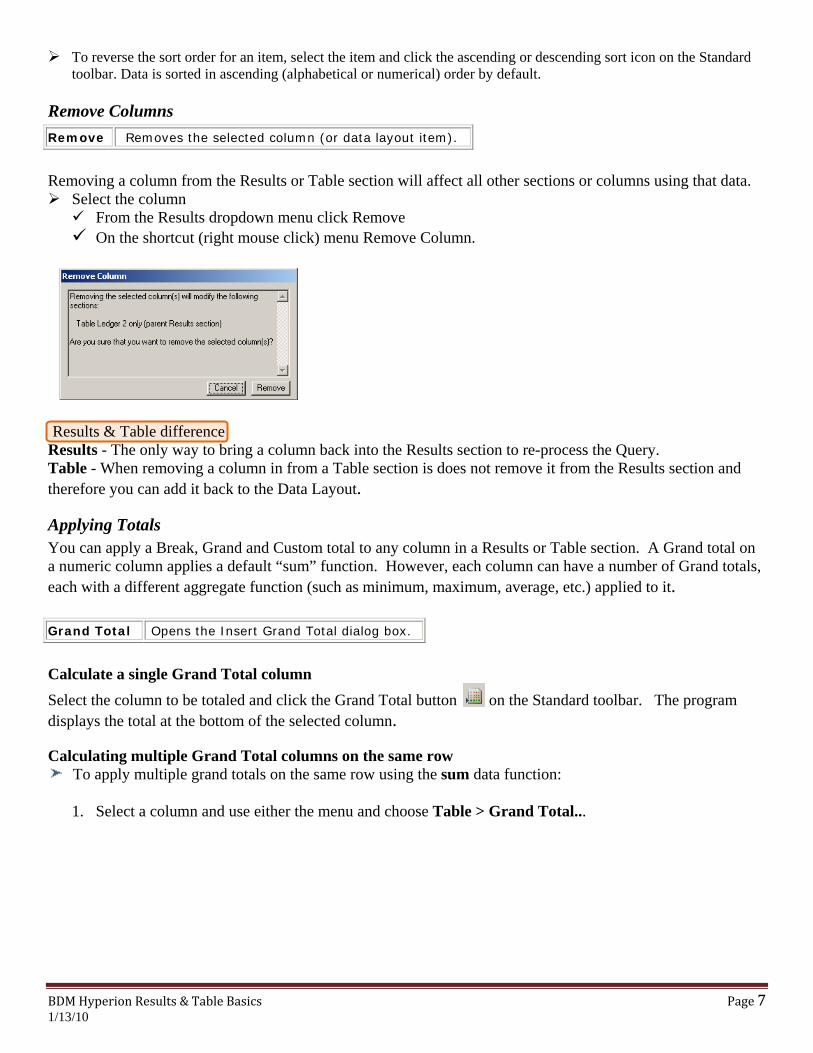
Remove Columns Remove Removes the selected column (or data layout item).
Removing a column from the Results or Table section will affect all other sections or columns using that data.
Select the column
From the Results dropdown menu click Remove On the shortcut (right mouse click) menu Remove Column.
BDM Hyperion Results & Table Basics Page 7 1/13/10
Results & Table difference Results - The only way to bring a column back into the Results section to re-process the Query. Table - When removing a column in from a Table section is does not remove it from the Results section and therefore you can add it back to the Data Layout.
Applying Totals You can apply a Break, Grand and Custom total to any column in a Results or Table section. A Grand total on a numeric column applies a default “sum” function. However, each column can have a number of Grand totals, each with a different aggregate function (such as minimum, maximum, average, etc.) applied to it. Grand Total Opens the Insert Grand Total dialog box.
Calculate a single Grand Total column Select the column to be totaled and click the Grand Total button on the Standard toolbar. The program displays the total at the bottom of the selected column.
Calculating multiple Grand Total columns on the same row To apply multiple grand totals on the same row using the sum data function:
1. Select a column and use either the menu and choose Table > Grand Total...
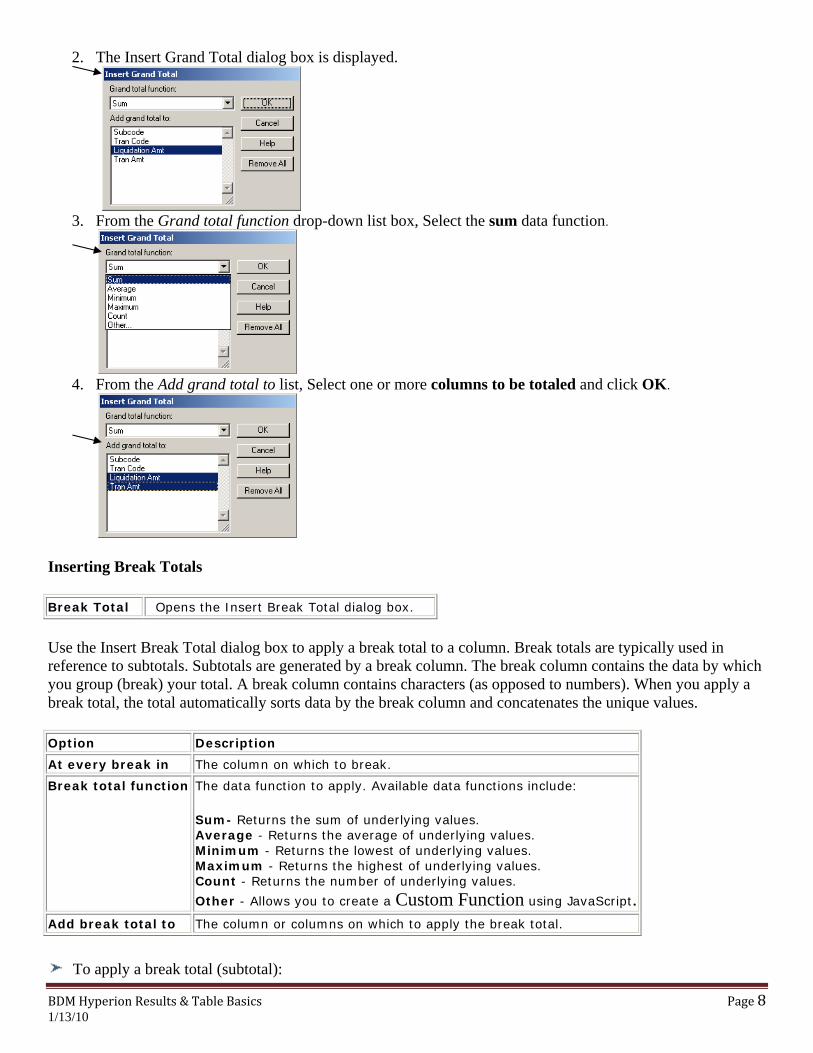
2. The Insert Grand Total dialog box is displayed.
BDM Hyperion Results & Table Basics Page 8 1/13/10
3. From the Grand total function drop-down list box, Select the sum data function.
4. From the Add grand total to list, Select one or more columns to be totaled and click OK.
Inserting Break Totals
Break Total Opens the Insert Break Total dialog box.
Use the Insert Break Total dialog box to apply a break total to a column. Break totals are typically used in reference to subtotals. Subtotals are generated by a break column. The break column contains the data by which you group (break) your total. A break column contains characters (as opposed to numbers). When you apply a break total, the total automatically sorts data by the break column and concatenates the unique values.
Option Description
At every break in The column on which to break.
Break total function The data function to apply. Available data functions include:
Sum- Returns the sum of underlying values. Average - Returns the average of underlying values. Minimum - Returns the lowest of underlying values. Maximum - Returns the highest of underlying values. Count - Returns the number of underlying values.
Other - Allows you to create a Custom Function using JavaScript. Add break total to The column or columns on which to apply the break total.
To apply a break total (subtotal):
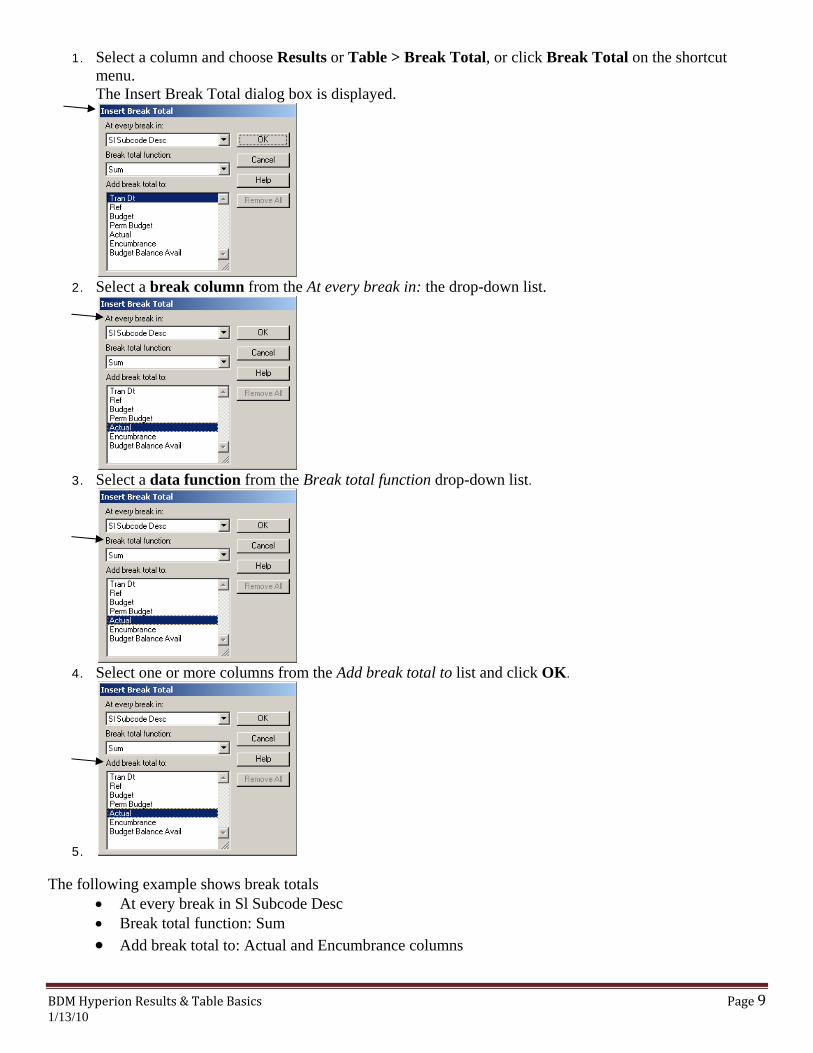
1. Select a column and choose Results or Table > Break Total, or click Break Total on the shortcut menu. The Insert Break Total dialog box is displayed.
BDM Hyperion Results & Table Basics Page 9 1/13/10
2. Select a break column from the At every break in: the drop-down list.
3. Select a data function from the Break total function drop-down list.
4. Select one or more columns from the Add break total to list and click OK.
5.
The following example shows break totals • At every break in Sl Subcode Desc • Break total function: Sum • Add break total to: Actual and Encumbrance columns

To remove a break total
Highlight a break total row by clicking in the left margin.
On the shortcut menu, click Remove Row.
Or Press the Delete key on your keyboard.
All break totals associated with the rows are removed from the column.
Hiding/Unhide Column Hide Column Hides the selected column from view.
Unhide Column Opens the Unhide Column dialog box.
To hide a column:
select the column on either the shortcut menu or the Results or Table menu, click Hide Column.
BDM Hyperio Page 10 n Results & Table Basics 1/13/10
To unhide a column:
click anywhere within the Contents pane on either the shortcut menu or the Results menu, click Unhide Column…
when the Unhide Column dialog box is displayed, select the desired column
click OK

Formatting Results and Tables
Column Titles
Size Rows To apply a custom height to a row, drag the bottom edge of the row to the new position. To apply the standard height to a row, choose Format > Row > Standard Height. When you resize a row, all rows are repositioned in the report.
Auto-Size Width Standard Width
Row Numbers Hide/Show Row Numbers
To hide row numbers, choose Format > Row Numbers. (The Row Numbers option is unchecked in hidden mode). To show column titles, choose Format > Column Titles. (The Row Numbers option is checked in show mode.)
Row numbers can be printed on reports, but cannot be copied to the clipboard or exported to a file. Only Rows with Totals can have font formatting applied to them.
Text Wrap
Text wrapping can give you narrow or uniform columns to display values without truncation.
Wrap Text To wrap text within a column, select the column and click Text Wrap on either the shortcut menu or the Format menu. Note: This option is available for detail and fact columns.
BDM Hyperion Results & Table Basics Page 11 1/13/10
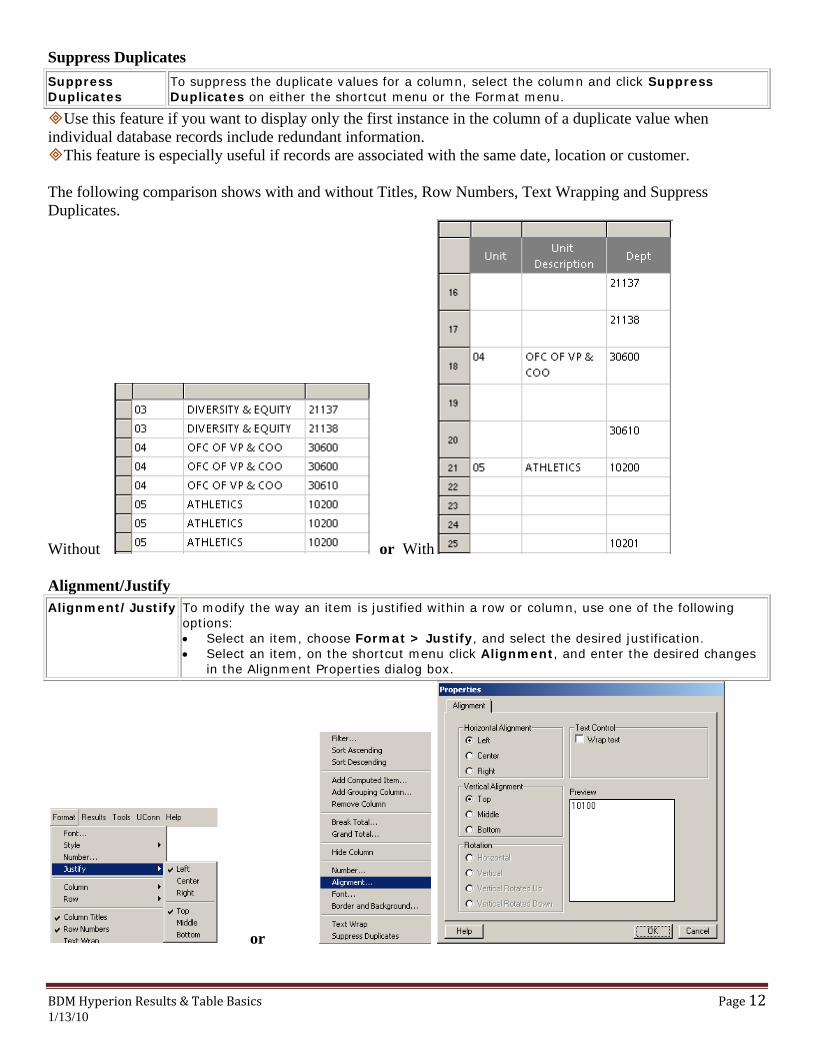
Suppress Duplicates
Use this feature if you want to display only the first instance in the column of a duplicate value when individual database records include redundant information.
Suppress Duplicates
To suppress the duplicate values for a column, select the column and click Suppress Duplicates on either the shortcut menu or the Format menu.
This feature is especially useful if records are associated with the same date, location or customer. The following comparison shows with and without Titles, Row Numbers, Text Wrapping and Suppress Duplicates.
Without or With Alignment/Justify Alignment/Justify To modify the way an item is justified within a row or column, use one of the following
options: • Select an item, choose Format > Justify, and select the desired justification. • Select an item, on the shortcut menu click Alignment, and enter the desired changes
in the Alignment Properties dialog box.
BDM Hyperion Results & Table Basics Page 12
or
1/13/10
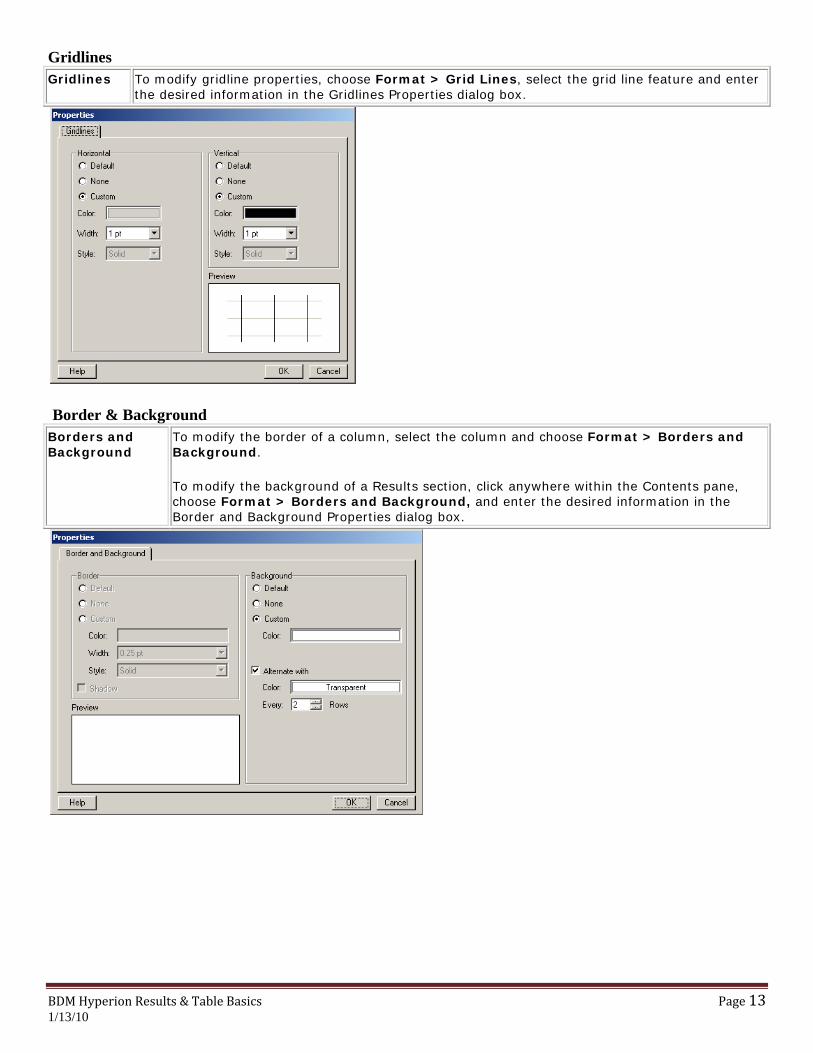
Gridlines Gridlines To modify gridline properties, choose Format > Grid Lines, select the grid line feature and enter
the desired information in the Gridlines Properties dialog box.
Border & Background Borders and Background
To modify the border of a column, select the column and choose Format > Borders and Background.
To modify the background of a Results section, click anywhere within the Contents pane, choose Format > Borders and Background, and enter the desired information in the Border and Background Properties dialog box.
BDM Hyperion Results & Table Basics Page 13 1/13/10
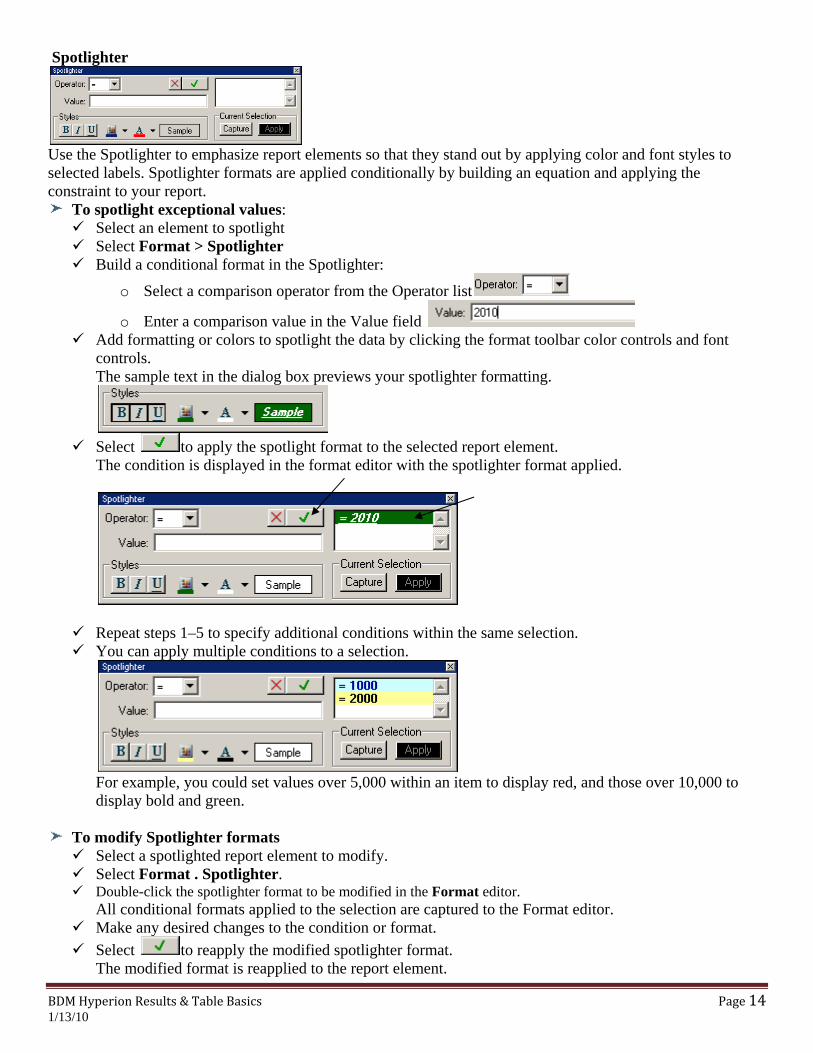
Spotlighter
Use the Spotlighter to emphasize report elements so that they stand out by applying color and font styles to selected labels. Spotlighter formats are applied conditionally by building an equation and applying the constraint to your report.
To spotlight exceptional values: Select an element to spotlight Select Format > Spotlighter Build a conditional format in the Spotlighter:
o Select a comparison operator from the Operator list
o Enter a comparison value in the Value field Add formatting or colors to spotlight the data by clicking the format toolbar color controls and font
controls. The sample text in the dialog box previews your spotlighter formatting.
Select to apply the spotlight format to the selected report element.
The condition is displayed in the format editor with the spotlighter format applied.
Repeat steps 1–5 to specify additional conditions within the same selection. You can apply multiple conditions to a selection.
For example, you could set values over 5,000 within an item to display red, and those over 10,000 to display bold and green.
To modify Spotlighter formats Select a spotlighted report element to modify. Select Format . Spotlighter. Double-click the spotlighter format to be modified in the Format editor.
All conditional formats applied to the selection are captured to the Format editor. Make any desired changes to the condition or format.
BDM Hyperion Results & Table Basics Page 14
Select to reapply the modified spotlighter format. The modified format is reapplied to the report element.
1/13/10
To copy Spotlighter formats
Select the spotlighted report element to copy. Select Format >Spotlighter.
The Spotlighter is displayed with the formats applied to the item displayed in the Format editor. Select Capture. Select the report element to which to apply the spotlighter formats.
The target area can be in the same report or in a different report. Select Restore.
The captured formats are applied to the selected report element.
To remove a format from a selected report element Select a report element. On the Format menu, select Spotlighter.
The Spotlighter formats applied to the report element are displayed in the Format editor. Select the format to remove in the Format editor. Click Delete.
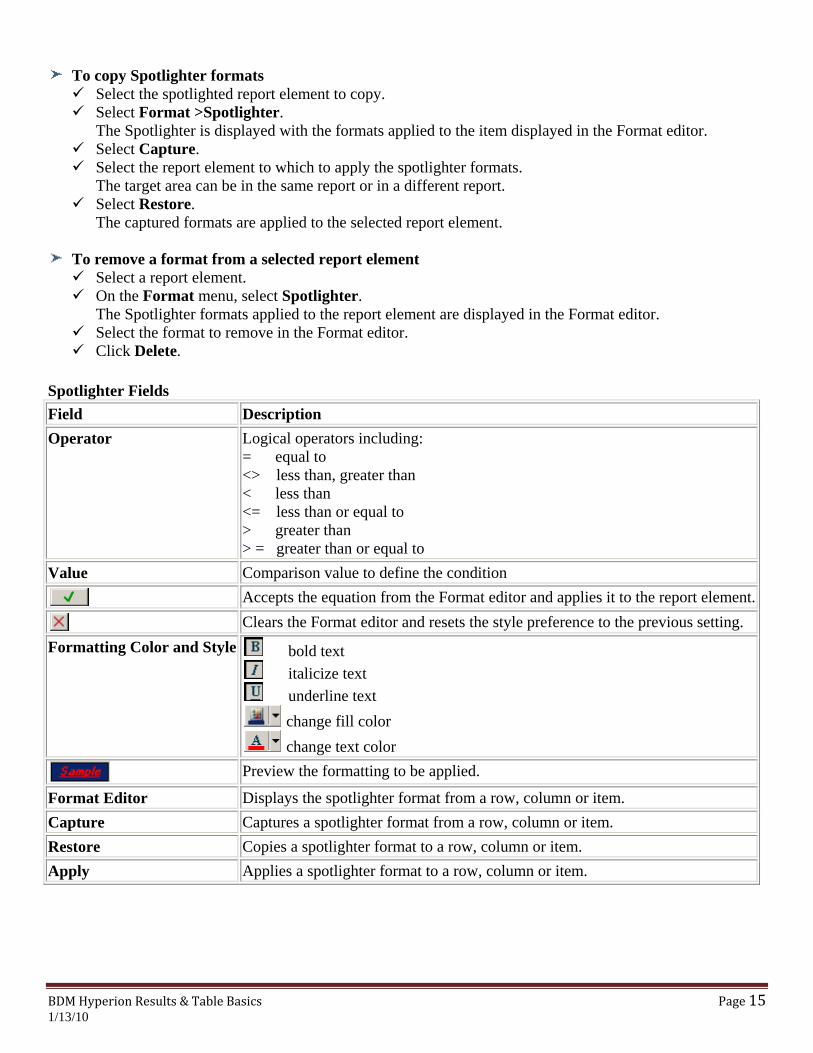
Spotlighter Fields Field Description Operator Logical operators including:
= equal to <> less than, greater than < less than <= less than or equal to > greater than > = greater than or equal to
Value Comparison value to define the condition
Accepts the equation from the Format editor and applies it to the report element.
Clears the Format editor and resets the style preference to the previous setting. Formatting Color and Style bold text
italicize text underline text
change fill color change text color
Preview the formatting to be applied.
Format Editor Displays the spotlighter format from a row, column or item. Capture Captures a spotlighter format from a row, column or item. Restore Copies a spotlighter format to a row, column or item. Apply Applies a spotlighter format to a row, column or item.
BDM Hyperion Results & Table Basics Page 15 1/13/10

Export Properties…
Adding a Header and Footer to the Results or Table Adding a Header and Footer to the Results or Table sections can give it a polished look. It is recommended that the columns (data) fit the page orientation (portrait/landscape). You must be in the Print Preview mode to add you Header and Footer. Print Preview
Placing the Results or Table report in print preview mode, File > Print Preview
or use the print preview button Adjusting margins
BDM Hyperion Results & Table Basics Page 16 1/13/10
Adjust the top, bottom and side margins as needed
The scrollbar is used to scroll what is on the screen, not through the pages of the report.
Print Preview Speed Menu Right mouse Click
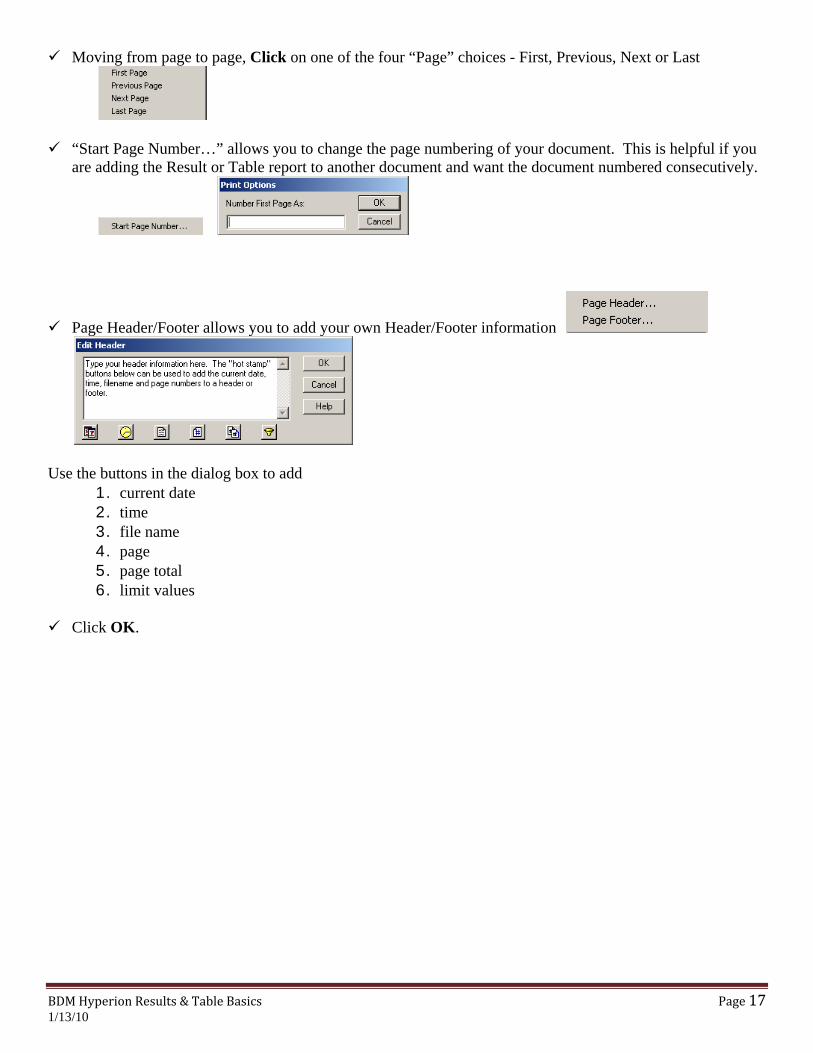
Moving from page to page, Click on one of the four “Page” choices - First, Previous, Next or Last
“Start Page Number…” allows you to change the page numbering of your document. This is helpful if you are adding the Result or Table report to another document and want the document numbered consecutively.
Page Header/Footer allows you to add your own Header/Footer information
Use the buttons in the dialog box to add 1. current date 2. time 3. file name 4. page 5. page total 6. limit values
Click OK.
BDM Hyperion Results & Table Basics Page 17 1/13/10