Embed Size (px)
Citation preview

BDA-3 Digital to Analog Converter
Owner’s Manual
The lightning flash with arrowhead symbol within an equilateral triangle, is intended to alert the user to the presence of un-insulated “dangerous voltage “ within the product’s enclosure that may be of sufficient magnitude to constitute a risk of electric shock to persons.
The exclamation point within an equilateral triangle is intended to alert the user to the presence of important operating and maintenance (servicing) instructions in the literature accompanying the product.
1. Read these instructions.2. Keep these instructions.3. Heed all warnings.4. Follow all instructions.5. Do not use this apparatus near water.6. Clean only with dry cloth.7. Do not block any ventilation openings. Install in accordance with the manufacturer’s instructions.8. Do not install near any heat sources such as radiators, heat registers, stoves, or other apparatus (including amplifiers) that produce heat.9. Do not defeat the safety purpose of the polarized or grounding-type plug. A polarized plug has two blades with one wider than the other. A grounding type plug has two blades
and a third grounding prong. The wide blade or the third prong are provided for your safety. If the provided plug does not fit into your outlet, consult an electrician for replace-ment of the obsolete outlet.
10. Protect the power cord from being walked on or pinched particularly at plugs, convenience receptacles, and the point where they exit from the apparatus.11. Only use attachments/accessories specified by the manufacturer.12. Use only with the cart, stand, tripod, bracket, or table specified by the manufacturer, or sold with the apparatus. When a cart is used use caution when moving the
cart/apparatus combination to avoid injury from tip-over.13. Unplug this apparatus during lightning storms or when unused for long periods of time.14. Refer all servicing to qualified service personnel. Servicing is required when the apparatus has been damaged in any way, such as power-supply cord or plug is damaged, liquid
has been spilled or objects have fallen into the apparatus, the apparatus has been exposed to rain or moisture, does not operate normally, or has been dropped.WARNING: TO REDUCE THE RISK OF FIRE OR ELECTRIC SHOCK, DO NOT EXPOSE THIS APPARATUS TO RAIN OR MOISTURE.DO NOT EXPOSE THIS EQUIPMENT TO DRIPPING OR SPLASHING AND ENSURE THAT NO OBJECTS FILLED WITH LIQUIDS, SUCH AS VASES, ARE PLACED ON THE EQUIPMENT.TO COMPLETELY DISCONNECT THIS EQUIPMENT FROM THE AC MAINS, DISCONNECT THE POWER SUPPLY CORD PLUG FROM THE AC RECEPTACLE.THE MAINS PLUG OF THE POWER SUPPLY CORD SHALL REMAIN READILY OPERABLE.
BRYSTON LIMITED WARRANTYBryston analog audio products are warranted to be free from manufacturing defects for twenty (20) years from the original date of manufacture. The warranty includes parts and labour.Bryston digital products and cables are warranted for five years from the original date of manufacture. The warranty includes parts and labour. Bryston products having motorized moving parts, excluding motorized volume controls, are warranted for three years from the original date of manufacture. The warranty includes parts and labour. Bryston will remedy the problem by repair or replacement, as we deem necessary, to restore the product to full performance. Bryston will pay return shipping only for the full length of the specific product's warranty.In the event of a defect or malfunction, contact Bryston’s repair centers for return authorization. Products must be returned using original packaging material only. Packing material may be purchased from Bryston if necessary. This warranty is considered void if the defect, malfunction or failure of the product or any component part was caused by damage (not resulting from a defect or malfunction) or abuse while in the possession of the customer. Tampering by persons other than factory authorized service personnel or failure to fully comply with Bryston operating instructions voids the warranty. This warranty gives you specific legal rights and you may also have other rights which may vary from province to province and country to country.As of 2006-02-22 Bryston will only warranty Bryston products purchased through authorized Bryston dealers. Bryston products with a date code of 0608 or higher (date code format is “yyww”, where “yy” is the two least significant digits of the year and “ww” is the week of the year) must be accompanied by a copy of the bill-of-sale from a Bryston authorized dealer to qualify for warranty service. The warranty is transferable from the original owner to a subsequent owner as long as a copy of the bill-of-sale from the original authorized Bryston dealer accompanies the re-sale. The copy of the bill of sale to any subsequent owner need ONLY include the Name of the Bryston Authorized Dealer and the Model and Serial number of the Bryston product The warranty will only be honored in the country of the original purchase unless otherwise pre-authorized by Bryston.
Postal address: P.O. BOX 2170, Stn. Main PETERBOROUGH, ONTARIO CANADA K9J 7Y4Courier address: 677 NEAL DRIVE PETERBOROUGH, ONTARIO CANADA K9J 6X7
PHONE: 705-742-5325FAX: 705-742-0882E-mail: [email protected]
79 COVENTRY ST., Suite 5NEWPORT, VERMONTU.S.A. 05855-2100
PHONE: 802-334-1201FAX: 802-334-6658E-mail: [email protected]
BRYSTON SERVICE in CANADA: BRYSTON SERVICE in the USA:
contact your local distributor or
CHECK OUR WEB SITE: www.bryston.com E-MAIL BRYSTON DIRECTLY: [email protected] BRYSTON DIRECTLY: 01-705-742-0882PHONE BRYSTON DIRECTLY: 01-705-742-5325
BRYSTON SERVICE outside Canada and the USA:
Important Safety Instructions
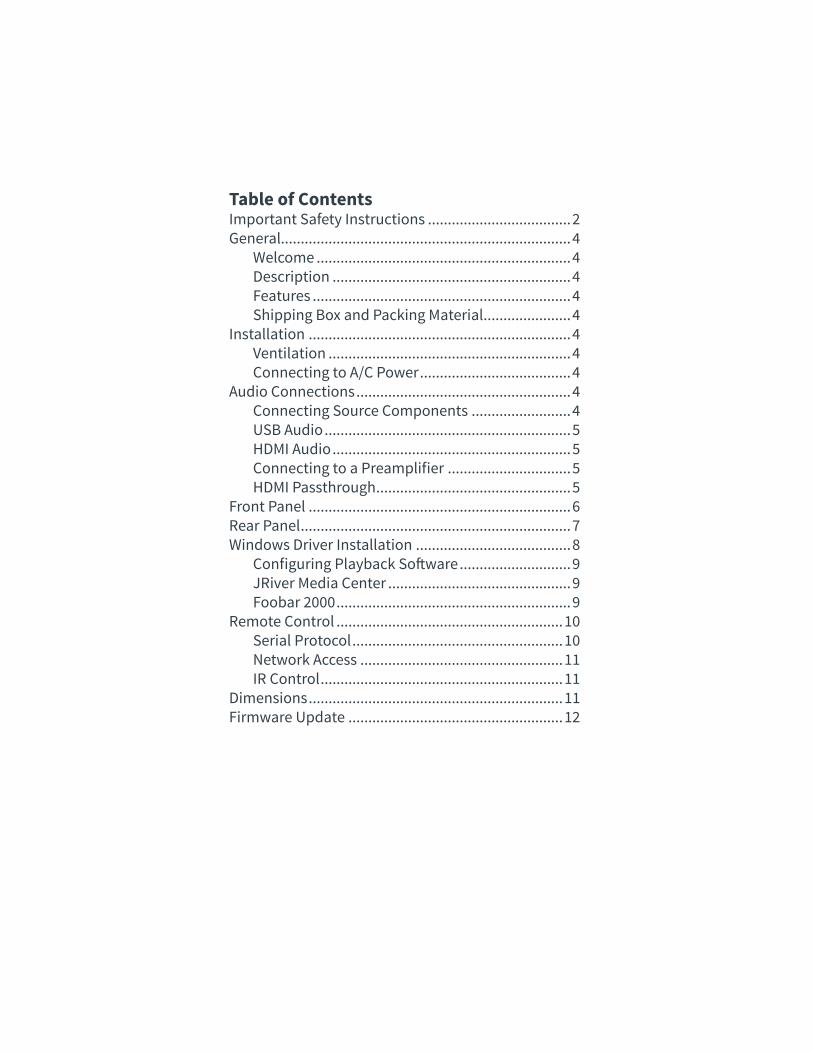
Table of ContentsImportant Safety Instructions ....................................2General.........................................................................4
Welcome ................................................................4Description ............................................................4Features .................................................................4Shipping Box and Packing Material ......................4
Installation ..................................................................4Ventilation .............................................................4Connecting to A/C Power ......................................4
Audio Connections ......................................................4Connecting Source Components .........................4USB Audio ..............................................................5HDMI Audio ............................................................5Connecting to a Preamplifier ...............................5HDMI Passthrough .................................................5
Front Panel ..................................................................6Rear Panel ....................................................................7Windows Driver Installation .......................................8
Configuring Playback Software ............................9JRiver Media Center ..............................................9Foobar 2000 ...........................................................9
Remote Control .........................................................10Serial Protocol .....................................................10Network Access ...................................................11IR Control .............................................................11
Dimensions ................................................................11Firmware Update ......................................................12
4
WelcomeThank you for your purchase of a Bryston BDA-3 Digital to Analog Converter! Decades of ongoing research and development have produced our highest performing and most capable DAC yet. With this model, Bryston sought to achieve maximum compatibility with a wide range of digital source components yet preserve state-of-the-art audio quality. Our customers are a tremendous resource to whom we look for a measure of success. Please feel welcome to contact us with feedback and suggestions.
DescriptionThe BDA-3 is a state of the art stereo digital to analog converter that accepts digital input from up to 10 source components and connects to an analog line-level preamplifier. Both DSD and PCM audio data are supported. Advanced engineering and application of techonological advancements mean that even previously highly regarded digital source components may have dramatically improved sound quality when connected to the BDA-3.
FeaturesBryston BDA-3 includes the following features:• 10 different digital inputs• Analog audio out via single ended RCA or
balanced XLR connections• PCM Audio up to 384 kHz sampling rate and 32
bit word lengths supported• DSD Audio up to DSD256 (quad rate)• Asynchronous USB Class 2.0 Audio inputs• Stereo HDMI Audio with video passthrough• Traditional digital inputs: S/PDIF via BNC, RCA,
or Toslink. AES/EBU via balanced XLR• Remote control via ethernet, USB, RS232, or IR• Video passthrough (HDMI audio out)• User selectable upsampling• Available in either 17 inch or 19 inch wide
C-Series dress panel in silver-toned (clear anodized) or black anodized aluminum.
Shipping Box and Packing MaterialPlease keep the original shipping box and all packing material. This will ensure the BDA-3 is protected in future transport. In the unlikely event you have a problem and must return it for service, you must use the proper packing material. Ship the BDA-3 only in the original packing material as the unit is not insurable by carriers otherwise. Replacement packing materials consisting of a shipping carton with plastic foam inserts is available from Bryston for a small fee.
InstallationVentilationThe BDA-3 is a cool-running line level component. It generates far less heat than amplifiers and many other components. It can be safely placed inside furniture or an equipment rack. However, it should not be tightly enclosed. Some airflow is desired.
Connecting to A/C PowerPlease check the Data Plate on the right rear of the amplifier to verify power requirements agree with your location. Plug the IEC-320 C14 end of the power cord into the BDA-3, then plug the other end into an approved and grounded A/C receptacle.
Audio ConnectionsConnecting Source ComponentsThe BDA-3 can accept DSD or PCM coded digital audio from up to 10 sources. Any source component capable of producing raw PCM, DSD, or DoP (DSD over PCM) audio is supported. Audio formats such as Dolby Digital, DTS, and other surround sound audio formats are unsupported.
Each of the available inputs can decode a subset of all available input formats. Further, a source component may have multiple interconnect options that can be used with the BDA-3. Choose first by compatibility with desired audio formats, then by order of sound quality. Source component permitting, multiple digital connections can be made between the source component and BDA-3.
General

BDA-3 Digital to Analog Converter
5
PCM DSD96 / 24 192 / 24 384 / 32 DSD-64 DSD-256
ToslinkRCABNCXLR
HDMIUSB
The question of which available input offers the best sound quality is not easily answered since it also depends on the quality of outputs on the source unit. Among S/PDIF inputs, BNC is favored for highest sound quality followed by RCA, then Toslink. AES/EBU (XLR) input is often superior to S/PDIF due to its balanced (therefore noise rejecting) topology. USB offers the most comprehensive compatibility with various audio formats and can offer most excellent sound quality. HDMI is ubiquitous on televisions and cable and satellite boxes as well as DVD and blu-ray disc players among other media servers. It also has the unique feature of offering digital transmission of SACD audio from select players. When choosing from many available inputs, there is no substitute for listening!
USB AudioUnlike traditional digital audio interfaces, USB is a 2-way multi-purpose interface originally developed for computer peripherals. Bryston’s advanced implementation is fully USB Audio Class 2.0 compliant. Additionally, we use a highly advanced asynchronous protocol whereby digital audio jitter is virtually eradicated by slaving the attached audio player (computer or dedicated music player) to the ultra-precise master clock in the BDA-3. Modern Macintosh and Linux computers do not need extra device drivers installed. To use the BDA-3 with Microsoft Windows computers, please install the driver according to the instructions in ”Windows Driver Installation” on page 8. Note that when switching between the two USB inputs, a few seconds delay in playback is normal. The BDA-3 can only maintain one active USB handshake at a time.
Some digital USB sources such as Bryston BDPs will require you to reinitialize the USB audio device when switching between USB inputs.
HDMI AudioThe BDA-3 can receive both PCM and DSD audio over the HDMI, but cannot receive encoded digital audio such as Dolby Digital or DTS. The BDA-3 will request 2-channel un-encoded audio from your source component.
The BDA-3 uses EDID to obtain the correctly formatted audio signal from the source. As a 2-channel only component, the BDA-3 will attempt to only retrieve the stereo program material from a disc and will ignore any Dolby or DTS program.
Connecting to a PreamplifierFixed level analog output is provided via left & right stereo pairs of XLR balanced outputs and RCA single-ended outputs. Balanced output is usually preferred when available on the partnering preamplifier especially when long runs (greater than 3 meters) of interconnect cable are required. Connect the Left and Right outputs to the respective inputs on the preamplifier. Note that the BDA-3 has no volume control therefore should not be connected directly to an amplifier!
HDMI PassthroughIncoming digital video may be passed through to another receiver such as a surround sound processor or display using the HDMI output. The HDMI output can only pass HDMI audio when a non-HDMI input is actively selected. See PTHD command in “Serial Protocol” on page 10. The digital audio outputs mirror the inputs. No sample rate conversion or any other processing is applied to the output.
HDMI inputs are 1.4a compliant and can pass 4K video at up to 30fps. HDMI input 4 is HDCP 2.2 compliant. Video is passed through to a connected monitor at the native resolution with no processing or conversion.
6
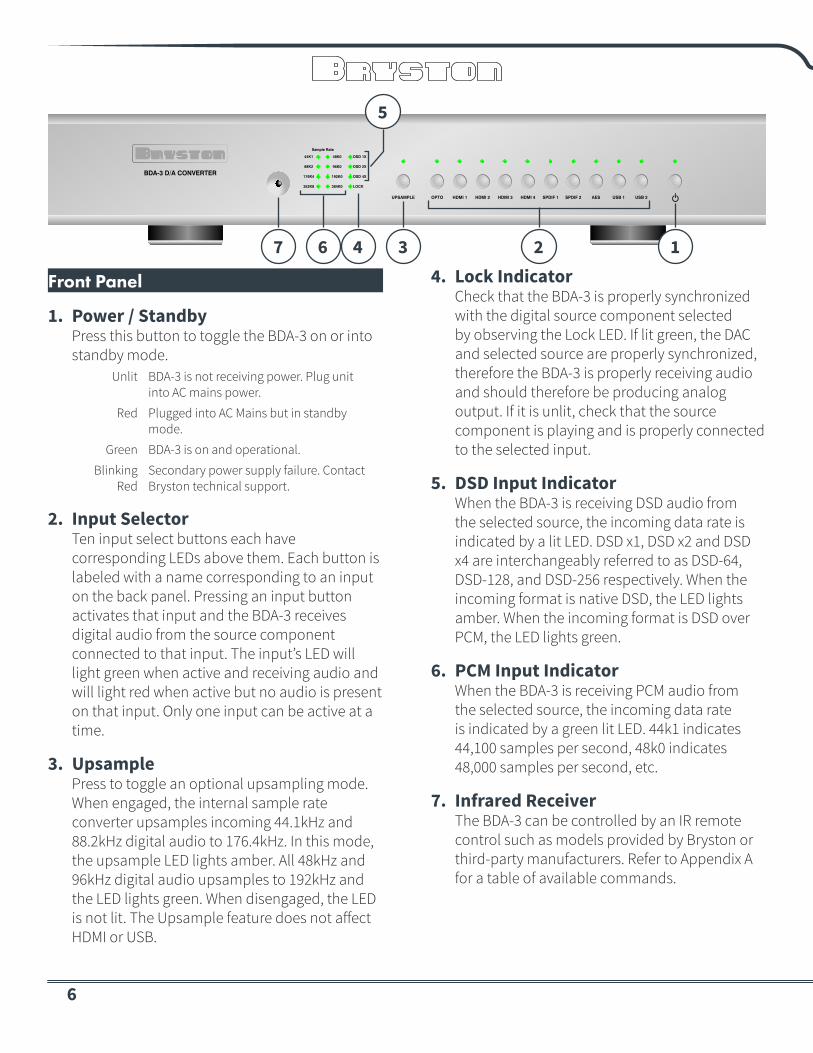
Front Panel
1. Power / StandbyPress this button to toggle the BDA-3 on or into standby mode.
Unlit BDA-3 is not receiving power. Plug unit into AC mains power.
Red Plugged into AC Mains but in standby mode.
Green BDA-3 is on and operational.
Blinking Red
Secondary power supply failure. Contact Bryston technical support.
2. Input SelectorTen input select buttons each have corresponding LEDs above them. Each button is labeled with a name corresponding to an input on the back panel. Pressing an input button activates that input and the BDA-3 receives digital audio from the source component connected to that input. The input’s LED will light green when active and receiving audio and will light red when active but no audio is present on that input. Only one input can be active at a time.
3. UpsamplePress to toggle an optional upsampling mode. When engaged, the internal sample rate converter upsamples incoming 44.1kHz and 88.2kHz digital audio to 176.4kHz. In this mode, the upsample LED lights amber. All 48kHz and 96kHz digital audio upsamples to 192kHz and the LED lights green. When disengaged, the LED is not lit. The Upsample feature does not affect HDMI or USB.
4. Lock IndicatorCheck that the BDA-3 is properly synchronized with the digital source component selected by observing the Lock LED. If lit green, the DAC and selected source are properly synchronized, therefore the BDA-3 is properly receiving audio and should therefore be producing analog output. If it is unlit, check that the source component is playing and is properly connected to the selected input.
5. DSD Input IndicatorWhen the BDA-3 is receiving DSD audio from the selected source, the incoming data rate is indicated by a lit LED. DSD x1, DSD x2 and DSD x4 are interchangeably referred to as DSD-64, DSD-128, and DSD-256 respectively. When the incoming format is native DSD, the LED lights amber. When the incoming format is DSD over PCM, the LED lights green.
6. PCM Input IndicatorWhen the BDA-3 is receiving PCM audio from the selected source, the incoming data rate is indicated by a green lit LED. 44k1 indicates 44,100 samples per second, 48k0 indicates 48,000 samples per second, etc.
7. Infrared ReceiverThe BDA-3 can be controlled by an IR remote control such as models provided by Bryston or third-party manufacturers. Refer to Appendix A for a table of available commands.
USB 2HDMI 4 SPDIF 1 SPDIF 2 AES USB 1HDMI 3HDMI 2HDMI 1OPTOUPSAMPLE
48K0
96K0
192K0
384K0
44K1
88K2
176K4
352K8
DSD 1X
DSD 2X
DSD 4X
LOCK
Sample Rate
BDA-3 D/A CONVERTER
1234
5
67
BDA-3 Digital to Analog Converter
7
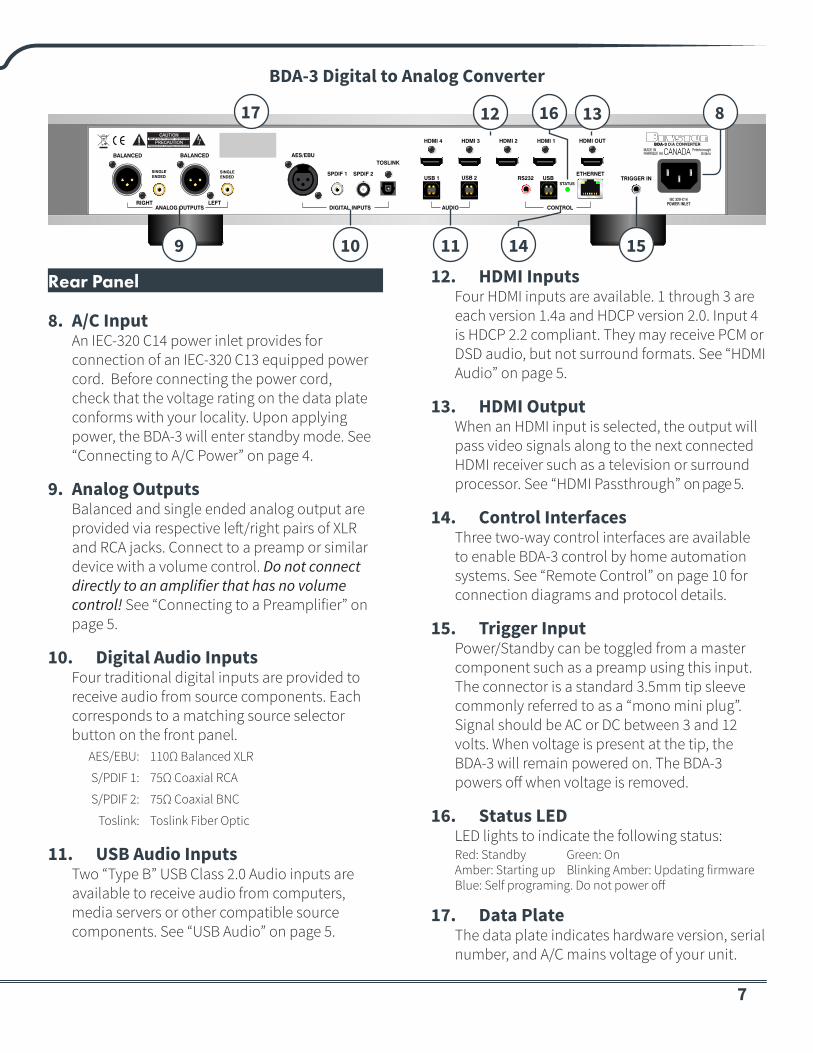
Rear Panel
8. A/C InputAn IEC-320 C14 power inlet provides for connection of an IEC-320 C13 equipped power cord. Before connecting the power cord, check that the voltage rating on the data plate conforms with your locality. Upon applying power, the BDA-3 will enter standby mode. See “Connecting to A/C Power” on page 4.
9. Analog OutputsBalanced and single ended analog output are provided via respective left/right pairs of XLR and RCA jacks. Connect to a preamp or similar device with a volume control. Do not connect directly to an amplifier that has no volume control! See “Connecting to a Preamplifier” on page 5.
10. Digital Audio InputsFour traditional digital inputs are provided to receive audio from source components. Each corresponds to a matching source selector button on the front panel.
AES/EBU: 110Ω Balanced XLR
S/PDIF 1: 75Ω Coaxial RCA
S/PDIF 2: 75Ω Coaxial BNC
Toslink: Toslink Fiber Optic
11. USB Audio InputsTwo “Type B” USB Class 2.0 Audio inputs are available to receive audio from computers, media servers or other compatible source components. See “USB Audio” on page 5.
12. HDMI InputsFour HDMI inputs are available. 1 through 3 are each version 1.4a and HDCP version 2.0. Input 4 is HDCP 2.2 compliant. They may receive PCM or DSD audio, but not surround formats. See “HDMI Audio” on page 5.
13. HDMI OutputWhen an HDMI input is selected, the output will pass video signals along to the next connected HDMI receiver such as a television or surround processor. See “HDMI Passthrough” on page 5.
14. Control InterfacesThree two-way control interfaces are available to enable BDA-3 control by home automation systems. See “Remote Control” on page 10 for connection diagrams and protocol details.
15. Trigger InputPower/Standby can be toggled from a master component such as a preamp using this input. The connector is a standard 3.5mm tip sleeve commonly referred to as a “mono mini plug”. Signal should be AC or DC between 3 and 12 volts. When voltage is present at the tip, the BDA-3 will remain powered on. The BDA-3 powers off when voltage is removed.
16. Status LEDLED lights to indicate the following status: Red: Standby Green: OnAmber: Starting up Blinking Amber: Updating firmwareBlue: Self programing. Do not power off
17. Data PlateThe data plate indicates hardware version, serial number, and A/C mains voltage of your unit.
CANADABDA-3 D/A CONVERTER
MADE INFABRIQUE AU Ontario
Peterborough
DIGITAL INPUTSANALOG OUTPUTSRIGHT
SINGLEENDED
BALANCED
LEFT
SINGLEENDED
BALANCED
CONTROL
HDMI OUTHDMI 1HDMI 2HDMI 3
TRIGGER IN
HDMI 4
AUDIO
USB 2USB 1
TOSLINK
STATUSRS232 USB
ETHERNETSPDIF 2SPDIF 1
AES/EBU
IEC 320-C14POWER INLET
8
9
17 12 13
14
16
1510 11
8
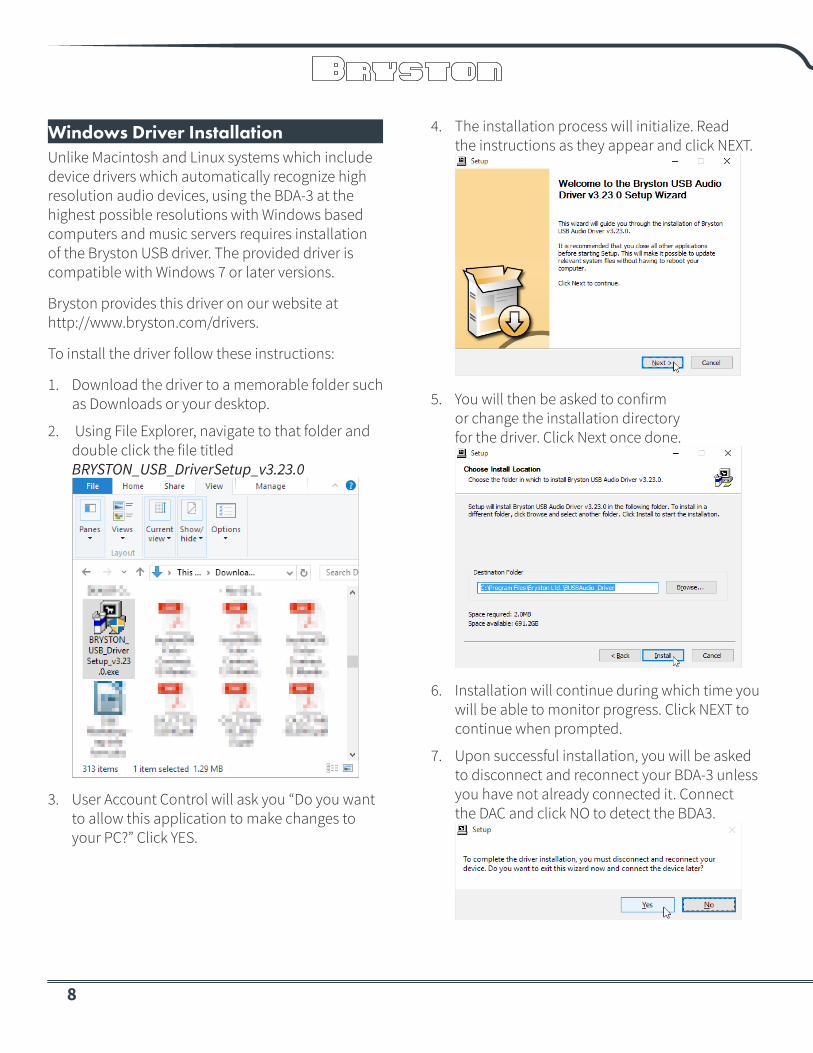
Windows Driver InstallationUnlike Macintosh and Linux systems which include device drivers which automatically recognize high resolution audio devices, using the BDA-3 at the highest possible resolutions with Windows based computers and music servers requires installation of the Bryston USB driver. The provided driver is compatible with Windows 7 or later versions.
Bryston provides this driver on our website at http://www.bryston.com/drivers.
To install the driver follow these instructions:
1. Download the driver to a memorable folder such as Downloads or your desktop.
2. Using File Explorer, navigate to that folder and double click the file titled BRYSTON_USB_DriverSetup_v3.23.0
3. User Account Control will ask you “Do you want to allow this application to make changes to your PC?” Click YES.
4. The installation process will initialize. Read the instructions as they appear and click NEXT.
5. You will then be asked to confirm or change the installation directory for the driver. Click Next once done.
6. Installation will continue during which time you will be able to monitor progress. Click NEXT to continue when prompted.
7. Upon successful installation, you will be asked to disconnect and reconnect your BDA-3 unless you have not already connected it. Connect the DAC and click NO to detect the BDA3.
BDA-3 Digital to Analog Converter
9
Configuring Playback SoftwareNow that your driver is installed, you will need to configure your playback software to address the BDA-3 as the sound output device. Unless your goal is for the BDA-3 to play all audio from the computer, you will most likely want to configure your audio playback software to take exclusive control over the BDA-3 for the best possible sound quality. You should refer to the help files associated with the software for specific setup instructions, but the basics for JRiver Media Center and Foobar 2000 are included below.
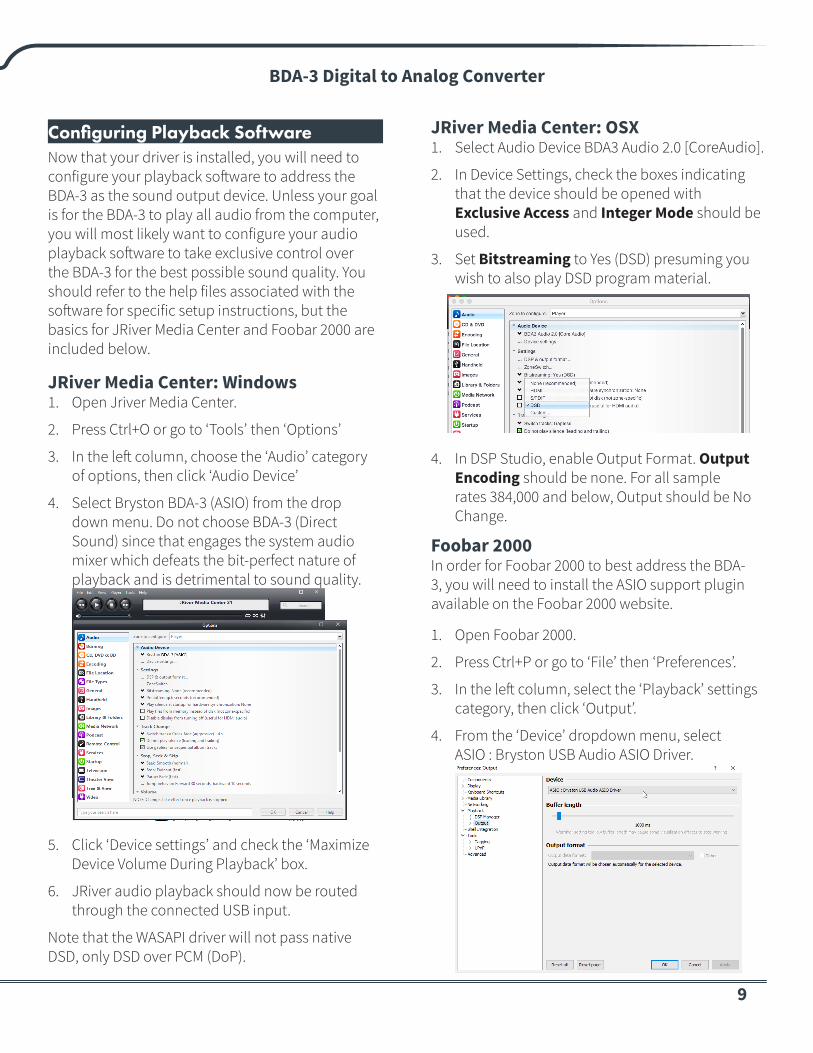
JRiver Media Center: Windows1. Open Jriver Media Center.
2. Press Ctrl+O or go to ‘Tools’ then ‘Options’
3. In the left column, choose the ‘Audio’ category of options, then click ‘Audio Device’
4. Select Bryston BDA-3 (ASIO) from the drop down menu. Do not choose BDA-3 (Direct Sound) since that engages the system audio mixer which defeats the bit-perfect nature of playback and is detrimental to sound quality.
5. Click ‘Device settings’ and check the ‘Maximize Device Volume During Playback’ box.
6. JRiver audio playback should now be routed through the connected USB input.
Note that the WASAPI driver will not pass native DSD, only DSD over PCM (DoP).
JRiver Media Center: OSX1. Select Audio Device BDA3 Audio 2.0 [CoreAudio].
2. In Device Settings, check the boxes indicating that the device should be opened with Exclusive Access and Integer Mode should be used.
3. Set Bitstreaming to Yes (DSD) presuming you wish to also play DSD program material.
4. In DSP Studio, enable Output Format. Output Encoding should be none. For all sample rates 384,000 and below, Output should be No Change.
Foobar 2000In order for Foobar 2000 to best address the BDA-3, you will need to install the ASIO support plugin available on the Foobar 2000 website.
1. Open Foobar 2000.
2. Press Ctrl+P or go to ‘File’ then ‘Preferences’.
3. In the left column, select the ‘Playback’ settings category, then click ‘Output’.
4. From the ‘Device’ dropdown menu, select ASIO : Bryston USB Audio ASIO Driver.
10
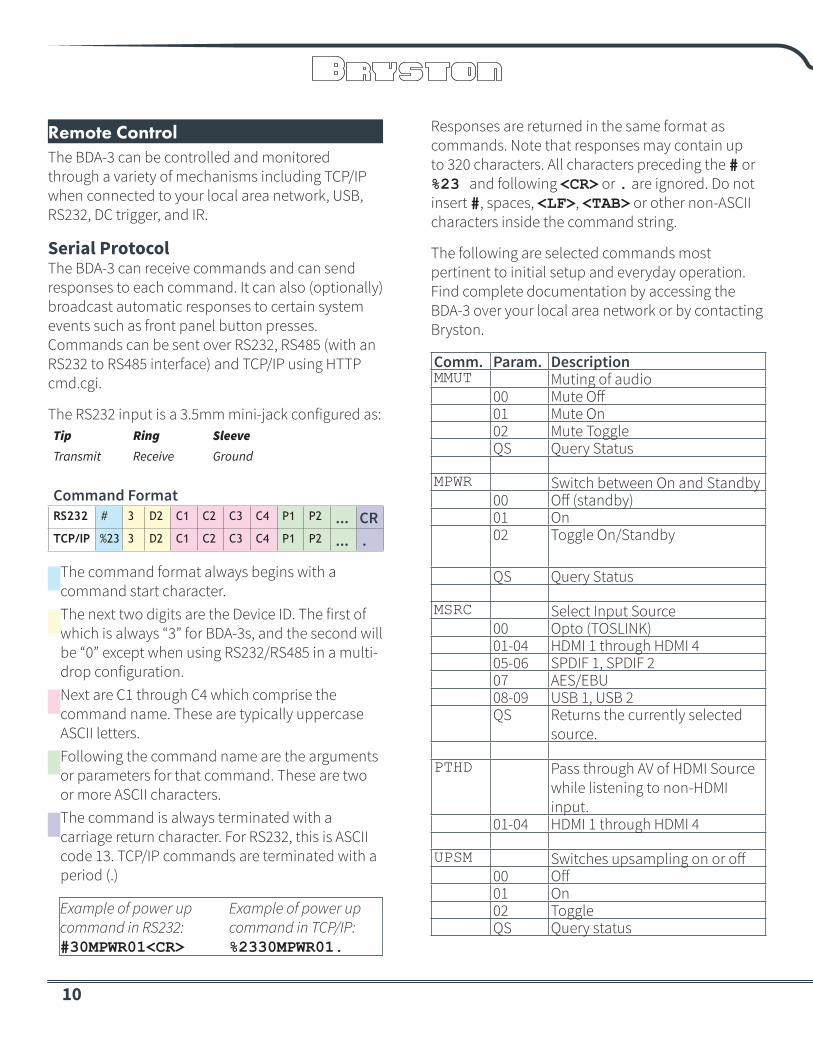
Remote ControlThe BDA-3 can be controlled and monitored through a variety of mechanisms including TCP/IP when connected to your local area network, USB, RS232, DC trigger, and IR.
Serial ProtocolThe BDA-3 can receive commands and can send responses to each command. It can also (optionally) broadcast automatic responses to certain system events such as front panel button presses. Commands can be sent over RS232, RS485 (with an RS232 to RS485 interface) and TCP/IP using HTTP cmd.cgi.
The RS232 input is a 3.5mm mini-jack configured as:Tip Ring SleeveTransmit Receive Ground
Command FormatRS232 # 3 D2 C1 C2 C3 C4 P1 P2 ... CRTCP/IP %23 3 D2 C1 C2 C3 C4 P1 P2 ... .
The command format always begins with a command start character.The next two digits are the Device ID. The first of which is always “3” for BDA-3s, and the second will be “0” except when using RS232/RS485 in a multi-drop configuration. Next are C1 through C4 which comprise the command name. These are typically uppercase ASCII letters.Following the command name are the arguments or parameters for that command. These are two or more ASCII characters.The command is always terminated with a carriage return character. For RS232, this is ASCII code 13. TCP/IP commands are terminated with a period (.)
Responses are returned in the same format as commands. Note that responses may contain up to 320 characters. All characters preceding the # or %23 and following <CR> or . are ignored. Do not insert #, spaces, <LF>, <TAB> or other non-ASCII characters inside the command string.
The following are selected commands most pertinent to initial setup and everyday operation. Find complete documentation by accessing the BDA-3 over your local area network or by contacting Bryston.
Comm. Param. DescriptionMMUT Muting of audio
00 Mute Off01 Mute On02 Mute ToggleQS Query Status
MPWR Switch between On and Standby00 Off (standby)01 On02 Toggle On/Standby
QS Query Status
MSRC Select Input Source00 Opto (TOSLINK)01-04 HDMI 1 through HDMI 405-06 SPDIF 1, SPDIF 207 AES/EBU 08-09 USB 1, USB 2QS Returns the currently selected
source.
PTHD Pass through AV of HDMI Source while listening to non-HDMI input.
01-04 HDMI 1 through HDMI 4
UPSM Switches upsampling on or off00 Off01 On02 ToggleQS Query status
Example of power up command in RS232:#30MPWR01<CR>
Example of power up command in TCP/IP:%2330MPWR01.
BDA-3 Digital to Analog Converter
11
Specifications and DimensionsOutput Voltage
Balanced:Single Ended:
4.0V2.0V
Frequency Response
20Hz - 20kHz: ± 0.1dB
Noise Balanced Out:Single Ended Out:
-140dB
IMD ≤0.0003%
THD + Noise 20Hz-20kHz : ≤0.002%
Weight 4kg | 8.75lbs
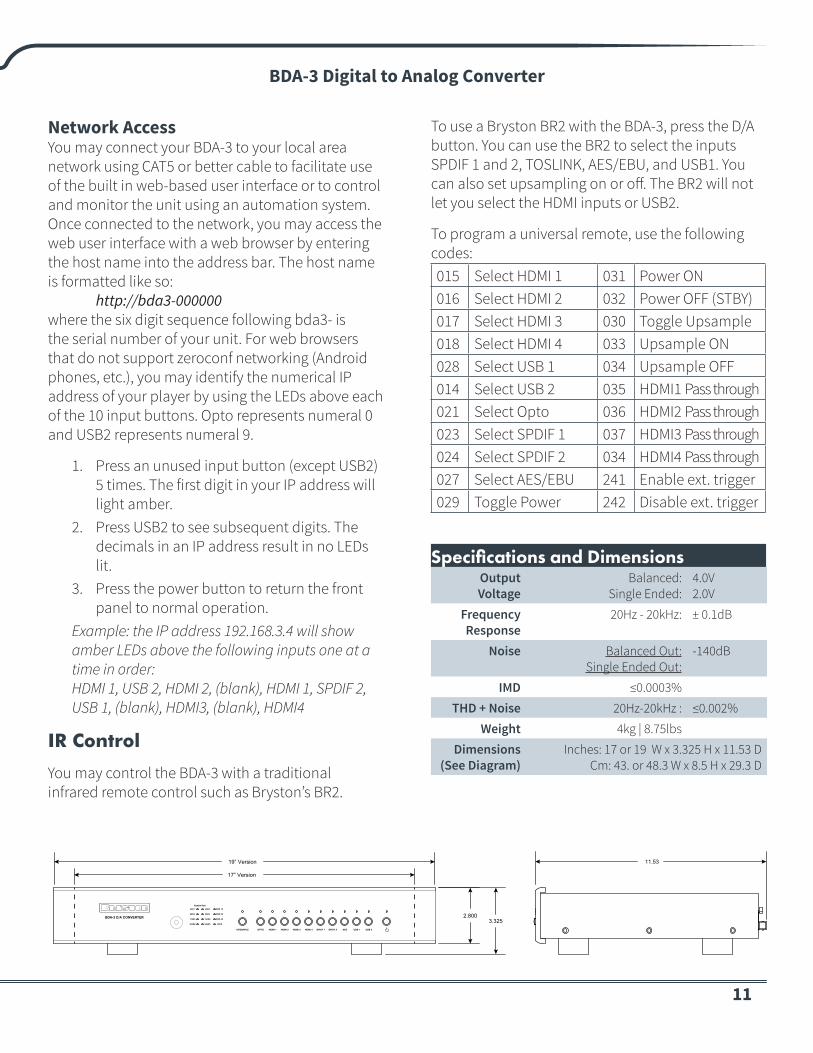
Dimensions (See Diagram)
Inches: 17 or 19 W x 3.325 H x 11.53 DCm: 43. or 48.3 W x 8.5 H x 29.3 D
3.3252.800
19” Version
17” Version
11.53
USB 2HDMI 4 SPDIF 1 SPDIF 2 AES USB 1HDMI 3HDMI 2HDMI 1OPTOUPSAMPLE
48K0
96K0
192K0
384K0
44K1
88K2
176K4
352K8
DSD 1X
DSD 2X
DSD 4X
LOCK
Sample Rate
BDA-3 D/A CONVERTER
Network AccessYou may connect your BDA-3 to your local area network using CAT5 or better cable to facilitate use of the built in web-based user interface or to control and monitor the unit using an automation system. Once connected to the network, you may access the web user interface with a web browser by entering the host name into the address bar. The host name is formatted like so: http://bda3-000000 where the six digit sequence following bda3- is the serial number of your unit. For web browsers that do not support zeroconf networking (Android phones, etc.), you may identify the numerical IP address of your player by using the LEDs above each of the 10 input buttons. Opto represents numeral 0 and USB2 represents numeral 9.
1. Press an unused input button (except USB2) 5 times. The first digit in your IP address will light amber.
2. Press USB2 to see subsequent digits. The decimals in an IP address result in no LEDs lit.
3. Press the power button to return the front panel to normal operation.
Example: the IP address 192.168.3.4 will show amber LEDs above the following inputs one at a time in order: HDMI 1, USB 2, HDMI 2, (blank), HDMI 1, SPDIF 2, USB 1, (blank), HDMI3, (blank), HDMI4
IR Control
You may control the BDA-3 with a traditional infrared remote control such as Bryston’s BR2.
To use a Bryston BR2 with the BDA-3, press the D/A button. You can use the BR2 to select the inputs SPDIF 1 and 2, TOSLINK, AES/EBU, and USB1. You can also set upsampling on or off. The BR2 will not let you select the HDMI inputs or USB2.
To program a universal remote, use the following codes:015 Select HDMI 1 031 Power ON016 Select HDMI 2 032 Power OFF (STBY)017 Select HDMI 3 030 Toggle Upsample018 Select HDMI 4 033 Upsample ON028 Select USB 1 034 Upsample OFF014 Select USB 2 035 HDMI1 Pass through021 Select Opto 036 HDMI2 Pass through023 Select SPDIF 1 037 HDMI3 Pass through024 Select SPDIF 2 034 HDMI4 Pass through027 Select AES/EBU 241 Enable ext. trigger029 Toggle Power 242 Disable ext. trigger
Bryston Limited | 677 Neal Drive | Peterborough, Ontario K9J 6X7 Canada | Phone: 705-742-5325 | www.bryston.com
05-26-2016300047-3
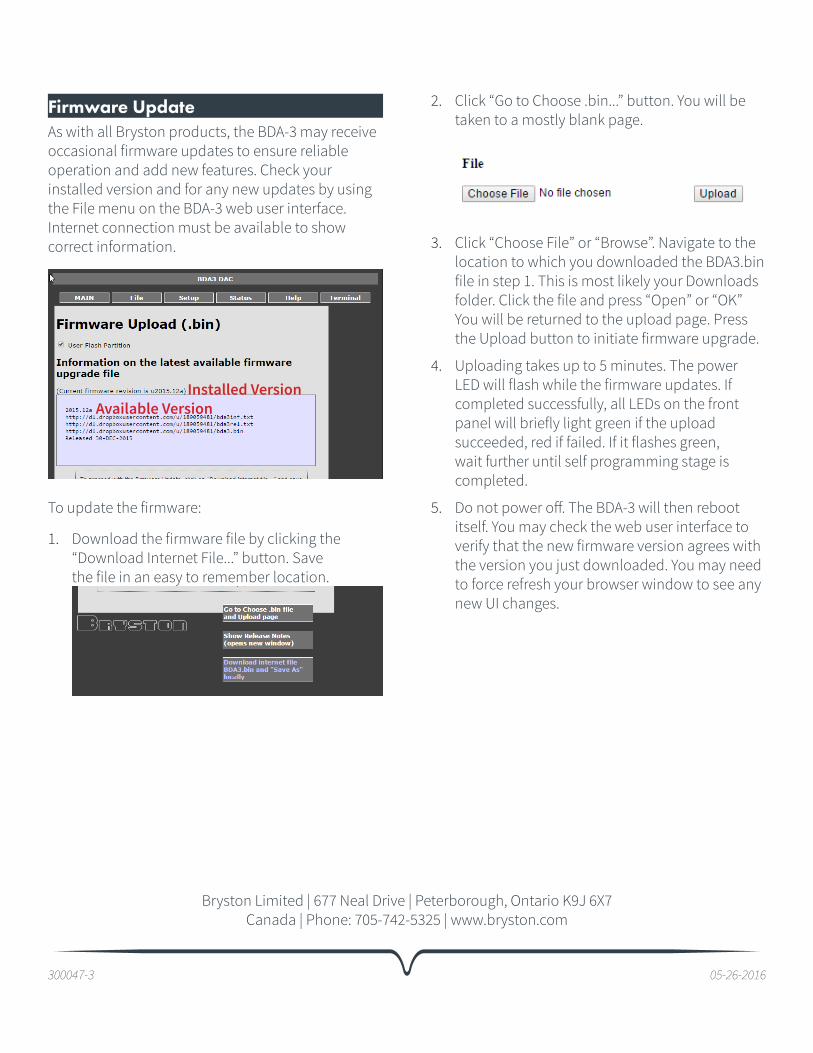
Firmware UpdateAs with all Bryston products, the BDA-3 may receive occasional firmware updates to ensure reliable operation and add new features. Check your installed version and for any new updates by using the File menu on the BDA-3 web user interface. Internet connection must be available to show correct information.
To update the firmware:
1. Download the firmware file by clicking the “Download Internet File...” button. Save the file in an easy to remember location.
Available VersionInstalled Version
2. Click “Go to Choose .bin...” button. You will be taken to a mostly blank page.
3. Click “Choose File” or “Browse”. Navigate to the location to which you downloaded the BDA3.bin file in step 1. This is most likely your Downloads folder. Click the file and press “Open” or “OK” You will be returned to the upload page. Press the Upload button to initiate firmware upgrade.
4. Uploading takes up to 5 minutes. The power LED will flash while the firmware updates. If completed successfully, all LEDs on the front panel will briefly light green if the upload succeeded, red if failed. If it flashes green, wait further until self programming stage is completed.
5. Do not power off. The BDA-3 will then reboot itself. You may check the web user interface to verify that the new firmware version agrees with the version you just downloaded. You may need to force refresh your browser window to see any new UI changes.