Embed Size (px)
Citation preview
AN100b
© Copyright CSR 2001
This material is subject to CSR’s non-disclosure agreement.
CSR
Unit 400 Cambridge Science Park Milton Road Cambridge
CB4 0WH United Kingdom
Registered in England 3665875
Tel: +44 (0)1223 692000 Fax: +44 (0)1223 692001
www.csr.com
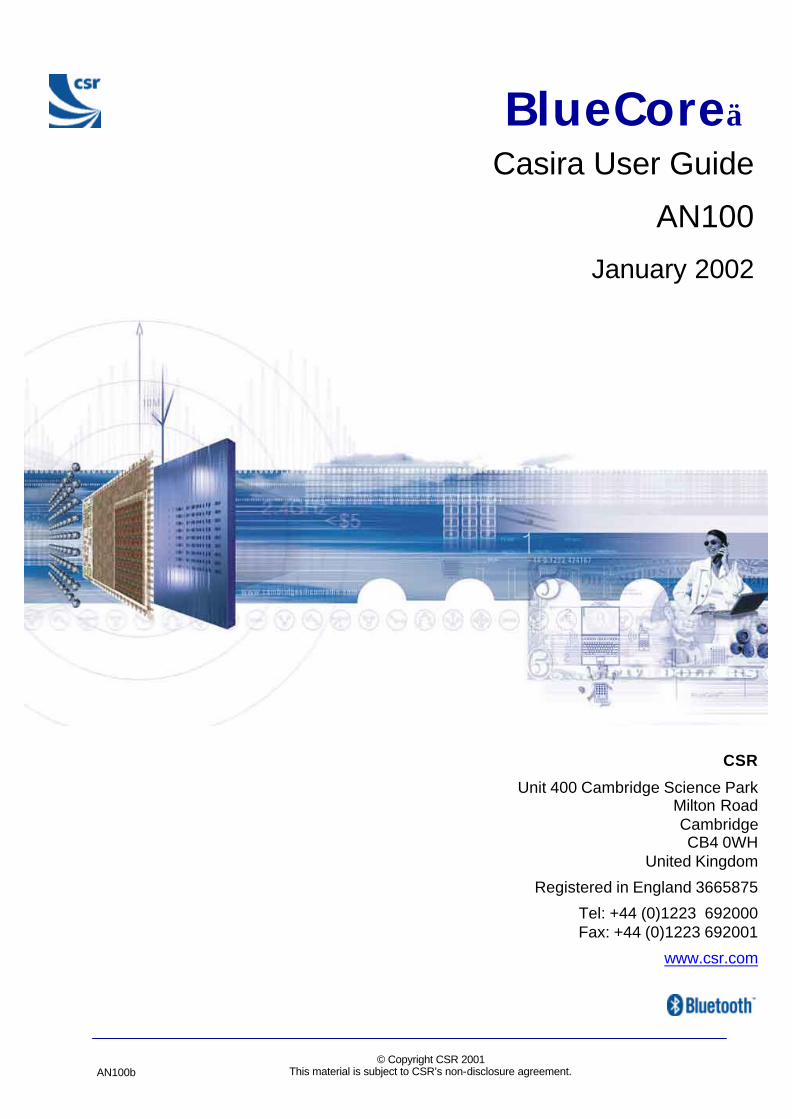
BlueCoreCasira User Guide
AN100
January 2002
Casira User Guide
AN100b
© Copyright CSR 2001
This material is subject to CSR’s non-disclosure agreement.
Page 2 of 32
BlueCoreTM
Contents Introduction ................................................................................................................................ 3 Overview..................................................................................................................................... 3 Parts List .................................................................................................................................... 4 System Requirements and OS Platforms.................................................................................... 5 Initial Steps................................................................................................................................. 6
Installing BlueSuite CE Software................................................................................................ 6 Installing USB Drivers ............................................................................................................... 7
Selecting the Driver............................................................................................................... 7 Changing the Driver.............................................................................................................. 7 ActiveSync 3.5...................................................................................................................... 7
Back Up New Casira Units ........................................................................................................ 7 BlueCore Utilities: BlueSuite.................................................................................................... 10
BlueFlash............................................................................................................................... 10 BlueFlash User Interface..................................................................................................... 10 BlueFlash Firmware ............................................................................................................ 11 Troubleshooting BlueFlash.................................................................................................. 13
PSTools ................................................................................................................................. 14 Access Levels .................................................................................................................... 14 PSTools Transport Interface................................................................................................ 14
SPI Debug Task ............................................................................................................... 14 SPI BCCMD..................................................................................................................... 14 BCSP............................................................................................................................... 14 H4 ................................................................................................................................... 15 USB................................................................................................................................. 15
Changing Transport Interface.............................................................................................. 15 PSTools User Interface ....................................................................................................... 17 Changing Baud Rate........................................................................................................... 18
BlueChat2 .............................................................................................................................. 19 BlueChat2 User Interface .................................................................................................... 19
Examples ......................................................................................................................... 20 BlueTest ................................................................................................................................ 22
BlueTest User Interface....................................................................................................... 22 BTCLI .................................................................................................................................... 24
Upgrading Casira Units............................................................................................................. 25 Download the Latest Tools ...................................................................................................... 25 Install the Latest Tools ............................................................................................................ 25
Install BlueSuite.................................................................................................................. 25 Install Firmware .................................................................................................................. 25
Other Applications.................................................................................................................... 27 Device Firmware Upgrade (DFU) ............................................................................................. 27 BlueLab On-chip Software Development Kit ............................................................................. 27 Bluetooth for Windows Software .............................................................................................. 27
Features and Benefits: ...................................................................................................... 27 Bluetooth for Windows Software Development Kit..................................................................... 28
Features and Benefits ......................................................................................................... 28 SDK Recommended System Requirements ......................................................................... 28 Host Side APIs Support ....................................................................................................... 29
Technical Support..................................................................................................................... 30 Definitions and Acronyms........................................................................................................ 31
Casira User Guide
AN100b
© Copyright CSR 2001
This material is subject to CSR’s non-disclosure agreement.
Page 3 of 32
BlueCoreTM
Introduction Thank you for your purchase of CSR’s Casira™ Development Kit.
The Casira User Guide is intended to help you set up your Casira and to quickly familiarise yourself with its development tools. This document will guide you through the installation of software and provide you with instruction on how to use Casira’s features.
Included in this guide is a brief overview of CSR’s BlueSuite, a suite of development tools that contains all of the BlueCore™ utilities. BlueSuite includes BlueChat2, BlueFlash, PSTools, BlueTest and BTCLI. These utilities will help you with your own Bluetooth™ development program.
There is a section on additional useful applications, which introduces the Device Firmware Upgrade (DFU) software and tools, the BlueLab™ Software Development Kit (SDK) and the Bluetooth for Windows software development kit. Casira has Flash memory, which can be upgraded via the UART with the DFU software provided. BlueLab allows embedded application development. Bluetooth for Windows allows Micros oft Windows platform developers to create state of the art software applications that utilise the latest in Bluetooth technology and demonstrate the full power of a Bluetooth enabled PC
The Technical Support section provides contact information for technical assistance.
Further to the firmware and documentation provided with your Casira kit, updates can be obtained from the CSR secure web site, www.csr.com/updates.htm.
Overview The Casira unit features the following:
• BlueCore chip at the heart of the Casira. This is an advanced single-chip Bluetooth device.
• Flash Memory device which stores BlueCore’s firmware and Persistent Store
• Antenna which allows communication with other Bluetooth devices
Casira User Guide
AN100b
© Copyright CSR 2001
This material is subject to CSR’s non-disclosure agreement.
Page 4 of 32
BlueCoreTM
Parts List The following items should be in your Casira case. If an item is missing, please contact your CSR sales representative.
Quantity Description
2 Casira Bluetooth development pods
2 Power supplies
2 Power cords
2 Country-specific electrical adaptor plugs
2 SPI programming cables
2 5 metre long RS232 cables
2 Audio headsets
1 Casira Bluetooth Development Kit CD ROM, containing documentation and software, BlueLab Software Development Kit and Bluetooth for Windows software
1 Mezoe BlueStack SDK evaluation version CD ROM, containing documentation and software
20 BlueCore devices
1 Screwdriver
Notes: CSR recommends that you use the provided power supplies, otherwise there is a risk of damaging the Casira unit(s).
Although Casira documentation is enclosed on the CD-ROM, check the CSR secure website regularly for the latest updates on documentation, tools and firmware for Casira at www.csr.com/updates.htm.
Casira User Guide
AN100b
© Copyright CSR 2001
This material is subject to CSR’s non-disclosure agreement.
Page 5 of 32
BlueCoreTM
System Requirements and OS Platforms The minimum system requirements for the Casira utilities are:
• Pentium processor-based personal computer
• 64MB of RAM is recommended
• 10MB of available hard disk space
Casira utilities are used on the following operating systems:
• Microsoft Windows 98
• Microsoft Me
• Microsoft 2000
• Microsoft NT v4.0 (service pack 3 or later)
Important Notes: Before you perform any operation with your Casira units, CSR recommends that you back up the original firmware and settings for each unit. Refer to the Back Up New Casira Units section later in this document.
Windows NT v4.0 does not offer native USB support. Support can be added via patches, but performance is rarely dependable. CSR does not recommend carrying out development work using Windows NT and USB, as USB patches are not supported.
Casira User Guide
AN100b
© Copyright CSR 2001
This material is subject to CSR’s non-disclosure agreement.
Page 6 of 32
BlueCoreTM
Initial Steps The following instructions will take you through the software installation and backup procedures for your Casira units.
Your first action should be to back up the firmware, as each Casira module has settings that are unique to that module, such as its Bluetooth Device Address. This data is stored in the Persistent Store (PS) as PS Keys. The Persistent Store also contains values that are specific to a particular design, e.g., whether it uses the UART in H4 or BCSP mode. Refer to the Back Up New Casira Units section.
Installing BlueSuite CE Software This installation contains Windows CE versions of the PC software. To install the CE versions follow these instructions:
1. Identify the target platform.
CE devices run one of the following versions of Windows CE:
• Pocket PC (Palm-sized device, small portrait screen, no keyboard)
• HPC Pro 2.11 (Older small-notebook-sized PC with keyboard and glide pad)
• HPC 2000 (Palmtop device with touch screen and keyboard)
• Palm-sized PC 2.11. (Older palmtop-sized PC with keyboard and touch-screen)
The CE version defines the screen size and user-input type for the device (e.g., touch-screen or glide pad, keyboard present, handwriting recognition present etc).
Identify your CE version from the above list.
2. Identify the processor to be used:
On your Windows CE device, identify the processor used in the device. On most platforms, this is found by looking at Control Panel > System > Device tab. On Pocket PC platforms, select Settings > System > About > Version.
3. Copy the CE Version of Software to the Device.
The Casira CD ROM contains versions of BlueSuite software for various popular Windows CE devices, all as .CAB files. These files are supplied on the CD ROM.
Select the version for your device from the .CAB files available. If an appropriate version is not available, please contact your distributor, or CSR.
Right -click on the .CAB file, and select Copy.
If you have not already done so, establish an ActiveSync connection to your CE device. The device should now appear as a directory in Windows Explorer. There is more information about ActiveSync at the end of this installation instruction.
Copy the correct .CAB file to the device by locating the ‘My Documents’ folder on the device. Right -click then select Paste.
Casira User Guide
AN100b
© Copyright CSR 2001
This material is subject to CSR’s non-disclosure agreement.
Page 7 of 32
BlueCoreTM
4. Install BlueSuite on the device.
Install BlueSuite CE by running the .CAB file on your CE device from the directory to which you saved it. You may need to use the CE File Explorer to navigate to the .CAB file.
Installing USB Drivers There are two sets of device drivers for Bluecore (CSR and WIDCOMM™). Each set contains drivers for Bluecore to use in normal operation and in Device Firmware Upgrade (DFU) mode. The CSR DFU driver offers better reliability and performance. Us e the CSR DFU Wizard if you use the CSR DFU driver. WIDCOMM Bluetooth for Windows (BTW) software works only with the WIDCOMM driver. CSR’s BlueSuite software was tested using both sets of drivers. If you installed a previous version of BlueSuite and CS R USB drivers, these will not work with the WIDCOMM BTW software. The CD ROM provided with your Casira Development Kit will allow you to remove the old USB drivers and install the new version, which co-exists with both software programs.
Selecting the Driver If you plan to use only the BlueSuite software to development your Bluetooth application(s), CSR recommends that you use the CSR drivers referenced in csrbc01.inf. If you plan to use both CSR and WIDCOMM software, CSR recommends that you use the drivers referenced in btwusb_csr_dfu.inf. This file uses the WIDCOMM driver for normal USB operation, but it uses the CSR driver for DFU operation. Use the CSR DFU Wizard to perform DFU operations over USB as this offers best performance and reliability. If you plan to use mainly WIDCOMM software, CSR recommends that you use the WIDCOMM drivers, as referenced in btwusb.inf.
Changing the Driver 1. Unplug the USB device.
2. Run install.exe from the CD ROM. Select Purge system of USB drivers for CSR chips. Clear all other options. Click Do It to run the option.
3. Insert the device. When prompted, select the appropriate driver (refer to the section on Selecting the Driver).
ActiveSync 3.5
Microsoft® ActiveSync® 3.5 is the latest and significantly improved synchronisation software for Microsoft Windows Powered Pocket PCs. ActiveSync 3.5 is easy to install and use and offers the best levels of reliability to date. ActiveSync 3.5 also brings you up to date with compatibility to Microsoft Office XP and Windows XP. If you do not have this on your computer go to: www.microsoft.com/mobile/pocketpc/downloads/activesync35.asp.
Back Up New Casira Units The following steps take you through the process of backing up your Casira firmware. Backing up the firmware should be your first action with a new Casira, but it can also be done at other times. Making backups when you upgrade firmware allows you to return to a known state in the event you incur problems as a result of the upgrade.
Casira User Guide
AN100b
© Copyright CSR 2001
This material is subject to CSR’s non-disclosure agreement.
Page 8 of 32
BlueCoreTM
To backup Casira firmware:
1. Open the Casira unit: Access to the SPI header is required. Open the Casira case by unscrewing all three screws located on the underside. Remove the case top.
2. Check Module Serial Number: The heart of a Casira kit is the radio module, held in place by the blue clip in the centre of the motherboard. The motherboard itself provides a stable environment for the radio module as well as easy access to all the important signals.
Each radio module has a unique serial number (this is not the same as the motherboard serial number). Before proceeding, check the module serial number. Slide the clip up toward the connectors on the top edge of the motherboard. The module will pop up. Remove the module and look on the underside for the serial number (in the format SNxxxxx). Note the serial number.
To replace the module, fit the top edge of the module into the blue clip. Press down gently until the module is correctly in place. Slide the clip down to lock it in place.
3. Connect SPI Cable: Take one of the SPI cables and connect it to the CN16 header on the Casira motherboard. Take the other end of the SPI cable and connect it to the LPT port on your PC.
Note: Ensure that the LPT port is in Normal mode and not in ECP/EPP mode. Normally this can be configured with the Device Manager under the System utility in the Windows Control Panel. For some PCs, it may be necessary to change the BIOS settings. If you have any doubts about changing the port’s mode and the effect it will have on any other devices to which you might interface, contact your Information Systems department for advice.
4. Power Up: Using the appropriate country specific AC adaptor, connect the power supply unit to the mains supply. Plug the power supply unit output into the Casira power input.
5. Run BlueFlash: Start the BlueFlash application (installed as part of BlueSuite).
6. Select LPT Port. In the top drop down menu, select the LPT port to which the SPI cable is connected. LPT1 is the default.
7. Check Connection: The BlueFlash window displays the status of the processor. The status of the chip should state that it is idle. The button Stop Processor should not be greyed out.
A connection to BlueCore has not been established if BlueFlash is still trying to identify the Flash memory. The message “Identifying Flash….” will indicate this state. The Flash identification process should take two to three seconds.
If the Flash is not identified, ensure that the LPT port is in Normal mode in the Windows Device Manager.
If the Flash is still not identified, try to remove jumper CN18 on the Casira motherboard (near the SPI connector). Due to different configurations of the LPT port on some PCs (particularly laptops), the Casira’s reset circuit may be being asserted by a connection in the SPI cable to the PC LPT port. This causes Casira to continuously reset itself. Removing jumper CN18 disconnects the reset pin on the SPI cable from the Casira reset circuit. Reset the Casira, close BlueFlash and repeat Steps 4-7.
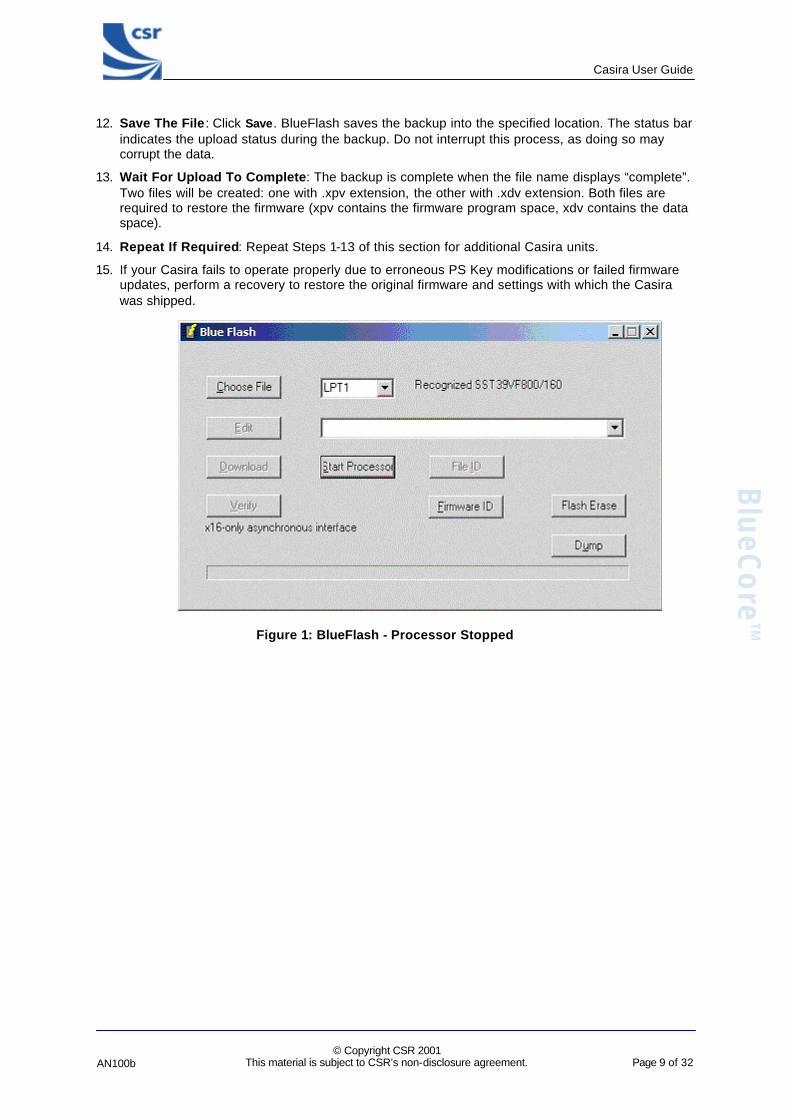
8. Stop BlueCore Processor: Click Stop Processor. If you successfully connected to the module, the BlueFlash window indicates recognition of the Flash memory type and displays device information in the top status bar as shown in Figure 1.
9. Verify Processor Has Stopped: When the processor has stopped, the Stop Processor button changes to Start Processor. You can now upload or download the BlueCore firmware.
10. Click on Dump: To upload the entire Casira Flash memory contents to a PC file, click on Dump.
11. Select a filename : A “Save as” window appears. Select a safe location and create a folder where the backup will be stored. The firmware dump contains calibration information for the module including host interface settings. CSR recommends that you use a descriptive filename that includes the module serial number, your name or company and the Casira setup to make identification easy. For example: “SN10337 – John Doe – Factory Settings”
Casira User Guide
AN100b
© Copyright CSR 2001
This material is subject to CSR’s non-disclosure agreement.
Page 9 of 32
BlueCoreTM
12. Save The File : Click Save. BlueFlash saves the backup into the specified location. The status bar indicates the upload status during the backup. Do not interrupt this process, as doing so may corrupt the data.
13. Wait For Upload To Complete: The backup is complete when the file name displays “complete”. Two files will be created: one with .xpv extension, the other with .xdv extension. Both files are required to restore the firmware (xpv contains the firmware program space, xdv contains the data space).
14. Repeat If Required: Repeat Steps 1-13 of this section for additional Casira units.
15. If your Casira fails to operate properly due to erroneous PS Key modifications or failed firmware updates, perform a recovery to restore the original firmware and settings with which the Casira was shipped.
Figure 1: BlueFlash - Processor Stopped
Casira User Guide
AN100b
© Copyright CSR 2001
This material is subject to CSR’s non-disclosure agreement.
Page 10 of 32
BlueCoreTM
BlueCore Utilities: BlueSuite This section describes the following BlueCore utilities incorporated in BlueSuite:
• BlueFlash, which upgrades the BlueCore firmware
• PSTools, which edits the Persistent Store Keys
• BlueChat 2, which creates simple ACL and SCO connections
• BlueTest, which exercises the radio for test purposes
• BTCLI, which allows sending HCI commands
It also includes examples of the most commonly used features for each of these utilities.
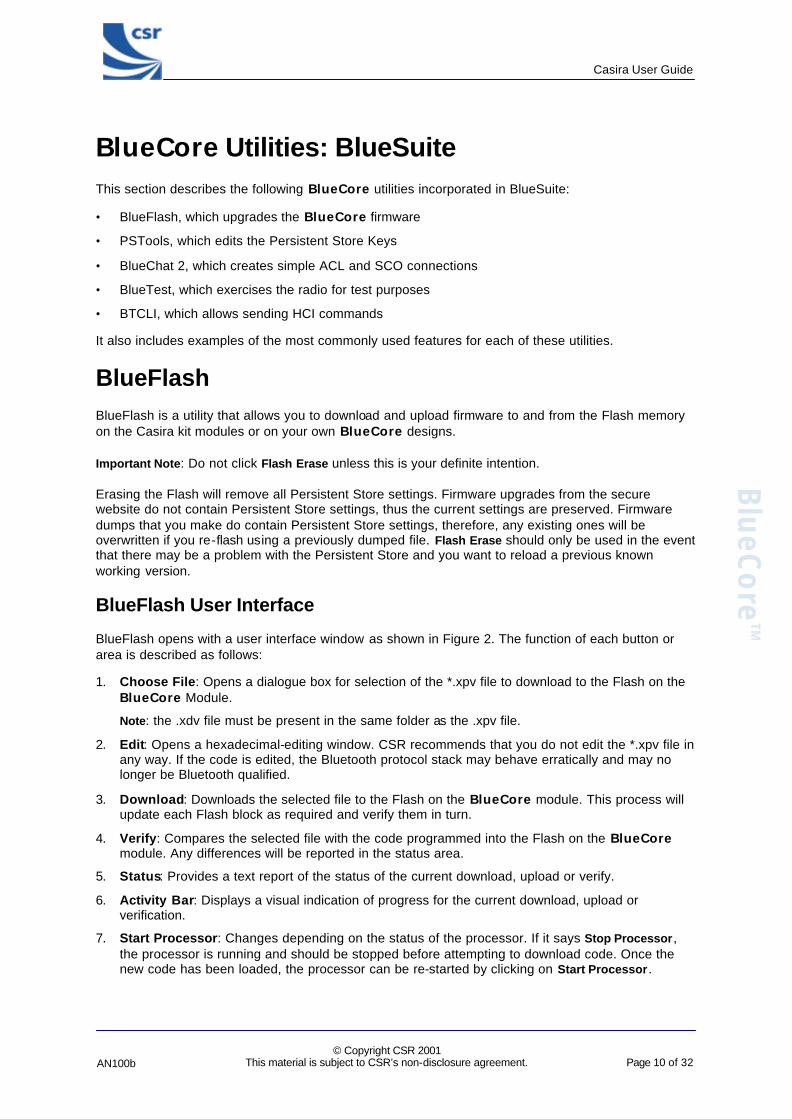
BlueFlash BlueFlash is a utility that allows you to download and upload firmware to and from the Flash memory on the Casira kit modules or on your own BlueCore designs.
Important Note: Do not click Flash Erase unless this is your definite intention.
Erasing the Flash will remove all Persistent Store settings. Firmware upgrades from the secure website do not contain Persistent Store settings, thus the current settings are preserved. Firmware dumps that you make do contain Persistent Store settings, therefore, any existing ones will be overwritten if you re-flash using a previously dumped file. Flash Erase should only be used in the event that there may be a problem with the Persistent Store and you want to reload a previous known working version.
BlueFlash User Interface
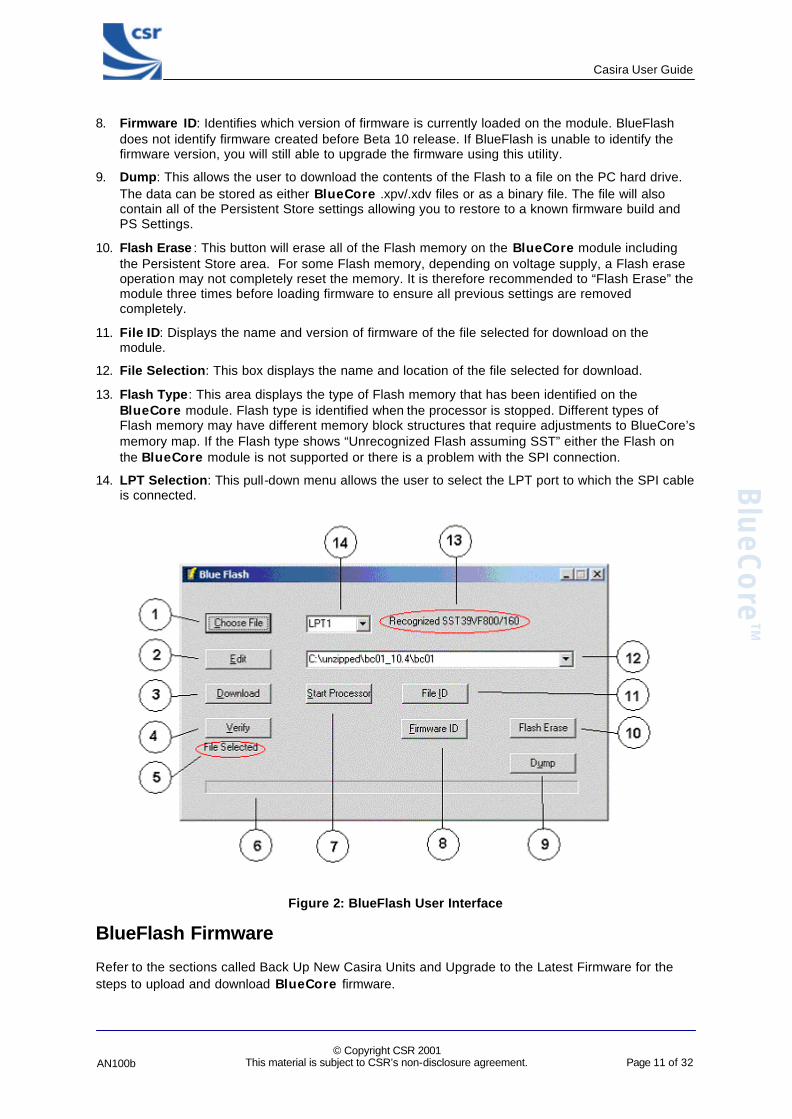
BlueFlash opens with a user interface window as shown in Figure 2. The function of each button or area is described as follows:
1. Choose File: Opens a dialogue box for selection of the *.xpv file to download to the Flash on the BlueCore Module.
Note: the .xdv file must be present in the same folder as the .xpv file.
2. Edit: Opens a hexadecimal-editing window. CSR recommends that you do not edit the *.xpv file in any way. If the code is edited, the Bluetooth protocol stack may behave erratically and may no longer be Bluetooth qualified.
3. Download: Downloads the selected file to the Flash on the BlueCore module. This process will update each Flash block as required and verify them in turn.
4. Verify: Compares the selected file with the code programmed into the Flash on the BlueCore module. Any differences will be reported in the status area.
5. Status: Provides a text report of the status of the current download, upload or verify.
6. Activity Bar: Displays a visual indication of progress for the current download, upload or verification.
7. Start Processor: Changes depending on the status of the processor. If it says Stop Processor, the processor is running and should be stopped before attempting to download code. Once the new code has been loaded, the processor can be re-started by clicking on Start Processor.
Casira User Guide
AN100b
© Copyright CSR 2001
This material is subject to CSR’s non-disclosure agreement.
Page 11 of 32
BlueCoreTM
8. Firmware ID: Identifies which version of firmware is currently loaded on the module. BlueFlash does not identify firmware created before Beta 10 release. If BlueFlash is unable to identify the firmware version, you will still able to upgrade the firmware using this utility.
9. Dump: This allows the user to download the contents of the Flash to a file on the PC hard drive. The data can be stored as either BlueCore .xpv/.xdv files or as a binary file. The file will also contain all of the Persistent Store settings allowing you to restore to a known firmware build and PS Settings.
10. Flash Erase : This button will erase all of the Flash memory on the BlueCore module including the Persistent Store area. For some Flash memory, depending on voltage supply, a Flash erase operation may not completely reset the memory. It is therefore recommended to “Flash Erase” the module three times before loading firmware to ensure all previous settings are removed completely.
11. File ID: Displays the name and version of firmware of the file selected for download on the module.
12. File Selection: This box displays the name and location of the file selected for download.
13. Flash Type: This area displays the type of Flash memory that has been identified on the BlueCore module. Flash type is identified when the processor is stopped. Different types of Flash memory may have different memory block structures that require adjustments to BlueCore’s memory map. If the Flash type shows “Unrecognized Flash assuming SST” either the Flash on the BlueCore module is not supported or there is a problem with the SPI connection.
14. LPT Selection: This pull-down menu allows the user to select the LPT port to which the SPI cable is connected.
Figure 2: BlueFlash User Interface
BlueFlash Firmware
Refer to the sections called Back Up New Casira Units and Upgrade to the Latest Firmware for the steps to upload and download BlueCore firmware.
Casira User Guide
AN100b
© Copyright CSR 2001
This material is subject to CSR’s non-disclosure agreement.
Page 12 of 32
BlueCoreTM
There are four possible components in a firmware file:
1. Stack. This is the main runtime code for BlueCore. There are two versions of stack, one contains all stack layers up to HCI, plus an HCI version of the Virtual Machine (VM); the other contains stack layers up to HCI, plus L2CAP, RFCOMM, SDP and the Virtual Machine (an RFCOMM version). Both stack versions uses both program and data space.
2. DFU Driver. Device Firmware Upgrade allows for updating the stack, Persistent Store and VM application over the HCI transport. You cannot use a DFU operation to upgrade the DFU driver itself. If you are using an RFCOMM version of the stack memory, space restrictions allow no room for the DFU Driver. The driver uses both program and data space.
3. Persistent Store. The Persistent Store holds all the setup and calibration information for BlueCore. Most settings are design-specific, but some are module specific. The Persistent Store resides entirely in the data space.
4. Virtual Machine Application. BlueCore allows small applications to be run on-chip using CSR’s BlueLab (refer to the section on Other Applications or to CSR’s secure website for more information about BlueLab). These applications reside in a special area of the data space.
BlueFlash firmware is held in *.xpv files (which correspond to the program space) and *.xdv files (which correspond to the data space). There is a single *.dfu file for DFU. Not all files contain all firmware components. Table 1 indicates the files containing which components.
Component BlueFlash
Firmware from CSR Website:
BlueFlash Firmware
Dump
BlueLab Firmware
Build
Casira DFU File from
CSR Website
DFU File for OEM
Module
Stack X X X X O(2)
DFU Driver O(1) X O(1)
Persistent Store X O(2)
VM Application X X O(2)
X: Included
O(1): Optional. Depends on stack. HCI Stack includes DFU. RFCOMM Stack does not include DFU.
O(2): Optional. OEM DFU files can contain any combination of three components
Table 1: Firmware File Components
Downloading a firmware file only to Flash memory overwrites the components contained in the file, all others remain intact. Hence, the only calibration information in the Persistent Store is affected. Downloading to Flash memory ensures that the module can be returned to a known calibrated state if the Persistent Store becomes corrupted beyond repair.
If firmware with no Persistent Store component is downloaded onto a blank Flash, the stack code will create a new Persistent Store using default values suitable for use on a Casira module. However, some keys will require calibration per module for optimal performance.
For more information, refer to CSR documentation on Persistent Store Key Settings.
The Verify function compares the contents of a firmware file to the contents of Flash memory and reports any differences. Only components contained in the file are compared.
Casira User Guide
AN100b
© Copyright CSR 2001
This material is subject to CSR’s non-disclosure agreement.
Page 13 of 32
BlueCoreTM
Troubleshooting BlueFlash
Problem:
• BlueFlash cannot identify Flash type
• BlueFlash fails to stop processor
• BlueFlash times out trying to make a connection to Bluecore
Solution:
• Ensure that the LPT port is in Normal mode and not in ECP/EPP mode
• Jumper CN18 may need to be removed as a result of some PC pin pull-up or pull-down configurations on LPT port
Problem:
• BlueFlash cannot identify the current build of firmware on BlueCore
Solution:
• Check the firmware version. BlueFlash cannot identify firmware versions prior to Beta 10
Casira User Guide
AN100b
© Copyright CSR 2001
This material is subject to CSR’s non-disclosure agreement.
Page 14 of 32
BlueCoreTM
PSTools PSTools is an editing suite that allows you to read and modify the Persistent Store. The Persistent Store consists of configuration keys that modify the operation of the firmware. Bluecore is a very flexible device with many setup options. PS Keys must be set correctly for Bluecore to work in a particular design. Some PS Keys must be calibrated for each module.
Important Note: Do not modify Persistent Store values unless you have a clear understanding of what they do. Careless changes to the Persistent Store could prevent the firmware from executing correctly or can stop BlueCore from communicating with the PC. In some cases, it may not be possible to restore the Bluecore device to the state in which it was supplied.
Refer to CSR documentation on PS Key settings before editing values.
Perform a backup before editing PS Keys.
Access Levels
PSTools has two customer access levels. At the higher access level, there are more PS Keys available for editing. The customer levels are:
• User: A minimum number of frequently used keys, e.g., UART Baud Rate
• Developer: All of the keys that a developer may need to modify
Note: There is a level of keys that is reserved for CSR use only (“All”). Changing some of the keys in this mode can degrade performance or completely prevent Bluecore from working.
The PSTools utility defaults to User level access at start up. To access Developer level, right-click on the blue title bar and select Access. Select Developer from the list and enter the access code, 1812.
PSTools Transport Interface
PSTools initially opens with a window that allows you to select the interface used to gain access to the Persistent Store. There are several transport interface options:
SPI Debug Task
Casira uses the SPI interface on Bluecore and a special debug task running in the Bluecore firmware to access the Persistent Store. The SPI cable connected to the LPT port of the PC is required. (For some early firmware builds, this is the only way to access the Persistent Store).
SPI BCCMD
Casira uses the BlueCore Command (BCCMD) Protocol running over the SPI transport layer to edit the Persistent Store.
Important Note: SPI BCCMD is the recommended method for editing the Persistent Store.
BCSP
Casira uses the BCCMD Protocol running over BCSP to edit the Persistent Store. Bluecore must already be configured for BCSP via PS Keys. When using this mode, ensure that you are using the correct Baud Rate settings.
Casira User Guide
AN100b
© Copyright CSR 2001
This material is subject to CSR’s non-disclosure agreement.
Page 15 of 32
BlueCoreTM
H4
Casira uses the BCCMD Protocol running over H4 to edit the Persistent Store. Bluecore must already be configured for H4 via PS Keys. When using this mode, ensure that you are using the correct Baud Rate settings.
USB
Casira can use the BCCMD Protocol running over USB to edit the Persistent Store. Bluecore must already be configured for USB via PS Keys. See below for more details on configuring BlueCore for USB operation.
Changing Transport Interface
To change the transport interface, enable the Developer access level (refer to the section on Access Levels earlier in this document).
Refer to CSR documentation for more information on transport interfaces.
To change to USB:
1. Change the Host Interface
• Select the Host Interface PS Key
• Set to USB link using the pull-down menu
• Click on Set to update the Persistent Store
2. Set D+ Pull-Up
• Select the USB d+ Pull-up PIO Line PS Key
• Set the key to the PIO output that drives the USB D+ pull-up resistor. On Casira modules this is PIO[2], hence, this key should be set to 0x02. If no value is present, then no pull-up is used (Note: If the value is 0x00, PIO[0] is used)
• Click on Set to update the Persistent Store
3. Reset BlueCore.
The module is now configured for USB mode.
Note: When a USB cable is connected to a Casira unit, the RS232 port does not work.
To change to BCSP:
1. Change the Host Interface
• Select the Host Interface PS Key
• Set to UART link running BCSP using the pull-down menu
• Click on Set to update the Persistent Store
2. Set Stop Bits
• Select the UART: Stop Bit PS Key
• Set to One stop bit
• Click on Set to update the Persistent Store
Casira User Guide
AN100b
© Copyright CSR 2001
This material is subject to CSR’s non-disclosure agreement.
Page 16 of 32
BlueCoreTM
3. Turn On Even Parity
• Select the UART: Parity Bit PS Key
• Set to Even Parity
• Click on Set to update the Persistent Store
4. Turn Off Flow Control
• Select the UART: Hardware Flow Control PS Key
• Set to Disabled
• Click on Set to update the Persistent Store
5. Turn Off RTS
• Select the UART: RTS Asserted PS Key
• Set to False
• Click on Set to update the Persistent Store
6. Turn Off Non-BCSP
• Select the UART: Non-BCSP Enabled PS Key
• Set to Disabled
• Click on Set to update the Persistent Store
7. Set Baud Rate
• Select the UART Baud Rate PS Key
• Set to the required baud rate (e.g., 115.2 kBaud)
• Click on Set to update the Persistent Store
8. Reset BlueCore
The BlueCore module is now configured to use BCSP over the UART.
To change to H4:
1. Change the Host Interface
• Select the Host Interface PS Key
• Set to UART link running H4 using the pull-down menu
• Click on Set to update the Persistent Store
2. Set Stop Bit
• Select the UART: Stop Bit PS Key.
• Set to One stop bit
• Click on Set to update the Persistent Store
3. Turn Off Parity
• Select the UART: Parity Bit PS Key
• Set to No Parity
• Click on Set to update the Persistent Store
Casira User Guide
AN100b
© Copyright CSR 2001
This material is subject to CSR’s non-disclosure agreement.
Page 17 of 32
BlueCoreTM
4. Turn On Flow Control
• Select the UART: Hardware Flow Control PS Key
• Set to Enabled
• Click on Set to update the Persistent Store
5. Turn On RTS
• Select the UART: RTS Asserted PS Key
• Set to True
• Click on Set to update the Persistent Store
6. Turn On Non-BCSP
• Select the UART: Non-BCSP Enabled PS Key
• Set to Enabled
• Click on Set to update the PS Store
7. Set Baud Rate
• Select the UART Baud Rate PS Key
• Set to the required baud rate (e.g., 115.2 kBaud)
• Click on Set to update the Persistent Store
8. Reset BlueCore
The BlueCore module is now configured to use H4 over the UART.
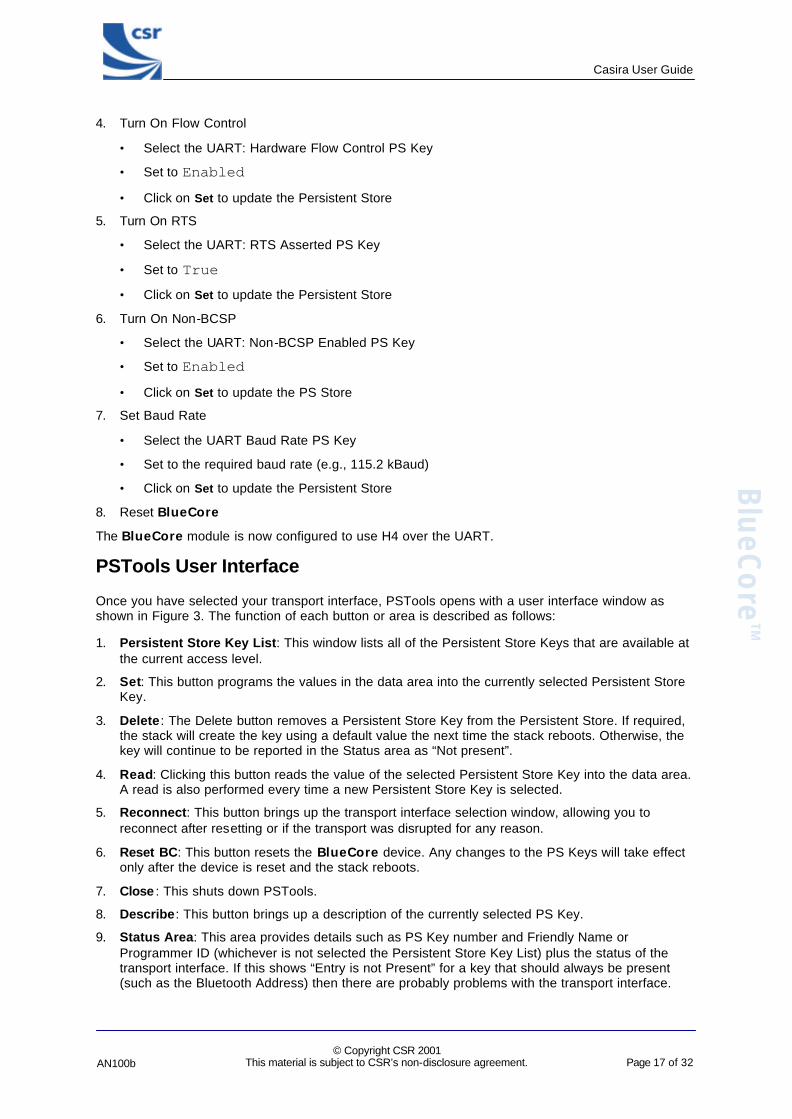
PSTools User Interface
Once you have selected your transport interface, PSTools opens with a user interface window as shown in Figure 3. The function of each button or area is described as follows:
1. Persistent Store Key List: This window lists all of the Persistent Store Keys that are available at the current access level.
2. Set: This button programs the values in the data area into the currently selected Persistent Store Key.
3. Delete : The Delete button removes a Persistent Store Key from the Persistent Store. If required, the stack will create the key using a default value the next time the stack reboots. Otherwise, the key will continue to be reported in the Status area as “Not present”.
4. Read: Clicking this button reads the value of the selected Persistent Store Key into the data area. A read is also performed every time a new Persistent Store Key is selected.
5. Reconnect: This button brings up the transport interface selection window, allowing you to reconnect after resetting or if the transport was disrupted for any reason.
6. Reset BC: This button resets the BlueCore device. Any changes to the PS Keys will take effect only after the device is reset and the stack reboots.
7. Close : This shuts down PSTools.
8. Describe: This button brings up a description of the currently selected PS Key.
9. Status Area: This area provides details such as PS Key number and Friendly Name or Programmer ID (whichever is not selected the Persistent Store Key List) plus the status of the transport interface. If this shows “Entry is not Present” for a key that should always be present (such as the Bluetooth Address) then there are probably problems with the transport interface.
Casira User Guide
AN100b
© Copyright CSR 2001
This material is subject to CSR’s non-disclosure agreement.
Page 18 of 32
BlueCoreTM
10. Data Area: This area shows the data that is stored in the selected Persistent Store Key and allows you to edit it.
The menu bar offers various other features including a low level PS Key editor and the ability to alter the Persistent Store Key List to display Friendly Names or Programmer IDs and sort using Name or Number. It also duplicates many of the button functions.
Note: Changes to a PS Key will not take effect until BlueCore is reset and the stack reboots.
Figure 3: PSTools User Interface
Changing Baud Rate
When running BCSP or H4 over the UART, a wide variety of Baud rates are available. PSTools provides a pull-down menu that allows you to quickly set BlueCore to use common Baud rates. Non-standard Baud rates must be programmed manually using PSTools’ Edit Raw function under the Entry menu. Contact CSR Technical Support for assistance in calculating non-standard Baud rates.
To change the Baud Rate:
1. Set Baud Rate
• Select the UART Baud Rate PS Key
• Set to the required baud rate (e.g., 38.4 kBaud) using the pull-down menu
• Click on Set to update the Persistent Store
2. Reset Bluecore
The Bluecore module is now configured to use the new Baud Rate.
Casira User Guide
AN100b
© Copyright CSR 2001
This material is subject to CSR’s non-disclosure agreement.
Page 19 of 32
BlueCoreTM
BlueChat2 BlueChat 2 is a utility that allows users create an asynchronous connectionless link (ACL) between two devices to send text or a file and add a synchronous connection orientated (SCO) link for a voice connection between the two devices. Users can select between BCSP, H4 (UART), or USB host interfaces.
The current version of Bluechat2 can only support a point -to-point connection.
BlueChat2 User Interface
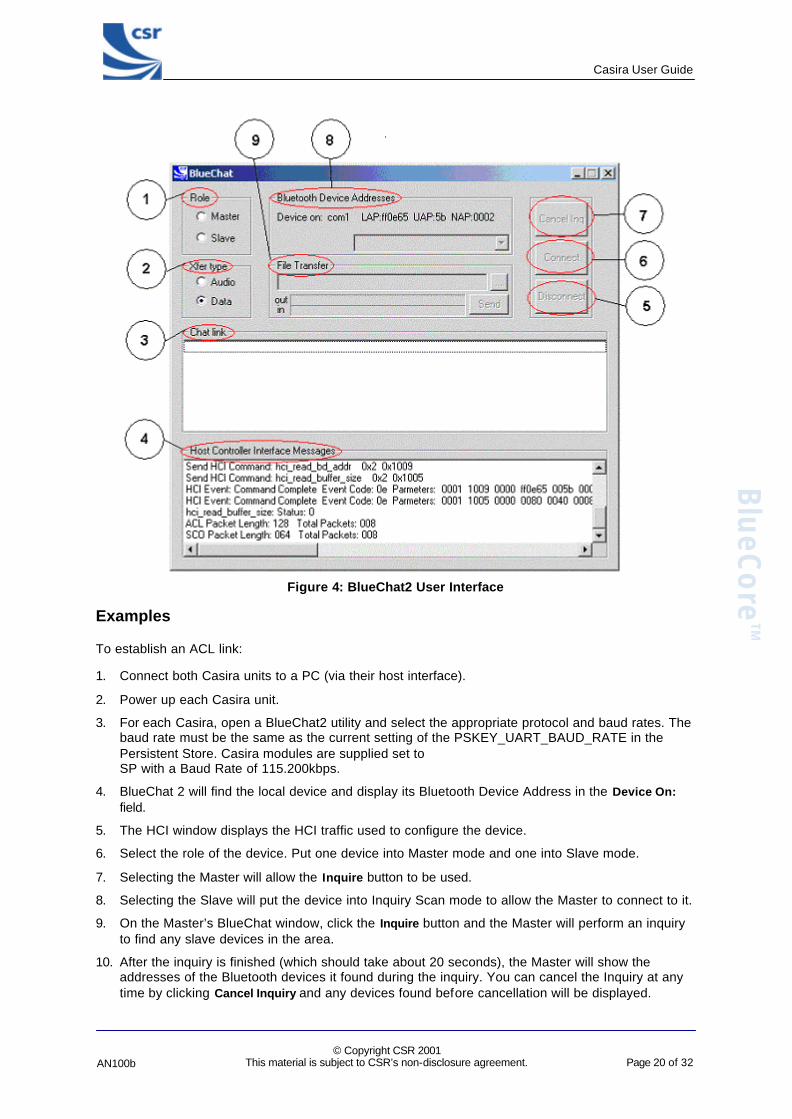
BlueChat2 opens with a user interface window as shown in Figure 4. The function of each button or area is described as follows:
1. Role: Selects the role for the device as either the master or the slave.
2. Xfer Type: Selects which type of data is sent.
3. Chat Link: Used to send and receive text data.
4. Host Controller Interface Messages: HCI commands and responses are displayed here.
5. Disconnect: Closes the link between the two devices.
6. Connect: Establishes a connection to the selected device by setting up an ACL link. If Xfer Type is set to Audio a .SCO link is also created.
7. Inquiry / Cancel Inquiry: If the device is the master, this button controls inquiry for other Bluetooth device in the area. If the local device is selected to be the slave, this button will be grayed out.
8. Bluetooth Device Address: This lists the address of the local device and, in the pull-down selection box, the addresses of any devices found during an inquiry. Use the selection box to highlight the Bluetooth device to which you wish to connect.
9. File Transfer: Active when connected to another device and Xfer Type “Data” is selected. This displays the name and the location of the file to be transferred. There are also status bars that show the progress of files that are being sent or received. Use the send button to start sending the data to the selected Bluetooth device.
Note: A dialog window may appear, indicating that a communication error occurred. If the HCI Messages that appear in the BlueChat User Interface dialog window are similar to those in Figure 2, click OK. A connection actually will have been made.
Casira User Guide
AN100b
© Copyright CSR 2001
This material is subject to CSR’s non-disclosure agreement.
Page 20 of 32
BlueCoreTM
Figure 4: BlueChat2 User Interface
Examples
To establish an ACL link:
1. Connect both Casira units to a PC (via their host interface).
2. Power up each Casira unit.
3. For each Casira, open a BlueChat2 utility and select the appropriate protocol and baud rates. The baud rate must be the same as the current setting of the PSKEY_UART_BAUD_RATE in the Persistent Store. Casira modules are supplied set to SP with a Baud Rate of 115.200kbps.
4. BlueChat 2 will find the local device and display its Bluetooth Device Address in the Device On: field.
5. The HCI window displays the HCI traffic used to configure the device.
6. Select the role of the device. Put one device into Master mode and one into Slave mode.
7. Selecting the Master will allow the Inquire button to be used.
8. Selecting the Slave will put the device into Inquiry Scan mode to allow the Master to connect to it.
9. On the Master’s BlueChat window, click the Inquire button and the Master will perform an inquiry to find any slave devices in the area.
10. After the inquiry is finished (which should take about 20 seconds), the Master will show the addresses of the Bluetooth devices it found during the inquiry. You can cancel the Inquiry at any time by clicking Cancel Inquiry and any devices found before cancellation will be displayed.
Casira User Guide
AN100b
© Copyright CSR 2001
This material is subject to CSR’s non-disclosure agreement.
Page 21 of 32
BlueCoreTM
11. Select the address of the Bluetooth device you want to connect to in the Bluetooth Address Box.
12. To connect, click on Connect.
13. After connecting, select Data in the Xfer type field.
14. You now should have a connection between the two devices. You can send messages through the chat window or transfer files.
To Establish a SCO link:
1. Using PSTools in developer mode, edit the MAP_SCO_OVER_PCM PS Key and set it to true on both Casiras.
2. Reset Casira.
3. Plug in headsets to Casiras
4. Follow steps 1 through 8 as for an ACL link above.
5. Select audio in the Xfer field.
6. You now should be able communicate with headsets over an audio SCO link to the other Casira.
Casira User Guide
AN100b
© Copyright CSR 2001
This material is subject to CSR’s non-disclosure agreement.
Page 22 of 32
BlueCoreTM
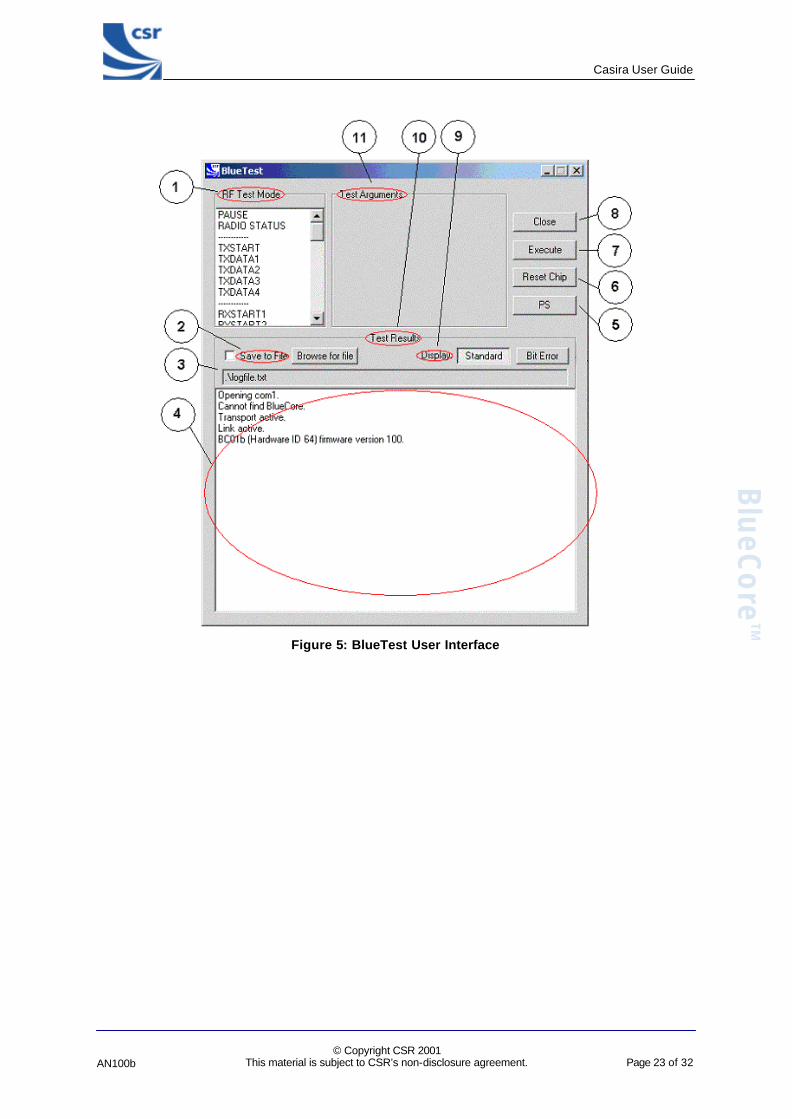
BlueTest Blue Test is a program that allows you to execute BlueCore’s Built In Self Test (BIST) functions for RF testing. The BIST functions consist mainly of low-level radio tests (transmitting a continuous wave at a proscribed frequency or receiving pseudo-random data and calculating bit error rates). Included are tests for the PCM port and other internal blocks. Refer to CSR documentation on BlueTest for more information.
BlueTest User Interface
Blue Test opens with a user interface window as shown in Figure 5. The function of each button or area is described as follows:
1. RF Test Mode: Shows the list of available tests and allows you to choose which one to execute.
2. Save to File : The results of each test can be saved to a file when this is selected. The default name of file is logfile.txt.
3. File Location: Shows the name and location of file being saved.
4. Test Results: When running the tests, the results will be displayed in this dialog box.
5. PS: This button opens a low level PS Key editor similar to the Edit Raw function within PSTools. You must enter the PS Key’s identification number in hex and edit the key in hex as well. Not for the faint-hearted.
6. Reset Chip: Resets the chip.
7. Execute: Executes the selected test using the current parameters.
8. Close : Exits the program.
9. Display: Two modes of display can be used to view results. Standard and Bit Error. The Bit Error mode provides a constantly updated table of the BER results and will only work with BER tests. The standard mode setting is the default and shows a scrolling window containing the individual test results.
10. Test Results: This field is where the test results are handled.
11. Test arguments: The arguments and parameters for each test can be viewed or set for some tests.
Casira User Guide
AN100b
© Copyright CSR 2001
This material is subject to CSR’s non-disclosure agreement.
Page 23 of 32
BlueCoreTM
Figure 5: BlueTest User Interface
Casira User Guide
AN100b
© Copyright CSR 2001
This material is subject to CSR’s non-disclosure agreement.
Page 24 of 32
BlueCoreTM
BTCLI BTCLI is an acronym for Bluetooth Command Line Interface. It is run from a DOS prompt and provides a means of sending arbitrary HCI commands. Like most command line interface programs, it is very powerful, but it is not very user-friendly. A basic user guide is provided as a text file (btcliug.txt) in the BlueSuite directory. Using this with the Bluetooth specification, it is possible to exercise thoroughly Bluecore’s functionality.
To run BTCLI, open a command prompt window (DOS window) and change into the BlueSuite directory. From there, run BTCLI with the appropriate arguments for the current host interface:
btcli <transport> <port> <baud rate>
For BCSP on COM port 1 at 115.2 kBaud, enter:
btcli bcsp com1 115200 For H4 on COM port 3 at 38.4 kBaud, enter:
btcli h4 com3 38400 USB is supported. No baud rate is required. Enter:
btcli usb \\.\csr0
or
btcli usb \\.\BTWUSB_0
The most common use for BTCLI is to activate Inquiry/Page Scan and allow the module to accept over-air test commands from an automated tester. With BTCLI this is very simple, involving only two commands: “slave”, which activates the scan mode and enables auto accept of connections and “edutm”, which stands for Enter Device Under Test Mode. A print out from BTCLI carrying out these commands is shown below. Text entered by the user is shown in bold.
C:\> btcli bcsp com1 115200 btcli (built Apr 11 2001, 12:29:32) Copyright © 2000-2001 Cambridge Silicon Radio bcsp on com1 at 115200 bps command_status pending nhcp:0x01 nop slave sef connection_setup all auto_accept wpsa 0x0080 0x0040 wisa 0x0080 0x0040 wse inquiry_page rba command_complete nhcp:0x01 set_event_filter success command_complete nhcp:0x01 write_page_scan_activity success command_complete nhcp:0x01 write_inquiry_scan_activity success command_complete nhcp:0x01 write_scan_enable success command_complete nhcp:0x01 read_bd_addr success edutm command_complete nhcp:0x01 enable_device_under_test_mode success

Casira User Guide
AN100b
© Copyright CSR 2001
This material is subject to CSR’s non-disclosure agreement.
Page 25 of 32
BlueCoreTM
Upgrading Casira Units
Download the Latest Tools Upgrade your Casira unit(s) with the most-up-to-date files available from the CSR secure website. For the latest firmware and documentation, go to the Casira section on the CSR secure website and download the following items:
• The latest version of firmware
• The latest version of BlueSuite
• The latest Casira User Guide and other documentation
The secure website address is www.csr.com/updates.htm.
Click on the Casira icon to log on to the Casira support website using the username and password that were issued with your Casira Kit.
If you do not have a user name and password, you can request one by clicking on the “password request” link at the bottom of the web page.
Note: CSR product updates are published on the secure website. Check the secure website regularly for the latest updates on all issues.
Install the Latest Tools
Install BlueSuite Install BlueSuite by running the BlueSuite self-installing executable.
Follow the instructions on the Installation Wizard. CSR recommends that you restart your PC after installing new software.
Install Firmware 1. Unzip the latest firmware downloaded from the secure website. Make a note of the directory to
which the unzipped files were saved. The *.xpv and the *.xdv files must be in the same folder: both are used during the firmware download process.
2. Connect the Casira to your PC via the SPI as described in the Back Up New Casira Units section.
3. Power-up the Casira and open the BlueFlash utility.
4. When the BlueFlash dialog first appears, ensure that the interface you select is correctly connected to your Casira, e.g., LPT1.
5. Click on Stop Processor.
6. Click on Choose File. An Open window appears. Search for the *.xpv file you just unzipped. Select the file and open it. The file location and name will display in the BlueFlash window.
7. Click on File ID to indicate which version of firmware is currently selected for download. Click on Firmware ID to display details of which firmware is currently loaded on BlueCore.
8. BlueFlash will not identify firmware builds prior to Beta 10. This does not, however, prevent you downloading or uploading these older firmware builds.
9. Click on Download.
10. After downloading completes, click on Verify to check the contents of the memory.

Casira User Guide
AN100b
© Copyright CSR 2001
This material is subject to CSR’s non-disclosure agreement.
Page 26 of 32
BlueCoreTM
11. Reset the Casira unit. You can do this via a full power cycle or by pressing the small blue reset button on the far right side of the motherboard.
12. Close BlueFlash, and re-open it. You can verify which version of firmware you are running on the chip by clicking the Firmware ID button (only for Beta 10 or later).
Important Note: Do not click on Flash Erase prior to downloading. Erasing the FLASH will remove all Persistent Store settings. Firmware upgrades from CSR’s website do not contain Persistent Store settings, so the current settings are preserved. Firmware dumps that you make contain Persistent Store settings, thus any existing settings will be overwritten if you re-flash using an uploaded dump file. Flash erase should only be used in cases of emergency where there may be a problem with the existing PS and you wish to reload an old one that you know works.
Casira User Guide
AN100b
© Copyright CSR 2001
This material is subject to CSR’s non-disclosure agreement.
Page 27 of 32
BlueCoreTM
Other Applications
Device Firmware Upgrade (DFU) Device Firmware Upgrade allows firmware to by upgraded over the same transport as the HCI (i.e., USB or UART). It is a USB standard and full details of its operation can be found at www.usb.org. Bluecore can tunnel the same protocol over the UART transport. Allowing firmware upgrades can potentially initiate unwanted or accidental downloads (such as introducing a computer virus or by a user accidentally downloading firmware intended for another manufacturer’s module). To protect against this, CSR offers digital signing for both original firmware and DFU upgrades. Only upgrade files with the same signature as the original firmware can be downloaded to Flash memory. Firmware and documentation updates for DFU are available on CSR’s secure website.
BlueLab On-chip Software Development Kit Bluecore can run upper stack layers and small applications on-chip. BlueLab is CSR’s complete development environment for such applications. There is no charge for upper stack layers when run on-chip. For more information, or to order a copy of BlueLab, go to www.csr.com.
Bluetooth for Windows Software Bluetooth for Windows is provided on the CD ROM with your Casira kit. This software is a complete communication software solution for integrating Bluetooth wireless technology into a Windows operating system. It has all the necessary protocol and driver software to enable PC OEMs to bring wireless devices to market quickly and efficiently. It includes USB drivers, protocol stacks, APIs, sample applications, support tools and documentation. It is designed to operate on any personal computer (desktop or notebook).
Features and Benefits:
• Portability and flexibility • Reduced development cost • Powerful companion testing • Interoperability • Support and training
The Host software solution contains:
Bluetooth Spec 1.1 compliant Windows protocol stack and profiles:
• Generic access profile • Service discovery application profile • Synchronisation profile • Object push profile • Dial-up network profile • Serial port profile • Headset profile • Generic object exchange profile • File transfer profile • LAN access profile
Casira User Guide
AN100b
© Copyright CSR 2001
This material is subject to CSR’s non-disclosure agreement.
Page 28 of 32
BlueCoreTM
Also included:
• Support for Windows 98 SE, Millennium Edition, and 2000 • User Interface including Shell Extension, System Tray and Control Panel applications • Extensive documentation that exposes and details Bluetooth wireless technology application
programming interface (API) • Optional Test Spy test tool (trace, diagnostic and debug tools) to exercise the Host
communication software • Sample application programs demonstrating Bluetooth out of the box connectivity
Bluetooth for Windows Software Development Kit As an upgrade to the Casira development kit, the Bluetooth for Windows Software Development Kit enables Microsoft Windows platform developers to rapidly create state-of-the-art software applications that utilise the latest in Bluetooth wireless technology.
The SDK contains everything you need to build Bluetooth wireless communication into your Windows application including:
• Bluetooth libraries
• Sample applications (source code included)
• Bluetime: L2CAP Time Monitor
• BlueChat: RFCOMM Chat
• BlueClient: FTP/OPP Client
• BlueCom Chat: Com Port Chat
• Complete User and Programmer reference documentation
• Technical support and maintenance upgrades for the first six months
Features and Benefits • Bluetooth specification 1.1 compliant for the latest released features and compatibility
• Rich set of APIs for maximum development flexibility
• Intelligently designed APIs for concise interfaces
• Simple, intuitive programmer interface
• Sample applications for quick start-up
• Complete and comprehensive documentation for quick and easy reference
SDK Recommended System Requirements • This SDK requires a MicroSira or Casira development kit and Bluetooth for Windows software
installed on the PC
• CSR HCI build V12.7 or later with valid Bluetooth address specific security key
• Windows 98 SE / Me / 2000 (SP 2) / XP
• Microsoft Visual C++ 6.0 (SP 5)
• USB port
• CD-ROM drive for installation
Casira User Guide
AN100b
© Copyright CSR 2001
This material is subject to CSR’s non-disclosure agreement.
Page 29 of 32
BlueCoreTM
Host Side APIs Support • L2CAP (Logical Link Control and Adaptation Protocol)
• SDP (Service Discovery Protocol)
• RFCOMM (Protocol for RS-232 serial cable emulation)
• OBEX (Object Exchange protocol)
• SPP (Serial Port Profile) Client and Server
• LAN Access Client
• OPP (Object Push Profile) Client
• FTP (File Transfer Profile) Client
Casira User Guide
AN100b
© Copyright CSR 2001
This material is subject to CSR’s non-disclosure agreement.
Page 30 of 32
BlueCoreTM
Technical Support If you encounter difficulties using your Casira units(s), send a detailed e-mail description of your issue and system set-up to your regional technical support group. Provide as much information as you can to help resolve your problem quickly.
When contacting technical support, please include the following details in your e-mail: • Your full name (First and Last)
• Company name
• Company address
• Contact phone number
• Serial numbers for the Casira unit(s) with which you experience problems
• Where possible, provide specific details about your set-up. For example:
• Windows platform in use
• Version of firmware used on the modules
• Any code or HCI commands used
• Modes of use
• Detailed description of issues Ensure that you are using the latest version of firmware and BlueSuite from CSR’s Secure website. For Technical Support in Europe, Asia and areas outside North or South America, please e-mail:
[email protected] For Technical Support in North or South America, please e-mail: [email protected]
Casira User Guide
AN100b
© Copyright CSR 2001
This material is subject to CSR’s non-disclosure agreement.
Page 31 of 32
BlueCoreTM
Definitions and Acronyms Bluetooth A set of technologies providing audio and data transfer over short-range radio
connections
BlueCoreTM The CSR Bluetooth chip used in the Casira
ACL Asynchronous Connectionless (packet data transmitted over Bluetooth)
BCSP BlueCore Serial Protocol. A robust, channel based protocol
BT Bluetooth
BTCLI Bluetooth Command Line Interface. A command-line program for exercising and configuring CSR Bluetooth chips
CSR Cambridge Silicon Radio
DFU Device Firmware Upgrade
H4 Bluetooth serial protocol as described in section H4 of the Bluetooth specification. A simple packet-based protocol
PS Persistent Store
ROM Read Only Memory
SCO Synchronous Connection Orientated. Continuous Stream data (e.g., voice) transmitted over Bluetooth, as opposed to ACL
SDK Software Development Kit
UART Universal Asynchronous Receiver Transmitter. A chip that turns parallel bus -based data into a signal that can run down just a few lines and back again.
USB Universal Serial Bus
Casira User Guide
AN100b
© Copyright CSR 2001
This material is subject to CSR’s non-disclosure agreement.
Page 32 of 32
BlueCoreTM
Record of ChangesDate: Revision: Reason for Change:
23 AUG 01 a Original publication of this document (CSR reference: bc01-an-100a)
21 JAN 02 b Revised and re-ordered document. Added information regarding installing BlueSuite CE software and USB drivers, BTCLI and Bluetooth for Windows (CSR reference: bc01-an-100b)
Casira User Guide
AN100
January 2002
BlueCore is a trademark of CSR.
Bluetooth™ and the Bluetooth logos are trademarks owned by Bluetooth SIG Inc, USA and licensed to CSR.
All other product, service, and company names are trademarks, registered trademarks, or service marks of their respective owners.
CSR’s products are not authorised for use in life-support or safety-critical applications.