Embed Size (px)
Citation preview
BC MANAGER
Version 4.0.1
MANUAL
Copyright © 2008-2018 by Mark van den Berg
MOUNTAIN UTILITIES
https://mountainutilities.eu/
CONTENTS
1. Overview . . . . . . . . . . . . . . . . . . . . . . . . . . . . . . . . . . . . . . . . . . . . . . . . . . . . . . . . . . . . . . . . . . . . 32. Version history . . . . . . . . . . . . . . . . . . . . . . . . . . . . . . . . . . . . . . . . . . . . . . . . . . . . . . . . . . . . . . . 53. Computer requirements . . . . . . . . . . . . . . . . . . . . . . . . . . . . . . . . . . . . . . . . . . . . . . . . . . . . . . . . 244. BCF2000/BCR2000 setup. . . . . . . . . . . . . . . . . . . . . . . . . . . . . . . . . . . . . . . . . . . . . . . . . . . . . . 255. Installation of BC Manager . . . . . . . . . . . . . . . . . . . . . . . . . . . . . . . . . . . . . . . . . . . . . . . . . . . . . 296. MIDI setup . . . . . . . . . . . . . . . . . . . . . . . . . . . . . . . . . . . . . . . . . . . . . . . . . . . . . . . . . . . . . . . . . 317. Tutorials . . . . . . . . . . . . . . . . . . . . . . . . . . . . . . . . . . . . . . . . . . . . . . . . . . . . . . . . . . . . . . . . . . . 368. The main window . . . . . . . . . . . . . . . . . . . . . . . . . . . . . . . . . . . . . . . . . . . . . . . . . . . . . . . . . . . . 399. The B-Control detection options dialog box. . . . . . . . . . . . . . . . . . . . . . . . . . . . . . . . . . . . . . . . 5010. The B-Controls window . . . . . . . . . . . . . . . . . . . . . . . . . . . . . . . . . . . . . . . . . . . . . . . . . . . . . . . 5211. The global setups window. . . . . . . . . . . . . . . . . . . . . . . . . . . . . . . . . . . . . . . . . . . . . . . . . . . . . . 6312. The presets window. . . . . . . . . . . . . . . . . . . . . . . . . . . . . . . . . . . . . . . . . . . . . . . . . . . . . . . . . . . 6513. The preset dialog box . . . . . . . . . . . . . . . . . . . . . . . . . . . . . . . . . . . . . . . . . . . . . . . . . . . . . . . . . 6914. The layout windows . . . . . . . . . . . . . . . . . . . . . . . . . . . . . . . . . . . . . . . . . . . . . . . . . . . . . . . . . . 7215. Printing overlays . . . . . . . . . . . . . . . . . . . . . . . . . . . . . . . . . . . . . . . . . . . . . . . . . . . . . . . . . . . . . 7516. The element windows . . . . . . . . . . . . . . . . . . . . . . . . . . . . . . . . . . . . . . . . . . . . . . . . . . . . . . . . . 7817. The element dialog boxes . . . . . . . . . . . . . . . . . . . . . . . . . . . . . . . . . . . . . . . . . . . . . . . . . . . . . . 8118. Editing LEARN and custom output . . . . . . . . . . . . . . . . . . . . . . . . . . . . . . . . . . . . . . . . . . . . . . 8519. The Insert SysEx parameter dialog box . . . . . . . . . . . . . . . . . . . . . . . . . . . . . . . . . . . . . . . . . . . 8720. The BCL output options dialog box . . . . . . . . . . . . . . . . . . . . . . . . . . . . . . . . . . . . . . . . . . . . . 10021. The BCL editor windows . . . . . . . . . . . . . . . . . . . . . . . . . . . . . . . . . . . . . . . . . . . . . . . . . . . . . 10222. Reason maps . . . . . . . . . . . . . . . . . . . . . . . . . . . . . . . . . . . . . . . . . . . . . . . . . . . . . . . . . . . . . . . 10623. The MIDI input messages window . . . . . . . . . . . . . . . . . . . . . . . . . . . . . . . . . . . . . . . . . . . . . . 10824. The Mackie monitors . . . . . . . . . . . . . . . . . . . . . . . . . . . . . . . . . . . . . . . . . . . . . . . . . . . . . . . . 11325. The MIDI keyboard. . . . . . . . . . . . . . . . . . . . . . . . . . . . . . . . . . . . . . . . . . . . . . . . . . . . . . . . . . 11526. The (N)RPN messages window . . . . . . . . . . . . . . . . . . . . . . . . . . . . . . . . . . . . . . . . . . . . . . . . 11727. The MIDI System messages window . . . . . . . . . . . . . . . . . . . . . . . . . . . . . . . . . . . . . . . . . . . . 11928. The MIDI controllers window. . . . . . . . . . . . . . . . . . . . . . . . . . . . . . . . . . . . . . . . . . . . . . . . . . 12029. The MIDI System Exclusive messages window . . . . . . . . . . . . . . . . . . . . . . . . . . . . . . . . . . . . 12230. Using the computer keyboard and mouse . . . . . . . . . . . . . . . . . . . . . . . . . . . . . . . . . . . . . . . . . 12431. Item dragging . . . . . . . . . . . . . . . . . . . . . . . . . . . . . . . . . . . . . . . . . . . . . . . . . . . . . . . . . . . . . . 12532. Known problems . . . . . . . . . . . . . . . . . . . . . . . . . . . . . . . . . . . . . . . . . . . . . . . . . . . . . . . . . . . . 12633. Wish list . . . . . . . . . . . . . . . . . . . . . . . . . . . . . . . . . . . . . . . . . . . . . . . . . . . . . . . . . . . . . . . . . . 12834. Frequently asked questions . . . . . . . . . . . . . . . . . . . . . . . . . . . . . . . . . . . . . . . . . . . . . . . . . . . . 128
1. Overview
BC Manager is a utility by Mountain Utilities for working with the Behringer BCF2000 andBCR2000 USB MIDI Controllers. It is available for macOS and Windows. It is free, althoughdonations are more than welcome.
A few notes on terminology used in this manual:! ‘BCF’ means the BCF2000, ‘BCR’ the BCR2000.! ‘BCL’ (Behringer’s term): this probably stands for ‘B-Control Language’, the language in which
all the BCF2000 and BCR2000’s settings are sent, embedded in MIDI System Exclusivemessages.
! ‘Element’: a generic term (also introduced by Behringer) for buttons, encoders and faders.! BCMI: the document BC MIDI Implementation.pdf, available from the Mountain Utilities web
site.
BC Manager provides the following facilities (among many others):
! Maintenance of up to sixteen B-Controls simultaneously: you can send and receive globalsettings and presets.
! Access to the B-Control’s internal global setup history.
! A hardware test mode, allowing you to test whether a B-Control’s buttons, encoders and faderswork correctly.
! For the BCF2000 in emulation mode (except bhuI): a window showing the messages which thecontrolling MIDI device sends to the BCF.
! You can save all B-Control data as ‘bcf’, ‘bcr’, ‘syx’,‘txt’ or ‘bc2’ files. BC Manager opens andsaves all these formats, so no manual, external conversion is needed between bcf, bcr, syx, txtand bc2. (Actually BC Manager does include a conversion utility, but you never need to use itfor BC Manager itself.)
! Display of all global, preset and element settings in on-screen tables.
! Graphical editing of all B-Control settings. (So you don’t have to know BCL.)
! You can edit a particular setting for a range of elements (or even presets) in one go, either to asingle value or incrementally.
! Full support for ‘custom’ (‘.tx’) MIDI messages: you can edit these graphically too.
! A ‘SysEx preprocessor’: for many MIDI devices (e.g. many models by Fractal Audio,Roland/BOSS, Waldorf and Yamaha) it is possible to use special ‘SysEx model definition files’:in this way you only have to tell BC Manager which parameter of a specific synthesizer (etc.)you want to assign to a particular button, encoder or fader on your B-Control, and BC Manager’sSysEx preprocessor generates the appropriate MIDI System Exclusive message definitionautomatically.
3

! Direct capture of BCF/BCR snapshots.
! Standard copy-and-paste facilities for presets and elements.
! Comparison of presets and elements.
! You can provide labels for elements (and print them — see below). Furthermore, you can addyour own comments (of unlimited length) to the global setup, to each preset and to each element.
Beware: these labels and comments cannot be stored in the B-Control itself. Therefore it isrecommended that you only send preset definitions containing labels and/or comments to the B-Control, but don’t attempt to receive those definitions back from the B-Control.
! Various printing facilities:! You can print colored overlays that you can put on your actual BCF/BCR2000s.! You can print the table window images as such.
! You can export a table to a specially formatted ‘txt’ file that you can use as an input file tocreate a table in an external word processor. (In any case this works for WordPerfect;presumably it works for other word processors as well.)
! Many generic MIDI input/output tools, such as a MIDI message recorder, a SysEx editor and amouse-controlled MIDI keyboard with chord and arpeggio facilities. There are also virtualdisplays for Mackie Controls (much like those provided by the Huskervu utility).
! For testing purposes, BC Manager incorporates a seamlessly integrated BCL editor featuringsyntax highlighting: you can load the internally maintained state of a B-Control (or even a singlepreset) directly into a BCL text editor window, and you can have BC Manager ‘execute’ the textfrom this window or send it directly to the B-Control via MIDI.
! Visualization of Propellerhead Reason’s native BCF2000/BCR2000 parameter mappings.
4
2. Version history
Version 4.0.1 (2018-03-03)Bug fix (Windows edition only):! The application’s setup files now always use the decimal point as the decimal separator,
irrespective of the operating system’s decimal separator. (Previously, on a Windows systemwhere some other character (typically a comma) was defined as the decimal separator, everystart of the application would lead to three error messages.)
Improvement:! In the ‘Compare preset names’ dialog box, the grid updates while the user is dragging the thumb
of the scroll bar.Additions to this manual:! Added a section describing the MIDI controllers window in detail: §28.! Added the problems with color boxes on macOS to the list of known problems (§32).! The answer to question 37 in the FAQ section (§34) mentions that the B-Control imposes a limit
of 125 on the number of bytes in custom output definitions.
Version 4.0.0 (2017-11-23)Global changes to the BC Manager package:! The BC Manager package incorporates the latest version of BC MIDI Implementation.pdf, 1.2.9.! Windows only:
! The exe file of the installer is no longer offered within a zip file, but directly.! The installer automatically installs the edition of the application that matches the operating
system: the 32-bit edition on 32-bit Windows, the 64-bit edition on 64-bit Windows.(Previously there was only a 32-bit edition, which was installed on 32- and 64-bit Windowsalike.)
! Portable 32- and 64-bit editions are available. The 32-bit edition runs on 32- and 64-bitWindows, the 64-bit edition only on 64-bit Windows.
! The BC Manager update mechanism allows you to specify in which update types you areinterested: alpha (development) versions, (‘public’) beta versions, release candidates and releaseversions.
! Since the Mountain Utilities website has changed from the HTTP protocol to HTTPS, all links tothe Mountain Utilities website have changed to HTTPS too.
! In accordance with Apple renaming OS X to macOS, all occurrences of ‘OS X’ in theapplication and this manual have been replaced with ‘macOS’.
New features in BC Manager itself:! The ‘Print strips’ operation (accessible via the File pull-down menu of the layout windows) has
been replaced with ‘Print overlays’. This opens a dialog box from which you can’t just printstrips, but also complete or partial overlays for your BCF or BCR. The button, encoder and faderlabels are printed in the colors you have defined for them (as also shown in the layout windows).Lots of customization options are available. A live preview panel shows exactly what you’reabout to print.
! Several new features in the BCL editor windows, most prominently syntax highlighting.! Via the Settings tab of the preset dialog box you can change the background color (by default
pink) and the text color (by default black) of the disabled/special buttons/encoders.! In a layout window you can move directly to cells in adjacent grids via the arrow keys of your
computer keyboard: it’s as if all the grids are one big grid.! The Resolutions column of the encoders window now warns about several anomalous
conditions:! If all four resolutions are 0, the Resolutions column says ‘Default’ if standard output has
5
been defined, ‘0 (ERROR)’ otherwise.! If any resolution is higher than 32673, the Resolutions column says ‘INVALID’ in front of
the sequence of resolutions.! The General tab of the encoder dialog box now mentions two resolution setups you should
avoid:! A resolution of 0 when there is only custom output.! A resolution higher than 32673.
! Several new features concerning SysEx model definition files:! Error messages concerning ini files now mention the line number where the error occurred.
Moreover, some error messages have become more informative.! An empty or invalid ProgramVersion is no longer interpreted as version ‘0.0.0.0’, but
generates an error message.! DevicePosition can be blank: this is for target devices that don’t use Device parameters in
their SysEx messages.! The new AfterData parameter in the header specifies any fixed data bytes occurring after
the variable data bytes (but before the checksum, if defined).! The Models folder of the BC Manager package now includes the SysEx model definition
file Axe-FX_II_XL_MvdB.ini, demonstrating the format of Fractal Audio’s Axe-FX II XL.! The Mackie monitors now accept display messages from all Mackie models (such as the Mackie
Control XT).Bug fixes (macOS and Windows editions):! In the B-Controls window, the Import operation now sets the ‘modified’ flag (shown as an
asterisk in the File column) of any affected data area; this is appropriate because Import isintended for loading partial data into an existing dataset, which creates a new ‘concoction’ thatmay have to be saved. However, the Open operation still does not set this flag: the idea is thatyou only apply Open to a file containing all data areas, so that no new concoction is created andsubsequent saving isn’t necessary.
! In the B-Controls window, the Open and Import operations now clear any pre-existing commentsin the global setup.
! In the ‘MIDI options’ dialog box, changes to ‘Select preset upon "Copy to preset 0"’ and‘Method’ are now retained when you press OK. (Thanks to Pistor for reporting this bug, whichwas introduced in BC Manager 2.6.0.)
! In a layout window the ‘Print window image’ operation now actually prints the window image.! In the preset dialog box, when you press Alt+T, the ‘Text color’ box is now actually selected.! In the preset dialog box, the tab order of the controls on the Settings tab has been corrected.Bug fix (macOS edition only):! In the MIDI data calculator, the position of a ‘Binary’ label has been corrected.Bug fix (Windows edition only):! In the View pull-down menu of the layout windows, the selected label scheme is no longer
indicated by a checkmark, but by a bullet.Additions to this manual:! CopperLan has been added to the list of MIDI pipes in §6. (Thanks to JAPP for bringing
CopperLan to my attention.)! A tutorial on setting up individual elements (buttons, encoders and faders) in §7.! A whole new section on printing overlays: §15.! In §19:
! The table of the SysEx model definition file format has been brushed up and updated.! There is a new sub-section on FractalAudio’s Axe-FX II XL.
! Information on the many new features of the BCL editor windows (such as syntax highlighting)has been added to §21.
6
Version 3.1.0 (2016-02-08)New features:! Windows edition only: If a previous version of the application has been installed, the installer
skips the dialog box in which you can set the destination folder and the dialog box in which youcan set the program group in the Windows menu. So if you wish to install to a different folder orprogram group, you must uninstall the previous version first.
! Maintenance of multiple application setups (such as window positions and the enabled/disabledstates of MIDI devices) via setup (‘.stp’) files. See the Setup submenu: on OS X this is in the BCManager pull-down menu, on Windows in the File pull-down menu of the main window. Notethat opening a previously saved setup file involves restarting the application. You can also startthe application with a setup file as a command line parameter: -s setupfile on OS X, /s setupfileon Windows.
! Maintenance of the positions of the application’s generic windows via desktop (‘.dsk’) files; seeView , Desktop in the main window. Unlike opening a setup file, opening a desktop file doesnot involve restarting the application. Note that desktop files do not maintain the positions of thewindows related to specific B-Controls: these can be maintained separately — see below.
! Maintenance of a B-Control’s window positions via B-Control desktop (‘.bcd’) files; see View, Desktop in the B-Controls window.
! You can sanitize the lists of most-recently opened/saved files in the menus via two operations:‘Remove absent files from list’ and ‘Clear list’.
! A B-Control-related grid updates its display immediately when you mouse-drag the ‘thumb’ inits horizontal or vertical scrollbar. (Previously these grids updated only when you released themouse button.)
! Element list windows: in the ‘Add number’ dialog box (opened via Parameter , Name , Addnumber), ‘Step per row’ (available when multiple elements have been selected) has a widerrange: from !100 to +100.
! BCL editor windows: the most-recently opened/saved files can be reopened via the menu.! MIDI controllers window: the control bars now respond to Control Change messages received at
the selected channel of the selected input device.! MIDI controllers window: in the Options dialog box a button selecting controllers 0-31 has been
added.! MIDI System messages window: System Exclusive messages can be sent repeatedly (via Start
and Stop). This can be useful for stress-testing the SysEx buffer implementations of MIDIdevices and applications.
New features in the MIDI System Exclusive window (many thanks to Royce Craven for his input!):! The window now has three panels: MIDI, Probe and Toolbar, each of which can be hidden via
the View pull-down menu.! On the Probe panel, an editbox (with a history list) allows you to type one or more SysEx
messages. These messages can be sent to a MIDI device, and the history list can be saved to andloaded from a text (‘.txt’) file.
! You can prevent the grid from automatically scrolling to the latest received message by clearingthe new View , ‘Scroll to new message’ setting.
! The vertical order of the representations of the message bytes in the grid has changed. From topto bottom the order is now: decimal, hexadecimal, binary, character. (This order is the same as inthe MIDI data calculator window, accessible from the main window's View pull-down menu.)
! The old Edit operation (allowing you to edit the selected messages as text lines) is still available,but has been renamed to ‘Edit message(s)’ and its icon has changed to a ‘T’.
! The ‘E’ icon is now associated with the new ‘Edit byte(s)’ operation. This operation allows youto edit the selected byte(s) in the message grid individually via a dialog box, offering threeediting formats: decimal, hexadecimal and binary. The corresponding ASCII character is alsodisplayed.
7
! Quite a few keyboard shortcuts have changed.! ‘Correct Roland checksum(s)’ can be applied on demand to the message(s) selected in the probe
edit box or the grid.! If ‘Auto-correct Roland checksum(s)’ in the Edit pull-down menu has been ticked, the ‘Edit
byte(s)’ and ‘Edit message(s)’ operations automatically correct any invalid Roland checksumsresulting from your edits to the grid. Similarly, if ‘Auto-correct Roland checksum(s)’ in theProbe pull-down menu has been ticked, the message(s) in the probe editbox is/are automaticallycorrected when you execute Send.
Bug fixes (OS X and Windows editions):! Mackie monitors: the height of the window now updates immediately after its font size has
changed.! MIDI System messages window: the Start button for Timing Clock now uses the correct interval.Bug fixes (OS X edition only):! Incoming MIDI System Exclusive messages are now processed correctly. (Previously the
terminating F7 could get cut off, leading to error message ‘Not enough MIDI SysEx inputbuffers’.) Many thanks to adriaanhendrik for reporting this bug and assistance in fixing it!
! Non-SysEx messages coming in in quick succession are now processed correctly. (Previouslysuch messages would get skipped and lead to error message ‘Non-SysEx MIDI input messagetoo long’.)
! MIDI input messages window: the actual maximum number of messages in the grid now keepsmatching the value stipulated in the Options dialog box.
! MIDI System Exclusive window: the Edit , Insert operation is now executed upon Ctrl+N.(Previously it was associated with Ctrl+I, but this was (and is) already associated with File ,Insert.)
! Output statement dialog box: ‘Paste bare hex sequence’ now works.! The menu bar now consistently shows the active window’s pull-down menus. So if the active
window doesn’t have any pull-down menus, nothing is shown; previously in this situation, thepull-down menus of the previously active window would still be shown.
Bug fix (Windows edition only):! BCL editor windows:
Previously, saving the BCL lines to a text file (with extension ‘.bcf’, ‘.bcr’, ‘.txt’ or ‘.bc2’)unintentionally created an RTF (Rich Text Format) file, containing several formatting codes.This has been corrected: saving to a text file now creates a ‘normal’ text file.In line with this, opening a text file now expects a ‘normal’ text file. (So if you open apreviously saved file containing RTF codes, these codes now show up as text too! Please removethese codes manually, then re-save.)
Version 3.0.0 (2015-09-23)! Many new features in the layout windows (many thanks to Peter Hintze for his input!):
! Each preset can have its own image, displayed to the left of the number LEDs. (The imagefile can be a bmp or ico file of any dimensions, although the image is always stretched to32×32.)
! The preset name is no longer displayed on the status bar, but to the left of the preset image— in big letters!
! The clarity of the number LEDs has improved: presets 0-9 no longer display a leading ‘0’and the temporary preset’s ‘0’ is a bit more yellowish.
! The color of the window’s background and the color of the preset name and the grouplabels (‘FOOT’ etc.) can be customized.
! The background of each element (button/encoder/fader) can be any of 17 colors. (Typicallyyou will assign a particular color to related elements.)The text of each element is shown in black or white, depending on which of these colors
8
contrasts best with the selected background color.! Because elements can now be color-coded, the currently selected element is no longer
indicated by a green background, but has a border in the same color as the element’s textcolor.
! Each preset has an Author field, editable on the Info tab of the preset dialog box.! New default text file types: bcf (for the BCF2000) and bcr (for the BCR2000).
Whereas all ‘old’ formats (syx, txt and bc2) are still supported, it is recommended to switch tobcf and bcr, for two reasons:1. The bcf and bcr extensions provide a natural distinction between files for the BCF2000 and
files for the BCR2000. What’s more, in its Open and Save dialogs BC Managerautomatically selects the appropriate extension for each B-Control: you won’t see bcf as anoption for a BCR2000 and vice versa.
2. Whereas the above-mentioned new metadata fields (colors, preset image and preset author)are retained in syx files too, they will cause ‘dumb’ third-party syx uploaders to uploadthese files to B-Controls more slowly. On the other hand, BC Manager knows exactly whatand what not to upload.
Several conversion methods are available:! You can open existing syx/txt/bc2 files in the B-Controls window and then save them as
bcf/bcr files.! You can simply rename existing txt and bc2 files: in OS X e.g. via Finder, in Windows e.g.
via Windows Explorer.! You can convert existing syx files to bcf/bcr files via File º Convert º ‘Syx to text’ in BC
Manager’s main window.! By default, BC Manager maintains backups of B-Control files.! Several new operations in the button, encoder and fader list windows:
! Bulk parameter editing: edit name (delete, add number, add text), swap Value 1 and 2.Note: the ‘add text’ operation allows you to specify multiple names on separate lines in
one go. So for instance if you select elements 1-3 and enter three lines in the ‘add text’dialog box, the first line gets added to the name of element 1, the second goes to element 2and the third to element 3. And as is the case for all ‘Parameter’ operations, if you enterfewer lines than the number of selected elements, the entered lines are ‘cycled’.
! You can now quickly set up an element (or range of elements) for ‘standard’ NRPNmessages, just as you already could for Program Change and Control Change.
! New: a window from which you can send NRPN and RPN messages. Useful for testingpurposes. See §26 for more information.
! In the ‘Window list’ dialog box you can make all windows visible in one operation.
Version 2.6.0 (2015-03-27)! This is the first version also available for OS X.
Features missing from the OS X edition compared to the Windows edition:! Printing. [This was implemented in version 4.0.0.]! MIDI Thru. This will never be implemented, simply because OS X doesn’t offer MIDI Thru
the way Windows does.! Almost entirely insignificantly, the MIDI System Exclusive messages window doesn’t
allow you to hide the grid lines in the header row and the leader columns.The OS edition also suffers from a few visual problems related to the scrollbars around grids;this may be fixed in a future version.More problems may exist, but at release time none were known. If you come across anyproblem, please report it at https://mountainutilities.eu/forums/b-control.
! By default, when you are about to send one or more memory presets to a B-Control, you areasked whether you really want to do this: this prevents you from accidentally overwriting presets
9
you don’t have a backup of. However, you can bypass this question by unchecking ‘Confirmsending memory presets’ in the BCL output options dialog box, accessible from the Optionspull-down menu in the main window.
! To improve usability, in the preset and element windows, the Set sub-menu has been movedfrom the Edit menu: it is now a separate pull-down menu called Parameter.
! Similarly, in the element windows, the ‘Create simple’ sub-menu has been moved from the Editmenu and become a separate pull-down menu called Simple. There are also buttons on thetoolbar for the items in this pull-down menu, Program Change and Control Change.
! Many internal improvements to MIDI input and output communication. In particular, the inputsystem for SysEx messages has been redesigned completely, one consequence being that themaximum SysEx message length is now fixed at 65536 bytes, hence it is no longer editable viathe Input tab of the MIDI devices dialog box.
! On the MIDI keyboard, Middle C has a blue border.! The MIDI input messages window can display message times in various formats:
((((days:)hours:)min:)sec.)ms.! Several new features in the MIDI System Exclusive window:
1. You can export the selected messsage(s) to a text file, optionally including the messageindexes and lengths.
2. The message bytes are displayed in a grid, in which you can highlight specific columns byright-clicking. Moreover, the bytes can be displayed in various formats simultaneously:binary, hexadecimal (the default), decimal and ASCII character.
See §29 for more information.! BC Manager no longer refuses to start if system.ini doesn’t exist in the Windows system folder.! The Tutorial section in this manual has been improved.! The Donate item in the main window’s Help pull-down menu no longer opens a dialog box, but
makes your web browser open the Donate page at the Mountain Utilities web site.
Version 2.5.0 (2014-02-05)! A window in which you can perform MIDI data byte conversions.! SysEx model definition files can now contain labeled parameter sections, which can be nested
up to any depth. The ‘Insert SysEx parameter’ dialog box displays these sections in anexpandable tree. (This dialog box has also been improved in several other ways.)
! Keyboard shortcuts to numerical edit boxes with up and down arrows work again. (This wasbroken in version 2.4.2.)
! Big changes to this manual:! Many screenshots of windows and dialog boxes.! Several new sections dedicated to particular windows.! A tutorial (§7) on working with presets.! Many small improvements.
Version 2.4.2 (2013-11-21)! The maximum of AddressLength in SysEx model definition files has been raised from 4 to 8.
(Make sure you set ProgramVersion to 2.4.2 if AddressLength is higher than 4.)! The dialog box in which you can type a parameter knob’s value can now also be opened by left-
clicking the knob while holding an Alt key. (See §30.)! The Help pull-down menu of the main window provides access to a window listing the computer
keyboard and mouse actions that can be applied to parameter knobs.! BC Manager uses the new Mountain Utilities web site at mountainutilities.eu in links and its
update mechanism.! New in this manual:
! A discussion of MIDI Yoke’s behavior under Windows versions with UAC.
10
! A discussion on using multiple BCFs/BCRs via USB. (This discussion was already presentin the separate document Windows USB drivers for BCc2000.pdf.)
! Improvements in the section about the SyxEx model definition file format.
Version 2.4.1 (2013-04-02)New features:! The ‘MIDI System messages’ window, which allows you to send System Exclusive, System
Common and System Real-time messages for testing purposes.! A significant overhaul of the MIDI controllers window, with many new display options.! The MIDI keyboard window can now switch a key off by a Note On message with Velocity 0 (as
before) or by a Note Off message (with customizable ‘offset velocity’). Press the ‘Velocityoptions’ button to edit all velocity-related settings; all these settings are retained between runs ofBC Manager.
Bug fixes:! In the MIDI keyboard window: a bug (introduced in version 2.4.0) concerning arpeggios and
chords was fixed.! In the ‘MIDI System Exclusive message(s)’ dialog box (opened from the MIDI System
Exclusive messages window): if the sequence contains an invalid byte, the dialog box poppingup when you press OK now shows the correct SysEx message number.
Version 2.4.0 (2012-08-23)New features:! The MIDI program changer window: this allows you to send MIDI Program Change messages
prefixed by Bank Select MSB/LSB messages, in any combination.! In the MIDI keyboard window, each note’s loudness (‘onset velocity’) is determined by the
mouse’s vertical position on the key.! LoopMIDI has been added to the list of known virtual MIDI ports (‘pipes’).
As in previous versions, when you start BC Manager for the first time you must choose todisable or enable all MIDI pipes in BC Manager, and this now includes all loopMIDI ports, orrather those ports that have ‘loopMIDI’ in their names — as suggested by loopMIDI. However,loopMIDI allows you to change these names completely — if you do so, BC Manager won’trecognize them as MIDI pipes, so then you can only enable them manually. i.e. via the MIDIdevices dialog box.
! The ‘Import Reason map’ operation can load Propellerhead Reason 6.5.1’s map files for theBCF2000 and BCR2000 (BCF2000.remotemap and BCF2000.remotemap respectively).
! In SysEx model definition files, ManufacturerID can now consist of multiple bytes.! Seven SysEx model definition files for the Elektron Machinedrum, provided by Bob Svitilla.
Many thanks again!Improvements:! Windows that were open when the previous session of BC Manager terminated reappear exactly
where they were. (In previous versions of BC Manager, even a window previously on asecondary monitor always reappeared on the primary display, even when the secondary monitorwas still available.)
This new behavior has one potentially problematic consequence: when you remove amonitor or reduce the screen resolution, windows may become invisible upon a restart of BCManager. To remedy this, you can use the new ‘Make fully visible’ operation in the ‘Windowlist’ dialog box (accessible via the main window’s View pull-down menu or the Alt+0 keycombination).
! The ‘Test hardware’ dialog box now includes an explanation of what you can do (namelymanipulate elements in synchrony and run a ‘light show’).
! When sending or saving a B-Control’s Global Setup (e.g. via MIDI , ‘Send all data’ from the
11
B-Controls window), BC Manager no longer includes a BCL message that sets the B-Control’sdevice ID (as occurring in the Global Setup). Thus, a B-Control can no longer suddenly becomeinaccessible in the middle of a Send operation due to an unintentional change to its device ID.
Accordingly, the ‘Device’ column in the ‘Global setups’ window has been renamed to‘Device (ignored)’ and you can’t edit the device ID in the Global Setup dialog box any more. Forreference purposes only, the ‘Device (ignored)’ column still shows the device ID received from aB-Control or read from an old-style or third-party syx/txt/bc2 file; however, these values arenever sent or saved.
As before, BC Manager only uses the ‘Device’ value defined in the ‘MIDI options’ dialogbox (accessible from the B-Controls window via MIDI , Options) for all its device ID‘fingerprints’ in communication with the B-Control and in syx files.
So from now on, you can only change a B-Control’s device ID manually on the B-Controlitself via its Global Setup edit mode (EDIT + STORE , ‘EG’); of course you still also have toupdate the device ID as maintained by BC Manager via the ‘MIDI options’ dialog box. Note thatcertain Behringer USB device drivers include the B-Control’s device ID in the B-Control’s MIDII/O port names; in this case you also have to restart BC Manager and any other runningprograms still using the old MIDI I/O ports.
! When saving a B-Control’s data (presets/global setup) to a syx file, BC Manager now by defaultuses the generic device ID ($7F) for each BCL SysEx message’s ‘fingerprint’, rather than theselected B-Control’s device ID (1-16), This ensures that any B-Control (of the same type, i.e.BCF or BCR) accepts the messages from this syx file when sent via a SysEx-uploader such asMIDI-OX, irrespective of the B-Control’s actual device ID. (For BC Manager the device IDfingerprints stored in syx files don’t matter: when opening a syx file, BC Manager ignores these;when sending SysEx data to a B-Control, BC Manager uses the B-Control’s actual device ID (1-16) as defined in the ‘MIDI options’ dialog box.)
If you want to restore the old saving behavior (i.e. use the selected B-Control’s device ID asmessage fingerprints), open the ‘BCL output options’ dialog box (accessible from the mainwindow via the Options pull-down menu) and set ‘Device to save to syx file’ to ‘Selected B-Control’.
! The Insert SysEx parameter dialog box no longer displays a definition file’s Comment field as asingle line (cutting off any characters that don’t fit the width of the dialog box), but in ascrollable, word-wrapping multi-line text box. (Note that the Comment field itself can still onlybe single-line in the definition file.)
Version 2.3.2 (2011-10-21)Bug fix:
The ‘Paste bare hex sequence’ operation in the ‘Output statement’ dialog box now workscorrectly.
Improvements:! A verification dialog box pops up whenever you are about to send a global setup to a B-Control,
warning you that changing the B-Control’s Operating Mode may invalidate its MIDI/USB ports.! In the BCR’s encoder list window, the LEDs column now shows ‘INVALID ...’ if a ‘fancy’
setting is chosen for a ‘normal’ (i.e. non-push) encoder. (A new question in the FAQ section ofthis manual discusses this phenomenon.)
! Invalid message indexes in the main window’s ‘Convert syx to txt/bc2’ operation are nowreported with their most significant byte first, in harmony with the error report generated whenthe same file is opened in the B-Controls window.
! For clarity, error messages concerning B-Control SysEx messages now add the $ prefix to thehexadecimal command number.
! Minor stylistic improvements to this manual.New:
12
Two new SysEx model definition files: one for the Alpha Juno 1 (by Bob Svitilla) and one forthe Waldorf Q (by Sven Baus). Many thanks!
Version 2.3.1 (2011-03-10)The Mackie monitors no longer display garbage.
Version 2.3.0 (2011-03-07)! Many improvements concerning SysEx model definition files. Most importantly:
! The format of SysEx model definition files has been widened in several ways. It nowsupports a much wider variety of manufacturers, such as Waldorf.
! The BC Manager package contains a few new SysEx model definition files and templates.! You can create a CSV report for the parameters in a SysEx model definition file.! In this manual the section about the ‘Insert SysEx parameter’ dialog box (§19) has been
revised to reflect all the changes. Also, there are now tables specifying some commonSysEx formats (Roland/BOSS, Waldorf and Yamaha).
! For clarity, the name of a disabled MIDI I/O device is no longer prefixed by an asterisk (*), butby ‘DISABLED ’, and the name of an absent MIDI I/O device is no longer written betweenparentheses, but prefixed by ‘ABSENT ’.
! The ‘Check for update’ dialog box opens on first startup of BC Manager. (Previously a silentupdate check was performed in this situation.)
Version 2.2.1 (2011-01-09)! Fixed a version 2.2.0 regression by which the size of a Mackie monitor window sometimes
became incorrect.
Version 2.2.0 (2011-01-07)New features:! Unicode support: in most text edit boxes in the program (e.g. for file names) you can now enter
any ‘international’ characters. But of course BCL as sent to/from the B-Control still only allowsASCII characters (from #32 to #127) in preset names. You can include Unicode characters incomments and element names, but these will only be retained if you save to a txt file: syx andbc2 files can’t contain Unicode characters (although their file names can). (Technical note: BCManager now saves txt files and its own ini file in UTF-8 format, starting with the three-byteUTF-8 BOM (byte order mark); however, it can still read any plain ASCII/ANSI txt/ini file.)
! As a consequence of its new Unicode support, BC Manager no longer runs under Windows 95,98 or Me, because these operating systems do not support Unicode. (If you require a version ofBC Manager that runs under these operating systems, please send a message to the contactaddress at the Mountain Utilities web site.)
! The ‘Output statement’ dialog box can paste a sequence of bare hexadecimals whileautomatically adding the $ prefixes required in BCL’s ‘.tx’ statements.
! The ‘Insert SysEx parameter’ dialog box displays the device’s manufacturer and version, dateand author of the SysEx model definition file. The dialog box also has a button that opens thefolder containing the SysEx model definition files in Windows Explorer, and a button that opensthe folder containing the templates.
! The ‘Import Reason map’ operation can load Propellerhead Reason 5’s map files for theBCF2000 and BCR2000 (BCF2000.remotemap and BCF2000.remotemap respectively). Sinceeach of these files contains more devices (38) than there are memory presets (32) in a B-Control,BC Manager imports such a file into two, new B-Controls. Accordingly, BC Manager no longerimports a Reason 3 or 4 map file into the currently selected B-Control, but into a (single) new B-Control.
To clarify the above-mentioned altered procedure of ‘Import Reason map’, the ‘Import
13
Reason map’ operation has been moved to the ‘B-Controls’ pull-down menu in the B-Controlswindow.
! The BC Manager package now includes a SysEx definition file (written by Patrick Manderson)for 4-operator Yamaha FM synthesizers.
Improvements:! Some error messages concerning MIDI System Exclusive messages now specify the BCL line
number in which they occur. This makes it easier to pinpoint the location of the error, e.g. in acorrupt syx file being opened.
! In the ‘Output statement’ dialog box, the edit box is a lot wider than before, which is useful forlong lines.
! BC Manager no longer rejects a SysEx model definition file if it contains one or more lines withonly spaces.
! A few cosmetic changes, e.g. to the main window’s Help menu.! Upon first startup, BC Manager now copies all the shipped SysEx model definition files from
the installation folder to the user’s application data folder.! The questions in the FAQ section of this manual are numbered.! Miscellaneous improvements and additions to this manual.Bug fixes:! The ‘Global setup history’ operation (in the menu of the B-Controls window) can no longer be
executed if no B-Controls are defined.! The ‘Global setup history’ window shows up in the middle of the screen.! Patrick Manderson has provided a corrected version of the TX81Z SysEx definition file.
Version 2.1.2 (2010-11-07)A blank toolbutton in the BCR’s preset list window was removed. This toolbutton was erroneouslyincluded in versions 2.1.0 and 2.1.1. (It was used for testing, but would usually only generate an errormessage when you pressed it.)
Version 2.1.1 (2010-11-05)! Several improvements to the BCF and Mackie Control virtual displays: they now stay on top of
the windows in other applications consistently and they have a few new settings (which can becustomized via their dialog boxes).
! The package now includes SysEx definition files for the Yamaha AN200 and TX81Z synths,written by Patrick Manderson. (See §19 on how to use these files.) Many thanks to Patrick!
! In this manual (particularly in the FAQ section): a few updates and improvements.
Version 2.1.0 (2010-09-23)New features:! Up to four virtual displays showing the text messages which certain MIDI applications send to
Mackie Controls. (You can use these displays if you have set up your BCF (in standard B-Control mode) or BCR as a Mackie Control.)
! For the BCF2000 in emulation mode (except bhuI): a virtual display showing the text messageswhich the BCF outputs.
! You can keep BC Manager’s main window on top of BC Manager’s other windows and otherapplications.
! A global setup history window (accessible from the B-Controls window’s MIDI pull-down menuvia Maintenance). This allows you to view and edit the BCF/BCR’s internal global setup history.
! A column in the presets window showing the currently used data size.! This manual’s FAQ section (under ‘MIDI connection’) describes how a BCF/BCR can
communicate with a synthesizer and BC Manager simultaneously.Improvements:
14
! A hint in the ‘MIDI System Exclusive messages’ window has been improved.! In this manual, the subsection on USB drivers has been rewritten completely, to take into
account the new Behringer drivers (published December 2009).! A few minor improvements to this manual and to BC MIDI Implementation.pdf (BCMI).! The link to the Mountain Utilities web site installed in Windows’ start menu has been updated.Bug fix:! The data size of $FE (Active Sensing) in LEARN/custom output is now counted correctly.
Version 2.0.3 (2009-11-02)All references to the Mountain Utilities web site have been updated from ‘home.hetnet.nl’ to‘home.kpn.nl’. Hence the automatic update mechanism will work again.
Version 2.0.2 (2009-08-06)New features:! From the System Exclusive window, you can extract the System Exclusive messages from a
standard MIDI file and save them to a System Exclusive file.! Facilities for automatic and manual checking whether an update of BC Manager is available
from the Mountain Utilities web site.! BCMI is now included in the BC Manager package, so that you can open BCMI from the
Windows Start Menu and from BC Manager’s Help pull-down menu.! A request for a ‘complex paste’ operation is discussed in this manual’s FAQ section.Improvements:! The package uses a different installer (Inno Setup instead of InstallShield). Consequently, the zip
file’s size has gone down from 4.5 MiB to 1.5 MiB, even though it now also includes BCMI!You may also note a few minor differences in the installation procedure.
! Every individual data section (global setup, preset specs, button, encoder, fader) that you save toa syx file or send to a B-Control can now contain up to 16384 BCL lines. Thus, there is hardlyany danger any more of getting a ‘too many BCL lines’ error message, which could previouslyoccur for a batch of very big presets (such as Reason 4’s BCR mapping).
! In the table windows, the widths of the File and MIDI asterisk columns are now initialized toaccommodate only the asterisks themselves (rather than the headers’ ‘F’ and ‘M’, which led todifferent widths for the File and MIDI columns).
! After the ‘Test hardware’ routine, the LEDs of the LEARN, EDIT and EXIT buttons can nolonger remain lit indefinitely. (Previously this occurred if these LEDs happened to be lit whenyou quit the ‘Test hardware’ dialog box: even switching to a different preset wouldn’t clearthese LEDs. In fact, this problem was caused by a bug in the B-Control firmware that affects anytransition from ‘.fkeys off’ to ‘.fkeys on’.)
! Some typos and inaccuracies in this manual’s FAQ section were corrected.
Version 2.0.1 (2009-04-30)New feature:! The Value 2 parameter can now be off for standard CC, NRPN, AT and GS/XG button
definitions. (This actually only works on the B-Control if the Mode parameter is toggleoff.For more information, see BCMI §15.)
Improvement:! New icons for the MIDI input and output meters.Bug fixes:! The ‘MIDI input messages: BCL’ window no longer generates a spurious MIDI error message
when it receives a non-BCL SysEx message in Record mode.! The window logic of the MIDI System Exclusive messages ‘Play’ dialog box has been corrected.! The Detach menu item is disabled after it has executed.
15
Version 2.0.0 (2009-03-01)New features:! Several additions to this manual:
! A section on the setup of BCFs and BCRs, discussing firmware, BCF emulation modes,operating modes and USB drivers.
! The MIDI setup section (§6) discusses some dangers related to virtual MIDI devices (MIDI‘pipes’) such as MIDI Yoke.
! An extensive FAQ section.! The new Restart operation terminates BC Manager and automatically starts a new instance of it.
This is particularly useful after a B-Control’s operating mode has changed from/to a U-mode, inorder to update BC Manager to the new set of available USB-based MIDI I/O devices. There isalso a version of Restart that restarts BC Manager with its default setup (i.e. by deletingBCMan.ini).
! Several procedures to optimize BC Manager’s setup of ‘MIDI pipes’ (i.e. virtual MIDI ports).See §6 for details.
! The MIDI controller window now allows you to send Control Change messages for anycontroller, i.e. from 0-127. (Previously the allowed range was 0-95). (Note: the program changebox has been moved to the MIDI keyboard window — see below.)
! A MIDI keyboard window, in which you can send mouse-generated note messages (even chordsand arpeggios) to any MIDI output device.
! A window in which you can create, edit, load, save, record and play MIDI System Exclusivemessages.
! You can detach a syx/txt/bc2 file from a B-Control.! BC Manager identifies a BCF2000’s ‘personality’. i.e. standard ‘B-Control’ mode or any of the
emulation modes. When BC Manager detects that a BCF is in emulation mode, it automaticallyrestricts the set of available communication operations to the only ones that work in emulationmode, namely connection status detection and firmware dumps.
! The MIDI pull-down menu of the B-Controls window contains a new submenu calledMaintenance. From this submenu you can execute the existing ‘Send firmware’ operation, butalso the new ‘Test hardware’ operation, which allows you to check whether your BCF/BCR’sbuttons, encoders and faders function correctly.
! You can directly move and copy preset, button, encoder and fader definitions from one positionto any other by mouse-dragging. See §31 for instructions.
! The layout windows display the selected element’s name and output summary on the status bar.! The element windows and dialog boxes additionally display the NRPN parameter as two
hexadecimal 7-bit values (MSB first).! In the element windows, the ‘Create simple’ submenu allows you to quickly set up an element
(or range of elements) for ‘standard’ Program Change and Control Change messages.! The encoder dialog box contains a button to quickly set the encoder resolutions to the standard
value of 96.! If a custom output definition is invalid (i.e. if it will cause the BCF/BCR to transmit incorrect
MIDI byte sequences), BC Manager displays a warning, indicating the exact location and natureof the error.
! BCL editor windows display the current line number and character index on the status bar.! In the MIDI input messages window, you can save the bytes of any MIDI messages (so not just
the SysEx messages) to a ‘flat’ binary file. This is mainly useful for specialistic furtherprocessing. (Previously you could only achieve this indirectly, namely by first saving the bytesto a text file, then converting that text file to a binary file.)
! The main window’s Help pull-down menu contains a link to the Mountain Utilities web site.Improvements:! BC Manager and its installer now adhere to the folder and registry access restrictions of modern
16
Windows operating systems (XP and later). As before, you must install BC Manager withAdministrator privileges, but you can now run BC Manager from a limited user account, i.e. onewithout Administrator privileges. (Previously this could lead to file access violations.)
In accordance with this new policy, BC Manager’s configuration file (BCMan.ini) and theSysEx model definition files are no longer kept in BC Manager’s installation folder (e.g.C:\Program Files\Mountain Utilities\BC Manager). Instead, BC Manager now stores these filesin your home folder: under Windows XP typically in C:\Documents andSettings\Username\Application Data\Mountain Utilities\BC Manager, under Windows Vista andlater typically in C:\Users\Username\AppData\Local\Mountain Utilities\BC Manager.
On its first run, this new version of BC Manager automatically copies any existingBCMan.ini from the installation folder to your home folder, so you don’t lose your previoussettings. However, if you have created any additional SysEx model definition files, you shouldmove these manually from C:\Program Files\Mountain Utilities\BC Manager\Models (on a 32-bit operating system) or C:\Program Files (x86)\Mountain Utilities\BC Manager\Models (on a64-bit operating system) to the Models subfolder at the new location, otherwise BC Managerwill no longer see them.
! A sequence of MIDI communication errors (e.g. those relating to a USB port that has beendisconnected after BC Manager was started) no longer leads to dozens of error boxes you haveto plow through; instead, these errors are gathered in a single window, which you only have toclick away once.
! Operations involving SysEx messages from the B-Control to BC Manager (such as ‘Refreshconnection status’, ‘Receive presets’ and ‘Send firmware’) can no longer be spoiled byinterference from unrelated incoming SysEx messages on the same MIDI input port.
! The ‘Send firmware’ operation is more robust and user-friendly.! The ‘MIDI input messages: BCL’ window can now record a maximum of 99,999 BCL messages
(previously only 9,999).! A number of small improvements to the user interface. For instance:
! Many menu and toolbar icons were modified (in particular to make them look more 3-D),and several new icons were added.
! In the B-Controls window: after you execute ‘New BCF2000’ or ‘New BCR2000’, the tableautomatically selects the row of the new B-Control. (Previously the selection bar stayedwhere it was.)
! The ‘BCF2000’ and ‘BCR2000’ windows have been renamed to ‘layout’ windows, andtheir preset LEDs change color from red to orange for preset 0 (i.e. the temporary preset).
! When a knob is selected, its position mark changes from green to red.! Many message boxes now contain an icon indicating the severity of the message:
information, warning or error.Bug fixes:! BC Manager now remains the active application throughout startup. (Previously it could become
inactive during startup (particularly the very first time it was run). Consequently, BC Manager’sintended active window or dialog box could end up hidden behind other running applications,forcing the user to manually navigate back to BC Manager.)
! The Exit operation from the main window’s Files pull-down menu now asks you whether youwant to save/send any unsaved/unsent B-Control data before termination of BC Manager; thisalso applies when you press the associated hotkey (Alt+X). (Previously the save/send questionsonly occurred when you pressed Alt+F4 or clicked on the V icon on the main window’s titlebar.)
! The mouse options dialog box can no longer be resized.! The maximum hint width (as set in the ‘Hint options’ dialog box) now works correctly.! Upon a restart, BC Manager restores all associations between B-Controls and syx/txt/bc2 files
correctly. (Previously, if e.g. the first B-Control did not have a file but the second B-Control did,
17
a restart would wrongly assign the second B-Control’s file to the first B-Control instead of to thesecond.)
! The byte display formats in the MIDI input messages window are now retained between sessionsof BC Manager.
! After the deletion of a range of recorded MIDI messages, the MIDI input messages window nowdisplays the correct remaining messages.
! It is no longer possible to paste more than 999 bytes from the MIDI message clipboard into apreset’s LEARN output or an element’s custom output.
! The Compare dialog box no longer reports that two identical items containing LEARN/customoutput are different.
! BC Manager no longer produces messy windows and dialog boxes under non-standard DPIsettings.
! The default table window widths are no longer too narrow under Windows Vista’s default‘Windows Vista Basic’ color scheme.
Version 1.5.1 (2008-08-19)New features:! If a button or encoder is dysfunctional on the BCF/BCR due to the preset settings (number of
encoder groups etc.), its background in the layout window is pink.! The ‘Record MIDI messages’ dialog box (opened by ‘Record MIDI messages’ in the
preset/element dialog boxes) can now apply MIDI ‘running status’. This may decrease thenumber of bytes recorded, so that the recorded messages are more likely to fit in the preset’sLEARN output or the element’s custom output. (The maximum is 125 bytes.)
! In the MIDI input messages window, an extra version of the ‘Save MIDI file’ operation is nowavailable: this version saves all selected MIDI messages with their times set to zero.
Improvements:! Previously, the saving and sending verification dialog boxes only showed up when a B-Control
was being closed or the program was being terminated. In this version, these dialog boxes alsoshow up during operations that can replace all data of a B-Control (as maintained by BCManager), namely ‘Open’ and ‘Receive all data’. (They still don’t appear during ‘Import’.)
! In the ‘Convert txt/bc2 to syx’ operation, the device ID dialog box is more user-friendly:! You can simply enter the device ID shown on the B-Control itself and in BC Manager’s
global setups window. (Previously, the value you entered was stored in the syx file ‘as is’,which meant that the dialog box caption was misleading: the caption stated that you had toenter a value from 1 to 16; if you entered 1, the actual value stored was indeed 1, but thatwrongly meant device 2!)
! The ‘generic’ device ID can be chosen by simply selecting the ‘Generic’ radio button: youno longer have to enter the actual value (127 = $7F).
! The handling of characters above #127 (e.g. ‘international’ characters with diacritics) incomments and element names has been improved: if you try to save such characters to a syx file,send them to a B-Control or load them in a BCL editor window, they are automaticallyconverted to dots; this also applies to the ‘Convert txt/bc2 to syx’ operation. (Previously, acharacter above #127 would simply trigger an error message and the operation would be cut off,resulting in e.g. a ‘truncated’, invalid syx file.)
Note that saving such characters to a txt or bc2 file is (and always has been) unproblematic,so if you use such characters, you should save to txt or bc2, not to syx. Also note that the B-Control itself doesn’t store any comments or element names anyway, which is why by defaultBC Manager doesn’t send comments or element names to the B-Control.
! A typo in the MIDI input messages window has been corrected.
Version 1.5.0 (2008-07-17)
18
New features:! The B-Control detection routines identify MIDI feedback loops.! In the element and layout windows you can paste an element whose type (button, encoder or
fader) differs from the target element’s type. (Naturally this does involve some data loss.)! ‘Set’ operations are now available for all standard output parameters, including Mode,
Increment, Frame Rate and Location.! You can compare presets and elements: select Compare from the View pull-down menu of the
B-Controls window.! In the MIDI input messages window, you can set the display formats of the recorded bytes to
hexadecimal and/or decimal. Separate settings are available for status and data bytes in bothSysEx and non-SysEx messages.
! All saving operations in the MIDI input messages window now only save the selected MIDImessages. (Previously, all messages were always saved, irrespective of the selected range.)
! You can save the MIDI messages recorded in the MIDI input messages window to a standardMIDI file (‘SMF’, with extension ‘.mid’).
! This manual contains a separate section on the MIDI input messages window (§23).! Miscellaneous relevant web links are created in BC Manager’s menu group in the Windows Start
Menu.Improvements:! BC Manager now takes up much less RAM when a lot of MIDI input devices are enabled.
Previously, every enabled MIDI input device reserved a total of 2 MiB for its System Exclusivemessage buffers: 64 KiB for each of its 32 buffers. By default BC Manager now reserves only 4KiB for each buffer, so a total of 128 KiB per enabled MIDI input device. The reduced buffersize is still more than enough for all BC-related SysEx communication. In the unlikely case thatyou need BC Manager to handle third-party, longer SysEx messages, you can raise the buffersize in the MIDI devices dialog box, up to the old value of 64 KiB.
! Several improvements to the low-level MIDI input handling routines. As a result, the MIDI inputbuffer is much less likely to overflow, and the B-Control detection routines are more robust. BCManager now also works with Microsoft’s standard USB audio driver (‘USB Audio Device’),which Windows XP and later install by default.
! Behringer’s B-Control USB driver vs. 1.2.1.3 for Windows 2000/XP contains a bug that canfreeze output from a BCF/BCR to a USB-based MIDI input device on the computer when thisMIDI input device gets closed and reopened in rapid succession.
In previous versions of BC Manager this bug in the USB driver sometimes manifested itselfwhen you quit the MIDI devices dialog box by pressing the OK button: the first USB-basedMIDI input device for a B-Control could then stop sending any MIDI messages to the computer.(Only entering the MIDI devices dialog box for the second time and pressing OK again wouldthen unfreeze this MIDI input device.)
The MIDI devices dialog box in BC Manager 1.5.0 waits 100 msec between closing andreopening the MIDI input devices, which should be more than enough to circumvent theBehringer USB driver bug, so USB-based MIDI input devices should not freeze any more uponexit of the MIDI devices dialog box.
Note: as far as I could establish, Microsoft’s USB driver (‘USB Audio Device’) andBehringer’s older USB drivers (vs. 1.1.1.0 and 1.1.1.1) do not suffer from vs. 1.2.1.3’s bug.However, vs. 1.2.1.3 is still to be preferred: Microsoft’s driver has no multi-client support andcreates generic, very confusing MIDI I/O device names, and Behringer’s vs. 1.1.1.0 and 1.1.1.1are confused about the names of the MIDI output A and B device names.
! A MIDI I/O device (typically a USB device) that is temporarily unavailable (as indicated by itsappearance between parentheses) now shows up in the MIDI options dialog box. As long as youkeep choosing the temporarily unavailable device name, the device will be connected again onceavailable upon a restart of BC Manager. However, if you have selected ‘[None]’ (or any present
19
device) when you press ‘OK’, the reference to the unavailable device disappears and won’t beshown the next time you open the dialog box.
! The ‘Receive firmware version’ dialog box now reports the response time.! The Comments areas in the dialog boxes now contain vertical scroll bars. (Horizontal scroll bars
are unnecessary, since any text gets wrapped.)! In the element dialog boxes: if any standard output is defined (i.e. Type isn’t None), the
Default’s value knob is enabled and the Default’s checkbox is disabled. This matches the B-Control’s actual behavior concerning the Default parameter: any standard output causes a defaultvalue to be defined. You can only forgo a default value if only custom output is defined; this isrelevant for snapshots: an initial snapshot only includes the element’s output if it has a defaultvalue.
! A positive button increment value is now displayed with ‘+’ in front of the number.! In the MIDI input messages window, the settings for ‘Buffer size’, ‘Buffer overflow protocol’
and ‘Scroll to new message’ are now editable via a separate dialog box. Moreover, they areretained across BC Manager sessions. (The MIDI message type filters already were.)
Bug fixes:! When opening a BCL data file, BC Manager no longer skips empty comment lines.! A bug has been fixed that sometimes caused the MMC frame rate to be set to a wrong value
upon entrance of the button dialog box.! In encoder and fader dialog boxes, the GS/XG parameter list no longer shows duplicates of all
items.
Version 1.4.0 (2008-06-23)New features:! You can now choose to skip the B-Control detection routine performed when BC Manager is
being run for the very first time. (Skipping this routine can avoid certain problems related toMIDI input/output devices, such as infinite feedback loops.)
! The ‘Set’ operation can now also be applied to most preset settings (Encoder groups, Request,etc.), to LEARN and custom output items, and to the Value 1 and Value 2 parameters ofstandard CC, NRPN, AT and GS/XG output.
! You can open a layout window directly from the B-Controls window, via either the View pull-down menu or the toolbar.
! You can ‘import’ a syx, txt or bc2 file containing BCL data. The only difference with opening isthat importing does not copy the imported file’s name to the file name associated with the B-Control. [Note: as of version 1.5.1 there is another difference: the Import operation never showsany saving or sending verification dialog boxes.]
! You can ‘export’ a range of presets to a BCL (syx, txt or bc2) file.! When importing a Propellerhead Reason remote map file, you can choose to only load the
Reason control names: BC Manager then skips its generation of fully functional elements. See§22 for why this is useful.
! You can now also open/save the content of the BCL editor window from/to a syx or bc2 file.! The BCL editor window now contains scroll bars.Improvements/bug fixes:! The preset number or range displayed in the caption of a ‘Set’ dialog box run from the presets
window is now correct.! BC Manager strictly enforces BCL’s allowed range of characters in preset names: characters
below #32 and above #127 are converted to dots, just as the B-Control itself does.! Changing the width of layout windows works more accurately than in version 1.3.0. (This is
particularly noticeable under Windows Vista’s default color scheme.)! BC Manager now maintains separate Value 1 and Value 2 parameters for CC (in both 7 and 14
bit versions), NRPN (7 and 14 bit), AT (7 bit) and GS/XG (7 bit). A few obscure problems
20
concerning the ranges of Value 1 and Value 2 have thus been solved.! The ‘Set MMC Device’ operation is no longer available in encoder and fader list windows.
(Encoders and faders don’t have MMC options, so the operation can’t apply to them.)
Version 1.3.0 (2008-06-10)New features:! The pdf file of this manual includes bookmarks for the document sections, which makes
navigation much easier.! Several new BCF2000/BCR2000 detection facilities are available.
For instance, when you start BC Manager for the very first time (actually: if BCMan.inidoesn’t exist), it automatically finds all switched-on B-Controls connected to the computer byUSB or standard MIDI I/O ports.
BC Manager is also a bit more strict when it comes to allowing MIDI communication with aB-Control: a successful ‘Refresh connection status’ check must have occurred before any MIDIdata exchange is allowed. However, by default BC Manager performs this check automatically,so you don’t have to do this manually.
! You can open, save and convert ‘bc2’ files.! You can import Propellerhead Reason’s remote map files for the BCF2000 and BCR2000. (This
is mainly useful for visualization and printing.)! The ‘Set’ operation now works for several more element parameters, and the step size per row
(element) can be set to any value.! The pop-up hints for the paste toolbuttons specify the number of items currently on the pertinent
clipboard.! Many changes to the layout windows:
! You can widen the window. (This is extremely useful when your element labels are long.)! Printing the window image now always uses Landscape orientation, irrespective of the
orientation selected in the main window’s printer dialog box. (This practice was alreadyused for printing element strips.)
! You can cut, copy, paste and initialize the selected element.! You can move to a particular element group by pressing the associated character underlined
in the group’s caption.! You can choose what is displayed in the element boxes: their names or their output
summaries.! The pull-down menu allows you to switch to the corresponding preset and element
windows.Bug fixes:! The ‘open’ and ‘save’ dialog boxes for B-Control data now use the extension of the current file
as the default file type (‘.syx’, ‘.txt’ or ‘.bc2’). (Previously, these dialog boxes always startedwith ‘.syx’, even when you were working with a ‘.txt’ file.)
! In the B-Controls window it is no longer possible to select more than one B-Control. (Previouslyyou could, but subsequent operations would only apply to one B-Control anyway.)
! In the B-Controls window and the global setups window: double-clicking on the table when noB-Control has been defined no longer produces an error message.
! Copying an element or preset to its clipboard now correctly enables the Paste operation in thepertinent windows of all B-Controls (not just the current one).
! In black & white prints of layout window images, all grid borders are now equally thick.! The tab order of the grids in a BCR2000 layout window is now correct.
Version 1.2.2 (2008-05-13)! In the MIDI message recording dialog box you can request a snapshot from the connected B-
Control.
21
! A tiny bug concerning the Record button in the preset and element dialog boxes has been fixed.
Version 1.2.1 (2008-05-11)! In the preset and element dialog boxes, you can now record MIDI messages directly as LEARN
and custom output.! Quite a few changes to the user interface. Among others:
! Some buttons have been added to the main window’s toolbar.! Custom output’s ‘Min’ and ‘Max’ settings have been renamed to ‘Value 1’ and ‘Value 2’ in
the element dialog boxes, and are now displayed in the ‘Value 1’ and ‘Value 2’ columns inthe element windows.
! A button’s custom output increment value is now only shown in the button table if the modeis Increment.
! In the BCL editor window, all references to ‘temporary preset’ have been renamed to‘preset 0’, and you can execute ‘Receive preset 0’ from the toolbar.
! Several changes to the MIDI controller window:! When BC Manager is restarted, the window is restored to its last position.! The window is more compact.! The controller names are available via hint boxes linked to the controller numbers.
Version 1.2.0 (2008-04-30)! You can now express your appreciation of BC Manager and support its further development by
making a donation via the ‘Donate’ dialog box (accessible via the main window’s Help pull-down menu).
! In the input message window you can copy recorded MIDI messages to the new ‘MIDI messageclipboard’, and you can then paste these messages as LEARN and custom output in the presetand element dialog boxes.
! For a button sending only custom output messages, you can now set the Mode parameter to‘Increment’ in the button dialog box. (This uses the recently discovered incval parameter.)
! Negative values for a button’s Increment parameter are now displayed correctly in the Inccolumn of the button window.
! ‘Receive firmware version’ and ‘Send firmware’ now also work correctly when the B-Control isin bootloader mode.
! In MIDI communication dialog boxes, the reported number of items transferred is now correct atall times. (In previous versions this number sometimes lagged behind by 1.)
Version 1.1.1 (2008-04-13)! Sending an individual element of preset 0 to the connected B-Control now tells the B-Control to
initialize the element if all its parameters are at their default values. (In version 1.1.0 such an‘empty’ element wasn’t sent at all, so that the B-Control didn’t clear it.) The same applies if youload such an element into a BCL editor window.
Version 1.1.0 (2008-04-09)Major changes:! This manual is now included in the BC Manager package itself and can be opened from the
Windows Start Menu or from BC Manager’s Help pull-down menu.! Closing the B-Controls window no longer leads to questions whether you want to save and/or
send a B-Control’s data if it has been modified. These questions now only occur when you try toquit BC Manager as a whole (i.e. the main window).
! A memory preset can be copied directly to the temporary preset (‘preset 0’), and the connectedB-Control can be ordered to follow this change immediately.
! Individual buttons, encoders and faders in the temporary preset can be sent to the B-Control and
22

loaded in a BCL editor window.! A bug has been fixed that prevented element names from being copied to other elements, and
from being cleared in the ‘Initialize’ operation. This bug was also responsible for thedisappearance of element names from memory presets when a previously saved syx or txt filewas being opened.
Minor changes:! BC Manager no longer terminates on startup if the syx or txt file associated with a B-Control
cannot be found.! The presets window can now be maximized.! In the preset dialog box:
! The caption now displays the correct preset number.! Hints are available for the toolbuttons on the ‘LEARN output’ tab.
! In the layout windows:! The buttons for decreasing/increasing the preset number are now aligned horizontally.! There are menu items and keyboard shortcuts for increasing and decreasing the preset
number.! The preset name is displayed on the status bar.! The preset’s general settings can be edited.! The window image can be saved or printed with an ink-saving white background.! Under Windows 95/98/Me, spurious scrollbars no longer mess up the element labels.
! The order of a few table columns has been changed to increase consistency.! The default width of the mode column in the button window has been increased to accommodate
the mode parameter names.! The new ‘Speed levels’ setting simplifies the manipulation of encoder resolutions.! A LEARN or custom output statement can be edited as a single text line.! The initial status of the ‘Stop’ menu item in the ‘MIDI input messages: BCL’ window has been
corrected to ‘disabled’.! The BCL interpreter accepts the incval parameter for the button ‘.mode’ statement, just as
the BCF and BCR do.
Version 1.0.0 (2008-02-27)First published version.
23

3. Computer requirements
To run BC Manager, your computer must comply with the following requirements:
! Processor: Any Intel 80486- or Pentium-compatible CPU. Processor speed is relativelyunimportant. The number of cores is irrelevant, since BC Manager only uses one core.
! Operating system:! macOS: any version for the Intel x86-architecture.! Windows: 2000 or later (XP, Vista, 7, 8, 10 etc.).
! An SVGA-compatible graphical card and monitor:! The screen size should be at least 800 × 600 pixels. (However, some of the bigger windows
and dialog boxes may be cut off if the screen is too narrow, so 1024 × 768 is the practicalminimum.)
! For best results, the color depth should be at least 16 bits. (At a depth of only 256 colors,some colors aren’t rendered as intended.)
! A mouse.
! Free hard disk space: about 30 MiB on macOS and 10 MiB on Windows.
! RAM: when running, BC Manager normally occupies roughly 24 MiB on macOS and 12 MiBon Windows.
! Unlike Behringer’s BC-EDIT, BC Manager does not require Java Runtime Environment (JRE).(By the way: it doesn’t require Microsoft .NET Framework either.)
! BC Manager runs perfectly without a MIDI link to an actual BCF2000 or BCR2000, but if youwant to establish a real-time connection between BC Manager and a B-Control, the B-Controlmust be linked to the computer via MIDI input and output ports; these can be either ‘standard’MIDI I/O ports or the B-Control’s USB-based MIDI I/O ports. See the next section for some tipson setting up your BCF/BCR.
24
4. BCF2000/BCR2000 setup
It is highly advisable to set up your B-Control correctly on your computer before installing BCManager. You should consult the relevant documentation for the full details on these matters, buthere are some guidelines:
1. The BCF2000’s emulation modes:For a BCF2000 you should first make sure that it is in standard ‘B-Control’ mode (at least at thisstage), not in any emulation mode. The BCF is in B-Control mode if its display shows ‘P!’followed by a preset number after power-on.
To change to B-Control mode from an emulation mode, you have to switch the unit off,then keep the top left button on the top panel pressed while switching it back on by pressing thePOWER ON button at the back. (See the Behringer documentation for further details on thisprocedure.)
B-Control mode has several advantages (at least at this stage):! In B-Control mode, all the BCF’s global settings can be changed at any moment after
power-on, but the emulation modes provide fewer global settings, and these setting can onlybe changed ‘during’ the power-on process. Thus, in B-Control mode it’s a lot easier to setup the BCF concerning I/O ports, USB drivers and application software like BC Manager.
! The BCF’s 32 memory presets are completely inaccessible when the BCF is in anyemulation mode. Consequently, BC Manager (which is mainly concerned with thesepresets) is of limited use when the BCF is in an emulation mode: many of BC Manager’sfeatures are then dysfunctional.
Note that the BCR2000 doesn’t have any emulation modes, so it is always in B-Control mode bydefinition.
2. The BCF2000/BCR2000’s firmware:This is the operating system of the BCF and BCR themselves. The data of this firmware resideson a flashable memory chip in the BCF/BCR.
You should ensure that your B-Control’s firmware is version 1.10, as indicated by thenumber briefly shown in the display immediately after power-on. If the version number is lowerthan 1.10, you may be able to proceed with the installation as described below, but it is advisableto upgrade as soon as possible, preferably via BC Manager’s ‘Send firmware’ operation (q.v.).(Beware: at least in my experience, Behringer’s firmware utility BCUPDATE.exe doesn’t work.)
3. MIDI connections:You can connect a BCF or BCR to your computer either via USB or standard MIDI I/O ports(typically on a soundcard).
For proper communication, BC Manager requires a bidirectional connection. If you use theB-Control’s USB connection, you can set the B-Control’s Operating Mode to U-1, U-2, U-3 orU-4. If you use the standard MIDI ports, S-4 (MIDI OUT A) is recommended, though S-3 (MIDIOUT B/THRU) is possible too; however, S-1 and S-2 should not be used, since these modes leadto inherent feedback, messing up communication between BC Manager and the B-Control.
BC Manager can even communicate with two chained B-Controls, where one B-Control isconnected to the computer directly via USB (in mode U-4), and the other (in mode S-3 or S-4) isconnected to the first B-Control’s standard MIDI sockets, as described in Behringer’s User’sManual.
The advantage of the U-modes is that more additional connections to other MIDI equipment
25
are possible than in the S-modes, because you don’t have to sacrifice any MIDI hardware portsto the bidirectional connection between BC Manager and the B-Control.
However, the USB connection also has some pitfalls:! Most extremely, several people have reported cases where the USB controller of their BCF
or BCR was defective. Very nasty.! You may experience USB driver problems, both concerning installation and later operation.
See point 4 below.! To get a working USB connection between the B-Control and any computer program (such
as BC Manager), you must always start up the B-Control before the computer program. Andswitching the B-Control’s Operating Mode to any other value (U-1/2/3/4 or S-1/2/3/4) whilea computer program is running completely disconnects any existing USB connectionsbetween the B-Control and the computer program, and any newly set USB connections onlystart working after you have terminated and restarted the computer program.
4. USB driver:If you wish to use a USB connection between your B-Control and your computer, an appropriatedriver must be installed. macOS handles this automatically; however, especially on earlierWindows versions it may be better or even required to replace the default driver automaticallyinstalled by Windows with a Behringer driver. You have the following options:
! Microsoft’s ‘USB Audio Device’:Advantage:
Available under any ‘modern’ Windows operating system. Windows XP and laterinstall this driver by default. Note: since I am still on Windows 7, I don’t know if thisis sill the case on Windows 8 and 10. I’ll update this section as soon as I have moreinformation.
Drawbacks:1. The resulting device names of the USB-based MIDI ports are truly horrible: the driver
only assigns incremental numbers to any simultaneously available ports. The situationgets particularly confusing when you connect more than one B-Control via USB.
2. The driver has a single-client nature: it can only connect to one computer program atthe same time. On the other hand, all Behringer’s USB drivers (see below) allow youto connect a virtually unlimited number of computer programs simultaneously; so forinstance you can work with BC Manager and a DAW program (Ableton Live, Cubase,Sonar etc.) at the same time.
! Behringer’s BCF2000/BCR2000 USB driver version 1.1.1.0:Advantage:
The resulting device names of the USB-based MIDI ports are much more informativethan under Microsoft’s ‘USB Audio Device’. (However, see drawback 2 below.)
Drawbacks:1. To install this driver under the 32-bit version of Windows Vista, 7 or 8(?), you need to
set the installer’s compatibility mode to ‘Windows XP (Service Pack 2)’ on theCompatibility tab of the file’s Properties dialog box.Even worse, this driver can’t be installed at all under the 64-bit versions of WindowsXP and later.
2. The driver provides very confusing MIDI port names in operating mode U-4.Note that Behringer no longer offer this driver on their web site.
! Behringer’s BCF2000/BCR2000 USB driver version 1.1.1.1:This has the same advantage and drawbacks as version 1.1.1.0. However, it fixes one or two
26

small bugs in version 1.1.1.0. Behringer no longer offer this driver on their web site either.
! Behringer’s BCF2000/BCR2000 USB driver version 1.2.1.3 (dated October 19, 2005):Advantage:
This driver consistently uses transparent device names for its USB-based MIDI inputand output ports (in particular in operating mode U-4).
Drawback:The same installation restrictions as version 1.1.1.0.
! Behringer’s generic USB MIDI driver version 1.0.10 (dated December 15, 2009):Advantage:
No more installation problems. As stated on the Behringer web site, this driver comesin two versions:1. BEHRINGER_MIDI_WIN32_1.0.10.zip for 32-bit operating systems (Windows
XP, Vista and 7; I’m not sure about 8 and 10).2. BEHRINGER_MIDI_X64_1.0.10.zip for Windows 7’s 64-bit version (I’m not
sure about 8 and 10).(However, does this mean there is no version for 64-bit XP and Vista?)
Drawback:The resulting device names of the USB-based MIDI ports are not as transparent asthose of Behringer’s BCF2000/BCR2000 driver 1.2.1.3 (or even 1.1.1.0 and 1.1.1.1).E.g. for a BCR2000 in operating mode U-4 you get ‘BCR2000 port 1’ and ‘BCR2000port 2’ instead of version 1.2.1.3’s ‘BCR2000[1]’ and ‘BCR2000[1]-B’.
BC Manager works with all the drivers mentioned above. However, I recommend Behringer’sBCF2000/BCR2000 USB driver 1.2.1.3 for any 32-bit version of Windows up to and includingWindows 7; to install this driver under the 32-bit versions of Windows Vista or 7, you must setbcr2000-driver-setup.exe’s compatibility mode to ‘Windows XP (Service Pack 2)’. For the 64-bit versions of XP, Vista and 7, try Behringer’s generic USB MIDI driver version 1.0.10. I don’tknow about the situation on Windows 8 and 10 yet; maybe you have no other option than acceptthe default driver.
5. Using multiple BCFs/BCRs via USB:It is very common to run into problems when you try to use two or more BCFs or BCRs via USBsimultaneously.
Perhaps it helps to distinguish two aspects of a working USB MIDI driver:1. The installed USB driver itself, i.e. its dll file(s), etc.2. The USB MIDI devices defined (for the driver) in the Windows registry.
In my experience, (re-)installing a USB driver often occurs only for a particular hardware device(e.g. BCF2000/BCR2000), thus affecting only that device’s settings (including its port names).
So for instance, if you first install driver P for hardware devices X and Y, then driver Q fordevice X, device Y may still have its ‘old’ settings/names. In other words, you may have toinstall driver Q twice in this case; not for the driver itself (once should be enough for that), but toupdate the settings/names of both individual hardware devices X and Y.
It may help to look at the device settings in Windows’ Device Manager.E.g. under Windows XP, select Control Panel , System , Hardware , Device Manager.In Device Manager, select View , ‘Devices by connection’, then look for the USB devicesunder ‘ACPI Uniprocessor PC’ , ‘Microsoft ACPI-Compliant System’ , ‘PCI bus’ (at least
27

that’s where they are in my case): in this way you can see exactly which USB ports use whichdrivers.
28
5. Installation of BC Manager
To install BC Manager on your computer, proceed as follows:
macOS1. Download BCMan-a.b.c.dmg (where a.b.c stands for the actual version number) to your
computer from the BC Manager page at the Mountain Utilities web site(https://mountainutilities.eu/bcmanager).
2. Open the dmg file in Finder, and drag-and-drop the BC Manager icon on the Applications icon.If a previously installed version of BC Manager exists in the Applications folder, you are askedwhat you want to do: it’s best to select Replace.
3. Right-click the dmg file’s ‘disc’ icon on the right side of the desktop and run Eject from the localmenu.
WindowsOn Windows, three editions are available: an installer, a 32-bit portable edition and a 64-bit portableedition:
Installer:1. Download BCMan-a.b.c-install.exe (where a.b.c stands for the actual version number) to your
computer from the BC Manager page at the Mountain Utilities web site(https://mountainutilities.eu/bcmanager).
2. Run BCMan-a.b.c-install.exe and follow its instructions. The installer automatically installs theedition of the actual application (BCMan.exe) that matches the operating system: the 32-bitedition on a 32-bit Windows system, the 64-bit edition on a 64-bit Windows system.
Note: the installation includes an uninstaller. It can be run from the Windows Start Menuvia Programs þ Mountain Utilities þ BC Manager, or via Settings þ Control Panel þ ‘Add orRemove Programs’ (Windows XP) or ‘Programs and Features’ (Windows Vista and later).
Note that when you install a new version of BC Manager, you do not have to uninstall anypreviously installed version first: the old version will be replaced with the new versionautomatically.
Portable (32- or 64-bit):1. Download BCMan-a.b.c-xnn-portable.zip (where a.b.c stands for the actual version number and
xnn is ‘x64’ or ‘x86’) to your computer from the BC Manager page at the Mountain Utilitiesweb site (https://mountainutilities.eu/bcmanager). The ‘x64’ (64-bit) edition only runs on 64-bitWindows, the ‘x86’ (32-bit) edition on 32- and 64-bit Windows.
2. Unzip BCMan-a.b.c-xnn-portable.zip completely (maintaining the zip file’s tree structure) to anyfolder to which BC Manager itself (BCMan.exe) will have write-access (which is necessary forits configuration files). Crucially, in Windows Vista and later you should not unzip to asubfolder of C:\Program Files or C:\Program Files (x86), since these folders are subject toWindows’ UAC (User Access Control), which means that BC Manager would not have write-access.
Running BC Manager itselfAfter installation, you can start BC Manager itself: BC Manager.app on macOS (from theApplications folder), BCMan.exe on Windows (e.g. via the Windows start menu). It is highlyadvisable to switch on your BCFs and BCRs before starting BC Manager. In fact, this is crucial forUSB connections (though not for standard MIDI connections), because BC Manager can only work
29

with USB ports that are active the very moment when BC Manager is being started. No matter whatconnection you’re using, the advantage of having your B-Controls switched on at the moment whenyou start BC Manager, is that BC Manager should then be able to immediately autodetect all your B-Controls.
If you have never run BC Manager (in any version) from the installed operating system before,the program notifies you that it can’t find your configuration. This is normal: the program saves itsconfiguration file (bcman.ini in macOS, BCMan.ini in Windows) whenever the program terminates,so obviously this configuration file doesn’t exist yet when you start the program for the very firsttime. The program also notifies you if the configuration file does exist but belongs to a previousversion; all existing settings are retained.
30
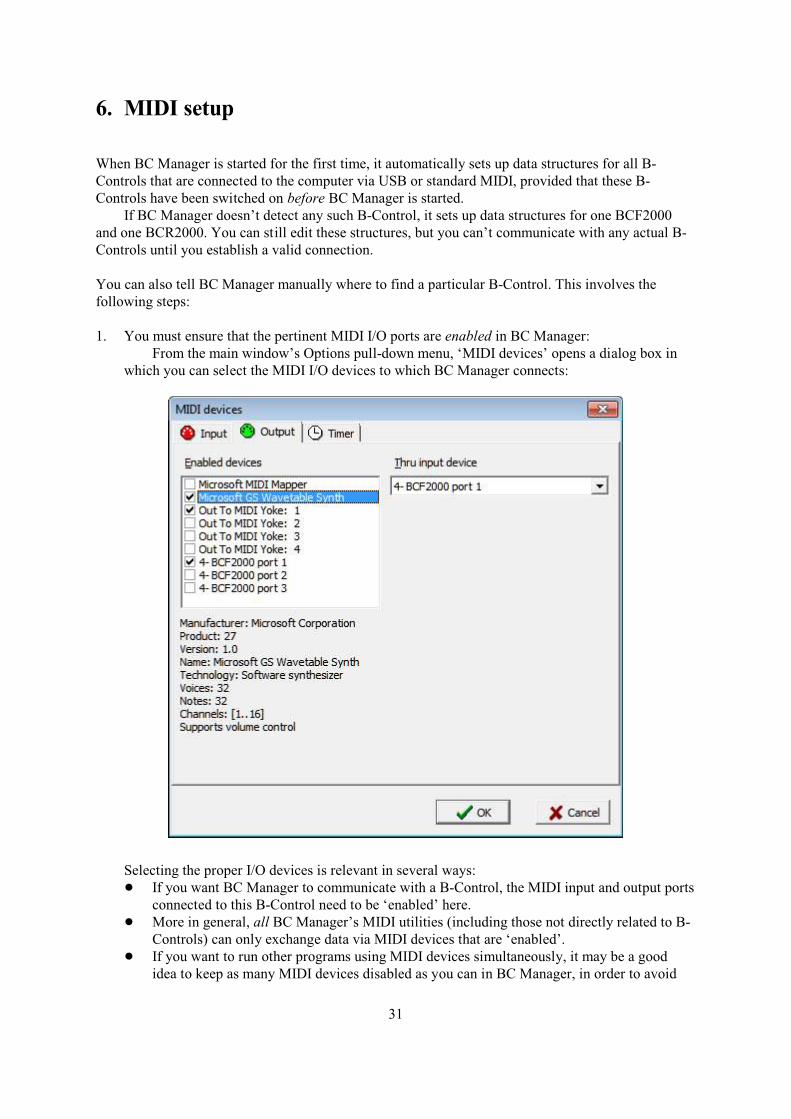
6. MIDI setup
When BC Manager is started for the first time, it automatically sets up data structures for all B-Controls that are connected to the computer via USB or standard MIDI, provided that these B-Controls have been switched on before BC Manager is started.
If BC Manager doesn’t detect any such B-Control, it sets up data structures for one BCF2000and one BCR2000. You can still edit these structures, but you can’t communicate with any actual B-Controls until you establish a valid connection.
You can also tell BC Manager manually where to find a particular B-Control. This involves thefollowing steps:
1. You must ensure that the pertinent MIDI I/O ports are enabled in BC Manager:From the main window’s Options pull-down menu, ‘MIDI devices’ opens a dialog box in
which you can select the MIDI I/O devices to which BC Manager connects:
Selecting the proper I/O devices is relevant in several ways:! If you want BC Manager to communicate with a B-Control, the MIDI input and output ports
connected to this B-Control need to be ‘enabled’ here.! More in general, all BC Manager’s MIDI utilities (including those not directly related to B-
Controls) can only exchange data via MIDI devices that are ‘enabled’.! If you want to run other programs using MIDI devices simultaneously, it may be a good
idea to keep as many MIDI devices disabled as you can in BC Manager, in order to avoid
31
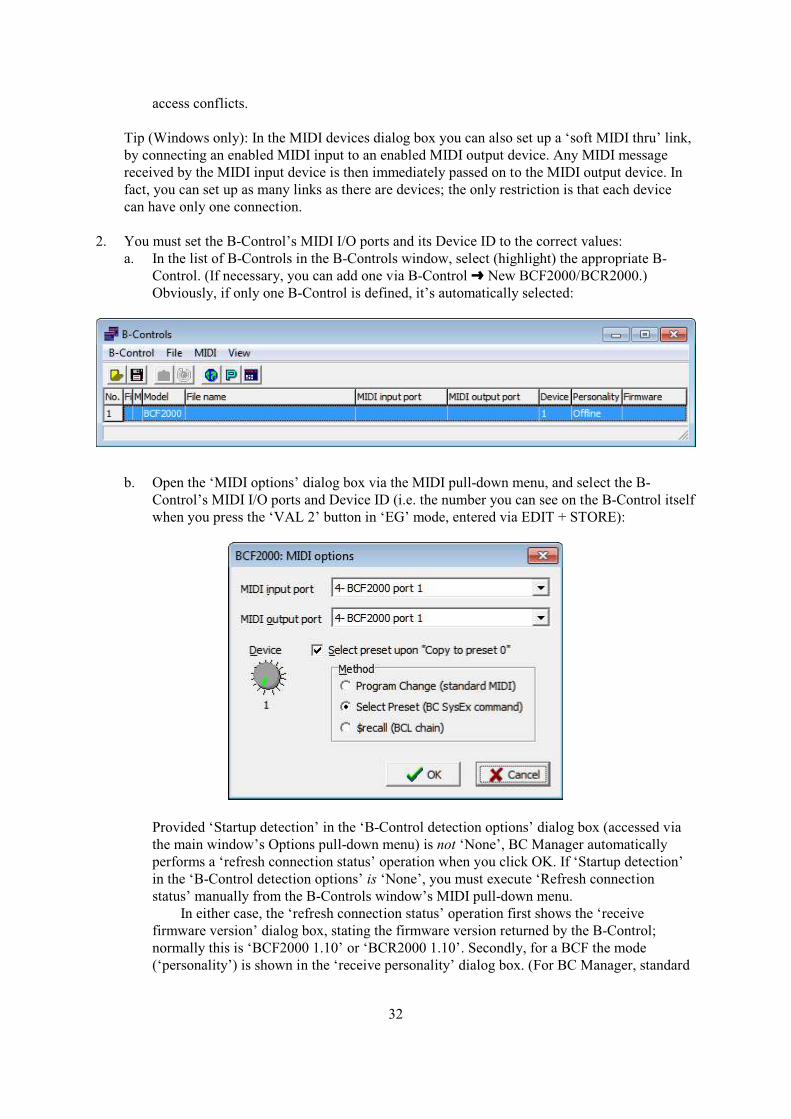
access conflicts.
Tip (Windows only): In the MIDI devices dialog box you can also set up a ‘soft MIDI thru’ link,by connecting an enabled MIDI input to an enabled MIDI output device. Any MIDI messagereceived by the MIDI input device is then immediately passed on to the MIDI output device. Infact, you can set up as many links as there are devices; the only restriction is that each devicecan have only one connection.
2. You must set the B-Control’s MIDI I/O ports and its Device ID to the correct values:a. In the list of B-Controls in the B-Controls window, select (highlight) the appropriate B-
Control. (If necessary, you can add one via B-Control º New BCF2000/BCR2000.)Obviously, if only one B-Control is defined, it’s automatically selected:
b. Open the ‘MIDI options’ dialog box via the MIDI pull-down menu, and select the B-Control’s MIDI I/O ports and Device ID (i.e. the number you can see on the B-Control itselfwhen you press the ‘VAL 2’ button in ‘EG’ mode, entered via EDIT + STORE):
Provided ‘Startup detection’ in the ‘B-Control detection options’ dialog box (accessed viathe main window’s Options pull-down menu) is not ‘None’, BC Manager automaticallyperforms a ‘refresh connection status’ operation when you click OK. If ‘Startup detection’in the ‘B-Control detection options’ is ‘None’, you must execute ‘Refresh connectionstatus’ manually from the B-Controls window’s MIDI pull-down menu.
In either case, the ‘refresh connection status’ operation first shows the ‘receivefirmware version’ dialog box, stating the firmware version returned by the B-Control;normally this is ‘BCF2000 1.10’ or ‘BCR2000 1.10’. Secondly, for a BCF the mode(‘personality’) is shown in the ‘receive personality’ dialog box. (For BC Manager, standard
32
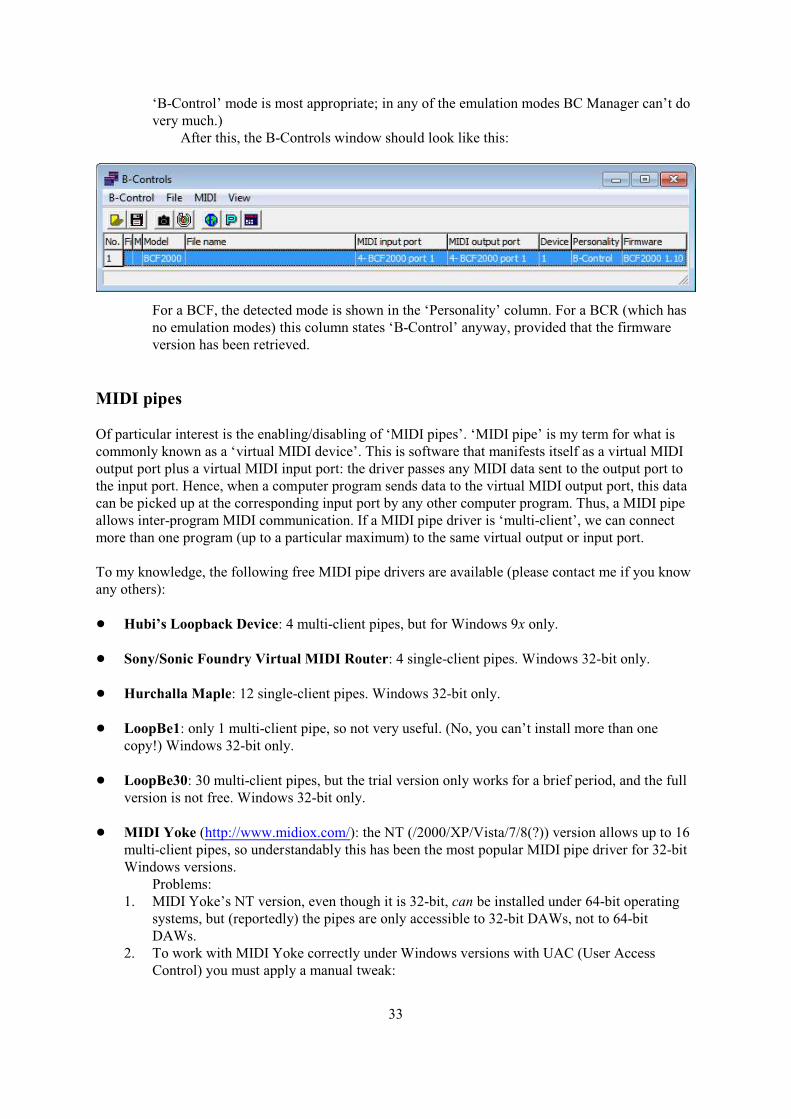
‘B-Control’ mode is most appropriate; in any of the emulation modes BC Manager can’t dovery much.)
After this, the B-Controls window should look like this:
For a BCF, the detected mode is shown in the ‘Personality’ column. For a BCR (which hasno emulation modes) this column states ‘B-Control’ anyway, provided that the firmwareversion has been retrieved.
MIDI pipes
Of particular interest is the enabling/disabling of ‘MIDI pipes’. ‘MIDI pipe’ is my term for what iscommonly known as a ‘virtual MIDI device’. This is software that manifests itself as a virtual MIDIoutput port plus a virtual MIDI input port: the driver passes any MIDI data sent to the output port tothe input port. Hence, when a computer program sends data to the virtual MIDI output port, this datacan be picked up at the corresponding input port by any other computer program. Thus, a MIDI pipeallows inter-program MIDI communication. If a MIDI pipe driver is ‘multi-client’, we can connectmore than one program (up to a particular maximum) to the same virtual output or input port.
To my knowledge, the following free MIDI pipe drivers are available (please contact me if you knowany others):
! Hubi’s Loopback Device: 4 multi-client pipes, but for Windows 9x only.
! Sony/Sonic Foundry Virtual MIDI Router: 4 single-client pipes. Windows 32-bit only.
! Hurchalla Maple: 12 single-client pipes. Windows 32-bit only.
! LoopBe1: only 1 multi-client pipe, so not very useful. (No, you can’t install more than onecopy!) Windows 32-bit only.
! LoopBe30: 30 multi-client pipes, but the trial version only works for a brief period, and the fullversion is not free. Windows 32-bit only.
! MIDI Yoke (http://www.midiox.com/): the NT (/2000/XP/Vista/7/8(?)) version allows up to 16multi-client pipes, so understandably this has been the most popular MIDI pipe driver for 32-bitWindows versions.
Problems:1. MIDI Yoke’s NT version, even though it is 32-bit, can be installed under 64-bit operating
systems, but (reportedly) the pipes are only accessible to 32-bit DAWs, not to 64-bitDAWs.
2. To work with MIDI Yoke correctly under Windows versions with UAC (User AccessControl) you must apply a manual tweak:
33
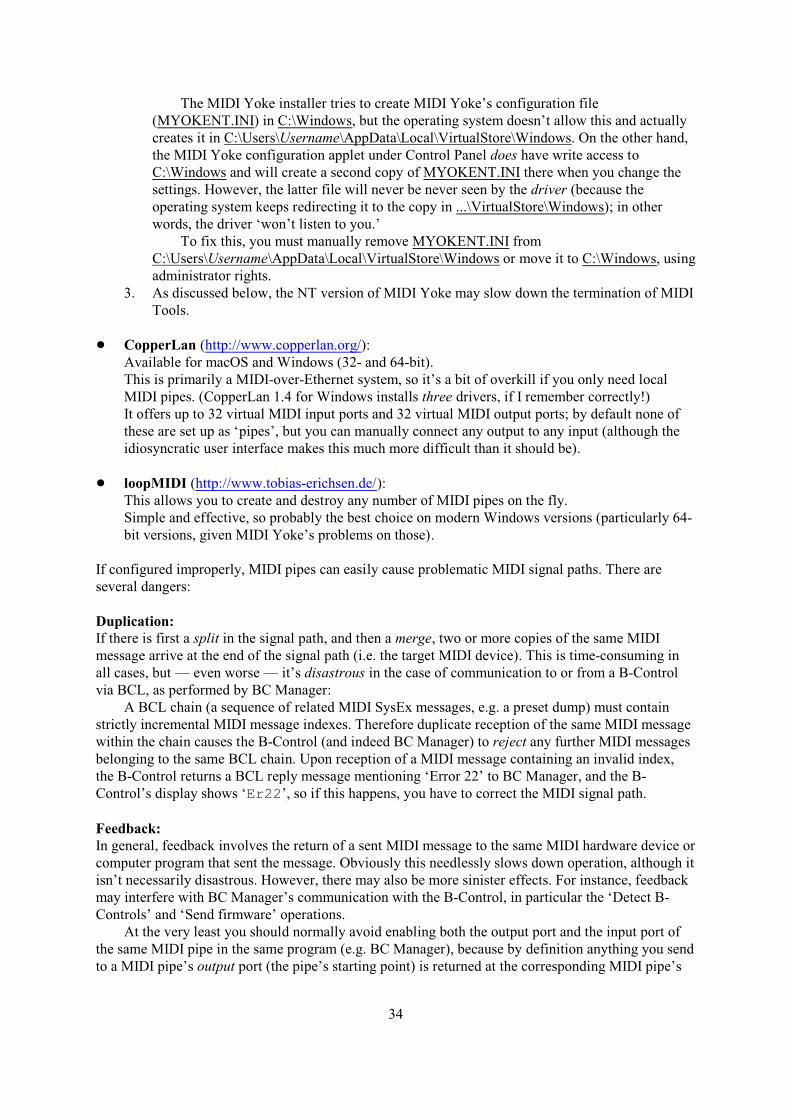
The MIDI Yoke installer tries to create MIDI Yoke’s configuration file(MYOKENT.INI) in C:\Windows, but the operating system doesn’t allow this and actuallycreates it in C:\Users\Username\AppData\Local\VirtualStore\Windows. On the other hand,the MIDI Yoke configuration applet under Control Panel does have write access toC:\Windows and will create a second copy of MYOKENT.INI there when you change thesettings. However, the latter file will never be never seen by the driver (because theoperating system keeps redirecting it to the copy in ...\VirtualStore\Windows); in otherwords, the driver ‘won’t listen to you.’
To fix this, you must manually remove MYOKENT.INI fromC:\Users\Username\AppData\Local\VirtualStore\Windows or move it to C:\Windows, usingadministrator rights.
3. As discussed below, the NT version of MIDI Yoke may slow down the termination of MIDITools.
! CopperLan (http://www.copperlan.org/):Available for macOS and Windows (32- and 64-bit).This is primarily a MIDI-over-Ethernet system, so it’s a bit of overkill if you only need localMIDI pipes. (CopperLan 1.4 for Windows installs three drivers, if I remember correctly!)It offers up to 32 virtual MIDI input ports and 32 virtual MIDI output ports; by default none ofthese are set up as ‘pipes’, but you can manually connect any output to any input (although theidiosyncratic user interface makes this much more difficult than it should be).
! loopMIDI (http://www.tobias-erichsen.de/):This allows you to create and destroy any number of MIDI pipes on the fly.Simple and effective, so probably the best choice on modern Windows versions (particularly 64-bit versions, given MIDI Yoke’s problems on those).
If configured improperly, MIDI pipes can easily cause problematic MIDI signal paths. There areseveral dangers:
Duplication:If there is first a split in the signal path, and then a merge, two or more copies of the same MIDImessage arrive at the end of the signal path (i.e. the target MIDI device). This is time-consuming inall cases, but — even worse — it’s disastrous in the case of communication to or from a B-Controlvia BCL, as performed by BC Manager:
A BCL chain (a sequence of related MIDI SysEx messages, e.g. a preset dump) must containstrictly incremental MIDI message indexes. Therefore duplicate reception of the same MIDI messagewithin the chain causes the B-Control (and indeed BC Manager) to reject any further MIDI messagesbelonging to the same BCL chain. Upon reception of a MIDI message containing an invalid index,the B-Control returns a BCL reply message mentioning ‘Error 22’ to BC Manager, and the B-Control’s display shows ‘Er22’, so if this happens, you have to correct the MIDI signal path.
Feedback:In general, feedback involves the return of a sent MIDI message to the same MIDI hardware device orcomputer program that sent the message. Obviously this needlessly slows down operation, although itisn’t necessarily disastrous. However, there may also be more sinister effects. For instance, feedbackmay interfere with BC Manager’s communication with the B-Control, in particular the ‘Detect B-Controls’ and ‘Send firmware’ operations.
At the very least you should normally avoid enabling both the output port and the input port ofthe same MIDI pipe in the same program (e.g. BC Manager), because by definition anything you sendto a MIDI pipe’s output port (the pipe’s starting point) is returned at the corresponding MIDI pipe’s
34
input port (the pipe’s end point). So for instance, if you enable both ‘Out To MIDI Yoke: 1’ and ‘InFrom MIDI Yoke: 1’ in a program, then any MIDI data the program sends to ‘Out To MIDI Yoke: 1’is returned to the program at ‘In From MIDI Yoke: 1’. This type of feedback is usually undesired,except perhaps for monitoring purposes.
The most severe type of feedback occurs when the sender/recipient actually re-sends thereturned MIDI message: this leads to an infinite loop, which may well grind the sender/recipient (andindeed the whole computer) to a virtual standstill.
In BC Manager this horror can happen if you enable the MIDI Thru feature in the MIDI devicesdialog box for an input-output pair already exhibiting feedback. For instance, if you activate MIDIThru from ‘In From MIDI Yoke: 1’ to ‘Out To MIDI Yoke: 1’ in BC Manager’s MIDI devices dialogbox, then any MIDI data sent to ‘Out To MIDI Yoke: 1’ not only comes back to BC Manager at ‘InFrom MIDI Yoke: 1’ (via MIDI Yoke’s pipe 1), but is then automatically re-sent from ‘In From MIDIYoke: 1’ to ‘Out To MIDI Yoke: 1’ via the MIDI Thru feature, in principle ad infinitum, althoughMIDI Yoke does perform some checks that spot and kill the infinite loop — but still...
Close delay:This problem only occurs with MIDI Yoke NT 1.75 (but not with MIDI Yoke for Windows95/98/Me): closing any MIDI Yoke NT input port causes a delay of 1 second. (Certain earlierversions even 3 seconds.)
Concerning BC Manager this is mainly relevant during program exit. In principle BC Managerterminates almost instantly upon exit, but when all the input ports of MIDI Yoke NT 1.75 areenabled, termination of BC Manager takes some 16 seconds longer than normal! Therefore youshould disable as many MIDI Yoke NT input ports as possible in BC Manager’s MIDI devices dialogbox, i.e. any MIDI Yoke NT input ports that BC Manager itself doesn’t use. (Note that you can stilluse any MIDI ports disabled in BC Manager in other programs!)
To help you avoid some of the serious problems discussed above, BC Manager takes the followingsteps:
! On first startup, if BC Manager detects any of the MIDI pipes listed above [excludingCopperLan, since by default its virtual ports aren’t interconnected], it asks you if you want toenable the I/O devices of these pipes. It’s best to answer No (to avoid feedback loops, and toavoid MIDI Yoke NT’s close delays during BC Manager’s exit procedure), unless some otherprogram (e.g. MIDI-OX) is routing a BCF2000 or BCR2000 through a MIDI pipe.
! On every startup, BC Manager optionally warns you if any MIDI Yoke NT input ports areenabled and thereby cause extra delays during termination of BC Manager. You canenable/disable this warning on the Input tab of the MIDI devices dialog box.
35

7. Tutorials
Working with presets
Probably the best way of manipulating presets via BC Manager is as follows:
1. First make sure that all memory presets are synchronized between the B-Control and BCManager.Two situations are possible:A. The B-Control contains one or more presets that you don’t have anywhere else.
In this case your first priority should be to make a backup file containing these presets. Todo so, you should perform the following sequence of actions:1. Execute ‘Receive all data’ from the MIDI pull-down menu in the B-Controls window.2. Execute ‘Save As ...’ from the File pull-down menu in the B-Controls window.Be aware though, that due to bugs in the B-Control’s firmware a few advanced features ofpresets cannot be retrieved from a B-Control, so if your presets use any of these features,the backup file will be imperfect.
B. The B-Control does not contain any presets of which you don’t have backups.In this case your best course of action is to synchronize from BC Manager to the B-Control.To do so, you should perform the following sequence of actions:1. Optionally: execute ‘Open’ from the File pull-down menu in the B-Controls window,
and choose a file containing presets you want to use. (E.g you could use one ofBehringer’s general-purpose syx files.)
2. Execute ‘Send all data’ from the MIDI pull-down menu in the B-Controls window.
Except in situation A above, it is always preferable to synchronize from BC Manager to the B-Control, because the B-Control is actually the worst place to store preset data: (1) as mentionedabove, due to bugs in its firmware the B-Control makes certain mistakes when sending presetdefinitions; (2) presets on the B-Control can’t store some of BC Manager’s preset metadata (i.e. infofields), so you would lose these data upon overwriting them with the corresponding presets from theB-Control.
Once you have synchronized the B-Control and BC Manager, you can start creating/editing presets inBC Manager:
2. Use BC Manager’s ‘Copy to preset 0’ operation in the preset list window (by pressing thespacebar or executing the menu item on the Edit pull-down menu). This achieves two things:1. The selected memory preset is copied to the temporary preset in BC Manager.2. BC Manager sends a ‘select memory preset N’ command to the B-Control, provided you
have enabled ‘Select preset upon "Copy to preset 0"’ in the ‘MIDI options’ dialog box(accessed via the MIDI pull-down menu of the B-Controls window). Note that thisoperation does not send any preset data to the B-Control, so this only works correctly if thememory preset on the B-Control has already been synchronized to the correspondingmemory preset in BC Manager.
3. In BC Manager, edit the temporary preset (‘preset 0’) to your liking. Using preset 0 for editinghas the additional advantage that you can send individual button/encoder/fader changes to the B-Control: you can see immediately how the edited element works on the B-Control itself, anddetermine which MIDI output it generates via BC Manager’s ‘MIDI input messages’ window.See the next section for a tutorial on setting up an encoder.
36

4. To save the changes you have made within the temporary preset to a memory preset, proceed asfollows:1. Copy the edited temporary preset to a memory preset in BC Manager.2. Send that memory preset to the B-Control. This achieves the following:
1. The memory preset data from BC Manager overwrites the temporary preset on the B-Control.
2. The memory preset data from BC Manager is copied from the B-Control’s temporarypreset to the memory preset on the B-Control.
3. The B-Control’s temporary preset is restored to BC Manager’s temporary preset data.(In this case this should be superfluous, but of course this is not automatically thecase.)
Note that the above editing procedure avoids pressing the B-Control’s PRESET buttons. This is agood thing, because that would only cause loss of synchronization between the B-Control and BCManager, hence potential confusion.
To summarize the general philosophy behind the above editing procedure: it’s best to do asmuch editing as possible in BC Manager as such. You use the B-Control’s temporary preset only toverify your changes, and the B-Control’s memory presets only as ‘dumb receivers’ (presumably forlater, ‘stand-alone’ use with your controlled MIDI hardware or software device).
Setting up individual elements (buttons, encoders and faders)
BC Manager offers several ways of setting up B-Control elements:
! The Button, Encoder and Fader dialog boxes:You can open these dialog boxes from the Buttons, Encoders and Faders windows by pressingthe Enter key or the ‘E’ toolbutton.These dialog boxes are BC Manager’s primary method for editing elements. They give you fullcontrol over the elements; their only drawback is that it can become tiresome to have tomanually set all parameters of all elements.See below for a tutorial on setting up an encoder via the Encoder dialog box.
! The ‘Simple’ operations:You can make a few common element setups very quickly from the Buttons, Encoders andFaders windows via the ‘PC’, ‘CC’ and ‘NRPN’ toolbuttons or from the corresponding items inthe Simple pull-down menu.You are only required to specify one or two essential parameters of the element; BC Managerautomatically sets up the other parameters to values it deems appropriate.
! The ‘Parameter’ operations:You can edit a single parameter of a range of elements in one go via the Parameter pull-downmenu of the Buttons, Encoders and Faders windows.The trick is to first select (highlight) a range of elements, then perform the operation from theParameter pull-down menu.Where applicable, you can even specify the parameter’s increment from one element to the next.
! The BCL editor window:You can open this window from the View pull-down menu of the B-Controls window.This window allows you to enter an element’s underlying BCL code directly.Drawbacks: (1) of course you have to learn BCL for this (see BCMI), and (2) you don’t gain
37
very much (if anything) on what BC Manager’s Button, Encoder and Fader dialog boxes offer.See §21 for in-depth discussion.
For instance, to set up an encoder via the Encoder dialog box:
1. Switch on your B-Control, start BC Manager and verify that BC Manager recognizes the B-Control, as indicated in the B-Controls window.
2. In BC Manager, create a definition for an encoder in preset 0:From the B-Controls window, open the Presets window. Its title bar should say something like‘BCF/R2000: Presets’.In the Presets window, select preset 0, i.e. make sure the selection bar is on the first row (with‘0’ in the ‘No.’ column).Then open the Encoders window, e.g. via the rightmost toolbutton. The title bar should saysomething like ‘BCF/R2000: Preset 0: Encoders’.In the Encoders window, select the encoder of your choice, and open its Encoder dialog box (e.g.via the ‘E’ toolbutton). The title bar of the Encoder dialog box should say something like‘BCF/R2000: Preset 0: Encoder 1’.In the Encoder dialog box you can set up the encoder any way you want. For instance:On the ‘Standard output’ tab, change Type to Control Change, then change Value 2 to 127.On the ‘General’ tab: tick ‘Show value’, set Resolutions to 96 and LEDs to ‘1 dot’.Finally press OK. This returns you to the Encoders window, where the settings you have justmade are now stated in the table.
3. Send your encoder definition from BC Manager to your B-Control:In the Encoders window, make sure the encoder definition you have just made is still selected(highlighted), then press the green Send toolbutton.Watch the B-Control’s display: it should flash while the B-Control is receiving the encoderdefinition data.
4. Verify that the B-Control’s encoder is now working according to the definition you have sent tothe B-Control:From BC Manager’s main window, open the ‘MIDI input messages’ window (e.g. via the thirdtoolbutton, the one with red horizontal lines).In the ‘MIDI input messages’ window, press the Record button.Then turn the encoder on the B-Control: the ‘MIDI input messages’ window should now showthe MIDI messages coming from the B-Control.Of course the specific MIDI messages reflect the encoder definition you have uploaded to the B-Control, so this monitoring is a nice way to learn about the MIDI data format and how it isimplemented in the B-Control.
38
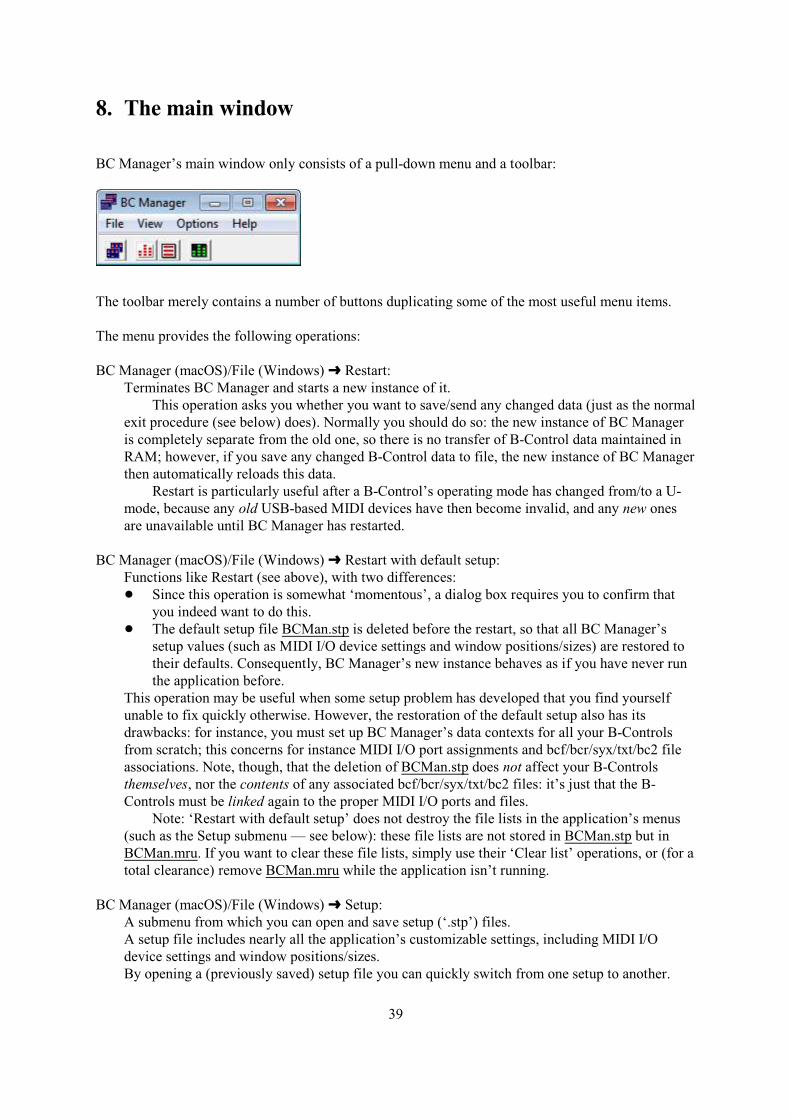
8. The main window
BC Manager’s main window only consists of a pull-down menu and a toolbar:
The toolbar merely contains a number of buttons duplicating some of the most useful menu items.
The menu provides the following operations:
BC Manager (macOS)/File (Windows) º Restart:Terminates BC Manager and starts a new instance of it.
This operation asks you whether you want to save/send any changed data (just as the normalexit procedure (see below) does). Normally you should do so: the new instance of BC Manageris completely separate from the old one, so there is no transfer of B-Control data maintained inRAM; however, if you save any changed B-Control data to file, the new instance of BC Managerthen automatically reloads this data.
Restart is particularly useful after a B-Control’s operating mode has changed from/to a U-mode, because any old USB-based MIDI devices have then become invalid, and any new onesare unavailable until BC Manager has restarted.
BC Manager (macOS)/File (Windows) º Restart with default setup:Functions like Restart (see above), with two differences:! Since this operation is somewhat ‘momentous’, a dialog box requires you to confirm that
you indeed want to do this.! The default setup file BCMan.stp is deleted before the restart, so that all BC Manager’s
setup values (such as MIDI I/O device settings and window positions/sizes) are restored totheir defaults. Consequently, BC Manager’s new instance behaves as if you have never runthe application before.
This operation may be useful when some setup problem has developed that you find yourselfunable to fix quickly otherwise. However, the restoration of the default setup also has itsdrawbacks: for instance, you must set up BC Manager’s data contexts for all your B-Controlsfrom scratch; this concerns for instance MIDI I/O port assignments and bcf/bcr/syx/txt/bc2 fileassociations. Note, though, that the deletion of BCMan.stp does not affect your B-Controlsthemselves, nor the contents of any associated bcf/bcr/syx/txt/bc2 files: it’s just that the B-Controls must be linked again to the proper MIDI I/O ports and files.
Note: ‘Restart with default setup’ does not destroy the file lists in the application’s menus(such as the Setup submenu — see below): these file lists are not stored in BCMan.stp but inBCMan.mru. If you want to clear these file lists, simply use their ‘Clear list’ operations, or (for atotal clearance) remove BCMan.mru while the application isn’t running.
BC Manager (macOS)/File (Windows) º Setup:A submenu from which you can open and save setup (‘.stp’) files.A setup file includes nearly all the application’s customizable settings, including MIDI I/Odevice settings and window positions/sizes.By opening a (previously saved) setup file you can quickly switch from one setup to another.
39

However, opening a setup file involves restarting the application; thus you will lose transientdata like unsaved recorded MIDI input messages. So if you only wish to change the windowpositions/sizes, it’s simpler to use the desktop (‘.dsk’) file facility (see View º Desktop),because this doesn’t involve restarting the application.Tip: you can force BC Manager to use a specific setup file via the command line, as follows:macOS: -s setupfileWindows: /s setupfile
BC Manager º Quit (macOS)/File º Exit (Windows):Terminates BC Manager. If there is any unsaved/unsent B-Control data, you are given theopportunity to save/send them before termination; if you answer ‘Cancel’ to any question, BCManager is not terminated.
Note that on Windows the associated hotkey (Alt+X) works from almost any location in theprogram, not just from the main window. Of course you can also terminate BC Manager byclicking on the V icon on the main window’s title bar: the same questions are asked. PressingAlt+F4 also works, but (unlike Alt+X) only from the main window.
File º Convert º Syx to text:This allows you to convert a syx file containing BCL messages to a bcf, bcr, txt or bc2 file. (Youcould then edit this file in an external editor.)
Notes:! It doesn’t matter whether you select bcf, bcr, txt or bc2 as the output file extension: the
resulting file is always in ASCII text file format.! This is a completely ‘dumb’ operation: BC Manager does not check the syntactic validity of
the BCL messages in any way: it just strips away the SysEx messages in which the BCLmessages are embedded.
! This operation does not affect the B-Control data structures being maintained in BCManager in any way.
File º Convert º Text to syx:The reverse of the ‘Syx to text’ operation. The same considerations apply.
Notes:! The input file can be in ASCII, ANSI or UTF-8 format, but any non-ASCII characters are
converted to dots. (Actually, bc2 files will always be ASCII/ANSI, not UTF-8, since RoyceCraven’s BCn2000 Script Editor (the ‘native’ application for bc2 files) only works withASCII/ANSI characters, not with Unicode characters.)
! The input file’s number of lines cannot exceed 16384; you should open a bcf/bcr/txt/bc2file exceeding this limit in the B-Controls window, then save it as a syx file.
View º B-Controls:Opens the B-Controls window. This is the gateway to the main functionality of BC Manager.See §10 for more information.
View º BCL errors:Opens the BCL error window. This window displays any errors that occurred in the most recentBCL script received by BC Manager’s BCL interpreter:
40
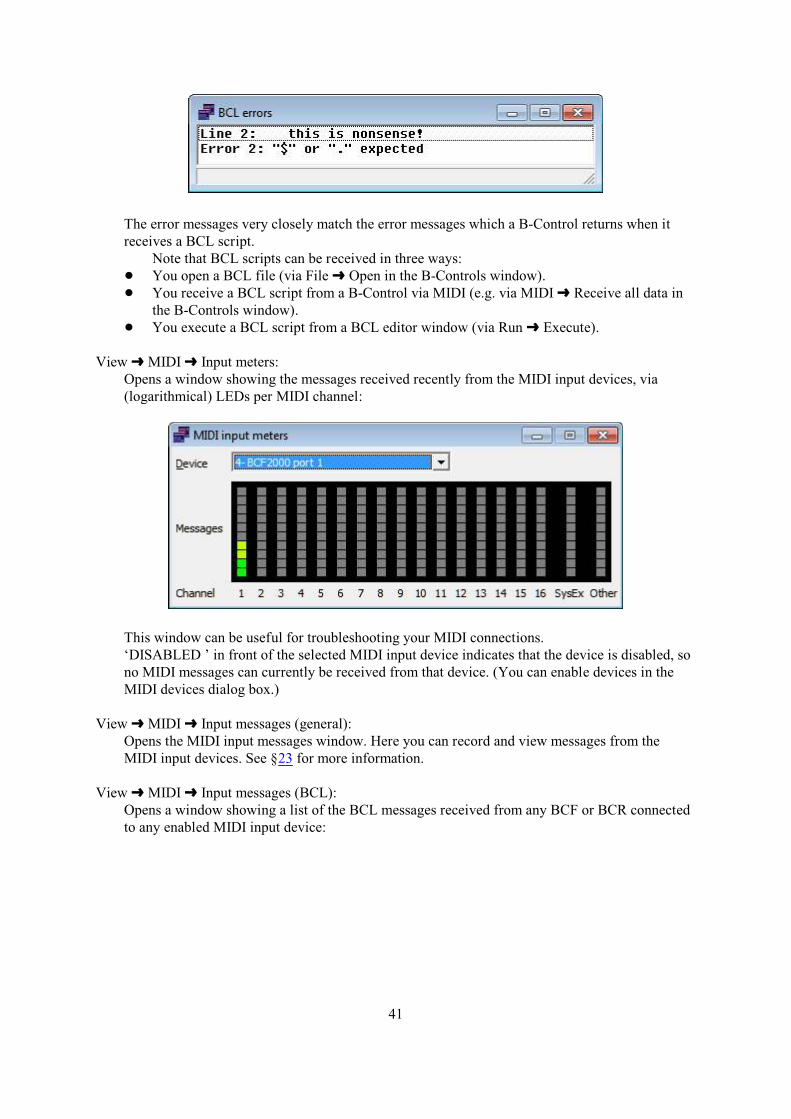
The error messages very closely match the error messages which a B-Control returns when itreceives a BCL script.
Note that BCL scripts can be received in three ways:! You open a BCL file (via File º Open in the B-Controls window).! You receive a BCL script from a B-Control via MIDI (e.g. via MIDI º Receive all data in
the B-Controls window).! You execute a BCL script from a BCL editor window (via Run º Execute).
View º MIDI º Input meters:Opens a window showing the messages received recently from the MIDI input devices, via(logarithmical) LEDs per MIDI channel:
This window can be useful for troubleshooting your MIDI connections.‘DISABLED ’ in front of the selected MIDI input device indicates that the device is disabled, sono MIDI messages can currently be received from that device. (You can enable devices in theMIDI devices dialog box.)
View º MIDI º Input messages (general):Opens the MIDI input messages window. Here you can record and view messages from theMIDI input devices. See §23 for more information.
View º MIDI º Input messages (BCL):Opens a window showing a list of the BCL messages received from any BCF or BCR connectedto any enabled MIDI input device:
41
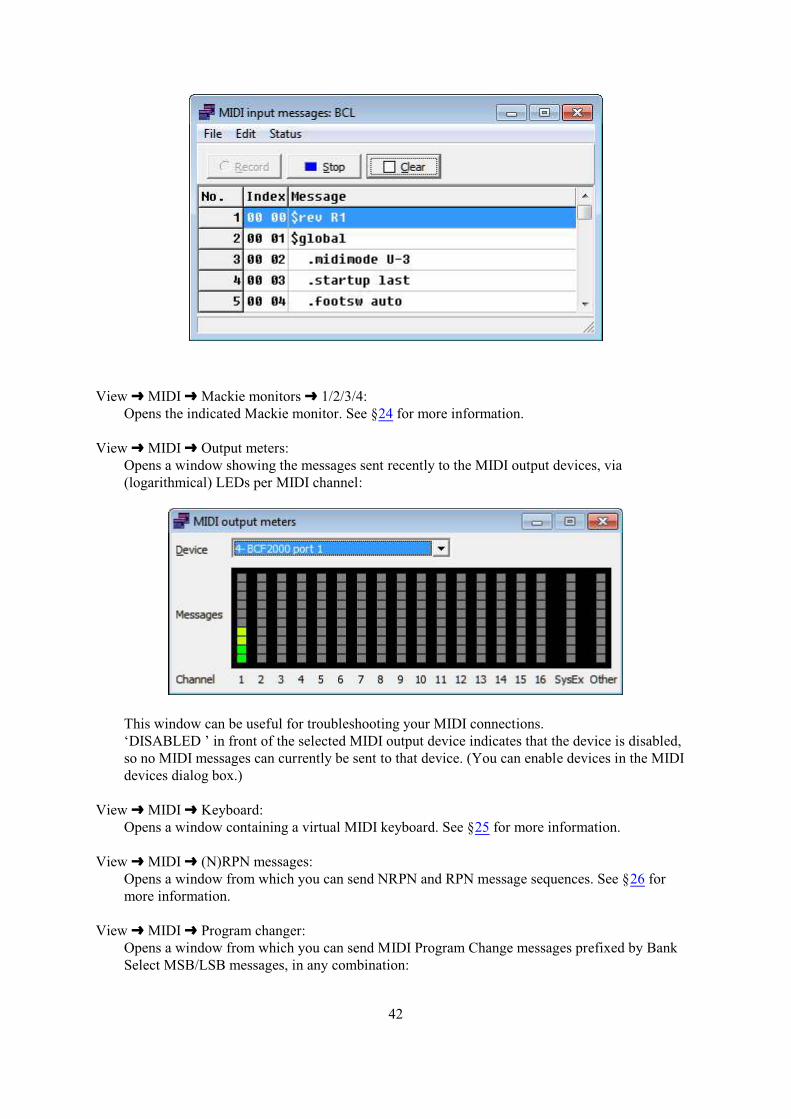
View º MIDI º Mackie monitors º 1/2/3/4:Opens the indicated Mackie monitor. See §24 for more information.
View º MIDI º Output meters:Opens a window showing the messages sent recently to the MIDI output devices, via(logarithmical) LEDs per MIDI channel:
This window can be useful for troubleshooting your MIDI connections.‘DISABLED ’ in front of the selected MIDI output device indicates that the device is disabled,so no MIDI messages can currently be sent to that device. (You can enable devices in the MIDIdevices dialog box.)
View º MIDI º Keyboard:Opens a window containing a virtual MIDI keyboard. See §25 for more information.
View º MIDI º (N)RPN messages:Opens a window from which you can send NRPN and RPN message sequences. See §26 formore information.
View º MIDI º Program changer:Opens a window from which you can send MIDI Program Change messages prefixed by BankSelect MSB/LSB messages, in any combination:
42

This window is very useful for testing devices that seem unwilling to change programs.
View º MIDI º System messages:Opens a window from which you can send MIDI System messages. See §27 for moreinformation.
View º MIDI º Controllers:Opens a window in which you can receive and send MIDI Control Change messages. See §28for more information.
View º MIDI º System Exclusive messages:Opens a window in which you can perform many actions related to MIDI System Exclusive(SysEx) messages. See §29 for more information.
View º MIDI º Data calculator:Opens a window in which you can convert a 4-byte sequence of ‘normal’ bytes to its MIDI datacounterpart or vice versa. (The MIDI protocol demands that the highest bit (‘bit 7’) of eachMIDI data byte is zero; consequently, if a sequence of two or more MIDI data bytes constituteone number, all bit 7s are ‘scrapped’ and all more significant bits are shifted to the right.)
43
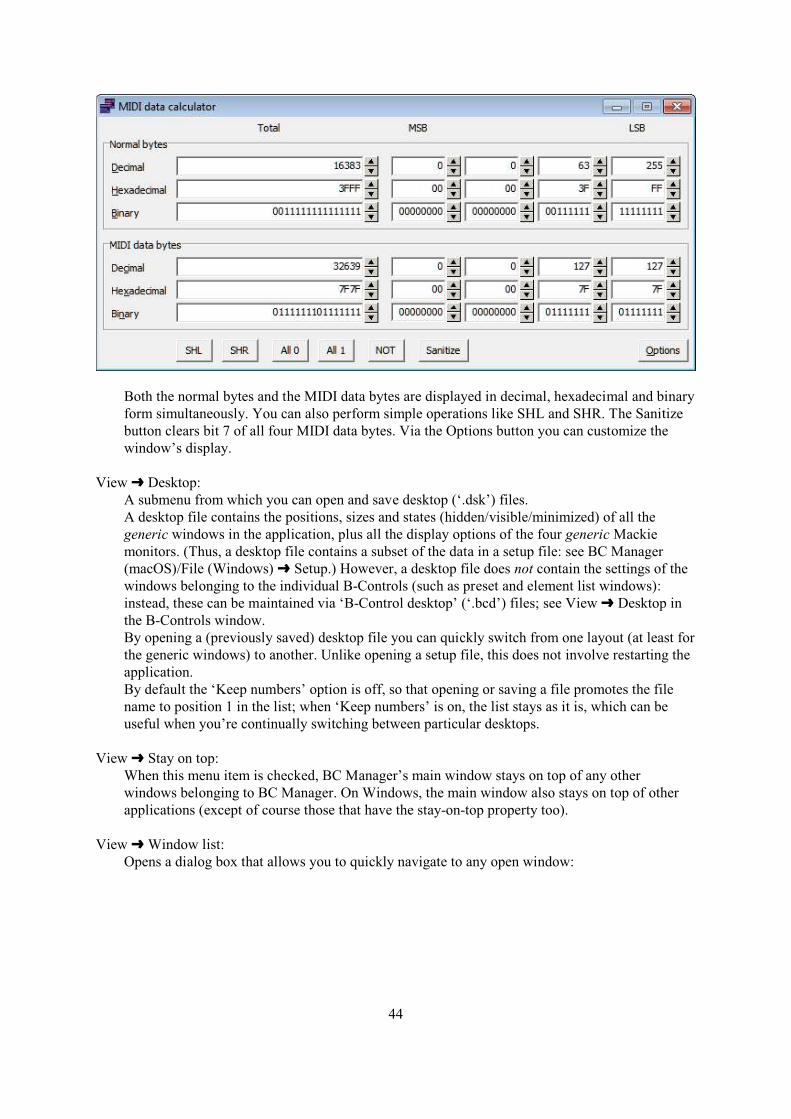
Both the normal bytes and the MIDI data bytes are displayed in decimal, hexadecimal and binaryform simultaneously. You can also perform simple operations like SHL and SHR. The Sanitizebutton clears bit 7 of all four MIDI data bytes. Via the Options button you can customize thewindow’s display.
View º Desktop:A submenu from which you can open and save desktop (‘.dsk’) files.A desktop file contains the positions, sizes and states (hidden/visible/minimized) of all thegeneric windows in the application, plus all the display options of the four generic Mackiemonitors. (Thus, a desktop file contains a subset of the data in a setup file: see BC Manager(macOS)/File (Windows) º Setup.) However, a desktop file does not contain the settings of thewindows belonging to the individual B-Controls (such as preset and element list windows):instead, these can be maintained via ‘B-Control desktop’ (‘.bcd’) files; see View º Desktop inthe B-Controls window.By opening a (previously saved) desktop file you can quickly switch from one layout (at least forthe generic windows) to another. Unlike opening a setup file, this does not involve restarting theapplication.By default the ‘Keep numbers’ option is off, so that opening or saving a file promotes the filename to position 1 in the list; when ‘Keep numbers’ is on, the list stays as it is, which can beuseful when you’re continually switching between particular desktops.
View º Stay on top:When this menu item is checked, BC Manager’s main window stays on top of any otherwindows belonging to BC Manager. On Windows, the main window also stays on top of otherapplications (except of course those that have the stay-on-top property too).
View º Window list:Opens a dialog box that allows you to quickly navigate to any open window:
44
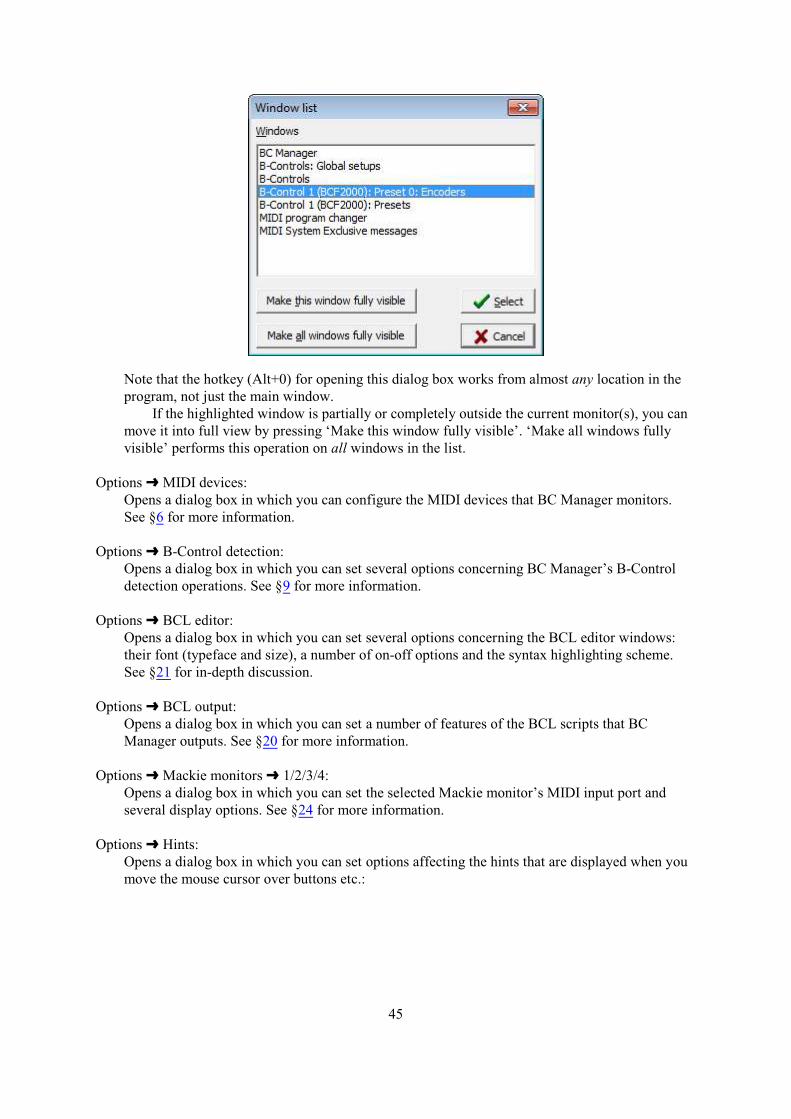
Note that the hotkey (Alt+0) for opening this dialog box works from almost any location in theprogram, not just the main window.
If the highlighted window is partially or completely outside the current monitor(s), you canmove it into full view by pressing ‘Make this window fully visible’. ‘Make all windows fullyvisible’ performs this operation on all windows in the list.
Options º MIDI devices:Opens a dialog box in which you can configure the MIDI devices that BC Manager monitors.See §6 for more information.
Options º B-Control detection:Opens a dialog box in which you can set several options concerning BC Manager’s B-Controldetection operations. See §9 for more information.
Options º BCL editor:Opens a dialog box in which you can set several options concerning the BCL editor windows:their font (typeface and size), a number of on-off options and the syntax highlighting scheme.See §21 for in-depth discussion.
Options º BCL output:Opens a dialog box in which you can set a number of features of the BCL scripts that BCManager outputs. See §20 for more information.
Options º Mackie monitors º 1/2/3/4:Opens a dialog box in which you can set the selected Mackie monitor’s MIDI input port andseveral display options. See §24 for more information.
Options º Hints:Opens a dialog box in which you can set options affecting the hints that are displayed when youmove the mouse cursor over buttons etc.:
45
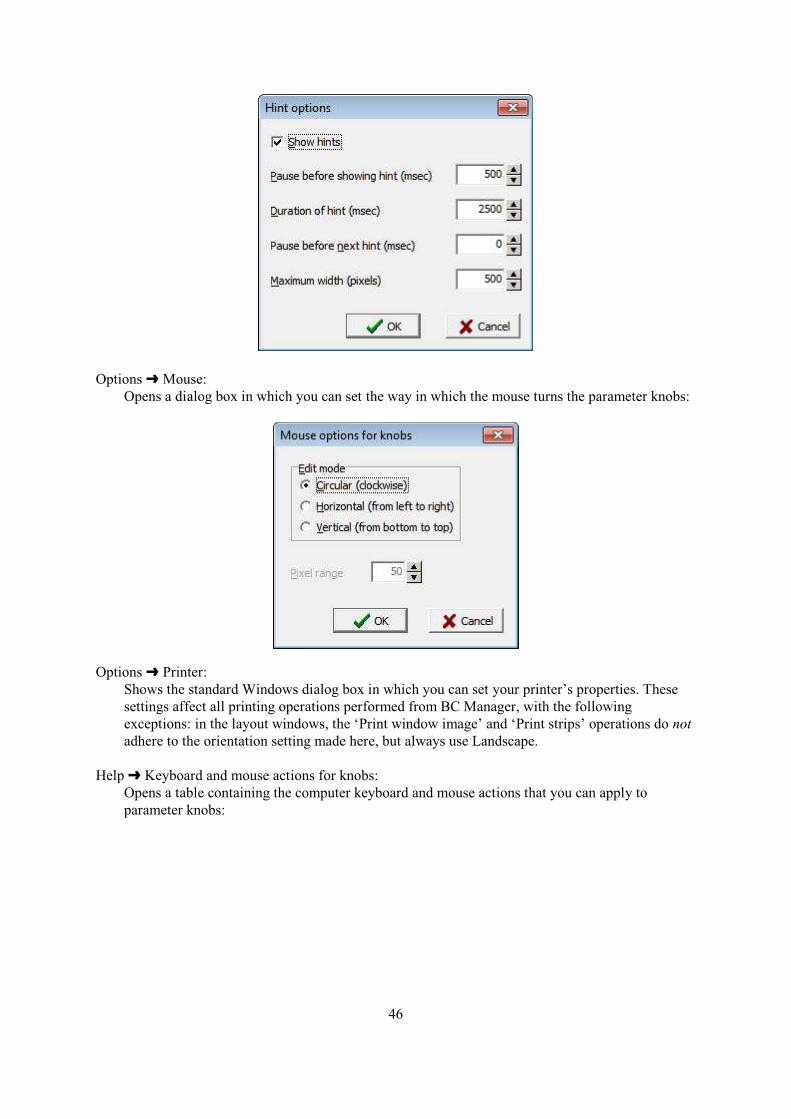
Options º Mouse:Opens a dialog box in which you can set the way in which the mouse turns the parameter knobs:
Options º Printer:Shows the standard Windows dialog box in which you can set your printer’s properties. Thesesettings affect all printing operations performed from BC Manager, with the followingexceptions: in the layout windows, the ‘Print window image’ and ‘Print strips’ operations do notadhere to the orientation setting made here, but always use Landscape.
Help º Keyboard and mouse actions for knobs:Opens a table containing the computer keyboard and mouse actions that you can apply toparameter knobs:
46
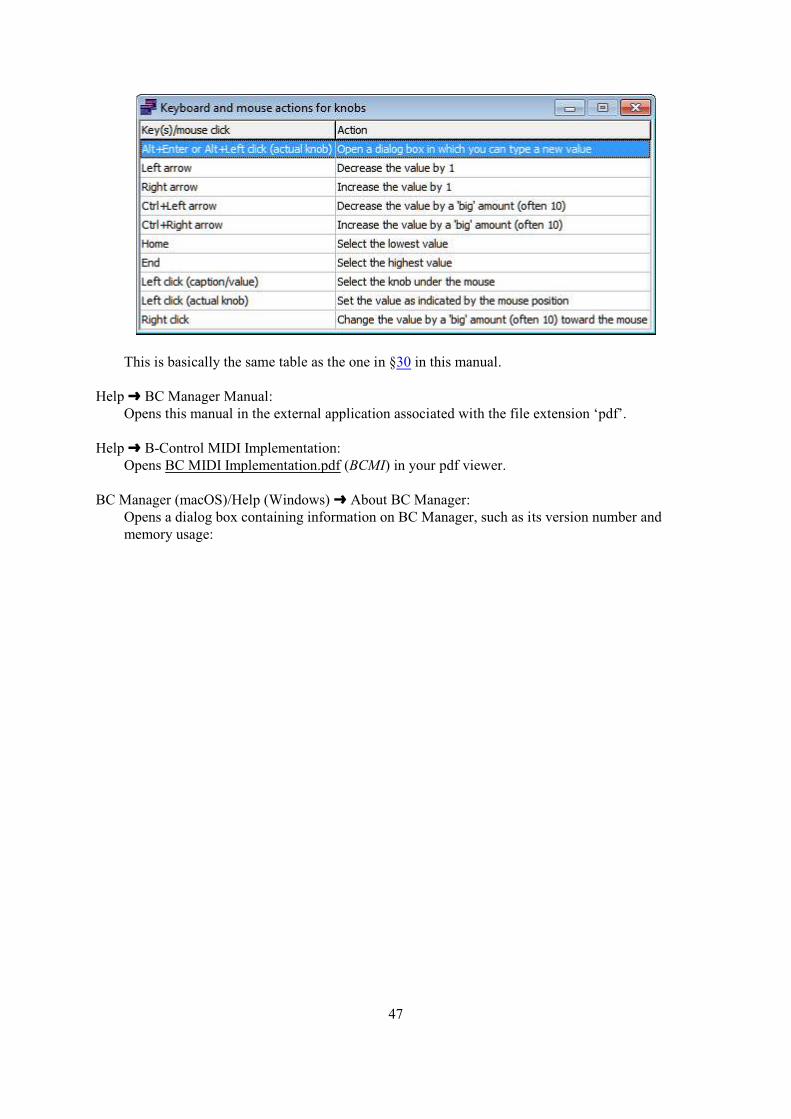
This is basically the same table as the one in §30 in this manual.
Help º BC Manager Manual:Opens this manual in the external application associated with the file extension ‘pdf’.
Help º B-Control MIDI Implementation:Opens BC MIDI Implementation.pdf (BCMI) in your pdf viewer.
BC Manager (macOS)/Help (Windows) º About BC Manager:Opens a dialog box containing information on BC Manager, such as its version number andmemory usage:
47
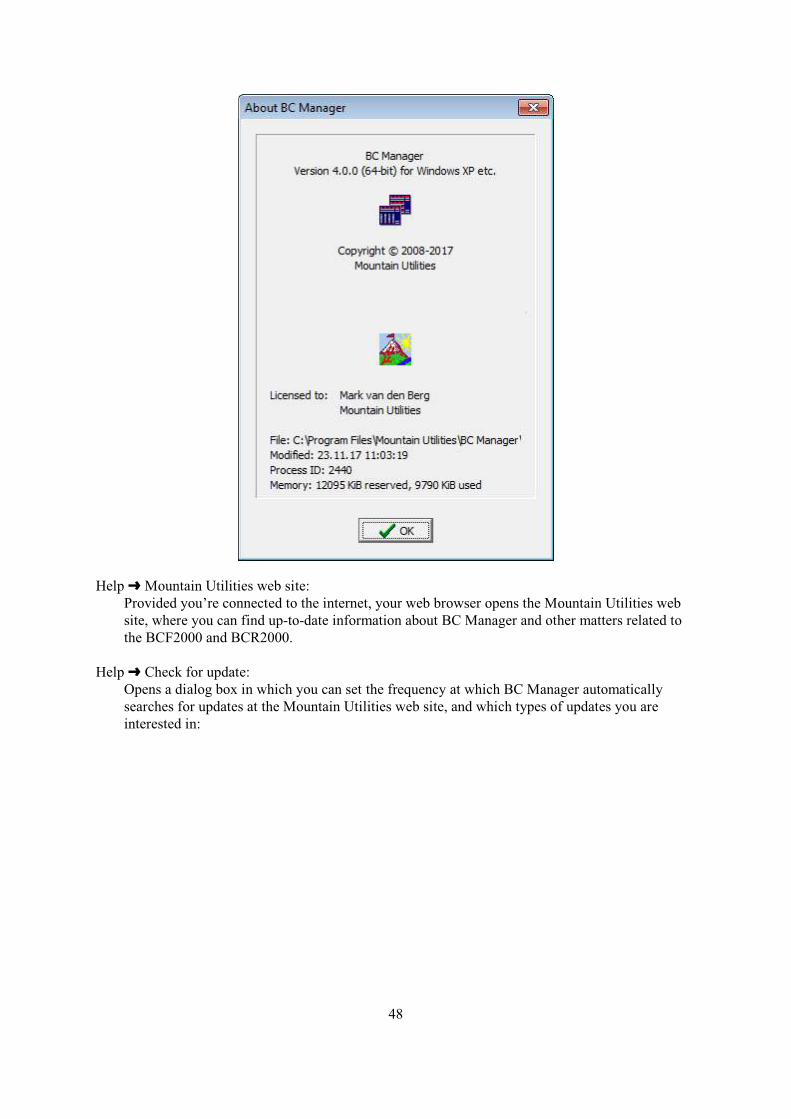
Help º Mountain Utilities web site:Provided you’re connected to the internet, your web browser opens the Mountain Utilities website, where you can find up-to-date information about BC Manager and other matters related tothe BCF2000 and BCR2000.
Help º Check for update:Opens a dialog box in which you can set the frequency at which BC Manager automaticallysearches for updates at the Mountain Utilities web site, and which types of updates you areinterested in:
48
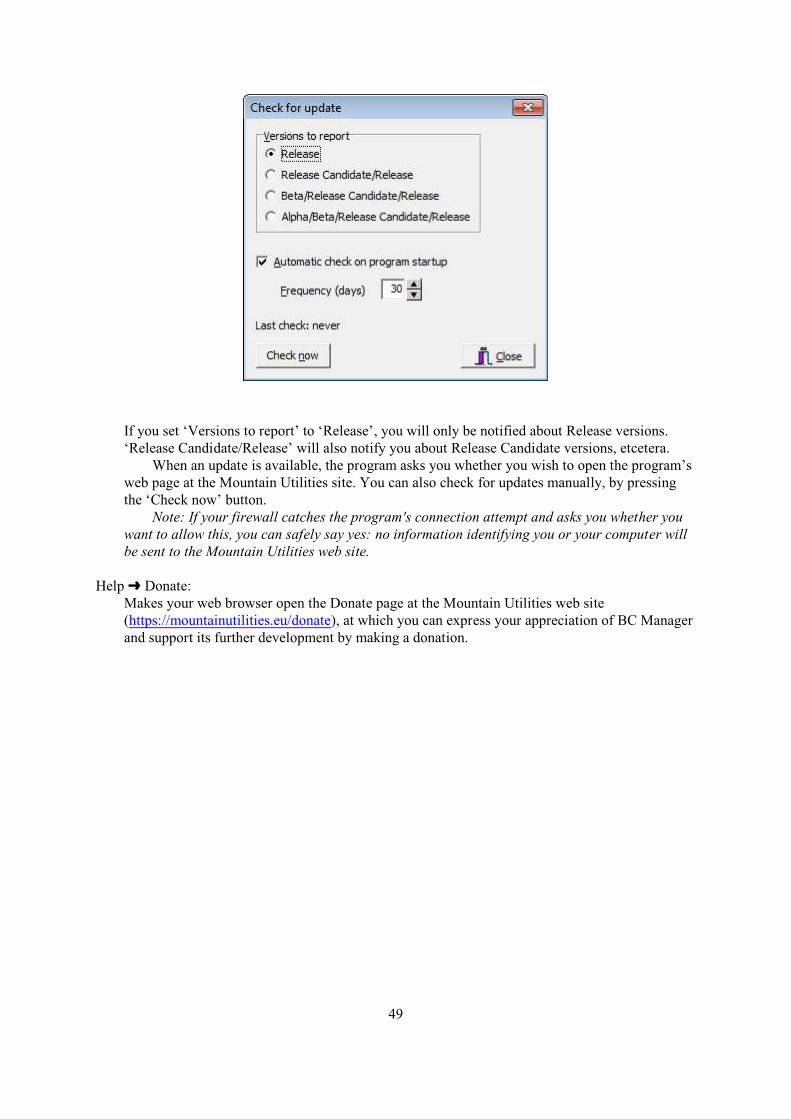
If you set ‘Versions to report’ to ‘Release’, you will only be notified about Release versions.‘Release Candidate/Release’ will also notify you about Release Candidate versions, etcetera.
When an update is available, the program asks you whether you wish to open the program’sweb page at the Mountain Utilities site. You can also check for updates manually, by pressingthe ‘Check now’ button.
Note: If your firewall catches the program's connection attempt and asks you whether youwant to allow this, you can safely say yes: no information identifying you or your computer willbe sent to the Mountain Utilities web site.
Help º Donate:Makes your web browser open the Donate page at the Mountain Utilities web site(https://mountainutilities.eu/donate), at which you can express your appreciation of BC Managerand support its further development by making a donation.
49
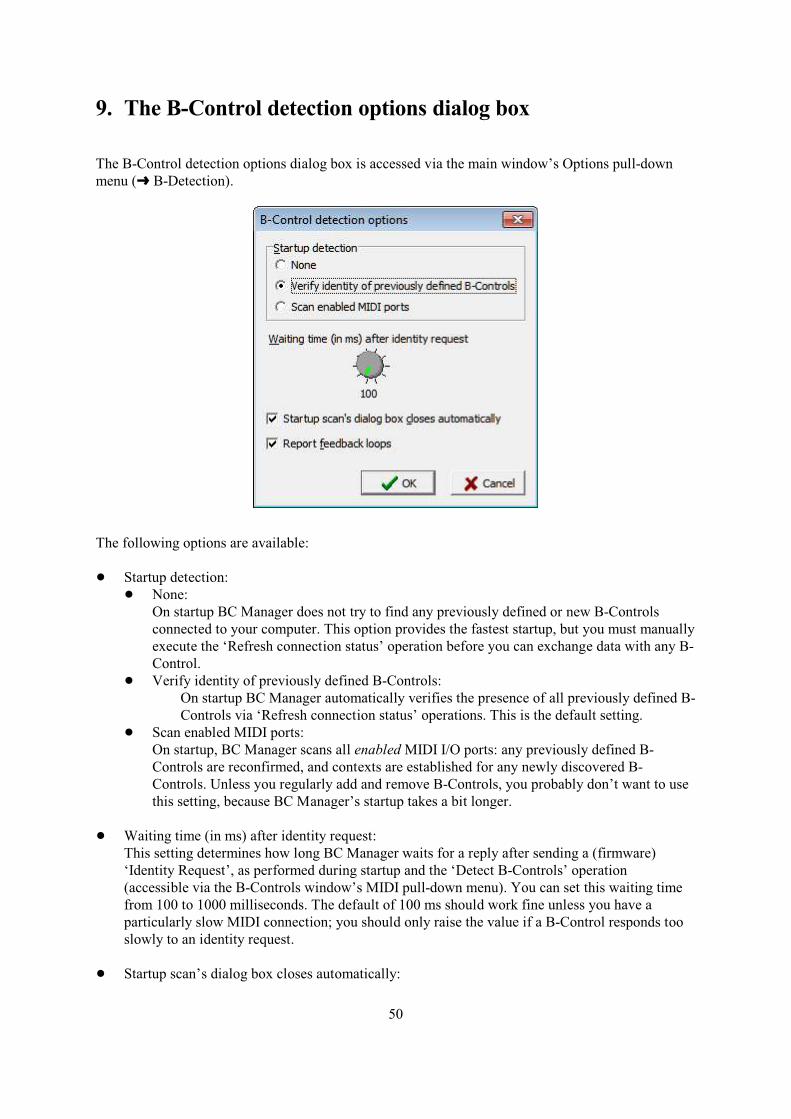
9. The B-Control detection options dialog box
The B-Control detection options dialog box is accessed via the main window’s Options pull-downmenu (º B-Detection).
The following options are available:
! Startup detection:! None:
On startup BC Manager does not try to find any previously defined or new B-Controlsconnected to your computer. This option provides the fastest startup, but you must manuallyexecute the ‘Refresh connection status’ operation before you can exchange data with any B-Control.
! Verify identity of previously defined B-Controls:On startup BC Manager automatically verifies the presence of all previously defined B-Controls via ‘Refresh connection status’ operations. This is the default setting.
! Scan enabled MIDI ports:On startup, BC Manager scans all enabled MIDI I/O ports: any previously defined B-Controls are reconfirmed, and contexts are established for any newly discovered B-Controls. Unless you regularly add and remove B-Controls, you probably don’t want to usethis setting, because BC Manager’s startup takes a bit longer.
! Waiting time (in ms) after identity request:This setting determines how long BC Manager waits for a reply after sending a (firmware)‘Identity Request’, as performed during startup and the ‘Detect B-Controls’ operation(accessible via the B-Controls window’s MIDI pull-down menu). You can set this waiting timefrom 100 to 1000 milliseconds. The default of 100 ms should work fine unless you have aparticularly slow MIDI connection; you should only raise the value if a B-Control responds tooslowly to an identity request.
! Startup scan’s dialog box closes automatically:
50

If this checkbox is checked, BC Manager’s startup scan dialog box closes automatically whenthe scan is complete. If this checkbox is unchecked, you must manually close this dialog box.
! Report feedback loops:This setting determines whether the detection operations inform you of any detected feedbackloops from the computer’s MIDI output ports to the computer’s MIDI input ports. So if thesereports annoy you, you can simply suppress them. However, usually it is better to remove thefeedback loops themselves, since they can degrade performance.
51
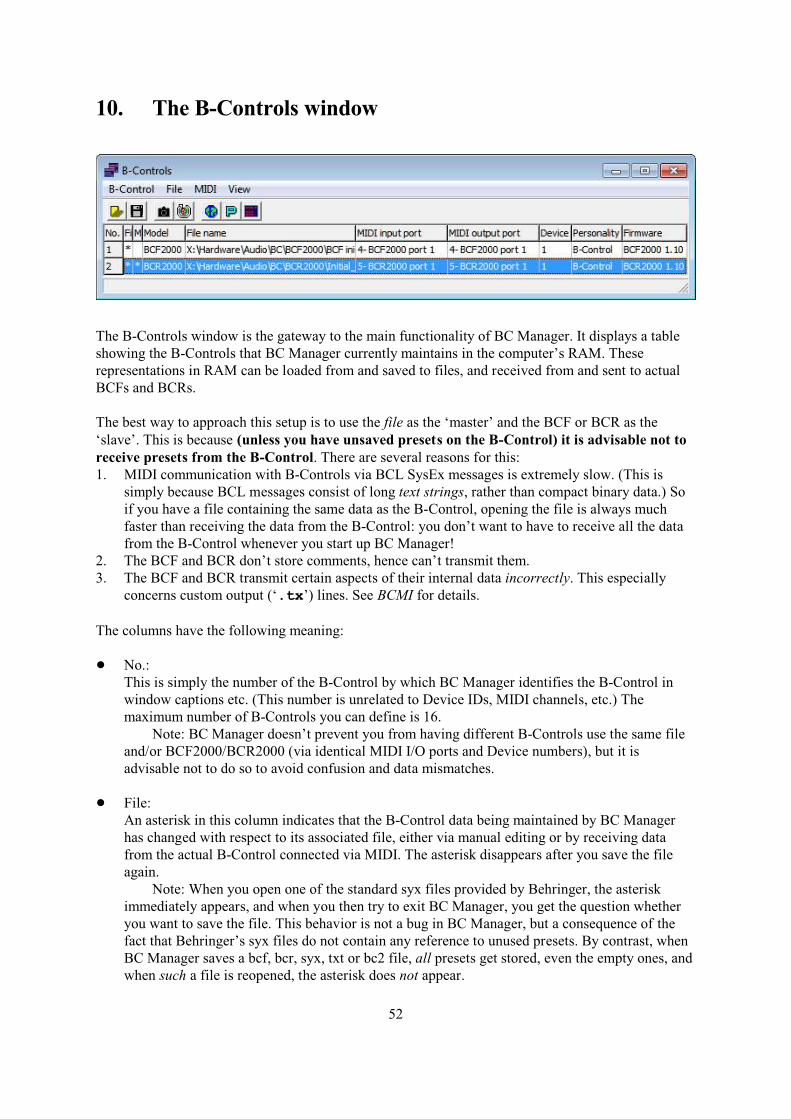
10. The B-Controls window
The B-Controls window is the gateway to the main functionality of BC Manager. It displays a tableshowing the B-Controls that BC Manager currently maintains in the computer’s RAM. Theserepresentations in RAM can be loaded from and saved to files, and received from and sent to actualBCFs and BCRs.
The best way to approach this setup is to use the file as the ‘master’ and the BCF or BCR as the‘slave’. This is because (unless you have unsaved presets on the B-Control) it is advisable not toreceive presets from the B-Control. There are several reasons for this:1. MIDI communication with B-Controls via BCL SysEx messages is extremely slow. (This is
simply because BCL messages consist of long text strings, rather than compact binary data.) Soif you have a file containing the same data as the B-Control, opening the file is always muchfaster than receiving the data from the B-Control: you don’t want to have to receive all the datafrom the B-Control whenever you start up BC Manager!
2. The BCF and BCR don’t store comments, hence can’t transmit them.3. The BCF and BCR transmit certain aspects of their internal data incorrectly. This especially
concerns custom output (‘.tx’) lines. See BCMI for details.
The columns have the following meaning:
! No.:This is simply the number of the B-Control by which BC Manager identifies the B-Control inwindow captions etc. (This number is unrelated to Device IDs, MIDI channels, etc.) Themaximum number of B-Controls you can define is 16.
Note: BC Manager doesn’t prevent you from having different B-Controls use the same fileand/or BCF2000/BCR2000 (via identical MIDI I/O ports and Device numbers), but it isadvisable not to do so to avoid confusion and data mismatches.
! File:An asterisk in this column indicates that the B-Control data being maintained by BC Managerhas changed with respect to its associated file, either via manual editing or by receiving datafrom the actual B-Control connected via MIDI. The asterisk disappears after you save the fileagain.
Note: When you open one of the standard syx files provided by Behringer, the asteriskimmediately appears, and when you then try to exit BC Manager, you get the question whetheryou want to save the file. This behavior is not a bug in BC Manager, but a consequence of thefact that Behringer’s syx files do not contain any reference to unused presets. By contrast, whenBC Manager saves a bcf, bcr, syx, txt or bc2 file, all presets get stored, even the empty ones, andwhen such a file is reopened, the asterisk does not appear.
52
! MIDI:An asterisk in this column indicates that the B-Control data being maintained by BC Managerhas changed with respect to the B-Control connected via MIDI, either via manual editing or byopening a file. The asterisk disappears after you send the data maintained by BC Manager to theB-Control.
! File:The name of the file associated with the B-Control data being maintained. This is a bcf, bcr, syx,txt or bc2 file containing the full BCL definition of the B-Control.
! MIDI input port/MIDI output port:The names of the MIDI input and output ports to which the BCF or BCR is connected.Special cases:! ‘ABSENT ’ in front of a name means that the device doesn’t currently exist.
Characteristically this happens to USB-based ports linked to a BCF/BCR that has beenswitched off. If you don’t need the BCF/BCR in your current session, you may simply leavethe situation as it is. When you switch the BCF/BCR back on and restart BC Manager, thedevice is immediately available again.
! ‘DISABLED ’ in front of a name means that the device has been disabled via the MIDIdevices dialog box. You can simply re-enable the device there.
! Device:The Device ID that BC Manager uses in its MIDI SysEx communication with the connected B-Control. For this communication to work, you must make sure that this number corresponds withthe Device ID set on the B-Control.
! Personality:The current status of the connected B-Control, as established via the latest ‘Refresh connectionstatus’ operation. The following values occur:
! Offline:The B-Control is not connected (or at least could not be detected), so no meaningful MIDIdata communication is possible. All you can do in this case is resolve the problem and retry‘Refresh connection status’.
The cause of the problem can be any of the following:
! The MIDI input and/or output ports are undefined or disabled. Refer to the MIDIdevices dialog box, accessible from BC Manager’s main window.
! The Device ID of the B-Control itself and the Device ID specified in BC Managerdon’t match.
Obviously, to remedy this situation, you should change one or both of theseDevice IDs so that they do match, and then try ‘Receive identity’ again. Beware: if theB-Control is in a USB operating mode (U-1/2/3/4), any change to its Device ID causesthe USB-based MIDI I/O ports to change their identities, and these new MIDI I/O portsare unavailable to BC Manager until you have quit and restarted BC Manager, andmanually enabled them via the MIDI devices dialog box. On the other hand, if the B-Control is in a standard MIDI operating mode (S-1/2/3/4), you can change the B-Control’s Device ID without having to quit and restart BC Manager.
! The B-Control is in Global Setup edit mode, the display showing ‘EG’. You should
53
press EXIT on the B-Control and retry ‘Refresh connection status’.
! The B-Control is in element edit mode, the display showing ‘b nn’, ‘E nn’ or (BCFonly) ‘Fd n’. You should press EXIT on the B-Control and retry ‘Refresh connectionstatus’.
! Bootloader:The B-Control has been started up in bootloader mode. BC Manager’s functionality islimited.
The B-Control enters bootloader mode on startup if there is a problem with itsfirmware or if you are holding the STORE and LEARN buttons when you press thePOWER button. In the former case the B-Control’s display shows ‘noOS’, in the latter‘LOAd’. Note that in bootloader mode the B-Control cannot communicate via USB-basedMIDI connections, only via standard MIDI connections (and only via Output A at that). SeeBCMI for further details on bootloader mode.
! Unknown:The BCF’s firmware version has been retrieved successfully, but somehow the BCF’semulation mode could not be established.
! B-Control:The B-Control is in standard B-Control mode. For BC Manager this is the desired value:you can access all the B-Control’s data structures, including global setup, the temporarypreset and the memory presets.
! MC C/So:The BCF is in ‘MC C’ or ‘MCSo’ emulation mode. BC Manager’s functionality is limited.
(Note: the fact that no distinction is made between ‘MC C’ and ‘MCSo’ is due to alimitation of the BCF’s emulation mode identification protocol.)
! LC:The BCF is in ‘LC’ emulation mode. BC Manager’s functionality is limited.
! bhuI:The BCF is in ‘bhuI’ emulation mode. BC Manager’s functionality is limited.
(Note: so far I haven’t found a way to ‘actively’ establish that the BCF is in bhuIemulation mode. Instead, BC Manager simply assumes that the BCF is in bhuI mode whennone of the active checks for the other modes have led to a positive result. Hence, it takes awhile for BC Manager to ‘discover’ bhuI mode.)
In all cases except ‘Offline’ and ‘B-Control’, you can only communicate with the B-Control via‘Refresh connection status’ and ‘Send firmware’.
! Firmware:The actual firmware identity string returned by the B-Control during the ‘Refresh connectionstatus’ operation. Normally this should be something like ‘BCF2000 1.10’ or ‘BCR2000 1.10’.Exceptionally, this can be ‘BCF2000 BOOTLOADER 1.0’ or ‘BCR2000 BOOTLOADER 1.0’,indicating that the B-Control is in bootloader mode.
The menu provides the following operations:
54
B-Controls º New BCF2000/BCR2000:Adds a new B-Control of the specified type to the list of B-Controls. (You are then responsiblefor assigning a file and/or MIDI ports to this new B-Control.)
B-Controls º Import Reason map:Imports a Propellerhead Reason ‘remote map’ file into one or two new B-Controls. (This worksfor Reason 3.0 to (at least) 7.0.1.) Each Reason device defined in the map file is emulated as aseparate memory preset.
The number of new B-Controls depends on the number of Reason devices defined in thefile. A Reason 3 map file defines 27 device, which fit in a single B-Control, and the same goesfor a Reason 4 map file: 29 devices. However, the map files of Reason 5 and later define morethan 32 devices, which require multiple new B-Controls.
See §22 for more details.
B-Controls º Close selected:Closes the selected (i.e. highlighted) B-Control. This merely removes BC Manager’s internallymaintained representation of the B-Control, including the references to the file and the MIDI I/Oports; it does not delete the file itself.
File º Open:Opens a dialog box in which you can select a bcf, bcr, syx, txt or bc2 file whose data you want toload into the selected B-Control (as maintained by BC Manager). By default, you can see onlythe existing bcf files (if the B-Control is a BCF2000) or the existing bcr files (if the B-Control isa BCR2000), but you can switch to the existing syx, txt or bc2 files via the ‘Files of type’ listbox.
Note that saving and sending verification dialog boxes show up when appropriate and thatthe file name associated with the selected B-Control is updated to the name of the opened file.By contrast, these things do not happen in case of the Import operation (see below). (The idea isthat an opened file contains all the data for a B-Control, although this is by no meansobligatory.)
File º Import:Works exactly like the Open operation (see above), except that no saving or sending verificationdialog boxes show up and the file name associated with the selected B-Control is not updated tothe name of the opened file. Thus, Import is ideal for assembling a B-Control setup from severaldifferent source files.
Note: if you import a file containing a memory preset (i.e. a file containing a presetdefinition followed by a $store statement), the B-Control’s temporary preset is alwayschanged too. This is simply a consequence of how BCL works: any preset definition alters thetemporary preset, and can only be copied to a memory preset by a subsequent $storestatement — of course by that time the temporary preset has already been changed.
File º Save:Saves the selected B-Control’s data (as maintained by BC Manager) to the bcf, bcr, syx, txt orbc2 file currently associated with the B-Control.
File º Save As ... :Opens a dialog box in which you can select a bcf, bcr, syx, txt or bc2 file to which you want tosave the selected B-Control’s data (as maintained by BC Manager). The default file type is bcffor the BCF2000 and bcr for the BCR2000, but you can save to a syx, txt or bc2 file by changingthe selected item of the ‘Save as type’ list box.
55

BC Manager can reopen any of these file types, but there are several notable differencesthat determine which file type is best for you:
Internally, the only the difference between bcf, bcr and txt files on the one hand and bc2files on the other is that BC Manager saves bcf, bcr and txt files in UTF-8 format and bc2 files inANSI format. Thus, a bcf, bcr or txt file retains any Unicode characters in comments andmetadata (such as element and author names), but a bc2 file doesn’t.
bcf and bcr were introduced in BC Manager 3.0.0 and are the recommended extensions,since they allow you to distinguish between files for the BCF2000 and files for the BCR2000:particularly syx and txt might cause confusion with other, non-BCL syx and txt files in the samefolder. On the other hand, syx files can be uploaded to B-Controls via third-party uploaders (butnote the caveat below), and txt makes it a bit easier to edit the file in a standard text editor suchas Notepad (note that Notepad supports UTF-8). bc2 is only provided for compatibility withRoyce Craven’s BCn2000 Script Editor.
The advantages of text files (bcf, bcr, txt and bc2) over syx are:! A bcf, bcr, txt or bc2 file is always slightly smaller than the corresponding syx file.! You can edit bcf, bcr, txt and bc2 files via any external text editor. (However, other BC-
managing products might only be able to work with syx files.)! When comments, element names and preset authors are saved to a syx file, all non-ASCII
characters (ANSI and Unicode) are converted to dots: this is necessary to comply with thesyx file format. On the other hand, ANSI characters are saved to bcf, bcr, txt and bc2 files,and bcf, bcr and txt files even retain Unicode characters.
! Each individual data section (global setup, preset specs, button, encoder, fader) in a syx filecan ‘only’ contain up to 16384 BCL messages (lines), so syx files can’t be used forextremely big data sections (i.e. with huge amounts of multi-line comments or ‘customoutput’ MIDI messages).
! Third-party syx uploaders will be unable to skip any comments and (comment-embedded)metadata (such as element names and colors), so they will need substantially more time toupload comment/metadata-heavy syx files to B-Controls than BC Manager.
File º Backups:If this option is on, a Save or Save As operation (see above) first renames the existing file (if itexists), by inserting a tilde (~) at the start of the extension. So e.g. the old demo.bcf is renamedto demo.~bcf.
File º 1-10 filename:The names of the (max. 10) most recently accessed file names are shown: if you select a file, thatfile is reopened.
File º Detach:Detaches the bcf/bcr/syx/txt/bc2 file from the selected B-Control. (Note that the file is notdeleted.)
This operation is mainly useful when you wish to transfer a file from one B-Control toanother: whereas BC Manager does allow you to associate a file with more than one B-Controlsimultaneously, it is advisable to detach the file from the ‘old’ B-Control to avoid confusion.
MIDI º Receive all data:Sends a request to the connected B-Control for sending all its data to BC Manager. Unless thereare presets on the B-Control that you don’t have elsewhere, you should avoid thisoperation, because of the reasons outlined at the start of this section. Also refer to §7.
MIDI º Receive snapshot:
56
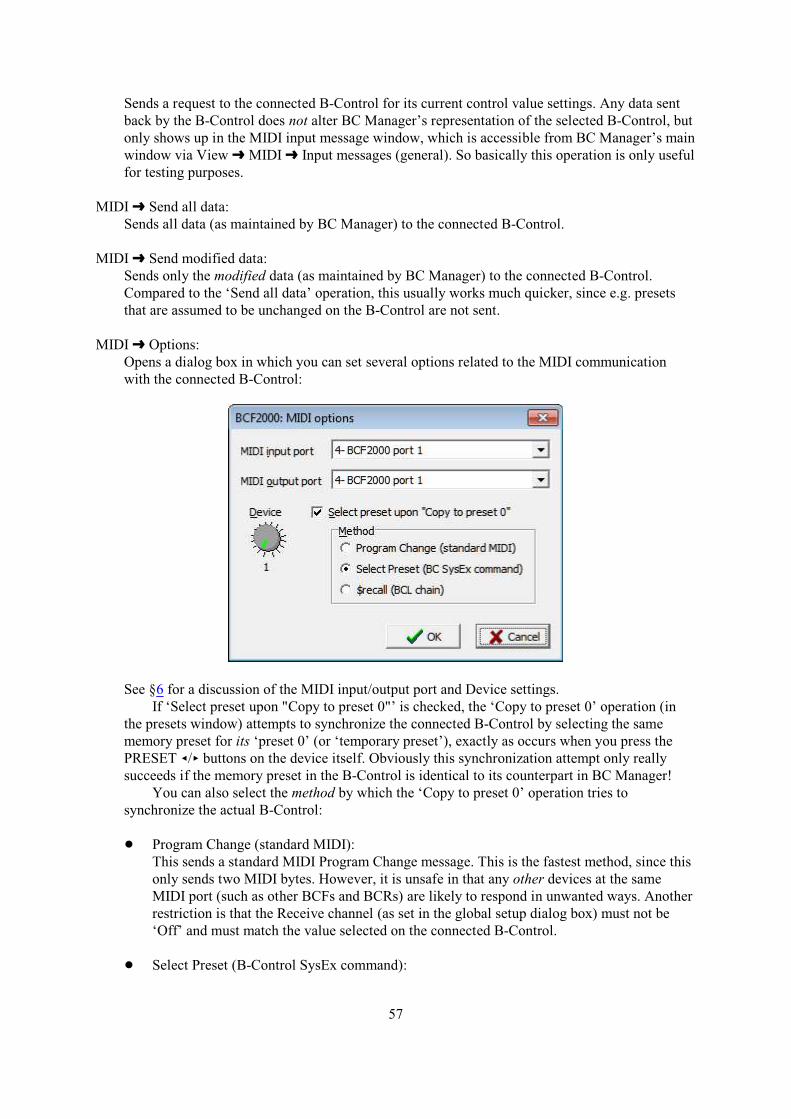
Sends a request to the connected B-Control for its current control value settings. Any data sentback by the B-Control does not alter BC Manager’s representation of the selected B-Control, butonly shows up in the MIDI input message window, which is accessible from BC Manager’s mainwindow via View º MIDI º Input messages (general). So basically this operation is only usefulfor testing purposes.
MIDI º Send all data:Sends all data (as maintained by BC Manager) to the connected B-Control.
MIDI º Send modified data:Sends only the modified data (as maintained by BC Manager) to the connected B-Control.Compared to the ‘Send all data’ operation, this usually works much quicker, since e.g. presetsthat are assumed to be unchanged on the B-Control are not sent.
MIDI º Options:Opens a dialog box in which you can set several options related to the MIDI communicationwith the connected B-Control:
See §6 for a discussion of the MIDI input/output port and Device settings.If ‘Select preset upon "Copy to preset 0"’ is checked, the ‘Copy to preset 0’ operation (in
the presets window) attempts to synchronize the connected B-Control by selecting the samememory preset for its ‘preset 0’ (or ‘temporary preset’), exactly as occurs when you press thePRESET =/< buttons on the device itself. Obviously this synchronization attempt only reallysucceeds if the memory preset in the B-Control is identical to its counterpart in BC Manager!
You can also select the method by which the ‘Copy to preset 0’ operation tries tosynchronize the actual B-Control:
! Program Change (standard MIDI):This sends a standard MIDI Program Change message. This is the fastest method, since thisonly sends two MIDI bytes. However, it is unsafe in that any other devices at the sameMIDI port (such as other BCFs and BCRs) are likely to respond in unwanted ways. Anotherrestriction is that the Receive channel (as set in the global setup dialog box) must not be‘Off’ and must match the value selected on the connected B-Control.
! Select Preset (B-Control SysEx command):
57
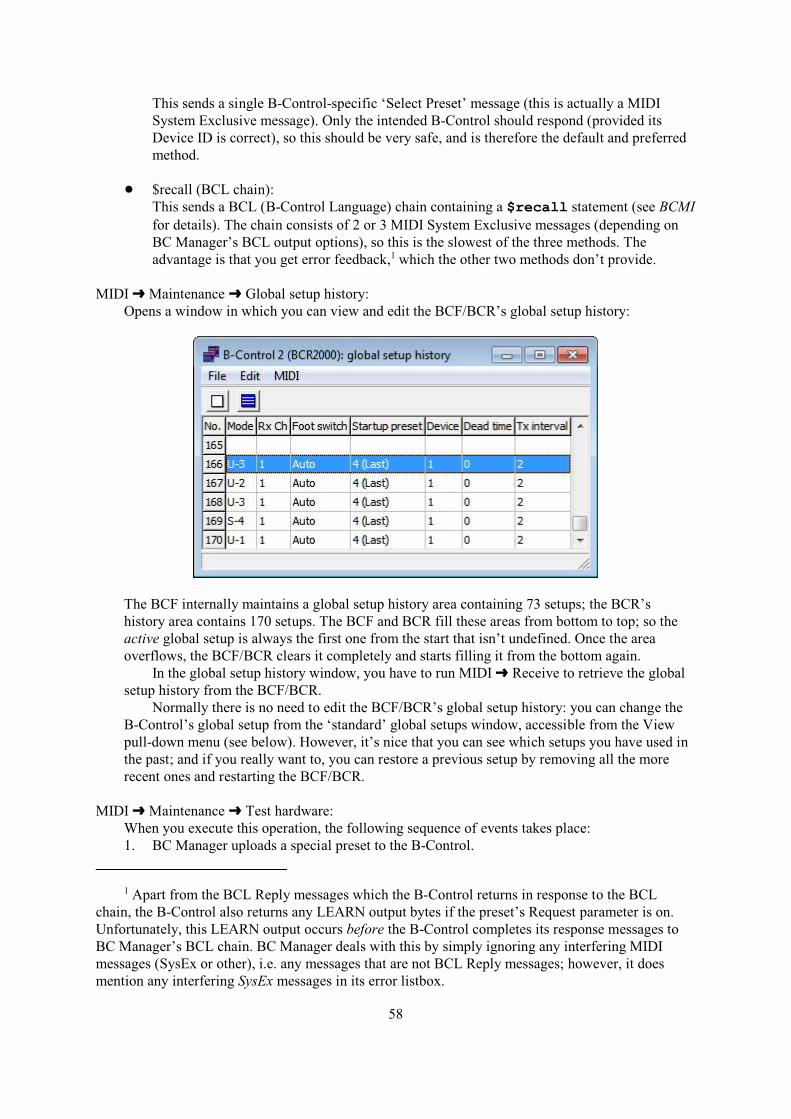
This sends a single B-Control-specific ‘Select Preset’ message (this is actually a MIDISystem Exclusive message). Only the intended B-Control should respond (provided itsDevice ID is correct), so this should be very safe, and is therefore the default and preferredmethod.
! $recall (BCL chain):This sends a BCL (B-Control Language) chain containing a $recall statement (see BCMIfor details). The chain consists of 2 or 3 MIDI System Exclusive messages (depending onBC Manager’s BCL output options), so this is the slowest of the three methods. Theadvantage is that you get error feedback,1 which the other two methods don’t provide.
MIDI º Maintenance º Global setup history:Opens a window in which you can view and edit the BCF/BCR’s global setup history:
The BCF internally maintains a global setup history area containing 73 setups; the BCR’shistory area contains 170 setups. The BCF and BCR fill these areas from bottom to top; so theactive global setup is always the first one from the start that isn’t undefined. Once the areaoverflows, the BCF/BCR clears it completely and starts filling it from the bottom again.
In the global setup history window, you have to run MIDI º Receive to retrieve the globalsetup history from the BCF/BCR.
Normally there is no need to edit the BCF/BCR’s global setup history: you can change theB-Control’s global setup from the ‘standard’ global setups window, accessible from the Viewpull-down menu (see below). However, it’s nice that you can see which setups you have used inthe past; and if you really want to, you can restore a previous setup by removing all the morerecent ones and restarting the BCF/BCR.
MIDI º Maintenance º Test hardware:When you execute this operation, the following sequence of events takes place:1. BC Manager uploads a special preset to the B-Control.
1 Apart from the BCL Reply messages which the B-Control returns in response to the BCLchain, the B-Control also returns any LEARN output bytes if the preset’s Request parameter is on.Unfortunately, this LEARN output occurs before the B-Control completes its response messages toBC Manager’s BCL chain. BC Manager deals with this by simply ignoring any interfering MIDImessages (SysEx or other), i.e. any messages that are not BCL Reply messages; however, it doesmention any interfering SysEx messages in its error listbox.
58
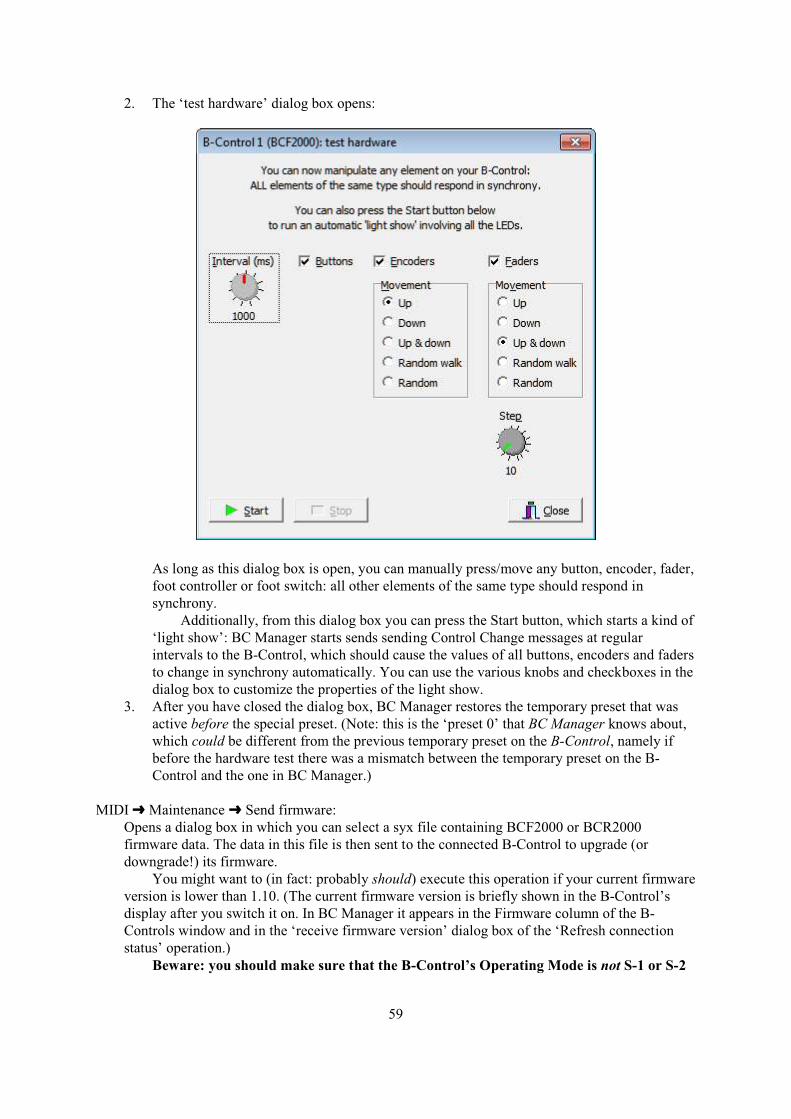
2. The ‘test hardware’ dialog box opens:
As long as this dialog box is open, you can manually press/move any button, encoder, fader,foot controller or foot switch: all other elements of the same type should respond insynchrony.
Additionally, from this dialog box you can press the Start button, which starts a kind of‘light show’: BC Manager starts sends sending Control Change messages at regularintervals to the B-Control, which should cause the values of all buttons, encoders and fadersto change in synchrony automatically. You can use the various knobs and checkboxes in thedialog box to customize the properties of the light show.
3. After you have closed the dialog box, BC Manager restores the temporary preset that wasactive before the special preset. (Note: this is the ‘preset 0’ that BC Manager knows about,which could be different from the previous temporary preset on the B-Control, namely ifbefore the hardware test there was a mismatch between the temporary preset on the B-Control and the one in BC Manager.)
MIDI º Maintenance º Send firmware:Opens a dialog box in which you can select a syx file containing BCF2000 or BCR2000firmware data. The data in this file is then sent to the connected B-Control to upgrade (ordowngrade!) its firmware.
You might want to (in fact: probably should) execute this operation if your current firmwareversion is lower than 1.10. (The current firmware version is briefly shown in the B-Control’sdisplay after you switch it on. In BC Manager it appears in the Firmware column of the B-Controls window and in the ‘receive firmware version’ dialog box of the ‘Refresh connectionstatus’ operation.)
Beware: you should make sure that the B-Control’s Operating Mode is not S-1 or S-2
59
when you execute this operation (because these modes use merging, which messes up theoperation). Any U mode should work fine (though U-1 is the safest of these), but thepreferred mode is S-4 (with BC Manager receiving the B-Control’s confirmation messagesvia MIDI OUT A, not MIDI OUT B/THRU). S-3 is also possible, provided you use MIDIOUT B/THRU.
MIDI º Refresh connection status:Sends a request to the supposedly connected B-Control for its firmware identity. If the B-Controlis indeed connected, it should respond with the name of the B-Control plus its firmware versionnumber, so e.g. ‘BCF2000 1.10’ or ‘BCR2000 1.10’. In the case of a BCF, ‘Refresh connectionstatus’ additionally tries to establish its emulation mode.
The ‘Refresh connection status’ operation is extremely useful for testing whether the MIDIconnection is working correctly bidirectionally. In fact, the establishment of a B-Control’s‘personality’ and ‘firmware’ is a prerequisite for any meaningful MIDI data exchanges betweenBC Manager and that B-Control: most MIDI communication operations are disabled if the B-Control’s personality isn’t ‘B-Control’.
The results of ‘Refresh connection status’ end up in the Personality and Firmware columnsof the B-Controls window. For further details, see the discussions of these columns above.
MIDI º Detect B-Controls:BC Manager scans for any B-Controls connected via the enabled MIDI I/O ports. This worksexactly the same as the scan performed on startup if ‘Startup detection’ has been set to ‘Scanenabled MIDI ports’; see the discussion of the ‘B-Control detection options’ dialog box,accessible via BC Manager’s main window.
View º Global setups:Opens the global setups window. See §11 for more information.
View º Presets:Opens the presets window for the selected B-Control. (Note: double-clicking on a B-Control’srow also achieves this.) See §12 for more information.
View º Layout:Opens the layout window for the selected B-Control. See §14 for more information.
View º BCL editor:Opens the BCL editor window for the selected B-Control. See §21 for more information.
View º Compare:Opens a dialog box in which you can compare presets and elements:
60
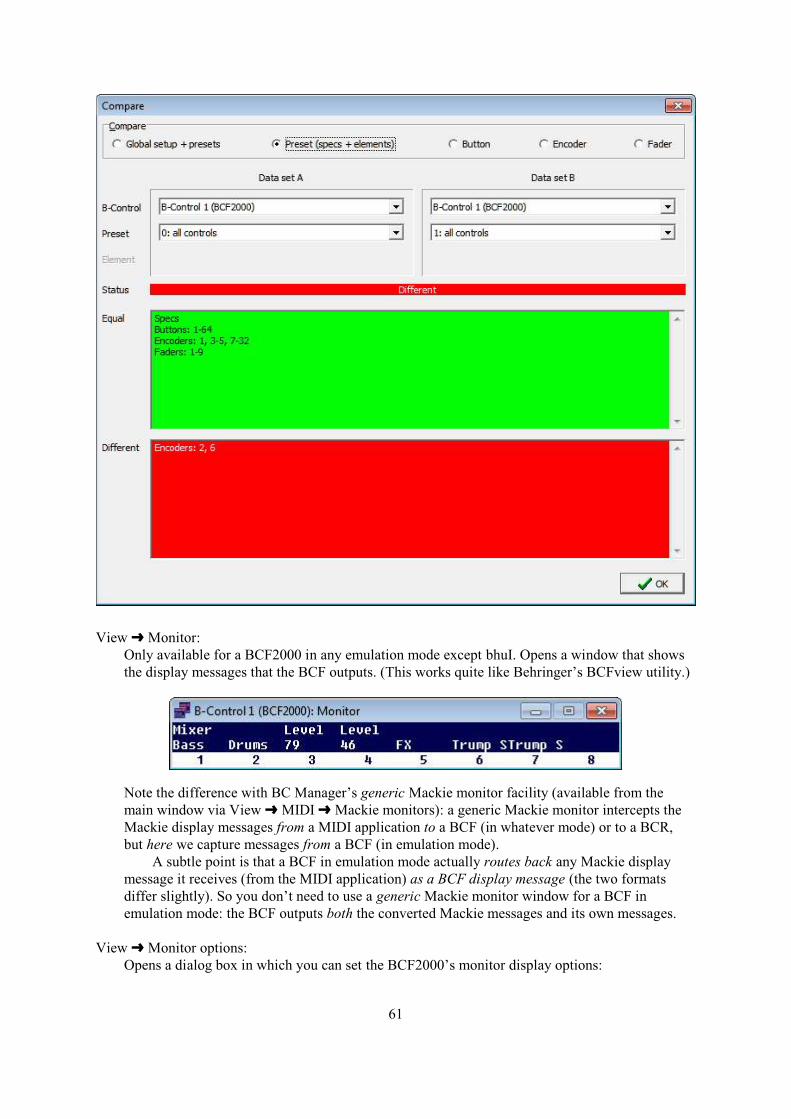
View º Monitor:Only available for a BCF2000 in any emulation mode except bhuI. Opens a window that showsthe display messages that the BCF outputs. (This works quite like Behringer’s BCFview utility.)
Note the difference with BC Manager’s generic Mackie monitor facility (available from themain window via View º MIDI º Mackie monitors): a generic Mackie monitor intercepts theMackie display messages from a MIDI application to a BCF (in whatever mode) or to a BCR,but here we capture messages from a BCF (in emulation mode).
A subtle point is that a BCF in emulation mode actually routes back any Mackie displaymessage it receives (from the MIDI application) as a BCF display message (the two formatsdiffer slightly). So you don’t need to use a generic Mackie monitor window for a BCF inemulation mode: the BCF outputs both the converted Mackie messages and its own messages.
View º Monitor options:Opens a dialog box in which you can set the BCF2000’s monitor display options:
61
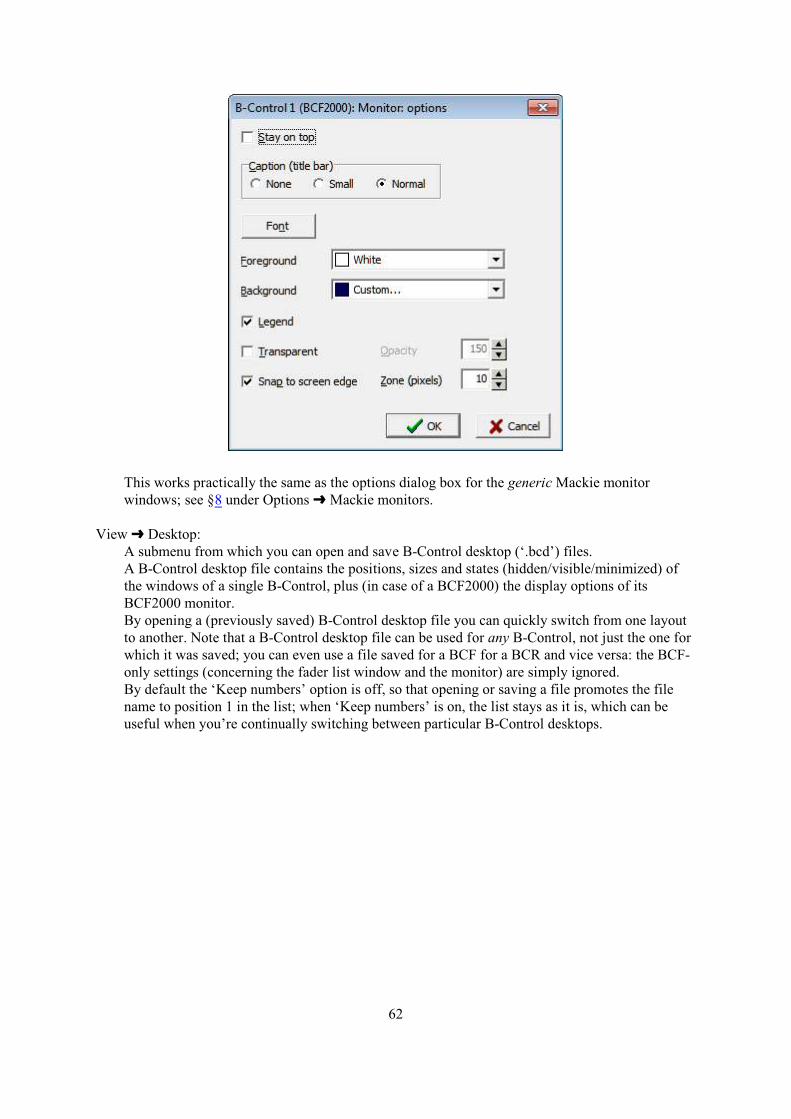
This works practically the same as the options dialog box for the generic Mackie monitorwindows; see §8 under Options º Mackie monitors.
View º Desktop:A submenu from which you can open and save B-Control desktop (‘.bcd’) files.A B-Control desktop file contains the positions, sizes and states (hidden/visible/minimized) ofthe windows of a single B-Control, plus (in case of a BCF2000) the display options of itsBCF2000 monitor.By opening a (previously saved) B-Control desktop file you can quickly switch from one layoutto another. Note that a B-Control desktop file can be used for any B-Control, not just the one forwhich it was saved; you can even use a file saved for a BCF for a BCR and vice versa: the BCF-only settings (concerning the fader list window and the monitor) are simply ignored.By default the ‘Keep numbers’ option is off, so that opening or saving a file promotes the filename to position 1 in the list; when ‘Keep numbers’ is on, the list stays as it is, which can beuseful when you’re continually switching between particular B-Control desktops.
62

11. The global setups window
The global setups window displays a table containing the global setup values of the currentlymaintained B-Controls:
The columns have the following meaning:
! No.:This is the number of the B-Control, exactly corresponding with the B-Controls displayed in theB-Controls window.
! File/MIDI:Asterisks in these columns indicate that the representation of the global setup (as maintained byBC Manager) has changed with respect to its associated file or the B-Control connected viaMIDI. See §10 for further explanation.
! Comments:A text that is editable via the Info tab of the global setup dialog box. This text can be of anylength.
! Other columns:These display the actual global setup parameters. See BCMI for details.Note: as of BC Manager 2.3.3 the Device IDs shown in the ‘Device (ignored)’ column arecompletely ignored, i.e. they are never sent to the B-Control or written to a bcf/bcr/syx/txt/bc2file.
The menu provides the following operations:
File º Export table:Opens a dialog box in which you can export the table of global setup parameters to a speciallyformatted ‘txt’ file. You could use this as an input file to create a table in an external wordprocessor.
File º Export window image:Opens a dialog box in which you can export an image of the global setups window to a bitmap(‘bmp’) file.
File º Print window image:Prints an image of the global setups window.
63
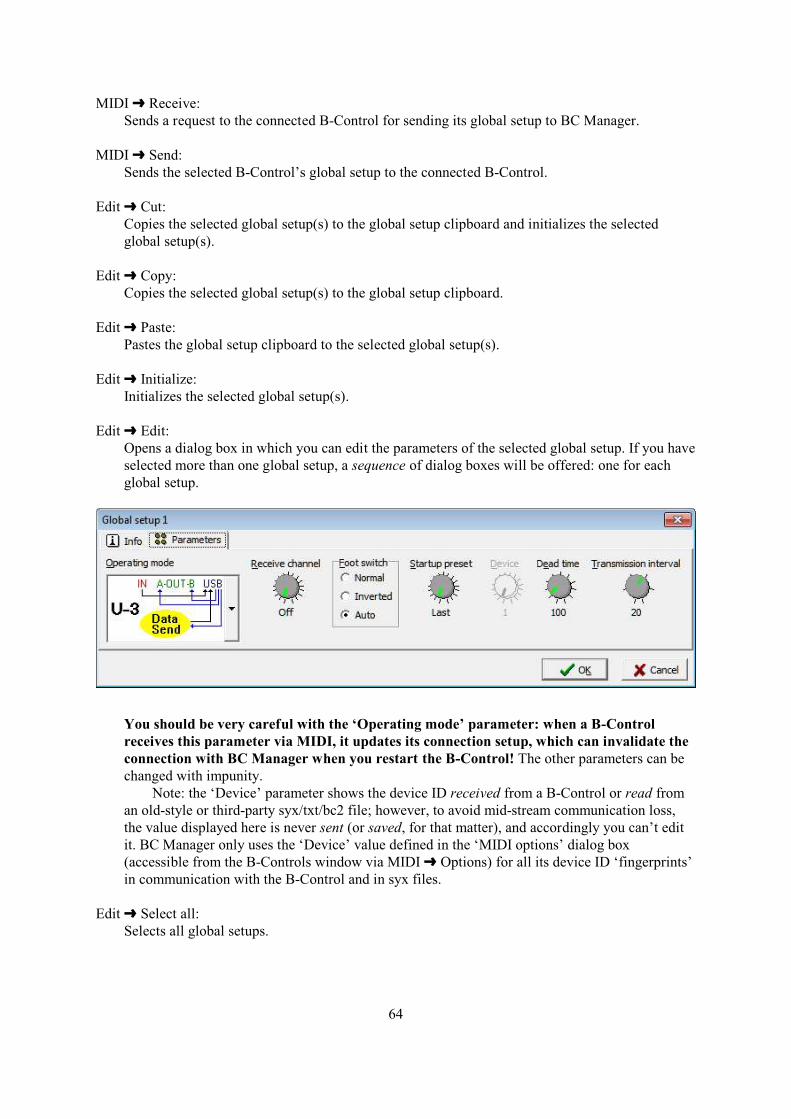
MIDI º Receive:Sends a request to the connected B-Control for sending its global setup to BC Manager.
MIDI º Send:Sends the selected B-Control’s global setup to the connected B-Control.
Edit º Cut:Copies the selected global setup(s) to the global setup clipboard and initializes the selectedglobal setup(s).
Edit º Copy:Copies the selected global setup(s) to the global setup clipboard.
Edit º Paste:Pastes the global setup clipboard to the selected global setup(s).
Edit º Initialize:Initializes the selected global setup(s).
Edit º Edit:Opens a dialog box in which you can edit the parameters of the selected global setup. If you haveselected more than one global setup, a sequence of dialog boxes will be offered: one for eachglobal setup.
You should be very careful with the ‘Operating mode’ parameter: when a B-Controlreceives this parameter via MIDI, it updates its connection setup, which can invalidate theconnection with BC Manager when you restart the B-Control! The other parameters can bechanged with impunity.
Note: the ‘Device’ parameter shows the device ID received from a B-Control or read froman old-style or third-party syx/txt/bc2 file; however, to avoid mid-stream communication loss,the value displayed here is never sent (or saved, for that matter), and accordingly you can’t editit. BC Manager only uses the ‘Device’ value defined in the ‘MIDI options’ dialog box(accessible from the B-Controls window via MIDI º Options) for all its device ID ‘fingerprints’in communication with the B-Control and in syx files.
Edit º Select all:Selects all global setups.
64
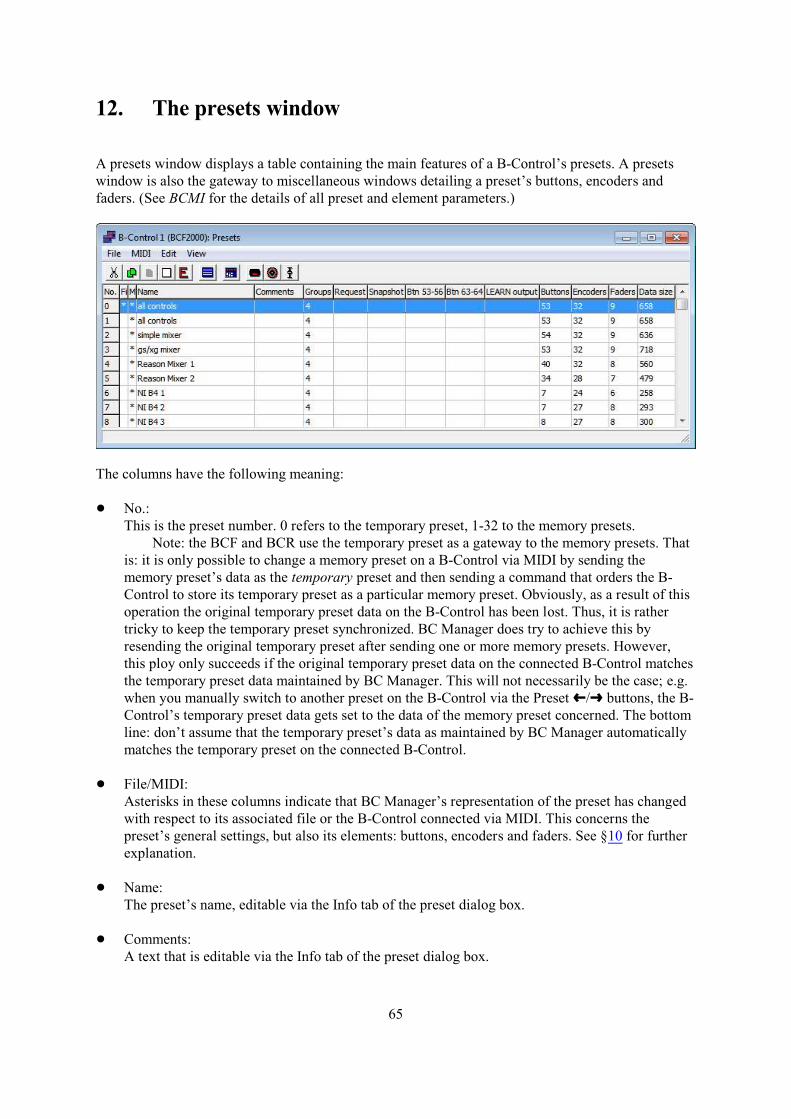
12. The presets window
A presets window displays a table containing the main features of a B-Control’s presets. A presetswindow is also the gateway to miscellaneous windows detailing a preset’s buttons, encoders andfaders. (See BCMI for the details of all preset and element parameters.)
The columns have the following meaning:
! No.:This is the preset number. 0 refers to the temporary preset, 1-32 to the memory presets.
Note: the BCF and BCR use the temporary preset as a gateway to the memory presets. Thatis: it is only possible to change a memory preset on a B-Control via MIDI by sending thememory preset’s data as the temporary preset and then sending a command that orders the B-Control to store its temporary preset as a particular memory preset. Obviously, as a result of thisoperation the original temporary preset data on the B-Control has been lost. Thus, it is rathertricky to keep the temporary preset synchronized. BC Manager does try to achieve this byresending the original temporary preset after sending one or more memory presets. However,this ploy only succeeds if the original temporary preset data on the connected B-Control matchesthe temporary preset data maintained by BC Manager. This will not necessarily be the case; e.g.when you manually switch to another preset on the B-Control via the Preset »/º buttons, the B-Control’s temporary preset data gets set to the data of the memory preset concerned. The bottomline: don’t assume that the temporary preset’s data as maintained by BC Manager automaticallymatches the temporary preset on the connected B-Control.
! File/MIDI:Asterisks in these columns indicate that BC Manager’s representation of the preset has changedwith respect to its associated file or the B-Control connected via MIDI. This concerns thepreset’s general settings, but also its elements: buttons, encoders and faders. See §10 for furtherexplanation.
! Name:The preset’s name, editable via the Info tab of the preset dialog box.
! Comments:A text that is editable via the Info tab of the preset dialog box.
65
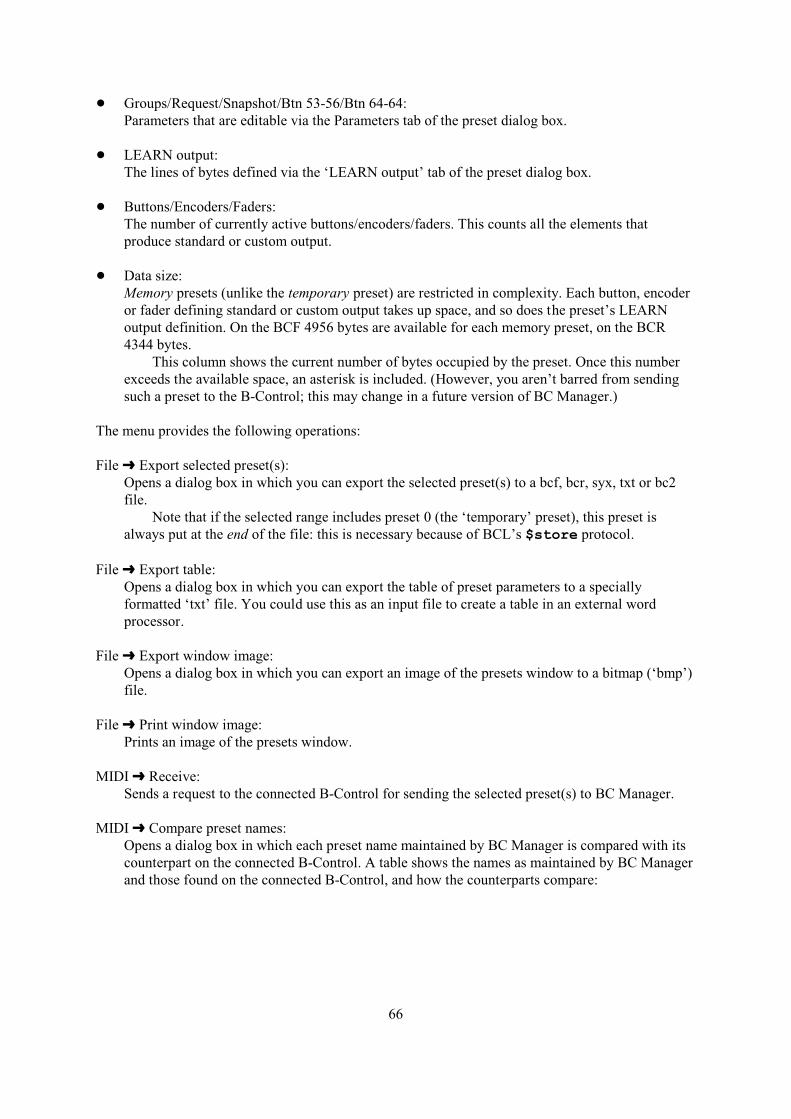
! Groups/Request/Snapshot/Btn 53-56/Btn 64-64:Parameters that are editable via the Parameters tab of the preset dialog box.
! LEARN output:The lines of bytes defined via the ‘LEARN output’ tab of the preset dialog box.
! Buttons/Encoders/Faders:The number of currently active buttons/encoders/faders. This counts all the elements thatproduce standard or custom output.
! Data size:Memory presets (unlike the temporary preset) are restricted in complexity. Each button, encoderor fader defining standard or custom output takes up space, and so does the preset’s LEARNoutput definition. On the BCF 4956 bytes are available for each memory preset, on the BCR4344 bytes.
This column shows the current number of bytes occupied by the preset. Once this numberexceeds the available space, an asterisk is included. (However, you aren’t barred from sendingsuch a preset to the B-Control; this may change in a future version of BC Manager.)
The menu provides the following operations:
File º Export selected preset(s):Opens a dialog box in which you can export the selected preset(s) to a bcf, bcr, syx, txt or bc2file.
Note that if the selected range includes preset 0 (the ‘temporary’ preset), this preset isalways put at the end of the file: this is necessary because of BCL’s $store protocol.
File º Export table:Opens a dialog box in which you can export the table of preset parameters to a speciallyformatted ‘txt’ file. You could use this as an input file to create a table in an external wordprocessor.
File º Export window image:Opens a dialog box in which you can export an image of the presets window to a bitmap (‘bmp’)file.
File º Print window image:Prints an image of the presets window.
MIDI º Receive:Sends a request to the connected B-Control for sending the selected preset(s) to BC Manager.
MIDI º Compare preset names:Opens a dialog box in which each preset name maintained by BC Manager is compared with itscounterpart on the connected B-Control. A table shows the names as maintained by BC Managerand those found on the connected B-Control, and how the counterparts compare:
66
Note that the preset names (let alone complete presets) do not get synchronized: it’s your ownresponsibility to subsequently achieve this (in whatever direction). The only lasting effect fromthe comparison concerns the MIDI column in the presets window: for your convenience, presetswith different names receive an asterisk, indicating (as usual) a mismatch between BC Managerand the connected B-Control.
Beware: even when two counterpart names are reported equal, their presets as a whole maystill differ! This is why BC Manager doesn’t give as much prominence to the preset names asBehringer’s own BC-EDIT program: as explained elsewhere in this manual, you are advised touse the bcf/bcr/syx/txt/bc2 files as masters and your B-Controls as slaves. In any case, if any pairof preset names differs, you should definitely synchronize the presets concerned in the directionthat is appropriate at the time; however, in line with BC Manager’s philosophy, the directionshould usually be from the computer to the B-Control.
MIDI º Send:Sends the selected presets to the connected B-Control.
Edit º Cut:Copies the selected preset(s) to the preset clipboard and initializes the selected preset(s).
Edit º Copy:Copies the selected preset(s) to the preset clipboard.
67
Edit º Paste:Pastes the preset clipboard to the selected preset(s).
Edit º Initialize:Initializes the selected preset(s).
Edit º Edit:Opens a dialog box in which you can edit the general settings of the selected preset. If you haveselected more than one preset, a sequence of dialog boxes will be offered: one for each preset.
Edit º Select all:Selects all presets.
Edit º Copy to preset 0:Copies the selected memory preset to preset 0, the ‘temporary preset’. (Obviously this doesn’twork when preset 0 itself is selected.)
Note that this may also update the temporary preset on the connected B-Control, dependingon the settings in the MIDI options dialog box (accessed via the B-Controls window).
Parameter º Various parameters:Changes the selected parameter of all elements (buttons, encoders and faders) in the selectedpreset(s) to one particular value in one go. The ‘No’ and ‘Yes’ cases apply the changes withoutfurther ado, in the other cases a dialog box opens in which you can set the parameter value.
Note that in case of Channel or MMC Device you won’t see any changes in the elementwindows for elements which currently don’t define a standard output message that uses theparameter concerned. Also note that the individual element windows (q.v) offer many otherParameter operations.
View º Layout:Opens the layout window. See §14 for more information.
View º Buttons/Encoders/Faders:Opens the Buttons, Encoders or Faders window. See §16 for more information.
68
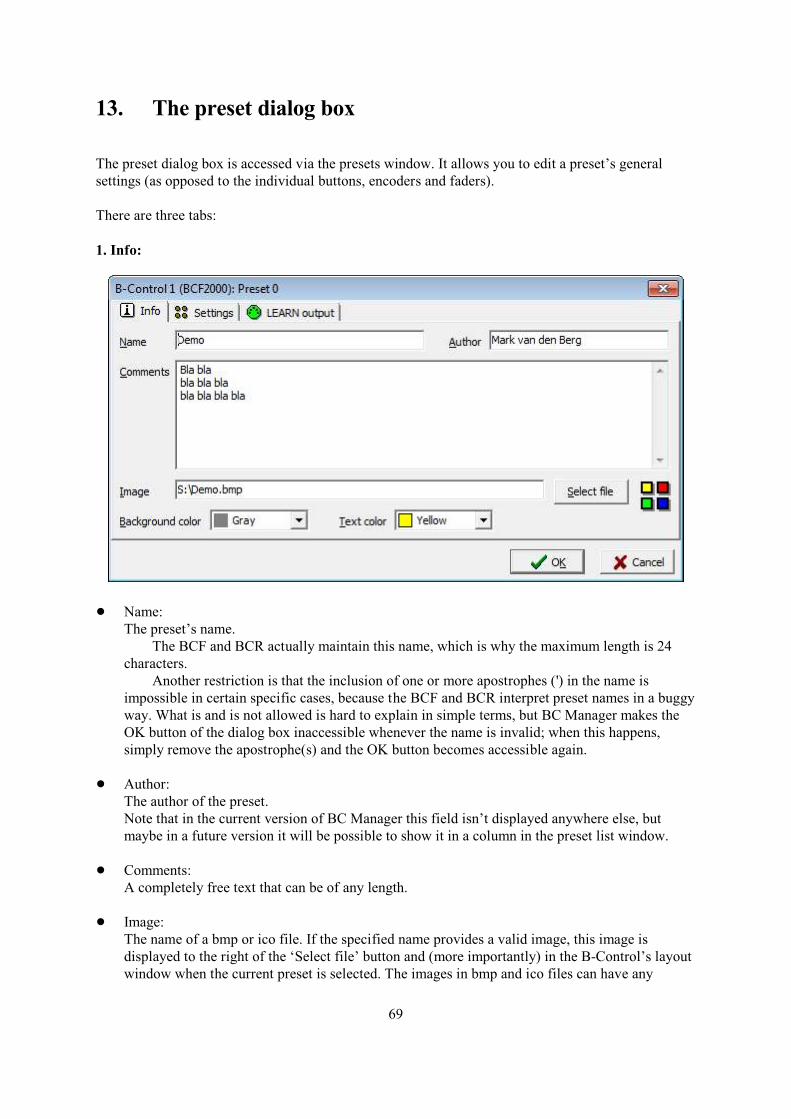
13. The preset dialog box
The preset dialog box is accessed via the presets window. It allows you to edit a preset’s generalsettings (as opposed to the individual buttons, encoders and faders).
There are three tabs:
1. Info:
! Name:The preset’s name.
The BCF and BCR actually maintain this name, which is why the maximum length is 24characters.
Another restriction is that the inclusion of one or more apostrophes (') in the name isimpossible in certain specific cases, because the BCF and BCR interpret preset names in a buggyway. What is and is not allowed is hard to explain in simple terms, but BC Manager makes theOK button of the dialog box inaccessible whenever the name is invalid; when this happens,simply remove the apostrophe(s) and the OK button becomes accessible again.
! Author:The author of the preset.Note that in the current version of BC Manager this field isn’t displayed anywhere else, butmaybe in a future version it will be possible to show it in a column in the preset list window.
! Comments:A completely free text that can be of any length.
! Image:The name of a bmp or ico file. If the specified name provides a valid image, this image isdisplayed to the right of the ‘Select file’ button and (more importantly) in the B-Control’s layoutwindow when the current preset is selected. The images in bmp and ico files can have any
69
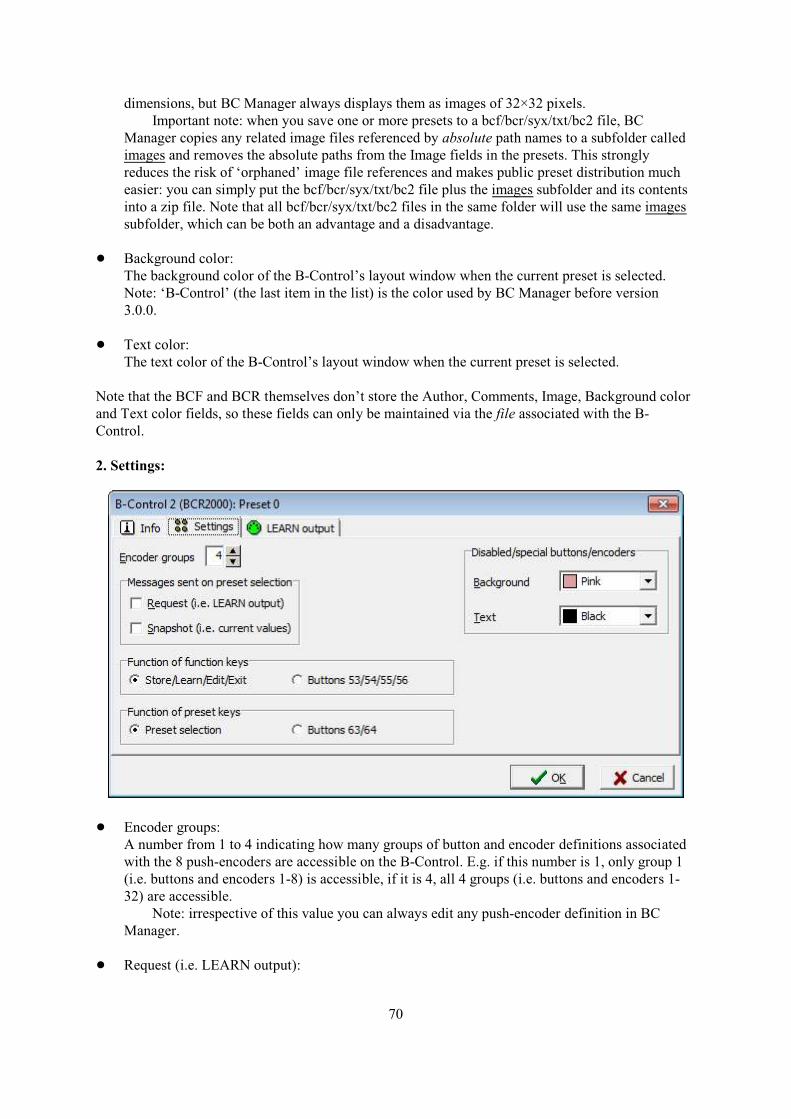
dimensions, but BC Manager always displays them as images of 32×32 pixels.Important note: when you save one or more presets to a bcf/bcr/syx/txt/bc2 file, BC
Manager copies any related image files referenced by absolute path names to a subfolder calledimages and removes the absolute paths from the Image fields in the presets. This stronglyreduces the risk of ‘orphaned’ image file references and makes public preset distribution mucheasier: you can simply put the bcf/bcr/syx/txt/bc2 file plus the images subfolder and its contentsinto a zip file. Note that all bcf/bcr/syx/txt/bc2 files in the same folder will use the same imagessubfolder, which can be both an advantage and a disadvantage.
! Background color:The background color of the B-Control’s layout window when the current preset is selected.Note: ‘B-Control’ (the last item in the list) is the color used by BC Manager before version3.0.0.
! Text color:The text color of the B-Control’s layout window when the current preset is selected.
Note that the BCF and BCR themselves don’t store the Author, Comments, Image, Background colorand Text color fields, so these fields can only be maintained via the file associated with the B-Control.
2. Settings:
! Encoder groups:A number from 1 to 4 indicating how many groups of button and encoder definitions associatedwith the 8 push-encoders are accessible on the B-Control. E.g. if this number is 1, only group 1(i.e. buttons and encoders 1-8) is accessible, if it is 4, all 4 groups (i.e. buttons and encoders 1-32) are accessible.
Note: irrespective of this value you can always edit any push-encoder definition in BCManager.
! Request (i.e. LEARN output):
70
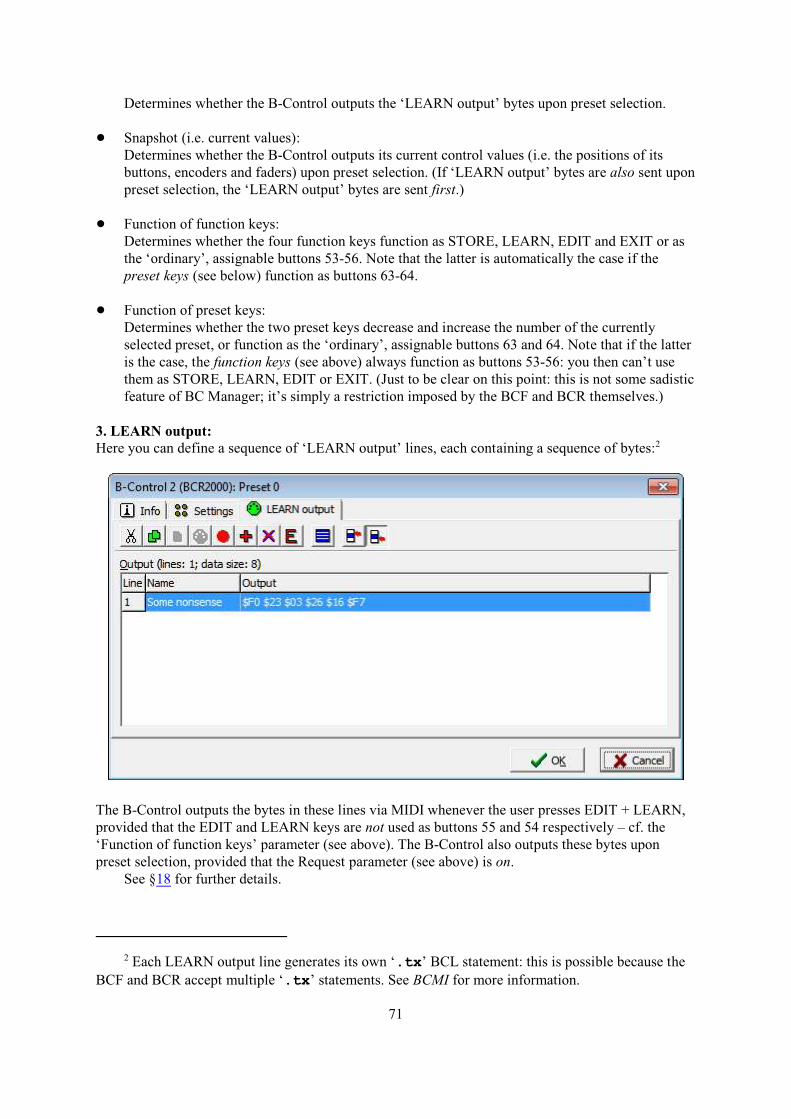
Determines whether the B-Control outputs the ‘LEARN output’ bytes upon preset selection.
! Snapshot (i.e. current values):Determines whether the B-Control outputs its current control values (i.e. the positions of itsbuttons, encoders and faders) upon preset selection. (If ‘LEARN output’ bytes are also sent uponpreset selection, the ‘LEARN output’ bytes are sent first.)
! Function of function keys:Determines whether the four function keys function as STORE, LEARN, EDIT and EXIT or asthe ‘ordinary’, assignable buttons 53-56. Note that the latter is automatically the case if thepreset keys (see below) function as buttons 63-64.
! Function of preset keys:Determines whether the two preset keys decrease and increase the number of the currentlyselected preset, or function as the ‘ordinary’, assignable buttons 63 and 64. Note that if the latteris the case, the function keys (see above) always function as buttons 53-56: you then can’t usethem as STORE, LEARN, EDIT or EXIT. (Just to be clear on this point: this is not some sadisticfeature of BC Manager; it’s simply a restriction imposed by the BCF and BCR themselves.)
3. LEARN output:Here you can define a sequence of ‘LEARN output’ lines, each containing a sequence of bytes:2
The B-Control outputs the bytes in these lines via MIDI whenever the user presses EDIT + LEARN,provided that the EDIT and LEARN keys are not used as buttons 55 and 54 respectively – cf. the‘Function of function keys’ parameter (see above). The B-Control also outputs these bytes uponpreset selection, provided that the Request parameter (see above) is on.
See §18 for further details.
2 Each LEARN output line generates its own ‘.tx’ BCL statement: this is possible because the
BCF and BCR accept multiple ‘.tx’ statements. See BCMI for more information.
71
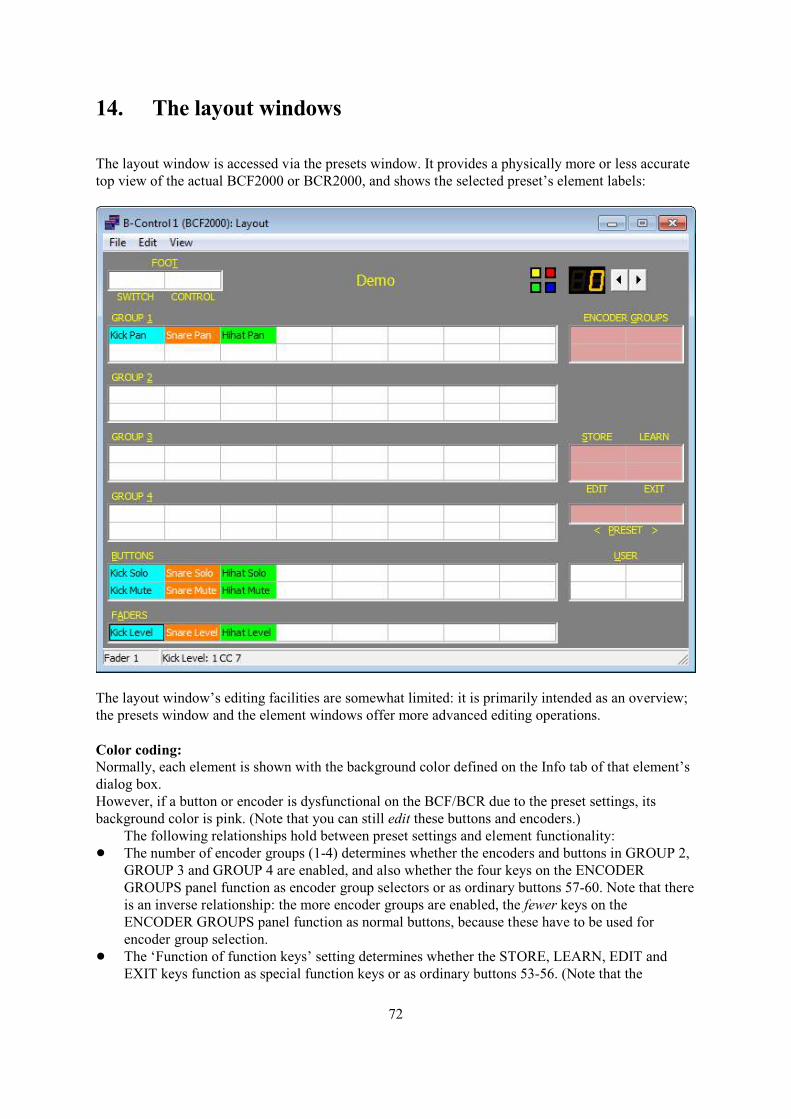
14. The layout windows
The layout window is accessed via the presets window. It provides a physically more or less accuratetop view of the actual BCF2000 or BCR2000, and shows the selected preset’s element labels:
The layout window’s editing facilities are somewhat limited: it is primarily intended as an overview;the presets window and the element windows offer more advanced editing operations.
Color coding:Normally, each element is shown with the background color defined on the Info tab of that element’sdialog box.However, if a button or encoder is dysfunctional on the BCF/BCR due to the preset settings, itsbackground color is pink. (Note that you can still edit these buttons and encoders.)
The following relationships hold between preset settings and element functionality:! The number of encoder groups (1-4) determines whether the encoders and buttons in GROUP 2,
GROUP 3 and GROUP 4 are enabled, and also whether the four keys on the ENCODERGROUPS panel function as encoder group selectors or as ordinary buttons 57-60. Note that thereis an inverse relationship: the more encoder groups are enabled, the fewer keys on theENCODER GROUPS panel function as normal buttons, because these have to be used forencoder group selection.
! The ‘Function of function keys’ setting determines whether the STORE, LEARN, EDIT andEXIT keys function as special function keys or as ordinary buttons 53-56. (Note that the
72
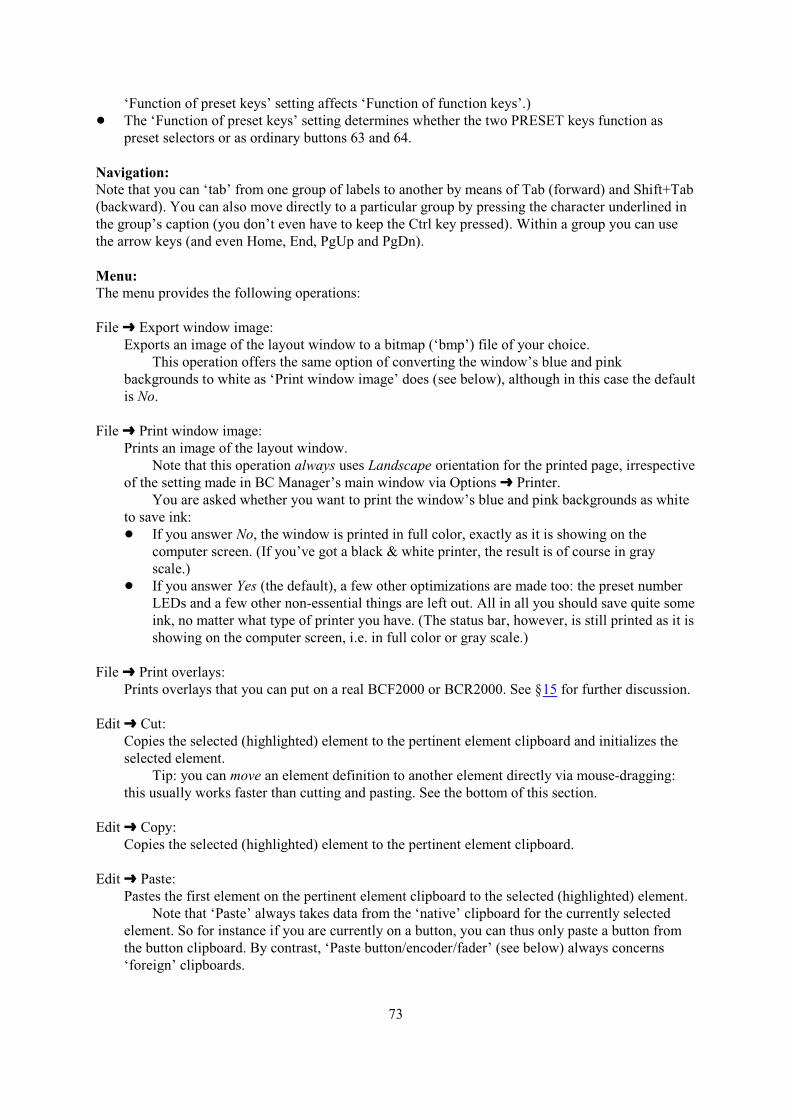
‘Function of preset keys’ setting affects ‘Function of function keys’.)! The ‘Function of preset keys’ setting determines whether the two PRESET keys function as
preset selectors or as ordinary buttons 63 and 64.
Navigation:Note that you can ‘tab’ from one group of labels to another by means of Tab (forward) and Shift+Tab(backward). You can also move directly to a particular group by pressing the character underlined inthe group’s caption (you don’t even have to keep the Ctrl key pressed). Within a group you can usethe arrow keys (and even Home, End, PgUp and PgDn).
Menu:The menu provides the following operations:
File º Export window image:Exports an image of the layout window to a bitmap (‘bmp’) file of your choice.
This operation offers the same option of converting the window’s blue and pinkbackgrounds to white as ‘Print window image’ does (see below), although in this case the defaultis No.
File º Print window image:Prints an image of the layout window.
Note that this operation always uses Landscape orientation for the printed page, irrespectiveof the setting made in BC Manager’s main window via Options º Printer.
You are asked whether you want to print the window’s blue and pink backgrounds as whiteto save ink:! If you answer No, the window is printed in full color, exactly as it is showing on the
computer screen. (If you’ve got a black & white printer, the result is of course in grayscale.)
! If you answer Yes (the default), a few other optimizations are made too: the preset numberLEDs and a few other non-essential things are left out. All in all you should save quite someink, no matter what type of printer you have. (The status bar, however, is still printed as it isshowing on the computer screen, i.e. in full color or gray scale.)
File º Print overlays:Prints overlays that you can put on a real BCF2000 or BCR2000. See §15 for further discussion.
Edit º Cut:Copies the selected (highlighted) element to the pertinent element clipboard and initializes theselected element.
Tip: you can move an element definition to another element directly via mouse-dragging:this usually works faster than cutting and pasting. See the bottom of this section.
Edit º Copy:Copies the selected (highlighted) element to the pertinent element clipboard.
Edit º Paste:Pastes the first element on the pertinent element clipboard to the selected (highlighted) element.
Note that ‘Paste’ always takes data from the ‘native’ clipboard for the currently selectedelement. So for instance if you are currently on a button, you can thus only paste a button fromthe button clipboard. By contrast, ‘Paste button/encoder/fader’ (see below) always concerns‘foreign’ clipboards.
73
Edit º Paste button/encoder/fader:Pastes the first element on the indicated ‘foreign’ element clipboard to the selected (highlighted)element. So for instance if you are currently on a button, you can thus paste an encoder from theencoder clipboard or a fader from the fader clipboard. Note that parameters in the target elementnot contained in the source element on the clipboard are set to default values.
Edit º Initialize:Initializes the selected (highlighted) element.
Edit º Edit:Opens a dialog box in which you can edit the selected (highlighted) element.
Edit º Preset:Opens a dialog box in which you can edit the general settings of the selected preset.
View º Next preset:Selects the next preset. Equivalent to pressing the upward button next to the LEDs showing thepreset number.
View º Previous preset:Selects the previous preset. Equivalent to pressing the downward button next to the LEDsshowing the preset number.
View º Element labels:This setting determines the nature of the element labels, i.e. what is displayed in the elementboxes. There are three choices:! Name, else output:
This is the default. The element’s name is displayed, except if the name is empty, inwhich case a summary of the element’s standard and/or custom output is displayed(usually this includes the Channel, Type and main parameter value).
! Name:The element’s name is displayed. If the name is empty, nothing is displayed.
! Output:A summary of the element’s standard and/or custom output is displayed. If no standardor custom output is defined, nothing is displayed.
Note: regardless of this setting, the status bar at the bottom of the window always shows theselected element’s name and output summary.
View º Presets:Opens the presets window for the B-Control to which the layout window belongs. See §12 formore information.
View º Buttons/Encoders/Faders:Opens the Buttons, Encoders or Faders window of the B-Control to which the layout windowbelongs. See §16 for more information.
74
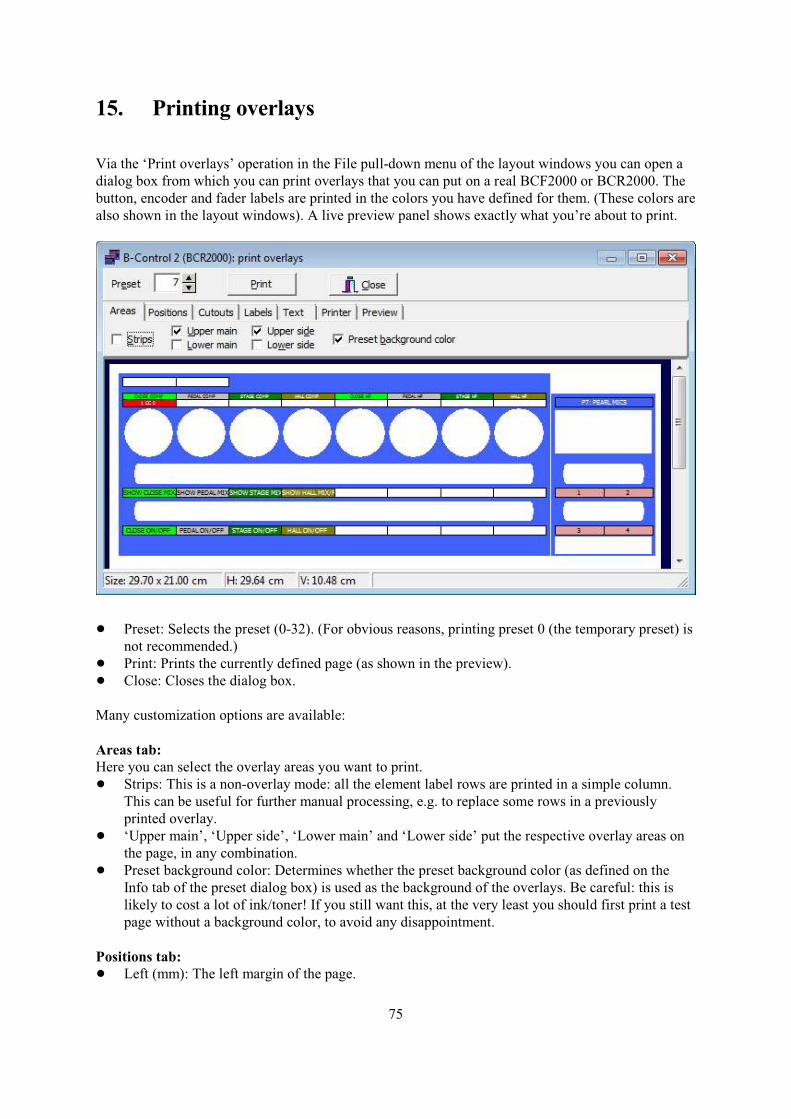
15. Printing overlays
Via the ‘Print overlays’ operation in the File pull-down menu of the layout windows you can open adialog box from which you can print overlays that you can put on a real BCF2000 or BCR2000. Thebutton, encoder and fader labels are printed in the colors you have defined for them. (These colors arealso shown in the layout windows). A live preview panel shows exactly what you’re about to print.
! Preset: Selects the preset (0-32). (For obvious reasons, printing preset 0 (the temporary preset) isnot recommended.)
! Print: Prints the currently defined page (as shown in the preview).! Close: Closes the dialog box.
Many customization options are available:
Areas tab:Here you can select the overlay areas you want to print.! Strips: This is a non-overlay mode: all the element label rows are printed in a simple column.
This can be useful for further manual processing, e.g. to replace some rows in a previouslyprinted overlay.
! ‘Upper main’, ‘Upper side’, ‘Lower main’ and ‘Lower side’ put the respective overlay areas onthe page, in any combination.
! Preset background color: Determines whether the preset background color (as defined on theInfo tab of the preset dialog box) is used as the background of the overlays. Be careful: this islikely to cost a lot of ink/toner! If you still want this, at the very least you should first print a testpage without a background color, to avoid any disappointment.
Positions tab:! Left (mm): The left margin of the page.
75

! Top (mm): The top margin of the page.! Height between upper and lower areas (mm): The vertical distance between the bottom of the
upper main/side areas and the top of the lower main/side areas.
Cutouts tab:! Border: Determines the style of the border of all cutouts (overlay areas, buttons, encoders etc.).! Rounded: Determines whether the cutouts for the buttons and encoders are rectangular or
rounded.! Individual encoders: Determines whether each individual encoder has a separate cutout (i.e. a
circle) or whether all encoders in the same row share a single cutout.
Labels tab:! Border width (1/10 mm): Determines the width of all label borders. Ranges from 0 to 1 mm, in
steps of 0.1 mm. Naturally, if you set this to 0, no borders are printed.! Preset label: Determines whether the name of the preset is printed (in the upper side and lower
side areas).! Foot labels: Determines whether labels for the foot controls are printed.! Empty labels: Determines whether the borders and backgrounds of labels of unused buttons,
encoders and faders are printed.! Row names: Determines whether the names of button, encoder and fader rows are printed next to
these rows. Very useful in Strips mode, sometimes also for the buttons and encoders in the fourencoder groups.
! Push encoder height (%): Determines the height of the labels of the buttons and encoders in thefour encoder groups. If there are many rows of these, it may help to reduce their height. Range:25-100%.
Text tab:! Font: Opens a dialog box in which you can set the font (‘typeface’) and the font style. (Don’t
bother about the ‘Script’ setting. I just don’t know how to remove it from the dialog box...)! All caps: Determines whether all preset, button, encoder and fader labels are capitalized.
Printer tab:! Printer setup: Opens the operating system’s standard Print Setup dialog box. Note that BC
Manager ignores the page orientation set in this dialog box; see below.! Orientation: Sets the page orientation.! Color scheme:
! Black & white: All labels and borders are printed in black, and no backgrounds are printed.Use this on any printer (monochrome or color) when you wish to conserve ink/toner.
! Colors: Everything is printed in color, as specified by the background and text colors youhave defined for the preset and its individual buttons, encoders and faders. (The driver of amonochrome printer will probably convert these colors to grayscale.)
! Grayscale: BC Manager converts all colors to grayscale values. (On a monochrome printer,the result should match what you get with the ‘Colors’ setting, but since it’s now BCManager rather than the printer driver that performs the grayscaling, total equivalence isn’tguaranteed.)
Preview tab:The settings on this tab only concern the preview on your computer monitor; they don’t affect theprinted page.! Page size: Determines the page size of the preview.! Zoom (%): Determines the zoom factor of the preview.
76

Note that you’re not restricted to the predefined values in the drop-down list: you can type anyvalue between 25 and 400 (even decimals are allowed). However, you should not use this tocalibrate the scale of your computer monitor: for that you should use the pixel pitch setting (seebelow).
! Monitor’s pixel pitch (um): If you calibrate this to the pixel pitch (in micrometer) of yourcomputer monitor, the size of the preview should exactly match what gets printed if Zoom is at100%. The pixel pitch of a monitor can often be found in its specs. Alternatively you can hold asheet of paper in front of the monitor, then tweak the value until the size of the preview pagematches the sheet of paper. (Note: the default value is based on the operating system’s default,but this is unlikely to be accurate.)
! Length unit: Determines the length unit used in the status bar. (The status bar shows thepreview’s page size and the current horizontal and vertical mouse positions.)
77
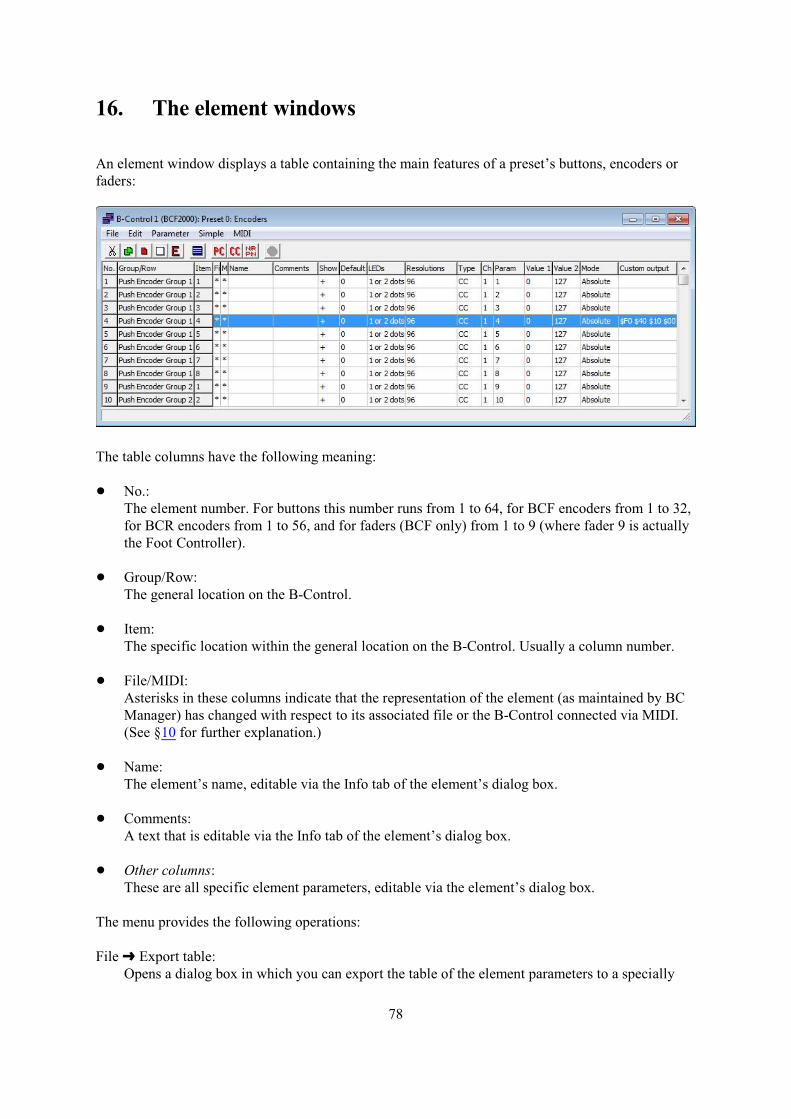
16. The element windows
An element window displays a table containing the main features of a preset’s buttons, encoders orfaders:
The table columns have the following meaning:
! No.:The element number. For buttons this number runs from 1 to 64, for BCF encoders from 1 to 32,for BCR encoders from 1 to 56, and for faders (BCF only) from 1 to 9 (where fader 9 is actuallythe Foot Controller).
! Group/Row:The general location on the B-Control.
! Item:The specific location within the general location on the B-Control. Usually a column number.
! File/MIDI:Asterisks in these columns indicate that the representation of the element (as maintained by BCManager) has changed with respect to its associated file or the B-Control connected via MIDI.(See §10 for further explanation.)
! Name:The element’s name, editable via the Info tab of the element’s dialog box.
! Comments:A text that is editable via the Info tab of the element’s dialog box.
! Other columns:These are all specific element parameters, editable via the element’s dialog box.
The menu provides the following operations:
File º Export table:Opens a dialog box in which you can export the table of the element parameters to a specially
78
formatted ‘txt’ file. You could use this as an input file to create a table in an external wordprocessor.
File º Export window image:Opens a dialog box in which you can export an image of the element window to a bitmap(‘bmp’) file.
File º Print window image:Prints an image of the element window.
Edit º Cut:Copies the selected element(s) to the pertinent element clipboard and initializes the selectedelement(s).
Edit º Copy:Copies the selected element(s) to the pertinent element clipboard.
Edit º Paste:Pastes the pertinent element clipboard to the selected element(s).
Note that ‘Paste’ always takes data from the ‘native’ clipboard. So for instance in a buttonwindow, you can thus only paste buttons from the button clipboard. By contrast, ‘Pastebutton(s)/encoder(s)/fader(s)’ (see below) always concerns ‘foreign’ clipboards.
Edit º Paste button(s)/encoder(s)/fader(s):Pastes the indicated ‘foreign’ element clipboard to the selected element(s). So for instance in abutton window, you can thus paste encoders from the encoder clipboard or faders from the faderclipboard. Note that parameters in the target elements not contained in the source elements onthe clipboard are set to default values.
Edit º Initialize:Initializes the selected element(s).
Edit º Edit:Opens a dialog box in which you can edit the parameters of the selected element. If you haveselected more than one element, a sequence of dialog boxes will be offered: one for eachelement. See §17 for more information on element dialog boxes.
Edit º Select all:Selects all buttons, encoders or faders.
Parameter º Various parameters:Changes the selected parameter of all the selected elements to one particular value in one go.The trick is to first select more than one element, then execute the Parameter operation.
The ‘No’ and ‘Yes’ cases apply the changes without further ado, in the other cases a dialogbox opens in which you can set the parameter value. If you have selected more than one element,some of these dialog boxes also contain a ‘Step per row’ knob: this determines by which amountthe selected parameter increases or decreases for each next element.
Note that in many cases you won’t see any changes for elements which currently don’tdefine a standard output message that uses the parameter concerned. Also note that the presetswindow (q.v.) offers even wider-ranging Parameter operations for several parameters.
79

Simple º Program Change/Control Change/NRPN:These operations allow you to quickly set up a ‘standard’ Program Change, Control Change orNRPN element. You are asked to define only a few essential parameters, upon which BCManager automatically sets up the whole element according to what BC Manager considerssuitable settings.
These operations also work very nicely if you have selected more than one element: you canthen also define increments for both channel and program/controller number per element.
Note: the difference between ‘Simple’ and ‘Parameter’ (see above) is that ‘Simple’ sets upwhole elements, whereas ‘Parameter’ only affects the selected parameter of the selectedelements.
MIDI º Send:Sends the selected element(s) to the connected B-Control. This operation can only be executedfor preset 0 (the temporary preset); this restriction is simply a consequence of the BCL protocol:it is impossible to send individual elements of memory presets to a B-Control.
80
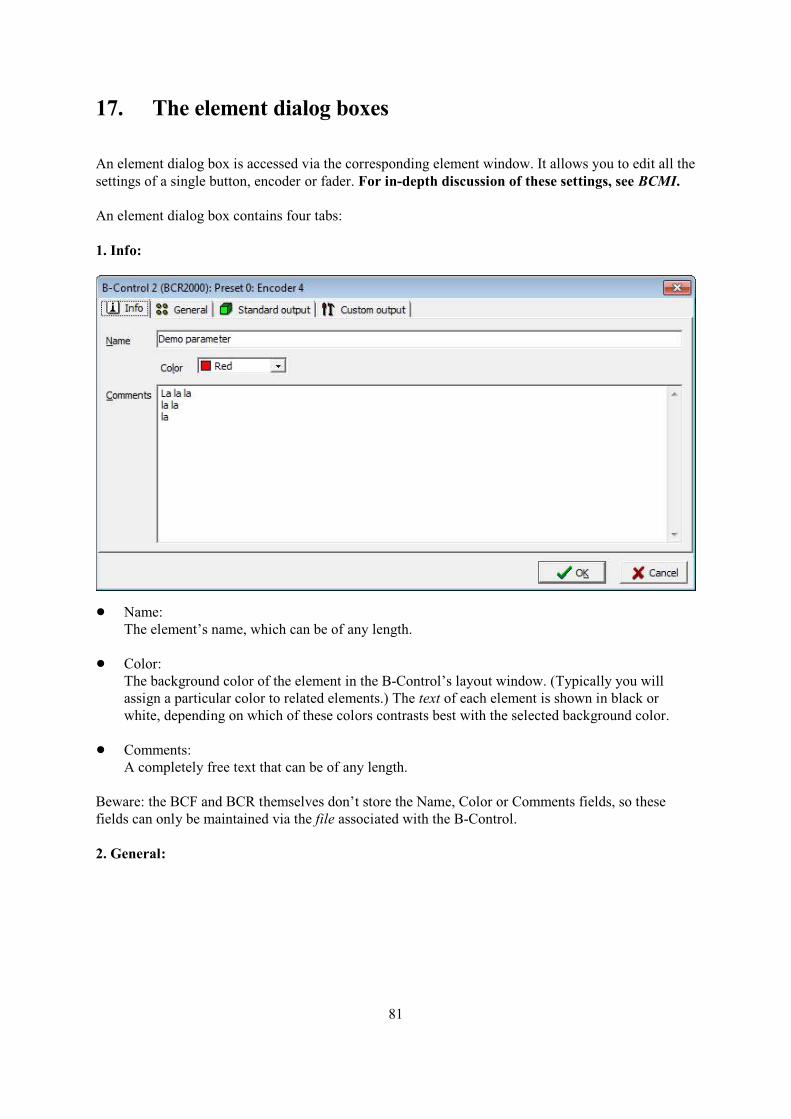
17. The element dialog boxes
An element dialog box is accessed via the corresponding element window. It allows you to edit all thesettings of a single button, encoder or fader. For in-depth discussion of these settings, see BCMI.
An element dialog box contains four tabs:
1. Info:
! Name:The element’s name, which can be of any length.
! Color:The background color of the element in the B-Control’s layout window. (Typically you willassign a particular color to related elements.) The text of each element is shown in black orwhite, depending on which of these colors contrasts best with the selected background color.
! Comments:A completely free text that can be of any length.
Beware: the BCF and BCR themselves don’t store the Name, Color or Comments fields, so thesefields can only be maintained via the file associated with the B-Control.
2. General:
81
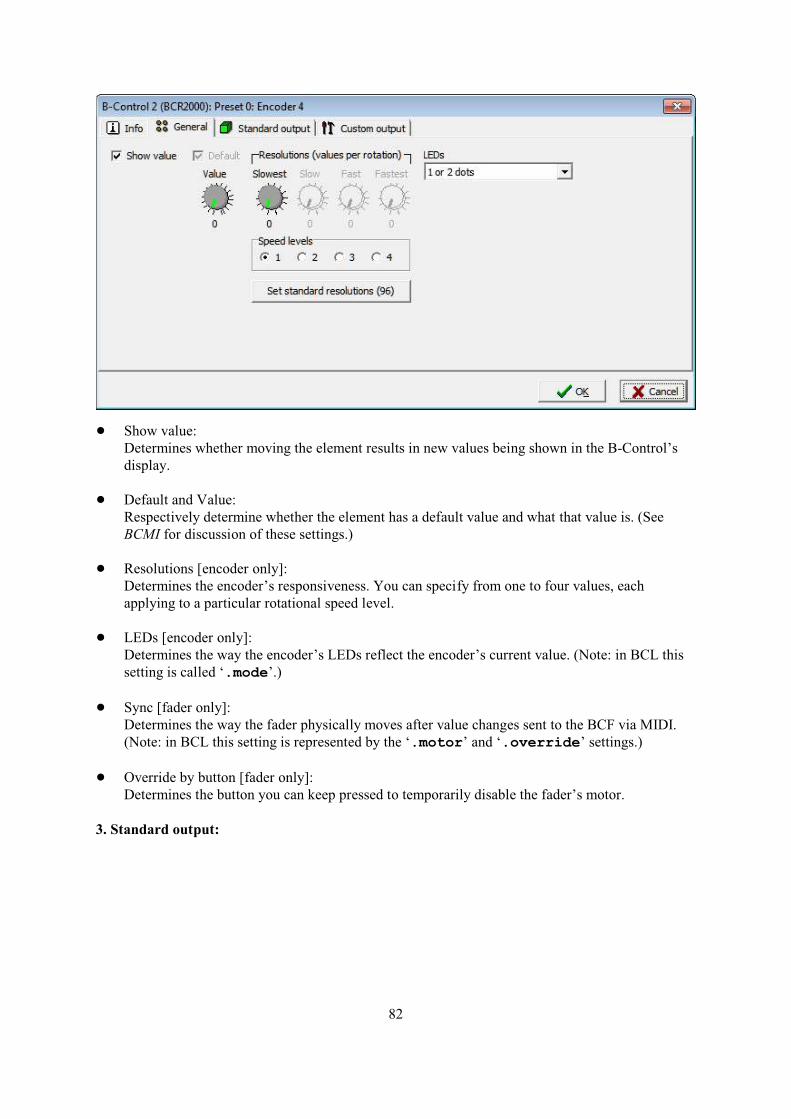
! Show value:Determines whether moving the element results in new values being shown in the B-Control’sdisplay.
! Default and Value:Respectively determine whether the element has a default value and what that value is. (SeeBCMI for discussion of these settings.)
! Resolutions [encoder only]:Determines the encoder’s responsiveness. You can specify from one to four values, eachapplying to a particular rotational speed level.
! LEDs [encoder only]:Determines the way the encoder’s LEDs reflect the encoder’s current value. (Note: in BCL thissetting is called ‘.mode’.)
! Sync [fader only]:Determines the way the fader physically moves after value changes sent to the BCF via MIDI.(Note: in BCL this setting is represented by the ‘.motor’ and ‘.override’ settings.)
! Override by button [fader only]:Determines the button you can keep pressed to temporarily disable the fader’s motor.
3. Standard output:
82
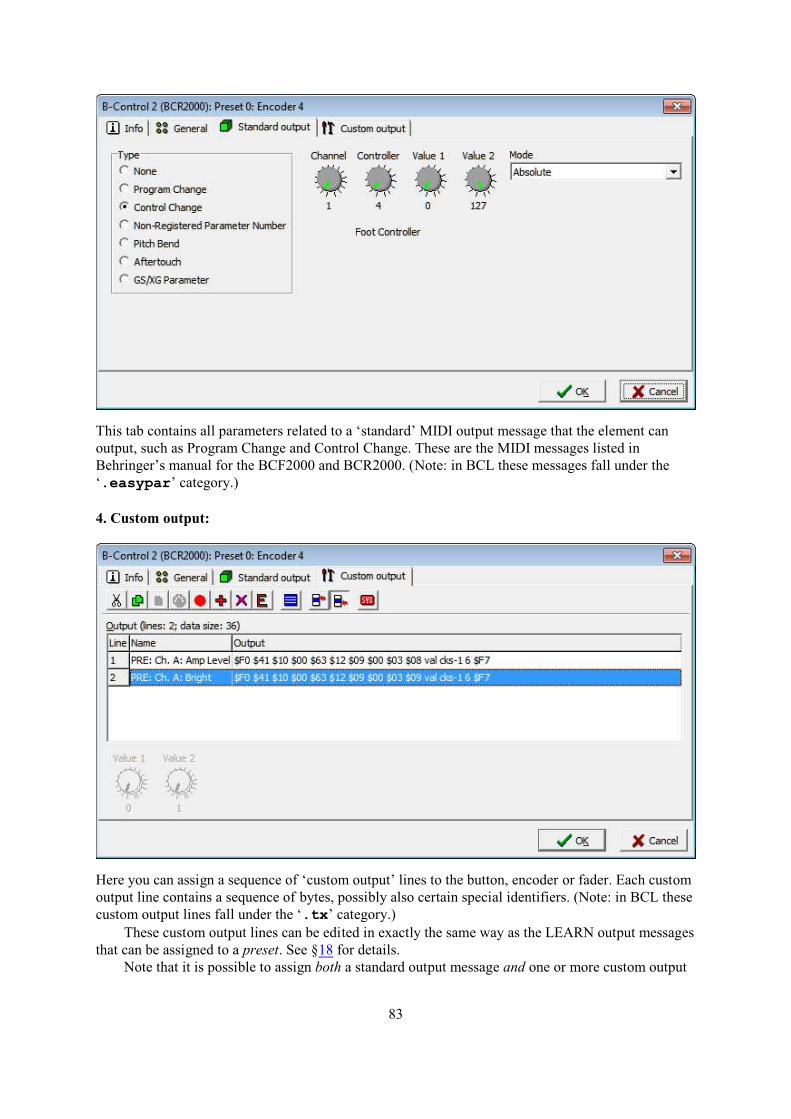
This tab contains all parameters related to a ‘standard’ MIDI output message that the element canoutput, such as Program Change and Control Change. These are the MIDI messages listed inBehringer’s manual for the BCF2000 and BCR2000. (Note: in BCL these messages fall under the‘.easypar’ category.)
4. Custom output:
Here you can assign a sequence of ‘custom output’ lines to the button, encoder or fader. Each customoutput line contains a sequence of bytes, possibly also certain special identifiers. (Note: in BCL thesecustom output lines fall under the ‘.tx’ category.)
These custom output lines can be edited in exactly the same way as the LEARN output messagesthat can be assigned to a preset. See §18 for details.
Note that it is possible to assign both a standard output message and one or more custom output
83

messages; in this case the element outputs the standard message first, then the custom messages.The Value 1 and Value 2 parameters shown on the custom output tab allow you to set the
minimum and maximum values of the element. Note that Value 1 and Value 2 only apply if thestandard MIDI output message’s Type parameter has been set to ‘None’: if any actual standardmessage has been assigned, that message’s minimum and maximum values prevail.
The same goes for the Mode parameter on the custom output tab for buttons: it is superseded byany Mode parameter setting on the standard output tab.
84
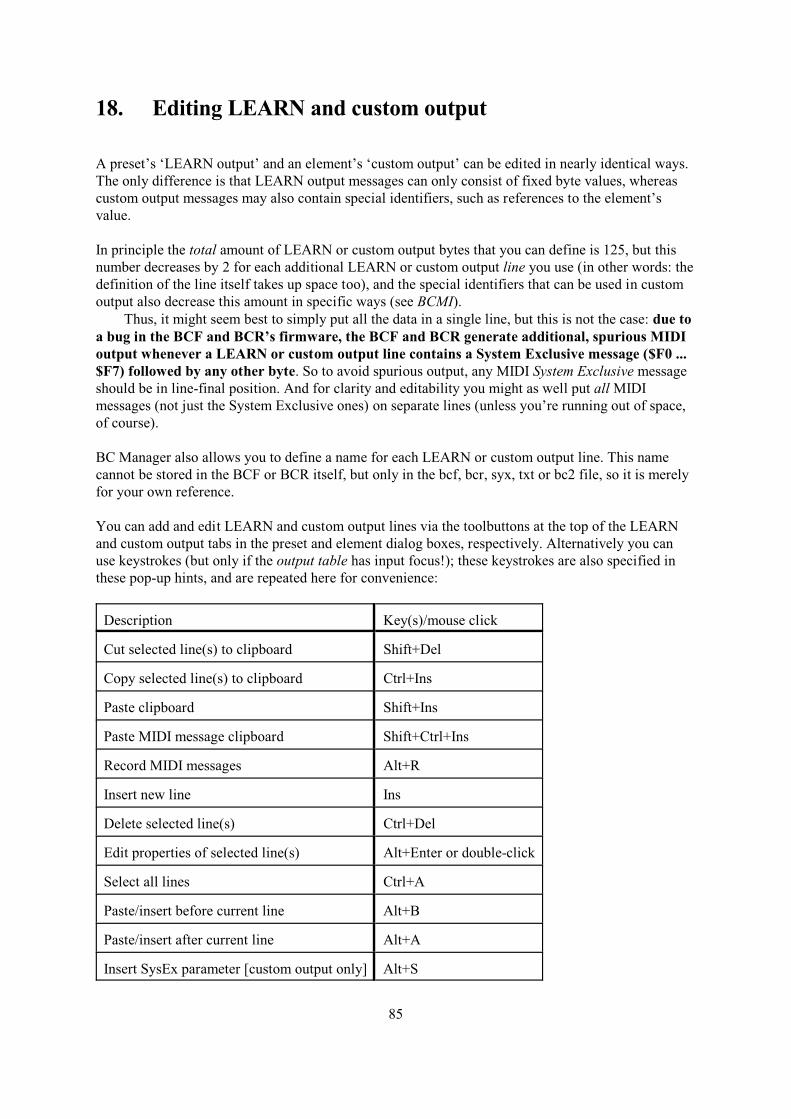
18. Editing LEARN and custom output
A preset’s ‘LEARN output’ and an element’s ‘custom output’ can be edited in nearly identical ways.The only difference is that LEARN output messages can only consist of fixed byte values, whereascustom output messages may also contain special identifiers, such as references to the element’svalue.
In principle the total amount of LEARN or custom output bytes that you can define is 125, but thisnumber decreases by 2 for each additional LEARN or custom output line you use (in other words: thedefinition of the line itself takes up space too), and the special identifiers that can be used in customoutput also decrease this amount in specific ways (see BCMI).
Thus, it might seem best to simply put all the data in a single line, but this is not the case: due toa bug in the BCF and BCR’s firmware, the BCF and BCR generate additional, spurious MIDIoutput whenever a LEARN or custom output line contains a System Exclusive message ($F0 ...$F7) followed by any other byte. So to avoid spurious output, any MIDI System Exclusive messageshould be in line-final position. And for clarity and editability you might as well put all MIDImessages (not just the System Exclusive ones) on separate lines (unless you’re running out of space,of course).
BC Manager also allows you to define a name for each LEARN or custom output line. This namecannot be stored in the BCF or BCR itself, but only in the bcf, bcr, syx, txt or bc2 file, so it is merelyfor your own reference.
You can add and edit LEARN and custom output lines via the toolbuttons at the top of the LEARNand custom output tabs in the preset and element dialog boxes, respectively. Alternatively you canuse keystrokes (but only if the output table has input focus!); these keystrokes are also specified inthese pop-up hints, and are repeated here for convenience:
Description Key(s)/mouse click
Cut selected line(s) to clipboard Shift+Del
Copy selected line(s) to clipboard Ctrl+Ins
Paste clipboard Shift+Ins
Paste MIDI message clipboard Shift+Ctrl+Ins
Record MIDI messages Alt+R
Insert new line Ins
Delete selected line(s) Ctrl+Del
Edit properties of selected line(s) Alt+Enter or double-click
Select all lines Ctrl+A
Paste/insert before current line Alt+B
Paste/insert after current line Alt+A
Insert SysEx parameter [custom output only] Alt+S
85
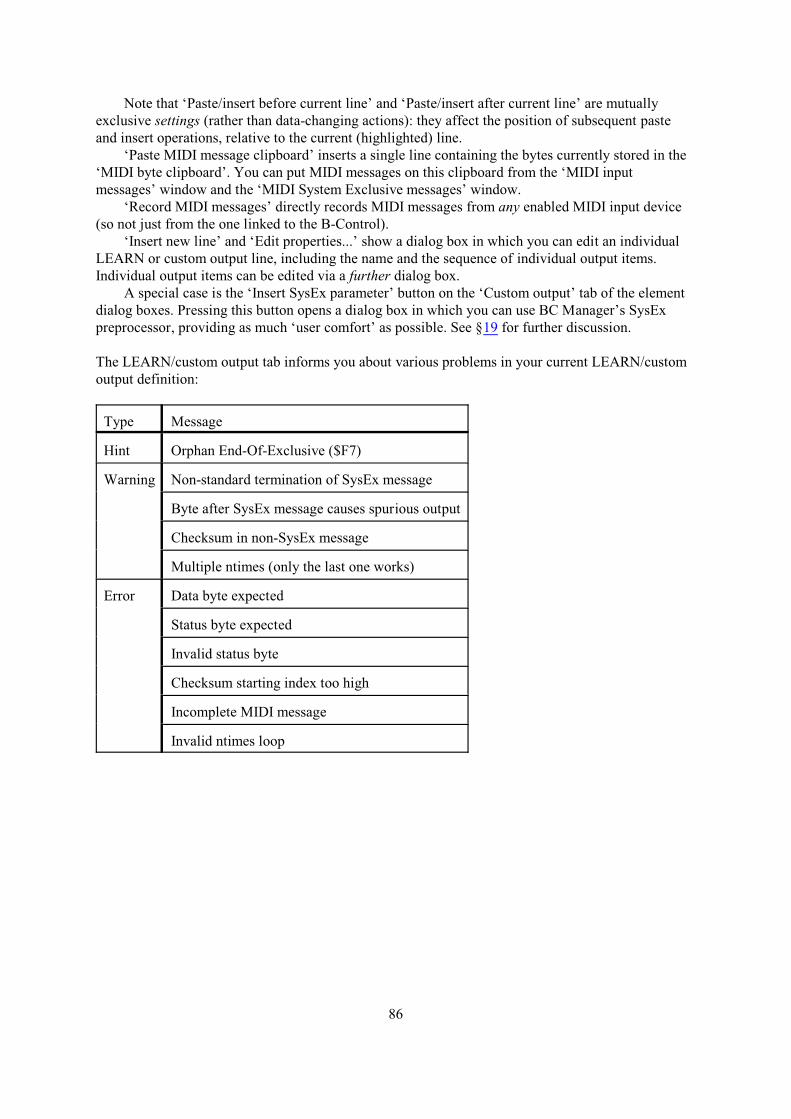
Note that ‘Paste/insert before current line’ and ‘Paste/insert after current line’ are mutuallyexclusive settings (rather than data-changing actions): they affect the position of subsequent pasteand insert operations, relative to the current (highlighted) line.
‘Paste MIDI message clipboard’ inserts a single line containing the bytes currently stored in the‘MIDI byte clipboard’. You can put MIDI messages on this clipboard from the ‘MIDI inputmessages’ window and the ‘MIDI System Exclusive messages’ window.
‘Record MIDI messages’ directly records MIDI messages from any enabled MIDI input device(so not just from the one linked to the B-Control).
‘Insert new line’ and ‘Edit properties...’ show a dialog box in which you can edit an individualLEARN or custom output line, including the name and the sequence of individual output items.Individual output items can be edited via a further dialog box.
A special case is the ‘Insert SysEx parameter’ button on the ‘Custom output’ tab of the elementdialog boxes. Pressing this button opens a dialog box in which you can use BC Manager’s SysExpreprocessor, providing as much ‘user comfort’ as possible. See §19 for further discussion.
The LEARN/custom output tab informs you about various problems in your current LEARN/customoutput definition:
Type Message
Hint Orphan End-Of-Exclusive ($F7)
Warning Non-standard termination of SysEx message
Byte after SysEx message causes spurious output
Checksum in non-SysEx message
Multiple ntimes (only the last one works)
Error Data byte expected
Status byte expected
Invalid status byte
Checksum starting index too high
Incomplete MIDI message
Invalid ntimes loop
86
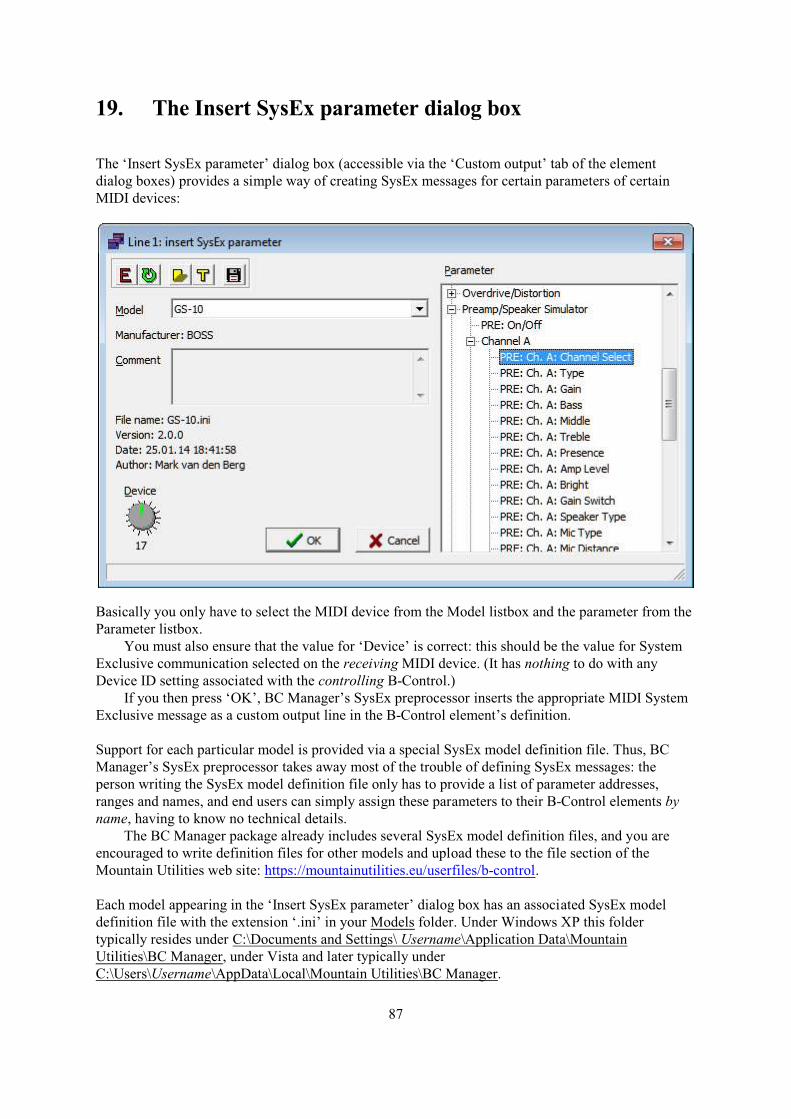
19. The Insert SysEx parameter dialog box
The ‘Insert SysEx parameter’ dialog box (accessible via the ‘Custom output’ tab of the elementdialog boxes) provides a simple way of creating SysEx messages for certain parameters of certainMIDI devices:
Basically you only have to select the MIDI device from the Model listbox and the parameter from theParameter listbox.
You must also ensure that the value for ‘Device’ is correct: this should be the value for SystemExclusive communication selected on the receiving MIDI device. (It has nothing to do with anyDevice ID setting associated with the controlling B-Control.)
If you then press ‘OK’, BC Manager’s SysEx preprocessor inserts the appropriate MIDI SystemExclusive message as a custom output line in the B-Control element’s definition.
Support for each particular model is provided via a special SysEx model definition file. Thus, BCManager’s SysEx preprocessor takes away most of the trouble of defining SysEx messages: theperson writing the SysEx model definition file only has to provide a list of parameter addresses,ranges and names, and end users can simply assign these parameters to their B-Control elements byname, having to know no technical details.
The BC Manager package already includes several SysEx model definition files, and you areencouraged to write definition files for other models and upload these to the file section of theMountain Utilities web site: https://mountainutilities.eu/userfiles/b-control.
Each model appearing in the ‘Insert SysEx parameter’ dialog box has an associated SysEx modeldefinition file with the extension ‘.ini’ in your Models folder. Under Windows XP this foldertypically resides under C:\Documents and Settings\ Username\Application Data\MountainUtilities\BC Manager, under Vista and later typically underC:\Users\Username\AppData\Local\Mountain Utilities\BC Manager.
87
Tip: the subfolder Templates of the folder to which BC Manager was installed (typicallyC:\Program Files\Mountain Utilities\BC Manager) contains the files BOSS.ini, Roland.ini,Waldorf.ini and Yamaha.ini; New.ini is for any other manufacturer. You can use these templates asstarting points for your own SysEx model definition files.
The ‘Insert SysEx parameter’ dialog box contains several buttons which help you create or editSysEx model definition files:
! Edit definition file:Opens the SysEx model definition file for the selected model in the external editor associatedwith ‘.ini’ files (e.g. Notepad).
! Reload definition files:Reloads all model definition files into BC Manager, so that the Model and Parameter boxesreflect any changes. You must do this when you have changed one or more definition filesbehind BC Manager’s back, i.e. while it has been running. Upon reloading, BC Manager willinform you if there is any syntactic error in one of these files.
! Open definition folder:Opens the folder containing the model files in Windows Explorer.
! Open template folder:Opens the folder containing the template files in Windows Explorer.
! Create report:Saves a CSV file containing a table of all the parameters in the selected definition file, includingeach parameter’s actual BCL line that it generates (for the Device value selected in the Deviceknob).
You should be able to import the CSV file in any ‘good’ spreadsheet application. It mayhelp to know that the file’s field separator is a comma and its field delimiter the doublequotecharacter ("). Beware: you should not use Quattro Pro (at least not version X5 — I haven’t testedother versions) to open these files, because it interprets and reformats any ‘bare’ hexadecimal asa decimal number if it can (in particular this may ruin the ‘Min H’ and ‘Max H’ columns);OpenOffice Calc 3.3 works fine though; I don’t know about Excel.
88
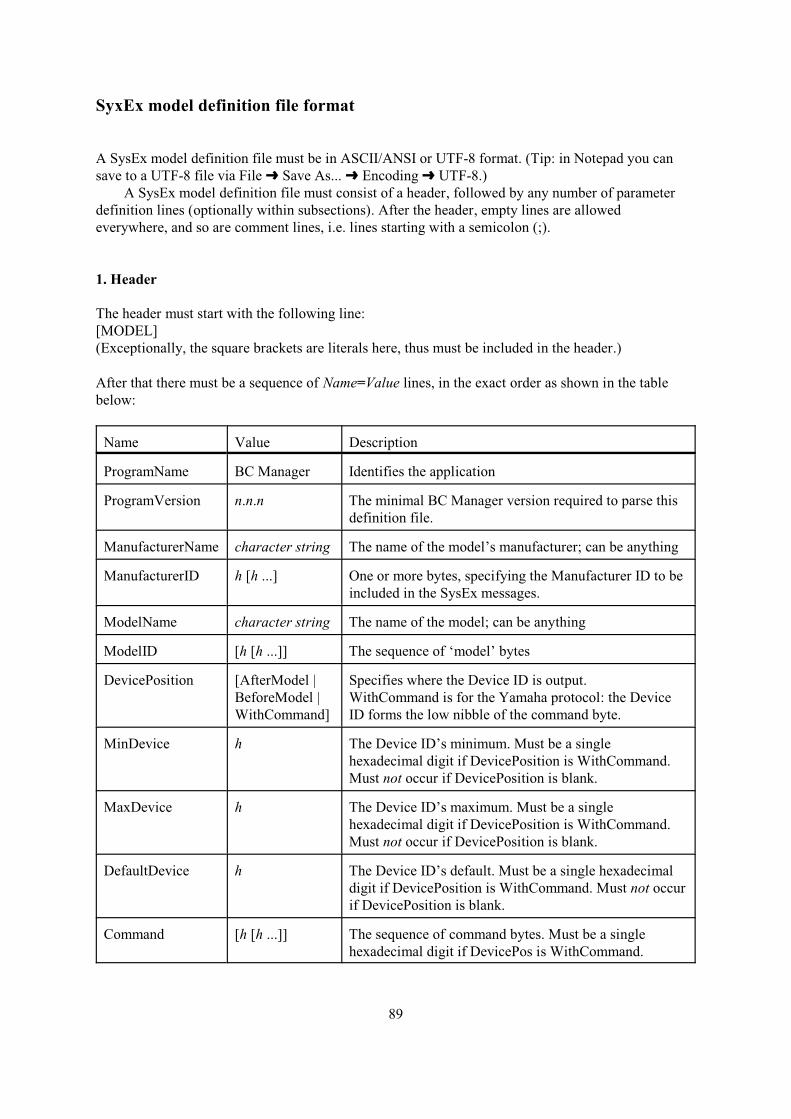
SyxEx model definition file format
A SysEx model definition file must be in ASCII/ANSI or UTF-8 format. (Tip: in Notepad you cansave to a UTF-8 file via File º Save As... º Encoding º UTF-8.)
A SysEx model definition file must consist of a header, followed by any number of parameterdefinition lines (optionally within subsections). After the header, empty lines are allowedeverywhere, and so are comment lines, i.e. lines starting with a semicolon (;).
1. Header
The header must start with the following line:[MODEL](Exceptionally, the square brackets are literals here, thus must be included in the header.)
After that there must be a sequence of Name=Value lines, in the exact order as shown in the tablebelow:
Name Value Description
ProgramName BC Manager Identifies the application
ProgramVersion n.n.n The minimal BC Manager version required to parse thisdefinition file.
ManufacturerName character string The name of the model’s manufacturer; can be anything
ManufacturerID h [h ...] One or more bytes, specifying the Manufacturer ID to beincluded in the SysEx messages.
ModelName character string The name of the model; can be anything
ModelID [h [h ...]] The sequence of ‘model’ bytes
DevicePosition [AfterModel |BeforeModel |WithCommand]
Specifies where the Device ID is output.WithCommand is for the Yamaha protocol: the DeviceID forms the low nibble of the command byte.
MinDevice h The Device ID’s minimum. Must be a singlehexadecimal digit if DevicePosition is WithCommand.Must not occur if DevicePosition is blank.
MaxDevice h The Device ID’s maximum. Must be a singlehexadecimal digit if DevicePosition is WithCommand.Must not occur if DevicePosition is blank.
DefaultDevice h The Device ID’s default. Must be a single hexadecimaldigit if DevicePosition is WithCommand. Must not occurif DevicePosition is blank.
Command [h [h ...]] The sequence of command bytes. Must be a singlehexadecimal digit if DevicePos is WithCommand.
89
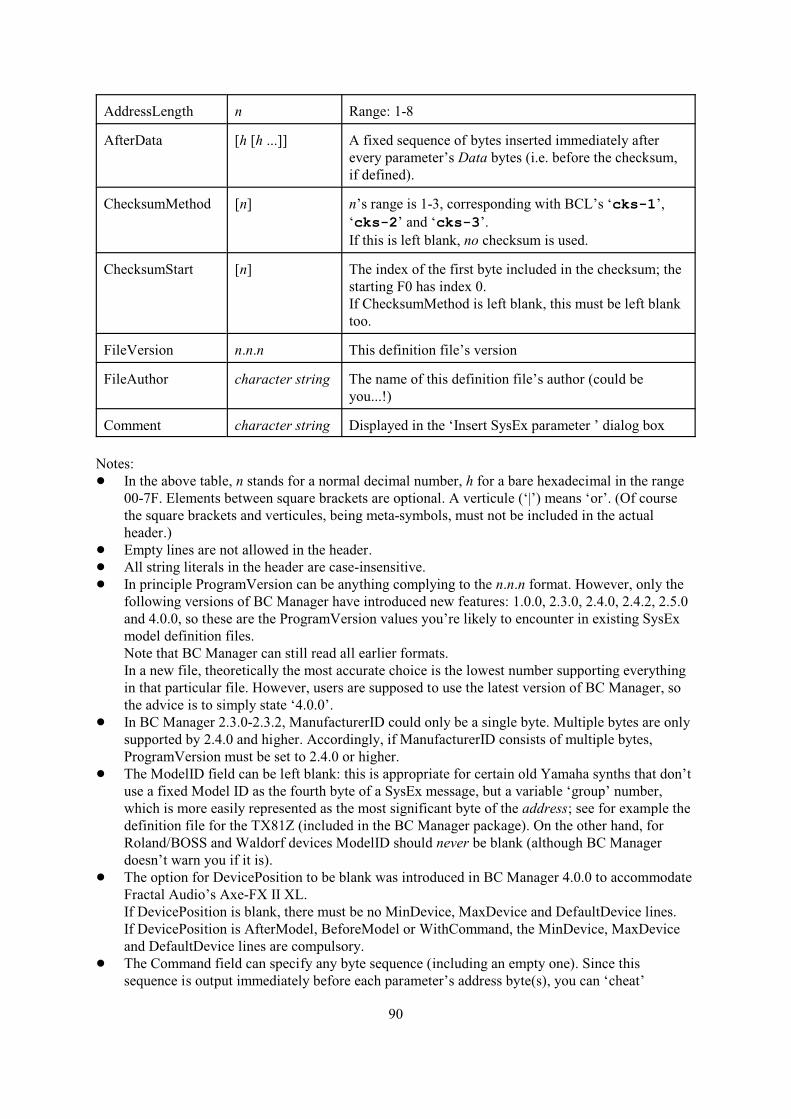
AddressLength n Range: 1-8
AfterData [h [h ...]] A fixed sequence of bytes inserted immediately afterevery parameter’s Data bytes (i.e. before the checksum,if defined).
ChecksumMethod [n] n’s range is 1-3, corresponding with BCL’s ‘cks-1’,‘cks-2’ and ‘cks-3’.If this is left blank, no checksum is used.
ChecksumStart [n] The index of the first byte included in the checksum; thestarting F0 has index 0.If ChecksumMethod is left blank, this must be left blanktoo.
FileVersion n.n.n This definition file’s version
FileAuthor character string The name of this definition file’s author (could beyou...!)
Comment character string Displayed in the ‘Insert SysEx parameter ’ dialog box
Notes:! In the above table, n stands for a normal decimal number, h for a bare hexadecimal in the range
00-7F. Elements between square brackets are optional. A verticule (‘|’) means ‘or’. (Of coursethe square brackets and verticules, being meta-symbols, must not be included in the actualheader.)
! Empty lines are not allowed in the header.! All string literals in the header are case-insensitive.! In principle ProgramVersion can be anything complying to the n.n.n format. However, only the
following versions of BC Manager have introduced new features: 1.0.0, 2.3.0, 2.4.0, 2.4.2, 2.5.0and 4.0.0, so these are the ProgramVersion values you’re likely to encounter in existing SysExmodel definition files.Note that BC Manager can still read all earlier formats.In a new file, theoretically the most accurate choice is the lowest number supporting everythingin that particular file. However, users are supposed to use the latest version of BC Manager, sothe advice is to simply state ‘4.0.0’.
! In BC Manager 2.3.0-2.3.2, ManufacturerID could only be a single byte. Multiple bytes are onlysupported by 2.4.0 and higher. Accordingly, if ManufacturerID consists of multiple bytes,ProgramVersion must be set to 2.4.0 or higher.
! The ModelID field can be left blank: this is appropriate for certain old Yamaha synths that don’tuse a fixed Model ID as the fourth byte of a SysEx message, but a variable ‘group’ number,which is more easily represented as the most significant byte of the address; see for example thedefinition file for the TX81Z (included in the BC Manager package). On the other hand, forRoland/BOSS and Waldorf devices ModelID should never be blank (although BC Managerdoesn’t warn you if it is).
! The option for DevicePosition to be blank was introduced in BC Manager 4.0.0 to accommodateFractal Audio’s Axe-FX II XL.If DevicePosition is blank, there must be no MinDevice, MaxDevice and DefaultDevice lines.If DevicePosition is AfterModel, BeforeModel or WithCommand, the MinDevice, MaxDeviceand DefaultDevice lines are compulsory.
! The Command field can specify any byte sequence (including an empty one). Since thissequence is output immediately before each parameter’s address byte(s), you can ‘cheat’
90
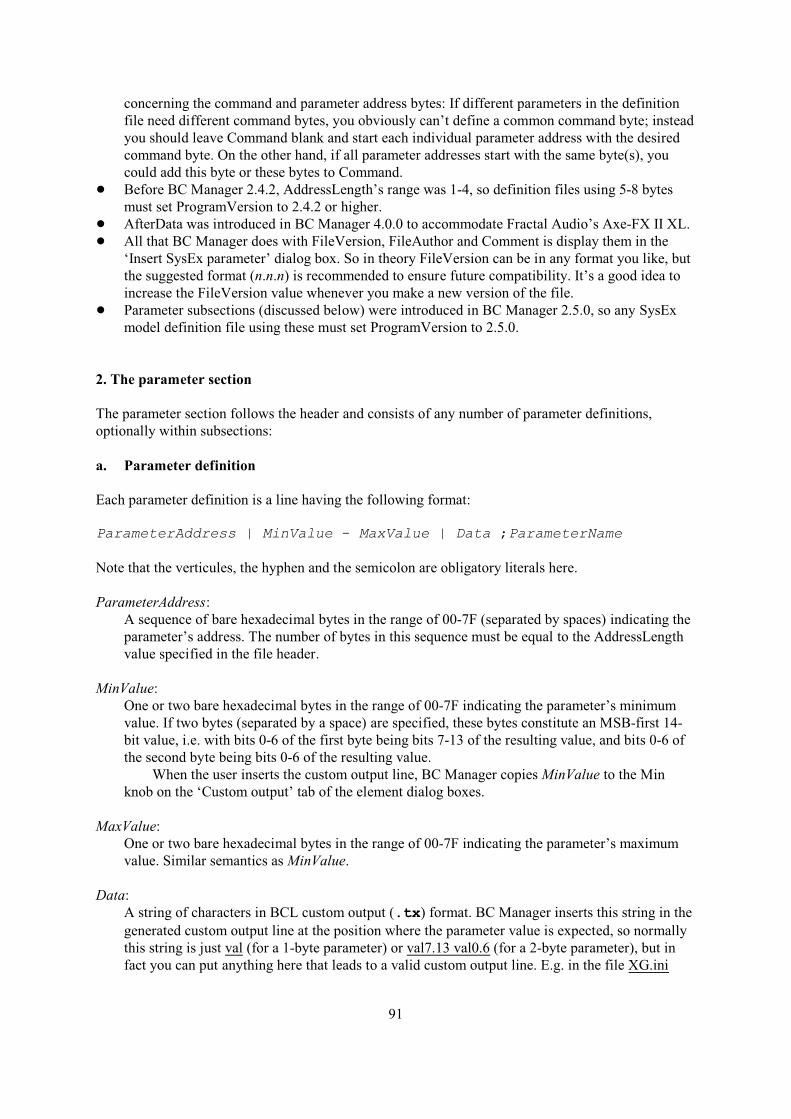
concerning the command and parameter address bytes: If different parameters in the definitionfile need different command bytes, you obviously can’t define a common command byte; insteadyou should leave Command blank and start each individual parameter address with the desiredcommand byte. On the other hand, if all parameter addresses start with the same byte(s), youcould add this byte or these bytes to Command.
! Before BC Manager 2.4.2, AddressLength’s range was 1-4, so definition files using 5-8 bytesmust set ProgramVersion to 2.4.2 or higher.
! AfterData was introduced in BC Manager 4.0.0 to accommodate Fractal Audio’s Axe-FX II XL.! All that BC Manager does with FileVersion, FileAuthor and Comment is display them in the
‘Insert SysEx parameter’ dialog box. So in theory FileVersion can be in any format you like, butthe suggested format (n.n.n) is recommended to ensure future compatibility. It’s a good idea toincrease the FileVersion value whenever you make a new version of the file.
! Parameter subsections (discussed below) were introduced in BC Manager 2.5.0, so any SysExmodel definition file using these must set ProgramVersion to 2.5.0.
2. The parameter section
The parameter section follows the header and consists of any number of parameter definitions,optionally within subsections:
a. Parameter definition
Each parameter definition is a line having the following format:
ParameterAddress | MinValue - MaxValue | Data ;ParameterName
Note that the verticules, the hyphen and the semicolon are obligatory literals here.
ParameterAddress:A sequence of bare hexadecimal bytes in the range of 00-7F (separated by spaces) indicating theparameter’s address. The number of bytes in this sequence must be equal to the AddressLengthvalue specified in the file header.
MinValue:One or two bare hexadecimal bytes in the range of 00-7F indicating the parameter’s minimumvalue. If two bytes (separated by a space) are specified, these bytes constitute an MSB-first 14-bit value, i.e. with bits 0-6 of the first byte being bits 7-13 of the resulting value, and bits 0-6 ofthe second byte being bits 0-6 of the resulting value.
When the user inserts the custom output line, BC Manager copies MinValue to the Minknob on the ‘Custom output’ tab of the element dialog boxes.
MaxValue:One or two bare hexadecimal bytes in the range of 00-7F indicating the parameter’s maximumvalue. Similar semantics as MinValue.
Data:A string of characters in BCL custom output (.tx) format. BC Manager inserts this string in thegenerated custom output line at the position where the parameter value is expected, so normallythis string is just val (for a 1-byte parameter) or val7.13 val0.6 (for a 2-byte parameter), but infact you can put anything here that leads to a valid custom output line. E.g. in the file XG.ini
91

(included in the BC Manager package), Data is val12.13 val8.11 val4.7 val0.3 for a particularparameter. You’re not even restricted to ‘val’-type identifiers: fixed byte values and any otherspecial identifiers are allowed too; see BCMI section 14.6. So in theory you can do weird thingshere, but remember that whatever you enter here will be embedded within the custom output lineas is. In particular, you should be aware that fixed hexadecimal bytes must be prefixed by ‘$’and bytes without ‘$’ are interpreted as ordinary decimal numbers; this contrasts sharply withParameterAddress, MinValue and MaxValue, which must be bare hexadecimals.
ParameterName:The name of the parameter as it will appear in the ‘Parameter’ box of the ‘Insert SysExparameter’ dialog box.
b. Subsection! A subsection starts with a line consisting of an opening brace (‘{’) optionally followed by the
subsection’s name (which will be displayed in the tree in the `Insert SysEx parameter’ dialogbox). Spaces and tabs in front of { or between { and the start of the name are ignored.
! A subsection may contain any number of subsections and parameter definitions. (So you can nestsubsections.)
! A subsection ends with a line consisting of a closing brace (‘}’). Spaces and tabs in front of }and any characters after } are ignored. (So you can’t close two nested subsections by ‘}}’ on thesame line: each closing brace must occur on a separate line.)
For how subsections work in practice, see D-5.ini and GS-10.ini in the BC Manager package.
Examples
On the following pages some typical SysEx formats of individual manufacturers are described.The Fractal Audio example can be found in the Model subfolder in BC Manager’s installation folder.For Roland/BOSS, Waldorf and Yamaha templates are available from the Templates subfolder.
92
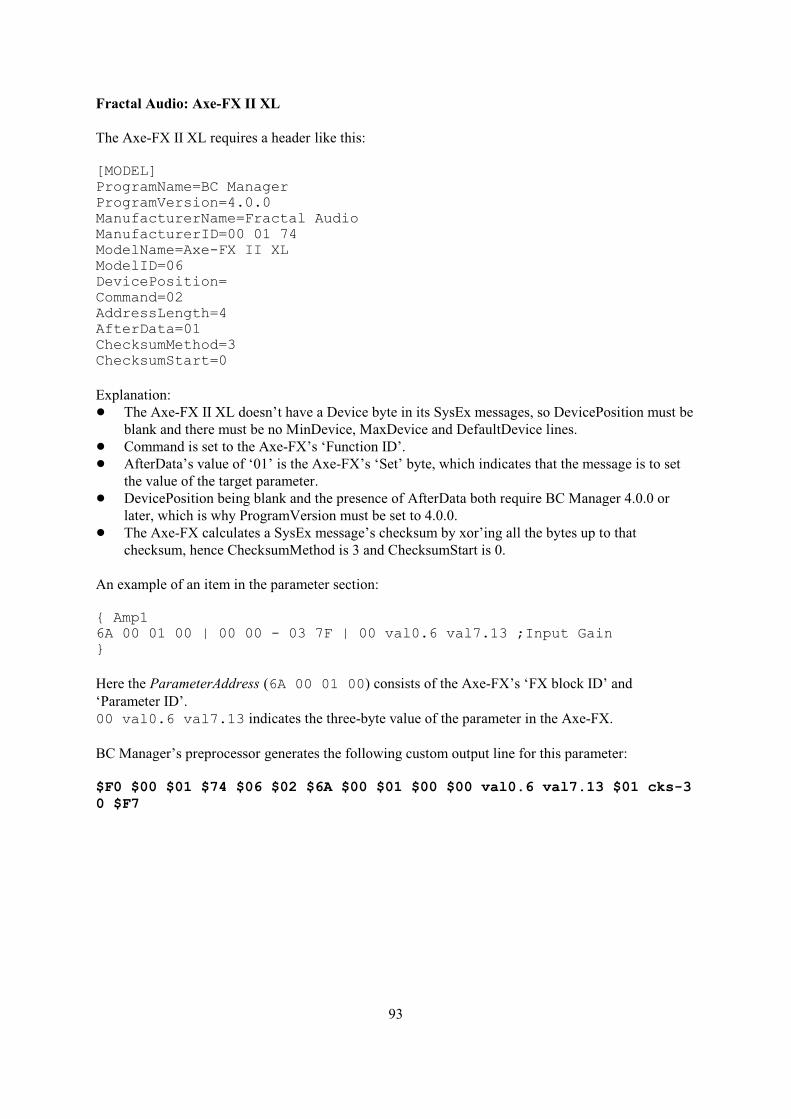
Fractal Audio: Axe-FX II XL
The Axe-FX II XL requires a header like this:
[MODEL]ProgramName=BC ManagerProgramVersion=4.0.0ManufacturerName=Fractal AudioManufacturerID=00 01 74ModelName=Axe-FX II XLModelID=06DevicePosition=Command=02AddressLength=4AfterData=01ChecksumMethod=3ChecksumStart=0
Explanation:! The Axe-FX II XL doesn’t have a Device byte in its SysEx messages, so DevicePosition must be
blank and there must be no MinDevice, MaxDevice and DefaultDevice lines.! Command is set to the Axe-FX’s ‘Function ID’.! AfterData’s value of ‘01’ is the Axe-FX’s ‘Set’ byte, which indicates that the message is to set
the value of the target parameter.! DevicePosition being blank and the presence of AfterData both require BC Manager 4.0.0 or
later, which is why ProgramVersion must be set to 4.0.0.! The Axe-FX calculates a SysEx message’s checksum by xor’ing all the bytes up to that
checksum, hence ChecksumMethod is 3 and ChecksumStart is 0.
An example of an item in the parameter section:
{ Amp16A 00 01 00 | 00 00 - 03 7F | 00 val0.6 val7.13 ;Input Gain}
Here the ParameterAddress (6A 00 01 00) consists of the Axe-FX’s ‘FX block ID’ and‘Parameter ID’.00 val0.6 val7.13 indicates the three-byte value of the parameter in the Axe-FX.
BC Manager’s preprocessor generates the following custom output line for this parameter:
$F0 $00 $01 $74 $06 $02 $6A $00 $01 $00 $00 val0.6 val7.13 $01 cks-30 $F7
93
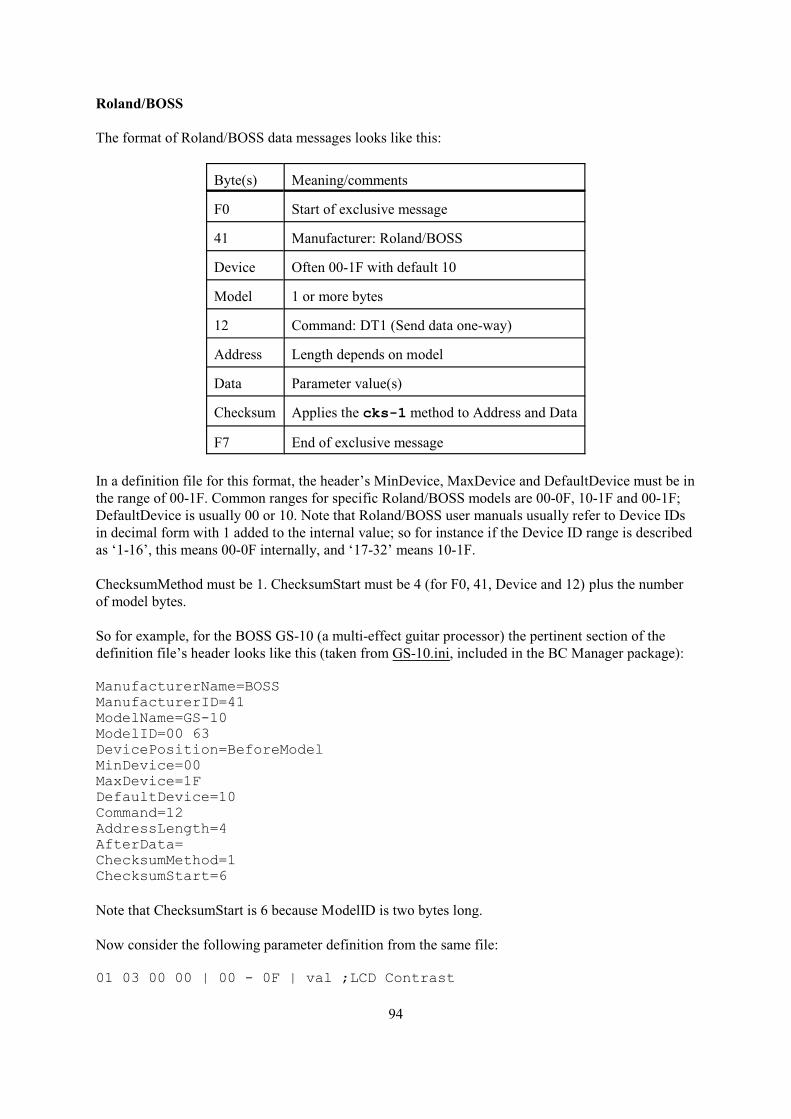
Roland/BOSS
The format of Roland/BOSS data messages looks like this:
Byte(s) Meaning/comments
F0 Start of exclusive message
41 Manufacturer: Roland/BOSS
Device Often 00-1F with default 10
Model 1 or more bytes
12 Command: DT1 (Send data one-way)
Address Length depends on model
Data Parameter value(s)
Checksum Applies the cks-1 method to Address and Data
F7 End of exclusive message
In a definition file for this format, the header’s MinDevice, MaxDevice and DefaultDevice must be inthe range of 00-1F. Common ranges for specific Roland/BOSS models are 00-0F, 10-1F and 00-1F;DefaultDevice is usually 00 or 10. Note that Roland/BOSS user manuals usually refer to Device IDsin decimal form with 1 added to the internal value; so for instance if the Device ID range is describedas ‘1-16’, this means 00-0F internally, and ‘17-32’ means 10-1F.
ChecksumMethod must be 1. ChecksumStart must be 4 (for F0, 41, Device and 12) plus the numberof model bytes.
So for example, for the BOSS GS-10 (a multi-effect guitar processor) the pertinent section of thedefinition file’s header looks like this (taken from GS-10.ini, included in the BC Manager package):
ManufacturerName=BOSSManufacturerID=41ModelName=GS-10ModelID=00 63DevicePosition=BeforeModelMinDevice=00MaxDevice=1FDefaultDevice=10Command=12AddressLength=4AfterData=ChecksumMethod=1ChecksumStart=6
Note that ChecksumStart is 6 because ModelID is two bytes long.
Now consider the following parameter definition from the same file:
01 03 00 00 | 00 - 0F | val ;LCD Contrast
94

This defines a 4-byte parameter address for a single-byte parameter in the range of 00-0F by the nameof ‘LCD Contrast’. When a user selects this parameter via the ‘Insert SysEx parameter’ dialog box,BC Manager’s preprocessor could generate the following custom output line:
$F0 $41 $00 $00 $63 $12 $01 $03 $00 $00 val cks-1 6 $F7
Thus, BC Manager automatically uses the correct Manufacturer ($41 = Roland/BOSS), Device (thefirst $00), Model ($00 $63 = GS-10), Command ($12 = DT1), parameter address ($01 $03$00 $00) and checksum specifier (cks-1 6). Note that Device is chosen by the end user in the‘Insert SysEx parameter’ dialog box.
95
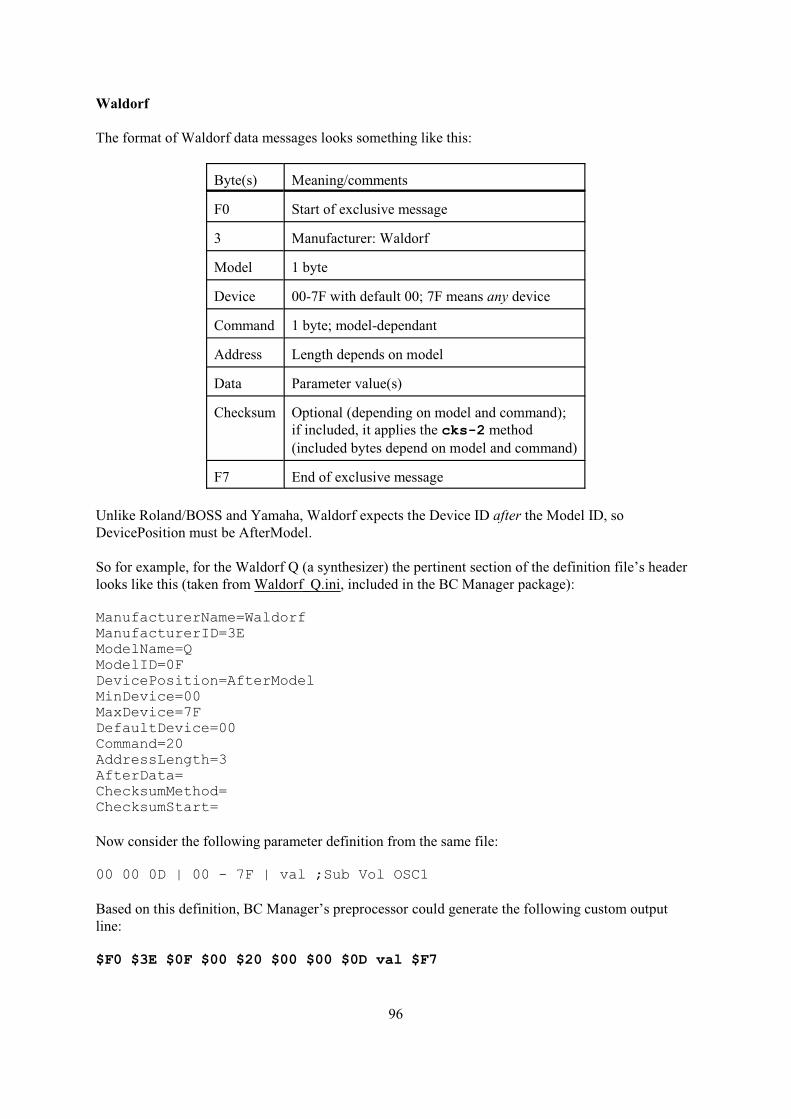
Waldorf
The format of Waldorf data messages looks something like this:
Byte(s) Meaning/comments
F0 Start of exclusive message
3 Manufacturer: Waldorf
Model 1 byte
Device 00-7F with default 00; 7F means any device
Command 1 byte; model-dependant
Address Length depends on model
Data Parameter value(s)
Checksum Optional (depending on model and command);if included, it applies the cks-2 method(included bytes depend on model and command)
F7 End of exclusive message
Unlike Roland/BOSS and Yamaha, Waldorf expects the Device ID after the Model ID, soDevicePosition must be AfterModel.
So for example, for the Waldorf Q (a synthesizer) the pertinent section of the definition file’s headerlooks like this (taken from Waldorf_Q.ini, included in the BC Manager package):
ManufacturerName=WaldorfManufacturerID=3EModelName=QModelID=0FDevicePosition=AfterModelMinDevice=00MaxDevice=7FDefaultDevice=00Command=20AddressLength=3AfterData=ChecksumMethod=ChecksumStart=
Now consider the following parameter definition from the same file:
00 00 0D | 00 - 7F | val ;Sub Vol OSC1
Based on this definition, BC Manager’s preprocessor could generate the following custom outputline:
$F0 $3E $0F $00 $20 $00 $00 $0D val $F7
96

Here $3E is the Waldorf Manufacturer ID. $0F is the Model ID for the Waldorf Q. The first $00 isthe user-selected Device. $20 is the Q’s ‘Sound Parameter Change’ command. $00 $00 $0D isthe address. There is no checksum in this case (as indicated by the value of ChecksumStart being leftblank in the definition file’s header).
97
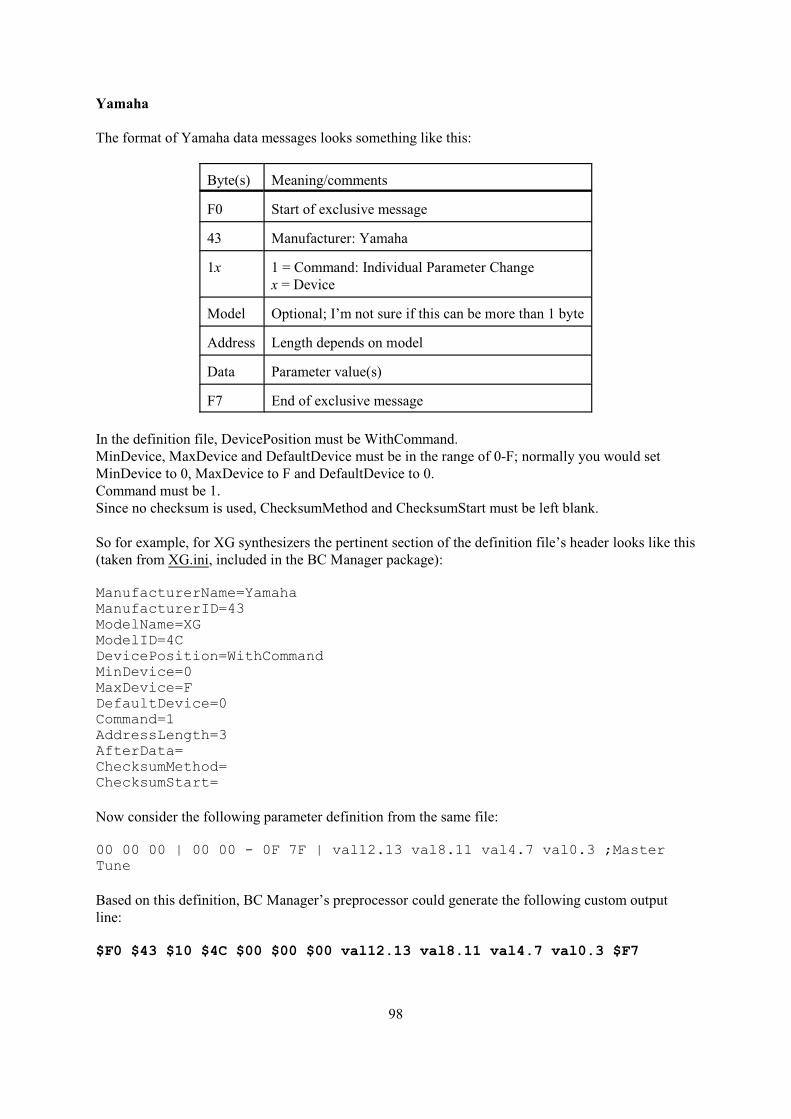
Yamaha
The format of Yamaha data messages looks something like this:
Byte(s) Meaning/comments
F0 Start of exclusive message
43 Manufacturer: Yamaha
1x 1 = Command: Individual Parameter Changex = Device
Model Optional; I’m not sure if this can be more than 1 byte
Address Length depends on model
Data Parameter value(s)
F7 End of exclusive message
In the definition file, DevicePosition must be WithCommand.MinDevice, MaxDevice and DefaultDevice must be in the range of 0-F; normally you would setMinDevice to 0, MaxDevice to F and DefaultDevice to 0.Command must be 1.Since no checksum is used, ChecksumMethod and ChecksumStart must be left blank.
So for example, for XG synthesizers the pertinent section of the definition file’s header looks like this(taken from XG.ini, included in the BC Manager package):
ManufacturerName=YamahaManufacturerID=43ModelName=XGModelID=4CDevicePosition=WithCommandMinDevice=0MaxDevice=FDefaultDevice=0Command=1AddressLength=3AfterData=ChecksumMethod=ChecksumStart=
Now consider the following parameter definition from the same file:
00 00 00 | 00 00 - 0F 7F | val12.13 val8.11 val4.7 val0.3 ;MasterTune
Based on this definition, BC Manager’s preprocessor could generate the following custom outputline:
$F0 $43 $10 $4C $00 $00 $00 val12.13 val8.11 val4.7 val0.3 $F7
98

Here $43 is the Manufacturer ID for Yamaha. The high nibble of the next byte ($1) stands for‘Individual Parameter Change’. The low nibble is the Device ($0 in this case). $4C is the XG ModelID, and then follow the 3-byte address for Master Tune ($00 $00 $00) and the four dataspecifiers.
99
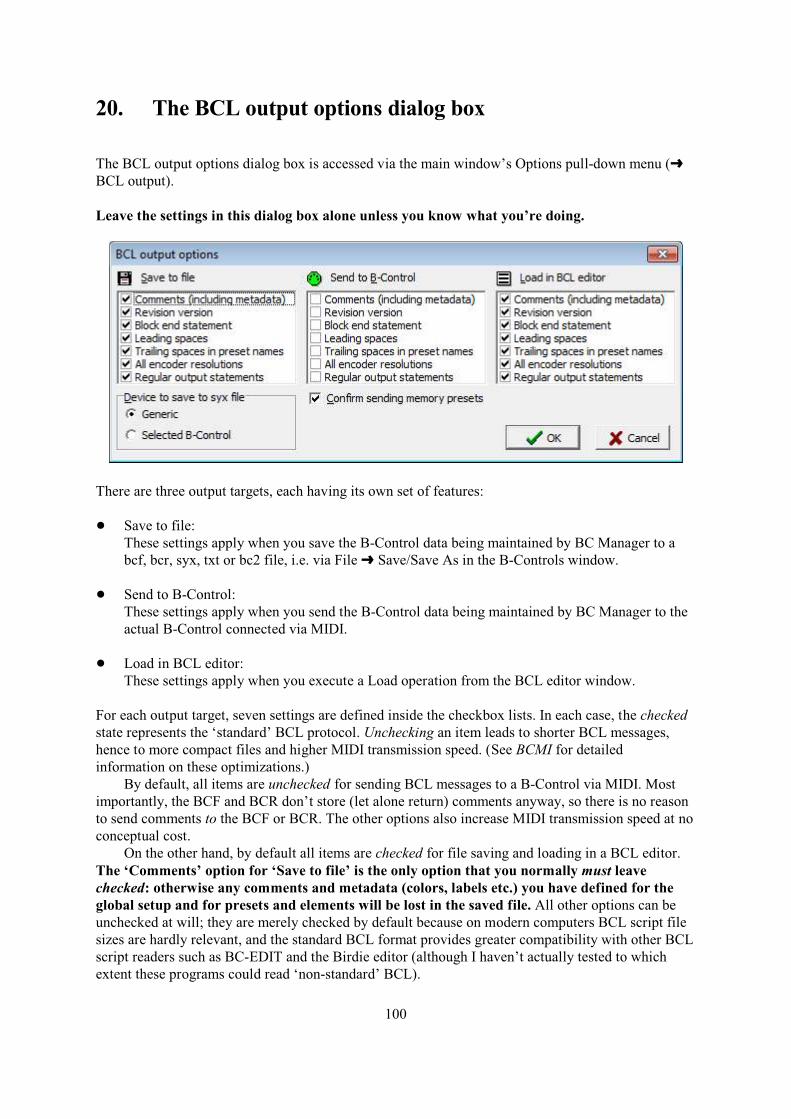
20. The BCL output options dialog box
The BCL output options dialog box is accessed via the main window’s Options pull-down menu (ºBCL output).
Leave the settings in this dialog box alone unless you know what you’re doing.
There are three output targets, each having its own set of features:
! Save to file:These settings apply when you save the B-Control data being maintained by BC Manager to abcf, bcr, syx, txt or bc2 file, i.e. via File º Save/Save As in the B-Controls window.
! Send to B-Control:These settings apply when you send the B-Control data being maintained by BC Manager to theactual B-Control connected via MIDI.
! Load in BCL editor:These settings apply when you execute a Load operation from the BCL editor window.
For each output target, seven settings are defined inside the checkbox lists. In each case, the checkedstate represents the ‘standard’ BCL protocol. Unchecking an item leads to shorter BCL messages,hence to more compact files and higher MIDI transmission speed. (See BCMI for detailedinformation on these optimizations.)
By default, all items are unchecked for sending BCL messages to a B-Control via MIDI. Mostimportantly, the BCF and BCR don’t store (let alone return) comments anyway, so there is no reasonto send comments to the BCF or BCR. The other options also increase MIDI transmission speed at noconceptual cost.
On the other hand, by default all items are checked for file saving and loading in a BCL editor.The ‘Comments’ option for ‘Save to file’ is the only option that you normally must leavechecked: otherwise any comments and metadata (colors, labels etc.) you have defined for theglobal setup and for presets and elements will be lost in the saved file. All other options can beunchecked at will; they are merely checked by default because on modern computers BCL script filesizes are hardly relevant, and the standard BCL format provides greater compatibility with other BCLscript readers such as BC-EDIT and the Birdie editor (although I haven’t actually tested to whichextent these programs could read ‘non-standard’ BCL).
100

Confirm sending memory presets:If this is checked, BC Manager requires you to confirm all your attempts at sending memory presetsto a B-Control. This may help preventing you from accidentally overwriting presets that you have nobackups of. However, before version 2.6.0 BC Manager didn’t ask for confirmation, so if you’re anexperienced user and/or the question annoys you, you can disable it here. Note that BC Managernever asks for confirmation when you’re only sending data to the temporary preset.
101
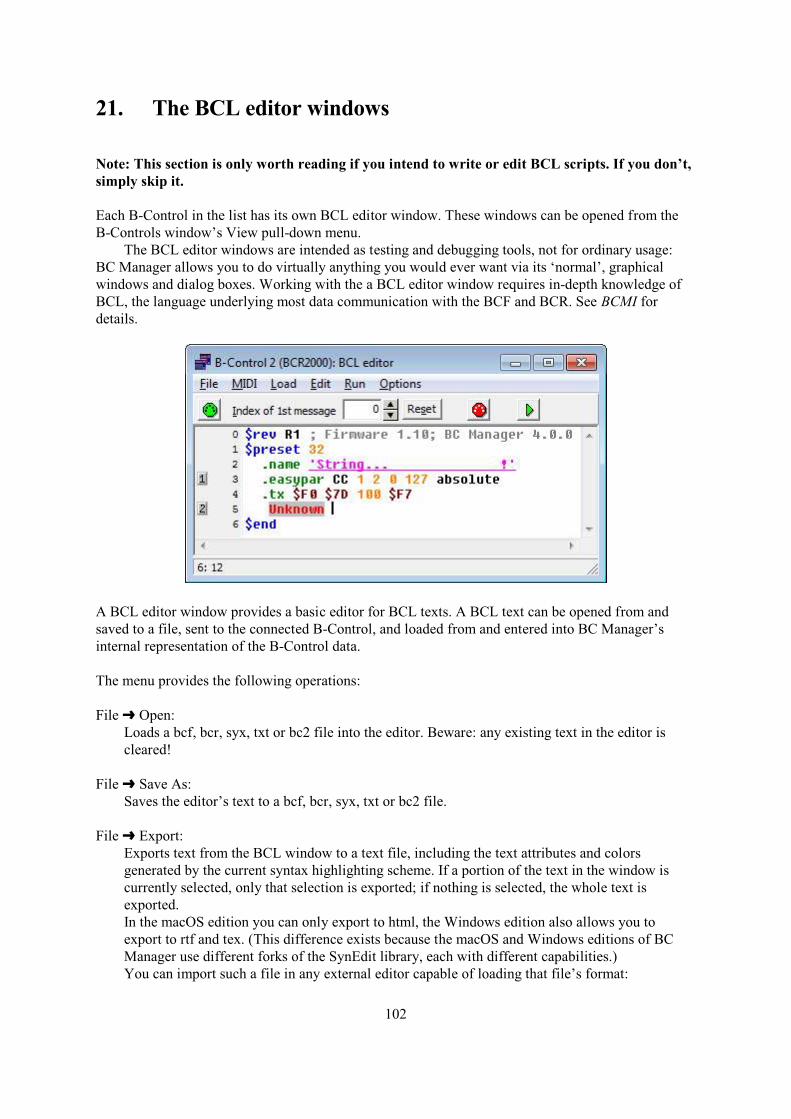
21. The BCL editor windows
Note: This section is only worth reading if you intend to write or edit BCL scripts. If you don’t,simply skip it.
Each B-Control in the list has its own BCL editor window. These windows can be opened from theB-Controls window’s View pull-down menu.
The BCL editor windows are intended as testing and debugging tools, not for ordinary usage:BC Manager allows you to do virtually anything you would ever want via its ‘normal’, graphicalwindows and dialog boxes. Working with the a BCL editor window requires in-depth knowledge ofBCL, the language underlying most data communication with the BCF and BCR. See BCMI fordetails.
A BCL editor window provides a basic editor for BCL texts. A BCL text can be opened from andsaved to a file, sent to the connected B-Control, and loaded from and entered into BC Manager’sinternal representation of the B-Control data.
The menu provides the following operations:
File º Open:Loads a bcf, bcr, syx, txt or bc2 file into the editor. Beware: any existing text in the editor iscleared!
File º Save As:Saves the editor’s text to a bcf, bcr, syx, txt or bc2 file.
File º Export:Exports text from the BCL window to a text file, including the text attributes and colorsgenerated by the current syntax highlighting scheme. If a portion of the text in the window iscurrently selected, only that selection is exported; if nothing is selected, the whole text isexported.In the macOS edition you can only export to html, the Windows edition also allows you toexport to rtf and tex. (This difference exists because the macOS and Windows editions of BCManager use different forks of the SynEdit library, each with different capabilities.)You can import such a file in any external editor capable of loading that file’s format:
102
! HTML:Any web browser should be able to load these html files correctly (i.e. maintaining theformatting). Dedicated html editors may or may not work.
! RTF:The rtf files can be loaded correctly in WordPad and WordPerfect.However, for some reason LibreOffice (at least 5.2) does not load them correctly.MS Word: I have no idea.
! TeX:Any combination of TeX backend (MiKTeX, TeXLive etc.) + frontend (Texmaker,TeXstudio, TeXworks etc.) should be able to load these files correctly.
MIDI º Send:Sends the editor’s text to the connected B-Control.
MIDI º Receive global setup/preset 0:Sends a request to the connected B-Control for the data in its global setup or preset 0 (the‘temporary’ preset), respectively. Any data returned by the B-Control does not appear in theBCL editor window itself, but in the ‘MIDI input messages: BCL’ window (accessible fromthe main window), provided that this window’s Record button has been pressed. Beware: anyreceived data is also entered in BC Manager’s representation of the B-Control, as shown in theglobal setups window and the windows associated with preset 0, respectively.
The idea of these operations is simply to check how a B-Control returns data previouslysent from the BCL editor window, rather than to edit any data returned by the B-Control in theBCL editor window.
Load º Empty block:Clears any existing text in the editor and loads a basic block consisting of an appropriate $revstatement, an empty line and a $end statement. Useful for starting small tasks from scratch.
Load º Global setup:Loads BC Manager’s representation of the B-Control’s global setup into the editor as a BCL textblock.
Load º Preset 0 º Selected buttons/encoders/faders:Loads BC Manager’s representation of a range of buttons, encoders or faders of preset 0 (the‘temporary’ preset) into the editor as a BCL block. The loaded range is determined by thecurrent selection in the pertinent element window. To avoid confusion, this operation is onlyallowed if preset 0 has actually been selected in the presets window.
Load º Selected presets:Loads BC Manager’s representation of a range of presets into the editor as a BCL block. Theloaded range is determined by the current selection in the presets window. (Beware: thisoperation only loads preset 0 if it is the only selected preset. The settings for preset 0 would beoverwritten during transmission of a subsequent memory preset. So if for instance preset 0 to 3are selected, you get only presets 1-3.)
Load º Selected presets and 0:Like ‘Selected presets’ (see above) this operation loads the selected presets, but this operationalso loads preset 0 after any memory presets (whether preset 0 has been actually selected or not).This mimicks the behavior of BC Manager itself when it sends memory presets to a B-Control:during transmission, the temporary preset (‘preset 0’) is used as a ‘corridor’ to the memory
103
presets; so by appending the (supposedly) original settings of preset 0 we can restore thesesettings.
Load º All:Loads BC Manager’s complete representation of the B-Control into the editor as a BCL block.
Edit º Copy formatted:Copies the selected text to the operating system’s clipboard, including the text attributes andcolors generated by the current syntax highlighting scheme.This works much like the File º Export operation (q.v.). Again, there is a difference betweenthe macOS and Windows editions of BC Manager: the macOS edition can only put the data onthe clipboard in html format, the Windows edition can also use rtf and tex format.
Edit º Format (Windows edition only):Selects the format used by subsequent ‘Copy formatted’ operations (see above): HTML, RTF orTEX.
Run º Execute:Executes the editor’s text: BC Manager’s representation (and its display) of the B-Control data isupdated according to this text. BC Manager’s BCL interpreter reports any syntax errors invirtually the same way as an actual B-Control would.
Options:Via this pull-down menu you can override the global settings of the ‘BCL editor options’ dialogbox (accessible via the main window’s Options pull-down menu).Any overrides you make here face two restrictions:! Naturally, they are local: they don’t apply to the BCL editor windows of other B-Controls.! They are temporary: they are lost upon termination of BC Manager. To make changes that
stick, use the global ‘BCL editor options’ dialog box.
Options º Auto-indent:Determines whether pressing the Enter key causes the editor to automatically insert spaces in thenew line up to the first non-space character in the existing line.
Options º Gutter:Determines whether the editor window’s ‘gutter’ is shown. This is a small vertical strip on theleft side of the editor window, containing:! The digits (0-9) of any bookmarks you have defined, next to the lines in which you defined
them.You can create a bookmark at the current location of the cursor via Ctrl+Shift+n (where n =0-9), and move the cursor to an existing bookmark via Ctrl+n.
! The message indexes of all text lines, provided that ‘Messages indexes in gutter’ (seebelow) is on.
Options º Message indexes in gutter:Determines whether the indexes (0-16383) of the SysEx messages encapsulating the BCL linesare shown in the gutter.Beware: normally the first line’s message index is 0 (cf. ‘Index of 1st message’ on the BCLeditor window’s toolbar), which means that there is a mismatch between the message indexesand the cursor’s current line number (shown on the status bar), which always assigns ‘1’ to thefirst line.
104
Options º Syntax highlighting:Determines whether syntax highlighting applies. See the discussion below.
Options º Word wrap (Windows edition only):Determines whether a text line too long to be shown fully on one window line is shown onmultiple window lines. (This is just a visual effect: it doesn’t affect the actual text line itself.)
Options º Syntax highlighting scheme:A sub-menu containing the five globally defined syntax highlighting schemes: the fourpredefined ones and the customizeable one. Selecting any of these five schemes copies thatscheme into the current BCL editor window.
The toolbar contains two items not present in the menu:
! Index of 1st message:Determines the index (0-16383) of the SysEx message encapsulating the first BCL line for the‘Send’ operation. This value should normally be left at 0, and should only be changed for veryadvanced testing.See section 7.1 in BCMI for discussion.
! Reset:Resets the ‘Index of 1st message’ to 0.
Syntax highlightingIf syntax highlighting has been enabled, various BCL elements are shown in their own colors andstyles (bold/italic/underline): dollar statements, dot statements, parameter constants, decimalnumbers, hexadecimal numbers etc.
The syntax highlighter does not perform a full syntactic check. So for instance it won’t warn youwhen a ‘.easypar’ statement contains an invalid number of parameters. However, it does assign thetype ‘unknown’ to any character sequence that doesn't constitute a valid BCL identifier, so you willbe able to see any typos instantly.
Four predefined syntax highlighting schemes and one customizable scheme are available:Two of the predefined ones have a black background, the other two a white background. The
only difference between the two blacks and between the two whites is the way they display‘unknown’ elements: when you’re reviewing a BCL script, you may prefer the scheme that assigns agray background to unknown elements; when you’re writing a script, you may prefer the scheme thatonly underlines your partial identifiers as you type them.
The customizable scheme (‘current global scheme’) can be edited via the global ‘BCL editoroptions’ dialog box (accessible via the main window’s Options pull-down menu). Note that you canload any of the four predefined schemes into the customizable scheme via the menu that opens whenyou click the ‘Predefined schemes’ button.
105

22. Reason maps
Propellerhead Reason (in any case versions 3.0-9.1) ‘natively’ supports the BCF2000 and BCR2000.This works as follows:
Reason supplies two remote map files, one for the BCF and one for the BCR:BCF2000.remotemap and BCR2000.remotemap respectively. (Under Windows XP these files aretypically located in C:\Documents and Settings\All Users\Application Data\PropellerheadSoftware\Remote\Maps\Behringer, under Vista and later in C:\Users\All Users\PropellerheadSoftware\Remote\Maps\Behringer.)
Reason uses these remote map files in conjunction with the file Behringer.remotecodec(typically in C:\Program Files\Propellerhead\Reason\Codecs) for its native support of the BCF andBCR: this support mode is triggered if you select the BCF2000 or BCR2000 via Edit º Preferencesº Keyboards and Control Surfaces º Add.
In this native support mode, Reason takes full control of the B-Control:On initialization of its link with the B-Control, Reason sets the B-Control’s global Transmission
interval to 2 and Deadtime to 400; furthermore, it assigns fixed Control Change messages to all theelements (buttons, encoders, faders) of the temporary preset, and prevents you from switching to anymemory preset for as long as Reason has control of the B-Control.
After this initialization, whenever you assign (‘lock’) the B-Control to a particular Reasondevice (mixer, synth, etc.), Reason merely changes its internal mapping from the fixed ControlChange numbers on the B-Control to the controls of the Reason device: it is precisely these mappingsthat are contained in the remote map files. (Actually, Reason may also update the LED modes of theB-Control encoders, but apart from that it doesn’t change its initial setup of the B-Control’stemporary preset.)
BC Manager provides access to Reason’s remote map files via the ‘Import Reason map’ operation,which is accessible via the B-Controls pull-down menu of the B-Controls window. This operationconverts the mappings defined in the remote map file to memory presets, one for each Reason device,in as many new B-Control contexts as needed. (Reason 5 and later define more than 32 devices, sothese wouldn’t fit in a single B-Control context.)
However, since Reason’s native support mode takes full control of the B-Control’s temporarypreset (and without reference to memory presets), it would be pointless to edit these memory presetsgenerated by BC Manager: it’s impossible to use them under Reason in any way. So these memorypresets are only useful for documentation: for instance, you can visualize and print the mappings viathe layout window.
The memory presets generated by BC Manager also allow you to see which B-Control elementsare currently unassigned: this is useful because in Reason itself you can add mappings from B-Control elements to Reason device controls via Options º Remote Override Edit Mode.
Note that many Reason control names are quite long, so you will probably want to widen thelayout window so that these names show up in full.
The ‘Import Reason map’ operation loads the Reason device and control names from the remote mapfile:! The name of each Reason device is copied to both the name field and the comments field of a
memory preset. (The reason for this duplication is that a name field can only contain up to 24characters, which results in quite a few truncated device names; the comments fields receive thefull device names.)
! For each Reason device, the names of the mapped controls are copied to the correspondingelement name fields of the memory preset.
106

‘Import Reason map’ also sets up the actual data structures in exactly the same way as Reason. Thatis: BC Manager changes the values of the global Transmission interval and Deadtime settings, and itassigns Control Change messages to all preset elements, even the ones that aren’t currently linked toany Reason control.
By default a layout window showing a Reason map displays only the Reason control names and‘low-level’ Control Change summaries for those elements that are currently mapped. However, youcan make the window also show the unmapped elements by selecting View º Element labels º‘Name, else output’ from the window’s menu.
Note: Reason’s native support for the BCF2000 and BCR2000 has nothing to do with the mappingsdefined in Reason’s MIDI Implementation Chart[s].pdf.3 The Control Change mappings specified inthat file are totally different: they only apply to Reason’s ‘<Other> MIDI Control Surface’ devicesand External Control Bus inputs.
3 In Reason 5 the file name includes ‘Charts’, Reason 7 and later have ‘Chart’. I haven’t checkedReason 6.
107
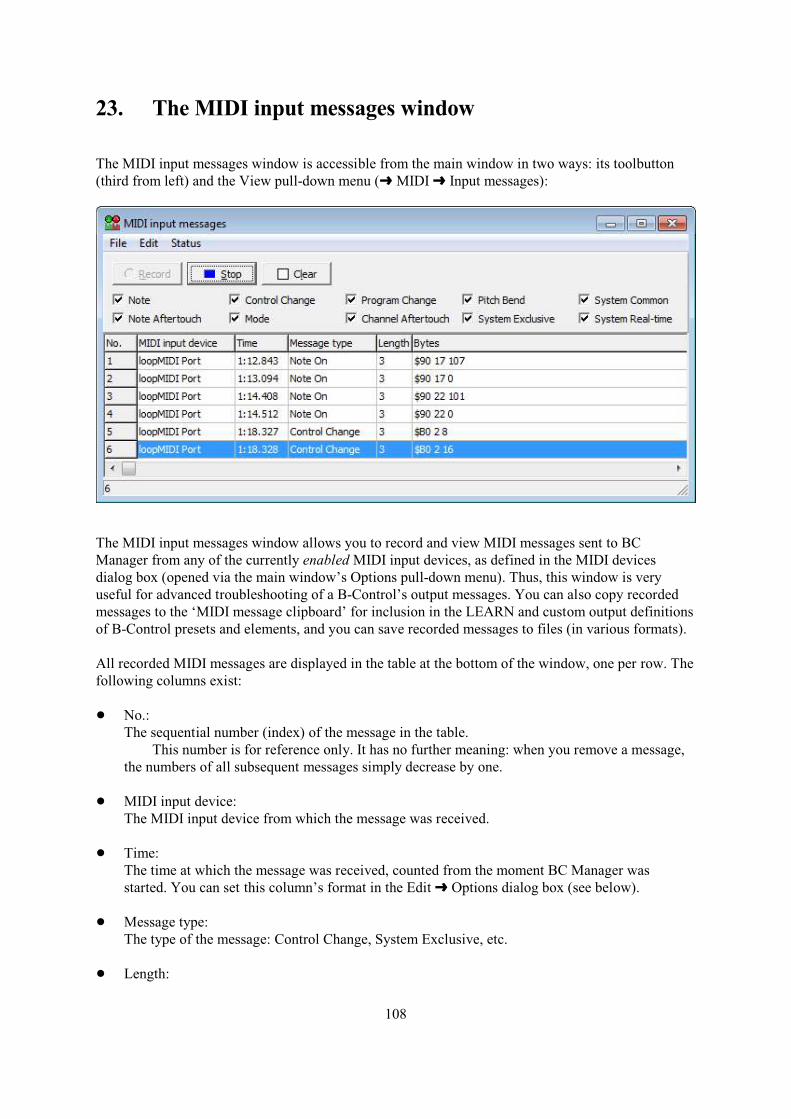
23. The MIDI input messages window
The MIDI input messages window is accessible from the main window in two ways: its toolbutton(third from left) and the View pull-down menu (º MIDI º Input messages):
The MIDI input messages window allows you to record and view MIDI messages sent to BCManager from any of the currently enabled MIDI input devices, as defined in the MIDI devicesdialog box (opened via the main window’s Options pull-down menu). Thus, this window is veryuseful for advanced troubleshooting of a B-Control’s output messages. You can also copy recordedmessages to the ‘MIDI message clipboard’ for inclusion in the LEARN and custom output definitionsof B-Control presets and elements, and you can save recorded messages to files (in various formats).
All recorded MIDI messages are displayed in the table at the bottom of the window, one per row. Thefollowing columns exist:
! No.:The sequential number (index) of the message in the table.
This number is for reference only. It has no further meaning: when you remove a message,the numbers of all subsequent messages simply decrease by one.
! MIDI input device:The MIDI input device from which the message was received.
! Time:The time at which the message was received, counted from the moment BC Manager wasstarted. You can set this column’s format in the Edit º Options dialog box (see below).
! Message type:The type of the message: Control Change, System Exclusive, etc.
! Length:
108
The number of bytes in the message.
! Bytes:The bytes of the message. The formatting (hexadecimal, decimal etc.) can be set via the optionsdialog box, accessed via the Edit pull-down menu.
The menu provides the following operations:
File º Save MIDI file:Saves the selected (highlighted) MIDI messages to a standard MIDI file (‘SMF’). You can loadthis file in a sequencer program etc.
Two versions of this operation are available via a submenu:
1. ‘Times relative to first-saved message’:The original recording times are maintained, but for convenience a displacement is applied:all messages are saved with their times ‘normalized’ to the first message saved; so the firstmessage saved itself always appears at time 0.
2. ‘All times zero’:All messages are saved with their times set to zero.
Technical notes:
! The MIDI file is in ‘format 0’, i.e. a single track.
! For convenience, the name of the program (‘BC Manager’) plus its version number isincluded as the track name. (It completely depends on the receiving program whether youcan see this in any way.)
! The file includes a tempo specification of 120 BPM.Beware: It seems that when you import a MIDI file into an existing Sonar 7 project,
Sonar ignores this file tempo of 120 BPM and wrongly interprets the message timesaccording to the existing project’s tempo. In the case of a file saved via ‘Times relative tofirst-saved message’, this may lead to unwanted stretching, so it’s best to only import such afile into a Sonar project having a tempo of 120 BPM. (I haven’t tested later Sonar versionsyet.)
! MIDI ‘running status’ is automatically applied, i.e. where possible the status bytes ofchannel messages are removed.
File º Save binary file:Saves the bytes of the selected (highlighted) MIDI messages to a binary file. Note that therecording times are not saved: you should save to a standard MIDI file for that (see ‘Save MIDIfile’ above).
You can select ‘bin’, ‘syx’ or any other extension for the output file, but your choice doesnot affect the content of the output file in any way.
Beware: a syx output file is only valid (i.e. usable in a standard way by other programs) if itonly contains System Exclusive MIDI messages. And since BC Manager specifically allows youto create a syx file containing only the recorded System Exclusive messages (see ‘Save SystemExclusive messages’ below), the ‘save binary file’ operation is primarily intended to facilitate
109
further processing by some specialistic computer program expecting a ‘flat’ sequence of MIDImessages. (Typically this is a program you write yourself!) Note that you can also save MIDImessage bytes to a text file (see below), which may or may not be easier for further processing.
File º Save text:Saves the selected (highlighted) MIDI messages to a text file: the bytes of each message areoutput on a separate line. The bytes are written in the formats defined in the options dialog box(cf. Edit º Options), so exactly as they are currently being displayed in the Bytes column of thewindow’s table.
You could process the output file in an external text editor, then convert them to a binaryfile: see ‘Convert text file(s) to binary file(s)’ below.
File º Save System Exclusive messages:Saves any selected (highlighted) MIDI System Exclusive messages to a syx file.
File º Convert text file(s) to binary file(s):Converts a text file containing lines of hexadecimal bytes (without ‘$’ prefixes) to a binary file.You can select ‘bin’, ‘syx’ or any other extension for the output file, but your choice does notaffect the content of the output file in any way.
This is a somewhat obscure utility that could be applied to a text file created by a ‘Savetext’ operation (see above), possibly edited afterwards via a normal text editor (such asNotepad). Specifically, you can thus convert a text file containing only MIDI System Exclusivemessages to a legal syx file.
Edit º Copy to MIDI message clipboard:Copies the selected (highlighted) MIDI messages to the MIDI messages clipboard. Note thatMIDI ‘running status’ is automatically applied, i.e. where possible the status bytes of channelmessages are removed.
Edit º Delete:Removes the selected (highlighted) recorded MIDI messages.
Edit º Clear:Removes all recorded MIDI messages.
Edit º Select all:Selects all recorded MIDI messages.
Edit º Options:Opens a dialog box in which you can set various options related to the MIDI input messageswindow:
! Buffer size:Sets the number of MIDI messages that can be recorded. The default is 65536; this is alsothe maximum. Note that lowering this setting removes any existing recorded messagesbeyond the new buffer size.
! Buffer overflow protocol:Determines what happens if the buffer is full (as determined by the ‘buffer size’ setting)when a MIDI message comes in:
110
! Clear:The whole table is cleared, and the incoming message is entered at number 1. This isthe default setting.
! Shift:The existing message at number 1 is removed from the table, all other messages shiftback one position, and the incoming message is added at the bottom.
Beware: this setting can be very time-consuming.
! Freeze:The incoming message is ignored. However, the recording process itself isn’t stoppedautomatically, so when you manually remove one or more recorded messages (e.g. viathe Clear button), new messages will be recorded again.
! Stop:Recording stops automatically.
! Scroll to new message:Determines whether the message table automatically scrolls to any incoming MIDImessage.
‘On’ is the default, but may result in ‘frantic’ scrolling when MIDI input is heavy,which may also starve other parts of the program. For instance, the MIDI input and outputmeter windows may become unable to update their gauges at the required frequency, so thatnot all incoming messages are displayed. So if you want a quieter display, switch scrollingoff.
Note that the number of recorded MIDI messages is always shown on the status bar atthe bottom of the window: this allows you to establish that messages are being recordedeven when you have disabled scrolling.
! Time format:Determines the time format used in the Time column. Five formats are available: ms,sec.ms, min:sec.ms, hrs:min:sec.ms and days:hrs:min:sec.ms. So e.g. in the sec.msec formatyou could get ‘61.000’, which would be ‘1:01.000’ in the min:sec.msec format.
! Byte formats:Determines the ways in which MIDI message bytes are formatted: this affects both thewindow’s Bytes column and the ‘Save text’ operation.
Separate settings are available for ‘status’ and ‘data’ bytes in both System Exclusiveand non-System Exclusive messages. A byte in a MIDI message is a status byte if it is in therange of $80-$FF (128-255), and a data byte if it is in the range of $00-$7F (0-127).
Status º Record:Starts the recording process.
Status º Stop:Stops the recording process.
The panel below the menu contains the following items:
Record/Stop/Clear buttons:These buttons duplicate the corresponding menu items.
111

Note/Note aftertouch/etc.:These checkboxes determine which incoming MIDI messages are recorded. Checked means‘yes’.
112

24. The Mackie monitors
Certain MIDI applications (e.g. Propellerhead’s Reason) send display messages to a MIDI output portwhere they suspect a Mackie Control. (Note: In my experience MIDI applications only send thesemessages in response to parameter changes sent from the (pseudo-)Mackie Control to the MIDIapplication, i.e. when you turn a knob on the Mackie Control. At least I’ve noticed that (curiouslyenough) Reason does not send a display message when you move a fader or knob in Reason itself.)
You can intercept these Mackie display messages and show them in one of four Mackie monitorwindows, accessible from the main window’s View pull-down menu (º MIDI º Mackie monitors º1/2/3/4):
Typically you would use one of these Mackie monitors for a BCF or BCR set up as a Mackie Controlvia a preset. For a BCF in an actual Mackie emulation mode (where presets don’t exist) it is better tointercept the display messages sent by the BCF: see the View º Monitor command in the B-Controlswindow.
You set up things as follows: you send the MIDI application’s output to a MIDI pipe (virtual MIDIdevice), you capture this pipe’s output in a Mackie monitor in BC Manager, and you pass on theMIDI pipe’s output to the BCF/BCR’s input by means of BC Manager’s MIDI Thru facility (set viathe main window: Options º MIDI devices).
You set the Mackie monitor’s MIDI input port and customize its display via a dialog box that you canaccess via the main window’s Options pull-down menu (º Mackie monitors º 1/2/3/4) or by right-clicking on the monitor window itself:
113
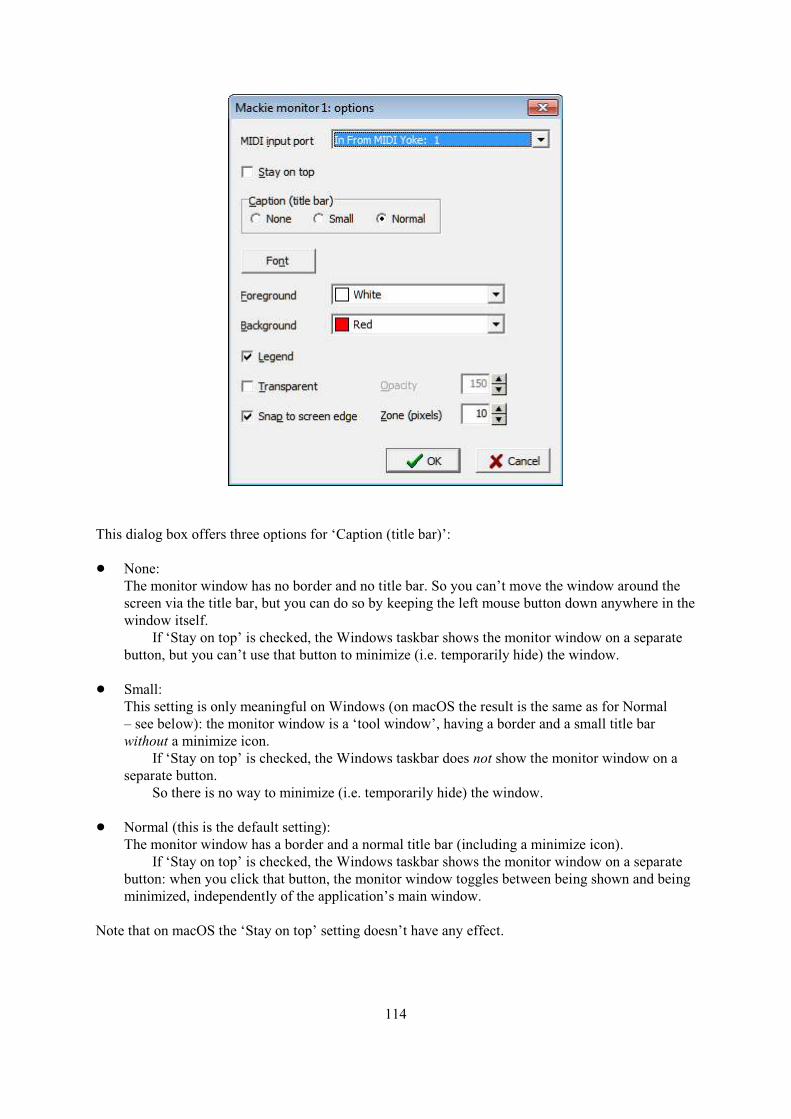
This dialog box offers three options for ‘Caption (title bar)’:
! None:The monitor window has no border and no title bar. So you can’t move the window around thescreen via the title bar, but you can do so by keeping the left mouse button down anywhere in thewindow itself.
If ‘Stay on top’ is checked, the Windows taskbar shows the monitor window on a separatebutton, but you can’t use that button to minimize (i.e. temporarily hide) the window.
! Small:This setting is only meaningful on Windows (on macOS the result is the same as for Normal– see below): the monitor window is a ‘tool window’, having a border and a small title barwithout a minimize icon.
If ‘Stay on top’ is checked, the Windows taskbar does not show the monitor window on aseparate button.
So there is no way to minimize (i.e. temporarily hide) the window.
! Normal (this is the default setting):The monitor window has a border and a normal title bar (including a minimize icon).
If ‘Stay on top’ is checked, the Windows taskbar shows the monitor window on a separatebutton: when you click that button, the monitor window toggles between being shown and beingminimized, independently of the application’s main window.
Note that on macOS the ‘Stay on top’ setting doesn’t have any effect.
114
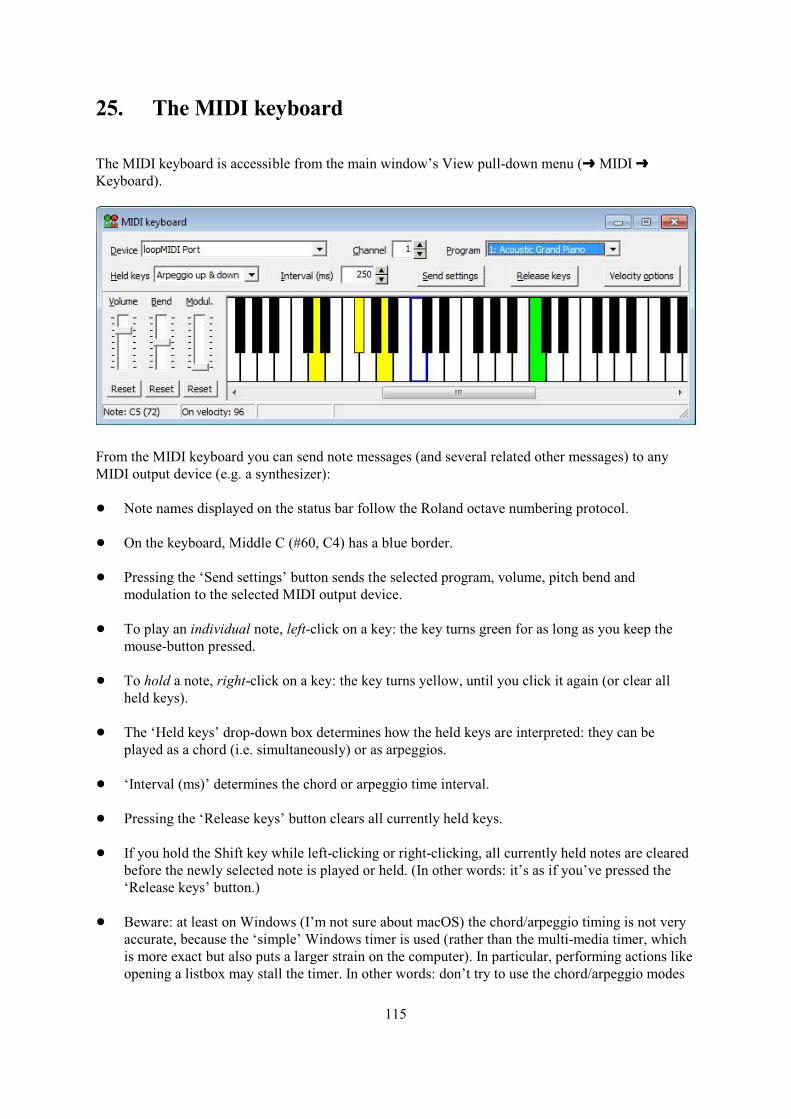
25. The MIDI keyboard
The MIDI keyboard is accessible from the main window’s View pull-down menu (º MIDI ºKeyboard).
From the MIDI keyboard you can send note messages (and several related other messages) to anyMIDI output device (e.g. a synthesizer):
! Note names displayed on the status bar follow the Roland octave numbering protocol.
! On the keyboard, Middle C (#60, C4) has a blue border.
! Pressing the ‘Send settings’ button sends the selected program, volume, pitch bend andmodulation to the selected MIDI output device.
! To play an individual note, left-click on a key: the key turns green for as long as you keep themouse-button pressed.
! To hold a note, right-click on a key: the key turns yellow, until you click it again (or clear allheld keys).
! The ‘Held keys’ drop-down box determines how the held keys are interpreted: they can beplayed as a chord (i.e. simultaneously) or as arpeggios.
! ‘Interval (ms)’ determines the chord or arpeggio time interval.
! Pressing the ‘Release keys’ button clears all currently held keys.
! If you hold the Shift key while left-clicking or right-clicking, all currently held notes are clearedbefore the newly selected note is played or held. (In other words: it’s as if you’ve pressed the‘Release keys’ button.)
! Beware: at least on Windows (I’m not sure about macOS) the chord/arpeggio timing is not veryaccurate, because the ‘simple’ Windows timer is used (rather than the multi-media timer, whichis more exact but also puts a larger strain on the computer). In particular, performing actions likeopening a listbox may stall the timer. In other words: don’t try to use the chord/arpeggio modes
115

for actual music production!
116
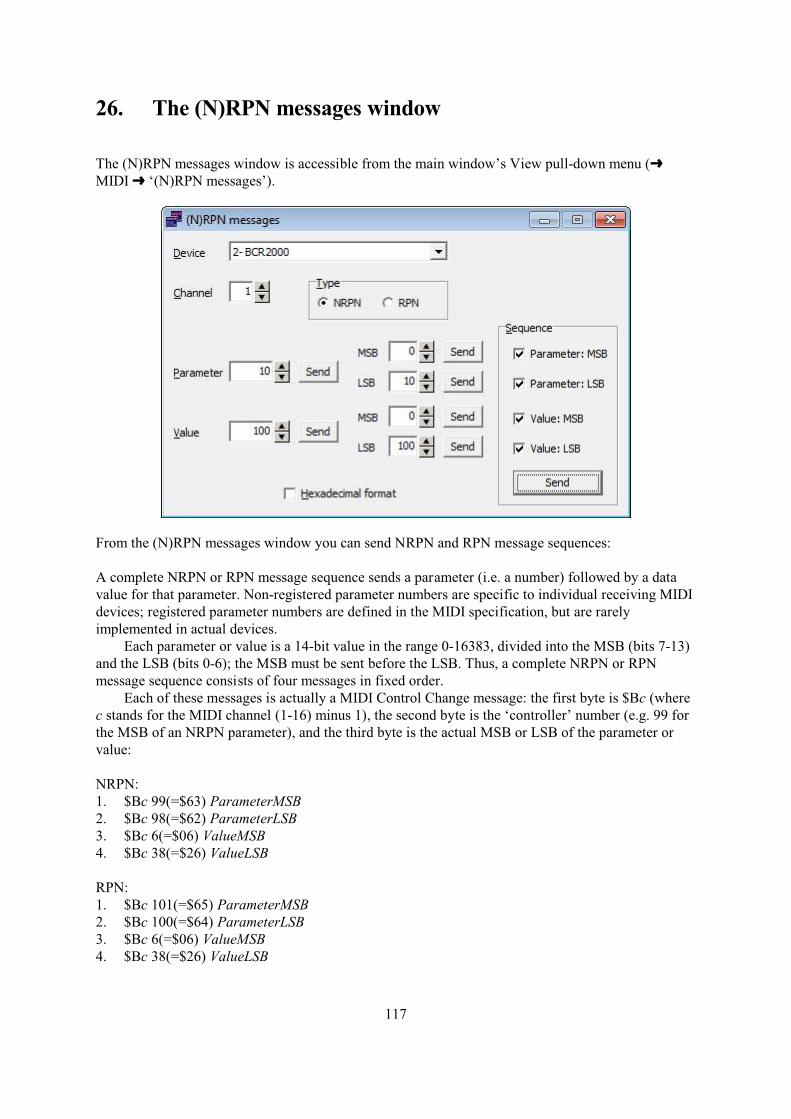
26. The (N)RPN messages window
The (N)RPN messages window is accessible from the main window’s View pull-down menu (ºMIDI º ‘(N)RPN messages’).
From the (N)RPN messages window you can send NRPN and RPN message sequences:
A complete NRPN or RPN message sequence sends a parameter (i.e. a number) followed by a datavalue for that parameter. Non-registered parameter numbers are specific to individual receiving MIDIdevices; registered parameter numbers are defined in the MIDI specification, but are rarelyimplemented in actual devices.
Each parameter or value is a 14-bit value in the range 0-16383, divided into the MSB (bits 7-13)and the LSB (bits 0-6); the MSB must be sent before the LSB. Thus, a complete NRPN or RPNmessage sequence consists of four messages in fixed order.
Each of these messages is actually a MIDI Control Change message: the first byte is $Bc (wherec stands for the MIDI channel (1-16) minus 1), the second byte is the ‘controller’ number (e.g. 99 forthe MSB of an NRPN parameter), and the third byte is the actual MSB or LSB of the parameter orvalue:
NRPN:1. $Bc 99(=$63) ParameterMSB2. $Bc 98(=$62) ParameterLSB3. $Bc 6(=$06) ValueMSB4. $Bc 38(=$26) ValueLSB
RPN:1. $Bc 101(=$65) ParameterMSB2. $Bc 100(=$64) ParameterLSB3. $Bc 6(=$06) ValueMSB4. $Bc 38(=$26) ValueLSB
117

However, in these sequences messages 1 and/or 2 can sometimes be omitted:! A particular receiving device may ignore either ParameterMSB or ParameterLSB altogether, so
that message 1 or 2 respectively may be omitted.! Message 1 may be omitted if ParameterMSB equals the most recently sent ParameterMSB.! If message 1 is omitted, message 2 may be omitted too if ParameterLSB equals the most recently
sent ParameterLSB.Similarly, message 3 or message 4 can sometimes be omitted:! A particular receiving device may ignore either ValueMSB or ValueLSB (possibly just for
particular parameters), so that message 3 or 4 respectively may be omitted.! Message 3 may be omitted if ValueMSB equals the most recently sent ValueMSB.
Clearly, since MIDI has a limited bandwidth, it’s a good thing that certain messages can be omitted asdescribed above. However, as will be clear from the above definitions, these omissions can causeconfusion, and devices may respond to them in unexpected, idiosyncratic ways. Therefore the(N)RPN messages window allows you to send individual messages or any combination of messages,so that you can test the actual behavior of the receiving device.
Tip: for a description of the BCF2000 and BCR2000’s NRPN capabilities, see BCMI sections15.4 and 16.4.
118
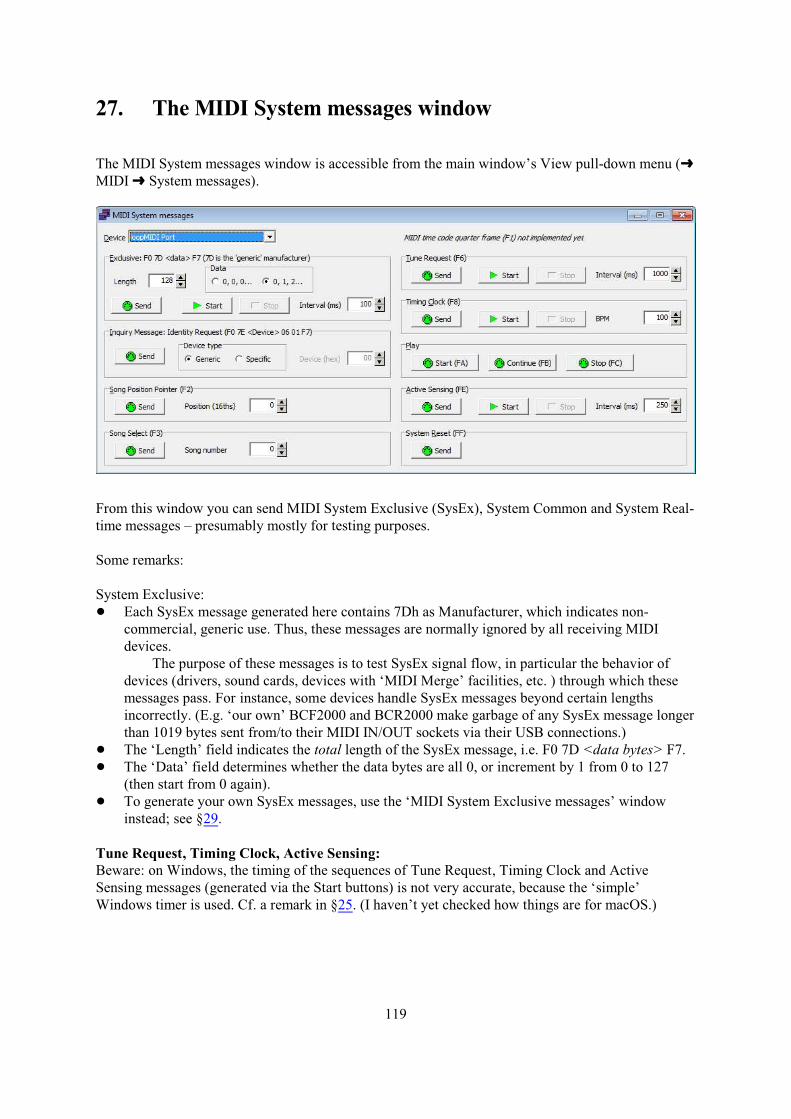
27. The MIDI System messages window
The MIDI System messages window is accessible from the main window’s View pull-down menu (ºMIDI º System messages).
From this window you can send MIDI System Exclusive (SysEx), System Common and System Real-time messages – presumably mostly for testing purposes.
Some remarks:
System Exclusive:! Each SysEx message generated here contains 7Dh as Manufacturer, which indicates non-
commercial, generic use. Thus, these messages are normally ignored by all receiving MIDIdevices.
The purpose of these messages is to test SysEx signal flow, in particular the behavior ofdevices (drivers, sound cards, devices with ‘MIDI Merge’ facilities, etc. ) through which thesemessages pass. For instance, some devices handle SysEx messages beyond certain lengthsincorrectly. (E.g. ‘our own’ BCF2000 and BCR2000 make garbage of any SysEx message longerthan 1019 bytes sent from/to their MIDI IN/OUT sockets via their USB connections.)
! The ‘Length’ field indicates the total length of the SysEx message, i.e. F0 7D <data bytes> F7.! The ‘Data’ field determines whether the data bytes are all 0, or increment by 1 from 0 to 127
(then start from 0 again).! To generate your own SysEx messages, use the ‘MIDI System Exclusive messages’ window
instead; see §29.
Tune Request, Timing Clock, Active Sensing:Beware: on Windows, the timing of the sequences of Tune Request, Timing Clock and ActiveSensing messages (generated via the Start buttons) is not very accurate, because the ‘simple’Windows timer is used. Cf. a remark in §25. (I haven’t yet checked how things are for macOS.)
119
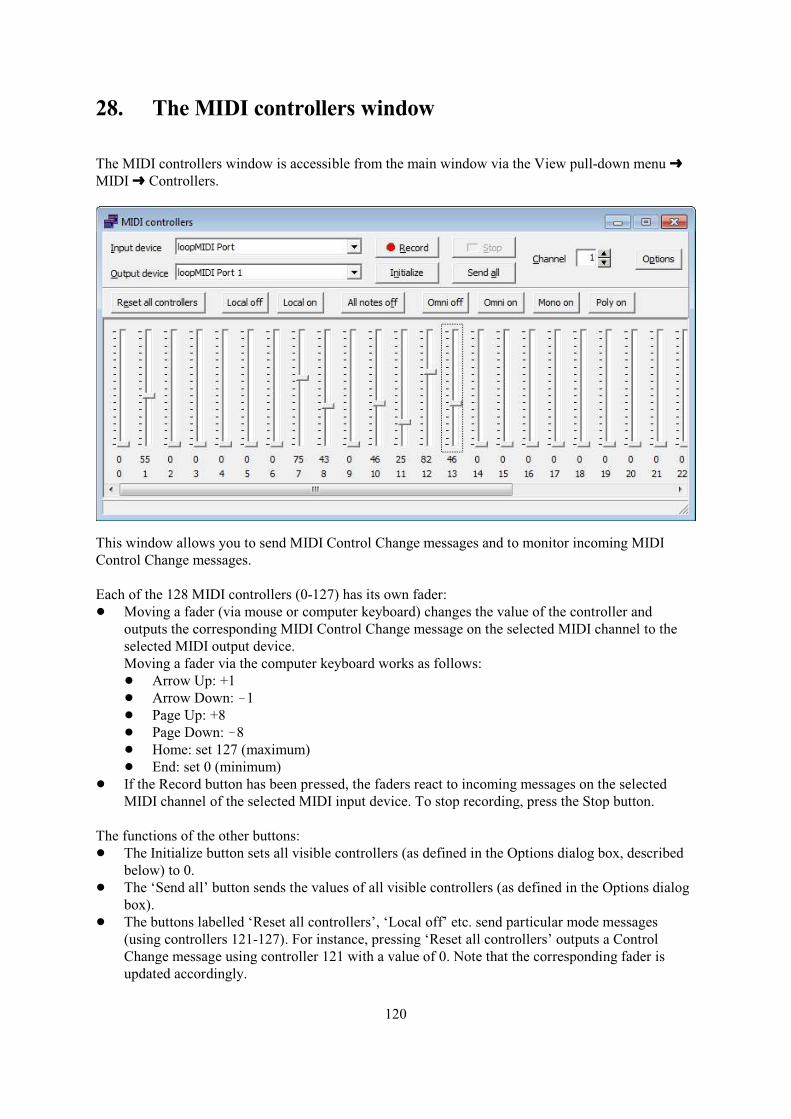
28. The MIDI controllers window
The MIDI controllers window is accessible from the main window via the View pull-down menu ºMIDI º Controllers.
This window allows you to send MIDI Control Change messages and to monitor incoming MIDIControl Change messages.
Each of the 128 MIDI controllers (0-127) has its own fader:! Moving a fader (via mouse or computer keyboard) changes the value of the controller and
outputs the corresponding MIDI Control Change message on the selected MIDI channel to theselected MIDI output device.Moving a fader via the computer keyboard works as follows:! Arrow Up: +1! Arrow Down: !1! Page Up: +8! Page Down: !8! Home: set 127 (maximum)! End: set 0 (minimum)
! If the Record button has been pressed, the faders react to incoming messages on the selectedMIDI channel of the selected MIDI input device. To stop recording, press the Stop button.
The functions of the other buttons:! The Initialize button sets all visible controllers (as defined in the Options dialog box, described
below) to 0.! The ‘Send all’ button sends the values of all visible controllers (as defined in the Options dialog
box).! The buttons labelled ‘Reset all controllers’, ‘Local off’ etc. send particular mode messages
(using controllers 121-127). For instance, pressing ‘Reset all controllers’ outputs a ControlChange message using controller 121 with a value of 0. Note that the corresponding fader isupdated accordingly.
120

! The Options button opens a dialog box called ‘MIDI controllers: options’, in which you cancustomize the following things:! Whether the mode message buttons (‘Reset all controllers’, ‘Local off’ etc.) are shown.! How big the faders of the controllers are.! How many controllers are visible per row.! Which controllers are visible. (The buttons on the right of the dialog box are ‘macros’,
selecting particular ranges.)
121
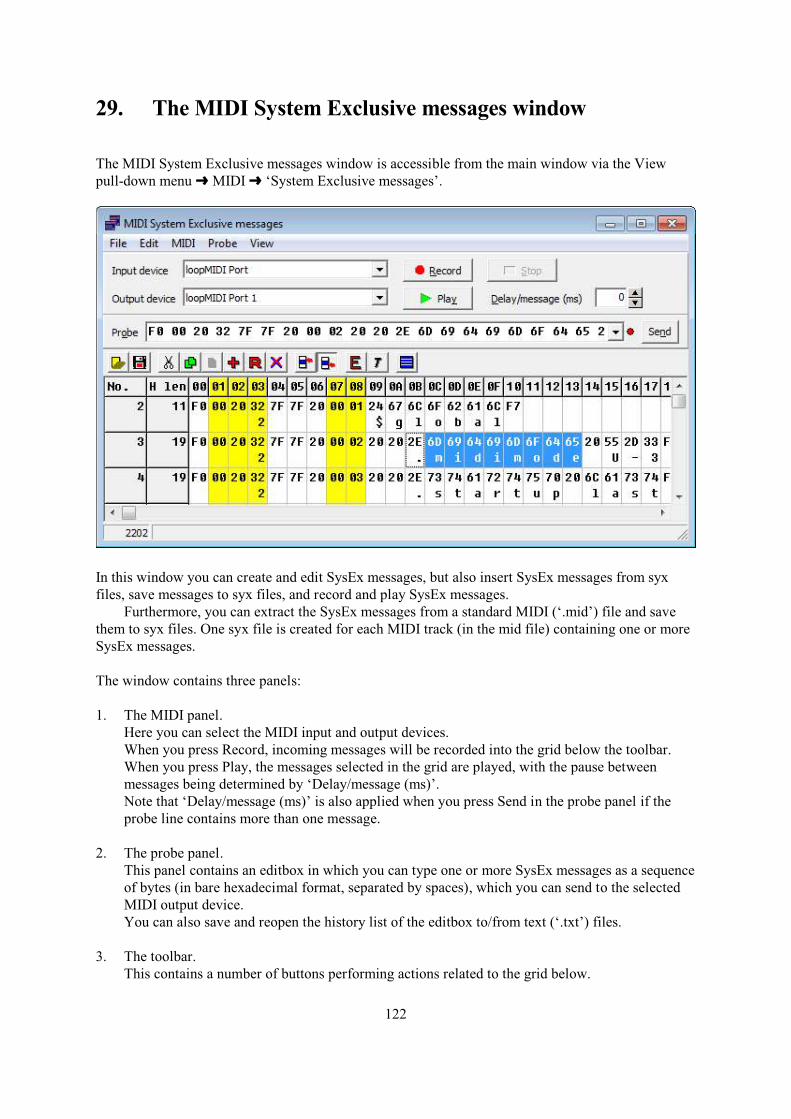
29. The MIDI System Exclusive messages window
The MIDI System Exclusive messages window is accessible from the main window via the Viewpull-down menu º MIDI º ‘System Exclusive messages’.
In this window you can create and edit SysEx messages, but also insert SysEx messages from syxfiles, save messages to syx files, and record and play SysEx messages.
Furthermore, you can extract the SysEx messages from a standard MIDI (‘.mid’) file and savethem to syx files. One syx file is created for each MIDI track (in the mid file) containing one or moreSysEx messages.
The window contains three panels:
1. The MIDI panel.Here you can select the MIDI input and output devices.When you press Record, incoming messages will be recorded into the grid below the toolbar.When you press Play, the messages selected in the grid are played, with the pause betweenmessages being determined by ‘Delay/message (ms)’.Note that ‘Delay/message (ms)’ is also applied when you press Send in the probe panel if theprobe line contains more than one message.
2. The probe panel.This panel contains an editbox in which you can type one or more SysEx messages as a sequenceof bytes (in bare hexadecimal format, separated by spaces), which you can send to the selectedMIDI output device.You can also save and reopen the history list of the editbox to/from text (‘.txt’) files.
3. The toolbar.This contains a number of buttons performing actions related to the grid below.
122

The grid below the toolbar contains a sequence of messages (recorded/opened/edited).You can edit the data in this grid in two ways: per byte or per message.
Both the probe panel and the grid allow you to correct the checksums of Roland DT1 and RQ1messages, either automatically or on demand:! If ‘Auto-correct Roland checksum(s)’ in the Edit pull-down menu has been ticked, the ‘Edit
byte(s)’ and ‘Edit message(s)’ operations automatically correct any invalid Roland checksumsresulting from your edits to the grid.
! If ‘Auto-correct Roland checksum(s)’ in the Probe pull-down menu has been ticked, themessage(s) in the probe editbox are automatically corrected when you execute Send.
! When you execute ‘Correct Roland checksum(s)’ from the Edit pull-down menu, any invalidchecksums in the selected messages in the grid get corrected.
! When you execute ‘Correct Roland checksum(s)’ from the Probe pull-down menu, any invalidchecksums in the probe editbox get corrected.
From the View pull-down menu you can customize the window in several ways:! You can hide any of the three panels (MIDI, probe, toolbar).! You can include or exclude the horizontal and vertical grid lines, separately for the header and
leader cells (gray in the screenshot above) and the (white) data cells. (However, on macOS thegrid lines in the header and leader cells don’t get hidden. This is probably due a bug in theprogramming library for macOS used by MIDI Tools, so at the moment I can’t fix this easily.)
! You can display the message lengths in decimal or hexadecimal format.! You can display the message bytes in various formats: decimal, hexadecimal (the default),
binary and character (insofar as the bytes are in the ASCII range). Note that you can select asmany formats simultaneously as you like: each format is displayed on a separate line.
! If ‘Select row’ is on, you can only select (and edit) whole lines (messages); if it is off, you canselect (and edit) blocks of bytes. Note that in the latter case certain operations (like Play and‘Correct Roland checksum(s)’) still use the whole message(s) of the selected bytes.
! You can highlight/unhighlight any column by right-clicking anywhere in the column or byexecuting View º ‘Highlight selected column’ from the menu. (Cf. the yellow columns in theimage above.) You can even customize the highlight color.
123
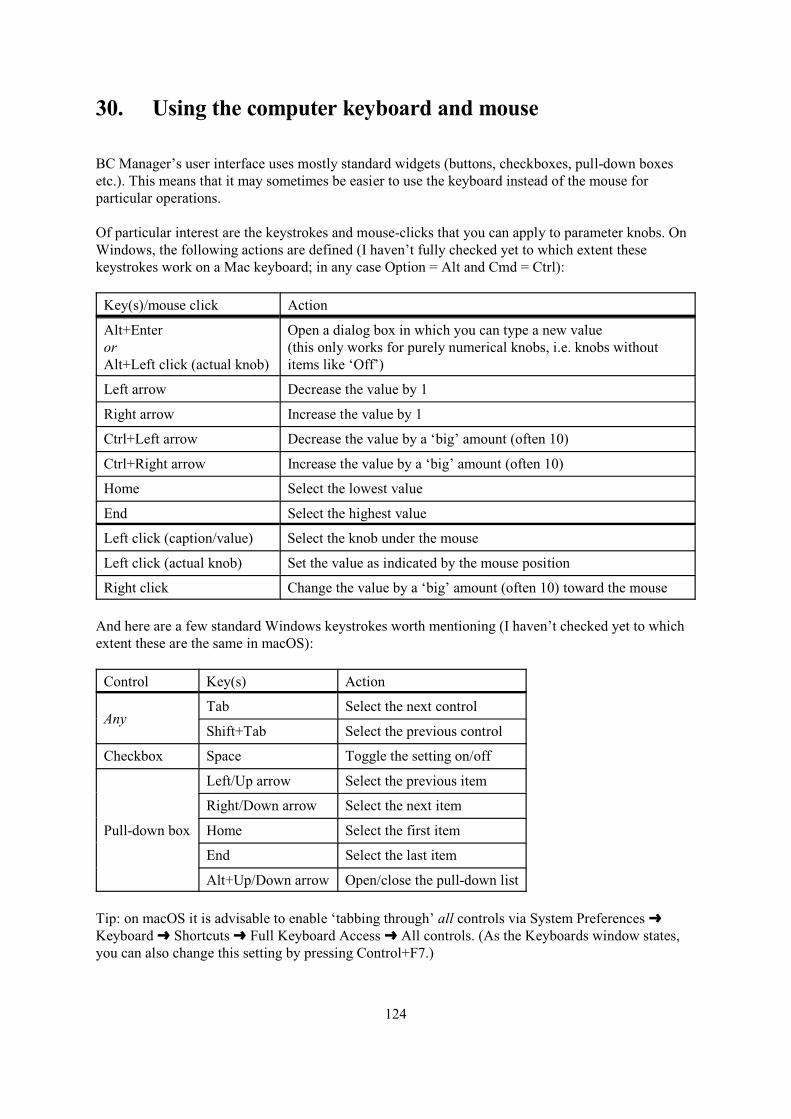
30. Using the computer keyboard and mouse
BC Manager’s user interface uses mostly standard widgets (buttons, checkboxes, pull-down boxesetc.). This means that it may sometimes be easier to use the keyboard instead of the mouse forparticular operations.
Of particular interest are the keystrokes and mouse-clicks that you can apply to parameter knobs. OnWindows, the following actions are defined (I haven’t fully checked yet to which extent thesekeystrokes work on a Mac keyboard; in any case Option = Alt and Cmd = Ctrl):
Key(s)/mouse click Action
Alt+EnterorAlt+Left click (actual knob)
Open a dialog box in which you can type a new value(this only works for purely numerical knobs, i.e. knobs withoutitems like ‘Off’)
Left arrow Decrease the value by 1
Right arrow Increase the value by 1
Ctrl+Left arrow Decrease the value by a ‘big’ amount (often 10)
Ctrl+Right arrow Increase the value by a ‘big’ amount (often 10)
Home Select the lowest value
End Select the highest value
Left click (caption/value) Select the knob under the mouse
Left click (actual knob) Set the value as indicated by the mouse position
Right click Change the value by a ‘big’ amount (often 10) toward the mouse
And here are a few standard Windows keystrokes worth mentioning (I haven’t checked yet to whichextent these are the same in macOS):
Control Key(s) Action
AnyTab Select the next control
Shift+Tab Select the previous control
Checkbox Space Toggle the setting on/off
Pull-down box
Left/Up arrow Select the previous item
Right/Down arrow Select the next item
Home Select the first item
End Select the last item
Alt+Up/Down arrow Open/close the pull-down list
Tip: on macOS it is advisable to enable ‘tabbing through’ all controls via System Preferences ºKeyboard º Shortcuts º Full Keyboard Access º All controls. (As the Keyboards window states,you can also change this setting by pressing Control+F7.)
124

31. Item dragging
You can directly copy or move any preset, button, encoder or fader definition (or range ofdefinitions) from one position to another, as follows:
1. If your intended source item or range of items is in a preset or element window, first select(highlight) this item or these items as you normally do (via mouse or keyboard).
2. Move the mouse to the source item(s). (If the source item is in a layout window, this does nothave to be the currently selected (highlighted) item.)
3. If you want to copy one or more elements rather than move them, press a Shift or Ctrl key andkeep it pressed.
4. Press the right mouse button and keep it pressed. (If the source item is in a layout window, thesource item immediately becomes the currently selected item as well.)
5. If you have pressed a Shift or Ctrl key under step 3 above (for copying), you may release thiskey now (although this is not required).
6. Move the mouse to the (first) target item. The target must be of the same type (preset, button,encoder or fader) as the source item, but it can be in any B-Control’s preset, element or layoutwindow. The mouse cursor is a ‘No’ symbol when it is on an invalid target, and an arrow plusrectangle whenever it is on a valid target.
7. Release the right mouse button.
8. The settings of the source item(s) have now been copied or moved to the target item(s). And ofcourse after a move the source item(s) has/have become empty, i.e. initialized.
Note that these dragging operations completely bypass the button, encoder and fader clipboards, sothey do not affect any items already there.
125
32. Known problems
MIDI Thru (Windows only):BC Manager’s MIDI Thru feature only passes on short MIDI messages, i.e. any message exceptSysEx (System Exclusive).
This is because BC Manager achieves its MIDI Thru feature by simply calling themidiConnect function in Windows’ MMSystem library: basically Windows handles all Thrutraffic behind BC Manager’s back, but unfortunately midiConnect doesn’t pass on SysExmessages. (Incidentally, the Huskervu utility’s MIDI Thru feature doesn’t pass on SysExmessages either, so it probably uses midiConnect as well!)
I may try to find a work-around for this in a future version of BC Manager. In the meantimeyou should use MIDI-OX if you need to pass on SysEx messages via a MIDI Thru connection.(Apparently MIDI-OX doesn’t use midiConnect, but handles all MIDI Thru traffic manually,which might actually be marginally slower than midiConnect, for non-SysEx messages that is...)
MIDI input:If an incoming SysEx message is followed immediately by a channel message, the channelmessage may be processed first. This regression was introduced in BC Manager 2.6.0 and willprobably be fixed in BC Manager 5.
USB MIDI ports:You should not connect or disconnect a B-Control via its USB cable while BC Manager isrunning, since this may lead to nasty error messages; instead, you must exit and restart BCManager manually. I’ve been working on a fix, but I don’t know if and when this will be madeavailable.
Presets that are too complex:Currently BC Manager doesn’t prevent you from sending a preset to the B-Control that is toocomplex for the B-Control to store in full.
Window widths:If the screen dimensions are too small, big windows of fixed size can get cut off. Normallyyou’re safe with a screen of 1024 × 768 pixels, but you can run into problems when youdecrease the screen size of a virtual machine running BC Manager.
Alternative DPI (dots per inch) settings:Nearly all screen elements scale correctly under alternative DPI settings. However, the bitmapsused in the pull-down menus don’t scale, which leads to rather cramped-looking pull-downmenus at high enlargement DPI settings, because the heights of the menu items follow thesebitmaps instead of the menu items’ names (which do scale).
In macOS, the program’s GUI (graphical user interface) has several shortcomings, such as:! Scrollbars around grids don’t go away once they are there: once you’ve made such a scrollbar
appear by making the window smaller, it remains, even when you re-enlarge the window.! Numbers in editboxes don’t align to the right but to the left. (Even worse, a long number may
initially be partly hidden behind the left edge of the editbox.)! Tabbing into a multi-line editbox by pressing Tab or Shift+Tab adds a spurious tab character in
the editbox.! If a combobox allows you to enter your own text in its editbox, its drop-down list wrongly limits
the number of items displayed simultaneously to six. So if the drop-down list contains more than
126

six items, you have to navigate to any out-of-view items via the scrollbar to the right of the list;this can be a bit inconvenient. For example, in Windows the ‘Zoom %’ combobox in the ‘Printoverlays’ dialog box displays all nine options simultaneously, in macOS only six.
! Color comboboxes:! Unlike in the Windows edition, no colored rectangles are available in the drop-down list.! The ‘Custom’ item in the drop-down list behaves strangely:
! Initially its ‘Colors’ dialog box doesn’t open when it should.! Once you have selected ‘Custom’, the ‘Colors’ dialog box opens when you try to
switch to another item in the drop-down list.Work-around: select the desired color in the ‘Colors’ dialog box.
All these shortcomings are caused by bugs in the GUI library that the program uses on macOS, so atthe moment there’s little or nothing I can do. I would either have to debug the library myself (whichwould be rather time-consuming, with success not guaranteed) or switch to a different library (whichwould be extremely time-consuming).
127
33. Wish list
! A Linux edition of BC Manager. (Planned for BC Manager 5.)! Direct access to the presets on the BCF and BCR, bypassing BCL. (Planned for BC Manager 6.)! An undo feature. (Very unlikely.)! A mechanism to select non-consecutive elements (buttons, encoders, faders).
If you have any other suggestions for improvement, please post these in the B-Control forum at theMountain Utilities web site: https://mountainutilities.eu/forums/b-control.
34. Frequently asked questions
The subsections on the following pages contain some of the most relevant questions concerning BCManager. Some actual questions by users appear here almost verbatim, others have been generalized,and a few were invented by yours truly specially for this section...Thanks to everyone for asking these questions!
128
General
[1] Why did you create BC Manager?Mainly because I am mad...
But seriously: after I had bought my BCR2000 (in 2007), I soon got very disappointed withBehringer’s own BC-Edit (see the next question), and to some extent also with the Birdie editor(because of its limited capabilities and its complicated layout). Whereas I liked Royce Craven’s BCLscript editor (although back then it didn’t have all its current capabilities), I wanted to write a GUIeditor that doesn’t require the user to know BCL with all its sordid details and quirks.
[2] What are BC Manager’s advantages over Behringer’s own BC-Edit?1. The transfer of data between BC-Edit and BCFs/BCRs doesn’t work with the latest versions of
JRE (Java Runtime Environment). (At least not under Windows; I have no idea about JRE underother operating systems.)
2. BC-Edit doesn’t support a lot of the advanced tricks of which the BCF and BCR are capable,such as ‘LEARN output’ and ‘custom output’. BC Manager provides almost complete support.
3. BC Manager has far more advanced editing facilities, and an extensive array of MIDI tools thatcan be used for testing.
[3] Why is BC Manager freeware?Back in 2007, when I announced that I had started writing BC Manager, someone in the BC2000Yahoo group suggested that he’d even be interested if I made it shareware. However, I have neverreally considered this, for several reasons, all amounting to the feeling that it would be more troublethan benefit: setting up a method for payment, building in a registration method, trying to preventpiracy. Perhaps most importantly: I would simply not feel comfortable demanding money frompeople I consider, in some abstract way, ‘my friends’. Relationships between me and the othermembers in the BC2000 Yahoo group would have become subtly ‘different’. Besides, there werequite a few people who had (in their own ways) contributed to the program: Michael Kukat, who (asfar as I know) wrote the first report on BCL, and Royce Craven with all his excellent work on BCLand his BCL script editor. And I feared that people might get more reluctant to contribute to theprogram in the future (pointing out bugs or making suggestions for new features etc.), for in a sensethey would then become some kind of unpaid employees. Maybe these fears were a bit exaggerated,but I would find this all a bit unpleasant — so that’s why BC Manager has always been free.
[4] Is there any chance of a Linux edition of BC Manager?Yes, a Linux edition is planned for BC Manager 5. There’s only one sticking-point remaining, butthis is a big one, namely ALSA’s MIDI interface, which is outrageously under-documented.
So for now, if you wish to use BC Manager under Linux, try running it from within a virtualmachine manager; BC Manager has been reported to work perfectly under Wine, and it should alsorun under any other VM manager.
[5] Can I shoot you a few bucks in appreciation of all your efforts?Of course! Please go to the Donate page at the Mountain Utilities web site(https://mountainutilities.eu/donate) for instructions. In BC Manager you can go directly to this pagevia Donate in the main window’s Help pull-down menu.
[6] Who or where should I send questions to?https://mountainutilities.eu/forums/b-control
129
Editing
[7] In the B-Controls window, how can I remove the BCF2000? I only have a BCR2000 andwould like to keep things clean.
In the table, select (highlight) the line containing the undesired device, then execute Close from theB-Control pull-down menu. The undesired device should disappear (and not return when you restartBC Manager).
[8] What is ‘preset 0’ and what is its relevance?Preset 0 is also known as the ‘temporary preset’. This preset exists only implicitly on the BCF andBCR: whenever a memory preset (1-32) gets selected, that memory preset gets copied to thetemporary preset area. In BC Manager preset 0 is explicit: you can work with it almost as with anyother memory preset. I say ‘almost’ because it has some peculiarities:
Any manual preset editing on the B-Control itself affects only the temporary preset. That’s whythe STORE operation exists on the B-Control: STORE copies the temporary preset to a memorypreset; and of course the temporary preset is lost when you switch to another memory preset orswitch off the B-Control.
Furthermore, any uploading of presets to the B-Control (e.g. by BC Manager) goes via thetemporary preset on the B-Control. What happens when you upload a memory preset (say: preset 6)to the B-Control, is this: First the B-Control’s temporary preset gets overwritten with the preset databeing uploaded. Then a ‘$store 6’ command (appended to the data stream sent to the B-Control) tellsthe B-Control to copy the new temporary preset data (i.e. the preset data that has just been uploaded)to memory preset 6.
[9] What do the Request checkbox and the ‘LEARN output’ tab in BC Manager’s Preset dialogbox refer to?
If the current preset on the B-Control has its Request parameter set to on, the B-Control automaticallysends the preset’s ‘LEARN output’ whenever you select that preset. If Request is off, the B-Controlonly sends this ‘LEARN output’ when you press EDIT + LEARN on the B-Control itself.
On the ‘LEARN output’ tab you can define a sequence of MIDI messages for each individualpreset. You’re completely free as to the nature of these MIDI messages (although the total length isrestricted to 125 bytes).
Probably Behringer’s original idea was that this LEARN data sent from the B-Control should bea request for settings getting sent back from the other device to the B-Control: hence the name‘LEARN’, i.e. learned by the B-Control. However, that doesn’t have to happen: you can of coursehave the B-Control send anything, not necessarily triggering a MIDI response from the other deviceback to the B-Control. One obvious idea is to have the B-Control simply send a MIDI ProgramChange message indicating that the B-Control has indeed selected that preset. So e.g. for preset 1 youcould define ‘$C0 $00’, for preset 2 ‘$C0 $01’, etc. Another application is the initialization of areceiving synthesizer or so.
[10] What is a snapshot and why would I use it?A snapshot is a facility built into the B-Control: it’s a sequence of MIDI messages sent by the B-Control, specifying all the current button, encoder and (for the BCF) fader positions. Typically theseare mostly MIDI Control Change messages, but this depends on the preset definition.
A snapshot should not be confused with the preset’s definition, which is a sequence ofcomplicated MIDI System Exclusive messages and specifies how the preset works, but does notinclude the current, actual positions of the buttons, encoders and faders.
A snapshot is very useful for saving a particular favorite setup of (for instance) a synthesizer:any computer program capable of receiving MIDI data (e.g. a DAW) may capture and save the
130
snapshot (e.g. as a standard MIDI file), and then you can resend the snapshot to the synthesizer at anylater time, so that the synthesizer is set exactly to your favorite setup.
There are several ways to trigger a snapshot:! On the B-Control itself: hold the EDIT button, then press the ‘= PRESET’ button.! From BC Manager: execute ‘Receive snapshot’ from the B-Controls window.! A bit more advanced: From BC Manager, record a snapshot from the B-Control and put it in a
button definition. Then send that button definition back to the B-Control, so that whenever youpress that button on the B-Control, the whole snapshot is output. In this way you could define apreset that is a collection of synthesizer setups!
It is also possible to have the B-Control send a preset’s snapshot whenever you select that preset (e.g.via pressing the ‘= PRESET’ and ‘PRESET <’ buttons): thus you ensure immediate synchronizationbetween the preset’s current values and e.g. a synthesizer. In BC Manager you can switch this featureon and off via the Snapshot checkbox on the Settings tab in the Preset dialog box.
[11] In the element (button/encoder/fader) tables, is there a way to change a particular parameter(e.g. the MIDI channel) of the selected elements? It seems that even when you select severalrows, you can only change the parameters for one element at a time.
The ‘E’ button or the Edit menu item indeed simply edits each selected button/encoder/fader in turnand as a whole. So that is not what you should use in this case.
Instead, to edit just a single parameter of a range of elements, use the Parameter pull-downmenu: there you can select the parameter of your choice (e.g. ‘Channel’) that you want to change inone go for all the selected elements. A dialog box appears in which you can select the new parametervalue. What’s more: the ‘Step per row’ knob allows you to define an increment: e.g. if ‘Step per row’is 1, the first element gets set to the value you have indicated, but the second becomes 1 higher thanthe first element, and so on. (See the next question for a concrete example of this procedure.)
Beware: afterwards you may not actually see the parameters change in the element table if theType parameter is ‘None’. But you can set Type in a bulk operation as well, so that can be fixedeasily...
[12] Wouldn’t it be nice if the paste operation could increase the previously copied element’sCC/NRPN number by 1 for every successive element? You could then set up one element, thencreate the others almost instantaneously.
BC Manager currently doesn’t allow this particular ‘complex paste’ operation. However, you canachieve basically the same result as follows:1. Select a range of elements (e.g. encoders 1-10).2. From the Parameter menu, execute Type and choose (for instance) NRPN.3. From the Parameter menu, execute NRPN º NRPN, setting NRPN to the first desired value and
‘Step per row’ to +1.4. Set any other parameters (e.g. Value 1 and 2) in the same way.Alternatively:1. Set up encoder 1 completely (via the Encoder dialog box).2. Copy encoder 1.3. Select encoders 2-10. (Or possibly 1-10, since you’re going to set the first selected encoder’s
NRPN value anyway in step 5 below; you then don’t even have to set up encoder 1’s NRPNvalue in step 1 above.)
4. Execute Paste: this pastes encoder 1 to all the selected encoders.5. Execute Parameter º NRPN º NRPN, again setting ‘Step per row’ to +1.
[13] The B-Control allows me to make a button send incremental Program Change messages. Ican set this on the B-Control itself by entering the button’s edit mode and setting pushencoder 6 to ‘InC’. However, I can’t do this in BC Manager; why not?
131
This feature was introduced in the B-Control’s firmware version 1.10. However, due to a bug in thisfirmware, the B-Control doesn’t include the ‘InC’ setting in its preset dumps, nor can it be set viaMIDI. Consequently, BC Manager (or any other B-Control editor) cannot work with this setting, anddestroys it whenever it sends the button’s settings to the B-Control.
[14] I use BC Manager to make tweaks on my B-Control. Is there a way to make a toggle-offbutton skip through the available options? For instance, for an effect parameter with only 3or 4 options I would like to make the button jump in skips, so that continuous presses revealvalues of 0, 64, 127, 0, 64, 127, 0, 64, etc. Is this possible?
In BC Manager, go to the ‘Standard output’ tab of the button dialog box. There, for a button with‘Type’ set to Control Change, you can set the ‘Mode’ parameter to ‘Increment’, and then the‘Increment’ parameter to the desired jump value. Obviously, a limitation of the increment parameteris that the step size is fixed. Please consult the sections called ‘Button increment mode’ and‘Increment mode’ in BCMI for in-depth discussion of the increment feature.
[15] Behringer’s BC-Edit program doesn’t allow me to assign note messages to an encoder. Is thispossible in BC Manager?
No in that it’s simply a feature of the BCF and BCR themselves that their ‘standard output’ protocolonly allows the assignment of note messages to buttons, not to encoders or faders.
Yes in that BC Manager allows you to assign any messages (including note messages) to buttons,encoders and faders under the ‘custom output’ protocol. However, this requires a bit more work,since you have to construct the MIDI byte sequence manually:
A MIDI Note On message has the format ‘$9c n v_on’, where c (a hexadecimal digit from 0 toF) is the MIDI channel (1-16) minus 1, n (0-127) is the note number, and v_on (1-127) is the (onset)velocity. So e.g. ‘$90 64 127’ (or the equivalent ‘$90 $40 $7F’) constitutes a Note On message onMIDI channel 1 for note 64 with maximum velocity.
For an encoder you can also include the knob’s value (position) in the output message, by usingthe keyword ‘val’. You can use this keyword for either the note number or the velocity, so forinstance ‘$90 val 127’ or ‘$90 64 val’ — whichever is appropriate in your situation. Note that youmust define the range of ‘val’ via the Value1 and Value2 parameters of the encoder’s custom outputdefinition.
You also have to decide whether you need to add the corresponding Note Off message (‘$8c nv_off’) to the custom output definition (or possibly ‘$9c n 0’, of course). This depends on therequirements of the receiving device.
[16] I have played with the Default value setting with no difference and I am a bit confused by thevalue range of 0-16383.
Default is a generic parameter, i.e. it applies to any ‘standard’ or ‘custom’ output message definition,so its wide range of 0-16383 is necessary to support even those output message types that use0-16383. In fact, as far as the ‘standard’ output definitions are concerned, this wide range is only usedby a few encoder and fader parameters (i.e. CC and NRPN in the 14-bit modes), not by any buttonparameters. So you should only ever set Default to the range currently indicated for Value 1 andValue 2 on the ‘Standard output’ tab, i.e. usually 0-127.
[17] When I set the encoder’s LEDs to a fancy setting like ‘Bar’ or ‘Spread’ on my BCR2000, onlythe eight push encoders are affected. Is this normal?
Yes. Although the BCR allows you to program the ‘fancy’ LED settings for any encoder, these fancysettings only work for the eight push encoders, not for the BCR’s twenty-four ‘simple’ encoders. (AsRoyce Craven has pointed out, this limitation is probably built into the BCR because the powerconsumption by the LEDs would be too big if they could all be lit simultaneously.)
So this is why BC Manager’s encoder dialog box says ‘Warning: this setting only works for push
132

encoders’ if you select a fancy setting for a simple encoder, and why the LEDs column in the encoderlist window says ‘INVALID ...’.
[18] Is it possible to enter values with the numeric buttons on the keyboard instead of using themouse?
When you’re on a knob, press Alt+Enter. See §30 for further applicable keyboard shortcuts. (Note:Kip’s BC Manager video erroneously talks about Ctrl+Enter: that doesn’t work.)
[19] I’m curious why BC Manager uses knobs in some of the dialog boxes. Some of the rangeskind of threw me off, but then again I’m not a big fan of dialing with a mouse in general. Itjust doesn’t feel natural or intuitive to me to drag up to have a knob turn right...
In my experience, knobs on computer screens are almost exclusively seen in music software:apparently the idea is that musicians are used to working with knobs on actual musical hardware.Personally I wasn’t a mouse user at first either (this may be a generation issue — I started usingcomputers in the 1980s!), and accordingly had my doubts about knobs: instead, my programs used tohave ‘spin edit boxes’, i.e. text edit boxes containing up and down arrows. However, around 2003 Ifinally decided to develop a rotational knob: that took me about a full month, but I was very satisfiedwith the result. So since then I have used both knobs and spin edit boxes in my programs. It’s alwaysa dilemma which to use where: there are arguments for and against either type of control:
E.g. BC Manager uses a spin edit box for the number of encoder groups (1-4), because the rangeis small and would look a bit weird on a knob.
On the other hand, knobs have the advantage that you can set any ‘remote’ value almostimmediately. This is especially useful if the range is large, e.g. the typical MIDI range of 0-127. Thiswould be much harder to do with a spin edit box (well, you could type the value, of course).
When you say that some of the ranges threw you off, I suppose you mean those ranges that go upto 16383. I agree that these are a bit difficult to manipulate (since we typically only want to set avalue in the 0-127 subrange). However, I can think of several reasons (some more convincing thanothers) for keeping things like they are now:1. The fact is that these ranges are that large, and at least the user now sees that potential
immediately.2. You can always change a knob’s value directly by means of the arrow keys (cf. §30).3. For most knobs it is possible to open a dialog box containing a spin edit box by pressing
Alt+Enter; so in that sense the user has that alternative available anyway whenever mouseoperation is difficult.
4. Via the main window’s ‘Mouse options’ dialog box, you can set the direction in which you haveto move the mouse to affect the knob value, and (if you select ‘horizontal’ or ‘vertical’) theresolution at which this happens. Also note that the mouse becomes more accurate when youwiden its circle of movement.
5. There is perhaps an issue of consistency (for what it’s worth): why use spin edit boxes forcertain parameters and knobs for others (in the same dialog box)? Things might start looking abit messy.
So all in all I think the current setup is reasonable, combining the ‘best of both worlds’. Still, I mustadmit that I do share your basic instinct, so if and when I get a clever idea, I may change things afterall.
(One thing that might work would be to narrow the range of the ‘0-16383’ knobs to ‘0-127’unless the wide range is actually valid (e.g. if Mode has been set to a 14-bit value) and/or if the userspecifically requests the wide range via an additional ‘14-bit range’ checkbox or so. But again, in asense that would also complicate things, so I don’t know... It’s just one of those headache-causinguser interface dilemmas...)
[20] How do I ‘search and replace’ a particular byte in custom output messages? I need to do this
133
for a series of almost identical SysEx messages, only differing in the byte(s) specifying theparameter addresses of my synth.
Select the elements you wish to change, then from the element window’s Parameter pull-down menu,execute Custom output º Item, and fill in the appropriate values in the dialog box that appears.
[21] Can you implement an undo feature in BC Manager? I have had to restart BC Managerseveral times, when I cut a line, then paste, but do something in the wrong order. This is thecase, say when I am revising a layout, moving things around to better suit me. I get stuck, Icopy something, then paste, or paste the last thing before I cut... I really need an undo feature.Otherwise I have to stop, close, not save, start over since last save, and I don’t save after everysingle move, although I could.
From a programmer’s point of view, an undo feature (in particular an application-wide one) isabsolutely one of the most horribly difficult and time-consuming things to implement: I don’t thinkI’ve ever seen a professional word processor or programming environment whose undo feature wasnot buggy in some way... The problem is this: the more editing operations a program has, the moredifficult it is to keep track of all the interacting effects of these operations, hence the more difficult itis to reverse all these operations. So I don’t think that it is on the cards in the near future, but I haveadded it to the wish list...
Instead of closing, can’t you just reopen the current file? One thing that might also help in thisrespect: you can open as many ‘B-Controls’ as you wish; note that you don’t have to link each ofthese to a real BCF/BCR (or even to a file). So instead of saving your intermediate presets (or evenbuttons etc.) to file, you could copy them to another ‘B-Control’ now and then.
[22] Is there a place in BC Manager where the underlying BCL script is visible/editable?You can open a BCL editor window (one for each B-Control) from the View pull-down menu of theB-Controls window.
A note to clear up a potential incomprehensibility you may run into: when you execute ‘Receiveglobal setup’ or ‘Receive preset 0’ from the BCL editor window’s MIDI pull-down menu, you canonly see the B-Control’s response in the (global) ‘MIDI input messages: BCL’ window. You canopen this window via the main window’s View º MIDI submenu; you must also press the Recordbutton in that window before any response is actually recorded/displayed.
[23] I loaded selected presets into the BCL editor. When I select e.g. presets 11-16, they all load,but so does preset 0, which is tacked on the end. Was that your intention?
Yes:When sending presets to the B-Control, BC Manager first sends (to use your example) memory
presets 11-16, then preset 0 (the temporary preset). The latter is necessary for restoring preset 0 to thecurrent values maintained by BC Manager, because preset 0 on the B-Control is used as a gateway forpresets 11-16. So it seems natural to copy this behavior in the BCL editor window — which is whypreset 0 is appended. The idea is that the user can edit the BCL text, then send it directly to the B-Control with the same ‘automatic’ restoration facility of preset 0.
However, I admit that in other situations (such as yours) it might be easier to leave out preset 0at the end. I could include an on/off-switch in the BCL editor window’s menu, or simply add anothermenu item that leaves out preset 0.
Note that if you simply want to export a single preset at a time, you can simply use preset 0 itselffor this — then you obviously don’t get an extra, appended preset.
However, you can also export presets directly from the preset list window — in that case youdon’t get the extra preset 0!
134
Files
[24] How do I import one or more individual presets (stored in a bcf/bcr/syx/txt/bc2 file) in thePresets window?
You have to go to the B-Controls window: from its File pull-down menu you can execute either Openor Import. Neither of these operations initializes the whole data area before loading the data from theinput file. So the input file can contain any BCL data you like: presets or even individual buttons etc.The only difference between Open and Import is that the Open operation renames the ‘current filename’ (as shown in the B-Controls table) to your imported file.
[25] I have the Presets window open and I load my presets using the Import operation. Theyautomatically go into preset 0, and I then copy and paste them into their appropriate slots. Isit normal for the syx file to automatically go into preset 0? If so, great! If not, what should Ido to fix that, and is my ‘workaround’ all right?
By nature any preset definition as such is a definition for the temporary preset. The syx file may ormay not contain a $store 1-32 command after the preset definition as such. So if a preset file doesn’tcontain a $store command at the end, BC Manager can only load that preset into preset 0.
Syx files saved via BC Manager’s ‘Export selected preset(s)’ operation (from the Presetswindow via the File pull-down menu) do append the $store command, but other preset files peoplehave made may not, in which case you indeed have to copy them to the intended locations manually.
In accordance with the BCF and BCR themselves, BC Manager’s Import operation (from theB-Controls window) always first loads the preset into preset 0, then if the file contains an appended$store N command, BC Manager copies that preset 0 to memory preset N.
By the way: if you wish to find out whether a preset syx file contains a $store command, youcould convert the syx file to a txt file (in BC Manager’s main window via File º Convert), then openthe txt file in any text editor (e.g. Notepad), and look for ‘$store’ at the bottom of the file.
[26] How should I save my presets to make them available to other people?In the Presets window, select (highlight) the preset(s) you want to save, and choose ‘Export selectedpreset(s)’ from the File pull-down menu. In the dialog box you can then select the output file type(bcf, bcr, syx, txt or bc2) via the ‘Save as type’ box; as of BC Manager 3.0.0 bcf and bcr arerecommended.
An important decision you have to make is whether the file contains the temporary preset (i.e.‘preset 0’) and/or one or more memory presets.
The saved file will contain all the presets’ respective ‘$store’ commands. However, if preset 0(the temporary preset) is among the selected presets, preset 0 will be saved last, and will not befollowed by a $store command. This protocol is similar to what happens when you send a bunch ofpresets to an actual B-Control: the B-Control uses the temporary preset as a gateway to any memorypresets: formally any preset definition concerns the temporary preset, and is only copied to a memorypreset the moment a $store command is encountered.
An obvious advantage of saving memory presets is that a single file can contain up to 32 memorypresets, whereas there can be only one temporary preset in a single file. Since files containingmemory presets are no problem to users of BC Manager, a file containing memory presets is probablyeasier to use than a collection of files each containing only one preset. If the user wants, he/she cancreate an additional ‘B-Control’, open the file containing the memory presets into that B-Control, andthen copy and paste the presets to the desired locations in the B-Control linked to the actual B-Control.
However, for greatest flexibility, you should save all your presets to separate files, eachcontaining the temporary preset (i.e. a preset definition without a $store N command). If you exportmemory presets (e.g. 11 to 16) to a single file, the output file contains $store (11/12 etc.) statements,
135
which is potentially dangerous to an unsuspecting user, because uploading such a file to a B-Controlimmediately overwrites those memory presets on the B-Control.
[27] I have looked at a txt output file created by BC Manager. There is a lot of stuff at the end thatwill set a lot of presets to a blank preset. For instance:
$preset .name ' ' .snapshot off .request off .egroups 4 .fkeys on .lock off .init$store 24$preset .name ' ' .snapshot off .request off .egroups 4 .fkeys on .lock off .init$store 25
... Why does BC Manager do this?
The File º Save operation from the B-Controls pull-down menu saves the complete sequence ofmemory presets (1-32) to a file. This is done to avoid any confusion that might occur when you opena preset file lacking certain presets: you could then end up with a very confusing mix of the presetsthat you were already editing and the newly loaded ones.
See the description of the File asterisk column in §10 for an explanation of this point in relationto Behringer’s own syx preset files.
If you want to mix presets from different files manually, you can simply create one B-Controlfor each file, then copy and paste.
136
MIDI communication
[28] Since BC Manager is largely useless when the BCF is in an emulation mode, how do I findout what is controlling what in emulation modes?
First of all, you should be prepared for ‘a few’ quirks, caused by the way the BCF behaves in itsemulation modes or by the expectations made by the hardware or software at the other end of theMIDI connection.
For finding out which MIDI messages a particular knob on the BCF sends in any emulationmode, you can always use a ‘MIDI pipe’ (e.g. MIDI Yoke) to insert a MIDI monitoring program likeBC Manager or MIDI-OX. (If you wish to use BC Manager in this way, you have to set up a ‘MIDIThru’ connection via BC Manager’s MIDI devices dialog box.)
In general, a little perseverance is called for here: making a controller like the BCF and areceiving device understand each other is often a struggle, even if you have worked with MIDI andindeed the BCF/BCR for a long time.
[29] Why won’t BC Manager 1.5.1 receive data from my BCF even though it recognizes it and cansend data?
BC Manager is primarily meant for working with the BCF in standard ‘B-Control’ mode. When aBCF is indeed in B-Control mode, BC Manager should in principle be able to communicate with itfully. However, when a BCF is in any emulation mode, communication is quite limited; for instance,no presets are available.
All BC Manager versions prior to 2.0.0 simply expected the BCF to be in B-Control mode, soconfusingly you could still send presets to the BCF in an emulation mode — but of course the BCFwouldn’t actually accept these presets. As of version 2.0.0, BC Manager autodetects the BCF’s mode(as reported in the Personality column of the B-Controls window) and automatically disables anyoperations that don’t apply to emulation modes; for instance, you can’t even send presets if the BCFis in an emulation mode.
[30] Why can’t BC Manager’s ‘Detect B-Controls’ operation detect my B-Control?The ‘Detect B-Controls’ operation itself doesn’t enable any MIDI input or output devices, so beforeexecuting ‘Detect B-Controls’ you must manually enable your newly connected B-Control’s MIDIinput and output devices in the MIDI devices dialog box. (The only exception to this is when youstart up BC Manager for the very first time: in this case all MIDI I/O ports are automaticallyenabled.)
Note that if you have switched on a B-Control connected via USB when the current instance ofBC Manager was already running, you must first restart BC Manager before the B-Control’s I/Odevices even appear in the MIDI devices dialog box.
Furthermore, the B-Control must not be in Global Setup (‘EG’) or Edit mode.
[31] I want my BCF/BCR to control my synthesizer via the BCF/BCR’s standard MIDIinput/output sockets. When I’m programming the BCF/BCR via BC Manager, I use a U-mode, but then I can’t simultaneously access my synthesizer for testing. So I keep switchingbetween U-mode (for programming) and S-mode (for testing), which causes BC Manager toreport a lost connection, so I have to restart BC Manager all the time. Isn’t there an easierway?
For many years I thought that it was simply a feature of Windows that a program could not respond toa USB-related MIDI port change while the program was running: all the MIDI applications I knewsuffered from this problem. However, around 2010 I noticed that some DAWs had become able toupdate their configuration immediately, and I have since figured out how this works too. However, inpractice this is quite tricky to implement. A big question is what should happen when a port change
137
occurs during a complicated upload or download operation. So until I’m totally sure I can make liveupdating work flawlessly, I’m keeping the current system in place, where the user has to restart theprogram to pick up the port change: at least this precludes any bugs...
But to answer your question in a practical way: you don’t have to switch between U and S operatingmodes for programming and testing. Instead, you can route the B-Control’s signals to your synth viaBC Manager:
1. On the BCF/BCR, select U-3, or possibly U-2. (U-3 supports both MIDI OUT A and B; U-2 onlyMIDI OUT A.)
2. Connect your synth (bidirectionally) to the BCF/BCR’s MIDI input socket and to the MIDIoutput socket of your choice (cf. the U-mode chosen above).
3. Start BC Manager. From the main window’s menu, open Options º MIDI devices:(a) On the Input tab, select (highlight) the B-Control’s input control device; then enable it (via
the checkbox) and set its ‘Thru output device’ to the B-Control’s MIDI output socket ofyour choice.
Also select and enable the B-Control’s MIDI input socket, and set its ‘Thru outputdevice’ to the B-Control’s output control device.
(b) On the Output tab, enable the B-Control’s output control device and the MIDI output socketof your choice. (Their ‘Thru input device’ settings should already have been taken care ofby point (a) above.)
Note: in the above procedure, I haven’t specified MIDI device names, since these vary,depending on the installed USB MIDI driver. But e.g. if you’re using a BCR2000 and theBehringer driver vs. 1.2.1.3, you should typically connect ‘BCR2000[1]’ ø ‘BCR2000[1]-A’.
Now the BCF/BCR should be able to talk to BC Manager and the synth simultaneously. You can testthe connection from the BCF/BCR to the synth by checking whether BC Manager’s MIDI input andoutput meters respond when you generate MIDI output on the B-Control or the synth: in the input andoutput meter windows, the ‘LEDs’ of the connected input and output devices should light upsimultaneously.
One warning though: you cannot pass MIDI System Exclusive messages from your B-Control toyour synthesizer this way. This is a limitation of BC Manager’s MIDI Thru facility. See §32 forexplanation.
[32] How do I upload presets (for instance Behringer’s original factory presets) to my B-Control?I could have sworn I was doing it correctly by uploading, pressing the STORE button, usingthe preset arrows to find the bank of choice, and then pressing STORE again, but it appears tonot have worked.
It’s easier to do this from BC Manager’s Presets window: once you have put a preset in its place (e.g.by opening its bcf/bcr/syx/txt/bc2 file), you select (highlight) the preset, then go to the MIDI pull-down menu and execute Send. In principle it should be unnecessary to press any buttons on the B-Control itself.
If you wish to restore the BCF or BCR’s original presets: these are in the filesFactory_Presets_BCF.zip and Factory_Presets_BCR.zip respectively, available from the Behringerweb site.
[33] Do I have to press any buttons on my B-Control to receive data from BC Manager?No, you don’t have to do anything on your B-Control, except that you have to make sure that your B-Control is not in Global Setup mode (the display showing ‘EG’; in this case it doesn’t accept
138
anything) or in Edit mode for a button, encoder or fader. And of course a BCF must be in standard‘B-Control’ mode, not in an emulation mode. However, in all these cases BC Manager warns you thatthings aren’t working when you send a preset or element definition to the B-Control.
[34] When I try to send a preset to my B-Control, BC Manager’s dialog box stops in the middle.Why?
Several things can go wrong. For instance, the very connection may be lost (this happens more oftenwith USB connections than standard MIDI ones). Whatever the source of the problem, one thing torealize is that BC Manager’s ‘send preset’ routine uses a handshaking protocol: BC Manager sends amessage, then waits for the B-Control to confirm reception of that message before sending the nextmessage. (But of course this doesn’t tell you what exactly is wrong.)
One thing you can do after a failed transmission is to execute ‘Refresh connection status’ (eithervia the button or the item in the MIDI menu). If this doesn’t work either (as reported in thePersonality and Firmware columns), the problem is indeed a sudden loss of connection, due toswitching off the B-Control, entering Global Setup or Edit mode, etc. On the other hand, if ‘Refreshconnection status’ reports nothing unusual, the problem may be more specifically connected with thedata you’re trying to send. You should also watch out for feedback loops and duplications in theMIDI paths to and from the B-Control: these may mess up the MIDI SysEx message ‘chains’ ofwhich preset and element dumps consist.
[35] I tried to send a preset to my B-Control via BC Manager, but BC Manager hung in the middleof the transfer process, so then I sent the syx file via MIDI-OX. What could have caused thetransfer to fail in BC Manager but succeed in MIDI-OX?
When BC Manager sends a preset to the B-Control, it uses a bidirectional, handshake protocol. Thatis: it sends one SysEx message, then waits for the B-Control to reply with a SysEx acknowledgmentmessage before sending the next message. So this may be the reason for your problem with uploadingyour data from BC Manager: maybe somehow the B-Control didn’t return the correctacknowledgment message, or BC Manager received an unexpected message back via a feedback loop,upon which it decided to stop transmitting.
By contrast, MIDI-OX simply sends all the SysEx messages to the B-Control with fixed delaysbetween them, without waiting for any acknowledgments from the B-Control. MIDI-OX’s methodhas two drawbacks:1. If the B-Control doesn’t actually accept the data (for whatever reason), MIDI-OX doesn’t inform
you, let alone halt the transfer.2. Perhaps surprisingly, in practice MIDI-OX’s method is usually slower than BC Manager’s,
because of MIDI-OX’s fixed delays between messages (by default 60 msec, I think): BCManager continues immediately upon reception of an acknowledgment from the B-Control.
Note: BC Manager version 2.0.0 and later allow you to use one-way, generic SysEx transfers as well(via the ‘MIDI System Exclusive messages’ window), but it is inadvisable to use this method for B-Control SysEx data such as presets — unless you don’t have a bidirectional connection, perhaps.
[36] Does BC Manager overwrite all 32 presets each time it sends a preset to the BCF/BCR?No. When you send one or more individual presets to the BCF/BCR, only those presets are sent (plusthe ‘temporary’ preset, but that’s a different matter). Only when you execute ‘Send all data’ does BCManager send all 32 (possibly ‘empty’) presets to the BCF/BCR.
By contrast, BC Manager’s Save operation (in the B-Controls window) does save all 32 presetsto any bcf/bcr/syx/txt/bc2 file it creates (even if some of these presets are ‘empty’). However, the‘Export selected preset(s)’ operation (in the Presets window) saves only the preset(s) you haveselected.
[37] How can I save a particular parameter setup made on my B-Control for my synthesizer? (I.e.
139

the current values (positions) of the various buttons, encoders and faders in a preset.)Execute the B-Control’s snapshot function, by pressing EDIT + ‘= PRESET’ on the B-Control, orpressing the ‘Snapshot’ button in BC Manager. This sends all the current positions of the B-Control’selements (at least those defining Control Change messages etc.) to BC Manager.
BC Manager can capture such a sequence of CC messages in various ways, and you can then dovarious things with this sequence. For instance:1. You can save it as a MIDI file. (Go to the ‘MIDI input messages’ window for this.)2. Even better: you can put such a sequence of CC messages in the definition of one B-Control
button, so that you only have to press this button to send all those settings to your synthesizer. Inthis way you can create whole banks of favorite parameter setups. You could put them under freebuttons in the same preset as the one containing the individual parameters, or dedicate separatepresets to them.
To do this via BC Manager, in the button dialog box (of a free B-Control button), go to the‘Custom output’ tab and press the ‘Record MIDI messages’ button (i.e. the round red button onthe toolbar). This opens a dialog box saying ‘Record MIDI messages’. Then press the ‘Snapshot’button, wait for the B-Control to send the data, and press OK. The CC messages are thenassigned to the B-Control button of your choice — all you have to do is send this buttondefinition to the B-Control.
Beware: the total number of bytes of the recorded messages should be 125 or less. Thislimit is imposed by the B-Control. Also see the next question.
[38] I pressed Record under the ‘LEARN output’ tab and executed Snapshot. This came back with‘Messages recorded: 114’ and ‘Bytes recorded: 229’. After this I click OK, but then I cannotexit the Preset’s ‘LEARN output’ tab. It gives me the option to cancel but not to accept thenew line it created from the snapshot. What am I doing wrong here?
The B-Control has a limit of 125 bytes for the LEARN output sequence. However, as a courtesy BCManager allows you to record up to 999 bytes: you can edit all these bytes (copy, paste etc.), but youcannot ‘save’ them as the actual LEARN output sequence, which is why OK is disabled until thenumber drops to 125 or lower.
[39] Sometimes BC Manager produces a sequence of error messages saying things like ‘Error:Error preparing MIDI input header. There is no driver installed on your system.’ What doesthis indicate?
This error message indicates that the USB connection (as maintained by Windows) between the B-Control and the computer has been lost, i.e. behind BC Manager’s back while it has been running.(The reason why you sometimes get the same message repeated many times is that these messagescan be triggered by each of BC Manager’s 32 MIDI input buffers it tries to set up.)
There are several potential causes for this:
1. You have switched off a B-Control connected via USB manually while running BC Manager.Any attempt at communication between BC Manager and this B-Control will then produce thistype of error. Beware: once you have switched a USB-connected B-Control off while BCManager is running, it doesn’t work to just switch the B-Control back on: you must also exit andrestart BC Manager.
2. A sudden connection loss (e.g. in the middle of a preset dump) might be due to a problem inWindows, but this isn’t very likely. (At least I think I have never actually experienced this.)
3. Your B-Control’s USB controller (actually a part of the B-Control’s CPU) is defective.This is not very likely, but definitely possible: about six people in the BC2000 Yahoo group
reported this problem over a period of about three years (around 2007-2010). In fact I myself
140

was one of these people: my first BCR kept shutting down the connection in mid-operation.(Mind you: this happened regularly while I was writing BCMI and developing BC Manager!) Ittook me almost a year to conclude that it really was the USB controller on the BCR itself. Then Ifinally went back to the shop; they soon gave me a new BCR — luckily it was still within thetwo-year warranty period. My new BCR has never given me any problems — I didn’t even haveto reinstall any Windows USB drivers or whatever.
One way to find out if you really have a faulty USB controller is to try and send the samedata via a standard MIDI connection: even my BCR with the defective USB controller never hadany problems in the S-modes. So switch off both the B-Control and the computer, disconnect theUSB cable between them, and connect the B-Control to the computer via e.g. the MIDI ports ofthe computer’s sound card. Put the B-Control in an appropriate S-mode (i.e. S-3 or S-4) and inBC Manager send your presets to the B-Control via that connection. If this does work, you mayindeed have a faulty USB controller, hence need a new B-Control; if this doesn’t work either,you should probably check your preset settings and the B-Control’s Global Setup parameters.
[40] I have tried dumping several presets to my B-Control using BC Manager. Everything Itransfer appears to go smoothly, but when I turn the encoders they all have a minimum of 0and a maximum of 1. I have experimented with changing the default value in the scripts. Thisseems to work but turning the associated encoder will only change its value by 1 or 2. Anysuggestions?
Are you by any chance sending memory presets to the B-Control? Basically the problem with this isthat the B-Control’s actual behavior is determined by the temporary preset (a.k.a. ‘preset 0’ in BCManager). For more explanation, see under ‘Editing’ in this FAQ section.
[41] When I transfer a preset from BC Manager, it doesn’t matter what MIDI channel I have set,it always ends up being channel 16 after transferring to the B-Control. Why is this so? I knowthat I can change the channel manually on the B-Control, but that kind of defeats the purposeof BC Manager.
See the previous question.
[42] When I send a preset from BC Manager to my B-Control, the B-Control doesn’t appear toaccept the new values, and some of the button and encoder lights go on, then off again. Mypreset settings are only set correctly when I press the left PRESET button followed by theright PRESET button. What’s going on here?
When BC Manager sends memory preset N to the B-Control, the following sequence of events takeplace:1. BC Manager sends memory preset N as such to the B-Control’s temporary preset.2. BC Manager sends a ‘store N’ command to the B-Control, ordering the B-Control to copy its
temporary preset (containing your memory preset data) to memory preset N.3. BC Manager sends the temporary preset as it occurs in BC Manager to the B-Control. This aims
to restore the temporary preset you were (supposedly!) working on, undoing the effect of step 1above (which overwrote the temporary preset on the B-Control with your memory preset data).So if the current temporary preset defined in BC Manager is ‘empty’, all the lights indeed go off.
After this procedure you can indeed select your memory preset by pressing the B-Control’s twoPRESET buttons in sequence, since pressing a PRESET button copies a memory preset’s data to thetemporary preset.
This reflects how the B-Control works: the display innocently shows ‘P-..’ all the time, but infact the temporary preset is the only preset that you can edit on the B-Control itself and the only onethat ever outputs MIDI data when you move the buttons, encoders and faders. The memory presetscan only be accessed by copying them to the temporary preset. And of course, when you select amemory preset, the current temporary preset (including any changes you have made) is lost.
141

The distinction between temporary and memory presets is a common one on synths etc., butalways liable to give rise to confusion of the did-I-save-my-changes type. That BC Manager allowsyou to (seemingly) bypass the temporary preset by sending memory presets directly, is probably agood thing, but I admit that it can be confusing.
But of course the B-Control does respond automatically when you send it the temporary preset(‘preset 0’) from BC Manager (you can even send individual buttons/encoders/faders of thetemporary preset, which is great when you’re developing a preset). But then of course if you likethese temporary settings, you ultimately have to copy them to a memory preset (either via the STOREbutton on the B-Control itself or by means of BC Manager). However, this method is still not ideal;see §7 for the intended way of manipulating presets via BC Manager.
[43] If the B-Control requires a preset change to actually select a memory preset you have justsent, wouldn’t it be easier if BC Manager sent a MIDI Program Change message after theSysEx send was finished?
There would be several problems with this:Curiously, the B-Control has no (SysEx) command for finding out which memory preset is
currently selected on the B-Control. So BC Manager would have to guess the desired memory presetnumber from the number of the memory preset that you have just sent to the B-Control. However, BCManager’s ‘Send preset’ operation allows you to send a range of presets, so how would BC Managerknow which of these presets you want to select on the B-Control (i.e. copy to the B-Control’stemporary preset)?
Another problem: how would BC Manager know that you don’t care about any pre-existing datain the temporary preset? (This data would get lost after a MIDI Program Change message selecting amemory preset on the B-Control.) So in a sense this would involve a totally different scheme ofworking with the temporary preset: ‘implicitly’ rather than ‘explicitly’. The advantage of the BCManager’s current, explicit scheme is (as mentioned above) that you can work directly with thetemporary preset (and its individual elements) as a separate entity.
[44] Say I record an arbitrary MIDI message (under 125 bytes) from a device (not necessarily aBCF/BCR) to the MIDI clipboard in BC Manager. Can I then go to a particular element, editthe custom output field and paste the recorded MIDI bytes via Shift+Ctrl+Ins?
Yes.
142
Printing
[45] Is there a way to save the print output to a file, e.g. in prn or bmp format?Creating graphical file formats is a very complicated business concerning scaling, fonts etc.
I have no idea how to create prn files.The main problem with bmp files containing high-resolution images (e.g. 600 dpi) is that they
have huge sizes, even in black and white. And lower resolutions, e.g. 150 dpi, provide far lesssatisfying results: one of the main strengths of the ‘print overlays’ operation is exactly the high fontresolution; by contrast, the ‘print window image’ operation yields a pretty awful resolution inprinting terms.
I have experimented with Windows metafiles (wmf/emf), but haven’t been able to get thingsright for those formats. They should be able to provide a very compact representation of the drawnobjects (i.e. lines + text, in case of B-Control element strips), but it has turned out to be very hard toget them right (in terms of scaling etc.), in relationship with the image and word processors that canread metafiles. And besides, a metafile doesn’t constitute a one-to-one representation of what you getwhen you print to the printer directly, so it’s a bit dangerous in that sense.
[46] If I am working on a computer without a printer or one with several attached, the ‘printoverlays’ operation sends the print data to the default printer, but is there a way to have theprint overlays operation actually bring up the printer dialog?
You can deviate from the default printer via BC Manager’s main menu: Options º Printer. However,anything you set in that dialog box only holds for the current run of BC Manager: once you restartBC Manager, you get the default settings again.
[47] In what format does the ‘print overlays’ operation output the print data?BC Manager first defines a printer object (as defined by a linked programming library), then draws anumber of lines and characters on that printer’s ‘canvas’. I don’t know how these data are processedfurther, but presumably they are ultimately converted to the native printing language of the printerbeing used.
143