Embed Size (px)
Citation preview

BAT Smart View for Budget Users
1
Miami-Dade County
BAT Smart View Training Activity Guide
BAT Smart View for Budget Users
2
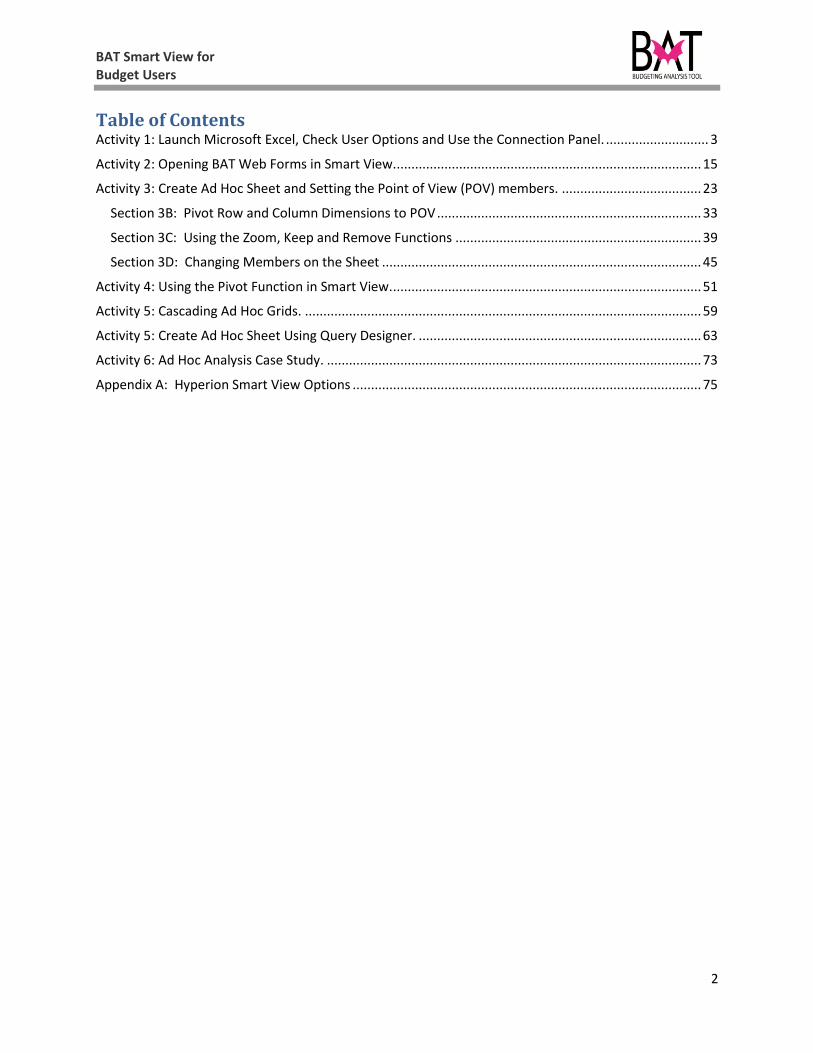
Table of Contents Activity 1: Launch Microsoft Excel, Check User Options and Use the Connection Panel. ............................ 3
Activity 2: Opening BAT Web Forms in Smart View. ................................................................................... 15
Activity 3: Create Ad Hoc Sheet and Setting the Point of View (POV) members. ...................................... 23
Section 3B: Pivot Row and Column Dimensions to POV ........................................................................ 33
Section 3C: Using the Zoom, Keep and Remove Functions ................................................................... 39
Section 3D: Changing Members on the Sheet ....................................................................................... 45
Activity 4: Using the Pivot Function in Smart View. .................................................................................... 51
Activity 5: Cascading Ad Hoc Grids. ............................................................................................................ 59
Activity 5: Create Ad Hoc Sheet Using Query Designer. ............................................................................. 63
Activity 6: Ad Hoc Analysis Case Study. ...................................................................................................... 73
Appendix A: Hyperion Smart View Options ............................................................................................... 75
BAT Smart View for Budget Users
3
BAT Smart View Training – In Class Activities
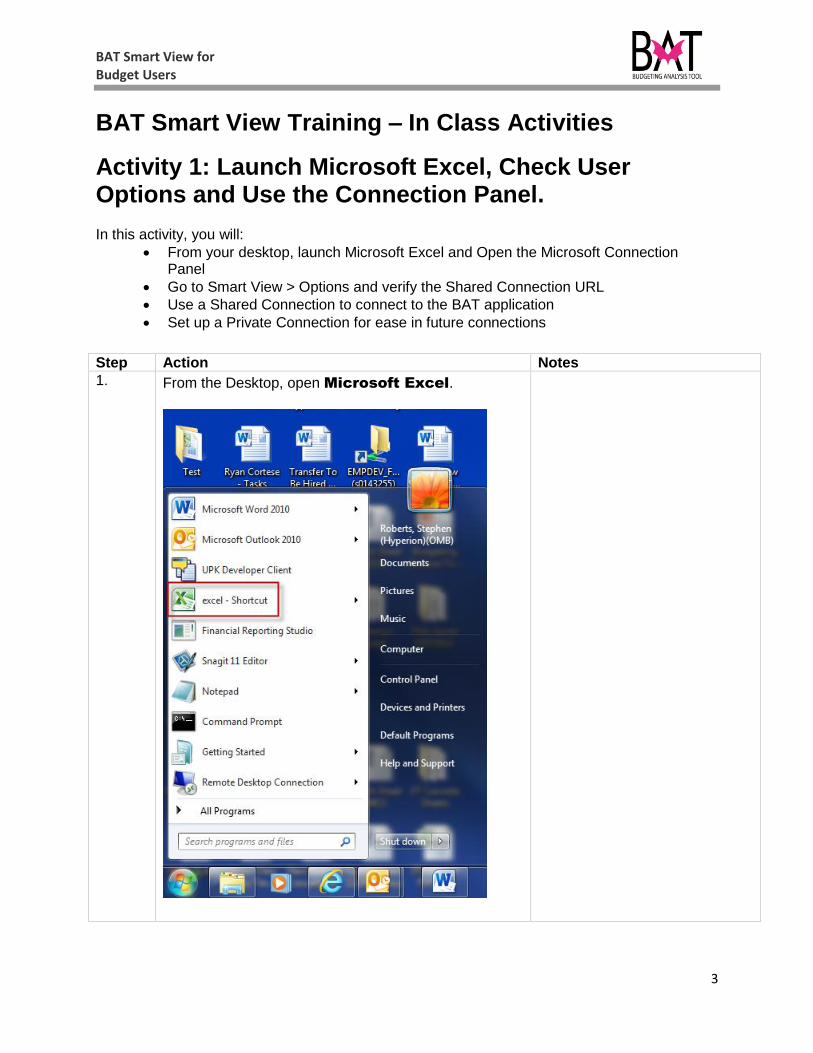
Activity 1: Launch Microsoft Excel, Check User Options and Use the Connection Panel. In this activity, you will:
From your desktop, launch Microsoft Excel and Open the Microsoft Connection Panel
Go to Smart View > Options and verify the Shared Connection URL Use a Shared Connection to connect to the BAT application Set up a Private Connection for ease in future connections
Step Action Notes
1. From the Desktop, open Microsoft Excel.
BAT Smart View for Budget Users
4
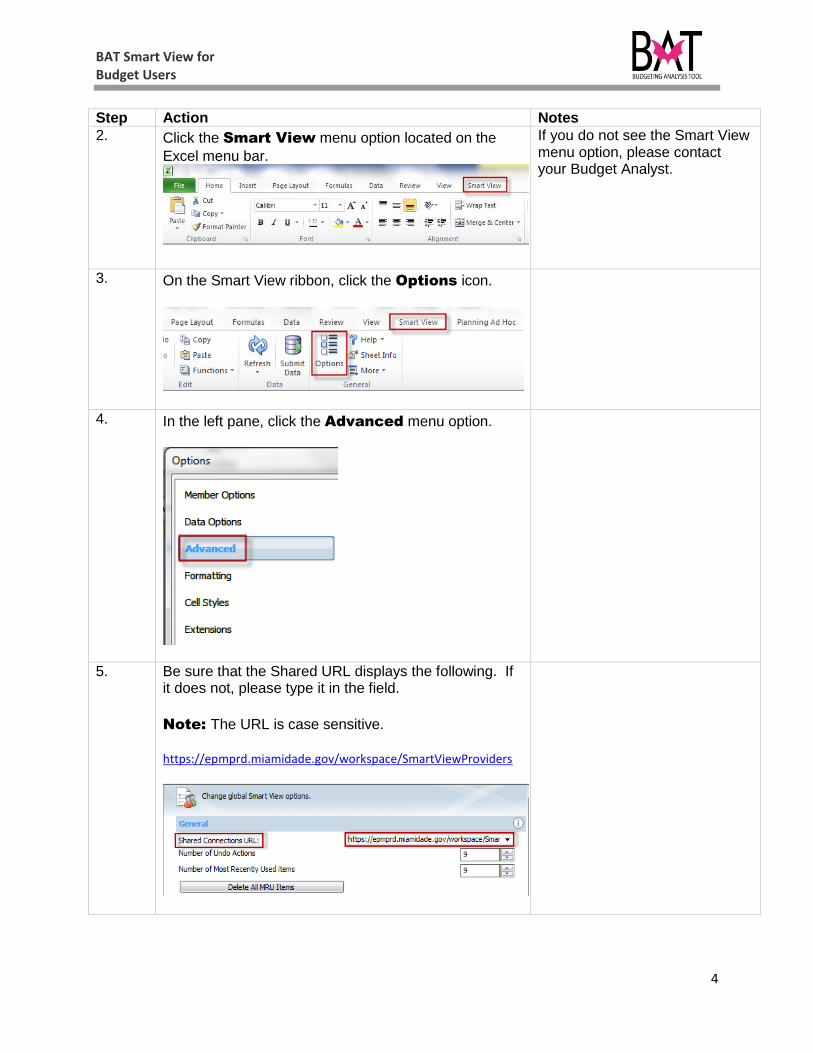
Step Action Notes
2. Click the Smart View menu option located on the
Excel menu bar.
If you do not see the Smart View menu option, please contact your Budget Analyst.
3. On the Smart View ribbon, click the Options icon.
4. In the left pane, click the Advanced menu option.
5. Be sure that the Shared URL displays the following. If it does not, please type it in the field.
Note: The URL is case sensitive.
https://epmprd.miamidade.gov/workspace/SmartViewProviders
BAT Smart View for Budget Users
5
Step Action Notes
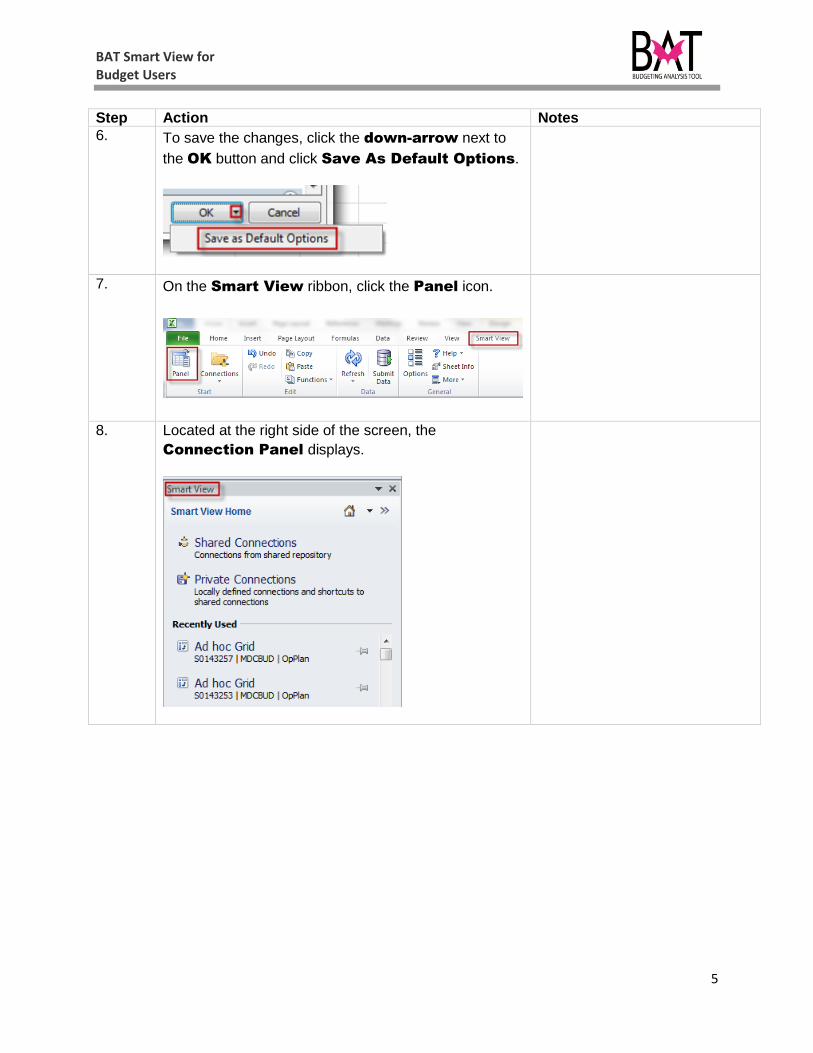
6. To save the changes, click the down-arrow next to
the OK button and click Save As Default Options.
7. On the Smart View ribbon, click the Panel icon.
8. Located at the right side of the screen, the
Connection Panel displays.
BAT Smart View for Budget Users
6
Step Action Notes
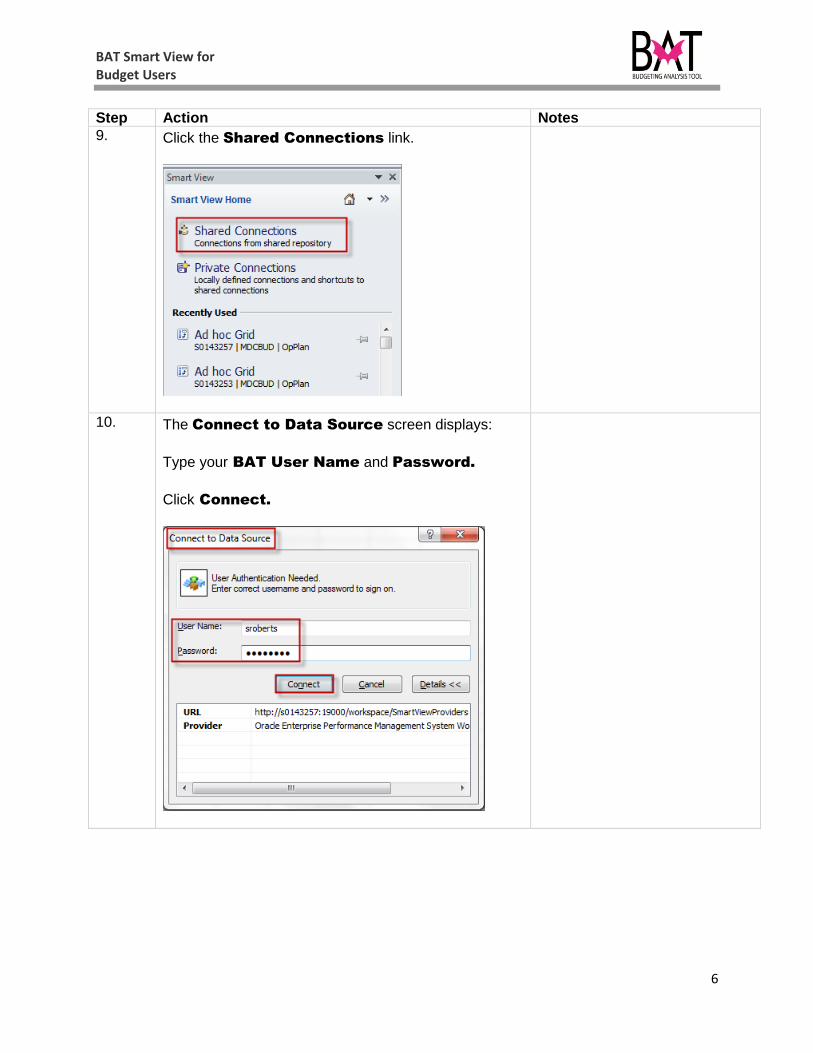
9. Click the Shared Connections link.
10. The Connect to Data Source screen displays:
Type your BAT User Name and Password.
Click Connect.

BAT Smart View for Budget Users
7
Step Action Notes
11. From the Connection Panel screen, click the drop-
down arrow and select Oracle Hyperion Planning,
Fusion Edition.
12. Click the + next to the server number.
Then expand the MDCBUD application.
BAT Smart View for Budget Users
8
Step Action Notes
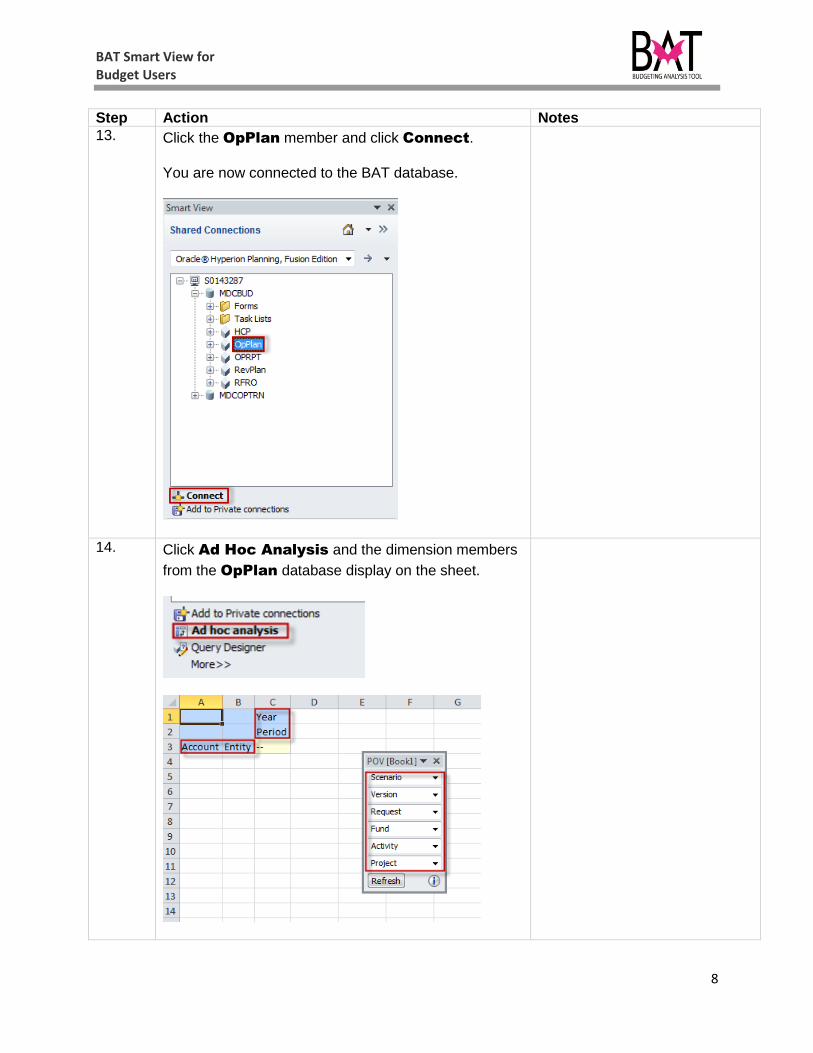
13. Click the OpPlan member and click Connect.
You are now connected to the BAT database.
14. Click Ad Hoc Analysis and the dimension members
from the OpPlan database display on the sheet.

BAT Smart View for Budget Users
9
Step Action Notes
15. If you will be connecting to this database on a regular
basis, you may add this connection as a Private
Connection.
Click the Add to Private Connections link.
A Private Connection is very
similar to marking a web site to your Favorites list in Internet Explorer.
16. On the Save as Private Connection screen, type
the following information Name and Description
information in the highlighted fields and click OK.

BAT Smart View for Budget Users
10
Step Action Notes
17. To test the new Private Connection, disconnect
from the database.
Click the drop-down arrow next to the Home Icon
and click Disconnect All.
18. From the Connection Panel screen, click the drop-
down arrow next to the Server field.

BAT Smart View for Budget Users
11
Step Action Notes
19. Click the All Named Connections and select the
newly created Private Connection.
20. The Private Connection name displays. Click
Connect.
21. When prompted, enter your User Name and
Password and click Connect.

BAT Smart View for Budget Users
12
Step Action Notes
22. Click the Ad Hoc Analysis link.
23. If the following screen appears, click the Clear Sheet
contents and POV option.
This screen appears when an existing Smart View sheet is displayed on the screen.
The Reuse sheet contents
only option will keep row and
column dimension members but remove the POV members.
The Reuse sheet contents
and POV will retain row and
column members as well as POV members.
BAT Smart View for Budget Users
13
Step Action Notes
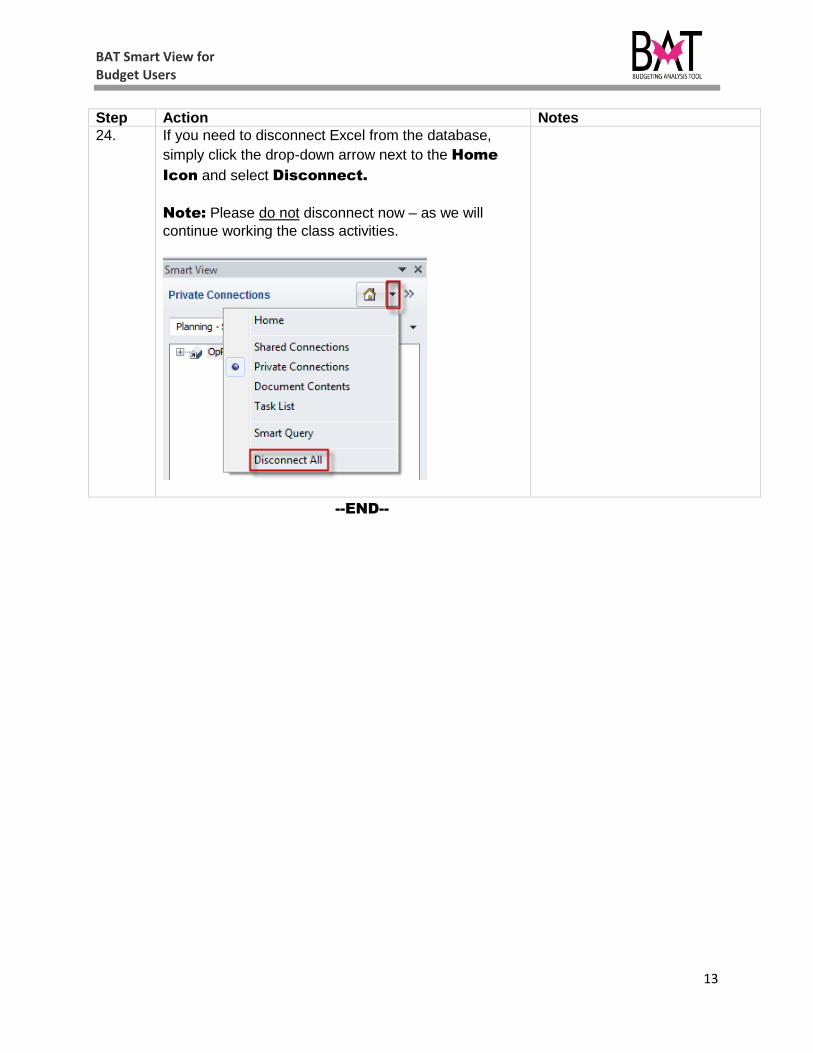
24. If you need to disconnect Excel from the database,
simply click the drop-down arrow next to the Home
Icon and select Disconnect.
Note: Please do not disconnect now – as we will
continue working the class activities.
--END--

BAT Smart View for Budget Users
14
BAT Smart View for Budget Users
15
Activity 2: Opening BAT Web Forms in Smart View. In this activity, you will:
Open the BAT, MDCBUD application and open a Web From
Use the connection manager to connect to the BAT OpPlan database
Connect using Shared Connections
Open the Forecast Smart View Export Form
Follow the steps to export the Forecast form to Hyperion Smart View (Excel)
Verify Smart View Options are set correctly Step Action Notes
1. Open Internet Explorer and type the following in
the URL bar: https://epmprd.miamidade.gov/workspace/index.jsp
2. Click on the MUDBUD application.
3. Navigate to My Task List and select Operating
Smart View Forms > Forecast Smart View
Export Form.
BAT Smart View for Budget Users
16
Step Action Notes
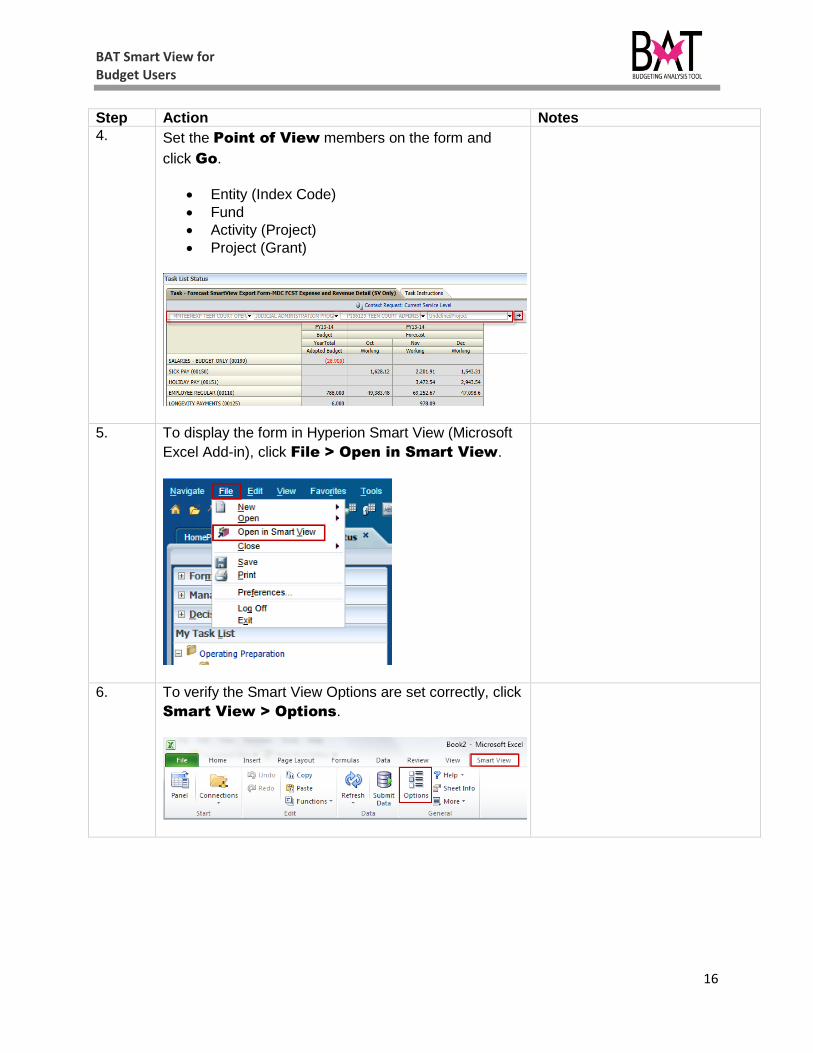
4. Set the Point of View members on the form and
click Go.
Entity (Index Code)
Fund
Activity (Project)
Project (Grant)
5. To display the form in Hyperion Smart View (Microsoft
Excel Add-in), click File > Open in Smart View.
6. To verify the Smart View Options are set correctly, click
Smart View > Options.

BAT Smart View for Budget Users
17
Step Action Notes
7. On the Options screen, click Data Options.
8. In the Suppress Rows and Suppress Columns
section, be sure that all items are unchecked.
9. In the Replacement sections, be sure that the
#NoData/Missing Label: field is set to -- (double
dashes).
BAT Smart View for Budget Users
18
Step Action Notes
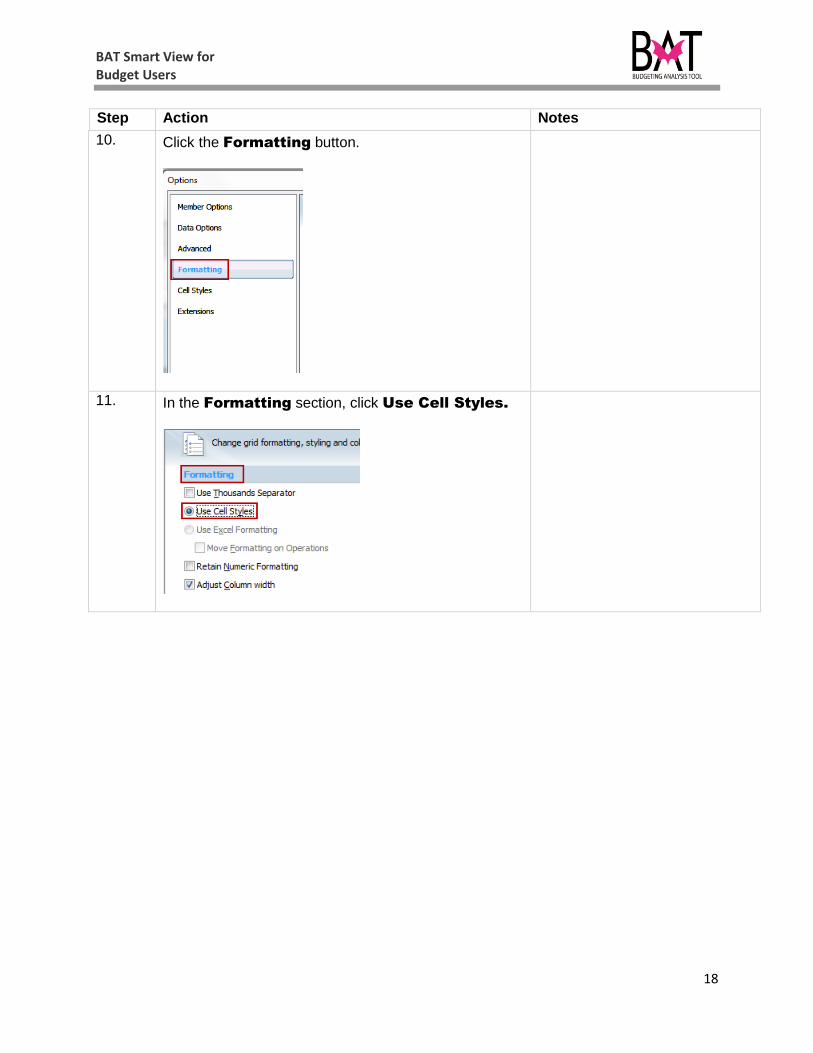
10. Click the Formatting button.
11. In the Formatting section, click Use Cell Styles.
BAT Smart View for Budget Users
19
Step Action Notes
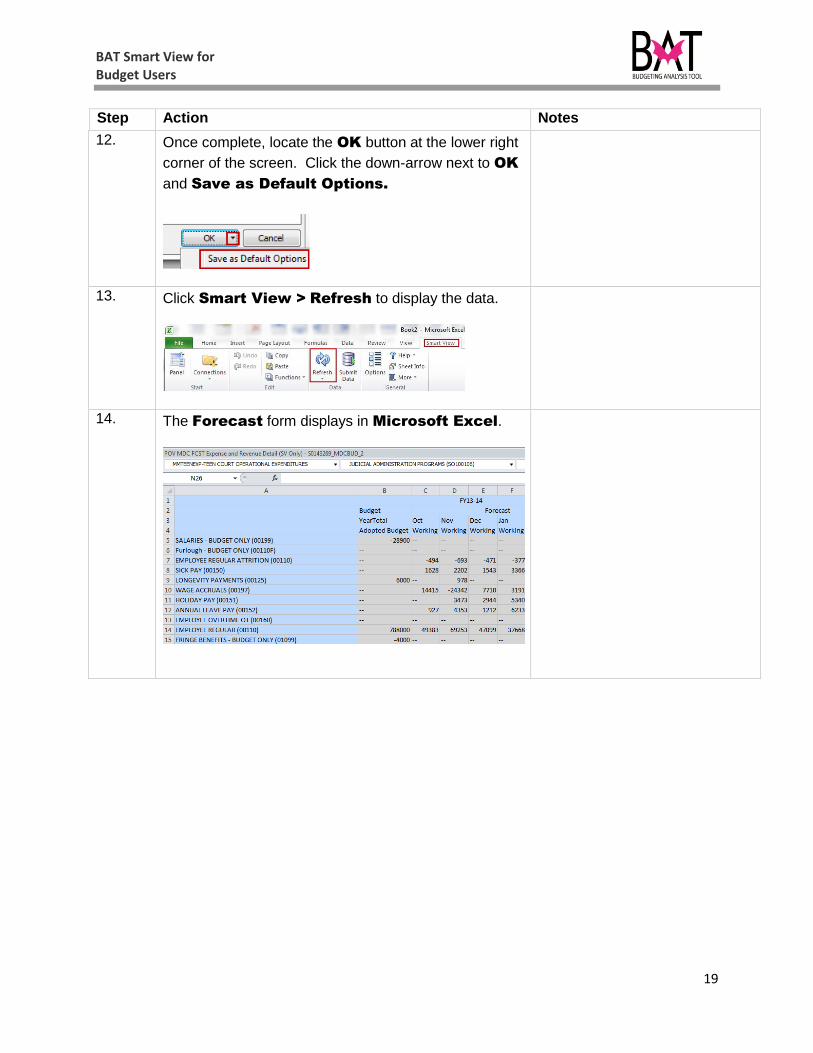
12. Once complete, locate the OK button at the lower right
corner of the screen. Click the down-arrow next to OK
and Save as Default Options.
13. Click Smart View > Refresh to display the data.
14. The Forecast form displays in Microsoft Excel.

BAT Smart View for Budget Users
20
Step Action Notes
15. Click File > Save As. Save the file on your desktop
– Name: Forecast Smart View Form.
16. To test the saved Smart View sheet, from the
Connection Panel, click the drop-down arrow
next to the Home Icon and click Disconnect All.
If the Connection Panel is
not displayed, simply click the
Panel icon on the Smart
View toolbar.
17. Select File > Exit to close Microsoft Excel.
BAT Smart View for Budget Users
21
Step Action Notes
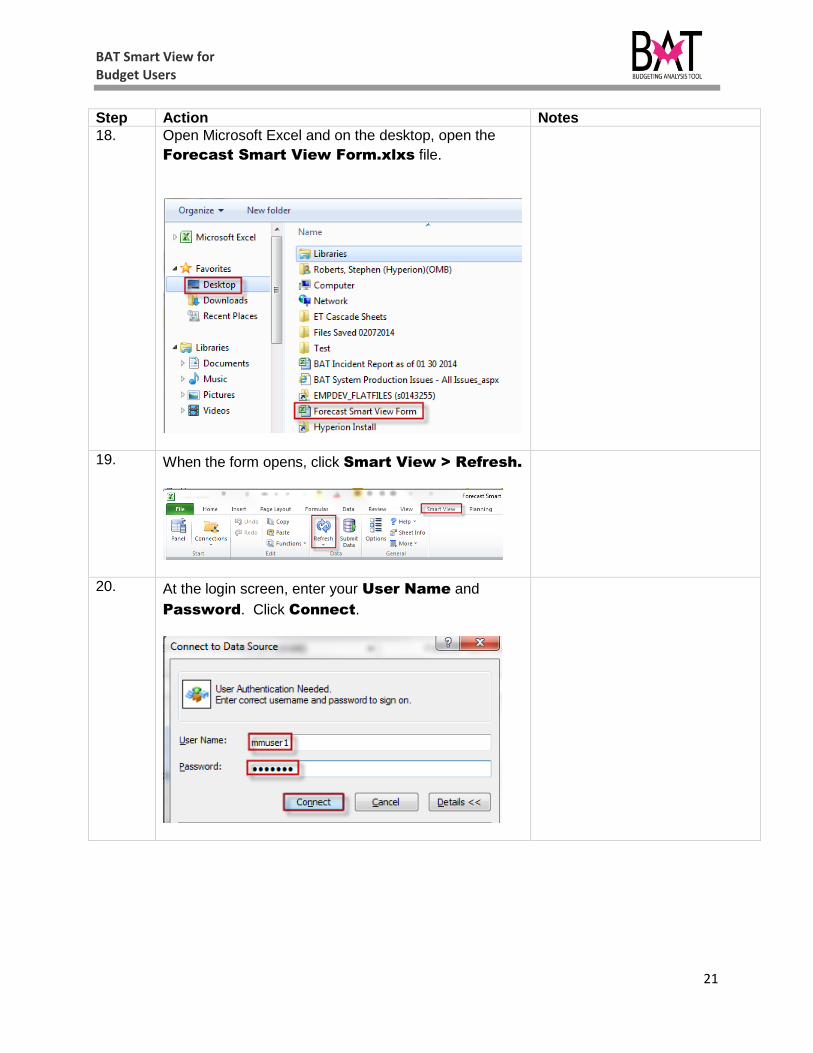
18. Open Microsoft Excel and on the desktop, open the
Forecast Smart View Form.xlxs file.
19. When the form opens, click Smart View > Refresh.
20. At the login screen, enter your User Name and
Password. Click Connect.
BAT Smart View for Budget Users
22
Step Action Notes
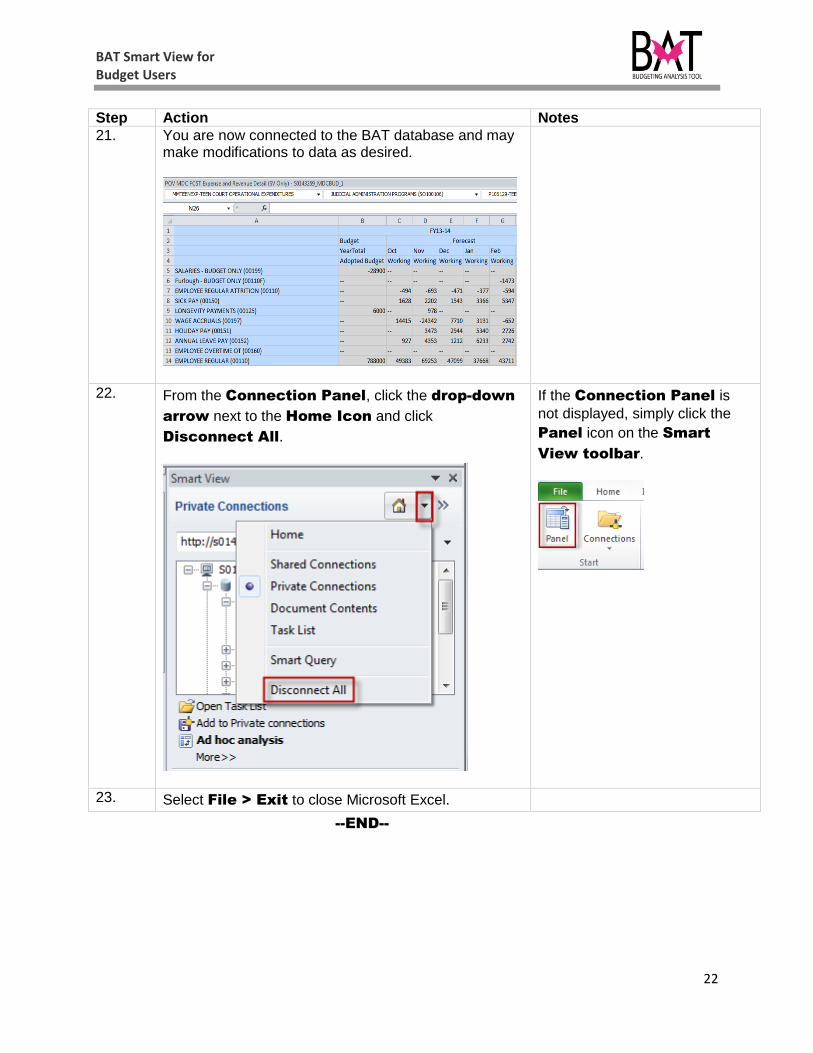
21. You are now connected to the BAT database and may make modifications to data as desired.
22. From the Connection Panel, click the drop-down
arrow next to the Home Icon and click
Disconnect All.
If the Connection Panel is
not displayed, simply click the
Panel icon on the Smart
View toolbar.
23. Select File > Exit to close Microsoft Excel. --END--
BAT Smart View for Budget Users
23
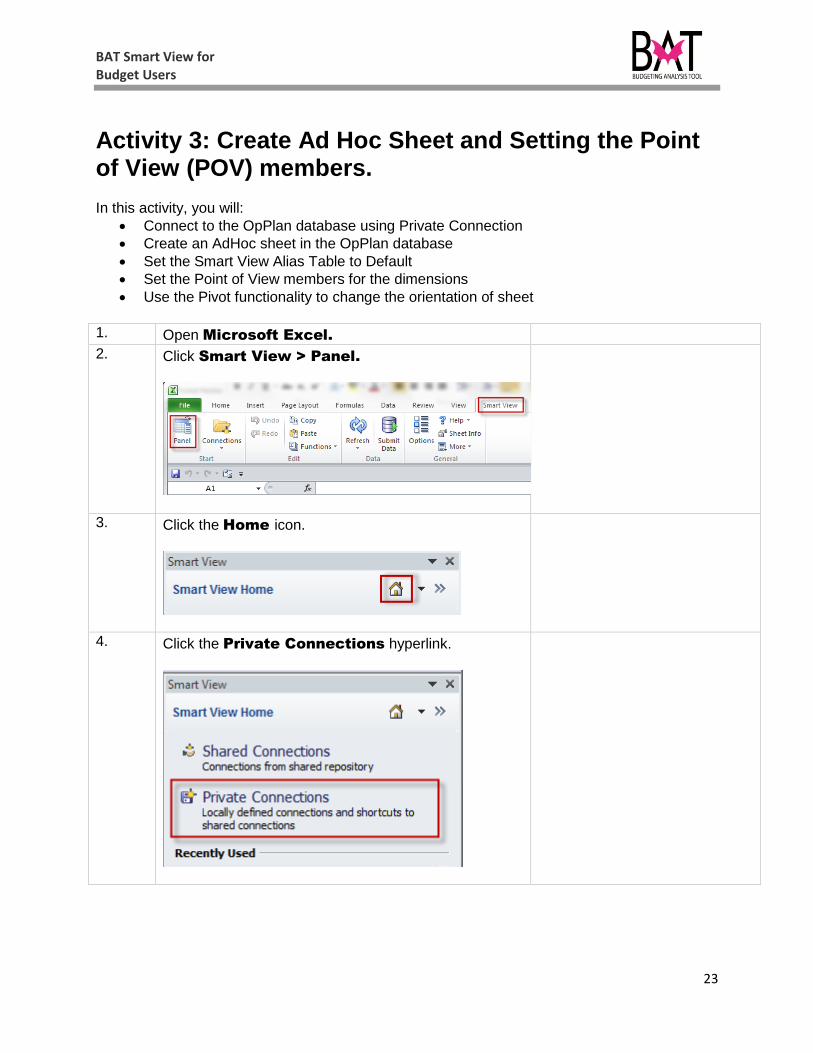
Activity 3: Create Ad Hoc Sheet and Setting the Point of View (POV) members. In this activity, you will:
Connect to the OpPlan database using Private Connection
Create an AdHoc sheet in the OpPlan database Set the Smart View Alias Table to Default Set the Point of View members for the dimensions Use the Pivot functionality to change the orientation of sheet
1. Open Microsoft Excel.
2. Click Smart View > Panel.
3. Click the Home icon.
4. Click the Private Connections hyperlink.
BAT Smart View for Budget Users
24
Step Action Notes
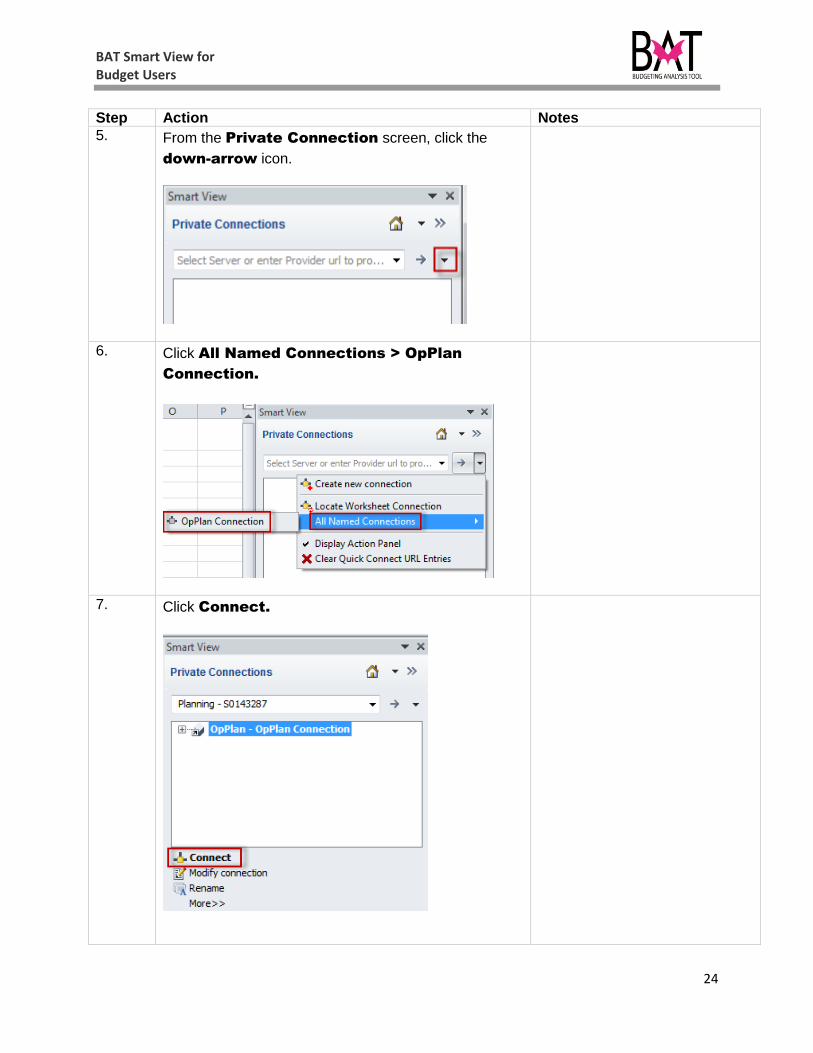
5. From the Private Connection screen, click the
down-arrow icon.
6. Click All Named Connections > OpPlan
Connection.
7. Click Connect.
BAT Smart View for Budget Users
25
Step Action Notes
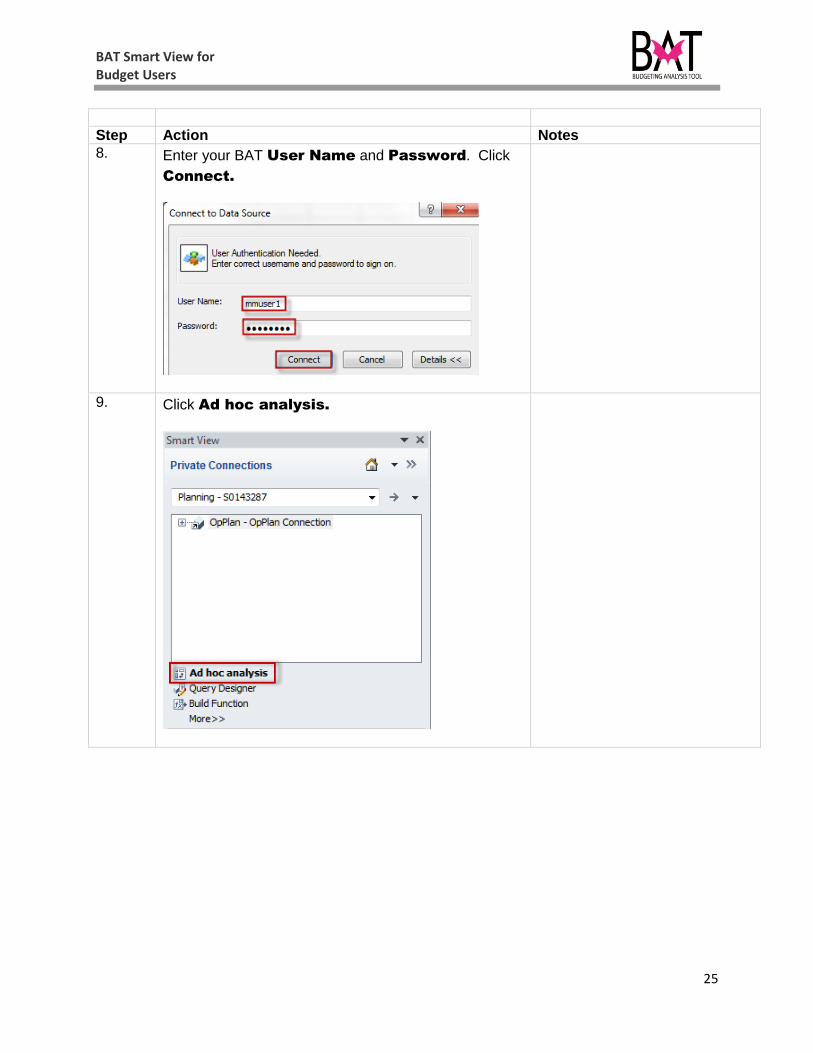
8. Enter your BAT User Name and Password. Click
Connect.
9. Click Ad hoc analysis.

BAT Smart View for Budget Users
26
Step Action Notes
10. Once you are connected to the database and the Ad
Hoc Analysis link is clicked, all 10 BAT
Dimensions from the OpPlan database display on
the screen:
Account and Entity in the rows
Year and Period in the Columns
All other dimensions in the Point of View (POV) box
All 10 dimensions from the MDCBUD application are displayed on the sheet.
11. On the Planning Ad Hoc toolbar, click Change
Alias.
12. Click the Default link.
The Default Alias table will
display the member names on the Smart View sheet.
BAT Smart View for Budget Users
27
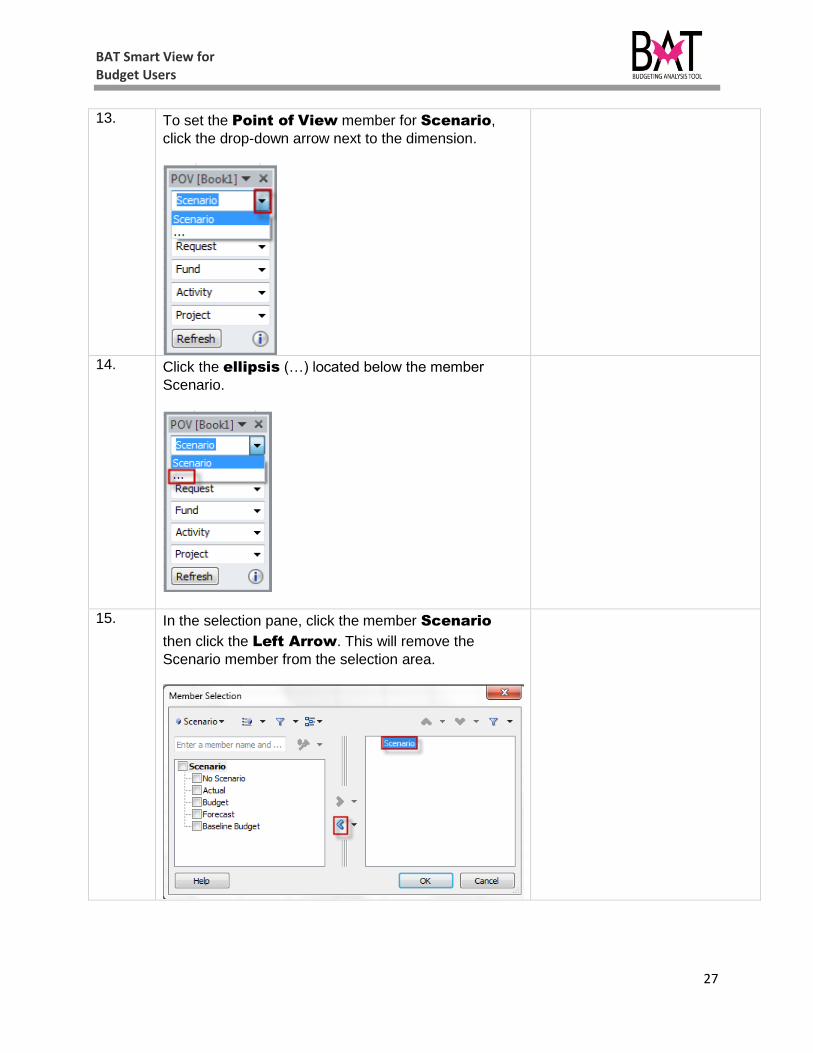
13. To set the Point of View member for Scenario,
click the drop-down arrow next to the dimension.
14. Click the ellipsis (…) located below the member
Scenario.
15. In the selection pane, click the member Scenario
then click the Left Arrow. This will remove the
Scenario member from the selection area.

BAT Smart View for Budget Users
28
Step Action Notes
16. Click the check box next to Budget and Forecast.
Click the Right-Arrow.
The Budget and Forecast members are moved to
the Selection Pane.
You may select multiple members from a dimension for Smart View analysis.
17. From the dimension drop-down list select the Version dimension.
BAT Smart View for Budget Users
29
Step Action Notes
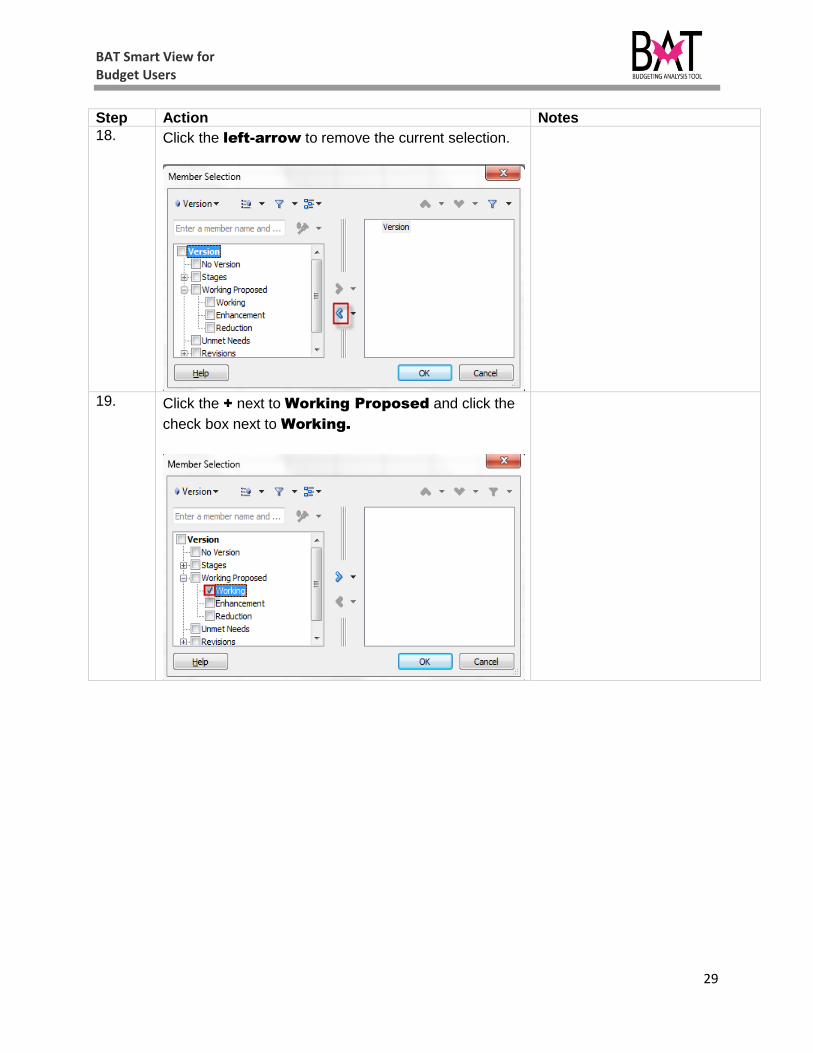
18. Click the left-arrow to remove the current selection.
19. Click the + next to Working Proposed and click the
check box next to Working.

BAT Smart View for Budget Users
30
Step Action Notes
20. Click the right-arrow to move it to the Selection
Pane.
21. Repeat the previous steps and make the following
POV Selections:
Request = Current Service Level
Fund = Search for a valid Fund
Activity = Search for a valid Project
Project = No Operating Grant
Hint: When searching for a member in the hierarchy,
you may type any part of the member name or
description in the Search Field and click the Search
Icon.
Please write the member(s) selected for your department and index code. Fund: ________________________ Activity: ________________________ Project: ________________________
BAT Smart View for Budget Users
31
Step Action Notes
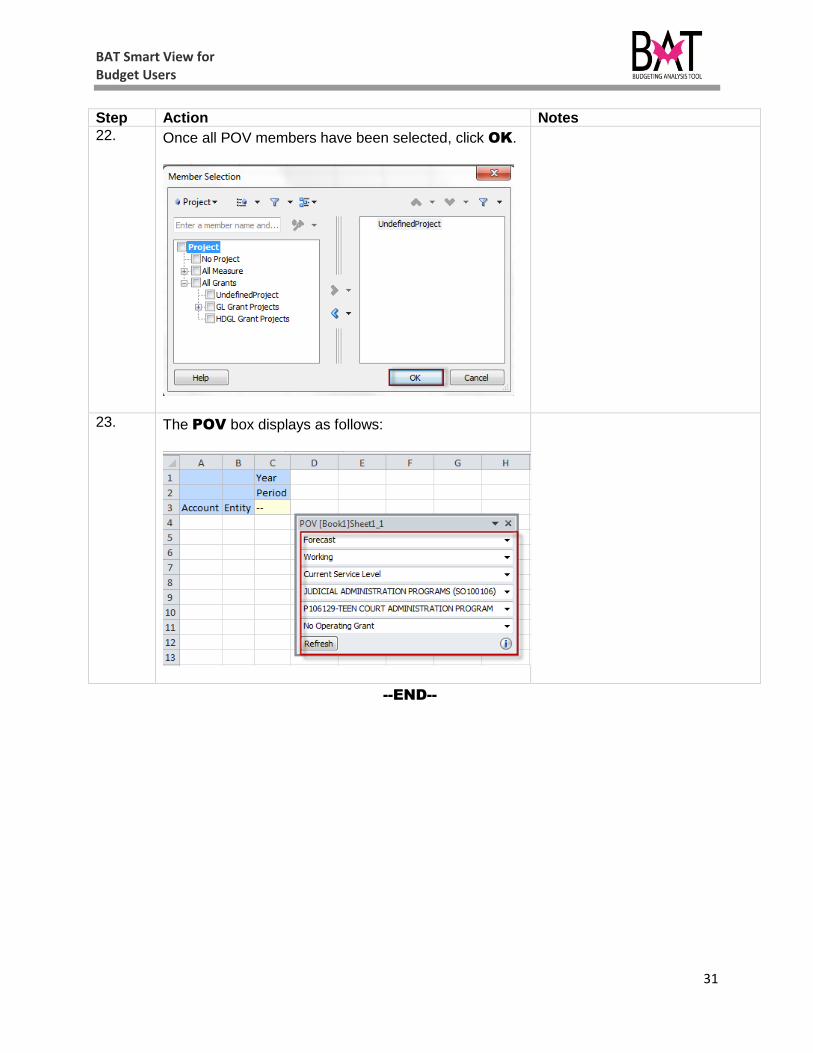
22. Once all POV members have been selected, click OK.
23. The POV box displays as follows:
--END--

BAT Smart View for Budget Users
32
BAT Smart View for Budget Users
33
Section 3B: Pivot Row and Column Dimensions to POV
In this section you will use the Pivot to POV function to move the Entity and Year
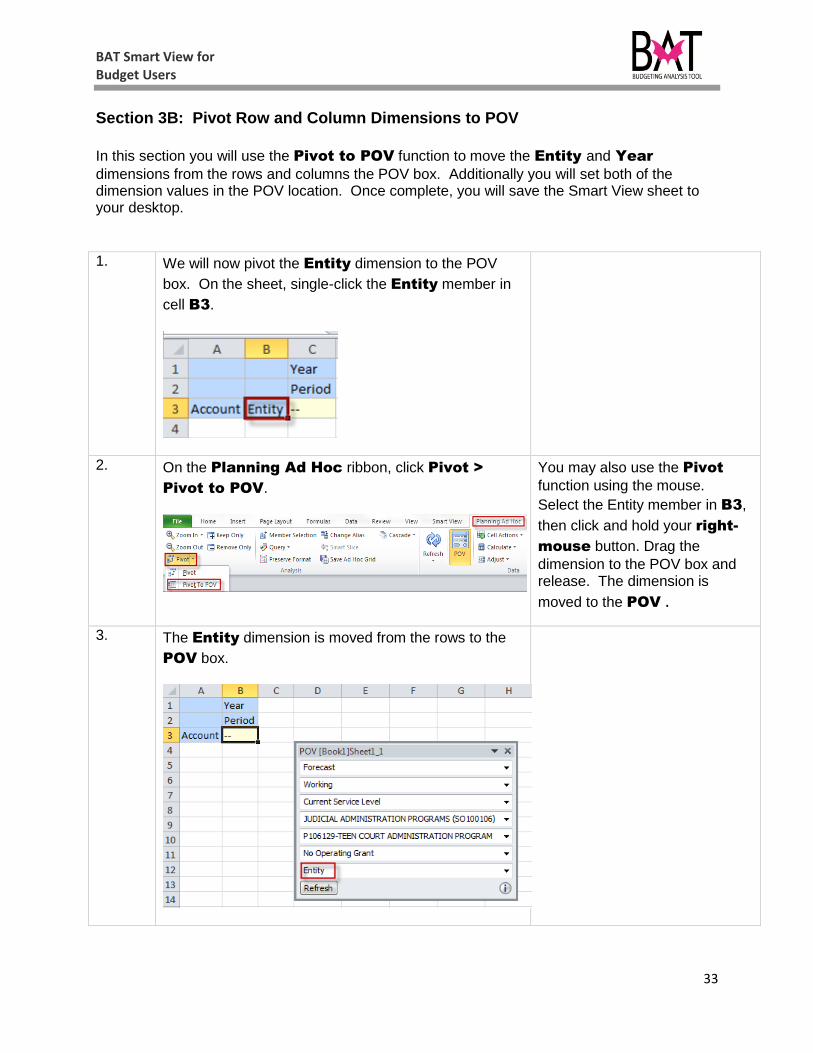
dimensions from the rows and columns the POV box. Additionally you will set both of the dimension values in the POV location. Once complete, you will save the Smart View sheet to your desktop. 1. We will now pivot the Entity dimension to the POV
box. On the sheet, single-click the Entity member in
cell B3.
2. On the Planning Ad Hoc ribbon, click Pivot >
Pivot to POV.
You may also use the Pivot
function using the mouse.
Select the Entity member in B3,
then click and hold your right-
mouse button. Drag the
dimension to the POV box and release. The dimension is
moved to the POV .
3. The Entity dimension is moved from the rows to the
POV box.
BAT Smart View for Budget Users
34
Step Action Notes
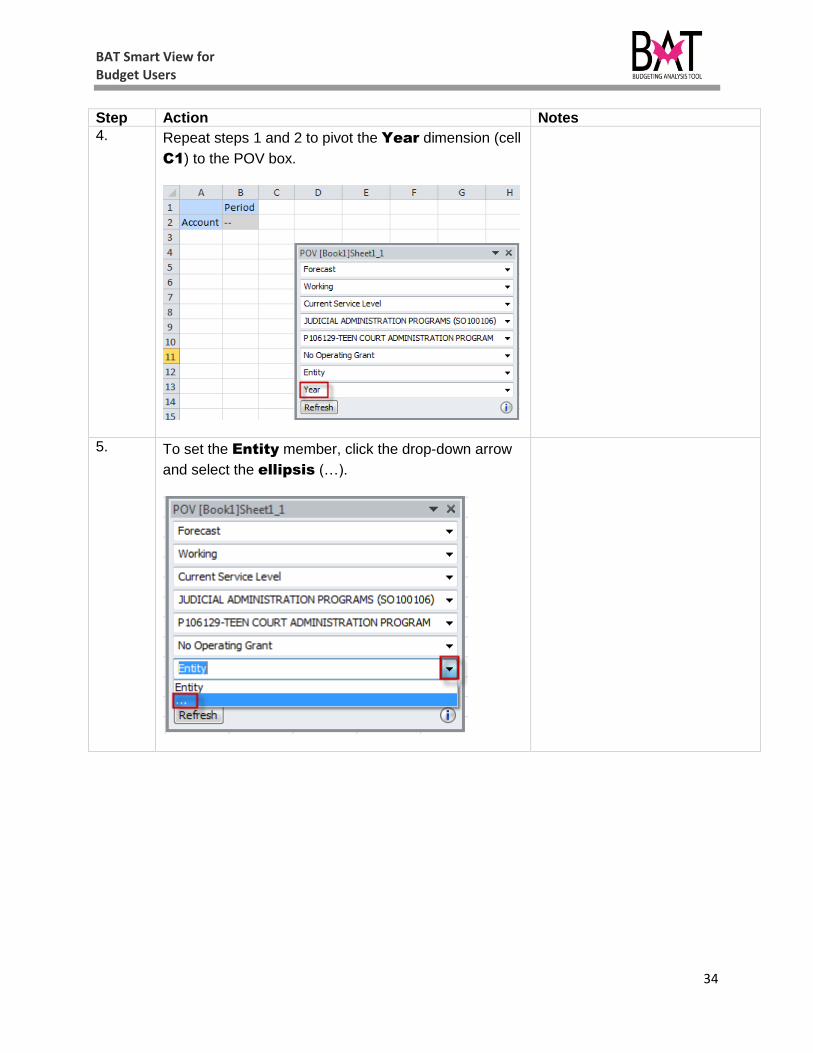
4. Repeat steps 1 and 2 to pivot the Year dimension (cell
C1) to the POV box.
5. To set the Entity member, click the drop-down arrow
and select the ellipsis (…).
BAT Smart View for Budget Users
35
Step Action Notes
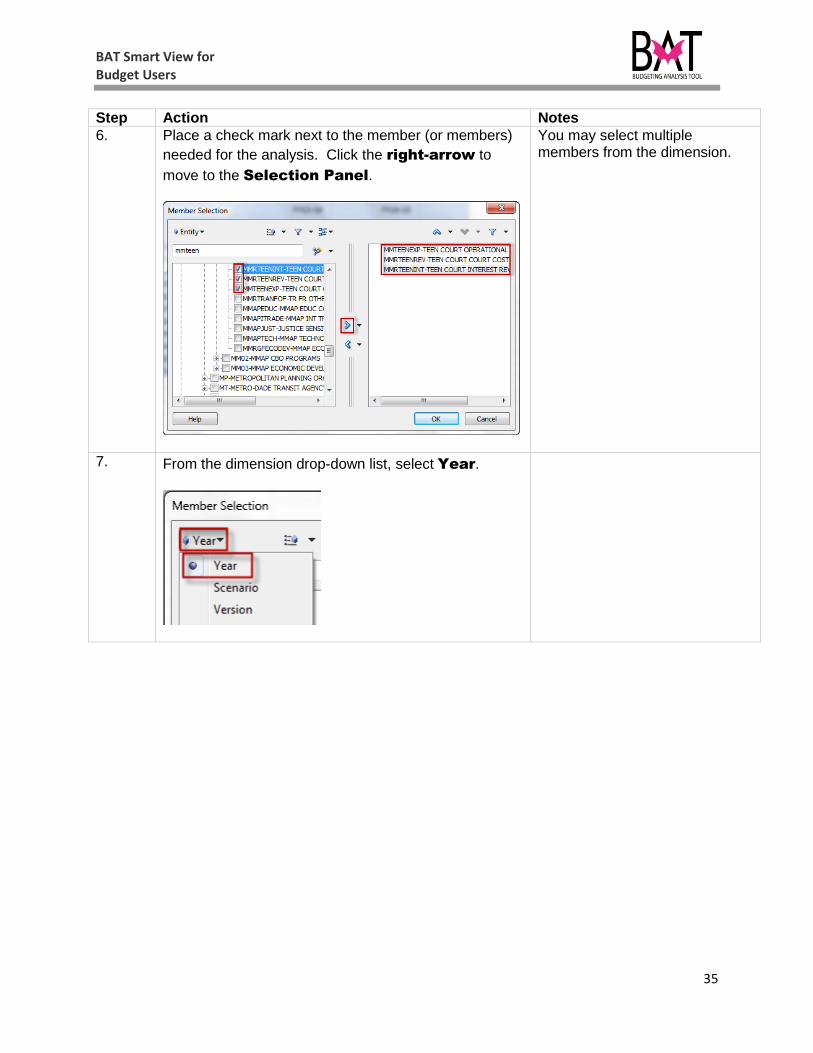
6. Place a check mark next to the member (or members)
needed for the analysis. Click the right-arrow to
move to the Selection Panel.
You may select multiple members from the dimension.
7. From the dimension drop-down list, select Year.

BAT Smart View for Budget Users
36
Step Step Step
8. Select the following Years and move the Selection
Pane:
FY 13-14
FY 14-15
9. Be sure that the POV Members are set as displayed
in the screenshot below:
Click the Refresh button at any
time to be sure the most current information is retrieved from the BAT system.

BAT Smart View for Budget Users
37
Step Step Step
10. Click File > Save As. Save the file to your desktop.
File Name: Smart View POV Template.
--END--

BAT Smart View for Budget Users
38

BAT Smart View for Budget Users
39
Section 3C: Using the Zoom, Keep and Remove Functions In this section you will use the Zoom In and Zoom Out functions to expand and collapse the dimensions on the sheet. You will also use the Keep and Remove Only functions to design the report as desired. 1. Be sure that the Smart View POV Template file is
open and connected to the OpPlan database.
2. Go to cell B1 and click the member Period. On the
Planning Ad Hoc ribbon, click the Zoom In button.
3. The children of the Period dimension display across
the columns.
BAT Smart View for Budget Users
40
Step Action Notes
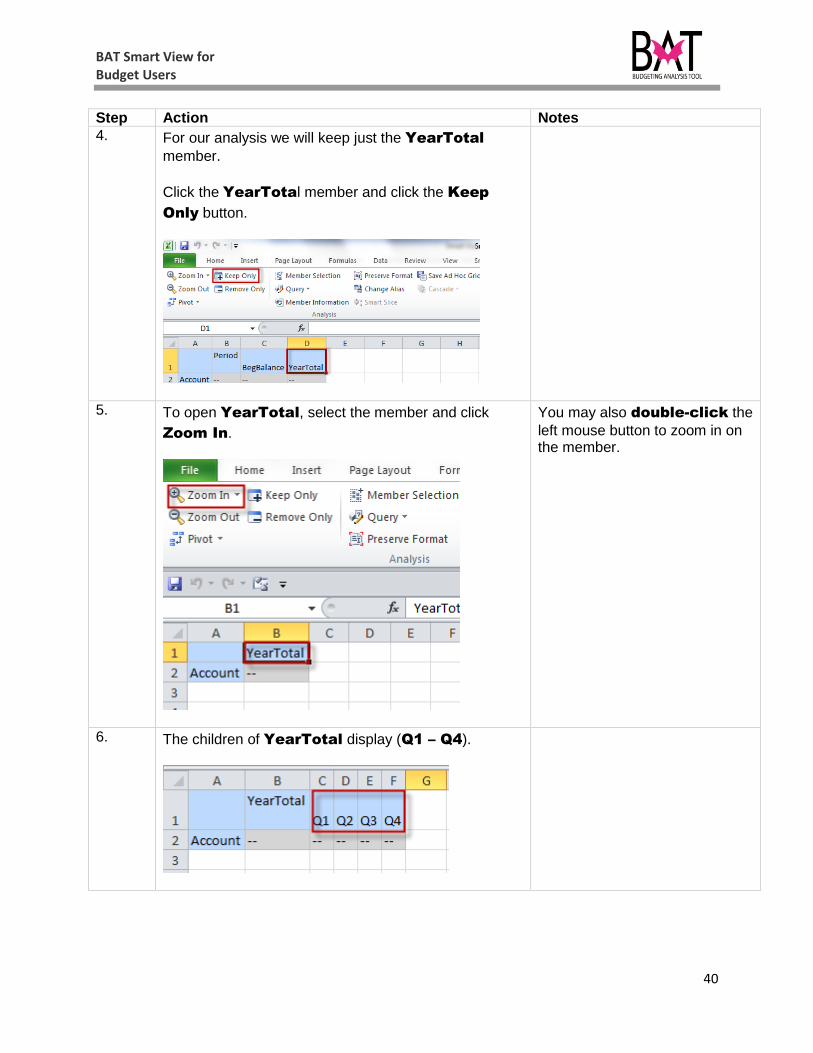
4. For our analysis we will keep just the YearTotal
member.
Click the YearTotal member and click the Keep
Only button.
5. To open YearTotal, select the member and click
Zoom In.
You may also double-click the
left mouse button to zoom in on the member.
6. The children of YearTotal display (Q1 – Q4).

BAT Smart View for Budget Users
41
Step Action Notes
7. Let’s assume that we need to do analysis on Q1 and
Q2 only.
Click and drag to select Q1 and Q2. Click Keep
Only.
8. Select Q1 and click Zoom In and do the same for
Q2.
The months for each quarter display on the sheet.
You may double-click your left
mouse to Zoom In on a member.
9. To expand on the Account dimension. Click the cell
A2 and select Zoom In.
BAT Smart View for Budget Users
42
Step Action Notes
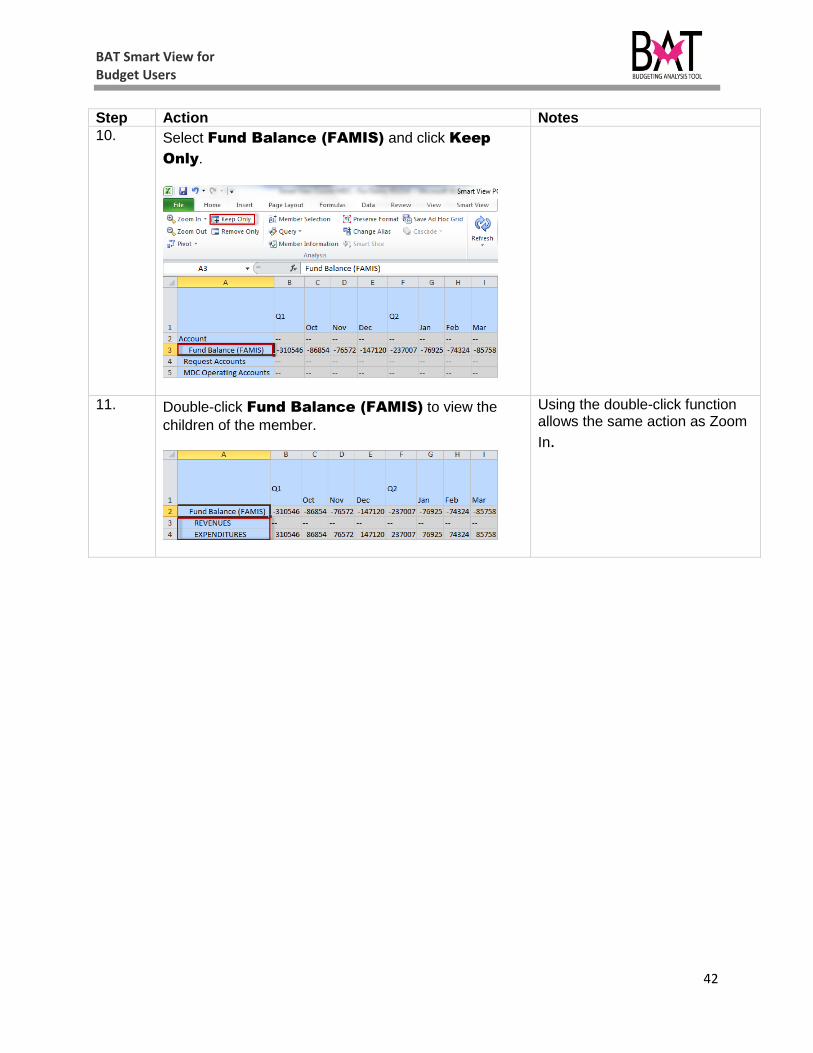
10. Select Fund Balance (FAMIS) and click Keep
Only.
11. Double-click Fund Balance (FAMIS) to view the
children of the member.
Using the double-click function allows the same action as Zoom
In.
BAT Smart View for Budget Users
43
Step Action Notes
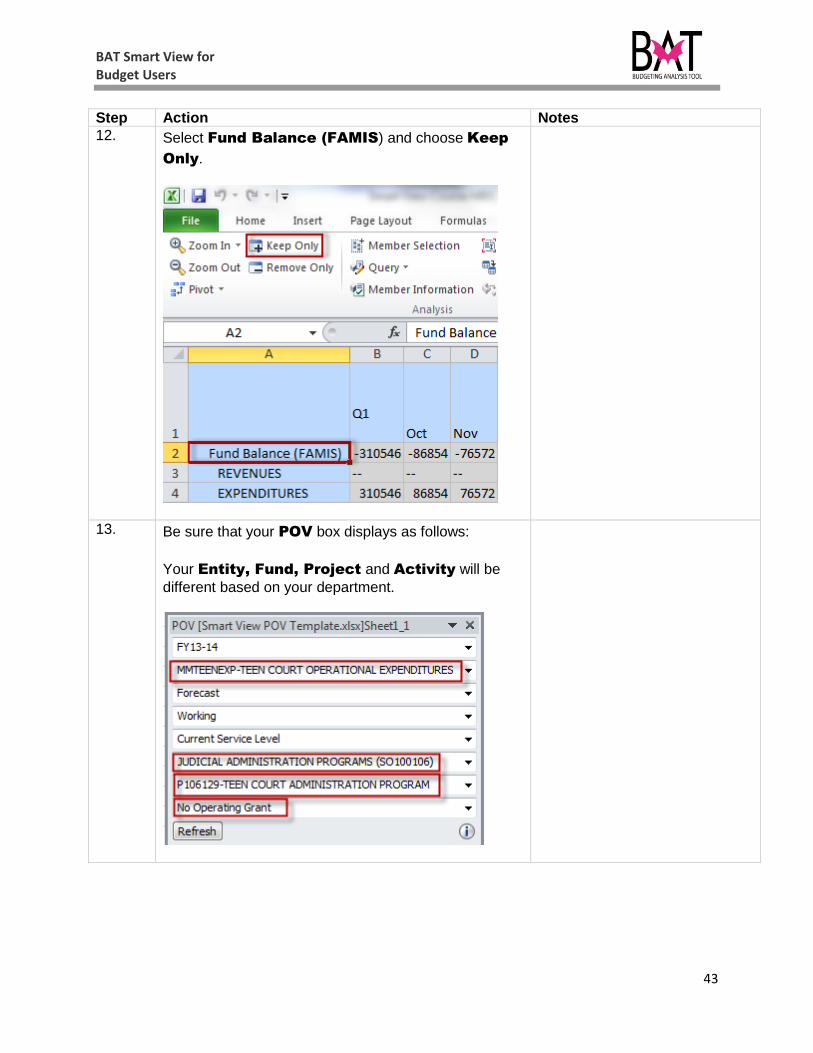
12. Select Fund Balance (FAMIS) and choose Keep
Only.
13. Be sure that your POV box displays as follows:
Your Entity, Fund, Project and Activity will be
different based on your department.
BAT Smart View for Budget Users
44
Step Action Notes
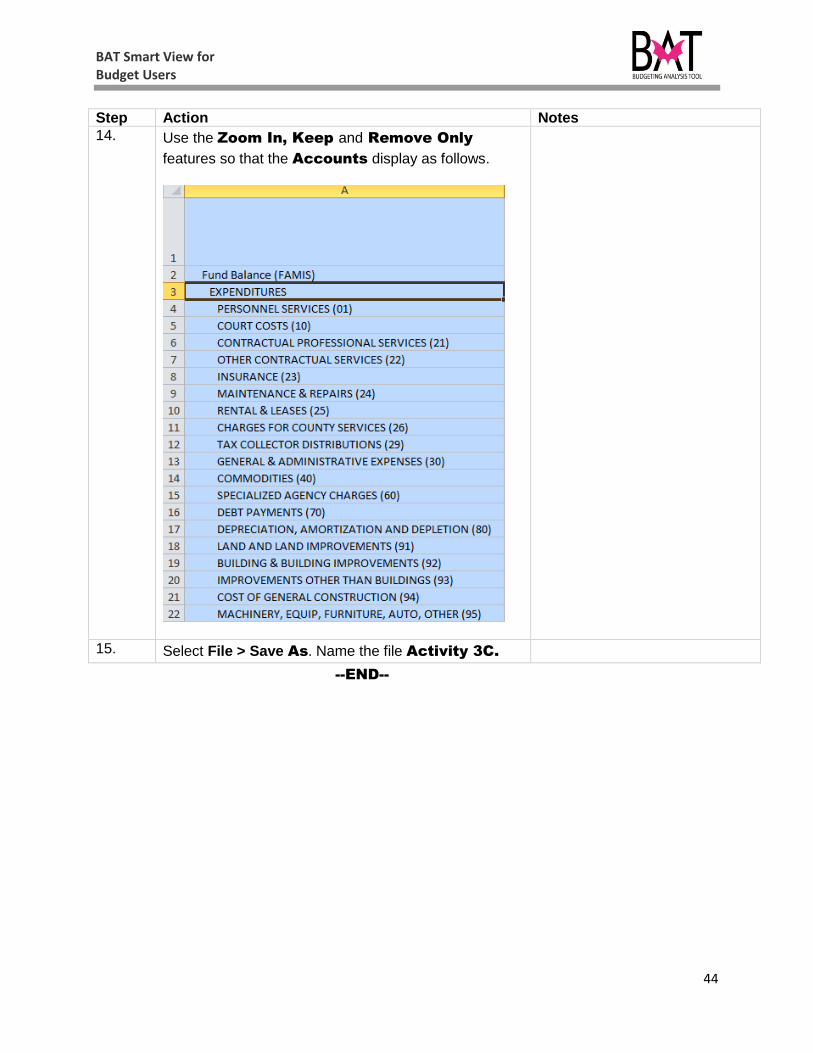
14. Use the Zoom In, Keep and Remove Only
features so that the Accounts display as follows.
15. Select File > Save As. Name the file Activity 3C. --END--
BAT Smart View for Budget Users
45
Section 3D: Changing Members on the Sheet In this section you will type members directly in the Excel Sheet and review the data changes. You will also use the left and right mouse buttons to Zoom In and Zoom Out members in the Period dimension. 1. Be sure that the Activity 3C.xlsx file is open and
connected to the BAT OpPlan database.
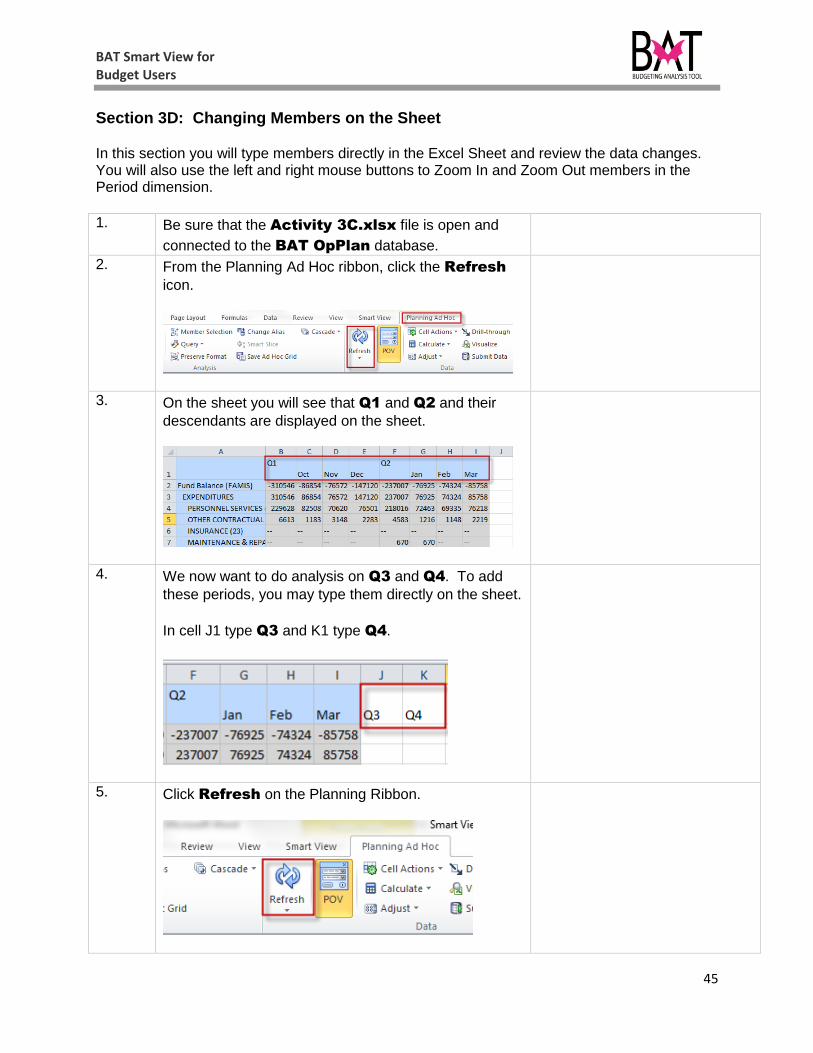
2. From the Planning Ad Hoc ribbon, click the Refresh
icon.
3. On the sheet you will see that Q1 and Q2 and their
descendants are displayed on the sheet.
4. We now want to do analysis on Q3 and Q4. To add
these periods, you may type them directly on the sheet.
In cell J1 type Q3 and K1 type Q4.
5. Click Refresh on the Planning Ribbon.

BAT Smart View for Budget Users
46
Step Action Notes
6. Double-click Q3 and Q4 to expand and display the
corresponding months.
7. You may use right-mouse button functionality
to Zoom Out (or collapse) members in the dimension.
Click the cell P1 that contains Aug. Using your right
mouse button. Double-click the member.
Jul, Aug and Sep are
collapsed into Q4.
8. If you right-double click any member for the
Quarters (Q1, Q2, Q3 or Q4) the time period will
collapse up to YearTotal.
Double right-click Q3. All Quarters are removed from
the sheet and YearTotal displays.

BAT Smart View for Budget Users
47
Step Action Notes
9. To redisplay the 4 Quarters, using your left mouse
button, double-click YearTotal.
The 4 Quarters display.
10. In Cell G1, type BegBalance. Click Refresh.
Current Budget data is stored in the Period member
BegBalance.
BAT Smart View for Budget Users
48
Step Action Notes
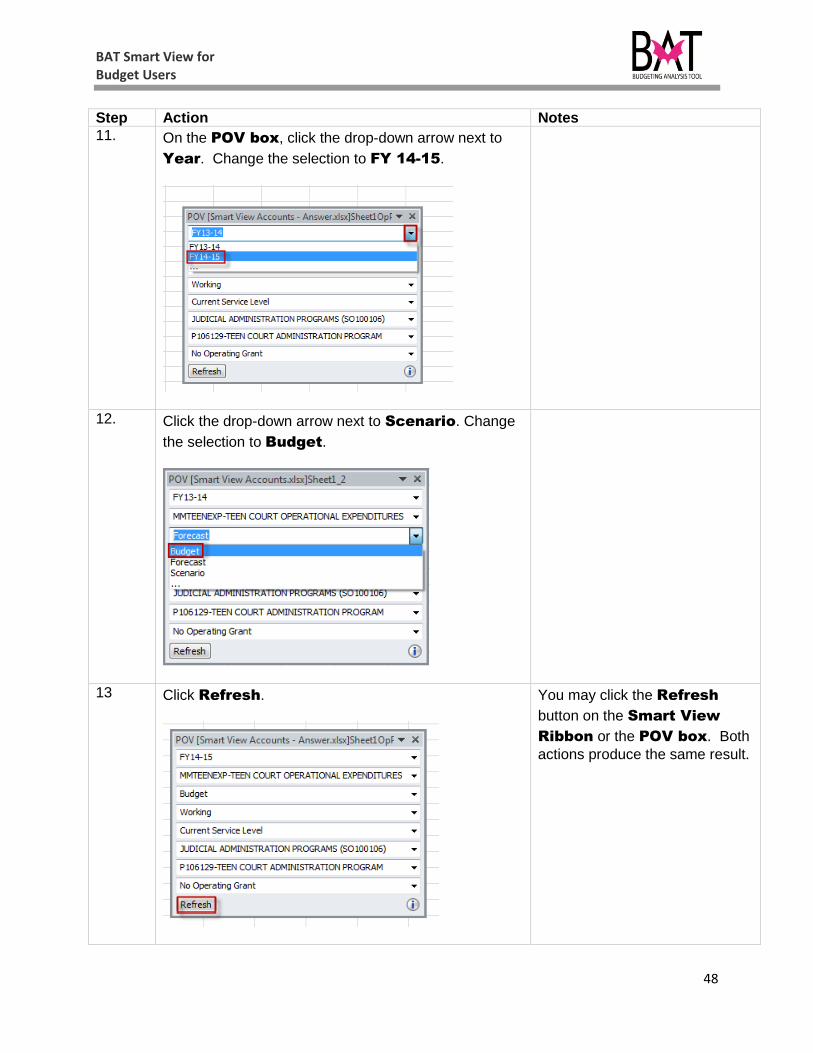
11. On the POV box, click the drop-down arrow next to
Year. Change the selection to FY 14-15.
12. Click the drop-down arrow next to Scenario. Change
the selection to Budget.
13 Click Refresh.
You may click the Refresh
button on the Smart View
Ribbon or the POV box. Both
actions produce the same result.
BAT Smart View for Budget Users
49
Step Action Notes
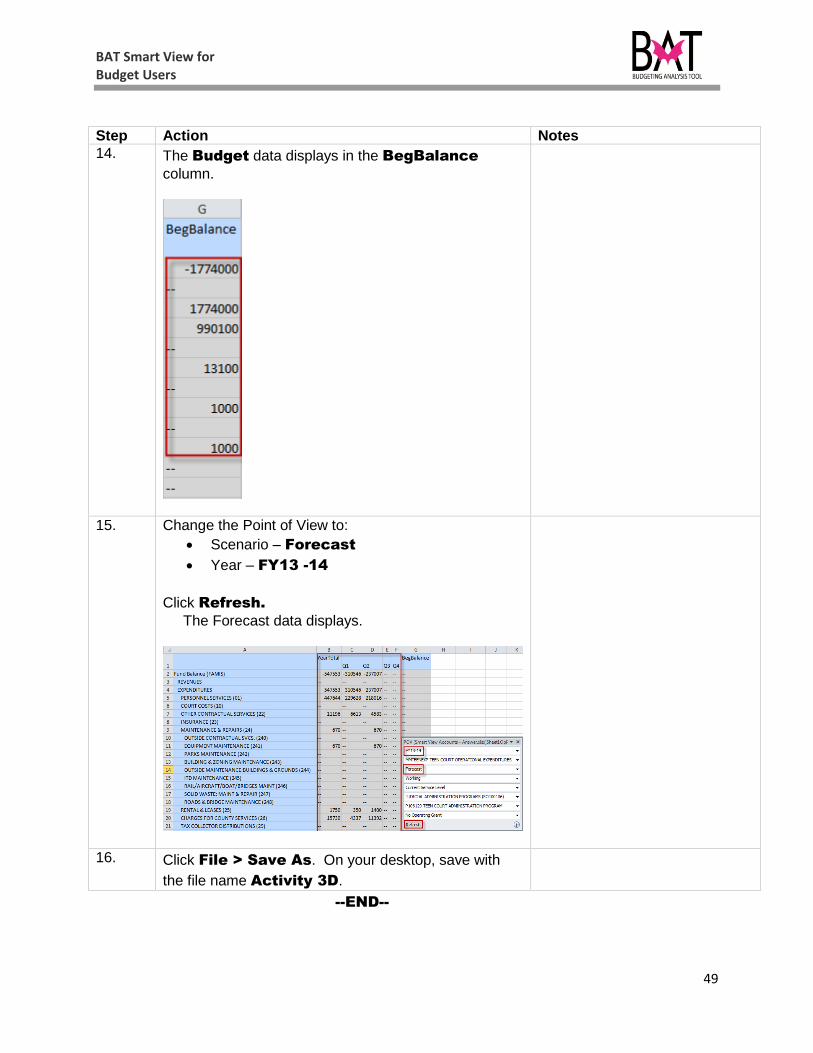
14. The Budget data displays in the BegBalance
column.
15. Change the Point of View to:
Scenario – Forecast
Year – FY13 -14
Click Refresh.
The Forecast data displays.
16. Click File > Save As. On your desktop, save with
the file name Activity 3D.
--END--

BAT Smart View for Budget Users
50
BAT Smart View for Budget Users
51
Activity 4: Using the Pivot Function in Smart View. In this activity, you will:
Open an Active Smart View Sheet
Use Pivot function in and out of the Point of View box Pivot members between Rows and Columns Work with nested dimensions in the Rows and Columns Set Smart View Options to adjust display of data on the Ad Hoc Sheet
1. Be sure that the Activity 3D file is open. Select File
> Save As and save the file with the name Activity
4.
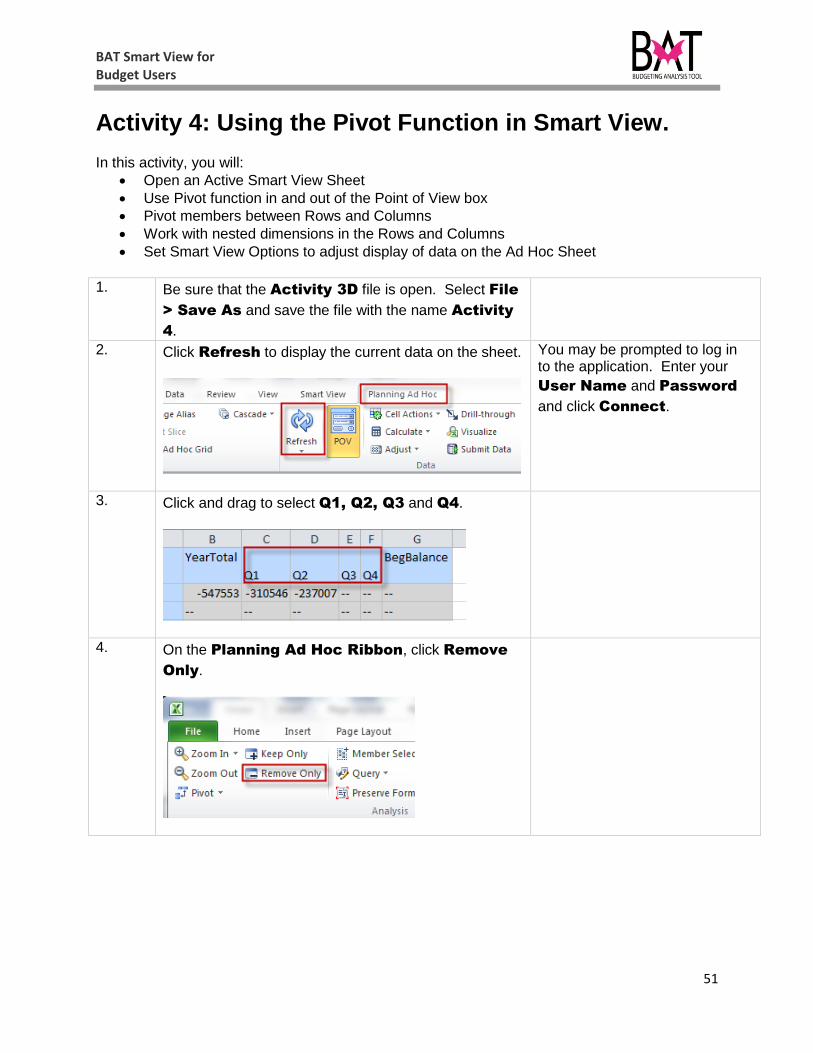
2. Click Refresh to display the current data on the sheet.
You may be prompted to log in to the application. Enter your
User Name and Password
and click Connect.
3. Click and drag to select Q1, Q2, Q3 and Q4.
4. On the Planning Ad Hoc Ribbon, click Remove
Only.
BAT Smart View for Budget Users
52
Step Action Notes
5. We will now pivot the Year and Scenario dimension
members to the columns.
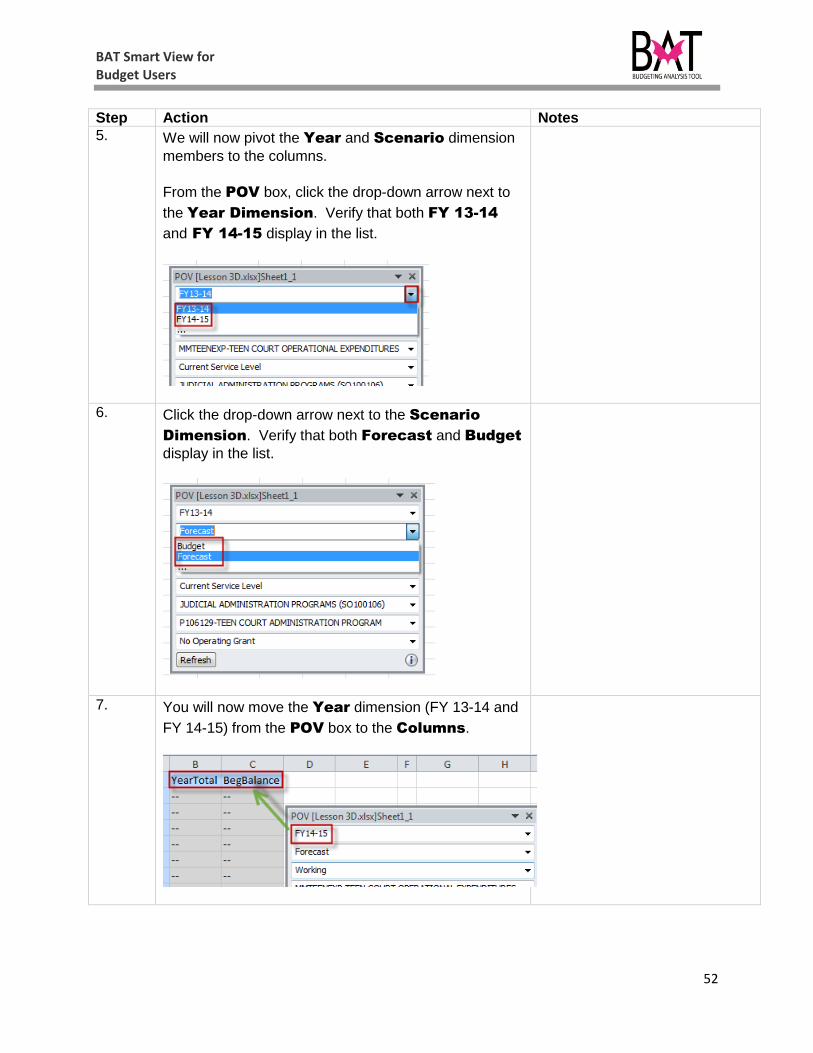
From the POV box, click the drop-down arrow next to
the Year Dimension. Verify that both FY 13-14
and FY 14-15 display in the list.
6. Click the drop-down arrow next to the Scenario
Dimension. Verify that both Forecast and Budget
display in the list.
7. You will now move the Year dimension (FY 13-14 and
FY 14-15) from the POV box to the Columns.
BAT Smart View for Budget Users
53
Step Action Notes
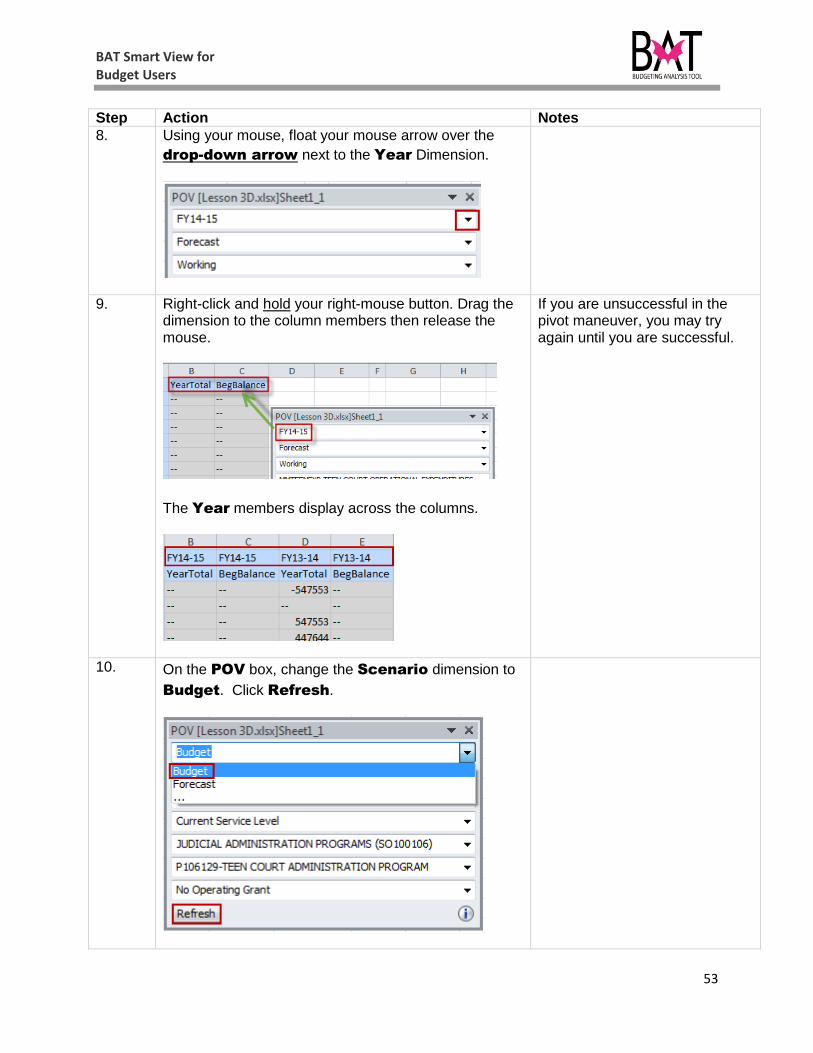
8. Using your mouse, float your mouse arrow over the
drop-down arrow next to the Year Dimension.
9. Right-click and hold your right-mouse button. Drag the dimension to the column members then release the mouse.
The Year members display across the columns.
If you are unsuccessful in the pivot maneuver, you may try again until you are successful.
10. On the POV box, change the Scenario dimension to
Budget. Click Refresh.
BAT Smart View for Budget Users
54
Step Action Notes
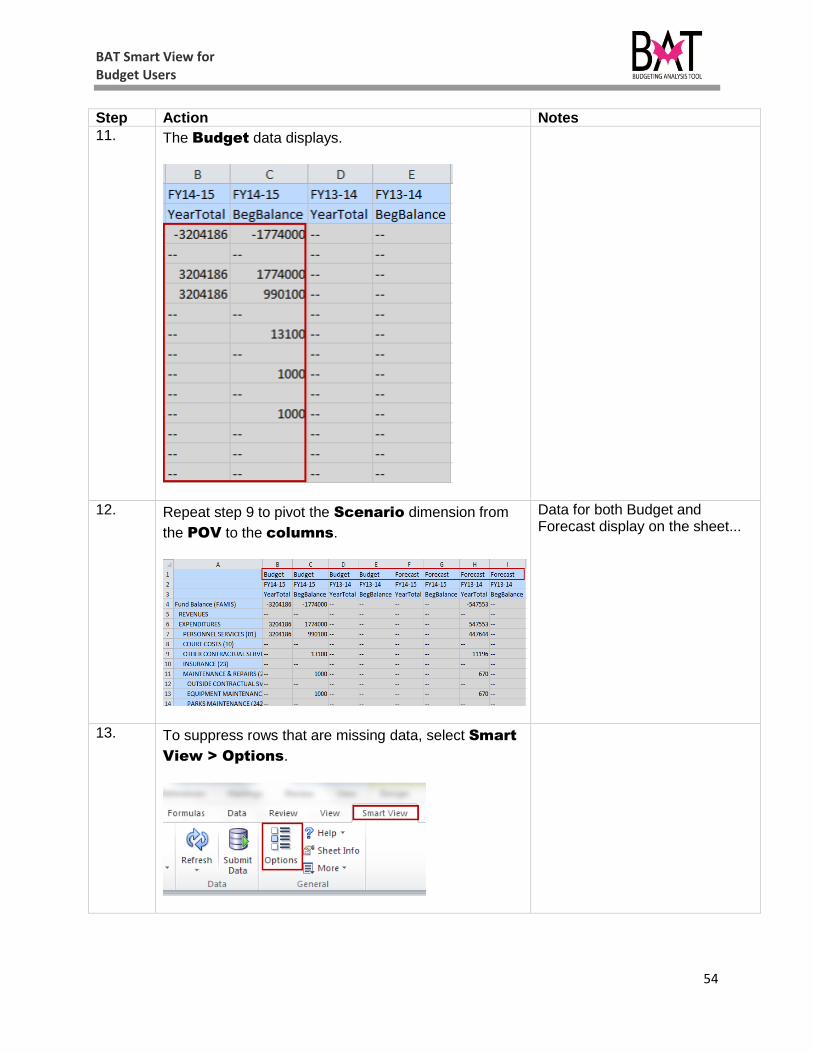
11. The Budget data displays.
12. Repeat step 9 to pivot the Scenario dimension from
the POV to the columns.
Data for both Budget and Forecast display on the sheet...
13. To suppress rows that are missing data, select Smart
View > Options.
BAT Smart View for Budget Users
55
Step Action Notes
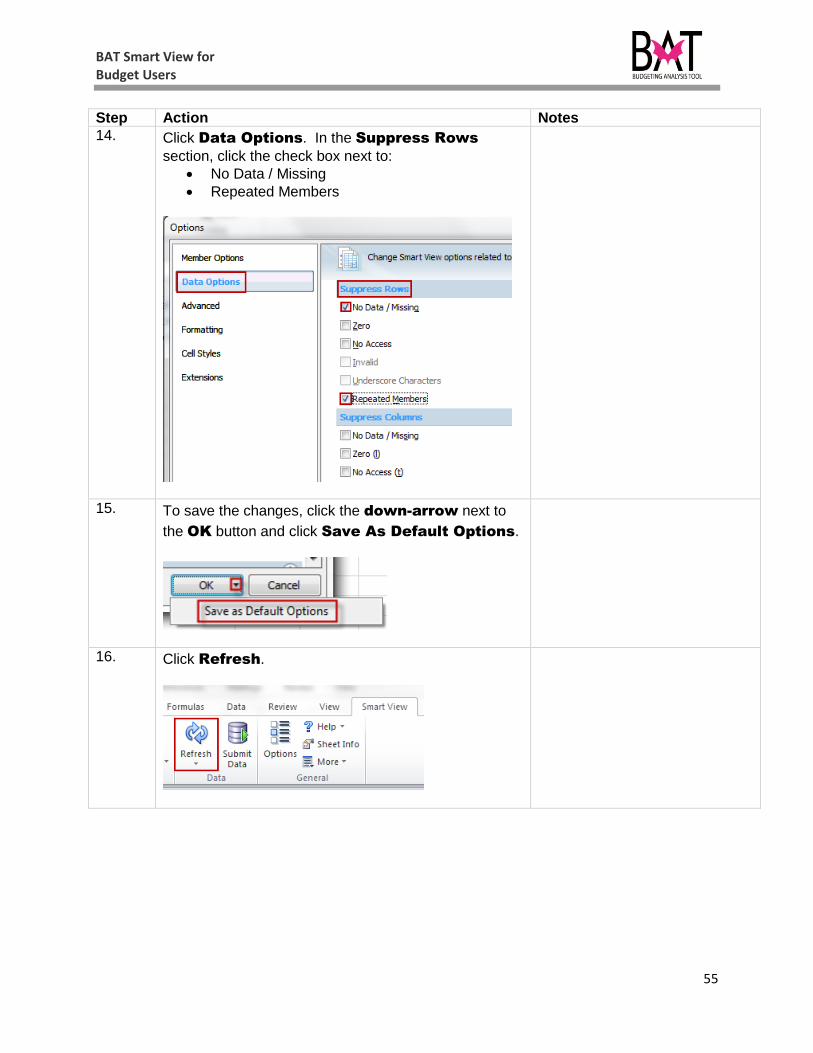
14. Click Data Options. In the Suppress Rows
section, click the check box next to:
No Data / Missing
Repeated Members
15. To save the changes, click the down-arrow next to
the OK button and click Save As Default Options.
16. Click Refresh.
BAT Smart View for Budget Users
56
Step Action Notes
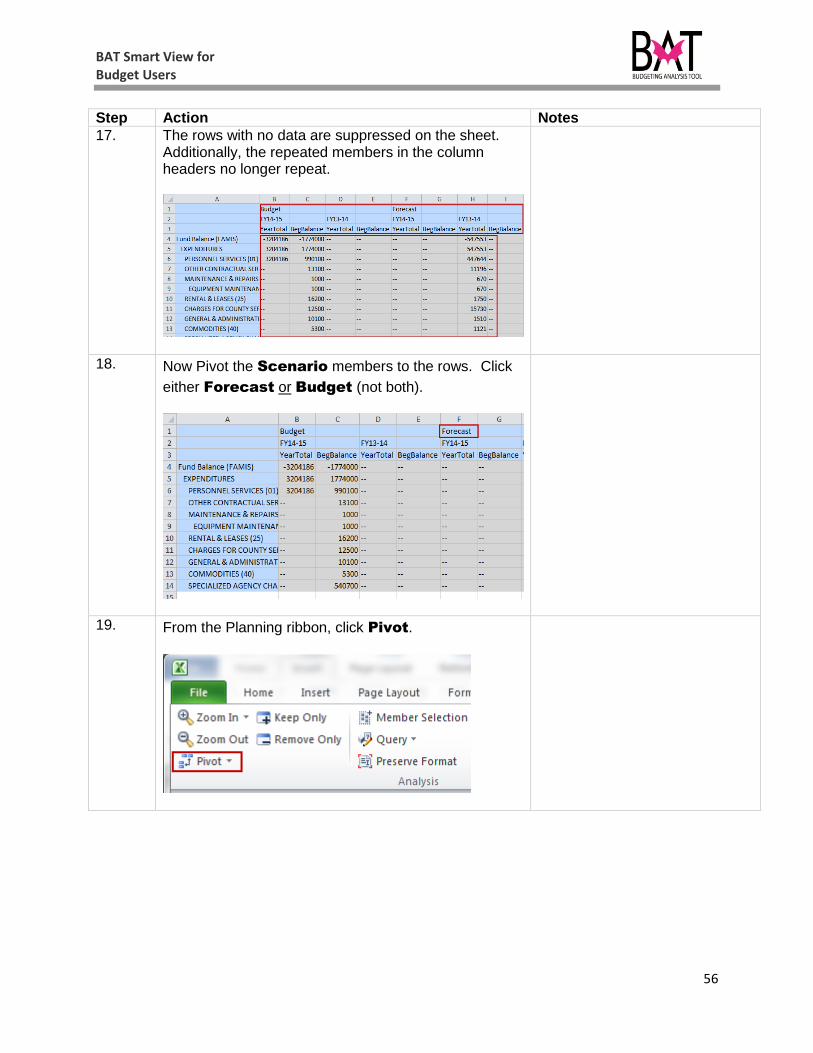
17. The rows with no data are suppressed on the sheet. Additionally, the repeated members in the column headers no longer repeat.
18. Now Pivot the Scenario members to the rows. Click
either Forecast or Budget (not both).
19. From the Planning ribbon, click Pivot.
BAT Smart View for Budget Users
57
Step Action Notes
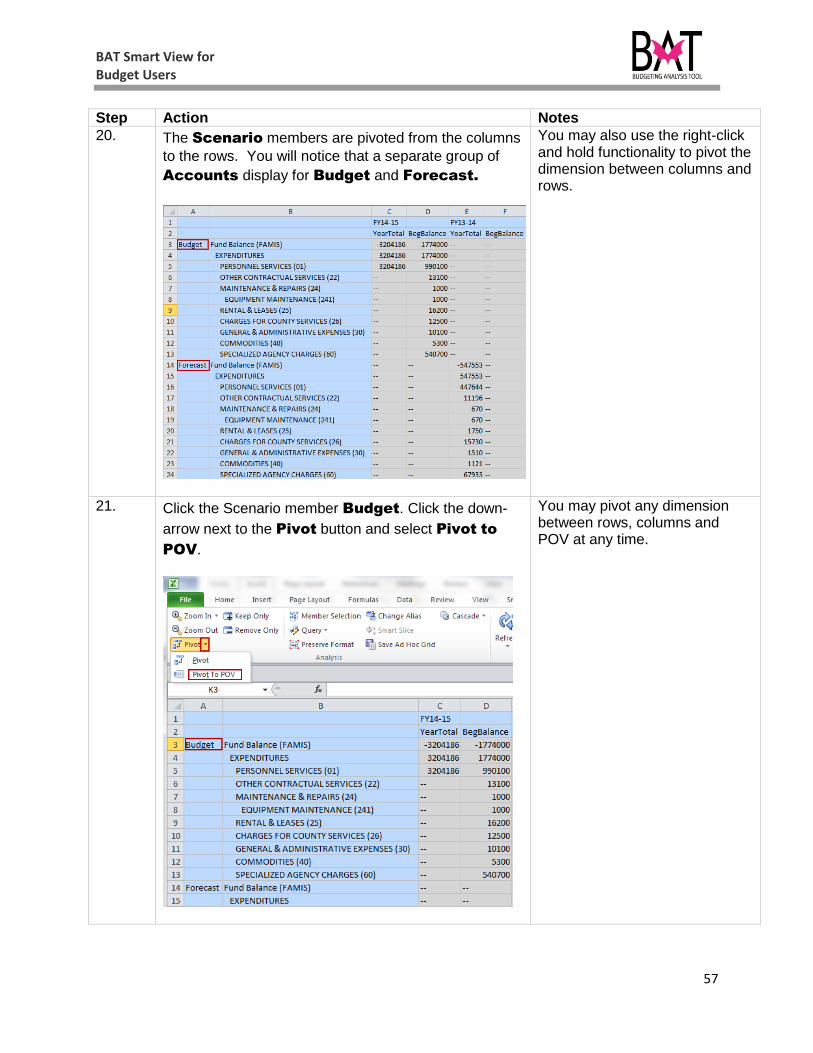
20. The Scenario members are pivoted from the columns
to the rows. You will notice that a separate group of
Accounts display for Budget and Forecast.
You may also use the right-click and hold functionality to pivot the dimension between columns and rows.
21. Click the Scenario member Budget. Click the down-
arrow next to the Pivot button and select Pivot to
POV.
You may pivot any dimension between rows, columns and POV at any time.
BAT Smart View for Budget Users
58
Step Action Notes
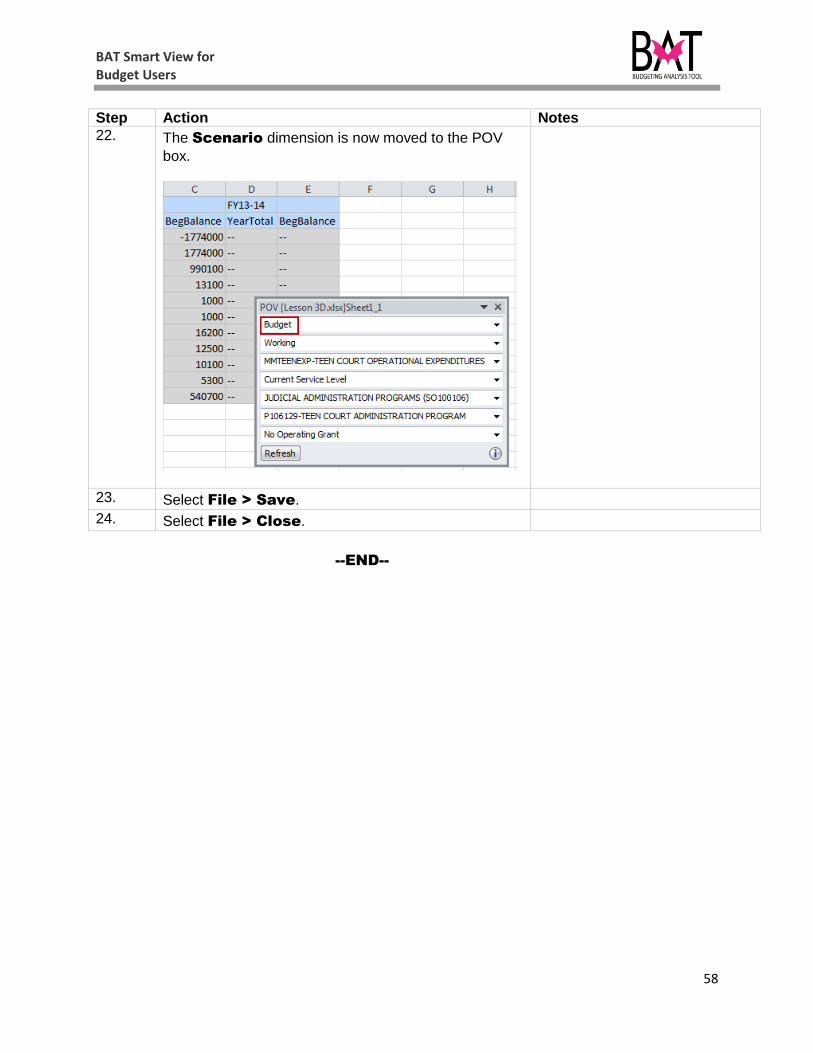
22. The Scenario dimension is now moved to the POV
box.
23. Select File > Save.
24. Select File > Close.
--END--
BAT Smart View for Budget Users
59
Activity 5: Cascading Ad Hoc Grids. In this activity, you will:
Open an existing Ad Hoc Smart View sheet Create a Cascade sheet by Entity Save the new file to your hard drive
Step Action Notes
1. Open the Activity 3D.xlsx file. Be sure that you are
connected to the BAT OpPlan database.
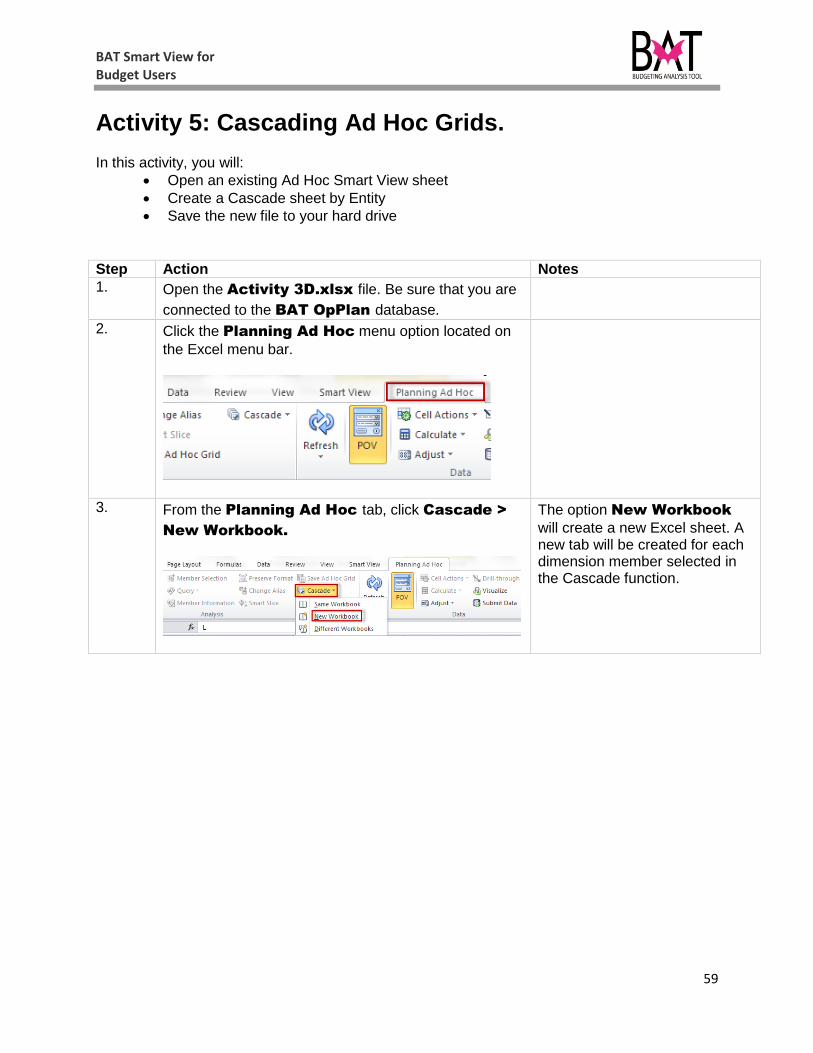
2. Click the Planning Ad Hoc menu option located on
the Excel menu bar.
3. From the Planning Ad Hoc tab, click Cascade >
New Workbook.
The option New Workbook
will create a new Excel sheet. A new tab will be created for each dimension member selected in the Cascade function.

BAT Smart View for Budget Users
60
Step Action Notes
4. From the dimension drop-drop list, select the Entity
dimension.
5. Click the left-arrow to remove the current selection.
BAT Smart View for Budget Users
61
Step Action Notes
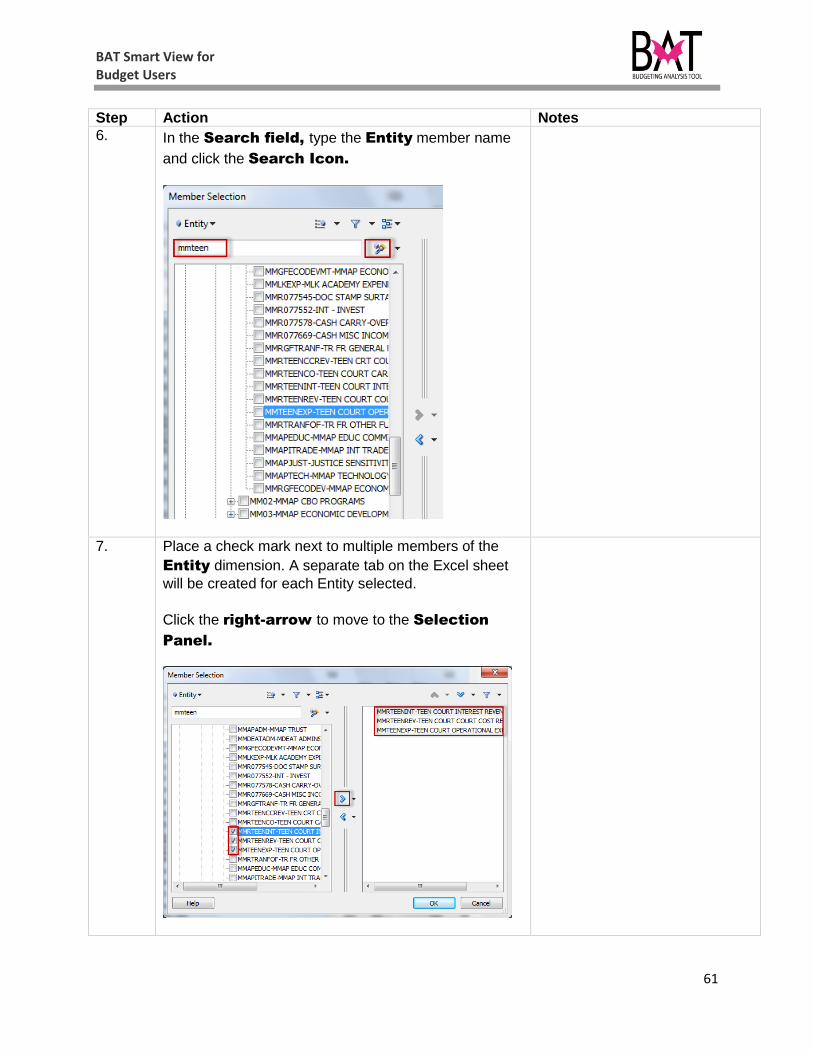
6. In the Search field, type the Entity member name
and click the Search Icon.
7. Place a check mark next to multiple members of the
Entity dimension. A separate tab on the Excel sheet
will be created for each Entity selected.
Click the right-arrow to move to the Selection
Panel.
BAT Smart View for Budget Users
62
Step Action Notes
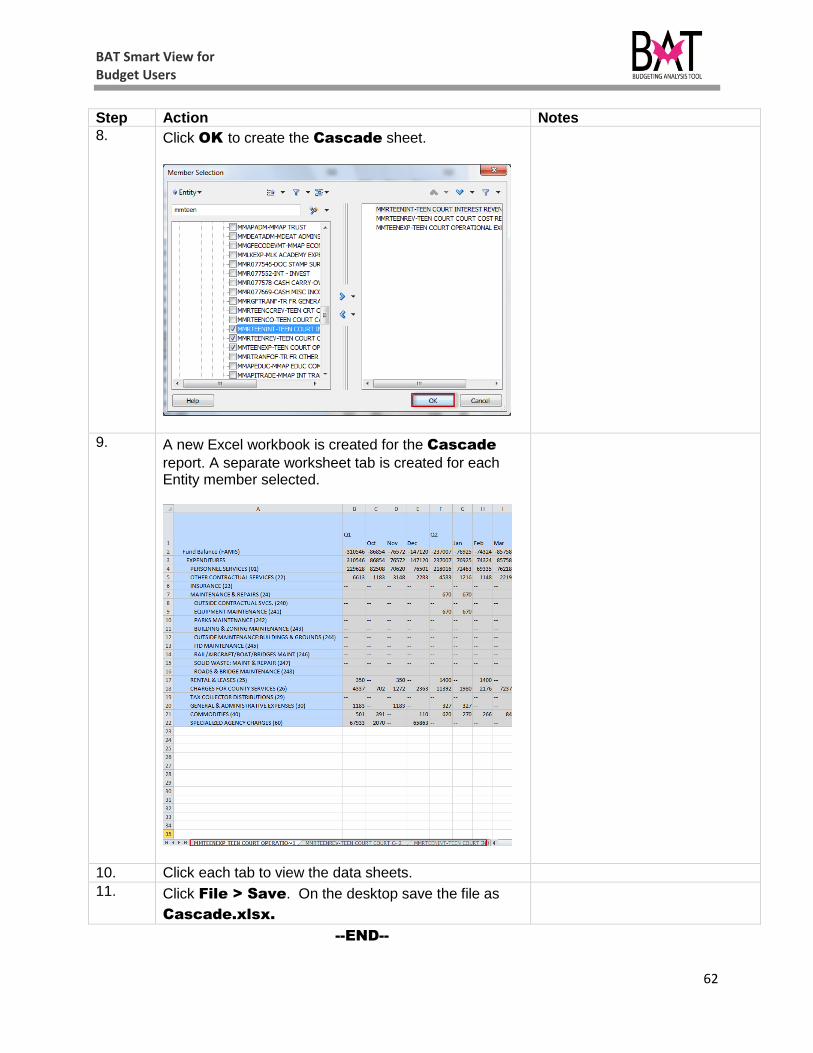
8. Click OK to create the Cascade sheet.
9. A new Excel workbook is created for the Cascade
report. A separate worksheet tab is created for each Entity member selected.
10. Click each tab to view the data sheets.
11. Click File > Save. On the desktop save the file as
Cascade.xlsx.
--END--
BAT Smart View for Budget Users
63
Activity 5: Create Ad Hoc Sheet Using Query Designer. In this activity, you will:
Open a New Excel Sheet
Verify you are connected using Private Connection
Create a new Query Designer Sheet Modify the layout of the Dimensions on the Sheet Make Point of View Selections Execute the Query and View data on the Ad Hoc Sheet.
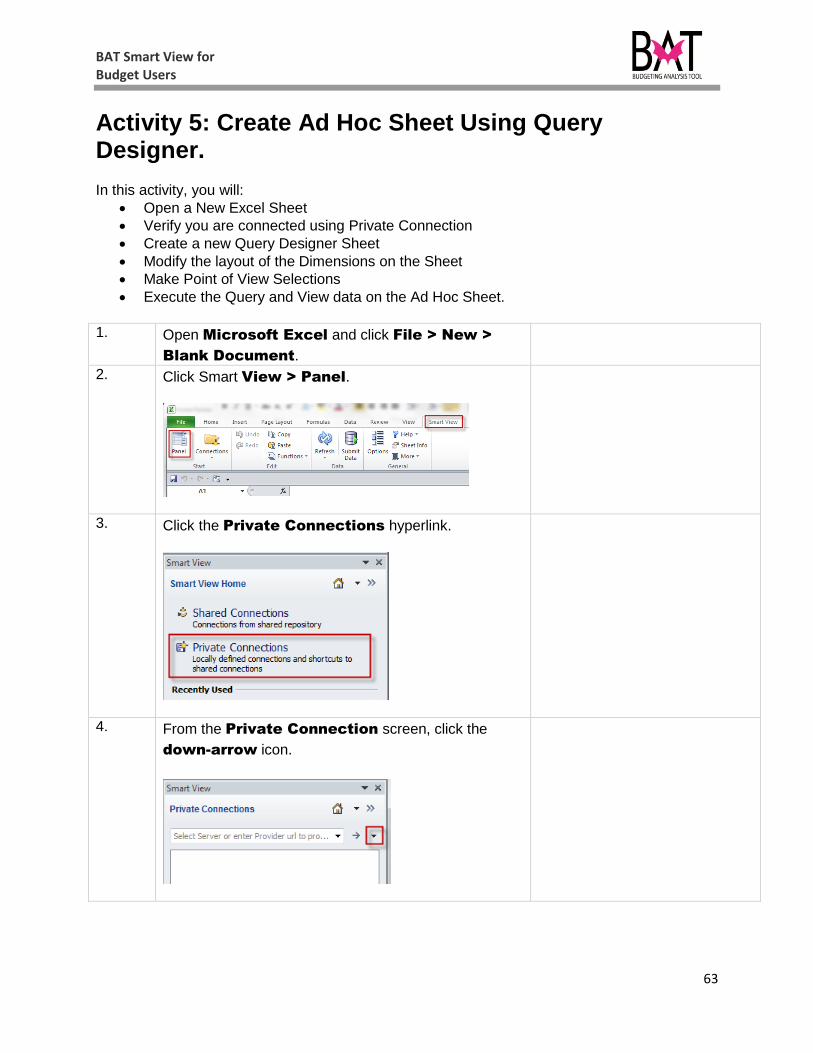
1. Open Microsoft Excel and click File > New >
Blank Document.
2. Click Smart View > Panel.
3. Click the Private Connections hyperlink.
4. From the Private Connection screen, click the
down-arrow icon.
BAT Smart View for Budget Users
64
Step Action Notes
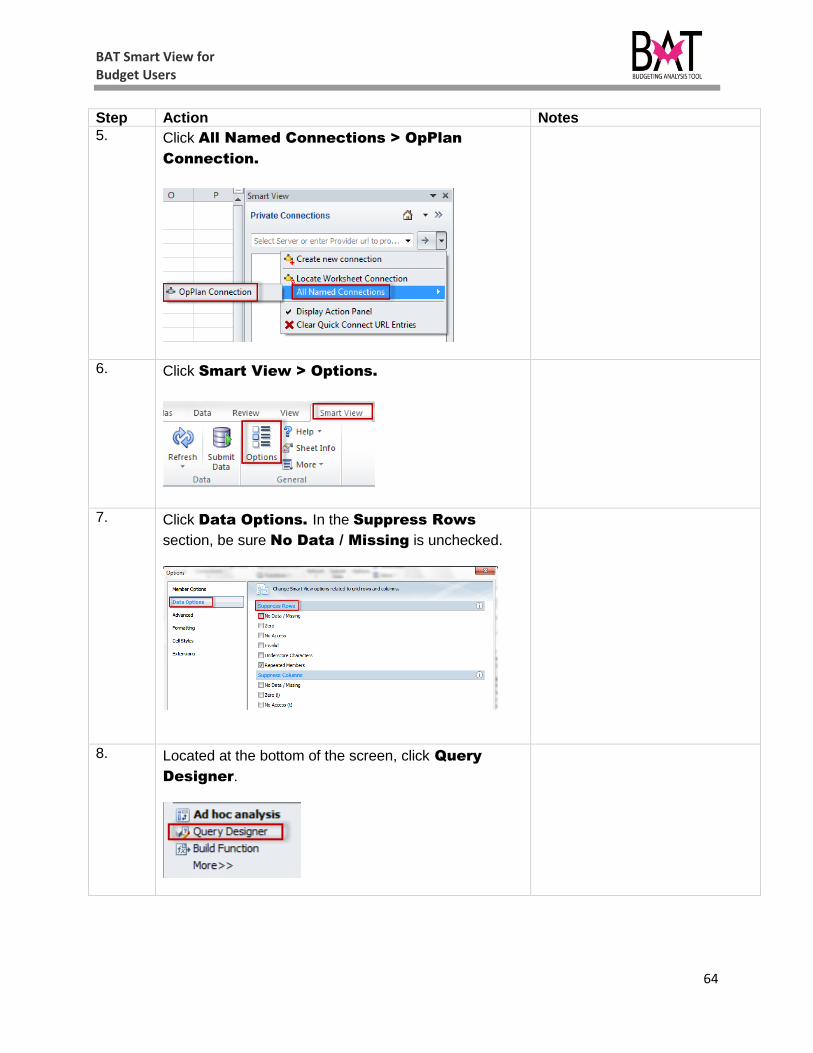
5. Click All Named Connections > OpPlan
Connection.
6. Click Smart View > Options.
7. Click Data Options. In the Suppress Rows
section, be sure No Data / Missing is unchecked.
8. Located at the bottom of the screen, click Query
Designer.

BAT Smart View for Budget Users
65
Step Action Notes
9. The Query Designer Dimension Tiles display
next to the Connection Panel.
A separate section for
Columns, Rows and POV
(Point of View) displays.
10. Click and drag the Year dimension from the
Columns section to the POV section.
Use your left-mouse button to move the dimension tiles between Column, Row and POV...
BAT Smart View for Budget Users
66
Step Action Notes
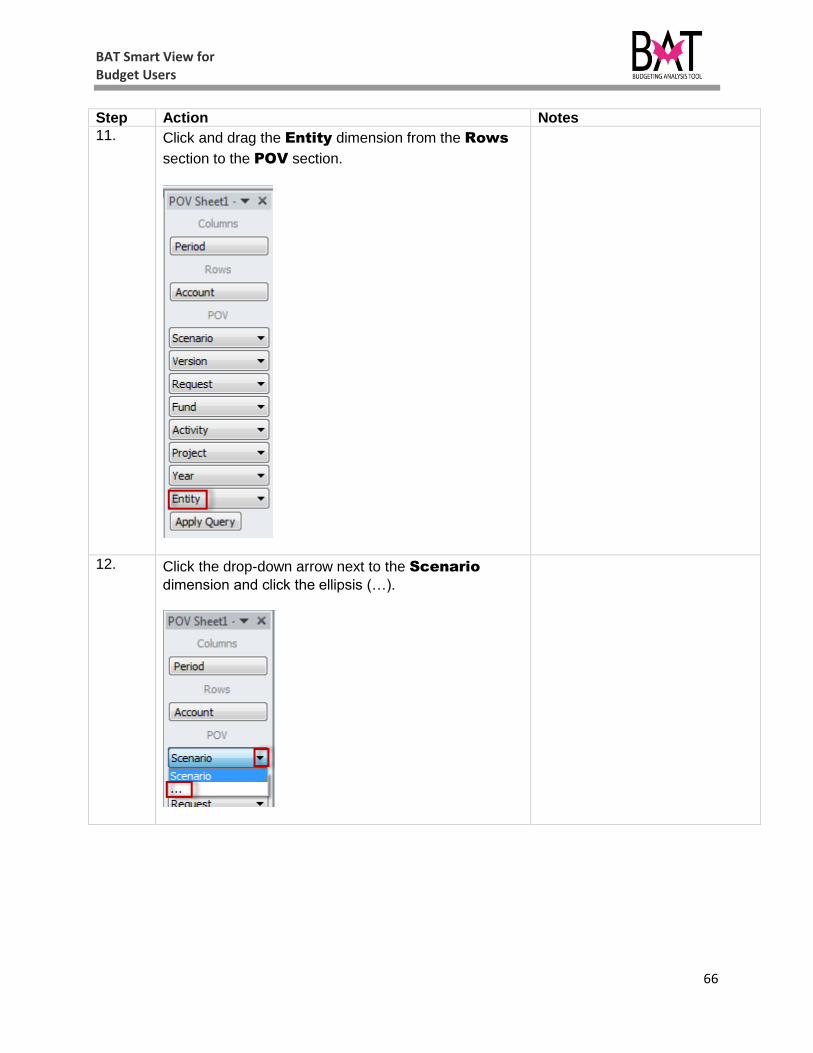
11. Click and drag the Entity dimension from the Rows
section to the POV section.
12. Click the drop-down arrow next to the Scenario
dimension and click the ellipsis (…).
BAT Smart View for Budget Users
67
Step Action Notes
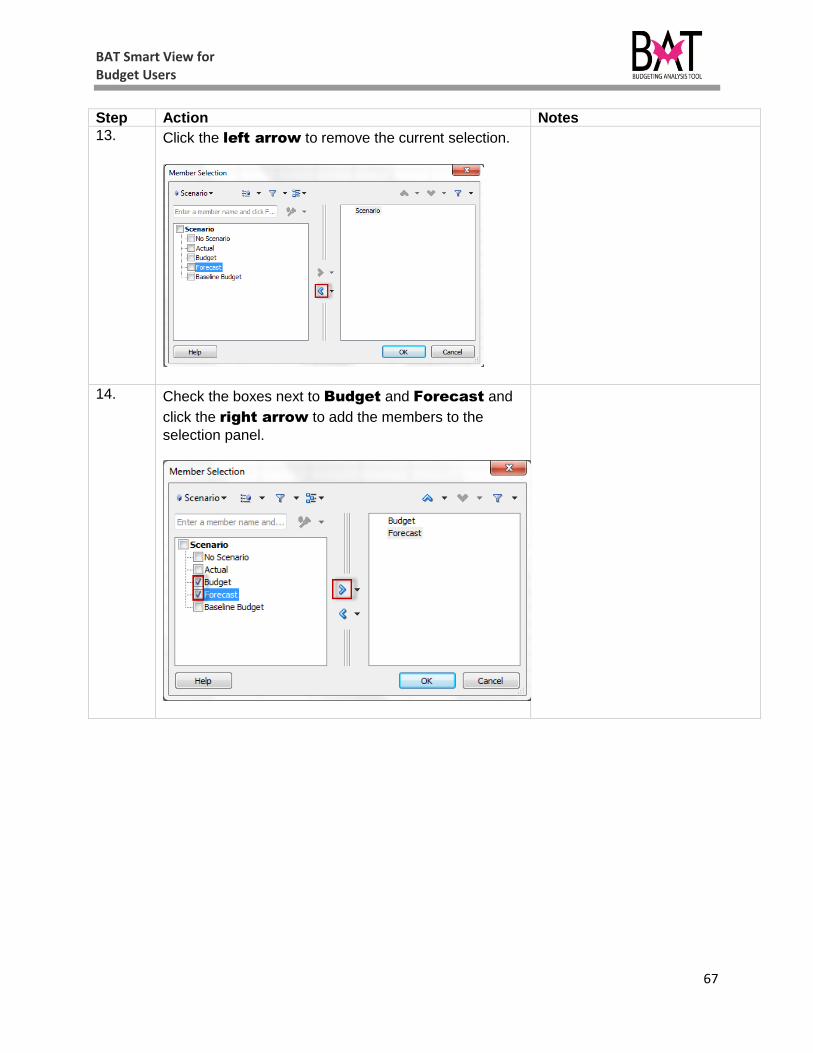
13. Click the left arrow to remove the current selection.
14. Check the boxes next to Budget and Forecast and
click the right arrow to add the members to the
selection panel.
BAT Smart View for Budget Users
68
Step Action Notes
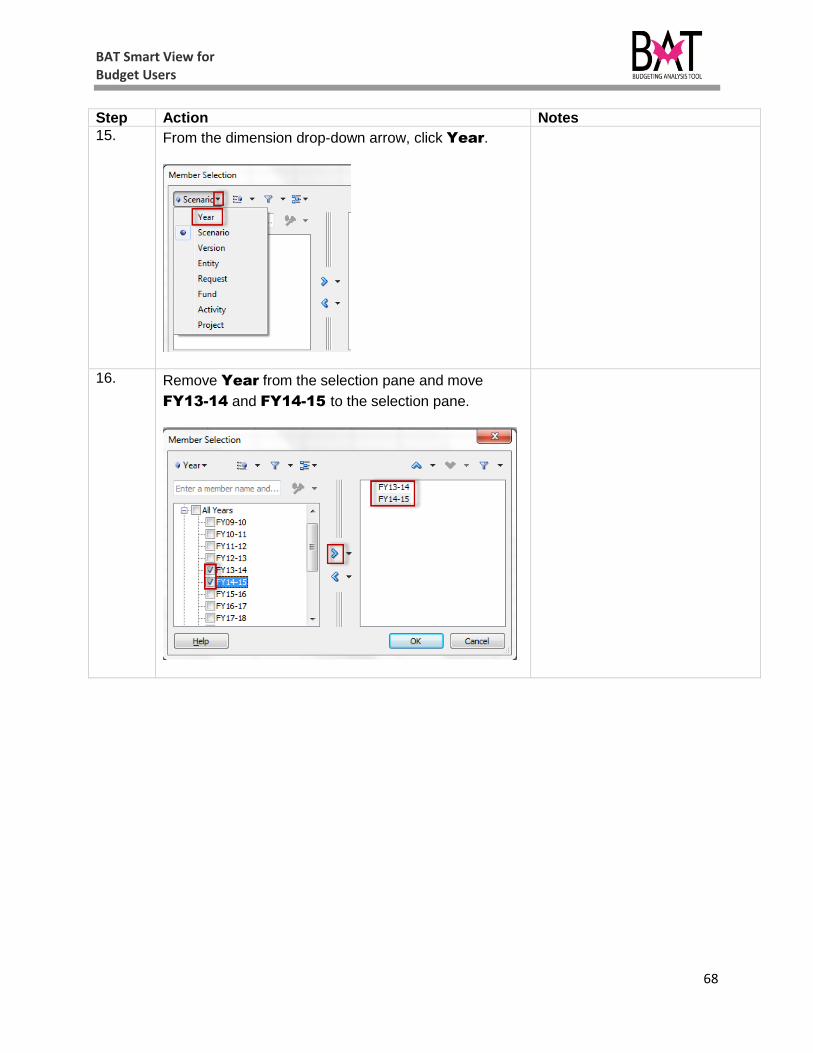
15. From the dimension drop-down arrow, click Year.
16. Remove Year from the selection pane and move
FY13-14 and FY14-15 to the selection pane.
BAT Smart View for Budget Users
69
Step Action Notes
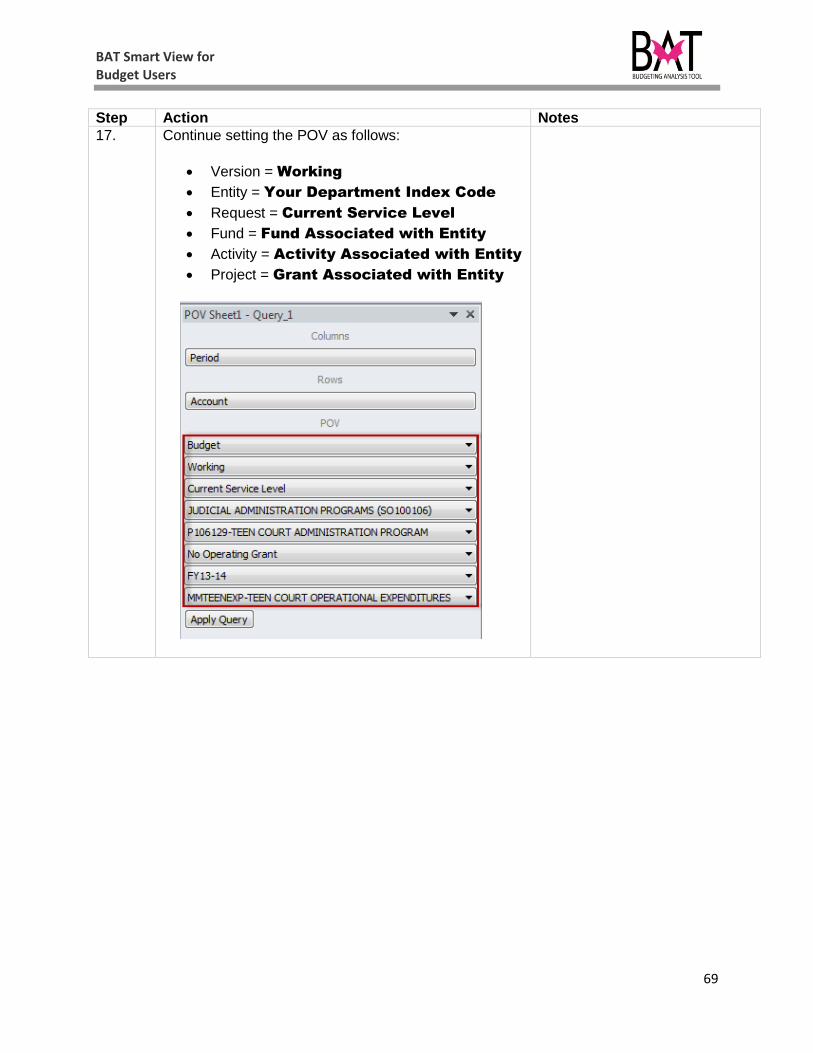
17. Continue setting the POV as follows:
Version = Working
Entity = Your Department Index Code
Request = Current Service Level
Fund = Fund Associated with Entity
Activity = Activity Associated with Entity
Project = Grant Associated with Entity
BAT Smart View for Budget Users
70
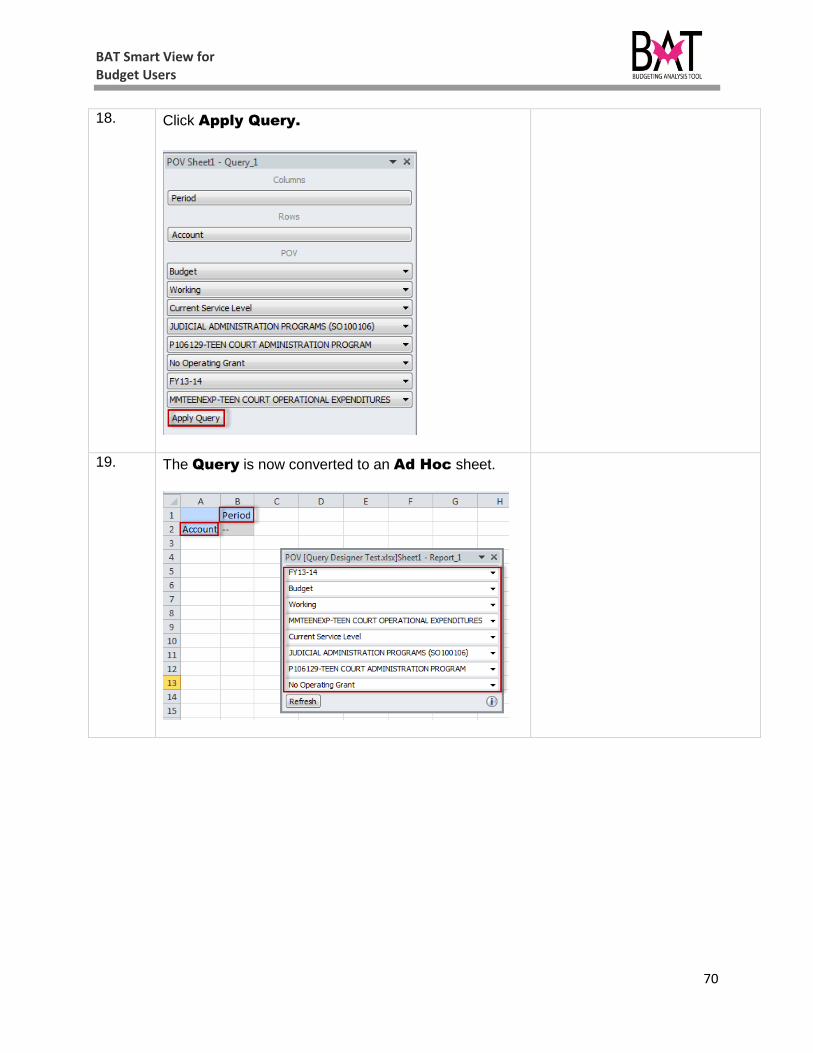
18. Click Apply Query.
19. The Query is now converted to an Ad Hoc sheet.
BAT Smart View for Budget Users
71
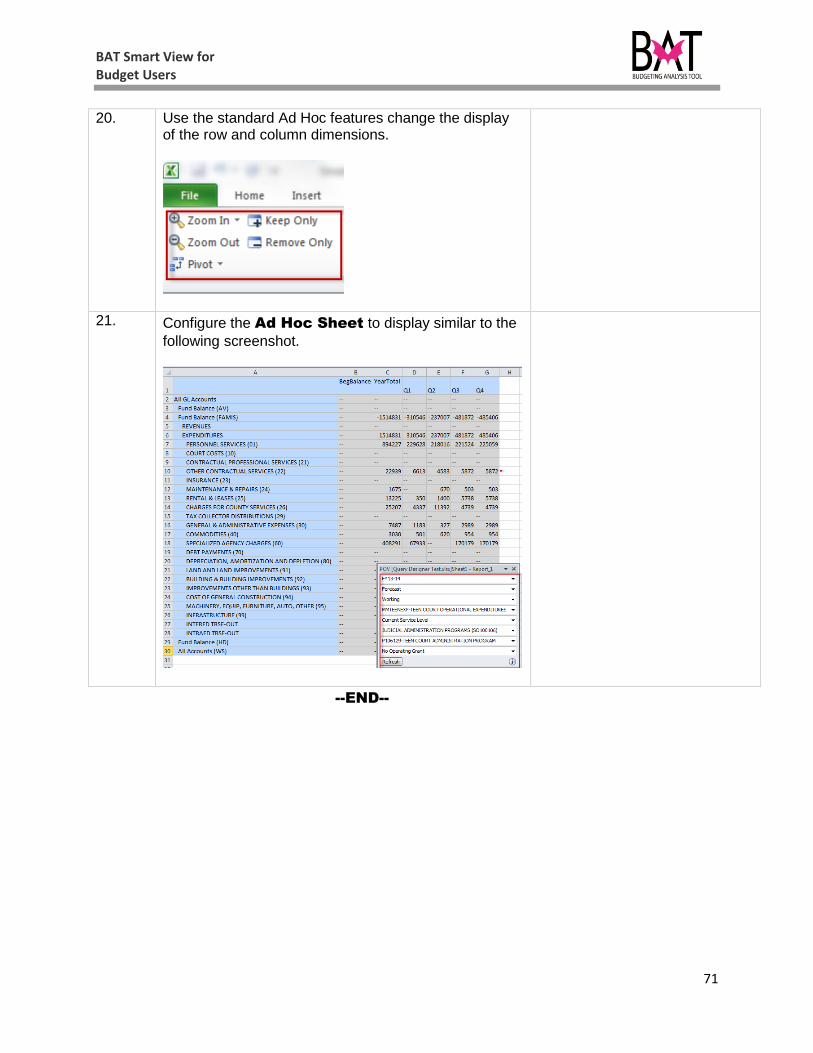
20. Use the standard Ad Hoc features change the display of the row and column dimensions.
21. Configure the Ad Hoc Sheet to display similar to the
following screenshot.
--END--

BAT Smart View for Budget Users
72
BAT Smart View for Budget Users
73
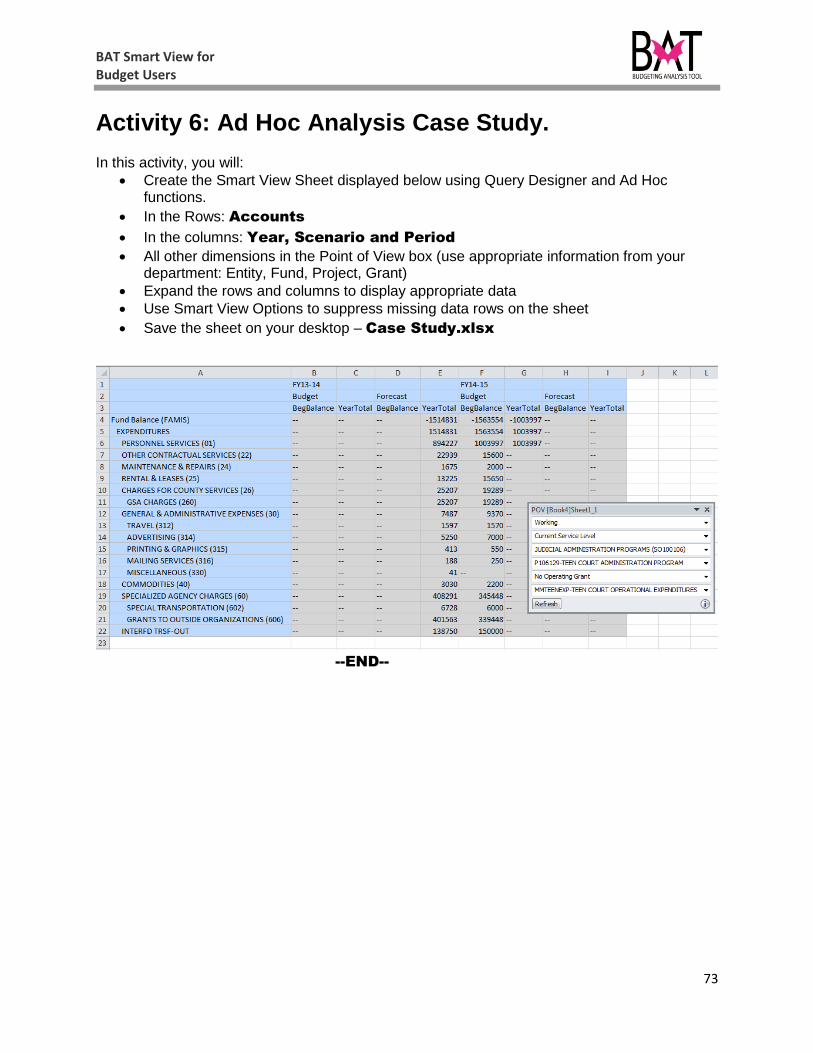
Activity 6: Ad Hoc Analysis Case Study. In this activity, you will:
Create the Smart View Sheet displayed below using Query Designer and Ad Hoc functions.
In the Rows: Accounts
In the columns: Year, Scenario and Period
All other dimensions in the Point of View box (use appropriate information from your department: Entity, Fund, Project, Grant)
Expand the rows and columns to display appropriate data Use Smart View Options to suppress missing data rows on the sheet
Save the sheet on your desktop – Case Study.xlsx
--END--

BAT Smart View for Budget Users
74
BAT Smart View for Budget Users
75
Appendix A: Hyperion Smart View Options MS Office (Excel) Smart View has a set of options that operate as preferences. These options affect the view of data forms ad hoc sheets and reports. These options do not affect other users’ view of the report or their data. The options are divided into several windows:
Member Options
Data Options
Advanced
Formatting
Cell Styles
Extensions
In this section of the activity, you will:
Access Hyperion Smart View and set Options
Step Action Notes
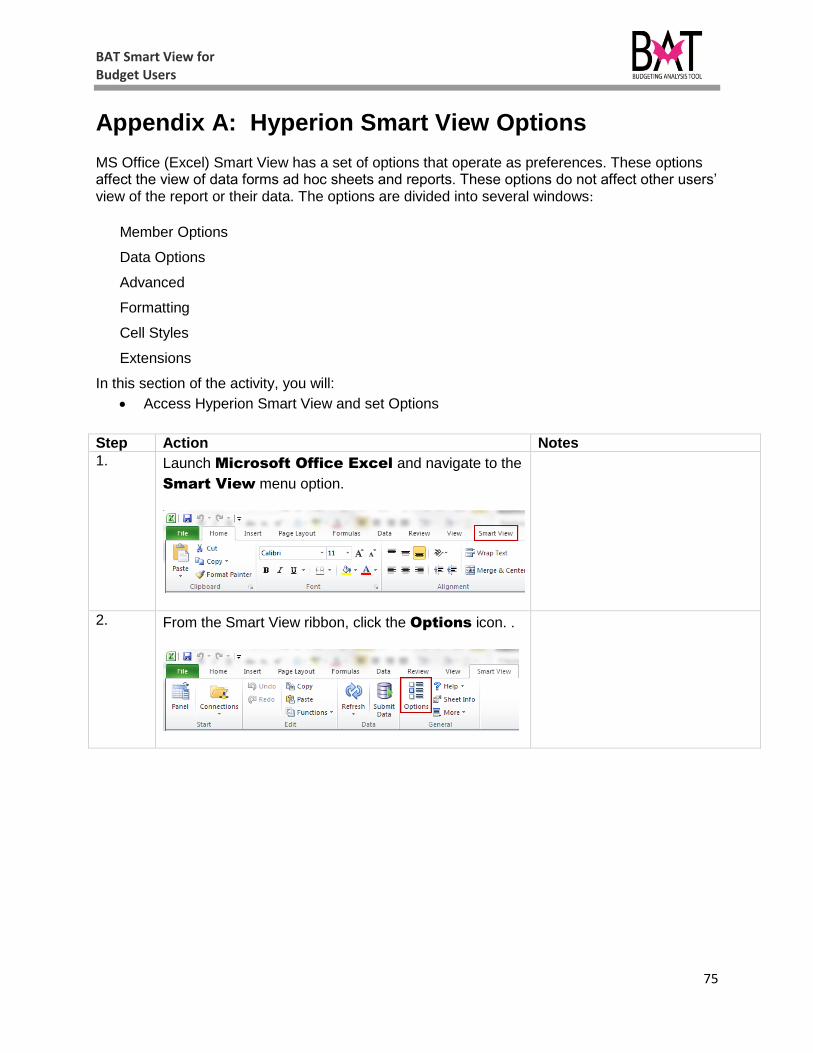
1. Launch Microsoft Office Excel and navigate to the
Smart View menu option.
2. From the Smart View ribbon, click the Options icon. .
BAT Smart View for Budget Users
76
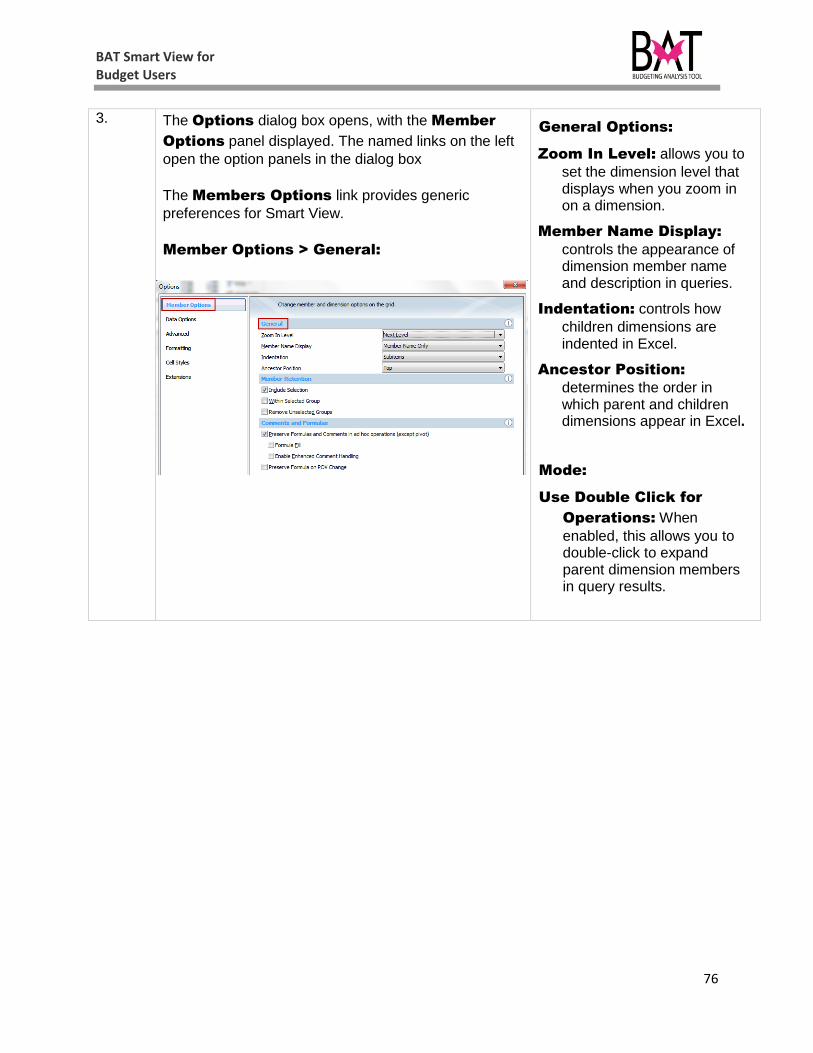
3. The Options dialog box opens, with the Member
Options panel displayed. The named links on the left
open the option panels in the dialog box
The Members Options link provides generic
preferences for Smart View.
Member Options > General:
General Options:
Zoom In Level: allows you to
set the dimension level that displays when you zoom in on a dimension.
Member Name Display:
controls the appearance of dimension member name and description in queries.
Indentation: controls how
children dimensions are indented in Excel.
Ancestor Position:
determines the order in which parent and children dimensions appear in Excel.
Mode:
Use Double Click for
Operations: When
enabled, this allows you to double-click to expand parent dimension members in query results.

BAT Smart View for Budget Users
77
4. Member Options > Member Retention:
Member Retention:
This option affects the display of members that are drilled on (either up or down). If no option is selected, Smart View removes the item drilled on and displays only the children or descendants. The following options are available:
Include Selection: keeps the
member when you drill-down. For example, if you drill from YearTotal to quarters and this option is selected, the YearTotal member will be retained as part of the report.
Within Selected Group:
keeps the member at the same indentation as the resulting member.
Remove Unselected
Groups: drills to the next
level on the item selected and remove all other items for the row or column. For example, if your report had quarters on the columns and you drill on Q1 with this option selected, the result would be Oct, Nov, and Dec. All other quarters would be removed from the report.

BAT Smart View for Budget Users
78
5. Data Options allow you to set row suppression
controls and replacement value controls for data grids.
Suppress Rows and
Suppress Columns:
The items control how no data and missing values display in Smart View sheets. Each setting will control either row or column data
NOTE: If you attempt a new
query and click Refresh, you may receive an error message if the #No Data / Missing and the Zero options are selected.
The options available for row and column information include:
No Data / Missing:
suppresses rows or columns that contain no data.
Zero: suppresses any rows of
columns where the value is 0.
No Access: user does not
have access to selected members
Invalid: intersection is not valid
Underscore Characters: if
these members are used in Planning, suppress them on the sheet
Repeated Members: hides
repeated labels in the rows or columns. For example, if you were looking at 10 accounts for each Entity (Index Code), rather than seeing the Entity display next to each account, it would only appear for the first account – when this option is selected.
BAT Smart View for Budget Users
79
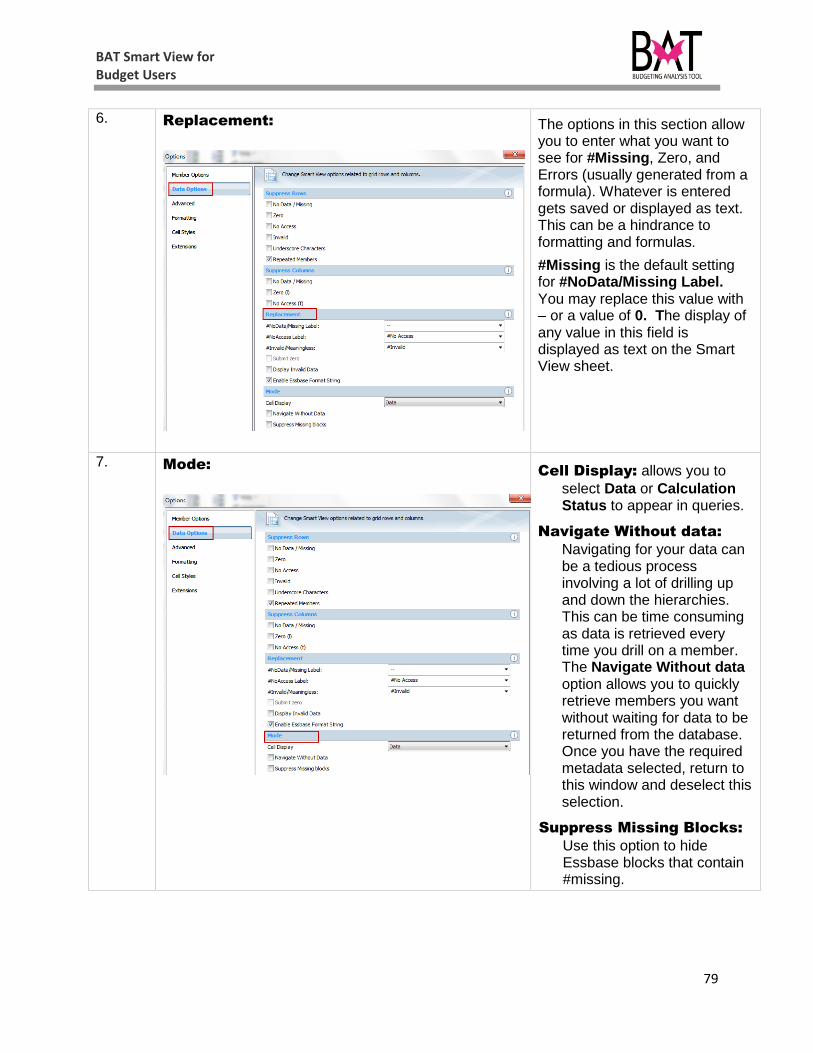
6. Replacement:
The options in this section allow you to enter what you want to see for #Missing, Zero, and Errors (usually generated from a formula). Whatever is entered gets saved or displayed as text. This can be a hindrance to formatting and formulas.
#Missing is the default setting for #NoData/Missing Label. You may replace this value with – or a value of 0. The display of any value in this field is displayed as text on the Smart View sheet.
7. Mode:
Cell Display: allows you to
select Data or Calculation Status to appear in queries.
Navigate Without data:
Navigating for your data can be a tedious process involving a lot of drilling up and down the hierarchies. This can be time consuming as data is retrieved every time you drill on a member. The Navigate Without data option allows you to quickly retrieve members you want without waiting for data to be returned from the database. Once you have the required metadata selected, return to this window and deselect this selection.
Suppress Missing Blocks:
Use this option to hide Essbase blocks that contain #missing.
BAT Smart View for Budget Users
80
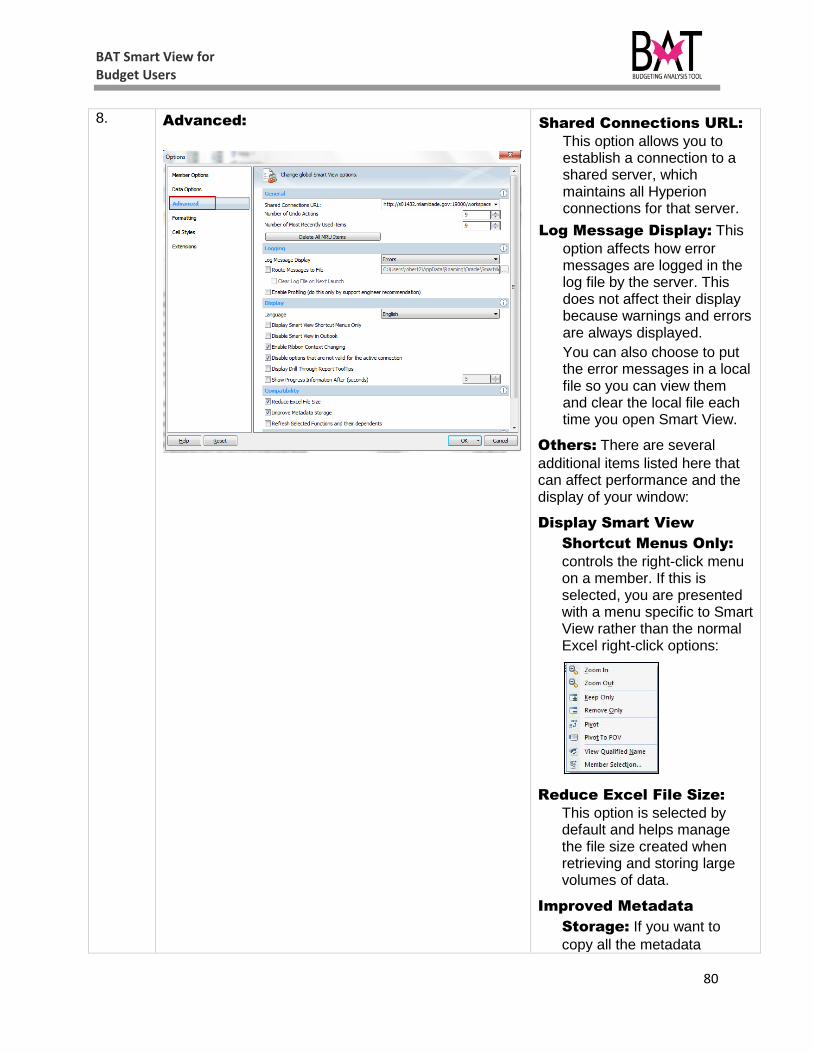
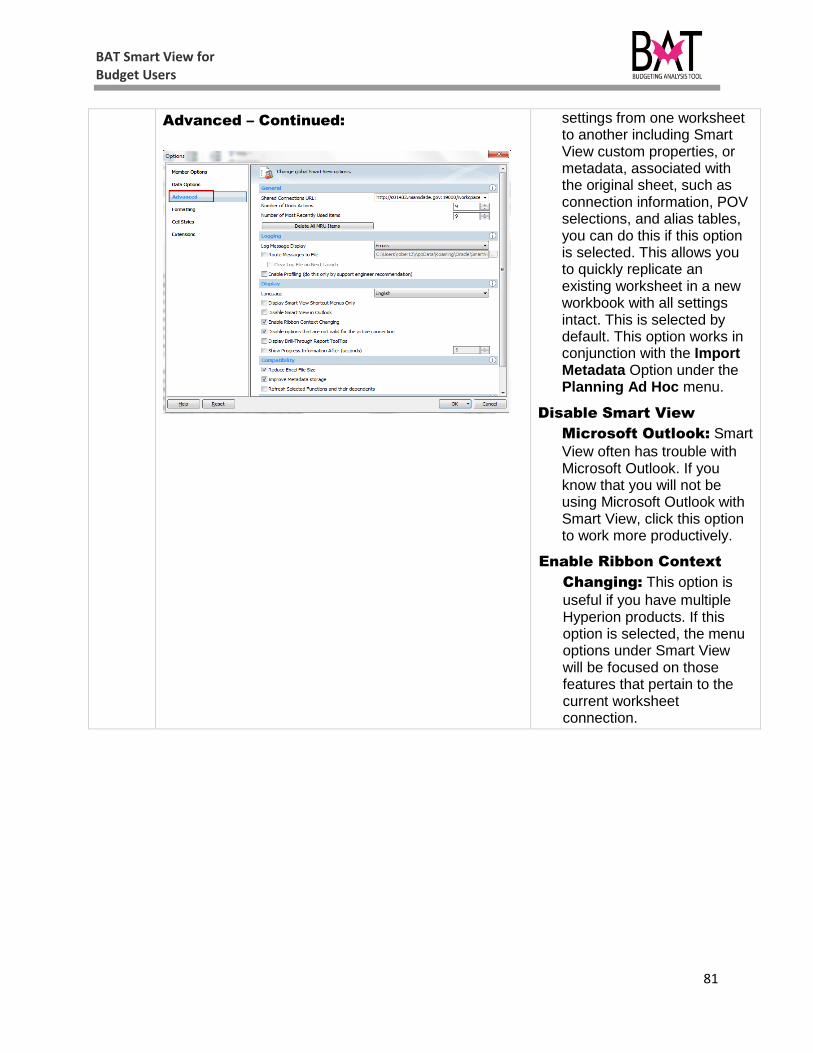
8. Advanced:
Shared Connections URL:
This option allows you to establish a connection to a shared server, which maintains all Hyperion connections for that server.
Log Message Display: This
option affects how error messages are logged in the log file by the server. This does not affect their display because warnings and errors are always displayed.
You can also choose to put the error messages in a local file so you can view them and clear the local file each time you open Smart View.
Others: There are several
additional items listed here that can affect performance and the display of your window:
Display Smart View
Shortcut Menus Only:
controls the right-click menu on a member. If this is selected, you are presented with a menu specific to Smart View rather than the normal Excel right-click options:
Reduce Excel File Size:
This option is selected by default and helps manage the file size created when retrieving and storing large volumes of data.
Improved Metadata
Storage: If you want to
copy all the metadata
BAT Smart View for Budget Users
81
Advanced – Continued:
settings from one worksheet to another including Smart View custom properties, or metadata, associated with the original sheet, such as connection information, POV selections, and alias tables, you can do this if this option is selected. This allows you to quickly replicate an existing worksheet in a new workbook with all settings intact. This is selected by default. This option works in conjunction with the Import Metadata Option under the Planning Ad Hoc menu.
Disable Smart View
Microsoft Outlook: Smart
View often has trouble with Microsoft Outlook. If you know that you will not be using Microsoft Outlook with Smart View, click this option to work more productively.
Enable Ribbon Context
Changing: This option is
useful if you have multiple Hyperion products. If this option is selected, the menu options under Smart View will be focused on those features that pertain to the current worksheet connection.

BAT Smart View for Budget Users
82
9. Formatting:
Number Formatting: The
number formatting options affect the way formatting of the data values render when you click Refresh.
Use Thousands Separator:
inserts commas or other characters into large numbers to identify thousands.
Use Cell Styles: Sheet inherits
the settings from the Use Cell Styles screen.
Use Excel formatting: Enables
the use of Excel standards for $, etc. as defined for the current worksheet.
Retain Numeric Formatting:
retains the number formatting in query results.
Scale: Allows you to alter the
appearance of numbers by scaling up or down, which is useful when dealing with large numbers.
BAT Smart View for Budget Users
83
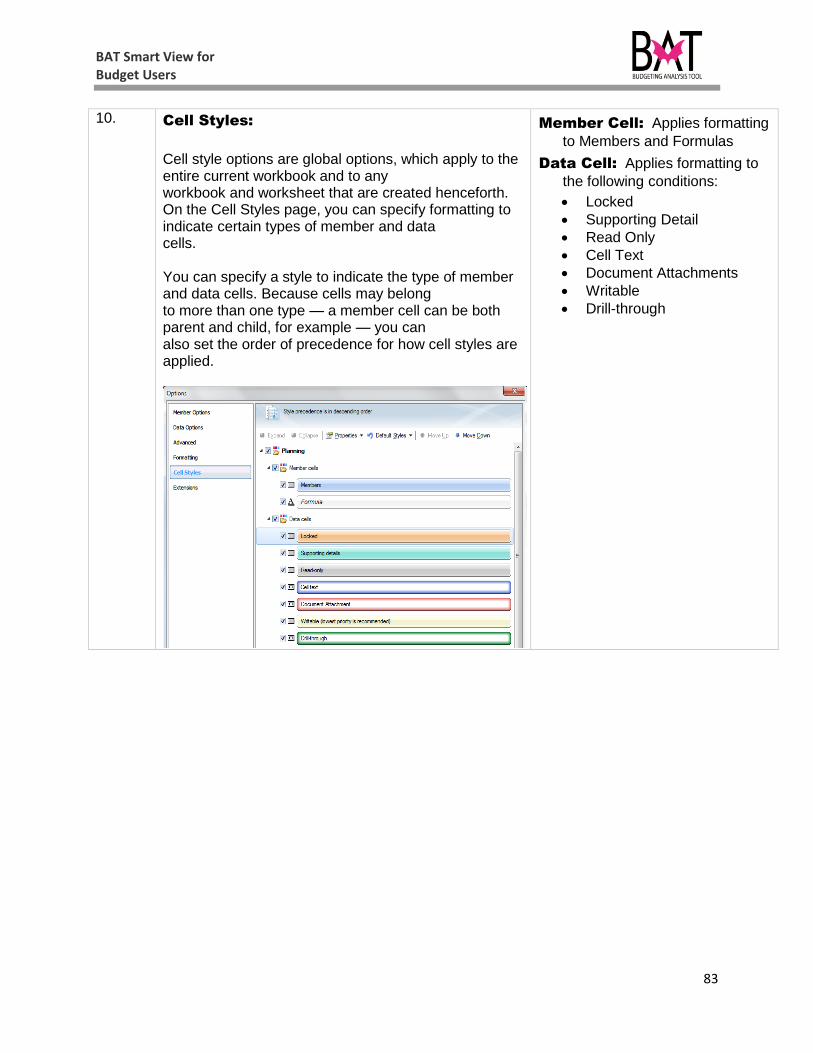
10. Cell Styles:
Cell style options are global options, which apply to the entire current workbook and to any workbook and worksheet that are created henceforth. On the Cell Styles page, you can specify formatting to indicate certain types of member and data cells. You can specify a style to indicate the type of member and data cells. Because cells may belong to more than one type — a member cell can be both parent and child, for example — you can also set the order of precedence for how cell styles are applied.
Member Cell: Applies formatting
to Members and Formulas
Data Cell: Applies formatting to
the following conditions:
Locked
Supporting Detail
Read Only
Cell Text
Document Attachments
Writable
Drill-through
BAT Smart View for Budget Users
84
11 Extensions:
Extension options are global options, which apply to the entire current workbook and to any workbook and worksheets that are created henceforth. The Extensions page contains a list of the extensions that are installed to leverage Smart View functionality for other Oracle products. From this page you can do the following:
Enable and Disable extensions.
Check for updates to extensions.
Enable logging for extension installations.
--END--


![Smart View Overview Wp 134759[1]](https://img.pdfslide.us/doc/110x75/546000f5b1af9ff0588b4fb7/smart-view-overview-wp-1347591.jpg)