Embed Size (px)
Citation preview
Asset Manager Admin GuideBasware P2P 18.1
© Copyright 1999-2017 Basware Corporation. All rights reserved..

1 Introduction
1.1 Assets OverviewAn asset is any item that the organization decides to track for maintenance or accountingpurposes. Assets can be as large as a building or as small as a pencil, depending on businessprocesses. Asset management is used to record the costs, depreciations, transfers, anddisposals associated with an asset. Each item is designated as an asset for it to be available inthe Asset Tracking and Work Order Management functionality.
For example, the organization purchases a delivery truck and wants to track it as an asset. Theinitial receipt of the truck is recorded and added to asset tracking. After adding to the item toasset tracking, record the purchase price, warranty information, date acquired, what user it isassigned to, and what status the asset is currently in. The asset can be further defined by usingattributes. Maintenance schedules can be recorded and depreciation can be tracked once thedate in service is set for the asset.
1.2 Asset LifecycleThe asset lifecycle forms the basis for an asset since all asset management takes place withinthe context of this lifecycle.
Figure 1: Asset Lifecycle
Basware P2P 18.1
© Copyright 1999-2017 Basware Corporation. All rights reserved.. 2

Acquisition: The lifecycle of an asset starts when the asset is acquired. In the system thisbegins when an item is received as an asset or added in the system through the Asset ManagerModule.
Deployment/Implementation: The second phase is the deployment/implementation stage.During this phase the asset details based on the asset category, such as asset warranty, usefullife, current meter, serial number, etc. are stored in the system and the asset is placed intoservice. This is when depreciation starts.
Use: The asset is fully functional and in use during this stage.
Service/Maintenance: This stage happens concurrently with the Use stage, in which certainservice or maintenance tasks can be performed on the asset to extend its lifecycle.
Disposal: The final stage is disposal, when the asset has reached its useful life years the assetcan be disposed. Certain costs can be incurred for disposal of the asset or a salvage cost canbe realized, which is the anticipated sale price at the end of the useful life.
1.3 Asset Management PrinciplesAsset management is used to track physical inventory allocated to different users and/orlocations. It is used to track the necessary maintenance and depreciation that accompanycertain items as well as model and serial numbers. It can track non-stock or stock items(inventory). Asset management also allows the adding of assets to Asset lists. This gives theability to assign assets to specific users or locations, as well as assigning an asset status orcategory. Once an asset is assigned to a list, the user can also perform actions on them, suchas tagging, maintenance, upgrade, repairs, and depreciation.
In regards to these management principles, they can be broken into three groups:
• Physical aspects• Financial aspects• Services aspects
Physical Aspects
The physical aspects of an asset include the category that the asset belongs to, the status ofthe asset, the maintenance types associated with the asset, and the location and currentassignment of the asset.
Financial Aspects
The financial aspect of an asset deals with the asset depreciations.
Depreciation is an estimate of the decrease in the value of an asset caused by “wear and tear,”“obsolescence,” or “impairment.”
Depreciations are used to spread the cost of an asset over its useful life. The system enablesthe organization to use different methods to account for depreciation such as straight linedepreciation, declining balance, etc.
Basware P2P 18.1
© Copyright 1999-2017 Basware Corporation. All rights reserved.. 3
The date set for the Date in Service field for an asset controls when depreciationbegins.
Depreciation can be calculated in different ways depending on the organization’s accountingpractices.
See Depreciation Management for more information.
Services Aspects
The services part of an asset mainly deals with work orders that are associated with assets.
The work order management feature is designed to automate the process of entering andcompleting a work order request. The system helps to manage all work order planning,scheduling, and deploying the services workforce.
Basware P2P 18.1
© Copyright 1999-2017 Basware Corporation. All rights reserved.. 4

2 Asset and Work Order Management
2.1 Asset Management OverviewAsset Management tracks physical inventory allocated to different users and/or locations. It isalso used to track the necessary maintenance and depreciation that accompany certain items,as well as model and serial numbers. It tracks non-stock or stock items.
Asset management also allows the addition of assets to asset lists. This gives the ability toassign assets to specific users or locations, as well as assigning an asset status or category.Once assets are assigned to a list, action can be performed on them, such as asset tagging,maintenance, upgrade, repairs, and depreciation.
Asset Management captures and tracks the data automatically needed. Multiple books can bekept and required reports generated. The organization knows what assets it has, what they areworth, and where they are. Key people get asset information quickly and easily. This informationcan give them the competitive edge needed.
Asset Management enables the user to:
• Track assets including the leasing details, maintenance schedule, and other attributes.• Check assets in and out of inventory.• Record costs associated with an asset and calculate the book value at any point in
time.• Define custom attributes for an asset and record values for these attributes.• Change the asset status at any time and keep a corresponding history record.• Categorize assets into different categories for reporting purposes.• Record asset parameters on per asset basis. For example, five items (assets) are
received; record them as five different assets with different asset IDs rather than oneasset with a quantity of five.
• Notify vendors instantly when work orders are created if they have access to theVendor Portal.
2.2 Asset CategoriesEach asset is assigned a category to help define the asset, and to provide grouping of assetsfor easier management. Asset categories must exist prior to the asset being added to AssetManagement. Some examples of categories are printers, laptops, or software.
The following is required to manage asset categories:
• Access to Assets and Work Order Module• Permission 81 – Manage Assets
Basware P2P 18.1
© Copyright 1999-2017 Basware Corporation. All rights reserved.. 5
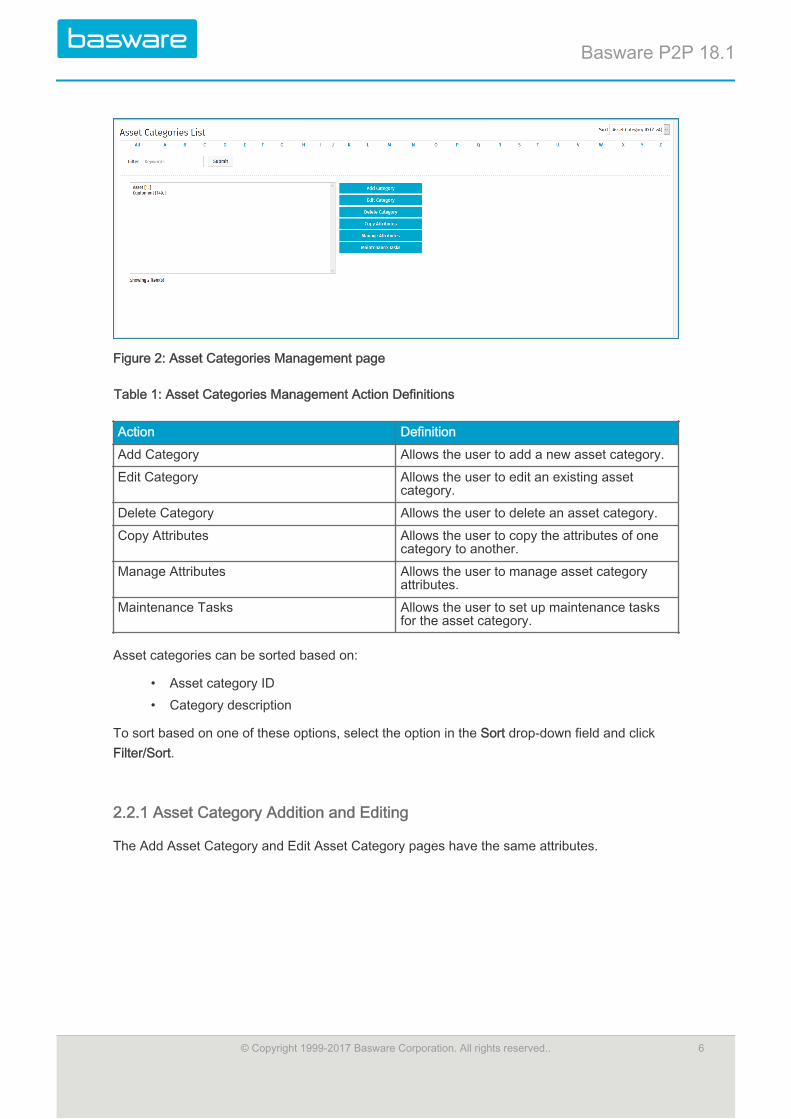
Figure 2: Asset Categories Management page
Table 1: Asset Categories Management Action Definitions
Action Definition
Add Category Allows the user to add a new asset category.
Edit Category Allows the user to edit an existing assetcategory.
Delete Category Allows the user to delete an asset category.
Copy Attributes Allows the user to copy the attributes of onecategory to another.
Manage Attributes Allows the user to manage asset categoryattributes.
Maintenance Tasks Allows the user to set up maintenance tasksfor the asset category.
Asset categories can be sorted based on:
• Asset category ID• Category description
To sort based on one of these options, select the option in the Sort drop-down field and clickFilter/Sort.
2.2.1 Asset Category Addition and Editing
The Add Asset Category and Edit Asset Category pages have the same attributes.
Basware P2P 18.1
© Copyright 1999-2017 Basware Corporation. All rights reserved.. 6
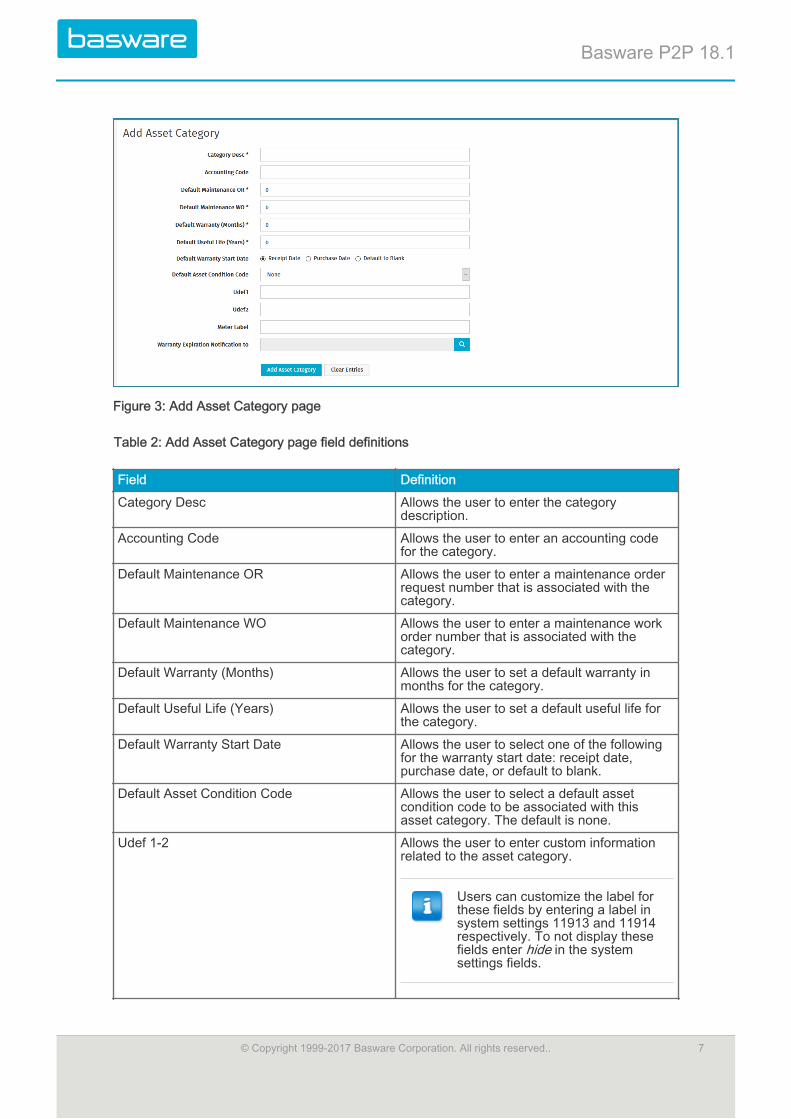
Figure 3: Add Asset Category page
Table 2: Add Asset Category page field definitions
Field Definition
Category Desc Allows the user to enter the categorydescription.
Accounting Code Allows the user to enter an accounting codefor the category.
Default Maintenance OR Allows the user to enter a maintenance orderrequest number that is associated with thecategory.
Default Maintenance WO Allows the user to enter a maintenance workorder number that is associated with thecategory.
Default Warranty (Months) Allows the user to set a default warranty inmonths for the category.
Default Useful Life (Years) Allows the user to set a default useful life forthe category.
Default Warranty Start Date Allows the user to select one of the followingfor the warranty start date: receipt date,purchase date, or default to blank.
Default Asset Condition Code Allows the user to select a default assetcondition code to be associated with thisasset category. The default is none.
Udef 1-2 Allows the user to enter custom informationrelated to the asset category.
Users can customize the label forthese fields by entering a label insystem settings 11913 and 11914respectively. To not display thesefields enter hide in the systemsettings fields.
Basware P2P 18.1
© Copyright 1999-2017 Basware Corporation. All rights reserved.. 7

Table 2: Add Asset Category page field definitions (continued)
Field Definition
Meter Label The label for the meter used for the categoryin the system. For instance, the meter labelfor a car would be miles.
Warranty Expiration Notification to Allows the user to select the user(s) in thesystem to which the warranty expirationnotification needs to be sent.
If a user tries to assign Condition Code other than none to an asset category that hasdepreciation set up, the system prompts the user with an error message.
2.2.1.1 Adding an Asset Category
To add an asset category:
1. From the Dashboard, navigate to > Assets > Asset Categories.
2. Click Add Category.
3. Complete the required fields.
4. Click Add Asset Category.
2.2.1.2 Editing an Asset Category
To edit an asset category:
1. From the Dashboard, navigate to > Assets > Asset Categories.
2. Click Edit Category.
3. Complete the required fields.
4. Click Edit Asset Category.
2.2.1.3 Deleting an Asset Category
To delete an asset category:
1. From the Dashboard, navigate to > Assets > Asset Categories.
2. Select the asset to delete and click Delete Category.
3. Click OK on the pop-up window.
If assets are currently assigned to the category being deleted then amessage is displayed that the asset category cannot be deleted.
Basware P2P 18.1
© Copyright 1999-2017 Basware Corporation. All rights reserved.. 8

2.2.2 Asset Category to Item Category Association
You can associate asset categories with an item category.
The following are required to perform this function:
• Access to the Admin Tools menu • Permission 19 - Manage Catalogs
2.2.2.1 Associating an Asset Category with an Item Category
Asset categories must be created before they can be associated to item categories.
To associate an asset category with an item category:
1. From the Dashboard, navigate to > Catalog > Item Categories.
2. Select the item category to associate with the asset category and click Edit.
3. Locate the Asset Category field and select a category from the drop-down list.
4. Click Edit Category.
For more information on item categories, refer to the General Admin Guide.
2.3 Asset StatusFrom the moment a new asset enters the system, its status is subject to change. The status ofan asset usually reflects at a glance what stage the asset is in its lifecycle.
The system includes 12 default asset statuses, which helps the users to define at a glance whatstatus the asset is. Additional statuses can be added or existing ones can be deleted.
The following permission is required when managing asset statuses:
• 81 – Manage Assets
Figure 4: Asset Status Management page
Basware P2P 18.1
© Copyright 1999-2017 Basware Corporation. All rights reserved.. 9
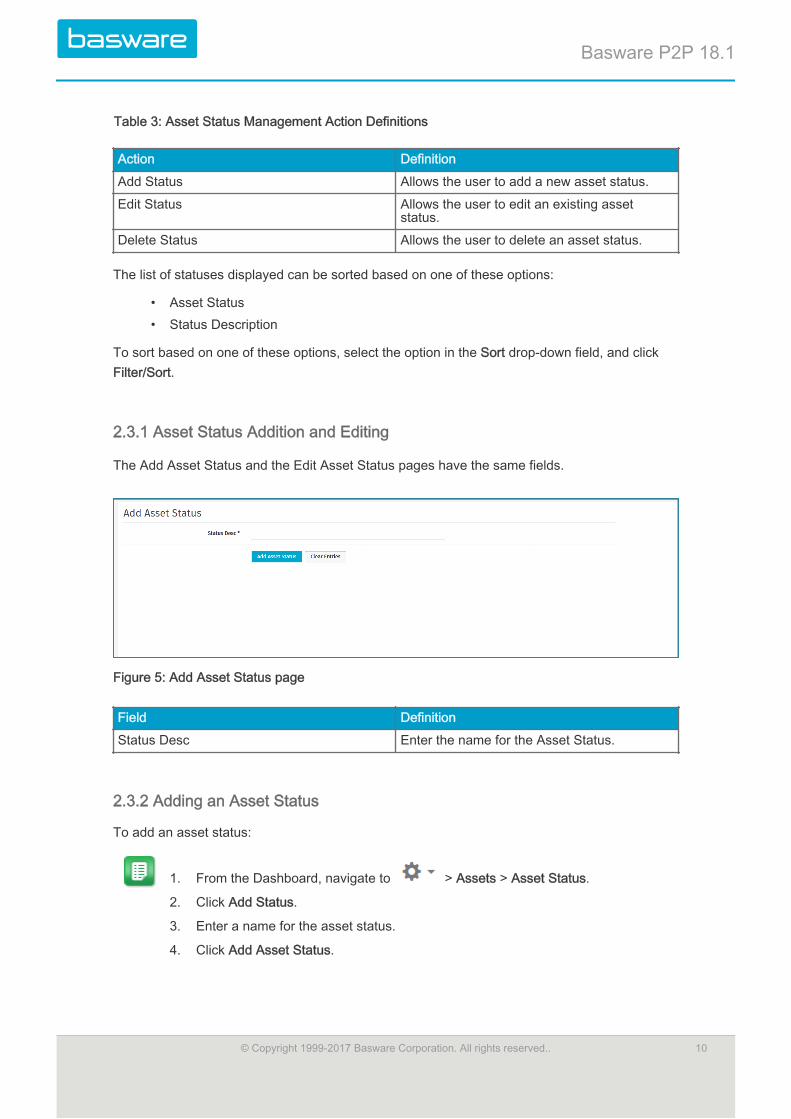
Table 3: Asset Status Management Action Definitions
Action Definition
Add Status Allows the user to add a new asset status.
Edit Status Allows the user to edit an existing assetstatus.
Delete Status Allows the user to delete an asset status.
The list of statuses displayed can be sorted based on one of these options:
• Asset Status• Status Description
To sort based on one of these options, select the option in the Sort drop-down field, and clickFilter/Sort.
2.3.1 Asset Status Addition and Editing
The Add Asset Status and the Edit Asset Status pages have the same fields.
Figure 5: Add Asset Status page
Field Definition
Status Desc Enter the name for the Asset Status.
2.3.2 Adding an Asset Status
To add an asset status:
1. From the Dashboard, navigate to > Assets > Asset Status.
2. Click Add Status.
3. Enter a name for the asset status.
4. Click Add Asset Status.
Basware P2P 18.1
© Copyright 1999-2017 Basware Corporation. All rights reserved.. 10
2.3.3 Editing an Asset Status
To edit an asset status:
1. From the Dashboard, navigate to > Assets > Asset Status.
2. Click Edit Status.
3. Revise the name for the asset status.
4. Click Edit Asset Status.
2.3.4 Deleting an Asset Status
To delete an asset status:
1. From the Dashboard, navigate to > Assets > Asset Status.
2. Select the status to be deleted and click Delete Status.
3. Click OK in the pop-up window.
2.4 Asset Category Attribute ManagementWhen additional fields need to be captured for an asset category in addition to the regular fields,manage attributes can be used to add new fields or edit the added fields.
Basware P2P 18.1
© Copyright 1999-2017 Basware Corporation. All rights reserved.. 11
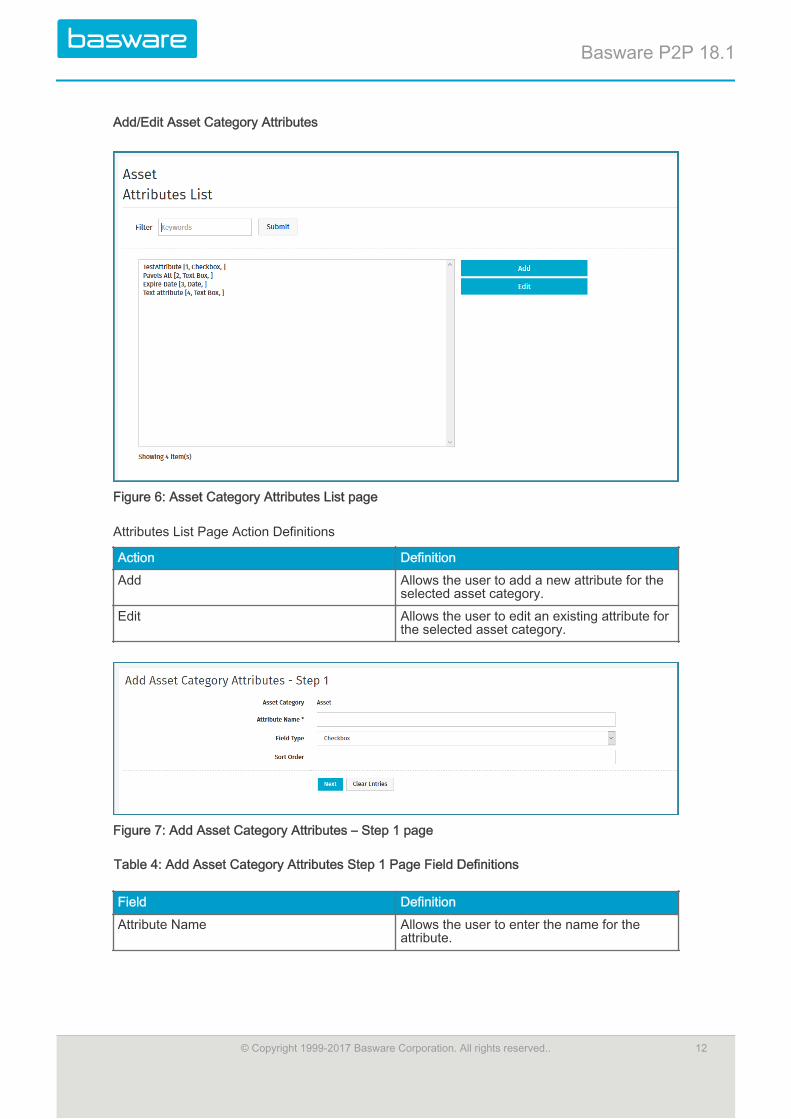
Add/Edit Asset Category Attributes
Figure 6: Asset Category Attributes List page
Attributes List Page Action Definitions
Action Definition
Add Allows the user to add a new attribute for theselected asset category.
Edit Allows the user to edit an existing attribute forthe selected asset category.
Figure 7: Add Asset Category Attributes – Step 1 page
Table 4: Add Asset Category Attributes Step 1 Page Field Definitions
Field Definition
Attribute Name Allows the user to enter the name for theattribute.
Basware P2P 18.1
© Copyright 1999-2017 Basware Corporation. All rights reserved.. 12
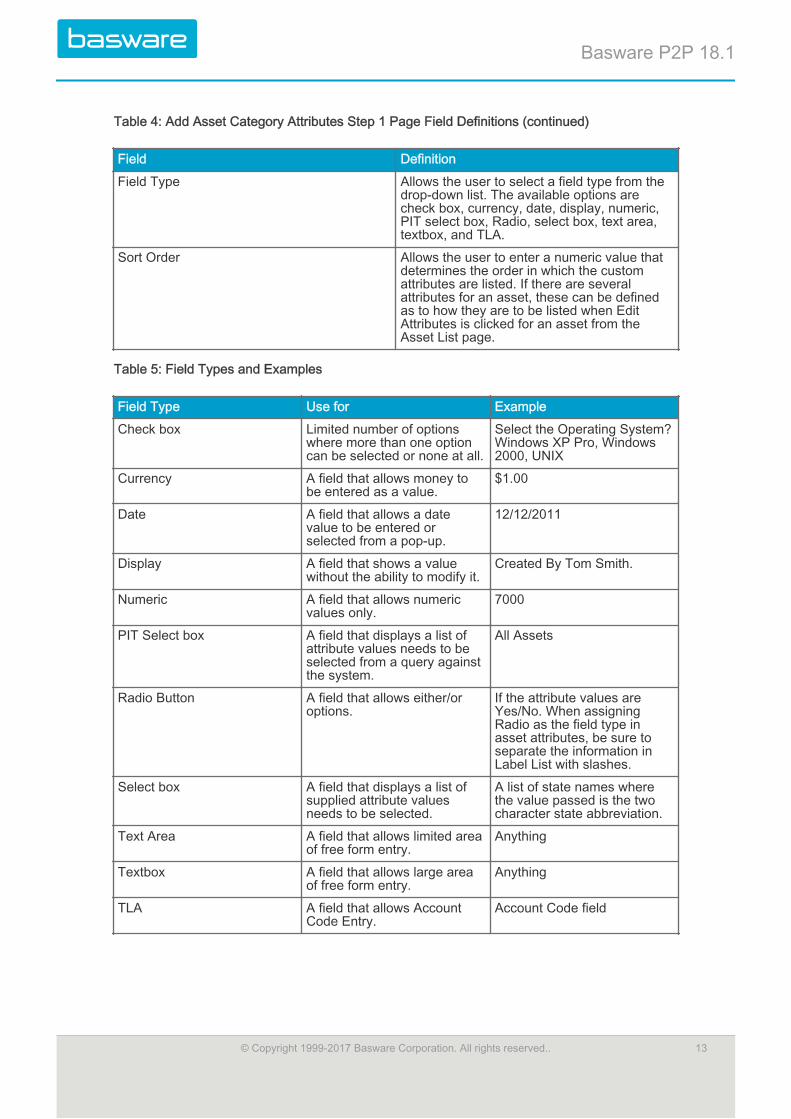
Table 4: Add Asset Category Attributes Step 1 Page Field Definitions (continued)
Field Definition
Field Type Allows the user to select a field type from thedrop-down list. The available options arecheck box, currency, date, display, numeric,PIT select box, Radio, select box, text area,textbox, and TLA.
Sort Order Allows the user to enter a numeric value thatdetermines the order in which the customattributes are listed. If there are severalattributes for an asset, these can be definedas to how they are to be listed when EditAttributes is clicked for an asset from theAsset List page.
Table 5: Field Types and Examples
Field Type Use for Example
Check box Limited number of optionswhere more than one optioncan be selected or none at all.
Select the Operating System?Windows XP Pro, Windows2000, UNIX
Currency A field that allows money tobe entered as a value.
$1.00
Date A field that allows a datevalue to be entered orselected from a pop-up.
12/12/2011
Display A field that shows a valuewithout the ability to modify it.
Created By Tom Smith.
Numeric A field that allows numericvalues only.
7000
PIT Select box A field that displays a list ofattribute values needs to beselected from a query againstthe system.
All Assets
Radio Button A field that allows either/oroptions.
If the attribute values areYes/No. When assigningRadio as the field type inasset attributes, be sure toseparate the information inLabel List with slashes.
Select box A field that displays a list ofsupplied attribute valuesneeds to be selected.
A list of state names wherethe value passed is the twocharacter state abbreviation.
Text Area A field that allows limited areaof free form entry.
Anything
Textbox A field that allows large areaof free form entry.
Anything
TLA A field that allows AccountCode Entry.
Account Code field
Basware P2P 18.1
© Copyright 1999-2017 Basware Corporation. All rights reserved.. 13
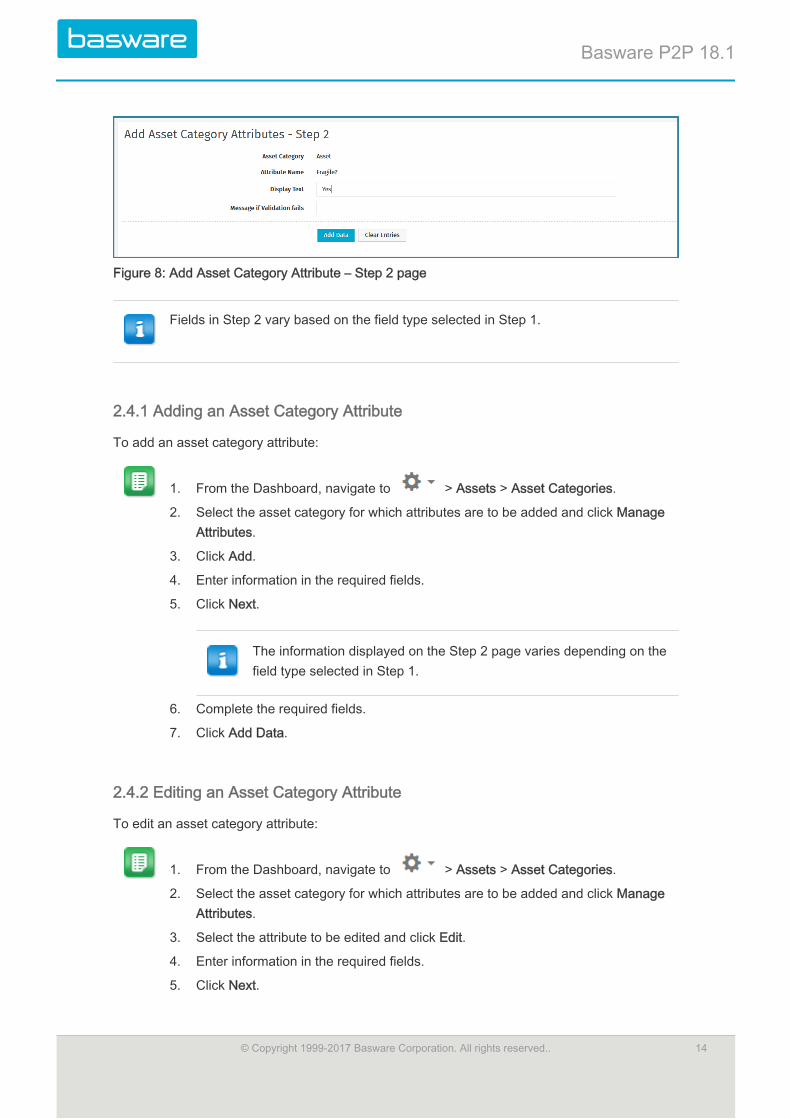
Figure 8: Add Asset Category Attribute – Step 2 page
Fields in Step 2 vary based on the field type selected in Step 1.
2.4.1 Adding an Asset Category Attribute
To add an asset category attribute:
1. From the Dashboard, navigate to > Assets > Asset Categories.
2. Select the asset category for which attributes are to be added and click ManageAttributes.
3. Click Add.
4. Enter information in the required fields.
5. Click Next.
The information displayed on the Step 2 page varies depending on thefield type selected in Step 1.
6. Complete the required fields.
7. Click Add Data.
2.4.2 Editing an Asset Category Attribute
To edit an asset category attribute:
1. From the Dashboard, navigate to > Assets > Asset Categories.
2. Select the asset category for which attributes are to be added and click ManageAttributes.
3. Select the attribute to be edited and click Edit.
4. Enter information in the required fields.
5. Click Next.
Basware P2P 18.1
© Copyright 1999-2017 Basware Corporation. All rights reserved.. 14
The information displayed on the Step 2 page varies depending on thefield type selected in Step 1.
6. Complete the required fields.
7. Click Update.
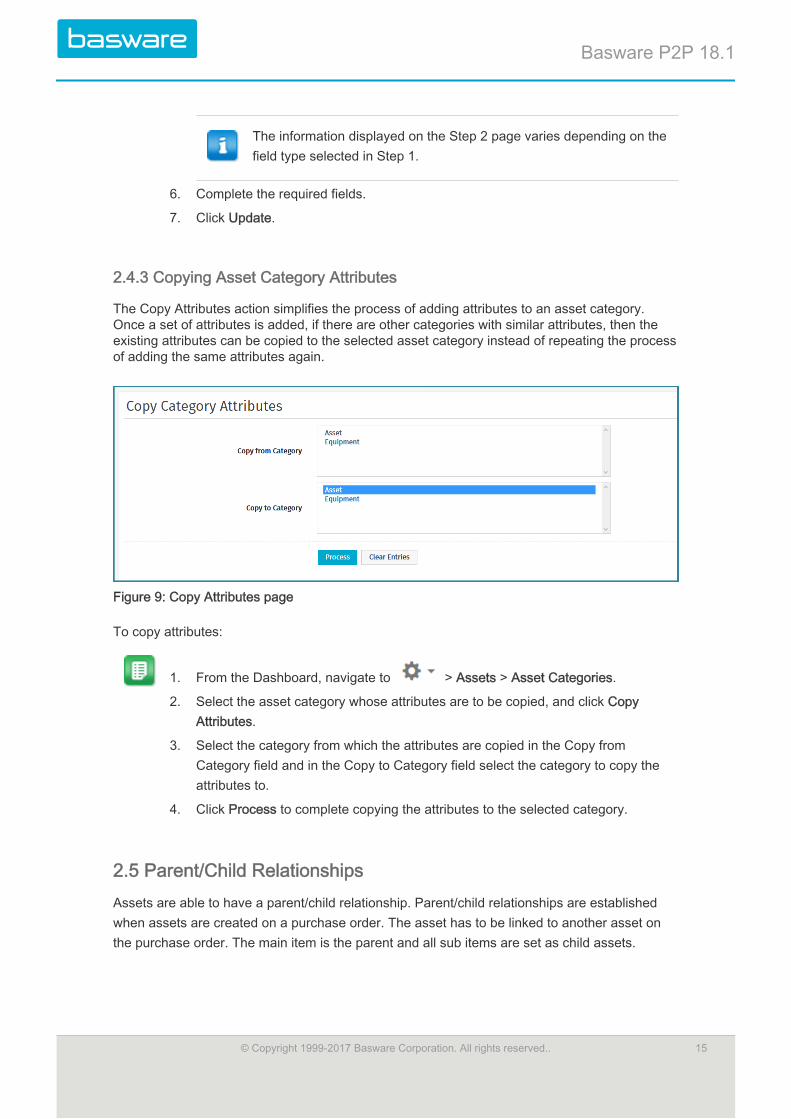
2.4.3 Copying Asset Category Attributes
The Copy Attributes action simplifies the process of adding attributes to an asset category.Once a set of attributes is added, if there are other categories with similar attributes, then theexisting attributes can be copied to the selected asset category instead of repeating the processof adding the same attributes again.
Figure 9: Copy Attributes page
To copy attributes:
1. From the Dashboard, navigate to > Assets > Asset Categories.
2. Select the asset category whose attributes are to be copied, and click CopyAttributes.
3. Select the category from which the attributes are copied in the Copy fromCategory field and in the Copy to Category field select the category to copy theattributes to.
4. Click Process to complete copying the attributes to the selected category.
2.5 Parent/Child RelationshipsAssets are able to have a parent/child relationship. Parent/child relationships are establishedwhen assets are created on a purchase order. The asset has to be linked to another asset onthe purchase order. The main item is the parent and all sub items are set as child assets.
Basware P2P 18.1
© Copyright 1999-2017 Basware Corporation. All rights reserved.. 15

When a parent asset is transferred, a list of the child assets is displayed. The assets can betransferred together; however, if the child assets are not selected, the parent/child relationshipis broken. A warning message is displayed when a child asset is transferred without the parent.
A warning message is displayed when a child asset is being edited. Modifying the following forchild assets breaks the relationship: location, user, or status (to disposed). If a parent asset isedited by changing the location, user, or status (to disposed) a warning message is displayedand the modifications are not allowed.
2.5.1 Creating Parent/Child Relationships through a Purchase Order
Figure 10: Associate Line Items with Assets page
To create parent/child relationships through a PO:
1. Populate the shopping cart with items to be added as assets with a parent/childrelationship.
2. In the Shopping Cart, click Special Functions > Associate Assets.
3. Select either an existing asset or an asset on the request to be the parent. Do thisfor all the assets to be associated with one another.
4. Click Save and Return.
5. Complete creating the order request and purchase order.
6. Place and receive the PO. Click Process to finish creating the asset.
Basware P2P 18.1
© Copyright 1999-2017 Basware Corporation. All rights reserved.. 16
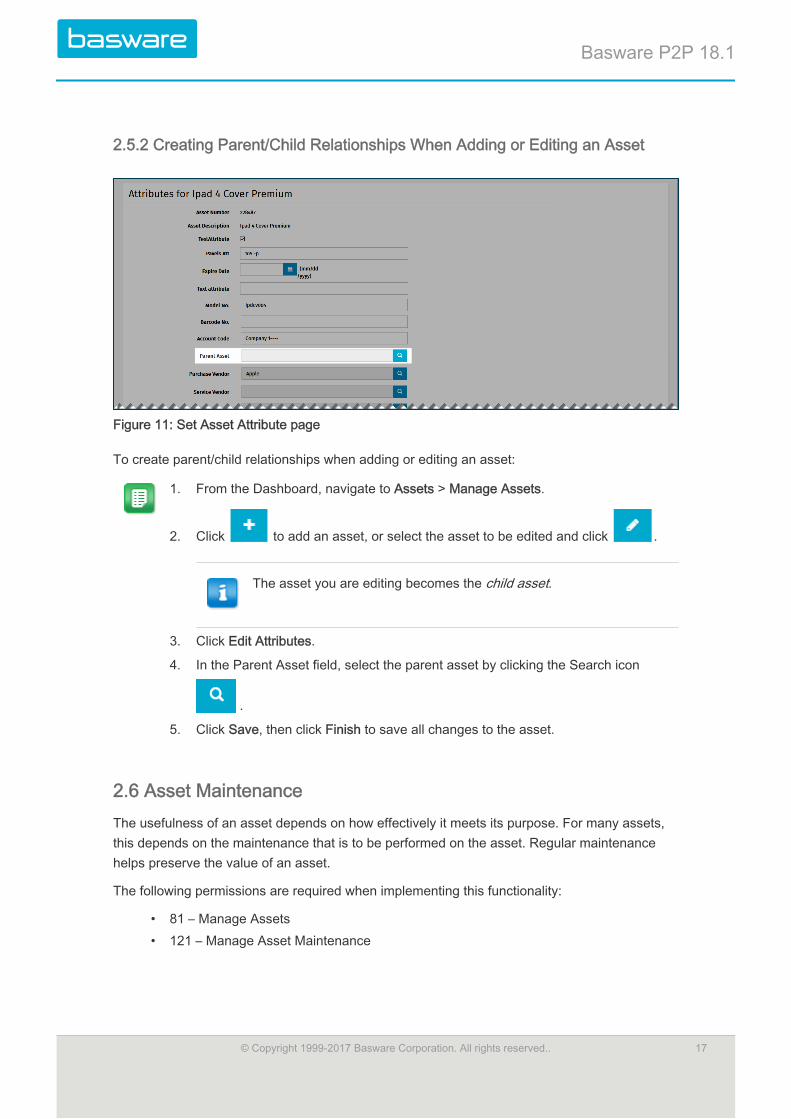
2.5.2 Creating Parent/Child Relationships When Adding or Editing an Asset
Figure 11: Set Asset Attribute page
To create parent/child relationships when adding or editing an asset:
1. From the Dashboard, navigate to Assets > Manage Assets.
2. Click to add an asset, or select the asset to be edited and click .
The asset you are editing becomes the child asset.
3. Click Edit Attributes.
4. In the Parent Asset field, select the parent asset by clicking the Search icon
.
5. Click Save, then click Finish to save all changes to the asset.
2.6 Asset MaintenanceThe usefulness of an asset depends on how effectively it meets its purpose. For many assets,this depends on the maintenance that is to be performed on the asset. Regular maintenancehelps preserve the value of an asset.
The following permissions are required when implementing this functionality:
• 81 – Manage Assets• 121 – Manage Asset Maintenance
Basware P2P 18.1
© Copyright 1999-2017 Basware Corporation. All rights reserved.. 17
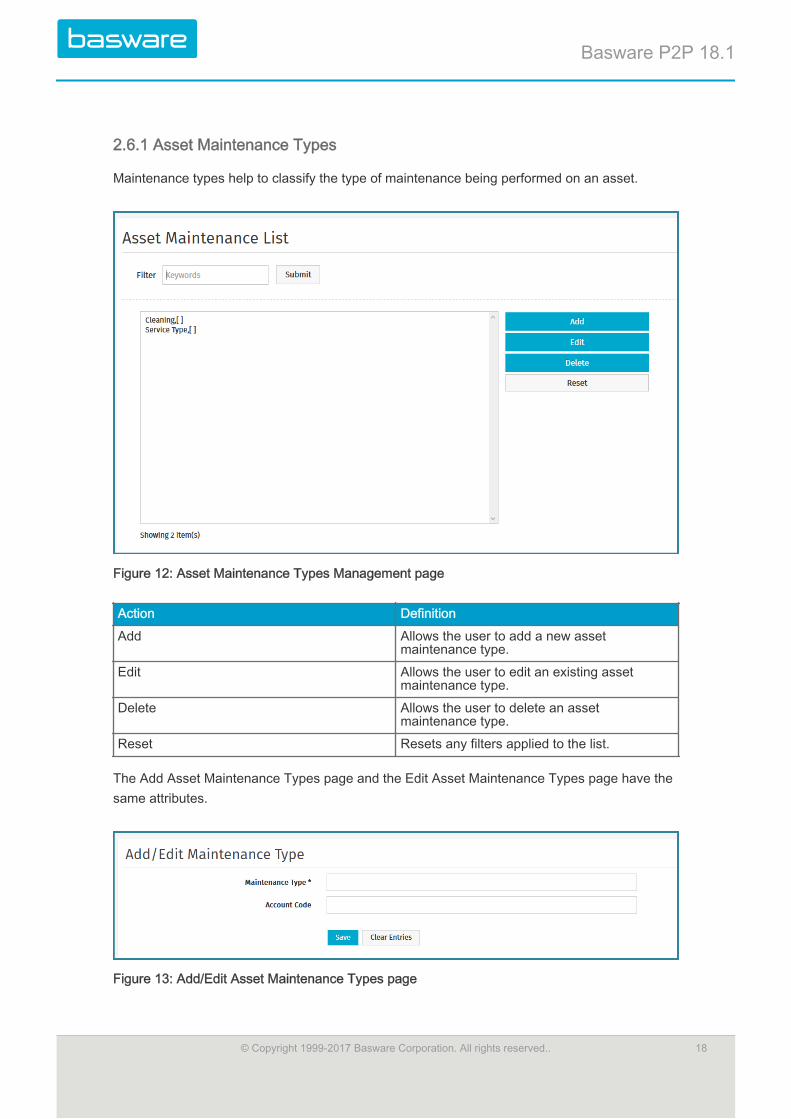
2.6.1 Asset Maintenance Types
Maintenance types help to classify the type of maintenance being performed on an asset.
Figure 12: Asset Maintenance Types Management page
Action Definition
Add Allows the user to add a new assetmaintenance type.
Edit Allows the user to edit an existing assetmaintenance type.
Delete Allows the user to delete an assetmaintenance type.
Reset Resets any filters applied to the list.
The Add Asset Maintenance Types page and the Edit Asset Maintenance Types page have thesame attributes.
Figure 13: Add/Edit Asset Maintenance Types page
Basware P2P 18.1
© Copyright 1999-2017 Basware Corporation. All rights reserved.. 18

Field Definition
Maintenance Type Enter the name for the maintenance type.
Account Code Enter the account code (GL code) to beassociated with this maintenance type.
2.6.1.1 Adding an Asset Maintenance Type
To add an asset maintenance type:
1. From the Dashboard, navigate to > Work Orders > Maintenance Types.
2. Click Add.
3. Enter the required fields.
4. Click Save.
2.6.1.2 Editing an Asset Maintenance Type
To edit an asset maintenance type:
1. From the Dashboard, navigate to > Work Orders > Maintenance Types.
2. Select the asset maintenance type to be edited and click Edit.
3. Edit the necessary fields.
4. Click Save.
2.6.1.3 Deleting Asset Maintenance Types
To delete an Asset Maintenance Type:
1. From the Dashboard, navigate to > Work Orders > Maintenance Types.
2. Select the asset maintenance type to be deleted and click Delete.
3. Click OK on the pop-up window.
2.6.2 Asset Maintenance Tasks
Asset maintenance can be based on a specified schedule or the meter value of an asset. Themaintenance of an asset can be based on the asset category or on individual assets.
Figure 14: Asset Maintenance Step 1 page
Basware P2P 18.1
© Copyright 1999-2017 Basware Corporation. All rights reserved.. 19
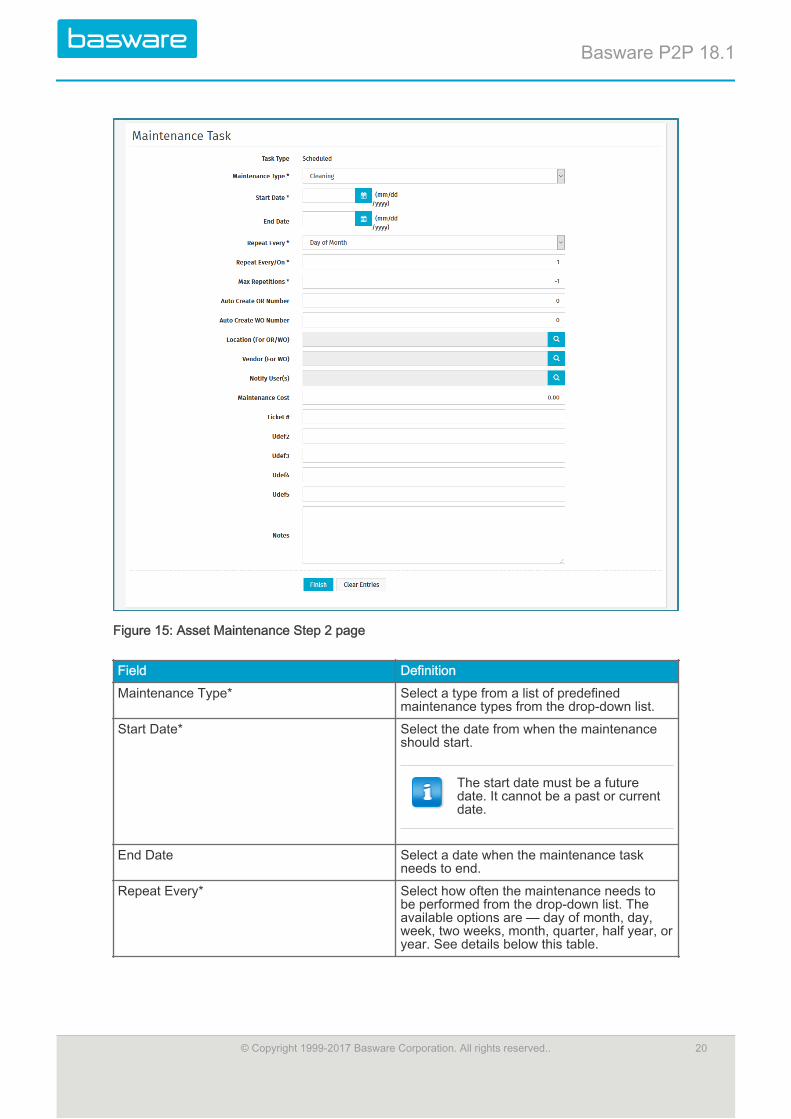
Figure 15: Asset Maintenance Step 2 page
Field Definition
Maintenance Type* Select a type from a list of predefinedmaintenance types from the drop-down list.
Start Date* Select the date from when the maintenanceshould start.
The start date must be a futuredate. It cannot be a past or currentdate.
End Date Select a date when the maintenance taskneeds to end.
Repeat Every* Select how often the maintenance needs tobe performed from the drop-down list. Theavailable options are — day of month, day,week, two weeks, month, quarter, half year, oryear. See details below this table.
Basware P2P 18.1
© Copyright 1999-2017 Basware Corporation. All rights reserved.. 20
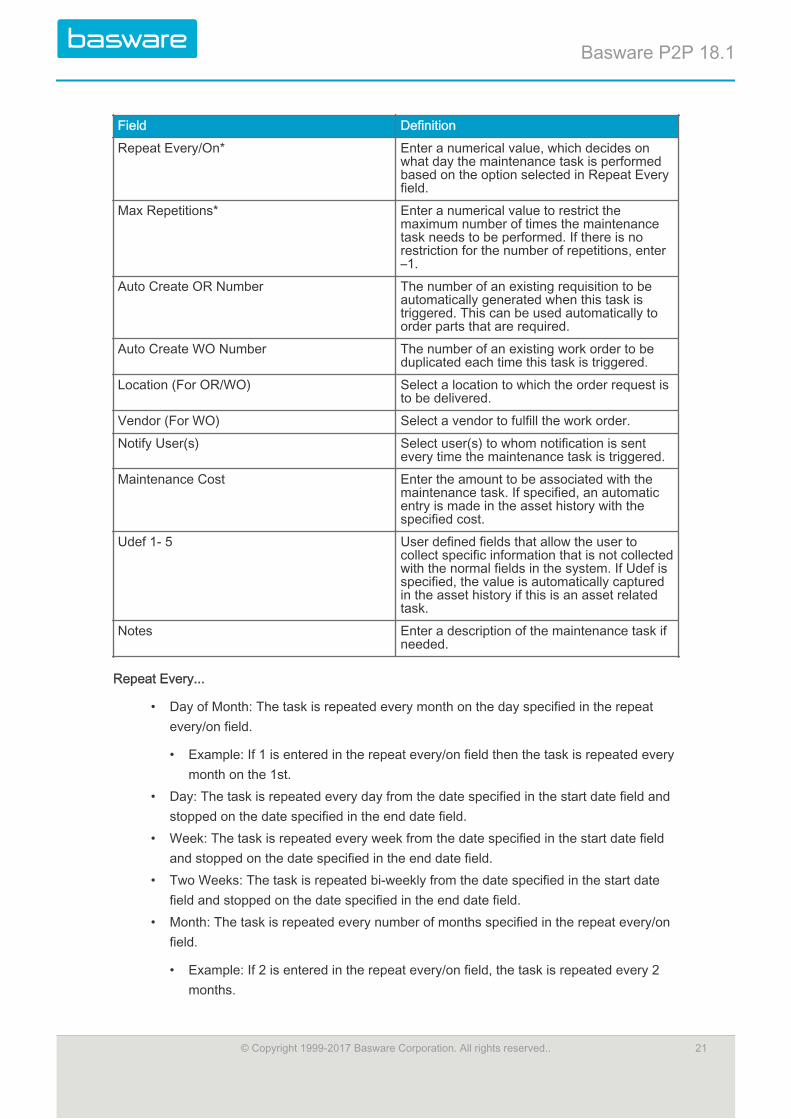
Field Definition
Repeat Every/On* Enter a numerical value, which decides onwhat day the maintenance task is performedbased on the option selected in Repeat Everyfield.
Max Repetitions* Enter a numerical value to restrict themaximum number of times the maintenancetask needs to be performed. If there is norestriction for the number of repetitions, enter–1.
Auto Create OR Number The number of an existing requisition to beautomatically generated when this task istriggered. This can be used automatically toorder parts that are required.
Auto Create WO Number The number of an existing work order to beduplicated each time this task is triggered.
Location (For OR/WO) Select a location to which the order request isto be delivered.
Vendor (For WO) Select a vendor to fulfill the work order.
Notify User(s) Select user(s) to whom notification is sentevery time the maintenance task is triggered.
Maintenance Cost Enter the amount to be associated with themaintenance task. If specified, an automaticentry is made in the asset history with thespecified cost.
Udef 1- 5 User defined fields that allow the user tocollect specific information that is not collectedwith the normal fields in the system. If Udef isspecified, the value is automatically capturedin the asset history if this is an asset relatedtask.
Notes Enter a description of the maintenance task ifneeded.
Repeat Every...
• Day of Month: The task is repeated every month on the day specified in the repeatevery/on field.
• Example: If 1 is entered in the repeat every/on field then the task is repeated everymonth on the 1st.
• Day: The task is repeated every day from the date specified in the start date field andstopped on the date specified in the end date field.
• Week: The task is repeated every week from the date specified in the start date fieldand stopped on the date specified in the end date field.
• Two Weeks: The task is repeated bi-weekly from the date specified in the start datefield and stopped on the date specified in the end date field.
• Month: The task is repeated every number of months specified in the repeat every/onfield.
• Example: If 2 is entered in the repeat every/on field, the task is repeated every 2months.
Basware P2P 18.1
© Copyright 1999-2017 Basware Corporation. All rights reserved.. 21

• Quarter: The task is repeated every third month from the date specified in the startdate field and stopped on the date specified in the end date field.
• Half Year: The task is repeated every sixth month from the date specified in the startdate field and stopped on the date specified in the end date field.
• Year: The task is repeated every year from the date specified in the start date fieldand stopped on the date specified in the end date field.
2.6.2.1 Setting Maintenance Tasks
To set maintenance tasks for an asset:
1. From the Dashboard, navigate to Assets > Manage > Manage Assets.
2. Select the asset the maintenance tasks need to be set to and click More Actions >Set Maintenance.
3. Select the type of task to be performed by selecting the appropriate radio button.
4. Click Continue.
5. If needed, complete the required fields in Add Maintenance Step 2.
6. Click Finish.
2.7 Asset Maintenance Management
Figure 16: Asset Maintenance Management page
Action Definition
Add Task Allows the user to add a new maintenancetask.
Edit Task Allows the user to edit an existingmaintenance task.
Delete Task Allows the user to delete an assetmaintenance task.
Upload Schedule Allows the user to upload a maintenanceschedule.
Basware P2P 18.1
© Copyright 1999-2017 Basware Corporation. All rights reserved.. 22

Action Definition
Copy Task Allows the user to copy an existingmaintenance task.
Run Task Allows the user manually to run the scheduledtask.
View Task Allows the user to view the maintenance taskdetails.
The list of maintenance tasks displayed can be sorted based on these options:
• Next Run Date: Sorts the fields based on their next run date.• End Date: Sorts the fields based on the end date for the maintenance task.• Task Type: Sorts based on the maintenance type.
To sort based on one of these options select the option in the Sort drop-down field and clickFilter/Sort.
2.7.1 Add/Edit Task
To add or edit a task refer to Setting Maintenance Tasks.
Using the Add Task action on the Maintenance Tasks List page or Maintenance Taskson the Asset Categories List page the user is only able to add maintenance tasksbased on a specified schedule. No other options are available.
2.7.2 Deleting an Asset Maintenance Task
To delete an asset maintenance task:
1. From the Dashboard, navigate to Assets > Maintenance > Maintenance Tasks.
2. Select the task to be deleted and click Delete Task.
3. Click OK on the pop-up delete verification window.
2.7.3 Copying an Asset Maintenance Task
To copy an asset maintenance task:
1. From the Dashboard, navigate to Assets > Maintenance > Maintenance Tasks.
2. Select the task to be copied and click Copy Task.
2.7.4 Manually Running an Asset Maintenance Task
To run manually an asset maintenance task:
Basware P2P 18.1
© Copyright 1999-2017 Basware Corporation. All rights reserved.. 23
1. From the Dashboard, navigate to Assets > Maintenance > Maintenance Tasks.
2. Select the task to be run, and click Run Task.
2.7.5 Viewing Asset Maintenance Task Details
To view asset maintenance task details:
1. From the Dashboard, navigate to Assets > Maintenance > Maintenance Tasks.
2. Select the task whose details need to be viewed, and click View Task.
2.7.6 Uploading an Asset Maintenance Task Schedule
For users to be able to upload asset maintenance tasks, the tasks first need to be added usingthe import specification. Refer to the General Admin Guide Chapter 13Admin Guide - General -Import Specifications for details on import specifications.
The following permission is required:
• 145 – Add Maintenance Records
To upload an asset maintenance task:
1. From the Dashboard, navigate to Assets > Maintenance > Maintenance Tasks.
2. Click Upload Schedule.
3. Select the import specification added using the Import Specs link in the SelectImport Specification field.
4. Using Browse, select the file to be uploaded and click Continue.
2.8 Asset ManagementManaging Assets is the core of the Asset module. This is where the attributes are edited,depreciation is set, and ownership is changed. This is also, where the serial number or anythingelse specific to that asset is recorded and tracked. Asset management provides a centralizedlocation to perform all asset related activities such as adding or editing an asset, creating workorders for the asset, setting maintenance tasks for the asset, etc.
The following permission is required to view the page:
• 81 – Manage Assets• 118 – View all Assets
Basware P2P 18.1
© Copyright 1999-2017 Basware Corporation. All rights reserved.. 24

Figure 17: Manage Asset page
Action Name Definition
Filter
Allows the user to filter for informationprovided in the columns.
When columns are hidden, theinformation for those columns isreturned, however the information isnot seen until the columns areunhidden.
Customize ViewAllows the user to select the columns shownwhen viewing the Manage Assets grid.
Add Asset
Takes the user to the Add Asset page. Theuser is able to click the Add icon withouthaving to select an existing asset.
Users must have permission 81 and114 to add a work order.
Edit Asset
Takes the user to the Edit Asset page for theselected asset. If more than one asset isselected, the Edit icon is disabled.
Users must have permission 81 and114 to edit a work order.
Delete Asset
Allows the user to remove an asset from thesystem.
TourProvides the user with a quick tour of thepage by giving highlights of key features. Thetour is always available.
Basware P2P 18.1
© Copyright 1999-2017 Basware Corporation. All rights reserved.. 25
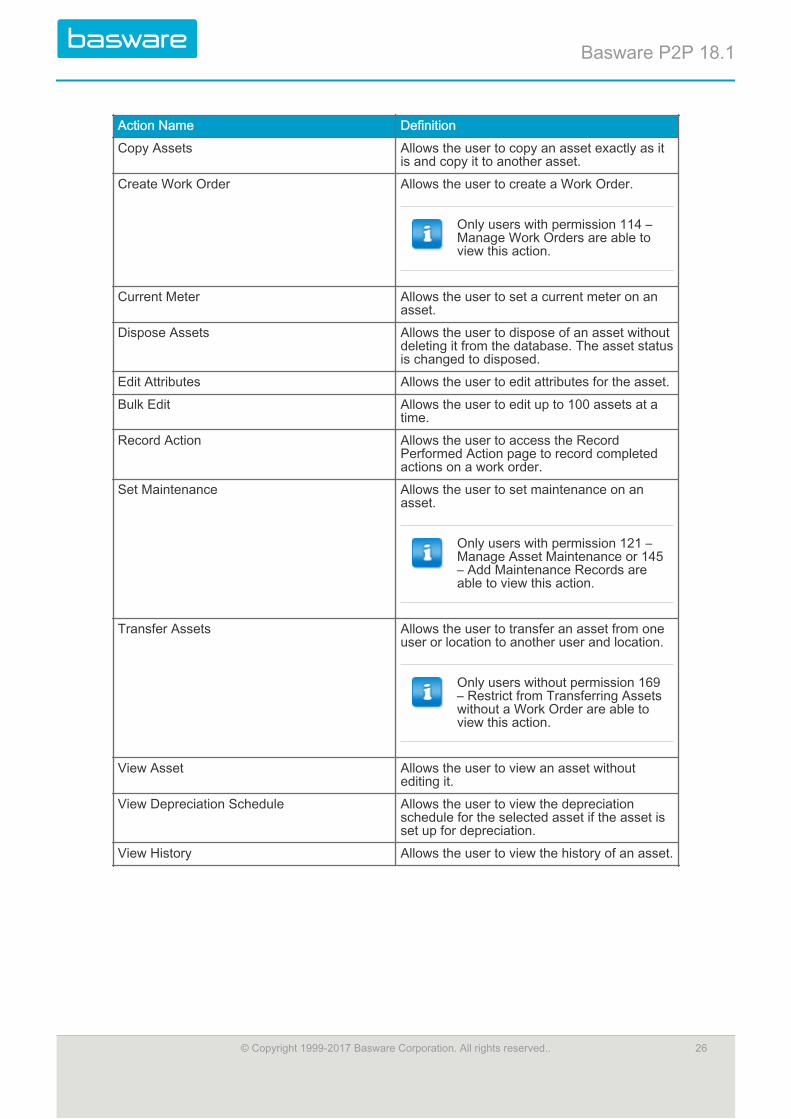
Action Name Definition
Copy Assets Allows the user to copy an asset exactly as itis and copy it to another asset.
Create Work Order Allows the user to create a Work Order.
Only users with permission 114 –Manage Work Orders are able toview this action.
Current Meter Allows the user to set a current meter on anasset.
Dispose Assets Allows the user to dispose of an asset withoutdeleting it from the database. The asset statusis changed to disposed.
Edit Attributes Allows the user to edit attributes for the asset.
Bulk Edit Allows the user to edit up to 100 assets at atime.
Record Action Allows the user to access the RecordPerformed Action page to record completedactions on a work order.
Set Maintenance Allows the user to set maintenance on anasset.
Only users with permission 121 –Manage Asset Maintenance or 145– Add Maintenance Records areable to view this action.
Transfer Assets Allows the user to transfer an asset from oneuser or location to another user and location.
Only users without permission 169– Restrict from Transferring Assetswithout a Work Order are able toview this action.
View Asset Allows the user to view an asset withoutediting it.
View Depreciation Schedule Allows the user to view the depreciationschedule for the selected asset if the asset isset up for depreciation.
View History Allows the user to view the history of an asset.
Basware P2P 18.1
© Copyright 1999-2017 Basware Corporation. All rights reserved.. 26

• If an asset is in transit, users can only View Asset, View Asset History, andView Depreciation Schedule.
• If a user has permission 118 but does not have permission 81, then the usercan only View Asset and View Asset History.
• A user must select AT LEAST one asset to perform any action on an existingasset.
Add/Edit Assets
The Add Asset page and the Edit Asset page have the same attributes.
Figure 18: Add Asset page
Table 6: Add Asset Page Field Definitions
Field Name Definition
Select Asset Item Select the item from the catalog to be set upas an asset.
Asset Number Enter an asset number. This field is usuallypre-populated.
Serial Number Enter the serial number of the asset.
Asset Category Select a predefined asset category.
Basware P2P 18.1
© Copyright 1999-2017 Basware Corporation. All rights reserved.. 27

Table 6: Add Asset Page Field Definitions (continued)
Field Name Definition
Asset Status Select the asset status to display the currentstatus of the asset.
Asset Condition Code Select the asset condition code that is to beassociated with this item.
Department or Location Select a location for the asset from the pop-upwindow.
Assigned to User Select a user the asset is assigned to from thepop-up window.
Assigned to (Non-system) Select a non-system user the asset isassigned to from the pop-up window.
Warehouse Select a warehouse from the drop-downselection box that the asset item is stocked.When selected and saved, the asset item isestablished in inventory.
Warranty Start Date Select the warranty start date from calendarpop-up window.
Warranty End Date Select the warranty end date from calendarpop-up window.
When editing an asset, the systemautomatically calculates thewarranty end date for an assetwhen the start date is entered,using the default warranty periodspecified for the asset category.
Upload Asset Image Upload an image for an asset using Browse.
Udef 1-2 Allows the user to enter custom informationrelated to an asset.
Users can customize the label forthese fields by entering the label insystem settings 11911 and 11912respectively. To not display thesefields, enter hide in the systemsettings fields.
Notes Enter any notes for the asset.
Basware P2P 18.1
© Copyright 1999-2017 Basware Corporation. All rights reserved.. 28

Figure 19: Set Asset Attributes page
Table 7: Set Asset Attributes Page Field Definitions
Field Name Definition
Model Number Enter the model number for the asset.
Barcode Number Enter the barcode number associated with theasset.
Accounting Code Enter an account code for the asset to beused for financial purposes.
Basware P2P 18.1
© Copyright 1999-2017 Basware Corporation. All rights reserved.. 29
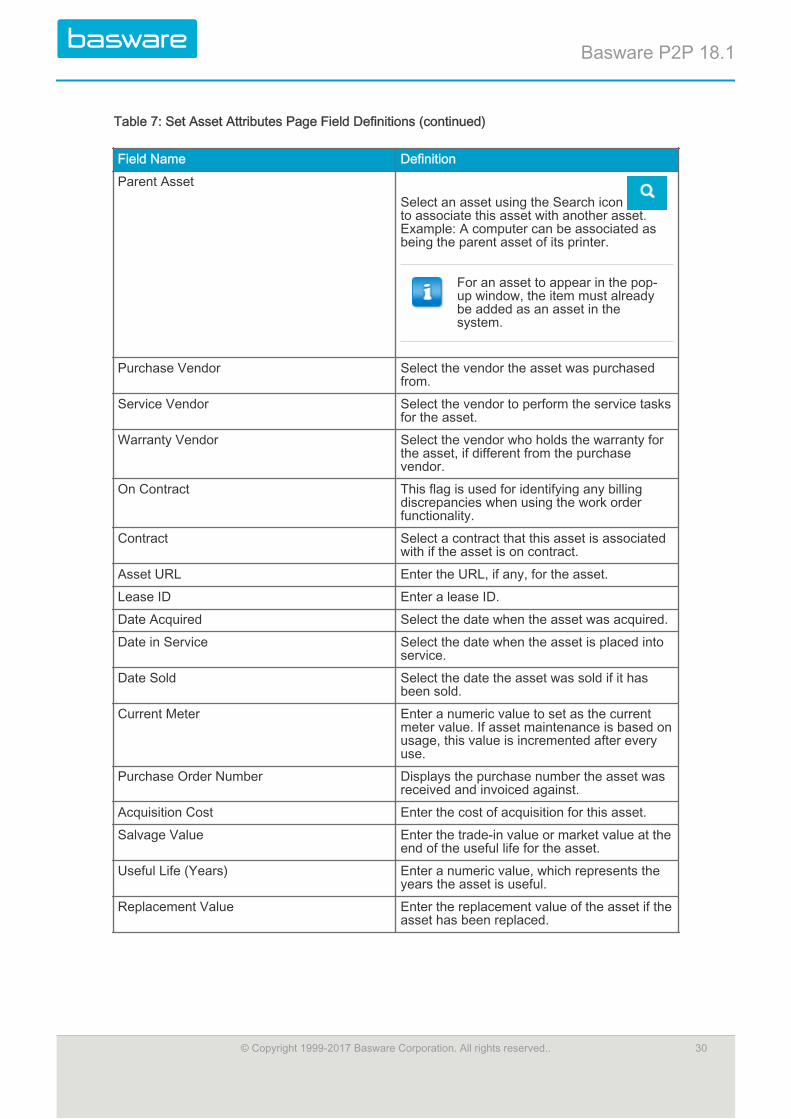
Table 7: Set Asset Attributes Page Field Definitions (continued)
Field Name Definition
Parent AssetSelect an asset using the Search icon to associate this asset with another asset.Example: A computer can be associated asbeing the parent asset of its printer.
For an asset to appear in the pop-up window, the item must alreadybe added as an asset in thesystem.
Purchase Vendor Select the vendor the asset was purchasedfrom.
Service Vendor Select the vendor to perform the service tasksfor the asset.
Warranty Vendor Select the vendor who holds the warranty forthe asset, if different from the purchasevendor.
On Contract This flag is used for identifying any billingdiscrepancies when using the work orderfunctionality.
Contract Select a contract that this asset is associatedwith if the asset is on contract.
Asset URL Enter the URL, if any, for the asset.
Lease ID Enter a lease ID.
Date Acquired Select the date when the asset was acquired.
Date in Service Select the date when the asset is placed intoservice.
Date Sold Select the date the asset was sold if it hasbeen sold.
Current Meter Enter a numeric value to set as the currentmeter value. If asset maintenance is based onusage, this value is incremented after everyuse.
Purchase Order Number Displays the purchase number the asset wasreceived and invoiced against.
Acquisition Cost Enter the cost of acquisition for this asset.
Salvage Value Enter the trade-in value or market value at theend of the useful life for the asset.
Useful Life (Years) Enter a numeric value, which represents theyears the asset is useful.
Replacement Value Enter the replacement value of the asset if theasset has been replaced.
Basware P2P 18.1
© Copyright 1999-2017 Basware Corporation. All rights reserved.. 30

The Date in Service field stores the date the asset is placed into service. This is thedate the asset starts depreciating. When the date in service is updated the AssetHistory table is updated.
2.8.1 Add Assets
To add an asset:
1. From the Dashboard, navigate to Assets > Manage > Manage Assets.
2. Click .
3. Enter the required fields.
4. If additional attributes are to be added, click Edit Attributes.
5. Enter the extended attributes for the asset.
6. Click Finish.
2.8.2 Edit an Asset
To edit an asset:
1. From the Dashboard, navigate to Assets > Manage > Manage Assets.
2. Select the asset to edit and click .
3. Edit the necessary fields.
4. If additional attributes are to be edited, click Edit Attributes.
5. Edit the additional attributes for the asset.
6. Click Finish.
2.8.2.1 Asset Category Changes for Active Assets
You can change the asset category on Edit Asset page. Active assets are assets that havedepreciation associated with them. When changing the asset category for active assets thesystem gives a warning message as given below:
“Depreciation is enabled for this asset. Note that changing the asset category will result inrecalculation of the depreciation schedule.”
Changing the asset category for active assets result in deleting the existing depreciationschedule and recalculation of the depreciation schedule again based on the depreciationmethod set for the new asset category.
Basware P2P 18.1
© Copyright 1999-2017 Basware Corporation. All rights reserved.. 31
2.8.2.2 Condition Code Restriction with Depreciation
When a user tries to assign an asset category with depreciation and condition code to the sameasset, an error message is displayed.
2.8.3 Removing an Asset
To delete an asset from the asset list:
1. From the Dashboard, navigate to Assets > Manage > Manage Assets.
2. Select the asset to delete and click .
3. Click OK on the pop-up window.
2.8.4 Copying an Asset
When adding a new asset, if the asset has the same properties as an existing asset, the assetcan be copied instead of creating a new asset.
To copy an existing asset:
1. From the Dashboard, navigate to Assets > Manage > Manage Assets.
2. Select the asset to be copied and click More Actions > Copy Asset.
3. Click OK on the pop-up window.
A success message is displayed with the asset name and number. The copied asset does nothave "copy" in the name.
2.8.5 Bulk Edit
When multiple assets need to be edited at one time, bulk edit is used to save time. All theselected assets are editable.
The data in the grid is editable on a line by line basis or all the assets can be updated at once
by clicking the Edit icon at the top of each editable column. When the user opts to update allthe assets at once and clicks the Edit icon, a modal specific to the column selected opens.
• Numbers or currency can be adjusted by value or percentage. The system calculatesand adjusts each row accordingly.
• Important: The asset cost cannot be less than zero.• Date columns have calendars.• The Assigned System User column uses typeahead.• Fields with updated and unsaved data have a yellow background with a border.
• Click the Save icon to save changes
Basware P2P 18.1
© Copyright 1999-2017 Basware Corporation. All rights reserved.. 32
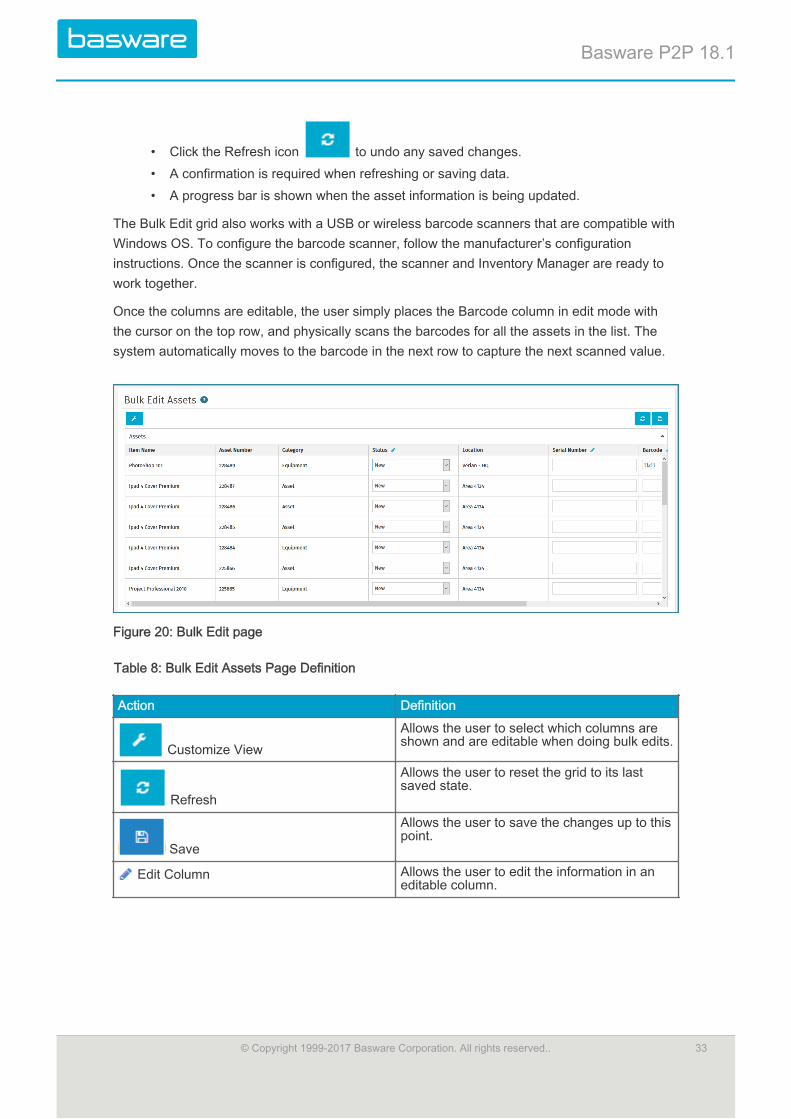
• Click the Refresh icon to undo any saved changes.• A confirmation is required when refreshing or saving data.• A progress bar is shown when the asset information is being updated.
The Bulk Edit grid also works with a USB or wireless barcode scanners that are compatible withWindows OS. To configure the barcode scanner, follow the manufacturer’s configurationinstructions. Once the scanner is configured, the scanner and Inventory Manager are ready towork together.
Once the columns are editable, the user simply places the Barcode column in edit mode withthe cursor on the top row, and physically scans the barcodes for all the assets in the list. Thesystem automatically moves to the barcode in the next row to capture the next scanned value.
Figure 20: Bulk Edit page
Table 8: Bulk Edit Assets Page Definition
Action Definition
Customize ViewAllows the user to select which columns areshown and are editable when doing bulk edits.
Refresh
Allows the user to reset the grid to its lastsaved state.
Save
Allows the user to save the changes up to thispoint.
Edit Column Allows the user to edit the information in aneditable column.
Basware P2P 18.1
© Copyright 1999-2017 Basware Corporation. All rights reserved.. 33
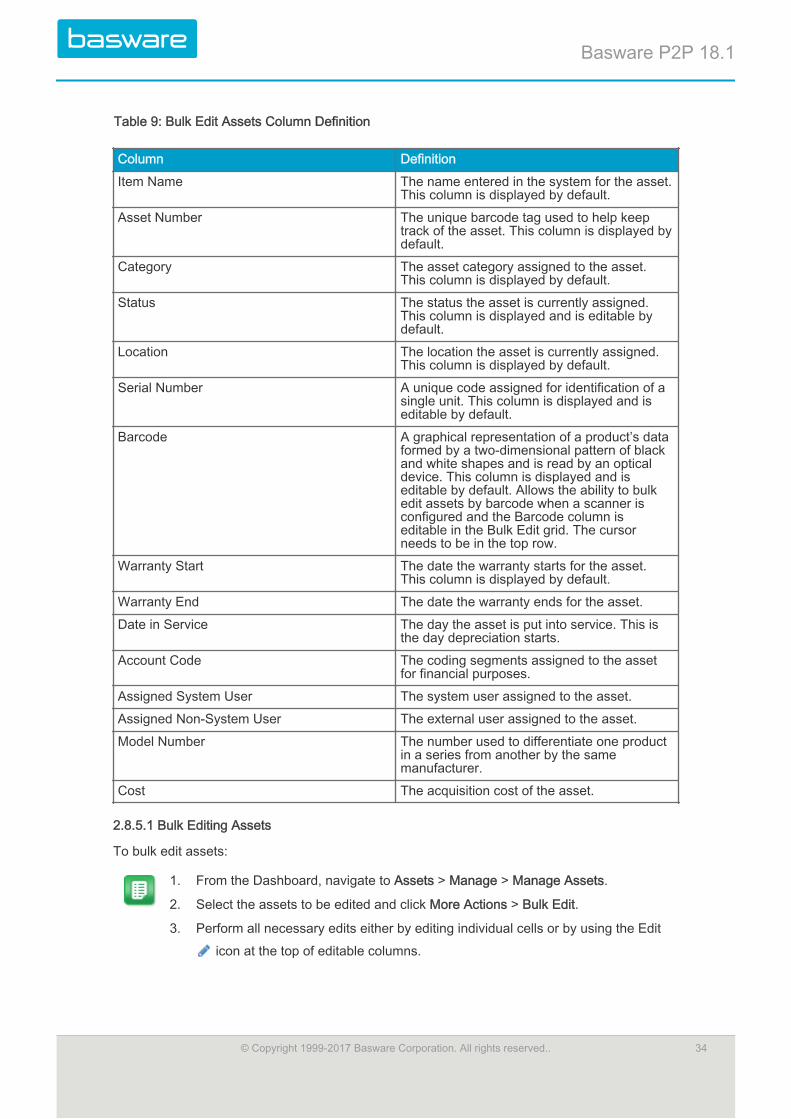
Table 9: Bulk Edit Assets Column Definition
Column Definition
Item Name The name entered in the system for the asset.This column is displayed by default.
Asset Number The unique barcode tag used to help keeptrack of the asset. This column is displayed bydefault.
Category The asset category assigned to the asset.This column is displayed by default.
Status The status the asset is currently assigned.This column is displayed and is editable bydefault.
Location The location the asset is currently assigned.This column is displayed by default.
Serial Number A unique code assigned for identification of asingle unit. This column is displayed and iseditable by default.
Barcode A graphical representation of a product’s dataformed by a two-dimensional pattern of blackand white shapes and is read by an opticaldevice. This column is displayed and iseditable by default. Allows the ability to bulkedit assets by barcode when a scanner isconfigured and the Barcode column iseditable in the Bulk Edit grid. The cursorneeds to be in the top row.
Warranty Start The date the warranty starts for the asset.This column is displayed by default.
Warranty End The date the warranty ends for the asset.
Date in Service The day the asset is put into service. This isthe day depreciation starts.
Account Code The coding segments assigned to the assetfor financial purposes.
Assigned System User The system user assigned to the asset.
Assigned Non-System User The external user assigned to the asset.
Model Number The number used to differentiate one productin a series from another by the samemanufacturer.
Cost The acquisition cost of the asset.
2.8.5.1 Bulk Editing Assets
To bulk edit assets:
1. From the Dashboard, navigate to Assets > Manage > Manage Assets.
2. Select the assets to be edited and click More Actions > Bulk Edit.
3. Perform all necessary edits either by editing individual cells or by using the Edit
icon at the top of editable columns.
Basware P2P 18.1
© Copyright 1999-2017 Basware Corporation. All rights reserved.. 34
4. When all edits are complete, click Save .
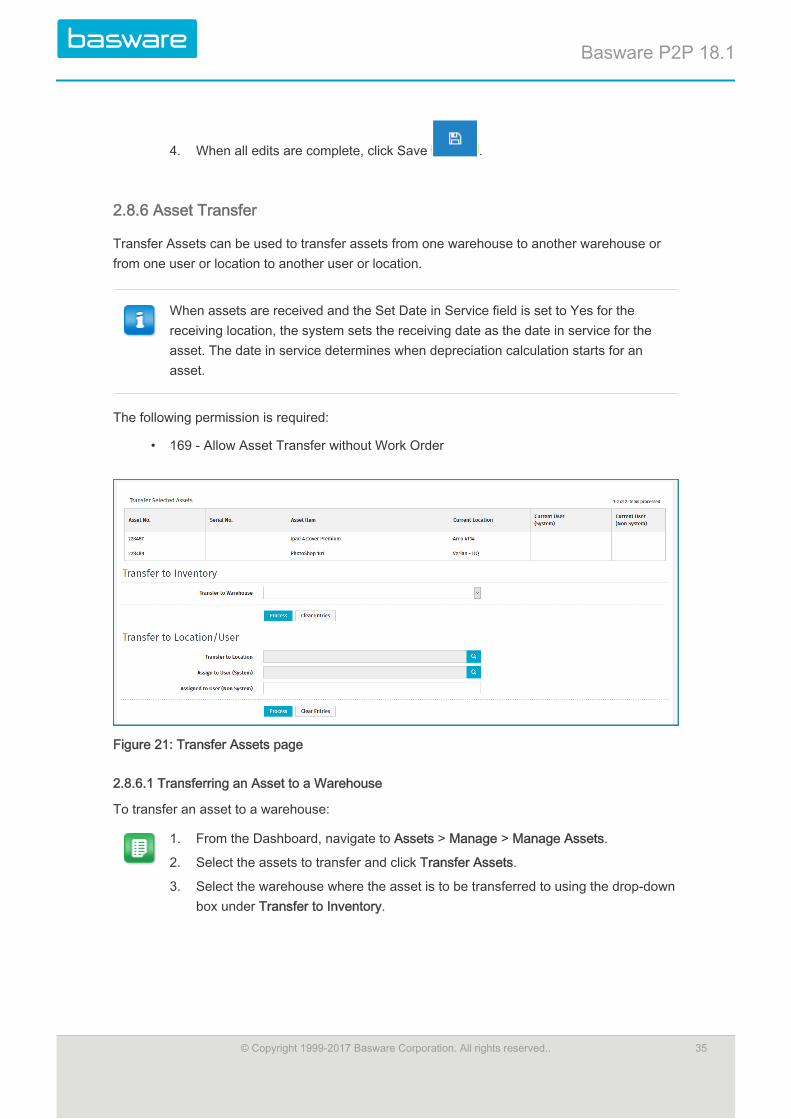
2.8.6 Asset Transfer
Transfer Assets can be used to transfer assets from one warehouse to another warehouse orfrom one user or location to another user or location.
When assets are received and the Set Date in Service field is set to Yes for thereceiving location, the system sets the receiving date as the date in service for theasset. The date in service determines when depreciation calculation starts for anasset.
The following permission is required:
• 169 - Allow Asset Transfer without Work Order
Figure 21: Transfer Assets page
2.8.6.1 Transferring an Asset to a Warehouse
To transfer an asset to a warehouse:
1. From the Dashboard, navigate to Assets > Manage > Manage Assets.
2. Select the assets to transfer and click Transfer Assets.
3. Select the warehouse where the asset is to be transferred to using the drop-downbox under Transfer to Inventory.
Basware P2P 18.1
© Copyright 1999-2017 Basware Corporation. All rights reserved.. 35

If a warehouse and a location are both selected, which Process action isclicked determines where the asset is transferred. If the Process actionin the warehouse section is clicked, the asset is transferred to thewarehouse. If the Process action in the location section is clicked, theasset is transferred to the location.
4. Click Process.
2.8.6.2 Transferring an Asset to a Location
To transfer an asset to a location:
1. From the Dashboard, navigate to Assets > Manage > Manage Assets.
2. Select the assets to transfer and click Transfer Assets.
3. Select the location where the asset is to be transferred to using the Search icon
.
4. Select the users the asset is to be assigned if needed using the Search icon
.
If a warehouse and a location are both selected, which Process action isclicked determines where the asset is transferred. If the Process actionin the warehouse section is clicked, the asset is transferred to thewarehouse. If the Process action in the location section is clicked, theasset is transferred to the location.
5. Click Process.
2.8.7 Viewing Asset Details
To view an asset's details:
1. From the Dashboard, navigate to Assets > Manage > Manage Assets.
2. Select the asset to be viewed and click View Asset.
2.8.8 Viewing the History of an Asset
The asset history displays the list of actions performed on an asset and the details of the action,such as the following:
• Date• Action Performed (including the date placed in service)• By User• Action Cost
Basware P2P 18.1
© Copyright 1999-2017 Basware Corporation. All rights reserved.. 36
• Asset Value Impact• Status,• Shipment• Source Location• Destination Location
Figure 22: View Asset History page
To view the history of an asset:
1. From the Dashboard, navigate to Assets > Manage > Manage Assets.
2. Select the asset whose history is to be viewed and click More Actions > ViewHistory.
3. Click View to view the details of each action.
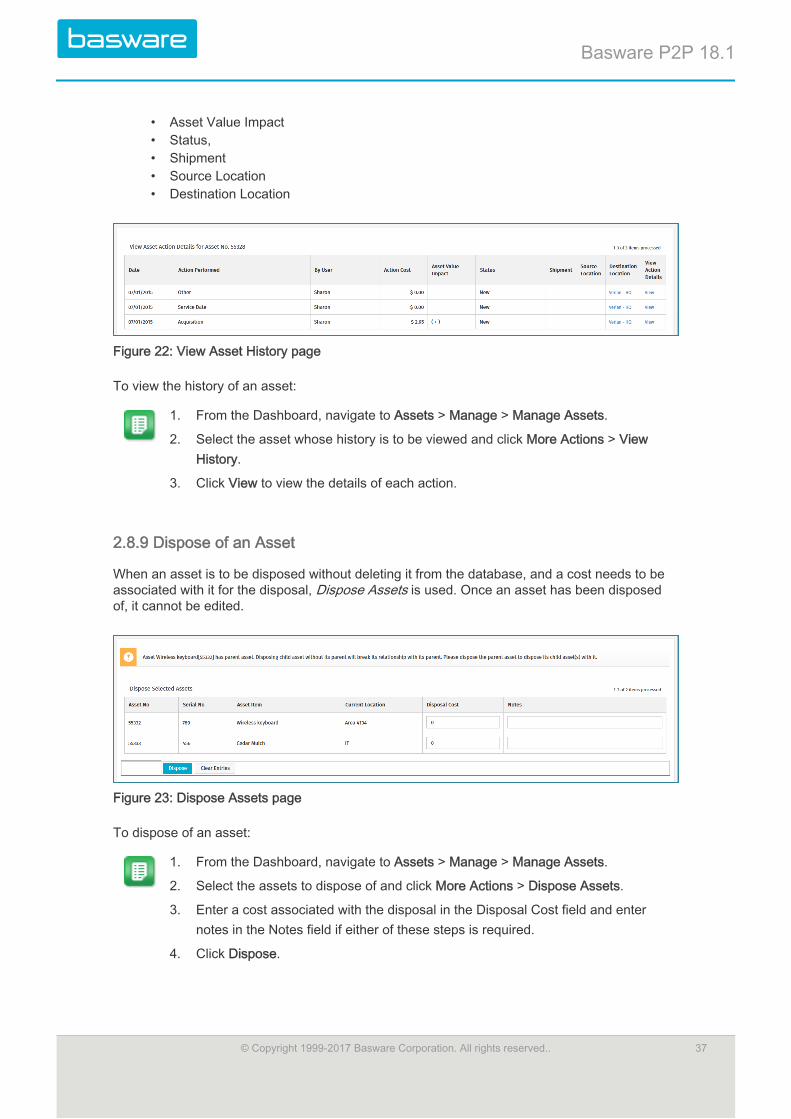
2.8.9 Dispose of an Asset
When an asset is to be disposed without deleting it from the database, and a cost needs to beassociated with it for the disposal, Dispose Assets is used. Once an asset has been disposedof, it cannot be edited.
Figure 23: Dispose Assets page
To dispose of an asset:
1. From the Dashboard, navigate to Assets > Manage > Manage Assets.
2. Select the assets to dispose of and click More Actions > Dispose Assets.
3. Enter a cost associated with the disposal in the Disposal Cost field and enternotes in the Notes field if either of these steps is required.
4. Click Dispose.
Basware P2P 18.1
© Copyright 1999-2017 Basware Corporation. All rights reserved.. 37
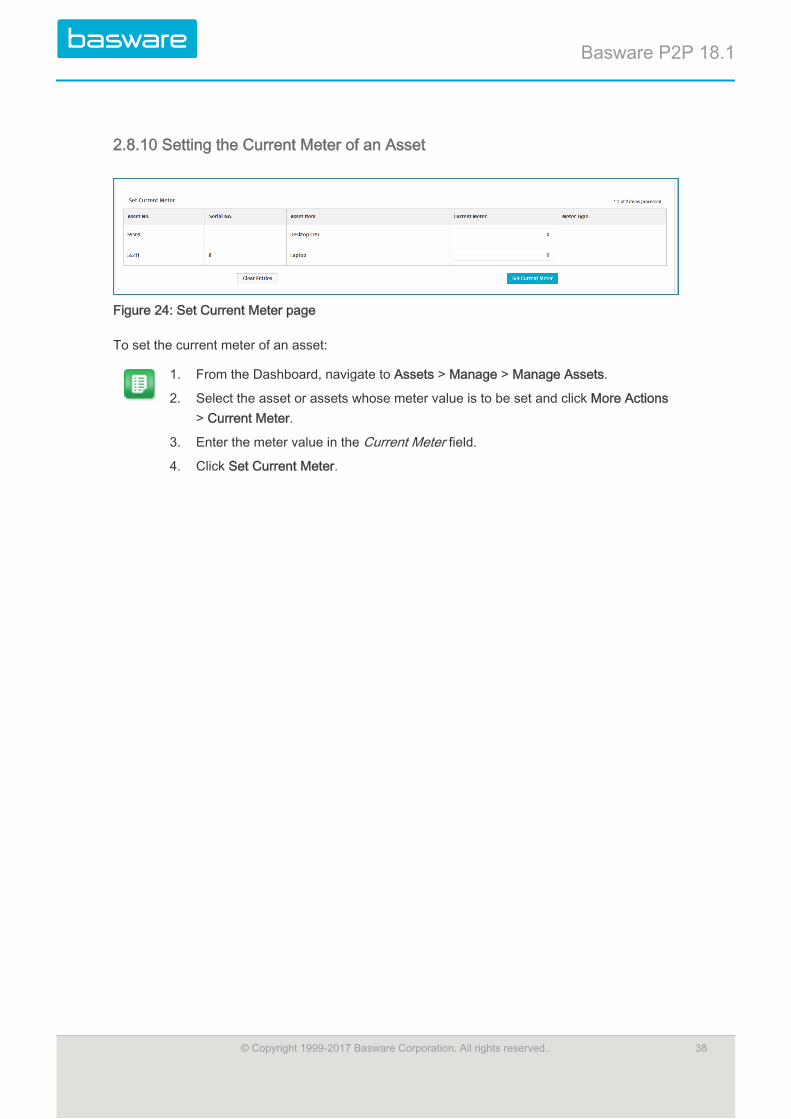
2.8.10 Setting the Current Meter of an Asset
Figure 24: Set Current Meter page
To set the current meter of an asset:
1. From the Dashboard, navigate to Assets > Manage > Manage Assets.
2. Select the asset or assets whose meter value is to be set and click More Actions> Current Meter.
3. Enter the meter value in the Current Meter field.
4. Click Set Current Meter.
Basware P2P 18.1
© Copyright 1999-2017 Basware Corporation. All rights reserved.. 38

2.8.11 Asset Actions
Figure 25: Record Asset Action page
Field Name Definition
Asset Number Displays the number assigned to this asset.This is a non-editable field.
Asset Description Displays the name of the asset. This is a non-editable field.
Asset Actions Select a predefined action to be performed.
Maintenance Type Select a maintenance type from thepredefined drop-down list.
Account Code Enter the account code that the asset isassigned.
Action Cost Enter the cost of the action performed.
Udef 1 - 5 User Defined Fields that allows the user tocollect specific information that is not collectedwith the normal fields in the system.
Action Notes Enter a description of the performed action.
Basware P2P 18.1
© Copyright 1999-2017 Basware Corporation. All rights reserved.. 39

Limits to Manual Depreciation Entry
When entering a manual (user) depreciation entry, the system performs validations on thatvalue. If the selected asset uses a depreciation schedule, the user is limited to, at most, theremaining scheduled depreciation. For example:
Acquisition cost: $ 7,000.00
Salvage value: $ 2,000.00
Depreciation method: Straight-line
Useful life (years): 5
Yearly Depreciation: $ 1,000 ((7,000 - 2,000) ÷ 5)
Suppose we are in the third year, and the asset has depreciated by $2,200.00. This means theasset has remaining scheduled depreciation of $2,800.00. If a user attempts to enter a manualdepreciation larger than $2,800.00, the system displays an error message.
For assets that do not depreciate, or that depreciate with “manual” depreciation method, themost depreciation that a user is allowed to enter is the current value. This is to prevent the assetfrom having a negative value.
2.8.11.1 Manually Recording an Action against an Asset
To record an action against an asset:
1. From the Dashboard, navigate to Assets > Manage > Manage Assets.
2. Select an asset to record an action against it and click More Actions > RecordAction.
3. Select the action from the Asset Actions drop-down list and a maintenance typefrom the drop-down list.
4. Enter an account code and a cost for the action performed, if any.
5. Click Save Record.
2.8.12 Set Maintenance
Maintenance tasks can be set against an asset using this action. For further details on assetmaintenance, refer to Asset Maintenance Tasks.
2.9 Depreciation ManagementDepreciation is the loss in value over the useful life of a fixed asset. The depreciation amountfor each type of asset needs is calculated differently based on the applicable standards.
Asset depreciation can be computed based on:
• The different depreciation methods such as straight line, declining balance, sum ofyear digits, or manually.
• Computation can reflect partial year conventions.• Depreciation methods can be set up by asset category.
Basware P2P 18.1
© Copyright 1999-2017 Basware Corporation. All rights reserved.. 40
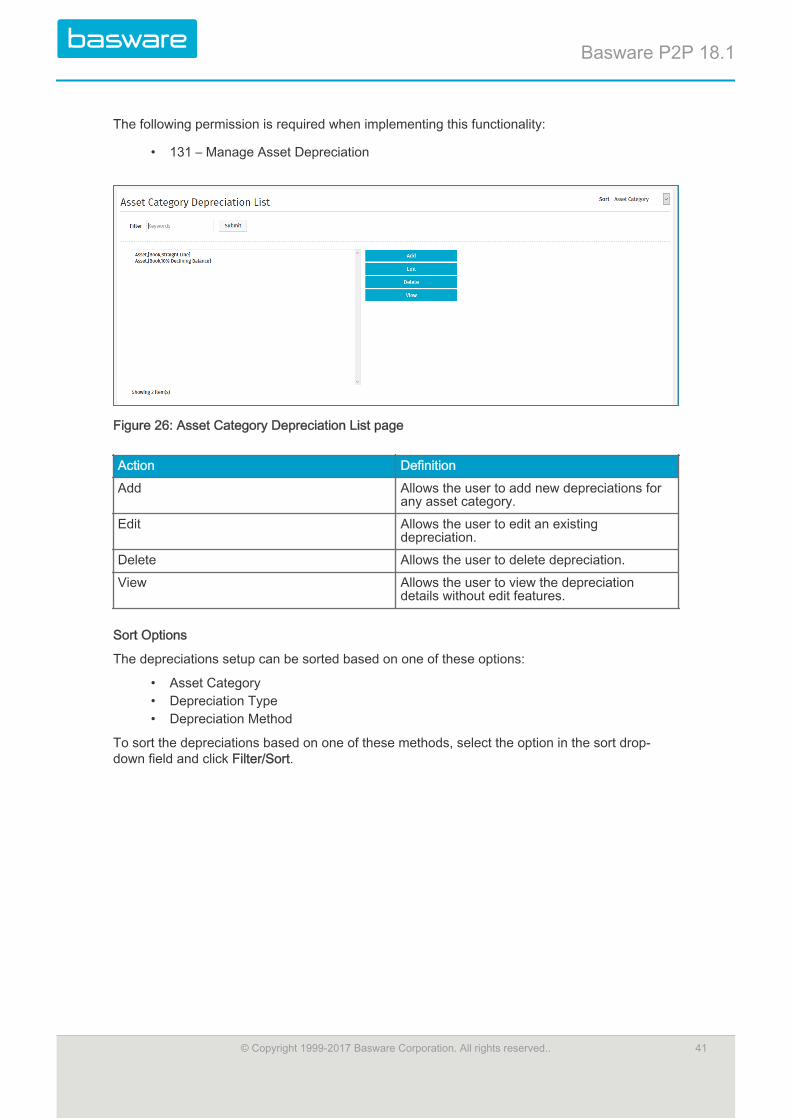
The following permission is required when implementing this functionality:
• 131 – Manage Asset Depreciation
Figure 26: Asset Category Depreciation List page
Action Definition
Add Allows the user to add new depreciations forany asset category.
Edit Allows the user to edit an existingdepreciation.
Delete Allows the user to delete depreciation.
View Allows the user to view the depreciationdetails without edit features.
Sort Options
The depreciations setup can be sorted based on one of these options:
• Asset Category• Depreciation Type• Depreciation Method
To sort the depreciations based on one of these methods, select the option in the sort drop-down field and click Filter/Sort.
Basware P2P 18.1
© Copyright 1999-2017 Basware Corporation. All rights reserved.. 41
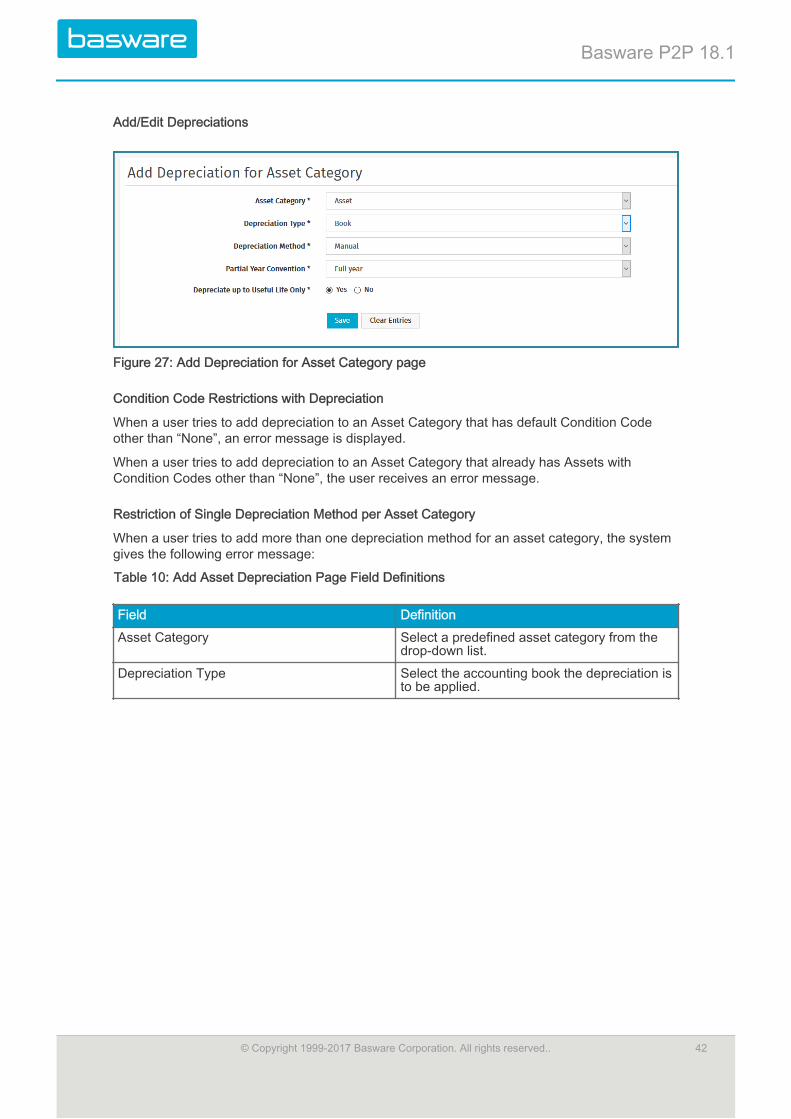
Add/Edit Depreciations
Figure 27: Add Depreciation for Asset Category page
Condition Code Restrictions with Depreciation
When a user tries to add depreciation to an Asset Category that has default Condition Codeother than “None”, an error message is displayed.
When a user tries to add depreciation to an Asset Category that already has Assets withCondition Codes other than “None”, the user receives an error message.
Restriction of Single Depreciation Method per Asset Category
When a user tries to add more than one depreciation method for an asset category, the systemgives the following error message:
Table 10: Add Asset Depreciation Page Field Definitions
Field Definition
Asset Category Select a predefined asset category from thedrop-down list.
Depreciation Type Select the accounting book the depreciation isto be applied.
Basware P2P 18.1
© Copyright 1999-2017 Basware Corporation. All rights reserved.. 42
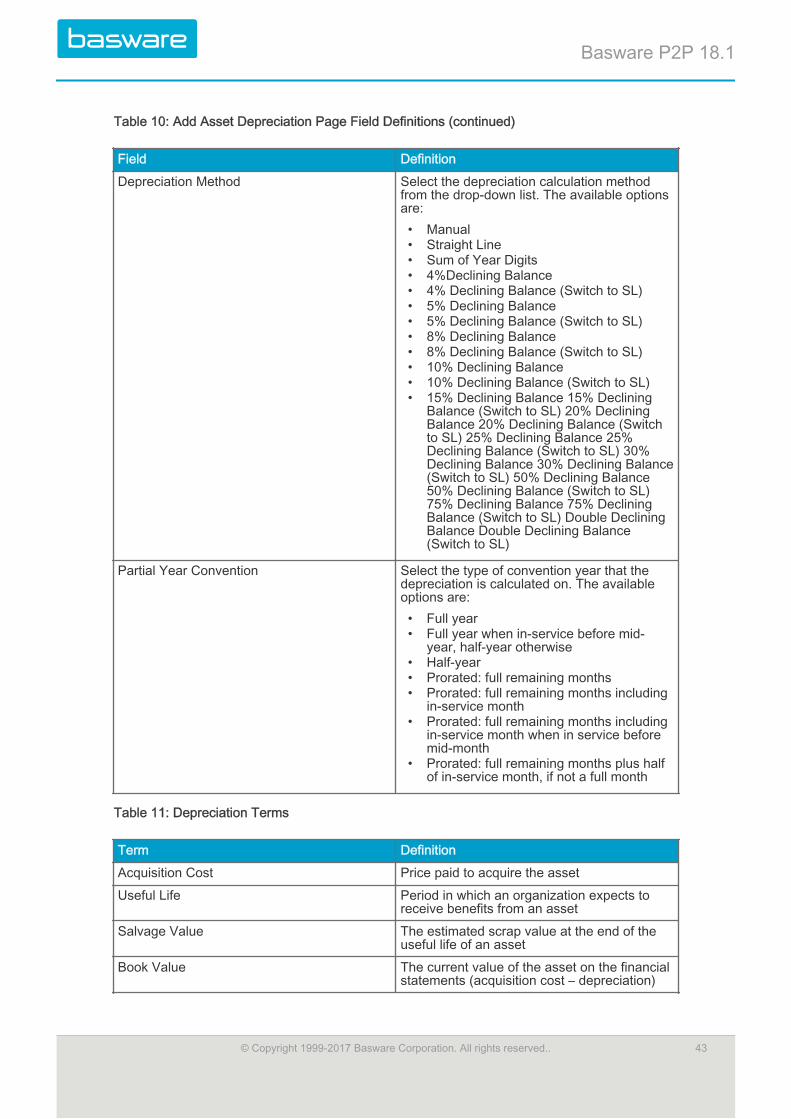
Table 10: Add Asset Depreciation Page Field Definitions (continued)
Field Definition
Depreciation Method Select the depreciation calculation methodfrom the drop-down list. The available optionsare:• Manual• Straight Line• Sum of Year Digits• 4%Declining Balance• 4% Declining Balance (Switch to SL)• 5% Declining Balance• 5% Declining Balance (Switch to SL)• 8% Declining Balance• 8% Declining Balance (Switch to SL)• 10% Declining Balance• 10% Declining Balance (Switch to SL)• 15% Declining Balance 15% Declining
Balance (Switch to SL) 20% DecliningBalance 20% Declining Balance (Switchto SL) 25% Declining Balance 25%Declining Balance (Switch to SL) 30%Declining Balance 30% Declining Balance(Switch to SL) 50% Declining Balance50% Declining Balance (Switch to SL)75% Declining Balance 75% DecliningBalance (Switch to SL) Double DecliningBalance Double Declining Balance(Switch to SL)
Partial Year Convention Select the type of convention year that thedepreciation is calculated on. The availableoptions are:• Full year• Full year when in-service before mid-
year, half-year otherwise• Half-year• Prorated: full remaining months• Prorated: full remaining months including
in-service month• Prorated: full remaining months including
in-service month when in service beforemid-month
• Prorated: full remaining months plus halfof in-service month, if not a full month
Table 11: Depreciation Terms
Term Definition
Acquisition Cost Price paid to acquire the asset
Useful Life Period in which an organization expects toreceive benefits from an asset
Salvage Value The estimated scrap value at the end of theuseful life of an asset
Book Value The current value of the asset on the financialstatements (acquisition cost – depreciation)
Basware P2P 18.1
© Copyright 1999-2017 Basware Corporation. All rights reserved.. 43
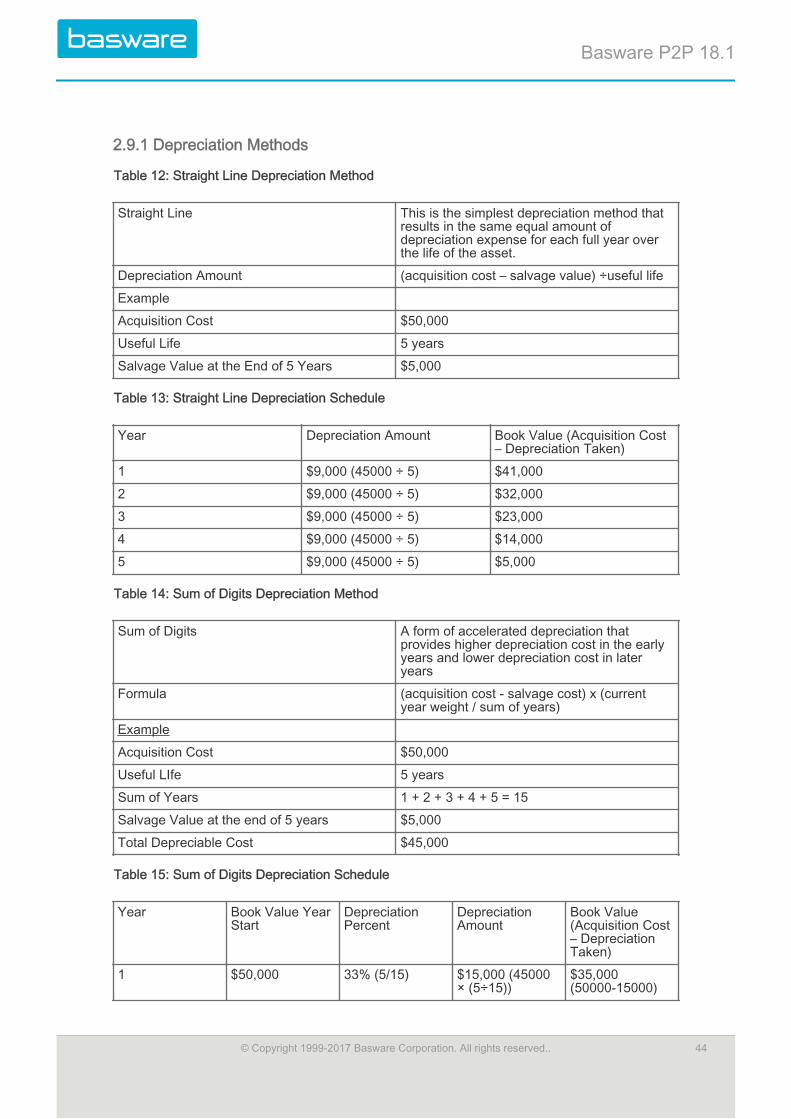
2.9.1 Depreciation Methods
Table 12: Straight Line Depreciation Method
Straight Line This is the simplest depreciation method thatresults in the same equal amount ofdepreciation expense for each full year overthe life of the asset.
Depreciation Amount (acquisition cost – salvage value) ÷useful life
Example
Acquisition Cost $50,000
Useful Life 5 years
Salvage Value at the End of 5 Years $5,000
Table 13: Straight Line Depreciation Schedule
Year Depreciation Amount Book Value (Acquisition Cost– Depreciation Taken)
1 $9,000 (45000 ÷ 5) $41,000
2 $9,000 (45000 ÷ 5) $32,000
3 $9,000 (45000 ÷ 5) $23,000
4 $9,000 (45000 ÷ 5) $14,000
5 $9,000 (45000 ÷ 5) $5,000
Table 14: Sum of Digits Depreciation Method
Sum of Digits A form of accelerated depreciation thatprovides higher depreciation cost in the earlyyears and lower depreciation cost in lateryears
Formula (acquisition cost - salvage cost) x (currentyear weight / sum of years)
Example
Acquisition Cost $50,000
Useful LIfe 5 years
Sum of Years 1 + 2 + 3 + 4 + 5 = 15
Salvage Value at the end of 5 years $5,000
Total Depreciable Cost $45,000
Table 15: Sum of Digits Depreciation Schedule
Year Book Value YearStart
DepreciationPercent
DepreciationAmount
Book Value(Acquisition Cost– DepreciationTaken)
1 $50,000 33% (5/15) $15,000 (45000× (5÷15))
$35,000(50000-15000)
Basware P2P 18.1
© Copyright 1999-2017 Basware Corporation. All rights reserved.. 44
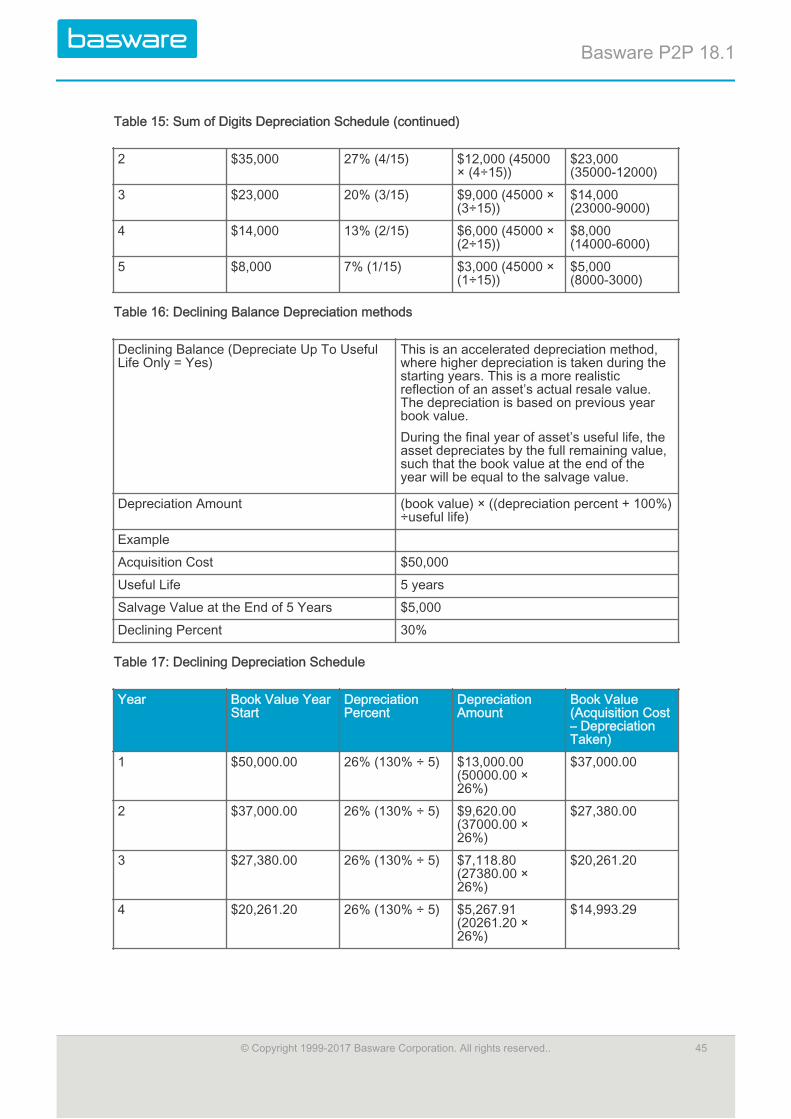
Table 15: Sum of Digits Depreciation Schedule (continued)
2 $35,000 27% (4/15) $12,000 (45000× (4÷15))
$23,000(35000-12000)
3 $23,000 20% (3/15) $9,000 (45000 ×(3÷15))
$14,000(23000-9000)
4 $14,000 13% (2/15) $6,000 (45000 ×(2÷15))
$8,000(14000-6000)
5 $8,000 7% (1/15) $3,000 (45000 ×(1÷15))
$5,000(8000-3000)
Table 16: Declining Balance Depreciation methods
Declining Balance (Depreciate Up To UsefulLife Only = Yes)
This is an accelerated depreciation method,where higher depreciation is taken during thestarting years. This is a more realisticreflection of an asset’s actual resale value.The depreciation is based on previous yearbook value.During the final year of asset’s useful life, theasset depreciates by the full remaining value,such that the book value at the end of theyear will be equal to the salvage value.
Depreciation Amount (book value) × ((depreciation percent + 100%)÷useful life)
Example
Acquisition Cost $50,000
Useful Life 5 years
Salvage Value at the End of 5 Years $5,000
Declining Percent 30%
Table 17: Declining Depreciation Schedule
Year Book Value YearStart
DepreciationPercent
DepreciationAmount
Book Value(Acquisition Cost– DepreciationTaken)
1 $50,000.00 26% (130% ÷ 5) $13,000.00(50000.00 ×26%)
$37,000.00
2 $37,000.00 26% (130% ÷ 5) $9,620.00(37000.00 ×26%)
$27,380.00
3 $27,380.00 26% (130% ÷ 5) $7,118.80(27380.00 ×26%)
$20,261.20
4 $20,261.20 26% (130% ÷ 5) $5,267.91(20261.20 ×26%)
$14,993.29
Basware P2P 18.1
© Copyright 1999-2017 Basware Corporation. All rights reserved.. 45
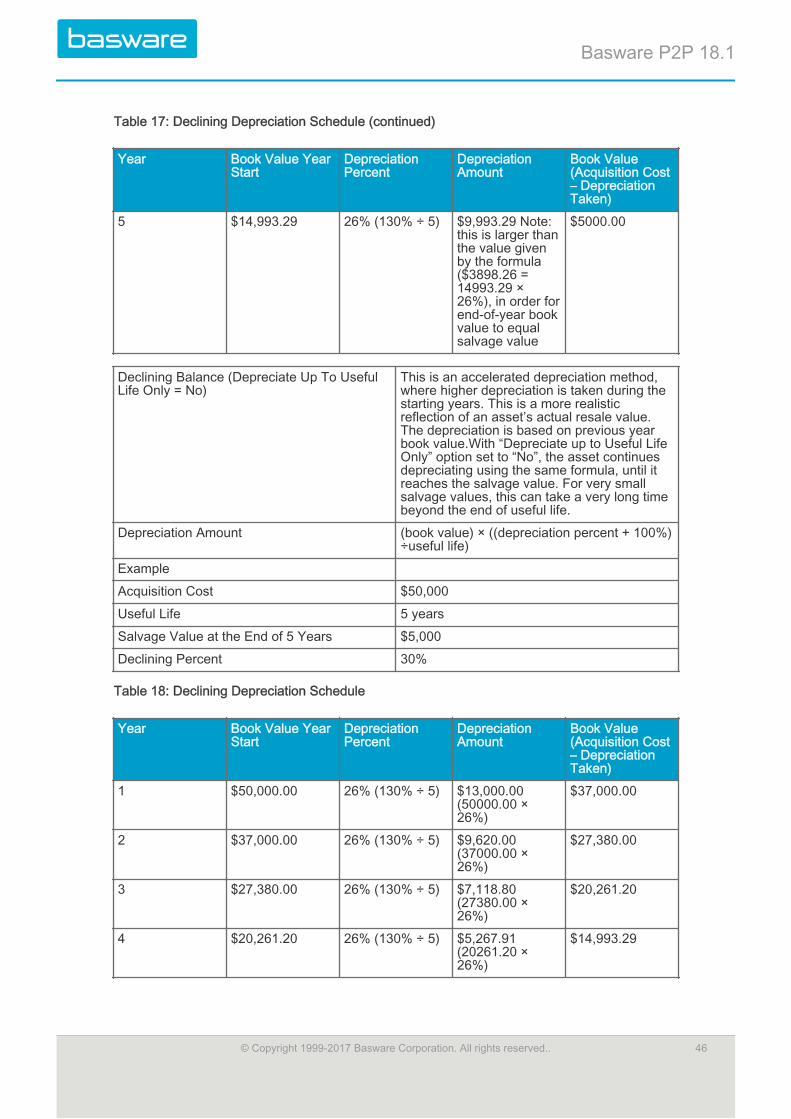
Table 17: Declining Depreciation Schedule (continued)
Year Book Value YearStart
DepreciationPercent
DepreciationAmount
Book Value(Acquisition Cost– DepreciationTaken)
5 $14,993.29 26% (130% ÷ 5) $9,993.29 Note:this is larger thanthe value givenby the formula($3898.26 =14993.29 ×26%), in order forend-of-year bookvalue to equalsalvage value
$5000.00
Declining Balance (Depreciate Up To UsefulLife Only = No)
This is an accelerated depreciation method,where higher depreciation is taken during thestarting years. This is a more realisticreflection of an asset’s actual resale value.The depreciation is based on previous yearbook value.With “Depreciate up to Useful LifeOnly” option set to “No”, the asset continuesdepreciating using the same formula, until itreaches the salvage value. For very smallsalvage values, this can take a very long timebeyond the end of useful life.
Depreciation Amount (book value) × ((depreciation percent + 100%)÷useful life)
Example
Acquisition Cost $50,000
Useful Life 5 years
Salvage Value at the End of 5 Years $5,000
Declining Percent 30%
Table 18: Declining Depreciation Schedule
Year Book Value YearStart
DepreciationPercent
DepreciationAmount
Book Value(Acquisition Cost– DepreciationTaken)
1 $50,000.00 26% (130% ÷ 5) $13,000.00(50000.00 ×26%)
$37,000.00
2 $37,000.00 26% (130% ÷ 5) $9,620.00(37000.00 ×26%)
$27,380.00
3 $27,380.00 26% (130% ÷ 5) $7,118.80(27380.00 ×26%)
$20,261.20
4 $20,261.20 26% (130% ÷ 5) $5,267.91(20261.20 ×26%)
$14,993.29
Basware P2P 18.1
© Copyright 1999-2017 Basware Corporation. All rights reserved.. 46

Table 18: Declining Depreciation Schedule (continued)
Year Book Value YearStart
DepreciationPercent
DepreciationAmount
Book Value(Acquisition Cost– DepreciationTaken)
5 $14,993.29 26% (130% ÷ 5) $3898.26(14993.29 ×26%)
$11,095.03 Note:this is the end ofuseful life, butthe asset has notreached salvagevalue yet, so itcontinuesdepreciating
6 $11095.03 26% (130% ÷ 5) $2884.71(11095.03 ×26%)
$8,210.32
7 $8210.32 26% (130% ÷ 5) $2134.68(8210.32 × 26%)
$6,075.64
8 $6075.64 26% (130% ÷ 5) $1075.64 Note:this is smallerthan valuecomputed byformula($1579.67=6075.64 × 26%) inorder to preventbook value fromdropping belowsalvage value
$5,000.00
Declining Balance (Switch to Straight Line) This is an accelerated depreciation method,where higher depreciation is taken during thestarting years. If depreciation amount to betaken in a year is less than the amount thatwould be taken by straight-line depreciation,the asset switches to straight-linedepreciation. This can be useful for ensuringthat the final year does not have a largeadditional depreciation in order to reachsalvage value.
Depreciation Amount Whichever is larger: (book value) ×((depreciation percent + 100%) ÷useful life) -or- (book value – salvage value) ÷ (remainingyears)
Example
Acquisition Cost $50,000
Useful Life 5 years
Salvage Value at the End of 5 Years $5,000
Declining Percent 30%
Basware P2P 18.1
© Copyright 1999-2017 Basware Corporation. All rights reserved.. 47
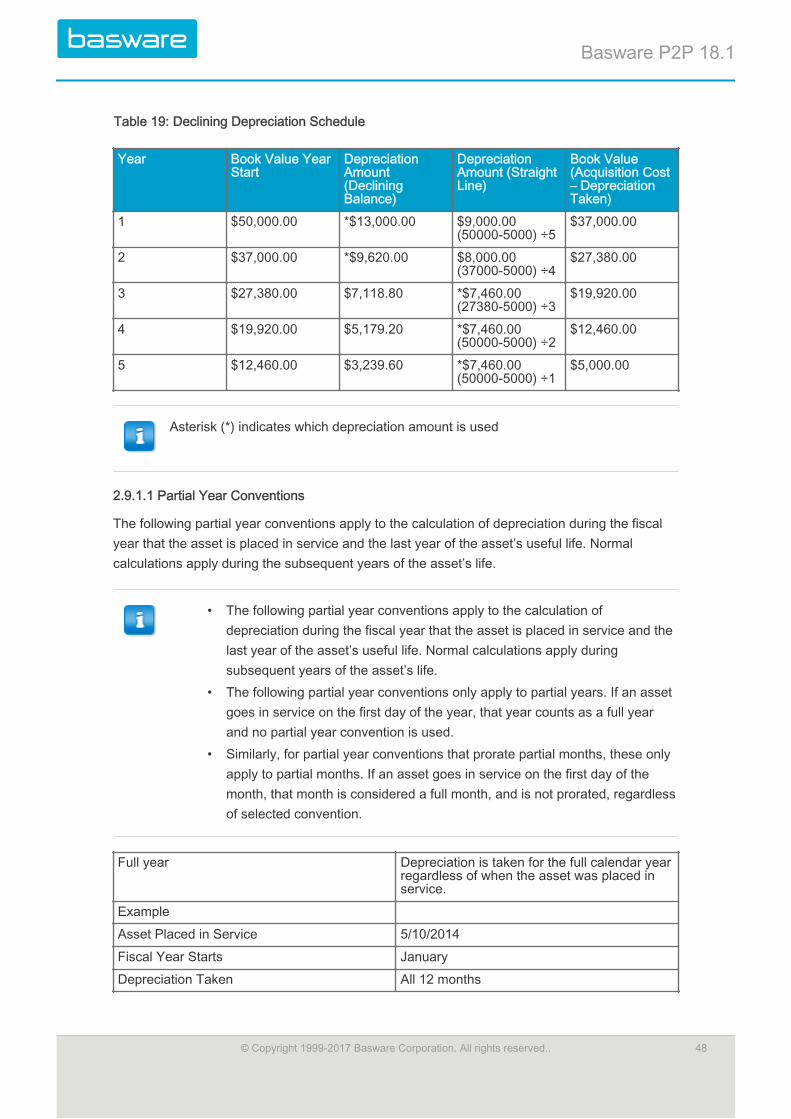
Table 19: Declining Depreciation Schedule
Year Book Value YearStart
DepreciationAmount(DecliningBalance)
DepreciationAmount (StraightLine)
Book Value(Acquisition Cost– DepreciationTaken)
1 $50,000.00 *$13,000.00 $9,000.00(50000-5000) ÷5
$37,000.00
2 $37,000.00 *$9,620.00 $8,000.00(37000-5000) ÷4
$27,380.00
3 $27,380.00 $7,118.80 *$7,460.00(27380-5000) ÷3
$19,920.00
4 $19,920.00 $5,179.20 *$7,460.00(50000-5000) ÷2
$12,460.00
5 $12,460.00 $3,239.60 *$7,460.00(50000-5000) ÷1
$5,000.00
Asterisk (*) indicates which depreciation amount is used
2.9.1.1 Partial Year Conventions
The following partial year conventions apply to the calculation of depreciation during the fiscalyear that the asset is placed in service and the last year of the asset’s useful life. Normalcalculations apply during the subsequent years of the asset’s life.
• The following partial year conventions apply to the calculation ofdepreciation during the fiscal year that the asset is placed in service and thelast year of the asset’s useful life. Normal calculations apply duringsubsequent years of the asset’s life.
• The following partial year conventions only apply to partial years. If an assetgoes in service on the first day of the year, that year counts as a full yearand no partial year convention is used.
• Similarly, for partial year conventions that prorate partial months, these onlyapply to partial months. If an asset goes in service on the first day of themonth, that month is considered a full month, and is not prorated, regardlessof selected convention.
Full year Depreciation is taken for the full calendar yearregardless of when the asset was placed inservice.
Example
Asset Placed in Service 5/10/2014
Fiscal Year Starts January
Depreciation Taken All 12 months
Basware P2P 18.1
© Copyright 1999-2017 Basware Corporation. All rights reserved.. 48
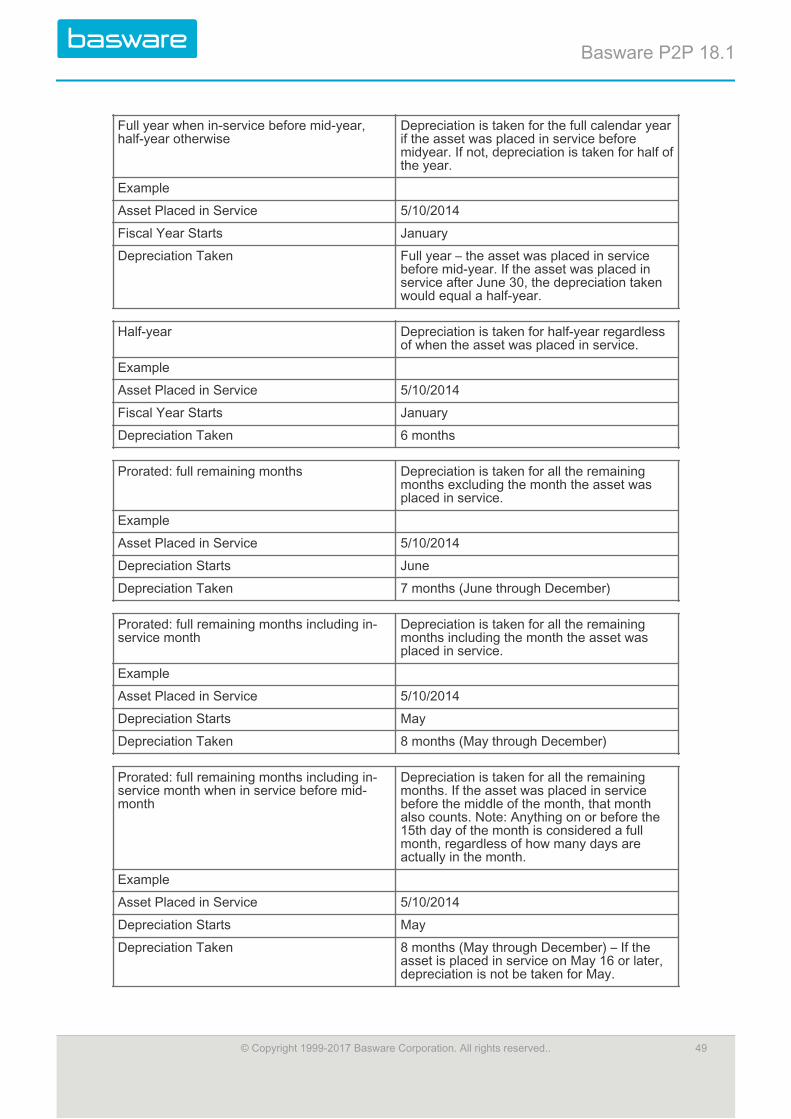
Full year when in-service before mid-year,half-year otherwise
Depreciation is taken for the full calendar yearif the asset was placed in service beforemidyear. If not, depreciation is taken for half ofthe year.
Example
Asset Placed in Service 5/10/2014
Fiscal Year Starts January
Depreciation Taken Full year – the asset was placed in servicebefore mid-year. If the asset was placed inservice after June 30, the depreciation takenwould equal a half-year.
Half-year Depreciation is taken for half-year regardlessof when the asset was placed in service.
Example
Asset Placed in Service 5/10/2014
Fiscal Year Starts January
Depreciation Taken 6 months
Prorated: full remaining months Depreciation is taken for all the remainingmonths excluding the month the asset wasplaced in service.
Example
Asset Placed in Service 5/10/2014
Depreciation Starts June
Depreciation Taken 7 months (June through December)
Prorated: full remaining months including in-service month
Depreciation is taken for all the remainingmonths including the month the asset wasplaced in service.
Example
Asset Placed in Service 5/10/2014
Depreciation Starts May
Depreciation Taken 8 months (May through December)
Prorated: full remaining months including in-service month when in service before mid-month
Depreciation is taken for all the remainingmonths. If the asset was placed in servicebefore the middle of the month, that monthalso counts. Note: Anything on or before the15th day of the month is considered a fullmonth, regardless of how many days areactually in the month.
Example
Asset Placed in Service 5/10/2014
Depreciation Starts May
Depreciation Taken 8 months (May through December) – If theasset is placed in service on May 16 or later,depreciation is not be taken for May.
Basware P2P 18.1
© Copyright 1999-2017 Basware Corporation. All rights reserved.. 49
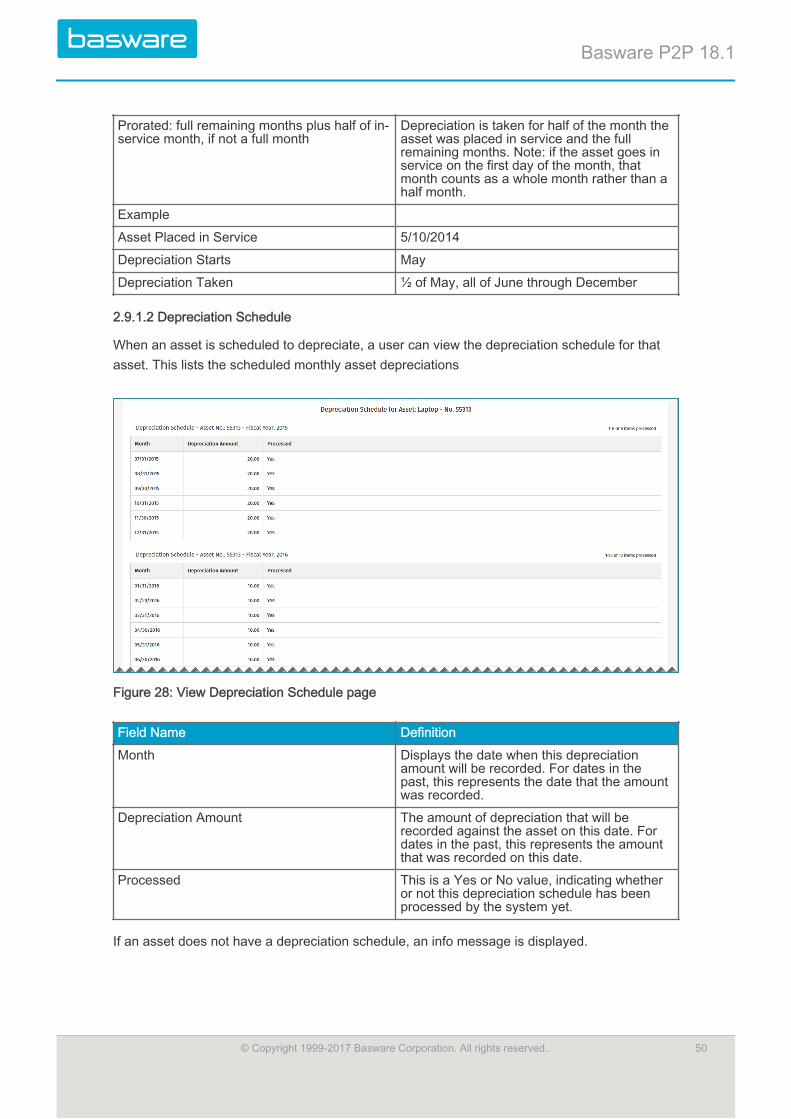
Prorated: full remaining months plus half of in-service month, if not a full month
Depreciation is taken for half of the month theasset was placed in service and the fullremaining months. Note: if the asset goes inservice on the first day of the month, thatmonth counts as a whole month rather than ahalf month.
Example
Asset Placed in Service 5/10/2014
Depreciation Starts May
Depreciation Taken ½ of May, all of June through December
2.9.1.2 Depreciation Schedule
When an asset is scheduled to depreciate, a user can view the depreciation schedule for thatasset. This lists the scheduled monthly asset depreciations
Figure 28: View Depreciation Schedule page
Field Name Definition
Month Displays the date when this depreciationamount will be recorded. For dates in thepast, this represents the date that the amountwas recorded.
Depreciation Amount The amount of depreciation that will berecorded against the asset on this date. Fordates in the past, this represents the amountthat was recorded on this date.
Processed This is a Yes or No value, indicating whetheror not this depreciation schedule has beenprocessed by the system yet.
If an asset does not have a depreciation schedule, an info message is displayed.
Basware P2P 18.1
© Copyright 1999-2017 Basware Corporation. All rights reserved.. 50
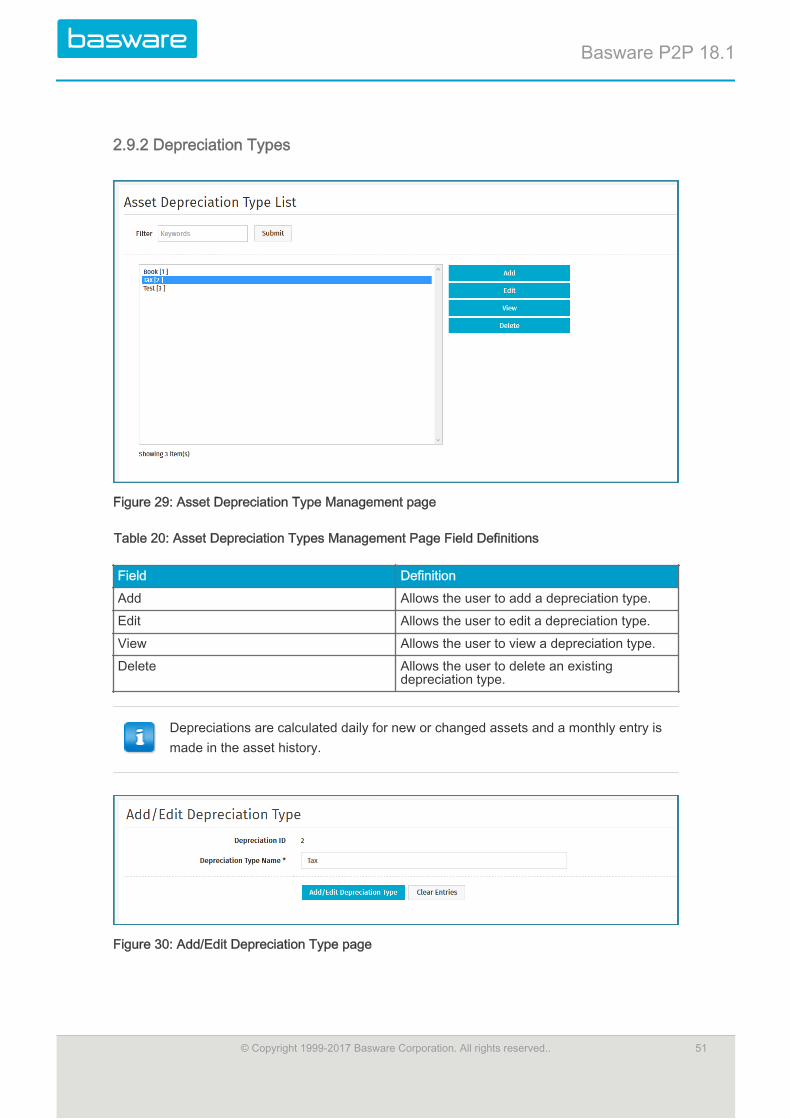
2.9.2 Depreciation Types
Figure 29: Asset Depreciation Type Management page
Table 20: Asset Depreciation Types Management Page Field Definitions
Field Definition
Add Allows the user to add a depreciation type.
Edit Allows the user to edit a depreciation type.
View Allows the user to view a depreciation type.
Delete Allows the user to delete an existingdepreciation type.
Depreciations are calculated daily for new or changed assets and a monthly entry ismade in the asset history.
Figure 30: Add/Edit Depreciation Type page
Basware P2P 18.1
© Copyright 1999-2017 Basware Corporation. All rights reserved.. 51

2.9.2.1 Adding or Editing a Depreciation Type
To add/edit a depreciation type:
1. From the Dashboard, navigate to > Assets > Depreciation Types.
2. Click Add.
3. Enter a name for the depreciation type.
4. Click Add/Edit Depreciation Type.
2.9.2.2 Deleting a Depreciation Type
To delete a depreciation type:
1. From the Dashboard, navigate to > Assets > Depreciation Types.
2. Select the depreciation type to be deleted and click Delete.
3. Click OK on the pop-up window.
2.9.3 Depreciation Schedule Recalculation
When certain properties of an asset are modified, the system flags the asset for recalculation ofthe depreciation schedule.
The following actions cause the system to recalculate the depreciation schedule:
• Edit asset category• Edit asset acquisition cost• Edit asset salvage value• Edit asset date in service• Edit asset useful life• Add manual depreciation entry
Actual vs Ideal Depreciation
When the system recalculates the depreciation schedule, it first computes an ideal depreciationschedule. This represents the monthly depreciation entries for the full lifetime of the asset (past,present, and future), if the asset had had its current configuration from the beginning.
The system also computes the actual life-to-date depreciation of this asset.
For any future depreciation entries, the system attempts to reconcile any discrepancies betweenactual and ideal depreciations. There are three possibilities:
• Actual and Ideal are equal• Actual is less than Ideal• Actual is greater than Ideal
Actual and Ideal are Equal
In this situation, the system does not need to make any adjustment. The asset continuesdepreciating as expected.
Basware P2P 18.1
© Copyright 1999-2017 Basware Corporation. All rights reserved.. 52
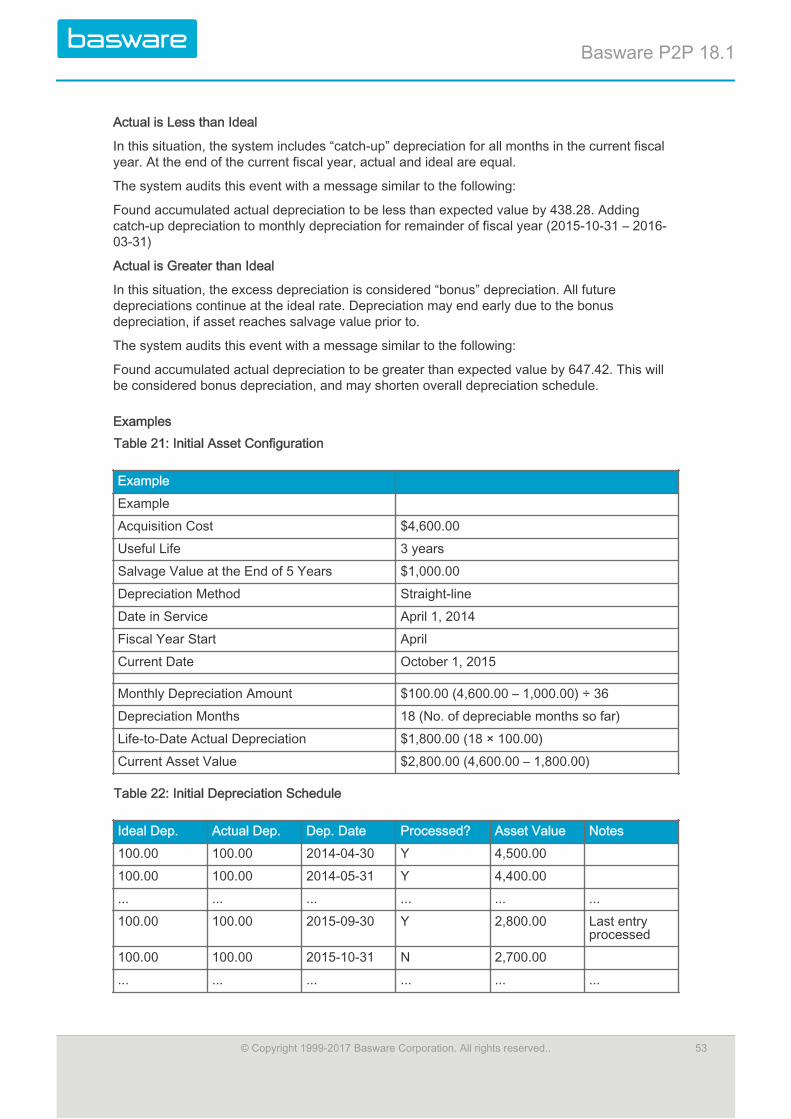
Actual is Less than Ideal
In this situation, the system includes “catch-up” depreciation for all months in the current fiscalyear. At the end of the current fiscal year, actual and ideal are equal.
The system audits this event with a message similar to the following:
Found accumulated actual depreciation to be less than expected value by 438.28. Addingcatch-up depreciation to monthly depreciation for remainder of fiscal year (2015-10-31 – 2016-03-31)
Actual is Greater than Ideal
In this situation, the excess depreciation is considered “bonus” depreciation. All futuredepreciations continue at the ideal rate. Depreciation may end early due to the bonusdepreciation, if asset reaches salvage value prior to.
The system audits this event with a message similar to the following:
Found accumulated actual depreciation to be greater than expected value by 647.42. This willbe considered bonus depreciation, and may shorten overall depreciation schedule.
ExamplesTable 21: Initial Asset Configuration
Example
Example
Acquisition Cost $4,600.00
Useful Life 3 years
Salvage Value at the End of 5 Years $1,000.00
Depreciation Method Straight-line
Date in Service April 1, 2014
Fiscal Year Start April
Current Date October 1, 2015
Monthly Depreciation Amount $100.00 (4,600.00 – 1,000.00) ÷ 36
Depreciation Months 18 (No. of depreciable months so far)
Life-to-Date Actual Depreciation $1,800.00 (18 × 100.00)
Current Asset Value $2,800.00 (4,600.00 – 1,800.00)
Table 22: Initial Depreciation Schedule
Ideal Dep. Actual Dep. Dep. Date Processed? Asset Value Notes
100.00 100.00 2014-04-30 Y 4,500.00
100.00 100.00 2014-05-31 Y 4,400.00
... ... ... ... ... ...
100.00 100.00 2015-09-30 Y 2,800.00 Last entryprocessed
100.00 100.00 2015-10-31 N 2,700.00
... ... ... ... ... ...
Basware P2P 18.1
© Copyright 1999-2017 Basware Corporation. All rights reserved.. 53
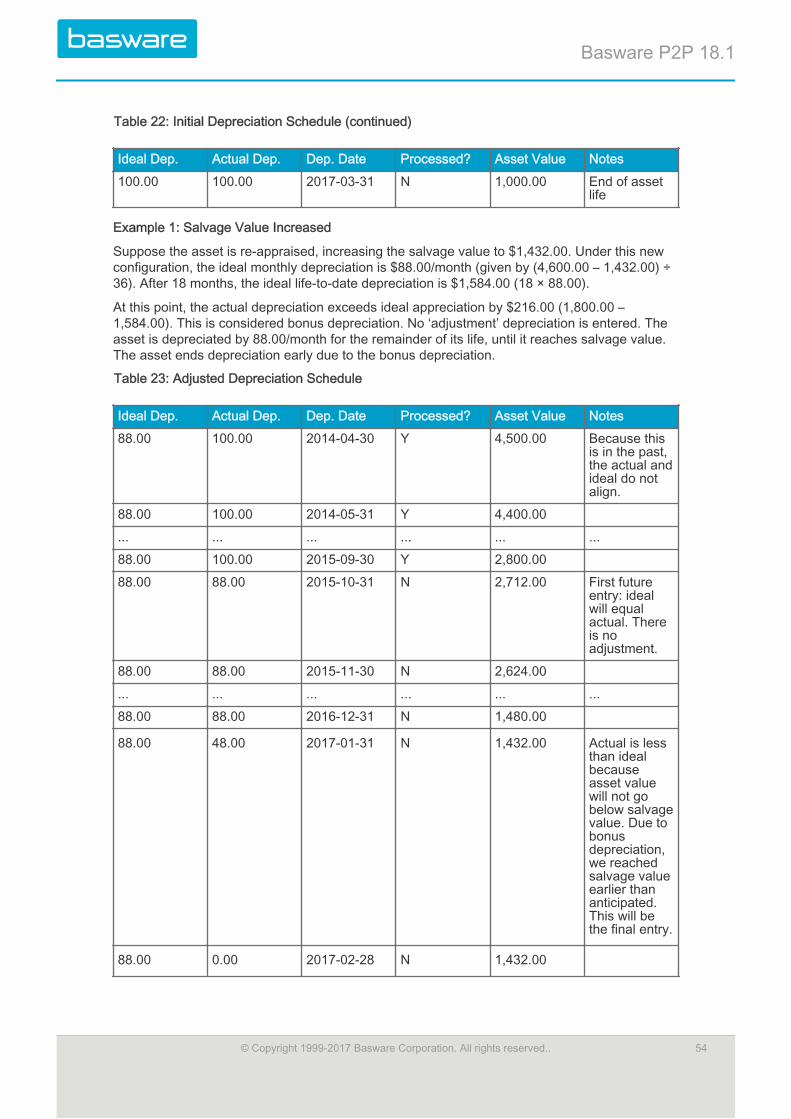
Table 22: Initial Depreciation Schedule (continued)
Ideal Dep. Actual Dep. Dep. Date Processed? Asset Value Notes
100.00 100.00 2017-03-31 N 1,000.00 End of assetlife
Example 1: Salvage Value Increased
Suppose the asset is re-appraised, increasing the salvage value to $1,432.00. Under this newconfiguration, the ideal monthly depreciation is $88.00/month (given by (4,600.00 – 1,432.00) ÷36). After 18 months, the ideal life-to-date depreciation is $1,584.00 (18 × 88.00).
At this point, the actual depreciation exceeds ideal appreciation by $216.00 (1,800.00 –1,584.00). This is considered bonus depreciation. No ‘adjustment’ depreciation is entered. Theasset is depreciated by 88.00/month for the remainder of its life, until it reaches salvage value.The asset ends depreciation early due to the bonus depreciation.
Table 23: Adjusted Depreciation Schedule
Ideal Dep. Actual Dep. Dep. Date Processed? Asset Value Notes
88.00 100.00 2014-04-30 Y 4,500.00 Because thisis in the past,the actual andideal do notalign.
88.00 100.00 2014-05-31 Y 4,400.00
... ... ... ... ... ...
88.00 100.00 2015-09-30 Y 2,800.00
88.00 88.00 2015-10-31 N 2,712.00 First futureentry: idealwill equalactual. Thereis noadjustment.
88.00 88.00 2015-11-30 N 2,624.00
... ... ... ... ... ...
88.00 88.00 2016-12-31 N 1,480.00
88.00 48.00 2017-01-31 N 1,432.00 Actual is lessthan idealbecauseasset valuewill not gobelow salvagevalue. Due tobonusdepreciation,we reachedsalvage valueearlier thananticipated.This will bethe final entry.
88.00 0.00 2017-02-28 N 1,432.00
Basware P2P 18.1
© Copyright 1999-2017 Basware Corporation. All rights reserved.. 54
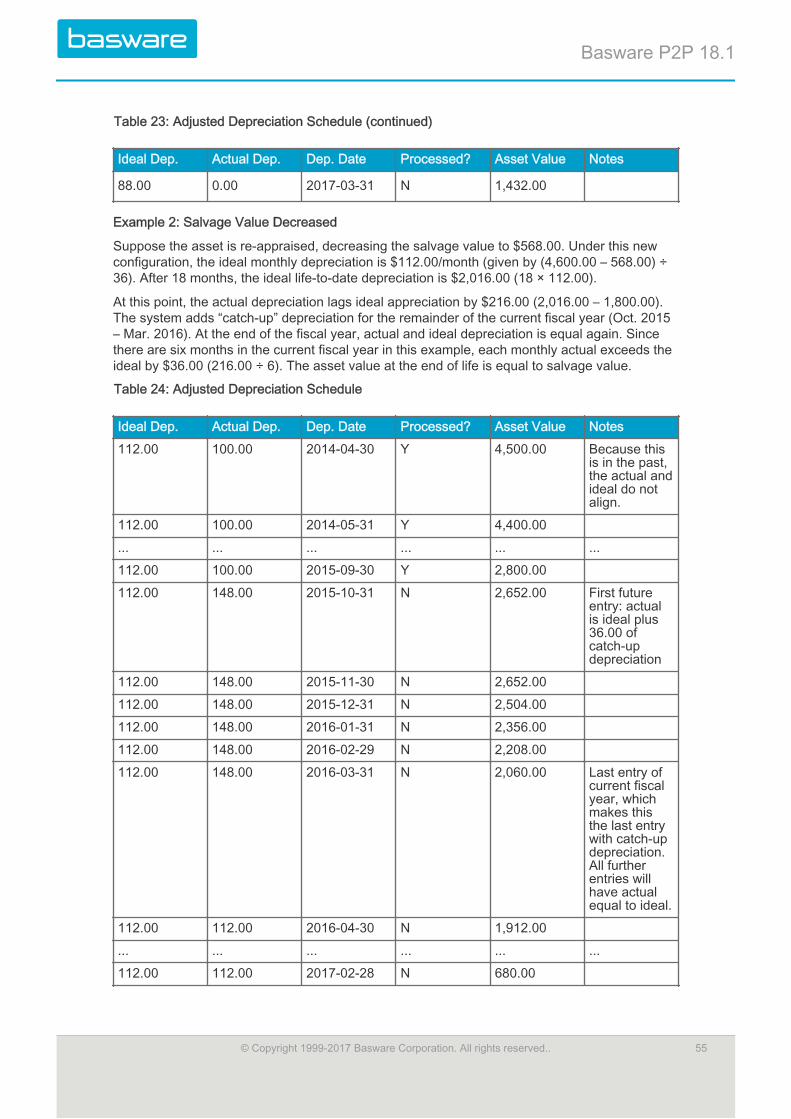
Table 23: Adjusted Depreciation Schedule (continued)
Ideal Dep. Actual Dep. Dep. Date Processed? Asset Value Notes
88.00 0.00 2017-03-31 N 1,432.00
Example 2: Salvage Value Decreased
Suppose the asset is re-appraised, decreasing the salvage value to $568.00. Under this newconfiguration, the ideal monthly depreciation is $112.00/month (given by (4,600.00 – 568.00) ÷36). After 18 months, the ideal life-to-date depreciation is $2,016.00 (18 × 112.00).
At this point, the actual depreciation lags ideal appreciation by $216.00 (2,016.00 – 1,800.00).The system adds “catch-up” depreciation for the remainder of the current fiscal year (Oct. 2015– Mar. 2016). At the end of the fiscal year, actual and ideal depreciation is equal again. Sincethere are six months in the current fiscal year in this example, each monthly actual exceeds theideal by $36.00 (216.00 ÷ 6). The asset value at the end of life is equal to salvage value.
Table 24: Adjusted Depreciation Schedule
Ideal Dep. Actual Dep. Dep. Date Processed? Asset Value Notes
112.00 100.00 2014-04-30 Y 4,500.00 Because thisis in the past,the actual andideal do notalign.
112.00 100.00 2014-05-31 Y 4,400.00
... ... ... ... ... ...
112.00 100.00 2015-09-30 Y 2,800.00
112.00 148.00 2015-10-31 N 2,652.00 First futureentry: actualis ideal plus36.00 ofcatch-updepreciation
112.00 148.00 2015-11-30 N 2,652.00
112.00 148.00 2015-12-31 N 2,504.00
112.00 148.00 2016-01-31 N 2,356.00
112.00 148.00 2016-02-29 N 2,208.00
112.00 148.00 2016-03-31 N 2,060.00 Last entry ofcurrent fiscalyear, whichmakes thisthe last entrywith catch-updepreciation.All furtherentries willhave actualequal to ideal.
112.00 112.00 2016-04-30 N 1,912.00
... ... ... ... ... ...
112.00 112.00 2017-02-28 N 680.00
Basware P2P 18.1
© Copyright 1999-2017 Basware Corporation. All rights reserved.. 55
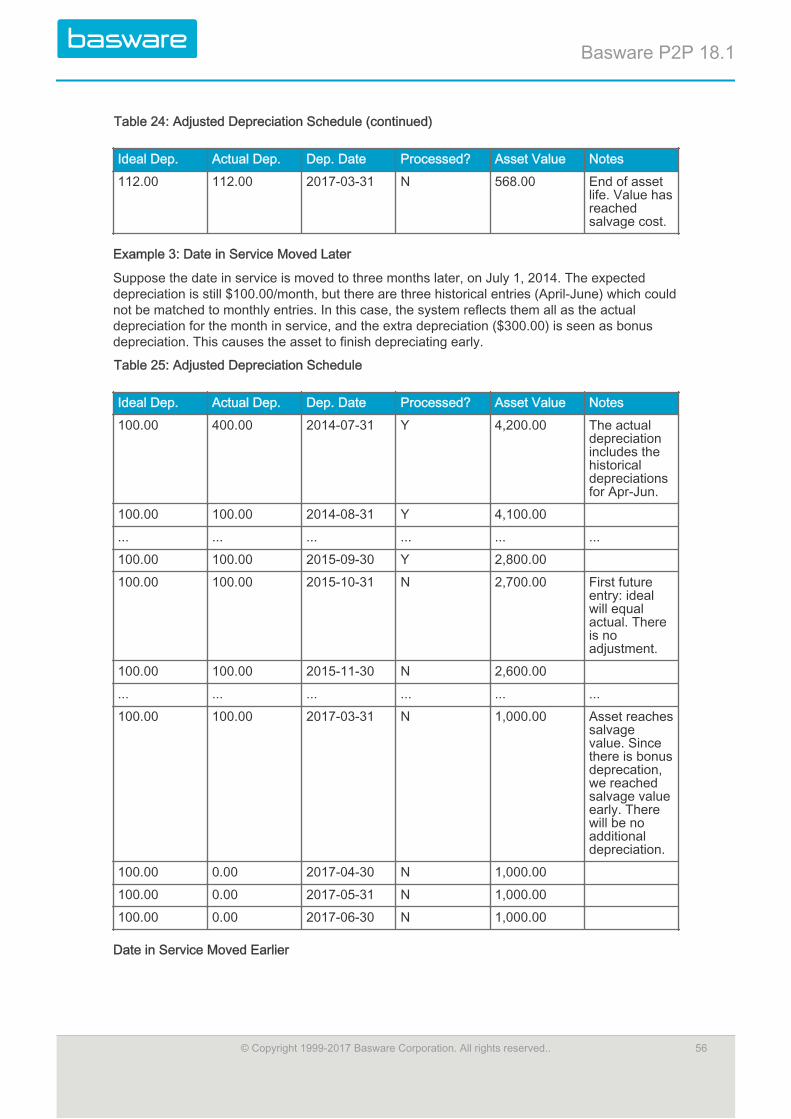
Table 24: Adjusted Depreciation Schedule (continued)
Ideal Dep. Actual Dep. Dep. Date Processed? Asset Value Notes
112.00 112.00 2017-03-31 N 568.00 End of assetlife. Value hasreachedsalvage cost.
Example 3: Date in Service Moved Later
Suppose the date in service is moved to three months later, on July 1, 2014. The expecteddepreciation is still $100.00/month, but there are three historical entries (April-June) which couldnot be matched to monthly entries. In this case, the system reflects them all as the actualdepreciation for the month in service, and the extra depreciation ($300.00) is seen as bonusdepreciation. This causes the asset to finish depreciating early.
Table 25: Adjusted Depreciation Schedule
Ideal Dep. Actual Dep. Dep. Date Processed? Asset Value Notes
100.00 400.00 2014-07-31 Y 4,200.00 The actualdepreciationincludes thehistoricaldepreciationsfor Apr-Jun.
100.00 100.00 2014-08-31 Y 4,100.00
... ... ... ... ... ...
100.00 100.00 2015-09-30 Y 2,800.00
100.00 100.00 2015-10-31 N 2,700.00 First futureentry: idealwill equalactual. Thereis noadjustment.
100.00 100.00 2015-11-30 N 2,600.00
... ... ... ... ... ...
100.00 100.00 2017-03-31 N 1,000.00 Asset reachessalvagevalue. Sincethere is bonusdeprecation,we reachedsalvage valueearly. Therewill be noadditionaldepreciation.
100.00 0.00 2017-04-30 N 1,000.00
100.00 0.00 2017-05-31 N 1,000.00
100.00 0.00 2017-06-30 N 1,000.00
Date in Service Moved Earlier
Basware P2P 18.1
© Copyright 1999-2017 Basware Corporation. All rights reserved.. 56
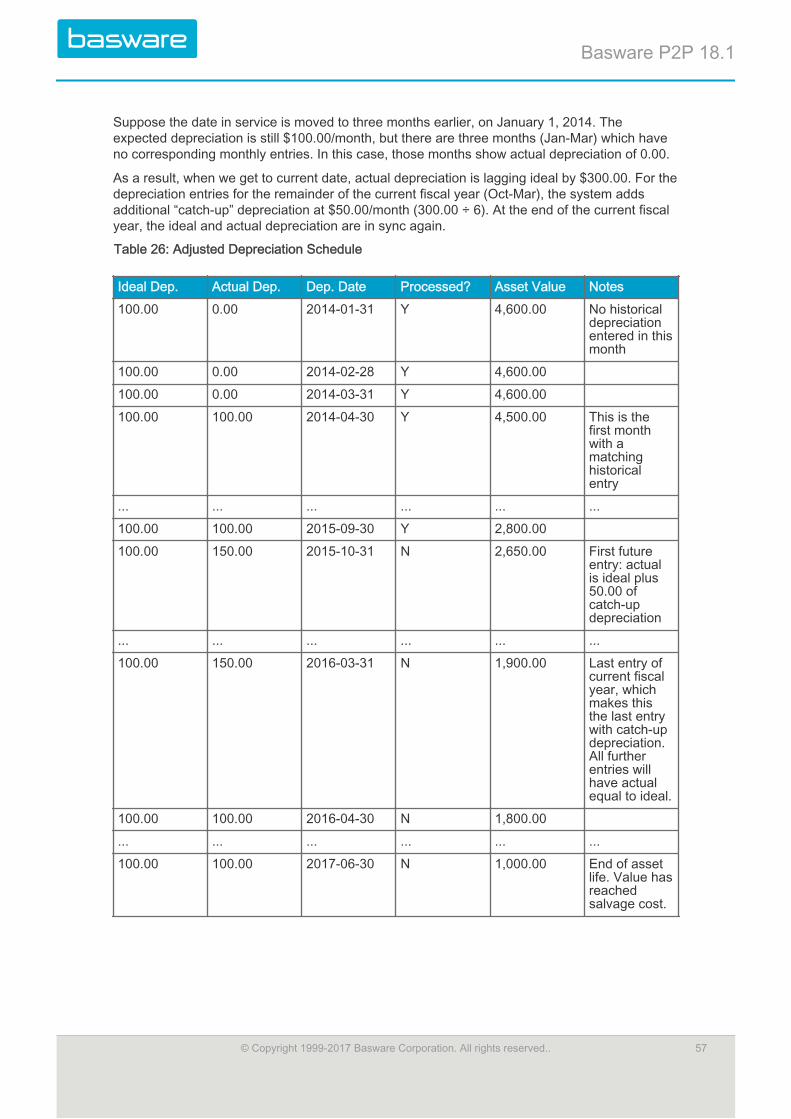
Suppose the date in service is moved to three months earlier, on January 1, 2014. Theexpected depreciation is still $100.00/month, but there are three months (Jan-Mar) which haveno corresponding monthly entries. In this case, those months show actual depreciation of 0.00.
As a result, when we get to current date, actual depreciation is lagging ideal by $300.00. For thedepreciation entries for the remainder of the current fiscal year (Oct-Mar), the system addsadditional “catch-up” depreciation at $50.00/month (300.00 ÷ 6). At the end of the current fiscalyear, the ideal and actual depreciation are in sync again.
Table 26: Adjusted Depreciation Schedule
Ideal Dep. Actual Dep. Dep. Date Processed? Asset Value Notes
100.00 0.00 2014-01-31 Y 4,600.00 No historicaldepreciationentered in thismonth
100.00 0.00 2014-02-28 Y 4,600.00
100.00 0.00 2014-03-31 Y 4,600.00
100.00 100.00 2014-04-30 Y 4,500.00 This is thefirst monthwith amatchinghistoricalentry
... ... ... ... ... ...
100.00 100.00 2015-09-30 Y 2,800.00
100.00 150.00 2015-10-31 N 2,650.00 First futureentry: actualis ideal plus50.00 ofcatch-updepreciation
... ... ... ... ... ...
100.00 150.00 2016-03-31 N 1,900.00 Last entry ofcurrent fiscalyear, whichmakes thisthe last entrywith catch-updepreciation.All furtherentries willhave actualequal to ideal.
100.00 100.00 2016-04-30 N 1,800.00
... ... ... ... ... ...
100.00 100.00 2017-06-30 N 1,000.00 End of assetlife. Value hasreachedsalvage cost.
Basware P2P 18.1
© Copyright 1999-2017 Basware Corporation. All rights reserved.. 57

2.10 Asset Valuation CalculationsWhen the asset history is updated and the item is flagged to be recalculated, the systemrecalculates the asset value. The formula to recalculate the asset value is
Asset value = (sum of all appreciations, upgrades, acquisition costs)– (sum of all depreciations action cost from the Asset History table)
After the calculation of the value, the system stores the new value in the Assets table.
Whenever the condition code is changed, the system adds a record to the Asset History table,also known as the Asset Action Details page. The action performed is depreciation (conditioncode change). The action cost is recorded as a change in the asset value due to a codechange. Users are able to view the action cost in the Asset Action History page. The assetvalue is displayed on the View Asset page.
Figure 31: View Asset History page
2.10.1 Viewing Asset History
To view the history of actions for an asset:
1. From the Dashboard, navigate to Assets > Manage > Manage Assets.
2. Select the asset whose actions are to be viewed.
3. Click More Actions > View History..
2.11 Work Order CategoriesWork order categories allow specific categorization of work orders for organizational andreporting purposes.
The following permission is required when implementing this functionality:
• 127 – Manage Work Order Types/Categories
Basware P2P 18.1
© Copyright 1999-2017 Basware Corporation. All rights reserved.. 58

Figure 32: Manage Work Order Categories page
Table 27: Work Order Categories Management Page Action Definitions
Action Definition
Add Allows the user to add new work ordercategory.
Edit Allows the user to edit an existing work ordercategory.
Delete Allows the user to delete an existing workorder category.
Enable Allows the user to enable a work ordercategory from the list.
Disable Allows the user to disable a work ordercategory from the list
You can filter the work order categories based on these options:
• All Categories: Select this option to display all work order categories.• Enabled: Select this option to display only enabled work order categories.• Disabled: Select this option to display only disabled work order categories.
To filter based on one of these options, select the category of work orders to view from the Filterdrop-down field and click Retrieve.
To filter for a particular work order category by its name, select all types from the Filter drop-down list and enter the name in the And field then click Retrieve.
Basware P2P 18.1
© Copyright 1999-2017 Basware Corporation. All rights reserved.. 59

2.11.1 Addition or Editing of Work Order Categories
The Add Work Order Category and the Edit Work Order Category pages have the sameattributes.
Figure 33: Add/Edit Work Order Category page
Table 28: Add/Edit Work Order Category page field definitions
Field Definition
Work Order Category* Enter a name for the work order category.This is a required field.
Account Code Enter an account code to be associated withthe work order category.
Enabled Select Yes to enable the work order category.Select No to disable the work order category.
2.11.1.1 Adding a Work Order Category
To add a work order category:
1. From the Dashboard, navigate to > Work Orders > Work OrderCategories.
2. Click Add.
3. Complete the required fields.
4. Click Add Work Order Category.
2.11.1.2 Editing a Work Order Category
To edit a work order category:
1. From the Dashboard, navigate to > Work Orders > Work OrderCategories.
2. Select the work order category to be edited and click Edit.
3. Change the required fields.
Basware P2P 18.1
© Copyright 1999-2017 Basware Corporation. All rights reserved.. 60
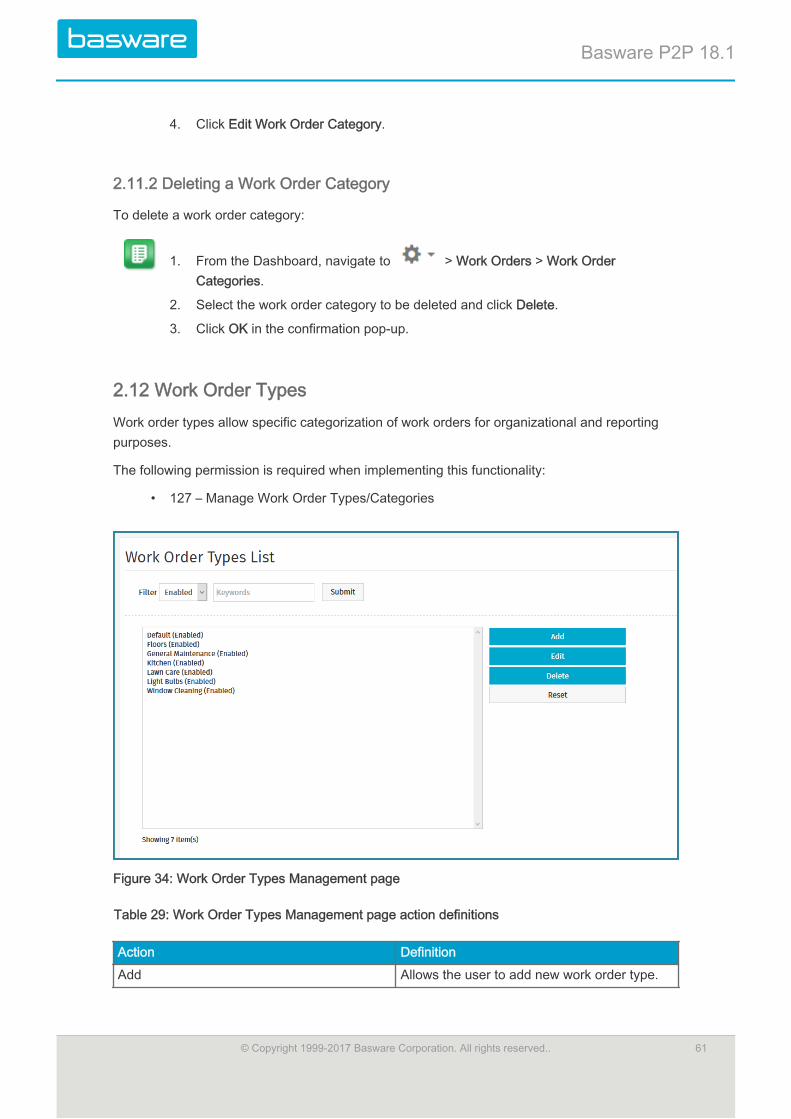
4. Click Edit Work Order Category.
2.11.2 Deleting a Work Order Category
To delete a work order category:
1. From the Dashboard, navigate to > Work Orders > Work OrderCategories.
2. Select the work order category to be deleted and click Delete.
3. Click OK in the confirmation pop-up.
2.12 Work Order TypesWork order types allow specific categorization of work orders for organizational and reportingpurposes.
The following permission is required when implementing this functionality:
• 127 – Manage Work Order Types/Categories
Figure 34: Work Order Types Management page
Table 29: Work Order Types Management page action definitions
Action Definition
Add Allows the user to add new work order type.
Basware P2P 18.1
© Copyright 1999-2017 Basware Corporation. All rights reserved.. 61
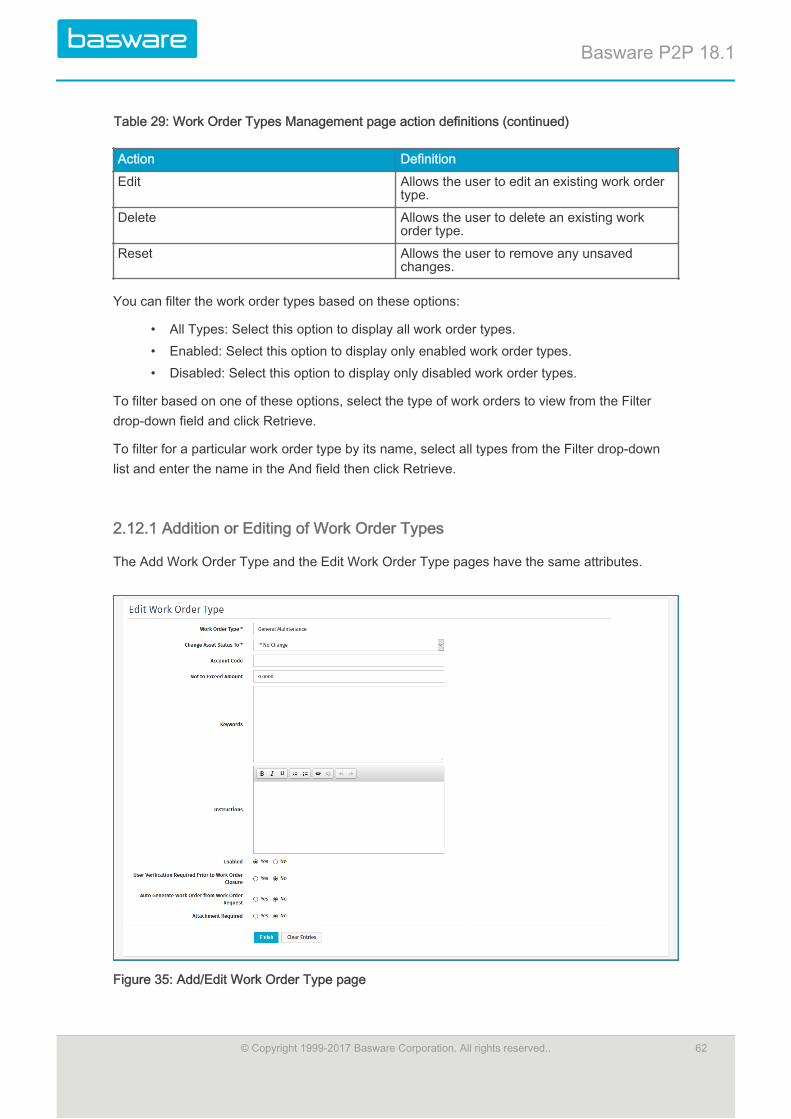
Table 29: Work Order Types Management page action definitions (continued)
Action Definition
Edit Allows the user to edit an existing work ordertype.
Delete Allows the user to delete an existing workorder type.
Reset Allows the user to remove any unsavedchanges.
You can filter the work order types based on these options:
• All Types: Select this option to display all work order types.• Enabled: Select this option to display only enabled work order types.• Disabled: Select this option to display only disabled work order types.
To filter based on one of these options, select the type of work orders to view from the Filterdrop-down field and click Retrieve.
To filter for a particular work order type by its name, select all types from the Filter drop-downlist and enter the name in the And field then click Retrieve.
2.12.1 Addition or Editing of Work Order Types
The Add Work Order Type and the Edit Work Order Type pages have the same attributes.
Figure 35: Add/Edit Work Order Type page
Basware P2P 18.1
© Copyright 1999-2017 Basware Corporation. All rights reserved.. 62
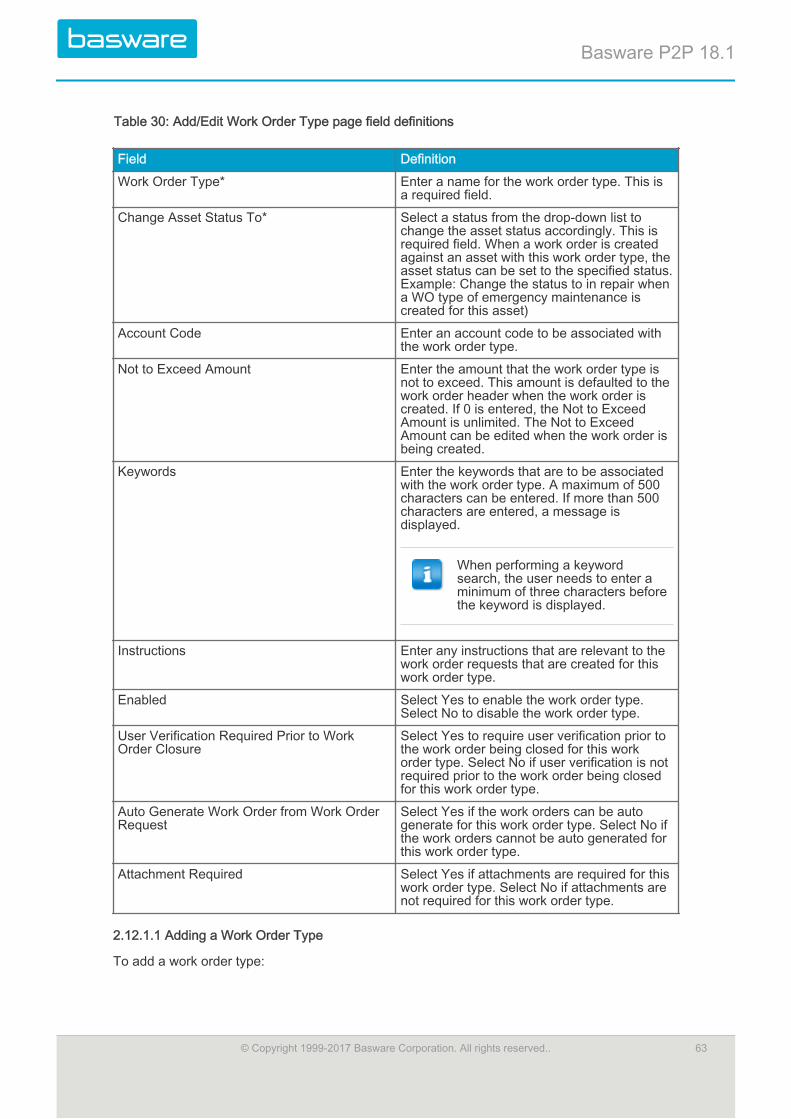
Table 30: Add/Edit Work Order Type page field definitions
Field Definition
Work Order Type* Enter a name for the work order type. This isa required field.
Change Asset Status To* Select a status from the drop-down list tochange the asset status accordingly. This isrequired field. When a work order is createdagainst an asset with this work order type, theasset status can be set to the specified status.Example: Change the status to in repair whena WO type of emergency maintenance iscreated for this asset)
Account Code Enter an account code to be associated withthe work order type.
Not to Exceed Amount Enter the amount that the work order type isnot to exceed. This amount is defaulted to thework order header when the work order iscreated. If 0 is entered, the Not to ExceedAmount is unlimited. The Not to ExceedAmount can be edited when the work order isbeing created.
Keywords Enter the keywords that are to be associatedwith the work order type. A maximum of 500characters can be entered. If more than 500characters are entered, a message isdisplayed.
When performing a keywordsearch, the user needs to enter aminimum of three characters beforethe keyword is displayed.
Instructions Enter any instructions that are relevant to thework order requests that are created for thiswork order type.
Enabled Select Yes to enable the work order type.Select No to disable the work order type.
User Verification Required Prior to WorkOrder Closure
Select Yes to require user verification prior tothe work order being closed for this workorder type. Select No if user verification is notrequired prior to the work order being closedfor this work order type.
Auto Generate Work Order from Work OrderRequest
Select Yes if the work orders can be autogenerate for this work order type. Select No ifthe work orders cannot be auto generated forthis work order type.
Attachment Required Select Yes if attachments are required for thiswork order type. Select No if attachments arenot required for this work order type.
2.12.1.1 Adding a Work Order Type
To add a work order type:
Basware P2P 18.1
© Copyright 1999-2017 Basware Corporation. All rights reserved.. 63
1. From the Dashboard, navigate to > Work Orders > Work Order Types.
2. Click Add.
3. Complete the required fields. Refer to Addition or Editing of Work Order Types forfield requirements and validations.
4. Click Finish.
2.12.1.2 Editing a Work Order Type
To edit a work order type:
1. From the Dashboard, navigate to > Work Orders > Work Order Types.
2. Select the work order type to be edited and click Edit.
3. Complete the required fields. Refer to Addition or Editing of Work Order Types forfield requirements and validations.
4. Click Finish.
2.12.2 Deleting a Work Order Type
To delete a work order type:
1. From the Dashboard, navigate to > Work Orders > Work Order Types.
2. Select the work order type to be deleted and click Delete.
3. Click OK in the verification pop-up.
2.13 Transfer Work OrdersTransfer Work Orders allow users to transfer assets from location to location or location towarehouse. This is only for assets that are not stocked in any warehouse inventory.
Requirements
Consider the following system settings to create transfer work orders.
Required System Settings
• 12019 – Default Vendor for Internal/Transfer Work Orders• 12026 – Work Order Type to Indicate Transfer Work Orders
These two system settings have to be enabled for the Create Work Order Transfer menu item tobe displayed.
Transfer work orders can only be created from Create Transfer Work Order under the WorkOrders menu group. It is recommended that transfer is the selected work order type for transferwork order types. The vendor for system setting 12019 needs be a virtual vendor.
Basware P2P 18.1
© Copyright 1999-2017 Basware Corporation. All rights reserved.. 64
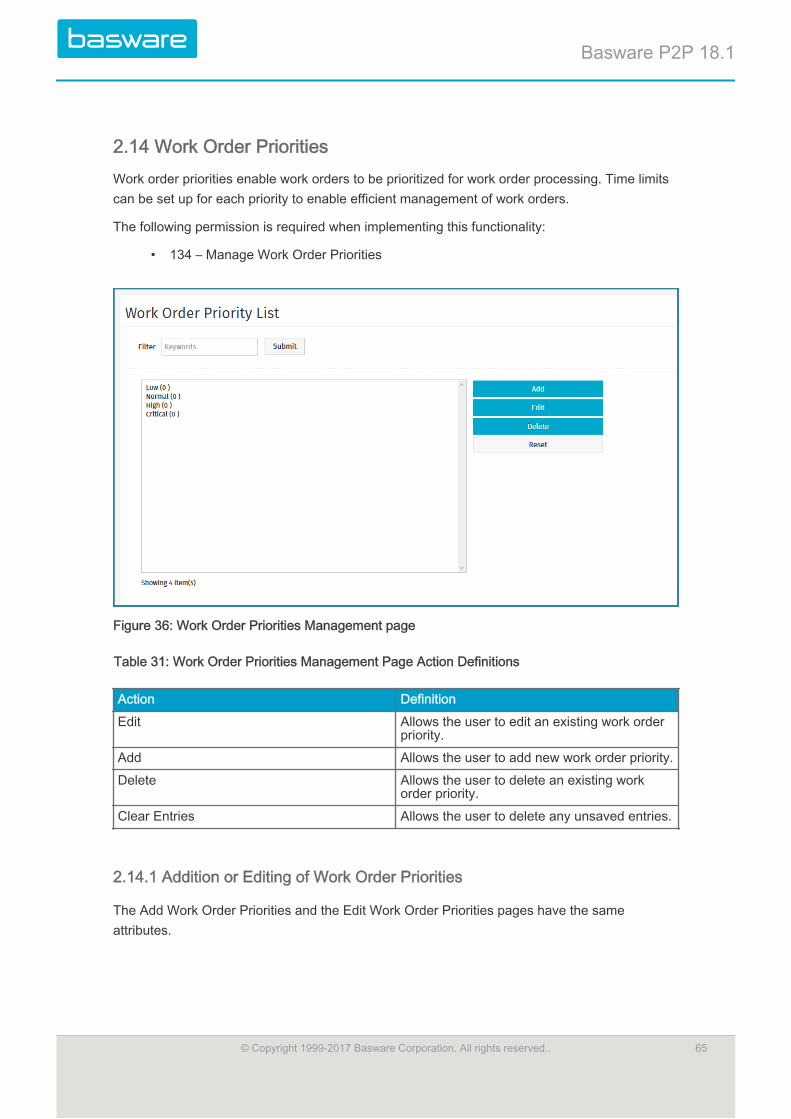
2.14 Work Order PrioritiesWork order priorities enable work orders to be prioritized for work order processing. Time limitscan be set up for each priority to enable efficient management of work orders.
The following permission is required when implementing this functionality:
• 134 – Manage Work Order Priorities
Figure 36: Work Order Priorities Management page
Table 31: Work Order Priorities Management Page Action Definitions
Action Definition
Edit Allows the user to edit an existing work orderpriority.
Add Allows the user to add new work order priority.
Delete Allows the user to delete an existing workorder priority.
Clear Entries Allows the user to delete any unsaved entries.
2.14.1 Addition or Editing of Work Order Priorities
The Add Work Order Priorities and the Edit Work Order Priorities pages have the sameattributes.
Basware P2P 18.1
© Copyright 1999-2017 Basware Corporation. All rights reserved.. 65

Figure 37: Add/Edit Work Order Priorities page
Field Definition
Work Order Priority Enter a name for the work order priority. Thisis a required field.
Resolution Time (Hours) Enter the hours for the resolution of the addedpriority. When specified, the work order enddate and time is automatically calculatedbased on the resolution hours and is used totrigger notifications later.
When a decimal value is entered, itis rounded off to the base value.
Example: When 12.3 is entered, it is changedto 12.
2.14.1.1 Adding a Work Order Priority
To add a work order priority:
1. From the Dashboard, navigate to > Work Orders > Work Order Priorities.
2. Click Add.
3. Complete the required fields. Refer to Addition or Editing of Work Order Prioritiesfor field requirements and validations.
4. Click Finish.
2.14.1.2 Editing a Work Order Priority
To edit a work order priority:
1. From the Dashboard, navigate to > Work Orders > Work Order Priorities.
2. Select the priority to be edited and click Edit.
3. Complete the required fields. Refer to Addition or Editing of Work Order Prioritiesfor field requirements and validations.
4. Click Finish.
Basware P2P 18.1
© Copyright 1999-2017 Basware Corporation. All rights reserved.. 66
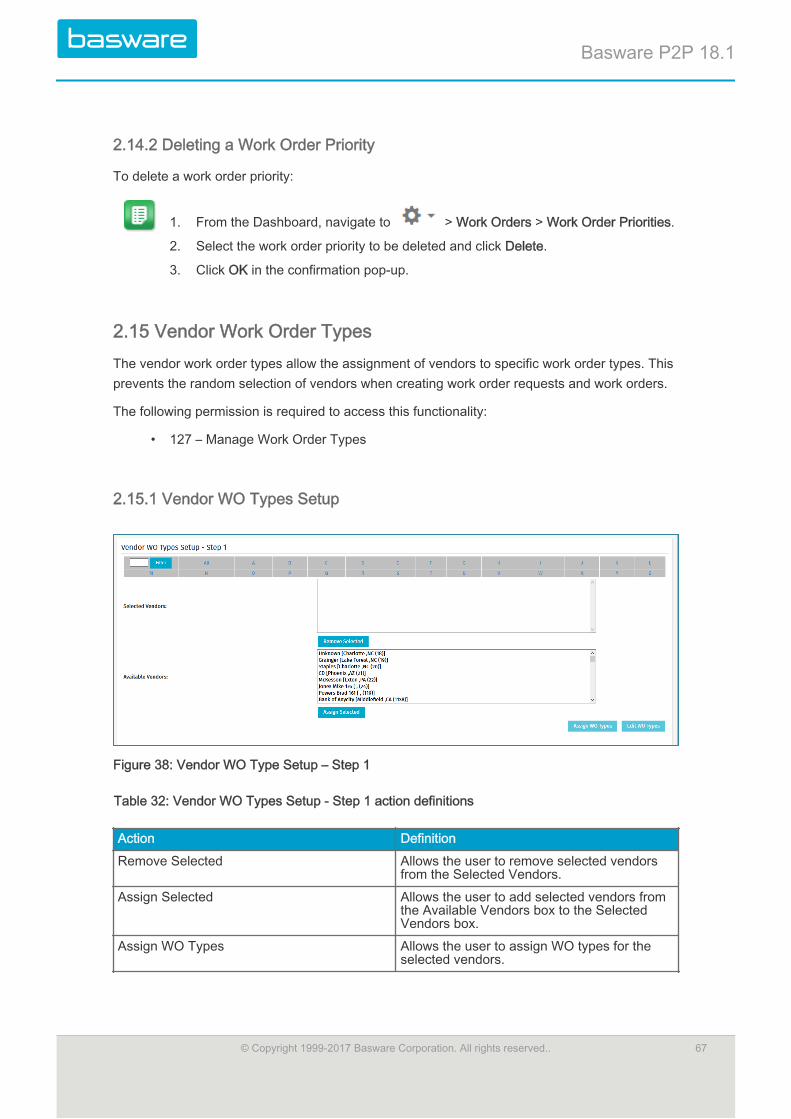
2.14.2 Deleting a Work Order Priority
To delete a work order priority:
1. From the Dashboard, navigate to > Work Orders > Work Order Priorities.
2. Select the work order priority to be deleted and click Delete.
3. Click OK in the confirmation pop-up.
2.15 Vendor Work Order TypesThe vendor work order types allow the assignment of vendors to specific work order types. Thisprevents the random selection of vendors when creating work order requests and work orders.
The following permission is required to access this functionality:
• 127 – Manage Work Order Types
2.15.1 Vendor WO Types Setup
Figure 38: Vendor WO Type Setup – Step 1
Table 32: Vendor WO Types Setup - Step 1 action definitions
Action Definition
Remove Selected Allows the user to remove selected vendorsfrom the Selected Vendors.
Assign Selected Allows the user to add selected vendors fromthe Available Vendors box to the SelectedVendors box.
Assign WO Types Allows the user to assign WO types for theselected vendors.
Basware P2P 18.1
© Copyright 1999-2017 Basware Corporation. All rights reserved.. 67
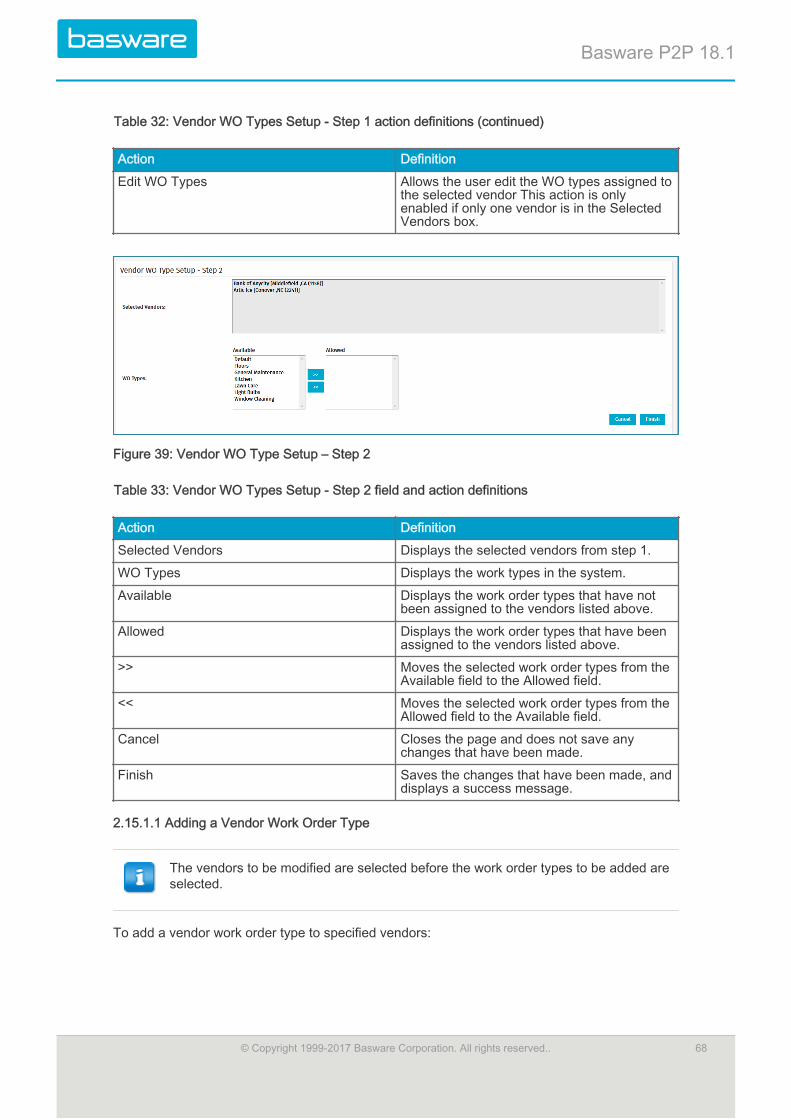
Table 32: Vendor WO Types Setup - Step 1 action definitions (continued)
Action Definition
Edit WO Types Allows the user edit the WO types assigned tothe selected vendor This action is onlyenabled if only one vendor is in the SelectedVendors box.
Figure 39: Vendor WO Type Setup – Step 2
Table 33: Vendor WO Types Setup - Step 2 field and action definitions
Action Definition
Selected Vendors Displays the selected vendors from step 1.
WO Types Displays the work types in the system.
Available Displays the work order types that have notbeen assigned to the vendors listed above.
Allowed Displays the work order types that have beenassigned to the vendors listed above.
>> Moves the selected work order types from theAvailable field to the Allowed field.
<< Moves the selected work order types from theAllowed field to the Available field.
Cancel Closes the page and does not save anychanges that have been made.
Finish Saves the changes that have been made, anddisplays a success message.
2.15.1.1 Adding a Vendor Work Order Type
The vendors to be modified are selected before the work order types to be added areselected.
To add a vendor work order type to specified vendors:
Basware P2P 18.1
© Copyright 1999-2017 Basware Corporation. All rights reserved.. 68
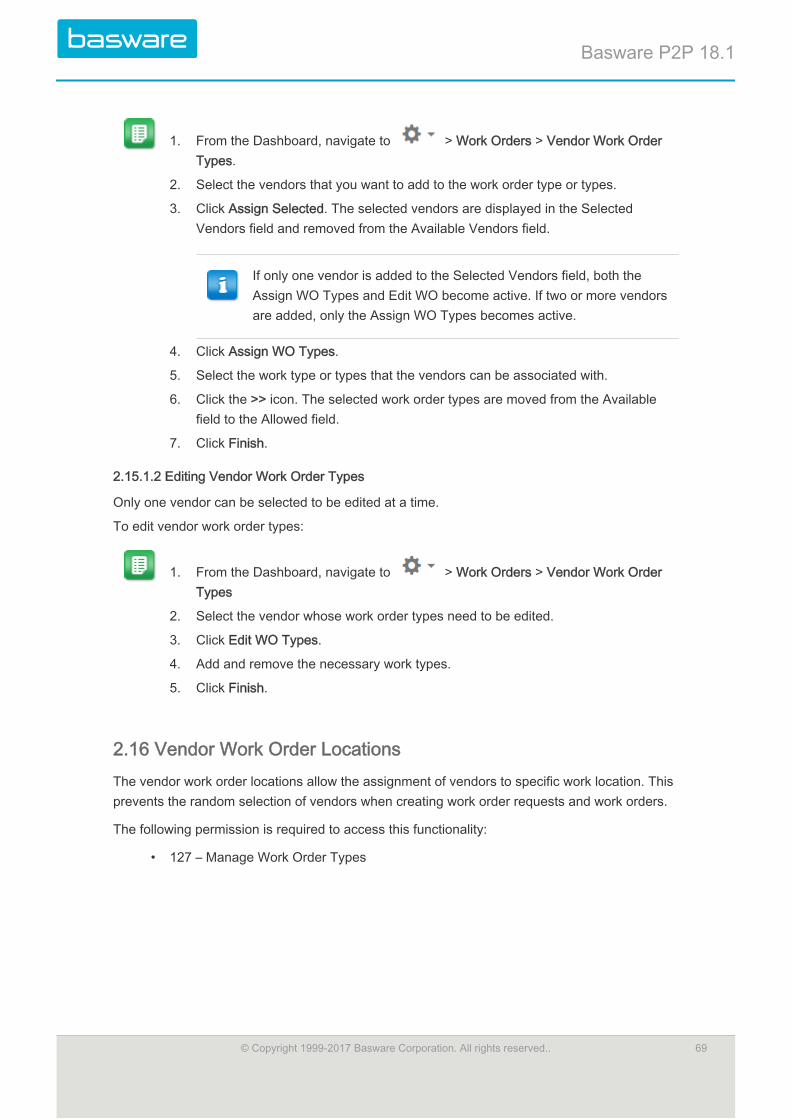
1. From the Dashboard, navigate to > Work Orders > Vendor Work OrderTypes.
2. Select the vendors that you want to add to the work order type or types.
3. Click Assign Selected. The selected vendors are displayed in the SelectedVendors field and removed from the Available Vendors field.
If only one vendor is added to the Selected Vendors field, both theAssign WO Types and Edit WO become active. If two or more vendorsare added, only the Assign WO Types becomes active.
4. Click Assign WO Types.
5. Select the work type or types that the vendors can be associated with.
6. Click the >> icon. The selected work order types are moved from the Availablefield to the Allowed field.
7. Click Finish.
2.15.1.2 Editing Vendor Work Order Types
Only one vendor can be selected to be edited at a time.
To edit vendor work order types:
1. From the Dashboard, navigate to > Work Orders > Vendor Work OrderTypes
2. Select the vendor whose work order types need to be edited.
3. Click Edit WO Types.
4. Add and remove the necessary work types.
5. Click Finish.
2.16 Vendor Work Order LocationsThe vendor work order locations allow the assignment of vendors to specific work location. Thisprevents the random selection of vendors when creating work order requests and work orders.
The following permission is required to access this functionality:
• 127 – Manage Work Order Types
Basware P2P 18.1
© Copyright 1999-2017 Basware Corporation. All rights reserved.. 69

2.16.1 Vendor WO Types Setup
Figure 40: Vendors WO Locations Setup – Step 1
Table 34: Vendor WO Locations Setup - Step 1 action definitions
Action Definition
Remove Selected Allows the user to remove selected vendorsfrom the Selected Vendors field.
Assign Selected Allows the user to add selected vendors fromthe Available Vendors field to the SelectedVendors field.
Assign Locations Allows the user to assign work order types forthe selected vendors.
Edit Locations Allows the user edit the work order typesassigned to the selected vendor. This action isenabled if only one vendor is in the SelectedVendors box.
Basware P2P 18.1
© Copyright 1999-2017 Basware Corporation. All rights reserved.. 70

Figure 41: Vendor WO Locations Setup – Step 2
Table 35: Vendor WO Locations Setup - Step 2 action definitions
Action Definition
Remove Selected Allows the user to remove selected locationsfrom the Allowed Locations field.
Assign Selected Allows the user to add selected vendors fromthe Available Locations field to the SelectedLocations field.
Cancel Closes the page and does not save anychanges that have been made.
Finish Saves the changes that have been made, anddisplays a success message.
2.16.1.1 Adding Vendor Work Order Locations
The vendors to be modified are selected before the work order locations to be addedare selected.
To add a vendor work order location:
1. From the Dashboard, navigate to > Work Orders > Vendor Work OrderLocations.
2. Select the vendors that you want to add to the work order location or locations.
3. Click Assign Selected. The selected vendors are displayed in the SelectedVendors field and removed from the Available Vendors field.
Basware P2P 18.1
© Copyright 1999-2017 Basware Corporation. All rights reserved.. 71
If only one vendor is added to the Selected Vendors field, both theAssign Locations and Edit Locations become active. If two or morevendors are added, only the Assign Locations becomes active.
4. Click Assign Locations.
5. Select the locations that the vendors can be associated with.
6. Click Assign Selected. The selected work order types are moved from theAvailable Locations field to the Allowed Locations field.
7. Click Finish.
2.16.1.2 Editing Vendor Work Order Locations
Only one vendor's work order locations can be edited at a time.
To edit vendor work order locations:
1. From the Dashboard, navigate to > Work Orders > Vendor Work OrderLocations.
2. Select the vendor whose work order locations need to be edited.
3. Click Edit Locations.
4. Add and remove the necessary work locations.
5. Click Finish.
2.17 Service TypesService types categorize the items being added by the type of services being performed onassets and work orders.
The following permission is required to access this functionality:
• 10 – Manage Items
Service types are added from the Items page.
For the item type, select service from the drop-down list and complete the otherrequired fields. Refer to General Admin Guide - Catalog Management section forfurther details on adding items.
2.18 Work Order Creation NotificationNotifications can be sent to the creator of the work order request and the backup for the userwhen a work order is created or when the work order is closed. The mode of notification can beset up using system setting 12053 – Work Order Notification Method 1 .
Basware P2P 18.1
© Copyright 1999-2017 Basware Corporation. All rights reserved.. 72
The available options are:
• None: No notification is sent• Contact email• Contact fax• Contact fax and Contact email
Basware P2P 18.1
© Copyright 1999-2017 Basware Corporation. All rights reserved.. 73
3 Asset Catalog
3.1 OverviewThis chapter explains the different methods that are used to add asset items to the catalog.Once the item is added in the system, the asset characteristics can be determined.
3.2 Asset Establishment in the CatalogThere are five different ways to add an asset:
• Through the Item page• By receiving• During invoicing• Adding it directly from Asset List page• Uploading from an external file — using import specifications, an external file is used
to add assets.
It is assumed that item categories, manufacturers, vendor types, and vendors havebeen added to the system prior to adding items to the catalog. Refer to the GeneralAdmin Guidefor details on these functions. More information on adding items to thecatalog is also found in the General Admin Guide.
3.3 Asset Item CreationYou have the option to establish an item as an asset during creation of the catalog item. Beforean asset can be tracked, it must first be added to the catalog as an asset item type. Asset itemsare established in inventory at the time of item creation or when asset item is added to theasset-tracking list.
The following permission is required:
• 10 - Manage Items
Basware P2P 18.1
© Copyright 1999-2017 Basware Corporation. All rights reserved.. 74
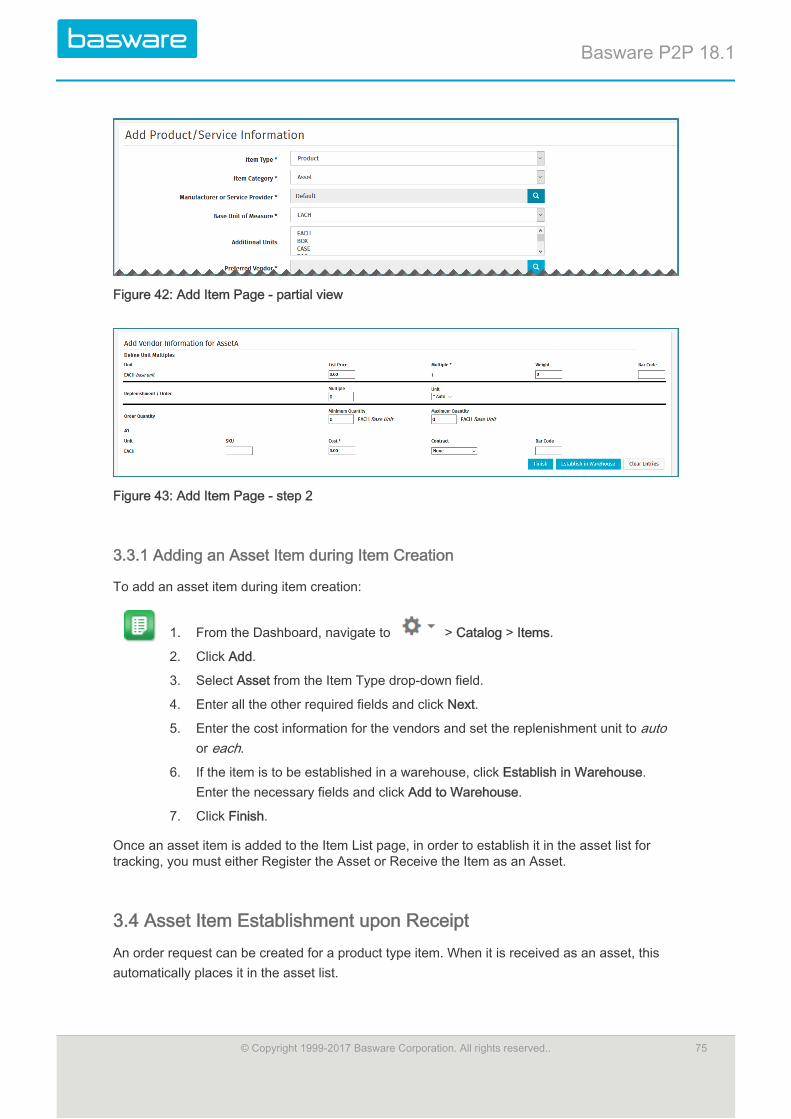
Figure 42: Add Item Page - partial view
Figure 43: Add Item Page - step 2
3.3.1 Adding an Asset Item during Item Creation
To add an asset item during item creation:
1. From the Dashboard, navigate to > Catalog > Items.
2. Click Add.
3. Select Asset from the Item Type drop-down field.
4. Enter all the other required fields and click Next.
5. Enter the cost information for the vendors and set the replenishment unit to autoor each.
6. If the item is to be established in a warehouse, click Establish in Warehouse.Enter the necessary fields and click Add to Warehouse.
7. Click Finish.
Once an asset item is added to the Item List page, in order to establish it in the asset list fortracking, you must either Register the Asset or Receive the Item as an Asset.
3.4 Asset Item Establishment upon ReceiptAn order request can be created for a product type item. When it is received as an asset, thisautomatically places it in the asset list.
Basware P2P 18.1
© Copyright 1999-2017 Basware Corporation. All rights reserved.. 75
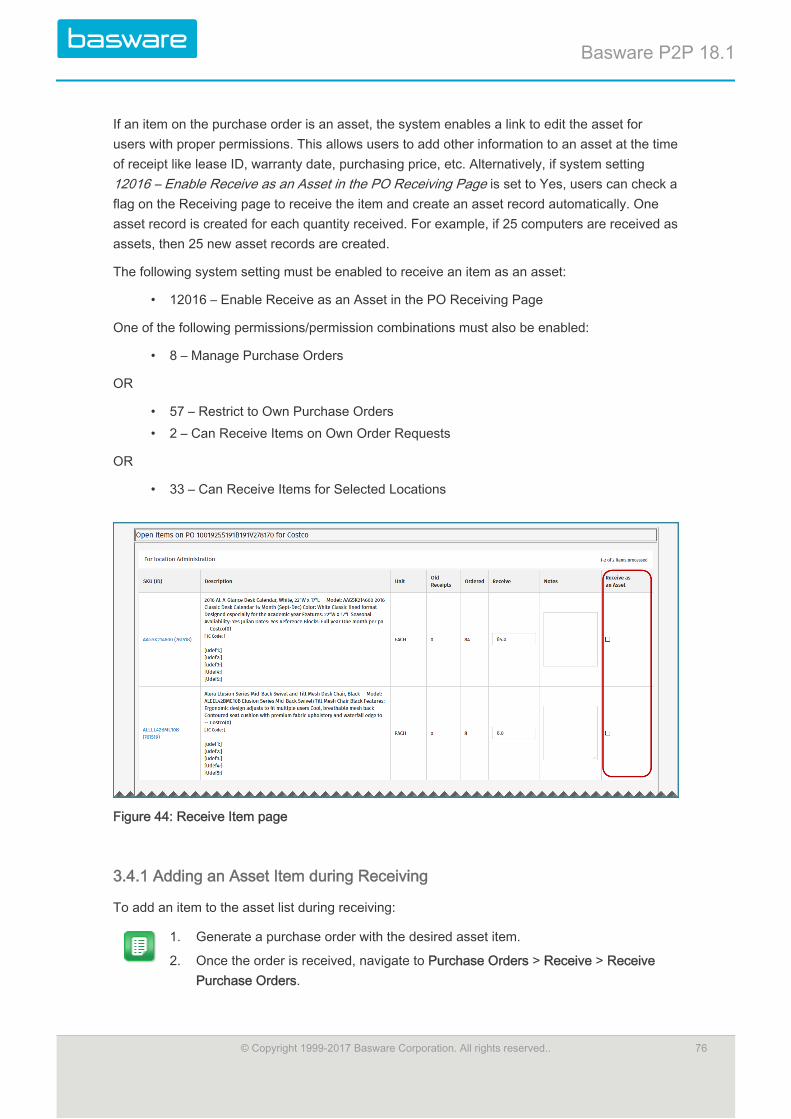
If an item on the purchase order is an asset, the system enables a link to edit the asset forusers with proper permissions. This allows users to add other information to an asset at the timeof receipt like lease ID, warranty date, purchasing price, etc. Alternatively, if system setting12016 – Enable Receive as an Asset in the PO Receiving Page is set to Yes, users can check aflag on the Receiving page to receive the item and create an asset record automatically. Oneasset record is created for each quantity received. For example, if 25 computers are received asassets, then 25 new asset records are created.
The following system setting must be enabled to receive an item as an asset:
• 12016 – Enable Receive as an Asset in the PO Receiving Page
One of the following permissions/permission combinations must also be enabled:
• 8 – Manage Purchase Orders
OR
• 57 – Restrict to Own Purchase Orders• 2 – Can Receive Items on Own Order Requests
OR
• 33 – Can Receive Items for Selected Locations
Figure 44: Receive Item page
3.4.1 Adding an Asset Item during Receiving
To add an item to the asset list during receiving:
1. Generate a purchase order with the desired asset item.
2. Once the order is received, navigate to Purchase Orders > Receive > ReceivePurchase Orders.
Basware P2P 18.1
© Copyright 1999-2017 Basware Corporation. All rights reserved.. 76
3. Select the purchase order to be received and click Receive PO.
4. Complete the required fields.
5. Check the Receive as an Asset checkbox.
When receiving an item already established as an asset, the checkboxis automatically checked and is non-editable.
6. Click Process Items.
Once an item is established as an asset, it is always received as an asset.
3.5 Asset Item Establishment during InvoicingAn order request can be created for an asset type item. When it is invoiced, this automaticallyplaces it in the asset list.
If the vendor for the asset is set to auto-receive on invoice (in the vendor profile), then theassets ordered are added to the asset list once the invoice is posted. The system includes theinformation in the Notes field on the Edit Asset page and View Asset page.
The following permissions are required to be able to receive item as an asset.
• 8 – Manage Purchase Orders
OR
• 34 – Can create Purchase Order Invoice
Basware P2P 18.1
© Copyright 1999-2017 Basware Corporation. All rights reserved.. 77
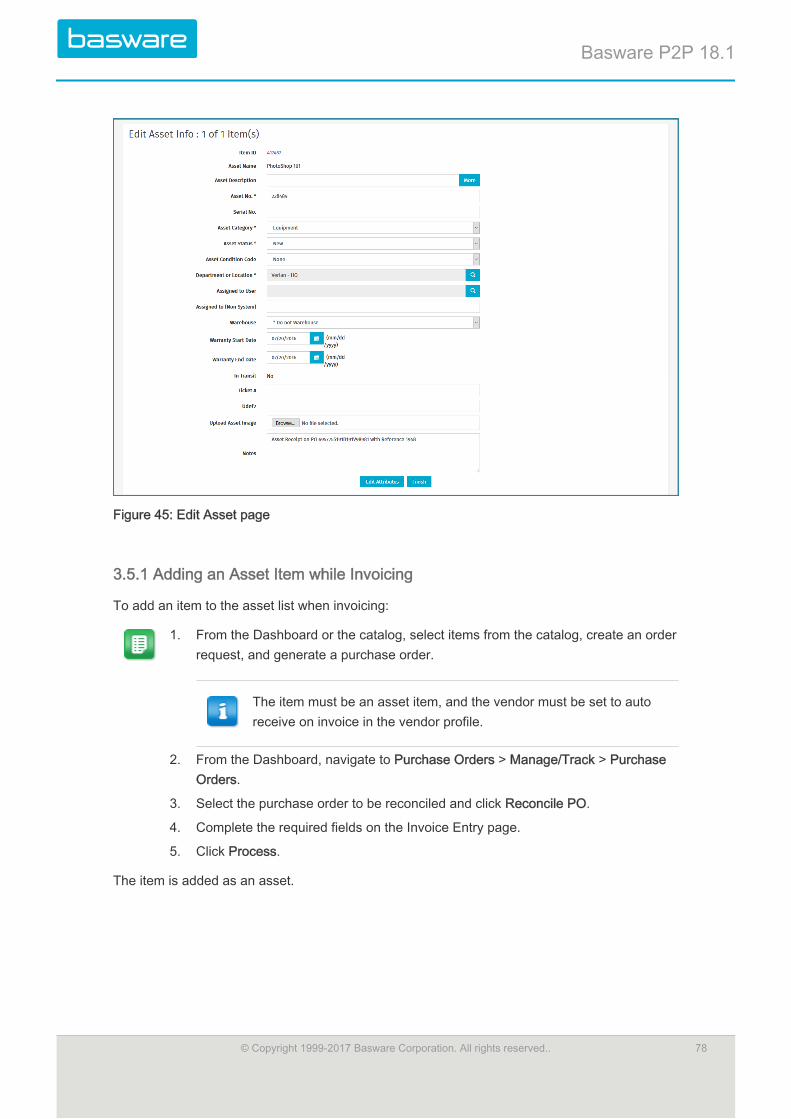
Figure 45: Edit Asset page
3.5.1 Adding an Asset Item while Invoicing
To add an item to the asset list when invoicing:
1. From the Dashboard or the catalog, select items from the catalog, create an orderrequest, and generate a purchase order.
The item must be an asset item, and the vendor must be set to autoreceive on invoice in the vendor profile.
2. From the Dashboard, navigate to Purchase Orders > Manage/Track > PurchaseOrders.
3. Select the purchase order to be reconciled and click Reconcile PO.
4. Complete the required fields on the Invoice Entry page.
5. Click Process.
The item is added as an asset.
Basware P2P 18.1
© Copyright 1999-2017 Basware Corporation. All rights reserved.. 78
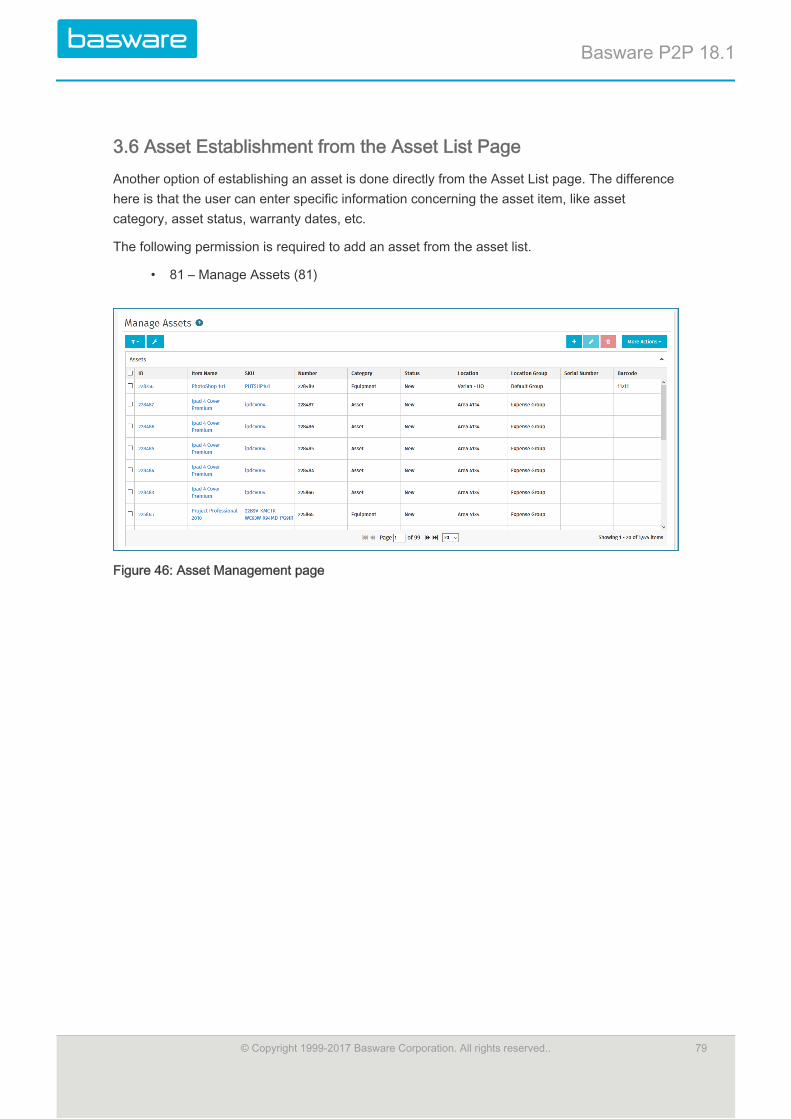
3.6 Asset Establishment from the Asset List PageAnother option of establishing an asset is done directly from the Asset List page. The differencehere is that the user can enter specific information concerning the asset item, like assetcategory, asset status, warranty dates, etc.
The following permission is required to add an asset from the asset list.
• 81 – Manage Assets (81)
Figure 46: Asset Management page
Basware P2P 18.1
© Copyright 1999-2017 Basware Corporation. All rights reserved.. 79
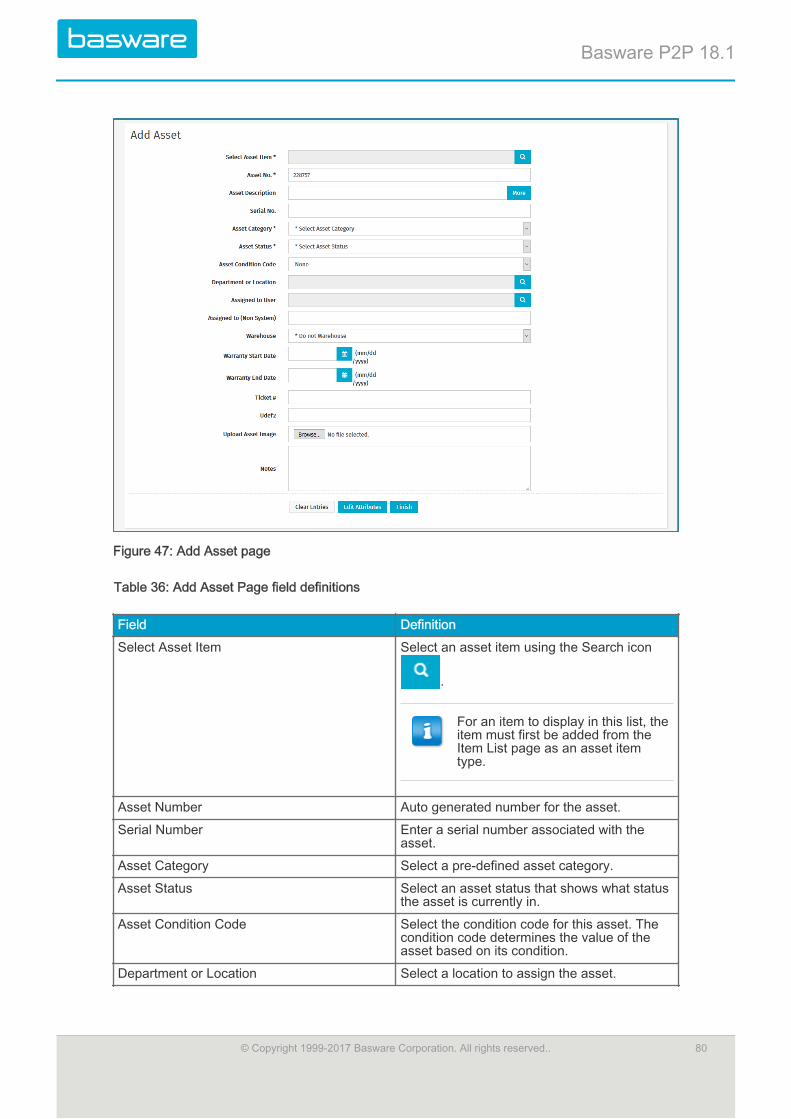
Figure 47: Add Asset page
Table 36: Add Asset Page field definitions
Field Definition
Select Asset Item Select an asset item using the Search icon
.
For an item to display in this list, theitem must first be added from theItem List page as an asset itemtype.
Asset Number Auto generated number for the asset.
Serial Number Enter a serial number associated with theasset.
Asset Category Select a pre-defined asset category.
Asset Status Select an asset status that shows what statusthe asset is currently in.
Asset Condition Code Select the condition code for this asset. Thecondition code determines the value of theasset based on its condition.
Department or Location Select a location to assign the asset.
Basware P2P 18.1
© Copyright 1999-2017 Basware Corporation. All rights reserved.. 80
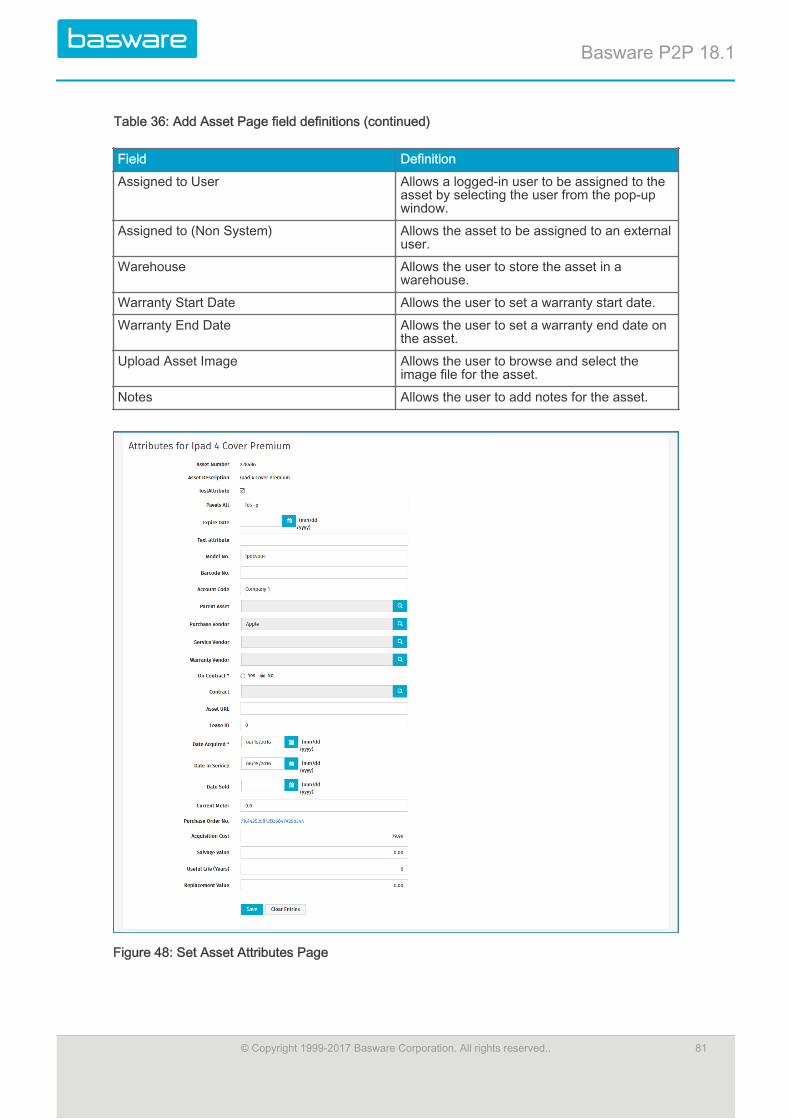
Table 36: Add Asset Page field definitions (continued)
Field Definition
Assigned to User Allows a logged-in user to be assigned to theasset by selecting the user from the pop-upwindow.
Assigned to (Non System) Allows the asset to be assigned to an externaluser.
Warehouse Allows the user to store the asset in awarehouse.
Warranty Start Date Allows the user to set a warranty start date.
Warranty End Date Allows the user to set a warranty end date onthe asset.
Upload Asset Image Allows the user to browse and select theimage file for the asset.
Notes Allows the user to add notes for the asset.
Figure 48: Set Asset Attributes Page
Basware P2P 18.1
© Copyright 1999-2017 Basware Corporation. All rights reserved.. 81

Table 37: Set Asset Attributes page field definitions
Field Definition
Model Number Enter the model number of the asset ifrequired.
Barcode Number Enter the barcode, if a barcode is associated.
Account Code Enter the accounting code that is assigned tothe asset item.
Parent Asset Select the parent for the asset if a parent/childrelationship is to be established.
Purchase Vendor Select the purchase vendor.
Service Vendor Select a vendor servicing the asset.
Warranty Vendor Select the vendor providing the warranty.
On Contract* Select Yes if the asset is on a contract. If not,select No.
Contract Select the associated contract if the asset ison a contract.
Asset URL Displays the URL for the asset if one isassigned.
Lease ID Enter the lease ID associated with the item.
Department or Location Select the location for the asset from the pop-up window.
Date Acquired* Enter the date the asset was purchased.
Date in Service Enter the date the asset started being used.
Date Sold Select the date the asset was sold from thecalendar pop-up window.
Current Meter Enter the amount of miles or the calculatedusage for the asset.
Acquisition Cost Enter the cost of the asset at the time ofpurchase. This should correspond to thepurchase order if ordered.
Salvage Value Enter the trade-in value or market value at theend of the useful life of the asset.
Useful Life (Years) Enter the useful life of the asset.
The value in this field is defaultedwith the useful life set for the assetcategory that this asset belongs.
Replacement Value Entered the cost associated with replacing theasset.
3.6.1 Adding an Asset from Asset List
To add an asset from asset list:
Basware P2P 18.1
© Copyright 1999-2017 Basware Corporation. All rights reserved.. 82

1. From the Dashboard, navigate to Assets > Manage > Manage Assets.
2. Click the Add icon .
3. In the Select Asset Item field, select the item to be set up as an asset.
4. Complete the other required fields.
5. To set the extended properties of the asset, click Edit Attributes.
6. If extended properties for the asset are not needed click Finish after Step 3.
7. Complete the required fields.
8. Click Save.
3.7 Asset RegistrationYou can register an asset that has not been purchased, from the Asset menu by clickingRegister Asset. Also, to establish an asset for tracking, which has been added as an asset itemtype from Item List page, the item needs to be registered.
The following permissions are required to register an asset.
• 123 – Register Assets
AND
• 122 – View Selected Assets
Figure 49: Add Asset by Registering
Basware P2P 18.1
© Copyright 1999-2017 Basware Corporation. All rights reserved.. 83

3.7.1 Register an Asset
To register an asset that has been added to the catalog:
1. From the Dashboard, navigate to Assets > Manage > My Assets.
2. Click the Add icon .
3. In the Select Asset Item field, select the item to be set up as an asset.
4. Complete the other required fields.
5. To set the extended properties of the asset, click Edit Attributes.
6. If extended properties for the asset are not needed click Finish after Step 3.
7. Complete the required fields.
8. Click Save.
3.8 Assets in InventoryAssets can be added to inventory at the time of asset creation using the Items page, whenadding/editing an asset from the Asset List page, when receiving an asset into a warehouse, ortransferring an asset to another warehouse.
Condition Codes
When an asset is in inventory and is assigned a condition code, the valuation of the asset iscalculated as follows:
Asset value = asset acquisition unit price * (quantity in ordered unit/quantity in inventory/assetreceiving unit) * % based on condition code.
When an asset is edited and the user changes the condition code, the system calculates thevalue of the asset based on the new condition code. A confirmation message is displayed to theuser when this happens.
Asset Profile
When the asset profiles are created for assets received, the warehouse that the assets werereceived into is displayed. This is a non-editable field when editing the assets.
Basware P2P 18.1
© Copyright 1999-2017 Basware Corporation. All rights reserved.. 84

Figure 50: Edit Asset page displaying warehouse and receiving information
Disposed Assets
When assets in inventory are disposed, the inventory quantity for those assets is adjusted toreflect the disposal. So, if Asset 123 has a quantity of 10 in inventory and 3 are disposed, theinventory quantity is now 7.
Transfer Assets
When an asset in inventory is being transferred to another warehouse and the asset isestablished in the target warehouse, the quantity for the asset is increased by the number ofassociated assets being transferred. If Asset 123 is located in the Charlotte warehouse and aquantity of three is being transferred to the Atlanta warehouse (where the asset is alreadyestablished), the quantity for the asset in the Atlanta warehouse increases by 3 and the quantityfor the Charlotte warehouse decreases by three.
If the asset being transferred is not established in the target warehouse, the system sets up theasset as an item in that warehouse. If Asset 123 is located in the Charlotte warehouse and isbeing transferred to the Memphis warehouse (where the asset is not established), the systemadds the asset item to the Memphis warehouse with the quantity that was transferred.
Manually Added Assets
When manually adding an asset, if the asset is associated with a warehouse as an inventoryitem, the quantity for that inventory item is increased by 1. If a relationship does not existbetween the asset and the inventory item for the associated warehouse, the system sets up theinventory item the warehouse with a quantity of 1.
Basware P2P 18.1
© Copyright 1999-2017 Basware Corporation. All rights reserved.. 85
Index
A
assetsadd assets............................................................................................................................ 31
T
transfer work order..................................................................................................................... 64
W
work ordercreate................................................................................................................................... 72notification of creation.......................................................................................................... 72
Basware P2P 18.1
© Copyright 1999-2017 Basware Corporation. All rights reserved.. 86