Embed Size (px)
Citation preview
TIBCO iProcess™ Decisions
Studio
Basic TutorialSoftware Release 4.1.1December 2007
Important Information
SOME TIBCO SOFTWARE EMBEDS OR BUNDLES OTHER TIBCO SOFTWARE. USE OF SUCH EMBEDDED OR BUNDLED TIBCO SOFTWARE IS SOLELY TO ENABLE THE FUNCTIONALITY (OR PROVIDE LIMITED ADD-ON FUNCTIONALITY) OF THE LICENSED TIBCO SOFTWARE. THE EMBEDDED OR BUNDLED SOFTWARE IS NOT LICENSED TO BE USED OR ACCESSED BY ANY OTHER TIBCO SOFTWARE OR FOR ANY OTHER PURPOSE.USE OF TIBCO SOFTWARE AND THIS DOCUMENT IS SUBJECT TO THE TERMS AND CONDITIONS OF A LICENSE AGREEMENT FOUND IN EITHER A SEPARATELY EXECUTED SOFTWARE LICENSE AGREEMENT, OR, IF THERE IS NO SUCH SEPARATE AGREEMENT, THE CLICKWRAP END USER LICENSE AGREEMENT WHICH IS DISPLAYED DURING DOWNLOAD OR INSTALLATION OF THE SOFTWARE (AND WHICH IS DUPLICATED IN TIBCO IPROCESS DECISIONS STUDIO INSTALLATION GUIDE) OR IF THERE IS NO SUCH SOFTWARE LICENSE AGREEMENT OR CLICKWRAP END USER LICENSE AGREEMENT, THE LICENSE(S) LOCATED IN THE “LICENSE” FILE(S) OF THE SOFTWARE. USE OF THIS DOCUMENT IS SUBJECT TO THOSE TERMS AND CONDITIONS, AND YOUR USE HEREOF SHALL CONSTITUTE ACCEPTANCE OF AND AN AGREEMENT TO BE BOUND BY THE SAME.This document contains confidential information that is subject to U.S. and international copyright laws and treaties. No part of this document may be reproduced in any form without the written authorization of TIBCO Software Inc.TIB, TIBCO, TIBCO Adapter, Predictive Business, Information Bus, The Power of Now, TIBCO iProcess are either registered trademarks or trademarks of TIBCO Software Inc. in the United States and/or other countries.EJB, Java EE, J2EE, and all Java-based trademarks and logos are trademarks or registered trademarks of Sun Microsystems, Inc. in the U.S. and other countries.All other product and company names and marks mentioned in this document are the property of their respective owners and are mentioned for identification purposes only.THIS SOFTWARE MAY BE AVAILABLE ON MULTIPLE OPERATING SYSTEMS. HOWEVER, NOT ALL OPERATING SYSTEM PLATFORMS FOR A SPECIFIC SOFTWARE VERSION ARE RELEASED AT THE SAME TIME. SEE THE README.TXT FILE FOR THE AVAILABILITY OF THIS SOFTWARE VERSION ON A SPECIFIC OPERATING SYSTEM PLATFORM.THIS DOCUMENT IS PROVIDED “AS IS” WITHOUT WARRANTY OF ANY KIND, EITHER EXPRESS OR IMPLIED, INCLUDING, BUT NOT LIMITED TO, THE IMPLIED WARRANTIES OF MERCHANTABILITY, FITNESS FOR A PARTICULAR PURPOSE, OR NON-INFRINGEMENT.THIS DOCUMENT COULD INCLUDE TECHNICAL INACCURACIES OR TYPOGRAPHICAL ERRORS. CHANGES ARE PERIODICALLY ADDED TO THE INFORMATION HEREIN; THESE CHANGES WILL BE INCORPORATED IN NEW EDITIONS OF THIS DOCUMENT. TIBCO SOFTWARE INC. MAY MAKE IMPROVEMENTS AND/OR CHANGES IN THE PRODUCT(S) AND/OR THE PROGRAM(S) DESCRIBED IN THIS DOCUMENT AT ANY TIME.THE CONTENTS OF THIS DOCUMENT MAY BE MODIFIED AND/OR QUALIFIED, DIRECTLY OR INDIRECTLY, BY OTHER DOCUMENTATION WHICH ACCOMPANIES THIS SOFTWARE, INCLUDING BUT NOT LIMITED TO ANY RELEASE NOTES AND "READ ME" FILES.Copyright © 2000-2007 Corticon Technologies, Inc. and TIBCO Software Inc. ALL RIGHTS RESERVED.TIBCO Software Inc. Confidential Information
Basic Tutorial for TIBCO iProcess Decisions Studio – Rule Modeling
Page ii
About this Guide
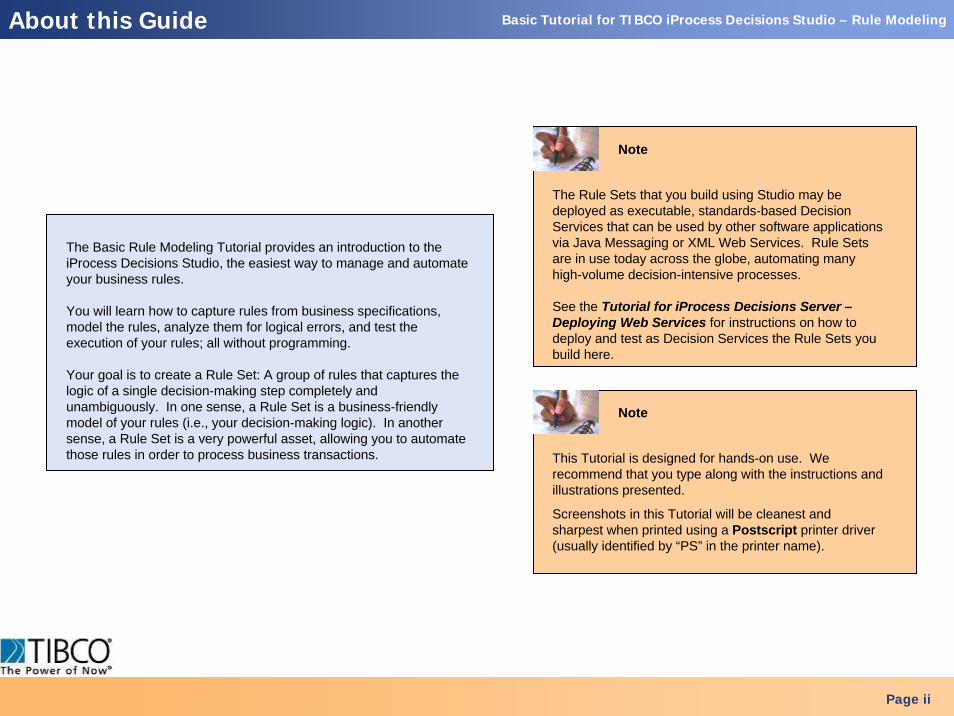
The Basic Rule Modeling Tutorial provides an introduction to theiProcess Decisions Studio, the easiest way to manage and automate your business rules.
You will learn how to capture rules from business specifications, model the rules, analyze them for logical errors, and test the execution of your rules; all without programming.
Your goal is to create a Rule Set: A group of rules that captures the logic of a single decision-making step completely and unambiguously. In one sense, a Rule Set is a business-friendly model of your rules (i.e., your decision-making logic). In another sense, a Rule Set is a very powerful asset, allowing you to automate those rules in order to process business transactions. This Tutorial is designed for hands-on use. We
recommend that you type along with the instructions and illustrations presented.
Screenshots in this Tutorial will be cleanest and sharpest when printed using a Postscript printer driver (usually identified by “PS” in the printer name).
Note
The Rule Sets that you build using Studio may be deployed as executable, standards-based Decision Services that can be used by other software applications via Java Messaging or XML Web Services. Rule Sets are in use today across the globe, automating many high-volume decision-intensive processes.
See the Tutorial for iProcess Decisions Server –Deploying Web Services for instructions on how to deploy and test as Decision Services the Rule Sets you build here.
Note
Basic Tutorial for TIBCO iProcess Decisions Studio – Rule Modeling
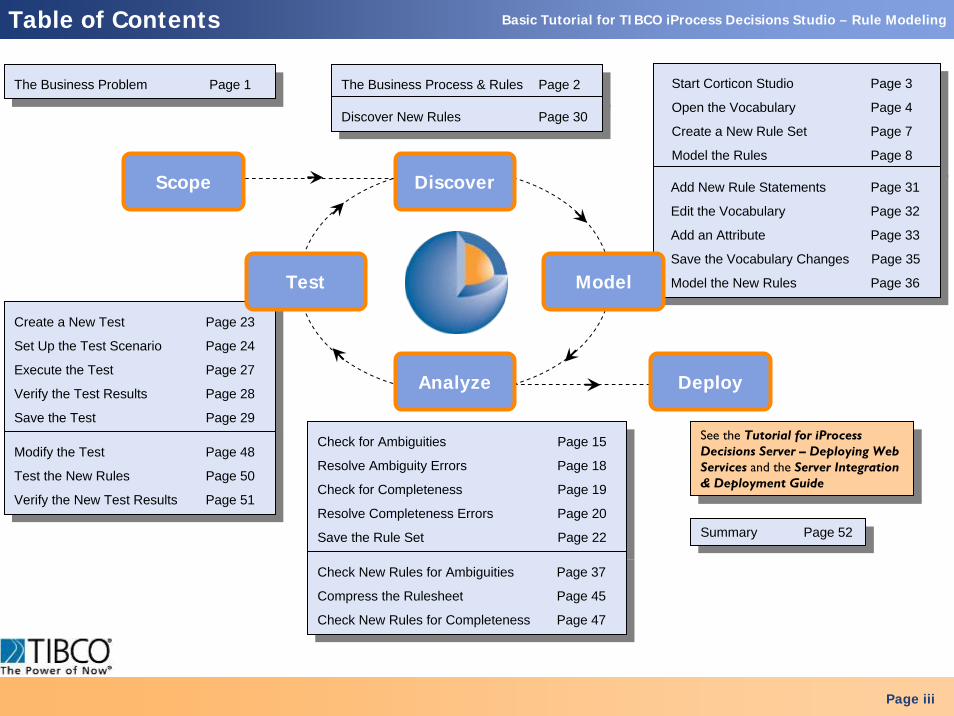
Check for Ambiguities Page 15
Resolve Ambiguity Errors Page 18
Check for Completeness Page 19
Resolve Completeness Errors Page 20
Save the Rule Set Page 22
Check for Ambiguities Page 15
Resolve Ambiguity Errors Page 18
Check for Completeness Page 19
Resolve Completeness Errors Page 20
Save the Rule Set Page 22
Check New Rules for Ambiguities Page 37
Compress the Rulesheet Page 45
Check New Rules for Completeness Page 47
Check New Rules for Ambiguities Page 37
Compress the Rulesheet Page 45
Check New Rules for Completeness Page 47
Create a New Test Page 23
Set Up the Test Scenario Page 24
Execute the Test Page 27
Verify the Test Results Page 28
Save the Test Page 29
Create a New Test Page 23
Set Up the Test Scenario Page 24
Execute the Test Page 27
Verify the Test Results Page 28
Save the Test Page 29
Modify the Test Page 48
Test the New Rules Page 50
Verify the New Test Results Page 51
Modify the Test Page 48
Test the New Rules Page 50
Verify the New Test Results Page 51
Start Corticon Studio Page 3
Open the Vocabulary Page 4
Create a New Rule Set Page 7
Model the Rules Page 8
Start Corticon Studio Page 3
Open the Vocabulary Page 4
Create a New Rule Set Page 7
Model the Rules Page 8
Add New Rule Statements Page 31
Edit the Vocabulary Page 32
Add an Attribute Page 33
Save the Vocabulary Changes Page 35
Model the New Rules Page 36
Add New Rule Statements Page 31
Edit the Vocabulary Page 32
Add an Attribute Page 33
Save the Vocabulary Changes Page 35
Model the New Rules Page 36
See the Tutorial for iProcess Decisions Server – Deploying Web Services and the Server Integration & Deployment Guide
See the Tutorial for iProcess Decisions Server – Deploying Web Services and the Server Integration & Deployment Guide
The Business Problem Page 1The Business Problem Page 1 The Business Process & Rules Page 2The Business Process & Rules Page 2
Summary Page 52Summary Page 52
Page iii
Table of Contents
ModelTest
Scope Discover
DeployAnalyze
Discover New Rules Page 30Discover New Rules Page 30

Basic Tutorial for TIBCO iProcess Decisions Studio – Rule Modeling
The example used in this Tutorial was developed from a business problem in which an air cargo company loads cargo of various sizes and weights onto its fleet of aircraft prior to shipment.
To operate safely, the company must ensure that an aircraft is never loaded with cargo that exceeds an aircraft’s capabilities. Flight plans are created by the company that assign specific cargo shipments to specific aircraft. Part of the flight plan creation process involves verifying that no plan violates any safety or operational rule.
The air cargo company desires to improve the quality and efficiency of the flight plan verification process by modeling and automating business rules using TIBCO iProcess Decisions software.
Page 1
The Business Problem
Scope
Note
Basic Tutorial for TIBCO iProcess Decisions Studio – Rule Modeling
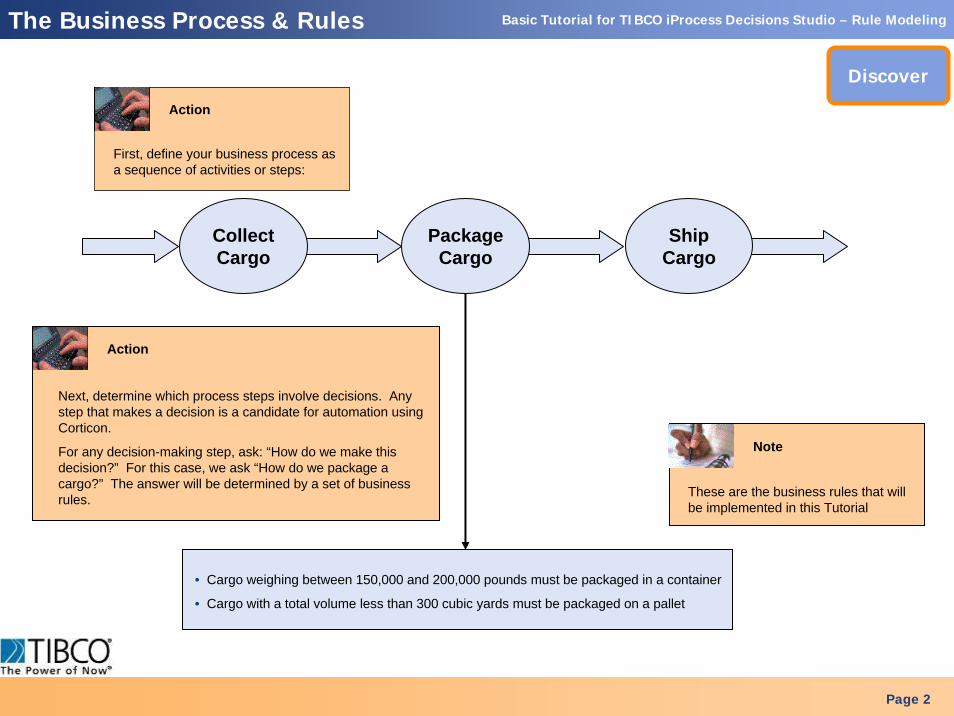
• Cargo weighing between 150,000 and 200,000 pounds must be packaged in a container
• Cargo with a total volume less than 300 cubic yards must be packaged on a pallet
These are the business rules that will be implemented in this Tutorial
First, define your business process as a sequence of activities or steps:
Note
PackageCargo
CollectCargo
ShipCargo
Action
Page 2
The Business Process & Rules
Discover
Next, determine which process steps involve decisions. Any step that makes a decision is a candidate for automation using Corticon.
For any decision-making step, ask: “How do we make this decision?” For this case, we ask “How do we package a cargo?” The answer will be determined by a set of business rules.
Action
Basic Tutorial for TIBCO iProcess Decisions Studio – Rule Modeling
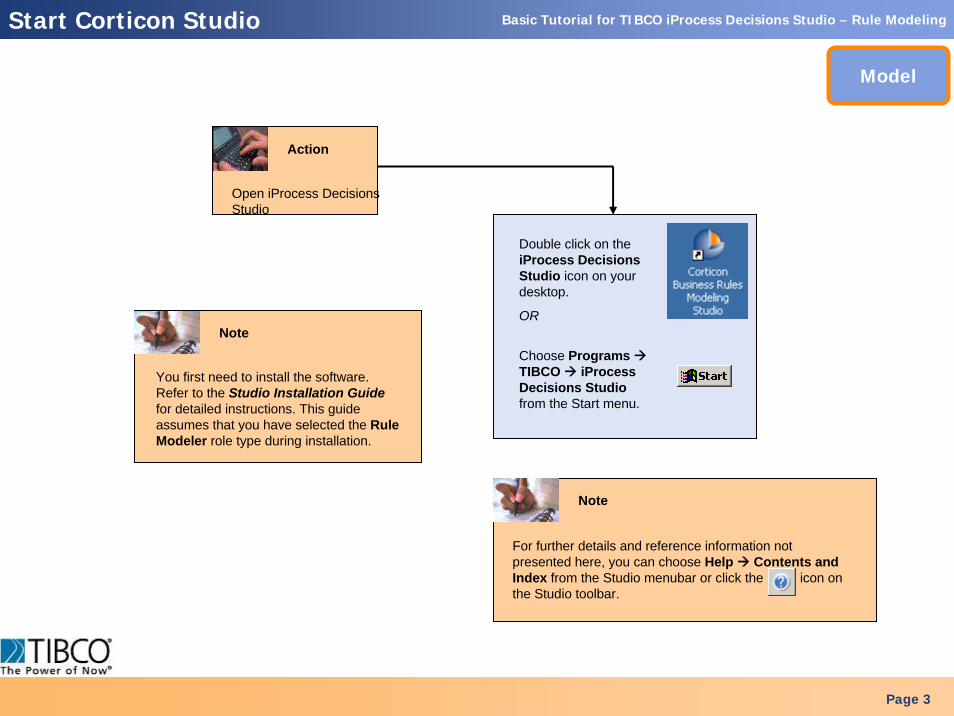
You first need to install the software. Refer to the Studio Installation Guide for detailed instructions. This guide assumes that you have selected the Rule Modeler role type during installation.
Double click on the iProcess Decisions Studio icon on your desktop.
OR
Choose Programs TIBCO iProcess Decisions Studiofrom the Start menu.
Page 3
Start Corticon Studio
Model
Note
Open iProcess Decisions Studio
Action
For further details and reference information not presented here, you can choose Help Contents and Index from the Studio menubar or click the icon on the Studio toolbar.
Note
Basic Tutorial for TIBCO iProcess Decisions Studio – Rule Modeling
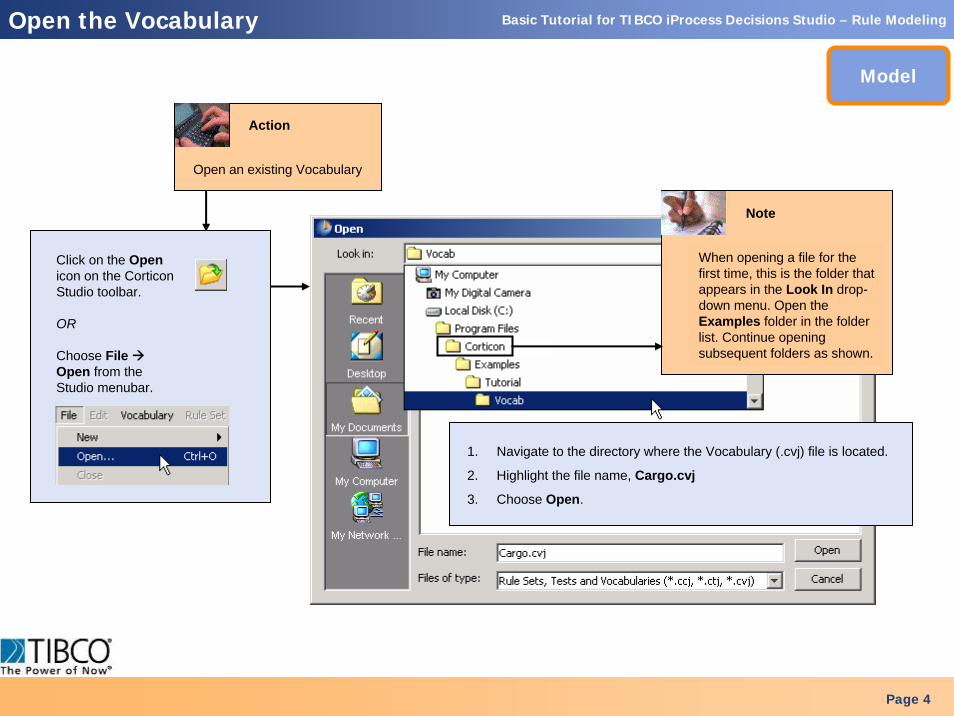
When opening a file for the first time, this is the folder that appears in the Look In drop-down menu. Open the Examples folder in the folder list. Continue opening subsequent folders as shown.
Note
1. Navigate to the directory where the Vocabulary (.cvj) file is located.
2. Highlight the file name, Cargo.cvj
3. Choose Open.
Page 4
Open the Vocabulary
Open an existing Vocabulary
Model
Action
Choose File Open from the Studio menubar.
OR
Click on the Open icon on the Corticon Studio toolbar.
Basic Tutorial for TIBCO iProcess Decisions Studio – Rule Modeling
Page 5
Open the Vocabulary
Model
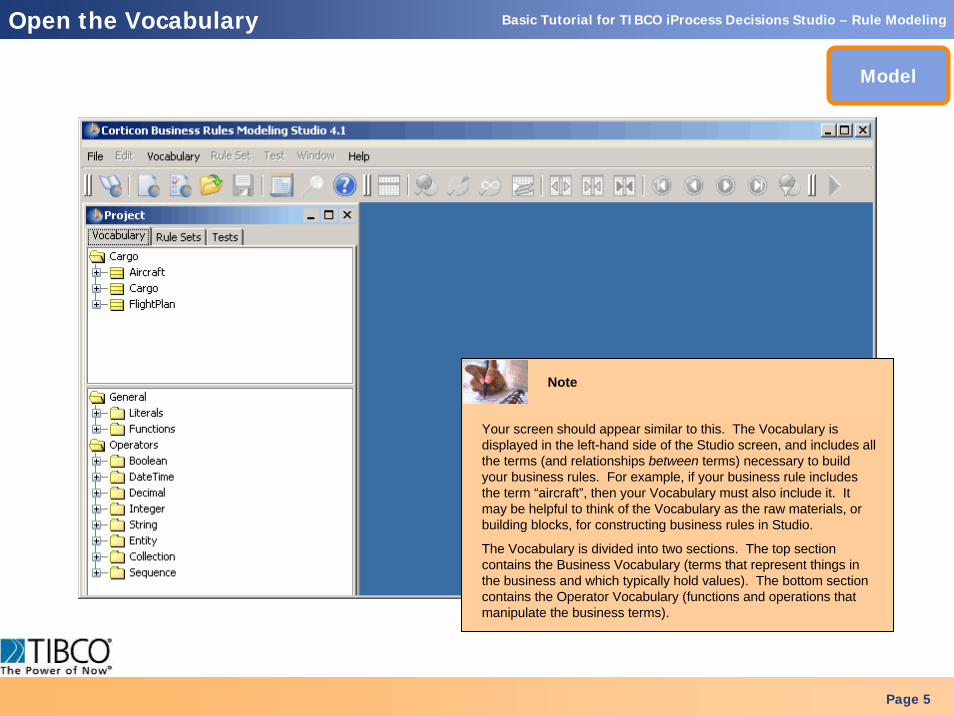
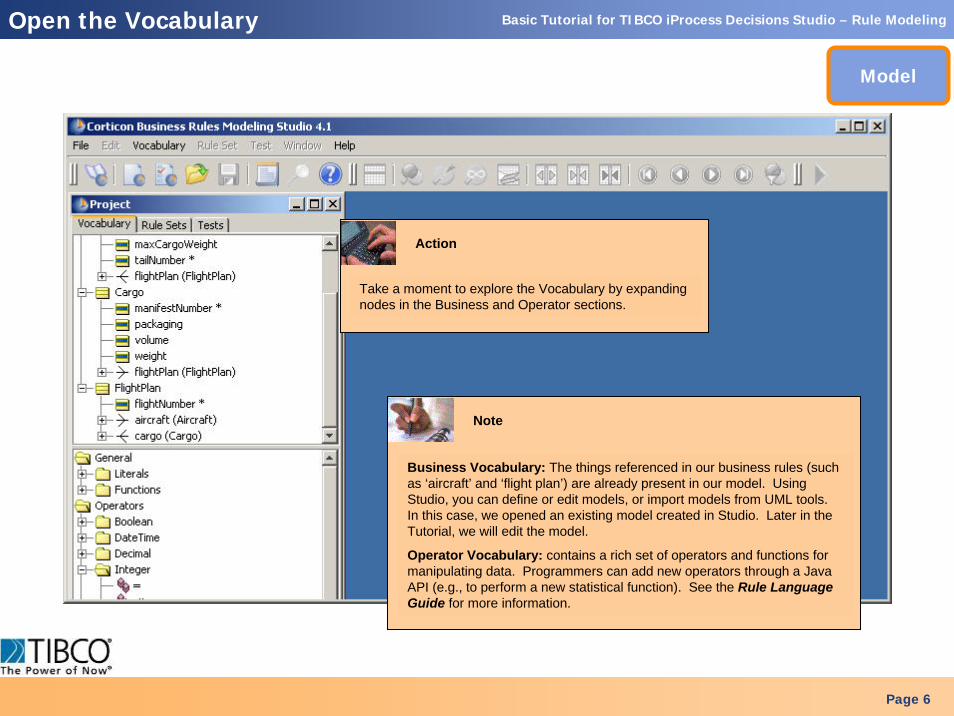
Your screen should appear similar to this. The Vocabulary is displayed in the left-hand side of the Studio screen, and includes all the terms (and relationships between terms) necessary to build your business rules. For example, if your business rule includes the term “aircraft”, then your Vocabulary must also include it. It may be helpful to think of the Vocabulary as the raw materials, or building blocks, for constructing business rules in Studio.
The Vocabulary is divided into two sections. The top section contains the Business Vocabulary (terms that represent things inthe business and which typically hold values). The bottom section contains the Operator Vocabulary (functions and operations that manipulate the business terms).
Note
Basic Tutorial for TIBCO iProcess Decisions Studio – Rule Modeling
Page 6
Open the Vocabulary
Model
Business Vocabulary: The things referenced in our business rules (such as ‘aircraft’ and ‘flight plan’) are already present in our model. Using Studio, you can define or edit models, or import models from UML tools. In this case, we opened an existing model created in Studio. Later in the Tutorial, we will edit the model.
Operator Vocabulary: contains a rich set of operators and functions for manipulating data. Programmers can add new operators through a Java API (e.g., to perform a new statistical function). See the Rule Language Guide for more information.
Note
Action
Take a moment to explore the Vocabulary by expanding nodes in the Business and Operator sections.
Basic Tutorial for TIBCO iProcess Decisions Studio – Rule Modeling
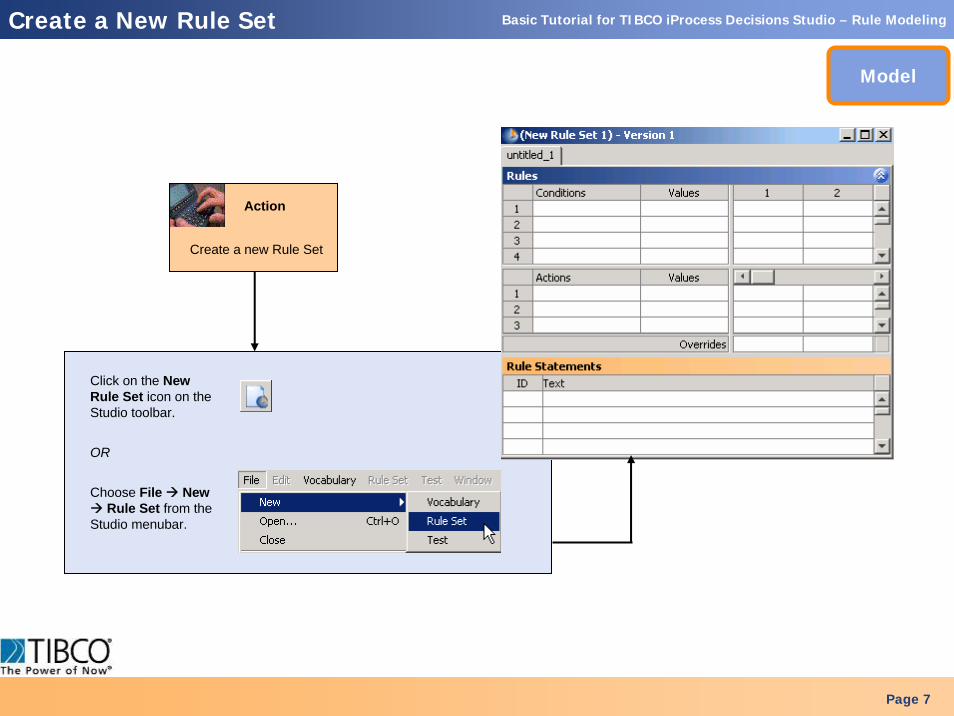
Choose File New Rule Set from the
Studio menubar.
OR
Click on the New Rule Set icon on the Studio toolbar.
Page 7
Create a New Rule Set
Create a new Rule Set
Model
Action
Basic Tutorial for TIBCO iProcess Decisions Studio – Rule Modeling
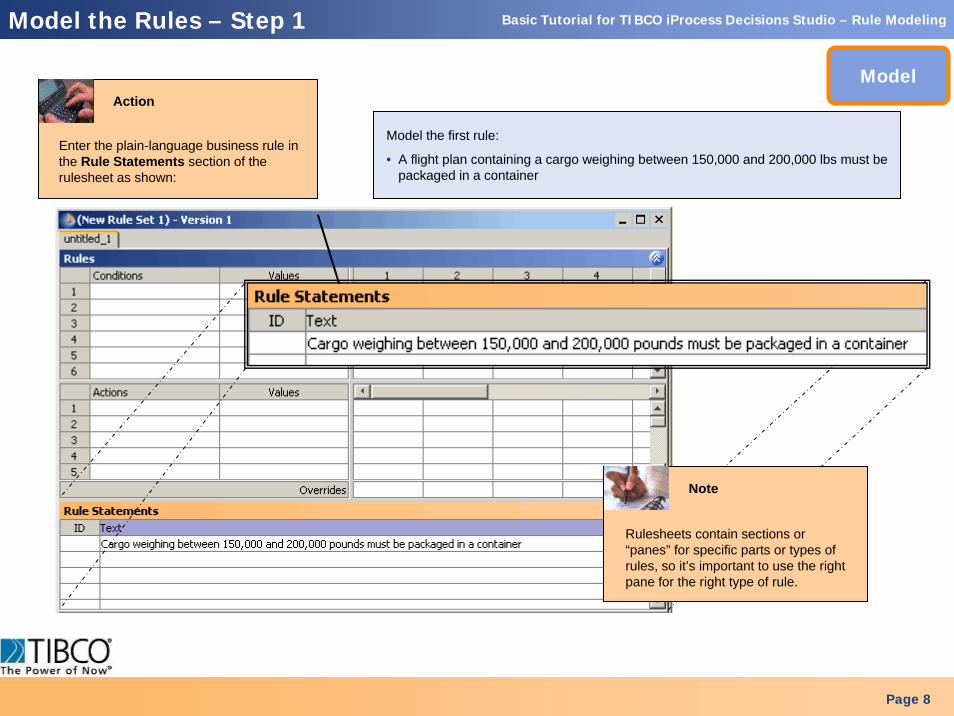
Model the first rule:
• A flight plan containing a cargo weighing between 150,000 and 200,000 lbs must be packaged in a container
Rulesheets contain sections or “panes” for specific parts or types of rules, so it’s important to use the right pane for the right type of rule.
Page 8
Model the Rules – Step 1
Enter the plain-language business rule in the Rule Statements section of the rulesheet as shown:
Model
Note
Action
Basic Tutorial for TIBCO iProcess Decisions Studio – Rule Modeling
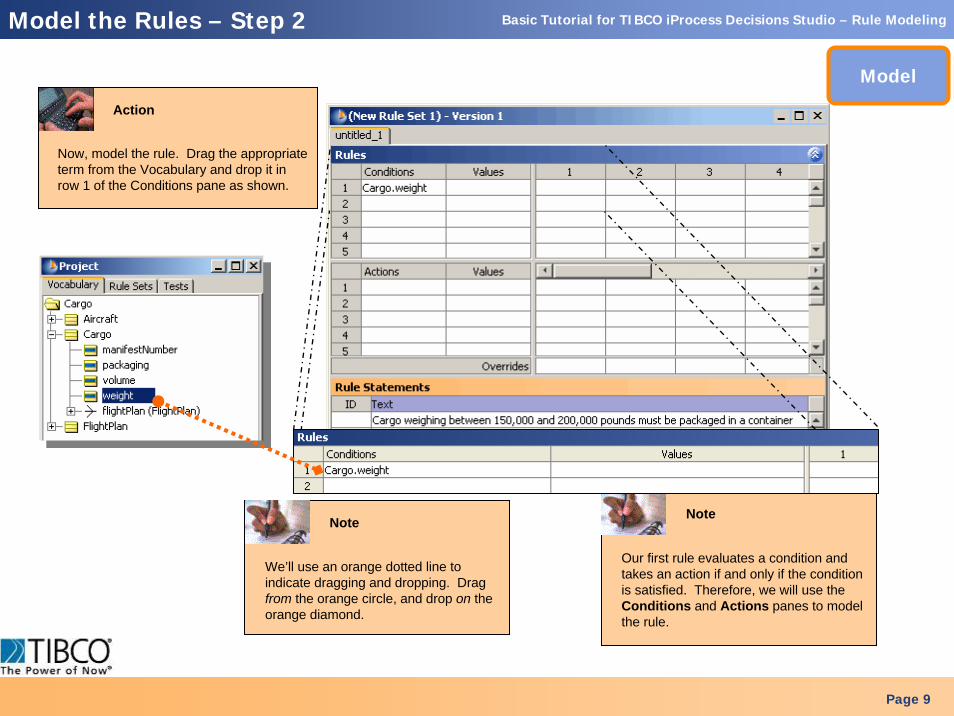
Now, model the rule. Drag the appropriate term from the Vocabulary and drop it in row 1 of the Conditions pane as shown.
Page 9
Model the Rules – Step 2
Our first rule evaluates a condition and takes an action if and only if the condition is satisfied. Therefore, we will use the Conditions and Actions panes to model the rule.
Model
We’ll use an orange dotted line to indicate dragging and dropping. Drag from the orange circle, and drop on the orange diamond.
Note
Action
Note
Basic Tutorial for TIBCO iProcess Decisions Studio – Rule Modeling
Page 10
Model the Rules – Step 3
Model
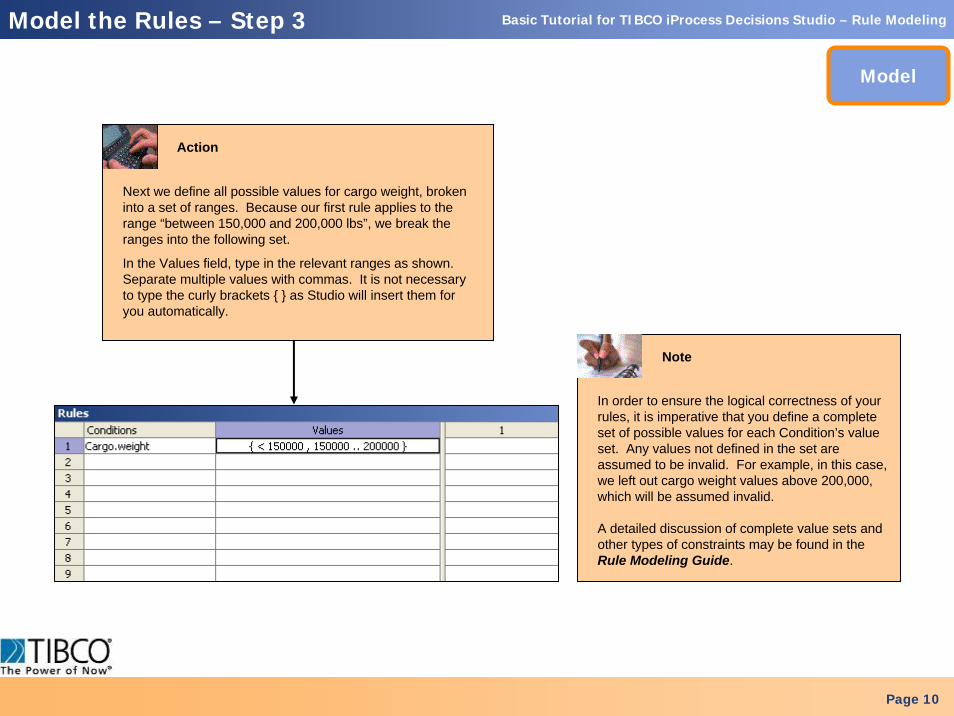
Next we define all possible values for cargo weight, broken into a set of ranges. Because our first rule applies to the range “between 150,000 and 200,000 lbs”, we break the ranges into the following set.
In the Values field, type in the relevant ranges as shown. Separate multiple values with commas. It is not necessary to type the curly brackets { } as Studio will insert them for you automatically.
Action
In order to ensure the logical correctness of your rules, it is imperative that you define a complete set of possible values for each Condition’s value set. Any values not defined in the set are assumed to be invalid. For example, in this case, we left out cargo weight values above 200,000, which will be assumed invalid.
A detailed discussion of complete value sets and other types of constraints may be found in the Rule Modeling Guide.
Note
Basic Tutorial for TIBCO iProcess Decisions Studio – Rule Modeling
Page 11
Model the Rules – Step 4
Model
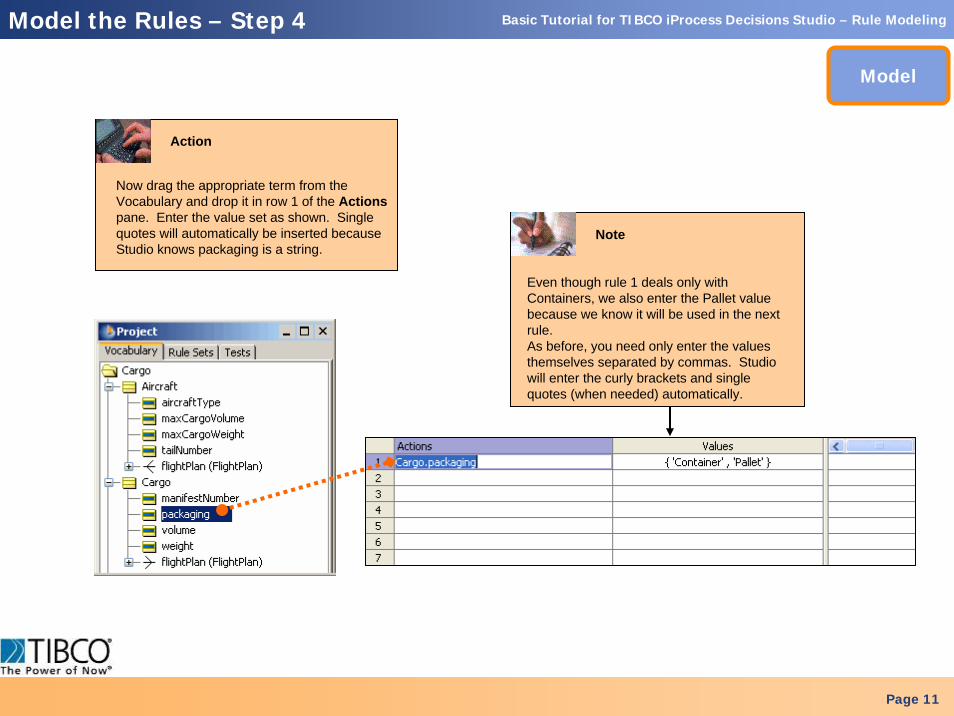
Even though rule 1 deals only with Containers, we also enter the Pallet value because we know it will be used in the next rule.As before, you need only enter the values themselves separated by commas. Studio will enter the curly brackets and single quotes (when needed) automatically.
Note
Now drag the appropriate term from the Vocabulary and drop it in row 1 of the Actionspane. Enter the value set as shown. Single quotes will automatically be inserted because Studio knows packaging is a string.
Action
Basic Tutorial for TIBCO iProcess Decisions Studio – Rule Modeling
Page 12
Model the Rules – Step 5
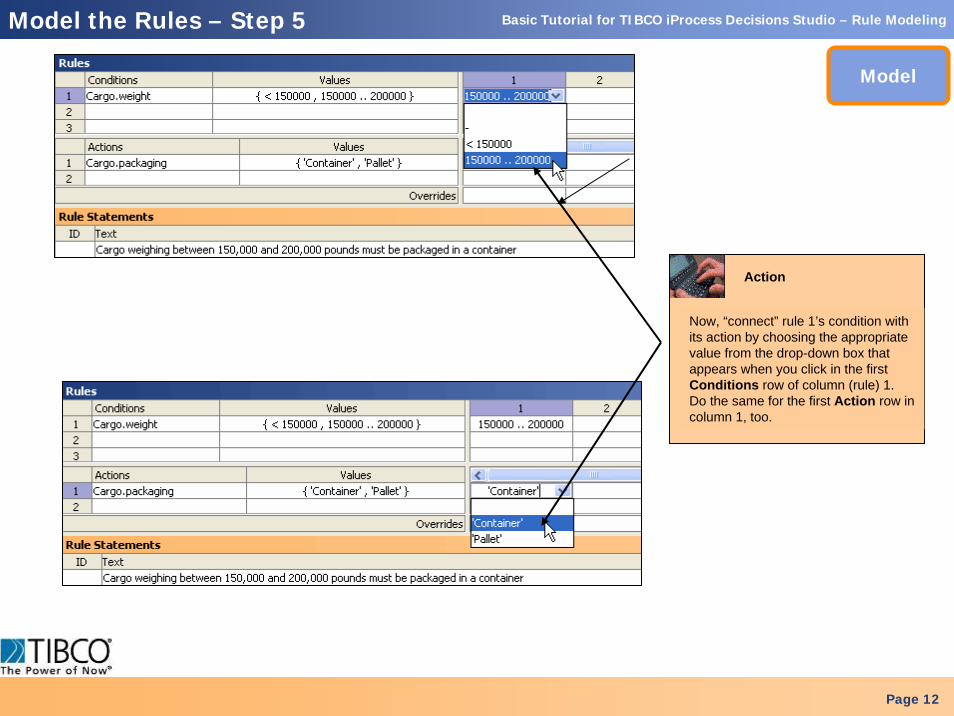
Now, “connect” rule 1’s condition with its action by choosing the appropriate value from the drop-down box that appears when you click in the first Conditions row of column (rule) 1. Do the same for the first Action row in column 1, too.
Model
Action
Basic Tutorial for TIBCO iProcess Decisions Studio – Rule Modeling
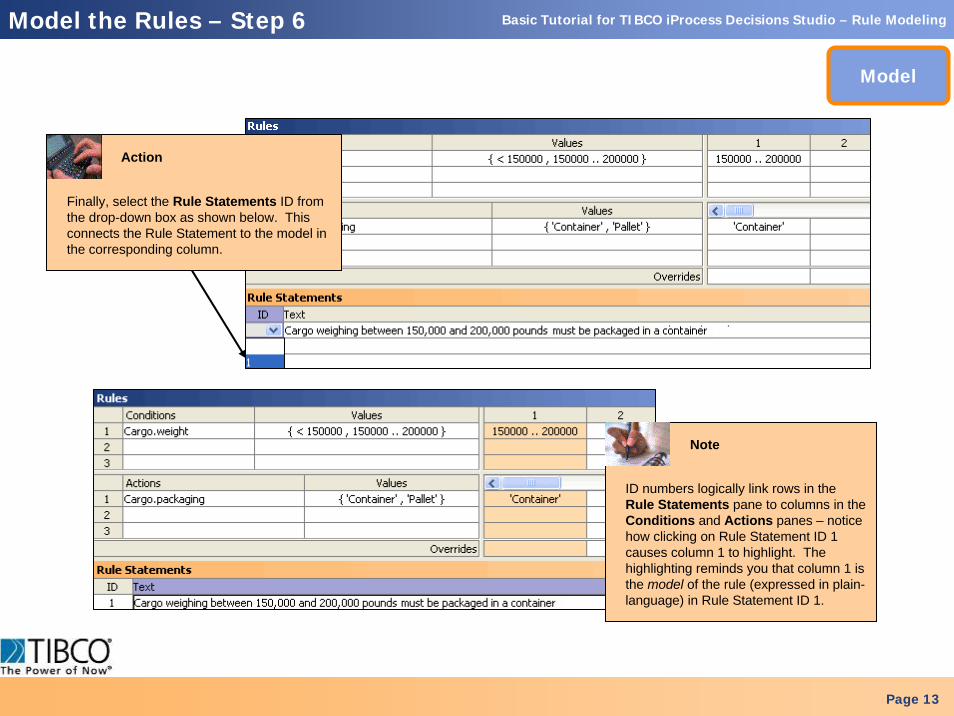
ID numbers logically link rows in the Rule Statements pane to columns in the Conditions and Actions panes – notice how clicking on Rule Statement ID 1 causes column 1 to highlight. The highlighting reminds you that column 1 is the model of the rule (expressed in plain-language) in Rule Statement ID 1.
Page 13
Model the Rules – Step 6
Model
Finally, select the Rule Statements ID from the drop-down box as shown below. This connects the Rule Statement to the model in the corresponding column.
Action
Note
Basic Tutorial for TIBCO iProcess Decisions Studio – Rule Modeling
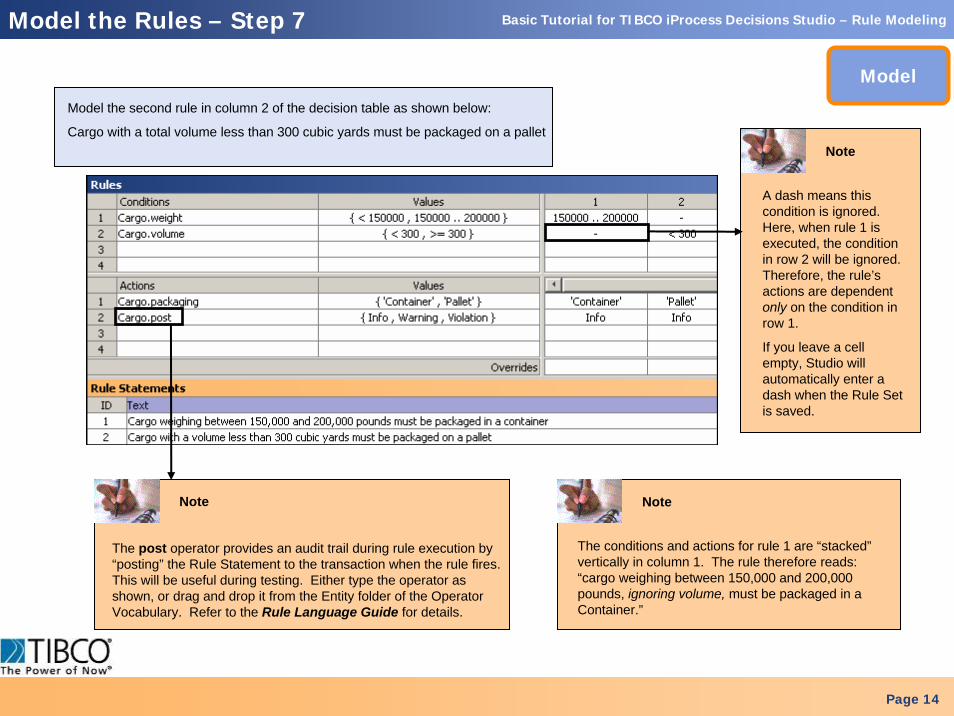
Model the second rule in column 2 of the decision table as shown below:
Cargo with a total volume less than 300 cubic yards must be packaged on a pallet
The conditions and actions for rule 1 are “stacked”vertically in column 1. The rule therefore reads: “cargo weighing between 150,000 and 200,000 pounds, ignoring volume, must be packaged in a Container.”
A dash means this condition is ignored. Here, when rule 1 is executed, the condition in row 2 will be ignored. Therefore, the rule’s actions are dependent only on the condition in row 1.
If you leave a cell empty, Studio will automatically enter a dash when the Rule Set is saved.
Page 14
Model the Rules – Step 7
Model
Note
Note
The post operator provides an audit trail during rule execution by “posting” the Rule Statement to the transaction when the rule fires. This will be useful during testing. Either type the operator asshown, or drag and drop it from the Entity folder of the Operator Vocabulary. Refer to the Rule Language Guide for details.
Note
Basic Tutorial for TIBCO iProcess Decisions Studio – Rule Modeling
Page 15
Check for Ambiguities
Analyze
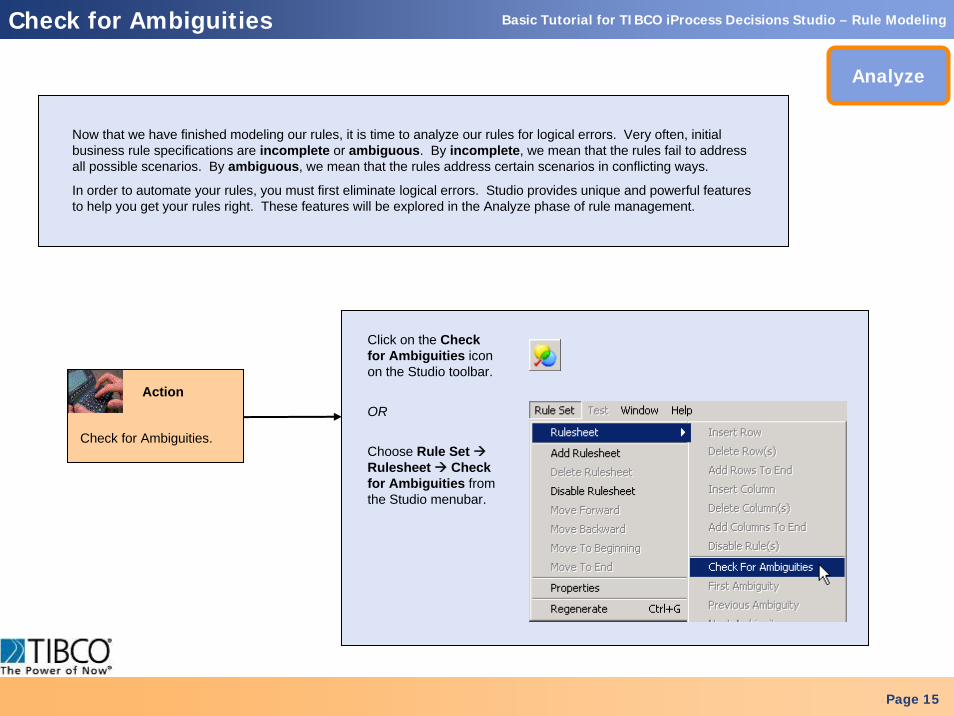
Choose Rule Set Rulesheet Check for Ambiguities from the Studio menubar.
OR
Click on the Check for Ambiguities icon on the Studio toolbar.
Check for Ambiguities.
Action
Now that we have finished modeling our rules, it is time to analyze our rules for logical errors. Very often, initial business rule specifications are incomplete or ambiguous. By incomplete, we mean that the rules fail to address all possible scenarios. By ambiguous, we mean that the rules address certain scenarios in conflicting ways.
In order to automate your rules, you must first eliminate logical errors. Studio provides unique and powerful features to help you get your rules right. These features will be explored in the Analyze phase of rule management.
Basic Tutorial for TIBCO iProcess Decisions Studio – Rule Modeling
Page 16
Identify Ambiguities
Analyze
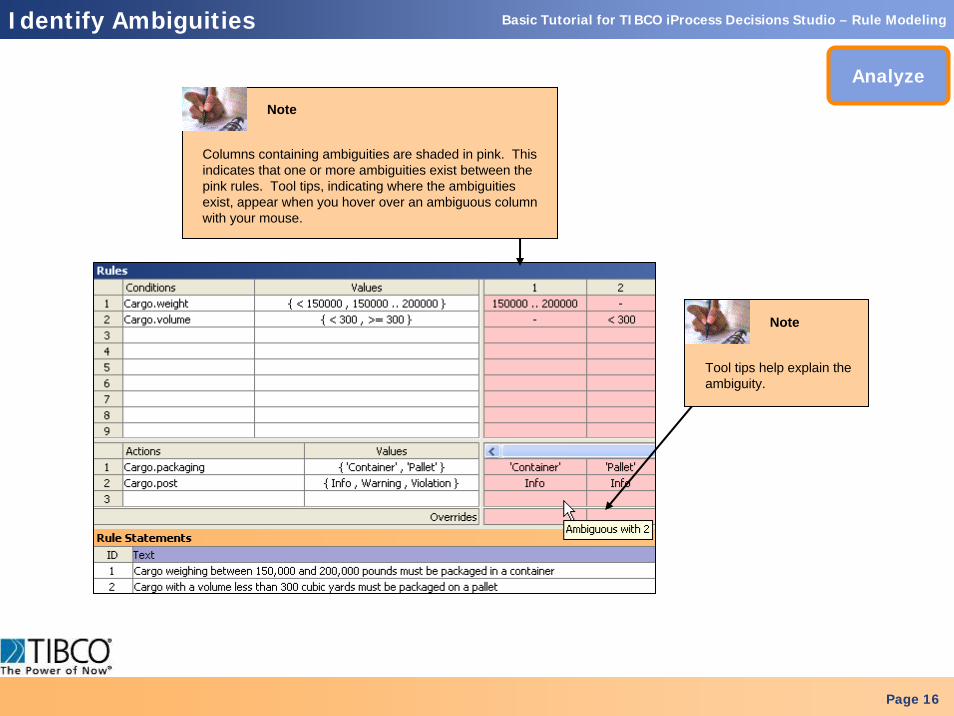
Columns containing ambiguities are shaded in pink. This indicates that one or more ambiguities exist between the pink rules. Tool tips, indicating where the ambiguities exist, appear when you hover over an ambiguous column with your mouse.
Tool tips help explain the ambiguity.
Note
Note
Basic Tutorial for TIBCO iProcess Decisions Studio – Rule Modeling
Page 17
Expand the Rules
Analyze
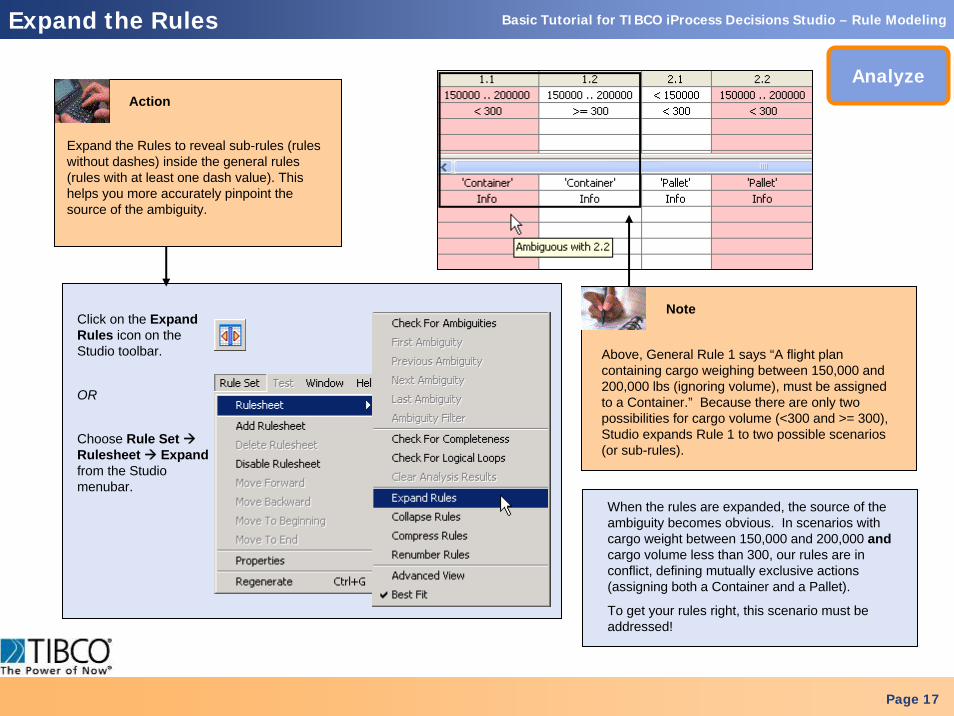
Choose Rule Set Rulesheet Expandfrom the Studio menubar.
OR
Click on the Expand Rules icon on the Studio toolbar. Above, General Rule 1 says “A flight plan
containing cargo weighing between 150,000 and 200,000 lbs (ignoring volume), must be assigned to a Container.” Because there are only two possibilities for cargo volume (<300 and >= 300), Studio expands Rule 1 to two possible scenarios (or sub-rules).
When the rules are expanded, the source of the ambiguity becomes obvious. In scenarios with cargo weight between 150,000 and 200,000 andcargo volume less than 300, our rules are in conflict, defining mutually exclusive actions (assigning both a Container and a Pallet).
To get your rules right, this scenario must be addressed!
Note
Expand the Rules to reveal sub-rules (rules without dashes) inside the general rules (rules with at least one dash value). This helps you more accurately pinpoint the source of the ambiguity.
Action
Basic Tutorial for TIBCO iProcess Decisions Studio – Rule Modeling
In large Rulesheets, use the Ambiguity Filter to display ONLY those rules that contain conflicts.
When finished with Ambiguity Checking, click on the Collapse Rules icon on the Studio toolbar to return the columns to their original general form.
Page 18
Resolve Ambiguity Errors
Analyze
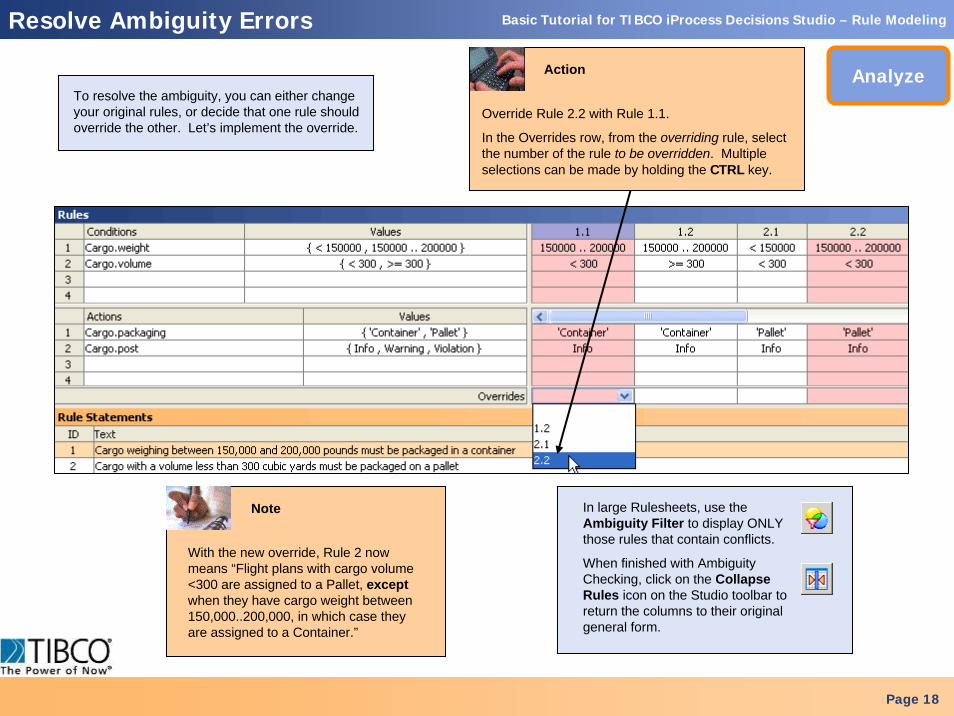
Override Rule 2.2 with Rule 1.1.
In the Overrides row, from the overriding rule, select the number of the rule to be overridden. Multiple selections can be made by holding the CTRL key.
Action
With the new override, Rule 2 now means “Flight plans with cargo volume <300 are assigned to a Pallet, exceptwhen they have cargo weight between 150,000..200,000, in which case they are assigned to a Container.”
Note
To resolve the ambiguity, you can either change your original rules, or decide that one rule should override the other. Let’s implement the override.
Basic Tutorial for TIBCO iProcess Decisions Studio – Rule Modeling
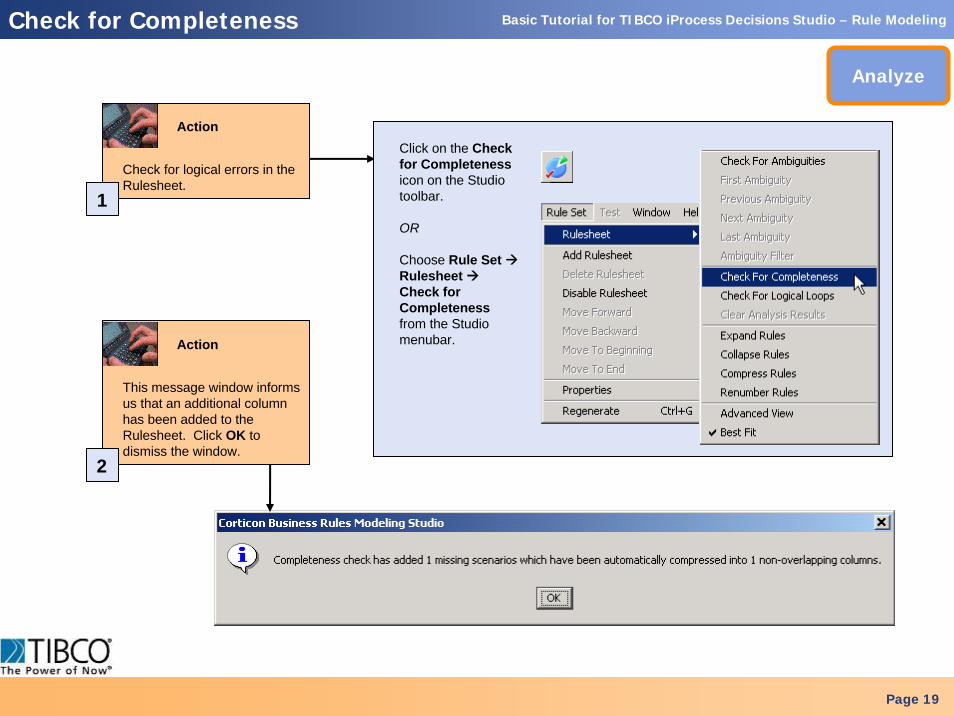
Choose Rule Set Rulesheet Check for Completenessfrom the Studio menubar.
OR
Click on the Check for Completenessicon on the Studio toolbar.
Page 19
Check for Completeness
Analyze
Check for logical errors in the Rulesheet.
Action
This message window informs us that an additional column has been added to the Rulesheet. Click OK to dismiss the window.
Action
2
1
Basic Tutorial for TIBCO iProcess Decisions Studio – Rule Modeling
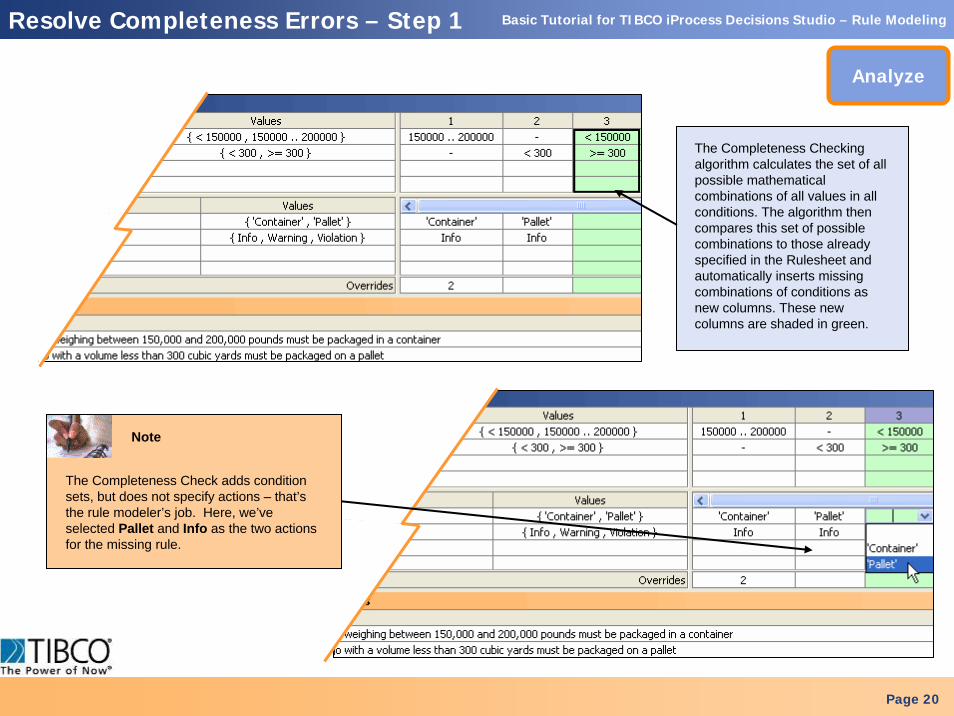
The Completeness Checking algorithm calculates the set of all possible mathematical combinations of all values in all conditions. The algorithm then compares this set of possible combinations to those already specified in the Rulesheet and automatically inserts missing combinations of conditions as new columns. These new columns are shaded in green.
Page 20
Resolve Completeness Errors – Step 1
The Completeness Check adds condition sets, but does not specify actions – that’s the rule modeler’s job. Here, we’ve selected Pallet and Info as the two actions for the missing rule.
Analyze
Note

Basic Tutorial for TIBCO iProcess Decisions Studio – Rule Modeling
In this example, incompleteness was resolved by specifying actions for column 3, along with adding a new rule statement. Once resolved, remove the green highlighting by clicking
Page 21
Resolve Completeness Errors – Step 2
Don’t forget to add a new Rule Statement for each new column added by the Completeness Check. Select the Rule Statement ID from the drop-down box to link it with the corresponding column.
Analyze
Note
Basic Tutorial for TIBCO iProcess Decisions Studio – Rule Modeling
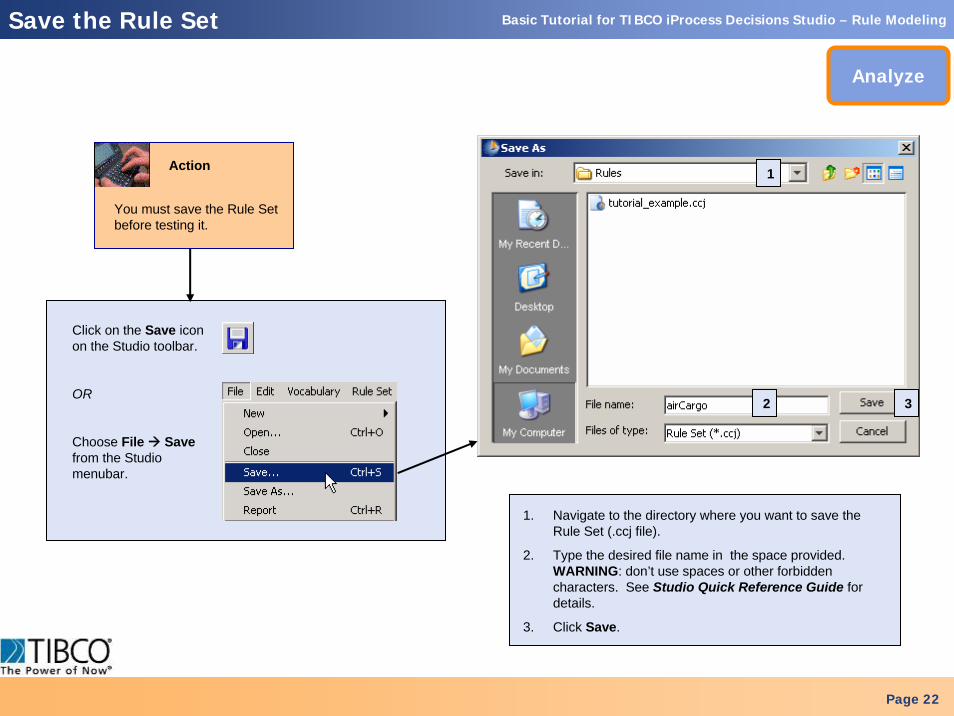
Choose File Savefrom the Studio menubar.
OR
Click on the Save icon on the Studio toolbar.
1
2 3
1. Navigate to the directory where you want to save the Rule Set (.ccj file).
2. Type the desired file name in the space provided. WARNING: don’t use spaces or other forbidden characters. See Studio Quick Reference Guide for details.
3. Click Save.
Page 22
Save the Rule Set
You must save the Rule Set before testing it.
Analyze
Action
Basic Tutorial for TIBCO iProcess Decisions Studio – Rule Modeling
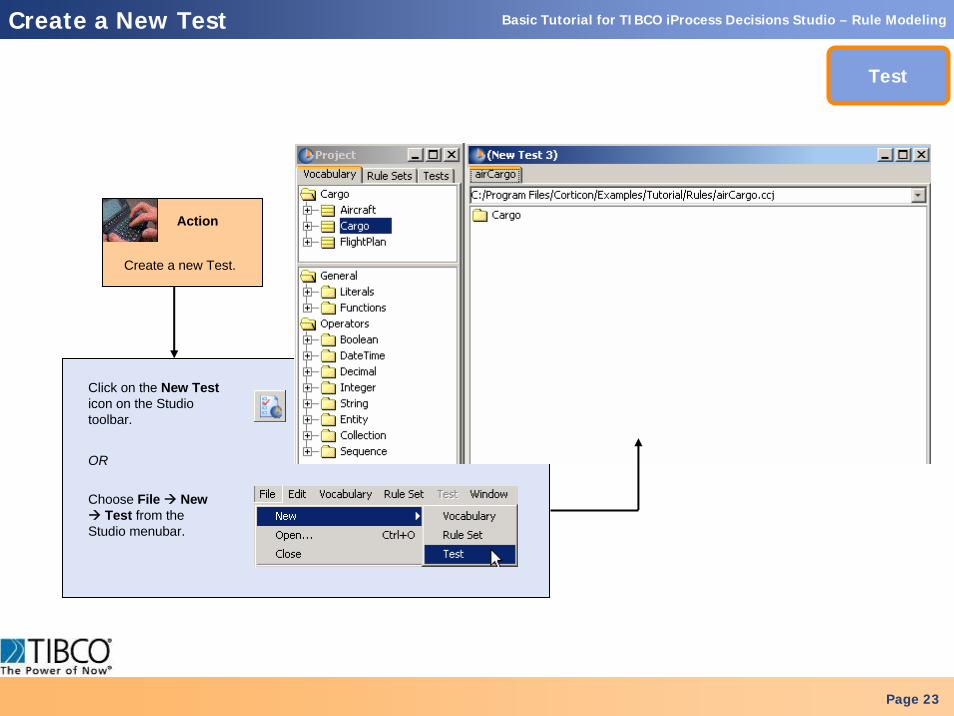
Choose File New Test from the
Studio menubar.
OR
Click on the New Testicon on the Studio toolbar.
Page 23
Create a New Test
Create a new Test.
Test
Action
Basic Tutorial for TIBCO iProcess Decisions Studio – Rule Modeling
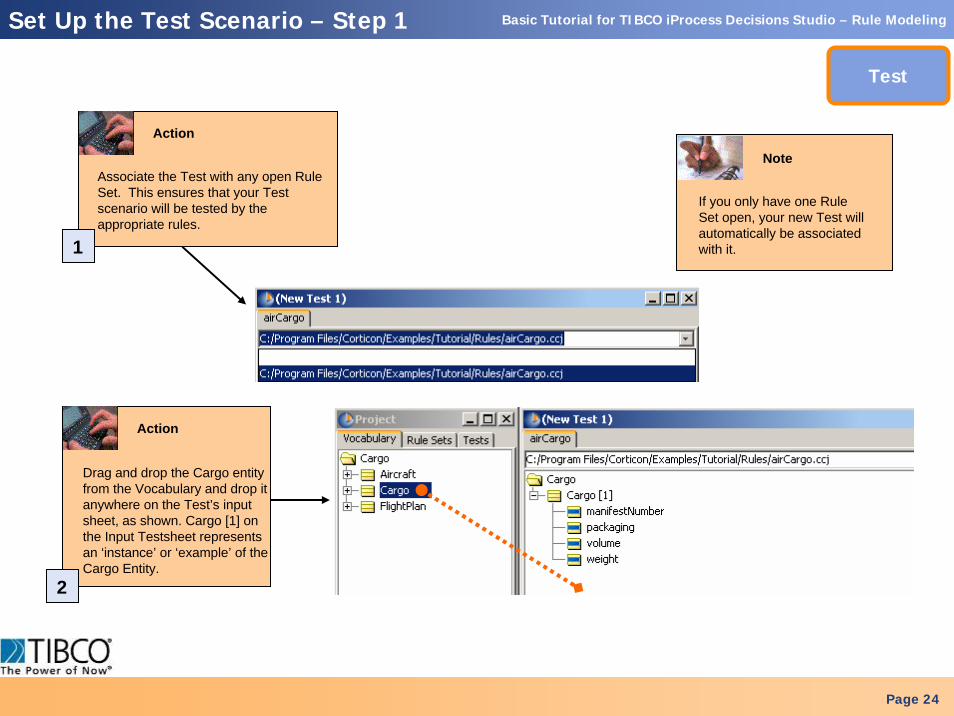
If you only have one Rule Set open, your new Test will automatically be associated with it.
Drag and drop the Cargo entity from the Vocabulary and drop it anywhere on the Test’s input sheet, as shown. Cargo [1] on the Input Testsheet represents an ‘instance’ or ‘example’ of the Cargo Entity.
2
Page 24
Set Up the Test Scenario – Step 1
Test
Note
Action
Associate the Test with any open Rule Set. This ensures that your Test scenario will be tested by the appropriate rules.
1
Action
Basic Tutorial for TIBCO iProcess Decisions Studio – Rule Modeling
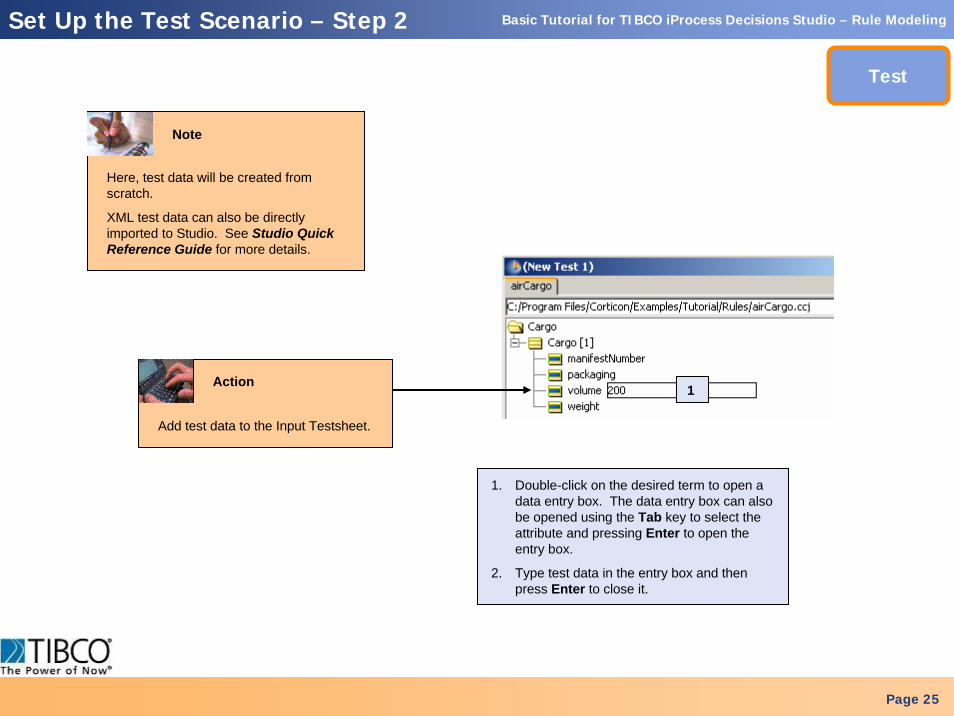
Here, test data will be created from scratch.
XML test data can also be directly imported to Studio. See Studio Quick Reference Guide for more details.
1. Double-click on the desired term to open a data entry box. The data entry box can also be opened using the Tab key to select the attribute and pressing Enter to open the entry box.
2. Type test data in the entry box and then press Enter to close it.
Page 25
1
Test
Note
Set Up the Test Scenario – Step 2
Add test data to the Input Testsheet.
Action
Basic Tutorial for TIBCO iProcess Decisions Studio – Rule Modeling
Page 26
Test
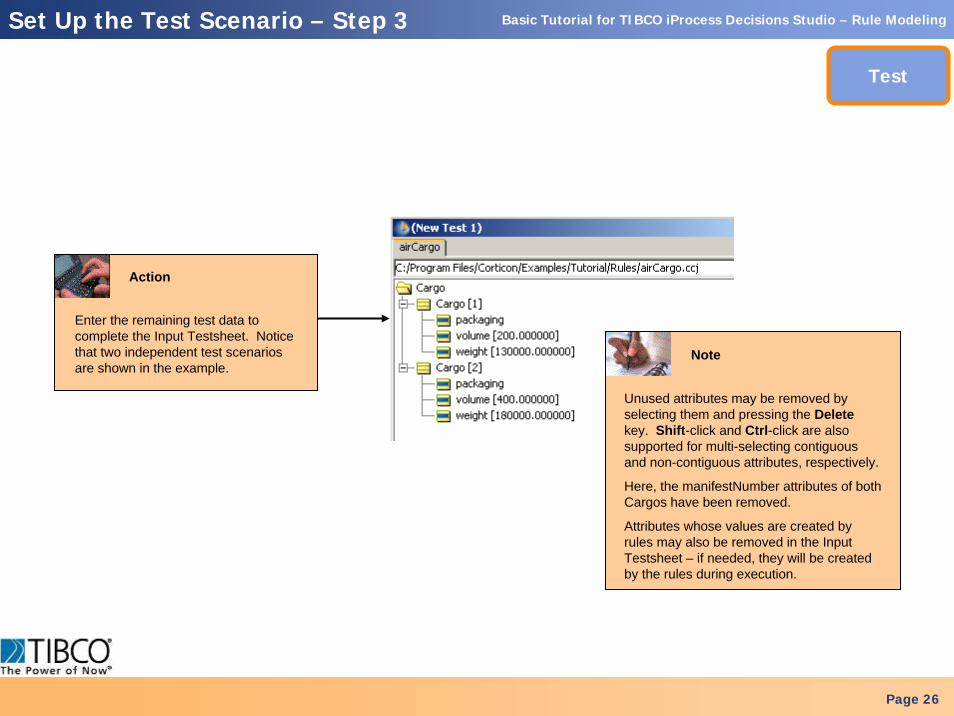
Enter the remaining test data to complete the Input Testsheet. Notice that two independent test scenarios are shown in the example.
Action
Set Up the Test Scenario – Step 3
Unused attributes may be removed by selecting them and pressing the Deletekey. Shift-click and Ctrl-click are also supported for multi-selecting contiguous and non-contiguous attributes, respectively.
Here, the manifestNumber attributes of both Cargos have been removed.
Attributes whose values are created by rules may also be removed in the Input Testsheet – if needed, they will be created by the rules during execution.
Note
Basic Tutorial for TIBCO iProcess Decisions Studio – Rule Modeling
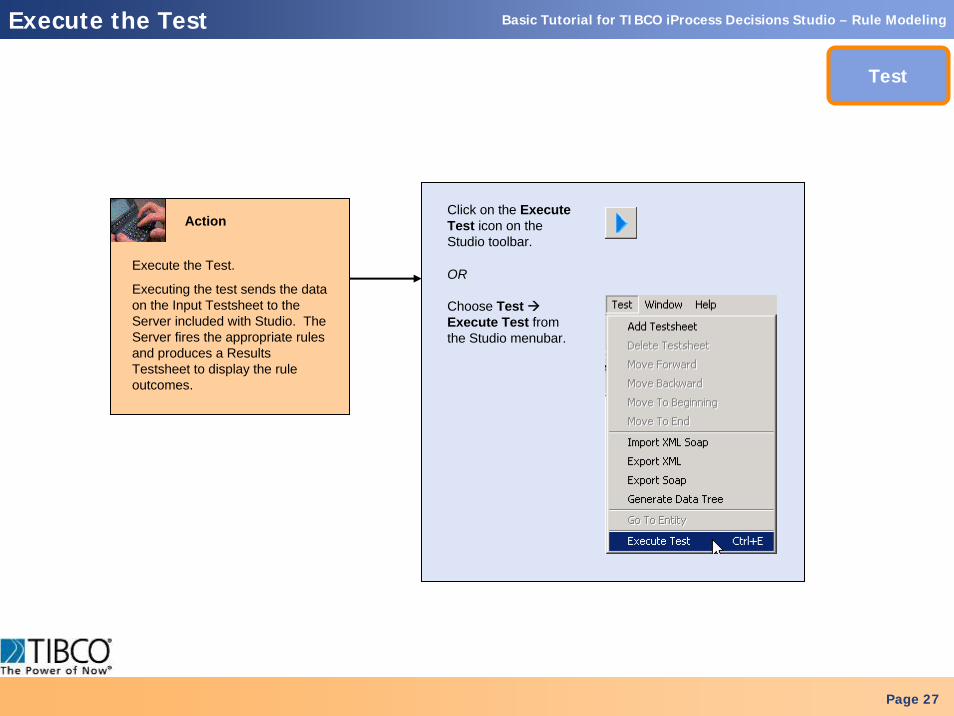
Choose Test Execute Test from the Studio menubar.
OR
Click on the Execute Test icon on the Studio toolbar.
Page 27
Execute the Test
Test
Execute the Test.
Executing the test sends the data on the Input Testsheet to the Server included with Studio. The Server fires the appropriate rules and produces a Results Testsheet to display the rule outcomes.
Action
Basic Tutorial for TIBCO iProcess Decisions Studio – Rule Modeling
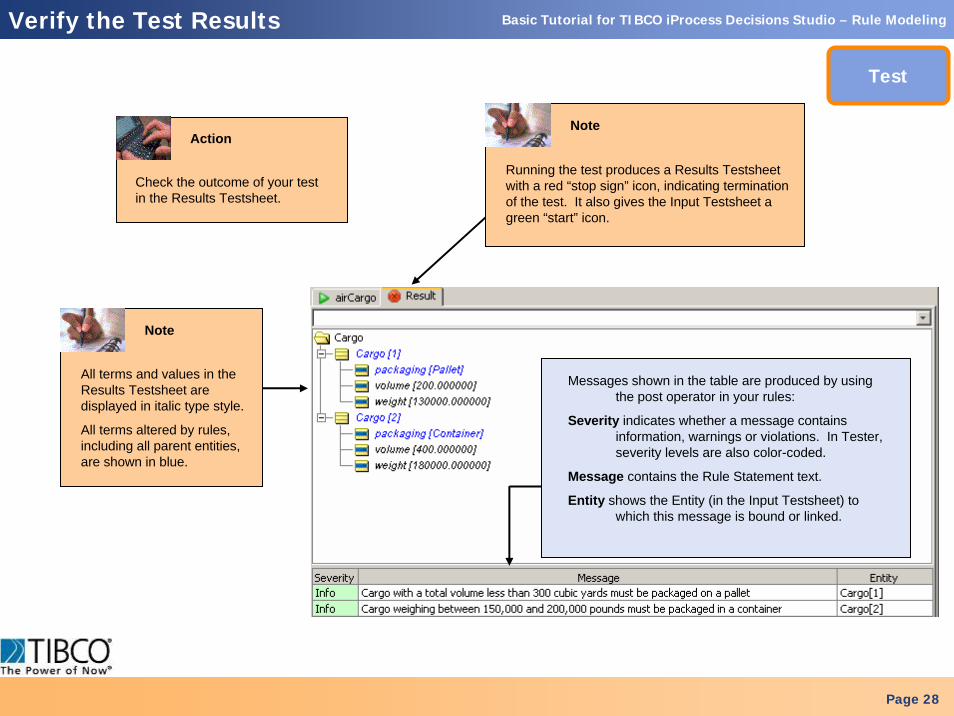
Check the outcome of your test in the Results Testsheet.
Page 28
Verify the Test Results
All terms and values in the Results Testsheet are displayed in italic type style.
All terms altered by rules, including all parent entities, are shown in blue.
Messages shown in the table are produced by using the post operator in your rules:
Severity indicates whether a message contains information, warnings or violations. In Tester, severity levels are also color-coded.
Message contains the Rule Statement text.
Entity shows the Entity (in the Input Testsheet) to which this message is bound or linked.
Test
Running the test produces a Results Testsheet with a red “stop sign” icon, indicating termination of the test. It also gives the Input Testsheet a green “start” icon.
Note
ActionNote
Basic Tutorial for TIBCO iProcess Decisions Studio – Rule Modeling
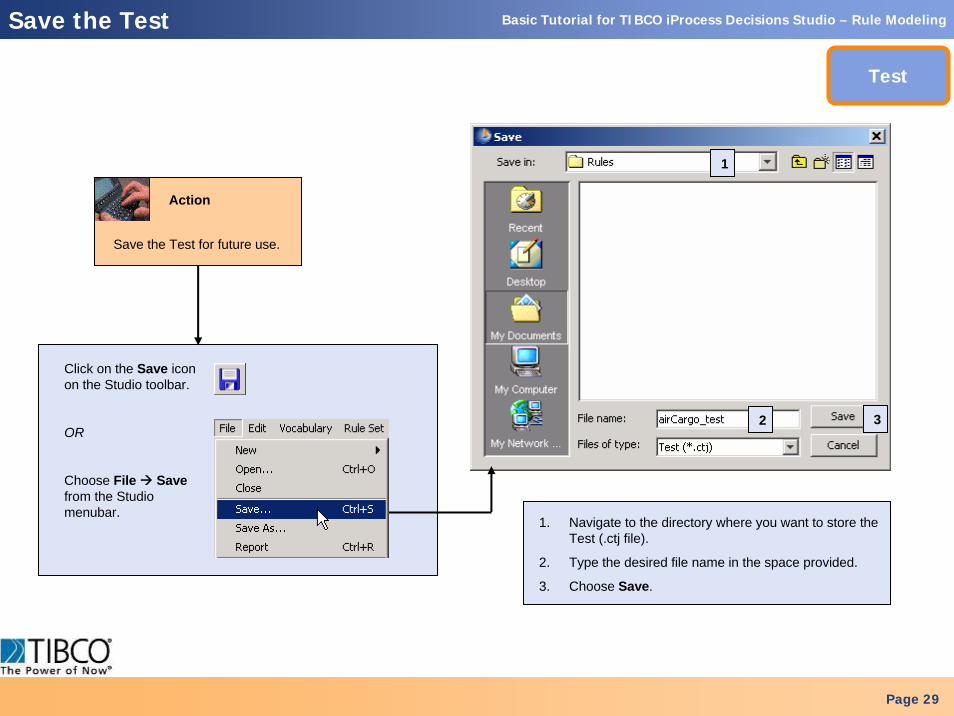
Choose File Savefrom the Studio menubar.
OR
Click on the Save icon on the Studio toolbar.
1
2 3
1. Navigate to the directory where you want to store the Test (.ctj file).
2. Type the desired file name in the space provided.
3. Choose Save.
Page 29
Save the Test for future use.
Test
Action
Save the Test
Basic Tutorial for TIBCO iProcess Decisions Studio – Rule ModelingDiscover New Business Rules
Discover
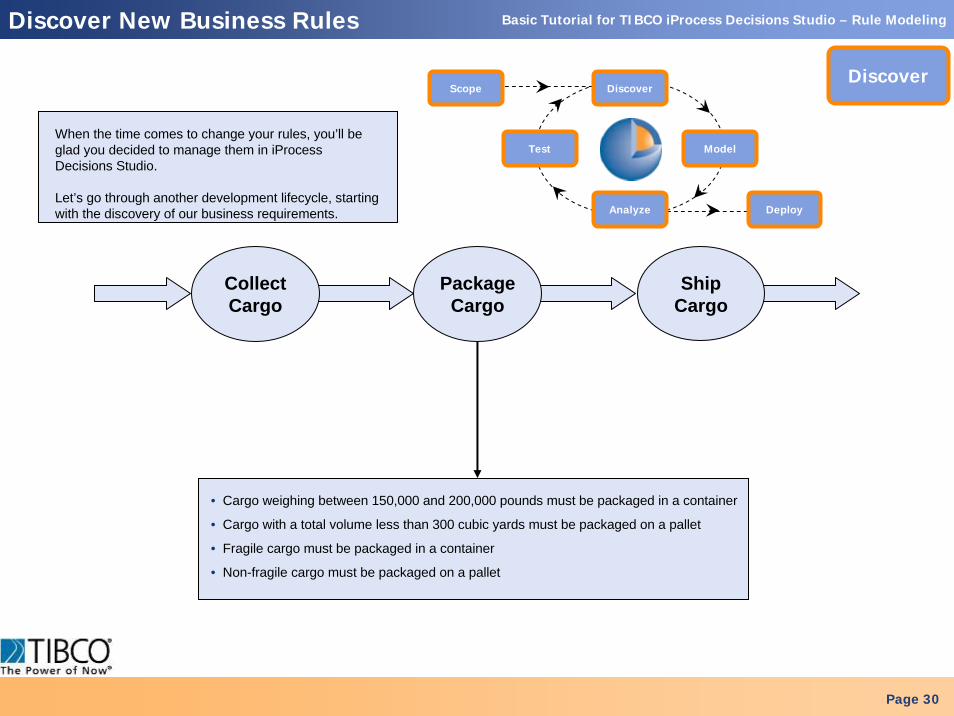
When the time comes to change your rules, you’ll be glad you decided to manage them in iProcess Decisions Studio.
Let’s go through another development lifecycle, starting with the discovery of our business requirements.
ModelTest
Scope Discover
DeployAnalyze
Page 30
• Cargo weighing between 150,000 and 200,000 pounds must be packaged in a container
• Cargo with a total volume less than 300 cubic yards must be packaged on a pallet
• Fragile cargo must be packaged in a container
• Non-fragile cargo must be packaged on a pallet
PackageCargo
CollectCargo
ShipCargo
Basic Tutorial for TIBCO iProcess Decisions Studio – Rule Modeling
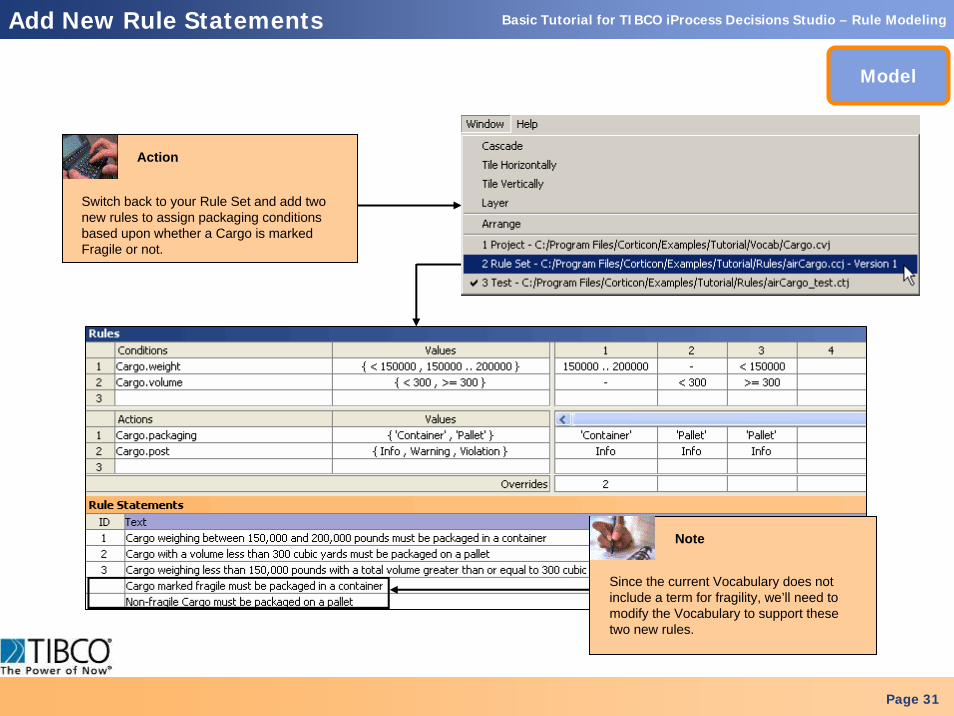
Switch back to your Rule Set and add two new rules to assign packaging conditions based upon whether a Cargo is marked Fragile or not.
Since the current Vocabulary does not include a term for fragility, we’ll need to modify the Vocabulary to support these two new rules.
Page 31
Add New Rule Statements
Model
Note
Action
Basic Tutorial for TIBCO iProcess Decisions Studio – Rule Modeling
Page 32
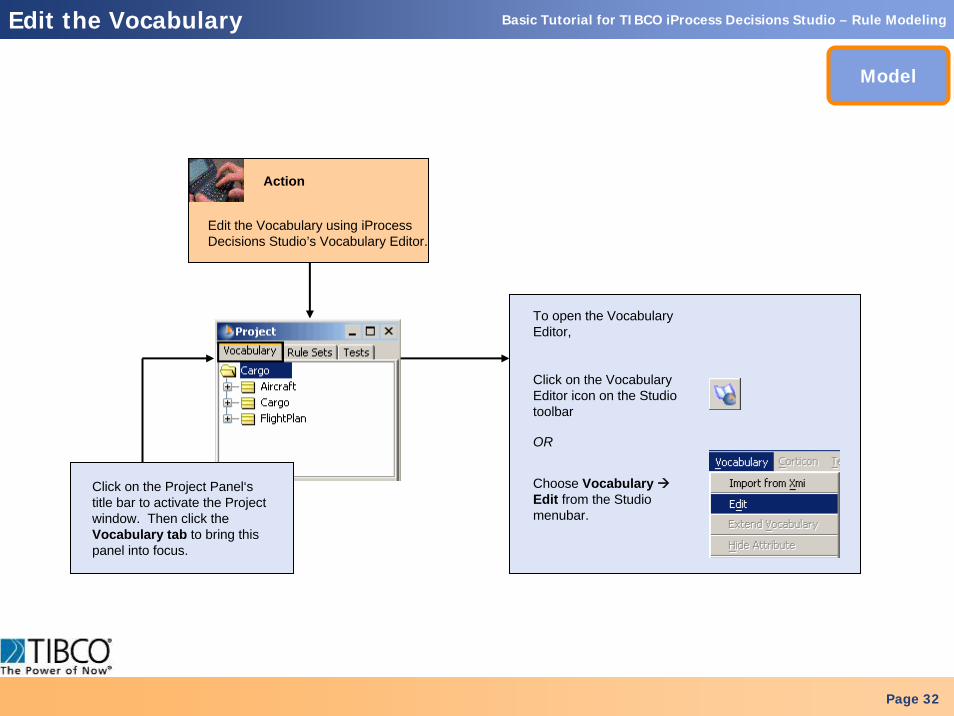
Edit the Vocabulary using iProcess Decisions Studio’s Vocabulary Editor.
Click on the Project Panel‘s title bar to activate the Project window. Then click the Vocabulary tab to bring this panel into focus.
Edit the Vocabulary
Model
Action
To open the Vocabulary Editor,
Click on the Vocabulary Editor icon on the Studio toolbar
Choose Vocabulary Edit from the Studio menubar.
OR
Basic Tutorial for TIBCO iProcess Decisions Studio – Rule Modeling
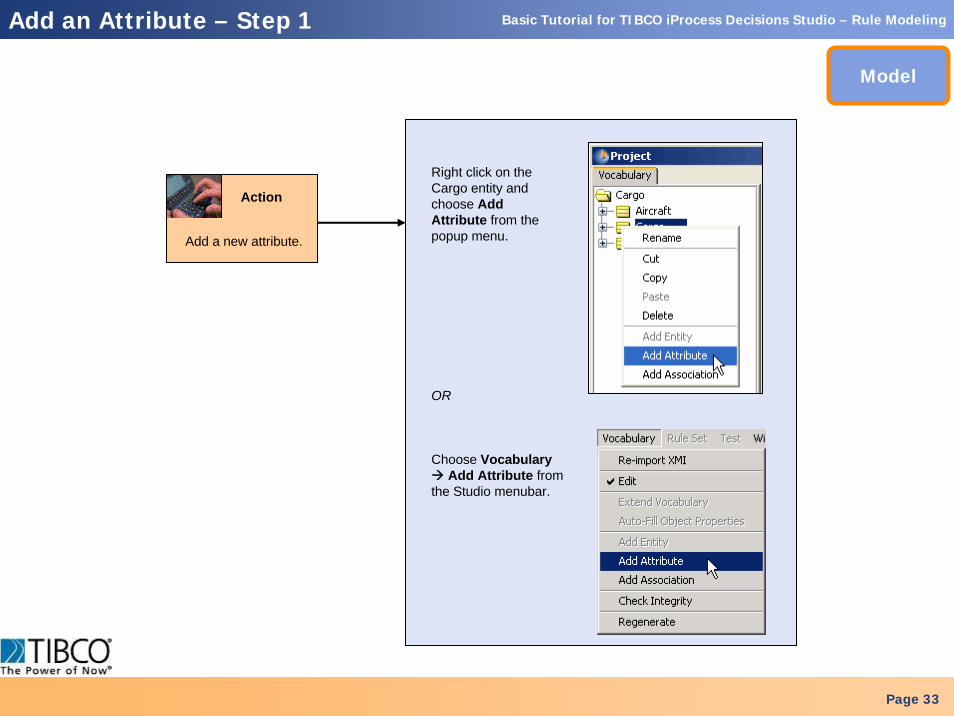
Right click on the Cargo entity and choose Add Attribute from the popup menu.
OR
Choose Vocabulary Add Attribute from
the Studio menubar.
Action
Page 33
Add an Attribute – Step 1
Model
Action
Add a new attribute.
Action
Basic Tutorial for TIBCO iProcess Decisions Studio – Rule Modeling
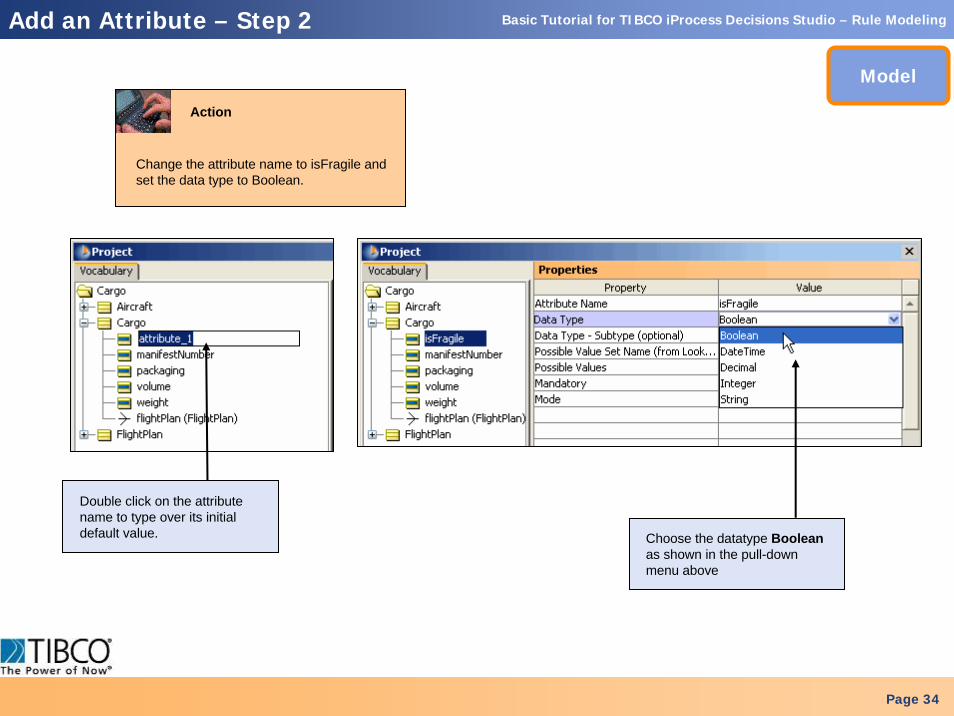
Change the attribute name to isFragile and set the data type to Boolean.
Page 34
Add an Attribute – Step 2
Model
Double click on the attribute name to type over its initial default value. Choose the datatype Boolean
as shown in the pull-down menu above
Action
Basic Tutorial for TIBCO iProcess Decisions Studio – Rule Modeling
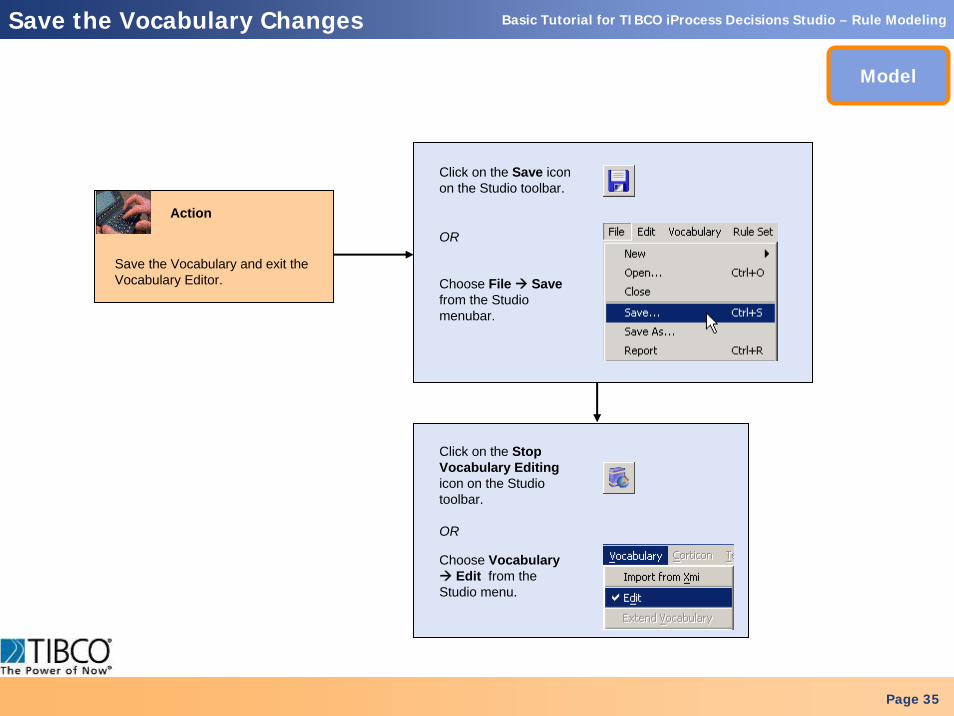
Choose File Savefrom the Studio menubar.
OR
Click on the Save icon on the Studio toolbar.
Choose Vocabulary Edit from the
Studio menu.
Page 35
Save the Vocabulary Changes
Model
Save the Vocabulary and exit the Vocabulary Editor.
Action
OR
Click on the Stop Vocabulary Editing icon on the Studio toolbar.
Basic Tutorial for TIBCO iProcess Decisions Studio – Rule Modeling
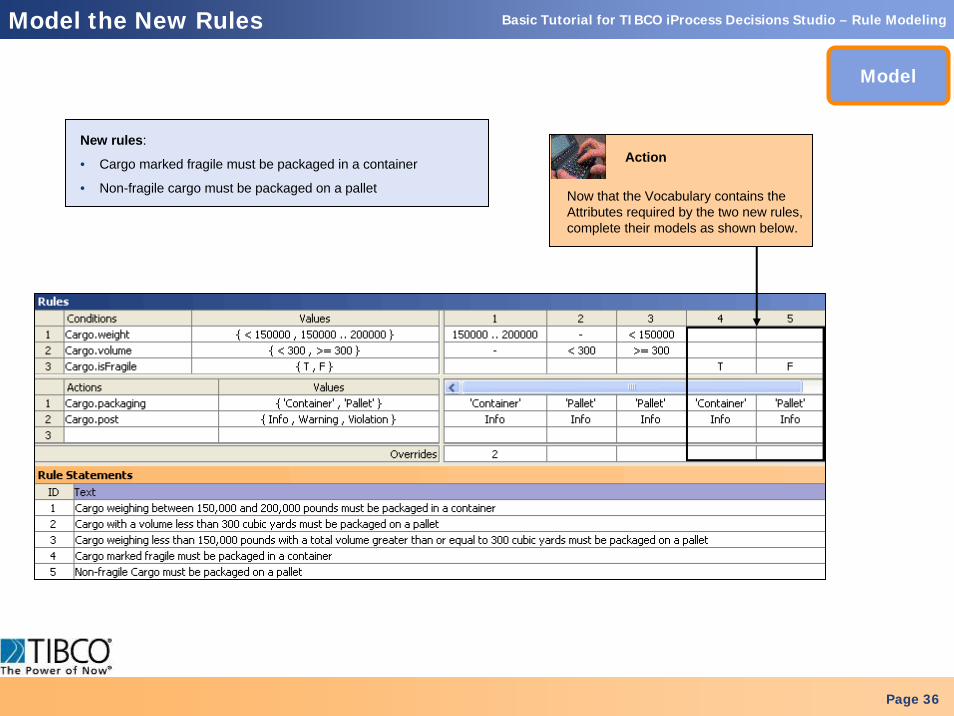
New rules:
• Cargo marked fragile must be packaged in a container
• Non-fragile cargo must be packaged on a pallet
Page 36
Model the New Rules
Model
Action
Now that the Vocabulary contains the Attributes required by the two new rules, complete their models as shown below.
Basic Tutorial for TIBCO iProcess Decisions Studio – Rule Modeling
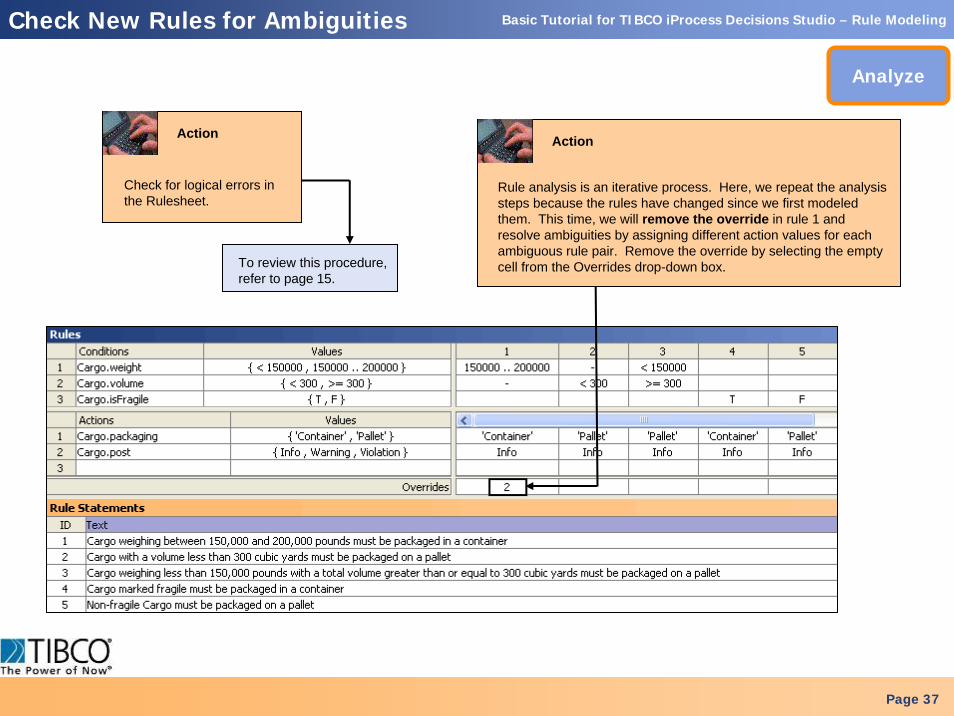
To review this procedure, refer to page 15.
Page 37
Check New Rules for Ambiguities
Analyze
Rule analysis is an iterative process. Here, we repeat the analysis steps because the rules have changed since we first modeled them. This time, we will remove the override in rule 1 and resolve ambiguities by assigning different action values for each ambiguous rule pair. Remove the override by selecting the emptycell from the Overrides drop-down box.
Action
Check for logical errors in the Rulesheet.
Action
Basic Tutorial for TIBCO iProcess Decisions Studio – Rule Modeling
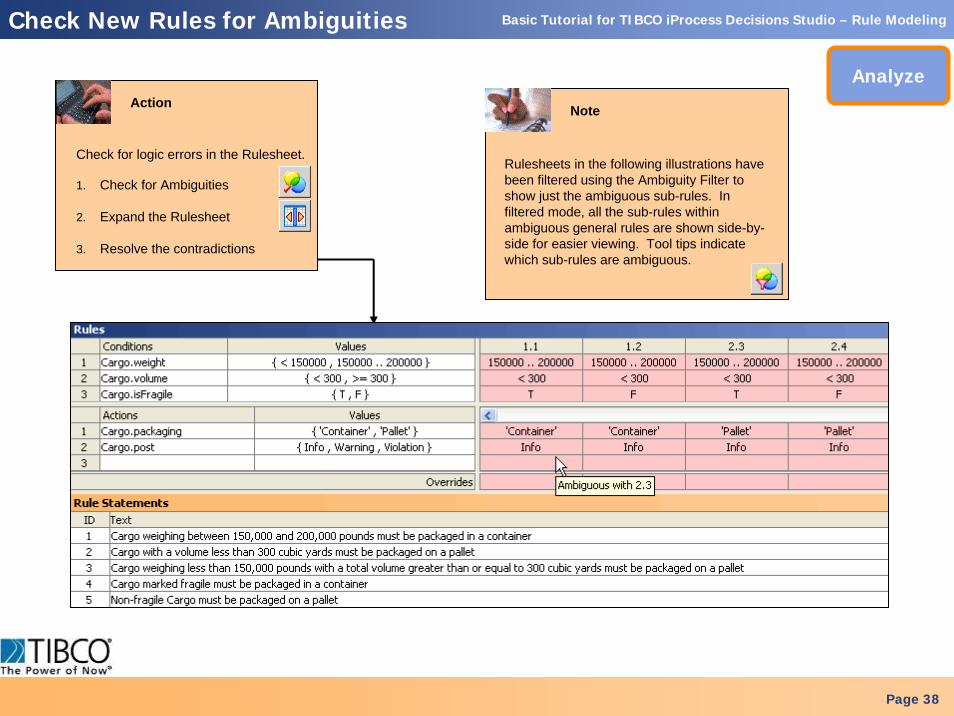
Check for logic errors in the Rulesheet.
1. Check for Ambiguities
2. Expand the Rulesheet
3. Resolve the contradictions
Rulesheets in the following illustrations have been filtered using the Ambiguity Filter to show just the ambiguous sub-rules. In filtered mode, all the sub-rules within ambiguous general rules are shown side-by-side for easier viewing. Tool tips indicate which sub-rules are ambiguous.
Page 38
Check New Rules for Ambiguities
Analyze
NoteAction
Basic Tutorial for TIBCO iProcess Decisions Studio – Rule Modeling
Page 39
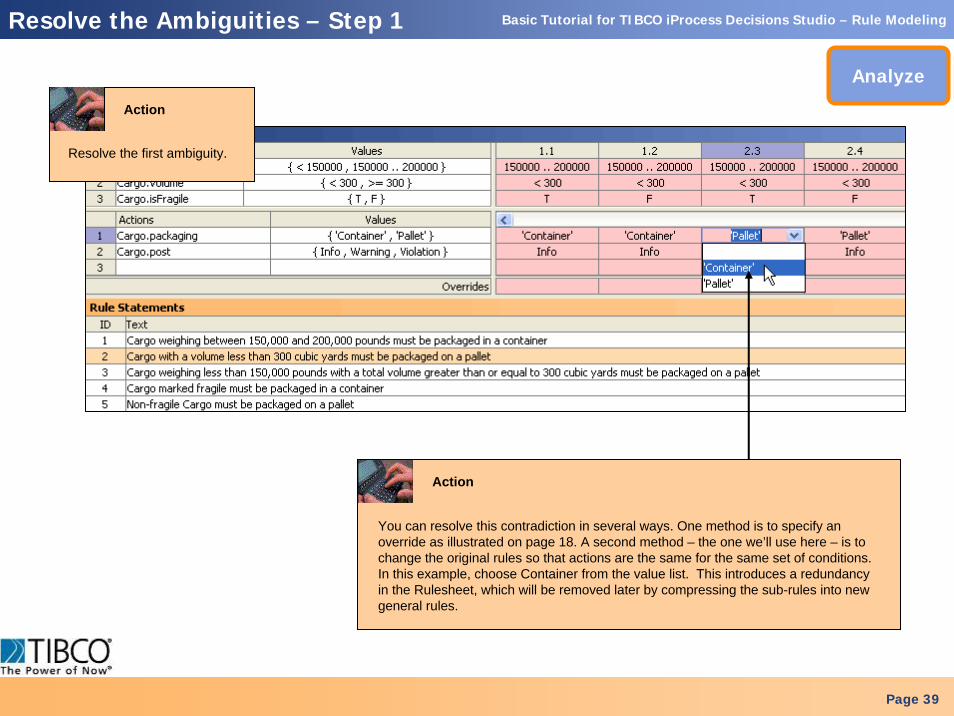
Resolve the Ambiguities – Step 1
Analyze
Again, resolve the contradiction by making a business decision to set identical actions for the same set of conditions.
Action
You can resolve this contradiction in several ways. One method is to specify an override as illustrated on page 18. A second method – the one we’ll use here – is to change the original rules so that actions are the same for the same set of conditions. In this example, choose Container from the value list. This introduces a redundancy in the Rulesheet, which will be removed later by compressing the sub-rules into new general rules.
Resolve the first ambiguity.
Action
Action
Basic Tutorial for TIBCO iProcess Decisions Studio – Rule Modeling
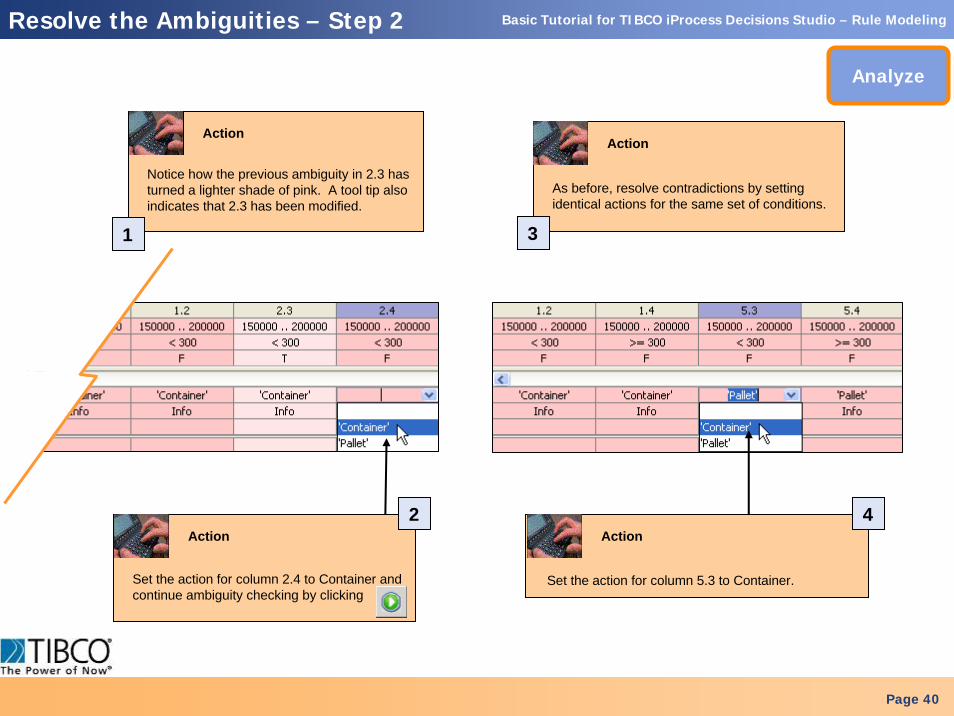
As before, resolve contradictions by setting identical actions for the same set of conditions.
3
Page 40
Resolve the Ambiguities – Step 2
Analyze
Set the action for column 5.3 to Container.
4Action
Action
Notice how the previous ambiguity in 2.3 has turned a lighter shade of pink. A tool tip also indicates that 2.3 has been modified.
1
Action
Set the action for column 2.4 to Container and continue ambiguity checking by clicking
2Action
Basic Tutorial for TIBCO iProcess Decisions Studio – Rule Modeling
Page 41
Resolve the Ambiguities – Step 3
Analyze
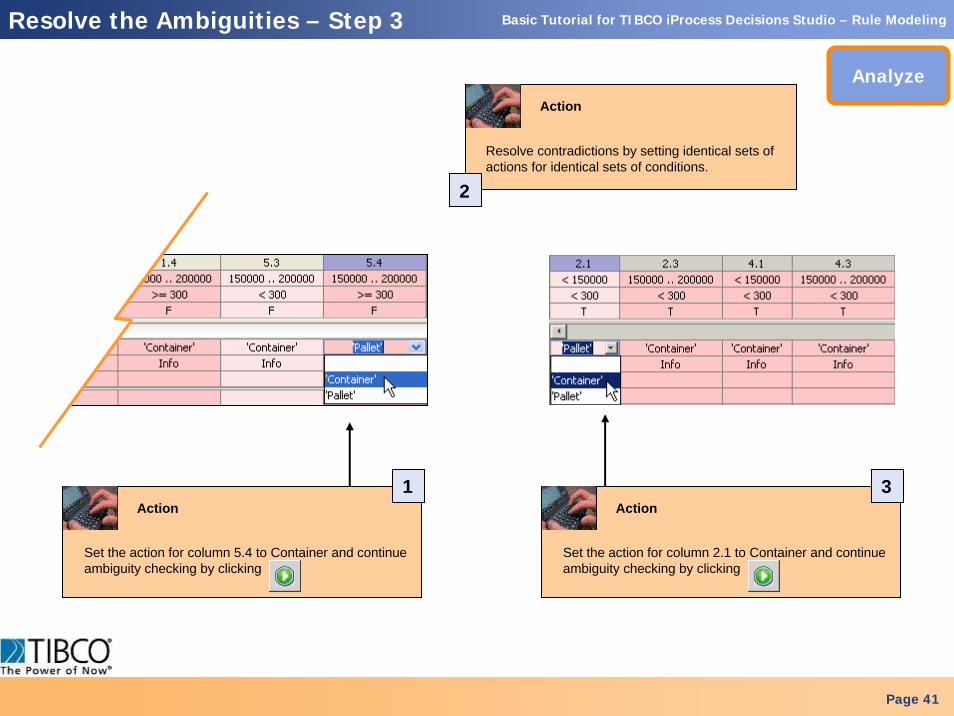
Set the action for column 5.4 to Container and continue ambiguity checking by clicking
1
Resolve contradictions by setting identical sets of actions for identical sets of conditions.
2
Set the action for column 2.1 to Container and continue ambiguity checking by clicking
Action Action
Action
3
Basic Tutorial for TIBCO iProcess Decisions Studio – Rule Modeling
Page 42
Resolve the Ambiguities – Step 4
Analyze
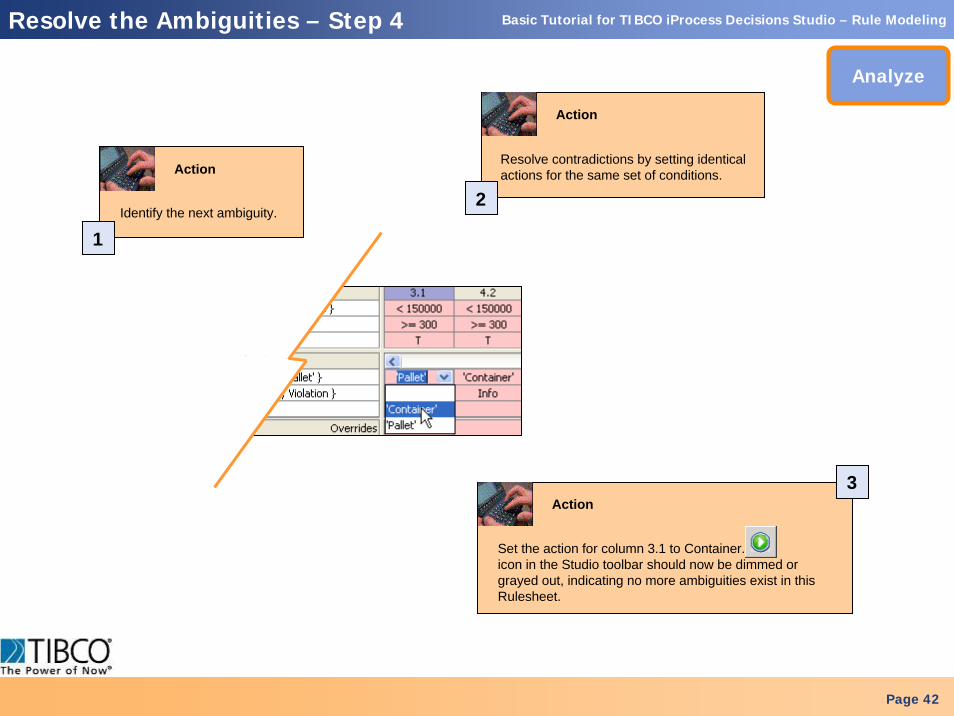
Identify the next ambiguity.
1
Set the action for column 3.1 to Container. The icon in the Studio toolbar should now be dimmed or grayed out, indicating no more ambiguities exist in this Rulesheet.
Resolve contradictions by setting identical actions for the same set of conditions.
2
3Action
Action
Action
Basic Tutorial for TIBCO iProcess Decisions Studio – Rule Modeling
Page 43
Collapse the Rules – Step 1
Analyze
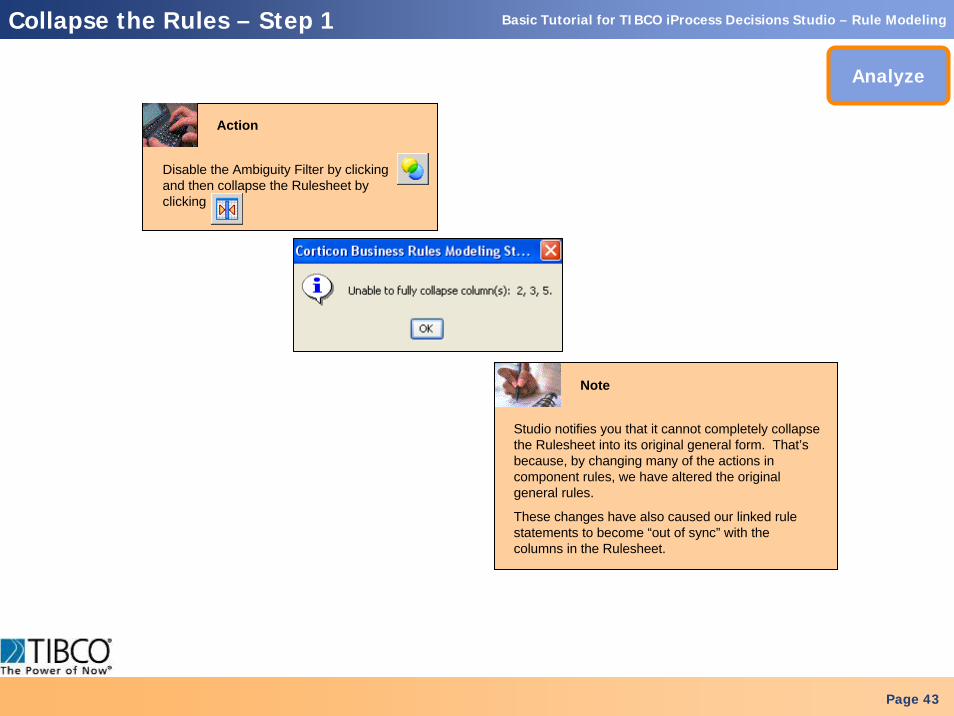
Disable the Ambiguity Filter by clicking and then collapse the Rulesheet by clicking
Studio notifies you that it cannot completely collapse the Rulesheet into its original general form. That’s because, by changing many of the actions in component rules, we have altered the original general rules.
These changes have also caused our linked rule statements to become “out of sync” with the columns in the Rulesheet.
Note
Action
Basic Tutorial for TIBCO iProcess Decisions Studio – Rule Modeling
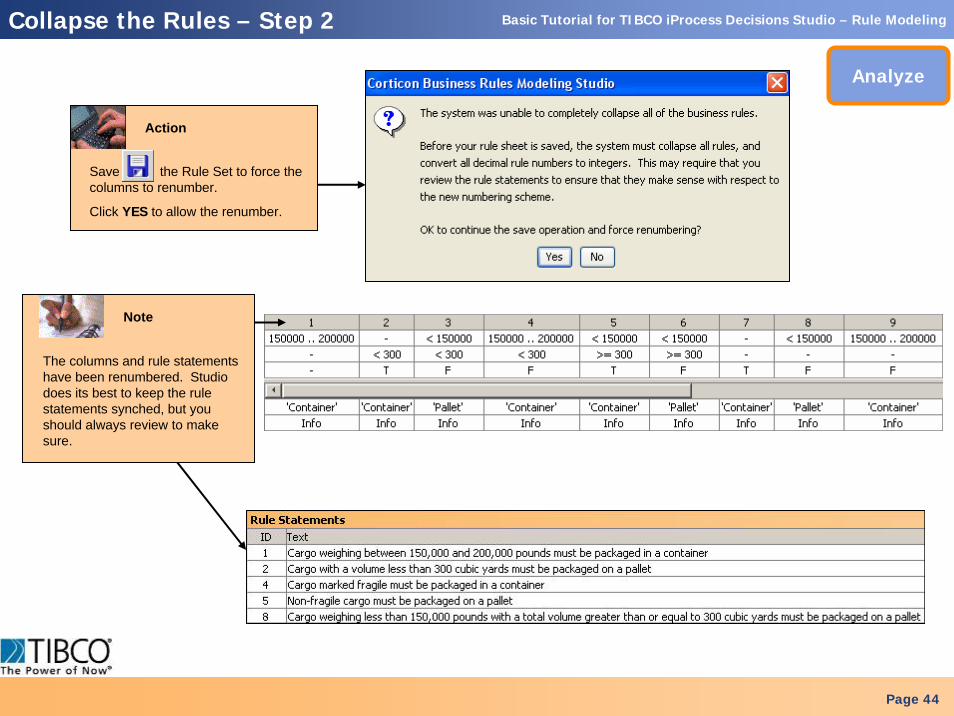
Save the Rule Set to force the columns to renumber.
Click YES to allow the renumber.
Page 44
Analyze
Collapse the Rules – Step 2
The columns and rule statements have been renumbered. Studio does its best to keep the rule statements synched, but you should always review to make sure.
Note
Action

Basic Tutorial for TIBCO iProcess Decisions Studio – Rule Modeling
Page 45
Compress the Rulesheet – Step 1
Analyze
These 9 rules have redundancies – look at columns 1 and 9, for example. Other redundancies are harder to detect because they consist of redundant sub-rules, which are hidden when the columns are collapsed.
Compress the Rulesheet to remove redundancies. Click OKwhen this window displays:
Note
Action
Basic Tutorial for TIBCO iProcess Decisions Studio – Rule Modeling
Page 46
Compress the Rulesheet – Step 2
Analyze
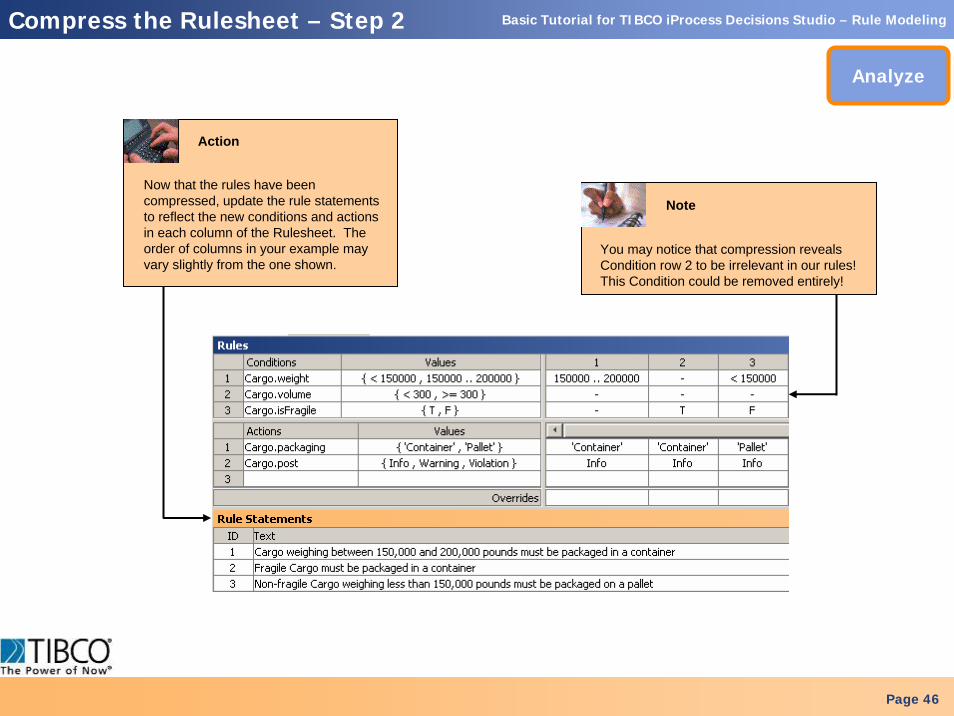
Now that the rules have been compressed, update the rule statements to reflect the new conditions and actions in each column of the Rulesheet. The order of columns in your example may vary slightly from the one shown.
Action
You may notice that compression reveals Condition row 2 to be irrelevant in our rules! This Condition could be removed entirely!
Note
Basic Tutorial for TIBCO iProcess Decisions Studio – Rule Modeling
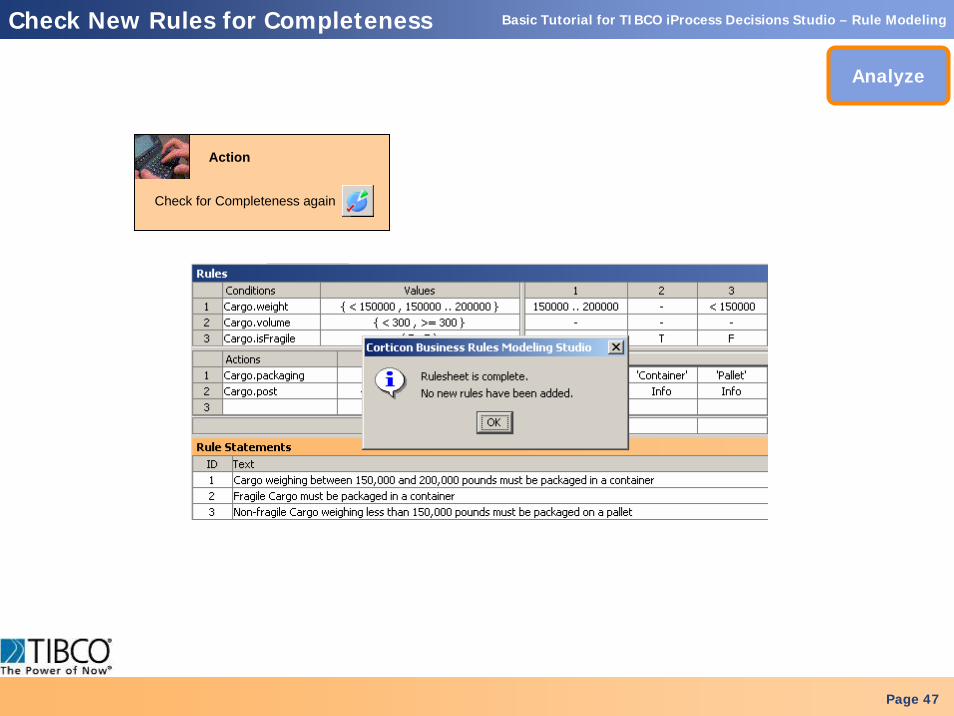
Check for Completeness again
Page 47
Check New Rules for Completeness
Analyze
Action
Basic Tutorial for TIBCO iProcess Decisions Studio – Rule Modeling
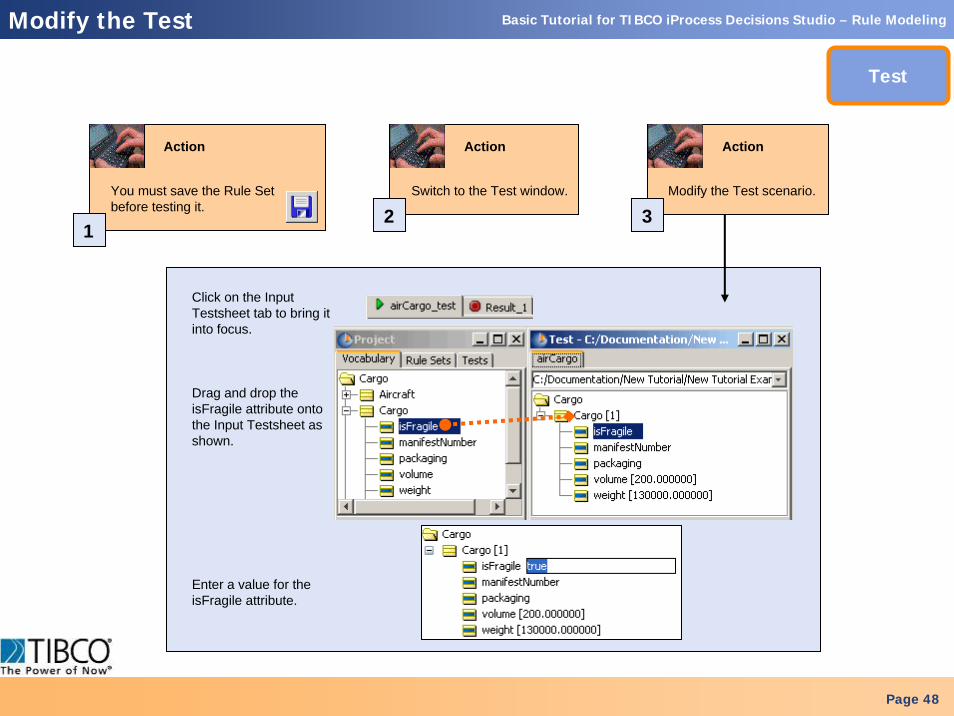
Click on the Input Testsheet tab to bring it into focus.
Enter a value for the isFragile attribute.
Drag and drop the isFragile attribute onto the Input Testsheet as shown.
Page 48
Modify the Test
Action
Test
Modify the Test scenario.
3
Action
Switch to the Test window.
2
Action
You must save the Rule Set before testing it.
1
Action
Basic Tutorial for TIBCO iProcess Decisions Studio – Rule Modeling
Page 49
Modify the Test
Test
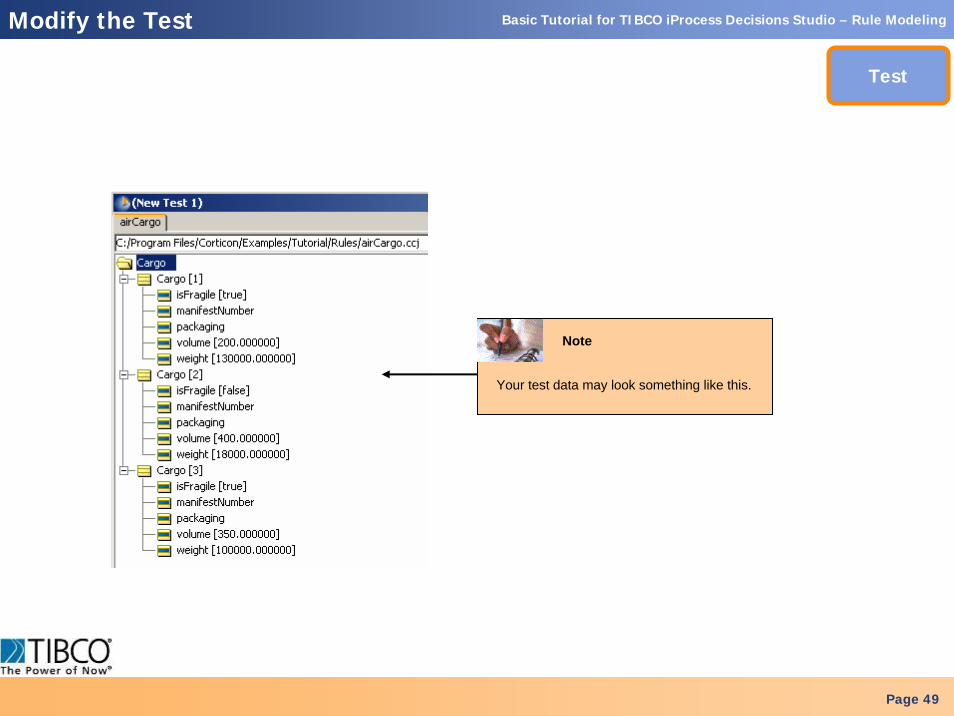
Your test data may look something like this.
Note
Basic Tutorial for TIBCO iProcess Decisions Studio – Rule Modeling
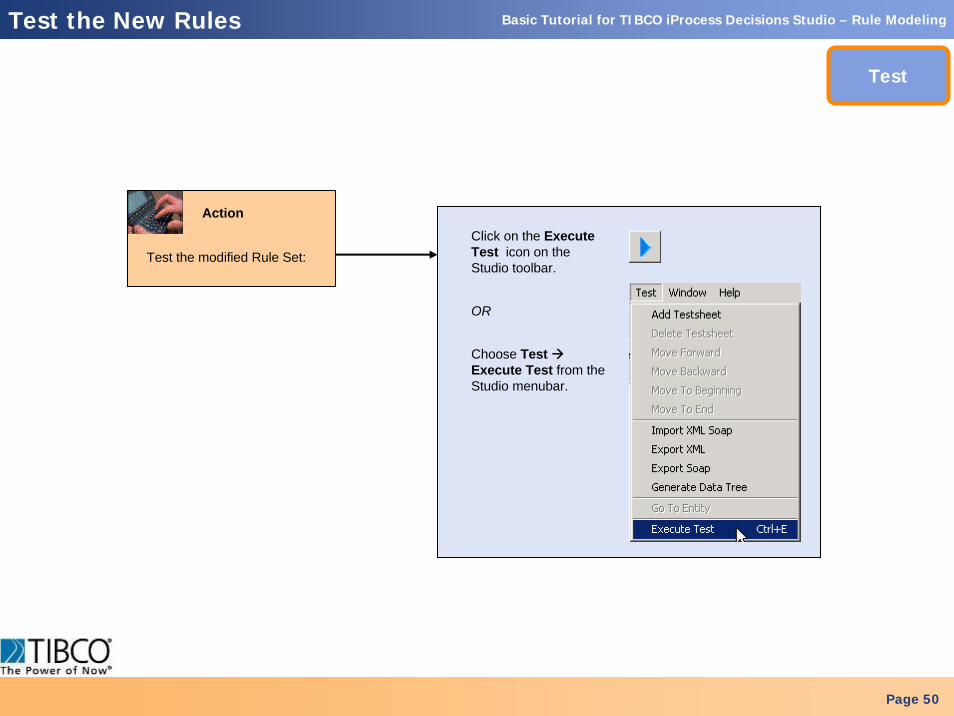
Test the modified Rule Set:
OR
Click on the Execute Test icon on the Studio toolbar.
Choose Test Execute Test from the Studio menubar.
Page 50
Test the New Rules
Test
Action
Basic Tutorial for TIBCO iProcess Decisions Studio – Rule Modeling
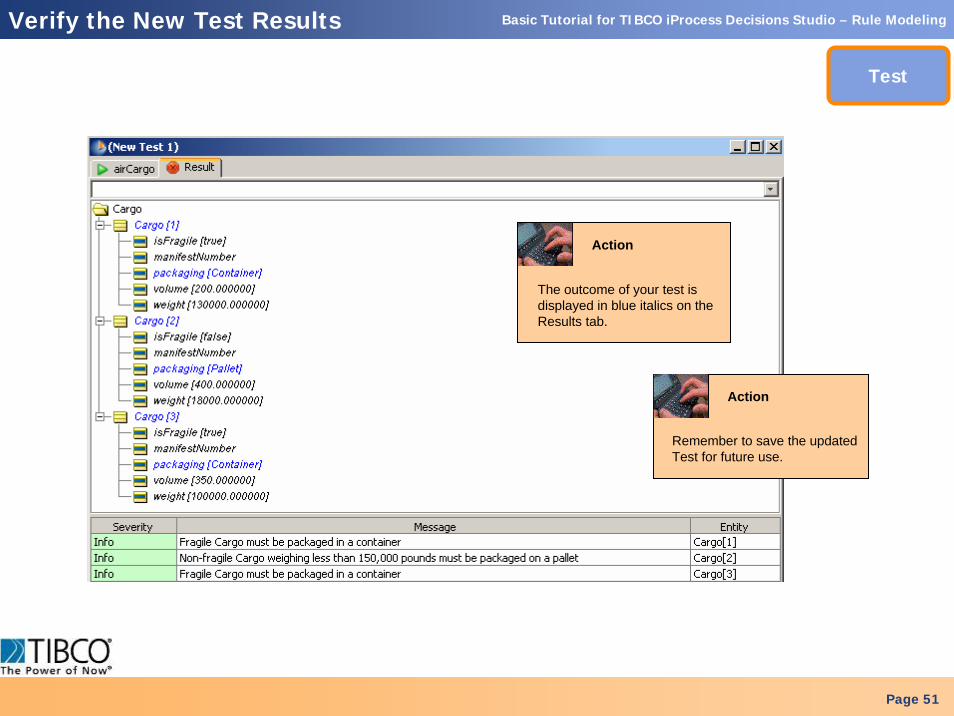
The outcome of your test is displayed in blue italics on the Results tab.
Page 51
Verify the New Test Results
Test
Action
Remember to save the updated Test for future use.
Action
Basic Tutorial for TIBCO iProcess Decisions Studio – Rule Modeling
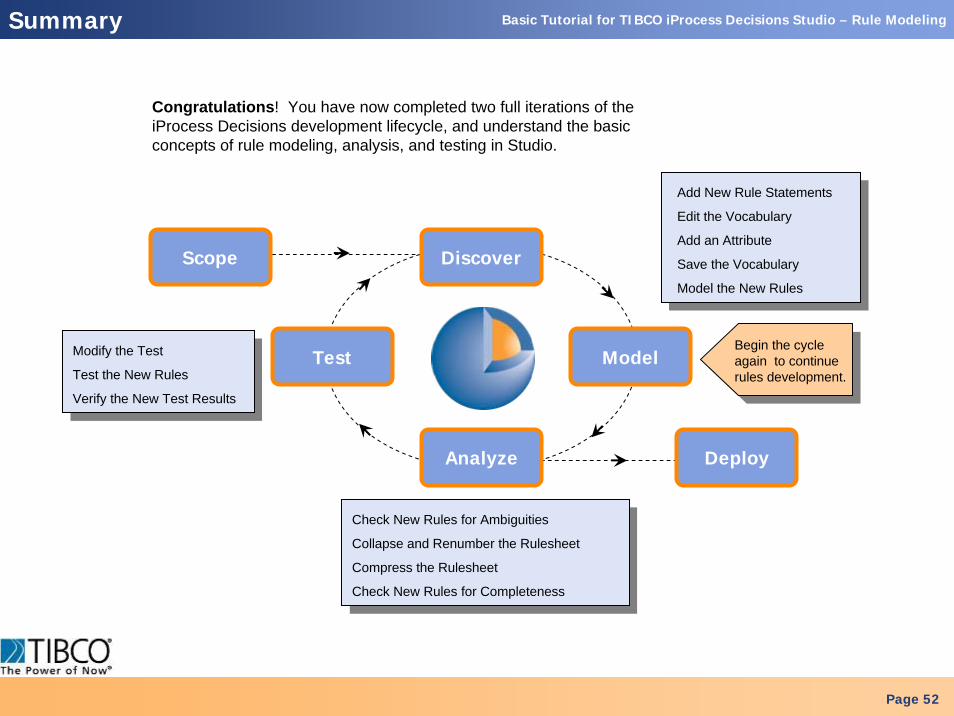
Check New Rules for Ambiguities
Collapse and Renumber the Rulesheet
Compress the Rulesheet
Check New Rules for Completeness
Check New Rules for Ambiguities
Collapse and Renumber the Rulesheet
Compress the Rulesheet
Check New Rules for Completeness
Modify the Test
Test the New Rules
Verify the New Test Results
Modify the Test
Test the New Rules
Verify the New Test Results
Add New Rule Statements
Edit the Vocabulary
Add an Attribute
Save the Vocabulary
Model the New Rules
Add New Rule Statements
Edit the Vocabulary
Add an Attribute
Save the Vocabulary
Model the New Rules
Begin the cycle again to continue rules development.
Page 52
Summary
ModelTest
Scope Discover
DeployAnalyze
Congratulations! You have now completed two full iterations of the iProcess Decisions development lifecycle, and understand the basic concepts of rule modeling, analysis, and testing in Studio.
Basic Tutorial for TIBCO iProcess Decisions Studio – Rule Modeling
Page 53
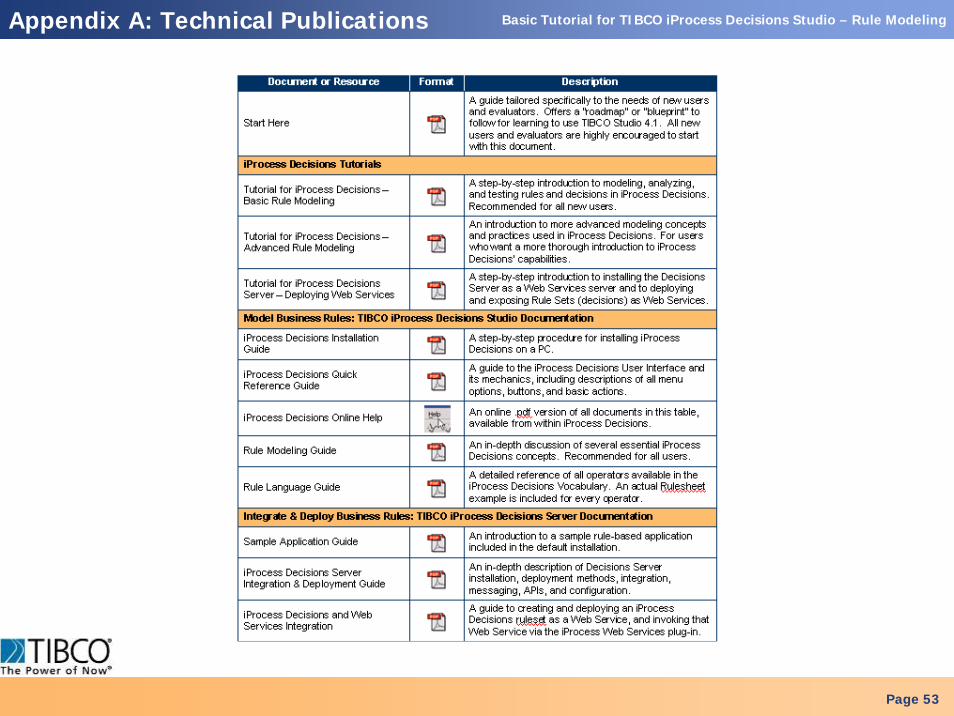
Appendix A: Technical Publications