Embed Size (px)
Citation preview
Basic Principles of the Eddy Current
Inspection Technique
Presentation to the 2014 Feedwater System Reliability User Group Workshop
January 20-23, 2014
Presented By: Steven SchaeferAuthored By: Steven Schaefer & C. Dan Spake

2
INTRODUCTION
• What is the Eddy Current Technique?• The interaction of an electromagnetic field generated by an AC current running
through a coil and induced into a conductive material
• What affects the eddy currents to cause signals?• The eddy current are disrupted by changes of material conductivity, permeability
and dimensional variations.
• How are damage and non-damage signals differentiated?• The signal response is compared to known defects in the calibration standard(s)
which provide different characteristics
• How is depth of damage estimated?• The known defects are used to create correlation curves to compare with the
responses identified during analysis
• The signal’s phase angle and/or amplitude is plotted along the data correlation curves

3
INTRODUCTION
• How are damage types of differentiated?• Tubing material
• Location along the tube and/or in the heat exchanger
• Fluid type inside & outside of the tubes
• Flow rates – high, low, stagnant
• Energy source – flow induced vibration or erosion
• Contaminants – chemical, sand, silts, debris, clams, mud, foreign material
• How is eddy current inspection applied to HX tubes?• Sample size – could be schedule or cost driven
• Historical information for trending or baseline documentation
• Known or suspected leak(s)
• Condition assessment or life extension analysis
4
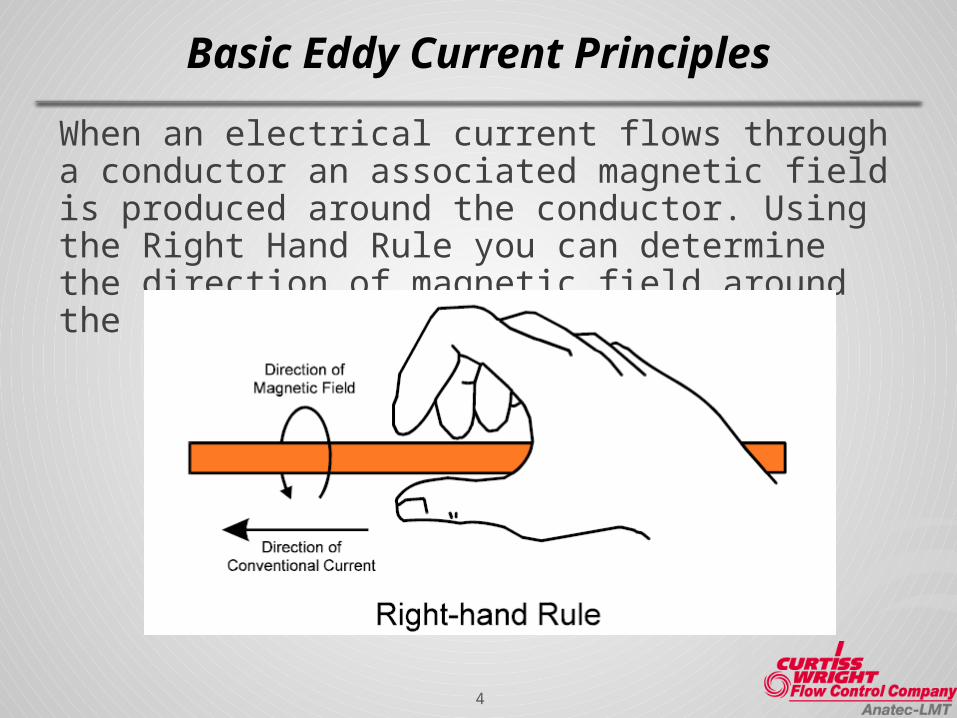
Basic Eddy Current Principles
When an electrical current flows through a conductor an associated magnetic field is produced around the conductor. Using the Right Hand Rule you can determine the direction of magnetic field around the conductor.
5
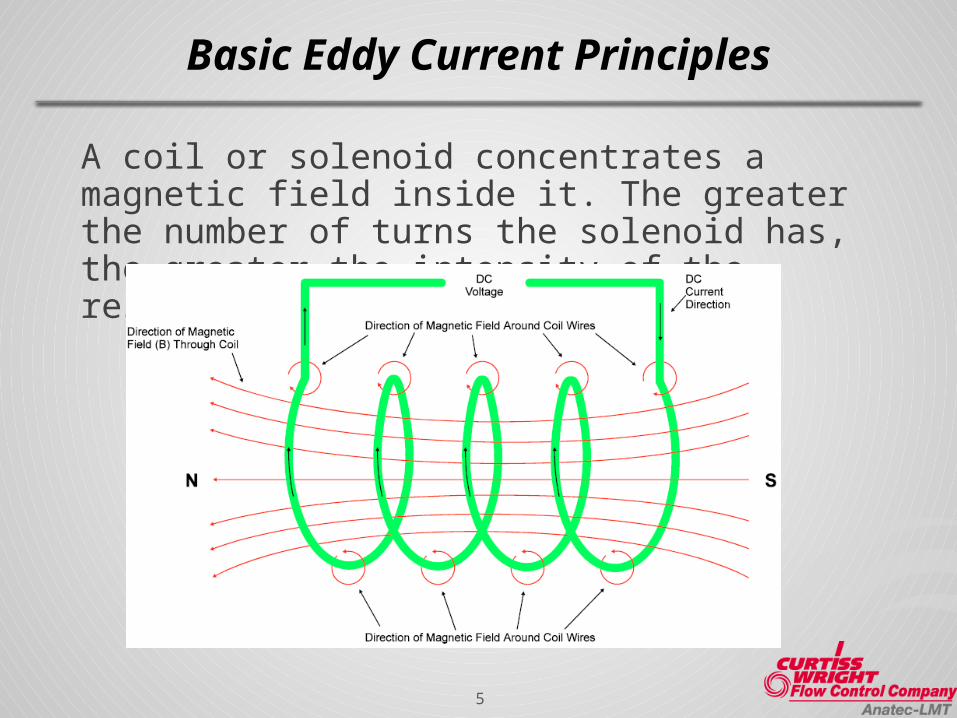
Basic Eddy Current Principles
A coil or solenoid concentrates a magnetic field inside it. The greater the number of turns the solenoid has, the greater the intensity of the resulting magnetic field.

6
Basic Eddy Current Principles
We discussed a magnetic field is produced when a current flows through a conductor or coil. If we apply an AC current to coil #1 a changing magnetic field will be produced. This changing magnetic field has the ability to induce voltage into other conductors or coils within it’s field. This current flow in coil #2 produces its own magnetic field that induces a voltage in coil #1. Since the magnetic field created by the current in either coil can induce a voltage into the other, they are said to have mutual inductance.

7
Basic Eddy Current Principles
Now, let’s replace the second coil with a conductive test specimen. When the specimen is placed near the coil so that the alternating magnetic field intersects it, a current is induced in the specimen by mutual inductance. The eddy currents induced in the specimen also produce their own alternating magnetic field which opposes the field of the coil. The eddy currents magnetic fields likewise induce a current in the coil. If the path of the eddy currents are disrupted by a physical flaw in the specimen, the eddy current magnetic fields also change inducing a change in the coil. The eddy current technique uses the effect of electromagnetism and induction to characterize physical properties of a conductive material under test.
8
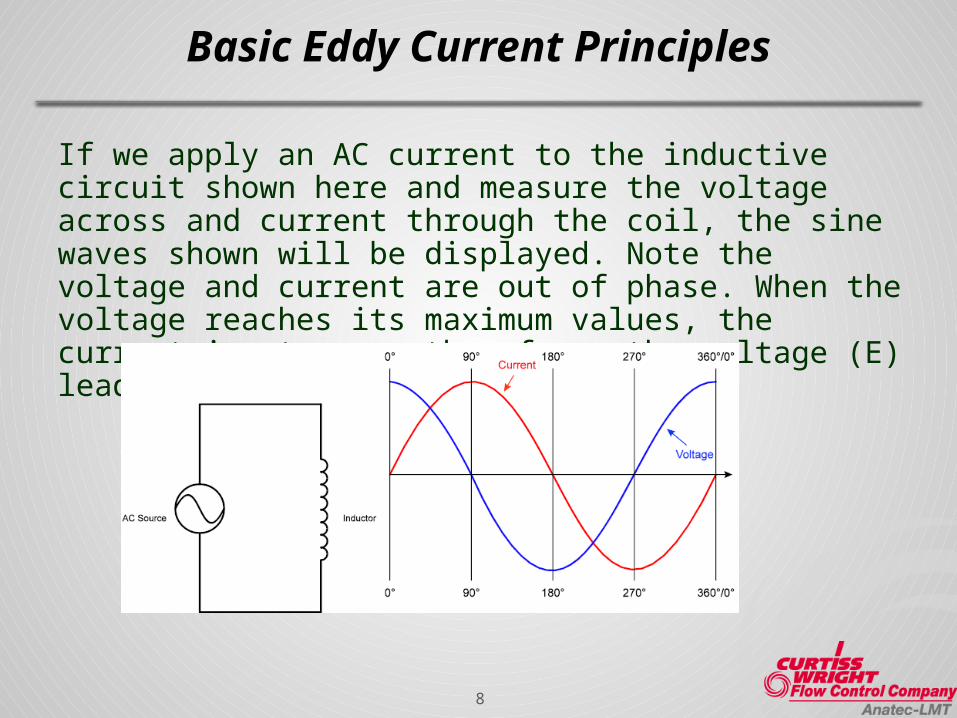
Basic Eddy Current Principles
If we apply an AC current to the inductive circuit shown here and measure the voltage across and current through the coil, the sine waves shown will be displayed. Note the voltage and current are out of phase. When the voltage reaches its maximum values, the current is at zero; therefore, the voltage (E) leads the current (I) by 90°.

9
Basic Eddy Current Principles
It is impossible to design a purely inductive circuit because resistance is always present, even in the wire itself. Resistance must be considered when we discuss total opposition to current flow in an AC circuit. If we measure the AC voltage across and the current through the resistor in the circuit below, the sine waves are similar to the ones shown here would be similar. The voltage and current are exactly in phase with each other through a resistor as there is no inductive effect.

10
Basic Eddy Current Principles
This illustration shown indicates that a coil offers opposition to the flow of AC current due to inductive reactance (XL) and resistance (R). The inductive reactance is a function of the applied AC frequency and the coil’s inductance while the wire that makes up the coil offers opposition to current flow just like resistance in a simple DC circuit. Together, resistance and inductive reactance offer a total opposition to AC current flow in a coil. This opposition to AC current flow in a coil is called impedance (Z). The total impedance of an AC current is the sum of the inductive reactance and resistance.

11
Basic Eddy Current Principles
Fundamental Principles of eddy current testing can be stated as follows:• An inspection coil powered by AC current is placed
on or near a conductive test specimen inducing the primary magnetic field into the specimen.
• Small circulating electrical currents are induced in the specimen.
• These eddy currents produce a secondary magnetic field that opposes the primary magnetic field.
• The secondary magnetic field causes a change in the primary magnetic field.
• These changes in the primary magnetizing field cause a change in the impedance of the coil.
• This change in impedance can be detected and displayed by the eddy current instrument.

12
Basic Eddy Current Principles
An inside –coil or bobbin coil consists of several turns of wire wrapped around a cylindrical form. This probe type is passed through the inside diameter of the test specimen such as tubes or bores. The bobbin coil’s axis is parallel to the longitudinal axis of the test object; therefore the coils magnetic field is also parallel to the coils axis. The magnetic field induces eddy currents that flow parallel to the coils windings.

13
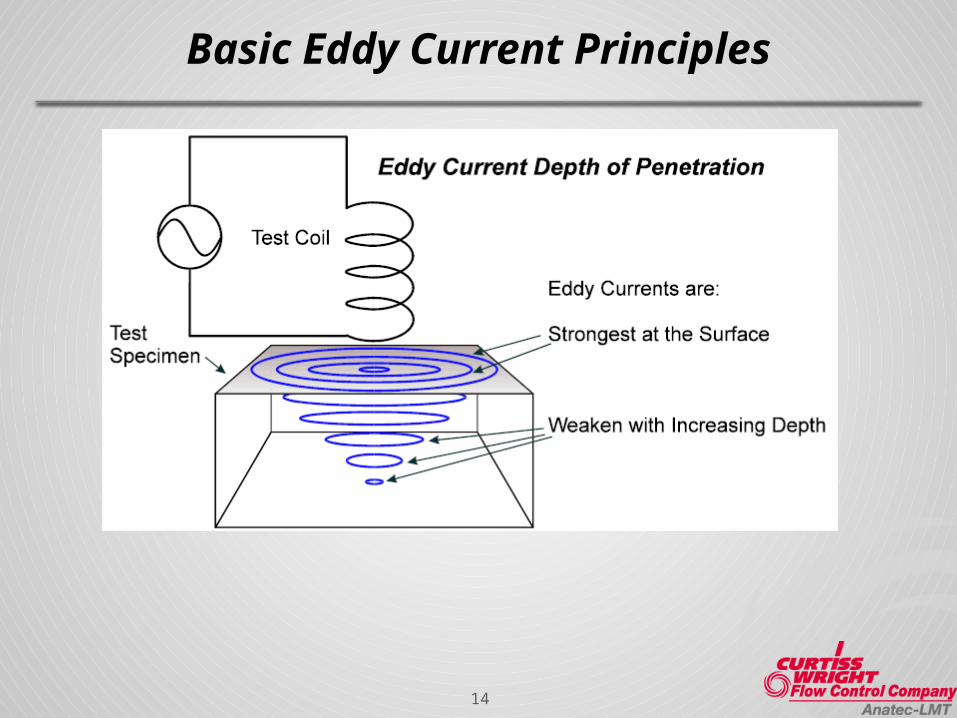
Basic Eddy Current Principles
The distance that eddy currents penetrates into the material is called the depth of penetration. The depth where the eddy current density is equal to 37% of the density at the surface is referred to as standard depth of penetration. When the conductivity of a material is known, the following equation can be used to determine the standard depth of penetration.
14
Basic Eddy Current Principles
15
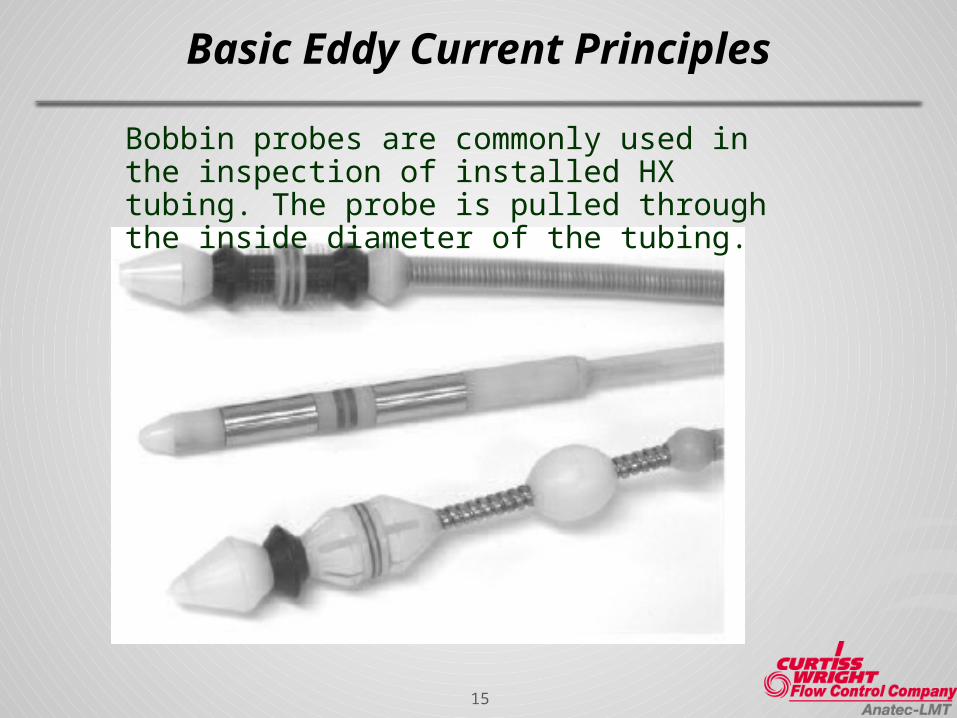
Basic Eddy Current Principles
Bobbin probes are commonly used in the inspection of installed HX tubing. The probe is pulled through the inside diameter of the tubing.

16
Basic Eddy Current Principles
Typical ASME / Combo Calibration Standard
17
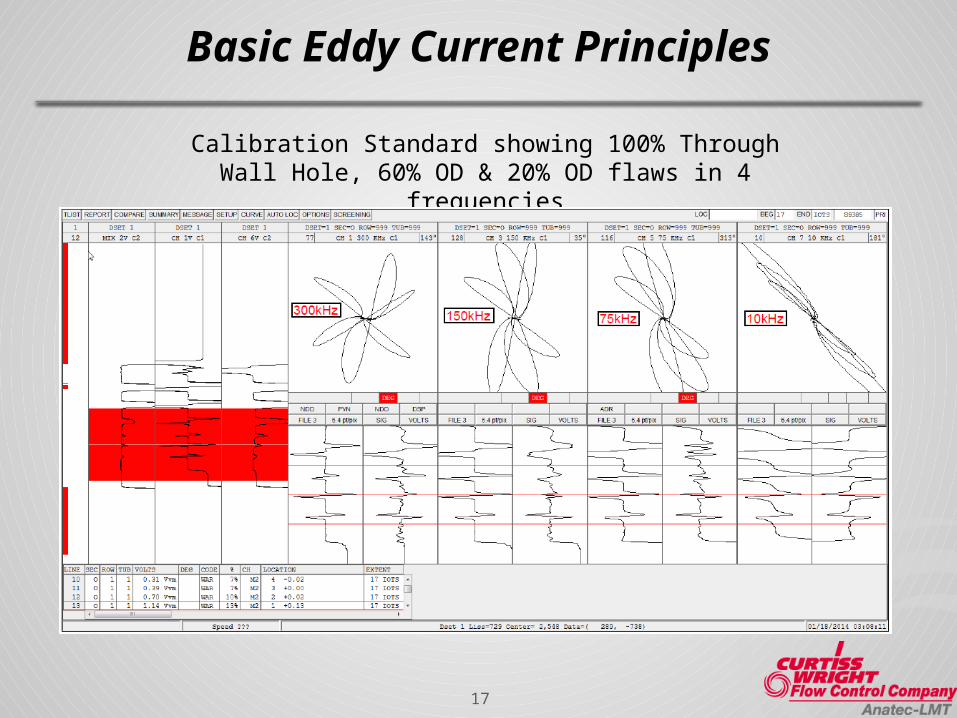
Basic Eddy Current Principles
Calibration Standard showing 100% Through Wall Hole, 60% OD & 20% OD flaws in 4 frequencies
18
Basic Eddy Current Principles
300kHz 150kHz 75kHz
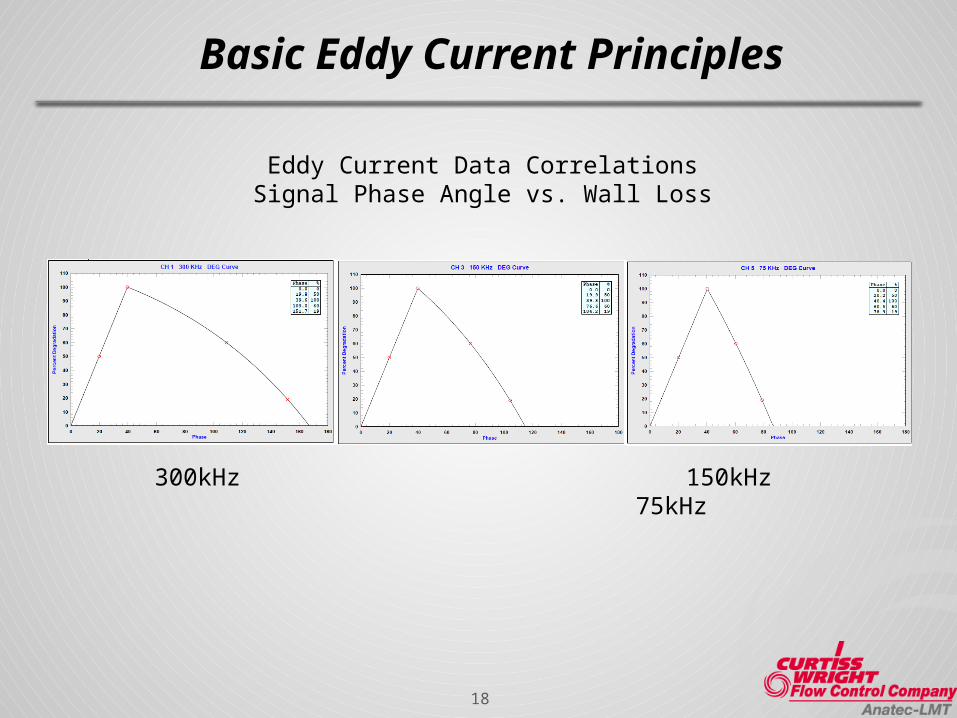
Eddy Current Data CorrelationsSignal Phase Angle vs. Wall Loss
19
Basic Eddy Current Principles
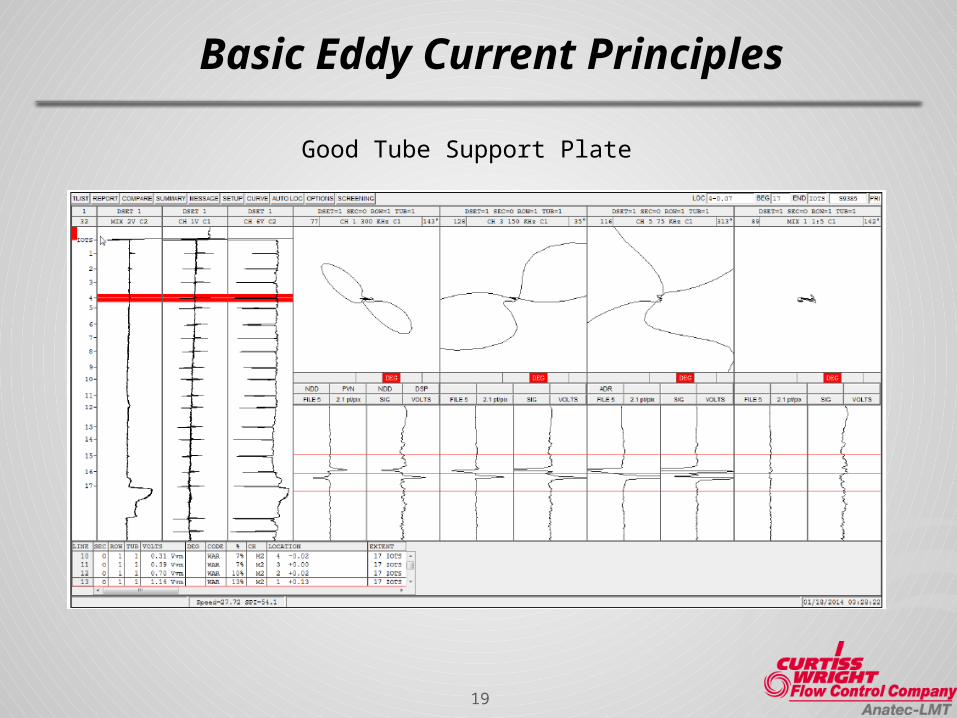
Good Tube Support Plate
20
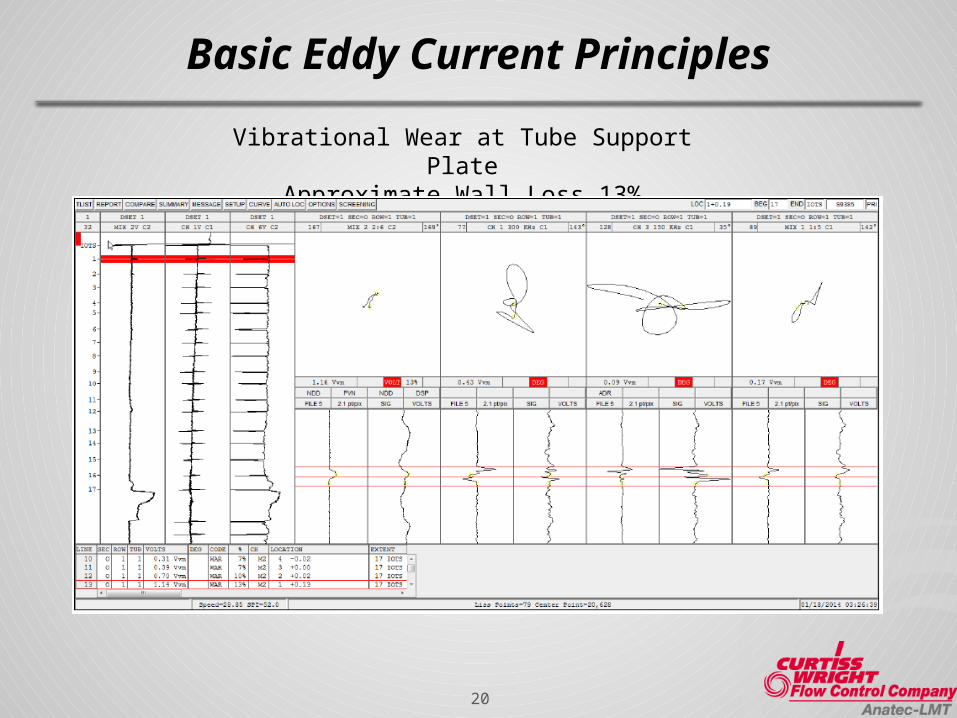
Basic Eddy Current Principles
Vibrational Wear at Tube Support PlateApproximate Wall Loss 13%
21
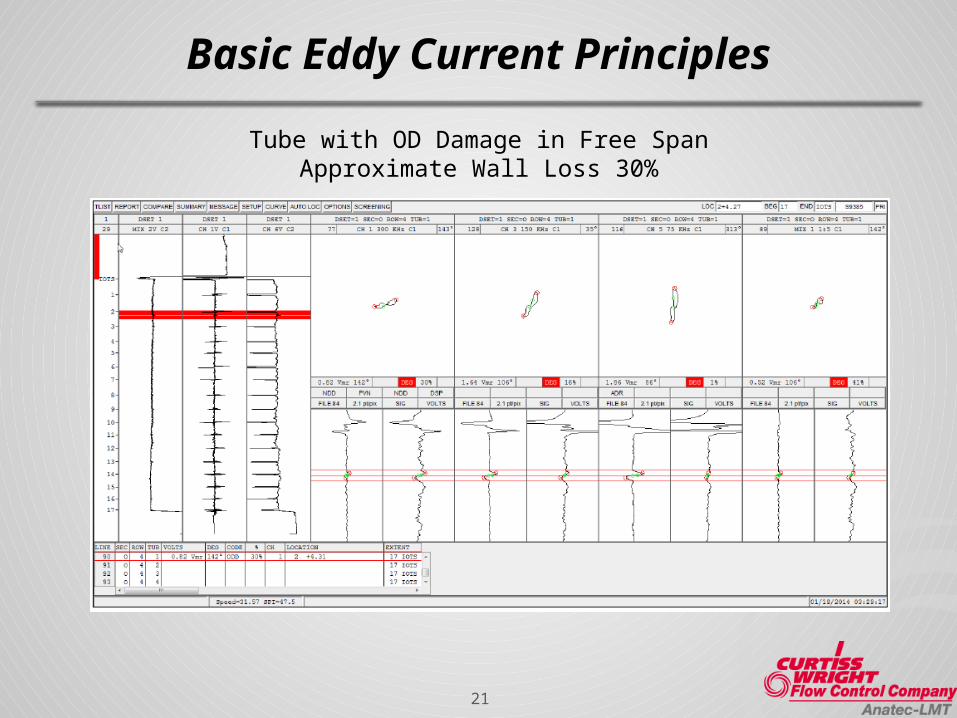
Basic Eddy Current Principles
Tube with OD Damage in Free SpanApproximate Wall Loss 30%

22
Basic Eddy Current Principles
Tube with OD Damage in Free SpanApproximate Wall Loss 86%

23
Basic Eddy Current Principles
Tube with Micro-Biological Induced Pits (MIC)Approximate Wall Loss 100%
24
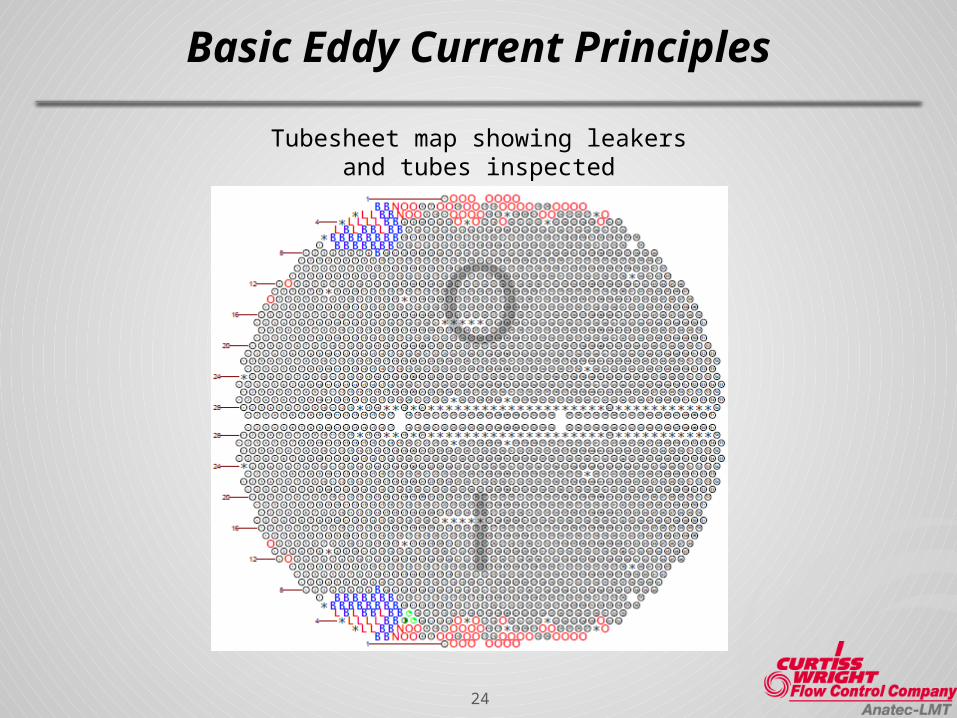
Basic Eddy Current Principles
Tubesheet map showing leakers and tubes inspected
25
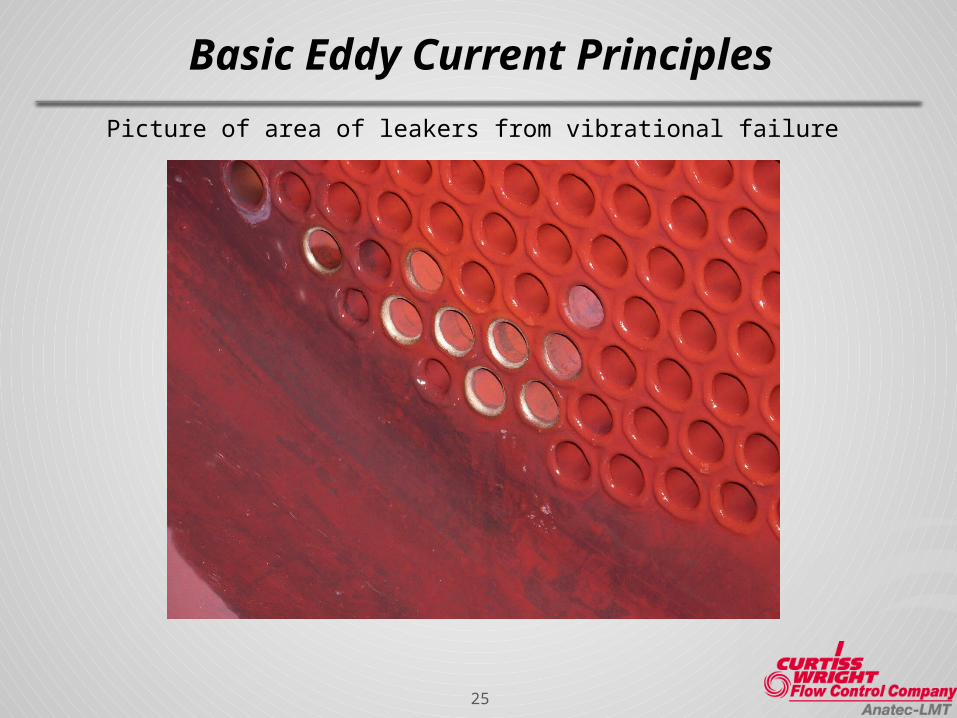
Basic Eddy Current Principles
Picture of area of leakers from vibrational failure
26
Basic Eddy Current Principles
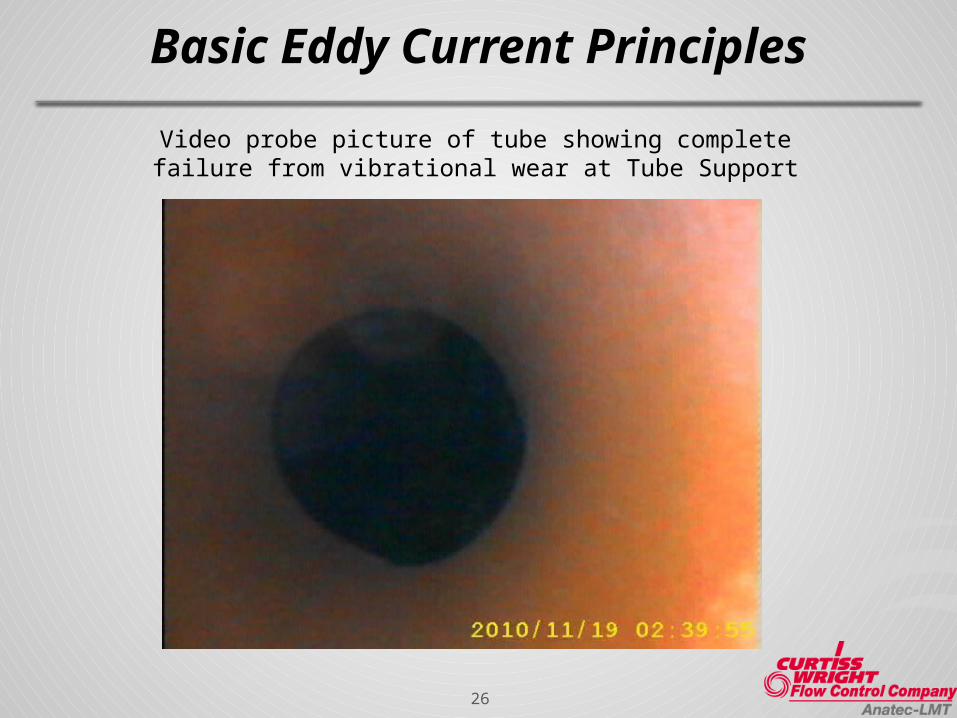
Video probe picture of tube showing complete failure from vibrational wear at Tube Support

27
Basic Eddy Current Principles
Drawing of FWH TSP spacing showing are of failures between 15 & 19 feet from tubesheet.
28
Basic Eddy Current Principles
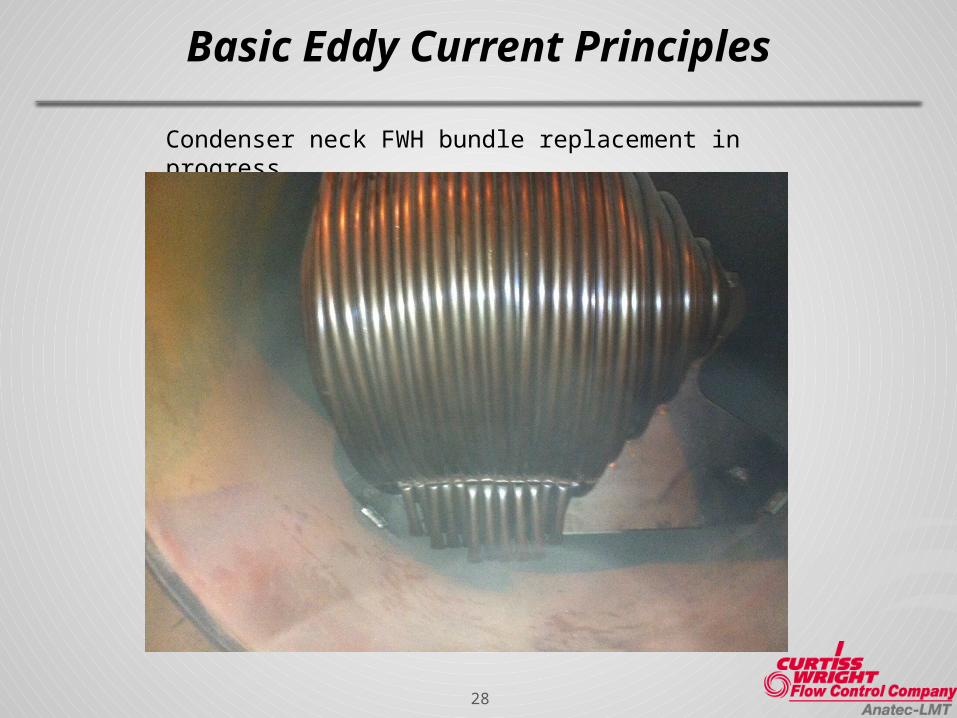
Condenser neck FWH bundle replacement in progress
29
Basic Eddy Current Principles
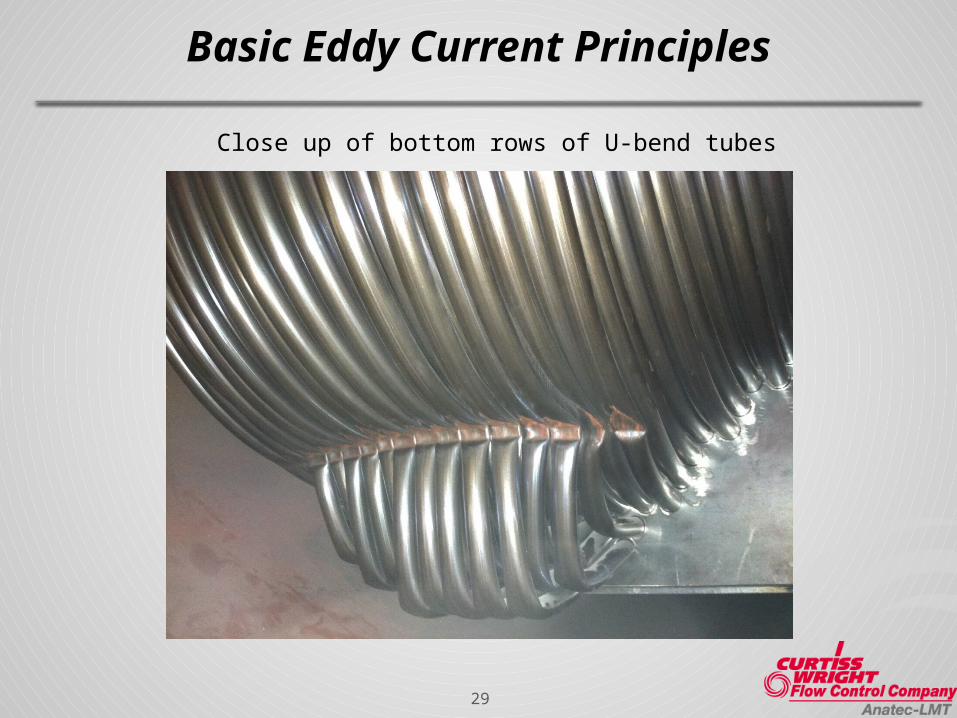
Close up of bottom rows of U-bend tubes

30
Basic Eddy Current Principles
Scrap bin a couple days later

31
Basic Eddy Current Principles
Showing U-bend end with approximately 8 rows removed
32
Basic Eddy Current Principles
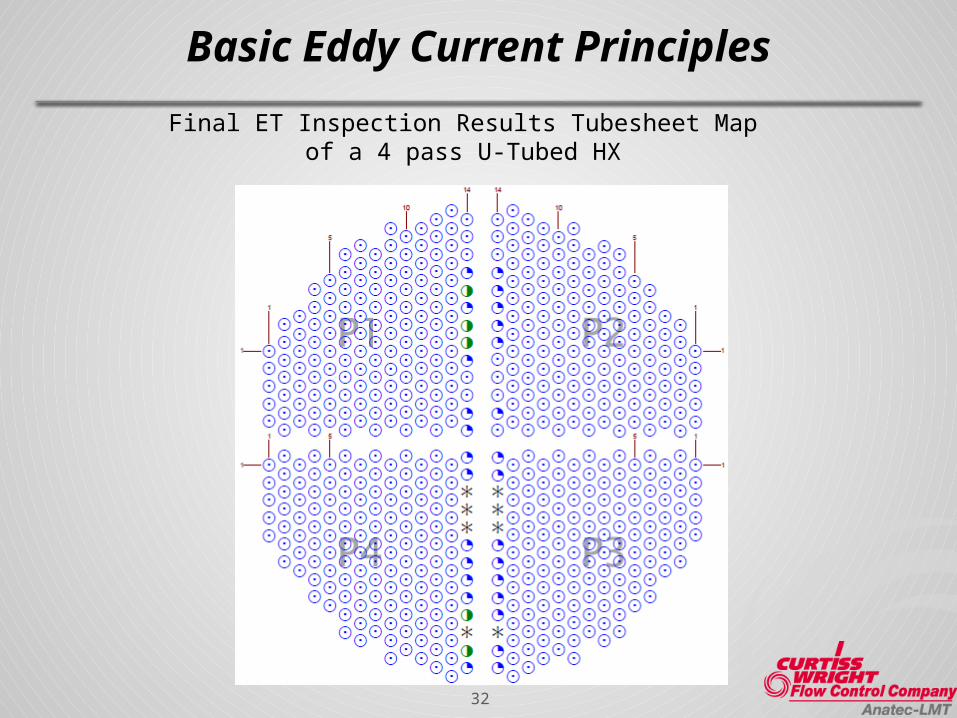
Final ET Inspection Results Tubesheet Mapof a 4 pass U-Tubed HX
33
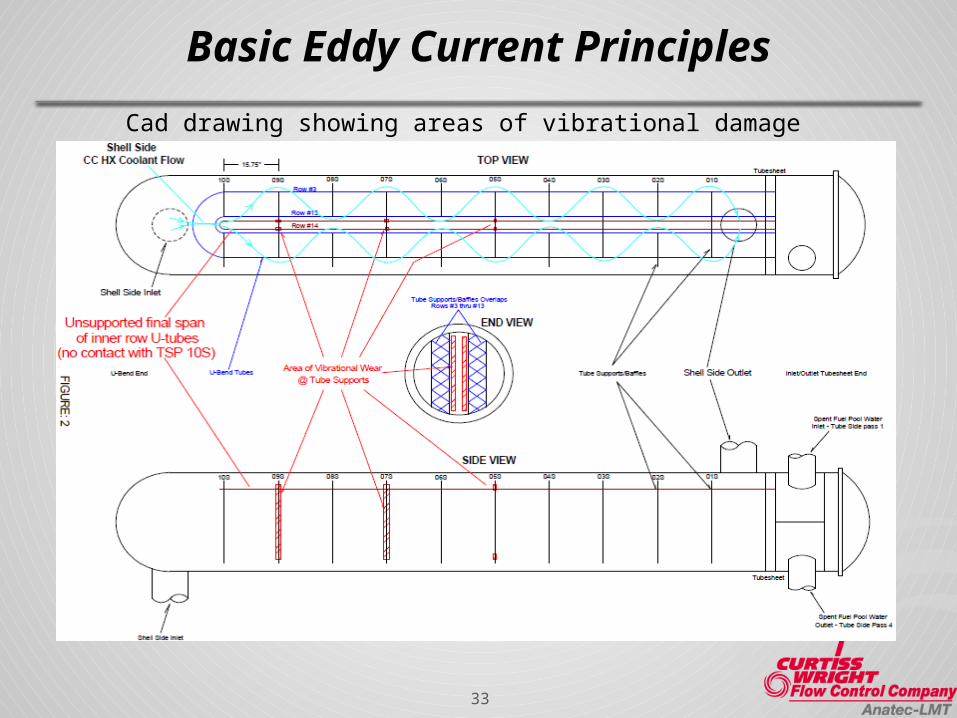
Basic Eddy Current Principles
Cad drawing showing areas of vibrational damage
34
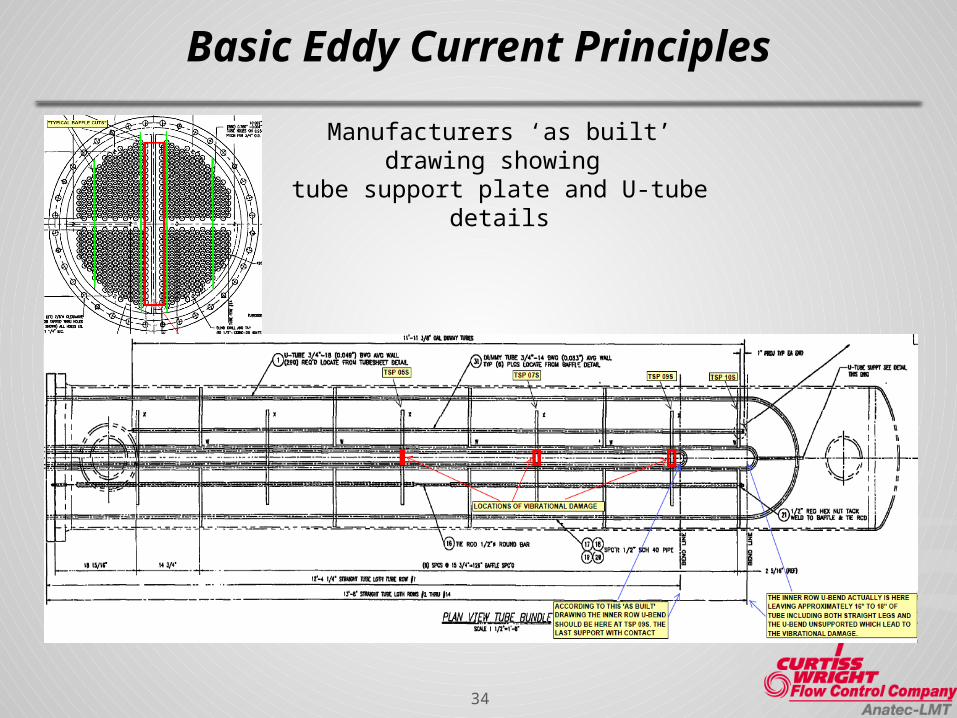
Basic Eddy Current Principles
Manufacturers ‘as built’ drawing showing tube support plate and U-tube details
35
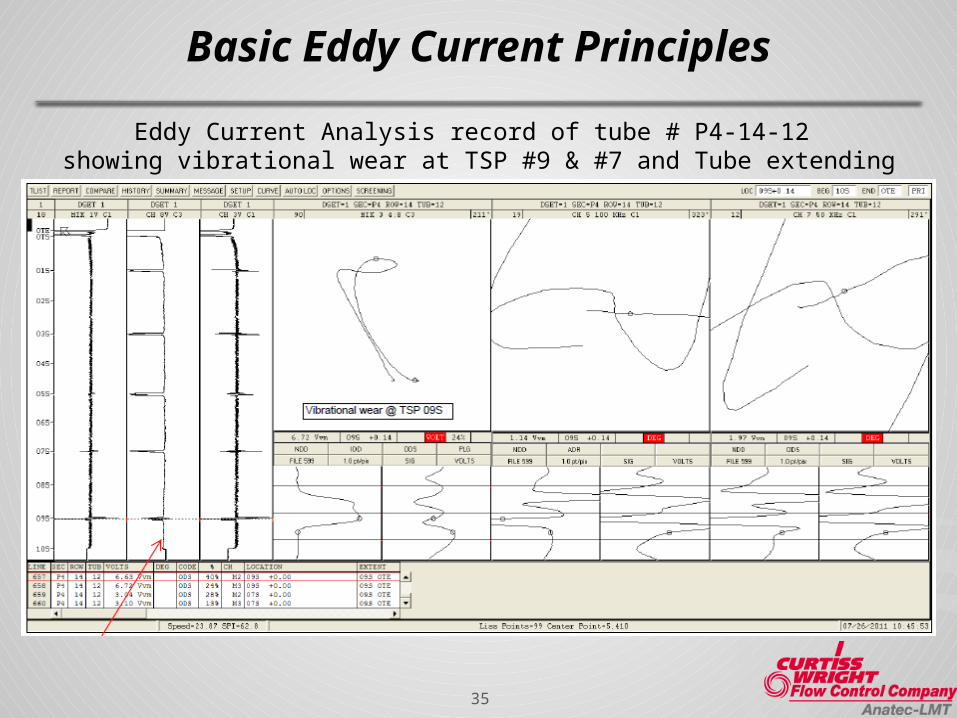
Basic Eddy Current Principles
Eddy Current Analysis record of tube # P4-14-12 showing vibrational wear at TSP #9 & #7 and Tube extending beyond TSP #9

36
Basic Eddy Current Principles
Eddy Current Analysis record of tube # P1-3-4 showing tube contact at only even numbered TSPs
37
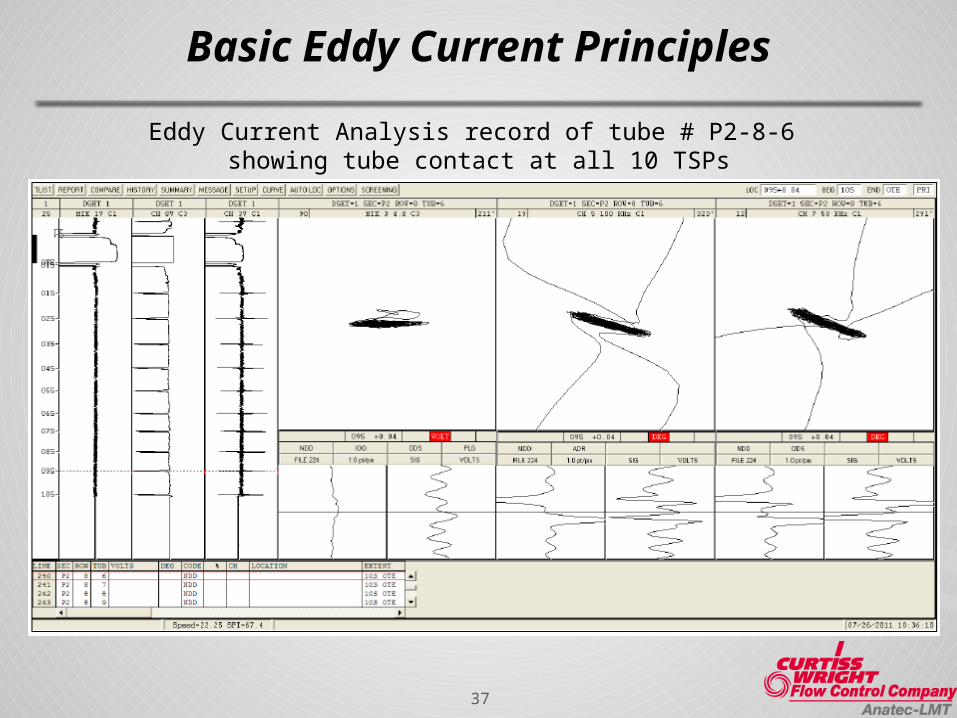
Basic Eddy Current Principles
Eddy Current Analysis record of tube # P2-8-6 showing tube contact at all 10 TSPs
38
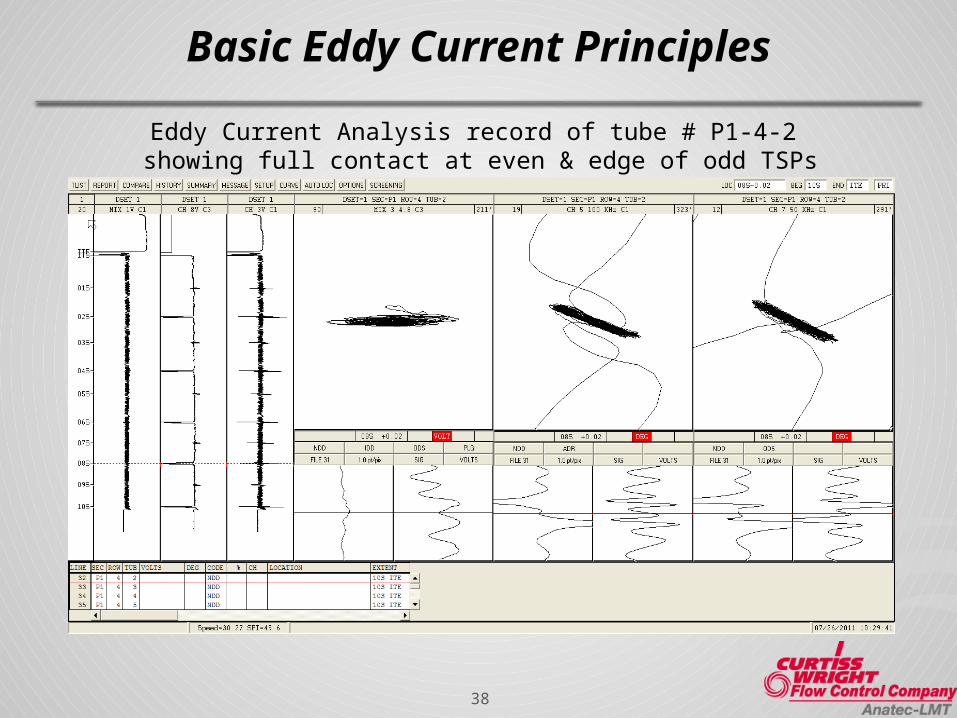
Basic Eddy Current Principles
Eddy Current Analysis record of tube # P1-4-2 showing full contact at even & edge of odd TSPs
39
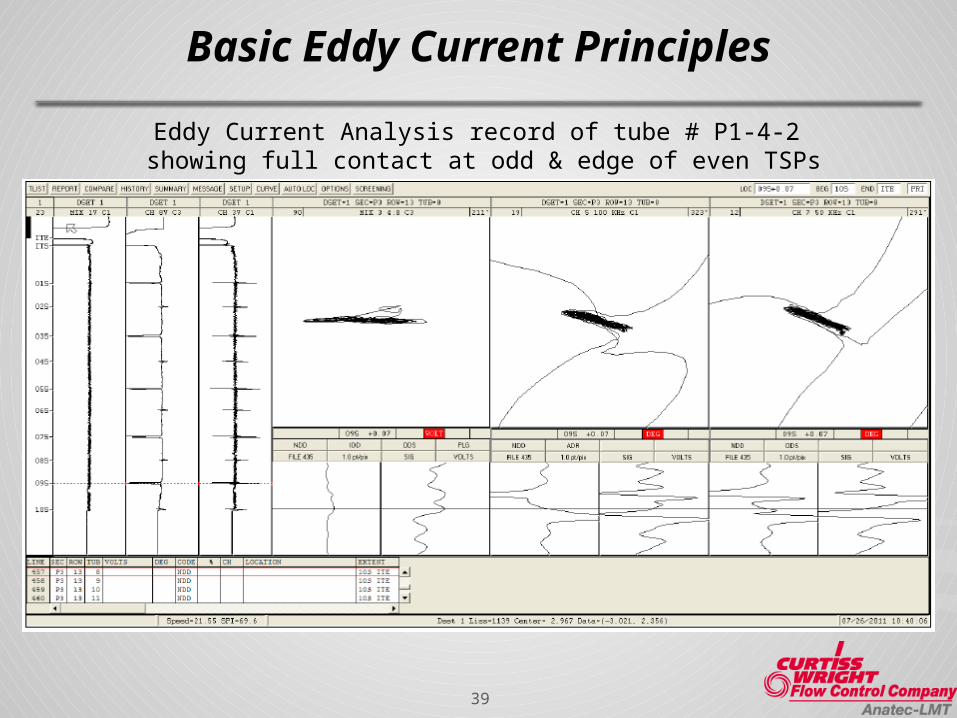
Basic Eddy Current Principles
Eddy Current Analysis record of tube # P1-4-2 showing full contact at odd & edge of even TSPs

40
SUMMARY
• What is the Eddy Current Technique?• The interaction of an electromagnetic field generated by an AC current running
through a coil and induced into a conductive material
• What affects the eddy currents to cause signals?• The eddy current are disrupted by changes of material conductivity, permeability
and dimensional variations.
• How are damage and non-damage signals differentiated?• The signal response is compared to known defects in the calibration standard(s)
which provide different characteristics
• How is depth of damage estimated?• The known defects are used to create correlation curves to compare with the
responses identified during analysis
• The signal’s phase angle and/or amplitude is plotted along the data correlation curves
41
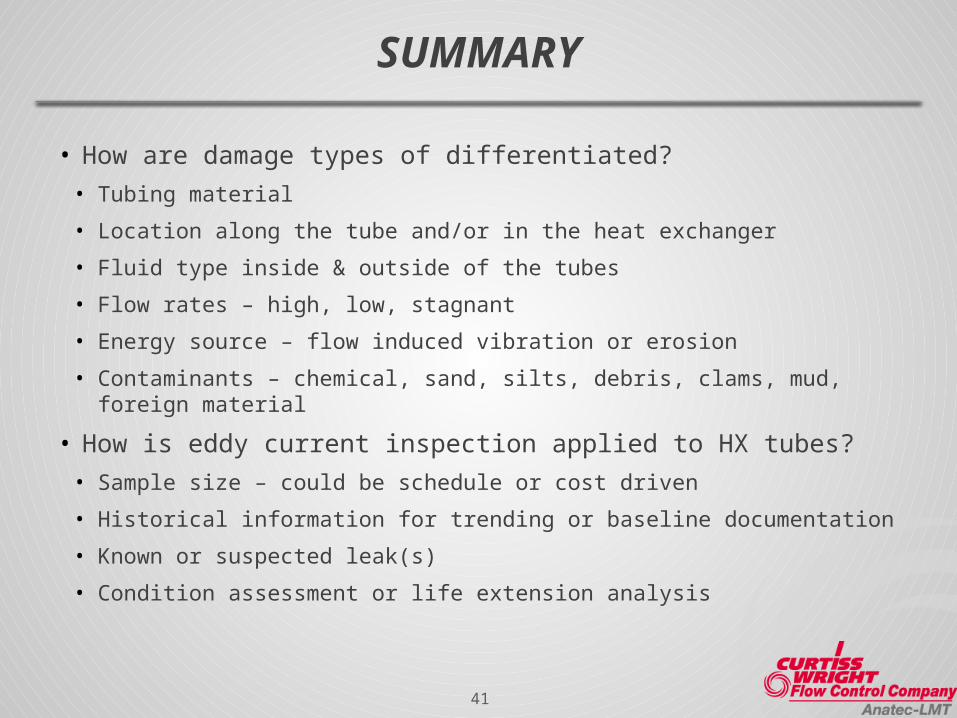
SUMMARY
• How are damage types of differentiated?• Tubing material
• Location along the tube and/or in the heat exchanger
• Fluid type inside & outside of the tubes
• Flow rates – high, low, stagnant
• Energy source – flow induced vibration or erosion
• Contaminants – chemical, sand, silts, debris, clams, mud, foreign material
• How is eddy current inspection applied to HX tubes?• Sample size – could be schedule or cost driven
• Historical information for trending or baseline documentation
• Known or suspected leak(s)
• Condition assessment or life extension analysis

Steven SchaeferManager, BOP Services
ET Level III QDA, ASNT ET IIIAnatec Division
Phone: 949-498-3350 Mobile: 860-885-4695
C. Dan SpakeProject ManagerET Level III QDAAnatec Division
Phone: 949-498-3350 Mobile: 704-477-1414
Darren HoweVice President
ET Level III QDAAnatec Division
Phone: 949-498-3350 x202Mobile: 949-300-2173
Chris J. SpeasV. P. - Business DevelopmentET Level III QDA, ASNT ET III
Anatec-LMTPhone: 949-498-3350 x302
Mobile: [email protected]
For Additional Information
42

Basic Principles of the Eddy Current
Inspection Technique
Presentation to the 2014 Feedwater System Reliability User Group Workshop
January 20-23, 2014
Presented By: Steven SchaeferAuthored By: Steven Schaefer & C. Dan Spake