Embed Size (px)
Citation preview

10/27/2016
1
BASIC PICTURE FRAMING BASIC PICTURE FRAMING
FOR PHOTOGRAPHY AND FOR PHOTOGRAPHY AND
FINE ARTFINE ART
Gary Steinfort, CPF
WHY MAT AND FRAME?
� A valued photograph or fine art should be matted and framed for all to see and protect.
� Mats have dual functions:
� Avoid Damage. They are used to create space between the photo and glass so the photo will not be ruined. A photo framed without a mat could become wrinkled or stuck to the glass.
� Aesthetic- A mat can enhance a photo and make an ordinary photo into a beautiful piece of art
10/27/2016author: Gary Steinfort
2

10/27/2016
2
�Picture Framer
� Picture Framers are: part engineer, part scientist, part museum conservator, part artist, part inventor, part carpenter
FRAMING OPTIONSFRAMING OPTIONS
� 16x20 frame/mat print, cost estimates examples:
� Normal custom frame, glass, matting$100-265 frame shop$70-125 do it yourself
� Frameless- Mat, glass, no frame$45
� Metal prints on Aluminum $80-100
� Canvas wrap $40-$100
10/27/2016author: Gary Steinfort
4

10/27/2016
3
CONSERVATION FRAMING CONSERVATION FRAMING
� What is Conservation and Archival Framing?
� Making sure that nothing potentially acidic will contact the and harm artwork.
� Limited edition prints and original art are handled a special way, by using proper mounting tapes for T-hinges or by trapping/supporting the artwork against the backing with mounting corners or mounting strips.
� Glass should not press against the Artwork
� Framing should involve NO permanent changes to the item; no trimming, folding, pressure sensitive or heat-activated glues or tapes.
� Mounting should be completely reversible at any future time, with the use of non-destructive materials and procedures.
� Art work should never be glued or dry mount to backing boards. This reduces the art valve. Low value poster can be glued to lay flat.
Acid burn damage example
CONSERVATION FRAMING CONSERVATION FRAMING
� What is Acid and What Can it Do to Your Artwork?
� Acid is a byproduct of the breakdown of wood lignin. Anything made of wood has lignin in it and is potentially acidic.
� Regular unbuffered paper mat board made of wood pulp has lignin (acid) in it. Foam board is potentially acidic.
� The frame itself is usually made of wood and is potentially acidic.
� Any brown hazy stain on the artwork under the mat is acid burn caused by the migration of acid out of the lignin. This is what conservation framing is safeguarding against.
� Today, all potentially acidic mat board is treated, making it pH neutral or buffered against acid migration.
� Conservation/Archival items
� Rag mat board verses regular paper mat board
� Acid fee backing board or acid form core board
� Archival mounting corners, strips and mounting hinge tapes
� Wood frames with tape sealed inner edges rabbet (rarely done)
� UV glass or plexiglass
Regular glass vs UV Glass

10/27/2016
4
MATTING & FRAMING MATTING & FRAMING PROCESS SUMMARYPROCESS SUMMARY
� Single Mat or Double mat?
� Choose Mat color/colors and type?
� Choose Frame style and color, could be done after matting
� Calculate mat size & borders
� Straight cut overall top mat, bottom mat, backing board
� Bevel cut top mat opening then bottom mat opening from back
� Attach/hinge photo/art to backing board
� Combine mats, photo, backing board (matted package)
� Choose Glazing (glass, Plexiglas)
� Assemble frame
� Assemble framing package-----------------------------------------------
� Mat cutting equipment
10/27/2016author: Gary Steinfort
7
MAT BOARDMAT BOARD� Mat board sizes 4ply ~1/16”
� Half sheet 32x20
� Full sheet 32x40 ($9-20) and 40x60 (oversize) limited colors
� 32”x40” = 2- 18x24 mats 4- 16x20 mats or 16- 8x10 mats
� Mat board types Brands- Crescent, Bainbridge, Artique
� Good- Paper Wood pulp Mat board buffered to a neutral pH (non-conservation) $ core may turn yellow over time
� Better- Alpha-Cellulose Mat board Acid-free and lignin-free (conservation) $$
� Best- Rag mat Cotton Mat board Acid-free (conservation) $$
� White core $ or Color core (black & other)$$
� Suede and metallic $$
10/27/2016author: Gary Steinfort
8

10/27/2016
5
MAT COLOR & MATTING DESIGNMAT COLOR & MATTING DESIGN
� Mat color selection guidelines
� Primary color scheme, primary background color
� Color of object to highlight or focus on
� Color of room
� All personal preferences
� Mat design/Layout
� Single or double matting?
� Double mat gap ¼- ½”
� Measure photo/art
� Border size. Size 1.5” to 4”. Bigger the photo the larger the border? 18% - 28% of the average [ (W+H)/2 ] dimension of the image
� Bottom weighed, extra ~1/2”?
� V-groove?
10/27/2016author: Gary Steinfort
9
BORDER BORDER SIZES SIZES A general comfort level of a simple percentage – i.e. 18 - 28% of the
average [ (W+H)/2 ] dimension of the image should be ok mat border. It is all personal taste.
Border too big 4+” 50% Ok large 2 ¾” border 33%

10/27/2016
6
Single mat 2.5” 15% border Double mat min border 2 ¼” 14%
* 18 - 28% is best
Double mat 2 ¼“ 23% Double mat 2” 28%
* 18 - 28% is best

10/27/2016
7
Triple mats 3” 18% border Triple Mats 2” 25% border
* 18 - 28% is best
Wide v-groove, double mat 2.5” 20% V-groove w/photo gray 1 3/8” 18%
* 18 - 28% is best

10/27/2016
8
MAT COLOR SELECTIONMAT COLOR SELECTION
� Mat color selection guidelines
� Art Primary color scheme, primary background color, top mat
� Color of important object to highlight bottom mat
� Color of room
� All personal preferences
� Visualize the frame, mat & artwork one corner at a time.
� Planning tools
� www.Matshop.com and Matomatic mat planning tool
� Lightroom printing layout border function
10/27/2016author: Gary Steinfort
15
MATTING COLOR CHOICESMATTING COLOR CHOICES

10/27/2016
9
MAT COLOR CONSIDERATIONSMAT COLOR CONSIDERATIONS
� ARTWORK COLORS
� Determine the dominant color of the piece
� Determine the secondary, tertiary & focal point colors
� EFFECT OF DIFFERENT COLORS
� Modern style ?
� Cool and Warm tones?
� Low or high contrast?
� Dark for dark image, Light for Light Images
� DOUBLE or TRIPLE MATS
� Emphasize focal point
� Complementary mat colors
� Darker color as the bottom mat/reveal
� MAT COLORS
� Many different whites
� Neutrals for matching decor
� Using bold colors
SINGLE

10/27/2016
10
DOUBLE
Dark colors tend to contain the art, while light colors tend to expand it.
� Dark imagedark mat
� Light imageLight mat unless youwant high contrast

10/27/2016
11
MATTING PHOTO OPTIONSMATTING PHOTO OPTIONS
� Numerous photographers and studios like to use white mats with black cores for their prints. Black cores create a well defined black outline and visually sets the photograph apart from the white mat.
MATTING B&W IMAGESMATTING B&W IMAGES
� Black or gray mats with a white core can add a little more drama to a photograph. They are typically most effective for photographs that contain black, white or gray.

10/27/2016
12
LIGHTROOMLIGHTROOM MATTING PLANNING 1MATTING PLANNING 1

10/27/2016
13
LIGHTROOMLIGHTROOM MATTING PLANNING 2MATTING PLANNING 2
MATTING DESIGNMATTING DESIGN
� Mat design/layout
� Worksheet to create design
� Measure photo/art
� Single or double matting?
� Double mat gap ¼- ½”
� Border size? Sizes 1.5” to 4”or more. Bigger the photo the larger the border
� 18 - 28% of the average [ (W+H)/2 ] dimension of the image.
� Bottom weighed, extra ~1/2” ?
� V-groove? Never center in border.
10/27/2016author: Gary Steinfort
26

10/27/2016
14
MAT VMAT V--GROOVESGROOVES
� A good rule of thumb is have your v-groove placed approximately 1/3 of the total width of your mat from an edge.
� A wide V-groove can show bottom/2nd mat.
MUSEUM MATTING

10/27/2016
15
LIMITED EDITION PRINT MATTINGLIMITED EDITION PRINT MATTING-USE CONSERVATION FRAMING TECHNIQUES
LIMITED EDITION PRINT MATTING LIMITED EDITION PRINT MATTING

10/27/2016
16
DESIGN DESIGN WORKSHEETWORKSHEET
10/27/2016author: Gary Steinfort
31
V groove Top
1st cut
2nd cut
image W> >
image H^ ^
Left Right
inner mat gap
lower border?
2nd cut normal .25
1st cut
Bottom
Width x Height
Image Wide height H Color top #
Mat top Left top
RT bottom
v-groove Color #
0.0631/16 bottom mat Left 0 Top 0
0.1251/8 RT 0 Bottom. 0
0.1883/16 white border Left 0 Border T 0
0.2501/4 RT 0 B 0
0.3135/16 Mat total" 0 X 0 % 0%
PRACTICE PRACTICE DESIGN DESIGN
5 x 7 photo or art project
10/27/2016author: Gary Steinfort
32
V groove none Top 1.5
1st cut 1.5
1/42nd cut 1.75
image W> 6.5 >
image H^ 4.5 ^
Left 1..5 Right 1.5
1/4 inner mat gap 1/4
lower border?
2nd cut normal .25
1/4 =0 25
1st cut
Bottom 1.5
Width x HeightImage W 6.5 height 4.5 H Color top #
Mat top Left 1.5 top 1.5
RT 1.5 bottom 1.5 GREEN
v-groovenone Sub total 9.5 Sub total 7.5 Color #
0.0631/16 bottom mat Left 0.25 Top 0.25
0.1251/8 Rt 0.25 Bottom 0.25 YELLOW
0.1883/16 white border Left 0 Border Top 0
0.2501/4 Rt 0 B 0
0.3135/16 Mat total" 10.0 X 8.0 % 0%
� Double mat
� Bottom mat ¼ inch showing (reveal)

10/27/2016
17
MATBOARDMATBOARD CUTTINGCUTTING
� Mat cutting tools
� Mat border maker/ruler
� Mat cutters
� Straight edge/ruler & hand bevel cutter $. Ok for single matting
� Budget Mat Cutters $90-$200
� Pro Board Mat cutter $$$
� 24”, 32”, 40”, 60”
� Oval & circle cutters $$
� Computerized mat cutter $$$$$
� Mat cutting
� Straight Cut overall mats & backing boards
� Top mat full size others 1/8’ less helps with uniform reveal on 2nd & 3rd mats
� Mark cut lines (measure twice cut once)
� Mark cut from back, cut with slip sheet for cleaner cuts
� Watch for corner overcuts
� Cut 2 sides then top/bottom
� Cutting order - top mat plus any v-grooves, 2nd
mat 3rd mat
10/27/2016author: Gary Steinfort
33
USE HAND CUTTER ($35) PLUS RULEOK FOR SINGLE MAT, TOUGH FOR DOUBLE MATS
*Logan Pull type * Dexter Push type
10/27/2016author: Gary Steinfort
34

10/27/2016
18
32” LOGAN COMPACT CLASSIC (~$125)*
40” LOGAN ELITE MAT CUTTER ($250)
10/27/2016author: Gary Steinfort
36

10/27/2016
19
*LOGAN 850 40” ($825-$1300) W/PRODUCTION STOPS
COMPUTERIZED MAT CUTTER $20KDOES EVERYTHING
10/27/2016author: Gary Steinfort
38

10/27/2016
20
RESOURCESRESOURCES
� PPFA (Professional Picture Faming Assoc.) part of PMA
� www.ppfa.com national picture framing certification org
� Denali Graphic (Anchorage, Arctic Ave) Frames & Mats (retail & wholesale)
� Blaine’s Art mats & custom framing (Anchorage)
� JBER (Ft Rich) DIY Framing shop 7 days 11am-6pm
� Michaels (Anchorage) - Custom framing & ready made frames
� OBEIDI’S Fine Art Gallery (Anchorage, Arctic Ave)- Custom framing, Mats & ready made frames
� *United Manufacturing Supplies (NY) UMS www.unitedmfrscatalog.com
� 888 Manufacturing Corporation (NY) http://888mfgcorp.com/
� www.framingsupplies.com (NC)
� Custom Frame Solutions (CA, TX, WV, NJ) www.customframesolutions.com
� Redimat.com & GoldenStateArt.com (CA) Precut mats
� www.Matshop.com (WA) and Matomatic mat planning tool
10/27/2016author: Gary Steinfort
39
SUMMARY SUMMARY MATTING & FRAMING PROCESSMATTING & FRAMING PROCESS
� Do it yourself is half the price of custom frame shop but requires tools, materials, knowledge and extra work.
� PROCESS
� Single Mat or Double mat?
� Choose Mat color/colors and type?
� Choose Frame style and color
� Calculate mat size & borders
� Straight cut overall top mat, bottom mat, backing board
� Bevel cut top mat opening then bottom mat opening from back
� Attach/hinge photo/art to backing board
� Combine mats, photo, backing board
� Choose Glazing (glass, pexiglas)
� Assemble frame
� Assemble framing package
� Next class bring a 5x7 image and $10 supplies fee
10/27/2016author: Gary Steinfort
40

10/27/2016
21
BASIC MATTING AND FRAMING PART 1BASIC MATTING AND FRAMING PART 1
� Mats have dual functions:
� Avoid Damage. They are used to create space between the photo and glass so the photo will not be ruined. A photo framed without a mat could become wrinkled or stuck to the glass.
� Aesthetic- A mat can enhance a photo and make an ordinary photo into a beautiful piece of art
� Next class, bring 5x7 image Supplies= $10
� Questions
� Gary Steinfort, CPF independent framer 907-301-0128
10/27/2016author: Gary Steinfort
41
PART 2

10/27/2016
22
ASSEMBLE ASSEMBLE
� Mount photo/art on mounting/backing board
� Place & position under top mats
� 2 T-hinges 1/3, 2/3 let photo hang, attached to mounting board
� Optional mounting corners at bottom
� Hinging mat to mount board or double sided top mat to mounting board
� Add glass
� Insert in frame
� Secure with framer or glass points
� Dustcover, hanging hardware & bumpers
10/27/2016author: Gary Steinfort
43
FRAME MAT PACKAGEFRAME MAT PACKAGE
� Picture Frame Package
� Frame wood or metal
� Glaze (Glass or Plexiglas) 1/8”
� Top mat 1/16”
� Bottom mat 1/16”
� Photo/art
� Mounting/backing board 1/8-3/16”
� Total thickness 3/8 – 1/2”
� Dustcover paper
� Hanging hardware & bumpers
� Connect hanging wire 1/3 or less down from frame top
10/27/2016author: Gary Steinfort
44OOK

10/27/2016
23
FRAMES
� Ready made frames (standard sizes 8x10, 16x20, etc)
� Pro: cost less, include glass
� Con: limited sizes and style/color
� Custom Frames
� Chopped – u assemble glue plus side nail or thumb wedges (easy)
� Assembled v nailed underpinner $$$
� Metal chopped, u assemble & screw together
CUSTOM FRAMES: UNITED INCHESCUSTOM FRAMES: UNITED INCHES
� Custom Frames
� Full stick - u cut, u assemble with nails or underpinning
� How long is a full stick? 8-10 ft
� Project Required lengthLength = 2*w +2*h+ 8* frame width (united inches)
� 8x10 example w/1.5” frame needs2x8+ 2x10+ 8x1.5”=48+” united inches rather than 36”

10/27/2016
24
GLAZING/GLASSGLAZING/GLASS
� Glass 11x14
� Regular clear glass $ $3
� Non-glare $ $5
� Not good for deep frames
� Tru-Vue UV regular and reflection control (non-glare) $$ $15
� Museum glass Tru-Vue $$$ $36(Conservation UV protection)
� Pexiglas/Acrylic 11x14
� Not good for pastels or pencil drawing
� Clear $ $ 6
� Non-glare $ $10
� Conservation UV protection $$ $14
10/27/2016author: Gary Steinfort
47
TOOLSTOOLS
� Framing tools
� Hammer – small, to drive brads into frame corners.
� Wire cutters – to cut picture framing wire.
� Pliers – long-nose and regular, for innumerable grabbing tasks.
� Fitting tools
� Screwdrivers – both common-type, and Phillips head, in several sizes.
� Drill & assorted bits – small hand drill is OK, but battery-operated is better.
� Knives – Utility knife, X-Acto knife, single-edge blades, and dustcover-trimmer.
� Glass tools� Sharpening stone -- smoothes cut edges of glass to
reduce breakage
� Manual glass cutters – for cutting glass of any shape or size.
� Files – assorted, for smoothing glass, metal and wood edge
� Plexi Cutter – to score and cut clear acrylic glazing
� Glass cleaner and cleaning cloth or towels
� Or let someone else cut your glass
10/27/2016author: Gary Steinfort
48

10/27/2016
25
FRAME MAT PACKAGEFRAME MAT PACKAGE
� Picture Frame Package
� Frame wood or metal
� Glaze (Glass or Plexiglas) 1/8”
� Top mat 1/16”
� Bottom mat 1/16”
� Photo/art
� Mounting/backing board 1/8-3/16”
� Total thickness 3/8 – 1/2”
� Dustcover paper
� Provides protection from insects and dust.
� Hanging hardware & bumpers
� Connect hanging wire 1/3 or less down from frame top
10/27/2016author: Gary Steinfort
49OOK
� Picture Frame Package
� Frame wood or metal
� Clean Glass
� Remove dust from mat & art
� Combine glass & mat to check for smudges and trapped dust
� Reclean & recheck
� Insert package in frame
� Secure package in frame with frame points
� Seal with Dustcover paper w/ tape or glue
� Add Hanging hardware D-rings & Wire
� Connect hanging wire 1/3 or less down from frame top
� Bumpers
10/27/2016author: Gary Steinfort
50OOK

10/27/2016
26
MATTING COLOR CHOICESMATTING COLOR CHOICES
MAT COLOR SELECTIONMAT COLOR SELECTION
� Mat color selection guidelines
� Primary color scheme, primary background color
� Color of important object to highlight
� Color of room
� All personal preferences
� Visualize the frame, mat & artwork one corner at a time.
� Planning tools
� www.Matshop.com and Matomatic mat planning tool
� Lightroom printing layout border function
� Mat color practice with 5x7
10/27/2016author: Gary Steinfort
52

10/27/2016
27
REVERSE CUSTOM FRAMING REVERSE CUSTOM FRAMING
� Standard photo sizes fit into common Ready Made frame/mat sizes
� PROs
� Cost less. 50-70% of custom framing
� CONs
� Limited frame style color selection
� Mat borders not uniform or best size
� Normally must crop photo with mat
� Only clear glass
� More mat design work
� Overlap photo at least by 1/8” to 1/4”
10/27/2016author: Gary Steinfort
53
How to use ready made frames and mats for reverse custom framing
full mat x
full
photo x
opening
w/ .25"
overlap x
1st
border
2nd
border
border
diff mats
Ready
made
w/glass
frame $
MichaelsC
custom
Standard
U.S. Frame
Sizes:
11 14 8 10 7.5 9.5 1.75 2.25 -0.5 40$ $60-160 4"x5"
11 14 4 6 3.5 5.5 3.75 4.25 -0.5 40$ $60-160 4"x6"
11 14 5 7 4.5 6.5 3.25 3.75 -0.5 40$ $60-160 6"x8"
11 14 8.5 11 8.0 10.5 1.50 1.75 -0.25 40$ $60-160 5"x7"
11 14 8 12 7.5 11.5 1.75 1.25 0.5 40$ $60-160 8"x10"
11 17 8 12 7.5 11.5 1.75 2.75 -1 45$ 8"x12"
11.75 36 6 30 5.5 29.5 3.13 3.25 -0.125 pano 75$ 8-1/2"x11"
12 12 8 8 7.5 7.5 2.25 2.25 0 40$ 9"x12"
12 16 8 12 7.5 11.5 2.25 2.25 0 45$ 10"x13"
14 18 11 14 10.5 13.5 1.75 2.25 -0.5 50$ 11"x14"
16 20 11 14 10.5 13.5 2.75 3.25 -0.5 55$ $80-220 12"x16"
16 20 11 15 10.5 14.5 2.75 2.75 0 custom 55$ $80-220 14"x18" metal
16 20 11 17 10.5 16.5 2.75 1.75 1 55$ $80-220 16"x20" $26
16 20 12 16 11.5 15.5 2.25 2.25 0 55$ $80-220 20"x24"
16 20 12 18 11.5 17.5 2.25 1.25 1 55$ $80-220 22"x28"
16 20 9 16 8.5 15.5 3.75 2.25 1.5 custom 55$ $80-220 24"x30"
18 24 9 16 8.5 15.5 4.75 4.25 0.5 75$ 24"x36"
18 24 12 18 11.5 17.5 3.25 3.25 0 75$ 30"x40"
18 24 13 19 12.5 18.5 2.75 2.75 0 75$
20 24 16 20 15.5 19.5 2.25 2.25 0 70$ $95-265
22 28 17 22 16.5 21.5 2.75 3.25 -0.5 75$
24 30 18 24 17.5 23.5 3.25 3.25 0 75$ $110-295
24 36 20 30 19.5 29.5 2.25 3.25 -1 custom $125-340
32 40 24 36 23.5 35.5 4.25 2.25 2 $155-425
32 40 24 30 23.5 29.5 4.25 5.25 -1 custom $155-425
40 60 30 45 29.5 44.5 5.25 7.75 -2.5 custom
source for precut mat GoldenStateart.com & redimat.com

10/27/2016
28
SAMPLE CUSTOM FRAME SHOP PRICINGSAMPLE CUSTOM FRAME SHOP PRICING
Finished Framed size Basic level Deluxe level Gallery level
single mat, regular glass, stock/budget frames
double mat, better glass, mid level frames
double mat, UV glass, premium frame
11x 14 $60 $105 $160
16 x 20 (11x14 art) $80 $135 $220
20 x 24 $95 $160 $265
22 x 30 $110 $185 $295
24 x 36 $125 $205 $340
32 x 40 $155 $250 $425
� What is and average cost of locally framing a finished 16 x 20 project?
� Posted at a local Alaska store, sample pricing 2014 for full custom framing. This would be average to below average pricing.
MAT CUTTING MAT CUTTING (REVIEW)(REVIEW)
�Mat cutting� Cut overall size mats & backing boards
� Top mat full size others 1/8’ less helps with uniform reveal on 2nd & 3rd mats
� Mark cut lines
� Mark cut from back with slip sheet to make cuts clean
� Make sure mat cutter is calibrated to avoid overcuts
� Cut 2 sides then top & bottom
� Cut order top mat + v groove, 2nd mat, 3rd mat
10/27/2016author: Gary Steinfort
56

10/27/2016
29
CONSERVATION FRAMING CONSERVATION FRAMING
� What is Conservation and Archival Framing?
� Making sure that nothing potentially acidic will contact the and harm artwork.
� Limited edition prints and original art are handled a special way, by using proper mounting tapes for T-hinges or by trapping/supporting the artwork against the backing with mounting corners or mounting strips.
� Glass should not press against the Artwork
� Conservation/Archival items
� Rag mat board verses regular paper mat board
� Acid fee backing board or acid form core board
� Archival mounting corners, strips and mounting hinge tapes
� Wood frames with tape sealed inner edges rabbet (rarely done)
� UV glass or plexiglass to prevent fading
Acid burn damage example
FRAMING TIPSFRAMING TIPS
� Color and frame selection 1 corners at a time
� T-hinge artwork or photos
� Use white cotton glove when handling art
� Lighter fluid can remove marks from mat.
� Fix minor mat cutting errors with burnishing bone.
� Color frame miter edge before assemble
� Place rubber bumper on 4 corners
� Rub soap or wax on screw threads
� Frame dents can sometime be remove with warm damp cloth.
� ?
10/27/2016
30
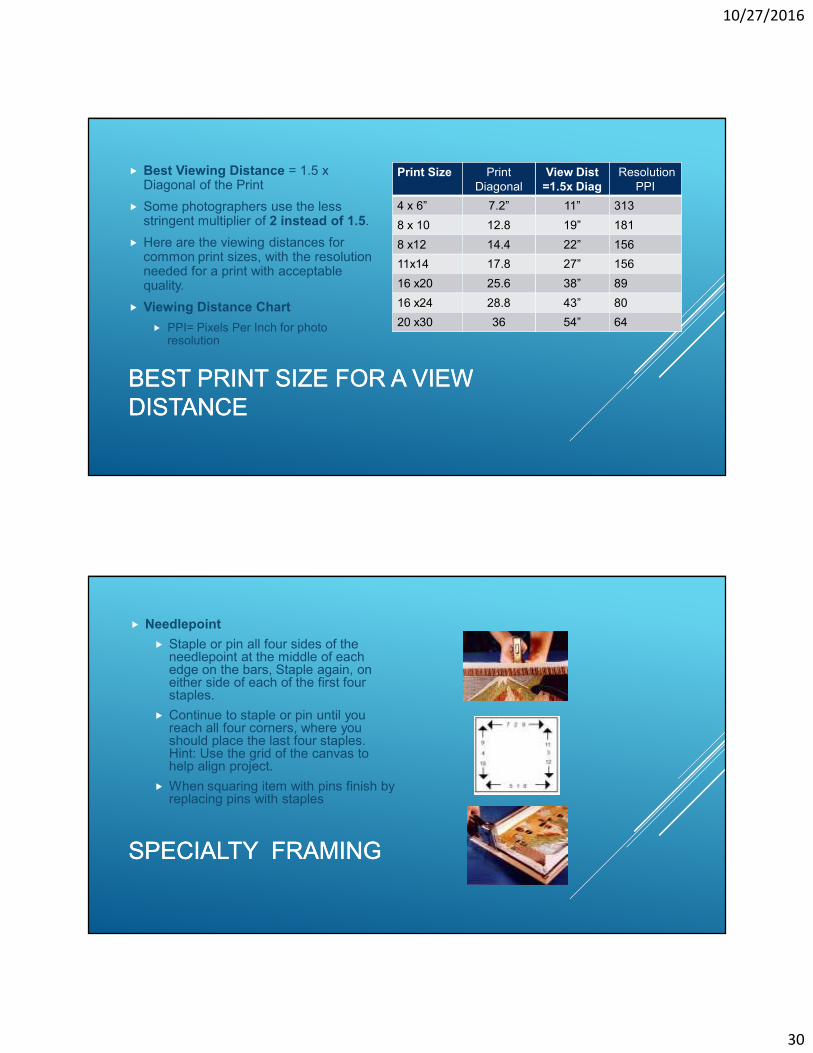
BEST PRINT SIZE FOR A VIEW BEST PRINT SIZE FOR A VIEW DISTANCEDISTANCE
� Best Viewing Distance = 1.5 x Diagonal of the Print
� Some photographers use the less stringent multiplier of 2 instead of 1.5.
� Here are the viewing distances for common print sizes, with the resolution needed for a print with acceptable quality.
� Viewing Distance Chart
� PPI= Pixels Per Inch for photo resolution
Print Size Print Diagonal
View Dist=1.5x Diag
Resolution PPI
4 x 6” 7.2” 11” 313
8 x 10 12.8 19” 181
8 x12 14.4 22” 156
11x14 17.8 27” 156
16 x20 25.6 38” 89
16 x24 28.8 43” 80
20 x30 36 54” 64
SPECIALTY FRAMINGSPECIALTY FRAMING
� Needlepoint
� Staple or pin all four sides of the needlepoint at the middle of each edge on the bars, Staple again, on either side of each of the first four staples.
� Continue to staple or pin until you reach all four corners, where you should place the last four staples. Hint: Use the grid of the canvas to help align project.
� When squaring item with pins finish by replacing pins with staples

10/27/2016
31
� Shadow boxes
� Deeper frame to hold thicker object that must be secured in different ways to the backing board
� Can have mats with thick spacers to separate mat from backing board
Very large 40x60” military retirement box
SPECIALTY FRAMINGSPECIALTY FRAMING
� Sink Mount
� For thick items such art or books etc.
� Create a well with strips of foam core to drop the item in and cover with a cut out mat board
� Requires a slightly deeper frame like a shadow box
Sink Mat mount

10/27/2016
32
FABRIC MATTING CREATIONFABRIC MATTING CREATION
FABRIC MAT CREATIONFABRIC MAT CREATION

10/27/2016
33
7 RULES FOR PERFECT PICTURE 7 RULES FOR PERFECT PICTURE HANGINGHANGING
Helpful hints to prevent the most common picture hanging mistakes.
� Rule 1 – Picture Perfect Environment
� Hang pictures only once you have determined a room layout and all your furniture is in place.
� Rule 2 – Define Boundaries
� To reinforce a sense of order in your groupings you need to define your positive and negative space. The negative space on the wall is the area you can hang your picture. Take a look at the shape and hang a picture or grouping that reflects that shape.
� Rule 3 – Art Spacing Issues
� Keep the spaces between pictures 2″ to 7″ apart. Spacing should be consistent vertically and horizontally, throughout the grouping. The larger the art, the wider the space can be. If you have too much space between pictures, your composition will look disjointed
� Rule 4 Picture Overload
� You don’t have to hang a picture or grouping on every wall. This often appears too busy, fussy, and prevents you from creating a focal point in the room.
� Rule 5 – High Art/Low Art Viewing Level
� As a general rule, hang art at eye level, which is 58″ to 60″ off the ground to centre of image. Don’t hang pictures at different heights in the room unless it is a grouping or tall wall area.
� Rule 6 – Picture and Furniture Integrity
� When hanging a picture over a piece of furniture, leave 6″ to 8″ above furniture, sideboard or mantel. Remember you want to place art low enough that it relates to the furniture, but not so low that it gets hidden by the accessories.
� Rule 7 – Size, and Group Size Counts
� A small picture over a big sofa will look awkward. A common mistake people make is hanging a grouping that is too small for the furniture under it. Plan your arrangement so that it covers at least two-thirds of the wall space. For instance, if your sofa is 7′ wide, your grouping or picture should be 5′ wide or more.
ARTART ARRANGEMENT ARRANGEMENT (BETTER HOME & GARDEN)(BETTER HOME & GARDEN)
� Lesson 1: Think It Through
� Carefully determine your arrangement before you start banging holes in the wall. Trace the outline of each frame onto Kraft paper and cut it out. Then tape the outlines to the wall using blue painter's tape.

10/27/2016
34
ARTART ARRANGEMENT ARRANGEMENT (BETTER HOME & GARDEN)(BETTER HOME & GARDEN)
� Lesson 2: Stay in Line
� Displaying a collection of pictures requires a careful eye. As a rule, a precise grid gives a graphic, formal look. But that's not the only option. An arrangement that's hung within the confines of a square or rectangle but aligned along only one axis (center, top, or bottom) will also appear orderly -- just a tad more relaxed. Placing a sofa or other piece of furniture under the arrangement will help anchor the artwork.
ARTART ARRANGEMENT ARRANGEMENT (BETTER HOME & GARDEN)(BETTER HOME & GARDEN)
� Lesson 3: Stagger the Look
� Sometimes an uneven pattern can be more interesting than a precise lineup. The key to a successful stair-stepped grouping: Vary the spacing between frames. Use your eye to gauge the distance. And because stairways are a high-traffic area, use small pieces of adhesive hook-and-loop tape to hold frame corners to the wall.

10/27/2016
35
ARTART ARRANGEMENT ARRANGEMENT (BETTER HOME & GARDEN)(BETTER HOME & GARDEN)
� Lesson 4: Add an Element of Surprise
� Try something unexpected. Here, instead of hanging a single piece of art over the bed, they created a sculptural grouping of plates and varied the shape, size, and design for interest.
� The plates are in perfect contrast to the headboard's boxy figure, so they attract attention and draw you into the space. The adjacent wall sports framed fabric cuttings.
ARTART ARRANGEMENT ARRANGEMENT (BETTER HOME & GARDEN)(BETTER HOME & GARDEN)
� Lesson 5: There's Safety in Symmetry
� When all else fails, go for the grid --and the grid doesn't have to be a perfect square. Though this notion is a good starting point, centering artwork horizontally and vertically over a prominent architectural element (in this case the mantel) while maintaining even spacing will do the trick. Add interest by mixing sizes, styles, and art mediums.

10/27/2016
36
ARTART ARRANGEMENT ARRANGEMENT (BETTER HOME & GARDEN)(BETTER HOME & GARDEN)
� Lesson 6 Rule of Threes
� Odd number arrangements are better than even number arrangements.
Templates By Etsy.com
OOK hangers
SUMMARY SUMMARY MATTING & FRAMING PROCESSMATTING & FRAMING PROCESS
� Do it yourself is half the price of custom frame shop but requires tools, materials, knowledge and extra work.
� PROCESS
� Single Mat or Double mat?
� Choose Mat color/colors and type?
� Choose Frame style and color
� Calculate mat size & borders
� Straight cut overall top mat, bottom mat, backing board
� Bevel cut top mat opening then bottom mat opening from back
� Attach/hinge photo/art to backing board
� Combine mats, photo, backing board
� Choose Glazing (glass, pexiglas)
� Assemble frame
� Assemble framing package
� Reverse custom matting/framing cost less but more thinking not always as professional
10/27/2016author: Gary Steinfort
72

10/27/2016
37
SUMMARY SUMMARY MATTING & FRAMING PROCESSMATTING & FRAMING PROCESS
� Do it yourself is half the price of custom frame shop but requires tools, materials, knowledge and extra work.
� Framing selection and assemble
� Choose Glazing (glass, Plexiglas)
� Reverse custom matting/framingcost less but requires more thinking not always as professional looking
� Framing tips
� Best print size for a view distance
� Art Hanging tips
� Arranging art work
� Next class session with split groups, practice mat cut & mounting, bring 5x7 image Supplies= $10
10/27/2016author: Gary Steinfort
73
BASIC MATTING AND FRAMINGBASIC MATTING AND FRAMING
� Mats have dual functions:
� Avoid Damage. They are used to create space between the photo and glass so the photo will not be ruined. A photo framed without a mat could become wrinkled or stuck to the glass.
� Aesthetic- A mat can enhance a photo and make an ordinary photo into a beautiful piece of art
� Matting and framing can be fun and creative.
� Next session mat cutting and framing bring 5x7 image
� The END
� Questions
� Gary Steinfort, CPF independent framer 907-301-0128
10/27/2016author: Gary Steinfort
74


![[XLS] for the month Apr... · Web viewMargin MarketType MarketType MarketType MarketType MarketType_Text MarketType_Text Mast Mast Mat Mat Mat Mat Mat Mat Mat Mat Mat Mat Mat Match1](https://img.pdfslide.us/doc/110x75/5ab4774c7f8b9a2f438b92c4/xls-for-the-month-aprweb-viewmargin-markettype-markettype-markettype-markettype.jpg)


![[Double-click to import picture] Rheboksfontein Wind](https://img.pdfslide.us/doc/110x75/61a146230434e3649858dcc6/double-click-to-import-picture-rheboksfontein-wind-.jpg)