Embed Size (px)
Citation preview
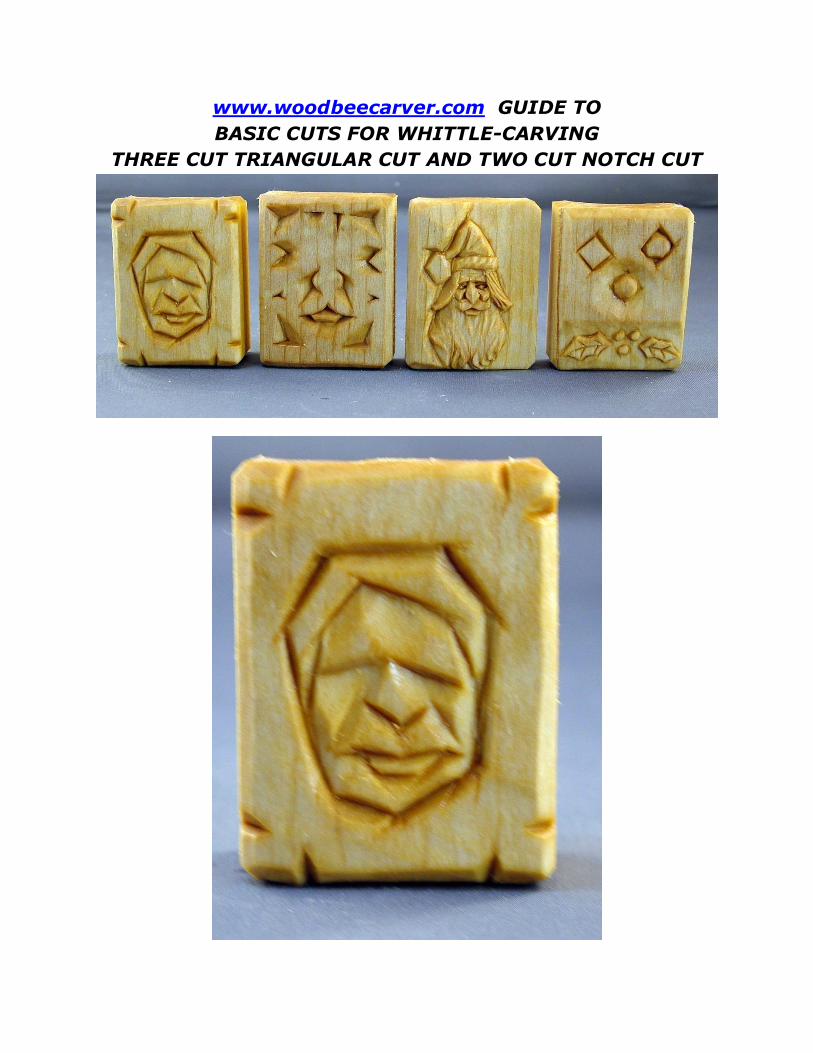
www.woodbeecarver.com GUIDE TO BASIC CUTS FOR WHITTLE-CARVING
THREE CUT TRIANGULAR CUT AND TWO CUT NOTCH CUT
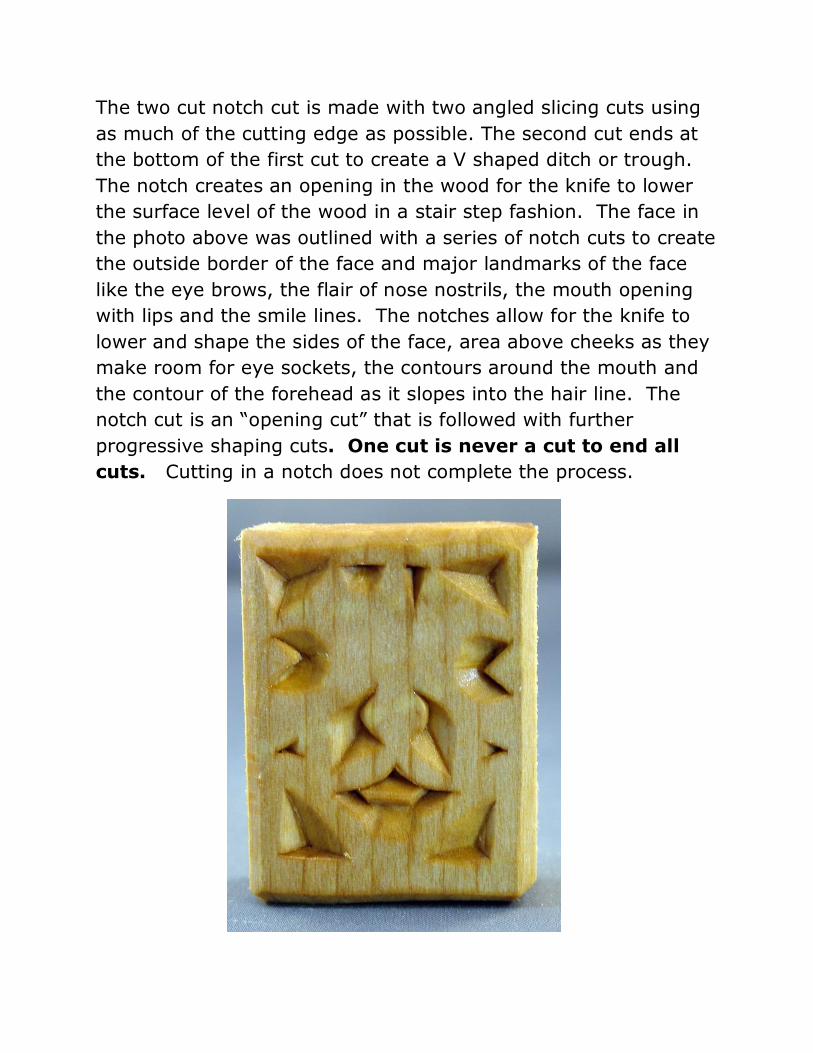
The two cut notch cut is made with two angled slicing cuts using as much of the cutting edge as possible. The second cut ends at the bottom of the first cut to create a V shaped ditch or trough. The notch creates an opening in the wood for the knife to lower the surface level of the wood in a stair step fashion. The face in the photo above was outlined with a series of notch cuts to create the outside border of the face and major landmarks of the face like the eye brows, the flair of nose nostrils, the mouth opening with lips and the smile lines. The notches allow for the knife to lower and shape the sides of the face, area above cheeks as they make room for eye sockets, the contours around the mouth and the contour of the forehead as it slopes into the hair line. The notch cut is an “opening cut” that is followed with further progressive shaping cuts. One cut is never a cut to end all cuts. Cutting in a notch does not complete the process.
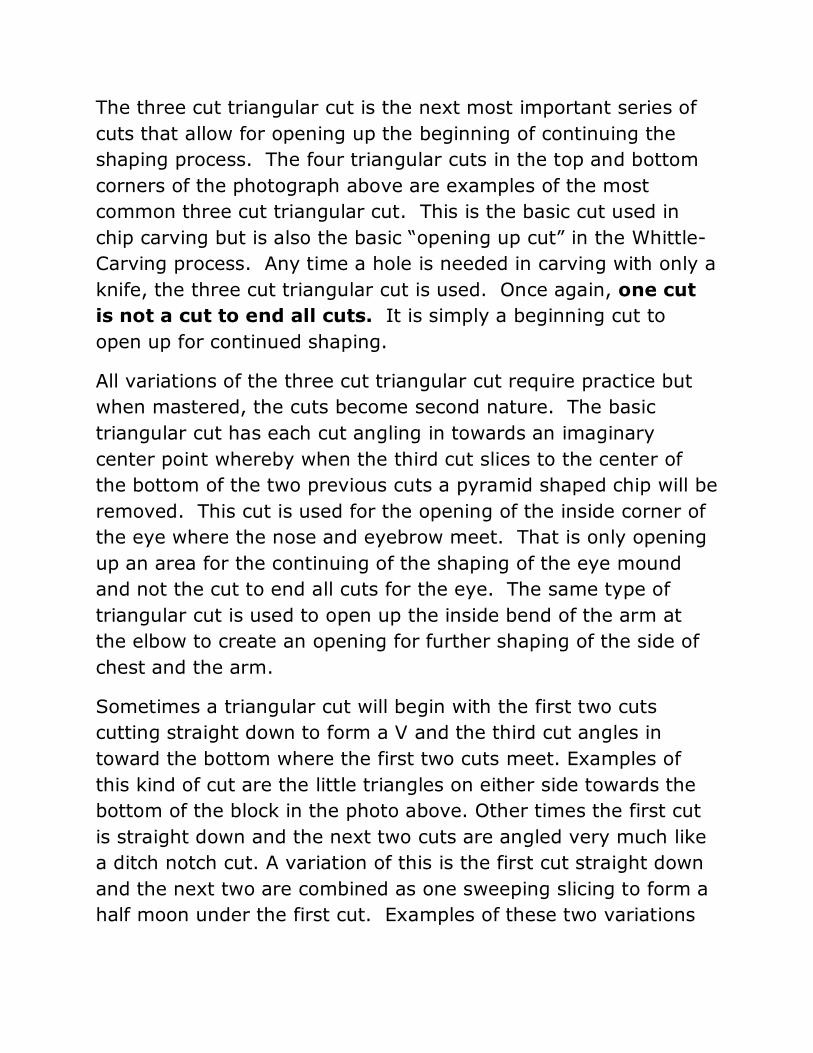
The three cut triangular cut is the next most important series of cuts that allow for opening up the beginning of continuing the shaping process. The four triangular cuts in the top and bottom corners of the photograph above are examples of the most common three cut triangular cut. This is the basic cut used in chip carving but is also the basic “opening up cut” in the Whittle-Carving process. Any time a hole is needed in carving with only a knife, the three cut triangular cut is used. Once again, one cut is not a cut to end all cuts. It is simply a beginning cut to open up for continued shaping.
All variations of the three cut triangular cut require practice but when mastered, the cuts become second nature. The basic triangular cut has each cut angling in towards an imaginary center point whereby when the third cut slices to the center of the bottom of the two previous cuts a pyramid shaped chip will be removed. This cut is used for the opening of the inside corner of the eye where the nose and eyebrow meet. That is only opening up an area for the continuing of the shaping of the eye mound and not the cut to end all cuts for the eye. The same type of triangular cut is used to open up the inside bend of the arm at the elbow to create an opening for further shaping of the side of chest and the arm.
Sometimes a triangular cut will begin with the first two cuts cutting straight down to form a V and the third cut angles in toward the bottom where the first two cuts meet. Examples of this kind of cut are the little triangles on either side towards the bottom of the block in the photo above. Other times the first cut is straight down and the next two cuts are angled very much like a ditch notch cut. A variation of this is the first cut straight down and the next two are combined as one sweeping slicing to form a half moon under the first cut. Examples of these two variations

are the middle two triangular opening at the top. These are sometimes used to create the impression of the pupil of an eye.
On either side of the top row of triangular cut examples are examples of another variation of making a three cut triangular opening. It this case the first two cuts are sliced straight down to make a backward V and the third cut is a sweeping slicing cut in a half moon removal of wood of the back side of the V cuts. This is used to begin forming the opening of the ear with the backward V cuts forming the tragus flap of the ear and the half-moon slice hollows out the opening in the ear. The same technique can be used to form the pupil of the eye with the upside down V cuts and the half-moon slicing cut create the negative image of the iris.
In the center of the study block in the photo there is the appearance of a nose, mustache and mouth. The outside curve of the nostril, the beginning of a smile line and the slope of the upper dental curve are created with curving three cut triangular cut. The first cut slices a half circle cut angled away for nose nostril towards the cheek area. The second cut is another wider circular slicing cut that angles towards the nose nostril. The third cut angles towards the bottom of the two previous cuts. This process is repeated on the other side of nose. These cuts are not the end of all cuts, only the beginning for further shaping of the upper dental curve, the further shaping of the nose and extending the smile line down along the horseshoe shape of the dental curve. If there is to be a mustache, the mustache will cover the upper dental curve with the mouth opening opened with another three cut triangular cut and the corners of the mouth to shape the bottom lip begins as a three cut triangular cut at each corner of mouth. A notch cut across the bottom of the lip connects up with the two triangular chip cuts at the corners of the mouth to form the bottom lip. Of course further shaping is always required
and even at times the three cuts are repeated for a deeper level in the shaping process.
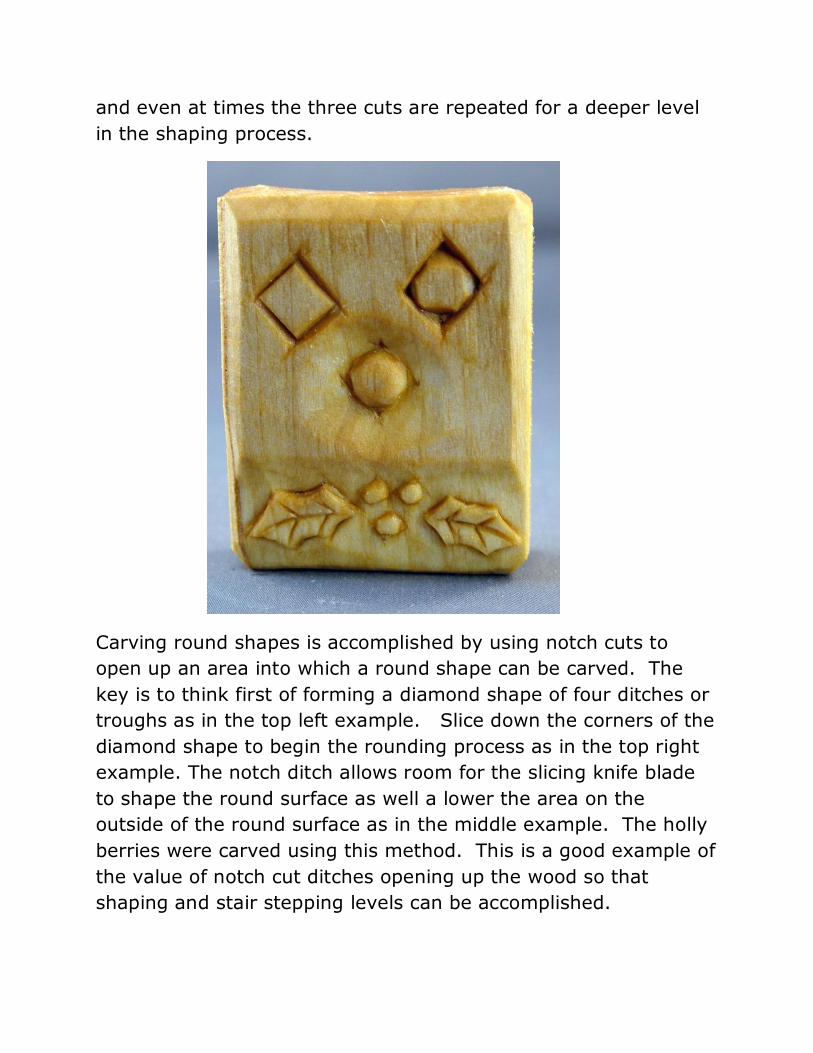
Carving round shapes is accomplished by using notch cuts to open up an area into which a round shape can be carved. The key is to think first of forming a diamond shape of four ditches or troughs as in the top left example. Slice down the corners of the diamond shape to begin the rounding process as in the top right example. The notch ditch allows room for the slicing knife blade to shape the round surface as well a lower the area on the outside of the round surface as in the middle example. The holly berries were carved using this method. This is a good example of the value of notch cut ditches opening up the wood so that shaping and stair stepping levels can be accomplished.
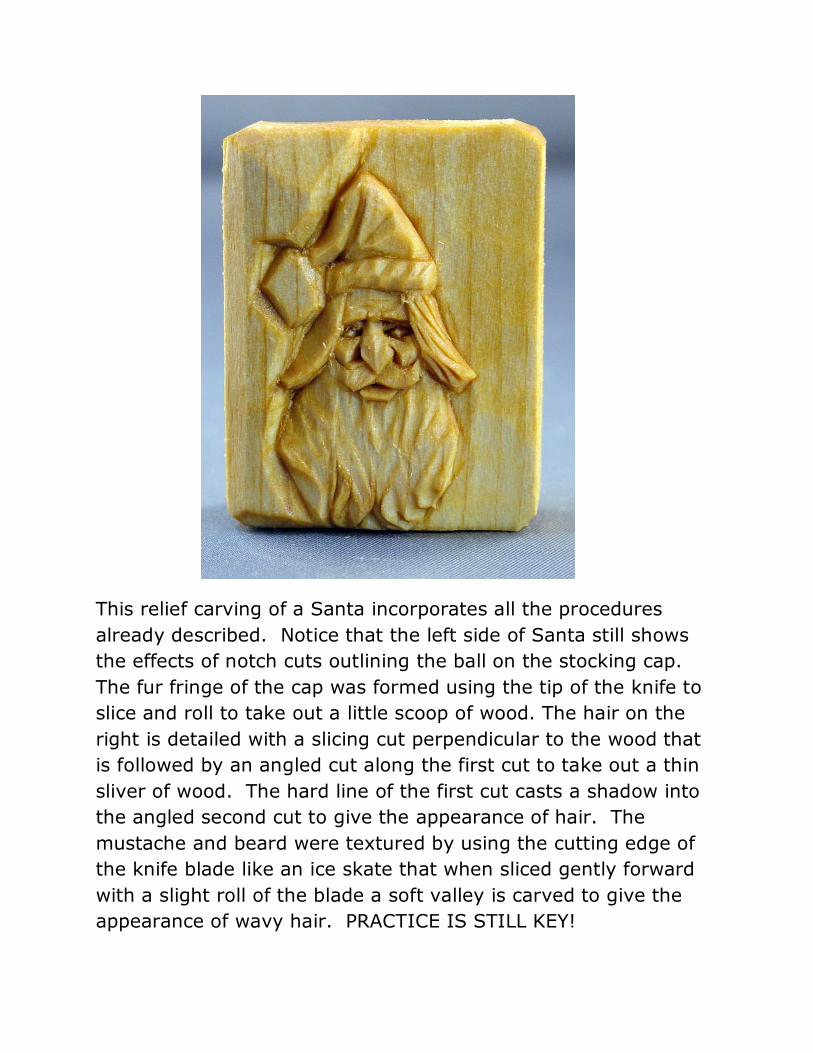
This relief carving of a Santa incorporates all the procedures already described. Notice that the left side of Santa still shows the effects of notch cuts outlining the ball on the stocking cap. The fur fringe of the cap was formed using the tip of the knife to slice and roll to take out a little scoop of wood. The hair on the right is detailed with a slicing cut perpendicular to the wood that is followed by an angled cut along the first cut to take out a thin sliver of wood. The hard line of the first cut casts a shadow into the angled second cut to give the appearance of hair. The mustache and beard were textured by using the cutting edge of the knife blade like an ice skate that when sliced gently forward with a slight roll of the blade a soft valley is carved to give the appearance of wavy hair. PRACTICE IS STILL KEY!
PRACTICE is the key to allow the various basic cuts described to become second nature in the carving process. “The more one carves the better one carves,” is the result of practice. Every carving project is basically a “practice” piece from which the carver learns and grows.
The next series of photographs are for a “visual tutorial” of identifying the basic cuts as they are being used in these progressive steps for carving an ear and an eye, nose, and mouth mound. Look for the basic notch cuts and the variations of the three cut triangular cut. Remember that “one cut is not a cut to end all cuts,” meaning that there are follow up cuts for the continuation of shaping the carving.
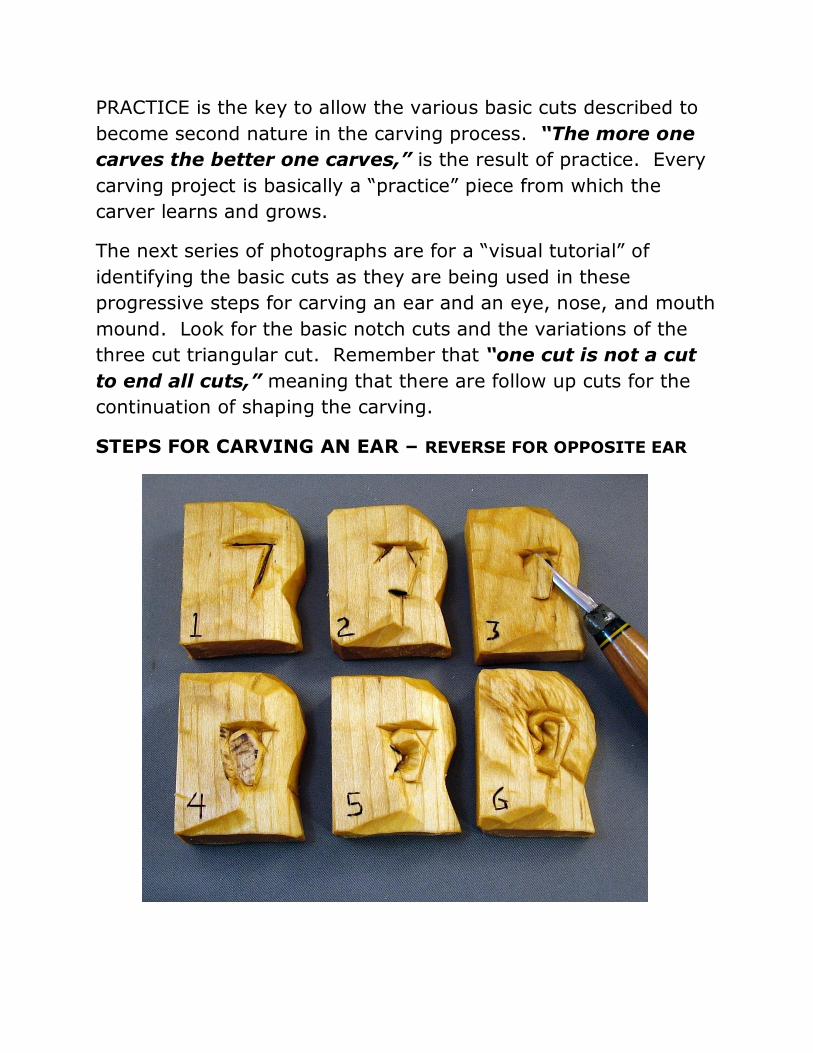
STEPS FOR CARVING AN EAR – REVERSE FOR OPPOSITE EAR
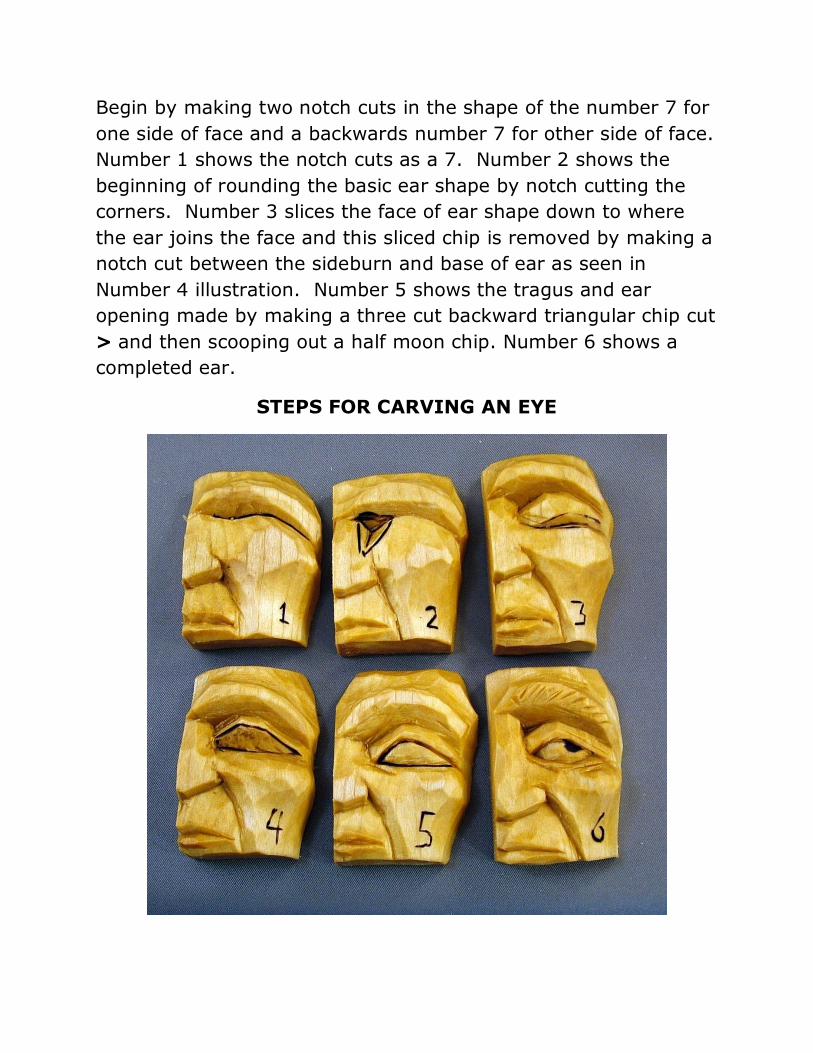
Begin by making two notch cuts in the shape of the number 7 for one side of face and a backwards number 7 for other side of face. Number 1 shows the notch cuts as a 7. Number 2 shows the beginning of rounding the basic ear shape by notch cutting the corners. Number 3 slices the face of ear shape down to where the ear joins the face and this sliced chip is removed by making a notch cut between the sideburn and base of ear as seen in Number 4 illustration. Number 5 shows the tragus and ear opening made by making a three cut backward triangular chip cut > and then scooping out a half moon chip. Number 6 shows a completed ear.
STEPS FOR CARVING AN EYE
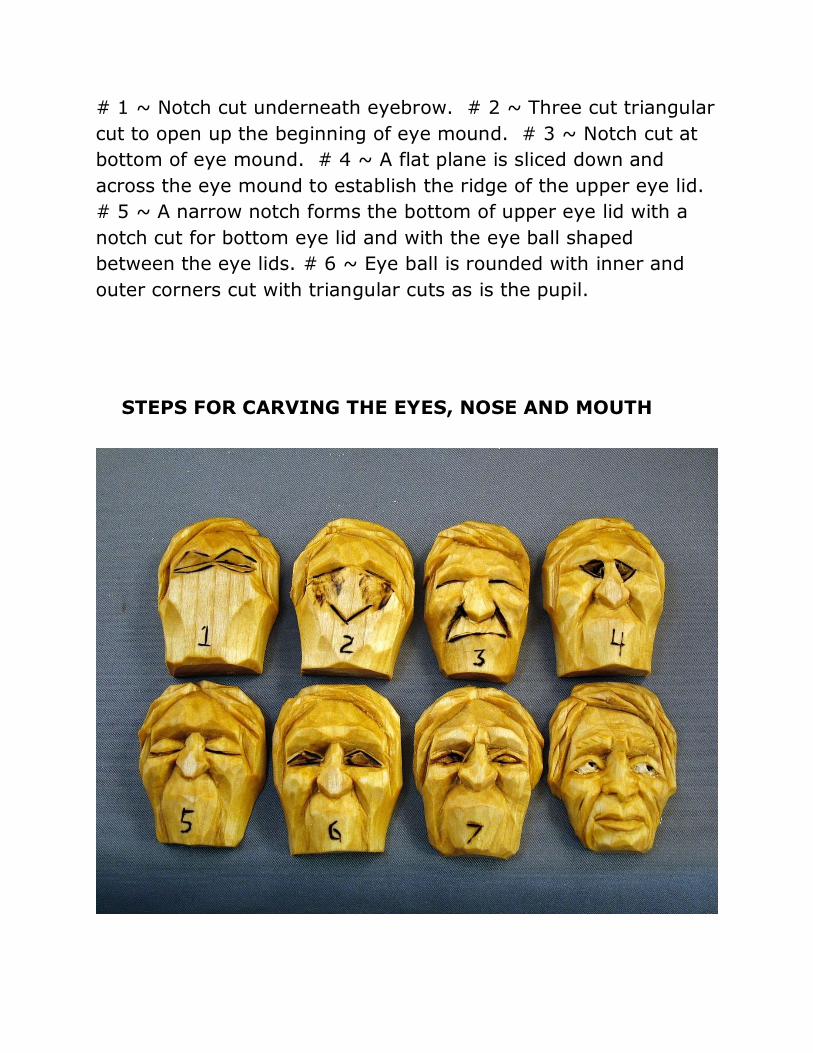
# 1 ~ Notch cut underneath eyebrow. # 2 ~ Three cut triangular cut to open up the beginning of eye mound. # 3 ~ Notch cut at bottom of eye mound. # 4 ~ A flat plane is sliced down and across the eye mound to establish the ridge of the upper eye lid. # 5 ~ A narrow notch forms the bottom of upper eye lid with a notch cut for bottom eye lid and with the eye ball shaped between the eye lids. # 6 ~ Eye ball is rounded with inner and outer corners cut with triangular cuts as is the pupil.
STEPS FOR CARVING THE EYES, NOSE AND MOUTH
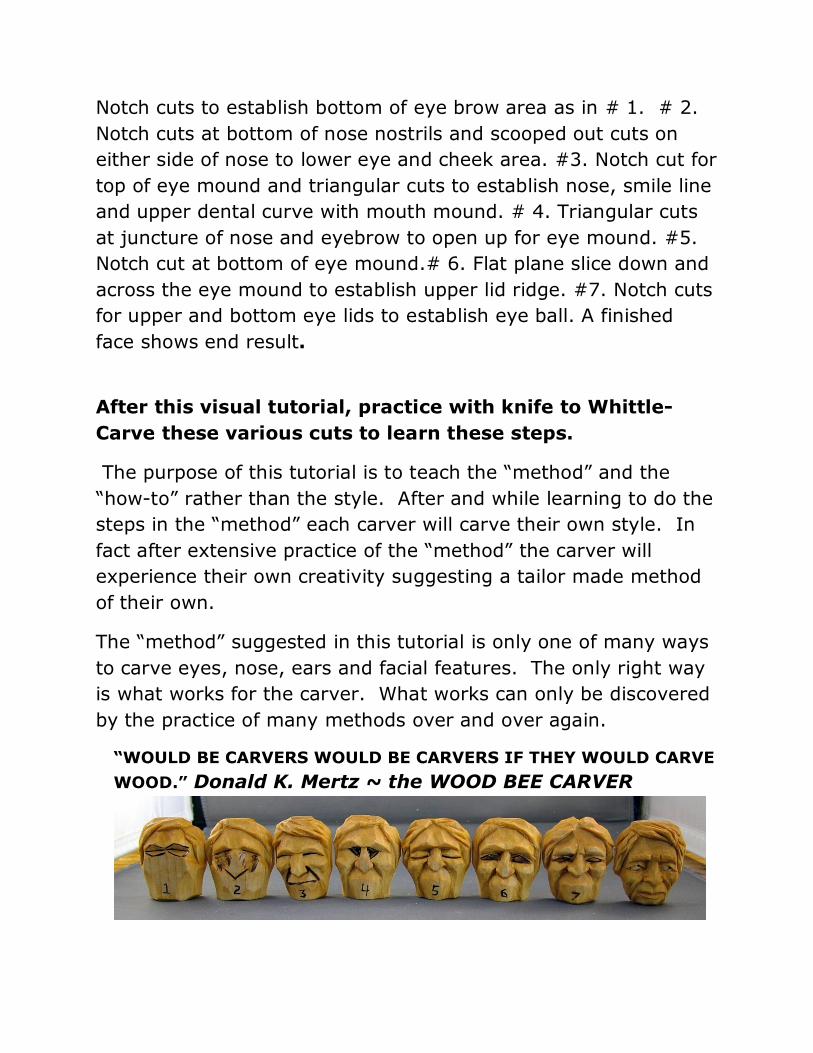
Notch cuts to establish bottom of eye brow area as in # 1. # 2. Notch cuts at bottom of nose nostrils and scooped out cuts on either side of nose to lower eye and cheek area. #3. Notch cut for top of eye mound and triangular cuts to establish nose, smile line and upper dental curve with mouth mound. # 4. Triangular cuts at juncture of nose and eyebrow to open up for eye mound. #5. Notch cut at bottom of eye mound.# 6. Flat plane slice down and across the eye mound to establish upper lid ridge. #7. Notch cuts for upper and bottom eye lids to establish eye ball. A finished face shows end result.
After this visual tutorial, practice with knife to Whittle-Carve these various cuts to learn these steps.
The purpose of this tutorial is to teach the “method” and the “how-to” rather than the style. After and while learning to do the steps in the “method” each carver will carve their own style. In fact after extensive practice of the “method” the carver will experience their own creativity suggesting a tailor made method of their own.
The “method” suggested in this tutorial is only one of many ways to carve eyes, nose, ears and facial features. The only right way is what works for the carver. What works can only be discovered by the practice of many methods over and over again.
“WOULD BE CARVERS WOULD BE CARVERS IF THEY WOULD CARVE WOOD.” Donald K. Mertz ~ the WOOD BEE CARVER