Embed Size (px)
Citation preview

Basic Computer Troubleshooting and Maintenance
Guide

Basic Computer Troubleshooting and Maintenance Guide
Introduction
Most computers come in for servicing have various problems. Pop-ups and slow response are the most common of those problems. A computer that has these problems can be fixed very easily. Windows itself has various programs that you can use to scan and optimize a computer. In this guide we will be taking a look at those utilities as well as utilizing some free ones available on the Internet. Please note that this is meant to be a guide and not a solution to all your computer maintenance and troubleshooting needs. It is also very important to note that you should backup crucial data (like documents and pictures, etc.) before attempting to clean out viruses or spyware from your computer in the event that any scans or virus removals render the system inoperable. This downtime may be temporary until you can get the system operational again and it may provide useful to have a backup copy of important documents in case you need to setup the user on a temporary workstation.
NOTE: This overview is for PCs with the Windows XP operating system on them, the steps may be different of other Window’s operating systems.
NOTE: The following steps have been explained along with graphics to help you out in learning these procedures. IMPORTANT: Before running any spy-ware or virus programs it is advised that you turn off system restore.
NOTE: You will see important notes like these spread throughout this guide. Pay close attention to them.
2

Basic Computer Troubleshooting and Maintenance Guide
Step One: Disable System Restore The reason we disable system restore is because some virus and ad-ware like to hide in old restore points. If you had a virus and scanned to remove it, then had to use system restore then you could be infecting your computer with the same virus that you got rid of before.
1. Bring up the START MENU by clicking on the start button in the bot-tom left hand side of your computers desktop, shown in the following pic-ture. From here, click on CONTROL PANEL. If you are using the classic Start menu you may need to click on Settings after “Start” and then Control Panel.
2. This will bring up the control panel, a window with icons to various
programs useful to the Microsoft® Windows XP user. As shown in the following screen we want to double-click on the SYSTEM icon. If you do not see the Control Panel exactly as
pictured here, you can switch to Clas-sic View by click “Switch to Classic
View” on the left task pane.
3
Basic Computer Troubleshooting and Maintenance Guide
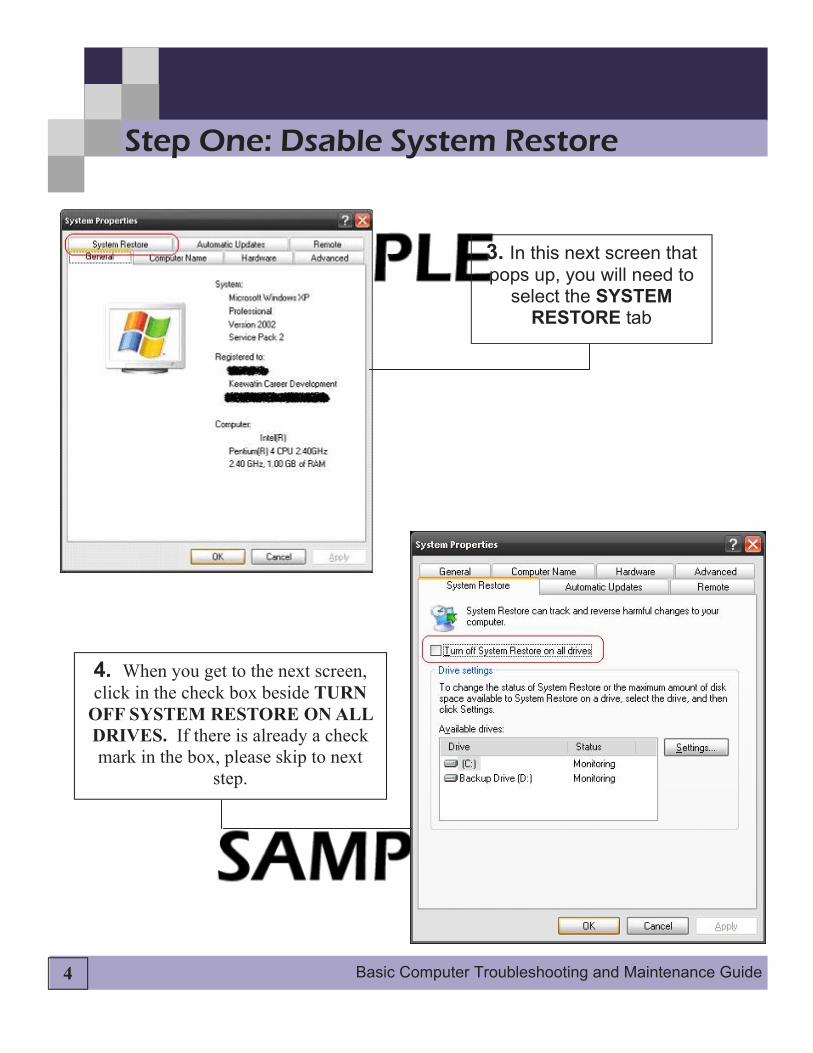
Step One: Dsable System Restore
4
3. In this next screen that pops up, you will need to
select the SYSTEM RESTORE tab
4. When you get to the next screen, click in the check box beside TURN
OFF SYSTEM RESTORE ON ALL DRIVES. If there is already a check mark in the box, please skip to next
step.

Basic Computer Troubleshooting and Maintenance Guide
Step One: Disable System Restore
5
5. The word APPLY should go from faded to black lettering as shown in the next screen, click
on APPLY.
6. The next screen that comes up after you click on ap-ply will be a system restore warning, this warning tells you
that the computer will be deleting all previous restore points that it has created. Click on YES in this box.

Basic Computer Troubleshooting and Maintenance Guide
Step One: Disable System Restore
6
7. Then it should take you back to system restore screen, note that the
status off all your drives will be set to TURNED OFF, if you have more than one drive in your computer like I do
then you will see multiple drives with this status. CLICK on OK to finish
this step.
NOTE: After the virus threat or spyware has been removed from the system, it is
important to turn the System Restore feature of Windows XP back on. Having restore points may provide useful in the future if you find yourself troubleshooting the system.

Basic Computer Troubleshooting and Maintenance Guide
Step Two: Ad-Aware SE Personal Scan Ad-Aware is a program that you use to scan for ad-ware or spy-ware programs that are in your computer. Some of these programs block access to the internet, create advertising pop-ups on your computer and generally slow your computer down.
7
1. Ad-Aware SE Personal is a free program downloadable from the internet. Their website address/URL is http://www.lavasoftusa.com or you can Google ADAWARE and click here.
2. Go to their homepage and you should see this image on the right hand side of
the page. Click on this image and you will be redirected to another webpage.
NOTE: If you have access to internet from the infected computer, you should download the Winsock XP Fix tool in the event that removing the spyware
from your system accidentally corrupts the Winsock on the computer. Read Appendix A for instructions on using the Winsock XP Fix tool. If the computer does not have access to the internet because of spyware or viruses, download the following tools using another working computer that has internet access.
3. On this next page you should see this image. Click on this image to start
downloading the install file for Ad-Aware.

Basic Computer Troubleshooting and Maintenance Guide
Step Two: Ad-Aware SE Personal Scan
8
4. Click on SAVE to download the install file to
your computer.
5. The next page that pops up is asking you where you want to save the installation file. Click on the arrow pointing down (1) to bring up a drop down list,.
From this list click on “Desktop(2) to choose that as the save to
area, then click on SAVE (3) then move on to the next step.

Basic Computer Troubleshooting and Maintenance Guide
Step Two: Ad-Aware SE Personal Scan
9
6. After the file is downloaded you’ll see the following image, then you can RUN the program now or you can CLOSE if you
plan to run the program later or on another computer. If you
choose to open it later, start at #7. If you choose to run now,
skip to #8.
7. The downloaded file is called aawsepersonal.exe; this will be located wherever you decided to save the file to, usually the desktop and can look like either of the two following pictures.
Double click the file to start the install process.
8. A security warning should pop up telling you that you are
about to run a program, click on RUN to continue.

Basic Computer Troubleshooting and Maintenance Guide
Step Two: Ad-Aware SE Personal Scan
10
9. This next screen is the program’s installation
wizard, click on NEXT to continue
10. In this next window click in the CHECKBOX beside I AC-CEPT THE LICENSE AGREE-
MENT and then the words NEXT should change from light lettering to dark lettering. Click
NEXT to continue.

Basic Computer Troubleshooting and Maintenance Guide
Step Two: Ad-Aware SE Personal Scan
11
11. Keep clicking NEXT, using default values until you reach
this screen. If you click FINISH the computer will update the ad-
ware definitions file, provided that you have access to the internet, then it will do a full
system scan.
12. The computer will scan for a bit and then it should end up looking like the following image when it is completed. Click on
NEXT to continue.