Embed Size (px)
Citation preview
QUILTS
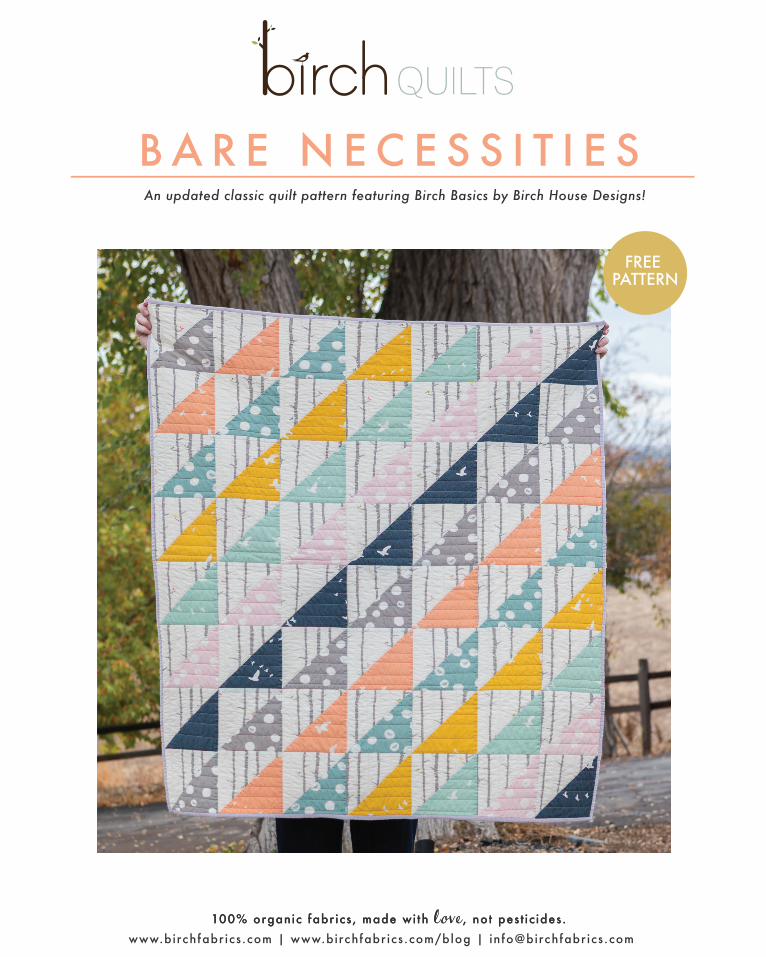
B A R E N E C E S S I T I E SAn updated classic quilt pattern featuring Birch Basics by Birch House Designs!
100% organic fabr ics, made with love , not pest ic ides.
FREE PATTERN
www.birchfabr ics.com | www.birchfabr ics.com/blog | info@birchfabr ics.com100% organic fabr ics, made with love , not pest ic ides.
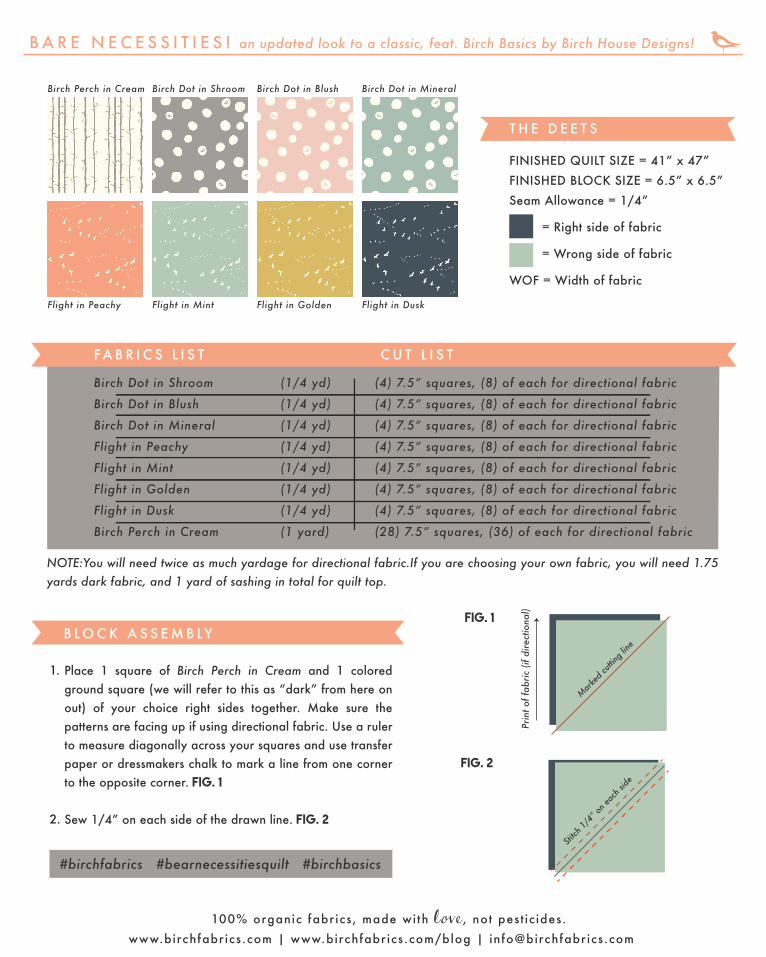
Place 1 square of Birch Perch in Cream and 1 colored ground square (we will refer to this as “dark” from here on out) of your choice right sides together. Make sure the patterns are facing up if using directional fabric. Use a ruler to measure diagonally across your squares and use transfer paper or dressmakers chalk to mark a line from one corner to the opposite corner. Fig. 1
Sew 1/4” on each side of the drawn line. Fig. 2
#birchfabrics #bearnecessitiesquilt #birchbasics
Birch Perch in Cream Birch Dot in Shroom Birch Dot in Blush Birch Dot in Mineral
Flight in Peachy Flight in Mint Flight in Golden Flight in Dusk
Birch Dot in Shroom
Birch Dot in Blush
Birch Dot in Mineral
Flight in Peachy
Flight in Mint
Flight in Golden
Flight in Dusk
Birch Perch in Cream
(1/4 yd)
(1/4 yd)
(1/4 yd)
(1/4 yd)
(1/4 yd)
(1/4 yd)
(1/4 yd)
(1 yard)
(4) 7.5” squares, (8) of each for directional fabric
(4) 7.5” squares, (8) of each for directional fabric
(4) 7.5” squares, (8) of each for directional fabric
(4) 7.5” squares, (8) of each for directional fabric
(4) 7.5” squares, (8) of each for directional fabric
(4) 7.5” squares, (8) of each for directional fabric
(4) 7.5” squares, (8) of each for directional fabric
(28) 7.5” squares, (36) of each for directional fabric
FA B R I C S L I S T C U T L I S T
B A R E N E C E S S I T I E S ! an updated look to a classic, feat. Birch Basics by Birch House Designs!
FINISHED QUILT SIZE = 41” x 47” FINISHED BLOCK SIZE = 6.5” x 6.5” Seam Allowance = 1/4”
WOF = Width of fabric
= Right side of fabric
= Wrong side of fabric
B L O C K A S S E M B LY
T H E D E E T S
Stitch
1/4”
on ea
ch si
de
Fig. 2
Prin
t of f
abric
(if d
irect
iona
l)
Mar
ked c
utting
line
Fig. 1
NOTE:You will need twice as much yardage for directional fabric.If you are choosing your own fabric, you will need 1.75 yards dark fabric, and 1 yard of sashing in total for quilt top.
1.
2.
www.birchfabr ics.com | www.birchfabr ics.com/blog | info@birchfabr ics.com100% organic fabr ics, made with love , not pest ic ides.

Using a rotary blade, cute along the marked line, forming two triangles. FIG. 3
Open your triangles to form 2 squares and press seam towards the dark side. Square up your block to make a finished square of 6.5” x 6.5”. If your fabric is directional, then you will have one right side up block and one upside down block. It is ultimately your decision to make a direction-al or non-directional quilt. FIG. 4
B L O C K A S S E M B LY C O N T .
Fig. 4
Fig. 3
Once all of your 56 blocks are complete, start forming columns. The first column, which we will sew together like rows, will start with Birch Dot in Shroom and end with Birch Dot in Shroom as shown in FIG. 5. Each row will start and end with the same fabric. Use FIG. 6 on the next page to arrange your blocks.
Q U I L T A S S E M B LY
Fig. 5
1 2 3 4 5 6 7 8
SEWING TIP!
Press seam allowances down along the whole first row, then on row 2 you will press all of the seam allowances up. Continue this pattern so odd rows are pressed down, and even are pressed up. This will allow you to “lock” and perfectly match your seams, all while evenly distributing the bulk.
seam allowance
seam allowance
wrong side of fabric
wrong side of fabric
seam
seam
1.
3.
4.
B A R E N E C E S S I T I E S ! an updated look to a classic, feat, Birch Basics by Birch House Designs!
www.birchfabr ics.com | www.birchfabr ics.com/blog | info@birchfabr ics.com100% organic fabr ics, made with love , not pest ic ides.
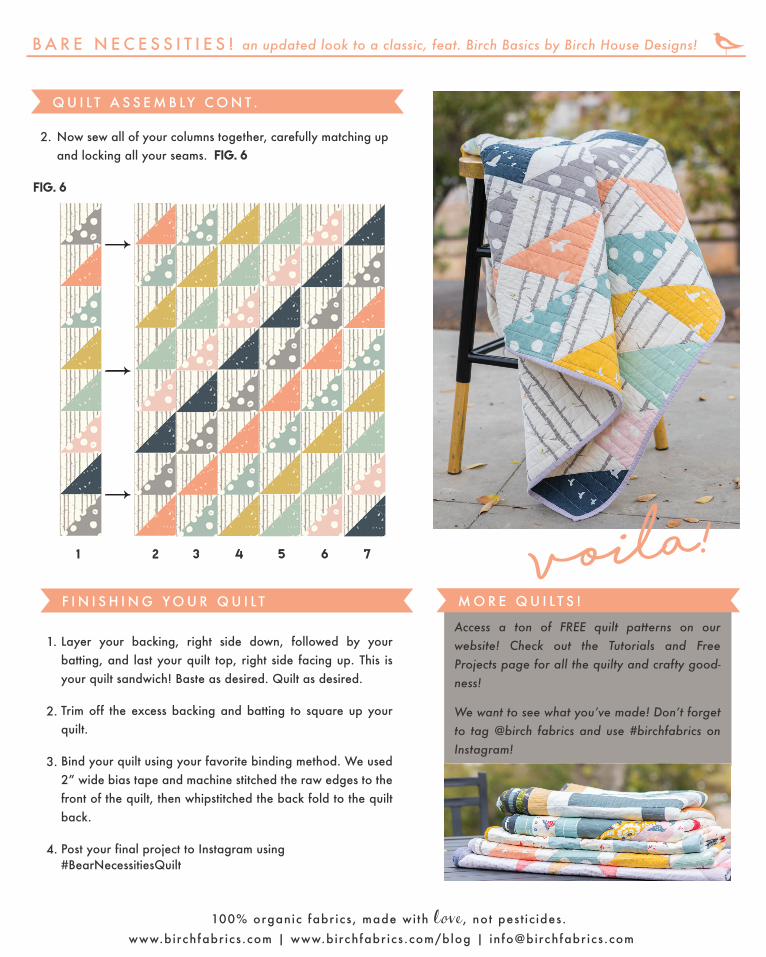
Fig. 6
1 2 3 4 5 6 7
Now sew all of your columns together, carefully matching up and locking all your seams. FIG. 6
Q U I L T A S S E M B LY C O N T .
Layer your backing, right side down, followed by your batting, and last your quilt top, right side facing up. This is your quilt sandwich! Baste as desired. Quilt as desired.
Trim off the excess backing and batting to square up your quilt.
Bind your quilt using your favorite binding method. We used 2” wide bias tape and machine stitched the raw edges to the front of the quilt, then whipstitched the back fold to the quilt back.
Post your final project to Instagram using #BearNecessitiesQuilt
F I N I S H I N G Y O U R Q U I L T
2.
1.
2.
3.
4.
M O R E Q U I L T S !
Access a ton of FREE quilt patterns on our website! Check out the Tutorials and Free Projects page for all the quilty and crafty good-ness!
We want to see what youʼve made! Donʼt forget to tag @birch fabrics and use #birchfabrics on Instagram!
voila!
B A R E N E C E S S I T I E S ! an updated look to a classic, feat. Birch Basics by Birch House Designs!
www.birchfabr ics.com | www.birchfabr ics.com/blog | info@birchfabr ics.com100% organic fabr ics, made with love , not pest ic ides.


![seasideukestrummers.weebly.comseasideukestrummers.weebly.com/uploads/2/5/5/6/... · The Bare Necessities Look for the [Cl bare necessities, the [F] simple bare necessities, [Cl Forget](https://img.pdfslide.us/doc/110x75/5ac76ba77f8b9aa1298b6c99/bare-necessities-look-for-the-cl-bare-necessities-the-f-simple-bare-necessities.jpg)