Embed Size (px)
Citation preview
page 1
Banner8 Navigation Workbook
page 2
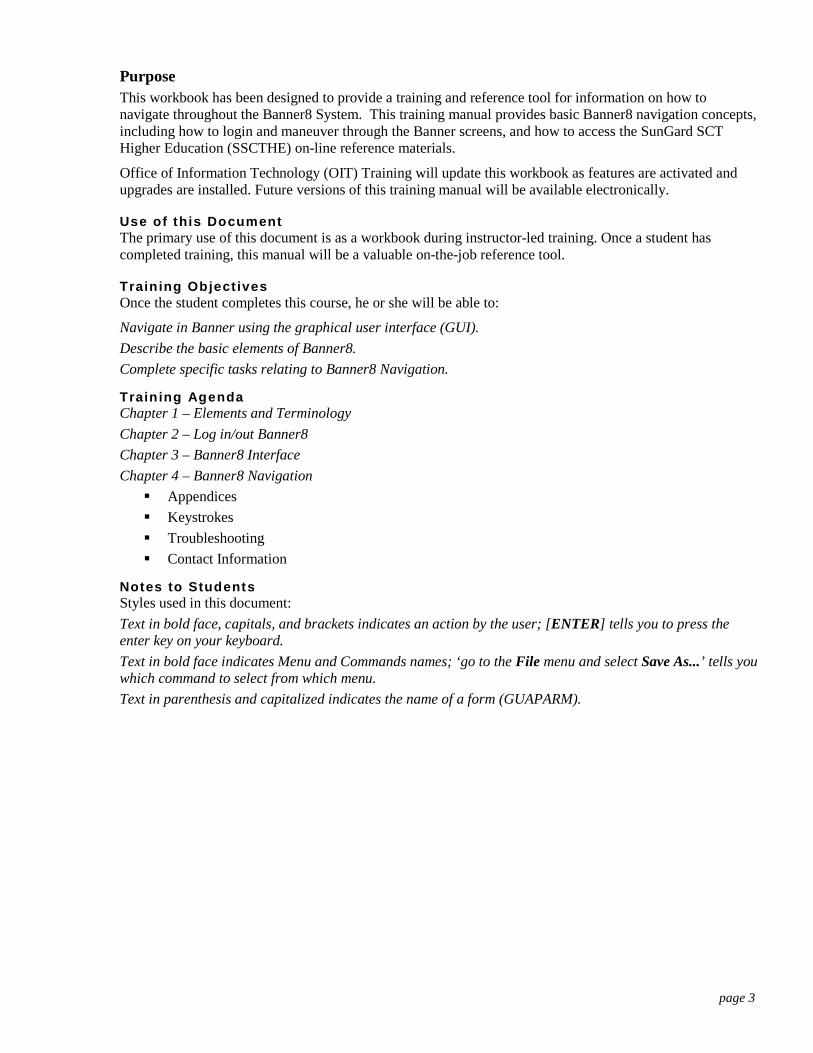
Banner 8 Navigation Workbook Elements and Terminology .................. 4 Elements and Terminology .................. 5 Banner8 Forms ........................................ 5 Banner8 Naming Conventions ................ 5 Login/out of Banner8 ............................ 8 Changing Your Password ..................... 10 Logging Out .......................................... 11 Banner8 Interface ............................... 12 Banner8 Interface ............................... 13 Banner8 General Menu ......................... 13 Types of Banner8 Forms ....................... 14 Parts of a Banner8 Form ....................... 17 Blocks ................................................... 19 Elements of a Banner8 Form ................ 20 Buttons .................................................. 21 Scroll Bars ............................................. 22 Banner8 Navigation ............................ 23 Banner8 Navigation ............................ 24 Navigation Methods .............................. 24 Tabs ....................................................... 33 Object Search ........................................ 35 Tool Bar (Standard) .............................. 36 Iconic buttons ........................................ 37 QuickFlow............................................. 41 Menu Bar .............................................. 42 Keystrokes............................................. 50 Banner Screen Printing ...................... 51 Appendices .............................................. i
page 3
Purpose This workbook has been designed to provide a training and reference tool for information on how to navigate throughout the Banner8 System. This training manual provides basic Banner8 navigation concepts, including how to login and maneuver through the Banner screens, and how to access the SunGard SCT Higher Education (SSCTHE) on-line reference materials.
Office of Information Technology (OIT) Training will update this workbook as features are activated and upgrades are installed. Future versions of this training manual will be available electronically.
Use of this Document The primary use of this document is as a workbook during instructor-led training. Once a student has completed training, this manual will be a valuable on-the-job reference tool.
Training Object ives Once the student completes this course, he or she will be able to:
Navigate in Banner using the graphical user interface (GUI). Describe the basic elements of Banner8. Complete specific tasks relating to Banner8 Navigation.
Training Agenda Chapter 1 – Elements and Terminology Chapter 2 – Log in/out Banner8 Chapter 3 – Banner8 Interface Chapter 4 – Banner8 Navigation Appendices Keystrokes Troubleshooting Contact Information
Notes to Students Styles used in this document: Text in bold face, capitals, and brackets indicates an action by the user; [ENTER] tells you to press the enter key on your keyboard. Text in bold face indicates Menu and Commands names; ‘go to the File menu and select Save As...’ tells you which command to select from which menu. Text in parenthesis and capitalized indicates the name of a form (GUAPARM).

page 4
Elements and Terminology
Chapter One Elements and Terminology
page 5
E l e me n ts a n d T e r mi n o l o g y Before logging into Banner8, it is important to understand the concept of a form and the terminology used by Banner8. This chapter covers the different types of forms within Banner8 and the naming conventions that govern those forms.
BAN N E R8 FORM S Forms are the critical elements in Banner8. It is through a form that all information is entered, maintained, edited, and queried. Forms have a standardized design and are similar to a paper form. Each form has a unique name that distinguishes it from other Banner8 forms and each has its own security parameters and monitoring techniques.
Types of Forms There are six types of forms. Specific examples of each form are detailed in Chapter 3 of this workbook.
General Menu Use this form to navigate through Banner8. It provides an overview of the menus, forms, jobs, and QuickFlows in the system.
Application Forms Use these forms to enter, update, and query information. This is the most common type of form.
Validation Forms Use these forms to define the values that can be entered in specific fields on Application forms. These values are used throughout Banner8.
Rule and Control Forms Use these forms to define the calculations, parameters, and processing rules that impact processing on other forms, reports, and jobs.
Query Forms Use these forms to look up existing information, often returning information to the calling form.
Inquiry Forms Use these forms to look up existing information, often returning information to the calling form. Users can access these forms from a menu, another form, with Direct Access, or with Object Search.
Validation, Rule, and Control forms are used to tailor Banner8 to the specific needs of the University of Alaska. University administrators with the proper security access may update these forms.
BAN N E R8 NAM IN G CON V E N T I ON S All Banner8 forms, with the exception of menus, use a seven character naming convention.
Position 1: Identifies the primary system owning form Position 2: Identifies the primary unit module owning the form Position 3: Identifies the type of form Position 4 – 7: Identifies the unique four character abbreviation for the form
Chapter One Elements and Terminology
page 6
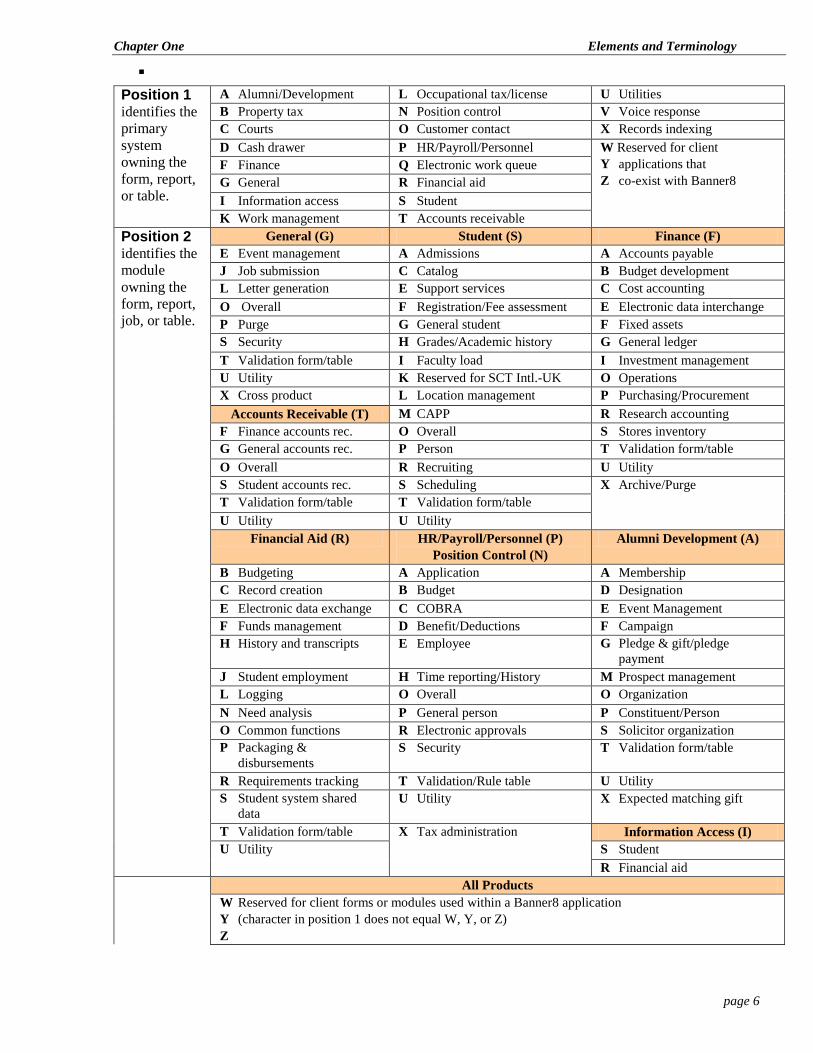
Position 1 identifies the primary system owning the form, report, or table.
A Alumni/Development L Occupational tax/license U Utilities B Property tax N Position control V Voice response C Courts O Customer contact X Records indexing D Cash drawer P HR/Payroll/Personnel W Reserved for client
Y applications that Z co-exist with Banner8
F Finance Q Electronic work queue G General R Financial aid I Information access S Student K Work management T Accounts receivable
Position 2 identifies the module owning the form, report, job, or table.
General (G) Student (S) Finance (F) E Event management A Admissions A Accounts payable J Job submission C Catalog B Budget development L Letter generation E Support services C Cost accounting O Overall F Registration/Fee assessment E Electronic data interchange P Purge G General student F Fixed assets S Security H Grades/Academic history G General ledger T Validation form/table I Faculty load I Investment management U Utility K Reserved for SCT Intl.-UK O Operations X Cross product L Location management P Purchasing/Procurement
Accounts Receivable (T) M CAPP R Research accounting F Finance accounts rec. O Overall S Stores inventory G General accounts rec. P Person T Validation form/table O Overall R Recruiting U Utility S Student accounts rec. S Scheduling X Archive/Purge T Validation form/table T Validation form/table U Utility U Utility
Financial Aid (R) HR/Payroll/Personnel (P) Position Control (N)
Alumni Development (A)
B Budgeting A Application A Membership C Record creation B Budget D Designation E Electronic data exchange C COBRA E Event Management F Funds management D Benefit/Deductions F Campaign H History and transcripts E Employee G Pledge & gift/pledge
payment J Student employment H Time reporting/History M Prospect management L Logging O Overall O Organization N Need analysis P General person P Constituent/Person O Common functions R Electronic approvals S Solicitor organization P Packaging &
disbursements S Security T Validation form/table
R Requirements tracking T Validation/Rule table U Utility S Student system shared
data U Utility X Expected matching gift
T Validation form/table X Tax administration Information Access (I) U Utility S Student
R Financial aid All Products
W Reserved for client forms or modules used within a Banner8 application Y (character in position 1 does not equal W, Y, or Z) Z

Chapter One Elements and Terminology
page 7
Position 3 identifies the type of form, report, job, or table.
General (G) Student (S) Finance (F) A Application form A Application form A Application form B Base table Batch COBOL process
B Base table B Base table
I Inquiry form I Inquiry form I Inquiry form O Online COBOL process P Process M Maintenance form Q Query form Q Query form Q Query form R Rule table Repeating table
Report/Process
R Rule table Repeating table
Report/Process
R Rule table Repeating table
Report/Process T General maintenance V Validation form/table
View V Validation form/table
View V Validation form/table View
Accounts Receivable (T) A Application form P Process R Report I Inquiry form Q Query form V Validation form/table
Financial Aid (R) HR/Payroll/Personnel (P) Position Control (N)
Alumni/Development (A)
A Application form A Application Form A Application Form B Base table B Base table
Batch COBOL Process B Base table
I Inquiry form I Inquiry form C Called/list form P Process/report P Process I Inquiry form R Rule table
Repeating table Report/Process
R Rule table Repeating table
Report/Process
P Process/Report
T Temporary table Information Access (I) R Repeating rules table V Validation form/table
View R Report T Temporary table
V Validation form/Table View
Positions 4, 5, 6, and 7 uniquely identify the form, report, job, or table. Most items with a ‘2’ or ‘9’ in
Position four are UA custom objects.
Examples NBAJOBS FGIBDST STVMAJR
N B A JOBS
Position Control Budget Application Form Employee Jobs
F G I BDST
Finance General Ledger Inquiry Form Budget Status
S T V MAJR
Student Validation form/table Validation form/table Major/Minor codes
page 8
Login/out of Banner8

Chapter Two Log in/out of Banner8
page 9
Login/out of Banner8 This chapter of the workbook covers how to log into and how to exit out of Banner8.
To Log into Banner8 1. Start Banner8 by opening Microsoft Internet Explorer (version 6.0 or higher).
2. Enter [https://bantrnx.alaska.edu] in the location bar and press the [Enter] key.
If you have the correct jiniator installed you will see the login dialog box below.
If it does not appear refer to http://www.alaska.edu/hat/web/HD/banner/faqBanner8.xml for troubleshooting steps.
4. Enter your username and press the [TAB] key or click on the Password field.
5. Enter your password and press the [TAB] key or click on the Database field.
6. Enter the Database (trnx) you wish to work in.
7. Click the [Connect] button to log in
Help! If access is not permitted, contact your local help desk.
Note: Internet Explorer 6 is the current supported browser for use with Banner.
A work-around is available to use Internet Explorer 8 with Banner 8 – contact your local help desk.
Chapter Two Log in/out of Banner8
page 10
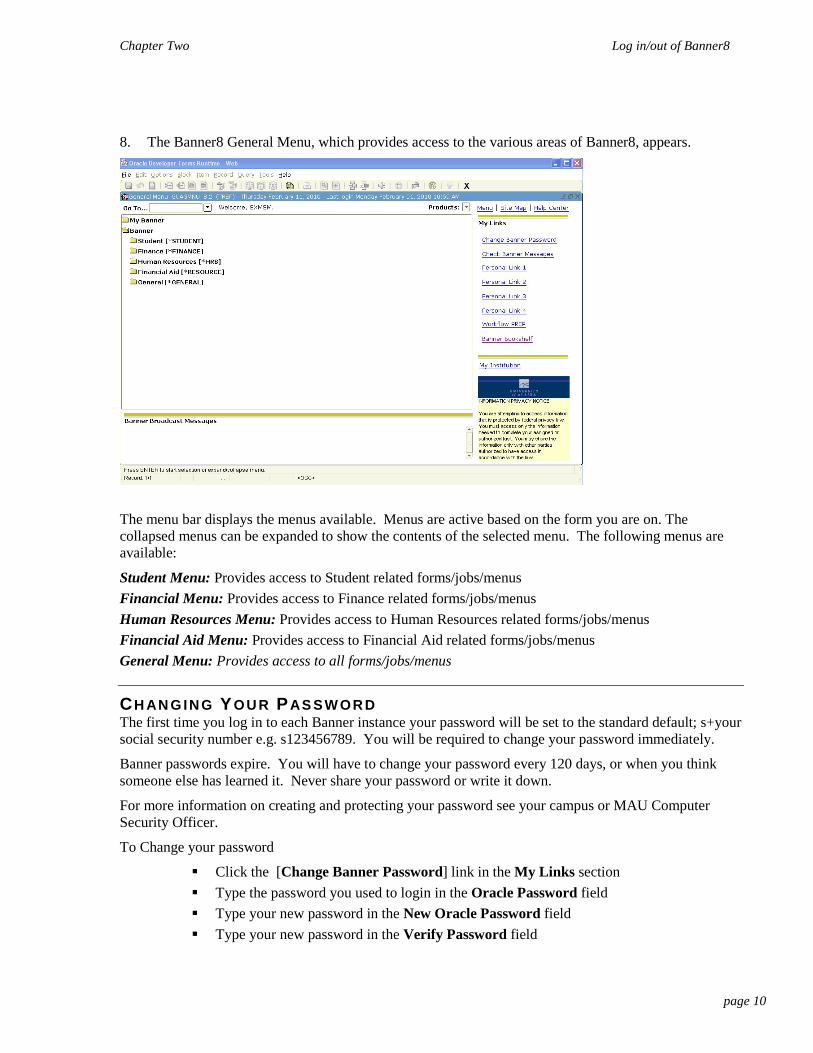
8. The Banner8 General Menu, which provides access to the various areas of Banner8, appears.
The menu bar displays the menus available. Menus are active based on the form you are on. The collapsed menus can be expanded to show the contents of the selected menu. The following menus are available:
Student Menu: Provides access to Student related forms/jobs/menus Financial Menu: Provides access to Finance related forms/jobs/menus Human Resources Menu: Provides access to Human Resources related forms/jobs/menus Financial Aid Menu: Provides access to Financial Aid related forms/jobs/menus General Menu: Provides access to all forms/jobs/menus
CH AN G IN G YOU R PAS S W OR D The first time you log in to each Banner instance your password will be set to the standard default; s+your social security number e.g. s123456789. You will be required to change your password immediately.
Banner passwords expire. You will have to change your password every 120 days, or when you think someone else has learned it. Never share your password or write it down.
For more information on creating and protecting your password see your campus or MAU Computer Security Officer.
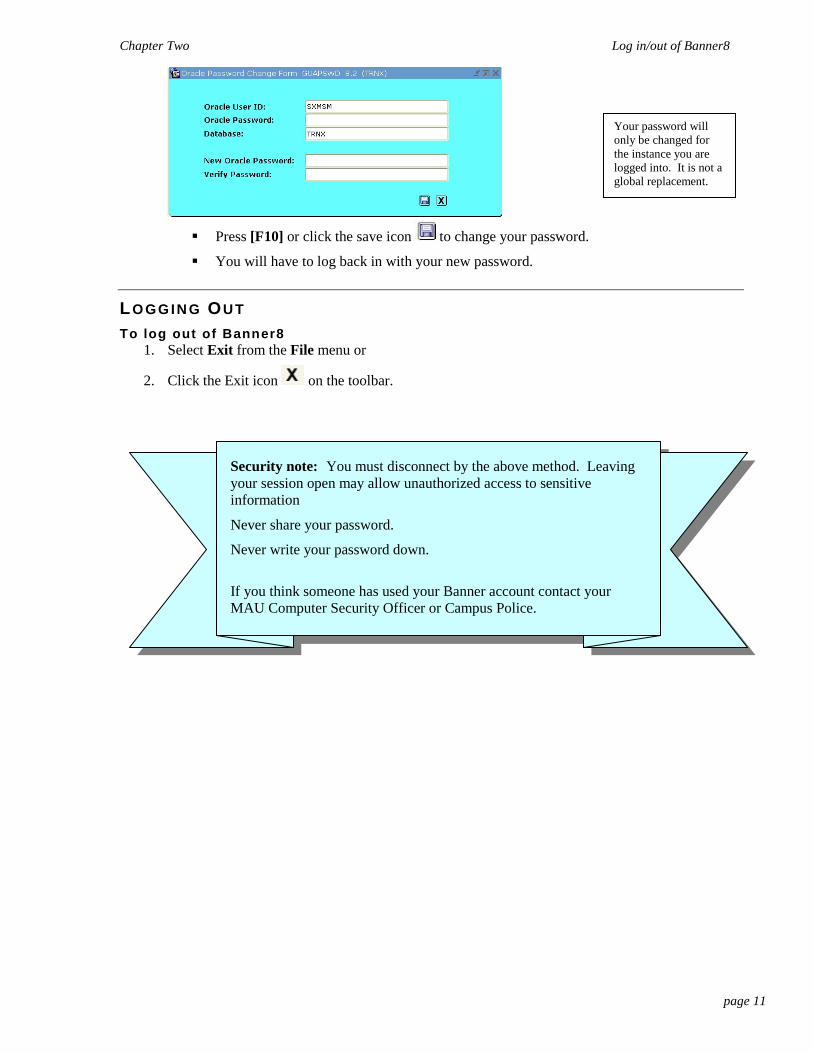
To Change your password
Click the [Change Banner Password] link in the My Links section Type the password you used to login in the Oracle Password field Type your new password in the New Oracle Password field Type your new password in the Verify Password field
Chapter Two Log in/out of Banner8
page 11
Press [F10] or click the save icon to change your password.
You will have to log back in with your new password.
LO GG IN G OU T To log out of Banner8
1. Select Exit from the File menu or
2. Click the Exit icon on the toolbar.
Security note: You must disconnect by the above method. Leaving your session open may allow unauthorized access to sensitive information
Never share your password.
Never write your password down.
If you think someone has used your Banner account contact your MAU Computer Security Officer or Campus Police.
Your password will only be changed for the instance you are logged into. It is not a global replacement.
page 12
Banner8 Interface
Chapter Three The Banner7 Interface
page 13
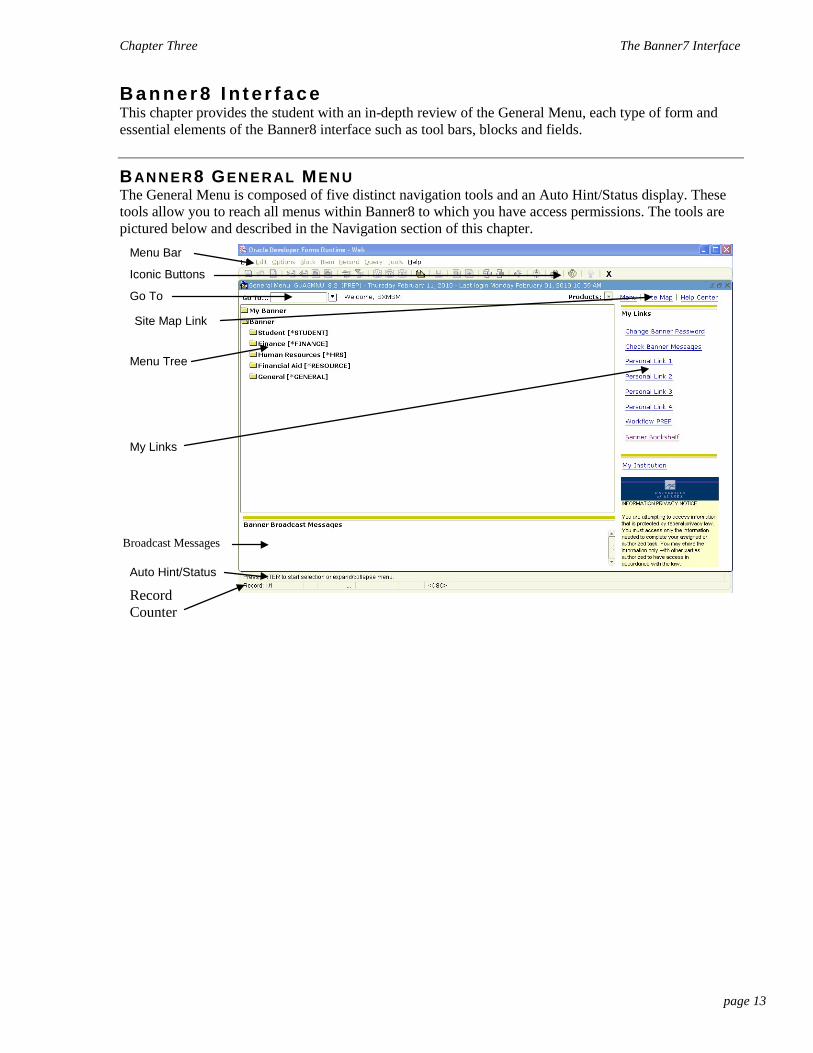
B a n n er 8 I n t e r f a ce This chapter provides the student with an in-depth review of the General Menu, each type of form and essential elements of the Banner8 interface such as tool bars, blocks and fields.
BAN N E R8 GE N E RAL ME N U The General Menu is composed of five distinct navigation tools and an Auto Hint/Status display. These tools allow you to reach all menus within Banner8 to which you have access permissions. The tools are pictured below and described in the Navigation section of this chapter.
Menu Bar
Iconic Buttons
Go To
Menu Tree
My Links
Auto Hint/Status
Record Counter
Site Map Link
Broadcast Messages

Chapter Three The Banner7 Interface
page 14
TYP E S OF BAN N E R8 FORM S As mentioned in chapter 1, there are six types of Banner8 forms. This section provides details about each form type. To see a comprehensive list of these types turn to the section on Banner8 Forms.
General Menu The GENERAL MENU provides access to a list of Banner8 menus, forms, jobs, and QuickFlows. Access the menus by clicking the link to the specific menu or expanding the menu tree. You will only see forms you have access permissions for.
Applicat ion Forms Use these forms to enter, update, and query information. This is the most common type of form. Application forms are also referred to as functional forms.
The Rush Order Form (FPARORD) is an example of an Application form.
Chapter Three The Banner7 Interface
page 15
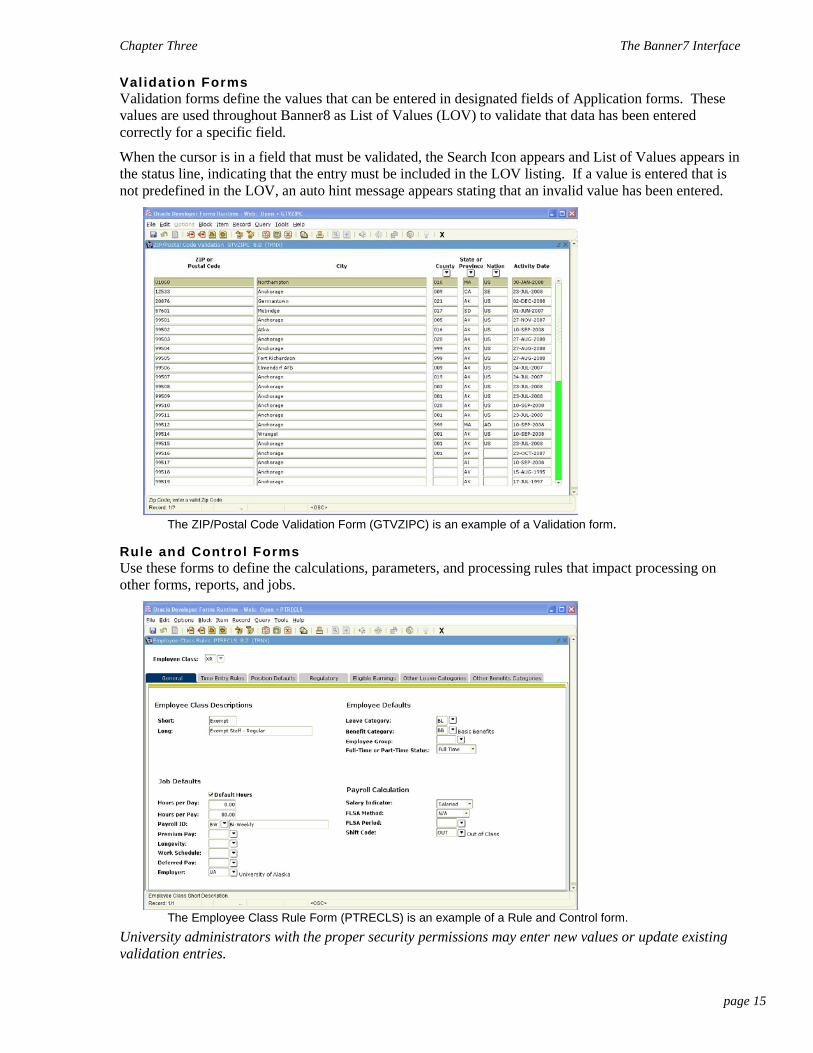
Validation Forms Validation forms define the values that can be entered in designated fields of Application forms. These values are used throughout Banner8 as List of Values (LOV) to validate that data has been entered correctly for a specific field.
When the cursor is in a field that must be validated, the Search Icon appears and List of Values appears in the status line, indicating that the entry must be included in the LOV listing. If a value is entered that is not predefined in the LOV, an auto hint message appears stating that an invalid value has been entered.
The ZIP/Postal Code Validation Form (GTVZIPC) is an example of a Validation form.
Rule and Control Forms Use these forms to define the calculations, parameters, and processing rules that impact processing on other forms, reports, and jobs.
The Employee Class Rule Form (PTRECLS) is an example of a Rule and Control form.
University administrators with the proper security permissions may enter new values or update existing validation entries.
Chapter Three The Banner7 Interface
page 16
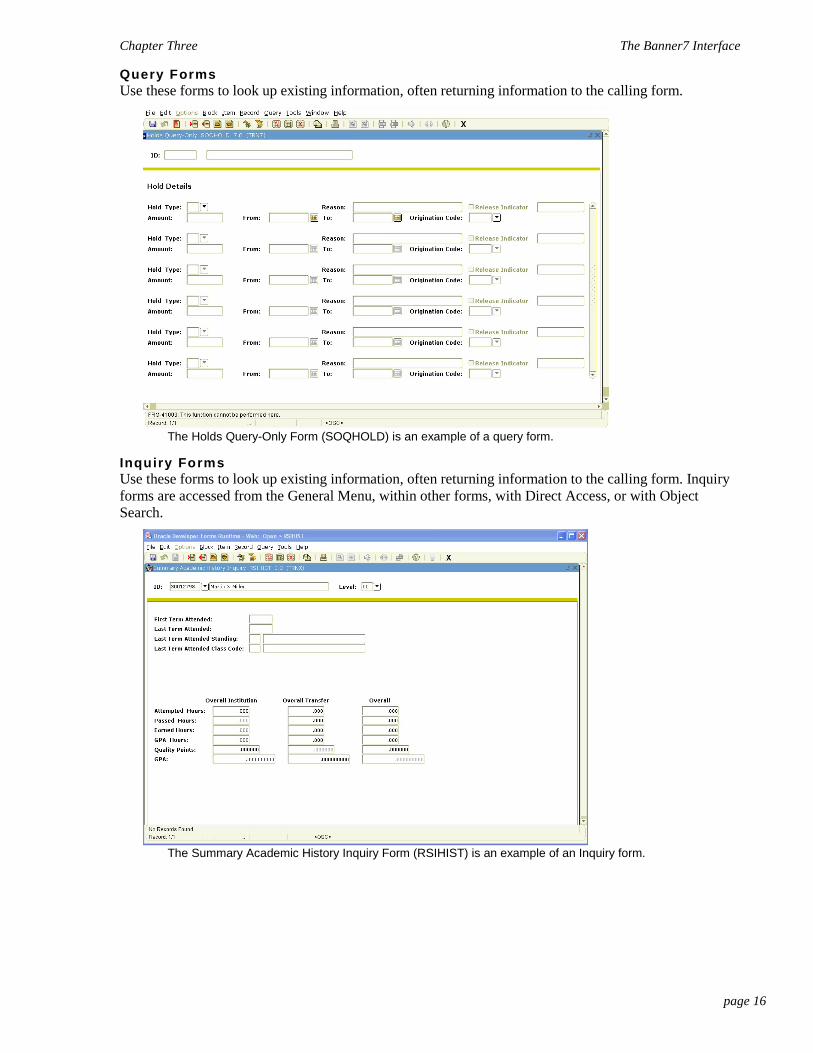
Query Forms Use these forms to look up existing information, often returning information to the calling form.
The Holds Query-Only Form (SOQHOLD) is an example of a query form.
Inquiry Forms Use these forms to look up existing information, often returning information to the calling form. Inquiry forms are accessed from the General Menu, within other forms, with Direct Access, or with Object Search.
The Summary Academic History Inquiry Form (RSIHIST) is an example of an Inquiry form.

Chapter Three The Banner7 Interface
page 17
PAR TS OF A B AN N E R8 FORM All Banner8 forms are composed of eight navigation tools, four of which are also included in the General Menu. These tools aid navigation through the various Banner forms and are pictured below.
Each navigation tool and its components are discussed below. More specific details are in the Navigation section of this workbook.
Menu Bar The menu bar is located on the top of every form and contains pull-down menus. It consists of several pull-down menus, which offers a variety of selections. If a menu is grayed out, it is not available for use at that time.
Menu Bar Tool Bar Title Bar
Key Block
Tab
Iconic Button Auto Hint/Status
Chapter Three The Banner7 Interface
page 18
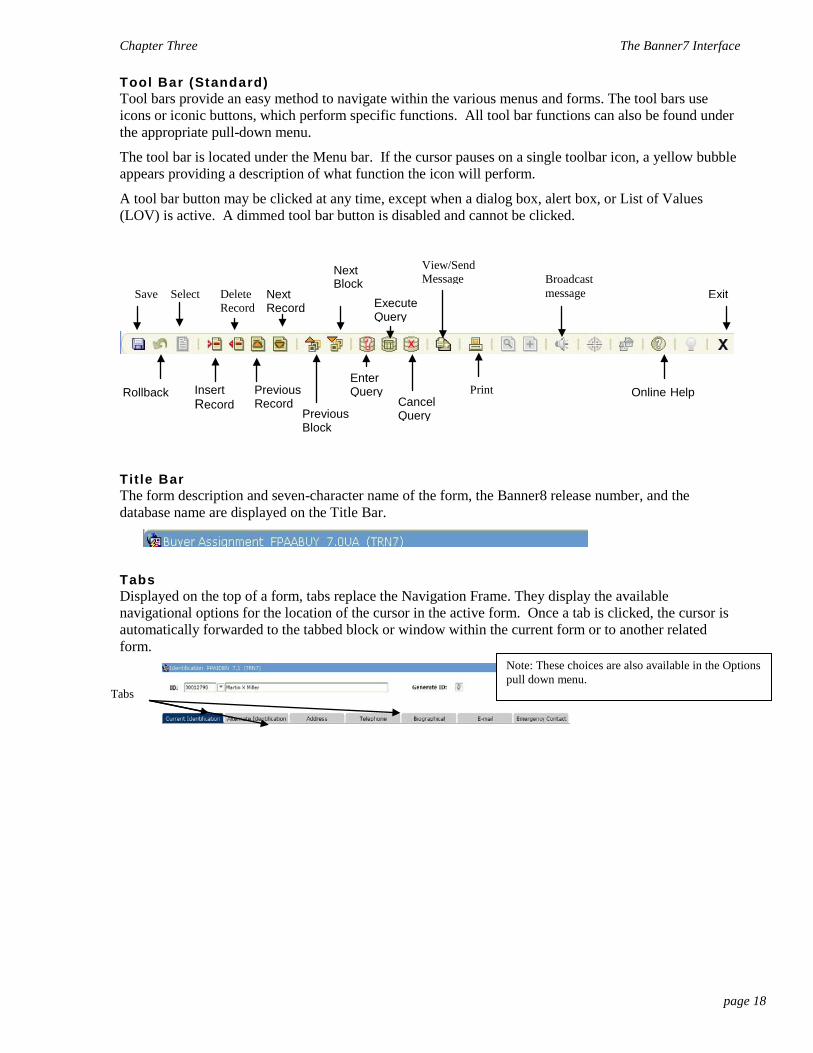
Tool Bar (Standard) Tool bars provide an easy method to navigate within the various menus and forms. The tool bars use icons or iconic buttons, which perform specific functions. All tool bar functions can also be found under the appropriate pull-down menu.
The tool bar is located under the Menu bar. If the cursor pauses on a single toolbar icon, a yellow bubble appears providing a description of what function the icon will perform.
A tool bar button may be clicked at any time, except when a dialog box, alert box, or List of Values (LOV) is active. A dimmed tool bar button is disabled and cannot be clicked.
Tit le Bar The form description and seven-character name of the form, the Banner8 release number, and the database name are displayed on the Title Bar.
Tabs Displayed on the top of a form, tabs replace the Navigation Frame. They display the available navigational options for the location of the cursor in the active form. Once a tab is clicked, the cursor is automatically forwarded to the tabbed block or window within the current form or to another related form.
Rollback
Insert Record Cancel
Query
Exit
Online Help
Next Block
Note: These choices are also available in the Options pull down menu.
Save Select Delete Record
Previous Record
Next Record
Previous Block
Enter Query
Execute Query
View/Send Message Broadcast
message
Tabs
Chapter Three The Banner7 Interface
page 19
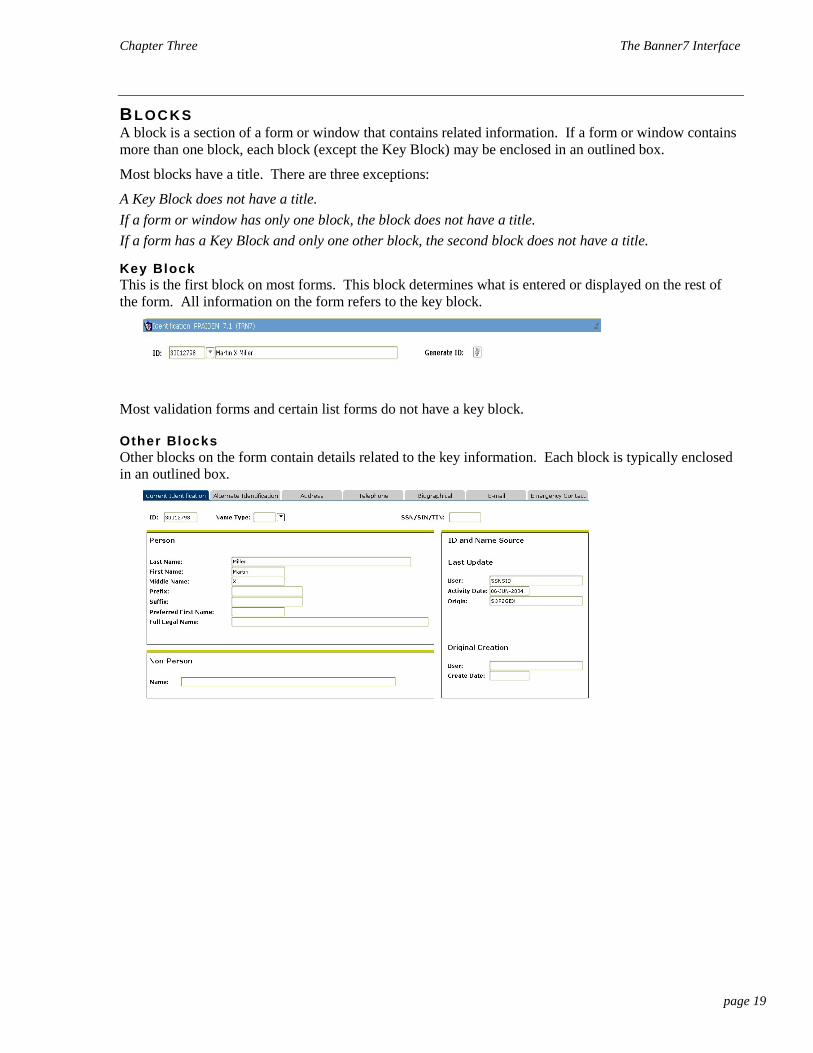
BLOC K S A block is a section of a form or window that contains related information. If a form or window contains more than one block, each block (except the Key Block) may be enclosed in an outlined box.
Most blocks have a title. There are three exceptions:
A Key Block does not have a title. If a form or window has only one block, the block does not have a title. If a form has a Key Block and only one other block, the second block does not have a title.
Key Block This is the first block on most forms. This block determines what is entered or displayed on the rest of the form. All information on the form refers to the key block.
Most validation forms and certain list forms do not have a key block.
Other Blocks Other blocks on the form contain details related to the key information. Each block is typically enclosed in an outlined box.
Chapter Three The Banner7 Interface
page 20
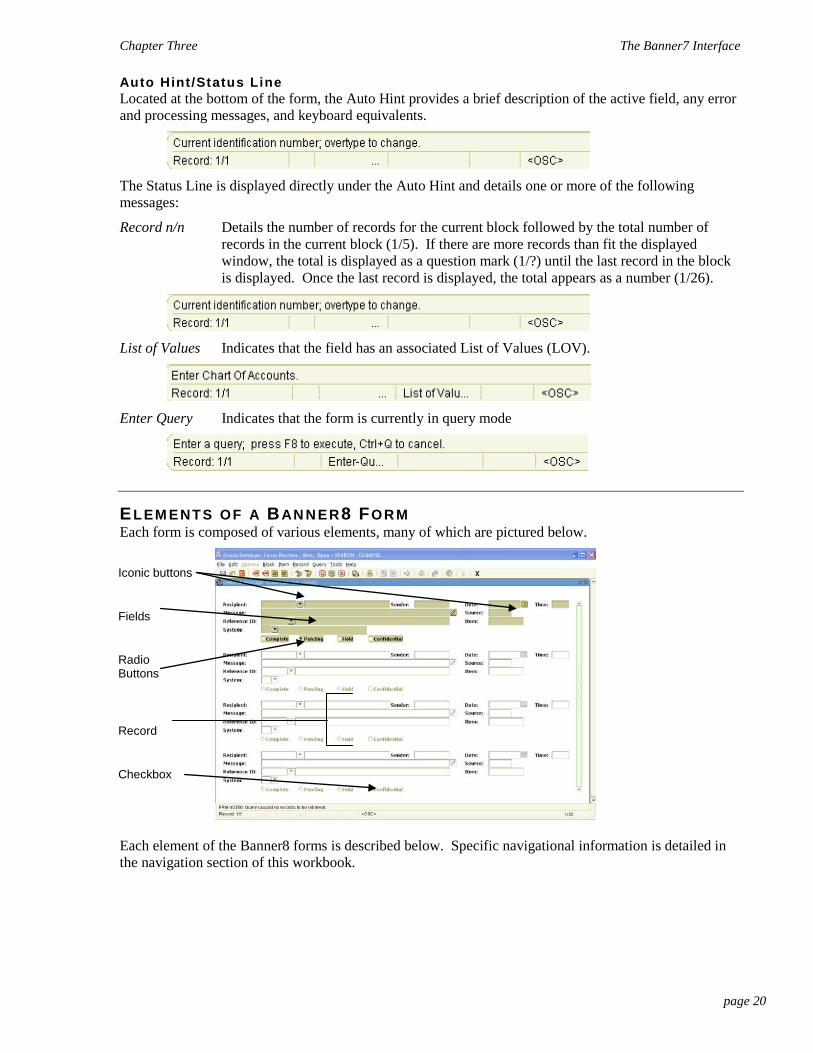
Auto Hint/Status Line Located at the bottom of the form, the Auto Hint provides a brief description of the active field, any error and processing messages, and keyboard equivalents.
The Status Line is displayed directly under the Auto Hint and details one or more of the following messages:
Record n/n Details the number of records for the current block followed by the total number of records in the current block (1/5). If there are more records than fit the displayed window, the total is displayed as a question mark (1/?) until the last record in the block is displayed. Once the last record is displayed, the total appears as a number (1/26).
List of Values Indicates that the field has an associated List of Values (LOV).
Enter Query Indicates that the form is currently in query mode
ELEM E NTS OF A BAN N E R8 FOR M Each form is composed of various elements, many of which are pictured below.
Each element of the Banner8 forms is described below. Specific navigational information is detailed in the navigation section of this workbook.
Iconic buttons
Fields
Radio Buttons
Record
Checkbox
Chapter Three The Banner7 Interface
page 21
BU TT ON S Buttons are visual images, which are used to perform an action or respond to the system. Banner8 uses iconic and response buttons. A description is provided below and more details are included in the Navigation section of this workbook.
Iconic Buttons These buttons are small squares that contain a picture (icon). Each button represents one or more actions that can be performed for the active field or record. If a button is grayed out, it is not currently available.
Response Buttons Response Buttons are shaded rectangles that appear in alert and dialog boxes. An alert box has one response button and a dialog box has two or more response buttons. A response button must be pressed to respond to the system before another action can take place.
Radio Buttons Small circles next to each data selection option indicate radio buttons. The user may select one and only one data item. When a radio button is selected, any previously selected radio button from the same data group is automatically deselected
Checkbox Checkboxes are small boxes used to enable or disable features or options. When an option is enabled, a check mark appears in the checkbox. When the option is disabled, the checkbox is empty.
Yes/no conditions are typically represented by checkboxes. Sometimes checkboxes indicate navigation to other windows. The Auto Hint at the bottom of the form will detail this information.
Record A record is a set of related fields. A street, city, state, and zip code is an example of an address record. The current record is highlighted in light yellow to indicate that it is selected. If you do not see the highlight color, verify that your color settings under the Application Set Settings are set to 16 or 24 bit color. Additional instructions are in the Appendix.
Fields Fields are areas on a form in which data can be entered, queried, changed, and displayed. The following terms further describe a field:
Enabled: Cursor may navigate to the field. Information displayed appears in black text. Disabled: Cursor may not navigate to the field. Existing data is grayed out. Enterable: Information may be entered in the field. The field is usually enabled but may be disabled in certain situations. Display only: Data may not be entered in the field. Since characters use different amounts of space, it may appear that a field has space available after the defined maximum length has been met.

Chapter Three The Banner7 Interface
page 22
Pull-down Lists Pull-down lists are used to select a field value from a list of pre-defined values. A down arrow is displayed on the right side of the field to indicate that a list is available. The Pull-down List arrow and Search Iconic button are very similar. The iconic button is separated from the field, the Pull-down List indicator is part of the field.
SC R OLL BAR S Scroll bars are used to display overflow information when a form has more information than can be displayed at one time. Scroll bars also indicate that a form has an unlimited number of repeating records.
A scroll bar has an arrow on each end and a scroll box in the middle. The position of the scroll box indicates approximately how far from the top/bottom or right/left of the window the cursor is currently located.
Vert ical Scrol l Bar A Vertical scroll bar is displayed directly to the right of the displayed records if more records are available than can be displayed in the current window or block. The Vertical scroll bar is disabled (no scroll box is displayed) if all the records appear at once.
Horizontal Scrol l Bar A Horizontal scroll bar is displayed directly under the window if more columns are available than can be displayed in the current window. The Horizontal scroll bar is disabled (no scroll bar is displayed) if all the columns appear at once.
Pull-Down List

page 23
Banner8 Navigation
Chapter Four Banner8 Navigation
page 24
B a n n er 8 Na v i g a t i o n This chapter details how to navigate within Banner8. Banner8 offers many methods to navigate and access the desired information, many of which have been introduced in the previous chapter. It is important to realize that typically there are several ways to perform a specific function.
NAV I G AT I ON ME TH OD S The Banner8 Navigation methods explained in this chapter are briefly described below:
General Menu Provides access to menus, forms, jobs, and QuickFlows.
Site Map Provides access to top level menus from the general menu.
My Banner Menu Provides access to personally selected menus, forms jobs and QuickFlows.
Tabs Provides easy access to other forms, windows, and blocks that are related to the active form, window, or block. Tabs replace the Navigation or Options Frame.
Go To… Access a menu, form, job, or QuickFlow by its name, or use the code/description lookup feature.
Object Search Provides the ability to access a form, job, or QuickFlow when only a portion of the name, description, or type is known.
Tool Bar Provides quick access to defined functions.
QuickFlow Automatically access forms that are linked in a chain.
Icons (iconic buttons) Displayed next to a field or the end of a record. Provides access to another related form or window.
Menu Bar Accessible from every form.
Mouse Use to click an iconic button, field, record, block, or window that is currently displayed.
Keystrokes The keyboard may also be used to access a form, window, block, or field.
Last 10 Quickly re-access a previously opened form. Located in the File pull-down menu.
Chapter Four Banner8 Navigation
page 25
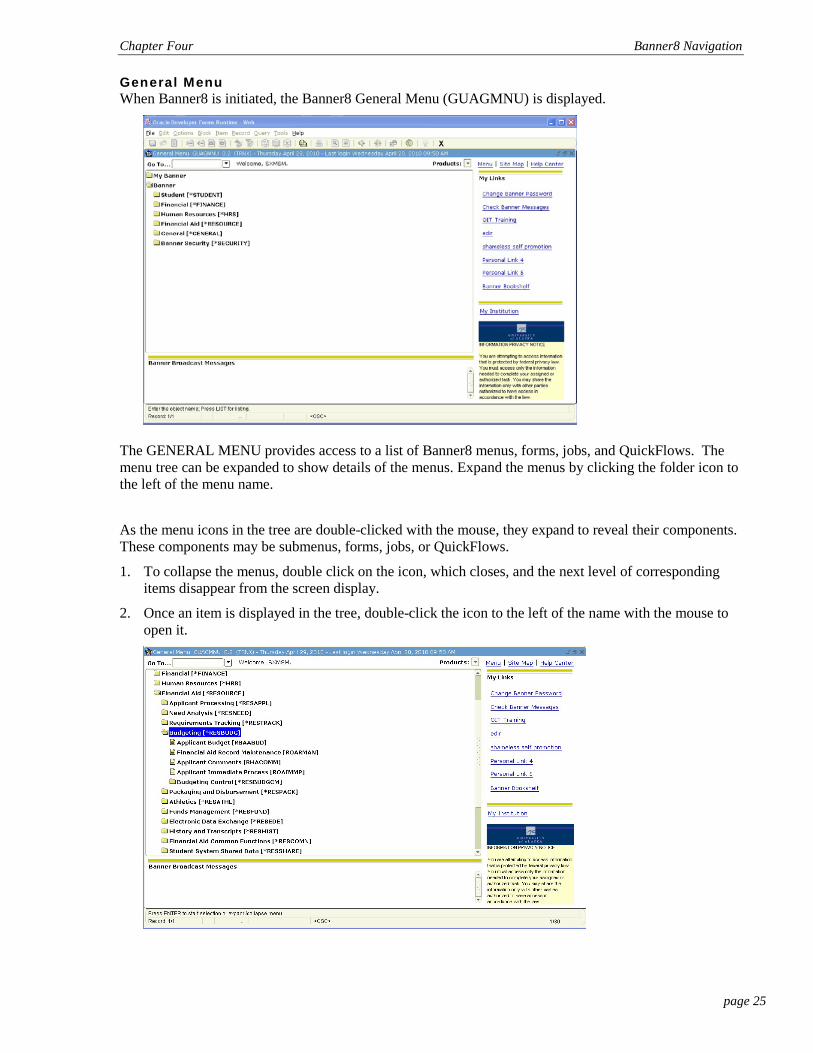
General Menu When Banner8 is initiated, the Banner8 General Menu (GUAGMNU) is displayed.
The GENERAL MENU provides access to a list of Banner8 menus, forms, jobs, and QuickFlows. The menu tree can be expanded to show details of the menus. Expand the menus by clicking the folder icon to the left of the menu name.
As the menu icons in the tree are double-clicked with the mouse, they expand to reveal their components. These components may be submenus, forms, jobs, or QuickFlows.
1. To collapse the menus, double click on the icon, which closes, and the next level of corresponding items disappear from the screen display.
2. Once an item is displayed in the tree, double-click the icon to the left of the name with the mouse to open it.

Chapter Four Banner8 Navigation
page 26
Site Map
The Site Map gives you access to the top level menus available within each functional area.
Click the [Site Map] link in the My Links frame
The Site Map appears
Double click any Menu to go to that expanded menu in the General Menu window.
Note: You may not have access to all visible menus.
UA is not using the Business Processes module.
Chapter Four Banner8 Navigation
page 27
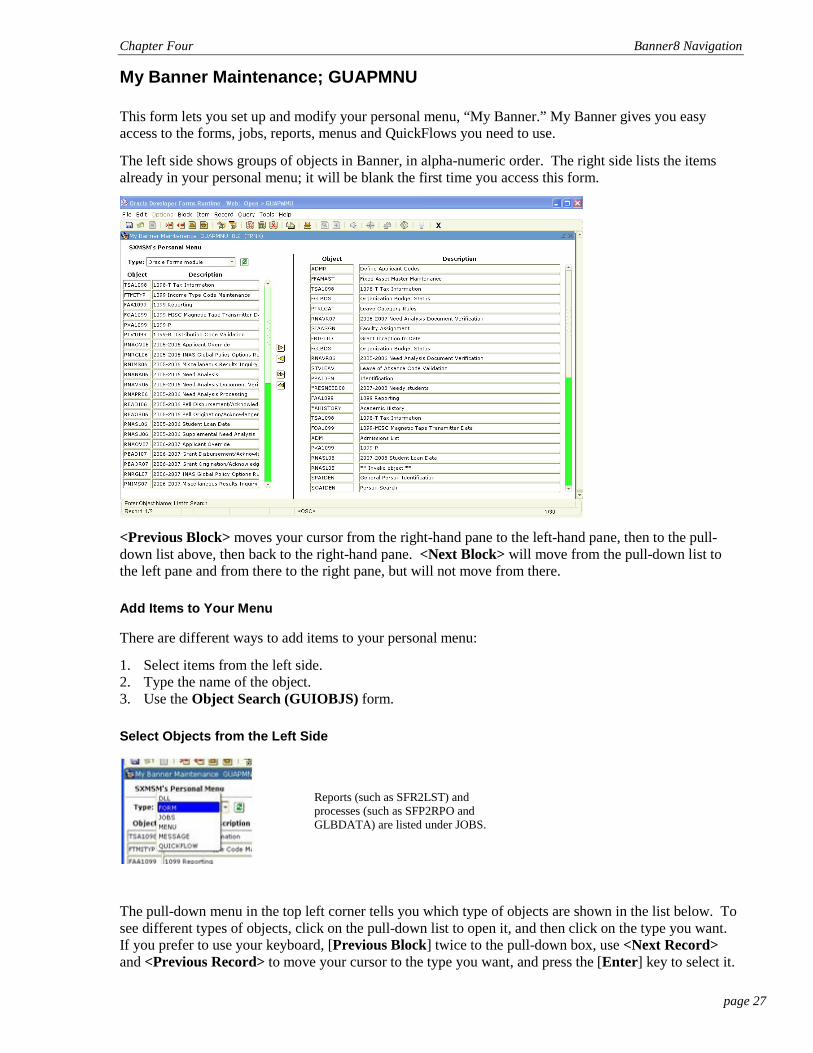
My Banner Maintenance; GUAPMNU
This form lets you set up and modify your personal menu, “My Banner.” My Banner gives you easy access to the forms, jobs, reports, menus and QuickFlows you need to use.
The left side shows groups of objects in Banner, in alpha-numeric order. The right side lists the items already in your personal menu; it will be blank the first time you access this form.
<Previous Block> moves your cursor from the right-hand pane to the left-hand pane, then to the pull-down list above, then back to the right-hand pane. <Next Block> will move from the pull-down list to the left pane and from there to the right pane, but will not move from there.
Add Items to Your Menu
There are different ways to add items to your personal menu:
1. Select items from the left side. 2. Type the name of the object. 3. Use the Object Search (GUIOBJS) form.
Select Objects from the Left Side
The pull-down menu in the top left corner tells you which type of objects are shown in the list below. To see different types of objects, click on the pull-down list to open it, and then click on the type you want. If you prefer to use your keyboard, [Previous Block] twice to the pull-down box, use <Next Record> and <Previous Record> to move your cursor to the type you want, and press the [Enter] key to select it.
Reports (such as SFR2LST) and processes (such as SFP2RPO and GLBDATA) are listed under JOBS.
Chapter Four Banner8 Navigation
page 28
The list of objects is initially in alpha-numeric order by description. If you want the list sorted by form name instead, click the Sort Object List button.
<Next Block> or click in the list of objects below. Clicking in the list may select an object: the text will turn white but not have a dark box around it. To unselect it, click on the object again.
Use <Next Record> and <Previous Record> or the vertical scroll bar to see more objects.
To see the contents of a QuickFlow, click on the QuickFlow description to select it. Right-click on the object name. A list of that object’s items—except those your account cannot access—will open. To close that list, left-click on the QuickFlow description again (that will also unselect it).
You can also do queries in the list. Make sure your cursor in the left side, but not in the pull-down menu. <Enter Query>. There are two columns—one for the name of the object, one for the description—but there is no visual marker to dividing them. If you want to do a query based on the name, leave your cursor at the left edge; if you want to do a query based on the description, <Next Field/Item> to the second column. Type what you are looking for. This search is case-sensitive; in descriptions, the first letter of each word is usually capitalized, but there are exceptions. Use % and _wildcards as needed.
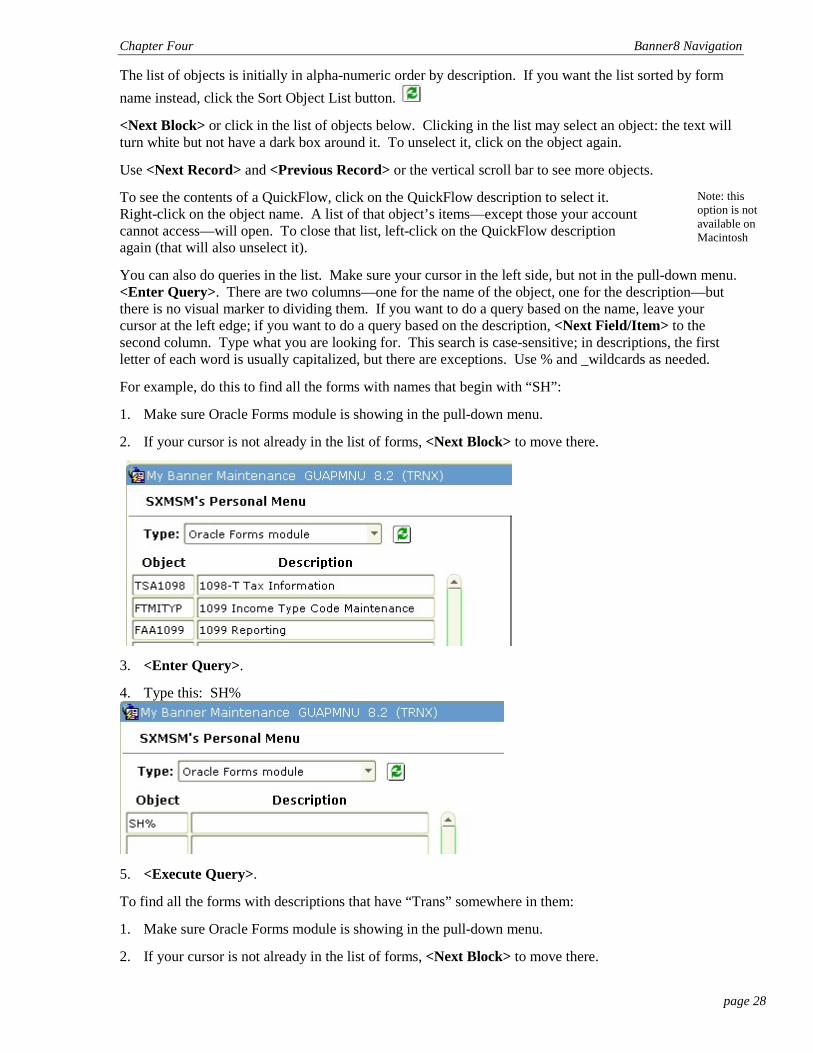
For example, do this to find all the forms with names that begin with “SH”:
1. Make sure Oracle Forms module is showing in the pull-down menu.
2. If your cursor is not already in the list of forms, <Next Block> to move there.
3. <Enter Query>.
4. Type this: SH%
5. <Execute Query>.
To find all the forms with descriptions that have “Trans” somewhere in them:
1. Make sure Oracle Forms module is showing in the pull-down menu.
2. If your cursor is not already in the list of forms, <Next Block> to move there.
Note: this option is not available on Macintosh

Chapter Four Banner8 Navigation
page 29
3. <Enter Query>.
4. <Next Field/Item>.
5. Type this: %Trans%
6. <Execute Query>.
You can also use both the name and the description in one query:
When you find an object you want to add to your personal menu, click on it once. The text will be highlighted in blue.
If you want the new object to go to a particular point in your menu, click where you want it to go in the right side. If there is already an object there, the new item will be inserted after it.
Click the Insert Selection button to add the object to your personal menu.
If you selected more than one object, all the selected objects are added to your personal menu when you click the Insert Selection button. This includes objects selected from more than one type list: for example, forms and jobs.
Chapter Four Banner8 Navigation
page 30
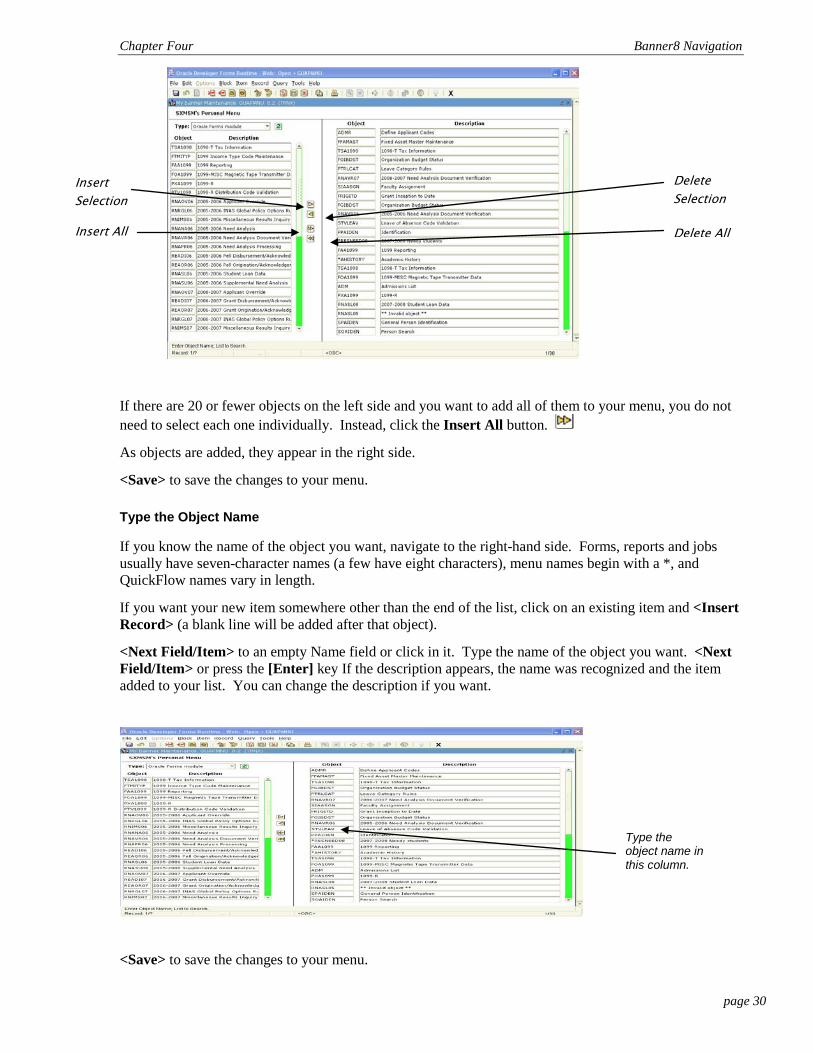
If there are 20 or fewer objects on the left side and you want to add all of them to your menu, you do not need to select each one individually. Instead, click the Insert All button.
As objects are added, they appear in the right side.
<Save> to save the changes to your menu.
Type the Object Name
If you know the name of the object you want, navigate to the right-hand side. Forms, reports and jobs usually have seven-character names (a few have eight characters), menu names begin with a *, and QuickFlow names vary in length.
If you want your new item somewhere other than the end of the list, click on an existing item and <Insert Record> (a blank line will be added after that object).
<Next Field/Item> to an empty Name field or click in it. Type the name of the object you want. <Next Field/Item> or press the [Enter] key If the description appears, the name was recognized and the item added to your list. You can change the description if you want.
<Save> to save the changes to your menu.
Type the object name in this column.
Insert Selection
Insert All
Delete Selection
Delete All

Chapter Four Banner8 Navigation
page 31
Use the Object Search (GUIOBJS) Form
If you don’t know the whole name of the object you want to add, you can use the <List> function while your cursor is in the Description or Name column. That will take you to the Object Search (GUIOBJS) form. You can do queries in that form, using parts of the object name, description and type, and the % and _ wildcards.
When you find the object you want, click on it or use <Next Record> to move your cursor to it. Then <Exit with Value> or <Count Query Hits> or double-click on the name to add it to your menu.
<Save> to save the changes to your menu.
Customize Descriptions
Once an object is in your menu, you can change the description that appears when you use My Banner: for example, you can change the description of SHA2TRU:
Original description: Transcript Request Form
New description: Unofficial Transcript (Step 1)
Click in the description you want to change. Type the changes. <Save>.
Changes made here will not affect the object description that appears in the regular menus or the title bar of the object itself.
Remove Items from Your Menu
On the right side, find the object you want to remove. Click on it once; it will be highlighted in blue.
Then click the Delete Selection button or use the <Delete Record> function.
You can also use the <Delete Record> function to delete the object your cursor is on.
To remove all the objects from your menu, you do not have to select each one. Use the Delete All button instead.
<Save> to save the changes to your menu.
Rearrange Objects
To arrange the objects in your menu in a different order, remove the object you want to move. Then add the object where you want it to go. Use the <Insert Record> function to get a blank line if necessary.
Customize Menus
If you add an existing Banner menu to My Banner, you can then make changes to that menu. These changes affect the menu shown in your My Banner listings, not the regular Banner menu area.
Add the existing menu to your personal menu using the techniques described above. Use the <Save> function to save your changes.
Select that menu by clicking on it in the right side of GUAPMNU. The text will be highlighted in blue.
Chapter Four Banner8 Navigation
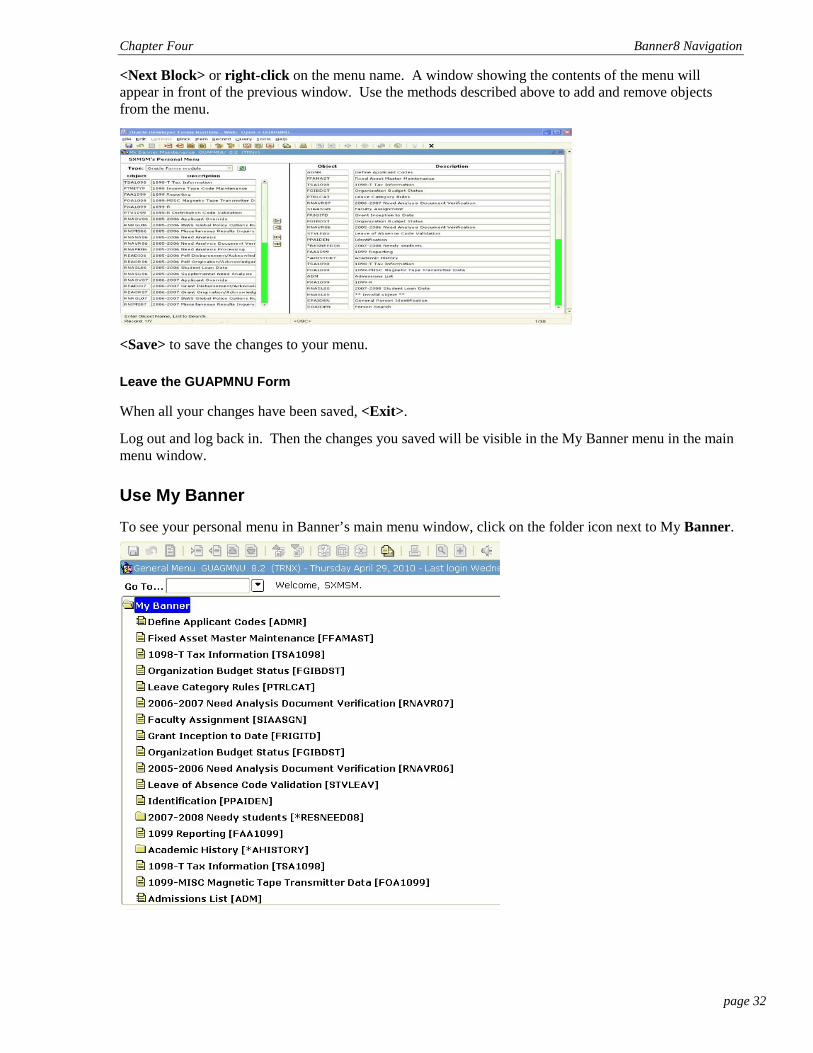
page 32
<Next Block> or right-click on the menu name. A window showing the contents of the menu will appear in front of the previous window. Use the methods described above to add and remove objects from the menu.
<Save> to save the changes to your menu.
Leave the GUAPMNU Form
When all your changes have been saved, <Exit>.
Log out and log back in. Then the changes you saved will be visible in the My Banner menu in the main menu window.
Use My Banner
To see your personal menu in Banner’s main menu window, click on the folder icon next to My Banner.
Chapter Four Banner8 Navigation
page 33
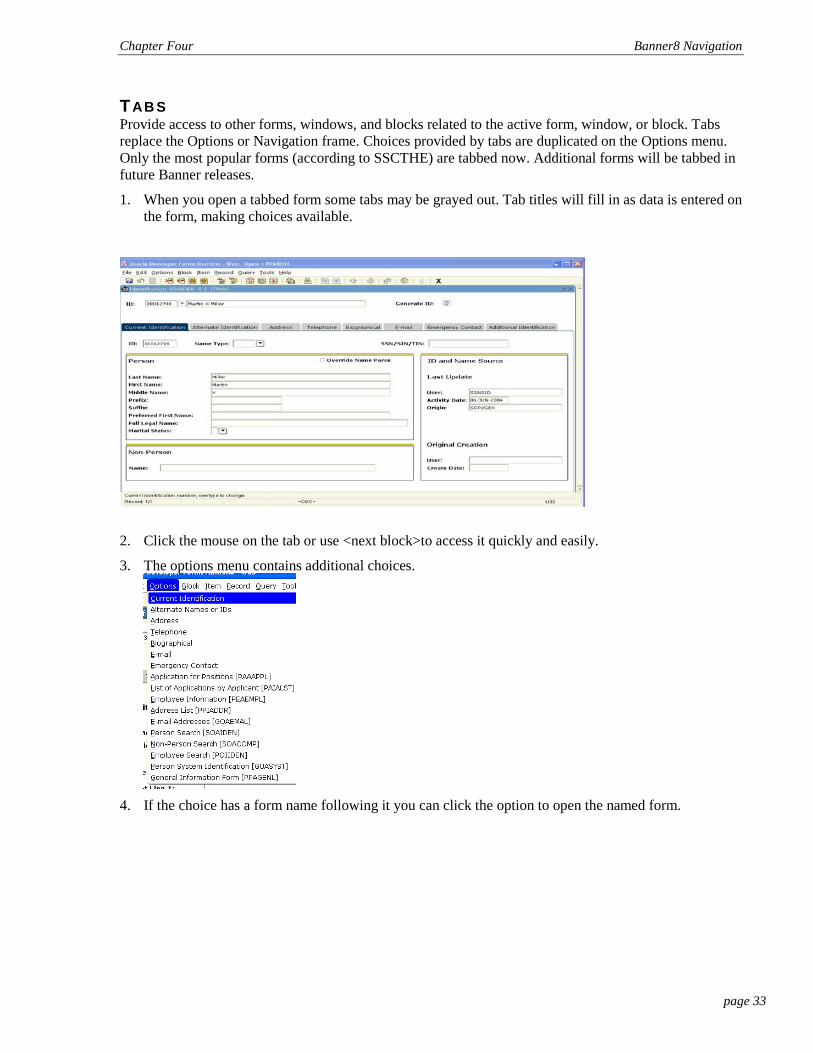
TAB S Provide access to other forms, windows, and blocks related to the active form, window, or block. Tabs replace the Options or Navigation frame. Choices provided by tabs are duplicated on the Options menu. Only the most popular forms (according to SSCTHE) are tabbed now. Additional forms will be tabbed in future Banner releases.
1. When you open a tabbed form some tabs may be grayed out. Tab titles will fill in as data is entered on the form, making choices available.
2. Click the mouse on the tab or use <next block>to access it quickly and easily.
3. The options menu contains additional choices.
4. If the choice has a form name following it you can click the option to open the named form.
Chapter Four Banner8 Navigation
page 34
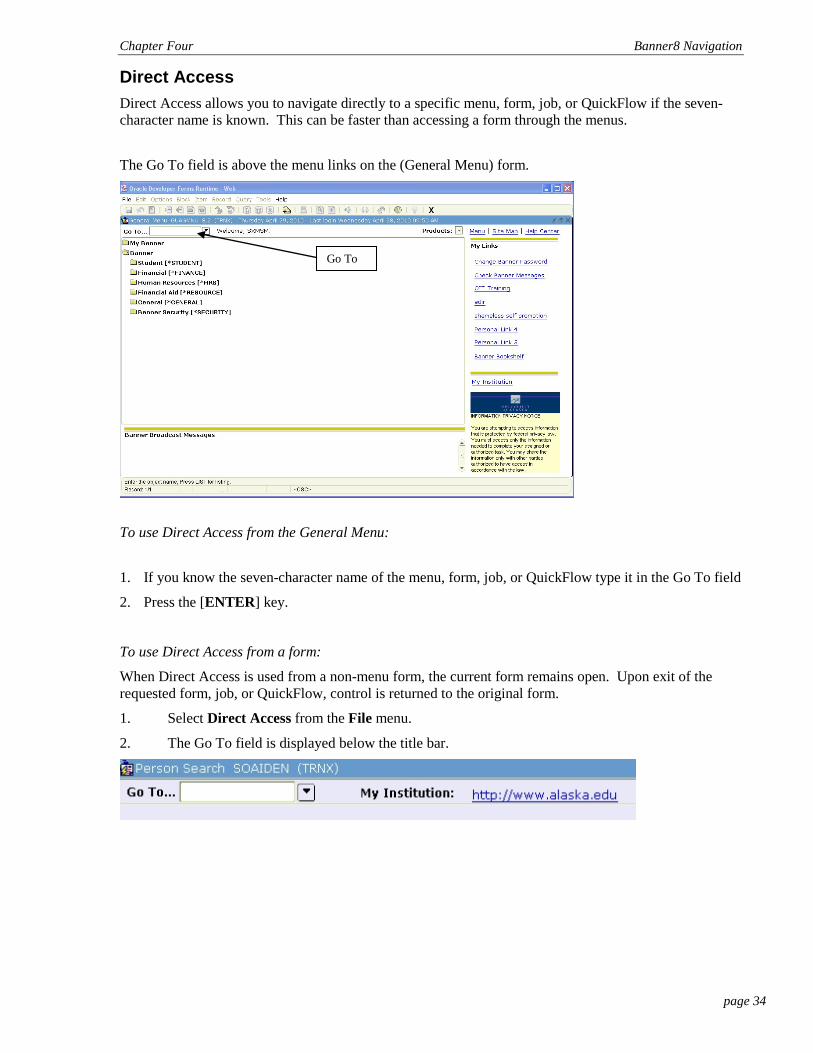
Direct Access Direct Access allows you to navigate directly to a specific menu, form, job, or QuickFlow if the seven-character name is known. This can be faster than accessing a form through the menus.
The Go To field is above the menu links on the (General Menu) form.
To use Direct Access from the General Menu:
1. If you know the seven-character name of the menu, form, job, or QuickFlow type it in the Go To field
2. Press the [ENTER] key.
To use Direct Access from a form:
When Direct Access is used from a non-menu form, the current form remains open. Upon exit of the requested form, job, or QuickFlow, control is returned to the original form.
1. Select Direct Access from the File menu.
2. The Go To field is displayed below the title bar.
Go To
Chapter Four Banner8 Navigation
page 35
3. If you know the seven-character name of the form, job, or, QuickFlow, type it in the Go To field.
If the correct or complete object name is not known, click the [SEARCH] button to initiate the Object Search Form (GUIOBJS) that provides access to a query to obtain the correct object name. See Object Search below.
4. Press the [ENTER] key.
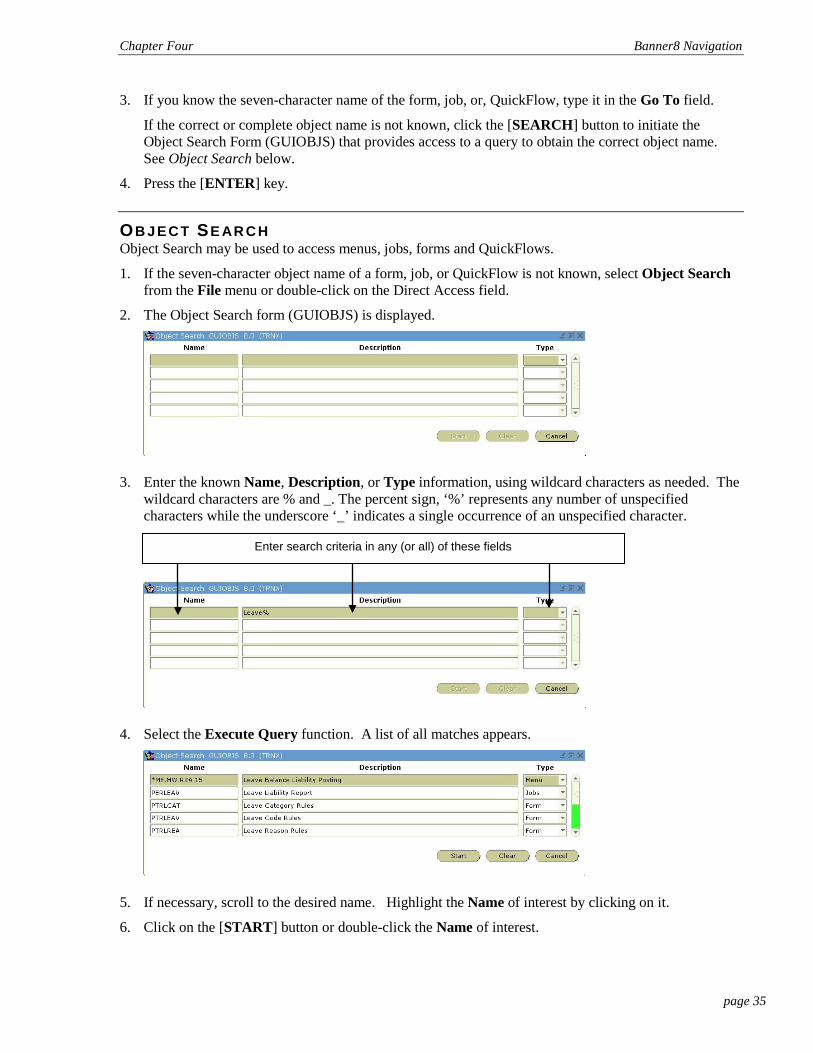
OB JE C T SE AR C H Object Search may be used to access menus, jobs, forms and QuickFlows.
1. If the seven-character object name of a form, job, or QuickFlow is not known, select Object Search from the File menu or double-click on the Direct Access field.
2. The Object Search form (GUIOBJS) is displayed.
3. Enter the known Name, Description, or Type information, using wildcard characters as needed. The wildcard characters are % and _. The percent sign, ‘%’ represents any number of unspecified characters while the underscore ‘_’ indicates a single occurrence of an unspecified character.
4. Select the Execute Query function. A list of all matches appears.
5. If necessary, scroll to the desired name. Highlight the Name of interest by clicking on it.
6. Click on the [START] button or double-click the Name of interest.
Enter search criteria in any (or all) of these fields

Chapter Four Banner8 Navigation
page 36
TO OL BAR (ST AN D AR D) The horizontal toolbar at the top of the Banner8 window provides quick and easy access to predefined functions. All functions can also be found under the appropriate pull-down menu.
The functions on the left side of the tool bar initiate many of the standard Oracle functions that are used to navigate throughout Banner8.
Rollback
Execute Query
View/Send Message
Save Select
Insert Record
Remove Record
Previous Record
Next Record
Enter Query
Cancel Query
Exit Print
Online Help
Previous Block
Next Block
Broadcast message
Chapter Four Banner8 Navigation
page 37
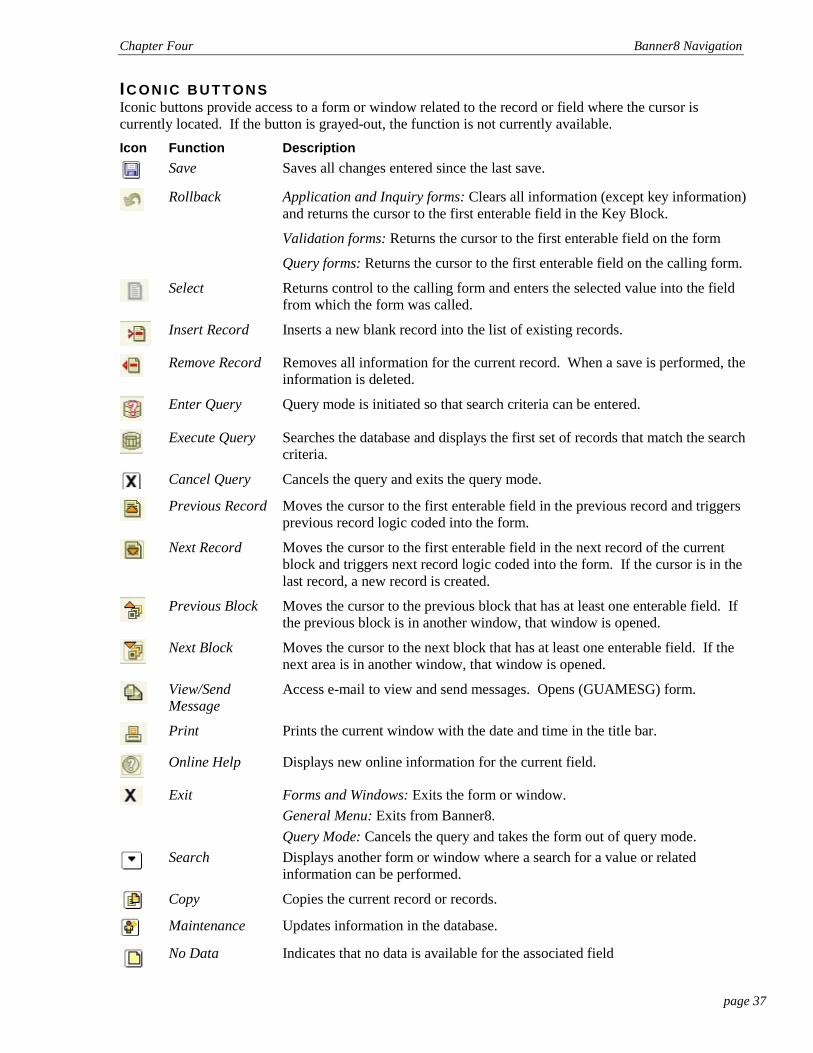
IC ON IC B U TTON S Iconic buttons provide access to a form or window related to the record or field where the cursor is currently located. If the button is grayed-out, the function is not currently available. Icon Function Description
Save Saves all changes entered since the last save.
Rollback Application and Inquiry forms: Clears all information (except key information)
and returns the cursor to the first enterable field in the Key Block.
Validation forms: Returns the cursor to the first enterable field on the form
Query forms: Returns the cursor to the first enterable field on the calling form.
Select Returns control to the calling form and enters the selected value into the field
from which the form was called.
Insert Record Inserts a new blank record into the list of existing records.
Remove Record Removes all information for the current record. When a save is performed, the
information is deleted.
Enter Query Query mode is initiated so that search criteria can be entered.
Execute Query Searches the database and displays the first set of records that match the search
criteria.
Cancel Query Cancels the query and exits the query mode.
Previous Record Moves the cursor to the first enterable field in the previous record and triggers
previous record logic coded into the form.
Next Record Moves the cursor to the first enterable field in the next record of the current block and triggers next record logic coded into the form. If the cursor is in the last record, a new record is created.
Previous Block Moves the cursor to the previous block that has at least one enterable field. If
the previous block is in another window, that window is opened.
Next Block Moves the cursor to the next block that has at least one enterable field. If the
next area is in another window, that window is opened.
View/Send Message
Access e-mail to view and send messages. Opens (GUAMESG) form.
Print Prints the current window with the date and time in the title bar.
Online Help Displays new online information for the current field.
Exit Forms and Windows: Exits the form or window. General Menu: Exits from Banner8. Query Mode: Cancels the query and takes the form out of query mode.
Search Displays another form or window where a search for a value or related information can be performed.
Copy Copies the current record or records.
Maintenance Updates information in the database.
No Data Indicates that no data is available for the associated field
Chapter Four Banner8 Navigation
page 38
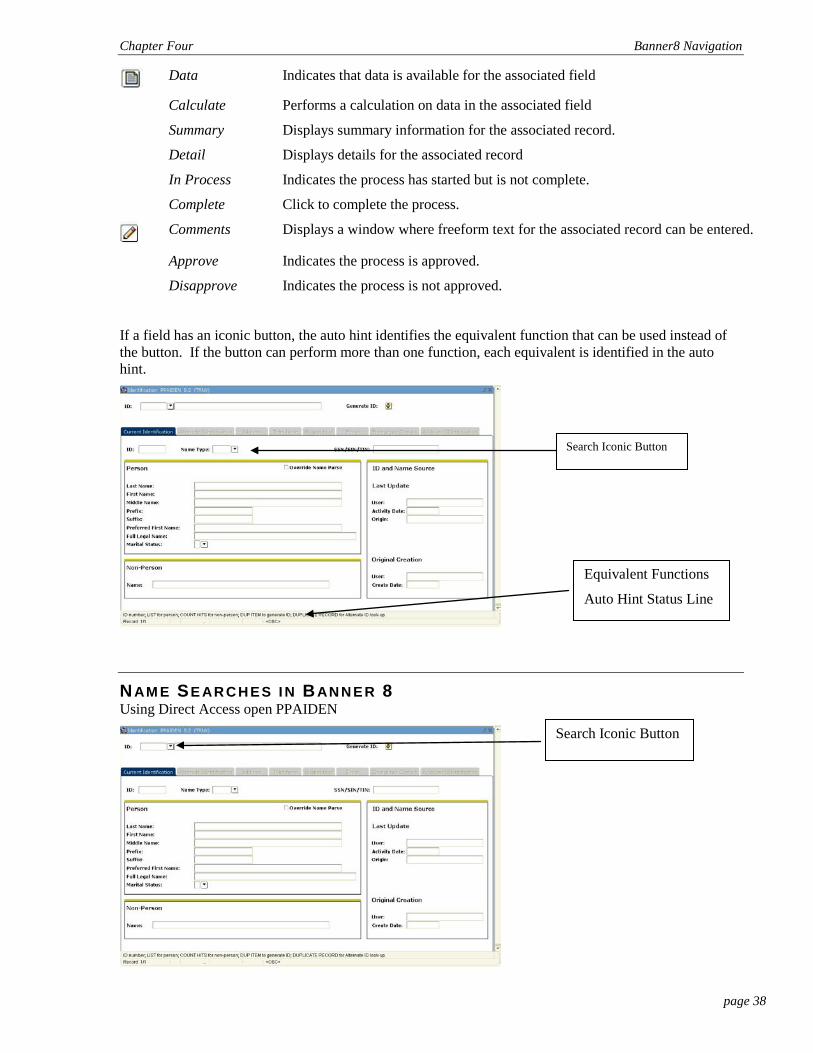
Data Indicates that data is available for the associated field
Calculate Performs a calculation on data in the associated field
Summary Displays summary information for the associated record.
Detail Displays details for the associated record
In Process Indicates the process has started but is not complete.
Complete Click to complete the process.
Comments Displays a window where freeform text for the associated record can be entered.
Approve Indicates the process is approved.
Disapprove Indicates the process is not approved.
If a field has an iconic button, the auto hint identifies the equivalent function that can be used instead of the button. If the button can perform more than one function, each equivalent is identified in the auto hint.
NAM E SE AR C H E S I N BAN N E R 8 Using Direct Access open PPAIDEN
Search Iconic Button
Equivalent Functions
Auto Hint Status Line
Search Iconic Button

Chapter Four Banner8 Navigation
page 39
1. Click the Search iconic button.
2. If the search button can perform more than one function, the button displays an Option List.
3. Click the desired option; Person Search
4. Once selected, the form SOAIDEN is presented. You may chose to make a case sensitive search with this form.
5. If an Option List is not displayed, the form appears automatically.
This search is not case sensitive, and assumes a full database search-in other words; it searches both the student and employee database. For that reason, you may wish to narrow your search down by including a first name, or using wildcards.
Tab to the Last Name field and enter [m%]
Tab to the First Name field and enter [martin]
Tab to the Middle Name field and enter [x]
Press the [F8] key to execute your query.
Some searches are case sensitive. If you do not see the radio button for selecting sensitive/non sensitive the search IS case sensitive.
Note: always use a % after a last name even if you think you know the full name.
The % wildcard will catch suffixes like Jr. or III.

Chapter Four Banner8 Navigation
page 40
After your search results come back you can double-click the name you want or highlight it and click the Select Icon to return the data to your calling form. This is known as “Exiting with value”.
Chapter Four Banner8 Navigation
page 41
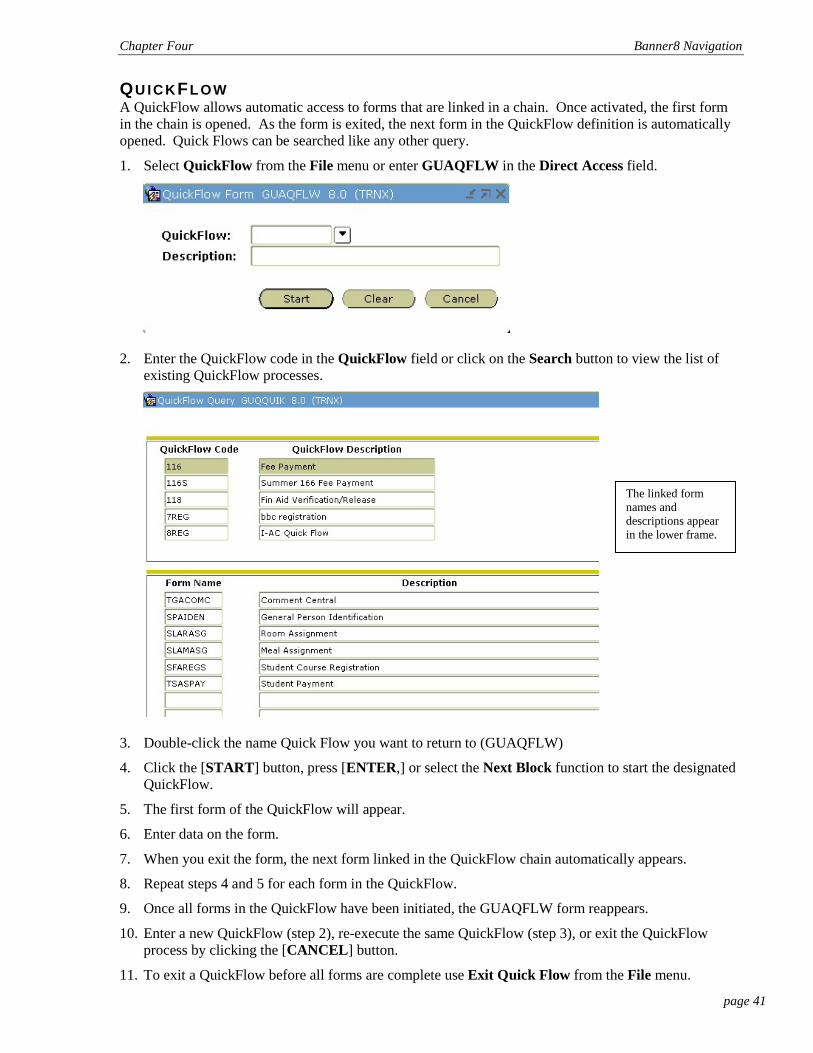
QU IC KFL OW A QuickFlow allows automatic access to forms that are linked in a chain. Once activated, the first form in the chain is opened. As the form is exited, the next form in the QuickFlow definition is automatically opened. Quick Flows can be searched like any other query.
1. Select QuickFlow from the File menu or enter GUAQFLW in the Direct Access field.
2. Enter the QuickFlow code in the QuickFlow field or click on the Search button to view the list of existing QuickFlow processes.
3. Double-click the name Quick Flow you want to return to (GUAQFLW)
4. Click the [START] button, press [ENTER,] or select the Next Block function to start the designated QuickFlow.
5. The first form of the QuickFlow will appear.
6. Enter data on the form.
7. When you exit the form, the next form linked in the QuickFlow chain automatically appears.
8. Repeat steps 4 and 5 for each form in the QuickFlow.
9. Once all forms in the QuickFlow have been initiated, the GUAQFLW form reappears.
10. Enter a new QuickFlow (step 2), re-execute the same QuickFlow (step 3), or exit the QuickFlow process by clicking the [CANCEL] button.
11. To exit a QuickFlow before all forms are complete use Exit Quick Flow from the File menu.
The linked form names and descriptions appear in the lower frame.
Chapter Four Banner8 Navigation
page 42
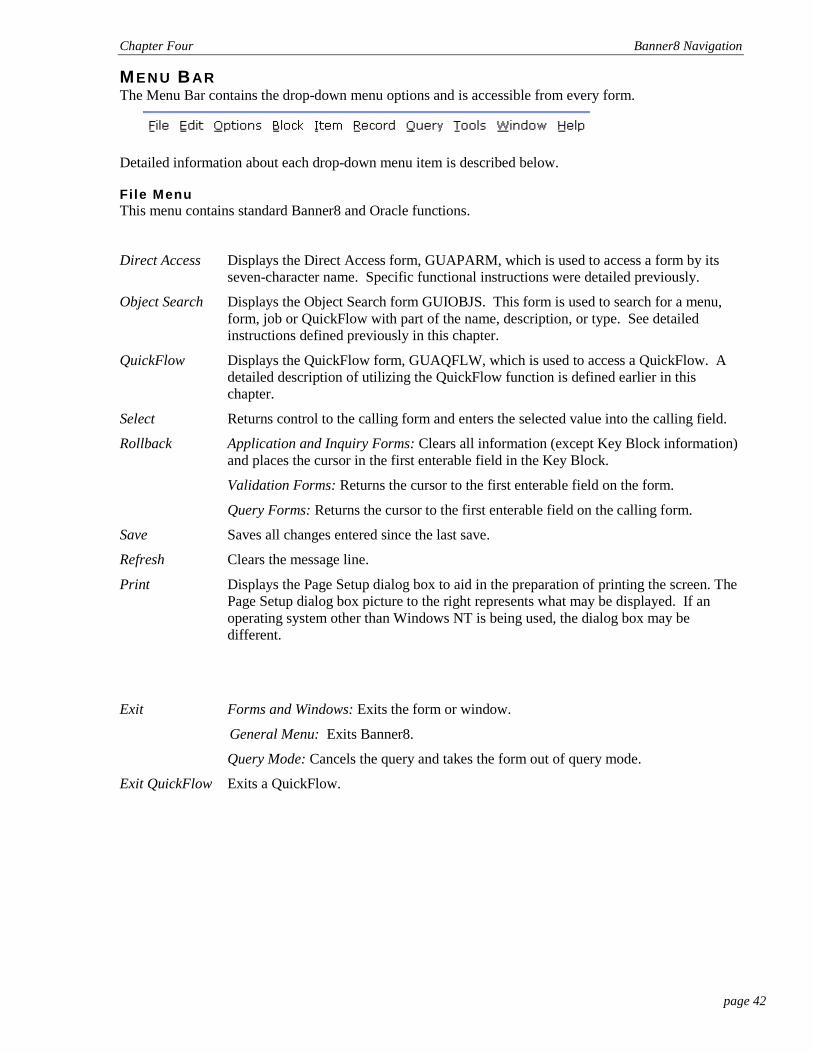
ME N U BAR The Menu Bar contains the drop-down menu options and is accessible from every form.
Detailed information about each drop-down menu item is described below.
File Menu This menu contains standard Banner8 and Oracle functions.
Direct Access Displays the Direct Access form, GUAPARM, which is used to access a form by its seven-character name. Specific functional instructions were detailed previously.
Object Search Displays the Object Search form GUIOBJS. This form is used to search for a menu, form, job or QuickFlow with part of the name, description, or type. See detailed instructions defined previously in this chapter.
QuickFlow Displays the QuickFlow form, GUAQFLW, which is used to access a QuickFlow. A detailed description of utilizing the QuickFlow function is defined earlier in this chapter.
Select Returns control to the calling form and enters the selected value into the calling field.
Rollback Application and Inquiry Forms: Clears all information (except Key Block information) and places the cursor in the first enterable field in the Key Block.
Validation Forms: Returns the cursor to the first enterable field on the form.
Query Forms: Returns the cursor to the first enterable field on the calling form.
Save Saves all changes entered since the last save.
Refresh Clears the message line.
Print Displays the Page Setup dialog box to aid in the preparation of printing the screen. The Page Setup dialog box picture to the right represents what may be displayed. If an operating system other than Windows NT is being used, the dialog box may be different.
Exit Forms and Windows: Exits the form or window.
General Menu: Exits Banner8.
Query Mode: Cancels the query and takes the form out of query mode.
Exit QuickFlow Exits a QuickFlow.
Chapter Four Banner8 Navigation
page 43
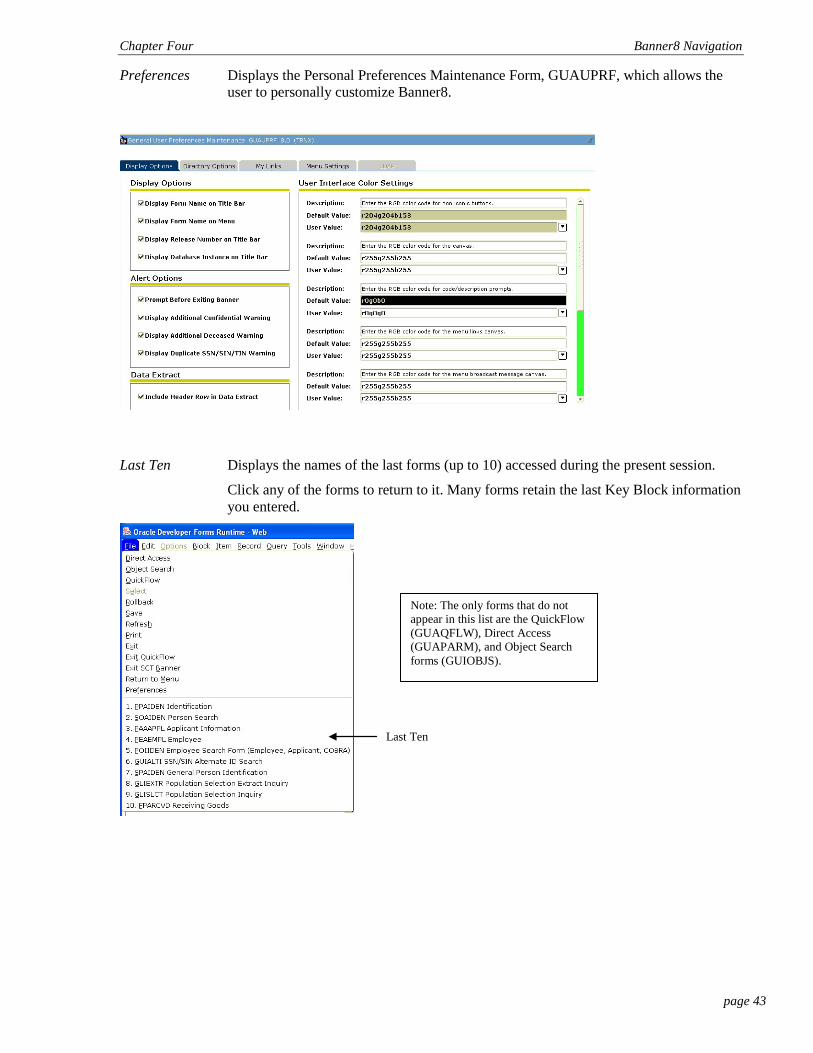
Preferences Displays the Personal Preferences Maintenance Form, GUAUPRF, which allows the user to personally customize Banner8.
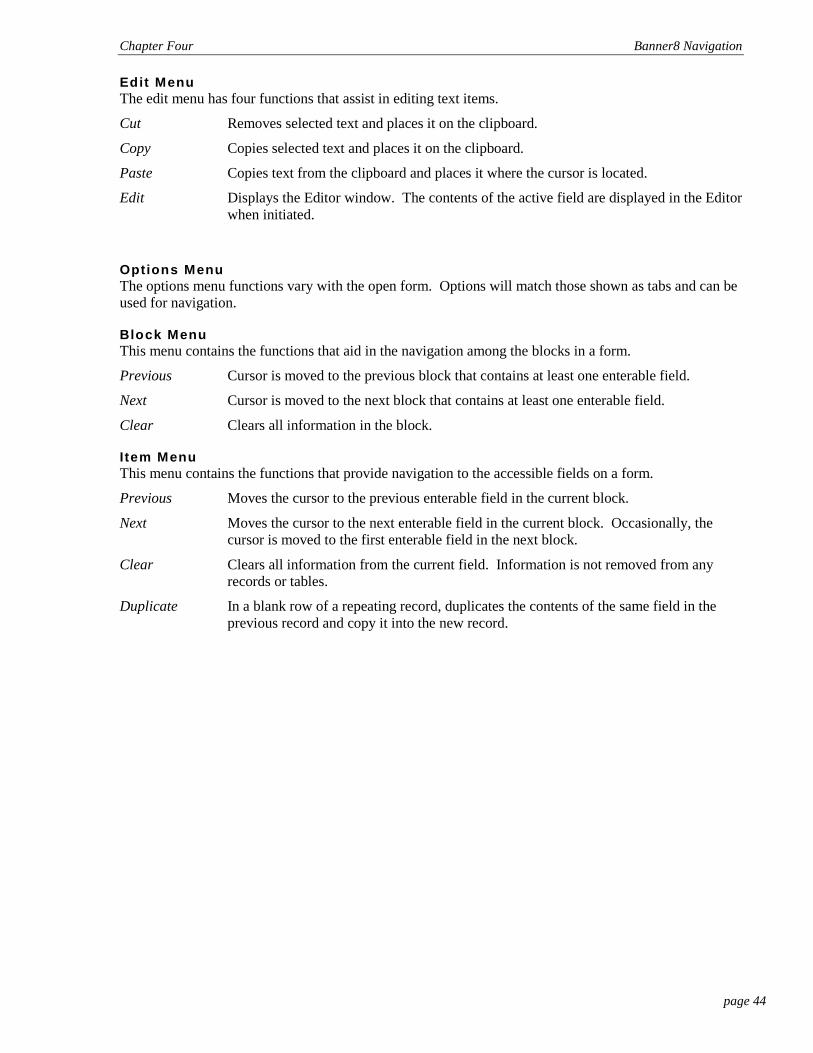
Last Ten Displays the names of the last forms (up to 10) accessed during the present session.
Click any of the forms to return to it. Many forms retain the last Key Block information you entered.
Last Ten
Note: The only forms that do not appear in this list are the QuickFlow (GUAQFLW), Direct Access (GUAPARM), and Object Search forms (GUIOBJS).
Chapter Four Banner8 Navigation
page 44
Edit Menu The edit menu has four functions that assist in editing text items.
Cut Removes selected text and places it on the clipboard.
Copy Copies selected text and places it on the clipboard.
Paste Copies text from the clipboard and places it where the cursor is located.
Edit Displays the Editor window. The contents of the active field are displayed in the Editor when initiated.
Options Menu The options menu functions vary with the open form. Options will match those shown as tabs and can be used for navigation.
Block Menu This menu contains the functions that aid in the navigation among the blocks in a form.
Previous Cursor is moved to the previous block that contains at least one enterable field.
Next Cursor is moved to the next block that contains at least one enterable field.
Clear Clears all information in the block.
I tem Menu This menu contains the functions that provide navigation to the accessible fields on a form.
Previous Moves the cursor to the previous enterable field in the current block.
Next Moves the cursor to the next enterable field in the current block. Occasionally, the cursor is moved to the first enterable field in the next block.
Clear Clears all information from the current field. Information is not removed from any records or tables.
Duplicate In a blank row of a repeating record, duplicates the contents of the same field in the previous record and copy it into the new record.
Chapter Four Banner8 Navigation
page 45
Record Menu This menu contains the functions that provide access to records in a form.
Previous Moves the cursor to the first enterable field in the previous record in the current block.
Next Moves the cursor to the first enterable field in the next record of the current block. If the cursor is on the last record, a new record is created.
Scroll Up Scrolls up the list of repeating records placing the first record near the bottom of the list.
Scroll Down Scrolls down the list of records, putting the last record near the top of the list.
Clear Clears all fields in the current record. The information is not removed from any records or tables.
Remove Removes all information from the current record. When the Save function is initiated, this information is permanently deleted.
Insert Inserts a new, blank record into the list of existing records.
Duplicate Duplicates the contents of all fields in the current record and copies them into a new record.
Lock Temporarily locks the content of the record so that another Banner8 user cannot update it. The Save, Rollback, and Exit functions release the lock.
Query Menu This menu contains the functions to retrieve information from the database based on specified criteria.
Enter Initiates query mode and allows entry of a search criteria.
Execute Queries the database for all records that match the specified search criteria.
Last Criteria Enters the criteria from the last search. This is only enabled in query mode.
Cancel Cancels the query and exits query mode.
Count Hits Counts the number of records that meet the specified search criteria and displays the number in the Auto Hint.
Fetch Next Set Retrieves the next set of records if more records which meet the search criteria than fit in the window are found.
Chapter Four Banner8 Navigation
page 46
Help Menu This menu contains the Banner8 Help tools.
Online Help Provides access to the Banner8 tools so that a user may troubleshoot problems. This option is disabled if Online Help is not available for the form.
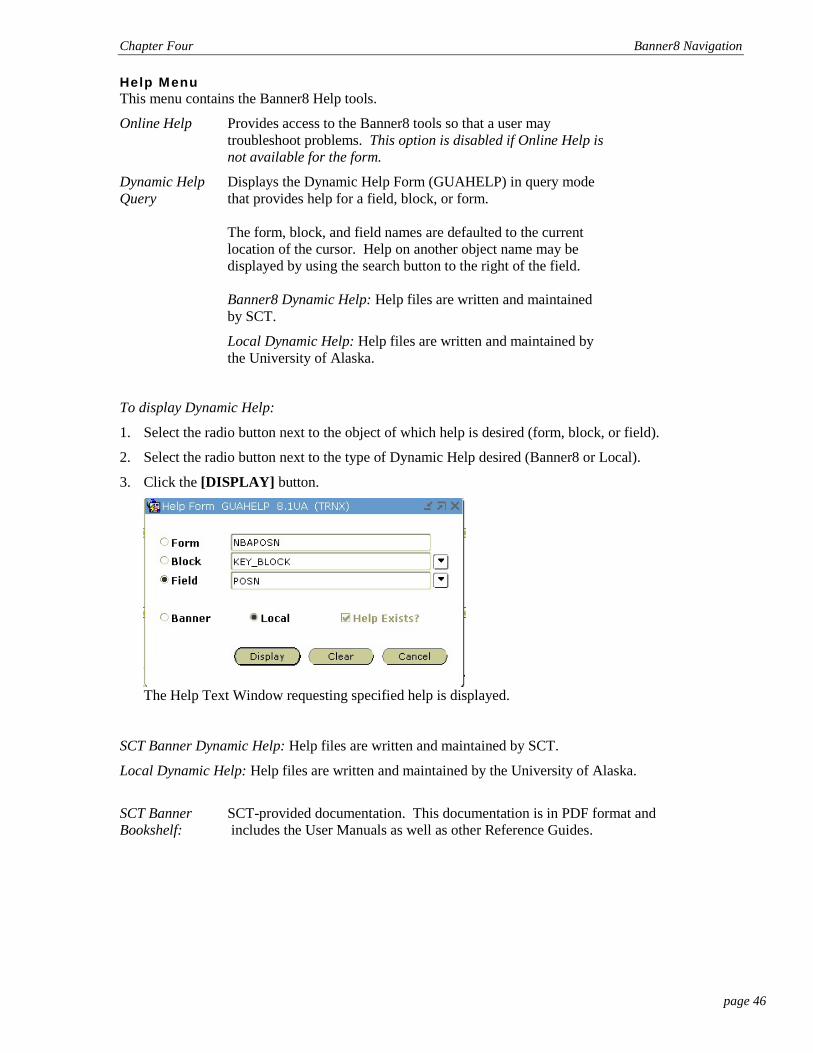
Dynamic Help Displays the Dynamic Help Form (GUAHELP) in query mode Query that provides help for a field, block, or form.
The form, block, and field names are defaulted to the current location of the cursor. Help on another object name may be displayed by using the search button to the right of the field.
Banner8 Dynamic Help: Help files are written and maintained
by SCT.
Local Dynamic Help: Help files are written and maintained by the University of Alaska.
To display Dynamic Help:
1. Select the radio button next to the object of which help is desired (form, block, or field).
2. Select the radio button next to the type of Dynamic Help desired (Banner8 or Local).
3. Click the [DISPLAY] button.
The Help Text Window requesting specified help is displayed.
SCT Banner Dynamic Help: Help files are written and maintained by SCT.
Local Dynamic Help: Help files are written and maintained by the University of Alaska.
SCT Banner SCT-provided documentation. This documentation is in PDF format and Bookshelf: includes the User Manuals as well as other Reference Guides.
Chapter Four Banner8 Navigation
page 47
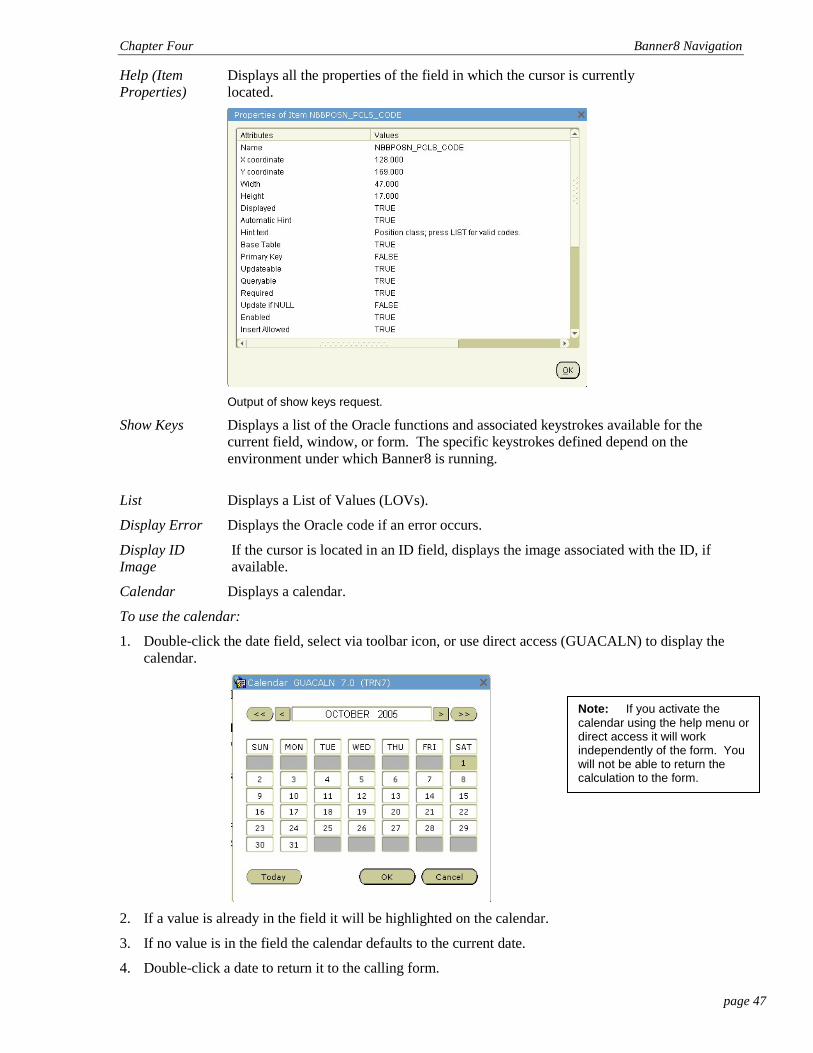
Help (Item Displays all the properties of the field in which the cursor is currently Properties) located.
Output of show keys request.
Show Keys Displays a list of the Oracle functions and associated keystrokes available for the current field, window, or form. The specific keystrokes defined depend on the environment under which Banner8 is running.
List Displays a List of Values (LOVs).
Display Error Displays the Oracle code if an error occurs.
Display ID If the cursor is located in an ID field, displays the image associated with the ID, if Image available.
Calendar Displays a calendar.
To use the calendar:
1. Double-click the date field, select via toolbar icon, or use direct access (GUACALN) to display the calendar.
2. If a value is already in the field it will be highlighted on the calendar.
3. If no value is in the field the calendar defaults to the current date.
4. Double-click a date to return it to the calling form.
Note: If you activate the calendar using the help menu or direct access it will work independently of the form. You will not be able to return the calculation to the form.
Chapter Four Banner8 Navigation
page 48
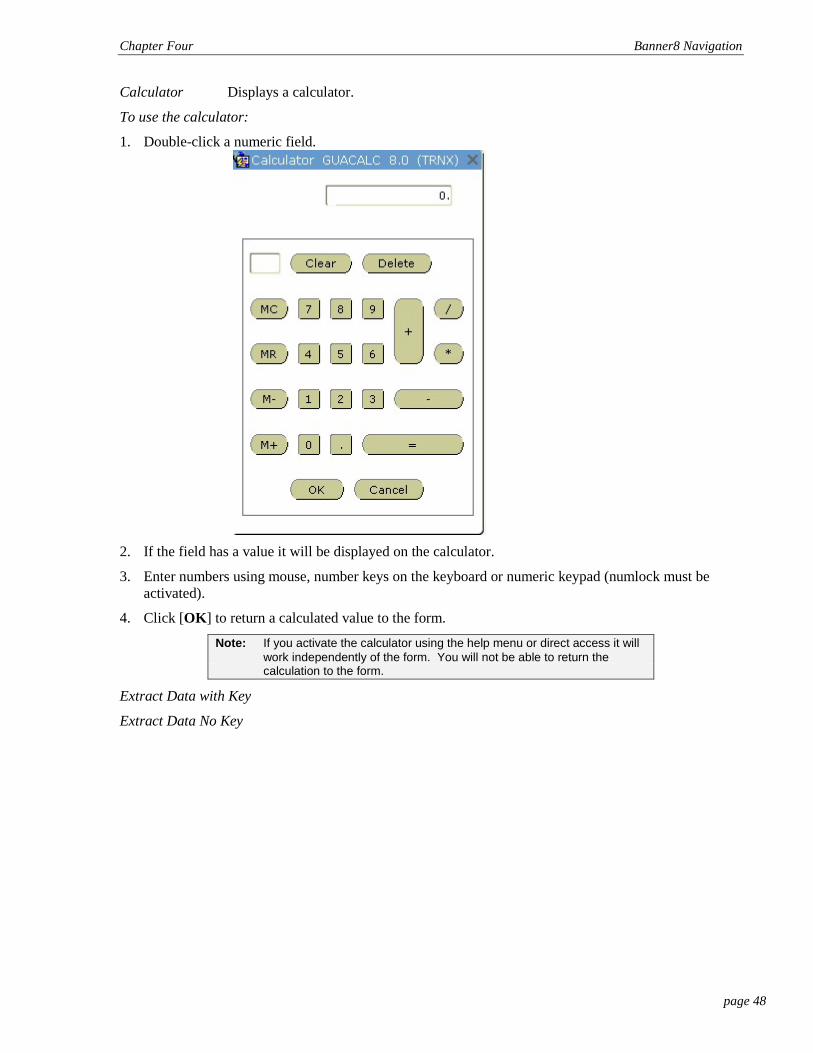
Calculator Displays a calculator.
To use the calculator:
1. Double-click a numeric field.
2. If the field has a value it will be displayed on the calculator.
3. Enter numbers using mouse, number keys on the keyboard or numeric keypad (numlock must be activated).
4. Click [OK] to return a calculated value to the form.
Note: If you activate the calculator using the help menu or direct access it will work independently of the form. You will not be able to return the calculation to the form.
Extract Data with Key
Extract Data No Key
Chapter Four Banner8 Navigation
page 49
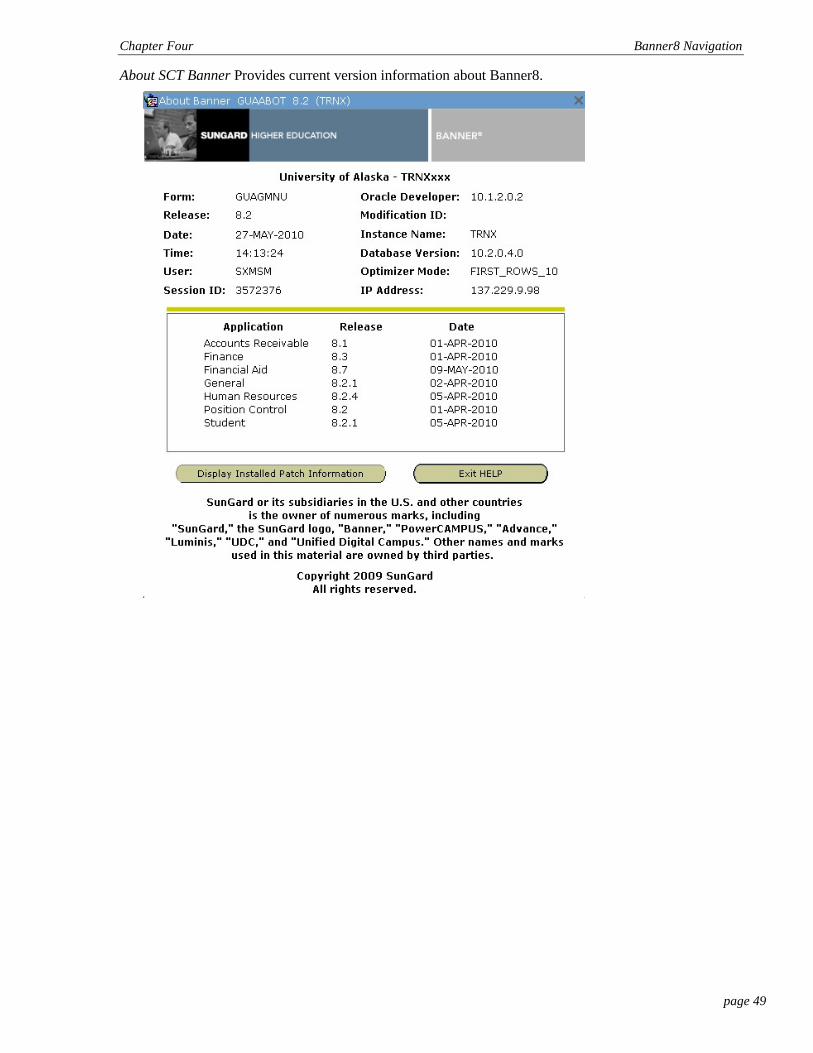
About SCT Banner Provides current version information about Banner8.
Chapter Four Banner8 Navigation
page 50
KE YS TR OK E S A keyboard equivalent of an Oracle function may be used to access a form, window, block, or field.
To access a form with a keyboard equivalent:
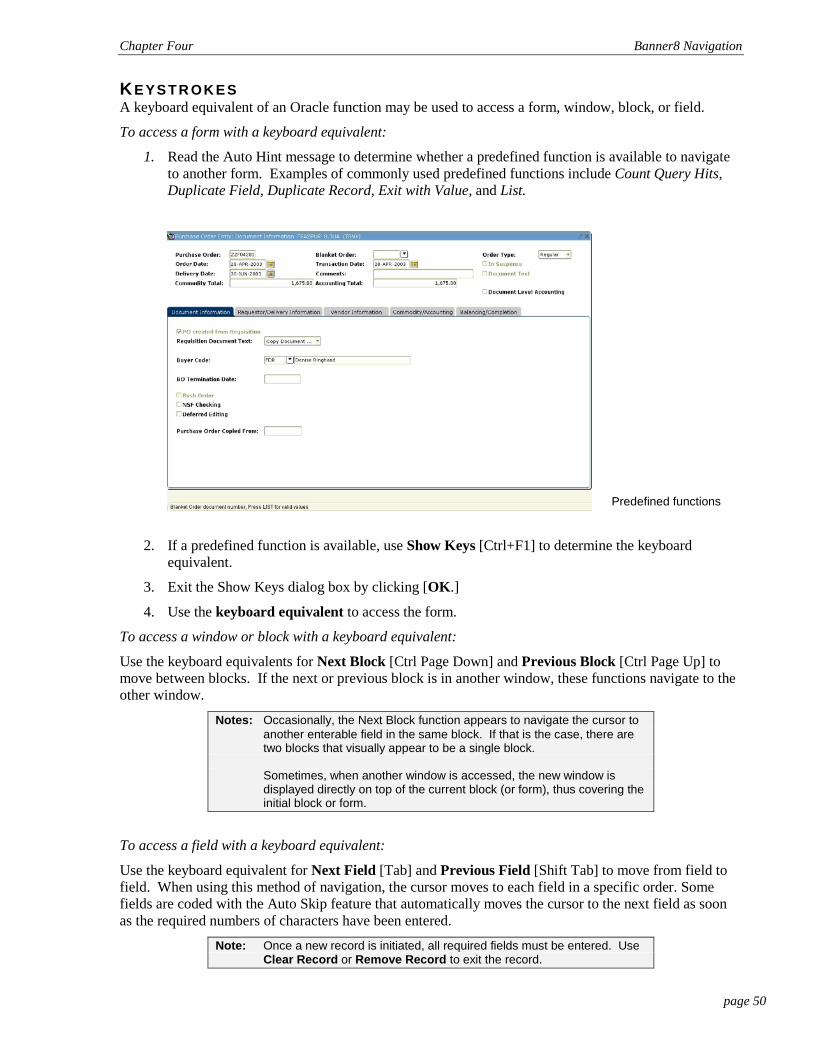
1. Read the Auto Hint message to determine whether a predefined function is available to navigate to another form. Examples of commonly used predefined functions include Count Query Hits, Duplicate Field, Duplicate Record, Exit with Value, and List.
2. If a predefined function is available, use Show Keys [Ctrl+F1] to determine the keyboard equivalent.
3. Exit the Show Keys dialog box by clicking [OK.]
4. Use the keyboard equivalent to access the form.
To access a window or block with a keyboard equivalent:
Use the keyboard equivalents for Next Block [Ctrl Page Down] and Previous Block [Ctrl Page Up] to move between blocks. If the next or previous block is in another window, these functions navigate to the other window.
Notes: Occasionally, the Next Block function appears to navigate the cursor to another enterable field in the same block. If that is the case, there are two blocks that visually appear to be a single block. Sometimes, when another window is accessed, the new window is displayed directly on top of the current block (or form), thus covering the initial block or form.
To access a field with a keyboard equivalent:
Use the keyboard equivalent for Next Field [Tab] and Previous Field [Shift Tab] to move from field to field. When using this method of navigation, the cursor moves to each field in a specific order. Some fields are coded with the Auto Skip feature that automatically moves the cursor to the next field as soon as the required numbers of characters have been entered.
Note: Once a new record is initiated, all required fields must be entered. Use Clear Record or Remove Record to exit the record.
Predefined functions
Chapter Five Banner7 Navigation
page 51
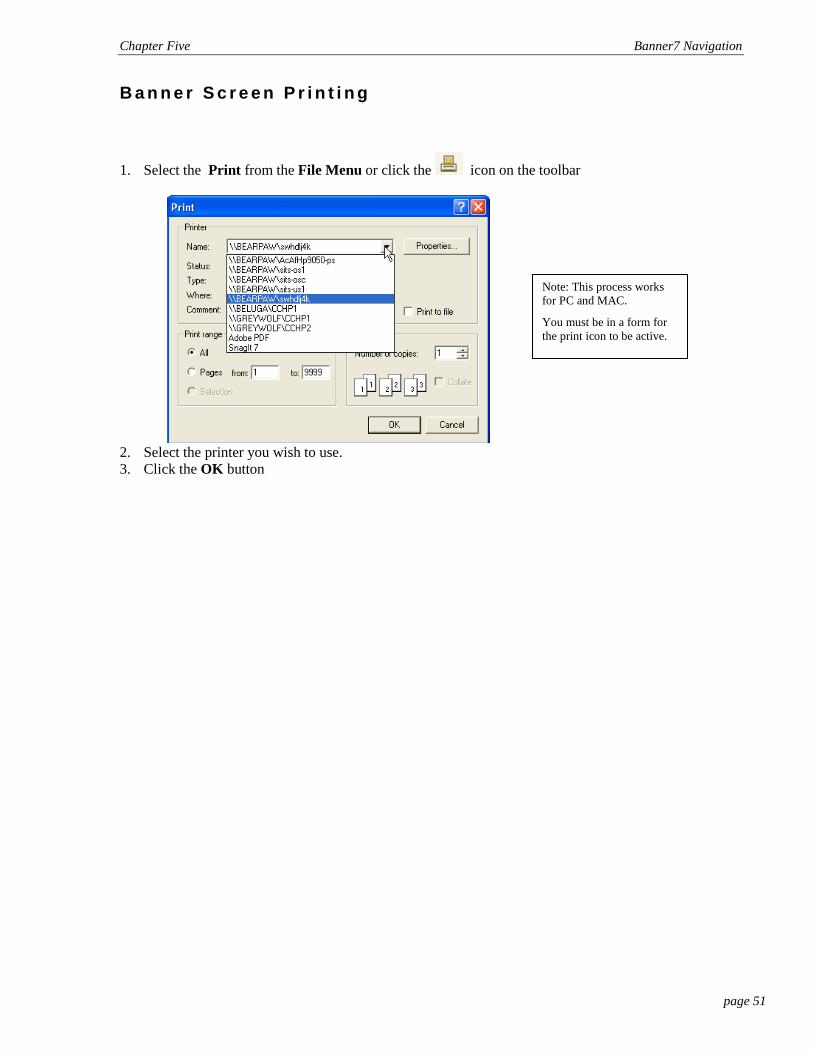
B a n n e r S c r e e n P r i n t i n g
1. Select the Print from the File Menu or click the icon on the toolbar
2. Select the printer you wish to use. 3. Click the OK button
Note: This process works for PC and MAC.
You must be in a form for the print icon to be active.

page i
Appendices

Appendices
page ii
Keystrokes
Function Keys Clear Block Shift+F5 Next Block Ctrl+Page Down Previous Block Ctrl+ Page Up Count Query Hits Shift+F2 Display Error Shift+F1 Exit Ctrl+q Clear Field Ctrl+u Duplicate Field F3 Next Field Tab Previous Field Shift+Tab Go To F5 LIST (List Of Values) F9 Options Right Click Print Shift+F8 Cancel Query l Ctrl+q Enter Query F7 Execute Query F8 Clear Record Shift+F4 Duplicate Record F4 Insert Record F6 Next Record ↓ or Page Down Previous Record ↑ or Page Up Remove Record (delete) Shift+F6 Rollback Shift+F7 Save F10 Select Shift+F3 Show Keys Ctrl+F1
NOTE: Not all keyboard commands are available on every form.

Appendices
page iii
Printing alternatives for the MAC Q: Are there alternatives to Banner’s Print function or CopyIt for Macintosh computers?
A: Macintosh users may be able to use Banner’s <Print> function to do screen prints, but sometimes
people can’t find their printer on the list. There’s no version of CopyIt for Macintosh computers, but you can try one of the Mac’s screen capture processes instead:
1. While the image you want to print is displayed on the screen, press Command-Shift-3 (also
known as Apple-Shift-3). 2. That takes a picture of what’s on screen and saves it as a SimpleText* file. The first one will be
named Picture 1, the second Picture 2, and so on. 3. Find those files on your hard drive. Which folder they end up in appears to depend on the
computer.* 4. Open and print them. *If you use MAC OS X, you can change the default graphic format (JPG, PDF, etc.) and the destination folder through System Preferences. If you want to capture just a portion of the screen, use Command-Shift-4 instead of Command-Shift-3. That turns your mouse pointer into a crosshair; use it to select the section you want to save. Some Mac users prefer to use Adobe Acrobat for doing their screen prints.
Q: I use Adobe Acrobat for my Mac screen prints, and I often have more than one image to print at a
time. Is there a quick way to crop multiple images in Acrobat? A: Open the first screen capture/pdf in Acrobat, then use Document-Insert Pages. Choose all the other
screen capture files/pdf files you want to print, and then click the Open button. Use the crop tool to crop to exactly what you want to print. If all of the screen captures had the banner window in the same position you can crop all of the pages at the same time by selecting “all” in the pop-up window after you crop. Extract all of the pages and then print.
Appendices
page iv
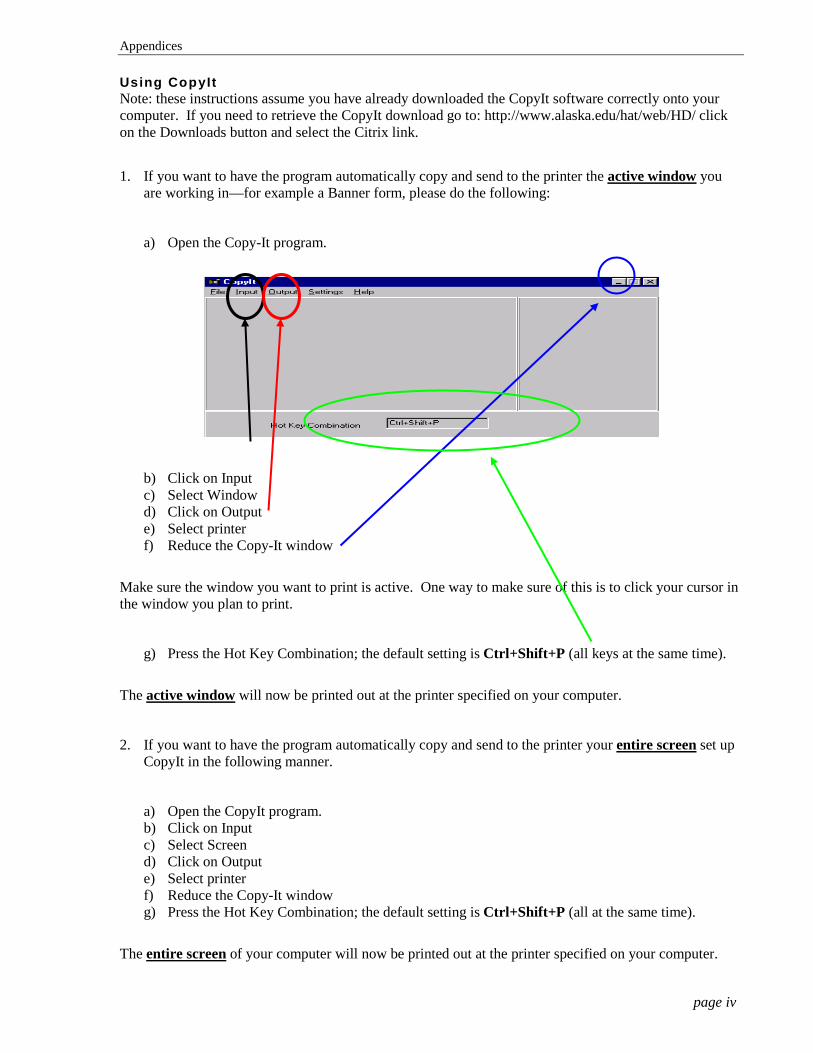
Using CopyIt Note: these instructions assume you have already downloaded the CopyIt software correctly onto your computer. If you need to retrieve the CopyIt download go to: http://www.alaska.edu/hat/web/HD/ click on the Downloads button and select the Citrix link.
1. If you want to have the program automatically copy and send to the printer the active window you are working in—for example a Banner form, please do the following:
a) Open the Copy-It program.
b) Click on Input c) Select Window d) Click on Output e) Select printer f) Reduce the Copy-It window
Make sure the window you want to print is active. One way to make sure of this is to click your cursor in the window you plan to print.
g) Press the Hot Key Combination; the default setting is Ctrl+Shift+P (all keys at the same time).
The active window will now be printed out at the printer specified on your computer.
2. If you want to have the program automatically copy and send to the printer your entire screen set up CopyIt in the following manner.
a) Open the CopyIt program. b) Click on Input c) Select Screen d) Click on Output e) Select printer f) Reduce the Copy-It window g) Press the Hot Key Combination; the default setting is Ctrl+Shift+P (all at the same time).
The entire screen of your computer will now be printed out at the printer specified on your computer.

Appendices
page v
3. If you want to select the item(s) to save to the clipboard (to be pasted into another document), please set up Copy-It in the following manner.
a) Open the CopyIt program. b) Click on Input c) Select Region d) Click on Output e) Select Clipboard f) Reduce the Copy-It window g) Press the Hot Key Combination: the default setting is Ctrl+Shift+P (all at the same time).
Once you have pressed the Hot Key Combination, your cursor will transform into a hand with the pointer finger extended (like your cursor does when it runs across a link on a web page).
h) Drag the cursor (hand) to the edge of the item you want to copy, press and hold the left mouse button. Now drag the “hand” across the item until a dotted-line box appears over the entire area you want copied.
i) Release the left button.
The area within the dotted-line box has now been saved to the clipboard. You may paste that image into another document using the paste command.
You may use the Input and Output selections in any combination—that is you can select the window or screen to be saved to the clipboard. Or have a region shipped automatically to your printer. Also if you want to see what you have copied, re-open the CopyIt window. A copy of the image will be on the left side and a thumbnail sketch will appear on the right side of Copy-It’s main window.
The Settings menu contains two useful items—the first is the Options menu. Using this item allows you to change the Hot Key Combination if you desire. The other item is called In System Tray. If you select this item, the Copy-It program will be placed in the lower right menu bar of your operating system. From there you can just double click when you need to use CopyIt.
A short cut to access the set-up parameters of CopyIt is available if you have clicked In System Tray and placed CopyIt in the bottom right corner of your operating system. Place your cursor on the CopyIt icon
Appendices
page vi
(it looks like a little camera) on the lower right corner of your window, click the RIGHT mouse button and a menu will appear that allows quicker access to selecting the Input and Output variables for using the CopyIt program.
Finally the rest of this document contains the general overview found within the CopyIt program. I encourage you to read the information.
(Instructions from the CopyIt Help)
This program is very simple to use. You just pick what you want to copy and where you want to copy it. This program copies the contents of (1) a highlighted window, or (2) any selected area, or (3) the entire desktop. The image may be copied to a file or to the printer or only to the clipboard.
This is how you use the program:
1. Pick what you want to copy by selecting the desired option from the Input menu choice
a. the whole desktop,
b. the active window, or
c. any region of the screen
2. Pick where you want to copy the image by selecting the desired option from the Output menu
a. the clipboard,
b. the printer or
c. to a file (in the bmp, ico ,jpg, emf, or wmf format)
3. Minimize this program
When you are ready to copy, press the necessary key combination. The default is Control (Ctrl) + Shift + P all at the same time. If you picked region as the source, then the mouse cursor will change to a hand. Move to one corner of the region that you want to copy and then hold the left mouse button down and move to the opposite corner of the area that you want to capture. Then release the right mouse button.
When you copy an image, this program will display a copy of the image on the left side and a thumbnail sketch on the right side of this program’s main window.

Appendices
page vii
Banner Tips and Tricks
Banner Window Size
The size of the Banner window is determined by the screen resolution you select in your Windows Display Properties (assuming you use the Windows operating system on your computer). Enlarging the window by using the Maximize button in the upper right-hand corner or by dragging the edge of the window will not make what is inside the Banner window look larger. Instead,
you get this effect.
To make the Banner window appear large enough to fill your entire computer monitor, find an empty area of the Desktop (not inside an open window) and right-click. Select Properties from the menu.
On the Settings tab, select your main monitor. Find Screen resolution. The further you move the slider to the left (Less), the larger your Banner window—and other objects shown on that monitor—will appear. A resolution of 1024 by 768 will make the Banner window fill the entire monitor. Do not use lower resolution than that. If you prefer to have smaller windows—allowing you to see more windows on your monitor at once—use higher (More) screen resolution.
I
If you choose 1024 by 768, make one more change. On the Appearance tab, find Windows and buttons, and change that to Windows Classic style. If you do not do that, your 1024 by 768 Banner window may be a fraction of an inch too large for your monitor, and you will have to use an extra set of scroll bars to see the whole thing.
To preview the effects of your new selections, click the Apply button at the bottom of the Display Properties window. Click the OK button to save the settings. If you are asked whether you want to keep those settings, answer affirmatively.
Appendices
page viii
My Banner Personal Menu
Setup
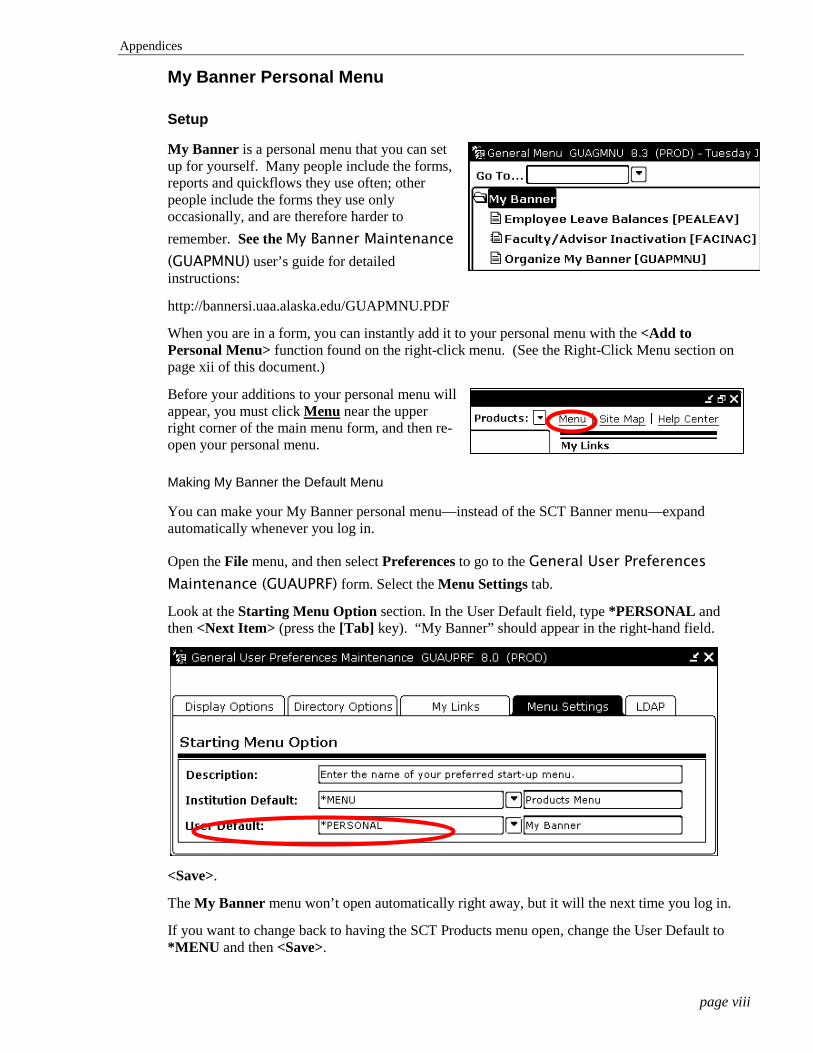
My Banner is a personal menu that you can set up for yourself. Many people include the forms, reports and quickflows they use often; other people include the forms they use only occasionally, and are therefore harder to remember. See the My Banner Maintenance (GUAPMNU) user’s guide for detailed instructions:
http://bannersi.uaa.alaska.edu/GUAPMNU.PDF
When you are in a form, you can instantly add it to your personal menu with the <Add to Personal Menu> function found on the right-click menu. (See the Right-Click Menu section on page xii of this document.)
Before your additions to your personal menu will appear, you must click Menu
Making My Banner the Default Menu
near the upper right corner of the main menu form, and then re-open your personal menu.
You can make your My Banner personal menu—instead of the SCT Banner menu—expand automatically whenever you log in.
Open the File menu, and then select Preferences to go to the General User Preferences Maintenance (GUAUPRF) form. Select the Menu Settings tab.
Look at the Starting Menu Option section. In the User Default field, type *PERSONAL and then <Next Item> (press the [Tab] key). “My Banner” should appear in the right-hand field.
<Save>.
The My Banner menu won’t open automatically right away, but it will the next time you log in.
If you want to change back to having the SCT Products menu open, change the User Default to *MENU and then <Save>.
Appendices
page ix
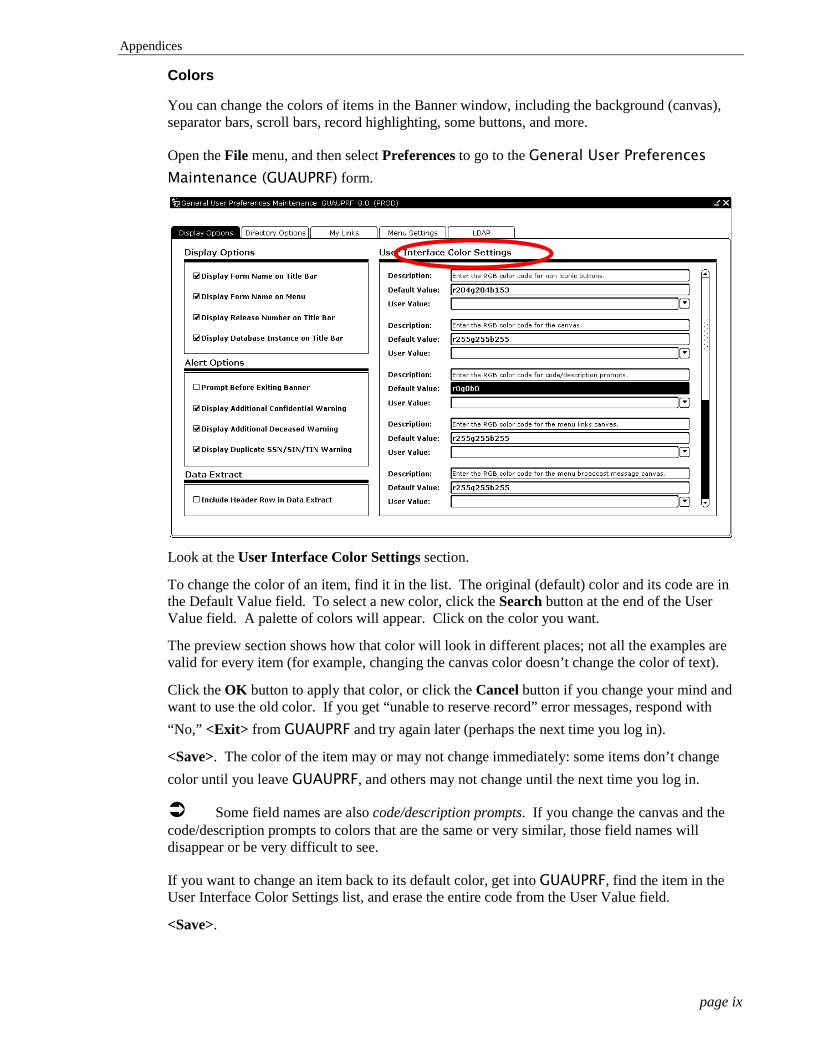
Colors
You can change the colors of items in the Banner window, including the background (canvas), separator bars, scroll bars, record highlighting, some buttons, and more.
Open the File menu, and then select Preferences to go to the General User Preferences Maintenance (GUAUPRF) form.
Look at the User Interface Color Settings section.
To change the color of an item, find it in the list. The original (default) color and its code are in the Default Value field. To select a new color, click the Search button at the end of the User Value field. A palette of colors will appear. Click on the color you want.
The preview section shows how that color will look in different places; not all the examples are valid for every item (for example, changing the canvas color doesn’t change the color of text).
Click the OK button to apply that color, or click the Cancel button if you change your mind and want to use the old color. If you get “unable to reserve record” error messages, respond with “No,” <Exit> from GUAUPRF and try again later (perhaps the next time you log in).
<Save>. The color of the item may or may not change immediately: some items don’t change color until you leave GUAUPRF, and others may not change until the next time you log in.
Some field names are also code/description prompts. If you change the canvas and the code/description prompts to colors that are the same or very similar, those field names will disappear or be very difficult to see.
If you want to change an item back to its default color, get into GUAUPRF, find the item in the User Interface Color Settings list, and erase the entire code from the User Value field.
<Save>.
Appendices
page x
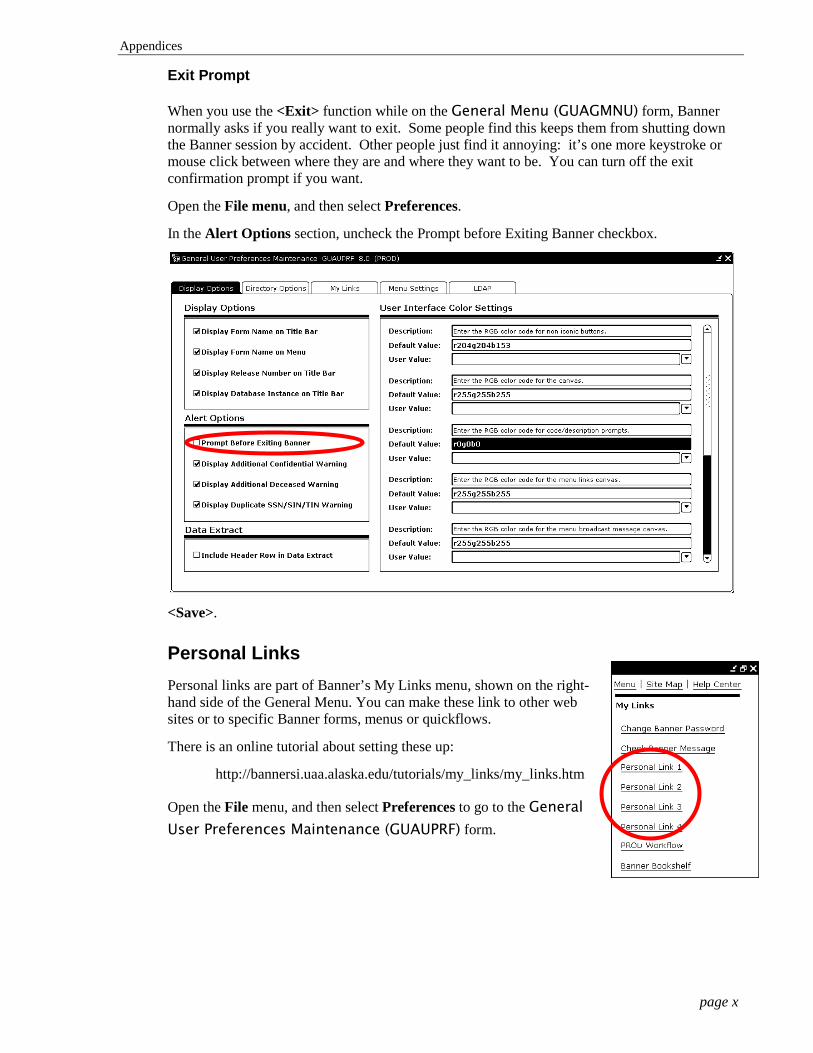
Exit Prompt
When you use the <Exit> function while on the General Menu (GUAGMNU) form, Banner normally asks if you really want to exit. Some people find this keeps them from shutting down the Banner session by accident. Other people just find it annoying: it’s one more keystroke or mouse click between where they are and where they want to be. You can turn off the exit confirmation prompt if you want.
Open the File menu, and then select Preferences.
In the Alert Options section, uncheck the Prompt before Exiting Banner checkbox.
<Save>.
Personal Links Personal links are part of Banner’s My Links menu, shown on the right-hand side of the General Menu. You can make these link to other web sites or to specific Banner forms, menus or quickflows.
There is an online tutorial about setting these up:
http://bannersi.uaa.alaska.edu/tutorials/my_links/my_links.htm
Open the File menu, and then select Preferences to go to the General User Preferences Maintenance (GUAUPRF) form.
Appendices
page xi
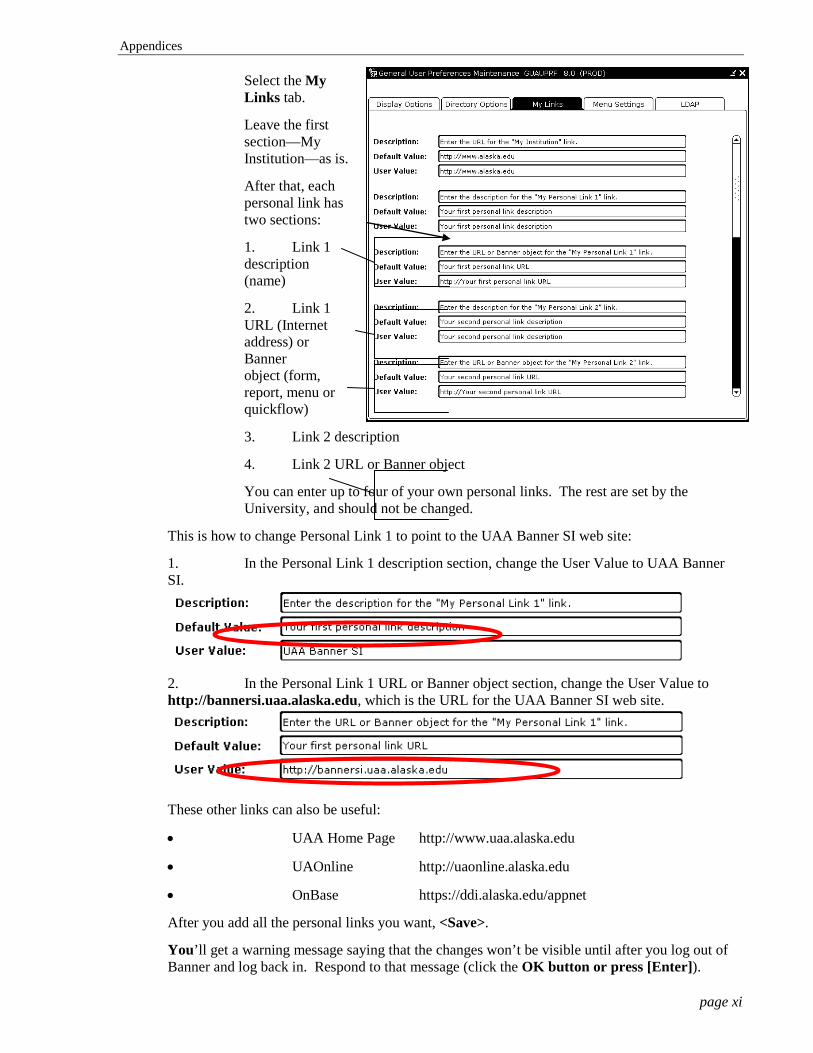
Select the My Links tab.
Leave the first section—My Institution—as is.
After that, each personal link has two sections:
1. Link 1 description (name)
2. Link 1 URL (Internet address) or Banner object (form, report, menu or quickflow)
3. Link 2 description
4. Link 2 URL or Banner object
You can enter up to four of your own personal links. The rest are set by the University, and should not be changed.
This is how to change Personal Link 1 to point to the UAA Banner SI web site:
1. In the Personal Link 1 description section, change the User Value to UAA Banner SI.
2. In the Personal Link 1 URL or Banner object section, change the User Value to http://bannersi.uaa.alaska.edu, which is the URL for the UAA Banner SI web site.
These other links can also be useful:
• UAA Home Page http://www.uaa.alaska.edu
• UAOnline http://uaonline.alaska.edu
• OnBase https://ddi.alaska.edu/appnet
After you add all the personal links you want, <Save>.
You’ll get a warning message saying that the changes won’t be visible until after you log out of Banner and log back in. Respond to that message (click the OK button or press [Enter]).
Appendices
page xii
Right-Click Menu
When you’re in a form, click the right-side mouse button (or, for left-handed mousers, the left-side mouse button) on an empty section of the form—not inside a field—to get a special pop-up shortcut menu. That menu includes several basic functions (<Rollback>, <Save>, <Exit> and <Print>), a special <Add to Personal Menu> function that adds the form to your My Banner menu, and the list of blocks and forms found in the Options menu.
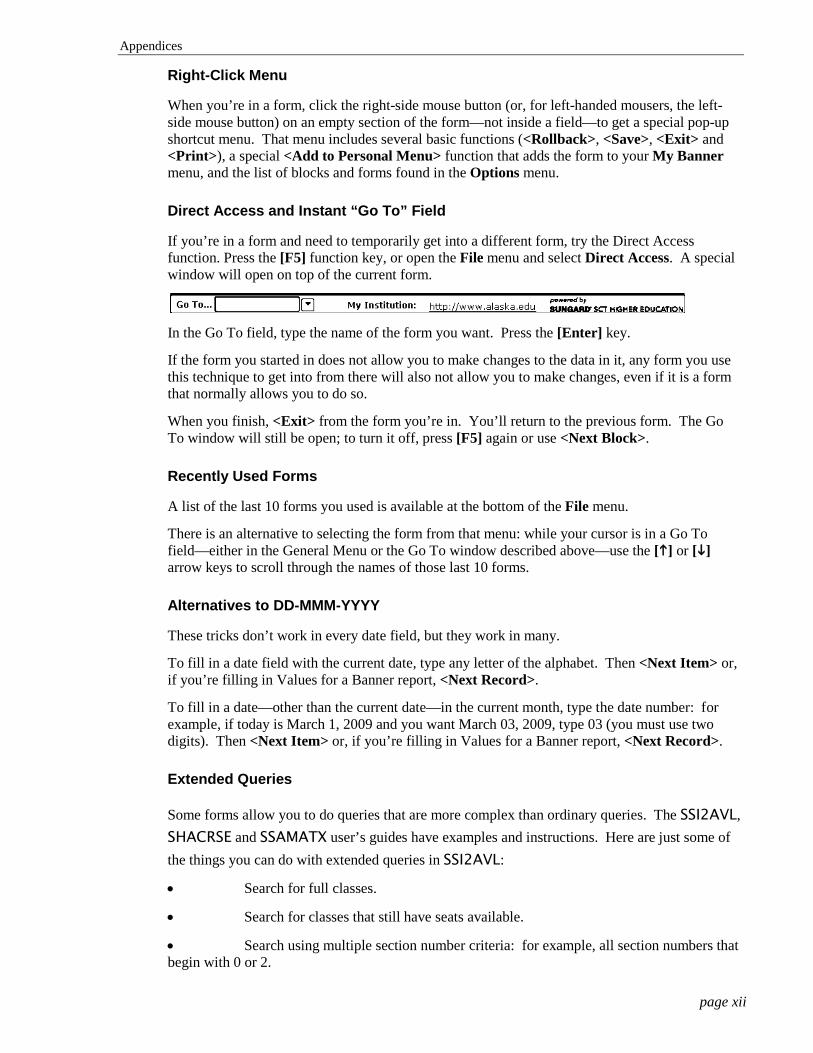
Direct Access and Instant “Go To” Field
If you’re in a form and need to temporarily get into a different form, try the Direct Access function. Press the [F5] function key, or open the File menu and select Direct Access. A special window will open on top of the current form.
In the Go To field, type the name of the form you want. Press the [Enter] key.
If the form you started in does not allow you to make changes to the data in it, any form you use this technique to get into from there will also not allow you to make changes, even if it is a form that normally allows you to do so.
When you finish, <Exit> from the form you’re in. You’ll return to the previous form. The Go To window will still be open; to turn it off, press [F5] again or use <Next Block>.
Recently Used Forms
A list of the last 10 forms you used is available at the bottom of the File menu.
There is an alternative to selecting the form from that menu: while your cursor is in a Go To field—either in the General Menu or the Go To window described above—use the [] or [] arrow keys to scroll through the names of those last 10 forms.
Alternatives to DD-MMM-YYYY
These tricks don’t work in every date field, but they work in many.
To fill in a date field with the current date, type any letter of the alphabet. Then <Next Item> or, if you’re filling in Values for a Banner report, <Next Record>.
To fill in a date—other than the current date—in the current month, type the date number: for example, if today is March 1, 2009 and you want March 03, 2009, type 03 (you must use two digits). Then <Next Item> or, if you’re filling in Values for a Banner report, <Next Record>.
Extended Queries
Some forms allow you to do queries that are more complex than ordinary queries. The SSI2AVL, SHACRSE and SSAMATX user’s guides have examples and instructions. Here are just some of the things you can do with extended queries in SSI2AVL:
• Search for full classes.
• Search for classes that still have seats available.
• Search using multiple section number criteria: for example, all section numbers that begin with 0 or 2.
Appendices
page xiii
• Change the order the results are sorted in: for example, sort based on the number of students enrolled, from high numbers to low, or low to high.
The same query techniques work in many fields in the Course Summary (SHACRSE) form:
• Sort classes in subject order.
• Sort classes in subject order, then in course number order within each subject.
• Search for all 300- and 400-level classes in one query.
• Search for multiple campuses in one query.
• Search by course name, without concern for capitalization.
Other forms also allow extended queries. Here are just a few examples:
• In the Student Course Registration Audit (SFASTCA) form, sort by CRN and, within each CRN, by activity date and time.
• In the Class Roster (SFASLST) form, sort students in registration sequence number order.
• In the Schedule Section Query (SSASECQ) form, search for multiple terms at once.
• In the Schedule Section Query (SSASECQ) form, sort in descending term order (latest term at the top).
There is an on-line tutorial about using extended queries for sorting:
http://bannersi.uaa.alaska.edu/tutorials/extended_query_sort/extended_query_sort.swf
Automatic Dates in Reports
Most dates in report parameters are automatically set to the current date. If a date parameter in your report has a past date in the Values field, you may want to change it so that it will once again update automatically. The System_Date user’s guide has detailed instructions:
http://bannersi.uaa.alaska.edu/System_Date.pdf
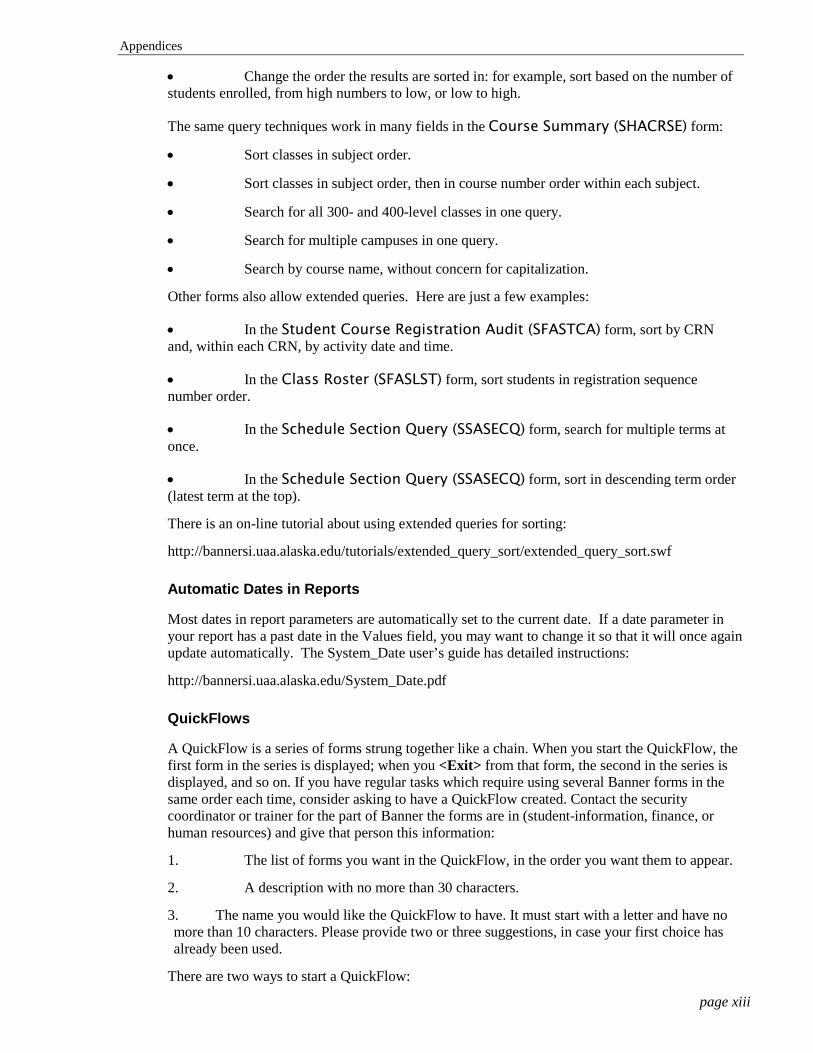
QuickFlows
A QuickFlow is a series of forms strung together like a chain. When you start the QuickFlow, the first form in the series is displayed; when you <Exit> from that form, the second in the series is displayed, and so on. If you have regular tasks which require using several Banner forms in the same order each time, consider asking to have a QuickFlow created. Contact the security coordinator or trainer for the part of Banner the forms are in (student-information, finance, or human resources) and give that person this information:
1. The list of forms you want in the QuickFlow, in the order you want them to appear.
2. A description with no more than 30 characters.
3. The name you would like the QuickFlow to have. It must start with a letter and have no more than 10 characters. Please provide two or three suggestions, in case your first choice has already been used.
There are two ways to start a QuickFlow:
Appendices
page xiv
1. Type the name into the Go To field in the main menu. This will go through the QuickFlow one time, and then return to the main menu.
2. Go to the QuickFlow (GUAQFLW) form—you can type that form name in the Go To field or select QuickFlow from the File menu—then fill in the QuickFlow’s name or use the Search button to view a list of all the existing QuickFlows. When the QuickFlow name field is filled in, press the Enter key or click the Start button. After all the forms in the series have been displayed, you will return to the GUAQFLW form. Then you can start the QuickFlow again, select and start a different one, or <Exit> from the form.
QuickFlow Shortcuts
If you need to back up to a form you already viewed, try using Direct Access (described on page xii). When you see the Go To field, use the [] or [] arrow keys to scroll through the list of forms you used recently. When the form you want to return to is shown, press the Enter key. <Exit> from that form to return to your earlier place in the QuickFlow.
If you are using a long QuickFlow and need to get out of it immediately, open the File menu and select Exit QuickFlow. If you started the QuickFlow from the Go To field, you will return there. If you started in the GUAQFLW form, you will return there.
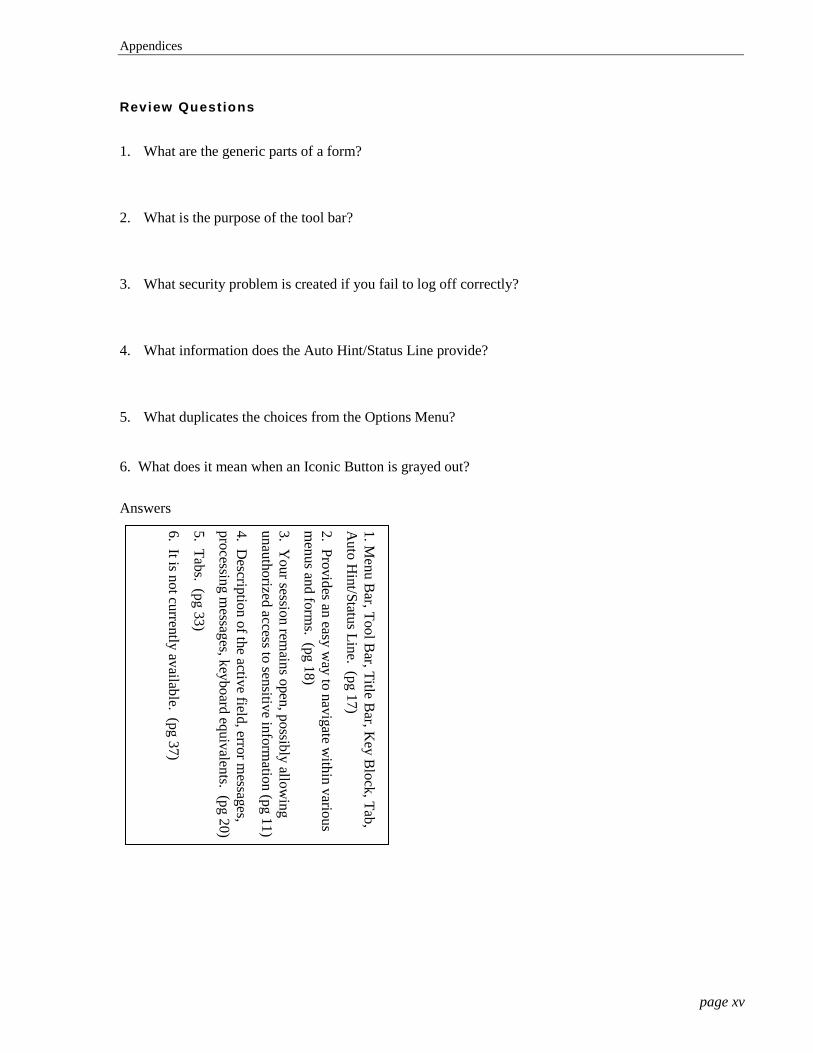
Appendices
page xv
Review Questions 1. What are the generic parts of a form?
2. What is the purpose of the tool bar?
3. What security problem is created if you fail to log off correctly?
4. What information does the Auto Hint/Status Line provide?
5. What duplicates the choices from the Options Menu?
6. What does it mean when an Iconic Button is grayed out?
Answers
1. Menu B
ar, Tool Bar, Title B
ar, Key B
lock, Tab, A
uto Hint/Status Line. (pg 17)
2. Provides an easy way to navigate w
ithin various m
enus and forms. (pg 18)
3. Your session rem
ains open, possibly allowing
unauthorized access to sensitive information (pg 11)
4. Description of the active field, error m
essages, processing m
essages, keyboard equivalents. (pg 20)
5. Tabs. (pg 33)
6. It is not currently available. (pg 37)
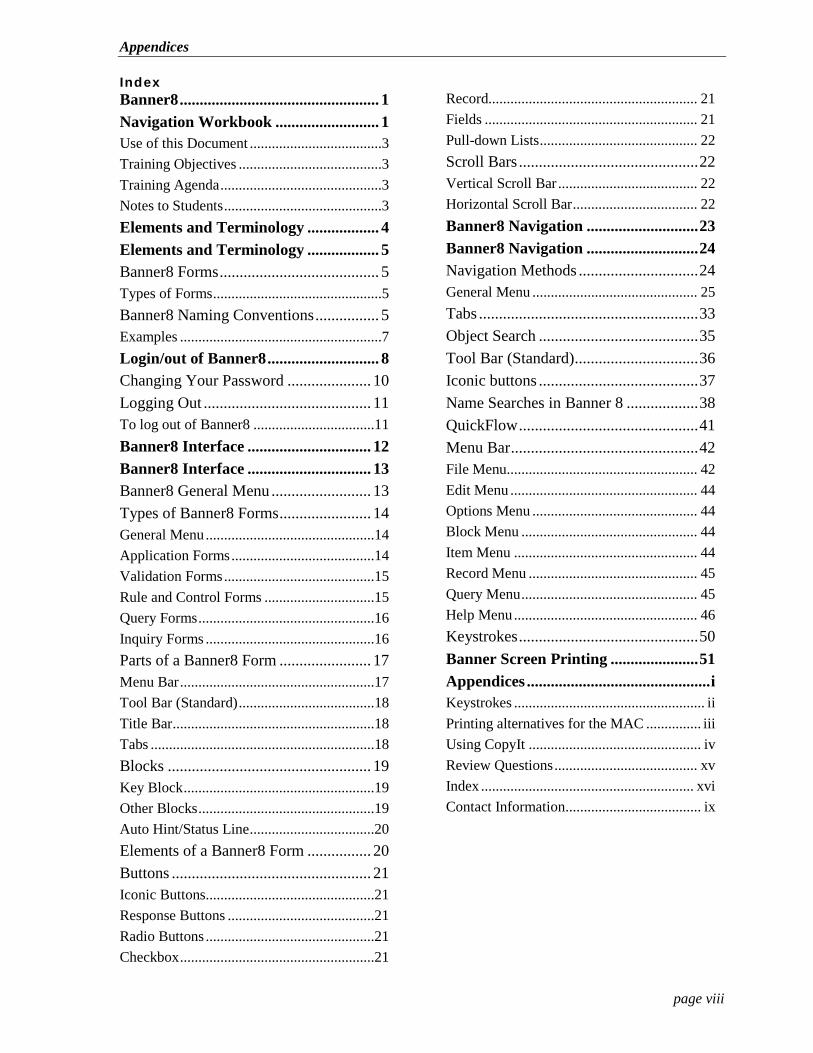
Appendices
page viii
Index Banner8 .................................................. 1
Navigation Workbook .......................... 1 Use of this Document ....................................3 Training Objectives .......................................3 Training Agenda ............................................3 Notes to Students ...........................................3
Elements and Terminology .................. 4
Elements and Terminology .................. 5
Banner8 Forms ........................................ 5
Types of Forms ..............................................5
Banner8 Naming Conventions ................ 5
Examples .......................................................7
Login/out of Banner8 ............................ 8
Changing Your Password ..................... 10
Logging Out .......................................... 11
To log out of Banner8 .................................11
Banner8 Interface ............................... 12
Banner8 Interface ............................... 13
Banner8 General Menu ......................... 13
Types of Banner8 Forms ....................... 14
General Menu ..............................................14 Application Forms .......................................14 Validation Forms .........................................15 Rule and Control Forms ..............................15 Query Forms ................................................16 Inquiry Forms ..............................................16
Parts of a Banner8 Form ....................... 17
Menu Bar .....................................................17 Tool Bar (Standard) .....................................18 Title Bar .......................................................18 Tabs .............................................................18
Blocks ................................................... 19
Key Block ....................................................19 Other Blocks ................................................19 Auto Hint/Status Line ..................................20
Elements of a Banner8 Form ................ 20
Buttons .................................................. 21
Iconic Buttons ..............................................21 Response Buttons ........................................21 Radio Buttons ..............................................21 Checkbox .....................................................21
Record......................................................... 21 Fields .......................................................... 21 Pull-down Lists ........................................... 22
Scroll Bars ............................................. 22
Vertical Scroll Bar ...................................... 22 Horizontal Scroll Bar .................................. 22
Banner8 Navigation ............................ 23
Banner8 Navigation ............................ 24
Navigation Methods .............................. 24
General Menu ............................................. 25
Tabs ....................................................... 33
Object Search ........................................ 35
Tool Bar (Standard) ............................... 36
Iconic buttons ........................................ 37
Name Searches in Banner 8 .................. 38
QuickFlow ............................................. 41
Menu Bar ............................................... 42
File Menu .................................................... 42 Edit Menu ................................................... 44 Options Menu ............................................. 44 Block Menu ................................................ 44 Item Menu .................................................. 44 Record Menu .............................................. 45 Query Menu ................................................ 45 Help Menu .................................................. 46
Keystrokes ............................................. 50
Banner Screen Printing ...................... 51
Appendices .............................................. i Keystrokes .................................................... ii Printing alternatives for the MAC ............... iii Using CopyIt ............................................... iv Review Questions ....................................... xv Index .......................................................... xvi Contact Information ..................................... ix

Appendices
page ix
Contact Informat ion Name Location E-mail Phone Raye Ann Robinson UA Finance [email protected] (907) 450-8050
Carolyn Weaver UA Human Resources [email protected] (907) 450-8219
Vickie Gilligan UA Human Resources [email protected] (907) 450-8200
Saichi Oba UA Student [email protected] (907) 450-8146
Martin Miller UA Help Desk and Training [email protected] (907) 450-8304
Brian deZeeuw UAA Finance [email protected] (907) 786-4686
Pam Jacobs UAA Human Resources [email protected] (907) 786-1422
Kathy Ivie UAA Human Resources [email protected] (907) 786-1454
Charese Gearhart-Dekreon UAA Student [email protected] (907) 786-1882
Linda Armstrong UA Human Resources [email protected] (907) 450-8203
Colleen Abrams UAF Student [email protected] (907) 322-5456
Michelle Littell UAF Purchasing [email protected] (907) 474-6461
Nancy Woods UAS Human Resources [email protected] (907) 786-6507
Barbara Hegel UAS Registrar [email protected] (907) 796-6294
Diane Meador UAS Records Manager [email protected] (907) 796-6259
Error/correction reporting OIT Helpdesk and Training [email protected]
Document generated: January 2001 Updated:23 September, 2010
END OF DOCUMENT