Embed Size (px)
Citation preview
Banner Student Location Management – Housing
Training Workbook
Banner Student
Release 8.0 - April 2008 Updated 4/16/2008
Location Management – Housing Training Workbook
Release 8.0 - April 2008 Updated 4/16/2008
What can we help you achieve? HIGHER EDUCATION
What can we help you achieve?
HIGHER EDUCATION
_________________________________________________________________________________________________________________ SunGard Higher Education 4 Country View Road Malvern, Pennsylvania 19355 United States of America (800) 522 - 4827 Customer Support Center website http://connect.sungardhe.com Distribution Services e-mail address [email protected] Other services In preparing and providing this publication, SunGard Higher Education is not rendering legal, accounting, or other similar professional services. SunGard Higher Education makes no claims that an institution's use of this publication or the software for which it is provided will insure compliance with applicable federal or state laws, rules, or regulations. Each organization should seek legal, accounting and other similar professional services from competent providers of the organization's own choosing. Trademark Without limitation, SunGard, the SunGard logo, Banner, Campus Pipeline, Luminis, PowerCAMPUS, Matrix, and Plus are trademarks or registered trademarks of SunGard Data Systems Inc. or its subsidiaries in the U.S. and other countries. Third-party names and marks referenced herein are trademarks or registered trademarks of their respective owners. Revision History Log Publication Date Summary
April 2008 New version that supports 8.0 software.
Notice of rights Copyright © SunGard Higher Education 2005-8. This document is proprietary and confidential information of SunGard Higher Education Inc. and is not to be copied, reproduced, lent, displayed or distributed, nor used for any purpose other than that for which it is specifically provided without the express written permission of SunGard Higher Education Inc.
Table of Contents
Introduction ............................................................................................................... 5 Process Introduction...................................................................................................... 7
Set Up ......................................................................................................................... 9 Location Management/Housing .....................................................................................10 Building Code Validation ...............................................................................................11 Building/Room Attribute Code Validation........................................................................14 Room and Meal Application Type Validation ...................................................................16 Room Status Code Validation ........................................................................................18 Room Assignment Status Code Validation ......................................................................20 Room Rate Code Validation...........................................................................................22 Housing Application Status Code Validation....................................................................24 Meal Rate Code Validation ............................................................................................26 Meal Assignment Status Code Validation ........................................................................28 Phone Rate Code Validation ..........................................................................................30 Phone Assignment Status Code Validation......................................................................32 Campus Code Validation ...............................................................................................34 County Code Validation.................................................................................................36 College Code Validation ................................................................................................38 Department Code Validation..........................................................................................40 Site Code Validation......................................................................................................42 State/Province Code Validation......................................................................................44 Term Code Validation ...................................................................................................46 Detail Code Control ......................................................................................................49 Creating and Analyzing Housing Control and Rules .........................................................53 Room/Meal/Phone Rate Code Rules...............................................................................54 Housing Term Control...................................................................................................57 Room Assignment Status ..............................................................................................59 Meal Assignment Status................................................................................................61 Phone Assignment Status..............................................................................................63 Self Check....................................................................................................................65 Answer Key for Self Check ............................................................................................67
Day-to-Day Operations ............................................................................................ 69 Process Introduction.....................................................................................................70 Defining a Residence Hall Building.................................................................................72 Defining a Residence Hall Room ....................................................................................74 Creating a Room and Meal Application...........................................................................76 Creating Roommate Applications ...................................................................................78 Creating and Maintaining Room Assignments .................................................................80 Creating and Maintaining Meal Assignments...................................................................82 Creating and Maintaining Phone Assignments.................................................................84 Defining a Classroom Building .......................................................................................86 Defining Classrooms .....................................................................................................89 Using Location Management/Housing Reports and Queries .............................................93 Dormitory Address Creation Report................................................................................94 Active Housing Assignments Report ...............................................................................97 Batch Room/Meal/Phone Assess Report .......................................................................101 Assignment Roll Process .............................................................................................104
Batch Scheduler .........................................................................................................108 Housing Purge............................................................................................................111 ACS Housing Interface................................................................................................114 Summary ...................................................................................................................117 Self Check..................................................................................................................118 Answer Key for Self Check ..........................................................................................121
Appendix................................................................................................................. 124 Forms Job Aid ............................................................................................................125 Terminology...............................................................................................................129
© SunGard 2004-2008 Location Management - Housing Page 5
Introduction
Course goal
The goal of this workbook is to provide you with the knowledge and practice to manage student housing and other buildings at your institution. The workbook is divided into three sections:
• Introduction
• Set Up
• Day-to-Day Operations
Course objectives
At the end of the Set Up section, you will be able to
• identify Location Management/Housing control, rules, and code validation forms
• create and analyze Housing control and rules
• define housing/meal/phone rates
• define housing assignment and assessment rules.
At the end of the Day-to-Day section, you will be able to
• define buildings and rooms
• create housing and meal applications
• create and maintain room, meal, and phone assignments
• identify the Location Management/Housing queries and reports.
See the Fee Assessment workbook for information on Fee Assessment.
© SunGard 2004-2008 Location Management - Housing Page 6
Intended audience
Residence Life Personnel and other personnel responsible for student housing and maintaining classroom information
Prerequisites
To complete this course, you should have
• completed the Education Practices computer-based training (CBT) tutorial Banner 8 Fundamentals, or have equivalent experience navigating in the Banner system
• administrative rights to create and perform the necessary set up in Banner
© SunGard 2004-2008 Location Management - Housing Page 7
Process Introduction
About the process
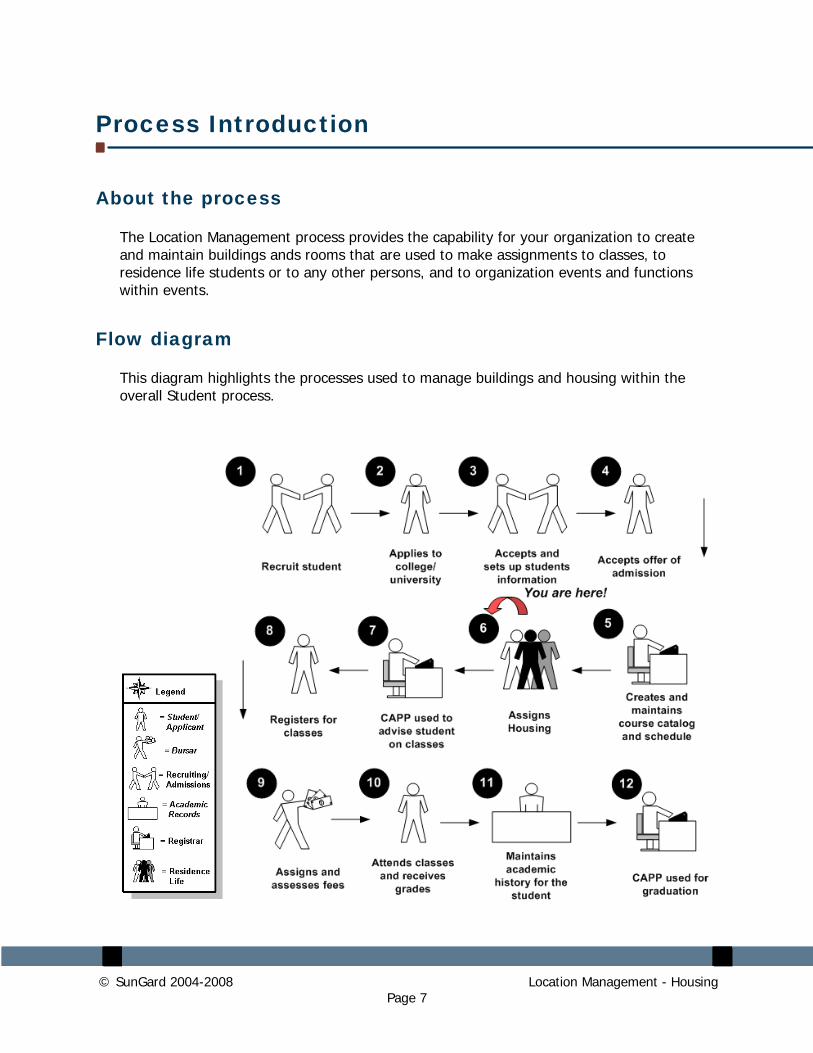
The Location Management process provides the capability for your organization to create and maintain buildings ands rooms that are used to make assignments to classes, to residence life students or to any other persons, and to organization events and functions within events.
Flow diagram
This diagram highlights the processes used to manage buildings and housing within the overall Student process.

© SunGard 2004-2008 Location Management - Housing Page 8
Personnel involved in the process
Multiple offices may use the Location Management module. Personnel from several administrative areas across your organization would share responsibility for performing the functions available within the module: Residence Life personnel for housing related records; Registrar’s office personnel or personnel from another academic area for assigning classrooms to class sections; and the Bursar or other designated personnel from the Student Accounts Receivable office for creating and maintaining housing fee assessment functionality.
© SunGard 2004-2008 Location Management - Housing Page 9
Set Up
Introduction
The purpose of this section is to outline the setup process and detail the procedures to set up your Banner Student System.
Objectives
At the end of this section, you will be able to
• identify Location Management/Housing control, rules, and code validation forms
• create and analyze Housing control and rules
• define housing/meal/phone rates
• define housing assignment and assessment rules.
© SunGard 2004-2008 Location Management - Housing Page 10
Location Management/Housing
Control, rule and code validation forms
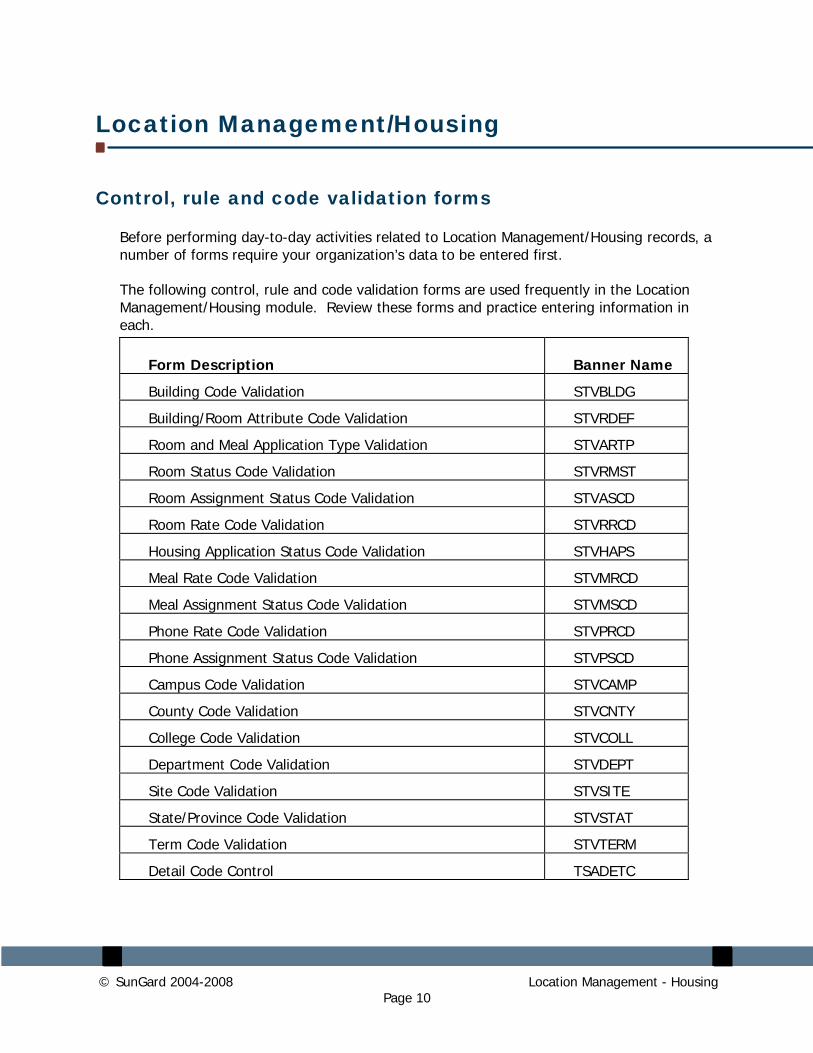
Before performing day-to-day activities related to Location Management/Housing records, a number of forms require your organization’s data to be entered first.
The following control, rule and code validation forms are used frequently in the Location Management/Housing module. Review these forms and practice entering information in each.
Form Description Banner Name
Building Code Validation STVBLDG
Building/Room Attribute Code Validation STVRDEF
Room and Meal Application Type Validation STVARTP
Room Status Code Validation STVRMST
Room Assignment Status Code Validation STVASCD
Room Rate Code Validation STVRRCD
Housing Application Status Code Validation STVHAPS
Meal Rate Code Validation STVMRCD
Meal Assignment Status Code Validation STVMSCD
Phone Rate Code Validation STVPRCD
Phone Assignment Status Code Validation STVPSCD
Campus Code Validation STVCAMP
County Code Validation STVCNTY
College Code Validation STVCOLL
Department Code Validation STVDEPT
Site Code Validation STVSITE
State/Province Code Validation STVSTAT
Term Code Validation STVTERM
Detail Code Control TSADETC
© SunGard 2004-2008 Location Management - Housing Page 11
Building Code Validation
Purpose
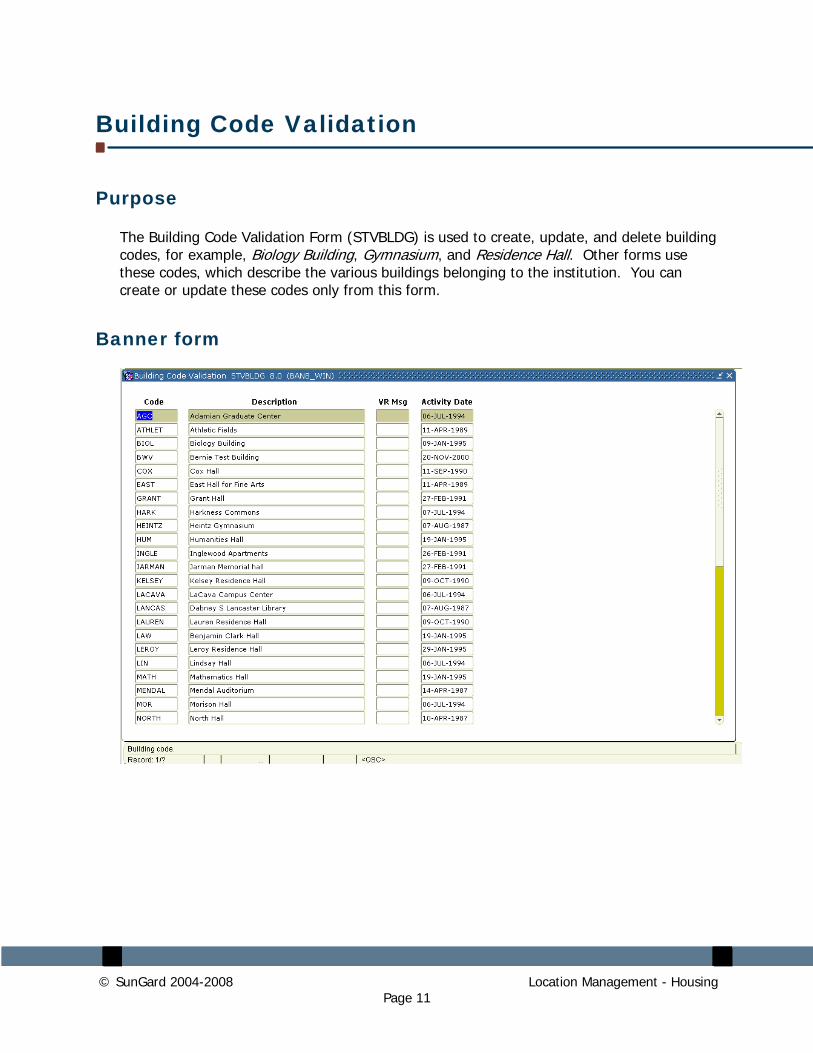
The Building Code Validation Form (STVBLDG) is used to create, update, and delete building codes, for example, Biology Building, Gymnasium, and Residence Hall. Other forms use these codes, which describe the various buildings belonging to the institution. You can create or update these codes only from this form.
Banner form

© SunGard 2004-2008 Location Management - Housing Page 12
Exercise 1
An inventory of buildings and rooms is necessary for assigning housing as well as classrooms. The Building names must first exist in the Building Code Validation Form (STVBLDG).
Follow these steps to complete the process.
1. Access the Building Code Validation Form (STVBLDG).
2. Perform an Insert Record function.
3. Define your own building by entering information into the Code and Description fields.
Example: JS_RH - John Smith’s Residence Hall.
4. Enter a value into the VR field, (Voice Response Message code).
5. Note that the activity date is automatically populated with today’s date.
6. Click the Save icon.
7. Click the Exit icon.
Exercise 2
Create a classroom building for the History department.
Follow these st omplete the process. eps to c
1. Access the Building Code Validation Form (STVBLDG).
8. Perform an Insert Record function.
9. Using your initials and your name, enter a code and a building name in the Code and Description fields.
Example: JS_HH John Smith’s Hall of History.
10. Enter a value into the VR field, (Voice Response Message code).
11. Note that the activity date is automatically populated with today’s date.
12. Click the Save icon.
© SunGard 2004-2008 Location Management - Housing Page 13
13. Click the Exit icon.
© SunGard 2004-2008 Location Management - Housing Page 14
Building/Room Attribute Code Validation
Purpose
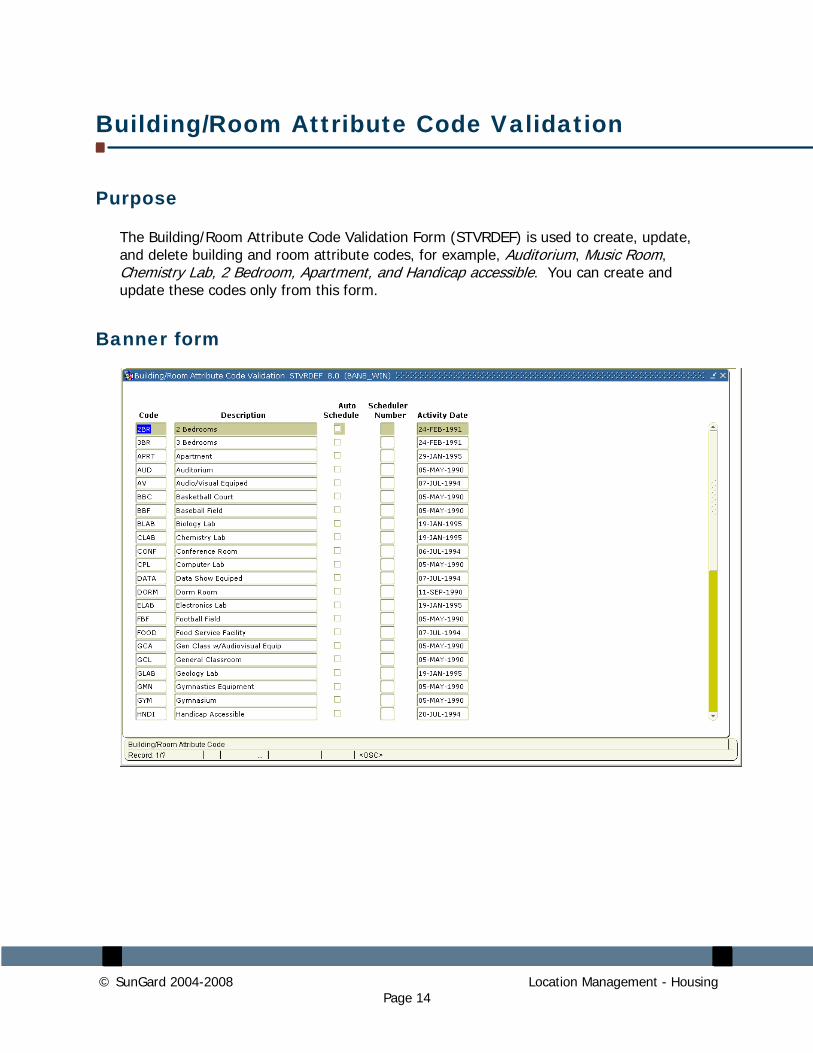
The Building/Room Attribute Code Validation Form (STVRDEF) is used to create, update, and delete building and room attribute codes, for example, Auditorium, Music Room, Chemistry Lab, 2 Bedroom, Apartment, and Handicap accessible. You can create and update these codes only from this form.
Banner form
© SunGard 2004-2008 Location Management - Housing Page 15
Steps
Follow these steps to define the Building/Room Attribute Codes.
1. Access the Building/Room Attribute Code Validation form (STVRDEF).
2. Perform an Insert Record function.
3. Using your initials and your name, enter a code and an Attribute Name in the Code and Description fields. Once a building/room attribute code record has been saved, the code entered in this field cannot be changed. Once this code has been used in any other record, the building/room attribute code record cannot be deleted.
Example: JS_HND John Smith’s Handicapped Accessible.
4. Select the Auto Schedule checkbox if applicable. Checkbox used to specify whether this building/room attribute is to be extracted for input into the Schedule25 process when the schedule type is assigned to a CRN. This checkbox also controls the operation of the Scheduler Number field.
5. Note the Scheduler Number field. If the Auto Schedule checkbox is checked, this field will be automatically populated with a unique one-up number, if the Schedule25 Code is null when the attribute record is saved. Of, if desired, you can enter a unique one-up number. If the Auto Schedule checkbox is unchecked, this field will be blank.
Use the Resequence option on the Option Menu to resequence the value in the Scheduler Number field. This process will overwrite the existing code and replace it in sequence starting with a value of 01.
6. Note that the Activity Date is automatically populated with today’s date.
7. Click the Save icon.
8. Click the Exit icon.
© SunGard 2004-2008 Location Management - Housing Page 16
Room and Meal Application Type Validation
Purpose
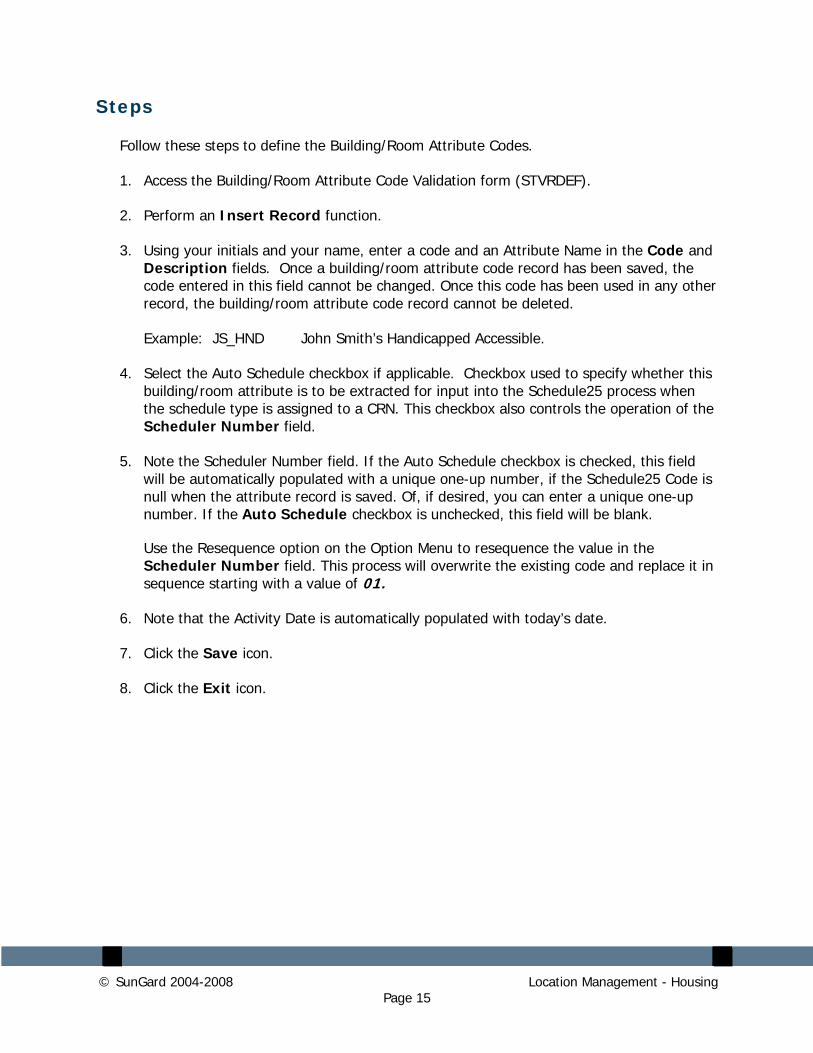
The Room and Meal Application Type Validation Form (STVARTP) is used to create, update, and delete codes for room and meal application types.
The Location Management/Housing module uses this form to validate the room and meal application types, for example, Housing Only and Meal Plan Only.
Banner form
Steps
Use the following steps to Define the Room and Meal Application Types.
1. Access the Room and Meal Application Type Validation Form (STVARTP).
2. Perform an Insert Record function.
3. Using your initials and your name, enter a code and an application type in the Code and Description fields.
Example: JS_MH John Smith’s Meal and Housing Request.
4. Select the Room checkbox, indicating that a housing assignment can be made on the Room Assignment Form (SLARASG).
5. Select the Meal checkbox, indicating that a meal assignment can be made on the Meal Assignment Form (SLAMASG).
© SunGard 2004-2008 Location Management - Housing Page 17
6. Note that the Activity Date is automatically populated with today’s date.
7. Click the Save icon.
8. Click the Exit icon.
© SunGard 2004-2008 Location Management - Housing Page 18
Room Status Code Validation
Purpose
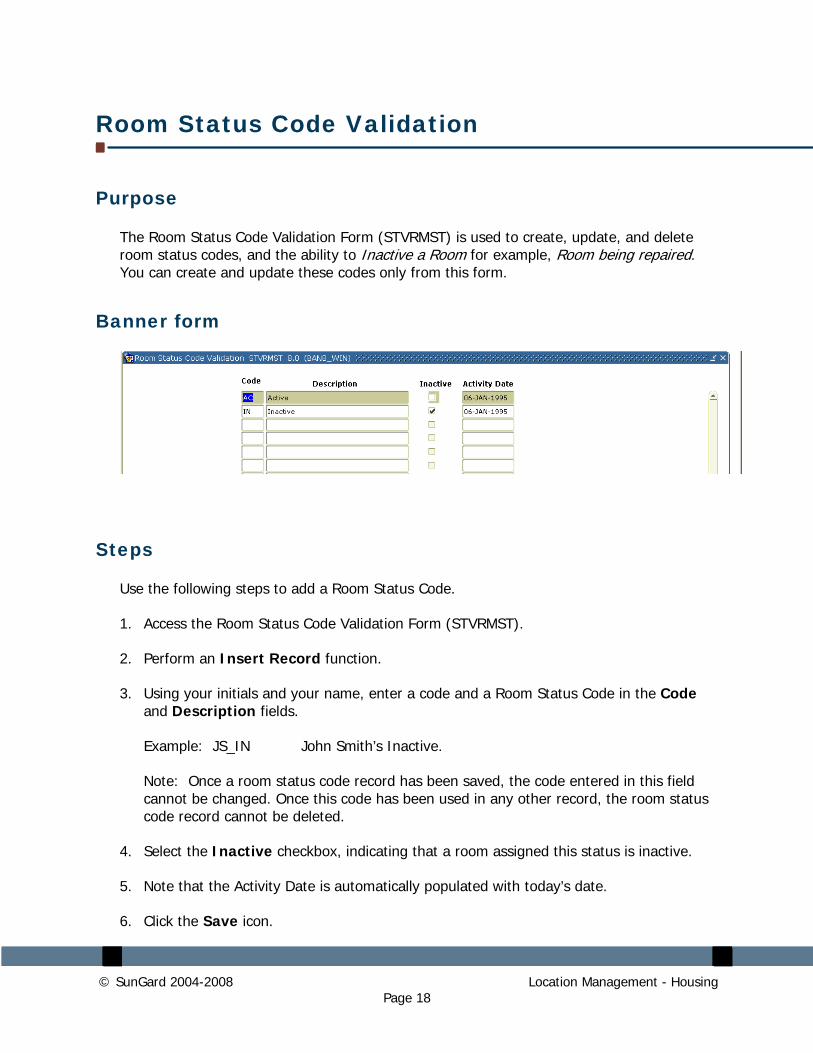
The Room Status Code Validation Form (STVRMST) is used to create, update, and delete room status codes, and the ability to Inactive a Room for example, Room being repaired. You can create and update these codes only from this form.
Banner form
Steps
Use the following steps to add a Room Status Code.
1. Access the Room Status Code Validation Form (STVRMST).
2. Perform an Insert Record function.
3. Using your initials and your name, enter a code and a Room Status Code in the Code and Description fields.
Example: JS_IN John Smith’s Inactive.
Note: Once a room status code record has been saved, the code entered in this field cannot be changed. Once this code has been used in any other record, the room status code record cannot be deleted.
4. Select the Inactive checkbox, indicating that a room assigned this status is inactive.
5. Note that the Activity Date is automatically populated with today’s date.
6. Click the Save icon.

© SunGard 2004-2008 Location Management - Housing Page 19
7. Click the Exit icon.
© SunGard 2004-2008 Location Management - Housing Page 20
Room Assignment Status Code Validation
Purpose
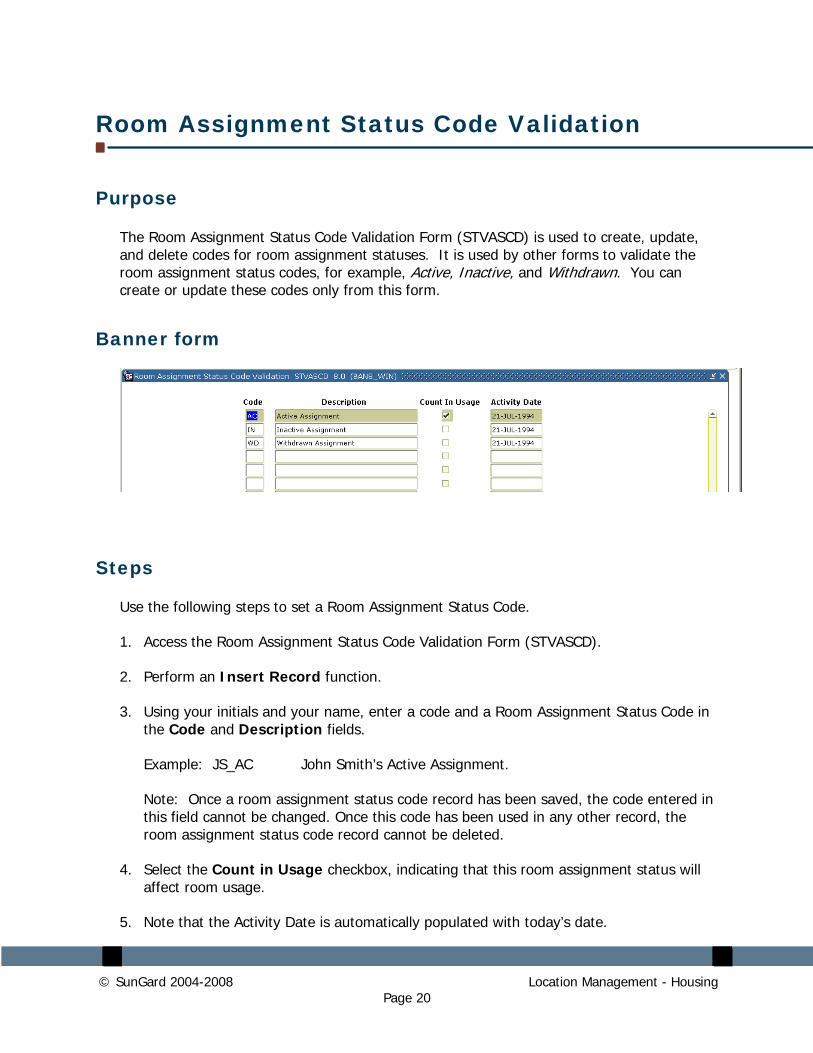
The Room Assignment Status Code Validation Form (STVASCD) is used to create, update, and delete codes for room assignment statuses. It is used by other forms to validate the room assignment status codes, for example, Active, Inactive, and Withdrawn. You can create or update these codes only from this form.
Banner form
Steps
Use the following steps to set a Room Assignment Status Code.
1. Access the Room Assignment Status Code Validation Form (STVASCD).
2. Perform an Insert Record function.
3. Using your initials and your name, enter a code and a Room Assignment Status Code in the Code and Description fields.
Example: JS_AC John Smith’s Active Assignment.
Note: Once a room assignment status code record has been saved, the code entered in this field cannot be changed. Once this code has been used in any other record, the room assignment status code record cannot be deleted.
4. Select the Count in Usage checkbox, indicating that this room assignment status will affect room usage.
5. Note that the Activity Date is automatically populated with today’s date.
© SunGard 2004-2008 Location Management - Housing Page 21
6. Click the Save icon.
7. Click the Exit icon.
© SunGard 2004-2008 Location Management - Housing Page 22
Room Rate Code Validation
Purpose
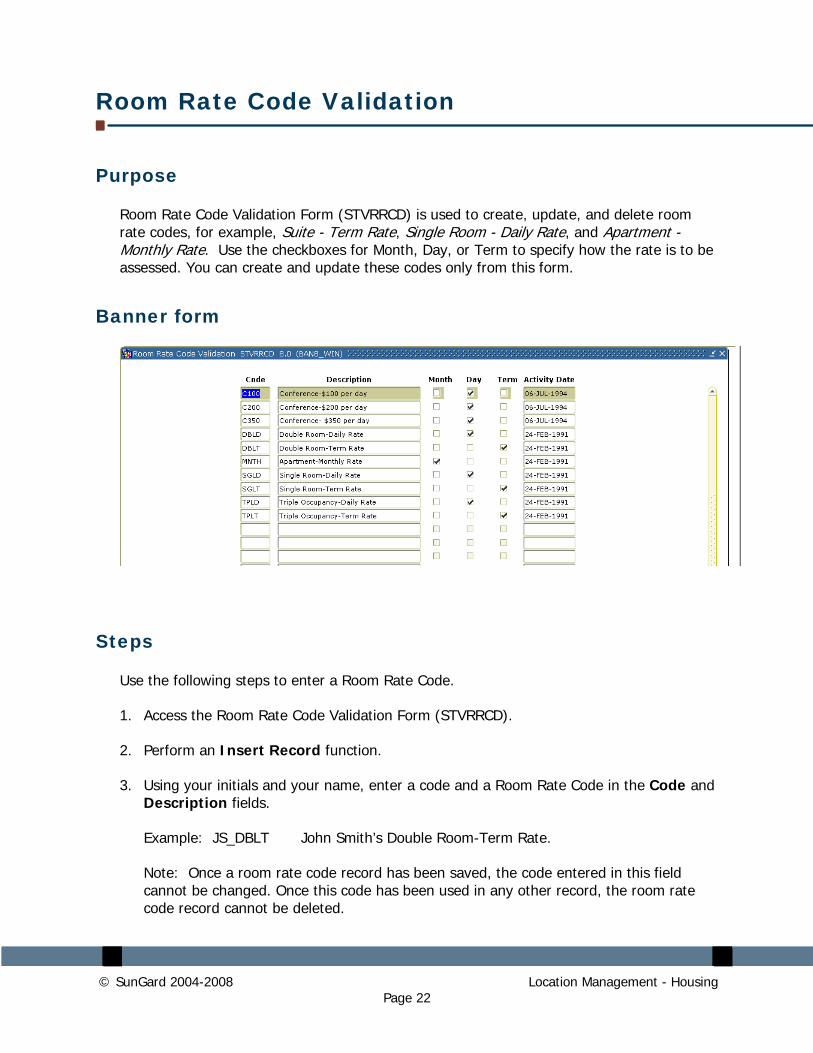
Room Rate Code Validation Form (STVRRCD) is used to create, update, and delete room rate codes, for example, Suite - Term Rate, Single Room - Daily Rate, and Apartment - Monthly Rate. Use the checkboxes for Month, Day, or Term to specify how the rate is to be assessed. You can create and update these codes only from this form.
Banner form
Steps
Use the following steps to enter a Room Rate Code.
1. Access the Room Rate Code Validation Form (STVRRCD).
2. Perform an Insert Record function.
3. Using your initials and your name, enter a code and a Room Rate Code in the Code and Description fields.
Example: JS_DBLT John Smith’s Double Room-Term Rate.
Note: Once a room rate code record has been saved, the code entered in this field cannot be changed. Once this code has been used in any other record, the room rate code record cannot be deleted.
© SunGard 2004-2008 Location Management - Housing Page 23
4. Select the Term checkbox, indicating that this room rate will be assessed on a Term basis.
5. Note: If Month or Day checkbox is checked, the rate will be assessed on a Monthly or Daily basis, respectively.
6. Note that the Activity Date is automatically populated with today’s date.
7. Click the Save icon.
8. Click the Exit icon.
© SunGard 2004-2008 Location Management - Housing Page 24
Housing Application Status Code Validation
Purpose
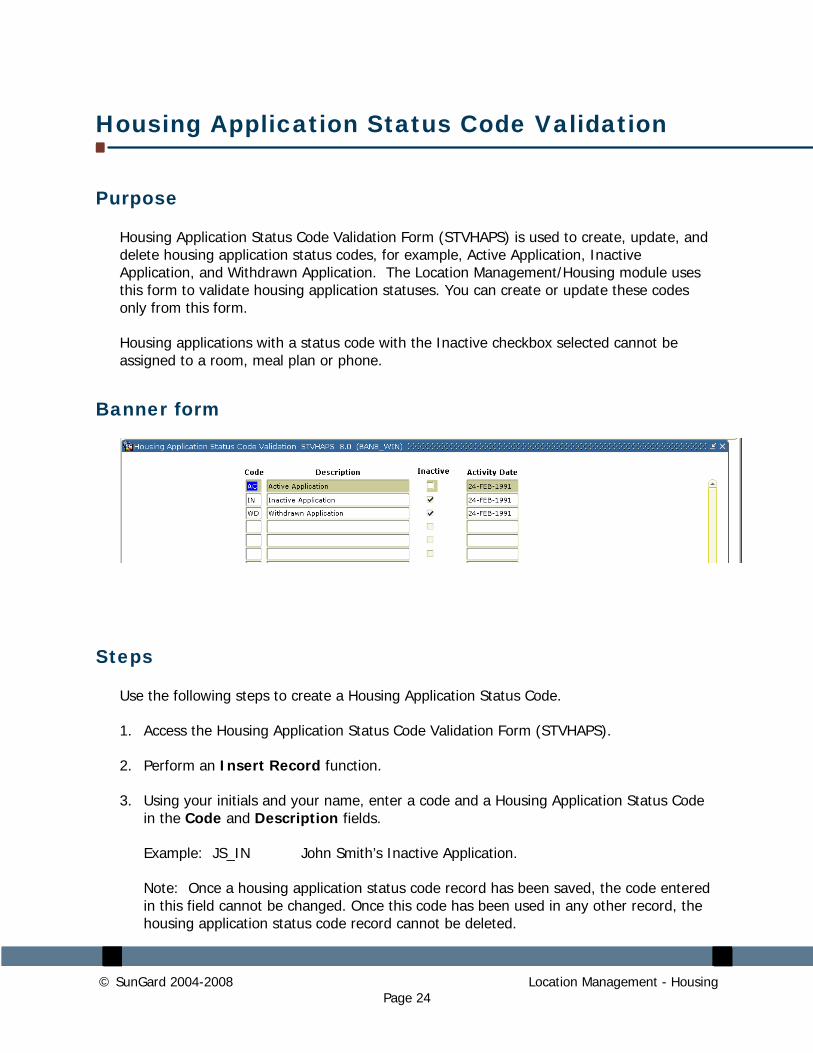
Housing Application Status Code Validation Form (STVHAPS) is used to create, update, and delete housing application status codes, for example, Active Application, Inactive Application, and Withdrawn Application. The Location Management/Housing module uses this form to validate housing application statuses. You can create or update these codes only from this form.
Housing applications with a status code with the Inactive checkbox selected cannot be assigned to a room, meal plan or phone.
Banner form
Steps
Use the following steps to create a Housing Application Status Code.
1. Access the Housing Application Status Code Validation Form (STVHAPS).
2. Perform an Insert Record function.
3. Using your initials and your name, enter a code and a Housing Application Status Code in the Code and Description fields.
Example: JS_IN John Smith’s Inactive Application.
Note: Once a housing application status code record has been saved, the code entered in this field cannot be changed. Once this code has been used in any other record, the housing application status code record cannot be deleted.
© SunGard 2004-2008 Location Management - Housing Page 25
4. Select the Inactive checkbox, indicating that this housing application in Inactive, and cannot be assigned to a room, meal plan or phone plan.
5. Note that the Activity Date is automatically populated with today’s date.
6. Click the Save icon.
7. Click the Exit icon.
© SunGard 2004-2008 Location Management - Housing Page 26
Meal Rate Code Validation
Purpose
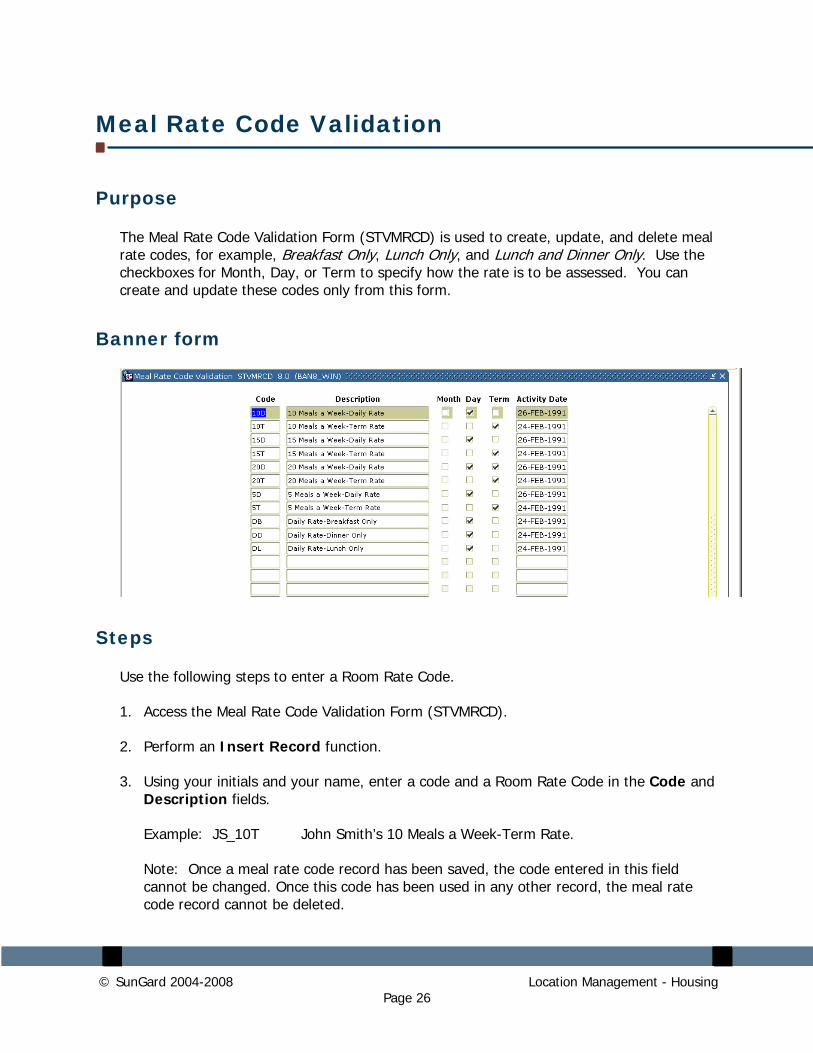
The Meal Rate Code Validation Form (STVMRCD) is used to create, update, and delete meal rate codes, for example, Breakfast Only, Lunch Only, and Lunch and Dinner Only. Use the checkboxes for Month, Day, or Term to specify how the rate is to be assessed. You can create and update these codes only from this form.
Banner form
Steps
Use the following steps to enter a Room Rate Code.
1. Access the Meal Rate Code Validation Form (STVMRCD).
2. Perform an Insert Record function.
3. Using your initials and your name, enter a code and a Room Rate Code in the Code and Description fields.
Example: JS_10T John Smith’s 10 Meals a Week-Term Rate.
Note: Once a meal rate code record has been saved, the code entered in this field cannot be changed. Once this code has been used in any other record, the meal rate code record cannot be deleted.

© SunGard 2004-2008 Location Management - Housing Page 27
4. Select the Term checkbox, indicating that this meal rate will be assessed on a Term basis.
Note: If Month or Day checkbox is checked, the rate will be assessed on a Monthly or Daily basis, respectively.
5. Note that the Activity Date is automatically populated with today’s date.
6. Click the Save icon.
7. Click the Exit icon.
© SunGard 2004-2008 Location Management - Housing Page 28
Meal Assignment Status Code Validation
Purpose
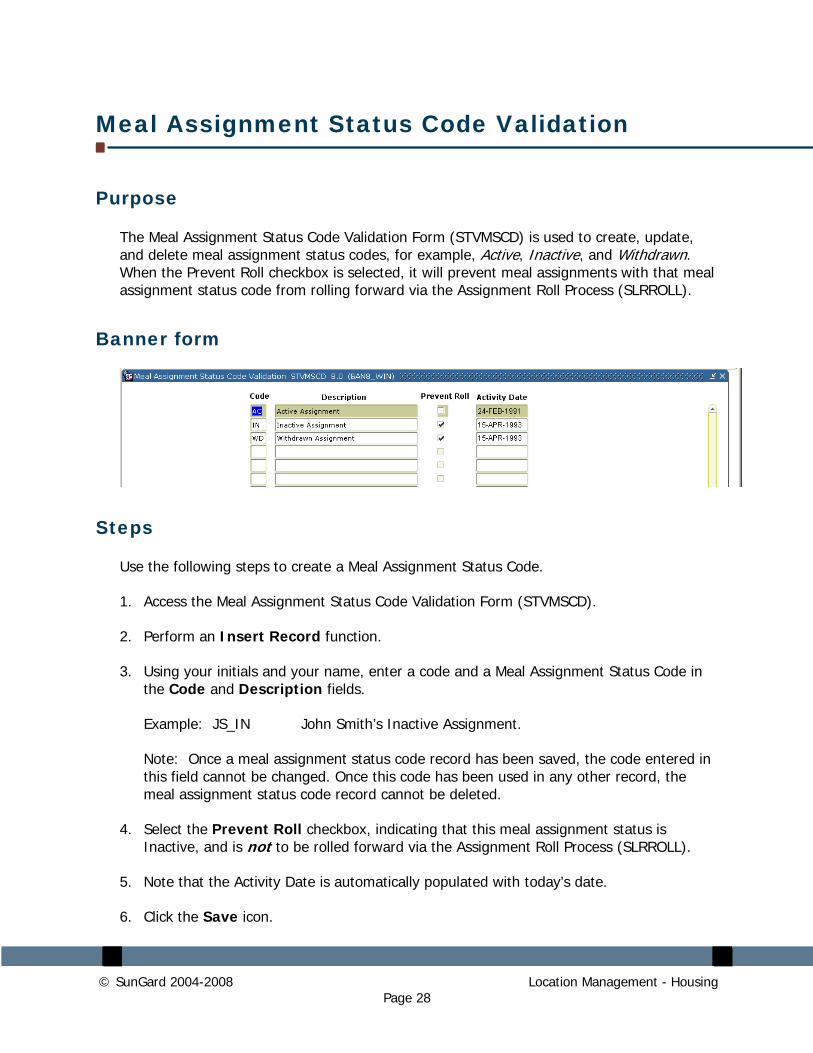
The Meal Assignment Status Code Validation Form (STVMSCD) is used to create, update, and delete meal assignment status codes, for example, Active, Inactive, and Withdrawn. When the Prevent Roll checkbox is selected, it will prevent meal assignments with that meal assignment status code from rolling forward via the Assignment Roll Process (SLRROLL).
Banner form
Steps
Use the following steps to create a Meal Assignment Status Code.
1. Access the Meal Assignment Status Code Validation Form (STVMSCD).
2. Perform an Insert Record function.
3. Using your initials and your name, enter a code and a Meal Assignment Status Code in the Code and Description fields.
Example: JS_IN John Smith’s Inactive Assignment.
Note: Once a meal assignment status code record has been saved, the code entered in this field cannot be changed. Once this code has been used in any other record, the meal assignment status code record cannot be deleted.
4. Select the Prevent Roll checkbox, indicating that this meal assignment status is Inactive, and is not to be rolled forward via the Assignment Roll Process (SLRROLL).
5. Note that the Activity Date is automatically populated with today’s date.
6. Click the Save icon.
© SunGard 2004-2008 Location Management - Housing Page 29
7. Click the Exit icon.
© SunGard 2004-2008 Location Management - Housing Page 30
Phone Rate Code Validation
Purpose
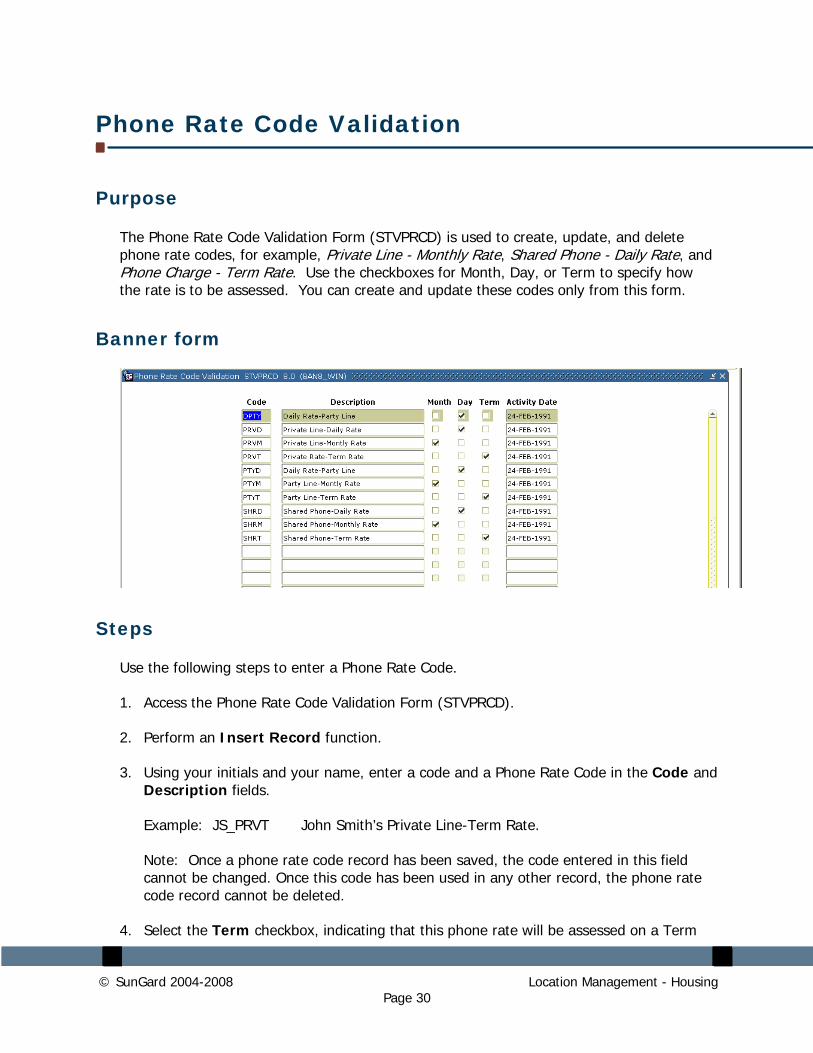
The Phone Rate Code Validation Form (STVPRCD) is used to create, update, and delete phone rate codes, for example, Private Line - Monthly Rate, Shared Phone - Daily Rate, and Phone Charge - Term Rate. Use the checkboxes for Month, Day, or Term to specify how the rate is to be assessed. You can create and update these codes only from this form.
Banner form
Steps
Use the following steps to enter a Phone Rate Code.
1. Access the Phone Rate Code Validation Form (STVPRCD).
2. Perform an Insert Record function.
3. Using your initials and your name, enter a code and a Phone Rate Code in the Code and Description fields.
Example: JS_PRVT John Smith’s Private Line-Term Rate.
Note: Once a phone rate code record has been saved, the code entered in this field cannot be changed. Once this code has been used in any other record, the phone rate code record cannot be deleted.
4. Select the Term checkbox, indicating that this phone rate will be assessed on a Term

© SunGard 2004-2008 Location Management - Housing Page 31
basis.
Note: If Month or Day checkbox is checked, the rate will be assessed on a Monthly or Daily basis, respectively.
5. Note that the Activity Date is automatically populated with today’s date.
6. Click the Save icon.
7. Click the Exit icon.
© SunGard 2004-2008 Location Management - Housing Page 32
Phone Assignment Status Code Validation
Purpose
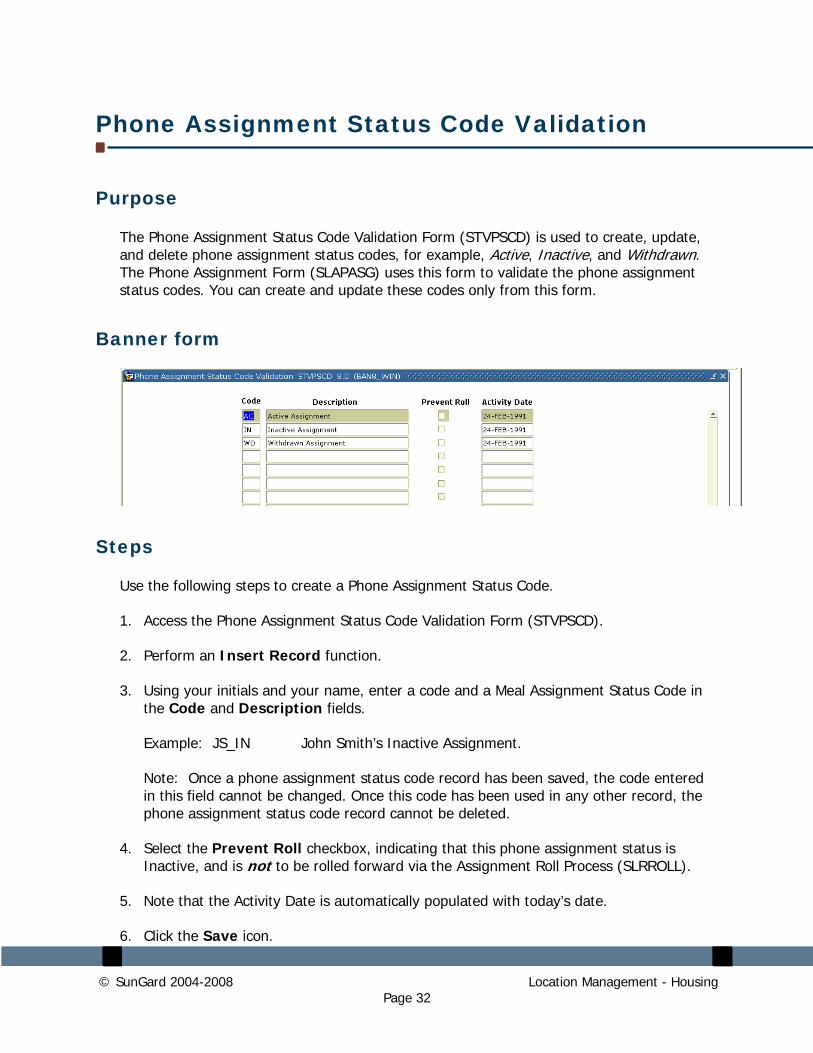
The Phone Assignment Status Code Validation Form (STVPSCD) is used to create, update, and delete phone assignment status codes, for example, Active, Inactive, and Withdrawn. The Phone Assignment Form (SLAPASG) uses this form to validate the phone assignment status codes. You can create and update these codes only from this form.
Banner form
Steps
Use the following steps to create a Phone Assignment Status Code.
1. Access the Phone Assignment Status Code Validation Form (STVPSCD).
2. Perform an Insert Record function.
3. Using your initials and your name, enter a code and a Meal Assignment Status Code in the Code and Description fields.
Example: JS_IN John Smith’s Inactive Assignment.
Note: Once a phone assignment status code record has been saved, the code entered in this field cannot be changed. Once this code has been used in any other record, the phone assignment status code record cannot be deleted.
4. Select the Prevent Roll checkbox, indicating that this phone assignment status is Inactive, and is not to be rolled forward via the Assignment Roll Process (SLRROLL).
5. Note that the Activity Date is automatically populated with today’s date.
6. Click the Save icon.

© SunGard 2004-2008 Location Management - Housing Page 33
7. Click the Exit icon.
© SunGard 2004-2008 Location Management - Housing Page 34
Campus Code Validation
Purpose
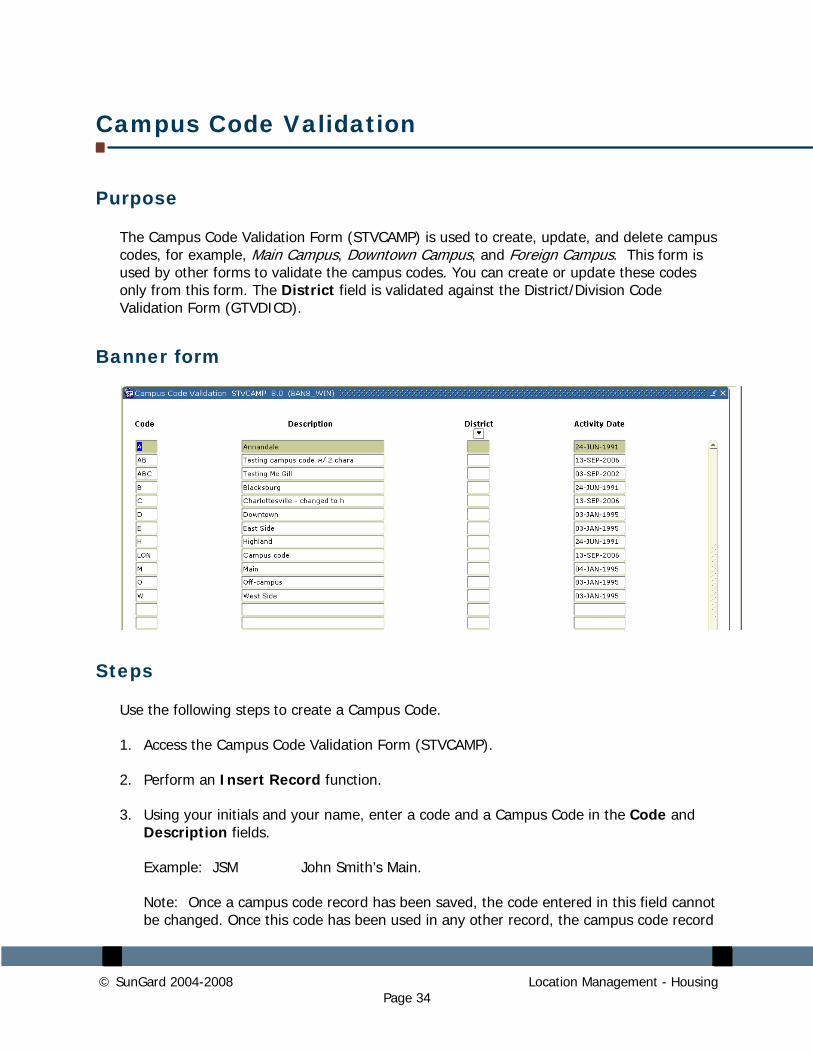
The Campus Code Validation Form (STVCAMP) is used to create, update, and delete campus codes, for example, Main Campus, Downtown Campus, and Foreign Campus. This form is used by other forms to validate the campus codes. You can create or update these codes only from this form. The District field is validated against the District/Division Code Validation Form (GTVDICD).
Banner form
Steps
Use the following steps to create a Campus Code.
1. Access the Campus Code Validation Form (STVCAMP).
2. Perform an Insert Record function.
3. Using your initials and your name, enter a code and a Campus Code in the Code and Description fields.
Example: JSM John Smith’s Main.
Note: Once a campus code record has been saved, the code entered in this field cannot be changed. Once this code has been used in any other record, the campus code record
© SunGard 2004-2008 Location Management - Housing Page 35
cannot be deleted.
4. Select the District drop down arrow, opening the Search window for this field to access the District/Division Code Validation (GTVDICD) list.
5. Select the District Code, then click on OK.
6. Note that the Activity Date is automatically populated with today’s date.
7. Click the Save icon.
8. Click the Exit icon.
© SunGard 2004-2008 Location Management - Housing Page 36
County Code Validation
Purpose
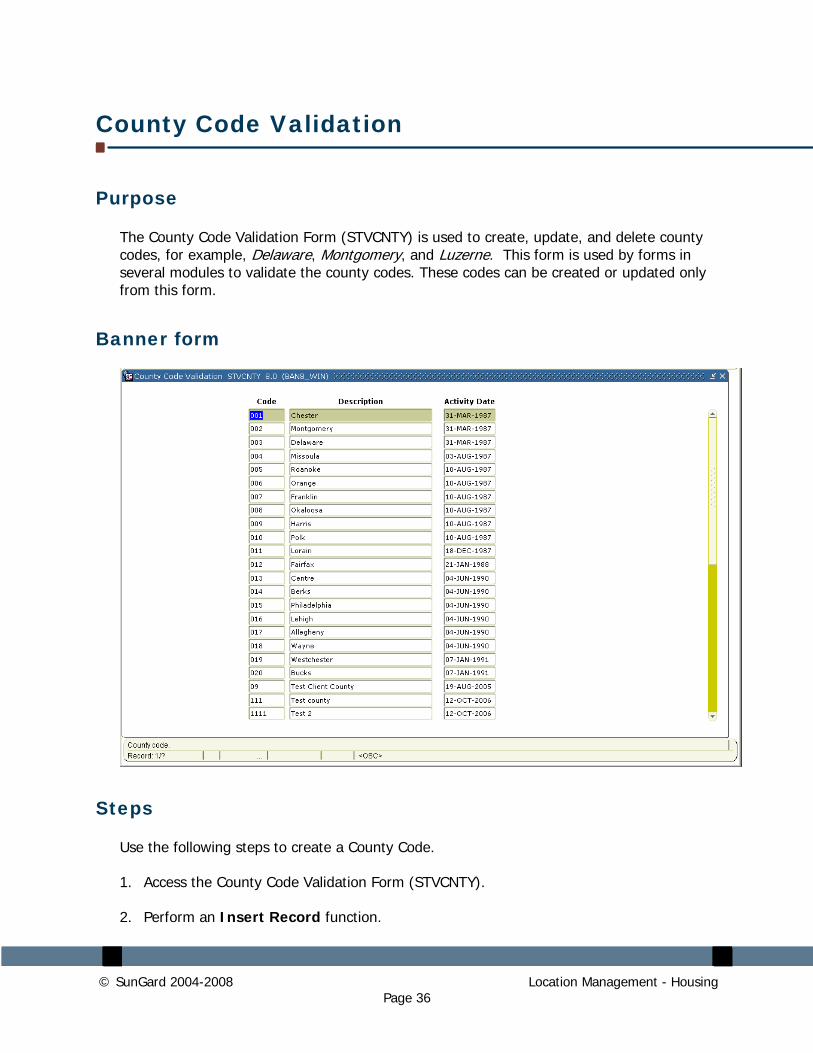
The County Code Validation Form (STVCNTY) is used to create, update, and delete county codes, for example, Delaware, Montgomery, and Luzerne. This form is used by forms in several modules to validate the county codes. These codes can be created or updated only from this form.
Banner form
Steps
Use the following steps to create a County Code.
1. Access the County Code Validation Form (STVCNTY).
2. Perform an Insert Record function.
© SunGard 2004-2008 Location Management - Housing Page 37
3. Using your initials and your name, enter a code and a County Code in the Code and Description fields.
Example: JSM John Smith’s Montgomery.
Note: Once a county code record has been saved, the code entered in this field cannot be changed. Once this code has been used in any other record, the county code record cannot be deleted.
4. Note that the Activity Date is automatically populated with today’s date.
5. Click the Save icon.
6. Click the Exit icon.

© SunGard 2004-2008 Location Management - Housing Page 38
College Code Validation
Purpose
The College Code Validation Form (STVCOLL) is used to create, update, and delete college codes, for example, College of Engineering, College of Law, and College of Music. Several other forms use this form to validate college codes. You can create or update college codes only from this form.
Banner form
Steps
Use the following steps to create a College Code.
1. Access the College Code Validation Form (STVCOLL).
2. Perform an Insert Record function.
3. Using your initials and your name, enter a code and a College Code in the Code and Description fields.
Example: JSAS John Smith’s College of Arts and Sciences.
Note: Once a college code record has been saved, the code entered in this field cannot be changed. Once this code has been used in any other record, the college code record
© SunGard 2004-2008 Location Management - Housing Page 39
cannot be deleted.
4. Enter the number assigned to the Voice Response message assigned to this college code into the Voice Response Message Code field.
5. Note whether the System Required checkbox should be checked. This checkbox specifies whether this value is required by the system. If this checkbox is checked, the validation table record cannot be deleted. Once this checkbox is checked, it cannot be unchecked.
6. If required, enter the five-digit code representing the college code that has been defined and used on the Annual University Full-Time Teaching Staff Survey into the Canadian Statistics Code field. Enter the code that identifies the institution’s college to Stats Canada.
7. Enter the district/division associated with this college in the MIS Code field. The MIS district code is used with the Banner Human Resources CA-MIS module for the Employee Assignment Extract Process (PEPAEXT) for the assignment information file. This field is for CA-MIS reporting purposes only. Valid values should be entered on the GTVDICD form.
Note: Select the Search button for this field to access the District/Division Code Validation (GTVDICD) list.
8. Activity Date is automatically populated with today’s date.
9. Click the Save icon.
10. Click the Exit icon.
© SunGard 2004-2008 Location Management - Housing Page 40
Department Code Validation
Purpose
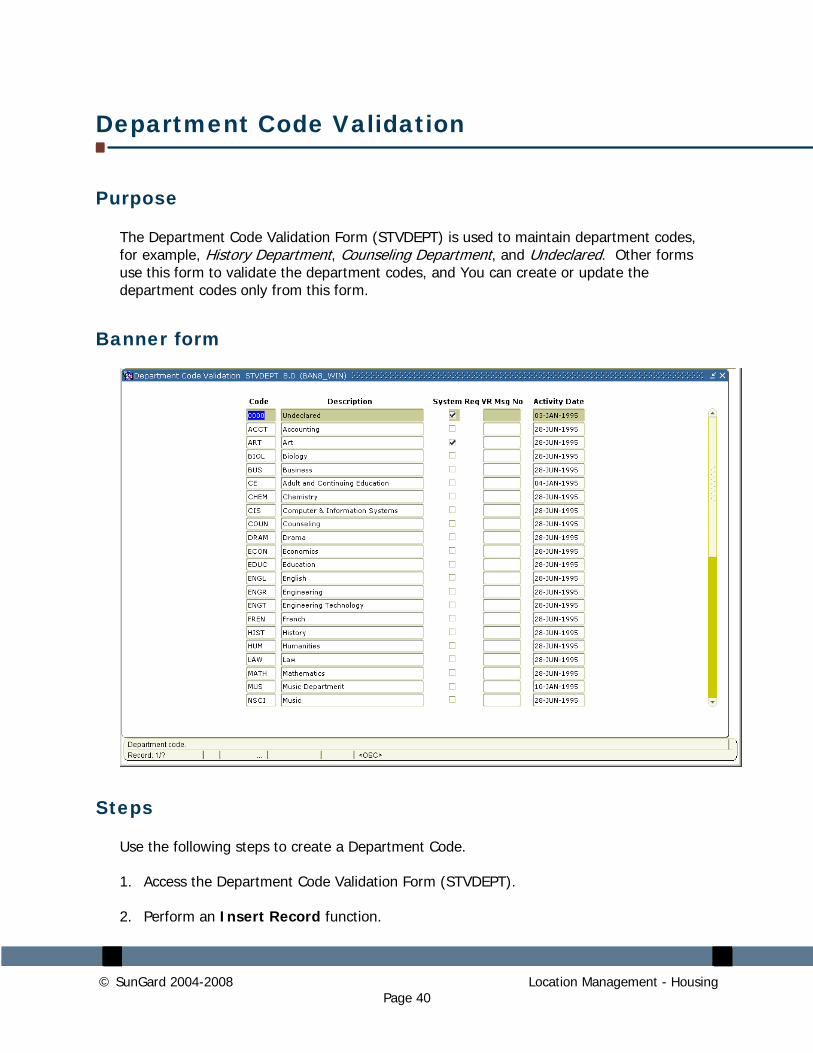
The Department Code Validation Form (STVDEPT) is used to maintain department codes, for example, History Department, Counseling Department, and Undeclared. Other forms use this form to validate the department codes, and You can create or update the department codes only from this form.
Banner form
Steps
Use the following steps to create a Department Code.
1. Access the Department Code Validation Form (STVDEPT).
2. Perform an Insert Record function.
© SunGard 2004-2008 Location Management - Housing Page 41
3. Using your initials and your name, enter a code and a Department Code in the Code and Description fields.
Example: JSLAW John Smith’s Law.
Note: Once a department code record has been saved, the code entered in this field cannot be changed. Once this code has been used in any other record, the department code record cannot be deleted.
4. Note whether the System Required checkbox should be checked. This checkbox specifies whether this value is required by the system. If this checkbox is checked, the validation table record cannot be deleted. Once this checkbox is checked, it cannot be unchecked.
5. Enter the number assigned to the Voice Response message assigned to this department code into the Voice Response Message Code field.
6. Activity Date is automatically populated with today’s date.
7. Click the Save icon.
8. Click the Exit icon.
© SunGard 2004-2008 Location Management - Housing Page 42
Site Code Validation
Purpose
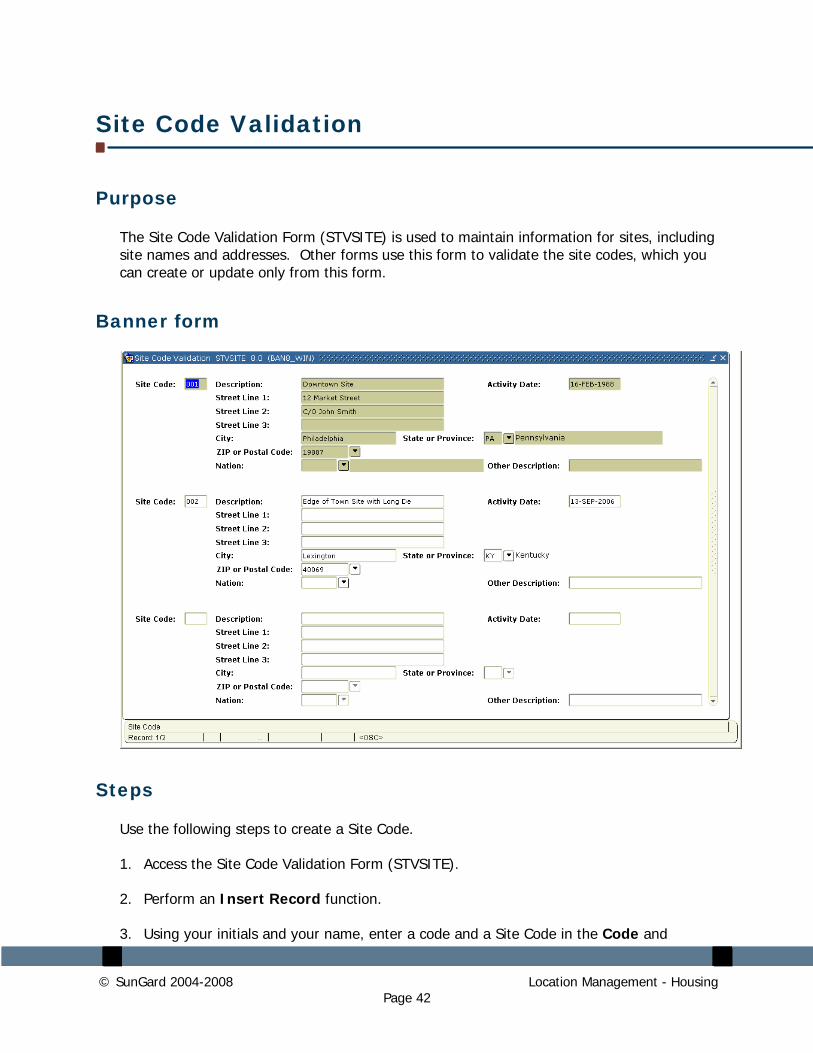
The Site Code Validation Form (STVSITE) is used to maintain information for sites, including site names and addresses. Other forms use this form to validate the site codes, which you can create or update only from this form.
Banner form
Steps
Use the following steps to create a Site Code.
1. Access the Site Code Validation Form (STVSITE).
2. Perform an Insert Record function.
3. Using your initials and your name, enter a code and a Site Code in the Code and
© SunGard 2004-2008 Location Management - Housing Page 43
Description fields.
Example: JS01 John Smith’s Main Site.
Note: Once a site code record has been saved, the code entered in this field cannot be changed. Once this code has been used in any other record, the site code record cannot be deleted.
4. Enter up to three lines for the street address where indicated.
5. Enter the City for the Address in the City Field.
6. Enter the Code for the State of Province in which the address is located. Use the Search button for this field to access the State/Province Code Validation (STVATYP) list.
7. Enter the Zip or Postal Code in which the address is located. When a valid ZIP or postal code is selected from the ZIP/Postal Code Validation Form (GTVZIPC), the combination of city, state/province, and nation information that exists in GTVZIPC defaults into the appropriate fields. The related information does not default in when the ZIP/postal code is entered manually. Use the Search button for this field to access the ZIP/Postal Code Validation Form (GTVZIPC).
8. Enter the Nation Code for the country in which the address is located. Use the Search button for this field to access the Nation Validation (STVNATN) list.
9. Enter the name of the foreign country in which the site is located in the Other Description field, if the site is located in a foreign country.
10. Activity Date is automatically populated with today’s date.
11. Click the Save icon.
12. Click the Exit icon.
© SunGard 2004-2008 Location Management - Housing Page 44
State/Province Code Validation
Purpose
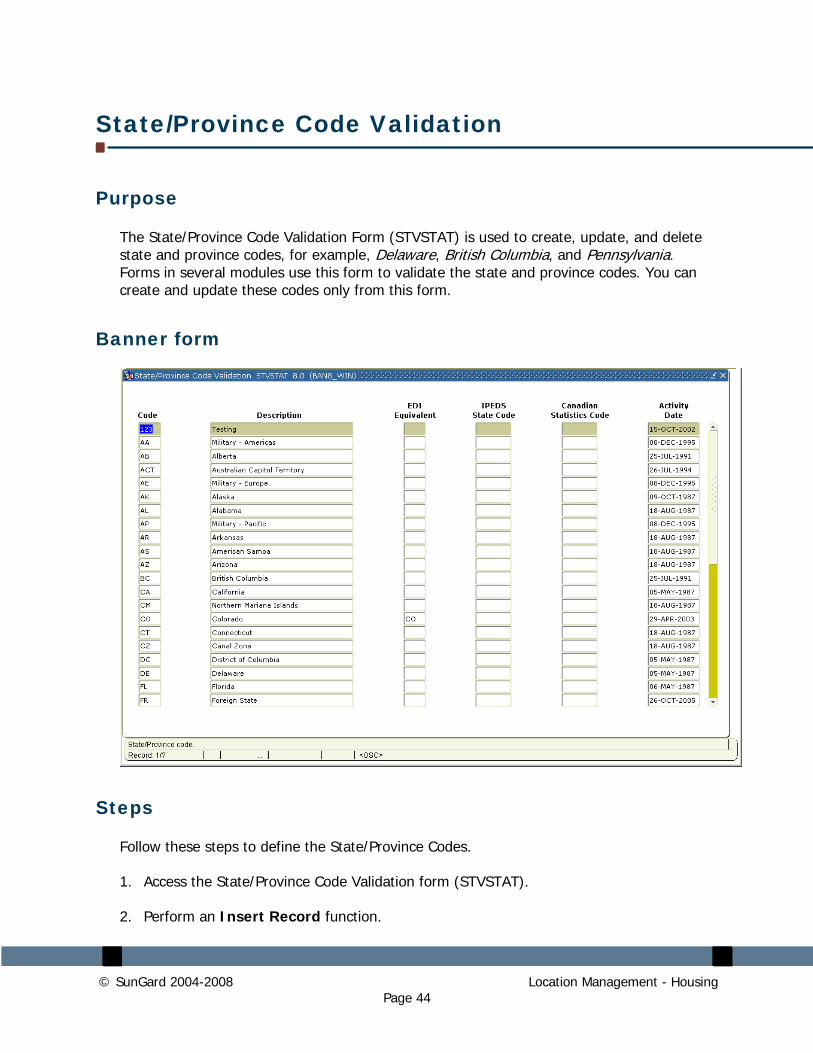
The State/Province Code Validation Form (STVSTAT) is used to create, update, and delete state and province codes, for example, Delaware, British Columbia, and Pennsylvania. Forms in several modules use this form to validate the state and province codes. You can create and update these codes only from this form.
Banner form
Steps
Follow these steps to define the State/Province Codes.
1. Access the State/Province Code Validation form (STVSTAT).
2. Perform an Insert Record function.
© SunGard 2004-2008 Location Management - Housing Page 45
3. Using your initials and your name, enter a code and an State/Province Name in the Code and Description fields. Once a state/province code record has been saved, the code entered in this field cannot be changed. Once this code has been used in any other record, the state/province code record cannot be deleted.
Example: JS1 John Smith’s State.
4. Enter the EDI SPEEDE/ExPRESS state and province code value. This field equates the EDI SPEEDE/ExPRESS state and province code values to the institution's state and province codes. When an institutional code is not equated with an EDI code, this field should be blank. The EDI equivalent value will be used in the transmission of transcript information electronically via EDI. These values are defined in the third party EDI SPEEDE/ExPRESS Implementation Guide under data element #156.
5. Enter the student IPEDS reporting code. This field is used in the production of the IPEDS First Time Residency Report (SHRIRES) Web upload file, which is produced in conjunction with the report output.
6. Enter the five-digit code representing the state or province code defined and used on the Annual University Full-Time Teaching Staff Survey associated in the Canadian Statistics Code field. Enter the code that identifies the state/province for the state or province to Stats Canada.
7. Note that the Activity Date is automatically populated with today’s date.
8. Click the Save icon.
9. Click the Exit icon.
© SunGard 2004-2008 Location Management - Housing Page 46
Term Code Validation
Purpose
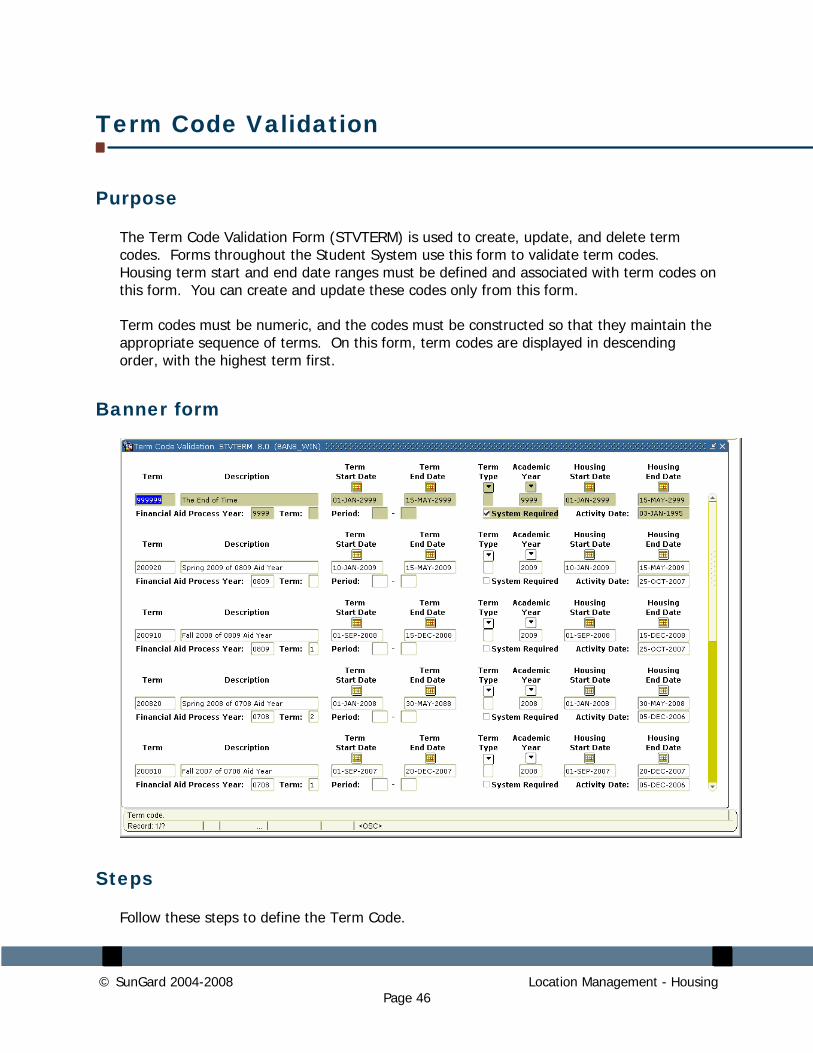
The Term Code Validation Form (STVTERM) is used to create, update, and delete term codes. Forms throughout the Student System use this form to validate term codes. Housing term start and end date ranges must be defined and associated with term codes on this form. You can create and update these codes only from this form.
Term codes must be numeric, and the codes must be constructed so that they maintain the appropriate sequence of terms. On this form, term codes are displayed in descending order, with the highest term first.
Banner form
Steps
Follow these steps to define the Term Code.
© SunGard 2004-2008 Location Management - Housing Page 47
1. Access the Term Code Validation form (STVTERM).
2. Perform an Insert Record function.
3. Using your initials and your name, enter a code and a Term Name in the Code and Description fields. Once a term code record has been saved, the code entered in this field cannot be changed. Once this code has been used in any other record, the term code record cannot be deleted.
Example: 99JS0001 John Smith’s Term.
4. Enter the Term Start Date. This is the first date on which classes meet for this term. Double-click in the field or select the Calendar button for this field to display a calendar that can be used to select the date.
5. Enter the Term End Date. This is the last date on which classes meet for this term. Double-click in the field or select the Calendar button for this field to display a calendar that can be used to select the date.
6. Enter the EDI/SPEEDE/ExPRESS session code (type of session) associated with this term code. The value will default from the Academic History Control Form (SHACTRL) and can be overridden. Type codes are used in transmission of transcript information electronically via EDI. Select the Search button for this field to access the Term Type Validation (STVTRMT) list.
7. Enter the code of the academic year to which this term code is assigned. Select the Search button for this field to access the Academic Year Validation (STVACYR) list.
8. Enter the Housing Start Date. This is the first date for housing, meal plan, and phone assignments associated with this term. Double-click in the field or select the Calendar button for this field to display a calendar that can be used to select the date.
9. Enter the Housing End Date. This is the last date for housing, meal plan, and phone assignments associated with this term. Double-click in the field or select the Calendar button for this field to display a calendar that can be used to select the date.
10. Enter the Financial Aid Process Year. This is the code of the aid year with which this term is associated. Since financial aid is processed by aid year, institutional terms must be associated with a value in this field.
11. Enter the Financial Aid Term. This is the code of the term for interfacing with a third-party financial aid system, if applicable. This field is not required for Banner Financial Aid.
12. Enter the Financial Aid Period (Beginning). This is the code of the beginning period for interfacing with a third-party financial aid system, if applicable. This field is not required for Banner Financial Aid.
© SunGard 2004-2008 Location Management - Housing Page 48
13. Enter the Financial Aid Period (Ending). This is the code of the ending period for interfacing with a third-party financial aid system, if applicable. This field is not required for Banner Financial Aid.
14. View the System Required checkbox, which is used to specify whether this value is required by the system. If this checkbox is checked, the validation table record cannot be deleted. Once this checkbox is checked, it cannot be unchecked.
15. Note that the Activity Date is automatically populated with today’s date.
16. Click the Save icon.
17. Click the Exit icon.

© SunGard 2004-2008 Location Management - Housing Page 49
Detail Code Control
Purpose
The Detail Code Control Form (TSADETC) is used to establish detail codes. Each detail code is defined as a charge or a payment, assigned to a user-defined category and application of payment information, and can be given data entry default information. The accounting information associated with each detail code on this form is used by the Accounting Feed Process (TGRFEED).
The detail code information on this form must be established prior to using any of the other Accounts Receivable application forms since they access the detail code information from this form.
The Location Management/Housing module uses detail codes for housing fees.
Banner form
© SunGard 2004-2008 Location Management - Housing Page 50
Steps
Follow these steps to define a Detail Code.
1. Access the Detail Code Control – Student form (TSADETC).
2. Perform an Insert Record function.
3. Using your initials and your name, enter a code and a descriptive Name in the Code and Description fields. Some changes are prevented: for example, you will not be able to delete a Detail Code after it has been used to create a Receivable transaction. If a Detail Code has not been used to create a transaction but has been used in a rule table (such as Fee Assessment via SFARGFE) you can delete the code only after you remove the code from the rules.
Example: JS001 John Smith’s Detail Code.
4. Enter the Category. This field specifies the category to which the detail code belongs (for example, fees, grants, or tuition). Choices come from the Detail Charge/Payment Category Code Validation (TTVDCAT) list.
5. Enter the Grant Type. This pull-down list specifies the type of transaction associated with the grant. The value in the Category field must be GRN in order to use this field.
Choices are:
B (Billing)--Billing transaction. This detail code will be used by the billing process.
W (Withholding)--Withholding transaction. This detail code will be used by the billing process.
P (Payment)--Payment transaction. Enter this detail code on the Research Accounting Payments Entry Form (FRAAREV) to process payments.
T (Transfer)--Transfer transaction. Enter this detail code on FRAAREV to process transfers.
R (Refund)--Refund transaction. Enter this detail code on FRAAREV to process refunds to the agency.
6. Set the Priority associated with this transaction.
7. Enter the Refund Code. Permitted values are Y (generate a refund automatically), M (generate a refund manually), P (detail code is a PLUS loan refund code), or blank (transaction is not a refund).
Note: Only one active detail code can exist with a Refund Code value of P.
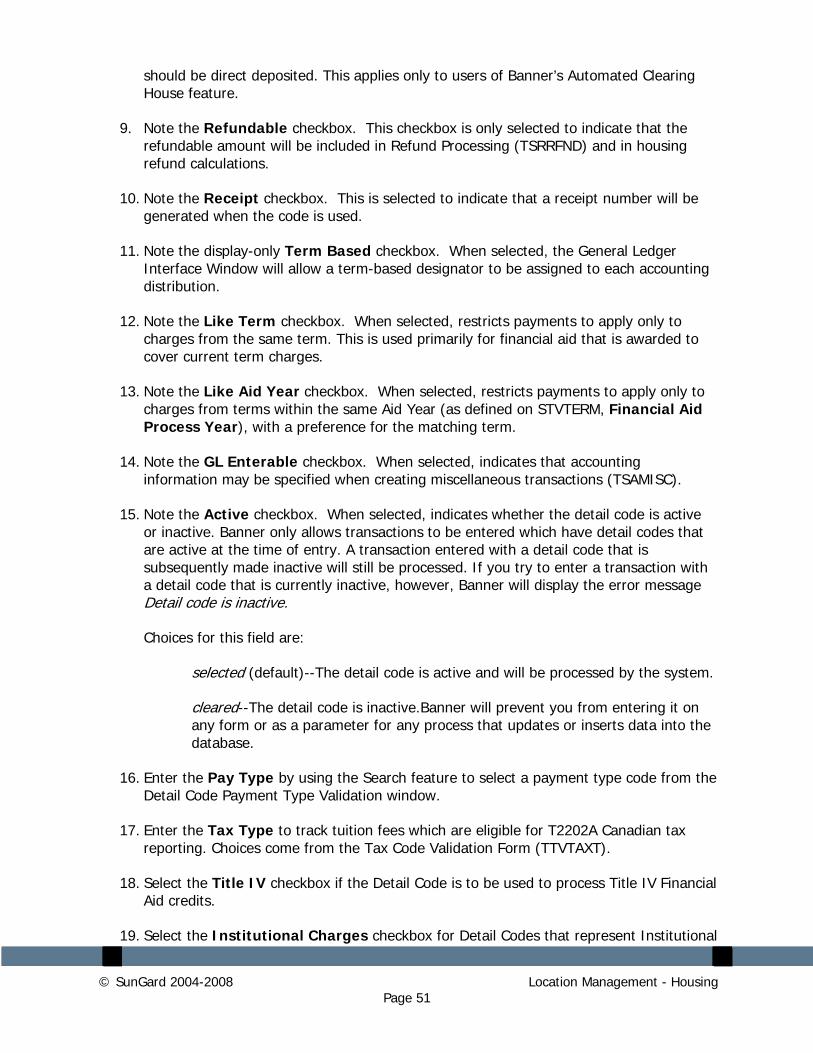
8. Note the Direct Deposit checkbox. This checkbox is only selected if any refunds
© SunGard 2004-2008 Location Management - Housing Page 51
should be direct deposited. This applies only to users of Banner’s Automated Clearing House feature.
9. Note the Refundable checkbox. This checkbox is only selected to indicate that the refundable amount will be included in Refund Processing (TSRRFND) and in housing refund calculations.
10. Note the Receipt checkbox. This is selected to indicate that a receipt number will be generated when the code is used.
11. Note the display-only Term Based checkbox. When selected, the General Ledger Interface Window will allow a term-based designator to be assigned to each accounting distribution.
12. Note the Like Term checkbox. When selected, restricts payments to apply only to charges from the same term. This is used primarily for financial aid that is awarded to cover current term charges.
13. Note the Like Aid Year checkbox. When selected, restricts payments to apply only to charges from terms within the same Aid Year (as defined on STVTERM, Financial Aid Process Year), with a preference for the matching term.
14. Note the GL Enterable checkbox. When selected, indicates that accounting information may be specified when creating miscellaneous transactions (TSAMISC).
15. Note the Active checkbox. When selected, indicates whether the detail code is active or inactive. Banner only allows transactions to be entered which have detail codes that are active at the time of entry. A transaction entered with a detail code that is subsequently made inactive will still be processed. If you try to enter a transaction with a detail code that is currently inactive, however, Banner will display the error message Detail code is inactive.
Choices for this field are:
selected (default)--The detail code is active and will be processed by the system.
cleared--The detail code is inactive.Banner will prevent you from entering it on any form or as a parameter for any process that updates or inserts data into the database.
16. Enter the Pay Type by using the Search feature to select a payment type code from the Detail Code Payment Type Validation window.
17. Enter the Tax Type to track tuition fees which are eligible for T2202A Canadian tax reporting. Choices come from the Tax Code Validation Form (TTVTAXT).
18. Select the Title IV checkbox if the Detail Code is to be used to process Title IV Financial Aid credits.
19. Select the Institutional Charges checkbox for Detail Codes that represent Institutional

© SunGard 2004-2008 Location Management - Housing Page 52
Charges under Title IV Aid programs.
20. Select the Payment History checkbox to include transactions with this Detail Code in the payment history.
21. Fill in the Default Monetary Amount. This is the default amount filled in for transactions with this Detail Code.
22. Fill in the Default Term. This is the default term used for new transactions with this Detail Code.
23. Fill in the Default Effective Date. This is the default date used for new transactions with this Detail Code.
24. Click the Save icon.
25. Click the Exit icon.
© SunGard 2004-2008 Location Management - Housing Page 53
Creating and Analyzing Housing Control and Rules
Rule forms
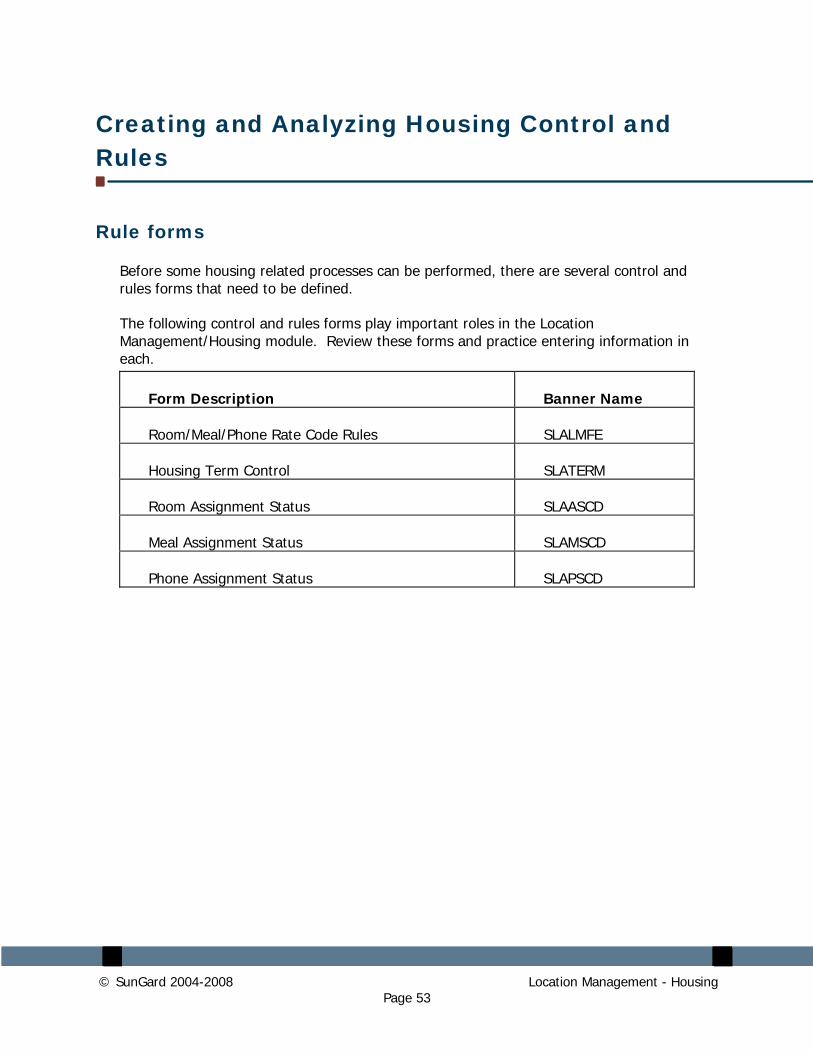
Before some housing related processes can be performed, there are several control and rules forms that need to be defined.
The following control and rules forms play important roles in the Location Management/Housing module. Review these forms and practice entering information in each.
Form Description Banner Name
Room/Meal/Phone Rate Code Rules SLALMFE
Housing Term Control SLATERM
Room Assignment Status SLAASCD
Meal Assignment Status SLAMSCD
Phone Assignment Status SLAPSCD
© SunGard 2004-2008 Location Management - Housing Page 54
Room/Meal/Phone Rate Code Rules
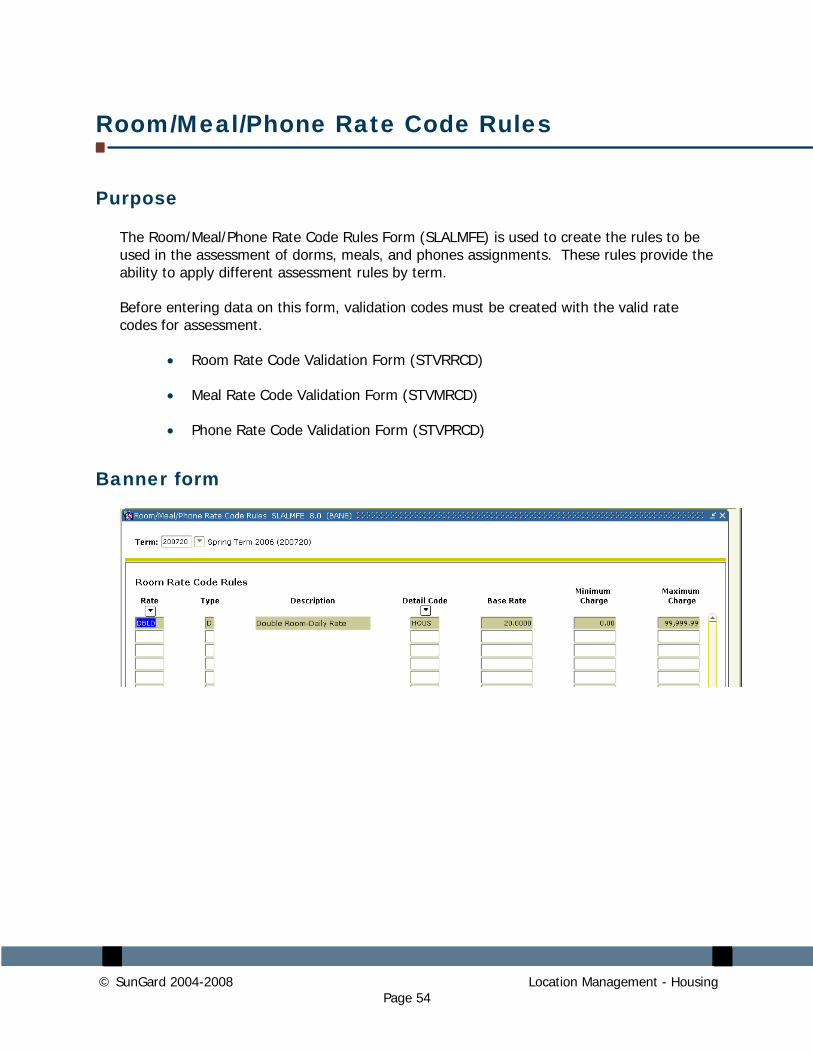
Purpose
The Room/Meal/Phone Rate Code Rules Form (SLALMFE) is used to create the rules to be used in the assessment of dorms, meals, and phones assignments. These rules provide the ability to apply different assessment rules by term.
Before entering data on this form, validation codes must be created with the valid rate codes for assessment.
• Room Rate Code Validation Form (STVRRCD)
• Meal Rate Code Validation Form (STVMRCD)
• Phone Rate Code Validation Form (STVPRCD)
Banner form
© SunGard 2004-2008 Location Management - Housing Page 55
Steps
This procedure covers the defining of the assessment rates for Housing, Meals and Phones. This must be completed before assessment can be performed either on-line or using the Batch Room/Meal/Phone Assessment Process (SLRFASM).
Follow these steps to define housing/meal/phone rates.
1. Access the Room/Meal/Phone Rate Code Rules Form (SLALMFE).
2. Enter the term or use the Search button to find one.
3. Perform a Next Block function to access the Room Rate Code Rules block.
4. Enter an appropriate Housing Rate code in the Rate field or select it from the list of values
5. Note: LOV is validated against STVRRCD.
6. Enter an appropriate code in the Detail Code field or select it from the LOV (validated against TSADETC).
Note: The detail code must be an HOU category detail code.
7. Enter the appropriate dollar amount of the charge in the Base Rate, Minimum Charge, and Maximum Charge fields.
8. Click the Save icon.
9. Enter any additional Housing rates as desired for the term.
10. Click the Save icon.
11. Perform a Next Block function to access the Meal Rates Codes Rules block.
12. Enter an appropriate Meal Rate code in the Rate field or select it from the LOV (validated against STVMRCD).
13. Enter an appropriate code in the Detail Code field or select it from the LOV (validated against TSADETC).
Note: The detail code must be an MEA category detail code.
14. Enter the appropriate dollar amount of the charge in the Base Rate, Minimum Charge, and Maximum Charge fields.
15. Click the Save icon.
© SunGard 2004-2008 Location Management - Housing Page 56
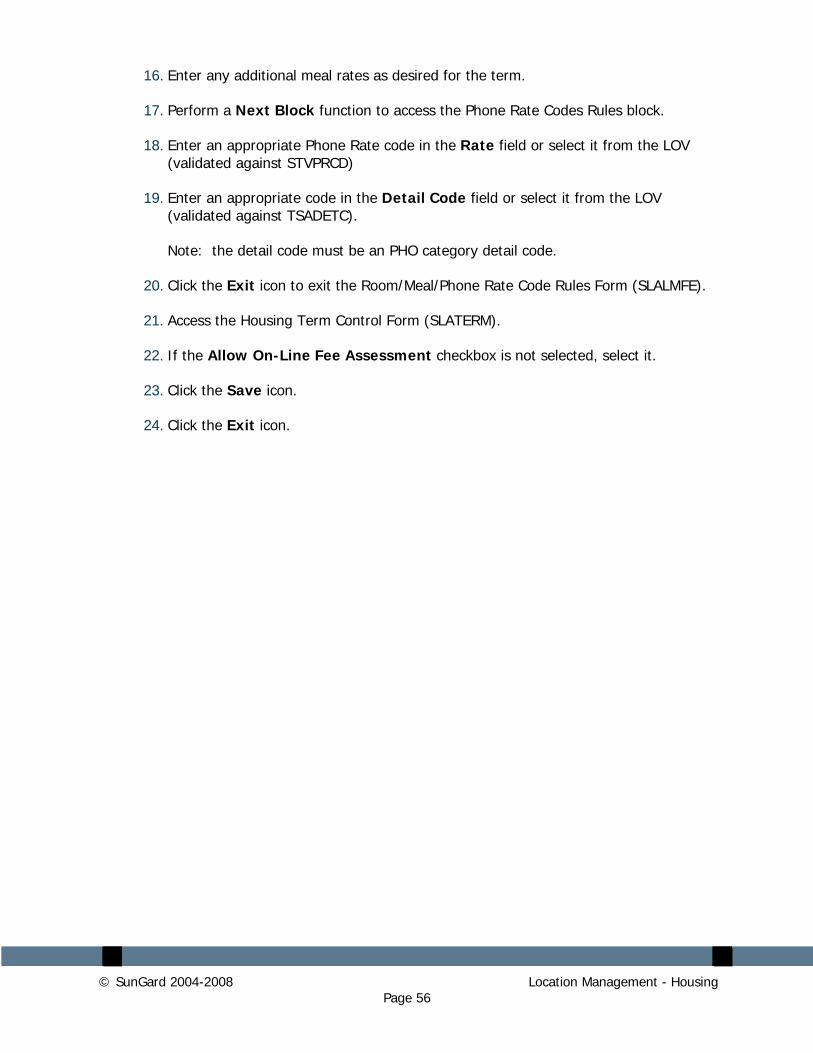
16. Enter any additional meal rates as desired for the term.
17. Perform a Next Block function to access the Phone Rate Codes Rules block.
18. Enter an appropriate Phone Rate code in the Rate field or select it from the LOV (validated against STVPRCD)
19. Enter an appropriate code in the Detail Code field or select it from the LOV (validated against TSADETC).
Note: the detail code must be an PHO category detail code.
20. Click the Exit icon to exit the Room/Meal/Phone Rate Code Rules Form (SLALMFE).
21. Access the Housing Term Control Form (SLATERM).
22. If the Allow On-Line Fee Assessment checkbox is not selected, select it.
23. Click the Save icon.
24. Click the Exit icon.
© SunGard 2004-2008 Location Management - Housing Page 57
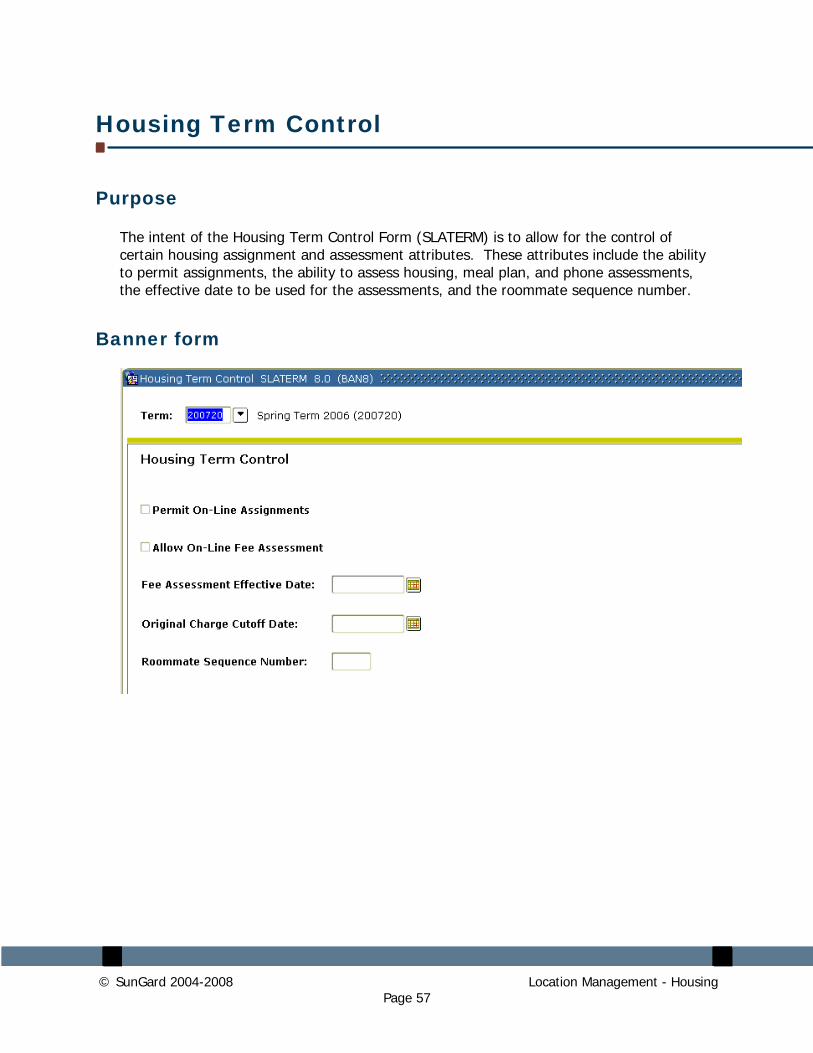
Housing Term Control
Purpose
The intent of the Housing Term Control Form (SLATERM) is to allow for the control of certain housing assignment and assessment attributes. These attributes include the ability to permit assignments, the ability to assess housing, meal plan, and phone assessments, the effective date to be used for the assessments, and the roommate sequence number.
Banner form
© SunGard 2004-2008 Location Management - Housing Page 58
Steps
Follow these steps to define housing assignment and assessment control functionality.
1. Access the Housing Term Control Form (SLATERM).
2. If the Permit On-Line Assignments checkbox is not selected, select it.
3. If you had to select the Permit On-Line Assignments checkbox, click the Save icon.
4. Click the Exit icon.
© SunGard 2004-2008 Location Management - Housing Page 59
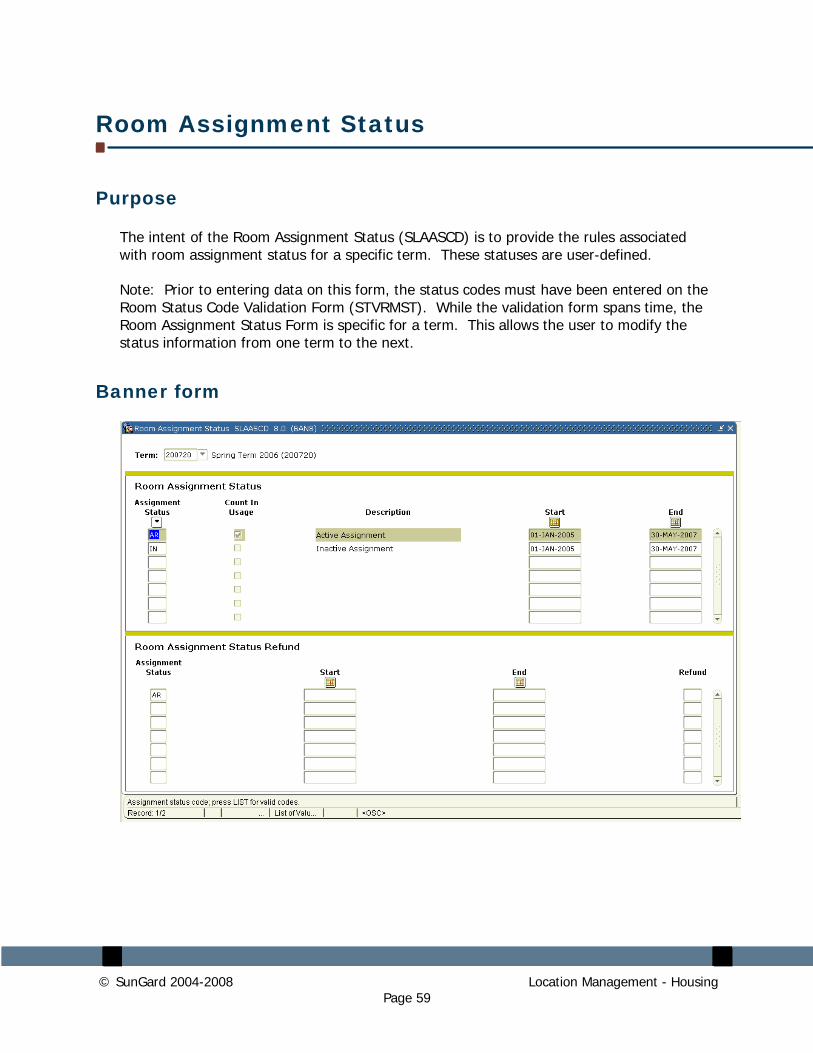
Room Assignment Status
Purpose
The intent of the Room Assignment Status (SLAASCD) is to provide the rules associated with room assignment status for a specific term. These statuses are user-defined.
Note: Prior to entering data on this form, the status codes must have been entered on the Room Status Code Validation Form (STVRMST). While the validation form spans time, the Room Assignment Status Form is specific for a term. This allows the user to modify the status information from one term to the next.
Banner form
© SunGard 2004-2008 Location Management - Housing Page 60
Steps
Follow these steps to define room assignment status functionality for the selected term.
1. Access the Room Assignment Status Form (SLAASCD).
2. Select the Term you created in a previous exercise from the drop down list.
3. Perform a Next Block function to move to the Room Assignment Status block.
4. Select the Assignment Status from the Search window.
5. For each Assignment Status selected, note the settings of the Count in Usage checkbox, and the Start and End dates for the status.
6. Perform a Next Block function to move to the Room Assignment Status Refund block.
7. Define the Assignment Status for refunds for this term.
8. Click the Save icon.
9. Click the Exit icon.
© SunGard 2004-2008 Location Management - Housing Page 61
Meal Assignment Status
Purpose
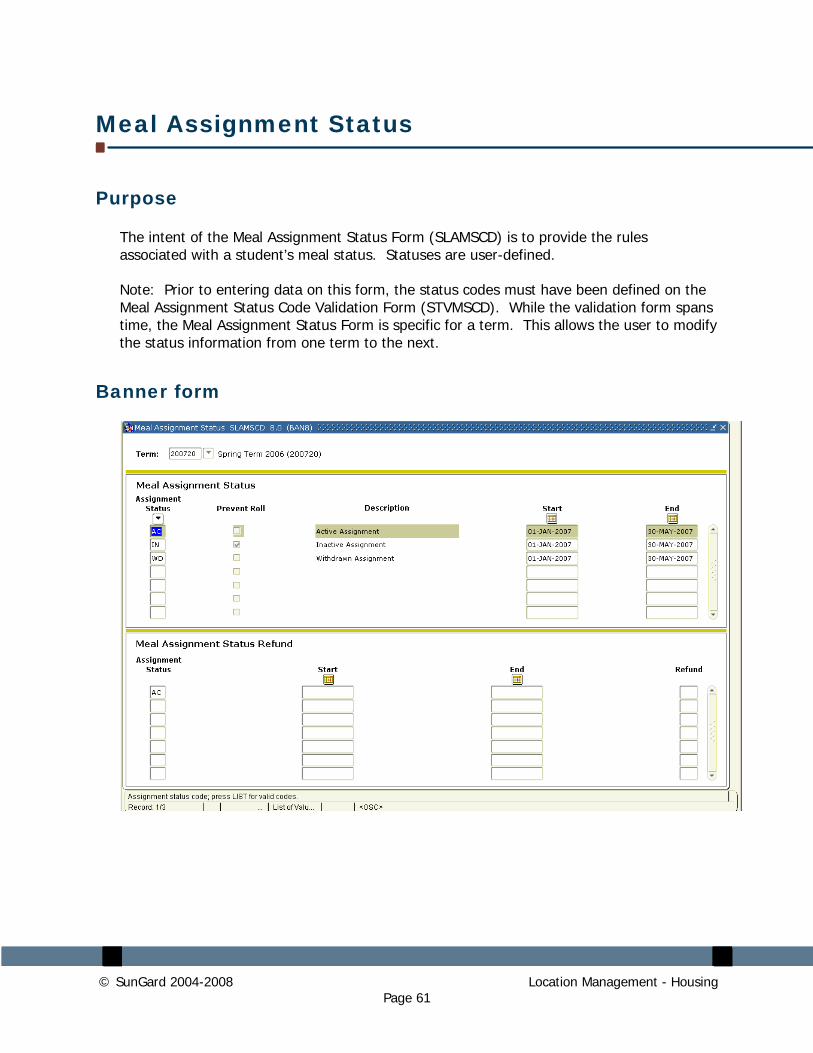
The intent of the Meal Assignment Status Form (SLAMSCD) is to provide the rules associated with a student’s meal status. Statuses are user-defined.
Note: Prior to entering data on this form, the status codes must have been defined on the Meal Assignment Status Code Validation Form (STVMSCD). While the validation form spans time, the Meal Assignment Status Form is specific for a term. This allows the user to modify the status information from one term to the next.
Banner form
© SunGard 2004-2008 Location Management - Housing Page 62
Steps
Follow these steps to define meal assignment status functionality for the selected term.
1. Access the Meal Assignment Status Form (SLAMSCD).
2. Select the Term you created in a previous exercise from the drop down list.
3. Perform a Next Block function to move to the Meal Assignment Status block.
4. Select the Assignment Status from the Search window.
5. For each Assignment Status selected, note the settings of the Count in Usage checkbox, and the Start and End dates for the status.
6. Perform a Next Block function to move to the Meal Assignment Status Refund block.
7. Define the Assignment Status for refunds for this term.
8. Click the Save icon.
9. Click the Exit icon.
© SunGard 2004-2008 Location Management - Housing Page 63
Phone Assignment Status
Purpose
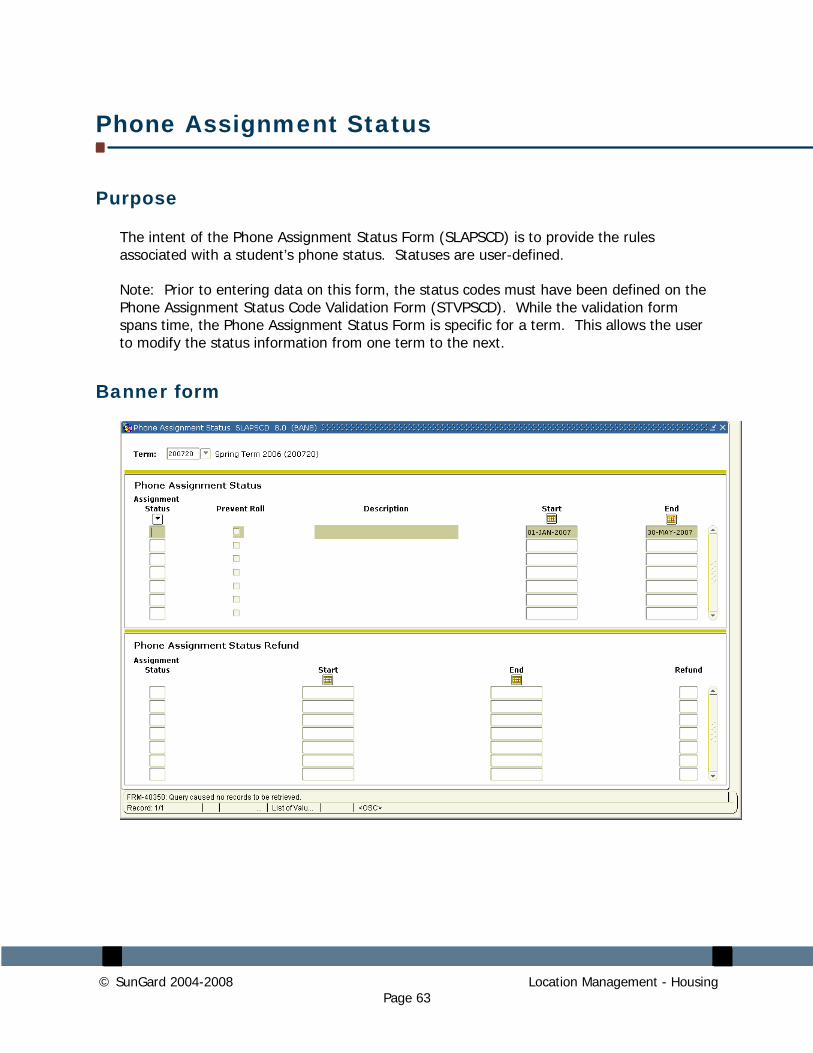
The intent of the Phone Assignment Status Form (SLAPSCD) is to provide the rules associated with a student’s phone status. Statuses are user-defined.
Note: Prior to entering data on this form, the status codes must have been defined on the Phone Assignment Status Code Validation Form (STVPSCD). While the validation form spans time, the Phone Assignment Status Form is specific for a term. This allows the user to modify the status information from one term to the next.
Banner form
© SunGard 2004-2008 Location Management - Housing Page 64
Steps
Follow these steps to define phone assignment status functionality for the selected term.
1. Access the Room Assignment Status Form (SLAPSCD).
2. Select the Term you created in a previous exercise from the drop down list.
3. Perform a Next Block function to move to the Phone Assignment Status block.
4. Select the Assignment Status from the Search window.
5. For each Assignment Status selected, note the settings of the Count in Usage checkbox, and the Start and End dates for the status.
6. Perform a Next Block function to move to the Phone Assignment Status Refund block.
7. Define the Assignment Status for refunds for this term.
8. Click the Save icon.
9. Click the Exit icon.
© SunGard 2004-2008 Location Management - Housing Page 65
Self Check
Directions
Use the information you have learned in this workbook to complete this self-check activity.
Question 1
The Building Code Validation Form (STVBLDG) is used to create, update, and delete building codes.
True / False
Question 2
Where do you define whether a rate is a term rate, monthly rate, or daily rate?
What type of detail code must be used for each rate?
Question 3
Using the Building Code Validation Form, you can specify that
A. the maximum capacity of a room is greater than the standard capacity.
B. a building is handicap-accessible.
C. a building has different wings.
D. All of the above.
© SunGard 2004-2008 Location Management - Housing Page 66
Question 4
What form is used to indicate that you will be using the Batch Housing/Meal/Phone Assessment Process?
Question 5
The Room/Meal/Phone Rate Code Rules Form allows you to define Housing, Meal, and Phone Rates for a term.
True / False
© SunGard 2004-2008 Location Management - Housing Page 67
Answer Key for Self Check
Question 1
The Building Code Validation Form (STVBLDG) is used to create, update, and delete building codes.
True
Question 2
Where do you define whether a rate is a term rate, monthly rate, or daily rate?
On the appropriate Rate Validation Tables – STVRRCD (Room Rates), STVMRCD (Meal Rates), STVPRCD (Phone Rates).
What type of detail code must be used for each rate?
HOU type for Housing, MEA for Meals, PHO for Phones.
Question 3
Using the Building Code Validation Form, you can specify that
A. the maximum capacity of a room is greater than the standard capacity.
B. a building is handicap-accessible.
C. a building has different wings.
D. All of the above.
Question 4
What form is used to indicate that you will be using the Batch Housing/Meal/Phone Assessment Process?
The Housing Term Control Form (SLATERM). The Allow On-Line Fee Assessment must NOT be selected.
© SunGard 2004-2008 Location Management - Housing Page 68
Question 5
The Room/Meal/Phone Rate Code Rules Form allows you to define Housing, Meal, and Phone Rates for a term.
True
© SunGard 2004-2008 Location Management - Housing Page 69
Day-to-Day Operations
Section goal
The goal of this section is to explain the regular process and detail the procedures to enter and maintain student housing and classroom information.
Objectives
At the end of this section, you will be able to
• define buildings and rooms
• create housing and meal applications
• create and maintain room, meal, and phone assignments
• identify the Location Management/Housing queries and reports.
© SunGard 2004-2008 Location Management - Housing Page 70
Process Introduction
Introduction
The Location Management/Housing process supports the creation and definition of Banner Student buildings and rooms, Residence Life housing activities related to room, meal, and phone assignments and assessment, and classroom definition and the maintenance of these records within Banner Student.
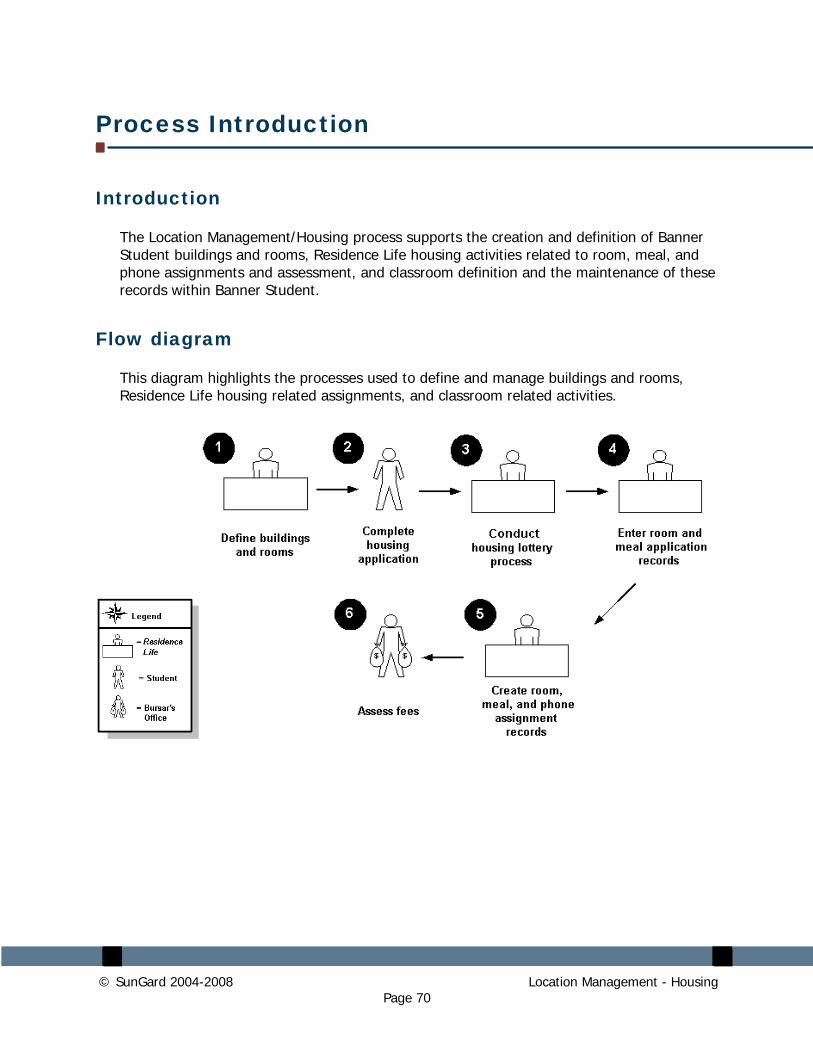
Flow diagram
This diagram highlights the processes used to define and manage buildings and rooms, Residence Life housing related assignments, and classroom related activities.
© SunGard 2004-2008 Location Management - Housing Page 71
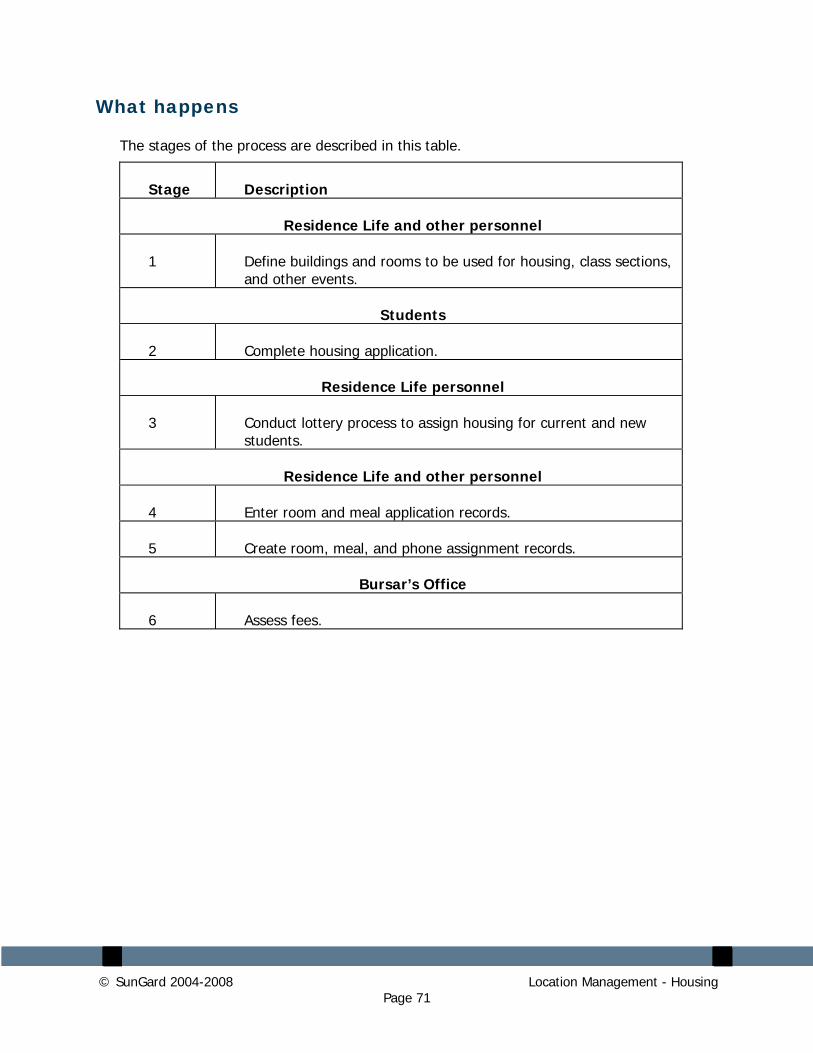
What happens
The stages of the process are described in this table.
Stage Description
Residence Life and other personnel
1 Define buildings and rooms to be used for housing, class sections, and other events.
Students
2 Complete housing application.
Residence Life personnel
3 Conduct lottery process to assign housing for current and new students.
Residence Life and other personnel
4 Enter room and meal application records.
5 Create room, meal, and phone assignment records.
Bursar’s Office
6 Assess fees.
© SunGard 2004-2008 Location Management - Housing Page 72
Defining a Residence Hall Building
Purpose
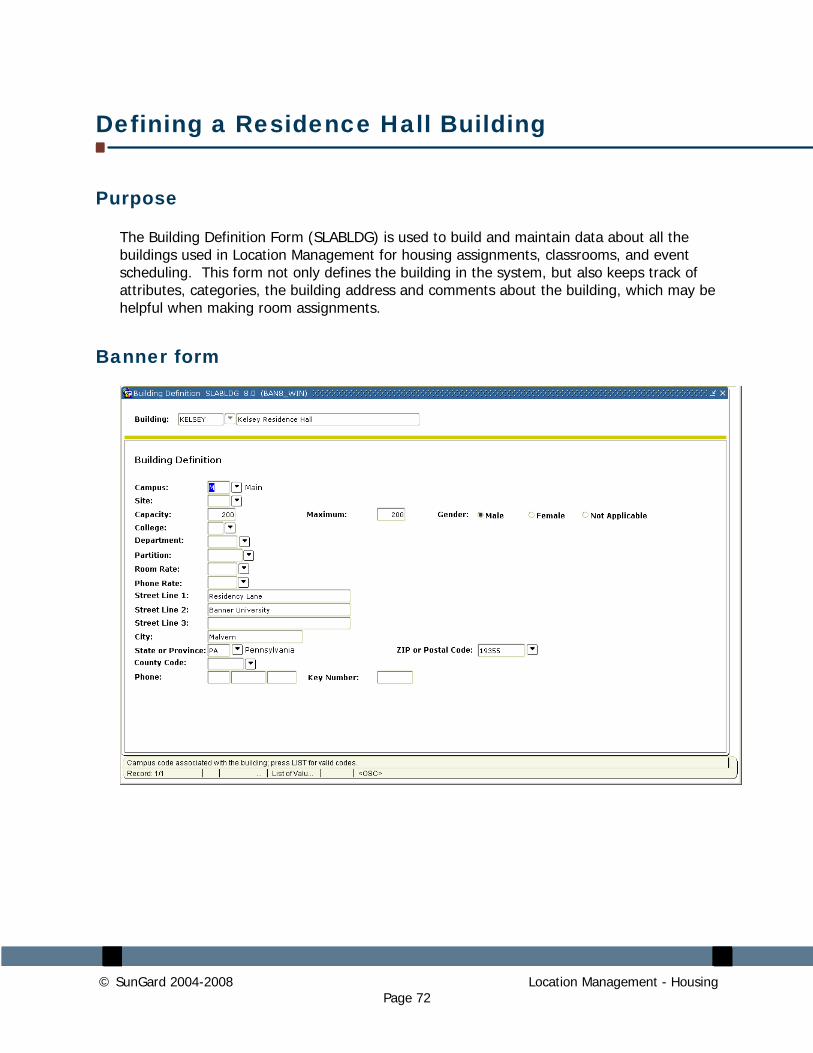
The Building Definition Form (SLABLDG) is used to build and maintain data about all the buildings used in Location Management for housing assignments, classrooms, and event scheduling. This form not only defines the building in the system, but also keeps track of attributes, categories, the building address and comments about the building, which may be helpful when making room assignments.
Banner form
© SunGard 2004-2008 Location Management - Housing Page 73
Steps
Follow these steps to complete the process.
1. Access the Building Definition Form (SLABLDG).
2. Enter the building code you defined in a previous exercise in the Building field or select it from the list of values (LOV).
3. Perform a Next Block function.
4. Select one of the radio buttons in the Gender radio button group to specify whether the entire building is for males, females, or N/A for both.
5. Enter information about the building’s location using the various fields.
6. Click the Save icon.
7. Select Building Attributes from the Options menu to access the Building Attributes, Category, and Comments window.
8. Select the attribute code for “Non-smoking Room” from the LOV in the Attributes field.
9. Enter appropriate category values to indicate that there is a 1st, 2nd and 3rd floor category for this building.
10. Perform a Next Block function.
11. Enter an appropriate Building Comment.
12. Click the Save icon.
13. Click the Exit icon.
© SunGard 2004-2008 Location Management - Housing Page 74
Defining a Residence Hall Room
Purpose
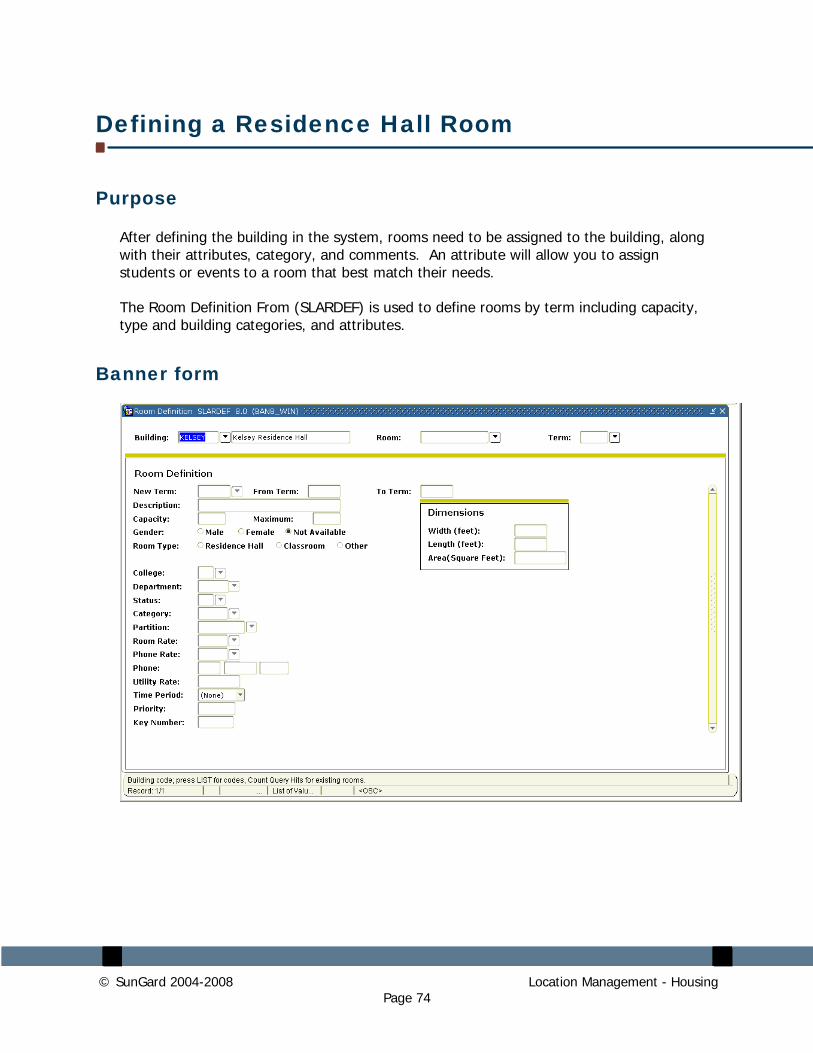
After defining the building in the system, rooms need to be assigned to the building, along with their attributes, category, and comments. An attribute will allow you to assign students or events to a room that best match their needs.
The Room Definition From (SLARDEF) is used to define rooms by term including capacity, type and building categories, and attributes.
Banner form
© SunGard 2004-2008 Location Management - Housing Page 75
Steps
Follow these steps to complete the process.
1. Access the Room Definition Form (SLARDEF).
2. Enter the building code that you defined in a previous lesson in the Bldg field or select it from the list of values (LOV).
3. Enter a room number in the Room field.
4. Perform a Next Block function.
5. Enter a term code in the New Term field or select one from the LOV.
6. Enter room information including a Description, Capacity, and Room Type using the fields provided.
7. Result: The system automatically populates the appropriate fields with some information about the building.
8. Enter other room qualities in the fields Dimension, Utility Rate, Period, Phone, and the Key Number.
Note: The Priority field is used with Batch Room Scheduling.
9. Click the Save icon.
10. Click Room Attributes from the Options menu.
11. Enter room attributes, start and end dates and times for an inactive period (for example, for the summer), and comments.
12. Click the Save icon.
13. Click the Exit icon.
© SunGard 2004-2008 Location Management - Housing Page 76
Creating a Room and Meal Application
Purpose
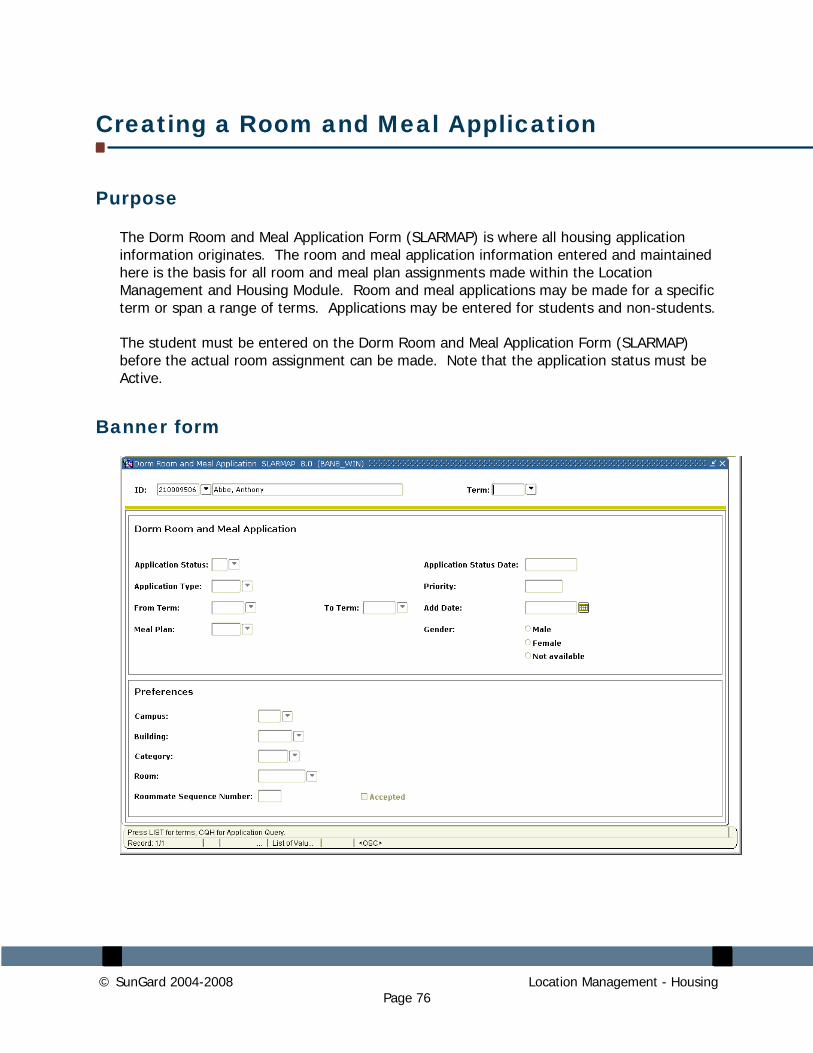
The Dorm Room and Meal Application Form (SLARMAP) is where all housing application information originates. The room and meal application information entered and maintained here is the basis for all room and meal plan assignments made within the Location Management and Housing Module. Room and meal applications may be made for a specific term or span a range of terms. Applications may be entered for students and non-students.
The student must be entered on the Dorm Room and Meal Application Form (SLARMAP) before the actual room assignment can be made. Note that the application status must be Active.
Banner form
© SunGard 2004-2008 Location Management - Housing Page 77
Steps
Follow these steps to complete the process of assigning the student to the building and room you creat d previously. e
1. Access the Dorm Room and Meal Application Form (SLARMAP).
2. Enter a student ID in the ID field or use the Search button to find one.
3. Note: Your instructor will provide a list of valid student ID numbers if you do not have your own student set up in the system.
4. Enter the term or use the Search button to access one.
5. Perform a Next Block function.
6. Enter the “Active Application” status code in the Application Status field or select it from the list of values (LOV).
7. Enter the “Housing and Meal Plan Request” type code in the Application Type field or select it from the LOV.
8. If the term code from the key block is not displayed in the From Term field, enter it or select it from the LOV.
9. Enter a term in the To Term field or select one from the LOV. This should be the same or later than the term in the From Term field.
10. Enter the building and room information that you created in the previous exercises. If necessary, use the Search button to find the values.
11. Click the Save icon.
12. Click the Exit icon.
© SunGard 2004-2008 Location Management - Housing Page 78
Creating Roommate Applications
Purpose
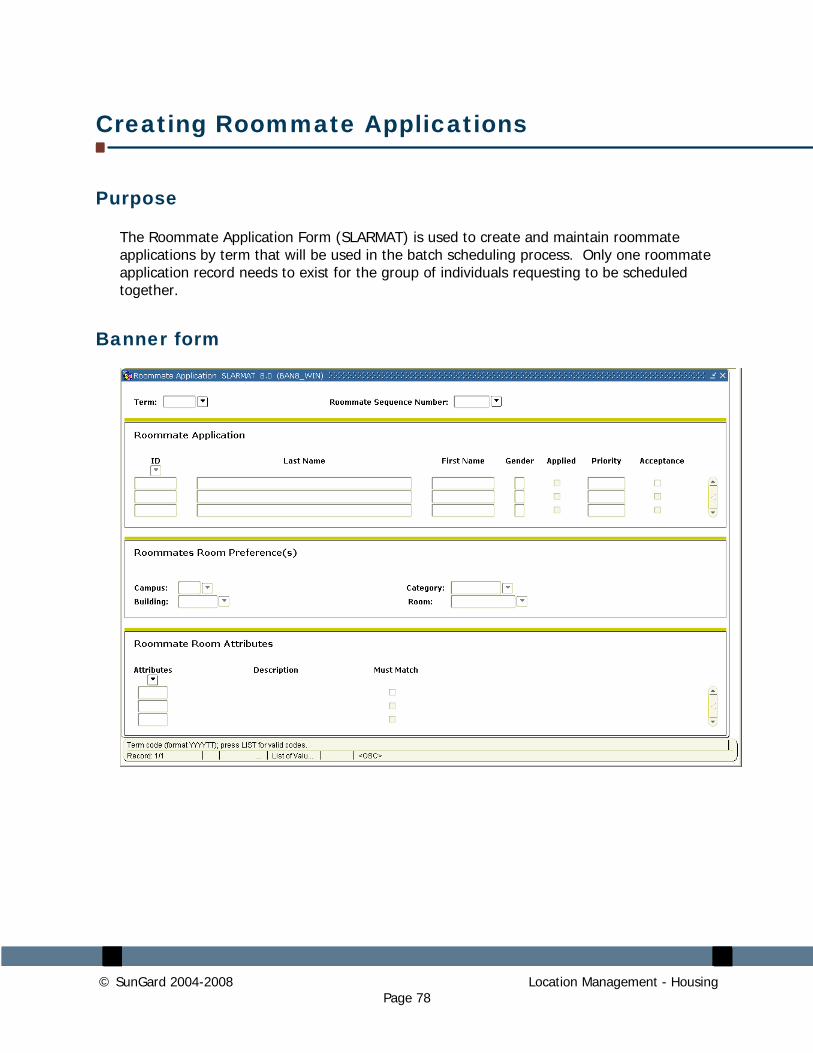
The Roommate Application Form (SLARMAT) is used to create and maintain roommate applications by term that will be used in the batch scheduling process. Only one roommate application record needs to exist for the group of individuals requesting to be scheduled together.
Banner form

© SunGard 2004-2008 Location Management - Housing Page 79
Steps
Follow these steps to complete the process.
1. Access the Roommate Application Form (SLARMAT).
2. In the key block, enter the term for which the roommate application will apply.
3. Type the word ADD in the Roommate Sequence Number field.
4. Perform a Next Block function.
5. Enter the IDs for the applicants that wish to room together.
6. Click the Save icon.
7. Perform a Next Block function.
8. Click the Down Arrow icon next to the Building field to add a building preference.
9. Perform a query on the SLABQRY form, locate your residence hall building, select it, and return it to SLARMAT.
10. Click the Save icon.
11. Perform a Next Block function to access the Roommate Room Attributes window.
12. Perform a LOV function, locate the 2 Bedroom attribute, and select it to return it to Room Attributes window.
13. Click the Save icon.
14. Perform a Next Block function to return to the Roommate Application block.
15. Repeat this process for the next roommate record.
16. When completed, click the Exit icon to exit the form.
© SunGard 2004-2008 Location Management - Housing Page 80
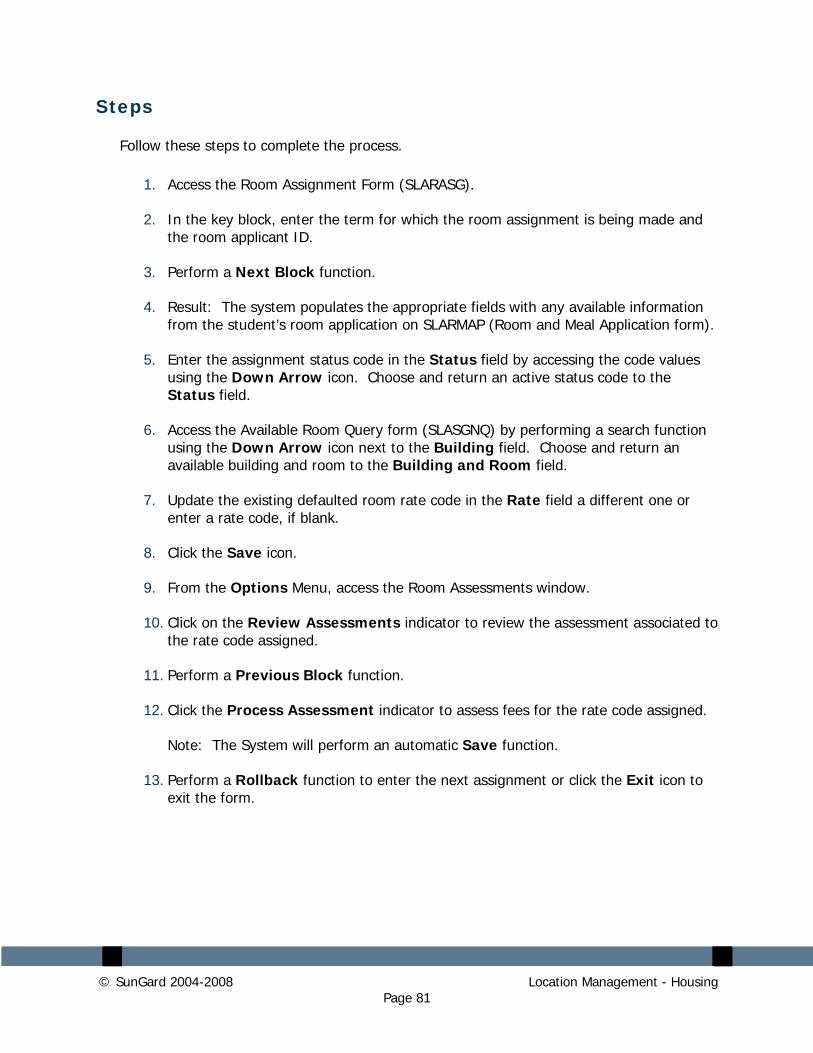
Creating and Maintaining Room Assignments
Purpose
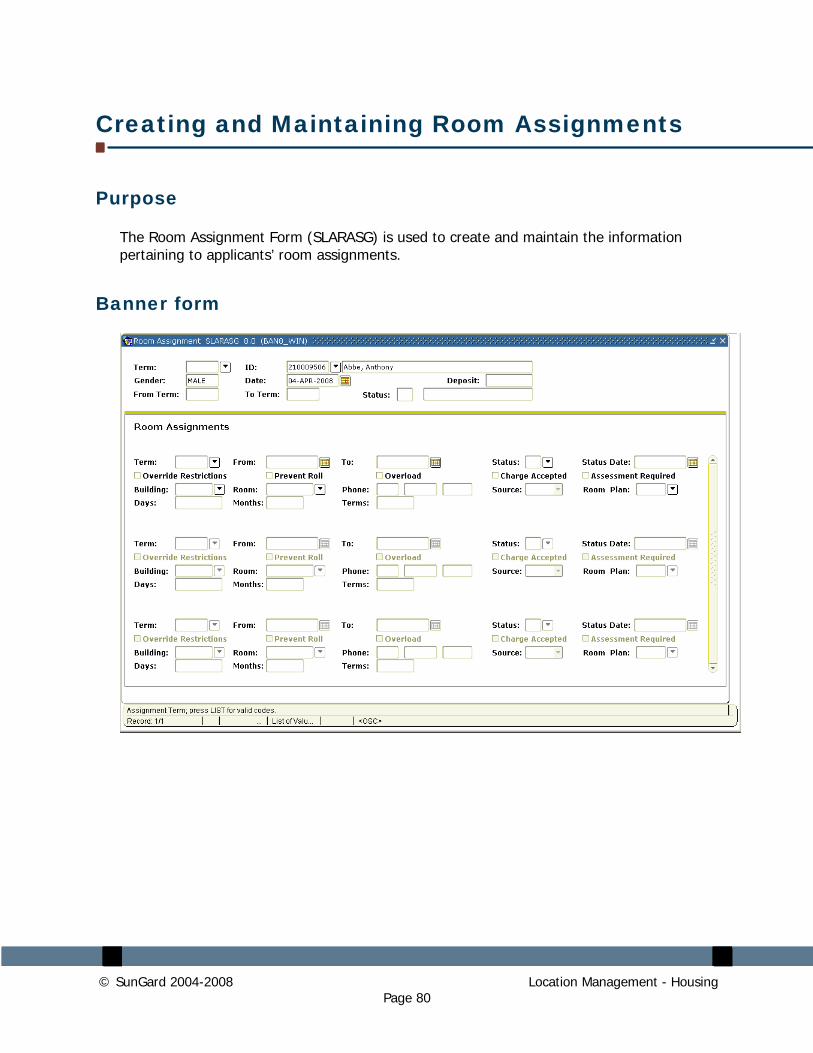
The Room Assignment Form (SLARASG) is used to create and maintain the information pertaining to applicants’ room assignments.
Banner form
© SunGard 2004-2008 Location Management - Housing Page 81
Steps
Follow these steps to complete the process.
1. Access the Room Assignment Form (SLARASG).
2. In the key block, enter the term for which the room assignment is being made and the room applicant ID.
3. Perform a Next Block function.
4. Result: The system populates the appropriate fields with any available information from the student’s room application on SLARMAP (Room and Meal Application form).
5. Enter the assignment status code in the Status field by accessing the code values using the Down Arrow icon. Choose and return an active status code to the Status field.
6. Access the Available Room Query form (SLASGNQ) by performing a search function using the Down Arrow icon next to the Building field. Choose and return an available building and room to the Building and Room field.
7. Update the existing defaulted room rate code in the Rate field a different one or enter a rate code, if blank.
8. Click the Save icon.
9. From the Options Menu, access the Room Assessments window.
10. Click on the Review Assessments indicator to review the assessment associated to the rate code assigned.
11. Perform a Previous Block function.
12. Click the Process Assessment indicator to assess fees for the rate code assigned.
Note: The System will perform an automatic Save function.
13. Perform a Rollback function to enter the next assignment or click the Exit icon to exit the form.
© SunGard 2004-2008 Location Management - Housing Page 82
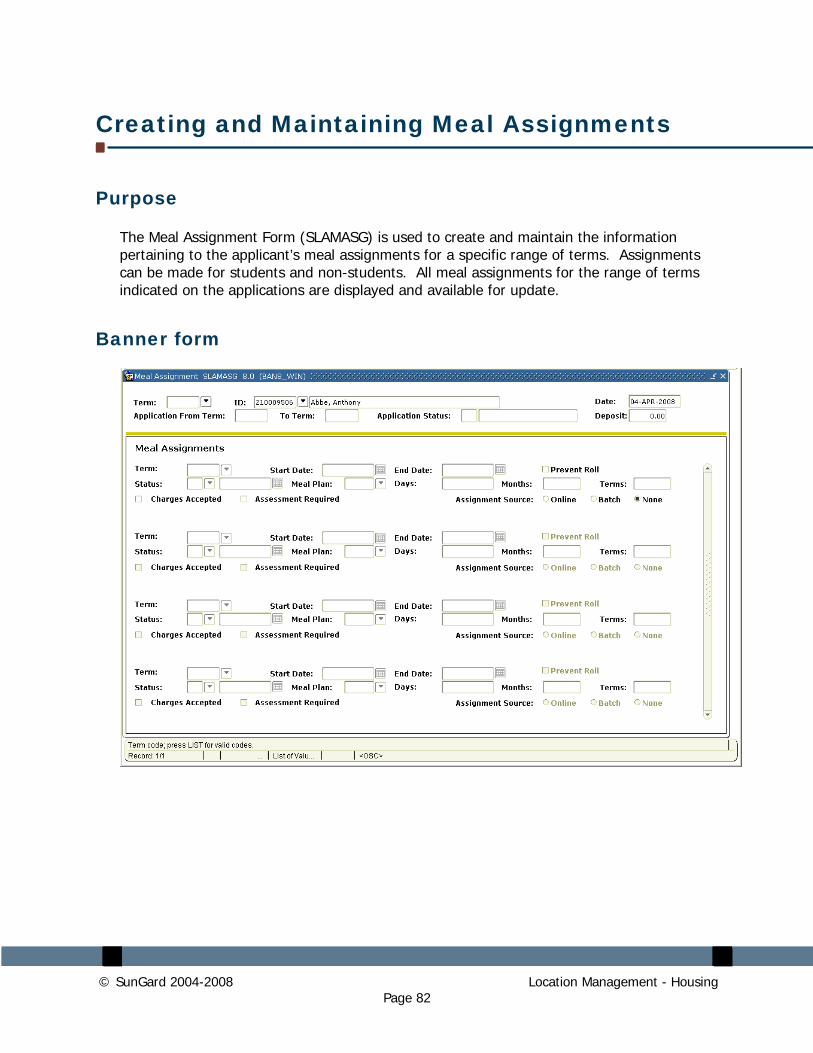
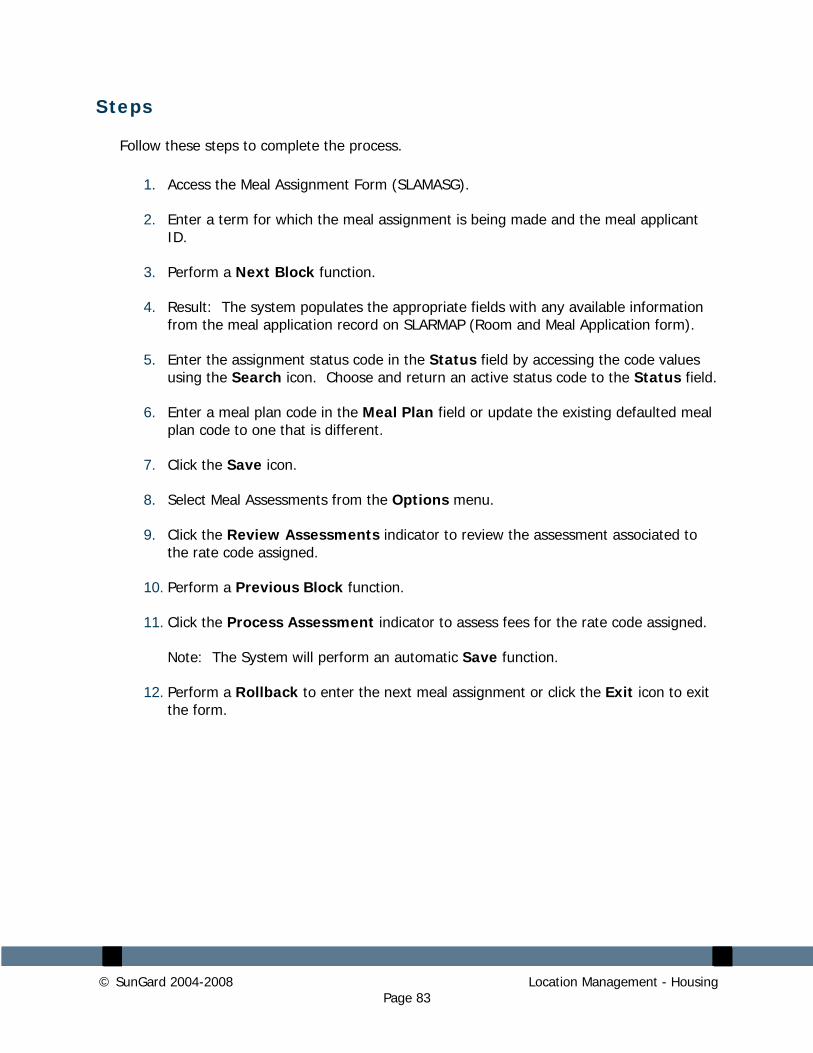
Creating and Maintaining Meal Assignments
Purpose
The Meal Assignment Form (SLAMASG) is used to create and maintain the information pertaining to the applicant’s meal assignments for a specific range of terms. Assignments can be made for students and non-students. All meal assignments for the range of terms indicated on the applications are displayed and available for update.
Banner form
© SunGard 2004-2008 Location Management - Housing Page 83
Steps
Follow these steps to complete the process.
1. Access the Meal Assignment Form (SLAMASG).
2. Enter a term for which the meal assignment is being made and the meal applicant ID.
3. Perform a Next Block function.
4. Result: The system populates the appropriate fields with any available information from the meal application record on SLARMAP (Room and Meal Application form).
5. Enter the assignment status code in the Status field by accessing the code values using the Search icon. Choose and return an active status code to the Status field.
6. Enter a meal plan code in the Meal Plan field or update the existing defaulted meal plan code to one that is different.
7. Click the Save icon.
8. Select Meal Assessments from the Options menu.
9. Click the Review Assessments indicator to review the assessment associated to the rate code assigned.
10. Perform a Previous Block function.
11. Click the Process Assessment indicator to assess fees for the rate code assigned.
Note: The System will perform an automatic Save function.
12. Perform a Rollback to enter the next meal assignment or click the Exit icon to exit the form.
© SunGard 2004-2008 Location Management - Housing Page 84
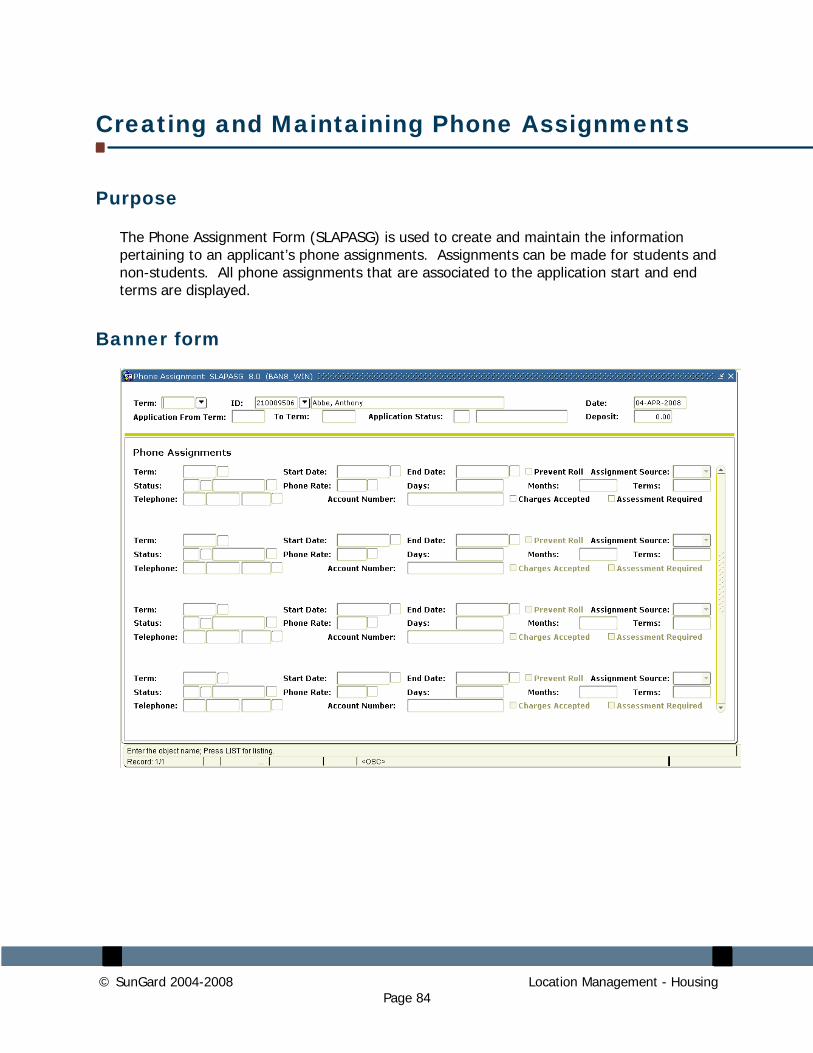
Creating and Maintaining Phone Assignments
Purpose
The Phone Assignment Form (SLAPASG) is used to create and maintain the information pertaining to an applicant’s phone assignments. Assignments can be made for students and non-students. All phone assignments that are associated to the application start and end terms are displayed.
Banner form
© SunGard 2004-2008 Location Management - Housing Page 85
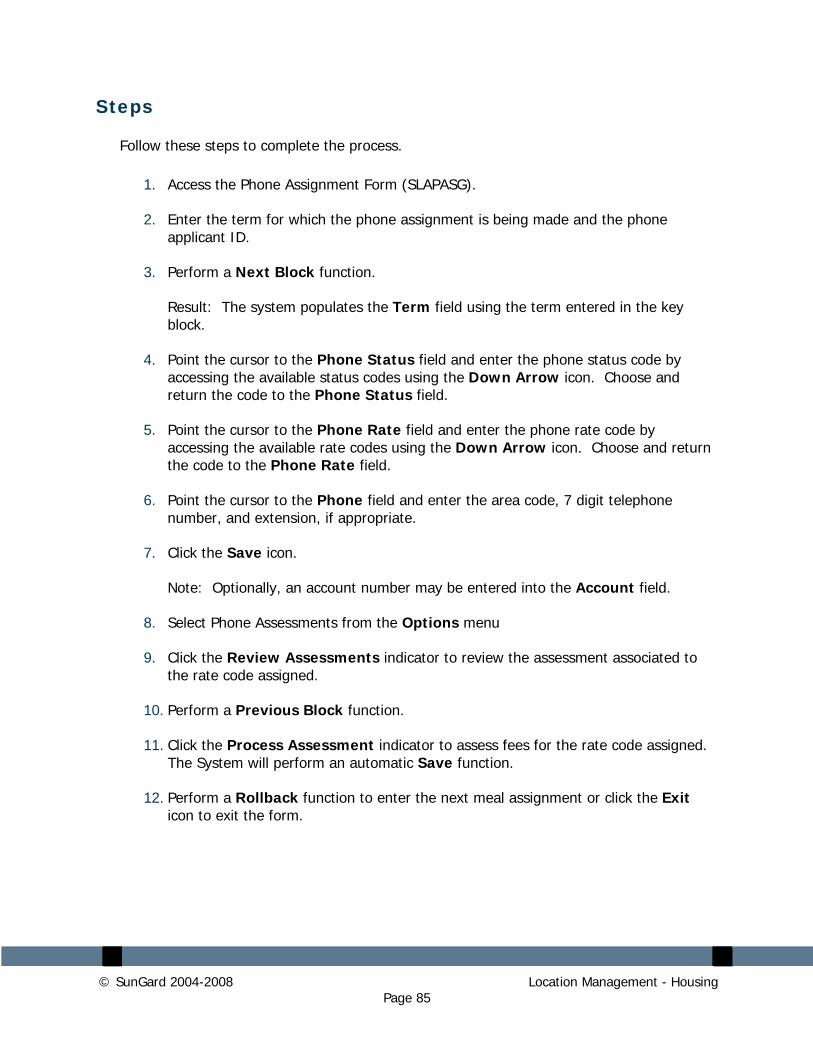
Steps
Follow these steps to complete the process.
1. Access the Phone Assignment Form (SLAPASG).
2. Enter the term for which the phone assignment is being made and the phone applicant ID.
3. Perform a Next Block function.
Result: The system populates the Term field using the term entered in the key block.
4. Point the cursor to the Phone Status field and enter the phone status code by accessing the available status codes using the Down Arrow icon. Choose and return the code to the Phone Status field.
5. Point the cursor to the Phone Rate field and enter the phone rate code by accessing the available rate codes using the Down Arrow icon. Choose and return the code to the Phone Rate field.
6. Point the cursor to the Phone field and enter the area code, 7 digit telephone number, and extension, if appropriate.
7. Click the Save icon.
Note: Optionally, an account number may be entered into the Account field.
8. Select Phone Assessments from the Options menu
9. Click the Review Assessments indicator to review the assessment associated to the rate code assigned.
10. Perform a Previous Block function.
11. Click the Process Assessment indicator to assess fees for the rate code assigned. The System will perform an automatic Save function.
12. Perform a Rollback function to enter the next meal assignment or click the Exit icon to exit the form.
© SunGard 2004-2008 Location Management - Housing Page 86
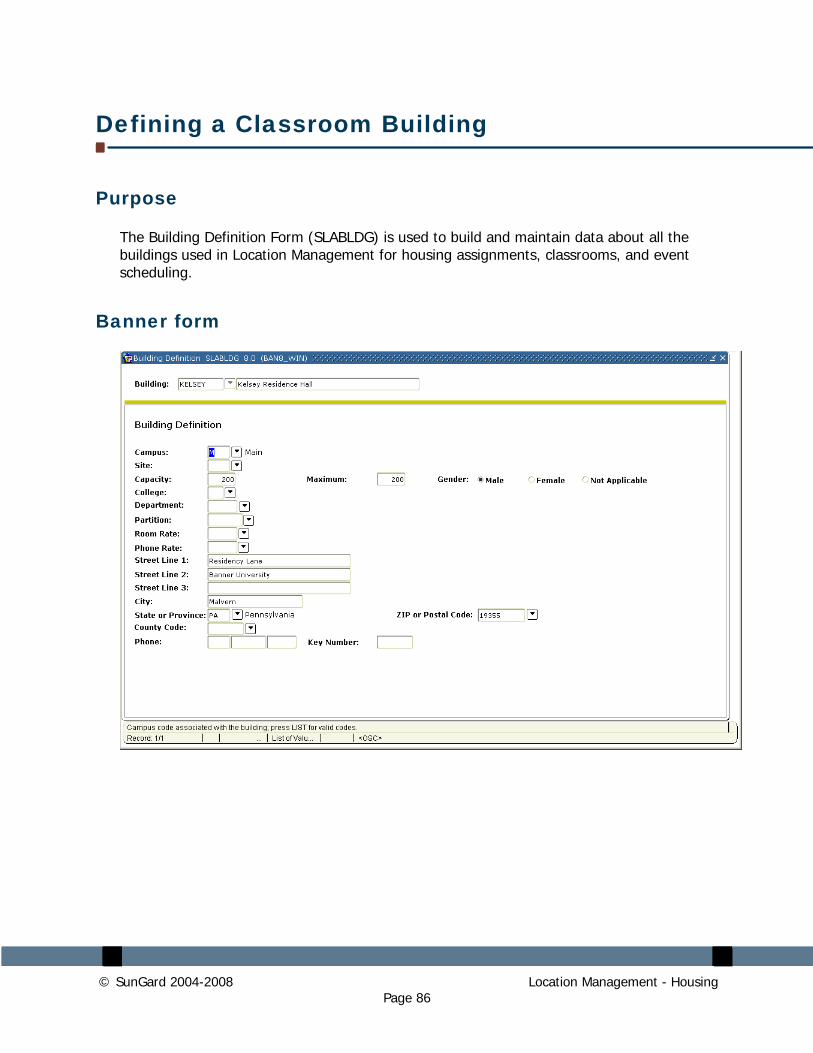
Defining a Classroom Building
Purpose
The Building Definition Form (SLABLDG) is used to build and maintain data about all the buildings used in Location Management for housing assignments, classrooms, and event scheduling.
Banner form
© SunGard 2004-2008 Location Management - Housing Page 87
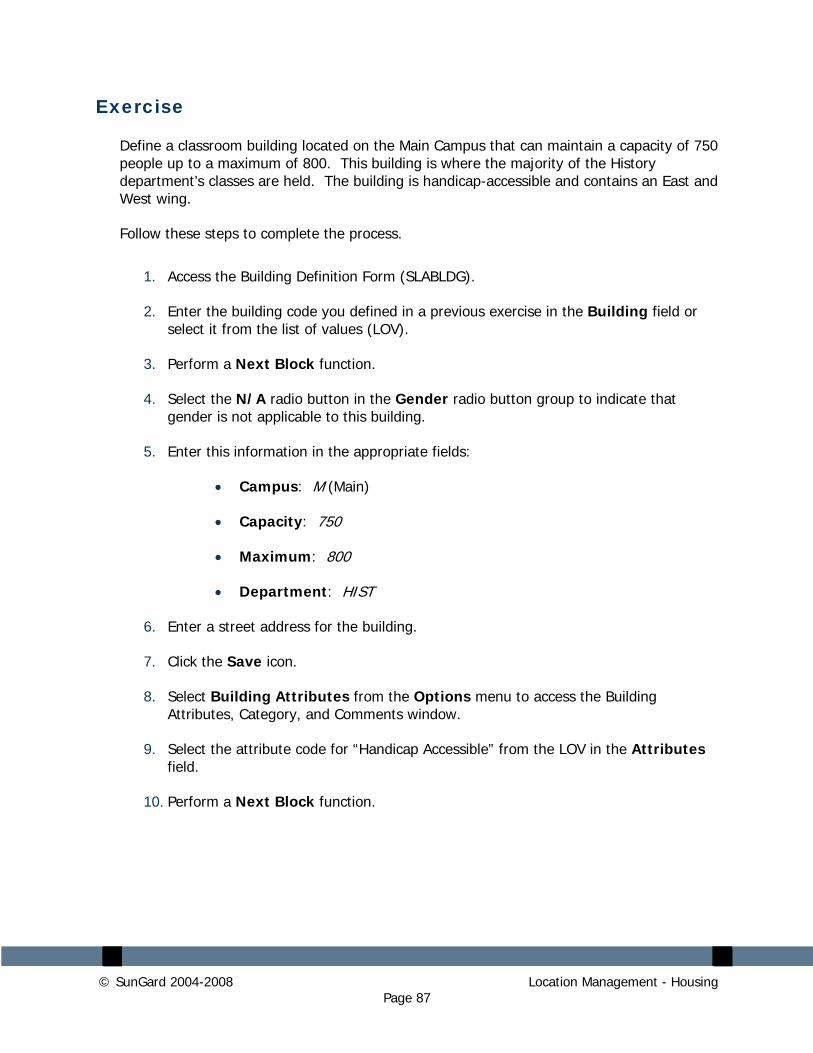
Exercise
Define a classroom building located on the Main Campus that can maintain a capacity of 750 people up to a maximum of 800. This building is where the majority of the History department’s classes are held. The building is handicap-accessible and contains an East and West wing.
Follow these steps to complete the process.
1. Access the Building Definition Form (SLABLDG).
2. Enter the building code you defined in a previous exercise in the Building field or select it from the list of values (LOV).
3. Perform a Next Block function.
4. Select the N/A radio button in the Gender radio button group to indicate that gender is not applicable to this building.
5. Enter this information in the appropriate fields:
• Campus: M (Main)
• Capacity: 750
• Maximum: 800
• Department: HIST
6. Enter a street address for the building.
7. Click the Save icon.
8. Select Building Attributes from the Options menu to access the Building Attributes, Category, and Comments window.
9. Select the attribute code for “Handicap Accessible” from the LOV in the Attributes field.
10. Perform a Next Block function.
© SunGard 2004-2008 Location Management - Housing Page 88
11. Enter the information in the specified fields, which are all free-form text:
• Category (first line): East
• Description (first line): East Wing
• Category (second line): West
• Description (second line): West Wing
12. Perform a Next Block function.
13. Enter a free-form comment on the first line in the Building Comments block.
14. Click the Save icon.
15. Click the Exit icon.
© SunGard 2004-2008 Location Management - Housing Page 89
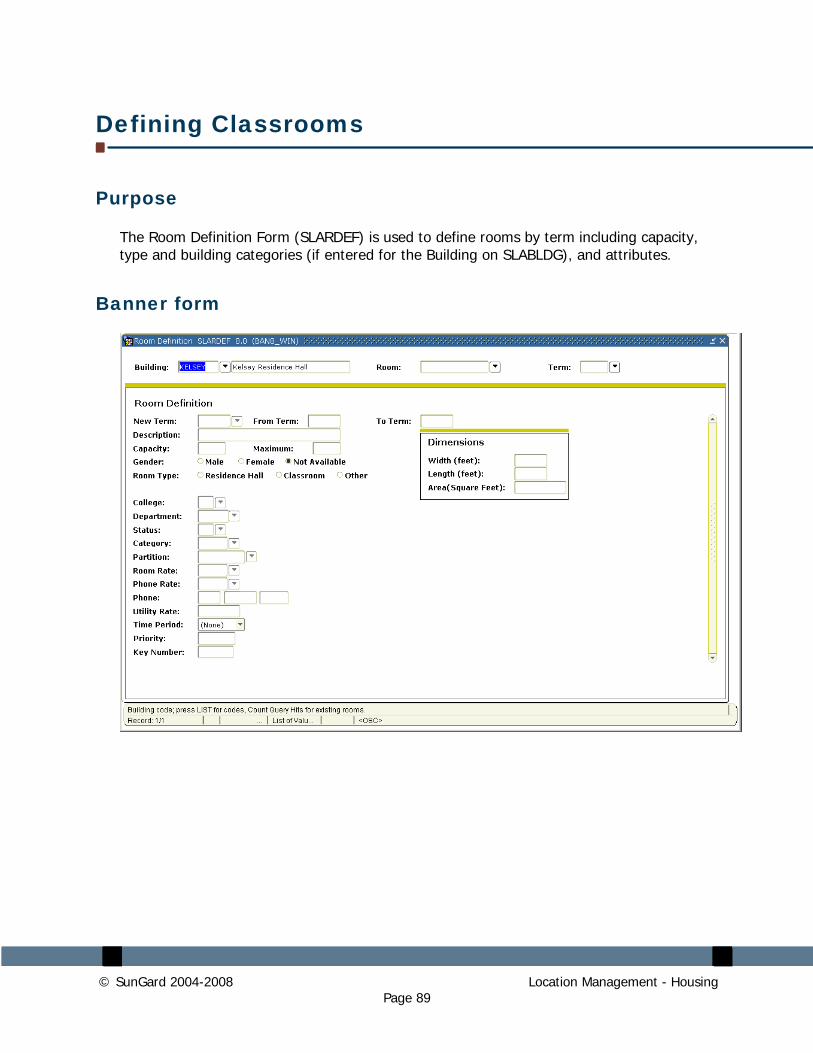
Defining Classrooms
Purpose
The Room Definition Form (SLARDEF) is used to define rooms by term including capacity, type and building categories (if entered for the Building on SLABLDG), and attributes.
Banner form
© SunGard 2004-2008 Location Management - Housing Page 90
Steps
Follow these steps to complete the process.
1. Access the Room Definition Form (SLARDEF).
2. Enter the building code for the building that you defined in a previous exercise in the Bldg field or use the Search icon to find it.
3. Enter 100 in the Room field.
4. Enter a term code in the Term field or select one from the list of values (LOV).
5. Perform a Next Block function.
6. Enter a term code in the New Term field or select one from the LOV.
7. Enter the information in the appropriate fields:
• Description: 100 History Hall
• Capacity: 30
• Maximum: 35
• Gender: N/A
• Room Type: Classroom
• Status: A (Active)
8. Click the Save icon.
9. Select Room Attributes from the Options menu to access the Attributes, Inactive Dates, & Comments window.
10. Note: The room already has an attribute of Handicap Accessible. Because the building was assigned this attribute, the attribute defaults to each room when defined within the building.
11. Enter a second room attribute by selecting the attribute code for “General Classroom” from the LOV in the Attribute field.
12. Click the Save icon.
© SunGard 2004-2008 Location Management - Housing Page 91
13. Select Room Definition from the Options menu to return to the main form window.
14. Click the Rollback icon to return to the key block.
15. Enter 101 in the Room field.
16. Perform a Next Block function.
17. Enter a term code in the New Term field or select one from the LOV.
18. Enter the information in the appropriate fields:
• Description: 101 History Hall
• Capacity: 30
• Maximum: 35
• Gender: N/A
• Room Type: Classroom
• Status: A (Active)
19. Click the Save icon.
20. Select Room Attributes from the Options menu to access the Attributes, Inactive Dates, & Comments window.
21. Enter a second room attribute by selecting the attribute code for “Computer Lab” from the LOV in the Attribute field.
22. Click the Save icon.
23. Select Room Definition from the Options menu to return to the main form window.
24. Click the Rollback icon to return to the key block.
25. Enter 102 in Room field.
26. Perform a Next Block function.
27. Enter a term code in the New Term field or select one from the LOV.
© SunGard 2004-2008 Location Management - Housing Page 92
28. Enter the information in the appropriate fields:
• Description: 102 History Hall
• Capacity: 200
• Maximum: 220
• Gender: N/A
• Room Type: Classroom
• Status: A (Active)
29. Click the Save icon.
30. Select Room Attributes from the Options menu to access the Attributes, Inactive Dates, & Comments window.
31. Enter a second room attribute by selecting the attribute code for “Auditorium” from the LOV in the Attributes field.
32. Click the Save icon.
33. Click the Exit icon.
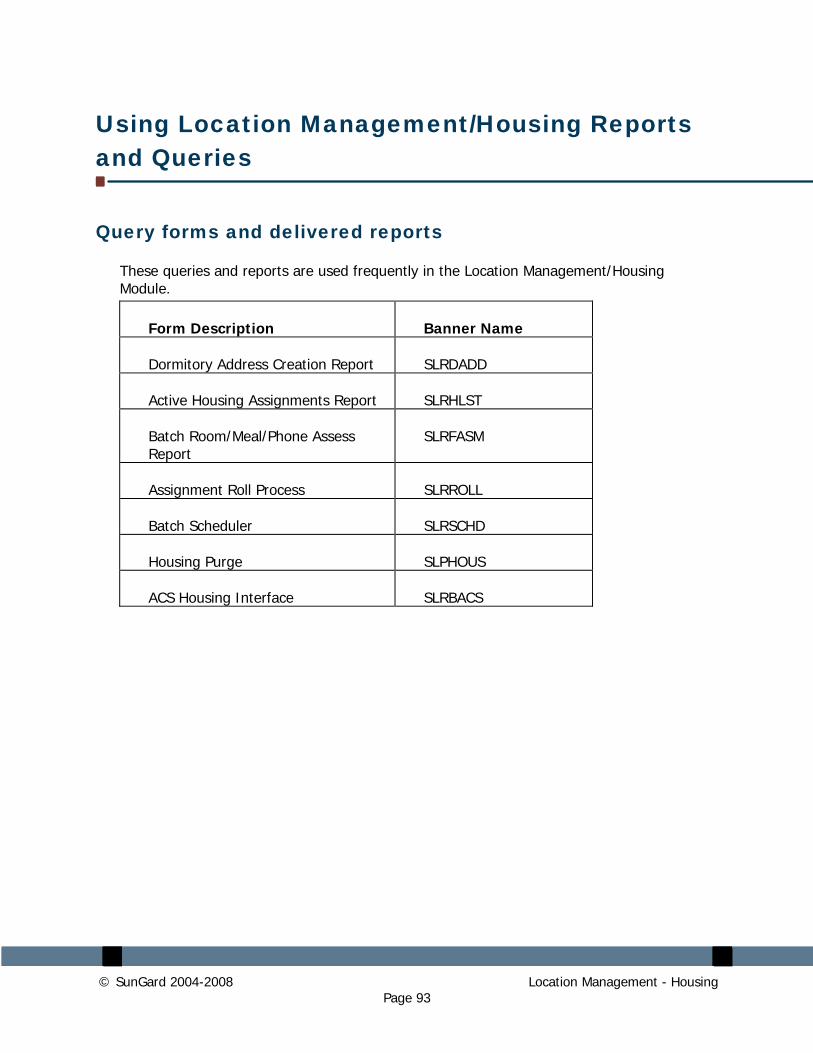
© SunGard 2004-2008 Location Management - Housing Page 93
Using Location Management/Housing Reports and Queries
Query forms and delivered reports
These queries and reports are used frequently in the Location Management/Housing Module.
Form Description Banner Name
Dormitory Address Creation Report SLRDADD
Active Housing Assignments Report SLRHLST
Batch Room/Meal/Phone Assess Report
SLRFASM
Assignment Roll Process SLRROLL
Batch Scheduler SLRSCHD
Housing Purge SLPHOUS
ACS Housing Interface SLRBACS
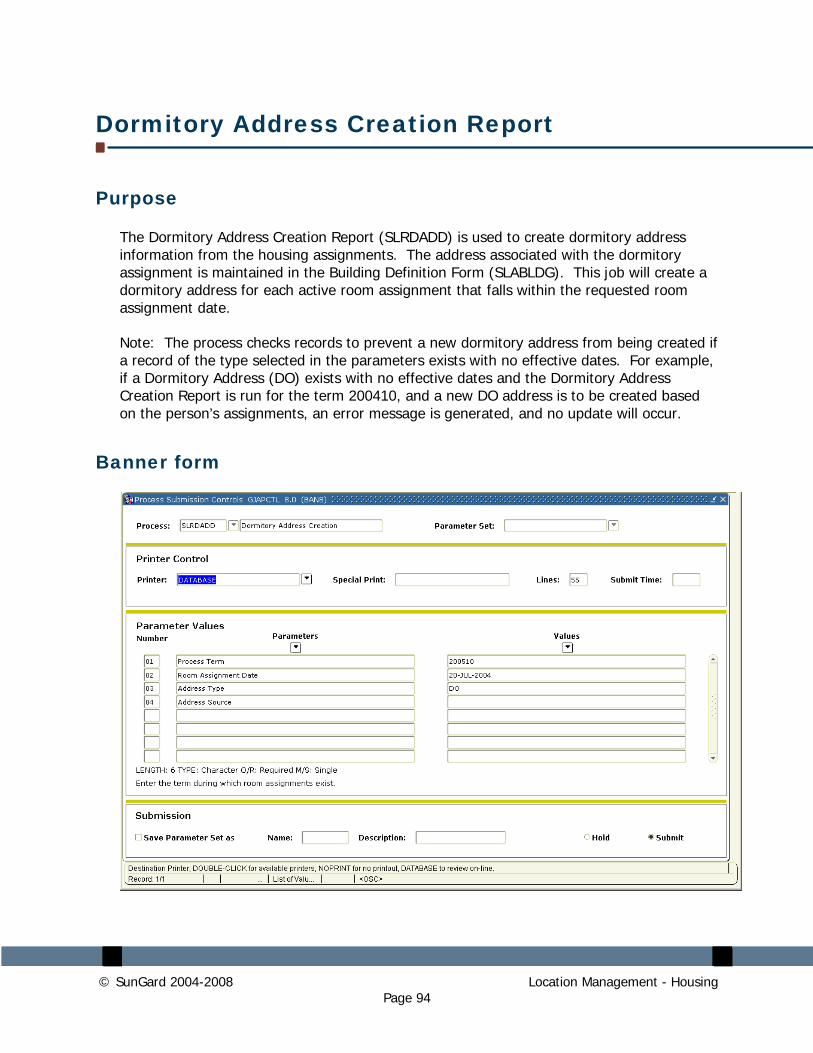
© SunGard 2004-2008 Location Management - Housing Page 94
Dormitory Address Creation Report
Purpose
The Dormitory Address Creation Report (SLRDADD) is used to create dormitory address information from the housing assignments. The address associated with the dormitory assignment is maintained in the Building Definition Form (SLABLDG). This job will create a dormitory address for each active room assignment that falls within the requested room assignment date.
Note: The process checks records to prevent a new dormitory address from being created if a record of the type selected in the parameters exists with no effective dates. For example, if a Dormitory Address (DO) exists with no effective dates and the Dormitory Address Creation Report is run for the term 200410, and a new DO address is to be created based on the person’s assignments, an error message is generated, and no update will occur.
Banner form
© SunGard 2004-2008 Location Management - Housing Page 95
Steps
Use the following steps to run the Dormitory Address Creation process.
1. Access the Dormitory Address Creation Process (SLADADD).
2. If desired, select the Parameter Set that was previously saved, (use the Search window to select the desired Parameter Set). All sets linked to the signed-on user ID and job or report are available.
3. Perform a Next Block function to access the Printer Control Block.
4. Select Database from the LOV in the Printer field. This field indicates the destination printer for output from the job or report.
Warning: Leave this field blank for jobs and reports that run with sleep/wake processing. For these kinds of jobs and reports, enter the printer code as a parameter.
Choices: Choices come from the Printer Validation (GTVPRNT) list. You can also use these values:
blank - Use the system printer.
NOPRINT - Skip printing.
DATABASE - Save output for viewing on the Saved Output Review Form (GJIREVO).
5. Note the Special Print field. This value comes from the Special Print Stock field on the Process Maintenance Form (GJAJOBS). It can be changed.
Choices: For special forms, use the specific operating system forms command. Other choices are:
LANDSCAPE (default) - Print across the wide side of the paper.
PORTRAIT - Print across the narrow side of the paper.
Note: This option is not available for Windows NT Server.
6. Note the Lines field. This denotes the number of lines per page and comes from the Lines Per Page field on the Process Maintenance Form (GJAJOBS). It can be changed. The default value is 55.
7. Note the Submit Time field. This is the Time when the job or report will be submitted for processing.
8. Perform a Next Block to access the Parameter Values Block. If a Parameter Set
© SunGard 2004-2008 Location Management - Housing Page 96
has been selected, these values are already filled in, and you may skip to the Submission Block.
9. Select the Process Term by using the Search window for the term value (STVTERM opens, the appropriate term code is highlighted and the Select Record function is performed). This is the term during which the Room Assignments exist.
10. Enter the Room Assignment Date in the form DD-MON-YYYY. This is the date during which the Room Assignments exist.
11. Select the Address Type from the Search window (STVATYP opens, the appropriate address type is highlighted and the Select Record function is performed). This is the address type to be used in creating the addresses.
12. Select the Address Source from the Search window (STVASRC opens, the appropriate address source is highlighted and the Select Record function is performed). This is the source for the address to be used in creating the addresses.
13. Perform a Next Block function to access the Submission Block.
14. Note the Save Parameter Set checkbox. It indicates whether the parameter values should be saved as user-level defaults for the job or report. If you have one set of defaults for the job or report, select this check box and leave the As fields blank. If you have more than one set of defaults for the job or report, select this check box and enter the name and description of the job parameter set in the As fields.
15. Note the Hold/Submit Radio Buttons. They indicate whether the job or report is held for later processing or run immediately. If the Hold button is selected, the report or process is held for later processing from the operating system. A sequence number appears in the Auto Hint when you Save the record. Use this number when you submit the job from the operating system. If the Submit button is selected, the job or report will be processed immediately when you Save the record.
16. Select the Submit radio button.
17. Select the Save icon.
18. Note the name of the report output in the lower left portion of the window:
19. Select Review Output [GJIREVO] from the Options Menu.
20. Enter the Report name you recorded above in the File Name field.
21. After reviewing the report, click on the Exit icon.
22. Click on the Exit icon again.
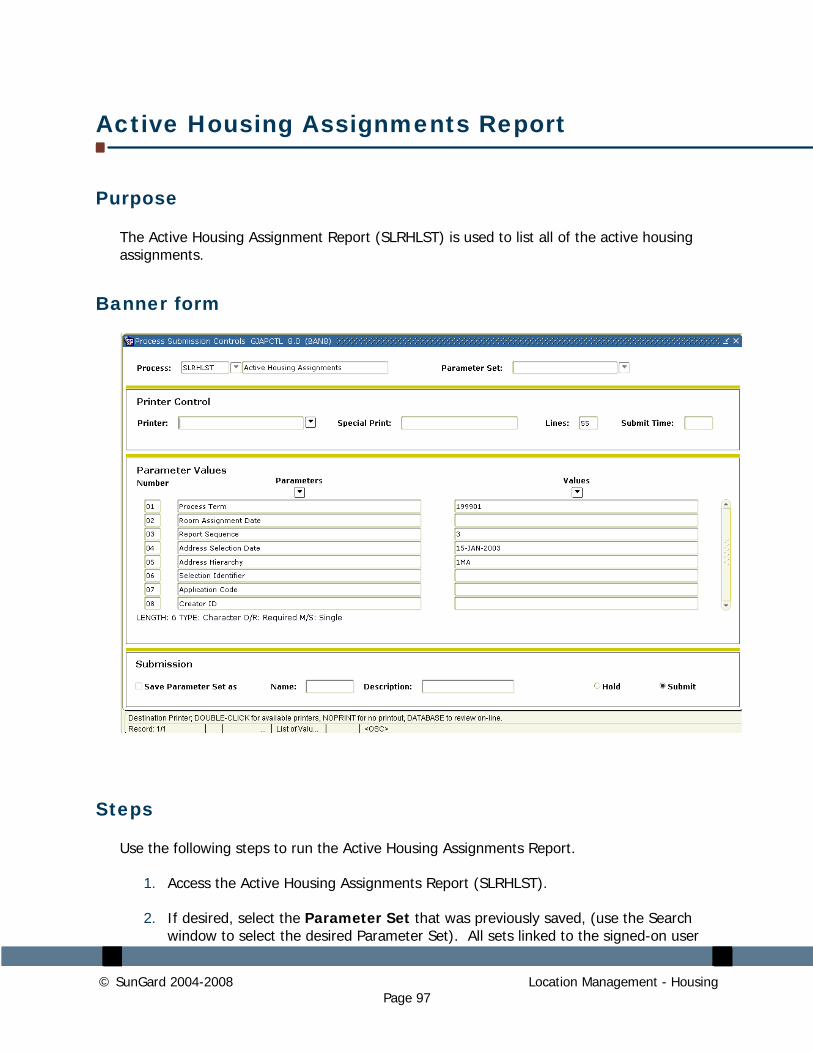
© SunGard 2004-2008 Location Management - Housing Page 97
Active Housing Assignments Report
Purpose
The Active Housing Assignment Report (SLRHLST) is used to list all of the active housing assignments.
Banner form
Steps
Use the following steps to run the Active Housing Assignments Report.
1. Access the Active Housing Assignments Report (SLRHLST).
2. If desired, select the Parameter Set that was previously saved, (use the Search window to select the desired Parameter Set). All sets linked to the signed-on user
© SunGard 2004-2008 Location Management - Housing Page 98
ID and job or report are available.
3. Perform a Next Block function to access the Printer Control Block.
4. Select Database from the LOV in the Printer field. This field indicates the destination printer for output from the job or report.
Warning: Leave this field blank for jobs and reports that run with sleep/wake processing. For these kinds of jobs and reports, enter the printer code as a parameter.
Choices: Choices come from the Printer Validation (GTVPRNT) list. You can also use these values:
blank - Use the system printer.
NOPRINT - Skip printing.
DATABASE - Save output for viewing on the Saved Output Review Form (GJIREVO).
5. Note the Special Print field. This value comes from the Special Print Stock field on the Process Maintenance Form (GJAJOBS). It can be changed.
Choices: For special forms, use the specific operating system forms command. Other choices are:
LANDSCAPE (default) - Print across the wide side of the paper.
PORTRAIT - Print across the narrow side of the paper.
Note: This option is not available for Windows NT Server.
6. Note the Lines field. This denotes the number of lines per page and comes from the Lines Per Page field on the Process Maintenance Form (GJAJOBS). It can be changed. The default value is 55.
7. Note the Submit Time field. This is the Time when the job or report will be submitted for processing.
8. Perform a Next Block to access the Parameter Values Block. If a Parameter Set has been selected, these values are already filled in, and you may skip to the Submission Block.
9. Select the Process Term by using the Search window for the term value (STVTERM opens, the appropriate term code is highlighted and the Select Record function is performed). This is the term during which the Room Assignments exist.
10. Enter the Room Assignment Date in the form DD-MON-YYYY. This is the date during which the Room Assignments exist. This field is not required.
© SunGard 2004-2008 Location Management - Housing Page 99
11. Select the Report Sequence from the Search window (The list of parameter values opens, the appropriate report sequence value is highlighted and the Select Record function is performed). This is the order in which the report is to be sequenced. The sequence can be by Name, by ID number or by Building/Room.
12. Set the Address Selection Date in the format DD-MON-YYYY. This field is not required.
13. Enter the Address Hierarchy from the Search window for the Address Type code (STVATYP opens, the appropriate address type code is highlighted and the Select Record function is performed). This is the Priority and the Address Type. There must be a number indicating priority placed in front of the selected Address Type code.
14. Enter the Selection Identifier by entering the name of a Population Selection if you wish to limit the population on which you are reporting. (See the workbook Banner Student 8.0 Population Selection for more on creating a Population Selection). This field is not required.
15. Enter the Application Code for the Population Selection identified in the previous field. This field is not required.
16. Enter the Creator ID of the individual who created the sub-population. This field is not required.
17. Perform a Next Block function to access the Submission Block.
18. Note the Save Parameter Set checkbox. It indicates whether the parameter values should be saved as user-level defaults for the job or report. If you have one set of defaults for the job or report, select this check box and leave the As fields blank. If you have more than one set of defaults for the job or report, select this check box and enter the name and description of the job parameter set in the As fields.
19. Note the Hold/Submit Radio Buttons. They indicate whether the job or report is held for later processing or run immediately. If the Hold button is selected, the report or process is held for later processing from the operating system. A sequence number appears in the Auto Hint when you Save the record. Use this number when you submit the job from the operating system. If the Submit button is selected, the job or report will be processed immediately when you Save the record.
20. Select the Submit radio button.
21. Select the Save icon.
22. Note the name of the report output in the lower left portion of the window:
23. Select Review Output [GJIREVO] from the Options Menu.
© SunGard 2004-2008 Location Management - Housing Page 100
24. Enter the Report name you recorded above in the File Name field.
25. After reviewing the report, click on the Exit icon.
26. Click on the Exit icon again.
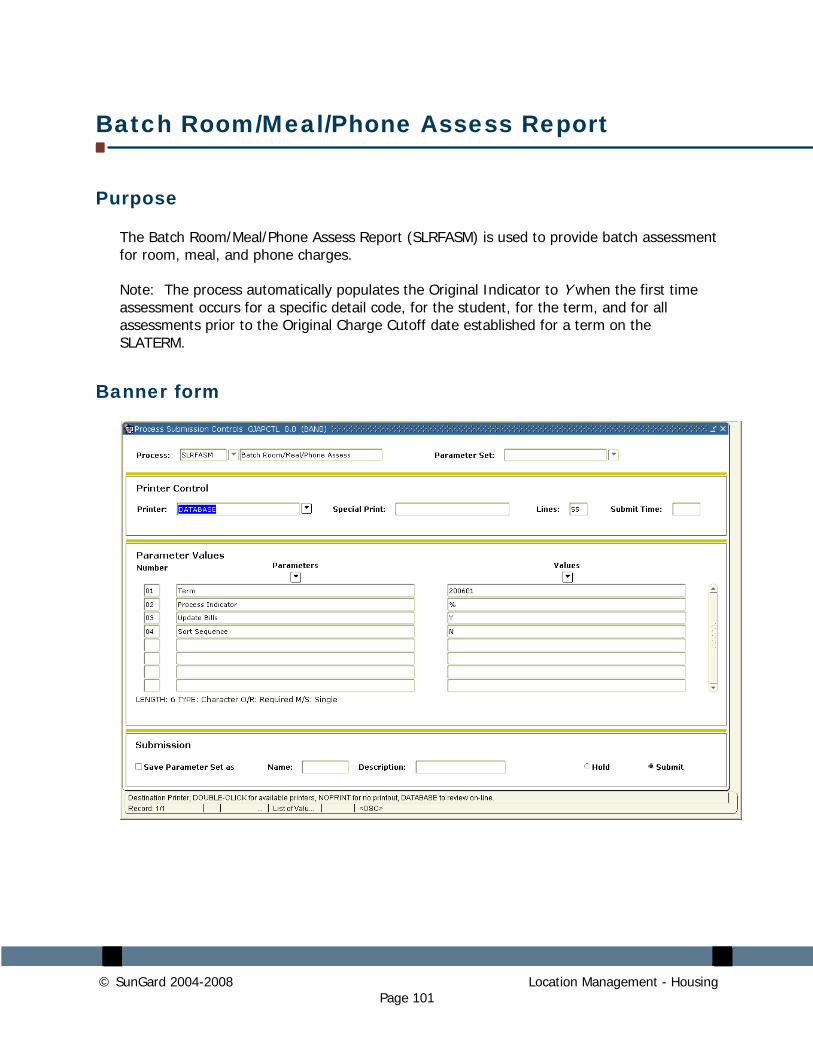
© SunGard 2004-2008 Location Management - Housing Page 101
Batch Room/Meal/Phone Assess Report
Purpose
The Batch Room/Meal/Phone Assess Report (SLRFASM) is used to provide batch assessment for room, meal, and phone charges.
Note: The process automatically populates the Original Indicator to Y when the first time assessment occurs for a specific detail code, for the student, for the term, and for all assessments prior to the Original Charge Cutoff date established for a term on the SLATERM.
Banner form

© SunGard 2004-2008 Location Management - Housing Page 102
Steps
Use the following steps to run the Batch Room/Meal/Phone Assessment process.
1. Access the Batch Room/Meal/Phone Assessment Process (SLRFASM).
2. If desired, select the Parameter Set that was previously saved, (use the Search window to select the desired Parameter Set). All sets linked to the signed-on user ID and job or report are available.
3. Perform a Next Block function to access the Printer Control Block.
4. Select Database from the LOV in the Printer field. This field indicates the destination printer for output from the job or report.
Warning: Leave this field blank for jobs and reports that run with sleep/wake processing. For these kinds of jobs and reports, enter the printer code as a parameter.
Choices: Choices come from the Printer Validation (GTVPRNT) list. You can also use these values:
blank - Use the system printer.
NOPRINT - Skip printing.
DATABASE - Save output for viewing on the Saved Output Review Form (GJIREVO).
5. Note the Special Print field. This value comes from the Special Print Stock field on the Process Maintenance Form (GJAJOBS). It can be changed.
Choices: For special forms, use the specific operating system forms command. Other choices are:
LANDSCAPE (default) - Print across the wide side of the paper.
PORTRAIT - Print across the narrow side of the paper.
Note: This option is not available for Windows NT Server.
6. Note the Lines field. This denotes the number of lines per page and comes from the Lines Per Page field on the Process Maintenance Form (GJAJOBS). It can be changed. The default value is 55.
7. Note the Submit Time field. This is the Time when the job or report will be submitted for processing.
© SunGard 2004-2008 Location Management - Housing Page 103
8. Perform a Next Block to access the Parameter Values Block. If a Parameter Set has been selected, these values are already filled in, and you may skip to the Submission Block.
9. Select the Term by using the Search window for the term value (STVTERM opens, the appropriate term code is highlighted and the Select Record function is performed). This is the term during which the Room/Meal/Phone Assessments exist.
10. Enter the Process Indicator in the form O (for only Outstanding Assessments) or % (for ALL Assessments).
11. Set the Update Bills parameter to either Y or N. If set to Y, bills for the selected population will be updated with the assessments.
12. Set the Sort Sequence parameter to I or N. I causes the output to be sorted in ID number order, N causes the output to be sorted in Name order.
13. Perform a Next Block function to access the Submission Block.
14. Note the Save Parameter Set checkbox. It indicates whether the parameter values should be saved as user-level defaults for the job or report. If you have one set of defaults for the job or report, select this check box and leave the As fields blank. If you have more than one set of defaults for the job or report, select this check box and enter the name and description of the job parameter set in the As fields.
15. Note the Hold/Submit Radio Buttons. They indicate whether the job or report is held for later processing or run immediately. If the Hold button is selected, the report or process is held for later processing from the operating system. A sequence number appears in the Auto Hint when you Save the record. Use this number when you submit the job from the operating system. If the Submit button is selected, the job or report will be processed immediately when you Save the record.
16. Select the Submit radio button.
17. Select the Save icon.
18. Note the name of the report output in the lower left portion of the window:
19. Select Review Output [GJIREVO] from the Options Menu.
20. Enter the Report name you recorded above in the File Name field.
21. After reviewing the report, click on the Exit icon.
22. Click on the Exit icon again.
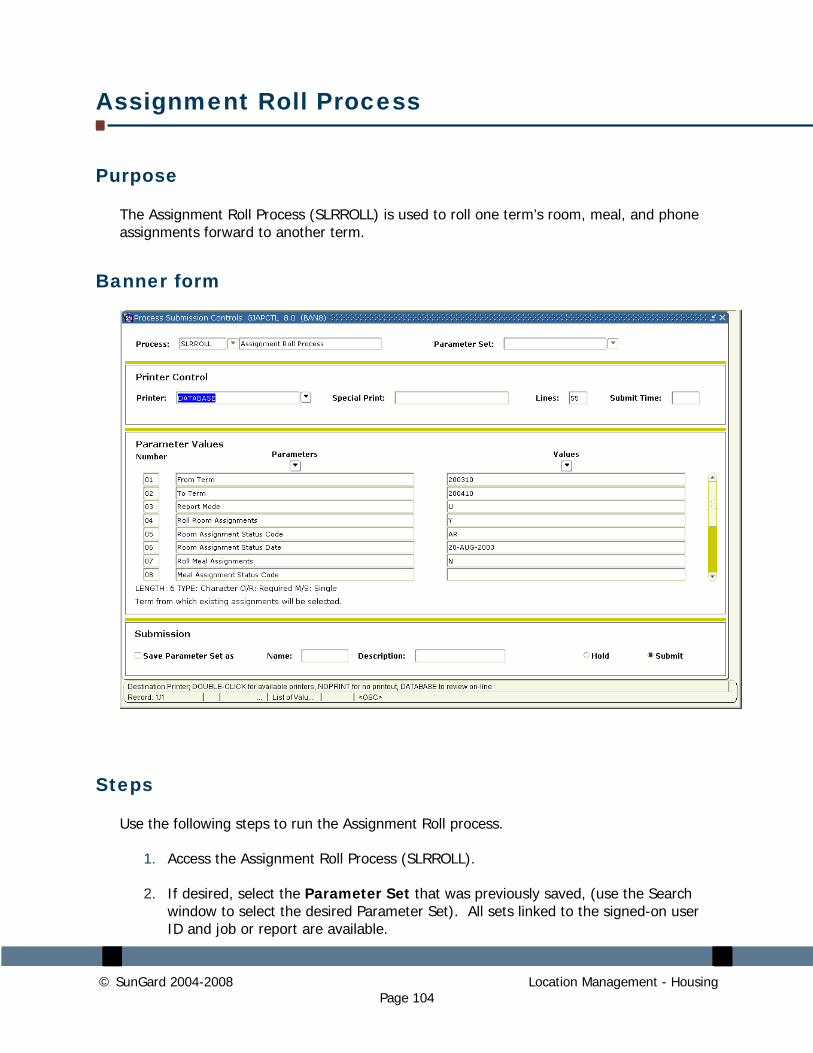
© SunGard 2004-2008 Location Management - Housing Page 104
Assignment Roll Process
Purpose
The Assignment Roll Process (SLRROLL) is used to roll one term’s room, meal, and phone assignments forward to another term.
Banner form
Steps
Use the following steps to run the Assignment Roll process.
1. Access the Assignment Roll Process (SLRROLL).
2. If desired, select the Parameter Set that was previously saved, (use the Search window to select the desired Parameter Set). All sets linked to the signed-on user ID and job or report are available.

© SunGard 2004-2008 Location Management - Housing Page 105
3. Perform a Next Block function to access the Printer Control Block.
4. Select Database from the LOV in the Printer field. This field indicates the destination printer for output from the job or report.
Warning: Leave this field blank for jobs and reports that run with sleep/wake processing. For these kinds of jobs and reports, enter the printer code as a parameter.
Choices: Choices come from the Printer Validation (GTVPRNT) list. You can also use these values:
blank - Use the system printer.
NOPRINT - Skip printing.
DATABASE - Save output for viewing on the Saved Output Review Form (GJIREVO).
5. Note the Special Print field. This value comes from the Special Print Stock field on the Process Maintenance Form (GJAJOBS). It can be changed.
Choices: For special forms, use the specific operating system forms command. Other choices are:
LANDSCAPE (default) - Print across the wide side of the paper.
PORTRAIT - Print across the narrow side of the paper.
Note: This option is not available for Windows NT Server.
6. Note the Lines field. This denotes the number of lines per page and comes from the Lines Per Page field on the Process Maintenance Form (GJAJOBS). It can be changed. The default value is 55.
7. Note the Submit Time field. This is the Time when the job or report will be submitted for processing.
8. Perform a Next Block to access the Parameter Values Block. If a Parameter Set has been selected, these values are already filled in, and you may skip to the Submission Block.
9. Select the From Term by using the Search window for the term value (STVTERM opens, the appropriate term code is highlighted and the Select Record function is performed). This is the term from which existing assignments will be selected.
10. Select the To Term by using the Search window for the term value (STVTERM opens, the appropriate term code is highlighted and the Select Record function is performed). This is the term for which new assignments will be created.
© SunGard 2004-2008 Location Management - Housing Page 106
11. Enter the Report Mode parameter. Choices are A (Audit) or U (Update). If A is selected, new records for the specified term will not be created.
12. Set Roll Room Assignment to indicate whether the Room Assignment record should be rolled to the new term. Settings are Y (Roll to new term) or N (Do not roll to new term).
13. Enter Room Assignment Status Code, using the Search window to access the Room Assignment Status Codes (STVASCD opens, the appropriate Room Assignment Status Code is highlighted, and the Select Record function is performed). This field is optional.
14. Enter the Room Assignment Status Date in the format DD-MON-YYYY. This field is optional.
15. Set Roll Meal Assignment to indicate whether the Meal Assignment record should be rolled to the new term. Settings are Y (Roll to new term) or N (Do not roll to new term).
16. Enter Meal Assignment Status Code, using the Search window to access the Meal Assignment Status Codes (STVMSCD opens, the appropriate Meal Assignment Status Code is highlighted, and the Select Record function is performed). This field is optional.
17. Enter the Meal Assignment Status Date in the format DD-MON-YYYY. This field is optional.
18. Set Roll Phone Assignment to indicate whether the Phone Assignment record should be rolled to the new term. Settings are Y (Roll to new term) or N (Do not roll to new term).
19. Enter Phone Assignment Status Code, using the Search window to access the Phone Assignment Status Codes (STVPSCD opens, the appropriate Phone Assignment Status Code is highlighted, and the Select Record function is performed). This field is optional.
20. Enter the Phone Assignment Status Date in the format DD-MON-YYYY. This field is optional.
21. Perform a Next Block function to access the Submission Block.
22. Note the Save Parameter Set checkbox. It indicates whether the parameter values should be saved as user-level defaults for the job or report. If you have one set of defaults for the job or report, select this check box and leave the As fields blank. If you have more than one set of defaults for the job or report, select this check box and enter the name and description of the job parameter set in the As fields.
23. Note the Hold/Submit Radio Buttons. They indicate whether the job or report is held for later processing or run immediately. If the Hold button is selected, the
© SunGard 2004-2008 Location Management - Housing Page 107
report or process is held for later processing from the operating system. A sequence number appears in the Auto Hint when you Save the record. Use this number when you submit the job from the operating system. If the Submit button is selected, the job or report will be processed immediately when you Save the record.
24. Select the Submit radio button.
25. Select the Save icon.
26. Note the name of the report output in the lower left portion of the window:
27. Select Review Output [GJIREVO] from the Options Menu.
28. Enter the Report name you recorded above in the File Name field.
29. After reviewing the report, click on the Exit icon.
30. Click on the Exit icon again.
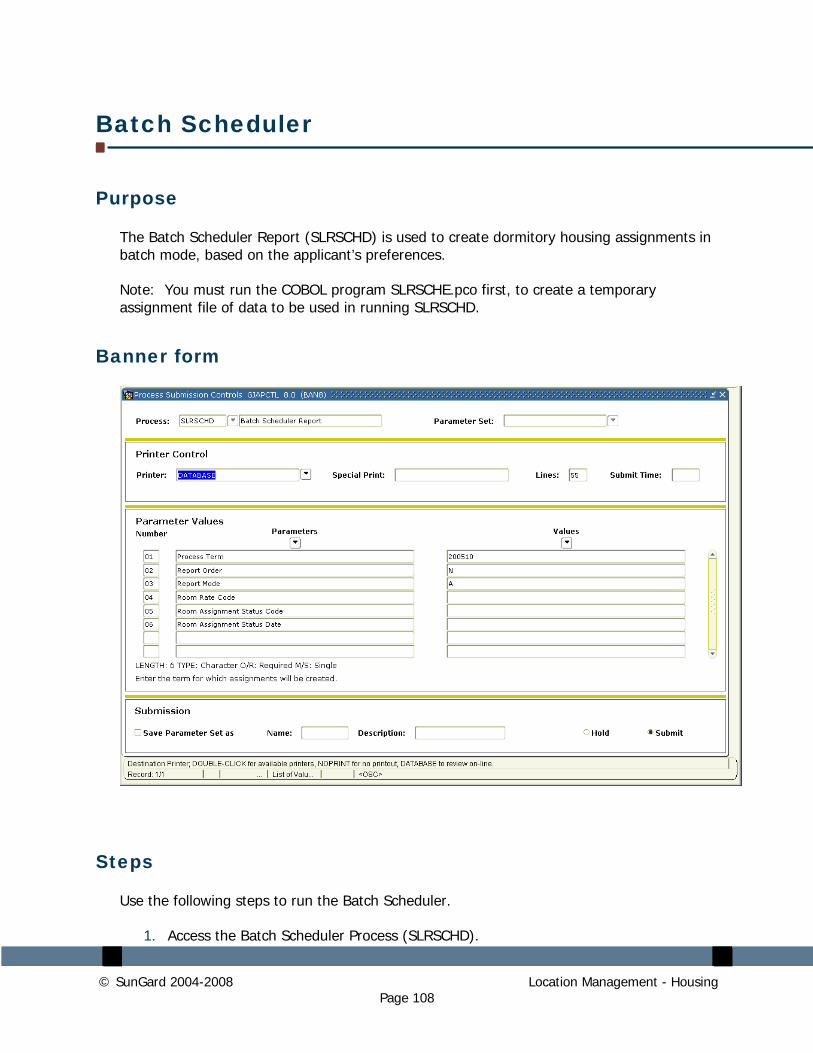
© SunGard 2004-2008 Location Management - Housing Page 108
Batch Scheduler
Purpose
The Batch Scheduler Report (SLRSCHD) is used to create dormitory housing assignments in batch mode, based on the applicant’s preferences.
Note: You must run the COBOL program SLRSCHE.pco first, to create a temporary assignment file of data to be used in running SLRSCHD.
Banner form
Steps
Use the following steps to run the Batch Scheduler.
1. Access the Batch Scheduler Process (SLRSCHD).
© SunGard 2004-2008 Location Management - Housing Page 109
2. If desired, select the Parameter Set that was previously saved, (use the Search window to select the desired Parameter Set). All sets linked to the signed-on user ID and job or report are available.
3. Perform a Next Block function to access the Printer Control Block.
4. Select Database from the LOV in the Printer field. This field indicates the destination printer for output from the job or report.
Warning: Leave this field blank for jobs and reports that run with sleep/wake processing. For these kinds of jobs and reports, enter the printer code as a parameter.
Choices: Choices come from the Printer Validation (GTVPRNT) list. You can also use these values:
blank - Use the system printer.
NOPRINT - Skip printing.
DATABASE - Save output for viewing on the Saved Output Review Form (GJIREVO).
5. Note the Special Print field. This value comes from the Special Print Stock field on the Process Maintenance Form (GJAJOBS). It can be changed.
Choices: For special forms, use the specific operating system forms command. Other choices are:
LANDSCAPE (default) - Print across the wide side of the paper.
PORTRAIT - Print across the narrow side of the paper.
Note: This option is not available for Windows NT Server.
6. Note the Lines field. This denotes the number of lines per page and comes from the Lines Per Page field on the Process Maintenance Form (GJAJOBS). It can be changed. The default value is 55.
7. Note the Submit Time field. This is the Time when the job or report will be submitted for processing.
8. Perform a Next Block to access the Parameter Values Block. If a Parameter Set has been selected, these values are already filled in, and you may skip to the Submission Block.
9. Select the Process Term by using the Search window for the term value (STVTERM opens, the appropriate term code is highlighted and the Select Record function is performed). This is the term for which assignments will be created.
© SunGard 2004-2008 Location Management - Housing Page 110
10. Set the Report Order parameter to N, I or P. N causes the report to be sorted in Name order, I causes the report to be sorted in ID Number order and P causes the report to be sorted in Priority order.
11. Enter the Report Mode parameter. Choices are A (Audit) or U (Update). If A is selected, new records for the specified term will not be created.
12. Enter the Room Rate Code for the assignments created by using the Search window for the room rate code (STVRRCD opens, the appropriate rate code is highlighted and the Select Record function is performed).
13. Enter the Room Assignment Status Code for the assignments created by using the Search window for the Room Assignment Status code (STVASCD opens, the appropriate room assignment status code is highlighted and the Select Record function is performed).
14. Enter the Room Assignment Status Date in the form DD-MON-YYY.
15. Perform a Next Block function to access the Submission Block.
16. Note the Save Parameter Set checkbox. It indicates whether the parameter values should be saved as user-level defaults for the job or report. If you have one set of defaults for the job or report, select this check box and leave the As fields blank. If you have more than one set of defaults for the job or report, select this check box and enter the name and description of the job parameter set in the As fields.
17. Note the Hold/Submit Radio Buttons. They indicate whether the job or report is held for later processing or run immediately. If the Hold button is selected, the report or process is held for later processing from the operating system. A sequence number appears in the Auto Hint when you Save the record. Use this number when you submit the job from the operating system. If the Submit button is selected, the job or report will be processed immediately when you Save the record.
18. Select the Submit radio button.
19. Select the Save icon.
20. Note the name of the report output in the lower left portion of the window:
21. Select Review Output [GJIREVO] from the Options Menu.
22. Enter the Report name you recorded above in the File Name field.
23. After reviewing the report, click on the Exit icon.
24. Click on the Exit icon again.
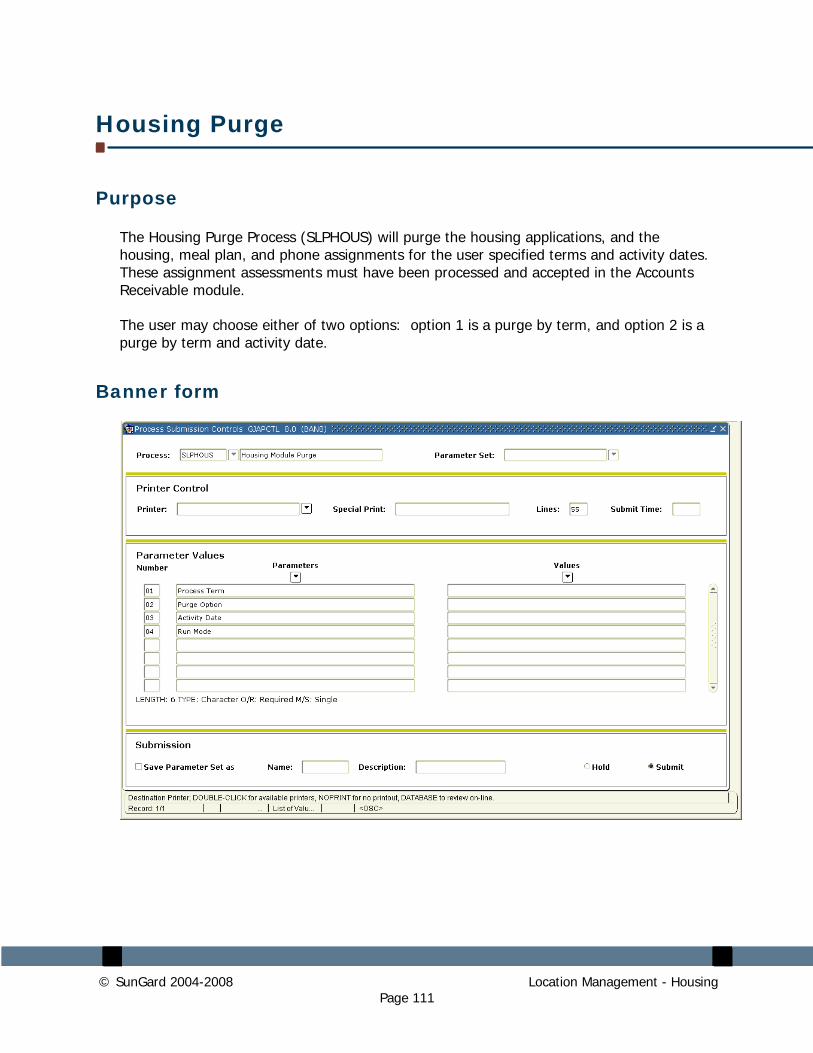
© SunGard 2004-2008 Location Management - Housing Page 111
Housing Purge
Purpose
The Housing Purge Process (SLPHOUS) will purge the housing applications, and the housing, meal plan, and phone assignments for the user specified terms and activity dates. These assignment assessments must have been processed and accepted in the Accounts Receivable module.
The user may choose either of two options: option 1 is a purge by term, and option 2 is a purge by term and activity date.
Banner form
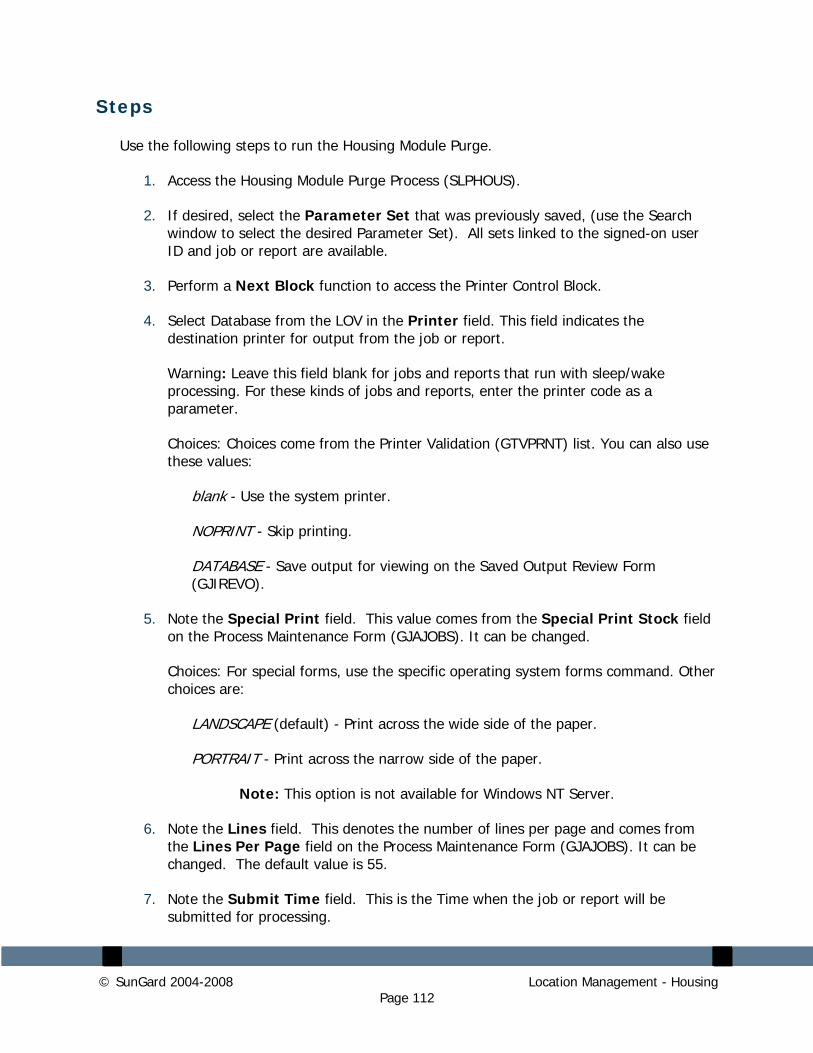
© SunGard 2004-2008 Location Management - Housing Page 112
Steps
Use the following steps to run the Housing Module Purge.
1. Access the Housing Module Purge Process (SLPHOUS).
2. If desired, select the Parameter Set that was previously saved, (use the Search window to select the desired Parameter Set). All sets linked to the signed-on user ID and job or report are available.
3. Perform a Next Block function to access the Printer Control Block.
4. Select Database from the LOV in the Printer field. This field indicates the destination printer for output from the job or report.
Warning: Leave this field blank for jobs and reports that run with sleep/wake processing. For these kinds of jobs and reports, enter the printer code as a parameter.
Choices: Choices come from the Printer Validation (GTVPRNT) list. You can also use these values:
blank - Use the system printer.
NOPRINT - Skip printing.
DATABASE - Save output for viewing on the Saved Output Review Form (GJIREVO).
5. Note the Special Print field. This value comes from the Special Print Stock field on the Process Maintenance Form (GJAJOBS). It can be changed.
Choices: For special forms, use the specific operating system forms command. Other choices are:
LANDSCAPE (default) - Print across the wide side of the paper.
PORTRAIT - Print across the narrow side of the paper.
Note: This option is not available for Windows NT Server.
6. Note the Lines field. This denotes the number of lines per page and comes from the Lines Per Page field on the Process Maintenance Form (GJAJOBS). It can be changed. The default value is 55.
7. Note the Submit Time field. This is the Time when the job or report will be submitted for processing.
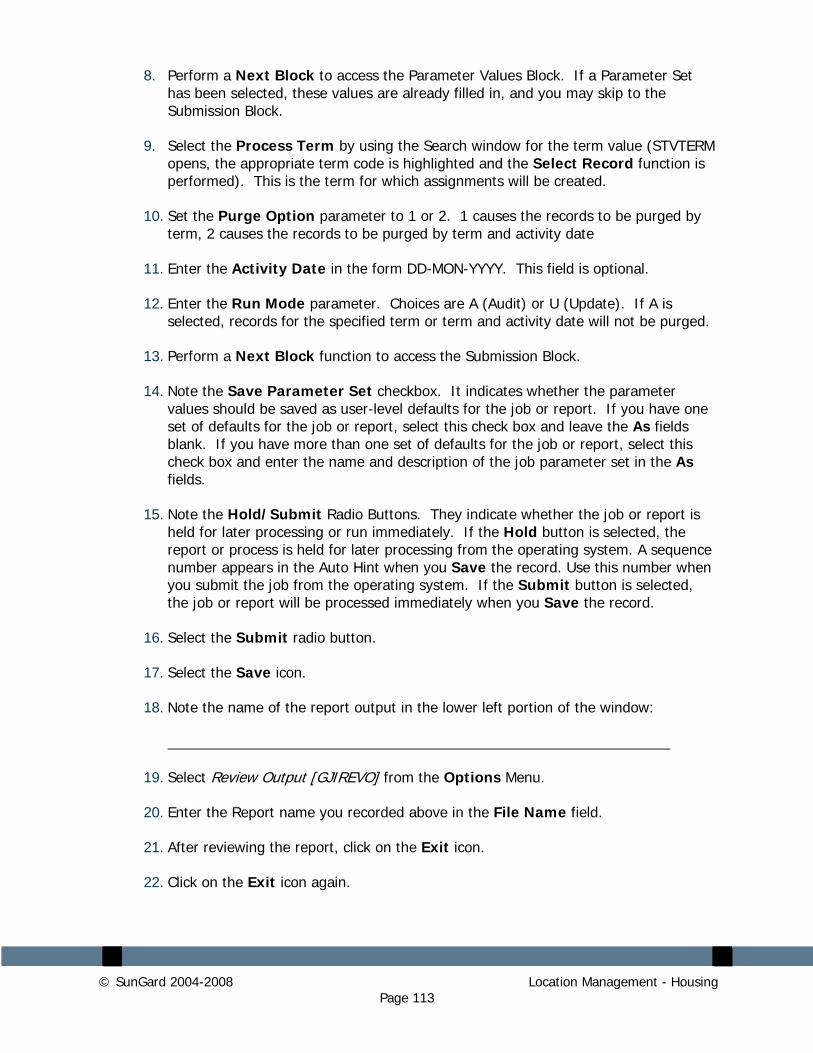
© SunGard 2004-2008 Location Management - Housing Page 113
8. Perform a Next Block to access the Parameter Values Block. If a Parameter Set has been selected, these values are already filled in, and you may skip to the Submission Block.
9. Select the Process Term by using the Search window for the term value (STVTERM opens, the appropriate term code is highlighted and the Select Record function is performed). This is the term for which assignments will be created.
10. Set the Purge Option parameter to 1 or 2. 1 causes the records to be purged by term, 2 causes the records to be purged by term and activity date
11. Enter the Activity Date in the form DD-MON-YYYY. This field is optional.
12. Enter the Run Mode parameter. Choices are A (Audit) or U (Update). If A is selected, records for the specified term or term and activity date will not be purged.
13. Perform a Next Block function to access the Submission Block.
14. Note the Save Parameter Set checkbox. It indicates whether the parameter values should be saved as user-level defaults for the job or report. If you have one set of defaults for the job or report, select this check box and leave the As fields blank. If you have more than one set of defaults for the job or report, select this check box and enter the name and description of the job parameter set in the As fields.
15. Note the Hold/Submit Radio Buttons. They indicate whether the job or report is held for later processing or run immediately. If the Hold button is selected, the report or process is held for later processing from the operating system. A sequence number appears in the Auto Hint when you Save the record. Use this number when you submit the job from the operating system. If the Submit button is selected, the job or report will be processed immediately when you Save the record.
16. Select the Submit radio button.
17. Select the Save icon.
18. Note the name of the report output in the lower left portion of the window:
19. Select Review Output [GJIREVO] from the Options Menu.
20. Enter the Report name you recorded above in the File Name field.
21. After reviewing the report, click on the Exit icon.
22. Click on the Exit icon again.
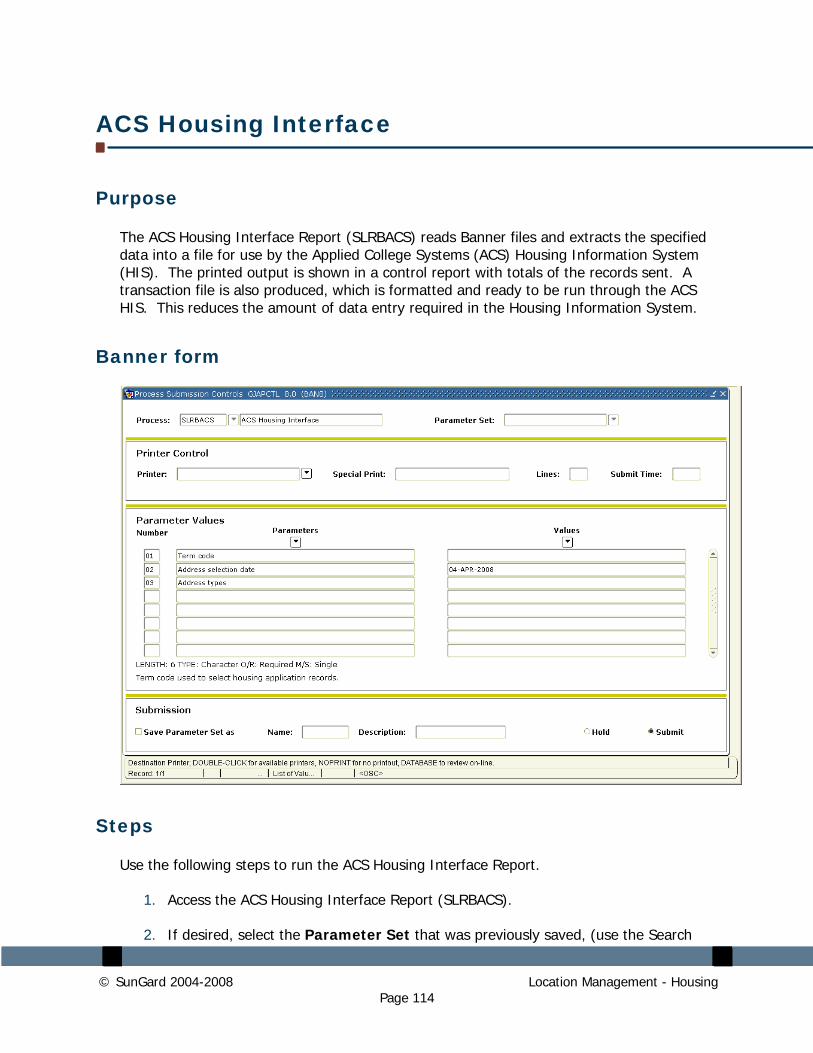
© SunGard 2004-2008 Location Management - Housing Page 114
ACS Housing Interface
Purpose
The ACS Housing Interface Report (SLRBACS) reads Banner files and extracts the specified data into a file for use by the Applied College Systems (ACS) Housing Information System (HIS). The printed output is shown in a control report with totals of the records sent. A transaction file is also produced, which is formatted and ready to be run through the ACS HIS. This reduces the amount of data entry required in the Housing Information System.
Banner form
Steps
Use the following steps to run the ACS Housing Interface Report.
1. Access the ACS Housing Interface Report (SLRBACS).
2. If desired, select the Parameter Set that was previously saved, (use the Search
© SunGard 2004-2008 Location Management - Housing Page 115
window to select the desired Parameter Set). All sets linked to the signed-on user ID and job or report are available.
3. Perform a Next Block function to access the Printer Control Block.
4. Select Database from the LOV in the Printer field. This field indicates the destination printer for output from the job or report.
Warning: Leave this field blank for jobs and reports that run with sleep/wake processing. For these kinds of jobs and reports, enter the printer code as a parameter.
Choices: Choices come from the Printer Validation (GTVPRNT) list. You can also use these values:
blank - Use the system printer.
NOPRINT - Skip printing.
DATABASE - Save output for viewing on the Saved Output Review Form (GJIREVO).
5. Note the Special Print field. This value comes from the Special Print Stock field on the Process Maintenance Form (GJAJOBS). It can be changed.
Choices: For special forms, use the specific operating system forms command. Other choices are:
LANDSCAPE (default) - Print across the wide side of the paper.
PORTRAIT - Print across the narrow side of the paper.
Note: This option is not available for Windows NT Server.
6. Note the Lines field. This denotes the number of lines per page and comes from the Lines Per Page field on the Process Maintenance Form (GJAJOBS). It can be changed. The default value is 55.
7. Note the Submit Time field. This is the Time when the job or report will be submitted for processing.
8. Perform a Next Block to access the Parameter Values Block. If a Parameter Set has been selected, these values are already filled in, and you may skip to the Submission Block.
9. Select the Term Code by using the Search window for the term value (STVTERM opens, the appropriate term code is highlighted and the Select Record function is performed). This is the term for which assignments will be created.
10. Enter the Address Selection Date in the form DD-MON-YYY. This field defaults to
© SunGard 2004-2008 Location Management - Housing Page 116
the system date.
11. Enter the Address Types. Up to two types may be entered.
12. Perform a Next Block function to access the Submission Block.
13. Note the Save Parameter Set checkbox. It indicates whether the parameter values should be saved as user-level defaults for the job or report. If you have one set of defaults for the job or report, select this check box and leave the As fields blank. If you have more than one set of defaults for the job or report, select this check box and enter the name and description of the job parameter set in the As fields.
14. Note the Hold/Submit Radio Buttons. They indicate whether the job or report is held for later processing or run immediately. If the Hold button is selected, the report or process is held for later processing from the operating system. A sequence number appears in the Auto Hint when you Save the record. Use this number when you submit the job from the operating system. If the Submit button is selected, the job or report will be processed immediately when you Save the record.
15. Select the Submit radio button.
16. Select the Save icon.
17. Note the name of the report output in the lower left portion of the window:
18. Select Review Output [GJIREVO] from the Options Menu.
19. Enter the Report name you recorded above in the File Name field.
20. After reviewing the report, click on the Exit icon.
21. Click on the Exit icon again.
© SunGard 2004-2008 Location Management - Housing Page 117
Summary
Let’s review
As a result of completing this workbook, you have
• identified Location Management/Housing control, rules, and code validation forms
• created and analyzed Housing control and rules
• defined housing/meal/phone rates
• defined housing assignment and assessment rules
• defined buildings and rooms
• created room and meal applications
• created and maintained room, meal, and phone assignments
• identified the Location Management/Housing queries and reports.
Next step
Now you are ready to begin determining what information related to your buildings and rooms, Residence Life records, and classroom records will be implemented within the Banner Student Location Management/Housing module. Decisions will need to be made based upon your organization’s needs as to which code validation forms and control and rules forms will be used as well as what your values will be on these forms.
© SunGard 2004-2008 Location Management - Housing Page 118
Self Check
Directions
Use the information you have learned in this workbook to complete this self-check activity.
Question 1
What Banner form do you use to record information about a building?
Question 2
If your institution has defined a “non-smoking” code, how do you specify that a building is a non-smoking building?
Question 3
How would you indicate that a building could be used for married student housing?
Question 4
Which form allows you to define a specific room in a building?
© SunGard 2004-2008 Location Management - Housing Page 119
Question 5
If the gender for a building is specified as “N/A” because it houses both male and female students, but you want to indicate that particular rooms (for example, all the rooms on a particular floor) are for either males or females, what do you need to do?
Question 6
How do you specify that a room is not to be available during a certain period?
Question 7
What forms do you need to use if a student has requested a specific residence room?
Question 8
How can you specify that a room assignment should be for more than one term?
© SunGard 2004-2008 Location Management - Housing Page 120
Question 9
How do you create a new room on the Room Definition Form (SLARDEF)?
Question 10
Why would you see an attribute already listed in the Attributes, Inactive Dates, & Comments window of the Room Definition Form (SLARDEF) if you are defining a room for the first time?
How can you enter an additional attribute?
Question 11
Which report is used to create dormitory housing assignments in batch mode, based on the applicant’s preferences?
A. Dormitory Address Creation Report (SLRDADD)
B. Active Housing Assignments Report (SLRHLST)
C. Batch Room/Meal/Phone Assess Report (SLRFASM)
D. Batch Scheduler Report (SLRSCHD)
© SunGard 2004-2008 Location Management - Housing Page 121
Answer Key for Self Check
Question 1
What Banner form do you use to record information about a building?
Building Definition Form (SLABLDG)
Question 2
If your institution has defined a “non-smoking” code, how do you specify that a building is a non-smoking building?
Specify the “non-smoking” code in the Attribute field on the Building Attributes, Category, and Comments window.
Question 3
How would you indicate that a building could be used for married student housing?
Define the gender on the Building Definition Form (SLABLDG) as Not Available (N/A) and leave it as N/A on the Room Definition Form (SLARDEF).
Question 4
Which form allows you to define a specific room in a building?
Room Definition Form (SLARDEF)
Question 5
If the gender for a building is specified as “N/A” because it houses both male and female students, but you want to indicate that particular rooms (for example, all the rooms on a particular floor) are for either males or females, what do you need to do?
Specify the gender for the particular rooms on the Room Definition Form (SLARDEF).
© SunGard 2004-2008 Location Management - Housing Page 122
Question 6
How do you specify that a room is not to be available during a certain period?
Specify start and end dates and times for the inactive period in the Attributes, Inactive Dates, & Comments window of the Room Definition Form (SLARDEF).
Question 7
What forms do you need to use if a student has requested a specific residence room?
• Dorm Room and Meal Application Form (SLARMAP)
• Housing and Term Control Form (SLATERM)
• Room Assignment Form (SLARASG)
Question 8
How can you specify that a room assignment should be for more than one term?
Enter a term code in the To Term field of the Dorm Room and Meal Application Form (SLARMAP) that is later than the one in the From Term field.
Question 9
How do you create a new room on the Room Definition Form (SLARDEF)?
Enter the room number in the Room field, then defining it in the Room Definition block and the other windows as necessary.
Question 10
Why would you see an attribute already listed in the Attributes, Inactive Dates, & Comments window of the Room Definition Form (SLARDEF) if you are defining a room for the first time?
If an attribute was already assigned to the building in which the room is located.
How can you enter an additional attribute?
Enter an additional attribute on the next line. (You can insert a new record if there are already multiple attributes set and you want to set another one.)
© SunGard 2004-2008 Location Management - Housing Page 123
Question 11
Which report is used to create dormitory housing assignments in batch mode, based on the applicant’s preferences?
A. Dormitory Address Creation Report (SLRDADD)
B. Active Housing Assignments Report (SLRHLST)
C. Batch Room/Meal/Phone Assess Report (SLRFASM)
D. Batch Scheduler Report (SLRSCHD)
Appendix
© SunGard 2004-2008 Location Management - Housing
Page 124
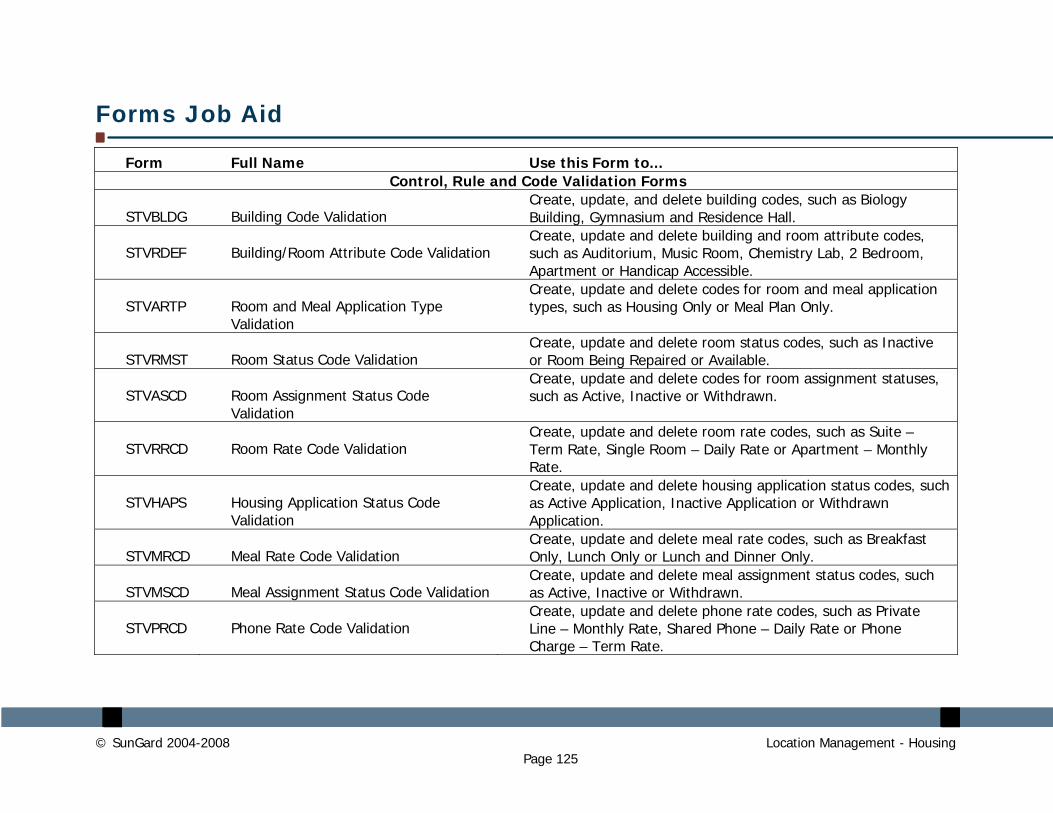
Forms Job Aid
Form Full Name Use this Form to... Control, Rule and Code Validation Forms
STVBLDG Building Code Validation Create, update, and delete building codes, such as Biology Building, Gymnasium and Residence Hall.
STVRDEF Building/Room Attribute Code Validation Create, update and delete building and room attribute codes, such as Auditorium, Music Room, Chemistry Lab, 2 Bedroom, Apartment or Handicap Accessible.
STVARTP Room and Meal Application Type Validation
Create, update and delete codes for room and meal application types, such as Housing Only or Meal Plan Only.
STVRMST Room Status Code Validation Create, update and delete room status codes, such as Inactive or Room Being Repaired or Available.
STVASCD Room Assignment Status Code Validation
Create, update and delete codes for room assignment statuses, such as Active, Inactive or Withdrawn.
STVRRCD Room Rate Code Validation Create, update and delete room rate codes, such as Suite – Term Rate, Single Room – Daily Rate or Apartment – Monthly Rate.
STVHAPS Housing Application Status Code Validation
Create, update and delete housing application status codes, such as Active Application, Inactive Application or Withdrawn Application.
STVMRCD Meal Rate Code Validation Create, update and delete meal rate codes, such as Breakfast Only, Lunch Only or Lunch and Dinner Only.
STVMSCD Meal Assignment Status Code Validation Create, update and delete meal assignment status codes, such as Active, Inactive or Withdrawn.
STVPRCD Phone Rate Code Validation Create, update and delete phone rate codes, such as Private Line – Monthly Rate, Shared Phone – Daily Rate or Phone Charge – Term Rate.
© SunGard 2004-2008 Location Management - Housing
Page 125
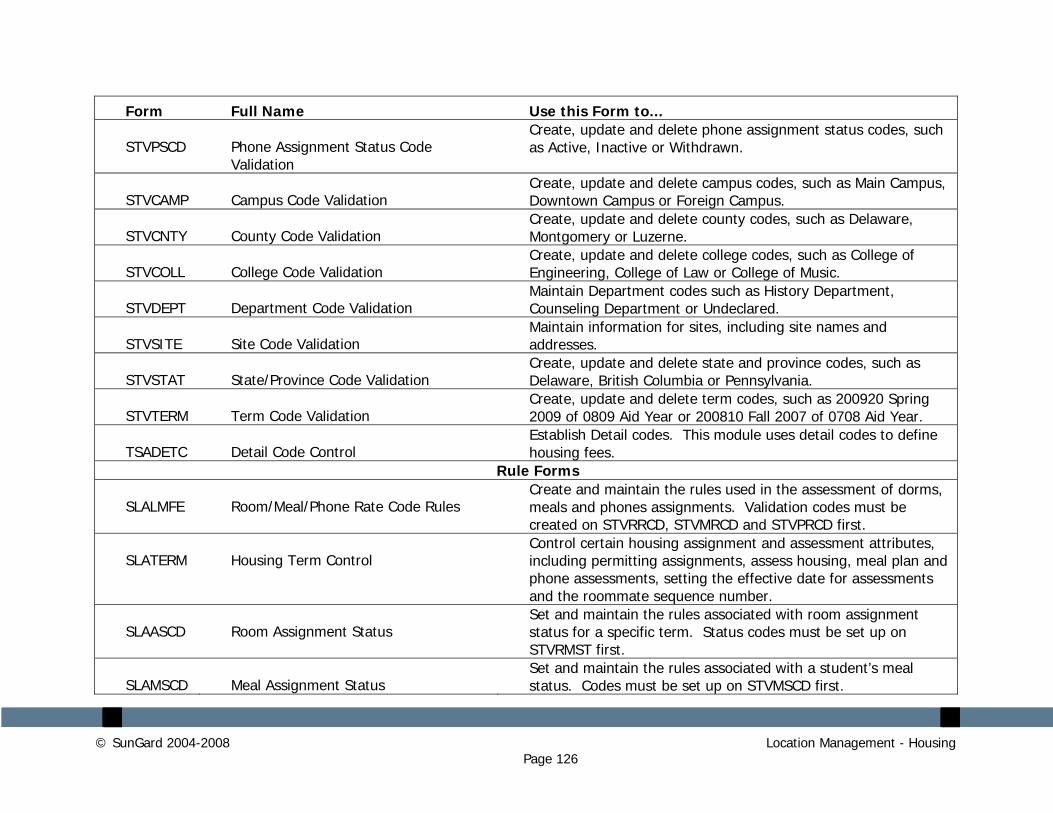
Form Full Name Use this Form to...
STVPSCD Phone Assignment Status Code Validation
Create, update and delete phone assignment status codes, such as Active, Inactive or Withdrawn.
STVCAMP Campus Code Validation Create, update and delete campus codes, such as Main Campus, Downtown Campus or Foreign Campus.
STVCNTY County Code Validation Create, update and delete county codes, such as Delaware, Montgomery or Luzerne.
STVCOLL College Code Validation Create, update and delete college codes, such as College of Engineering, College of Law or College of Music.
STVDEPT Department Code Validation Maintain Department codes such as History Department, Counseling Department or Undeclared.
STVSITE Site Code Validation Maintain information for sites, including site names and addresses.
STVSTAT State/Province Code Validation Create, update and delete state and province codes, such as Delaware, British Columbia or Pennsylvania.
STVTERM Term Code Validation Create, update and delete term codes, such as 200920 Spring 2009 of 0809 Aid Year or 200810 Fall 2007 of 0708 Aid Year.
TSADETC Detail Code Control Establish Detail codes. This module uses detail codes to define housing fees.
Rule Forms
SLALMFE Room/Meal/Phone Rate Code Rules Create and maintain the rules used in the assessment of dorms, meals and phones assignments. Validation codes must be created on STVRRCD, STVMRCD and STVPRCD first.
SLATERM Housing Term Control Control certain housing assignment and assessment attributes, including permitting assignments, assess housing, meal plan and phone assessments, setting the effective date for assessments and the roommate sequence number.
SLAASCD Room Assignment Status Set and maintain the rules associated with room assignment status for a specific term. Status codes must be set up on STVRMST first.
SLAMSCD Meal Assignment Status Set and maintain the rules associated with a student’s meal status. Codes must be set up on STVMSCD first.
© SunGard 2004-2008 Location Management - Housing Page 126
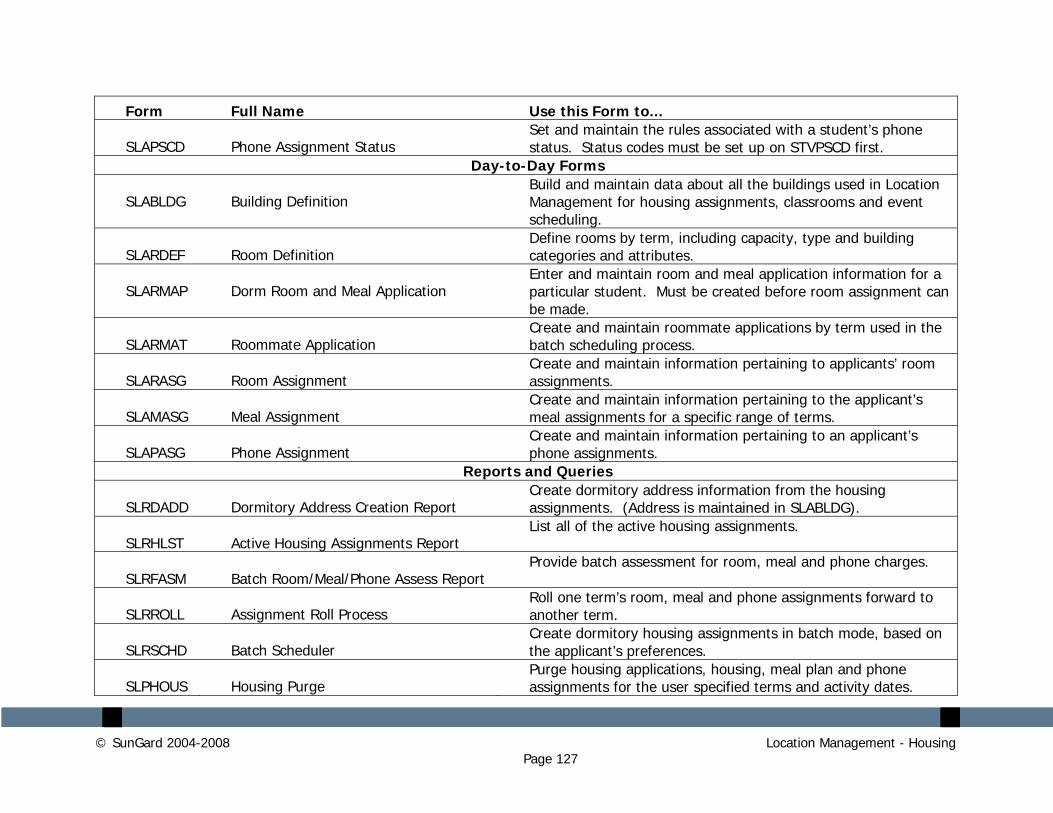
Form Full Name Use this Form to...
SLAPSCD Phone Assignment Status Set and maintain the rules associated with a student’s phone status. Status codes must be set up on STVPSCD first.
Day-to-Day Forms
SLABLDG Building Definition Build and maintain data about all the buildings used in Location Management for housing assignments, classrooms and event scheduling.
SLARDEF Room Definition Define rooms by term, including capacity, type and building categories and attributes.
SLARMAP Dorm Room and Meal Application Enter and maintain room and meal application information for a particular student. Must be created before room assignment can be made.
SLARMAT Roommate Application Create and maintain roommate applications by term used in the batch scheduling process.
SLARASG Room Assignment Create and maintain information pertaining to applicants’ room assignments.
SLAMASG Meal Assignment Create and maintain information pertaining to the applicant’s meal assignments for a specific range of terms.
SLAPASG Phone Assignment Create and maintain information pertaining to an applicant’s phone assignments.
Reports and Queries
SLRDADD Dormitory Address Creation Report Create dormitory address information from the housing assignments. (Address is maintained in SLABLDG).
SLRHLST Active Housing Assignments Report List all of the active housing assignments.
SLRFASM Batch Room/Meal/Phone Assess Report Provide batch assessment for room, meal and phone charges.
SLRROLL Assignment Roll Process Roll one term’s room, meal and phone assignments forward to another term.
SLRSCHD Batch Scheduler Create dormitory housing assignments in batch mode, based on the applicant’s preferences.
SLPHOUS Housing Purge Purge housing applications, housing, meal plan and phone assignments for the user specified terms and activity dates.
© SunGard 2004-2008 Location Management - Housing Page 127
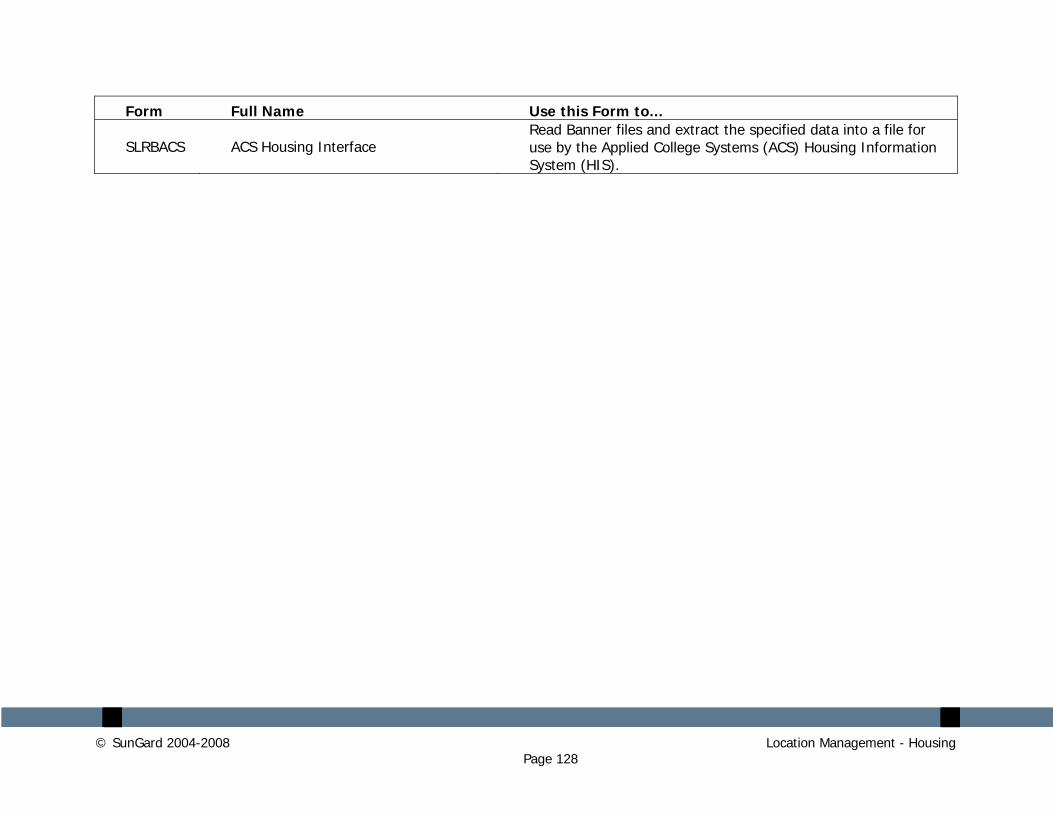
Form Full Name Use this Form to...
SLRBACS ACS Housing Interface Read Banner files and extract the specified data into a file for use by the Applied College Systems (ACS) Housing Information System (HIS).
© SunGard 2004-2008 Location Management - Housing Page 128
© SunGard 2004-2008 Location Management - Housing Page 129
Terminology
A Rules form provides the ability for end users to define your institution’s information that will allow Banner the capability to consistently apply the information to the appropriate records.
A Control form provides the ability for end users to indicate what functionality related to a module’s processing functionality will be invoked.
Control form
Rules form