Embed Size (px)
Citation preview

Banner Enrollment Management SuiteRelationship Management
Prospects WorkspaceTraining Workbook
Release 1.4 – August 2010 Last updated 08/13/2010
What can we help you achieve? HIGHER EDUCATION
____________________________________________________________________________________
This documentation is proprietary information of SunGard Higher Education and is not to be copied, reproduced, lent or disposed of, nor used for any purpose other than that for which it is specifically provided without the written permission of SunGard Higher Education. SunGard Higher Education 4 Country View Road Malvern, Pennsylvania 19355 United States of America (800) 522 - 4827 Customer Support Center website http://connect.sungardhe.com Distribution Services e-mail address [email protected] Other services In preparing and providing this publication, SunGard Higher Education is not rendering legal, accounting, or other similar professional services. SunGard Higher Education makes no claims that an institution's use of this publication or the software for which it is provided will insure compliance with applicable federal or state laws, rules, or regulations. Each organization should seek legal, accounting and other similar professional services from competent providers of the organization's own choosing. Trademark Without limitation, SunGard, the SunGard logo, Banner, Campus Pipeline, Luminis, PowerCAMPUS, Matrix, and Plus are trademarks or registered trademarks of SunGard Data Systems Inc. or its subsidiaries in the U.S. and other countries. Third-party names and marks referenced herein are trademarks or registered trademarks of their respective owners. Notice of rights Copyright © SunGard Higher Education 2004-2010. This document is proprietary and confidential information of SunGard Higher Education Inc. and is not to be copied, reproduced, lent, displayed or distributed, nor used for any purpose other than that for which it is specifically provided without the express written permission of SunGard Higher Education Inc.
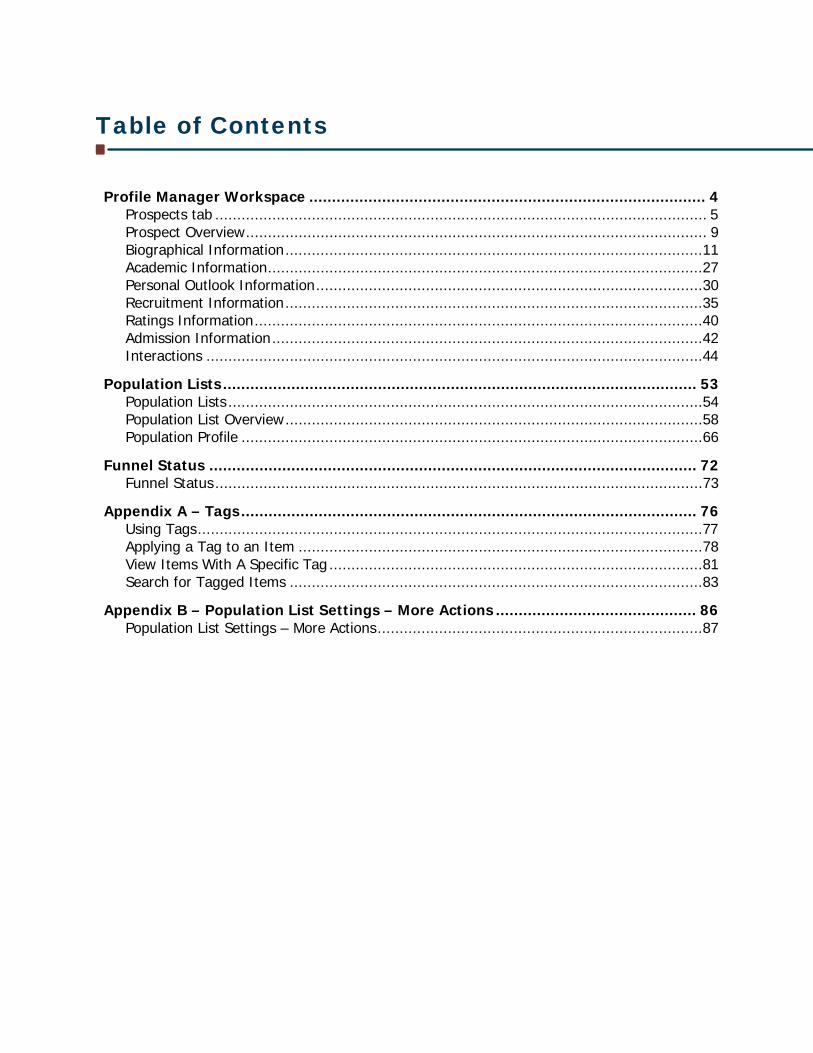
Table of Contents
Profile Manager Workspace ....................................................................................... 4 Prospects tab ................................................................................................................ 5 Prospect Overview ......................................................................................................... 9 Biographical Information ...............................................................................................11 Academic Information ...................................................................................................27 Personal Outlook Information ........................................................................................30 Recruitment Information ...............................................................................................35 Ratings Information ......................................................................................................40 Admission Information ..................................................................................................42 Interactions .................................................................................................................44
Population Lists ........................................................................................................ 53 Population Lists ............................................................................................................54 Population List Overview ...............................................................................................58 Population Profile .........................................................................................................66
Funnel Status ........................................................................................................... 72 Funnel Status ...............................................................................................................73
Appendix A – Tags .................................................................................................... 76 Using Tags ...................................................................................................................77 Applying a Tag to an Item ............................................................................................78 View Items With A Specific Tag .....................................................................................81 Search for Tagged Items ..............................................................................................83
Appendix B – Population List Settings – More Actions ............................................ 86 Population List Settings – More Actions ..........................................................................87
© SunGard 2004-2010 Relationship Management – Prospects Page 4
Profile Manager Workspace
Workbook goal
The goal of this workbook is to provide you with an understanding of the features and functions of the Prospects workspace in Relationship Management.
Intended audience
Admissions Office, Students Services, and Recruiting staff.
Course objectives
After completing this course, you should understand and be able to utilize the various functions within the Prospects workspace.
© SunGard 2004-2010 Relationship Management – Prospects Page 5
Prospects tab
Introduction
The Prospects tab displays a collection of information about a selected prospect or applicant in the recruiting and admissions cycle. Information about a prospect can come from many sources, such as test scores, a college fair, or an inquiry from a high school student. As information is received, it is collected in a profile for recruiters to view and include in specific campaign activities.
As a recruiter, you can create lists of prospects for use in communications and campaigns. You can view and edit information about your constituents, such as their interests, contact information, and recruitment status. In addition, a recruiter can create lists of students for use in communications and campaigns designed to improve prospect communication.
Using the Prospects
Recruiters can obtain the most current information about their prospects. They can view the latest inquiries from the prospective students and respond immediately to those students who are in their particular region or geographic area.
Recruiters can create customized lists of prospects on-the-spot to enhance their campaign efforts. They can search the entire Banner database for prospects and applicants and get the latest information. Telephone numbers and e-mail addresses are a click away.
A prospect’s interests, field of study, and curriculum are immediately available so that admissions counselors can target communications highlighting the university’s offerings in those areas that match the prospect’s interests. Using the data provided in the Prospect Overview, admissions counselors can gain additional insights regarding their pool of candidates.
Prior to spending time on the road, recruiters can use Prospects tab to discover information about the prospective students from the high schools that they will visit, including the names of students from the school who have contacted the institution prior to the visit. They can send the students an e-mail or make a phone call indicating that they will be at the school on a particular date and time.
In addition, recruiters can prepare follow-up correspondence for prospects they have met during the week, and enter specific interests, attributes, legacy information, and contact information for each of those prospects.
With Relationship Management, an up-to-date profile for each prospect is easy to locate and read. With accessible and updatable prospect information, recruiters can cultivate
© SunGard 2004-2010 Relationship Management – Prospects Page 6
prospective students into becoming applicants by making follow-up calls to selected contacts from recent road visits. If prospects are not available via phone, recruiters can send an e-mail which automatically updates the history of interactions with these prospects.
Whether on the road or in the office, the Prospects tab provides easily accessible and up to date profile information about each prospect. The information displayed in Relationship Management is coming from Banner, so there is no risk of asking for or entering duplicate information.
Finding information
The fastest way to get acquainted with Prospects tab is to begin with a prospect’s profile and then explore the data that is displayed in all the windows for this prospect.
Conduct a Search for Prospects to access an individual’s profile (for more information regarding the search and advanced search functions in Relationship Management, please refer to the Overview workbook).
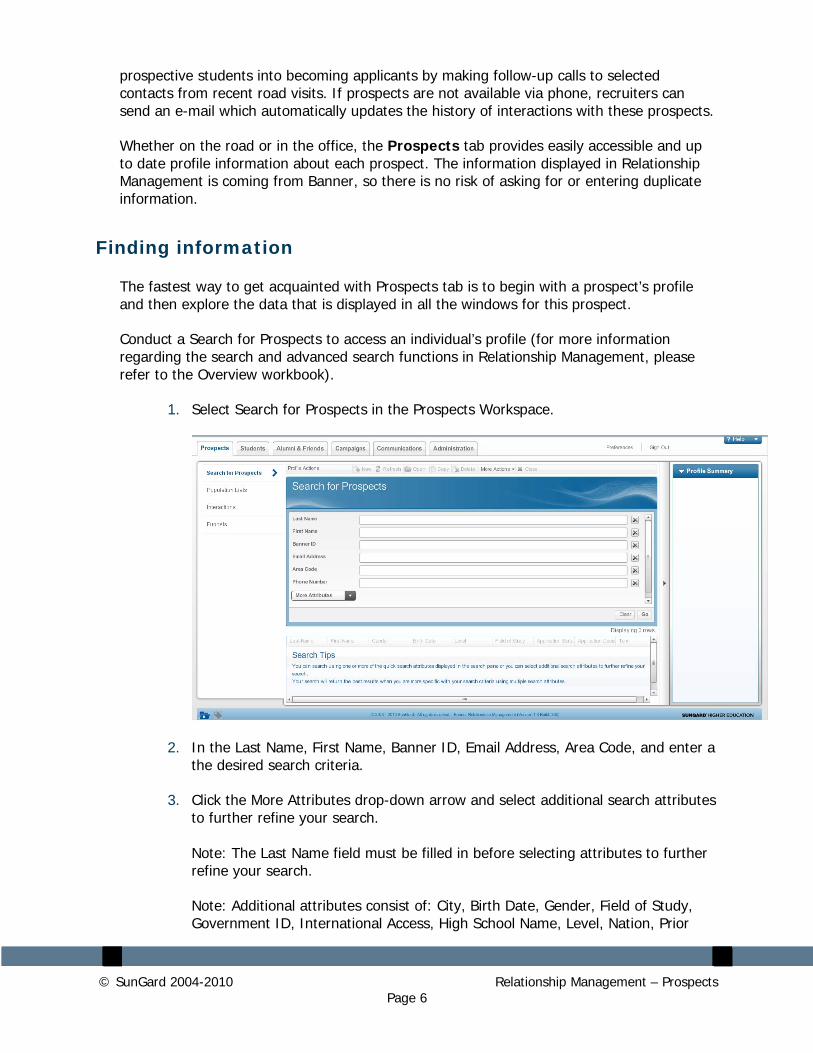
1. Select Search for Prospects in the Prospects Workspace.
2. In the Last Name, First Name, Banner ID, Email Address, Area Code, and enter a the desired search criteria.
3. Click the More Attributes drop-down arrow and select additional search attributes to further refine your search. Note: The Last Name field must be filled in before selecting attributes to further refine your search.
Note: Additional attributes consist of: City, Birth Date, Gender, Field of Study, Government ID, International Access, High School Name, Level, Nation, Prior
© SunGard 2004-2010 Relationship Management – Prospects Page 7
College Name, State, Term or Zip.
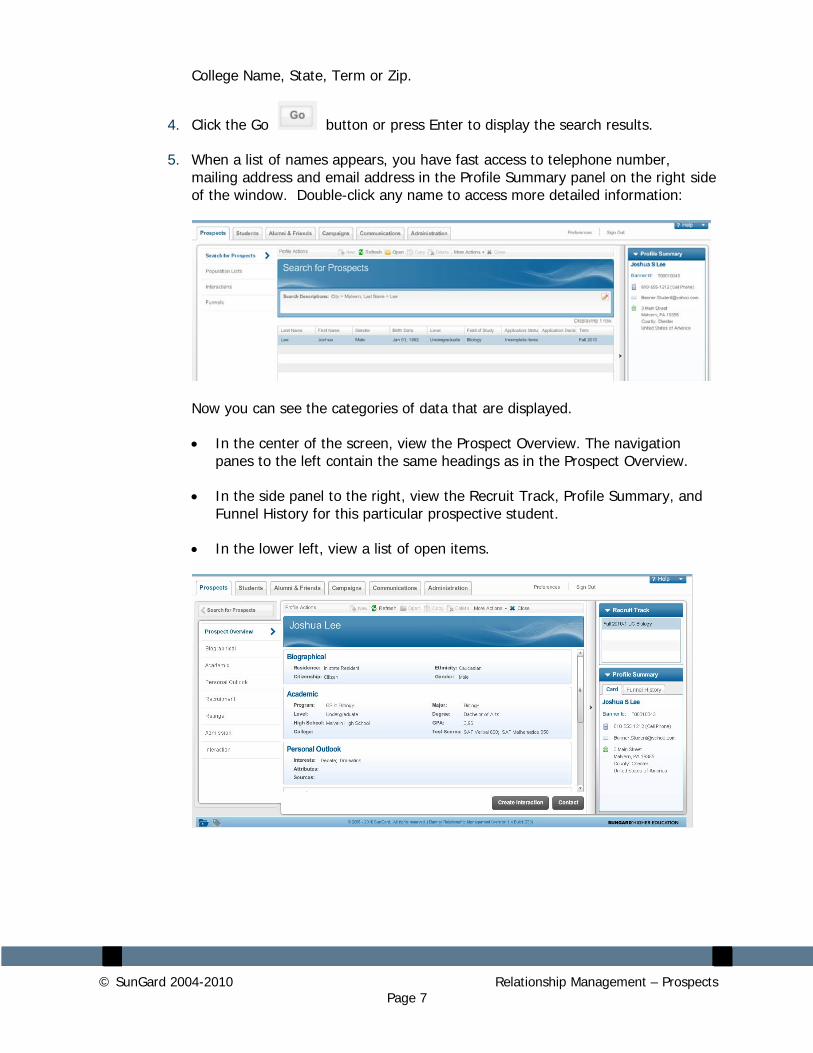
4. Click the Go button or press Enter to display the search results.
5. When a list of names appears, you have fast access to telephone number, mailing address and email address in the Profile Summary panel on the right side of the window. Double-click any name to access more detailed information:
Now you can see the categories of data that are displayed.
• In the center of the screen, view the Prospect Overview. The navigation panes to the left contain the same headings as in the Prospect Overview.
• In the side panel to the right, view the Recruit Track, Profile Summary, and Funnel History for this particular prospective student.
• In the lower left, view a list of open items.
© SunGard 2004-2010 Relationship Management – Prospects Page 8
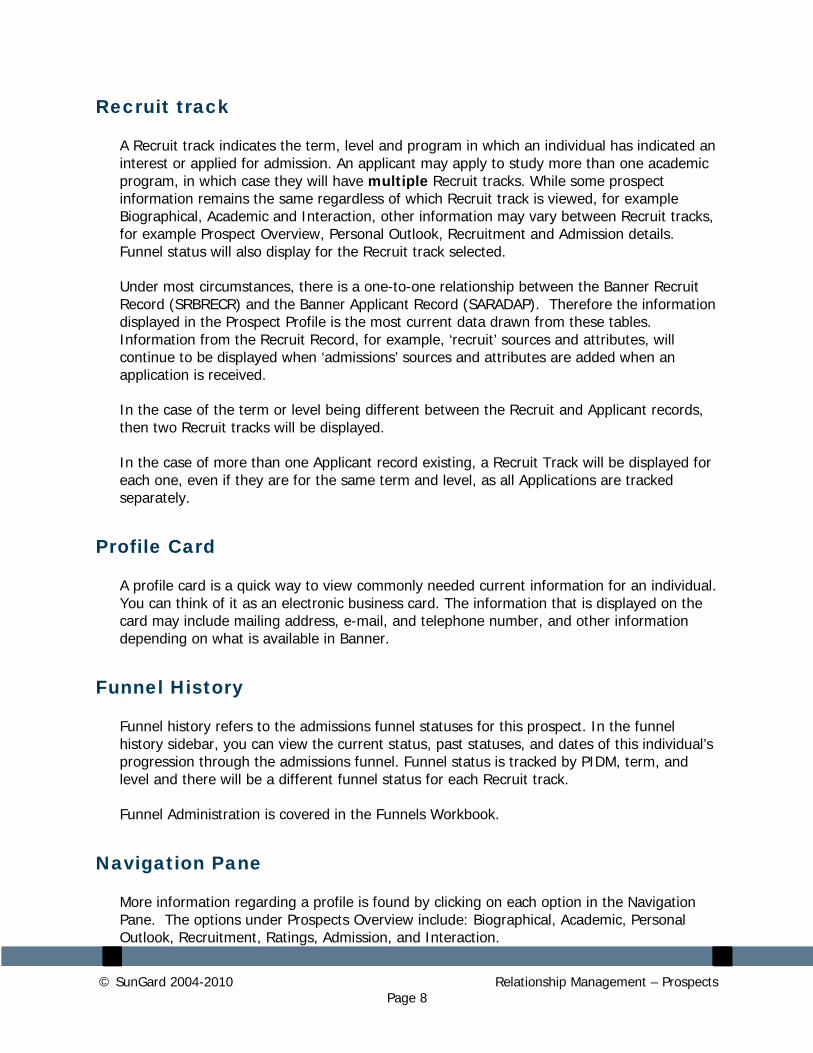
Recruit track
A Recruit track indicates the term, level and program in which an individual has indicated an interest or applied for admission. An applicant may apply to study more than one academic program, in which case they will have multiple Recruit tracks. While some prospect information remains the same regardless of which Recruit track is viewed, for example Biographical, Academic and Interaction, other information may vary between Recruit tracks, for example Prospect Overview, Personal Outlook, Recruitment and Admission details. Funnel status will also display for the Recruit track selected.
Under most circumstances, there is a one-to-one relationship between the Banner Recruit Record (SRBRECR) and the Banner Applicant Record (SARADAP). Therefore the information displayed in the Prospect Profile is the most current data drawn from these tables. Information from the Recruit Record, for example, ‘recruit’ sources and attributes, will continue to be displayed when ‘admissions’ sources and attributes are added when an application is received.
In the case of the term or level being different between the Recruit and Applicant records, then two Recruit tracks will be displayed.
In the case of more than one Applicant record existing, a Recruit Track will be displayed for each one, even if they are for the same term and level, as all Applications are tracked separately.
Profile Card
A profile card is a quick way to view commonly needed current information for an individual. You can think of it as an electronic business card. The information that is displayed on the card may include mailing address, e-mail, and telephone number, and other information depending on what is available in Banner.
Funnel History
Funnel history refers to the admissions funnel statuses for this prospect. In the funnel history sidebar, you can view the current status, past statuses, and dates of this individual’s progression through the admissions funnel. Funnel status is tracked by PIDM, term, and level and there will be a different funnel status for each Recruit track.
Funnel Administration is covered in the Funnels Workbook.
Navigation Pane
More information regarding a profile is found by clicking on each option in the Navigation Pane. The options under Prospects Overview include: Biographical, Academic, Personal Outlook, Recruitment, Ratings, Admission, and Interaction.
© SunGard 2004-2010 Relationship Management – Prospects Page 9
Prospect Overview
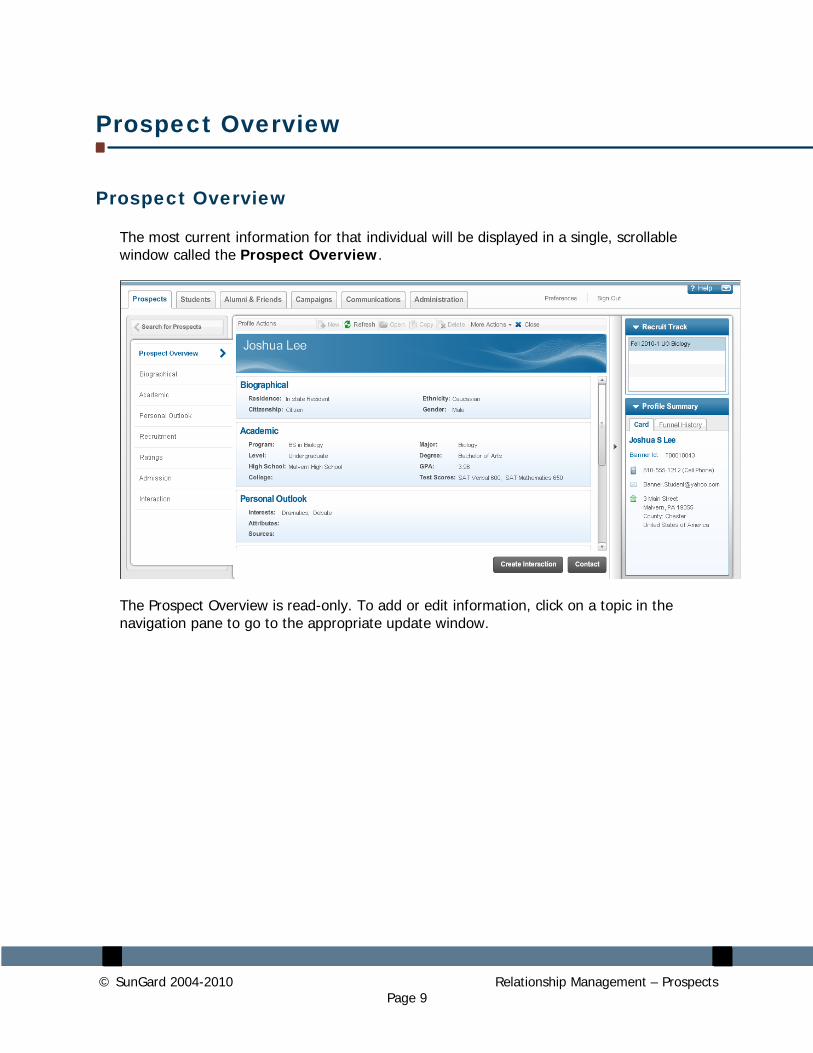
Prospect Overview
The most current information for that individual will be displayed in a single, scrollable window called the Prospect Overview.
The Prospect Overview is read-only. To add or edit information, click on a topic in the navigation pane to go to the appropriate update window.
© SunGard 2004-2010 Relationship Management – Prospects Page 10
Information in the Prospect Overview is organized from top to bottom in the same order as the list of topics in the navigation pane on the side:
• Biographical – View Residence, Ethnicity, New Ethnicity, Citizenship, and Gender
• Academic - View Program, Major, Level, Degree, High School, GPA, College, and Test Scores
• Personal Outlook - View Interests, Attributes, and Sources
• Recruitment - View Recruit Type, Student Type, Recruit Status, Geo Region, and Recruiter
• Ratings – View applicant probability and Desirability information
• Admission View Application Status, Current Decision, Decision Date, and Check List Items
• Interaction - View Interaction History, Interaction Types and Dates, Create Interaction to record an interaction with this prospect, Contact to contact this prospect
In the right-hand side pane next to the Prospect Overview, you can view the individual’s Recruit Track, Profile Summary Card and Funnel History. These windows can be expanded or collapsed by clicking the arrows on the title bars. If you navigate to another Recruit Track, the Prospect Overview will display the information associated with the new Recruit Track.
The Create Interaction button on the Prospect Overview page allows you record an interaction between the institution and the prospect. The Contact button allows you to send an e-mail, letter or targeted announcement to the prospect. (These functions will be covered in more detail later in the Workbook)
© SunGard 2004-2010 Relationship Management – Prospects Page 11
Biographical Information
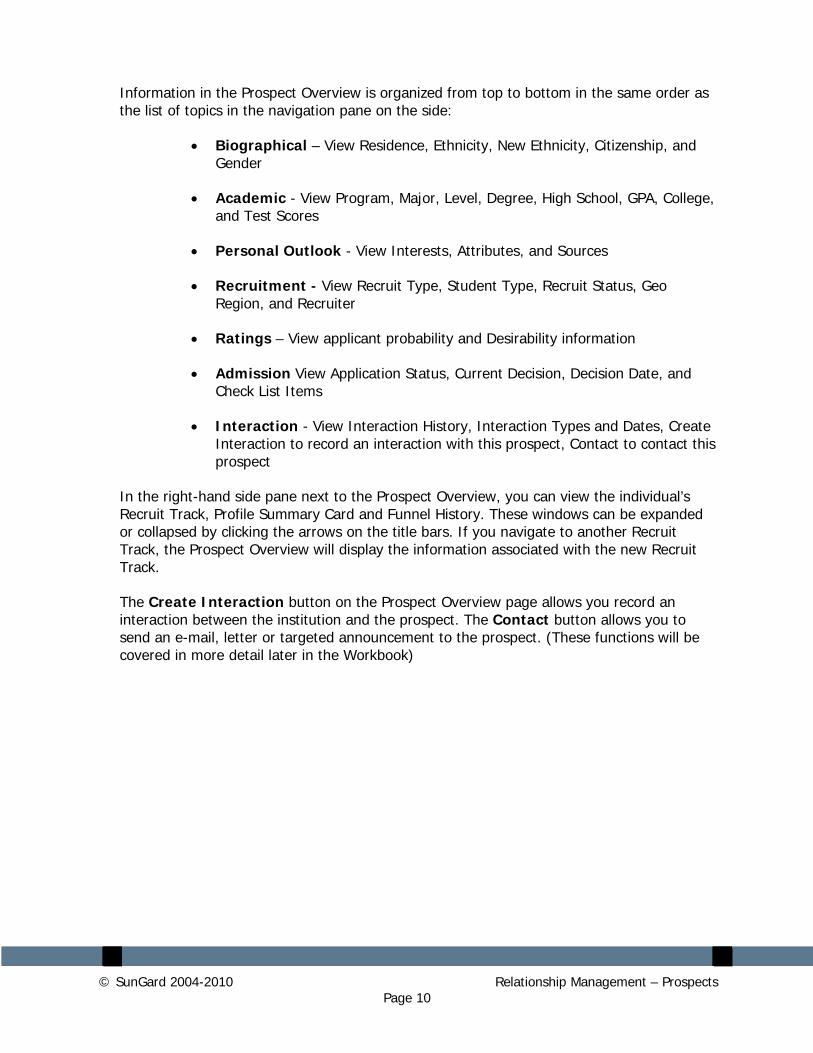
Prospect Biographical Information includes Bio Data and Contact Information for an individual.
Bio Data Tab
Bio Data includes Nickname, Gender, Date of Birth, Age, Marital Status, Religion, Legacy, Citizenship, and Ethnicity, and New Ethnicity which are displayed on the Bio Data tab. You may enter or change Biographical Information.
The list of values available for Marital Status, Religion, Legacy, Citizenship, Ethnicity, New Ethnicity, Address Type, Telephone Type, and E-mail Address Type display the values that have been defined in the associated Banner validation forms. Changes made here will also update in Banner and vice versa.
© SunGard 2004-2010 Relationship Management – Prospects Page 12
Steps
Steps to follow to view and edit Biographical Information for a prospect:
1. Select the Biographical option in the left pane.
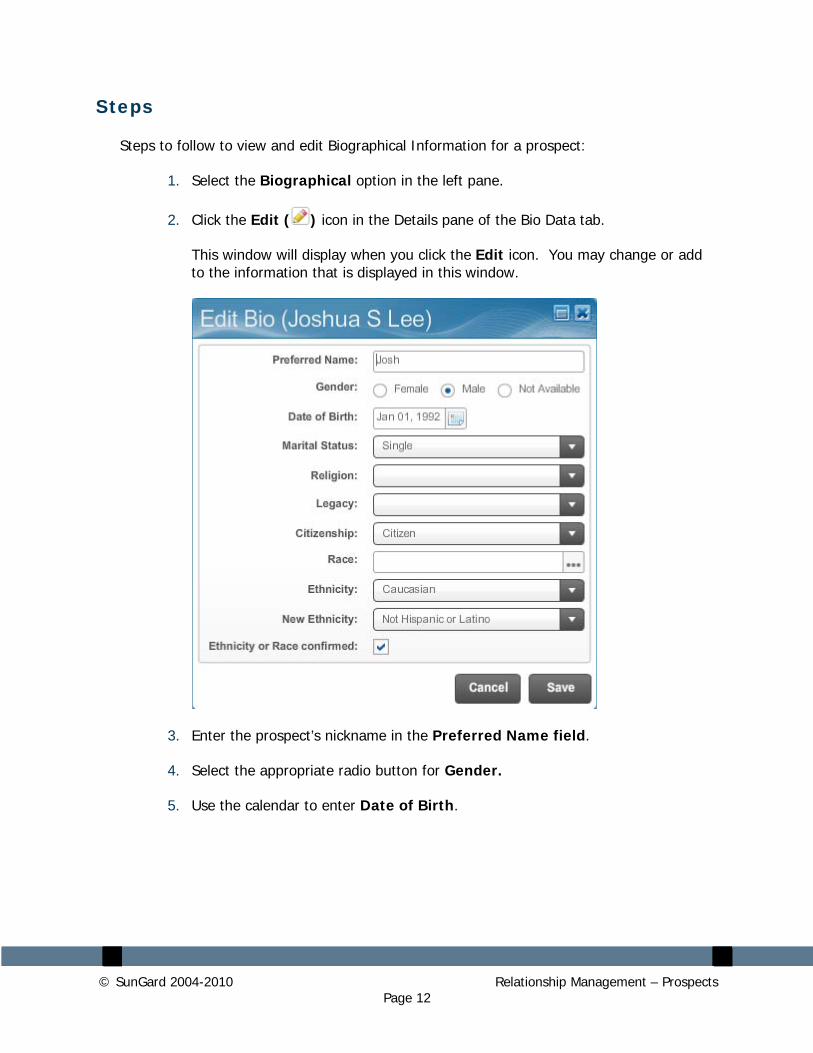
2. Click the Edit ( ) icon in the Details pane of the Bio Data tab.
This window will display when you click the Edit icon. You may change or add to the information that is displayed in this window.
3. Enter the prospect’s nickname in the Preferred Name field.
4. Select the appropriate radio button for Gender.
5. Use the calendar to enter Date of Birth.
© SunGard 2004-2010 Relationship Management – Prospects Page 13
6. Click the dropdown arrow to select from a list of options available to edit the remaining fields: (These options are coming from values created in Banner)
• Marital Status
• Religion
• Legacy
• Citizenship
• Ethnicity
• New Ethnicity
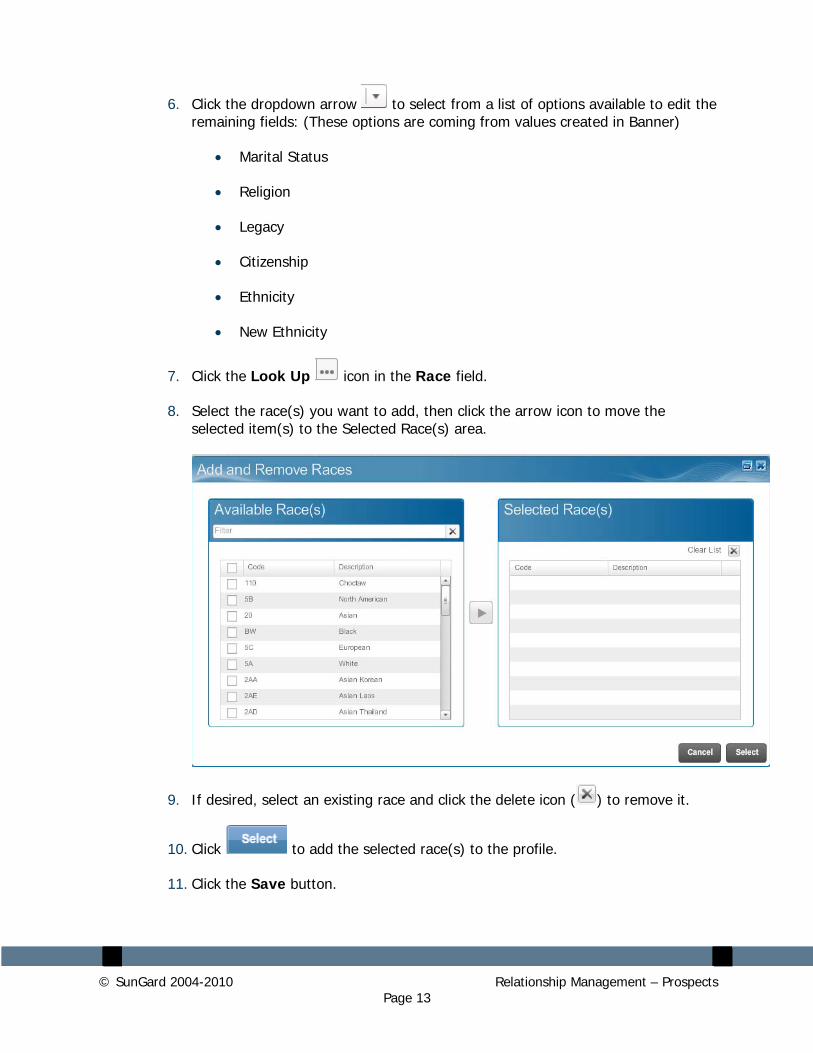
7. Click the Look Up icon in the Race field.
8. Select the race(s) you want to add, then click the arrow icon to move the selected item(s) to the Selected Race(s) area.
9. If desired, select an existing race and click the delete icon ( ) to remove it.
10. Click to add the selected race(s) to the profile.
11. Click the Save button.
© SunGard 2004-2010 Relationship Management – Prospects Page 14
Contact Information Tab
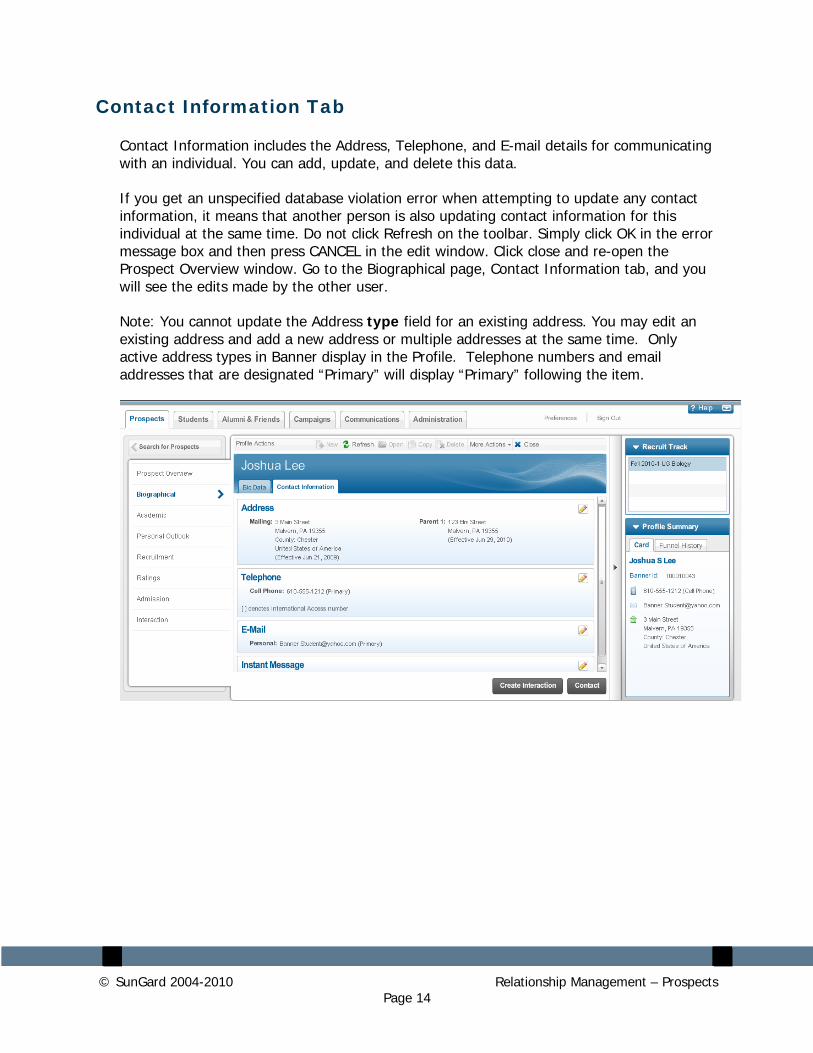
Contact Information includes the Address, Telephone, and E-mail details for communicating with an individual. You can add, update, and delete this data.
If you get an unspecified database violation error when attempting to update any contact information, it means that another person is also updating contact information for this individual at the same time. Do not click Refresh on the toolbar. Simply click OK in the error message box and then press CANCEL in the edit window. Click close and re-open the Prospect Overview window. Go to the Biographical page, Contact Information tab, and you will see the edits made by the other user.
Note: You cannot update the Address type field for an existing address. You may edit an existing address and add a new address or multiple addresses at the same time. Only active address types in Banner display in the Profile. Telephone numbers and email addresses that are designated “Primary” will display “Primary” following the item.
© SunGard 2004-2010 Relationship Management – Prospects Page 15
Add or Edit Contact Information
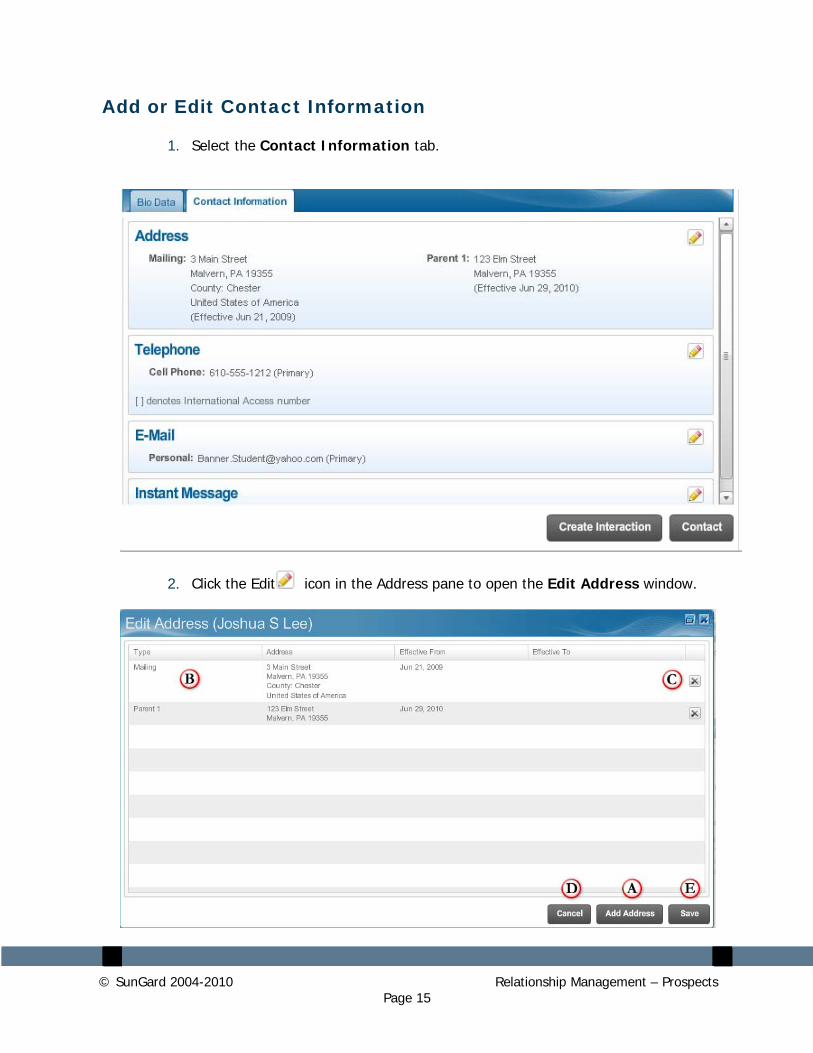
1. Select the Contact Information tab.
2. Click the Edit icon in the Address pane to open the Edit Address window.
© SunGard 2004-2010 Relationship Management – Prospects Page 16
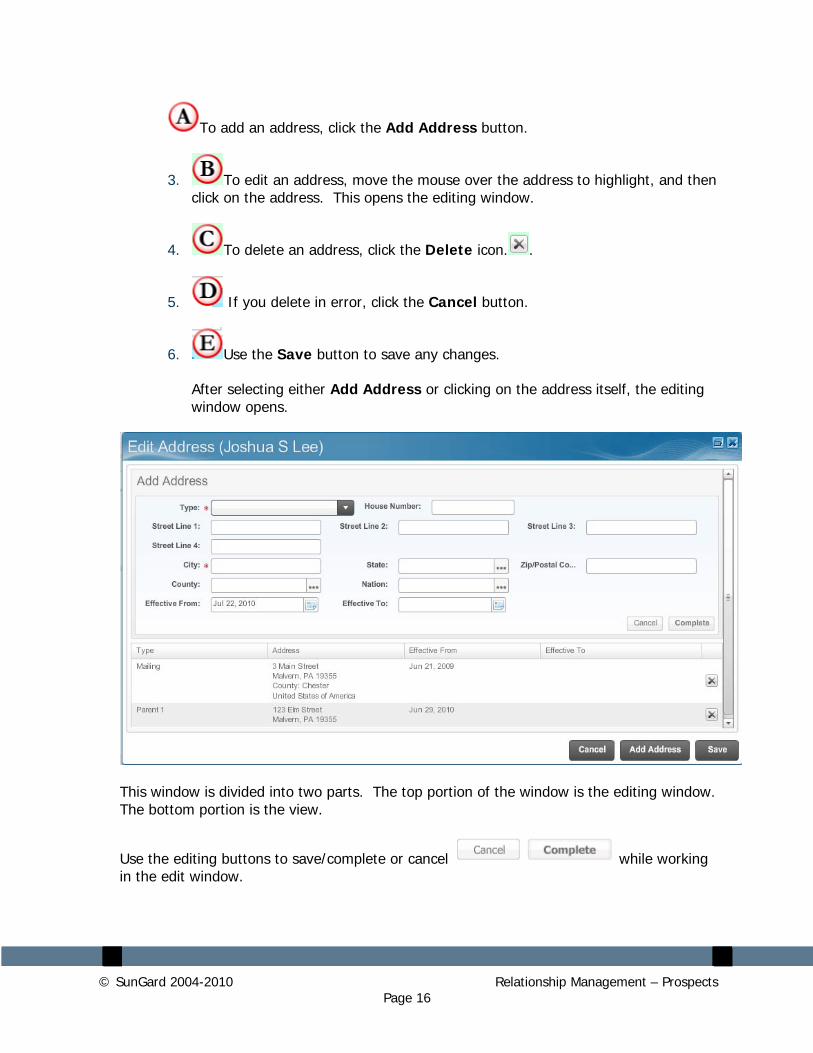
To add an address, click the Add Address button.
3. To edit an address, move the mouse over the address to highlight, and then click on the address. This opens the editing window.
4. To delete an address, click the Delete icon. .
5. If you delete in error, click the Cancel button.
6. Use the Save button to save any changes.
After selecting either Add Address or clicking on the address itself, the editing window opens.
This window is divided into two parts. The top portion of the window is the editing window. The bottom portion is the view.
Use the editing buttons to save/complete or cancel while working in the edit window.
© SunGard 2004-2010 Relationship Management – Prospects Page 17
Add an Address
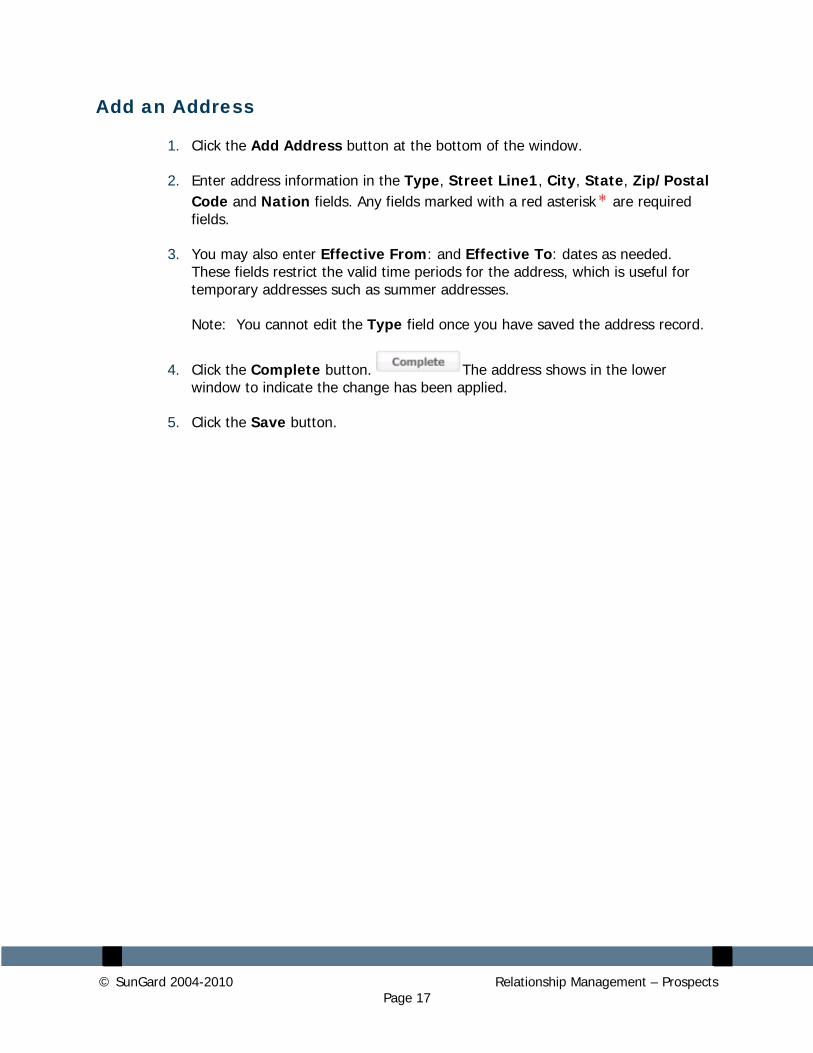
1. Click the Add Address button at the bottom of the window.
2. Enter address information in the Type, Street Line1, City, State, Zip/Postal Code and Nation fields. Any fields marked with a red asterisk are required fields.
3. You may also enter Effective From: and Effective To: dates as needed. These fields restrict the valid time periods for the address, which is useful for temporary addresses such as summer addresses.
Note: You cannot edit the Type field once you have saved the address record.
4. Click the Complete button. The address shows in the lower window to indicate the change has been applied.
5. Click the Save button.
© SunGard 2004-2010 Relationship Management – Prospects Page 18
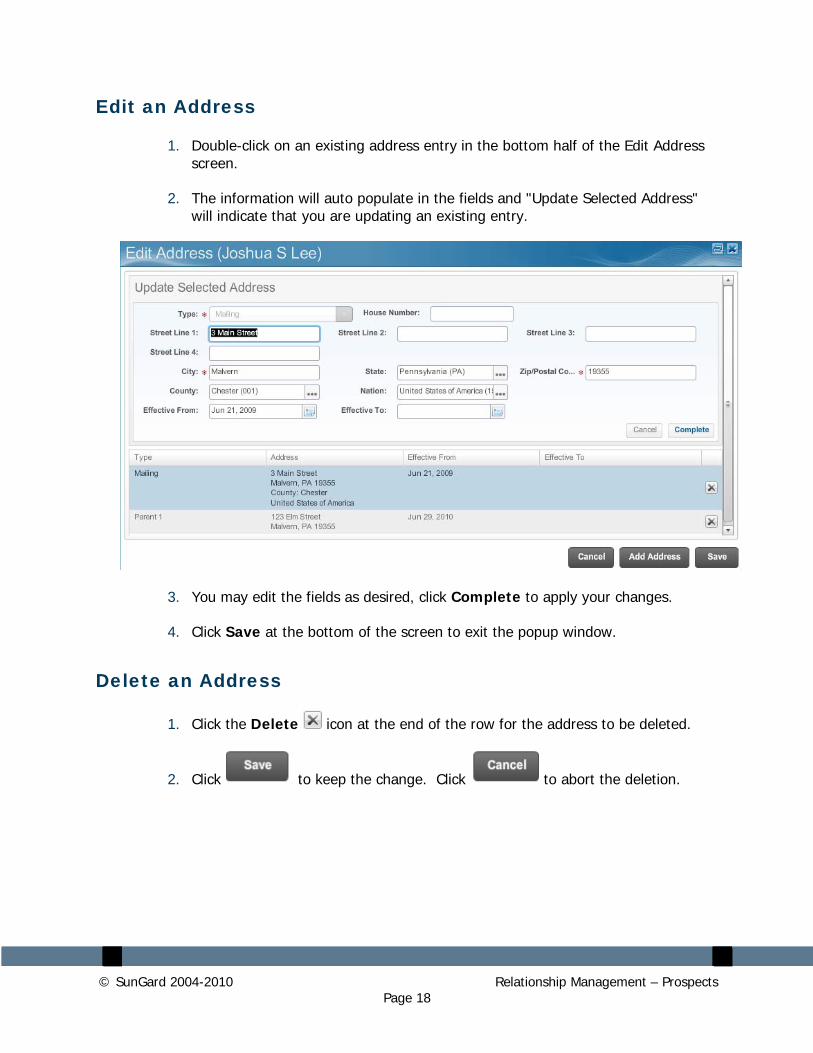
Edit an Address
1. Double-click on an existing address entry in the bottom half of the Edit Address screen.
2. The information will auto populate in the fields and "Update Selected Address" will indicate that you are updating an existing entry.
3. You may edit the fields as desired, click Complete to apply your changes.
4. Click Save at the bottom of the screen to exit the popup window.
Delete an Address
1. Click the Delete icon at the end of the row for the address to be deleted.
2. Click to keep the change. Click to abort the deletion.
© SunGard 2004-2010 Relationship Management – Prospects Page 19
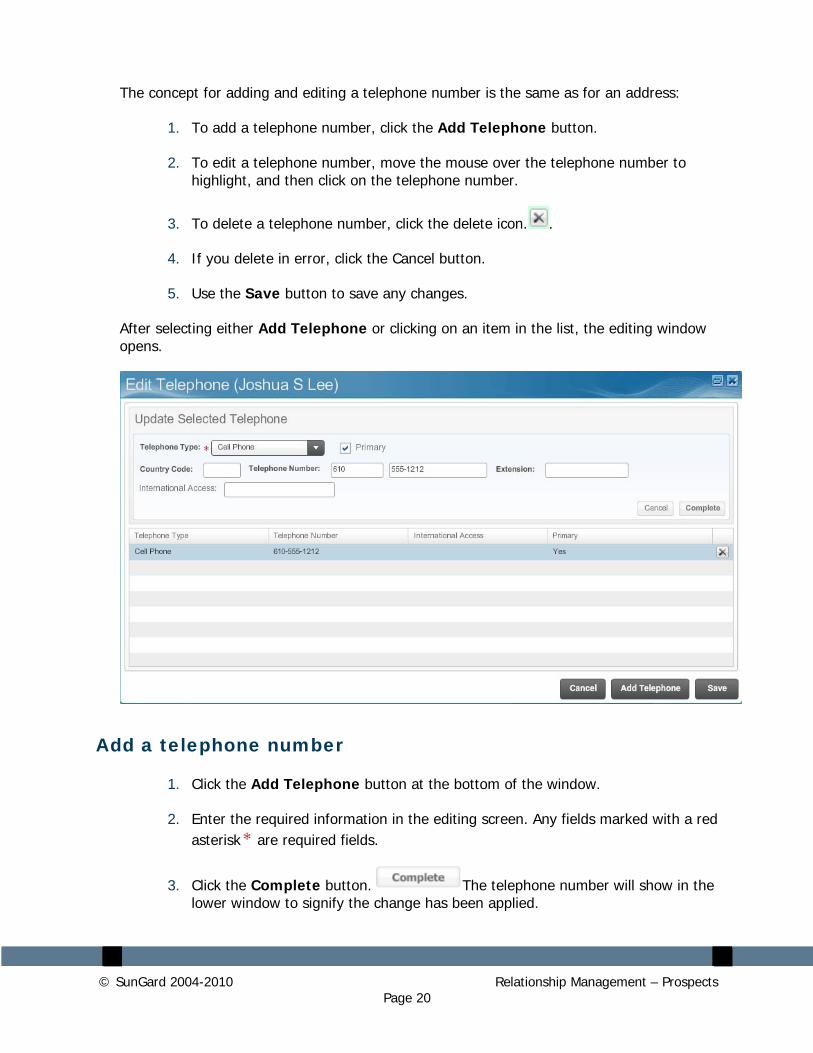
Telephone Numbers
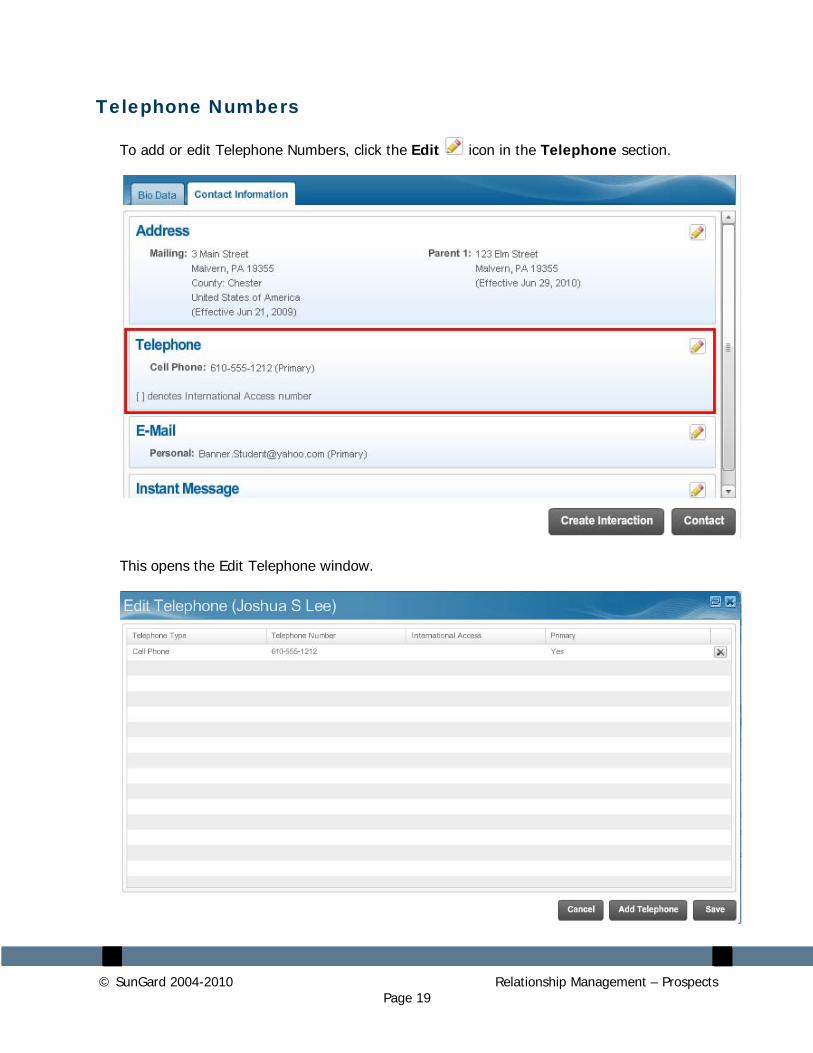
To add or edit Telephone Numbers, click the Edit icon in the Telephone section.
This opens the Edit Telephone window.
© SunGard 2004-2010 Relationship Management – Prospects Page 20
The concept for adding and editing a telephone number is the same as for an address:
1. To add a telephone number, click the Add Telephone button.
2. To edit a telephone number, move the mouse over the telephone number to highlight, and then click on the telephone number.
3. To delete a telephone number, click the delete icon. .
4. If you delete in error, click the Cancel button.
5. Use the Save button to save any changes.
After selecting either Add Telephone or clicking on an item in the list, the editing window opens.
Add a telephone number
1. Click the Add Telephone button at the bottom of the window.
2. Enter the required information in the editing screen. Any fields marked with a red asterisk are required fields.
3. Click the Complete button. The telephone number will show in the lower window to signify the change has been applied.
© SunGard 2004-2010 Relationship Management – Prospects Page 21
4. Click the Save button
Edit a phone number
1. Double-click on an existing telephone number entry in the bottom half of the Edit Telephone number screen.
2. The information will auto populate in the fields and Update Selected Telephone will indicate that you are updating an existing entry.
3. You may edit the fields as desired, click Complete to apply your changes.
4. Click Save at the bottom of the screen to exit the popup window.
Delete a Telephone Number
1. Click the Delete icon at the end of the row for the telephone number to be deleted.
2. Click to keep the change. Click to abort the deletion.
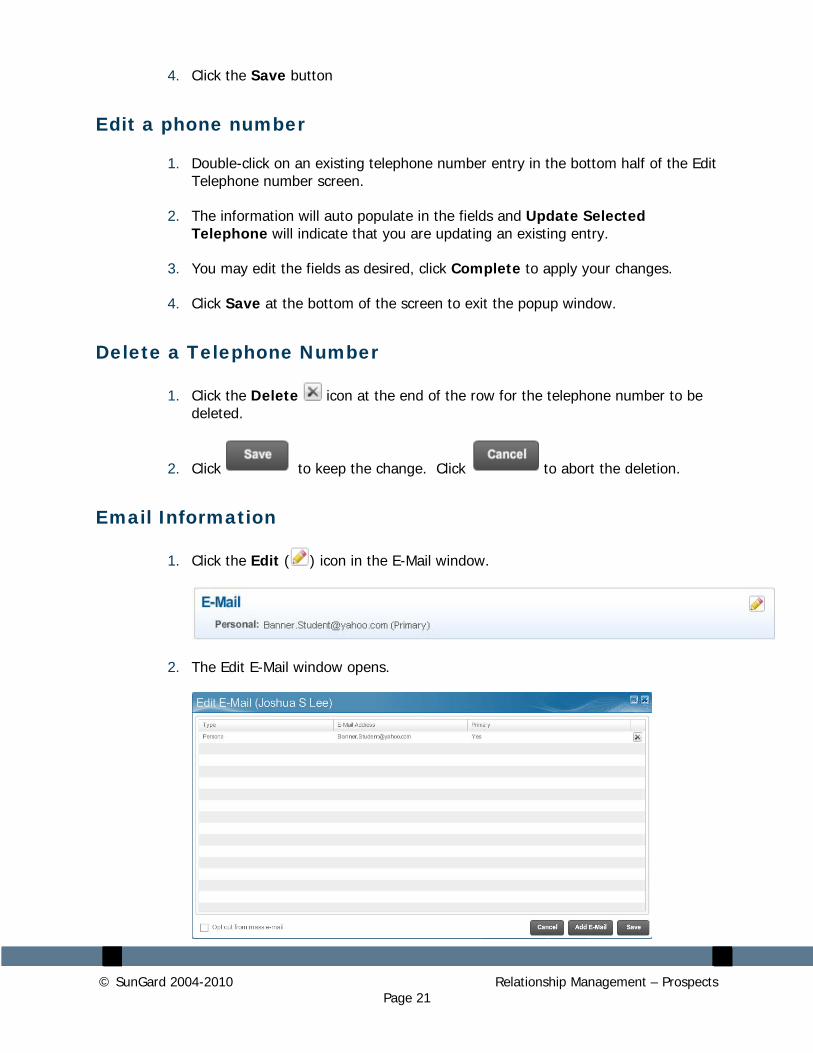
Email Information
1. Click the Edit ( ) icon in the E-Mail window.
2. The Edit E-Mail window opens.
© SunGard 2004-2010 Relationship Management – Prospects Page 22
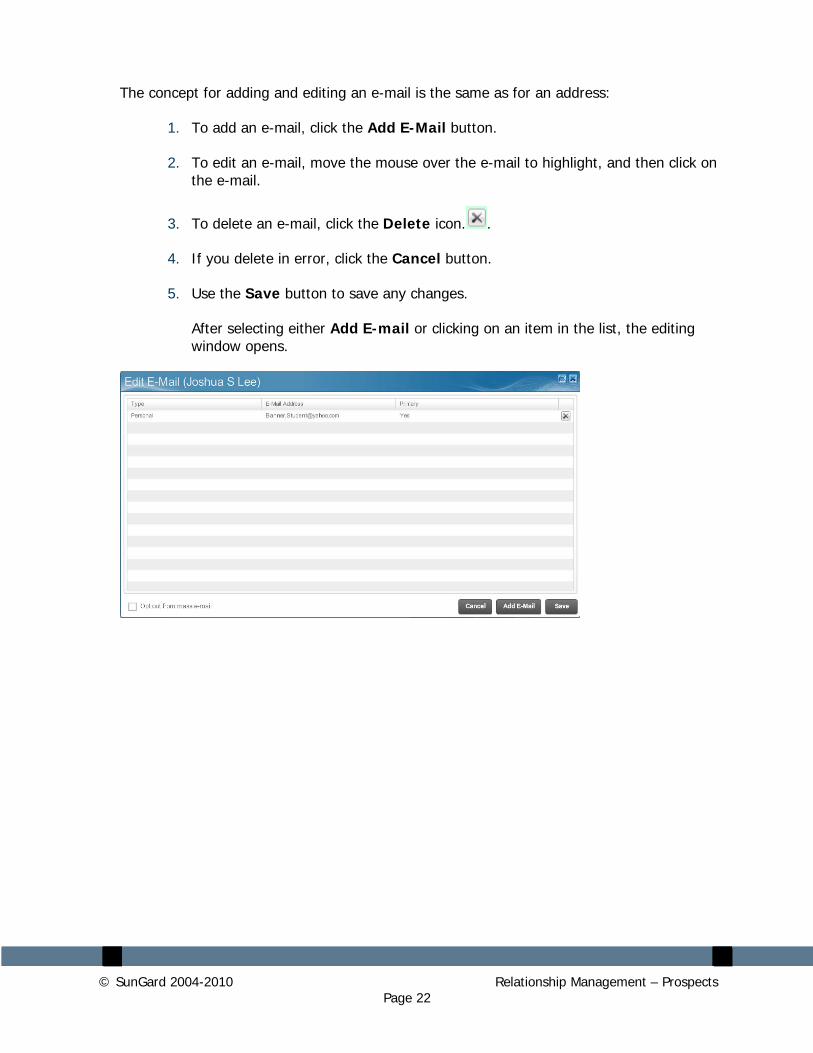
The concept for adding and editing an e-mail is the same as for an address:
1. To add an e-mail, click the Add E-Mail button.
2. To edit an e-mail, move the mouse over the e-mail to highlight, and then click on the e-mail.
3. To delete an e-mail, click the Delete icon. .
4. If you delete in error, click the Cancel button.
5. Use the Save button to save any changes.
After selecting either Add E-mail or clicking on an item in the list, the editing window opens.
© SunGard 2004-2010 Relationship Management – Prospects Page 23
Add an email
1. Click the Add E-Mail button at the bottom of the window.
2. Enter the required information in the editing screen. Any fields marked with a red asterisk are required fields.
3. Click the Complete button. The e-mail will show in the lower window to signify the change has been applied.
4. Click the Save button
Edit an E-mail
1. Double-click on an existing e-mail entry in the bottom half of the Edit E-mail screen.
2. The information will auto populate in the fields and Update Selected E-Mail will indicate that you are updating an existing entry.
3. You may edit the fields as desired, click Complete to apply your changes.
4. Click Save at the bottom of the screen to exit the popup window.
Delete an E-Mail
1. Click the Delete icon at the end of the row for the e-mail to be deleted.
2. Click to save the change. Click to cancel the deletion.
© SunGard 2004-2010 Relationship Management – Prospects Page 24
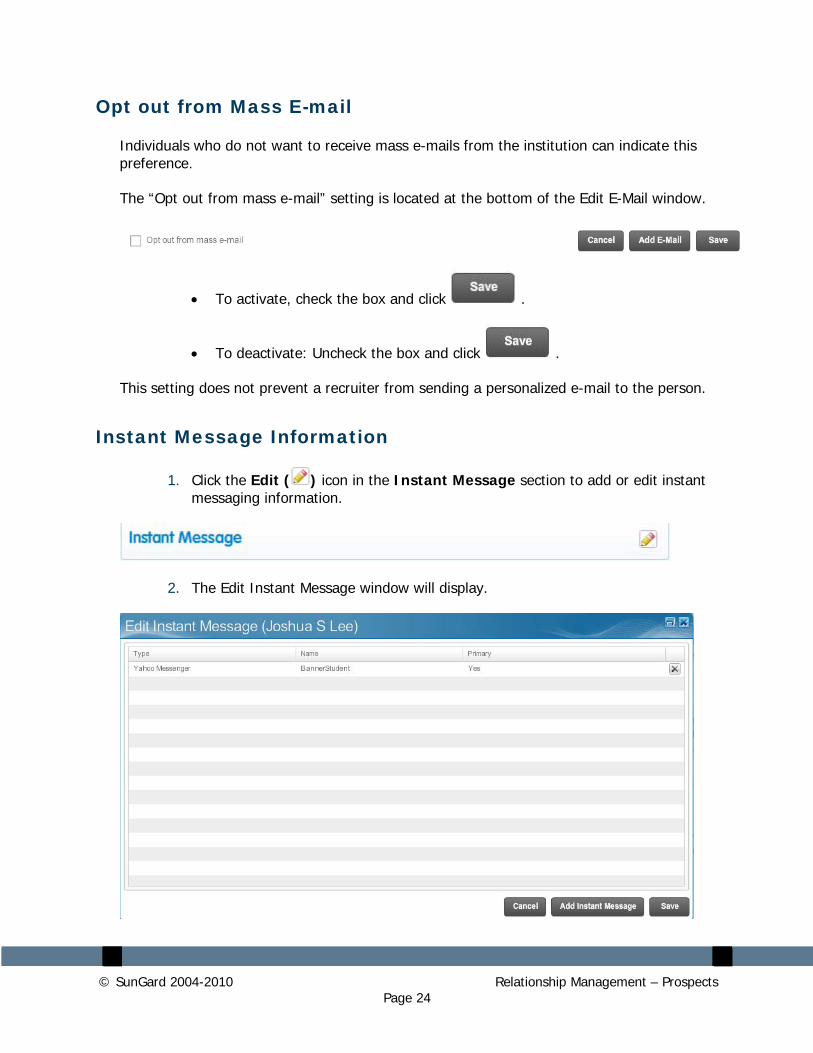
Opt out from Mass E-mail
Individuals who do not want to receive mass e-mails from the institution can indicate this preference.
The “Opt out from mass e-mail” setting is located at the bottom of the Edit E-Mail window.
• To activate, check the box and click .
• To deactivate: Uncheck the box and click .
This setting does not prevent a recruiter from sending a personalized e-mail to the person.
Instant Message Information
1. Click the Edit ( ) icon in the Instant Message section to add or edit instant messaging information.
2. The Edit Instant Message window will display.
© SunGard 2004-2010 Relationship Management – Prospects Page 25
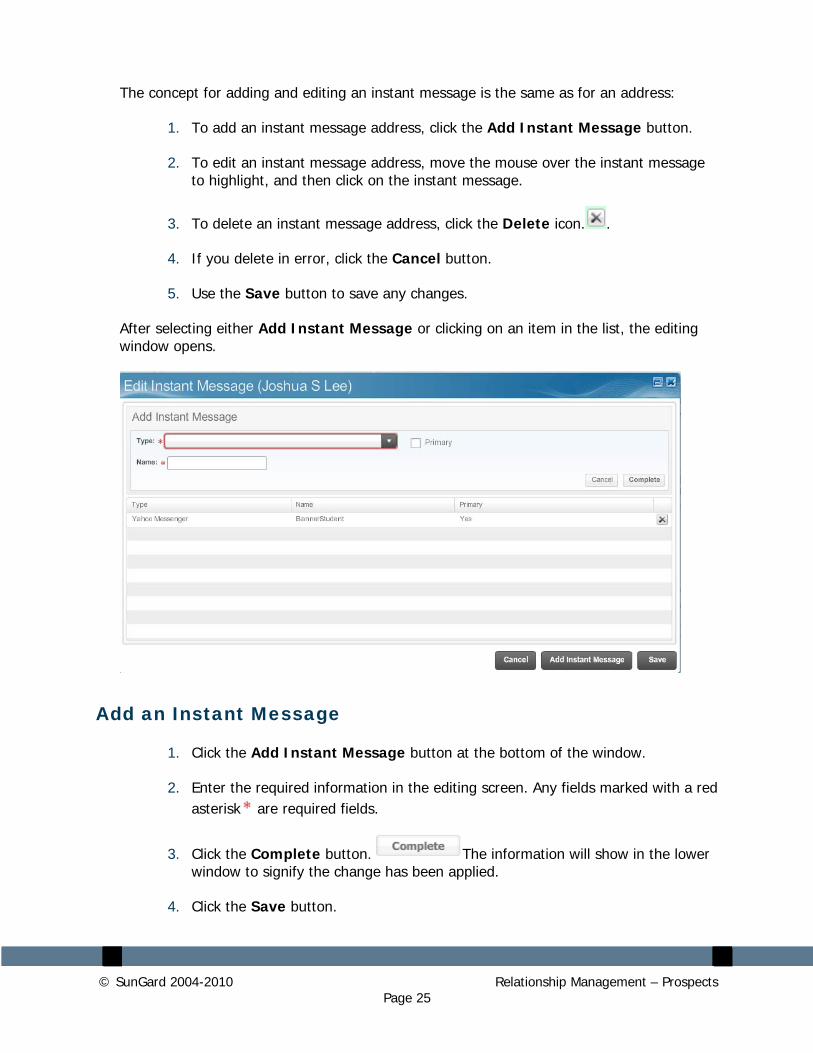
The concept for adding and editing an instant message is the same as for an address:
1. To add an instant message address, click the Add Instant Message button.
2. To edit an instant message address, move the mouse over the instant message to highlight, and then click on the instant message.
3. To delete an instant message address, click the Delete icon. .
4. If you delete in error, click the Cancel button.
5. Use the Save button to save any changes.
After selecting either Add Instant Message or clicking on an item in the list, the editing window opens.
Add an Instant Message
1. Click the Add Instant Message button at the bottom of the window.
2. Enter the required information in the editing screen. Any fields marked with a red asterisk are required fields.
3. Click the Complete button. The information will show in the lower window to signify the change has been applied.
4. Click the Save button.
© SunGard 2004-2010 Relationship Management – Prospects Page 26
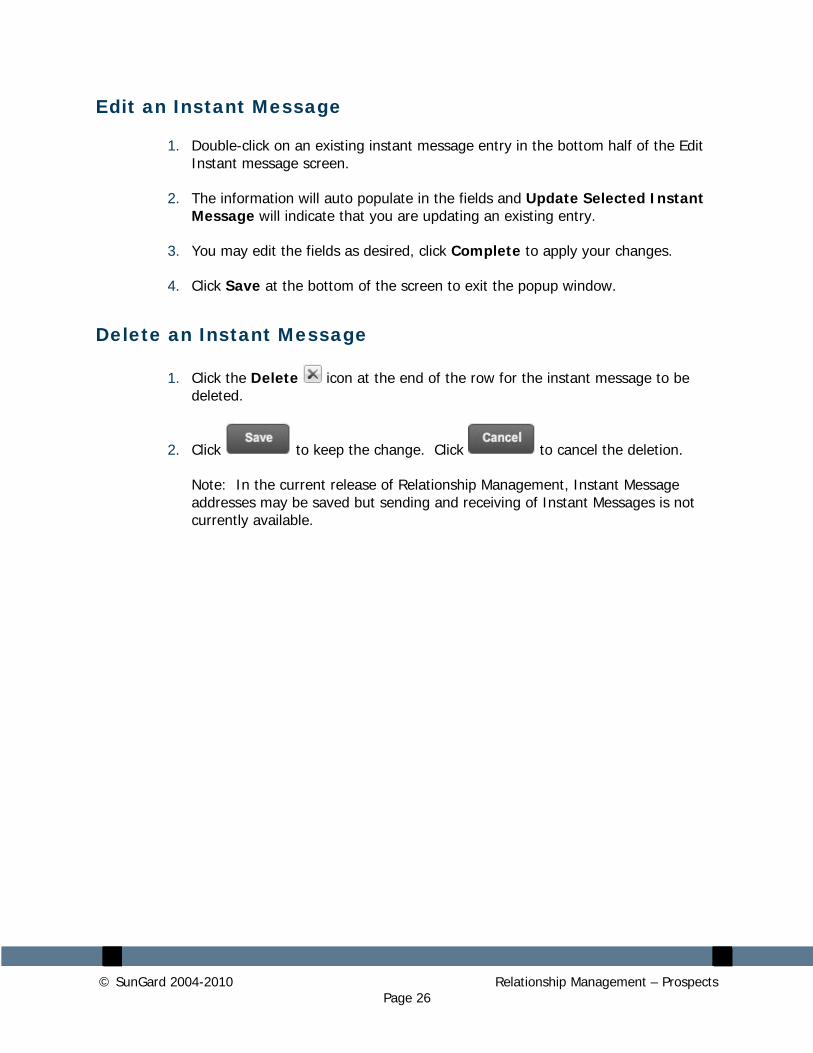
Edit an Instant Message
1. Double-click on an existing instant message entry in the bottom half of the Edit Instant message screen.
2. The information will auto populate in the fields and Update Selected Instant Message will indicate that you are updating an existing entry.
3. You may edit the fields as desired, click Complete to apply your changes.
4. Click Save at the bottom of the screen to exit the popup window.
Delete an Instant Message
1. Click the Delete icon at the end of the row for the instant message to be deleted.
2. Click to keep the change. Click to cancel the deletion.
Note: In the current release of Relationship Management, Instant Message addresses may be saved but sending and receiving of Instant Messages is not currently available.
© SunGard 2004-2010 Relationship Management – Prospects Page 27
Academic Information
Introduction
Prospect Academic Information includes Credentials and Curricula information for an individual. This information is view-only in Relationship Management; any changes or updates must be entered directly into Banner.
Credentials are the prospect’s qualifications related to test scores, academic credentials from their high school, and any prior college experience. This view helps you build a picture of the individual’s academic performance and strengths.
Academic curricula include the courses of study in which an individual has expressed interest, the admit term, and degree sought. If the individual has applied for more than one course of study, a priority number will indicate the first and second choice.
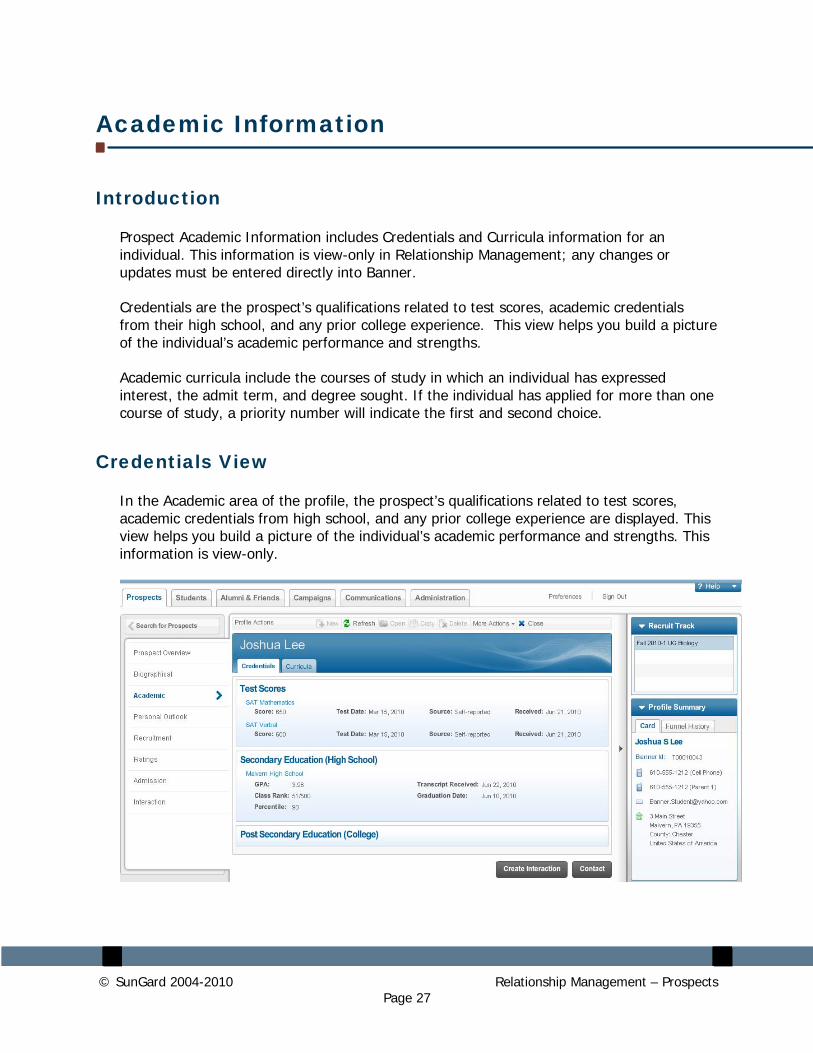
Credentials View
In the Academic area of the profile, the prospect’s qualifications related to test scores, academic credentials from high school, and any prior college experience are displayed. This view helps you build a picture of the individual’s academic performance and strengths. This information is view-only.
© SunGard 2004-2010 Relationship Management – Prospects Page 28
The Academic Credentials page contains the following fields:
• Test Scores - Information displayed in Test Scores includes test name, date received, score, and test date. The specific test scores that are displayed are controlled by institution specific configuration in the Banner Integration Configuration Settings form (GORICCR).
• Secondary Education (High School) - View High School information.
• Post Secondary Education (College) - View prior College information.
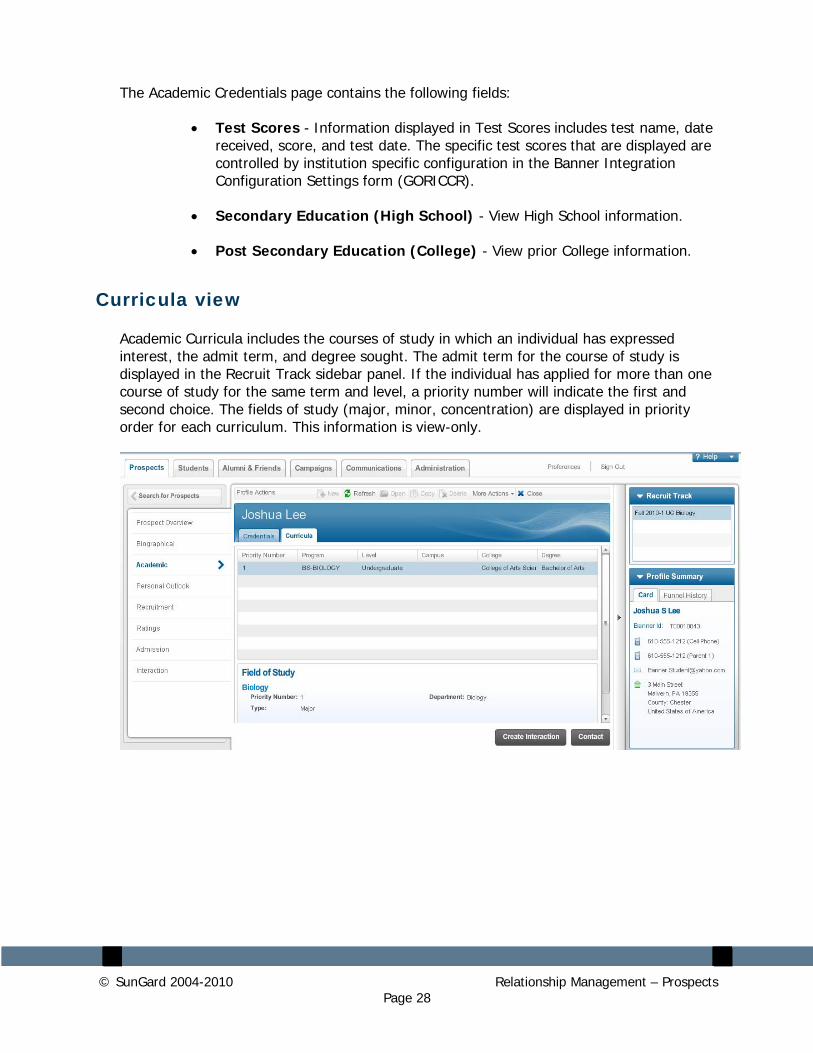
Curricula view
Academic Curricula includes the courses of study in which an individual has expressed interest, the admit term, and degree sought. The admit term for the course of study is displayed in the Recruit Track sidebar panel. If the individual has applied for more than one course of study for the same term and level, a priority number will indicate the first and second choice. The fields of study (major, minor, concentration) are displayed in priority order for each curriculum. This information is view-only.
© SunGard 2004-2010 Relationship Management – Prospects Page 29
The Academic Curricula page contains the following view-only fields and buttons.
• Priority Number - Displays the priority number for this curriculum. This number is required by Banner.
• Program - Displays the program the individual has chosen.
• Level - Displays the level of study for this application or recruit record.
• Campus - Displays the campus to which this curriculum belongs.
• College - Displays the college to which this curriculum belongs.
• Degree - Displays the degree the student is seeking.
• Field of Study - Displays the field of study (major, minor, or concentration) the individual has chosen, including the priority number, type, and department.
© SunGard 2004-2010 Relationship Management – Prospects Page 30
Personal Outlook Information
Introduction
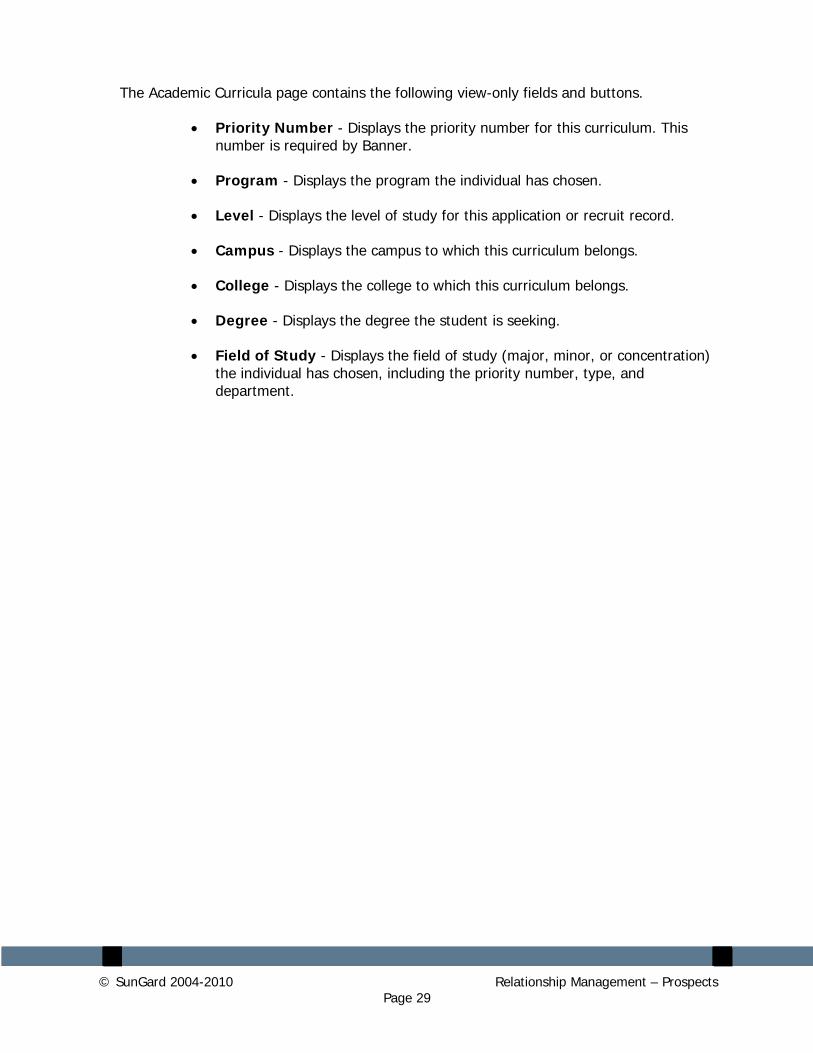
The Personal Outlook information in the Prospect Overview indicates the extracurricular interests, attributes, and sources that are known about the prospect. This information helps institutions to build relationships with prospects and target them with relevant recruiting campaign activities. A recruiter can view, add, or delete interests, attributes and sources.
Additions of new Attribute information will populate the most current and appropriate Banner table. For example, if an attribute is added for an applicant, the Admissions Attribute table will be updated (and not the Recruiting Attribute table, which would be populated for a prospect).
The Source information is the manner in which the prospect became interested in attending the institution.
© SunGard 2004-2010 Relationship Management – Prospects Page 31
Interests
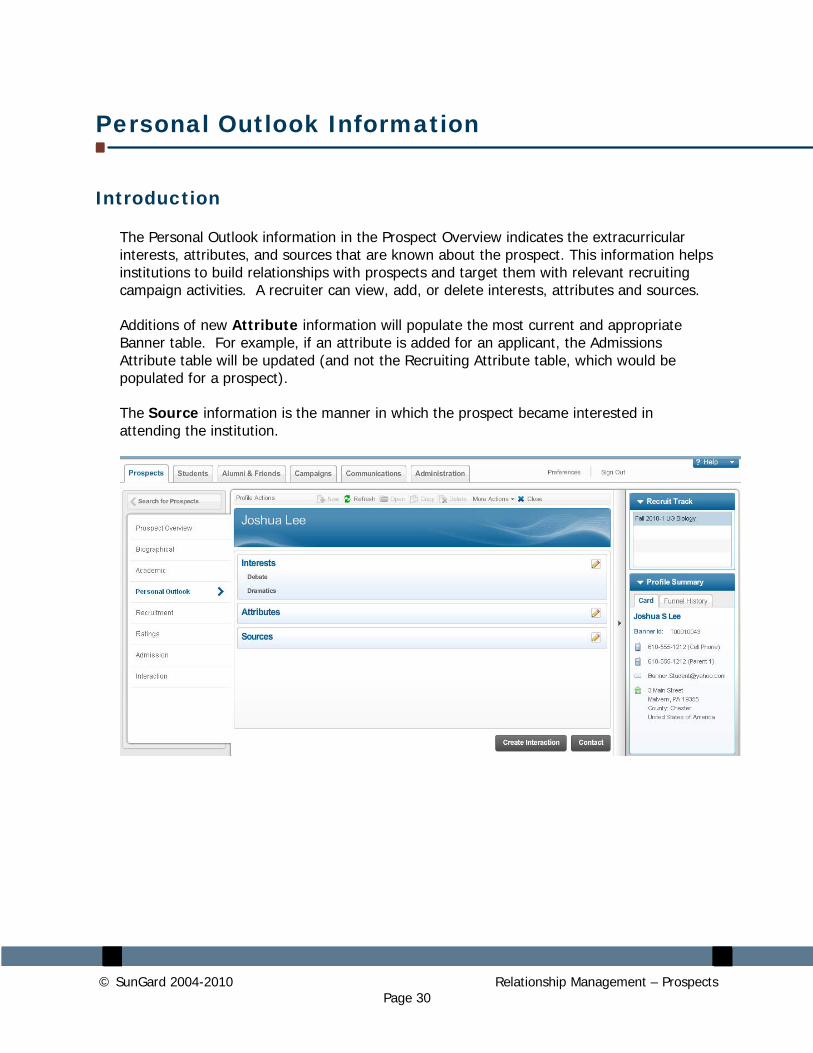
Profile interests are areas in which a person has indicated involvement or curiosity, such as a club, sport, skill, hobby, pastime, or extracurricular activity. Interests can be added to the profile by the recruiter. This information is used to personalize future interactions.
To add or edit a profile interest:
1. In the Interests section of the page, click Edit to open the Edit window.
2. Select the interest you want to add, then click the arrow icon to move the selected item(s) to the Selected Interest(s) area.
3. If desired, select an existing interest and click the delete icon ( ) to remove it.
4. Click to add the selected interests to the profile.

© SunGard 2004-2010 Relationship Management – Prospects Page 32
Attributes
Attributes are characteristics or qualities that your institution has selected to help you search for or identify one or more individuals. Attributes can be added and deleted.
To add or edit an Attribute:
• In the Attributes section of the page, click Edit to open the Edit window.
• Follow the same steps as in Interests.
© SunGard 2004-2010 Relationship Management – Prospects Page 33
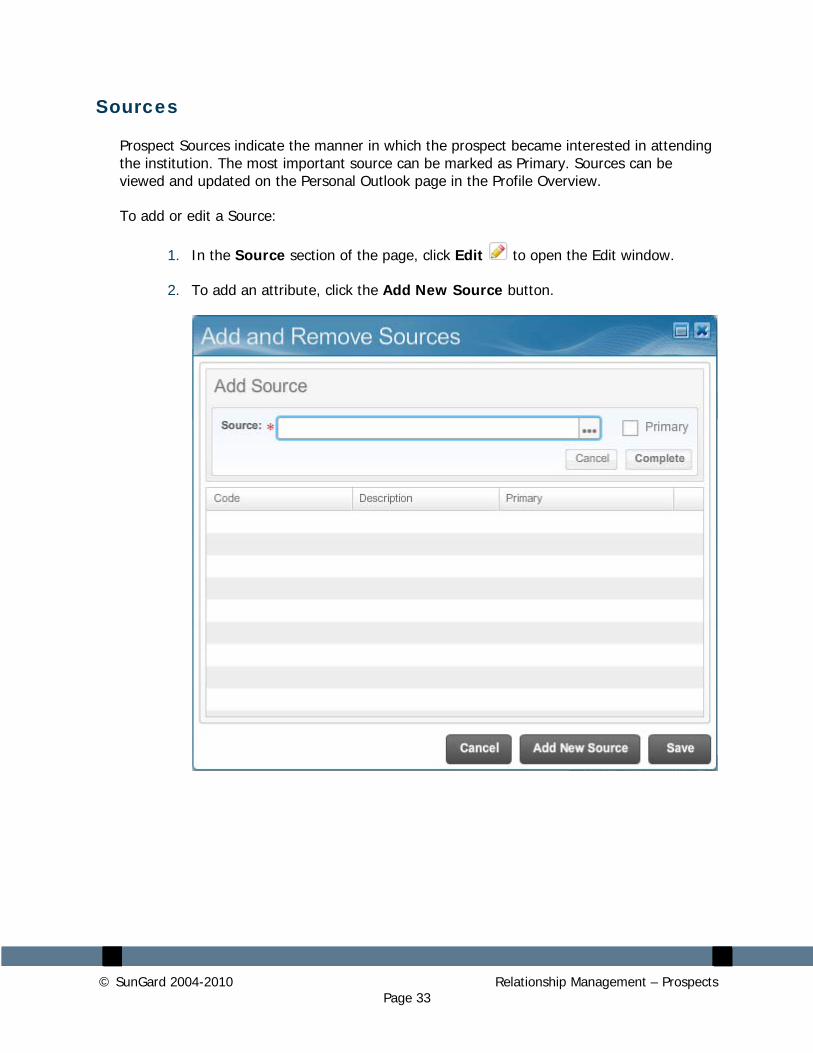
Sources
Prospect Sources indicate the manner in which the prospect became interested in attending the institution. The most important source can be marked as Primary. Sources can be viewed and updated on the Personal Outlook page in the Profile Overview.
To add or edit a Source:
1. In the Source section of the page, click Edit to open the Edit window.
2. To add an attribute, click the Add New Source button.
© SunGard 2004-2010 Relationship Management – Prospects Page 34
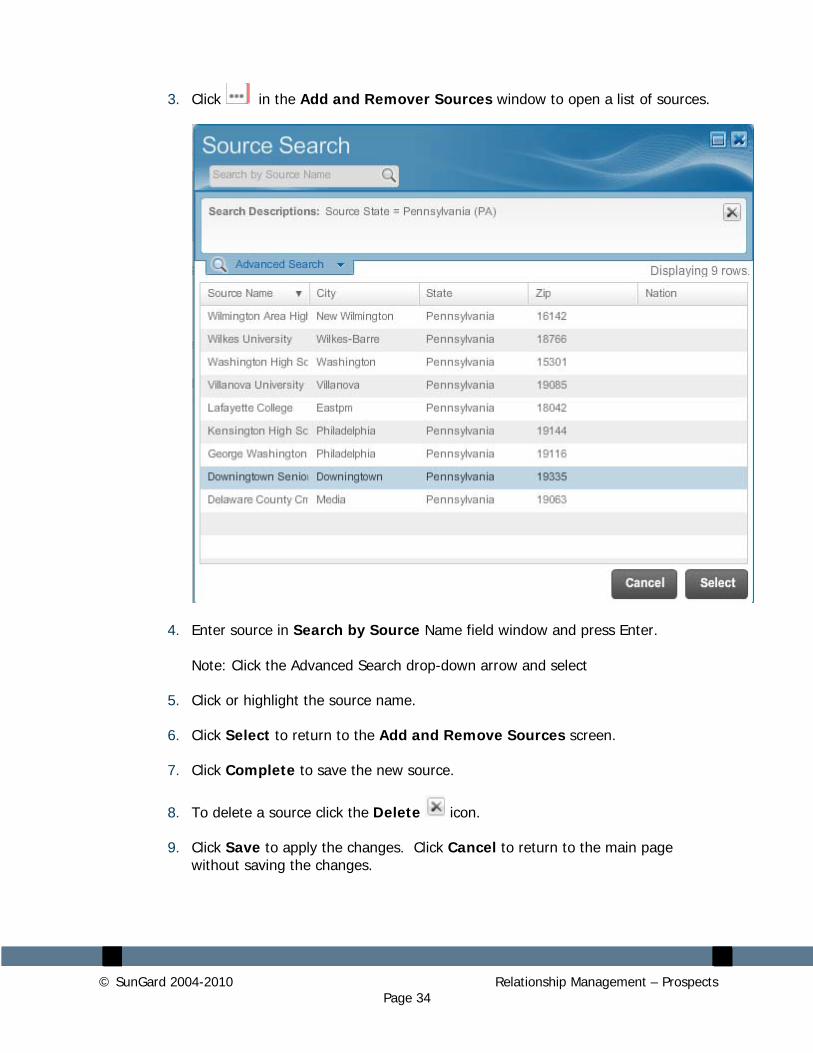
3. Click in the Add and Remover Sources window to open a list of sources.
4. Enter source in Search by Source Name field window and press Enter. Note: Click the Advanced Search drop-down arrow and select
5. Click or highlight the source name.
6. Click Select to return to the Add and Remove Sources screen.
7. Click Complete to save the new source.
8. To delete a source click the Delete icon.
9. Click Save to apply the changes. Click Cancel to return to the main page without saving the changes.
© SunGard 2004-2010 Relationship Management – Prospects Page 35
Recruitment Information
Introduction
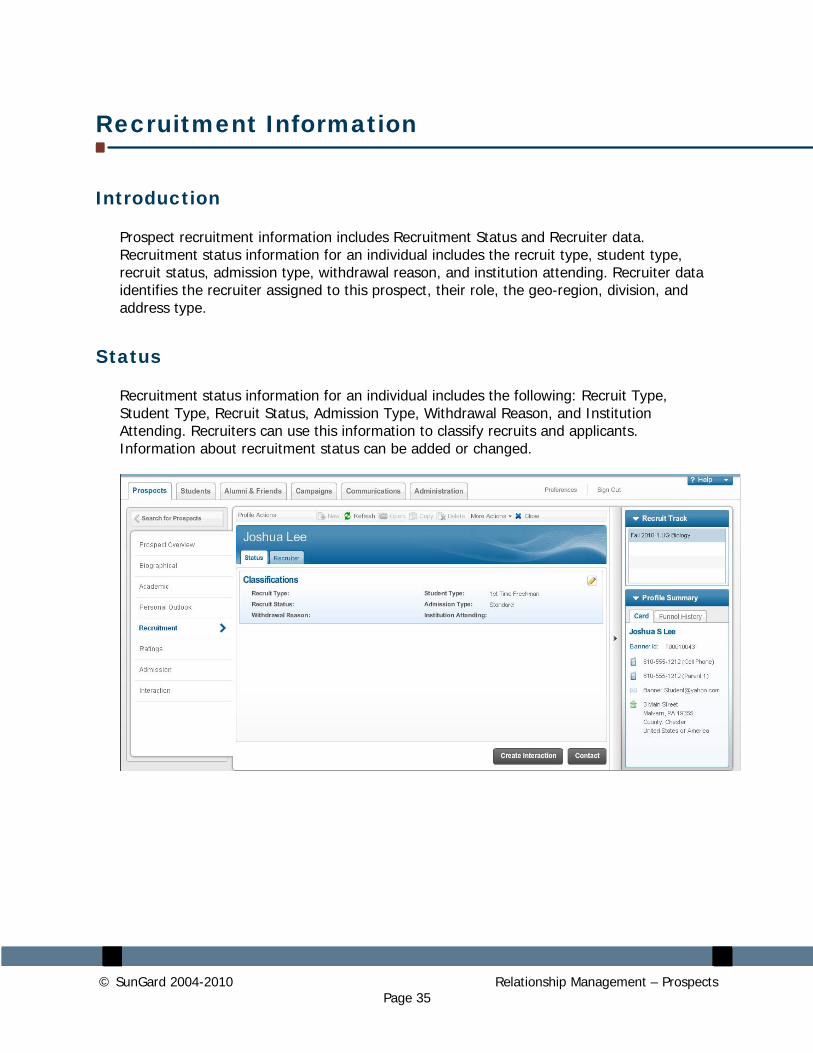
Prospect recruitment information includes Recruitment Status and Recruiter data. Recruitment status information for an individual includes the recruit type, student type, recruit status, admission type, withdrawal reason, and institution attending. Recruiter data identifies the recruiter assigned to this prospect, their role, the geo-region, division, and address type.
Status
Recruitment status information for an individual includes the following: Recruit Type, Student Type, Recruit Status, Admission Type, Withdrawal Reason, and Institution Attending. Recruiters can use this information to classify recruits and applicants. Information about recruitment status can be added or changed.
© SunGard 2004-2010 Relationship Management – Prospects Page 36
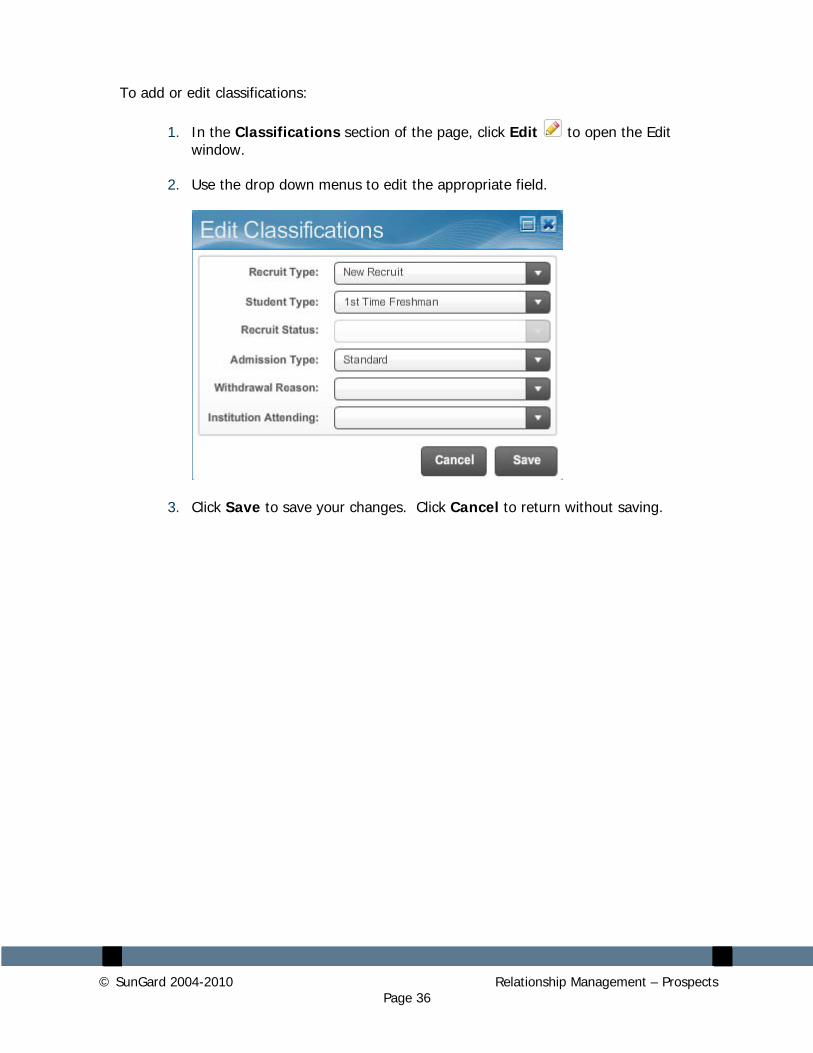
To add or edit classifications:
1. In the Classifications section of the page, click Edit to open the Edit window.
2. Use the drop down menus to edit the appropriate field.
3. Click Save to save your changes. Click Cancel to return without saving.
© SunGard 2004-2010 Relationship Management – Prospects Page 37
Recruiter
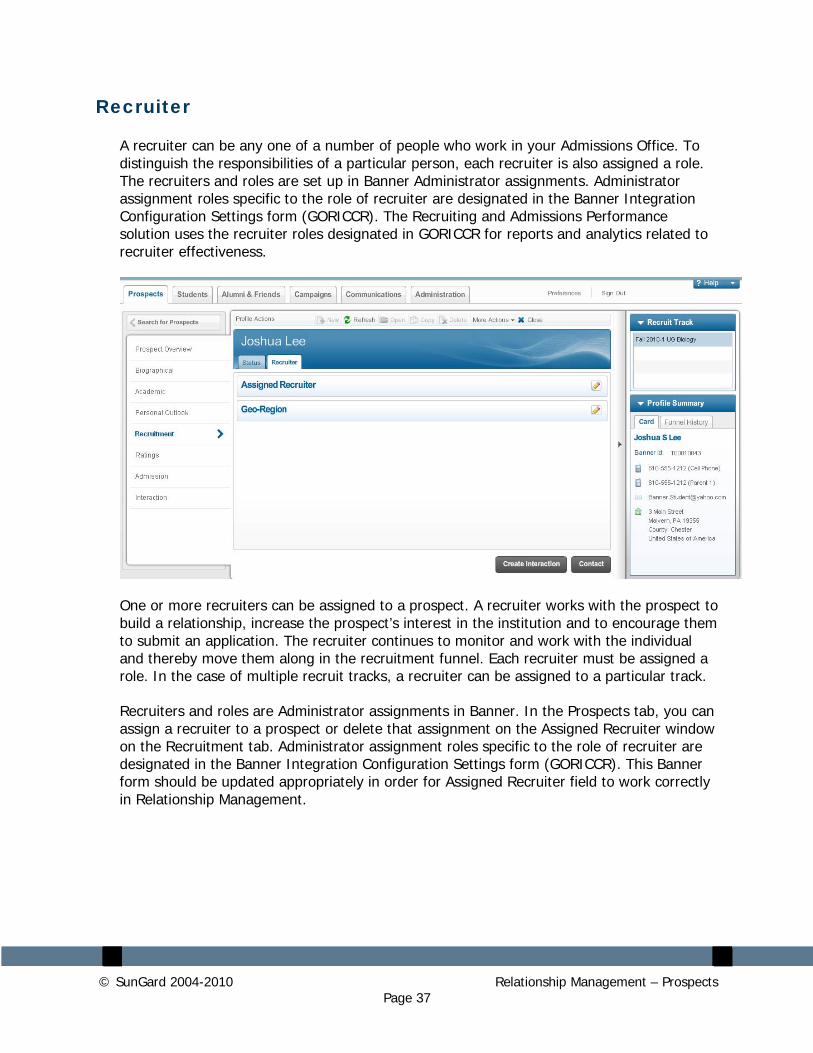
A recruiter can be any one of a number of people who work in your Admissions Office. To distinguish the responsibilities of a particular person, each recruiter is also assigned a role. The recruiters and roles are set up in Banner Administrator assignments. Administrator assignment roles specific to the role of recruiter are designated in the Banner Integration Configuration Settings form (GORICCR). The Recruiting and Admissions Performance solution uses the recruiter roles designated in GORICCR for reports and analytics related to recruiter effectiveness.
One or more recruiters can be assigned to a prospect. A recruiter works with the prospect to build a relationship, increase the prospect’s interest in the institution and to encourage them to submit an application. The recruiter continues to monitor and work with the individual and thereby move them along in the recruitment funnel. Each recruiter must be assigned a role. In the case of multiple recruit tracks, a recruiter can be assigned to a particular track.
Recruiters and roles are Administrator assignments in Banner. In the Prospects tab, you can assign a recruiter to a prospect or delete that assignment on the Assigned Recruiter window on the Recruitment tab. Administrator assignment roles specific to the role of recruiter are designated in the Banner Integration Configuration Settings form (GORICCR). This Banner form should be updated appropriately in order for Assigned Recruiter field to work correctly in Relationship Management.
© SunGard 2004-2010 Relationship Management – Prospects Page 38
Steps
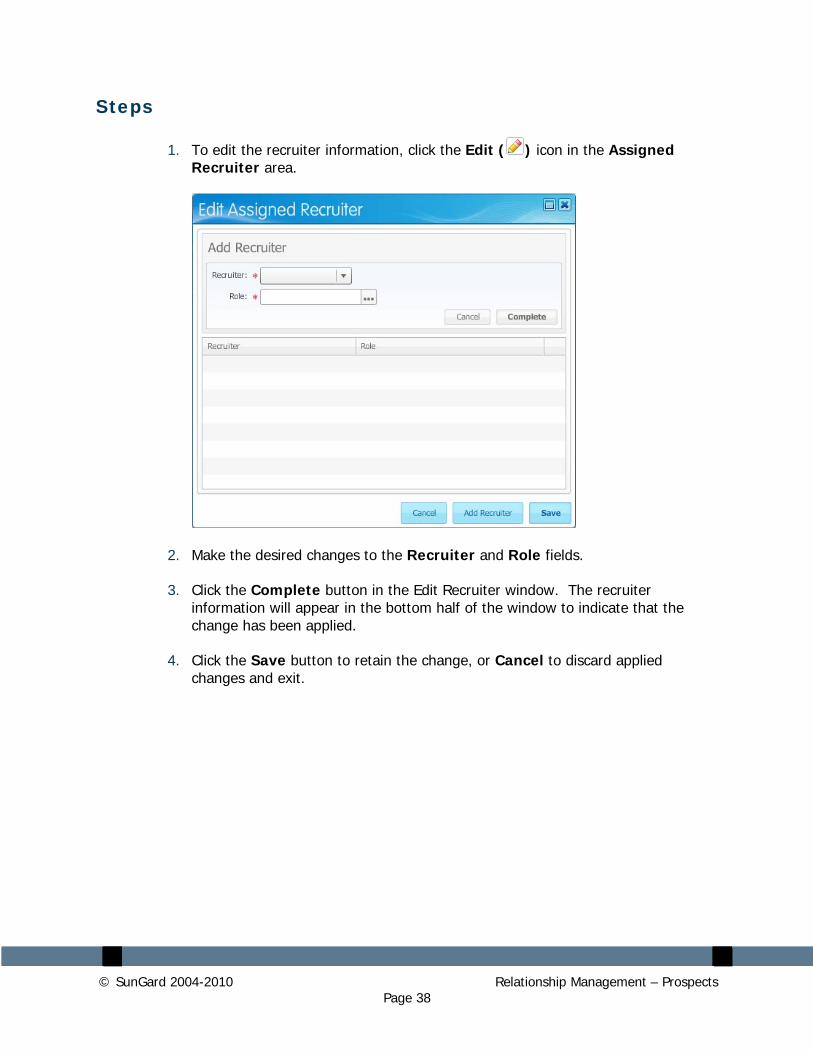
1. To edit the recruiter information, click the Edit ( ) icon in the Assigned Recruiter area.
2. Make the desired changes to the Recruiter and Role fields.
3. Click the Complete button in the Edit Recruiter window. The recruiter information will appear in the bottom half of the window to indicate that the change has been applied.
4. Click the Save button to retain the change, or Cancel to discard applied changes and exit.
© SunGard 2004-2010 Relationship Management – Prospects Page 39
Geo-Region
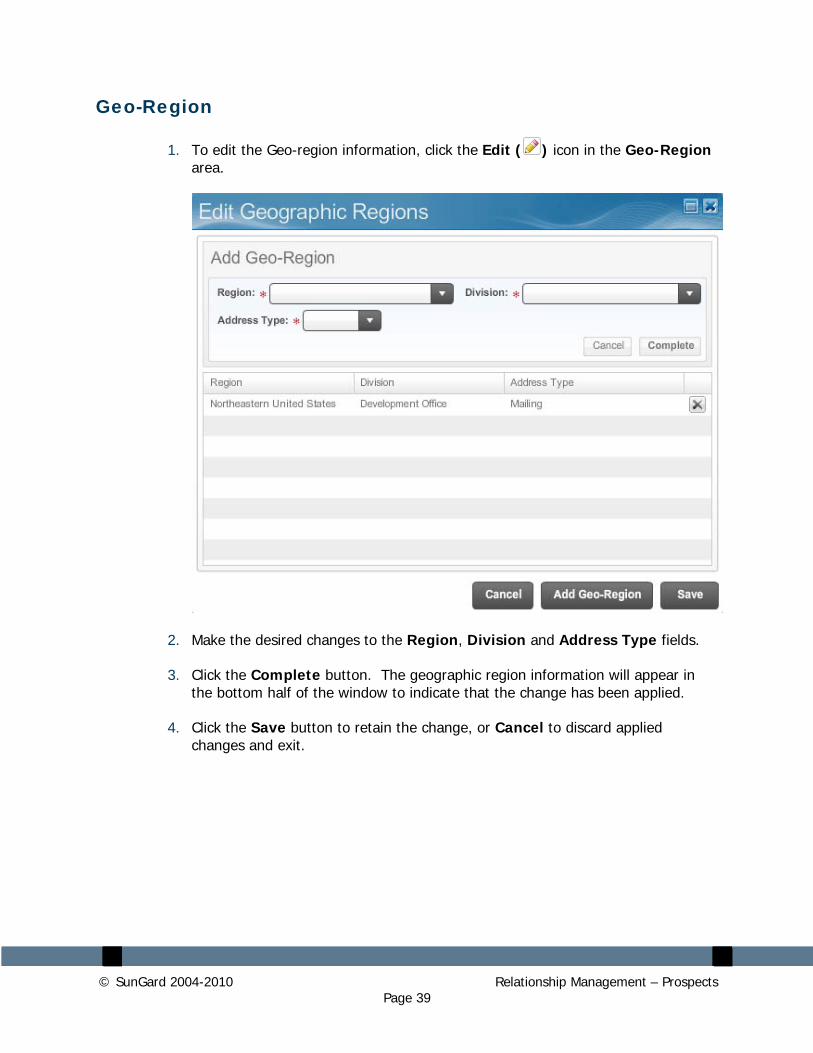
1. To edit the Geo-region information, click the Edit ( ) icon in the Geo-Region area.
2. Make the desired changes to the Region, Division and Address Type fields.
3. Click the Complete button. The geographic region information will appear in the bottom half of the window to indicate that the change has been applied.
4. Click the Save button to retain the change, or Cancel to discard applied changes and exit.
© SunGard 2004-2010 Relationship Management – Prospects Page 40
Ratings Information
Introduction
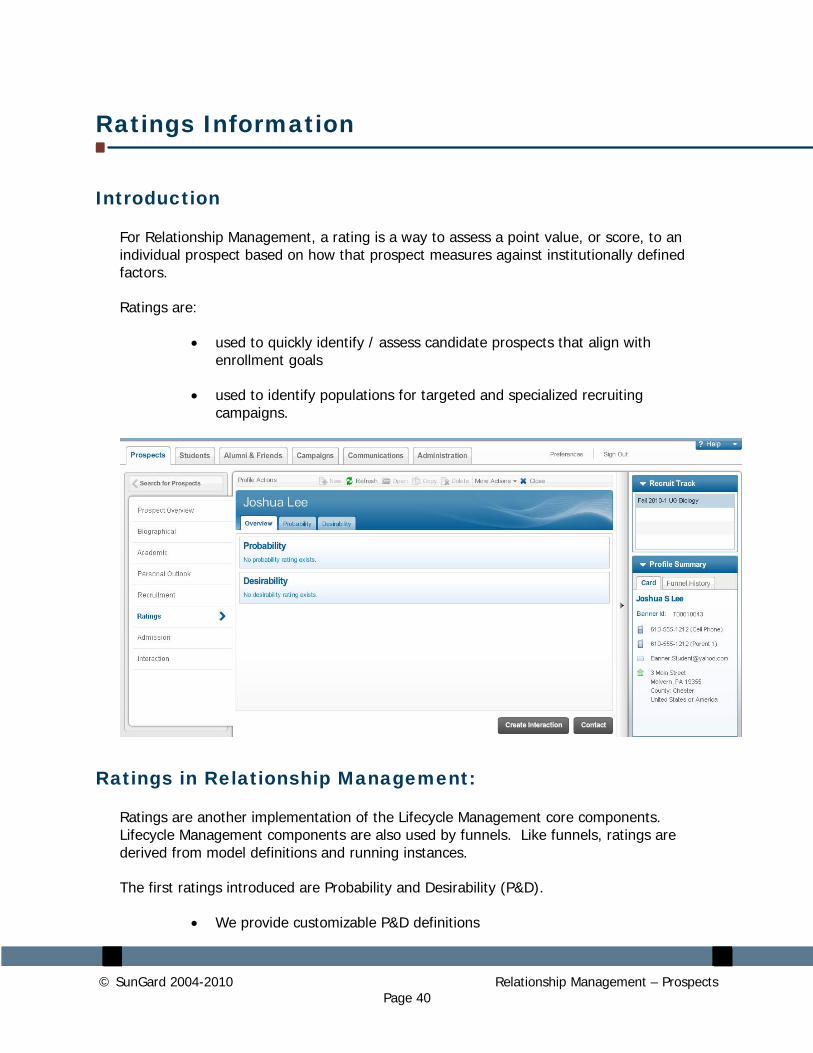
For Relationship Management, a rating is a way to assess a point value, or score, to an individual prospect based on how that prospect measures against institutionally defined factors.
Ratings are:
• used to quickly identify / assess candidate prospects that align with enrollment goals
• used to identify populations for targeted and specialized recruiting campaigns.
Ratings in Relationship Management:
Ratings are another implementation of the Lifecycle Management core components. Lifecycle Management components are also used by funnels. Like funnels, ratings are derived from model definitions and running instances.
The first ratings introduced are Probability and Desirability (P&D).
• We provide customizable P&D definitions
© SunGard 2004-2010 Relationship Management – Prospects Page 41
• We provide current scoring information for prospects
• We provide graphical representation of the prospect’s score and its relationship to the pool of prospects within the same term and level.
Implementation of Ratings is optional.
What is Probability?
Probability represents the likelihood that a prospect will enroll in the institution.
What is Desirability?
Desirability represents how closely a prospect matches the enrollment goals and objectives of the institution.
© SunGard 2004-2010 Relationship Management – Prospects Page 42
Admission Information
Introduction
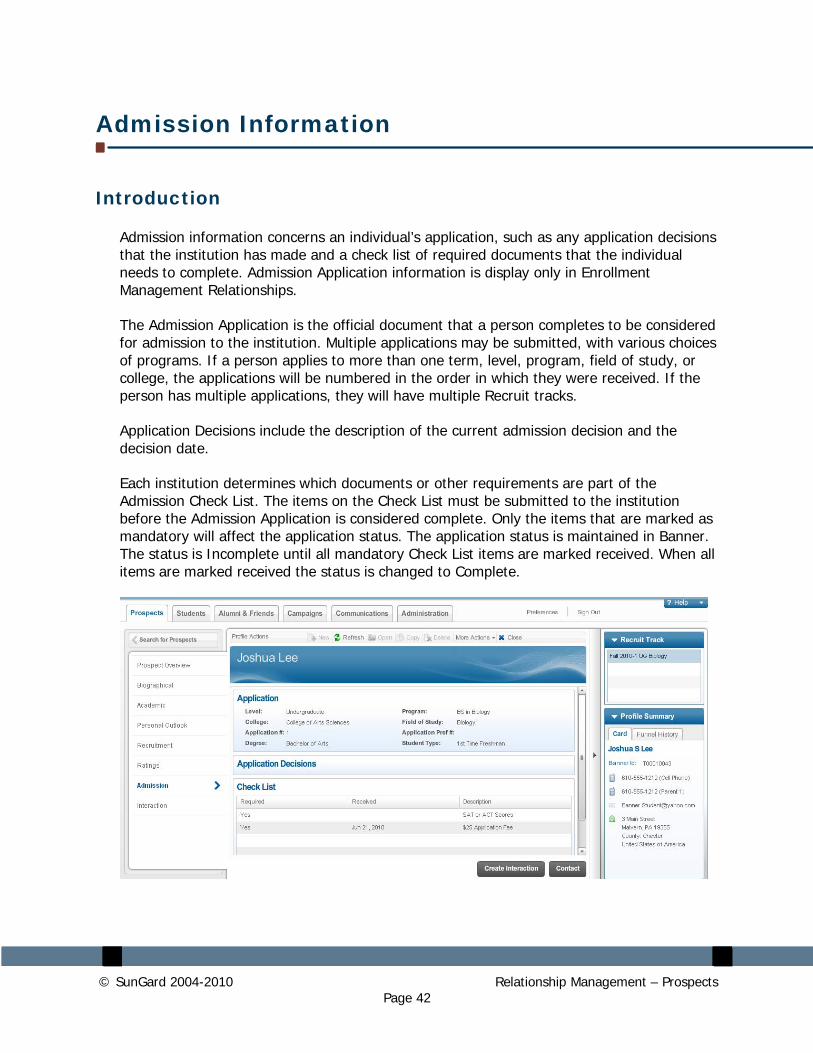
Admission information concerns an individual’s application, such as any application decisions that the institution has made and a check list of required documents that the individual needs to complete. Admission Application information is display only in Enrollment Management Relationships.
The Admission Application is the official document that a person completes to be considered for admission to the institution. Multiple applications may be submitted, with various choices of programs. If a person applies to more than one term, level, program, field of study, or college, the applications will be numbered in the order in which they were received. If the person has multiple applications, they will have multiple Recruit tracks.
Application Decisions include the description of the current admission decision and the decision date.
Each institution determines which documents or other requirements are part of the Admission Check List. The items on the Check List must be submitted to the institution before the Admission Application is considered complete. Only the items that are marked as mandatory will affect the application status. The application status is maintained in Banner. The status is Incomplete until all mandatory Check List items are marked received. When all items are marked received the status is changed to Complete.
© SunGard 2004-2010 Relationship Management – Prospects Page 43
The Admissions page contains the following view-only fields:
• Level - Displays the level of study for this application.
• Program - Displays the program chosen by this individual.
• College - Displays the college in which this curriculum belongs.
• Field of Study - Displays the field of study chosen by this individual.
• Application # - If the individual has submitted multiple applications, displays the number for this application.
• Application Pref # - If the individual has submitted multiple applications, displays the preference number for this application.
• Degree - Displays the degree the student is seeking.
• Application Decisions - Displays the description and date the decision was entered into Banner.
• Required - Indicates whether a mandatory check list item is required to complete this application.
• Received - Indicates the date when a check list item was received.
• Description - Displays the documents or other requirements requested to complete this application.
Note: Use the scroll bar to view more information.
The Check List Items area contains all of the items that are required to be completed by the applicant before the Admissions Application is considered complete. When viewing the check list from the Prospect Overview, the check list will display with a Received Date associated with any item that is complete.
© SunGard 2004-2010 Relationship Management – Prospects Page 44
Interactions
Introduction
An Interaction is a communication, or event, that has taken place between the institution and the prospect. Some Interactions are added automatically if the communication is generated from within Relationship Management. Other Interactions may be manually added by a user with appropriate permissions.
Examples of Interactions include:
• an e-mail contact from a recruiter to a prospect sent from within Relationship Management
• a mass mailing generated from a campaign in Relationship Management
• a targeted announcement generated from within Relationship Management and displayed in the prospect’s Prospective Student Portal account
• a manual entry by a recruiter concerning a telephone conversation with a prospect
• a manual entry by a recruiter indicating that a prospect has attended an event such as a Campus Tour
• a contact about attending a college night that was entered in Banner on the Recruit or Admissions form on the Contacts, Cohorts, Attributes Tab
• a Watch List that contains a list of prospects and interactions to be monitored. Watch Lists display in the upper right hand corner of the Interactions window.
© SunGard 2004-2010 Relationship Management – Prospects Page 45
Interaction Watch List
Watch List functionality is accessible from the Prospects tab by clicking Interactions in the navigation panel on the left of the screen.
The initial page allows for query on Interactions by Prospect.
• You can search based on the last name of a prospect.
• Advanced Search Criteria are also available for searching.
You also have the ability to set up a “Watch List”. This is a customized grouping of population lists for which the recruiter can monitor any interactions that occur for profiles in the lists within specified time frames. The recruiter can quickly and easily access and view the most recent interactions related to any profiles of interest, without having to drill down into each profile.
The full prospect profile is now available from the Interaction Watch List. When you query a Watch List or a list of interactions in the Prospects tab and highlights a specific interaction, a View Profile link is available in the More Actions toolbar. Selecting View Profile opens the profile overview
The Watch List Panel is at the upper right hand of the Interactions window. A Watch List can be created at any time while in Interactions.
Characteristics of a Watch List
• It is a personalized view for a specific user. Other users cannot view others’ personal lists.
• One Watch List entry allows for one-to-many lists to be aggregated
• Users may have several Watch Lists
• Default search shows any interaction activity in the last 48 hours
• Searches can be modified to reflect changed date ranges.

© SunGard 2004-2010 Relationship Management – Prospects Page 46
Creating a Watch List
1. Click on Interactions on the Navigation Panel in the Prospects tab. The Prospect Watch List panel is visible in the upper right hand of the screen.
© SunGard 2004-2010 Relationship Management – Prospects Page 47
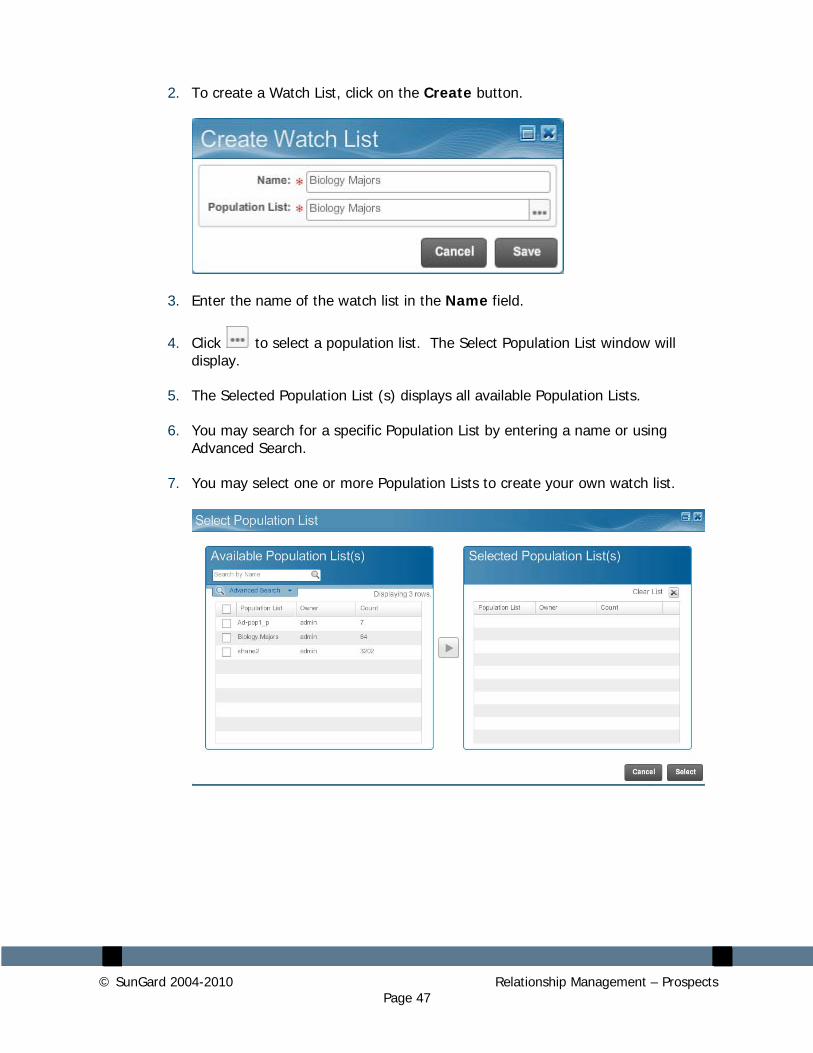
2. To create a Watch List, click on the Create button.
3. Enter the name of the watch list in the Name field.
4. Click to select a population list. The Select Population List window will display.
5. The Selected Population List (s) displays all available Population Lists.
6. You may search for a specific Population List by entering a name or using Advanced Search.
7. You may select one or more Population Lists to create your own watch list.
© SunGard 2004-2010 Relationship Management – Prospects Page 48
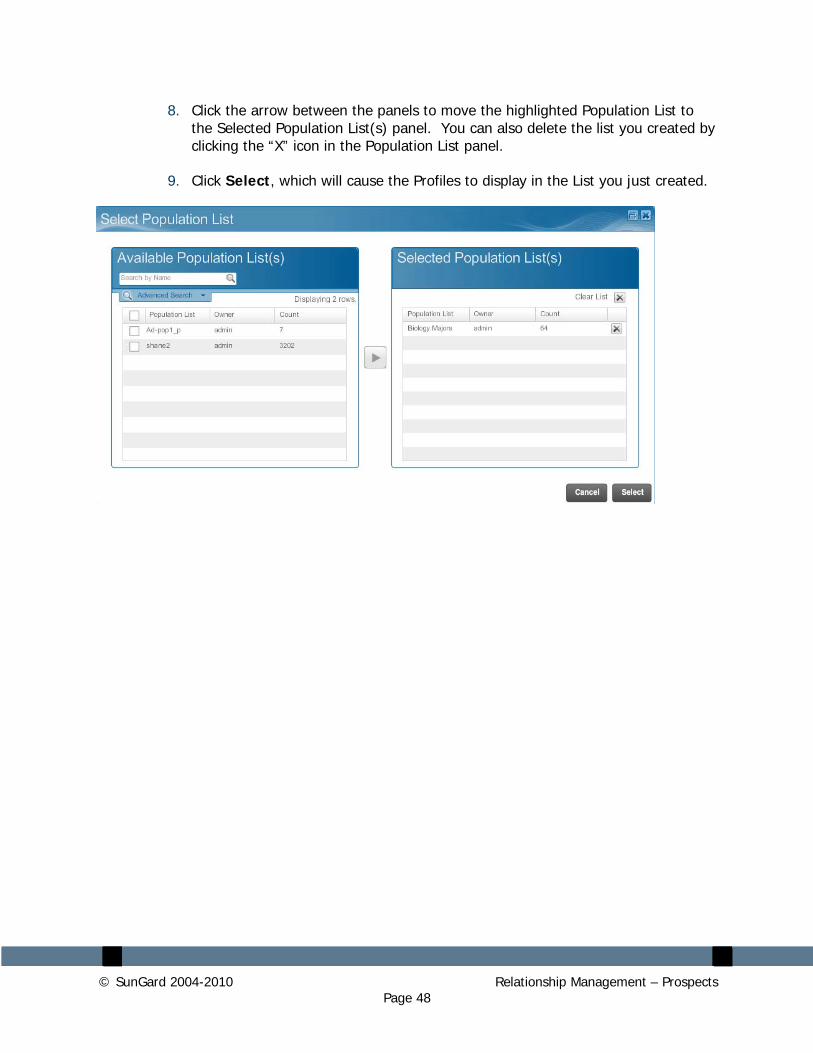
8. Click the arrow between the panels to move the highlighted Population List to the Selected Population List(s) panel. You can also delete the list you created by clicking the “X” icon in the Population List panel.
9. Click Select, which will cause the Profiles to display in the List you just created.
© SunGard 2004-2010 Relationship Management – Prospects Page 49
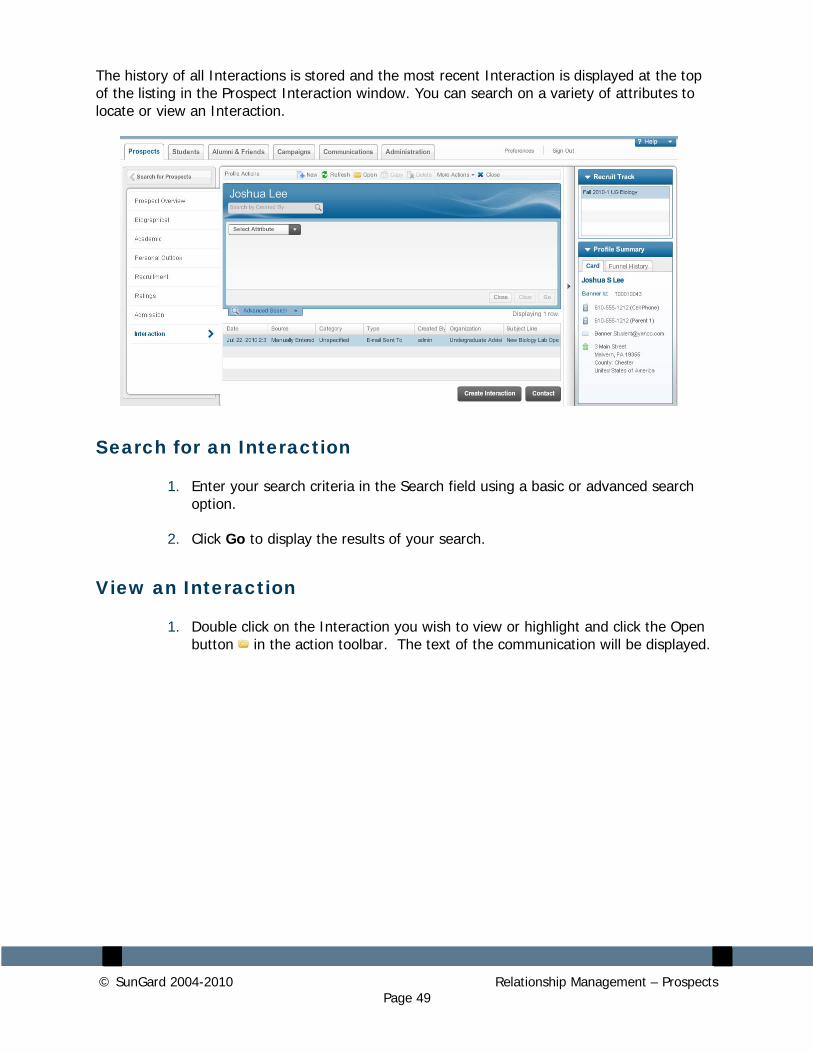
The history of all Interactions is stored and the most recent Interaction is displayed at the top of the listing in the Prospect Interaction window. You can search on a variety of attributes to locate or view an Interaction.
Search for an Interaction
1. Enter your search criteria in the Search field using a basic or advanced search option.
2. Click Go to display the results of your search.
View an Interaction
1. Double click on the Interaction you wish to view or highlight and click the Open button in the action toolbar. The text of the communication will be displayed.
© SunGard 2004-2010 Relationship Management – Prospects Page 50
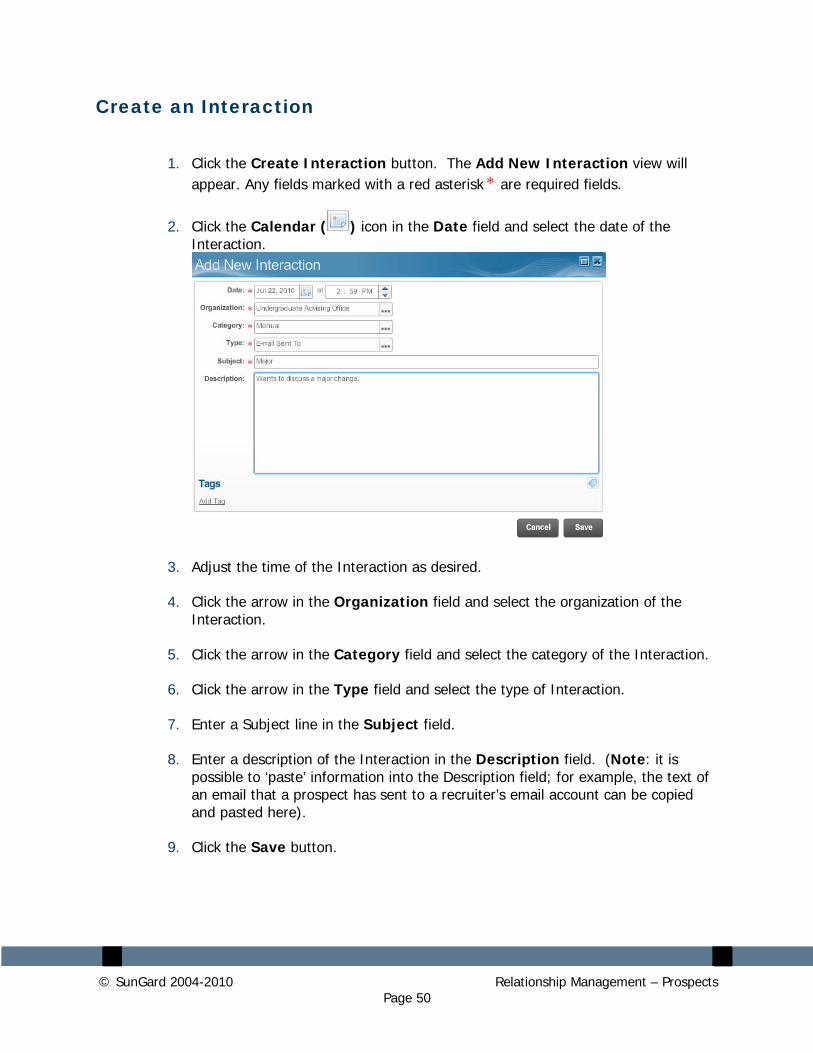
Create an Interaction
1. Click the Create Interaction button. The Add New Interaction view will appear. Any fields marked with a red asterisk are required fields.
2. Click the Calendar ( ) icon in the Date field and select the date of the Interaction.
3. Adjust the time of the Interaction as desired.
4. Click the arrow in the Organization field and select the organization of the Interaction.
5. Click the arrow in the Category field and select the category of the Interaction.
6. Click the arrow in the Type field and select the type of Interaction.
7. Enter a Subject line in the Subject field.
8. Enter a description of the Interaction in the Description field. (Note: it is possible to ‘paste’ information into the Description field; for example, the text of an email that a prospect has sent to a recruiter’s email account can be copied and pasted here).
9. Click the Save button.
© SunGard 2004-2010 Relationship Management – Prospects Page 51
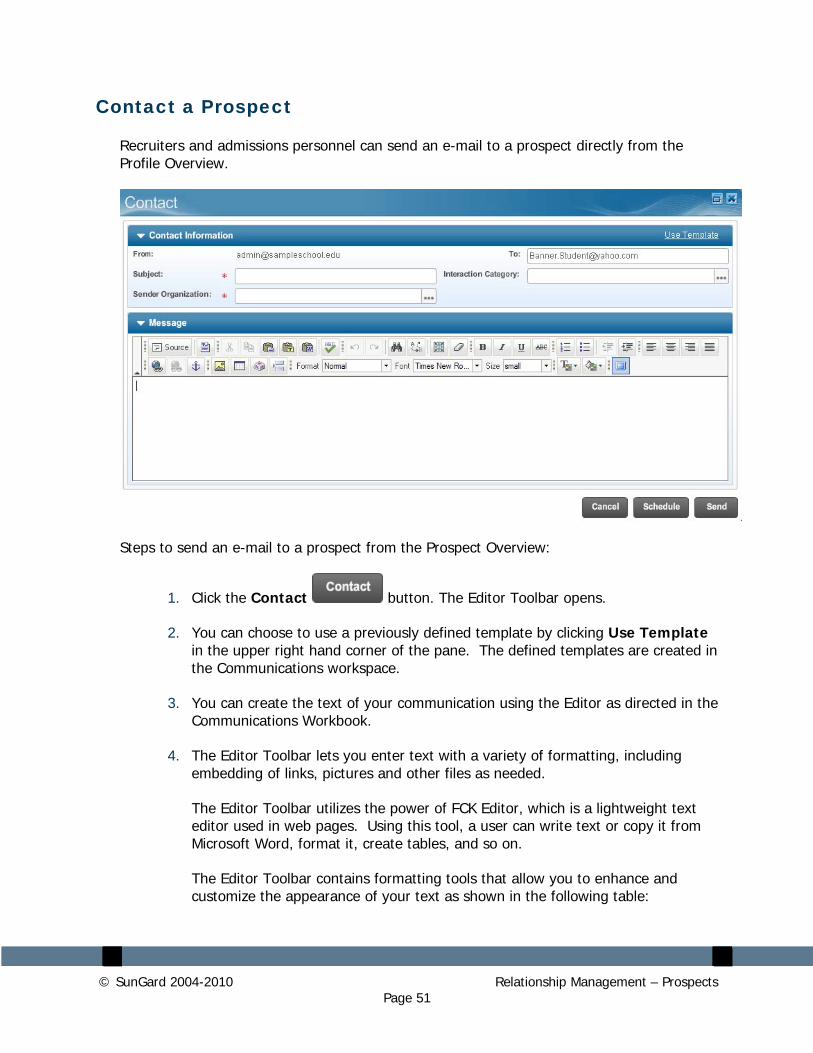
Contact a Prospect
Recruiters and admissions personnel can send an e-mail to a prospect directly from the Profile Overview.
Steps to send an e-mail to a prospect from the Prospect Overview:
1. Click the Contact button. The Editor Toolbar opens.
2. You can choose to use a previously defined template by clicking Use Template in the upper right hand corner of the pane. The defined templates are created in the Communications workspace.
3. You can create the text of your communication using the Editor as directed in the Communications Workbook.
4. The Editor Toolbar lets you enter text with a variety of formatting, including embedding of links, pictures and other files as needed.
The Editor Toolbar utilizes the power of FCK Editor, which is a lightweight text editor used in web pages. Using this tool, a user can write text or copy it from Microsoft Word, format it, create tables, and so on.
The Editor Toolbar contains formatting tools that allow you to enhance and customize the appearance of your text as shown in the following table:
© SunGard 2004-2010 Relationship Management – Prospects Page 52
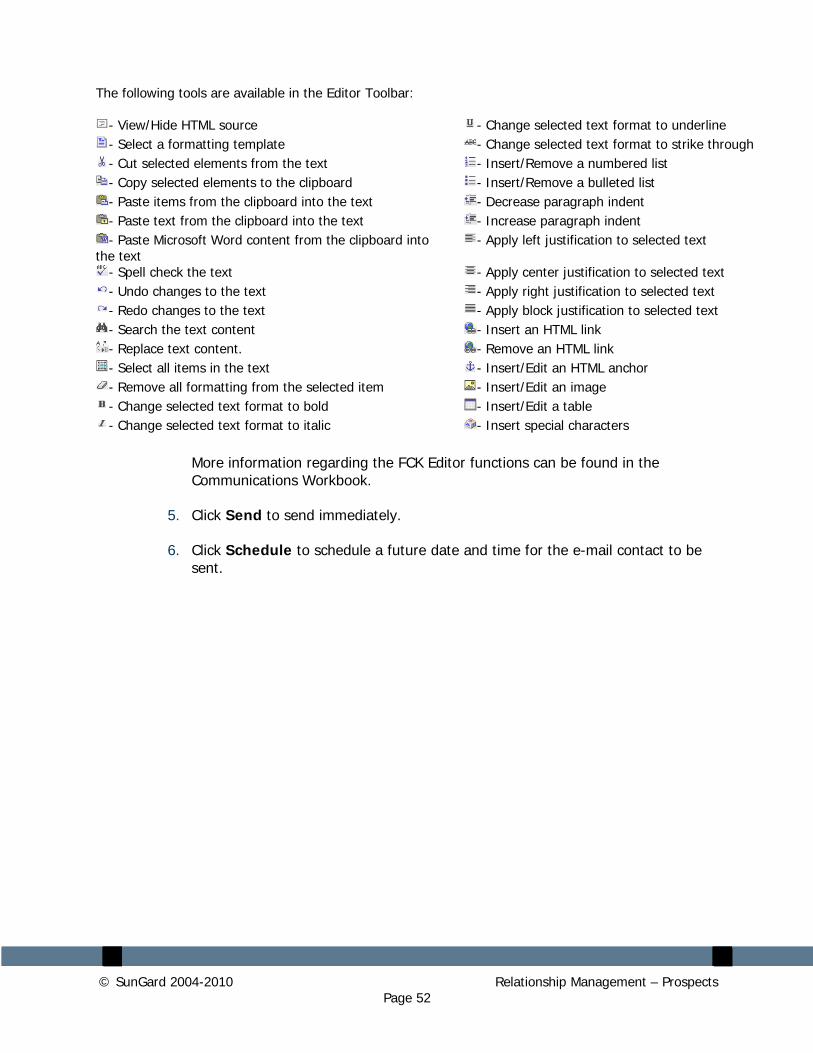
The following tools are available in the Editor Toolbar:
- View/Hide HTML source - Change selected text format to underline - Select a formatting template - Change selected text format to strike through - Cut selected elements from the text - Insert/Remove a numbered list - Copy selected elements to the clipboard - Insert/Remove a bulleted list - Paste items from the clipboard into the text - Decrease paragraph indent - Paste text from the clipboard into the text - Increase paragraph indent - Paste Microsoft Word content from the clipboard into
the text - Apply left justification to selected text
- Spell check the text - Apply center justification to selected text - Undo changes to the text - Apply right justification to selected text - Redo changes to the text - Apply block justification to selected text - Search the text content - Insert an HTML link - Replace text content. - Remove an HTML link - Select all items in the text - Insert/Edit an HTML anchor - Remove all formatting from the selected item - Insert/Edit an image - Change selected text format to bold - Insert/Edit a table - Change selected text format to italic - Insert special characters
More information regarding the FCK Editor functions can be found in the Communications Workbook.
5. Click Send to send immediately.
6. Click Schedule to schedule a future date and time for the e-mail contact to be sent.
© SunGard 2004-2010 Relationship Management – Prospects Page 53
Population Lists
© SunGard 2004-2010 Relationship Management – Prospects Page 54
Population Lists
Introduction
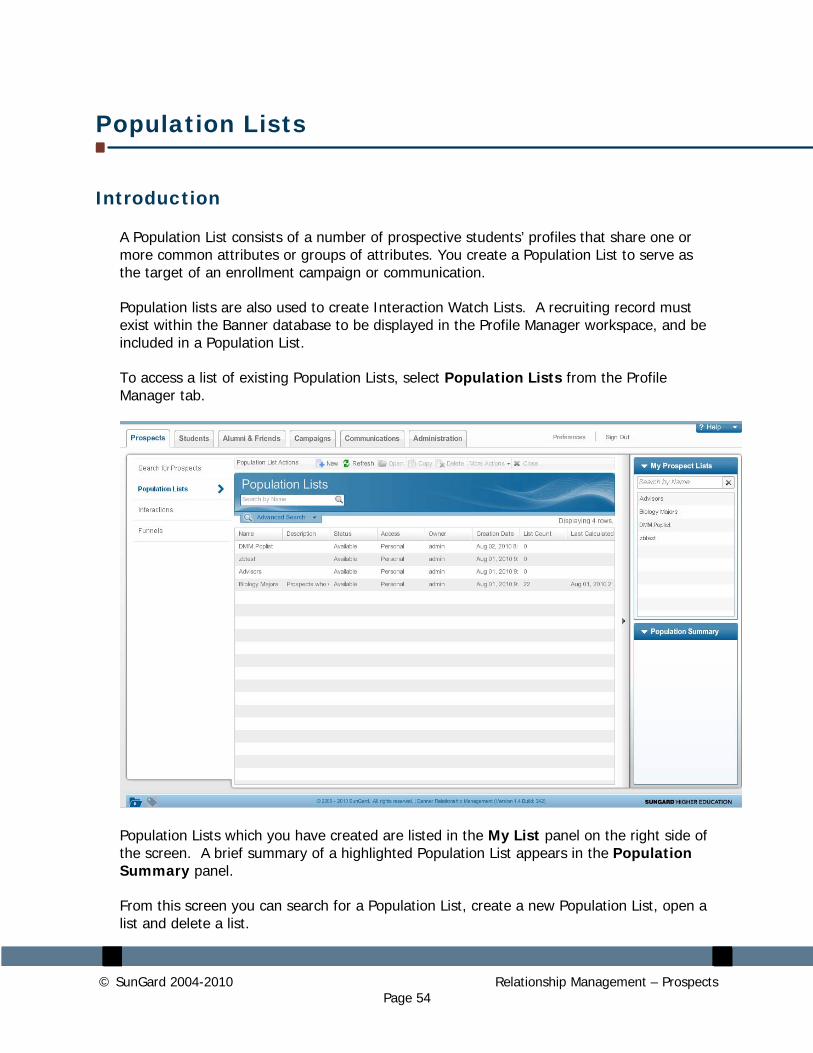
A Population List consists of a number of prospective students’ profiles that share one or more common attributes or groups of attributes. You create a Population List to serve as the target of an enrollment campaign or communication.
Population lists are also used to create Interaction Watch Lists. A recruiting record must exist within the Banner database to be displayed in the Profile Manager workspace, and be included in a Population List.
To access a list of existing Population Lists, select Population Lists from the Profile Manager tab.
Population Lists which you have created are listed in the My List panel on the right side of the screen. A brief summary of a highlighted Population List appears in the Population Summary panel.
From this screen you can search for a Population List, create a new Population List, open a list and delete a list.
© SunGard 2004-2010 Relationship Management – Prospects Page 55
Search for a Population List
To search for a Population List, use the following procedure:
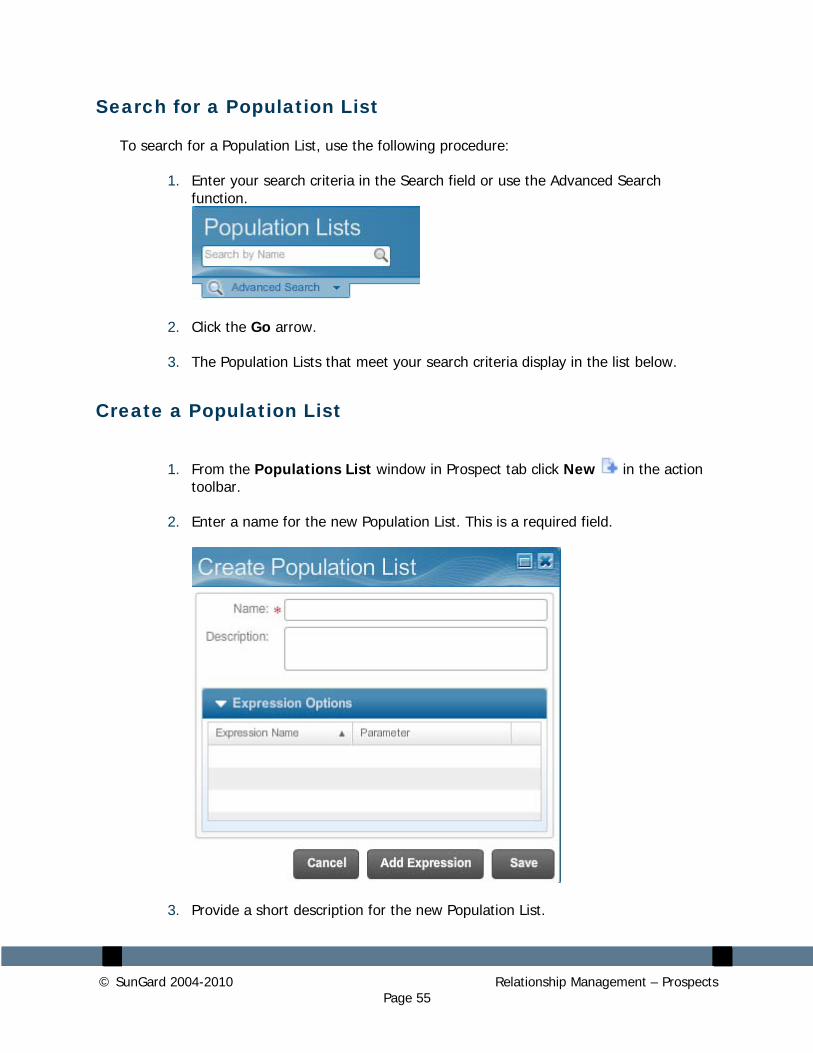
1. Enter your search criteria in the Search field or use the Advanced Search function.
2. Click the Go arrow.
3. The Population Lists that meet your search criteria display in the list below.
Create a Population List
1. From the Populations List window in Prospect tab click New in the action toolbar.
2. Enter a name for the new Population List. This is a required field.
3. Provide a short description for the new Population List.
© SunGard 2004-2010 Relationship Management – Prospects Page 56
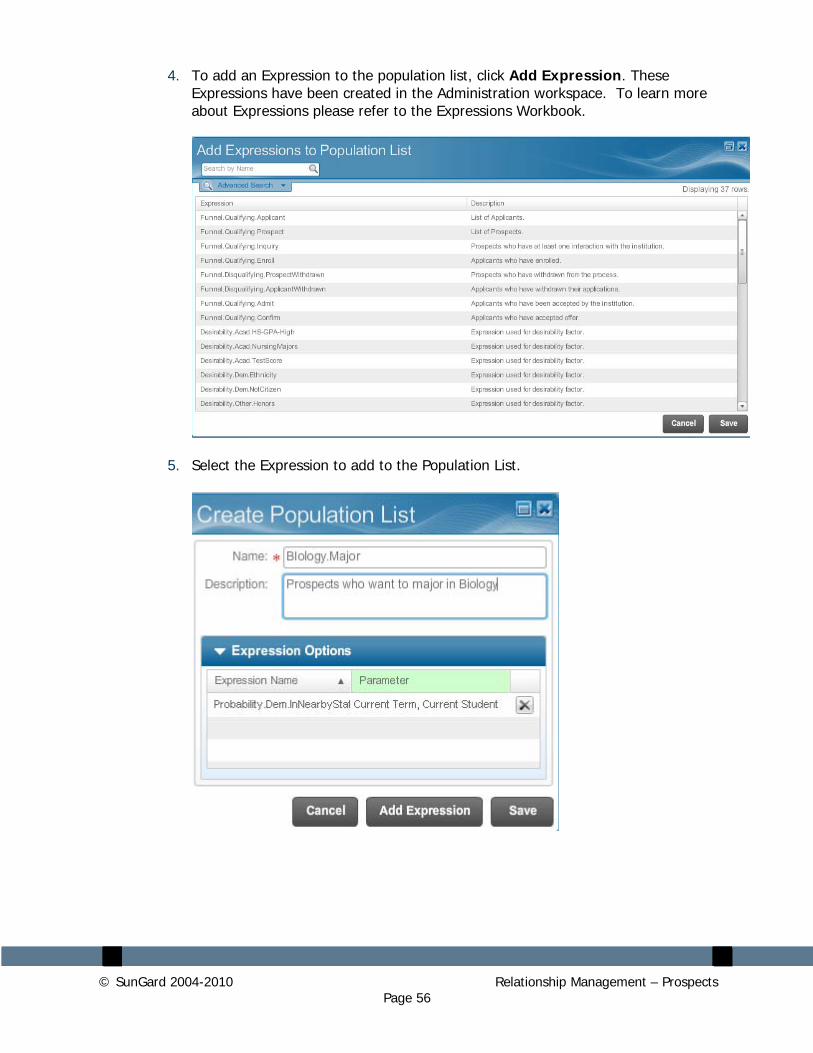
4. To add an Expression to the population list, click Add Expression. These Expressions have been created in the Administration workspace. To learn more about Expressions please refer to the Expressions Workbook.
5. Select the Expression to add to the Population List.
© SunGard 2004-2010 Relationship Management – Prospects Page 57
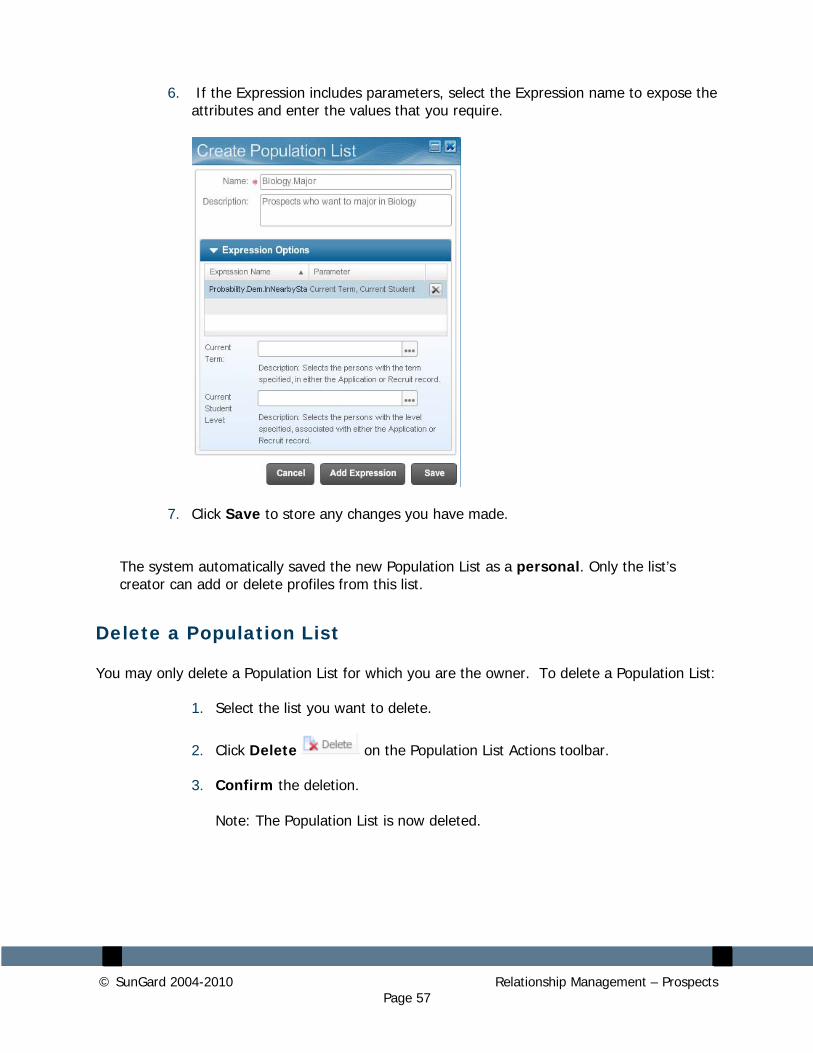
6. If the Expression includes parameters, select the Expression name to expose the attributes and enter the values that you require.
7. Click Save to store any changes you have made.
The system automatically saved the new Population List as a personal. Only the list’s creator can add or delete profiles from this list.
Delete a Population List You may only delete a Population List for which you are the owner. To delete a Population List:
1. Select the list you want to delete.
2. Click Delete on the Population List Actions toolbar.
3. Confirm the deletion. Note: The Population List is now deleted.
© SunGard 2004-2010 Relationship Management – Prospects Page 58
Population List Overview
Overview
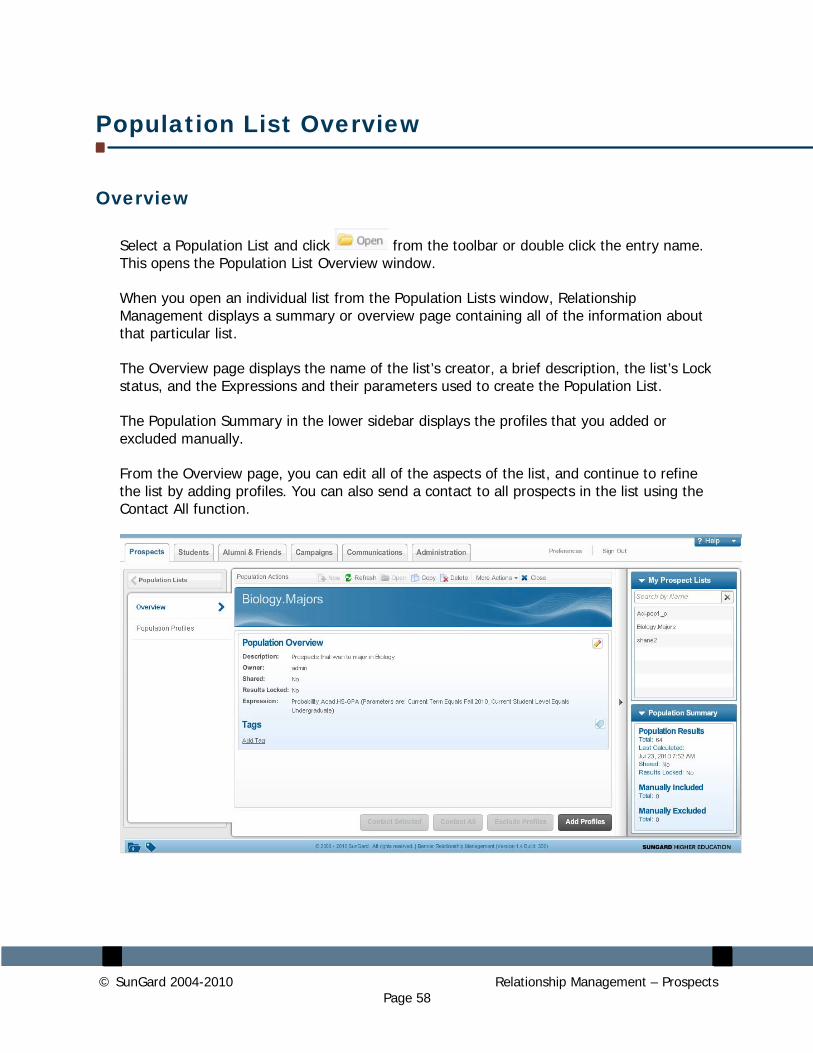
Select a Population List and click from the toolbar or double click the entry name. This opens the Population List Overview window.
When you open an individual list from the Population Lists window, Relationship Management displays a summary or overview page containing all of the information about that particular list.
The Overview page displays the name of the list’s creator, a brief description, the list’s Lock status, and the Expressions and their parameters used to create the Population List.
The Population Summary in the lower sidebar displays the profiles that you added or excluded manually.
From the Overview page, you can edit all of the aspects of the list, and continue to refine the list by adding profiles. You can also send a contact to all prospects in the list using the Contact All function.
© SunGard 2004-2010 Relationship Management – Prospects Page 59
Your personal Population Lists will appear in the My Prospect Lists space in the top right panel but shared lists will not. The Population Summary panel gives an overview of the Population List.
It is important to note that certain menu items and button functions may or may not be available depending on the Shared status for the Population List.
• Personal - When you create a new Population List, the system automatically saves the list as a Personal list, which means that only you can add or delete profiles from it manually. Your personal lists will appear in you’re my Prospect Lists space. When you search for a Population List, the system displays all lists matching the search criteria. You can filter on “Owner” to see only your lists by using the Advanced Search function.
The system also saves the list with Results Unlocked. Anyone who can edit a list can lock or unlock it. Locking a list means it will not recalculate and you cannot manually add or exclude profiles from it. You can continue to edit the name and description of a locked list -- locking a list locks only the list results. You may choose to lock a list if you have ongoing activities with the list members, and you do not want the population to change.
Users can view other users’ Personal lists, but cannot edit them. This means that they can view another user’s Personal list name and description, and can open the list to see the prospects in the list, and can see which Expressions are used to create the list, as well as any manually included or excluded prospects for the list. They will not be able to edit any of that information in another user’s Personal list, nor will they be able to manually add or exclude prospects.
• Shared - You can edit the new list to change it to a Shared list, giving all users access to the population list. Shared lists do not appear in your My Lists space. Once you share a list, it cannot be made personal again. Shared lists can be seen by all users, but modified only by users with specific roles/permissions.
All users can make a Personal copy of a Shared list for their own purposes.
Tags
You can associate a tag with an entity directly from the entity’s Overview page. Add and Remove Tags capability is available on the Overview page for Populations, Campaigns, Templates, Profile Interactions, and Expressions. Each Overview detail page allows you to add and remove existing tags, and add additional tags.
Use the Tag icon to open and edit the existing list of tags associated with the entity. If no tags exist, the overview displays the Add Tag link. Click the link or the Tag icon to add any available tags to the item directly from its overview page.
© SunGard 2004-2010 Relationship Management – Prospects Page 60
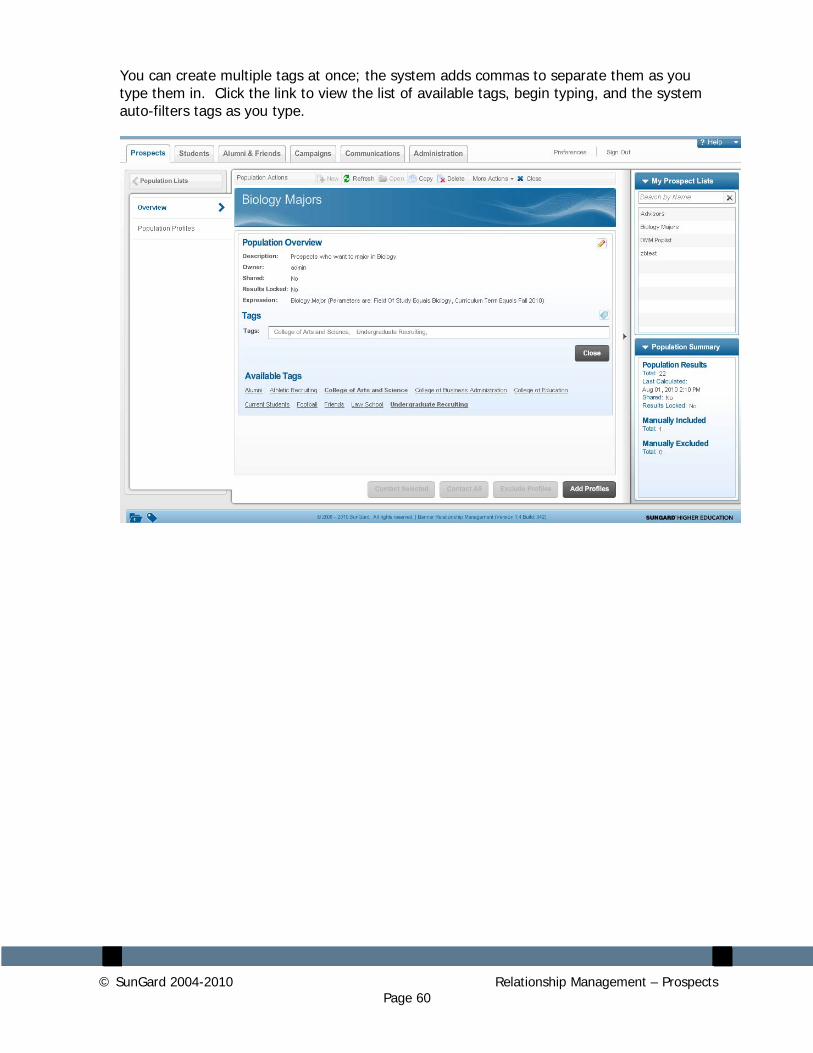
You can create multiple tags at once; the system adds commas to separate them as you type them in. Click the link to view the list of available tags, begin typing, and the system auto-filters tags as you type.
© SunGard 2004-2010 Relationship Management – Prospects Page 61
Edit a Population List
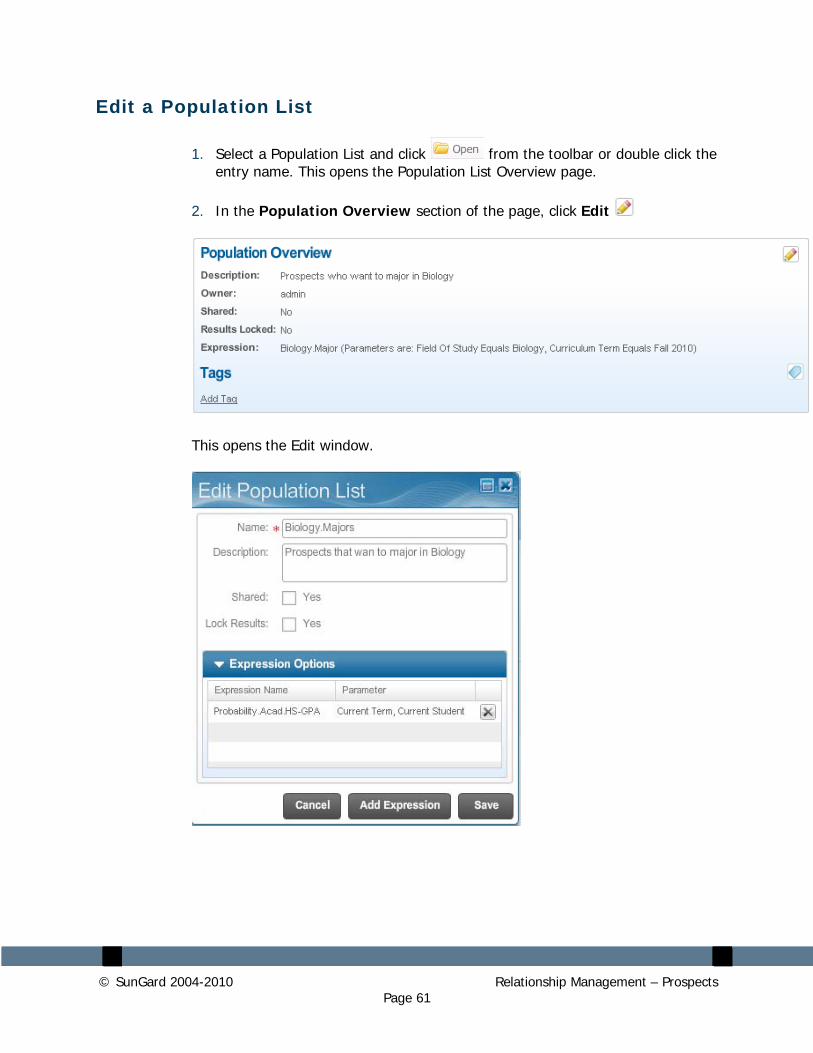
1. Select a Population List and click from the toolbar or double click the entry name. This opens the Population List Overview page.
2. In the Population Overview section of the page, click Edit
This opens the Edit window.
© SunGard 2004-2010 Relationship Management – Prospects Page 62
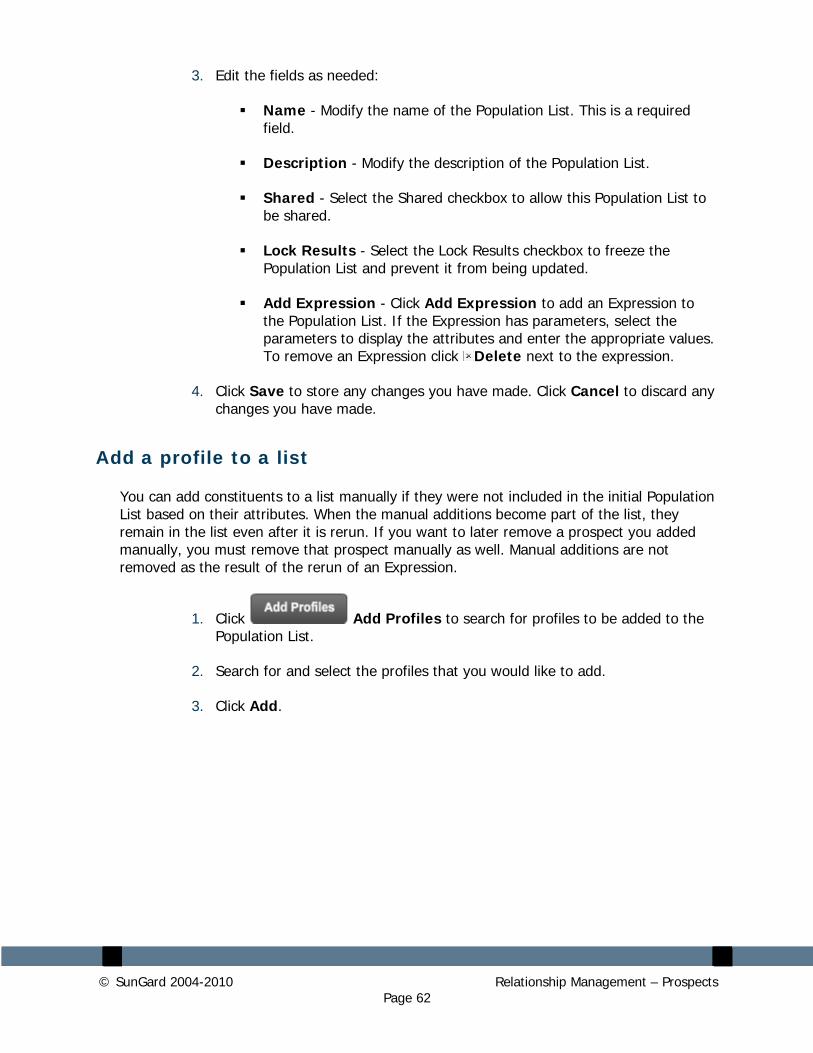
3. Edit the fields as needed:
Name - Modify the name of the Population List. This is a required field.
Description - Modify the description of the Population List.
Shared - Select the Shared checkbox to allow this Population List to be shared.
Lock Results - Select the Lock Results checkbox to freeze the Population List and prevent it from being updated.
Add Expression - Click Add Expression to add an Expression to the Population List. If the Expression has parameters, select the parameters to display the attributes and enter the appropriate values. To remove an Expression click Delete next to the expression.
4. Click Save to store any changes you have made. Click Cancel to discard any changes you have made.
Add a profile to a list
You can add constituents to a list manually if they were not included in the initial Population List based on their attributes. When the manual additions become part of the list, they remain in the list even after it is rerun. If you want to later remove a prospect you added manually, you must remove that prospect manually as well. Manual additions are not removed as the result of the rerun of an Expression.
1. Click Add Profiles to search for profiles to be added to the Population List.
2. Search for and select the profiles that you would like to add.
3. Click Add.

© SunGard 2004-2010 Relationship Management – Prospects Page 63
Contact all prospects in a Population List
1. In the Population Overview page, click the Population Profiles link.
2. Click Contact All to send an e-mail message to all prospects in the list.
3. Compose the e-mail. For further instructions regarding this screen go to the Interactions section of this workbook.
4. Click Schedule to assign a specific date and time that this e-mail will be sent to the recipients or Click Send to immediately send the message.
More Actions
From the More Actions drop down list in the Population Actions bar, you can choose from several additional actions to perform on the current Population List. The menu options vary depending on if the Population List is shared.
© SunGard 2004-2010 Relationship Management – Prospects Page 64
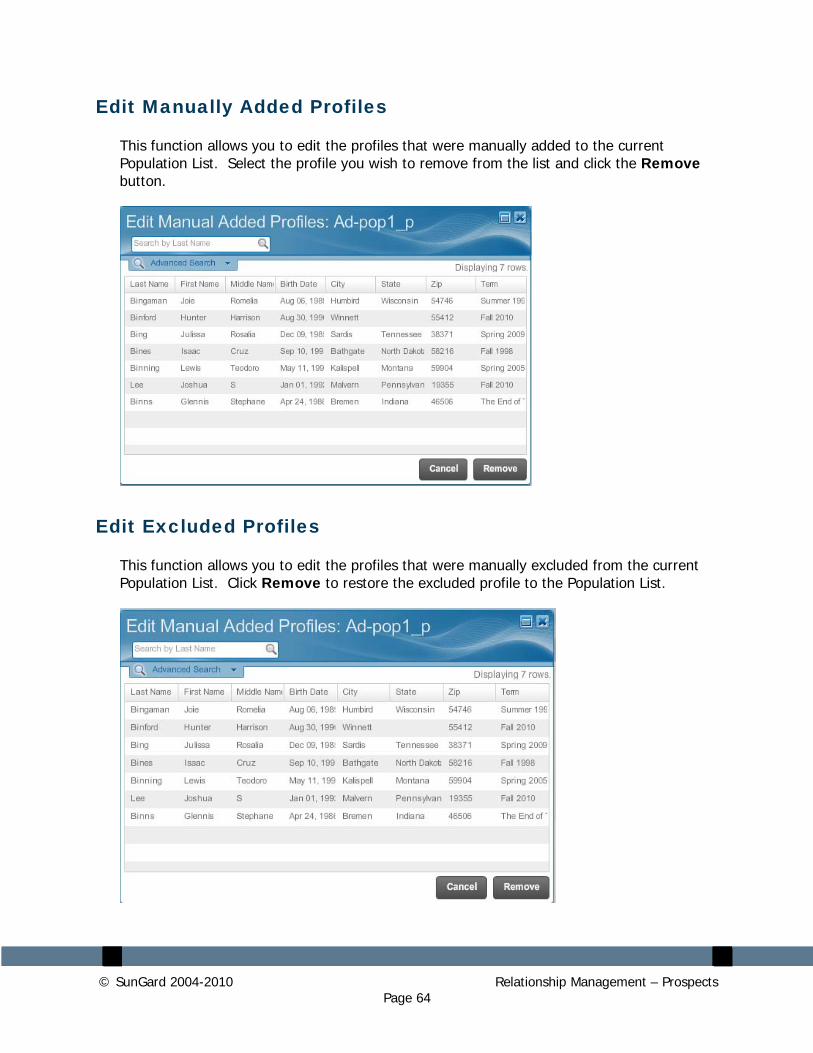
Edit Manually Added Profiles
This function allows you to edit the profiles that were manually added to the current Population List. Select the profile you wish to remove from the list and click the Remove button.
Edit Excluded Profiles
This function allows you to edit the profiles that were manually excluded from the current Population List. Click Remove to restore the excluded profile to the Population List.
© SunGard 2004-2010 Relationship Management – Prospects Page 65
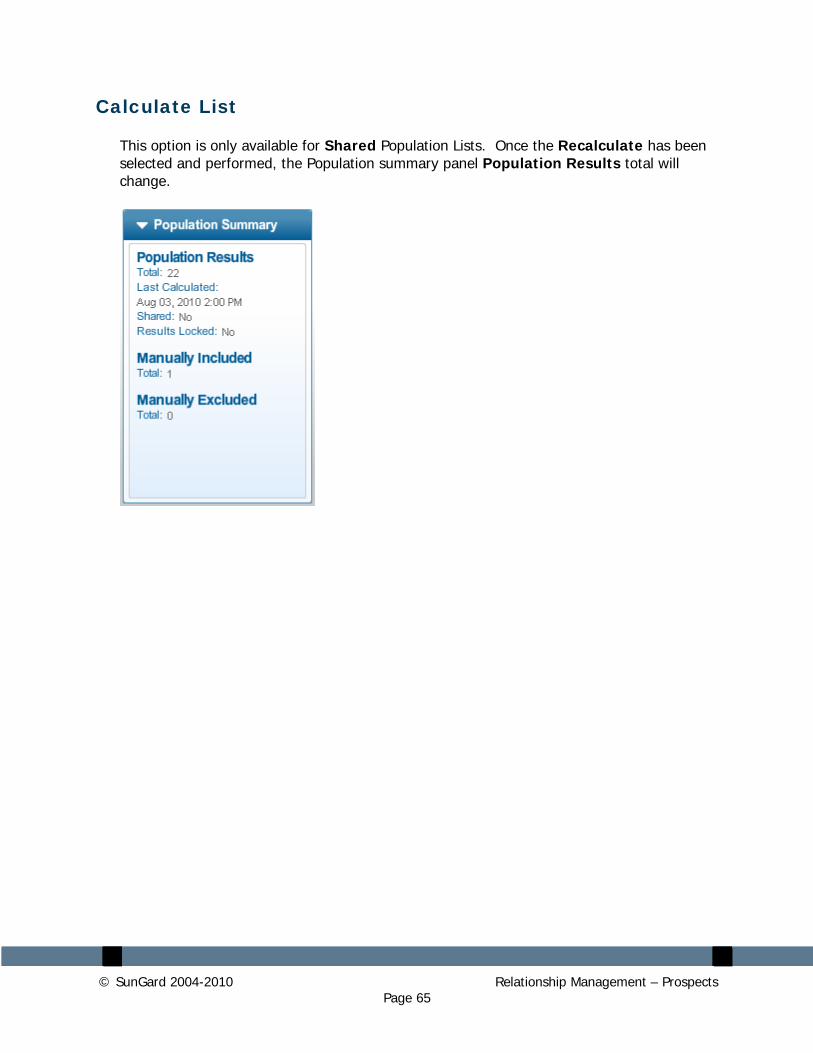
Calculate List
This option is only available for Shared Population Lists. Once the Recalculate has been selected and performed, the Population summary panel Population Results total will change.
© SunGard 2004-2010 Relationship Management – Prospects Page 66
Population Profiles
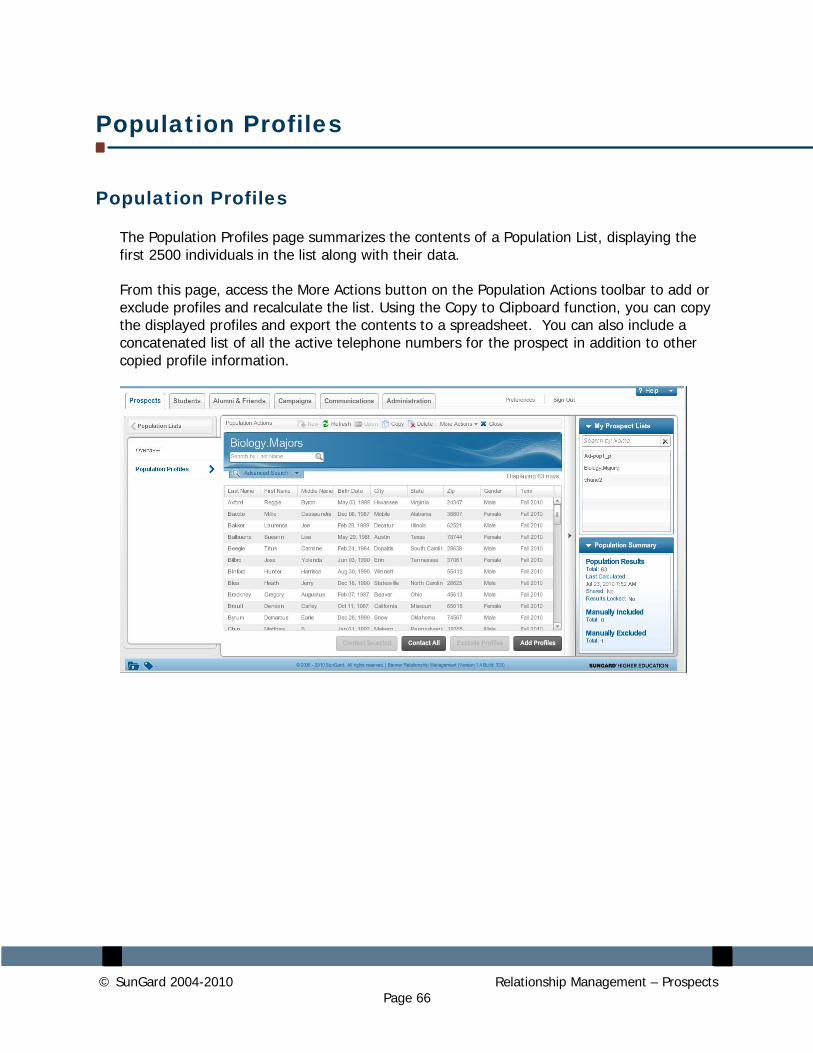
Population Profiles
The Population Profiles page summarizes the contents of a Population List, displaying the first 2500 individuals in the list along with their data.
From this page, access the More Actions button on the Population Actions toolbar to add or exclude profiles and recalculate the list. Using the Copy to Clipboard function, you can copy the displayed profiles and export the contents to a spreadsheet. You can also include a concatenated list of all the active telephone numbers for the prospect in addition to other copied profile information.
© SunGard 2004-2010 Relationship Management – Prospects Page 67
Add a profile to a list
You can add prospects to a list manually if they were not included in the Population List based on their attributes. When the manual additions become part of the list, they remain in the grouping even after it is rerun. If you want to later remove a constituent you added manually, you must remove that individual manually as well. Manual additions are not removed as the result of the rerun of an Expression.
1. Search for and select the Population List that you would like to edit.
2. Click Open.
3. Click Add Profiles to search for profiles to be added to the Population List.
4. Search for and select the profiles that you would like to add.
5. Click Add.
Exclude a profile from a list
You may need to exclude some profiles from a Population List. Certain constituents, for example, may require special or personalized handling, or may have been reassigned to another recruiter, or may have simply lost interest in pursuing enrollment. Follow the steps below to remove or exclude constituents from a Population List:
1. Search for and select the Population List that you would like to edit.
2. Click Open.
3. Select Population Profiles.
4. Select the profiles to exclude from the Population List.
5. Click Exclude Profiles to exclude unwanted profiles from the list.
6. If you are excluding profiles that were manually added to the Population List, you are asked to confirm that you want to remove the profiles.
7. Click OK.
© SunGard 2004-2010 Relationship Management – Prospects Page 68
Contact profiles in a population list
To contact all profiles in a Population List, follow these steps:
1. Search for and select the Population List that you would like to edit.
2. Click Open.
3. Click Contact All to send an e-mail message to all prospects in the list.
4. Compose the e-mail. For further instructions regarding this screen go to the Interactions section of this Workbook.
5. Click Schedule to assign a specific date and time that this e-mail will be sent to the recipient or Click Send to immediately send the message.
Follow these steps to contact selected profiles in a Population List.
1. Search for and select the Population List that you would like to edit.
2. Click Open.
3. Select Population Profiles.
4. Select the profiles to contact from the Population List. To select more than one profile in the list use the shift key or the control key.
5. Click Contact Selected to send an e-mail message to specific profiles in a Population List.
6. Compose the e-mail. For further instructions regarding this screen go to the Interactions section of this workbook.
7. Click Schedule to assign a specific date and time that this e-mail will be sent to the recipient or Click Send to immediately send the message
© SunGard 2004-2010 Relationship Management – Prospects Page 69
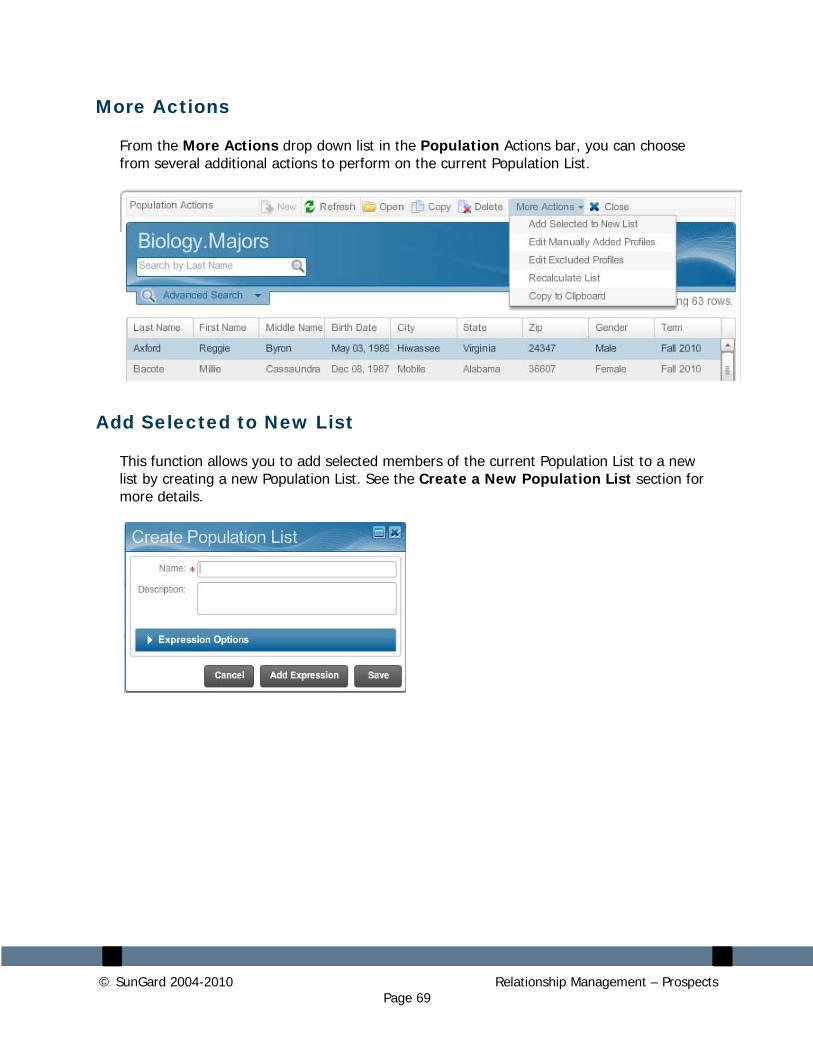
More Actions
From the More Actions drop down list in the Population Actions bar, you can choose from several additional actions to perform on the current Population List.
Add Selected to New List
This function allows you to add selected members of the current Population List to a new list by creating a new Population List. See the Create a New Population List section for more details.
© SunGard 2004-2010 Relationship Management – Prospects Page 70
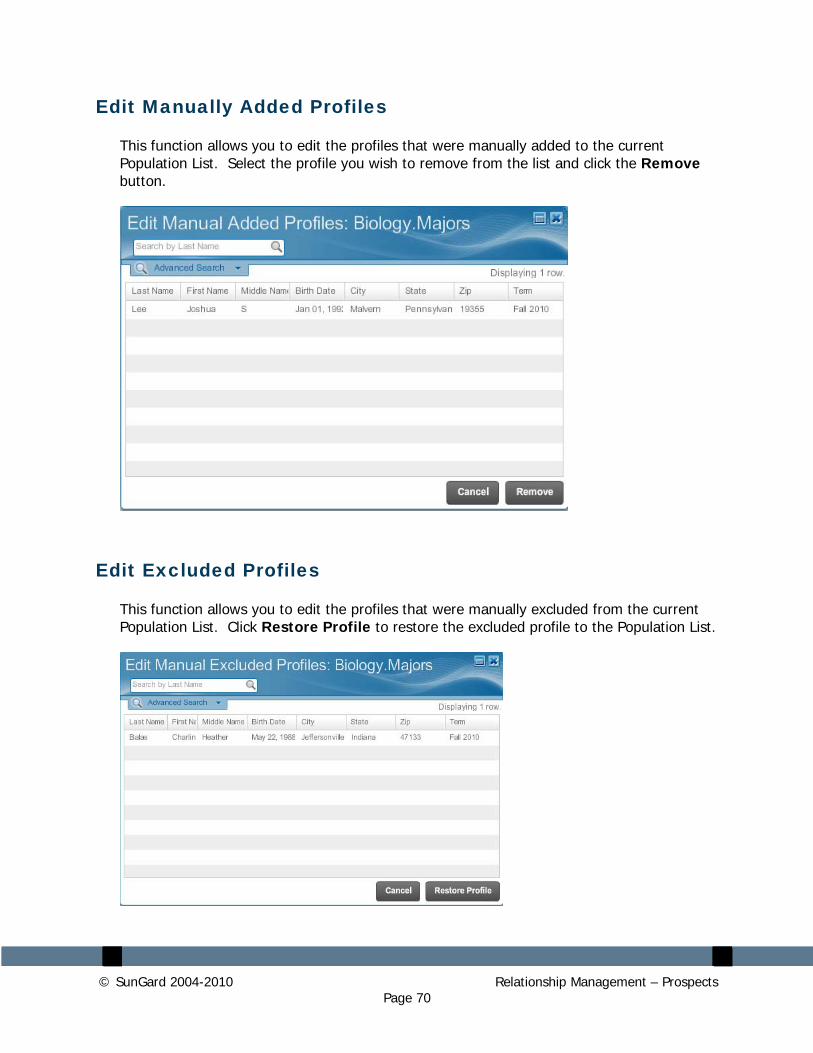
Edit Manually Added Profiles
This function allows you to edit the profiles that were manually added to the current Population List. Select the profile you wish to remove from the list and click the Remove button.
Edit Excluded Profiles
This function allows you to edit the profiles that were manually excluded from the current Population List. Click Restore Profile to restore the excluded profile to the Population List.
© SunGard 2004-2010 Relationship Management – Prospects Page 71
Calculate List
If you click on Calculate List when an Expression has been defined for your list, it will refresh the list with any new prospects which meet the criteria of the Expression. If the list is manual with no Expression, then no recalculation will occur.
Copy to Clipboard
The Copy to Clipboard feature is one of several options that are available when working with Population Lists. Copy to Clipboard creates a .csv file of the students that can be opened in Microsoft Excel or other software program. Relationship Management will only display 2500 rows of a Population List even if the list is greater than 2500 rows. In addition, only those 2500 rows that display will be copied to the Clipboard.
To copy a list to Clipboard, use the following procedure:
1. Select Population Lists.
2. Select a Population List that is shared, or one that you created.
3. Select Population Profiles to display the Population List.
4. Select Copy to Clipboard from More Actions on the toolbar.
5. Copy the results to a spreadsheet.
© SunGard 2004-2010 Relationship Management – Prospects Page 72
Funnel Status
© SunGard 2004-2010 Relationship Management – Prospects Page 73
Funnel Status
Introduction
The Funnel Status is a graphical indicator that shows you at a glance where each prospect is in his or her progress toward becoming an applicant, an admitted, or an enrolled student. Funnel Status indicators have been implemented according to your own institution’s definitions, and customized with the rules that determine when and under what circumstances a prospect progresses from one stage to the next. The Funnel Status tracks major milestones and when a prospect has achieved each one.
Funnel Instance
A Funnel Instance is an implementation of a Funnel Model for a particular term and student academic level, used to track the progress of that group of constituents toward enrollment. You can select and view an instance of an active Funnel Model.
To view a Funnel Instance, click Funnels in the Prospects tab navigation panel. This lists all the Funnel Instances in Relationship Management.
Select a Funnel Instance from the list to view the Instance Summary information about the particular instance, including its name and description, its status when last executed, and the date of execution.
© SunGard 2004-2010 Relationship Management – Prospects Page 74
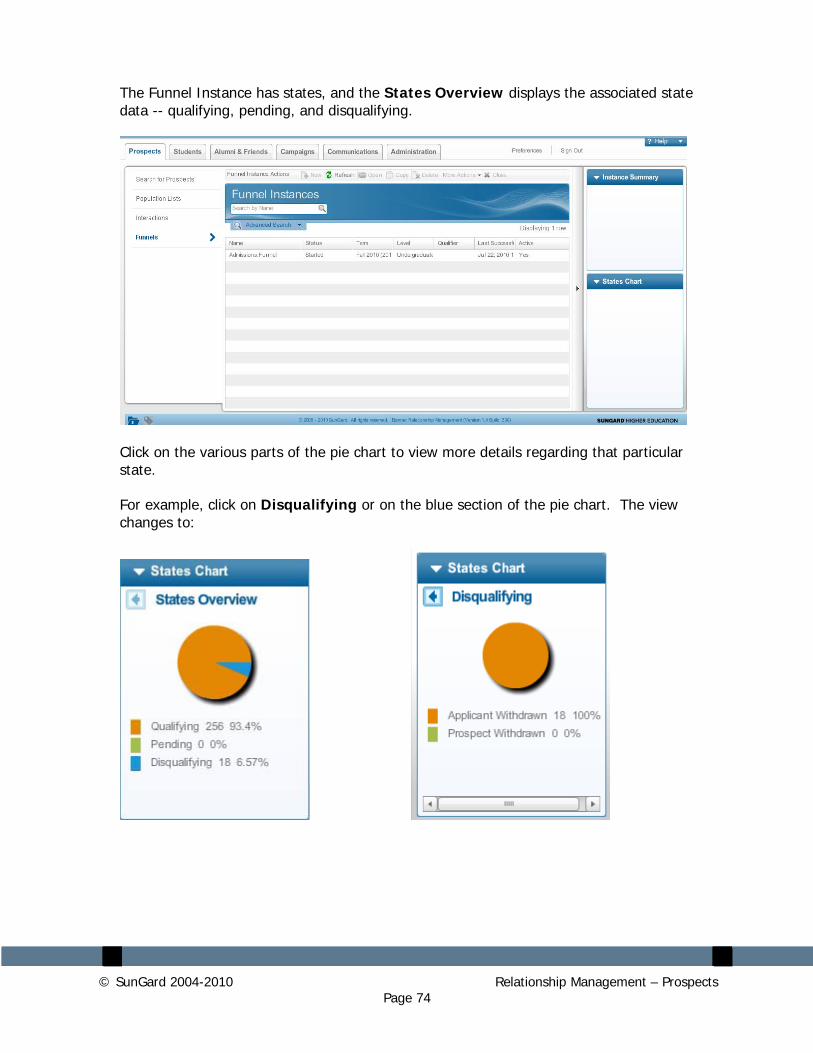
The Funnel Instance has states, and the States Overview displays the associated state data -- qualifying, pending, and disqualifying.
Click on the various parts of the pie chart to view more details regarding that particular state.
For example, click on Disqualifying or on the blue section of the pie chart. The view changes to:
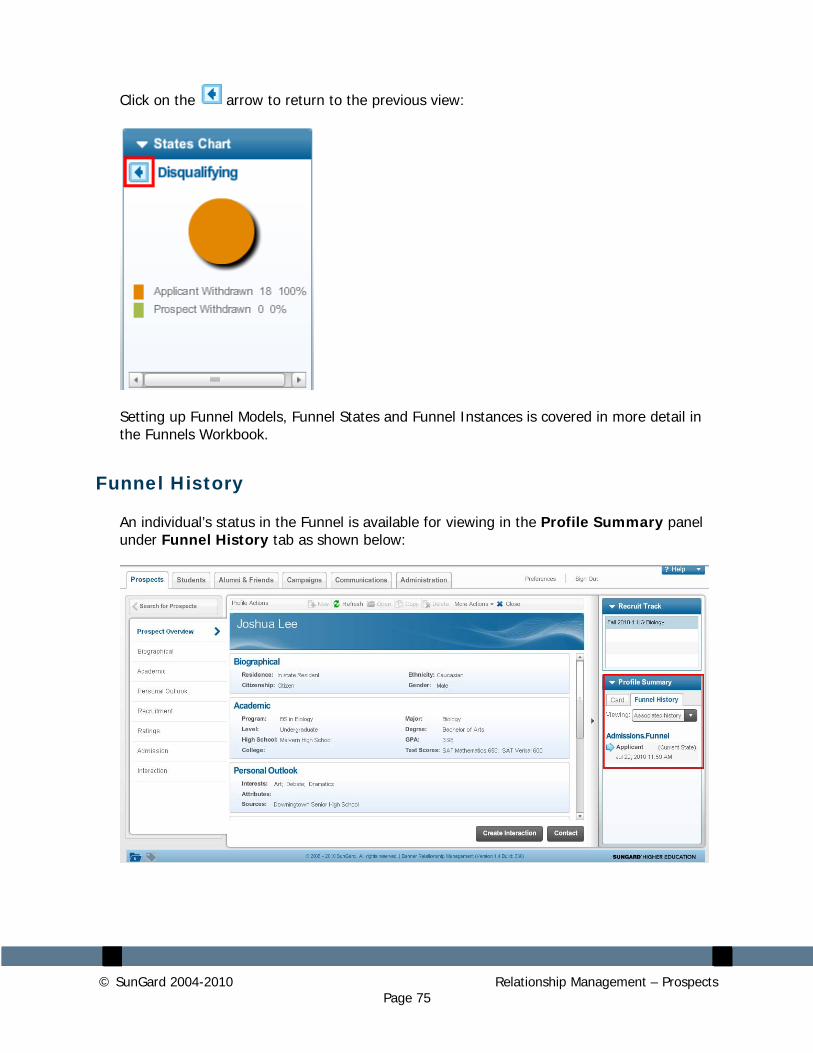
© SunGard 2004-2010 Relationship Management – Prospects Page 75
Click on the arrow to return to the previous view:
Setting up Funnel Models, Funnel States and Funnel Instances is covered in more detail in the Funnels Workbook.
Funnel History
An individual’s status in the Funnel is available for viewing in the Profile Summary panel under Funnel History tab as shown below:
© SunGard 2004-2010 Relationship Management – Prospects Page 76
Appendix A – Tags
© SunGard 2004-2010 Relationship Management – Prospects Page 77
Using Tags
Description
In Relationship Management, Tags are similar in concept to keywords allowing institutions to characterize and categorize items and subsequently search for them using those tags.
Taggable items
The following types of items can have tags applied to them:
• Expressions
• Populations
• Templates
• Campaigns
• Interactions
When working with expressions, tags can be incorporated into expression query criteria.
The following example will use a population list, but the steps are similar for each type of item.
© SunGard 2004-2010 Relationship Management – Prospects Page 78
Applying a Tag to an Item
Introduction
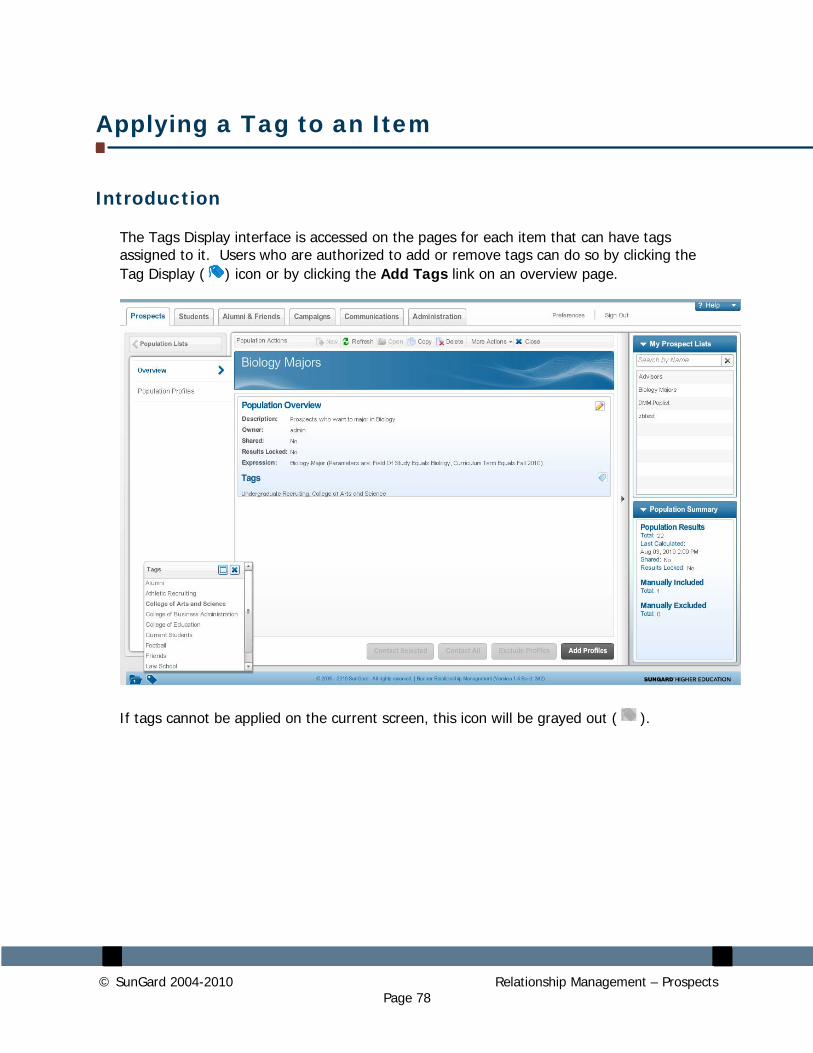
The Tags Display interface is accessed on the pages for each item that can have tags assigned to it. Users who are authorized to add or remove tags can do so by clicking the Tag Display ( ) icon or by clicking the Add Tags link on an overview page.
If tags cannot be applied on the current screen, this icon will be grayed out ( ).
© SunGard 2004-2010 Relationship Management – Prospects Page 79
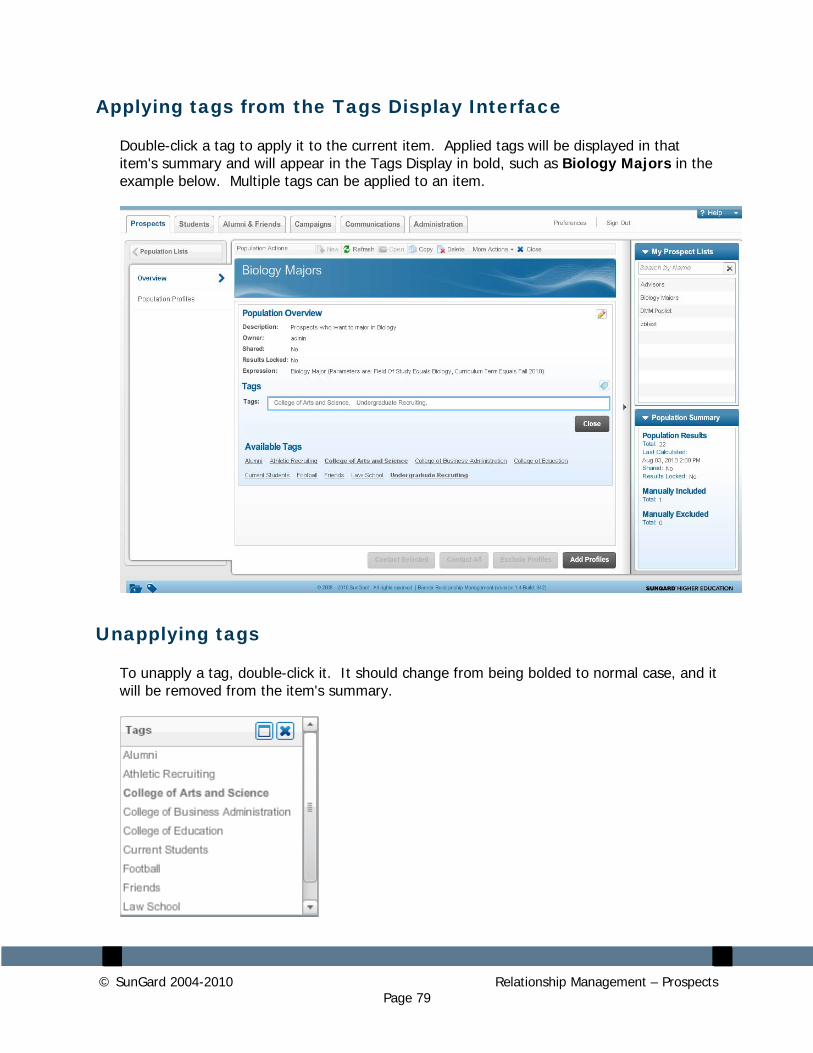
Applying tags from the Tags Display Interface
Double-click a tag to apply it to the current item. Applied tags will be displayed in that item's summary and will appear in the Tags Display in bold, such as Biology Majors in the example below. Multiple tags can be applied to an item.
Unapplying tags
To unapply a tag, double-click it. It should change from being bolded to normal case, and it will be removed from the item's summary.
© SunGard 2004-2010 Relationship Management – Prospects Page 80
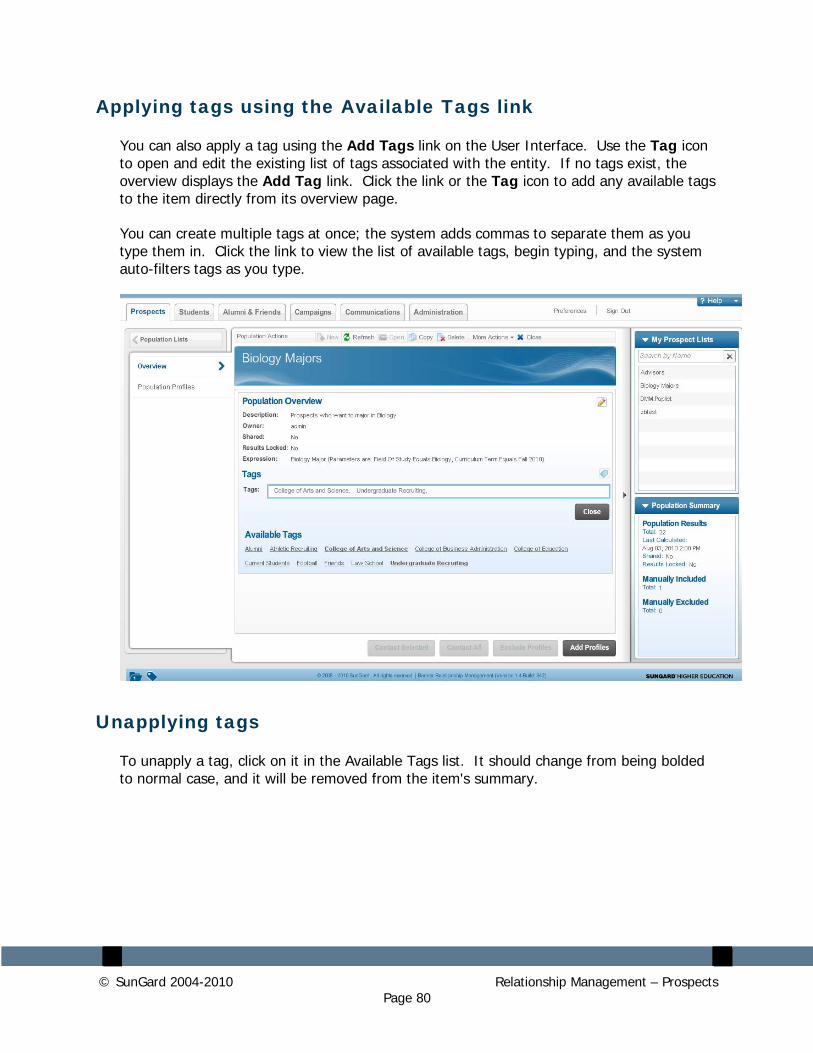
Applying tags using the Available Tags link
You can also apply a tag using the Add Tags link on the User Interface. Use the Tag icon to open and edit the existing list of tags associated with the entity. If no tags exist, the overview displays the Add Tag link. Click the link or the Tag icon to add any available tags to the item directly from its overview page.
You can create multiple tags at once; the system adds commas to separate them as you type them in. Click the link to view the list of available tags, begin typing, and the system auto-filters tags as you type.
Unapplying tags
To unapply a tag, click on it in the Available Tags list. It should change from being bolded to normal case, and it will be removed from the item's summary.
© SunGard 2004-2010 Relationship Management – Prospects Page 81
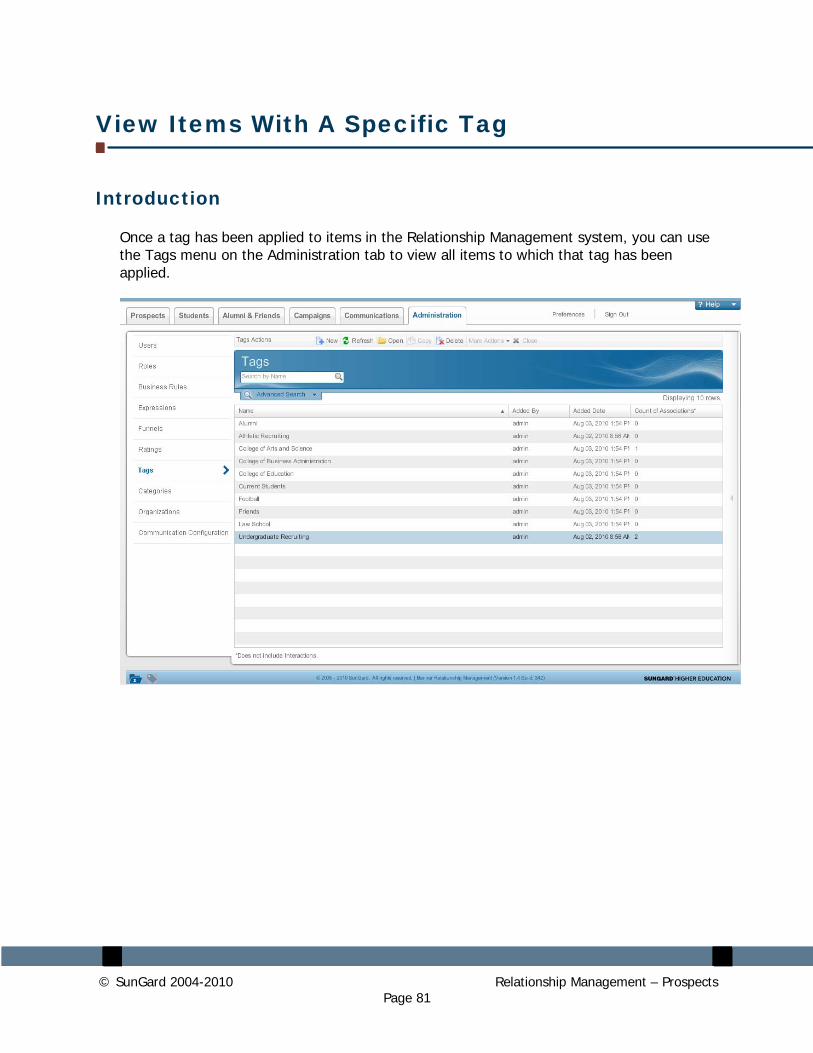
View Items With A Specific Tag
Introduction
Once a tag has been applied to items in the Relationship Management system, you can use the Tags menu on the Administration tab to view all items to which that tag has been applied.
© SunGard 2004-2010 Relationship Management – Prospects Page 82
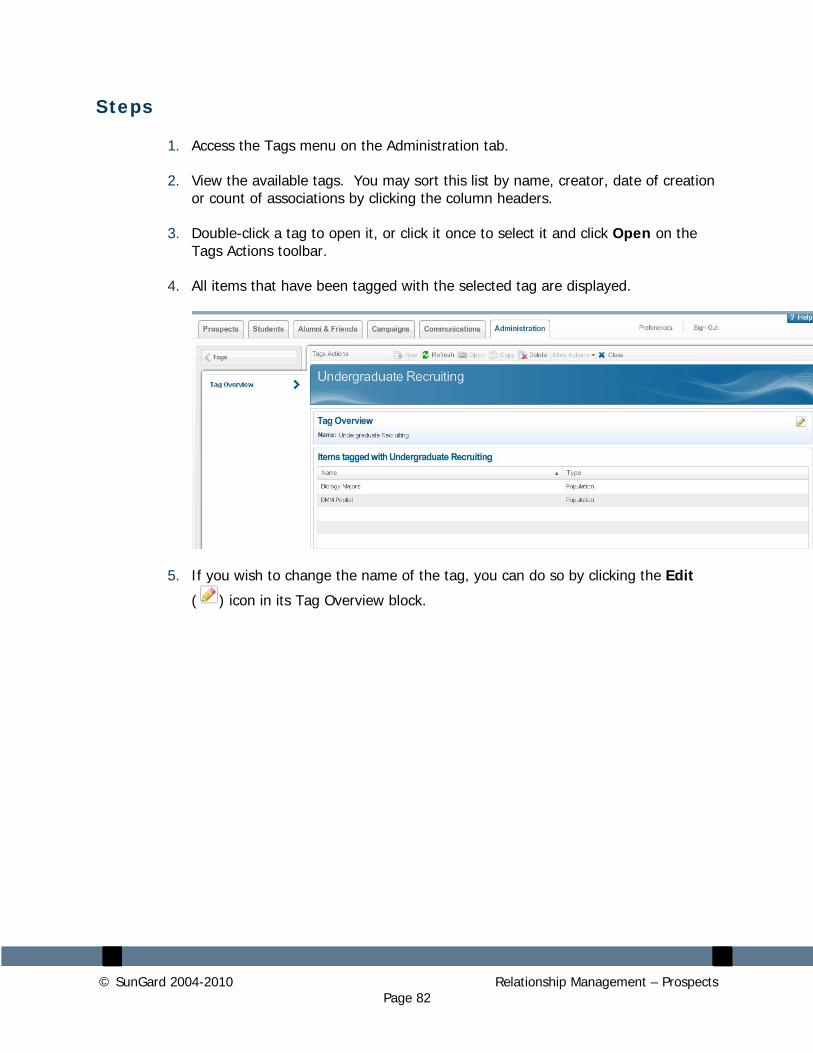
Steps
1. Access the Tags menu on the Administration tab.
2. View the available tags. You may sort this list by name, creator, date of creation or count of associations by clicking the column headers.
3. Double-click a tag to open it, or click it once to select it and click Open on the Tags Actions toolbar.
4. All items that have been tagged with the selected tag are displayed.
5. If you wish to change the name of the tag, you can do so by clicking the Edit
( ) icon in its Tag Overview block.
© SunGard 2004-2010 Relationship Management – Prospects Page 83
Search for Tagged Items
Introduction
Once tags have been applied to items in the Relationship Management system, you can use Advanced Search to search for items that contain specific tags.
Steps
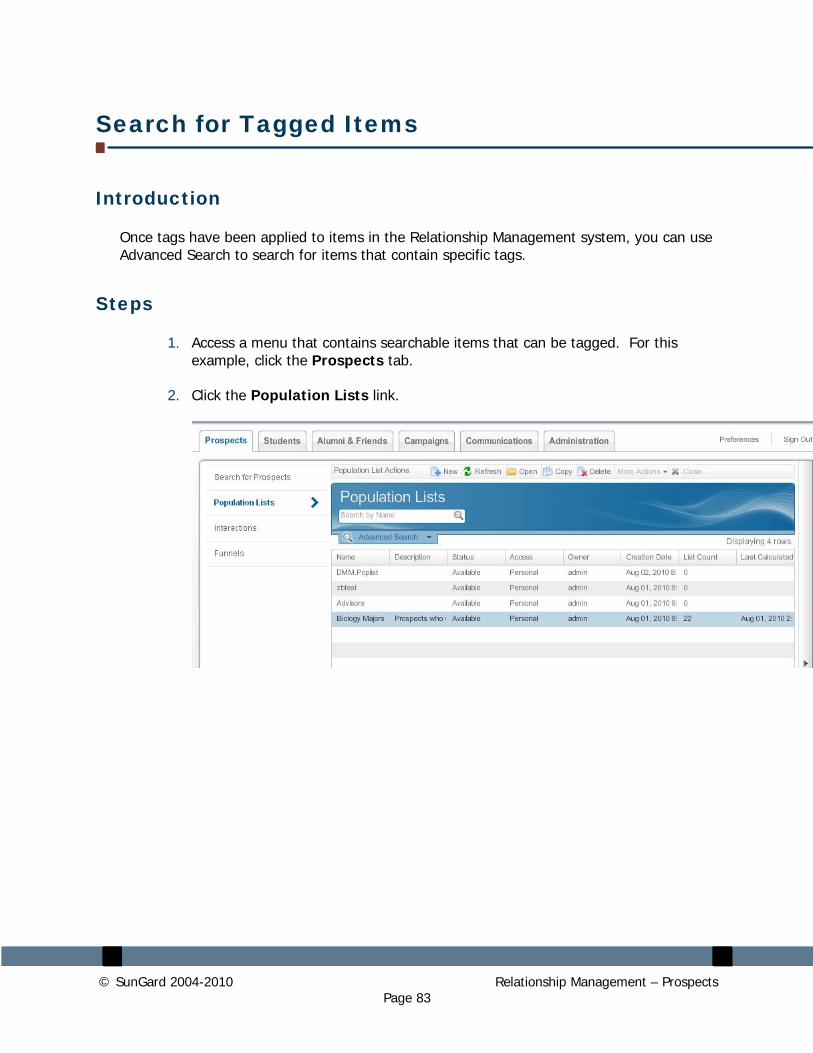
1. Access a menu that contains searchable items that can be tagged. For this example, click the Prospects tab.
2. Click the Population Lists link.
© SunGard 2004-2010 Relationship Management – Prospects Page 84
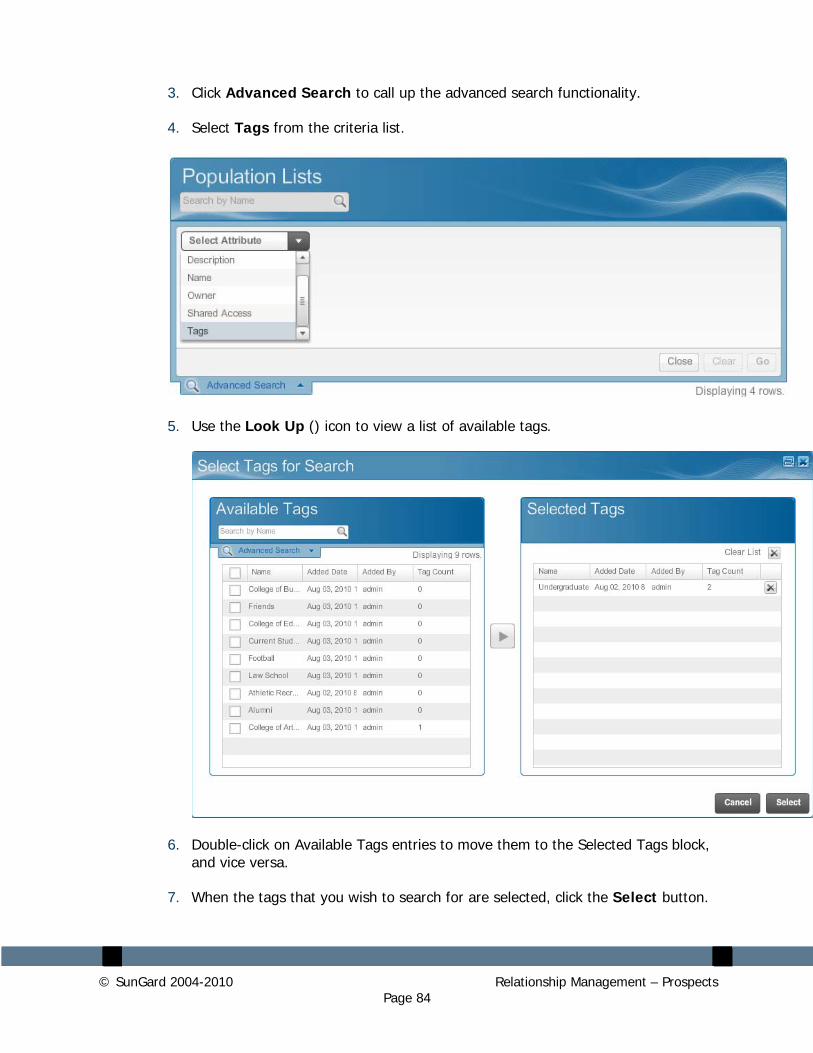
3. Click Advanced Search to call up the advanced search functionality.
4. Select Tags from the criteria list.
5. Use the Look Up () icon to view a list of available tags.
6. Double-click on Available Tags entries to move them to the Selected Tags block, and vice versa.
7. When the tags that you wish to search for are selected, click the Select button.
© SunGard 2004-2010 Relationship Management – Prospects Page 85
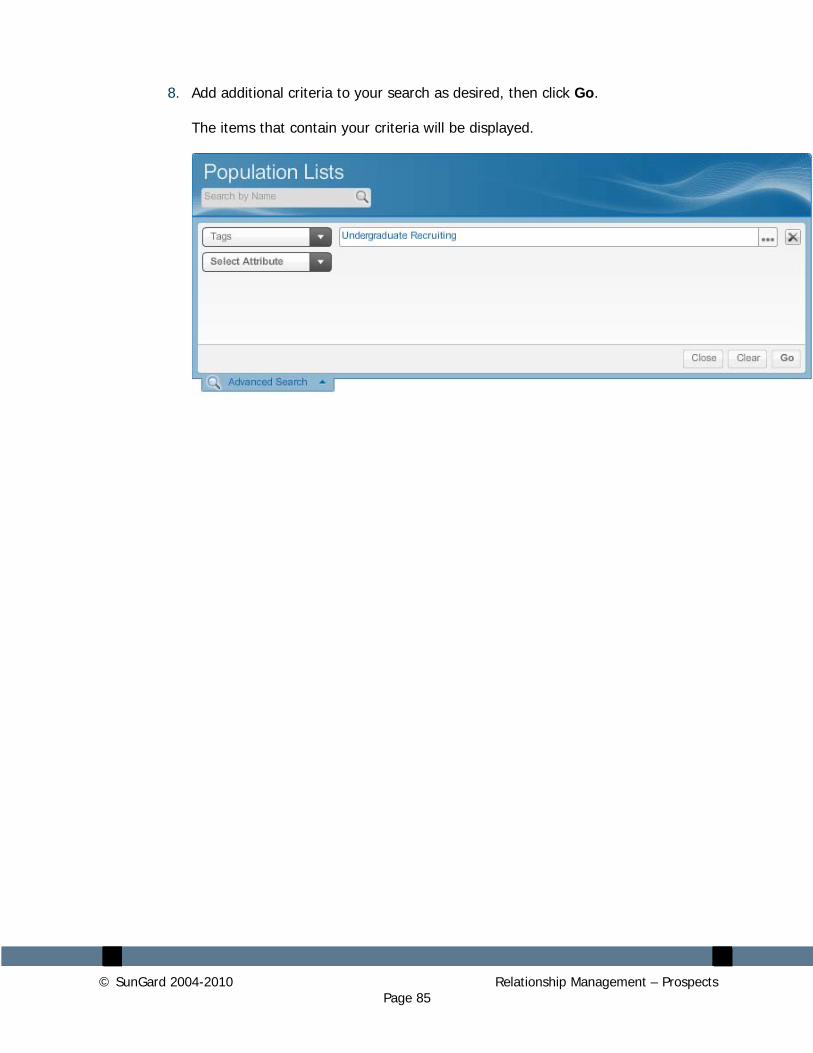
8. Add additional criteria to your search as desired, then click Go.
The items that contain your criteria will be displayed.
© SunGard 2004-2010 Relationship Management – Prospects Page 86
Appendix B – Population List Settings – More Actions
© SunGard 2004-2010 Relationship Management – Prospects Page 87
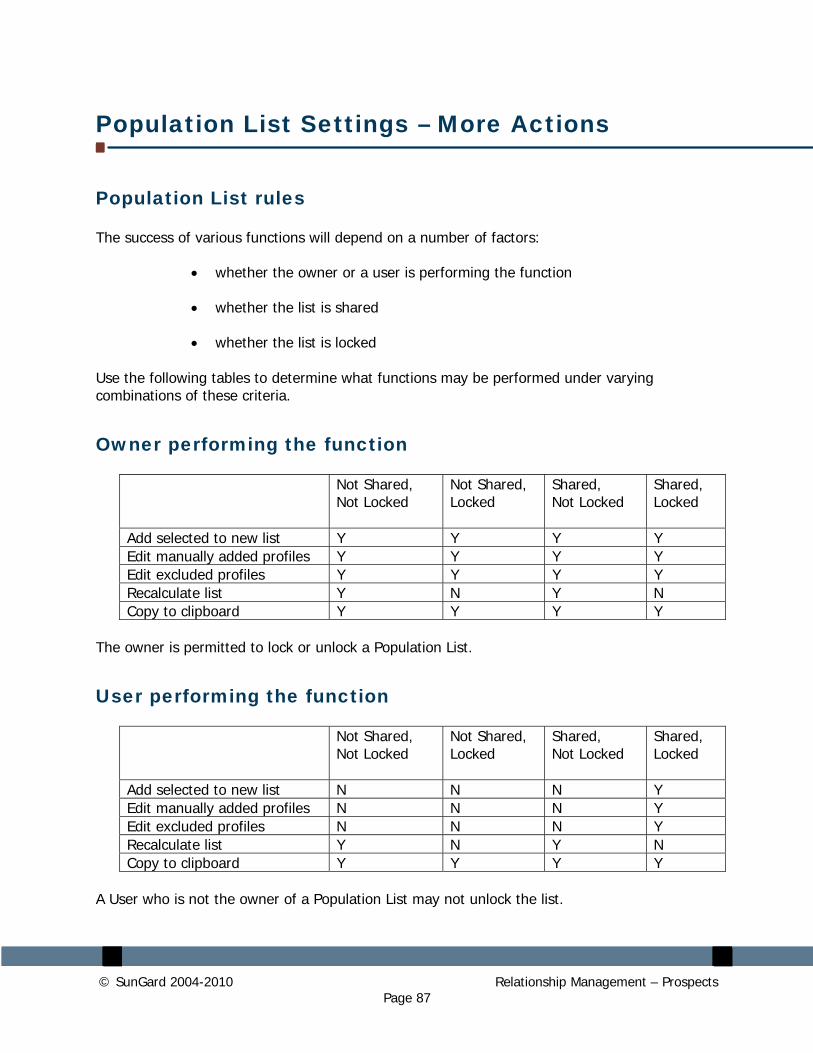
Population List Settings – More Actions
Population List rules The success of various functions will depend on a number of factors:
• whether the owner or a user is performing the function
• whether the list is shared
• whether the list is locked Use the following tables to determine what functions may be performed under varying combinations of these criteria.
Owner performing the function
Not Shared, Not Locked
Not Shared, Locked
Shared, Not Locked
Shared, Locked
Add selected to new list Y Y Y Y Edit manually added profiles Y Y Y Y Edit excluded profiles Y Y Y Y Recalculate list Y N Y N Copy to clipboard Y Y Y Y
The owner is permitted to lock or unlock a Population List.
User performing the function
Not Shared, Not Locked
Not Shared, Locked
Shared, Not Locked
Shared, Locked
Add selected to new list N N N Y Edit manually added profiles N N N Y Edit excluded profiles N N N Y Recalculate list Y N Y N Copy to clipboard Y Y Y Y
A User who is not the owner of a Population List may not unlock the list.