Embed Size (px)
Citation preview

Banner 9
The Getting Started Guide

General Overview

Front End Improvements
BANNER TODAY BANNER 9
End of 2018 – will no longer work with any browser
Works on all browsers except Internet Explorer
Occasional compatibility issues No longer requires Java applet
PC and laptop friendly PC, laptop, mobile and tablet friendly
A separate Banner username and password need to be maintained
CAS* allows users to log in with the same credentials used for gmail
Banner “forms” Now referred to as “admin pages”
Sections within a form are referred to as “blocks.”
Now referred to as “panels”
*CAS – Centralized Authentication Service allows users to access multiple applications while providing their username and password only once.

Front End Challenges
BANNER 9
New architecture results in slower performance when:
• Loading a page • Executing a search • Saving entries • Tabbing to the next field
Dates format has changed: 12-NOV-2018 (Banner 8) → 11/12/2018 (Banner 9)
When date is entered with only digits and no slashes, automatic date conversions may occur in error.*
Some common keystrokes have changed.
Features that no longer exist: • Toolbar with icons
• Ability to broadcast messages on the main menu
Color scheme cannot be personalized at this time.
Front End Challenges - General
*Dates should be double- and triple-checked when saving entries.

Front End Challenges Front End Challenges – Log In
BANNER 9
On occasion, users may be presented with an invalid message upon login. Selecting OK RETURN HOME is most efficient and will quickly lead to a successful login.
Invalid message X
X The LOGOUT button will also work but users will need to re-enter the Banner url and their login credentials.

Front End Challenges User Preference Settings (GUAUPRF)
Step 1: On the “Display Option”
tab on GUAUPRF, check the following two boxes and “save” (F10):
Step 2: Two messages will
display in the upper right hand corner.
Step 3: Log out and back in to
Banner to view the change.
BANNER 9
Display the 7-character page identifier alongside the page name by adjusting user settings on GUAUPRF. This setting need only be adjusted once and will remain unless changed by the user.
Before
After

The Basics

General Keystrokes & Navigation
BANNER TODAY BANNER 9
Toolbars
Multiple toolbars:
•Page toolbar
•Panel toolbar(s)
Keystrokes Many exist as an alternative to using a mouse
Some have changed + new ones created
Multiple Records
Vertical scrollbar
Greater control over the display when multiple entries exist
Font Size Adjustable by adding text to the Banner url
CNTRL + Mouse scroll wheel OR CNTRL + keyboard plus sign (+)
or minus sign (-)

BANNER 9
Toolbars
The toolbar at the top of the form has now been separated into two: 1. Page toolbar 2. Panel toolbar
PAGE
PANEL

Page Toolbars
CHANGE - Change home institution (option is page specific) ADD – <Not currently in use> RETRIEVE – <Not currently in use> RELATED – Displays a list of pages related to the current page TOOLS – Displays a list of actions related to the current page (e.g. refresh, clear record)
BANNER 9

Panel Toolbars
INSERT – Insert a new record DELETE - Delete an existing record or clear an unsaved record COPY – Copy an existing record FILTER – Search for existing records that meet certain criteria
BANNER 9

Expanded Collapsed
Panel Display
BANNER 9
Some pages are made of up multiple panels, formerly known as “blocks.” Each panel can be collapsed (not visible) or expanded (visible) by clicking on the arrow ( , ) next to the panel header.
1 2 3
1 2 3
Contents of all three panels display. Panels 1 and 3 have been collapsed. Panel 2 is expanded so contents continue to display.
- Collapsed
- Expanded
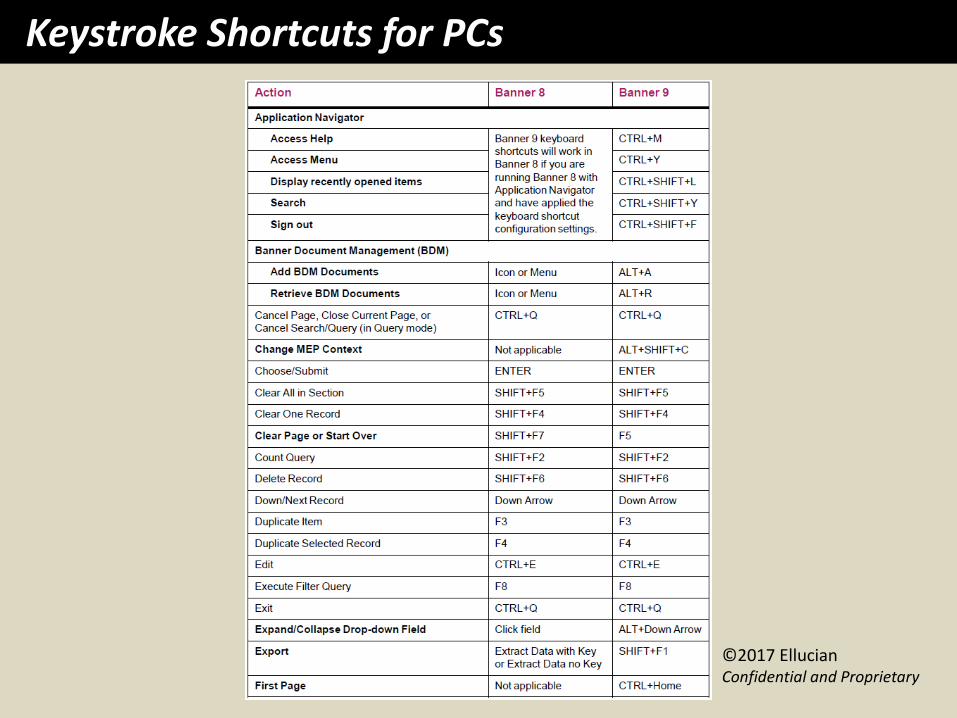
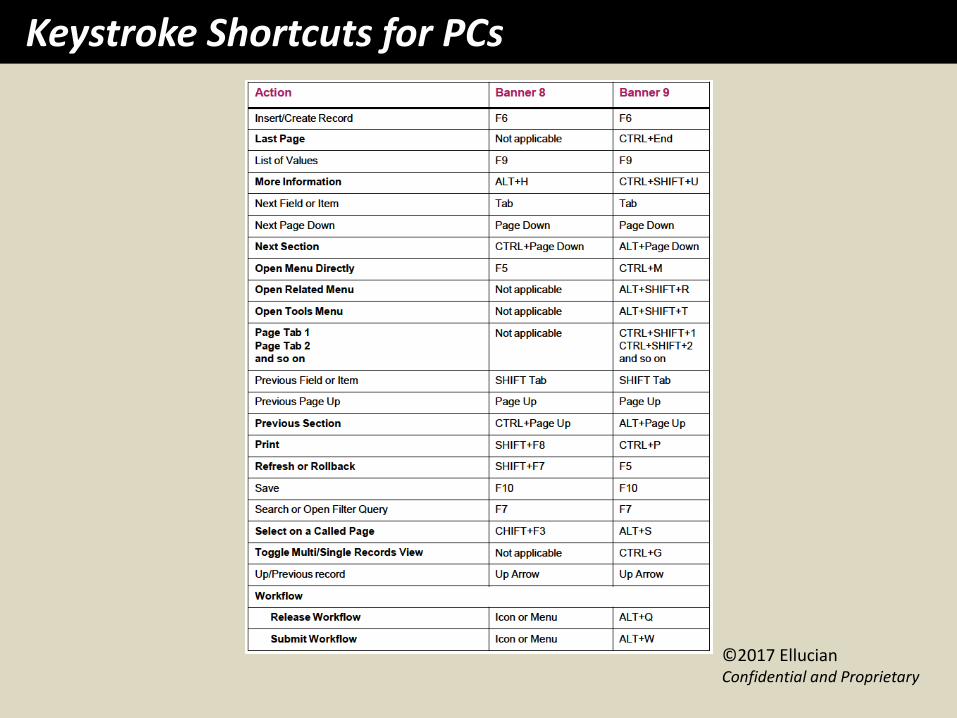
Keystroke Shortcuts for PCs
©2017 Ellucian Confidential and Proprietary
©2017 Ellucian Confidential and Proprietary
Keystroke Shortcuts for PCs

Keystroke Shortcuts for Macs
These Mac keystrokes have not been verified by Ellucian.

Keystroke Shortcuts for Macs
These Mac keystrokes have not been verified by Ellucian.

Pages with Multiple Records
For Admin Pages containing panels with multiple entries, users can control the number of records that display on the screen at one time. Users can also quickly navigate to a specific page number.
BANNER 9

Pages with Multiple Records
5 pages exist when set to view 10 records per page
3 pages exist when set to 20 records per page
The number of total pages will decrease when the setting for the number of records per page increase since more entries are displayed on the screen at one time.
Only 1 page exists when set to view 50 records per page since all records can display at once.
BANNER 9
BANNER 9
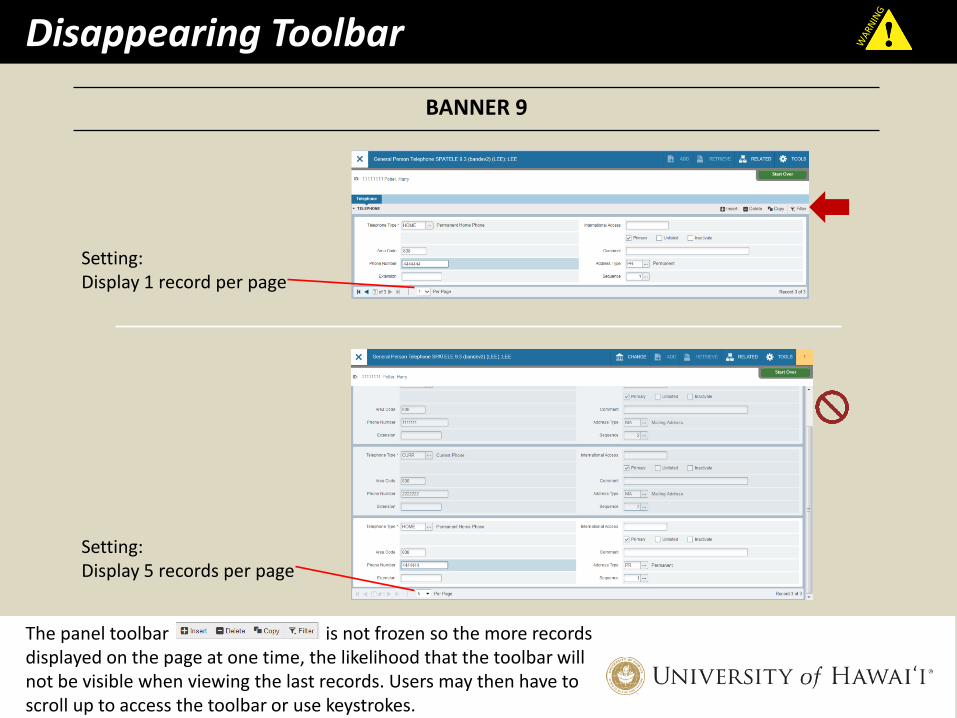
Disappearing Toolbar
The panel toolbar is not frozen so the more records displayed on the page at one time, the likelihood that the toolbar will not be visible when viewing the last records. Users may then have to scroll up to access the toolbar or use keystrokes.
Setting: Display 1 record per page
Setting: Display 5 records per page

Scrollbars
BANNER TODAY BANNER 9
Screenshot
Vertical Scrollbar Only 2 records can display at one time so a vertical scrollbar is needed to view
multiple records.
Entries can be set to display 10, 20, 30+ records per page so that they are distributed amongst multiple pages. Users can easily go directly to a page to view
a specific record.
Horizontal Scrollbar There are 3 rows of fields for a single record. A horizontal scrollbar is not
needed since all fields for that record are visible on the screen.
There are no longer multiple rows for each record; the fields are all on a single line for each entry. A
horizontal scrollbar is needed to view fields that do not fit on the screen.
Example: SSASECQ Schedule Section Query

BANNER 9
General Map of a Page – Navigation
Page Navigation Search, Breadcrumbs, Return to Home/Main Menu Logout, Help Page Controls
Change Home Institution, Quick Access to Related Pages,
Page-related Actions
Panel Toolbars
Page Controls Exit Page
Multiple Records Controls
Designate the number of records displayed per page
Panel Navigation Jump to the different panels and
tabs within the page (a.k.a. “Next Block”)
OR
Action Buttons Save Changes, Cancel Last Unsaved Action, Select the Selected Record
OR
Action Buttons Rollback, Initiate page functions
based on info entered in the keyblock
Panel Controls Collapse/Expand Panels
Scrollbars Horizontal and Vertical
BANNER 9
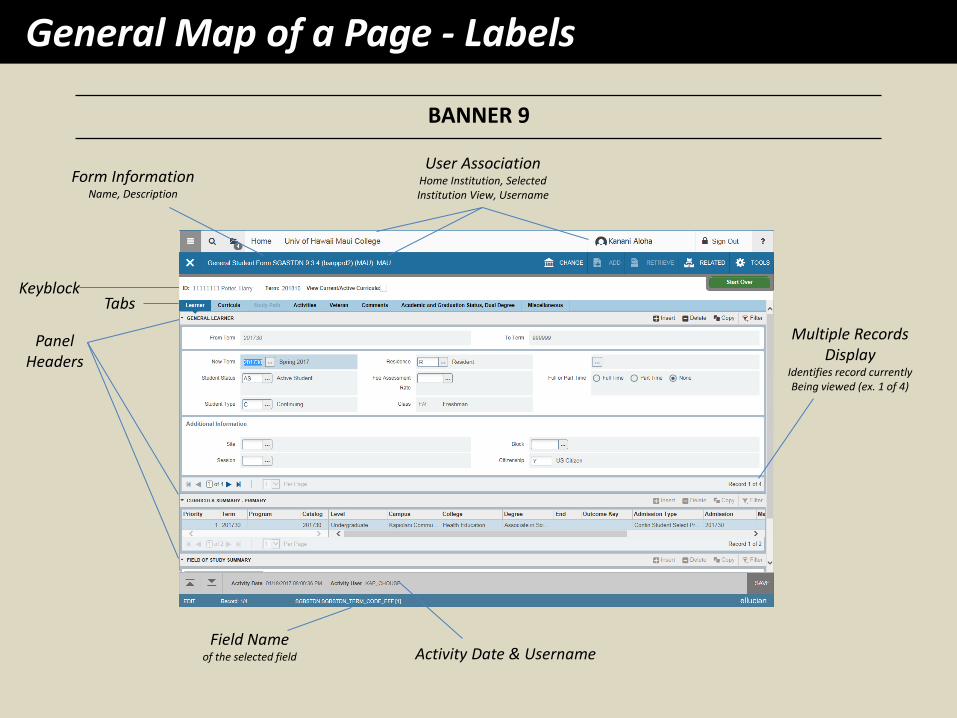
General Map of a Page - Labels
User Association Home Institution, Selected Institution View, Username
Keyblock Tabs
Panel Headers
Form Information Name, Description
Activity Date & Username Field Name
of the selected field
Multiple Records Display
Identifies record currently Being viewed (ex. 1 of 4)

The Experience

Since Java is no longer needed, users go directly to the login prompt. Banner 9 is CAS enabled so users enter the same credentials used to access their hawaii.edu gmail account.
2 steps 1 step
Login
BANNER TODAY BANNER 9
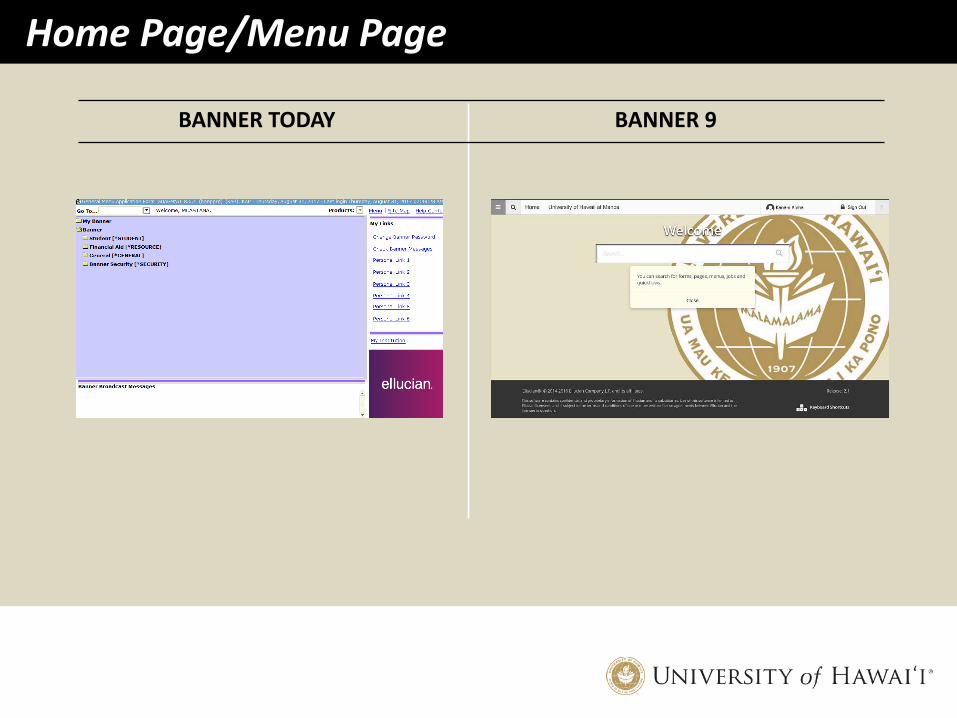
Home Page/Menu Page
BANNER TODAY BANNER 9

GUAGMNU General Menu Application Form no longer exists.
-- OR --
Enter the 7-letter page identifier in the Go To search box.
In the Object Search box, enter partial/full page name.
In the same search box, enter the 7-letter page identifier or partial/full page name.
Wildcard is needed for searches on partial names. Wildcard is not needed for searches on partial names.
Accessing a page from the menu
%
BANNER TODAY BANNER 9

BANNER 9
1. Click on in the upper left corner and enter a few letters or the complete 7-letter page identifier.
3. Click on and select the page from pre-grouped lists
2. Click on and type in the page name or part of the page name.
Wildcards (%) are no longer necessary when searching for pages. Text entered in the search box is treated as if a wildcard exists at both at the beginning and end.
Accessing a page from the menu

BANNER TODAY BANNER 9
Forms with a Keyblock
After information is entered in the keyblock, instead of Next Block (Cntrl + Page Down), click on the green GO button or Alt + Page Down.

BANNER TODAY BANNER 9
Forms with a Keyblock
To clear or rollback to the keyblock, instead of Rollback (Shift + F7), click on the green Start Over button or F5.

Forms without a Keyblock
No change from Banner 8. Previously saved records automatically display upon opening the page (ex. SHAGRDE).
BANNER TODAY BANNER 9

Query vs. Filter
BANNER TODAY BANNER 9
Term used: Query Term used: Filter
Search parameters are entered directly in the appropriate field(s) on the first record.
Only fields to be used as filters are selected from drop down menus.
Symbols (%, <, >) can be used to further refine the search
Symbols are now presented in text format (ex. “greater than” vs. “>”) with more options available.
Only one option available Two levels of filtering available: Basic and Advanced
Displays as a blank first record Depending on the page, filters may automatically display or must be accessed via the “filter” button.
Filters provide more flexibility in refining the search.

Searching Using Filters
BASIC ADVANCED
Limited to only the “equal to” operator. Records that do not match the value exactly as entered will be excluded from the results.
A variety of operator options are available such as: “starts with,” “less than,” and “contains.”

Step 1: Select “Advanced Filter” Step 2: For each field used to define the search criteria:
NOTE: Select additional fields to use as filters from the “add another field” drop down menu.
ENTERING FILTERS
Searching Using Advanced Filters
1). Select the operator using the down arrow 2). Enter the appropriate value by typing it directly into the field or selecting it using the ellipsis. Fields not used in the search can be left with the defaulted null value or removed from the screen by clicking on the
Step 3: Once all desired filters are entered, click GO to initiate the search.

MODIFYING THE SEARCH
Searching Using Advanced Filters
“Filter” or “Filter Again” to modify previously entered filters.
to remove a filter from the search criteria and re-query the database
or clears filters and automatically returns
all records on the table.
After a query has been executed, there are multiple options available should filters need to be modified.
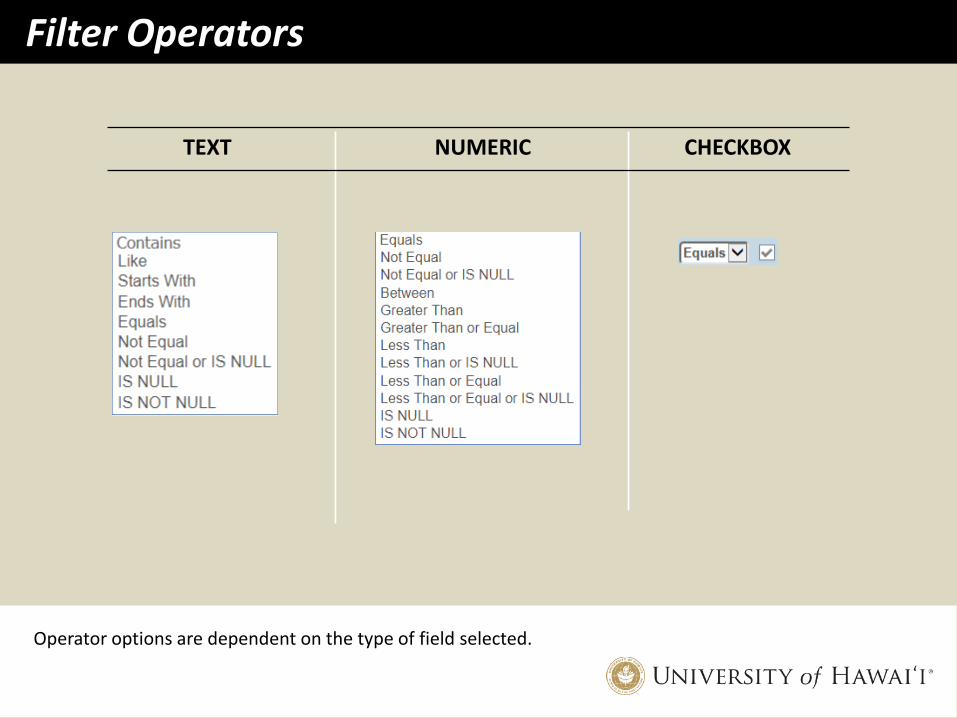
Filter Operators
Operator options are dependent on the type of field selected.
TEXT NUMERIC CHECKBOX

OPERATOR TEXT ENTERED BY USER
en %en en%
Contains All three entries return the same results: ANYWHERE
Like --- no titles returned --- END BEGINNING
Starts With BEGINNING ANYWHERE BEGINNING
Ends With END END ANYWHERE
Equals --- no titles returned --- END ANYWHERE
Not Equal --- no titles returned --- END BEGINNING
Not Equal or IS NULL All three entries return the same results: ALL TITLES ARE RETURNED w/ and w/o EN
IS NULL This operator does not allow text entry. --- no titles returned ---
IS NOT NULL This operator does not allow text entry. --- no titles returned ---
Filter Operators – Results for Text Fields
Example: Performing a search on the Course/Section Title field on SSASECQ Schedule Section Query
Text appears ANYWHERE in the title: Body and Fender, Hawai’i on Screen, Engineering
Text appears at the END of the title: Hawai’i on Screen, Speak and Listen
Text appears at the BEGINNING of the title: English, Engineering, Engines

OPERATOR DESCRIPTION SAMPLE TEST RESULTS Entered Returned
Equals Exactly the same as the number entered 10 10
Not Equal Any number that is not the numbered entered
10 …7, 8, 9, 11, 12, 13…
Not Equal or IS NULL Any number that is not the number entered + null entries
10 …7, 8, 9, 11, 12, 13…
and null entries
Between Any number that is equal to or in between the two numbers entered
10 and 15 10, 11, 12, 13, 14, 15
Greater Than Any number that is greater than and not equal to the number entered
10 11, 12, 13, 14…
Greater Than or Equal Any number that is greater than or equal to the number entered
10 10, 11, 12, 13, 14…
Less Than Any number that is less than and not equal to the number entered
10 …6, 7, 8, 9
Less Than or IS NULL Any number that is less than and not equal to the number entered + null entries
10 …6, 7, 8, 9 and null entries
Less Than or Equal Any number that is less than or equal to the number entered
10 …6, 7, 8, 9, 10
Less Than or Equal or IS NULL
Any number that is less than or equal to the number entered + null entries
10 …6, 7, 8, 9, 10
And null entries
IS NULL All null entries This operator does not allow a number entry. All null entries
IS NOT NULL All entries that are not null This operator does not allow a number entry.
All entries with a number value
Filter Operators – Results for Numeric Fields Wildcard (%) cannot be used for number fields.

Person Search
BANNER TODAY BANNER 9
Upon opening page, both ID and Name fields display.
Upon opening page, only ID field displays. Users must TAB to display Name field.
Searches can be performed on both fields.
No Change
Both ID and username can be entered into the ID field
No Change
Enter name directly in the name field or by opening up SOAIDEN. Wildcards (%) are needed for partial names.
No Change
Access SOAIDEN directly by clicking on the down arrow
Access SOAIDEN by clicking on the ellipsis
Once the correct ID and name display, instead of “Next Block” (CNTRL + Page Down), click on the button.
+ Tab =

BANNER
TODAY
BANNER
9
Inserting/Deleting records
Previously located on the RECORD drop down list, these commonly used functions are now readily available as buttons on each panel. Keystrokes for inserting (F6) and deleting (shift + F6) records remain the same.

BANNER TODAY BANNER 9
Inconsistently display at either the bottom of the form and/or in a pop up window
Confirmation Messages
Always display in the upper right hand corner
To remove messages in Banner 9: • Authorize/disallow action if YES, NO, or OK buttons are present OR • Click on the number box in the upper right hand corner

BANNER 9
GREEN Save successful, Instructional
Confirmation Messages
In addition to the use of icons, confirmation messages are color coded to identify the type of message displayed.
RED Error, action not allowed
YELLOW Warning with a required call to action
BLUE Informative

The icon has changed but the process and display remain the same.
(User’s Home Institution) :: Selected Institution
Changing the institution
BANNER TODAY BANNER 9

Date Fields
Date fields continue to be identified with a calendar icon . The properties of data entry have generally remain unchanged except for auto populated dates.
BANNER TODAY BANNER 9
Typing any character (letter or symbol) + TAB (or ENTER) auto populates the current date.
Symbols can no longer be used. A single letter, however, still works.
Typing 01 through 31 + TAB (or ENTER) populates the date for the current month and year.
Ex. If today’s date is 10/14/2017, typing just 20 in the field will auto populate 10/20/17.
This feature is no longer available.
Dates can be entered in the following formats:
MMDDYY MMDDYYYY MM/DD/YYYY
No change

BANNER TODAY BANNER 9
Exists as its own field within the form Displays at the bottom of the page
The activity date (i.e. last time the record was saved/modified) for each record now displays at the bottom of the form. The date and time displayed is dependent on the line item selected within the form.
Activity Date and Time Stamp

BANNER TODAY BANNER 9
For ease of navigation, breadcrumbs provide a trail of forms recently accessed with direct links to each page.
Breadcrumb Trail
BANNER 9
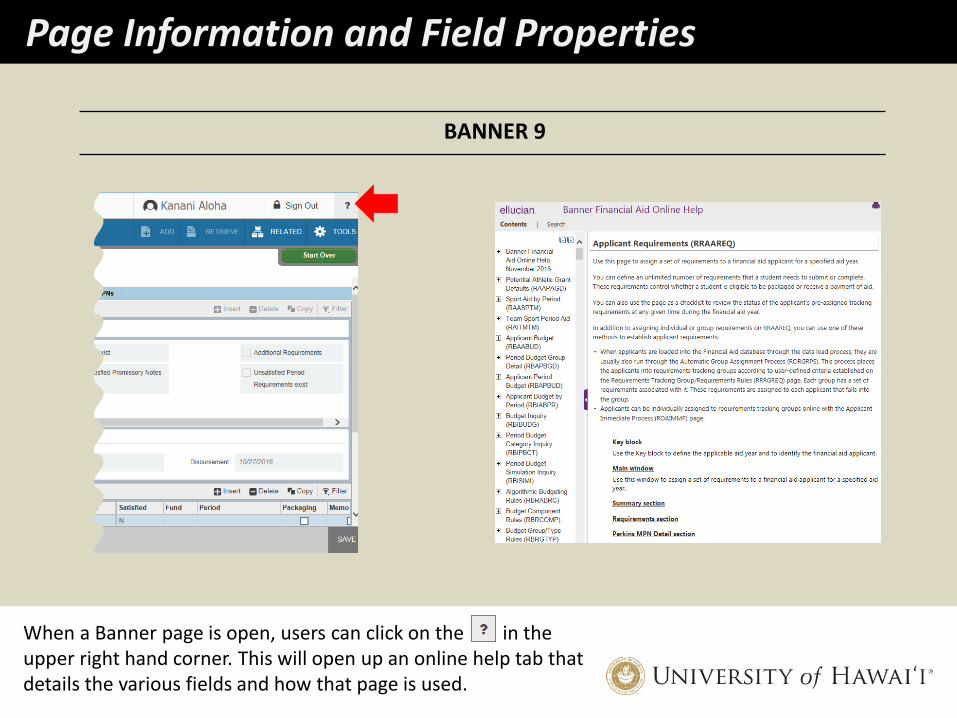
Page Information and Field Properties
When a Banner page is open, users can click on the in the upper right hand corner. This will open up an online help tab that details the various fields and how that page is used.

BANNER 9
Date Field
Required upon “save”
Restricted Values/Codes (keystroke: F9)
Field Name
Icons continue to be used to identify different types of fields. An asterisk (*) has been added to identify fields required to save an entry. Additional details about each field are available by clicking on the TOOLS button and selecting ITEM PROPERTIES as well as the previously mentioned online help feature.
1
2
Page Information and Field Properties
*
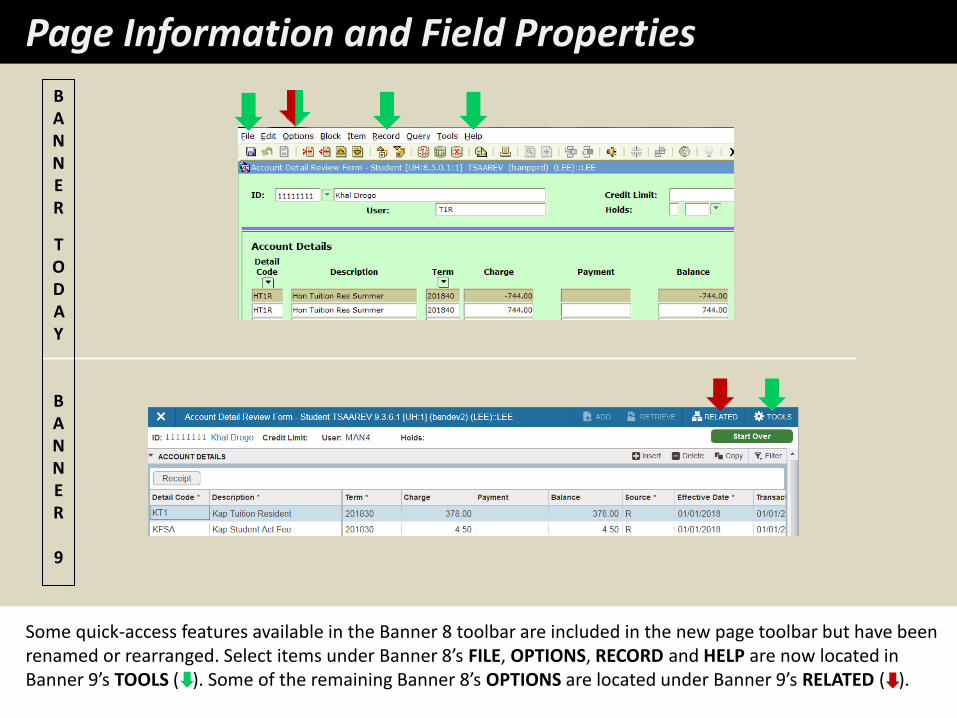
Page Information and Field Properties
BANNER
TODAY
BANNER
9
Some quick-access features available in the Banner 8 toolbar are included in the new page toolbar but have been renamed or rearranged. Select items under Banner 8’s FILE, OPTIONS, RECORD and HELP are now located in Banner 9’s TOOLS ( ). Some of the remaining Banner 8’s OPTIONS are located under Banner 9’s RELATED ( ).

Extract Data
1
2
Data displayed on select pages can be conveniently extracted into an Excel document by using the TOOLS EXPORT feature.
BANNER 9

BANNER 9
View Job Submission Results - GJIREVO
Step 1: When the job has
completed processing, the sequence number will display in the upper right hand corner.
Step 2: Click on the RELATED
button and select GJIREVO from the drop down list. This will launch GJIREVO.
Step 3: Enter the sequence
number in the FILE NAME field or click on the ellipsis and select it from the file list.
The output will display in the SAVED OUTPUT REVIEW PANEL.

View Job Submission Results – Browser Window
As with Banner 8, files displayed in GJIREVO can also be viewed in a browser. For some outputs, this option is more convenient than viewing the report within Banner.
Step 1: When the output is
displayed in GJIREVO, click on the TOOLS button ( ) and select SHOW DOCUMENT (SAVE AND PRINT FILE) from the drop down list.
Step 2: User will be prompted
to authorize displaying the report in a browser. Click YES. Remember to remove any pop-up blockers that would prevent the new tab from displaying.
Step 3: A new tab will open
in the browser displaying the output.
BANNER 9

BANNER TODAY BANNER 9
Time out
Sessions will be timed out after 30 minutes of inactivity (e.g. no mouse scrolls/clicks, no data entry, etc.).
• A 5-minute warning is given prior to expiring a session.
• Within these 5 minutes, sessions can be extended by a simple click of a button.
• No warning is given. • Users do not know their sessions have
already expired until they attempt to resume activity.
• Users are then prompted to log in again.

BANNER TODAY BANNER 9
Logout

Go Live:
October 17, 2018