Embed Size (px)
Citation preview

Redpaper
ibm.com/redbooks
Backup Recovery and Media Services for OS/400More Practical Information
Susan Powers Scott Buttel
Gunnar Swenson Mervyn Venter
Online Lotus server and SAP backups with BRMS/400
Server consolidation with BRMS/400 data
Application Client to Tivoli Storage Manager


International Technical Support Organization REDP0508
Backup Recovery and Media Services for OS/400: More Practical Information
March 2001

© Copyright International Business Machines Corporation 2001. All rights reserved.Note to U.S Government Users - Documentation related to restricted rights - Use, duplication or disclosure is subject to restrictionsset forth in GSA ADP Schedule Contract with IBM Corp.
First Edition (March 2001)
This edition applies to Version 4, Release 5 of Backup Recovery and Media Services for OS/400, 5769-BR1, for use with OS/400.
This document created or updated on March 12, 2001.
Comments may be addressed to:IBM Corporation, International Technical Support OrganizationDept. JLU Building 107-23605 Highway 52NRochester, Minnesota 55901-7829
When you send information to IBM, you grant IBM a non-exclusive right to use or distribute the information in any way it believes appropriate without incurring any obligation to you.
Before using this information and the product it supports, be sure to read the general information in Appendix C, “Special notices” on page 57.
Take Note!

Contents
Preface . . . . . . . . . . . . . . . . . . . . . . . . . . . . . . . . . . . . . . . . . . . . . . . . . . . . . . .vThe team that wrote this redpaperredbook. . . . . . . . . . . . . . . . . . . . . . . . . . . . . . . . vComments welcome . . . . . . . . . . . . . . . . . . . . . . . . . . . . . . . . . . . . . . . . . . . . . . . . . vi
Chapter 1. BRMS package options . . . . . . . . . . . . . . . . . . . . . . . . . . . . . . . .11.1 BRMS Standard . . . . . . . . . . . . . . . . . . . . . . . . . . . . . . . . . . . . . . . . . . . . .11.2 BRMS Network Feature . . . . . . . . . . . . . . . . . . . . . . . . . . . . . . . . . . . . . . .11.3 BRMS Advanced Functions Feature . . . . . . . . . . . . . . . . . . . . . . . . . . . . . .2
1.3.1 Parallel save support: Advanced Feature . . . . . . . . . . . . . . . . . . . . . .2
Chapter 2. BRMS/400 Application Client to TSM . . . . . . . . . . . . . . . . . . . . . .32.1 Overviews . . . . . . . . . . . . . . . . . . . . . . . . . . . . . . . . . . . . . . . . . . . . . . . . . .32.2 BRMS/400 Application Client software requirements. . . . . . . . . . . . . . . . . .42.3 Benefits of TSM in a BRMS environment . . . . . . . . . . . . . . . . . . . . . . . . . .42.4 Restrictions . . . . . . . . . . . . . . . . . . . . . . . . . . . . . . . . . . . . . . . . . . . . . . . . .52.5 Backup . . . . . . . . . . . . . . . . . . . . . . . . . . . . . . . . . . . . . . . . . . . . . . . . . . . .62.6 Restore . . . . . . . . . . . . . . . . . . . . . . . . . . . . . . . . . . . . . . . . . . . . . . . . . . . .62.7 Setting up BRMS/400 Application Client . . . . . . . . . . . . . . . . . . . . . . . . . . .72.8 Enabling BRMS/400 Application Client on the TSM server . . . . . . . . . . . . .72.9 Performance . . . . . . . . . . . . . . . . . . . . . . . . . . . . . . . . . . . . . . . . . . . . . . . .7
2.9.1 TCP/IP network capacity . . . . . . . . . . . . . . . . . . . . . . . . . . . . . . . . . . .72.9.2 Setting the maximum buffer size to improve performance . . . . . . . . . .82.9.3 Using multiple concurrent control groups to improve performance. . . .92.9.4 Setting up policies for BRMS/400 Application Client on TSM server . .9
Chapter 3. Merging BRMS/400 data and consolidating systems . . . . . . . .113.1 General server consolidation planning . . . . . . . . . . . . . . . . . . . . . . . . . . .113.2 Merging BRMS/400 data . . . . . . . . . . . . . . . . . . . . . . . . . . . . . . . . . . . . . .123.3 Prerequisites for merging BRMS/400 data . . . . . . . . . . . . . . . . . . . . . . . .133.4 Flowchart and scenarios for merging BRMS/400 data . . . . . . . . . . . . . . . .14
3.4.1 Scenarios for merging BRMS/400 data . . . . . . . . . . . . . . . . . . . . . . .153.5 Copying control group information. . . . . . . . . . . . . . . . . . . . . . . . . . . . . . .22
3.5.1 Copying control groups when BRMS/400 Network is active . . . . . . . .223.5.2 Copying control groups when BRMS/400 Network is not active . . . . .22
3.6 Renaming history data for duplicate control groups . . . . . . . . . . . . . . . . . .233.7 Merging additional BRMS/400 data . . . . . . . . . . . . . . . . . . . . . . . . . . . . . .233.8 Post-requisites for merging BRMS/400 data . . . . . . . . . . . . . . . . . . . . . . .24
Chapter 4. Online Lotus server backups . . . . . . . . . . . . . . . . . . . . . . . . . . .254.1 What is Lotus Domino . . . . . . . . . . . . . . . . . . . . . . . . . . . . . . . . . . . . . . . .25
4.1.1 Domino Mail Server. . . . . . . . . . . . . . . . . . . . . . . . . . . . . . . . . . . . . .254.1.2 Domino Application Server . . . . . . . . . . . . . . . . . . . . . . . . . . . . . . . .254.1.3 Domino Enterprise Server . . . . . . . . . . . . . . . . . . . . . . . . . . . . . . . . .25
4.2 What changes for an online backup . . . . . . . . . . . . . . . . . . . . . . . . . . . . .264.3 Initializing BRMS for Lotus server backup . . . . . . . . . . . . . . . . . . . . . . . . .274.4 Considerations for performing an online backup . . . . . . . . . . . . . . . . . . . .29
4.4.1 Determining the device and media class to use . . . . . . . . . . . . . . . . .294.4.2 Adding media to the scratch pool . . . . . . . . . . . . . . . . . . . . . . . . . . .30
4.5 Performing an online Lotus server backup . . . . . . . . . . . . . . . . . . . . . . . .304.5.1 Interactive saves . . . . . . . . . . . . . . . . . . . . . . . . . . . . . . . . . . . . . . . .304.5.2 Scheduled entry . . . . . . . . . . . . . . . . . . . . . . . . . . . . . . . . . . . . . . . .30
iii
4.6 Messages and timing . . . . . . . . . . . . . . . . . . . . . . . . . . . . . . . . . . . . . . . . 304.7 Viewing the Lotus server saved history . . . . . . . . . . . . . . . . . . . . . . . . . . 314.8 Planning for recovery. . . . . . . . . . . . . . . . . . . . . . . . . . . . . . . . . . . . . . . . 314.9 Recovering a single Lotus server database . . . . . . . . . . . . . . . . . . . . . . . 314.10 Lotus server backup performance tuning . . . . . . . . . . . . . . . . . . . . . . . . 32
4.10.1 Domino servers . . . . . . . . . . . . . . . . . . . . . . . . . . . . . . . . . . . . . . . 324.10.2 QuickPlace servers . . . . . . . . . . . . . . . . . . . . . . . . . . . . . . . . . . . . 32
4.11 Copying control groups . . . . . . . . . . . . . . . . . . . . . . . . . . . . . . . . . . . . . 334.12 Restrictions of Lotus server online backups . . . . . . . . . . . . . . . . . . . . . . 334.13 Considerations when using online Lotus server backups . . . . . . . . . . . . 334.14 Enhancing Lotus server online backup . . . . . . . . . . . . . . . . . . . . . . . . . 34
4.14.1 Temporary files . . . . . . . . . . . . . . . . . . . . . . . . . . . . . . . . . . . . . . . 344.14.2 Files to back up . . . . . . . . . . . . . . . . . . . . . . . . . . . . . . . . . . . . . . . 344.14.3 Restoration messages . . . . . . . . . . . . . . . . . . . . . . . . . . . . . . . . . . 344.14.4 Checking which Domino version is installed . . . . . . . . . . . . . . . . . . 34
Chapter 5. BRMS/400 and SAP backup . . . . . . . . . . . . . . . . . . . . . . . . . . . 375.1 BRMS/400 implementation when SAP is installed . . . . . . . . . . . . . . . . . . 375.2 Additional reading . . . . . . . . . . . . . . . . . . . . . . . . . . . . . . . . . . . . . . . . . . 37
Appendix A. Quick start implementation of BRMS/400. . . . . . . . . . . . . . . . .39
Appendix B. Collecting documentation for BRMS for OS/400 . . . . . . . . . . .41B.1 Basic problem determination . . . . . . . . . . . . . . . . . . . . . . . . . . . . . . . . . . . . . .41B.2 Installed code levels. . . . . . . . . . . . . . . . . . . . . . . . . . . . . . . . . . . . . . . . . . . . .41B.3 Primary problem areas. . . . . . . . . . . . . . . . . . . . . . . . . . . . . . . . . . . . . . . . . . .42
B.3.1 BRMS/400 code . . . . . . . . . . . . . . . . . . . . . . . . . . . . . . . . . . . . . . . . . . . .42B.3.2 SLIC, tape code, and OS/400 . . . . . . . . . . . . . . . . . . . . . . . . . . . . . . . . .44B.3.3 Library Manager code (on the 3494) . . . . . . . . . . . . . . . . . . . . . . . . . . . .45B.3.4 Hardware problems . . . . . . . . . . . . . . . . . . . . . . . . . . . . . . . . . . . . . . . . .45
B.4 Specific problem areas. . . . . . . . . . . . . . . . . . . . . . . . . . . . . . . . . . . . . . . . . . .46B.4.1 Installation problems . . . . . . . . . . . . . . . . . . . . . . . . . . . . . . . . . . . . . . . .46B.4.2 BRMS/400 networking . . . . . . . . . . . . . . . . . . . . . . . . . . . . . . . . . . . . . . .46B.4.3 Shared media inventory problems . . . . . . . . . . . . . . . . . . . . . . . . . . . . . .47B.4.4 Media library inventory mismatches. . . . . . . . . . . . . . . . . . . . . . . . . . . . .48B.4.5 Complex problems . . . . . . . . . . . . . . . . . . . . . . . . . . . . . . . . . . . . . . . . . .49
B.5 The last resort . . . . . . . . . . . . . . . . . . . . . . . . . . . . . . . . . . . . . . . . . . . . . . . . .49B.5.1 Disabling BRMS/400 . . . . . . . . . . . . . . . . . . . . . . . . . . . . . . . . . . . . . . . .49
B.6 Basic traps, traces, and tools . . . . . . . . . . . . . . . . . . . . . . . . . . . . . . . . . . . .50B.6.1 Performing a manual job trace . . . . . . . . . . . . . . . . . . . . . . . . . . . . . . . . .51B.6.2 Tape and tape code . . . . . . . . . . . . . . . . . . . . . . . . . . . . . . . . . . . . . . . . .51B.6.3 Useful commands . . . . . . . . . . . . . . . . . . . . . . . . . . . . . . . . . . . . . . . . . .54B.6.4 Collecting documentation . . . . . . . . . . . . . . . . . . . . . . . . . . . . . . . . . . . .54B.6.5 DMPBRM command . . . . . . . . . . . . . . . . . . . . . . . . . . . . . . . . . . . . . . . .55B.6.6 TSM backup failures . . . . . . . . . . . . . . . . . . . . . . . . . . . . . . . . . . . . . . . .55
B.7 Informational APARs . . . . . . . . . . . . . . . . . . . . . . . . . . . . . . . . . . . . . . . . . . . .56
Appendix C. Special notices . . . . . . . . . . . . . . . . . . . . . . . . . . . . . . . . . . . . . . .57
Index . . . . . . . . . . . . . . . . . . . . . . . . . . . . . . . . . . . . . . . . . . . . . . . . . . . . . . . 59
iv Backup Recovery and Media Services for OS/400

Preface
This redpaper complements the second edition of the IBM Redbook Backup Recovery Media Services: A Practical Approach, SG24-4840. This new information complements the redbook in that, for RISC systems (those systems beyond V3Rn), new functions and features are available for managing backup and recovery.
This new information includes:
• The procedures used to save and restore the SAP environment using Backup Recovery and Media Services (BRMS) for OS/400. Examples are included for two types of backups: full and incremental.
• The steps involved to merge BRMS/400 data from one system to another system. This information is useful in a server consolidation setting, where BRMS for OS/400 is installed on one or more of the servers.
• How BRMS for OS/400 can be used with Tivoli Storage Manager (TSM), formerly called ADSTAR Distributed System Manager (ADSM/400).
• The tools and procedures to diagnose BRMS for OS/400 problems. This basic guide to BRMS/400 problem determination is to be used in conjunction with existing BRMS/400 manuals.
• A description of the restructuring of BRMS for OS/400 code with V4R4 and later. Three installation options can be selected: Standard, Network, and Advanced. Order the features you need, when you need them.
• A checklist of the steps used to implement BRMS/400. If you are already familiar with BRMS/400 implementation, the list can serve as a reminder for the implementation tasks described in the following books:
– Backup Recovery Media Services: A Practical Approach, SG24-4840 – Backup Recovery and Media Services for OS/400, SC41-4345
In the future, the information in this redpaper will be merged into a redbook planned to reflect the information in Backup Recovery Media Services: A Practical Approach, SG24-4840, at a later OS/400 level.
The team that wrote this redpaperredbook
This redpaperredbook was produced by a team of specialists from around the world working at the International Technical Support Organization Rochester Center.
Susan Powers Scott ButtelGunnar SvensonMervyn Venter
© Copyright IBM Corp. 2001 v

Comments welcome
Your comments are important to us!
We want our redpapersRedbooks to be as helpful as possible. Please send us your comments about this redpaper or other Redbooks in one of the following ways:
• Use the online evaluation form found at ibm.com/redbooks
• Send your comments in an Internet note to [email protected]
vi Backup Recovery and Media Services for OS/400

Chapter 1. BRMS package options
In V4R4 and later, Backup Recovery and Media Services (BRMS) is restructured to incrementally include functions and features as business needs change and grow. There are three installation options to choose from with BRMS:
• Standard • Network • Advanced
This chapter explains each of these package options.
1.1 BRMS Standard
BRMS Standard, installed as Backup Recovery and Media Services/400 (5769-BR1) option *BASE, offers many of the base functions that AS/400 users need to implement a fully automated, single system, backup, recovery, and media management strategy. The cost of this feature does not depend on the number of media used. The standard functions of BRMS are offered at a lower cost, for an unlimited number of media, using shared tape devices, automated tape libraries, and ADSTAR Distributed System Manager (ADSM) servers.
The standard BRMS product backs up a single library or single QSYS.LIB object, in parallel, across any number of tape devices. Parallel backup lets you shorten backup windows by simultaneously using up to 32 tape devices. An easy-to-use interface allows parallel backup, using an automated tape library device, to save a large library, for example, to all currently available tape resources. Parallel saves reduce the administration involved in setting up a backup strategy. They eliminate the need for an administrator to design a strategy based on the current number of devices and the composition of the current objects.
With BRMS Standard, you can control BRMS interfaces, known as a functional usage model. Administrators can secure the setup and function of BRMS from users who are not skilled in administration or in using BRMS. The functional usage model can secure the following types of functions from specific users:
• Backup • Archive • Recovery • Movement • Media
Each user can be allowed to use one function and not the others. The administrator controls specific setup such as a control group or policy. Users can use and view a policy, for example, but not change its contents.
Archive, dynamic retrieval, automated migration operations, and shared media are supported by the Network or Advanced Features of BRMS, as described in the following sections.
1.2 BRMS Network Feature
With BRMS Network Feature (installed as BRMS/400 - Network Feature (5769-BR1) option 1), BRMS system information is interconnected to other BRMS
© Copyright IBM Corp. 2001 1

systems in the network. A BRMS network system shares the inventory and policies associated with media. Media management is from a central BRMS system.
1.3 BRMS Advanced Functions Feature
BRMS Advanced Functions Feature (installed as BRMS/400 Advanced Functions Feature (5769-BR1) option 2) enables hierarchical storage management (HSM) archive with HSM dynamic retrieval and an automated migration of data across auxiliary storage pools (ASPs).
The BRMS Advanced Functions feature allows the archive capabilities of database files, stream files, and documents based on frequency-of-use criteria. Archive rules typically allow the archiving of a file that has not been changed in six months, for example. Archive based on frequency support allows the archiving of a file that has been used less than twice a month over a specified period. The frequency of use is based on the number of days used and is calculated on a monthly basis.
Note: The number of days used can differ from the days since first use and the days since last use. You can enter the specified value for the number of days used into the archive control group that drives the archive operation.
The BRMS Advanced Function Feature includes an easy-to-use interface to archive non-current QHST files. QHST files may also be dynamically retrieved.
1.3.1 Parallel save support: Advanced FeatureParallel backup works with the BRMS Advanced Functions feature to allow for parallel archive and parallel dynamic retrieval of a single object. The ability to dynamically retrieve a large database file in parallel helps reduce the window of the retrieval process, and therefore, increase the benefits to use HSM archive and dynamic retrieval support.
2 Backup Recovery and Media Services for OS/400

Chapter 2. BRMS/400 Application Client to TSM
This chapter discusses the BRMS/400 Application Client to Tivoli Storage Manager (TSM), which is a part of the Tivoli Storage Manager Solution. TSM is the successor to the IBM and Tivoli ADSM storage management software product set. For more information, visit the Tivoli Storage Management Solution Web site at: http://www.tivoli.com/products/index/storage_mgr
Also, refer to the redbook A Practical Guide to Implementing Tivoli Storage Manager on AS/400, SG24-5472.
Note: The IBM and Tivoli ADSM product sets have been withdrawn from marketing effective 31 December 1999 and replaced by the TSM product. Access to technical support information is available at: http://www.tivoli.com/support/storage_mgt/index.htm
2.1 Overviews
BRMS/400 Application Client to TSM is a function integrated into the BRMS/400 product at Version 4 Release 3 and later. This client allows BRMS/400 users to store saved AS/400 user objects on any TSM server automatically. The save and restore operations directed to the TSM server can be automated using the policies and schedules provided by BRMS/400. BRMS/400 policies provide an easy way to identify TSM as the storage server.
Users of the client can selectively restore one or more objects stored on the TSM server or automatically restore all stored objects.
BRMS for OS/400 is the strategic IBM solution for backup, recovery, media, and storage management on the AS/400. Tivoli Storage Manager for OS/400 (TSM/400) is the strategic IBM solution for backup, recovery, and storage management of PC workstations and network servers attached to the AS/400.
The BRMS/400 Application Client function is based on a unique implementation of the TSM application programming interface (API) and does not provide functions that are typically available with TSM Backup/Archive clients. The solution is integrated into BRMS/400 and has a native AS/400 look and feel. There is no TSM command line or GUI interface.
The BRMS/400 Application Client supports the TCP/IP and APPC communications methods.
BRMS/400 uses the TSM servers as if they are virtual tape devices. BRMS/400 tracks the objects saved on TSM servers in the same manner it tracks objects saved to local media. The BRMS/400 media information for objects saved at TSM servers contains *ADSM for the volume serial identifier and 0 (zero) for the file sequence number. The media information detail identifies the device (TSM server) where the objects were saved, as well as the file space, high-level and low-level names, and the management class.
In Figure 1 on page 4, note the number of servers with which the ADSM Client interfaces.
© Copyright IBM Corp. 2001 3

Figure 1. BRMS/400 Application Client
2.2 BRMS/400 Application Client software requirements
The BRMS/400 Application Client communicates with the TSM servers through a special set of APIs that are referred to as the TSM Application Programming Interface for AS/400.
The AS/400 clients must include:
• BRMS/400: A minimal number of registered tapes for *SAVSYS and other local backups.
• MSE: Media Storage Extensions.
• TSM APIs: The TSM APIs are available from the CD shipped with the BRMS/400 code. The TSM APIs can also be downloaded from the Internet at: ftp://index.storsys.ibm.com/adsm/fixes/v3r1/as40api
To find information on how to install these APIs, follow the steps that are outlined in the as400.readme.cli41 file.
If desired, the AS/400 client or server can be configured in a BRMS/400 network to allow additional TSM and BRMS/400 functions.
2.3 Benefits of TSM in a BRMS environment
There are several benefits that can be derived depending how you configure your systems with BRMS/400 and TSM:
• TSM only offers auto-recall for UNIX clients at the present time (via the TSM HSM for UNIX feature). However, TSM/400 client customers have the
ADSM Server
ADSM for OS/2 Server
ADSM for AS/400 Server
ADSM Application Client API for AS/400
Backup Recovery& Media Services
for AS/4000
ADSM for WindowsNT Server
ADSM for VSE/ESA Server
ADSM for HP-UX Server
ADSM for SunSolaris Server
ADSM for AIX Server
ADSM for MVS Server
ADSM for VM Server
AS/400ADSMClient
4 Backup Recovery and Media Services for OS/400

auto-recall function via BRMS/400 for *FILE objects. If someone touches an AS/400 *FILE object that has been archived to the TSM server with storage *FREE, BRMS/400 locates that object in its database and automatically restores it from the server.
• You do not need to have a BRMS/400 network among the systems in your TSM environment. However, if you create a network, you will see the following benefits:
– On other platforms, TSM can do a “cross-client restore”. For example, if you have two PCs that are TSM clients, you can save a file to TSM from one PC, then restore the file on the other PC. This is not a native function with a TSM/400 client. However, if you have a BRMS/400 network between the two clients, this works if you do a BRMS/400 cross-system restore. In the background, the data is gathered from the TSM server repository.
– If you create a BRMS/400 network among your TSM server and your TSM clients, then the server knows the contents of the TSM transmissions it has received from the clients, since it can look in the BRMS/400 shared-inventory database. If you do not have a BRMS/400 network among your systems, the TSM server knows that it has a “blob” of data sent by a certain AS/400 client on a certain date.
The “Server-to-Server” function allows TSM to pass TSM data among servers. For example, the AS/400 servers in your environment could pass data to a regional AS/400 server. The regional AS/400 could then pass the TSM data to an MVS host at the central site.
2.4 Restrictions
There is no intent to design TSM/400 as a disaster recovery solution for AS/400 servers. The disaster recovery solution is managed by BRMS/400. At present, there is no intent to use BRMS/400 to backup, recover, or manage the storage on PC workstations or network servers. Consequently, there are two backup solutions for AS/400 enterprises. The TSM/400 client lets you use TSM to backup an AS/400 server to a larger system that has the TSM Server code installed. That server could be another AS/400 or another TSM server such as a UNIX or MVS system. Initially, the TSM/400 client is intended only for low volume data file backups.
The AS/400 architecture and BRMS/400 will allow you to save the system data to local media so that you are protected if you need to recover the system. The means of recovery is to re-install all the system software and fixes or to re-boot the system using the media containing the latest system save. BRMS/400 Application Client cannot perform save or restore operations while in a restricted state because the AS/400 subsystems that manage the communication with the TSM servers are no longer running in this state. Only after the operating system is restored, communication with the TSM server can be established for restoration of the user data stored there. BRMS/400 automatically restores the most current data stored in the TSM servers, or you can request older data to be restored.
User data consists of OS/400 objects that are not required to restore the operating system to a functional level. Typically this is any object that can be saved to a save file with the following exceptions:
Chapter 2. BRMS/400 Application Client to TSM 5

• Libraries with names prefixed with the letter Q, including QUSRBRM • Security data • Configuration data • Licensed programs
2.5 Backup
The BRMS/400 Application Client can perform full backup of the DB2 UDB for AS/400 databases, which are AS/400 physical file objects (data) and logical file objects (access paths). There is no real AS/400 equivalent to table spaces because of the AS/400 single-level store concept. A collection of database files in a library is the closest similarity. You can backup all databases in a library (full save) or all changed databases in a library (incremental save). You may also backup spooled files to the TSM server using a BRMS/400 spooled file list within your control group.
The BRMS/400 Application Client sets up the operation as a save to a save file, but the data is intercepted and rerouted to the TSM/400 API instead of being written to the save file. This allows the BRMS/400 Application Client to operate on storage constrained systems and with better performance. The size of the objects is limited only by the size of the storage pool defined at the TSM server.
The BRMS/400 Application Client does not save individual objects to the TSM server, which is typical of TSM Backup/Archive clients. Saving OS/400 objects one by one degrades AS/400 save/restore performance. The BRMS/400 Application Client saves collections of objects, such as:
• All objects in a library • All changed objects in a library • All objects of a specific type or all documents in a folder
These objects are stored at the TSM server as a single file. BRMS/400 assigns a unique name to this file. BRMS/400 manages the expiration of the objects in this file and explicitly deletes the file from the TSM server when all objects in the file have expired.
2.6 Restore
BRMS/400 uses TSM servers as if they are virtual tape devices. BRMS/400 tracks the objects saved on TSM servers in the same manner that it tracks objects saved to local media. BRMS/400 media information for objects saved on TSM servers contains *ADSM for the volume serial identifier and 0 (zero) for the file sequence number. The media information detail identifies the device (TSM server) where the objects were saved, as well as the file space, high-level and low-level names, and the management class.
The BRMS/400 Application Client allows a single object to be restored from a TSM server. The operation is similar to restoring the same object from tape media, where OS/400 only needs to read the tape file until it finds the object it needs. In TSM, the file data is retrieved from the TSM server and scanned for the object descriptor. When the object is found, it is restored and the retrieval of the file from the TSM server is terminated. The entire file in most cases does not need to be retrieved unless the target object was the last object saved.
6 Backup Recovery and Media Services for OS/400

2.7 Setting up BRMS/400 Application Client
You can find information on how to set up BRMS/400 Application Client in:
• BRMS/400 Manual, SC41-5345 • A Practical Guide to Implementing Tivoli Storage Manager on AS/400,
SG24-5472
2.8 Enabling BRMS/400 Application Client on the TSM server
No special action is required other than registering the node name of the client and assigning it to a domain. Although the standard domain could be used, it is usually better to create a special domain for AS/400 saves. See 2.9.4, “Setting up policies for BRMS/400 Application Client on TSM server” on page 9.
TSM servers cannot perform scheduled operations to Application Clients using the TSM application programming interface. BRMS/400 provides the abilities to automate backup or restore operations through its own scheduling functions.
You should provide the TSM administrator your node name and password that are set in your BRMS/400 media policy. The TSM administrator provides you the communications method and the means to identify the host system on the network.
2.9 Performance
There are several factors that affect the performance of the TSM backups such as:
• Network capacity • CPU model • Buffer size • TSM management class
2.9.1 TCP/IP network capacitySince any save or restore of data between an AS/400 and TSM server will have to traverse a network, it is important for you to understand how fast data can be transferred across the network. The following transfer rates are the approximate maximums that you can expect when using TCP/IP for data transfers over the two types of networks:
• 16 Mb token-ring: 5.4 GB per hour • 100 Mb Ethernet: 13.8 GB per hour
The maximum data rates cannot be achieved by a single system if there is additional traffic on the network generated by other systems. The maximum data rates represent the total capabilities of the network for all systems sending and receiving data. The maximum data rate can only be achieved by a single system if all other systems on the network are quiesced and if the system has a processor of sufficient capability to send and receive the data at the maximum rate.
The maximum performance you can expect on a 16 Mb token-ring is about 5 GB/hour. AS/400 clients with processors rated at CPW 200 or greater should be
Chapter 2. BRMS/400 Application Client to TSM 7

able to fully use the network bandwidth. Consider running three or four multiple concurrent control groups if the libraries are small and the saves do not complete within the backup window.
The maximum performance you can expect on a 100 Mb Ethernet is about 13 GB/hour. AS/400 clients with processors rated at CPW 200 or greater should be able to drive this network at about 10 GB/hour. This may require running two or three multiple current control groups if the libraries are small and the saves do not complete within the backup window.
If you saturate the network, additional AS/400 processors will not improve performance. The alternative is to increase the bandwidth of the network.
2.9.2 Setting the maximum buffer size to improve performance BRMS/400 Application Client transfers save and restore data in 1 MB blocks. The TSM application programming interface (TSM APIs) sends data to, and receives data from, the TSM server as requested by the BRMS Application Client. The TSM API default buffer size for these data transfers is 64 KB for TCP/IP. Set the TSM API buffer size to the maximum value to minimize the number of calls the TSM APIs make to transfer the data across the network.
Data transfer rates improve when the TSM API buffer size is increased to 512 KB. Change this parameter value as explained here:
1. Enter the command:
WRKDEVBRM
2. On the Work with Devices display, enter option 2 (Change) next to the device name for the TSM server (Category *NET).
3. On the Change Net Device display, change the value of the Buffer size parameter to 512.
4. Change Net device as shown here:
Net device . . . . . : TSMSERVER
5. Type your changes and press Enter. See Figure 2.
Figure 2. Change Net device
Text . . . . . . . . . Created by TSM AdministratorLocation . . . . . . . TSMSERVER Name, F4 for listTSM file space . . . . *LCLBuffer size . . . . . . 512 *DEVTYPE, 1-512 KBInternet address . . . 1.2.3.4Internet port . . . . . 1500 1-65534
Support for the 512 KB buffer size was introduced with Version 3 of the TSM APIs. PTF SF53289 for product 5733-197 is required to support the larger buffer size. You can download this PTF to your AS/400 using the SNDPTFORD command.
Note
8 Backup Recovery and Media Services for OS/400

The data transfer buffer size for *APPC type devices is limited to a maximum of 31 KB. If additional performance is required, consider changing the protocol from APPC to TCP/IP.
2.9.3 Using multiple concurrent control groups to improve performance Assuming there is adequate bandwidth on the network and at the TSM server, BRMS/400 Application Client can be used to establish multiple, concurrent sessions with the TSM server when saving AS/400 data. This does not require additional TSM user licenses. TSM allows multiple connections of a registered user under a single user license. Testing has demonstrated that as many as eight TSM sessions can be run concurrently without running into AS/400 or BRMS/400 resource contention problems.
Setting up the BRMS/400 Application Client for multiple concurrent sessions does not require additional media policies, devices, or locations. It requires the entries in the backup control group to be split into multiple backup control groups. These control groups can be scheduled for batch processing simultaneously.
2.9.4 Setting up policies for BRMS/400 Application Client on TSM server The TSM standard management class does not provide the most efficient use of TSM server storage when used with BRMS/400 Application Client. This is because BRMS/400 stores each saved AS/400 object under a unique name. A second backup of the same object again uses a unique name. From a TSM server perspective, each of these AS/400 objects are considered active because of the unique names. Therefore, TSM server versioning does not play a role in BRMS/400 Application Client object retention, since TSM always saves active versions of objects. BRMS/400 explicitly deletes TSM stored objects when they expire in the BRMS/400 database.
Retention is governed by BRMS/400 Media policies. TSM server copy group retentions are not used. Therefore, when BRMS/400 expires an object and deletes it from the TSM server, the TSM server in turn deletes it from TSM storage during the next inventory expiration process.
Consider using the following TSM administrative commands to create and enable a new TSM domain and TSM management class for BRMS/400 use. This assures that the TSM server expires objects soon after these are deleted by BRMS/400.
Note: AS400 is the management class name that is used by the BRMS/400 Application Client. See Figure 3 on page 10.
Chapter 2. BRMS/400 Application Client to TSM 9

Figure 3. Defining a TSM management class
Archival operations by the BRMS/400 Application Client store objects in the TSM server backup storage pool, not in the archive storage pool as you might expect. When BRMS/400 saves data to the TSM server, it always puts the data in the storage pool indicated on Backup copy group, even if the BRMS/400 operation is an archive. The TSM Archive copy group is ignored by BRMS/400. If you want separate your BRMS/400 data in different TSM storage pools, you need to create separate TSM management classes and point to them using separate BRMS/400 media policies that are used on the BRMS/400 control groups.
For archival purposes, consider using the native BRMS/400 archive option.
DEFine DOmain AS400 DESCription='Domain for BRMS Application Clients'BACKRETention=365 ARCHRETention=0
DEFine POLicyset AS400 AS400 DESCription='Policy set for BRMS ApplicationClients'
DEFine MGmtclass AS400 AS400 AS400 DESCription='Management class for BRMSApplication Clients'
DEFine COpygroup AS400 AS400 AS400 STANDARD Type=BackupDESTination=storage-pool-name VERExists=1 VERDeleted=0 RETExtra=0RETOnly=0
ASSign DEFMGmtclass AS400 AS400 AS400ACTivate POlicyset AS400 AS400
10 Backup Recovery and Media Services for OS/400

Chapter 3. Merging BRMS/400 data and consolidating systems
This chapter looks at how to merge BRMS/400 data from one system to another system. If multiple systems are to be merged into one or more systems, merge one system at a time.
For purposes of this chapter, the following terms are defined:
• BRMS/400 data: The libraries and files used by the Backup Recovery and Media Services/400 licensed product.
• Merge: Taking BRMS/400 data from a donor system and adding it to the current BRMS/400 data on a target system.
• Migration: Taking BRMS/400 data from a donor system of a lower release of OS/400 and restoring it to a target system of a higher release.
This chapter looks at the following topics:
• Migrating BRMS/400 data from one system to another system • Merging multiple BRMS/400 data systems into a single system • Verifying BRMS/400 data
3.1 General server consolidation planning
Before merging BRMS/400 data, be aware of the following points:
• DASD utilization: BRMS/400 data can use a fair amount of DASD when object level detail is saved as part of your backup strategy. Ensure that the target system has sufficient free storage space. The more systems we merge, the more DASD is used.
• Job scheduler entries: BRMS/400-related job scheduler entries are not transferred during a merge or migration of BRMS/400 data. We either merge the current job scheduler entries (see Appendix D, “Consolidating Job Scheduler for OS/400 Entries” in AS/400 Consolidation Strategies and Implementation, SG24-5186) or create new job scheduler entries on the target system.
• Backup window: Having a single system with multiple system data on it can increase the time to do backups, due to more DASD utilization. Users should be aware that their backup routines may contain additional processes after merging BRMS/400 data.
• Different time zones: If a donor system is in an earlier time zone than the target system, do not merge BRMS/400 data onto the target system until the time at which the data was saved on the donor system is reached. This prevents the possibility of overwriting current data on the target system.
• Primary and secondary languages: BRMS/400 data is not affected by different language codes. However, it is possible that menus and reports generated within BRMS are of another language on the target system.
• ASPs: If your donor system has more auxiliary storage pools (ASPs) than the target system, be aware that BRMS/400 has created a library for savefile backups for each ASP. The libraries are named Q1ABRMSFasp_number. Make sure the Q1ABRMSFxx library, which resides in an ASP that does not exist on the target system, is empty before the merge.
© Copyright IBM Corp. 2001 11

Note: Never move the Q1ABRMSFxx libraries to a system that has BRMS/400 installed. Move only the objects within the library, within BRMS/400.
• Spooled files: If spooled files are required from a donor system, save and then restore them on the target system. This can be done using a spooled list. Refer to “Saving spooled files using BRMS/400” in the second edition of Backup Recovery Media Services: A Practical Approach, SG24-4840.
• Coexistence with other systems: If the donor system is a server, point the clients to the target system if it is to be the new server.
For additional information, refer to AS/400 Consolidation Strategies and Implementation, SG24-5186.
3.2 Merging BRMS/400 data
This section lists considerations to resolve prior to merging BRMS/400 data. Do not attempt to merge multiple donor systems to a system at the same time.
Note: Although the following points are important, the user must use their own discretion as to whether they should take any action prior to the merge.
• Same or backward releases: Merging from a higher release of BRMS/400 to a lower release is not covered in the scope of this chapter.
• Policies in BRMS/400: Review all BRMS/400 policies prior to the merge. Note the differences between the donor and the target systems. Do a print screen of the different policies for reference.
• Using BRMS/400 save files: If BRMS/400 save files are used as part of your backup strategy, save the Q1ABRMSF* libraries.
• Omit lists: Compare omit lists between the donor and target systems.
• BRMS/400 maintenance: May take longer to run after the merge is completed, as more data is involved.
• Duplicate objects considerations: Evaluate whether duplicate object names (or object function) exist before you attempt a merge of BRMS/400 data. Correct any duplications if possible. If there are differences within the duplicates, one of the policies must be renamed.
– Media policies: Check retention type, move policy, storage location, and save type:
WRKPCYBRM *MED
– Move policies: Check storage locations, calendars, and containers:
WRKPCYBRM *MOV
– Media classes: Check shared media and reorder point:
WRKCLSBRM *MED
– Storage locations: Check container and volume thresholds, maximum parameters, and whether volumes are allowed to expire:
WRKLOCBRM
– Volume IDs enrolled: BRMS/400 requires unique volume identifiers. Duplicate volume IDs cannot be moved. Use the DUPMEDBRM command to copy duplicates to new volume IDs:
12 Backup Recovery and Media Services for OS/400

WRKMEDBRM
– Container IDs: Check container classes and the number of slots:
WRKCNRBRM
– Calendar entries: Check the date, days, and reference calendars:
WRKCALBRM
– Control groups: Control group duplicates are discussed later in this chapter.
3.3 Prerequisites for merging BRMS/400 data
This section provides a listing of prerequisites for merging BRMS/400 data. This listing is important when you consider a BRMS/400 data merge. Be sure to follow it carefully for a successful merge. To prepare and plan for a successful consolidation, read this entire chapter before you start any BRMS/400 data merge. The prerequisites are:
• Compatible media types
Drives on the target system should be compatible with the media coming from the donor system.
• Print the backup plan prior to merging the data
Print the current backup plan for BRMS on the donor system and target systems. The report (QP1ABP) can be printed using the following command:
DSPBKUBRM OUTPUT(*PRINT)
This report lists all backup control groups on the systems and can be used to compare backup control group entries.
Review the archive groups, migration groups, and lists on the display. No print option is currently available.
• BRMS/400 Network Feature must be installed if PTF SF64458 for V4R4 is not applied. For V5R1 and later, the Network Feature is not required.
For V4R3 and earlier, the Network Feature is not installed separately, and therefore, this consideration does not apply.
Install BRMS/400 Network licensed program (BRMS/400 5769-BR1, option 1) to enable use of the CPYMEDIBRM command. This command is used extensively during the merge process. The network component of the licensed program can be ordered and reviewed for a trial period of 70 days. This should give ample time to plan and merge the BRMS/400 data.
• Media Storage Extensions (MSE 5769-SS1, option 18)
Install Media Storage Extensions on the target system. Be aware of any other backup applications that may use MSE.
• Network or stand-alone systems
Remove systems that form part of an existing BRMS/400 network from the BRMS/400 network. Refer to “Removing System From Network Group” in the second edition of Backup Recovery Media Services: A Practical Approach, SG24-4840.
Chapter 3. Merging BRMS/400 data and consolidating systems 13

• Use BRMS/400 to perform a full system backup of all systems
We recommend that full system backups are processed prior to any system change.
• No activity on any BRMS/400 system
To ensure a successful BRMS/400 data merge, cease all activity on any networked BRMS system.
3.4 Flowchart and scenarios for merging BRMS/400 data
The flowchart in Figure 4 shows example scenarios to merge BRMS/400 data. In this flowchart, references are made to ending points A, B, and C. The end points correlate to different scenarios.
Figure 4. Flowchart for merging BRMS/400 data
The scenarios are explained in the following section.
When you save, restore, move, or merge BRMS/400 data, use a user profile with *SECOFR authority to ensure correct authorities are restored.
Note
ConsolidationConsiderations
BRMSInstalled
onTarget
ObjectDetail
No
No
Yes
Yes
ScenarioB
ScenarioC
ScenarioA
14 Backup Recovery and Media Services for OS/400

3.4.1 Scenarios for merging BRMS/400 dataIn the following scenarios, these terms are used:
TARGET The AS/400 system that receives all merged BRMS/400 data.
DONOR An AS/400 system that will have its BRMS/400 data merged to the TARGET system.
3.4.1.1 Scenario AIn this scenario, BRMS/400 will be moved from the DONOR to the TARGET system. At this point, BRMS/400 is not installed on the TARGET system.
Figure 5 shows an overview of steps to follow when merging data to the TARGET system.
Figure 5. Scenario A: Process flow
Follow these steps for Scenario A:
1. Ensure all prerequisites for merging BRMS/400 data are met.
2. Ensure a full backup of the QUSRBRM library on the DONOR system has been taken:
SAVLIB LIB(QUSRBRM) DEV(tape_device)
3. If the DONOR system is part of a BRMS/400 network group, check that the QUSRBRM/QA1ANET file is empty on all systems in the BRMS/400 network group. This indicates that the DONOR system has no data to send across the current network. Use the following command:
DSPPFM QUSRBRM/QA1ANET
The BRMS/400 Network Feature is not required for this scenario.
Note
ConsolidationConsiderations
IsDONORpart ofBRMS
networkgroup?
TARGETSystem
Back upQUSRBRM
DONORSystem
Do NOTConsolidate
Change local locationname, network ID, and
system name onsystem if differentfrom DONOR for
ownership purposes
Load and apply allPTFs
Restore QUSRBRM,QBRM, and
Q1ABRMSF* libraries
Install BRMS/400 onthe system
Save QUSRBRM,QBRM, and
Q1ABRMSF* libraries
Check whetherQUSRBRM/QA1ANET
is empty
No
No
Are allprerequisitesanalyzed andcompleted?
Yes
SCENARIOA
Yes
Chapter 3. Merging BRMS/400 data and consolidating systems 15

If the QA1ANET file is not empty, refer to “Verifying the BRMS/400 network” in the second edition of Backup Recovery Media Services: A Practical Approach, SG24-4840.
4. Save the QBRM, QUSRBRM, and Q1ABRMSF* libraries on the DONOR system using the SAVLIB command:
SAVLIB LIB(QBRM QUSRBRM Q1ABRMSF*) DEV(tape_device)
5. Restore QBRM, QUSRBRM, and Q1ABRMSF* on the TARGET system using the RSTLIB command with *SECOFR authority:
RSTLIB LIB(QBRM QUSRBRM Q1ABRMSF*) DEV(tape_device) ALWOBJDIF(*ALL)+MBROPT(*ALL
6. Install the BRMS/400 5769-BR1 Licensed Program on the TARGET system.
7. Load and apply all relevant PTFs.
8. If the TARGET system has a different local location name, network ID, or system name than the DONOR system, transfer ownership of all BRMS/400 data to it. Refer to “Changing the system name” in Backup Recovery Media Services: A Practical Approach, SG24-4840.
3.4.1.2 Scenario BIn this scenario, BRMS/400 data is moved from the DONOR system to the TARGET system without object-level detail. At this point, BRMS/400 is installed on the TARGET system. Figure 6 shows an overview of steps to follow when you merge data to the TARGET system.
Figure 6. Scenario B: Process flow
If the TARGET system has the identical local location name, network ID, and system name as the DONOR system, step 8 is not required.
Note
ConsolidationConsiderations
IsDONORpart ofBRMS
networkgroup?
TARGETSystem
Back upQUSRBRM
DONORSystem
Do NOTConsolidate
Spool file QP1AEN willbe produced from the
CPYMEDIBRMcommand. Check for
errors and/orduplicates
Restore QA1AMEDfrom DONOR system
Back upQUSRBRM
Create a temporarylibrary to receive
DONOR BRMS/400data
Save QUSRBRM,QBRM, and
Q1ABRMSF* libraries
Check whetherQUSRBRM/QA1ANET
is empty
No
No
Are allprerequisitesanalyzed andcompleted? Yes
SCENARIOB
Rename the controlgroup field in the
QA1AHS history file
Copy media informationto QA1AMED and thensave QA1AMED to tape
Restore Q1ABRMSF*from DONOR system
with *SECOFRauthority
Merge DONOR data(QA1AMED) to
TARGET system
Yes
16 Backup Recovery and Media Services for OS/400

Follow these steps for scenario B:
1. Ensure all prerequisites for merging BRMS/400 data are met.
2. Ensure a full backup of the QUSRBRM library on the DONOR and TARGET systems has been completed:
SAVLIB LIB(QUSRBRM) DEV(tape_device)
3. If the DONOR system is part of a BRMS/400 network group, check that the QUSRBRM/QA1ANET file is empty on all systems in the BRMS/400 network group. This indicates that the DONOR system has no data to send across the current network. Use the following command:
DSPPFM FILE(QUSRBRM/QA1ANET)
If the QA1ANET file is not empty, refer to “Verifying the BRMS/400 network” in Backup Recovery Media Services: A Practical Approach, SG24-4840.
Figure 7 shows an example of an empty QUSRBRM/QA1ANET file produced using the DSPPFM command.
Figure 7. Example of an empty QUSRBRM/QA1ANET file
4. On the DONOR system, perform these steps:
a. To differentiate between backups of items on the DONOR and TARGET systems, rename the control group field in the history file. To do this, refer to 3.6, “Renaming history data for duplicate control groups” on page 23.
b. Save the Q1ABRMSF* libraries using the following command:
SAVLIB LIB(Q1ABRMSF*) DEV(tape_device)
c. Copy BRMS/400 data using the following command:
CPYMEDIBRM OPTION(*TOFILE) FILE(QGPL/QA1AMED) CPYMEDI(*YES)
d. Save the file created in step 3 to tape using the following command:
SAVOBJ OBJ(QA1AMED) LIB(QGPL) DEV(tape_device)
5. On the TARGET system, perform these steps:
a. Restore objects in the Q1ABRMSF* libraries as they are obtained from the DONOR system using the RSTOBJ command with *SECOFR authority:
RSTOBJ OBJ(*ALL) LIB(Q1ABRMSFxx) DEV(tape_device) ALWOBJDIF(*ALL)+MBROPT(*ALL)
b. Create a temporary library on the TARGET system.
c. Restore QGPL/QA1AMED that are obtained from the DONOR system:
RSTOBJ OBJ(QA1AMED) LIB(temporary_library) DEV(tape_device)
d. Restore BRMS/400 data obtained from the DONOR system using the following command:
Display Physical File MemberFile . . . . . . : QA1ANET Library . . . . : QUSRBRMMember . . . . . : QA1ANET
*...+....1....+....2....+....3....+....4....+....5....+....6....+....7....+....8
(Selected member contains no records)
Chapter 3. Merging BRMS/400 data and consolidating systems 17

CPYMEDIBRM OPTION(*FROMFILE) FILE(temporary_library/QA1AMED)+CPYMEDI(*YES)
e. A spooled file called QP1AEN is created from the CPYMEDIBRM command in the previous step. Analyze it for possible duplicates of:
• Containers • Container classes • Media or media classes • Move policies • Move policy rules • Storage locations
An example of the Media Merge Report is shown in Figure 8.
Figure 8. Example of Media Merge Report
f. If backup control group information is required, refer to 3.5, “Copying control group information” on page 22.
3.4.1.3 Scenario CIn this scenario, BRMS/400 data is moved from the DONOR system to the TARGET system with object level detail. At this point, the TARGET AS/400 system has BRMS/400 installed. The TARGET and DONOR systems are assumed to be on the same BRMS/400 release, or the DONOR system has a lower release of BRMS/400 data than the TARGET system.
Figure 9 shows an overview of steps to you need to follow when you merge data to the target system.
File . . . . . : QP1AEN Page/Line 1/2Control . . . . . Columns 1 - 78Find . . . . . .*...+....1....+....2....+....3....+....4....+....5....+....6....+....7....+...5722BR1 V5R1M0 010523 Media Merge Report
Informational messagesQIC1000 Media class already existsQIC150 Media class already existsSAVSYS *WARNING: Media class already exists with different density.*HOME Location already existsADSM Location already existsAS25 Location already existsAS25 Container already existsAS25CN Container class already existsAS25 Move policy already existsOFFSITE Move policy already existsBRM002 *ERROR: Volume already existsBRM006 *ERROR: Volume already existsBRM351 *ERROR: Volume already exists
Total volumes . . . . . . . . . . . . . . . : 3Volumes merged . . . . . . . . . . . . . . : 0Total media information entries . . . . . . : 1Media information entries merged . . . . . : 0
* * * * * E N D O F L I S T I N G *
18 Backup Recovery and Media Services for OS/400

Figure 9. Scenario C: Process flow
Follow these steps for scenario C:
1. Ensure all prerequisites for merging BRMS/400 data are met.
2. Ensure a full backup of the QUSRBRM library on the DONOR and TARGET systems has been completed:
SAVLIB LIB(QUSRBRM) DEV(tape_device)
3. If the DONOR system is part of a BRMS/400 network group, check that the QUSRBRM/QA1ANET file is empty on all systems in the BRMS/400 network group. This indicates that the DONOR system has no data to send across the current network. Use the following command:
DSPPFM FILE(QUSRBRM/QA1ANET)
If the QA1ANET file is not empty, refer to “Verifying the BRMS/400 network” in Backup Recovery Media Services: A Practical Approach, SG24-4840.
Figure 10 shows an example of an empty QUSRBRM/QA1ANET file.
Figure 10. Example of an empty QUSRBRM/QA1ANET file
4. On the DONOR system, perform these tasks:
ConsolidationConsiderations
IsDONORpart ofBRMS
networkgroup?
TARGETSystem
Back upQUSRBRM
DONORSystem
Do notconsolidate
Restore QA1AMEDfrom DONOR system
Back upQUSRBRM
Save QUSRBRM,QBRM, and
Q1ABRMSF* libraries
Check whetherQUSRBRM/QA1ANET
is empty
No
No
Are allprerequisitesanalyzed andcompleted? Yes
SCENARIOC
Rename the controlgroup field in QA1AHS
history file
Copy media informationto QA1AMED and thensave QA1AMEDto tape.
Restore Q1ABRMSF*from DONOR system
with *SECOFRauthority
Merge DONOR data(QA1AMED) to
TARGET system
Yes
Copy QA1A* files totape from QUSRBRM
Create TMPBRMtemporary library
Copy QA1A* files totape from QUSRBRM
to TMPBRM
Use CPYF command tomerge BRMS/400 data
from TMPBRM toQUSRBRM. Removethe TMPBRM library
when complete.
Display Physical File MemberFile . . . . . . : QA1ANET Library . . . . : QUSRBRMMember . . . . . : QA1ANET
*...+....1....+....2....+....3....+....4....+....5....+....6....+....7....+....8
(Selected member contains no records)
Chapter 3. Merging BRMS/400 data and consolidating systems 19

a. To differentiate between backups from the DONOR and TARGET systems, rename the control group field in the history file. To do this, refer to 3.6, “Renaming history data for duplicate control groups” on page 23.
b. Save the Q1ABRMSF* libraries using the following command:
SAVLIB LIB(Q1ABRMSF*) DEV(tape_device)
c. Copy BRMS/400 data using the following command:
CPYMEDIBRM OPTION(*TOFILE) FILE(QGPL/QA1AMED) CPYMEDI(*YES)
d. Save the file created in step 3 to tape using the following command:
SAVOBJ OBJ(QA1AMED) LIB(QGPL) DEV(tape_device)
e. Save the following objects from QUSRBRM using the SAVOBJ command:
• QA1ACA: Calendar names (not required if the DONOR system has BRMS/400 V4R4 or later and PTF for APAR SA91251 is applied)
• QA1A1CA: Calendar entries (not required if the DONOR system has BRMS/400 V4R4 or above and PTF for APAR SA91251 is applied)
• QA1ADI: IFS directory information
• QA1ADI2: Unicode IFS directory information
• QA1AFD: History of saved folders
• QA1ALI: IFS object link information
• QA1ALI2: Unicode IFS object link information
• QA1AMB: History of file members
• QA1AOD: History of object detail
• QA1AOQ: Saved spooled file history
SAVOBJ OBJ(QA1ACA QA1A1CA QA1ADI QA1ADI2 QA1AFD QA1ALI QA1ALI2 QA1AMBQA1AOD + QA1AOQ) LIB(QUSRBRM) DEV(tape_device)
5. On the TARGET system, perform these steps:
a. Restore Q1ABRMSF* as obtained from the DONOR system using the RSTOBJ command with *SECOFR authority:
RSTOBJ OBJ(*ALL) LIB(Q1ABRMSFxx) DEV(tape device) ALWOBJDIF(*ALL)+MBROPT(*ALL)
b. Restore QGPL/QA1AMED obtained from the DONOR system using the RSTOBJ command with *SECOFR authority:
RSTOBJ OBJ(QA1AMED) LIB(QGPL) DEV(tape_device)
c. Restore BRMS/400 data obtained from the DONOR system using the command:
CPYMEDIBRM OPTION(*FROMFILE) FILE(QGPL/QA1AMED) CPYMEDI(*YES)
d. Create a temporary library called TMPBRM.
e. Restore the following objects saved from the DONOR system to the TMPBRM library using the RSTOBJ command:
• QA1ACA: Calendar names (not required if the DONOR system has BRMS/400 V4R4 or above and PTF for APAR SA91251 is applied)
• QA1A1CA: Calendar entries (not required if the DONOR system has BRMS/400 V4R4 or above and PTF for APAR SA91251 is applied)
20 Backup Recovery and Media Services for OS/400

• QA1ADI: IFS directory information
• QA1ADI2: Unicode IFS directory information
• QA1AFD: History of saved folders
• QA1ALI: IFS object link information
• QA1ALI2: Unicode IFS object link information
• QA1AMB: History of file members
• QA1AOD: History of object detail
• QA1AOQ: Saved spooled file history
RSTOBJ OBJ(QA1ACA QA1A1CA QA1ADI QA1ADI2 QA1AFD QA1ALI QA1ALI2 QA1AMBQA1AOD + QA1AOQ) LIB(QUSRBRM) RSTLIB(TMPBRM) DEV(tape_device)
f. Use the CPYF command to merge BRMS/400 data from the DONOR system.
Table 1 contains a list of files and commands that are used to copy the required object level detail files from the DONOR system to the TARGET system.
Table 1. Files required for object level detail retention
If the QA1AOD and QA1AFD files are merged, change the system identifier to reflect the new TARGET system. To do this, use the following SQL commands:
UPDATE QUSRBRM/QA1AOD SET OBHSYS = ’target_system_name’ WHERE OBHSYS ='donor_system_name'UPDATE QUSRBRM/QA1AFD SET FHSYS = ’target_system_name’ WHERE FHSYS ='donor_system_name'
File description File Command to use
Calendar names QA1ACA CPYF FROMFILE(TMPBRM/QA1ACA) TOFILE(QUSRBRM/QA1ACA)+MBROPT(*ADD) FMTOPT(*MAP *DROP)
Calendar entries QA1A1CA CPYF FROMFILE(TMPBRM/QA1A1CA) TOFILE(QUSRBRM/QA1A1CA)+MBROPT(*ADD) FMTOPT(*MAP *DROP)
IFS directory information QA1ADI CPYF FROMFILE(TMPBRM/QA1ADI) TOFILE(QUSRBRM/QA1ADI)+MBROPT(*ADD) FMTOPT(*MAP *DROP)
IFS directory information UNICODE
QA1ADI2 CPYF FROMFILE(TMPBRM/QA1ADI2) TOFILE(QUSRBRM/QA1ADI2)+MBROPT(*ADD) FMTOPT(*MAP *DROP)
Folder save history QA1AFD CPYF FROMFILE(TMPBRM/QA1AFD) TOFILE(QUSRBRM/QA1AFD)+MBROPT(*ADD) FMTOPT(*MAP *DROP)
IFS history entries QA1ALI CPYF FROMFILE(TMPBRM/QA1ALI) TOFILE(QUSRBRM/QA1ALI)+MBROPT(*ADD) FMTOPT(*MAP *DROP)
IFS history entries - UNICODE
QA1ALI2 CPYF FROMFILE(TMPBRM/QA1ALI2) TOFILE(QUSRBRM/QA1ALI2)+MBROPT(*ADD) FMTOPT(*MAP *DROP)
Member history entries QA1AMB CPYF FROMFILE(TMPBRM/QA1AMB) TOFILE(QUSRBRM/QA1AMB)+MBROPT(*ADD) FMTOPT(*MAP *DROP)
Object detail QA1AOD CPYF FROMFILE(TMPBRM/QA1AOD) TOFILE(QUSRBRM/QA1AOD)+MBROPT(*ADD) FMTOPT(*MAP *DROP)
Spooled file history QA1AOQ CPYF FROMFILE(TMPBRM/QA1AOQ) TOFILE(QUSRBRM/QA1AOQ)+MBROPT(*ADD) FMTOPT(*MAP *DROP)
Chapter 3. Merging BRMS/400 data and consolidating systems 21

g. Delete the temporary library that was previously created. Type the command:
DLTLIB LIB(TMPBRM)
For additional information on BRMS/400 files, refer to “The QUSRBRM library” appendix in Backup Recovery Media Services: A Practical Approach, SG24-4840.
3.5 Copying control group information
There are several ways to copy control group information across to the target system. Some points to note include:
• If the control groups are no longer required on the target system, no action is required.
• If both the donor and target systems have identical backup control groups and entries, no action is required.
• If both the donor and target systems have duplicate control groups, with different entries, copy the control group on the donor system to a new name, before you copy it to the target system.
3.5.1 Copying control groups when BRMS/400 Network is activeIf the donor and target systems form part of an active BRMS/400 network group, use the BRMS Network to copy the control group or groups you require.
Refer to “Copying control groups between networks AS/400 systems” in Backup Recovery Media Services: A Practical Approach, SG24-4840, to copy backup control groups in a BRMS/400 network environment.
3.5.2 Copying control groups when BRMS/400 Network is not activeAs mentioned earlier in this chapter, the BRMS/400 Network Feature has to be installed on both the donor and target systems. This enables the CPYMEDIBRM command to be used. The donor and target systems do not need to communicate via an AS/400 network or the BRMS network.
To copy control groups when the network is not active, follow these steps:
1. Create a control group without entries or attributes on the target system. Only enter text in the text field.
2. Copy the QUSRBRM/QA1ACG file on the donor system and copy it to a temporary library. Use the following command:
CPYF FROMFILE(QUSRBRM/QA1ACG) TOFILE(temporary library/QA1ACG)+CRTFILE(*YES) MBROPT(*ADD) INCCHAR(CTLLST 1 *EQ <control group name>)
3. Move the temporary library to the target system.
4. Copy the information from the temporary library into BRMS/400 on the target system. Use the following command:
CPYF FROMFILE(temporary library/QA1ACG) TOFILE(QUSRBRM/QA1ACG)+MBROPT(*ADD) FMTOPT(*MAP *DROP)
5. Update control group attributes, if needed.
22 Backup Recovery and Media Services for OS/400

3.6 Renaming history data for duplicate control groups
To differentiate between backups of items on donor and target systems, rename the control group field in the history file.
If you have duplicate control groups, change the history data accordingly on the donor system before the data is moved to the target system.
Use the following SQL statement to change the control group name in the QUSRBRM/QA1AHS file:
UPDATE QUSRBRM/QA1AHS SET BKHGRP = ’new_control_group_name’ WHERE BKHGRP =’old_control_group_name’
3.7 Merging additional BRMS/400 data
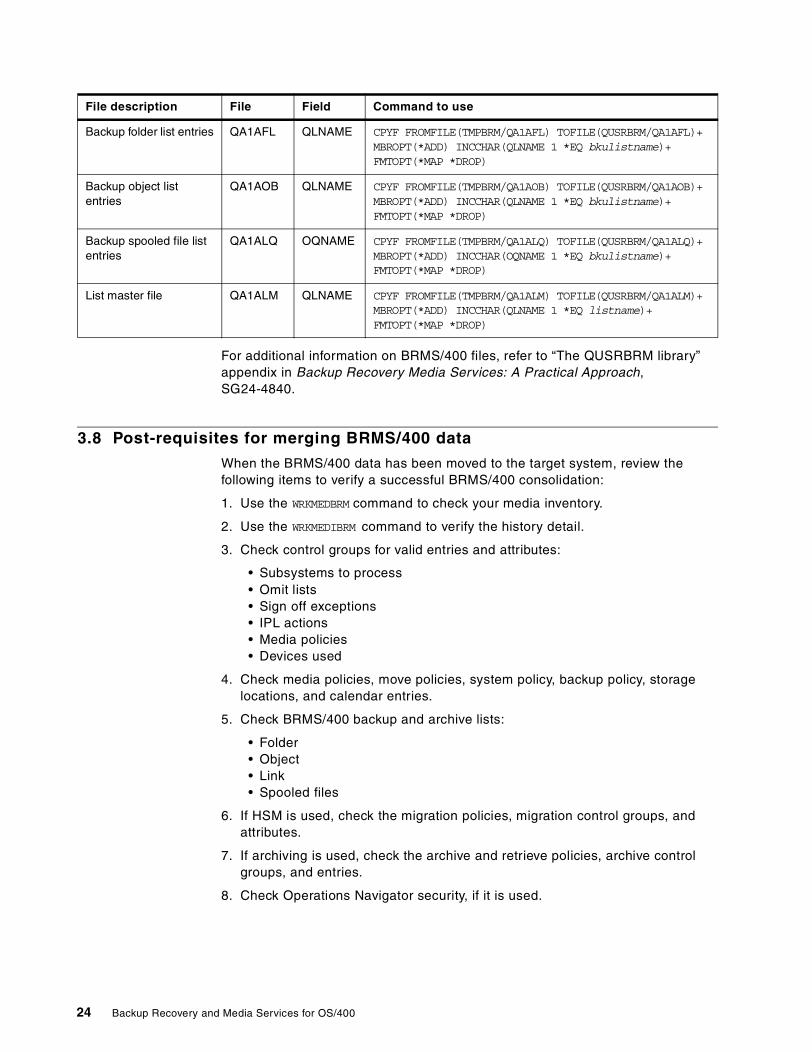
If additional BRMS/400 data needs to be merged from the donor systems to the target system, use Table 2 to determine the command to use for each file type.
Note that the backup and archive list consists of a master list file entry (QA1ALM) and additional entries in the file of each specific list type (*FLR, *LNK, *OBJ, or *SPL).
Table 2. Files required for merging additional BRMS/400 data
File description File Field Command to use
Archive control group entries
QA1AAM AGNAME CPYF FROMFILE(TMPBRM/QA1AAM) TOFILE(QUSRBRM/QA1AAM)+MBROPT(*ADD) INCCHAR(AGNAME 1 *EQ arcctlgrp)+FMTOPT(*MAP *DROP)
Migration control group entries
QA1AHM HMNAME CPYF FROMFILE(TMPBRM/QA1AHM) TOFILE(QUSRBRM/QA1AHM)+MBROPT(*ADD) INCCHAR(HGNAME 1 *EQ arcctlgrp)+FMTOPT(*MAP *DROP)
Archive folder list entries QA1AAF QLNAME CPYF FROMFILE(TMPBRM/QA1AAF) TOFILE(QUSRBRM/QA1AAF)+MBROPT(*ADD) INCCHAR(QLNAME 1 *EQ arclistname)+FMTOPT(*MAP *DROP)
Archive object list entries
QA1AAO QLNAME CPYF FROMFILE(TMPBRM/QA1AAO) TOFILE(QUSRBRM/QA1AAO)+MBROPT(*ADD) INCCHAR(QLNAME 1 *EQ arclistname)+FMTOPT(*MAP *DROP)
Archive spooled file list entries
QA1AAQ AQNAME CPYF FROMFILE(TMPBRM/QA1AAQ) TOFILE(QUSRBRM/QA1AAQ)+MBROPT(*ADD) INCCHAR(AQNAME 1 *EQ arclistname)+FMTOPT(*MAP *DROP)
IFS link lists QA1AFS FSNAME CPYF FROMFILE(TMPBRM/QA1AFS) TOFILE(QUSRBRM/QA1AFS)+MBROPT(*ADD) INCCHAR(FSNAME 1 *EQ arclistname)+FMTOPT(*MAP *DROP)
Use a new control group name that easily identifies the donor system when running recovery reports on the target system, for example: DONORD and TARGETD to indicate DONOR and TARGET daily recovery reports respectively.
Tip
Chapter 3. Merging BRMS/400 data and consolidating systems 23
For additional information on BRMS/400 files, refer to “The QUSRBRM library” appendix in Backup Recovery Media Services: A Practical Approach, SG24-4840.
3.8 Post-requisites for merging BRMS/400 data
When the BRMS/400 data has been moved to the target system, review the following items to verify a successful BRMS/400 consolidation:
1. Use the WRKMEDBRM command to check your media inventory.
2. Use the WRKMEDIBRM command to verify the history detail.
3. Check control groups for valid entries and attributes:
• Subsystems to process • Omit lists • Sign off exceptions • IPL actions • Media policies • Devices used
4. Check media policies, move policies, system policy, backup policy, storage locations, and calendar entries.
5. Check BRMS/400 backup and archive lists:
• Folder • Object • Link • Spooled files
6. If HSM is used, check the migration policies, migration control groups, and attributes.
7. If archiving is used, check the archive and retrieve policies, archive control groups, and entries.
8. Check Operations Navigator security, if it is used.
Backup folder list entries QA1AFL QLNAME CPYF FROMFILE(TMPBRM/QA1AFL) TOFILE(QUSRBRM/QA1AFL)+MBROPT(*ADD) INCCHAR(QLNAME 1 *EQ bkulistname)+FMTOPT(*MAP *DROP)
Backup object list entries
QA1AOB QLNAME CPYF FROMFILE(TMPBRM/QA1AOB) TOFILE(QUSRBRM/QA1AOB)+MBROPT(*ADD) INCCHAR(QLNAME 1 *EQ bkulistname)+FMTOPT(*MAP *DROP)
Backup spooled file list entries
QA1ALQ OQNAME CPYF FROMFILE(TMPBRM/QA1ALQ) TOFILE(QUSRBRM/QA1ALQ)+MBROPT(*ADD) INCCHAR(OQNAME 1 *EQ bkulistname)+FMTOPT(*MAP *DROP)
List master file QA1ALM QLNAME CPYF FROMFILE(TMPBRM/QA1ALM) TOFILE(QUSRBRM/QA1ALM)+MBROPT(*ADD) INCCHAR(QLNAME 1 *EQ listname)+FMTOPT(*MAP *DROP)
File description File Field Command to use
24 Backup Recovery and Media Services for OS/400

Chapter 4. Online Lotus server backups
Starting with V4R4, Backup Recovery and Media Services for OS/400 (BRMS/400) supports online backup capabilities for Lotus Notes servers on the AS/400. With today’s servers growing in performance and size, system downtime to backup critical data is very limited. With BRMS/400, Lotus server databases can be saved while they are in use.
4.1 What is Lotus Domino
For those of you BRMS/400 users who are not familiar with Lotus Domino functions, this section offers a helpful introduction.
In the context of this chapter, Lotus Domino refers to the Domino Server family – an integrated messaging and Web application software platform. Built on an open, unified architecture, it is trusted by the world’s leading companies to deliver secure communication, collaboration, and business applications.
Domino R5.0 servers set provide Internet messaging with an ease of administration to integrate with back-end systems. The Domino R5.0 server is offered in different packages: the Mail Server, Application Server, and Enterprise Server, as described in the following sections.
4.1.1 Domino Mail ServerThe Domino Mail Server combines support for the latest Internet mail standards with advanced messaging capabilities. It provides the reliability at an enterprise level with the valued performance of Lotus Domino. The integrated, cross-platform services include Web access, group scheduling, collaborative workspaces, and news groups. Each service is accessible from a Web browser or other standards-based client. The Domino Mail Server is used for messaging only.
4.1.2 Domino Application ServerThe Application Server is an integrated messaging and applications server. It delivers messaging as well as an open, secure Web application platform. The server easily integrates back-end systems with the front-end systems business process.
4.1.3 Domino Enterprise ServerThe Domino Enterprise Server extends the functionality of the Domino Mail and Domino Applications Servers with high availability services such as partitioning,
The use of true online backups must not take the place of standard system backups completed on a regular basis. The online backup system only saves Lotus server database objects (*.nsf, *.box and *.ntf data). Other objects, such as files and libraries within the integrated file system structure should be backed up with standard means (SAV command) on a frequent basis, preferably as part of the full system save routine.
Important note
© Copyright IBM Corp. 2001 25

clustering, and billing. It enables customers to have uninterrupted access and maximum performance under all conditions in a customer’s mission-critical deployment.
Note: Domino Enterprise Server was previously called Domino Advanced Services.
You can find further background information on Lotus Domino in the redbook Lotus Domino Release 5.0: A Developer’s Handbook, SG24-5331.
4.2 What changes for an online backup
With the V4R4 release of BRMS/400 and onward, a change is available from an online backup perspective. What is produced during an online backup depends on the level of Lotus Domino for AS/400 that is installed and whether a functional PTF is installed, so for:
• V4R4 BRMS/400 without PTF SF60285
To backup mail folders, it is necessary to:
1. End the server in question.2. Back up the server.3. Restart the server.
Or, use the following process:
1. Replicate the server.2. End and save the replicate.3. Restart the server and re-synchronize.
• V4R4 BRMS/400 with PTF SF60285 and Lotus Domino for AS/400 V5.02
– Domino backups are easier to process.
– Does not use save-while-active (there are no synchronization points).
– Domino server information is included on recovery reports.
– Control groups are created automatically for Lotus Domino servers, after running the INZBRM *DATA command.
– Restoration of user data is easier.
• V4R4 BRMS/400 with PTF SF61489 and Lotus Domino for AS/400 V5.02
– Supports QuickPlace for AS/400 Version 1.03.
– Control groups are created automatically for Lotus Domino servers and QuickPlace servers when they are created, after you run the INZBRM *DATA command.
– Renaming BRMS/400 default control groups, media policies, and exclusion lists is done when BRMS processes the INZBRM *DATA or STRMNTBRM commands.
A PTF is already planned to deliver the function of incremental saves of Lotus online servers.
Note
26 Backup Recovery and Media Services for OS/400
4.3 Initializing BRMS for Lotus server backup
With PTF SF60285 installed on your system, BRMS automatically configures the control groups and media policies required to successfully back up all Lotus server databases on your system. In addition to this, BRMS also creates a link list used to exclude all Lotus server databases when a full system save is completed. The *LINK control group entry you would normally use is replaced by the BRMS-created list (discussed below).
To create automatic BRMS control groups, run either of the following commands after a Lotus server is added to the AS/400 system:
• INZBRM *DATA
• STRMNTBRM
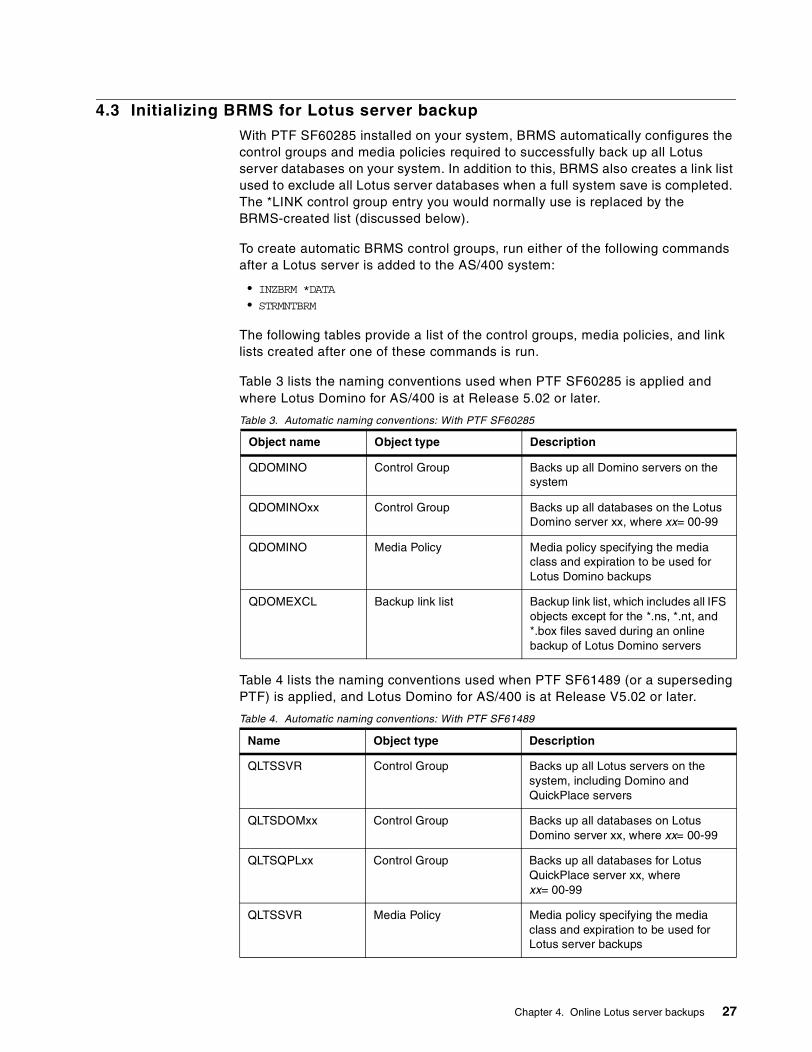
The following tables provide a list of the control groups, media policies, and link lists created after one of these commands is run.
Table 3 lists the naming conventions used when PTF SF60285 is applied and where Lotus Domino for AS/400 is at Release 5.02 or later.
Table 3. Automatic naming conventions: With PTF SF60285
Table 4 lists the naming conventions used when PTF SF61489 (or a superseding PTF) is applied, and Lotus Domino for AS/400 is at Release V5.02 or later.
Table 4. Automatic naming conventions: With PTF SF61489
Object name Object type Description
QDOMINO Control Group Backs up all Domino servers on the system
QDOMINOxx Control Group Backs up all databases on the Lotus Domino server xx, where xx= 00-99
QDOMINO Media Policy Media policy specifying the media class and expiration to be used for Lotus Domino backups
QDOMEXCL Backup link list Backup link list, which includes all IFS objects except for the *.ns, *.nt, and *.box files saved during an online backup of Lotus Domino servers
Name Object type Description
QLTSSVR Control Group Backs up all Lotus servers on the system, including Domino and QuickPlace servers
QLTSDOMxx Control Group Backs up all databases on Lotus Domino server xx, where xx= 00-99
QLTSQPLxx Control Group Backs up all databases for Lotus QuickPlace server xx, where xx= 00-99
QLTSSVR Media Policy Media policy specifying the media class and expiration to be used for Lotus server backups
Chapter 4. Online Lotus server backups 27

Figure 11 shows the BRMS configuration after two Domino servers, and two QuickPlace servers have been configured on the AS/400 system. Remember that these entries only appear after the INZBRM *DATA or STRMNTBRM commands are processed.
Figure 11. Work with Backup Control Groups screen
By using the entry QLTSSVR as an example, select option 5 (Display entries), and select function F11 to display all exits within the control group. The control group entries are displayed. See the screen example in Figure 12.
QLTSEXCL Backup link list Backup link list, which includes all IFS objects except for the *.ns, *.nt, and *.box files saved during an online backup of all Lotus servers
Name Object type Description
• If PTF SF61489 (or a superseding PTF) is installed, and entries as in Table 3 were previously used, BRMS does not remove the old naming conventions automatically. Instead, delete the old entries when you are ready to use the new set of conventions, such as in Table 4 on page 27.
• The backup link lists (QDOMEXCL and QLTSEXCL) described above should not take the place of the *LINK entry in every full system save processed. Standard *LINK processing should be completed routinely when your system is in a restricted state for backup.
Notes
28 Backup Recovery and Media Services for OS/400
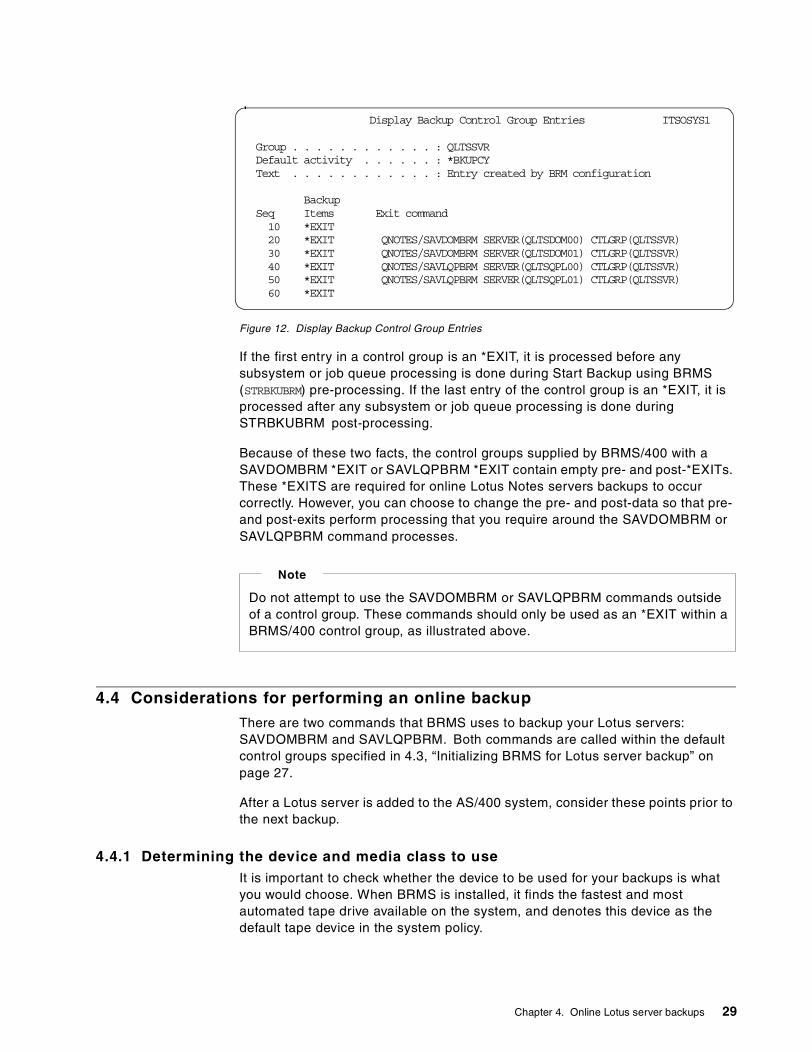
Figure 12. Display Backup Control Group Entries
If the first entry in a control group is an *EXIT, it is processed before any subsystem or job queue processing is done during Start Backup using BRMS (STRBKUBRM) pre-processing. If the last entry of the control group is an *EXIT, it is processed after any subsystem or job queue processing is done during STRBKUBRM post-processing.
Because of these two facts, the control groups supplied by BRMS/400 with a SAVDOMBRM *EXIT or SAVLQPBRM *EXIT contain empty pre- and post-*EXITs. These *EXITS are required for online Lotus Notes servers backups to occur correctly. However, you can choose to change the pre- and post-data so that pre- and post-exits perform processing that you require around the SAVDOMBRM or SAVLQPBRM command processes.
4.4 Considerations for performing an online backup
There are two commands that BRMS uses to backup your Lotus servers: SAVDOMBRM and SAVLQPBRM. Both commands are called within the default control groups specified in 4.3, “Initializing BRMS for Lotus server backup” on page 27.
After a Lotus server is added to the AS/400 system, consider these points prior to the next backup.
4.4.1 Determining the device and media class to useIt is important to check whether the device to be used for your backups is what you would choose. When BRMS is installed, it finds the fastest and most automated tape drive available on the system, and denotes this device as the default tape device in the system policy.
Display Backup Control Group Entries ITSOSYS1
Group . . . . . . . . . . . . : QLTSSVRDefault activity . . . . . . : *BKUPCYText . . . . . . . . . . . . : Entry created by BRM configuration
BackupSeq Items Exit command10 *EXIT20 *EXIT QNOTES/SAVDOMBRM SERVER(QLTSDOM00) CTLGRP(QLTSSVR)30 *EXIT QNOTES/SAVDOMBRM SERVER(QLTSDOM01) CTLGRP(QLTSSVR)40 *EXIT QNOTES/SAVLQPBRM SERVER(QLTSQPL00) CTLGRP(QLTSSVR)50 *EXIT QNOTES/SAVLQPBRM SERVER(QLTSQPL01) CTLGRP(QLTSSVR)60 *EXIT
Do not attempt to use the SAVDOMBRM or SAVLQPBRM commands outside of a control group. These commands should only be used as an *EXIT within a BRMS/400 control group, as illustrated above.
Note
Chapter 4. Online Lotus server backups 29

If this backup device is not the one required to save your Lotus server databases, change either the backup policy or the control group attributes associated with the Lotus server backups. See Table 3 or Table 4 on page 27 for details on default control group names.
4.4.2 Adding media to the scratch poolCareful consideration and ample media should be allocated prior to backing up Lotus servers. Consider what the capacity of the chosen backup device is, as well as the size of the Lotus server data to be backed up to tape. Allocate media as necessary. For a closer estimate of media utilization, consider how often servers are to be backed up, and for how long to retain the media.
4.5 Performing an online Lotus server backup
There are two ways to commence the backup of Lotus servers, interactively and as a BRMS scheduled entry.
4.5.1 Interactive savesTo backup Lotus servers interactively, follow these steps:
1. Be sure you have initialized, or performed maintenance on, BRMS if you recently added a Lotus server and this is the first time it will be backed up. BRMS cannot find your new server unless you run one of the initialization commands, which are listed in 4.3, “Initializing BRMS for Lotus server backup” on page 27.
2. From any command line, enter:
STRBKUBRM CTLGRP(QLTSSVR) SUBMIT(*NO)
4.5.2 Scheduled entryThe Lotus server backup can also be executed using a BRMS scheduled entry. The command to use is identical to the one specified in 4.5.1, “Interactive saves” on page 30. However, the job is scheduled to run in batch at a time specified by you, either now or later. The notes included in the chapter are also relevant when creating a scheduled entry for the Lotus server save.
4.6 Messages and timing
From time to time (and sometimes depending on the hardware configured on your system), a message can appear on the screen if running a backup interactively, or you receive a MSGW indicator from batch backups, alerting the system operator that a message has been received by the QSYSOPR message queue. These messages halt the BRMS backup process. Answer them as soon as possible.
• This process also backs up any QuickPlace servers configured on your machine.
• Substitute CTLGRP(QLTSSVR) with CTLGRP(QDOMINO) if you do not have PTF SF61489 installed on your system.
Notes
30 Backup Recovery and Media Services for OS/400

The time it takes to backup your Lotus servers heavily depends on processor size, device capabilities, the amount of data to be saved, and the amount of activity currently on the Lotus servers that are nominated for save.
Check the BRMS log and the system log to ensure the backup completed successfully. You can do this by using the following commands:
• Use the DSPLOGBRM command for the BRMS log. • Use the DSPLOG command for the system log.
4.7 Viewing the Lotus server saved history
To view a list of saved items from your Lotus server backups, use the following menu options:
From the BRMS main menu, select the following options in order:
1. Choose option 2 (Backup).
2. Choose option 3 (Display backup activity).
3. Choose option 3 (Display backup history).
4. Choose option 7 (Work with saved link information). Press Enter twice to see a list of all saved directories under BRMS backup control.
If required, select additional options to see the save history and saved object information:
1. Choose option 9 (Work with directory information) from the Saved Link Information screen to select a required directory to see the save history.
2. Choose option 9 (Work with saved objects) from the Work with Directory Information screen to work with individual saved objects in the nominated directory.
Note: The WRKMEDIBRM and WRKLNKBRM commands provide the same information. The WRKMEDIBRM command provides additional flexibility in that it supports many parameters for filtering the display of the save history information.
4.8 Planning for recovery
BRMS helps you plan for a complete recovery of your system. The disaster recovery plan report inducts all Lotus server backups to ensure all of your latest database backups are restored in the event of a disaster.
4.9 Recovering a single Lotus server database
Use the WRKLNKBRM command to recover a specific Lotus server database. For example, to restore a database called names, from TAP01, enter this command:
RSTBRM DEV(TAP01) OBJ((’/notes/data/names.nsf’))
The BRMS system then attempts to locate the media that possesses the latest edition of the file in question. If it is found, the process commences to restore the .nsf object. If unsuccessful in locating the media, a message is sent to the QSYSOPR message queue, informing the operator that a specified media volume
Chapter 4. Online Lotus server backups 31

is required for the restore to take place. Once the media is located and loaded, the system re-commences processing of the recovery.
4.10 Lotus server backup performance tuning
Backing up Lotus server databases individually to devices may not perform well. Therefore, by default, the Lotus server databases are backed up in groups of five databases per save operation. The Notes.ini file can be altered to reflect better performance by completing steps for both Domino and QuickPlace servers. These steps are outlined in 4.10.1, “Domino servers” on page 32, and 4.10.2, “QuickPlace servers” on page 32.
As you increase the number of databases in a group, your Lotus server is backed up more efficiently. However, all databases in the group are journaled during the backup with the changes backed up separately. Therefore, the time taken to backup the changes increases. When the databases are recovered, the changes to the database that occurred during the backup are re-applied. As the number of changes increases, so does the time to complete the restore process.
If you are backing up your servers during a heavy utilization period, keep the FILES_IN_GROUP entry to a lower amount (between 3 and 7), so fewer changes are made during the save operation. This improves overall performance. Should your backup routine occur where server utilization is much lower, set the FILES_IN_GROUP value to a higher amount to speed up the backup operation, while keeping recovery time to a reasonable level.
The maximum group value is 120.
4.10.1 Domino serversTo edit a number of files in a group for Domino servers, follow these steps:
1. On a command line, type:
WRKDOMSVR
2. Choose option 13 (Edit Notes.ini) on the server you want to modify.
3. Position your cursor to the following entry and modify it as required:
SAVDOMBRM_FILES_IN_GROUP=nnn,
Here, nnn is the number of databases to be grouped within one BRMS package.
4.10.2 QuickPlace serversTo edit the number of files in a group for QuickPlace servers, follow these steps:
1. On a command line, type:
WRKLQPSVR
The FILES_IN_GROUP entry in the .ini file must not be greater than 19 when saving to a TSM server (formerly ADSM server). See APAR SA88641 for further information.
Important note
32 Backup Recovery and Media Services for OS/400

2. Choose option 13 (Edit Notes.ini) on the server you want to modify.
3. Position to the following entry and modify it as required:
SAVLQPBRM_FILES_IN_GROUP=nnn,
Here, nnn is the number of databases to be grouped within one BRMS package.
4.11 Copying control groups
The control groups that are created by BRMS/400 have one or more *EXIT routines, which include the SAVDOMBRM and SAVLQPBRM commands. Each of these commands has a control group parameter. The default value refers to the control group name BRMS configured for you (as an example, QLTSSVR). See 4.3, “Initializing BRMS for Lotus server backup” on page 27.
If you want to copy default control groups, you may do so. After the copy, alter the *EXIT points (where the SAVDOMBRM or SAVLQPBRM commands are referenced) within the new control group. Change the Control group parameter on each command to be changed to refer to the new control group name.
Problems and exceptions can arise when you run the new control group without changing the parameters accordingly.
4.12 Restrictions of Lotus server online backups
The restrictions you should note when you use online Lotus server backups include:
• Media policy retention type VERSIONS is not supported.
• Prior to PTF SF64458 (V4R4), restoring a saved Lotus server database across a BRMS network is supported only if Receive media info attribute is set to *LIB. Use option 4 in the BRMSSYSPCY menu (Change network group) to review the value.
4.13 Considerations when using online Lotus server backups
You should perform a full system save routinely, even when the Lotus servers are backed up online. The considerations include:
• Incremental saves were not possible for Lotus server online backups at the time this redpaper was written.
• Lotus servers use subsystem descriptions. These subsystem descriptions must exist on the system prior to recovering any Lotus servers.
• The SAVDOMBRM and SAVLQPBRM commands do not function outside control groups. They depend on their pre- and post-processing *EXIT points.
Lotus Domino for AS/400 Version 5.03b is required for this functionality. Previous releases of Lotus Domino for AS/400 do not support this function.
Special note
Chapter 4. Online Lotus server backups 33

4.14 Enhancing Lotus server online backup
This section addresses some points to enhance the Lotus server online backup solution.
4.14.1 Temporary filesFiles similar to the examples below are written during a save process and are cleared automatically upon successful backup. However, if the backup function fails, these files may still remain and use storage space.
The files that should be deleted are named similar to those shown in italics in the following example:
/server_name/sub_directory/admin4.ntf.99999999999999.brmschgs
In the example above, 99999999999999 is the system time stamp at the time the file was created. Note that on the WRKLNK screen, it can appear as seven digits in length due to truncation.
4.14.2 Files to back upBe sure to correctly back up the admin4.nsf and alog4.ntf files for each server instance. The admin4.nsf file is an administrative tasks file, and alog4.ntf is used for building other .nsf files. Both are required for recovery purposes and are backed up automatically when each server is saved.
4.14.3 Restoration messagesWhen you restore individual Lotus server databases using the RSTBRM command, the user receives messages at completion of the restore.
The two messages received are similar to the following examples:
• '1 object restored'
• 'x objects restored'
Here, x is the number of databases within the file sequence. This message suggests all the changes for these databases are being restored instead of just the one specified. In fact, BRMS restores the one database, as requested.
Included in BRMS is a “package” with multiple databases and a “change file” (like a journal) that is used to back up with a save-while-active checkpoint.
When BRMS restores the pieces needed to get one database back, OS/400 issues the multiple files being restored message.
4.14.4 Checking which Domino version is installedPerform the following steps to check your version of Lotus Domino for AS/400:
1. From a command line, type:
WRKDOMSVR
2. When prompted, select a Domino server and use option 8 (Show console).3. On the command line, type:
SHOW SERVER
34 Backup Recovery and Media Services for OS/400

4. Press the F5 key to refresh your screen.5. Press the Page Up key to go to the top of the console.
A screen similar to the example Figure 13 appears.
Figure 13. Domino console
The second line in the example refers to Version 5.0.4a. This is the version of Lotus Domino that is installed on this AS/400 system.
Chapter 4. Online Lotus server backups 35

36 Backup Recovery and Media Services for OS/400

Chapter 5. BRMS/400 and SAP backup
This chapter discusses the procedures to save and restore the SAP environment using BRMS/400. It includes examples for two types of backups: full and incremental. The full backup is used as a weekly backup. The incremental is used as a daily backup.
5.1 BRMS/400 implementation when SAP is installedWe recommend that you create a BRMS/400 control group for your SAP backups. SAP user data consists of both OS/400 objects contained in libraries, and integrated file system objects contained in the integrated file structure. Therefore, you need to create a BRMS/400 link list.
When the SAP control group and *LNK list are created as outlined in the SAP manual, the integrated file system objects included within the SAP *LNK list must be excluded when you run the backup for the rest of the integrated file system objects. You should no longer run the *LINK control group item. Create a new *LNK list that omits:
• /QSYS.LIB • /QDLS.LIB • /usr/SAP....
You must run the DSCR3SYS and RCNR3SYS commands using a correct library list and under a user profile (<sid>OFR) that has authority to the commands. To assure that BRMS/400 is executing the SAP commands correctly with the *EXITs within the control group, schedule the backup job with the correct job description.
5.2 Additional reading
For more detailed information about SAP and backups, see the redbook SAP R/3 Implementation for AS/400, SG24-4672. You should also refer to the R/3 online documentation BC-SAP Database Administration: DB2/400 on the PC (client) side.
© Copyright IBM Corp. 2001 37

38 Backup Recovery and Media Services for OS/400

Appendix A. Quick start implementation of BRMS/400
This appendix contains a summary of the steps described in this redbook to implement BRMS/400. It can serve as a checklist or quick start guide for readers who are already familiar with the BRMS/400 implementation tasks. It is written to supplement the corresponding chapters in Backup Recovery Media Services: A Practical Approach, SG24-4840, and Backup Recovery and Media Services for OS/400, SC41-4345.
The tasks to implement BRMS/400 are:
1. Install licensed program and OS/400 options: Use GO LICPGM to install the following program components:
• Media Storage Extension (5769-SS1) option 18
• BRMS/400 (5769-BR1), *BASE, option 1 (Network Feature) and option 2 (Advanced Feature)
Note: Install the Media Storage Extensions option before you install BRMS/400.
2. Install PTFs: Install the latest PTFs for BRMS/400 and the save/restore group PTF.
3. Add the license key for BRMS/400: Use the ADDLICKEY command to license BRMS/400 for use. You have a 70-day trial period after the installation.
4. Initialize BRMS/400: To initialize BRMS/400, use the command:
INZBRM *DATA
5. Storage locations: Create the locations where your tapes should be kept, for example:
– COMPROOM – SCRATCH
Use the WRKLOCBRM command to create your storage locations.
Note: Allow tapes to expire only in a location where they can be reached within a reasonable time.
6. Media devices: Use the WRKDEVBRM command to review the list of configured devices.
For media libraries, use the WRKMLBBRM command.
Note: If tape devices have been added or removed since you installed BRMS/400, run the following command to update the list:
INZBRM *DEVICE
7. Media classes: Use the following command to review the list of media formats:
WRKCLSBRM *MED
Ensure all media formats you need are included.
8. Containers: If containers will be used for your tapes, use the following command to add the container classes:
WRKCLSBRM *CNR
Then use the WRKCNRBRM command to add the containers.
© Copyright IBM Corp. 2001 39

9. Move policies: Use the following command to create the move policies needed to rotate your media between the storage locations:
WRKPCYBRM *MOV
10.Media policies: Use the following command to create the media policies needed:
WRKPCYBRM *MED
Media policies hold the retention information, media type, and move policy.
11.System policy: Check your system policy. Take special notice of the following parameters:
– Output queue: Create an output queue (QUSRSYS/BRMS) for BRMS reports. If applicable, set up the output queue as a remote output queue so your BRMS/400 reports are sent to a secure location.
– The day start time affects both the media and the control groups.
– Change option 5 (Presentation control) to match your defaults.
12.Backup policy: Check your backup policy. On the Work with items to omit from backup option, enter Q1ABRMSF* to be omitted from *IBM backup. Do not back up the BRMS/400 save file libraries. They can become very large within a short period of time before the save files are backed up to tape.
13.Enroll and initialize media: Use the ADDMEDBRM to enroll and initialize your tapes. If you have a media library, use the ADDMLMBRM command.
14.Create control groups: You can divide your data into multiple control groups. To allow a backup of data at different times, have different retention periods or use different media. Use the WRKCTLGBRM command to create your control groups. Use option 6 (Add to schedule) to add the control groups to the job scheduler.
15.BRMS/400 maintenance: Schedule the STRMNTBRM command as part of your daily routines. The STRMNTBRM command creates your disaster recovery reports. The reports are created on the output queue specified in the system policy.
40 Backup Recovery and Media Services for OS/400

Appendix B. Collecting documentation for BRMS for OS/400
This chapter discusses the tools and procedures for diagnosing BRMS for OS/400 problems. It is intended as a basic guide to BRMS/400 problem determination. Use this appendix in conjunction with existing BRMS/400 manuals.
B.1 Basic problem determination
Basic questions and answers can trigger conclusions to help isolate or eliminate suspected areas of a problem within BRMS/400 (or any product). Ask yourself these questions:
• Has this ever worked?
• Is the failure intermittent or constant?
• Can the problem be reproduced?
• What, if anything, changed just prior to the failure?
• What is the software or PTF level?
• Is the configuration correct?
• Are there new users? Does the failure occur for everyone?
• Is there new hardware?
• Are there new procedures implemented?
• Can the failing function be performed successfully outside of the BRMS/400 environment?
• Can the failing function be performed successfully another way inside the BRMS/400 environment?
• What is the problem area? Most BRMS/400 problems relate to a specific problem area, for example a given policy, set of media, and so on?
The process of answering these questions many times leads to a resolution.
B.2 Installed code levels
The level of installed code is important to note when reporting problems to IBM. To determine the level of software involved, use the following commands in the order in which they are presented:
1. For BRMS/400 code, type the command:
GO LICPGM
Select option 10 to display the installed licensed program.
2. Determine the cumulative PTF package level by typing the following command:
DSPPTF
The cumulative package number is prefixed to indicate the extent of PTF installation.
© Copyright IBM Corp. 2001 41

• TC: The entire cumulative PTF package has been fully applied • TA: Only HIPER OS/400 and microcode PTFs have been applied • TL: Only HIPER microcode PTFs have been applied.
3. Determine the BRMS/400 PTF level by typing this command:
DSPPTF 5769BR1
4. To determine if Media Storage Extensions (MSE) is correctly installed, type:
GO LICPGM
Check that no error is displayed for the installation status of 5769-SS1 option 18.
5. In regard to Library Manager Code (for 3494 users only), this code resides on the PC on the 3494 device itself. This code drives the 3494 at the device end. It can be accessed from the SERVICE menu from the Library Manager console. Read the first display.
Logging this information in a problem log is useful for organizing basic facts.
B.3 Primary problem areas
BRMS/400 and Media Library (MLB) problems can be divided into four distinct areas. First determine in which of the following areas the problem lies:
• BRMS/400 code • Tape code, OS/400 or SLIC (non-BRMS/400) • Library manager code (3494 users only) • Media library hardware
Once you identify the likely problem area, use the following guidelines to determine what to collect. This list applies to complex, routine, intermittent, and re-creatable errors.
B.3.1 BRMS/400 code
The following information sources are presented in an approximate order of importance. The most commonly requested materials are listed first.
B.3.1.1 BRMS/400 job logThe single most important item needed in almost all problems with BRMS/400 is the BRMS/400 job log. By this, we mean the job log for the BRMS/400 job or jobs that issue an error message. For example, if BRMS/400 is failing to move media, the job log when MOVMEDBRM executes is required. To produce a job log, issue this command:
DSPJOBLOG OUTPUT(*PRINT)
To increase the visibility of messages in the job log for jobs submitted by BRMS/400, change the job description message logging level of the job. Use the CHGJOB command as illustrated in Figure 14.
42 Backup Recovery and Media Services for OS/400
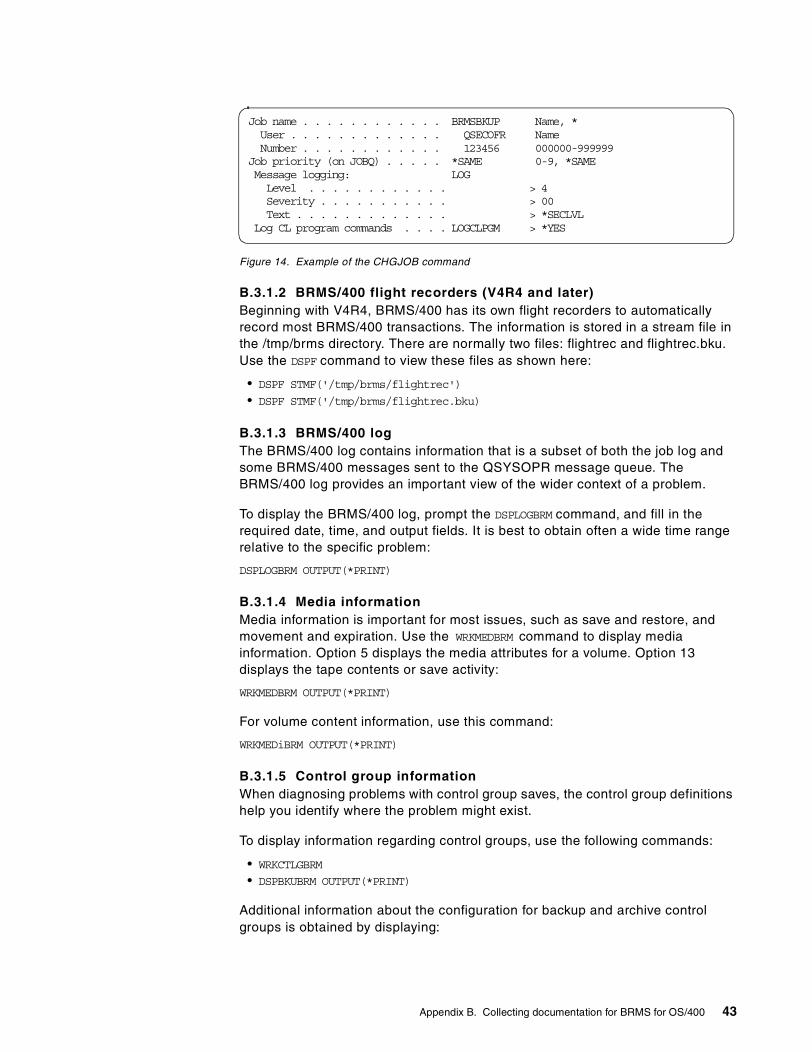
Figure 14. Example of the CHGJOB command
B.3.1.2 BRMS/400 flight recorders (V4R4 and later)Beginning with V4R4, BRMS/400 has its own flight recorders to automatically record most BRMS/400 transactions. The information is stored in a stream file in the /tmp/brms directory. There are normally two files: flightrec and flightrec.bku. Use the DSPF command to view these files as shown here:
• DSPF STMF('/tmp/brms/flightrec')
• DSPF STMF('/tmp/brms/flightrec.bku)
B.3.1.3 BRMS/400 logThe BRMS/400 log contains information that is a subset of both the job log and some BRMS/400 messages sent to the QSYSOPR message queue. The BRMS/400 log provides an important view of the wider context of a problem.
To display the BRMS/400 log, prompt the DSPLOGBRM command, and fill in the required date, time, and output fields. It is best to obtain often a wide time range relative to the specific problem:
DSPLOGBRM OUTPUT(*PRINT)
B.3.1.4 Media informationMedia information is important for most issues, such as save and restore, and movement and expiration. Use the WRKMEDBRM command to display media information. Option 5 displays the media attributes for a volume. Option 13 displays the tape contents or save activity:
WRKMEDBRM OUTPUT(*PRINT)
For volume content information, use this command:
WRKMEDiBRM OUTPUT(*PRINT)
B.3.1.5 Control group informationWhen diagnosing problems with control group saves, the control group definitions help you identify where the problem might exist.
To display information regarding control groups, use the following commands:
• WRKCTLGBRM
• DSPBKUBRM OUTPUT(*PRINT)
Additional information about the configuration for backup and archive control groups is obtained by displaying:
Job name . . . . . . . . . . . . BRMSBKUP Name, *User . . . . . . . . . . . . . QSECOFR NameNumber . . . . . . . . . . . . 123456 000000-999999
Job priority (on JOBQ) . . . . . *SAME 0-9, *SAMEMessage logging: LOGLevel . . . . . . . . . . . . > 4Severity . . . . . . . . . . . > 00Text . . . . . . . . . . . . . > *SECLVL
Log CL program commands . . . . LOGCLPGM > *YES
Appendix B. Collecting documentation for BRMS for OS/400 43

• Control Group Attributes
Option 8: WRKCTLGBRM
• Backup/Archive Policy
– WRKPCYBRM *BKU
– WRKPCYBRM *ARC
• System Policy
WRKPCYBRM *SYS
Screen prints of the policies are often needed.
B.3.1.6 BRMS/400 generated reportsBRMS/400 generated reports are useful in general problem determination. A list of all available reports is available in the “Report Examples” section in Backup Recovery and Media Services for OS/400, SC41-4345.
Location informationWhen diagnosing problems that involve either the movement or expiration of media, location information is often needed:
DSPLOCBRM OUTPUT(*PRINT)
Screen prints of location attributes are also often needed.
Device informationInformation about tape devices configured for use in BRMS/400 is found by selecting option 5 from the WRKDEVBRM display:
WRKDEVBRM OUTPUT(*PRINT)
Screen prints of location attributes are also often needed.
MLB informationInformation about the BRMS/400 configuration of a Media Library Device, such as a 3494, is found by selecting option 5 from the Work with Media Libraries display:
WRKMLBBRM
To display Media Library Media, use the following command:
WRKMLMBRM OUTPUT(*PRINT)
B.3.2 SLIC, tape code, and OS/400
The following is a basic outline of what needs to be looked at if the problem appears to be specific to the tape code.
For movement, archive, and expiration problems, producing reports can show what the system intends to do. This can help determine if the problem is in the execution of any given operation.
Tip
44 Backup Recovery and Media Services for OS/400

B.3.2.1 SLIC codeIf you believe the problem is in the SLIC part of the tape code, collect this basic information:
• VLOG information • PTF listings • QTADMPDV API information
B.3.2.2 QTADMPDV API: Tape Dump Flight RecorderIn addition, you may need some of the traces and trap techniques outlined in B.6.2.2, “QTADMPDV API: Tape Dump Flight Recorder” on page 52. QTADMPDV is a comprehensive documentation collection tool if you are not sure what to collect.
B.3.2.3 OS/400 codeIf you believe the problem is in the OS/400 part of the tape code, collect this basic information:
• Job trace • PTF listings
In addition, you may need some of the traces and trap techniques outlined in B.3.2.2, “QTADMPDV API: Tape Dump Flight Recorder” on page 45. QTADMPDV is a comprehensive documentation collection tool if you are not sure what to collect.
B.3.3 Library Manager code (on the 3494)
The Library Manager (LM) is controlled by an adapted PC console in the back of the 3494. In addition to controlling the robot and keeping track of the physical location of all the tapes in the MLB, LM keeps a log of all errors and transactions that occur on the 3494. Always check the time stamps of the logs you collect to ensure they include the time of the failure. Send these logs to the IBM Hardware Support Center.
Contact your hardware engineer to ascertain which levels of Library Manager Code are comparable with which levels of SLIC. This is particularly important when planning for an upgrade.
B.3.4 Hardware problems
If you experience problems with 3494 media mounts and dismounts, there may be a problem with the hardware. Alert your hardware CE if you suspect this may be the cause of the problem.
B.3.4.1 The QTADMPDV APIWe strongly recommend that you use the QTADMPDV API in any problem that involves the tape hardware. Issue a call to this API to collect a comprehensive set of material. Refer to B.3.2.2, “QTADMPDV API: Tape Dump Flight Recorder” on page 45, for more information.
B.3.4.2 Hardware error logsThese commands, issued on the AS/400 system, can be used to create reports of reported hardware problems:
Appendix B. Collecting documentation for BRMS for OS/400 45

• PRTERRLOG OUTPUT(*PRINT)
• WRKPRB
Often an indication of a hardware problem can be investigated by obtaining the Library Manager Transaction logs (which were mentioned previously).
B.4 Specific problem areas
Specific problem areas and tools to diagnose them are discussed in this section.
B.4.1 Installation problems
To debug an installation problem of Backup Recovery and Media Services/400, make sure you are signed on as QSECOFR. It is better to use the QSECOFR profile itself rather than a profile that has *SECOFR authority. If you still have problems, enter the following command:
CHGDTAARA DTAARA(*LDA(444 5)) VALUE(’*TEST’)
This command turns on special trace information to dump additional messages to the job log. Otherwise, this information is removed.
After debugging the problem, the data area is reset when signing off.
B.4.2 BRMS/400 networking
A diagram on how a BRMS/400 Network functions is contained in the latest BRMS/400 redbook Backup Recovery Media Services: A Practical Approach, SG24-4840.
B.4.2.1 Synchronization problems between systemsSome common points to consider with network problems are:
• Is the update correct on the local system?
• Does each system in the Network Group appear as ACTIVE?
• Has enough time passed to allow the DDM updates to transfer?
• Is QA1ANET file empty? Use the following command to check this:
DSPPFM QUSRBRM/QA1ANET
• Is anything locking a BRMS OS/400 file?
• Use the DSPLOGBRM command to check the BRMS log for errors.
• Check the QSYSOPR message queue for errors.
• Is subsystem Q1ABRMNET started on all systems in the network?
• Is there a MSGW status indicated next to the QBRMSYNC job? If so, what is the message?
Before you attempt to diagnose any complex networking issue, it is vital you contact IBM Support to prevent making changes that could have an unpredictable result on the integrity of the network.
Important
46 Backup Recovery and Media Services for OS/400

• Has any system in the network been in a restricted state for any extended period of time for an upgrade or similar activity?
• Has any system had its network name changed recently?
• If the problem is fixed by a PTF, check if the PTF is needed on all systems. Check to see if the PTF is installed on each system (this is a common cause).
B.4.2.2 DDM and communication problemsThere are a couple of simple tests to isolate DDM and communication problems. The questions you need to ask and the commands that you should use to check the answer are:
1. Can you pass through or perform a DDM job to the remote system?
STRPASTHR
If you cannot perform this function successfully outside of BRMS/400, it may not be an issue specific to BRMS/400.
2. Are the BRMS/400 required user profiles disabled?
WRKUSRPRF
3. BRMS/400 uses QBRMS as the default DDM profile used. If it is disabled, the DDM jobs will fail.
4. Change the logging level of the QBRMSYNC job to log all messages:
CHGJOB
The QBRMSYNC synchronization job, by default, does not force a job log. Even when it is failing, it does not force a job log. Manually change the job description of QBRMSYNC to force a job log. Remember to change the default back once you have diagnosed the problem, because this job is normally run every few minutes and will log a job log each time unless you change the value back.
5. On the local system, check QSYSOPR:
DSPMSG QSYSOPR
QYSOPR often reports why a DDM job fails to be sent to a remote system.
6. On the remote system, check the QHST log:
DSPLOG
This often records information about why an incoming DDM job fails.
B.4.3 Shared media inventory problems
When media is setup to share across network systems, it is helpful to review the inventory report.
B.4.3.1 Centralized Media Audit ReportThis function is automatically produced by the STRMNTBRM function when the system is defined in a BRMS/400 network. It is produced irrespective of what options are selected in the STRMNTBRM command. This report can be used to diagnose and detect problems with shared media inventory mismatches. Figure 15 on 48 shows an extract of the type of information that is produced.
Appendix B. Collecting documentation for BRMS for OS/400 47

Figure 15. Example of Centralized Media Audit Report
The Volumes in error parameter denotes that a volume on the local system was not found to exist on the remote system.
Volumes updated denotes a volume on a remote system was found to have an older time stamp than the local system. In a BRMS/400 network, all file time stamps should match. If not, the remote system was updated with the information on the local system.
Under normal conditions when the shared media inventory is fully synchronized, this report is produced, but the report will be empty.
B.4.4 Media library inventory mismatches
A mismatch in the media library inventory is most commonly experienced when the media inventory becomes out of sync with either what is physically positioned within locations, or with the media inventory of a media library device. Two techniques to help resolve the mismatch are explained here.
B.4.4.1 A manual processThe manual process requires these steps:
1. To print out a list by location of MLB, type the command:
WRKMEDBRM OUTPUT(*PRINT)
2. Compare the printout from step 1 to a printout that is produced by running the WRKMLMBRM OUTPUT(*PRINT) command from the MLB.
3. In a network, the *NOSHARE media is viewable only from the system to which it belongs. Go to all the other systems and run the WRKTAPCTG command to *PRINT the *NOSHARE category.
4. If a volume is in the MLB, but is at some other location according to BRMS/400, run the MOVMEDBRM command on the volume or volumes in question.
5. If the MLB doesn't identify the volume and the WRKMEDBRM report does, locate the volume and use the ADDMLMBRM command to add it to the MLB.
6. If you cannot physically find the tape, temporarily move it to the “lost” location of *HOME. Determine where it should be and update the inventory accordingly.
7. Consider the running movement on each system and then carefully look at the reports. Verify the necessary moves and check that everything is satisfactory.
5722BR1 V5R1M0 990521 Centralized Media Audit ReportFrom System . . . . . . . . . . : ITSOSYS1To system . . . . . . . . . . . : ITSOSYS2Volume BRM001 on system ITSOSYS1 not found on network system . . : ITSOSYS2Volume BRM003 on system ITSOSYS2 updated with data from system . : ITSOSYS1Volume BRM056 on system ITSOSYS2 updated with data from system . : ITSOSYS1Volume BRM990 on system ITSOSYS1 not found on network system . . : ITSOSYS2Total volumes checked . . . . . : 67Volumes in error . . . . . . . . : 2Volumes updated . . . . . . . . : 2
48 Backup Recovery and Media Services for OS/400

B.4.4.2 An automated processFor large or networked systems, refer to the redbook Backup Recovery Media Services: A Practical Approach, SG24-4840. Appendix E of the redbook contains a sample program to use to automate the realignment of media and its location.
B.4.5 Complex problems
In the case of complex problems or when you are unsure what data to collect, save the entire QUSRBRM library to tape and send it into the IBM Support Center.
Figure 16 shows an example of the DMPBRM command to use instead of saving the entire QUSRBRM library.
Figure 16. Example of the DMPBRM command
DMPBRM also dumps a copy of QUSRBRM to assist in problem determination. You can specify various levels of detail and one or more jobs to dump. This command produces a file that is used in problem determination by the IBM technical representative. Performing a DMPBRM should be done in conjunction with recommendations from an IBM representative.
B.5 The last resort
If you have reached this part on the document, you may be in a serious situation where you have to do the backups outside of BRMS/400. Recovery actions are more than disruptive.
B.5.1 Disabling BRMS/400
BRMS/400 continues to be active, even if you are not using a BRMS/400 save or tape function. This can cause a conflict, because, for example, BRMS/400 can intervene and prevent an attempt to use the INZTAP command to a BRMS/400 enrolled tape.
To disable BRMS/400, perform the following steps (see Figure 17 on 50):
Dump BRMS/400 (DMPBRM)
Type choices, press Enter.
Device . . . . . . . . . . . . . DEV > *SAVFLevel . . . . . . . . . . . . . LVL > *ALLTarget release . . . . . . . . . TGTRLS *CURRENTDump device . . . . . . . . . . DMPDEV *ALL
+ for more valuesJoblog to dump . . . . . . . . . JOBLOG *NONE
Disabling BRMS/400 should be a last resort due to the fact that you can accidentally overwrite data. Any save operation done while BRMS/400 is disabled will not be known to BRMS/400. You will also not be able to run any BRMS/400 commands successfully while the product is disabled.
Note
Appendix B. Collecting documentation for BRMS for OS/400 49
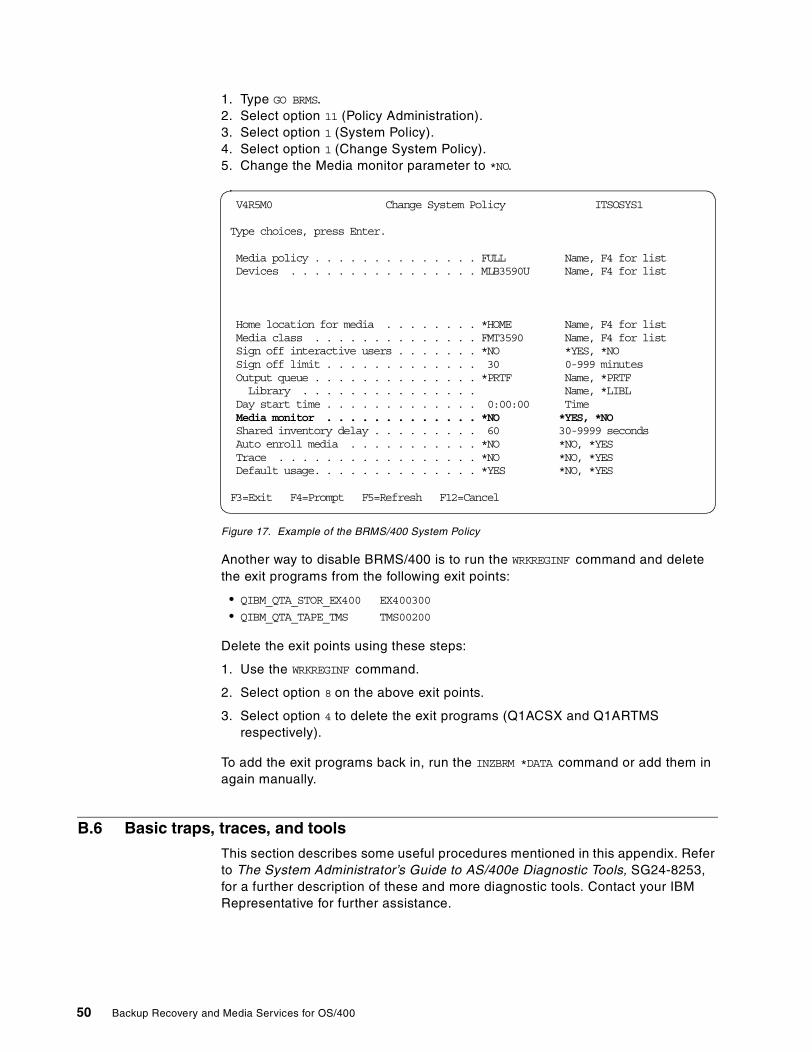
1. Type GO BRMS.2. Select option 11 (Policy Administration). 3. Select option 1 (System Policy).4. Select option 1 (Change System Policy). 5. Change the Media monitor parameter to *NO.
Figure 17. Example of the BRMS/400 System Policy
Another way to disable BRMS/400 is to run the WRKREGINF command and delete the exit programs from the following exit points:
• QIBM_QTA_STOR_EX400 EX400300 • QIBM_QTA_TAPE_TMS TMS00200
Delete the exit points using these steps:
1. Use the WRKREGINF command.
2. Select option 8 on the above exit points.
3. Select option 4 to delete the exit programs (Q1ACSX and Q1ARTMS respectively).
To add the exit programs back in, run the INZBRM *DATA command or add them in again manually.
B.6 Basic traps, traces, and tools
This section describes some useful procedures mentioned in this appendix. Refer to The System Administrator’s Guide to AS/400e Diagnostic Tools, SG24-8253, for a further description of these and more diagnostic tools. Contact your IBM Representative for further assistance.
V4R5M0 Change System Policy ITSOSYS1
Type choices, press Enter.
Media policy . . . . . . . . . . . . . . FULL Name, F4 for listDevices . . . . . . . . . . . . . . . . MLB3590U Name, F4 for list
Home location for media . . . . . . . . *HOME Name, F4 for listMedia class . . . . . . . . . . . . . . FMT3590 Name, F4 for listSign off interactive users . . . . . . . *NO *YES, *NOSign off limit . . . . . . . . . . . . . 30 0-999 minutesOutput queue . . . . . . . . . . . . . . *PRTF Name, *PRTFLibrary . . . . . . . . . . . . . . . Name, *LIBL
Day start time . . . . . . . . . . . . . 0:00:00 TimeMedia monitor . . . . . . . . . . . . . *NO *YES, *NOShared inventory delay . . . . . . . . . 60 30-9999 secondsAuto enroll media . . . . . . . . . . . *NO *NO, *YESTrace . . . . . . . . . . . . . . . . . *NO *NO, *YESDefault usage. . . . . . . . . . . . . . *YES *NO, *YES
F3=Exit F4=Prompt F5=Refresh F12=Cancel
50 Backup Recovery and Media Services for OS/400

B.6.1 Performing a manual job trace
Job traces are useful for situations when you suspect there is a problem with the IBM code itself. A job trace shows the individual modules called by any given command.
To execute a job trace, place the failing command or commands in between two TRCJOB statements:
TRCJOB *ONMOVMEDBRMTRCJOB *OFF
This process applies when the job in question is your own job.
Turning the trace off produces a spooled file. The resulting output looks like the example in Figure 18.
Figure 18. Example of a trace job printout
Output from a job trace can extend to dozens of pages for even a trace of the simplest job. For this reason, use the TRCJOB command selectively.
B.6.2 Tape and tape code
Tools to diagnose tape programs are described in the following sections.
B.6.2.1 Tape exit traceThe tape exit trace tool is useful for IBM to understand whether BRMS/400 or the tape code is generating the problem with saves. The tape exit trace shows you which part is making the other part function incorrectly.
The trace can be activated for a specific control group or job, or by a global change with the System Policy. Either way, use the tape exit trace for the duration of the failing save only. Disable it once the relevant data is collected.
1. Clear the QA1ATR file in library QGPL, if it exists:
CLRPFM FILE(QUSRBRMS/QA1ATR)
This file is never cleared or deleted by BRMS/400. It can be cleared or deleted safely by the user whenever it is needed. Prior to clearing or deleting, check to make sure no other problem diagnoses have taken place and data in this file is needed.
5769SS1 V4R5M0 990909 AS/400 TRACE JOB INFORMATIONTRACE TYPE - *ALL MAX STORAGE- 01024 EXIT PROGRAM-RECORD COUNT- 002460 START TIME - 11:11:17 START DATE - 02/21/00TIME SEQNBR FUNCTION PROGRAM LIBRARY ENTRY EXIT CALL11:11:29.563 000505 XCTL QDMOVERD QSYS 0001 03E7 0711:11:29.570 000506 RETURN Q1ACVMS QBRM 00EA 00F0 0611:11:29.575 000507 CALL QCADRV QSYS 0001 005A 0711:11:29.582 000508 CALL QCARULE QSYS 0001 011D 0811:11:29.610 000509 RETURN QCADRV QSYS 005B 00A8 0711:11:29.629 000510 CALL QCAPOS QSYS 0001 04D1 0811:11:29.636 000511 CALL QCAFSCAN QSYS 0001 00D1 0911:11:29.642 000512 RETURN QCAPOS QSYS 04D2 013F 0811:11:29.669 000513 RETURN QCADRV QSYS 00A9 0108 0711:11:29.675 000514 CALL QCAFLD QSYS 0001 0181 0811:11:29.687 000515 RETURN QCADRV QSYS 0109 0135 07
Appendix B. Collecting documentation for BRMS for OS/400 51

2. Insert the following command before the tape command within the job:
CHGDTAARA DTAARA(*LDA (800 3)) VALUE('*ON')
This statement can be inserted as an *EXIT into a control group if necessary.
3. Save the QA1ATR file to tape after the problem has occurred.
Figure 19 outlines how the System Policy can be changed.
Figure 19. Example of the system policy
B.6.2.2 QTADMPDV API: Tape Dump Flight RecorderAn API is provided to gather information for OS/400 tape debugging. Dump Device (QTADMPDV) is provided to gather debugging information for tape device and Media Storage Extension (MSE) support. Use the QTADMPDV API to collect information for your IBM service representative. Use this API immediately after a suspected device or tape management system failure. If the API is not used immediately, other device operation can cause the flight recorders to wrap and result in lost information.
After a problem is created, use the Work with Problems (WRKPRB) command. Select option 8 next to the problem identifier to work with the problem that was created. To save the information to be sent in, select option 30. Save APAR data to an APAR library to save the library with the information that has been collected.
The Dump Device API currently supports the following device types to receive the data:
• Tape (TAP) devices • Tape media library (TAPMLB) devices • Optical (OPT) devices • Optical media library (OPTMLB) devices • Diskette (DKT) devices
V4R5M0 Change System Policy ITSOSYS1
Type choices, press Enter.
Media policy . . . . . . . . . . . . . . FULL Name, F4 for listDevices . . . . . . . . . . . . . . . . MLB3590U Name, F4 for list
Home location for media . . . . . . . . L34943590 Name, F4 for listMedia class . . . . . . . . . . . . . . FMT3590 Name, F4 for listSign off interactive users . . . . . . . *NO *YES, *NOSign off limit . . . . . . . . . . . . . 30 0-999 minutesOutput queue . . . . . . . . . . . . . . *PRTF Name, *PRTFLibrary . . . . . . . . . . . . . . . Name, *LIBL
Day start time . . . . . . . . . . . . . 0:00:00 TimeMedia monitor . . . . . . . . . . . . . *YES *YES, *NOShared inventory delay . . . . . . . . . 60 30-9999 secondsAuto enroll media . . . . . . . . . . . *NO *NO, *YESTrace . . . . . . . . . . . . . . . . . *YES *NO, *YESDefault usage. . . . . . . . . . . . . . *YES *NO, *YES
F3=Exit F4=Prompt F5=Refresh F12=Cancel
52 Backup Recovery and Media Services for OS/400

Here is an example of a call to the API from a command entry line:
CALL QTADMPDV TAP01
The Dump Device (QTADMPDV) API dumps the contents of the device flight recorder for the device specified in the parameter passed to the program. The information that is found in spooled files includes:
• QSYSARB job log
• QSYSOPR message queue
• Job logs of the active jobs that have used the device as indicated in the flight recorder data
• The history log (QHST)
• Device description of the device
• Line, controller, and device description associated with a media library device
• The job log executing this API
• Work with Configuration Status (WRKCFGSTS) listing
• Licensed internal code logs from the last 24 hours
• Error logs associated with the device resource (and each resource within a media library device)
• Associated internal system objects
• Media Storage Extensions (MSE) flight recorder, if available. This flight recorder traces the structures passed to a tape management system registered with the registration facility and traces the response from the registered program.
This flight recorder can be helpful in developing and maintaining a tape management product.
Since many and potentially large spooled files can be generated, be sure enough system DASD is available to handle the request.
The information provided and the number of spooled files can change at any time. The information is intended for problem determination. The spooled files are generated in the QEZDEBUG output queue in library QUSRSYS if QEZDEBUG exists. If it does not exist, the spooled files are generated in the users output queue.
Note
The QTADMPDV API generates multiple spooled files, which can become large depending upon the job logs that are printed and the size of the device information. Submitting the API call to be processed as a batch job may be used if system performance is a concern. If the API is called from the system console at high priority, it can degrade performance for other critical processing.
Note
Appendix B. Collecting documentation for BRMS for OS/400 53

B.6.3 Useful commands
You can use the following QUSRTOOL tools. Compile these tools from the source supplied in the QUSRTOOL library:
1. Check the integrity of a save tape:
CHKSAVTAP
2. Convert DSPTAP output to a database file:
CVTDSPTAP
3. Check the integrity of database file contents:
VALDBF
4. Check a library for object damage:
CHKOBJDMG
B.6.4 Collecting documentation
Printed reports contain a lot of information. It is useful to copy these reports to tape.
Copying a spooled file to tapeThe basic procedure to copy a spooled file to tape is explained here:
1. On the OS/400 command line, type the following command:
WRKSPLF
2. Find the spooled file to copy. Select option 8 to find the attributes. Write them down on paper or press Print Screen to print them.
3. To create a physical file, on the OS/400 command line, type the following command:
CRTPF FILE(name_of_library/file) RCDLEN(133) MAXMBRS(3) SIZE(*NOMAX)
Ensure the record length (RCDLEN) is set to 133 characters. This allows for an extra control character that the spooled files contain. If the spooled file you are to copy is large, you may need to set the PF size to *NOMAX in the Additional parameters.
4. Use the CPYSPLF command to copy the spooled information to a physical database file:
CPYSPLF FILE(SPOOLFILE) TOFILE(name_of_library/file) CTLCHAR(*FCFC)
5. Use the SAVOBJ command to save the database file to tape:
SAVOBJ OBJ(file_name) LIB(libarary_name) DEV(tape_device_name)
6. Use the RSTOBJ command to restore the object saved in step 5:
RSTOBJ OBJ(file_name) SAVLIB(library_name) DEV(tape_device_name)
7. Use the OVRPRTF command to override the print file:
OVRPRTF QSYSPRT CTLCHAR(*FCFC)
From V3R6 onwards, QUSRTOOL is a chargeable option. Formal support is provided through this site on the Web: http://www.taatool.com
Reminder
54 Backup Recovery and Media Services for OS/400

8. Use the CPYF command to re-create the spooled file on the target box:
CPYF FROMFILE(rstlib/nameofpf) FROMMBR(mbrname) TOFILE(QSYSPRT)
B.6.5 DMPBRM command
The following sections explain each of the levels in DMPBRM. The Help text suggests that you contact your service representative because IBM developers and support personnel want to be able to change it based on need, without affecting documentation. When we process the DMPBRM command, we list all the objects in QUSRBRM and remove all object types except physical files, data areas, and journals. With the objects left in the list, we run through and build the SAVOBJ command and include job logs specified on the command.
See Figure 16 on 49 for details of the DMPBRM command.
B.6.5.1 Level number This number specifies the level of detail to be included in the dump. The level of detail can range from one to nine, with one having the least amount of detail and nine having the most detail. All physical files will be included unless they are based on the level number for which they are omitted. Ask your support representative for the level of detail to specify.
B.6.5.2 Job logs If the parameter for “Job log to dump” is filled in, the DSPJOBLOG command is run for each job entered. The job logs are copied to a physical file called JOBLOGS in the QUSRBRM library. Each job log is put into a member in the file with the name JOBLOGnnn, where nnn is the number of job logs processed.
B.6.5.3 Dump device For devices specified here, the device capabilities API is used to dump information for each device. The information is put into the DMPDEV file in the QUSRBRM library.
B.6.6 TSM backup failures
When saving to a TSM server, additional traces are available and may be needed to diagnose problems. To enable the trace, use the following commands:
CHGPFM FILE(QUSRSYS/QANESAVA) MBR(TRACE) EXPDATE('*NONE')CHGPFM FILE(QUSRSYS/QANERSTA) MBR(TRACE) EXPDATE('*NONE')
Use PDM to view the trace information:
WRKOBJPDM LIB(QUSRSYS) OBJ(QANESAVA)WRKOBJPDM LIB(QUSRSYS) OBJ(QANERSTA)
These files can be saved to save files or tape using the SAVOBJ command.
The DMPBRM command saves the BRMS/400 flight recorders at V4R4 and later at all levels.
Note
Appendix B. Collecting documentation for BRMS for OS/400 55

Use the CHGPFM command to stop the trace after the problem is resolved:
CHGPFM FILE(QUSRSYS/QANESAVA) MBR(TRACE) EXPDATE('mm/dd/yy')CHGPFM FILE(QUSRSYS/QANERSTA) MBR(TRACE) EXPDATE('mm/dd/yy')
Additional TSM traces may be requested by TSM service personnel. This is normally done by adding or changing entries in the APIOPT member of the QANSAPI/QOPTADSM file.
Figure 20. Extracting the QANSAPI/QOPTADSM(APIOPT) member
TSM service personnel may request other TRACEFLAGS options.
B.7 Informational APARs
For a regularly updated list of all BRMS/400 Information APARs, consult Information APAR II09772. Use the SNDPTFORD command to order Informational APARs or view them on the Internet at: http://techsupport.rchland.ibm.com/
Select Software Problems - APARS from the drop-down list and then select All Info APARS by Release.
Columns . . . : 1 121 Edit QANSAPI/QOPTADSMSEU==> APIOPTFMT ** ...+... 1 ...+... 2 ...+... 3 ...+... 4 ...+... 5 ...+... 6 ...+... 7 ...+... 8 ...+... 9 ...+... 0 ...+... 1 ...+... 20030.00 * TCPPORT 15000031.000032.000033.00 * Setting Nodename0034.00 * -------------------------------------------------------0035.000036.00 * NODENAME your_node_name0037.000038.00 * SETTING TRACE INFO0039.00 * --------------------------------------------------------0040.00 TRACEFILE QANSAPI/TRACE0041.00 TRACEFLAGS ALLSESS API
****************** End of data ******************************************************************************************
Asterisks (*) in column 1 serve to “comment” out the entries. Remove the asterisks to enable the program statements.
Note
56 Backup Recovery and Media Services for OS/400

Appendix C. Special notices
This publication is intended to help customers, business partners, and IBM Availability Services personnel understand the important considerations of planning and managing Backup Recovery and Media Services for OS/400 (BRMS/400) in a single system environment or in a networked environment. The information in this publication is not intended as the specification of any programming interfaces that are provided by OS/400 and BRMS/400. See the PUBLICATIONS section of the IBM Programming Announcement for OS/400 and BRMS/400 for more information about what publications are considered to be product documentation.
References in this publication to IBM products, programs or services do not imply that IBM intends to make these available in all countries in which IBM operates. Any reference to an IBM product, program, or service is not intended to state or imply that only IBM's product, program, or service may be used. Any functionally equivalent program that does not infringe any of IBM's intellectual property rights may be used instead of the IBM product, program or service.
Information in this book was developed in conjunction with use of the equipment specified, and is limited in application to those specific hardware and software products and levels.
IBM may have patents or pending patent applications covering subject matter in this document. The furnishing of this document does not give you any license to these patents. You can send license inquiries, in writing, to the IBM Director of Licensing, IBM Corporation, North Castle Drive, Armonk, NY 10504-1785.
Licensees of this program who wish to have information about it for the purpose of enabling: (i) the exchange of information between independently created programs and other programs (including this one) and (ii) the mutual use of the information which has been exchanged, should contact IBM Corporation, Dept. 600A, Mail Drop 1329, Somers, NY 10589 USA.
Such information may be available, subject to appropriate terms and conditions, including in some cases, payment of a fee.
The information contained in this document has not been submitted to any formal IBM test and is distributed AS IS. The use of this information or the implementation of any of these techniques is a customer responsibility and depends on the customer's ability to evaluate and integrate them into the customer's operational environment. While each item may have been reviewed by IBM for accuracy in a specific situation, there is no guarantee that the same or similar results will be obtained elsewhere. Customers attempting to adapt these techniques to their own environments do so at their own risk.
Any pointers in this publication to external Web sites are provided for convenience only and do not in any manner serve as an endorsement of these Web sites.
The following terms are trademarks of the International Business Machines Corporation in the United States and/or other countries:
e (logo)® IBM �
RedbooksRedbooks Logo
© Copyright IBM Corp. 2001 57

The following terms are trademarks of other companies:
Tivoli, Manage. Anything. Anywhere.,The Power To Manage., Anything. Anywhere.,TME, NetView, Cross-Site, Tivoli Ready, Tivoli Certified, Planet Tivoli, and Tivoli Enterprise are trademarks or registered trademarks of Tivoli Systems Inc., an IBM company, in the United States, other countries, or both. In Denmark, Tivoli is a trademark licensed from Kjøbenhavns Sommer - Tivoli A/S.
C-bus is a trademark of Corollary, Inc. in the United States and/or other countries.
Java and all Java-based trademarks and logos are trademarks or registered trademarks of Sun Microsystems, Inc. in the United States and/or other countries.
Microsoft, Windows, Windows NT, and the Windows logo are trademarks of Microsoft Corporation in the United States and/or other countries.
PC Direct is a trademark of Ziff Communications Company in the United States and/or other countries and is used by IBM Corporation under license.
ActionMedia, LANDesk, MMX, Pentium and ProShare are trademarks of Intel Corporation in the United States and/or other countries.
UNIX is a registered trademark in the United States and other countries licensed exclusively through The Open Group.
SET, SET Secure Electronic Transaction, and the SET Logo are trademarks owned by SET Secure Electronic Transaction LLC.
Other company, product, and service names may be trademarks or service marks of others.
AS/400 AS/400eAT CTDB2 OS/400SP 400Lotus ApproachLotus Notes DominoNotes QuickPlaceTivoli
58 Backup Recovery and Media Services for OS/400

Index
Symbols*EXIT 29
AADSM 41ADSTAR Distributed Storage Management 41ASPs 11
Bbackup 6
Lotus servers 30performance tuning 32
backup window 11BRMS
collecting documentation 41environment with TSM 4package options 1
BRMS Advanced Functions Feature 2parallel save support 2
BRMS Network Feature 1BRMS Standard 1BRMS/400
merging data 12, 14, 23scenarios 15
networking 11saving IFS 5
BRMS/400 Application Clientbackup 6enabling on the TSM server 7restore 6setting up policies for the TSM server 9setup 7software requirements 4Tivoli Storage Manager 3
Ccollecting documentation 41control group 33
information 22
DDASD utilization 11data merging 11, 12, 14, 23data merging scenarios 15DB2 UDB for AS/400 database backup 6device 29different time zones 11documentation collection 41Domino Application Server 25Domino Enterprise Server 25Domino Mail Server 25Domino server 32Domino version verification 34duplicate control groups, renaming history data 23
Ffiles in a group 32files to back up 34functional usage model 1
Hhistory data, renaming for duplicate control groups 23
IIFS
LAN server 41overview 41restore 41save 41
integrated file system 41integration
Lotus Notes 41Novell NetWare 41
interactive saves 30
Jjob scheduler entries 11
Llanguage codes 11Lotus Domino 25Lotus Notes integration 41Lotus server
initializing BRMS 27online backup restrictions 33online backups 25performing online backup 30saved history 31single database recovery 31
Mmaximum buffer size 8media class 29messages 30
restoration 34multiple concurrent control groups 9
Nnaming conventions 27networking with BRMS/400 11Novell NetWare integration 41
Oonline backup 25
adding media to the scratch pool 30considerations 29device and media class 29Lotus server 30restrictions for Lotus servers 33
overview of IFS 41
Index 59

Pparallel save support 2performance 7
maximum buffer size 7, 8multiple concurrent control groups 9policies on the TSM server 9
performance tuning 32policies on TSM server 9post-exit 29pre-exit 29
QQuickPlace server 32
Rrecovery planning 31restoration messages 34restore 6
Sscheduled entry 30scratch pool 30server consolidation 11
planning 11spooled files 12standard BRMS product 1system consolidation 11
TTCP/IP network capacity 7temporary file 34timing 30Tivoli Storage Manager (TSM) 3TMS (Tivoli Storage Manager) 3TSM Application Programming Interface for AS/400 4TSM backup performance 7TSM in a BRMS enironment 4TSM server with BRMS/4 Application Client 7TSM servers for backup 6TSM standard management class 9
60 Backup Recovery and Media Services for OS/400