Embed Size (px)
Citation preview

Back of the House: The Essentials

The information in this document is subject to change without notice and does not represent a commitment onthe part of Horizon. The software described in this document is furnished under a license agreement. Thesoftware may be used or copied only in accordance with the terms of agreement. It is against the law to copy thesoftware on any medium except as specifically allowed in the license agreement. The purchaser may make onecopy of the software for backup purposes. No part of this document may be reproduced or transmitted in anyform or by any means, electronic or mechanical, including photocopying, recording, or information storage andretrieval systems, without the express written consent and permission of Horizon Software International, LLC,Duluth, GA 30097.
Contact Technical Support: (800)741-7100
Contact Technical Publications: [email protected]
© 2016 Horizon Software International All Rights Reserved.
Horizon Software International, LLC2915 Premiere Parkway
Suite 300Duluth, GA 30097
http://www.horizonsoftware.com

Table Of Contents
Back of the House: The EssentialsBack of the House Setup Ch. 1Add OneSource Users ................................................................. 5Add Vendors................................................................................ 5Add Categories and Classes......................................................... 6Add Brands .................................................................................. 6Define Location Areas ................................................................. 6
Inventory Best Practices Ch. 2Packaging .................................................................................... 7Category and Class ...................................................................... 8Physical Inventory ....................................................................... 8Ordering ...................................................................................... 8Consolidate Orders...................................................................... 9Adjustments ................................................................................ 9Key Inventory Reports............................................................... 10
Managing Inventory – Central Office Ch. 3Checklist .................................................................................... 11Set an Item’s Availability at the Central Office ......................... 11
Add Inventory Items............................................................... 11Edit Inventory Items............................................................. 12Copy Inventory Items ........................................................... 12
Discontinue Items................................................................... 13Assign Vendors ....................................................................... 13
Update Preferred/Commodity Vendors............................... 14Assign Warehouse/Central Kitchen...................................... 14
Set Item Availability for Multiple Items.................................. 14Set What’s Available............................................................. 14Copy From One Site Type to Another .................................. 15
Change an Item’s Cost at the Central Office ............................. 16Change an Item’s Packaging at the Central Office .................... 16
Update the Broken Unit ......................................................... 16Update the Case Size.............................................................. 17Update the Vendor................................................................. 18
Create a Site’s Inventory at the Central Office.......................... 18
Maintaining Physical Inventory Ch. 4Checklist .................................................................................... 19Prepare for Physical Inventory.................................................. 19 Complete Inventory ................................................................. 21
Process Orders Ch. 5Menu Plan Ordering .................................................................. 25
Complete the Ez-Steps for Projected MP Quantities (Menu Plan Ordering) ................................................................................ 25Enter a Shopping List .............................................................. 25
Edit and Complete a Shopping List............................................ 26
Using the Calendar Ch. 6Manage Production................................................................... 28Enter Daily Production Data...................................................... 29Delete Production Records........................................................ 30Reopen Production Records...................................................... 30Receive Goods Manually ........................................................... 31Send Stock Transfers ................................................................. 31Make Adjustments .................................................................... 32Receive Ordered Goods............................................................. 32
Menu Planning Ch. 7Add Nutrition Link Food Items .................................................. 33Add Recipes ............................................................................... 34Create, Schedule, and Assign Base Menus................................ 35Menu Planner and Production Reports..................................... 37
iii

Horizon Software International
iv

CHAPTER 1: BACK OF THE HOUSE SETUP
Topics:• Add OneSource Users ........................................Pg. 5• Add Vendors.......................................................Pg. 5• Add Categories and Classes ...............................Pg. 6
• Add Brands ........................................................ Pg. 6• Define Location Areas........................................ Pg. 6
Add OneSource UsersUse the following steps to create the users who will log into OneSource.
1. Go to System Management > User Management > User Maintenance.2. Click New to enter in the user information.3. Enter the Last Name, First Name, Middle Name (optional).4. Enter in a Password for the user.
For information regarding the password requirements, see User Management > Security Options.
5. From the User Sites tab, select the sites that the user should have access to; i.e. - Elementary cashier, select the appropriate Elementary School.
6. Click the User Groups tab and select which group the user will belong to. 7. Click Save.
Add Vendors1. Go to Inventory Management > File Setup > Vendors (110507).2. Click New. 3. Enter the Vendor ID. The ID can be alphanumeric and must be unique.4. Select the Active option.5. Enter the street Address, City, State, ZIP Code, and Country.6. Select the Last Purchase date.7. Select the Include in Procurement option unless it is the miscellaneous vendor.8. Select the Include in Bid List option if the vendor is to be included for selection in bid analysis.9. Click the Inventory Groups tab and assign it to at least one Inventory Group.
The vendor will not be available on the Management Level Inventory screen (110101) > Vendor tab if you do not assign it to a group.
10. Click Assign to Sites and check Display if the vendor can be used at the site.11. Click Save.
5Back of the House Setup
Add OneSource Users

6
Add Categories and ClassesDefine categories and classes for organizing inventory for functions such as accounting, reporting, bidding and ordering.
You are required to enter the Category Code, Category Description, at least one Class, Class Code, and Class Description when creating a new inventory category.
1. Go to Back of the House > Inventory Management > File Setup > Category/Classes (110500).2. Click New. 3. Enter an ID for the category in the Category Code field.4. Enter a description for the category in the Category Description field.5. Choose the COA code from the COA Code drop-down list, if applicable.6. Click Add Item. A new line is added to the table.7. Enter an ID for the class in the Class Code field.8. Enter a description for the class in the Class Description field.9. Click Save.
Add BrandsCreate brand names for stock items to use with inventory, ordering, production and bid specifications.
1. Go to Back of the House > Inventory Management > File Setup > Brands (110506). 2. Click New.3. Enter the name of the brand in the new Brands field.4. Click Save.
Define Location AreasUse this feature to define location areas that are used in inventory.
1. Go to Back of the House > Inventory Management > File Setup > Location Areas (110510). 2. Click New. 3. Enter the name of the location area. 4. Click Assign To Sites. The Site Selection by Site Group and Site Type screen displays.5. Use the following information to perform this task.
To assign by site: Select the applicable sites and click OK. To assign by site group and site type: Select a Site Group and Site Type. Sites that belong to the
site group are automatically selected.6. Click OK.7. Click Save.
Back of the House SetupAdd Categories and Classes

CHAPTER 2: INVENTORY BEST PRACTICES
Topics:• Packaging ...........................................................Pg. 7• Category and Class.............................................Pg. 8• Physical Inventory ..............................................Pg. 8• Ordering.............................................................Pg. 8
• Consolidate Orders ............................................ Pg. 9• Adjustments....................................................... Pg. 9• Key Inventory Reports ..................................... Pg. 10
PackagingPackaging affects every back office operation. Packaging information for each inventory item MUST be entered accurately for proper behavior of the software and ease of use.
Apply this thought process when entering an item's packaging information:
The way in which each item is packaged is reflected in the following Inventory Management fields:
What unit do you order from the vendor? CASE
When you open the case, what do you see inside?
BROKEN UNIT
How many broken units are in the case? UNITS PER CASE
UNITS PER CASE x BROKEN UNIT = CASE
Field DEFINITION
Broken Unit Description
The smallest, most feasible unit of measure for counting purposes.
Gram Weight The weight of the broken unit in grams (or ounces), used to convert servings to inventory units and vice-versa. Gram Weight is NOT required for non-food items.
Units Per Case The number of broken units packaged together in one case.
Case Description The larger unit of measure ordered from the vendor.
7Inventory Best Practices
Packaging
8
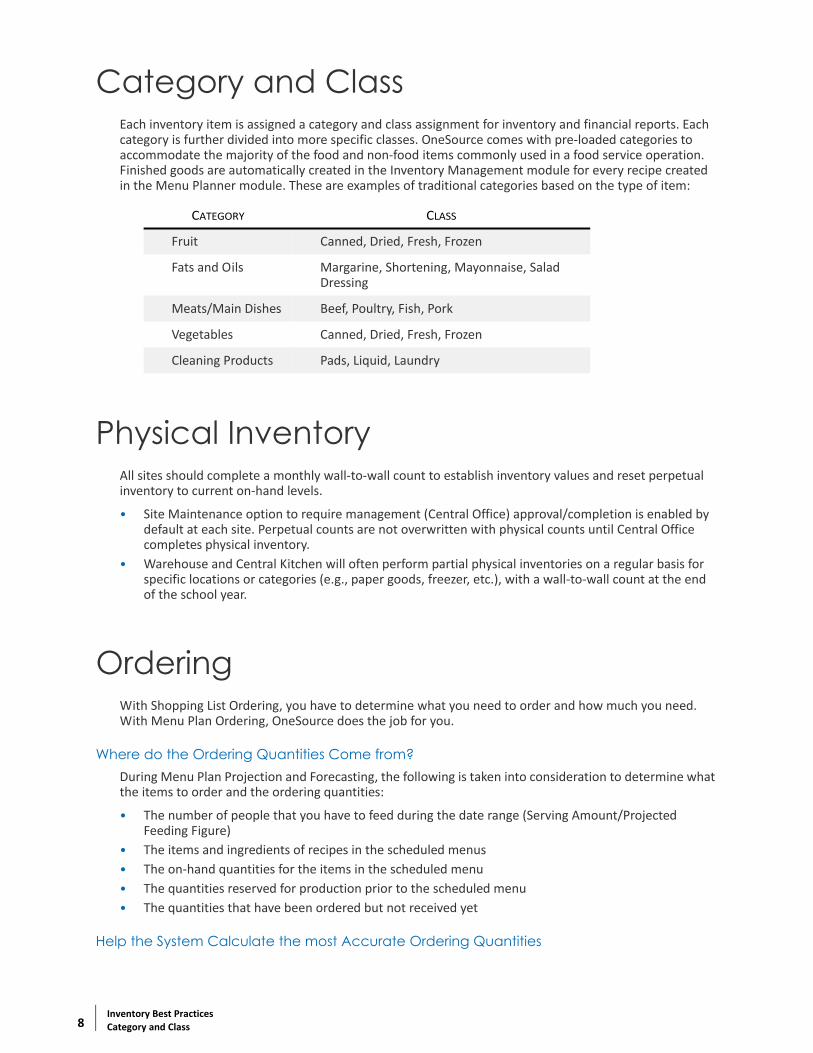
Category and ClassEach inventory item is assigned a category and class assignment for inventory and financial reports. Each category is further divided into more specific classes. OneSource comes with pre-loaded categories to accommodate the majority of the food and non-food items commonly used in a food service operation. Finished goods are automatically created in the Inventory Management module for every recipe created in the Menu Planner module. These are examples of traditional categories based on the type of item:
Physical InventoryAll sites should complete a monthly wall-to-wall count to establish inventory values and reset perpetual inventory to current on-hand levels.
• Site Maintenance option to require management (Central Office) approval/completion is enabled by default at each site. Perpetual counts are not overwritten with physical counts until Central Office completes physical inventory.
• Warehouse and Central Kitchen will often perform partial physical inventories on a regular basis for specific locations or categories (e.g., paper goods, freezer, etc.), with a wall-to-wall count at the end of the school year.
OrderingWith Shopping List Ordering, you have to determine what you need to order and how much you need. With Menu Plan Ordering, OneSource does the job for you.
Where do the Ordering Quantities Come from?During Menu Plan Projection and Forecasting, the following is taken into consideration to determine what the items to order and the ordering quantities:
• The number of people that you have to feed during the date range (Serving Amount/Projected Feeding Figure)
• The items and ingredients of recipes in the scheduled menus• The on-hand quantities for the items in the scheduled menu• The quantities reserved for production prior to the scheduled menu• The quantities that have been ordered but not received yet
Help the System Calculate the most Accurate Ordering Quantities
CATEGORY CLASS
Fruit Canned, Dried, Fresh, Frozen
Fats and Oils Margarine, Shortening, Mayonnaise, Salad Dressing
Meats/Main Dishes Beef, Poultry, Fish, Pork
Vegetables Canned, Dried, Fresh, Frozen
Cleaning Products Pads, Liquid, Laundry
Inventory Best PracticesCategory and Class

Keep your perpetual inventory up-to-date! For the system to calculate the ordering quantities most accurately, Central Office and sites need to keep track all of the following inventory transactions:
• Physical Inventory• Ordering, including Shopping List and Menu Plan Ordering• Order Receiving• Daily Production Record• Stock Transfers• Inventory Adjustment
Consolidate Orders• Complete all Shopping List before attempting a consolidation.• Use the Shopping List Audit Summary report to see what will consolidate at Central Office.• Send up orders to Central Office every 60 minutes.• Use delivery schedules to enter shopping lists based on serving dates.• The Weekly Order option will not consolidate if the Required Delivery Date is not used.
AdjustmentsThe software automatically creates adjustments to on-hand inventory quantities as a result of physical inventory, receiving, transfers, returns and daily production. To maintain perpetual inventory, enter manual adjustments to account for the following inventory movement:
• Spoilage• Damage/breakage• Count corrections• Location change• Other (requires comment)
Entering Adjustments• Use the Adjustment Worksheet to record adjustments throughout the day as they occur. Site
managers will enter all adjustments at the end of the day.• For Count Correction and Other, you must select addition/subtraction appropriately. • Do not make adjustments for items that are received or removed through the normal processes. On
the Inventory Adjustments screen, add or subtract inventory quantities to adjust on-hand amounts. • You must enter comments entered when Other, the default reason, is selected as the reason.
ReportingTo track automated and manual adjustments, you can filter the Inventory Movement Report by specific reasons.
9Inventory Best PracticesConsolidate Orders

10
Key Inventory ReportsThe following is a list of inventory reports that are used on a frequent basis.
REPORT FREQUENCY PURPOSE
Inventory Movement
Daily or as needed
This is your adjustments report. Use it for monitoring stock transfers and therefore reducing loss, and troubleshooting. You can generate a record of any adjustment completed in the system.
Inventory On Hand As needed
Save money by identifying opportunities for re-allocating commodities, and avoiding spoilage and low turnover rates.
Order Goods Receiving Audit Report (Procurement)
Weekly See which sites still have open orders that need to be completed.
Stock Transfer Reconciliation - Filter to show exceptions only
Weekly Reduce loss and keep your inventory records accurate by seeing when sites did not send or receive items as directed.
Physical vs. Perpetual Inventory
Monthly This report is vital to menu plan ordering (MPO), but should be used even if you are not using MPO. Use it to determine which sites are successfully maintaining perpetual inventory.
Physical Inventory Value
Monthly If you do not have time to validate each physical inventory, you can use this report to see major counting errors or when a site has too much or too little inventory. After running this report a few times, you should be able to establish a benchmark for each site (by site types).
Inventory Cost Listing
As needed
Validate that the vendor and packaging information is up-to-date.
Inventory Best PracticesKey Inventory Reports

CHAPTER 3: MANAGING INVENTORY – CENTRAL OFFICE
Topics:• Checklist...................................................................Pg. 11• Set an Item’s Availability at the Central Office.........Pg. 11• Change an Item’s Cost at the Central Office ............Pg. 16
• Change an Item’s Packaging at the Central Office... Pg. 16• Create a Site’s Inventory at the Central Office ........ Pg. 18
ChecklistSet an Item’s Availability at the Central Office..................................................... Pg. 11
Add Inventory Items........................................................................................ .......Pg. 11 Discontinue Items ........................................................................................... .......Pg. 13 Set Item Availability for Multiple Items .......................................................... .......Pg. 14
Change an Item’s Cost at the Central Office ........................................................ Pg. 16Change an Item’s Packaging at the Central Office................................................ Pg. 16
Update the Broken Unit .................................................................................. .......Pg. 16 Update the Case Size....................................................................................... .......Pg. 17 Update the Vendor.......................................................................................... .......Pg. 18
Create a Site’s Inventory at the Central Office ..................................................... Pg. 18
Set an Item’s Availability at the Central Office
Refer to the following topics for more information:• Add Inventory Items .........................................................................................Pg. 11• Discontinue Items.............................................................................................Pg. 13• Assign Vendors .................................................................................................Pg. 13• Set Item Availability for Multiple Items............................................................Pg. 14
Add Inventory Items
1. Go to Back of the House > Inventory Management > Inventory/Items Management > Management Level Inventory (110101).
2. Click New.
Stock Item tab
1. Enter the Stock Number and Stock Description.2. Select the Category/Class.
11Managing Inventory – Central Office
Checklist

12
3. Select an Inventory Type. 4. Enter the Broken Unit Description.
Vendor tab
1. Click Add Item from the Available Vendors section. 2. On the Product Information subtab, select the following:
Preferred vendor from the Vendor dropdown list. Preferred checkbox. Case Description, Unit Per Case, and Case Cost. For a commodity item:
- Select the Commodity option.- Enter the Commodity Cases Allocated.- Select the Cost Type, which is typically Cost Plus Processing Fee.
3. Click Save. Complete the next section.
Select the site types that should display the new item
1. Select the site types where you want the item to be available.2. Click OK.3. Click Save. If the stock number is a duplicate, an error message is displayed.4. Do you wish to save your changes anyway?
To continue saving the item, click Yes. To enter a unique Stock Number, click No.
EDIT INVENTORY ITEMS
1. Go to Back of the House > Inventory Management > Inventory/Items Management > Management Level Inventory (110101).
2. Search for and double-click the record. 3. Modify the item as needed. 4. Click Save.
COPY INVENTORY ITEMSNOTE: You must enter a new Stock Number, Stock Description, and Preferred Vendor before you can save the new item.
1. Go to Back of the House > Inventory Management > Inventory/Items Management > Management Level Inventory (110101).
2. Search for and double-click the record.
Stock Item tab
1. Click Copy Stock Item. The stock number defaults to Copy of XXXX (where XXXX is the stock number you copied).
2. Enter an identification number of the new inventory item in the Stock Number field.3. Edit the description for the item in the Stock Description field.
Managing Inventory – Central OfficeSet an Item’s Availability at the Central Office
Vendor tab
1. Click Add Item from the Available Vendors section. 2. On the Product Information subtab, select the following:
Preferred vendor from the Vendor dropdown list. Preferred checkbox. Case Description, Unit Per Case, and Case Cost. For a commodity item:
- Select the Commodity option.- Enter the Commodity Cases Allocated.- Select the Cost Type, which is typically Cost Plus Processing Fee.
3. Click Save. Complete the next section.
Select the site types that should display the new item
1. Select the sites types you want to display the new item. 2. Click OK.3. Make the applicable changes to the inventory item information on the tabs and sub-tabs.
Discontinue Items If the item is used in any recipes/menus, substitute it with another item
before disabling it.
1. Go to Back of the House > Inventory Management > File Setup > Inventory Modes (110501).2. Select the correct Site Type. 3. Search for and double-click the record. 4. Clear the Display and Allow Ordering options.5. Select the Include in physical inventory option. This allows you to account for the remaining quantities
during physical inventory.6. Click Save.
Hide Inactive ItemsAfter the item is no longer available in inventory, you can disable it so that it is no longer visible.
1. Go to Back of the House > Inventory Management > Inventory File Setup > Inventory Modes (100501).2. Enter the search criteria to locate the item.3. Click Save.
Assign VendorsRefer to the following topics for more information:• Update Preferred/Commodity Vendors............................................................Pg. 14• Assign Warehouse/Central Kitchen ..................................................................Pg. 14• Add the vendor before you complete these steps. See Add Vendors on page 5.
13Managing Inventory – Central OfficeSet an Item’s Availability at the Central Office

14
UPDATE PREFERRED/COMMODITY VENDORS
1. Go to Back of the House > Inventory Management > Inventory/Items Management > Management Level Inventory (110101).
2. Search for and double-click the record.
Vendor tab
1. Click Add Item from the Available Vendors section. The Product Information sub-tab becomes active.2. From the Vendor dropdown list, select the Preferred vendor.3. Select the Preferred checkbox. 4. Click Save.
ASSIGN WAREHOUSE/CENTRAL KITCHEN
1. Go to Back of the House > Inventory Management > File Setup > Inventory Modes (110501). 2. Select a Site Type. Make sure that you do not select Central Office. 3. Search for the record. 4. For the item, select the Warehouse option.5. Select the Warehouse/Central Kitchen from the Vendor dropdown list.6. Click Save.
Set Item Availability for Multiple ItemsTo make your items available to your sites, you will set the Inventory modes. Inventory modes determine what is made available to your sites.
Refer to the following topics for more information:• Set What’s Available .........................................................................................Pg. 14• Copy From One Site Type to Another ...............................................................Pg. 15
SET WHAT’S AVAILABLE
For each new item that you added to the inventory, complete the following steps:
1. Go to Back of the House > Inventory Management > File Setup > Inventory Modes (110501).2. Click the Copy Modes tab.
Select Template
1. Select the options that you want to apply to all of the inventory that you are updating: Allow Ordering—Select to make the inventory item available for use when placing orders in the
Procurement module. If Allow Ordering is NOT selected, the following three options are
ignored.
- Include in Shopping List—Select to display the inventory item when placing a shopping list order.
Managing Inventory – Central OfficeSet an Item’s Availability at the Central Office

- Include in Direct Ordering—Select to display the inventory item when placing a manual vendor order.
- Include in Menu Plan Ordering—Select to display the inventory item when placing a menu plan order.
Is Frequently Ordered—Select to display the inventory item when the Frequently Ordered option is selected when placing a shopping list order in the Procurement module.
Manual—Select to include the selected items in manual ordering. Physical Inventory—Select to display the inventory item when entering physical inventory counts
in the Inventory Management module. Warehouse—Select to indicate the inventory item is ordered from an internal warehouse vendor.
2. If you are using the Warehouse option, select the internal warehouse from the Vendor dropdown list to order from the warehouse.
Select Stock Numbers
1. To locate the items that you have recently added or updated, enter the Date Entered from and to. 2. Use the arrows to move the item(s) from the Available Stock Numbers to the Selected Stock Numbers
list.
Select Site Type The Central Office site type is a global setup and is rarely used when
selecting a site to copy to.
Copy the items to the highest level in your organization first, and then copy the items to the next highest level. Typically, Central Office will have more items, high schools will have more items than middle schools, and middle schools more than elementary schools. As you copy items over, you can just remove the items that are not used at that site level.
1. Use the arrows to move the item(s) from the Available Site Types to the Selected Site Types list. 2. Click Copy and Save.
COPY FROM ONE SITE TYPE TO ANOTHER Only use this method if all items in both site types match.
1. Go to Back of the House > Inventory Management > File Setup > Inventory Modes (110501). 2. Click the Copy Modes tab.3. Click the Copy From One Type to Selected Types sub-tab.4. From the Site Type dropdown list, select the site type that you want to copy the inventory modes
from.5. From the Available Site Types, click the arrows to move the item(s) to the Selected Site Types list. 6. Click Copy and Save.
15Managing Inventory – Central OfficeSet an Item’s Availability at the Central Office

16
Change an Item’s Cost at the Central Office
You will need to change an items cost if the cost per case increases or decreases. For example, Vendor A increases cost per case from $10 to $11.
1. Go to Back of the House > Inventory Management > Inventory/Items Management > Management Level Inventory (110101).
2. Search for and double-click the record.
Vendor tab
1. Enter the new Cost.2. Click Save.
Change an Item’s Packaging at the Central Office
Refer to the following topics for more information:• Update the Broken Unit....................................................................................Pg. 16• Update the Case Size ........................................................................................Pg. 17• Update the Vendor ...........................................................................................Pg. 18
Update the Broken UnitIf the broken unit changes, you need to make changes to the packaging. For example, a 10 oz. bottled water now ships in 16.9 oz. bottles.
If the broken unit changes, you MUST create a new stock item with a new stock number.
If a new vendor is supplying the new item, add the vendor before you complete these steps. See Add Vendors on page 5.
1. Go to Back of the House > Inventory Management > Inventory/Items Management > Management Level Inventory (110101).
2. Search for and double-click the record.
Stock Item tab
1. Click Copy Stock Item.2. Edit the following fields:
Broken Unit Description Stock Number Stock Description - to differentiate it from the original item's description if both will be in use.
Managing Inventory – Central OfficeChange an Item’s Cost at the Central Office
Vendor tab
1. From the Available Vendors section, click Add Item. The Product Information sub-tab becomes active.2. Select the preferred vendor from the Vendor dropdown list.3. Select the Preferred checkbox. 4. Edit the following fields:
Units per Case Case Description Case Cost
5. Click Save.
Select the site types that should display the new item screen
1. Select the sites types you want to display the new item. 2. Click OK.3. Make the applicable changes to the inventory item information on the tabs and sub-tabs.4. Click Save.
Update the Case SizeIf just the number of broken units packaged in a case is changing, edit the existing stock item, use the same stock number, and add the new case size.
1. Go to Back of the House > Inventory Management > Inventory/Items Management > Management Level Inventory (110101).
2. Search for and double-click the record.
Vendor tab
1. In the Available Vendors section, click Add Item. The Product Information sub-tab becomes active. Even if the vendor is not changing, add that same vendor again, this
time with the new case size.
2. Select the preferred vendor from the Vendor dropdown list.3. Select the Preferred checkbox. 4. Edit the following fields:
Units per Case Case Description Case Cost
5. Click Save.
17Managing Inventory – Central OfficeChange an Item’s Packaging at the Central Office

18
Update the VendorIf an item now ships from a different vendor but packaging stays the same, you need to update the vendor.
If a new vendor is supplying the new item, add the vendor before you complete these steps.
1. Go to Back of the House > Inventory Management > Inventory/Items Management > Management Level Inventory (110101).
2. Search for and double-click the record.
Vendor tab
1. Click Add Item from the Available Vendors section. The Product Information sub-tab becomes active.2. Select the preferred vendor from the Vendor dropdown list.3. Select the Preferred checkbox. 4. Edit the following fields:
Units per Case Case Description Case Cost
5. Click Save.
Create a Site’s Inventory at the Central Office
Print the Production Audit Report (800184) to ensure all sites have completed their Production Records (800021) before you create site inventories.
Create the site inventory the day before the sites start their counts. This ensures the sites have the latest information; for example, packaging and vendor changes.
1. Go to Back of the House > Inventory/Items Management > Create Site Inventories (110105).2. Select All Inventory Items.3. Select All Sites.4. Click Create Site Inventories.
Managing Inventory – Central OfficeCreate a Site’s Inventory at the Central Office
CHAPTER 4: MAINTAINING PHYSICAL INVENTORY
Topics:• Checklist.....................................................................Pg. 19• Prepare for Physical Inventory ...................................Pg. 19• Complete Inventory ...................................................Pg. 21
ChecklistPrepare for Physical Inventory ............................................................................. Pg. 19
1. Create Physical Inventory Dates ............................................................ ......... 4-19 2. Verify What’s Available at Your Sites..................................................... ......... 4-20 3. Create Site Inventories .......................................................................... ......... 4-20
Complete Inventory ............................................................................................. Pg. 21 1. Review a Site’s Physical Progress ................................................................ ......... 4-21 2. Review a Site’s Physical Inventory Counts .................................................. ......... 4-21 3. Edit Physical Inventory Counts .................................................................... ......... 4-21 4. Complete Physical Inventory at Management Level................................... ......... 4-22 5. Approve Physical Inventory......................................................................... ......... 4-23 6. Report Your Inventory Values ..................................................................... ......... 4-23
Prepare for Physical Inventory Refer to the following topics for more information:
1. Create Physical Inventory Dates ............................................................ ......... 4-19 2. Verify What’s Available at Your Sites..................................................... ......... 4-20 3. Create Site Inventories .......................................................................... ......... 4-20
1. Create Physical Inventory Dates Create the Physical inventory date on the last calendar day of the
month, whether it is an operational day or not (e.g., Feb 28, Dec 31, etc.).
Instead of creating the physical inventory schedule for the entire school year, create the physical inventory date a few days before it is due. When the site manager opens a physical inventory record in the software, there is only one day available to choose, and that reduces the chance to choose a wrong date.
1. Go to Back of the House > Inventory Management > Physical Inventory > Physical Inventory Dates (110202).
2. Click New. 3. Select the Physical Inventory Date. 4. Do you want the site to do a complete physical inventory?
19Maintaining Physical Inventory
Checklist

20
If yes, choose Wall to Wall. If no, choose Partial, and then enter a Partial Description.
5. (Optional) Select a group from Click By Group to filter the available sites. 6. Use the Mover Control to move the desired records to the Selected section. 7. Click Save.
Edit Physical Inventory Dates
1. Go to Back of the House > Inventory Management > Physical Inventory > Physical Inventory Dates (110202).
2. Search for and double-click the record. 3. Make any applicable changes.4. Click Save.
Delete Physical Inventory DatesPhysical inventory dates can be deleted from the query screen or details screen.
1. Go to Back of the House > Inventory Management > Physical Inventory > Physical Inventory Dates (110202).
2. Click the record.3. Click Delete. 4. Click Yes to confirm.5. Click Save. If the record cannot be deleted, a message displays stating that it cannot be deleted
because it is currently in use.6. Click OK.
2. Verify What’s Available at Your Sites Refer to Set Item Availability for Multiple Items on page 3-14 for more
information on Inventory Modes.
Double check your Inventory modes to verify what’s available at your sites.
1. Go to Back of the House > Inventory Management > File Setup > Inventory Modes (110501).2. Review the inventory and make any necessary changes.3. Click Save.
3. Create Site Inventories Print the Production Audit Report (800184) to ensure all sites have
completed their Production Records (800021) before you create site inventories.
Run Create Site Inventories (110105) for all items and sites prior to each physical inventory count. This ensures all sites have the current list of items with correct pricing and packaging info. Do this a day before the sites start their counts.
1. Go to Back of the House > Inventory/Items Management > Create Site Inventories (110105).2. Select All Inventory Items.3. Select All Sites.4. Click Create Site Inventories.
Maintaining Physical InventoryPrepare for Physical Inventory

Complete InventoryAfter you have verified tat the site has completed the inventory, you can complete the inventory.
Refer to the following topics for more information: Review a Site’s Physical Progress .............................................................. ...... Pg. 21 Review a Site’s Physical Inventory Counts................................................. ...... Pg. 21 Edit Physical Inventory Counts .................................................................. ...... Pg. 21 Complete Physical Inventory at Management Level ................................. ...... Pg. 22 Approve Physical Inventory ....................................................................... ...... Pg. 23 Report Your Inventory Values ................................................................... ...... Pg. 23
1. Review a Site’s Physical ProgressUse the Physical Inventory Dates report to identify sites that have not completed their counts.
1. Go to Reports > Inventory > Physical Inventory Dates.2. Specify applicable criteria.3. Click Print.
2. Review a Site’s Physical Inventory Counts Maintain a consistent procedure for approving site counts.
Use the Physical Inventory Counts Report to review and complete physical inventory counts within a reasonable time frame after sites have completed and submitted their counts.
1. Go to Reports > Inventory > Physical Inventory Value.2. Select the Physical Inventory Date.3. Clear the Consolidated option.4. On Report Type: Choose Detailed.5. Click Preview, then click Printer if you wanted a copy of Report.6. Click Close.
3. Edit Physical Inventory Counts The available options depends on your system configuration.
Return to the Physical Inventory screen to edit a current physical inventory, prior to completing the inventory. Once the physical inventory has been completed, any changes made to the counts only affect reports; on-hand counts are not adjusted.
Physical Inventory has not Been Completed at Management Level
1. Go to Back of the House > Inventory Management > Physical Inventory > Physical Inventory Counts (110201).
2. Search for and double-click the record. 3. To view the counts currently entered for the selected physical inventory date, click the Physical
Inventory List tab. 4. Make the required edits.5. Click Save.
21Maintaining Physical InventoryComplete Inventory

22
Physical Inventory has Been Completed at Management Level
1. Go to Back of the House > Inventory Management > Physical Inventory > Physical Inventory Counts (110201).
2. Search for and double-click the record. A message displays stating that the physical inventory counts have been reconciled with the on-hand quantities.
3. Click OK.4. Click the Physical Inventory List tab to view the counts currently entered for the selected physical
inventory date.5. Make the required edits.6. Click Save. A message displays stating that the physical inventory counts have been reconciled with
the on-hand quantities. Any changes made to the physical inventory counts only affect reports
and do not affect the on-hand quantities.
7. Click OK.
Delete Physical Inventory CountsIf necessary, you can delete counts from the query or details screen.
1. Go to Back of the House > Inventory Management > Physical Inventory > Physical Inventory Counts (110201).
2. Click the record.3. Click Delete. A confirmation message displays.4. Click Yes. 5. Click Save. If the record cannot be deleted, a message displays stating that it cannot be deleted
because it is currently in use. 6. Click OK.
4. Complete Physical Inventory at Management Level It is rare that you would not want to update the inventory quantities.
Scenarios that you might not update the inventory quantities include performing a practice run.
When the physical inventory is saved, the entered quantities are reconciled with the on-hand quantities. Changes made to the physical inventory quantities after the reconciliation only affect reports, not the on-hand quantities. Once you have reviewed a site's physical inventory counts, you must complete the inventory.
1. Go to Back of the House > Inventory Management > Physical Inventory > Physical Inventory Counts (110201).
2. Select Management Completed. An Inventory Completed message displays stating the inventory quantities are about to be updated.
3. Click Yes. The inventory quantities are updated.4. Click Save. A Inventory Completed message displays.5. Click OK.
Maintaining Physical InventoryComplete Inventory

5. Approve Physical InventoryMake sure you approve the physical inventories within a timely manner of it being submitted. This is important because items are being used and received during the time it takes to approve it. The sooner you approve the inventory counts, the more accurate it will be in the system.
IMPORTANT! Print the Inventory On Hand report to review the sites’ inventory before you approve it. This will help you to identify where you can transfer stocks instead of ordering them and where you should allocate commodities.
To Approve physical inventory for all sites
1. Go to Back of the House > Inventory Management > Physical Inventory > Approve Physical Inventories (110204).
2. Select Approve All Sites Physical Inventories.3. Select the date for which to approve the physical inventories from the Click Date to Approve Physical
Inventories For dropdown list.4. Click OK.
To approve physical inventory for individual sites
1. Go to Back of the House > Inventory Management > Physical Inventory > Approve Physical Inventories (110204).
2. Select Approve Individual Sites Physical Inventories.3. Select the date for which to approve the physical inventories from the Click Date to Approve Physical
Inventories For dropdown list.4. Click OK. The Site Selection screen displays.5. Select the sites for which you want to approve the physical inventory.6. Click OK.
6. Report Your Inventory ValuesRun the following reports to review your resulting inventory values:
Report Use it to... Go to Reports > Inventory >
Physical vs. Perpetual Inventory
Determine which sites are successfully maintaining perpetual inventory.
Physical vs. Physical Inventory (800017).
Physical Inventory Value
See if a site has major counting errors or too much or too little inventory. After running this report a few times, you should be able to establish a benchmark for each site (by site type).
Physical Inventory Value (800015).
23Maintaining Physical InventoryComplete Inventory

24
Maintaining Physical InventoryComplete Inventory
CHAPTER 5: PROCESS ORDERS
Topics:• Menu Plan Ordering...................................................Pg. 25• Edit and Complete a Shopping List ............................Pg. 26
Menu Plan OrderingYou can complete your order processing by using the EZ steps or by entering a shopping list.
Complete the Ez-Steps for Projected MP Quantities (Menu Plan Ordering)
1. Go to Back of the House > Procurement > Menu Plan Ordering > Ez-Steps for Projected MP Quantities. Complete the wizard based on your site setup.
2. Complete the steps in Task 2: Editing and Completing the Shopping Lists.
Enter a Shopping List
1. Print the Shopping List Worksheet (800029), Sorted By – Vendor, Stock, Description. (Optional)2. Go to Back to the House > Procurement > Shopping List > Enter Shopping List (120100). 3. Click New. 4. Choose the Delivery Date. The Shopping List screen is displayed.5. Enter the Stock Number.6. Press [Enter].7. Enter the Order Quantity amount. 8. Press [Enter] and [Enter].9. Repeat steps 4- 8 until all items have been entered.10. Click Save.11. Click Print Shopping List. 12. Verify each item on the Shopping List has the correct stock number and quantities ordered.13. Click Save if changes were made.14. Click Close. A message displays asking if you want to complete an order.
You will NOT be able to edit completed shopping lists.
15. Do you want to complete the shopping list? If yes, click Yes. After CO approves your shopping list, and you receive your ordered goods, go to
task 3.
25Process Orders
Menu Plan Ordering

26
If no, click No. Go to task 2 to edit it before CO reviews and approves it.
Edit and Complete a Shopping List1. Go to Back of House > Procurement > Shopping List > Enter Shopping List (120100).2. Search for and double-click the shopping list record.3. Click the Shopping List Entry tab.4. Mark Ordered Only and click Apply Filters.5. Make the required edits.6. Click Save.7. Click Print Shopping List. Keep the Shopping List report so that you can compare it to the Receiving
Ticket once CO has approved and consolidated the orders.8. Mark Order Complete. You cannot edit the shopping list after it has been completed.
Process OrdersEdit and Complete a Shopping List

CHAPTER 6: USING THE CALENDAR
Topics:• Manage Production................................................Pg. 28• Enter Daily Production Data ...................................Pg. 29• Delete Production Records.....................................Pg. 30• Reopen Production Records ...................................Pg. 30
• Receive Goods Manually........................................ Pg. 31• Send Stock Transfers .............................................. Pg. 31• Make Adjustments ................................................. Pg. 32• Receive Ordered Goods ......................................... Pg. 32
OverviewThe OneSource Calendar is your one-stop resource for accessing your commonly performed Production and Menu Planner functionality. Using the Calendar search criteria, you can view information for a specific site, serving period, or serving line. Calendar Functions
The Calendar allows you to perform the following tasks:
• Create Weekly Production• Create Weekly Order• Recreate Production• View Projected Daily Servings• Reopen Production• Create a Forecast• View Daily Production• View Open Receiving• Create Production• Print Receiving Orders and tickets• Print Recipe Report• Print Production Tickets• Print the Inventory Worksheet, Inventory Counts, Physical Value, and Physical vs. Perpetual reports• Print the Allergen Report• Print the Allergen Roster• Receive Ordered Goods• Manually Receive Orders• Complete Stock Transfers Sent• Make Inventory Adjustments
27Using the Calendar
28
Manage Production 1. Create Production Records
1. Go to Home Page > Calendar.2. Using the Calendar > highlight Monday on the week you wish to Create Production for.3. Select Serving Period4. Select Serving Line (only if district uses serving lines)5. Click on Create Weekly Production6. Click on View Daily Production
Columns for Leftovers and Recipes will populate automatically based on leftovers from previous production records or recipes created by CO.
Make edits as needed to Projected column.
2. Add/Delete Items Add/remove items based on what you will actually prepare and serve, then update your Projected Servings.
Remove Items
1. Go to Back of the House > Production > Daily Production (140002). 2. Search for and double-click the production record. 3. Click the item you want to remove.4. Click Remove Item. 5. Click Yes and click Save.
Add Items
1. Go to Back of the House > Production > Daily Production (140002).2. Search for and double-click the production record.3. Click Add Item. 4. Choose to search for a Stock Item, Recipe, or Leftover, and enter the search criteria.5. Click Search. The search results display.6. Click the item in Search Results section.7. Choose the appropriate Measure for the item. Enter the Quantity for one serving. 8. Enter Servings to Add. 9. Choose the item type from the Food/Non Food/ Ala Carte drop-down list. 10. Do one of the following:11. Click Save and Add Another Item and repeat steps 4 through 10.12. Click Add Item and Return to Production. 13. Click Save.
Using the CalendarManage Production
3. Print the Production WorksheetUse the Production Worksheet to track actual production usage and leftover information.
Create a recipe book using the Recipe Cards (800113). You’ll only have to print the recipe once. If your auditor wants to see all ingredients used for all recipes, you can print the detailed Production Records (800021).
1. Go to Reports > Production > Production Worksheet Report (800020). 2. Enter the date range for this week.3. Enter the criteria required by your CO.4. Click Print.
Enter Daily Production DataUse data provided from the Production Worksheet after the meal service. If using Update From POS, served amounts are automatically updated based on sales data from the point of service.
1. Update Production CountsMake sure that Prepared + Added = Leftover + Served. If these quantities are not equal for all menu items an error message displays when you attempt to update inventory or complete production.
1. Go to Back of the House > Production > Daily Production (140002). The query screen displays. 2. Search for and double-click the production record. The details screen displays.3. On the Item Counts tab, enter the number of projected servings that was prepared during production
in the Prepared column. 4. Enter the number of servings that was added during production in the Added column.5. Enter the servings of leftovers after service in the Leftover column for each item. Refer to Task 5 for
more information about handling leftovers. The amount served is calculated automatically for each item on the production record.
Use the Non Reimb. and Adult column to track servings that cannot be reimbursed and are sold to adults.
6. Click Save.
2. Enter Leftover InformationThis procedure applies when you have leftovers.
1. Go to Home Page > Calendar.2. On the Item Counts tab, choose the appropriate Leftover Codes.
3. If you choose the Dispose of or Served As Second leftover code, enter comments in the Deposition Comment field.
4. Click Save.
29Using the CalendarEnter Daily Production Data
30
3. Enter Meal CountsIf you select Update from POS, Meals Served by applicable groups and Revenue amounts are automatically updated based on sales data from the point of service.
1. Go to Home Page > Calendar.2. On the Meals/Revenue tab, enter the number of projected meals planned for each applicable field in
the Meals Planned section.
3. In the Meals Served section, enter the number of meals served for each applicable field.4. Click Save.
4. Complete Inventory and ProductionIf warnings occur when updating inventory or completing production, inform central office so that they can resolve them.
1. Go to Home Page > Calendar.2. Select the correct Serving Period.3. For the applicable date, select View Daily Production.4. Verify portions and served quantities.5. Mark Update Inventory and click Save. The inventory is updated.6. Mark Complete Production and click Save. The production record is completed. 7. Click Print Records and enter the criteria specified by your state representative.
Delete Production Records1. Go to Back of the House > Production > Daily Production (140002). The query screen displays.2. Search for and click the production record.3. Click Delete. A confirmation message displays.4. Click Yes. The production record is deleted.
Reopen Production Records1. Go to Home Page > Calendar.2. Select the correct Serving Period.3. For the applicable date, select Reopen Production.
Using the CalendarDelete Production Records
Receive Goods ManuallyOnly use manual receiving for daily orders, like milk and bread, or unexpected store-bought items.
1. Go to Home Page > Calendar.2. Click Manual Receiving.3. Choose the Date Received.4. Choose who it was Received By.5. Click Add Item. The Add Item to Receiving screen displays.6. Enter the Stock Number or Description.7. Click Search.8. Double-click the item record.9. Enter the Case Quantity.10. Are you adding another item:
Yes: Click Save and Add Another Item, and then repeat steps 7 through 11. No: Click Add Item and Return. Continue to the next step.
11. Click Save. 12. Click Yes when the Print Delivery Receipt message displays. Print and close the report.
Send Stock Transfers1. Go to Home Page > Calendar.2. Click Stock Transfer Send.3. Choose the date you are sending the item from the Date Sent drop-down. The Estimate Receive Date
should match the Date Sent.4. Click Search for Site. To display a list of all sites, just click Search. To enter a specific site, enter the Site
ID or name. Select the site and click OK. 5. If needed, enter comments regarding the stock transfer in the Comments field. 6. Click Add Item. The Add Item to Receiving screen displays.7. Enter the Stock Number or Description.8. Click Search.9. Double-click the item record.10. Enter the Case and/or Broken Unit Quantity.11. Are you adding another item?
Yes: Click Save and Add Another Item, and then repeat steps 7 through 11. No: Click Add Item and Return. Continue to the next step.
12. Select Issued. You cannot edit the stock transfer after it is marked as issued. 13. Click Save. The inventory is updated for the From Site at the time the transfer is saved. 14. Click Yes when the Print Sending Ticket message displays. Print and close the report.
31Using the CalendarReceive Goods Manually

32
Make Adjustments1. Go to Home Page > Calendar.2. Click Inventory Adjustments.3. Choose the Adjustment Date.4. Choose the Stock Number.5. Choose the Reason for Adjustment. If the reason is either Count Correction or Other, choose either
Addition or Subtraction. 6.Note: If the Reason for Adjustment is Other, enter the adjustment reason in the Comments.
6. Enter the adjusted Case and Broken Units amount.7. Click Save.
Receive Ordered GoodsOn the Calendar, a blue day represents an ordered good that needs to be received in.
1. Go to Home Page > Calendar.2. Double click the day (indicated in blue). The Ordered Goods Receiving screen is displayed.3. If there are multiple orders, select the correct order.4. Enter who it was Received By.5. Enter Invoice Number and Invoice Date (optional).6. Click Receive All Items. 7. Make any necessary changes to the Case Quantity Received. 8. Click Save.9. Click Yes when prompted to print the Delivery Ticket. You will need it for the central office and
auditors.10. Click Close.
Using the CalendarMake Adjustments
CHAPTER 7: MENU PLANNING
Topics:• Add Nutrition Link Food Items .................................. Pg. 33• Add Recipes............................................................... Pg. 34• Create, Schedule, and Assign Base Menus................ Pg. 35• Menu Planner and Production Reports..................... Pg. 37
Add Nutrition Link Food ItemsIf you’re using production measures, make sure you have it set to display in Global System Options.
1. Go to Back of the House > Inventory Management > Inventory / Items Management > Management Level Inventory.
2. Search for and double-click the item you want to link.3. Click the Menu Planner tab.4. Click Maintain Nutrition Links.5. Click New. 6. Enter the Description of the nutrition link food item. 7. Enter the Food Category and Manufacturer.8. On the Measures tab, click Add Item.9. Enter the broken unit as the Description. Reference the Stock Item Nutrition Links (800120) report for a
list of broken unit descriptions as well as the item’s label. 10. Enter the Weight and choose Grams or Ounces.
Important: Should the measure be converted to standard units of measure (pounds, ounces, cups, etc.) during production?
11. If yes, choose a Production Measure.12. If no, leave Production Measure blank.13. On the Meal Patterns tab, enter the Quantity and choose Measure per serving for each Meal Pattern.14. Click the Nutritional Analysis tab. 15. Choose the Base Measure Description.16. Enter the nutritional information.
If you have a picture of the item’s label, you can attach it on the Nutrition Label tab. This will help auditors quickly confirm nutritional values.
If you want the value as a percentage, enter the Value, click in the % field, press [Shift + 5], and click outside of the % column. If will automatically calculate.
17. Click Save.
33Menu Planning
Add Nutrition Link Food Items

34
Add Recipes 1. Enter Basic Recipe Information
1. Go to Back of the House > Menu Planner > Recipes > Recipes.2. Click New. 3. Choose the Recipe Source.4. Enter the Recipe Number, Recipe Name, Standard Yield, Batch Quantity, Serving Size, Serving Measure,
and Serving Description, 5. Choose the Food Category.6. Choose the applicable HACCP item and HACCP Process Category from each drop-down list.7. Click Save.
2. Add Recipe Ingredients
1. On the Recipe details screen, click Add Item.2. Search for and select an item.3. Enter Amount 1 in the Amount to Add section. Choose the type of measure from the Measure 1 drop-
down list. 4. Choose one of the following:
Click Save and Add Another Item and repeat Step 2 through 4. Click Add Item and Return to Recipes.
5. Click Save.
3. Add Recipe Ingredients Instructions for Recipe Cards
1. On the Recipes screen, click the Ingredient Instructions tab. 2. Enter the preparation instructions (including thawing instructions) for each ingredient in the
Instructions column, as needed. 3. Click Save.
4. Add Recipe Instructions
1. On the Recipe Instructions tab, enter the number of servings the recipe Provides.2. If necessary, enter the Pre-Preparation Days and Pre-Preparation Instructions.3. Enter the Cook Temperature, Cooking Time Hours, and Minutes. 4. Enter the Preparation Instructions.5. Enter the Serving Instructions. 6. Click Save.
5. If Necessary, Enter Moisture / Fat Changes
1. On the Moisture / Fat Changes tab, choose the Predefined Moisture / Fat Change.
Menu PlanningAdd Recipes
2. Enter the Moisture Gain or Loss Factor and the Fat Gain or Loss Factor.3. Choose the Type of Fat. 4. Click Save.
6. If Necessary, Enter the Yield Factor
1. On the Recipes screen, click the ingredient.2. Click Yield Factor Method.3. Search for and select the cooked item.4. Enter the Amount and Measure of the cooked item.5. Click Set.
7. Assign Meal Patterns
1. On the Food Groups/Meal Patterns tab, enter the contribution towards each meal pattern. 2. Click Save.
8. Assign to Sites
1. On the Assign to Sites tab, check Display for each site that you want to see the recipe.2. Is the recipe prepared by the site or central kitchen?
Site: Check Produced by Site. Central Kitchen: Check Produced by CK.
3. Click Save.
9. Perform Recipe Analysis On the Recipes screen, click Analysis. The Recipe Analysis report (800024) is displayed. The report shows the cost and analysis for the selected site types and recipes.
Create, Schedule, and Assign Base Menus 1. Create Base Menus
1. Go to Back of the House > Menu Planner > Base Menus > Base Menus. 2. Click New. 3. Enter the Description.4. Choose the Age Group, Serving Period, and Category.
NOTE: You MUST pick the Grade K-5, 6-8, or 9-12 Age Group to produce the meal pattern reports that meet USDA regulations.
35Menu PlanningCreate, Schedule, and Assign Base Menus

36
5. Enter 100 as the Projected Feeding Figure so that it calculates as a percentage.6. Click Add Item. 7. Search for and select the item.8. Enter the quantity in the Amount field and choose the Measurement.9. Enter the Projected Quantity, the number of people out of 100 that will eat the item.10. Choose the item type from the Food/Non Food/Ala Carte drop-down list. 11. Do you need to add another item?
Yes: Click Save and Add Another Item. Repeat Step 7 through 11 as needed. No: Click Add Item and Return to Recipes.
12. Click the Calendar Description tab and click Copy Items. Only the first 8 items are copied to the calendar. Enter the remaining descriptions.
13. On the Food Groups/Types/Meals tab, for each reimbursable meal, choose Entree from the Entree/Side/Milk drop-down field.
14. Enter the Meal Name.15. On the Meal Patterns tab, click a meal item.16. In the Meal Pattern Analysis section, enter the meal contributions to each meal period.
Sat. Fat, Calories, and Sodium will automatically be calculated. Reference the Item Analysis to help define what each item contributes to the meal.
17. Click Save.
2. Add Base Menu Cycles
1. Go to Back of the House > Menu Planner > Base Menus > Menu Cycles.2. Click New.3. Enter the Description. 4. Choose the appropriate Age Group and Serving Period. 5. Click Add Menu Assignment. 6. Choose the Week and Day when you want to assign the base menu and the Menu Description. 7. Click Save.
3. Schedule Menu Cycles
1. Go to Back of the House > Menu Planner > Schedule Menu Plans > Schedule Menu Plans. 2. Choose the Site. 3. Choose the Serving Period, Age Group, and Serving Line.4. On the Schedule Cycle tab, choose the menu cycle from the Cycle to Schedule drop-down list. 5. Choose the Start and End Date.6. Click Schedule Cycle.
4. Copy Menu to Sites
1. Go to Back of the House > Menu Planner > Schedule Menu Plans > Schedule Menu Plans.2. Click the Copy Menus tab.3. Choose the date range to Copy Menu Plan(s) from.4. Choose the date range to Copy the Menu Plan(s) to.
Menu PlanningCreate, Schedule, and Assign Base Menus

5. At which sites do you want the menu cycle to display? One Site: Select One Site and choose the Site. All Sites of This Type: Select Site of This Type Selected Sites: Select Selected Sites and click Browse [...] to choose the sites.
6. During which serving period(s) do you want the menu cycle to display? One Serving Period: Select One Serving Period and choose the Serving Period. Multiple Serving Periods: Select Selected Serving Periods, click Browse [...] and then choose the
serving periods.7. Choose the Age Group.8. At which lines to you want the menu cycle to display?
One Line: Select One Line and choose the Serving Line. All Lines of This Line Number: Select All Lines of This Line Number and choose the Serving Line Selected Lines: Select Selected Lines and click Browse [...] to choose the serving lines.
9. Click Copy.
Menu Planner and Production ReportsPrint Daily Daily Report Details
Stock Item Nutrition Link (800120)
Identify all the items that are not linked and/or with Quantity Measure Missing on the report. You have to resolve all of them before using in recipes or menus.
Recipe Cost and Nutrition Analysis (800024)
Scan the report for unusually large or small plate costs. All ingredients should have a Cost/Student less than $1.00. The secondary report shows any recipes with broken CN links.
Recipe Cost and Nutrition Analysis (800024)
Mark Error Listing before running the report. Identify any Missing Values on the report. You have to enter a nutrient value instead of N/A on the Enter/Edit Food Items screen (130100) > Nutrient Analysis tab to meet the USDA guidelines.
Recipe Production (800026) and Recipe Cards (800113)
Edit default standard recipes without reconverting all measurements. Make sure standard measures for all local items have been set up on the Maintain Nutritional Link screen (130100). For example, for at least one volume measure, unmark weight based and then select the correct “production” measure from the Production Measure drop-down box.
Print Weekly Weekly Report Details
Base Menu Cost and Nutritional Analysis (800000) and Scheduled Menu Cost/Nutritional Analysis (800027)
Mark Error Listing before running this report. Identify all Errors on the report. Fix broken quantity measures in any recipe or scheduled/base menu. Also, fix site productions errors that occur due to the unlinking of food items and zero cost.
Production Audit (800184) Confirm all site managers have updated their inventory values and closed the production records. Sites should have a C-Completed status.
Profits and Losses (800040)
Look at the food and non-food cost, overhead, and labor cost. It will give you a more accurate depiction of what meals actually cost.
Production Nutrition Analysis (800019)
Identify all Missing Values and resolve them to make sure the meals being served meet USDA nutrient guidelines.
37Menu PlanningMenu Planner and Production Reports

38
Print Monthly Monthly Report Details
Over-Production (800073) Determine how much of each item is actually being served versus produced. For example, if you prepare 240 hamburgers but only serve 214, you have an over production percentage of 12.15%
Production Creation Errors (800064)
Review production errors for a date range. Any errors on the report will need to be corrected on the Recipes (130200) or Base Menu screen (130300).
Menu PlanningMenu Planner and Production Reports