Embed Size (px)
Citation preview
Baby%Bump%Tutorial!By#Alisa#Seidling#
www.CakeWorksBakery.com#
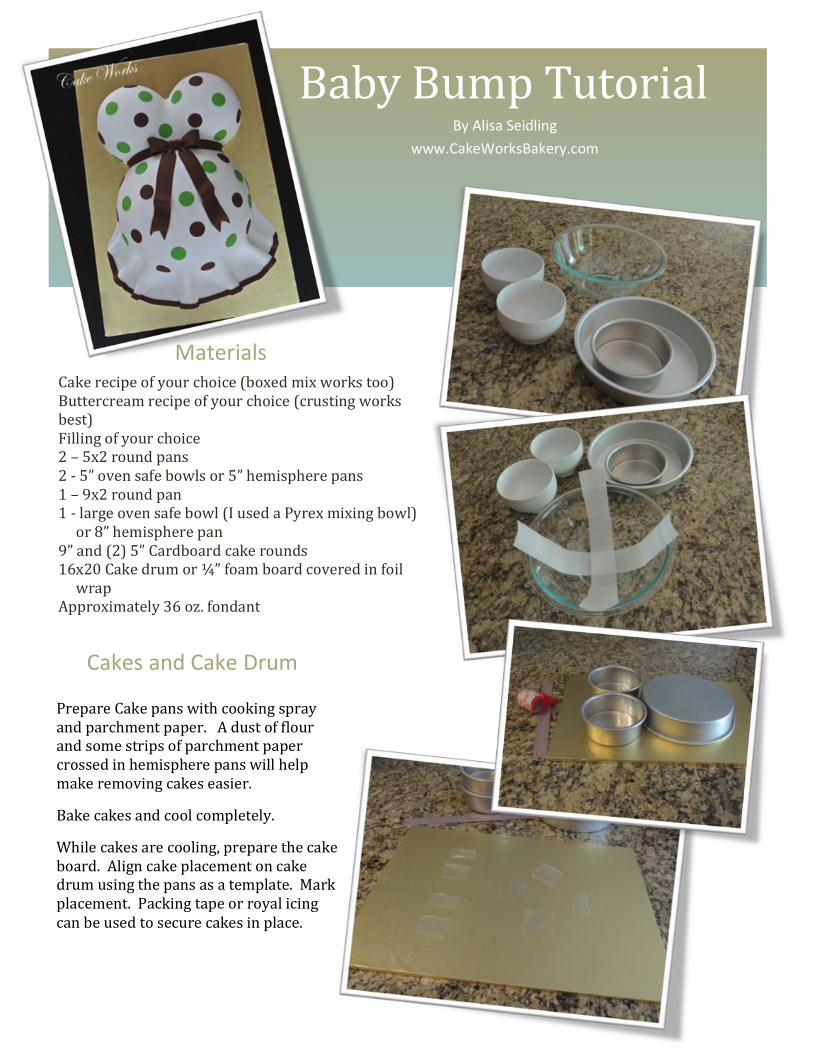
Materials#
Cakes#and#Cake#Drum#
Cake!recipe!of!your!choice!(boxed!mix!works!too)!Buttercream!recipe!of!your!choice!(crusting!works!best)!Filling!of!your!choice!2!–!5x2!round!pans!2!@!5”!oven!safe!bowls!or!5”!hemisphere!pans!1!–!9x2!round!pan!1!@!large!oven!safe!bowl!(I!used!a!Pyrex!mixing!bowl)!!!!!!or!8”!hemisphere!pan!9”!and!(2)!5”!Cardboard!cake!rounds!16x20!Cake!drum!or!¼”!foam!board!covered!in!foil!!!!!!!wrap!Approximately!36!oz.!fondant!
Prepare!Cake!pans!with!cooking!spray!and!parchment!paper.!!!A!dust!of!flour!and!some!strips!of!parchment!paper!crossed!in!hemisphere!pans!will!help!make!removing!cakes!easier.!!!
Bake!cakes!and!cool!completely.!
While!cakes!are!cooling,!prepare!the!cake!board.!!Align!cake!placement!on!cake!drum!using!the!pans!as!a!template.!!Mark!placement.!!Packing!tape!or!royal!icing!can!be!used!to!secure!cakes!in!place.!

!
!!2!
Place!each!baked!round!cake!on!cardboard!cake!circle!and!fill!with!filling!of!your!choice.!!A!fairly!thick!buttercream!dam!(as!shown)!will!help!keep!fillings!in!when!carving!cakes.!!Top!with!coordinating!sized!hemisphere!cake.!!Place!cakes!in!refrigerator!for!about!20!min!to!firm!up.!!!
Filling#
Carving#Gently!trim!overhanging!edges!of!cake!off!with!a!serrated!knife.!
Crumb#Coat#
Final#Buttercream#Coat#Frost!cakes!with!final!buttercream!coat.!!Let!cakes!sit!at!room!temperature!for!about!15@20!minutes!to!allow!crusting!buttercream!to!set!up.!
Frost!filled!cakes!with!a!thin!layer!of!buttercream!to!seal!in!crumbs.!Chill!cakes!in!a!refrigerator!for!about!20!minutes!or!until!crumb!coat!sets!up.!
!
!!3!
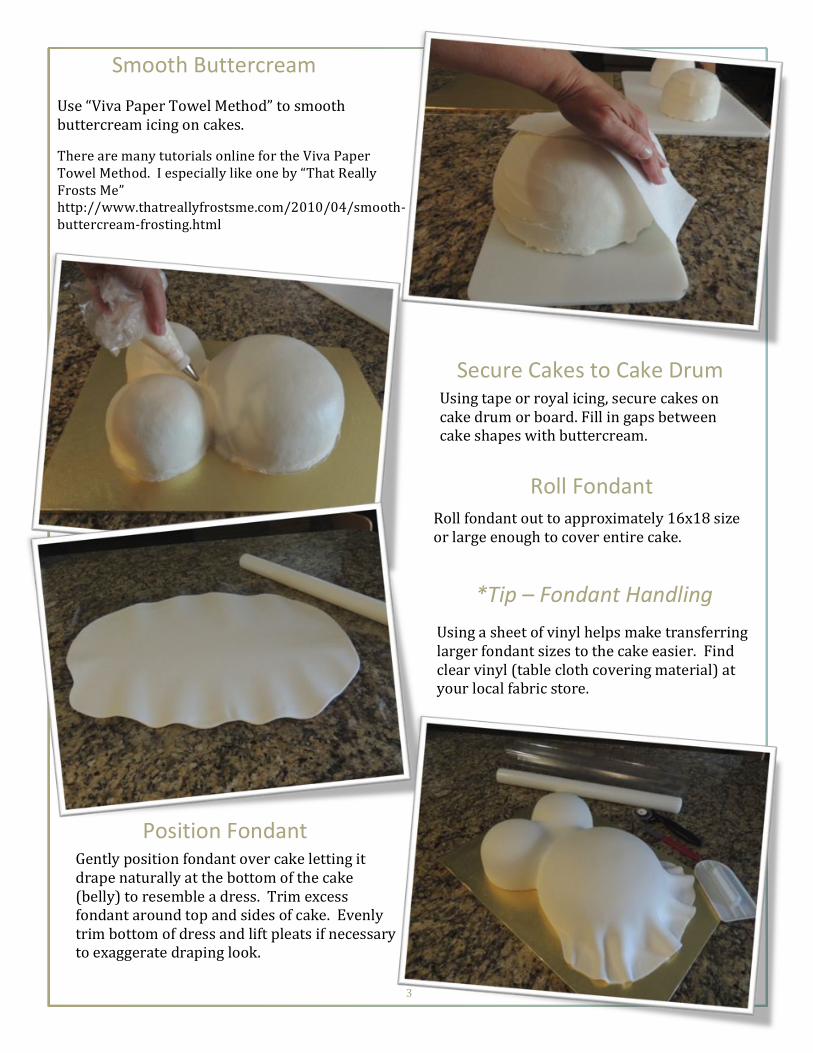
Use!“Viva!Paper!Towel!Method”!to!smooth!buttercream!icing!on!cakes.!!
There!are!many!tutorials!online!for!the!Viva!Paper!Towel!Method.!!I!especially!like!one!by!“That!Really!Frosts!Me”!http://www.thatreallyfrostsme.com/2010/04/smooth@[email protected]!
Secure#Cakes#to#Cake#Drum#Using!tape!or!royal!icing,!secure!cakes!on!cake!drum!or!board.!Fill!in!gaps!between!cake!shapes!with!buttercream.!
Roll#Fondant#Roll!fondant!out!to!approximately!16x18!size!or!large!enough!to!cover!entire!cake.!!!
Position#Fondant#Gently!position!fondant!over!cake!letting!it!drape!naturally!at!the!bottom!of!the!cake!(belly)!to!resemble!a!dress.!!Trim!excess!fondant!around!top!and!sides!of!cake.!!Evenly!trim!bottom!of!dress!and!lift!pleats!if!necessary!to!exaggerate!draping!look.!
Smooth#Buttercream#
*Tip%–%Fondant%Handling%Using!a!sheet!of!vinyl!helps!make!transferring!larger!fondant!sizes!to!the!cake!easier.!!Find!clear!vinyl!(table!cloth!covering!material)!at!your!local!fabric!store.!
!
!!4!
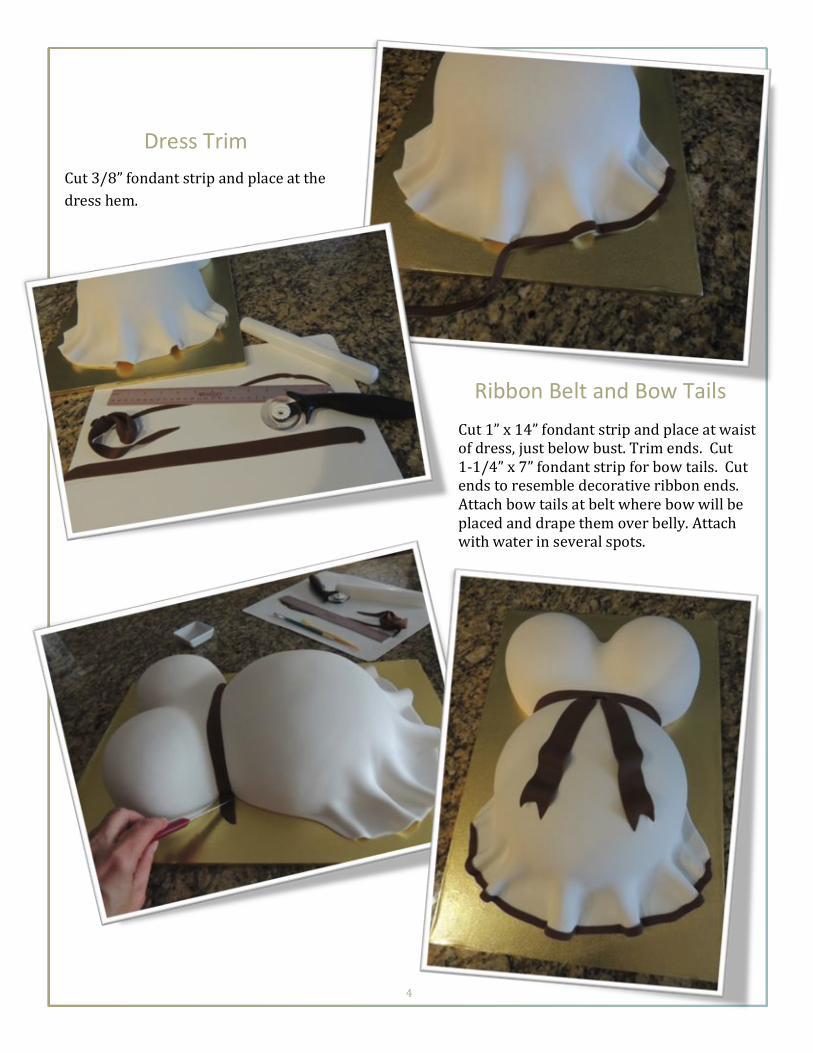
Ribbon#Belt#and#Bow#Tails#Cut!1”!x!14”!fondant!strip!and!place!at!waist!of!dress,!just!below!bust.!Trim!ends.!!Cut!!!!1@1/4”!x!7”!fondant!strip!for!bow!tails.!!Cut!ends!to!resemble!decorative!ribbon!ends.!!!Attach!bow!tails!at!belt!where!bow!will!be!placed!and!drape!them!over!belly.!Attach!with!water!in!several!spots.!
Dress#Trim#Cut!3/8”!fondant!strip!and!place!at!the!dress!hem.!
!
!!5!
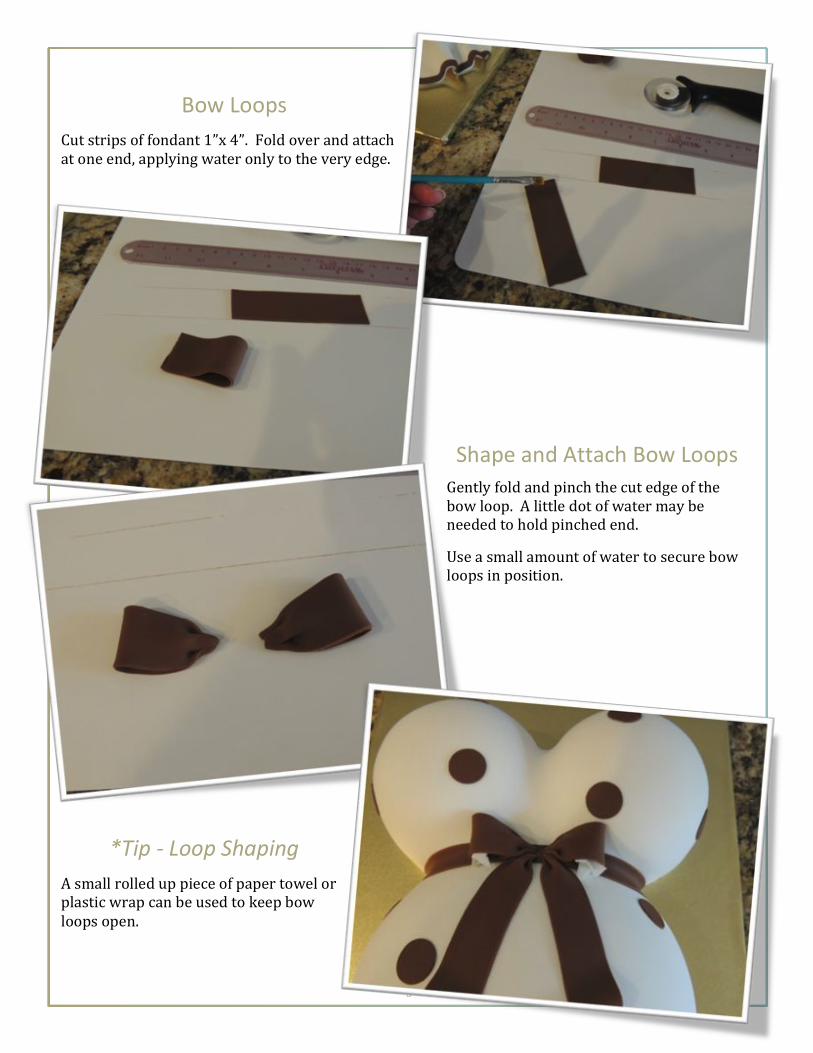
Bow#Loops#Cut!strips!of!fondant!1”x!4”.!!Fold!over!and!attach!at!one!end,!applying!water!only!to!the!very!edge.!
Shape#and#Attach#Bow#Loops#Gently!fold!and!pinch!the!cut!edge!of!the!bow!loop.!!A!little!dot!of!water!may!be!needed!to!hold!pinched!end.!
Use!a!small!amount!of!water!to!secure!bow!loops!in!position.!
*Tip%0%Loop%Shaping%A!small!rolled!up!piece!of!paper!towel!or!plastic!wrap!can!be!used!to!keep!bow!loops!open.!
!
!!6!
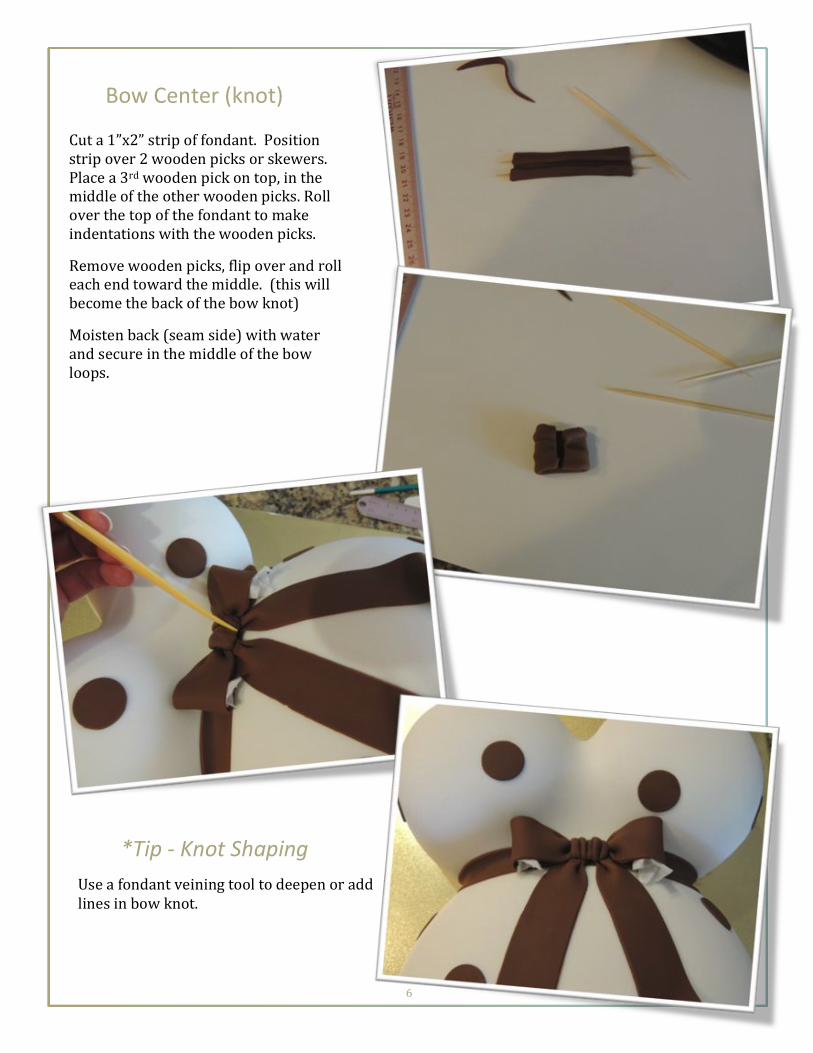
Bow#Center#(knot)#
Cut!a!1”x2”!strip!of!fondant.!!Position!strip!over!2!wooden!picks!or!skewers.!Place!a!3rd!wooden!pick!on!top,!in!the!middle!of!the!other!wooden!picks.!Roll!over!the!top!of!the!fondant!to!make!indentations!with!the!wooden!picks.!!!
Remove!wooden!picks,!flip!over!and!roll!each!end!toward!the!middle.!!(this!will!become!the!back!of!the!bow!knot)!
Moisten!back!(seam!side)!with!water!and!secure!in!the!middle!of!the!bow!loops.!
!
*Tip%0%Knot%Shaping%Use!a!fondant!veining!tool!to!deepen!or!add!lines!in!bow!knot.!
!
!!7!#
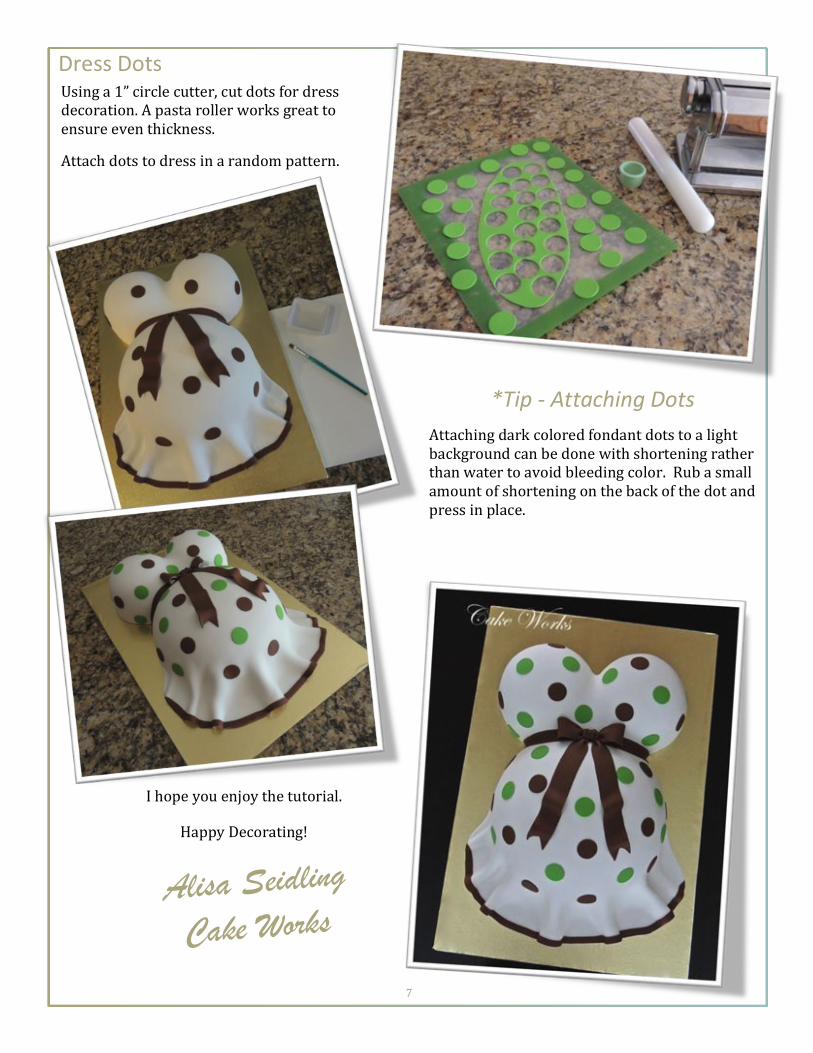
Dress#Dots#Using!a!1”!circle!cutter,!cut!dots!for!dress!decoration.!A!pasta!roller!works!great!to!ensure!even!thickness.!
Attach!dots!to!dress!in!a!random!pattern.!
*Tip%0%Attaching%Dots%Attaching!dark!colored!fondant!dots!to!a!light!background!can!be!done!with!shortening!rather!than!water!to!avoid!bleeding!color.!!Rub!a!small!amount!of!shortening!on!the!back!of!the!dot!and!press!in!place.!!
I!hope!you!enjoy!the!tutorial.!
Happy!Decorating!!
Alisa Seidling Cake Works
![CVF Open Access - Neural Baby Talk...puppy cake table tie Detector Figure 1. Example captions generated by (a) Baby Talk [24], (c) neural image captioning [20] and (b) our Neural Baby](https://img.pdfslide.us/doc/110x75/60e9cdda9bd7a30d3b025f0f/cvf-open-access-neural-baby-talk-puppy-cake-table-tie-detector-figure-1-example.jpg)