Embed Size (px)
Citation preview

Azotel Confidential Proprietary © Azotel Technologies Ltd 2018
AZOTEL S08-03 v103 (2016-07)
S08 - SIMPLer RADIUS Mikrotik: Customer MAC Authentication
Azotel Technologies Ltd, 3rd Floor, River House,
Blackpool Park, Cork,
Republic of Ireland.
Azotel Canada Inc. 325 Vulcan Avenue
NS B1P 5X1 Sydney Canada
Azotel Poland
PLAC Powstancow Slaskich 17A/222
53-329 Wroclaw Poland
Phone (EMEA): +353-21-234-8100 Phone (North America): +1-312-239-0680 / +1-902-539-2665
Phone (Poland): +48-71-710-1530 Phone (UK): +44-20-719-3417
Phone (South Africa): +27-11-083-6900 Fax: +353-21-467-1699

AZOTEL S08-03 v103 (2016-07)
Azotel Confidential Proprietary © Azotel Technologies Ltd 2018
2
Contents Contents .............................................................................................................................................................. 2 1 Scope ............................................................................................................................................................ 3 2 Prerequisites ................................................................................................................................................. 4 3 SIMPLer server configuration ...................................................................................................................... 5 3.1 Adding a new Network Access Server to the system ................................................................................................. 5 3.2 Setting up RADIUS Groups for Bandwidth Limiting ................................................................................................ 7 3.3 Customer settings – manual configuration ................................................................................................................. 8 3.4 Customer Settings – Automated Provisioning ......................................................................................................... 11 4 Mikrotik NAS configuration ...................................................................................................................... 15 4.1 RADIUS configuration ............................................................................................................................................ 15 4.2 Hotspot with MAC Authentcation setup .................................................................................................................. 17 4.3 Hotspot IP Bindings ................................................................................................................................................. 22 4.4 Walled Garden .......................................................................................................................................................... 22 4.5 Template for restricted users .................................................................................................................................... 23 4.6 Host maintenance script ........................................................................................................................................... 23 5 Setup for Static IP addresses from DHCP server ....................................................................................... 26 5.1 Setting up Radius server ........................................................................................................................................... 26 5.2 Setting up Mikrotik .................................................................................................................................................. 28 6 Debugging .................................................................................................................................................. 29 6.1 No DHCP service ..................................................................................................................................................... 29 6.2 Everyone gets authenticated ..................................................................................................................................... 29 6.3 Everyone gets “You are not authenticated” page ..................................................................................................... 30 6.4 Particular customer cannot get online ...................................................................................................................... 31 6.5 Expected throughputs are not achieved .................................................................................................................... 31 Annex A: References .................................................................................................................................... 33 A.1 Document References .............................................................................................................................................. 33 A.2 Link References ....................................................................................................................................................... 33 Annex B: Definitions & Abbreviations ......................................................................................................... 34 B.1 Definitions ............................................................................................................................................................... 34 B.2 Abbreviations ........................................................................................................................................................... 34 Annex C: Typical login.html file .................................................................................................................. 35 Annex D: Change history .............................................................................................................................. 37

AZOTEL S08-03 v103 (2016-07)
Azotel Confidential Proprietary © Azotel Technologies Ltd 2018
3
1 Scope The purpose of this guide is to explain the integration of an Operator's Network with Azotel’s SIMPLer platform, using a Mikrotik device with MAC authentication and a RADIUS server.
Note that the operator’s network must be integrated with the SIMPLer platform, in order to have the ability to:
• Control customer access to the network based on the customer’s status • Authorise an appropriate level of service to the customer’s connection accordingly to the products provisioned
to their account • Log usage data to their account, which can then be used for Usage Based Billing.
There are two main branches to integrating the SIMPLer platform:
• using WIB-C controllers in-line to control the traffic in the operator network • using RADIUS to integrate SIMPLer with Network Access Server (NAS’es) deployed in the operator network
This manual explains the second scenario: “using RADIUS to integrate SIMPLer with NAS’es” where a Mikrotik device is used as a NAS. There are number of options a Mikrotik controller can utilise to provide RADIUS authenticated customer traffic control:
• PPPoE – a PPPoE server can be run on the Mikrotik. This approach provides a full Authentication / Authorization / Accounting integration with SIMPLer platform. It requires switching the network to use the PPPoE protocol.
• Hotspot – a standard hotspot controller can be run on Mikrotik – this approach provides a full Authentication / Authorization / Accounting integration with the SIMPLer platform. The Operator can use hotspot services for both ‘recurring’ and ‘hotspot’ type customers. Customers are required to log in via a splash page.
• Hotspot with Mac Authentication – using this mode allows the Operator to deploy a login-less authentication mechanism for recurring customers. This approach provides a full Authentication / Authorization / Accounting integration with SIMPLer platform. If the MAC address for a customer already exists in RADIUS, that customer will be authenticated without the need to go through the Customer Portal. It requires a Layer 2 connection between the Mikrotik and the customer. This is the precise scenario, described in this guide.
• WiFi – Mikrotik can authenticate a wireless CPE access and register only units with MAC addresses that are defined under customer accounts. This approach provides only the Authentication / Authorization integration with SIMPLer platform. There will be no Accounting data sent from Mikrotik to SIMPLer. This can be used as an additional security measure, by the Operator.
• DHCP – Mikrotik can run a standalone DHCP server that will assign IP addresses based on what is defined under the customer account in SIMPLer. This approach provides only the Authentication / Authorization integration with SIMPLer platform. There will be no Accounting data sent from Mikrotik to SIMPLer. This should be treated as an additional service that can be provided from RADIUS integration.
To conclude, this document will discuss in detail the third scenario i.e Hotspot – Mac Authentication option .

AZOTEL S08-03 v103 (2016-07)
Azotel Confidential Proprietary © Azotel Technologies Ltd 2018
4
2 Prerequisites In order to have this setup completed Operator's network must cover following components / requirements:
1) RADIUS server – Azotel recommend using a local to operator RADIUS servers. The operator should also have a standy RADIUS server, in case of any issues encountered by the primary at any stage.
2) Mikrotik Router 3) Flat (switched or VLAN) network run between Mikrotik and CPE.
Fig. 2.1. Mikrotik: customer MAC Authentication integrated with SIMPLer using RADIUS server
AZOTEL S08-03 v103 (2016-07)
Azotel Confidential Proprietary © Azotel Technologies Ltd 2018
5
3 SIMPLer server configuration 3.1 Adding a new Network Access Server to the system Note: A local RADIUS server (if a local RADIUS server is used) must be integrated with the SIMPLer platform prior to starting the configuration procedure. Contact Azotel at: [email protected] to receive details on that procedure.
Note: It is possible to use a RADIUS server embedded into SIMPLer platform, for testing purposes only. Each SIMPLer server runs a RADIUS server at standard ports (1812 for Authentication and Authorization and 1813 for Accounting) under its public IP address. Though it is not recommended to use the embedded server for production environment – a RADIUS server that is local to the operator’s network should be deployed.
Note: For the purpose of this guide following assumptions have been made on the RADIUS server:
• RADIUS IP address: 192.168.1.125 • The RADIUS server is local to operator’s network • RADIUS server has already been integrated with SIMPLer platform
Note: The SIMPLer platform management actions described here may not cover all details/options available for RADIUS integration under SIMPLer. For further details please refer to RADIUS Integration User’s Guide that can be found under: http://www.azotel.com/azotel-operator-manuals-doc/
For security reasons each RADIUS server runs it’s ACL (Access Lists) that covers the NAS’es allowed to communicate with the server. This list can be managed from the SIMPLer platform. Follow the steps below to add a new NAS position to your local RADIUS server using SIMPLer platform:
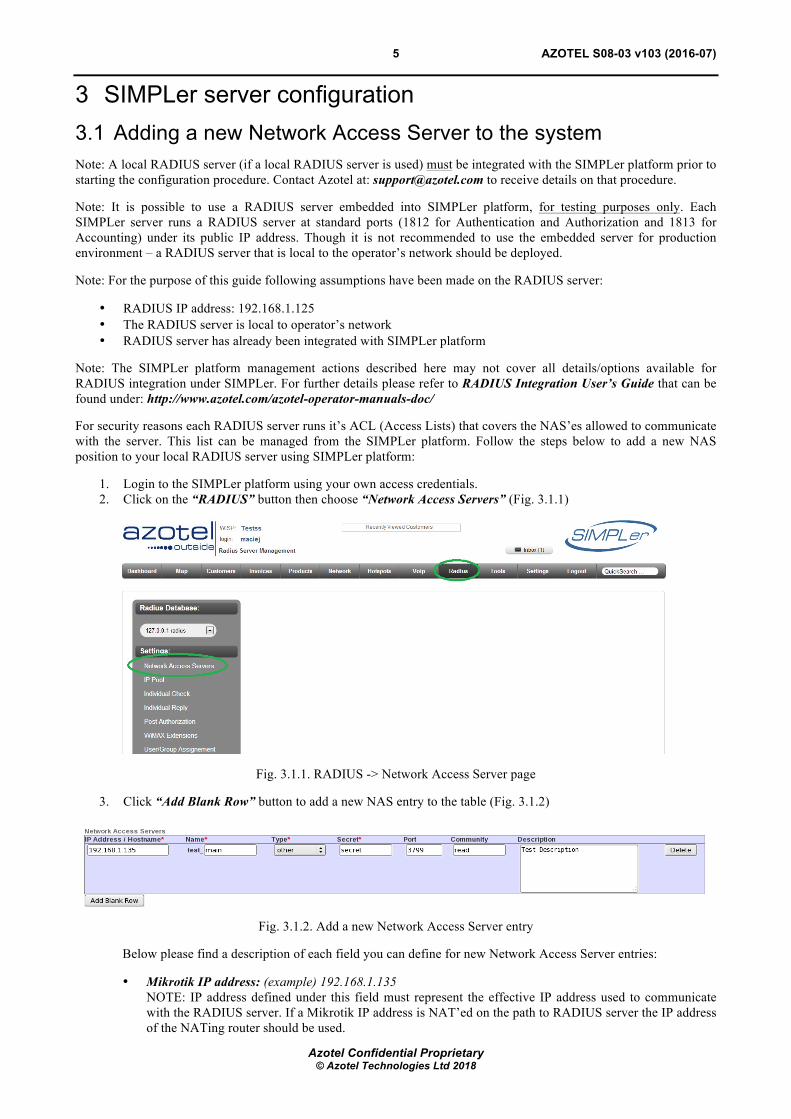
1. Login to the SIMPLer platform using your own access credentials. 2. Click on the “RADIUS” button then choose “Network Access Servers” (Fig. 3.1.1)
Fig. 3.1.1. RADIUS -> Network Access Server page
3. Click “Add Blank Row” button to add a new NAS entry to the table (Fig. 3.1.2)
Fig. 3.1.2. Add a new Network Access Server entry
Below please find a description of each field you can define for new Network Access Server entries:
• Mikrotik IP address: (example) 192.168.1.135 NOTE: IP address defined under this field must represent the effective IP address used to communicate with the RADIUS server. If a Mikrotik IP address is NAT’ed on the path to RADIUS server the IP address of the NATing router should be used.

AZOTEL S08-03 v103 (2016-07)
Azotel Confidential Proprietary © Azotel Technologies Ltd 2018
6
• Name: (example) main NOTE: The name should match the name you will define under “System->Identity” on the Mikrotik Router (Fig. 3.1.3). Setting up the Mikrotik will be covered in more detail in section 4.
Fig. 3.1.3. Winbox: Mikrotik NAS “System->Identity”
• Type: other • Secret: (example) secret
NOTE: The secret must match the secret you will define under “RADIUS server” general details on the Mikrotik (Fig. 3.1.4). Setting up the Mikrotik will be covered in more detail in section 4.
Fig 3.1.4. Winbox: Mikrotik NAS “RADIUS Secret” field
• Port: (example) 3799
NOTE: The port number must match the port number you will set under “RADIUS -> Incoming” section on the Mikrotik (Fig. 3.1.5). Setting up the Mikrotik will be covered in more detail in section 4.
Fig. 3.1.5. Winbox: Mikrotik NAS “Incoming port” number
• Community: (example) read. This field is optional. • Description: (example) Test Description
4. Click “Update Table” to submit adding a new entry
Note: It may take up to 60 seconds for a new NAS entry to become active on the local RADIUS server.
AZOTEL S08-03 v103 (2016-07)
Azotel Confidential Proprietary © Azotel Technologies Ltd 2018
7
3.2 Setting up RADIUS Groups for Bandwidth Limiting Note: The SIMPLer platform management actions described here may not cover all details/options available for RADIUS integration under SIMPLer. For further details please refer to RADIUS Integration User’s Guide that can be found under: http://www.azotel.com/azotel-operator-manuals-doc/
All authenticated customers will get the service they are authorized for. The most typical setup will cover the upload/download speed rates definition. This can be done under the “RADIUS->Group Reply” section of the SIMPLer platform (Fig. 3.2.1). RADIUS Group Replies can be used to define common attributes (effectively services). Customers assigned to a group will inherit the group services. To add a new “RADIUS Group Reply” with Uplink / Downlink rate limits on a Mikrotik please follow the steps below:
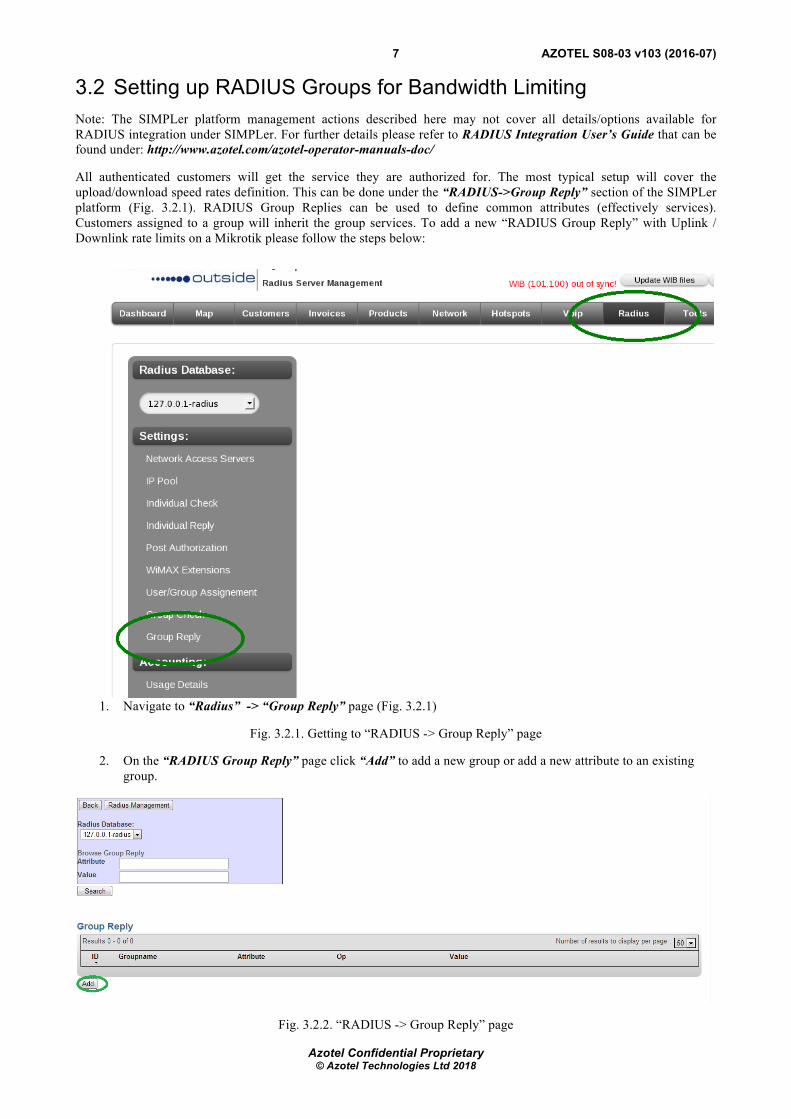
1. Navigate to “Radius” -> “Group Reply” page (Fig. 3.2.1)
Fig. 3.2.1. Getting to “RADIUS -> Group Reply” page
2. On the “RADIUS Group Reply” page click “Add” to add a new group or add a new attribute to an existing group.
Fig. 3.2.2. “RADIUS -> Group Reply” page

AZOTEL S08-03 v103 (2016-07)
Azotel Confidential Proprietary © Azotel Technologies Ltd 2018
8
3. If you add a new group – check the radio button “Define new group” and enter following information: • Fill in the “Groupname”: (example) fast_speed. • From the “Dictionary” dropdown select “Mikrotik” - that will limit “Attribute” dropdown menu to list
only Mikrotik attributes. • From “Attribute” dropdown menu select “Mikrotik-Rate-Limit”. • Leave “Operator” to “=”. Enter the desired speed for a customer connection in the following format:
xxxk/yyyk (example 512k/1024k) where: o xxx – numeric upload speed in kbits/sec o yyy – numeric download speed in kbits/sec
See figure 3.2.3 for reference.
Fig. 3.2.3. “RADIUS -> Group Reply -> Add Group Radius Reply” page
4. Click the “Add” button to finish adding new group. 5. Repeat steps 2-4 to define further groups with other speed definitions accordingly to the planned product /
services.
Note: You can also define other group attributes here. Please refer to “Supported RADIUS Attributes” section of the following web page:
• http://www.mikrotik.com/testdocs/ros/2.9/guide/aaa_radius.php
3.3 Customer settings – manual configuration Note: A customer account must be active (in a ‘current’ state in SIMPLer) and assigned to a network gateway that has the RADIUS option enabled prior to adding any RADIUS related details to a customer account. A network gateway setup is typically performed as a part of the process of “integrating with a local RADIUS gateway”, when an appropriate network gateway is created.
Note: The SIMPLer platform management actions described here may not cover all details/options available for RADIUS integration under SIMPLer. For further details please refer to RADIUS Integration User’s Guide that can be found under: http://www.azotel.com/azotel-operator-manuals-doc/
The following steps describe the manual provision of a RADIUS details to a customer account.
• In the SIMPLer platform on the customer account details page, scroll down to the “Customer Network Details” section. From the “RADIUS details” subsection select “modify” (Fig. 3.3.1)
AZOTEL S08-03 v103 (2016-07)
Azotel Confidential Proprietary © Azotel Technologies Ltd 2018
9
Fig. 3.3.1 Customer details page: “RADIUS Details” section
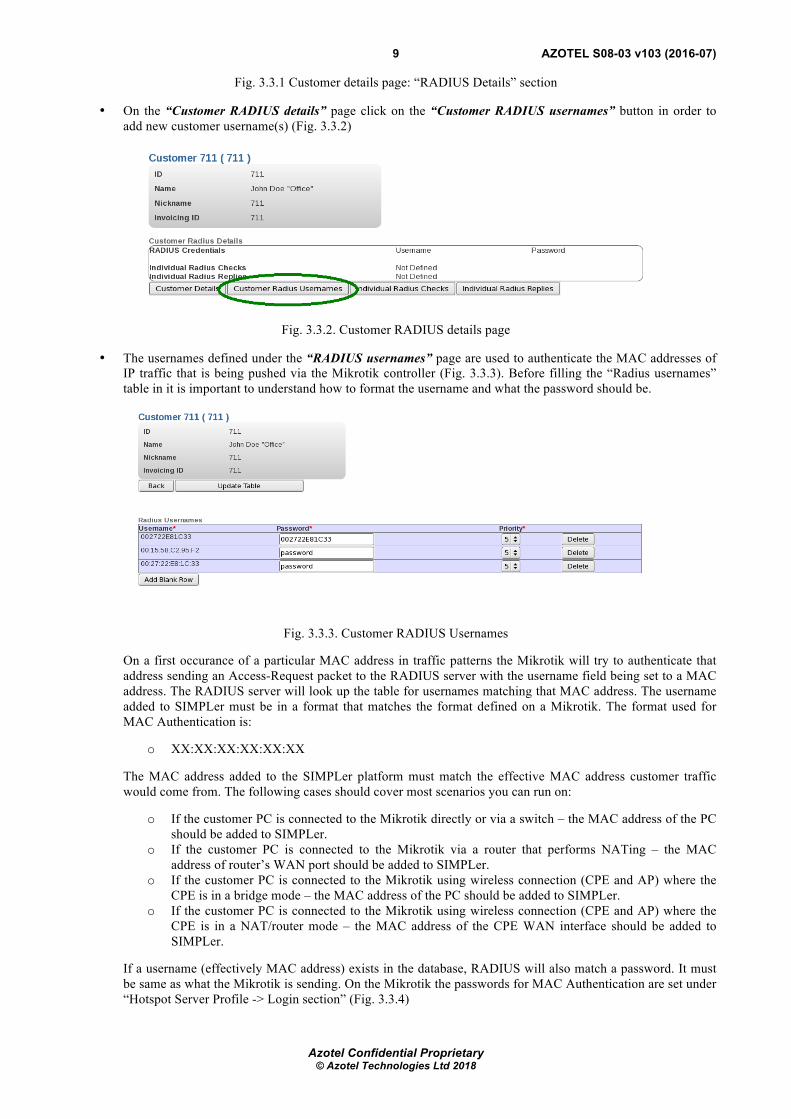
• On the “Customer RADIUS details” page click on the “Customer RADIUS usernames” button in order to add new customer username(s) (Fig. 3.3.2)
Fig. 3.3.2. Customer RADIUS details page
• The usernames defined under the “RADIUS usernames” page are used to authenticate the MAC addresses of IP traffic that is being pushed via the Mikrotik controller (Fig. 3.3.3). Before filling the “Radius usernames” table in it is important to understand how to format the username and what the password should be.
Fig. 3.3.3. Customer RADIUS Usernames
On a first occurance of a particular MAC address in traffic patterns the Mikrotik will try to authenticate that address sending an Access-Request packet to the RADIUS server with the username field being set to a MAC address. The RADIUS server will look up the table for usernames matching that MAC address. The username added to SIMPLer must be in a format that matches the format defined on a Mikrotik. The format used for MAC Authentication is:
o XX:XX:XX:XX:XX:XX
The MAC address added to the SIMPLer platform must match the effective MAC address customer traffic would come from. The following cases should cover most scenarios you can run on:
o If the customer PC is connected to the Mikrotik directly or via a switch – the MAC address of the PC should be added to SIMPLer.
o If the customer PC is connected to the Mikrotik via a router that performs NATing – the MAC address of router’s WAN port should be added to SIMPLer.
o If the customer PC is connected to the Mikrotik using wireless connection (CPE and AP) where the CPE is in a bridge mode – the MAC address of the PC should be added to SIMPLer.
o If the customer PC is connected to the Mikrotik using wireless connection (CPE and AP) where the CPE is in a NAT/router mode – the MAC address of the CPE WAN interface should be added to SIMPLer.
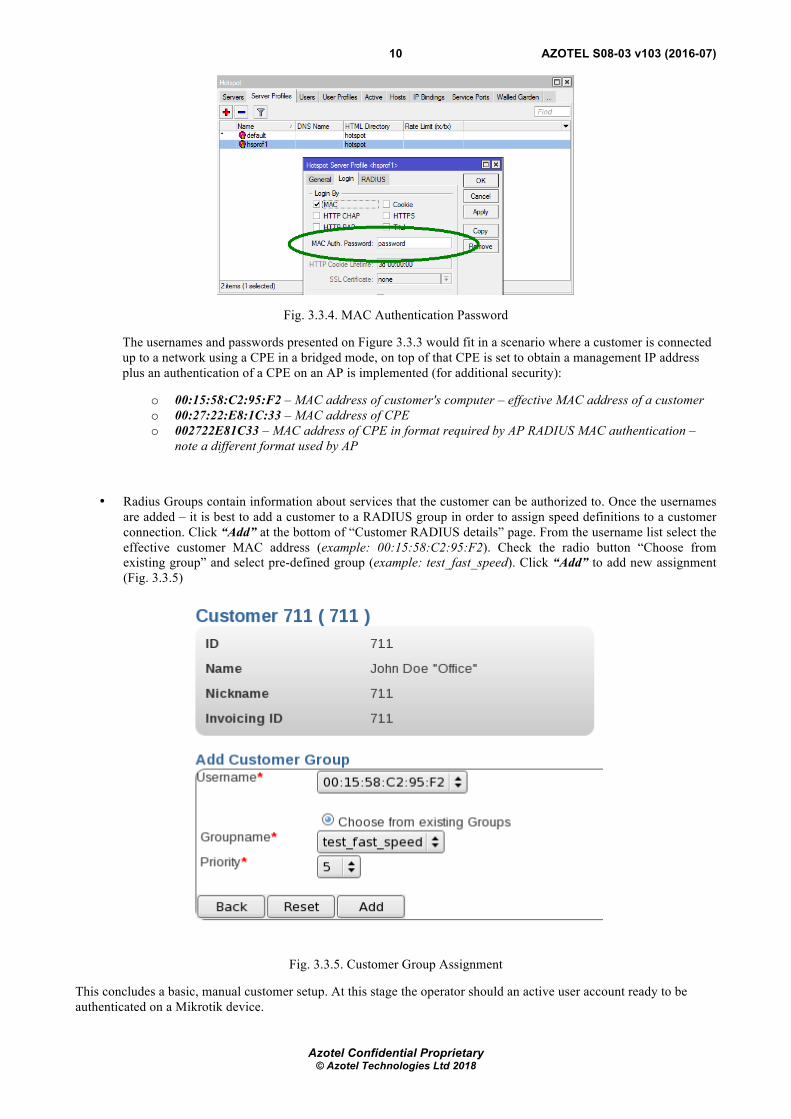
If a username (effectively MAC address) exists in the database, RADIUS will also match a password. It must be same as what the Mikrotik is sending. On the Mikrotik the passwords for MAC Authentication are set under “Hotspot Server Profile -> Login section” (Fig. 3.3.4)
AZOTEL S08-03 v103 (2016-07)
Azotel Confidential Proprietary © Azotel Technologies Ltd 2018
10
Fig. 3.3.4. MAC Authentication Password
The usernames and passwords presented on Figure 3.3.3 would fit in a scenario where a customer is connected up to a network using a CPE in a bridged mode, on top of that CPE is set to obtain a management IP address plus an authentication of a CPE on an AP is implemented (for additional security):
o 00:15:58:C2:95:F2 – MAC address of customer's computer – effective MAC address of a customer o 00:27:22:E8:1C:33 – MAC address of CPE o 002722E81C33 – MAC address of CPE in format required by AP RADIUS MAC authentication –
note a different format used by AP
• Radius Groups contain information about services that the customer can be authorized to. Once the usernames are added – it is best to add a customer to a RADIUS group in order to assign speed definitions to a customer connection. Click “Add” at the bottom of “Customer RADIUS details” page. From the username list select the effective customer MAC address (example: 00:15:58:C2:95:F2). Check the radio button “Choose from existing group” and select pre-defined group (example: test_fast_speed). Click “Add” to add new assignment (Fig. 3.3.5)
Fig. 3.3.5. Customer Group Assignment
This concludes a basic, manual customer setup. At this stage the operator should an active user account ready to be authenticated on a Mikrotik device.

AZOTEL S08-03 v103 (2016-07)
Azotel Confidential Proprietary © Azotel Technologies Ltd 2018
11
3.4 Customer Settings – Automated Provisioning There is a quick way to provision a customer while these are still in ‘waiting for install’ status – a ‘Provision w/o CPE’ option is available for such an account. This tool - that is designed to help bringing a customer ‘current’ without active provisioning process happening with a CPE - can be used to provision an account in a quick and efficient manner. It can be found on a customer details page.
Note: “Provision w/o CPE” tools has been documented separately under Azotel WiKi (available from www.wiki.azotel.com)
Please follow the steps below to provision an account:
• On the “customer details” page click on “Provision w/o CPE” link (Fig 3.4.1)
Fig. 3.4.1. Customer Details Page
• Choose an appropriate gateway, and choose the type of IP address you will use (Fig 3.4.2). Click the “Next” button.
Fig. 3.4.2. “Provision w/o CPE” Step #1

AZOTEL S08-03 v103 (2016-07)
Azotel Confidential Proprietary © Azotel Technologies Ltd 2018
12
• From the dropdown menu pick an appropriate “Bucket” for the customer and decide if you would like to create a CPE entry and an IP address (Fig. 3.4.3). Click “Next” button.
Fig. 3.4.3. “Provision w/o CPE” Step #2
Check the number of IP addresses required (if applicable) and enter if you would like to create a CPE entry. Select the box for “create RADIUS accounts” per fig, 3.4.4 and click next.
Fig. 3.4.4. “Provision w/o CPE” Step #3
Select the IP class you would like to generate IP addresses from (if applicable). Click next.

AZOTEL S08-03 v103 (2016-07)
Azotel Confidential Proprietary © Azotel Technologies Ltd 2018
13
Fig. 3.4.5. “Provision w/o CPE” Step #4
Enter CPE information (if applicable) and click next.
Fig. 3.4.6. “Provision w/o CPE” Step #5
Verify the details on the provision process summary page. Go back and correct if anything is wrong, otherwise proceed by clicking the “Provision” button (Fig 3.4.7).

AZOTEL S08-03 v103 (2016-07)
Azotel Confidential Proprietary © Azotel Technologies Ltd 2018
14
Fig. 3.4.7. “Provision w/o CPE” Provisioning Step
• Wait for the SIMPLer platform to configure the customer account. Once that is finished a report page listing all
steps undertaken by the system will be displayed (Fig. 3.4.8). This concludes the setup.
Fig. 3.4.8. “Provision w/o CPE”
AZOTEL S08-03 v103 (2016-07)
Azotel Confidential Proprietary © Azotel Technologies Ltd 2018
15
4 Mikrotik NAS configuration Note: It is highly recommended to use Winbox to configure Mikrotik devices. The Winbox software can be downloaded from the Mikrotik site:
• http://www.mikrotik.com/download
Note: The Mikrotik NAS should be added to the SIMPLer RADIUS server NAS list in order to communicate properly with RADIUS server (see fig. 3.1.2). This has been covered in the chapter 3 of this guide.
Note: Mikrotik NAS System -> Identity (see fig. 4.1) should match NAS name defined under SIMPLer RADIUS NAS details table (fig. 3.1.2)
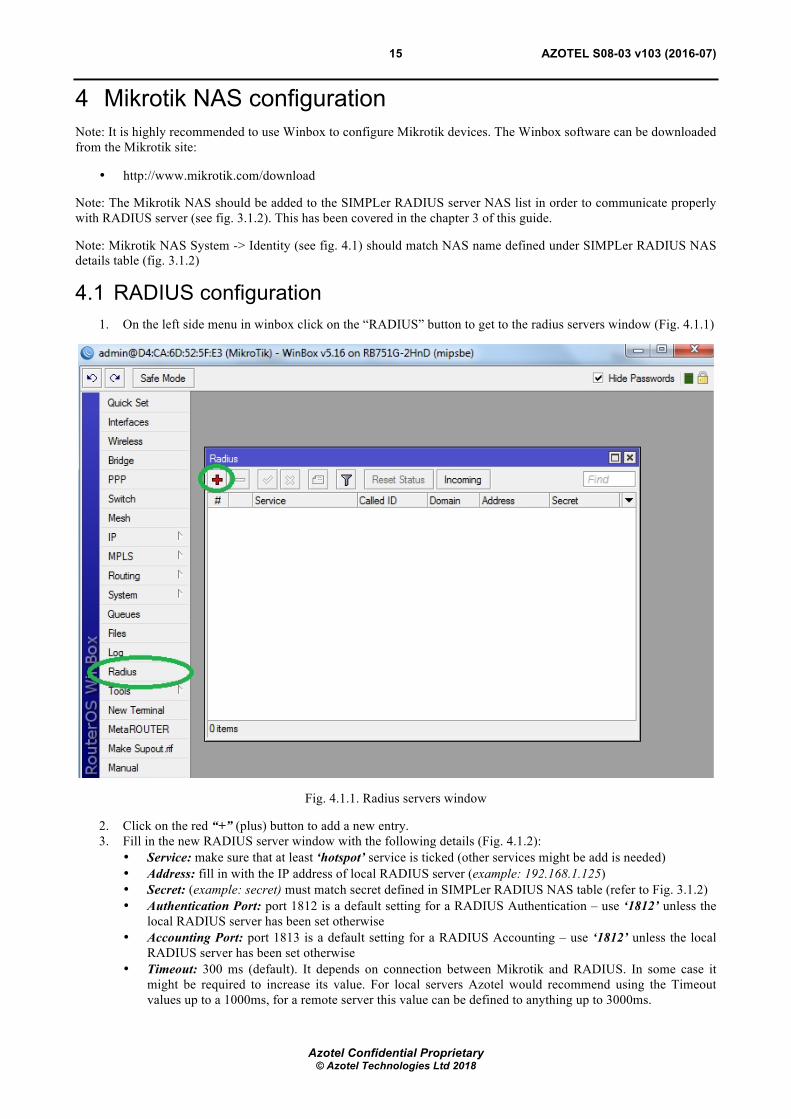
4.1 RADIUS configuration 1. On the left side menu in winbox click on the “RADIUS” button to get to the radius servers window (Fig. 4.1.1)
Fig. 4.1.1. Radius servers window
2. Click on the red “+” (plus) button to add a new entry. 3. Fill in the new RADIUS server window with the following details (Fig. 4.1.2):
• Service: make sure that at least ‘hotspot’ service is ticked (other services might be add is needed) • Address: fill in with the IP address of local RADIUS server (example: 192.168.1.125) • Secret: (example: secret) must match secret defined in SIMPLer RADIUS NAS table (refer to Fig. 3.1.2) • Authentication Port: port 1812 is a default setting for a RADIUS Authentication – use ‘1812’ unless the
local RADIUS server has been set otherwise • Accounting Port: port 1813 is a default setting for a RADIUS Accounting – use ‘1812’ unless the local
RADIUS server has been set otherwise • Timeout: 300 ms (default). It depends on connection between Mikrotik and RADIUS. In some case it
might be required to increase its value. For local servers Azotel would recommend using the Timeout values up to a 1000ms, for a remote server this value can be defined to anything up to 3000ms.

AZOTEL S08-03 v103 (2016-07)
Azotel Confidential Proprietary © Azotel Technologies Ltd 2018
16
Fig. 4.1.2. RADIUS server details
4. Click “OK” button to submit the new entry. NOTE: If a RADIUS server that is not hosted on SIMPLer server (i.e. local RADIUS server) is used it is required to add a second RADIUS server entry to the radius servers table on Mikrotik that will point at the SIMPLer server IP address. It should have all services disabled and the secret field should match the secret defined under the local RADIUS server defined in the previous step (Fig. 4.1.2). This is required for incoming CoA packets to be allowed and accepted. In example: 84.203.220.3 IP address (public IP of the wib.azotel.com server) has been used as an example on figure 4.1.3
Fig. 4.1.3. additional RADIUS server details

AZOTEL S08-03 v103 (2016-07)
Azotel Confidential Proprietary © Azotel Technologies Ltd 2018
17
5. Under Radius window click on the “Incoming” button to bring up the “RADIUS Incoming” section (fig. 4.1.4). Tick “Accept” box and enter port number (example: 3799) that will match port number defined under SIMPLer RADIUS NAS table (fig. 3.1.2)
Fig. 4.1.4. RADIUS Incoming section
At this stage the Mikrotik is set to send the RADIUS requests to SIMPLer (to do the Authentication, Authorisation and Accounting) and receive the incoming CoA packet from the SIMPLer server (to re-provision a customer).
4.2 Hotspot with MAC Authentcation setup This chapter covers setting up the Hotspot service on a Mikrotik controller and enabling a “MAC authentication” feature to provide a login-less authentication experience for recurring customers. Following below steps to get this setup completed:
1. Navigate to the “IP -> Hotspot” window in Winbox and click “Hotspot Setup”
Fig. 4.2.1. Winbox: “Hotspot” window

AZOTEL S08-03 v103 (2016-07)
Azotel Confidential Proprietary © Azotel Technologies Ltd 2018
18
2. A new “Hotspot Setup” window will pop up to select the hotspot interface (Fig. 4.2.2). The interface selected will be used to deploy the hotspot service on. Note that only on this interface the hotspot service will run. Interfaces list covers the physical interfaces available on the device (i.e. eth0, eth1, wifi1) as well as additional ports that were added (i.e. vlans, bridges, pppoe). Once done click “Next”.
Fig. 4.2.2. Hotspot Interface
3. Next thing to specify is the “Local Address of Network” (Fig. 4.2.3). Enter network IP details that are to be used for hotspot customers. As presented on the figure this should cover the IP address assigned to the hotspot interface (that will effectively be a gateway to hotspot customers) and the network mask. If these IP addresses are private tick “Masquerade Network” option to MASQUERADE (NAT) the customer connections at the Mikrotik, otherwise if the IP addresses are public make sure not to tick this option. Once done click “Next”.
Fig. 4.2.3. Local Network
4. Enter the address pool of the network to be used (fig. 4.2.4). This value specifies what IP addresses should be used by hotspot “Dynamic IP” customers. In another words this field defines the IP addresses range that is to be dynamically assigned to hotspot service customers. By default this range will be calculated properly from the network details specified in previous step and should not be changed unless something more specific is to be done. Once done click “Next”.
Fig. 4.2.4. Address Pool
5. Omit certificate setup (Fig. 4.2.5). The SSL certificate would be useful when running a secure login page. It usually is not something required to deploy a hotspot service. On top of that in case of MAC authentication it becomes completely redundant. Once done click “Next”.
Fig. 4.2.5. SSL Certificate
AZOTEL S08-03 v103 (2016-07)
Azotel Confidential Proprietary © Azotel Technologies Ltd 2018
19
6. Specify the “IP Address of SMTP Server” if an SMTP relay is run in the network (Fig. 4.2.6). The SMTP relay might be a very good addition to a network where an operator would want to limit the number of SPAM activity that is generated by private IP customers that may lead to blacklisting the shared public IP address. If this field is specified, all SMTP traffic coming from hotspot network will be redirected to the defined IP address. Once done click “Next”. Note: SMTP server if not required to get the Hotspot service with MAC authentication up and running.
Fig. 4.2.6. SMTP server details
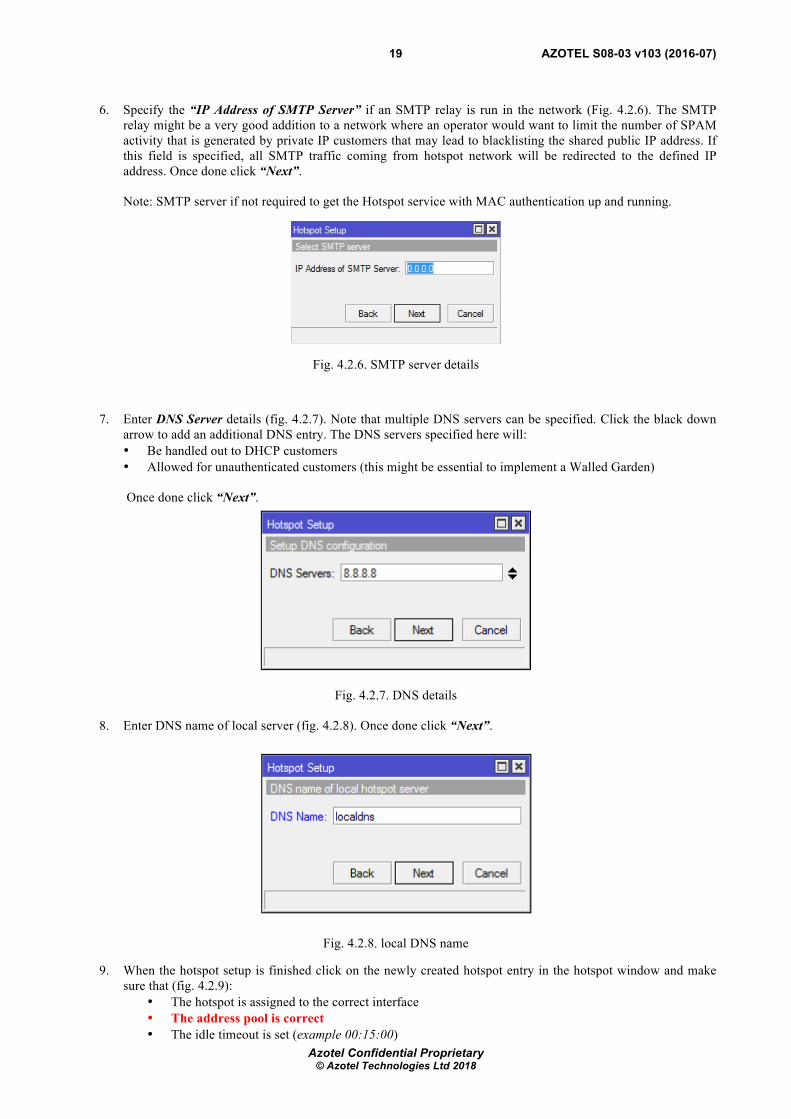
7. Enter DNS Server details (fig. 4.2.7). Note that multiple DNS servers can be specified. Click the black down arrow to add an additional DNS entry. The DNS servers specified here will: • Be handled out to DHCP customers • Allowed for unauthenticated customers (this might be essential to implement a Walled Garden) Once done click “Next”.
Fig. 4.2.7. DNS details
8. Enter DNS name of local server (fig. 4.2.8). Once done click “Next”.
Fig. 4.2.8. local DNS name
9. When the hotspot setup is finished click on the newly created hotspot entry in the hotspot window and make sure that (fig. 4.2.9):
• The hotspot is assigned to the correct interface • The address pool is correct • The idle timeout is set (example 00:15:00)

AZOTEL S08-03 v103 (2016-07)
Azotel Confidential Proprietary © Azotel Technologies Ltd 2018
20
Fig. 4.2.9. Hotspot Server Details
10. Hotspot Profile a) Under the General tab make sure that:
• Hotspot Address is turned off (fig. 4.2.10)
Fig. 4.2.10. Hotspot Profile General Details
b) Under the Login tab set (fig. 4.2.11): • Login By: MAC • MAC Auth. Password: (example) password – customer usernames in SIMPLer will match this
password (see fig. 3.11????)

AZOTEL S08-03 v103 (2016-07)
Azotel Confidential Proprietary © Azotel Technologies Ltd 2018
21
Fig. 4.2.11. Hotspot Profile Login Details
c) Under the RADIUS tab set (fig. 4.11): • Use RADIUS checkbox • Accounting checkbox • Interim Update: 00:05:00
Fig. 4.2.12. Hotspot Profile RADIUS Details
AZOTEL S08-03 v103 (2016-07)
Azotel Confidential Proprietary © Azotel Technologies Ltd 2018
22
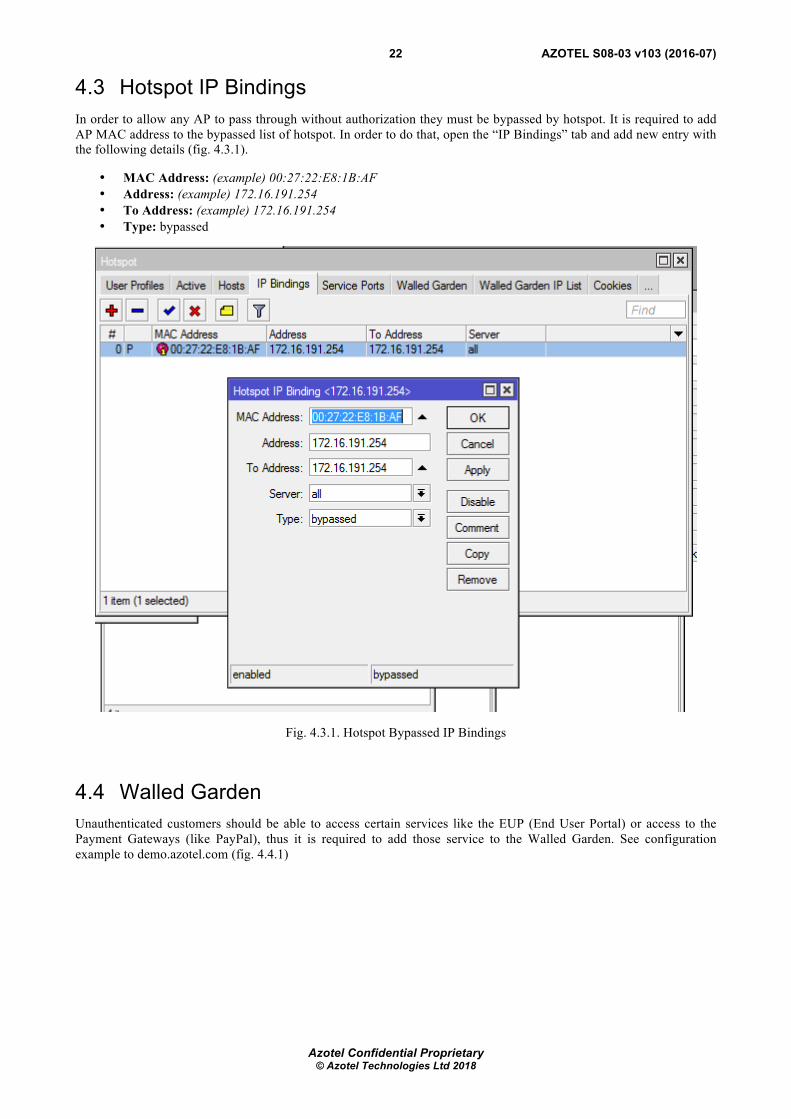
4.3 Hotspot IP Bindings In order to allow any AP to pass through without authorization they must be bypassed by hotspot. It is required to add AP MAC address to the bypassed list of hotspot. In order to do that, open the “IP Bindings” tab and add new entry with the following details (fig. 4.3.1).
• MAC Address: (example) 00:27:22:E8:1B:AF • Address: (example) 172.16.191.254 • To Address: (example) 172.16.191.254 • Type: bypassed
Fig. 4.3.1. Hotspot Bypassed IP Bindings
4.4 Walled Garden Unauthenticated customers should be able to access certain services like the EUP (End User Portal) or access to the Payment Gateways (like PayPal), thus it is required to add those service to the Walled Garden. See configuration example to demo.azotel.com (fig. 4.4.1)

AZOTEL S08-03 v103 (2016-07)
Azotel Confidential Proprietary © Azotel Technologies Ltd 2018
23
Fig. 4.4.1. Walled Garden Entry
4.5 Template for restricted users Unauthenticated users are redirected to the default Mikrotik login page. This template may be modified completely by the Operator by downloading login.html file from Mikrotik and changing it content. Template is available under “Files” window (fig. 4.5.1). After that is done template can be uploaded back. It is recommended to add to this template some links to the EUP and services available for unauthenticated users to allow them to perform steps to reconnect (pay outstanding invoice, buy additional bandwidth etc). A typical login.html file contents can be found in Appendix C.
Fig. 4.5.1. Winbox: File List
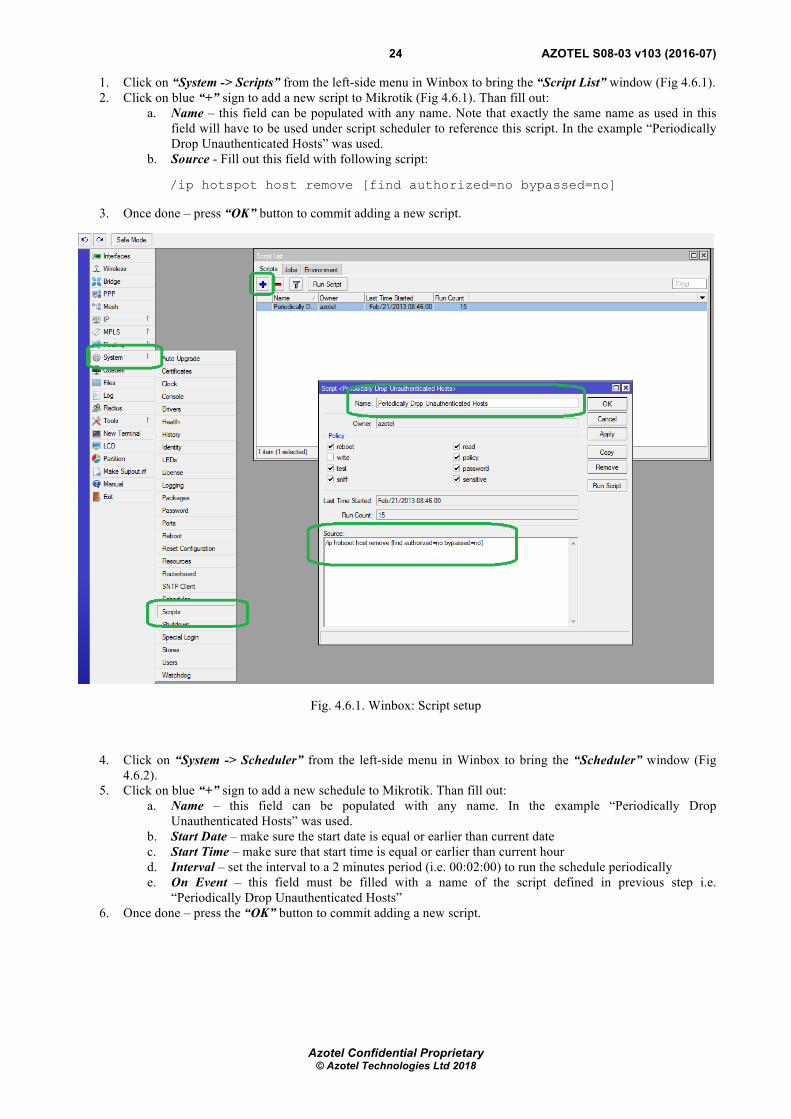
4.6 Host maintenance script Unauthenticated customers will not have a session data. This would cause an issue in case of reconnecting a customer i.e. changing the status from ‘post’ to ‘current’. As there is no session data reported in SIMPLer – server cannot send a CoA / PoD packet towards Mikrotik that would de-register MAC and in turn force it to re-authenticate. To work around this a script has to be deployed on a Mikrotik NAS that on a periodical basis will drop and in turn re-authenticate each host that has not been authenticated or bypassed. Follow the steps below to achieve this goal.
AZOTEL S08-03 v103 (2016-07)
Azotel Confidential Proprietary © Azotel Technologies Ltd 2018
24
1. Click on “System -> Scripts” from the left-side menu in Winbox to bring the “Script List” window (Fig 4.6.1). 2. Click on blue “+” sign to add a new script to Mikrotik (Fig 4.6.1). Than fill out:
a. Name – this field can be populated with any name. Note that exactly the same name as used in this field will have to be used under script scheduler to reference this script. In the example “Periodically Drop Unauthenticated Hosts” was used.
b. Source - Fill out this field with following script:
/ip hotspot host remove [find authorized=no bypassed=no]
3. Once done – press “OK” button to commit adding a new script.
Fig. 4.6.1. Winbox: Script setup
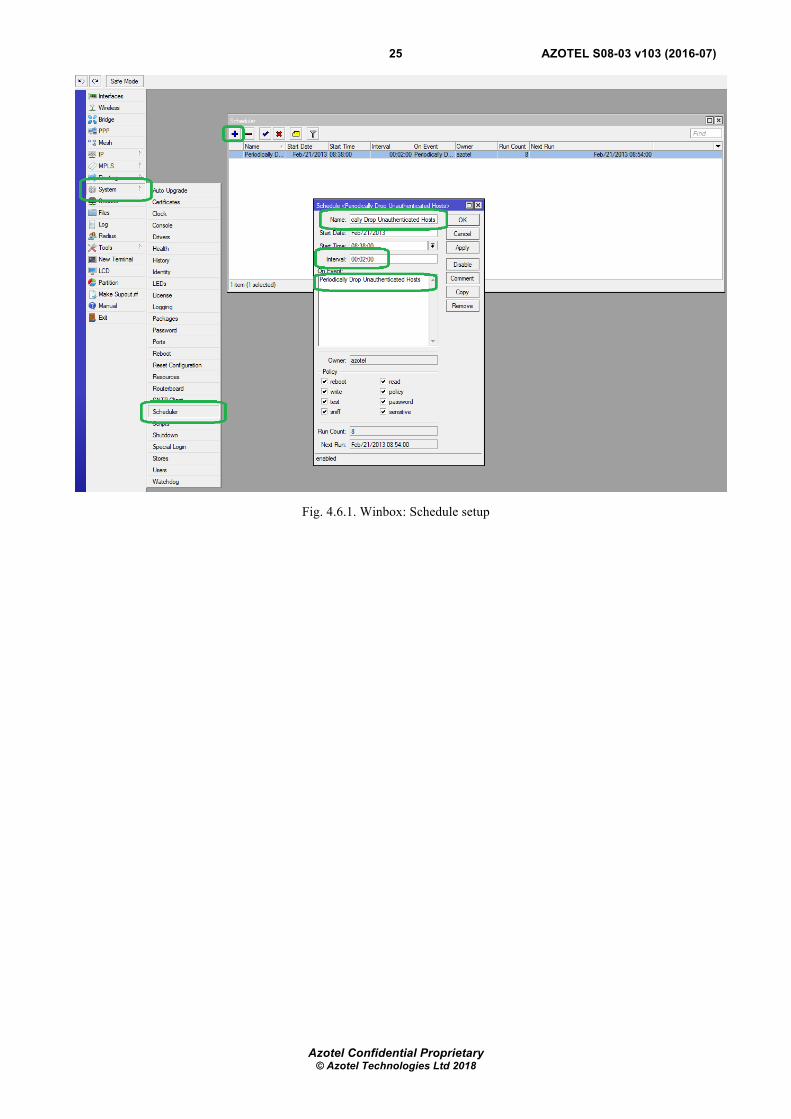
4. Click on “System -> Scheduler” from the left-side menu in Winbox to bring the “Scheduler” window (Fig 4.6.2).
5. Click on blue “+” sign to add a new schedule to Mikrotik. Than fill out: a. Name – this field can be populated with any name. In the example “Periodically Drop
Unauthenticated Hosts” was used. b. Start Date – make sure the start date is equal or earlier than current date c. Start Time – make sure that start time is equal or earlier than current hour d. Interval – set the interval to a 2 minutes period (i.e. 00:02:00) to run the schedule periodically e. On Event – this field must be filled with a name of the script defined in previous step i.e.
“Periodically Drop Unauthenticated Hosts” 6. Once done – press the “OK” button to commit adding a new script.
AZOTEL S08-03 v103 (2016-07)
Azotel Confidential Proprietary © Azotel Technologies Ltd 2018
25
Fig. 4.6.1. Winbox: Schedule setup

AZOTEL S08-03 v103 (2016-07)
Azotel Confidential Proprietary © Azotel Technologies Ltd 2018
26
5 Setup for Static IP addresses from DHCP server By default Hotspot is set to run with either:
• Dynamic IP addresses as assigned from DHCP • IP addresses that are statically assigned and set on customer equipment
It might be required though to assign statically assigned IP addresses (as set in SIMPLer) from a DHCP server. Running such services require a dedicated setup on a RADIUS server. These additional setup requirements come from the fact that on Mikrotik DHCP and Hotspot services are separate and do not use same RADIUS Access-Request packet, but both services will send one. There are two issues that are best addressed on the RADIUS server:
1. Radius by default uses a Framed-IP-Address attribute to communicate the IP back to Mikrotik. While for Radius service this is a required answer attribute – so that the DHCP server knows what IP should be assigned to a customer, for Hotspot service the Framed-IP-Address attribute might be harmful – especially when running MAC authentication and CPE with NAT, where some additional IP addresses may leak out – in such case hotspot controller will try to mask each connection coming from that particular MAC address with the Framed-IP-Address which may result in intermittent connection issues for a customer. Hence the first requirement is for RADIUS server NOT to send the Framed-IP-Address to hotspot controller services
2. DHCP server sends the username in ‘XX:XX:XX:XX:XX:XX’ format and there is no way to change this setting – hence same format must be used by hotspot in order to use a single username under SIMPLer accounts
3. DHCP server sends the empty password with PAP – which requires adding a DEFAULT Auth-Type := Accept on the Radius server otherwise all DHCP requests will fail. This must be limited only to DHCP server requests though as otherwise all hotspot traffic would be granted an access (even for disabled accounts)
4. DHCP must assign same IP address even if user is not currently active in RADIUS (i.e. does not have a Cleartext-Password attribute in the radcheck table)
5.1 Setting up Radius server The Radius server must be prepared prior to switching Mikrotik to use Radius for DHCP services. Otherwise some issues might occur. The below steps document setting up a FreeRADIUS server.
Note: Unless the operator runs it’s own RADIUS server this setup is usually performed by a trained Azotel Engineer.
1. Navigate to FreeRadius configuration folder (usually located at /usr/local/etc/raddb/ or /etc/raddb/) and open the ‘users’ file for editing (i.e. using: vim users). Add the lines highlighted on figure 5.1.1 at the end of the users file. This will make sure that all Access-Request packets coming from Mikrotik services where name contains ‘DHCP’ will be accepted. Make sure that on your Mikrotik you use ‘DHCP’ tag in each dhcp server name (Fig. 5.1.2). That ‘DHCP’ tag will be used to match the Called-Station-Id in users file.

AZOTEL S08-03 v103 (2016-07)
Azotel Confidential Proprietary © Azotel Technologies Ltd 2018
27
Fig. 5.1.1. FreeRADIUS ‘users’ file
Fig. 5.1.2. Winbox: Mikrotik DHCP Server names
2. Open your ‘default’ file site from ‘sites-enabled’ folder and add the changes listed on figure 5.1.3 to the end Post-Auth section. These changes will remove the Framed-IP –Address from each Access-Accept reply send to a Mikroik service that contains a ‘hs’ tag. Make sure that on your Mikrotik you use ‘hs’ tag in each hotspot server name (Fig. 5.1.44). That ‘hs’ tag will be used to match the Called-Station-Id in default site file.
Fig. 5.1.3. FreeRADIUS ‘default site’ file

AZOTEL S08-03 v103 (2016-07)
Azotel Confidential Proprietary © Azotel Technologies Ltd 2018
28
Fig. 5.1.4. Winbox: Mikrotik Hotspot Server names
1. Open your ‘default’ site file from ‘sites-enabled’ folder and add the changes listed on figure 5.1.5 to the end Post-Auth section. Last step is to make sure that DHCP server will handle out proper IP address even for customers that are not in the ‘current’ state.
Fig. 5.1.5. FreeRADIUS ‘default site’ file additions
5.2 Setting up Mikrotik Setting up Mikrotik DHCP server to use Radius is trivial once the Radius setup is complete. As presented on figure 5.2.1:
• ‘Use RADIUS’ option must be ticked • It is recommended to ‘up’ the ‘Lease Time’. In the example we have used 30 days as a lease time given the IP
environment is static and there are no dynamic, temporary network customers
Fig. 5.2.1. Winbox: Mikrotik DHCP server setup

AZOTEL S08-03 v103 (2016-07)
Azotel Confidential Proprietary © Azotel Technologies Ltd 2018
29
6 Debugging This section of the guide should help with resolving typical issues the operator can run on with the running the MAC Authentication on a Mikrotik integrated with SIMPLer system. This part of a manual is intended to be kept up-to-date with resolutions of support cases Azotel finds generic and useful for other operators.
6.1 No DHCP service After cutting existing structure over to MAC Authentication on a Mikrotik in case where customers are using DHCP server built into Mikrotik for either dynamic or static IP addresses — if after a while, when customer equipment DHCP lease is up and the up for a renewal – the customer devices are not being assigned an IP anymore. In such situation the thing to check is if the DHCP server on a Mikrotik is running on a correct port / vlan. Log to Mikrotik with Winbox software and navigate to “IP –> DHCP Server” position. Under “DHCP” tab verify that:
• Your DHCP server position is not in red – which in most cases means that there is something wrong with its setup and requires attention
• Your DHCP server is attached to a correct “Interface” and uses correct “Address-Pool” (address pools can be verified under “IP -> Pool”)
Fig. 6.1.1. Winbox: DHCP Server details
6.2 Everyone gets authenticated In cases where everyone gets authenticated regardless if his MAC exists in SIMPLer system or not, and regardless of his SIMPLer account status, most probable is that either hotspot service has not been setup or it has been set on a wrong interface. Log to Mikrotik with Winbox software and navigate to “IP –> Hotspot” position. Under “Servers” tab verify that:
• Your hotspot server position is not in red – which in most cases means that there is something wrong with its setup and requires attention
• Your hotspot server is attached to a correct “Interface” and uses correct “Profile” that has MAC Authentication selected (profiles can be verified under “Server Profiles” tab)

AZOTEL S08-03 v103 (2016-07)
Azotel Confidential Proprietary © Azotel Technologies Ltd 2018
30
Fig. 6.2.1. Winbox: Hotspot details
6.3 Everyone gets “You are not authenticated” page In case where every single customer gets the “You are not authenticated” page – as set in the chapter 4.5 of this manual the biggest probability is that the connection with RADIUS server is not acting properly or has not been set. Log to Mikrotik with Winbox software and navigate to “RADIUS” position. Under “Servers” tab (Fig. 6.3.1):
• Verify the IP address of RADIUS server is correct • Type in the Secret again to make sure it is correct • Make sure “hotspot” checkbox is selected • Verify that port settings match your RADIUs server. By default port 1812 should be used for Authentication
and port 1813 for Accounting
Fig. 6.3.1. Winbox: RADIUS Server details

AZOTEL S08-03 v103 (2016-07)
Azotel Confidential Proprietary © Azotel Technologies Ltd 2018
31
• Switch to Status tab (Fig. 6.3.2) and verify status of the connection
Fig. 6.3.2. Winbox: RADIUS Server status
6.4 Particular customer cannot get online If a single customer gets a “You are not authenticated” page while every other customer is being authenticated properly – in most case it means that either:
• There will be no RADIUS username for his MAC Address defined under his account • Or the MAC address defined in SIMPLer does not match the effective MAC address as used by customer.
It is very easy to check what the effective MAC address of a customer is if using the default login.html page as specified in the Appendix C of this guide. This page will display customer IP and MAC. Operator can verify this information while on phone with customer and update customer details in SIMPLer system accordingly as described in chapter 3.3 or 3.4 of the following guide.
6.5 Expected throughputs are not achieved When a customer connects and has a MikroTik Rate Limit RADIUS attribute, the MikroTik creates a simple queue for the customer to limit their bandwidth. By default a queue type of “default-small” is used, and this queue type is defined in Queues -> Queue Types to be of type “pfifo” and size 10:

AZOTEL S08-03 v103 (2016-07)
Azotel Confidential Proprietary © Azotel Technologies Ltd 2018
32
Fig. 6.5.1. Default Queue Types
Unfortunately this type of queue can cause problems with certain types of radio networks – e.g. WiMax, where the packet scheduler on the AP can delay the delivery of packets. Symptoms of this happening are that throughput is limited to about 1.5Mb/s. If this appears to be happening, then the queue type should be changed.
Unfortunately it is not possible to configure the MikroTik to use a different queue-type – it always defaults to “default-small” for RADIUS authenticated customers. Therefore it is necessary to re-define “default-small” to use one of the other queue types. This can be done on the Queue Type tab as in Fig 6.5.1 above. It may be necessary to try different queue types to find the one which works best. For a Purewave WiMax AP changing the Queue Size to 50 worked well, as did changing the Queue Kind to “sfq” with default parameters of perturb=5, allot=1514.

AZOTEL S08-03 v103 (2016-07)
Azotel Confidential Proprietary © Azotel Technologies Ltd 2018
33
Annex A: References A.1 Document References
10017 SIMPLer RADIUS Server Integration
A.2 Link References http://www.azotel.com – Azotel Website
http://wiki.mikrotik.com/wiki/Main_Page – Mikrotik WIKI
http://forum.ubnt.com/ – Ubiquity Forum

AZOTEL S08-03 v103 (2016-07)
Azotel Confidential Proprietary © Azotel Technologies Ltd 2018
34
Annex B: Definitions & Abbreviations B.1 Definitions
B.2 Abbreviations SIMPLer Subscriber Information Management Platform from Azotel
NAS Network Access Server
EUP End User Portal
AP Access Point
CPE Customer Premises Equipment
RADIUS Remote Authentication Dial In User Service

AZOTEL S08-03 v103 (2016-07)
Azotel Confidential Proprietary © Azotel Technologies Ltd 2018
35
Annex C: Typical login.html file <!DOCTYPE HTML PUBLIC “-//W3C//DTD HTML 4.01 Transitional//EN” “http://www.w3.org/TR/html4/loose.dtd”> <html><head> <meta http-equiv=”Content-Type” content=”text/html; charset=iso-8859-1”><title>Azotel</title> <link href=”http://wib.azotel.com/PortalImages/styles.css” rel=”stylesheet” type=”text/css”> <style media=”all” type=”text/css”>@import “http://wib.azotel.com/PortalImages/menu/menu_style.css”;</style> <!—[if lt IE 7]> <link rel=”stylesheet” type=”text/css” href=”http://wib.azotel.com/PortalImages/menu/ie6.css” media=”screen”/> <![endif]! <style type=”text/css”> <!— body { background-color: #F3F3F3; margin-top: 18px; } ! </style></head><body> <table align=”center” cellpadding=”0” cellspacing=”0” width=”779”> <tbody><tr> <td style=”padding-right: 50px;” align=”left” valign=”bottom”> <div align=”right”> <a href=”http://wib.azotel.com/CP/login.pl?operator=template” class=”top_but”>Login</a> </div></td> </tr> <tr> <td style=”border: 1px solid rgb(153, 153, 153);” align=”left” bgcolor=”#ffffff” height=”326” valign=”top”><table cellpadding=”0” cellspacing=”0” width=”779”> <tbody><tr> <td><table cellpadding=”0” cellspacing=”0” width=”779”> <tbody><tr> <td style=”padding-top: 28px; padding-left: 78px;” align=”left” valign=”top” width=”498”><table cellpadding=”0” cellspacing=”0” width=”100%”> <tbody><tr> <td class=”name” width=”407”>Operator Name</td> </tr> <tr> <td><div class=”payment_info” align=”left”>Customer Portal </div></td> </tr> </tbody></table></td> <td style=”padding-top: 45px; padding-bottom: 29px; padding-right: 78px;” width=”279”><div align=”right”><img src=”/PortalImages/logo.gif”></div></td> </tr> </tbody></table></td> </tr> <tr> <td style=”padding-top: 0px; padding-bottom: 30px;”> <div align=”center”> <table border=0 cellspacing=0 cellpadding=5 width=”100%”> <tr> <td valign=top><img src=”inc/spacer.gif” width=15 height=1 border=0 alt=’’><br><img src=”inc/spacer.gif” width=1 height=37 border=0 alt=’’><br> <br></td> <td width=”100%” valign=top> <table width=”100%”> <tr><td width=”100%” align=”center”> <div style=”margin-left: 4em; width: 600px; text-align: left;”> <center><span style=”font-weight: bold; font-size: 24px; color: red;”>Your Internet Access Is Temporarily Unavailable!</span></center> <center> <br> <h2>Your IP: $(ip)</h2> <h2>Your MAC: $(mac)</h2> </center> <h2>You are seeing this message for one of the following reasons:</h2> <ul> <li style=”font-size:15px”>You are not an authorized customer of Operator Name.</li> <li style=”font-size:15px”>Your Computer and/or Router is not configured properly.</li> <li style=”font-size:15px”>Your account has become delinquent.</li> <li style=”font-size:15px”>A virus has been detected on your system.</li> </ul> <br> <h2>In order to clear this message you will need to either:</h2> <ul> <li style=”font-size:15px”>Reboot your Computer and/or Router.</li> <li style=”font-size:15px”>Run a virus scanning/removal tool.</li> <!--<li style=”font-size:15px”>Call Customer Support at PHONENUMBER.</li>! </ul> <br><br> <span style=”font-weight: bold; font-size: 16px; font-style: italic;”>You may also pay your bill online by <a href=”https://wib.azotel.com/CP/login.pl? operator=template/”>Clicking Here</a>.</span> <br><br> </div> </td> </tr><tr> <td width=”20%” align=”center”> <br><br> <script type=”text/javascript”><!—google_ad_client = “pub-5535280914415875”; google_ad_width = 120; google_ad_height = 240; google_ad_format = “120x240_as_rimg”; google_cpa_choice = “CAAQhfCXhAIaCJM442ipyzWdKPG193M”; google_ad_channel = “9130903211”;//!</script> </td></tr> </table> </td>

AZOTEL S08-03 v103 (2016-07)
Azotel Confidential Proprietary © Azotel Technologies Ltd 2018
36
<td valign=top><img src=”inc/spacer.gif” width=30 height=1 border=0 alt=’’><br><img src=”inc/spacer.gif” width=1 height=37 border=0 alt=’’><br> <br></td> </tr> </table> </div> </td> </tr> </tbody></table> </td> </tr> <tr> <td><table align=”center” border=”0” cellpadding=”0” cellspacing=”0” width=”754”> <tbody><tr> <td height=”33” width=”467”><span class=”main”>Copyright ©<script language=”javascript” class=”main”>document.write((new Date()).getFullYear());</script> Operator Name, All rights reserved </span></td> <td class=”main”><div align=”right”>Powered by <strong>AZOTEL </strong></div></td> </tr> </tbody></table></td> </tr></tbody></table> </body></html>
Fig. A.C.1. “You are not authenticated” page

AZOTEL S08-03 v103 (2016-07)
Azotel Confidential Proprietary © Azotel Technologies Ltd 2018
37
Annex D: Change history Change history
Date Author(s) Subject/Comment Old New 10-01-13 Pawel Initial Draft n/a 001 17-01-13 Maciej Put the initial draft into the Azotel template format, reviewed the text, added common
introduction, expanded descriptions, added network drawings 001 002
21-01-13 Maciej Initial Version 002 003 22-02-13 Maciej Host Maintenance Script 003 004 04-04-13 Stephen Added MikroTik Queue info 004 005 17-06-13 paul Changed doc’s title, copyright and correct year, doc num on all pages 005 100 15-01-15 Stephen Corrected MikroTik-Rate-Limit information 100 101 11-07-16 emma Reviewed 101 102 22-07-16 emma Updated provision without CPE part 102 103 ·