Embed Size (px)
Citation preview

2012 Preview of DRC/eDirect On-line
Corrections for Student Enrollment
MCPSSAYP Process Step # 2
Academic Affairs/Assessment and Accountability

To log on, type the URL into the address bar of your web browser (https://al.drcedirect.com). The eDirect log on window will display.

Click the log on link located in the upper right corner of the screen. The eDirect log on screen will display.

The first time you log on, you will use the temporary user name and password provided via email.

SYSTEM NOT YET AVAILABLE
You have arrived at the Data Recognition Corporation (DRC) Online Correction System (OCS) website for the Alabama Accountability/AHSGE Corrections System.
This system is not yet available for use. OCS will be ready for use beginning at 12:00 AM on Monday, April 23, 2012. Please revisit this site at that time.
Thank you for visiting.
Logging onto the system prior to the availability date and time will prompt a “System Not Yet Available” window to display.

Once you successfully log on, the menu screen will display. The next step is to select Manage Users and chooseMy Account.

A window will display prompting you to create a new password and to choose a security question. This new password will replace your previously assigned password and will be known only by you. Please note: The temporary password will expire within 5 days of receiving the email.

Upon completion of creating a password, the security and confidentiality agreement screen will appear. Check the “I Agree” box and “Continue” to move to the menu screen.

Once a valid user name and password are entered during the availability date, the Home/Welcome page will be displayed. The left navigation pane will display the system and school. Click on the school you wish to review/make corrections.

The corrections tab located at the top of the menu bar will now be activated. Click the corrections tab. The student enrollment window will be displayed.

From the Student Enrollment window, the school’s student demographic information may be viewed. There are two viewing options by grade in the drop down list box. The “All” grade option will be the window default. The other option is by specific grade.
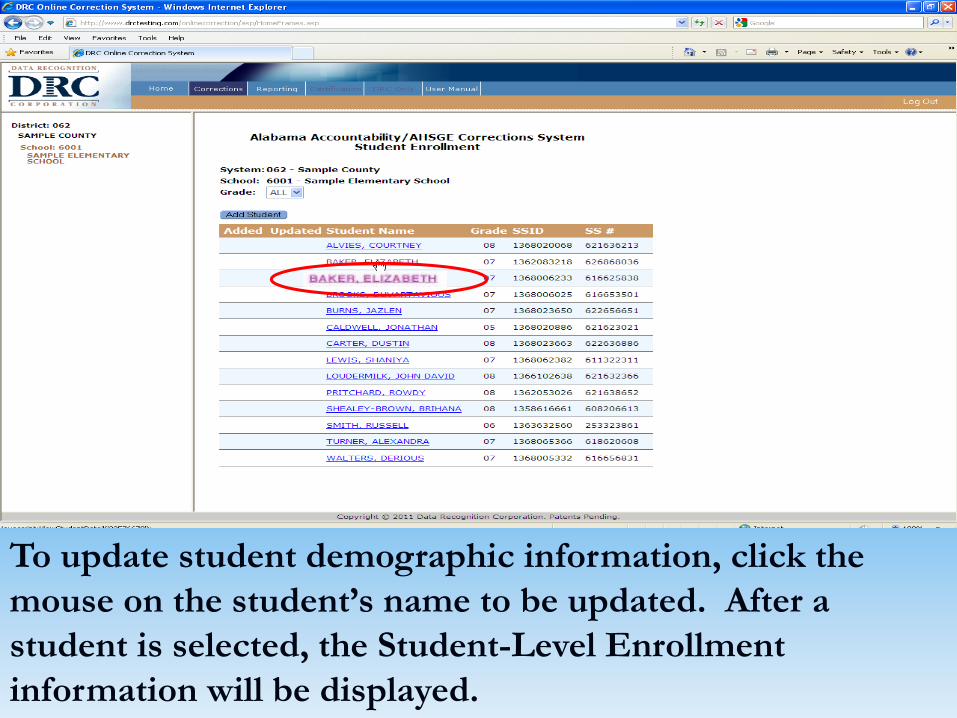
To update student demographic information, click the mouse on the student’s name to be updated. After a student is selected, the Student-Level Enrollment information will be displayed.

In the Student-Level Enrollment Information window, there are two sides of the window: the Original Student Data side and the Updated Student Data side.
Original Student
Data
Updated Student
Data

On the Original Student Data side, updates will not be allowed; this side is display only. On the Updated Student Data side, updates will be allowed to fields. (The only two fields that cannot be updated are the SSID and Meal Status fields.)
Original Student
Data
Updated Student
Data

SSID#- Cannot be updated
Open FieldsSS#
Last Name, First Name, Middle Initial
Drop Down List BoxGender- The possible values for Gender include: Male or Female
Birthdate- (MM/DD/YYYY)
Grade- The possible values for Grade include: K, 01, 02, 03, 04, 05, 06, 07, 08, 09, 10, 11, or 12
Meal Status- Cannot be updated
Student Level Enrollment Information Fields

LEP Status- The possible values for LEP Status include: Not LEP, LEP1, LEP2, FLEP, FLEP1, FLEP2, or LEP Waived Services (Change from last year)
Ethnicity/Race- The possible values for Ethnicity/Race include: 2 or more races, American Indian or Alaskan Native, Asian, Black, Hispanic, Pacific Islander, or White (Change from last year)
SpEd- The possible values for SpEd include: None, Autism, Deaf Blindness, Developmental Delay, Emotional Disability, Hearing Impairment, Multiple Disabilities, Intellectual Disability, Other Health Impairment, Orthopedic Impairment, Specific Learning Disabilities, Speech and Language Impairment, Traumatic Brain Injury, or Visual Impairment
Student Level Enrollment Information Fields

•Withdrawn Status- The possible values for Withdrawn Status include:
•Not Withdrawn•Withdrawn before Testing- Student withdrew prior to the first day of the testing window•Withdrawn during Testing- Student withdrew during the testing window and was unable to complete testing•Withdrawn after Testing- Student withdrew after testing was completed
Student Level Enrollment Information Fields

Transfer Status- The possible values for Transfer Status include:
•None •Transferred into School- Any student who transfers into a school from another school within the school district after September 1st. •Transferred into System- Any student who transfers into a school from a school outside of the school district after September 1st.
Foreign Exchange Student Status- The possible values for Foreign Exchange Student Status include:
•No •Yes – Working Toward Diploma•Yes – Not Working Toward Diploma
Student Level Enrollment Information Fields
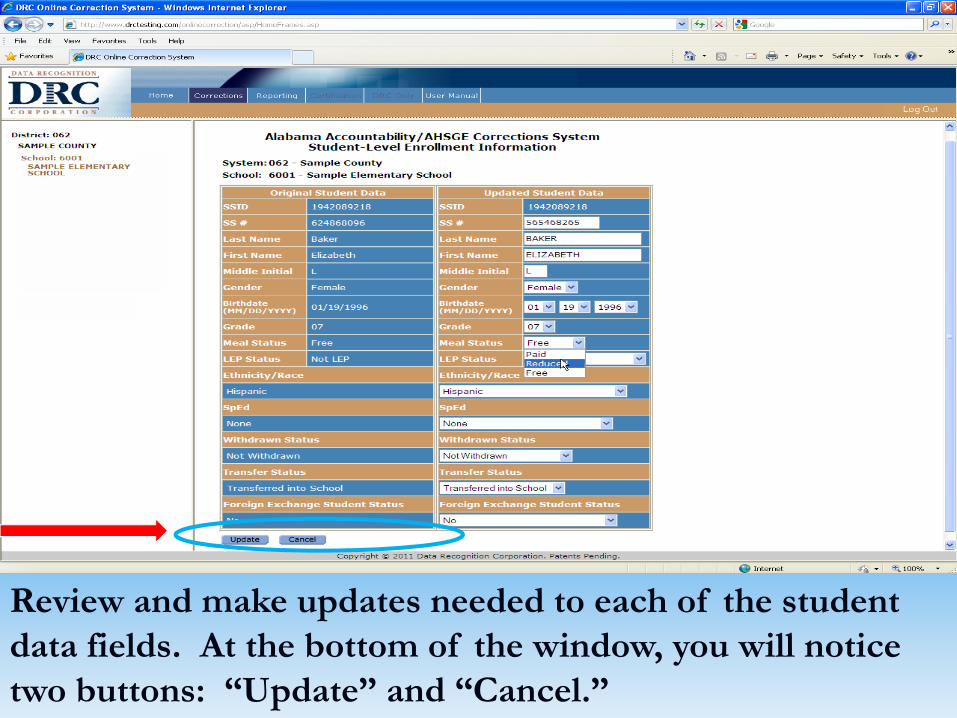
Review and make updates needed to each of the student data fields. At the bottom of the window, you will notice two buttons: “Update” and “Cancel.”

Selecting “Update” will accept the demographic changes made in this window. The system will automatically return to the Student Enrollment window.
Update

A check-mark in the "Updated" column will be displayed to show that the student information has been updated. If a check-mark is not displayed in the "Updated" column, the student has not been updated and the process should be repeated.

In order to modify changes made to student demographic information, click on the student’s name with a check-mark in the “Updated” column.

At the bottom of the window, three buttons will now appear: “Update,” “Cancel,” and “Revert.”

Selecting “Update” will accept the demographic changes made in this window. The system will automatically return to the Student
Update

Selecting “Cancel” will not accept any changes made in this window. The system will automatically return to the Student Enrollment window.
Cancel

Selecting “Revert” will return the data in this window to the original student data displayed. All changes made in this window will be removed. A confirmation window will display if this button is selected.
Revert

Once corrections have been completed for the student displayed in the window, click the “Update” button at the bottom of the window and two confirmation screens will display.

An update verification window will display first.

Then a confirmation window will display indicating that the student information has been successfully updated.

Next, the student enrollment window will be displayed. A check-mark in the “Updated” column will be displayed to show that the student information has been updated.

In the event there are missing students in the online correction information, click on the “Add Student” button to add missing student demographic information.

Please note: A student who enrolled after the first day of the state’s testing window is not considered missing. Remember the online correction information is based on students who were enrolled in your school on or before the first day of the state’s testing window.

If the “Add Student” button is selected, you will see a confirmation window stating that you can only add a student who was enrolled in your school on or before the first day of the state’s testing window.

After you confirm that the missing student was enrolled in your school on or before the first day of the state testing window, the Student-Level Enrollment Information window will be displayed.

You can then enter the missing student’s demographic information in the blank fields. All student demographic fields in the Student-Level Enrollment Information window will allow data entry and will be designated by a red asterisk if the field is required.

Notice that the “Middle Initial” field does not have a red asterisk as it is not required. This field should only be left blank for those students without a middle name.

To add missing student demographic information, click on the field and type in the additions. For your convenience, valid selections are also available in the drop down list box.

At the bottom of the window, you will notice two buttons: “Add” and “Cancel.”Selecting “Add” will accept the missing student’s demographic information entered. If this button is selected, you will see two confirmation windows.
Add
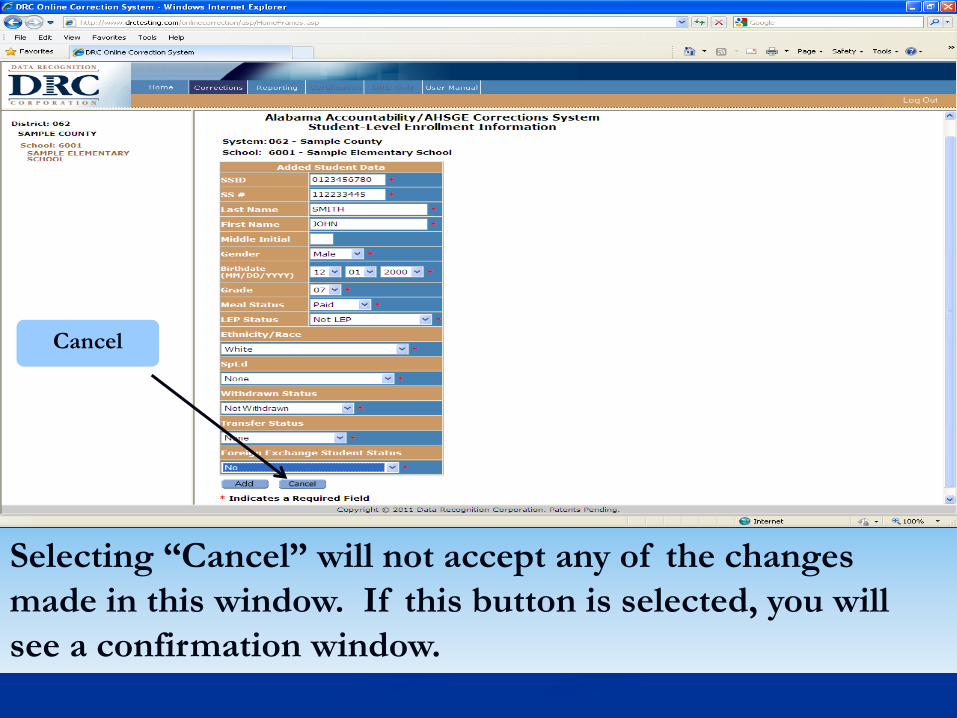
Selecting “Cancel” will not accept any of the changes made in this window. If this button is selected, you will see a confirmation window.
Cancel

Once the missing student’s demographic information has been added, please verify that it is correct. Note that if any of the required fields are blank or invalid, an error message will be received.

If the missing student’s demographic information entered is correct, click the “Add” button. A verification window will appear to make certain the student is to be added.

You will see a confirmation window stating that the student has been successfully added.

If for any reason, the SSID or SS# entered already exist in the on-line corrections system, a warning message will display. The message will prompt you to confirm that the SSID or SS# entered is correct before proceeding. If the choice is made to proceed and add the missing student without correcting the SSID or SS#, the missing student will be added with a duplicate SSID or SS#.
Please Note

Once the student has been added, the Student Enrollment window will display. A check-mark in the "Added" column will be displayed to show that the missing student has been added.

If the missing student is not displayed in the Student Enrollment window, the missing student has not been added and you will need to try again.

Additions will be allowed until the end of the on-line corrections window or until the system-level user has completed the certification process.The last additions are stored ONLY when the system coordinator has completed the certification process.Any additions made will not be applied unless the system coordinator completes the certification process for the system.
Please Note

In the event a student that has just been added needs to be deleted, simply click on the student’s name with a check mark in the “Added” column. Remember, you can only delete student demographic information that has been added in the Student-Level Enrollment Information window.

After you select a student, the Student-Level Enrollment Information window will be displayed. At the bottom of the window three buttons are displayed: “Update,” “Cancel,” and “Delete.”

An added student may be deleted by selecting “Delete”. If this button is selected, two confirmation windows will follow.
Delete

The first window to appear is a verification window asking the questions- “Are you sure you want to delete the student?”

Once “OK” has been selected, a confirmation window stating- “ The student has been successfully deleted.”

As mentioned earlier, only student demographic information that has been added can be deleted .

In order to view a school’s Enrollment Certification Report, select a school in the left navigation pane. Click the “Reporting” tab. The Enrollment Certification Report window will be displayed.
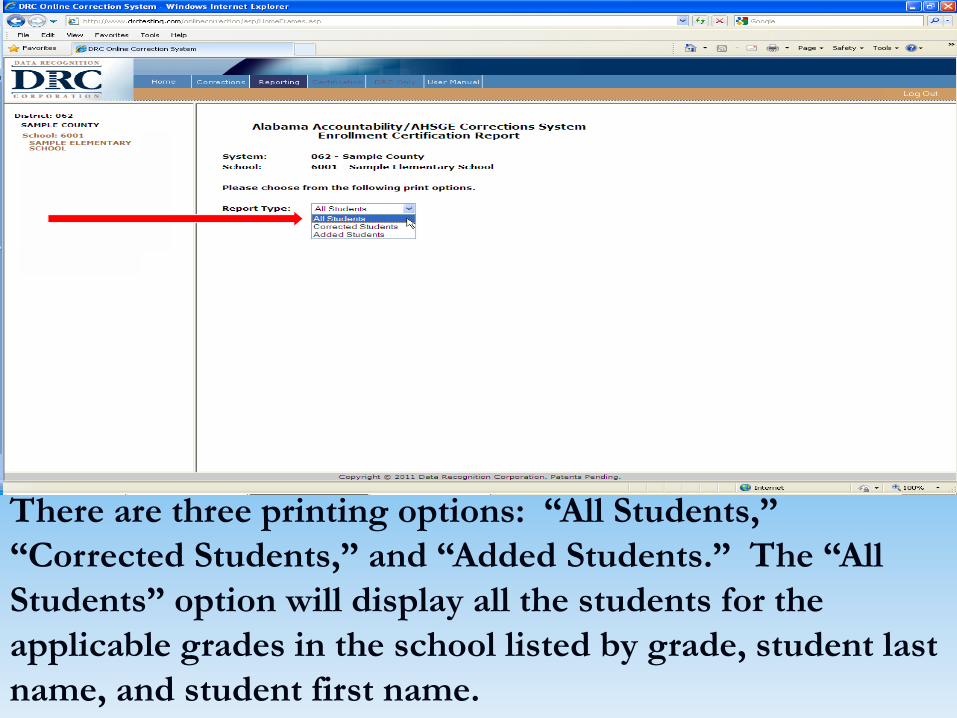
There are three printing options: “All Students,” “Corrected Students,” and “Added Students.” The “All Students” option will display all the students for the applicable grades in the school listed by grade, student last name, and student first name.

The “Corrected Students” option will display only the students that have been corrected for the applicable grades in the school listed by grade, student last name, and student first name.

The “Added Students” option will display only the students that were added in the Student-Level Enrollment Information window for the applicable grades in the school listed by grade, student last name, and student first name.

Once the report type has been selected, click the “Run” button to generate the report.

The Enrollment Certification Report will appear. The report will display in PDF format for viewing. There will be two report lines for each student, even if there are no changes for the student.
Alabama 2011-2012 Accountability/AHSGE CorrectionsEnrollment Certification Report- All Students

In the event the system coordinator chooses to make a school’s corrections online, this report can be provided to the school personnel. The student corrections, in this case, will be noted on the second line of the report and returned to the system coordinator. Please ensure that personal student information is always kept confidential and secure.
Alabama 2011-2012 Accountability/AHSGE CorrectionsEnrollment Certification Report- All Students

The first student line will contain the original data. Missing students that were added in the Student-Level Enrollment Information window will display as italicized on the first line of the report.
Alabama 2011-2012 Accountability/AHSGE CorrectionsEnrollment Certification Report- All Students

The second student line is shaded and will display the updated data.
Alabama 2011-2012 Accountability/AHSGE CorrectionsEnrollment Certification Report- All Students

VERY IMPORTANT!• The Student Enrollment Report will display ONLY IF there are applicable students at your school. If there are no students, a message may appear that reads, “There are no students to display for your school. Please contact the SDE if this is incorrect.” STOP! If you think it’s incorrect, first call DENITA REED at 221‐5219 or email [email protected].
• DO NOT CALL THE SDE.
PRINTYOUR ENROLLMENT
CERTIFICATION REPORT.
If there are any issues, the ALSDE will need to review this report.
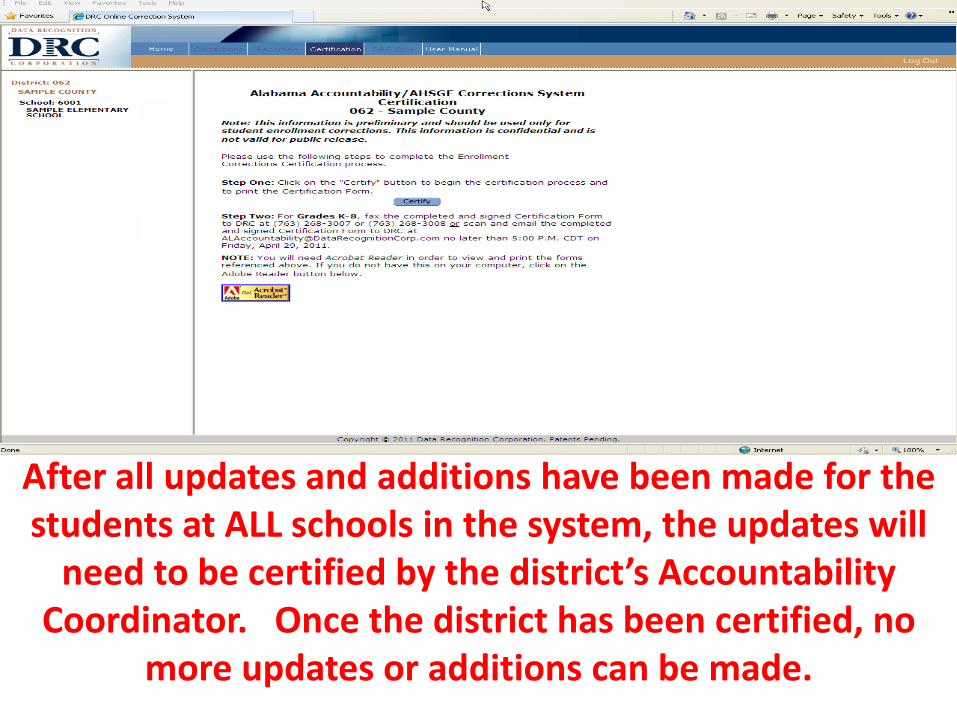
After all updates and additions have been made for the students at ALL schools in the system, the updates will
need to be certified by the district’s Accountability Coordinator. Once the district has been certified, no
more updates or additions can be made.

This information is preliminary and should be used only for student enrollment corrections. This information is confidential and is not valid for public release.Please be mindful that changes made in the On-line Correction system will not be reflected in system/school student management systems (i.e. INOW).
Please Note