Embed Size (px)
Citation preview

Axon.ivy 7.0
Axon.ivy Portal Documentation
Axon.ivy 7.0: Axon.ivy Portal Documentation
Publication date 04.06.2020Copyright © 2015-2020 AXON IVY AG
iii
1. Introduction .............................................................................................................................................. 1Main features ....................................................................................................................................... 1Reference architecture ............................................................................................................................ 1
2. Installation ............................................................................................................................................... 2Release installation ................................................................................................................................ 2Basic installation ................................................................................................................................... 2Migration notes .................................................................................................................................... 7Release notes ...................................................................................................................................... 11
3. Architecture ............................................................................................................................................ 13 ........................................................................................................................................................ 13Portal kit ............................................................................................................................................ 13Portal style ......................................................................................................................................... 13Portal template .................................................................................................................................... 14Self service BPM ................................................................................................................................ 14Axon.ivy Express ................................................................................................................................ 14Portal connector .................................................................................................................................. 14
4. Components ............................................................................................................................................ 15Widget concept ................................................................................................................................... 15Layout templates ................................................................................................................................. 19Enable Portal chat ............................................................................................................................... 28Error handling .................................................................................................................................... 29Enable Export feature .......................................................................................................................... 32Additional Components ........................................................................................................................ 32Change Last Drilldown Level Of Task By Expiry Chart ............................................................................ 37
5. Customization ......................................................................................................................................... 38Build your own portal .......................................................................................................................... 38PortalStyle customization (logos, colors, date patterns) .............................................................................. 41Login page ......................................................................................................................................... 43Menu ................................................................................................................................................ 43Portal home ........................................................................................................................................ 45Task widget ....................................................................................................................................... 47Case widget ....................................................................................................................................... 52Default user process ............................................................................................................................ 55Change password process ..................................................................................................................... 56Logout process ................................................................................................................................... 57Express end page ................................................................................................................................ 58Navigate back ..................................................................................................................................... 59Hide technical stuffs ............................................................................................................................ 60Additional case details page .................................................................................................................. 60
6. Settings .................................................................................................................................................. 62 ........................................................................................................................................................ 62Admin settings .................................................................................................................................... 62Absence and substitute settings .............................................................................................................. 69Email settings ..................................................................................................................................... 70Language settings ................................................................................................................................ 70
7. Troubleshooting ....................................................................................................................................... 72 ........................................................................................................................................................ 72IE Security Problem ............................................................................................................................ 72Portal install with IIS ........................................................................................................................... 72
1
Chapter 1. IntroductionMain features
• Central access for end users - Only one portal for all applications
• Repository of reusable components
• Fast integration of process applications to the portal
• Provide customers and other system vendors the flexibility to build their own portals, but reuse portal components of Ivy
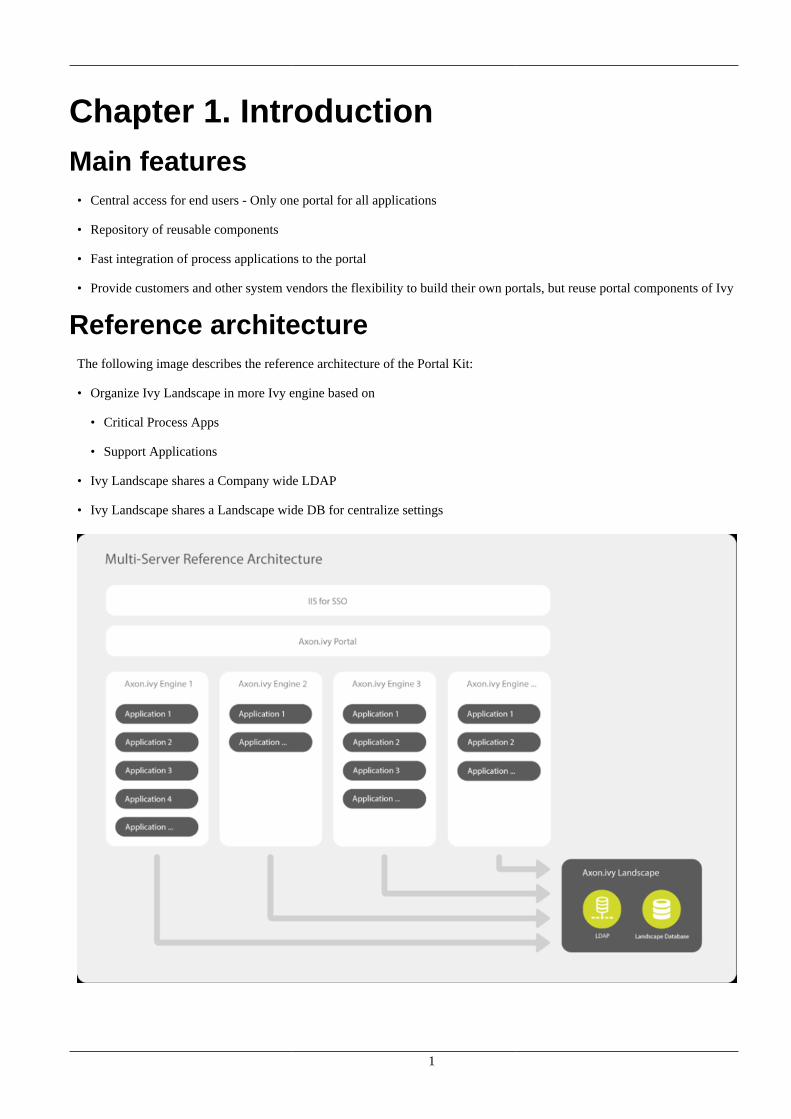
Reference architectureThe following image describes the reference architecture of the Portal Kit:
• Organize Ivy Landscape in more Ivy engine based on
• Critical Process Apps
• Support Applications
• Ivy Landscape shares a Company wide LDAP
• Ivy Landscape shares a Landscape wide DB for centralize settings
2
Chapter 2. InstallationRelease installation
InstallationThe installation section describes all the steps, that are necessary to install and setup the Process Application.
If you install the application for the first time than it's important to start with the Basic installation . It describes all the initialsteps, that must be done for the first installation.
Release InstallationIf the application is already installed and initial prepared, than refer to the Release Installation Steps, that are provided, hereyou will only find those steps, that are necessary to install this release.
Basic installation
Project modulesThe application consists of 5 process modules. For detailed information of each module, refer to Architecture .
• PortalStyle
• PortalKit
• PortalTemplate
• SelfServiceBPM
• AxonIvyExpress
The project deployment of Ivy project are described in project deployment .
Important
• Portal Connector is already part of Ivy engine, only import it to your designer, NEVER install it to yourapplication on Ivy engine. Doing it causes malfunction and unexpected behavior.
Server configuration• The minimum required engine version is 6.0.0.49863
Specify servers, applications used in Portal
General concept
Portal has 3 different configurations:
• Single mode : Only one Portal application on one engine. The Portal application must include portalKit, portalTemplateand portalStyle modules. By default, portalConnector is already deployed on the System application of Axon.ivy engine.
• Multi applications on single engine mode : Multiple Portal applications on one engine. Each Portal application mustinclude portalKit, portalTemplate and portalStyle modules. Only one portalConnector of the System application is needed.
Installation
3
• Multi applications on multi engines mode : Single or multiple Portal applications on multiple engines. The engines willcommunicate with each other via the portalConnector of their System application (This mode is not supported yet).
Important
• In single mode, if you deploy a new Portal application with a customer project, you need to deactivate thestandard Portal application.
• In multi applications on single engine mode, if you do not need overall dashboard, deactivate the standardPortal application. Otherwise, keep the standard Portal application activated.
Automatically detect servers, applications
By default, PortalKit will connect to PortalConnector using the address specified by the system propertyWebServer.HTTP.Address . If the property is not set, PortalKit will use the address localhost to connect toPortalConnector. All applications of the server which have the logged-in user are used in Portal.
NoteSystem property WebServer.HTTP.Address specifies the address that will listen on the ivy engine port.
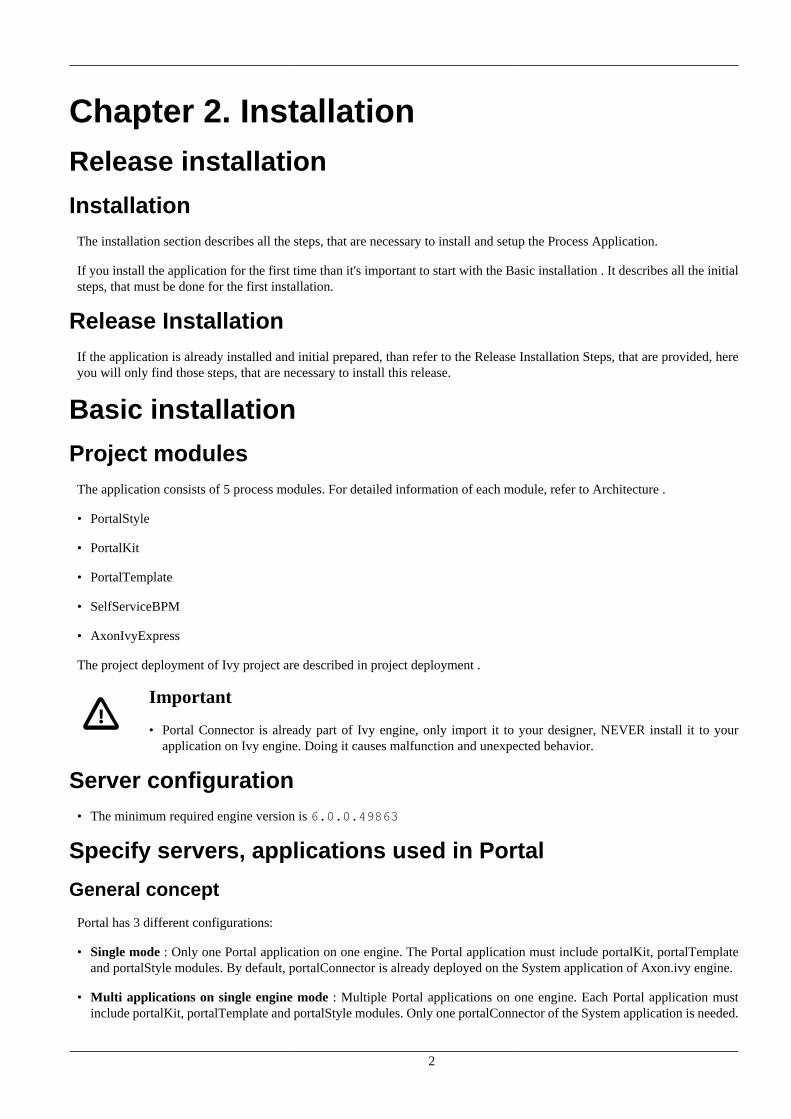
Steps to set the system property WebServer.HTTP.Address
1. Open AdminUI and go to System Properties.
2. Set the WebServer.HTTP.Address property to the value of the address that will be used to connect toPortalConnector.
3. Restart the ivy engine.
Manually configure servers, applications
Refer Setup multi portals .
Default user credentialsPortal provides 3 default users:
Username Password Description
admin admin This user has all Portal permissions, canaccess to Portal Admin Settings.
demo demo This user has permission to manage userabsences.
guest guest Default normal user of portal.
Table 2.1. Default user credentials

Installation
4
TipYou can change these accounts info in the AdminUI.
Role configuration
PortalKit roles Rights
AXONIVY_PORTAL_ADMIN User belong to this role can handle AdminUI page, configurethe internal role properties, create public filters. Users whoown this role need some permissions. See Permission settings.
Table 2.2. Role configuration
Permission settings
Absences
• READ
This function will be disabled if session user does not have IPermission.USER_READ_OWN_ABSENCES andIPermission.USER_READ_ABSENCES.
• CREATE/MODIFY
This function will be disabled if session user does not have IPermission.USER_CREATE_OWN_ABSENCE andIPermission.USER_CREATE_ABSENCE.
• DELETE
This function will be disabled if session user does not have IPermission.USER_DELETE_OWN_ABSENCE andIPermission.USER_DELETE_ABSENCE.
• MANAGE EVERY USER ABSENCES
User can read, add, delete absences of all users. This function will be disabled if session user does not have all of thefollowing permissions: IPermission.USER_CREATE_ABSENCE , IPermission.USER_DELETE_ABSENCE ,IPermission.USER_READ_ABSENCES.
Personal task permission
• DELEGATE
This function will be enabled if session user has permission IPermission.TASK_WRITE_ACTIVATOR .
ImportantTask state cannot be one of the following: DONE , DESTROYED , RESUMED , FAILED .
• ADD NOTE
No permission requires.
ImportantTask state cannot be one of the following: DONE , DESTROYED , RESUMED , FAILED .
Installation
5
• RESET
This function will be enabled if session user has permission IPermission.TASK_RESET_OWN_WORKING_TASK orIPermission.TASK_RESET .
ImportantTask state has to be one of following: RESUMED , PARKED .
• PARK
This function will be enabled if session user has permission IPermission.TASK_PARK_OWN_WORKING_TASK .
ImportantTask state has to be RESUMED .
• CHANGE TASK NAME
This function will be enabled if session user has IPermission.TASK_WRITE_NAME .
ImportantTask state cannot be one of following values: DONE , DESTROYED , FAILED .
• CHANGE TASK DESCRIPTION
This function will be enabled if session user has IPermission.TASK_WRITE_DESCRIPTION .
ImportantTask state cannot be one of following values: DONE , DESTROYED , FAILED .
• CHANGE DEADLINE
This function will be enabled if session user has IPermission.TASK_WRITE_EXPIRY_TIMESTAMP .
ImportantTask state cannot be one of following values: DONE , DESTROYED , FAILED .
• CHANGE PRIORITY
This function will be disabled if session user does not have IPermission.TASK_WRITE_ORIGINAL_PRIORITY .
ImportantTask state cannot be one of following: DONE , DESTROYED , FAILED .
Personal case permission
• ADD NOTE
Add note function will be enabled if case state is RUNNING .
• DELETE CASE
Delete case function will be enabled if session user has IPermission.CASE_DESTROY .
Installation
6
ImportantCase state has to be RUNNING .
• CHANGE CASE NAME
Delete case function will be enabled if session user has IPermission.CASE_WRITE_NAME .
ImportantCase state cannot to be: DESTROYED.
• CHANGE CASE DESCRIPTION
Delete case function will be enabled if session user has IPermission.CASE_WRITE_DESCRIPTION .
ImportantCase state cannot to be: DESTROYED.
Administrator permission can see all tasks/cases in the application
Normal users can only see their tasks/cases they can work on.
Administrator can see all tasks/cases in the application.
Permissions needed: IPermission.TASK_READ_ALL , IPermission.CASE_READ_ALL .
Administrator permission can interact with all workflows in theapplication
Normal users can updates and deletes workflows which created by him and can interact with workflow's task which assignedto him.
Administrator can creates, updates and deletes all workflows in the application.
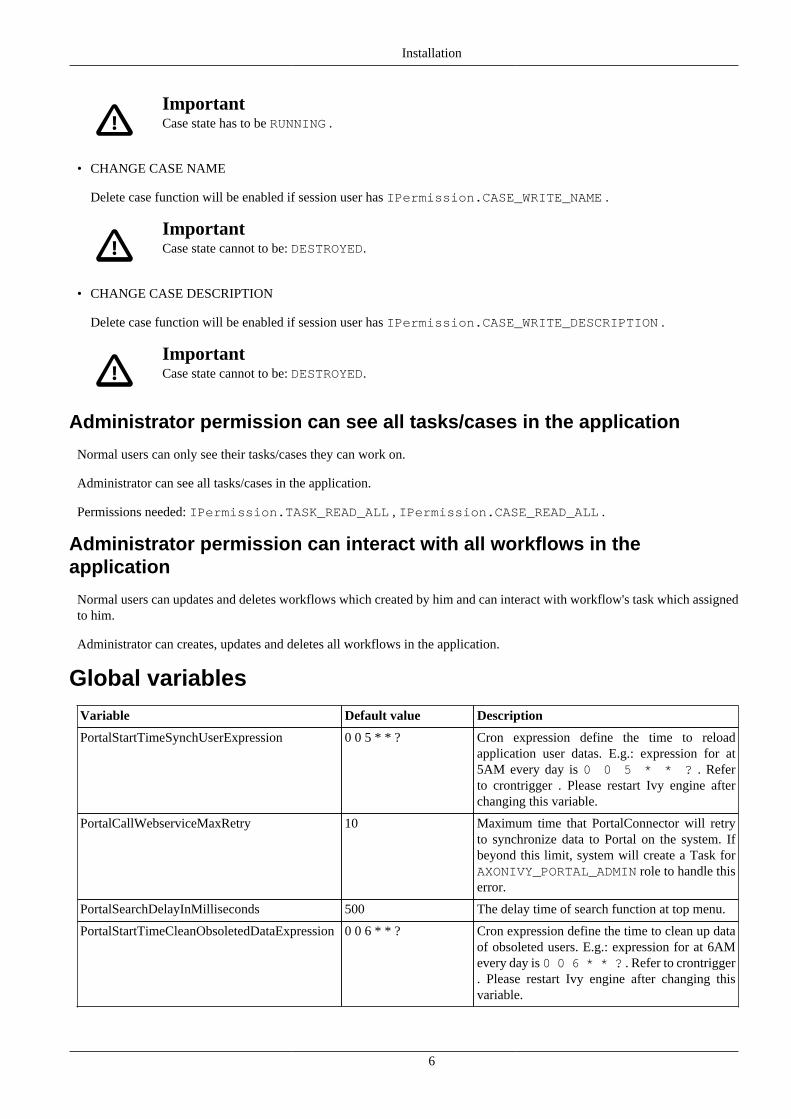
Global variablesVariable Default value Description
PortalStartTimeSynchUserExpression 0 0 5 * * ? Cron expression define the time to reloadapplication user datas. E.g.: expression for at5AM every day is 0 0 5 * * ? . Referto crontrigger . Please restart Ivy engine afterchanging this variable.
PortalCallWebserviceMaxRetry 10 Maximum time that PortalConnector will retryto synchronize data to Portal on the system. Ifbeyond this limit, system will create a Task forAXONIVY_PORTAL_ADMIN role to handle thiserror.
PortalSearchDelayInMilliseconds 500 The delay time of search function at top menu.
PortalStartTimeCleanObsoletedDataExpression 0 0 6 * * ? Cron expression define the time to clean up dataof obsoleted users. E.g.: expression for at 6AMevery day is 0 0 6 * * ? . Refer to crontrigger. Please restart Ivy engine after changing thisvariable.
Installation
7
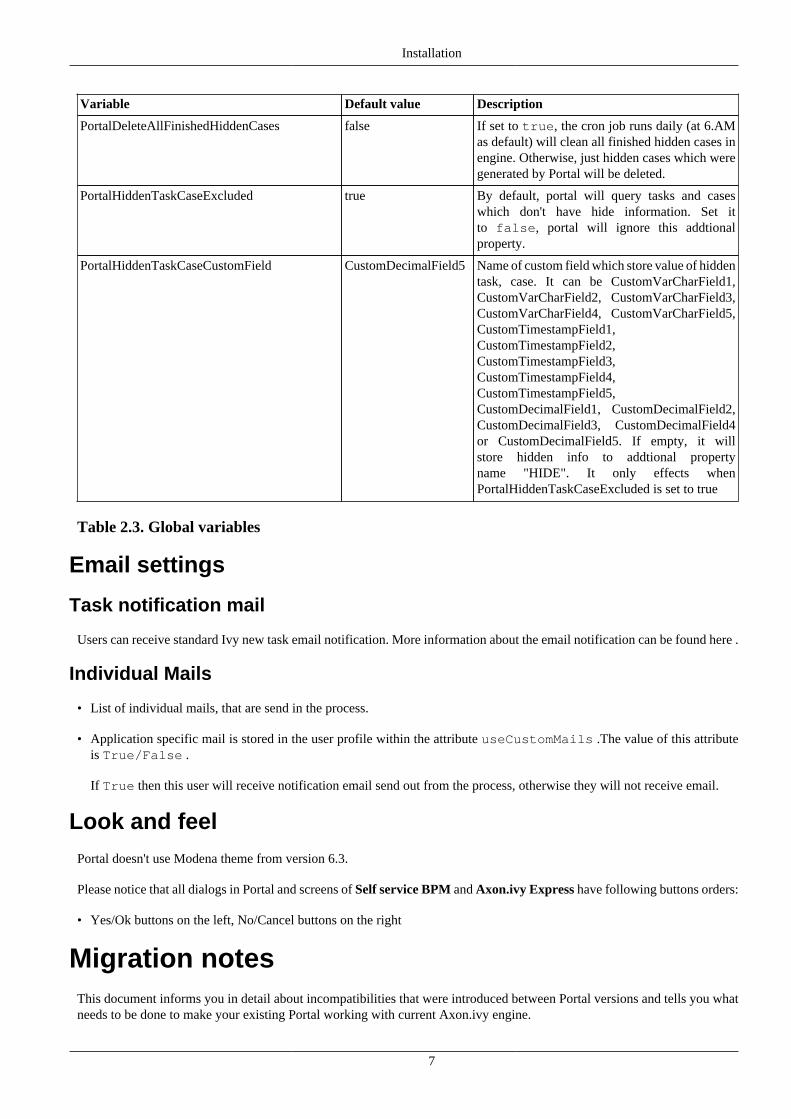
Variable Default value Description
PortalDeleteAllFinishedHiddenCases false If set to true, the cron job runs daily (at 6.AMas default) will clean all finished hidden cases inengine. Otherwise, just hidden cases which weregenerated by Portal will be deleted.
PortalHiddenTaskCaseExcluded true By default, portal will query tasks and caseswhich don't have hide information. Set itto false, portal will ignore this addtionalproperty.
PortalHiddenTaskCaseCustomField CustomDecimalField5 Name of custom field which store value of hiddentask, case. It can be CustomVarCharField1,CustomVarCharField2, CustomVarCharField3,CustomVarCharField4, CustomVarCharField5,CustomTimestampField1,CustomTimestampField2,CustomTimestampField3,CustomTimestampField4,CustomTimestampField5,CustomDecimalField1, CustomDecimalField2,CustomDecimalField3, CustomDecimalField4or CustomDecimalField5. If empty, it willstore hidden info to addtional propertyname "HIDE". It only effects whenPortalHiddenTaskCaseExcluded is set to true
Table 2.3. Global variables
Email settings
Task notification mail
Users can receive standard Ivy new task email notification. More information about the email notification can be found here .
Individual Mails
• List of individual mails, that are send in the process.
• Application specific mail is stored in the user profile within the attribute useCustomMails .The value of this attributeis True/False .
If True then this user will receive notification email send out from the process, otherwise they will not receive email.
Look and feelPortal doesn't use Modena theme from version 6.3.
Please notice that all dialogs in Portal and screens of Self service BPM and Axon.ivy Express have following buttons orders:
• Yes/Ok buttons on the left, No/Cancel buttons on the right
Migration notesThis document informs you in detail about incompatibilities that were introduced between Portal versions and tells you whatneeds to be done to make your existing Portal working with current Axon.ivy engine.
Installation
8
How to migrate
ImportantIn order to migrate Portal, you need to migrate Axon.ivy, refer Axon.ivy migration notes. Changes in Axon.ivycould lead to problems if the customer project is not migrated properly.
In designer
1. Replace all Portal projects
2. Update PortalTemplate dependency of customer project in pom.xml.
3. If PortalStyle is customized, copy logo, customization.less, font-faces.less, customized stuff from old to new PortalStyle,run maven to compile CSS.
4. Follow migration notes.
5. If customization needs copying code from Portal, merge changes between 2 version of Portal for copied code.
Important
• Scenario migrating one customer project without customization: Follow the guidelines to step 2.
• Scenario migrating one customer project with supported customization: Follow the guidelines.
• Scenario migrating one customer project with (un)supported customization: Follow the guidelines forsupported customization. If unsupported customization needs copying code from Portal, merge changesbetween 2 versions of Portal for copied code. Take care your own unsupported customization.
In engine
1. Convert database schema if needed.
2. Deactivate standard Portal application if it is not needed.
3. Redeploy Portal projects (exclude PortalConnector) and customer project.
4. Follow migration notes to migrate data, if any.
Migrate 7.0.x to 7.0.10
Migrate hidden task and case
If you use feature hide technical task and case by set addtional property, Portal 7.0.10 has option to store it in custom fieldof task and case instead of additional property for better performance.
In case you don't want to change the place to store information of technical task, case from additional property to customfield. You just simply set global variable PortalHiddenTaskCaseCustomField to empty.
Otherwise, you need to follow these steps:
1. Make sure PortalHiddenTaskCaseExcluded is set to true in each application(default value)
2. In each application, set PortalHiddenTaskCaseCustomField to one available custom field of your task andcase e.g CustomDecimalField5. This value must be the same for all applications.
3. Deploy this project MigrateHiddenTaskCase.iar to all your portal applications
4. In each application, run start process MigrateHiddenTaskCase to migrate.
Installation
9
5. After migration finishes succesfully, run start process RemoveHideAddtionalProperty in each application toclean up HIDE addtional property. It will delete HIDE additional property of all tasks and cases in current application.So be careful with it.
Migrate 7.0.3 to 7.0.5 (or 7.1.0)There are some changes in PortalStart process of Portal Template. If you have customized this process in your project, pleasecopy the new PortalStart from Portal Template to your project and re-apply your customization.
We introduce new method findStartableLinkByUserFriendlyRequestPath(String requestPath) inProcessStartCollector class. If your project has cutomized Default user process, please use this method to generatelink to your process. If user doesn't have permission to start the process, this method will return empty string.
Migrate 7.0.2 to 7.0.3If you have additional columns in your customized task widget, refer Task widget to adapt your customization intaskHeader section.
Migrate 7.0.1 to 7.0.2In PortalStyle\pom.xml, update project-build-plugin version to 7.1.0 and run maven to compile CSS.
If changing password is customized, change method callPasswordService.mod#changePassword(String,String) toPasswordService.mod#changePasswordService(String, String) in this customization.
Custom fields in Portal task list can now be sorted properly. The method extendSort() of TaskLazyDataModel ischanged to have a taskQuery parameter. If you override this method, please change your code to use the new parameterinstead of using the queryCriteria taskQuery.
Portal does not have separate full task list in the homepage anymore. It's mean that you don't have to customize thetask list in /layouts/DefaultHomePageTemplate.xhtml. You can remove your task list customization code inPortalHome.xhtml.
If you have added new language to Portal by adding cms entry /AppInfo/SupportedLanguages in your project. Pleasemove this entry to Portal Style.
Migrate 7.0.0 to 7.0.1Ajax error handling: By default, Portal handles all exceptions from ajax requests. Old configuration, customization of ajaxerror handling should be removed.
Migrate 6.x to 7.0.0If you copy the PortalStart process or the PortalHome HTMLDialog for customizations, please adapt the changes:
• The whole process is refactored to be clearer. So it is recommended that you copy it again.
• New process is introduced: restorePortalTaskList.ivp
• PortalStart: some new ivy scripts are added to handle the navigation back to the same page before starting a task.
• PortalHome: The taskView parameter is added to the start method.
SQL conversion
From Portal 7.0 , we use standard axon.ivy Task Category field to store task category.
Installation
10
To migrate task categories, please deploy MigrateTaskCategorySample.iar to your application and run Migrate TaskCategory process to:
1. Migrate data from column customVarCharField5 to category for all tasks in the application.
2. Delete leftover data in customVarCharField5 of all tasks in the application.
3. Create CMS entries for task categories in the application.
If you have queries which referring to task category, plese replace customVarCharField5() part with category()part.
Migrate 6.4 or 6.5 to 6.6• Task header is supported to be customized. The useOverride param, which is used to override the task item's body,
is changed to useOverrideBody
• If you customize TaskLazyDataModel, remove that customized class and customize as How to override task widget'sdata query.
Migrate 6.4 to 6.5• If compilation error "The type org.apache.axis2.databinding.ADBBean cannot be resolved" occurs, refer Project
compilation classpath to fix.
• The relative link in default user processes starts with ivy context path instead of "pro". If there are customizeddefault user proceses, append context path at the beginning. E.g. in Portal 6.4, it is /pro/.../PortalStart.ivp.In Portal 6.5, change it to /ivy/pro/.../PortalStart.ivp. You may use : ivy.html.startref(...) orRequestUriFactory.createProcessStartUri(...) to generate links.
Migrate 6.x (x < 4) to 6.4 (Jakobshorn)
Portal appearance
Portal 6.4 are redesigned. Therefore many components look different from the previous version like menu, task list, caselist ... . Portal BasicTemplate does not use p:layout and p:layoutUnit anymore. You may need to adapt yourpages to this change.
For now the menu customization is not supported.
From 6.4 , Portal applies LESS to support customizing Portal styles. You can customize colors, fonts and Portal's componentstyles. For more information about customizing Portal's style with LESS, please refer to PortalStyle customization (logos,colors, date patterns) .
Steps to migrate
1. Copy PortalStyle/webContent/resources of Portal 6.4 to PortalStyle/webContent/resources of the current Portal.
2. Modify PortalStyle/webContent/resources/less/theme.less, update value of @body-background-color for the backgroundcolor and @menu-color for the menu, button color.
3. Put custom styles to PortalStyle/webContent/resources/less/customization.less.
4. Add properties and plugins which are defined in PortalStyle/pom.xml of Portal 6.4 to PortalStyle/pom.xml of the currentPortal.
5. Run the maven command mvn lesscss:compile in PortalStyle to build CSS file.
6. PortalStyle/webContent/resources/css/theme.css is obsolete, please remove it.
Installation
11
Migrate 5.0 (Rothorn) to 6.0 (Säntis)
Database conversion
If you are using Portal 5.0 , you have to manual configure all settings (create servers, applications, variables) again sincePortal now doesn't use external database. All settings on from Portal 6.0 are stored in Ivy system database. If you are usingPortal 6.0 , you don't need to convert database.
Portal appearance
Portal now doesn't use Modena theme, it's a big difference to previous 6.0 . Therefore many things in Portal 5.0 and 6.0will not look the same in new Portal. Many things have been redesigned like menu, task list, case list ...
Release notesThis part lists all relevant changes since the last official product releases of Axon.ivy.
Changes in 7.0.15• Portal variable for Global growl setting DISPLAY_MESSAGE_AFTER_FINISH_TASK displays growl message for two
situations: finish task and leave task.
Changes in 7.0.10• Hide technical task / case can be configured using additional property or custom field (more performance).
• Hide Statistic widget can be configured in Admin setting.
Changes in 7.0.9• Portal version 7.0.9 .. 7.0.x latest is compatible with Portal Connector latest (of 7.0.x latest engine).
Changes in 7.0 (Jakobshorn)• Introduced the variables to customize task priority and state colors
• More search criteria for user in Task list are added and allowed to customize.
• Task delegate customization is supported
• The same task list is displayed before and after a task. Set default end page to another project to remove this feature.
• Task category of Portal is now stored in new Task category field of ivy.
Please refer to Migration notes to learn how to migrate data from customVarCharField5 to new category field.
• Hide technical tasks (the HIDE additional property is set), so that they are not displayed in any Portal task lists.
• Change password is supported to be customized. Please refer to Change password process to know how to customize thisfeature.
Changes in 6.6 (Jakobshorn)• Task widget's customization is extended with task header and task data query.
• Hide technical roles (the HIDE property is set), so that they are not displayed anywhere (e.g. delegate, absence mgmt). Thedefault hidden role is AXONIVY_PORTAL_ADMIN
Installation
12
Changes in 6.0 (Säntis)• Portal has 2 level menu with animation.
• All components such as button, text field ...have been re-styled, not applied Modena's styles.
• Portal supports responsiveness with 3 screen widths: 1920, 1366 and 1024. Please refer to Responsiveness for more details.
• Some customizations are not supported in this release: main menu, case header.
13
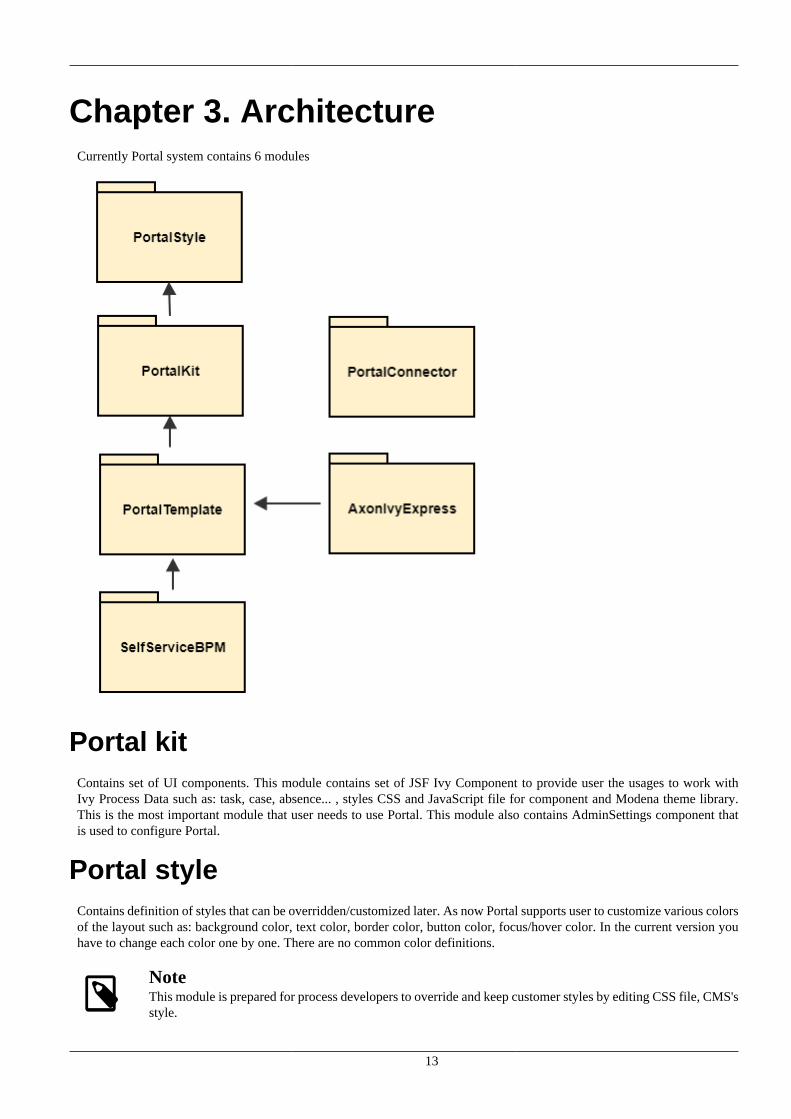
Chapter 3. ArchitectureCurrently Portal system contains 6 modules
Portal kitContains set of UI components. This module contains set of JSF Ivy Component to provide user the usages to work withIvy Process Data such as: task, case, absence... , styles CSS and JavaScript file for component and Modena theme library.This is the most important module that user needs to use Portal. This module also contains AdminSettings component thatis used to configure Portal.
Portal styleContains definition of styles that can be overridden/customized later. As now Portal supports user to customize various colorsof the layout such as: background color, text color, border color, button color, focus/hover color. In the current version youhave to change each color one by one. There are no common color definitions.
NoteThis module is prepared for process developers to override and keep customer styles by editing CSS file, CMS'sstyle.
Architecture
14
Portal templateProvides default portal's templates and pages. This module contains templates page for Portal's user to use as composition,then they will have supporting features such as : top menu, application menu, user menu. It also contains some start processlinks to default page such as : Portal home, Portal task list, Portal case list... . Portal's user is advised to depend on this moduleto use Portal easily.
Self service BPMThis project extends PortalTemplate and is a utility which implements concept of Adaptive Case Management. The idea isthat user can start any cases and add simultaneously new roles and tasks while doing his process work.
Axon.ivy ExpressThe idea is that user can create his own process and can manage it easily, it gives user more flexibility when working withPortal.
This project is an extended project from PortalTemplate. It provides:
• Ability to create his/her own workflow
• Tools to create and modify the web form for his workflow
Portal connectorCommunication channel to communicate between portal axon.ivy engine (e.g.: for synchronizing data, read ivy process datalike task, case, absence, substitute,...). This module acts like service layer that contains web service's implementation forPortalKit to call and get data, only PortalKit knows about these web services.
NoteBy default, this module is integrated to System application of Axon.Ivy engine. To be able to run Portal indesigner, you need to import this module.
15
Chapter 4. ComponentsWidget conceptBefore beginning
This guide assumes that you are already familiar with concepts inherent in JSF programming and in Ivy development.
IntroductionThis document provides a high-level explanation of how to develop a Portal widget. The ability to use Portal services andstyles can be particularly useful to developers who wish to do one or more of the following:
• Create their own widgets for Portal which have a consistent look and feel with the existing widgets.
• Reuse existing portal services to create their own widgets which can manipulate Portal data, such as: cases, tasks, processstarts, users,...
How it isThis section introduces the Html Dialog Component and Portal services, predefined styles used in building a widget, and goeson to describe the process of designing and implementing.
Portal widgets should be implemented using the Html Dialog Component technology from Axon.ivy and follow the famousmodel-view-controller pattern.
Furthermore, to have a clean architecture and avoid a lot of headaches going forward, we suggest that you should separateyour widget into layers like below:
• Entities
Entities are the business objects of the widget. They encapsulate the most general and high-level rules. They are the leastlikely to change when something external changes. (e.g.: by a change to page navigation, or security).
• Use Cases
Use case are widget specific business rules. This layer encapsulates and implements all of the use case of the widget.Changes in this layer should not affect the entities. This layer should not be affected by changes to externalities such as thePortal services, the UI, or any of the common frameworks.
• Interfaces Adapters
Interfaces Adapters are set of adapters that convert data from the format most convenient for the use cases and entities, to theformat most convenient for some external agency such as the database or the web. Similarly, data is converted, in this layer,from the form most convenient for entities and use case, into the form most convenient for whatever persistence frameworkis being used. (The presenters, views, and controllers all belong in here. The models are likely just data structures that arepassed from the controllers to the use case, and then back from the use cases to the presenters and views.)
• Frameworks and Drivers
This layer is generally composed of frameworks and tools such as the database, the web framework, Portal services, etc.This layer is where all the details go. The Web is a detail. The Portal services are detail. We keep these thing on the outsidewhere they can do little harm.
Tip
There's no rule that says you must always have just the four layers above. However, you should always applythat the source code dependencies point from mechanisms to policies:
Components
16
Frameworks and Drivers > Interfaces Adapters > User Cases > Entities
By doing so, you will create a widget that is intrinsically testable, independent of frameworks, independent ofUI, independent of database, and independent of any external agency. When any of the external parts of thesystem become obsolete, like the database, or the web framework, you can replace those obsolete elements witha minimum of fuss.
Main technology and conceptYou should have an understanding of the following technology and concept as you build your widget:
• Managed Beans: in Html Dialog Component it is possible to communicate with normal Java Objects by using ManagedBeans.
• User Dialog Concept: an Html Dialog Component follows the model-view-controller pattern of the User Dialog Concept.
• Model is a data class whose data fields can be bound to widget properties of the view via the special object data.
• Controller is implemented by a series of UI processes that can be mapped to events on the view such as mouse clicks.Axon.ivy provides the keyword logic to call an event process or a method process in the logic.
• View of an Html Dialog is defined with the means of an XHTML document.
ServicesThere are separate services for working with each type of data:
• Application Services: set of services for getting information about applications.
• Absence Services: set of services for manipulating the user's absence.
• Case Services: set of services for working with cases and related data, such as: additional properties, notes,...
• Task Services: set of services for working with tasks.
• Process Start Services: set of services for querying process starts from the Portal system.
• Security Services: set of services for querying users and roles.
• User Setting Services: set of services for manipulating the user settings and related data, such as: email settings, languagesettings.
• Portal Configuration Services: set of services for controlling the Portal configuration.
Built-in widgetsPortal comes with some useful widgets:
1. Task widget
Below is the sample how the task widget being use in the default template:
<ui:define name="taskWidget">
<ic:ch.ivy.addon.portalkit.component.TaskWidget id="task-widget"tasks="#{logic.getTasksOfSessionUser()}" ... />
</ui:define>
2. Process widget
Components
17
Below is the sample how the process widget being use in the default template:
<ui:define name="processWidget">
<ic:ch.ivy.addon.portalkit.component.ProcessWidget id="process-widget"compactMode="true" ... .>
</ui:define>
3. Statistic widget
Below is the sample how the statistic widget being use in the default template:
<ui:define name="statisticWidget">
<ic:ch.ivy.addon.portalkit.component.StatisticWidget id="statistics-widget"compactMode="true" ... >
...
</ic:ch.ivy.addon.portalkit.component.StatisticWidget>
</ui:define>
Portal setup these widget with the default settings for you, but you can always re-define them in order to match with yourneeds. Moreover, if you want to turn off a built-in widget, you can simply leave its ui:define container empty like this:
<ui:define name="taskWidget">
<!-- leave it empty -->
</ui:define>
Predefined stylesThere are separate common styles are predefined to ensure every Portal widget has a consistent structure and appearance:
<div class="widget">
<div class="widget-header">
<ul class="widget-header-menu">
<li class="widget-header-menu-item">...</li>
<li class="widget-header-menu-item">...</li>
<li class="widget-header-menu-item">...</li>
...
</ul>
...
</div>
<div class="widget-content">
<div class="widget-content-list">
<div class="widget-content-list-item">...</div>
Components
18
<div class="widget-content-list-item">...</div>
<div class="widget-content-list-item">...</div>
...
</div>
</div>
<div class="widdget-footer">
...
</div>
</div>
FlowThe general flow for developing a widget for portal is as follows:
1. Design your widget, deciding which parts to implement in Ivy component, and which parts to implement as pure JSF.
2. Create an Html Dialog Component.
The following code fragment defines an example Html Dialog component:
<cc:interface componentType="IvyComponent">
<cc:attribute name="caption" />
</cc:interface>
<cc:implementation>
...
</cc:implementation>
A component could be inserted with the ic tag.
<ic:my.namespace.ComponentName ... />
For more information, see the Html Dialog Component section in Axon.ivy Designer - Help: Designer Guide > UserInterface > User Dialogs > Html Dialogs
3. If you are writing a widget, which manipulates task, case,... consider using Portal built-in services.
4. Optionally, your widgets can have their own configuration. There are separate methods for manipulating widgetconfiguration:
• You can initiate or update your widget configuration by passing an JSON object to saveSettings().
• You can load your widget configuration by calling loadSettings().
IntegrationThe general flow for integrating a widget into Portal homepage is as follows:
1. Create a new home page which uses the DefaultHomePageTemplate.xhtml template. By doing this, your newhome page will inherit the widget from the previous home page and has a place holder for your own widgets. Yourcustom home page should look like below:
Components
19
<ui:composition template="/layouts/DefaultHomePageTemplate.xhtml" xmlns="http://www.w3.org/1999/xhtml"
xmlns:f="http://xmlns.jcp.org/jsf/core" xmlns:h="http://xmlns.jcp.org/jsf/html"
xmlns:ui="http://xmlns.jcp.org/jsf/facelets" xmlns:ic="http://ivyteam.ch/jsf/component">
<ui:define name="customWidget">
...
</ui:define>
</ui:composition>
2. Create a new process start for the new home page. Now you will use this process start as the entry point of your portalinstead of the default one. To let portal know about your new portal home, you have to go to the portal settings and setthe portal home url to the new one.
3. In your new home page, place your widget inside the customWidget section.
<ui:define name="customWidget">
<ic:my.namespace.ComponentName ... />
...
</ui:define>
For more details, visit Portal home.
Exception handlingPortal separates exception into 2 types: ajax and non-ajax exception.
Portal handle non-ajax exception for you. You do not need to do anything for this type of exception.
Portal also handle ajax exception for you as default, but you can implement your own exception handler by using thePrimefaces built-in exception handler: p:ajaxExceptionHandler.
Layout templates
Templates for developmentYour Portal Project is dependent on PortalTemplate project, in which there are 7 templates that can be used directly.
1. Basic template
2. Two column template
3. Task template
4. Case template
5. Task list template
6. Case list template
7. Default homepage template
Components
20
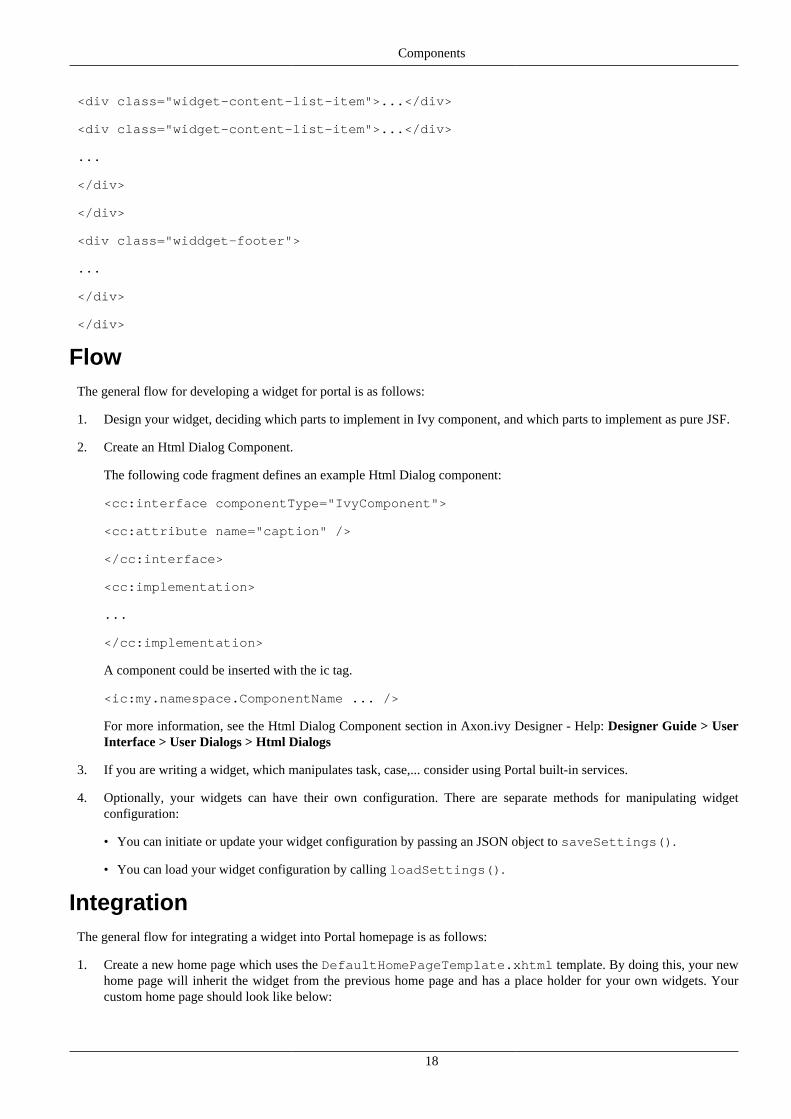
These templates have the same header, which is a menu of applications that you configure in Administration page. Sinceversion 6.4, Portal officially supports responsiveness for 3 resolutions: iMac (1920*1050), iPad (1366*1024) iPad Portrait:(1024*1366), every templates has its default responsiveness, you can refer to Responsiveness to override it. Besides, thereare user settings like: Absences, Email, Language Settings and Administration (for admin only). Details about user settingscan be found in Settings.
Basic templateBasic template provides basic layout where user can put their custom content. It lacks Portal menu and Case details. Werecommend to use task template for your process.
How to use Basic template
1. Create a new HTML User Dialog and then use ui:composition to define the template inside and reuse thedefault responsiveness behavior. To override it, please use pageContent instead of simplePageContent andResponsiveness.
<ui:composition template="/layouts/BasicTemplate.xhtml">
<ui:define name="pageTitle">Sample Page</ui:define>
<ui:define name="simplePageContent">
This is sample content.
</ui:define>
</ui:composition>
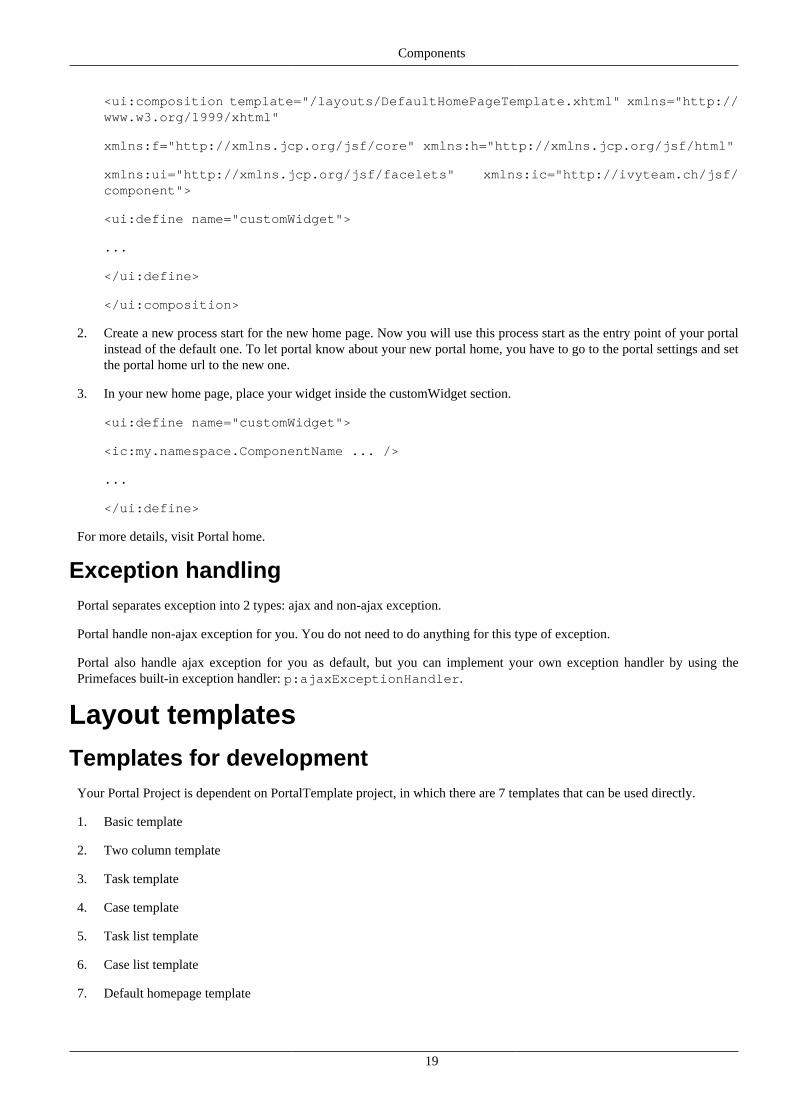
2. See the result after using Basic template for example:
Two column templateTwo column template inherits Basic Template. It has 2 columns which user can customize their contents. Normally, the firstcolumn is for navigation, the second for displaying corresponding content.
Components
21
How to use Two column template
1. Create a HTML User Dialog, define template in ui:composition and insert content of second column and thirdcolumn using ui:define.
<ui:composition template="/layouts/TwoColumnTemplate.xhtml">
<ui:define name="pageTitle">Sample Page</ui:define>
<ui:define name="navigationRegion">
Navigation Region
</ui:define>
<ui:define name="contentRegion">
Content Region
</ui:define>
</ui:composition>
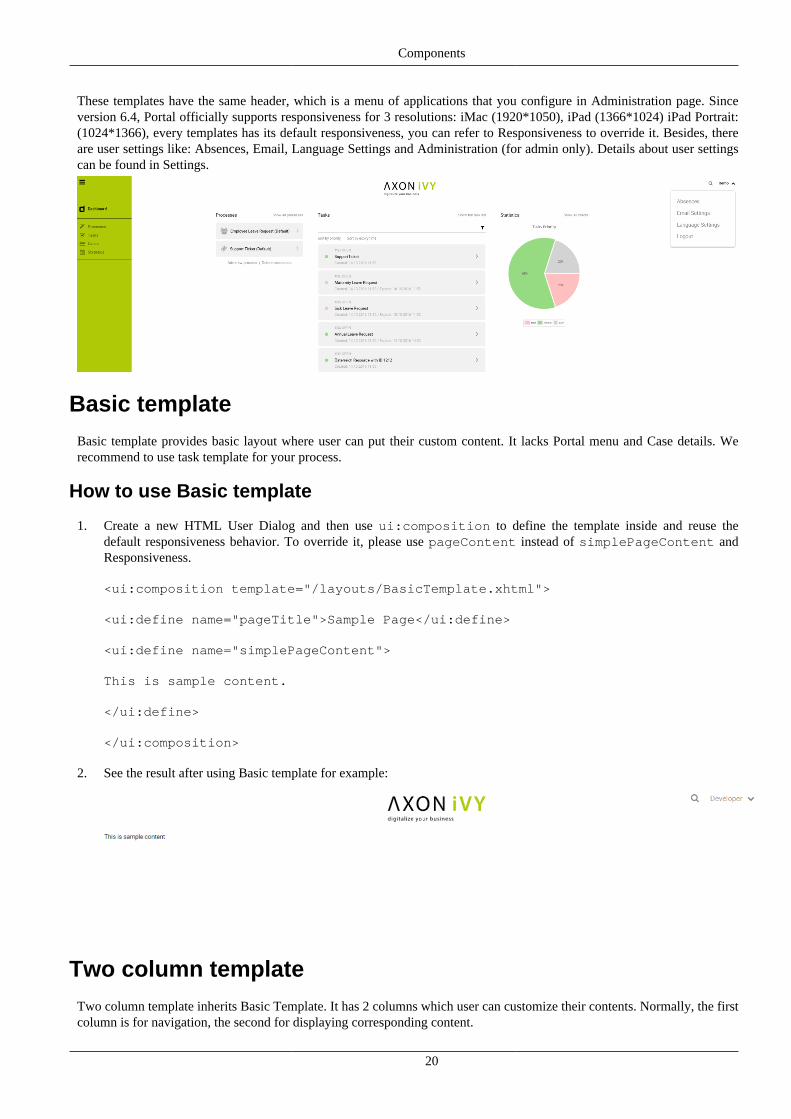
2. See the result after using Two column template for example:
Task template
Task template is used for displaying task functionality and related information to support completing the task. There are alot of regions to be filled with your custom content:
• Request name
• Process chain
• Errors
• Information
• Dynamic tabs
• Request form
• Case information tab
• Buttons at footer
How to use template TaskTemplate.xhtml
1. Create a new HTML User Dialog and then use ui:composition to define template which you use inside.
<ui:composition template="/layouts/TaskTemplate.xhtml">
2. Set task value so that the taskName is available to users where they can see the task name of request. It is mandatory.
Components
22
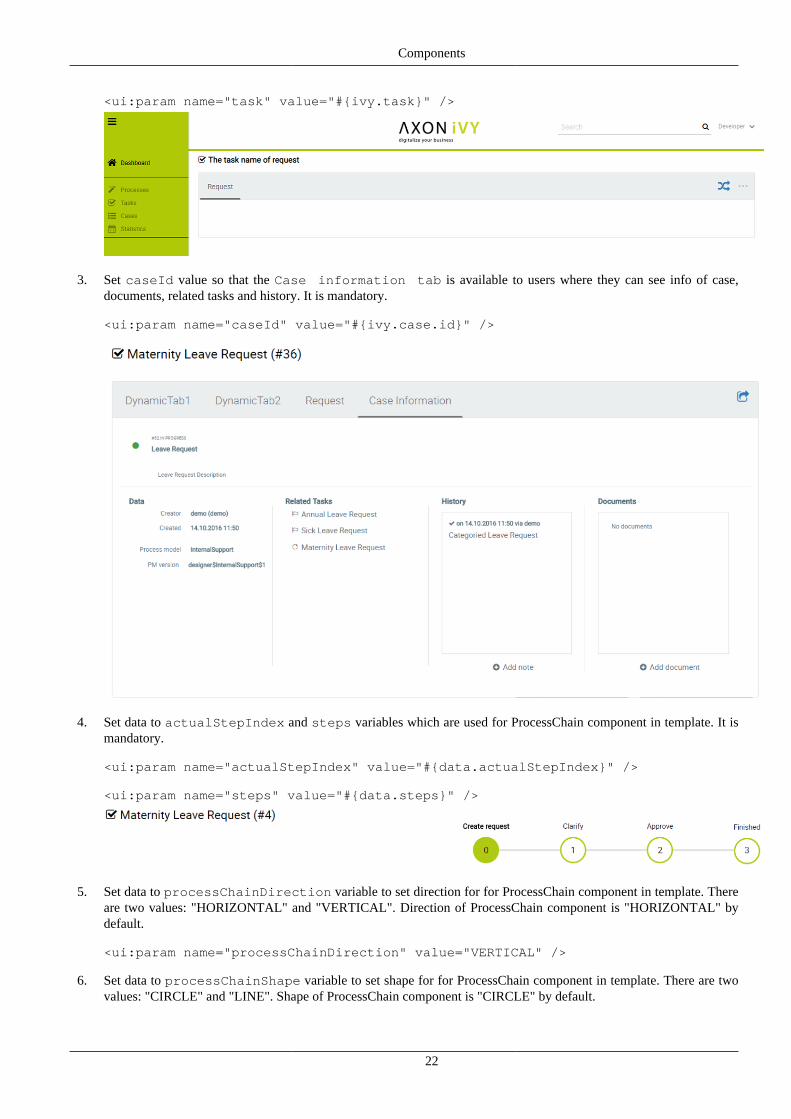
<ui:param name="task" value="#{ivy.task}" />
3. Set caseId value so that the Case information tab is available to users where they can see info of case,documents, related tasks and history. It is mandatory.
<ui:param name="caseId" value="#{ivy.case.id}" />
4. Set data to actualStepIndex and steps variables which are used for ProcessChain component in template. It ismandatory.
<ui:param name="actualStepIndex" value="#{data.actualStepIndex}" />
<ui:param name="steps" value="#{data.steps}" />
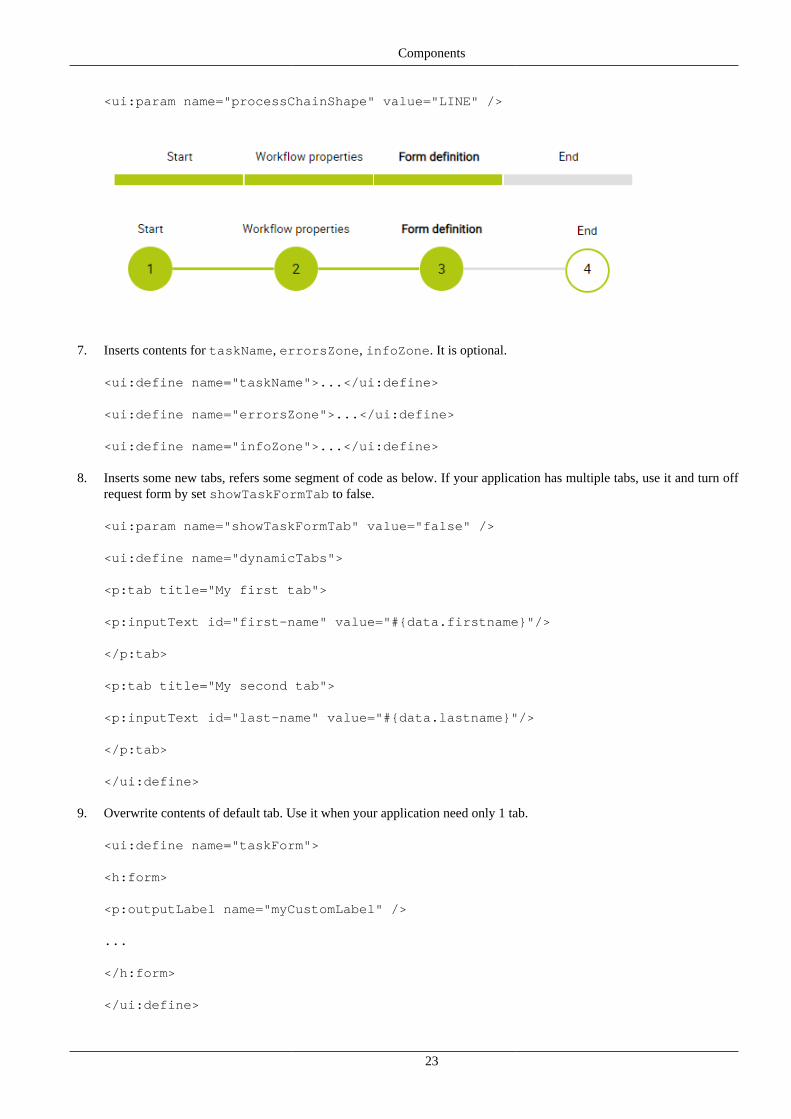
5. Set data to processChainDirection variable to set direction for for ProcessChain component in template. Thereare two values: "HORIZONTAL" and "VERTICAL". Direction of ProcessChain component is "HORIZONTAL" bydefault.
<ui:param name="processChainDirection" value="VERTICAL" />
6. Set data to processChainShape variable to set shape for for ProcessChain component in template. There are twovalues: "CIRCLE" and "LINE". Shape of ProcessChain component is "CIRCLE" by default.
Components
23
<ui:param name="processChainShape" value="LINE" />
7. Inserts contents for taskName, errorsZone, infoZone. It is optional.
<ui:define name="taskName">...</ui:define>
<ui:define name="errorsZone">...</ui:define>
<ui:define name="infoZone">...</ui:define>
8. Inserts some new tabs, refers some segment of code as below. If your application has multiple tabs, use it and turn offrequest form by set showTaskFormTab to false.
<ui:param name="showTaskFormTab" value="false" />
<ui:define name="dynamicTabs">
<p:tab title="My first tab">
<p:inputText id="first-name" value="#{data.firstname}"/>
</p:tab>
<p:tab title="My second tab">
<p:inputText id="last-name" value="#{data.lastname}"/>
</p:tab>
</ui:define>
9. Overwrite contents of default tab. Use it when your application need only 1 tab.
<ui:define name="taskForm">
<h:form>
<p:outputLabel name="myCustomLabel" />
...
</h:form>
</ui:define>
Components
24
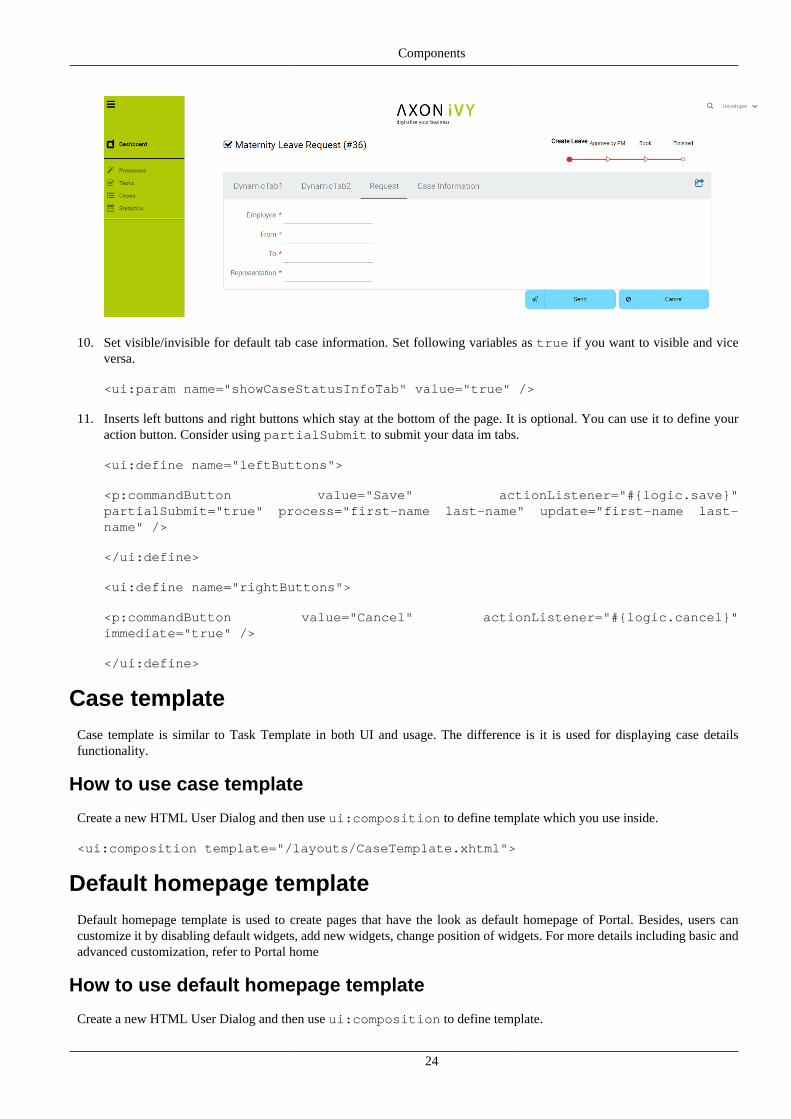
10. Set visible/invisible for default tab case information. Set following variables as true if you want to visible and viceversa.
<ui:param name="showCaseStatusInfoTab" value="true" />
11. Inserts left buttons and right buttons which stay at the bottom of the page. It is optional. You can use it to define youraction button. Consider using partialSubmit to submit your data im tabs.
<ui:define name="leftButtons">
<p:commandButton value="Save" actionListener="#{logic.save}"partialSubmit="true" process="first-name last-name" update="first-name last-name" />
</ui:define>
<ui:define name="rightButtons">
<p:commandButton value="Cancel" actionListener="#{logic.cancel}"immediate="true" />
</ui:define>
Case templateCase template is similar to Task Template in both UI and usage. The difference is it is used for displaying case detailsfunctionality.
How to use case template
Create a new HTML User Dialog and then use ui:composition to define template which you use inside.
<ui:composition template="/layouts/CaseTemplate.xhtml">
Default homepage templateDefault homepage template is used to create pages that have the look as default homepage of Portal. Besides, users cancustomize it by disabling default widgets, add new widgets, change position of widgets. For more details including basic andadvanced customization, refer to Portal home
How to use default homepage template
Create a new HTML User Dialog and then use ui:composition to define template.
Components
25
<ui:composition template="/layouts/DefaultHomePageTemplate.xhtml">
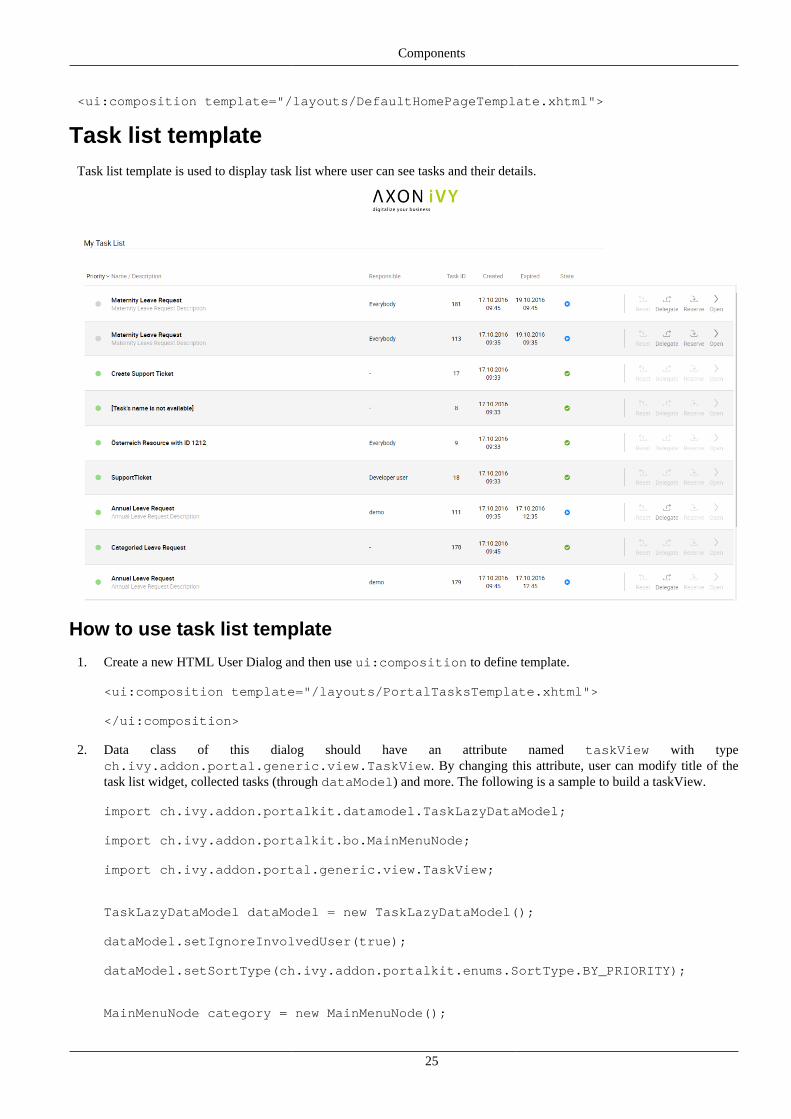
Task list templateTask list template is used to display task list where user can see tasks and their details.
How to use task list template
1. Create a new HTML User Dialog and then use ui:composition to define template.
<ui:composition template="/layouts/PortalTasksTemplate.xhtml">
</ui:composition>
2. Data class of this dialog should have an attribute named taskView with typech.ivy.addon.portal.generic.view.TaskView. By changing this attribute, user can modify title of thetask list widget, collected tasks (through dataModel) and more. The following is a sample to build a taskView.
import ch.ivy.addon.portalkit.datamodel.TaskLazyDataModel;
import ch.ivy.addon.portalkit.bo.MainMenuNode;
import ch.ivy.addon.portal.generic.view.TaskView;
TaskLazyDataModel dataModel = new TaskLazyDataModel();
dataModel.setIgnoreInvolvedUser(true);
dataModel.setSortType(ch.ivy.addon.portalkit.enums.SortType.BY_PRIORITY);
MainMenuNode category = new MainMenuNode();
Components
26
category.value = "My Task List";
out.taskView = TaskView.create().dataModel(dataModel).pageTitle("My TaskList").hideTaskFilter(true).category(category).showHeaderToolbar(false).createNewTaskView();
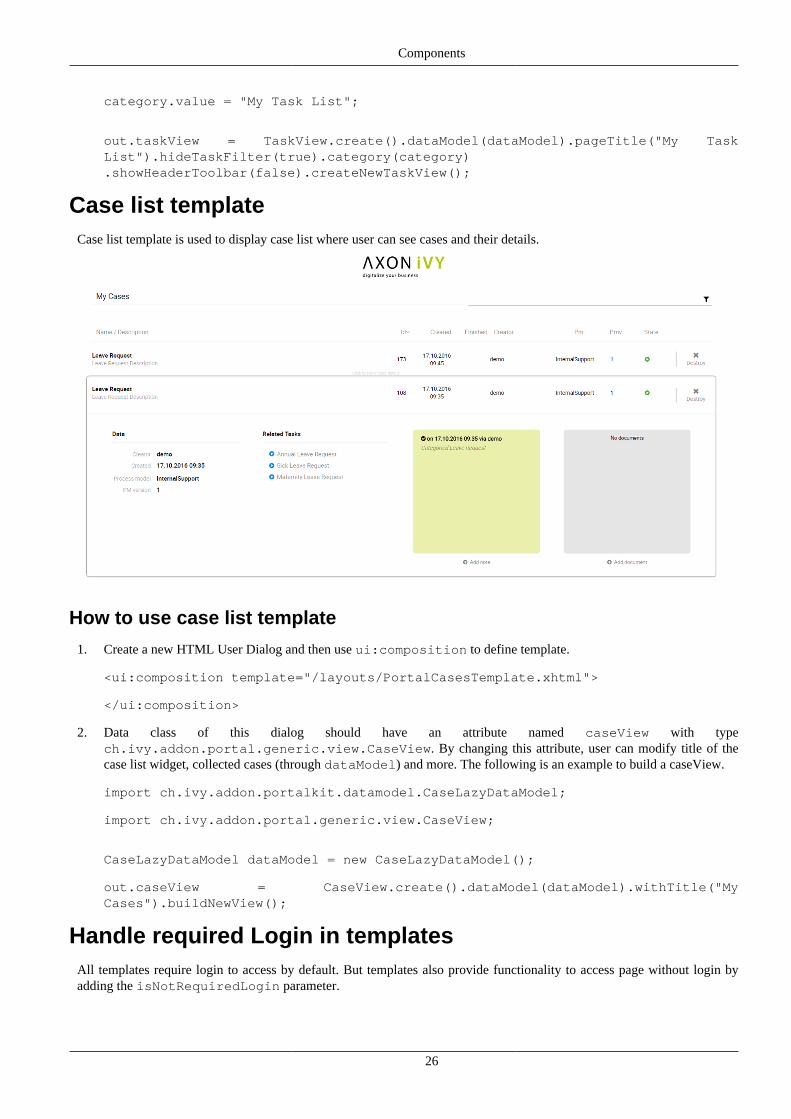
Case list templateCase list template is used to display case list where user can see cases and their details.
How to use case list template
1. Create a new HTML User Dialog and then use ui:composition to define template.
<ui:composition template="/layouts/PortalCasesTemplate.xhtml">
</ui:composition>
2. Data class of this dialog should have an attribute named caseView with typech.ivy.addon.portal.generic.view.CaseView. By changing this attribute, user can modify title of thecase list widget, collected cases (through dataModel) and more. The following is an example to build a caseView.
import ch.ivy.addon.portalkit.datamodel.CaseLazyDataModel;
import ch.ivy.addon.portal.generic.view.CaseView;
CaseLazyDataModel dataModel = new CaseLazyDataModel();
out.caseView = CaseView.create().dataModel(dataModel).withTitle("MyCases").buildNewView();
Handle required Login in templatesAll templates require login to access by default. But templates also provide functionality to access page without login byadding the isNotRequiredLogin parameter.
Components
27
How to handle required login in template
1. Create a new HTML User Dialog and then use ui:param to define the template inside
<ui:composition template="/layouts/BasicTemplate.xhtml">
<ui:param name="isNotRequiredLogin" value="#{data.isNotRequiredLogin}" />
<ui:define name="pageContent">
This is sample content.
</ui:define>
</ui:composition>
2. Result after using template for example (All user settings and application menus will not visible).
Responsiveness
Since version 6.4, Portal officially supports responsiveness for 3 screen widths: iMac(width 1920), iPad landscape(width1366) and iPad portrait(width 1024).
To apply your styles for the above resolutions, you can add your own media query css:
/* Small screen */ @media screen and (max-width: 1365px) {/*.....*/}
/* Medium screen */ @media screen and (min-width: 1366px) and (max-width: 1919px){/*.....*/},
/* Large screen */ @media screen and (min-width: 1920px) {/*......*/}
In Portal's new design, the main container's width should be changed according to menu state (expand/colapse).
To adapt the change, you need to initialize the ResponsiveToolkit Javascript object and introduce 3 objects to handle3 screen resolutions and each object has to implement the updateMainContainer method.Portal templates define their own responsiveness, you can redefine the footer section to override:
E.g. Initialize ResponsiveToolkit for TaskList page.
<ui:define name="footer">
<script type="text/javascript">
$(function(){
var taskListLargeScreen = new TaskListLargeScreenHandler();
var taskListMediumScreen = new TaskListMediumScreenHandler();
var taskListSmallScreen = new TaskListSmallScreenHandler();
var responsiveToolkit = ResponsiveToolkit(taskListLargeScreen, taskListMediumScreen,taskListSmallScreen);
Portal.init(responsiveToolkit);
});
Components
28
</script>
</ui:define>
Enable Portal chat
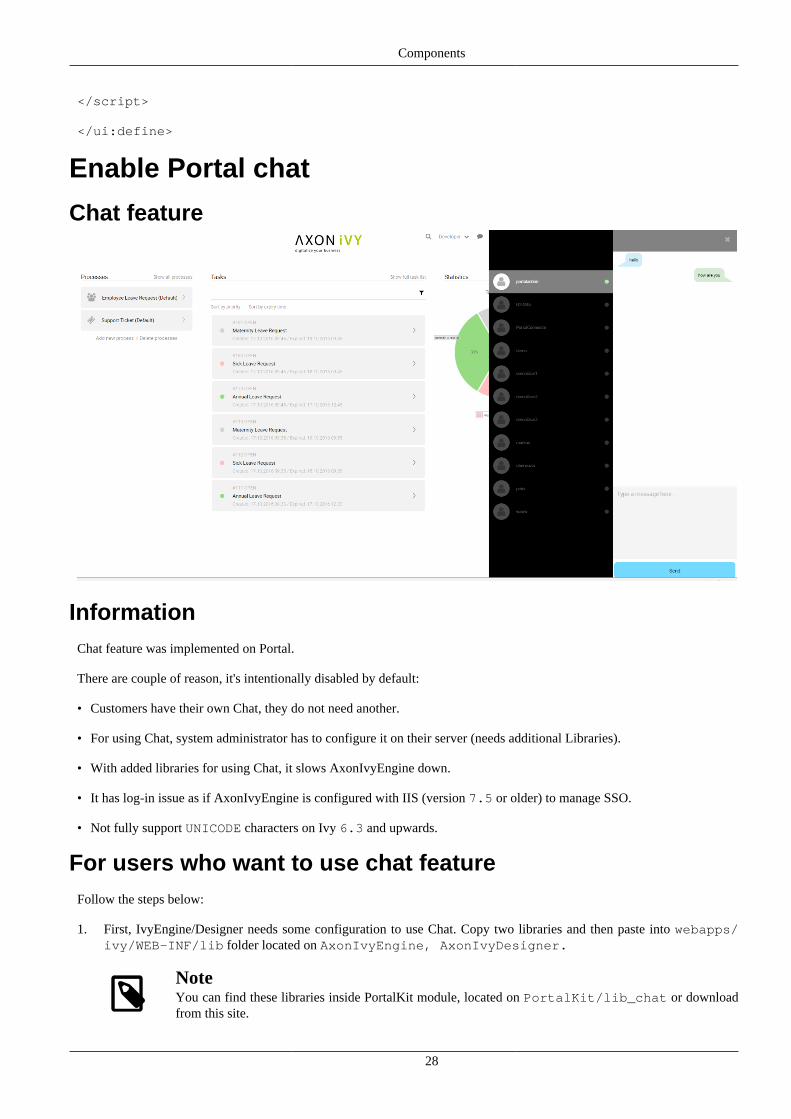
Chat feature
InformationChat feature was implemented on Portal.
There are couple of reason, it's intentionally disabled by default:
• Customers have their own Chat, they do not need another.
• For using Chat, system administrator has to configure it on their server (needs additional Libraries).
• With added libraries for using Chat, it slows AxonIvyEngine down.
• It has log-in issue as if AxonIvyEngine is configured with IIS (version 7.5 or older) to manage SSO.
• Not fully support UNICODE characters on Ivy 6.3 and upwards.
For users who want to use chat featureFollow the steps below:
1. First, IvyEngine/Designer needs some configuration to use Chat. Copy two libraries and then paste into webapps/ivy/WEB-INF/lib folder located on AxonIvyEngine, AxonIvyDesigner.
NoteYou can find these libraries inside PortalKit module, located on PortalKit/lib_chat or downloadfrom this site.
Components
29
• portal-chat-endpoints-s125.jar
• atmosphere-runtime-2.4.2.jar
2. Second, Enables Chat on UI by setting enablesChat param
<ui:param name="enablesChat" value="true" />
Added this line to your pages that are using BasicTemplates of Portal (adds toDefaultPortalHomeTemplate.xhtml, TaskTempate.xhtml, etc.)
E.g.:
<ui:composition template="/layouts/BasicTemplate.xhtml">
<ui:param name="enablesChat" value="true" />
<...>
</ui:composition>
Or simply change param's value on BasicTemplate.xhtml
<ui:param name="enablesChat" value="#{enablesChat}" /> to <ui:param name="enablesChat" value="true" />
3. Restarts AxonIvy Desinger/Engine. Then enjoy Chat.
Error handlingIn this section, we introduce 2 kinds of errors, when and how to handle them in Portal.
• Ajax error : this kind of errors occur during a JSF ajax requests, for example when the user clicks on the show full modebutton to tell the task widget switches to full mode, without handling the end user would not get any form of feedback ifthe action was successfully performed or not.
• Non-ajax error : this kind of errors occur when user access to Portal from a url which could not be handled successfullyby server side, or being navigated by a corrupted url. For example, when the user clicks on a link to start a task whichdoes not exist.
Ajax error handling
Introduction
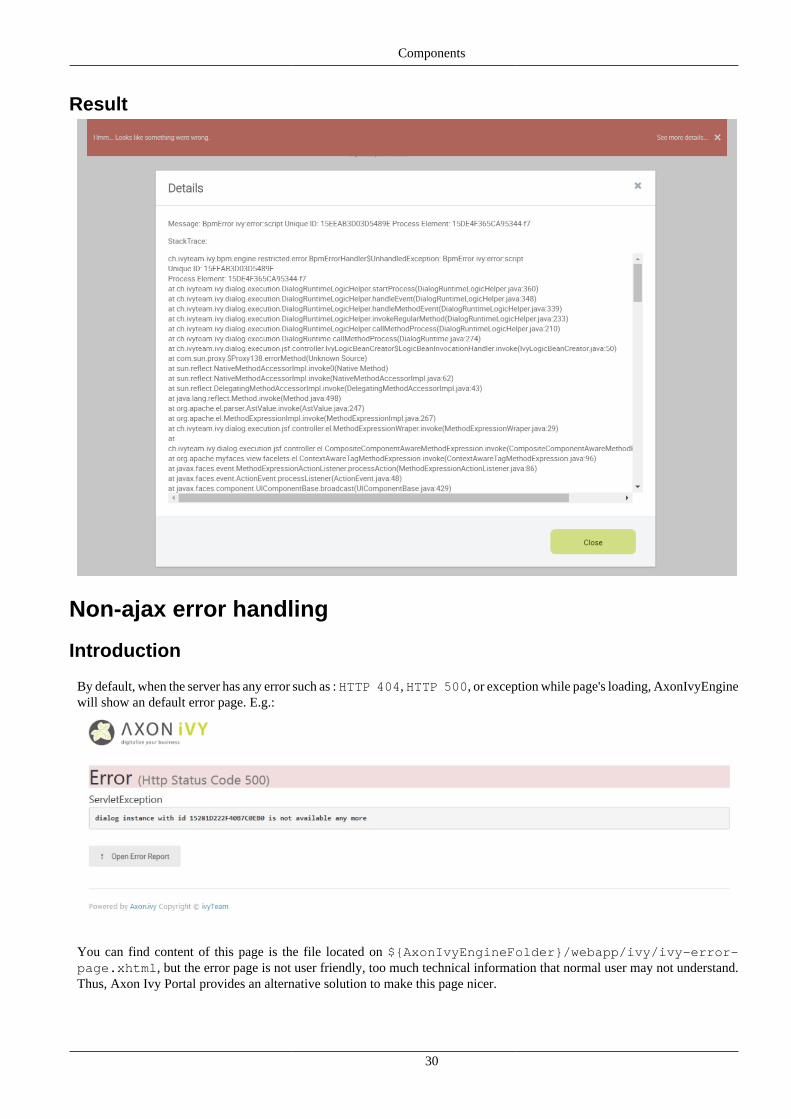
By default, Portal handles all exceptions from ajax requests.
When an exception occurs, Portal will show an error notification with the exception type and message to end user. Theexception details is available when user click on show details button.
Stacktrace on error messages can be showed/hid depend on ivy system property Errors.ShowDetailsToEndUser.
NoteThis feature is only available if using the portal default template: BasicTemplate or its extension.
Components
30
Result
Non-ajax error handling
Introduction
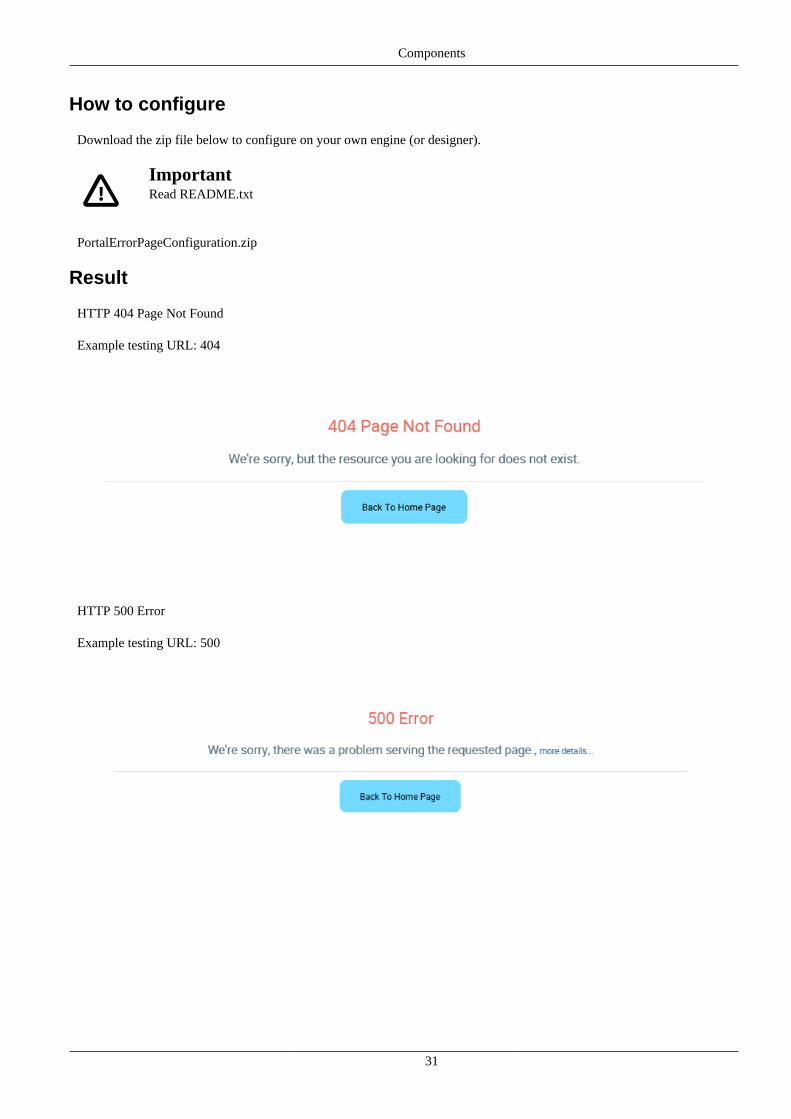
By default, when the server has any error such as : HTTP 404, HTTP 500, or exception while page's loading, AxonIvyEnginewill show an default error page. E.g.:
You can find content of this page is the file located on ${AxonIvyEngineFolder}/webapp/ivy/ivy-error-page.xhtml, but the error page is not user friendly, too much technical information that normal user may not understand.Thus, Axon Ivy Portal provides an alternative solution to make this page nicer.
Components
31
How to configure
Download the zip file below to configure on your own engine (or designer).
ImportantRead README.txt
PortalErrorPageConfiguration.zip
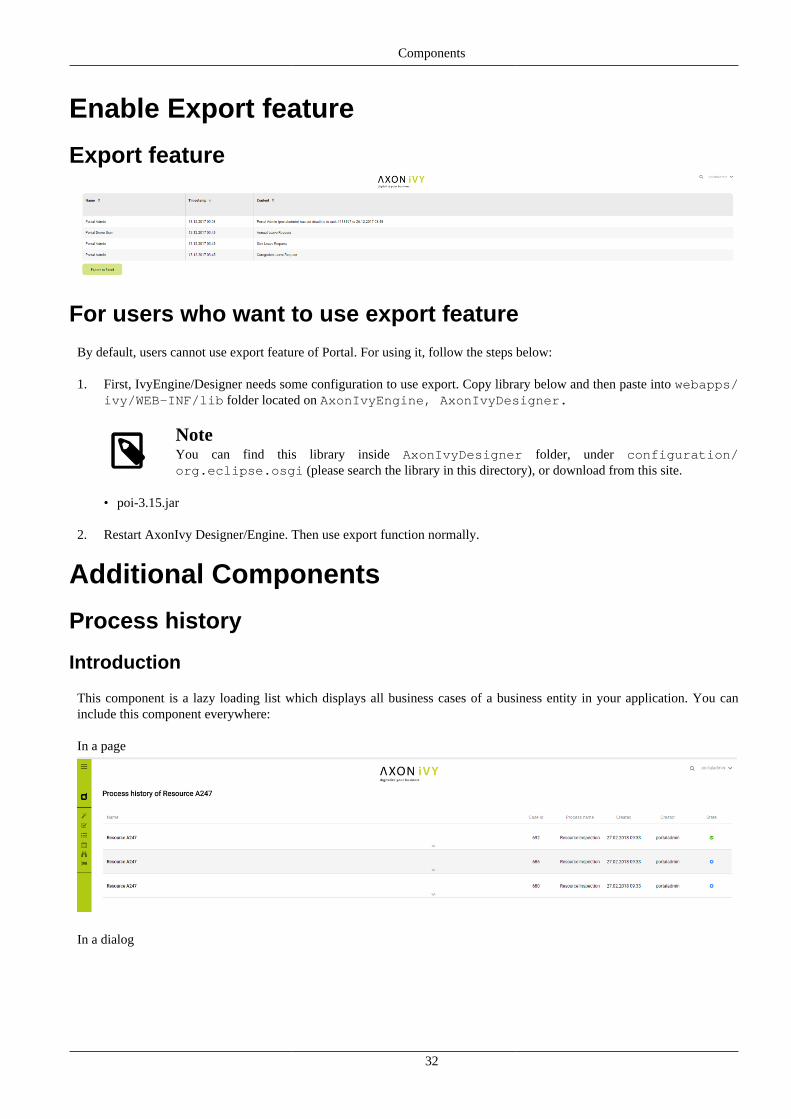
Result
HTTP 404 Page Not Found
Example testing URL: 404
HTTP 500 Error
Example testing URL: 500
Components
32
Enable Export feature
Export feature
For users who want to use export feature
By default, users cannot use export feature of Portal. For using it, follow the steps below:
1. First, IvyEngine/Designer needs some configuration to use export. Copy library below and then paste into webapps/ivy/WEB-INF/lib folder located on AxonIvyEngine, AxonIvyDesigner.
NoteYou can find this library inside AxonIvyDesigner folder, under configuration/org.eclipse.osgi (please search the library in this directory), or download from this site.
• poi-3.15.jar
2. Restart AxonIvy Designer/Engine. Then use export function normally.
Additional Components
Process history
Introduction
This component is a lazy loading list which displays all business cases of a business entity in your application. You caninclude this component everywhere:
In a page
In a dialog
Components
33
How to use
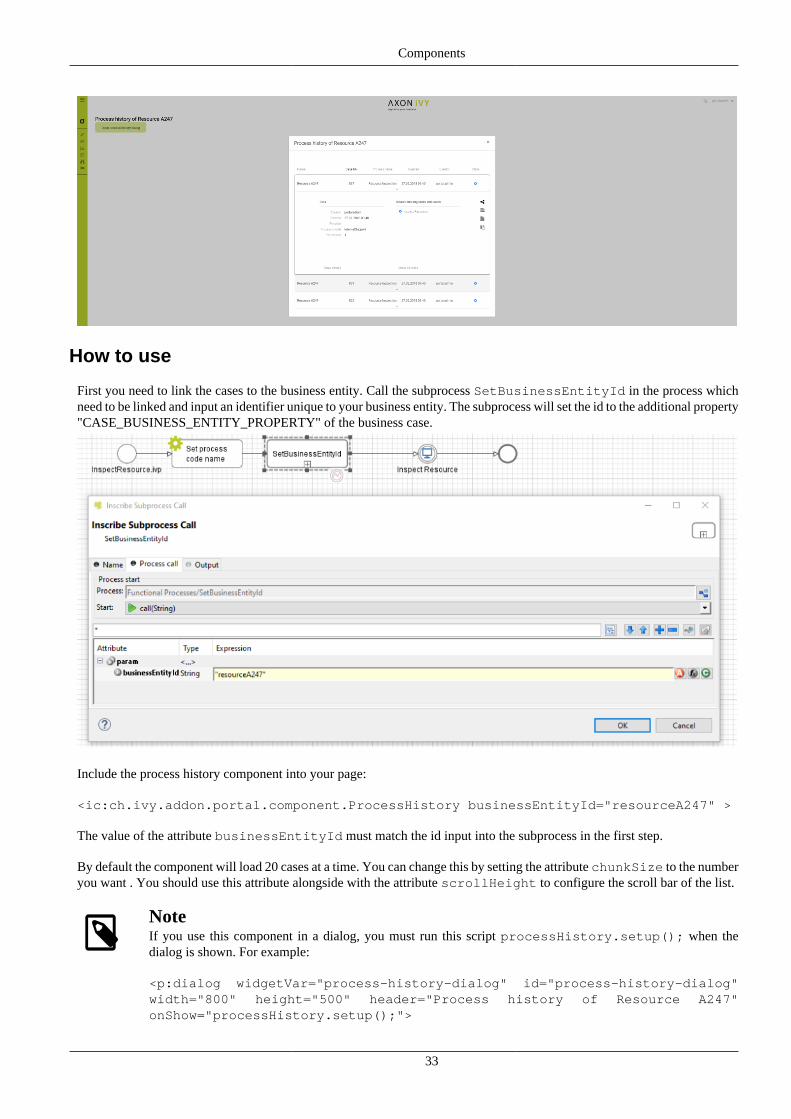
First you need to link the cases to the business entity. Call the subprocess SetBusinessEntityId in the process whichneed to be linked and input an identifier unique to your business entity. The subprocess will set the id to the additional property"CASE_BUSINESS_ENTITY_PROPERTY" of the business case.
Include the process history component into your page:
<ic:ch.ivy.addon.portal.component.ProcessHistory businessEntityId="resourceA247" >
The value of the attribute businessEntityId must match the id input into the subprocess in the first step.
By default the component will load 20 cases at a time. You can change this by setting the attribute chunkSize to the numberyou want . You should use this attribute alongside with the attribute scrollHeight to configure the scroll bar of the list.
NoteIf you use this component in a dialog, you must run this script processHistory.setup(); when thedialog is shown. For example:
<p:dialog widgetVar="process-history-dialog" id="process-history-dialog"width="800" height="500" header="Process history of Resource A247"onShow="processHistory.setup();">
Components
34
<ic:ch.ivy.addon.portal.component.ProcessHistorybusinessEntityId="resourceA247" chunkSize="6" scrollHeight="400" />
</p:dialog>
ImportantIf your process has a Trigger component or sends a signal to start another process with the option "Attach toBusiness Case that triggered this process" selected, the current case of the process will become a technical caseand will not be loaded into the process history list. In this case You need to call the SetBusinessEntityIdsubprocess after the first Trigger or signal sending step.
Process Chain
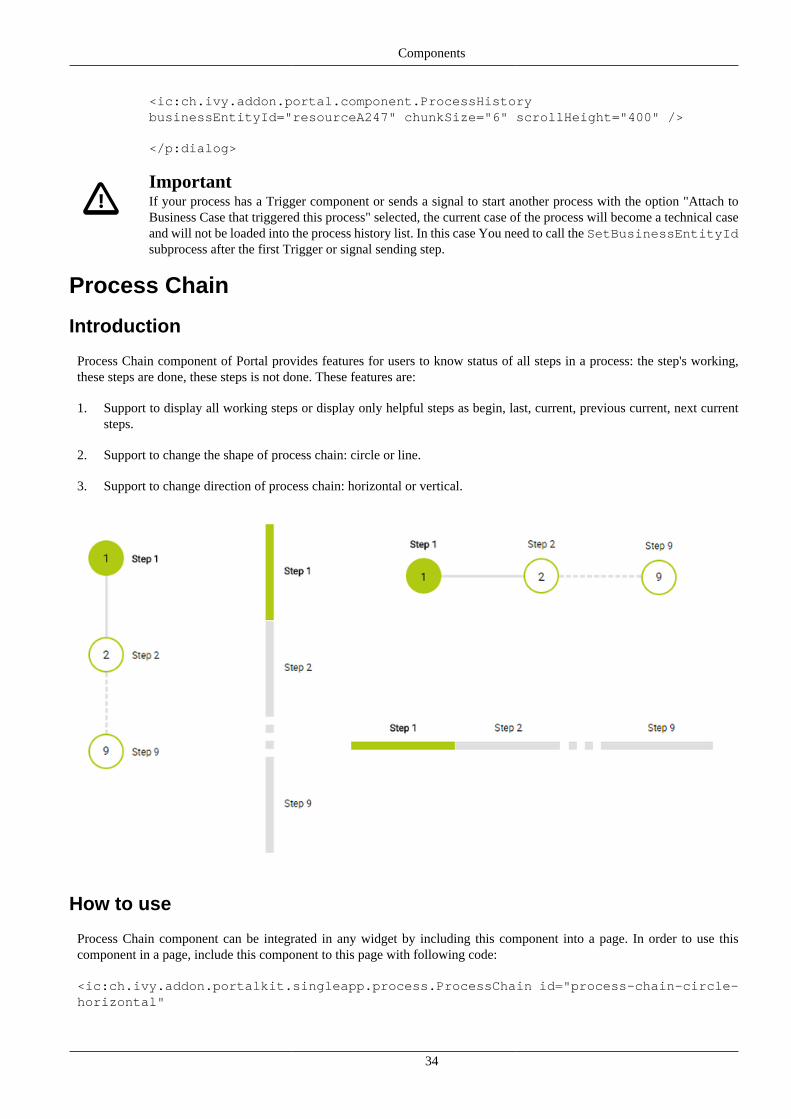
Introduction
Process Chain component of Portal provides features for users to know status of all steps in a process: the step's working,these steps are done, these steps is not done. These features are:
1. Support to display all working steps or display only helpful steps as begin, last, current, previous current, next currentsteps.
2. Support to change the shape of process chain: circle or line.
3. Support to change direction of process chain: horizontal or vertical.
How to use
Process Chain component can be integrated in any widget by including this component into a page. In order to use thiscomponent in a page, include this component to this page with following code:
<ic:ch.ivy.addon.portalkit.singleapp.process.ProcessChain id="process-chain-circle-horizontal"

Components
35
componentId="component-circle-horizontal" shape="CIRCLE" direction="HORIZONTAL"
isShowAllSteps="FALSE" actualStepIndex="#{data.actualCurrentIndex}"steps="#{data.steps}" />
1. Must to set value for actualStepIndex parameter. This is current step index.
2. Must to set value for steps parameter. This is list of working steps.
3. Can change shape parameter to CIRCLE or LINE based on the requirement. Default value of this is CIRCLE.
4. Can change direction parameter to HORIZONTAL or VERTICAL based on the requirement. Default value of thisis HORIZONTAL.
5. Can change isShowAllSteps parameter to TRUE or FALSE based on the requirement. Default value of this is FALSE.
Global growl
Introduction
This component is a global growl introduced in BasicTemplate, you can use it to display your messages in Portal.
Display growl after finishing a task
To make growl message appears as default after a task is finished, administrator could set theDISPLAY_MESSAGE_AFTER_FINISH_TASK Portal variable to true.
Display growl after leaving a task
If DISPLAY_MESSAGE_AFTER_FINISH_TASK Portal variable is true, growl message will be displayed after a task is left.
Components
36
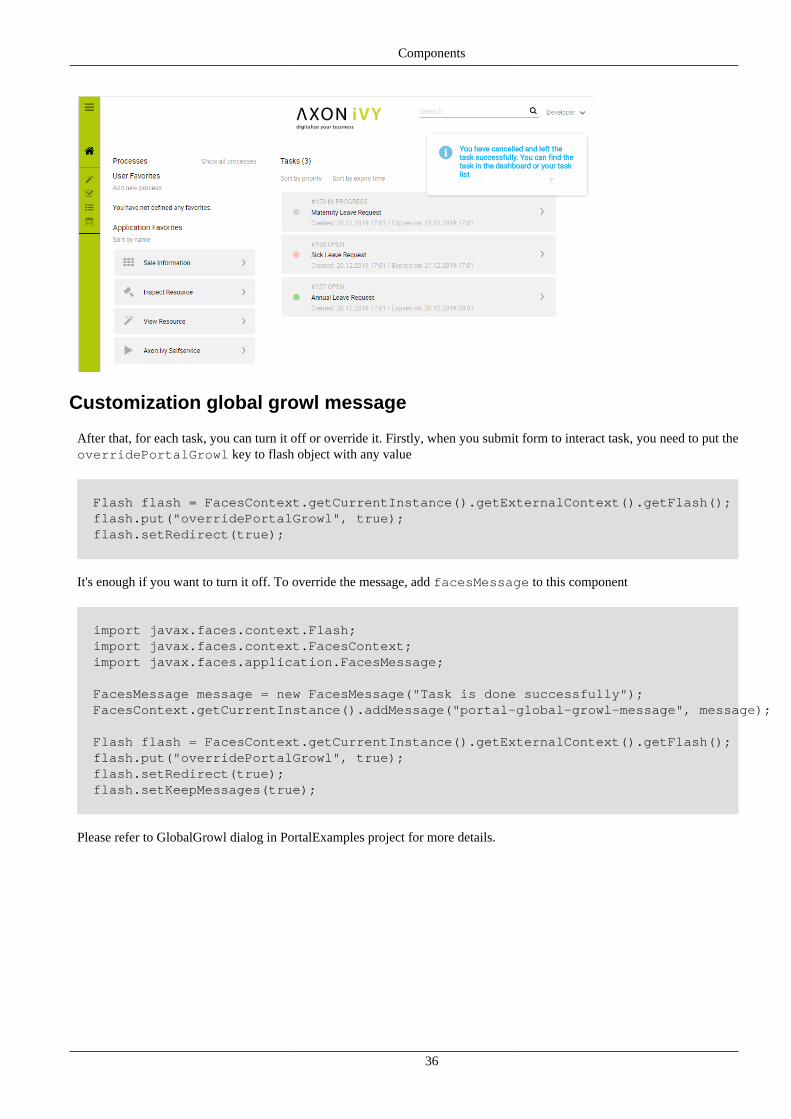
Customization global growl message
After that, for each task, you can turn it off or override it. Firstly, when you submit form to interact task, you need to put theoverridePortalGrowl key to flash object with any value
Flash flash = FacesContext.getCurrentInstance().getExternalContext().getFlash(); flash.put("overridePortalGrowl", true); flash.setRedirect(true);
It's enough if you want to turn it off. To override the message, add facesMessage to this component
import javax.faces.context.Flash; import javax.faces.context.FacesContext; import javax.faces.application.FacesMessage; FacesMessage message = new FacesMessage("Task is done successfully"); FacesContext.getCurrentInstance().addMessage("portal-global-growl-message", message); Flash flash = FacesContext.getCurrentInstance().getExternalContext().getFlash(); flash.put("overridePortalGrowl", true); flash.setRedirect(true); flash.setKeepMessages(true);
Please refer to GlobalGrowl dialog in PortalExamples project for more details.
Components
37
Change Last Drilldown Level Of Task By ExpiryChart
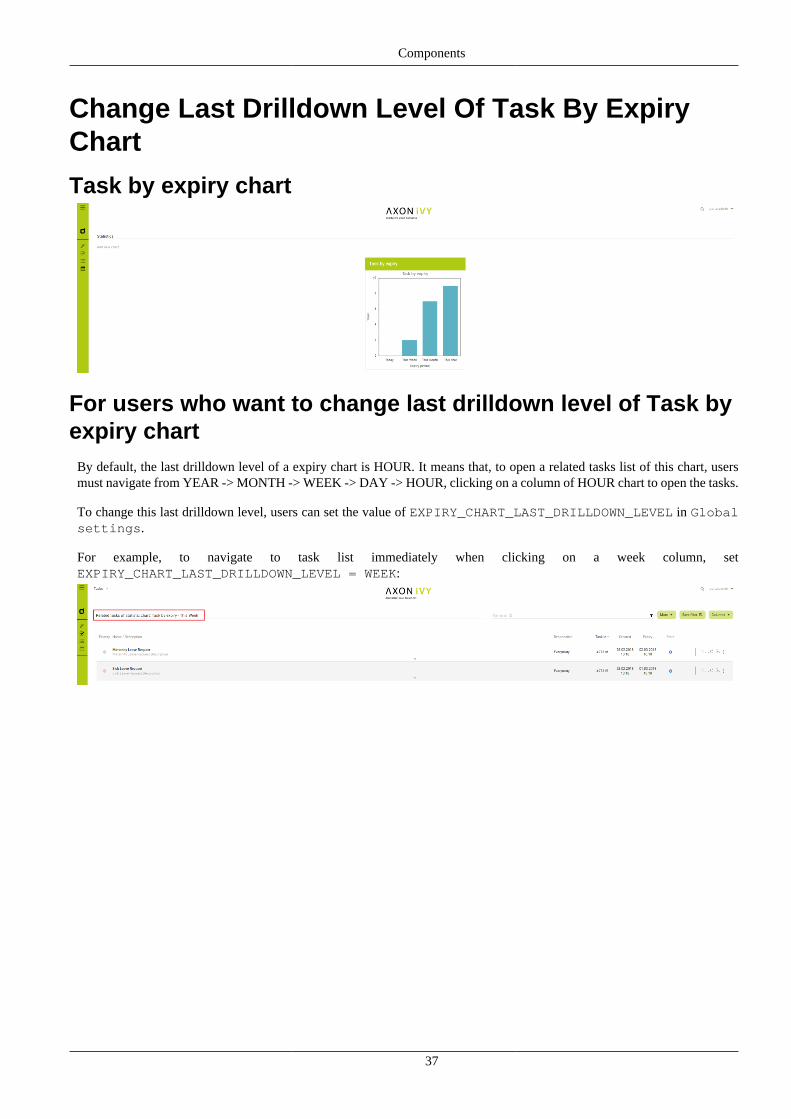
Task by expiry chart
For users who want to change last drilldown level of Task byexpiry chart
By default, the last drilldown level of a expiry chart is HOUR. It means that, to open a related tasks list of this chart, usersmust navigate from YEAR -> MONTH -> WEEK -> DAY -> HOUR, clicking on a column of HOUR chart to open the tasks.
To change this last drilldown level, users can set the value of EXPIRY_CHART_LAST_DRILLDOWN_LEVEL in Globalsettings.
For example, to navigate to task list immediately when clicking on a week column, setEXPIRY_CHART_LAST_DRILLDOWN_LEVEL = WEEK:
38
Chapter 5. Customization
Build your own portal
Build your own portal using Portal kit
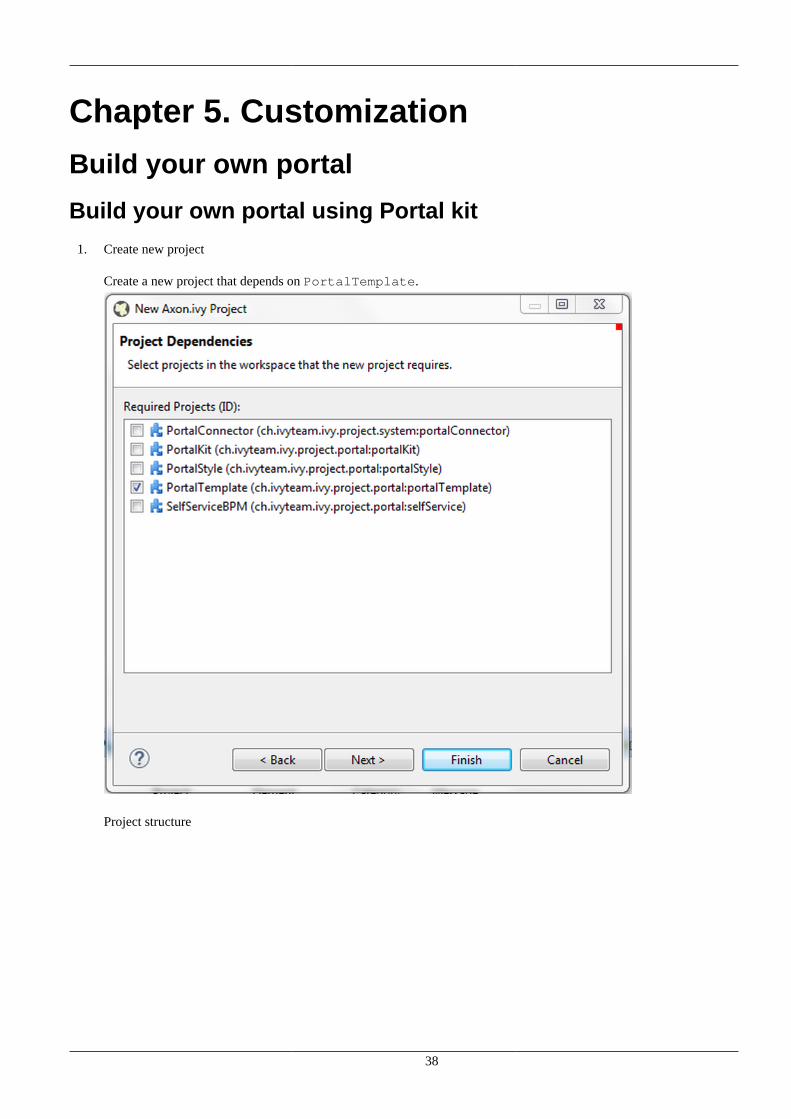
1. Create new project
Create a new project that depends on PortalTemplate.
Project structure
Customization
39
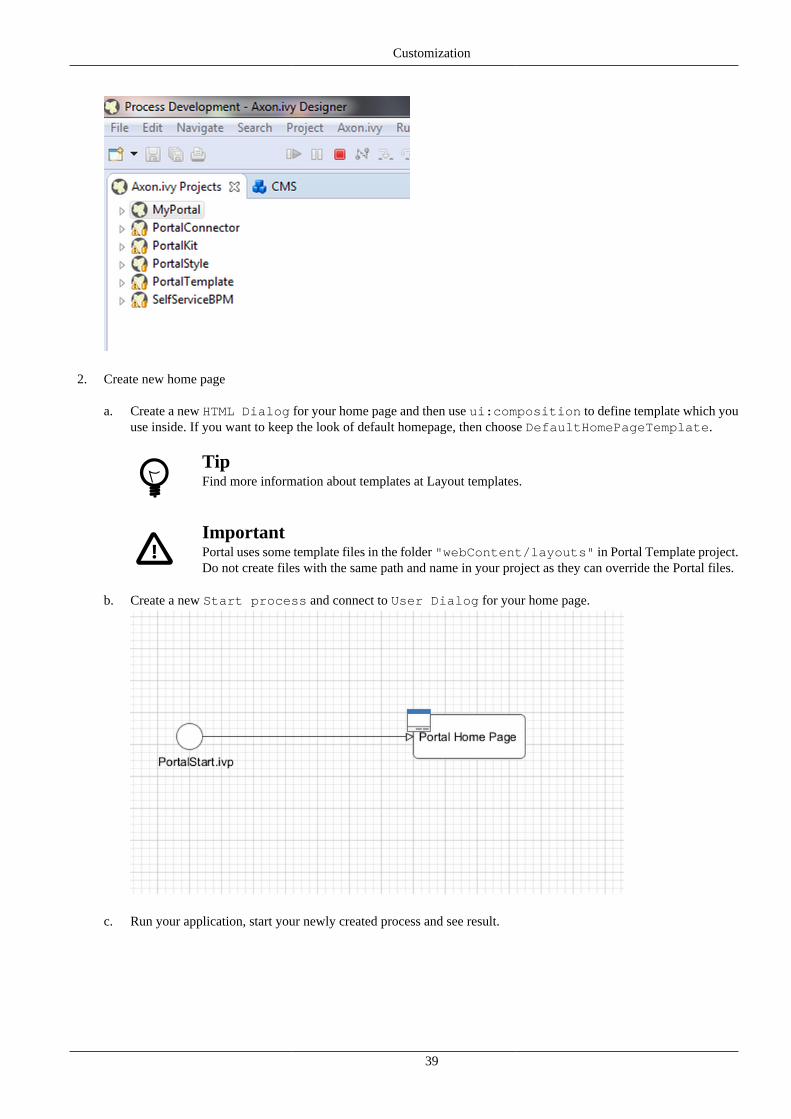
2. Create new home page
a. Create a new HTML Dialog for your home page and then use ui:composition to define template which youuse inside. If you want to keep the look of default homepage, then choose DefaultHomePageTemplate.
TipFind more information about templates at Layout templates.
ImportantPortal uses some template files in the folder "webContent/layouts" in Portal Template project.Do not create files with the same path and name in your project as they can override the Portal files.
b. Create a new Start process and connect to User Dialog for your home page.
c. Run your application, start your newly created process and see result.
Customization
40
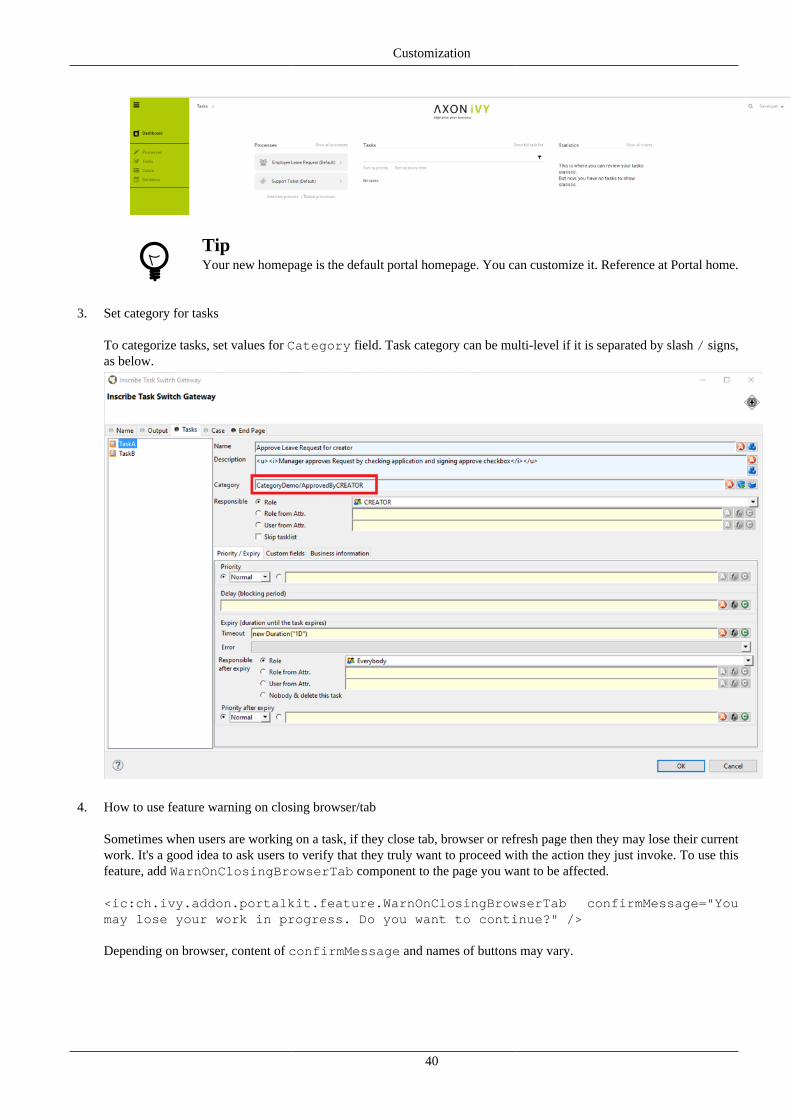
TipYour new homepage is the default portal homepage. You can customize it. Reference at Portal home.
3. Set category for tasks
To categorize tasks, set values for Category field. Task category can be multi-level if it is separated by slash / signs,as below.
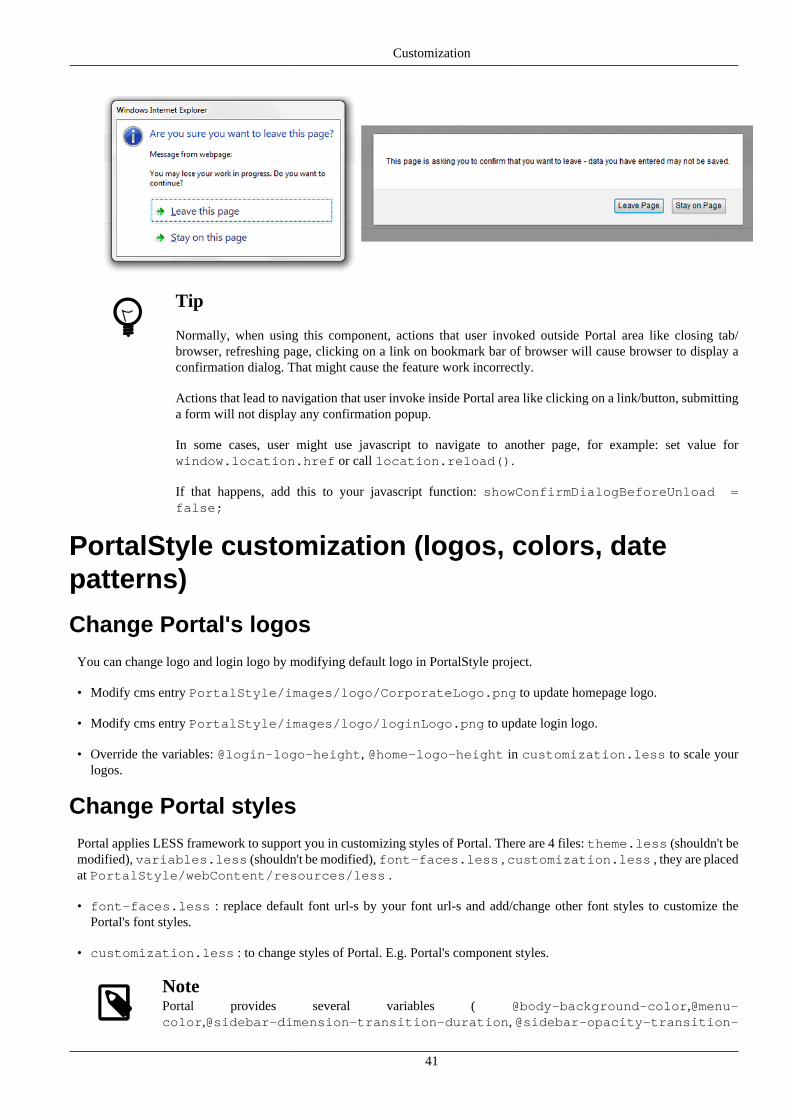
4. How to use feature warning on closing browser/tab
Sometimes when users are working on a task, if they close tab, browser or refresh page then they may lose their currentwork. It's a good idea to ask users to verify that they truly want to proceed with the action they just invoke. To use thisfeature, add WarnOnClosingBrowserTab component to the page you want to be affected.
<ic:ch.ivy.addon.portalkit.feature.WarnOnClosingBrowserTab confirmMessage="Youmay lose your work in progress. Do you want to continue?" />
Depending on browser, content of confirmMessage and names of buttons may vary.
Customization
41
Tip
Normally, when using this component, actions that user invoked outside Portal area like closing tab/browser, refreshing page, clicking on a link on bookmark bar of browser will cause browser to display aconfirmation dialog. That might cause the feature work incorrectly.
Actions that lead to navigation that user invoke inside Portal area like clicking on a link/button, submittinga form will not display any confirmation popup.
In some cases, user might use javascript to navigate to another page, for example: set value forwindow.location.href or call location.reload().
If that happens, add this to your javascript function: showConfirmDialogBeforeUnload =false;
PortalStyle customization (logos, colors, datepatterns)
Change Portal's logosYou can change logo and login logo by modifying default logo in PortalStyle project.
• Modify cms entry PortalStyle/images/logo/CorporateLogo.png to update homepage logo.
• Modify cms entry PortalStyle/images/logo/loginLogo.png to update login logo.
• Override the variables: @login-logo-height, @home-logo-height in customization.less to scale yourlogos.
Change Portal stylesPortal applies LESS framework to support you in customizing styles of Portal. There are 4 files: theme.less (shouldn't bemodified), variables.less (shouldn't be modified), font-faces.less , customization.less , they are placedat PortalStyle/webContent/resources/less .
• font-faces.less : replace default font url-s by your font url-s and add/change other font styles to customize thePortal's font styles.
• customization.less : to change styles of Portal. E.g. Portal's component styles.
NotePortal provides several variables ( @body-background-color,@menu-color,@sidebar-dimension-transition-duration, @sidebar-opacity-transition-
Customization
42
duration,@process-chain-menu-color , etc.) to change Portal's style. To override variables, youshould put overriding code (e.g. @body-background-color: red ) at customization.less file.
• @body-background-color: Portal background color.
• @menu-color: application menu color, color of texts and icons on the menu will be calculated based onbrightness of menu color.
• @sidebar-opacity-transition-duration: application menu text opacity transition duration.
• @process-chain-menu-color: process chain component color.
• @action-button-color: Portal action button color e.g: close, add, next ...
• @action-button-border-radius: action button shape, it's rectangle when set @action-button-border-radius:0px;
• @sidebar-dimension-transition-duration: expanding/collapsing transition duration ofapplication menu.
• @cancel-button-background-color: cancel button background color.
• @task-priority-low-color, @task-priority-normal-color, @task-priority-high-color, @task-priority-exception-color: task priority color.
• @task-state-open-color, @task-state-in-progress-color, @task-state-done-color, @task-state-zombie-destroyed-color, @task-state-reserved-color,@task-state-system-color: task state color.
• @circle-step-number-color: circle process chain number step color.
Important
• Do not change font-family property values.
• Limitation: the task priority color customization hasn't changed the task priority colors in statistic.
There is additional button type allows developer to configure its color and shape. Use it when you need different button typesin your own project. How to: use style class context-button for it. For example : <p:commandButton value="Mybutton" styleClass="context-button" > There are 2 variables allow developers to change color and shape
• @context-button-color : it is the color of context button
• @context-button-border-radius : it sets shape of action button, it's rectangle when set @context-button-border-radius:0px;
After you finish your customization, compile these above less files to build the css file named theme.min.css and put it atPortalStyle/webContent/resources/css . You are highly recommended to run the mvn lesscss:compilemaven command in PortalStyle to do it quickly.
Change date time pattern
You can change date pattern by modifying CMS in PortalStyle project: PortalStyle/patterns/datePattern andPortalStyle/patterns/dateTimePattern .
Customization
43
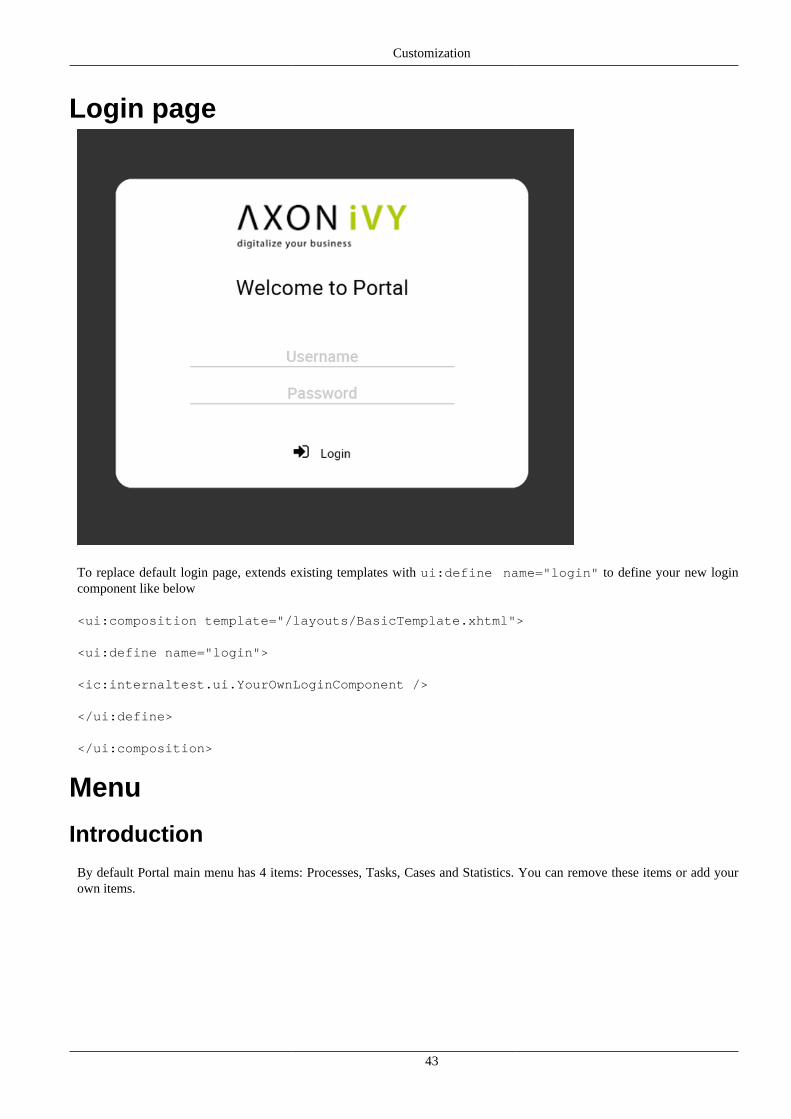
Login page
To replace default login page, extends existing templates with ui:define name="login" to define your new logincomponent like below
<ui:composition template="/layouts/BasicTemplate.xhtml">
<ui:define name="login">
<ic:internaltest.ui.YourOwnLoginComponent />
</ui:define>
</ui:composition>
Menu
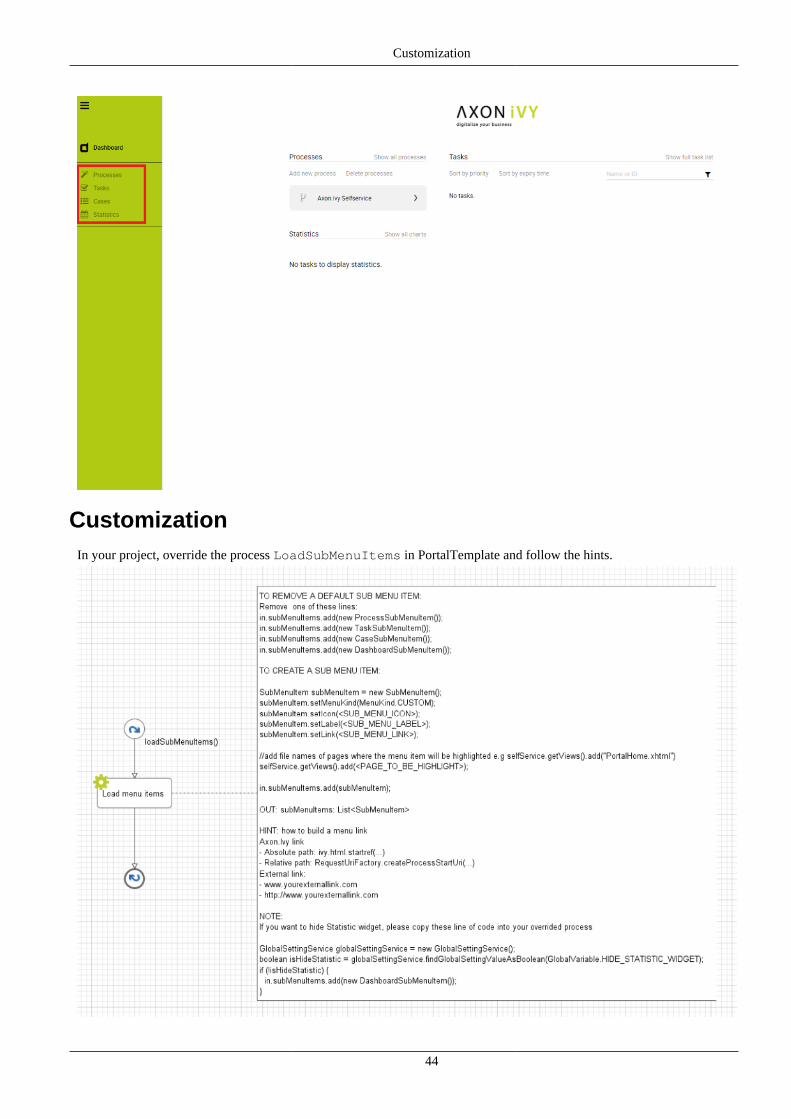
Introduction
By default Portal main menu has 4 items: Processes, Tasks, Cases and Statistics. You can remove these items or add yourown items.
Customization
44
CustomizationIn your project, override the process LoadSubMenuItems in PortalTemplate and follow the hints.
Customization
45
User can hide Statistic widget in Admin settings. Therefore, if you want to hide Statistic widget in your overrided process,please take a look on NOTE section of LoadSubMenuItems in PortalTemplate.
Portal homeBefore beginning
This guide assumes that you are already familiar with CSS to integrate your own widgets.
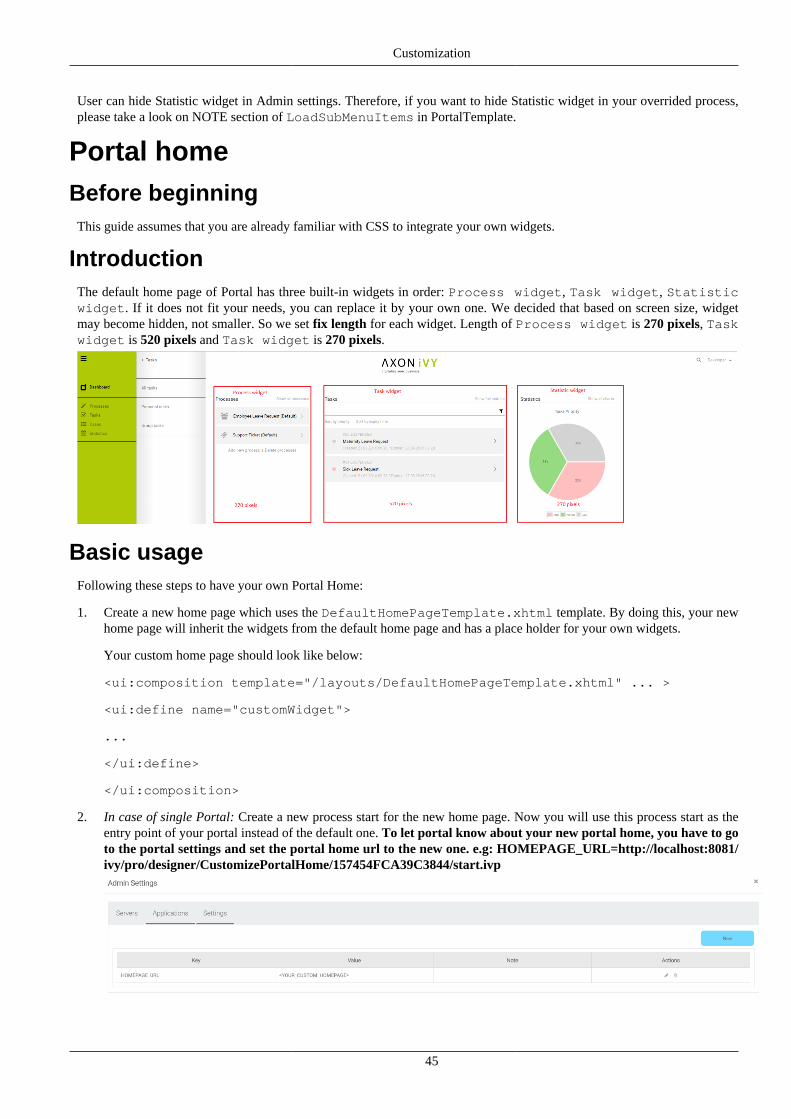
IntroductionThe default home page of Portal has three built-in widgets in order: Process widget, Task widget, Statisticwidget. If it does not fit your needs, you can replace it by your own one. We decided that based on screen size, widgetmay become hidden, not smaller. So we set fix length for each widget. Length of Process widget is 270 pixels, Taskwidget is 520 pixels and Task widget is 270 pixels.
Basic usageFollowing these steps to have your own Portal Home:
1. Create a new home page which uses the DefaultHomePageTemplate.xhtml template. By doing this, your newhome page will inherit the widgets from the default home page and has a place holder for your own widgets.
Your custom home page should look like below:
<ui:composition template="/layouts/DefaultHomePageTemplate.xhtml" ... >
<ui:define name="customWidget">
...
</ui:define>
</ui:composition>
2. In case of single Portal: Create a new process start for the new home page. Now you will use this process start as theentry point of your portal instead of the default one. To let portal know about your new portal home, you have to goto the portal settings and set the portal home url to the new one. e.g: HOMEPAGE_URL=http://localhost:8081/ivy/pro/designer/CustomizePortalHome/157454FCA39C3844/start.ivp
Customization
46
In case of multi Portal: refer to Setup multi portals to setup.
NoteCurrently, responsive custom home page is not supported.
Advanced usageThe DefaultHomePageTemplate.xhtml template supports some customizations.
Display your statistics data
The template has a parameter: statistic to display the statistic data. Their default values are the tasks which the sessionuser can work on.
<ui:composition template="/layouts/DefaultHomePageTemplate.xhtml" ... >
<ui:param name="statistic" value="#{logic.getStatistic()}" /> <!-- A method returnsStatisticData -->
</ui:composition>
Display/hide the default widgets
The template has three parameters: displayProcessWidget, displayTaskWidget,displayStatisticWidget to display or hide the default widgets. Their default values are true, you can set them toboolean values (true/false) to display or hide them as you need.
<ui:composition template="/layouts/DefaultHomePageTemplate.xhtml" ... >
<ui:param name="displayTaskWidget" value="false" />
</ui:composition>
TipTask widget now is hidden.
Customize the default widget's sections
The template has the placeholders to redefine the default widgets' sections.
<ui:composition template="/layouts/DefaultHomePageTemplate.xhtml" ... >
<ui:define name="statisticWidget">
<div class="js-dashboard-main-content-3rd-col dashboard-main-content-3rd-collayout-col">
<h:panelGroup layout="block" styleClass="js-statistic-widget" id="statistic-widget-container">
<!-- KEEP THE STATISTIC WIDGET -->
<ic:ch.ivy.addon.portalkit.component.StatisticWidget id="statistics-widget"compactMode="true" tasks="#{tasks}" ... >
<!-- ADD THE WEATHER WIDGET BELOW STATISTIC WIDGET -->
<ic:my.namespace.WeatherWidget />
</h:panelGroup>
Customization
47
</div>
</ui:define>
</ui:composition>
Add your own widgets
The template has a placeholder to add your own widgets. Your own widgets' default positions are next to statistic widget, youcan change them by setting the default widgets' positions.
<ui:composition template="/layouts/DefaultHomePageTemplate.xhtml" ... >
<ui:define name="customWidget">
<ic:my.namespace.ComponentName ... />
</ui:define>
</ui:composition>
TipThis custom widget will show below the 3 default widget
Change the page's title
The default page title is Cockpit. Apply the following code to change it:
<ui:composition template="/layouts/DefaultHomePageTemplate.xhtml" ... >
<ui:define name="pageTitle">YOUR PAGE'S TITLE</ui:define>
</ui:composition>
Task widgetTaskWidget is a built-in component of Portal which contains the tasks users can interact with. In order to show needed task'sinformation, Portal supports overriding concept for TaskWidget. Each TaskWidget contains 2 parts:
1. UI: TaskHeader and TaskListHeader and TaskBody and TaskFilter
2. Data query: display the tasks as you want
Important
1. Task header customization does not support responsive design, smaller resolutions (iPad, etc.)
2. Additional properties cannot be displayed right now as a column
3. Task header's buttons cannot be modified (they stay where they are)
How to override task widget's UIRefer to PortalExamples project for examples
1. Introduce an Axon.ivy project which has PortalTemplate as a required library.
2. To customize task widget, you must customize Portal Home first. Refer to Customize Portal home to set new home page.
3. Copy the PortalStart process from PortalTemplate to your project. Point PortalHome element to your customhome page in previous step. This process is new home page and administrator should register this link by Portal's AdminSettings.
Customization
48
4. Override Task widget in: TaskList page, Task Search result, Relate tasks of a case, History tasks of a case.
• Introduce a new HTMLDialog which uses template /layouts/PortalTasksTemplate.xhtml (refer toResponsiveness to override responsiveness). You can take a look at PortalTasks.xhtml to see how to customizeit.
Tip
Highly recommend to copy the PortalTasks HTMLDialog in PortalTemplate and change the copiedone's view.
• Use Axon.ivy Override to override the OpenPortalTasks callable. The original implementation of this callableis calling PortalTasks, change it to call the customized Page introduced in the step above. The signature of thiscallable is useView(TaskView) and customized page must receive this TaskView instance, put in the dialog'sData with the exact name taskView.
5. After previous steps, you can override TaskHeader and TaskListHeader and TaskBody and TaskFilter
Task header
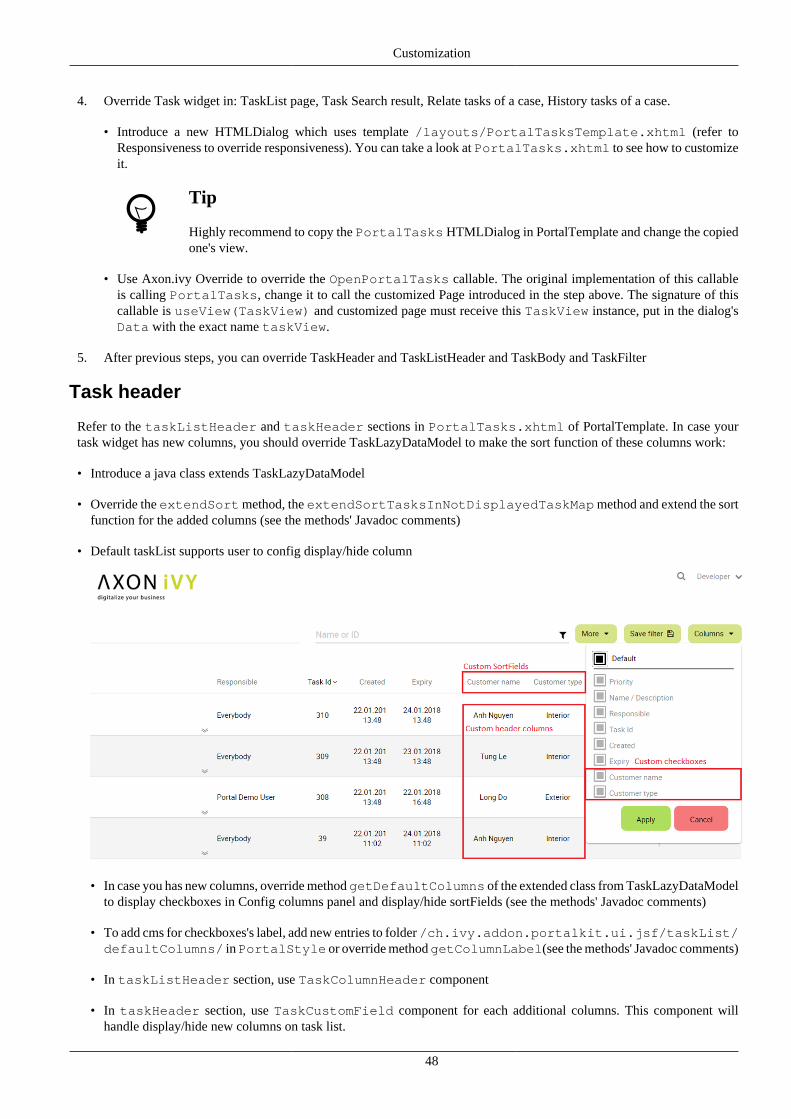
Refer to the taskListHeader and taskHeader sections in PortalTasks.xhtml of PortalTemplate. In case yourtask widget has new columns, you should override TaskLazyDataModel to make the sort function of these columns work:
• Introduce a java class extends TaskLazyDataModel
• Override the extendSort method, the extendSortTasksInNotDisplayedTaskMap method and extend the sortfunction for the added columns (see the methods' Javadoc comments)
• Default taskList supports user to config display/hide column
• In case you has new columns, override method getDefaultColumns of the extended class from TaskLazyDataModelto display checkboxes in Config columns panel and display/hide sortFields (see the methods' Javadoc comments)
• To add cms for checkboxes's label, add new entries to folder /ch.ivy.addon.portalkit.ui.jsf/taskList/defaultColumns/ in PortalStyle or override method getColumnLabel(see the methods' Javadoc comments)
• In taskListHeader section, use TaskColumnHeader component
• In taskHeader section, use TaskCustomField component for each additional columns. This component willhandle display/hide new columns on task list.
Customization
49
Currently, TaskCustomField only supports text field. If you want to create your own component, remember to addrendered="#{taskView.dataModel.isSelectedColumn('YOUR_CUSTOM_COLUMN')}"
For example: Show custom field customer name which stored in task.customVarCharField5
<ic:ch.ivy.addon.portalkit.component.task.column.TaskCustomField id="customer-name-component" componentId="customer-name" column="customVarCharField5"dataModel="#{taskView.dataModel}" labelValue="#{task.customVarCharField5}" />
• Use Axon.ivy Override to override the InitializeTaskDataModel callable and initialize data model by yourcustomized one.
• In your customized portal tasks HTMLDialog, the customized data model should be passed as a parameter to components(refer to PortalTasks.xhtml).
Task body
Refer to the taskBody section in PortalTasks.xhtml of PortalTemplate.
If you need to apply the responsiveness behavior of Portal for task details, there are 2 components which can be used:ResponsivenessHandleContainer and ResponsivenessHandleButton:
• ResponsivenessHandleContainer: a container contains ResponsivenessHandleButton and your javascript whichcontains the onstart and oncomplete function of ResponsivenessHandleButton.
• ResponsivenessHandleButton: contains the params which handle responsiveness:
• icon: the icon of button
• displayedSelectors: css selectors of the components which need to be displayed.
• hiddenSelectorsInLargeScreen: css selectors of the components which need to be hidden in large screen (width: 1920).
• hiddenSelectorsInMediumScreen: css selectors of the components which need to be hidden in medium screen (width:1366).
• hiddenSelectorsInSmallScreen: css selectors of the components which need to be hidden in small screen (width: 1024).
• fadeTime: the fade in/out time.
• onstart: client side callback to execute before responsiveness execution.
• oncomplete: client side callback to execute after responsiveness execution.
For example:
<ui:composition template="/layouts/PortalTasksTemplate.xhtml">
<ui:param name="useOverrideBody" value="true" />
<ui:define name="taskBody">
Customized content
<ic:ch.ivy.addon.portalkit.component.ResponsivenessHandleContainerstyleClass="hidden-lg">
<ic:ch.ivy.addon.portalkit.component.ResponsivenessHandleButton icon="fa fa-file js-note-column-responsive-button" displayedSelectors="['#task-note']" hiddenSelectorsInMediumScreen="['.task-details .replaced']"hiddenSelectorsInSmallScreen="['.task-details .replaced']" />
<h:outputScript library="js" name="task-detail-default-responsiveness.js" />
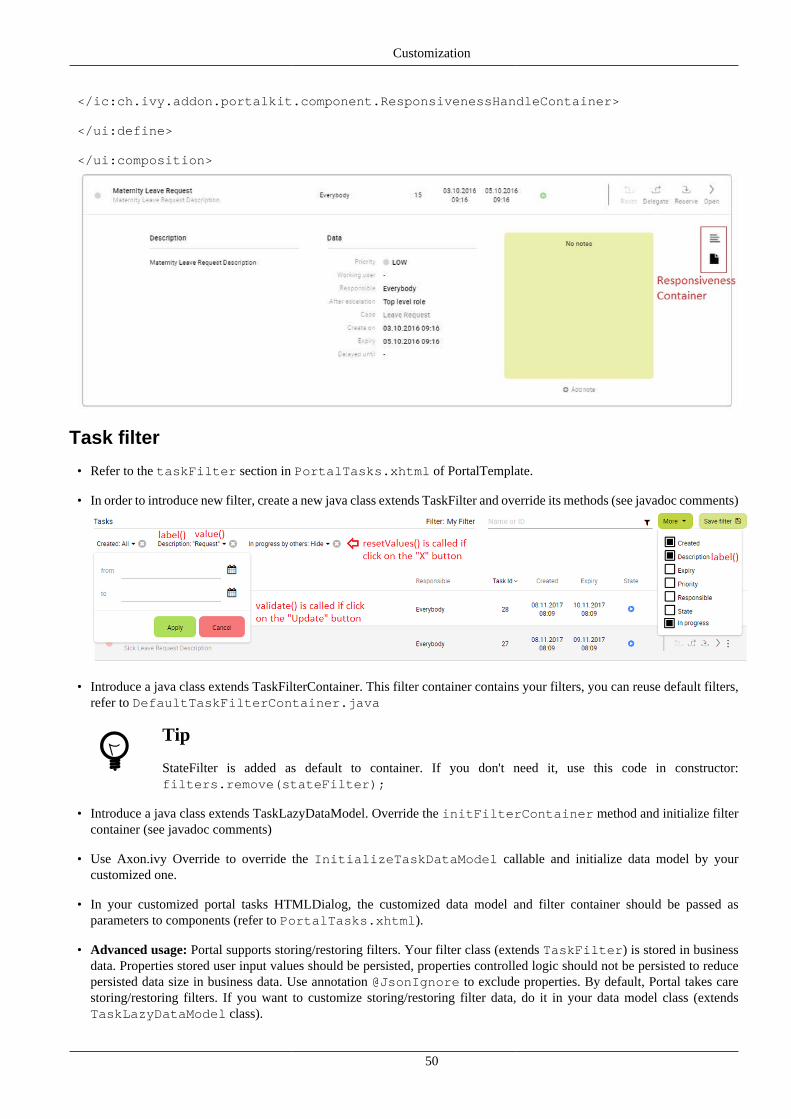
Customization
50
</ic:ch.ivy.addon.portalkit.component.ResponsivenessHandleContainer>
</ui:define>
</ui:composition>
Task filter
• Refer to the taskFilter section in PortalTasks.xhtml of PortalTemplate.
• In order to introduce new filter, create a new java class extends TaskFilter and override its methods (see javadoc comments)
• Introduce a java class extends TaskFilterContainer. This filter container contains your filters, you can reuse default filters,refer to DefaultTaskFilterContainer.java
Tip
StateFilter is added as default to container. If you don't need it, use this code in constructor:filters.remove(stateFilter);
• Introduce a java class extends TaskLazyDataModel. Override the initFilterContainer method and initialize filtercontainer (see javadoc comments)
• Use Axon.ivy Override to override the InitializeTaskDataModel callable and initialize data model by yourcustomized one.
• In your customized portal tasks HTMLDialog, the customized data model and filter container should be passed asparameters to components (refer to PortalTasks.xhtml).
• Advanced usage: Portal supports storing/restoring filters. Your filter class (extends TaskFilter) is stored in businessdata. Properties stored user input values should be persisted, properties controlled logic should not be persisted to reducepersisted data size in business data. Use annotation @JsonIgnore to exclude properties. By default, Portal takes carestoring/restoring filters. If you want to customize storing/restoring filter data, do it in your data model class (extendsTaskLazyDataModel class).
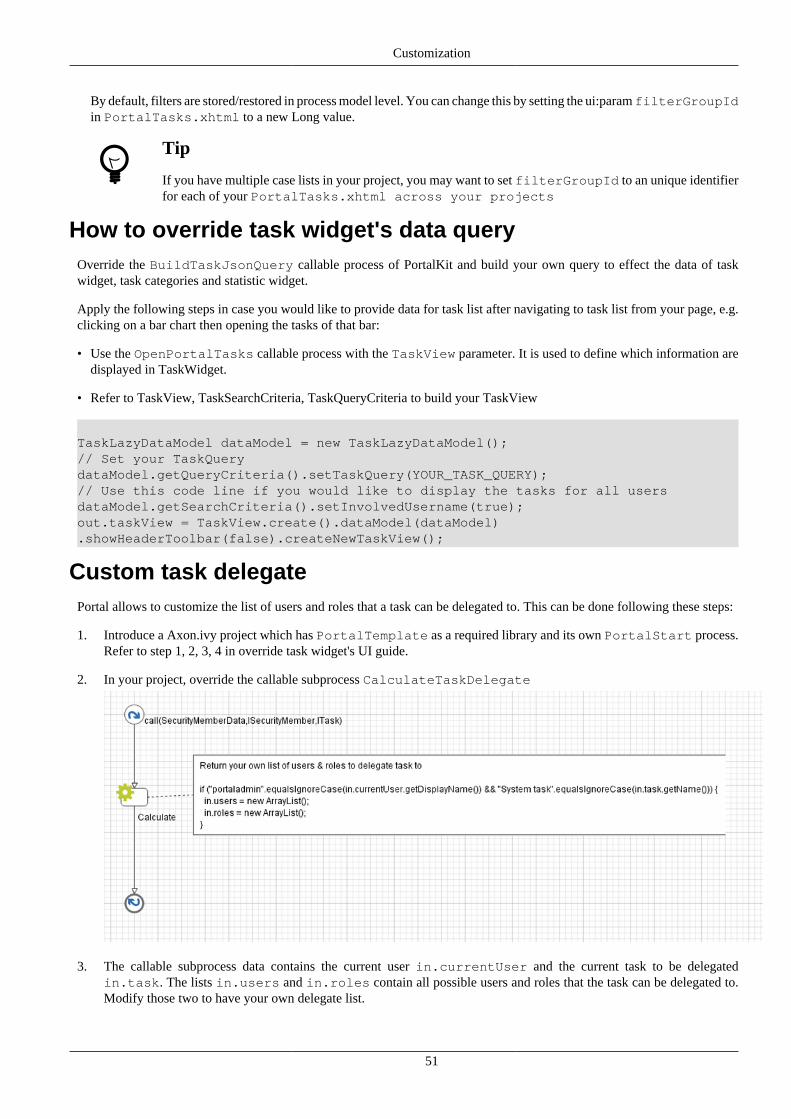
Customization
51
By default, filters are stored/restored in process model level. You can change this by setting the ui:param filterGroupIdin PortalTasks.xhtml to a new Long value.
Tip
If you have multiple case lists in your project, you may want to set filterGroupId to an unique identifierfor each of your PortalTasks.xhtml across your projects
How to override task widget's data queryOverride the BuildTaskJsonQuery callable process of PortalKit and build your own query to effect the data of taskwidget, task categories and statistic widget.
Apply the following steps in case you would like to provide data for task list after navigating to task list from your page, e.g.clicking on a bar chart then opening the tasks of that bar:
• Use the OpenPortalTasks callable process with the TaskView parameter. It is used to define which information aredisplayed in TaskWidget.
• Refer to TaskView, TaskSearchCriteria, TaskQueryCriteria to build your TaskView
TaskLazyDataModel dataModel = new TaskLazyDataModel();// Set your TaskQuerydataModel.getQueryCriteria().setTaskQuery(YOUR_TASK_QUERY); // Use this code line if you would like to display the tasks for all usersdataModel.getSearchCriteria().setInvolvedUsername(true); out.taskView = TaskView.create().dataModel(dataModel).showHeaderToolbar(false).createNewTaskView();
Custom task delegatePortal allows to customize the list of users and roles that a task can be delegated to. This can be done following these steps:
1. Introduce a Axon.ivy project which has PortalTemplate as a required library and its own PortalStart process.Refer to step 1, 2, 3, 4 in override task widget's UI guide.
2. In your project, override the callable subprocess CalculateTaskDelegate
3. The callable subprocess data contains the current user in.currentUser and the current task to be delegatedin.task. The lists in.users and in.roles contain all possible users and roles that the task can be delegated to.Modify those two to have your own delegate list.
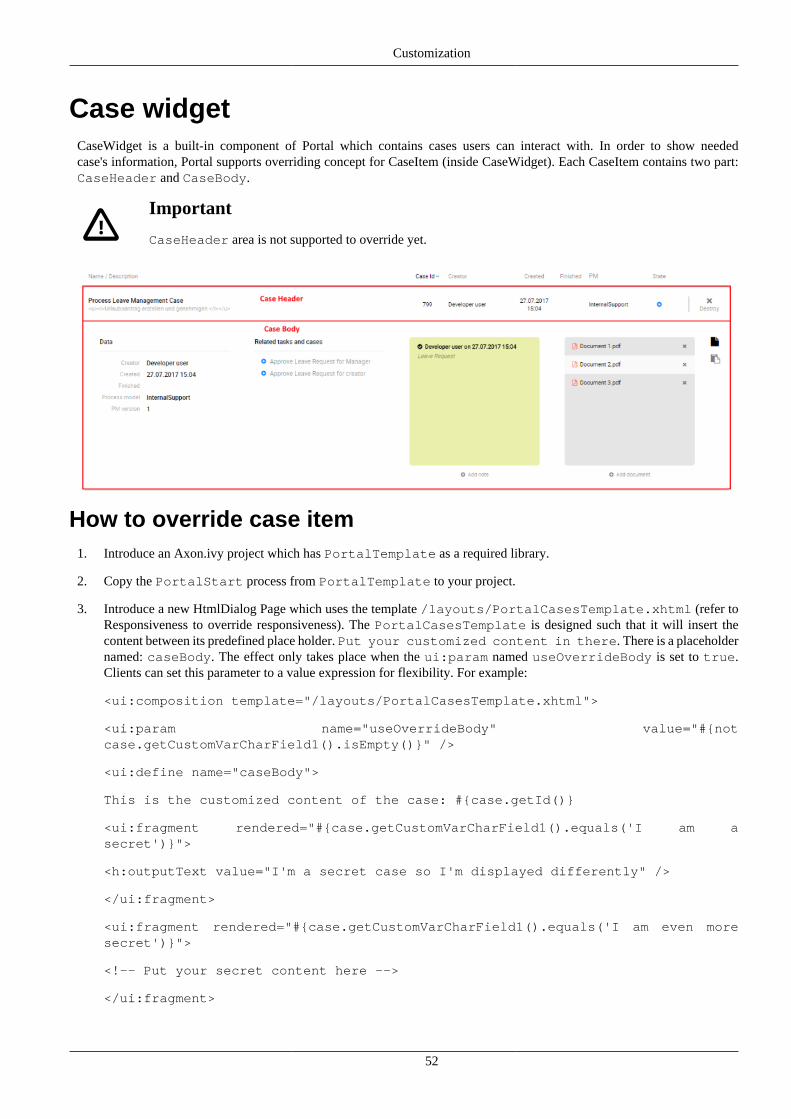
Customization
52
Case widgetCaseWidget is a built-in component of Portal which contains cases users can interact with. In order to show neededcase's information, Portal supports overriding concept for CaseItem (inside CaseWidget). Each CaseItem contains two part:CaseHeader and CaseBody.
Important
CaseHeader area is not supported to override yet.
How to override case item1. Introduce an Axon.ivy project which has PortalTemplate as a required library.
2. Copy the PortalStart process from PortalTemplate to your project.
3. Introduce a new HtmlDialog Page which uses the template /layouts/PortalCasesTemplate.xhtml (refer toResponsiveness to override responsiveness). The PortalCasesTemplate is designed such that it will insert thecontent between its predefined place holder. Put your customized content in there. There is a placeholdernamed: caseBody. The effect only takes place when the ui:param named useOverrideBody is set to true.Clients can set this parameter to a value expression for flexibility. For example:
<ui:composition template="/layouts/PortalCasesTemplate.xhtml">
<ui:param name="useOverrideBody" value="#{notcase.getCustomVarCharField1().isEmpty()}" />
<ui:define name="caseBody">
This is the customized content of the case: #{case.getId()}
<ui:fragment rendered="#{case.getCustomVarCharField1().equals('I am asecret')}">
<h:outputText value="I'm a secret case so I'm displayed differently" />
</ui:fragment>
<ui:fragment rendered="#{case.getCustomVarCharField1().equals('I am even moresecret')}">
<!-- Put your secret content here -->
</ui:fragment>
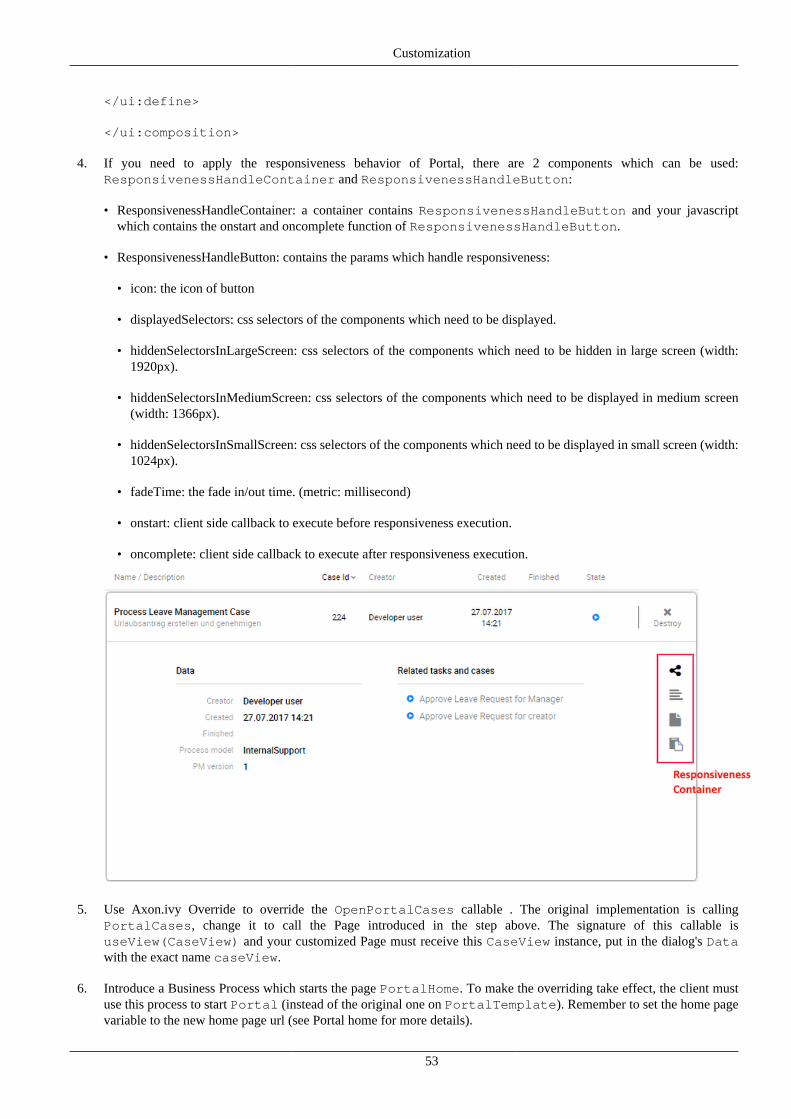
Customization
53
</ui:define>
</ui:composition>
4. If you need to apply the responsiveness behavior of Portal, there are 2 components which can be used:ResponsivenessHandleContainer and ResponsivenessHandleButton:
• ResponsivenessHandleContainer: a container contains ResponsivenessHandleButton and your javascriptwhich contains the onstart and oncomplete function of ResponsivenessHandleButton.
• ResponsivenessHandleButton: contains the params which handle responsiveness:
• icon: the icon of button
• displayedSelectors: css selectors of the components which need to be displayed.
• hiddenSelectorsInLargeScreen: css selectors of the components which need to be hidden in large screen (width:1920px).
• hiddenSelectorsInMediumScreen: css selectors of the components which need to be displayed in medium screen(width: 1366px).
• hiddenSelectorsInSmallScreen: css selectors of the components which need to be displayed in small screen (width:1024px).
• fadeTime: the fade in/out time. (metric: millisecond)
• onstart: client side callback to execute before responsiveness execution.
• oncomplete: client side callback to execute after responsiveness execution.
5. Use Axon.ivy Override to override the OpenPortalCases callable . The original implementation is callingPortalCases, change it to call the Page introduced in the step above. The signature of this callable isuseView(CaseView) and your customized Page must receive this CaseView instance, put in the dialog's Datawith the exact name caseView.
6. Introduce a Business Process which starts the page PortalHome. To make the overriding take effect, the client mustuse this process to start Portal (instead of the original one on PortalTemplate). Remember to set the home pagevariable to the new home page url (see Portal home for more details).
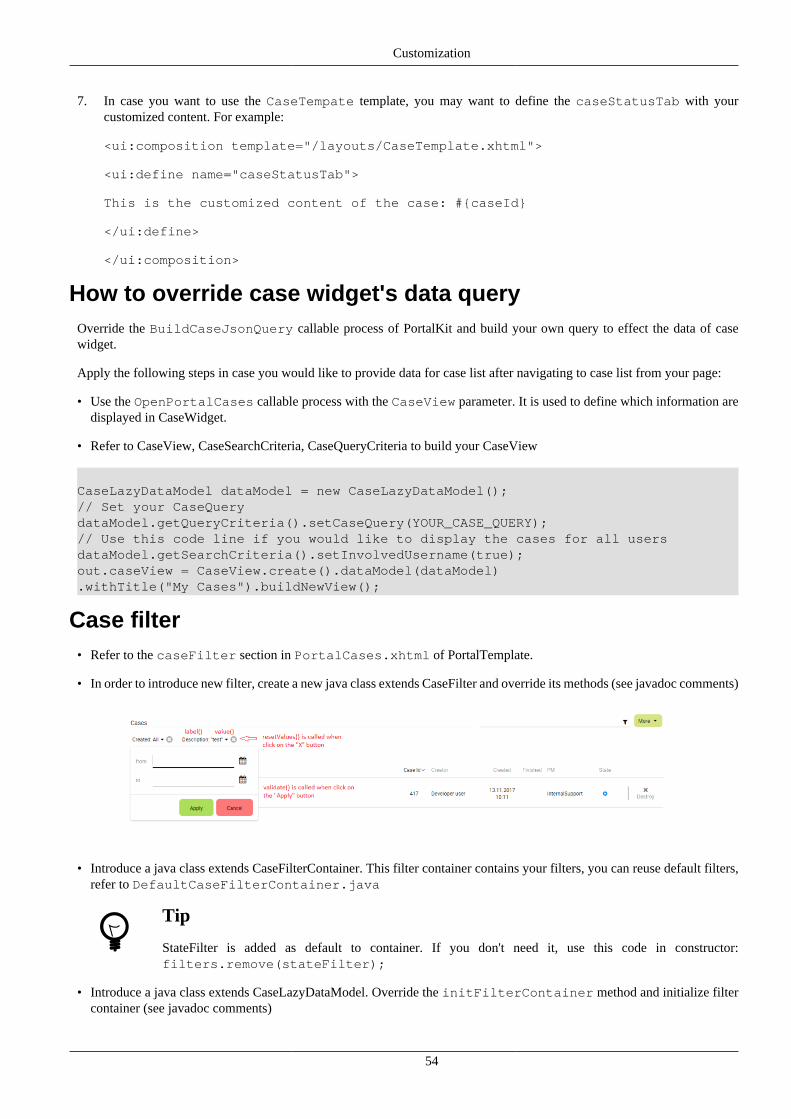
Customization
54
7. In case you want to use the CaseTempate template, you may want to define the caseStatusTab with yourcustomized content. For example:
<ui:composition template="/layouts/CaseTemplate.xhtml">
<ui:define name="caseStatusTab">
This is the customized content of the case: #{caseId}
</ui:define>
</ui:composition>
How to override case widget's data queryOverride the BuildCaseJsonQuery callable process of PortalKit and build your own query to effect the data of casewidget.
Apply the following steps in case you would like to provide data for case list after navigating to case list from your page:
• Use the OpenPortalCases callable process with the CaseView parameter. It is used to define which information aredisplayed in CaseWidget.
• Refer to CaseView, CaseSearchCriteria, CaseQueryCriteria to build your CaseView
CaseLazyDataModel dataModel = new CaseLazyDataModel();// Set your CaseQuerydataModel.getQueryCriteria().setCaseQuery(YOUR_CASE_QUERY); // Use this code line if you would like to display the cases for all usersdataModel.getSearchCriteria().setInvolvedUsername(true); out.caseView = CaseView.create().dataModel(dataModel).withTitle("My Cases").buildNewView();
Case filter• Refer to the caseFilter section in PortalCases.xhtml of PortalTemplate.
• In order to introduce new filter, create a new java class extends CaseFilter and override its methods (see javadoc comments)
• Introduce a java class extends CaseFilterContainer. This filter container contains your filters, you can reuse default filters,refer to DefaultCaseFilterContainer.java
Tip
StateFilter is added as default to container. If you don't need it, use this code in constructor:filters.remove(stateFilter);
• Introduce a java class extends CaseLazyDataModel. Override the initFilterContainer method and initialize filtercontainer (see javadoc comments)
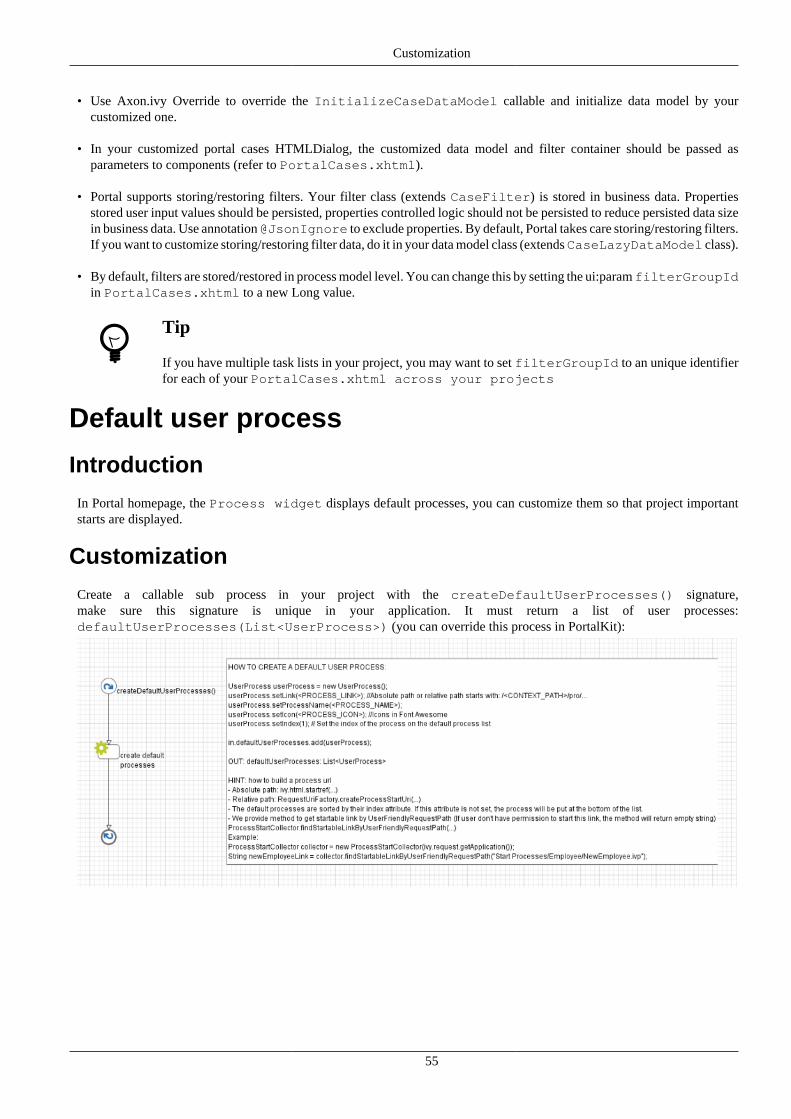
Customization
55
• Use Axon.ivy Override to override the InitializeCaseDataModel callable and initialize data model by yourcustomized one.
• In your customized portal cases HTMLDialog, the customized data model and filter container should be passed asparameters to components (refer to PortalCases.xhtml).
• Portal supports storing/restoring filters. Your filter class (extends CaseFilter) is stored in business data. Propertiesstored user input values should be persisted, properties controlled logic should not be persisted to reduce persisted data sizein business data. Use annotation @JsonIgnore to exclude properties. By default, Portal takes care storing/restoring filters.If you want to customize storing/restoring filter data, do it in your data model class (extends CaseLazyDataModel class).
• By default, filters are stored/restored in process model level. You can change this by setting the ui:param filterGroupIdin PortalCases.xhtml to a new Long value.
Tip
If you have multiple task lists in your project, you may want to set filterGroupId to an unique identifierfor each of your PortalCases.xhtml across your projects
Default user process
Introduction
In Portal homepage, the Process widget displays default processes, you can customize them so that project importantstarts are displayed.
Customization
Create a callable sub process in your project with the createDefaultUserProcesses() signature,make sure this signature is unique in your application. It must return a list of user processes:defaultUserProcesses(List<UserProcess>) (you can override this process in PortalKit):
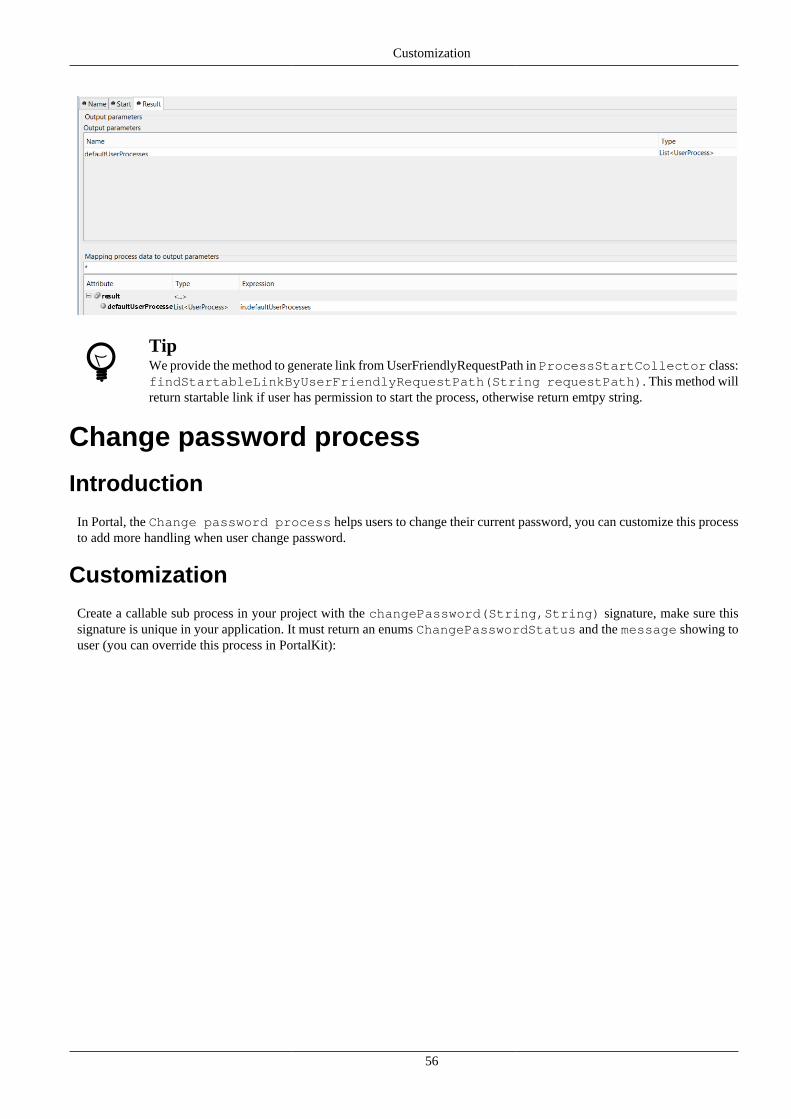
Customization
56
TipWe provide the method to generate link from UserFriendlyRequestPath in ProcessStartCollector class:findStartableLinkByUserFriendlyRequestPath(String requestPath). This method willreturn startable link if user has permission to start the process, otherwise return emtpy string.
Change password process
Introduction
In Portal, the Change password process helps users to change their current password, you can customize this processto add more handling when user change password.
Customization
Create a callable sub process in your project with the changePassword(String,String) signature, make sure thissignature is unique in your application. It must return an enums ChangePasswordStatus and the message showing touser (you can override this process in PortalKit):
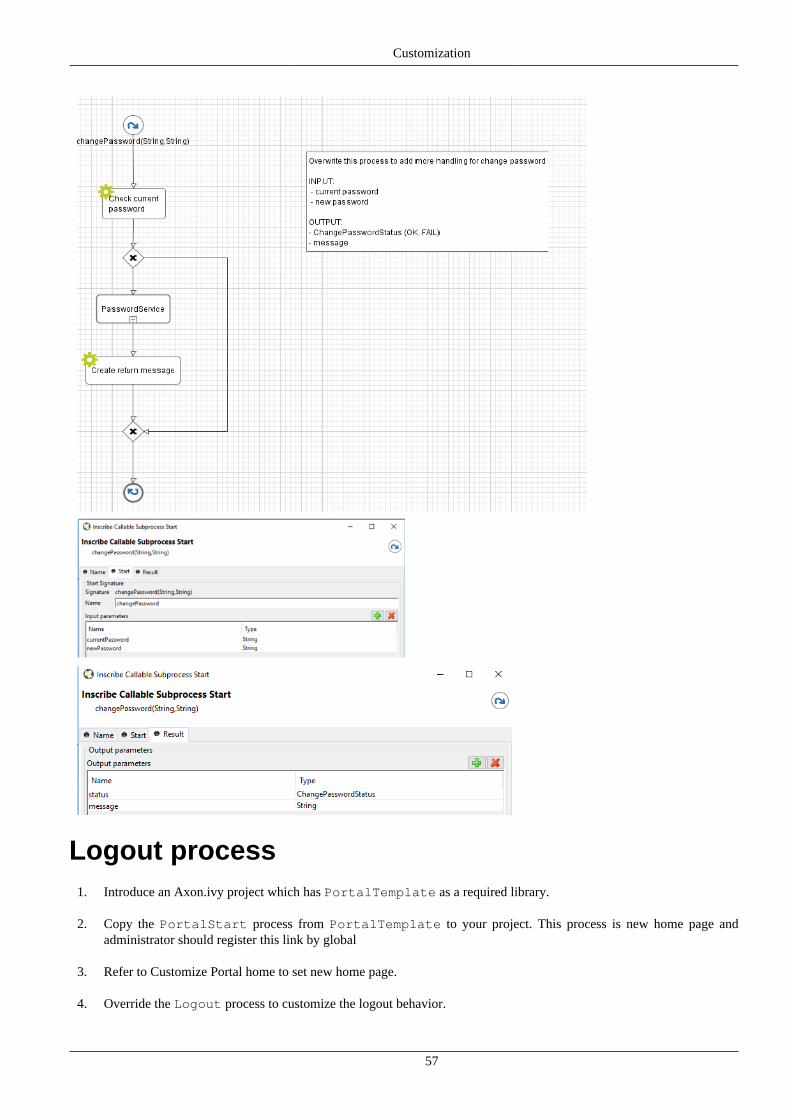
Customization
57
Logout process1. Introduce an Axon.ivy project which has PortalTemplate as a required library.
2. Copy the PortalStart process from PortalTemplate to your project. This process is new home page andadministrator should register this link by global
3. Refer to Customize Portal home to set new home page.
4. Override the Logout process to customize the logout behavior.
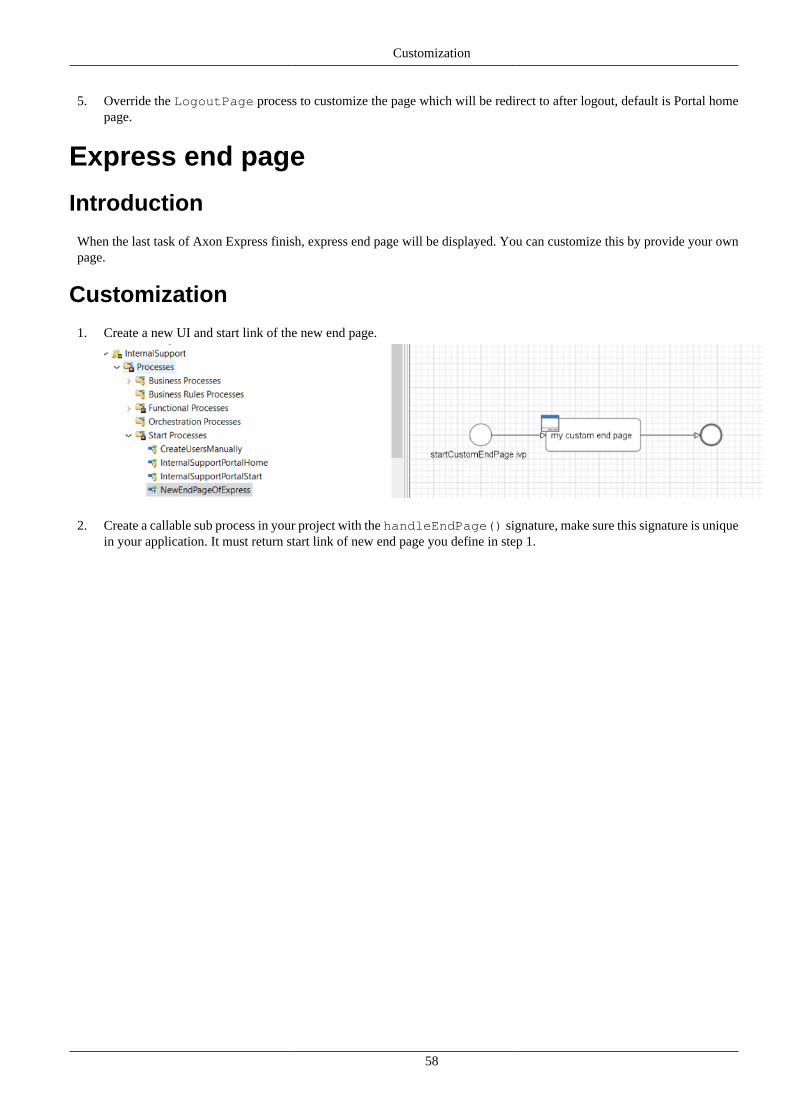
Customization
58
5. Override the LogoutPage process to customize the page which will be redirect to after logout, default is Portal homepage.
Express end page
Introduction
When the last task of Axon Express finish, express end page will be displayed. You can customize this by provide your ownpage.
Customization
1. Create a new UI and start link of the new end page.
2. Create a callable sub process in your project with the handleEndPage() signature, make sure this signature is uniquein your application. It must return start link of new end page you define in step 1.

Customization
59
Navigate back• When a task finish, Portal will navigate back to previous page. For example if a task is started from homepage, then go
back to homepage. In case task is started from task list, then go back to task list after finish.
• Developer can also apply this feature to their own button e.g Cancel a task.
• Just call PortalNavigator.navigateToPortalEndPage() in your button function
Customization
60
Hide technical stuffs
Hide technical rolesA technical role is the role which is not displayed anywhere (e.g. delegate, absence management).AXONIVY_PORTAL_ADMIN is a technical role by default.
To mark a role as a technical role, set the HIDE property with any value to the role.
Tip
Use the utility method of Portal to set property:
ch.ivy.addon.portalkit.util.RoleUtils.setProperty([YOUR_ROLE], ch.ivy.addon.portalkit.util.HIDE,[ANY_VALUE])
Hide technical tasksA technical task is the task which is not displayed in any task lists of Portal.
To mark a task as a technical task, make sure Ivy global variable PortalHiddenTaskCaseExcluded is set to true. Thendepends on value of PortalHiddenTaskCaseCustomField, it will mark task as technical. Follow tip
Tip
Use the utility methods of Portal:
• Set task as technical: ch.ivy.addon.portalkit.util.TaskUtils.setHidePropertyToHideInPortal(ITask)
• Reverse it: ch.ivy.addon.portalkit.util.TaskUtils.removeHidePropertyToDisplayInPortal(ITask)
Hide technical casesA technical case is the case which is not displayed in any case lists of Portal.
Tasks belong to the technical case is considered as technical tasks and should be hide as well.
To mark a case as a technical case, make sure Ivy global variable PortalHiddenTaskCaseExcluded is set to true.Then depends on value of PortalHiddenTaskCaseCustomField, it will mark case as technical. Follow tip
Tip
Use the utility methods of Portal:
• Set case as technical: ch.ivy.addon.portalkit.util.CaseUtils.setHidePropertyToHideInPortal(ICase)
• Reverse it: ch.ivy.addon.portalkit.util.CaseUtils.removeHidePropertyToDisplayInPortal(ICase)
Additional case details page
IntroductionThe additional case details page shows all custom fields of a case by clicking on "Show details" link in case details.
You can customize this page for each case by providing a relative URL to case.
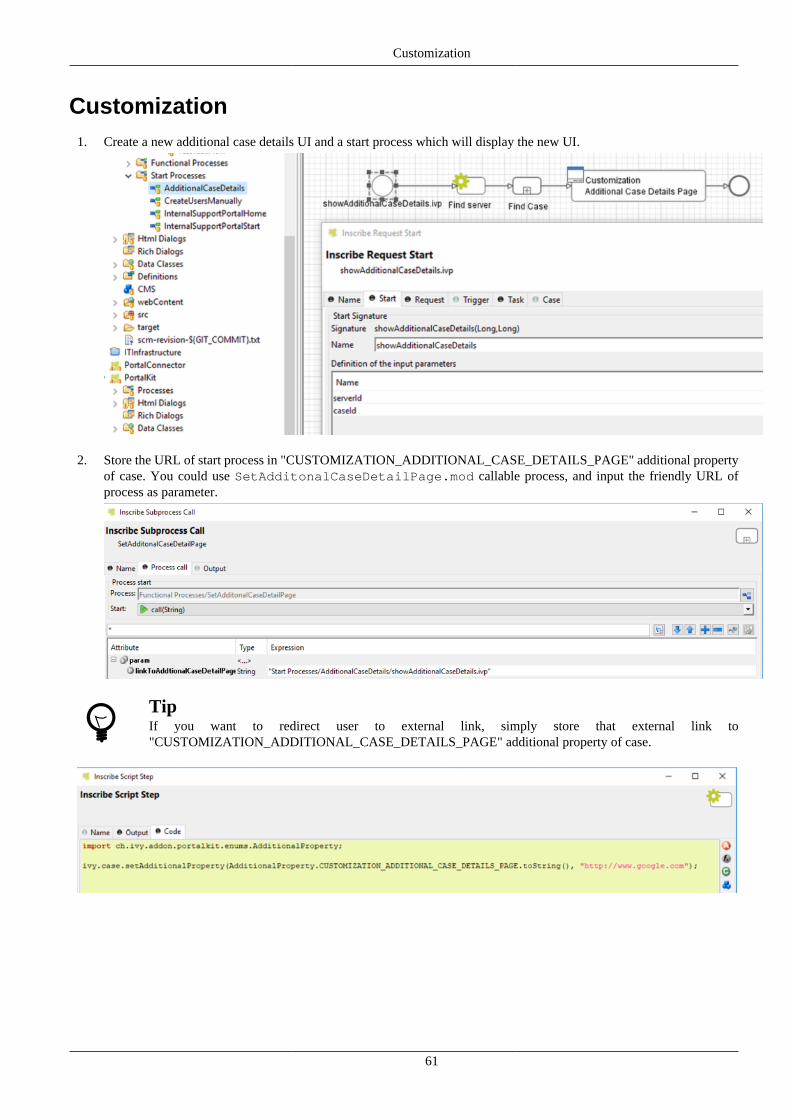
Customization
61
Customization1. Create a new additional case details UI and a start process which will display the new UI.
2. Store the URL of start process in "CUSTOMIZATION_ADDITIONAL_CASE_DETAILS_PAGE" additional propertyof case. You could use SetAdditonalCaseDetailPage.mod callable process, and input the friendly URL ofprocess as parameter.
TipIf you want to redirect user to external link, simply store that external link to"CUSTOMIZATION_ADDITIONAL_CASE_DETAILS_PAGE" additional property of case.
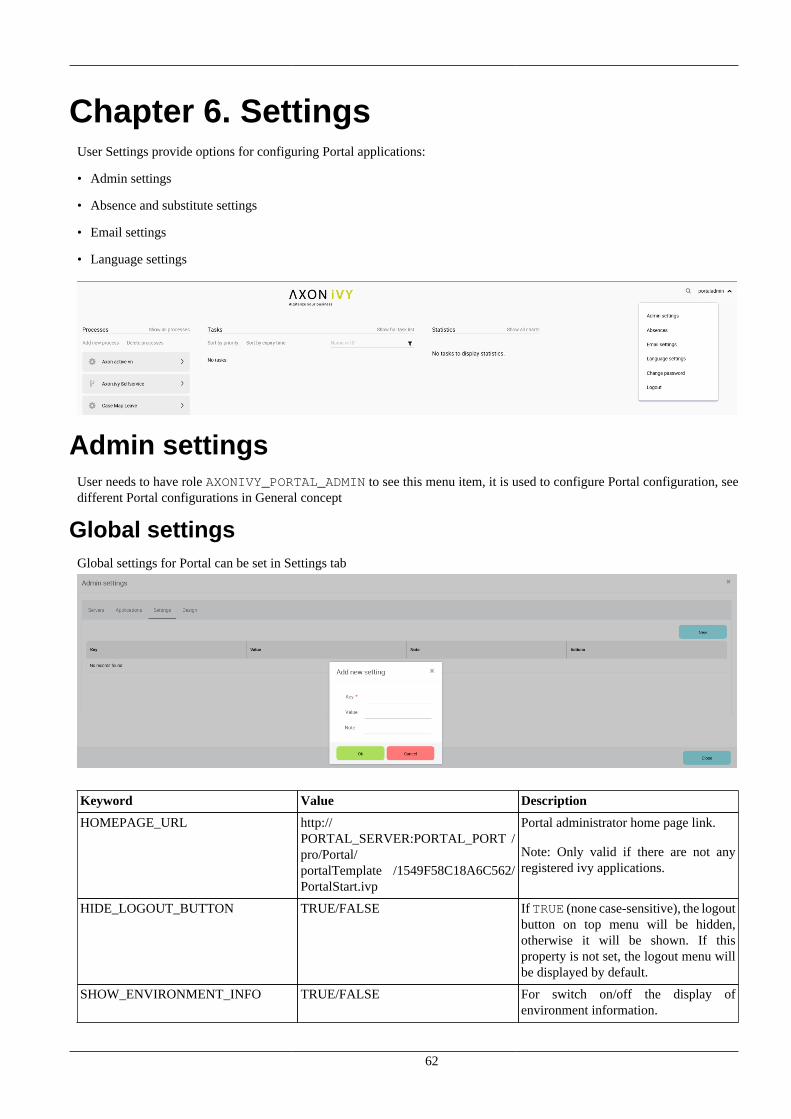
62
Chapter 6. SettingsUser Settings provide options for configuring Portal applications:
• Admin settings
• Absence and substitute settings
• Email settings
• Language settings
Admin settingsUser needs to have role AXONIVY_PORTAL_ADMIN to see this menu item, it is used to configure Portal configuration, seedifferent Portal configurations in General concept
Global settingsGlobal settings for Portal can be set in Settings tab
Keyword Value Description
HOMEPAGE_URL http://PORTAL_SERVER:PORTAL_PORT /pro/Portal/portalTemplate /1549F58C18A6C562/PortalStart.ivp
Portal administrator home page link.
Note: Only valid if there are not anyregistered ivy applications.
HIDE_LOGOUT_BUTTON TRUE/FALSE If TRUE (none case-sensitive), the logoutbutton on top menu will be hidden,otherwise it will be shown. If thisproperty is not set, the logout menu willbe displayed by default.
SHOW_ENVIRONMENT_INFO TRUE/FALSE For switch on/off the display ofenvironment information.
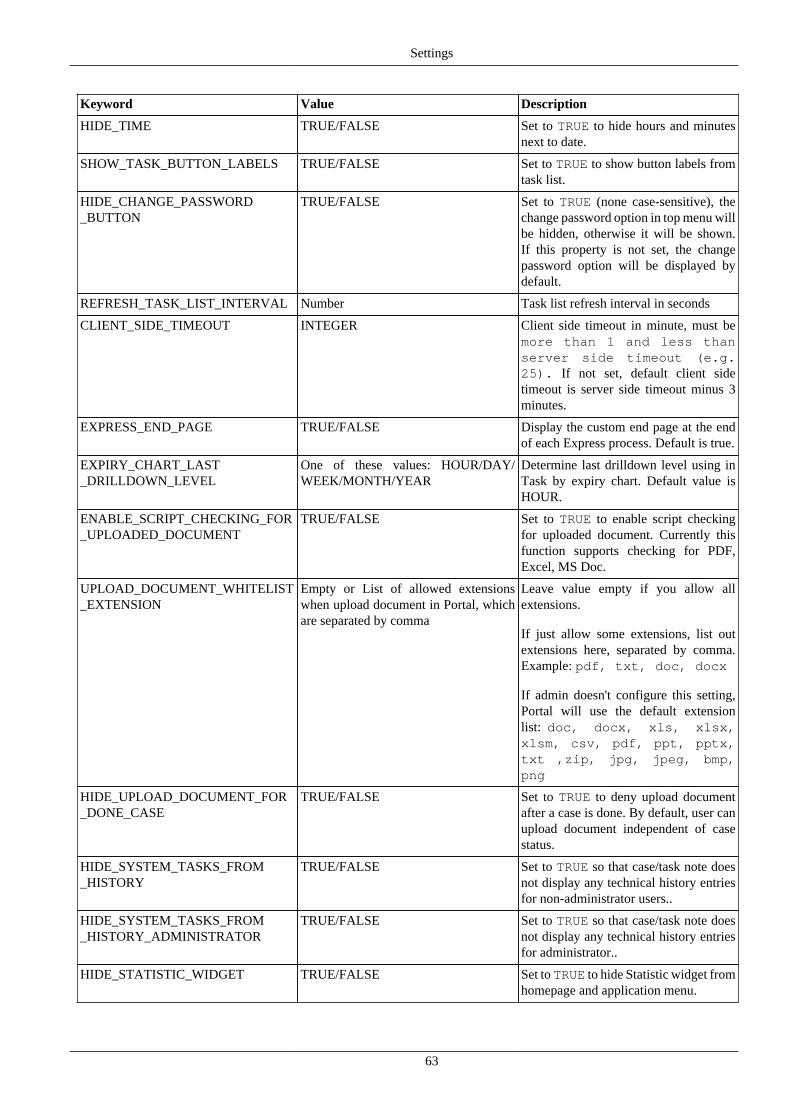
Settings
63
Keyword Value Description
HIDE_TIME TRUE/FALSE Set to TRUE to hide hours and minutesnext to date.
SHOW_TASK_BUTTON_LABELS TRUE/FALSE Set to TRUE to show button labels fromtask list.
HIDE_CHANGE_PASSWORD_BUTTON
TRUE/FALSE Set to TRUE (none case-sensitive), thechange password option in top menu willbe hidden, otherwise it will be shown.If this property is not set, the changepassword option will be displayed bydefault.
REFRESH_TASK_LIST_INTERVAL Number Task list refresh interval in seconds
CLIENT_SIDE_TIMEOUT INTEGER Client side timeout in minute, must bemore than 1 and less thanserver side timeout (e.g.25). If not set, default client sidetimeout is server side timeout minus 3minutes.
EXPRESS_END_PAGE TRUE/FALSE Display the custom end page at the endof each Express process. Default is true.
EXPIRY_CHART_LAST_DRILLDOWN_LEVEL
One of these values: HOUR/DAY/WEEK/MONTH/YEAR
Determine last drilldown level using inTask by expiry chart. Default value isHOUR.
ENABLE_SCRIPT_CHECKING_FOR_UPLOADED_DOCUMENT
TRUE/FALSE Set to TRUE to enable script checkingfor uploaded document. Currently thisfunction supports checking for PDF,Excel, MS Doc.
UPLOAD_DOCUMENT_WHITELIST_EXTENSION
Empty or List of allowed extensionswhen upload document in Portal, whichare separated by comma
Leave value empty if you allow allextensions.
If just allow some extensions, list outextensions here, separated by comma.Example: pdf, txt, doc, docx
If admin doesn't configure this setting,Portal will use the default extensionlist: doc, docx, xls, xlsx,xlsm, csv, pdf, ppt, pptx,txt ,zip, jpg, jpeg, bmp,png
HIDE_UPLOAD_DOCUMENT_FOR_DONE_CASE
TRUE/FALSE Set to TRUE to deny upload documentafter a case is done. By default, user canupload document independent of casestatus.
HIDE_SYSTEM_TASKS_FROM_HISTORY
TRUE/FALSE Set to TRUE so that case/task note doesnot display any technical history entriesfor non-administrator users..
HIDE_SYSTEM_TASKS_FROM_HISTORY_ADMINISTRATOR
TRUE/FALSE Set to TRUE so that case/task note doesnot display any technical history entriesfor administrator..
HIDE_STATISTIC_WIDGET TRUE/FALSE Set to TRUE to hide Statistic widget fromhomepage and application menu.
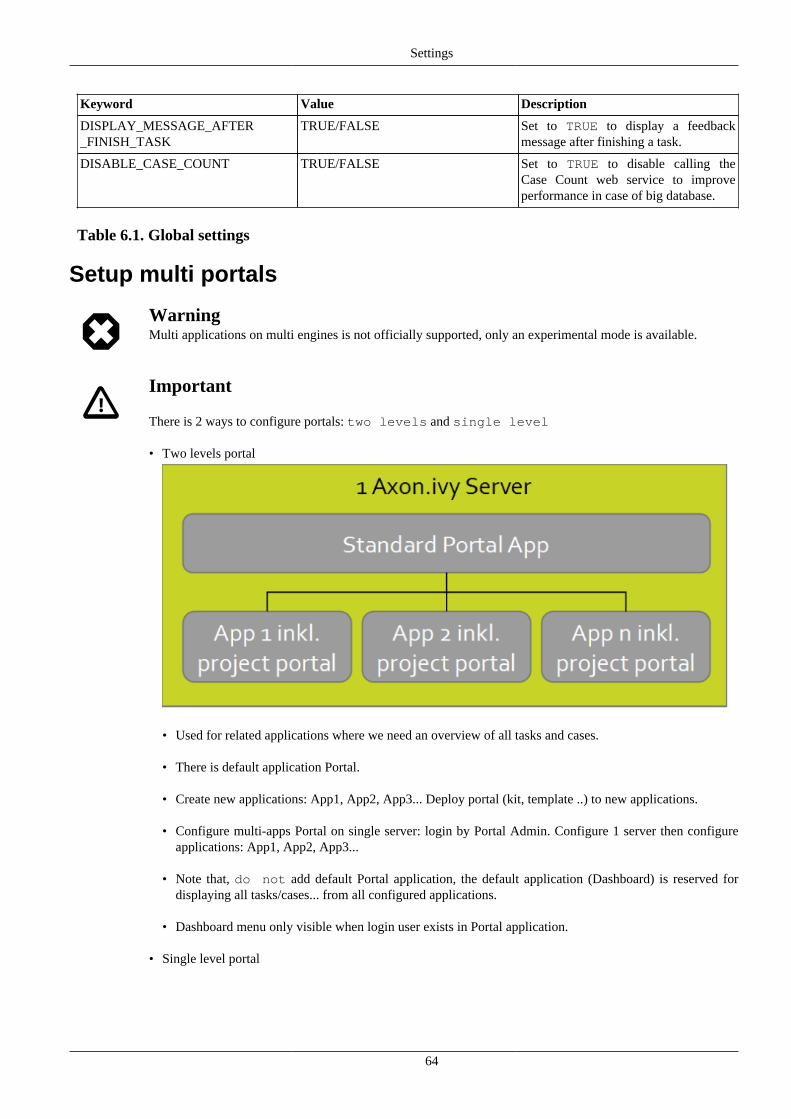
Settings
64
Keyword Value Description
DISPLAY_MESSAGE_AFTER_FINISH_TASK
TRUE/FALSE Set to TRUE to display a feedbackmessage after finishing a task.
DISABLE_CASE_COUNT TRUE/FALSE Set to TRUE to disable calling theCase Count web service to improveperformance in case of big database.
Table 6.1. Global settings
Setup multi portals
WarningMulti applications on multi engines is not officially supported, only an experimental mode is available.
Important
There is 2 ways to configure portals: two levels and single level
• Two levels portal
• Used for related applications where we need an overview of all tasks and cases.
• There is default application Portal.
• Create new applications: App1, App2, App3... Deploy portal (kit, template ..) to new applications.
• Configure multi-apps Portal on single server: login by Portal Admin. Configure 1 server then configureapplications: App1, App2, App3...
• Note that, do not add default Portal application, the default application (Dashboard) is reserved fordisplaying all tasks/cases... from all configured applications.
• Dashboard menu only visible when login user exists in Portal application.
• Single level portal
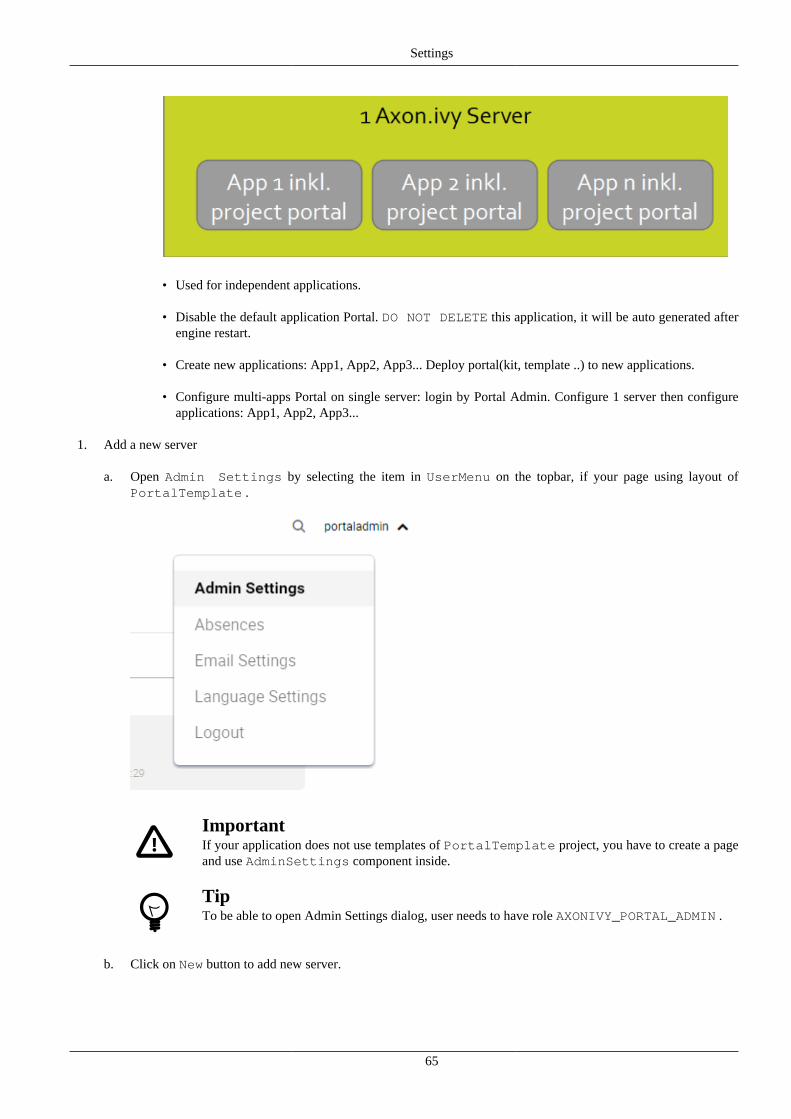
Settings
65
• Used for independent applications.
• Disable the default application Portal. DO NOT DELETE this application, it will be auto generated afterengine restart.
• Create new applications: App1, App2, App3... Deploy portal(kit, template ..) to new applications.
• Configure multi-apps Portal on single server: login by Portal Admin. Configure 1 server then configureapplications: App1, App2, App3...
1. Add a new server
a. Open Admin Settings by selecting the item in UserMenu on the topbar, if your page using layout ofPortalTemplate .
ImportantIf your application does not use templates of PortalTemplate project, you have to create a pageand use AdminSettings component inside.
TipTo be able to open Admin Settings dialog, user needs to have role AXONIVY_PORTAL_ADMIN .
b. Click on New button to add new server.
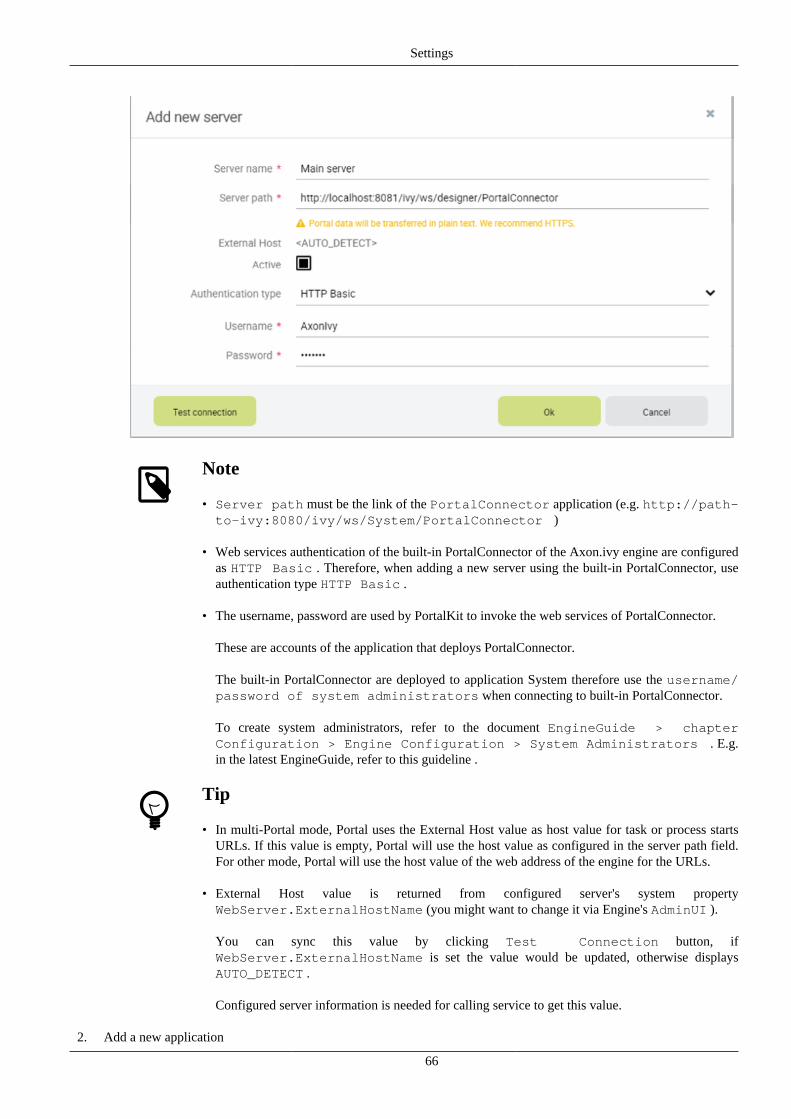
Settings
66
Note
• Server path must be the link of the PortalConnector application (e.g. http://path-to-ivy:8080/ivy/ws/System/PortalConnector )
• Web services authentication of the built-in PortalConnector of the Axon.ivy engine are configuredas HTTP Basic . Therefore, when adding a new server using the built-in PortalConnector, useauthentication type HTTP Basic .
• The username, password are used by PortalKit to invoke the web services of PortalConnector.
These are accounts of the application that deploys PortalConnector.
The built-in PortalConnector are deployed to application System therefore use the username/password of system administrators when connecting to built-in PortalConnector.
To create system administrators, refer to the document EngineGuide > chapterConfiguration > Engine Configuration > System Administrators . E.g.in the latest EngineGuide, refer to this guideline .
Tip
• In multi-Portal mode, Portal uses the External Host value as host value for task or process startsURLs. If this value is empty, Portal will use the host value as configured in the server path field.For other mode, Portal will use the host value of the web address of the engine for the URLs.
• External Host value is returned from configured server's system propertyWebServer.ExternalHostName (you might want to change it via Engine's AdminUI ).
You can sync this value by clicking Test Connection button, ifWebServer.ExternalHostName is set the value would be updated, otherwise displaysAUTO_DETECT .
Configured server information is needed for calling service to get this value.
2. Add a new application
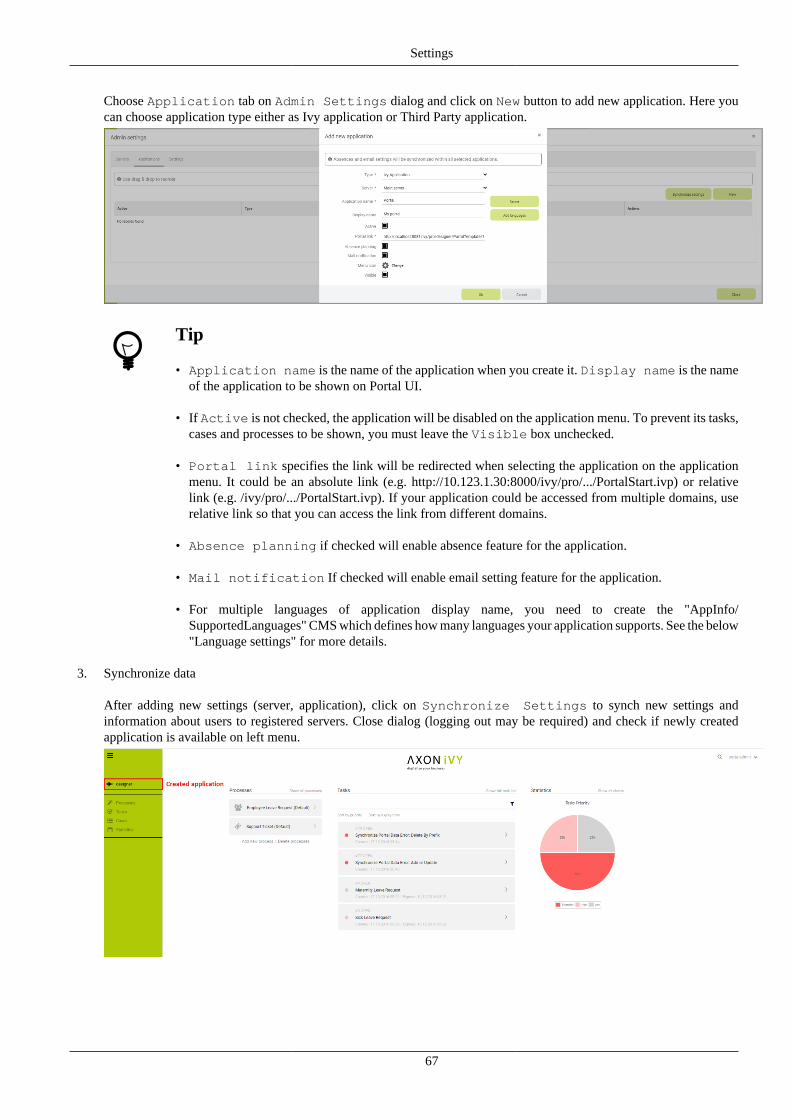
Settings
67
Choose Application tab on Admin Settings dialog and click on New button to add new application. Here youcan choose application type either as Ivy application or Third Party application.
Tip
• Application name is the name of the application when you create it. Display name is the nameof the application to be shown on Portal UI.
• If Active is not checked, the application will be disabled on the application menu. To prevent its tasks,cases and processes to be shown, you must leave the Visible box unchecked.
• Portal link specifies the link will be redirected when selecting the application on the applicationmenu. It could be an absolute link (e.g. http://10.123.1.30:8000/ivy/pro/.../PortalStart.ivp) or relativelink (e.g. /ivy/pro/.../PortalStart.ivp). If your application could be accessed from multiple domains, userelative link so that you can access the link from different domains.
• Absence planning if checked will enable absence feature for the application.
• Mail notification If checked will enable email setting feature for the application.
• For multiple languages of application display name, you need to create the "AppInfo/SupportedLanguages" CMS which defines how many languages your application supports. See the below"Language settings" for more details.
3. Synchronize data
After adding new settings (server, application), click on Synchronize Settings to synch new settings andinformation about users to registered servers. Close dialog (logging out may be required) and check if newly createdapplication is available on left menu.

Settings
68
TipIn single mode, Portal detects the applications that have the login user in the current engine. Based onthat, Portal will collect tasks, cases of those applications. In multi-portal mode, Portal will only collect onregistered applications.
By default, Portal will automatically synchronize user settings to registered servers at 5AM everyday. You canchange the time when the synchronization start by going to AdminUI and change the value of the global variablePortalStartTimeSynchUserExpression of the application that will run the synchronization process.
Important
Synchronization process is needed to run on one application each server. If there are multiple applicationsregistered per server, only one application needs to run this process. Select one application as you wish andset value for global variable PortalStartTimeSynchUserExpression. On other applications,set this value empty.
Change logos and colors
Open the "Design" tab and you can upload new logos or change new colors.
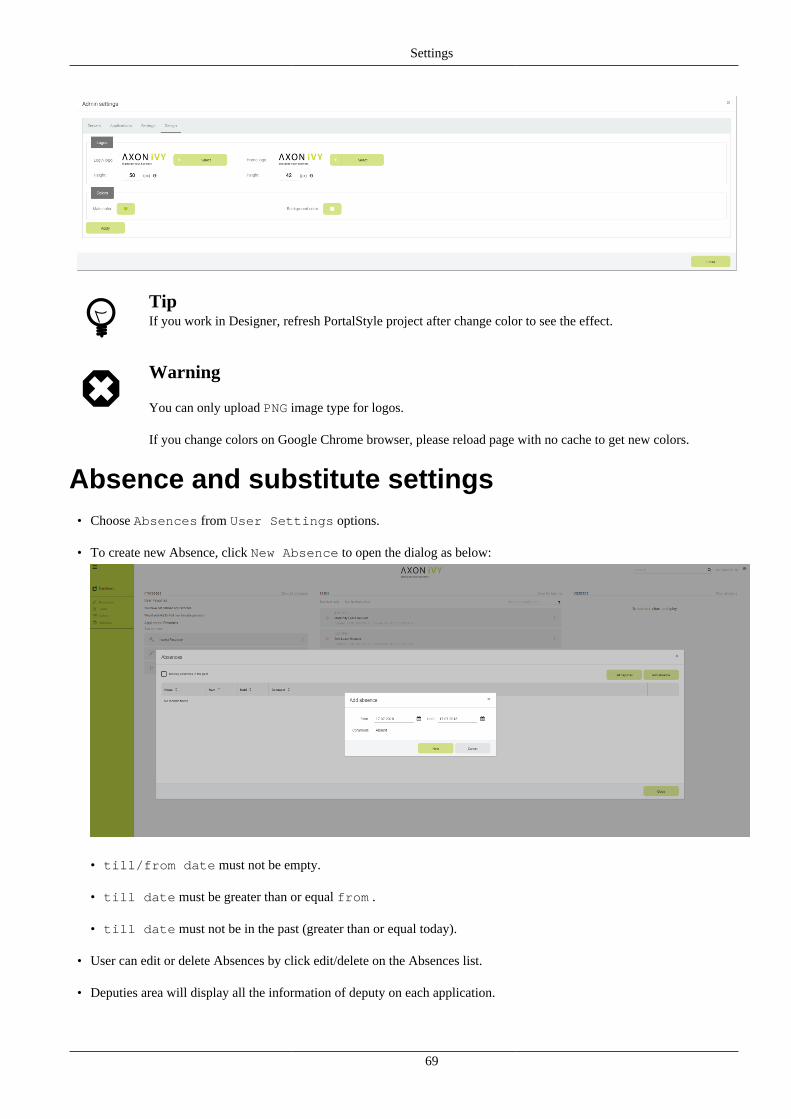
Settings
69
TipIf you work in Designer, refresh PortalStyle project after change color to see the effect.
Warning
You can only upload PNG image type for logos.
If you change colors on Google Chrome browser, please reload page with no cache to get new colors.
Absence and substitute settings• Choose Absences from User Settings options.
• To create new Absence, click New Absence to open the dialog as below:
• till/from date must not be empty.
• till date must be greater than or equal from .
• till date must not be in the past (greater than or equal today).
• User can edit or delete Absences by click edit/delete on the Absences list.
• Deputies area will display all the information of deputy on each application.
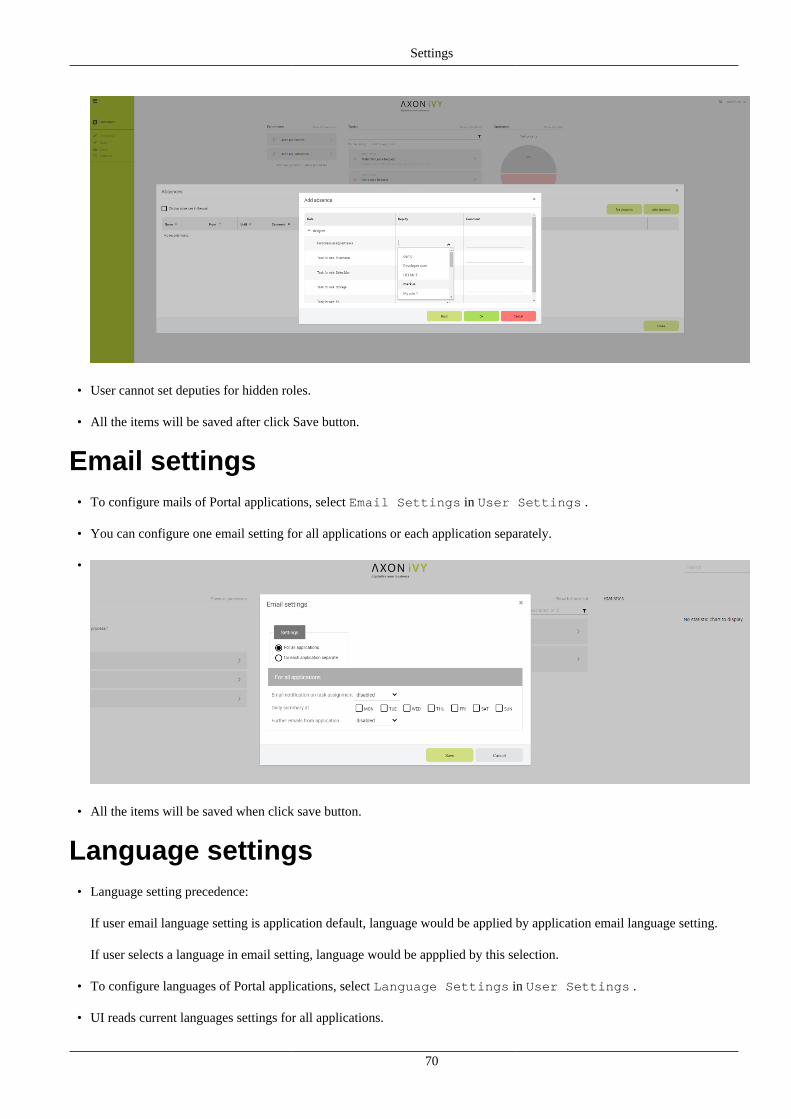
Settings
70
• User cannot set deputies for hidden roles.
• All the items will be saved after click Save button.
Email settings• To configure mails of Portal applications, select Email Settings in User Settings .
• You can configure one email setting for all applications or each application separately.
•
• All the items will be saved when click save button.
Language settings• Language setting precedence:
If user email language setting is application default, language would be applied by application email language setting.
If user selects a language in email setting, language would be appplied by this selection.
• To configure languages of Portal applications, select Language Settings in User Settings .
• UI reads current languages settings for all applications.
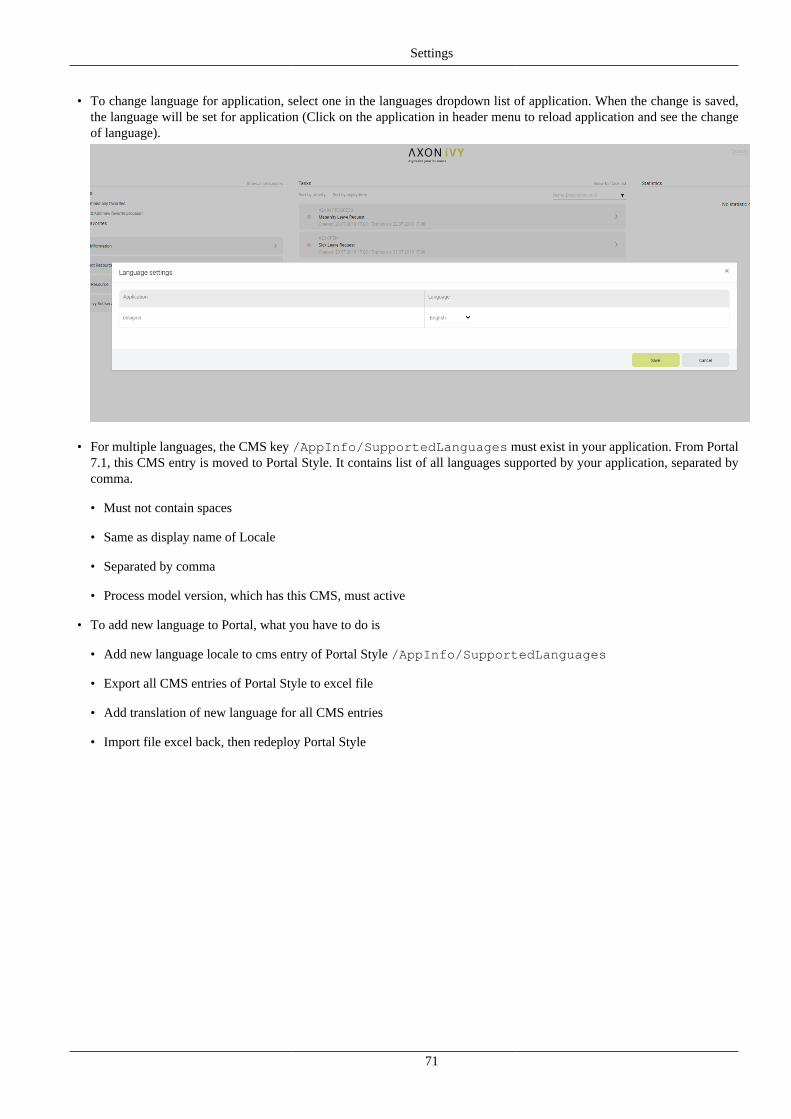
Settings
71
• To change language for application, select one in the languages dropdown list of application. When the change is saved,the language will be set for application (Click on the application in header menu to reload application and see the changeof language).
• For multiple languages, the CMS key /AppInfo/SupportedLanguages must exist in your application. From Portal7.1, this CMS entry is moved to Portal Style. It contains list of all languages supported by your application, separated bycomma.
• Must not contain spaces
• Same as display name of Locale
• Separated by comma
• Process model version, which has this CMS, must active
• To add new language to Portal, what you have to do is
• Add new language locale to cms entry of Portal Style /AppInfo/SupportedLanguages
• Export all CMS entries of Portal Style to excel file
• Add translation of new language for all CMS entries
• Import file excel back, then redeploy Portal Style
72
Chapter 7. TroubleshootingHere you will find solutions to some of the most common problems related to Axon.ivy Portal.
If you can't find your solution here there are some other sources which could help:
• Axon.ivy Q&A
The Axon.ivy Q&A contains a considerable amount of questions and answers related to Axon.ivy Designer and Engine.
• Stack Overflow
Problems related to common technologies like Java, JSF, Primefaces are answered on the web, e.g. on Stack Overflow.
• Support
You can get support via [email protected] (support may be subject to charging, depending on your licence agreement).
IE Security ProblemIf you start Portal in Internet Explorer installed on Windows Server then Portal application may not work correctly. The reasoncould be Internet Explorer Enhanced Security Configuration is enabled by default which means ActiveX Controls andscripting are disabled, so Internet sites may not display in Internet Explorer as you expect.
To fix this, you may turn off Internet Explorer Enhanced Security Configuration if you are running in Windows Server.Another way is adding that site to the Trusted sites zone in Internet Explorer.
Portal install with IISIt could be a problem when install portal with IIS with proxy, depends on your environment. Consider to configure if yourIIS is called via proxy. Add -Dhttp.proxyHost to VM argument could help.

![Introduction to Dependency Grammar [0.2cm] and Dependency ...ufal.mff.cuni.cz/~bejcek/parseme/prague/Nivre1.pdf · Introduction to Dependency Grammar and Dependency Parsing Joakim](https://img.pdfslide.us/doc/110x75/5b14bded7f8b9a201a8b9282/introduction-to-dependency-grammar-02cm-and-dependency-ufalmffcuniczbejcekparsemeprague.jpg)