Embed Size (px)
Citation preview
EXTREME ENVIRONMENTS. EXTREMELY RELIABLE.
Axiom Device Firmware Updater Device Firmware Update Tool for the Axiom F6, H1, and H2 Dataloggers
User Manual Download, Installation and Use Instructions
1.800.548.4264 | www.ftsinc.com
700-Firmware Updater Rev 6 14 Nov 2017

Contact Information
Canadian Headquarters:
1065 Henry Eng Place
Victoria, BC | V9B 6B2 | Canada
www.ftsinc.com
Toll-free: 1.800.548.4264
Local: 250.478.5561
Technical support portal: http://support.ftsinc.com
Email: [email protected]
i
Contents
CHAPTER 1 INTRODUCTION ..................................................................................... 1
1.1 PURPOSE ................................................................................................................................................................................ 1
1.2 TERMINOLOGY .................................................................................................................................................................... 1
1.3 PREREQUISITES .................................................................................................................................................................... 1
1.4 SUPPORTED DEVICES ........................................................................................................................................................ 1
CHAPTER 2 PREPARATION ........................................................................................ 2
2.1 DOWNLOADING THE DEVICE FIRMWARE UPDATER ............................................................................................. 2
2.1.1 Moving the files to the USB Flash Drive ......................................................................................................... 2
CHAPTER 3 UPDATING SDI DEVICE FIRMWARE ...................................................... 5
3.1 UPDATING DIGIBP FIRMWARE....................................................................................................................................... 5
3.2 UPDATING RADAR RANGE SENSOR FIRMWARE ..................................................................................................... 8
3.3 UPDATING SDI-AM FIRMWARE ...................................................................................................................................11
CHAPTER 4 UPDATING TELEMETRY DEVICE FIRMWARE ...................................... 14
4.1 UPDATING AIRTALK FIRMWARE .................................................................................................................................14
4.2 UPDATING G5 GOES FIRMWARE ................................................................................................................................17
4.3 UPDATING G6 GOES FIRMWARE ................................................................................................................................21
CHAPTER 5 TROUBLESHOOTING............................................................................ 25
DOCUMENT REVISION HISTORY ................................................................................ 26
700-Firmware Updater Rev. 6 14 Nov 2017 Page 1/26
INTRODUCTION Chapter 1
1.1 PURPOSE
This document describes how to download, install and use the Firmware Updater (Axiom Device
Firmware Updater) application to update devices attached to the Axiom Datalogger.
Firmware Updater is a smart device application developed for the Axiom Datalogger and can be used
on F6, H2, and H1 Dataloggers. The Firmware Updater will automatically display the firmware version
that is valid for your device during the upload process. If you browse for a firmware version that is not
valid for your device, the Firmware Updater will not display invalid files, thereby preventing
inadvertent loading of the wrong firmware version.
NOTE This application only updates device firmware.
To update the Datalogger application, refer to Axiom Operator’s Manual.
To update the Datalogger operating system, refer to the OS Updater Manual
1.2 TERMINOLOGY
SDI-AM A flexible expansion interface module that is compatible with a wide variety of analog sensors and any SDI-12 compliant Datalogger.
AirTalk Gives the Datalogger the ability to “talk” with crews through their current handheld radios, giving them access to all current weather conditions.
1.3 PREREQUISITES
The following are required to successfully perform a firmware update:
Axiom F6, H2 or H1 Datalogger
Device to upgrade (may be internal depending on the Datalogger model)
Flash drive with the Firmware Updater application
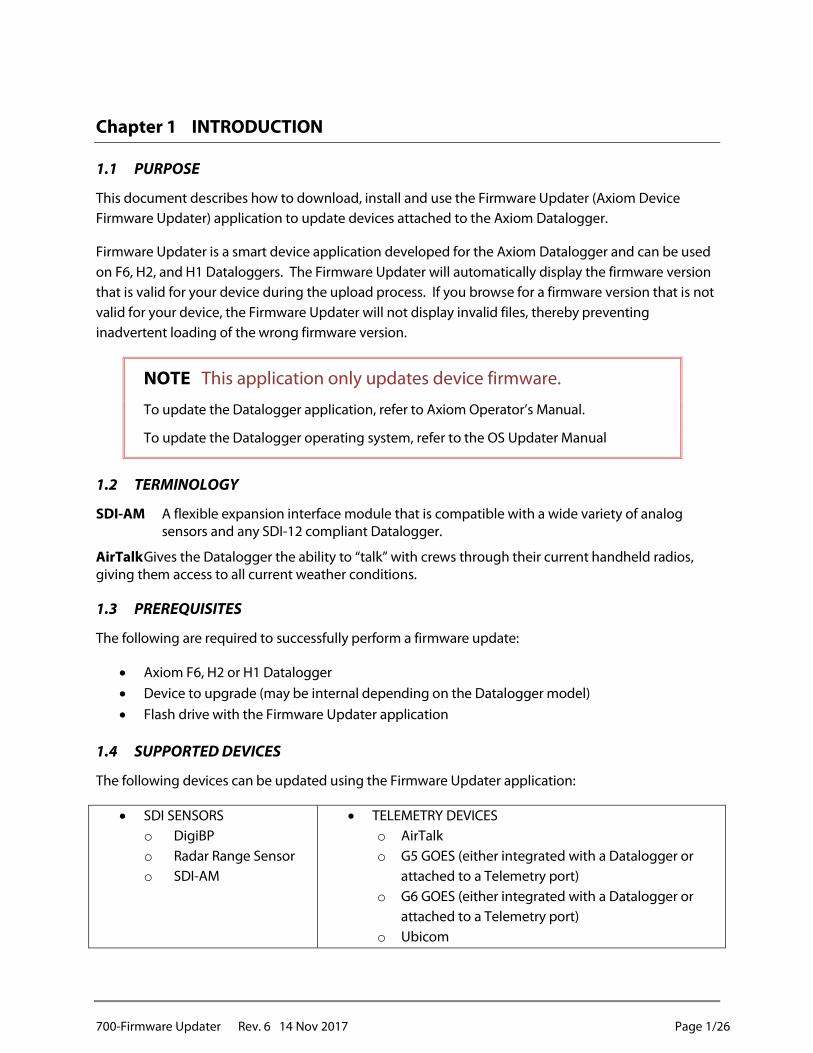
1.4 SUPPORTED DEVICES
The following devices can be updated using the Firmware Updater application:
SDI SENSORS
o DigiBP
o Radar Range Sensor
o SDI-AM
TELEMETRY DEVICES
o AirTalk
o G5 GOES (either integrated with a Datalogger or
attached to a Telemetry port)
o G6 GOES (either integrated with a Datalogger or
attached to a Telemetry port)
o Ubicom
700-Firmware Updater Rev. 6 14 Nov 2017 Page 2/26
PREPARATION Chapter 2
2.1 DOWNLOADING THE DEVICE FIRMWARE UPDATER
If you already have a flash drive with the needed files, you can skip to Chapter 3 (for an SDI Device) or
Chapter 4 (for a Telemetry device).
If you were not provided with a USB flash drive with the Axiom Device Firmware Updater files you will
need to download these files and place them on a USB flash drive.
1. Download the latest Device Firmware Updater. It is found on the support section of the FTS
website under Products>Software: http://support.ftsinc.com/products/software/device-
firmware-updater/
2. This is (a self-extracting installer file named ‘AxiomDeviceFirmwareUpdater-Installer-v[version
number].exe’.
NOTE [version number] is the new firmware version you will be installing and will be
expressed in numerals.
2.1.1 MOVING THE FILES TO THE USB FLASH DRIVE
To extract the F6/H2/H1 Axiom Device Firmware Updater tool:
1. Insert an EMPTY USB flash drive into the computer.
WARNING: The USB flash drive that you use must ONLY have this tool on it, if you
need a USB for other purposes you will need to obtain a second USB.
2. Find the self extracting installer file you downloaded (AxiomDeviceFirmwareUpdater-Installer-
[version number].exe).
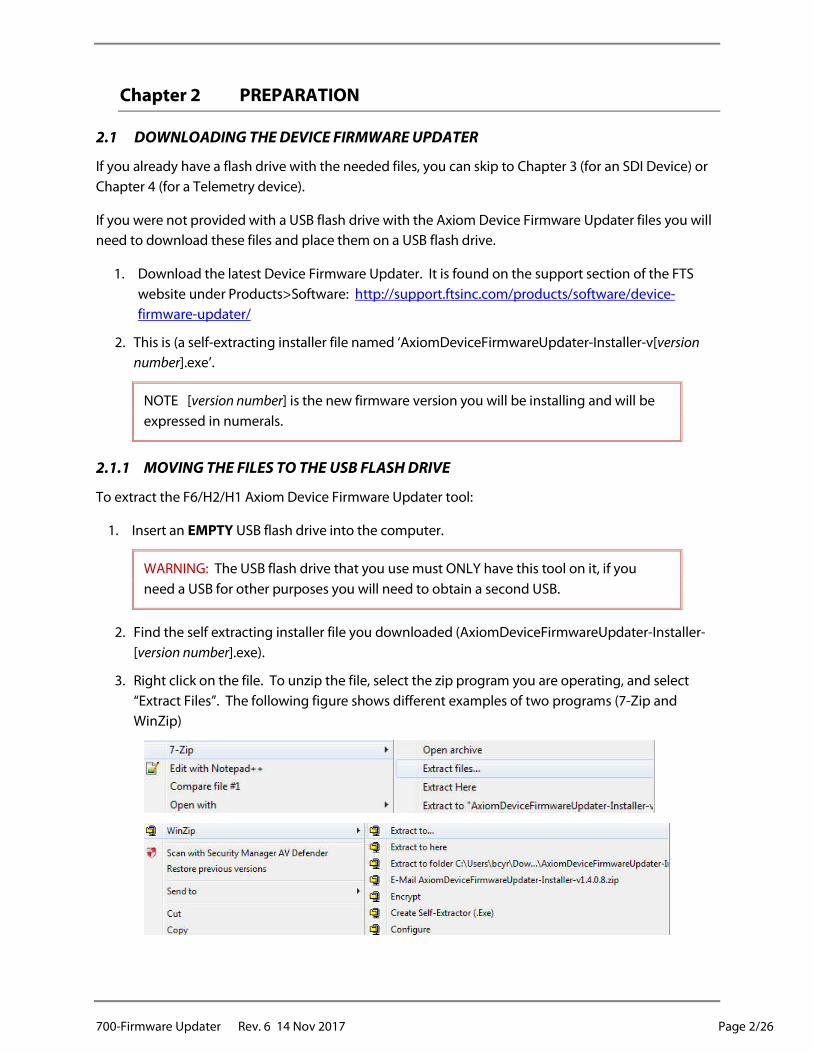
3. Right click on the file. To unzip the file, select the zip program you are operating, and select
“Extract Files”. The following figure shows different examples of two programs (7-Zip and
WinZip)
700-Firmware Updater Rev. 6 14 Nov 2017 Page 3/26
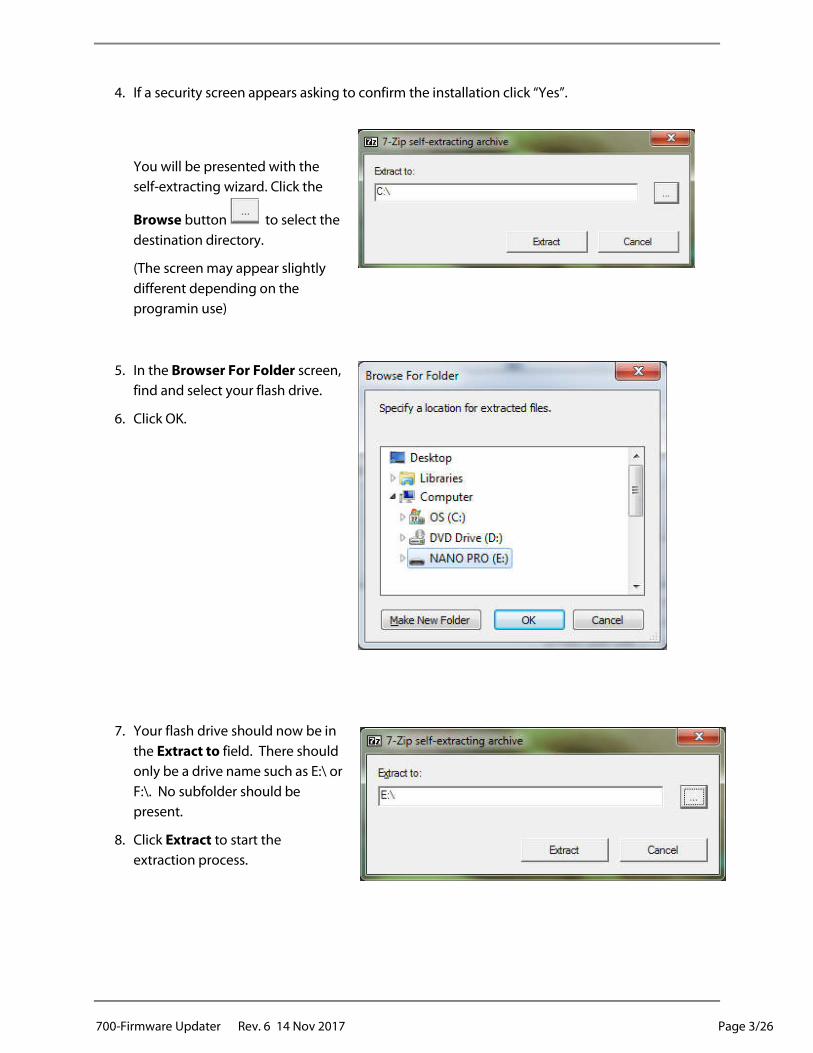
4. If a security screen appears asking to confirm the installation click “Yes”.
You will be presented with the
self-extracting wizard. Click the
Browse button to select the
destination directory.
(The screen may appear slightly
different depending on the
programin use)
5. In the Browser For Folder screen,
find and select your flash drive.
6. Click OK.
7. Your flash drive should now be in
the Extract to field. There should
only be a drive name such as E:\ or
F:\. No subfolder should be
present.
8. Click Extract to start the
extraction process.
700-Firmware Updater Rev. 6 14 Nov 2017 Page 4/26
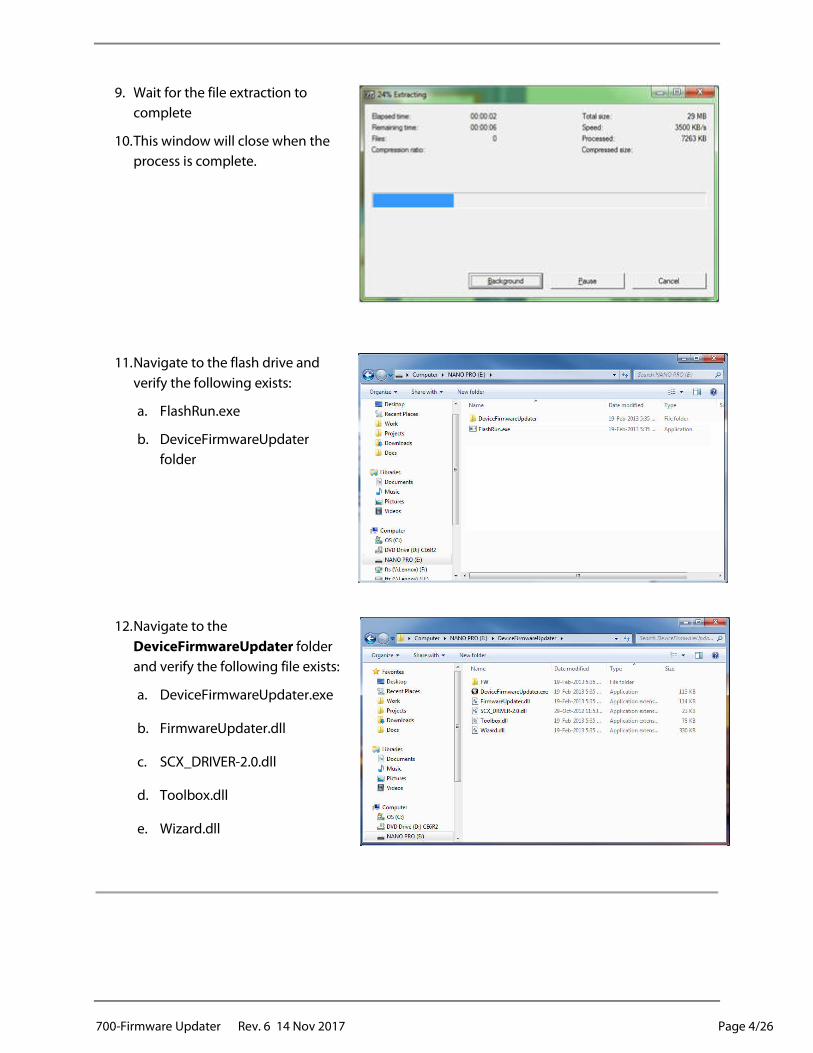
9. Wait for the file extraction to
complete
10. This window will close when the
process is complete.
11. Navigate to the flash drive and
verify the following exists:
a. FlashRun.exe
b. DeviceFirmwareUpdater
folder
12. Navigate to the
DeviceFirmwareUpdater folder
and verify the following file exists:
a. DeviceFirmwareUpdater.exe
b. FirmwareUpdater.dll
c. SCX_DRIVER-2.0.dll
d. Toolbox.dll
e. Wizard.dll
700-Firmware Updater Rev. 6 14 Nov 2017 Page 5/26
UPDATING SDI DEVICE FIRMWARE Chapter 3
3.1 UPDATING DIGIBP FIRMWARE
To update the DIGIBP firmware, perform the following steps:
1. Power down the Datalogger.
a. Remove the battery connector from the Datalogger and solar panel connector (if present)
2. Insert the USB flash drive prepared in Chapter 2 into the Datalogger. Remove all other USB flash drives or
USB DEVICE cables.
3. Power up the Datalogger:
a. Replace the battery connector and solar connector (if present).
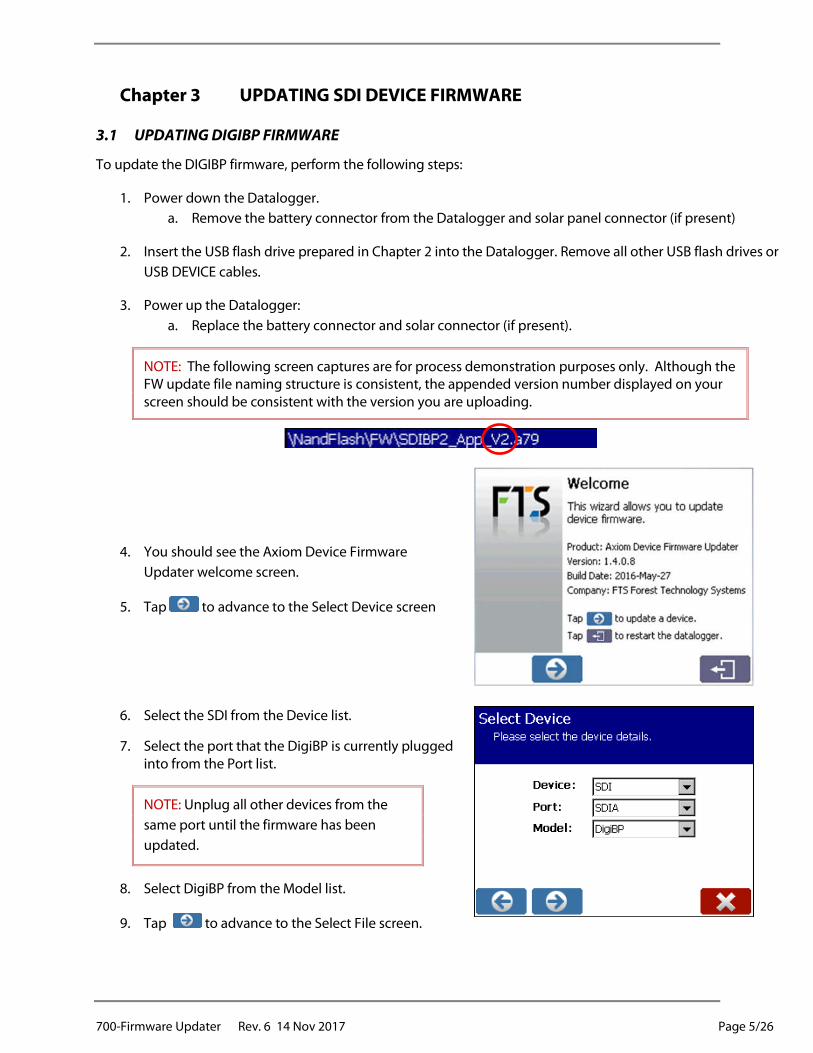
NOTE: The following screen captures are for process demonstration purposes only. Although the FW update file naming structure is consistent, the appended version number displayed on your screen should be consistent with the version you are uploading.
4. You should see the Axiom Device Firmware
Updater welcome screen.
5. Tap to advance to the Select Device screen
6. Select the SDI from the Device list.
7. Select the port that the DigiBP is currently plugged into from the Port list.
NOTE: Unplug all other devices from the
same port until the firmware has been
updated.
8. Select DigiBP from the Model list.
9. Tap to advance to the Select File screen.
700-Firmware Updater Rev. 6 14 Nov 2017 Page 6/26
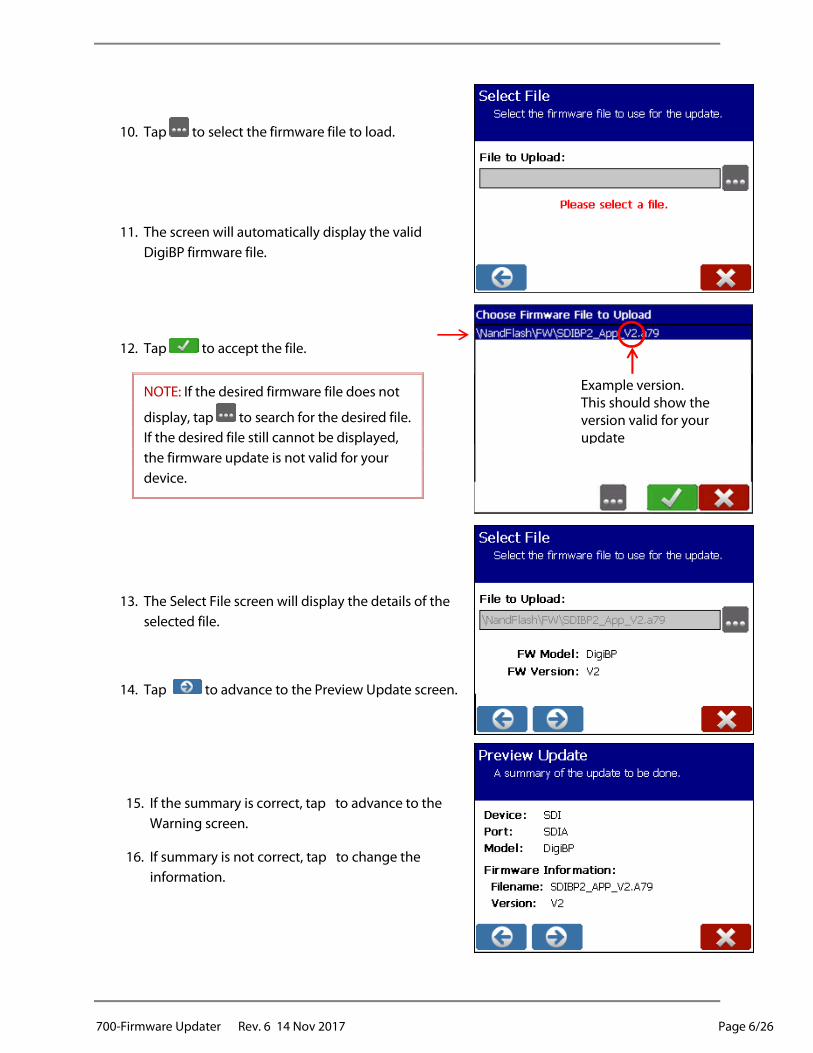
10. Tap to select the firmware file to load.
11. The screen will automatically display the valid
DigiBP firmware file.
12. Tap to accept the file.
NOTE: If the desired firmware file does not
display, tap to search for the desired file.
If the desired file still cannot be displayed,
the firmware update is not valid for your
device.
13. The Select File screen will display the details of the
selected file.
14. Tap to advance to the Preview Update screen.
15. If the summary is correct, tap to advance to the
Warning screen.
16. If summary is not correct, tap to change the
information.
Example version. This should show the version valid for your update
700-Firmware Updater Rev. 6 14 Nov 2017 Page 7/26
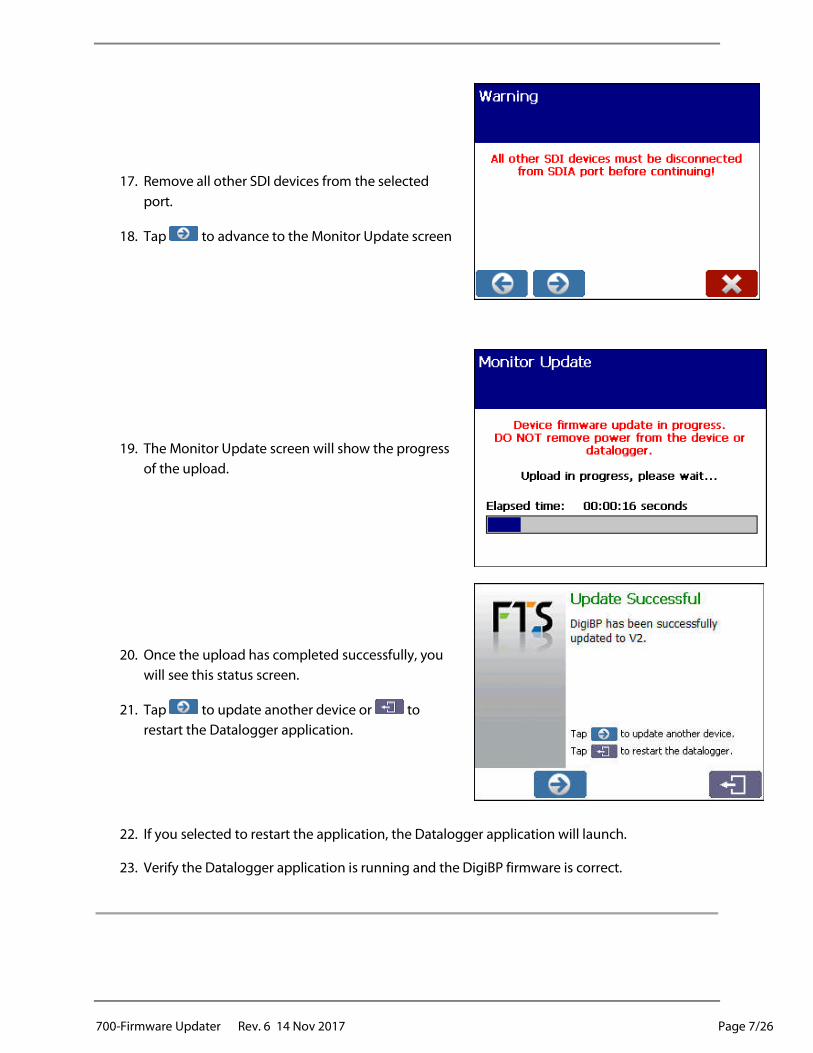
17. Remove all other SDI devices from the selected
port.
18. Tap to advance to the Monitor Update screen
19. The Monitor Update screen will show the progress
of the upload.
20. Once the upload has completed successfully, you
will see this status screen.
21. Tap to update another device or to
restart the Datalogger application.
22. If you selected to restart the application, the Datalogger application will launch.
23. Verify the Datalogger application is running and the DigiBP firmware is correct.

700-Firmware Updater Rev. 6 14 Nov 2017 Page 8/26
3.2 UPDATING RADAR RANGE SENSOR FIRMWARE
To update the Radar Range Sensor firmware, perform the following steps:
1. Power down the Datalogger.
a. Remove the battery connector from the Datalogger and solar panel connector (if present)
2. Insert the USB flash drive prepared in Chapter 2 into the Datalogger. Remove all other USB flash
drives or USB DEVICE cables.
3. Power up the Datalogger:
a. Replace the battery connector and solar connector (if present).
NOTE: The following screen captures are for process demonstration purposes only. Although the FW update file naming structure is consistent, the appended version number displayed on your screen should be consistent with the version you are uploading.
4. You should see the Axiom Device Firmware
Updater welcome screen.
5. Tap to advance to the Select Device screen.
6. Select SDI from the Device list.
7. Select the port that the Radar Range Sensor is
currently plugged into from the Port list.
NOTE: Unplug all other devices from the
same port until the firmware has been
updated.
8. Select SDIRADAR from the Model list.
9. Tap to advance to the Select File screen.
700-Firmware Updater Rev. 6 14 Nov 2017 Page 9/26
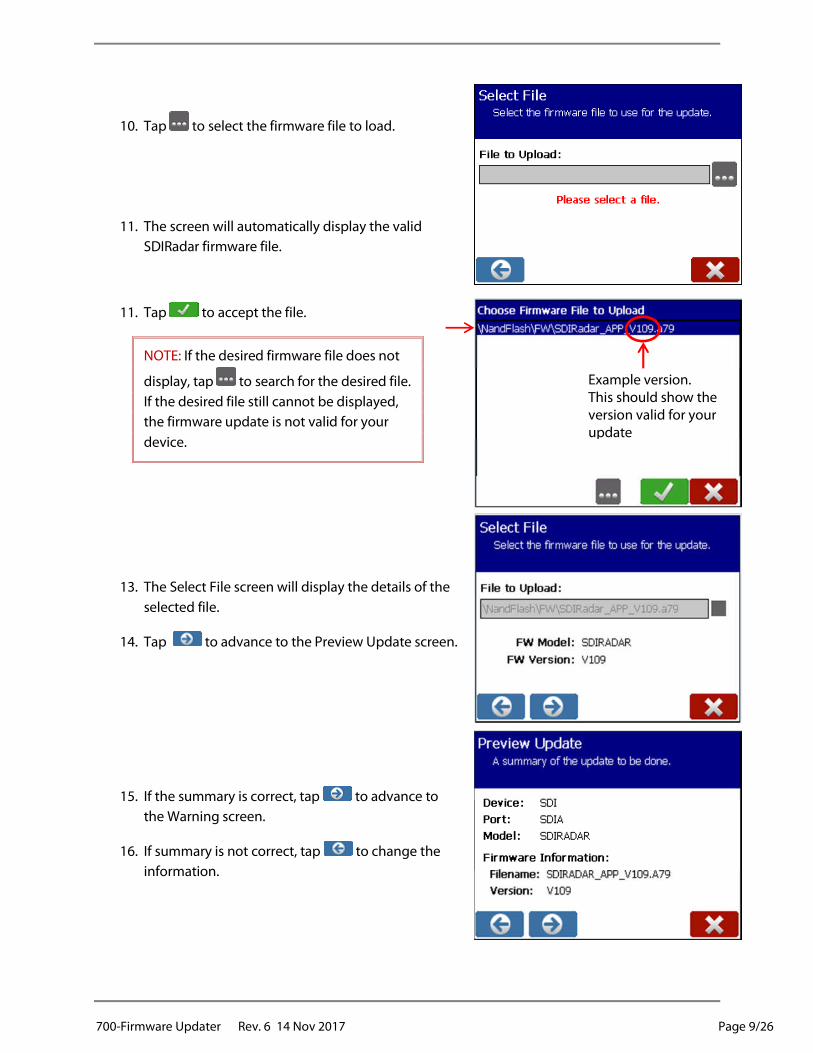
10. Tap to select the firmware file to load.
11. The screen will automatically display the valid
SDIRadar firmware file.
11. Tap to accept the file.
NOTE: If the desired firmware file does not
display, tap to search for the desired file.
If the desired file still cannot be displayed,
the firmware update is not valid for your
device.
13. The Select File screen will display the details of the
selected file.
14. Tap to advance to the Preview Update screen.
15. If the summary is correct, tap to advance to
the Warning screen.
16. If summary is not correct, tap to change the
information.
Example version. This should show the version valid for your update
700-Firmware Updater Rev. 6 14 Nov 2017 Page 10/26
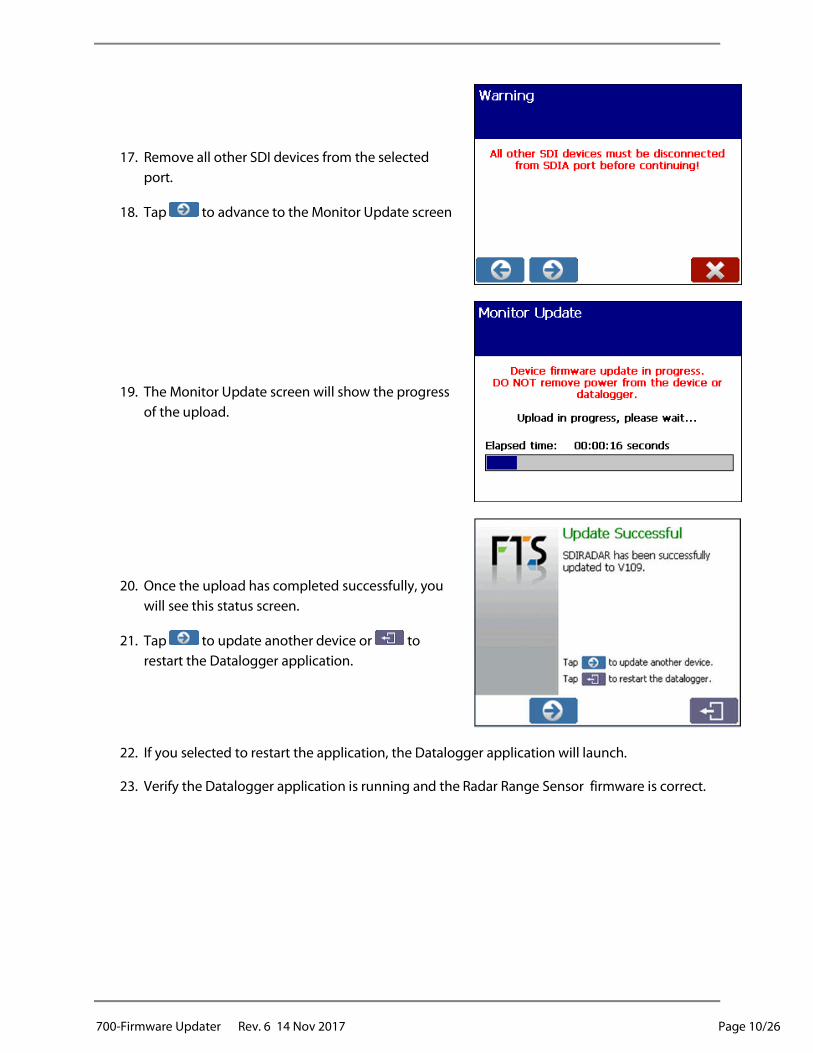
17. Remove all other SDI devices from the selected
port.
18. Tap to advance to the Monitor Update screen
19. The Monitor Update screen will show the progress
of the upload.
20. Once the upload has completed successfully, you
will see this status screen.
21. Tap to update another device or to
restart the Datalogger application.
22. If you selected to restart the application, the Datalogger application will launch.
23. Verify the Datalogger application is running and the Radar Range Sensor firmware is correct.

700-Firmware Updater Rev. 6 14 Nov 2017 Page 11/26
3.3 UPDATING SDI-AM FIRMWARE
To update the SDI-AM firmware, perform the following steps:
1. Power down the Datalogger.
a. Remove the battery connector from the Datalogger and solar panel connector (if present)
2. Insert the USB flash drive prepared in Chapter 2 into the Datalogger. Remove all other USB flash
drives or USB DEVICE cables.
3. Power up the Datalogger:
a. Replace the battery connector and solar connector (if present).
NOTE: The following screen captures are for process demonstration purposes only. Although the FW update file naming structure is consistent, the appended version number displayed on your screen should be consistent with the version you are uploading.
4. You should see the Axiom Device Firmware
Updater welcome screen.
5. Tap to advance to the Select Device screen.
6. Select SDI from the Device list.
7. Select the port the SDI-AM is currently plugged into
from the Port list.
NOTE: Unplug all other devices from the
same port until the firmware has been
updated.
8. Select SDIAM from the Model list.
9. Tap to advance to the next screen.
700-Firmware Updater Rev. 6 14 Nov 2017 Page 12/26
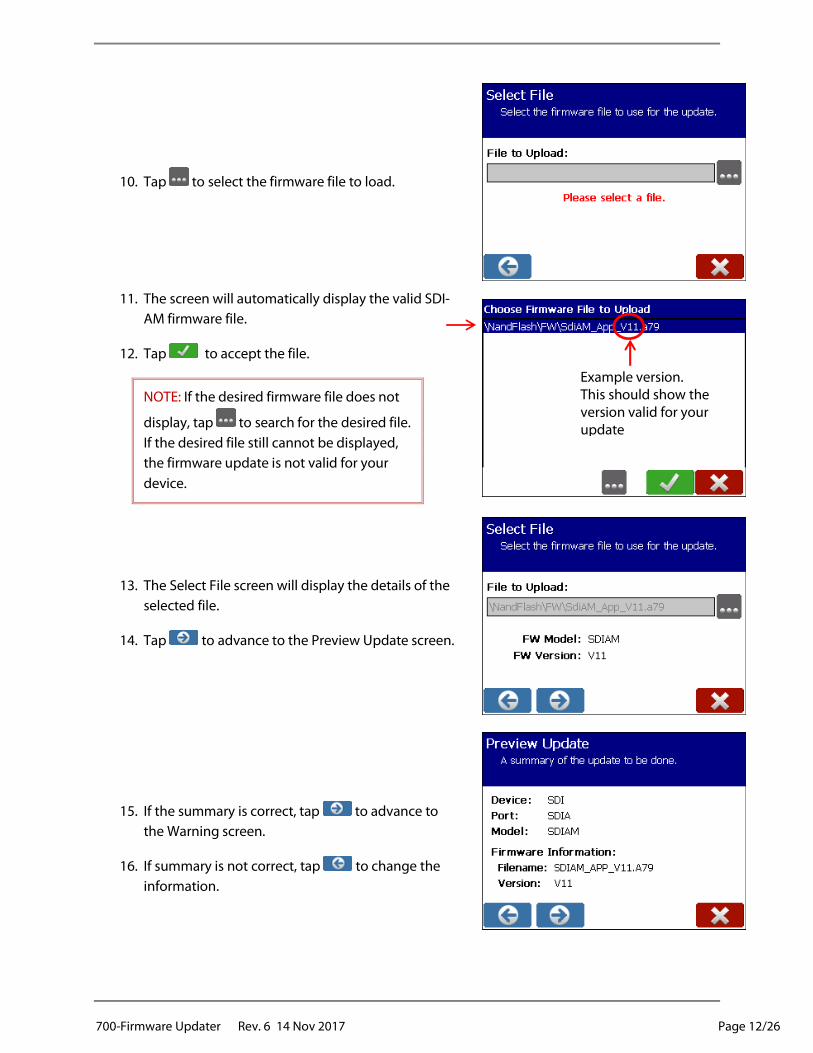
10. Tap to select the firmware file to load.
11. The screen will automatically display the valid SDI-
AM firmware file.
12. Tap to accept the file.
NOTE: If the desired firmware file does not
display, tap to search for the desired file.
If the desired file still cannot be displayed,
the firmware update is not valid for your
device.
13. The Select File screen will display the details of the
selected file.
14. Tap to advance to the Preview Update screen.
15. If the summary is correct, tap to advance to
the Warning screen.
16. If summary is not correct, tap to change the
information.
Example version. This should show the version valid for your update
700-Firmware Updater Rev. 6 14 Nov 2017 Page 13/26
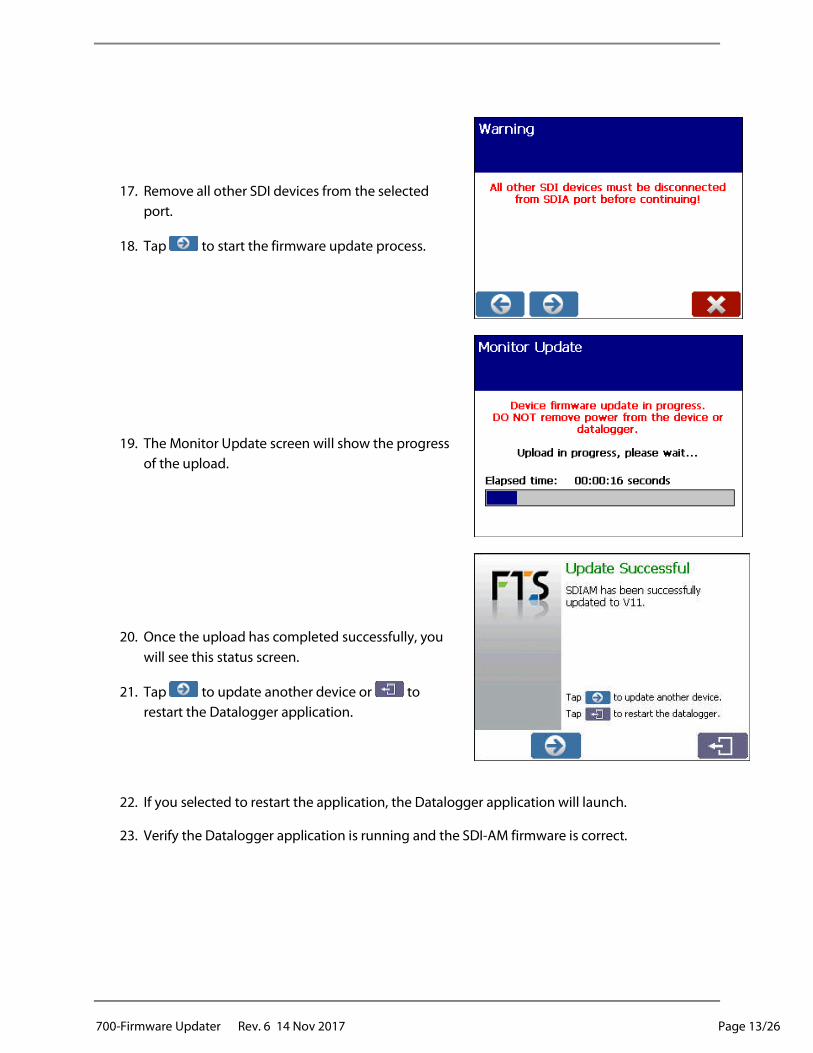
17. Remove all other SDI devices from the selected
port.
18. Tap to start the firmware update process.
19. The Monitor Update screen will show the progress
of the upload.
20. Once the upload has completed successfully, you
will see this status screen.
21. Tap to update another device or to
restart the Datalogger application.
22. If you selected to restart the application, the Datalogger application will launch.
23. Verify the Datalogger application is running and the SDI-AM firmware is correct.
700-Firmware Updater Rev. 6 14 Nov 2017 Page 14/26
UPDATING TELEMETRY DEVICE FIRMWARE Chapter 4
4.1 UPDATING AIRTALK FIRMWARE
To update the AirTalk firmware, perform the following steps:
1. Power down the Datalogger.
a. Remove the battery connector from the Datalogger and solar panel connector (if present)
2. Insert the USB flash drive prepared in Chapter 2 into the Datalogger. Remove all other USB flash
drives or USB DEVICE cables.
3. Power up the Datalogger:
a. Replace the battery connector and solar connector (if present).
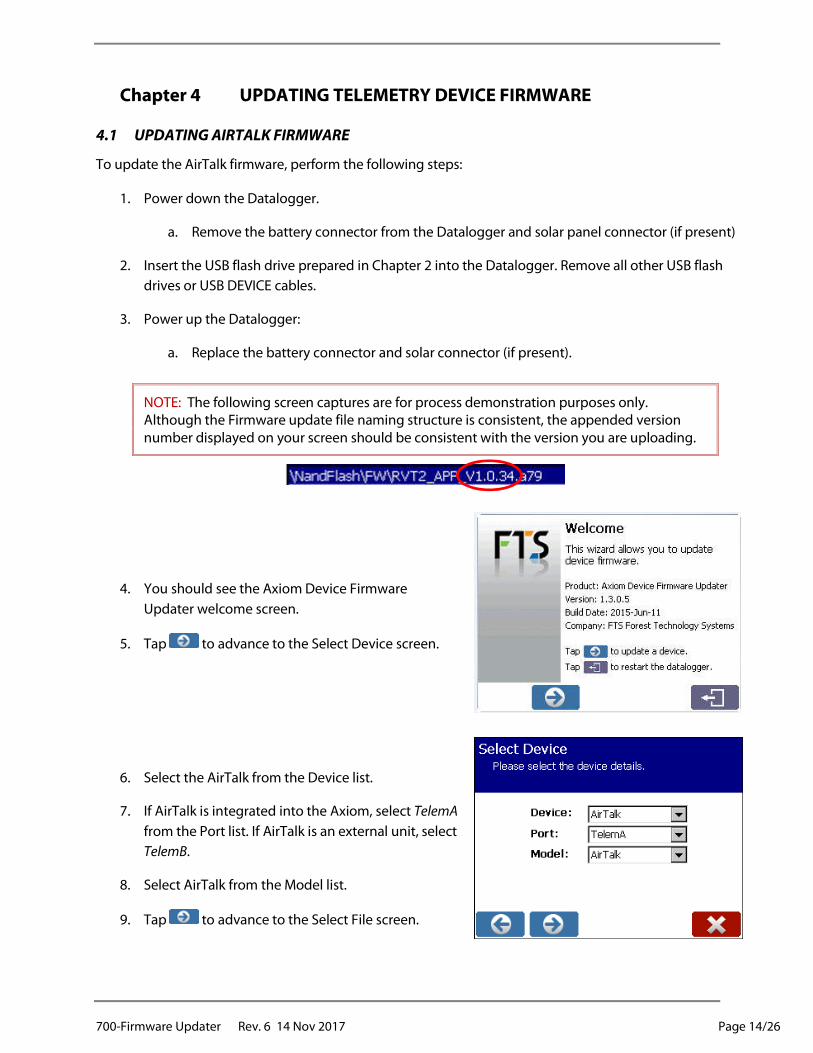
NOTE: The following screen captures are for process demonstration purposes only. Although the Firmware update file naming structure is consistent, the appended version number displayed on your screen should be consistent with the version you are uploading.
4. You should see the Axiom Device Firmware
Updater welcome screen.
5. Tap to advance to the Select Device screen.
6. Select the AirTalk from the Device list.
7. If AirTalk is integrated into the Axiom, select TelemA
from the Port list. If AirTalk is an external unit, select
TelemB.
8. Select AirTalk from the Model list.
9. Tap to advance to the Select File screen.

700-Firmware Updater Rev. 6 14 Nov 2017 Page 15/26
10. Tap to select the firmware file to load.
11. The screen will automatically display the valid
AirTalk firmware file.
12. Tap to accept the file.
NOTE: If the desired firmware file does not
display, tap to search for the desired file.
If the desired file still cannot be displayed,
the firmware update is not valid for your
device.
.
13. The Select File screen will display the details of the
selected file.
14. Tap to advance to the Preview Update screen.
Example version. This should show the version valid for your update
700-Firmware Updater Rev. 6 14 Nov 2017 Page 16/26
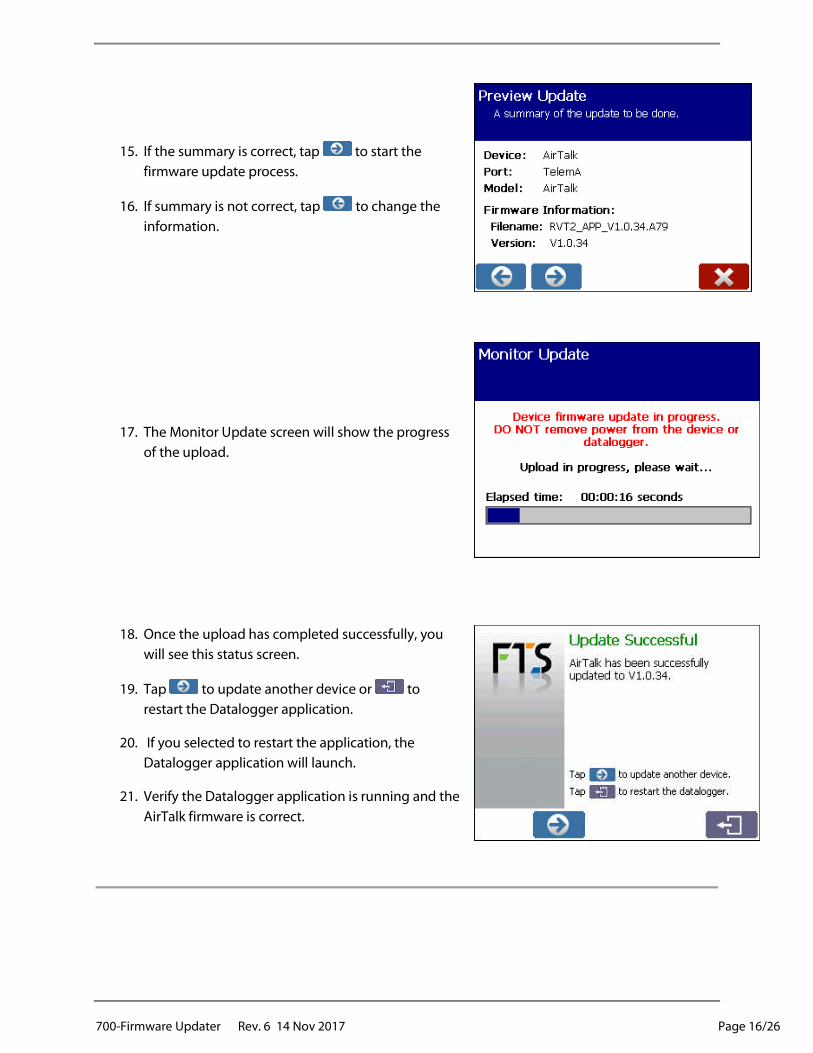
15. If the summary is correct, tap to start the
firmware update process.
16. If summary is not correct, tap to change the
information.
17. The Monitor Update screen will show the progress
of the upload.
18. Once the upload has completed successfully, you
will see this status screen.
19. Tap to update another device or to
restart the Datalogger application.
20. If you selected to restart the application, the
Datalogger application will launch.
21. Verify the Datalogger application is running and the
AirTalk firmware is correct.
700-Firmware Updater Rev. 6 14 Nov 2017 Page 17/26
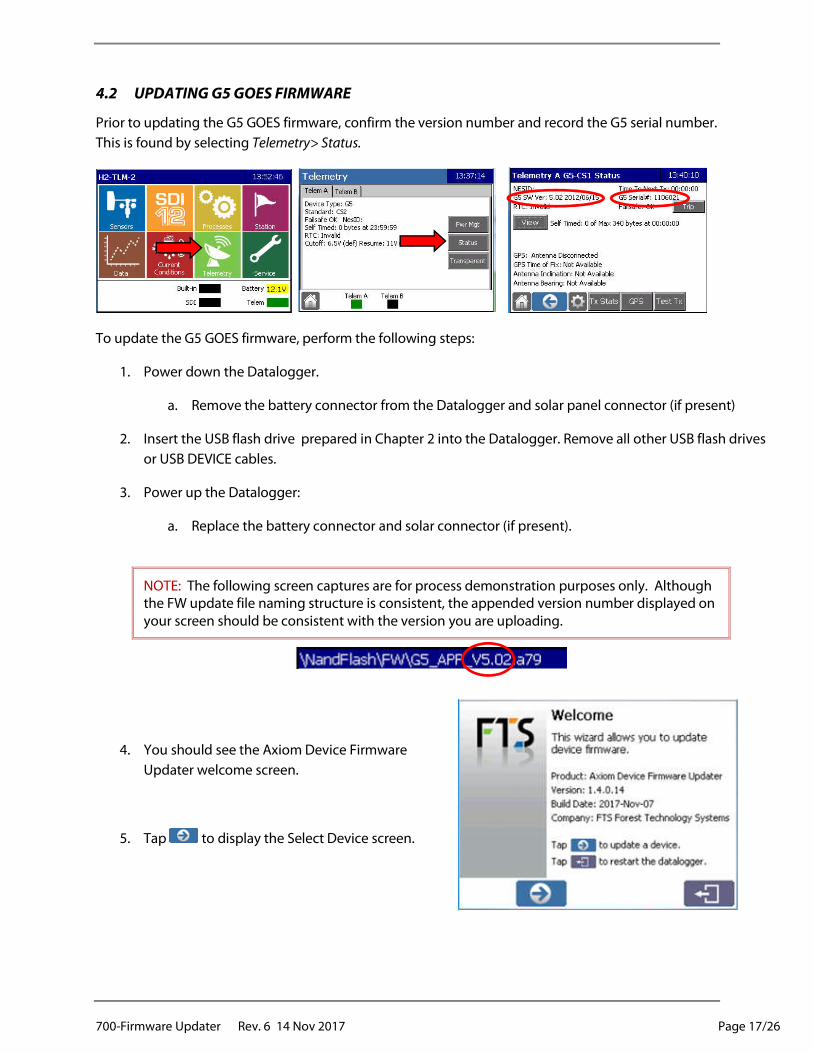
4.2 UPDATING G5 GOES FIRMWARE
Prior to updating the G5 GOES firmware, confirm the version number and record the G5 serial number.
This is found by selecting Telemetry> Status.
To update the G5 GOES firmware, perform the following steps:
1. Power down the Datalogger.
a. Remove the battery connector from the Datalogger and solar panel connector (if present)
2. Insert the USB flash drive prepared in Chapter 2 into the Datalogger. Remove all other USB flash drives
or USB DEVICE cables.
3. Power up the Datalogger:
a. Replace the battery connector and solar connector (if present).
NOTE: The following screen captures are for process demonstration purposes only. Although the FW update file naming structure is consistent, the appended version number displayed on your screen should be consistent with the version you are uploading.
4. You should see the Axiom Device Firmware
Updater welcome screen.
5. Tap to display the Select Device screen.
700-Firmware Updater Rev. 6 14 Nov 2017 Page 18/26
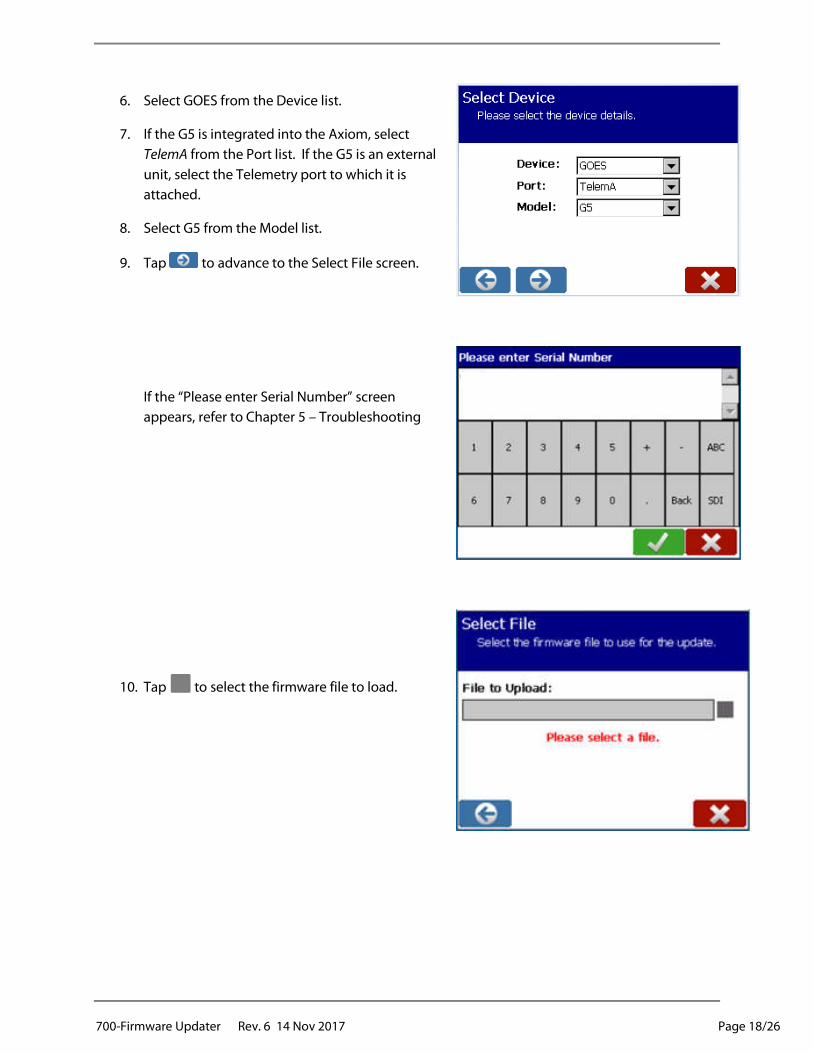
6. Select GOES from the Device list.
7. If the G5 is integrated into the Axiom, select
TelemA from the Port list. If the G5 is an external
unit, select the Telemetry port to which it is
attached.
8. Select G5 from the Model list.
9. Tap to advance to the Select File screen.
If the “Please enter Serial Number” screen
appears, refer to Chapter 5 – Troubleshooting
10. Tap to select the firmware file to load.
700-Firmware Updater Rev. 6 14 Nov 2017 Page 19/26
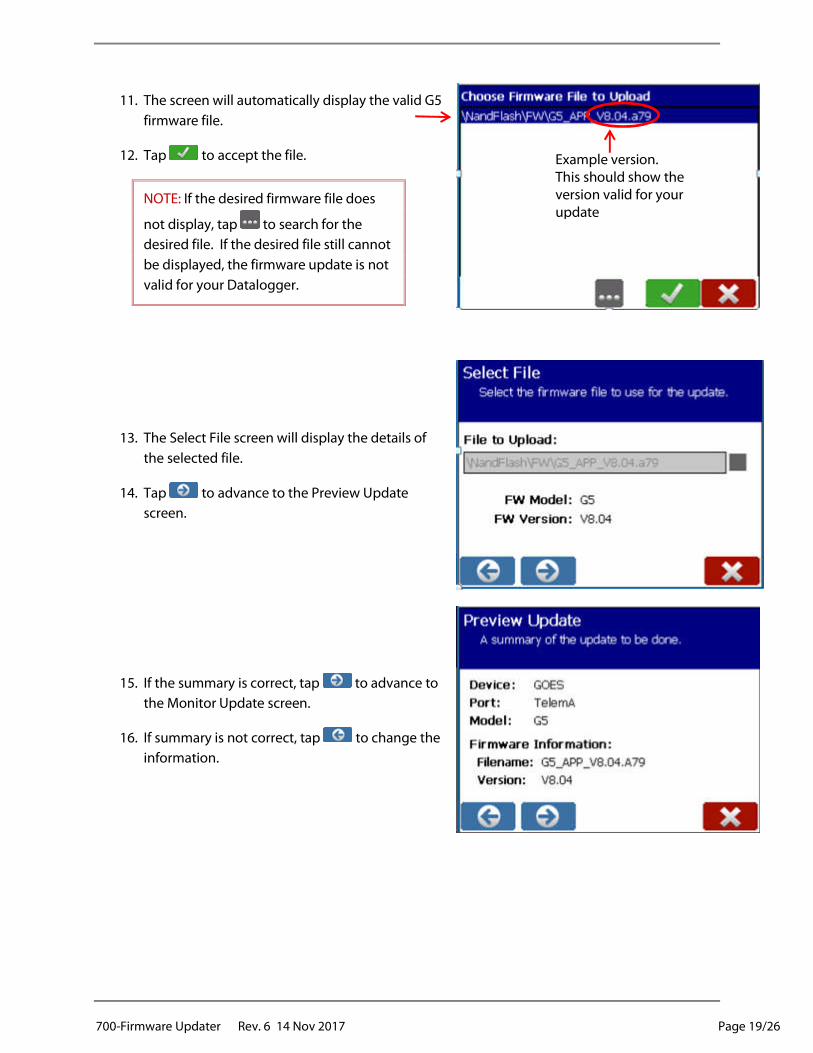
11. The screen will automatically display the valid G5
firmware file.
12. Tap to accept the file.
NOTE: If the desired firmware file does
not display, tap to search for the
desired file. If the desired file still cannot
be displayed, the firmware update is not
valid for your Datalogger.
13. The Select File screen will display the details of
the selected file.
14. Tap to advance to the Preview Update
screen.
15. If the summary is correct, tap to advance to
the Monitor Update screen.
16. If summary is not correct, tap to change the
information.
Example version. This should show the version valid for your update
700-Firmware Updater Rev. 6 14 Nov 2017 Page 20/26
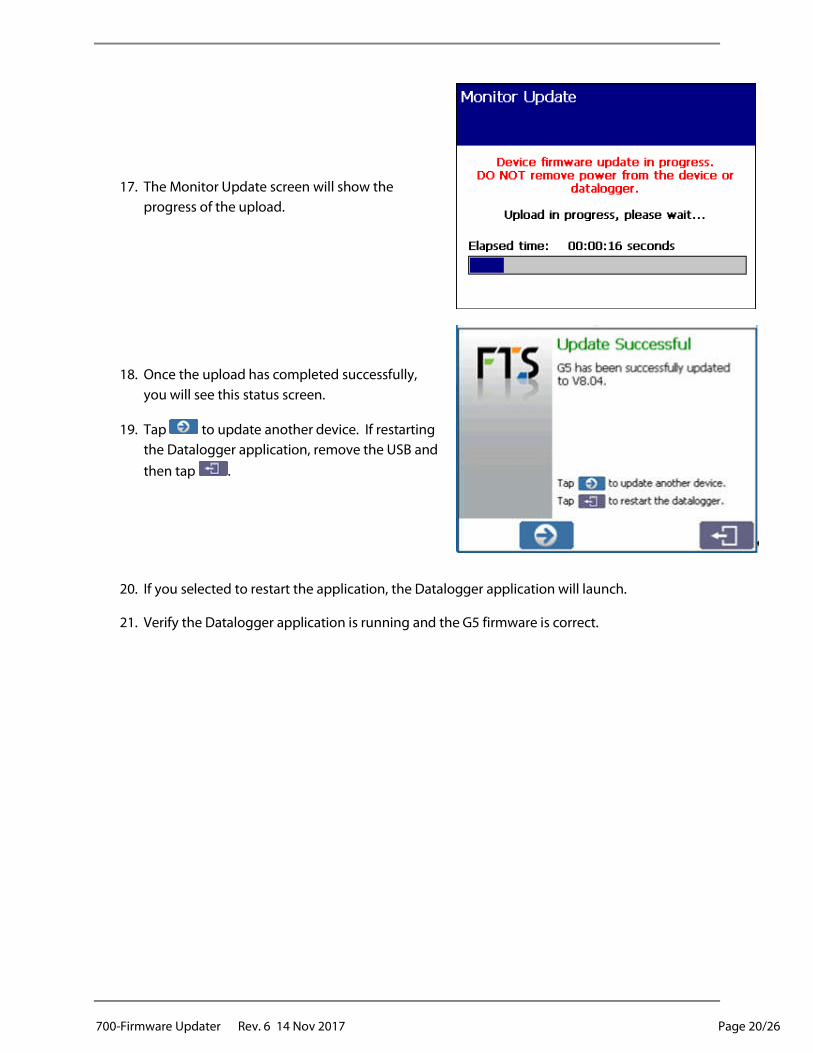
17. The Monitor Update screen will show the
progress of the upload.
18. Once the upload has completed successfully,
you will see this status screen.
19. Tap to update another device. If restarting
the Datalogger application, remove the USB and
then tap .
20. If you selected to restart the application, the Datalogger application will launch.
21. Verify the Datalogger application is running and the G5 firmware is correct.
700-Firmware Updater Rev. 6 14 Nov 2017 Page 21/26
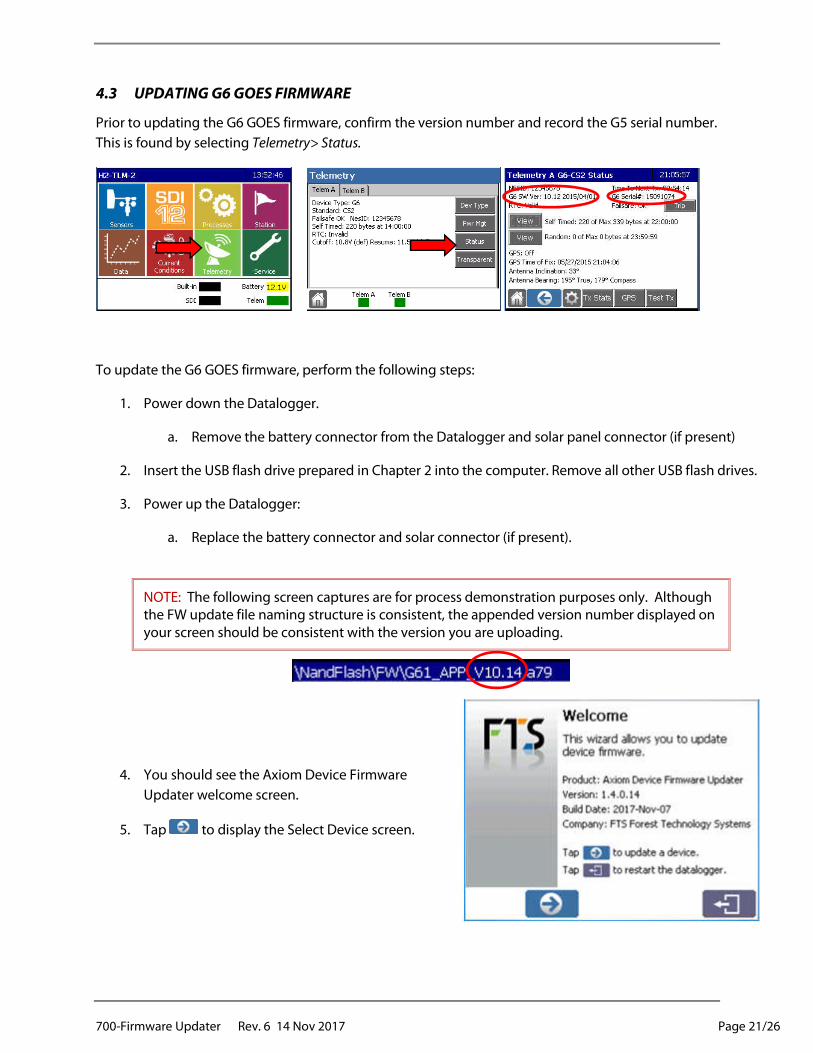
4.3 UPDATING G6 GOES FIRMWARE
Prior to updating the G6 GOES firmware, confirm the version number and record the G5 serial number.
This is found by selecting Telemetry> Status.
To update the G6 GOES firmware, perform the following steps:
1. Power down the Datalogger.
a. Remove the battery connector from the Datalogger and solar panel connector (if present)
2. Insert the USB flash drive prepared in Chapter 2 into the computer. Remove all other USB flash drives.
3. Power up the Datalogger:
a. Replace the battery connector and solar connector (if present).
NOTE: The following screen captures are for process demonstration purposes only. Although the FW update file naming structure is consistent, the appended version number displayed on your screen should be consistent with the version you are uploading.
4. You should see the Axiom Device Firmware
Updater welcome screen.
5. Tap to display the Select Device screen.
700-Firmware Updater Rev. 6 14 Nov 2017 Page 22/26
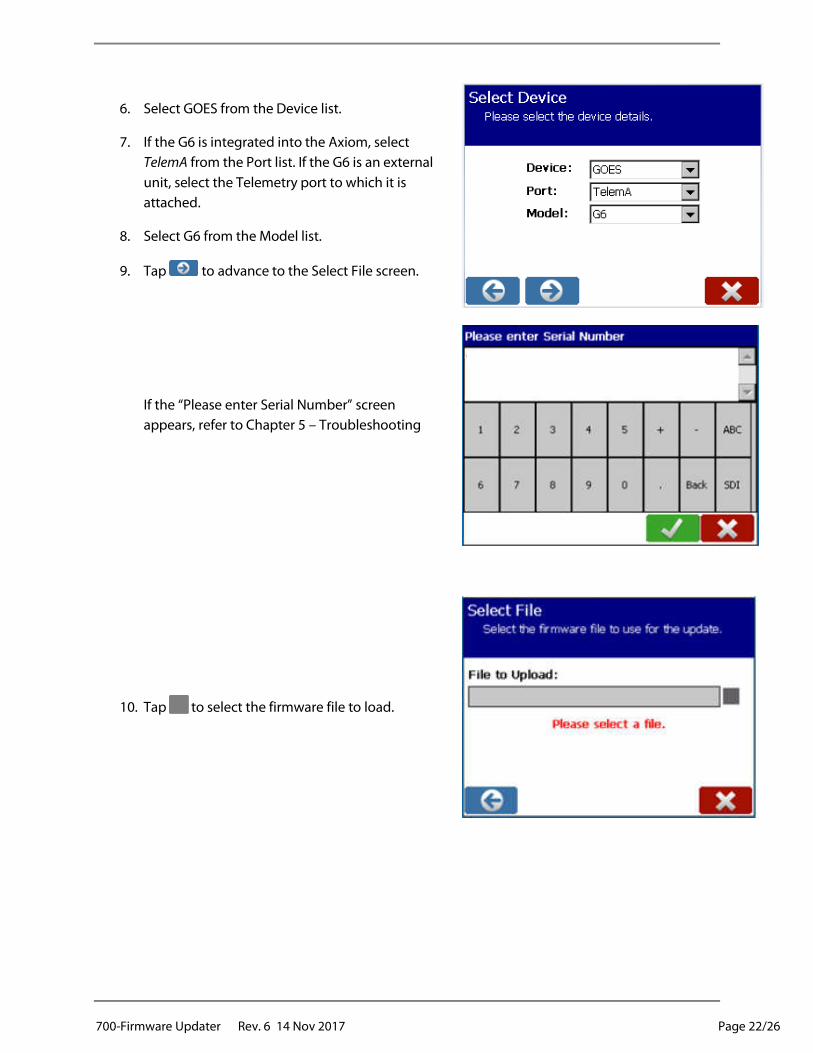
6. Select GOES from the Device list.
7. If the G6 is integrated into the Axiom, select
TelemA from the Port list. If the G6 is an external
unit, select the Telemetry port to which it is
attached.
8. Select G6 from the Model list.
9. Tap to advance to the Select File screen.
If the “Please enter Serial Number” screen
appears, refer to Chapter 5 – Troubleshooting
10. Tap to select the firmware file to load.
700-Firmware Updater Rev. 6 14 Nov 2017 Page 23/26
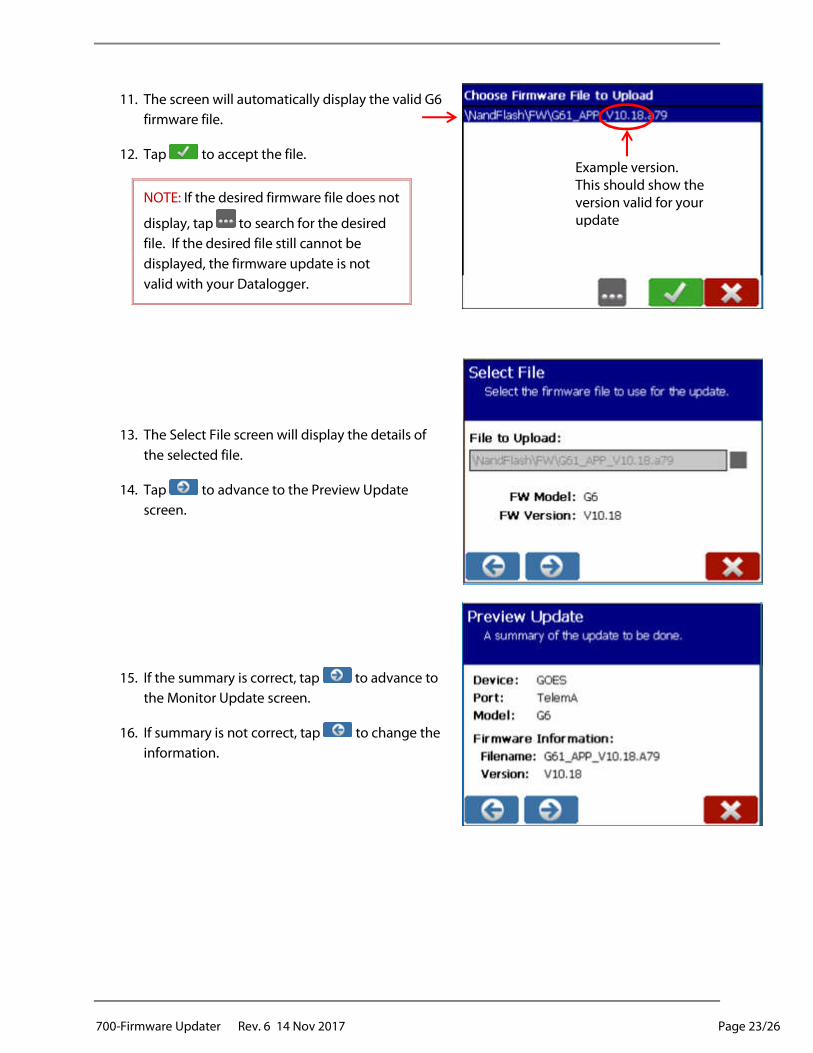
11. The screen will automatically display the valid G6
firmware file.
12. Tap to accept the file.
NOTE: If the desired firmware file does not
display, tap to search for the desired
file. If the desired file still cannot be
displayed, the firmware update is not
valid with your Datalogger.
13. The Select File screen will display the details of
the selected file.
14. Tap to advance to the Preview Update
screen.
15. If the summary is correct, tap to advance to
the Monitor Update screen.
16. If summary is not correct, tap to change the
information.
Example version. This should show the version valid for your update
700-Firmware Updater Rev. 6 14 Nov 2017 Page 24/26
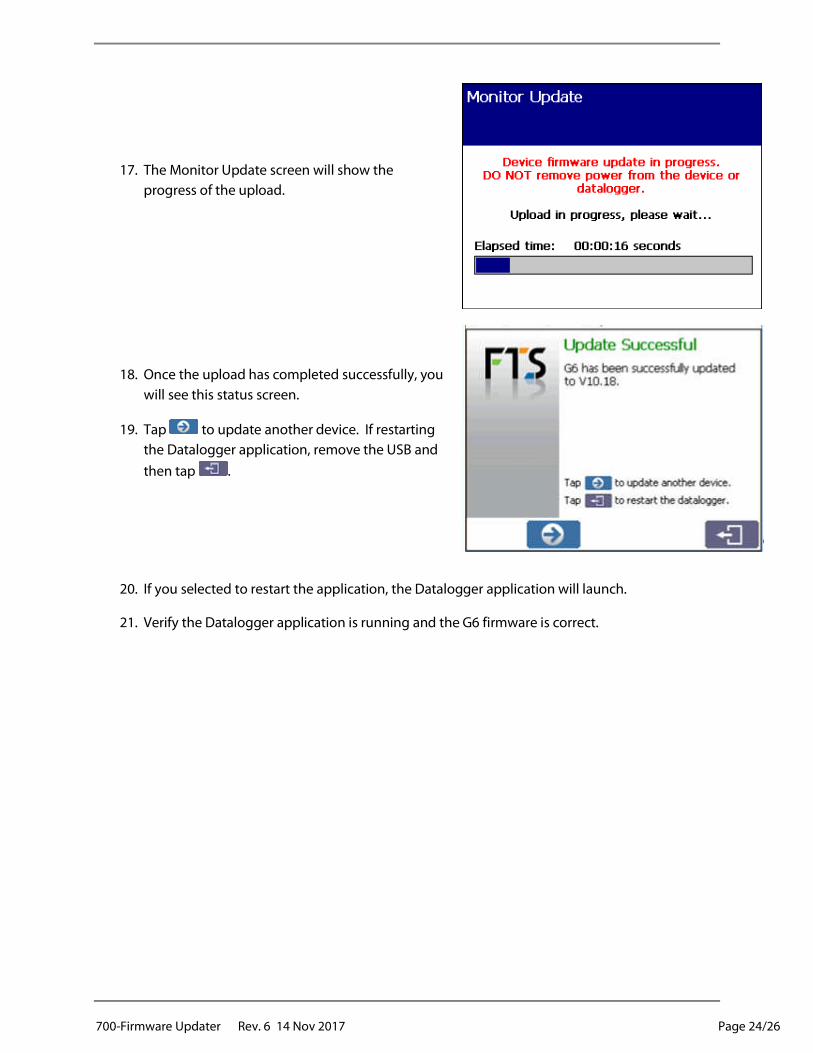
17. The Monitor Update screen will show the
progress of the upload.
18. Once the upload has completed successfully, you
will see this status screen.
19. Tap to update another device. If restarting
the Datalogger application, remove the USB and
then tap .
20. If you selected to restart the application, the Datalogger application will launch.
21. Verify the Datalogger application is running and the G6 firmware is correct.
700-Firmware Updater Rev. 6 14 Nov 2017 Page 25/26
TROUBLESHOOTING Chapter 5
If you experience an issue not documented below, contact FTS for technical support at: 1-800-548-
4264.
ISSUE RESOLUTION
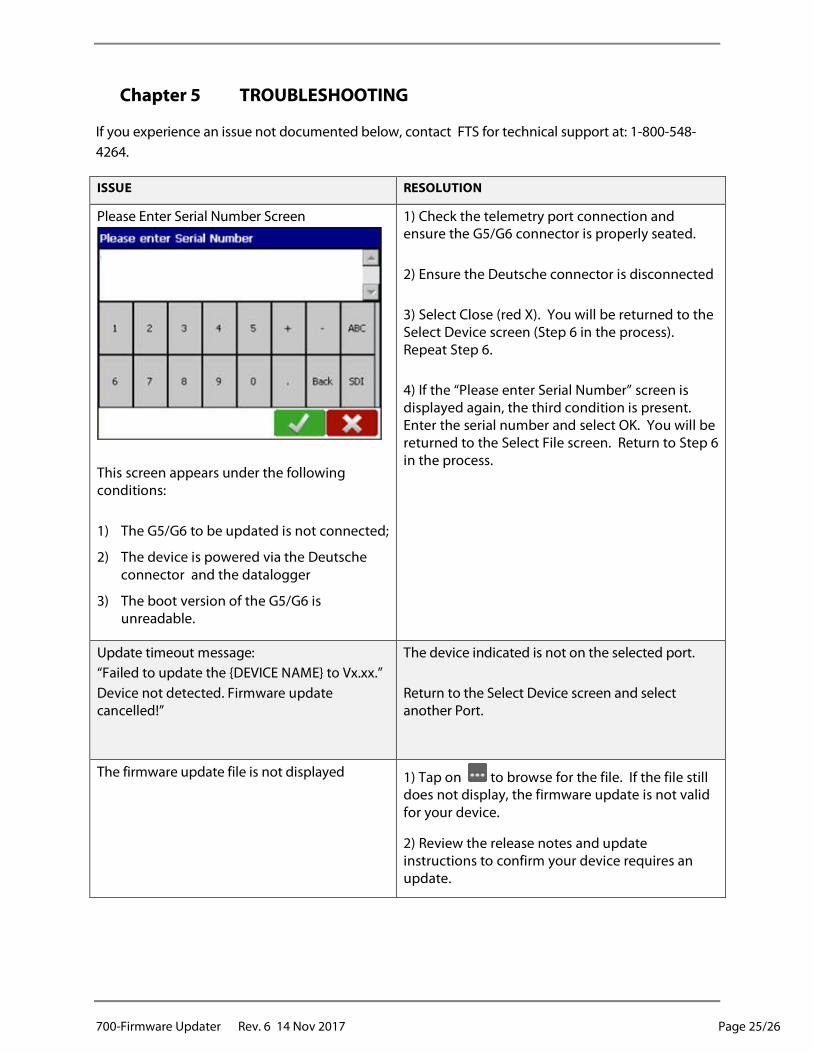
Please Enter Serial Number Screen
This screen appears under the following conditions:
1) The G5/G6 to be updated is not connected;
2) The device is powered via the Deutsche connector and the datalogger
3) The boot version of the G5/G6 is unreadable.
1) Check the telemetry port connection and ensure the G5/G6 connector is properly seated.
2) Ensure the Deutsche connector is disconnected
3) Select Close (red X). You will be returned to the Select Device screen (Step 6 in the process). Repeat Step 6.
4) If the “Please enter Serial Number” screen is displayed again, the third condition is present. Enter the serial number and select OK. You will be returned to the Select File screen. Return to Step 6 in the process.
Update timeout message:
“Failed to update the {DEVICE NAME} to Vx.xx.”
Device not detected. Firmware update cancelled!”
The device indicated is not on the selected port.
Return to the Select Device screen and select another Port.
The firmware update file is not displayed 1) Tap on to browse for the file. If the file still does not display, the firmware update is not valid for your device.
2) Review the release notes and update instructions to confirm your device requires an update.
700-Firmware Updater Rev. 6 14 Nov 2017 Page 26/26
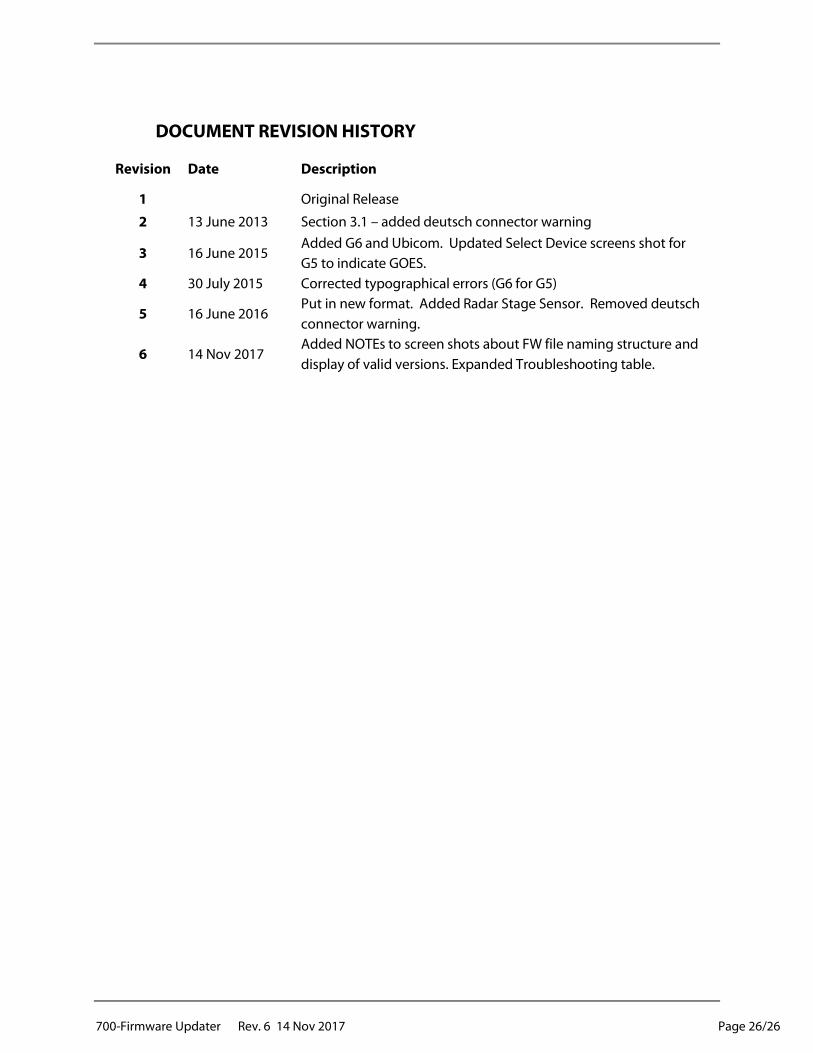
DOCUMENT REVISION HISTORY
Revision Date Description
1 Original Release
2 13 June 2013 Section 3.1 – added deutsch connector warning
3 16 June 2015 Added G6 and Ubicom. Updated Select Device screens shot for
G5 to indicate GOES.
4 30 July 2015 Corrected typographical errors (G6 for G5)
5 16 June 2016 Put in new format. Added Radar Stage Sensor. Removed deutsch
connector warning.
6 14 Nov 2017 Added NOTEs to screen shots about FW file naming structure and
display of valid versions. Expanded Troubleshooting table.