Embed Size (px)
Citation preview
Axeda® Platform
Axeda® Access Viewer User’s Guide
Release 6.1
June 2010
2 Copyright © 2001- 2010 Axeda Corporation. All rights reserved. Confidential property
Copyright © 2001 - 2010 . Axeda Corporation. All rights reserved. Portions of Axeda® ServiceLink™ protected by U.S. Pat. Nos.: 6757714, 7046134, 7117239, 7149792, and 7185014; and EU Patent Nos.: 1350367 and 1305712.
Axeda Corporation 25 Forbes Boulevard, Suite 3 Foxborough, MA 02035 USA (508) 337-9200
Axeda® ServiceLink™ and Axeda® Platform software and services (“Axeda Products”) and Questra® IDM software (“IDM Software”) are protected by contract law, copyright laws, and international treaties. Axeda Products and IDM Software are supplied under license and/or services contracts with Axeda’s customers and only users authorized under the applicable contract are permitted to access and use the Axeda Products and IDM Software. Unauthorized use and distribution may result in civil and criminal penalties. Use, duplication, or disclosure of Axeda software by the U.S. government is subject to FAR 12.211 and 12.212 which state that Government shall acquire only the technical data and the rights in that data customarily provided to the public with a commercial item or process and commercial computer software or commercial computer software documentation shall be acquired by the Government under licenses customarily provided to the public to the extent such licenses are consistent with Federal law. Portions of the Axeda Products include one or more open source or other third party software programs. Please refer to the Open_Source_License_Requirements.pdf included in your Axeda product(s) for important notices and licensing information related to such programs. This information is also available through the Axeda Support Site for authorized customers. The information in this manual is subject to change without notice and does not represent a commitment on the part of Axeda Corporation. This manual and the accompanying Axeda products are copyrighted by Axeda Corporation and contain proprietary and confidential information of Axeda Corporation. All rights are reserved. Any reproduction and/or distribution without the prior written consent from Axeda Corporation is strictly prohibited, except as permitted under the contract between your company and Axeda Corporation. Please refer to the contract for details. "Axeda" is a registered trademark and the "Axeda" logo is a trademark of Axeda Corporation. “Questra” is a registered trademark of Axeda Corporation. Axeda ServiceLink, Safe Access, Firewall-Friendly, and Maximum Support are trademarks or service marks of Axeda Corporation. Questra IDM Application Suite, Questra RemoteService, Questra SmartMonitor, Questra SoftwareDirector, Questra SoftwareCourier, Questra TotalAccess, A2B, and Asset-to-Business are trademarks of Axeda Corporation. All third party brand or product names are trademarks or registered trademarks of their respective companies or organizations and are hereby acknowledged, including without limitation the following: Microsoft, .Net logo, Access (database software), Active Desktop, Active Directory, Internet Explorer, the Microsoft Internet Explorer logo (graphic only), SQL Server, Terminal Services RemoteApp, Visual C++, Visual InterDev, Visual Studio, Visual Studio logo (graphic only), Win32, Windows, the Windows logo (aka the flag logo, graphic only), Windows NT, Windows start button, Windows Start logo (design), and Windows Vista are registered trademarks of Microsoft Corporation. Sun, Solaris, iPlanet, Java, and all Java-based marks are trademarks or registered trademarks of Sun Microsystems, Inc. in the United States and other countries. Axeda Corporation is independent of Sun Microsystems, Inc. Oracle and Siebel are registered trademarks of Oracle Corporation and/or its affiliates. IBM and Cognos are registered trademarks of International Business Machines, Incorporated, in the United States and other countries. Linux is a trademark of Linus Torvalds. RED HAT and JBOSS are registered trademarks of Red Hat, Inc. and its subsidiaries in the US and other countries. SuSE Linux is a trademark of SuSE, Inc. Apache Tomcat and Tomcat are trademarks of the Apache Software Foundation. VxWorks is a registered trademark of Wind River Systems, Inc. Netscape is a registered trademark of Netscape Communications Corporation in the U.S. and other countries. Navigator is also a trademark of Netscape Communications Corporation and may be registered outside the U.S. Accelerated Technology and Nucleus are registered trademarks of Accelerated Technology, Inc. ThreadX is a registered trademark of Express Logic, Inc. NetSilicon and NET+OS are trademarks of NetSilicon, Inc. ARM is a registered trademark of ARM Limited. This product includes software developed by the OpenSSL Project for use in the OpenSSL toolkit (http:// www.openssl.org/). Contains software developed by the University of California, Berkeley and its contributors. All other brand or product names are trademarks or registered trademarks of their respective companies or organizations and are hereby acknowledged.
Document Number: Axeda Access Viewer/UserGuide/6.1/0610
3 Copyright © 2001- 2010 Axeda Corporation. All rights reserved. Confidential property
Table of Contents 1 OVERVIEW OF AXEDA® ACCESS ............................................................ 0H1
1.1 Sharing a Desktop is Secure..................................................................... 1H3
1.2 Example Use of Axeda Access ................................................................. 2H6
1.3 Support for multiple languages.................................................................. 3H8
1.4 How to start and use Axeda Access Remote ............................................ 4H8
1.5 How to start and use Axeda Access Viewer.............................................. 5H9
2 SYSTEM REQUIREMENTS ....................................................................... 6H10
3 INSTALLATION AND CONFIGURATION.................................................. 7H10
3.1 Using the installation wizard.................................................................... 8H10
3.2 Configuring Axeda Access Viewer Settings ............................................ 9H10
4 CONNECTING TO AN AXEDA ACCESS SESSION ................................. 10H23
4.1 Desktop sharing through Axeda Service ................................................. 11H23
4.2 Desktop sharing through Axeda Access ................................................. 12H26
4.3 Desktop sharing through a direct LAN connection .................................. 13H30
5 COLLECTING SESSION FEEDBACK....................................................... 14H31
6 ACTIONS FROM THE AXEDA ACCESS VIEWER WINDOW................... 15H33
6.1 Closing a shared session ........................................................................ 16H34
6.2 Changing Axeda Access Viewer settings................................................ 17H35
6.3 Viewing connection information............................................................... 18H35
6.4 Refreshing the Axeda Access Viewer window ........................................ 19H36
4 Copyright © 2001- 2010 Axeda Corporation. All rights reserved. Confidential property
6.5 Showing or hiding the Axeda Access Viewer toolbar .............................. 20H37
6.6 Managing files and directories using File Transfer .................................. 21H37
6.7 Starting a Chat session with an Axeda Access Remote operator ........... 22H39
6.8 Changing the Axeda Access Viewer window size ................................... 23H41
6.9 Simulating Ctrl+Alt+Del on the remote desktop....................................... 24H42
6.10 Switching applications on the remote desktop ........................................ 25H42
6.11 Simulating the Windows Start menu on the remote desktop................... 26H43
6.12 Viewing Help for the Axeda Access Viewer application .......................... 27H43
6.13 Displaying version information ................................................................ 28H43
6.14 Copying file content................................................................................. 29H44
7 VIEWING INFORMATION ABOUT SHARED SESSIONS......................... 30H45
8 TROUBLESHOOTING ............................................................................... 31H46
8.1 If you cannot start Axeda Access Viewer (aviewer.exe).......................... 32H46
8.2 If you cannot communicate with the Axeda Enterprise server................. 33H46
8.3 If you cannot connect to a shared desktop.............................................. 34H47
8.4 If the Axeda Access Viewer window does not accurately reflect the current desktop .............................................................................................................. 35H48
8.5 If the connection closes unexpectedly..................................................... 36H48
8.6 Slow dial-up connections......................................................................... 37H48
9 GETTING HELP ......................................................................................... 38H49
10 DOCUMENTATION FEEDBACK ........................................................... 39H49
Overview of Axeda® Access 1 Copyright © 2001- 2010 Axeda Corporation. All rights reserved. Confidential property
1 Overview of Axeda® Access
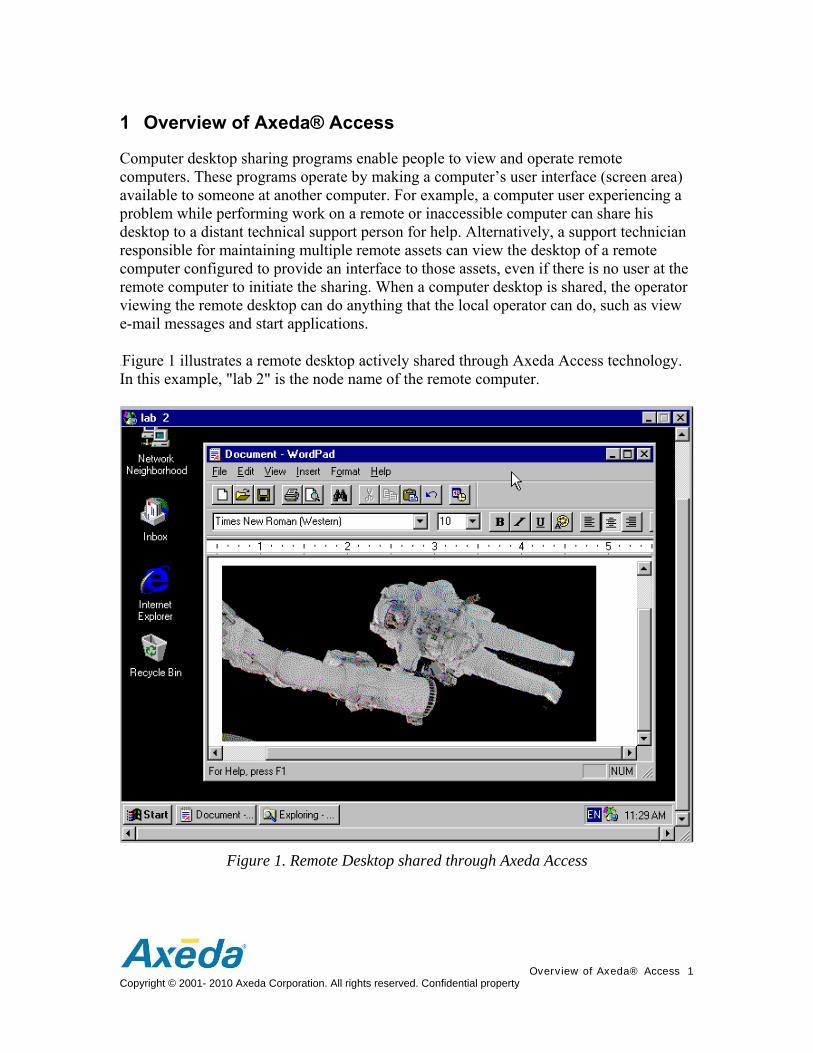
Computer desktop sharing programs enable people to view and operate remote computers. These programs operate by making a computer’s user interface (screen area) available to someone at another computer. For example, a computer user experiencing a problem while performing work on a remote or inaccessible computer can share his desktop to a distant technical support person for help. Alternatively, a support technician responsible for maintaining multiple remote assets can view the desktop of a remote computer configured to provide an interface to those assets, even if there is no user at the remote computer to initiate the sharing. When a computer desktop is shared, the operator viewing the remote desktop can do anything that the local operator can do, such as view e-mail messages and start applications.
40HFigure 1 illustrates a remote desktop actively shared through Axeda Access technology. In this example, "lab 2" is the node name of the remote computer.
Figure 1. Remote Desktop shared through Axeda Access
2 Copyright © 2001- 2010 Axeda Corporation. All rights reserved. Confidential property
The Axeda® Access Viewer application (a client) lets you view the desktop of a computer with the Axeda® Access Remote application (a server) installed. You can connect the computers through the Axeda Access application, to support desktop sharing to anyone connected to the Internet. You can also connect the computers through either a direct network connection or a configured Axeda® Application Bridge. Once the desktop of the Access Remote computer is shared to the Access Viewer computer, the Access Viewer operator can view and operate the Access Remote desktop.
An Access Viewer operator uses the local keyboard and mouse to operate a shared Access Remote computer. The shared Access Remote computer's entire desktop appears in a window on the Access Viewer computer. Access Viewer operators can perform the same types of actions on the Access Remote desktop as the local operator, unless configured security restricts their actions. An Access Viewer operator can also copy data and files between the two computers, and start an instant-messaging session with the Access Remote operator.
The Axeda® Enterprise server provides a secure Web server through which the Access Remote and Viewer computers can communicate. Both Access computers may be hidden from the Internet through firewalls and proxy servers; however, as long as they can both browse to the Axeda Enterprise server, they can share a session. Because the Axeda Enterprise server is Firewall-Friendly, IT departments do not need to assign external IP addresses, reconfigure firewalls, or install direct telephone lines. In addition, for companies that use them, Axeda Access supports dynamic IP addresses for new assets or changes to existing IP addresses. The Axeda Enterprise server authenticates users and manages sessions to make administration centralized and easy.
Overview of Axeda® Access 3 Copyright © 2001- 2010 Axeda Corporation. All rights reserved. Confidential property
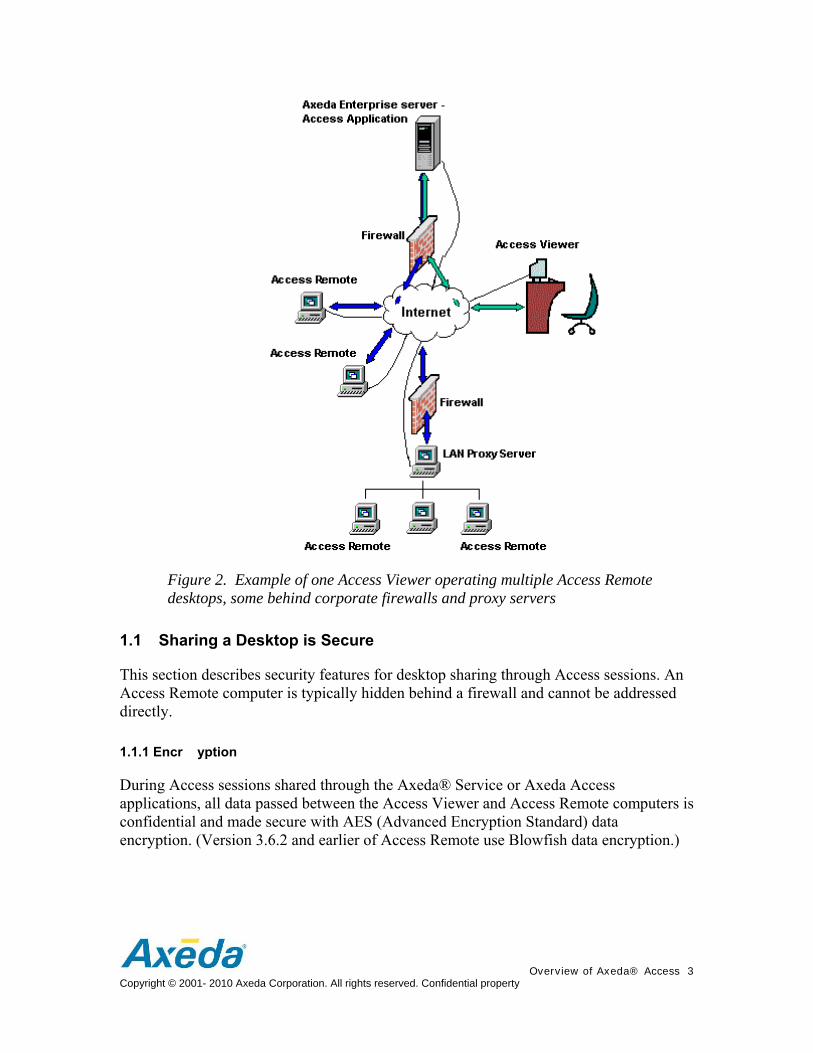
Figure 2. Example of one Access Viewer operating multiple Access Remote desktops, some behind corporate firewalls and proxy servers
1.1 1Sharing a Desktop is Secure
This section describes security features for desktop sharing through Access sessions. An Access Remote computer is typically hidden behind a firewall and cannot be addressed directly.
1.1.1 Encr yption
During Access sessions shared through the Axeda® Service or Axeda Access applications, all data passed between the Access Viewer and Access Remote computers is confidential and made secure with AES (Advanced Encryption Standard) data encryption. (Version 3.6.2 and earlier of Access Remote use Blowfish data encryption.)
4 Copyright © 2001- 2010 Axeda Corporation. All rights reserved. Confidential property
1.1.2 O wner-controlled access
An Access Viewer operator cannot share an Access Remote desktop without the expressed knowledge and permission of that computer’s owner. For sessions through Axeda Access, either an operator at the Access Remote computer must be present to connect to the session (attended operation) or the Access Remote application must be configured to allow a session to start without local operator intervention (unattended operation).
Before allowing any sessions, configure the properties for Access Remote at each asset running the application. Refer to the user’s guide for Access Remote for details. Note that one of these properties allows the intervention of an Access Remote operator to accept or reject requests for sessions. If this option is enabled, an Access Viewer session may be rejected by the Access Remote operator or, if the operator does not respond within two minutes, by Access Remote itself.
During a shared session, the Access Remote properties cannot be changed. This restriction prevents Access Viewer operators from changing any settings that limit their actions during the session.
1.1.2.1 Axeda® Policy Server and Axeda Access Remote
If an Access Remote computer has an Axeda® Gateway or Axeda® Connector agent installed (as is required for sessions through Axeda Service), and the agent is configured with Axeda Policy Server support, then the Access Remote asset is subject to any Axeda Policy Server settings. For example, desktop sharing may not be allowed for that asset.
1.1.2.2 Axeda Access Remote password
The Access Remote application can be configured with a password for desktop sharing. If a password is configured, the Access Viewer operator must know and type that password to share the desktop of that Access Remote computer.
1.1.2.3 Runtime security and control of the connection
An operator at an Access Remote computer can cancel an active connection or session at any time. Also, the Access Remote application can be configured to limit the Access Viewer operator’s actions during the shared session: the Access Viewer operator's ability to use a keyboard or mouse for navigating in the Access Remote desktop can be restricted, as can the ability to browse directories, upload files from, and download files to the Access Remote desktop. In this way, the Access Viewer operator can be limited to view-only use of the Access Remote computer.
Overview of Axeda® Access 5 Copyright © 2001- 2010 Axeda Corporation. All rights reserved. Confidential property
1.1.3 User privileges
To use the Axeda Access application to create sessions, the Access Viewer operator must be defined in a user group with privileges to use the Axeda Access application and to create Access sessions.
To use the Axeda Service application to run a remote application configuration, the Access Viewer operator must be defined in a user group with privileges to use the Axeda Service application. In addition, the user must belong to a user group that has privileges to the asset (the asset group to which the asset belongs has been assigned to the user group).
1.1.4 Desktop sharing through Axeda Access…
1.1.4.1 Masking
You can configure IP masks for Access Remote and Access Viewer computers. Masks restrict connections through the Axeda Enterprise server to only those computers with validated IP addresses. Depending upon your needs and concerns, you can configure the masking to be very lenient, very strict, or somewhere in between. For example, you can configure masks that permit session connections for particular Access Viewer computers, or for any Access Viewer computer on a specified subnet. The same is true for the Access Remote computers that need to connect to a shared session. For more information about how to configure masking, refer to the online Help for the Axeda Access application.
1.1.4.2 Timeout periods
For desktop sharing through Axeda Access, two timeout periods restrict how long the Access Viewer and Access Remote computers have to connect to a session. Once a new session is created, one of the two computers must connect to the session within 40 seconds (or whichever time period is configured); otherwise, the session is removed from the Axeda Enterprise server. Once either computer connects to the session, the second computer has 10 minutes (or whichever time period is configured) to connect to the session; if the second computer does not connect within this time period, the session is removed.
Note: The second timeout period (10 minutes) has separate settings for attended and unattended sessions.
1.1.4.3 Session IDs
When you create a new Axeda Access session using the Axeda Access application, a session ID is generated. To start the session, both the Access Viewer and Access Remote computers must connect to that session ID. For unattended sessions, the Access Remote computer connects to that session ID when it next polls the Axeda Enterprise server for a waiting session.
6 Copyright © 2001- 2010 Axeda Corporation. All rights reserved. Confidential property
Once an Axeda Access session ends, the session ID is inactivated in the Axeda Enterprise server. Regaining access to the Access Remote desktop requires a new session ID. This requirement prevents accidental or malicious reentry to a system without the Access Remote computer owner’s involvement.
1.1.4.4 Confirmation of Session Requests
Users at assets running Axeda Access Remote can enable the property, Ask for Confirmation, so that Access Remote prompts the operator at the asset to accept or reject the request for remote access. If the operator does not respond within two minutes, Access Remote rejects the request and closes the prompt dialog box.
1.1.5 Desktop sharing through Axeda Service…
1.1.5.1 Timeout periods
For desktop sharing through the Axeda Service application, two timeout periods affect sessions. First, the Axeda Gateway or Axeda Connector Agent running on the Access Remote asset must contact the Axeda Enterprise server to start the session within 120 seconds (the editable default) of the session’s creation. If the Agent does not contact the Axeda Enterprise server within that time period, the session is closed. Second, once the session starts, if 60 seconds (the editable default) of inactivity elapse for the session, the session is closed.
1.2 1Example Use of Axeda Access
Let’s assume a user is experiencing problems with the ACME application installed on his computer. The user contacts the Service and Support department at ACME. To troubleshoot the problem, the ACME Service Technician needs to share the desktop of the problematic computer. The Service Technician can connect to the Axeda Access Remote computer through Axeda Access, or through Axeda Service, as described here:
Connection through Axeda Access…
The Service Technician logs in to the Axeda® ServiceLink™ Applications, opens the Axeda Access application, and requests a session ID. The Axeda Access application creates a session with a unique shared session ID, such as 123987. The Service Technician tells the user to start Access Remote on the problem computer and select Start ServiceLink Session from the Access Remote menu. Access Remote prompts for the session ID; the Service Technician tells the session ID to the user. The Access Remote user types that session ID in the Access Remote: Session dialog box, and then tells the Service Technician the password configured for the Access Remote computer.
Overview of Axeda® Access 7 Copyright © 2001- 2010 Axeda Corporation. All rights reserved. Confidential property
The Service Technician starts Access Viewer on her computer, selects the Axeda Enterprise server for the session, types the same session ID, and then types the password.
Connection through Axeda Service…
With an Axeda Gateway or Axeda Connector Agent installed on the Access Remote computer, Access Remote started on that asset, and a remote application configuration for an Axeda Application Bridge defined (listening on port 5900), the Service Technician starts her local browser. She logs in to the ServiceLink Applications and opens the Axeda Service application. In the Axeda Service application, the Technician opens the Remote Sessions list for the particular asset, and runs the remote application configuration for Application Bridge communication. Then, she starts her local Access Viewer application and provides either the IP address or node name for the local Access Viewer computer, followed by a colon and the port number (for example, 127.0.0.1:5900 or localhost:5900); and then provides any password defined for the Access Remote application.
At this point, the Access Remote desktop appears in a window on the Access Viewer computer monitor. The ACME Service Technician can now operate the Access Remote desktop by mouse or keyboard actions. She can start programs, initiate a chat session with the Access Remote user, close and open windows, browse the computer’s folders and files, and more.
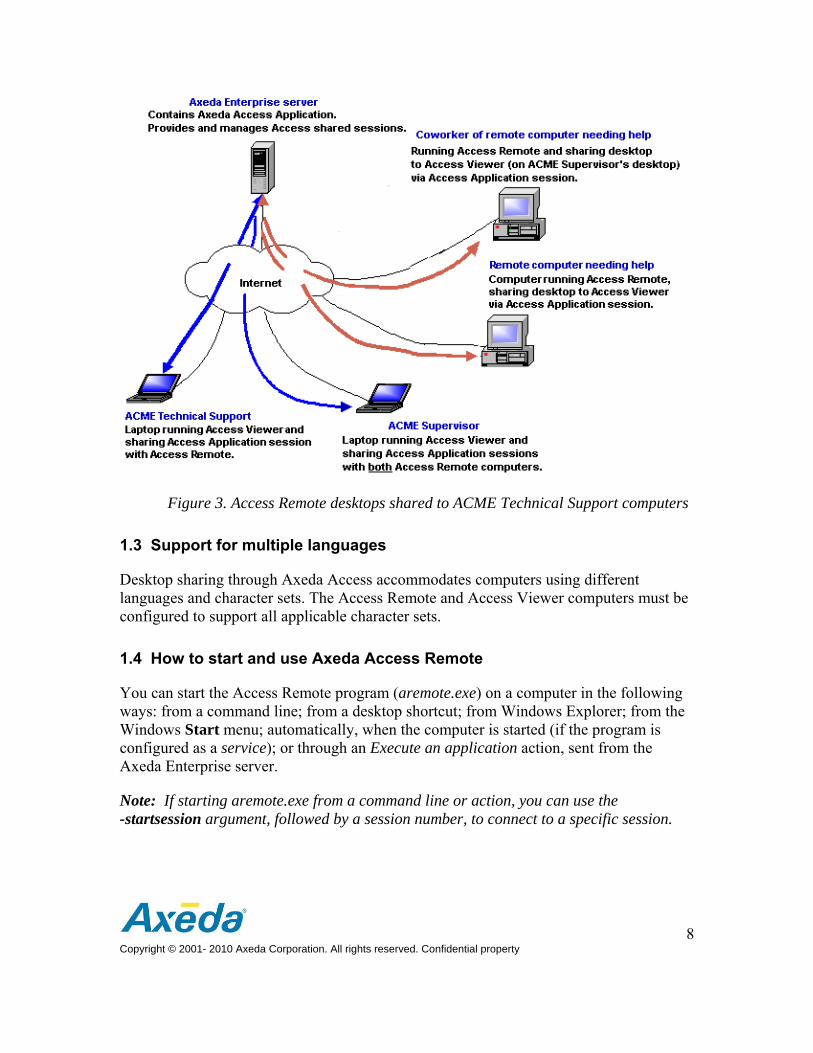
If the Service Technician’s supervisor wants to review something on the Access Remote desktop, he would follow one of the above-mentioned procedures to make a connection. At that point, two Access Viewer computers would be viewing the same Access Remote desktop.
If the supervisor wants to compare the user's ACME application settings to that of another computer, he can create another session or connection on a second Access Remote computer. At that point, he would be operating two different Access Remote desktops.
8 Copyright © 2001- 2010 Axeda Corporation. All rights reserved. Confidential property
Figure 3. Access Remote desktops shared to ACME Technical Support computers
1.3 Support for multiple languages
Desktop sharing through Axeda Access accommodates computers using different languages and character sets. The Access Remote and Access Viewer computers must be configured to support all applicable character sets.
1.4 How to start and use Axeda Access Remote
You can start the Access Remote program (aremote.exe) on a computer in the following ways: from a command line; from a desktop shortcut; from Windows Explorer; from the Windows Start menu; automatically, when the computer is started (if the program is configured as a service); or through an Execute an application action, sent from the Axeda Enterprise server.
Note: If starting aremote.exe from a command line or action, you can use the -startsession argument, followed by a session number, to connect to a specific session.
Overview of Axeda® Access 9 Copyright © 2001- 2010 Axeda Corporation. All rights reserved. Confidential property
When Access Remote is running, the Access Remote icon ( ) appears on the Windows taskbar. Right-click this icon to display the context menu for Access Remote. That menu contains commands to share or stop sharing the desktop, and to change the properties.
1.5 How to start and use Axeda Access Viewer
You can start the Access Viewer program (aviewer.exe) on a computer in the following ways: from a command line; from a desktop shortcut; from Windows Explorer; from the Windows Start menu; and from the Axeda Access application (Install Remote Viewer option). You can have multiple instances of Access Viewer running on a single computer; one for each Access Remote desktop that you are viewing.
When you start Access Viewer, you are immediately prompted to identify the type of desktop sharing: Axeda Service (connection through a configured Axeda Application Bridge), Axeda Access (connection through a session ID generated in Axeda Access application), or Direct (direct LAN connection to the Access Remote computer).
For Axeda Service connections, you type or select the local computer’s IP address or node name followed by a colon and port number 5900 (for example, 127.0.0.1:5900), and then you type the password configured for Access Remote.
For Axeda Access connections, you type or select the name of the Axeda Enterprise server, followed by a colon and the port number, then type the session ID (as generated in the Axeda Access application), and finally type the password configured for Access Remote.
For Direct LAN connections, you type or select the node name of the Access Remote asset, and then type the password configured for Access Remote.
When the Access Remote computer is actively sharing its desktop to the Access Viewer computer, the desktop of the Access Remote computer appears in a window on the desktop of the computer running Access Viewer. The Access Viewer icon appears in the top left of that window. Click that icon to show the Access Viewer menu. That menu contains commands to configure connection settings, transfer files between the two computers, stop the shared session, and more.
10 Copyright © 2001- 2010 Axeda Corporation. All rights reserved. Confidential property
2 Sy stem Requirements
This document does not attempt to provide the supported software, hardware, and operating system platforms for Axeda Access. For a complete summary of the supported and compatible platforms for all Axeda ServiceLink components, go to http://help.axeda.com/.
3 Installation and Configuration
Install Access Viewer software (as described next) on the computer that will be used to view Access Remote desktops. To view a desktop through the Axeda Enterprise server, make sure the Access Viewer computer has a network connection to the Axeda Enterprise server.
3.1 BUsing the installation wizard
To install Access Viewer, use the installation wizard provided on the installation CD. You can install Access Viewer and its supporting file to any directory location on the computer(s) you will use to view remote desktops. The maximum number of Access Viewer users is specified in your Axeda Access license agreement.
3.2 Configuring Axeda Access Viewer Settings
You can define several configuration settings on the Access Viewer computer for your Axeda Access sessions.
1. Start Access Viewer (aviewer.exe). The Axeda Access Viewer - New Connection dialog box appears.

Installation and Configuration 11 Copyright © 2001- 2010 Axeda Corporation. All rights reserved. Confidential property
Figure 4. Axeda Access Viewer – New Connection dialog box, Axeda Access selected
2. Click Options. The Axeda Access Viewer - Settings dialog box appears. Depending on the type of connection selected, the available Connection settings differ.
The following figure shows the Connection settings available when you select either Axeda Service or Direct connection in the New Connection dialog box.
Figure 5. Configuring Axeda Access Viewer settings – Connection type is Axeda Service
or Direct
12 Copyright © 2001- 2010 Axeda Corporation. All rights reserved. Confidential property
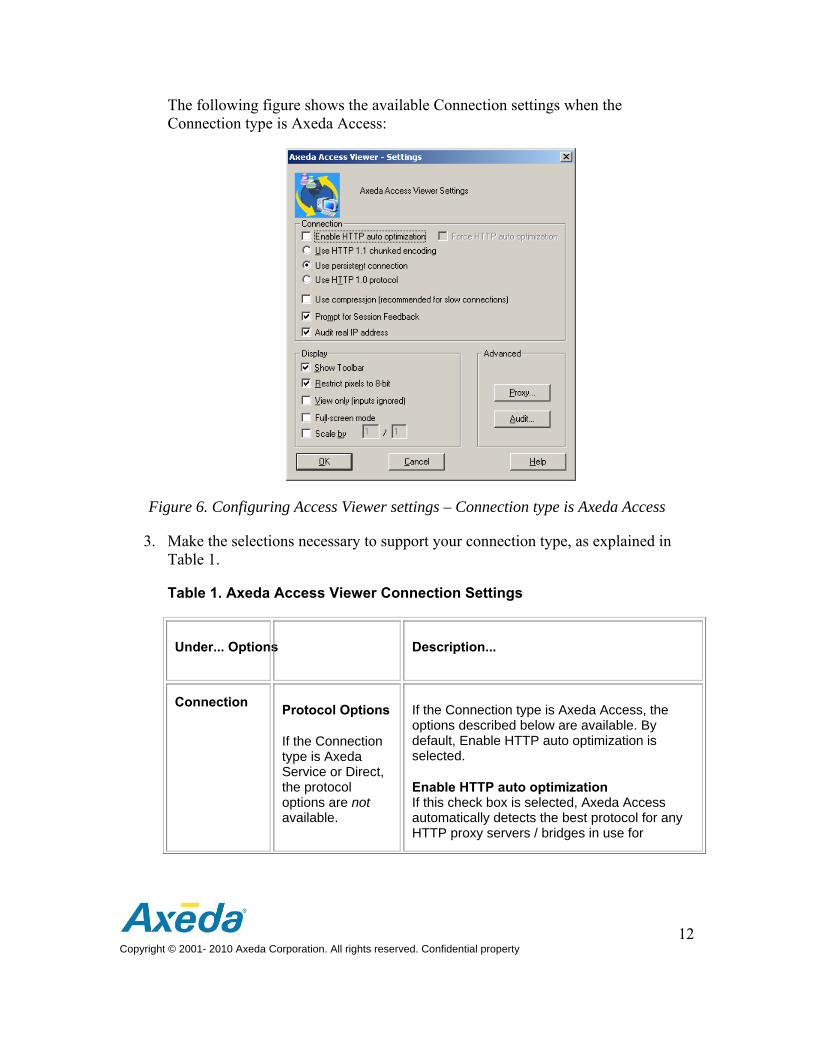
The following figure shows the available Connection settings when the Connection type is Axeda Access:
Figure 6. Configuring Access Viewer settings – Connection type is Axeda Access
3. Make the selections necessary to support your connection type, as explained in Table 1.
Table 1. Axeda Access Viewer Connection Settings
Under... Options Description...
Connection Protocol Options
If the Connection type is Axeda Service or Direct, the protocol options are not available.
If the Connection type is Axeda Access, the options described below are available. By default, Enable HTTP auto optimization is selected.
Enable HTTP auto optimization If this check box is selected, Axeda Access automatically detects the best protocol for any HTTP proxy servers / bridges in use for
Installation and Configuration 13 Copyright © 2001- 2010 Axeda Corporation. All rights reserved. Confidential property
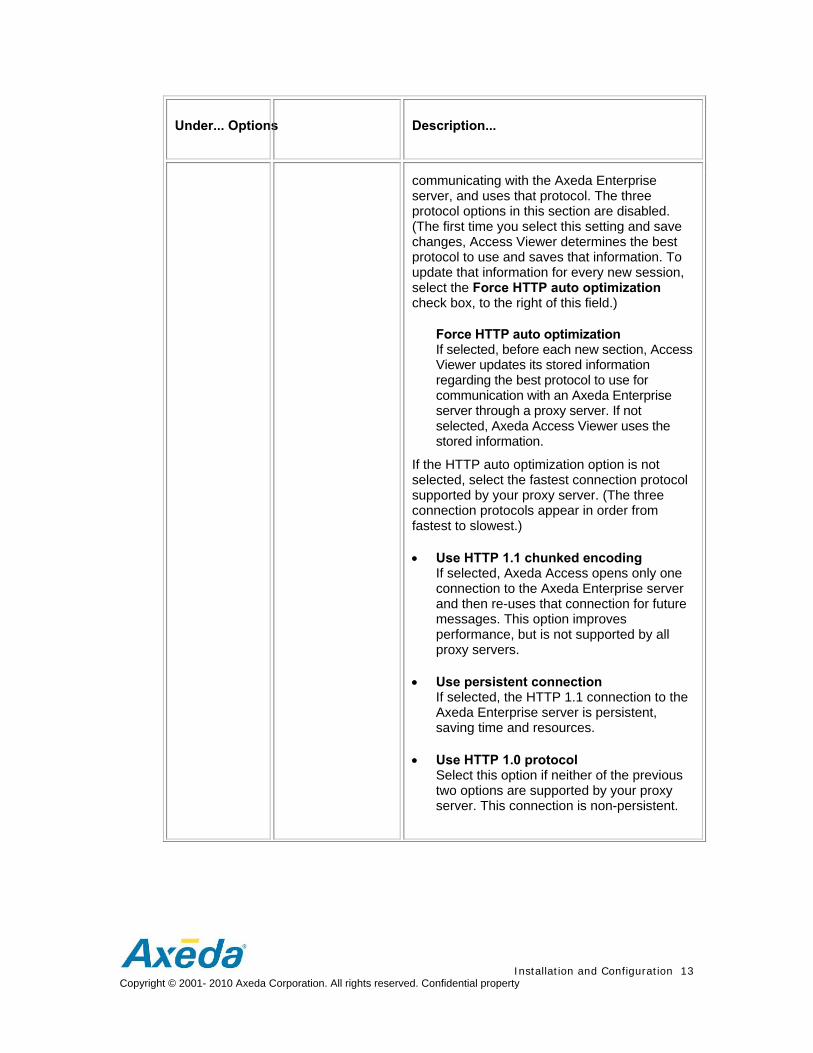
Under... Options Description...
communicating with the Axeda Enterprise server, and uses that protocol. The three protocol options in this section are disabled. (The first time you select this setting and save changes, Access Viewer determines the best protocol to use and saves that information. To update that information for every new session, select the Force HTTP auto optimization check box, to the right of this field.)
Force HTTP auto optimization If selected, before each new section, Access Viewer updates its stored information regarding the best protocol to use for communication with an Axeda Enterprise server through a proxy server. If not selected, Axeda Access Viewer uses the stored information.
If the HTTP auto optimization option is not selected, select the fastest connection protocol supported by your proxy server. (The three connection protocols appear in order from fastest to slowest.)
Use HTTP 1.1 chunked encoding If selected, Axeda Access opens only one connection to the Axeda Enterprise server and then re-uses that connection for future messages. This option improves performance, but is not supported by all proxy servers.
Use persistent connection If selected, the HTTP 1.1 connection to the Axeda Enterprise server is persistent, saving time and resources.
Use HTTP 1.0 protocol Select this option if neither of the previous two options are supported by your proxy server. This connection is non-persistent.
14 Copyright © 2001- 2010 Axeda Corporation. All rights reserved. Confidential property
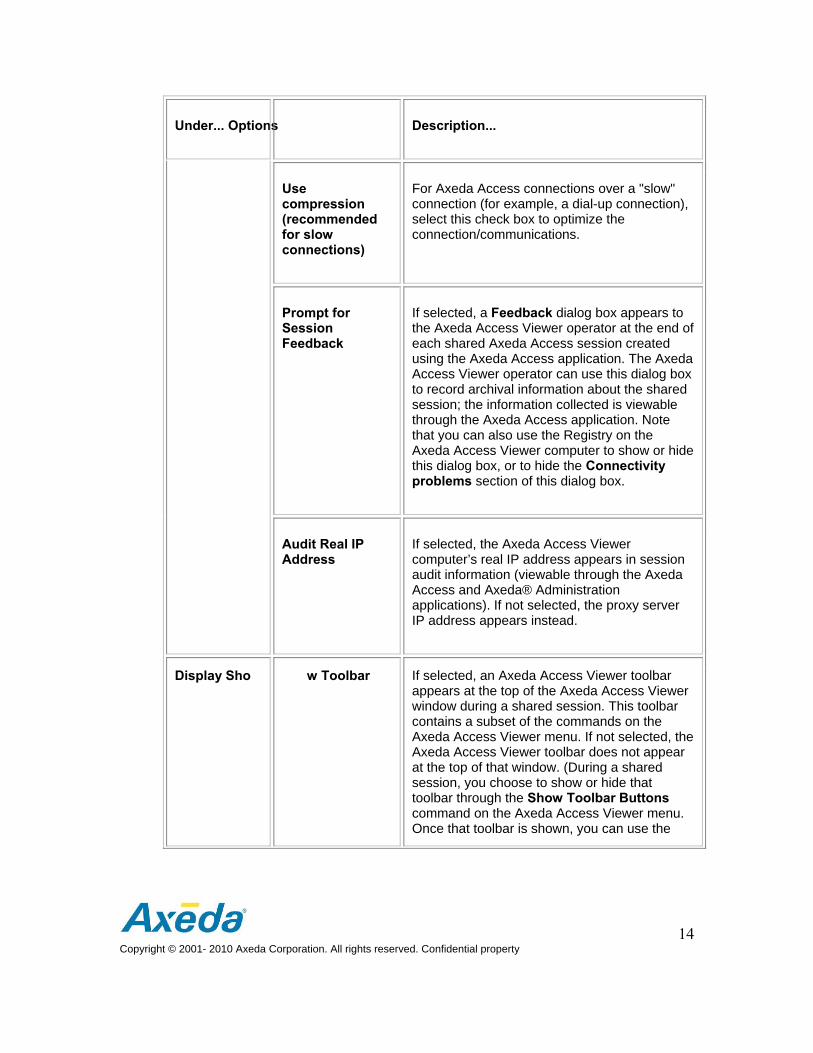
Under... Options Description...
Use compression (recommended for slow connections)
For Axeda Access connections over a "slow" connection (for example, a dial-up connection), select this check box to optimize the connection/communications.
Prompt for Session Feedback
If selected, a Feedback dialog box appears to the Axeda Access Viewer operator at the end of each shared Axeda Access session created using the Axeda Access application. The Axeda Access Viewer operator can use this dialog box to record archival information about the shared session; the information collected is viewable through the Axeda Access application. Note that you can also use the Registry on the Axeda Access Viewer computer to show or hide this dialog box, or to hide the Connectivity problems section of this dialog box.
Audit Real IP Address
If selected, the Axeda Access Viewer computer’s real IP address appears in session audit information (viewable through the Axeda Access and Axeda® Administration applications). If not selected, the proxy server IP address appears instead.
Display Sho w Toolbar If selected, an Axeda Access Viewer toolbar appears at the top of the Axeda Access Viewer window during a shared session. This toolbar contains a subset of the commands on the Axeda Access Viewer menu. If not selected, the Axeda Access Viewer toolbar does not appear at the top of that window. (During a shared session, you choose to show or hide that toolbar through the Show Toolbar Buttons command on the Axeda Access Viewer menu. Once that toolbar is shown, you can use the
Installation and Configuration 15 Copyright © 2001- 2010 Axeda Corporation. All rights reserved. Confidential property
Under... Options Description...
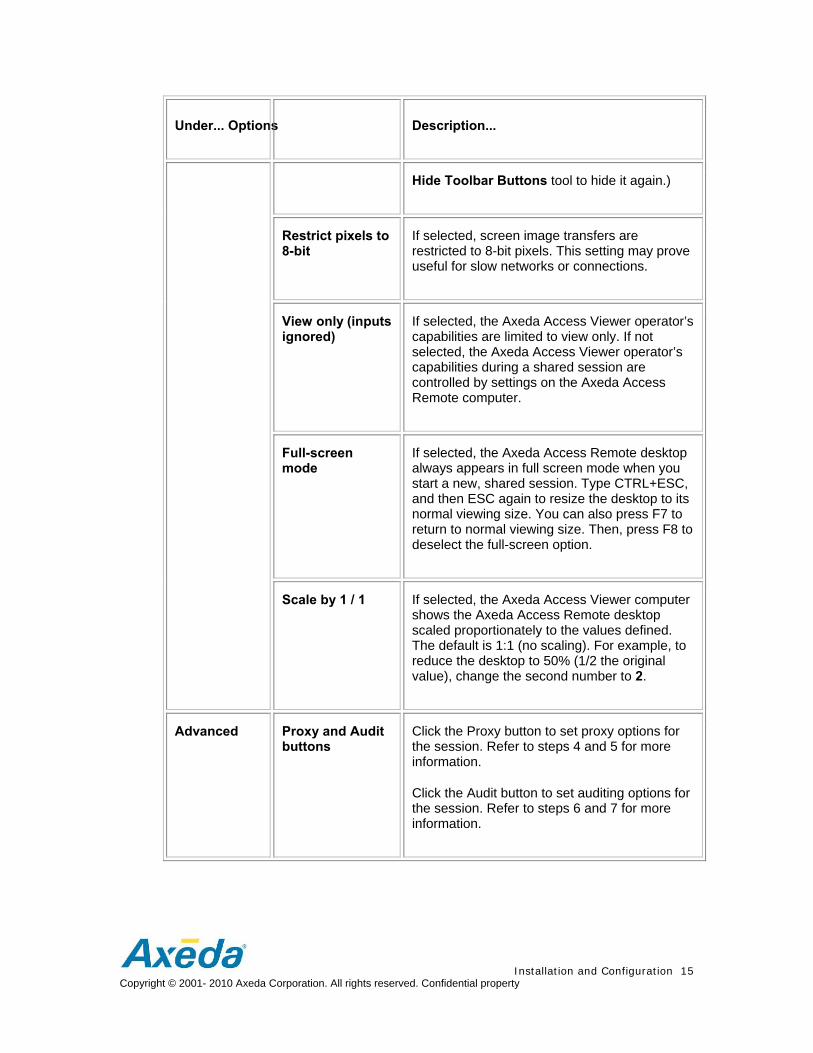
Hide Toolbar Buttons tool to hide it again.)
Restrict pixels to 8-bit
If selected, screen image transfers are restricted to 8-bit pixels. This setting may prove useful for slow networks or connections.
View only (inputs ignored)
If selected, the Axeda Access Viewer operator’s capabilities are limited to view only. If not selected, the Axeda Access Viewer operator’s capabilities during a shared session are controlled by settings on the Axeda Access Remote computer.
Full-screen mode
If selected, the Axeda Access Remote desktop always appears in full screen mode when you start a new, shared session. Type CTRL+ESC, and then ESC again to resize the desktop to its normal viewing size. You can also press F7 to return to normal viewing size. Then, press F8 to deselect the full-screen option.
Scale by 1 / 1 If selected, the Axeda Access Viewer computer shows the Axeda Access Remote desktop scaled proportionately to the values defined. The default is 1:1 (no scaling). For example, to reduce the desktop to 50% (1/2 the original value), change the second number to 2.
Advanced Proxy and Audit buttons
Click the Proxy button to set proxy options for the session. Refer to steps 4 and 5 for more information.
Click the Audit button to set auditing options for the session. Refer to steps 6 and 7 for more information.
16 Copyright © 2001- 2010 Axeda Corporation. All rights reserved. Confidential property
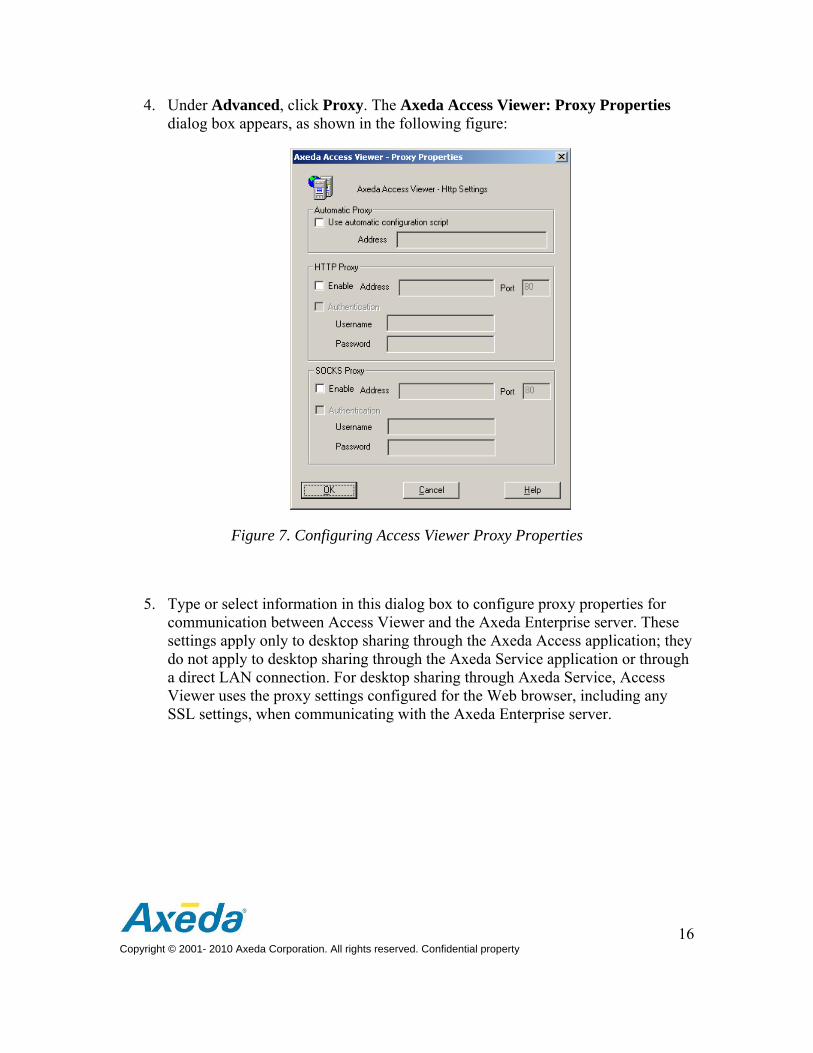
4. Under Advanced, click Proxy. The Axeda Access Viewer: Proxy Properties dialog box appears, as shown in the following figure:
Figure 7. Configuring Access Viewer Proxy Properties
5. Type or select information in this dialog box to configure proxy properties for communication between Access Viewer and the Axeda Enterprise server. These settings apply only to desktop sharing through the Axeda Access application; they do not apply to desktop sharing through the Axeda Service application or through a direct LAN connection. For desktop sharing through Axeda Service, Access Viewer uses the proxy settings configured for the Web browser, including any SSL settings, when communicating with the Axeda Enterprise server.
Installation and Configuration 17 Copyright © 2001- 2010 Axeda Corporation. All rights reserved. Confidential property
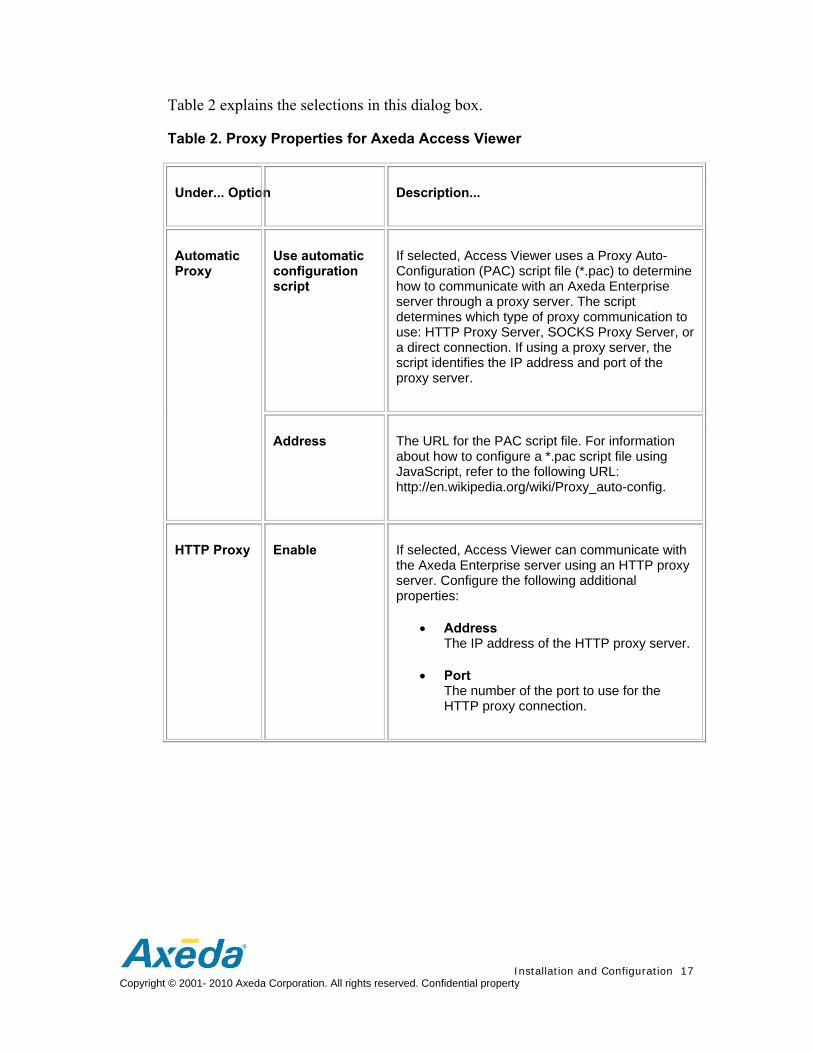
Table 2 explains the selections in this dialog box.
Table 2. Proxy Properties for Axeda Access Viewer
Under... Option Description...
Use automatic configuration script
If selected, Access Viewer uses a Proxy Auto-Configuration (PAC) script file (*.pac) to determine how to communicate with an Axeda Enterprise server through a proxy server. The script determines which type of proxy communication to use: HTTP Proxy Server, SOCKS Proxy Server, or a direct connection. If using a proxy server, the script identifies the IP address and port of the proxy server.
Automatic Proxy
Address The URL for the PAC script file. For information about how to configure a *.pac script file using JavaScript, refer to the following URL: http://en.wikipedia.org/wiki/Proxy_auto-config.
HTTP Proxy Enable If selected, Access Viewer can communicate with the Axeda Enterprise server using an HTTP proxy server. Configure the following additional properties:
Address The IP address of the HTTP proxy server.
Port The number of the port to use for the HTTP proxy connection.
18 Copyright © 2001- 2010 Axeda Corporation. All rights reserved. Confidential property
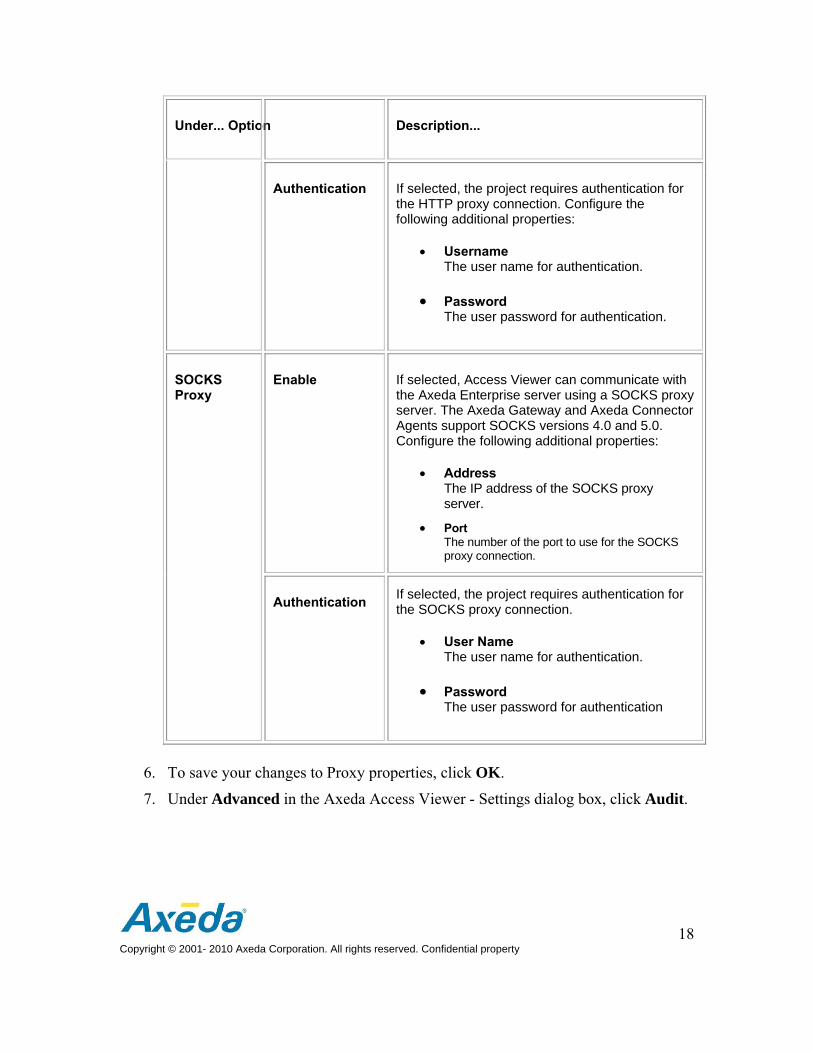
Under... Option Description...
Authentication If selected, the project requires authentication for the HTTP proxy connection. Configure the following additional properties:
Username The user name for authentication.
Password The user password for authentication.
Enable If selected, Access Viewer can communicate with the Axeda Enterprise server using a SOCKS proxy server. The Axeda Gateway and Axeda Connector Agents support SOCKS versions 4.0 and 5.0. Configure the following additional properties:
Address The IP address of the SOCKS proxy server.
Port The number of the port to use for the SOCKS proxy connection.
SOCKS Proxy
Authentication If selected, the project requires authentication for the SOCKS proxy connection.
User Name The user name for authentication.
Password The user password for authentication
6. To save your changes to Proxy properties, click OK.
7. Under Advanced in the Axeda Access Viewer - Settings dialog box, click Audit.
Installation and Configuration 19 Copyright © 2001- 2010 Axeda Corporation. All rights reserved. Confidential property
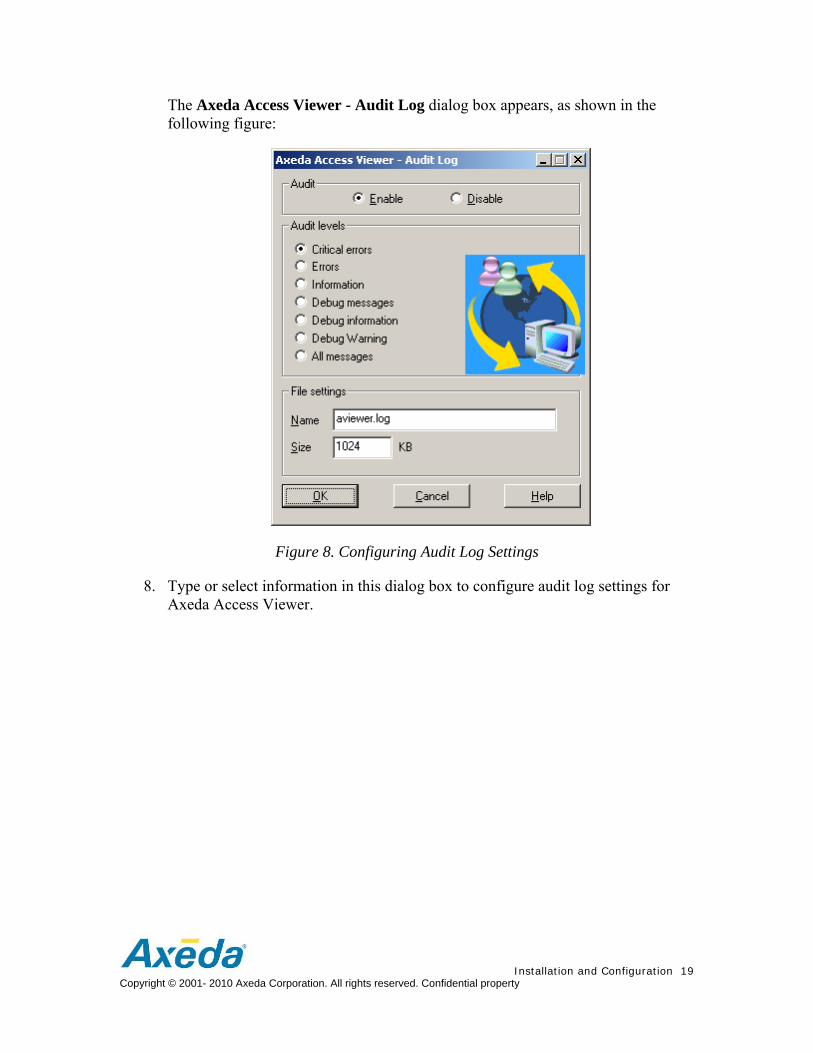
The Axeda Access Viewer - Audit Log dialog box appears, as shown in the following figure:
Figure 8. Configuring Audit Log Settings
8. Type or select information in this dialog box to configure audit log settings for Axeda Access Viewer.
20 Copyright © 2001- 2010 Axeda Corporation. All rights reserved. Confidential property
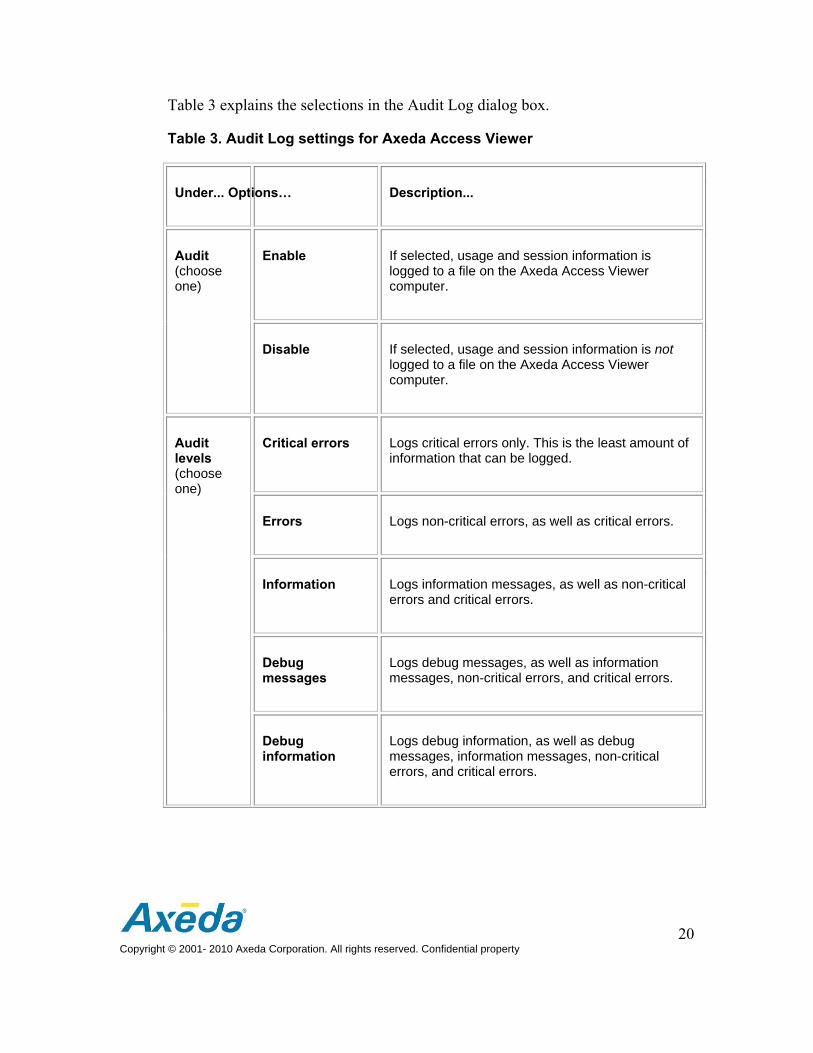
Table 3 explains the selections in the Audit Log dialog box.
Table 3. Audit Log settings for Axeda Access Viewer
Under... Options… Description...
Enable If selected, usage and session information is logged to a file on the Axeda Access Viewer computer.
Audit (choose one)
Disable If selected, usage and session information is not logged to a file on the Axeda Access Viewer computer.
Critical errors Logs critical errors only. This is the least amount of information that can be logged.
Errors Logs non-critical errors, as well as critical errors.
Information Logs information messages, as well as non-critical errors and critical errors.
Debug messages
Logs debug messages, as well as information messages, non-critical errors, and critical errors.
Audit levels (choose one)
Debug information
Logs debug information, as well as debug messages, information messages, non-critical errors, and critical errors.
Installation and Configuration 21 Copyright © 2001- 2010 Axeda Corporation. All rights reserved. Confidential property
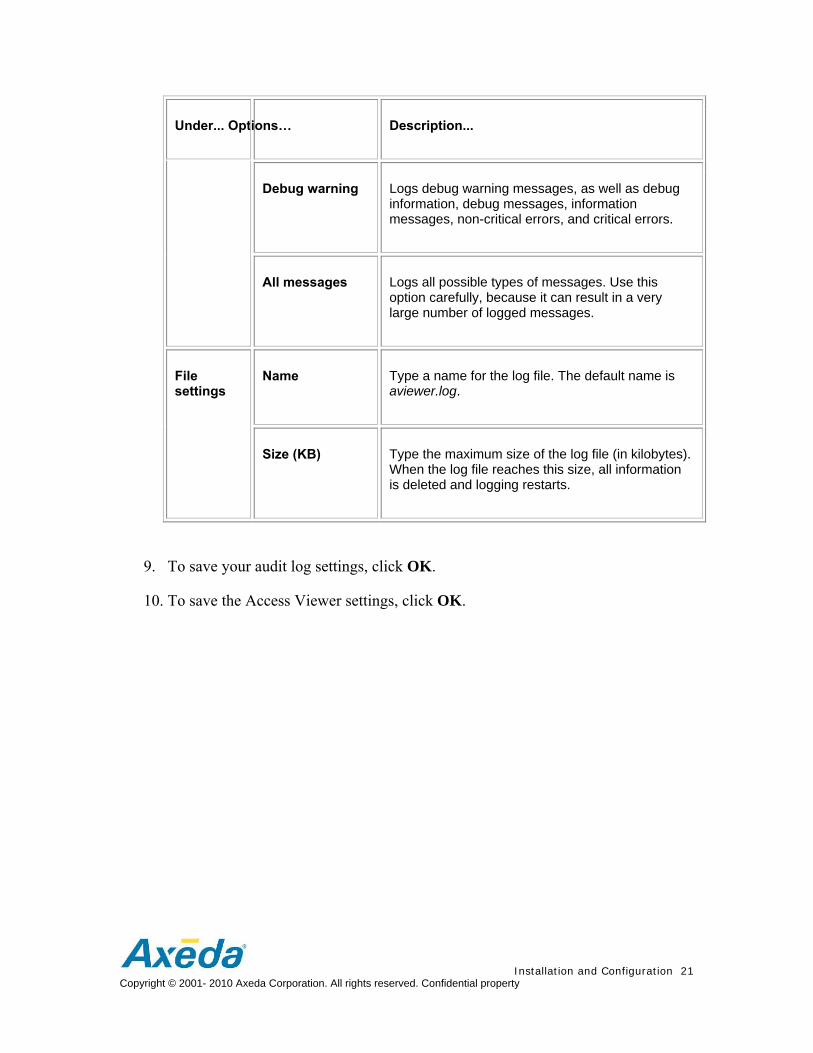
Under... Options… Description...
Debug warning Logs debug warning messages, as well as debug information, debug messages, information messages, non-critical errors, and critical errors.
All messages Logs all possible types of messages. Use this option carefully, because it can result in a very large number of logged messages.
Name Type a name for the log file. The default name is aviewer.log.
File settings
Size (KB) Type the maximum size of the log file (in kilobytes). When the log file reaches this size, all information is deleted and logging restarts.
9. To save your audit log settings, click OK.
10. To save the Access Viewer settings, click OK.
22 Copyright © 2001- 2010 Axeda Corporation. All rights reserved. Confidential property
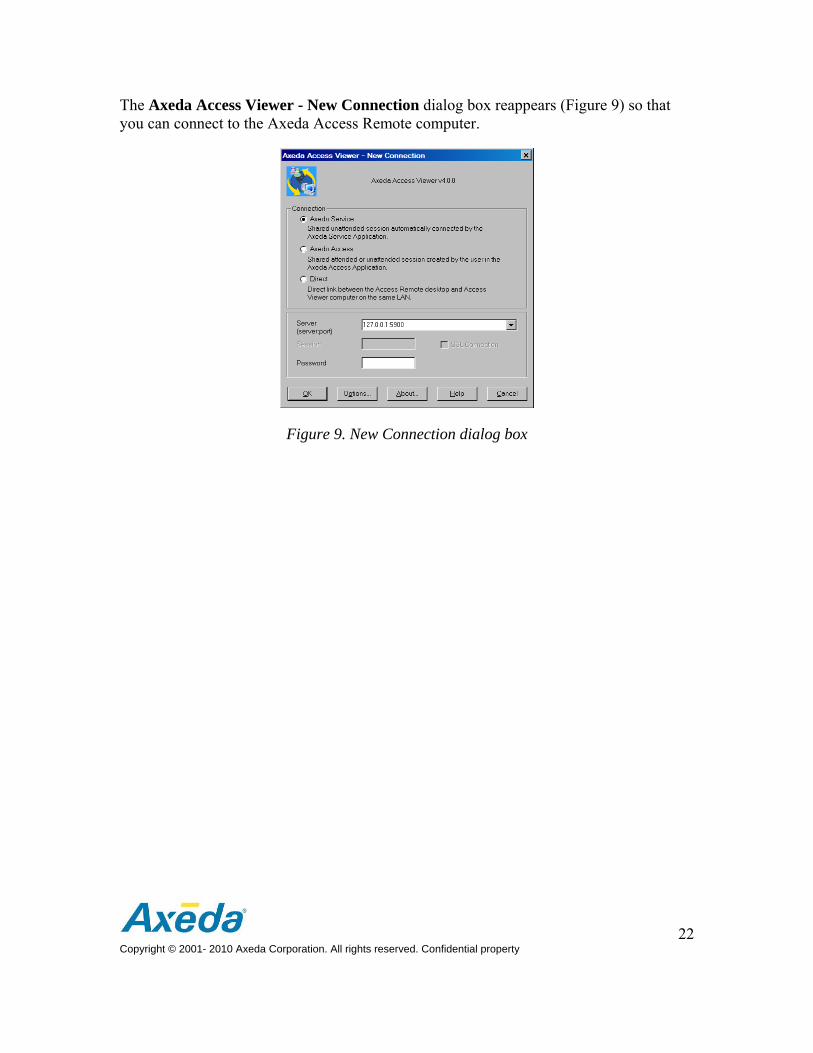
The Axeda Access Viewer - New Connection dialog box reappears (Figure 9) so that you can connect to the Axeda Access Remote computer.
Figure 9. New Connection dialog box
Connecting to an Axeda Access session 23 Copyright © 2001- 2010 Axeda Corporation. All rights reserved. Confidential property
4 Connecting to an Axeda Access session
From the Axeda Access Viewer - New Connection dialog box, you can share to the desktop of an Axeda Access Remote computer by selecting the type of desktop sharing:
Axeda Service
Axeda Access
Direct
Before starting a shared session, you can force Access Viewer to update its stored HTTP auto optimization information. During a shared session, you can communicate instantly with the Axeda Access Remote operator using text-based messages. After the session ends, you can record reference information about the session, as described in Collecting session feedback.
4.1 Desktop sharing through Axeda Service
For desktop sharing through the Axeda Service application, you create a virtual tunnel or socket between the Access Viewer and Access Remote computers.
To use this type of sharing, the Access Remote asset must have an Axeda Agent (Axeda® Connector or Axeda® Gateway) installed, Access Remote must be configured to allow direct LAN connections, and both Access Remote and the Agent must be running on the asset. In addition, a remote Desktop configuration for an Axeda Application Bridge (defined to listen on port 5900) must be defined for the Agent project. (A remote Desktop configuration can be defined using the Remote Sessions tool in the Axeda® Builder application. Selecting the Enable Remote Desktop Axeda Access check box in that tool results in the automatic configuration of a Desktop remote session listening on port 5900.)
An operator is needed at the Access Viewer computer to connect to the session. An operator may or may not be needed at the Access Remote computer, depending on how the Access Remote application is configured. The Access Viewer operator must know the password for sharing the Access Remote desktop, if a password is configured.

24 Copyright © 2001- 2010 Axeda Corporation. All rights reserved. Confidential property
4.1.1 Create session for desktop sharing through Axeda Service
This procedure assumes that you have access to the Axeda Enterprise server and are using the Axeda Service application to set up a Remote Session with the Access Remote asset. Make sure the Axeda Enterprise server is running and actively connected to the Internet.
Note: The ability to perform operations on assets configured with the Axeda® Policy Server support is subject to the security defined for the Axeda Policy Server (or a Local Policy Manager).
1. From a browser, log in to the ServiceLink Applications.
2. Browse to the home page for the Axeda Service application, search for the Access Remote asset and display the Asset Dashboard for the asset.
3. In the Asset Dashboard, click the Desktop link in the Remote Sessions module.
Note: If the Desktop link does not appear in the Remote Sessions module, click the View all link to display the complete Remote Sessions list for the asset. Locate and select the Desktop remote session, and then click Run in the Actions column.
The Axeda Enterprise server checks the policies (configured in the Axeda Policy Server or by the Local Policy Manager of the Axeda® Deployment Utility) for the Access Remote asset. If desktop sharing is not a permitted action, a Session Denied message appears on your desktop. If the policy check passes, or if the asset is not configured with policies, proceed to the next step. A new browser window opens. This window shows the session status, listen port number, session ID, and a Close Session button. The session can be closed from this window, if necessary.
The Axeda Enterprise server also checks for configured viewer applications for the model of the asset. If no special viewer is configured, the Enterprise server checks which Axeda remote server application is running on the asset. If the asset is running Axeda Access Remote, the Enterprise server launches Access Viewer automatically. This action is referred to as the Quick Launch feature.
Connecting to an Axeda Access session 25 Copyright © 2001- 2010 Axeda Corporation. All rights reserved. Confidential property
4.1.2 Connect to Axeda Service session
Once the session is created, the Axeda Gateway or Axeda Connector Agent connects the Access Remote computer to the session the next time it pings the Axeda Enterprise server. To connect the Access Viewer computer to the session:
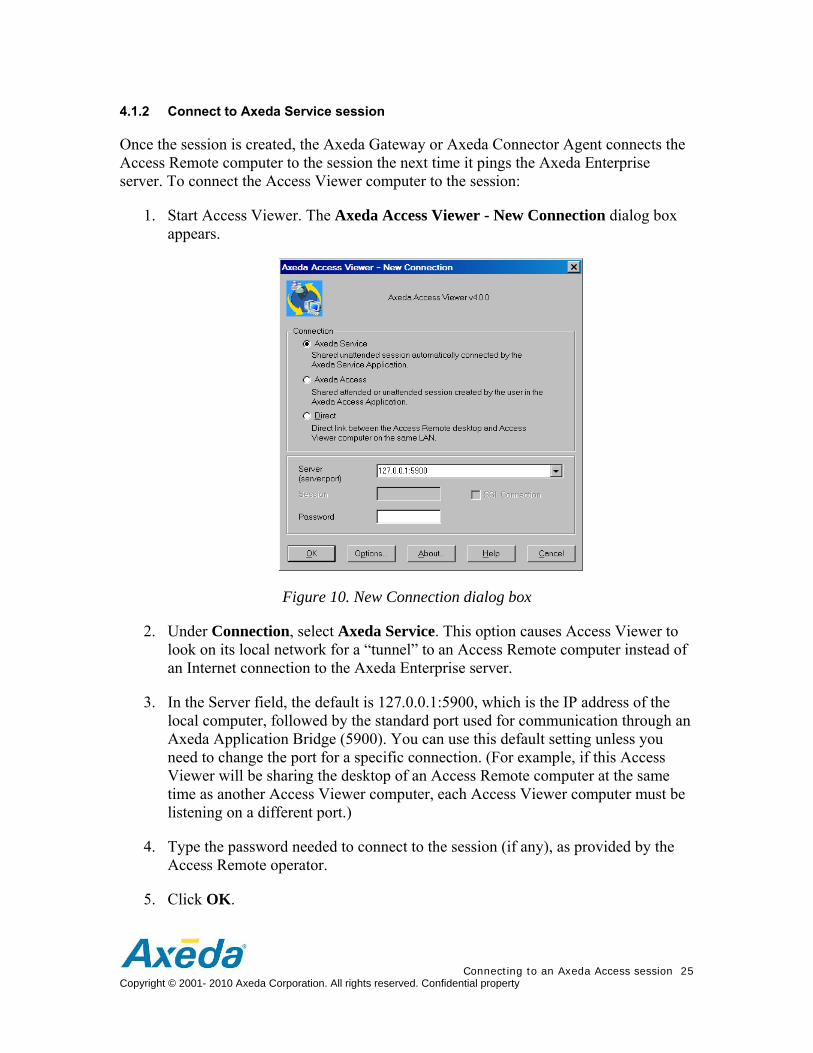
1. Start Access Viewer. The Axeda Access Viewer - New Connection dialog box appears.
Figure 10. New Connection dialog box
2. Under Connection, select Axeda Service. This option causes Access Viewer to look on its local network for a “tunnel” to an Access Remote computer instead of an Internet connection to the Axeda Enterprise server.
3. In the Server field, the default is 127.0.0.1:5900, which is the IP address of the local computer, followed by the standard port used for communication through an Axeda Application Bridge (5900). You can use this default setting unless you need to change the port for a specific connection. (For example, if this Access Viewer will be sharing the desktop of an Access Remote computer at the same time as another Access Viewer computer, each Access Viewer computer must be listening on a different port.)
4. Type the password needed to connect to the session (if any), as provided by the Access Remote operator.
5. Click OK.
26 Copyright © 2001- 2010 Axeda Corporation. All rights reserved. Confidential property
When the Access Remote desktop is shared, it appears in a window on the Access Viewer computer. If that window does not appear, refer to the Troubleshooting section of this guide.
4.2 Desktop sharing through Axeda Access
For desktop sharing through the Axeda Access application, you first create a session using the Axeda Access application. The session can be attended or unattended. An attended session requires an operator at both the Access Viewer and Access Remote computers to connect to the session. An unattended session requires an operator at the Access Viewer computer only. To use the unattended operation feature, the Access Remote computer must be configured to allow it, as described in the Axeda® Access Remote User's Guide.
Axeda Access provides the following additional features for desktop sharing:
Dynamic IP addresses – Axeda Access supports dynamic IP addresses for new assets or changes to existing IP addresses.
Full URL – You can specify a full URL and port number for both the Axeda Enterprise server and Axeda Gateway or Axeda Connector Agent remote connections.
Pre/post handlers – Using Axeda® Builder, you can define custom handlers to run before and after an Axeda Access session.
Session end time – Axeda Access sessions display accurate end times for abandoned sessions.
4.2.1 Create attended session for desktop sharing through Axeda Access
This procedure assumes that you have access to the Axeda Enterprise server and are using the Axeda Access application to request the shared session ID. Make sure the Axeda Enterprise server is running and actively connected to the Internet.
1. From a browser, log in to the ServiceLink Applications.
2. Browse to the home page for the Axeda Access Application, and select Request Session ID. The page returns a session ID.
3. Provide the session ID to the Axeda Access Remote operator.
Connecting to an Axeda Access session 27 Copyright © 2001- 2010 Axeda Corporation. All rights reserved. Confidential property
This ID needs to be specified on both the Access Viewer and Access Remote computers within the configured timeout periods. By default, if a session ID is not used within 10 minutes, it is deleted from the Axeda Enterprise server. Once the Access Remote or Access Viewer computer connects to a session, the other computer has 40 seconds to connect to the session. (The timeout periods are defined as part of the configuration properties for the Axeda Enterprise server. For more information about those settings, refer to the online Help for the Axeda Access application.)
Note: For Access Remote assets with an Axeda Gateway or Axeda Connector Agent installed, an alternative to having an operator at the Access Remote computer connect to the session is to configure an action that starts Access Remote and connects to a specific Axeda Access session, as described in Using an action to connect Axeda Access Remote to an existing session. From Access Viewer, you connect to these types of sessions through Axeda Access, as described later in this topic.
4.2.2 Create unattended session for desktop sharing through Axeda Access
This procedure assumes that you have access to the Axeda Enterprise server and will be using the Axeda Access application to request the shared session ID. Make sure the Axeda Enterprise server is running and actively connected to the Internet.
1. From a browser, log in to the ServiceLink Applications and browse to the home page for the Axeda Access application.
2. Select Manage Remote Hosts to view a list of all Axeda Access Remote computers configured to enable unattended operation.
3. Locate the Axeda Access Remote computer whose desktop you want to share, and, under Actions, click Create Unattended Session.
A new session ID is created specifically for that Access Remote computer. The Access Session Requested page appears, showing the new session ID. The Access Remote and Access Viewer computers need to connect to the session within the defined timeout periods. By default, if an unattended session ID is not used within 40 seconds, it is deleted from the Axeda Enterprise server. Once either the Access Viewer operator connects to the session or the Access Remote computer polls the Axeda Enterprise server and connects to the session, the other computer has 10 minutes to connect to the session. (The timeout periods are editable settings in the Axeda Access application configuration properties; you can view the set timeout periods in the Axeda Administration application - System Configuration page, system_config.jsp. For more information, refer to the online Help for the Axeda Administration application.)
28 Copyright © 2001- 2010 Axeda Corporation. All rights reserved. Confidential property
4.2.3 Connect to Axeda Access session
1. Start Access Viewer (aviewer.exe).
The Axeda Access Viewer - New Connection dialog box appears (see Figure 9).
2. Next to Connection, select Axeda Access.
3. In the Server field, type or select the IP address or host name of the Axeda Enterprise server.
4. Type the ID of the shared session.
5. Type the password needed to connect to the session, as provided by the Access Remote operator.
6. Click OK.
When the Access Remote desktop is shared, it appears in a window on the Access Viewer computer. If that window does not appear, refer to the Troubleshooting section of this guide.
4.2.4 Using an action to connect Axeda Access Remote to an existing session
For Access Remote computers that have an Axeda Gateway or Axeda ConnectorAgent installed, you can use the Axeda® Configuration application to define an Execute an application type of action that starts the Access Remote application (aremote.exe) on the Agent asset, and then connects to a specific, existing session ID. No operator is needed at the Access Remote computer to connect to the session. Before you can define the action, you must create the session ID as described in Create attended session for desktop sharing through Axeda Access. For instructions on how to define an Execute an application type of action for the Access Remote program (aremote.exe), refer to the online Help for the Configuration application.

Connecting to an Axeda Access session 29 Copyright © 2001- 2010 Axeda Corporation. All rights reserved. Confidential property
You can use the arguments described in Table 2 in an action that starts Access Remote:
Table 2. Arguments for starting aremote.exe from a command line or action
Option... Description.. .
-startsession
Identifies the Axeda Access session to connect to. Type the session ID after the argument. For example:
-startsession 123456
Note: For security reasons, if a session is started with the -startsession argument, and multiple Access Viewers are sharing that desktop, all sessions for that desktop are automatically stopped when any one of the Access Viewer computers closes their session.
-register Directs the asset to recognize aremote.exe as a service; as a result, aremote.exe starts automatically each time the asset is restarted.
Once you configure aremote.exe as a service, use the Windows Services tool (in the Control Panel) to stop and restart the program. When Access Remote starts as a service on a asset, an Access Viewer computer can be used to log on to the Access Remote computer.
-unregister Directs the asset to stop recognizing aremote.exe as a service; as a result, aremote.exe no longer starts automatically when the asset is restarted.
If using a trigger to start a specific session, you may want to adjust the sessiontimeout property (in the Axeda Enterprise server) accordingly.
30 Copyright © 2001- 2010 Axeda Corporation. All rights reserved. Confidential property
4.3 Desktop sharing through a direct LAN connection
At times you may want to use Access Viewer to view an Access Remote desktop outside of the Axeda Enterprise server. For example, if Access Viewer and Remote are defined nodes on the same network, Access Remote can share its desktop using a direct network connection to the Access Viewer node. Although an operator does not need to be at the Access Remote computer to connect to the session, Access Remote must be running on that computer. Before the session can be shared, the Access Remote computer must be configured to allow direct LAN connections; in the Axeda Access Remote Properties dialog box, the Accept Direct LAN Connections option must be selected.
Note: For sharing a desktop through a direct LAN connection, the connection should be made using port 5900 (the default port for local connections); port 80 is reserved for the HTTP port.
1. Start Access Viewer.
The Axeda Access Viewer - New Connection dialog box appears (see 41HFigure 10).
2. Next to Connection, select Direct. This option causes Access Viewer to look on its local network for a socket connection to an Access Remote computer instead of an Internet connection to the Axeda Enterprise server.
3. In the Server field, type the node name of the Access Remote computer as defined on the local network. The node name can be the name assigned to the computer or the IP address of the computer.
4. Type the password needed to connect to the session, as provided by the Access Remote operator.
5. Click OK.
When the Access Remote desktop is shared, it appears in a window on the Access Viewer computer. If that window does not appear, refer to the Troubleshooting section of this guide.
Collecting session feedback 31 Copyright © 2001- 2010 Axeda Corporation. All rights reserved. Confidential property
5 Collecting session feedback
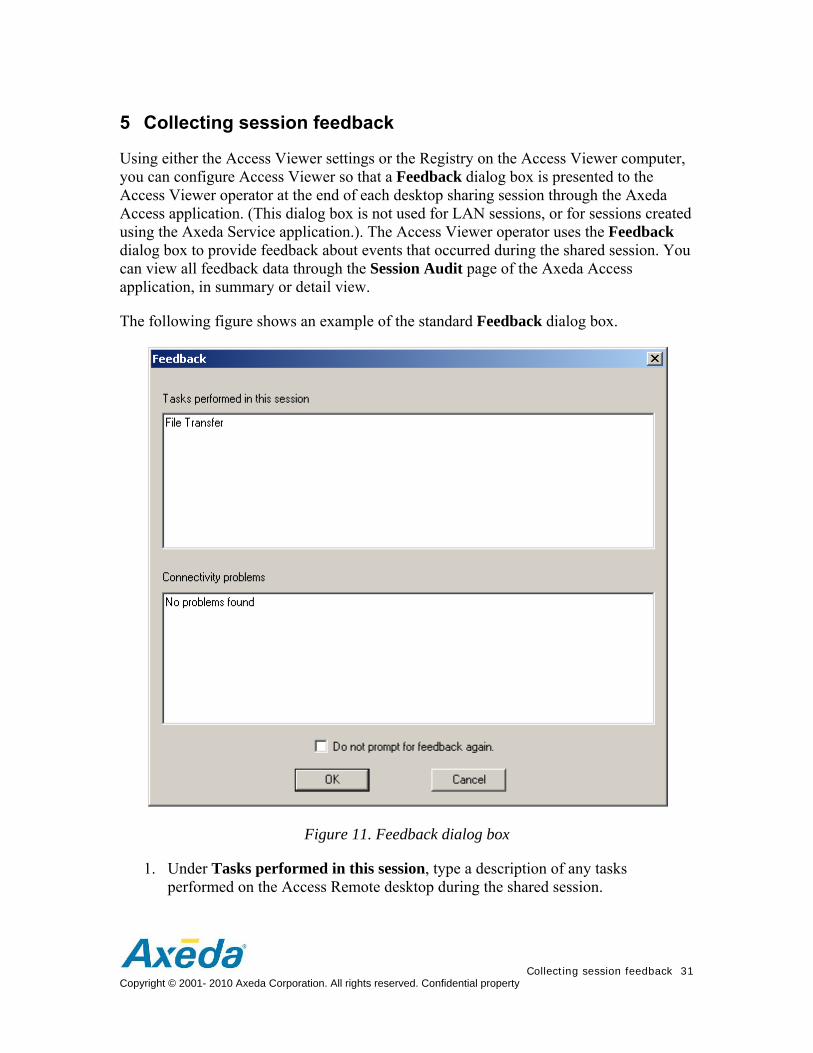
Using either the Access Viewer settings or the Registry on the Access Viewer computer, you can configure Access Viewer so that a Feedback dialog box is presented to the Access Viewer operator at the end of each desktop sharing session through the Axeda Access application. (This dialog box is not used for LAN sessions, or for sessions created using the Axeda Service application.). The Access Viewer operator uses the Feedback dialog box to provide feedback about events that occurred during the shared session. You can view all feedback data through the Session Audit page of the Axeda Access application, in summary or detail view.
The following figure shows an example of the standard Feedback dialog box.
Figure 11. Feedback dialog box
1. Under Tasks performed in this session, type a description of any tasks performed on the Access Remote desktop during the shared session.
32 Copyright © 2001- 2010 Axeda Corporation. All rights reserved. Confidential property
2. Under Connectivity problems, type a description of any connectivity problems encountered during the shared session. (You can use the Registry on the Access Viewer computer to select whether to show or hide this section of the Feedback dialog box. If you hide this section, the Tasks section is expanded.)
3. If you do not want the Feedback dialog box to appear for future sessions, select the check box next to Do not prompt for feedback again.
4. Click OK.
For information about viewing session feedback in the Axeda Access application, refer to the online Help for the Axeda Access application.
You can choose to show or hide the Feedback dialog box in two ways: by selecting the Prompt for Session Feedback check box when configuring Access Viewer settings, or by changing the Registry setting DisplayFeedback on the Access Viewer computer. When that setting is “1,” the Feedback dialog box appears; when that setting is “0,” the Feedback dialog box does not appear. When you choose to show the Feedback dialog box, you can use another Registry setting - ShowConProblems - to show or hide the Connectivity problems section of that dialog box. When that setting is “1,” the Connectivity problems section is presented. When that setting is “0,” the Connectivity problems section is hidden, and the Tasks performed in this session section is expanded.
Actions from the Axeda Access Viewer window 33 Copyright © 2001- 2010 Axeda Corporation. All rights reserved. Confidential property
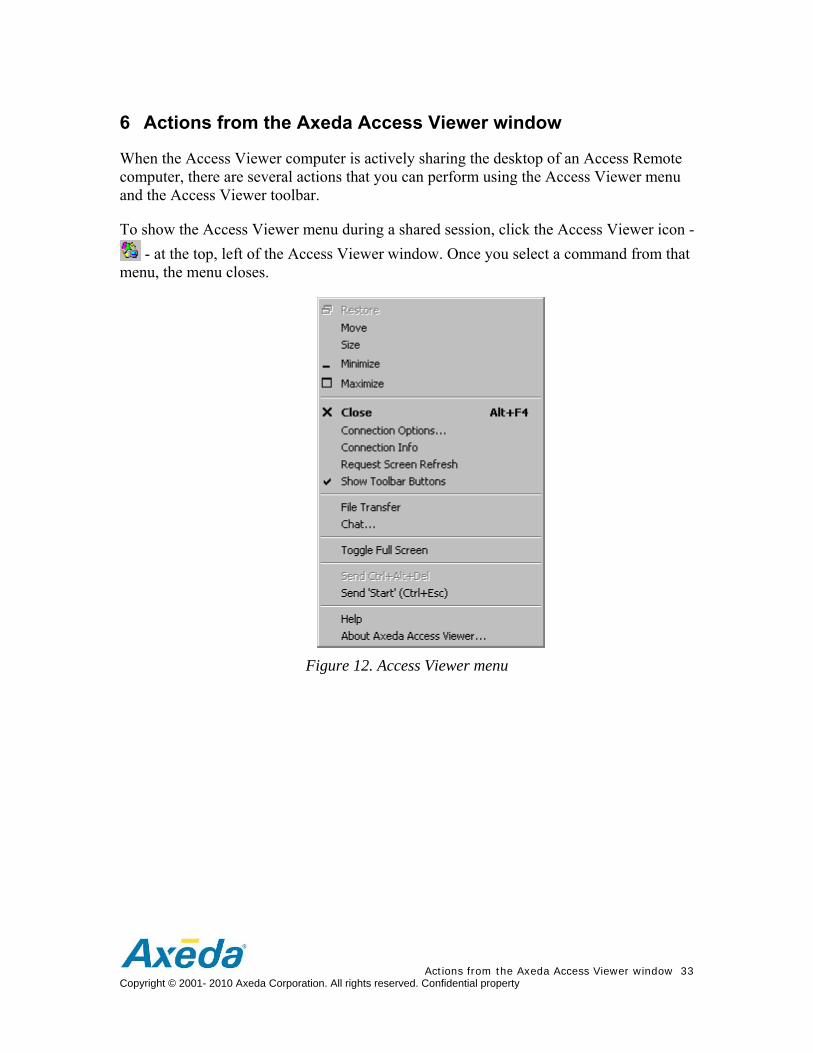
6 Actions from the Axeda Access Viewer window
When the Access Viewer computer is actively sharing the desktop of an Access Remote computer, there are several actions that you can perform using the Access Viewer menu and the Access Viewer toolbar.
To show the Access Viewer menu during a shared session, click the Access Viewer icon - - at the top, left of the Access Viewer window. Once you select a command from that
menu, the menu closes.
Figure 12. Access Viewer menu
34 Copyright © 2001- 2010 Axeda Corporation. All rights reserved. Confidential property
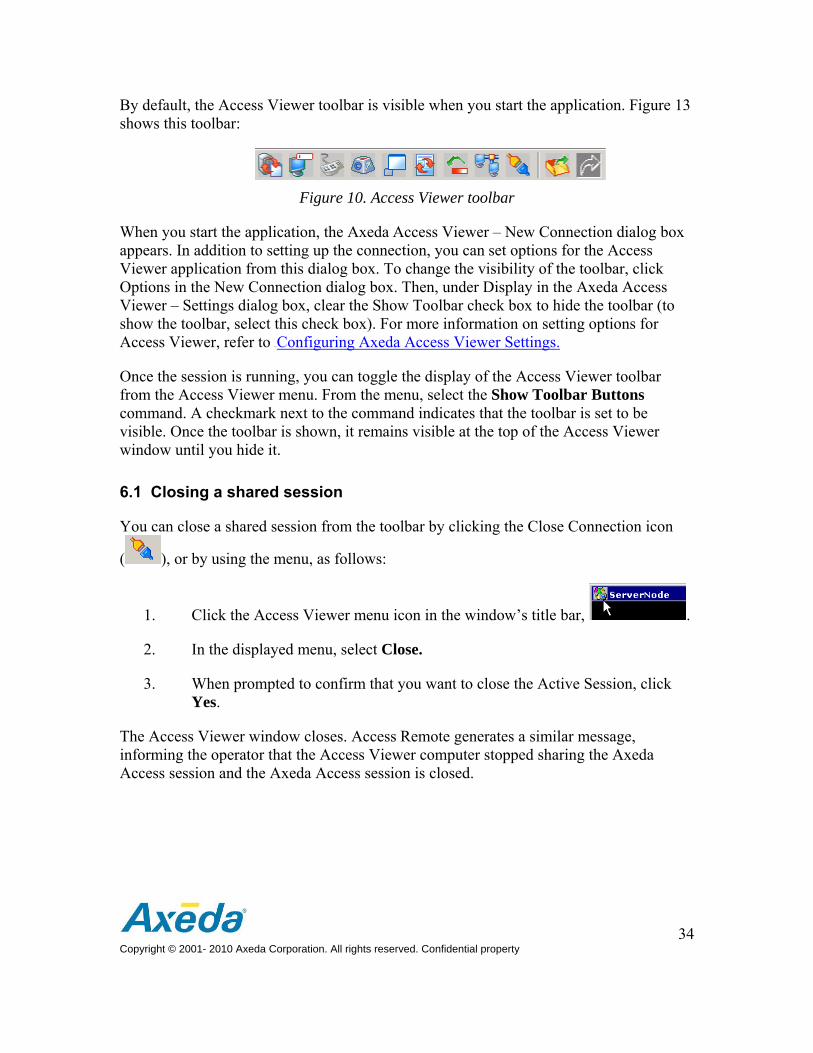
By default, the Access Viewer toolbar is visible when you start the application. Figure 13 shows this toolbar:
Figure 10. Access Viewer toolbar
When you start the application, the Axeda Access Viewer – New Connection dialog box appears. In addition to setting up the connection, you can set options for the Access Viewer application from this dialog box. To change the visibility of the toolbar, click Options in the New Connection dialog box. Then, under Display in the Axeda Access Viewer – Settings dialog box, clear the Show Toolbar check box to hide the toolbar (to show the toolbar, select this check box). For more information on setting options for Access Viewer, refer to 42HConfiguring Axeda Access Viewer Settings.
Once the session is running, you can toggle the display of the Access Viewer toolbar from the Access Viewer menu. From the menu, select the Show Toolbar Buttons command. A checkmark next to the command indicates that the toolbar is set to be visible. Once the toolbar is shown, it remains visible at the top of the Access Viewer window until you hide it.
6.1 Closing a shared session
You can close a shared session from the toolbar by clicking the Close Connection icon
( ), or by using the menu, as follows:
1. Click the Access Viewer menu icon in the window’s title bar, .
2. In the displayed menu, select Close.
3. When prompted to confirm that you want to close the Active Session, click Yes.
The Access Viewer window closes. Access Remote generates a similar message, informing the operator that the Access Viewer computer stopped sharing the Axeda Access session and the Axeda Access session is closed.
Actions from the Axeda Access Viewer window 35 Copyright © 2001- 2010 Axeda Corporation. All rights reserved. Confidential property
6.2 Changing Axeda Access Viewer settings
If you want to change the Access Viewer settings during a session, follow these steps:
1. To display the Axeda Access Viewer – Settings dialog box, you can use either of the following methods:
Click the Access Viewer menu icon in the window’s title bar,
. In the displayed menu, select Connections Options.
If the Access Viewer toolbar is visible, click the Connections Options icon
on the toolbar ( ).
The Axeda Access Viewer - Settings dialog box appears. (See 43HFigure 5 or 44HFigure 6 for examples of this dialog box.)
2. Change the desired settings and click OK to save the changes and close the dialog box.
6.3 Viewing connection information
To view information about the connection for this session, follow these steps:
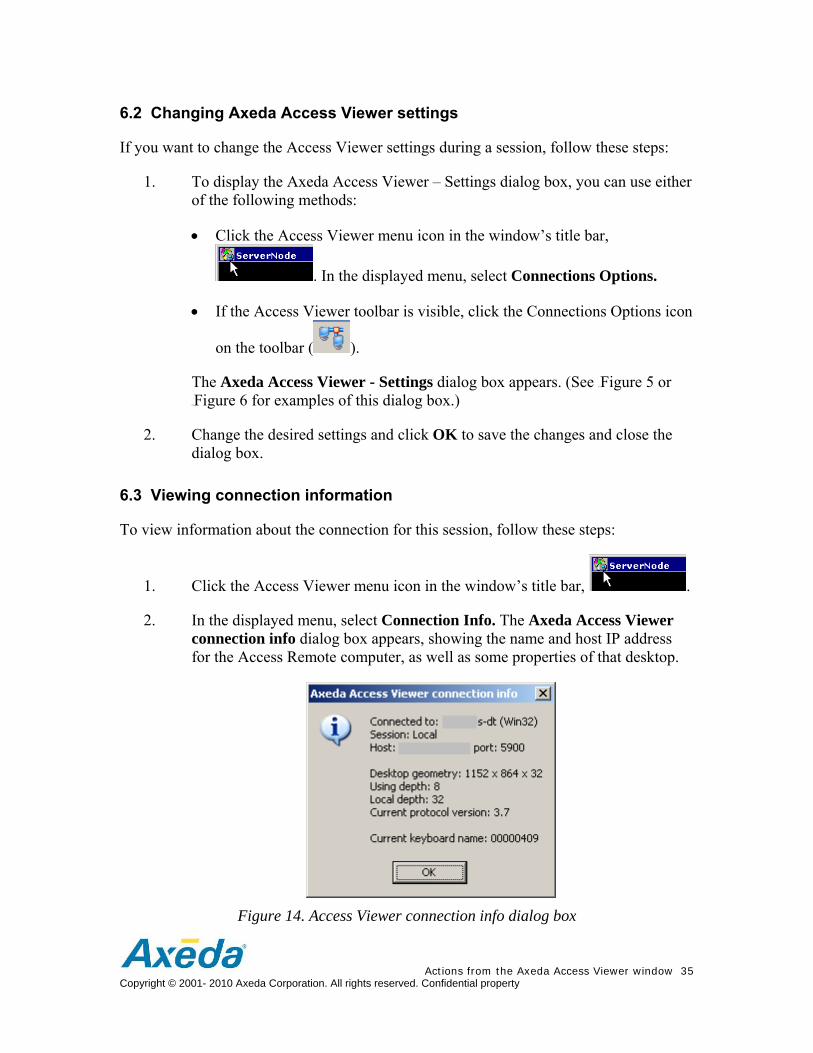
1. Click the Access Viewer menu icon in the window’s title bar, .
2. In the displayed menu, select Connection Info. The Axeda Access Viewer connection info dialog box appears, showing the name and host IP address for the Access Remote computer, as well as some properties of that desktop.
Figure 14. Access Viewer connection info dialog box
36 Copyright © 2001- 2010 Axeda Corporation. All rights reserved. Confidential property
6.4 Refreshing the Axeda Access Viewer window
Although the Access Viewer window constantly refreshes to reflect the current Access Remote desktop, there may be situations when you need to immediately refresh your Access Viewer window. You can use the icon in the toolbar or the menu, as follows:
Click the Request Screen Refresh icon ( ) in the Access Viewer toolbar. OR
Click the Access Viewer menu icon in the window’s title bar, . and in the displayed menu, select Request Screen Refresh.
The Access Viewer window is updated to show the current Access Remote computer’s desktop.
Actions from the Axeda Access Viewer window 37 Copyright © 2001- 2010 Axeda Corporation. All rights reserved. Confidential property
6.5 Showing or hiding the Axeda Access Viewer toolbar
Use this procedure to show or hide the Access Viewer toolbar. When shown, the toolbar appears at the top of the Access Viewer window during shared sessions. The Access Viewer toolbar contains a subset of the commands on the Access Viewer menu, plus additional tools.
1. Click the Access Viewer menu icon in the window’s title bar, .
2. In the displayed menu, select Show Toolbar Buttons.
If the toolbar was hidden, it opens. If the toolbar was open, it closes.
3. When the toolbar is shown, use the Hide Toolbar tool to hide it.
6.6 Managing files and directories using File Transfer
You can use the File Transfer dialog box to transfer files and directories to or from the Access Remote desktop; create new directories on the local or Access Remote desktop; and delete files from the local or Access Remote desktop. For desktop sharing through Axeda Access, file transfers are recorded as part of the session’s audit trail.
1. Click the Access Viewer menu icon in the window’s title bar, .
2. In the displayed menu, select File Transfer. Alternatively, click the File Transfer icon on the toolbar of the Access Viewer
window ( ).
38 Copyright © 2001- 2010 Axeda Corporation. All rights reserved. Confidential property
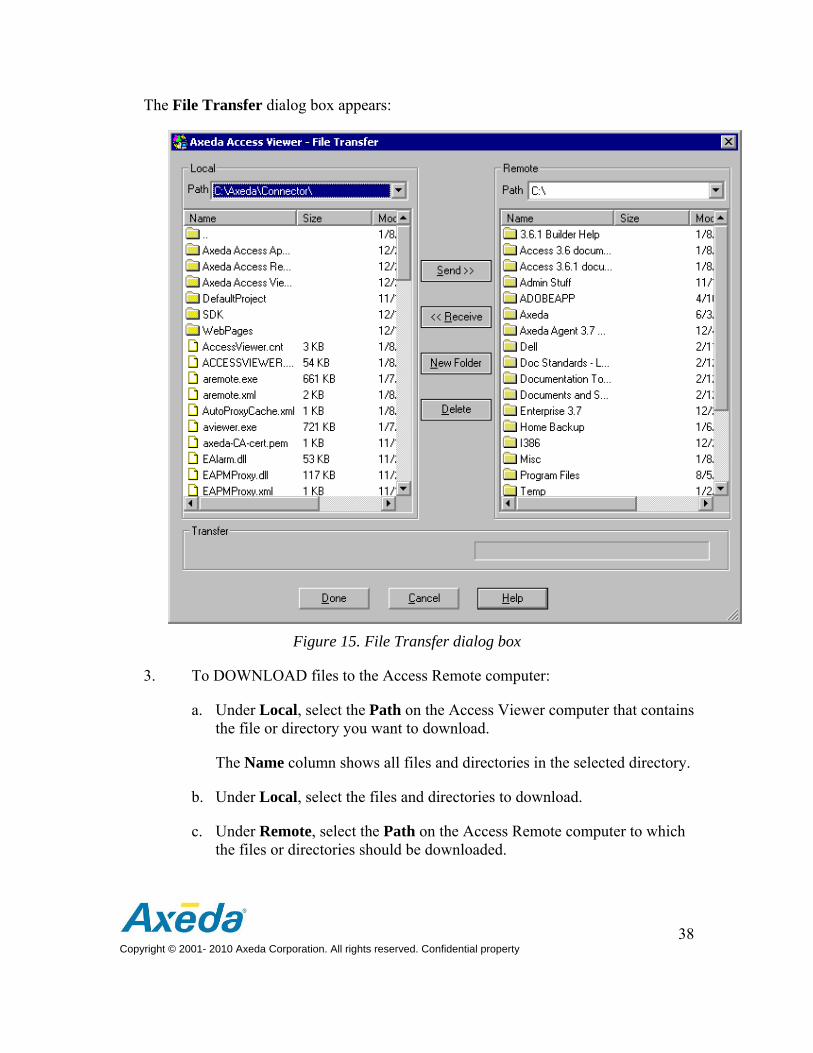
The File Transfer dialog box appears:
Figure 15. File Transfer dialog box
3. To DOWNLOAD files to the Access Remote computer:
a. Under Local, select the Path on the Access Viewer computer that contains the file or directory you want to download.
The Name column shows all files and directories in the selected directory.
b. Under Local, select the files and directories to download.
c. Under Remote, select the Path on the Access Remote computer to which the files or directories should be downloaded.
Actions from the Axeda Access Viewer window 39 Copyright © 2001- 2010 Axeda Corporation. All rights reserved. Confidential property
d. Click [Send >>]. The files are downloaded to the Access Remote computer.
4. To UPLOAD files from the Access Remote computer:
a. Under Remote, select the Path on the Access Remote computer that contains the files or directories you want to upload.
The Name column shows all files and directories in the selected directory.
b. Under Remote, select the name of the file or directory to upload.
c. Under Local, select the Path on the Access Viewer computer to which the files and directories should be uploaded.
d. Click [Receive <<]. The files are uploaded to the local Access Viewer computer.
5. To create a new directory, select the Path where the new directory will be located. Depending on where you want to create the new directory:
On the local Access Viewer computer -- Select the path under Local.
On the Access Remote computer -- Select the path under Remote.
Then, click New Folder. When prompted, type the name of the new folder, and click OK.
6. To delete a file, select it under Local (files on the Access Viewer computer) or Remote (files on the Access Remote computer). Then, click Delete. When prompted to confirm the deletion, click Yes.
7. Click Done to close the File Transfer dialog box.
While the file(s) and directories are copying, you can continue to operate the desktop environment if necessary. The dialog box shows the percentage completed and indicates Done when the transfer is complete.
You can stop a transfer by clicking Cancel. A message appears asking if you want to stop the file transfer in progress. If you do, any bytes in the process of being transferred are deleted from the destination computer. Files transferred before the process was canceled are not deleted.
6.7 Starting a Chat session with an Axeda Access Remote operator
During a shared session, you can start an instant, text-based messaging session with the Access Remote operator. To do so:
40 Copyright © 2001- 2010 Axeda Corporation. All rights reserved. Confidential property
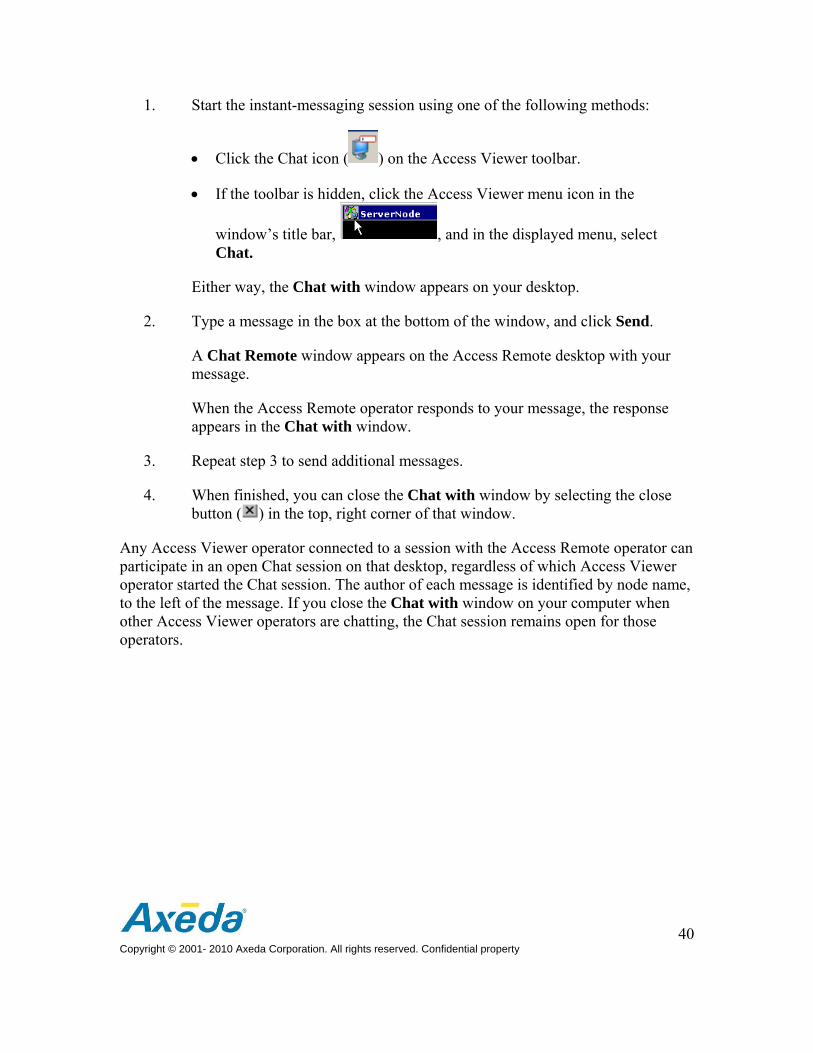
1. Start the instant-messaging session using one of the following methods:
Click the Chat icon ( ) on the Access Viewer toolbar.
If the toolbar is hidden, click the Access Viewer menu icon in the
window’s title bar, , and in the displayed menu, select Chat.
Either way, the Chat with window appears on your desktop.
2. Type a message in the box at the bottom of the window, and click Send.
A Chat Remote window appears on the Access Remote desktop with your message.
When the Access Remote operator responds to your message, the response appears in the Chat with window.
3. Repeat step 3 to send additional messages.
4. When finished, you can close the Chat with window by selecting the close button ( ) in the top, right corner of that window.
Any Access Viewer operator connected to a session with the Access Remote operator can participate in an open Chat session on that desktop, regardless of which Access Viewer operator started the Chat session. The author of each message is identified by node name, to the left of the message. If you close the Chat with window on your computer when other Access Viewer operators are chatting, the Chat session remains open for those operators.
Actions from the Axeda Access Viewer window 41 Copyright © 2001- 2010 Axeda Corporation. All rights reserved. Confidential property
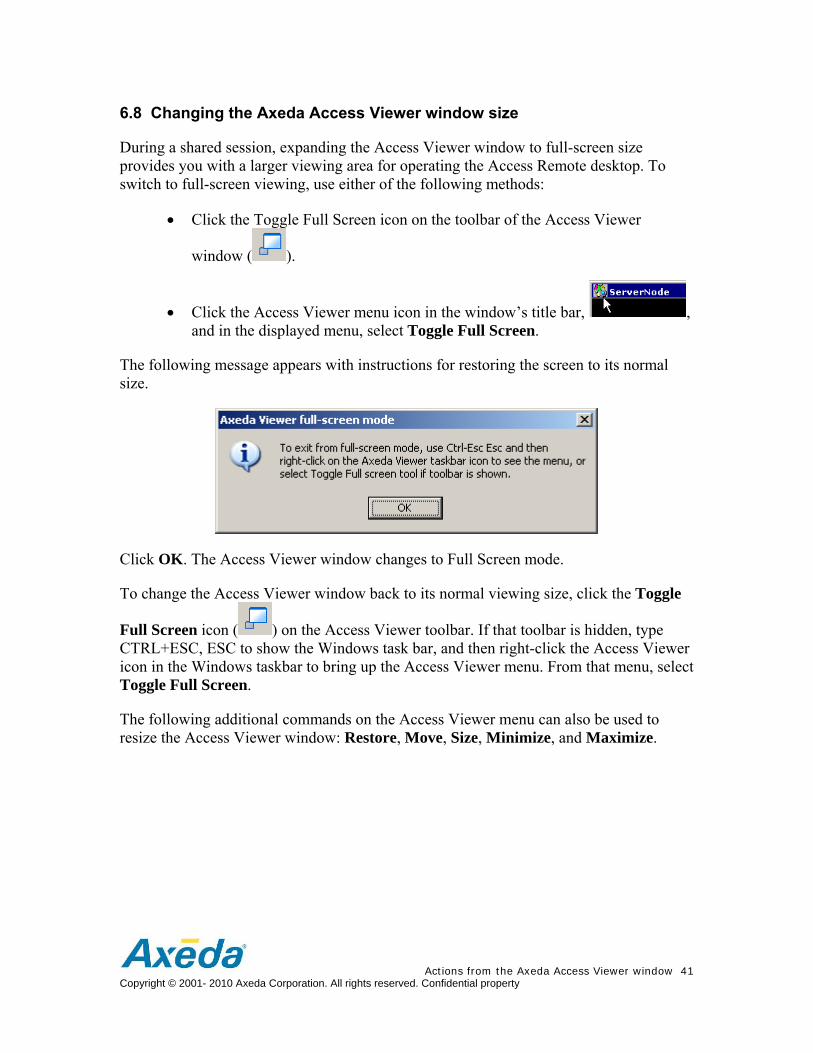
6.8 Changing the Axeda Access Viewer window size
During a shared session, expanding the Access Viewer window to full-screen size provides you with a larger viewing area for operating the Access Remote desktop. To switch to full-screen viewing, use either of the following methods:
Click the Toggle Full Screen icon on the toolbar of the Access Viewer
window ( ).
Click the Access Viewer menu icon in the window’s title bar, , and in the displayed menu, select Toggle Full Screen.
The following message appears with instructions for restoring the screen to its normal size.
Click OK. The Access Viewer window changes to Full Screen mode.
To change the Access Viewer window back to its normal viewing size, click the Toggle
Full Screen icon ( ) on the Access Viewer toolbar. If that toolbar is hidden, type CTRL+ESC, ESC to show the Windows task bar, and then right-click the Access Viewer icon in the Windows taskbar to bring up the Access Viewer menu. From that menu, select Toggle Full Screen.
The following additional commands on the Access Viewer menu can also be used to resize the Access Viewer window: Restore, Move, Size, Minimize, and Maximize.
42 Copyright © 2001- 2010 Axeda Corporation. All rights reserved. Confidential property
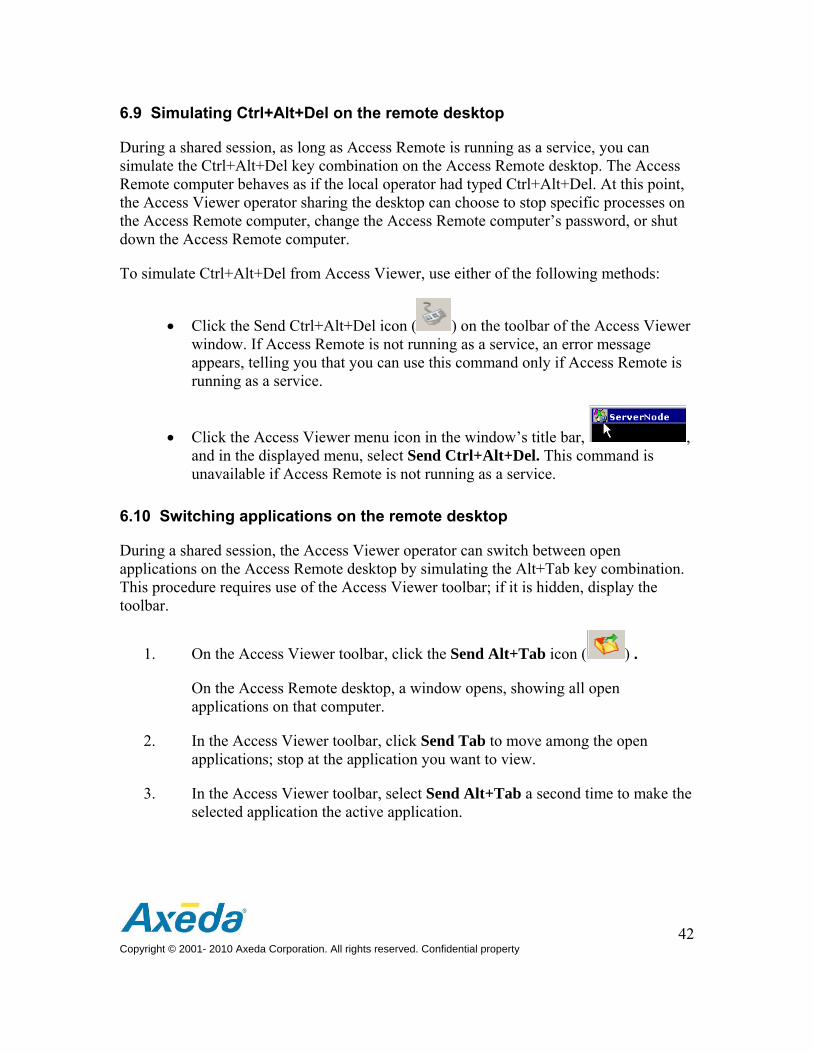
6.9 Simulating Ctrl+Alt+Del on the remote desktop
During a shared session, as long as Access Remote is running as a service, you can simulate the Ctrl+Alt+Del key combination on the Access Remote desktop. The Access Remote computer behaves as if the local operator had typed Ctrl+Alt+Del. At this point, the Access Viewer operator sharing the desktop can choose to stop specific processes on the Access Remote computer, change the Access Remote computer’s password, or shut down the Access Remote computer.
To simulate Ctrl+Alt+Del from Access Viewer, use either of the following methods:
Click the Send Ctrl+Alt+Del icon ( ) on the toolbar of the Access Viewer window. If Access Remote is not running as a service, an error message appears, telling you that you can use this command only if Access Remote is running as a service.
Click the Access Viewer menu icon in the window’s title bar, , and in the displayed menu, select Send Ctrl+Alt+Del. This command is unavailable if Access Remote is not running as a service.
6.10 Switching applications on the remote desktop
During a shared session, the Access Viewer operator can switch between open applications on the Access Remote desktop by simulating the Alt+Tab key combination. This procedure requires use of the Access Viewer toolbar; if it is hidden, display the toolbar.
1. On the Access Viewer toolbar, click the Send Alt+Tab icon ( ) .
On the Access Remote desktop, a window opens, showing all open applications on that computer.
2. In the Access Viewer toolbar, click Send Tab to move among the open applications; stop at the application you want to view.
3. In the Access Viewer toolbar, select Send Alt+Tab a second time to make the selected application the active application.
Actions from the Axeda Access Viewer window 43 Copyright © 2001- 2010 Axeda Corporation. All rights reserved. Confidential property
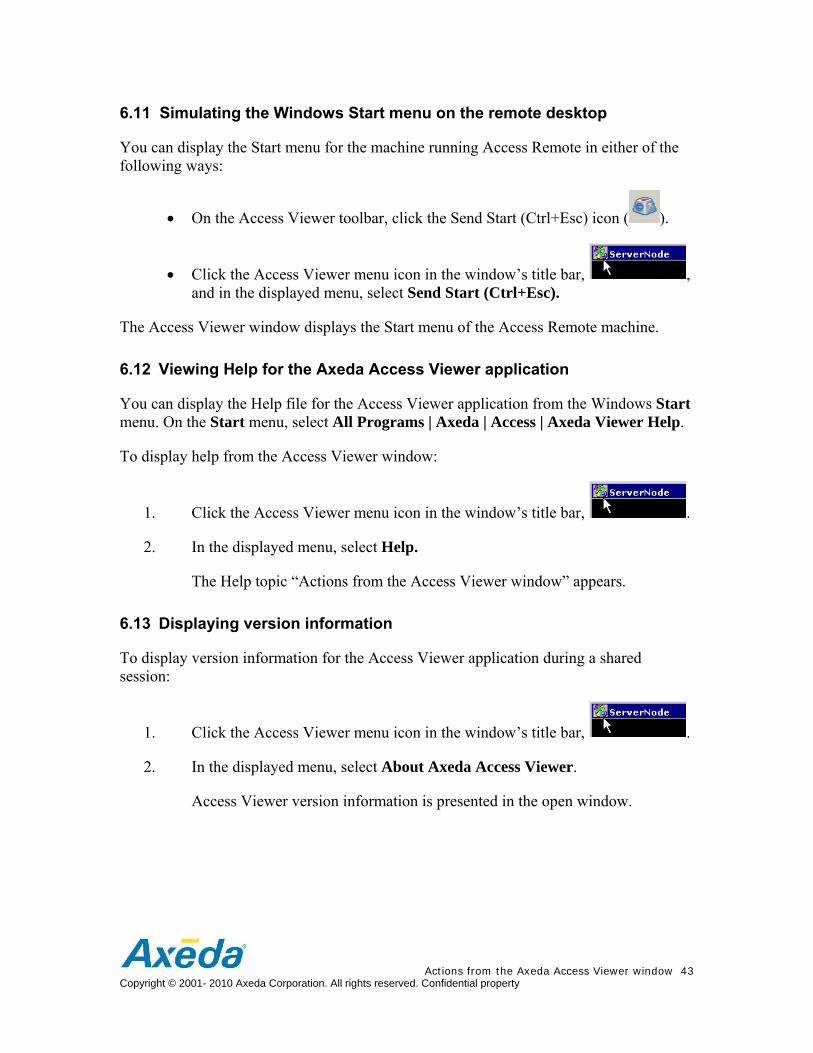
6.11 Simulating the Windows Start menu on the remote desktop
You can display the Start menu for the machine running Access Remote in either of the following ways:
On the Access Viewer toolbar, click the Send Start (Ctrl+Esc) icon ( ).
Click the Access Viewer menu icon in the window’s title bar, , and in the displayed menu, select Send Start (Ctrl+Esc).
The Access Viewer window displays the Start menu of the Access Remote machine.
6.12 3Viewing Help for the Axeda Access Viewer application
You can display the Help file for the Access Viewer application from the Windows Start menu. On the Start menu, select All Programs | Axeda | Access | Axeda Viewer Help.
To display help from the Access Viewer window:
1. Click the Access Viewer menu icon in the window’s title bar, .
2. In the displayed menu, select Help.
The Help topic “Actions from the Access Viewer window” appears.
6.13 3Displaying version information
To display version information for the Access Viewer application during a shared session:
1. Click the Access Viewer menu icon in the window’s title bar, .
2. In the displayed menu, select About Axeda Access Viewer.
Access Viewer version information is presented in the open window.
44 Copyright © 2001- 2010 Axeda Corporation. All rights reserved. Confidential property
6.14 Copying file content
You can copy file content from the Access Remote desktop to the Access Viewer desktop, and vice-versa. To do so:
1. In the desktop you want to copy from, open the file that contains the data you want to copy. Select and copy the desired data.
Whether you are copying from the Access Remote machine or the Access Viewer machine, the data is copied to the clipboard on the Access Viewer computer.
2. From the desktop of the machine you want to copy to, open (or create) the file where you want to paste the data, and then paste the data.
3. Save changes to the file.
Viewing information about shared sessions 45 Copyright © 2001- 2010 Axeda Corporation. All rights reserved. Confidential property
7 Viewing information about shared sessions
In the Axeda Access application, the Session Status page shows information for all active sessions created using either the Axeda Access or Axeda Service application. In addition, three audit reports show information for sessions through Axeda Access or Axeda Service: Access Audit Report by User, Axeda Access Audit Report by Organization, and Access Audit Report by Asset. Refer to the PDF document, Axeda® ServiceLinkTM Report Pack: Standard Reports Reference Guide, for details about running these three reports from the Axeda® Report application.
The Session Audit page of the Axeda Access application provides an audit trail for active and closed sessions created using the Axeda Access application, including feedback provided by the Access Viewer operator at the end of a shared session. Axeda ServiceLink users with Administrator rights are allowed to delete session histories from the Session Audit table. For more information about the Axeda Access application, refer to the online Help for that application.
In the Axeda Service application, the Session Audit page provides an audit trail for active and closed sessions created using the Axeda Service application. For more information, refer to the online Help for the Axeda Service application.
Finally, the Audit report of the Axeda Administration application includes shared session activity, including file transfers, for sessions created using either the Axeda Access or Axeda Service application.
46 Copyright © 2001- 2010 Axeda Corporation. All rights reserved. Confidential property
8 Troubleshooting
Make sure you are using a supported Web browser version for the ServiceLink Applications.
8.1 If you cannot start Axeda Access Viewer (aviewer.exe)
If you have problems starting Access Viewer (aviewer.exe), check for a hung version of that program in the Task Manager (that is, the Task Manager shows the Process as Not Responding). This situation can occur if a session connection fails on the Access Viewer computer. If Access Viewer is shown to be Not Responding in the Task Manager, click End Task in the Task Manager dialog box to stop the hung version of aviewer.exe.
8.2 If you cannot communicate with the Axeda Enterprise server
Make sure you are using a supported Web browser version for the ServiceLink Applications. See System Requirements.
Make sure the IP address or name you are using to access the Axeda Enterprise server is correct. If you are using the name of the machine, change to the IP address. Occasionally, this change solves the problem.
If a proxy server is configured on the network, make sure you have the correct IP address or name for that server.
Make sure the Axeda license does not restrict your access to the Axeda Enterprise server. (The Axeda Enterprise license may include restrictions on the number of clients who can access the Axeda Enterprise server simultaneously.)
It may be that current configuration settings (specifically, the "masking" setup) in the Axeda Enterprise server are blocking your computer based on your IP address. Ask your Axeda Enterprise server administrator if your computer’s IP address is prohibited from accessing the Axeda Enterprise server.
Contact your own IT department if you still cannot access a shared desktop.
Troubleshooting 47 Copyright © 2001- 2010 Axeda Corporation. All rights reserved. Confidential property
8.3 If you cannot connect to a shared desktop
Check the following:
Make sure the proxy settings defined for Access Viewer are valid.
Make sure your Access Viewer computer is connected to the Axeda Enterprise server.
Make sure the Axeda Enterprise server is running, and that you are using the correct IP address or hostname for that server.
For connections through the Axeda Service Applications, check whether Axeda Policy Server settings for the Axeda Gateway or Axeda Connector Agent prevent shared sessions.
For connections through the Axeda Service application, check whether the port configured for LAN connections (typically, 5900) is available.
Check if the Axeda Access Remote computer is down, and check if the version of Axeda Access Remote is compatible with your version of Axeda Access Viewer.
The session ID may be invalid. Once you attempt a connection using a session ID, it becomes invalid if the connection is not successful. Create a new session ID if necessary.
Check whether the current configuration settings (specifically, the "masking" setup) in the Axeda Enterprise server are blocking your computer from connecting to the session, based on your IP address. If this is true, ask your System Administrator to change those settings so that your computer can connect to an Axeda Access session.
48 Copyright © 2001- 2010 Axeda Corporation. All rights reserved. Confidential property
8.4 3If the Axeda Access Viewer window does not accurately reflect the current desktop
If the Access Viewer window does not accurately show the desktop of the Access Remote computer, refresh the Viewer window. For example, if artifacts from previous windows appear, or if you know that new information is being displayed on the Access Remote desktop, but you cannot see it, refresh the Viewer window.
You can refresh the Viewer window in either of the following ways:
Click the Request Refresh icon in the Access Viewer toolbar ( ).
Click the Access Viewer menu icon in the title bar of the window to show the Access Viewer menu. Then, select Request Screen Refresh.
8.5 If the connection closes unexpectedly
If a "Connection Lost…" message appears, the Axeda Enterprise server may have gone down, or the Access Remote computer may have stopped communicating with the Axeda Enterprise server, or an operator at the Access Remote computer may have ended the session.
This message can also appear if the dial-up connection ends. Any activity over a dial-up connection, including shared sessions, will last only as long as your ISP will allow.
8.6 Slow dial-up connections
If you are trying to connect Access Viewer to Access Remote through a slow dial-up connection, it may prove useful to configure Access Viewer to optimize the connection by selecting the Use compression (recommended for slow connections) option, on the Axeda Access Viewer: Settings dialog box.
When using a dial-up connection to transfer files between the Access Viewer and Access Remote computers, reducing activities on the Viewer computer that use system resources will improve speed. For example, minimize windows and avoid unnecessary cursor movements.
Getting Help 49 Copyright © 2001- 2010 Axeda Corporation. All rights reserved. Confidential property
9 Getting Help
For assistance with Axeda Access Viewer and remote sessions beyond this guide, go to http://help.axeda.com/.
10 Documentation Feedback
As part of our ongoing efforts to produce effective documentation, Axeda asks that you sendus any comments, additions or corrections for the documentation. Your feedback is very important to us and we will use it to improve our products and services.
Please send your comments to mailto:[email protected]. Thank you for your help.