Embed Size (px)
Citation preview
AWS Elemental LiveUser Guide
Version 2.14 and later

AWS Elemental Live User Guide
AWS Elemental Live: User GuideCopyright © Amazon Web Services, Inc. and/or its affiliates. All rights reserved.
Amazon's trademarks and trade dress may not be used in connection with any product or service that is notAmazon's, in any manner that is likely to cause confusion among customers, or in any manner that disparages ordiscredits Amazon. All other trademarks not owned by Amazon are the property of their respective owners, who mayor may not be affiliated with, connected to, or sponsored by Amazon.
AWS Elemental Live User Guide
Table of ContentsWhat is AWS Elemental Live? .... . . . . . . . . . . . . . . . . . . . . . . . . . . . . . . . . . . . . . . . . . . . . . . . . . . . . . . . . . . . . . . . . . . . . . . . . . . . . . . . . . . . . . . . . . . . . . . . . . . . . . . . . . . 1
Information about using AWS Elemental Live .... . . . . . . . . . . . . . . . . . . . . . . . . . . . . . . . . . . . . . . . . . . . . . . . . . . . . . . . . . . . . . . . . . . . . . . . . . . . . 1Interfaces for AWS Elemental Live .... . . . . . . . . . . . . . . . . . . . . . . . . . . . . . . . . . . . . . . . . . . . . . . . . . . . . . . . . . . . . . . . . . . . . . . . . . . . . . . . . . . . . . . . . . . . . 1How AWS Elemental Live works .... . . . . . . . . . . . . . . . . . . . . . . . . . . . . . . . . . . . . . . . . . . . . . . . . . . . . . . . . . . . . . . . . . . . . . . . . . . . . . . . . . . . . . . . . . . . . . . . 2Terminology .... . . . . . . . . . . . . . . . . . . . . . . . . . . . . . . . . . . . . . . . . . . . . . . . . . . . . . . . . . . . . . . . . . . . . . . . . . . . . . . . . . . . . . . . . . . . . . . . . . . . . . . . . . . . . . . . . . . . . . . . . . . 3
Inputs .... . . . . . . . . . . . . . . . . . . . . . . . . . . . . . . . . . . . . . . . . . . . . . . . . . . . . . . . . . . . . . . . . . . . . . . . . . . . . . . . . . . . . . . . . . . . . . . . . . . . . . . . . . . . . . . . . . . . . . . . . . . . . . . . . . . . . . . . . . . . 4Reference: Supported inputs .... . . . . . . . . . . . . . . . . . . . . . . . . . . . . . . . . . . . . . . . . . . . . . . . . . . . . . . . . . . . . . . . . . . . . . . . . . . . . . . . . . . . . . . . . . . . . . . . . . . . . 4
Live inputs: Supported types .... . . . . . . . . . . . . . . . . . . . . . . . . . . . . . . . . . . . . . . . . . . . . . . . . . . . . . . . . . . . . . . . . . . . . . . . . . . . . . . . . . . . . . . . . . . . 4Live inputs: Supported codecs .... . . . . . . . . . . . . . . . . . . . . . . . . . . . . . . . . . . . . . . . . . . . . . . . . . . . . . . . . . . . . . . . . . . . . . . . . . . . . . . . . . . . . . . . . . 8File inputs: Supported upstream systems .... . . . . . . . . . . . . . . . . . . . . . . . . . . . . . . . . . . . . . . . . . . . . . . . . . . . . . . . . . . . . . . . . . . . . . . . . . . 9File inputs: Supported containers ... . . . . . . . . . . . . . . . . . . . . . . . . . . . . . . . . . . . . . . . . . . . . . . . . . . . . . . . . . . . . . . . . . . . . . . . . . . . . . . . . . . . . 10File inputs: Supported codecs .... . . . . . . . . . . . . . . . . . . . . . . . . . . . . . . . . . . . . . . . . . . . . . . . . . . . . . . . . . . . . . . . . . . . . . . . . . . . . . . . . . . . . . . . . 10
Interleave 4K Inputs .... . . . . . . . . . . . . . . . . . . . . . . . . . . . . . . . . . . . . . . . . . . . . . . . . . . . . . . . . . . . . . . . . . . . . . . . . . . . . . . . . . . . . . . . . . . . . . . . . . . . . . . . . . . . . . 13SMPTE 2022-6 inputs .... . . . . . . . . . . . . . . . . . . . . . . . . . . . . . . . . . . . . . . . . . . . . . . . . . . . . . . . . . . . . . . . . . . . . . . . . . . . . . . . . . . . . . . . . . . . . . . . . . . . . . . . . . . . 13
Appliance requirements .... . . . . . . . . . . . . . . . . . . . . . . . . . . . . . . . . . . . . . . . . . . . . . . . . . . . . . . . . . . . . . . . . . . . . . . . . . . . . . . . . . . . . . . . . . . . . . . . . . 14Supported content .... . . . . . . . . . . . . . . . . . . . . . . . . . . . . . . . . . . . . . . . . . . . . . . . . . . . . . . . . . . . . . . . . . . . . . . . . . . . . . . . . . . . . . . . . . . . . . . . . . . . . . . . 14Get ready: Remove bonded interfaces .... . . . . . . . . . . . . . . . . . . . . . . . . . . . . . . . . . . . . . . . . . . . . . . . . . . . . . . . . . . . . . . . . . . . . . . . . . . . . . 15Get ready: Reserve processing cores .... . . . . . . . . . . . . . . . . . . . . . . . . . . . . . . . . . . . . . . . . . . . . . . . . . . . . . . . . . . . . . . . . . . . . . . . . . . . . . . . . 15Set up the input .... . . . . . . . . . . . . . . . . . . . . . . . . . . . . . . . . . . . . . . . . . . . . . . . . . . . . . . . . . . . . . . . . . . . . . . . . . . . . . . . . . . . . . . . . . . . . . . . . . . . . . . . . . . 16
SMPTE 2038 ancillary data .... . . . . . . . . . . . . . . . . . . . . . . . . . . . . . . . . . . . . . . . . . . . . . . . . . . . . . . . . . . . . . . . . . . . . . . . . . . . . . . . . . . . . . . . . . . . . . . . . . . . . 16Supported ancillary data .... . . . . . . . . . . . . . . . . . . . . . . . . . . . . . . . . . . . . . . . . . . . . . . . . . . . . . . . . . . . . . . . . . . . . . . . . . . . . . . . . . . . . . . . . . . . . . . . 17Well-formed SMPTE 2038 source .... . . . . . . . . . . . . . . . . . . . . . . . . . . . . . . . . . . . . . . . . . . . . . . . . . . . . . . . . . . . . . . . . . . . . . . . . . . . . . . . . . . . 17Enable SMPTE 2038 .... . . . . . . . . . . . . . . . . . . . . . . . . . . . . . . . . . . . . . . . . . . . . . . . . . . . . . . . . . . . . . . . . . . . . . . . . . . . . . . . . . . . . . . . . . . . . . . . . . . . . . 17Set up to use the data .... . . . . . . . . . . . . . . . . . . . . . . . . . . . . . . . . . . . . . . . . . . . . . . . . . . . . . . . . . . . . . . . . . . . . . . . . . . . . . . . . . . . . . . . . . . . . . . . . . . 18Set up to pass through custom data .... . . . . . . . . . . . . . . . . . . . . . . . . . . . . . . . . . . . . . . . . . . . . . . . . . . . . . . . . . . . . . . . . . . . . . . . . . . . . . . . 19
SMPTE 2110 inputs .... . . . . . . . . . . . . . . . . . . . . . . . . . . . . . . . . . . . . . . . . . . . . . . . . . . . . . . . . . . . . . . . . . . . . . . . . . . . . . . . . . . . . . . . . . . . . . . . . . . . . . . . . . . . . . . 19Get ready .... . . . . . . . . . . . . . . . . . . . . . . . . . . . . . . . . . . . . . . . . . . . . . . . . . . . . . . . . . . . . . . . . . . . . . . . . . . . . . . . . . . . . . . . . . . . . . . . . . . . . . . . . . . . . . . . . . . . . 20SMPTE 2110 using NMOS ..... . . . . . . . . . . . . . . . . . . . . . . . . . . . . . . . . . . . . . . . . . . . . . . . . . . . . . . . . . . . . . . . . . . . . . . . . . . . . . . . . . . . . . . . . . . . . 20SMPTE 2110 without NMOS ..... . . . . . . . . . . . . . . . . . . . . . . . . . . . . . . . . . . . . . . . . . . . . . . . . . . . . . . . . . . . . . . . . . . . . . . . . . . . . . . . . . . . . . . . . . 22
SRT Inputs .... . . . . . . . . . . . . . . . . . . . . . . . . . . . . . . . . . . . . . . . . . . . . . . . . . . . . . . . . . . . . . . . . . . . . . . . . . . . . . . . . . . . . . . . . . . . . . . . . . . . . . . . . . . . . . . . . . . . . . . . . . . . 22Get ready .... . . . . . . . . . . . . . . . . . . . . . . . . . . . . . . . . . . . . . . . . . . . . . . . . . . . . . . . . . . . . . . . . . . . . . . . . . . . . . . . . . . . . . . . . . . . . . . . . . . . . . . . . . . . . . . . . . . . . 23Set up the input .... . . . . . . . . . . . . . . . . . . . . . . . . . . . . . . . . . . . . . . . . . . . . . . . . . . . . . . . . . . . . . . . . . . . . . . . . . . . . . . . . . . . . . . . . . . . . . . . . . . . . . . . . . . 23
VSF TR-01 in a TS input .... . . . . . . . . . . . . . . . . . . . . . . . . . . . . . . . . . . . . . . . . . . . . . . . . . . . . . . . . . . . . . . . . . . . . . . . . . . . . . . . . . . . . . . . . . . . . . . . . . . . . . . . . 23Supported Sources .... . . . . . . . . . . . . . . . . . . . . . . . . . . . . . . . . . . . . . . . . . . . . . . . . . . . . . . . . . . . . . . . . . . . . . . . . . . . . . . . . . . . . . . . . . . . . . . . . . . . . . . . 24Setting up a new event .... . . . . . . . . . . . . . . . . . . . . . . . . . . . . . . . . . . . . . . . . . . . . . . . . . . . . . . . . . . . . . . . . . . . . . . . . . . . . . . . . . . . . . . . . . . . . . . . . . 24Migrating from SDI Inputs to TR-01 inputs .... . . . . . . . . . . . . . . . . . . . . . . . . . . . . . . . . . . . . . . . . . . . . . . . . . . . . . . . . . . . . . . . . . . . . . . 25
Outputs .... . . . . . . . . . . . . . . . . . . . . . . . . . . . . . . . . . . . . . . . . . . . . . . . . . . . . . . . . . . . . . . . . . . . . . . . . . . . . . . . . . . . . . . . . . . . . . . . . . . . . . . . . . . . . . . . . . . . . . . . . . . . . . . . . . . . . . . . 26Reference: Supported outputs .... . . . . . . . . . . . . . . . . . . . . . . . . . . . . . . . . . . . . . . . . . . . . . . . . . . . . . . . . . . . . . . . . . . . . . . . . . . . . . . . . . . . . . . . . . . . . . . . . 26
Delivering to an AWS service .... . . . . . . . . . . . . . . . . . . . . . . . . . . . . . . . . . . . . . . . . . . . . . . . . . . . . . . . . . . . . . . . . . . . . . . . . . . . . . . . . . . . . . . . . . 26Delivering to destinations other than AWS ..... . . . . . . . . . . . . . . . . . . . . . . . . . . . . . . . . . . . . . . . . . . . . . . . . . . . . . . . . . . . . . . . . . . . . . 29Audio codecs and supported conversions .... . . . . . . . . . . . . . . . . . . . . . . . . . . . . . . . . . . . . . . . . . . . . . . . . . . . . . . . . . . . . . . . . . . . . . . . . . 32Live outputs: Supported codecs .... . . . . . . . . . . . . . . . . . . . . . . . . . . . . . . . . . . . . . . . . . . . . . . . . . . . . . . . . . . . . . . . . . . . . . . . . . . . . . . . . . . . . . 32VOD outputs: Supported codecs .... . . . . . . . . . . . . . . . . . . . . . . . . . . . . . . . . . . . . . . . . . . . . . . . . . . . . . . . . . . . . . . . . . . . . . . . . . . . . . . . . . . . . . 34
MediaConnect .... . . . . . . . . . . . . . . . . . . . . . . . . . . . . . . . . . . . . . . . . . . . . . . . . . . . . . . . . . . . . . . . . . . . . . . . . . . . . . . . . . . . . . . . . . . . . . . . . . . . . . . . . . . . . . . . . . . . . . . 37Assumptions .... . . . . . . . . . . . . . . . . . . . . . . . . . . . . . . . . . . . . . . . . . . . . . . . . . . . . . . . . . . . . . . . . . . . . . . . . . . . . . . . . . . . . . . . . . . . . . . . . . . . . . . . . . . . . . . . . 37Setup procedure .... . . . . . . . . . . . . . . . . . . . . . . . . . . . . . . . . . . . . . . . . . . . . . . . . . . . . . . . . . . . . . . . . . . . . . . . . . . . . . . . . . . . . . . . . . . . . . . . . . . . . . . . . . . . 38How delivery from AWS Elemental Live to MediaConnect works at runtime .... . . . . . . . . . . . . . . . . . . . . . . . . . . 41
MediaStore .... . . . . . . . . . . . . . . . . . . . . . . . . . . . . . . . . . . . . . . . . . . . . . . . . . . . . . . . . . . . . . . . . . . . . . . . . . . . . . . . . . . . . . . . . . . . . . . . . . . . . . . . . . . . . . . . . . . . . . . . . . . 42Step A: Set up permissions .... . . . . . . . . . . . . . . . . . . . . . . . . . . . . . . . . . . . . . . . . . . . . . . . . . . . . . . . . . . . . . . . . . . . . . . . . . . . . . . . . . . . . . . . . . . . . 42Step B: Create output group .... . . . . . . . . . . . . . . . . . . . . . . . . . . . . . . . . . . . . . . . . . . . . . . . . . . . . . . . . . . . . . . . . . . . . . . . . . . . . . . . . . . . . . . . . . . 44
SMPTE 2110 output group .... . . . . . . . . . . . . . . . . . . . . . . . . . . . . . . . . . . . . . . . . . . . . . . . . . . . . . . . . . . . . . . . . . . . . . . . . . . . . . . . . . . . . . . . . . . . . . . . . . . . . 44Step 1: Get ready .... . . . . . . . . . . . . . . . . . . . . . . . . . . . . . . . . . . . . . . . . . . . . . . . . . . . . . . . . . . . . . . . . . . . . . . . . . . . . . . . . . . . . . . . . . . . . . . . . . . . . . . . . . 45Step 2: Design the workflow ..... . . . . . . . . . . . . . . . . . . . . . . . . . . . . . . . . . . . . . . . . . . . . . . . . . . . . . . . . . . . . . . . . . . . . . . . . . . . . . . . . . . . . . . . . . 45Step 3: Create output group .... . . . . . . . . . . . . . . . . . . . . . . . . . . . . . . . . . . . . . . . . . . . . . . . . . . . . . . . . . . . . . . . . . . . . . . . . . . . . . . . . . . . . . . . . . . 46
Version 2.14 and lateriii
AWS Elemental Live User Guide
Step 4: Download the SDP file .... . . . . . . . . . . . . . . . . . . . . . . . . . . . . . . . . . . . . . . . . . . . . . . . . . . . . . . . . . . . . . . . . . . . . . . . . . . . . . . . . . . . . . . . 51TS output using SRT .... . . . . . . . . . . . . . . . . . . . . . . . . . . . . . . . . . . . . . . . . . . . . . . . . . . . . . . . . . . . . . . . . . . . . . . . . . . . . . . . . . . . . . . . . . . . . . . . . . . . . . . . . . . . . . 52
Get ready .... . . . . . . . . . . . . . . . . . . . . . . . . . . . . . . . . . . . . . . . . . . . . . . . . . . . . . . . . . . . . . . . . . . . . . . . . . . . . . . . . . . . . . . . . . . . . . . . . . . . . . . . . . . . . . . . . . . . . 52Create the output .... . . . . . . . . . . . . . . . . . . . . . . . . . . . . . . . . . . . . . . . . . . . . . . . . . . . . . . . . . . . . . . . . . . . . . . . . . . . . . . . . . . . . . . . . . . . . . . . . . . . . . . . . . 53
TS output using Zixi .. . . . . . . . . . . . . . . . . . . . . . . . . . . . . . . . . . . . . . . . . . . . . . . . . . . . . . . . . . . . . . . . . . . . . . . . . . . . . . . . . . . . . . . . . . . . . . . . . . . . . . . . . . . . . . . . 53Get ready .... . . . . . . . . . . . . . . . . . . . . . . . . . . . . . . . . . . . . . . . . . . . . . . . . . . . . . . . . . . . . . . . . . . . . . . . . . . . . . . . . . . . . . . . . . . . . . . . . . . . . . . . . . . . . . . . . . . . . 54Create the output .... . . . . . . . . . . . . . . . . . . . . . . . . . . . . . . . . . . . . . . . . . . . . . . . . . . . . . . . . . . . . . . . . . . . . . . . . . . . . . . . . . . . . . . . . . . . . . . . . . . . . . . . . . 54
Video .... . . . . . . . . . . . . . . . . . . . . . . . . . . . . . . . . . . . . . . . . . . . . . . . . . . . . . . . . . . . . . . . . . . . . . . . . . . . . . . . . . . . . . . . . . . . . . . . . . . . . . . . . . . . . . . . . . . . . . . . . . . . . . . . . . . . . . . . . . . 56Color space .... . . . . . . . . . . . . . . . . . . . . . . . . . . . . . . . . . . . . . . . . . . . . . . . . . . . . . . . . . . . . . . . . . . . . . . . . . . . . . . . . . . . . . . . . . . . . . . . . . . . . . . . . . . . . . . . . . . . . . . . . . . 56
Color space versus video resolution .... . . . . . . . . . . . . . . . . . . . . . . . . . . . . . . . . . . . . . . . . . . . . . . . . . . . . . . . . . . . . . . . . . . . . . . . . . . . . . . . . 56General information .... . . . . . . . . . . . . . . . . . . . . . . . . . . . . . . . . . . . . . . . . . . . . . . . . . . . . . . . . . . . . . . . . . . . . . . . . . . . . . . . . . . . . . . . . . . . . . . . . . . . . . 57Configuring input .... . . . . . . . . . . . . . . . . . . . . . . . . . . . . . . . . . . . . . . . . . . . . . . . . . . . . . . . . . . . . . . . . . . . . . . . . . . . . . . . . . . . . . . . . . . . . . . . . . . . . . . . . . 60Configuring output .... . . . . . . . . . . . . . . . . . . . . . . . . . . . . . . . . . . . . . . . . . . . . . . . . . . . . . . . . . . . . . . . . . . . . . . . . . . . . . . . . . . . . . . . . . . . . . . . . . . . . . . . 67The results of different types of conversions .... . . . . . . . . . . . . . . . . . . . . . . . . . . . . . . . . . . . . . . . . . . . . . . . . . . . . . . . . . . . . . . . . . . . . 72Location of HDR fields on the web interface .... . . . . . . . . . . . . . . . . . . . . . . . . . . . . . . . . . . . . . . . . . . . . . . . . . . . . . . . . . . . . . . . . . . . . 74Location of HDR fields in the XML .... . . . . . . . . . . . . . . . . . . . . . . . . . . . . . . . . . . . . . . . . . . . . . . . . . . . . . . . . . . . . . . . . . . . . . . . . . . . . . . . . . . 75
Dolby Vision HDR10 .... . . . . . . . . . . . . . . . . . . . . . . . . . . . . . . . . . . . . . . . . . . . . . . . . . . . . . . . . . . . . . . . . . . . . . . . . . . . . . . . . . . . . . . . . . . . . . . . . . . . . . . . . . . . . . 76QVBR and rate control mode .... . . . . . . . . . . . . . . . . . . . . . . . . . . . . . . . . . . . . . . . . . . . . . . . . . . . . . . . . . . . . . . . . . . . . . . . . . . . . . . . . . . . . . . . . . . . . . . . . . 76Ultra-low latency .... . . . . . . . . . . . . . . . . . . . . . . . . . . . . . . . . . . . . . . . . . . . . . . . . . . . . . . . . . . . . . . . . . . . . . . . . . . . . . . . . . . . . . . . . . . . . . . . . . . . . . . . . . . . . . . . . . . 78Video quality ... . . . . . . . . . . . . . . . . . . . . . . . . . . . . . . . . . . . . . . . . . . . . . . . . . . . . . . . . . . . . . . . . . . . . . . . . . . . . . . . . . . . . . . . . . . . . . . . . . . . . . . . . . . . . . . . . . . . . . . . . 79
Image processing controls ... . . . . . . . . . . . . . . . . . . . . . . . . . . . . . . . . . . . . . . . . . . . . . . . . . . . . . . . . . . . . . . . . . . . . . . . . . . . . . . . . . . . . . . . . . . . . . . 79Encoding controls ... . . . . . . . . . . . . . . . . . . . . . . . . . . . . . . . . . . . . . . . . . . . . . . . . . . . . . . . . . . . . . . . . . . . . . . . . . . . . . . . . . . . . . . . . . . . . . . . . . . . . . . . . . . 87
Audio .... . . . . . . . . . . . . . . . . . . . . . . . . . . . . . . . . . . . . . . . . . . . . . . . . . . . . . . . . . . . . . . . . . . . . . . . . . . . . . . . . . . . . . . . . . . . . . . . . . . . . . . . . . . . . . . . . . . . . . . . . . . . . . . . . . . . . . . . . . . 99Dolby Digital Plus with Atmos .... . . . . . . . . . . . . . . . . . . . . . . . . . . . . . . . . . . . . . . . . . . . . . . . . . . . . . . . . . . . . . . . . . . . . . . . . . . . . . . . . . . . . . . . . . . . . . . . 99
Supported sources .... . . . . . . . . . . . . . . . . . . . . . . . . . . . . . . . . . . . . . . . . . . . . . . . . . . . . . . . . . . . . . . . . . . . . . . . . . . . . . . . . . . . . . . . . . . . . . . . . . . . . . . . . 99Supported outputs .... . . . . . . . . . . . . . . . . . . . . . . . . . . . . . . . . . . . . . . . . . . . . . . . . . . . . . . . . . . . . . . . . . . . . . . . . . . . . . . . . . . . . . . . . . . . . . . . . . . . . . 100Setting up the event .... . . . . . . . . . . . . . . . . . . . . . . . . . . . . . . . . . . . . . . . . . . . . . . . . . . . . . . . . . . . . . . . . . . . . . . . . . . . . . . . . . . . . . . . . . . . . . . . . . . . 100
Dolby metadata .... . . . . . . . . . . . . . . . . . . . . . . . . . . . . . . . . . . . . . . . . . . . . . . . . . . . . . . . . . . . . . . . . . . . . . . . . . . . . . . . . . . . . . . . . . . . . . . . . . . . . . . . . . . . . . . . . . 102Categories of Metadata .... . . . . . . . . . . . . . . . . . . . . . . . . . . . . . . . . . . . . . . . . . . . . . . . . . . . . . . . . . . . . . . . . . . . . . . . . . . . . . . . . . . . . . . . . . . . . . . . 102Source of metadata .... . . . . . . . . . . . . . . . . . . . . . . . . . . . . . . . . . . . . . . . . . . . . . . . . . . . . . . . . . . . . . . . . . . . . . . . . . . . . . . . . . . . . . . . . . . . . . . . . . . . . 103Impact on output audio .... . . . . . . . . . . . . . . . . . . . . . . . . . . . . . . . . . . . . . . . . . . . . . . . . . . . . . . . . . . . . . . . . . . . . . . . . . . . . . . . . . . . . . . . . . . . . . . 103Codec combinations .... . . . . . . . . . . . . . . . . . . . . . . . . . . . . . . . . . . . . . . . . . . . . . . . . . . . . . . . . . . . . . . . . . . . . . . . . . . . . . . . . . . . . . . . . . . . . . . . . . . . . 103Setting up .... . . . . . . . . . . . . . . . . . . . . . . . . . . . . . . . . . . . . . . . . . . . . . . . . . . . . . . . . . . . . . . . . . . . . . . . . . . . . . . . . . . . . . . . . . . . . . . . . . . . . . . . . . . . . . . . . . 104Output with Dolby Digital ... . . . . . . . . . . . . . . . . . . . . . . . . . . . . . . . . . . . . . . . . . . . . . . . . . . . . . . . . . . . . . . . . . . . . . . . . . . . . . . . . . . . . . . . . . . . . 107Output with Dolby Digital Plus .... . . . . . . . . . . . . . . . . . . . . . . . . . . . . . . . . . . . . . . . . . . . . . . . . . . . . . . . . . . . . . . . . . . . . . . . . . . . . . . . . . . . . . 110
HLS rendition groups .... . . . . . . . . . . . . . . . . . . . . . . . . . . . . . . . . . . . . . . . . . . . . . . . . . . . . . . . . . . . . . . . . . . . . . . . . . . . . . . . . . . . . . . . . . . . . . . . . . . . . . . . . . . 113How video is associated with audio rendition groups .... . . . . . . . . . . . . . . . . . . . . . . . . . . . . . . . . . . . . . . . . . . . . . . . . . . . . . . . 114Rules for rendition groups .... . . . . . . . . . . . . . . . . . . . . . . . . . . . . . . . . . . . . . . . . . . . . . . . . . . . . . . . . . . . . . . . . . . . . . . . . . . . . . . . . . . . . . . . . . . . 114Examples .... . . . . . . . . . . . . . . . . . . . . . . . . . . . . . . . . . . . . . . . . . . . . . . . . . . . . . . . . . . . . . . . . . . . . . . . . . . . . . . . . . . . . . . . . . . . . . . . . . . . . . . . . . . . . . . . . . . . 115Creating HLS rendition groups .... . . . . . . . . . . . . . . . . . . . . . . . . . . . . . . . . . . . . . . . . . . . . . . . . . . . . . . . . . . . . . . . . . . . . . . . . . . . . . . . . . . . . . 117Sample HLS output group .... . . . . . . . . . . . . . . . . . . . . . . . . . . . . . . . . . . . . . . . . . . . . . . . . . . . . . . . . . . . . . . . . . . . . . . . . . . . . . . . . . . . . . . . . . . . 129
Features .... . . . . . . . . . . . . . . . . . . . . . . . . . . . . . . . . . . . . . . . . . . . . . . . . . . . . . . . . . . . . . . . . . . . . . . . . . . . . . . . . . . . . . . . . . . . . . . . . . . . . . . . . . . . . . . . . . . . . . . . . . . . . . . . . . . . . 131Captions .... . . . . . . . . . . . . . . . . . . . . . . . . . . . . . . . . . . . . . . . . . . . . . . . . . . . . . . . . . . . . . . . . . . . . . . . . . . . . . . . . . . . . . . . . . . . . . . . . . . . . . . . . . . . . . . . . . . . . . . . . . . . 131
Supported features .... . . . . . . . . . . . . . . . . . . . . . . . . . . . . . . . . . . . . . . . . . . . . . . . . . . . . . . . . . . . . . . . . . . . . . . . . . . . . . . . . . . . . . . . . . . . . . . . . . . . . . 132Typical scenarios .... . . . . . . . . . . . . . . . . . . . . . . . . . . . . . . . . . . . . . . . . . . . . . . . . . . . . . . . . . . . . . . . . . . . . . . . . . . . . . . . . . . . . . . . . . . . . . . . . . . . . . . . . 136Setting up for captions .... . . . . . . . . . . . . . . . . . . . . . . . . . . . . . . . . . . . . . . . . . . . . . . . . . . . . . . . . . . . . . . . . . . . . . . . . . . . . . . . . . . . . . . . . . . . . . . . 138Examples of implementing use cases .... . . . . . . . . . . . . . . . . . . . . . . . . . . . . . . . . . . . . . . . . . . . . . . . . . . . . . . . . . . . . . . . . . . . . . . . . . . . . 159Passing through VBI data .... . . . . . . . . . . . . . . . . . . . . . . . . . . . . . . . . . . . . . . . . . . . . . . . . . . . . . . . . . . . . . . . . . . . . . . . . . . . . . . . . . . . . . . . . . . . . 166Reference: OCR languages .... . . . . . . . . . . . . . . . . . . . . . . . . . . . . . . . . . . . . . . . . . . . . . . . . . . . . . . . . . . . . . . . . . . . . . . . . . . . . . . . . . . . . . . . . . . . 166
Dynamicinput switching .... . . . . . . . . . . . . . . . . . . . . . . . . . . . . . . . . . . . . . . . . . . . . . . . . . . . . . . . . . . . . . . . . . . . . . . . . . . . . . . . . . . . . . . . . . . . . . . . . . . . . . . 169Typical Use Cases .... . . . . . . . . . . . . . . . . . . . . . . . . . . . . . . . . . . . . . . . . . . . . . . . . . . . . . . . . . . . . . . . . . . . . . . . . . . . . . . . . . . . . . . . . . . . . . . . . . . . . . . . 170Procedures .... . . . . . . . . . . . . . . . . . . . . . . . . . . . . . . . . . . . . . . . . . . . . . . . . . . . . . . . . . . . . . . . . . . . . . . . . . . . . . . . . . . . . . . . . . . . . . . . . . . . . . . . . . . . . . . . . . 171Using the REST API ... . . . . . . . . . . . . . . . . . . . . . . . . . . . . . . . . . . . . . . . . . . . . . . . . . . . . . . . . . . . . . . . . . . . . . . . . . . . . . . . . . . . . . . . . . . . . . . . . . . . . . . 180Elements and tags .... . . . . . . . . . . . . . . . . . . . . . . . . . . . . . . . . . . . . . . . . . . . . . . . . . . . . . . . . . . . . . . . . . . . . . . . . . . . . . . . . . . . . . . . . . . . . . . . . . . . . . . 193
Graphic overlay overview .... . . . . . . . . . . . . . . . . . . . . . . . . . . . . . . . . . . . . . . . . . . . . . . . . . . . . . . . . . . . . . . . . . . . . . . . . . . . . . . . . . . . . . . . . . . . . . . . . . . . . . 198Static overlay .... . . . . . . . . . . . . . . . . . . . . . . . . . . . . . . . . . . . . . . . . . . . . . . . . . . . . . . . . . . . . . . . . . . . . . . . . . . . . . . . . . . . . . . . . . . . . . . . . . . . . . . . . . . . . . 199Motion graphic overlay .... . . . . . . . . . . . . . . . . . . . . . . . . . . . . . . . . . . . . . . . . . . . . . . . . . . . . . . . . . . . . . . . . . . . . . . . . . . . . . . . . . . . . . . . . . . . . . . . . 199
Version 2.14 and lateriv
AWS Elemental Live User Guide
Inserting both overlay types .... . . . . . . . . . . . . . . . . . . . . . . . . . . . . . . . . . . . . . . . . . . . . . . . . . . . . . . . . . . . . . . . . . . . . . . . . . . . . . . . . . . . . . . . . 199Graphic overlay: Motion overlay .... . . . . . . . . . . . . . . . . . . . . . . . . . . . . . . . . . . . . . . . . . . . . . . . . . . . . . . . . . . . . . . . . . . . . . . . . . . . . . . . . . . . . . . . . . . . 200
HTML5 .... . . . . . . . . . . . . . . . . . . . . . . . . . . . . . . . . . . . . . . . . . . . . . . . . . . . . . . . . . . . . . . . . . . . . . . . . . . . . . . . . . . . . . . . . . . . . . . . . . . . . . . . . . . . . . . . . . . . . . . 200Quicktime MOV ..... . . . . . . . . . . . . . . . . . . . . . . . . . . . . . . . . . . . . . . . . . . . . . . . . . . . . . . . . . . . . . . . . . . . . . . . . . . . . . . . . . . . . . . . . . . . . . . . . . . . . . . . . . 205PNG ..... . . . . . . . . . . . . . . . . . . . . . . . . . . . . . . . . . . . . . . . . . . . . . . . . . . . . . . . . . . . . . . . . . . . . . . . . . . . . . . . . . . . . . . . . . . . . . . . . . . . . . . . . . . . . . . . . . . . . . . . . 215SWF .... . . . . . . . . . . . . . . . . . . . . . . . . . . . . . . . . . . . . . . . . . . . . . . . . . . . . . . . . . . . . . . . . . . . . . . . . . . . . . . . . . . . . . . . . . . . . . . . . . . . . . . . . . . . . . . . . . . . . . . . . . 225
Graphic overlay: Static overlay .... . . . . . . . . . . . . . . . . . . . . . . . . . . . . . . . . . . . . . . . . . . . . . . . . . . . . . . . . . . . . . . . . . . . . . . . . . . . . . . . . . . . . . . . . . . . . . 240Insertion options .... . . . . . . . . . . . . . . . . . . . . . . . . . . . . . . . . . . . . . . . . . . . . . . . . . . . . . . . . . . . . . . . . . . . . . . . . . . . . . . . . . . . . . . . . . . . . . . . . . . . . . . . . 240Multiple Overlays .... . . . . . . . . . . . . . . . . . . . . . . . . . . . . . . . . . . . . . . . . . . . . . . . . . . . . . . . . . . . . . . . . . . . . . . . . . . . . . . . . . . . . . . . . . . . . . . . . . . . . . . . 243Combining overlays and insertion options .... . . . . . . . . . . . . . . . . . . . . . . . . . . . . . . . . . . . . . . . . . . . . . . . . . . . . . . . . . . . . . . . . . . . . . 244Procedure .... . . . . . . . . . . . . . . . . . . . . . . . . . . . . . . . . . . . . . . . . . . . . . . . . . . . . . . . . . . . . . . . . . . . . . . . . . . . . . . . . . . . . . . . . . . . . . . . . . . . . . . . . . . . . . . . . . . 244Static overlays with REST API ... . . . . . . . . . . . . . . . . . . . . . . . . . . . . . . . . . . . . . . . . . . . . . . . . . . . . . . . . . . . . . . . . . . . . . . . . . . . . . . . . . . . . . . . . 251Static overlay and content switching .... . . . . . . . . . . . . . . . . . . . . . . . . . . . . . . . . . . . . . . . . . . . . . . . . . . . . . . . . . . . . . . . . . . . . . . . . . . . . . 260XML structure .... . . . . . . . . . . . . . . . . . . . . . . . . . . . . . . . . . . . . . . . . . . . . . . . . . . . . . . . . . . . . . . . . . . . . . . . . . . . . . . . . . . . . . . . . . . . . . . . . . . . . . . . . . . . . 261
Input switching .... . . . . . . . . . . . . . . . . . . . . . . . . . . . . . . . . . . . . . . . . . . . . . . . . . . . . . . . . . . . . . . . . . . . . . . . . . . . . . . . . . . . . . . . . . . . . . . . . . . . . . . . . . . . . . . . . . . 265Dynamic input switching .... . . . . . . . . . . . . . . . . . . . . . . . . . . . . . . . . . . . . . . . . . . . . . . . . . . . . . . . . . . . . . . . . . . . . . . . . . . . . . . . . . . . . . . . . . . . . . 265Virtual input switching .... . . . . . . . . . . . . . . . . . . . . . . . . . . . . . . . . . . . . . . . . . . . . . . . . . . . . . . . . . . . . . . . . . . . . . . . . . . . . . . . . . . . . . . . . . . . . . . . . 265Automatic input switching .... . . . . . . . . . . . . . . . . . . . . . . . . . . . . . . . . . . . . . . . . . . . . . . . . . . . . . . . . . . . . . . . . . . . . . . . . . . . . . . . . . . . . . . . . . . 266Combining different input switching features .... . . . . . . . . . . . . . . . . . . . . . . . . . . . . . . . . . . . . . . . . . . . . . . . . . . . . . . . . . . . . . . . . 266
Nielsen watermark insertion .... . . . . . . . . . . . . . . . . . . . . . . . . . . . . . . . . . . . . . . . . . . . . . . . . . . . . . . . . . . . . . . . . . . . . . . . . . . . . . . . . . . . . . . . . . . . . . . . . 266Audio requirements .... . . . . . . . . . . . . . . . . . . . . . . . . . . . . . . . . . . . . . . . . . . . . . . . . . . . . . . . . . . . . . . . . . . . . . . . . . . . . . . . . . . . . . . . . . . . . . . . . . . . . 266Get ready .... . . . . . . . . . . . . . . . . . . . . . . . . . . . . . . . . . . . . . . . . . . . . . . . . . . . . . . . . . . . . . . . . . . . . . . . . . . . . . . . . . . . . . . . . . . . . . . . . . . . . . . . . . . . . . . . . . . 267Setting up Nielsen watermarks .... . . . . . . . . . . . . . . . . . . . . . . . . . . . . . . . . . . . . . . . . . . . . . . . . . . . . . . . . . . . . . . . . . . . . . . . . . . . . . . . . . . . . . 268
Nielsen watermarks to ID3 .... . . . . . . . . . . . . . . . . . . . . . . . . . . . . . . . . . . . . . . . . . . . . . . . . . . . . . . . . . . . . . . . . . . . . . . . . . . . . . . . . . . . . . . . . . . . . . . . . . . . 268Output locking .... . . . . . . . . . . . . . . . . . . . . . . . . . . . . . . . . . . . . . . . . . . . . . . . . . . . . . . . . . . . . . . . . . . . . . . . . . . . . . . . . . . . . . . . . . . . . . . . . . . . . . . . . . . . . . . . . . . . 269
General information .... . . . . . . . . . . . . . . . . . . . . . . . . . . . . . . . . . . . . . . . . . . . . . . . . . . . . . . . . . . . . . . . . . . . . . . . . . . . . . . . . . . . . . . . . . . . . . . . . . . . . 269Setting up the events .... . . . . . . . . . . . . . . . . . . . . . . . . . . . . . . . . . . . . . . . . . . . . . . . . . . . . . . . . . . . . . . . . . . . . . . . . . . . . . . . . . . . . . . . . . . . . . . . . . 271
SCTE-35 and SCTE-104 message processing .... . . . . . . . . . . . . . . . . . . . . . . . . . . . . . . . . . . . . . . . . . . . . . . . . . . . . . . . . . . . . . . . . . . . . . . . . . . . 273Eligible messages and streams .... . . . . . . . . . . . . . . . . . . . . . . . . . . . . . . . . . . . . . . . . . . . . . . . . . . . . . . . . . . . . . . . . . . . . . . . . . . . . . . . . . . . . . 274Getting ready: setting the ad avail mode .... . . . . . . . . . . . . . . . . . . . . . . . . . . . . . . . . . . . . . . . . . . . . . . . . . . . . . . . . . . . . . . . . . . . . . . . 284Manifest decoration .... . . . . . . . . . . . . . . . . . . . . . . . . . . . . . . . . . . . . . . . . . . . . . . . . . . . . . . . . . . . . . . . . . . . . . . . . . . . . . . . . . . . . . . . . . . . . . . . . . . . . 286Ad avail blanking and blackout .... . . . . . . . . . . . . . . . . . . . . . . . . . . . . . . . . . . . . . . . . . . . . . . . . . . . . . . . . . . . . . . . . . . . . . . . . . . . . . . . . . . . . 288Passthrough or removal of SCTE messages .... . . . . . . . . . . . . . . . . . . . . . . . . . . . . . . . . . . . . . . . . . . . . . . . . . . . . . . . . . . . . . . . . . . . . 293SCTE-35 message insertion into currently running events .... . . . . . . . . . . . . . . . . . . . . . . . . . . . . . . . . . . . . . . . . . . . . . . . . 295POIS conditioning .... . . . . . . . . . . . . . . . . . . . . . . . . . . . . . . . . . . . . . . . . . . . . . . . . . . . . . . . . . . . . . . . . . . . . . . . . . . . . . . . . . . . . . . . . . . . . . . . . . . . . . . . 307Setting up using the REST API ... . . . . . . . . . . . . . . . . . . . . . . . . . . . . . . . . . . . . . . . . . . . . . . . . . . . . . . . . . . . . . . . . . . . . . . . . . . . . . . . . . . . . . . 308Example manifests for Apple HLS .... . . . . . . . . . . . . . . . . . . . . . . . . . . . . . . . . . . . . . . . . . . . . . . . . . . . . . . . . . . . . . . . . . . . . . . . . . . . . . . . . . 312
SCTE-35 ad marker EXT-X-DATERANGE .... . . . . . . . . . . . . . . . . . . . . . . . . . . . . . . . . . . . . . . . . . . . . . . . . . . . . . . . . . . . . . . . . . . . . . . . . . . . . . . . . . 314SMPTE 2022-6 inputs .... . . . . . . . . . . . . . . . . . . . . . . . . . . . . . . . . . . . . . . . . . . . . . . . . . . . . . . . . . . . . . . . . . . . . . . . . . . . . . . . . . . . . . . . . . . . . . . . . . . . . . . . . . 314SMPTE 2110 inputs and outputs .... . . . . . . . . . . . . . . . . . . . . . . . . . . . . . . . . . . . . . . . . . . . . . . . . . . . . . . . . . . . . . . . . . . . . . . . . . . . . . . . . . . . . . . . . . . 315
Appliance requirements .... . . . . . . . . . . . . . . . . . . . . . . . . . . . . . . . . . . . . . . . . . . . . . . . . . . . . . . . . . . . . . . . . . . . . . . . . . . . . . . . . . . . . . . . . . . . . . . . 316Supported content .... . . . . . . . . . . . . . . . . . . . . . . . . . . . . . . . . . . . . . . . . . . . . . . . . . . . . . . . . . . . . . . . . . . . . . . . . . . . . . . . . . . . . . . . . . . . . . . . . . . . . . 316About SDP files .... . . . . . . . . . . . . . . . . . . . . . . . . . . . . . . . . . . . . . . . . . . . . . . . . . . . . . . . . . . . . . . . . . . . . . . . . . . . . . . . . . . . . . . . . . . . . . . . . . . . . . . . . . . 318Support for SMPTE 2022-7 .... . . . . . . . . . . . . . . . . . . . . . . . . . . . . . . . . . . . . . . . . . . . . . . . . . . . . . . . . . . . . . . . . . . . . . . . . . . . . . . . . . . . . . . . . . . 322Support for NMOS ..... . . . . . . . . . . . . . . . . . . . . . . . . . . . . . . . . . . . . . . . . . . . . . . . . . . . . . . . . . . . . . . . . . . . . . . . . . . . . . . . . . . . . . . . . . . . . . . . . . . . . . 323Setup: Remove bonded interfaces .... . . . . . . . . . . . . . . . . . . . . . . . . . . . . . . . . . . . . . . . . . . . . . . . . . . . . . . . . . . . . . . . . . . . . . . . . . . . . . . . . . 323Setup: Reserve processing cores .... . . . . . . . . . . . . . . . . . . . . . . . . . . . . . . . . . . . . . . . . . . . . . . . . . . . . . . . . . . . . . . . . . . . . . . . . . . . . . . . . . . . 324Setup: Enable PTP .... . . . . . . . . . . . . . . . . . . . . . . . . . . . . . . . . . . . . . . . . . . . . . . . . . . . . . . . . . . . . . . . . . . . . . . . . . . . . . . . . . . . . . . . . . . . . . . . . . . . . . . 324
SRT inputs and outputs .... . . . . . . . . . . . . . . . . . . . . . . . . . . . . . . . . . . . . . . . . . . . . . . . . . . . . . . . . . . . . . . . . . . . . . . . . . . . . . . . . . . . . . . . . . . . . . . . . . . . . . . . 325Trick-play track .... . . . . . . . . . . . . . . . . . . . . . . . . . . . . . . . . . . . . . . . . . . . . . . . . . . . . . . . . . . . . . . . . . . . . . . . . . . . . . . . . . . . . . . . . . . . . . . . . . . . . . . . . . . . . . . . . . . . 325
Choosing an implementation of trick-play track .... . . . . . . . . . . . . . . . . . . . . . . . . . . . . . . . . . . . . . . . . . . . . . . . . . . . . . . . . . . . . . 325Trick-play track via I-frames .... . . . . . . . . . . . . . . . . . . . . . . . . . . . . . . . . . . . . . . . . . . . . . . . . . . . . . . . . . . . . . . . . . . . . . . . . . . . . . . . . . . . . . . . . . 326Trick-play track via the Image Media Playlist specification .... . . . . . . . . . . . . . . . . . . . . . . . . . . . . . . . . . . . . . . . . . . . . . . . . 327
Virtual input switching .... . . . . . . . . . . . . . . . . . . . . . . . . . . . . . . . . . . . . . . . . . . . . . . . . . . . . . . . . . . . . . . . . . . . . . . . . . . . . . . . . . . . . . . . . . . . . . . . . . . . . . . . . 328About virtual input switching .... . . . . . . . . . . . . . . . . . . . . . . . . . . . . . . . . . . . . . . . . . . . . . . . . . . . . . . . . . . . . . . . . . . . . . . . . . . . . . . . . . . . . . . . 328How virtual input switching works .... . . . . . . . . . . . . . . . . . . . . . . . . . . . . . . . . . . . . . . . . . . . . . . . . . . . . . . . . . . . . . . . . . . . . . . . . . . . . . . . . 329Setting up for virtual input switching .... . . . . . . . . . . . . . . . . . . . . . . . . . . . . . . . . . . . . . . . . . . . . . . . . . . . . . . . . . . . . . . . . . . . . . . . . . . . . 333
Version 2.14 and laterv
AWS Elemental Live User Guide
Reference .... . . . . . . . . . . . . . . . . . . . . . . . . . . . . . . . . . . . . . . . . . . . . . . . . . . . . . . . . . . . . . . . . . . . . . . . . . . . . . . . . . . . . . . . . . . . . . . . . . . . . . . . . . . . . . . . . . . . . . . . . . . . . . . . . . . 337Reference: Supported captions .... . . . . . . . . . . . . . . . . . . . . . . . . . . . . . . . . . . . . . . . . . . . . . . . . . . . . . . . . . . . . . . . . . . . . . . . . . . . . . . . . . . . . . . . . . . . . . 337
Supported caption formats .... . . . . . . . . . . . . . . . . . . . . . . . . . . . . . . . . . . . . . . . . . . . . . . . . . . . . . . . . . . . . . . . . . . . . . . . . . . . . . . . . . . . . . . . . . . 337Supported output containers ... . . . . . . . . . . . . . . . . . . . . . . . . . . . . . . . . . . . . . . . . . . . . . . . . . . . . . . . . . . . . . . . . . . . . . . . . . . . . . . . . . . . . . . . . 341Support tables .... . . . . . . . . . . . . . . . . . . . . . . . . . . . . . . . . . . . . . . . . . . . . . . . . . . . . . . . . . . . . . . . . . . . . . . . . . . . . . . . . . . . . . . . . . . . . . . . . . . . . . . . . . . . 341
Codec and Container Support ... . . . . . . . . . . . . . . . . . . . . . . . . . . . . . . . . . . . . . . . . . . . . . . . . . . . . . . . . . . . . . . . . . . . . . . . . . . . . . . . . . . . . . . . . . . . . . . . 355General information on codecs and containers ... . . . . . . . . . . . . . . . . . . . . . . . . . . . . . . . . . . . . . . . . . . . . . . . . . . . . . . . . . . . . . . . . 355Containers and codecs by input/output .... . . . . . . . . . . . . . . . . . . . . . . . . . . . . . . . . . . . . . . . . . . . . . . . . . . . . . . . . . . . . . . . . . . . . . . . . . 361
Reference: Supported DRM solutions .... . . . . . . . . . . . . . . . . . . . . . . . . . . . . . . . . . . . . . . . . . . . . . . . . . . . . . . . . . . . . . . . . . . . . . . . . . . . . . . . . . . . . 361DASH output .... . . . . . . . . . . . . . . . . . . . . . . . . . . . . . . . . . . . . . . . . . . . . . . . . . . . . . . . . . . . . . . . . . . . . . . . . . . . . . . . . . . . . . . . . . . . . . . . . . . . . . . . . . . . . . . 361HLS output with Apple FairPlay .... . . . . . . . . . . . . . . . . . . . . . . . . . . . . . . . . . . . . . . . . . . . . . . . . . . . . . . . . . . . . . . . . . . . . . . . . . . . . . . . . . . . . 362HLS output with PlayReady .... . . . . . . . . . . . . . . . . . . . . . . . . . . . . . . . . . . . . . . . . . . . . . . . . . . . . . . . . . . . . . . . . . . . . . . . . . . . . . . . . . . . . . . . . . 364HLS output with SecureMedia .... . . . . . . . . . . . . . . . . . . . . . . . . . . . . . . . . . . . . . . . . . . . . . . . . . . . . . . . . . . . . . . . . . . . . . . . . . . . . . . . . . . . . . . 365HLS output with Verimatrix ... . . . . . . . . . . . . . . . . . . . . . . . . . . . . . . . . . . . . . . . . . . . . . . . . . . . . . . . . . . . . . . . . . . . . . . . . . . . . . . . . . . . . . . . . . . 365Microsoft smooth output with PlayReady .... . . . . . . . . . . . . . . . . . . . . . . . . . . . . . . . . . . . . . . . . . . . . . . . . . . . . . . . . . . . . . . . . . . . . . . 366UDP/TS outputs with DVB Simulcrypt Standard .... . . . . . . . . . . . . . . . . . . . . . . . . . . . . . . . . . . . . . . . . . . . . . . . . . . . . . . . . . . . . . . 368
Licenses for add-on packages .... . . . . . . . . . . . . . . . . . . . . . . . . . . . . . . . . . . . . . . . . . . . . . . . . . . . . . . . . . . . . . . . . . . . . . . . . . . . . . . . . . . . . . . . . . . . . . . . 368Purchasing a license .... . . . . . . . . . . . . . . . . . . . . . . . . . . . . . . . . . . . . . . . . . . . . . . . . . . . . . . . . . . . . . . . . . . . . . . . . . . . . . . . . . . . . . . . . . . . . . . . . . . . . 368Add-on packages for features .... . . . . . . . . . . . . . . . . . . . . . . . . . . . . . . . . . . . . . . . . . . . . . . . . . . . . . . . . . . . . . . . . . . . . . . . . . . . . . . . . . . . . . . 369Video codec packages .... . . . . . . . . . . . . . . . . . . . . . . . . . . . . . . . . . . . . . . . . . . . . . . . . . . . . . . . . . . . . . . . . . . . . . . . . . . . . . . . . . . . . . . . . . . . . . . . . . 372Audio codec packages .... . . . . . . . . . . . . . . . . . . . . . . . . . . . . . . . . . . . . . . . . . . . . . . . . . . . . . . . . . . . . . . . . . . . . . . . . . . . . . . . . . . . . . . . . . . . . . . . . . 375
Document History .... . . . . . . . . . . . . . . . . . . . . . . . . . . . . . . . . . . . . . . . . . . . . . . . . . . . . . . . . . . . . . . . . . . . . . . . . . . . . . . . . . . . . . . . . . . . . . . . . . . . . . . . . . . . . . . . . . . . . . . 378
Version 2.14 and latervi
AWS Elemental Live User GuideInformation about using AWS Elemental Live
What is AWS Elemental Live?AWS Elemental Live is a real-time video service that lets you create live outputs for broadcast andstreaming delivery.
You use AWS Elemental Live to transform live video content from one format and package into otherformats and packages. You typically need to transform the content in order to provide a format andpackage that a playback device can handle. Playback devices include smartphones and set-top boxesattached to televisions.
This high-level introduction to AWS Elemental Live includes workflow diagrams, detailed featurespecifications, and a link to Sales.
Topics• Information about using AWS Elemental Live (p. 1)• Interfaces for AWS Elemental Live (p. 1)• How AWS Elemental Live works (p. 2)• AWS Elemental Live terminology (p. 3)
Information about using AWS Elemental LiveInformation about AWS Elemental Live is available in the following guides and resources.
This guide
This guide offers conceptual and procedural information for specific features of AWS Elemental Live. Fora list of the features covered in this guide, see the topic list previous to this section.
AWS Elemental Live API guide
This guide is intended for system integrators and AWS Elemental Live operators. It contains the followinginformation:
• An outline of the interfaces for machine and human control, configuration, and monitoring. For asummary of the interfaces covered in the guide, see the next section.
• An overview of how to work with transcoding events, event profiles, and presets.• A list and explanation of event and system parameters.
This guide is available on the Support tab of the web interface of your AWS Elemental Live appliance.
AWS Elemental Live Installation Guide
AWS Elemental Live Upgrade Guide
AWS Elemental Live Configuration Guide
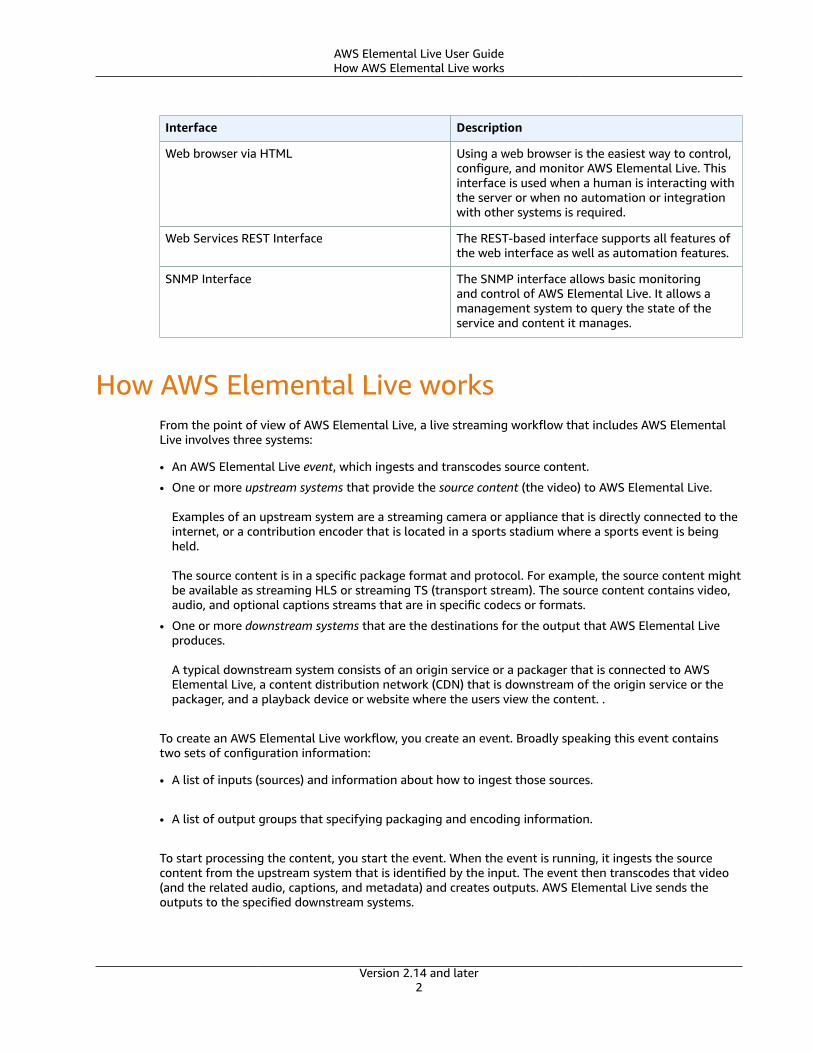
Interfaces for AWS Elemental LiveAWS Elemental Live can be controlled, configured, and monitored through the following interfaces.
Version 2.14 and later1
AWS Elemental Live User GuideHow AWS Elemental Live works
Interface Description
Web browser via HTML Using a web browser is the easiest way to control,configure, and monitor AWS Elemental Live. Thisinterface is used when a human is interacting withthe server or when no automation or integrationwith other systems is required.
Web Services REST Interface The REST-based interface supports all features ofthe web interface as well as automation features.
SNMP Interface The SNMP interface allows basic monitoringand control of AWS Elemental Live. It allows amanagement system to query the state of theservice and content it manages.
How AWS Elemental Live worksFrom the point of view of AWS Elemental Live, a live streaming workflow that includes AWS ElementalLive involves three systems:
• An AWS Elemental Live event, which ingests and transcodes source content.
• One or more upstream systems that provide the source content (the video) to AWS Elemental Live.
Examples of an upstream system are a streaming camera or appliance that is directly connected to theinternet, or a contribution encoder that is located in a sports stadium where a sports event is beingheld.
The source content is in a specific package format and protocol. For example, the source content mightbe available as streaming HLS or streaming TS (transport stream). The source content contains video,audio, and optional captions streams that are in specific codecs or formats.
• One or more downstream systems that are the destinations for the output that AWS Elemental Liveproduces.
A typical downstream system consists of an origin service or a packager that is connected to AWSElemental Live, a content distribution network (CDN) that is downstream of the origin service or thepackager, and a playback device or website where the users view the content. .
To create an AWS Elemental Live workflow, you create an event. Broadly speaking this event containstwo sets of configuration information:
• A list of inputs (sources) and information about how to ingest those sources.
• A list of output groups that specifying packaging and encoding information.
To start processing the content, you start the event. When the event is running, it ingests the sourcecontent from the upstream system that is identified by the input. The event then transcodes that video(and the related audio, captions, and metadata) and creates outputs. AWS Elemental Live sends theoutputs to the specified downstream systems.
Version 2.14 and later2
AWS Elemental Live User GuideTerminology
AWS Elemental Live terminologyCDN
A content distribution network (CDN) is a network of servers that is downstream of the originserver or packager. The CDN distributes the content from the origin server to dozens or hundredsof networked servers that serve the content to your viewing users. This distributed network ensuresthat content can be delivered to thousands or millions of viewing users simultaneously.
Downstream system
The downstream system is a set of one or more servers that is positioned after AWS Elemental Live inthe workflow. The downstream system handles the content that is output from AWS Elemental Live.
Encode
An encode exists within an output. There are three types of encodes: video, audio, and captions. Eachencode contains the instructions for one video stream, one audio stream, or one captions track thatthe transcoding process will create. Different encodes have different characteristics. For example,one video encode produced from the input might be high resolution while another is low resolution.
Event
An AWS Elemental Live event ingests and transcodes (decodes and encodes) source content from theinputs that are attached to that event, and packages the new content into outputs.
Event configuration
An AWS Elemental Live event configuration contains information about how the event ingests,transcodes, and packages content into output.
Origin service
An origin service might be part of the downstream system that is positioned after AWS ElementalLive in the workflow. It accepts the video output from AWS Elemental Live.
Output
An output exists within an output group. It is a collection of encodes that you want to handle as oneset.
Output Group
An output group is a collection of outputs within the AWS Elemental Live event.Packager
A packager might be part of the downstream system. It accepts the video output from AWSElemental Live and repackages it. AWS Elemental MediaPackage is a packager.
Playback device
A playback device is the final component of the downstream system. It is the device that the peoplewho are your audience use to view the video.
Source content
The video content that AWS Elemental Live transcodes. The content typically consists of video,audio, captions, and metadata.
Upstream system
The system that is in front of AWS Elemental Live in the workflow and that holds the source content.Examples of an upstream system are a streaming camera or appliance that is directly connected tothe internet, or a contribution encoder that is located in a stadium at a sports event.
Version 2.14 and later3
AWS Elemental Live User GuideReference: Supported inputs
Working with InputsThis chapter describes how to set up the different types of inputs that AWS Elemental Live supports.
Topics• Reference: Supported inputs (p. 4)• Interleave 4K inputs (p. 13)• Ingesting SMPTE 2022-6 content (p. 13)• Handling ancillary data in SMPTE 2038 (p. 16)• Ingesting SMPTE 2110 content (p. 19)• Ingesting SRT content (p. 22)• Ingesting from VSF TR-01 in a TS input (p. 23)
Reference: Supported inputsThe following tables describe the supported types of source content (input) that an AWS Elemental Liveevent can ingest. Read this section to find the types of source content that you must request from yourcontent provider.
Topics• Live inputs: Supported types (p. 4)• Live inputs: Supported codecs (p. 8)• File inputs: Supported upstream systems (p. 9)• File inputs: Supported containers (p. 10)• File inputs: Supported codecs (p. 10)
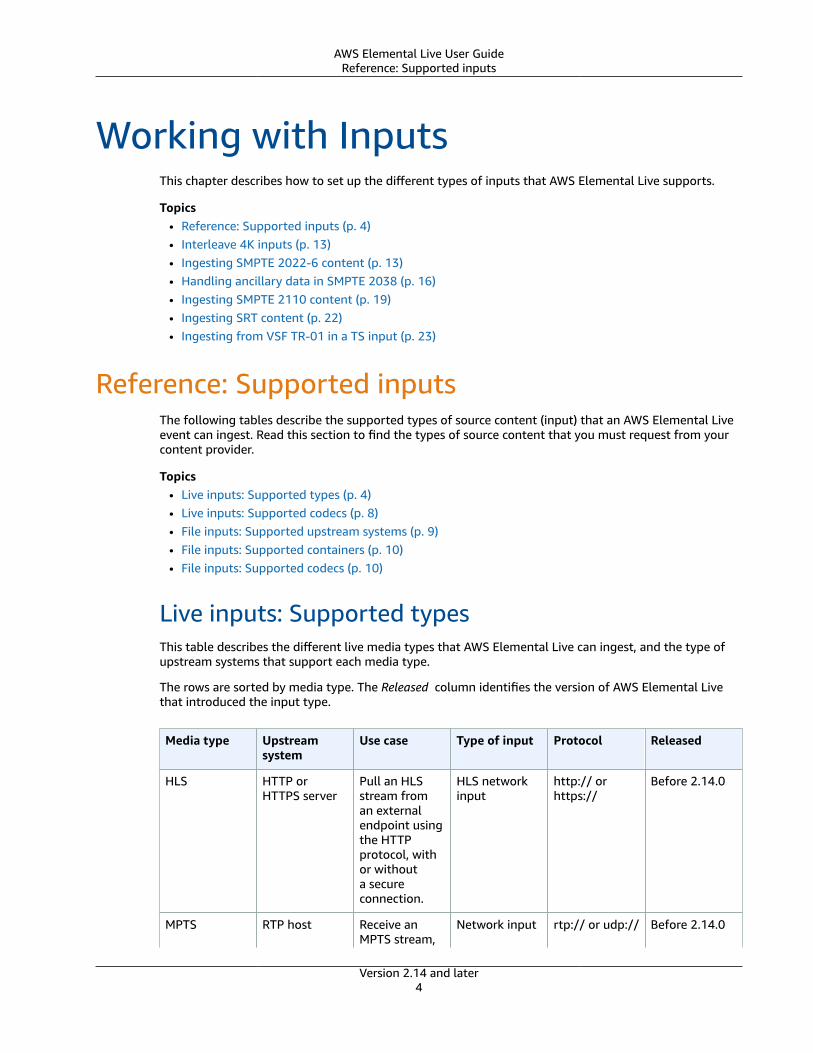
Live inputs: Supported typesThis table describes the different live media types that AWS Elemental Live can ingest, and the type ofupstream systems that support each media type.
The rows are sorted by media type. The Released column identifies the version of AWS Elemental Livethat introduced the input type.
Media type Upstreamsystem
Use case Type of input Protocol Released
HLS HTTP orHTTPS server
Pull an HLSstream froman externalendpoint usingthe HTTPprotocol, withor withouta secureconnection.
HLS networkinput
http:// orhttps://
Before 2.14.0
MPTS RTP host Receive anMPTS stream,
Network input rtp:// or udp:// Before 2.14.0
Version 2.14 and later4
AWS Elemental Live User GuideLive inputs: Supported types
Media type Upstreamsystem
Use case Type of input Protocol Released
using the RTPprotocol orUDP protocol.
RTMP RTMP server Receive astream usingthe RTMPpush protocol.Support forRTMPS wasintroduced inversion 2.22.2.
Network input rtmp:// orrtmps://
RTMPsupportedbefore 2.14.0
RTMPSintroduced in2.22.2
RTSP A device thatsupports RTSP.
Receive anRTSP streamusing theTCP or UDPprotocol. RTSPstreaming ispopular withdevices suchas securitycameras.
RTSP input rtsp:// 2.22.4
SMPTE2110 withcompressedvideo
RTP or UDPhost thatsupportsSMPTE 2110sources
Receive aJPEG XS livestream that iscompliant withSMPTE 2110.Redundantinputs usingSMPTE 2022-7are supportedbut optional.
SMPTE 2110input
rtp:// 2.21.3
Transportstream
AWS ElementalMediaConnect
Receive anencrypted orunencryptedtransportstream (TS)from anSRT listeneroutput on AWSElementalMediaConnectAWS ElementalLive is the SRTcaller.
Secure ReliableTransport(SRT)
srt:// 2.21.3
Transportstream
RTP host Receive atransportstream (TS),using the RTPprotocol.
Network input rtp:// or udp:// Before 2.14.0
Version 2.14 and later5

AWS Elemental Live User GuideLive inputs: Supported types
Media type Upstreamsystem
Use case Type of input Protocol Released
Transportstream
RTP host thatis compliantwith SMPTE2022-7
Receive atransportstream (TS)over RTP. Thisinput typespecificallysupportsredundantinputs usingSMPTE 2022-7.AWS ElementalLive expectsto receive twosources.
SMPTE 2022-7network input
rtp:// 2.17.3
Transportstream
SRT caller Receive atransportstream (TS)from an SRTcaller. Thecontent canbe encryptedusing AES.
Secure reliabletransport (SRT)
srt:// 2.21.1
Transportstream
UDP host Receive atransportstream (TS),using the UDPprotocol.
Network input rtp:// or udp:// Before 2.14.0
Uncompressedcontent –HDMI
HDMI sourcedevice
Receive HDMIcontent. TheAWS ElementalLive appliancemust beconfiguredwith an HDMIinterface.
One of theHDMI options
Not applicable Before 2.14.0
Uncompressedcontent – SDI
Standard SDIsource device
Receive SD-SDI, HD-SDI,or 3G-SDI.The AWSElemental Liveappliance mustbe configuredwith an SDIinterface.
One of the SDIoptions
Not applicable Before 2.14.0
Version 2.14 and later6
AWS Elemental Live User GuideLive inputs: Supported types
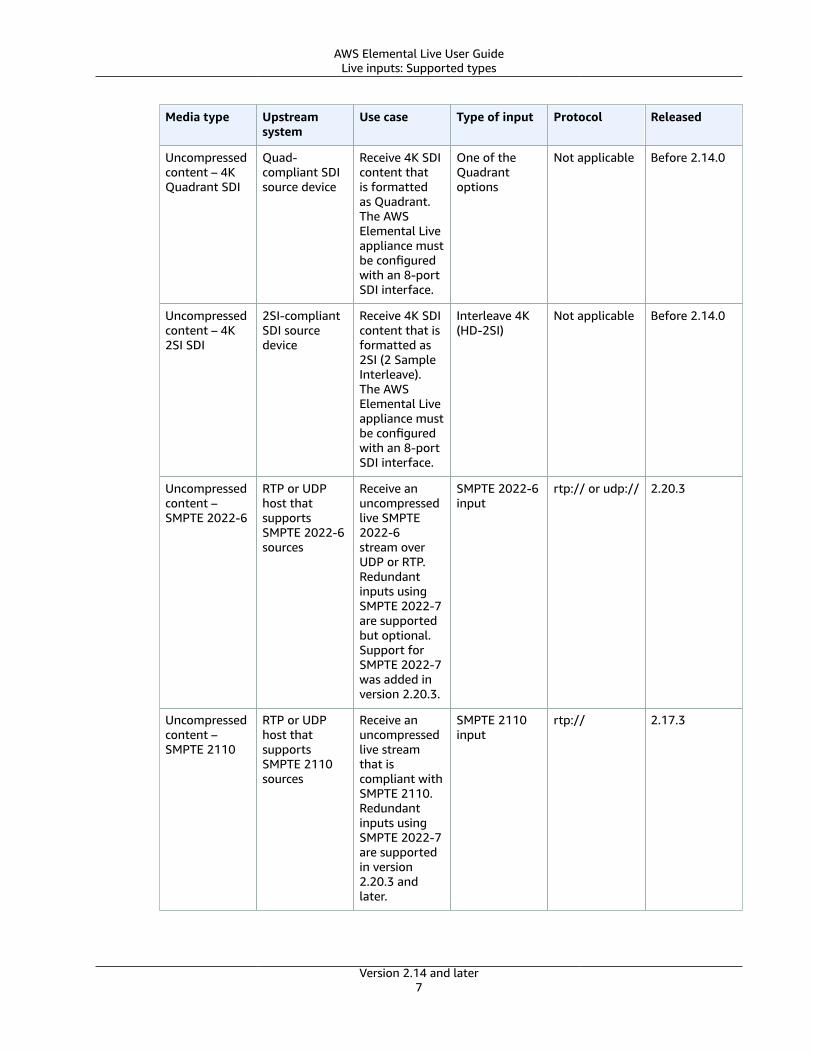
Media type Upstreamsystem
Use case Type of input Protocol Released
Uncompressedcontent – 4KQuadrant SDI
Quad-compliant SDIsource device
Receive 4K SDIcontent thatis formattedas Quadrant.The AWSElemental Liveappliance mustbe configuredwith an 8-portSDI interface.
One of theQuadrantoptions
Not applicable Before 2.14.0
Uncompressedcontent – 4K2SI SDI
2SI-compliantSDI sourcedevice
Receive 4K SDIcontent that isformatted as2SI (2 SampleInterleave).The AWSElemental Liveappliance mustbe configuredwith an 8-portSDI interface.
Interleave 4K(HD-2SI)
Not applicable Before 2.14.0
Uncompressedcontent –SMPTE 2022-6
RTP or UDPhost thatsupportsSMPTE 2022-6sources
Receive anuncompressedlive SMPTE2022-6stream overUDP or RTP.Redundantinputs usingSMPTE 2022-7are supportedbut optional.Support forSMPTE 2022-7was added inversion 2.20.3.
SMPTE 2022-6input
rtp:// or udp:// 2.20.3
Uncompressedcontent –SMPTE 2110
RTP or UDPhost thatsupportsSMPTE 2110sources
Receive anuncompressedlive streamthat iscompliant withSMPTE 2110.Redundantinputs usingSMPTE 2022-7are supportedin version2.20.3 andlater.
SMPTE 2110input
rtp:// 2.17.3
Version 2.14 and later7

AWS Elemental Live User GuideLive inputs: Supported codecs
Live inputs: Supported codecsThis table specifies the codecs that are supported for each input media type that AWS Elemental Livesupports.
Media Type Video Codecs Audio Codecs
HLS H.264
H.265
AAC
MPTS H.264
H.265
MPEG-2
AAC
Dolby Digital
Dolby Digital Plus
Dolby Digital Plus with Atmos
MPEG-1, layer II
PCM
RTMP H.264 AAC
RTSP H.264
H.265
AAC
Transport stream H.264
H.265
J2K (only in a TS that iscompliant with TR-01)
MPEG-2
AAC
Dolby Digital
Dolby Digital Plus
Dolby Digital Plus with Atmos
MPEG-1, layer II
PCM
SDI Uncompressed Dolby Digital
Dolby Digital Plus
Dolby Digital Plus with Atmos
Dolby E frames carried in PCMstreams tagged with SMPTE-337
PCM
HDMI Uncompressed Dolby Digital
Dolby Digital Plus
Dolby Digital Plus with Atmos
Dolby E frames carried in PCMstreams tagged with SMPTE-337
Version 2.14 and later8
AWS Elemental Live User GuideFile inputs: Supported upstream systems
Media Type Video Codecs Audio Codecs
PCM
SDI Quad-compliant SDI 2SI-compliant SDI
Uncompressed Dolby Digital
Dolby Digital Plus
Dolby Digital Plus with Atmos
Dolby E frames carried in PCMstreams tagged with SMPTE-337
PCM
Uncompressed SMPTE 2110 Uncompressed
JPEG XS (starting with version2.21.3)
Dolby Digital
Dolby Digital Plus
PCM
Uncompressed SMPTE 2022-6 Uncompressed Dolby Digital
Dolby Digital Plus
Dolby Digital Plus with Atmos
PCM
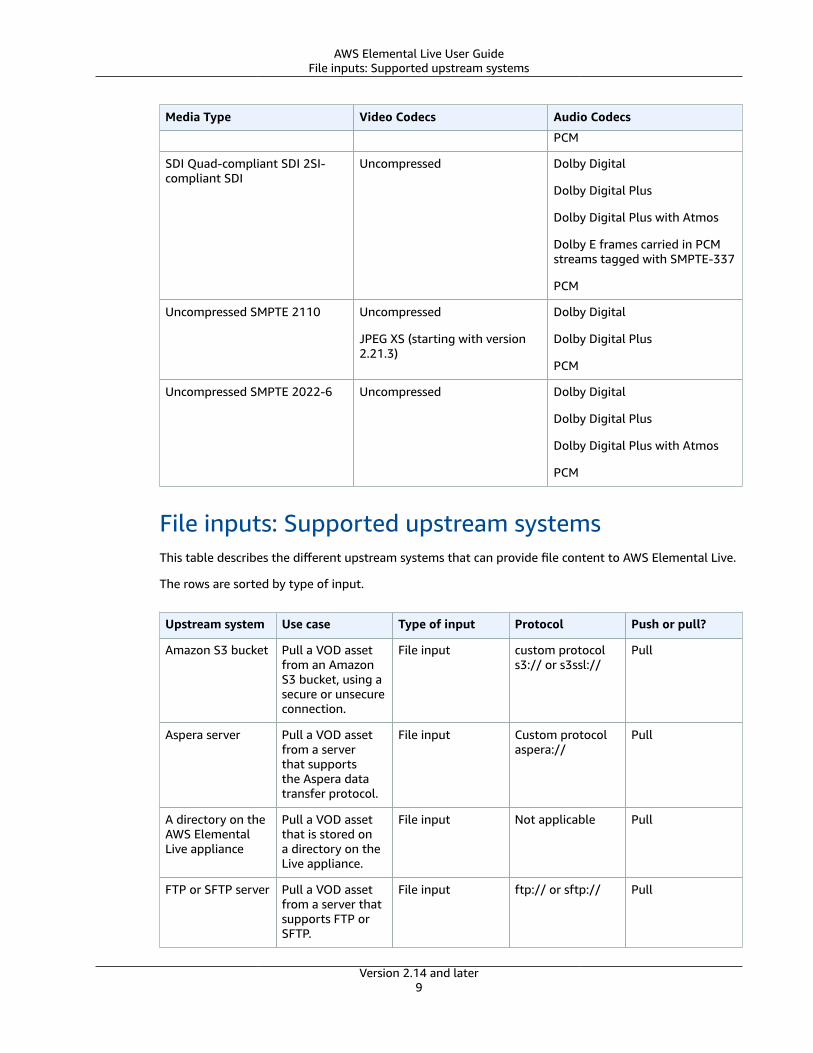
File inputs: Supported upstream systemsThis table describes the different upstream systems that can provide file content to AWS Elemental Live.
The rows are sorted by type of input.
Upstream system Use case Type of input Protocol Push or pull?
Amazon S3 bucket Pull a VOD assetfrom an AmazonS3 bucket, using asecure or unsecureconnection.
File input custom protocols3:// or s3ssl://
Pull
Aspera server Pull a VOD assetfrom a serverthat supportsthe Aspera datatransfer protocol.
File input Custom protocolaspera://
Pull
A directory on theAWS ElementalLive appliance
Pull a VOD assetthat is stored ona directory on theLive appliance.
File input Not applicable Pull
FTP or SFTP server Pull a VOD assetfrom a server thatsupports FTP orSFTP.
File input ftp:// or sftp:// Pull
Version 2.14 and later9

AWS Elemental Live User GuideFile inputs: Supported containers
Upstream system Use case Type of input Protocol Push or pull?
SCP server Pull a VOD assetfrom a server thatsupports SCP.
File input scp:// Pull
Amazon S3 bucket Pull an HLSVOD asset froman Amazon S3bucket, using asecure or unsecureconnection.
HLS file input custom protocols3:// or s3ssl://
Pull
HTTP or HTTPSserver
Pull an HLS VODasset from a serverthat supportsHTTP or HTTPS.
HLS file input http:// or https:// Pull
File inputs: Supported containersThis table specifies the types of containers that are supported for file inputs. These containers apply toall the types of upstream systems.
Input type Container Media Type Supported extensionsfor the file
File input Adobe Flash F4V .f4v, .flv
File input Apple HLS HLS .m3u8
File input Audio Video Interleave AVI .avi, .divx, .xvid
File input Matroska MKV .mkv
File input MPEG TransportStreams
MPEG TS .m2ts, .m2t, .mts, .ts, .trp, .mpeg
File input MPEG-1 SystemStreams
MPEG SS .mpg, .mpeg
File input MPEG-4 MPEG-4 .mp4, .m4v, .f4v
File input MXF MXF .mxf
File input No Container MPEG-1 or MPEG-2video
.m2v, .m1v
File input QuickTime QuickTime .mov
File input WAV WAV .wav
HLS file input Apple HLS HLS .m3u8
File inputs: Supported codecsThis table specifies the codecs that are supported for each type of file input container.
Version 2.14 and later10

AWS Elemental Live User GuideFile inputs: Supported codecs
Container Media Type Video Codecs Audio Codecs
Adobe Flash F4V H.264 AAC
Apple HLS HLS H.264
H.265
AAC
Audio Video Interleave AVI Uncompressed
DivX/Xvid
DV/DVCPRO
Dolby Digital
Dolby Digital Plus up tocoding mode 7.1
Dolby Digital Plus withAtmos
Dolby E frames carriedin PCM streams taggedwith SMPTE-337
MPEG-1, layer II
PCM
Matroska MKV H.264
MPEG-2
MPEG-4 part 2
AAC
Dolby Digital
Dolby Digital Plus up tocoding mode 7.1
Dolby Digital Plus withAtmos
MPEG TransportStreams
MPEG TS H.264
H.265
MPEG-2
AAC
AIFF
Dolby Digital
Dolby Digital Plus up tocoding mode 7.1
Dolby Digital Plus withAtmos
Dolby E frames carriedin non-PCM streams
MPEG-1, layer II
PCM
MPEG-1 SystemStreams
MPEG SS MPEG-1
MPEG-2
AAC
AIFF
Dolby Digital
Dolby Digital Plus up tocoding mode 7.1
Version 2.14 and later11

AWS Elemental Live User GuideFile inputs: Supported codecs
Container Media Type Video Codecs Audio Codecs
Dolby Digital Plus withAtmos
MPEG-1, layer II
PCM
MPEG-4 MPEG-4 Uncompressed
AVC Intra 50/100
DivX/Xvid
H.262
H.264
JPEG 2000
MJPEG
MPEG-2
MPEG-4 part 2
AAC
Dolby Digital
Dolby Digital Plus up tocoding mode 7.1
Dolby Digital Plus withAtmos
PCM
MXF MXF Uncompressed
AVC Intra 50/100
DNxHD
DV/DVCPRO
DV25
DV50
DVCPro HD
H.264
JPEG 2000
MPEG-2
AAC
AIFF
MPEG-1, layer II
PCM
Dolby E frames carriedin PCM streams taggedwith SMPTE-337
No Container DV/DVCPRO
H.264
H.265
MPEG-1
MPEG-2
Version 2.14 and later12
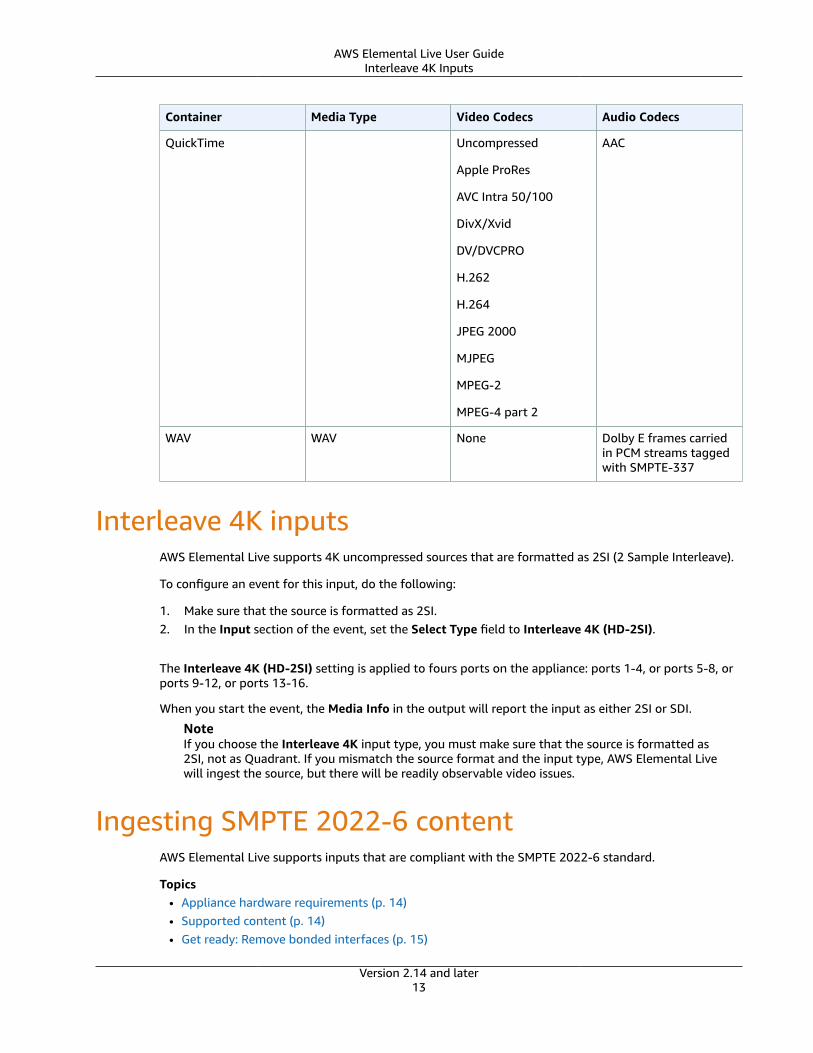
AWS Elemental Live User GuideInterleave 4K Inputs
Container Media Type Video Codecs Audio Codecs
QuickTime Uncompressed
Apple ProRes
AVC Intra 50/100
DivX/Xvid
DV/DVCPRO
H.262
H.264
JPEG 2000
MJPEG
MPEG-2
MPEG-4 part 2
AAC
WAV WAV None Dolby E frames carriedin PCM streams taggedwith SMPTE-337
Interleave 4K inputsAWS Elemental Live supports 4K uncompressed sources that are formatted as 2SI (2 Sample Interleave).
To configure an event for this input, do the following:
1. Make sure that the source is formatted as 2SI.2. In the Input section of the event, set the Select Type field to Interleave 4K (HD-2SI).
The Interleave 4K (HD-2SI) setting is applied to fours ports on the appliance: ports 1-4, or ports 5-8, orports 9-12, or ports 13-16.
When you start the event, the Media Info in the output will report the input as either 2SI or SDI.
NoteIf you choose the Interleave 4K input type, you must make sure that the source is formatted as2SI, not as Quadrant. If you mismatch the source format and the input type, AWS Elemental Livewill ingest the source, but there will be readily observable video issues.
Ingesting SMPTE 2022-6 contentAWS Elemental Live supports inputs that are compliant with the SMPTE 2022-6 standard.
Topics• Appliance hardware requirements (p. 14)• Supported content (p. 14)• Get ready: Remove bonded interfaces (p. 15)
Version 2.14 and later13
AWS Elemental Live User GuideAppliance requirements
• Get ready: Reserve cores for SMPTE 2022-6 (p. 15)
• Setting up a SMPTE 2022-6 input with or without SMPTE 2022-7 (p. 16)
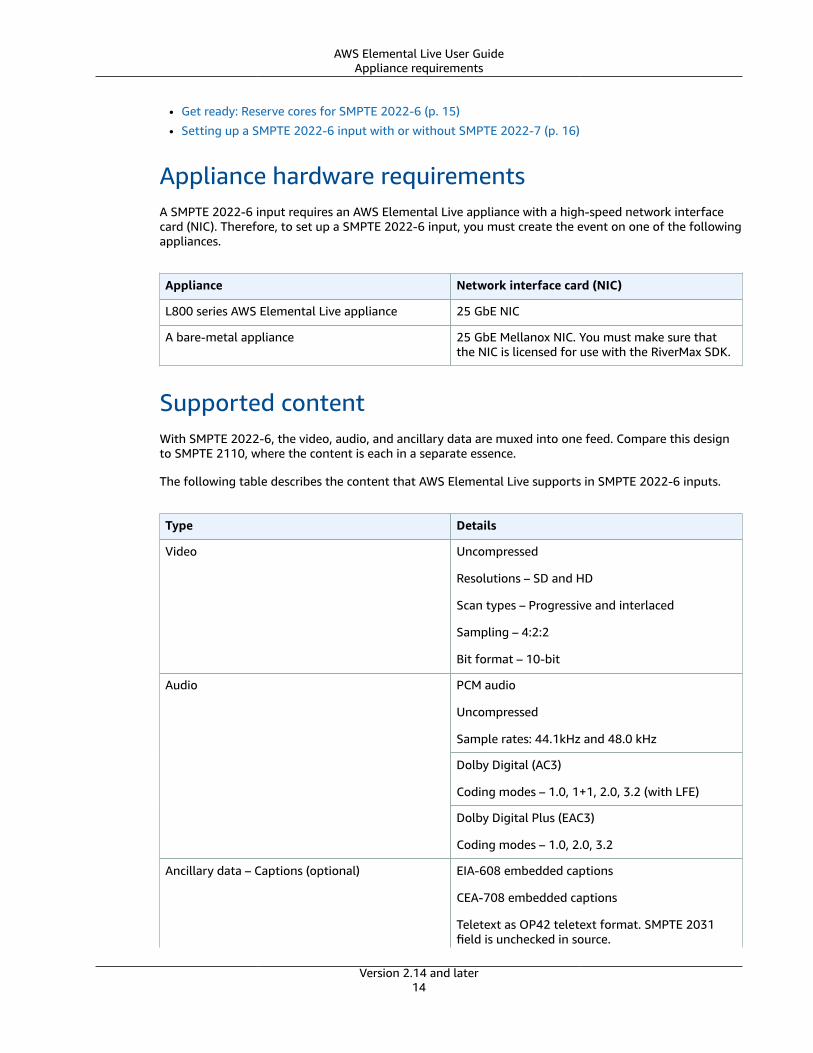
Appliance hardware requirementsA SMPTE 2022-6 input requires an AWS Elemental Live appliance with a high-speed network interfacecard (NIC). Therefore, to set up a SMPTE 2022-6 input, you must create the event on one of the followingappliances.
Appliance Network interface card (NIC)
L800 series AWS Elemental Live appliance 25 GbE NIC
A bare-metal appliance 25 GbE Mellanox NIC. You must make sure thatthe NIC is licensed for use with the RiverMax SDK.
Supported contentWith SMPTE 2022-6, the video, audio, and ancillary data are muxed into one feed. Compare this designto SMPTE 2110, where the content is each in a separate essence.
The following table describes the content that AWS Elemental Live supports in SMPTE 2022-6 inputs.
Type Details
Video Uncompressed
Resolutions – SD and HD
Scan types – Progressive and interlaced
Sampling – 4:2:2
Bit format – 10-bit
PCM audio
Uncompressed
Sample rates: 44.1kHz and 48.0 kHz
Dolby Digital (AC3)
Coding modes – 1.0, 1+1, 2.0, 3.2 (with LFE)
Audio
Dolby Digital Plus (EAC3)
Coding modes – 1.0, 2.0, 3.2
Ancillary data – Captions (optional) EIA-608 embedded captions
CEA-708 embedded captions
Teletext as OP42 teletext format. SMPTE 2031field is unchecked in source.
Version 2.14 and later14
AWS Elemental Live User GuideGet ready: Remove bonded interfaces
Type Details
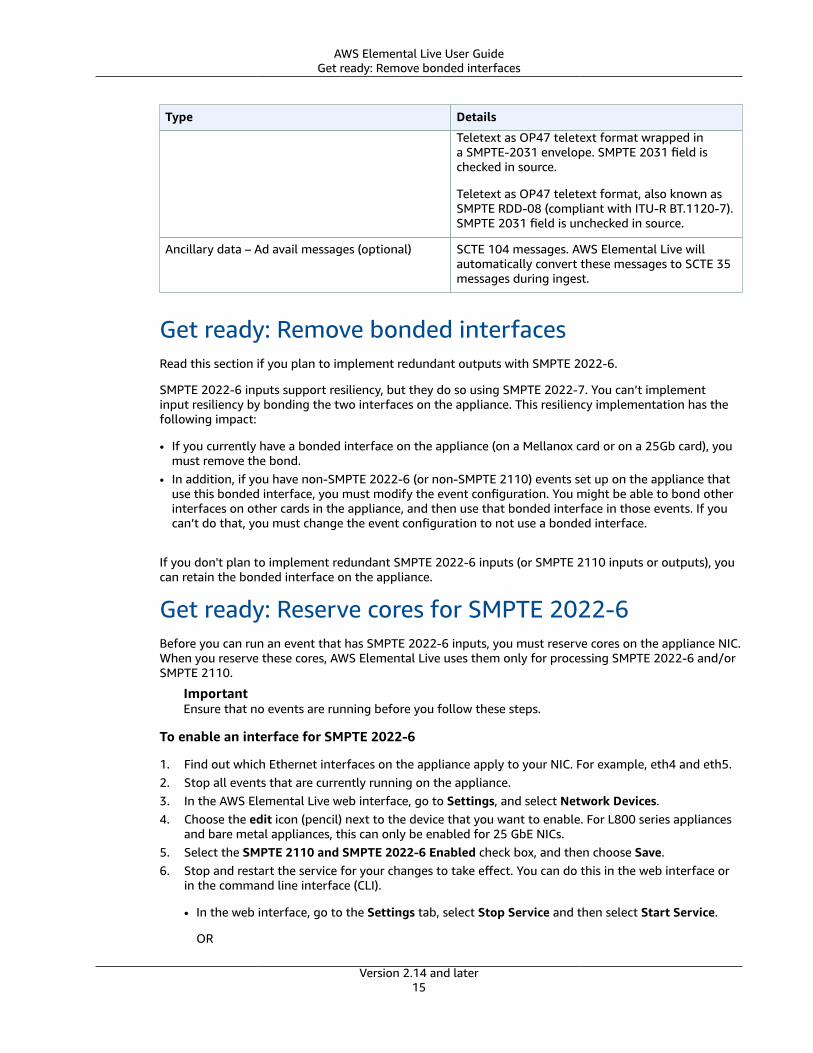
Teletext as OP47 teletext format wrapped ina SMPTE-2031 envelope. SMPTE 2031 field ischecked in source.
Teletext as OP47 teletext format, also known asSMPTE RDD-08 (compliant with ITU-R BT.1120-7).SMPTE 2031 field is unchecked in source.
Ancillary data – Ad avail messages (optional) SCTE 104 messages. AWS Elemental Live willautomatically convert these messages to SCTE 35messages during ingest.
Get ready: Remove bonded interfacesRead this section if you plan to implement redundant outputs with SMPTE 2022-6.
SMPTE 2022-6 inputs support resiliency, but they do so using SMPTE 2022-7. You can’t implementinput resiliency by bonding the two interfaces on the appliance. This resiliency implementation has thefollowing impact:
• If you currently have a bonded interface on the appliance (on a Mellanox card or on a 25Gb card), youmust remove the bond.
• In addition, if you have non-SMPTE 2022-6 (or non-SMPTE 2110) events set up on the appliance thatuse this bonded interface, you must modify the event configuration. You might be able to bond otherinterfaces on other cards in the appliance, and then use that bonded interface in those events. If youcan’t do that, you must change the event configuration to not use a bonded interface.
If you don't plan to implement redundant SMPTE 2022-6 inputs (or SMPTE 2110 inputs or outputs), youcan retain the bonded interface on the appliance.
Get ready: Reserve cores for SMPTE 2022-6Before you can run an event that has SMPTE 2022-6 inputs, you must reserve cores on the appliance NIC.When you reserve these cores, AWS Elemental Live uses them only for processing SMPTE 2022-6 and/orSMPTE 2110.
ImportantEnsure that no events are running before you follow these steps.
To enable an interface for SMPTE 2022-6
1. Find out which Ethernet interfaces on the appliance apply to your NIC. For example, eth4 and eth5.2. Stop all events that are currently running on the appliance.3. In the AWS Elemental Live web interface, go to Settings, and select Network Devices.4. Choose the edit icon (pencil) next to the device that you want to enable. For L800 series appliances
and bare metal appliances, this can only be enabled for 25 GbE NICs.5. Select the SMPTE 2110 and SMPTE 2022-6 Enabled check box, and then choose Save.6. Stop and restart the service for your changes to take effect. You can do this in the web interface or
in the command line interface (CLI).
• In the web interface, go to the Settings tab, select Stop Service and then select Start Service.
OR
Version 2.14 and later15

AWS Elemental Live User GuideSet up the input
• In the CLI, run sudo service elemental_se restart
Setting up a SMPTE 2022-6 input with or withoutSMPTE 2022-7You can create a SMPTE 2022-6 input in AWS Elemental Live in order to ingest a source that is compliantwith the SMPTE 2022-6 specification.
You can optionally configure the input to use SMPTE 2022-7, if the source offers it. This standarddescribes a resiliency solution that uses seamless protection switching. Seamless protection switchingrefers to a method of transmission in which two identical packet streams are transmitted over separatenetwork routes at the same time. If packets are lost from the first stream, the second stream can be usedto reconstruct the data. This switching between the two streams is instantaneous, so the content is notaffected. This is what makes it seamless.
To set up a SMPTE 2022-6 input
1. From the Input menu in your event, select SMPTE 2022-6 Input.2. Complete the following fields:
• In Network Location, provide the UDP or RTP network location.• For Interface, enter the network interface to use for this particular stream. For example, eth4.
NoteThe network interface must be on a 25 GbE Mellanox card.
• In IGMP Source, provide the source-specific multicast streams. Only packets from the specifiedsource are processed. All others are discarded.
3. If you are implementing seamless protection switching (SMPTE 2022-7), complete the followingfields:
• Secondary Network Location• Secondary Interface. The secondary interface must be different from the primary interface• Secondary IGMP Source
Handling ancillary data in SMPTE 2038Whenever you plan to set up a transport stream (TS) source, you should find out if the content providerhas set up the TS so that some data is included in SMPTE 2038 packets, rather than in the standardlocations. The content provider typically sets up the TS in this way because they have converted an SDIstream to a TS.
If the content provider has provided data in SMPTE 2038, set up the input to extract that data from theSMPTE 2038 packets. Doing so ensures that AWS Elemental Live will handle the source correctly. Don'tignore the data.
Topics• Supported ancillary data (p. 17)• Well-formed SMPTE 2038 source (p. 17)• Enable SMPTE 2038 (p. 17)• Setting up the event to use the ancillary data (p. 18)• Setting up the event to pass through custom data (p. 19)
Version 2.14 and later16
AWS Elemental Live User GuideSupported ancillary data
Supported ancillary dataAWS Elemental Live can ingest several types of ancillary data. After the data has been ingested, AWSElemental Live can handle it in one of two ways—use it, following the instructions you set up in thechannel, or passing it through in the output, so that a downstream system can use it.
AWS Elemental Live can use the following ancillary data:
• Time code – If a time code is included in the SMPTE 2038, it is always an embedded time code.
You can choose to configure the event to use the extracted time code as the timecode source for videoprocessing.
• Captions – The SMPTE 2038 might include embedded, Teletext, or ARIB captions.
You can choose to set up the extracted captions as the source for output captions, in the usualway (p. 131).
• AFD signals – The SMPTE 2038 might include AFD signals.
You can choose to set up one or more outputs so that AWS Elemental Live uses the signals to modifythe video.
• SCTE 104 messages – The SMPTE 2038 might include SCTE 104 messages. AWS Elemental Liveautomatically converts the messages to SCTE 35 messages.
You can choose to handle these messages in the usual way (p. 273).
AWS Elemental Live can pass through the following ancillary data:
• Custom data – AWS Elemental Live considers ancillary data to be custom data if it is not any of thefour types listed above.
You can choose to identify this custom data so that AWS Elemental Live can extract it.
You can then set up SMPTE 2110 outputs to include that data. AWS Elemental Live doesn't read or usethe ancillary data in any way.
Well-formed SMPTE 2038 sourceFor AWS Elemental Live to handle the ancillary data, the SMPTE 2038 must meet certain criteria:
• The SMPTE 2038 packet must be present in every PMT.
• The PID in which the SMPTE 2038 packet is located must not change in the stream. There is no supportfor changing the PID and sending a new PMT identifying that PID.
• The stream should contain the SMPTE 2038 packet in only one PID. If it is present in more than onePID, there is no guarantee that AWS Elemental Live will identify the PID that appears first. It couldchoose another PID, with results you do not intend.
Enable SMPTE 2038You must set up the input to ingest the SMPTE 2038 ancillary data.
NoteThe information in this section assumes that you are familiar with the general steps for creatingan event.
Version 2.14 and later17
AWS Elemental Live User GuideSet up to use the data
To set up the event to look for ancillary data in SMPTE 2038
Follow these steps for both types of handling—extract and use, and passthrough.
1. Speak to the content provider to obtain information about the SMPTE 2038 ancillary data in thesource:
• Find out which of the four types of ancillary data are in the SMPTE 2038. If the ancillary dataincludes captions, find out which format of captions is present.
• Find out whether the SMPTE 2038 includes custom data. AWS Elemental Live can ingest customdata only if it is set up in a DID/SDID pair. It can't ingest data that's set up in a DID/DBN pair.
Obtain the values of the DID and SDID for all the custom data pairs.
Obtain a description of the data in each pair.2. On the AWS Elemental Live web interface, display the details for the event that you want to set up.3. In Input, make sure you have set the Input type field to one of the following. These types are all
valid for TS inputs:
• Network Input• File Input• HLS File Input• HLS Network Input• SMPTE 2022-7 Network Input
The Prefer SMPTE 2038 field appears in the Advanced section of the Input section.4. In Input > Advanced, set Prefer SMPTE 2038:
• Checked – You should choose this option if the source content contains SMPTE 2038 ancillarydata. If the content provider has included SMPTE-2038, they intend for you to use it.
• Unchecked – If you do not want AWS Elemental Live to look at the SMPTE 2038, uncheck thisfield. Choose this option if the source content doesn't include SMPTE 2038 ancillary data. AWSElemental Live looks for ancillary data in the native TS. Even if a SMPTE 2038 PID is present, AWSElemental Live ignores that PID.
Setting up the event to use the ancillary dataAfter you have enabled SMPTE 2038, you should specify how you want AWS Elemental Live to use thetimecode, captions, AFD signals, and SCTE 104 messages that it detects.
NoteThe information in this section assumes that you are familiar with the general steps for creatingan event.
• For timecode, set the Timecode Source (in Video Selector) using one of the following options:• If the SMPTE 2038 contains a timecode and you want to use it – Set the source to Embedded. AWS
Elemental Live will extract the timecode from the SMPTE 2038, and never from the native TS.• Choose another value in order to use a different timecode source, such as system clock. These other
timecode sources are never found in the SMPTE 2038.• For captions, in Input > Caption Selector, set up the captions in the usual way.
• If you don't want to use the captions from the SMPTE 2038 – Don't create any caption selectors thatspecify the captions of that type.
Version 2.14 and later18

AWS Elemental Live User GuideSet up to pass through custom data
• If you want to use the captions from the SMPTE 2038 – Create a caption selector that specifies thattype of captions—Embedded, Teletext, or ARIB. AWS Elemental Live will extract those captionsfrom the SMPTE 2038. It won't look for those captions in the native TS.
Perform the setup of the captions in the output in the usual way. For more information aboutworking with captions, see Working with captions (p. 131).
• For AFD signals, you can choose to use the AFD signals to modify the video:• If you don't want to use the signals – Set Respond to AFD and Insert AFD signaling to None.• If the SMPTE 2038 contains AFD signals and you want to use them – In Output > Video Stream >
Advanced set the Respond to AFD field and the Insert AFD signaling field in the usual way. Forinformation about the fields, click the question mark icon for the field.
• If the SMPTE 2038 doesn't contain AFD signals, AWS Elemental Live ignores the values in the twofields.
• For SCTE 104 messages, AWS Elemental Live automatically converts the messages to SCTE 35messages.• If you don't want to include the SCTE 35 messages in the output – There is nothing you need to do
because omitting the messages is the default behavior.• If you want to work with the messages – See the section called “SCTE-35 and SCTE-104 message
processing” (p. 273).
Setting up the event to pass through custom dataAfter you have enabled SMPTE 2038, you can identify the custom data to extract, and then set up toinclude that data in your SMPTE 2110 outputs.
NoteThe information in this section assumes that you are familiar with the general steps for creatingan event.
To pass through custom data
1. Decide which custom data you want to pass through to the SMPTE 2110 outputs. Make a note of theDID/SDID values.
2. On the AWS Elemental Live web interface, display the details for the event that you want to set up.3. In the Input section of the web interface, find the input that contains the SMPTE 2038. Find the Add
Custom DID/SDID Pair button below the Prefer SMPTE 2038 field. The button appears only if youselected the Prefer field.
4. Click the button and enter the appropriate values in the DID and SDID fields that appear. Repeat toadd more pairs.
5. In the web interface, find the SMPTE 2110 output where you want to pass through the custom data.Find the ancillary output for that output. If you are not sure how to set up an ancillary output forSMPTE 2110, see the section called “Step 3: Create output group” (p. 46).
6. In the Ancillary Data Settings section, select SMPTE 2038.
AWS Elemental Live will extract each custom data pair that you identified in the input, convert it to aSMPTE 291 packet, and include it in the ancillary data stream of the SMPTE 2110 output.
Ingesting SMPTE 2110 contentYou can create a SMPTE 2110 input in AWS Elemental Live in order to ingest a source that is compliantwith the SMPTE 2110 specification. You can optionally configure the input to use SMPTE 2022-7, if the
Version 2.14 and later19
AWS Elemental Live User GuideGet ready
source offers it. This standard describes a resiliency solution that the event can use when ingesting thecontent.
You can configure the SMPTE 2110 input by specifying an SDP file that contains information about theSMPTE 2110 content. Or you can configure the input to use NMOS to provide that information.
For more information about SMPTE 2110 video content, SMPTE 2022-7, NMOS, and SDP files, see thesection called “SMPTE 2110 inputs and outputs” (p. 315).
Topics• Get ready (p. 20)• Setting up a SMPTE 2110 input using NMOS (p. 20)• Setting up a SMPTE 2110 input without NMOS (p. 22)
Get readyBefore you set up a SMPTE 2110 input in an event, read the following information:
• the section called “Setup: Remove bonded interfaces” (p. 323)• the section called “Setup: Reserve processing cores” (p. 324)• the section called “Setup: Enable PTP” (p. 324)
Setting up a SMPTE 2110 input using NMOSFollow this procedure if you have a SMPTE 2110 source and your organization uses NMOS IS-04 andIS-05.
If your organization uses NMOS, you don't need to provide information about an SDP file. Instead, AWSElemental Live automatically connects to the NMOS registry on your internal network. You don't need toconfigure AWS Elemental Live for that registry—the AWS Elemental Live input will automatically detectand connect to it as a receiver that applies to this source, so that AWS Elemental Live can extract contentcorrectly.
You can also configure the input for two interfaces, to support seamless protection switching. The sourcemust already implement SMPTE 2022-7.
ImportantMake sure that your appliance can support NMOS (p. 323). Make sure that your organizationhas an NMOS registry.
To set up a SMPTE 2110 input using NMOS IS-04 and IS-05
1. From the Input menu in your event, select SMPTE 2110 Input.
Optionally, complete the field to the right of the Input menu empty, to assign a name to the inputfor internal use.
2. Select the NMOS Control check box. The fields on the console change.3. Decide how to complete the Use Static Receivers field. Typically, you leave the field unchecked. For
more details, see the section called “About receiver IDs” (p. 21).4. In the video line, complete the fields in one of these ways:
• If you are not implementing seamless protection switching, complete only Video StreamInterface. For example, eth4.
• If you are implementing seamless protection switching, complete both Interface fields, oneinterface for the primary stream, the other for the secondary stream.
Version 2.14 and later20
AWS Elemental Live User GuideSMPTE 2110 using NMOS
Choose the interface carefully. In AWS Elemental Live, network interfaces are shared across events.Be careful not to overload the capacity of an interface.
5. In the audio line, complete the interface fields.
Keep in mind that you can implement seamless protection switching for some streams but not forothers.
6. If the source includes an ancillary data stream, choose Add Ancillary SDP +. Complete the interfacefields.
7. After you have saved the event, start it. The event will go into the preprocessing state, but will notimmediately run because it includes a SMPTE 2110 input.
8. Log on to your NMOS client application. The event will become visible in the NMOS registry and inyour organization's NMOS client application.
Configure and activate all input streams, including ancillary data. When all of the streams are active,the event will change to a Running state.
About receiver IDsWhen you create an event that includes one or more SMPTE 2110 inputs, AWS Elemental Live createsregistry information for the devices in the SMPTE 2110 input. AWS Elemental Live then sends theinformation each time that you start the event (but not when you unpause it).
One piece of information that AWS Elemental Live sends is an ID for each receiver that you extract fromthe input. (You specify the inputs to extract in the Interface fields on the web interface.) In the NMOSregistry, a receiver ID might look like this: 4214d615-67a8-5987-9276-8321159d7d01.
AWS Elemental Live assigns IDs in one of these ways:
• System-generated IDs. The default is to assign a system-generated ID. The ID of each receiver is alwaysunique among all inputs and events on one AWS Elemental Live appliance (NMOS host).
• Static IDs. You have control over the uniqueness of the receiver IDs. You can set up any input in one ofthese ways:
• So that it is the same as an input in another event on this AWS Elemental Live appliance. You can'tmake it the same as an input on another appliance.
• So that when you duplicate an event, the input on the original event and the input on the new eventhave the same receiver ID.
You should set up for static IDs only if your organization has a use case that requires static IDs. Settingup so that two inputs share the same receiver ID can lead to unexpected results in the SMPTE 2110input, if you don't plan carefully.
To set up for static IDs
To set up for static IDs, select the Use Static Receivers field, and enter a name for the input (theunnamed field that is to the right of the SMPTE 2110 Input option). Naming the input preventsproblems in your NMOS registry.
Tip for duplicating an event
You might duplicate an event that has a SMPTE 2110 input with static receiver IDs. Set up as follows:
• If you want the new event to have the same receiver IDs as the original event, then save the new eventwithout changing the static ID setup.
Version 2.14 and later21
AWS Elemental Live User GuideSMPTE 2110 without NMOS
• If you want the new event to have different receiver IDs, make the changes before you save the newevent. Don't save the event and then modify it.
Setting up a SMPTE 2110 input without NMOSFollow this procedure if you have a SMPTE 2110 source and your organization doesn't use NMOS IS-04and IS-05 (p. 323).
NoteThis section assumes that you have read the section called “SMPTE 2110 inputs andoutputs” (p. 315) and are familiar with how SMPTE 2110 works and with its prerequisites.
When your organization doesn't use NMOS, you must provide information about the SDP that appliesto this source, so that AWS Elemental Live can extract content correctly. For example, you must specifywhere the SDP file for the video is located, and identify the specific video streams to ingest. In addition,if you are using seamless protection switching, you must configure two interfaces for traffic.
You can also configure the input for two interfaces, to support seamless protection switching. The sourcemust already use SMPTE 2022-7.
NoteThe information in this section assumes that you are familiar with the general steps for creatingan event.
To set up a SMPTE 2110 input
1. From the Input menu in your event, select SMPTE 2110 Input.2. In Video SDP Location, enter the location of the SDP file for the video. For example:
http://172.18.8.19/curling_video.sdp
For more information about SDP files, see the section called “About SDP files” (p. 318).3. In Media Index, enter the index of the video stream that you want AWS Elemental Live to extract.
For example, enter 0 if the video is the first stream, 1 if it's the second stream, and so on.4. Complete the Interface fields in one of these ways:
• If you are not implementing seamless protection switching, complete only Interface.• If you are implementing seamless protection switching, complete both Interface fields, one
interface for the primary stream, the other for the secondary stream.
Choose the interface carefully. In AWS Elemental Live, network interfaces are shared across events.Be careful not to overload the capacity of an interface.
5. Complete the audio fields in the same way – Audio SDP Location, Media Index, and Interface fields.
Keep in mind that you can implement seamless protection switching for some streams and not forothers.
6. If the source includes an ancillary data stream, choose Add Ancillary SDP +. Complete the AncillarySDP Location, Media Index, and Interface fields.
Ingesting SRT contentAWS Elemental Live supports ingest of a transport stream (TS) that is sent from an upstream systemthat is set up as an SRT listener. In this scenario, the upstream system waits for MediaLive (the SRT caller)to initiate the SRT connection handshake that precedes the transmission of the source content. Thetransport stream source can be encrypted with AES.
Version 2.14 and later22
AWS Elemental Live User GuideGet ready
Topics• Get ready (p. 23)• Setting up an SRT input (p. 23)
Get readyBefore you create an SRT input in your event, speak to the administrator of the upstream system, andobtain the following information:
• The IP address and port of the content. For example, 192.168.1.2:5000.• Whether the content is encrypted. If it is encrypted, find out if encryption uses AES 128, AES 192, or
AES 256.
Obtain the passphrase from the administrator of the upstream system.• The stream ID, if the upstream system uses this identifier. The sender might require a stream ID, in
which case you must obtain it. Otherwise the SRT handshake between the caller and listener mightfail.
• The preferred latency (in milliseconds) for implementing packet loss and recovery. Packet recovery is akey feature of SRT.
Setting up an SRT inputYou create an SRT input in AWS Elemental Live in order to ingest a transport stream that is delivered byan SRT sender that is set up as an SRT caller.
To set up an SRT input
1. From the Input menu in your event, select Secure Reliable Transport.2. Complete the following fields:
• Network Location: The IP address and host that you obtained from the upstream, with theprotocol. For example:
srt://192.168.1.2:5000
• Interface: See the tooltip on the web interface.• Latency: The latency that you want to apply to aid in packet recovery in AWS Elemental Live.
You should closely match the latency that the upstream system prefers. For more details, see thetooltip.
• Stream ID: Enter this value if the upstream system provided it.3. Complete the encryption fields, if applicable:
• Encryption: Choose None, or choose the encryption level that you obtained from the upstreamsystem.
• Passphrase: Enter the passphrase that the upstream system provided.
Ingesting from VSF TR-01 in a TS inputAWS Elemental Live supports VSF TR-01 ingest over a transport stream (TS). Support for TR-01 providesa solution to migrating from SDI infrastructure to an all-IP infrastructure. Handling of IP inputs usingTR-01 is almost feature-equivalent to the handling of SDI inputs.
Version 2.14 and later23
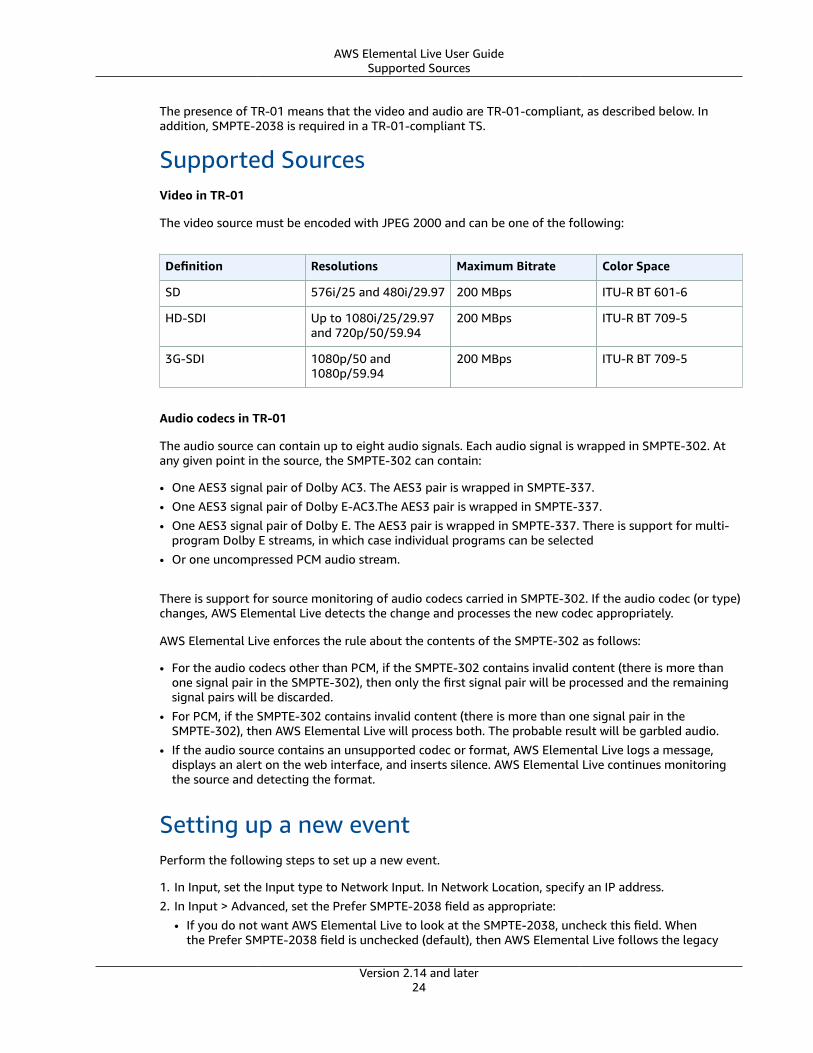
AWS Elemental Live User GuideSupported Sources
The presence of TR-01 means that the video and audio are TR-01-compliant, as described below. Inaddition, SMPTE-2038 is required in a TR-01-compliant TS.
Supported SourcesVideo in TR-01
The video source must be encoded with JPEG 2000 and can be one of the following:
Definition Resolutions Maximum Bitrate Color Space
SD 576i/25 and 480i/29.97 200 MBps ITU-R BT 601-6
HD-SDI Up to 1080i/25/29.97and 720p/50/59.94
200 MBps ITU-R BT 709-5
3G-SDI 1080p/50 and1080p/59.94
200 MBps ITU-R BT 709-5
Audio codecs in TR-01
The audio source can contain up to eight audio signals. Each audio signal is wrapped in SMPTE-302. Atany given point in the source, the SMPTE-302 can contain:
• One AES3 signal pair of Dolby AC3. The AES3 pair is wrapped in SMPTE-337.• One AES3 signal pair of Dolby E-AC3.The AES3 pair is wrapped in SMPTE-337.• One AES3 signal pair of Dolby E. The AES3 pair is wrapped in SMPTE-337. There is support for multi-
program Dolby E streams, in which case individual programs can be selected• Or one uncompressed PCM audio stream.
There is support for source monitoring of audio codecs carried in SMPTE-302. If the audio codec (or type)changes, AWS Elemental Live detects the change and processes the new codec appropriately.
AWS Elemental Live enforces the rule about the contents of the SMPTE-302 as follows:
• For the audio codecs other than PCM, if the SMPTE-302 contains invalid content (there is more thanone signal pair in the SMPTE-302), then only the first signal pair will be processed and the remainingsignal pairs will be discarded.
• For PCM, if the SMPTE-302 contains invalid content (there is more than one signal pair in theSMPTE-302), then AWS Elemental Live will process both. The probable result will be garbled audio.
• If the audio source contains an unsupported codec or format, AWS Elemental Live logs a message,displays an alert on the web interface, and inserts silence. AWS Elemental Live continues monitoringthe source and detecting the format.
Setting up a new eventPerform the following steps to set up a new event.
1. In Input, set the Input type to Network Input. In Network Location, specify an IP address.2. In Input > Advanced, set the Prefer SMPTE-2038 field as appropriate:
• If you do not want AWS Elemental Live to look at the SMPTE-2038, uncheck this field. Whenthe Prefer SMPTE-2038 field is unchecked (default), then AWS Elemental Live follows the legacy
Version 2.14 and later24
AWS Elemental Live User GuideMigrating from SDI Inputs to TR-01 inputs
behavior. It looks for ancillary data in the native TS. Even if a SMPTE-2038 PID is present, AWSElemental Live ignores that PID.
• If you want to use the SMPTE-2038 ancillary data, and assuming the stream contains well-formedSMPTE-2038 (above), then check this field.
For information about how SMPTE-2038 ancillary data is extracted and processed, see Handlingancillary data in SMPTE 2038 (p. 16).
3. In Input > Video Selector and Input > Audio Selector, set up the video and audio in the usual way.There are no special steps for setting up TR-01 video or audio inputs.
4. Set up the remainder of the event in the usual way.
The video identified in the video selector and the audio identified in the audio selector are extractedfrom the TR-01 in the TS. The video and audio are processed in the usual way, as specified in the outputsections of the event. The ancillary data (if used) is extracted from the SMPTE-2038 and processed asdescribed in Handling ancillary data in SMPTE 2038 (p. 16).
Migrating from SDI Inputs to TR-01 inputsIf you have an event that is configured to use an SDI input, you can easily adapt it to use an IP networkfeed that contains TR-01-compliant video and audio. Change the existing event as follows:
• Change the Input Type to Network Input. In Network Location, specify an IP address.
• Set the Prefer SMPTE-2038 box as appropriate:• If you do not want AWS Elemental Live to look at the SMPTE-2038, uncheck this field. When the
Prefer SMPTE-2038 field is unchecked (default), then AWS Elemental Live follows the legacybehavior. It looks for ancillary data in the native TS. Even if a SMPTE-2038 PID is present, AWSElemental Live ignores that PID.
• If you want to use the SMPTE-2038 ancillary data, and assuming the stream contains well-formedSMPTE-2038 (above), then check this field.
For information about how SMPTE-2038 ancillary data is extracted and processed, see Handlingancillary data in SMPTE 2038 (p. 16).
There is no requirement to change any other fields: the event should now perform the sameprocessing as previously.
The video identified in the video selector and the audio identified in the audio selector are extractedfrom the TR-01 in the TS. The video and audio are processed in the usual way, as specified in the outputsections of the event. The ancillary data (if used) is extracted from the SMPTE-2038 and processed asdescribed in Handling ancillary data in SMPTE 2038 (p. 16).
Version 2.14 and later25
AWS Elemental Live User GuideReference: Supported outputs
Working with outputsThis chapter describes how to set up the different types of outputs that AWS Elemental Live supports.
Topics• Reference: Supported outputs (p. 26)• Setting up AWS Elemental Live as a Contribution Encoder for AWS Elemental
MediaConnect (p. 37)• Sending AWS Elemental Live output to AWS Elemental MediaStore (p. 42)• Configuring SMPTE 2110 outputs (p. 44)• Delivering TS using the SRT protocol (p. 52)• Delivering TS output using the Zixi protocol (p. 53)
Reference: Supported outputsThe following tables describe the supported mechanisms for delivering output to the downstreamdestination. Read this section to find the output group type that applies to your intended downstreamdestination.
Topics• Delivering to an AWS service (p. 26)• Delivering to destinations other than AWS (p. 29)• Audio codecs and supported conversions (p. 32)• Live outputs: Supported codecs (p. 32)• VOD outputs: Supported codecs (p. 34)
Delivering to an AWS serviceThis table describes options that you can use to send output from AWS Elemental Live to a downstreamsystem that is an AWS service. Each row describes a different use case.
The rows are sorted by downstream system (destination AWS service). The Released column identifies theversion of AWS Elemental Live that introduced the output group type.
Downstreamsystem
Type ofoutput
DescriptionType ofoutputgroup
Outputoption(if any)
Supportedprotocol
Liveoutputsupported
VODoutputsupported
Released
AmazonS3
DASH SendDASHcontenttoAmazonS3 .
DASH Customprotocol:s3:// ors3ssl://
Yes Yes 2.14.3
AmazonS3
HLS Send HLScontentto anAmazon
HLS A TScontaineror an
Customprotocol:s3:// ors3ssl://
Yes Yes Before2.14.0
Version 2.14 and later26
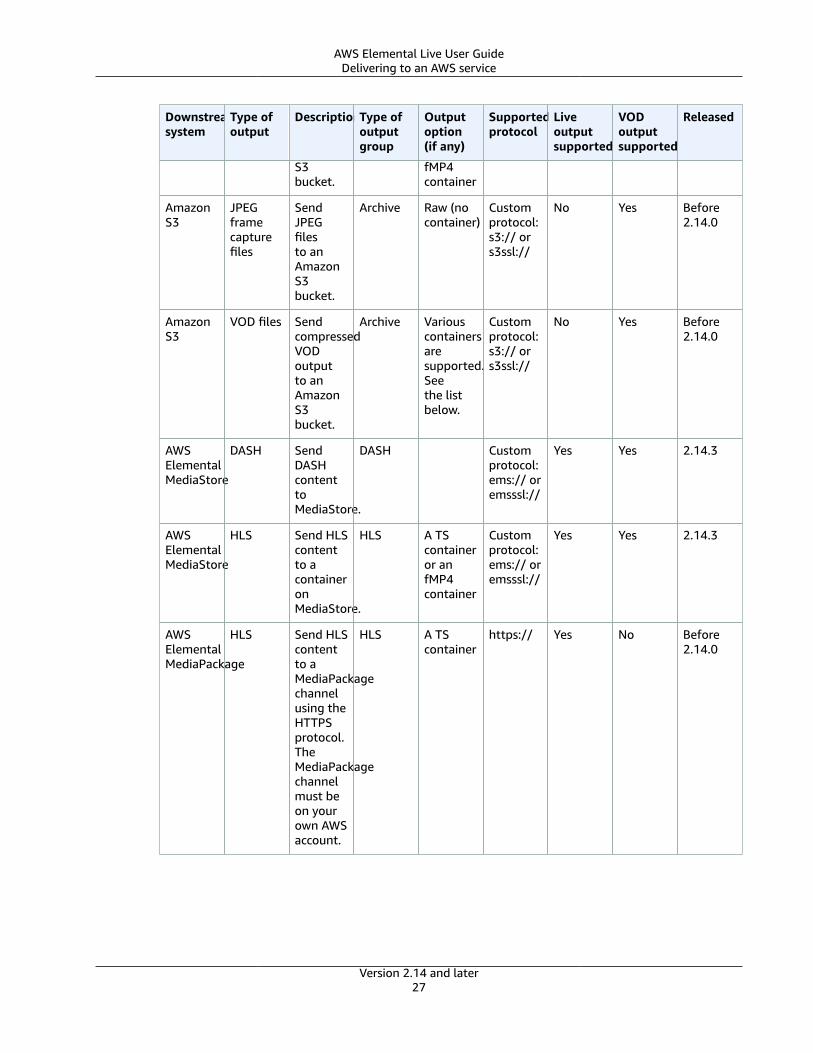
AWS Elemental Live User GuideDelivering to an AWS service
Downstreamsystem
Type ofoutput
DescriptionType ofoutputgroup
Outputoption(if any)
Supportedprotocol
Liveoutputsupported
VODoutputsupported
Released
S3bucket.
fMP4container
AmazonS3
JPEGframecapturefiles
SendJPEGfilesto anAmazonS3bucket.
Archive Raw (nocontainer)
Customprotocol:s3:// ors3ssl://
No Yes Before2.14.0
AmazonS3
VOD files SendcompressedVODoutputto anAmazonS3bucket.
Archive Variouscontainersaresupported.Seethe listbelow.
Customprotocol:s3:// ors3ssl://
No Yes Before2.14.0
AWSElementalMediaStore
DASH SendDASHcontenttoMediaStore.
DASH Customprotocol:ems:// oremsssl://
Yes Yes 2.14.3
AWSElementalMediaStore
HLS Send HLScontentto acontaineronMediaStore.
HLS A TScontaineror anfMP4container
Customprotocol:ems:// oremsssl://
Yes Yes 2.14.3
AWSElementalMediaPackage
HLS Send HLScontentto aMediaPackagechannelusing theHTTPSprotocol.TheMediaPackagechannelmust beon yourown AWSaccount.
HLS A TScontainer
https:// Yes No Before2.14.0
Version 2.14 and later27
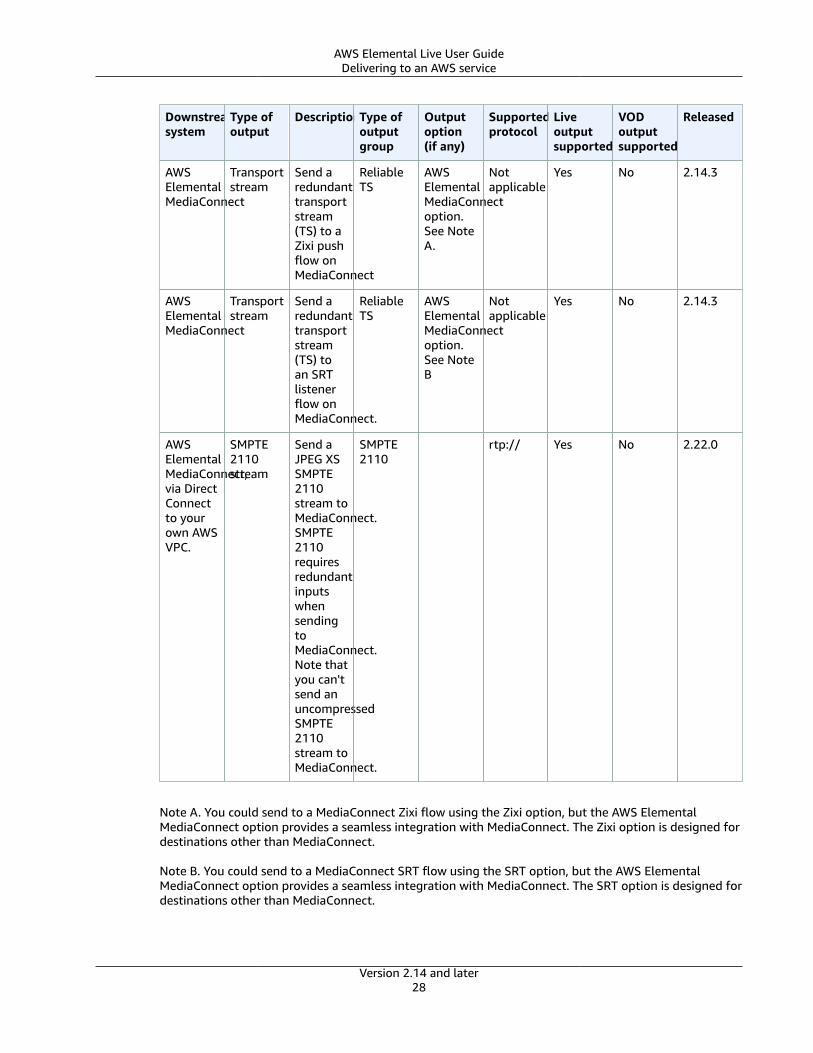
AWS Elemental Live User GuideDelivering to an AWS service
Downstreamsystem
Type ofoutput
DescriptionType ofoutputgroup
Outputoption(if any)
Supportedprotocol
Liveoutputsupported
VODoutputsupported
Released
AWSElementalMediaConnect
Transportstream
Send aredundanttransportstream(TS) to aZixi pushflow onMediaConnect
ReliableTS
AWSElementalMediaConnectoption.See NoteA.
Notapplicable
Yes No 2.14.3
AWSElementalMediaConnect
Transportstream
Send aredundanttransportstream(TS) toan SRTlistenerflow onMediaConnect.
ReliableTS
AWSElementalMediaConnectoption.See NoteB
Notapplicable
Yes No 2.14.3
AWSElementalMediaConnect,via DirectConnectto yourown AWSVPC.
SMPTE2110stream
Send aJPEG XSSMPTE2110stream toMediaConnect.SMPTE2110requiresredundantinputswhensendingtoMediaConnect.Note thatyou can'tsend anuncompressedSMPTE2110stream toMediaConnect.
SMPTE2110
rtp:// Yes No 2.22.0
Note A. You could send to a MediaConnect Zixi flow using the Zixi option, but the AWS ElementalMediaConnect option provides a seamless integration with MediaConnect. The Zixi option is designed fordestinations other than MediaConnect.
Note B. You could send to a MediaConnect SRT flow using the SRT option, but the AWS ElementalMediaConnect option provides a seamless integration with MediaConnect. The SRT option is designed fordestinations other than MediaConnect.
Version 2.14 and later28

AWS Elemental Live User GuideDelivering to destinations other than AWS
Delivering to destinations other than AWSThis table describes options that you can use to send output from AWS Elemental Live to a destinationthat is not an AWS service. Each row describes a different use case.
The rows are sorted by type of output group. The Version column identifies the version of AWSElemental Live that introduced the output group type.
Downstreamsystem
Type ofoutput
DescriptionType ofoutputgroup
Outputgroupoption
Supportedprotocol
Liveoutputsupported
VODoutputsupported
Version
A folderon theappliance
VOD files SendVODoutputto a localfolder
Archive Variouscontainersaresupported.Seethe listbelow.
Notapplicable
No Yes Before2.14.0
A folderon theappliance
VOD files SenduncompressedVODoutputto a localfolder
Archive Raw (nocontainer)
Notapplicable
No Yes Before2.14.0
A folderon theappliance
JPEGframecapturefiles
SendJPEGfiles toa localfolder
Archive Raw (nocontainer)
Notapplicable
No Yes Before2.14.0
An HTTPor HTTPSserver
DASH SendDASHcontentto anHTTP orHTTPSserver
DASH http:// orhttps://
Yes Yes Before2.14.0
An HTTPor HTTPSserver
HLS Send HLScontentto anHTTP orHTTPSserver
HLS A TScontaineror anfMP4container
http:// orhttps://
Yes Yes Before2.14.0
AkamaiCDN
HLS Send HLScontentto anAkamaiCDN.
HLS A TScontaineror anfMP4container
http:// orhttps://
Yes No Before2.14.0
AsupportedCDN,over
MicrosoftSmooth
Sendcontentto anorigin
MicrosoftSmooth
http:// orhttps://
Yes Yes Before2.14.0
Version 2.14 and later29

AWS Elemental Live User GuideDelivering to destinations other than AWS
Downstreamsystem
Type ofoutput
DescriptionType ofoutputgroup
Outputgroupoption
Supportedprotocol
Liveoutputsupported
VODoutputsupported
Version
HTTP orHTTPS
server orCDN thatsupportsMicrosoftSmoothStreaming.
A Zixibroadcaster
Transportstream
Sendredundantor non-redundanttransportstream(TS)contentto anendpointthatsupportsthe Zixiprotocol.
ReliableTS
Zixioption
zixi:// Yes No 2.14.3
An SRTcallerendpointorlistenerendpoint
Transportstream
Sendredundantor non-redundantRTPcontentto an SRTendpointthat isset up aseither acaller ora listener.
ReliableTS
SRToption
srt:// Yes No 2.22.2
RTMP orRTMPSserver
RTMP Send astream toa serverthatsupportstheRTMPprotocol.
RTMP rtmp://orrtmps://
Yes No Before2.14.0
Version 2.14 and later30

AWS Elemental Live User GuideDelivering to destinations other than AWS
Downstreamsystem
Type ofoutput
DescriptionType ofoutputgroup
Outputgroupoption
Supportedprotocol
Liveoutputsupported
VODoutputsupported
Version
A systemthatsupportsSMPTE2110
SMPTE2110stream
Send anuncompressedSMPTE2110stream toa devicethatsupportsSMPTE2110.RedundantstreamsusingSMPTE2022-7aresupportedbutoptional.
SMPTE2110
rtp:// Yes No 2.19.3
A systemthatsupportsSMPTE2110
SMPTE2110stream
Send aJPEG XScompressedSMPTE2110stream toa devicethatsupportsSMPTE2110.RedundantstreamsusingSMPTE2022-7aresupportedbutoptional.
SMPTE2110
rtp:// Yes No 2.21.3
Version 2.14 and later31

AWS Elemental Live User GuideAudio codecs and supported conversions
Downstreamsystem
Type ofoutput
DescriptionType ofoutputgroup
Outputgroupoption
Supportedprotocol
Liveoutputsupported
VODoutputsupported
Version
A systemthatsupportsRTP orUDP overunicastormulticast
Transportstream
Send atransportstream(TS) toa serverthatsupportsunicastormulticastRTP orunicastormulticastUDP.
UDP/TS rtp:// orudp://
Yes No Before2.14.0
Audio codecs and supported conversionsGenerally, AWS Elemental Live can convert any audio codec that is supported as a source to any audiocodec that is supported as an output. However, there are some constraints, as follows.
• Constraint when Dolby Digital with Atmos is the source. Conversion to another codec isn't supported.You can only pass through this source codec.
• Constraint when converting to another codec (other than Dolby Digital with Atmos) and changing thecoding mode. The following rules apply:
• The source must contain at least as many channels as the output. For example, to produce Dolby 5.1(6 channels), the source must contain 6 channels.
• The source can contain fewer channels. For example, you can convert Dolby 5.1 to AAC 2.0.
In both cases, you might need to remix the channels in the output.
Live outputs: Supported codecsThis table specifies the codecs that are supported in output groups that support live outputs.
Use this table if you identified a use case in the section called “Delivering to an AWS service” (p. 26) orthe section called “Delivering to destinations other than AWS” (p. 29) and your output is live output.
In the table, find the output group and container (if applicable) for the user case that you identified.Then read across to identify the video and audio codecs that are supported for that output group.
Output group type Container Video Codecs Audio Codecs
DASH H.264
H.265
AAC
Dolby Digital
Dolby Digital Plus
Version 2.14 and later32

AWS Elemental Live User GuideLive outputs: Supported codecs
Output group type Container Video Codecs Audio Codecs
Dolby Digital Plus withAtmos (converted)
Dolby Digital Plus withAtmos (as passthrough)
HLS Standard H.264
H.265
AAC
Dolby Digital
Dolby Digital Plus
Dolby Digital Plus withAtmos (converted)
Dolby Digital Plus withAtmos (as passthrough)
HLS fMP4 H.264
H.265
AAC
Dolby Digital
Dolby Digital Plus
Dolby Digital Plus withAtmos (converted)
Dolby Digital Plus withAtmos (as passthrough)
Microsoft Smooth H.264 AAC
Dolby Digital
Dolby Digital Plus withAtmos (as passthrough)
Reliable TS H.264
H.265
MPEG2
AAC
Dolby Digital
Dolby Digital Plus
Dolby Digital Plus withAtmos (converted)
Dolby Plus with Atmos(as passthrough)
RTMP H.264 AAC
SMPTE 2110 Uncompressed JPEG XS
(Version 2.21.3 andlater)
PCM
Dolby Digital
Dolby Digital Plus
Version 2.14 and later33
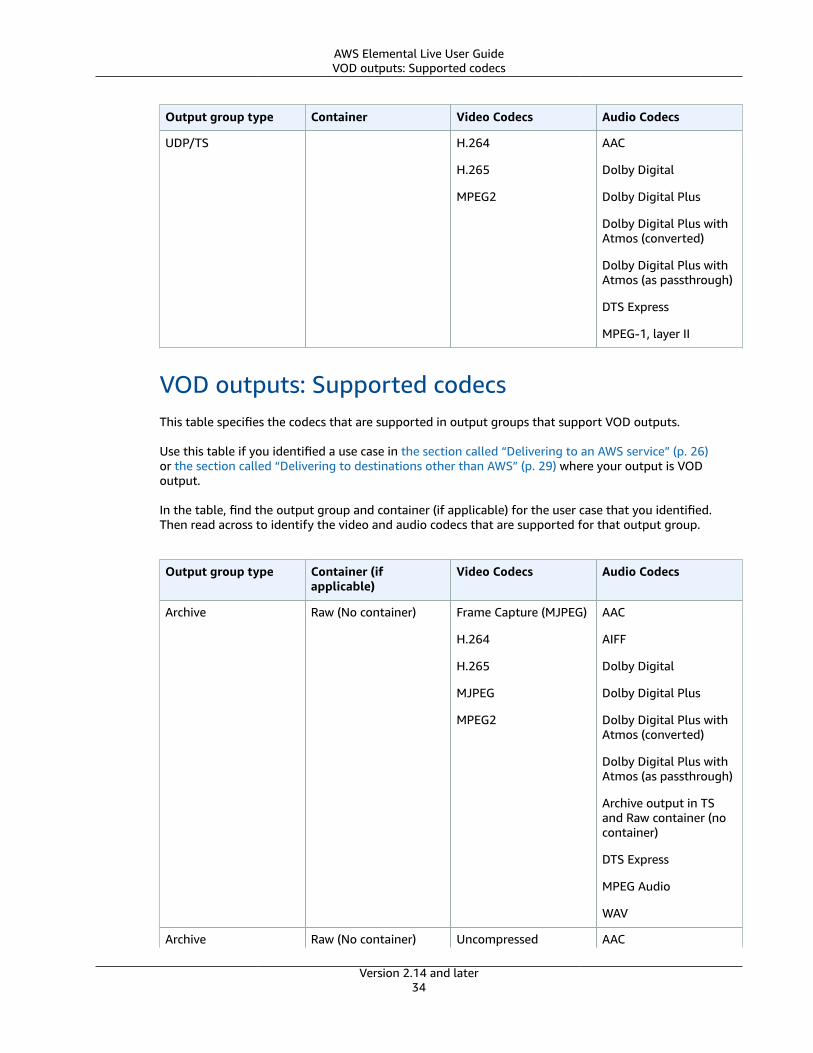
AWS Elemental Live User GuideVOD outputs: Supported codecs
Output group type Container Video Codecs Audio Codecs
UDP/TS H.264
H.265
MPEG2
AAC
Dolby Digital
Dolby Digital Plus
Dolby Digital Plus withAtmos (converted)
Dolby Digital Plus withAtmos (as passthrough)
DTS Express
MPEG-1, layer II
VOD outputs: Supported codecsThis table specifies the codecs that are supported in output groups that support VOD outputs.
Use this table if you identified a use case in the section called “Delivering to an AWS service” (p. 26)or the section called “Delivering to destinations other than AWS” (p. 29) where your output is VODoutput.
In the table, find the output group and container (if applicable) for the user case that you identified.Then read across to identify the video and audio codecs that are supported for that output group.
Output group type Container (ifapplicable)
Video Codecs Audio Codecs
Archive Raw (No container) Frame Capture (MJPEG)
H.264
H.265
MJPEG
MPEG2
AAC
AIFF
Dolby Digital
Dolby Digital Plus
Dolby Digital Plus withAtmos (converted)
Dolby Digital Plus withAtmos (as passthrough)
Archive output in TSand Raw container (nocontainer)
DTS Express
MPEG Audio
WAV
Archive Raw (No container) Uncompressed AAC
Version 2.14 and later34

AWS Elemental Live User GuideVOD outputs: Supported codecs
Output group type Container (ifapplicable)
Video Codecs Audio Codecs
For information aboutthe 4CC codes that aresupported, and thepixel formats for each4CC code, see the tablebelow
AIFF
Dolby Digital
Dolby Digital Plus
Dolby Digital Plus withAtmos (converted)
Dolby DigitalPlus ATMOS (aspassthrough)
DTS Express
MPEG Audio
WAV
Archive 3GPP H.264 AAC
Archive MXF MPEG-2 WAV
Archive MPEG-2 TransportStream
H.264
H.265
MPEG2
AAC
Dolby Digital
Dolby Digital Plus
Dolby Digital Plus withAtmos (converted)
Dolby DigitalPlus ATMOS (aspassthrough)
MPEG Audio
Archive MPEG-4 (.mp4) H.264
H.265
AAC
Dolby Digital
Dolby Digital Plus
Dolby Digital Plus withAtmos (converted)
Dolby DigitalPlus ATMOS (aspassthrough)
DTS Express
Archive MPEG-4 Flash (.f4v) H.264 AAC
Version 2.14 and later35

AWS Elemental Live User GuideVOD outputs: Supported codecs
Output group type Container (ifapplicable)
Video Codecs Audio Codecs
Archive QuickTime H.264
MPEG2
Apple ProRes
Uncompressed (Forinformation about the4CC codes that aresupported, and thepixel formats for each4CC code, see the tablebelow)
AAC
AIFF
Dolby Digital
Dolby Digital Plus
Dolby Digital Plus withAtmos (converted)
Dolby DigitalPlus ATMOS (aspassthrough)
WAV
HLS Standard H.264
H.265
AAC
Dolby Digital
Dolby Digital Plus
Dolby Digital Plus withAtmos (converted)
Dolby DigitalPlus ATMOS (aspassthrough)
HLS fMP4 H.264
H.265
AAC
Dolby Digital
Dolby Digital Plus
Dolby Digital Plus withAtmos (converted)
Dolby DigitalPlus ATMOS (aspassthrough)
Microsoft Smooth H.264 AAC
Dolby Digital
Dolby Digital Plus
Dolby DigitalPlus ATMOS (aspassthrough)
Version 2.14 and later36
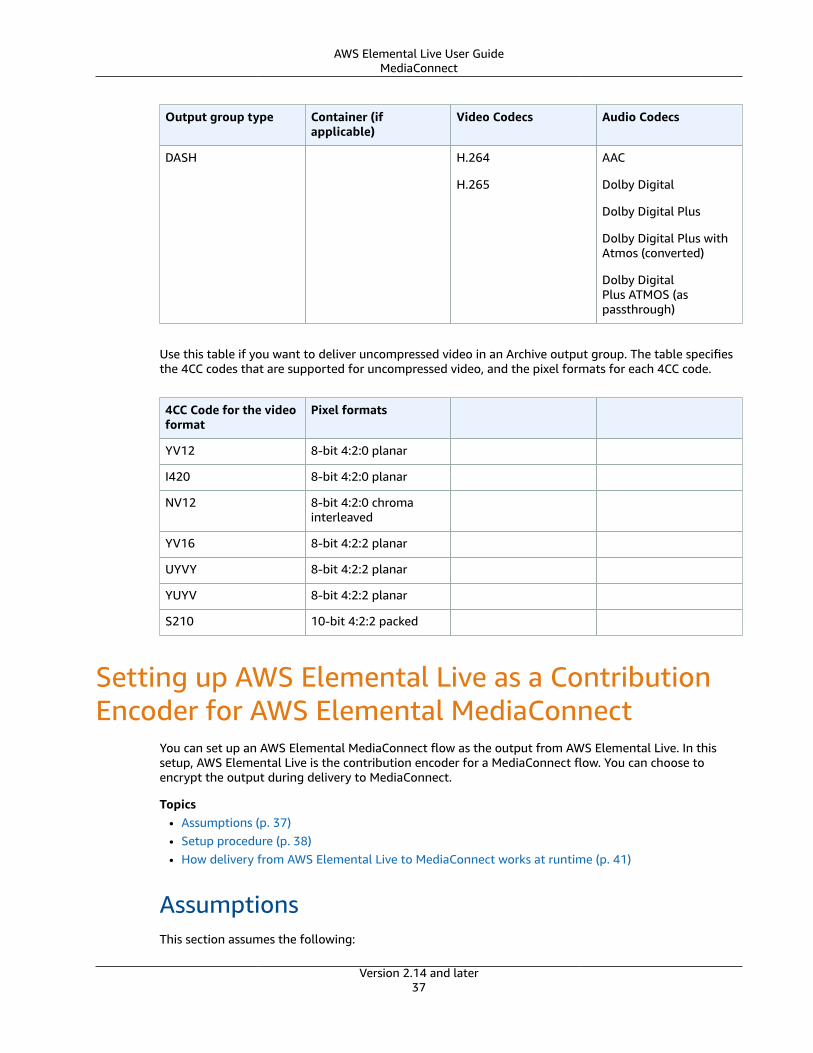
AWS Elemental Live User GuideMediaConnect
Output group type Container (ifapplicable)
Video Codecs Audio Codecs
DASH H.264
H.265
AAC
Dolby Digital
Dolby Digital Plus
Dolby Digital Plus withAtmos (converted)
Dolby DigitalPlus ATMOS (aspassthrough)
Use this table if you want to deliver uncompressed video in an Archive output group. The table specifiesthe 4CC codes that are supported for uncompressed video, and the pixel formats for each 4CC code.
4CC Code for the videoformat
Pixel formats
YV12 8-bit 4:2:0 planar
I420 8-bit 4:2:0 planar
NV12 8-bit 4:2:0 chromainterleaved
YV16 8-bit 4:2:2 planar
UYVY 8-bit 4:2:2 planar
YUYV 8-bit 4:2:2 planar
S210 10-bit 4:2:2 packed
Setting up AWS Elemental Live as a ContributionEncoder for AWS Elemental MediaConnect
You can set up an AWS Elemental MediaConnect flow as the output from AWS Elemental Live. In thissetup, AWS Elemental Live is the contribution encoder for a MediaConnect flow. You can choose toencrypt the output during delivery to MediaConnect.
Topics• Assumptions (p. 37)• Setup procedure (p. 38)• How delivery from AWS Elemental Live to MediaConnect works at runtime (p. 41)
AssumptionsThis section assumes the following:
Version 2.14 and later37
AWS Elemental Live User GuideSetup procedure
• We assume that you know how to use the AWS console, AWS Identity and Access Management, andAWS Elemental MediaConnect, and that you have access to the user guides for the AWS services:
• What Is AWS Elemental MediaConnect? in the AWS Elemental MediaConnect User Guide
• What Is IAM? in the IAM User Guide
• What Is AWS Secrets Manager? in the AWS Secrets Manager User Guide.
• We assume that you have already set up permissions for MediaConnect— you have created at leastone AWS user and given permissions to those users so that they can use the features of MediaConnect.Specifically, for the purposes of this procedure, the user can create a MediaConnect flow. You have alsoset up MediaConnect as a trusted entity with Secrets Manager; see Step 3: Create an IAM Role with aTrusted Relationship in the AWS Elemental MediaConnect User Guide.
• We don't assume that you have set up AWS Elemental Live with permissions in AWS. Setting up thosepermissions is one of the steps in this section.
Setup procedure
Step A: Create a role in IAM and attach policies
You must use AWS Identity and Access Management (IAM) to set up AWS Elemental Live as an AWS user(the "AWS Elemental Live user") and give it permissions so that it can communicate with AWS SecretsManager and AWS Elemental MediaConnect. You must:
• Create policies that contain specific permissions.
• Create the "AWS Elemental Live user" in your AWS account. The user must be in the same AWS accountas the user who is operating MediaConnect.
• Associate the AWS Elemental Live user with those policies, which gives the user the permissions ofthose policies.
Create a policy for AWS Elemental Live to make requests to MediaConnect
AWS Elemental Live must have permissions on MediaConnect. Follow this procedure to set up thesepermissions:
To create a policy for AWS Elemental Live to make requests to MediaConnect
1. Log into the AWS console and go to the IAM console.
2. On the left menu, choose Policies. Use the filters to determine if there is already a policy with aname similar to "ElementalAccessToMediaConnect".
3. If the policy does not exist, choose Create policy. Click the Visual editor tab and create the policyusing the IAM policy generator. This generator lets you choose the service from a list and thenchoose operations from a list:
• Service: MediaConnect.
• Actions: Under List, click DescribeFlow and ListFlows.
• Resources: If your organization does not have strict rules about accessing containers onMediaConnect, you can ignore this section; you will have access to all flows. Otherwise, followyour internal policies to identify specific flows.
• Give the policy a name such as "ElementalAccessToMediaConnect"
For more information on how to create and manage IAM policies, see the IAM User Guide.
Version 2.14 and later38
AWS Elemental Live User GuideSetup procedure
Create a policy for AWS Elemental Live to make requests to Secrets Manager
If you plan to encrypt the output from AWS Elemental Live when you send it to MediaConnect, then AWSElemental Live must have permissions on AWS Secrets Manager. Follow this procedure to set up thesepermissions:
To create a policy for AWS Elemental Live to make requests to Secrets Manager
1. Log into the AWS console and go to the IAM console. Choose Policies and look for a policy that givesMediaConnect the permissions for Secrets Manager. If you or someone else previously followed theprocedure in Step 2: Create an IAM Policy to Allow AWS Elemental MediaConnect to Access YourSecret, then this policy will be called SecretsManagerForMediaConnect.
2. If this policy exists, make sure it contains the following actions:
• DescribeSecret• GetResourcePolicy• GetSecretValue• ListSecretVersionIds
3. Also make sure that the resources section gives access to the ARN of the secret that you will use.Read the information in IAM Policy Examples for Secrets in AWS Secrets Manager. You may need toedit the policy to include the ARN for this secret in the resources section.
4. If the policy does not exist, follow the procedure in Step 2: Create an IAM Policy to Allow AWSElemental MediaConnect to Access Your Secret to create the policy.
Create a user
To create a user
1. Log into the AWS console and go to the IAM console.2. If the user does not exist or it does exist but you want to create separate users for each Elemental
product, choose Add User. (Note that you may want separate users for separate products, but thereis probably no need to create a separate user for each Elemental node.) Follow the prompts to addthe user with this information:
• Give the user a name such as ElementalUser.• For Access type, choose Programmatic access. Do not choose Console access.• In permissions, choose Attach existing policies directly. Attach the policies you created above. For
example, ElementalAccessToMediaConnect and SecretsManagerReadSecrets.• Ignore tags.
3. Create the user and choose Close.4. Choose the user by clicking the name, for example, click ElementalUser.5. Choose the Security tab.6. Click Create Access Key.7. On the Create access key dialog, choose to download the .csv file. Save the file in a safe place, so
that you have a permanent record of the access key ID and the secret access key.
The Access key ID looks like this:AKIAIOSFODNN7EXAMPLE
The Secret access key looks like this: wJalrXUtnFEMI/K7MDENG/bPxRfiCYEXAMPLEKEY8. Give the Access key ID and the Secret access key to the AWS Elemental Live operator. Do not give the
username and password to the operator.9. How it works: You have created an AWS user with the permissions required to make requests to
MediaConnect and optionally to Secrets Manager. When the AWS Elemental Live user sets up the
Version 2.14 and later39
AWS Elemental Live User GuideSetup procedure
output with MediaConnect as the destination, they will enter the Access key ID and Secret access key.When the AWS Elemental Live event is running, AWS Elemental Live sends these two IDs to the AWSservices, instead of sending the user name and password. These IDs provide authorization for theAWS Elemental Live node to make requests to the AWS services.
Step B: Set up for encryption (optional)If you are encrypting the AWS Elemental Live output, you must generate an encryption key and setit up in Secrets Manager. In this scenario, Secrets Manager is effectively acting as the key server forthe encryption key. Secrets Manager serves the key to AWS Elemental Live so it can encrypt and toMediaConnect to it can decrypt. In this scenario, encryption/decryption is supported with a staticSHA-256 encryption key and using the AES-256, AES-192, or AES-128 algorithm.
Perform the following steps according to the security policies and procedures for your organization.
To set up for encryption
1. Use a suitable tool for generating a SHA-256 encryption key from a seed that you specify. AWS doesnot provide a generation tool. Note that you need only one key, even if you are creating two flows.
2. Save the key to the secret, as described in Setting Up Static Key Encryption Using AWS ElementalMediaConnect. You must assign a name to the secret, for example, "key_sports". Save the key in thesame AWS Region as the flow you plan to create.
3. Make a note of the ARN for this secret. You need this ARN when you create the MediaConnect flow.It looks like the following example, where "key_sports" is the name you assigned to the secret.
arn:aws:secretsmanager:us-west-2:111122223333:secret:key_sports-7g8H9i
Step C: Create the AWS Elemental MediaConnect flowsYou must follow this procedure before you create the AWS Elemental Live outputs because AWSElemental Live needs data that is generated by this procedure.
To create the MediaConnect flows
1. Create one or two MediaConnect flows. (Create two flows if your have set up AWS Elemental Live foroutput redundancy using output locking. If you have not set up redundant outputs, create one flow.)
2. Follow the procedure in Creating a Flow in the AWS Elemental MediaConnect User Guide.3. Complete Availability Zone and Name as appropriate. These fields do not relate to using AWS
Elemental Live as the source.4. In the Source section, follow the steps for setting up a standard source. Specifically:
• Protocol: Zixi push.• Whitelist CIDR block: This is the IP address (in CIDR format) of the Elemental node that will
be delivering to this flow. It must be a public facing IP address. Speak to your organization'sadministrator for a value to enter here.
• Stream ID: You must enter a value when AWS Elemental Live is the source.5. If you are encrypting the video, check Enable in the Decryption section and complete the fields as
described in the MediaConnect documentation. Specifically:
• Decryption type: Always Static key.• Role ARN: The role that has been set up for MediaConnect to be a trusted entity with Secrets
Manager. See Step 3: Create an IAM Role with a Trusted Relationship in the AWS ElementalMediaConnect User Guide. You must specify this role ARN here so that MediaConnect can obtainthe encryption key.
Version 2.14 and later40

AWS Elemental Live User GuideHow delivery from AWS Elemental Live
to MediaConnect works at runtime
• To find the ARN for the role, go to the IAM console, choose Roles, click the name of the role, andlook at the Role ARN field in the Summary. The role ARN looks like this:
arn:aws:iam::111122223333:role/MediaConnectASM
• Secret ARN: The ARN you obtained in step A, for example: arn:aws:secretsmanager:us-west-2:111122223333:secret:key_sports-7g8H9i
• Decryption algorithm: Specify the algorithm that you want to use. AWS Elemental Live will beinstructed to use this algorithm to encrypt. MediaConnect will read this information and use thisalgorithm to decrypt.
6. When you create each flow, MediaConnect creates an ARN for that flow. The ARNs look like thefollowing, where "curling_finals_A" and "curling_finals_B" are the flow names you specified in eachflow:
arn:aws:mediaconnect:us-west-1:111122223333:flow:1bgf67:curling_finals_A
arn:aws:mediaconnect:us-west-1:111122223333:flow:9pmlk76:curling_finals_B
7. Make a note of these ARNs. You need them to set up the AWS Elemental Live output(s).
Step D: Create the AWS Elemental Live output groupYou must create one output group of type "Reliable TS". Inside that group, you must create one or twooutputs: create two outputs if you created two MediaConnect flows, create one output if you createdonly one flow.
To create the AWS Elemental Live output group
1. In the AWS Elemental Live event, go to Output Groups > Reliable TS.2. Click Add Output to create an output in this Reliable TS output group.3. Complete the fields in each output as follows:
• Delivery Protocol: Choose AWS Elemental MediaConnect.• Destination/Amazon Resource Name: Enter the ARN for the flow. Following from the example
above, enter the following in the first output:
arn:aws:mediaconnect:us-west-1:111122223333:flow:1bgf67:curling_finals_A
• Interface: Optional; see the tooltip.• Lock icon: Click this icon. Two more fields appear:
• Username/Access Key ID: The Access key ID for the user you created in AWS IAM. For example,AKIAIOSFODNN7EXAMPLE
• Password/Secret Access Key: The Secret access key for this user. For example, wJalrXUtnFEMI/K7MDENG/bPxRfiCYEXAMPLEKEY
4. Note that there is no encryption field. See "How It Works at Runtime", below, to understand howencryption is handled.
5. Repeat these steps to create a second output in this output group, if applicable. Use the same Accesskey ID and Secret access key.
How delivery from AWS Elemental Live toMediaConnect works at runtimeHere is the data that AWS Elemental Live has: The flow ARN. The Access key ID and Secret access key.Here is the data that MediaConnect has: The flow ARN. The destination IPs and protocol details. The
Version 2.14 and later41
AWS Elemental Live User GuideMediaStore
encryption type and algorithm. The role ARN (for obtaining the secret - the encryption key). The secretARN. When the event starts, AWS Elemental Live authenticates with AWS using the AWS access key IDand AWS secret access key. It then sends the flow ARN to MediaConnect. MediaConnect accepts therequest because AWS Elemental Live has permission to make requests to MediaConnect. MediaConnectlooks up the flow and determines if the flow is set up for encryption.
• If the flow is set up for encryption, MediaConnect sends the encryption type and algorithminformation, and the secret ARN to AWS Elemental Live. AWS Elemental Live uses the secret ARN toget the secret (the encryption key) from Secrets Manager. Secrets Manager accepts the request fromAWS Elemental Live because AWS Elemental Live has permission to get this secret.
AWS Elemental Live uses the encryption key to encrypt the video and sends the encrypted video toMediaConnect.
MediaConnect in its turn uses the secret ARN to get the secret (the encryption key) from the SecretsManager. Secrets Manager accepts the request from MediaConnect because MediaConnect haspermission to get this secret; it has permission because it has been set up as a trusted entity withSecrets Manager. MediaConnect uses the encryption key to decrypt the video.
• If the flow is not set up for encryption, MediaConnect instructs AWS Elemental Live to deliver thevideo unencrypted. Secrets Manager is not involved.
Sending AWS Elemental Live output to AWSElemental MediaStore
You can set up a container on AWS Elemental MediaStore as the destination for Apple HLS and DASHoutputs.
This article assumes you know how to use the AWS Management Console and AWS Identity and AccessManagement, and that you have access to IAM User Guide.
This article assumes that you or someone in your organization has created the MediaStore containerwhere AWS Elemental Live will deliver the output. Make sure you have the path to this container orcontainers.
Step A: Set up AWS Elemental Live in AWS Identityand Access ManagementYou must use the IAM (AWS Identity and Access Management) service to set up AWS Elemental Live as anAWS user (the "Elemental user") and give it permissions so that it can communicate with MediaStore. Youmust do the following:
• Create a policy that contains specific permissions.• Create the AWS Elemental Live user in your AWS account. The user must be in the same AWS account
as the user who is operating AWS Elemental MediaStore.• Associate the AWS Elemental Live user with the policy, which gives the user the permissions of that
policy.
You perform this setup only once. You can use the same "Elemental user" every time you want to sendoutput to MediaStore.
Create a policy for AWS Elemental Live to Make Requests to MediaStore
Version 2.14 and later42

AWS Elemental Live User GuideStep A: Set up permissions
AWS Elemental Live must have permissions on MediaStore. Follow this procedure to set up thesepermissions:
1. Open the IAM console at https://console.aws.amazon.com/iam/.
2. On the left menu, choose Policies. Use the filters to determine if there is already a policy with a namesimilar to ElementalAccessToMediaStore.
3. If the policy does not exist, choose Create policy. Choose the Visual editor tab and create the policyusing the IAM policy generator. This generator lets you choose the service from a list and then chooseoperations from a list:
• Service: MediaStore
• Actions:Under List, choose DescribeContainer,
• Actions: Under Read, choose GetObject, DescribeObject, GetContainerPolicy.
• Actions: Under Write, choose PutObject.
• Resources: If your organization does not have strict rules about accessing containers on MediaStore,you can ignore this section; you will have access to all containers. Otherwise, follow your internalpolicies to identify specific containers.
• Give the group a name such as ElementalAccessToMediaStore.
For detailed instructions on creating a policy, see IAM User Guide Creating IAM Policies.
Create a user
Follow this procedure to create a user:
1. Open the IAM console at https://console.aws.amazon.com/iam/.
2. On the left menu, choose User. Use the filters to determine if there is already a user for Elementalproducts. The user might be called ElementalUser.
3. If the user does not exist or it does exist but you want to create separate users for each Elementalproduct, choose Add User. (Note that you may want separate users for separate products, but there isprobably no need to create a separate user for each Elemental node.) Follow the prompts to add theuser with this information:
• Give the user a name such as ElementalUser.
• For Access type, choose Programmatic access. Do not choose Console access.
• In permissions, choose Attach existing policies directly. Attach the policy you created above. Forexample, ElementalAccessToMediaStore.
• Ignore tags.
4. Create the user and choose Close.
5. On the left menu, choose Users again:
• Choose the user name, for example, ElementalUser.
• Choose the Security tab.
• Choose Create Access Key.
• On the Create access key dialog, choose to download the .csv file. Save the file in a safe place, sothat you have a permanent record of the Access key ID and the Secret access key.
The Access key ID looks like this:KIAIOSFODNNYEXAMPLE
The Secret access key looks like this: 94afd1f2e64d908bc90dbca0035a5b567EXAMPLE
6. Give the Access key ID and the Secret access key to the AWS Elemental Live operator. Do notgive the username and password to the operator.
Version 2.14 and later43
AWS Elemental Live User GuideStep B: Create output group
This creates an AWS user with the permissions required to let AWS Elemental Live make requeststo MediaStore. When the AWS Elemental Live operator sets up the output with MediaStore as thedestination, they will enter the Access key ID and Secret access key. When the AWS ElementalLive event is running, AWS Elemental Live sends these two IDs to the AWS service, instead of sending theuser name and password. These IDs provide authorization to AWS for the AWS Elemental Live node tomake requests to MediaStore.
Step B: Create the AWS Elemental Live output groupTo set up MediaStore as the destination in the HLS or DASH output group:
1. Obtain the endpoint for the MediaStore container where you want to send the output. For moreinformation, see AWS Elemental MediaStore User Guide Viewing the Details for a Container.
The following is an example of an endpoint:
https://w9710g.data.mediastore.us-west-2.amazonaws.com
2. In the AWS Elemental Live event, go to the HLS or DASH output group and in Output > HTTP PushDialect field, choose AWS Elemental MediaStore.
3. Complete the fields that appear: Retry Interval, Num Retries, FileCache Size, Restart Delay, LogUploads.
For details on these fields, see the field tooltips.4. In the output group > Output > Destination field (above the HTTP Push Dialect field), enter the
destination in the format <endpoint>/path/file/.
For example: https://w9710g.data.mediastore.us-west-2.amazonaws.com/sports/curling/, where https://w9710g.data.mediastore.us-west-2.amazonaws.com/ is theendpoint for the MediaStore container and /sports/curling/ is the name of the MediaStoreobject.
5. Choose the Lock icon. Two more fields appear.• Username/Access Key ID: The Access key ID you created in IAM. For example,
AKIAIOSFODNNYEXAMPL• Password/Secret Access Key: The Secret access key you created in IAM. For example,
wJalrXUtnFEMI/K7MDENG/bPxRfiCYEXAMPLEKEY
Repeat the preceding steps to create a second output in this output group, if applicable.
Configuring SMPTE 2110 outputsYou can include one or more SMPTE 2110 outputs in an AWS Elemental Live event. You can optionallyconfigure the output to implement SMPTE 2022-7, so that the output delivers identical content to twodestinations, which improves resiliency for the downstream system.
For general information about SMPTE 2110 video content, SMPTE 2022-7, NMOS, and SDP files, see thesection called “SMPTE 2110 inputs and outputs” (p. 315).
Topics• Step 1: Get ready (p. 45)• Step 2: Design the workflow (p. 45)• Step 3: Create SMPTE 2110 output group (p. 46)• Step 4: Download and post the SDP file (p. 51)
Version 2.14 and later44
AWS Elemental Live User GuideStep 1: Get ready
Step 1: Get readyBefore you set up a SMPTE 2110 output in an event, read the following information:
• the section called “Setup: Remove bonded interfaces” (p. 323)
• the section called “Setup: Reserve processing cores” (p. 324)
• the section called “Setup: Enable PTP” (p. 324)
Step 2: Design the workflowBefore you start to create the SMPTE 2110 output group, plan the contents, to make sure that youobserve the rules for the number of video, audio, and ancillary data streams that you can include.
Topics
• Design the video (p. 45)
• Design the audio (p. 45)
• Design the ancillary data (p. 46)
Design the videoDecide if you want the output video to be uncompressed or JPEG XS.
The output group can contain only one video output. This Elemental Live output represents one SMPTE2110 stream. If you need multiple SMPTE 2110 streams, you must create one SMPTE 2110 output groupfor each.
Design the audioNotePay attention to the terminology in this section because there is terminology from SMPTE 2110and there is terminology from AWS Elemental Live.A Elemental Live output is a SMPTE 2110 stream.A Elemental Live stream is a SMPTE 2110 essence.A Elemental Live stream contains encodes.
1. Decide how many audio outputs you need. This Live output represents one SMPTE 2110 stream.
Follow these guidelines:
• You need a separate output for each variation of audio codec and bit depth/sample ratecombination. For example:
• One output for PCM audio, and one output for Dolby Digital.
• One output for Dolby Digital Plus, and one output for Dolby Digital Passthrough.
• One output for Dolby Digital with a bit depth of 24 and another output for Dolby Digital with abit depth of 16.
You don't need separate outputs for different channel configurations (PCM) or coding mode (DolbyDigital codecs). For example, in a PCM output, you can include one encode that is PCM 6-channeland one encode that is PCM 2-channel.
• All audio encodes that are in the same output must follow these rules:
• They must have the same sample rate.
• They must have the same bit depth.
Version 2.14 and later45
AWS Elemental Live User GuideStep 3: Create output group
Therefore, for example, you need separate outputs if you want to produce one Dolby Digital 5.1with 24-bit depth and another Dolby Digital 5.1 with 16-bit depth.
2. In each output, decide how many encodes you need. You need one encode for each PCM channelconfiguration or Dolby Digital coding-mode.
For example, to include two PCM stereo channels (perhaps one English and one French), you need twoencodes.
Or to include one Dolby Digital 5.1 and one Dolby Digital stereo pair, you need two encodes.
Result of these decisions
You will have a list of outputs, streams, and encodes. For example:
• One PCM output containing one Elemental Live stream. The stream contains eight 2-channel encodes.• One Dolby Digital output containing one Elemental Live stream. The stream contains one encode, for
5.1 audio.
Design the ancillary dataIn the ancillary data, you configure the output to include or exclude embedded captions and SCTE 104messages.
Embedded captions
1. If your input includes captions, you can convert those captions to embedded captions and includethem in the ancillary data output. For detailed information about setting up captions, see the sectioncalled “Setting up for captions” (p. 138).
2. If you decide to include embedded captions, identify the line where you want them to appear in theVANC (vertical ancillary data space) of the video stream. If you aren't sure which line to use, speak tothe downstream system.
SCTE 104 messages
1. Decide if you want to include ad avail messages in the output. These messages can come from twosources:• SCTE 35 or SCTE 104 ad avail messages already present in the event input. When AWS Elemental
Live ingests the input, SCTE 104 messages are always converted to SCTE 35 messages.• SCTE 35 messages that you insert when the event is running, using the API.
In both cases, AWS Elemental Live converts the messages to SCTE 104 messages in the SMPTE 2110output. For general information about ad avail handling in AWS Elemental Live, see the section called“SCTE-35 and SCTE-104 message processing” (p. 273).
2. If you decide to include ad avail messages, identify the line where you want them to appear in theVANC of the video stream.
Step 3: Create SMPTE 2110 output groupIn a SMPTE 2110 output group, you create one output for the single video, for each audio, and for thesingle (optional) ancillary data stream.
Topics• General procedure (p. 47)
Version 2.14 and later46
AWS Elemental Live User GuideStep 3: Create output group
• Set up the video stream (p. 48)• Set up the audio stream (p. 49)• Set up the ancillary data stream (p. 50)
General procedureFollow this procedure to create an SMPTE 2110 output. This procedure applies if your organization usesNMOS IS-04 and IS-05, and if it doesn't.
NotePay attention to the terminology in this section because there is terminology from SMPTE 2110and there is terminology from AWS Elemental Live.An Elemental Live output is a SMPTE 2110 stream.A Elemental Live stream is a SMPTE 2110 essence.A Elemental Live stream contains encodes.
To configure a SMPTE 2110 output
To create a SMPTE 2110 output on the web interface, you create one SMPTE 2110 output group thatcontains one output for video, one output for audio, and (optionally) one output for ancillary data. Thevideo output contains one stream that contains one video.
1. On the web interface for the event, scroll down to the Additional Global Configuration section.
Open the section and choose Low Framerate Input. We recommend that you enable this field forany event that includes SMPTE 2110 outputs.
2. Scroll down to the Output Groups section and choose the SMPTE 2110 tab.3. In the output group section, complete the NMOS Control field:
• Check this field if your organization has an NMOS registry.• Otherwise, leave the field unchecked.
4. Choose Add Output on the far right of the page. A new output section appears, with a reference toone Elemental Live stream. For example, Stream 1. Assume that this stream is for video.
5. Choose Add Output again for each audio output you want to include. You should have identifiedthe output you need when you designed the audio output (p. 45). Each time you add an output, anew output section appears, with a reference to one Elemental Live stream. For example, Stream 2.
6. Optionally, choose Add Output again to create an output for ancillary data. A new output sectionappears, with a reference to one Elemental Live stream. For example, Stream 3.
Scroll down to the Streams section. There is one Elemental Live stream for each output you created.7. To set up the video stream (for example, Stream 1), hover over Audio 1 and click x. The stream now
contains only a video stream.8. To set up each audio stream (for example, Stream 2), hover over Video and click x. The stream now
contains only an audio stream. If you scroll back up to the output that references this stream, you'llsee that there is now an Audio Settings section.
9. To set up the ancillary data stream (for example, Stream 3), hover over Audio 1 and click x. Thenclick Caption +. The stream now contains a video stream and a captions stream. If you scroll backup to the output that references this stream, you'll see that there is now an Ancillary Data Settingssection.
10. To set up the content of the video, audio, and ancillary data streams, see the sections the sectioncalled “Set up the video stream” (p. 48), the section called “Set up the audio stream” (p. 49),and the section called “Set up the ancillary data stream” (p. 50).
11. When you save the event, AWS Elemental Live creates an SDP file for each output you included inthe output group. The files are stored on your appliance at this location:
Version 2.14 and later47
AWS Elemental Live User GuideStep 3: Create output group
http://locahost/<filename>
For information about the file name, see the section called “Step 4: Download the SDPfile” (p. 51).
12. Follow the appropriate step with the SDP files:
• If you enabled NMOS in the output group, AWS Elemental Live automatically sends the SDP fileto your registry, and your registry processes the information in each file. You don't need to doanything with the files.
• If you didn't enable NMOS, you can download this file so that you can make it available tothe downstream system for this output. See the section called “Step 4: Download the SDPfile” (p. 51).
You must put the files on an HTTP server that is accessible to the downstream system.
Set up the video streamFollow this procedure to set up the video stream.
To set up the video stream
1. Complete the Outputs section:
• RTP Payload Type – Enter a number for the type. For example, 96 for a video stream. If you aren'tsure what number to enter, speak to the administrator of the downstream system.
This number will appear in the m= line in the SDP file.
• Primary Destination and Secondary Destination – These fields appear only if the NMOS Controlfield is unchecked. Complete the two fields in one of these ways:
• If you are not implementing seamless protection switching, complete only the primarydestination.
• If you are implementing seamless protection switching, complete both destinations fields, oneinterface for the primary stream, the other for the secondary stream.
Enter the unicast or multicast address to deliver the video stream to. For example:
rtp://239.x.x.x:5000
This information will appear in the SDP file.
• Interface – complete these two fields in one of these ways:
• If you are not implementing seamless protection switching, complete only Interface.
• If you are implementing seamless protection switching, complete both Interface fields, oneinterface for the primary stream, the other for the secondary stream.
2. Complete the Streams section for the video (for example, Stream 1):
• Video Codec – Choose the codec that you identified when you designed the video (p. 45).
• Interlace Mode – Choose Progressive or Interlaced.
• FourCC (Uncompressed only) – Choose s210 (10-bit 4:2:2 packed).
• Compression Ratio (JPEG XS only) – Choose the compression that the downstream system hasrequested.
• Resolution - Width – Enter a value that meets one of the following conditions:
• A value between 352 and 1152. The value must be divisible by 4.
• A value between 1160 and 2048. The value must be divisible by 8.
Version 2.14 and later48
AWS Elemental Live User GuideStep 3: Create output group
• A value between 2054 and 4096. The value must be divisible by 16.• Resolution - Height – Enter a value that meets one of the following conditions:
• If Interlace Mode is Progressive – a value of 240 or more. The value must be divisible by 4.
If Interlace Mode is Interlaced – a value of 240 or more. The value must be divisible by 8.
• Complete other fields according to your preference.
Many of the fields in this section appear in the a=ftmp line in the SDP file.
Set up the audio stream
To set up the audio stream
Follow this procedure to set up each audio stream.
1. Complete the Outputs section in the same way that you completed the section for the video. Makesure that you enter an RTP payload type that is unique in this SMPTE 2110 output group.
For information on the packet time, see the information after this procedure.2. Add more encodes to each stream, according to your design (p. 45). For example, if your design
includes an output that must contain four stereo PCM channels, you need four encodes in thestream.
3. Complete the Streams section for the video (for example, Stream 1):
• Audio Source – Choose the input selector that identifies the source for this audio. You previouslyset up this selector in the Input section of the event.
• Audio Codec – Choose the codec you identified for this stream when you designed the audio.Choose the same audio codec for all the encodes in this Elemental Live stream.
• Channels (PCM only) – Set the number of channels you identified for this audio when youdesigned the audio.
• Coding Mode (Dolby Digital and Dolby Digital Plus) – Choose the mode you identified for thisaudio when you designed the audio.
• Sample Rate (PCM only) – See the information after this procedure.• Bit Depth – Choose a value. Choose the same value for all the encodes in this Elemental Live
stream.• Complete other fields according to your preference. For Dolby Digital and Dolby Digital Plus, some
of the remaining fields relate to Dolby metadata. For more information, see the section called“Dolby metadata” (p. 102).
Many of the fields in this section appear in the a=ftmp line in the SDP file.
Setting the sample rate and packet rate for PCM audio
Complete the Sample Packet (in the stream section) and the Packet Time field (in the output section).Follow this procedure:
• Identify the number of audio channels in all the encodes in this Elemental Live stream.• Choose a sample rate and a packet time that both fall within the limits for the number of channels, as
specified in the following table.
Version 2.14 and later49
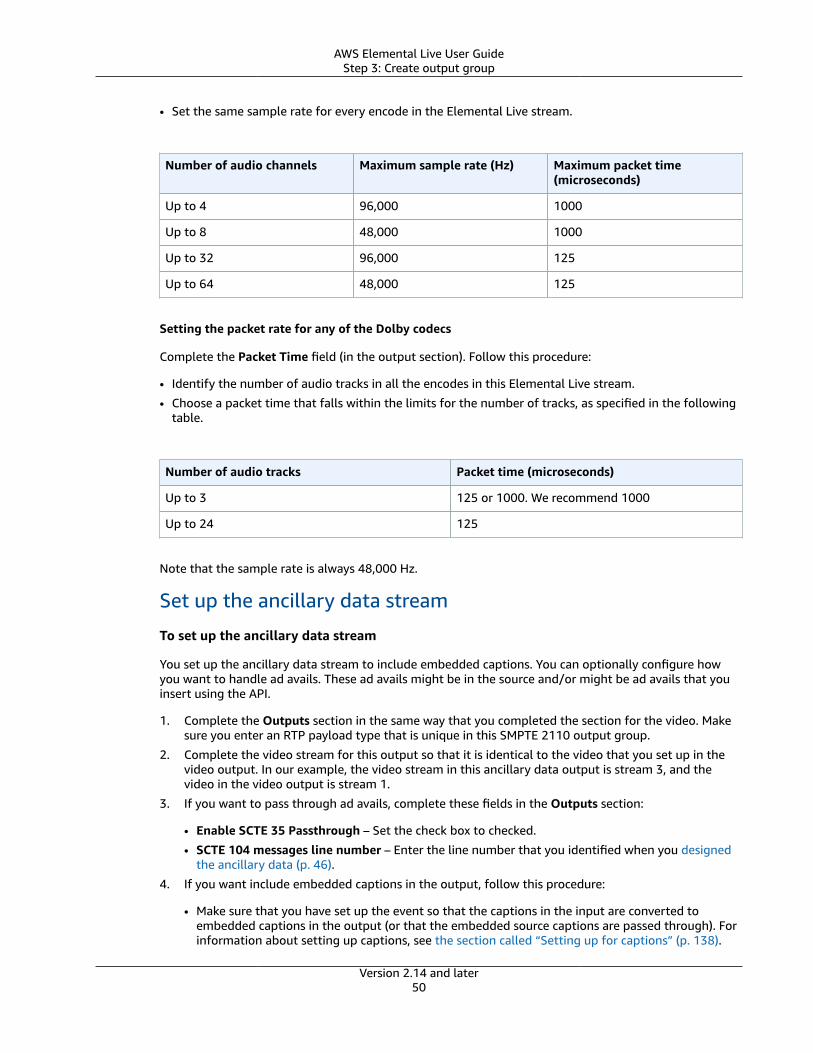
AWS Elemental Live User GuideStep 3: Create output group
• Set the same sample rate for every encode in the Elemental Live stream.
Number of audio channels Maximum sample rate (Hz) Maximum packet time(microseconds)
Up to 4 96,000 1000
Up to 8 48,000 1000
Up to 32 96,000 125
Up to 64 48,000 125
Setting the packet rate for any of the Dolby codecs
Complete the Packet Time field (in the output section). Follow this procedure:
• Identify the number of audio tracks in all the encodes in this Elemental Live stream.
• Choose a packet time that falls within the limits for the number of tracks, as specified in the followingtable.
Number of audio tracks Packet time (microseconds)
Up to 3 125 or 1000. We recommend 1000
Up to 24 125
Note that the sample rate is always 48,000 Hz.
Set up the ancillary data stream
To set up the ancillary data stream
You set up the ancillary data stream to include embedded captions. You can optionally configure howyou want to handle ad avails. These ad avails might be in the source and/or might be ad avails that youinsert using the API.
1. Complete the Outputs section in the same way that you completed the section for the video. Makesure you enter an RTP payload type that is unique in this SMPTE 2110 output group.
2. Complete the video stream for this output so that it is identical to the video that you set up in thevideo output. In our example, the video stream in this ancillary data output is stream 3, and thevideo in the video output is stream 1.
3. If you want to pass through ad avails, complete these fields in the Outputs section:
• Enable SCTE 35 Passthrough – Set the check box to checked.
• SCTE 104 messages line number – Enter the line number that you identified when you designedthe ancillary data (p. 46).
4. If you want include embedded captions in the output, follow this procedure:
• Make sure that you have set up the event so that the captions in the input are converted toembedded captions in the output (or that the embedded source captions are passed through). Forinformation about setting up captions, see the section called “Setting up for captions” (p. 138).
Version 2.14 and later50
AWS Elemental Live User GuideStep 4: Download the SDP file
• In the Outputs section for the ancillary data, for CEA-608-E captions line number, enter the linenumber that you identified when you designed the ancillary data (p. 46).
Step 4: Download and post the SDP fileIf your organization doesn't use NMOS, you must make sure that the downstream system (the SMPTE2110 receiver) can access them:
• If the location is accessible and doesn't need user credentials, provide the downstream systemoperator with the full path so that they can download the SDP files.
• If the location where the files are stored isn't accessible from the public internet, you must downloadthe files and put them on a location that is accessible.
If your organization uses NMOS, skip this step.
Location and syntax of the files
AWS Elemental Live puts the SDP files on the HTTP root folder:
/opt/elemental_se/web/public/
The files are named as follows:
SmpteSt2110Output.LiveEvent_<event ID>.OutputGroup_<output group>_2110-<ID>_<media>_<unique number on node>.sdp
For example:
SmpteSt2110Output.LiveEvent_123.OutputGroup_curling_smpte_2110.2110-20_video_473.sdp
The key pieces of information are:
• 123 – The number for this event, unique on this AWS Elemental Live node.• curling – The name you assigned to this output group.• 2110-20_video – Identifies this file type. In this example, it's an SDP file for uncompressed video.• 473 – A number that is unique for this AWS Elemental Live node.
To locate and download the SMPTE 2110 SDP file
1. From your output, select View Logs.2. Select the eme log to view its contents.3. Within the eme log, search for Writing SDP file to. You will find a line for the video, and a line
for the audio. Copy the portions that follow /opt/elemental_se/web/public/ for each line.These are your SDP files. For example:
SmpteSt2110Output.LiveEvent_123.OutputGroup_curling_smpte_2110.2110-20_video_473.sdp
4. If you don't know the IP address of your AWS Elemental Live appliance, find it now. In the AWSElemental Live web interface, choose Settings. (Don't choose Input Devices or Routers from thesubmenu).
On the Settings page, choose the Network tab, then choose the Current Settings tab. Make a noteof the IP addresses in the Domain Name Servers section.
5. Download the file using a suitable tool to connect from a computer that is on your network to theAWS Elemental Live appliance. For example:
Version 2.14 and later51
AWS Elemental Live User GuideTS output using SRT
• On a PC, use Windows Share protocol. Connect to:
\\<IP address>\opt\elemental_se\web\public\
• On a Mac, use Samba. Connect to:
smb://<IP address>/opt/elemental_se/web/public/
6. Download the files. Then put the files on an HTTP server that you know the receiver can access.
Delivering TS using the SRT protocolYou can deliver a transport stream (TS) output using the SRT protocol. You can choose to encrypt thecontent with AES. This SRT delivery option is part of the Reliable TS output group.
NoteThe SRT option is intended for sending to a downstream system other than AWS ElementalMediaConnect.To send to an SRT flow on MediaConnect, we recommend that you use the Reliable TSoutput group with the AWS Elemental MediaConnect option. See the section called“MediaConnect” (p. 37).
There are two ways to configure the transmission, one with AWS Elemental Live as the SRT caller, onewith AWS Elemental Live as the SRT listener. (In both cases, AWS Elemental Live is the sender. In otherwords, don't confuse the sender/receiver roles with the caller/listener roles.)
Typically, the decision about the caller/listener roles is made by the downstream destination:
• If the downstream destination is set up as the listener, then AWS Elemental Live must set up as thecaller.
• If the downstream destination is set up as the caller, then AWS Elemental Live must set up as thelistener.
The SRT caller always initiates the handshake that precedes successful transmission of the output. TheSRT listener accepts or rejects the handshake.
Topics• Getting ready (p. 52)• Creating the output (p. 53)
Getting readyBefore you create an SRT output in your event, perform the following preparation.
• Decide if you want to deliver redundant streams in the output. Each stream has a different destinationon the downstream system. The downstream destination initially handles one stream. If that streamfails, the downstream destination can switch to the other stream.
You should find out if the downstream destination can handle this type of resiliency. If they can't thenthere is no point to delivering two streams.
If you do want to deliver two streams, you must make sure that your content provider can send youtwo copies of the source. The two copies must be completely identical.
• Decide if you want to encrypt the content. If you do, discuss the following with the downstreamdestination:
Version 2.14 and later52
AWS Elemental Live User GuideCreate the output
• Discuss the encryption level with the administrator of the downstream system. Both sides must usethe same level. You can use AES 128, AES 192, or AES 256. You should provide this information tothe downstream destination so that they can set up with the same level.
• Agree on a passphrase that you will both use for encryption. It can be any length because it's not theencryption key itself, it's just used to generate the encryption key. The passphrase can use an ASCIIcharacters including spaces.
• Discuss the following with the administrator of the downstream destination:
• Find out the role of the downstream destination in the transmission—either the SRT caller or theSRT listener. If you can't obtain this information, then you could assume that the downstreamdestination is the listener, which is typically the case.
• Obtain the IP address and port for each destination for the output. For example,192.168.1.2:5000.
• Make sure that the administrator of the downstream system sets up to allow AWS Elemental Liveto access the destination. For example, they might need to open ports on the destination, or allowtraffic from the public IP address of AWS Elemental Live.
• Tell the downstream destination the latency (in milliseconds) that you plan to configure into AWSElemental Live for packet loss and recovery. Packet recovery is a key feature of SRT. The downstreamdestination should choose a latency value that is close to the value that you plan to use.
•
• Note that AWS Elemental Live doesn't use an SRT stream ID when delivering output.
Creating the outputThe setup for the output is identical for both roles (caller or listener), except for the SRT ConnectionMode
1. In the AWS Elemental Live event, go to Output Groups, then to Reliable TS.
2. Choose Add Output to create an output in this Reliable TS output group.
3. Set Delivery Protocol to SRT.
4. Set SRT Connection Mode to the mode for AWS Elemental Live—Caller or Listener.
5. Complete the fields for the primary destination:
• Primary Destination/Amazon Resource Name: The IP address and port on the downstream system.For example:
srt://192.168.1.2:5000
• Interface: Optional. See the tooltip.
• Stream ID: Leave blank.
• Latency: Enter the value that you decided to use.
• Encryption: Choose None, or choose an level.
• Key Value /Passphrase: If you chose an encryption level, enter the passphrase that you decided touse.
6. Complete the fields for the secondary destination, if you decided to deliver redundant streams.
Delivering TS output using the Zixi protocolYou can deliver TS output using the Zixi protocol. The destination is considered to be a Zixi broadcaster.You can choose to encrypt the content with AES. This Zixi delivery option is part of the Reliable TSoutput group.
Version 2.14 and later53
AWS Elemental Live User GuideGet ready
NoteThe Zixi option is intended for sending to a downstream system other than AWS ElementalMediaConnect.To send to a Zixi flow on MediaConnect, we recommend that you use the Reliable TSoutput group with the AWS Elemental MediaConnect option. See the section called“MediaConnect” (p. 37).
The Zixi protocol involves two roles—the caller and the listener. The caller always initiates the handshakethat precedes successful transmission of the output. The listener accepts or rejects the handshake.
With the Zixi option in the Reliable TS output group, AWS Elemental Live is always the Zixi caller, whichmeans the downstream system must be the Zixi listener.
Getting readyBefore you create a Zixi output in your event, perform the following preparation.
• Speak to the administrator of the downstream system and make sure that they can work as the Zixilistener. If they can't, then you can't deliver using the Zixi option.
• Decide if you want to deliver redundant streams in the output. Each stream has a different destinationon the downstream system. The downstream destination initially handles one stream. If that streamfails, the downstream destination can switch to the other stream.
You should find out if the downstream destination can handle this type of resiliency. If they can't thenthere is no point to delivering two streams.
If you do want to deliver two streams, you must make sure that your content provider can send youtwo copies of the source. The two copies must be completely identical.
• Decide if you want to encrypt the content. If you do, discuss the following with the downstreamdestination:• Discuss the encryption level with the administrator of the downstream system. Both sides must use
the same level. You can use AES 128, AES 192, or AES 256. You should provide this information tothe downstream destination so that they can set up with the same level.
• Agree on an encryption key value. The value is an ASCII representation of hexadecimal bytes. Thelength must be correct for the encryption level. For example, for AES 128, it must be a 32-characterstring of 16 hexadecimal bytes.
• Discuss the following with the administrator of the downstream destination:• Obtain the IP address and port for each destination for the output. For example,198.51.100.0:2088.
• Make sure that the administrator of the downstream system sets up to allow AWS Elemental Liveto access the destination. For example, they might need to open ports on the destination, or allowtraffic from the public IP address of AWS Elemental Live.
• Tell the downstream destination the latency (in milliseconds) that you plan to configure into AWSElemental Live for packet loss and recovery. Packet recovery is a key feature of Zixi. The downstreamdestination should choose a latency value that is close to the value that you plan to use.
•
Creating the output1. In the AWS Elemental Live event, go to Output Groups > Reliable TS.2. Choose Add Output to create an output in this Reliable TS output group.3. Complete the fields in each output as follows:
• Delivery Protocol: Zixi
Version 2.14 and later54
AWS Elemental Live User GuideCreate the output
• Destination/Amazon Resource Name: Enter the IP address (that you obtained from the operator ofthe downstream system), a colon, and the port (default is 2088). For example:
zixi://198.51.100.0:2088
• Interface: Optional. See the tooltip.• If the downstream system requires that you authenticate, obtain the username and password from
them. Then choose the Lock icon and complete the fields that appear.• Username/Access Key ID: The username.• Password/Secret Access Key: The password.
• Stream ID: Enter the stream ID that you and the operator of the downstream system agreed on. It isrequired.
• Latency: See the tooltip.• Encryption: Choose None, or choose an algorithm. The downstream system must support the
algorithm you choose.• Key Value: Enter the encryption key that you and the operator of the downstream system agreed
on. See the tooltip.
Repeat the preceding steps to create a second output in this output group, if applicable. Use the sameuser name and password. You can also use the same encryption key, if you are encrypting.
Version 2.14 and later55
AWS Elemental Live User GuideColor space
Working with VideoThis chapter describes how to set up the video features of AWS Elemental Live.
Topics• Working with color space (p. 56)• Dolby Vision color space (p. 76)• Setting up QVBR and rate control mode (p. 76)• Setting up for ultra-low latency (p. 78)• Handling video quality (p. 79)
Working with color spaceYou can control how AWS Elemental Live handles the color space that a video source. You can set up anevent to perform one of these actions on the color space:
• You can set up to pass through the color space. AWS Elemental Live doesn't touch the color space orthe color space metadata.
In this case, you might need to adjust the color space metadata in the input. For example, you mightwant to do this if you know that the color space metadata is incorrect or missing.
• You can set up to remove the color space metadata, because you aren't interested in including it in theoutputs. AWS Elemental Live doesn't touch the color space but it removes the metadata.
• You can set up to convert the color space itself—to change the pixels in the video.AWS Elemental Livechanges both the color space and the color space metadata.
You can set up each output in the event for different handling. For example, you can set up one outputto remove the color space metadata, one to convert it to a different color space, and another to convertit to a second different color space.
By default, AWS Elemental Live doesn't convert the color space (in the output) or change the color spacemetadata (in the input). It passes through the source color space and metadata to the output.
Topics• Color space versus video resolution (p. 56)• General information about color space (p. 57)• Configuring the handling in the input (p. 60)• Configuring color space handling in each output (p. 67)• The results of different types of conversions (p. 72)• Location of HDR fields on the web interface (p. 74)• Location of HDR fields in the XML (p. 75)
Color space versus video resolutionColor space refers to the range of color. AWS Elemental Live supports the following color spaces:
Version 2.14 and later56

AWS Elemental Live User GuideGeneral information
• SDR (standard dynamic range)
• HDR (high dynamic range)
Resolution refers to the video pixel count. AWS Elemental Live supports the following resolutions:
• SD (standard definition).
• HD (high definition).
• UHD (ultra-high definition). For UHD, AWS Elemental Live supports resolutions up to 4K.
The following combinations of color space and resolution are typically used:
• SDR color space can be associated with SD, HD, and UHD video.
• HDR color space can be associated with HD or UHD video.
HDR isn't typically associated with SD content, but AWS Elemental Live does support this combination.
General information about color spaceFollowing is some general information about color space.
Topics
• Definitions (p. 57)
• Supported color space standards (p. 57)
• Requirements for inputs (p. 58)
• Requirements for outputs (p. 59)
• Support for conversion and passthrough (p. 59)
DefinitionsThere are four aspects to color space:
• The specific color space that applies to the video content. The color space specifies a range of pixelcolors that can apply to the content.
• The color space metadata, which identifies the color space being used. If this metadata is present, thecontent is said to be marked for a color space.
• The brightness function that applies to the color space. The brightness function controls the brightnessof each pixel. The brightness is also known as gamma tables, lookup tables (LUT), electro-opticaltransfer function (EOTF), and transfer function.
• The brightness metadata, which identifies the brightness function being used.
• The display metadata that applies to the color space. Not all standards have this metadata.
The source video might use a specific color space and a specific brightness function. The source videomight also carry color space metadata that describes aspects of the color.
Supported color space standardsEach color space has different standards for the three sets of color data.
Version 2.14 and later57
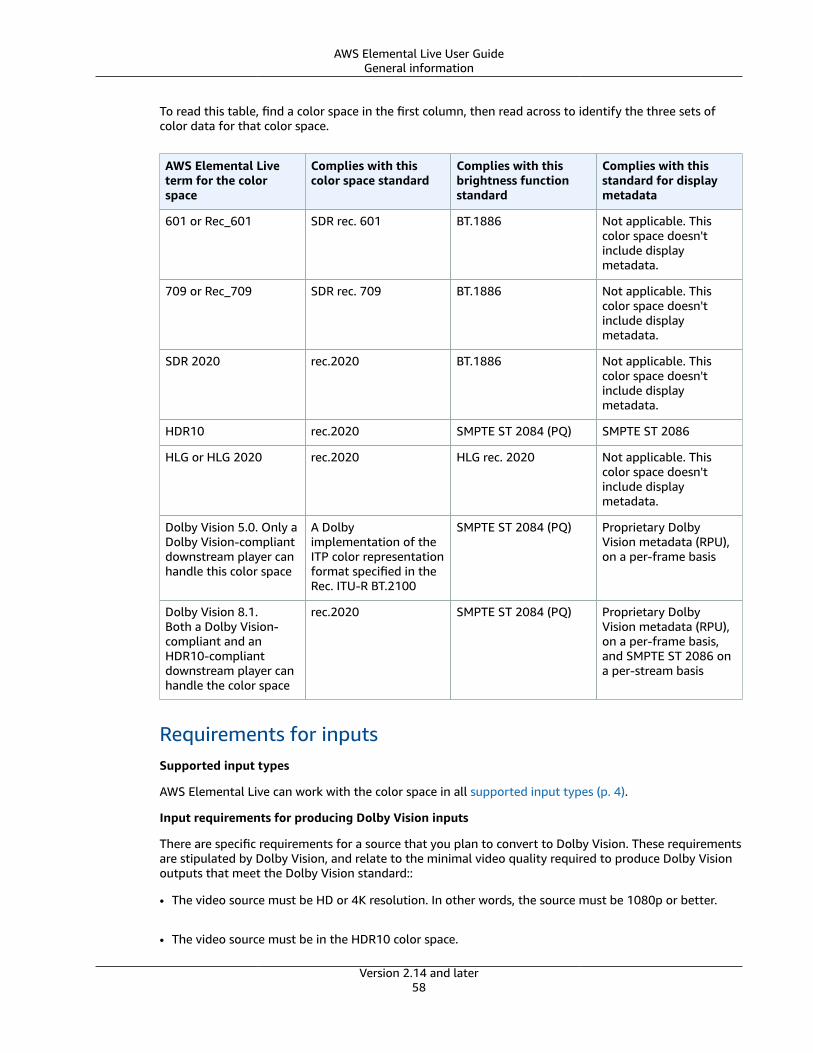
AWS Elemental Live User GuideGeneral information
To read this table, find a color space in the first column, then read across to identify the three sets ofcolor data for that color space.
AWS Elemental Liveterm for the colorspace
Complies with thiscolor space standard
Complies with thisbrightness functionstandard
Complies with thisstandard for displaymetadata
601 or Rec_601 SDR rec. 601 BT.1886 Not applicable. Thiscolor space doesn'tinclude displaymetadata.
709 or Rec_709 SDR rec. 709 BT.1886 Not applicable. Thiscolor space doesn'tinclude displaymetadata.
SDR 2020 rec.2020 BT.1886 Not applicable. Thiscolor space doesn'tinclude displaymetadata.
HDR10 rec.2020 SMPTE ST 2084 (PQ) SMPTE ST 2086
HLG or HLG 2020 rec.2020 HLG rec. 2020 Not applicable. Thiscolor space doesn'tinclude displaymetadata.
Dolby Vision 5.0. Only aDolby Vision-compliantdownstream player canhandle this color space
A Dolbyimplementation of theITP color representationformat specified in theRec. ITU-R BT.2100
SMPTE ST 2084 (PQ) Proprietary DolbyVision metadata (RPU),on a per-frame basis
Dolby Vision 8.1.Both a Dolby Vision-compliant and anHDR10-compliantdownstream player canhandle the color space
rec.2020 SMPTE ST 2084 (PQ) Proprietary DolbyVision metadata (RPU),on a per-frame basis,and SMPTE ST 2086 ona per-stream basis
Requirements for inputsSupported input types
AWS Elemental Live can work with the color space in all supported input types (p. 4).
Input requirements for producing Dolby Vision inputs
There are specific requirements for a source that you plan to convert to Dolby Vision. These requirementsare stipulated by Dolby Vision, and relate to the minimal video quality required to produce Dolby Visionoutputs that meet the Dolby Vision standard::
• The video source must be HD or 4K resolution. In other words, the source must be 1080p or better.
• The video source must be in the HDR10 color space.
Version 2.14 and later58
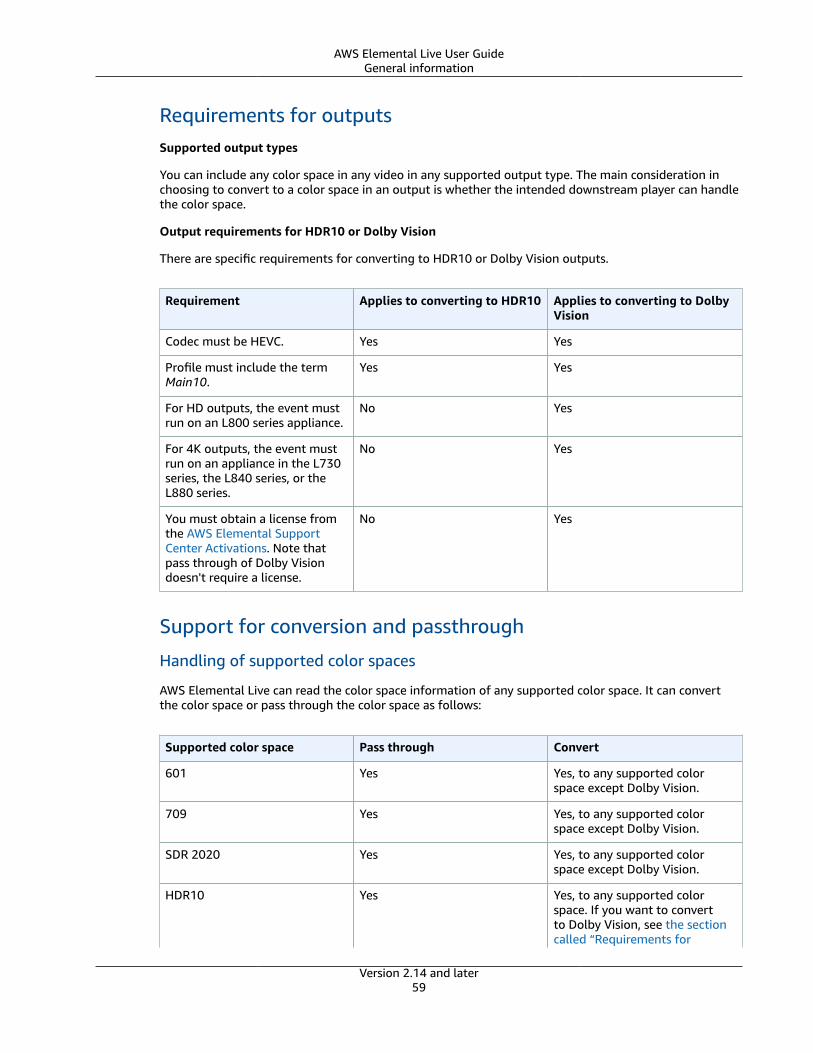
AWS Elemental Live User GuideGeneral information
Requirements for outputsSupported output types
You can include any color space in any video in any supported output type. The main consideration inchoosing to convert to a color space in an output is whether the intended downstream player can handlethe color space.
Output requirements for HDR10 or Dolby Vision
There are specific requirements for converting to HDR10 or Dolby Vision outputs.
Requirement Applies to converting to HDR10 Applies to converting to DolbyVision
Codec must be HEVC. Yes Yes
Profile must include the termMain10.
Yes Yes
For HD outputs, the event mustrun on an L800 series appliance.
No Yes
For 4K outputs, the event mustrun on an appliance in the L730series, the L840 series, or theL880 series.
No Yes
You must obtain a license fromthe AWS Elemental SupportCenter Activations. Note thatpass through of Dolby Visiondoesn't require a license.
No Yes
Support for conversion and passthrough
Handling of supported color spaces
AWS Elemental Live can read the color space information of any supported color space. It can convertthe color space or pass through the color space as follows:
Supported color space Pass through Convert
601 Yes Yes, to any supported colorspace except Dolby Vision.
709 Yes Yes, to any supported colorspace except Dolby Vision.
SDR 2020 Yes Yes, to any supported colorspace except Dolby Vision.
HDR10 Yes Yes, to any supported colorspace. If you want to convertto Dolby Vision, see the sectioncalled “Requirements for
Version 2.14 and later59
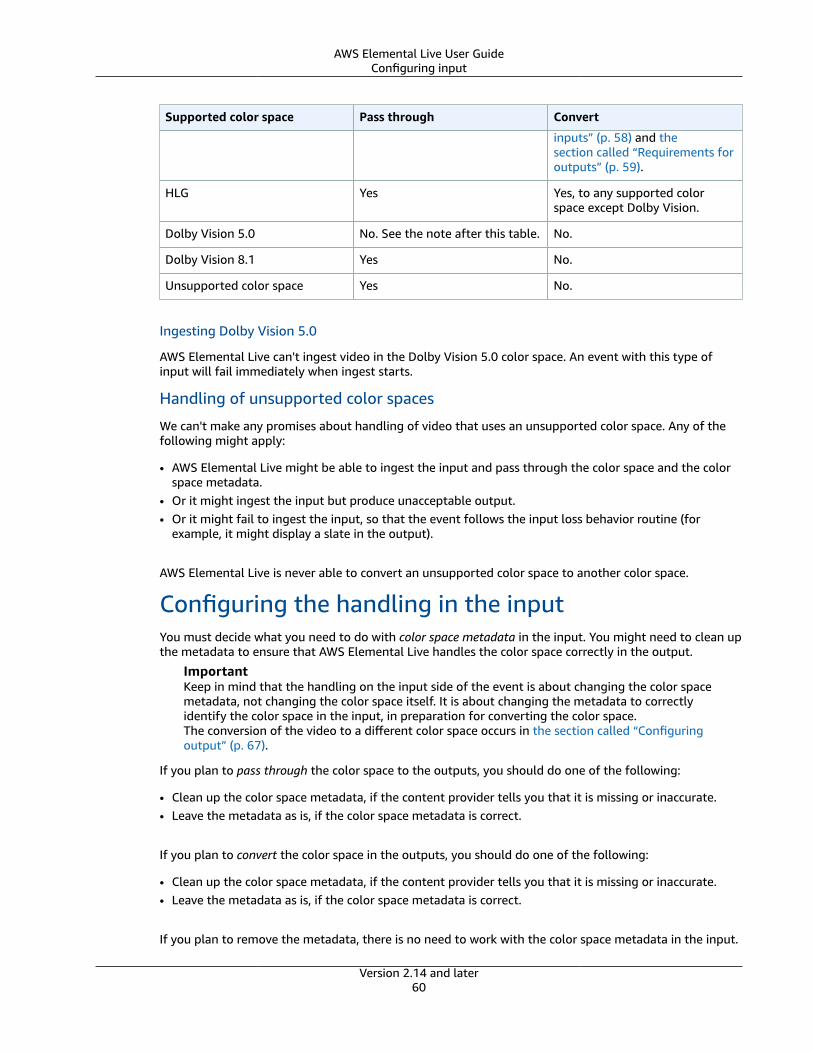
AWS Elemental Live User GuideConfiguring input
Supported color space Pass through Convert
inputs” (p. 58) and thesection called “Requirements foroutputs” (p. 59).
HLG Yes Yes, to any supported colorspace except Dolby Vision.
Dolby Vision 5.0 No. See the note after this table. No.
Dolby Vision 8.1 Yes No.
Unsupported color space Yes No.
Ingesting Dolby Vision 5.0
AWS Elemental Live can't ingest video in the Dolby Vision 5.0 color space. An event with this type ofinput will fail immediately when ingest starts.
Handling of unsupported color spaces
We can't make any promises about handling of video that uses an unsupported color space. Any of thefollowing might apply:
• AWS Elemental Live might be able to ingest the input and pass through the color space and the colorspace metadata.
• Or it might ingest the input but produce unacceptable output.• Or it might fail to ingest the input, so that the event follows the input loss behavior routine (for
example, it might display a slate in the output).
AWS Elemental Live is never able to convert an unsupported color space to another color space.
Configuring the handling in the inputYou must decide what you need to do with color space metadata in the input. You might need to clean upthe metadata to ensure that AWS Elemental Live handles the color space correctly in the output.
ImportantKeep in mind that the handling on the input side of the event is about changing the color spacemetadata, not changing the color space itself. It is about changing the metadata to correctlyidentify the color space in the input, in preparation for converting the color space.The conversion of the video to a different color space occurs in the section called “Configuringoutput” (p. 67).
If you plan to pass through the color space to the outputs, you should do one of the following:
• Clean up the color space metadata, if the content provider tells you that it is missing or inaccurate.• Leave the metadata as is, if the color space metadata is correct.
If you plan to convert the color space in the outputs, you should do one of the following:
• Clean up the color space metadata, if the content provider tells you that it is missing or inaccurate.• Leave the metadata as is, if the color space metadata is correct.
If you plan to remove the metadata, there is no need to work with the color space metadata in the input.
Version 2.14 and later60
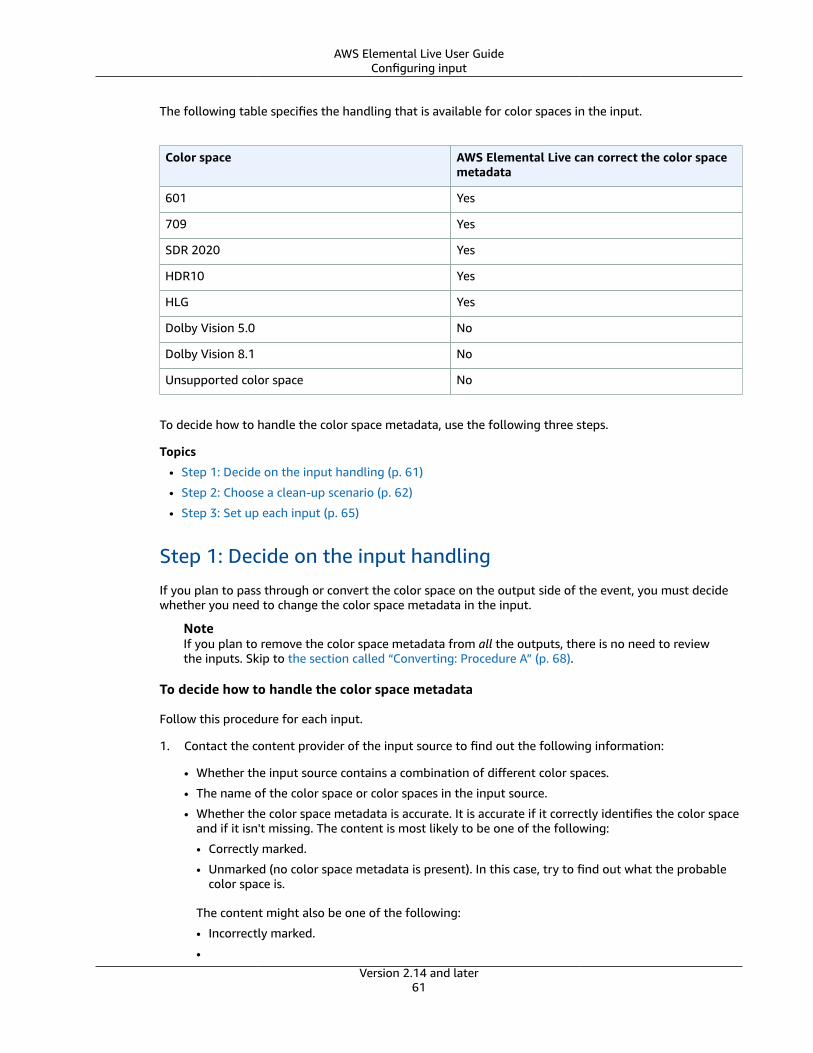
AWS Elemental Live User GuideConfiguring input
The following table specifies the handling that is available for color spaces in the input.
Color space AWS Elemental Live can correct the color spacemetadata
601 Yes
709 Yes
SDR 2020 Yes
HDR10 Yes
HLG Yes
Dolby Vision 5.0 No
Dolby Vision 8.1 No
Unsupported color space No
To decide how to handle the color space metadata, use the following three steps.
Topics
• Step 1: Decide on the input handling (p. 61)
• Step 2: Choose a clean-up scenario (p. 62)
• Step 3: Set up each input (p. 65)
Step 1: Decide on the input handling
If you plan to pass through or convert the color space on the output side of the event, you must decidewhether you need to change the color space metadata in the input.
NoteIf you plan to remove the color space metadata from all the outputs, there is no need to reviewthe inputs. Skip to the section called “Converting: Procedure A” (p. 68).
To decide how to handle the color space metadata
Follow this procedure for each input.
1. Contact the content provider of the input source to find out the following information:
• Whether the input source contains a combination of different color spaces.
• The name of the color space or color spaces in the input source.
• Whether the color space metadata is accurate. It is accurate if it correctly identifies the color spaceand if it isn't missing. The content is most likely to be one of the following:
• Correctly marked.
• Unmarked (no color space metadata is present). In this case, try to find out what the probablecolor space is.
The content might also be one of the following:
• Incorrectly marked.
•Version 2.14 and later
61
AWS Elemental Live User GuideConfiguring input
• Marked as unknown.
• Marked with a color space that AWS Elemental Live doesn't support (p. 59) and thereforedoesn't read.
• If the color space metadata isn't accurate or is missing, and if the color space is HDR10, obtain thevalues that the content provider intends for the HDR10 master display metadata.
• If you plan to convert the color space to HDR10 or Dolby Vision, find out whether the source videois Full Range or Video Range. You will need this information in order to correctly set the VideoRange field in the output.
If the content provider can't provide accurate information about the color space or its metadata,you might choose at this point to remove the color space metadata. Move on to the next input.Or if this is the only input, stop reading this section and go to the section called “Configuringoutput” (p. 67).
2. Make a note of the information:
• The names of the color spaces.
• If applicable, the values for the HDR10 display metadata.
• If applicable, whether the source video is full range or video range.
Step 2: Choose a clean-up scenarioRead the following scenarios to decide if you need to clean up the color space metadata in each input.
The following rules apply:
• If you are planning to convert the color space on the output side, keep in mind that the conversion willapply only to marked content. So if you use cleanup to insert missing metadata, you can increase thepercentage of the content that gets converted in the output.
•
• The cleanup options don't convert the color space. Instead, cleanup options work on the metadata thatis attached to the video.
• You should only clean up the color space if you are sure that all the unmarked portions use the colorspace that you choose. If the cleanup results in marking content as being in a specific color space whenit isn't, then the video color quality will be degraded in the output.
Topics
• Scenario A – Pass through accurate metadata (p. 62)
• Scenario B – Convert accuratelymarked color space (p. 63)
• Scenario C – Remove metadata (p. 63)
• Scenario D – Correct the metadata (p. 63)
• Scenario E – Correct the metadata in one color space (p. 64)
• Scenario F – Correct the metadata in multiple color spaces (p. 64)
Scenario A – Pass through accurate metadata
The details of this scenario are the following:
• Intended handling in the output – Pass through the color space.
• Status of the input – The video content is any combination of color spaces—SDR, HDR, or both.
Version 2.14 and later62
AWS Elemental Live User GuideConfiguring input
• Status of the input color space metadata – The metadata is correct.
Recommendation:
• Color Space field – Set to FOLLOW• Force Color field – AWS Elemental Live ignores this field.
During ingest, AWS Elemental Live will retain (pass through) the metadata.
Scenario B – Convert accuratelymarked color space
The details of this scenario are the following:
• Intended handling in the output – Convert the color space and metadata.• Status of the input color space – The video content is any combination of color spaces—SDR, HDR, or
both.• Status of the input color space metadata – The metadata is correct.
Recommendation:
• Color Space field – Set to FOLLOW.• Force Color field – AWS Elemental Live ignores this field.
During ingest, AWS Elemental Live will retain (pass through) the metadata.
Scenario C – Remove metadata
The details of this scenario are the following:
• Intended handling in the output – Remove the color space metadata.• Status of the input – The video content is any combination of color spaces—SDR, HDR, or both.• Status of the input color space metadata – The metadata can be of any quality.
Recommendation:
• Color Space field – Set to FOLLOW.• Force Color field – AWS Elemental Live ignores this field.
During ingest, AWS Elemental Live will retain (pass through) the metadata. You plan to remove themetadata, so you don't care about its quality.
Scenario D – Correct the metadata
The details of this scenario are the following:
• Intended handling in the output – Convert or pass through the color space.• Status of the input – The video content is one color space. For example, the content is all REC_601.• Status of the input color space metadata – Some of the metadata is missing, marked as unknown, or
marked as a color space that AWS Elemental Live doesn't support.
In addition, some of the metadata is wrong. For example, it is marked as HDR10, but in fact, it isREC_601.
Version 2.14 and later63
AWS Elemental Live User GuideConfiguring input
So in this scenario, the video content is all one color space, but the color space metadata doesn'tcorrectly indicate that fact.
Recommendation:
• Color Space field – Set to the color space that applies to the video content.• Force Color field – Set to FORCE.
During ingest, AWS Elemental Live will create metadata of the specified color space for all missing,unmarked, and unknown metadata.
It will also force all existing metadata to match the specified color space. Therefore, all the content in theinput will be consistently marked as belonging to one color space.
Scenario E – Correct the metadata in one color space
The details of this scenario are the following:
• Intended handling in the output – Convert or pass through the color space.• Status of the input – The video content is any combination of color spaces—REC_601, REC_709, HDR,
and HLG.• Status of the input color space metadata – The metadata for the video content of one color space
is a mixture of acceptable and unacceptable. The metadata for that content is missing, marked asunknown, or marked as a color space that AWS Elemental Live doesn't support. But in fact, all thatcontent should be marked as one specific color space, for example, as REC_601.
The metadata for content for any other color space is correct. For example, the metadata for REC_709content and HDR10 content is correct.
Recommendation:
• Color Space field – Set to the color space that has unacceptable metadata.• Force Color field – Set to FALLBACK.
During ingest, AWS Elemental Live will create metadata of the specific color space for all missing,unmarked, and unknown video content. It will retain existing metadata.
If you clean up the metadata in this way, AWS Elemental Live might be able to handle the color spaceappropriately in the output. However, if the color map of the output is wrong in whole or in part, thevideo source was probably in a color space that AWS Elemental Live can't handle.
Scenario F – Correct the metadata in multiple color spaces
The details of this scenario are the following:
• Intended handling in the output – Convert or pass through the color space.• Status of the input – The video content is in more than one color space. For example, the content is a
mix of REC_601, REC_709, and HDR10.• Status of the input color space metadata – The metadata for one color space is missing, wrong, marked
as unknown, or marked as a color space that AWS Elemental Live doesn't support. For example, thecolor space is REC_601, but its corresponding metadata is unreliable.
In addition, the metadata for one or more other color spaces is also missing, wrong, unknown, or notsupported. For example, the color space of that content is HLG, but its corresponding metadata isunreliable.
Version 2.14 and later64

AWS Elemental Live User GuideConfiguring input
Recommendation:
There is no way to clean up this content because you can only mark all the content as one type of colorspace. But in this scenario, the metadata is incorrect in different types of color space.
If you force the color space, some of it will be forced to be correct, but some of it will be forced toincorrect information. Inaccurate metadata will result in an inaccurate conversion (if you convert in theoutput), or in an inferior viewing experience (if you pass through in the output).
The best recommendation we can provide is to remove the metadata on the output side, as described inscenario C (p. 63).
If you remove the metadata, AWS Elemental Live might be able to handle the color space appropriatelyin the output. However, if the color map of the output is wrong in whole or in part, the video source wasprobably in a color space that AWS Elemental Live can't handle.
Step 3: Set up each inputTo set up each input in the event
NoteThis section assumes that you are familiar with creating or editing an event.
1. On the Event page, in the Input section, open the Advanced section. More fields appear.2. In the Video selector section, set the appropriate values for Color Space and Force Color.
In the following table, each row shows a valid combination of the two fields and the result of thatcombination.
Color Space field Force Color field HDR Master DisplayInformation field
Result
FOLLOW This field is ignored. Passthrough. AWSElemental Live doesn'tchange the color spacemetadata.
REC_601 or REC_709or
HLG
Force Cleanup. AWSElemental Live marksall the content asusing the specifiedcolor space.
HDR10 Force See /the sectioncalled “Tips forHDR master displayinformation” (p. 66)
Cleanup. AWSElemental Live marksall the content asusing HDR10, and setsthe metadata to thespecified values.
REC_601 or REC_709or
HLG
Fallback Cleanup. AWSElemental Live marksthe content as usingthe specified colorspace only for portionsthat are marked asfollows:
• Unmarked
Version 2.14 and later65

AWS Elemental Live User GuideConfiguring input
Color Space field Force Color field HDR Master DisplayInformation field
Result
• Marked as unknown• Marked with an
unsupported colorspace
HDR10 Fallback See /the sectioncalled “Tips forHDR master displayinformation” (p. 66)
Cleanup. AWSElemental Live marksthe content as usingthe specified colorspace only for portionsthat are marked asfollows:
• Unmarked• Marked as unknown• Marked with an
unsupported colorspace
AWS Elemental Livemarks the relevantportions as usingHDR10, and setsthe metadata to thespecified values.
Tips for HDR master display information
The HDR Master Display Information fields appear in the color space fields if you set the Color Spacefield to HDR10. Take the appropriate action:
• Complete these fields only if your plan is to pass through this color space to the output, and only ifthe content provider has told you that the content currently doesn't include this metadata. For detailsabout a field on the web interface, choose the question mark next to the field.
If the content provider has told you that the content already contains the metadata, leave these fieldsblank.
Make sure to obtain values used in the color grading process for the input. You can't use the defaultsor null values and expect to obtain valid color results. It's better to set the fields to null values, ratherthan to make up values.
• Don't complete these fields if your plan is to convert from this HDR10 color space to another colorspace.
Red, green, blue, white point x and y
Your content provider might provide numbers like this for X and Y points:
• G (x=0.265, y=0.690)
• B (x=0.150, y=0.060)
• R (x=0.680, y=0.320)
Version 2.14 and later66
AWS Elemental Live User GuideConfiguring output
You must convert these numbers to numbers like this:
• G (13250, 34500)• B (7500, 3000)• R (34000, 16000)
To convert between the two formats, divide each number by 0.00002 as per the HEVC specification.
For example, 0.265 divided by 0.00002 is 13250.
Max luminance and min luminance
The maximum and minimum luminance are given in units of 0.0001 candelas per square meter. Yourcontent provider might provide this value in candelas per square meter instead. If so, then convert thesenumbers by multiplying by 10,000, then entering the result in the web interface.
For example, a value of 1000.0000 cd/m2 for max luminance would be converted to 10,000,000 andentered as that in the web interface.
Configuring color space handling in each outputAfter you have set up each input in the event, you must configure the outputs for the desired handling ofcolor space. You can do the following:
• Convert the color space in the content to a different color space in the output. See the section called“Supported color space standards” (p. 57) for the supported conversions.
• Remove the color space metadata. AWS Elemental Live doesn't touch the color space itself, it onlyremoves the color space metadata.
You might choose to remove the color space metadata in situations such as the following:• The pixel data and color space data in the input is incorrect, so that the downstream player can't use
it to enhance the color.• The color space (and its metadata) changes frequently within the input, or between one input and
another, and you know that there is a system downstream of AWS Elemental Live that can't handlechanges in the metadata.
Keep in mind that removing metadata doesn't necessarily make the color poorer. Removing it mightonly mean that the downstream player can't implement enhancements to make the color even richer.
• Pass the color space metadata and the color space through to the output.
You can set up each output with different color space handling. For example, you can create one outputthat passes through the original color space, and another that converts it.
NoteAWS Elemental Live converts from one color space to another based on the metadata in thecontent. AWS Elemental Live doesn't examine the video to try to determine whether it actuallymatches the color space identified in the metadata. Therefore, to successfully convert, themetadata must be as accurate as possible. To correct the metadata, see the section called“Configuring input” (p. 60).
Topics• Passing through color space (p. 68)• Converting color space: Procedure A (p. 68)• Converting color space: Procedure B (p. 69)• Removing color space metadata (p. 71)
Version 2.14 and later67
AWS Elemental Live User GuideConfiguring output
Passing through color spaceYou can pass through any color space that AWS Elemental Live supports, except for Dolby Vision 5.0. Youcan pass through This includes both color spaces that AWS Elemental Live supports, and color spacesthat it doesn't support.
NoteThis section assumes that you are familiar with creating or editing an event.
To set up each output
Follow this procedure in each output.
1. On the Event page, in the Output groups section, choose the output group, and choose the outputthat contains the video.
2. Open the Advanced section. More fields appear.3. Leave Insert Color Metadata checked. You should never remove the color metadata if you are
passing through the color space.4. Scroll down to the Preprocessors section and turn on Color Corrector. More fields appear.5. Set Color Space Conversion to None, which means you don't want to convert the color space.
The following table shows how AWS Elemental Live handles each type of color space that it encounters.Each row in the table describes a different handling.
Color space metadata that AWS Elemental Liveencounters
How AWS Elemental Live handles the colorspace
Content in any color space that AWS ElementalLive supports
It doesn't touch the color space or brightness (thepixel values) in the output.
It passes through any of the three sets ofmetadata that are present.
Content marked with unknown or an unsupportedcolor space
It doesn't touch the color space or brightness (thepixel values) in the output.
It leaves the content as marked with the unknowncolor space.
It passes through any brightness metadata anddisplay metadata.
Content with no color space metadata It doesn't touch the color space or brightness (thepixel values) in the output.
It leaves the content as unmarked (no color spacemetadata).
Converting color space: Procedure AFollow this procedure to convert to one of these color spaces:
• 601• 709• SDR2020
Version 2.14 and later68
AWS Elemental Live User GuideConfiguring output
• HLG
For information on the source color spaces that you can convert to one of these color spaces, see thesection called “Support for conversion and passthrough” (p. 59).
For information about the results of conversion, see the section called “The results of different types ofconversions” (p. 72).
NoteThis section assumes that you are familiar with creating or editing an event.
To set up each output
Follow this procedure in each output.
1. On the Event page, in the Output groups section, choose the output group, and choose the outputthat contains the video.
2. Open the Advanced section. More fields appear.3. Scroll down to the Preprocessors section and turn on Color Corrector. More fields appear.4. Complete fields in the Video section as described in the following table
Field Description
Video Codec Choose any codec.
Advanced, then Insert Color Metadata Leave this field checked.
You should never remove the color metadata ifyou are converting the color space.
Video Range Choose the correct option. For details, choose theicon above the field.
Preprocessors, then Color Space Conversion Choose the correct conversion:
Force 601
Force 709
Force SDR2020
Force HLG 2020
Converting color space: Procedure BFollow this procedure to convert to one of these color spaces:
• HDR10• Dolby Vision
For information on the source color spaces that you can convert to one of these color spaces, see thesection called “Support for conversion and passthrough” (p. 59).
For information about the results of conversion, see the section called “The results of different types ofconversions” (p. 72).
Version 2.14 and later69
AWS Elemental Live User GuideConfiguring output
To set up each output
NoteThis section assumes that you are familiar with creating or editing an event.
Follow this procedure in each output.
1. On the Event page, in the Output groups section, choose the output group, and choose the outputthat contains the video.
2. Open the Advanced section. More fields appear.
3. Scroll down to the Preprocessors section and turn on Color Corrector. More fields appear.
4. Complete fields in the Video section as described in the following table.
Field Description
Video Codec If you are converting to HDR10, choose MPEG-4AVC (H.264) or HEVC (H.265).
If you are converting to Dolby Vision, chooseHEVC (H.265).
Advanced, then Insert Color Metadata Leave this field checked.
You should never remove the color metadata ifyou are converting the color space.
Advanced, then Profile
This field is towards the end of the Advancedsection
Choose a profile that includes the term Main10.
Preprocessors, then Video Range Choose the correct option, according to theinformation you obtained from the contentprovider (p. 61):
• If the video input is full range, choosePassthrough.
• If the video input is video range, choose FullSwing.
Preprocessors, then Color Space Conversion Choose the correct conversion:
Force HDR10
Dolby Vision Profile 5
Dolby Vision Profile 8.1
Preprocessors, then HDR Master DisplayInformation
These fields appear after you complete the ColorSpace Conversion.
You can optionally complete the HDR MasterDisplay Information fields. For informationabout master display information, see thesection called “Tips for HDR master displayinformation” (p. 71).
Version 2.14 and later70

AWS Elemental Live User GuideConfiguring output
Tips for HDR master display information
The HDR Master Display Information fields appear if you are converting to HDR10 or Dolby Vision. Takethe appropriate action:
• If you have previously converted similar content to HDR10 and a color grading specialist in yourorganization has given you metadata, then enter it here. The values to enter here depend on thedownstream player, so there is no point to asking your content provider for values.
For details about a field on the web interface, choose the question mark next to the field.• If you don't have metadata to use, set all fields to null values. It's better to set the fields to null values,
rather than to make up values or to use the default values.
Red, green, blue, white point x and y
Your color grader might provide numbers like this for X and Y points:
• G (x=0.265, y=0.690)• B (x=0.150, y=0.060)• R (x=0.680, y=0.320)
You must convert these numbers to numbers like this:
• G (13250, 34500)• B (7500, 3000)• R (34000, 16000)
To convert between the two formats, divide each number by 0.00002 as per the HEVC specification.
For example, 0.265 divided by 0.00002 is 13250.
Max luminance and min luminance
The maximum and minimum luminance are given in units of 0.0001 candelas per square meter. Yourcolor grader might provide this value in candelas per square meter instead. If so, then convert thesenumbers by multiplying by 10,000, then entering the result in the web interface.
For example, a value of 1000.0000 cd/m2 for max luminance would be converted to 10,000,000 andentered as that in the web interface.
Removing color space metadataFollow this procedure in each output where you want to remove the color space metadata.
You might choose to remove the color space metadata in situations such as the following:
• The pixel data and color space data in the input is incorrect, so that the downstream player can't use itto enhance the color.
• The color space (and its metadata) changes frequently within the input, or between one input andanother, and you know that there is a system downstream of AWS Elemental Live that can't handlechanges in the metadata.
Keep in mind that removing metadata doesn't necessarily make the color poorer. Removing it might onlymean that the downstream player can't implement enhancements to make the color even richer.
Version 2.14 and later71

AWS Elemental Live User GuideThe results of different types of conversions
NoteThis section assumes that you are familiar with creating or editing an event.
To set up each output
1. On the Event page, in the Output groups section, choose the output group, and choose the outputthat contains the video.
2. Open the Advanced section. More fields appear.
3. Set Insert Color Metadata to unchecked.
4. Scroll down to the Preprocessors section and turn on Color Corrector. More fields appear.
5. Set Color Space Conversion to None, which means you don't want to convert the color space.
The following table shows how AWS Elemental Live handles each type of color space it encounters.
Color space metadata that AWS Elemental Liveencounters
How AWS Elemental Live handles the colorspace
Content in any color space that AWS ElementalLive supports
Content with no color space metadata
Content with unknown or unsupported colorspace metadata
It doesn't touch the color space or brightness (thepixel values) in the output.It removes all the metadata. The output won'tcontain any color space metadata, brightnessmetadata, or display metadata.
The results of different types of conversionsFollowing is information about how AWS Elemental Live handles the different types of conversion of thecolor space.
Topics
• Converting one SDR color space to another (p. 72)
• Converting an SDR color space to HDR (p. 73)
• Converting one HDR color space to another (p. 73)
• Converting an HDR color space to SDR (p. 73)
• Converting HDR10 to Dolby Vision 5.0 or 8.1 (p. 73)
• Converting other color spaces to Dolby Vision 5.0 or 8.1 (p. 74)
• Converting a mixed color space to one color space (p. 74)
Converting one SDR color space to anotherYou can convert an SDR color space to another SDR color space. In this case, AWS Elemental Live makesthe following changes:
• It changes pixels to values that represent the same color as the original values. The video now fits inthe larger color space.
• It changes the color space metadata to identify the new color space.
• It applies the same brightness function to the video, because all the SDR color spaces use the samefunction.
Version 2.14 and later72
AWS Elemental Live User GuideThe results of different types of conversions
After the conversion, the video complies completely with the new color space.
Converting an SDR color space to HDRYou can convert an SDR color space to HDR10 or HLG color space. In this case, AWS Elemental Live makesthe following changes:
• It changes the pixel values, if necessary, to fit the colors into the different color space.• It changes the color space metadata to identify the new color space.• It applies the new brightness function to the video.• If converting to HDR10, it calculates display metadata for the video.
After the conversion, the video fits in the new color spaces, but the color is not any richer than before theconversion. However, the bright parts of the video are brighter, and the dark parts are darker.
Converting one HDR color space to anotherYou can convert video between the HDR10 color space and the HLG color space, in either direction. Inthis case, AWS Elemental Live makes the following changes:
• It changes the pixel values, if necessary, to fit the colors into the different color space.• It changes the color space metadata to identify the new color space.• It applies the new brightness function to the video.• If converting to HDR10, it calculates display metadata for the video.
After the conversion, the video complies completely with the new color space. The color will be slightlydifferent, but probably not more or less rich. The color will match the new brightness function.
Converting an HDR color space to SDRYou can convert HDR10 or HLG video to an SDR color space. In this case, AWS Elemental Live makes thefollowing changes:
• It changes the pixel values, if necessary, to fit the colors into the smaller color space.• It changes the color space metadata to identify the new color space.• It applies the new brightness function to the video.• It removes any display metadata because the SDR color spaces don't include display metadata.
After the conversion, the video complies completely with the new color space. The color will be less rich.The color will match the new brightness function.
Converting HDR10 to Dolby Vision 5.0 or 8.1You can convert video in the HDR10 color space to Dolby Vision 5.0 or 8.1.
If you convert the video to Dolby Vision 5.0, video players that are Dolby Vision-compliant will be ableto play it. If you convert the video to Dolby Vision 8.1, video players that are Dolby Vision-compliant andvideo players that are HDR10-compliant will be able to play it.
When you convert a suitable video to Dolby Vision, AWS Elemental Live makes the following changes:
• It doesn't change the pixel values, because HDR10 and Dolby Vision both use the same color space.
Version 2.14 and later73
AWS Elemental Live User GuideLocation of HDR fields on the web interface
• It changes the color space metadata to identify the new color space.
• It applies the new brightness function to the video.
• It calculates the Dolby Vision display metadata for the video.
After the conversion, the video fits in the new color spaces, but the color is not any richer than before theconversion, because the color space hasn't changed. However, the bright parts of the video are brighter,and the dark parts are darker.
Converting other color spaces to Dolby Vision 5.0 or 8.1You shouldn't convert non-HDR10 video to Dolby Vision. For example, you shouldn't convert SDR 601 toDolby Vision. Converting a non-HDR10 video to Dolby Vision doesn't comply with the usage intended byDolby Vision. After conversion of the color space, the color map of the video will be completely wrong.
The only color space that you should convert to Dolby Vision is HDR10.
Converting a mixed color space to one color spaceThe video in your input or inputs might contain a mix of color spaces. You can still set up to convert thesecolor spaces to one color space.
In this case, AWS Elemental Live makes the following changes to the pixel values:
• For color spaces where it supports conversion, AWS Elemental Live changes the pixel values to valuesthat are appropriate to the new color space. See the sections (p. 72) that describe the otherconversions.
• It doesn't change the pixel values for video in unsupported color spaces, or video that has no colorspace metadata. See the section called “Handling of unsupported color spaces” (p. 60) for moreinformation.
• It doesn't change the pixel values for Dolby Vision 8.1 video because AWS Elemental Live doesn't readthe color space metadata for Dolby Vision. On the input side, AWS Elemental Live treats Dolby Vision8.1 as an unknown color space.
• Keep in mind that AWS Elemental Live can't ingest Dolby Vision 5.0 (p. 60), so the handling isirrelevant.
AWS Elemental Live makes the following changes to the metadata:
• If it converts the color space, it changes the color space metadata to identify the new color space. Itapplies the new brightness function to the video.
• If it leaves the color space unchanged, it also leaves the metadata unchanged.
Location of HDR fields on the web interface• Input > Video Selector > Color Space
• Input > Video Selector > Force Color
• Input > Video Selector > HDR Master Display Information group of fields
• Stream > Video > Video Codec
• Stream > Video > Insert Color Metadata (near the top of the tab)
• Stream > Video > Profile (near the bottom of the tab)
• Stream > Video > Preprocessors > Color Corrector > Color Space Conversion
Version 2.14 and later74
AWS Elemental Live User GuideLocation of HDR fields in the XML
Location of HDR fields in the XML
Input > Video Selector > Color Space input/video_selector/color_space
Input > Video Selector > Force Color input/video_selector/force_color
input/video_selector/hdr10_metadata/blue_primary_x
input/video_selector/hdr10_metadata/blue_primary_y
input/video_selector/hdr10_metadata/green_primary_x
input/video_selector/hdr10_metadata/green_primary_y
input/video_selector/hdr10_metadata/max_content_light
input/video_selector/hdr10_metadata/max_luminescence
input/video_selector/hdr10_metadata/max_picture_avg_light
input/video_selector/hdr10_metadata/min_luminescence
input/video_selector/hdr10_metadata/red_primary_x
input/video_selector/hdr10_metadata/red_primary_y
input/video_selector/hdr10_metadata/white_point_x
Input > Video Selector > HDR Master DisplayInformation group of fields
input/video_selector/hdr10_metadata/white_point_y
Stream > Video > Video Codec stream_assembly/video_description/codec
Stream > Video > Insert Color Metadata stream_assembly/video_description/insert_color_metadata
Stream > Video > Profile stream_assembly/video_description/profile
Stream > Video > Preprocessors > ColorCorrector > Color Space Correction > ColorSpace Conversion
stream_assembly/video_description/color_corrector/color_space_conversion
stream_assembly/video_description/color_corrector/hdr10_metadata/blue_primary_x
Stream > Video > Preprocessors > ColorCorrector > Color Space Correction > HDRMaster Display Information group of fields
stream_assembly/video_description/video_preprocessors/color_corrector/hdr10_metadata/blue_primary_y
Version 2.14 and later75
AWS Elemental Live User GuideDolby Vision HDR10
stream_assembly/video_description/video_preprocessors/color_corrector/hdr10_metadata/green_primary_x
stream_assembly/video_description/video_preprocessors/color_corrector/hdr10_metadata/green_primary_y
stream_assembly/video_description/video_preprocessors/color_corrector/hdr10_metadata/max_content_light
stream_assembly/video_description/video_preprocessors/color_corrector/hdr10_metadata/max_luminescence
stream_assembly/video_description/video_preprocessors/color_corrector/hdr10_metadata/max_picture_avg_light
stream_assembly/video_description/video_preprocessors/color_corrector/hdr10_metadata/min_luminescence
stream_assembly/video_description/video_preprocessors/color_corrector/hdr10_metadata/red_primary_x
stream_assembly/video_description/video_preprocessors/color_corrector/hdr10_metadata/red_primary_y
stream_assembly/video_description/video_preprocessors/color_corrector/hdr10_metadata/white_point_x
stream_assembly/video_description/video_preprocessors/color_corrector/hdr10_metadata/white_point_y
Dolby Vision color spaceThe information for handling video that is in the Dolby Vision color space has changed. AWS ElementalLive no longer requires source video to contain the RPUs that are used to produce some of the colorspace metadata. Now, AWS Elemental Live produces the metadata without relying on external RPUs.
In addition, the information for Dolby Vision has been integrated into the standard section on colorspace, the section called “Color space” (p. 56).
Setting up QVBR and rate control modeThe Rate Control Mode fields in the Video section of each output on the AWS Elemental Live webinterface let you control the quality and bitrate of the video.
Version 2.14 and later76

AWS Elemental Live User GuideQVBR and rate control mode
When encoding visually complex video (such as high-motion sports events with brightly dressed crowdsin the background), there is always a trade-off between high video quality and low bitrate. Higher videoquality requires higher bitrate. There is less trade-off with visually simple video such as cartoons.
AWS Elemental Live offers several options that provide different balances of video quality versus bitrate.
Do the following to set the rate control mode and bitrate for the output:
• In Event > Streams > Video > Video Code, choose H.264
• In Event > Streams > Video > Advanced > Rate Control Mode for Video, for Codec settings, select thedesired option. For information about choosing the best option, see the sections below.
• Complete other fields, as appropriate:
• If you select QVBR, complete Max bitrate, Quality level, Buffer size, and Buffer fill percentage.
• If you select VBR, complete Bitrate (average bitrate), Max bitrate, Buffer size, and Buffer fillpercentage.
• If you select CBR, complete Bitrate, Buffer size, and Buffer fill percentage.
NoteWe do not recommend use of either the CQ or ABR options. The Statmux option only appliesif you have the Statmux option enabled on AWS Elemental Live and only if you are creating a"statmux output".
Quality-defined variable bitrate mode (QVBR)
With quality-defined variable bitrate mode (QVBR), you specify a maximum bitrate and a quality level.Video quality will match the specified quality level except when it is constrained by the maximum bitrate.This constraint occurs when the video is very complex, so that it is not possible to reach the quality levelwithout exceeding the maximum bitrate.
We recommend this mode if you or your viewers pay for bandwidth, for example, if you are delivering toa CDN or if your viewing users are on mobile networks.
When selecting QVBR, set the quality level and maximum bitrate for your most important viewingdevices. Set the buffer size to twice the maximum bitrate, and set the initial buffer to 90%. Set the Buffersize to twice (2x) the Max bitrate and set the Buffer fill percentage to 90%. The buffer contributes to asmooth playout.
The following table lists the recommended values for this mode:
Viewing device Quality level Max bitrate
Primary screen 8 to 10 4,000,000 to 6,000,000
PC or tablet 7 1,500,000 to 3,000,000
Smartphone 6 1,000,000 to 1,500,000
With this mode, the bitrate can change with each frame (in order to obtain at least the specified quality),but it cannot exceed the maximum bitrate. AWS Elemental Live does not attempt to maintain an averagebitrate. It always hits the maximum bitrate if that is necessary to obtain the specified quality. On theother hand, if the quality can be obtained with lower bitrates, AWS Elemental Live does not use a higherbitrate.
Variable bitrate mode (VBR)
Version 2.14 and later77
AWS Elemental Live User GuideUltra-low latency
With variable bitrate mode (VBR), you specify an average bitrate and a maximum bitrate. Video qualityand bitrate vary, depending on the video complexity.
Select VBR instead of QVBR if you want to maintain a specific average bitrate over the duration of thechannel. If bitrate does not need to be constrained, then consider using QVBR.
When selecting VBR, try to assess the expected complexity of the video, and set a suitable averagebitrate. Set the maximum bitrate to accommodate expected spikes. Set the Buffer size to twice (2x) theMax bitrate and set the Buffer fill percentage to 90%. The buffer contributes to a smooth playout.
With this mode, the bitrate can change with each frame (in order to obtain the best quality) but it cannotexceed the specified maximum bitrate. AWS Elemental Live also ensures that as the channel progresses,the stream meets the specified average bitrate. This mode is useful when you expect short spikes in thecomplexity of the video. AWS Elemental Live aims for the average bitrate but spikes to the maximumbitrate for a short time when necessary.
Constant bitrate mode (CBR)
With constant bitrate mode (CBR), you specify a bitrate. Video quality varies, depending on the videocomplexity.
Select CBR only if you distribute your assets to devices that cannot handle variable bitrates. But if it isacceptable for the bitrate to occasionally differ from a specified rate, then consider using VBR or QVBRinstead. Over the duration of the channel, you might obtain both a lower bitrate and better quality withVBR or QVBR.
When selecting CBR, set the bitrate to balance the video quality and the output bitrate. Set the Buffersize to twice (2x) the Max bitrate and set the Buffer fill percentage to 90%. The buffer contributes to asmooth playout.
With this mode, the output always matches the specified bitrate. Sometimes that bitrate results inhigher-quality video, and sometimes it results in lower-quality video.
Setting up for ultra-low latencyIf you are sending output to an HTTP server or to AWS Elemental MediaStore, you can produce ultra-lowlatency outputs if you create a DASH output and enable chunked encoding and chunked transfer.
With chunked encoding and transfer AWS Elemental Live delivers more quickly, without any decreasein quality. When you enable chunked encoding and transfer, AWS Elemental Live divides the video intofragments, with several fragments in each segment. AWS Elemental Live delivers the fragments beforethe entire segment is complete. Delivery of smaller chunks more frequently can speed up handling bythe downstream system, assuming that the downstream system can handle the frequency.
From the AWS Elemental Live side, this feature works with any downstream system that can acceptDASH. But you should always discuss your requirements with the downstream system administrator, tomake sure that they are prepared to accept the output.
Setup
NoteThe information in this section assumes that you are familiar with the general steps for creatingan event.
To produce an ultra-low latency DASH output, create a DASH output group in the usual way, with theseadditions:
1. Enable Chunked Encoding.
Version 2.14 and later78
AWS Elemental Live User GuideVideo quality
2. Change Fragment Length and Segment Length if necessary. For information on these fields, choosethe ? icon that appears when you hover over the field name.
3. In HTTP Push Dialect, choose the appropriate option. The Chunked Transfer field appears.4. Enable Chunked Transfer.
Handling video qualityTopics
• Image processing controls (p. 79)• Encoding controls (p. 87)
Image processing controlsTopics
• Image processing – Scaling content (p. 79)• Image processing – Color correction (p. 80)• Image processing – Scan type – Key controls (p. 81)• Image processing – Scan type – Secondary fields (p. 84)• Image processing – Noise reduction (p. 85)• Image processing – Framerate conversion (p. 85)
Image processing – Scaling content
Description
Scaling content is typically applied to adjust source content to better match the intended output devicescreen size or to optimize the resolution of a video output for a particular bitrate. Typically, the lower thebitrate, the smaller the resolution. These settings relate to scaling.
• Resolution (width, height): Controls the number of pixels encoded (e.g. 1280x720, 640x480)• Stretch to Output: Controls the aspect ratio of video content itself. For example, if Stretch to Output
is enabled and source content with a resolution of 1280x720 (16:9) is transcoded to 640x480 (4:3), theresulting output video appears skewed as the aspect ratio of the video content is modified.
• Anti-alias: Choose Bilinear Interpolation or the variable-tap Lanczos filter. In almost all cases, theLanczos filter provides much better quality when scaling video content, with a small impact onperformance.
Recommendations
Enable Anti-alias unless speed is of utmost importance and video quality is not.
Location of fields
Stream – Video > Resolution stream_assembly/video_description/resolution
Stream – Video > Stretch to output stream_assembly/video_description/stretch_to_output
Version 2.14 and later79
AWS Elemental Live User GuideImage processing controls
Stream – Video > Resolution stream_assembly/video_description/resolution
Stream – Video > Anti-alias stream_assembly/video_description/anti_alias
Image processing – Color correction
Description
In some situations, color correction can be used to adjust the visual color representation of content:
• Brightness / Contrast / Hue / Saturation: Provide basic pixel luma and chroma adjustment.
• Video Range: Expands the pixel value range from 16-235 vs 0-255 (full-swing encoding). Set to true toset to full-swing encoding or set to false to pass through the encoding.
Set to "true" only if you are sure the range of the input is not full-swing. If it is full-swing and youchoose "true", the blacks and whites in the output are clipped.
• Color Space Conversion: Adjusts pixel values from input to output color space (e.g. REC-601).
• Set to "None" to perform no conversion.
• Set to "Force 601" or "Force 709" to convert inputs with differing colorspaces. When choosing eitherof these options, either the metadata must specify the colorspace of the input or you must manuallyspecify that colorspace via the Color Space field in the Video Selector section. If the input colorspaceis not specified in one of these ways, AWS Elemental Live ignores the selected value and does not doany conversion.
Recommendations
Color adjustment does not affect output quality so there are no specific recommendations.
Location of fields
The following table lists each field by its location on the web interface and shows the location of thecorresponding tag in the XML.
Location of field on web interface Location of tag in XML
Input > Video Selector > Color Space input/video_selector/color_space
Stream – Video > Advanced > Preprocessors >Color Corrector > Brightness
stream_assembly/video_description/video_preprocessor/
color_corrector/brightness
Stream – Video > Advanced > Preprocessors >Color Corrector > Contrast
stream_assembly/video_description/video_preprocessor/
color_corrector/contrast
Stream – Video > Advanced > Preprocessors >Color Corrector > Hue
stream_assembly/video_description/video_preprocessor/
color_corrector/hue
Stream – Video > Advanced > Preprocessors >Color Corrector > Saturation
stream_assembly/video_description/video_preprocessor/
Version 2.14 and later80
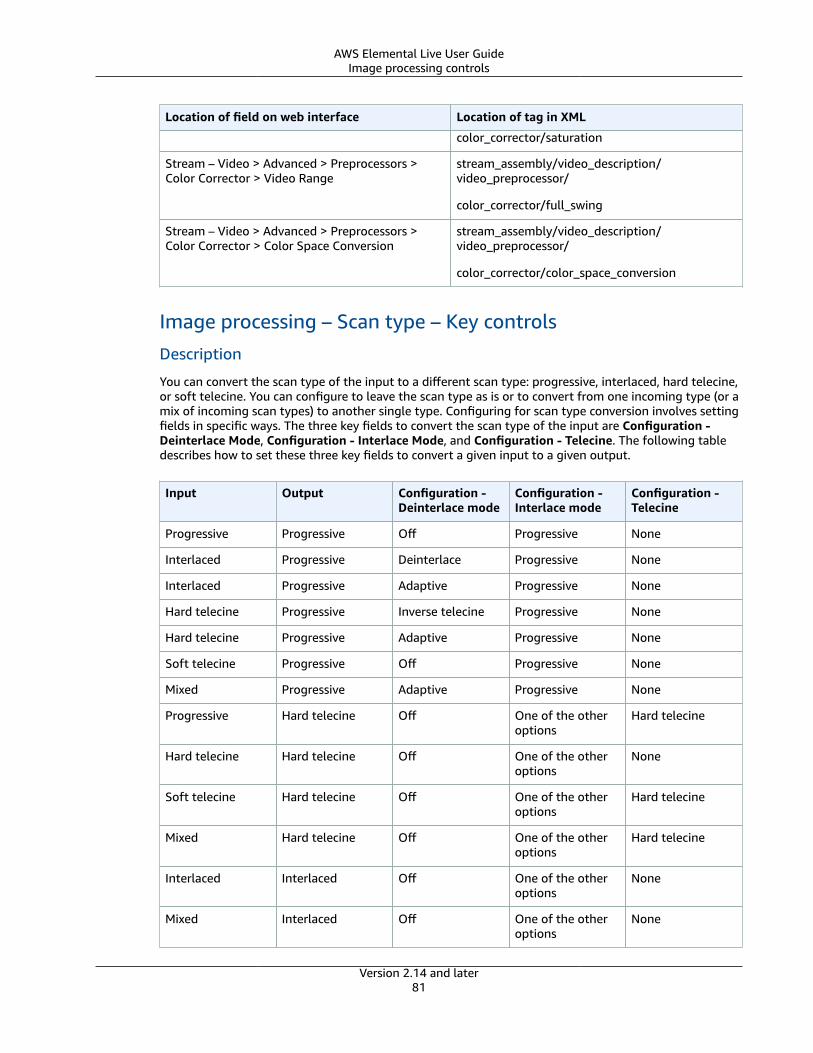
AWS Elemental Live User GuideImage processing controls
Location of field on web interface Location of tag in XML
color_corrector/saturation
Stream – Video > Advanced > Preprocessors >Color Corrector > Video Range
stream_assembly/video_description/video_preprocessor/
color_corrector/full_swing
Stream – Video > Advanced > Preprocessors >Color Corrector > Color Space Conversion
stream_assembly/video_description/video_preprocessor/
color_corrector/color_space_conversion
Image processing – Scan type – Key controlsDescription
You can convert the scan type of the input to a different scan type: progressive, interlaced, hard telecine,or soft telecine. You can configure to leave the scan type as is or to convert from one incoming type (or amix of incoming scan types) to another single type. Configuring for scan type conversion involves settingfields in specific ways. The three key fields to convert the scan type of the input are Configuration -Deinterlace Mode, Configuration - Interlace Mode, and Configuration - Telecine. The following tabledescribes how to set these three key fields to convert a given input to a given output.
Input Output Configuration -Deinterlace mode
Configuration -Interlace mode
Configuration -Telecine
Progressive Progressive Off Progressive None
Interlaced Progressive Deinterlace Progressive None
Interlaced Progressive Adaptive Progressive None
Hard telecine Progressive Inverse telecine Progressive None
Hard telecine Progressive Adaptive Progressive None
Soft telecine Progressive Off Progressive None
Mixed Progressive Adaptive Progressive None
Progressive Hard telecine Off One of the otheroptions
Hard telecine
Hard telecine Hard telecine Off One of the otheroptions
None
Soft telecine Hard telecine Off One of the otheroptions
Hard telecine
Mixed Hard telecine Off One of the otheroptions
Hard telecine
Interlaced Interlaced Off One of the otheroptions
None
Mixed Interlaced Off One of the otheroptions
None
Version 2.14 and later81

AWS Elemental Live User GuideImage processing controls
Input Output Configuration -Deinterlace mode
Configuration -Interlace mode
Configuration -Telecine
Progressive Soft telecine Off One of the otheroptions
Soft telecine
Hard telecine Soft telecine Inverse telecine One of the otheroptions
Soft telecine
Hard telecine Soft telecine Adaptive One of the otheroptions
Soft telecine
Soft telecine Soft telecine Off One of the otheroptions
Soft telecine
Mixed Soft telecine Adaptive One of the otheroptions
Soft telecine
* Deinterlace Mode is an image processing control. Interlace Mode and Telecine are encoding controls.
Note: Converting the scan type to progressive
If content is not being converted to a higher framerate, the deinterlacer outputs one frame for everytwo fields in the source content (i.e., 1080i30 content is converted to 1080p30). If the framerate is beingdoubled (e.g. 29.97 fps to 59.94 fps, 29.97 to 60, or 25 to 50), the deinterlacer converts each field into aframe.
Deinterlace mode
This field applies an initial conversion for certain from/to conversions (as shown in the table above).
• Deinterlace: Applies a deinterlace algorithm to content. If AWS Elemental Live detects that the sourcecontent is already progressive, no deinterlacing is applied.
• Inverse Telecine: Converts hard telecine 29.97i to progressive 23.976p.
• Adaptive: Analyzes source content to determine whether to apply the deinterlace or inverse telecinealgorithm on source content.
Interlace mode
This field controls video field order and how the scan type is represented in the output bitstream.
• Progressive: Encodes output as "progressive."
• Top Field First or Bottom Field First: Forces field polarity (top or bottom first) to the specified value,reordering fields if the source has a different order and encodes the result as interlaced.
• Follow (Default Top) and Follow (Default Bottom): Produces interlaced output, with the outputhaving the same field polarity as the source. Therefore:
• If the source is "interlaced", the output is interlaced with the same polarity as the source (it followsthe source). The output could therefore be a mix of “top field first” and “bottom field first.”
• If the source is "progressive", the output is interlaced with “top field first” or “bottom field first”polarity (depending on which Follow option you chose).
Telecine
This field appears for MPEG-4 AVC and MPEG-2 only if the Streams > Advanced > framerate field is set to29.970.
Version 2.14 and later82
AWS Elemental Live User GuideImage processing controls
• Hard: Produce 29.97i output from 23.976 input.
• Soft: Produce 23.976; the player converts this output to 29.97i.
Recommendations
• Converting to progressive output always improves output quality and should be enabled in any usecase where progressive output is required or acceptable.
• Interlace coding is inherently less efficient than progressive coding so use interlace coding only forcontent that has already been interlaced.
• The choice of deinterlacing algorithm is very subjective. Motion Adaptive Interpolation is generallyrecommended as the sharper image quality tends to provide the best perceived quality across abroad set of users. Use the Force Mode option for deinterlacing only when the input is known to beinterlaced content incorrectly flagged as "progressive."
• Use the Force Mode option for Inverse Hard Telecine when the input is known to consist entirely ofHard Telecine content.
Location of fields
Location of field on web interface Location of tag in XML
Streams > Advanced > Telecine stream_assembly/video_description/codec/telecine
where codec is one of the following:
• h264_settings
• mpeg2_settings
• h265_settings
• prores_settings
Streams > Advanced > Interlace Mode stream_assembly/video_description/codec/interlace_mode
where codec is one of the following:
• vc1_settings
• h264_settings
• mpeg2_settings
• h265_settings
• prores_settings
Streams > Advanced >Preprocessors >Deinterlacer > Deinterlace Mode
stream_assembly/video_description/video_preprocessors/deinterlacer/deinterlace_mode
Streams > Advanced >Preprocessors >Deinterlacer > Deinterlace Algorithm
stream_assembly/video_description/video_preprocessors/deinterlacer/algorithm
Streams > Advanced >Preprocessors >Deinterlacer > Force Mode
stream_assembly/video_description/video_preprocessors/deinterlacer/force
Version 2.14 and later83
AWS Elemental Live User GuideImage processing controls
Image processing – Scan type – Secondary fields
Description
The scan type of the input can be converted to a different scan type: progressive, interlaced, hardtelecine, or soft telecine. You can configure to leave the scan type as is or to convert from one incomingtype (or a mix of incoming scan types) to another single type. Configuring for scan type conversioninvolves setting fields in specific ways.
Force deinterlace
The field applies only when the Deinterlacer Preprocessor is turned on. It deals with issues of badlytagged frames.
• When the Deinterlace Mode is Adaptive, set Force Mode to Off.
• When the Deinterlace Mode is Deinterlace, use Force Mode as follows:
• Off: The processor does not convert frames that are tagged in metadata as "progressive." It onlyconverts those that are tagged as some other type.
• On: The processor converts every frame to "progressive" – even those that are already tagged as"progressive." Turn Force Mode on only if the input frames are incorrectly marked as "progressive."Do not turn otherwise; processing frames that are already tagged as "progressive" degrade videoquality.
• When the Deinterlace Mode is Inverse Telecine, use Force Mode as follows:
• Off: The processor monitors presence/absence of the hard telecine field repeat cadence and appliesonly to hard telecine to progressive conversion on frames that have a distinct cadence.
• On: The processor still monitors for hard telecine cadence and adapts to cadence, but all frames areconverted from hard telecine to progressive using the last detected cadence.
Deinterlace algorithm
The field applies only when the Deinterlacer Preprocessor is turned on and when the Deinterlace Modeis set to Deinterlace or Adaptive. Set it to the desired value:
• Motion adaptive interpolation: Provides for better spatial quality (i.e. produces sharper images).
• Motion adaptive blend: Provides for better temporal quality (i.e. produces smoother motion).
• Low latency interpolation: Performs interpolated line-doubling to allow for lower latency applications.
Location of fields
Location of field on web interface Location of tag in XML
Streams > Advanced >Preprocessors >Deinterlacer > Deinterlace Algorithm
stream_assembly/video_description/video_preprocessors/deinterlacer/algorithm
Streams > Advanced >Preprocessors >Deinterlacer > Force Mode
stream_assembly/video_description/video_preprocessors/deinterlacer/force
Version 2.14 and later84
AWS Elemental Live User GuideImage processing controls
Image processing – Noise reductionDescription
In some applications, you can apply the Noise Reducer Preprocessor to improve output quality. It worksby reducing spatial noise, which makes images compress better. But it changes the visual quality of thevideo.
• The Filter field has four options:• Mean / Gaussian / Lanczos: All of these algorithms allow for varying blur strengths. Mean is the
strongest filter (it operates on a smaller group of pixels) while Lanczos is the mildest (it operates ona larger group of pixels).
• Sharpen: This algorithm sharpens the edges instead of softening them.• Conserve: This algorithm limits the pixel values to within the minimum and maximum values of the
neighboring pixel values. It is designed to reduce speckle noise. This filter does not seem to be veryvaluable with video.
• Bilateral: This algorithm tends to preserve strong edges and is the best compromise between noisereduction and visual quality.
• Strength: The strength field of the filtering has its greatest effect at 3.
Recommendations
In most cases, enabling the Noise Reducer is not required, but can help output quality if the content willbe compressed heavily. When enabled, the recommended algorithm is Bilateral, but the other algorithmsmay produce better results in certain use cases. Testing the different algorithms using the expectedsource content is the recommended method to determine the best option.
Location of fields
Location of field on web interface Location of tag in XML
Streams > Advanced >Preprocessors > NoiseReducer > Filter
stream_assembly/video_description/video_preprocessors/
noise_reducer/filter
Streams > Advanced >Preprocessors > NoiseReducer > Strength
stream_assembly/video_description/video_preprocessors/
noise_reducer/strength
Image processing – Framerate conversionDescription
framerate conversion is typically used when producing content for devices that use different standards(e.g. NTSC vs. PAL) or different content playback scenarios (e.g. film at 24 fps vs. television at 25 fps or29.97 fps). There are a few different encoding settings that can be adjusted when performing framerateconversion:
• framerate: Defines the framerate of the output. The AWS Elemental system has some common built-insettings, but you can define custom settings.
• Interpolated: If Interpolated is disabled, the AWS Elemental engine drops or repeats frames asneeded. This results in sharp individual frames. If Interpolated is enabled, a weighted average is
Version 2.14 and later85
AWS Elemental Live User GuideImage processing controls
applied between frames when “new” frames need to be added. This results in smoother motion.For example, when converting from a 24 fps input to 29.97 fps output, AWS Elemental Live uses analgorithm to average the 4th and 5th frames of the source content to produce the additional frameneeded in the output.
• Slow PAL: This field appears only when framerate specifies 25 and applies when you are convertingcontent from 23.976 fps to 25 fps frame rates. Slow PAL may be used to re-label the content as 25 fpsand speed up the audio to compensate for the slower playback.
Recommendations
• If possible, try to avoid framerate conversion if you want to provide the best video quality. However,given workflow requirements or playback devices, it may not always be possible to avoid framerateconversion.
• Enable Interpolation if input and output frame rates are close (e.g. 24 fps inputs to 25 fps outputs).
Location of fields
Location of field on web interface Location of tag in XML
Stream – Video > Advanced > Framerate stream_assembly/video_description/codec/framerate_numerator
stream_assembly/video_description/codec/framerate_denominator
where codec is one of the following:
• h264_settings
• vc1_settings
• mpeg2_settings
• h265_settings
• prores_settings
Stream – Video > Advanced > Interpolated stream_assembly/video_description/codec/interpolate_frc
where codec is:
• h264_settings
• vc1_settings
• mpeg2_settings
• h265_settings
• prores_settings
Stream – Video > Advanced > Slow PAL stream_assembly/video_description/codec/slow_pal
where codec is:
• h264_settings
• vc1_settings
• mpeg2_settings
• h265_settings
Version 2.14 and later86
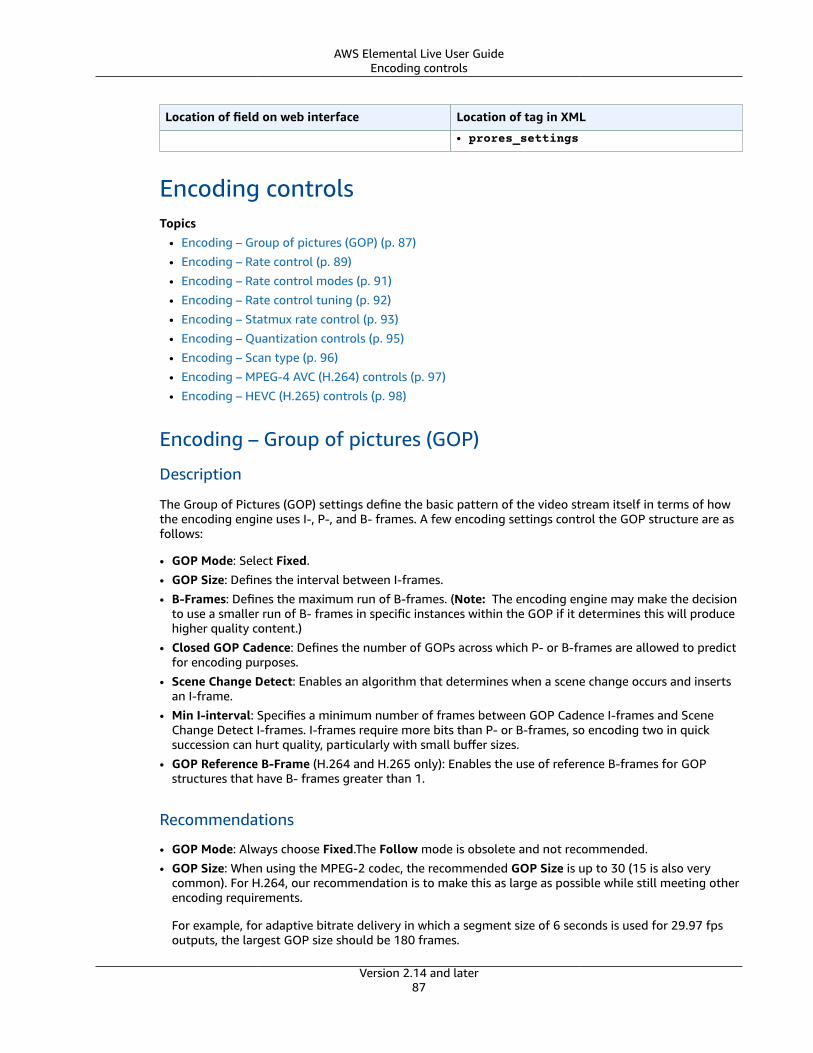
AWS Elemental Live User GuideEncoding controls
Location of field on web interface Location of tag in XML
• prores_settings
Encoding controlsTopics
• Encoding – Group of pictures (GOP) (p. 87)• Encoding – Rate control (p. 89)• Encoding – Rate control modes (p. 91)• Encoding – Rate control tuning (p. 92)• Encoding – Statmux rate control (p. 93)• Encoding – Quantization controls (p. 95)• Encoding – Scan type (p. 96)• Encoding – MPEG-4 AVC (H.264) controls (p. 97)• Encoding – HEVC (H.265) controls (p. 98)
Encoding – Group of pictures (GOP)
Description
The Group of Pictures (GOP) settings define the basic pattern of the video stream itself in terms of howthe encoding engine uses I-, P-, and B- frames. A few encoding settings control the GOP structure are asfollows:
• GOP Mode: Select Fixed.• GOP Size: Defines the interval between I-frames.• B-Frames: Defines the maximum run of B-frames. (Note: The encoding engine may make the decision
to use a smaller run of B- frames in specific instances within the GOP if it determines this will producehigher quality content.)
• Closed GOP Cadence: Defines the number of GOPs across which P- or B-frames are allowed to predictfor encoding purposes.
• Scene Change Detect: Enables an algorithm that determines when a scene change occurs and insertsan I-frame.
• Min I-interval: Specifies a minimum number of frames between GOP Cadence I-frames and SceneChange Detect I-frames. I-frames require more bits than P- or B-frames, so encoding two in quicksuccession can hurt quality, particularly with small buffer sizes.
• GOP Reference B-Frame (H.264 and H.265 only): Enables the use of reference B-frames for GOPstructures that have B- frames greater than 1.
Recommendations
• GOP Mode: Always choose Fixed.The Follow mode is obsolete and not recommended.• GOP Size: When using the MPEG-2 codec, the recommended GOP Size is up to 30 (15 is also very
common). For H.264, our recommendation is to make this as large as possible while still meeting otherencoding requirements.
For example, for adaptive bitrate delivery in which a segment size of 6 seconds is used for 29.97 fpsoutputs, the largest GOP size should be 180 frames.
Version 2.14 and later87
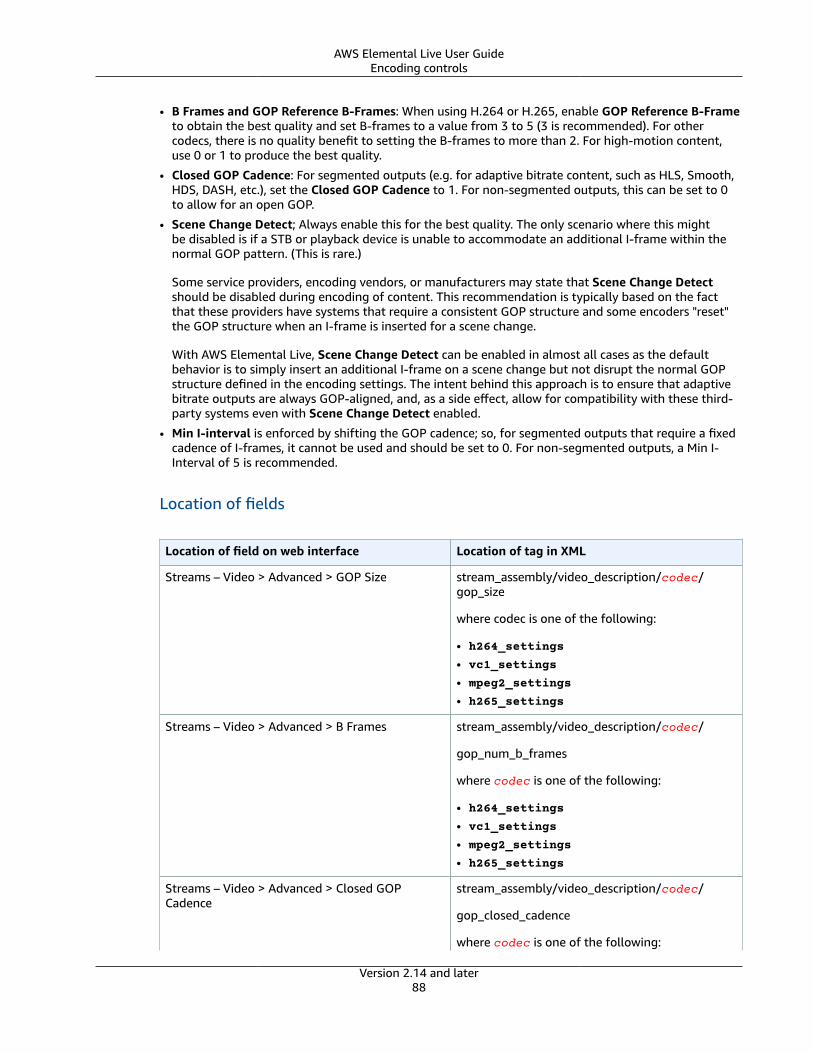
AWS Elemental Live User GuideEncoding controls
• B Frames and GOP Reference B-Frames: When using H.264 or H.265, enable GOP Reference B-Frameto obtain the best quality and set B-frames to a value from 3 to 5 (3 is recommended). For othercodecs, there is no quality benefit to setting the B-frames to more than 2. For high-motion content,use 0 or 1 to produce the best quality.
• Closed GOP Cadence: For segmented outputs (e.g. for adaptive bitrate content, such as HLS, Smooth,HDS, DASH, etc.), set the Closed GOP Cadence to 1. For non-segmented outputs, this can be set to 0to allow for an open GOP.
• Scene Change Detect; Always enable this for the best quality. The only scenario where this mightbe disabled is if a STB or playback device is unable to accommodate an additional I-frame within thenormal GOP pattern. (This is rare.)
Some service providers, encoding vendors, or manufacturers may state that Scene Change Detectshould be disabled during encoding of content. This recommendation is typically based on the factthat these providers have systems that require a consistent GOP structure and some encoders "reset"the GOP structure when an I-frame is inserted for a scene change.
With AWS Elemental Live, Scene Change Detect can be enabled in almost all cases as the defaultbehavior is to simply insert an additional I-frame on a scene change but not disrupt the normal GOPstructure defined in the encoding settings. The intent behind this approach is to ensure that adaptivebitrate outputs are always GOP-aligned, and, as a side effect, allow for compatibility with these third-party systems even with Scene Change Detect enabled.
• Min I-interval is enforced by shifting the GOP cadence; so, for segmented outputs that require a fixedcadence of I-frames, it cannot be used and should be set to 0. For non-segmented outputs, a Min I-Interval of 5 is recommended.
Location of fields
Location of field on web interface Location of tag in XML
Streams – Video > Advanced > GOP Size stream_assembly/video_description/codec/gop_size
where codec is one of the following:
• h264_settings
• vc1_settings
• mpeg2_settings
• h265_settings
Streams – Video > Advanced > B Frames stream_assembly/video_description/codec/
gop_num_b_frames
where codec is one of the following:
• h264_settings
• vc1_settings
• mpeg2_settings
• h265_settings
Streams – Video > Advanced > Closed GOPCadence
stream_assembly/video_description/codec/
gop_closed_cadence
where codec is one of the following:
Version 2.14 and later88
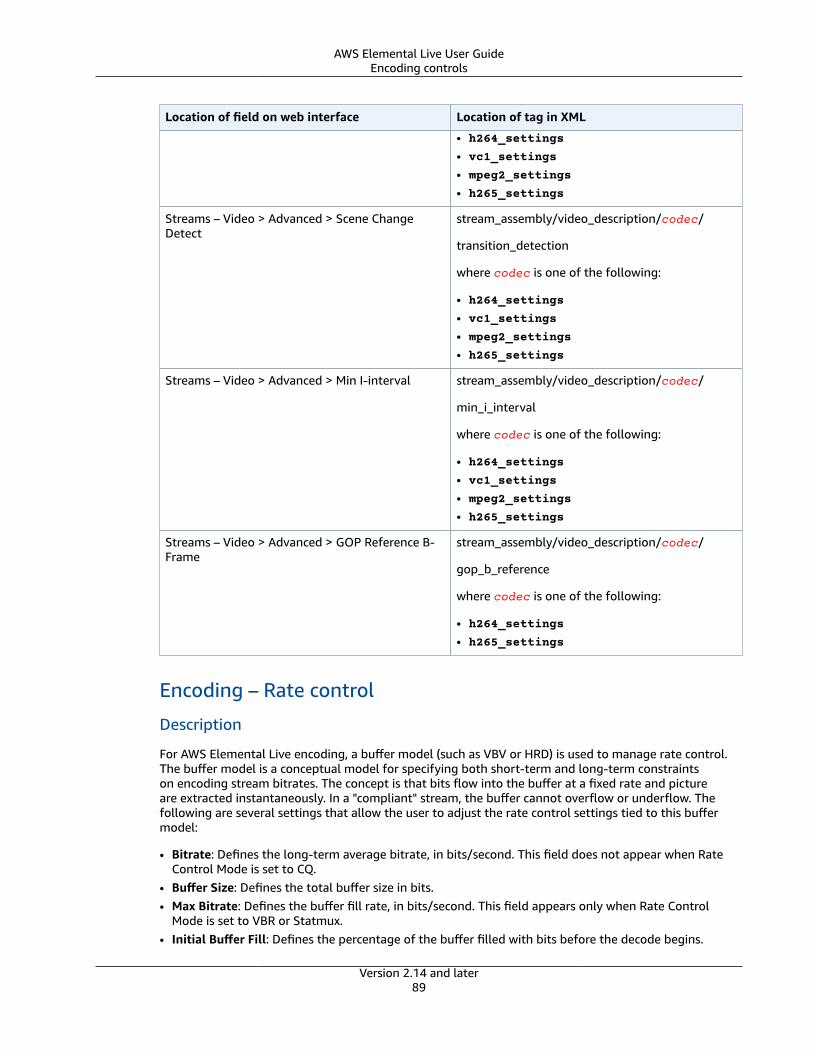
AWS Elemental Live User GuideEncoding controls
Location of field on web interface Location of tag in XML
• h264_settings
• vc1_settings
• mpeg2_settings
• h265_settings
Streams – Video > Advanced > Scene ChangeDetect
stream_assembly/video_description/codec/
transition_detection
where codec is one of the following:
• h264_settings
• vc1_settings
• mpeg2_settings
• h265_settings
Streams – Video > Advanced > Min I-interval stream_assembly/video_description/codec/
min_i_interval
where codec is one of the following:
• h264_settings
• vc1_settings
• mpeg2_settings
• h265_settings
Streams – Video > Advanced > GOP Reference B-Frame
stream_assembly/video_description/codec/
gop_b_reference
where codec is one of the following:
• h264_settings
• h265_settings
Encoding – Rate control
Description
For AWS Elemental Live encoding, a buffer model (such as VBV or HRD) is used to manage rate control.The buffer model is a conceptual model for specifying both short-term and long-term constraintson encoding stream bitrates. The concept is that bits flow into the buffer at a fixed rate and pictureare extracted instantaneously. In a "compliant" stream, the buffer cannot overflow or underflow. Thefollowing are several settings that allow the user to adjust the rate control settings tied to this buffermodel:
• Bitrate: Defines the long-term average bitrate, in bits/second. This field does not appear when RateControl Mode is set to CQ.
• Buffer Size: Defines the total buffer size in bits.• Max Bitrate: Defines the buffer fill rate, in bits/second. This field appears only when Rate Control
Mode is set to VBR or Statmux.• Initial Buffer Fill: Defines the percentage of the buffer filled with bits before the decode begins.
Version 2.14 and later89
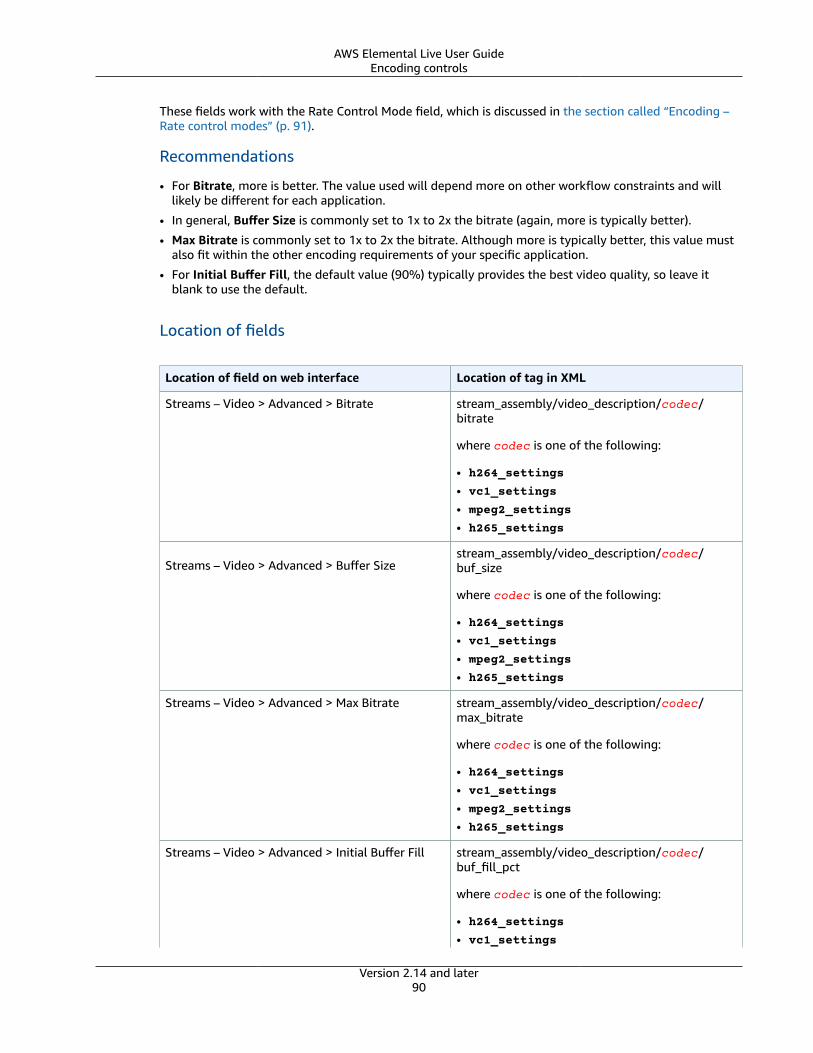
AWS Elemental Live User GuideEncoding controls
These fields work with the Rate Control Mode field, which is discussed in the section called “Encoding –Rate control modes” (p. 91).
Recommendations
• For Bitrate, more is better. The value used will depend more on other workflow constraints and willlikely be different for each application.
• In general, Buffer Size is commonly set to 1x to 2x the bitrate (again, more is typically better).
• Max Bitrate is commonly set to 1x to 2x the bitrate. Although more is typically better, this value mustalso fit within the other encoding requirements of your specific application.
• For Initial Buffer Fill, the default value (90%) typically provides the best video quality, so leave itblank to use the default.
Location of fields
Location of field on web interface Location of tag in XML
Streams – Video > Advanced > Bitrate stream_assembly/video_description/codec/bitrate
where codec is one of the following:
• h264_settings
• vc1_settings
• mpeg2_settings
• h265_settings
Streams – Video > Advanced > Buffer Sizestream_assembly/video_description/codec/buf_size
where codec is one of the following:
• h264_settings
• vc1_settings
• mpeg2_settings
• h265_settings
Streams – Video > Advanced > Max Bitrate stream_assembly/video_description/codec/max_bitrate
where codec is one of the following:
• h264_settings
• vc1_settings
• mpeg2_settings
• h265_settings
Streams – Video > Advanced > Initial Buffer Fill stream_assembly/video_description/codec/buf_fill_pct
where codec is one of the following:
• h264_settings
• vc1_settings
Version 2.14 and later90
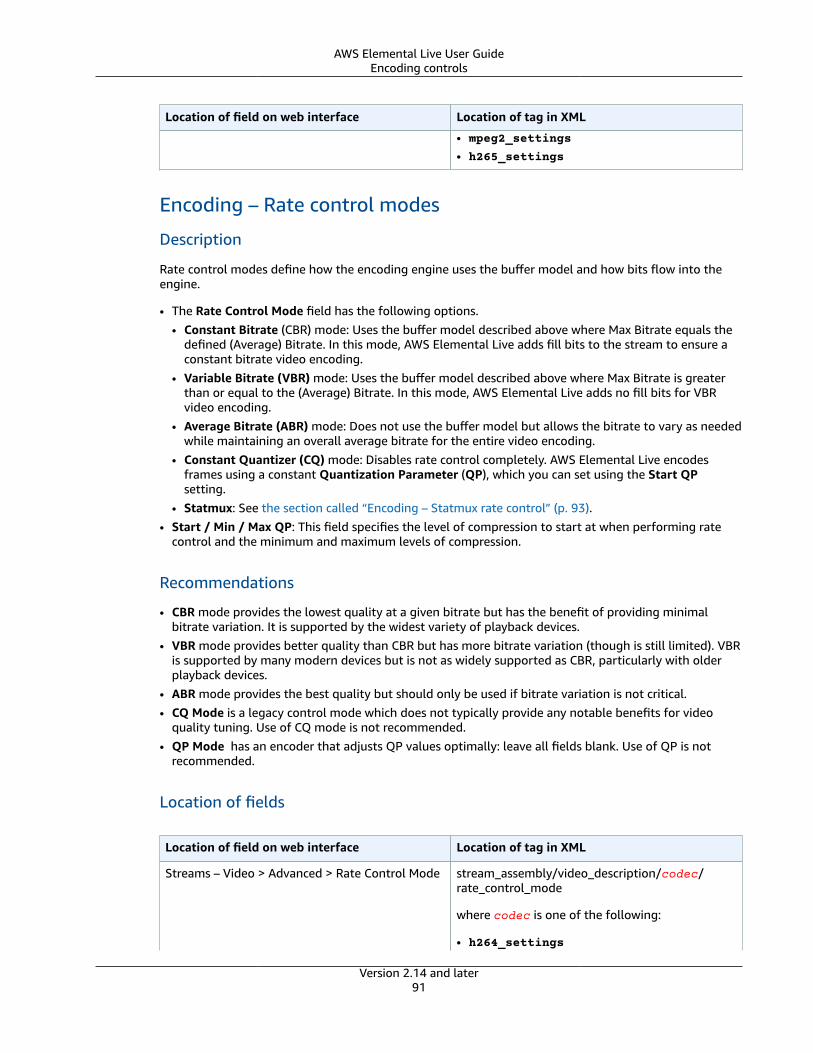
AWS Elemental Live User GuideEncoding controls
Location of field on web interface Location of tag in XML
• mpeg2_settings
• h265_settings
Encoding – Rate control modes
Description
Rate control modes define how the encoding engine uses the buffer model and how bits flow into theengine.
• The Rate Control Mode field has the following options.• Constant Bitrate (CBR) mode: Uses the buffer model described above where Max Bitrate equals the
defined (Average) Bitrate. In this mode, AWS Elemental Live adds fill bits to the stream to ensure aconstant bitrate video encoding.
• Variable Bitrate (VBR) mode: Uses the buffer model described above where Max Bitrate is greaterthan or equal to the (Average) Bitrate. In this mode, AWS Elemental Live adds no fill bits for VBRvideo encoding.
• Average Bitrate (ABR) mode: Does not use the buffer model but allows the bitrate to vary as neededwhile maintaining an overall average bitrate for the entire video encoding.
• Constant Quantizer (CQ) mode: Disables rate control completely. AWS Elemental Live encodesframes using a constant Quantization Parameter (QP), which you can set using the Start QPsetting.
• Statmux: See the section called “Encoding – Statmux rate control” (p. 93).• Start / Min / Max QP: This field specifies the level of compression to start at when performing rate
control and the minimum and maximum levels of compression.
Recommendations
• CBR mode provides the lowest quality at a given bitrate but has the benefit of providing minimalbitrate variation. It is supported by the widest variety of playback devices.
• VBR mode provides better quality than CBR but has more bitrate variation (though is still limited). VBRis supported by many modern devices but is not as widely supported as CBR, particularly with olderplayback devices.
• ABR mode provides the best quality but should only be used if bitrate variation is not critical.• CQ Mode is a legacy control mode which does not typically provide any notable benefits for video
quality tuning. Use of CQ mode is not recommended.• QP Mode has an encoder that adjusts QP values optimally: leave all fields blank. Use of QP is not
recommended.
Location of fields
Location of field on web interface Location of tag in XML
Streams – Video > Advanced > Rate Control Mode stream_assembly/video_description/codec/rate_control_mode
where codec is one of the following:
• h264_settings
Version 2.14 and later91
AWS Elemental Live User GuideEncoding controls
Location of field on web interface Location of tag in XML
• vc1_settings
• mpeg2_settings
• h265_settings
Streams – Video > Advanced > Start QP stream_assembly/video_description/codec/qp
where codec is one of the following:
• h264_settings
• vc1_settings
• mpeg2_settings
Streams – Video > Advanced > Min QP stream_assembly/video_description/codec/min_qp
where codec is one of the following:
• h264_settings
• vc1_settings
• mpeg2_settings
Streams – Video > Advanced > Max QP stream_assembly/video_description/codec/max_qp
where codec is one of the following:
• h265_settings
• vc1_settings
• mpeg2_settings
Encoding – Rate control tuning
Description
Following are encoding settings that can be used to provide additional tuning of video quality.
• Lookahead: This setting indicates that AWS Elemental Live should analyze a few frames in the futureof the currently encoded frame (higher values mean more frames) and allow AWS Elemental Live totake future frame data into account during rate control logic.
For example, if future frames are more complex, AWS Elemental Live can allocate fewer bits to encodethe current frame to allow those bits to be used to encode those future frames. The tradeoff is thatprocessing and latency are increased slightly to allow those future frames to be analyzed by theencoding engine.
Recommendations
• Use 2-pass encoding for VOD unless minimize encoding time is critical.
• Set Lookahead to "medium" for use with 1-pass encoding unless latency is critical.
Version 2.14 and later92
AWS Elemental Live User GuideEncoding controls
Location of fields
Location of field on web interface Location of tag in XML
Streams – Video > Advanced > Passes stream_assembly/video_description/codec/passes
where codec is one of the following:
• h264_settings
• vc1_settings
• mpeg2_settings
• h265_settings
Streams – Video > Advanced > Lookahead stream_assembly/video_description/codec/look_ahead_rate_control
where codec is one of the following:
• h264_settings
• vc1_settings
• mpeg2_settings
• h265_settings
Encoding – Statmux rate control
Description
Statistical multiplexing (statmux) rate control applies only to an event created on an AWS Elemental Livenode that has the Statmux add-on package.
The statmux controls are divided between the stream assembly of the event or profile and several fieldson the MPTS output. The event is always created on the AWS Elemental Live node. The MPTS output iscreated on the AWS Elemental Live node or the Statmux node.
Statistical multiplexing is performed on the STPS channels that make up an MPTS output when the RateControl Mode of the video stream is set to Statmux. In terms of video quality, all the controls describedin the other sections of this chapter apply, along with the following special controls.
SPTS channel (event) controls
In the event (which is called an SPTS channel in an MPTS output) the following controls apply:
• Bitrate (Nominal Bitrate).• Minimum Bitrate. The bitrate allocated to a given SPTS channel, which will never go below this
number.• Maximum Bitrate. The bitrate allocated to a given SPTS channel, which will never exceed this number.
These settings guide the distribution of bitrate among the channels in the multiplex as described below.
MPTS output controls
The MPTS output has the following controls:
• Transport Stream Bitrate: The total size of the MPTS output.
Version 2.14 and later93

AWS Elemental Live User GuideEncoding controls
• Video Allocation: The portion of the Transport Stream Bitrate that is allocated to the video of all theSPTS channels.
These settings determine the overall bitrate "pool" that is distributed among the channels in themultiplex as described below.
Statmux bitrate allocation
At runtime, each SPTS channel sends per-frame complexity information to the multiplexer and receivescorresponding bitrate allocations. The allocations for each frame in channel are computed as follows.
• The Nominal Bitrates for all channels are scaled proportionately; such sum of the scaled nominalbitrates matches the Video Allocation for the multiplex. This is bitrate distribution if all the channelshave the same complexity.
• The complexity of each channel is examined (relative to the other channels) and the Nominal Bitrateof each channel is adjusted. In this adjustment, the spread between the Min and Max of a givenchannel affects how much that channel's Nominal Bitrate is adjusted: the bigger the range, the biggerthe adjustment.
• The Nominal Bitrate of each channel is adjusted again, if necessary, to stay within the Min and Maxrange.
• This last adjustment may result in “leftovers.” These leftovers are distributed among channels that didnot get adjusted.
• The final bitrate allocation is sent to each SPTS channel.
Recommendations
• Transport Stream Bitrate: The total size of the MPTS output; this number is set based on thebandwidth characteristics of the intended network.
• Video Allocation: This number is typically calculated as follows:
VA = Useable bitrate - (the maximum anticipated audio of all SPTS channels) - (the maximumanticipated data of all SPTS channels).
where the useable bitrate is typically 95-97% of the Transportation Stream Bitrate.• Nominal bitrate is set for each SPTS channel relative to other channels depending on resolution,
framerate, and codec used to encode the video. Typically the nominal bit rate is set to a value thatprovides the desired video quality in an non-statmuxed application.
• Minimum bitrate sets a minimum allocation for a channel regardless of how low its relativecomplexity. A typical value for each SPTS channel is:
(Nominal) ÷ 2
The combined minimum bitrates for all channels in the multiplex is less than the Video Allocation(VA). An alert is triggered if it ever equals or exceeds the VA.
• Maximum bitrate sets a maximum allocation for a channel, regardless of how high its relativecomplexity is. A typical value for each SPTS channel is:
Nominal x 2
The combined maximum bitrate is typically greater than the combined Video Allocation (VA): if it isless than the VA, then all channels receive their maximum allocation (they are encoded at constantbitrates).
The allocation of bitrates in the MPTS can be monitored in real time via the MPTS Performance screen onthe web interface.
Version 2.14 and later94
AWS Elemental Live User GuideEncoding controls
Location of fields
Event or profile API
Location of field on web interface Location of tag in XML
Streams – Video > Advanced > Bitrate stream_assembly/video_description/bitrate
Streams – Video > Advanced > Min Bitrate stream_assembly/video_description/min_bitrate
Streams – Video > Advanced > Max Bitrate stream_assembly/video_description/max_bitrate
MPTS API
Location of field on web interface Location of tag in XML
MPTS > Transportation Stream Bitrate bitrate
MPTS > Video Allocation video_allocation
Encoding – Quantization controls
Description
• Adaptive Quantization (AQ): Allows AWS Elemental Live to vary compression within a frame toimprove subjective visual quality. It can distribute bits to provide more data to areas of a frame thatare more complex for the encoding process. It can also reduce "smear" in high motion and sportscontent.
Note that although it may seem counter-intuitive, areas of solid color are considered more complex ashuman perception is more likely to notice small variations in smooth surfaces or gradients as opposedto more varied areas. For this reason, with Adaptive Quantization, more bits are allocated to smoothsurfaces to minimize the perceptual variation between frames.
• Framing Quantization: An extension of Adaptive Quantization that compresses the edges of thevideo slightly more than the center. The effect shifts bits, and thus quality, from the boundary of theimage to the middle of the image, where the action and viewers' attention is typically focused. Thisfield appears only when the output codec is MPEG-2.
• Softness: Adjusts the quantization matrices used in the encoder, which determine the relativecompression of high vs. low spatial frequency components of the video. Higher softness settingscompress high frequencies more, reducing bitrate at the cost of image sharpness. This field appearsonly when the output codec is H.264 or MPEG-2.
Recommendations
• Adaptive Quantization: For high bitrate outputs, we recommend that you always set AdaptiveQuantization to "Auto." For moderate bitrate outputs, our recommendation is "medium." For lowbitrate outputs, our recommendation is "high" to "medium" or "high" for h.264 content. We generallyrecommend "high " , but, particular for low bitrate use cases, this setting can result in some use caseshaving too many bits be distributed to complex areas of the picture, resulting in more noticeable,lower quality in less complex areas. In those cases, "medium " may be more appropriate.
• Framing Quantization: For low bitrate encodes, we recommend using Framing Quantization (e.g.MPEG-2 1080i at 10 Mbps) and set based on subjective tuning at values between 1.0 and 2.0. (Note:The visual effect of framing quantization is intentionally subtle.)
Version 2.14 and later95
AWS Elemental Live User GuideEncoding controls
• Softness For low bitrate encodes softness can be used (e.g. MPEG-2 1080i at 10 Mbps) and set basedon subjective tuning at values between 24 and 32.
Location of fields
Location of field on web interface Location of tag in XML
Streams – Video > Advanced > AdaptiveQuantization
stream_assembly/video_description/codec/adaptive_quantization
where codec is one of the following:
• h264_settings
• vc1_settings
• mpeg2_settings
• h265_settings
Streams – Video > Advanced > FramingQuantization
stream_assembly/video_description/codec/framing_quantization
where codec is:
meg2_settings
Streams – Video > Advanced > Softness stream_assembly/video_description/codec/softness
where codec is one of the following:
• h264_settings
• mpeg2_settings
Encoding – Scan type
Description
The scan type of content can affect the video quality. The following are the settings and internalalgorithms tied to the scan type:
• The encoding controls that deal with scan type are dealt with in the section called “Image processing –Scan type – Key controls” (p. 81).
• Picture Adaptive Field Frame (PAFF): This control is automatically enabled on Graphics ProcessingUnit (GPU)-enabled versions of AWS Elemental Live and automatically disabled on Central ProcessingUnit (CPU)-only versions.
• Macroblock Adaptive Field Frame (MBAFF): This control is automatically enabled on CPU-onlyversions of AWS Elemental Live and automatically disabled on GPU-enabled versions.
• Force Field Pictures: This field appears only if the codec is H.264 and only affects GPU-enabledversions of AWS Elemental Live.
• Enabled: All outputs are forced to use PAFF field picture encoding.
• Disabled: AWS Elemental Live switches between PAFF and MBAFF, depending on the content.
Version 2.14 and later96
AWS Elemental Live User GuideEncoding controls
Recommendations
• Force Field Pictures results in a significant reduction in quality so it should only be used if required forcompatibility with specific decoders or playback devices.
Location of fields
Location of field on web interface Location of tag in XML
Streams – Video > Advanced > Force Field Pictures stream_assembly/video_description/codec/force_field_pictures
where codec is:
h264_settings
Encoding – MPEG-4 AVC (H.264) controlsDescription
A few H.264-specific controls are available on AWS Elemental Live that affect video quality:
• CABAC: This control enables arithmetic coding and can compress the same data with ~15% fewer bits.• Slices: This control improves speed of encoding. Using a higher number of slices can improve speed
optimization but results in slightly less quality.• Flicker Reduction: This control reduces flicker in the video. It enables an additional encoding
algorithm that compensates for visual differences when I-frames have occurred (often referred to as I-frame "pop"). AWS Elemental Live uses this approach to encode I-frames as if they were P-frames (thuscreating a "PI"-frame), identify macroblocks that are prone to flicker, merge pixels from the PI-framefor the flicker-prone MBs into the I-frame, and then encode the PI-frame. This method carries some ofthe visual quality from the end of one GOP to the start of the next GOP, preventing the abrupt changein detail that gives the effect of a flicker in the video.
• Reference Frames: This control defines the number of frames that can be used to define B- and P-frames.
Recommendations
• Use High Profile with H.264 to improve quality over Baseline Profile and Main Profile.• Always enable CABAC unless the intended decoder or playback device doesn't support it.• Set Slices to 2 (or higher) for all HD resolution outputs or high bitrate outputs. (AWS Elemental Live
presets typically use 2 slices for 720p content and 4 slices for 1080p content.) For resolutions below720p, set Slices to 1.
• Set Flicker Reduction to "high" for low-motion content. Disable it for high-motion content.• Set Reference Frames to 2 or more for flash compensation.
Location of fields
Location of field on web interface Location of tag in XML
Streams – Video > Advanced > Profile stream_assembly/video_description/h264_settings>/cabac
Version 2.14 and later97
AWS Elemental Live User GuideEncoding controls
Location of field on web interface Location of tag in XML
Streams – Video > Advanced > Level stream_assembly/video_description/h264_settings>/level
Streams – Video > Advanced > CABAC stream_assembly/video_description/h264_settings>/cabac
Streams – Video > Advanced > Slices stream_assembly/video_description/h264_settings/slices
Streams – Video > Advanced > Flicker Reduction stream_assembly/video_description/h264_settings/flicker_reduction
Encoding – HEVC (H.265) controls
Description
The following HEVC-specific control can affect video quality:
• Slices: This control improves speed of encoding. Using a higher number of slices can improve speedoptimization but results in slightly less quality.
Recommendations
The AWS Elemental Live HEVC encoder performance is less sensitive to changes in slices than theMPEG-4 AVC encoder (the section called “Encoding – MPEG-4 AVC (H.264) controls” (p. 97)), sothe benefit of using more slices is reduced and having more slices reduces video quality. For thesereasons, the recommendation is to use half as many slices with HEVC as with MPEG-4 AVC for the sameresolution. In other words, set Slices to 2 (or higher) for all 1080p (or above) resolution outputs or highbitrate outputs. Set Slices to 1 for Resolutions below 1080p .
Location of fields
Location of field on web interface Location of tag in XML
Streams – Video > Advanced > Profile stream_assembly/video_description/h265_settings>/cabac
Streams – Video > Advanced > Slices stream_assembly/video_description/h265_settings/slices
Version 2.14 and later98
AWS Elemental Live User GuideDolby Digital Plus with Atmos
Working with AudioThis chapter describes how to set up the audio features of AWS Elemental Live.
Topics
• Converting to Dolby Digital Plus with Atmos (p. 99)
• Working with Dolby metadata (p. 102)
• Setting up HLS rendition groups (p. 113)
Converting to Dolby Digital Plus with AtmosThe following handling is supported:
• Encoding an audio output as Dolby Digital Plus with Atmos. The audio source must be a source thatcontains up to 16 channels.
• Passthrough of a source audio that is already Dolby Digital Plus with Atmos.
AWS Elemental Live doesn't support transcoding (re-encoding) an audio source that is Dolby Digital Pluswith Atmos.
Conversion to Dolby Digital Plus with Atmos requires the Advanced Audio Pack. For information aboutpurchasing this package, see the section called “Purchasing a license” (p. 368). Note that passthroughof Dolby Digital Plus with Atmos doesn't require a license.
Supported sourcesThe source must have these characteristics:
• To convert to Dolby Digital Plus with Atmos, the audio input can be any source that has thesecharacteristics:
• Up to 16 channels in the following order:
L R C LFE Ls Rs Lb Rb Tfl Tfr Tsl Tsr Tbl Tbr Lw Rw
• If the source has fewer than 16 channels, AWS Elemental Live extracts all the channels and thenpads the output by inserting silence in the higher-numbered channels. For example, if the sourcehas two channels, AWS Elemental Live puts those channels in L and R, then inserts silence in theremaining channels.
• If the source doesn't have the channels in the specified order, the results might be wrong on thedownstream player. For example, the sound of rain falling might come out of the left speakerinstead of a ceiling speaker.
• A sampling rate of 48000 hz.
• To pass through Dolby Digital Plus with Atmos, the audio can be any coding mode and any samplingrate that Dolby Digital Plus supports.
For information about the types of inputs that support Dolby Digital Plus and Dolby Digital Plus withAtmos, see the section called “Reference: Supported inputs” (p. 4).
Version 2.14 and later99
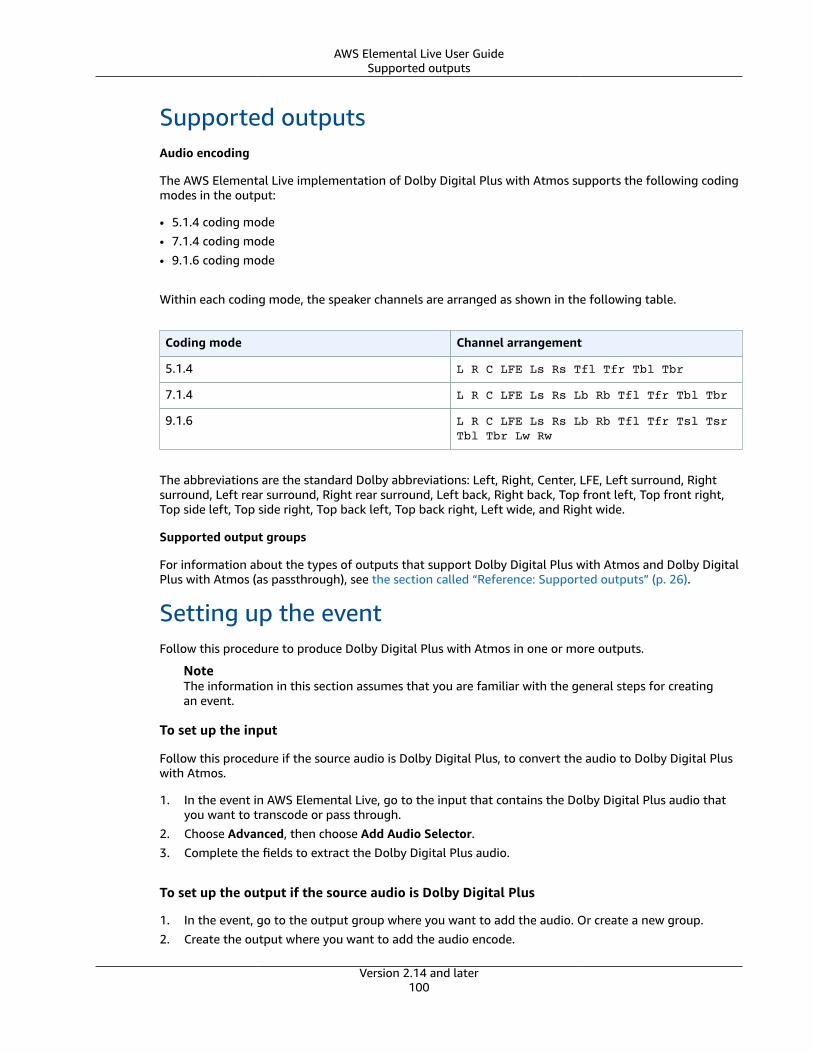
AWS Elemental Live User GuideSupported outputs
Supported outputsAudio encoding
The AWS Elemental Live implementation of Dolby Digital Plus with Atmos supports the following codingmodes in the output:
• 5.1.4 coding mode• 7.1.4 coding mode• 9.1.6 coding mode
Within each coding mode, the speaker channels are arranged as shown in the following table.
Coding mode Channel arrangement
5.1.4 L R C LFE Ls Rs Tfl Tfr Tbl Tbr
7.1.4 L R C LFE Ls Rs Lb Rb Tfl Tfr Tbl Tbr
9.1.6 L R C LFE Ls Rs Lb Rb Tfl Tfr Tsl TsrTbl Tbr Lw Rw
The abbreviations are the standard Dolby abbreviations: Left, Right, Center, LFE, Left surround, Rightsurround, Left rear surround, Right rear surround, Left back, Right back, Top front left, Top front right,Top side left, Top side right, Top back left, Top back right, Left wide, and Right wide.
Supported output groups
For information about the types of outputs that support Dolby Digital Plus with Atmos and Dolby DigitalPlus with Atmos (as passthrough), see the section called “Reference: Supported outputs” (p. 26).
Setting up the eventFollow this procedure to produce Dolby Digital Plus with Atmos in one or more outputs.
NoteThe information in this section assumes that you are familiar with the general steps for creatingan event.
To set up the input
Follow this procedure if the source audio is Dolby Digital Plus, to convert the audio to Dolby Digital Pluswith Atmos.
1. In the event in AWS Elemental Live, go to the input that contains the Dolby Digital Plus audio thatyou want to transcode or pass through.
2. Choose Advanced, then choose Add Audio Selector.3. Complete the fields to extract the Dolby Digital Plus audio.
To set up the output if the source audio is Dolby Digital Plus
1. In the event, go to the output group where you want to add the audio. Or create a new group.2. Create the output where you want to add the audio encode.
Version 2.14 and later100
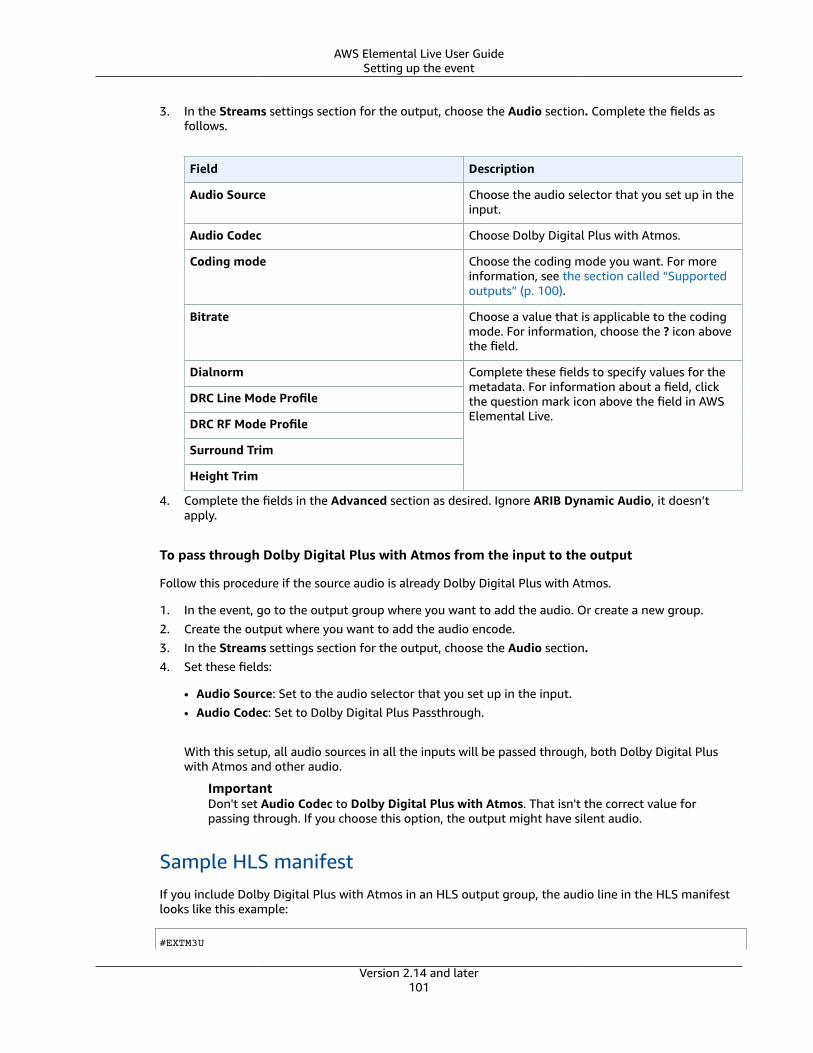
AWS Elemental Live User GuideSetting up the event
3. In the Streams settings section for the output, choose the Audio section. Complete the fields asfollows.
Field Description
Audio Source Choose the audio selector that you set up in theinput.
Audio Codec Choose Dolby Digital Plus with Atmos.
Coding mode Choose the coding mode you want. For moreinformation, see the section called “Supportedoutputs” (p. 100).
Bitrate Choose a value that is applicable to the codingmode. For information, choose the ? icon abovethe field.
Dialnorm
DRC Line Mode Profile
DRC RF Mode Profile
Surround Trim
Height Trim
Complete these fields to specify values for themetadata. For information about a field, clickthe question mark icon above the field in AWSElemental Live.
4. Complete the fields in the Advanced section as desired. Ignore ARIB Dynamic Audio, it doesn’tapply.
To pass through Dolby Digital Plus with Atmos from the input to the output
Follow this procedure if the source audio is already Dolby Digital Plus with Atmos.
1. In the event, go to the output group where you want to add the audio. Or create a new group.2. Create the output where you want to add the audio encode.3. In the Streams settings section for the output, choose the Audio section.4. Set these fields:
• Audio Source: Set to the audio selector that you set up in the input.• Audio Codec: Set to Dolby Digital Plus Passthrough.
With this setup, all audio sources in all the inputs will be passed through, both Dolby Digital Pluswith Atmos and other audio.
ImportantDon't set Audio Codec to Dolby Digital Plus with Atmos. That isn't the correct value forpassing through. If you choose this option, the output might have silent audio.
Sample HLS manifestIf you include Dolby Digital Plus with Atmos in an HLS output group, the audio line in the HLS manifestlooks like this example:
#EXTM3U
Version 2.14 and later101
AWS Elemental Live User GuideDolby metadata
#EXT-X-VERSION:4#EXT-X-INDEPENDENT-SEGMENTS#EXT-X-STREAM-INF:BANDWIDTH=2208800,AVERAGE-BANDWIDTH=2142800,CODECS="avc1.64001f,ec-3",RESOLUTION=1280x720,FRAME-RATE=30.000,AUDIO="program_audio_0"index_video.m3u8#EXT-X-MEDIA:TYPE=AUDIO,LANGUAGE="eng",NAME="English",AUTOSELECT=YES,DEFAULT=YES,CHANNELS="12/JOC",GROUP-ID="program_audio_0",URI="index_audio.m3u8"
The Channels attribute in the last line is significant for Dolby Digital Plus with Atmos:
• 12/JOC indicates that the coding mode is 5.1.4 or 7.1.4 and the codec is Dolby Digital with Atmos.• 16/JOC indicates that the coding mode is 9.1.6 and the codec is Dolby Digital with Atmos.
Working with Dolby metadataAudio encoded with a Dolby codec always includes Dolby metadata, as per the ATSC A/52 2012standard. This Dolby metadata is used by AWS Elemental Live in two ways when the stream is encodedwith Dolby codec:
• It is used to manipulate the audio just before encoding the output.• It is included in the metadata for the output stream.
This document describes how to set up an AWS Elemental Live profile or event to use Dolby metadata inthese ways.
Dolby metadata is supported in the output only when the audio codec for the output is Dolby Digital(also known as AC3) or Dolby Digital Plus (also known as Enhanced AC3).
Topics• Categories of metadata: Delivered and encoder control (p. 102)• Source of AWS Elemental Live metadata (p. 103)• Impact of the metadata on the output audio (p. 103)• Combinations of input and output codec (p. 103)• Setting up the profile or event using the web interface (p. 104)• Output with the Dolby Digital codec (p. 107)• Output with Dolby Digital Plus (EC2, EAC3) codec (p. 110)
Categories of metadata: Delivered and encodercontrolThere are two categories of parameters in the Dolby metadata, characterized by how AWS Elemental Liveuses it:
• Delivered: AWS Elemental Live does not read these parameters, so they have no effect on the audioproduced by AWS Elemental Live. Instead, they are included as metadata in the output in order todeliver them to the downstream decoder.
“Delivered” metadata is also called Consumer metadata because it is intended to be used by the endconsumer’s home decoder.
Version 2.14 and later102
AWS Elemental Live User GuideSource of metadata
• Encoder Control: AWS Elemental Live uses these parameters to manipulate the audio just beforeencoding the stream and producing the output. They provide a mechanism for AWS Elemental Live tocontrol the transcoding performed by AWS Elemental Live. These parameters are never included in theoutput metadata.
“Encoder Control” metadata is also called Professional metadata because it is intended to be used by aprofessional device – in our case AWS Elemental Live. It is never intended for the end consumer's homedecoder.
Source of AWS Elemental Live metadataThe metadata that AWS Elemental Live emits can come from one of two sources:
• Metadata that is already in the source. Only audio sources that use a Dolby codec can include thismetadata. Different Dolby codecs include different categories of metadata as shown in this table.
Codec Categories present
Dolby Digital or Dolby Digital Plus Delivered only
Dolby E Delivered and Encoder Control
• Metadata that is specified by completing metadata fields in the profile or event. You can specify thismetadata in any audio whose output codec is a Dolby codec. In other words, you can add it when theaudio source is not a Dolby codec as long as the output audio uses a Dolby codec.
Both categories of metadata can be specified when specifying this source.
You specify the source when setting up the profile or event.
Impact of the metadata on the output audioRegardless of the source of the metadata, it affects the audio (either by manipulating encoder control orby being included in the output metadata) but only if the output codec is Dolby Digital or Dolby DigitalPlus.
Combinations of input and output codecThe possible input and output codec combinations (in which at least one codec is a Dolby codec) are asfollows. All these combinations support including metadata in the output.
Input codec Output codec
Dolby Digital or Dolby Digital Plus Dolby Digital or Dolby Digital Plus
Dolby Digital Dolby Digital Passthrough (so Dolby Digital audiois passed through; it is not transcoded)
Dolby Digital Plus Dolby Digital Passthrough (so Dolby Digital Plusaudio is passed through; it is not transcoded)
Mix of Dolby Digital Plus and another codec Dolby Digital Plus (with the AutomaticPassthrough field checked)
Version 2.14 and later103
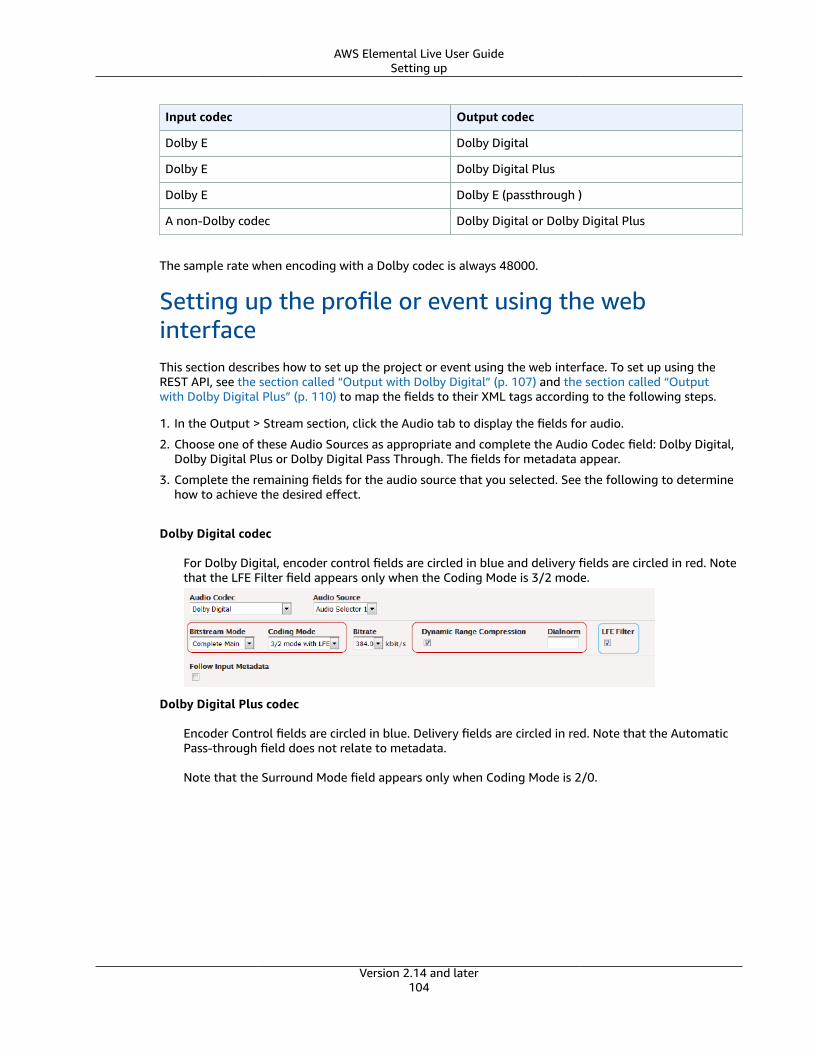
AWS Elemental Live User GuideSetting up
Input codec Output codec
Dolby E Dolby Digital
Dolby E Dolby Digital Plus
Dolby E Dolby E (passthrough )
A non-Dolby codec Dolby Digital or Dolby Digital Plus
The sample rate when encoding with a Dolby codec is always 48000.
Setting up the profile or event using the webinterfaceThis section describes how to set up the project or event using the web interface. To set up using theREST API, see the section called “Output with Dolby Digital” (p. 107) and the section called “Outputwith Dolby Digital Plus” (p. 110) to map the fields to their XML tags according to the following steps.
1. In the Output > Stream section, click the Audio tab to display the fields for audio.
2. Choose one of these Audio Sources as appropriate and complete the Audio Codec field: Dolby Digital,Dolby Digital Plus or Dolby Digital Pass Through. The fields for metadata appear.
3. Complete the remaining fields for the audio source that you selected. See the following to determinehow to achieve the desired effect.
Dolby Digital codec
For Dolby Digital, encoder control fields are circled in blue and delivery fields are circled in red. Notethat the LFE Filter field appears only when the Coding Mode is 3/2 mode.
Dolby Digital Plus codec
Encoder Control fields are circled in blue. Delivery fields are circled in red. Note that the AutomaticPass-through field does not relate to metadata.
Note that the Surround Mode field appears only when Coding Mode is 2/0.
Version 2.14 and later104
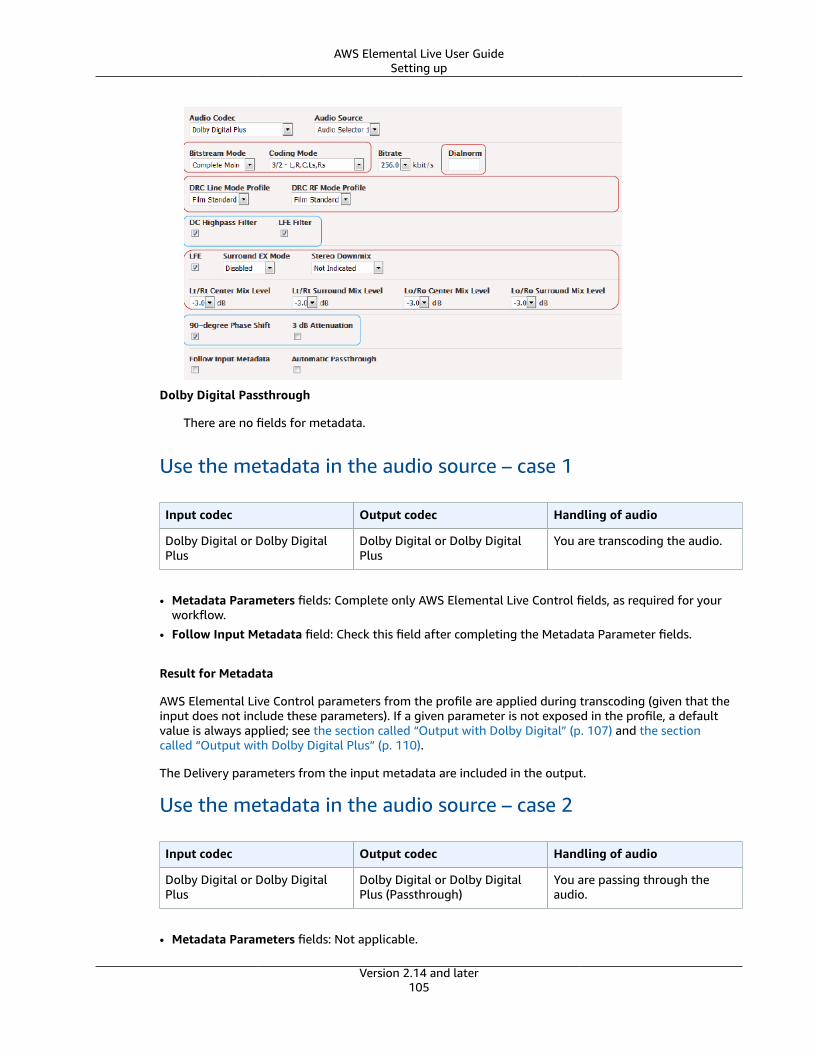
AWS Elemental Live User GuideSetting up
Dolby Digital Passthrough
There are no fields for metadata.
Use the metadata in the audio source – case 1
Input codec Output codec Handling of audio
Dolby Digital or Dolby DigitalPlus
Dolby Digital or Dolby DigitalPlus
You are transcoding the audio.
• Metadata Parameters fields: Complete only AWS Elemental Live Control fields, as required for yourworkflow.
• Follow Input Metadata field: Check this field after completing the Metadata Parameter fields.
Result for Metadata
AWS Elemental Live Control parameters from the profile are applied during transcoding (given that theinput does not include these parameters). If a given parameter is not exposed in the profile, a defaultvalue is always applied; see the section called “Output with Dolby Digital” (p. 107) and the sectioncalled “Output with Dolby Digital Plus” (p. 110).
The Delivery parameters from the input metadata are included in the output.
Use the metadata in the audio source – case 2
Input codec Output codec Handling of audio
Dolby Digital or Dolby DigitalPlus
Dolby Digital or Dolby DigitalPlus (Passthrough)
You are passing through theaudio.
• Metadata Parameters fields: Not applicable.
Version 2.14 and later105
AWS Elemental Live User GuideSetting up
• Follow Input Metadata field: No Encoder Control parameters are applied (because no transcodingoccurs).
Result for Metadata
The Delivery parameters from the input metadata will be included in the output.
Use the metadata in the audio source – case 3
Input codec Output codec Handling of audio
Mix of Dolby Digital Plus andanother codec
Dolby Digital Plus You are passing through theDolby Digital Plus audio andtranscoding the remainder(Automatic Passthrough field ischecked).
• Metadata Parameters field: Complete all the parameters.
• Follow Input Metadata field: Check this field after completing the metadata fields.
Result for Metadata
• AWS Elemental Live Control parameters from the profile will be applied when transcoding the non-Dolby Digital Plus audio.
• No Encoder Control parameters will be applied when passing through the Dolby Digital Plus audio.
• The Delivery parameters from the profile will be used when transcoding the non-Dolby Digital Plusaudio.
• The Delivery parameters from the audio source will be used for the passed-through Dolby Digitalaudio.
Use the metadata in the audio source – case 4
Input codec Output codec Handling of audio
Dolby E Dolby Digital or Dolby DigitalPlus
You are transcoding the audio.
• Metadata Parameters fields: Ignore.
• Follow Input Metadata field: Check.
Result for Metadata
• AWS Elemental Live Control parameters from the input metadata are applied during transcoding.
• The Delivery parameters from the input metadata are included in the output.
Version 2.14 and later106
AWS Elemental Live User GuideOutput with Dolby Digital
Override the metadata with new values – case 5
Input codec Output codec Desired effect
Any codec Dolby Digital or Dolby DigitalPlus
To override the metadata in theaudio source.
• Metadata Parameters field: Complete as desired.• Follow Input Metadata field: Leave unchecked.
Result for metadata
The values from the profile are used.
• With all parameters except Dialnorm, the values from the profile are used. If a given parameter is notexposed in the profile, a default value is always applied; see the section called “Output with DolbyDigital” (p. 107) and the section called “Output with Dolby Digital Plus” (p. 110).
• With Dialnorm, the value from the profile is used. If the profile has no value and the source is a Dolbyfile, the value from the input metadata is used. If the profile has no value and the source is not aDolby file, a default value is used; see the section called “Output with Dolby Digital” (p. 107) and thesection called “Output with Dolby Digital Plus” (p. 110).
AWS Elemental Live Control parameters are applied during transcoding. The Delivery parameters areincluded in the output.
Output with the Dolby Digital codec
Namedmetadataparameters
CategoryFieldAPItag(atstream_assembly\audio_description\ac3_settings)
Default
DialogueLevel
D DialnormdialnormNotset
ChannelMode
D CodingMode
coding_mode2/0
LFEChannel
D CodingMode
CodingModesetto“3/2modewithLFE”meansLFEis
Disabled
Version 2.14 and later107

AWS Elemental Live User GuideOutput with Dolby Digital
Namedmetadataparameters
CategoryFieldAPItag(atstream_assembly\audio_description\ac3_settings)
Default
enabled.AllotheroptionsmeanLFEisdisabled.
BitstreamMode
D BitstreamMode
bitstream_modeCompleteMain
LineModeCompression
D Nousercontrol
FilmStd.
RFModeCompression
D Nousercontrol
FilmStd.
RFOvermodulationProtection
D Nousercontrol
CenterDownmixLevel
D Nousercontrol
-3dB
SurroundDownmixLevel
D Nousercontrol
Notindicated
DolbySurroundMode
D Nousercontrol
Disabled
AudioProductionInformation
D Nousercontrol
0(doesnotexist)
MixLevel
D Nousercontrol
Notset
RoomType
D Nousercontrol
Notset
CopyrightBit
D Nousercontrol
0
Version 2.14 and later108

AWS Elemental Live User GuideOutput with Dolby Digital
Namedmetadataparameters
CategoryFieldAPItag(atstream_assembly\audio_description\ac3_settings)
Default
OriginalBitstream
D Nousercontrol
0
PreferredStereoDownmix
D Nousercontrol
Notindicated
Lt/RtCenterDownmixLevel
D Nousercontrol
-3.0dB
Lt/RtSurroundDownmixLevel
D Nousercontrol
-3.0dB
Lo/RoCenterDownmixLevel
D Nousercontrol
-3.0dB
Lo/RoSurroundDownmixLevel
D Nousercontrol
-3.0dB
DolbySurroundEXMode
D Nousercontrol
Disabled
A/DConverterType
D Nousercontrol
0(standard)
DCFilter
EC Nousercontrol
Enabled
Version 2.14 and later109
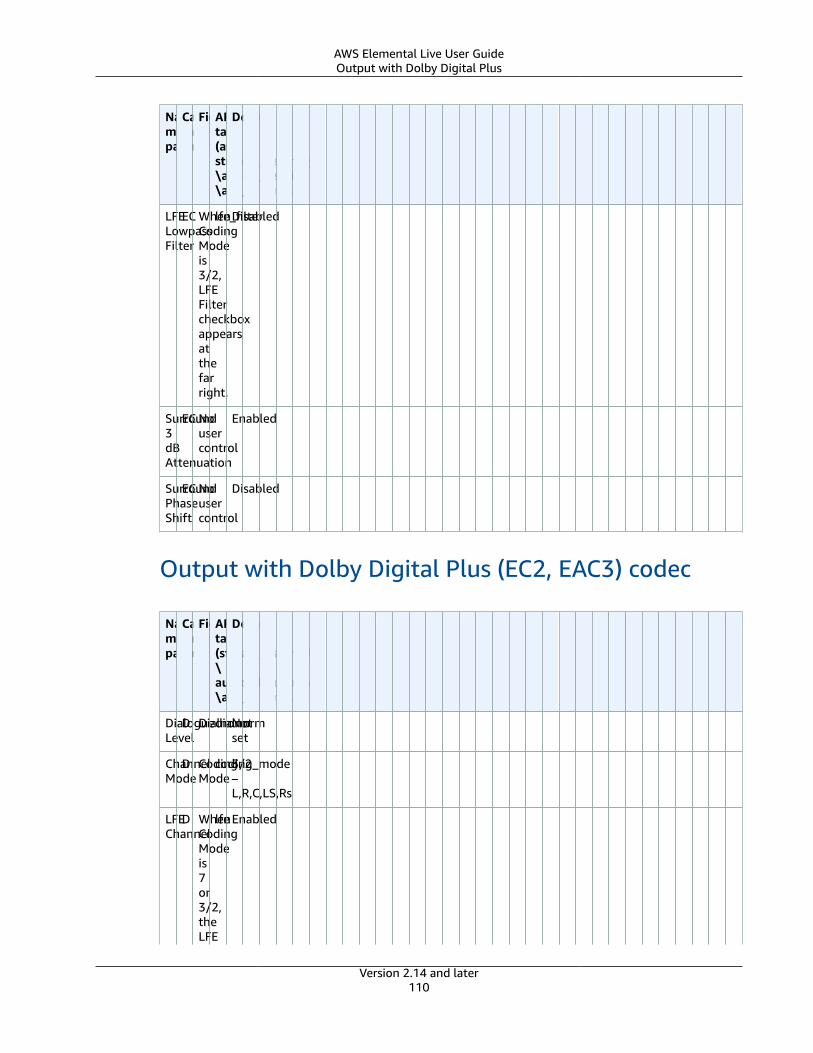
AWS Elemental Live User GuideOutput with Dolby Digital Plus
Namedmetadataparameters
CategoryFieldAPItag(atstream_assembly\audio_description\ac3_settings)
Default
LFELowpassFilter
EC WhenCodingModeis3/2,LFEFiltercheckboxappearsatthefarright.
lfe_filterDisabled
Surround3dBAttenuation
EC Nousercontrol
Enabled
SurroundPhaseShift
EC Nousercontrol
Disabled
Output with Dolby Digital Plus (EC2, EAC3) codec
Namedmetadataparameters
CategoryFieldAPItag(stream_assembly\audio_description\ac3_settings)
Default
DialogueLevel
D DialnormdialnormNotset
ChannelMode
D CodingMode
coding_mode3/2–L,R,C,LS,Rs
LFEChannel
D WhenCodingModeis7or3/2,theLFE
lfe Enabled
Version 2.14 and later110
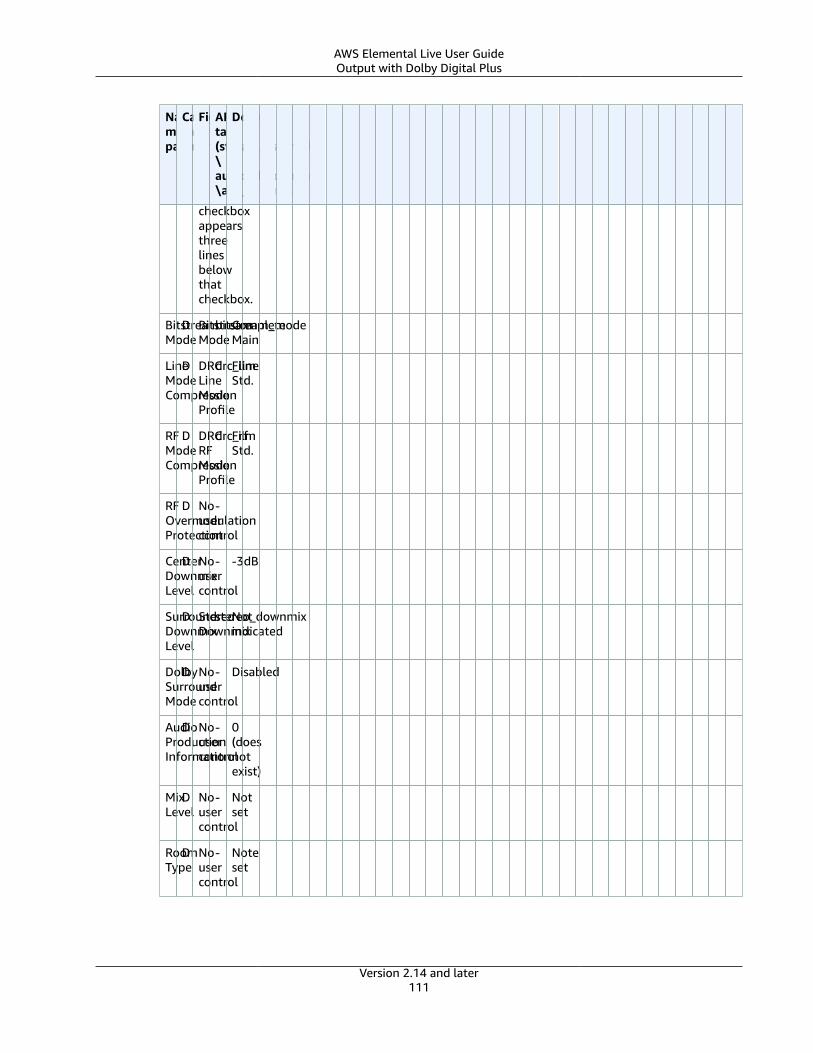
AWS Elemental Live User GuideOutput with Dolby Digital Plus
Namedmetadataparameters
CategoryFieldAPItag(stream_assembly\audio_description\ac3_settings)
Default
checkboxappearsthreelinesbelowthatcheckbox.
BitstreamMode
D BitstreamMode
bitstream_modeCompleteMain
LineModeCompression
D DRCLineModeProfile
drc_lineFilmStd.
RFModeCompression
D DRCRFModeProfile
drc_rfFilmStd.
RFOvermodulationProtection
D Nousercontrol
-
CenterDownmixLevel
D Nousercontrol
- -3dB
SurroundDownmixLevel
D StereoDownmix
stereo_downmixNotindicated
DolbySurroundMode
D Nousercontrol
- Disabled
AudioProductionInformation
D Nousercontrol
- 0(doesnotexist)
MixLevel
D Nousercontrol
- Notset
RoomType
D Nousercontrol
- Noteset
Version 2.14 and later111
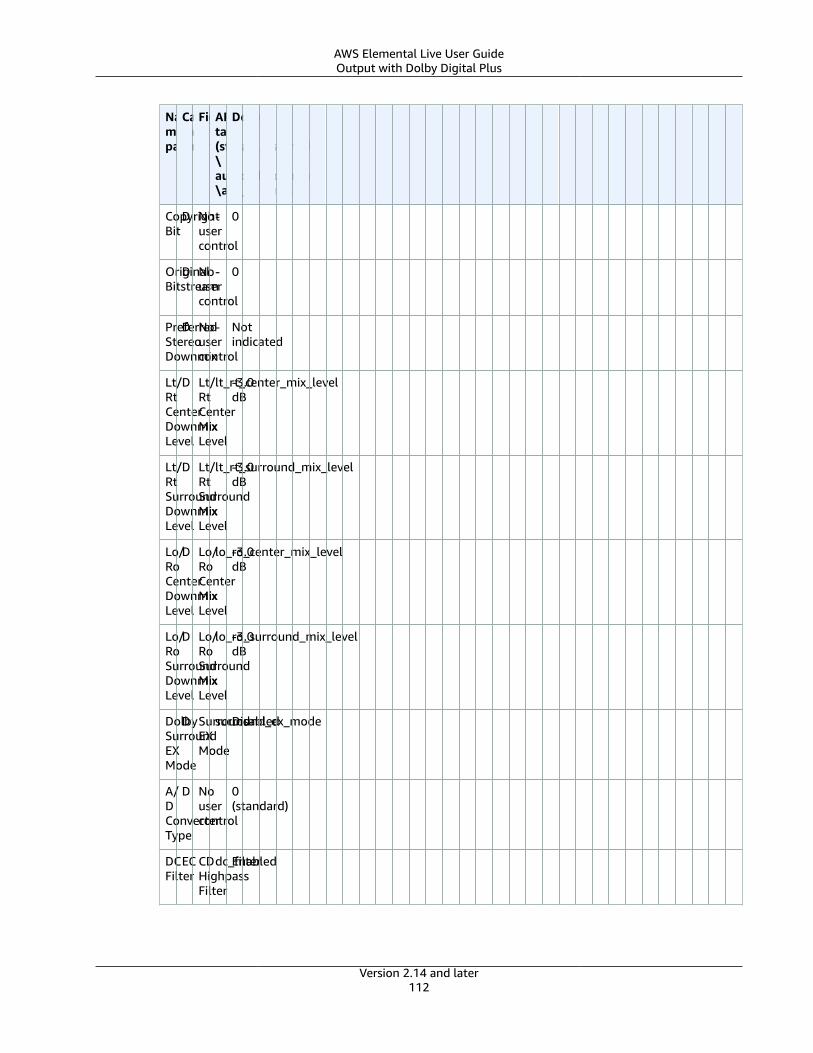
AWS Elemental Live User GuideOutput with Dolby Digital Plus
Namedmetadataparameters
CategoryFieldAPItag(stream_assembly\audio_description\ac3_settings)
Default
CopyrightBit
D Nousercontrol
- 0
OriginalBitstream
D Nousercontrol
- 0
PreferredStereoDownmix
D Nousercontrol
- Notindicated
Lt/RtCenterDownmixLevel
D Lt/RtCenterMixLevel
lt_rt_center_mix_level-3.0dB
Lt/RtSurroundDownmixLevel
D Lt/RtSurroundMixLevel
lt_rt_surround_mix_level-3.0dB
Lo/RoCenterDownmixLevel
D Lo/RoCenterMixLevel
lo_ro_center_mix_level-3.0dB
Lo/RoSurroundDownmixLevel
D Lo/RoSurroundMixLevel
lo_ro_surround_mix_level-3.0dB
DolbySurroundEXMode
D SurroundEXMode
surround_ex_modeDisabled
A/DConverterType
D Nousercontrol
0(standard)
DCFilter
EC CDHighpassFilter
dc_filterEnabled
Version 2.14 and later112
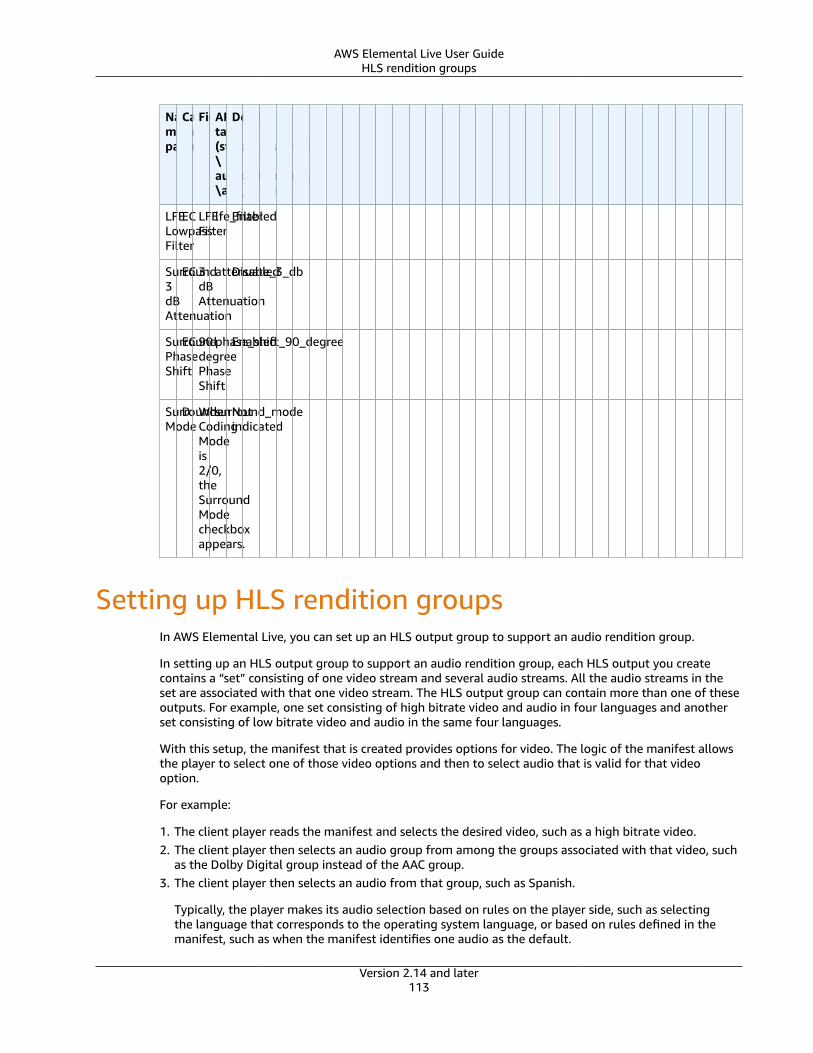
AWS Elemental Live User GuideHLS rendition groups
Namedmetadataparameters
CategoryFieldAPItag(stream_assembly\audio_description\ac3_settings)
Default
LFELowpassFilter
EC LFEFilter
lfe_filterEnabled
Surround3dBAttenuation
EC 3dBAttenuation
attenuate_3_dbDisabled
SurroundPhaseShift
EC 90-degreePhaseShift
phase_shift_90_degreeEnabled
SurroundMode
D WhenCodingModeis2/0,theSurroundModecheckboxappears.
surround_modeNotindicated
Setting up HLS rendition groupsIn AWS Elemental Live, you can set up an HLS output group to support an audio rendition group.
In setting up an HLS output group to support an audio rendition group, each HLS output you createcontains a “set” consisting of one video stream and several audio streams. All the audio streams in theset are associated with that one video stream. The HLS output group can contain more than one of theseoutputs. For example, one set consisting of high bitrate video and audio in four languages and anotherset consisting of low bitrate video and audio in the same four languages.
With this setup, the manifest that is created provides options for video. The logic of the manifest allowsthe player to select one of those video options and then to select audio that is valid for that videooption.
For example:
1. The client player reads the manifest and selects the desired video, such as a high bitrate video.2. The client player then selects an audio group from among the groups associated with that video, such
as the Dolby Digital group instead of the AAC group.3. The client player then selects an audio from that group, such as Spanish.
Typically, the player makes its audio selection based on rules on the player side, such as selectingthe language that corresponds to the operating system language, or based on rules defined in themanifest, such as when the manifest identifies one audio as the default.
Version 2.14 and later113
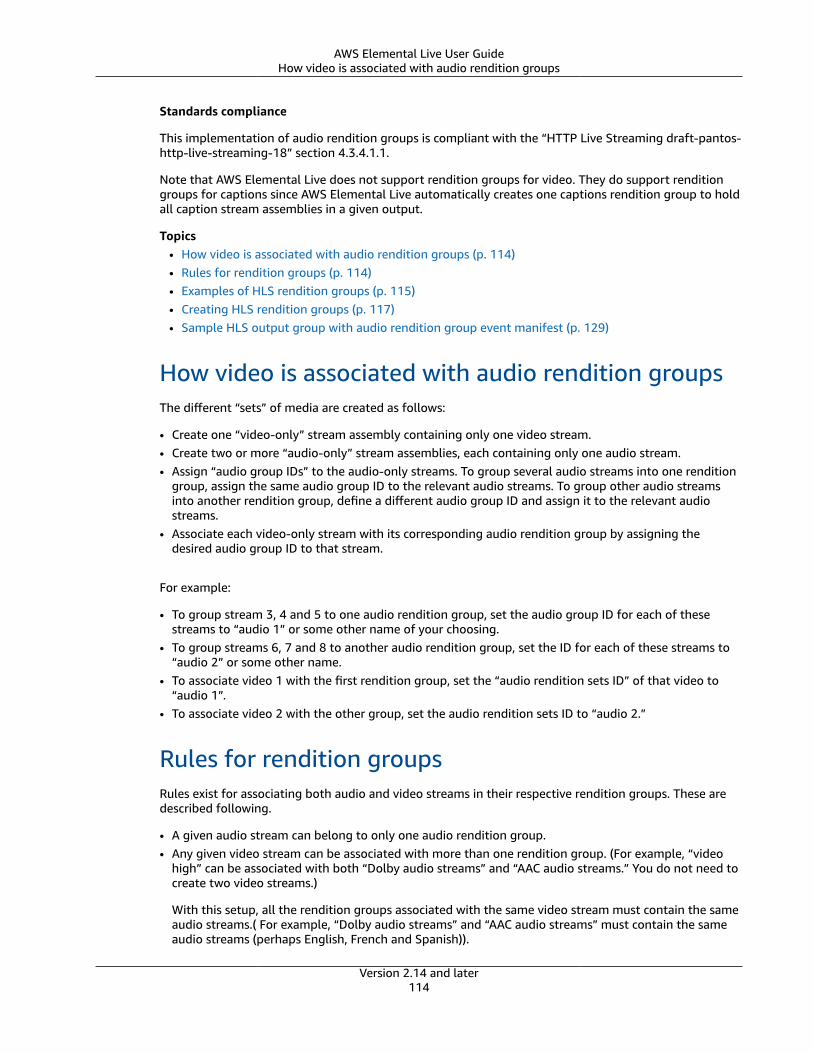
AWS Elemental Live User GuideHow video is associated with audio rendition groups
Standards compliance
This implementation of audio rendition groups is compliant with the “HTTP Live Streaming draft-pantos-http-live-streaming-18” section 4.3.4.1.1.
Note that AWS Elemental Live does not support rendition groups for video. They do support renditiongroups for captions since AWS Elemental Live automatically creates one captions rendition group to holdall caption stream assemblies in a given output.
Topics• How video is associated with audio rendition groups (p. 114)• Rules for rendition groups (p. 114)• Examples of HLS rendition groups (p. 115)• Creating HLS rendition groups (p. 117)• Sample HLS output group with audio rendition group event manifest (p. 129)
How video is associated with audio rendition groupsThe different “sets” of media are created as follows:
• Create one “video-only” stream assembly containing only one video stream.• Create two or more “audio-only” stream assemblies, each containing only one audio stream.• Assign “audio group IDs” to the audio-only streams. To group several audio streams into one rendition
group, assign the same audio group ID to the relevant audio streams. To group other audio streamsinto another rendition group, define a different audio group ID and assign it to the relevant audiostreams.
• Associate each video-only stream with its corresponding audio rendition group by assigning thedesired audio group ID to that stream.
For example:
• To group stream 3, 4 and 5 to one audio rendition group, set the audio group ID for each of thesestreams to “audio 1” or some other name of your choosing.
• To group streams 6, 7 and 8 to another audio rendition group, set the ID for each of these streams to“audio 2” or some other name.
• To associate video 1 with the first rendition group, set the “audio rendition sets ID” of that video to“audio 1”.
• To associate video 2 with the other group, set the audio rendition sets ID to “audio 2.”
Rules for rendition groupsRules exist for associating both audio and video streams in their respective rendition groups. These aredescribed following.
• A given audio stream can belong to only one audio rendition group.• Any given video stream can be associated with more than one rendition group. (For example, “video
high” can be associated with both “Dolby audio streams” and “AAC audio streams.” You do not need tocreate two video streams.)
With this setup, all the rendition groups associated with the same video stream must contain the sameaudio streams.( For example, “Dolby audio streams” and “AAC audio streams” must contain the sameaudio streams (perhaps English, French and Spanish)).
Version 2.14 and later114
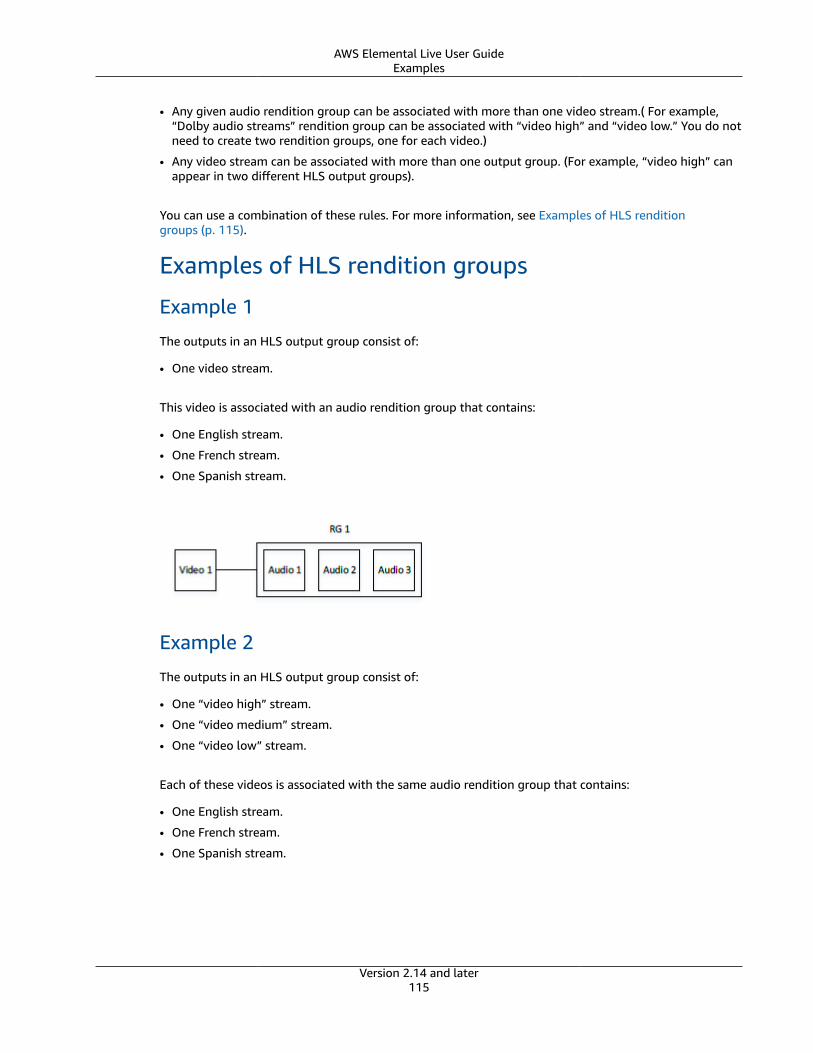
AWS Elemental Live User GuideExamples
• Any given audio rendition group can be associated with more than one video stream.( For example,“Dolby audio streams” rendition group can be associated with “video high” and “video low.” You do notneed to create two rendition groups, one for each video.)
• Any video stream can be associated with more than one output group. (For example, “video high” canappear in two different HLS output groups).
You can use a combination of these rules. For more information, see Examples of HLS renditiongroups (p. 115).
Examples of HLS rendition groups
Example 1
The outputs in an HLS output group consist of:
• One video stream.
This video is associated with an audio rendition group that contains:
• One English stream.
• One French stream.
• One Spanish stream.
Example 2
The outputs in an HLS output group consist of:
• One “video high” stream.
• One “video medium” stream.
• One “video low” stream.
Each of these videos is associated with the same audio rendition group that contains:
• One English stream.
• One French stream.
• One Spanish stream.
Version 2.14 and later115
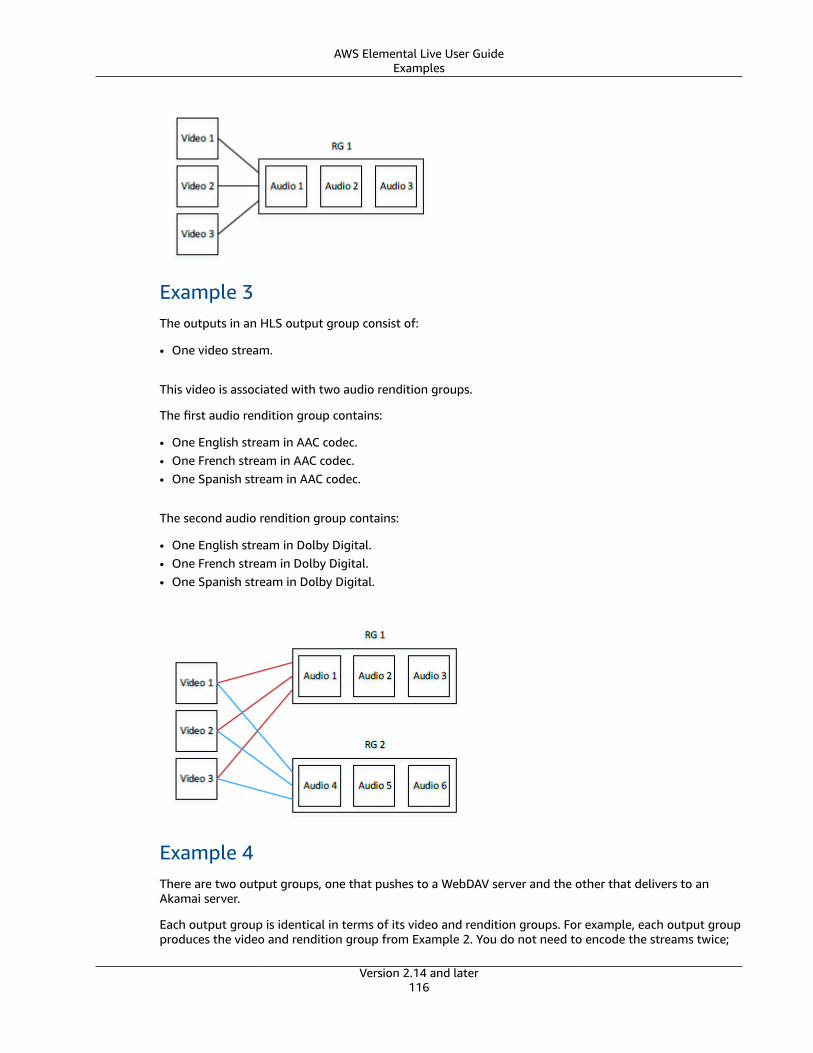
AWS Elemental Live User GuideExamples
Example 3The outputs in an HLS output group consist of:
• One video stream.
This video is associated with two audio rendition groups.
The first audio rendition group contains:
• One English stream in AAC codec.• One French stream in AAC codec.• One Spanish stream in AAC codec.
The second audio rendition group contains:
• One English stream in Dolby Digital.• One French stream in Dolby Digital.• One Spanish stream in Dolby Digital.
Example 4There are two output groups, one that pushes to a WebDAV server and the other that delivers to anAkamai server.
Each output group is identical in terms of its video and rendition groups. For example, each output groupproduces the video and rendition group from Example 2. You do not need to encode the streams twice;
Version 2.14 and later116
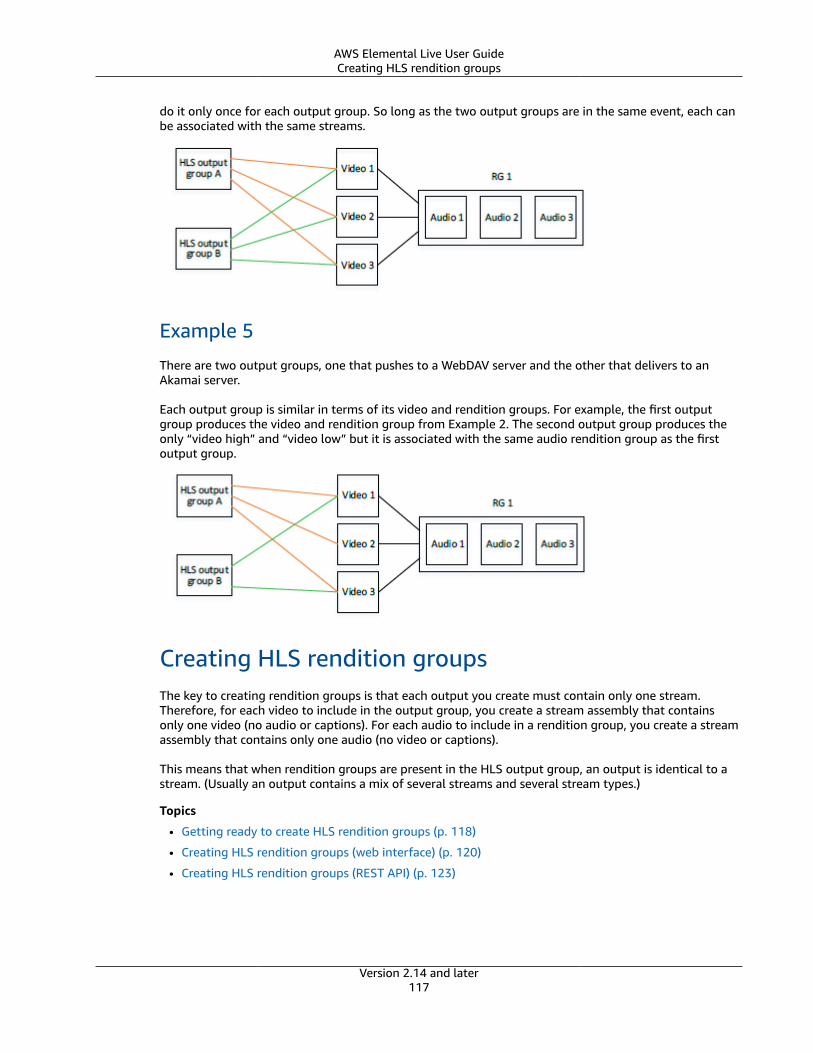
AWS Elemental Live User GuideCreating HLS rendition groups
do it only once for each output group. So long as the two output groups are in the same event, each canbe associated with the same streams.
Example 5
There are two output groups, one that pushes to a WebDAV server and the other that delivers to anAkamai server.
Each output group is similar in terms of its video and rendition groups. For example, the first outputgroup produces the video and rendition group from Example 2. The second output group produces theonly “video high” and “video low” but it is associated with the same audio rendition group as the firstoutput group.
Creating HLS rendition groupsThe key to creating rendition groups is that each output you create must contain only one stream.Therefore, for each video to include in the output group, you create a stream assembly that containsonly one video (no audio or captions). For each audio to include in a rendition group, you create a streamassembly that contains only one audio (no video or captions).
This means that when rendition groups are present in the HLS output group, an output is identical to astream. (Usually an output contains a mix of several streams and several stream types.)
Topics
• Getting ready to create HLS rendition groups (p. 118)
• Creating HLS rendition groups (web interface) (p. 120)
• Creating HLS rendition groups (REST API) (p. 123)
Version 2.14 and later117
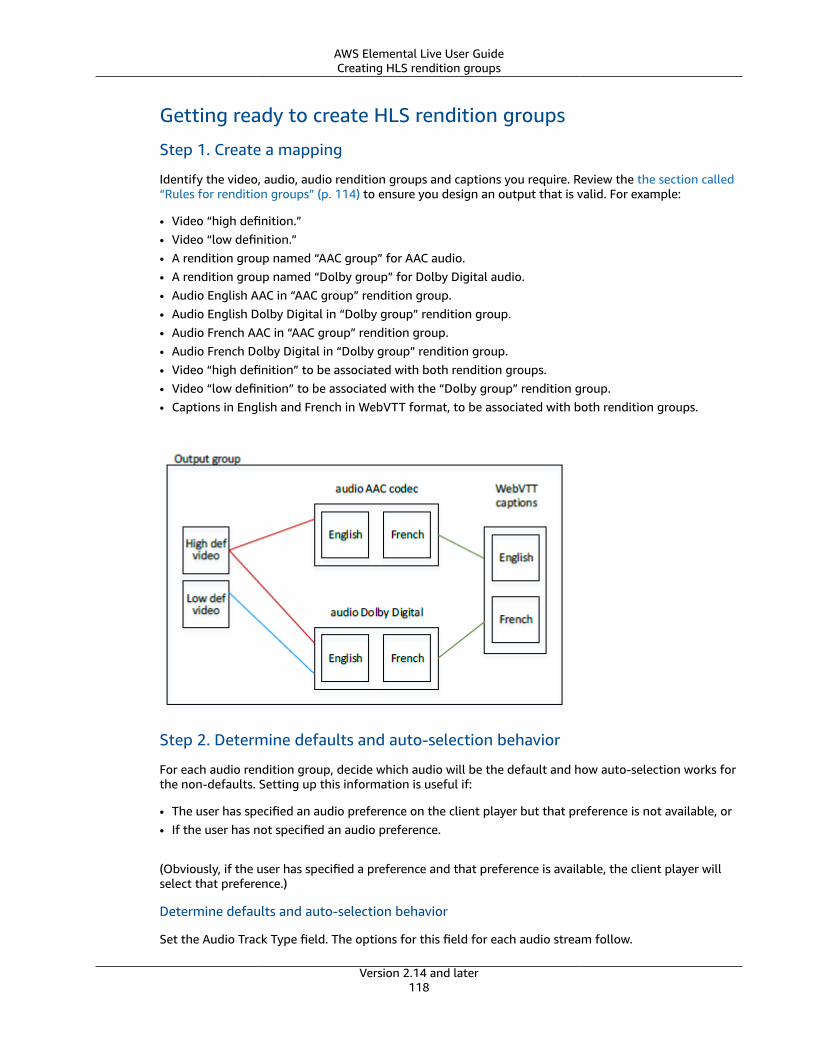
AWS Elemental Live User GuideCreating HLS rendition groups
Getting ready to create HLS rendition groups
Step 1. Create a mapping
Identify the video, audio, audio rendition groups and captions you require. Review the the section called“Rules for rendition groups” (p. 114) to ensure you design an output that is valid. For example:
• Video “high definition.”• Video “low definition.”• A rendition group named “AAC group” for AAC audio.• A rendition group named “Dolby group” for Dolby Digital audio.• Audio English AAC in “AAC group” rendition group.• Audio English Dolby Digital in “Dolby group” rendition group.• Audio French AAC in “AAC group” rendition group.• Audio French Dolby Digital in “Dolby group” rendition group.• Video “high definition” to be associated with both rendition groups.• Video “low definition” to be associated with the “Dolby group” rendition group.• Captions in English and French in WebVTT format, to be associated with both rendition groups.
Step 2. Determine defaults and auto-selection behavior
For each audio rendition group, decide which audio will be the default and how auto-selection works forthe non-defaults. Setting up this information is useful if:
• The user has specified an audio preference on the client player but that preference is not available, or• If the user has not specified an audio preference.
(Obviously, if the user has specified a preference and that preference is available, the client player willselect that preference.)
Determine defaults and auto-selection behavior
Set the Audio Track Type field. The options for this field for each audio stream follow.
Version 2.14 and later118
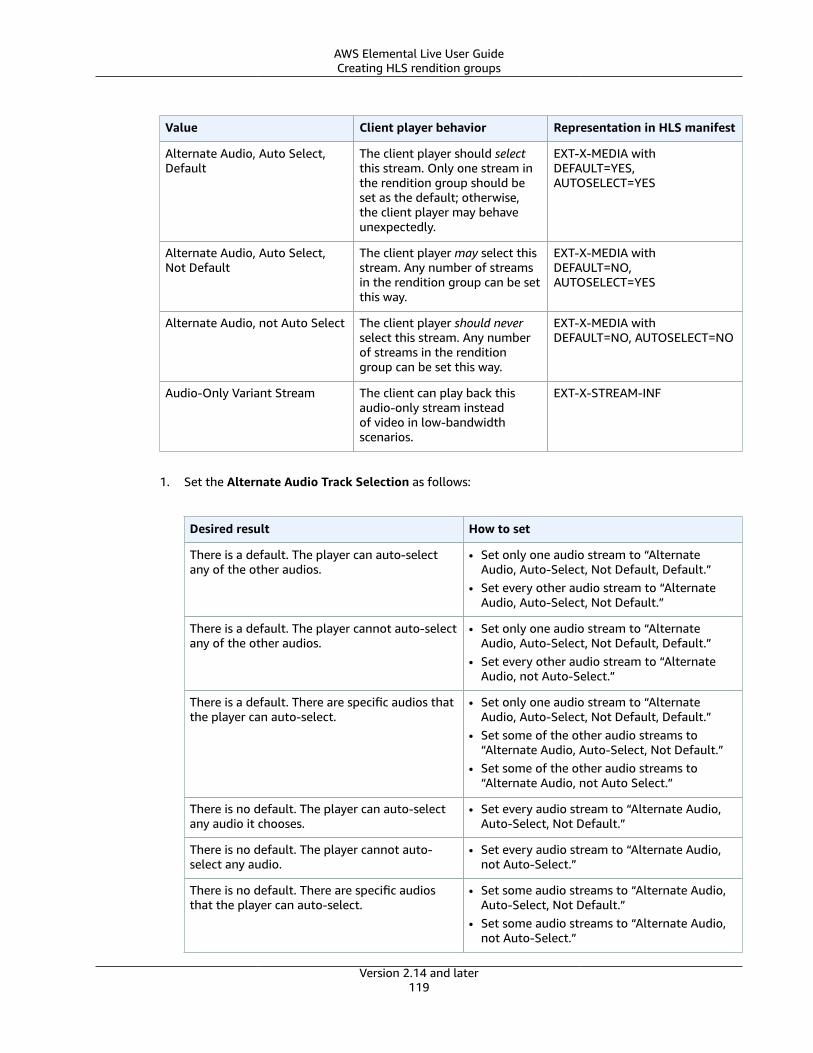
AWS Elemental Live User GuideCreating HLS rendition groups
Value Client player behavior Representation in HLS manifest
Alternate Audio, Auto Select,Default
The client player should selectthis stream. Only one stream inthe rendition group should beset as the default; otherwise,the client player may behaveunexpectedly.
EXT-X-MEDIA withDEFAULT=YES,AUTOSELECT=YES
Alternate Audio, Auto Select,Not Default
The client player may select thisstream. Any number of streamsin the rendition group can be setthis way.
EXT-X-MEDIA withDEFAULT=NO,AUTOSELECT=YES
Alternate Audio, not Auto Select The client player should neverselect this stream. Any numberof streams in the renditiongroup can be set this way.
EXT-X-MEDIA withDEFAULT=NO, AUTOSELECT=NO
Audio-Only Variant Stream The client can play back thisaudio-only stream insteadof video in low-bandwidthscenarios.
EXT-X-STREAM-INF
1. Set the Alternate Audio Track Selection as follows:
Desired result How to set
There is a default. The player can auto-selectany of the other audios.
• Set only one audio stream to “AlternateAudio, Auto-Select, Not Default, Default.”
• Set every other audio stream to “AlternateAudio, Auto-Select, Not Default.”
There is a default. The player cannot auto-selectany of the other audios.
• Set only one audio stream to “AlternateAudio, Auto-Select, Not Default, Default.”
• Set every other audio stream to “AlternateAudio, not Auto-Select.”
There is a default. There are specific audios thatthe player can auto-select.
• Set only one audio stream to “AlternateAudio, Auto-Select, Not Default, Default.”
• Set some of the other audio streams to“Alternate Audio, Auto-Select, Not Default.”
• Set some of the other audio streams to“Alternate Audio, not Auto Select.”
There is no default. The player can auto-selectany audio it chooses.
• Set every audio stream to “Alternate Audio,Auto-Select, Not Default.”
There is no default. The player cannot auto-select any audio.
• Set every audio stream to “Alternate Audio,not Auto-Select.”
There is no default. There are specific audiosthat the player can auto-select.
• Set some audio streams to “Alternate Audio,Auto-Select, Not Default.”
• Set some audio streams to “Alternate Audio,not Auto-Select.”
Version 2.14 and later119

AWS Elemental Live User GuideCreating HLS rendition groups
2. In addition, if you have an audio that is intended as the audio to play when the bandwidth is so lowthat the video cannot be delivered, then set that audio to “Audio-Only Variant Stream.”
Creating HLS rendition groups (web interface)Topics
• Step 1. Create video-only outputs (p. 120)• Step 3. Create audio-only outputs (p. 120)• Step 4. Caption-only streams (p. 121)• Step 5. Verify Outputs for the HLS Rendition Group (p. 121)• Summary of the steps to create an HLS rendition group (p. 121)• Example of the Event Output: Creating Caption-Only Streams for an HLS Rendition Group (p. 121)
Step 1. Create video-only outputs
You must create “video-only” outputs. Follow these steps for each video-only output you need:
1. In the AWS Elemental Live web interface, display the Apple HLS output group tab.2. Click Add Output in order to create an output.3. Select or create a stream to be associated with that output. For example, Stream 1.4. In that stream, delete the Default Audio tab. This stream now contains only a video stream.5. Go back to the Output section associated with this stream and click Advanced. The Audio Rendition
Sets field now appears, with a default value of “audio_program.” This field shows in an output onlywhen the associated stream contains only one video stream.
6. Change the Audio Rendition Sets field to specify the rendition group or groups to associate withthis video:
• To associate the video with one rendition group, enter the name of the rendition group.• To associate the video with several rendition groups, enter a comma-separated list of the rendition
group names. Do not put a space after each comma.
Step 3. Create audio-only outputs
Follow these steps for each audio-only output you need:
1. Click Add Output in order to create an output.2. Select or create a stream to be associated with that output. For example, Stream 3.3. In that stream, delete the default Video and Captions tabs.This stream is now an audio stream.4. Complete the following fields in the Advanced section:
• Stream Name: The wording for the NAME parameter in the manifest, as described in Audioinformation for an HLS output group with audio rendition group event (p. 129). This is the audiodescription that the client player user interface displays. If the description is a language, it shouldbe in that language. For example, “Deutsch ”, not “German”.
• Language Code: Optional; complete only if the audio is a language. The wording that is to appearin the LANGUAGE parameter in the manifest should be the language code as per RFC 5646,as described in Audio information for an HLS output group with audio rendition group event (p. 129). This is the language code that the client player reads.
You can also leave this field blank and check Follow Input Language Code; the language of theaudio (specified in Audio Source, a bit higher up on the screen) is detected.
Version 2.14 and later120

AWS Elemental Live User GuideCreating HLS rendition groups
5. Go back to the Output section associated with the first audio stream and click Advanced.
The Audio Group ID field and Audio Track Type now show. These fields show in an output onlywhen the associated stream contains only one audio stream. The Audio Group ID field shows thedefault value “audio_program.”
(Note that the Audio Only Image field also appears in an audio-only stream. This field has nothingto do with audio rendition groups; it is used to assign an image in a “regular stream that has novideo.”)
• Set the Audio Group ID field to specify the audio rendition group that this audio will belong to.For example, “AAC group” or “Dolby group.”
• Set up the Alternate Audio Track Selection field (Audio Track Type field), as described in Step 2.Determine defaults and auto-selection behavior (p. 118).
Step 4. Caption-only streams
If your output includes captions, you must create “captions-only” outputs. Follow these steps for eachcaptions-only output you need:
1. Click Add Output in order to create an output.
2. Select or create a stream to be associated with that output.For example, Stream 4.
3. In that stream, delete the default Video tab and the default Audio tab. This stream now containsonly a captions stream.
For more information on setting up captions, see Working with captions (p. 131).
Step 5. Verify Outputs for the HLS Rendition Group
• Finally, check all your outputs for the HLS output groups and make sure you do not have an outputthat contains both audio and video. Including such an output may produce a manifest that the clientplayer cannot interpret.
Summary of the steps to create an HLS rendition group
After these steps, you have:
• One or more video-only outputs. Each output is associated through its Audio Rendition Sets field toone or more audio rendition groups.
• Two or more audio-only outputs. Each output belongs to an audio rendition group based on the valuein the Audio Group ID field.
• Optionally, one or more captions-only outputs.
Example of the Event Output: Creating Caption-Only Streams for an HLSRendition Group
Here is the Output section.
Version 2.14 and later121
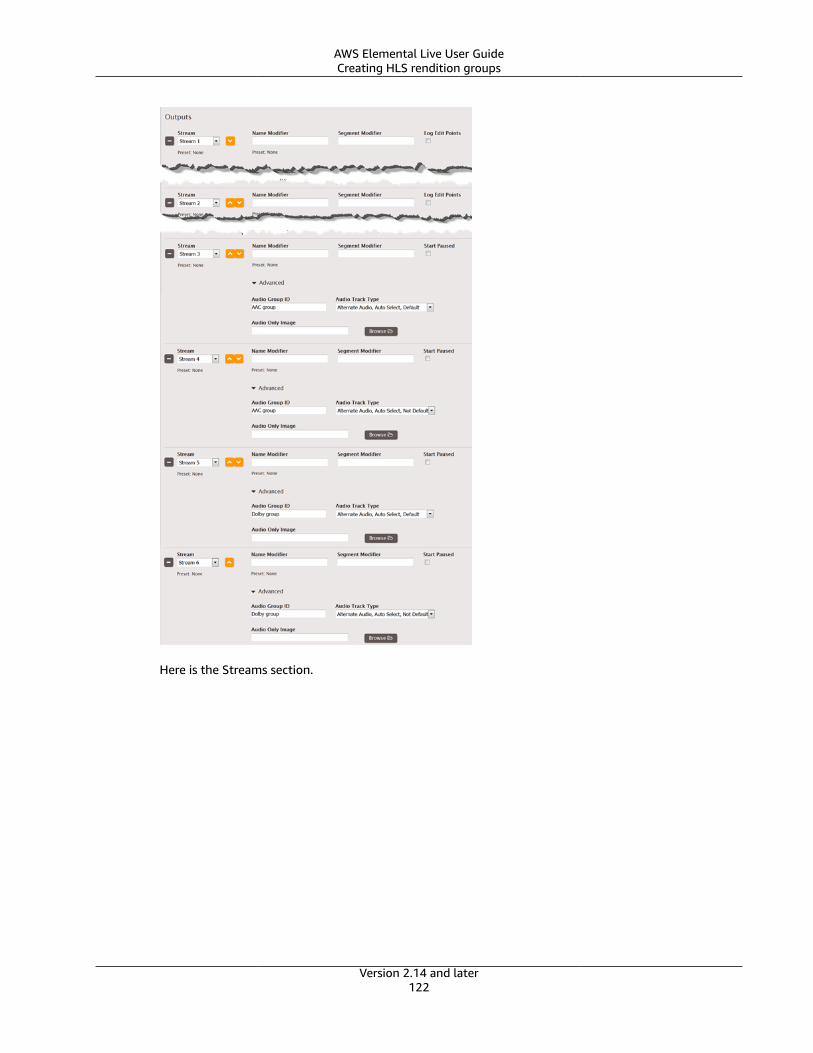
AWS Elemental Live User GuideCreating HLS rendition groups
Here is the Streams section.
Version 2.14 and later122
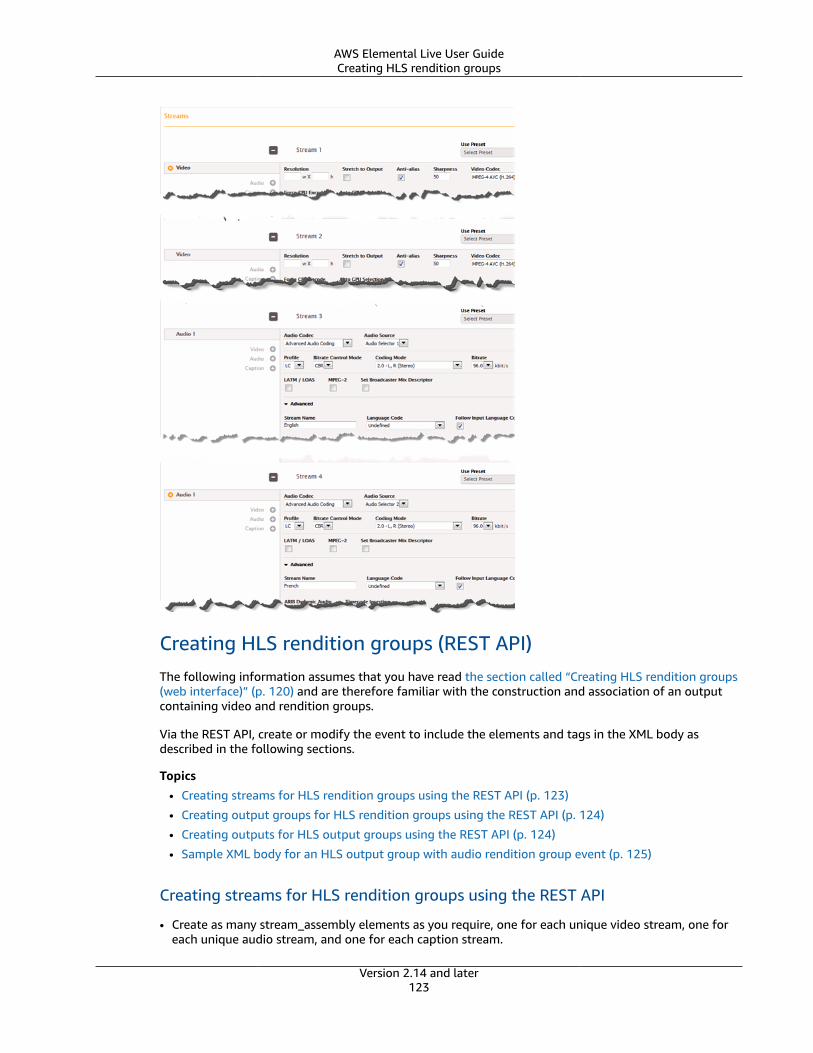
AWS Elemental Live User GuideCreating HLS rendition groups
Creating HLS rendition groups (REST API)The following information assumes that you have read the section called “Creating HLS rendition groups(web interface)” (p. 120) and are therefore familiar with the construction and association of an outputcontaining video and rendition groups.
Via the REST API, create or modify the event to include the elements and tags in the XML body asdescribed in the following sections.
Topics
• Creating streams for HLS rendition groups using the REST API (p. 123)
• Creating output groups for HLS rendition groups using the REST API (p. 124)
• Creating outputs for HLS output groups using the REST API (p. 124)
• Sample XML body for an HLS output group with audio rendition group event (p. 125)
Creating streams for HLS rendition groups using the REST API
• Create as many stream_assembly elements as you require, one for each unique video stream, one foreach unique audio stream, and one for each caption stream.
Version 2.14 and later123
AWS Elemental Live User GuideCreating HLS rendition groups
• Each stream_assembly element must contain only of these:
• One video_description element (plus an optional preset_id tag and name tag), or
• One audio_description element (plus an optional preset_id tag and name tag), or
• One caption_description element (plus an optional preset_id tag and name tag).
Creating output groups for HLS rendition groups using the REST API
• Create as many HLS output groups as desired by creating one output group that has the value“apple_live_group_settings” in its type tag and that contains one apple_live_group_settings element.Set other tags as desired.
Creating outputs for HLS output groups using the REST API
• Within each HLS output group, create as many output elements as required, one for each video stream(plus captions), one for each audio stream, and one for each captions stream.
• Each video output element must contain:
• container: m3u8
• extension: m3u8
• stream_assembly_name: The name of the one stream_assembly to associate with this output.Thisvalue matches the value of the name tag in the corresponding stream_assembly_name element.
• apple_live_settings element that contains:
• audio_rendition_sets tag: A comma-separated list of the names of the audio rendition groupsto associate with this video output to create a set. This value matches the value of theaudio_group_id tag in each of the associated audio outputs. For example, “audio_1” in theaudio_rendition_sets of this video output matches the “audio_1” in the audio_group_id tag of theassociated audio output.
• Other tags as you require.
• Each audio output element must contain:
• container: m3u8
• extension: m3u8
• stream_assembly_name: The name of the one stream_assembly to associate with this output.Thisvalue matches the value of the name tag in the corresponding stream_assembly_name element.
• apple_live_settings element that contains:
• audio_group_id: The name of the audio rendition group this audio output belongs to. Specifying avalue here creates the rendition group and puts this audio output into that rendition group.
• audio_track_type: Either “alternate_audio_auto_select_default” or “alternate_audio_auto_select”or “alternate_audio_not_auto_select” or “audio_only_variant_stream”. See the section called “Step2. Determine defaults and auto-selection behavior” (p. 118)for information.
• Other tags as you require.
• Each captions output element must contain:
• container: m3u8
• extension: m3u8
• stream_assembly_name: The name of the one stream_assembly to associate with this output.Thisvalue matches the value of the name tag in the corresponding stream_assembly_name element.
• apple_live_settings element that contains the usual tags as required.
Version 2.14 and later124
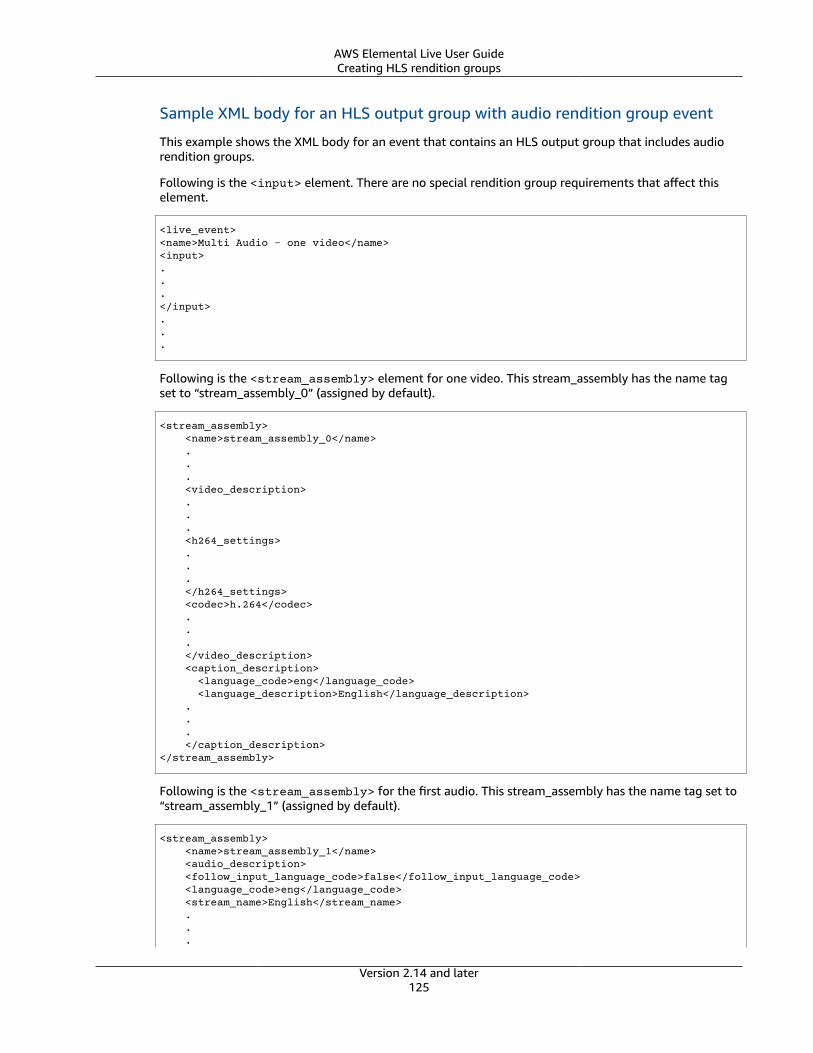
AWS Elemental Live User GuideCreating HLS rendition groups
Sample XML body for an HLS output group with audio rendition group event
This example shows the XML body for an event that contains an HLS output group that includes audiorendition groups.
Following is the <input> element. There are no special rendition group requirements that affect thiselement.
<live_event><name>Multi Audio - one video</name><input>...</input>...
Following is the <stream_assembly> element for one video. This stream_assembly has the name tagset to “stream_assembly_0” (assigned by default).
<stream_assembly> <name>stream_assembly_0</name> . . . <video_description> . . . <h264_settings> . . . </h264_settings> <codec>h.264</codec> . . . </video_description> <caption_description> <language_code>eng</language_code> <language_description>English</language_description> . . . </caption_description></stream_assembly>
Following is the <stream_assembly> for the first audio. This stream_assembly has the name tag set to“stream_assembly_1” (assigned by default).
<stream_assembly> <name>stream_assembly_1</name> <audio_description> <follow_input_language_code>false</follow_input_language_code> <language_code>eng</language_code> <stream_name>English</stream_name> . . .
Version 2.14 and later125
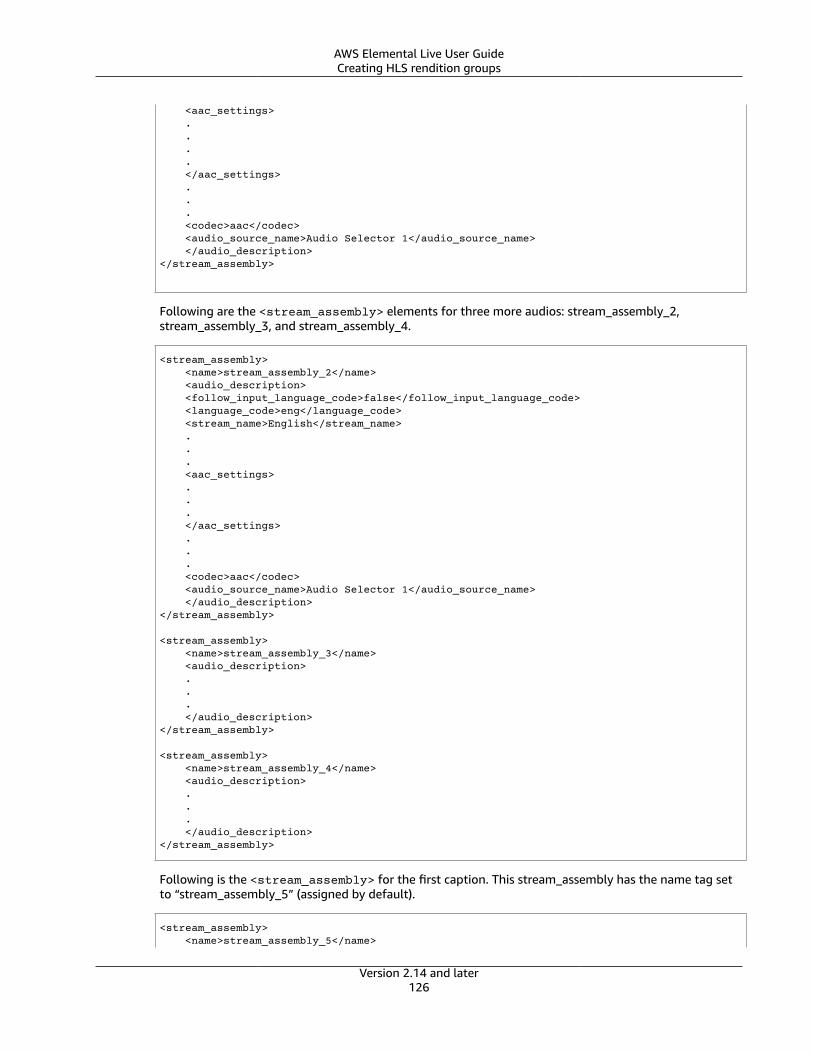
AWS Elemental Live User GuideCreating HLS rendition groups
<aac_settings> . . . . </aac_settings> . . . <codec>aac</codec> <audio_source_name>Audio Selector 1</audio_source_name> </audio_description></stream_assembly>
Following are the <stream_assembly> elements for three more audios: stream_assembly_2,stream_assembly_3, and stream_assembly_4.
<stream_assembly> <name>stream_assembly_2</name> <audio_description> <follow_input_language_code>false</follow_input_language_code> <language_code>eng</language_code> <stream_name>English</stream_name> . . . <aac_settings> . . . </aac_settings> . . . <codec>aac</codec> <audio_source_name>Audio Selector 1</audio_source_name> </audio_description></stream_assembly> <stream_assembly> <name>stream_assembly_3</name> <audio_description> . . . </audio_description></stream_assembly> <stream_assembly> <name>stream_assembly_4</name> <audio_description> . . . </audio_description></stream_assembly>
Following is the <stream_assembly> for the first caption. This stream_assembly has the name tag setto “stream_assembly_5” (assigned by default).
<stream_assembly> <name>stream_assembly_5</name>
Version 2.14 and later126
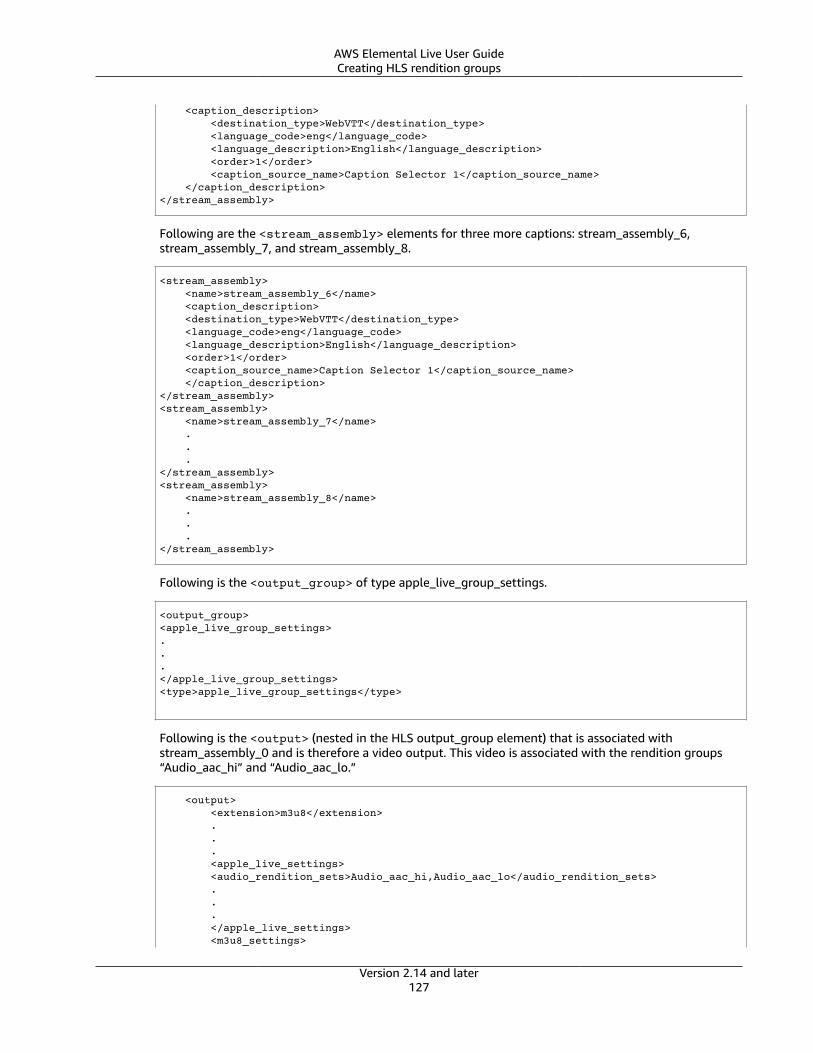
AWS Elemental Live User GuideCreating HLS rendition groups
<caption_description> <destination_type>WebVTT</destination_type> <language_code>eng</language_code> <language_description>English</language_description> <order>1</order> <caption_source_name>Caption Selector 1</caption_source_name> </caption_description></stream_assembly>
Following are the <stream_assembly> elements for three more captions: stream_assembly_6,stream_assembly_7, and stream_assembly_8.
<stream_assembly> <name>stream_assembly_6</name> <caption_description> <destination_type>WebVTT</destination_type> <language_code>eng</language_code> <language_description>English</language_description> <order>1</order> <caption_source_name>Caption Selector 1</caption_source_name> </caption_description></stream_assembly><stream_assembly> <name>stream_assembly_7</name> . . .</stream_assembly><stream_assembly> <name>stream_assembly_8</name> . . .</stream_assembly>
Following is the <output_group> of type apple_live_group_settings.
<output_group><apple_live_group_settings>...</apple_live_group_settings><type>apple_live_group_settings</type>
Following is the <output> (nested in the HLS output_group element) that is associated withstream_assembly_0 and is therefore a video output. This video is associated with the rendition groups“Audio_aac_hi” and “Audio_aac_lo.”
<output> <extension>m3u8</extension> . . . <apple_live_settings> <audio_rendition_sets>Audio_aac_hi,Audio_aac_lo</audio_rendition_sets> . . . </apple_live_settings> <m3u8_settings>
Version 2.14 and later127
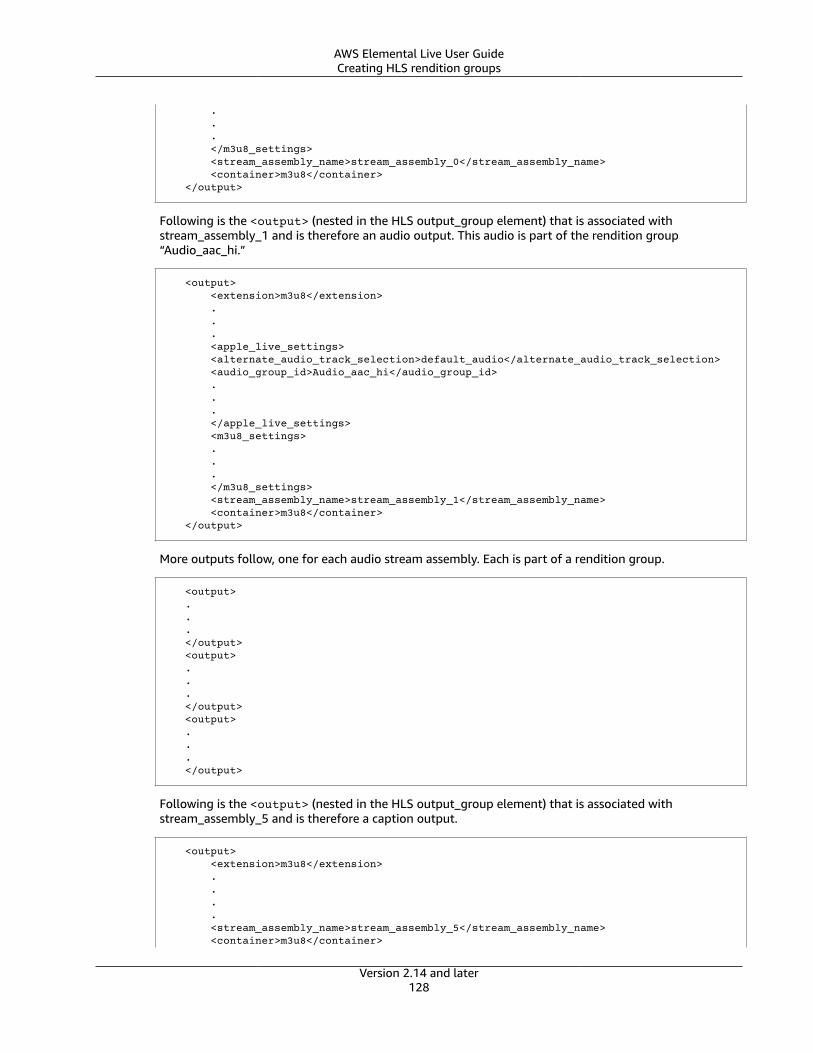
AWS Elemental Live User GuideCreating HLS rendition groups
. . . </m3u8_settings> <stream_assembly_name>stream_assembly_0</stream_assembly_name> <container>m3u8</container> </output>
Following is the <output> (nested in the HLS output_group element) that is associated withstream_assembly_1 and is therefore an audio output. This audio is part of the rendition group“Audio_aac_hi.”
<output> <extension>m3u8</extension> . . . <apple_live_settings> <alternate_audio_track_selection>default_audio</alternate_audio_track_selection> <audio_group_id>Audio_aac_hi</audio_group_id> . . . </apple_live_settings> <m3u8_settings> . . . </m3u8_settings> <stream_assembly_name>stream_assembly_1</stream_assembly_name> <container>m3u8</container> </output>
More outputs follow, one for each audio stream assembly. Each is part of a rendition group.
<output> . . . </output> <output> . . . </output> <output> . . . </output>
Following is the <output> (nested in the HLS output_group element) that is associated withstream_assembly_5 and is therefore a caption output.
<output> <extension>m3u8</extension> . . . . <stream_assembly_name>stream_assembly_5</stream_assembly_name> <container>m3u8</container>
Version 2.14 and later128
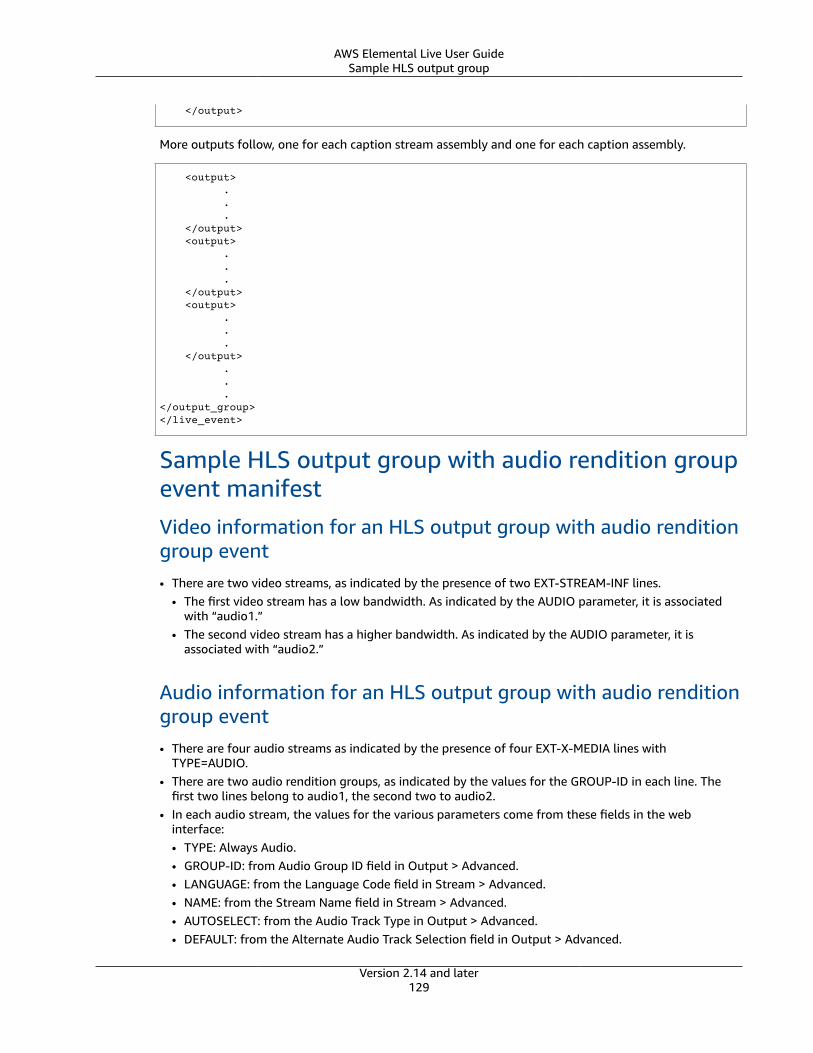
AWS Elemental Live User GuideSample HLS output group
</output>
More outputs follow, one for each caption stream assembly and one for each caption assembly.
<output> . . . </output> <output> . . . </output> <output> . . . </output> . . .</output_group></live_event>
Sample HLS output group with audio rendition groupevent manifestVideo information for an HLS output group with audio renditiongroup event• There are two video streams, as indicated by the presence of two EXT-STREAM-INF lines.
• The first video stream has a low bandwidth. As indicated by the AUDIO parameter, it is associatedwith “audio1.”
• The second video stream has a higher bandwidth. As indicated by the AUDIO parameter, it isassociated with “audio2.”
Audio information for an HLS output group with audio renditiongroup event• There are four audio streams as indicated by the presence of four EXT-X-MEDIA lines with
TYPE=AUDIO.• There are two audio rendition groups, as indicated by the values for the GROUP-ID in each line. The
first two lines belong to audio1, the second two to audio2.• In each audio stream, the values for the various parameters come from these fields in the web
interface:• TYPE: Always Audio.• GROUP-ID: from Audio Group ID field in Output > Advanced.• LANGUAGE: from the Language Code field in Stream > Advanced.• NAME: from the Stream Name field in Stream > Advanced.• AUTOSELECT: from the Audio Track Type in Output > Advanced.• DEFAULT: from the Alternate Audio Track Selection field in Output > Advanced.
Version 2.14 and later129
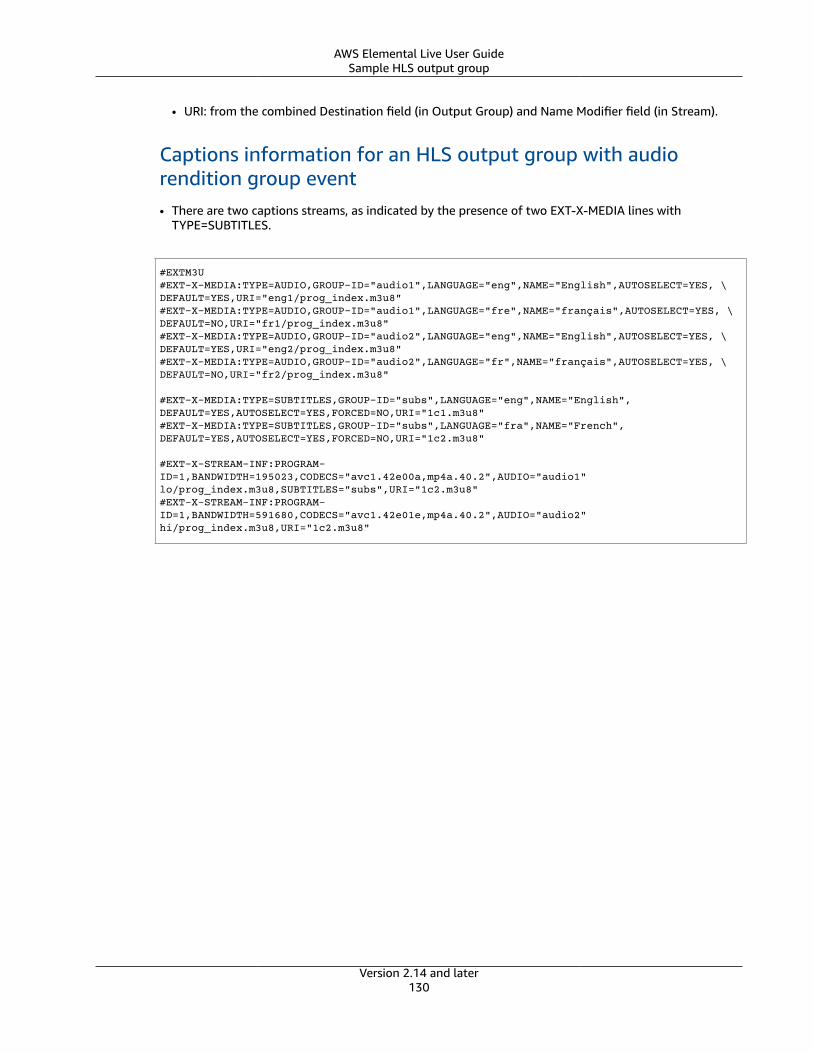
AWS Elemental Live User GuideSample HLS output group
• URI: from the combined Destination field (in Output Group) and Name Modifier field (in Stream).
Captions information for an HLS output group with audiorendition group event• There are two captions streams, as indicated by the presence of two EXT-X-MEDIA lines with
TYPE=SUBTITLES.
#EXTM3U#EXT-X-MEDIA:TYPE=AUDIO,GROUP-ID="audio1",LANGUAGE="eng",NAME="English",AUTOSELECT=YES, \DEFAULT=YES,URI="eng1/prog_index.m3u8"#EXT-X-MEDIA:TYPE=AUDIO,GROUP-ID="audio1",LANGUAGE="fre",NAME="français",AUTOSELECT=YES, \DEFAULT=NO,URI="fr1/prog_index.m3u8"#EXT-X-MEDIA:TYPE=AUDIO,GROUP-ID="audio2",LANGUAGE="eng",NAME="English",AUTOSELECT=YES, \DEFAULT=YES,URI="eng2/prog_index.m3u8"#EXT-X-MEDIA:TYPE=AUDIO,GROUP-ID="audio2",LANGUAGE="fr",NAME="français",AUTOSELECT=YES, \DEFAULT=NO,URI="fr2/prog_index.m3u8"
#EXT-X-MEDIA:TYPE=SUBTITLES,GROUP-ID="subs",LANGUAGE="eng",NAME="English",DEFAULT=YES,AUTOSELECT=YES,FORCED=NO,URI="1c1.m3u8"#EXT-X-MEDIA:TYPE=SUBTITLES,GROUP-ID="subs",LANGUAGE="fra",NAME="French",DEFAULT=YES,AUTOSELECT=YES,FORCED=NO,URI="1c2.m3u8"
#EXT-X-STREAM-INF:PROGRAM-ID=1,BANDWIDTH=195023,CODECS="avc1.42e00a,mp4a.40.2",AUDIO="audio1"lo/prog_index.m3u8,SUBTITLES="subs",URI="1c2.m3u8" #EXT-X-STREAM-INF:PROGRAM-ID=1,BANDWIDTH=591680,CODECS="avc1.42e01e,mp4a.40.2",AUDIO="audio2"hi/prog_index.m3u8,URI="1c2.m3u8"
Version 2.14 and later130
AWS Elemental Live User GuideCaptions
AWS Elemental Live FeaturesThis chapter describes the features you can implement in AWS Elemental Live.
Topics
• Working with captions (p. 131)
• Dynamicinput switching (p. 169)
• Overview of graphic overlay solutions (p. 198)
• Motion graphic overlay (p. 200)
• Static graphic overlay (p. 240)
• Input switching (p. 265)
• Inserting Nielsen watermarks (p. 266)
• Converting Nielsen watermarks to ID3 (p. 268)
• Output locking (p. 269)
• SCTE-35 and SCTE-104 message processing in AWS Elemental Live (p. 273)
• SCTE-35 ad marker EXT-X-DATERANGE (p. 314)
• Working with SMPTE 2022-6 (p. 314)
• Working with SMPTE 2110 (p. 315)
• Working with SRT (p. 325)
• Implementing a trick-play track (p. 325)
• Virtual input switching (p. 328)
Working with captionsThe information in this section assumes that you are familiar with the general steps for creating anevent.
You can set up AWS Elemental Live to extract captions when it ingests the source and to include thosecaptions in the output in either the same or a different format. You can include several captions in theoutput. For example, you can include captions for several languages. You can take a source captions assetand convert it to one format in one output and to another format in a different output.
You perform the setup for captions in your AWS Elemental Live event.
By default, AWS Elemental Live does not ingest any captions (not even captions that are embedded inthe video). You must explicitly identify the captions to ingest and the captions to output.
Topics
• Supported features (p. 132)
• Typical scenarios (p. 136)
• Setting up for captions (p. 138)
• Examples of implementing use cases (p. 159)
• Passing through VBI data (p. 166)
Version 2.14 and later131
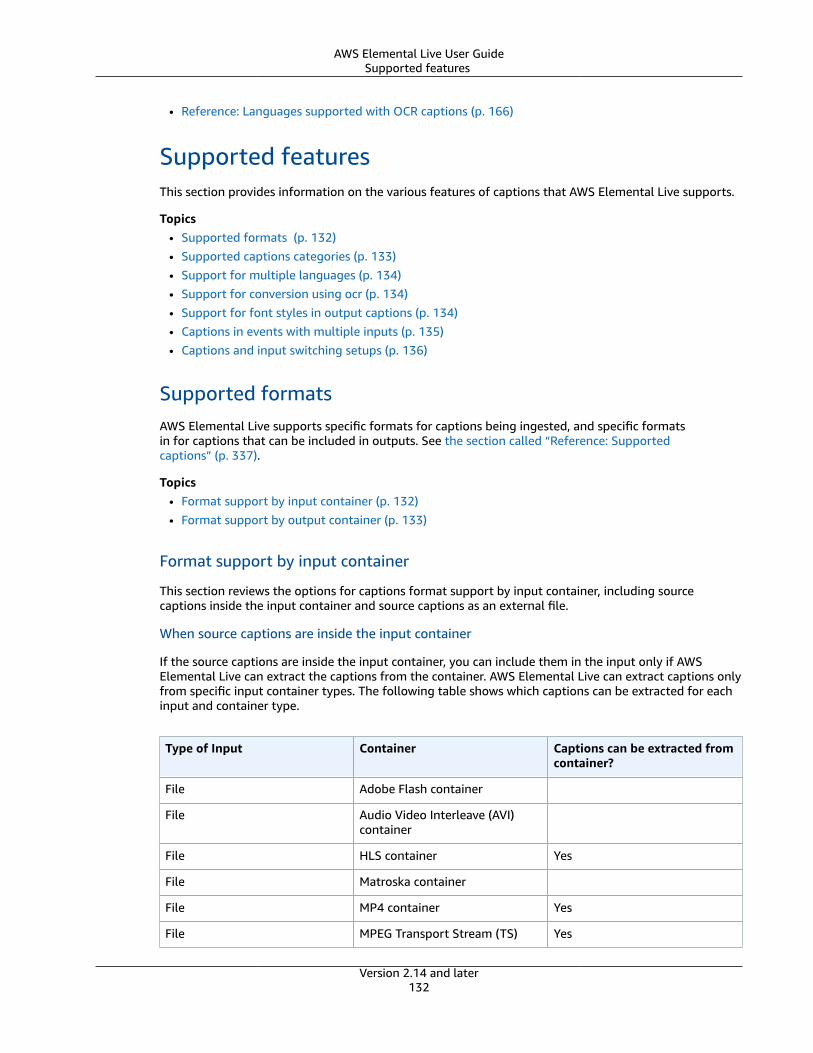
AWS Elemental Live User GuideSupported features
• Reference: Languages supported with OCR captions (p. 166)
Supported featuresThis section provides information on the various features of captions that AWS Elemental Live supports.
Topics• Supported formats (p. 132)• Supported captions categories (p. 133)• Support for multiple languages (p. 134)• Support for conversion using ocr (p. 134)• Support for font styles in output captions (p. 134)• Captions in events with multiple inputs (p. 135)• Captions and input switching setups (p. 136)
Supported formatsAWS Elemental Live supports specific formats for captions being ingested, and specific formatsin for captions that can be included in outputs. See the section called “Reference: Supportedcaptions” (p. 337).
Topics• Format support by input container (p. 132)• Format support by output container (p. 133)
Format support by input container
This section reviews the options for captions format support by input container, including sourcecaptions inside the input container and source captions as an external file.
When source captions are inside the input container
If the source captions are inside the input container, you can include them in the input only if AWSElemental Live can extract the captions from the container. AWS Elemental Live can extract captions onlyfrom specific input container types. The following table shows which captions can be extracted for eachinput and container type.
Type of Input Container Captions can be extracted fromcontainer?
File Adobe Flash container
File Audio Video Interleave (AVI)container
File HLS container Yes
File Matroska container
File MP4 container Yes
File MPEG Transport Stream (TS) Yes
Version 2.14 and later132
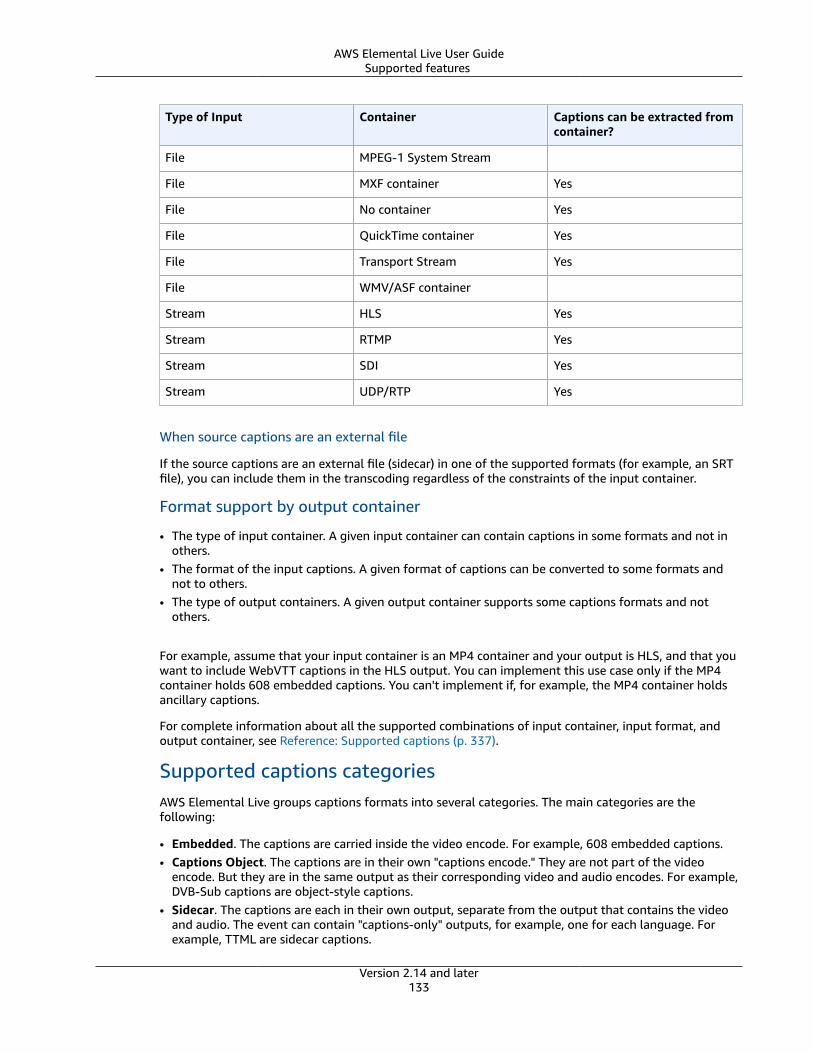
AWS Elemental Live User GuideSupported features
Type of Input Container Captions can be extracted fromcontainer?
File MPEG-1 System Stream
File MXF container Yes
File No container Yes
File QuickTime container Yes
File Transport Stream Yes
File WMV/ASF container
Stream HLS Yes
Stream RTMP Yes
Stream SDI Yes
Stream UDP/RTP Yes
When source captions are an external file
If the source captions are an external file (sidecar) in one of the supported formats (for example, an SRTfile), you can include them in the transcoding regardless of the constraints of the input container.
Format support by output container
• The type of input container. A given input container can contain captions in some formats and not inothers.
• The format of the input captions. A given format of captions can be converted to some formats andnot to others.
• The type of output containers. A given output container supports some captions formats and notothers.
For example, assume that your input container is an MP4 container and your output is HLS, and that youwant to include WebVTT captions in the HLS output. You can implement this use case only if the MP4container holds 608 embedded captions. You can't implement if, for example, the MP4 container holdsancillary captions.
For complete information about all the supported combinations of input container, input format, andoutput container, see Reference: Supported captions (p. 337).
Supported captions categoriesAWS Elemental Live groups captions formats into several categories. The main categories are thefollowing:
• Embedded. The captions are carried inside the video encode. For example, 608 embedded captions.• Captions Object. The captions are in their own "captions encode." They are not part of the video
encode. But they are in the same output as their corresponding video and audio encodes. For example,DVB-Sub captions are object-style captions.
• Sidecar. The captions are each in their own output, separate from the output that contains the videoand audio. The event can contain "captions-only" outputs, for example, one for each language. Forexample, TTML are sidecar captions.
Version 2.14 and later133
AWS Elemental Live User GuideSupported features
You need to be aware of captions categories when you set up captions in the output. For moreinformation about all categories and which category each captions format belongs to, see the sectioncalled “ Step 4: Match formats to categories” (p. 145).
Support for multiple languagesIf the source includes captions in multiple languages, you can include multiple languages in the outputas follows:
• Embedded Passthrough. For any of the embedded source formats, if you specify embedded as theoutput format, then all languages that are in the input are included in the output. You can't removeany of the languages.
• Embedded In, Other Out. For any of the embedded source formats, if you are doing “embedded in,other out,” you can specify which languages to extract from the input.
• Teletext Passthrough. For teletext sources, if you specify teletext as the output, then all languages(pages) are included in the output. You can't strip out any languages. In fact, the entire teletextcontent is included in the output; you can't strip out any of the pages. Furthermore, teletextpassthrough is supported only in TS outputs.
• Teletext In, Other Out. For teletext source, if you are doing “teletext in, other out,” you can specifywhich languages (teletext pages) to extract and which languages to include in an output.
• Any Other Combination. For all other sources, you always specify the language to extract from theinput and the language to include in an output, regardless of the source format and output format.
Support for conversion using ocrAWS Elemental Live supports the ability to produce WebVTT output captions by converting object-basedsource captions that are in DVB-Sub or SCTE-27 format. AWS Elemental Live uses OCR (optical characterrecognition) to perform this conversion.
Enabling the OCR feature
If you want to use OCR conversion, you must enable the feature when you install or upgrade AWSElemental Live. For more information, see these guides:
• AWS Elemental Live Installation Guide• AWS Elemental Live Upgrade Guide
You can determine if the feature has already been enabled. In the event, go to the output section andstart to set up a captions encode. Choose WebVTT as the output format. If the feature is enabled, a listof languages (language libraries) appears.
NoteWhen you enable OCR, you must make sure that you don't use the --skip-all option with thecommand to install, upgrade or configure. If you use that skip option, you won't see the promptsto enable OCR conversion.
Using OCR conversion
For more information about setting up to convert captions using OCR, see the section called “Sidecarcaptions or SMPTE-TT captions in MS Smooth” (p. 155).
For a list of languages supported with OCR conversion, see the section called “Reference: OCRlanguages” (p. 166).
Support for font styles in output captionsDepending on the scenario, there are three possibilities for the font style for output captions:
Version 2.14 and later134
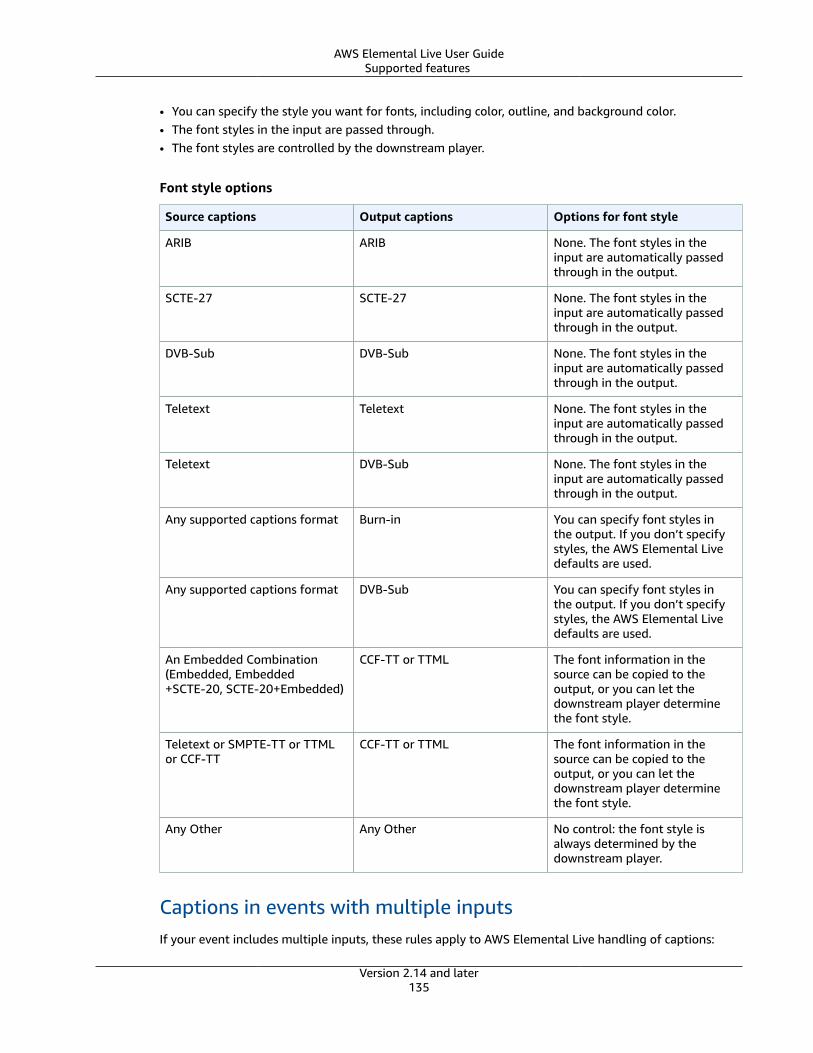
AWS Elemental Live User GuideSupported features
• You can specify the style you want for fonts, including color, outline, and background color.• The font styles in the input are passed through.• The font styles are controlled by the downstream player.
Font style options
Source captions Output captions Options for font style
ARIB ARIB None. The font styles in theinput are automatically passedthrough in the output.
SCTE-27 SCTE-27 None. The font styles in theinput are automatically passedthrough in the output.
DVB-Sub DVB-Sub None. The font styles in theinput are automatically passedthrough in the output.
Teletext Teletext None. The font styles in theinput are automatically passedthrough in the output.
Teletext DVB-Sub None. The font styles in theinput are automatically passedthrough in the output.
Any supported captions format Burn-in You can specify font styles inthe output. If you don’t specifystyles, the AWS Elemental Livedefaults are used.
Any supported captions format DVB-Sub You can specify font styles inthe output. If you don’t specifystyles, the AWS Elemental Livedefaults are used.
An Embedded Combination(Embedded, Embedded+SCTE-20, SCTE-20+Embedded)
CCF-TT or TTML The font information in thesource can be copied to theoutput, or you can let thedownstream player determinethe font style.
Teletext or SMPTE-TT or TTMLor CCF-TT
CCF-TT or TTML The font information in thesource can be copied to theoutput, or you can let thedownstream player determinethe font style.
Any Other Any Other No control: the font style isalways determined by thedownstream player.
Captions in events with multiple inputsIf your event includes multiple inputs, these rules apply to AWS Elemental Live handling of captions:
Version 2.14 and later135
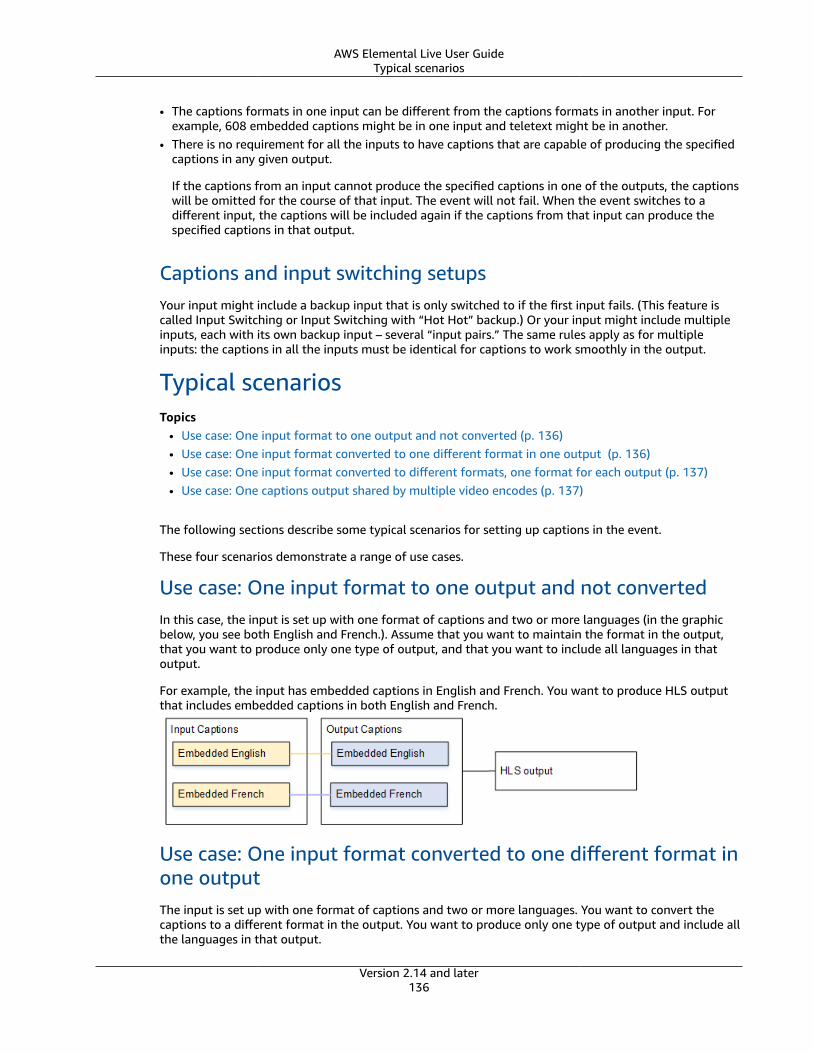
AWS Elemental Live User GuideTypical scenarios
• The captions formats in one input can be different from the captions formats in another input. Forexample, 608 embedded captions might be in one input and teletext might be in another.
• There is no requirement for all the inputs to have captions that are capable of producing the specifiedcaptions in any given output.
If the captions from an input cannot produce the specified captions in one of the outputs, the captionswill be omitted for the course of that input. The event will not fail. When the event switches to adifferent input, the captions will be included again if the captions from that input can produce thespecified captions in that output.
Captions and input switching setupsYour input might include a backup input that is only switched to if the first input fails. (This feature iscalled Input Switching or Input Switching with “Hot Hot” backup.) Or your input might include multipleinputs, each with its own backup input – several “input pairs.” The same rules apply as for multipleinputs: the captions in all the inputs must be identical for captions to work smoothly in the output.
Typical scenariosTopics
• Use case: One input format to one output and not converted (p. 136)• Use case: One input format converted to one different format in one output (p. 136)• Use case: One input format converted to different formats, one format for each output (p. 137)• Use case: One captions output shared by multiple video encodes (p. 137)
The following sections describe some typical scenarios for setting up captions in the event.
These four scenarios demonstrate a range of use cases.
Use case: One input format to one output and not convertedIn this case, the input is set up with one format of captions and two or more languages (in the graphicbelow, you see both English and French.). Assume that you want to maintain the format in the output,that you want to produce only one type of output, and that you want to include all languages in thatoutput.
For example, the input has embedded captions in English and French. You want to produce HLS outputthat includes embedded captions in both English and French.
Use case: One input format converted to one different format inone outputThe input is set up with one format of captions and two or more languages. You want to convert thecaptions to a different format in the output. You want to produce only one type of output and include allthe languages in that output.
Version 2.14 and later136
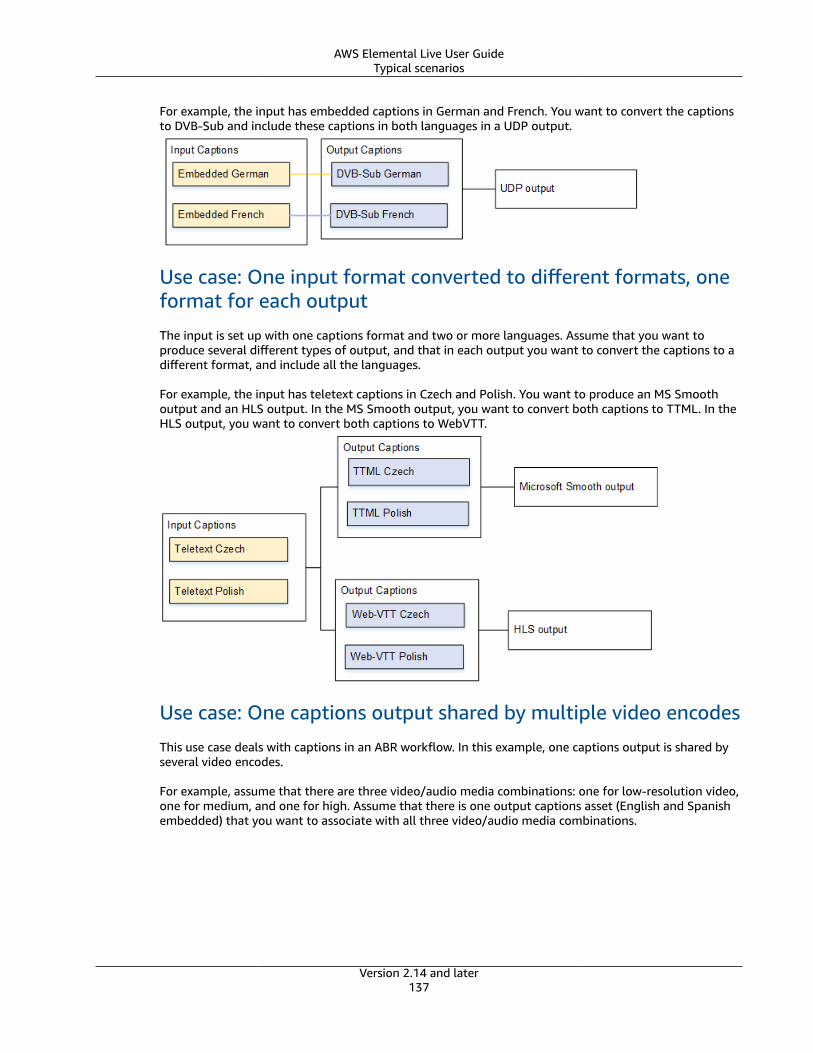
AWS Elemental Live User GuideTypical scenarios
For example, the input has embedded captions in German and French. You want to convert the captionsto DVB-Sub and include these captions in both languages in a UDP output.
Use case: One input format converted to different formats, oneformat for each output
The input is set up with one captions format and two or more languages. Assume that you want toproduce several different types of output, and that in each output you want to convert the captions to adifferent format, and include all the languages.
For example, the input has teletext captions in Czech and Polish. You want to produce an MS Smoothoutput and an HLS output. In the MS Smooth output, you want to convert both captions to TTML. In theHLS output, you want to convert both captions to WebVTT.
Use case: One captions output shared by multiple video encodes
This use case deals with captions in an ABR workflow. In this example, one captions output is shared byseveral video encodes.
For example, assume that there are three video/audio media combinations: one for low-resolution video,one for medium, and one for high. Assume that there is one output captions asset (English and Spanishembedded) that you want to associate with all three video/audio media combinations.
Version 2.14 and later137
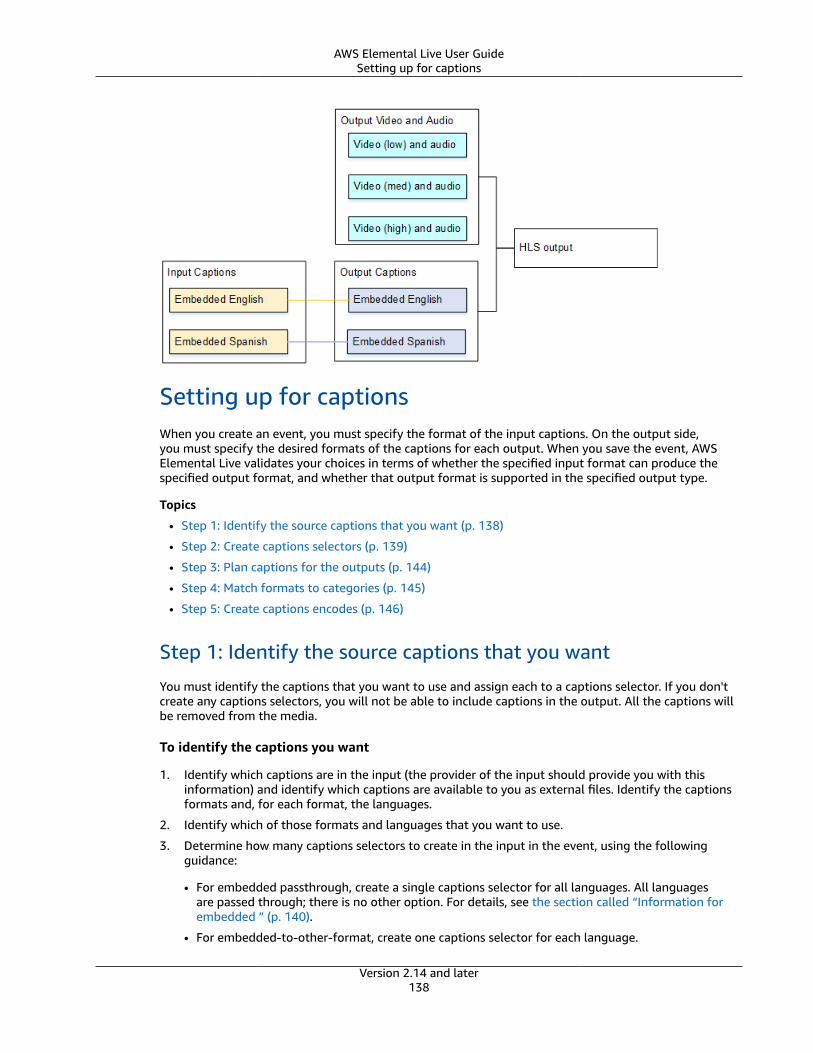
AWS Elemental Live User GuideSetting up for captions
Setting up for captionsWhen you create an event, you must specify the format of the input captions. On the output side,you must specify the desired formats of the captions for each output. When you save the event, AWSElemental Live validates your choices in terms of whether the specified input format can produce thespecified output format, and whether that output format is supported in the specified output type.
Topics
• Step 1: Identify the source captions that you want (p. 138)
• Step 2: Create captions selectors (p. 139)
• Step 3: Plan captions for the outputs (p. 144)
• Step 4: Match formats to categories (p. 145)
• Step 5: Create captions encodes (p. 146)
Step 1: Identify the source captions that you want
You must identify the captions that you want to use and assign each to a captions selector. If you don'tcreate any captions selectors, you will not be able to include captions in the output. All the captions willbe removed from the media.
To identify the captions you want
1. Identify which captions are in the input (the provider of the input should provide you with thisinformation) and identify which captions are available to you as external files. Identify the captionsformats and, for each format, the languages.
2. Identify which of those formats and languages that you want to use.
3. Determine how many captions selectors to create in the input in the event, using the followingguidance:
• For embedded passthrough, create a single captions selector for all languages. All languagesare passed through; there is no other option. For details, see the section called “Information forembedded ” (p. 140).
• For embedded-to-other-format, create one captions selector for each language.
Version 2.14 and later138
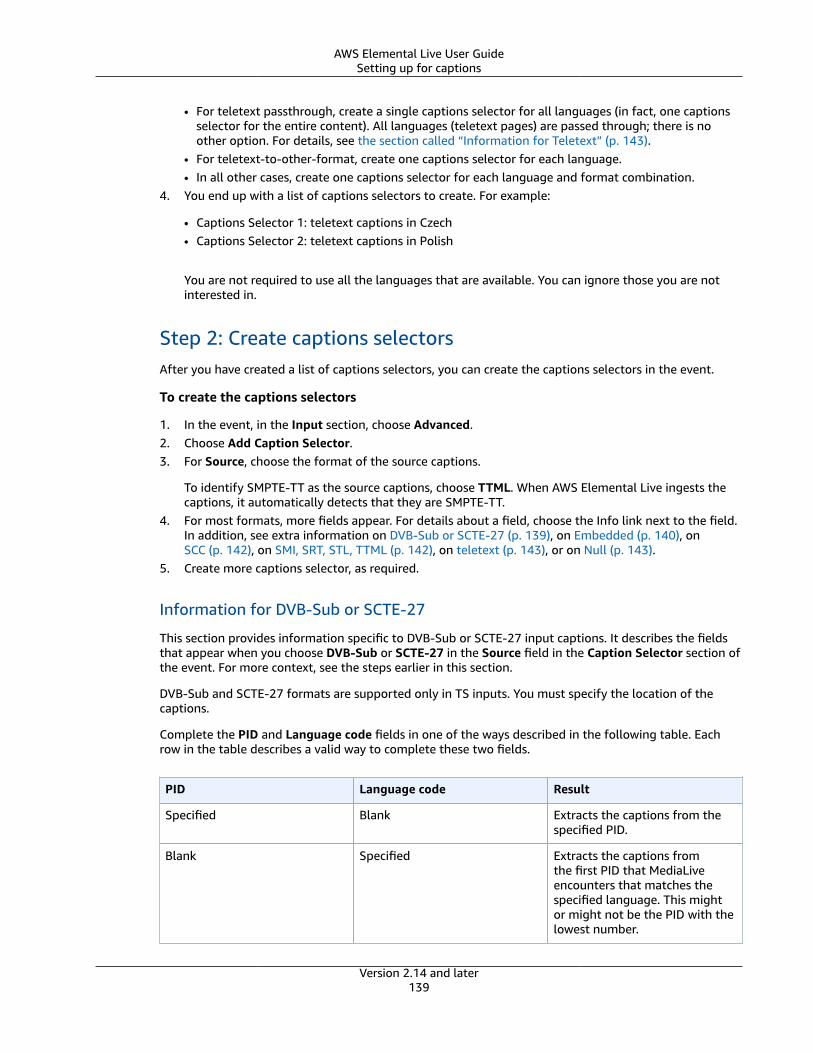
AWS Elemental Live User GuideSetting up for captions
• For teletext passthrough, create a single captions selector for all languages (in fact, one captionsselector for the entire content). All languages (teletext pages) are passed through; there is noother option. For details, see the section called “Information for Teletext” (p. 143).
• For teletext-to-other-format, create one captions selector for each language.• In all other cases, create one captions selector for each language and format combination.
4. You end up with a list of captions selectors to create. For example:
• Captions Selector 1: teletext captions in Czech• Captions Selector 2: teletext captions in Polish
You are not required to use all the languages that are available. You can ignore those you are notinterested in.
Step 2: Create captions selectorsAfter you have created a list of captions selectors, you can create the captions selectors in the event.
To create the captions selectors
1. In the event, in the Input section, choose Advanced.2. Choose Add Caption Selector.3. For Source, choose the format of the source captions.
To identify SMPTE-TT as the source captions, choose TTML. When AWS Elemental Live ingests thecaptions, it automatically detects that they are SMPTE-TT.
4. For most formats, more fields appear. For details about a field, choose the Info link next to the field.In addition, see extra information on DVB-Sub or SCTE-27 (p. 139), on Embedded (p. 140), onSCC (p. 142), on SMI, SRT, STL, TTML (p. 142), on teletext (p. 143), or on Null (p. 143).
5. Create more captions selector, as required.
Information for DVB-Sub or SCTE-27
This section provides information specific to DVB-Sub or SCTE-27 input captions. It describes the fieldsthat appear when you choose DVB-Sub or SCTE-27 in the Source field in the Caption Selector section ofthe event. For more context, see the steps earlier in this section.
DVB-Sub and SCTE-27 formats are supported only in TS inputs. You must specify the location of thecaptions.
Complete the PID and Language code fields in one of the ways described in the following table. Eachrow in the table describes a valid way to complete these two fields.
PID Language code Result
Specified Blank Extracts the captions from thespecified PID.
Blank Specified Extracts the captions fromthe first PID that MediaLiveencounters that matches thespecified language. This mightor might not be the PID with thelowest number.
Version 2.14 and later139
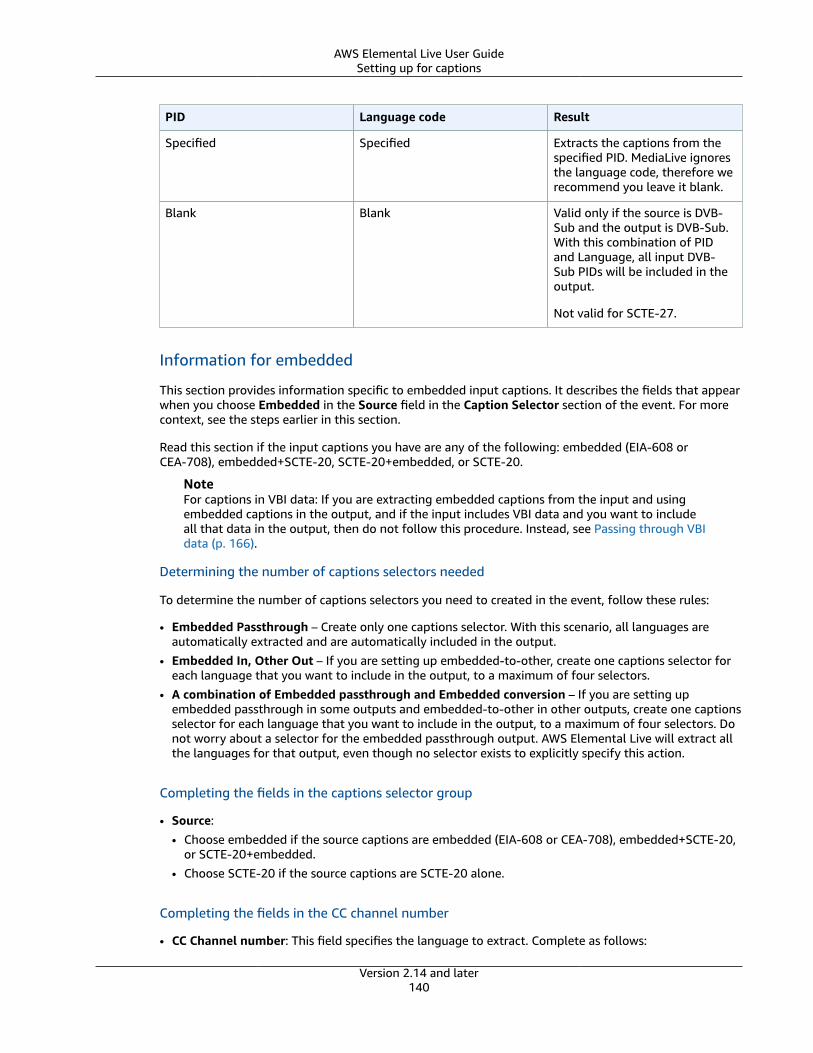
AWS Elemental Live User GuideSetting up for captions
PID Language code Result
Specified Specified Extracts the captions from thespecified PID. MediaLive ignoresthe language code, therefore werecommend you leave it blank.
Blank Blank Valid only if the source is DVB-Sub and the output is DVB-Sub.With this combination of PIDand Language, all input DVB-Sub PIDs will be included in theoutput.
Not valid for SCTE-27.
Information for embedded
This section provides information specific to embedded input captions. It describes the fields that appearwhen you choose Embedded in the Source field in the Caption Selector section of the event. For morecontext, see the steps earlier in this section.
Read this section if the input captions you have are any of the following: embedded (EIA-608 orCEA-708), embedded+SCTE-20, SCTE-20+embedded, or SCTE-20.
NoteFor captions in VBI data: If you are extracting embedded captions from the input and usingembedded captions in the output, and if the input includes VBI data and you want to includeall that data in the output, then do not follow this procedure. Instead, see Passing through VBIdata (p. 166).
Determining the number of captions selectors needed
To determine the number of captions selectors you need to created in the event, follow these rules:
• Embedded Passthrough – Create only one captions selector. With this scenario, all languages areautomatically extracted and are automatically included in the output.
• Embedded In, Other Out – If you are setting up embedded-to-other, create one captions selector foreach language that you want to include in the output, to a maximum of four selectors.
• A combination of Embedded passthrough and Embedded conversion – If you are setting upembedded passthrough in some outputs and embedded-to-other in other outputs, create one captionsselector for each language that you want to include in the output, to a maximum of four selectors. Donot worry about a selector for the embedded passthrough output. AWS Elemental Live will extract allthe languages for that output, even though no selector exists to explicitly specify this action.
Completing the fields in the captions selector group
• Source:• Choose embedded if the source captions are embedded (EIA-608 or CEA-708), embedded+SCTE-20,
or SCTE-20+embedded.• Choose SCTE-20 if the source captions are SCTE-20 alone.
Completing the fields in the CC channel number
• CC Channel number: This field specifies the language to extract. Complete as follows:
Version 2.14 and later140

AWS Elemental Live User GuideSetting up for captions
• If you are setting up embedded passthrough only (you are creating only one captions selector forthe input embedded captions), this field is ignored, so keep the default.
• If you are setting up embedded-to-another-format, (you are creating several captions selectors,one for each language), enter the number of the CC instance (from the input) that holds the desiredlanguage. For example, if this captions selector is intended to hold the French captions and theFrench captions are in event 2, enter 2 in this field.
• Force 608 to 708 Upconvert: The embedded source captions can be EIA-608 captions, CEA-708captions, or both EIA-608 and CEA-708. You can specify how you want these captions to be handledwhen AWS Elemental Live is ingesting content. The following table describes the behavior for variousscenarios.
EIA-608 in Source CEA-708 in Source Convert Field Result
Yes No Checked CEA-708 data iscreated based on theEIA-608 data. EIA-608data is added as 608-compatibility bits inthe CEA-708 data.
Yes No Unchecked Original EIA-608 ispreserved.
No Yes Checked Original CEA-708 ispreserved.
No Yes Unchecked Original CEA-708 ispreserved.
Yes Yes Checked CEA-708 data isdiscarded. NewCEA-708 data iscreated based on theEIA-608 data, andEIA-608 data is addedas 608-compatibilitybits in the CEA-708data.
The new CEA-708 datawill not include anyCEA-708 formattingfeatures.
Not recommended.
Yes Yes Unchecked Original EIA-608 ispreserved and originalCEA-708 is preserved.
• Use SCTE-20 if Embedded Unavailable: This field appears only if you set the Source to Embedded.If the source captions combine embedded (EIA-608 or CEA-708) and SCTE-20, you might want to setthis field to Auto. AWS Elemental Live will give preference to the 608/708 embedded captions but willswitch to use the SCTE-20 captions when necessary. If you set this field to Off, AWS Elemental Live willnever use the SCTE-20 captions.
Version 2.14 and later141
AWS Elemental Live User GuideSetting up for captions
Information for SCC
This section provides information specific to SCC input captions. It describes the fields that appear whenyou choose SCC in the Source field in the Caption Selector section of the event. For more context, seethis procedure.
SCC source captions are supplied in a captions file that is external to the video input. You must specifythis file.
• External Caption File: Specify the location of the file.• Time Delta: Complete this field to adjust the timestamp in the caption file. With the SCC files, the
situation sometimes arises where the timestamp in the file for the first captions does not work withthe video. The start time for the video/audio always 00:00:00. The start time of the captions may notbe 00:00:00 – it may be some completely different, arbitrary time, such as 20:00:15. Assume that, inthe video, the first words are spoken at 00:06:15. But given that the start time for the captions file is20:00:15, then the time for the first caption will be marked as 20:06:30. This time will usually neverwork with the video. The solution is to adjust the times in the captions file. In this example, subtract 20hours and 15 seconds (72015 seconds) from the captions file.
Enter a value in this field to push the captions earlier or later:• Enter a positive number to add to the times in the caption file. For example, enter 15 to add 15
seconds to all the times in the caption file.• Enter a negative number to subtract from the times in the caption file. For example, enter -5 to
remove 5 seconds from all the times in the caption file.
The format of the times in the captions does not have to match the value in the Timecode Config field(in the Input) of the video. The number you enter in this field will simply delay the captions or makethe captions play earlier, regardless of the formats.
When using SCC, the video must absolutely have a value in the Timecode Config field. Otherwise thecaptions will not be inserted.
• Force 608 to 708 Upconvert: SCC source captions are EIA-608 format and are contained in an externalfile. The options for converting the caption are the following:• Check: To convert the captions to CEA-708 format.• Unchecked: To leave the captions unconverted.
Information for SMI, SMPTE-TT, SRT, STL, TTML
This section provides information specific to SMI, SMPTE-TT, SRT, STL, and TTML input captions.describes the fields that appear when you choose SCC in the Source field in the Caption Selector sectionof the Create New Live Event screen. For more context, see the section called “Step 1: Identify sourcecaptions” (p. 138).
With these formats, the source captions are supplied in a captions file that is external to the video input.You must specify this file.
• External Caption File: Specify the location of this file.• Time Delta: Complete this field to adjust the timestamp in the caption file. With the SCC files, the
situation sometimes arises where the timestamp in the file for the first captions does not work withthe video. With these types of captions, the start time for both the video/audio always 00:00:00.Assume that, in the video, the first words are spoken at 00:06:15. But in the captions file, this timeis marked as 00:06:18, and every other caption is also off by 3 seconds. The solution is to adjust thetimes in the captions file. In this example, subtract 3 seconds from the captions file.
Enter a value in this field to push the captions earlier or later.
Version 2.14 and later142

AWS Elemental Live User GuideSetting up for captions
• Enter a positive number to add to the times in the caption file. For example, enter 2 to add 2seconds to all the times in the caption file.
• Enter a negative number to subtract from the times in the caption file. For example, enter -3 toremove 3 seconds from all the times in the caption file.
Information for Teletext
This section provides information specific to Teletext input captions. It describes the fields that appearwhen you choose SCC in the Source field in the Caption Selector section of the event. For more context,see the section called “Step 1: Identify source captions” (p. 138).
Teletext is a form of data that can contain several types of information, not just captions. Teletext canbe present in SDI input, in MXF input, and in TS input, in which case it might be referred to as “DVBteletext.”.
You can set up to handle teletext in one of the following ways:
• If you want to extract the entire teletext input, you must set up teletext passthrough. The entireteletext can never be converted to another format. Teletext passthrough is supported only in a TSoutput.
• You can extract individual captions pages (the captions in a specific language) and convert them toanother captions format.
• You cannot extract individual captions pages (the captions in a specific language) and keep them inteletext.
Determining the number of captions selectors needed
• If you are setting up teletext passthrough captions, create only one captions selector, even if youwant to include multiple languages in the output. With this scenario, all languages are automaticallyextracted and are automatically included in the output.
• If you are setting up teletext-to-other, create one captions selector for each language that you want toinclude in the output. For example, one selector to extract English teletext, and one selector to extractSwedish teletext.
• If you are setting up teletext passthrough in some outputs and teletext-to-other in other outputs,create individual selectors for the teletext-to-other, one for each language being converted. Do notworry about a selector for the teletext passthrough output. AWS Elemental Live will extract all thedata in the teletext, even though there is not a selector to explicitly specify this action.
Completing the fields in the Captions Selector Group
• Source: Choose Teletext.
• Page: This field specifies the page of the desired language. Complete as follows:
• If you are setting up teletext passthrough captions (you are creating only one captions selector forthe input captions), leave blank: the value is ignored.
• If you are converting teletext to another format (you are creating several captions selectors, one foreach language), specify the page for the desired language. If you leave this field blank, you get avalidation error when you save the event.
Information for null
The list of sources in the Sources field for the caption selector includes the option Null. This source is notintended for stripping out captions. Instead, it is used for 608 XDS data (p. 159).
Version 2.14 and later143

AWS Elemental Live User GuideSetting up for captions
Step 3: Plan captions for the outputs
If you followed the instructions in the section called “Step 1: Identify source captions” (p. 138), youshould have a list of the captions formats and languages that will be available for inclusion in theoutputs.
You must now plan the captions information for the outputs.
To plan captions for the outputs
1. Identify the types of output media that you plan to create in the event. For example, MS Smoothand HLS.
2. Identify the streams (the combinations of video and audio) that you plan to create for each outputmedia.
3. Map each output to the stream it uses. For example:
• HLS (Output 1) uses video/audio Stream 1.
• DASH (Output 2) also uses video/audio Stream 1. (Or it might need its own stream if the videorequirements are different.)
4. For each output media, identify which input captions will be converted to which output formats. Forexample, you might convert teletext captions to TTML for the MS Smooth output media, and thosesame teletext captions to WebVTT for the HLS output media.
The output formats that are possible depend on the input formats and the type of output media.See Reference: Supported captions (p. 337) to determine which output captions are possible giventhe input format.
5. Identify the languages for each output format:
• In general, count each language separately.
• Exception: For embedded passthrough, count all languages as one.
• Exception: For teletext passthrough, count all languages as one.
The Result
You end up with a list of outputs, and the captions formats and languages for each output. For example:
• MS Smooth output with TTML captions in Czech
• MS Smooth output with TTML captions in Polish
• HLS output with WebVTT captions in Czech
• HLS output with WebVTT captions in Polish.
Planning for Output in Multiple Formats
You can include captions from two or more different formats in an output. For example, you can includeboth embedded captions and WebVTT captions in an HLS output, to give the downstream system morechoices about which captions to use. The only rules for multiple formats are the following:
• The output container must support all the formats. See Reference: Supported captions (p. 337).
• The font styles in all the captions that are associated with an output must match. This means that theend result must be identical, not that you must use the same option to get that result. For example,all captions that are associated with the output must be white for the first language and blue for thesecond language.
Version 2.14 and later144
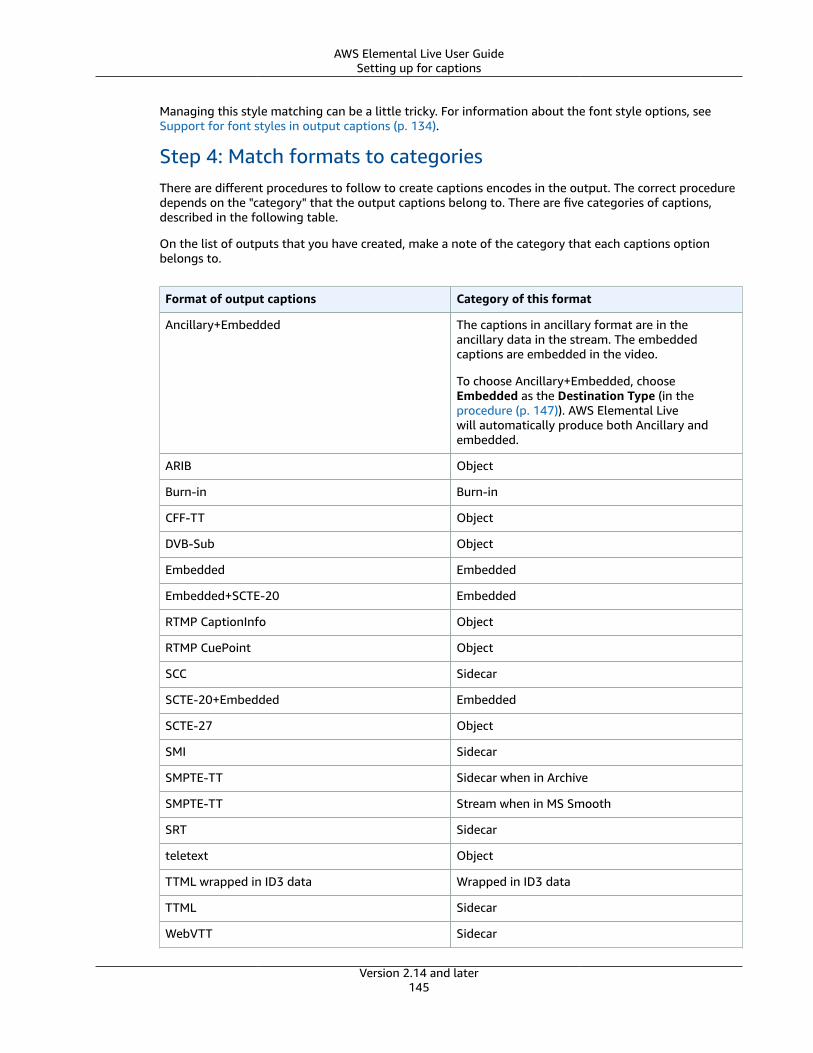
AWS Elemental Live User GuideSetting up for captions
Managing this style matching can be a little tricky. For information about the font style options, seeSupport for font styles in output captions (p. 134).
Step 4: Match formats to categoriesThere are different procedures to follow to create captions encodes in the output. The correct proceduredepends on the "category" that the output captions belong to. There are five categories of captions,described in the following table.
On the list of outputs that you have created, make a note of the category that each captions optionbelongs to.
Format of output captions Category of this format
Ancillary+Embedded The captions in ancillary format are in theancillary data in the stream. The embeddedcaptions are embedded in the video.
To choose Ancillary+Embedded, chooseEmbedded as the Destination Type (in theprocedure (p. 147)). AWS Elemental Livewill automatically produce both Ancillary andembedded.
ARIB Object
Burn-in Burn-in
CFF-TT Object
DVB-Sub Object
Embedded Embedded
Embedded+SCTE-20 Embedded
RTMP CaptionInfo Object
RTMP CuePoint Object
SCC Sidecar
SCTE-20+Embedded Embedded
SCTE-27 Object
SMI Sidecar
SMPTE-TT Sidecar when in Archive
SMPTE-TT Stream when in MS Smooth
SRT Sidecar
teletext Object
TTML wrapped in ID3 data Wrapped in ID3 data
TTML Sidecar
WebVTT Sidecar
Version 2.14 and later145
AWS Elemental Live User GuideSetting up for captions
For example, your list of outputs might now look like this:
• MS Smooth output with TTML captions (sidecar) in Czech.• MS Smooth output with TTML captions (sidecar) in Polish.• HLS output with WebVTT captions (sidecar) in Czech.• HLS output with WebVTT captions (sidecar) in Polish.
Captions embedded in video
The captions are carried inside the video encode, which is itself in an output in the output group. Onlyone captions asset ever exists within that video encode. That single asset might contain captions forseveral languages.
Captions object
The captions are in their own "captions encode" in an output in the output group. They are not part ofthe video encode. However, they are in the same output as their corresponding video and audio encodes.There might be several captions encodes in the output, for example, for different languages.
Sidecar
The captions are each in their own output in the output group, separate from the output that containsthe video and audio. Each captions output contains only one captions asset (file), meaning that it is a"captions-only" output. The output group might contain several "captions-only" outputs, for example,one for each language in the output group.
TTML captions wrapped in ID3 data
The captions are converted to TTML and included in ID3 data. (The other way to produce TTML output isas a sidecar.)
SMPTE-TT in MS Smooth
The captions are handled as a separate stream in MS Smooth.
Note that SMPTE-TT captions for other package types are handled as sidecars. However, for both sidecarhandling and stream handling, the procedure for setting up (p. 155) SMPTE-TT captions in the outputis identical. AWS Elemental Live will package the SMPTE-TT captions correctly for the package type.
Burn-in
Here, the captions are converted into text and then overlaid on the picture directly in the videoencode. Strictly speaking, once the overlay occurs, these are not really captions because they areindistinguishable from the video.
Step 5: Create captions encodesGo through the list of outputs you created and set up the captions in each output group, one by one.
Follow the procedure that applies to the format category of the captions output.
Topics• All captions except sidecar or SMPTE-TT in MS Smooth (p. 147)• Sidecar captions or SMPTE-TT captions in MS Smooth (p. 155)• TTML captions wrapped in ID3 data (p. 158)• Setting up for 608 XDS data (p. 159)
Version 2.14 and later146

AWS Elemental Live User GuideSetting up for captions
All captions except sidecar or SMPTE-TT in MS Smooth
Follow this procedure if the format of the captions asset that you want to add belongs to the category ofembedded, burn-in, or object. You will set up the captions and video and audio in the same output.
To create captions (not sidecar or SMPTE-TT)
1. On the web interface, on the Event screen, click the appropriate output group.
2. If you have already set up this output group with video and audio, find the outputs where you wantto add the captions. Or if you have not set up with video and audio, create a new output in thisoutput group; you can set up the captions now and you can set up the video and audio later.
3. Go to the output, then go to the stream that is associated with that output. For example, go toStream 1.
4. Click the + beside Caption to add a Caption section.
5. Complete the fields that appear for the selected format. For details about a field, choose the Infolink beside the field.
Field Applicability Description
Caption Source All formats Select the Caption Selectorthat you created when youspecified the input captions.
Destination Type All formats Select the caption type.
Pass Style Information If Destination Type is CCF-TT orTTML.
And if the source captiontype is an Embeddedcombination (Embedded,Embedded+SCTE-20,SCTE-20+Embedded), orTeletext, or TTML, or SMPTE-TT, or CCF-TT.
The choices are:
• Check this box if you wantthe style (font, position andso on) of the input captionsto be copied.
• Leave unchecked if youwant a simplified captionstyle. Some client playerswork best with a simplifiedcaption style.
(For other combinations ofsource caption types andoutput caption type, theoutput is always simplified.)
Font style fields Destination type is Burn-in orDVB-Sub
For tips about font styles inDVB-Sub or burn-in, see FontStyles for Burn-in or DVB-SubOutput (p. 148).
Language All captions except not forembedded-to-embedded orteletext-to-teletext.
Complete if desired. Thisinformation may be useful toor required by a downstreamsystem.
For embedded-to-embeddedor teletext-to-teletext, leave asUndefined.
Version 2.14 and later147
AWS Elemental Live User GuideSetting up for captions
Field Applicability Description
Description All captions except not forembedded-to-embedded.
This field is auto-completedafter you specify the language.
Use ID3 as Caption Content Destination type is TTML
And if this stream is associatedwith an MS Smooth output.
Leave unchecked.
This field applies only whenwrapping TTML captions inID3; see the section called“TTML captions wrapped in ID3data” (p. 158).
6. If the output format is embedded and the output group is HLS, you can include captions languageinformation in the manifest. You perform this setup in the output settings (separate from thecaptions encode). See the section called “Set up the HLS Manifest (embedded captions)” (p. 154).
7. If the output format is ARIB or DVB-Sub or SCTE-27, you must perform some extra setup in theoutput settings (separate from the captions encode). See PIDS for ARIB output (p. 153) or PIDs forDVB-Sub output (p. 153) or PIDs for teletext output (p. 154).
8. You now have a captions encode that is fully defined.
9. Repeat these steps to create captions, as applicable.
10. Go to the output group and output that this stream belongs to. Set the Stream field in that outputto match the stream you created.
11. When you are ready, save the event.
If the “Caption Stream Incompatible” message appears, see the section called “"Caption StreamIncompatible" message” (p. 154).
Font styles for Burn-in or DVB-Sub Captions
When you set up the captions encode as described in the section called “All captions except sidecaror SMPTE-TT in MS Smooth” (p. 147), you can specify the appearance of the captions if the outputcaptions are Burn-in or DVB-Sub. In the following table, the first column shows the field name, the thirdcolumn specifies how to complete the field, and the third column specifies whether the descriptionapplies to Burn-in or DVB-Sub.
Name Description Applicability
Font Click Browse to find a font fileto use. The file must be on aserver mounted to the node andmust have the extension TTF orTTE.
Do not specify a font file if thecaption source is embedded orteletext.
Both
Font Size Specify auto or enter a number.When set to auto, font_size willscale depending on the size ofthe output. Giving a positiveinteger will specify the exactfont size in points.
Both
Version 2.14 and later148
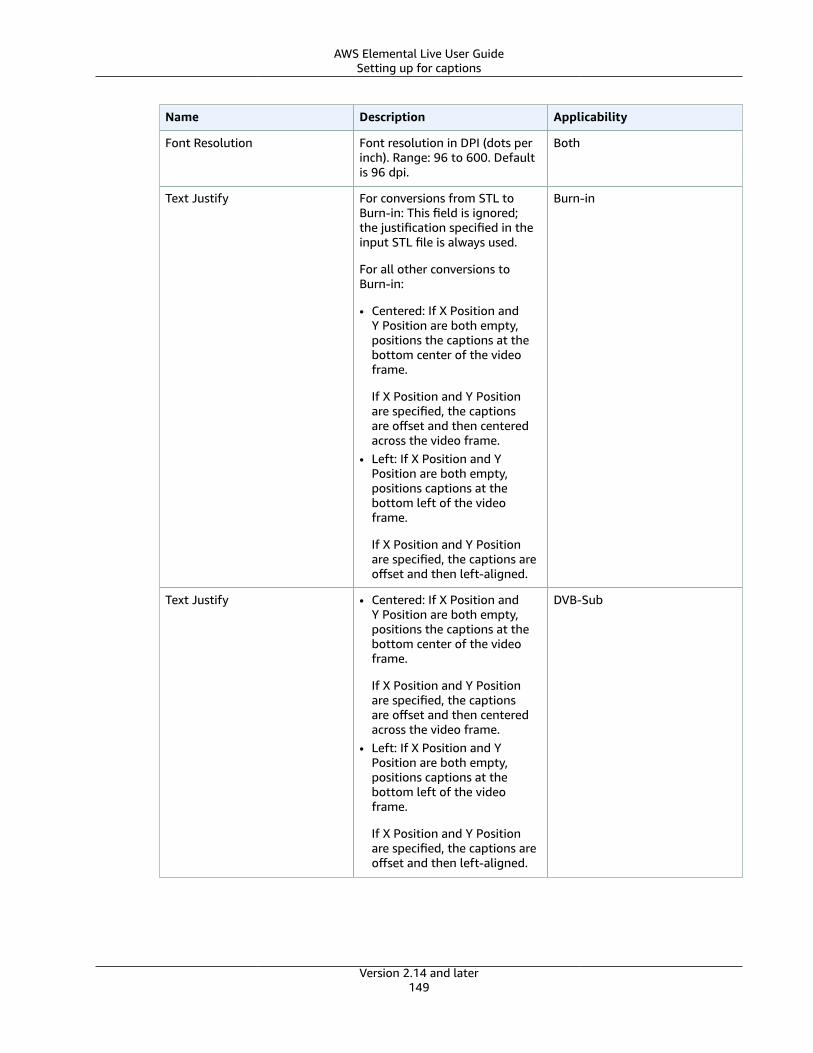
AWS Elemental Live User GuideSetting up for captions
Name Description Applicability
Font Resolution Font resolution in DPI (dots perinch). Range: 96 to 600. Defaultis 96 dpi.
Both
Text Justify For conversions from STL toBurn-in: This field is ignored;the justification specified in theinput STL file is always used.
For all other conversions toBurn-in:
• Centered: If X Position andY Position are both empty,positions the captions at thebottom center of the videoframe.
If X Position and Y Positionare specified, the captionsare offset and then centeredacross the video frame.
• Left: If X Position and YPosition are both empty,positions captions at thebottom left of the videoframe.
If X Position and Y Positionare specified, the captions areoffset and then left-aligned.
Burn-in
Text Justify • Centered: If X Position andY Position are both empty,positions the captions at thebottom center of the videoframe.
If X Position and Y Positionare specified, the captionsare offset and then centeredacross the video frame.
• Left: If X Position and YPosition are both empty,positions captions at thebottom left of the videoframe.
If X Position and Y Positionare specified, the captions areoffset and then left-aligned.
DVB-Sub
Version 2.14 and later149
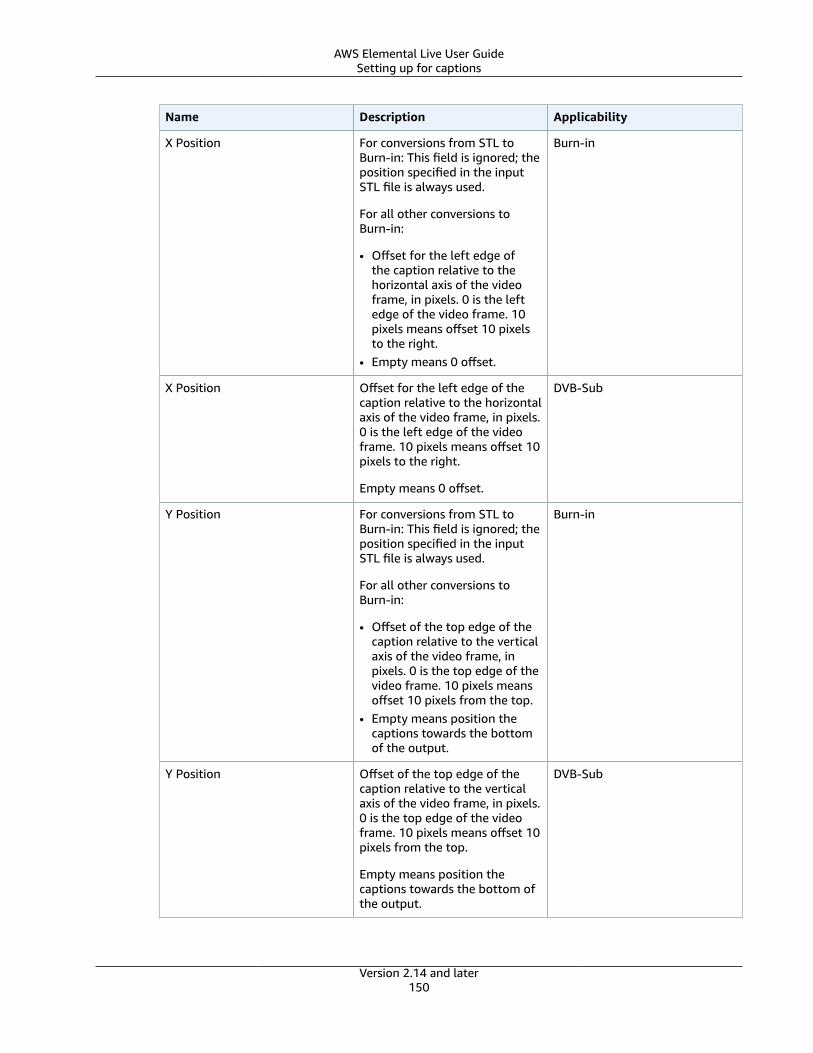
AWS Elemental Live User GuideSetting up for captions
Name Description Applicability
X Position For conversions from STL toBurn-in: This field is ignored; theposition specified in the inputSTL file is always used.
For all other conversions toBurn-in:
• Offset for the left edge ofthe caption relative to thehorizontal axis of the videoframe, in pixels. 0 is the leftedge of the video frame. 10pixels means offset 10 pixelsto the right.
• Empty means 0 offset.
Burn-in
X Position Offset for the left edge of thecaption relative to the horizontalaxis of the video frame, in pixels.0 is the left edge of the videoframe. 10 pixels means offset 10pixels to the right.
Empty means 0 offset.
DVB-Sub
Y Position For conversions from STL toBurn-in: This field is ignored; theposition specified in the inputSTL file is always used.
For all other conversions toBurn-in:
• Offset of the top edge of thecaption relative to the verticalaxis of the video frame, inpixels. 0 is the top edge of thevideo frame. 10 pixels meansoffset 10 pixels from the top.
• Empty means position thecaptions towards the bottomof the output.
Burn-in
Y Position Offset of the top edge of thecaption relative to the verticalaxis of the video frame, in pixels.0 is the top edge of the videoframe. 10 pixels means offset 10pixels from the top.
Empty means position thecaptions towards the bottom ofthe output.
DVB-Sub
Version 2.14 and later150
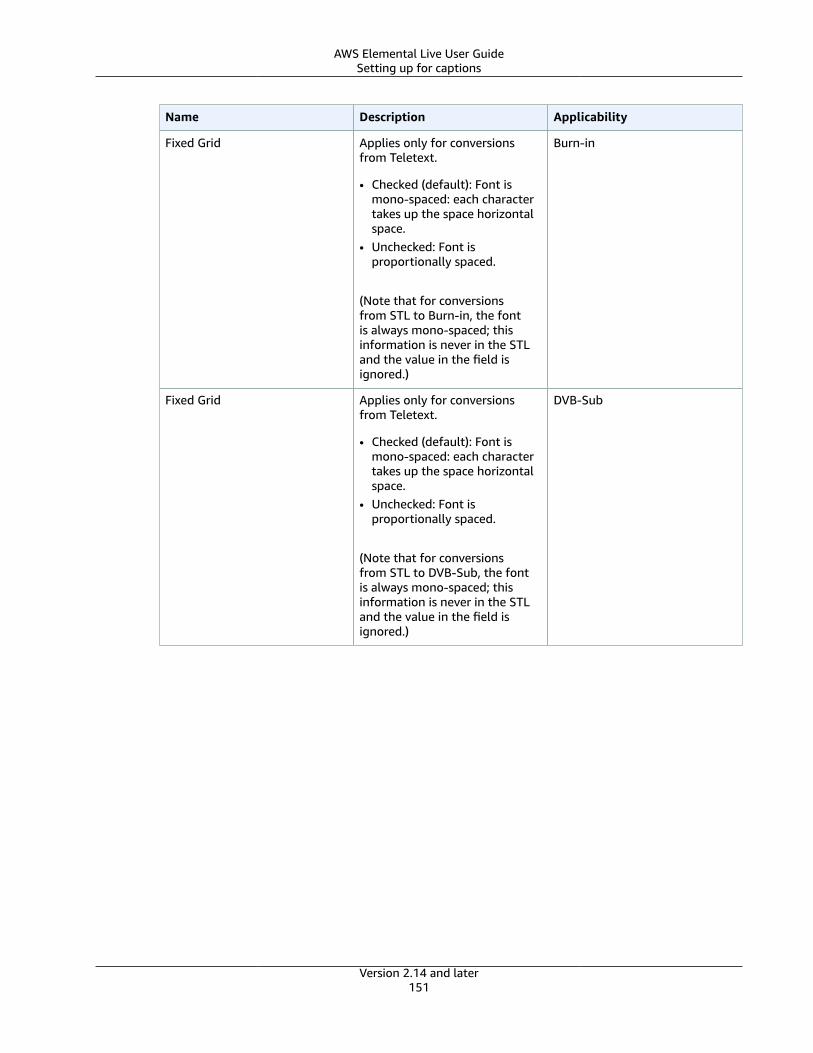
AWS Elemental Live User GuideSetting up for captions
Name Description Applicability
Fixed Grid Applies only for conversionsfrom Teletext.
• Checked (default): Font ismono-spaced: each charactertakes up the space horizontalspace.
• Unchecked: Font isproportionally spaced.
(Note that for conversionsfrom STL to Burn-in, the fontis always mono-spaced; thisinformation is never in the STLand the value in the field isignored.)
Burn-in
Fixed Grid Applies only for conversionsfrom Teletext.
• Checked (default): Font ismono-spaced: each charactertakes up the space horizontalspace.
• Unchecked: Font isproportionally spaced.
(Note that for conversionsfrom STL to DVB-Sub, the fontis always mono-spaced; thisinformation is never in the STLand the value in the field isignored.)
DVB-Sub
Version 2.14 and later151
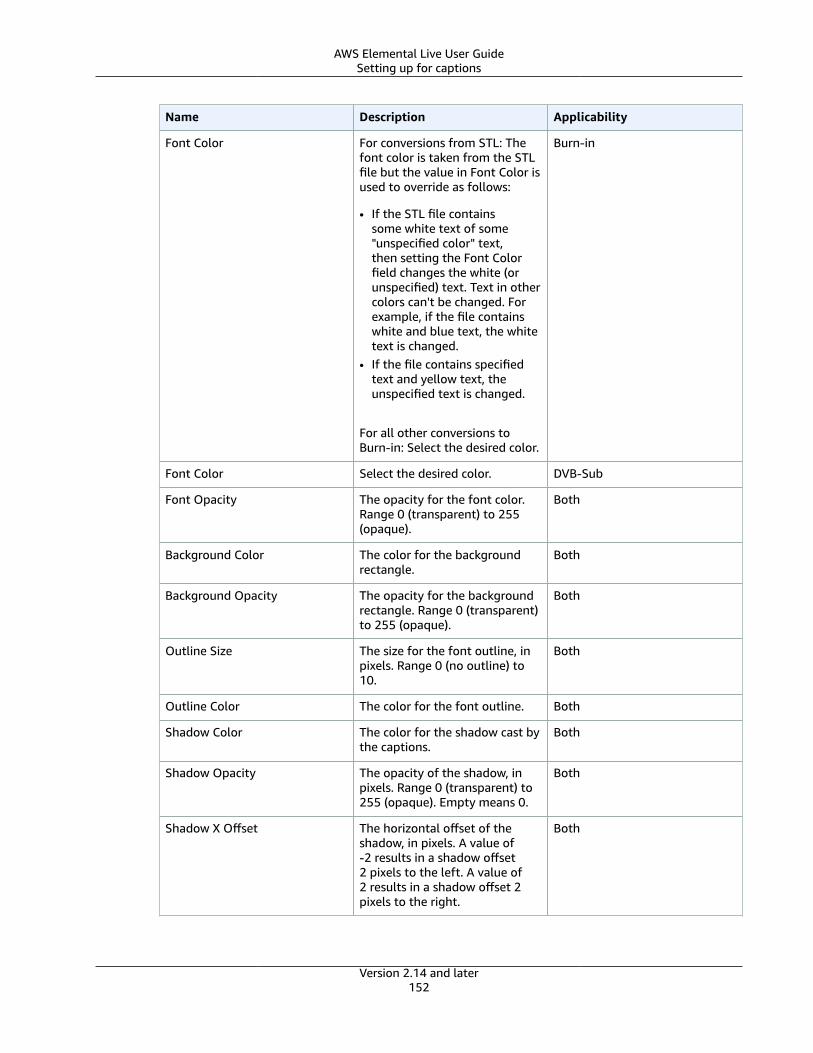
AWS Elemental Live User GuideSetting up for captions
Name Description Applicability
Font Color For conversions from STL: Thefont color is taken from the STLfile but the value in Font Color isused to override as follows:
• If the STL file containssome white text of some"unspecified color" text,then setting the Font Colorfield changes the white (orunspecified) text. Text in othercolors can't be changed. Forexample, if the file containswhite and blue text, the whitetext is changed.
• If the file contains specifiedtext and yellow text, theunspecified text is changed.
For all other conversions toBurn-in: Select the desired color.
Burn-in
Font Color Select the desired color. DVB-Sub
Font Opacity The opacity for the font color.Range 0 (transparent) to 255(opaque).
Both
Background Color The color for the backgroundrectangle.
Both
Background Opacity The opacity for the backgroundrectangle. Range 0 (transparent)to 255 (opaque).
Both
Outline Size The size for the font outline, inpixels. Range 0 (no outline) to10.
Both
Outline Color The color for the font outline. Both
Shadow Color The color for the shadow cast bythe captions.
Both
Shadow Opacity The opacity of the shadow, inpixels. Range 0 (transparent) to255 (opaque). Empty means 0.
Both
Shadow X Offset The horizontal offset of theshadow, in pixels. A value of-2 results in a shadow offset2 pixels to the left. A value of2 results in a shadow offset 2pixels to the right.
Both
Version 2.14 and later152

AWS Elemental Live User GuideSetting up for captions
Name Description Applicability
Shadow Y Offset The vertical offset of theshadow, in pixels. A value of-2 results in a shadow offset 2pixels above the text. A value of2 results in a shadow offset 2pixels above the text.
Both
Font Styles When You Use the Same Source in Several Outputs
If you are using the same caption source in several Stream sections (in other words, you are selecting thesame Caption Selector in the Caption Source field in several Stream sections), then you must set up thefont style information identically in each Stream section. If you do not, you will get an error when yousave the event.
For example, stream 1 may use Caption Selector 1 with the Destination Type set to Burn-in. And stream2 may also use Caption Selector 1 with the Destination Type set to Burn-in. You set the font informationonce in stream 1 and again in stream 2. You must make sure to set up all the font information identicallyin both streams.
The same rule applies if the output captions are all DVB-Sub.
Complete the PIDs for ARIB
This section applies when you set up the captions encode as described in the section called “Step 1:Identify source captions” (p. 138), if the output group is UDP/TS and the output captions format isARIB. It describes how to complete the PIDs for the output that contains these captions.
To complete the PIDs (ARIB)
1. In the Output section, open the PID Control section.
2. Complete the ARIB Captions field and the ARIB Captions PID field as follows:
ARIB Captions PID Control ARIB Captions PID Result
Unchecked Ignore. A PID will automatically beassigned during encoding; thisvalue could be any number.
Type a decimal or hexadecimal. This PID will be used for thecaptions.
Leave the default (507) The PID for captions will be 507.
Checked
Delete the default A PID will automatically beassigned during encoding; thisvalue could be any number.
Complete the PIDs for DVB-Sub
This section applies when you set up the captions encode as described in the section called “Step 1:Identify source captions” (p. 138), if the output group is UDP/TS and the output captions format isDVB-Sub. It describes how to complete the PIDs for the output that contains these captions.
Version 2.14 and later153
AWS Elemental Live User GuideSetting up for captions
To complete the PIDs (DVB-Sub)
1. In the Output section, open the PID Control section.2. In the DVB Subtitle PIDs field, enter the PID for the DVB-Sub caption in the stream for this output.
Or leave the default.
Complete the PIDs for Teletext
This section applies when you set up the captions encode as described in the section called “Step 1:Identify source captions” (p. 138), if the output group is UDP/TS and the output captions format isteletext. It describes how to complete the PIDs for the output that contains these captions.
To complete the PIDs (teletext)
1. In the Output section, open the PID Control section.2. In the DVB Teletext PID field, enter the PID for the Teletext caption in the stream for this output. Or
leave the default.
Set up the HLS Manifest (embedded captions)
This section applies when you set up the captions encode as described in the section called “Step1: Identify source captions” (p. 138), if the output group is HLS and the output captions format isembedded. It describes how to include captions language information in the manifest.
To specify language information in the manifest
1. In the HLS output group, go to the output. Click Advanced.2. Complete Caption Languages as desired:
• Omit: To omit any CLOSED-CAPTION lines in the manifest.• None: To include one CLOSED-CAPTION=None line in the manifest.• Insert: To insert one or more lines in the manifest.
3. If you chose Insert, more fields appear. Complete on more sets of fields.
• You should complete as many fields as there are languages in this output.• The order in which you enter the languages must match the order of the captions in the source.
For example, if the captions are in the order English, then French, then Spanish, then Portuguese,then set up CC1 as English, CC2 as French, and so on. If you do not order them correctly, thecaptions will be tagged with the wrong languages.
"Caption Stream Incompatible" message
When you save the event, this validation message might appear:
Stream Caption Destination Type Is Incompatible With XX Output...
Typically, this error will occur because of the following scenario:
• You have two outputs – perhaps HLS and DASH – that will have the same audio and video descriptions,which means you want them to share the same stream:
• You set up the HLS output group and add an Output and Stream 1. You add embedded captions.• You then set up the DASH output group and add an Output and associate that output with the existing
Stream 1.• The problem is that DASH cannot contain embedded captions. Therefore, when you save the event,
you will get the validation message.
Version 2.14 and later154
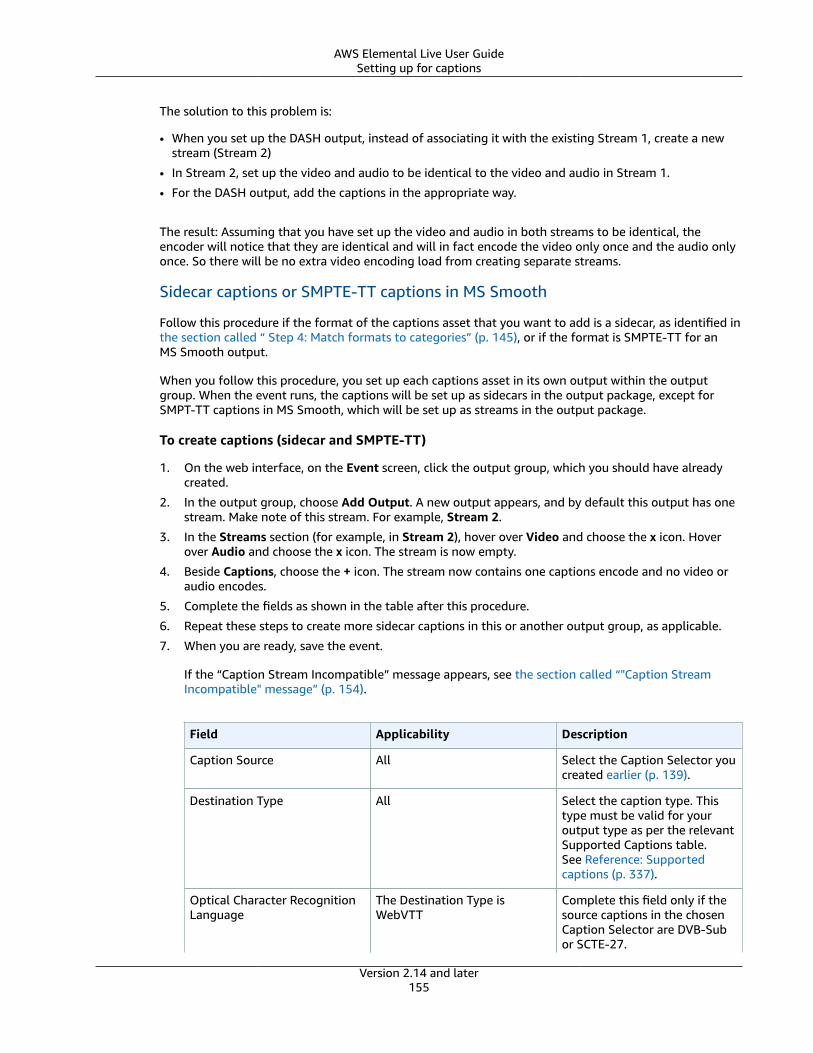
AWS Elemental Live User GuideSetting up for captions
The solution to this problem is:
• When you set up the DASH output, instead of associating it with the existing Stream 1, create a newstream (Stream 2)
• In Stream 2, set up the video and audio to be identical to the video and audio in Stream 1.
• For the DASH output, add the captions in the appropriate way.
The result: Assuming that you have set up the video and audio in both streams to be identical, theencoder will notice that they are identical and will in fact encode the video only once and the audio onlyonce. So there will be no extra video encoding load from creating separate streams.
Sidecar captions or SMPTE-TT captions in MS Smooth
Follow this procedure if the format of the captions asset that you want to add is a sidecar, as identified inthe section called “ Step 4: Match formats to categories” (p. 145), or if the format is SMPTE-TT for anMS Smooth output.
When you follow this procedure, you set up each captions asset in its own output within the outputgroup. When the event runs, the captions will be set up as sidecars in the output package, except forSMPT-TT captions in MS Smooth, which will be set up as streams in the output package.
To create captions (sidecar and SMPTE-TT)
1. On the web interface, on the Event screen, click the output group, which you should have alreadycreated.
2. In the output group, choose Add Output. A new output appears, and by default this output has onestream. Make note of this stream. For example, Stream 2.
3. In the Streams section (for example, in Stream 2), hover over Video and choose the x icon. Hoverover Audio and choose the x icon. The stream is now empty.
4. Beside Captions, choose the + icon. The stream now contains one captions encode and no video oraudio encodes.
5. Complete the fields as shown in the table after this procedure.
6. Repeat these steps to create more sidecar captions in this or another output group, as applicable.
7. When you are ready, save the event.
If the “Caption Stream Incompatible” message appears, see the section called “"Caption StreamIncompatible" message” (p. 154).
Field Applicability Description
Caption Source All Select the Caption Selector youcreated earlier (p. 139).
Destination Type All Select the caption type. Thistype must be valid for youroutput type as per the relevantSupported Captions table.See Reference: Supportedcaptions (p. 337).
Optical Character RecognitionLanguage
The Destination Type isWebVTT
Complete this field only if thesource captions in the chosenCaption Selector are DVB-Subor SCTE-27.
Version 2.14 and later155
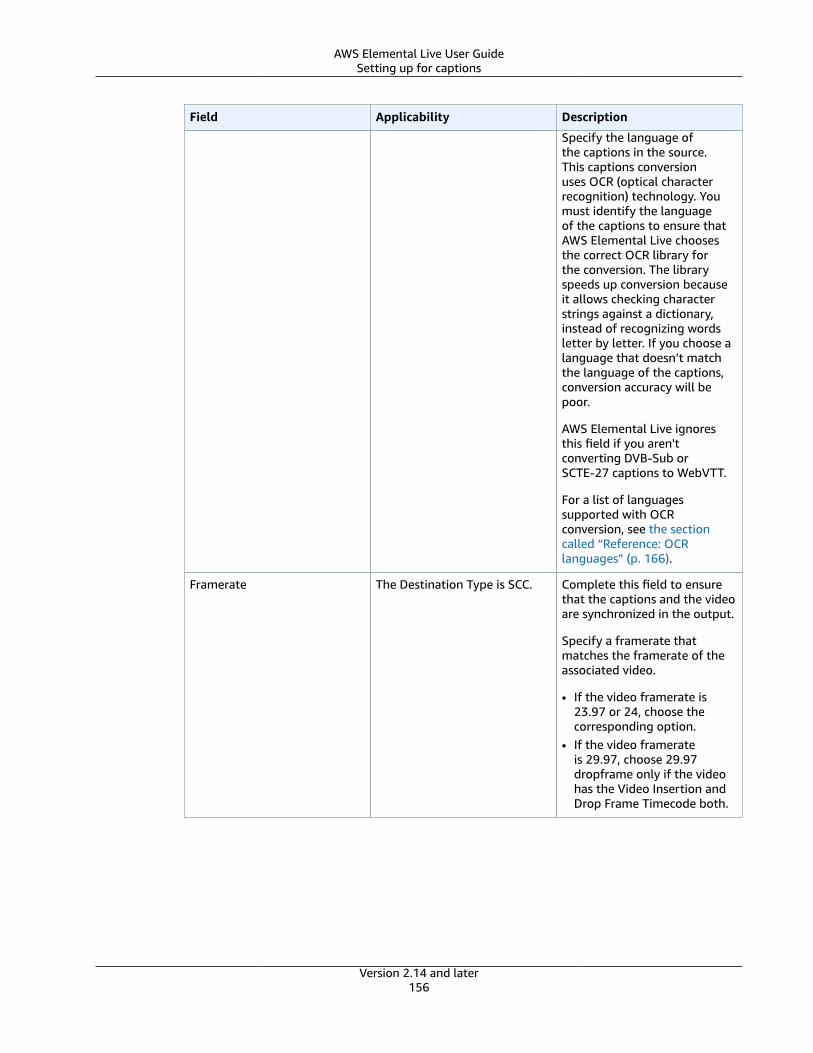
AWS Elemental Live User GuideSetting up for captions
Field Applicability Description
Specify the language ofthe captions in the source.This captions conversionuses OCR (optical characterrecognition) technology. Youmust identify the languageof the captions to ensure thatAWS Elemental Live choosesthe correct OCR library forthe conversion. The libraryspeeds up conversion becauseit allows checking characterstrings against a dictionary,instead of recognizing wordsletter by letter. If you choose alanguage that doesn’t matchthe language of the captions,conversion accuracy will bepoor.
AWS Elemental Live ignoresthis field if you aren'tconverting DVB-Sub orSCTE-27 captions to WebVTT.
For a list of languagessupported with OCRconversion, see the sectioncalled “Reference: OCRlanguages” (p. 166).
Framerate The Destination Type is SCC. Complete this field to ensurethat the captions and the videoare synchronized in the output.
Specify a framerate thatmatches the framerate of theassociated video.
• If the video framerate is23.97 or 24, choose thecorresponding option.
• If the video framerateis 29.97, choose 29.97dropframe only if the videohas the Video Insertion andDrop Frame Timecode both.
Version 2.14 and later156
AWS Elemental Live User GuideSetting up for captions
Field Applicability Description
Pass-style The Destination Type is TTML Complete this field only if:
• The source caption type isTTML, or SMPTE-TT, or CCF-TT.
• And the output is an Archiveoutput.
Complete as follows:
• Check this box if you wantthe style (font, position andso on) of the input captionsto be copied.
• Leave unchecked if youwant a simplified captionstyle. Some client playerswork best with a simplifiedcaption style.
(For other combinations ofsource caption types andoutput caption type, theoutput is always simplified.)
Font style fields The Destination Type is Burn-in See the table in the sectioncalled “Font styles” (p. 148).
Language All Complete if desired. Thisinformation may be useful toor required by a downstreamsystem.
Description All Complete if desired. Thisinformation may be useful toor required by a downstreamsystem.
"Caption Stream Incompatible" message
When you save the event, this validation message might appear:
Stream Caption Destination Type Is Incompatible With XX Output...
Typically, this error will occur because of the following scenario:
• You have two outputs – perhaps HLS and RTMP – that will have the same audio and video descriptions,which means you want them to share the same stream:
• You set up the HLS output group and add an Output and Stream 1. You add embedded captions.• You then set up the RTMP output group and add an Output and associate that output with the existing
Stream 1.• The problem is that RTMP cannot contain embedded captions. Therefore, when you save the event,
you will get the validation message.
Version 2.14 and later157
AWS Elemental Live User GuideSetting up for captions
The solution to this problem is:
• When you set up the RTMP output, instead of associating it with the existing Stream 1, create a newstream (Stream 2)
• In Stream 2, set up the video and audio to be identical to the video and audio in Stream 1.
• For the RTMP output, add the captions in the appropriate way.
The result: Assuming that you have set up the video and audio in both streams to be identical, theencoder will notice that they are identical and will in fact encode the video only once and the audio onlyonce. So there will be no extra video encoding load from creating separate streams.
TTML captions wrapped in ID3 data
Follow this procedure to produce an output that includes TTML captions wrapped in ID3 data. Thisformat is supported only in an MSS output. Unlike unwrapped TTML captions (which you create asdescribed in the section called “Sidecar captions or SMPTE-TT captions in MS Smooth” (p. 155)), thesecaptions are included as an ID3 object in the same stream as the video.
To produce TTML captions wrapped in ID3 data
1. On the web interface, on the Event screen, click the appropriate output group.
2. In the output group, go to the output where you want to add captions.
3. Identify the stream that is associated with that output. In this example, there are two outputs; thefirst is associated with stream 1, the second is associated with stream 2.
4. Go to that Stream section. For example, go to Stream 1.
5. Click the + beside Caption to add a Caption section.
6. Complete the fields as shown in the table that follows this procedure.
7. Repeat these steps to add more captions for this output. For example, to add captions in anotherlanguage.
8. Go to the MSS output group and output that this stream belongs to. Set the Stream field in thatoutput to match the stream you created. For example:
9. When you are ready, save the event.
If the “Caption Stream Incompatible” message appears, see the section called “"Caption StreamIncompatible" message” (p. 157).
Field Description
Caption Source Select the Caption Selector you created whenspecifying the input captions (p. 139).
Destination Type Select the caption type. This type must bevalid for your output type as per the relevantSupported Captions table.
Pass Style Information Applicable only if the source caption type is anEmbedded combination (Embedded, Embedded+SCTE-20, SCTE-20+Embedded), or Teletext, orTTML, or SMPTE-TT, or CCF-TT. The choices are:
• Check this box if you want the style (font,position and so on) of the input captions to becopied.
Version 2.14 and later158
AWS Elemental Live User GuideExamples of implementing use cases
Field Description
• Leave unchecked if you want a simplifiedcaption style. Some client players work bestwith a simplified caption style.
(For other source caption types, the output isalways simplified.)
Language Complete if desired. This information may beuseful to or required by a downstream system.
Description This field is automatically completed after youspecify the language.
Use ID3 as Caption Content Check this field, to insert the TTML captions intoID3 data.
Setting up for 608 XDS data
If your source content includes 608 XDS data, you can set up the event to include it or strip it from theoutput.
The Extended Data Services (XDS or EDS) standard is part of EIA-608 and allows for the delivery ofancillary data.
NoteYou set up handling of this source data for the entire event, so you set up to either include it inevery output and stream, or you set up to exclude it from every output and stream.
To configure handling of this data
1. In the Input section of the event, click Advanced.
2. Click the Add Caption Selector button.
3. Set the source to Null.
You only need to create one Caption Selector for 608 XDS data, regardless of the number of outputsyou are creating.
4. If you also want to extract regular captions, create more Caption Selectors according to the regularprocedure.
5. In the Global Processors section, turn on 608 Extended Data Services and complete the fields asdesired.
NoteNo setup is required in the captions section of the output or the streams.
Examples of implementing use casesThe following examples describe how to implement the use cases from the section called “Typicalscenarios” (p. 136).
Topics• Use case 1: one input format to one output (p. 160)
• Use case 2: One input format converted to one different output format (p. 161)
Version 2.14 and later159
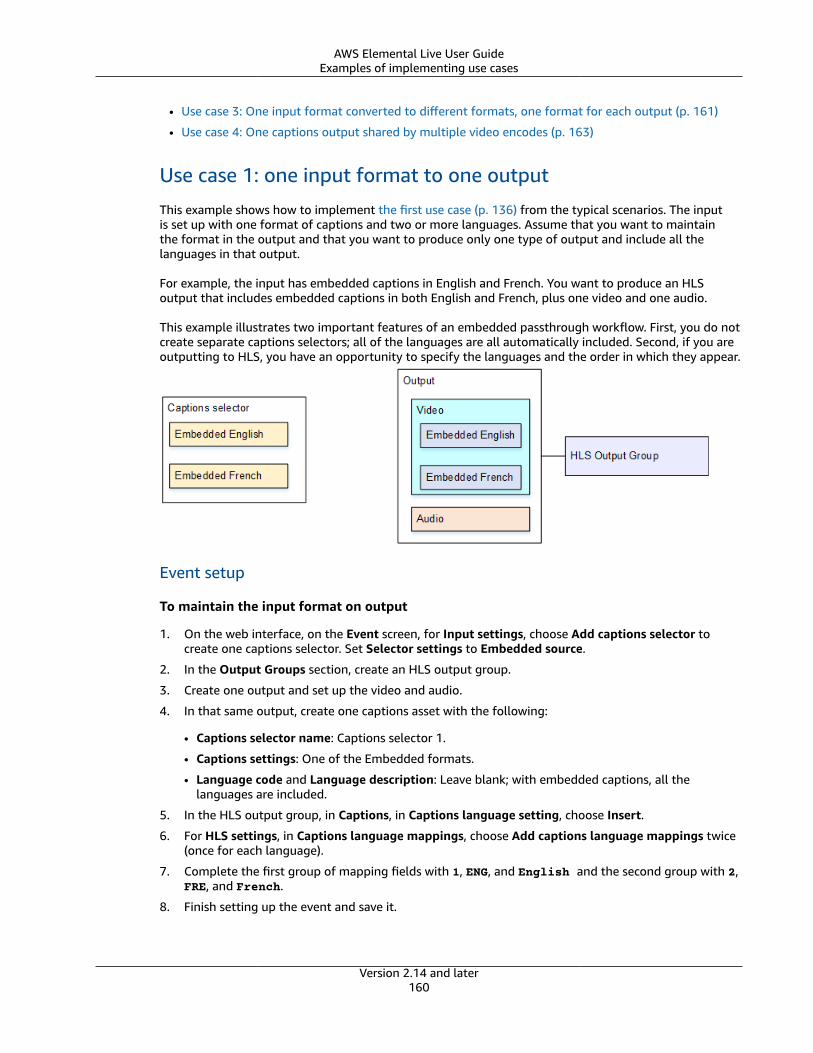
AWS Elemental Live User GuideExamples of implementing use cases
• Use case 3: One input format converted to different formats, one format for each output (p. 161)
• Use case 4: One captions output shared by multiple video encodes (p. 163)
Use case 1: one input format to one output
This example shows how to implement the first use case (p. 136) from the typical scenarios. The inputis set up with one format of captions and two or more languages. Assume that you want to maintainthe format in the output and that you want to produce only one type of output and include all thelanguages in that output.
For example, the input has embedded captions in English and French. You want to produce an HLSoutput that includes embedded captions in both English and French, plus one video and one audio.
This example illustrates two important features of an embedded passthrough workflow. First, you do notcreate separate captions selectors; all of the languages are all automatically included. Second, if you areoutputting to HLS, you have an opportunity to specify the languages and the order in which they appear.
Event setup
To maintain the input format on output
1. On the web interface, on the Event screen, for Input settings, choose Add captions selector tocreate one captions selector. Set Selector settings to Embedded source.
2. In the Output Groups section, create an HLS output group.
3. Create one output and set up the video and audio.
4. In that same output, create one captions asset with the following:
• Captions selector name: Captions selector 1.
• Captions settings: One of the Embedded formats.
• Language code and Language description: Leave blank; with embedded captions, all thelanguages are included.
5. In the HLS output group, in Captions, in Captions language setting, choose Insert.
6. For HLS settings, in Captions language mappings, choose Add captions language mappings twice(once for each language).
7. Complete the first group of mapping fields with 1, ENG, and English and the second group with 2,FRE, and French.
8. Finish setting up the event and save it.
Version 2.14 and later160
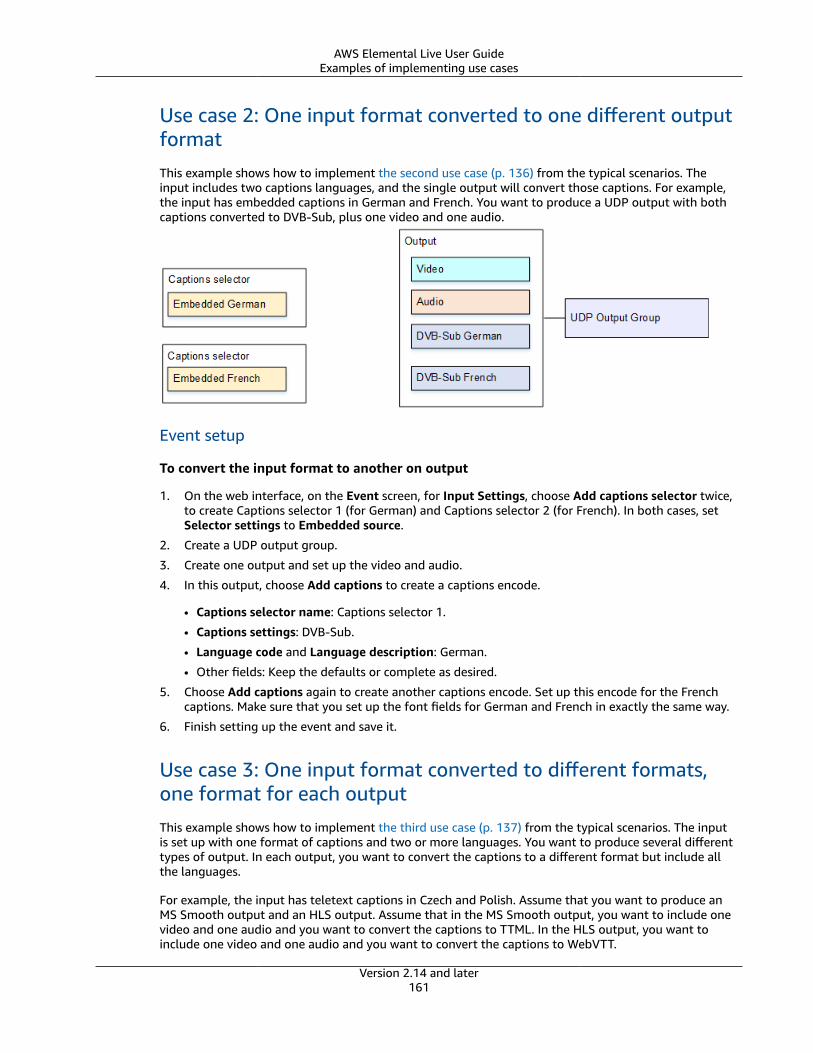
AWS Elemental Live User GuideExamples of implementing use cases
Use case 2: One input format converted to one different outputformatThis example shows how to implement the second use case (p. 136) from the typical scenarios. Theinput includes two captions languages, and the single output will convert those captions. For example,the input has embedded captions in German and French. You want to produce a UDP output with bothcaptions converted to DVB-Sub, plus one video and one audio.
Event setup
To convert the input format to another on output
1. On the web interface, on the Event screen, for Input Settings, choose Add captions selector twice,to create Captions selector 1 (for German) and Captions selector 2 (for French). In both cases, setSelector settings to Embedded source.
2. Create a UDP output group.
3. Create one output and set up the video and audio.
4. In this output, choose Add captions to create a captions encode.
• Captions selector name: Captions selector 1.
• Captions settings: DVB-Sub.
• Language code and Language description: German.
• Other fields: Keep the defaults or complete as desired.
5. Choose Add captions again to create another captions encode. Set up this encode for the Frenchcaptions. Make sure that you set up the font fields for German and French in exactly the same way.
6. Finish setting up the event and save it.
Use case 3: One input format converted to different formats,one format for each outputThis example shows how to implement the third use case (p. 137) from the typical scenarios. The inputis set up with one format of captions and two or more languages. You want to produce several differenttypes of output. In each output, you want to convert the captions to a different format but include allthe languages.
For example, the input has teletext captions in Czech and Polish. Assume that you want to produce anMS Smooth output and an HLS output. Assume that in the MS Smooth output, you want to include onevideo and one audio and you want to convert the captions to TTML. In the HLS output, you want toinclude one video and one audio and you want to convert the captions to WebVTT.
Version 2.14 and later161
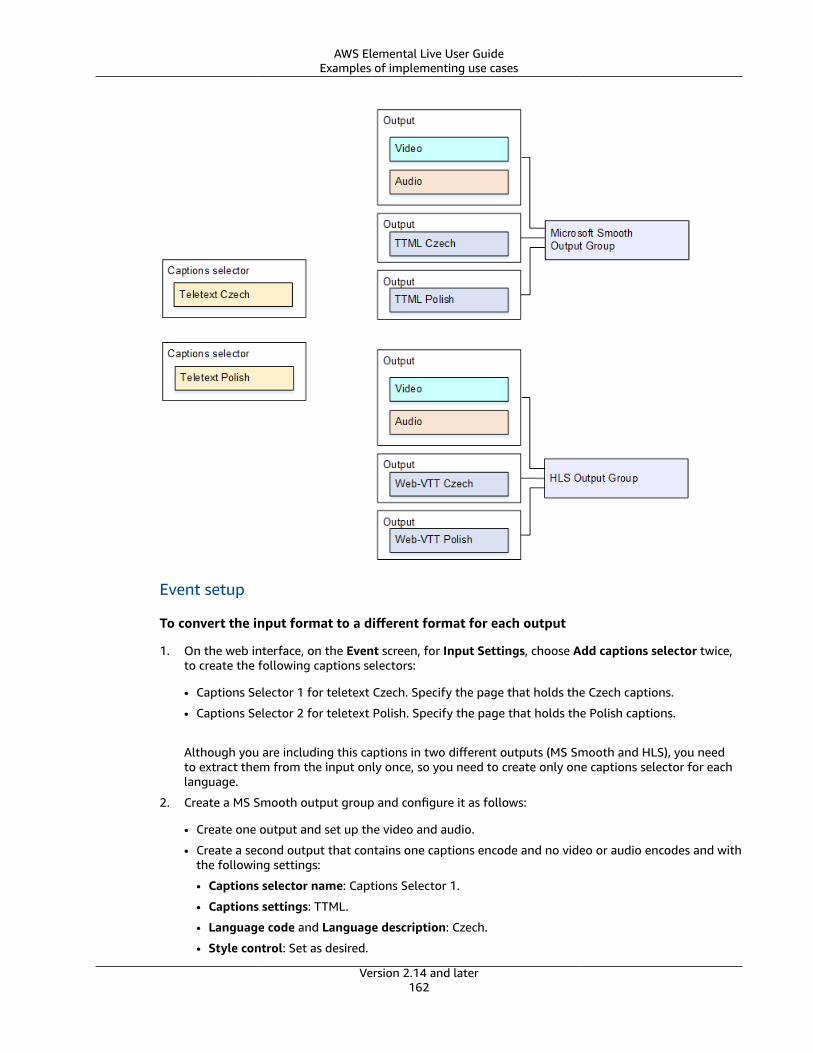
AWS Elemental Live User GuideExamples of implementing use cases
Event setup
To convert the input format to a different format for each output
1. On the web interface, on the Event screen, for Input Settings, choose Add captions selector twice,to create the following captions selectors:
• Captions Selector 1 for teletext Czech. Specify the page that holds the Czech captions.
• Captions Selector 2 for teletext Polish. Specify the page that holds the Polish captions.
Although you are including this captions in two different outputs (MS Smooth and HLS), you needto extract them from the input only once, so you need to create only one captions selector for eachlanguage.
2. Create a MS Smooth output group and configure it as follows:
• Create one output and set up the video and audio.
• Create a second output that contains one captions encode and no video or audio encodes and withthe following settings:
• Captions selector name: Captions Selector 1.
• Captions settings: TTML.
• Language code and Language description: Czech.
• Style control: Set as desired.
Version 2.14 and later162
AWS Elemental Live User GuideExamples of implementing use cases
• Create a third output that contains one captions encode and no video or audio encodes, with thefollowing settings:
• Captions selector name: Captions Selector 2.
• Captions settings: TTML.
• Language code and Language description: Polish.
• Other fields: same as the second output (the Czech captions).
3. Create an HLS output group and configure it as follows:
• Create one output and set up the video and audio.
• Create a second output that contains one captions encode and no video or audio encodes and withthe following settings:
• Captions selector name: Captions Selector 1.
• Captions settings: WebVTT.
• Language code and Language description: Czech.
• Other fields: Set as desired.
• Create a third captions output that contains one captions encode and no video or audio encodesand with the following settings:
• Captions selector name: Captions Selector 2.
• Captions settings: WebVTT
• Language code and Language description: Polish.
• Other fields: same as the second output (the Czech captions).
4. Finish setting up the event and save it.
Use case 4: One captions output shared by multiple videoencodes
This example shows how to set up captions in an ABR workflow. The first setup shows how to set up anABR workflow when the captions are in the same output as the video, meaning that the captions areeither embedded or captions style.
The second setup shows how to set up an ABR workflow when the captions belong to the sidecarcategory, in which case each captions encode is in its own output.
Event setup with embedded or object-style captions
This example shows how to implement the fourth use case (p. 137) from the typical scenarios. Forexample, you want to produce an HLS output with three video encodes (one for low-resolution video,one for medium, one for high) and one audio. You also want to include embedded captions (in Englishand Spanish) and associate them with all three video encodes.
Version 2.14 and later163
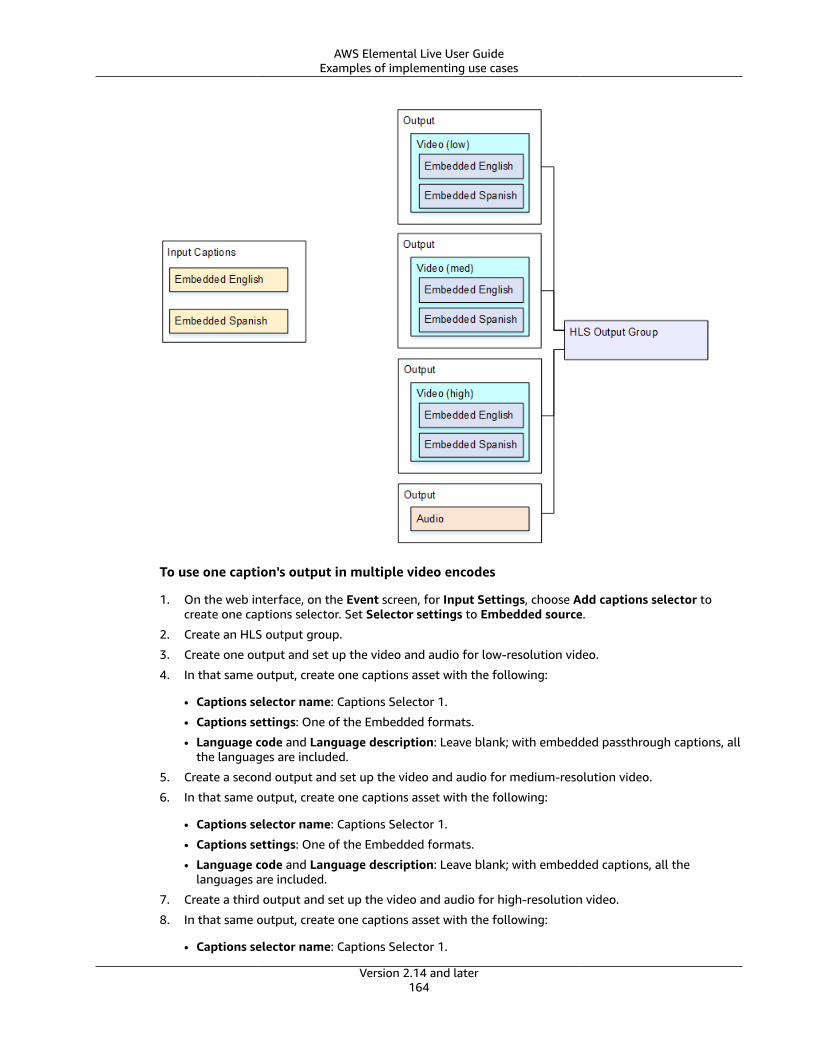
AWS Elemental Live User GuideExamples of implementing use cases
To use one caption's output in multiple video encodes
1. On the web interface, on the Event screen, for Input Settings, choose Add captions selector tocreate one captions selector. Set Selector settings to Embedded source.
2. Create an HLS output group.
3. Create one output and set up the video and audio for low-resolution video.
4. In that same output, create one captions asset with the following:
• Captions selector name: Captions Selector 1.
• Captions settings: One of the Embedded formats.
• Language code and Language description: Leave blank; with embedded passthrough captions, allthe languages are included.
5. Create a second output and set up the video and audio for medium-resolution video.
6. In that same output, create one captions asset with the following:
• Captions selector name: Captions Selector 1.
• Captions settings: One of the Embedded formats.
• Language code and Language description: Leave blank; with embedded captions, all thelanguages are included.
7. Create a third output and set up the video and audio for high-resolution video.
8. In that same output, create one captions asset with the following:
• Captions selector name: Captions Selector 1.
Version 2.14 and later164
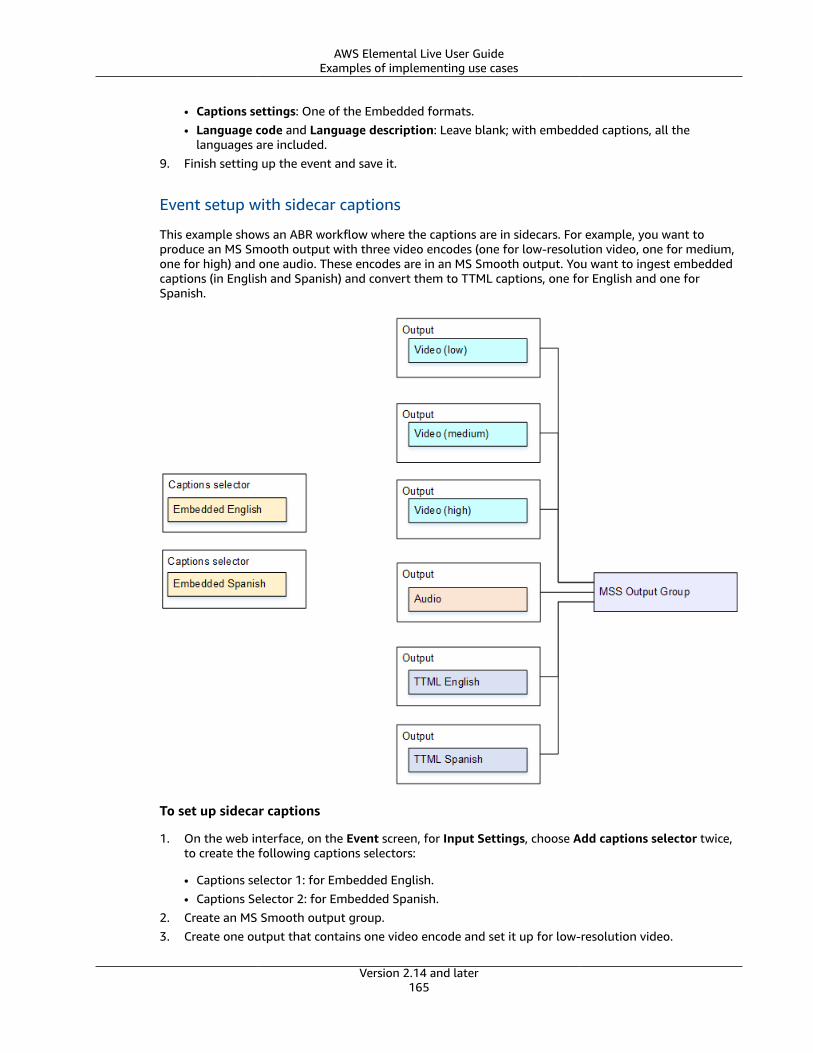
AWS Elemental Live User GuideExamples of implementing use cases
• Captions settings: One of the Embedded formats.• Language code and Language description: Leave blank; with embedded captions, all the
languages are included.9. Finish setting up the event and save it.
Event setup with sidecar captions
This example shows an ABR workflow where the captions are in sidecars. For example, you want toproduce an MS Smooth output with three video encodes (one for low-resolution video, one for medium,one for high) and one audio. These encodes are in an MS Smooth output. You want to ingest embeddedcaptions (in English and Spanish) and convert them to TTML captions, one for English and one forSpanish.
To set up sidecar captions
1. On the web interface, on the Event screen, for Input Settings, choose Add captions selector twice,to create the following captions selectors:
• Captions selector 1: for Embedded English.• Captions Selector 2: for Embedded Spanish.
2. Create an MS Smooth output group.3. Create one output that contains one video encode and set it up for low-resolution video.
Version 2.14 and later165
AWS Elemental Live User GuidePassing through VBI data
4. Create a second output that contains one video encode and set it up for medium-resolution video.5. Create a third output that contains one video encode and set it up for high-resolution video.6. Create a fourth output that contains one audio encode and no video encode.7. Create a fifth output that contains one captions encode and no video or audio encodes and with the
following settings for the captions encode:
• Captions selector name: Captions Selector 1.• Captions settings: TTML.• Language code and Language description: English.
8. Create a sixth output that contains one captions encode and no video or audio encodes, and with thefollowing settings for the captions encode:
• Captions selector name: Captions Selector 2.• Captions settings: TTML.• Language code and Language description: Spanish.
9. Finish setting up the event and save it.
Passing through VBI dataAWS Elemental Live supports passthrough of VBI data. You can pass through this data if the followingstatements are true:
• The input includes VBI data.• You want to include all that data in the output. This data might include embedded captions.
To pass through VBI data
1. Create an output for the asset that is to include VBI data.2. In the Outputs section, choose the Settings link for the output that contains the video asset.3. Go to the Stream section. Display the Video fields. Click Advanced. More fields appear.4. Check the VBI Passthrough field.
ImportantDo not create a Captions object in this output.
All the VBI data (including embedded captions) from the input will be included in the output.
Reference: Languages supported with OCR captionsFollowing is a list of the languages that AWS Elemental Live supports in OCR captions (p. 155).
Afrikaans
Amharic
Arabic
Assamese
Azerbaijani
Azerbaijani - Cyrillic
Belarusian
Version 2.14 and later166

AWS Elemental Live User GuideReference: OCR languages
Bengali
Tibetan
Bosnian
Bulgarian
Catalan; Valencian
Cebuano
Czech
Chinese - Simplified
Chinese - Simplified Vertical
Chinese - Traditional
Chinese - Traditional Vertical
Cherokee
Welsh
Danish
German
Dzongkha
Greek, Modern (1453-)
English
English, Middle (1100-1500)
Esperanto
Estonian
Basque
Persian
Finnish
French
German Fraktur
French, Middle (ca. 1400-1600)
Irish
Galician
Greek, Ancient (-1453)
Gujarati
Haitian; Haitian Creole
Hebrew
Hindi
Version 2.14 and later167

AWS Elemental Live User GuideReference: OCR languages
Croatian
Hungarian
Inuktitut
Indonesian
Icelandic
Italian
Italian - Old
Javanese
Japanese
Japanese Vertical
Kannada
Georgian
Georgian - Old
Kazakh
Central Khmer
Kirghiz; Kyrgyz
Korean
Korean Vertical
Lao
Latin
Latvian
Lithuanian
Malayalam
Marathi
Macedonian
Maltese
Malay
Burmese
Nepali
Dutch; Flemish
Norwegian
Oriya
Panjabi; Punjabi
Polish
Version 2.14 and later168

AWS Elemental Live User GuideDynamicinput switching
Portuguese
Pushto; Pashto
Romanian; Moldavian; Moldovan
Russian
Sanskrit
Sinhala; Sinhalese
Slovak
Slovenian
Spanish; Castilian
Spanish; Castilian - Old
Albanian
Serbian
Serbian - Latin
Swahili
Swedish
Syriac
Tamil
Telugu
Tajik
Thai
Tigrinya
Turkish
Uighur; Uyghur
Ukrainian
Urdu
Uzbek
Uzbek - Cyrillic
Vietnamese
Dynamicinput switchingThe dynamic input switching feature lets use REST API commands to switch inputs in an event. Thismethod of input switching has two key features:
• The switching control (the REST API) is built into AWS Elemental Live. You don't need an externalserver to control switching.
Version 2.14 and later169
AWS Elemental Live User GuideTypical Use Cases
• You can modify the playlist of inputs without stopping the event. This ability to dynamically changethe playlist is particularly useful when you can't identify in advance (before starting the event) all theinputs that you'll want.
You can also switch inputs using virtual input switching using an ESAM server. For more information seethe section called “Virtual input switching” (p. 328).
NoteWe strongly recommend against implementing a combination of these input switching features.You shouldn't give control of the input switching logic to both an ESAM server and a REST-based application. There should be only one mechanism controlling the input switching.
How Dynamic Input Switching Works
The dynamic input witching feature works as follows. When you create the event, you set up only thefirst input you plan to process.
You start the event. You then use the AWS Elemental Live REST API to add more inputs to the event, tocreate a playlist consisting of any number of live and/or file inputs. You now have a playlist consisting ofthe first input (which is currently being processed) and the inputs you added using the REST API.
An input switch can occur in one of these ways:
• REST API-triggered switch. You switch to a different input by entering a REST API command to activatethat input. This input can be any input in the playlist. You can set up so that an input becomes activeimmediately or at a specific time.
• Automatic switch. If Elemental Live gets to the end of a file input that is not set up to loop, thenElemental Live switches to the next input in the list of inputs in the event..
This method works well when you have a series of file inputs such as ad content. You let AWSElemental Live go through the inputs one by one. Before the series ends, you enter a REST APIcommand to activate a different input (perhaps a live input) to break out of the event order.
You can modify the playlist to add and remove inputs. If your event runs on a 24/7 basis, you willtypically remove old inputs and add a fresh set of inputs on a regular basis.
Typical Use CasesUse case 1An event is designed to process live feed from a specific source. The input does not include ad markers.
You create a dynamic playlist in the event to process the live input, then at a given time process one ormore file inputs (the ad content), then switch back to the live input, either at a given time or when thelast ad content has been processed. The dynamic playlist consists of the single live input “interrupted”periodically by ad content.
Use case 2An event is designed to process live feed from a specific source. Periodically, the live feed should bereplaced by file content (perhaps a movie). Then the same live feed should be resumed.
Use case 3An event is designed to process live feed from a specific source. However, you may need to cut awayfrom the live feed to process a file input. This cutaway file may be somewhat planned (for example, you
Version 2.14 and later170
AWS Elemental Live User GuideProcedures
may have a “broadcasting will resume shortly” message already prepared), or the cutaway file may besomething that is created on the spot to convey an unanticipated public announcement.
You create an event to process the live input. You then either create a dynamic playlist ahead of time toswitch to a special file input if required. Or at the last minute you create the entire dynamic playlist andits input, and then switch to it immediately.
Use case 4An event is designed to process live feed from a specific source. Another event is designed to process livefeed from a different source.
Before the dynamic playlist feature was introduced, you could only switch to the other live feed bystopping one event and starting the other. Now, you can merge these two events into one event, witheach live feed in the dynamic playlist. You can set up the dynamic playlist to switch from one feed toanother either at a scheduled time, or when the operator interrupts.
Use case 5An event is designed to process file inputs, one after the other, without the event ending.
Before the dynamic playlist feature was introduced, you could add inputs to the event, but only one at atime. Now, you can add as many inputs as you want in one command.
In a variation of this use case, the event may contain only two files; the event can be set up so that assoon as one input ends, the next one starts over again, but with different content specified inside thatinput.
Use case 6An event is designed to process file content (perhaps a movie). Periodically, the file content should bereplaced by different file content that contains ad content. Then the original file content should beresumed.
You create a dynamic playlist in the event that interleaves sections of the movie with ad content, so:movie, ad content, movie, ad content, movie, and so on. All the inputs are file inputs.
Each time you add the movie file as an input, you include the input clipping tags to create a clip out ofa different segment of the movie: 0 to 20 minutes, 20 to 25 minutes, 25 to 40 minutes, and so on. Eachtime that the movie resumes, it will resume at the desired point.
The proceduresTopics
• General procedure (p. 171)• Sample implementations (p. 174)• Details on preparing inputs (p. 176)• Details on Activating Inputs (p. 177)• Monitoring activity via the web interface (p. 179)• Monitoring activity via the API (p. 180)
General procedureTopics
Version 2.14 and later171
AWS Elemental Live User GuideProcedures
• Step A: Design the dynamic playlist (p. 172)• Step B: Create and start the event (p. 172)• Step C: Add more inputs (p. 172)• Step D: Prepare inputs (p. 173)• Step E: Activate inputs (p. 173)• Step F: Continue adding to the dynamic playlist (p. 174)• Step G: Interrupt the currently active input (p. 174)• Step H: Clean up the playlist (p. 174)• Step I: Troubleshoot (p. 174)
Step A: Design the dynamic playlist
Identify inputs
1. Identify the inputs and the order in which they are to play.
• The first input can be a live asset or a file asset.• The inputs can be all live assets, all file assets, or a mix of live and file assets.• The same input can be repeated as many times as you want in the dynamic playlist.
Generally, it is a good idea to add the inputs to the event in the order in which they will be played. Youshould do this even if you plan to specify a start time for some or all inputs (below).
Identify inputs to prepare manually
2. Identify inputs that must first be prepared:
• Live streaming inputs: You must manually prepare each live input before it is due to be played.• File inputs: There is no need to manually prepare file inputs, but you may do so if you prefer. Perhaps
a reason to prepare is that you know you have to prepare live inputs and you want to follow the samesteps for both live and file inputs.
Identify inputs to activate manually
3. Identify inputs that must start at a specific time, rather than simply starting after the previous inputends.
If you follow the recommended procedure (Step E: below), you will need a placeholder input. Read theprocedure in Step E: so that you can prepare this input now.
Step B: Create and start the event
4. Create the event with only the first input. (If the event contains more than one input, the others willbe deleted when you create the dynamic playlist.)
Use the REST API Create Event command or use the web interface. See below for tips on setting up theevent for the different use cases.
5. Start the event. Use the REST API or the web interface. Processing starts on that single input.
Step C: Add more inputs
6. Once the event has been started, you can create the dynamic playlist in order to add more inputs tothe event.
Version 2.14 and later172
AWS Elemental Live User GuideProcedures
There are two ways to add inputs to the dynamic playlist:
• Use the Add Dynamic Playlist Inputs command to create an array of inputs that are appended to theinputs currently in the event. Up to 29 inputs can be added in this way. For more information, see Adddynamic playlist inputs (p. 181).
• Use the Replace Dynamic List command to create an array of inputs that replaces the existing dynamicplaylist (except for the currently running input). You can add any number of inputs this way. For moreinformation, see Replace dynamic playlist (p. 183).
Step D: Prepare inputs
7. If you have identified inputs that must be manually prepared, then as soon as one of those inputsbecomes “next in line”, you prepare it by calling Prepare Dynamic Playlist Input (p. 188).
• Time the preparation correctly: For a live input, you must prepare enough time in advance to allowAWS Elemental Live to inspect the entire next-in-line input and decode at least one frame. But youshould not prepare it too far in advance because once preparation starts, this is what happens:
AWS Elemental Live inspects the entire input then decodes the first frame in the pipeline. If this inputis still not due to run, it discards that frame and decodes the frame that is now first in the pipeline. Itdiscards that frame and decodes the frame that is now first in the pipeline, on and on until the input isdue to run. This decoding obviously uses processing resources.
• This timing rule does not apply to file inputs.
• You can optionally specify a prepare time. The input will transition to the Prepare state but nopreparing will actually occur until the specified time.
• Keep in mind that you can only manually prepare one input at a time: if you prepare input A, do notprepare the next input until input A is active. If you do, input A may not start as expected.
For more information on the rules around preparation, see Details on preparing inputs (p. 176).
Step E: Activate inputs
8. For each input that must start at a specific time, set the activate time when the input is next in line.
Activating using placeholders
Scheduling inputs is a bit tricky because an AWS Elemental Live event must always be encoding: thereis no concept of waiting for a frame to arrive. Therefore, if you do not time input B to start immediatelyafter input A ends, then AWS Elemental Live will move to the next input that does not have an activatetime (perhaps the input that appears after input B in the XML). But it is very difficult to get this timingbetween inputs exact enough.
The workaround is to use a “placeholder” input between inputs A and B, as follows:
• Estimate the expected end time of input A.
• Assign an activate time for input B that is as close to the end time without being before it. (In this way,input A is not interrupted.)
• Between input A and input B insert a “placeholder” file input (this input could be a blackout slate, forexample). Do not assign a start to this placeholder but do set the loop_source tag to true for this inputin order to play the content repeatedly until it is time to return to the live input.
This will be the result: if input A end time does not exactly match the activate time for input B, then theplaceholder will play. When the activate time for input B arrives, the placeholder will be interrupted byinput B. Input B will start at the scheduled time.
Version 2.14 and later173
AWS Elemental Live User GuideProcedures
Step F: Continue adding to the dynamic playlist
9. As inputs are run, add more inputs to the event.
• So long as the event is still running, you can continue to add inputs to it; the event will not end.• Add inputs using either the Add Dynamic Playlist Inputs (p. 181) command or the Replace Dynamic
List (p. 183) command.
Step G: Interrupt the currently active input
Occasionally, you may need to interrupt the current active input and start a different input (input B). SeeImplementing use case 3 (p. 175) for an example of an unanticipated interruption.
• If necessary, add input B to the dynamic playlist. There are two ways to add:• Rebuild the entire playlist, with input B inserted at the top, using the Replace Dynamic Playlist
command. The currently active input will not be removed when you do this. For more information,see Replace dynamic playlist (p. 183).
• Append input B to the end of the playlist, using the Add Dynamic Playlist Inputs command. Thedrawback to this method is that the input appears at the end of the playlist on the web interface,but then gets activated, which may confuse your operators. For more information, see Add dynamicplaylist inputs (p. 181).
• If input B is a live input, prepare it using the Prepare Dynamic Playlist command. For more information,see Prepare Dynamic Playlist Input (p. 188).
• Use the Activate Dynamic List Input command (without an activate time) to immediately activate theinput. For more information, see Activate dynamic playlist input (p. 189).
Step H: Clean up the playlist
10. The dynamic playlist is never automatically cleaned up; even after an input has been processed, itremains on the dynamic playlist.
• If you use the Replace Dynamic Playlist command, the entire playlist is replaced, which effectivelycleans up old inputs. Fore more information, see Replace dynamic playlist (p. 183).
• If you use the Add Dynamic Playlist Inputs command, then you may want to occasionally usethe Delete Dynamic Playlist Input command. For more information, see Delete dynamic playlistinput (p. 187).
Step I: Troubleshoot
If the dynamic playlist is not behaving as expected, see the information on preparation and activationstarting here (p. 176). You may have broken a preparation or activation rule.
Sample implementations
Implementing use case 1
Use case 1 is described here (p. 170).
1. Create an event that has the live feed as the input.2. Once the event starts, create a dynamic playlist that consists of the following:
• Second input – ad content – from file.• Third input – live input (identical to first input).• Fourth input - ad content – from file.
Version 2.14 and later174
AWS Elemental Live User GuideProcedures
• And so on.
3. Immediately set an activate time for the second input. The first input will be interrupted by the secondinput at this time.
4. After the second input becomes Active, prepare the third input.
When the second input ends, the third input will immediately become Active.
5. After the third input becomes Active, set an activate time for the fourth input. The third input will beinterrupted by the fourth input at this time.
Implementing use case 2
Use case 2 is described here (p. 170).
1. Create an event that has the live feed as the input.
• Once the event starts, create a dynamic playlist that consists of the following:
• Second input – ad content – from file.
• Fourth input and others – file input, as required.
• Finally, create an input to return to the live feed (same input source as the first input).
2. Immediately set an activate time for the second input in order to interrupt the live feed at the desiredtime.
The third input and others will play one after the other, one starting when the previous hascompleted.
3. When the last file input becomes Active:
• Optionally set an activate time to return to the live feed. Or omit an activate time and let the livefeed resume when the last file has completed.
• Prepare the live input you are returning to.
Implementing use case 3
Use case 3 is described here (p. 170).
1. Create an event that has the live feed as the input.
2. Once the event starts, create a dynamic playlist that consists of the following:
• Second input – a file that displays the desired content. Include the loop_source tag for this input inorder to play the content repeatedly until it is time to return to the live input.
• Third input – live input (identical to the first input).
3. If an unanticipated event occurs, switch to the second input: either use the REST API (ActivateDynamic Playlist Input) or let the operator manually activate this input using the web interfacecontrol.
4. When you want to resume live input, prepare the third input and then switch to the third input.
5. If another unanticipated event occurs, you can switch again to the second input.
Implementing use case 4
Use case 4 is described here (p. 171).
1. Create an event that has the live feed as the input.
2. Once the event starts, create a dynamic playlist that consists of the following:
• Second input – a live input from a different live source.
Version 2.14 and later175
AWS Elemental Live User GuideProcedures
3. Follow the desired action:
• Optionally set an activate time to return to the live feed. Or omit an activate time and let the livefeed resume when the last file has completed. Or omit the activate time and manually switch to thesecond input: either use the REST API (Activate Dynamic Playlist Input) or let the operator manuallyactivate the second input using the web interface control.
• Prepare the live input you are returning to.
Implementing use case 5
Use case 5 is described here (p. 171).
1. Create an event that has the first file as the input. In the event, set loop_all_inputs to true.
2. Once the event starts, create a dynamic playlist that consists of the following:
• Second input – a file input.
3. Once the second input has become Active:
• Modify the first input to point to a different file source. Change other tags as required (for example,the audio selectors).
• Optionally set an activate time for the first input.
When the second input has ended, the first input will become Active again.
4. Once the first input has become Active again:
• Modify the second input to point to a different file source. Change other tags as required (forexample, the audio selectors).
• Optionally set an activate time for the second input.
5. Repeat as required.
Implementing use case 6
Use case 6 is described here (p. 171).
1. Create an event that has the live feed as the input.
2. Once the event starts, create a dynamic playlist that consists of the following:
• Second input – a file input such as a movie. Include the input_clipper tags to clip content. Forexample, clip it to run from the 0 mark to the 20 minute mark.
• Third input – ad content – from file.
• Fourth input – file input identical to the second input. Include the input_clipper tags to clip content,for example, to clip it to run from the 20 minute mark to the 35 minute mark.
• Fifth input – ad content – from file.
• Continue switching between the movie and ads.
• Finally, create a dynamic playlist to return to the live feed.
3. Let each input complete. The next input in the XML will automatically start.
4. When the last file input becomes Active:
• Optionally set an activate time to return to the live feed. Or omit an activate time and let the livefeed resume when the last file has completed.
• Prepare the live input you are returning to.
Details on preparing inputsRead this section if your inputs are not being prepared as expected.
Version 2.14 and later176
AWS Elemental Live User GuideProcedures
File inputs vs live streaming inputs
• Preparing a live input involves a one-time inspection of the stream to determine what audio, video,and data tracks it holds and then continually decoding the frames. So: frame X gets decoded; the inputdoes not become Active so frame X is discarded; frame Y gets decoded; the input does not becomeActive so frame Y is discarded; and so on decoding and discarding until finally the input does becomeActive.
As you can see, this preparation may be expensive in terms of processing power.
• File inputs are automatically prepared just before they are Due-to-be-processed. Preparation of a fileinput involves decoding the first frame; after that, processing pauses until the input becomes Due-to-be-processed. Preparation of file inputs is not expensive.
Rules for preparing
• The input must not be currently Active.
• Only one input can be in the Prepared state at a time. If you manually prepare input A and thenmanually prepare input B before A becomes Active, input A will become unprepared.
• An input is put in the Prepared state only when the Prepare command is called on that input. So if afile input that is unprepared is Due-to-be-processed, it transitions directly to the Active state, whereit gets both prepared and Active. This means that you can safely prepare a live input several inputsahead of time, if you want.
• Timing of the manual prepare is important:
• You should probably prepare a live input only when it is the Next-in-line.
• You must prepare enough time in advance to allow AWS Elemental Live to inspect the entire thirdinput and decode at least one frame.
• If the current input is quite long, you may want to wait until it is close to completion beforepreparing the Next-in-line input.
• If you prepare an input and specify a prepare time, note that the input will transition to the Preparestate but no preparing will occur until the specified time.
• If you both manually prepare an input with a prepare time and manually activate it with an activatetime, make sure the prepare time is before the activate time; AWS Elemental Live does not check.
• When you call Prepare Immediately on an input that has previously been set up to be prepared at atime that is still in the future, the input will prepare immediately and the future preparation will becleared. It will not be prepared both immediately and in the future.
For example, you prepare with a prepare time of 2:00 p.m., then you prepare it immediately, then theinput becomes Active and completes at 1:45 p.m. The input will not get prepared again at 2:00 p.m.
• If you prepare input X with a prepare time, any previously prepared input will immediately becomeunprepared, even though the preparation of input x is still in the future. although input x is not beingprepared, it is still considered to be in the Prepared state; only one input can be Prepared at a time, sothe previous input becomes unprepared.
Details on Activating Inputs
Dynamic playlist order rules
When an input starts to be processed (it is “playing”) that input becomes “active”.
A file input typically moves through these stages:
• Idle and not prepared.
Version 2.14 and later177
AWS Elemental Live User GuideProcedures
• Next-in-line and not prepared.• Due-to-be-processed and not prepared.• Active (prepared and processing).• Idle (completed)
A live input typically moves through these stages:
• Idle and not prepared.• Next-in-line and prepared.• Due-to-be-processed and prepared.• Active (processing).• Idle (completed)
Idle
Any number of inputs can be idle.
The list of idle inputs includes inputs that have completed and those that have not been processed.
Next-in-Line
Only one input can be Next-in-line. This is the input that is either:
• The input that is after the currently active input, based on the order in which the inputs appear in theevent XML and on the web interface.
• The input that has an activate time that exactly aligns with the end time of the current input.
Ideally, you should order the inputs in the XML so that an input that has an activate time also appearsin its natural order. For example, it does not appear at the end of the list; this placement will causeconfusion to your operators.
A next-in-line input may be prepared or unprepared.
"Due-to-be-processed" input
The input that is currently Next-in-line becomes Due-to-be-processed at the moment that the currentlyActive input completes.
This input then instantaneously transitions to Active.
Active input
This is the input that is being processed. An input becomes active as follows:
• If the input is a live input has been prepared, it will be activated and processing will start seamlessly.• If the input is a live input has not yet been prepared, it will still be activated; it will not be skipped.
Instead, it will first be prepared, then activated. There will be a noticeable delay while the input isprepared.
• If the input is a file input, it will be prepared and activated.
Rules for activating
The rules apply to activating an input.
Version 2.14 and later178
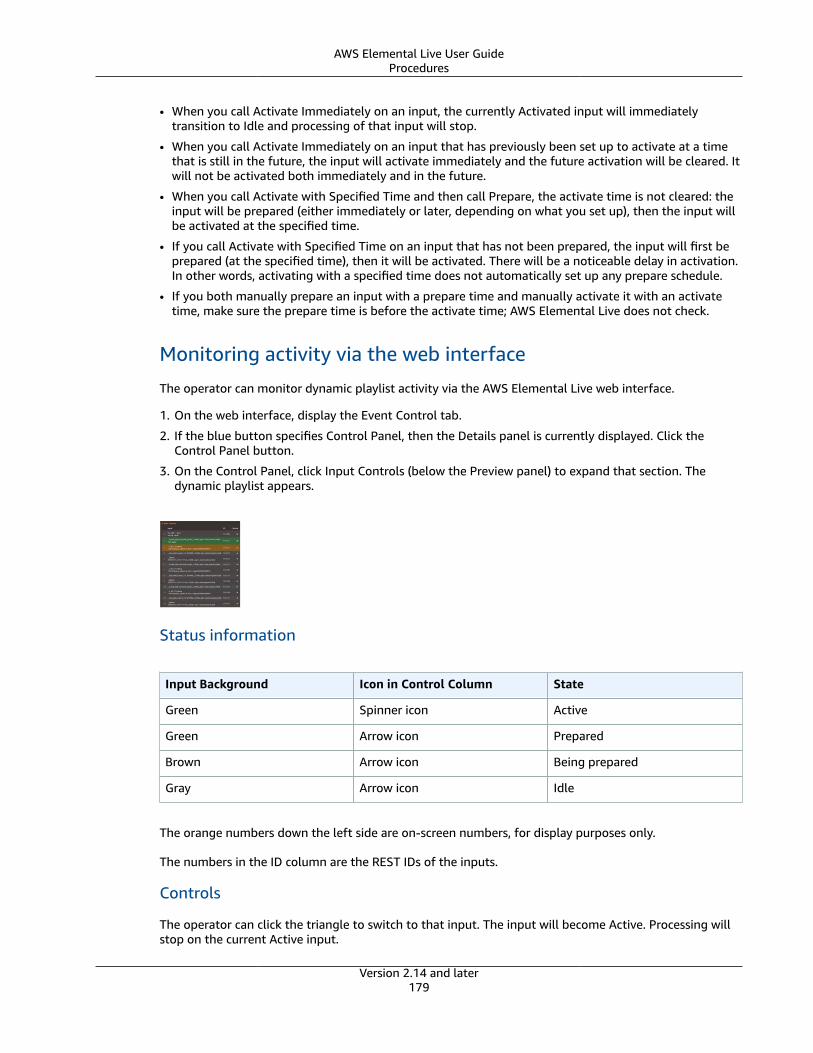
AWS Elemental Live User GuideProcedures
• When you call Activate Immediately on an input, the currently Activated input will immediatelytransition to Idle and processing of that input will stop.
• When you call Activate Immediately on an input that has previously been set up to activate at a timethat is still in the future, the input will activate immediately and the future activation will be cleared. Itwill not be activated both immediately and in the future.
• When you call Activate with Specified Time and then call Prepare, the activate time is not cleared: theinput will be prepared (either immediately or later, depending on what you set up), then the input willbe activated at the specified time.
• If you call Activate with Specified Time on an input that has not been prepared, the input will first beprepared (at the specified time), then it will be activated. There will be a noticeable delay in activation.In other words, activating with a specified time does not automatically set up any prepare schedule.
• If you both manually prepare an input with a prepare time and manually activate it with an activatetime, make sure the prepare time is before the activate time; AWS Elemental Live does not check.
Monitoring activity via the web interface
The operator can monitor dynamic playlist activity via the AWS Elemental Live web interface.
1. On the web interface, display the Event Control tab.
2. If the blue button specifies Control Panel, then the Details panel is currently displayed. Click theControl Panel button.
3. On the Control Panel, click Input Controls (below the Preview panel) to expand that section. Thedynamic playlist appears.
Status information
Input Background Icon in Control Column State
Green Spinner icon Active
Green Arrow icon Prepared
Brown Arrow icon Being prepared
Gray Arrow icon Idle
The orange numbers down the left side are on-screen numbers, for display purposes only.
The numbers in the ID column are the REST IDs of the inputs.
Controls
The operator can click the triangle to switch to that input. The input will become Active. Processing willstop on the current Active input.
Version 2.14 and later179
AWS Elemental Live User GuideUsing the REST API
Monitoring activity via the API
Fine points and pitfalls
You can obtain a list of inputs currently in the dynamic playlist using the Get event (p. 184) commandor the Get event status (p. 191) command.
You can obtain information on the status of each input in the dynamic playlist using the Get Event Statuscommand. for more information, see Get event status (p. 191).
Using the REST APITopics
• List of commands (p. 180)• Add dynamic playlist inputs (p. 181)• Replace dynamic playlist (p. 183)• Get event (p. 184)• Modify one dynamic playlist input (p. 186)• Delete dynamic playlist input (p. 187)• Prepare Dynamic Playlist Input (p. 188)• Activate dynamic playlist input (p. 189)• Get event status (p. 191)
List of commands
Nickname Action Signature Description
Add dynamic playlistinputs
POST /live_events/<eventID>/inputs
In the specified event(which must becurrently running), addthe specified input orinputs to the end of thedynamic playlist.
Replace dynamicplaylist
POST /live_events/<eventID>/playlist
In the specified event(which must becurrently running),remove all non-Active inputs from thedynamic playlist andappend the specifiedinput or inputs. Afterthis command, only theActive input remainsfrom the originaldynamic playlist.
Get event GET /live_events/<event ID> Gets the contents of theevent, including the listof inputs.
Modify dynamic playlistinput
PUT /live_events/<eventID>/inputs/ <input ID>
In the specified event(which must be
Version 2.14 and later180
AWS Elemental Live User GuideUsing the REST API
Nickname Action Signature Description
currently running),modify the specifieddynamic playlist input(which must be non-Active).
PUT /live_events/<eventID>/inputs/ by_label/<input_label>
In the specified event(which must becurrently running),modify the specifiedinput (which must benon-Active).
Delete dynamic playlistinput
DELETE /live_events/<eventID>/inputs/ <input ID>
In the specified event(which must becurrently running),delete the specifiednon-Active input fromthe dynamic playlist.
DELETE /live_events/<eventID>/inputs/ by_label/<input_label>
In the specified event(which must becurrently running),delete the specifiednon-Active input fromthe dynamic playlist.
Activate dynamicplaylist input
POST /live_events/<eventID>/ activate_input
In the specified event(which must becurrently running),activate the specifieddynamic playlist inputeither at the specifiedtime or immediately.
Prepare dynamicplaylist input
POST /live_events/<eventID>/ prepare_input
In the specified event(which must becurrently running),prepare the specifieddynamic playlistinput and optionallyactivate encoding atthe specified time orimmediately.
Get status GET /live_events/<eventID>status
Gets the status ofthe specified event,including informationon the stage and stateof each input.
Add dynamic playlist inputs
In the specified event (which must be currently running), add the specified input or inputs (maximum 29inputs for a total of 30, including the Active input) to the end of the dynamic playlist.
Version 2.14 and later181

AWS Elemental Live User GuideUsing the REST API
HTTP request and response
HTTP URL
POST http://<Live IP address>/live_events/<event ID>/inputs
Body of HTTP
XML content consisting of one:
• One inputs element that contains:• One or more input elements that each contains one or more of the regular input tags. See Elements
and tags in an event input XML (p. 193).
Tips for elements and tags
Here are some notes on tags of particular interest:
• input_label: It is recommended that you include the input_label tag. If you include this tag, you canreference the input later on using this label (rather than using the input ID, which you first have toquery for using Get Event).
An input label must be unique among all the inputs in the event when you add inputs – the existinginputs and the new inputs.
If you add an input with label X and later remove the input, you can add another input with label X,even if the input actually has different content. AWS Elemental Live does not track the content, it justenforces the rule for label uniqueness at a given time.
• loop_source: This tag can be used to loop the dynamic playlist. If you set this tag to true for input X,it is a good idea to set an activate time for the next intended input, otherwise input X will processforever. See Activating using placeholders (p. 173) for a typical use case for loop_source.
When this tag is true and AWS Elemental Live is at the last input listed in the event XML, the first inputin the dynamic playlist may be considered as the Next-in-line input.
• order: This tag is ignored in determining the dynamic playlist order.• For the input source, include one of: network_input or device_input or router_input or file_input.
Different inputs can have a different source.• audio_selector, caption_selector: All inputs must have the same number of these elements: none
or more than one. So if the first input has two audio_selector elements, all inputs must have twoaudio_selectors. This rule applies to the lifetime of the event: as soon as it starts, the count ofaudio_selector and caption_selectors is fixed and cannot vary.
• input_clipping: Can be used to process only a specific section of a live or file input.
Response
200 OK for a successful request.
Example
This request adds two inputs to the event with the ID 31. The first input is a live input, the second is a fileinput.
POST http://10.4.136.92/live_events/31/inputs---------------------------------------------<inputs>
Version 2.14 and later182
AWS Elemental Live User GuideUsing the REST API
<input> <input_label>movie08E45_section_1</input_label> <loop_source>false</loop_source> <network_input> <quad>false</quad> <uri>udp://10.0.0.1:5005</uri> </network_input> <audio_selector> <default_selection>true</default_selection> <track>1</track> </audio_selector> </input> <input> <input_label>enigmatic_car_ad</input_label> <loop_source></loop_source> <file_input> <uri>/data/server/ad13978.mp4</uri> </file_input> <audio_selector> <default_selection>true</default_selection> <track>1</track> </audio_selector> </input></inputs>
Replace dynamic playlistIn the specified event (which must be currently running), remove all non-Active inputs from the dynamicplaylist and append the specified file input or inputs. After this command, only the Active input remainsfrom the original dynamic playlist; the rest of the dynamic playlist consists of new inputs.
The dynamic playlist can only consist of file inputs; if you want to add live inputs or live and file inputs,use Add Dynamic Playlist Inputs.
There is no maximum to the number of inputs that can be added using this command, and there is nomaximum to the number inputs that result in the event. For example, you can replace the 15 inputscurrently in the event with 900 new inputs. Compare this lack of restrictions to the restrictions that applywith Add Dynamic Playlist Inputs.
You can use Replace Dynamic Playlist to clear the dynamic playlist: create a Body consisting of an emptyinputs element.
HTTP request and response
HTTP URL
POST http://<Live IP address>/live_events/<event ID>/playlist
Body of HTTP
XML content consisting of:
• One inputs element that contains:• One or more input elements that each contains one or more of the regular input tags. See Elements
and tags in an event input XML (p. 193).
Response
200 OK for a successful request.
Version 2.14 and later183
AWS Elemental Live User GuideUsing the REST API
Example
This request specifies two inputs to the event with the ID 31. The first input is a live input, the second isa file input. This list of inputs will replace the current dynamic playlist, not including the currently activeinput.
POST http://10.4.136.92/live_events/31/playlist---------------------------------------------<inputs> <input> <input_label>movie08E45_section_1</input_label> <loop_source>false</loop_source> <network_input> <quad>false</quad> <uri>udp://10.0.0.1:5005</uri> </network_input> <audio_selector> <default_selection>true</default_selection> <track>1</track> </audio_selector> </input> <input> <input_label>enigmatic_car_ad</input_label> <loop_source></loop_source> <file_input> <uri>/data/server/ad13978.mp4</uri> </file_input> <audio_selector> <default_selection>true</default_selection> <track>1</track> </audio_selector> </input></inputs>
Get event
Get a list of the inputs in the specified event.
There is no explicit command to get the dynamic playlist. But you can get the event in order to getinformation about the dynamic playlist.
Get Event is useful for obtaining the IDs of the inputs in the dynamic playlist and for parsing for theorder in which they are listed in the XML.
Get Event includes the status of each input in these tags:
• active tag. Possible values are true and false.
• status tag. Possible values are preprocessing, pending, running, postprocessing, complete.
• active_input_id tag. Only the currently active input has this tag. For that input, the active tag and theinput_ID specify the same value.
Get Event does not provide information about the prepare time or activate time on inputs on which youexplicitly called Prepare with Specified Time or Activate with Specified Time. That information cannot beretrieved from AWS Elemental Live; you must maintain the schedule outside of AWS Elemental Live.
Version 2.14 and later184
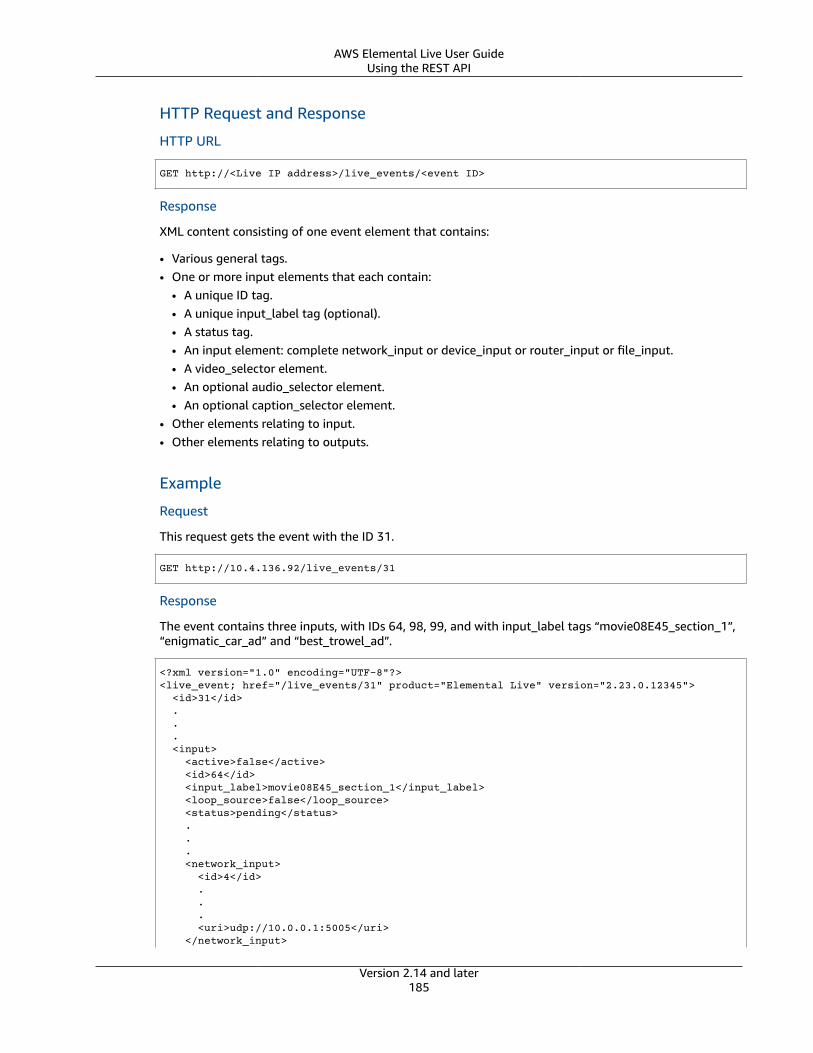
AWS Elemental Live User GuideUsing the REST API
HTTP Request and Response
HTTP URL
GET http://<Live IP address>/live_events/<event ID>
Response
XML content consisting of one event element that contains:
• Various general tags.• One or more input elements that each contain:
• A unique ID tag.• A unique input_label tag (optional).• A status tag.• An input element: complete network_input or device_input or router_input or file_input.• A video_selector element.• An optional audio_selector element.• An optional caption_selector element.
• Other elements relating to input.• Other elements relating to outputs.
Example
Request
This request gets the event with the ID 31.
GET http://10.4.136.92/live_events/31
Response
The event contains three inputs, with IDs 64, 98, 99, and with input_label tags “movie08E45_section_1”,“enigmatic_car_ad” and “best_trowel_ad”.
<?xml version="1.0" encoding="UTF-8"?><live_event; href="/live_events/31" product="Elemental Live" version="2.23.0.12345"> <id>31</id> . . . <input> <active>false</active> <id>64</id> <input_label>movie08E45_section_1</input_label> <loop_source>false</loop_source> <status>pending</status> . . . <network_input> <id>4</id> . . . <uri>udp://10.0.0.1:5005</uri> </network_input>
Version 2.14 and later185
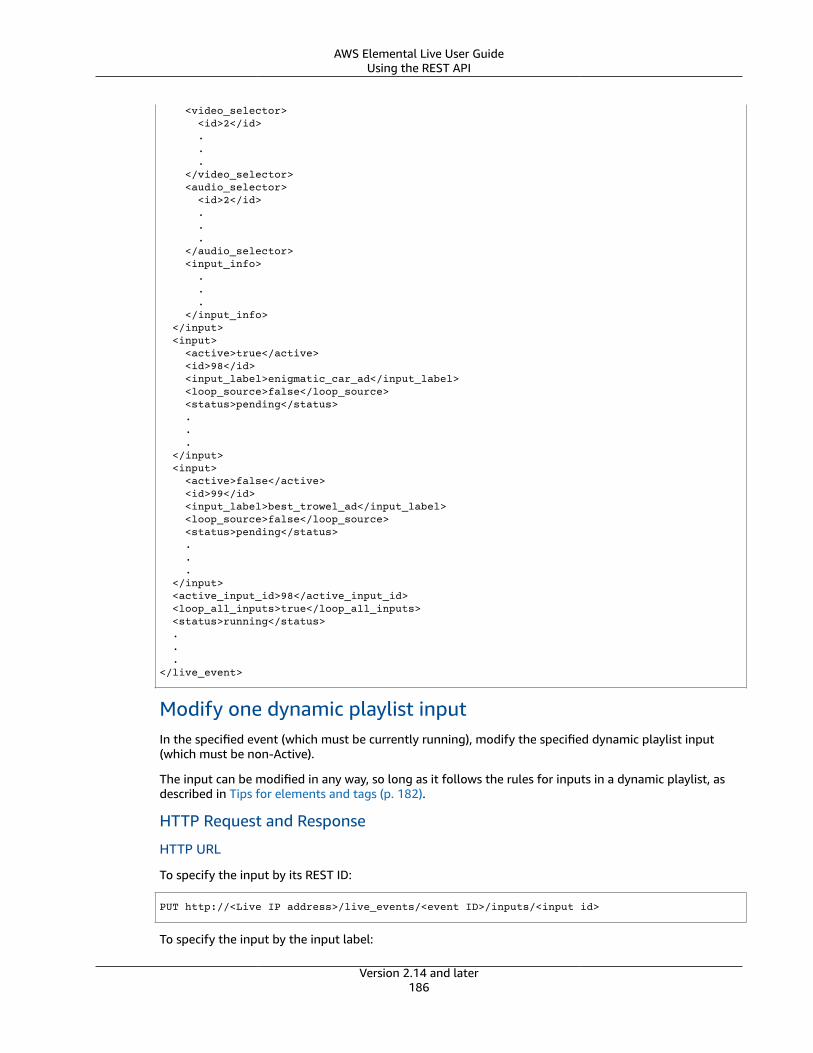
AWS Elemental Live User GuideUsing the REST API
<video_selector> <id>2</id> . . . </video_selector> <audio_selector> <id>2</id> . . . </audio_selector> <input_info> . . . </input_info> </input> <input> <active>true</active> <id>98</id> <input_label>enigmatic_car_ad</input_label> <loop_source>false</loop_source> <status>pending</status> . . . </input> <input> <active>false</active> <id>99</id> <input_label>best_trowel_ad</input_label> <loop_source>false</loop_source> <status>pending</status> . . . </input> <active_input_id>98</active_input_id> <loop_all_inputs>true</loop_all_inputs> <status>running</status> . . .</live_event>
Modify one dynamic playlist inputIn the specified event (which must be currently running), modify the specified dynamic playlist input(which must be non-Active).
The input can be modified in any way, so long as it follows the rules for inputs in a dynamic playlist, asdescribed in Tips for elements and tags (p. 182).
HTTP Request and Response
HTTP URL
To specify the input by its REST ID:
PUT http://<Live IP address>/live_events/<event ID>/inputs/<input id>
To specify the input by the input label:
Version 2.14 and later186
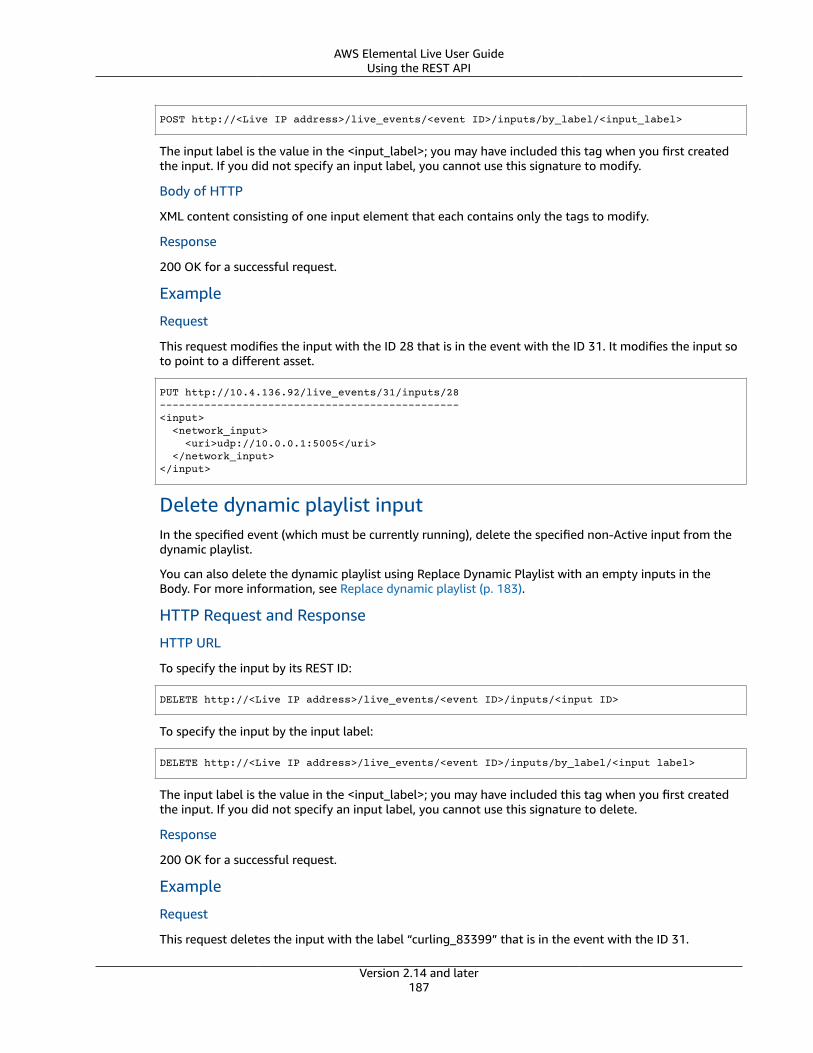
AWS Elemental Live User GuideUsing the REST API
POST http://<Live IP address>/live_events/<event ID>/inputs/by_label/<input_label>
The input label is the value in the <input_label>; you may have included this tag when you first createdthe input. If you did not specify an input label, you cannot use this signature to modify.
Body of HTTP
XML content consisting of one input element that each contains only the tags to modify.
Response
200 OK for a successful request.
Example
Request
This request modifies the input with the ID 28 that is in the event with the ID 31. It modifies the input soto point to a different asset.
PUT http://10.4.136.92/live_events/31/inputs/28-----------------------------------------------<input> <network_input> <uri>udp://10.0.0.1:5005</uri> </network_input></input>
Delete dynamic playlist inputIn the specified event (which must be currently running), delete the specified non-Active input from thedynamic playlist.
You can also delete the dynamic playlist using Replace Dynamic Playlist with an empty inputs in theBody. For more information, see Replace dynamic playlist (p. 183).
HTTP Request and Response
HTTP URL
To specify the input by its REST ID:
DELETE http://<Live IP address>/live_events/<event ID>/inputs/<input ID>
To specify the input by the input label:
DELETE http://<Live IP address>/live_events/<event ID>/inputs/by_label/<input label>
The input label is the value in the <input_label>; you may have included this tag when you first createdthe input. If you did not specify an input label, you cannot use this signature to delete.
Response
200 OK for a successful request.
Example
Request
This request deletes the input with the label “curling_83399” that is in the event with the ID 31.
Version 2.14 and later187
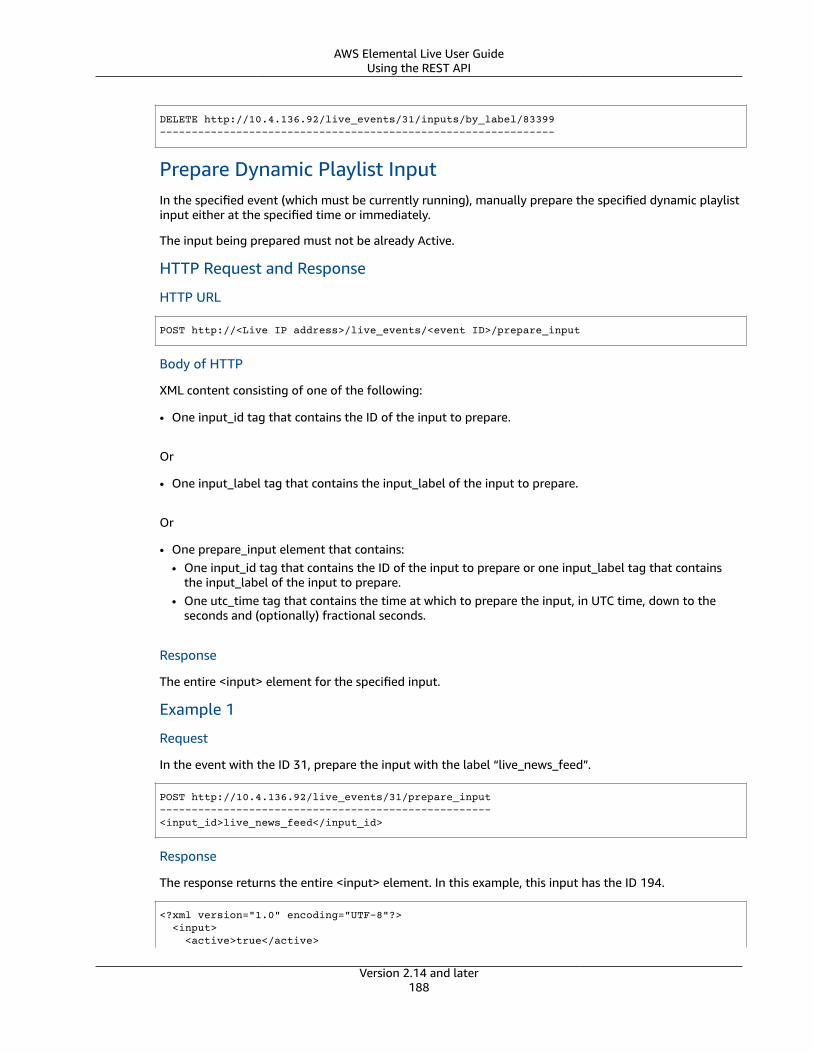
AWS Elemental Live User GuideUsing the REST API
DELETE http://10.4.136.92/live_events/31/inputs/by_label/83399--------------------------------------------------------------
Prepare Dynamic Playlist InputIn the specified event (which must be currently running), manually prepare the specified dynamic playlistinput either at the specified time or immediately.
The input being prepared must not be already Active.
HTTP Request and Response
HTTP URL
POST http://<Live IP address>/live_events/<event ID>/prepare_input
Body of HTTP
XML content consisting of one of the following:
• One input_id tag that contains the ID of the input to prepare.
Or
• One input_label tag that contains the input_label of the input to prepare.
Or
• One prepare_input element that contains:• One input_id tag that contains the ID of the input to prepare or one input_label tag that contains
the input_label of the input to prepare.• One utc_time tag that contains the time at which to prepare the input, in UTC time, down to the
seconds and (optionally) fractional seconds.
Response
The entire <input> element for the specified input.
Example 1
Request
In the event with the ID 31, prepare the input with the label “live_news_feed”.
POST http://10.4.136.92/live_events/31/prepare_input----------------------------------------------------<input_id>live_news_feed</input_id>
Response
The response returns the entire <input> element. In this example, this input has the ID 194.
<?xml version="1.0" encoding="UTF-8"?> <input> <active>true</active>
Version 2.14 and later188
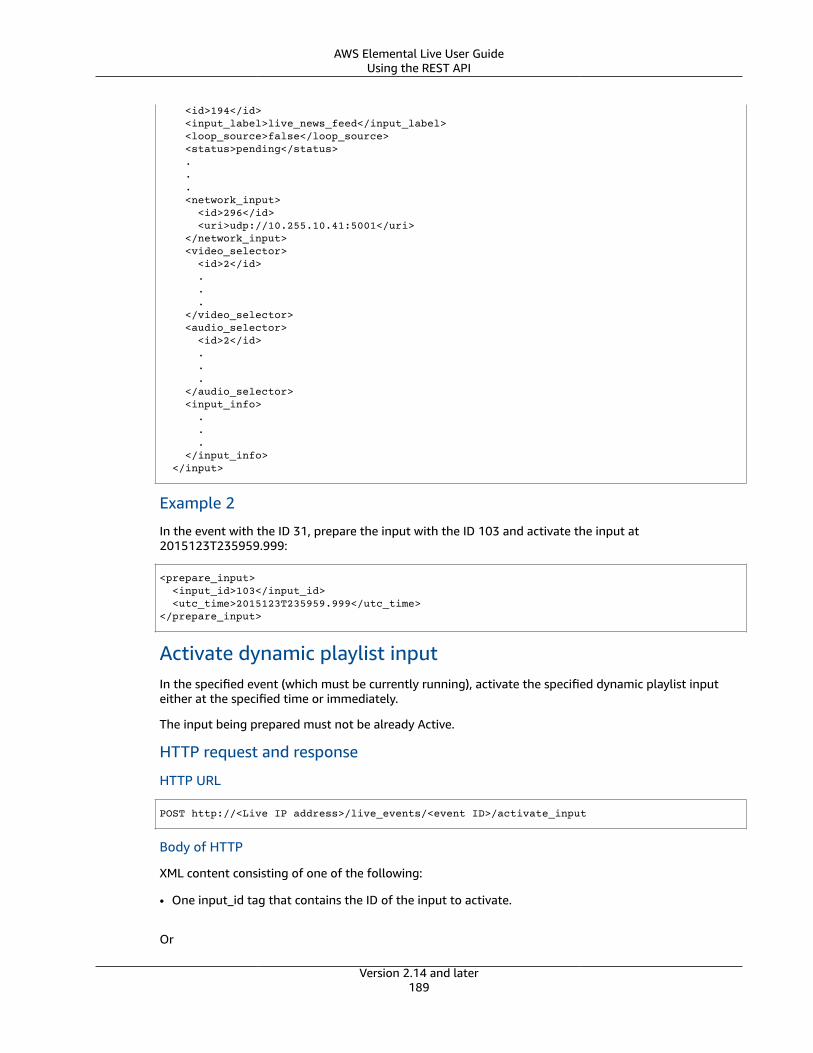
AWS Elemental Live User GuideUsing the REST API
<id>194</id> <input_label>live_news_feed</input_label> <loop_source>false</loop_source> <status>pending</status> . . . <network_input> <id>296</id> <uri>udp://10.255.10.41:5001</uri> </network_input> <video_selector> <id>2</id> . . . </video_selector> <audio_selector> <id>2</id> . . . </audio_selector> <input_info> . . . </input_info> </input>
Example 2
In the event with the ID 31, prepare the input with the ID 103 and activate the input at2015123T235959.999:
<prepare_input> <input_id>103</input_id> <utc_time>2015123T235959.999</utc_time></prepare_input>
Activate dynamic playlist inputIn the specified event (which must be currently running), activate the specified dynamic playlist inputeither at the specified time or immediately.
The input being prepared must not be already Active.
HTTP request and response
HTTP URL
POST http://<Live IP address>/live_events/<event ID>/activate_input
Body of HTTP
XML content consisting of one of the following:
• One input_id tag that contains the ID of the input to activate.
Or
Version 2.14 and later189
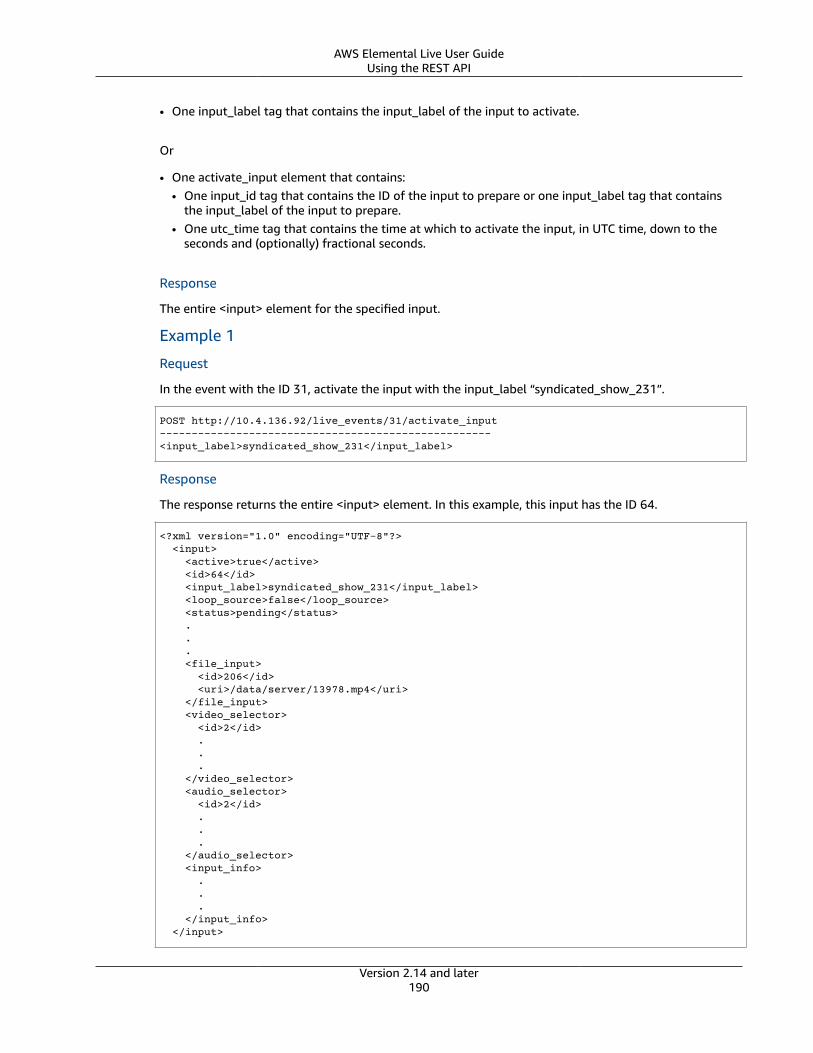
AWS Elemental Live User GuideUsing the REST API
• One input_label tag that contains the input_label of the input to activate.
Or
• One activate_input element that contains:• One input_id tag that contains the ID of the input to prepare or one input_label tag that contains
the input_label of the input to prepare.• One utc_time tag that contains the time at which to activate the input, in UTC time, down to the
seconds and (optionally) fractional seconds.
Response
The entire <input> element for the specified input.
Example 1
Request
In the event with the ID 31, activate the input with the input_label “syndicated_show_231”.
POST http://10.4.136.92/live_events/31/activate_input----------------------------------------------------<input_label>syndicated_show_231</input_label>
Response
The response returns the entire <input> element. In this example, this input has the ID 64.
<?xml version="1.0" encoding="UTF-8"?> <input> <active>true</active> <id>64</id> <input_label>syndicated_show_231</input_label> <loop_source>false</loop_source> <status>pending</status> . . . <file_input> <id>206</id> <uri>/data/server/13978.mp4</uri> </file_input> <video_selector> <id>2</id> . . . </video_selector> <audio_selector> <id>2</id> . . . </audio_selector> <input_info> . . . </input_info> </input>
Version 2.14 and later190
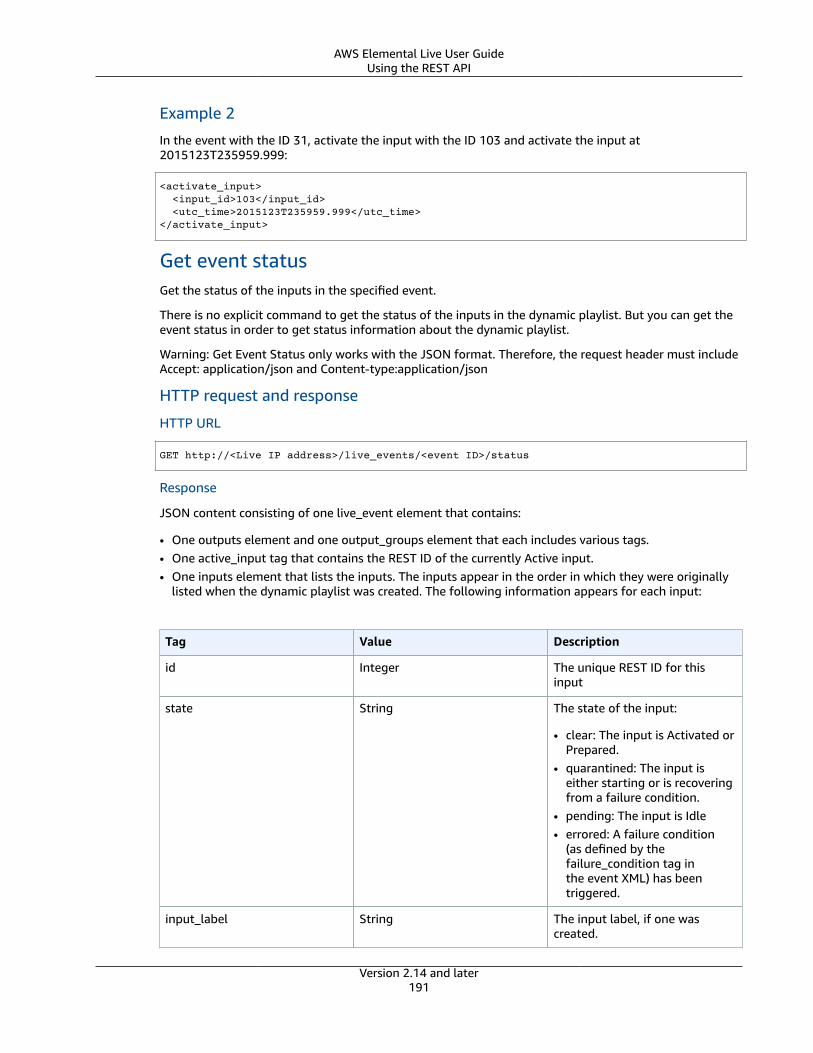
AWS Elemental Live User GuideUsing the REST API
Example 2
In the event with the ID 31, activate the input with the ID 103 and activate the input at2015123T235959.999:
<activate_input> <input_id>103</input_id> <utc_time>2015123T235959.999</utc_time></activate_input>
Get event statusGet the status of the inputs in the specified event.
There is no explicit command to get the status of the inputs in the dynamic playlist. But you can get theevent status in order to get status information about the dynamic playlist.
Warning: Get Event Status only works with the JSON format. Therefore, the request header must includeAccept: application/json and Content-type:application/json
HTTP request and response
HTTP URL
GET http://<Live IP address>/live_events/<event ID>/status
Response
JSON content consisting of one live_event element that contains:
• One outputs element and one output_groups element that each includes various tags.• One active_input tag that contains the REST ID of the currently Active input.• One inputs element that lists the inputs. The inputs appear in the order in which they were originally
listed when the dynamic playlist was created. The following information appears for each input:
Tag Value Description
id Integer The unique REST ID for thisinput
state String The state of the input:
• clear: The input is Activated orPrepared.
• quarantined: The input iseither starting or is recoveringfrom a failure condition.
• pending: The input is Idle• errored: A failure condition
(as defined by thefailure_condition tag inthe event XML) has beentriggered.
input_label String The input label, if one wascreated.
Version 2.14 and later191
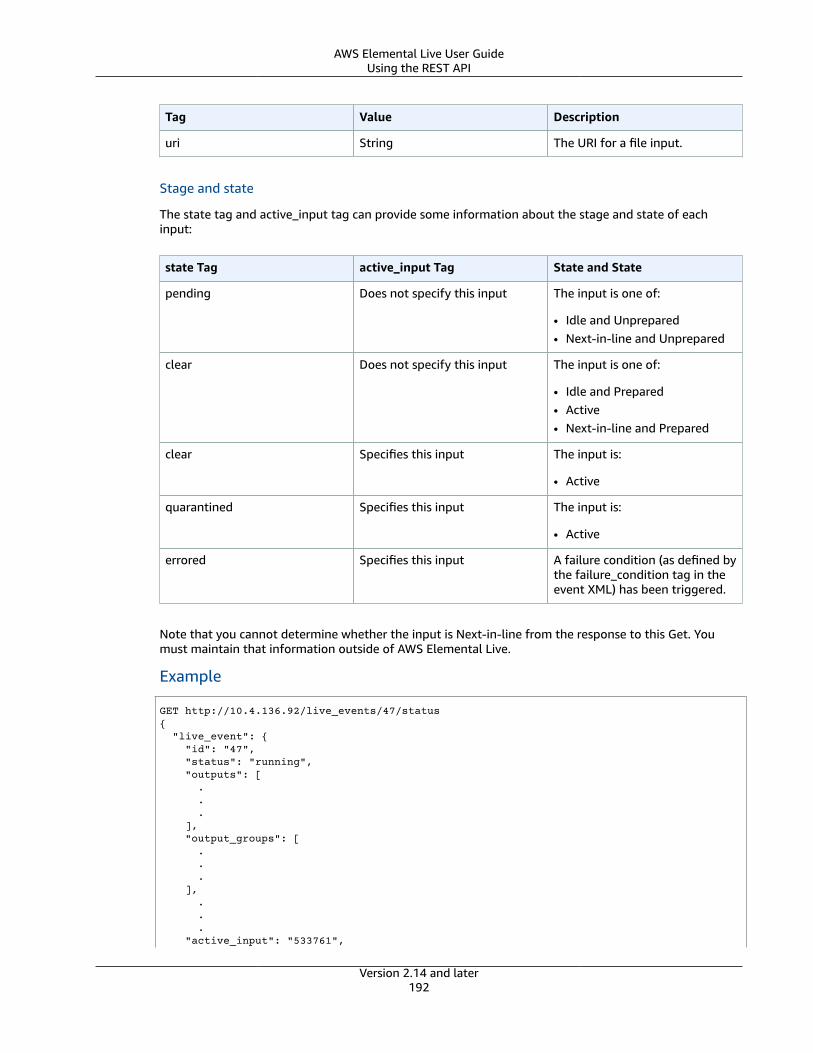
AWS Elemental Live User GuideUsing the REST API
Tag Value Description
uri String The URI for a file input.
Stage and state
The state tag and active_input tag can provide some information about the stage and state of eachinput:
state Tag active_input Tag State and State
pending Does not specify this input The input is one of:
• Idle and Unprepared• Next-in-line and Unprepared
clear Does not specify this input The input is one of:
• Idle and Prepared• Active• Next-in-line and Prepared
clear Specifies this input The input is:
• Active
quarantined Specifies this input The input is:
• Active
errored Specifies this input A failure condition (as defined bythe failure_condition tag in theevent XML) has been triggered.
Note that you cannot determine whether the input is Next-in-line from the response to this Get. Youmust maintain that information outside of AWS Elemental Live.
Example
GET http://10.4.136.92/live_events/47/status{ "live_event": { "id": "47", "status": "running", "outputs": [ . . . ], "output_groups": [ . . . ], . . . "active_input": "533761",
Version 2.14 and later192
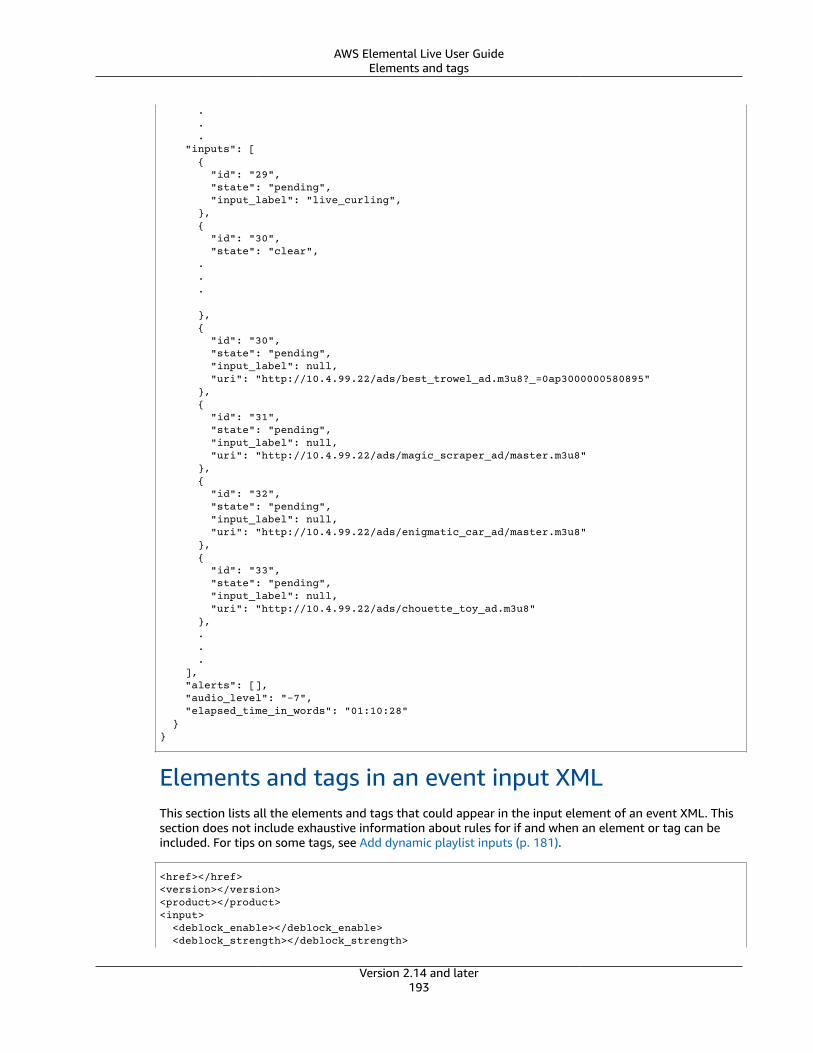
AWS Elemental Live User GuideElements and tags
. . . "inputs": [ { "id": "29", "state": "pending", "input_label": "live_curling", }, { "id": "30", "state": "clear", . . .
}, { "id": "30", "state": "pending", "input_label": null, "uri": "http://10.4.99.22/ads/best_trowel_ad.m3u8?_=0ap3000000580895" }, { "id": "31", "state": "pending", "input_label": null, "uri": "http://10.4.99.22/ads/magic_scraper_ad/master.m3u8" }, { "id": "32", "state": "pending", "input_label": null, "uri": "http://10.4.99.22/ads/enigmatic_car_ad/master.m3u8" }, { "id": "33", "state": "pending", "input_label": null, "uri": "http://10.4.99.22/ads/chouette_toy_ad.m3u8" }, . . . ], "alerts": [], "audio_level": "-7", "elapsed_time_in_words": "01:10:28" }}
Elements and tags in an event input XMLThis section lists all the elements and tags that could appear in the input element of an event XML. Thissection does not include exhaustive information about rules for if and when an element or tag can beincluded. For tips on some tags, see Add dynamic playlist inputs (p. 181).
<href></href><version></version><product></product><input> <deblock_enable></deblock_enable> <deblock_strength></deblock_strength>
Version 2.14 and later193

AWS Elemental Live User GuideElements and tags
<error_clear_time></error_clear_time> <failback_rule></failback_rule> <hot_backup_pair></hot_backup_pair> <input_label></input_label> <loop_source></loop_source> <name></name> <no_psi></no_psi> <order></order> <program_id></program_id> <service_name></service_name> <service_provider_name></service_provider_name> <image_inserter> <image_x></image_x> <image_y></image_y> <opacity></opacity> <image_inserter_input> <uri></uri> <username></username> <password></password> <interface></interface> </image_inserter_input> </image_inserter> <network_input> <enable_fec_rx></enable_fec_rx> <interface ></interface > <password></password> <quad></quad> <udp_igmp_source></udp_igmp_source> <uri></uri> <username></username> </network_input> <device_input> <channel></channel> <channel_type></channel_type> <device_id></device_id> <device_name></device_name> <device_number></device_number> <device_type></device_type> <input_format></input_format> <fec_settings> <udp_igmp_source></udp_igmp_source> <uri></uri> </fec_settings> <hdmi_settings> <input_format></input_format> </hdmi_settings> <sdi_settings> <input_format></input_format> <scte104_offset></scte104_offset> </sdi_settings> </device_input> <router_input> <input_number></input_number> <input_number_end></input_number_end> <quad></quad> <router_ip></router_ip> <router_type></router_type> </router_input> <file_input> <certificate_file></certificate_file> <interface></interface> <password></password> <uri></uri> <username></username> </file_input> <failover_condition>
Version 2.14 and later194
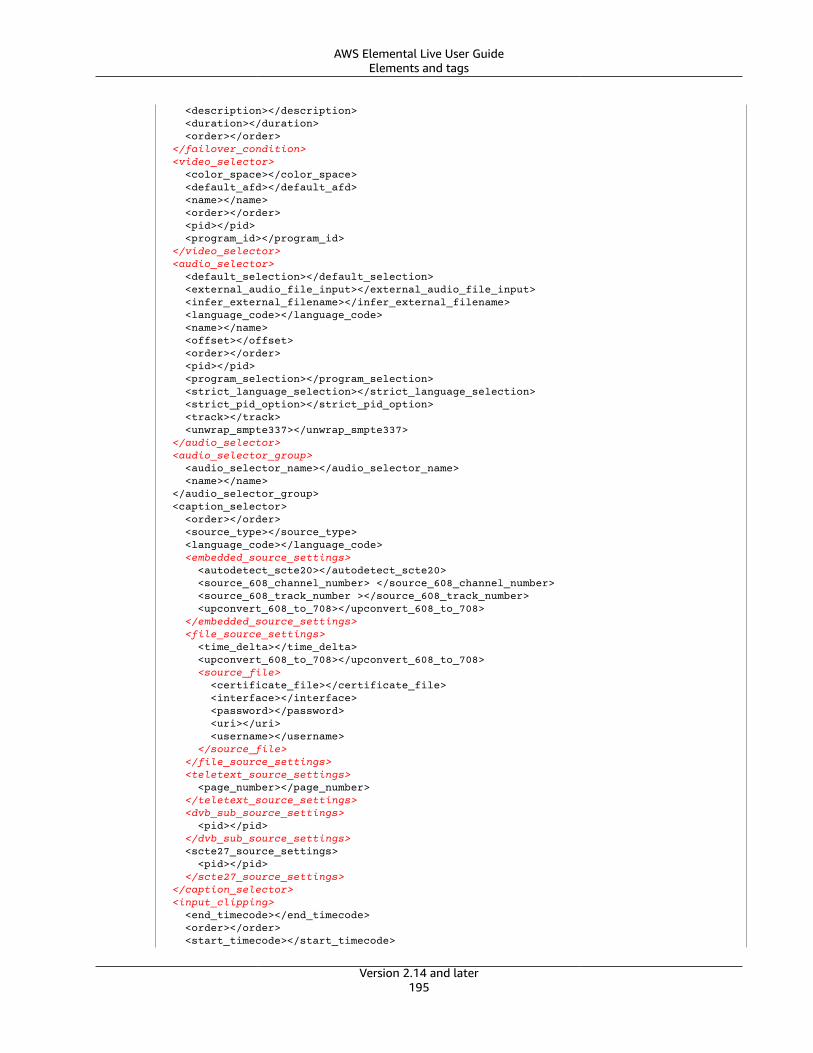
AWS Elemental Live User GuideElements and tags
<description></description> <duration></duration> <order></order> </failover_condition> <video_selector> <color_space></color_space> <default_afd></default_afd> <name></name> <order></order> <pid></pid> <program_id></program_id> </video_selector> <audio_selector> <default_selection></default_selection> <external_audio_file_input></external_audio_file_input> <infer_external_filename></infer_external_filename> <language_code></language_code> <name></name> <offset></offset> <order></order> <pid></pid> <program_selection></program_selection> <strict_language_selection></strict_language_selection> <strict_pid_option></strict_pid_option> <track></track> <unwrap_smpte337></unwrap_smpte337> </audio_selector> <audio_selector_group> <audio_selector_name></audio_selector_name> <name></name> </audio_selector_group> <caption_selector> <order></order> <source_type></source_type> <language_code></language_code> <embedded_source_settings> <autodetect_scte20></autodetect_scte20> <source_608_channel_number> </source_608_channel_number> <source_608_track_number ></source_608_track_number> <upconvert_608_to_708></upconvert_608_to_708> </embedded_source_settings> <file_source_settings> <time_delta></time_delta> <upconvert_608_to_708></upconvert_608_to_708> <source_file> <certificate_file></certificate_file> <interface></interface> <password></password> <uri></uri> <username></username> </source_file> </file_source_settings> <teletext_source_settings> <page_number></page_number> </teletext_source_settings> <dvb_sub_source_settings> <pid></pid> </dvb_sub_source_settings> <scte27_source_settings> <pid></pid> </scte27_source_settings> </caption_selector> <input_clipping> <end_timecode></end_timecode> <order></order> <start_timecode></start_timecode>
Version 2.14 and later195
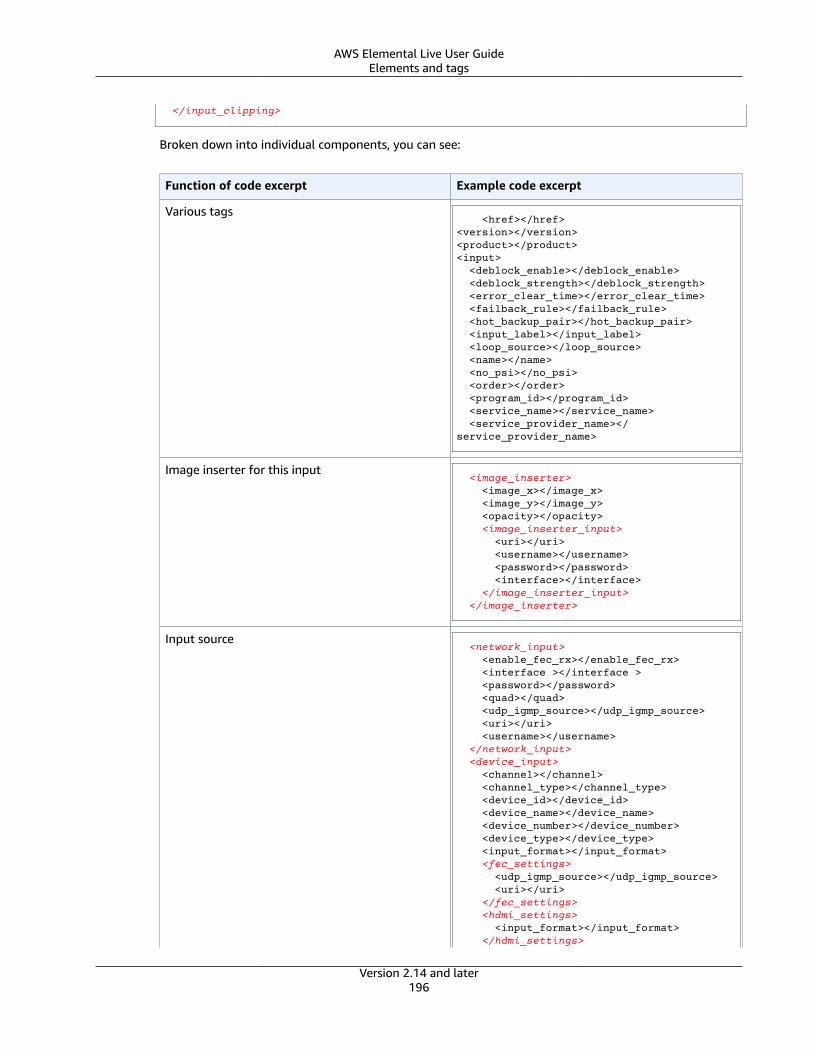
AWS Elemental Live User GuideElements and tags
</input_clipping>
Broken down into individual components, you can see:
Function of code excerpt Example code excerpt
Various tags <href></href><version></version><product></product><input> <deblock_enable></deblock_enable> <deblock_strength></deblock_strength> <error_clear_time></error_clear_time> <failback_rule></failback_rule> <hot_backup_pair></hot_backup_pair> <input_label></input_label> <loop_source></loop_source> <name></name> <no_psi></no_psi> <order></order> <program_id></program_id> <service_name></service_name> <service_provider_name></service_provider_name>
Image inserter for this input <image_inserter> <image_x></image_x> <image_y></image_y> <opacity></opacity> <image_inserter_input> <uri></uri> <username></username> <password></password> <interface></interface> </image_inserter_input> </image_inserter>
Input source <network_input> <enable_fec_rx></enable_fec_rx> <interface ></interface > <password></password> <quad></quad> <udp_igmp_source></udp_igmp_source> <uri></uri> <username></username> </network_input> <device_input> <channel></channel> <channel_type></channel_type> <device_id></device_id> <device_name></device_name> <device_number></device_number> <device_type></device_type> <input_format></input_format> <fec_settings> <udp_igmp_source></udp_igmp_source> <uri></uri> </fec_settings> <hdmi_settings> <input_format></input_format> </hdmi_settings>
Version 2.14 and later196
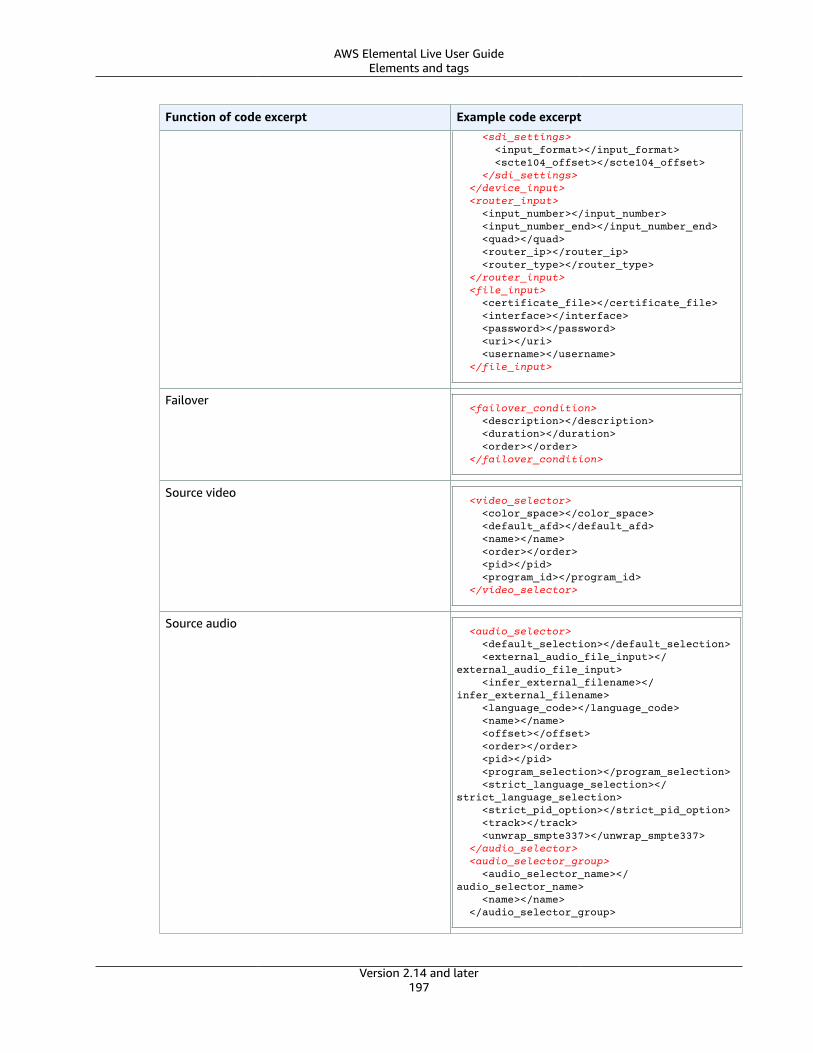
AWS Elemental Live User GuideElements and tags
Function of code excerpt Example code excerpt <sdi_settings> <input_format></input_format> <scte104_offset></scte104_offset> </sdi_settings> </device_input> <router_input> <input_number></input_number> <input_number_end></input_number_end> <quad></quad> <router_ip></router_ip> <router_type></router_type> </router_input> <file_input> <certificate_file></certificate_file> <interface></interface> <password></password> <uri></uri> <username></username> </file_input>
Failover <failover_condition> <description></description> <duration></duration> <order></order> </failover_condition>
Source video <video_selector> <color_space></color_space> <default_afd></default_afd> <name></name> <order></order> <pid></pid> <program_id></program_id> </video_selector>
Source audio <audio_selector> <default_selection></default_selection> <external_audio_file_input></external_audio_file_input> <infer_external_filename></infer_external_filename> <language_code></language_code> <name></name> <offset></offset> <order></order> <pid></pid> <program_selection></program_selection> <strict_language_selection></strict_language_selection> <strict_pid_option></strict_pid_option> <track></track> <unwrap_smpte337></unwrap_smpte337> </audio_selector> <audio_selector_group> <audio_selector_name></audio_selector_name> <name></name> </audio_selector_group>
Version 2.14 and later197
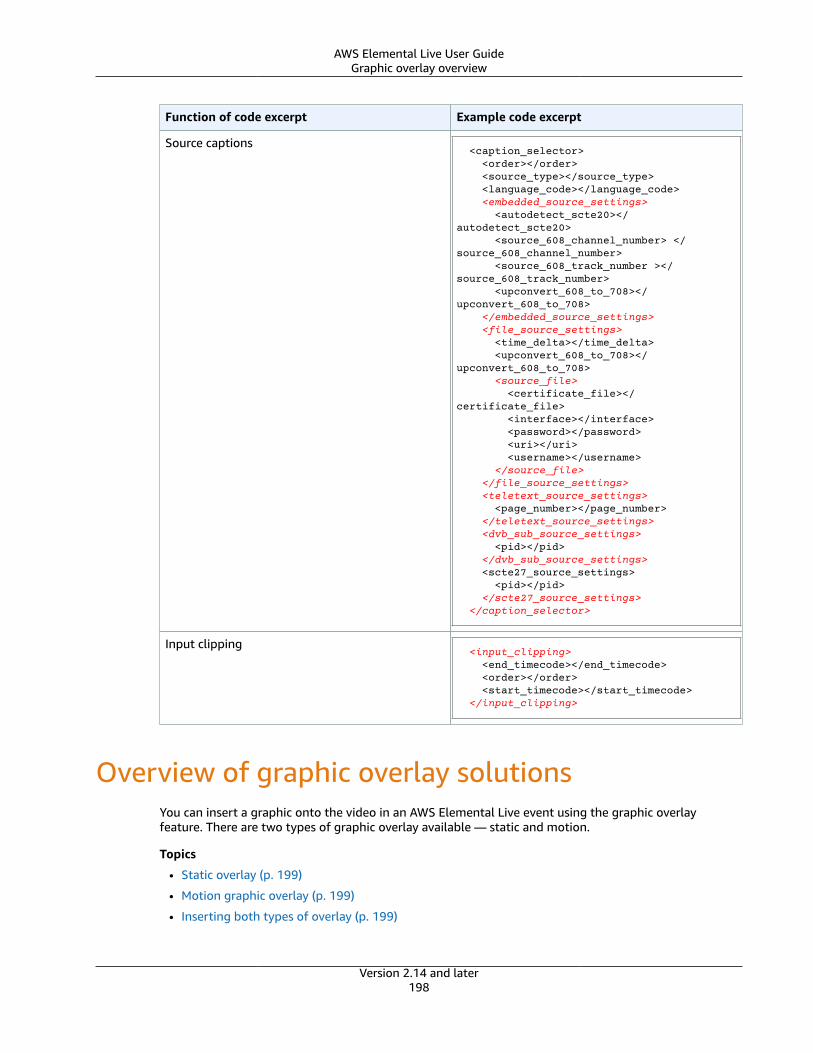
AWS Elemental Live User GuideGraphic overlay overview
Function of code excerpt Example code excerpt
Source captions <caption_selector> <order></order> <source_type></source_type> <language_code></language_code> <embedded_source_settings> <autodetect_scte20></autodetect_scte20> <source_608_channel_number> </source_608_channel_number> <source_608_track_number ></source_608_track_number> <upconvert_608_to_708></upconvert_608_to_708> </embedded_source_settings> <file_source_settings> <time_delta></time_delta> <upconvert_608_to_708></upconvert_608_to_708> <source_file> <certificate_file></certificate_file> <interface></interface> <password></password> <uri></uri> <username></username> </source_file> </file_source_settings> <teletext_source_settings> <page_number></page_number> </teletext_source_settings> <dvb_sub_source_settings> <pid></pid> </dvb_sub_source_settings> <scte27_source_settings> <pid></pid> </scte27_source_settings> </caption_selector>
Input clipping <input_clipping> <end_timecode></end_timecode> <order></order> <start_timecode></start_timecode> </input_clipping>
Overview of graphic overlay solutionsYou can insert a graphic onto the video in an AWS Elemental Live event using the graphic overlayfeature. There are two types of graphic overlay available — static and motion.
Topics
• Static overlay (p. 199)
• Motion graphic overlay (p. 199)
• Inserting both types of overlay (p. 199)
Version 2.14 and later198
AWS Elemental Live User GuideStatic overlay
Static overlayThe static overlay feature lets you insert an image on the video at a specified time and to display it for aspecified duration.
The static overlay can be a BMP, PNG, or TGA file.
You can insert up to eight overlays through the web interface and any number of overlays through theREST interface. The overlays are all independent of each other, which means that they can be set up toall appear on the underlying video at the same time (or not), and they can be set up to physically overlapeach other (or not). This feature includes fade-in/fade-out capability and opacity.
For more information, see the section called “Graphic overlay: Static overlay” (p. 240).
Motion graphic overlayThe motion graphic overlay feature lets you insert one animated overlay on the underlying video at aspecified time for a specified duration.
You set up one overlay for the event. When the event is running, you use the REST interface to modifythe start time of the single overlay, and to change the content. In this way, you achieve the effect ofseveral motion overlays played at different times in the event.
You can insert an animation in one of the following ways:
• HTML Files – You can use an HTML asset that you are continually publishing to a location outsideof AWS Elemental Live, and insert the asset into the video as an overlay. Use one of the followingmethods to control when the image appears:
• You can let the authoring system control everything.
• You can enter REST API commands to show or hide the image.
• Your content provider can insert SCTE-35 messages to show and hide the image.
• MOV Files – Using a .mov file is a straightforward way to insert an animation onto the video of yourevent. You provide the file and set up your event to use it.
• Series of PNG Files – You can specify a series of .png files to be inserted one after the other to createan animation.
• SWF Files – In .swf files, you can optionally include Adobe ActionScript code that sends a series ofcommands at a specified time to manipulate the underlying video to provide special effects. You canchange the content of the .swf animation during a running AWS Elemental Live event by passingarguments to the ActionScript code via the AWS Elemental Live REST interface. A typical use case isdisplaying a scoreboard whose content is dynamically refreshed in response to changing scores overthe course of a game. SWF files tend to use more system resources than .mov files. Only use .swf ifyou need a special effect that is available only with that format, such as squeezeback of the underlyingvideo. For information on optimizing your .swf file to run well with AWS Elemental Live, see thesection called “Tips for using SWF” (p. 236).
For more information, see the section called “Graphic overlay: Motion overlay” (p. 200).
Inserting both types of overlayYou can insert both static overlays and one motion overlay onto the underlying video.
Version 2.14 and later199

AWS Elemental Live User GuideGraphic overlay: Motion overlay
Motion graphic overlayYou can insert one asset into the event so that you can use it as a motion overlay on all the videooutputs.
You can set up the event to use one of the following assets:
• An HTML5 asset• A .mov file• A .swf (Shockwave Flash) file• A set of ordered still .png files as assets for motion image overlays
The motion overlay will always be inserted in all outputs in the event.
The motion overlay will be burned into the video after decoding and input-specific processing, andbefore encoding and creation of individual streams and outputs.
License requirement
To include a motion overlay in any event, the software installed on the AWS Elemental Live appliancemust include the motion graphics license.
Topics• How to insert a motion overlay with HTML5 (p. 200)• How to insert a motion overlay with QuickTime MOV (p. 205)• How to insert a motion overlay with a set of PNG files (p. 215)• How to insert a motion overlay with a set of SWF files (p. 225)
How to insert a motion overlay with HTML5You can use an HTML5 asset for the motion image overlay. The overlay could be an animated overlaysuch as a sports scoreboard, a stock price ticker tape, or the current time and temperature. You use anHTML5 authoring system to create and publish an HTML asset. This system usually has an authoringcomponent that lets you create the overlay content, and a control component that lets you control howand when the overlay is visible.
You configure the AWS Elemental Live event with all the information about the motion overlay, includingthe location of the asset. After the event starts, AWS Elemental Live pulls the asset that is beingpublished, and includes the overlay in the video, when appropriate. AWS Elemental Live doesn't provideany features for manipulating the content or position of the overlay.
Topics• Step A: Choose the method for show/hide (p. 200)• Step B: Prepare the HTML5 asset (p. 201)• Step C: Set up the event (p. 202)• Step D: Showing and hiding the motion overlay (p. 205)
Step A: Choose the method for show/hideYou must speak to the operator of the authoring system and decide how the overlay will be controlled.There are several options.
Version 2.14 and later200

AWS Elemental Live User GuideHTML5
Authoring system control
The authoring system might set up the asset so that it controls how and when the motion overlayappears. In the output video, the overlay is always present, but sometimes it contains no content. Forexample, the authoring system might set up so that when the motion overlay shouldn't appear on thevideo, the overlay is present but contains no content (it is transparent).
Your role is to set up in AWS Elemental Live so that the event shows the overlay as soon as the eventstarts. You never hide the overlay. You (the AWS Elemental Live operator) don't have to coordinate withthe operator of the authoring system.
It is the job of the authoring system to make sure that the asset shows content sometimes and appearsas transparent (no content) at other times.
REST API control
The authoring system might set up the asset with the expectation that you (the AWS Elemental Liveoperator) will show and hide the overlay at the appropriate times.
AWS Elemental Live is always pulling the asset from the authoring system.
Your role is to enter REST API commands to show and hide the overlay. You (the AWS Elemental Liveoperator) and the operator of the authoring system must coordinate the schedule for showing overlays.
SCTE 35 control
The authoring system might set up the asset with the expectation that the source content includesspecific SCTE 35 messages that AWS Elemental Live reads to know when to show or hide the overlay.
You have no role in showing or hiding the overlay.
Instead, the overlay is controlled as follows. AWS Elemental Live is always pulling the asset from theauthoring system. In addition, AWS Elemental Live automatically shows or hides the overlay when itencounters the SCTE 35 messages.
To use this method, the content must already contain the appropriate SCTE 35 messages. You can't useAWS Elemental Live to insert these messages.
The authoring system, the content provider (who must insert the SCTE 35 messages in the content), andyou (the AWS Elemental Live operator) must coordinate the SCTE 35 messages and the schedule.
AWS Elemental Live reacts to well-formed SCTE 35 messages of type time_signal. The message mustinclude the following tags:
• segmentation_type_id: Provider Overlay Placement Opportunity Start (0x38) or Provider OverlayPlacement Opportunity End (type 0x39).
• segmentation_duration_flag: true or false• segmentation_duration: Must be included if the segmentation_duration_flag is true.
Step B: Prepare the HTML5 assetYou use an authoring system to create the asset and to manage the content, including implementationof features such as fade or opacity.
1. Choose an authoring system and create the asset – Use the authoring system to create the asset. TheHTML5 content must meet these requirements:
• It can be any HTML5 authoring system that uses standard browser-based rendering techniques.• It can use any HTML5 tags except video and audio.
Version 2.14 and later201
AWS Elemental Live User GuideHTML5
• It can incorporate javascript that interacts with a backend system to dynamically control the assetthat is being published to the source URL. You should size the content to be the same size orsmaller than the width and height of the largest video rendition in your channel. You might wantto use responsive HTML (HTML that resizes automatically to different frame sizes).
See the list after this procedure for more guidelines for preparing the asset.2. Make a note of the URL of the asset. This URL must be accessible to AWS Elemental Live.3. If the location of the motion graphics asset requires login in order for AWS Elemental Live to
download the asset, make a note of the user name and password.
Supported authoring features
The asset can include features that are supported in Chrome version 84.0.4147.125. If you includefeatures that are supported only in a later version, the asset might not render properly in AWS ElementalLive.
CPU requirements
An HTML5 asset increases CPU utilization for each enabled event by up to 20%, depending oncomplexity of the asset. For example, if your event currently uses 30% of CPU (without HTML5 motiongraphics), it might use approximately 36% with HTML5 motion graphics.
Resolution
AWS Elemental Live renders the asset to match full-frame for the resolution of the first video input. Ifthe input resolution changes during the event, AWS Elemental Live will continue to render at the initialresolution, but will scale up or down to match the asset's new resolution.
We recommend that you set up the asset to have the same pixel ratio as the video. The resolution of theasset can change through the life of the event, but its ratio shouldn't change.
Color space
If you set up the event to convert the color space (p. 56) of the video, AWS Elemental Live will convertthe asset in the same way. For example, it will convert the color space to HDR10. To perform thisconversion, AWS Elemental Live will assume that the asset color space is SDR.
Step C: Set up the eventYou configure the event with all the information about the motion overlay. After you start the event, youwon't be able to change any information about the motion overlay. You can only show or hide it.
You can configure the information using the web interface or the REST API.
Using the web interface
To configure the event using the web interface
1. Obtain the asset URL and user credentials (if required) from the administrator of the authoringsystem that is publishing the HTML5 asset.
2. In the Global Processors section, go to the Image Inserter field and choose On. More fields appear.3. Complete these fields:
• Insertion Mode: Choose HTML.• Input: Enter the location of the HTML5 asset.
If access to your local or mounted directory requires authentication, enter the user name andpassword.
Version 2.14 and later202
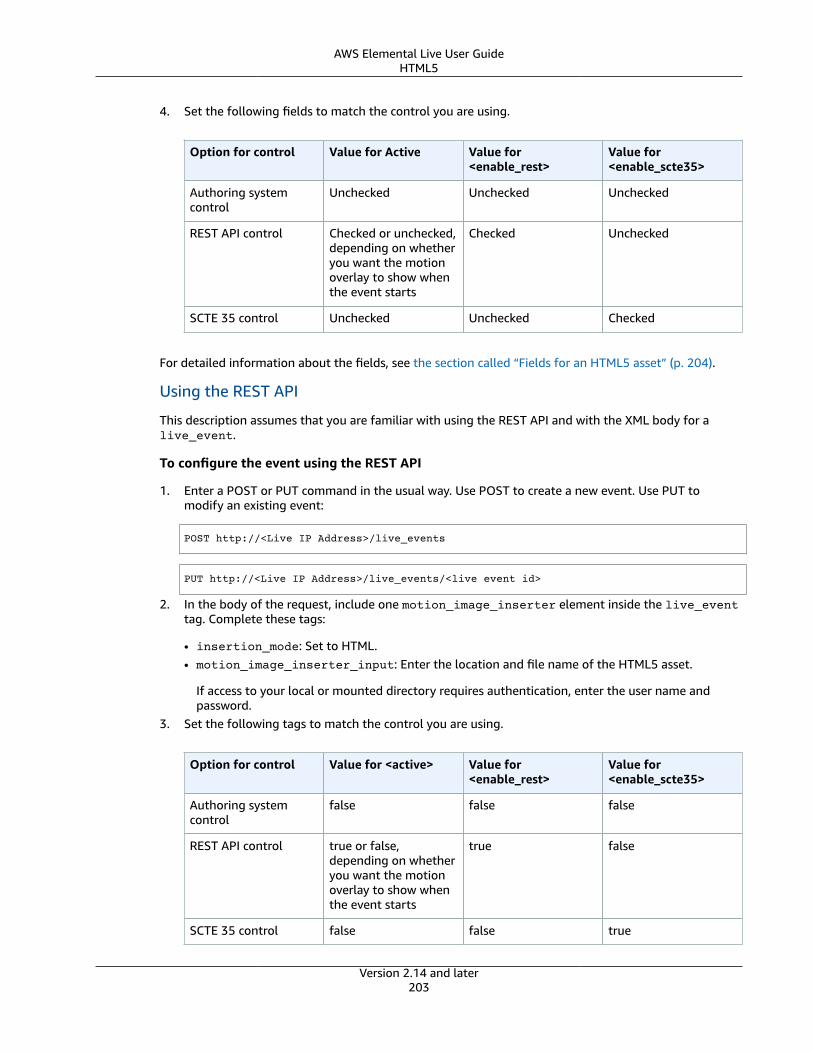
AWS Elemental Live User GuideHTML5
4. Set the following fields to match the control you are using.
Option for control Value for Active Value for<enable_rest>
Value for<enable_scte35>
Authoring systemcontrol
Unchecked Unchecked Unchecked
REST API control Checked or unchecked,depending on whetheryou want the motionoverlay to show whenthe event starts
Checked Unchecked
SCTE 35 control Unchecked Unchecked Checked
For detailed information about the fields, see the section called “Fields for an HTML5 asset” (p. 204).
Using the REST API
This description assumes that you are familiar with using the REST API and with the XML body for alive_event.
To configure the event using the REST API
1. Enter a POST or PUT command in the usual way. Use POST to create a new event. Use PUT tomodify an existing event:
POST http://<Live IP Address>/live_events
PUT http://<Live IP Address>/live_events/<live event id>
2. In the body of the request, include one motion_image_inserter element inside the live_eventtag. Complete these tags:
• insertion_mode: Set to HTML.• motion_image_inserter_input: Enter the location and file name of the HTML5 asset.
If access to your local or mounted directory requires authentication, enter the user name andpassword.
3. Set the following tags to match the control you are using.
Option for control Value for <active> Value for<enable_rest>
Value for<enable_scte35>
Authoring systemcontrol
false false false
REST API control true or false,depending on whetheryou want the motionoverlay to show whenthe event starts
true false
SCTE 35 control false false true
Version 2.14 and later203
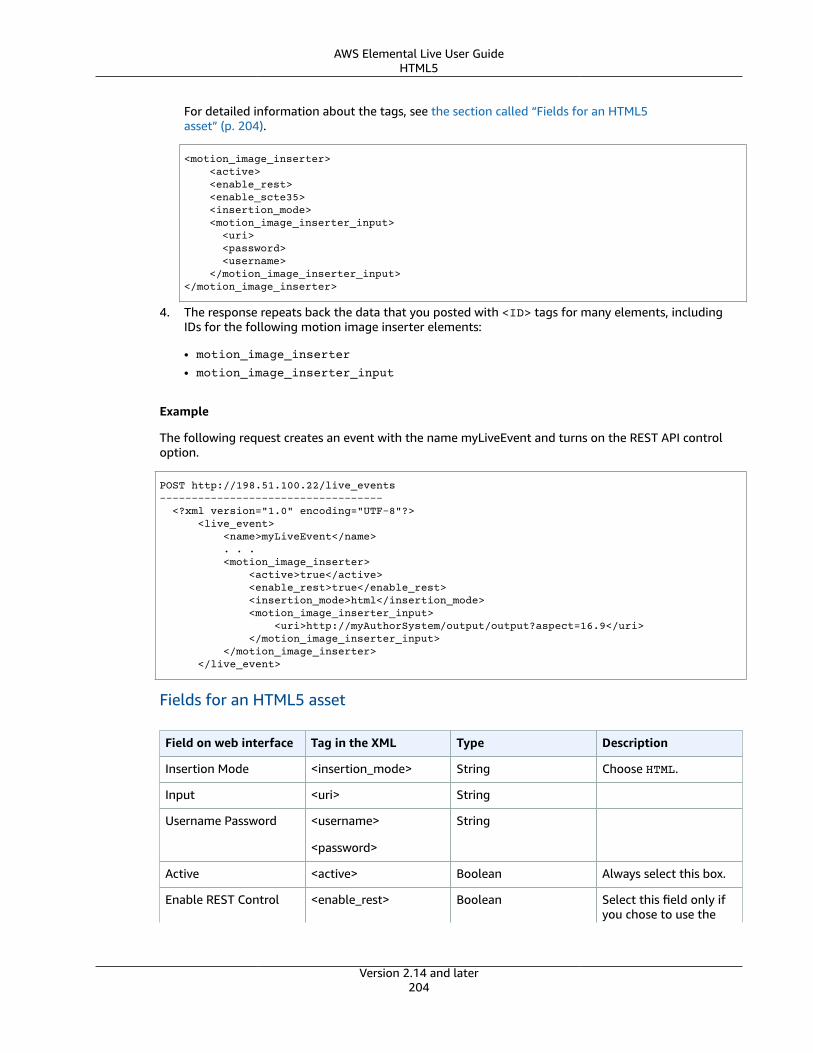
AWS Elemental Live User GuideHTML5
For detailed information about the tags, see the section called “Fields for an HTML5asset” (p. 204).
<motion_image_inserter> <active> <enable_rest> <enable_scte35> <insertion_mode> <motion_image_inserter_input> <uri> <password> <username> </motion_image_inserter_input></motion_image_inserter>
4. The response repeats back the data that you posted with <ID> tags for many elements, includingIDs for the following motion image inserter elements:
• motion_image_inserter
• motion_image_inserter_input
Example
The following request creates an event with the name myLiveEvent and turns on the REST API controloption.
POST http://198.51.100.22/live_events----------------------------------- <?xml version="1.0" encoding="UTF-8"?> <live_event> <name>myLiveEvent</name> . . . <motion_image_inserter> <active>true</active> <enable_rest>true</enable_rest> <insertion_mode>html</insertion_mode> <motion_image_inserter_input> <uri>http://myAuthorSystem/output/output?aspect=16.9</uri> </motion_image_inserter_input> </motion_image_inserter> </live_event>
Fields for an HTML5 asset
Field on web interface Tag in the XML Type Description
Insertion Mode <insertion_mode> String Choose HTML.
Input <uri> String
Username Password <username>
<password>
String
Active <active> Boolean Always select this box.
Enable REST Control <enable_rest> Boolean Select this field only ifyou chose to use the
Version 2.14 and later204
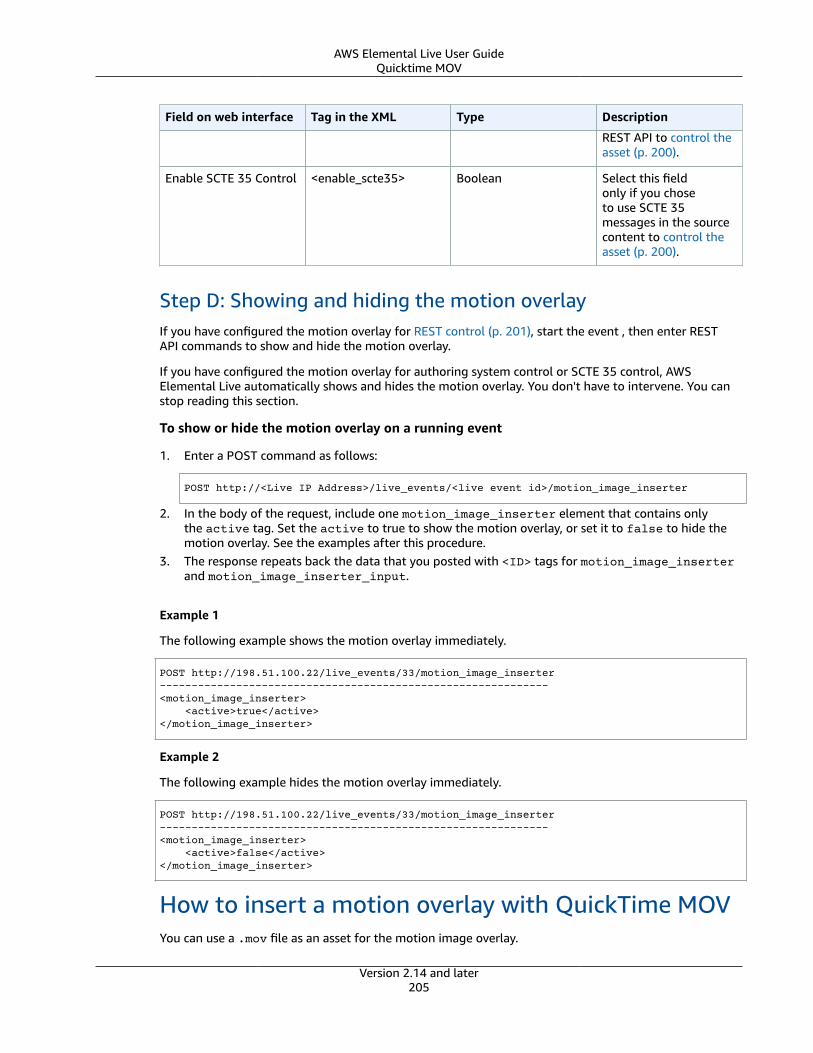
AWS Elemental Live User GuideQuicktime MOV
Field on web interface Tag in the XML Type Description
REST API to control theasset (p. 200).
Enable SCTE 35 Control <enable_scte35> Boolean Select this fieldonly if you choseto use SCTE 35messages in the sourcecontent to control theasset (p. 200).
Step D: Showing and hiding the motion overlayIf you have configured the motion overlay for REST control (p. 201), start the event , then enter RESTAPI commands to show and hide the motion overlay.
If you have configured the motion overlay for authoring system control or SCTE 35 control, AWSElemental Live automatically shows and hides the motion overlay. You don't have to intervene. You canstop reading this section.
To show or hide the motion overlay on a running event
1. Enter a POST command as follows:
POST http://<Live IP Address>/live_events/<live event id>/motion_image_inserter
2. In the body of the request, include one motion_image_inserter element that contains onlythe active tag. Set the active to true to show the motion overlay, or set it to false to hide themotion overlay. See the examples after this procedure.
3. The response repeats back the data that you posted with <ID> tags for motion_image_inserterand motion_image_inserter_input.
Example 1
The following example shows the motion overlay immediately.
POST http://198.51.100.22/live_events/33/motion_image_inserter-------------------------------------------------------------<motion_image_inserter> <active>true</active></motion_image_inserter>
Example 2
The following example hides the motion overlay immediately.
POST http://198.51.100.22/live_events/33/motion_image_inserter-------------------------------------------------------------<motion_image_inserter> <active>false</active></motion_image_inserter>
How to insert a motion overlay with QuickTime MOVYou can use a .mov file as an asset for the motion image overlay.
Version 2.14 and later205
AWS Elemental Live User GuideQuicktime MOV
Here are some examples of how motion image overlay works with a MOV file:
• Example 1: “Coming up” motion overlay – You want to insert an asset that will run as a 10-secondmotion overlay 59 minutes into the runtime of the event. You want the motion overlay to be placed inthe lower right corner of the video frame.
• Example 2: Animated corporate logo – You want to insert an asset and run it every 5 minutes, starting20 minutes into the runtime of the event. You specify the single asset in the event and specify thefirst runtime. You start the event and, after the motion overlay has run once, you send a REST APIcommand to modify the start time of the asset to a new time. You repeat this command (each timewith a new start time) as many times as you want.
Typically, you set up the event as follows:
• You prepare a MOV file and store it at a location that is accessible to AWS Elemental Live.
• You configure the event with the location URL and start time of the first motion overlay you want torun, with position and size information, and with an instruction to run the motion overlay once or toloop it. You set up the motion overlay to be active when the event starts, and you enable control viathe REST API.
• When you're ready, you start the event. The motion overlay configured in the event runs at thespecified time. You then enter REST API commands to specify different content (a different URL),a start time, and a new position and size. After that motion overlay plays, you can enter anothercommand to run different content, as required, for the duration of the event.
Step A: Prepare the MOV asset1. Create a file – Use a third-party process to create a MOV file encoded with Apple QuickTime
Run Length Encoding. Other codecs in the MOV container are not supported. Take care with thefollowing settings:
• Aspect ratio: The motion overlay can have any aspect ratio. It does not have to match the aspectratio of the video output.
• Frame rate: The frame rate of the motion overlay asset must match the frame rate of theunderlying video.
• Size: The motion overlay can be any size, in pixels, up to the size of the underlying video. Themotion overlay must be prepared in the desired size; there is no way to resize it when setting it upin the event.
• Position: The motion overlay cannot be positioned so that part of the motion overlay runs beyondthe right edge or bottom edge of the underlying video.
• If you set up a motion overlay so that it is too big or it overruns and AWS Elemental Live canidentify this error at event creation time, then an error message will appear.
• If AWS Elemental Live cannot identify the error in advance, an error message will appear whilethe event is running. The event will not stop but the insertion request will fail.
2. Place the file – Place the MOV file in a location accessible to the AWS Elemental Live: on a localdirectory, on a remote filesystem accessible via mount point, or in an Amazon S3 bucket.
You can specify the location in one of the following ways:
• Local to the AWS Elemental Live appliance. For example, /data/assets/motion overlay.mov
• A remote server via a mount point. For example, /data/mnt/assets/motion overlay.mov
• An Amazon S3 bucket, using SSL. For example, Amazon S3ssl://company.test/DOC-EXAMPLE-BUCKET/motion overlay.mov
• An Amazon S3 bucket, without SSL. For example, S3://company.test/DOC-EXAMPLE-BUCKET/motion overlay.mov
Version 2.14 and later206
AWS Elemental Live User GuideQuicktime MOV
Step B: Set up the eventYou configure the event with information about the first motion overlay. You can configure thisinformation when creating an event. Or you can change the existing motion overlay configuration on anon-running event. You can configure the information using the web interface or the REST API.
Topics• Using the web interface (p. 207)• Using the REST API (p. 207)• Fields for a MOV asset (p. 209)
Using the web interface
To configure the event using the web interface
1. In the Global Processors section, go to the Image Inserter field and choose On. More fields appear.2. Complete the fields. You can configure some or all the information in the non-running event, but
you must at least set the following fields:
• Insertion Mode• Enable REST Control
You must also configure the motion overlay behavior when the event first starts:
• If you want the motion overlay to appear as soon as the event starts, specify all the fields. Makesure that you check Active, and make sure that you leave the Action Time empty.
• If you don't want the motion overlay to appear as soon as the event starts, leave Activeunchecked.
You can configure the remaining fields after you've started the event, when you want to run the firstmotion overlay.
For detailed information about the fields, see the section called “Fields for a MOV asset” (p. 209).
Using the REST API
This description assumes that you are familiar with using the REST API and with the XML body for alive_event.
To configure the event using the REST API
1. Enter a POST or PUT command in the usual way. Use POST to create a new event. Use PUT tomodify an existing event:
POST http://<Live IP Address>/live_events
PUT http://<Live IP Address>/live_events/<live event id>
2. In the body of the request, include one motion_image_inserter element inside thelive_event tag. The XML is structured as follows.
You can configure some or all the information in the non-running event, but you must at least setthe following tags:
Version 2.14 and later207
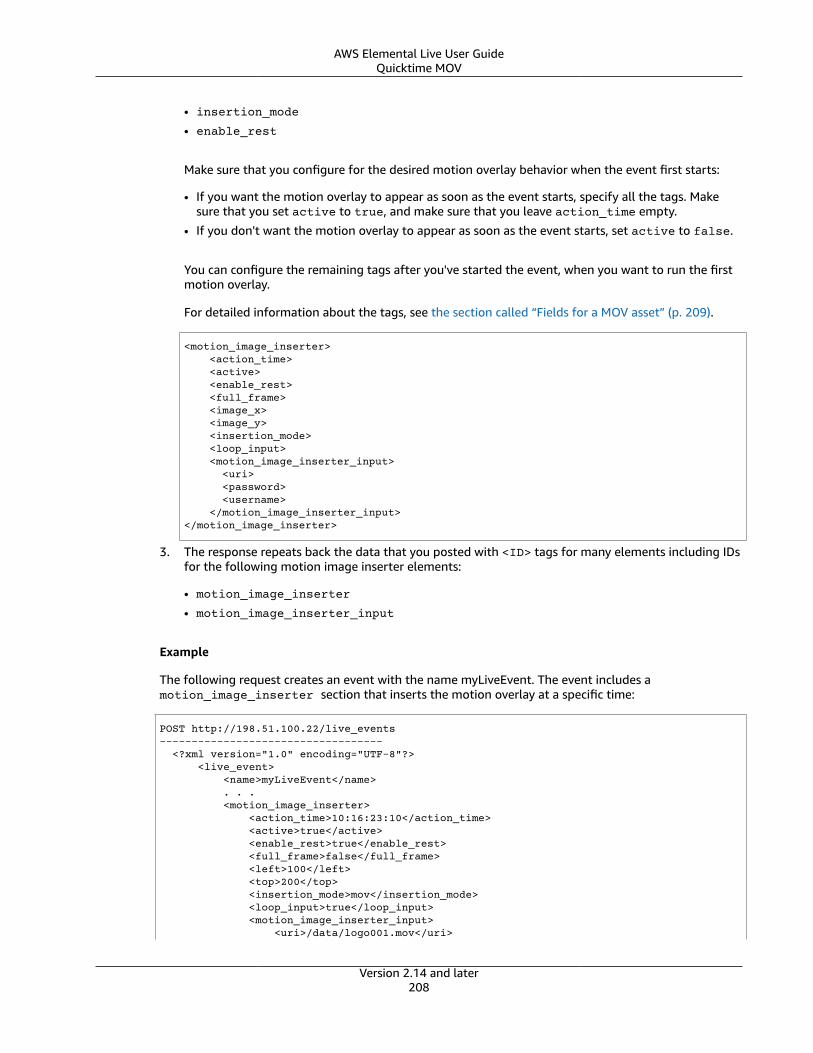
AWS Elemental Live User GuideQuicktime MOV
• insertion_mode
• enable_rest
Make sure that you configure for the desired motion overlay behavior when the event first starts:
• If you want the motion overlay to appear as soon as the event starts, specify all the tags. Makesure that you set active to true, and make sure that you leave action_time empty.
• If you don't want the motion overlay to appear as soon as the event starts, set active to false.
You can configure the remaining tags after you've started the event, when you want to run the firstmotion overlay.
For detailed information about the tags, see the section called “Fields for a MOV asset” (p. 209).
<motion_image_inserter> <action_time> <active> <enable_rest> <full_frame> <image_x> <image_y> <insertion_mode> <loop_input> <motion_image_inserter_input> <uri> <password> <username> </motion_image_inserter_input></motion_image_inserter>
3. The response repeats back the data that you posted with <ID> tags for many elements including IDsfor the following motion image inserter elements:
• motion_image_inserter
• motion_image_inserter_input
Example
The following request creates an event with the name myLiveEvent. The event includes amotion_image_inserter section that inserts the motion overlay at a specific time:
POST http://198.51.100.22/live_events----------------------------------- <?xml version="1.0" encoding="UTF-8"?> <live_event> <name>myLiveEvent</name> . . . <motion_image_inserter> <action_time>10:16:23:10</action_time> <active>true</active> <enable_rest>true</enable_rest> <full_frame>false</full_frame> <left>100</left> <top>200</top> <insertion_mode>mov</insertion_mode> <loop_input>true</loop_input> <motion_image_inserter_input> <uri>/data/logo001.mov</uri>
Version 2.14 and later208
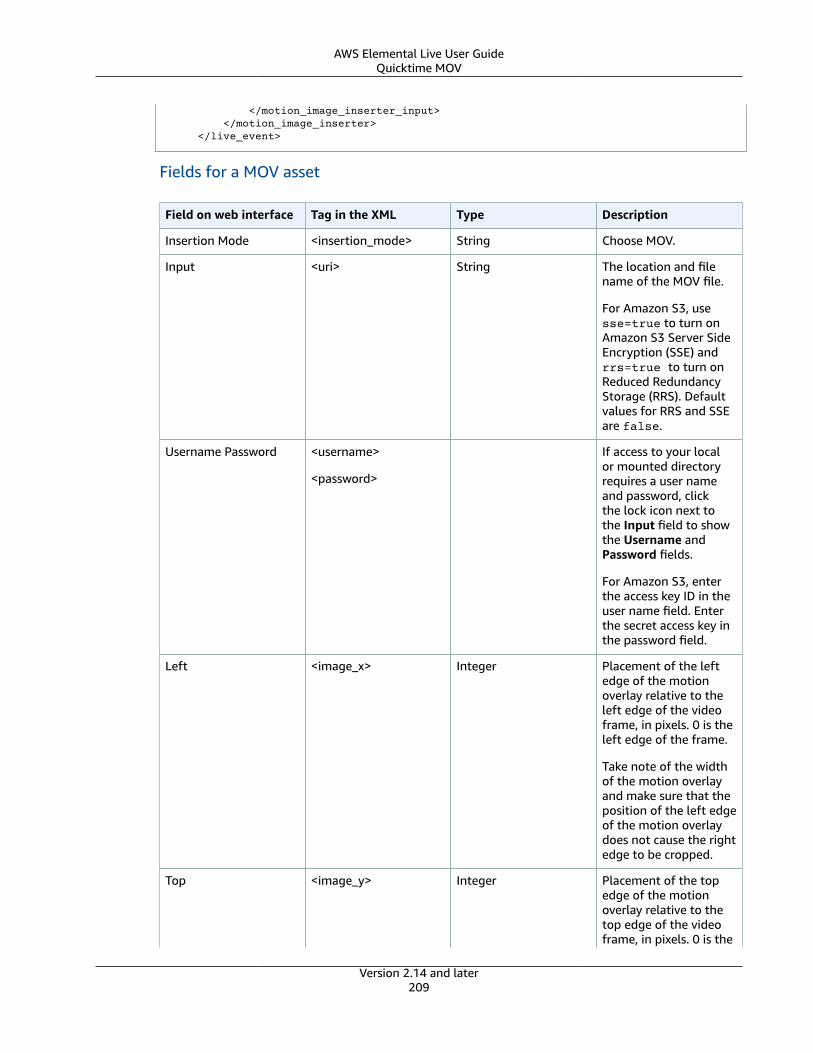
AWS Elemental Live User GuideQuicktime MOV
</motion_image_inserter_input> </motion_image_inserter> </live_event>
Fields for a MOV asset
Field on web interface Tag in the XML Type Description
Insertion Mode <insertion_mode> String Choose MOV.
Input <uri> String The location and filename of the MOV file.
For Amazon S3, usesse=true to turn onAmazon S3 Server SideEncryption (SSE) andrrs=true to turn onReduced RedundancyStorage (RRS). Defaultvalues for RRS and SSEare false.
Username Password <username>
<password>
If access to your localor mounted directoryrequires a user nameand password, clickthe lock icon next tothe Input field to showthe Username andPassword fields.
For Amazon S3, enterthe access key ID in theuser name field. Enterthe secret access key inthe password field.
Left <image_x> Integer Placement of the leftedge of the motionoverlay relative to theleft edge of the videoframe, in pixels. 0 is theleft edge of the frame.
Take note of the widthof the motion overlayand make sure that theposition of the left edgeof the motion overlaydoes not cause the rightedge to be cropped.
Top <image_y> Integer Placement of the topedge of the motionoverlay relative to thetop edge of the videoframe, in pixels. 0 is the
Version 2.14 and later209

AWS Elemental Live User GuideQuicktime MOV
Field on web interface Tag in the XML Type Description
top edge of the frame.Default 0.
Take note of the heightof the motion overlayand make sure thatthe position of the topedge of the motionoverlay does not causethe bottom edge to becropped.
ActionTime <action_time> String The start time for themotion overlay. Specifythe start time in one ofthe formats discussedin detail below thistable.
Loop Input <loop_input> Boolean • Select to loop themotion overlayindefinitely.
The motion overlaywill run until theevent ends. Tostop the motionoverlay earlier, seethe section called“Step C: Manage atruntime” (p. 212).
• Clear the check boxto run the motionoverlay only once.
Version 2.14 and later210
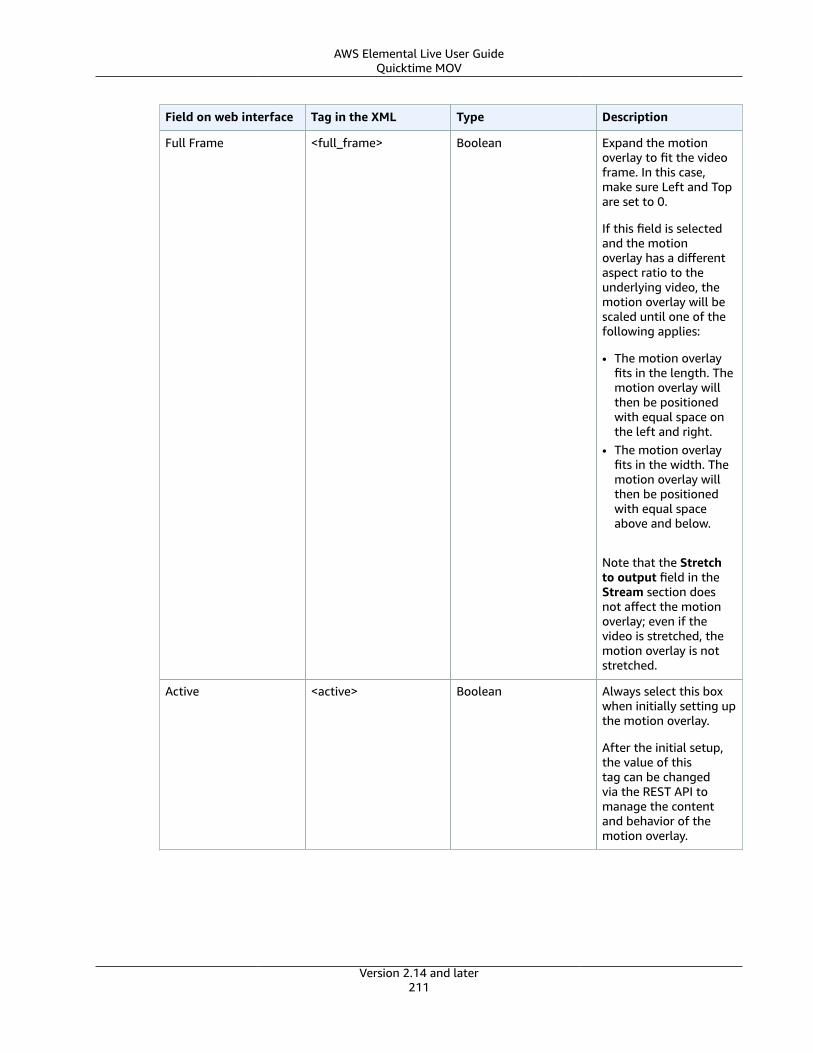
AWS Elemental Live User GuideQuicktime MOV
Field on web interface Tag in the XML Type Description
Full Frame <full_frame> Boolean Expand the motionoverlay to fit the videoframe. In this case,make sure Left and Topare set to 0.
If this field is selectedand the motionoverlay has a differentaspect ratio to theunderlying video, themotion overlay will bescaled until one of thefollowing applies:
• The motion overlayfits in the length. Themotion overlay willthen be positionedwith equal space onthe left and right.
• The motion overlayfits in the width. Themotion overlay willthen be positionedwith equal spaceabove and below.
Note that the Stretchto output field in theStream section doesnot affect the motionoverlay; even if thevideo is stretched, themotion overlay is notstretched.
Active <active> Boolean Always select this boxwhen initially setting upthe motion overlay.
After the initial setup,the value of thistag can be changedvia the REST API tomanage the contentand behavior of themotion overlay.
Version 2.14 and later211
AWS Elemental Live User GuideQuicktime MOV
Field on web interface Tag in the XML Type Description
Enable REST Control <enable_rest> Boolean Check this field onlyif you plan to managemotion overlays viathe REST API, after thisinitial setup via the webinterface. Typically, youwill want this tag to betrue.
Action time formats
Option 1: Timecode format (HH:MM:SS:FF).
The value to enter for HH:MM:SS:FF depends on the method used to calculate the output timecode. Thismethod is specified in the Timecode Config > Source field. Identify the Source method set for yourevent, then set the action time to match the timecode of the frame where you want the action to occur.
• If Source is Embedded: The output timecode is extracted from the timecode that is carried with theinput media. That timecode becomes the output timecode for the first transcoded frame. Then theoutput timecode counts up with each successive frame in the entire output. For example, 10:24:25:20,10:24:25:21, and so on.
• If Source is Start at 0: The output timecode for the first frame is 00:00:00:00 and then the outputtimecode counts up with each successive frame in the entire output. For example, 00:00:00;01:00;00:00:02, and so on.
• If Source is System Clock or Local System Clock: The output timecode for the first frame is the systemtime at which the frame is decoded. Then the output timecode counts up with each successive framein the entire output. For example, if the first frame is decoded at 09:45:51, then that timecode is09:45:51:01. The timecode for the next frame is 09:45:51:02, and so on.
• If Source is Specified Start: The output timecode for the first frame is the time you specified when youselected this option as the timecode source. Then the output timecode counts up with each successiveframe in the entire output. For example, if you set the time to 15:30;00, then the timecode for the firstframe is 15;30:00:01, and so on.
• If Source is External Reference Connector: The timecode is extracted from external LTC source. Thattimecode becomes the output timecode for the first transcoded frame. Then the output timecodecounts up with each successive frame in the entire output. For example, the timecode for the firstframe is 20:03:19:01, then 20:03:19:01, and so on.
Option 2: ISO 8601 UTC time with no dashes or colons. For example, 20160102T030405.678Z. In thiscase, the start time for every motion overlay will be the UTC time.
Option 3: You can only use this option while adding or modifying a motion overlay in a running event.Set the action_time tag to an empty string to set the start time to “now”. With this option, the starttime is never exact. You cannot use this option when creating an event or modifying a non-runningevent.
Step C: Manage the motion overlay on a running eventAfter the event starts, the motion overlay that is configured in the event runs at the specified time. Whenthe event is running, you can work with the motion overlay only via the REST API. You can enter RESTAPI commands to make the following changes:
• A different URL, to specify different content.• A start time, the new position and size, and the specified loop behavior.
Version 2.14 and later212
AWS Elemental Live User GuideQuicktime MOV
NoteCommands sent during an event change the event XML. Therefore, if you export the XML andcreate a new event with it, the new event will have any motion overlays set up as they were setduring the course of the event, not as they were when the event was created.
To modify the motion overlay on a running event
1. Decide which fields you want to modify. For information on the types of changes that you can make,see the table later in this section (p. 213).
2. Enter a POST command to modify any of the image overlay parameters in the running event:
POST http://<Live IP Address>/live_events/<live event id>/motion_image_inserter
3. In the body of the request, include one motion_image_inserter element that contains therequired tags. For more information about the tags, see the section called “Using the RESTAPI” (p. 207).
4. The response repeats back the data that you posted with <ID> tags for motion_image_inserterand motion_image_inserter_input.
Example 1
The following example request modifies the running event with the ID 33. It sets up the currentlydefined motion overlay MOV to run again at 20160102T030405.678Z.
POST http://198.51.100.22/live_events/33/motion_image_inserter-------------------------------------------------------------<motion_image_inserter> <action_time>20160102T030405.678Z</action_time> <active>true</active></motion_image_inserter>
Example 2
The following example request modifies the running event with the ID 33. It stops the motion overlay.Notice that you include action_time with an empty value so that you clear the time currently specified inthe XML. If you forget to do this, AWS Elemental Live might try to apply that time to the next show/hiderequest.
POST http://198.51.100.22/live_events/33/motion_image_inserter-------------------------------------------------------------<motion_image_inserter> <action_time></action_time> <active>false</active></motion_image_inserter>
Types of changes
This table provides information on some of the changes you can make to a running event via the RESTAPI:
State of motionoverlay
Desired action How to use themotion_image_insertercommand
Tags to change
Not running Run the motion overlayimmediately.
Enter the commandto set the active tag
active
Version 2.14 and later213
AWS Elemental Live User GuideQuicktime MOV
State of motionoverlay
Desired action How to use themotion_image_insertercommand
Tags to change
to true and set the<action_time> tag toempty.
action_time
Not running Run the motion overlayagain at a specifiedtime.
Enter the commandto set the active tagto true and set the<action_time> tag tothe desired start time.
active
action_time
Not running Run a different motionoverlay of the same filetype.
Enter the commandto change the motionoverlay to point to adifferent asset.
Set the <active> tagto true and set the<action_time> tag tothe time you want thestart the new motionoverlay. Set the <loop>tag to true or false.
All tags that apply tothe current motionoverlay type.
Running Stop the runningmotion overlay.
Just before you wantthe motion overlayto stop, enter thecommand to set theactive tag to false.
active
Running Start the motionoverlay.
To start the motionoverlay again, enterthe command toset the <active>tag to true and the<action_time>tag set to the timeyou want the motionoverlay to begin.
active
Running Change to a differentmotion overlay.
Enter the commandto change the motionoverlay to a differentfile.
All tags, not just theones you want tochange. If you excludea tag, the default valuewill apply.
Step D: Run the event again
You might want to run the same event again. If you do so, make sure that the motion overlay is set upcorrectly. You must do this because when you enter REST API commands to control the motion overlaywhen the event is running, the event XML for the motion overlay changes.
For example, you might set up the event with motion overlay A and a start time of 9:00 am. You then runthe event and change the content and start time of the motion overlay several times. The last motion
Version 2.14 and later214
AWS Elemental Live User GuidePNG
overlay to run in the event is motion overlay B with a start time of 4:00 pm. That is the informationnow in the event XML. Before you start the event the next day, review and modify the motion overlayinformation.
How to insert a motion overlay with a set of PNG filesYou can use a set of .png files as an asset for the motion image overlay.
Here are some examples of how motion image overlay works with a set of PNG files:
• Example 1: “Coming up” motion overlay – You want to insert an asset that will run as a 10-secondmotion overlay 59 minutes into the runtime of the event. You want the motion overlay to be placed inthe lower right corner of the video frame.
• Example 2: Animated corporate logo – You want to insert an asset and run it every 5 minutes, starting20 minutes into the runtime of the event. You specify the single asset in the event and specify the firstruntime. You start the event. After the motion overlay has run once, you send a REST API command tomodify the start time of the asset to a new time. You repeat this command (each time with a new starttime) as many times as you want.
Typically, you set up the event as follows:
• You prepare a set of PNG files and store them at a location that is accessible to AWS Elemental Live.
• You configure the event with the location URL and start time of the first motion overlay you want torun, with position and size information, and with an instruction to run the motion overlay once or toloop it. You set up the motion overlay to be active when the event starts, and you enable control viathe REST API.
• When you're ready, you start the event. The motion overlay configured in the event runs at thespecified time. You then enter REST API commands to specify different content (a different URL),a start time, and a new position and size. After that motion overlay plays, you can enter anothercommand to run different content, as required, for the duration of the event.
Step A: Prepare the png asset1. Create a file – Use a third-party process to convert an animation asset to a series of PNG files.
2. Take care with these aspects of the conversion:
• File count: When you insert the files into the video, you will specify the frame rate for the motionoverlay. Therefore, make sure that the conversion results in a file count that aligns with theintended frame rate. (The frame rate of the motion overlay does not necessarily have to match theframe rate of the underlying video.) For example, if the motion overlay will run for 10 seconds at30 frames/second, make sure that the conversion produces 300 files. If the file count and framerate do not align, the quality of the animation might suffer.
• The PNG files must contain RGB and one alpha channel. The alpha channel will be used for per-pixel blending.
• File names: Make sure that the file names of the converted files include a sequential number.There can be any number of digits in the numerical part of the file name, as long as it is the samefor each file. For example, 001 to 200 but not 01 to 200. Note that the sequential numbering doesnot have to start at zero.
• Aspect ratio: The motion overlay can have any aspect ratio. It does not have to match the aspectratio of the video output.
• Size: The motion overlay can be any size, in pixels, up to the size of the underlying video. Themotion overlay must be prepared in the desired size; there is no way to resize it when setting it upin the event.
Version 2.14 and later215
AWS Elemental Live User GuidePNG
• Position: The motion overlay cannot be positioned so that part of the motion overlay runs beyondthe right edge or bottom edge of the underlying video.
• If you set up a motion overlay so that it is too big or it overruns and AWS Elemental Live canidentify this error at event creation time, then an error message will appear.
• If AWS Elemental Live cannot identify the error in advance, an error message will appear whilethe event is running. The event will not stop but the insertion request will fail.
3. Place the file – Place the converted file in a location accessible to AWS Elemental Live: On a localdirectory, on a remote filesystem accessible via mount point, or in an Amazon S3 bucket. Choose alocation as described in the section called “Fields for a PNG asset” (p. 218), then note the locationfor setting up the motion overlay in the event.
You can specify the location in one of the following ways:
• Local to the AWS Elemental Live appliance. For example, /data/assets/motionoverlay_001.png
• A remote server via a mount point. For example, /data/mnt/assets/motionoverlay_001.png
• An Amazon S3 bucket, using SSL. For example, Amazon S3ssl://company.test/DOC-EXAMPLE-BUCKET/motion overlay_001.png
• An Amazon S3 bucket, without SSL. For example, S3://company.test/DOC-EXAMPLE-BUCKET/motion overlay_001.png
Step B: Set up the event
You configure the event with information about the first motion overlay. You can configure thisinformation when creating an event. Or you can change the existing motion overlay configuration on anon-running event. You can configure the information using the web interface or the REST API.
Topics
• Using the web interface (p. 216)
• Using the REST API (p. 217)
• Fields for a PNG asset (p. 218)
Using the web interface
To configure the event using the web interface
1. In the Global Processors section, go to the Image Inserter field and choose On. More fields appear.
2. Complete the fields. You can configure some or all the information in the non-running event, butyou must at least set the following fields:
• Insertion Mode
• Enable REST Control
You must also configure the motion overlay behavior when the event first starts:
• If you want the motion overlay to appear as soon as the event starts, specify all the fields. Makesure that you check Active, and make sure that you leave the Action Time empty.
• If you don't want the motion overlay to appear as soon as the event starts, leave Activeunchecked.
Version 2.14 and later216
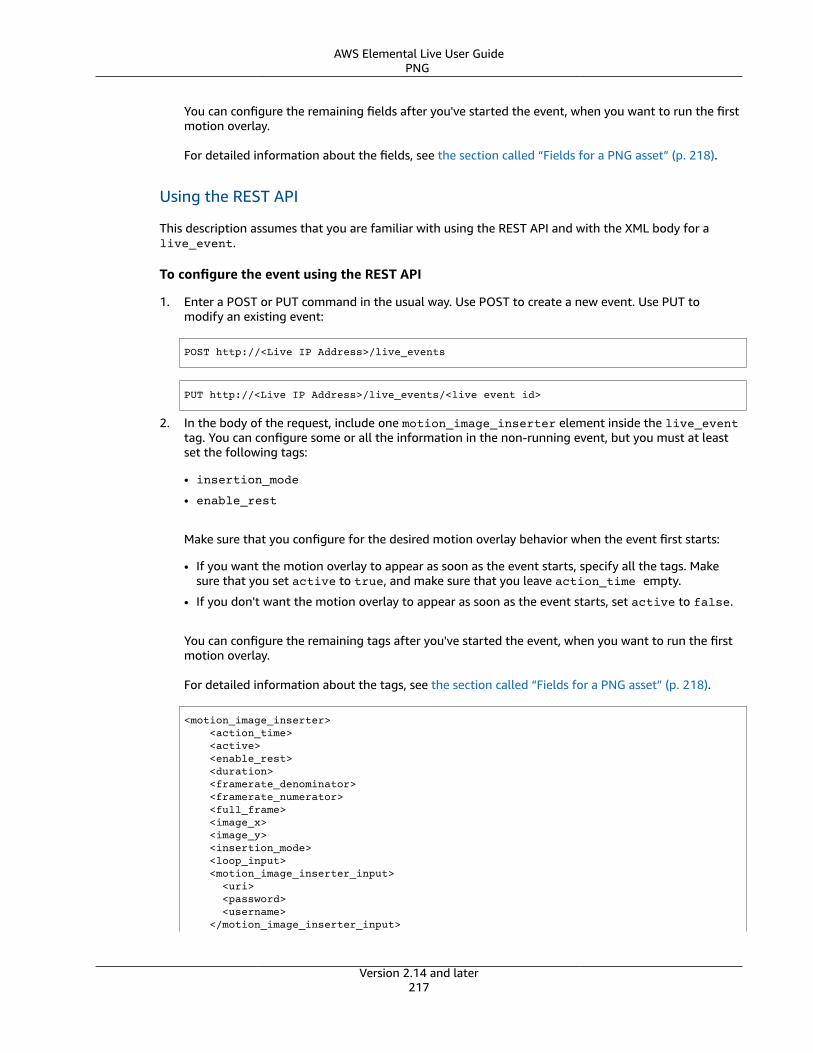
AWS Elemental Live User GuidePNG
You can configure the remaining fields after you've started the event, when you want to run the firstmotion overlay.
For detailed information about the fields, see the section called “Fields for a PNG asset” (p. 218).
Using the REST API
This description assumes that you are familiar with using the REST API and with the XML body for alive_event.
To configure the event using the REST API
1. Enter a POST or PUT command in the usual way. Use POST to create a new event. Use PUT tomodify an existing event:
POST http://<Live IP Address>/live_events
PUT http://<Live IP Address>/live_events/<live event id>
2. In the body of the request, include one motion_image_inserter element inside the live_eventtag. You can configure some or all the information in the non-running event, but you must at leastset the following tags:
• insertion_mode
• enable_rest
Make sure that you configure for the desired motion overlay behavior when the event first starts:
• If you want the motion overlay to appear as soon as the event starts, specify all the tags. Makesure that you set active to true, and make sure that you leave action_time empty.
• If you don't want the motion overlay to appear as soon as the event starts, set active to false.
You can configure the remaining tags after you've started the event, when you want to run the firstmotion overlay.
For detailed information about the tags, see the section called “Fields for a PNG asset” (p. 218).
<motion_image_inserter> <action_time> <active> <enable_rest> <duration> <framerate_denominator> <framerate_numerator> <full_frame> <image_x> <image_y> <insertion_mode> <loop_input> <motion_image_inserter_input> <uri> <password> <username> </motion_image_inserter_input>
Version 2.14 and later217
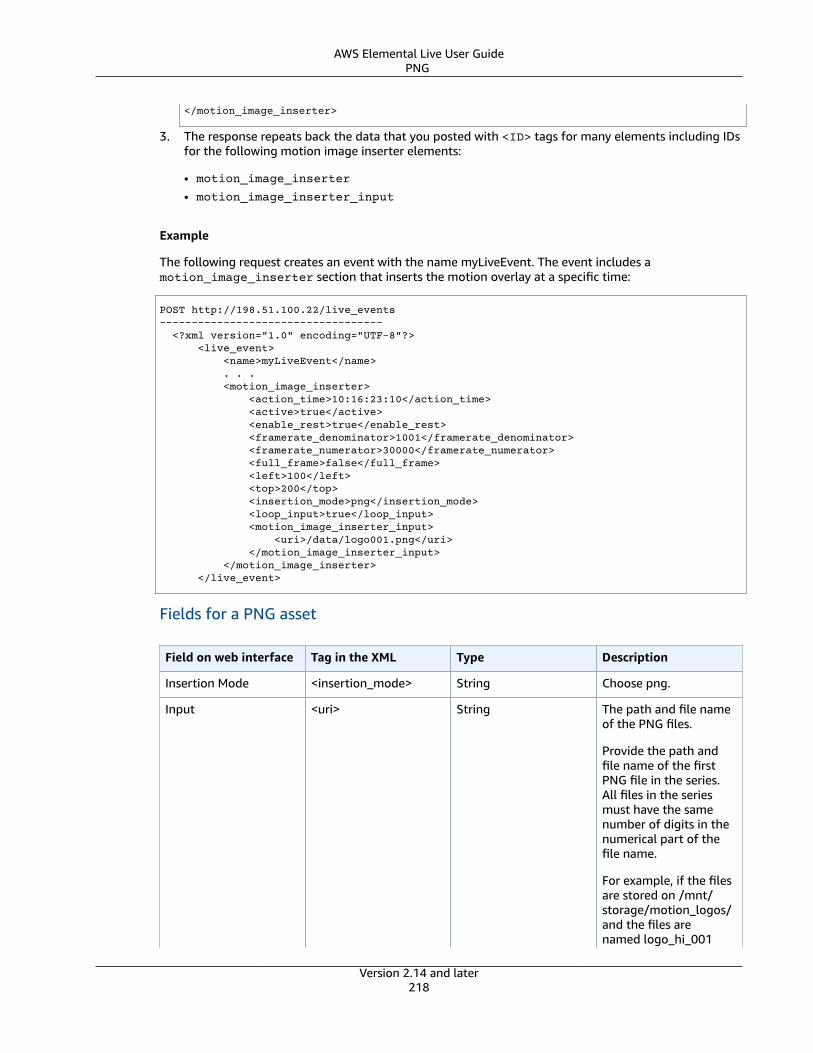
AWS Elemental Live User GuidePNG
</motion_image_inserter>
3. The response repeats back the data that you posted with <ID> tags for many elements including IDsfor the following motion image inserter elements:
• motion_image_inserter
• motion_image_inserter_input
Example
The following request creates an event with the name myLiveEvent. The event includes amotion_image_inserter section that inserts the motion overlay at a specific time:
POST http://198.51.100.22/live_events----------------------------------- <?xml version="1.0" encoding="UTF-8"?> <live_event> <name>myLiveEvent</name> . . . <motion_image_inserter> <action_time>10:16:23:10</action_time> <active>true</active> <enable_rest>true</enable_rest> <framerate_denominator>1001</framerate_denominator> <framerate_numerator>30000</framerate_numerator> <full_frame>false</full_frame> <left>100</left> <top>200</top> <insertion_mode>png</insertion_mode> <loop_input>true</loop_input> <motion_image_inserter_input> <uri>/data/logo001.png</uri> </motion_image_inserter_input> </motion_image_inserter> </live_event>
Fields for a PNG asset
Field on web interface Tag in the XML Type Description
Insertion Mode <insertion_mode> String Choose png.
Input <uri> String The path and file nameof the PNG files.
Provide the path andfile name of the firstPNG file in the series.All files in the seriesmust have the samenumber of digits in thenumerical part of thefile name.
For example, if the filesare stored on /mnt/storage/motion_logos/and the files arenamed logo_hi_001
Version 2.14 and later218

AWS Elemental Live User GuidePNG
Field on web interface Tag in the XML Type Description
to logo_hi_357, enter/mnt/storage/motion_logos/logo_hi_001.
When using AmazonS3, you can optionallyappend the path asfollows:
• Use sse=true toturn on AmazonS3 Server SideEncryption (SSE).
• Use rrs=true toenable ReducedRedundancy Storage(RRS).
Default values for RRSand SSE are false.
Username Password <username>
<password>
If access to your localor mounted directoryrequires a user nameand password, clickthe lock icon next tothe Input field to showthe Username andPassword fields.
For Amazon S3, enterthe access key ID in theusername field. Enterthe secret access key inthe password field.
Left <image_x> Integer Placement of the leftedge of the motionoverlay relative to theleft edge of the videoframe, in pixels. 0 is theleft edge of the frame.
Take note of the widthof the motion overlayand make sure that theposition of the left edgeof the motion overlaydoes not cause the rightedge to be cropped.
Version 2.14 and later219

AWS Elemental Live User GuidePNG
Field on web interface Tag in the XML Type Description
Top <image_y> Integer Placement of the topedge of the motionoverlay relative to thetop edge of the videoframe, in pixels. 0 is thetop edge of the frame.Default 0.
Take note of the heightof the motion overlayand make sure thatthe position of the topedge of the motionoverlay does not causethe bottom edge to becropped.
ActionTime <action_time> String The start time for themotion overlay. Specifythe start time in one ofthe formats discussedin detail below thistable.
NumeratorDenominator
framerate_numerator
framerate_denominator
Integer On the web interface,enter the frame rateas a numerator overa denominator. Forexample, 29.97 fps isa numerator of 30000and a denominator of1001. Enter numbersthat give a frame rateratio between 1 and120.
When using theREST API, enterthe numeratorand denominatorseparately.
Version 2.14 and later220

AWS Elemental Live User GuidePNG
Field on web interface Tag in the XML Type Description
Loop Input <loop_input> Boolean • Select to loopthe motion overlayindefinitely.
The motion overlaywill run until the eventends. To stop themotion overlay earlier,see the section called“Step C: Manage atruntime” (p. 223).
• Clear the check box torun the motion overlayonly once.
Full Frame <full_frame> Boolean Expand the motionoverlay to fit the videoframe. In this case,make sure Left and Topare set to 0.
If this field is selectedand the motionoverlay has a differentaspect ratio to theunderlying video, themotion overlay will bescaled until one of thefollowing applies:
• The motion overlayfits in the length. Themotion overlay willthen be positionedwith equal space onthe left and right.
• The motion overlayfits in the width. Themotion overlay willthen be positionedwith equal spaceabove and below.
Note that the Stretchto output field in theStream section doesnot affect the motionoverlay; even if thevideo is stretched, themotion overlay is notstretched.
Version 2.14 and later221
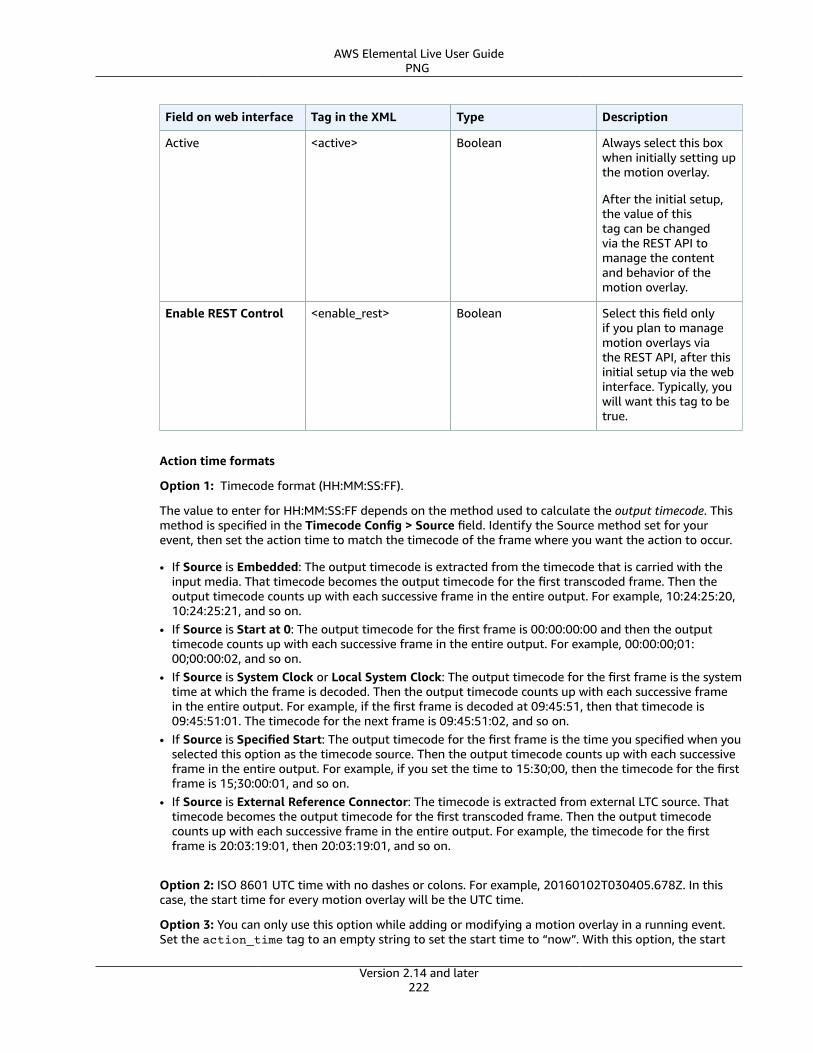
AWS Elemental Live User GuidePNG
Field on web interface Tag in the XML Type Description
Active <active> Boolean Always select this boxwhen initially setting upthe motion overlay.
After the initial setup,the value of thistag can be changedvia the REST API tomanage the contentand behavior of themotion overlay.
Enable REST Control <enable_rest> Boolean Select this field onlyif you plan to managemotion overlays viathe REST API, after thisinitial setup via the webinterface. Typically, youwill want this tag to betrue.
Action time formats
Option 1: Timecode format (HH:MM:SS:FF).
The value to enter for HH:MM:SS:FF depends on the method used to calculate the output timecode. Thismethod is specified in the Timecode Config > Source field. Identify the Source method set for yourevent, then set the action time to match the timecode of the frame where you want the action to occur.
• If Source is Embedded: The output timecode is extracted from the timecode that is carried with theinput media. That timecode becomes the output timecode for the first transcoded frame. Then theoutput timecode counts up with each successive frame in the entire output. For example, 10:24:25:20,10:24:25:21, and so on.
• If Source is Start at 0: The output timecode for the first frame is 00:00:00:00 and then the outputtimecode counts up with each successive frame in the entire output. For example, 00:00:00;01:00;00:00:02, and so on.
• If Source is System Clock or Local System Clock: The output timecode for the first frame is the systemtime at which the frame is decoded. Then the output timecode counts up with each successive framein the entire output. For example, if the first frame is decoded at 09:45:51, then that timecode is09:45:51:01. The timecode for the next frame is 09:45:51:02, and so on.
• If Source is Specified Start: The output timecode for the first frame is the time you specified when youselected this option as the timecode source. Then the output timecode counts up with each successiveframe in the entire output. For example, if you set the time to 15:30;00, then the timecode for the firstframe is 15;30:00:01, and so on.
• If Source is External Reference Connector: The timecode is extracted from external LTC source. Thattimecode becomes the output timecode for the first transcoded frame. Then the output timecodecounts up with each successive frame in the entire output. For example, the timecode for the firstframe is 20:03:19:01, then 20:03:19:01, and so on.
Option 2: ISO 8601 UTC time with no dashes or colons. For example, 20160102T030405.678Z. In thiscase, the start time for every motion overlay will be the UTC time.
Option 3: You can only use this option while adding or modifying a motion overlay in a running event.Set the action_time tag to an empty string to set the start time to “now”. With this option, the start
Version 2.14 and later222
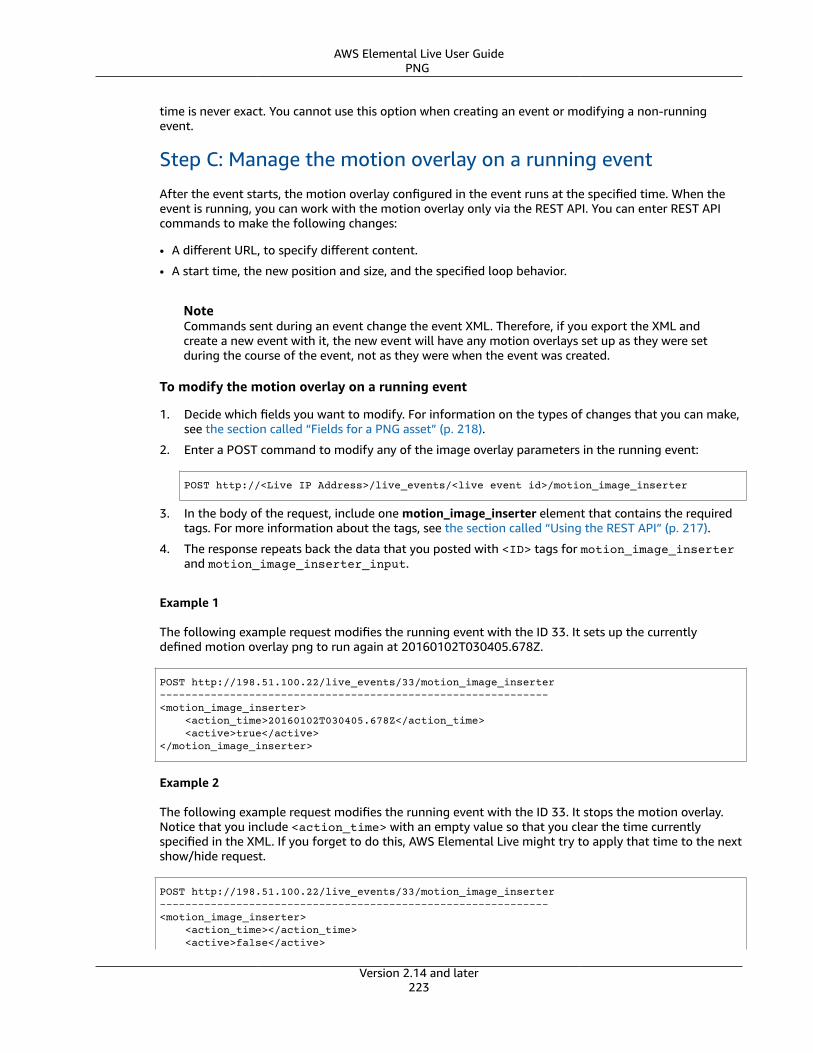
AWS Elemental Live User GuidePNG
time is never exact. You cannot use this option when creating an event or modifying a non-runningevent.
Step C: Manage the motion overlay on a running event
After the event starts, the motion overlay configured in the event runs at the specified time. When theevent is running, you can work with the motion overlay only via the REST API. You can enter REST APIcommands to make the following changes:
• A different URL, to specify different content.
• A start time, the new position and size, and the specified loop behavior.
NoteCommands sent during an event change the event XML. Therefore, if you export the XML andcreate a new event with it, the new event will have any motion overlays set up as they were setduring the course of the event, not as they were when the event was created.
To modify the motion overlay on a running event
1. Decide which fields you want to modify. For information on the types of changes that you can make,see the section called “Fields for a PNG asset” (p. 218).
2. Enter a POST command to modify any of the image overlay parameters in the running event:
POST http://<Live IP Address>/live_events/<live event id>/motion_image_inserter
3. In the body of the request, include one motion_image_inserter element that contains the requiredtags. For more information about the tags, see the section called “Using the REST API” (p. 217).
4. The response repeats back the data that you posted with <ID> tags for motion_image_inserterand motion_image_inserter_input.
Example 1
The following example request modifies the running event with the ID 33. It sets up the currentlydefined motion overlay png to run again at 20160102T030405.678Z.
POST http://198.51.100.22/live_events/33/motion_image_inserter-------------------------------------------------------------<motion_image_inserter> <action_time>20160102T030405.678Z</action_time> <active>true</active></motion_image_inserter>
Example 2
The following example request modifies the running event with the ID 33. It stops the motion overlay.Notice that you include <action_time> with an empty value so that you clear the time currentlyspecified in the XML. If you forget to do this, AWS Elemental Live might try to apply that time to the nextshow/hide request.
POST http://198.51.100.22/live_events/33/motion_image_inserter-------------------------------------------------------------<motion_image_inserter> <action_time></action_time> <active>false</active>
Version 2.14 and later223
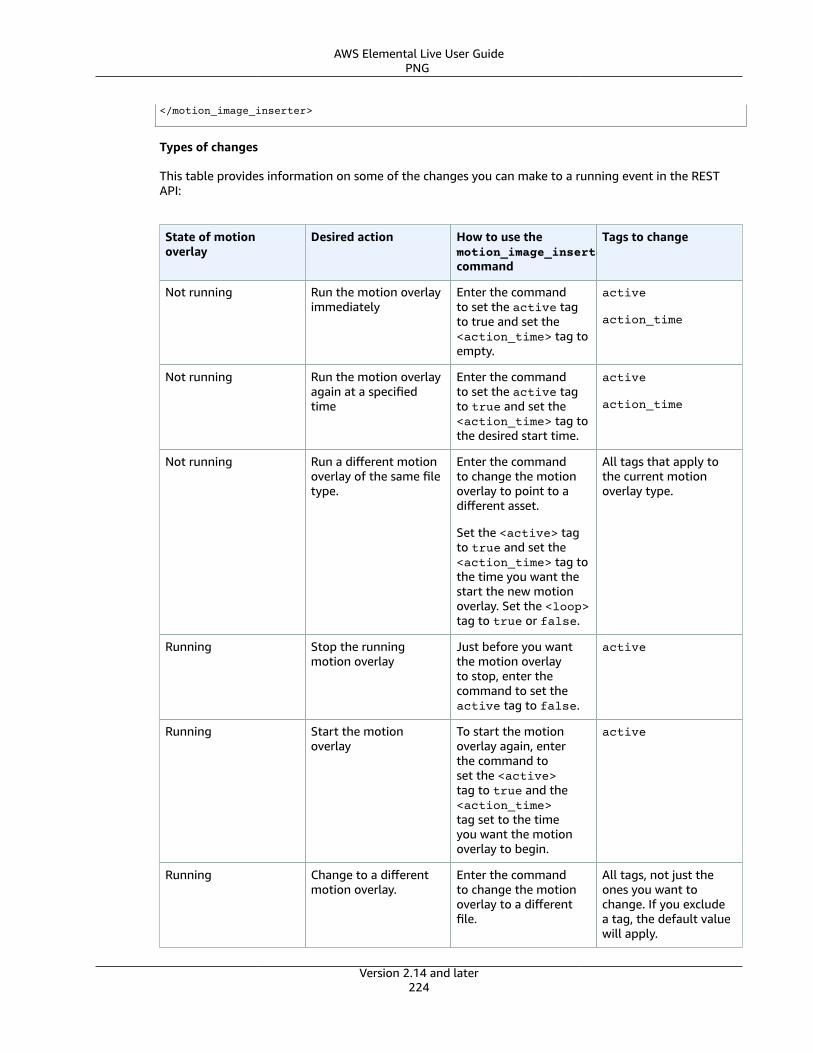
AWS Elemental Live User GuidePNG
</motion_image_inserter>
Types of changes
This table provides information on some of the changes you can make to a running event in the RESTAPI:
State of motionoverlay
Desired action How to use themotion_image_insertercommand
Tags to change
Not running Run the motion overlayimmediately
Enter the commandto set the active tagto true and set the<action_time> tag toempty.
active
action_time
Not running Run the motion overlayagain at a specifiedtime
Enter the commandto set the active tagto true and set the<action_time> tag tothe desired start time.
active
action_time
Not running Run a different motionoverlay of the same filetype.
Enter the commandto change the motionoverlay to point to adifferent asset.
Set the <active> tagto true and set the<action_time> tag tothe time you want thestart the new motionoverlay. Set the <loop>tag to true or false.
All tags that apply tothe current motionoverlay type.
Running Stop the runningmotion overlay
Just before you wantthe motion overlayto stop, enter thecommand to set theactive tag to false.
active
Running Start the motionoverlay
To start the motionoverlay again, enterthe command toset the <active>tag to true and the<action_time>tag set to the timeyou want the motionoverlay to begin.
active
Running Change to a differentmotion overlay.
Enter the commandto change the motionoverlay to a differentfile.
All tags, not just theones you want tochange. If you excludea tag, the default valuewill apply.
Version 2.14 and later224
AWS Elemental Live User GuideSWF
Step D: Run the event againYou might want to run the same event again. If you do so, make sure that the motion overlay is set upcorrectly. You must do this because when you enter REST API commands to control the motion overlaywhen the event is running, the event XML for the motion overlay changes.
For example, you might set up the event with motion overlay A and a start time of 9:00 am. You then runthe event and change the content and start time of the motion overlay several times. The last motionoverlay to run in the event is motion overlay B with a start time of 4:00 pm. That is the informationnow in the event XML. Before you start the event the next day, review and modify the motion overlayinformation.
How to insert a motion overlay with a set of SWF filesYou can use a set of .swf files (Shockwave Flash fields) as an asset for the motion image overlay. Thefile can implement ActionScript abilities of Adobe Flash, such as passing in arguments and performingsqueezeback.
Here are some examples of how motion image overlay works with a SWF file:
• Example 1: “Coming up” motion overlay – You want to insert an asset that will run as a 10-secondmotion overlay 59 minutes into the runtime of the event. You want the motion overlay to be placed inthe lower right corner of the video frame.
• Example 2: Animated corporate logo – You want to insert an asset and run it every 5 minutes, starting20 minutes into the runtime of the event. You specify the single asset in the event and specify thefirst runtime. You start the event then, after the motion overlay has run once, you send a REST APIcommand to modify the start time of the asset to a new time. You repeat this command (each timewith a new start time) as many times as you want.
Typically, you set up the event as follows:
• You prepare a SWF file and store it at a location that is accessible to AWS Elemental Live.• You configure the event with the location URL and start time of the first motion overlay you want to
run, with position and size information, and with an instruction to run the motion overlay once or toloop it. You set up the motion overlay to be active when the event starts, and you enable control viathe REST API.
• When you're ready, you start the event. The motion overlay configured in the event runs at thespecified time. You then enter REST API commands to specify different content (a different URL),a start time, and a new position and size. After that motion overlay plays, you can enter anothercommand to run different content, as required, for the duration of the event.
Step A: Prepare the SWF asset1. Create a file – Use third-party software to create the SWF file. Take care with these aspects:
• Encoder processing resources: SWF files can be very resource-intensive. See the section called“Tips for using SWF” (p. 236).
• Aspect ratio: The motion overlay can have any aspect ratio. It does not have to match the aspectratio of the video output.
• Frame rate: The frame rate of the motion overlay asset must match the frame rate of theunderlying video.
• Size: The motion overlay can be any size, in pixels, up to the size of the underlying video. Themotion overlay must be prepared in the desired size; there is no way to resize it when setting it upin the event.
Version 2.14 and later225
AWS Elemental Live User GuideSWF
• Position: The motion overlay cannot be positioned so that part of the motion overlay runs beyondthe right edge and/or bottom edge of the underlying video.
• If you set up a motion overlay so that it is too big or it overruns and AWS Elemental Live canidentify this error at event creation time, then an error message will appear.
• If AWS Elemental Live cannot identify the error in advance, an error message will appear whilethe event is running. The event will not stop but the insertion request will fail.
2. Place the file – Place the SWF file in a location accessible to AWS Elemental Live: on a local directory,on a remote filesystem accessible via mount point, or in an Amazon S3 bucket.
You can specify the location in one of the following ways:
• Local to the AWS Elemental Live appliance. For example, /data/assets/motion overlay.swf
• A remote server via a mount point. For example, /data/mnt/assets/motion overlay.swf
• An Amazon S3 bucket, using SSL. For example, Amazon S3ssl://company.test/DOC-EXAMPLE-BUCKET/motion overlay.swf
• An Amazon S3 bucket, without SSL. For example, S3://company.test/DOC-EXAMPLE-BUCKET/motion overlay.swf
Step B: Set up the event
You configure the event with information about the first motion overlay. You can configure thisinformation when creating an event. Or you can change the existing motion overlay configuration on anon-running event. You can configure the information using the web interface or the REST API.
Topics
• Using the web interface (p. 226)
• Using the REST API (p. 227)
• Fields for a SWF asset (p. 228)
Using the web interface
To configure the event using the web interface
1. In the Global Processors section, go to the Image Inserter field and choose On. More fields appear.
2. Complete the fields. You can configure some or all the information in the non-running event, butyou must at least set the following fields:
• Insertion Mode
• Enable REST Control
You must also configure the motion overlay behavior when the event first starts:
• If you want the motion overlay to appear as soon as the event starts, specify all the fields. Makesure that you check Active, and make sure that you leave the Action Time empty.
• If you don't want the motion overlay to appear as soon as the event starts, leave Activeunchecked.
You can configure the remaining fields after you've started the event, when you want to run the firstmotion overlay.
For detailed information about the fields, see the section called “Fields for a SWF asset” (p. 228).
Version 2.14 and later226
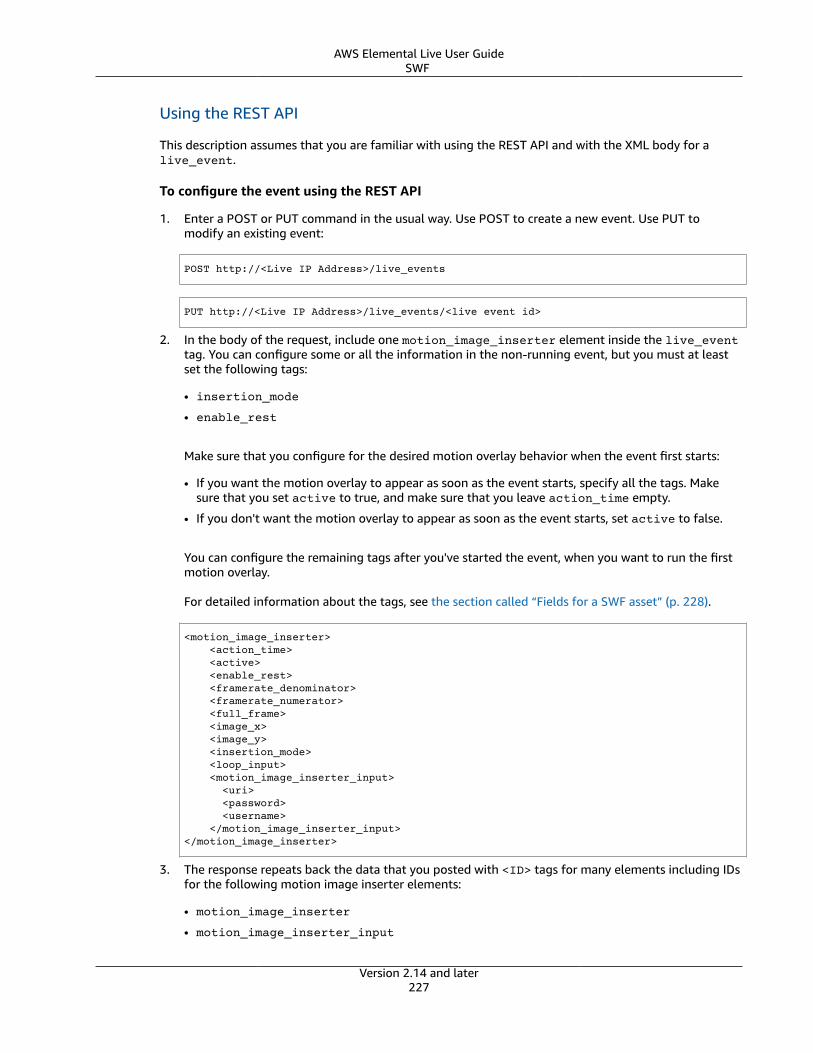
AWS Elemental Live User GuideSWF
Using the REST API
This description assumes that you are familiar with using the REST API and with the XML body for alive_event.
To configure the event using the REST API
1. Enter a POST or PUT command in the usual way. Use POST to create a new event. Use PUT tomodify an existing event:
POST http://<Live IP Address>/live_events
PUT http://<Live IP Address>/live_events/<live event id>
2. In the body of the request, include one motion_image_inserter element inside the live_eventtag. You can configure some or all the information in the non-running event, but you must at leastset the following tags:
• insertion_mode
• enable_rest
Make sure that you configure for the desired motion overlay behavior when the event first starts:
• If you want the motion overlay to appear as soon as the event starts, specify all the tags. Makesure that you set active to true, and make sure that you leave action_time empty.
• If you don't want the motion overlay to appear as soon as the event starts, set active to false.
You can configure the remaining tags after you've started the event, when you want to run the firstmotion overlay.
For detailed information about the tags, see the section called “Fields for a SWF asset” (p. 228).
<motion_image_inserter> <action_time> <active> <enable_rest> <framerate_denominator> <framerate_numerator> <full_frame> <image_x> <image_y> <insertion_mode> <loop_input> <motion_image_inserter_input> <uri> <password> <username> </motion_image_inserter_input></motion_image_inserter>
3. The response repeats back the data that you posted with <ID> tags for many elements including IDsfor the following motion image inserter elements:
• motion_image_inserter
• motion_image_inserter_input
Version 2.14 and later227
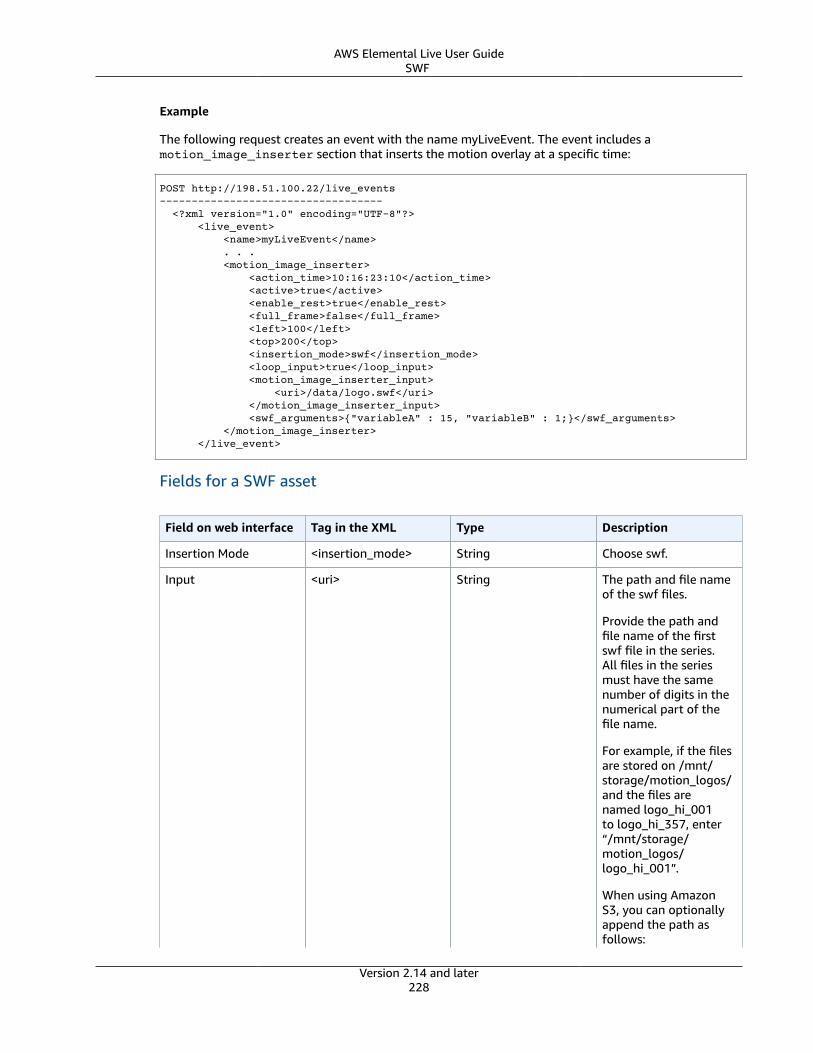
AWS Elemental Live User GuideSWF
Example
The following request creates an event with the name myLiveEvent. The event includes amotion_image_inserter section that inserts the motion overlay at a specific time:
POST http://198.51.100.22/live_events----------------------------------- <?xml version="1.0" encoding="UTF-8"?> <live_event> <name>myLiveEvent</name> . . . <motion_image_inserter> <action_time>10:16:23:10</action_time> <active>true</active> <enable_rest>true</enable_rest> <full_frame>false</full_frame> <left>100</left> <top>200</top> <insertion_mode>swf</insertion_mode> <loop_input>true</loop_input> <motion_image_inserter_input> <uri>/data/logo.swf</uri> </motion_image_inserter_input> <swf_arguments>{"variableA" : 15, "variableB" : 1;}</swf_arguments> </motion_image_inserter> </live_event>
Fields for a SWF asset
Field on web interface Tag in the XML Type Description
Insertion Mode <insertion_mode> String Choose swf.
Input <uri> String The path and file nameof the swf files.
Provide the path andfile name of the firstswf file in the series.All files in the seriesmust have the samenumber of digits in thenumerical part of thefile name.
For example, if the filesare stored on /mnt/storage/motion_logos/and the files arenamed logo_hi_001to logo_hi_357, enter“/mnt/storage/motion_logos/logo_hi_001”.
When using AmazonS3, you can optionallyappend the path asfollows:
Version 2.14 and later228

AWS Elemental Live User GuideSWF
Field on web interface Tag in the XML Type Description
• Use sse=true toturn on AmazonS3 Server SideEncryption (SSE).
• Use rrs=true toturn on ReducedRedundancy Storage(RRS).
Default values for RRSand SSE are false.
Username Password <username>
<password>
If access to your localor mounted directoryrequires a user nameand password, clickthe lock icon next tothe Input field to showthe Username andPassword fields.
For Amazon S3, enterthe access key ID in theusername field. Enterthe secret access key inthe password field.
Left <image_x> Integer Placement of the leftedge of the motionoverlay relative to theleft edge of the videoframe, in pixels. 0 is theleft edge of the frame.
Take note of the widthof the motion overlayand make sure that theposition of the left edgeof the motion overlaydoes not cause the rightedge to be cropped.
Version 2.14 and later229

AWS Elemental Live User GuideSWF
Field on web interface Tag in the XML Type Description
Top <image_y> Integer Placement of the topedge of the motionoverlay relative to thetop edge of the videoframe, in pixels. 0 is thetop edge of the frame.Default 0.
Take note of the heightof the motion overlayand make sure thatthe position of the topedge of the motionoverlay does not causethe bottom edge to becropped.
ActionTime <action_time> String The start time for themotion overlay. Specifythe start time in one ofthe formats discussedin detail after this table.
Duration <duration> Integer The time, inmilliseconds, for themotion overlay toremain on the video. Ifkept blank, the motionoverlay plays for thefull length of the .swffile.
Loop Input <loop_input> Boolean • Select to loop themotion overlayindefinitely.
The motion overlaywill run until theevent ends. Tostop the motionoverlay earlier, seethe section called“Step C: Manage atruntime” (p. 233).
• Clear the check boxto run the motionoverlay only once.
Version 2.14 and later230
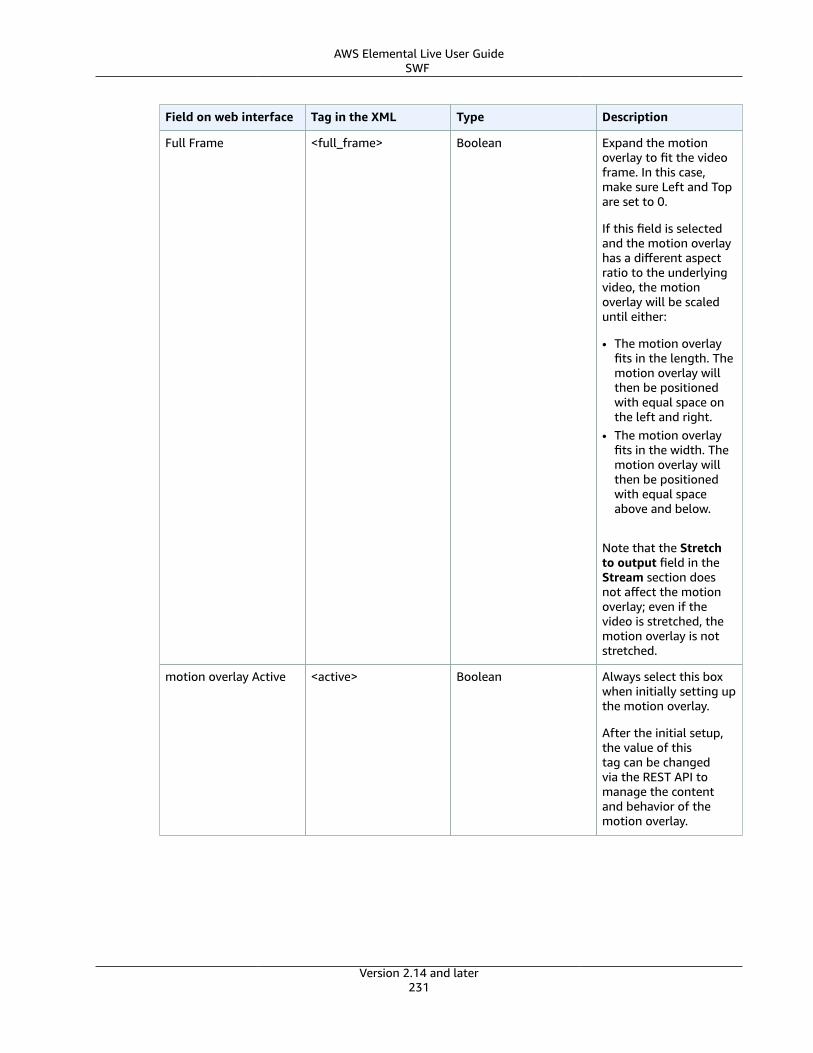
AWS Elemental Live User GuideSWF
Field on web interface Tag in the XML Type Description
Full Frame <full_frame> Boolean Expand the motionoverlay to fit the videoframe. In this case,make sure Left and Topare set to 0.
If this field is selectedand the motion overlayhas a different aspectratio to the underlyingvideo, the motionoverlay will be scaleduntil either:
• The motion overlayfits in the length. Themotion overlay willthen be positionedwith equal space onthe left and right.
• The motion overlayfits in the width. Themotion overlay willthen be positionedwith equal spaceabove and below.
Note that the Stretchto output field in theStream section doesnot affect the motionoverlay; even if thevideo is stretched, themotion overlay is notstretched.
motion overlay Active <active> Boolean Always select this boxwhen initially setting upthe motion overlay.
After the initial setup,the value of thistag can be changedvia the REST API tomanage the contentand behavior of themotion overlay.
Version 2.14 and later231
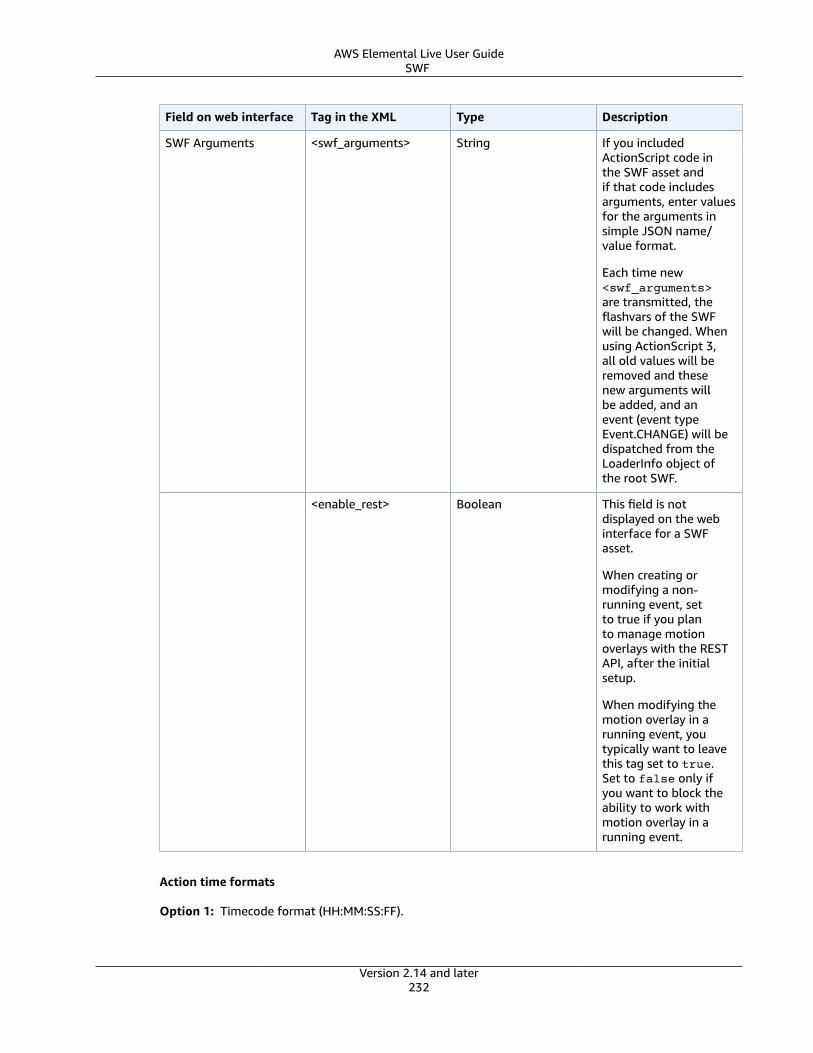
AWS Elemental Live User GuideSWF
Field on web interface Tag in the XML Type Description
SWF Arguments <swf_arguments> String If you includedActionScript code inthe SWF asset andif that code includesarguments, enter valuesfor the arguments insimple JSON name/value format.
Each time new<swf_arguments>are transmitted, theflashvars of the SWFwill be changed. Whenusing ActionScript 3,all old values will beremoved and thesenew arguments willbe added, and anevent (event typeEvent.CHANGE) will bedispatched from theLoaderInfo object ofthe root SWF.
<enable_rest> Boolean This field is notdisplayed on the webinterface for a SWFasset.
When creating ormodifying a non-running event, setto true if you planto manage motionoverlays with the RESTAPI, after the initialsetup.
When modifying themotion overlay in arunning event, youtypically want to leavethis tag set to true.Set to false only ifyou want to block theability to work withmotion overlay in arunning event.
Action time formats
Option 1: Timecode format (HH:MM:SS:FF).
Version 2.14 and later232
AWS Elemental Live User GuideSWF
The value to enter for HH:MM:SS:FF depends on the method used to calculate the output timecode. Thismethod is specified in the Timecode Config > Source field. Identify the Source method set for yourevent, then set the action time to match the timecode of the frame where you want the action to occur.
• If Source is Embedded: The output timecode is extracted from the timecode that is carried with theinput media. That timecode becomes the output timecode for the first transcoded frame. Then theoutput timecode counts up with each successive frame in the entire output. For example, 10:24:25:20,10:24:25:21, and so on.
• If Source is Start at 0: The output timecode for the first frame is 00:00:00:00 and then the outputtimecode counts up with each successive frame in the entire output. For example, 00:00:00;01:00;00:00:02, and so on.
• If Source is System Clock or Local System Clock: The output timecode for the first frame is the systemtime at which the frame is decoded. Then the output timecode counts up with each successive framein the entire output. For example, if the first frame is decoded at 09:45:51, then that timecode is09:45:51:01. The timecode for the next frame is 09:45:51:02, and so on.
• If Source is Specified Start: The output timecode for the first frame is the time you specified when youselected this option as the timecode source. Then the output timecode counts up with each successiveframe in the entire output. For example, if you set the time to 15:30;00, then the timecode for the firstframe is 15;30:00:01, and so on.
• If Source is External Reference Connector: The timecode is extracted from external LTC source. Thattimecode becomes the output timecode for the first transcoded frame. Then the output timecodecounts up with each successive frame in the entire output. For example, the timecode for the firstframe is 20:03:19:01, then 20:03:19:01, and so on.
Option 2: ISO 8601 UTC time with no dashes or colons. For example, 20160102T030405.678Z. In thiscase, the start time for every motion overlay will be the UTC time.
Option 3: You can only use this option while adding or modifying a motion overlay in a running event.Set the action_time tag to an empty string to set the start time to “now”. With this option, the starttime is never exact. You cannot use this option when creating an event or modifying a non-runningevent.
Step C: Manage the motion overlay on a running event
After the event starts, the motion overlay configured in the event runs at the specified time. When theevent is running, you can work with the motion overlay only via the REST API. You can enter REST APIcommands to make the following changes:
• A different URL, to specify different content.
• A start time, the new position and size, and the specified loop behavior.
• Send updated values for SWF arguments. You can change the arguments with or without changing inthe existing content.
NoteCommands sent during an event change the event XML. Therefore, if you export the XML andcreate a new event with it, the new event will have any motion overlays set up as they were setduring the course of the event, not as they were when the event was created.
To modify the motion overlay on a running event
1. Decide which fields you want to modify. For information on the types of changes that you can make,see the table later in this section (p. 234).
2. Enter a POST command to modify any of the image overlay parameters in the running event:
Version 2.14 and later233
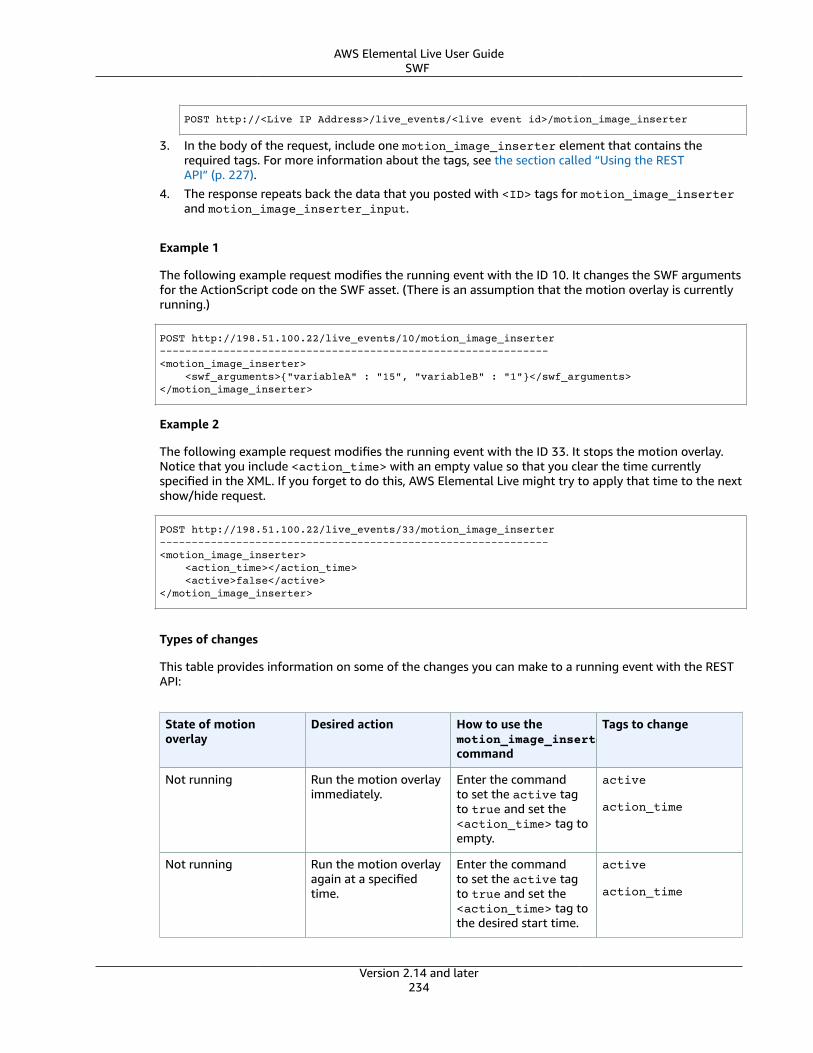
AWS Elemental Live User GuideSWF
POST http://<Live IP Address>/live_events/<live event id>/motion_image_inserter
3. In the body of the request, include one motion_image_inserter element that contains therequired tags. For more information about the tags, see the section called “Using the RESTAPI” (p. 227).
4. The response repeats back the data that you posted with <ID> tags for motion_image_inserterand motion_image_inserter_input.
Example 1
The following example request modifies the running event with the ID 10. It changes the SWF argumentsfor the ActionScript code on the SWF asset. (There is an assumption that the motion overlay is currentlyrunning.)
POST http://198.51.100.22/live_events/10/motion_image_inserter-------------------------------------------------------------<motion_image_inserter> <swf_arguments>{"variableA" : "15", "variableB" : "1"}</swf_arguments> </motion_image_inserter>
Example 2
The following example request modifies the running event with the ID 33. It stops the motion overlay.Notice that you include <action_time> with an empty value so that you clear the time currentlyspecified in the XML. If you forget to do this, AWS Elemental Live might try to apply that time to the nextshow/hide request.
POST http://198.51.100.22/live_events/33/motion_image_inserter-------------------------------------------------------------<motion_image_inserter> <action_time></action_time> <active>false</active></motion_image_inserter>
Types of changes
This table provides information on some of the changes you can make to a running event with the RESTAPI:
State of motionoverlay
Desired action How to use themotion_image_insertercommand
Tags to change
Not running Run the motion overlayimmediately.
Enter the commandto set the active tagto true and set the<action_time> tag toempty.
active
action_time
Not running Run the motion overlayagain at a specifiedtime.
Enter the commandto set the active tagto true and set the<action_time> tag tothe desired start time.
active
action_time
Version 2.14 and later234
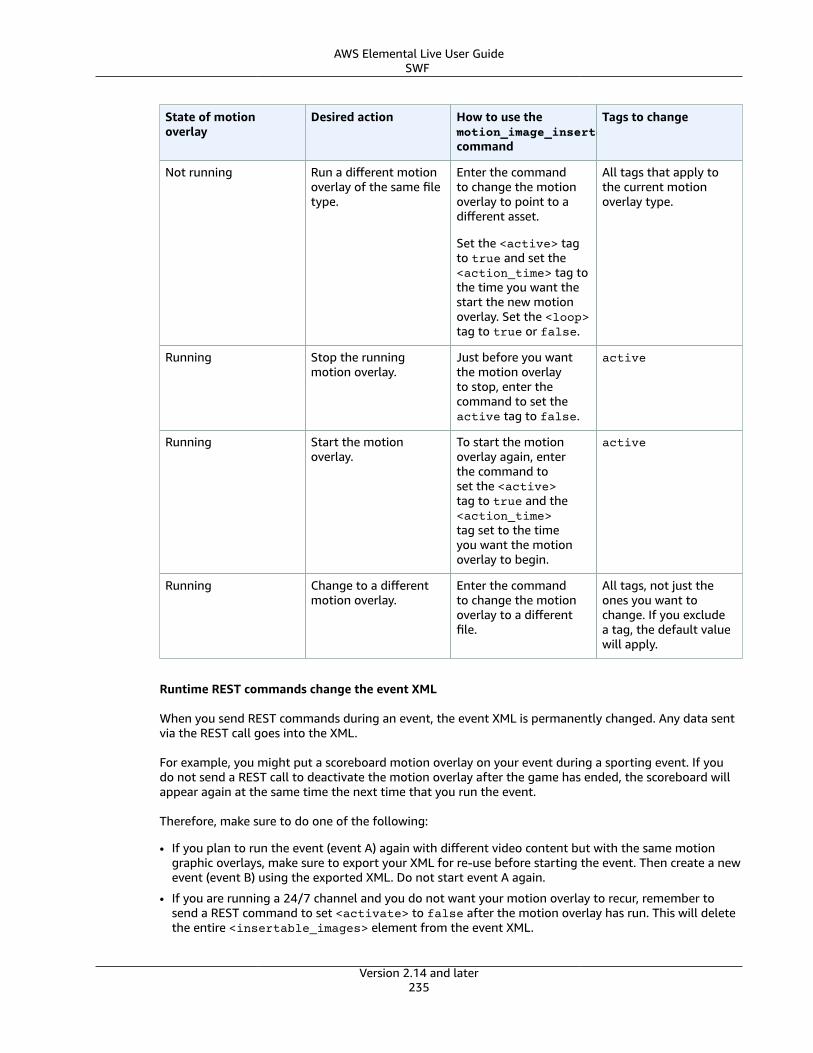
AWS Elemental Live User GuideSWF
State of motionoverlay
Desired action How to use themotion_image_insertercommand
Tags to change
Not running Run a different motionoverlay of the same filetype.
Enter the commandto change the motionoverlay to point to adifferent asset.
Set the <active> tagto true and set the<action_time> tag tothe time you want thestart the new motionoverlay. Set the <loop>tag to true or false.
All tags that apply tothe current motionoverlay type.
Running Stop the runningmotion overlay.
Just before you wantthe motion overlayto stop, enter thecommand to set theactive tag to false.
active
Running Start the motionoverlay.
To start the motionoverlay again, enterthe command toset the <active>tag to true and the<action_time>tag set to the timeyou want the motionoverlay to begin.
active
Running Change to a differentmotion overlay.
Enter the commandto change the motionoverlay to a differentfile.
All tags, not just theones you want tochange. If you excludea tag, the default valuewill apply.
Runtime REST commands change the event XML
When you send REST commands during an event, the event XML is permanently changed. Any data sentvia the REST call goes into the XML.
For example, you might put a scoreboard motion overlay on your event during a sporting event. If youdo not send a REST call to deactivate the motion overlay after the game has ended, the scoreboard willappear again at the same time the next time that you run the event.
Therefore, make sure to do one of the following:
• If you plan to run the event (event A) again with different video content but with the same motiongraphic overlays, make sure to export your XML for re-use before starting the event. Then create a newevent (event B) using the exported XML. Do not start event A again.
• If you are running a 24/7 channel and you do not want your motion overlay to recur, remember tosend a REST command to set <activate> to false after the motion overlay has run. This will deletethe entire <insertable_images> element from the event XML.
Version 2.14 and later235
AWS Elemental Live User GuideSWF
You could use the ISO 8601 UTC time format to specify an absolute time and date for the motionoverlay. The motion overlays will not run again the next day.
Step D: Run the event againYou might want to run the same event again. If you do so, make sure that the motion overlay is set upcorrectly. You must do this because when you enter REST API commands to control the motion overlaywhen the event is running, the event XML for the motion overlay changes.
For example, you might set up the event with motion overlay A and a start time of 9:00 am. You then runthe event and change the content and start time of the motion overlay several times. The last motionoverlay to run in the event is motion overlay B with a start time of 4:00 pm. That is the informationnow in the event XML. Before you start the event the next day, review and modify the motion overlayinformation.
Tips for using SWFThis section provides guidelines and tips for working effectively with SWF.
Topics• Is SWF the best choice? (p. 236)
• Working with Adobe Flash and SWF files (p. 236)
• How AWS Elemental Live integrates with ActionScript (p. 237)
• Validating your animations with swf-check (p. 239)
Is SWF the best choice?
With Shockwave Flash (SWF) files, AWS Elemental Live must render each frame of animation in real timeand place it on the corresponding video frame. SWF rendering is resource-intensive, so poorly optimizedSWF assets might degrade video output quality.
If your motion graphic overlay does not rely on any of the ActionScript abilities of Flash—namely passingin arguments and performing squeezeback—then an SWF file may not be the best choice, especially athigh resolutions and/or high frame rates. The other supported formats for motion graphic overlay assetscan be cached in their entirety at the beginning of the event, avoiding resource issues with rendering inreal time.
For motion graphics that rely on ActionScript, follow the best practices outlined in this document tocreate SWF files that are optimized to render with the least impact on AWS Elemental Live systemresources.
Working with Adobe Flash and SWF files
Topics• Minimize your flash stage size (p. 237)
• Optimize flash stage for input (p. 237)
• Optimize your assets (p. 237)
• Sandbox the SWF file (p. 237)
• Do not embed video (p. 237)
• Be wary of simulating video in Flash (p. 237)
• Set publish target and script (p. 237)
Version 2.14 and later236
AWS Elemental Live User GuideSWF
Minimize your flash stage size
If your motion overlay only takes up a small portion of the screen (such as a lower-third or animatedbug), size your Flash stage as small as possible to still contain the asset's size/motion/movement.Position it within the underlying video in AWS Elemental Live when setting up the event. For example,instead of putting a 40x40 animation on a 1280x720 Flash canvas, size your canvas down to 40x40 (orjust slightly larger to capture any dropshadow, embossing, and such).
To specify the position of the animation, go to the Motion Image Inserter portion of the GlobalProcessors section of the AWS Elemental Live event. Use the Left and Top fields to specify the offset, inpixels, from the top-left corner of the screen.
Optimize flash stage for input
For best quality, the resolution and frame rate of the animation should match those of the underlyingvideo. We particularly recommend against scaling down.
If the animation resolution and frame rate cannot be changed, AWS Elemental Live automatically adjuststhe animation, but the quality of the animation might suffer.
Optimize your assets
Be sure that the assets in your Flash animation are optimized for the canvas. Don’t embed a series oflarge images and scale them down to fit. Instead, use images that are properly sized before bringingthem into Flash.
Sandbox the SWF file
Test the SWF file in the sandbox environment before using it. In the sandbox testing environment, theSWF file must not reference other resources on the filesystem or network, which would slow down therendering of the frames.
Do not embed video
The AWS Elemental Live motion graphic overlay feature can't decode video.
Therefore, you cannot embed video into your Flash animation.
Be wary of simulating video in Flash
One way of simulating video in Flash is to include a sequence of images in the SWF file. This mechanismis supported but not recommended. We strongly encourage use of the native Flash animationcomponents because Flash is optimized for those. Use sequences of images only as a last resort and onlyfor small subsections of the screen because Flash is more reliable in those situations.
If you do use a sequence of images, it is especially important to optimize your images—make sure theyare small and simple, crop them down to the smallest possible area, and keep them scaled 1:1 with theimage canvas.
Set publish target and script
Set your Publish Settings so that Target is Flash Player 11.1 and Script is set to ActionScript 3.0. This isthe only version that is supported.
How AWS Elemental Live integrates with ActionScript
How Flash arguments are passed to ActionScript
Variables can be passed to the Flash asset via the swf_arguments tag in the AWS Elemental Live event.These variables are accessible in the ActionScript code via stage.loaderInfo.parameters.
Version 2.14 and later237
AWS Elemental Live User GuideSWF
Topics• How squeezeback is implemented (p. 238)
How squeezeback is implemented
On the ActionScript side
Squeezeback commands must be set up in ActionScript using ExternalInterface.call. You couldset up this call so that it is run, for example, in an event listener for the ActionScript ENTER_FRAMEevent.
The signature of the call() method must contain only five parameters:
• squeezeback
• x
• y
• width
• height
These are the only parameters that AWS Elemental Live handles. Parsing of the parameters is case-sensitive.
Examples of squeezeback
This example instructs AWS Elemental Live to perform squeezeback on the underlying video atcoordinates 0,0 (which positions its upper left corner in the upper left corner of the screen) and to resizethe underlying video to 120 x 60 pixels.
ExternalInterface.call( "squeezeback", "x=0", "y=0", "width=120", "height=60";
)
This example positions the video it at coordinates 1040,560 and to resize the underlying video to 240 x160 pixels. (This positions it in the bottom right corner of a 1280 x 720 frame.)
ExternalInterface.call( "squeezeback", "x=1040", "y=560", "width=120", "height=60";
)
NoteThe command must be entered exactly as shown above, with each parameter in quotes. Thevalues for the position and size parameters must be integers. Parameters are case-sensitive.
On the AWS Elemental Live side
With the first squeezeback command, AWS Elemental Live resizes and/or positions the underlying videoframe. This size and position are permanent: the underlying video does not snap back with the next
Version 2.14 and later238
AWS Elemental Live User GuideSWF
frame. You are free to use any sort of squeezeback you like, including distorting aspect ratio, smoothlyadjusting squeezeback coordinates over time, or suddenly snapping to new coordinates.
The maximum frequency for squeezeback commands is based on the frame rate of the underlying video.If the frame rate is 60 fps, then AWS Elemental Live can send a command every 1/60 second.
Validating your animations with swf-check
AWS Elemental Live includes a tool called swf-check. The tool can do the following:
• Check Flash version and frame render times for your animation.
• Compare frame render times to the Flash animation’s stated frame rate and flag if it detects slowframes.
You should run the tool on real hardware in two situations:
• When the AWS Elemental Live node is idle, to determine whether the Flash animation can be renderedin real time.
• While the AWS Elemental Live node encodes an event that does not include motion graphics. Thistest determines whether the Flash animation can render within the available resources while videoencoding is in progress.
The following is an example of swf-check being run via the command line and the feedback that isdisplayed on the screen for a SWF file does not work well at runtime:
[elemental@hostname ~]$ swf-check -f 30 ~/my_animation.swf Elemental SWF validation tool ./UnsuccessfulExample.swf: - 1920x1080 pixels - 24.000000 fps (max 0.042 sec/frame) - 130 frames - SWF version: 14 - Compression: not compressed Frame 1: status 0: dirty rects (0,0-1920,1080) (0,0-0,0) (0,0-0,0) (0,0-0,0) Duration: 0.0697 !!!!! Render time too long !!!!! Frame 2: status 0: dirty rects (0,0-1920,1080) (0,0-0,0) (0,0-0,0) (0,0-0,0) Duration: 0.0668 !!!!! Render time too long !!!!! Frame 3: status 0: dirty rects (0,0-1920,1080) (0,0-0,0) (0,0-0,0) (0,0-0,0) Duration: 0.0644 !!!!! Render time too long !!!!!
An example of swf-check feedback for a SWF file that runs successfully:
Elemental SWF validation tool./SuccessfulExample.swf: - 1280x720 pixels - 60.000000 fps (max 0.017 sec/frame) - 265 frames - SWF version: 14 - Compression: not compressedFrame 1: status 0: dirty rects (0,0-1280,720) (0,0-0,0) (0,0-0,0) (0,0-0,0) Duration: 0.0051Frame 2: status 0: dirty rects (0,0-1280,720) (0,0-0,0) (0,0-0,0) (0,0-0,0) Duration: 0.0039Frame 3: status 0: dirty rects (0,0-1280,720) (0,0-0,0) (0,0-0,0) (0,0-0,0) Duration: 0.0005
Version 2.14 and later239
AWS Elemental Live User GuideGraphic overlay: Static overlay
Frame 4: status 0: dirty rects (0,0-1280,720) (0,0-0,0) (0,0-0,0) (0,0-0,0) Duration: 0.0092Frame 5: status 0: dirty rects (0,0-1280,720) (0,0-0,0) (0,0-0,0) (0,0-0,0) Duration: 0.0020Frame 6: status 0: dirty rects (0,0-1280,720) (0,0-0,0) (0,0-0,0) (0,0-0,0) Duration: 0.0006
Static graphic overlayYou can insert a static overlay into the event so that it appears on the video in one or more of the videooutputs. You can configure the static overlay with a start time and duration. You can insert the staticoverlay at any position on the video frame, as specified by x/y coordinates. You can configure with anopacity and with fade-in and/or fade- out.
You can insert any number of static overlays in the event.
Topics
• Insertion options and the effect on outputs (p. 240)
• Multiple overlays and layers (p. 243)
• Combining overlays and insertion options (p. 244)
• Procedure (p. 244)
• Using the REST API for static overlays (p. 251)
• Static overlay plus dynamic content switching (p. 260)
• XML structure (p. 261)
Insertion options and the effect on outputs
In the input section: Insert in portion of all outputs
The static overlay can be inserted in the input section in a specific input.
Result: the portion of the output that is sourced from the given input includes the static overlay.
A typical use case for inserting in this section is if some of the inputs already have a static overlay inthe desired location; you do not want to insert another static overlay over this existing static overlay.Therefore, you would insert the static overlay into the inputs that do not have an existing static overlayand omit it from inputs that do have an existing static overlay.
The static overlay will be burned into the video in this input after the input is decoded and before anyglobal processors. This means that the static overlay “sticks” to its input; if the specified start time andduration extend beyond the end of the input, the static overlay will end when the input ends.
If you insert at the Input stage, be very careful with the start time and durations of the static overlays toavoid the static overlay ending abruptly.
Version 2.14 and later240
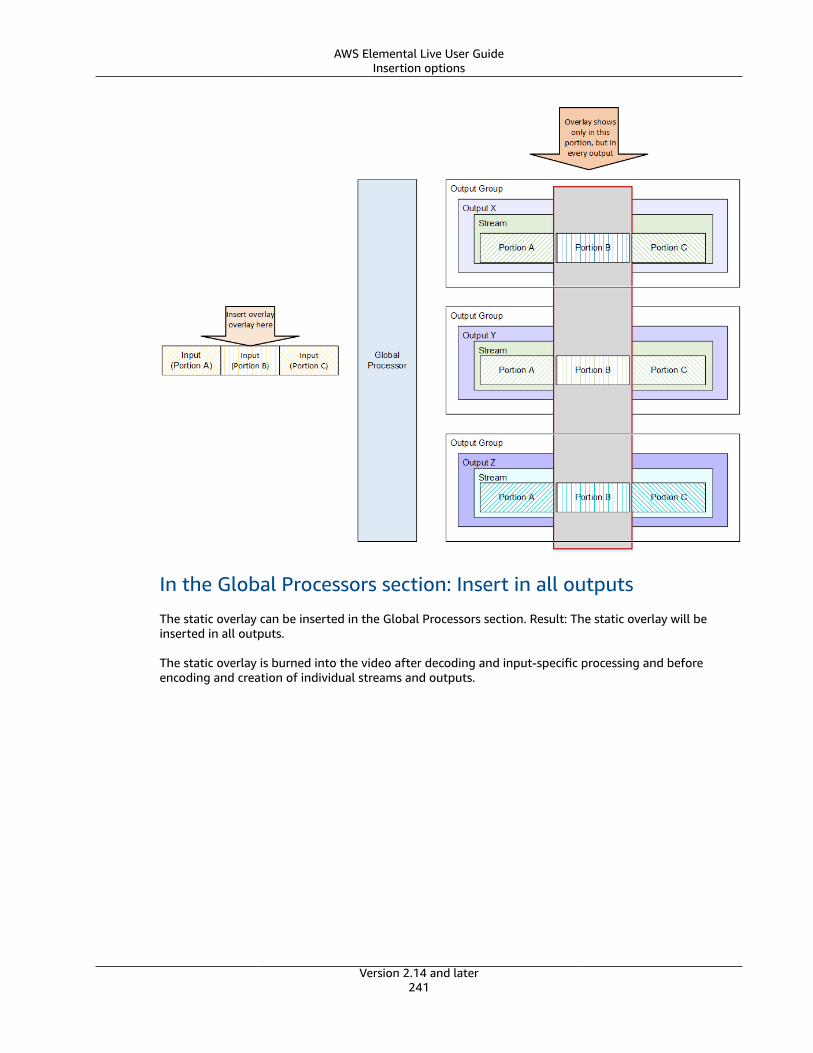
AWS Elemental Live User GuideInsertion options
In the Global Processors section: Insert in all outputs
The static overlay can be inserted in the Global Processors section. Result: The static overlay will beinserted in all outputs.
The static overlay is burned into the video after decoding and input-specific processing and beforeencoding and creation of individual streams and outputs.
Version 2.14 and later241
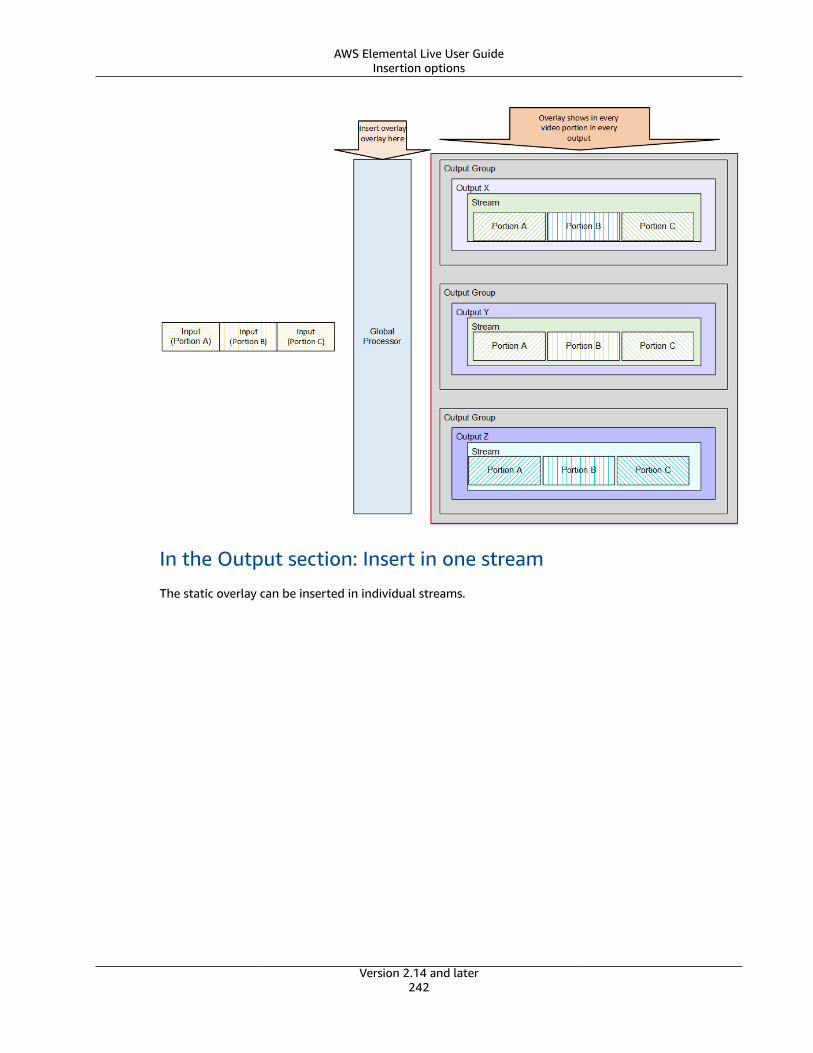
AWS Elemental Live User GuideInsertion options
In the Output section: Insert in one stream
The static overlay can be inserted in individual streams.
Version 2.14 and later242
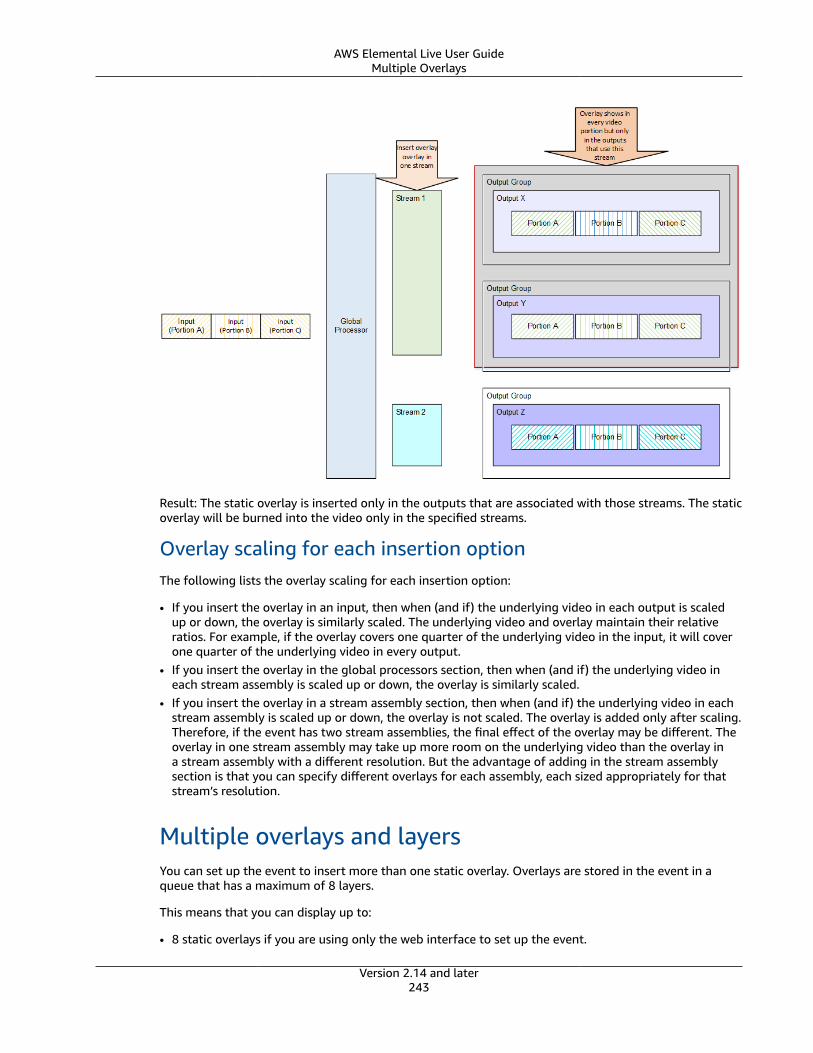
AWS Elemental Live User GuideMultiple Overlays
Result: The static overlay is inserted only in the outputs that are associated with those streams. The staticoverlay will be burned into the video only in the specified streams.
Overlay scaling for each insertion optionThe following lists the overlay scaling for each insertion option:
• If you insert the overlay in an input, then when (and if) the underlying video in each output is scaledup or down, the overlay is similarly scaled. The underlying video and overlay maintain their relativeratios. For example, if the overlay covers one quarter of the underlying video in the input, it will coverone quarter of the underlying video in every output.
• If you insert the overlay in the global processors section, then when (and if) the underlying video ineach stream assembly is scaled up or down, the overlay is similarly scaled.
• If you insert the overlay in a stream assembly section, then when (and if) the underlying video in eachstream assembly is scaled up or down, the overlay is not scaled. The overlay is added only after scaling.Therefore, if the event has two stream assemblies, the final effect of the overlay may be different. Theoverlay in one stream assembly may take up more room on the underlying video than the overlay ina stream assembly with a different resolution. But the advantage of adding in the stream assemblysection is that you can specify different overlays for each assembly, each sized appropriately for thatstream’s resolution.
Multiple overlays and layersYou can set up the event to insert more than one static overlay. Overlays are stored in the event in aqueue that has a maximum of 8 layers.
This means that you can display up to:
• 8 static overlays if you are using only the web interface to set up the event.
Version 2.14 and later243
AWS Elemental Live User GuideCombining overlays and insertion options
• As many static overlays as you want over the duration of the event if you are using the REST API. Seethe section called “Step C” (p. 249). A maximum of 8 static overlays can be “queued” at one time (onein each layer).
Combining overlays and insertion optionsYou can set up the event to insert a static overlay in more than one way. For example, you can insert astatic overlay in one layer in the Input section and insert a static overlay in another layer in the GlobalProcessors section.
Examples
• Example 1 – You want to insert a static overlay at a specific time and run it for 10 seconds. You wantthe static overlay to be placed in the lower right corner of the video frame. You want the static overlayto be 50% opaque and to fade in from nothing to full 50% opacity over 2 seconds, then to fade out tonothing starting 2 seconds before the end of the insertion.
You can implement this use case via the web interface or the REST API.• Example 2 – You want to insert 2 static overlays so that they both appear on the video frame either at
the same time, or with some overlap. You want the display of the static overlays to slightly overlap, sothat one static overlay appears in a location and then while that static overlay is still showing, anotherstatic overlay appears in a specified location. If the locations overlap either partially or completely, youwant to be able to specify which static overlay appears on top.
When you want to insert between 1 and 8 static overlays, you can implement this use case via the webinterface or the REST API.
• Example 3 – You want to insert 20 static overlays over the duration of the video. Some of the staticoverlays repeat, while some are unique. Some of them appear at the same time as others – up to 8static overlays can appear at the same time.
When you want to insert more than 8 static overlays, you must use the REST API.• Example 4 – You want the same static overlay to appear repeatedly over the duration of the video,
either in the same location each time or in different locations. This use case is simply a variation of usecases 2 or 3 with the same static overlay being used each time.
Procedure
Step Methods available
1. Create the event with thedesired static overlays.
Use the REST API or the webinterface.
2. Start the event. Use the REST API or the webinterface.
3. While the event is running,set up more static overlays asdesired.
Use the REST API.
You can implement all features described in this section via REST as well as the web interface. Thissection describes how to use the web interface to insert a graphic overlay. For instructions on doing sovia REST, see the section called “Static overlays with REST API” (p. 251).
The following are valid web interface and REST API combinations:
Version 2.14 and later244
AWS Elemental Live User GuideProcedure
• Initial setup via web interface and run-time changes via the REST API.
• Initial setup and run-time changes via the REST API.
If you use the web interface to perform the initial setup, note the following restrictions:
• You cannot specify more than 8 static overlays in the event.
• You must set up all the static overlays before the event starts to run; there is no mechanism forchanging static overlays at runtime via the web interface.
Topics
• Step A: Prepare the overlay asset (p. 245)
• Step B: Initial setup (p. 245)
• Step C: Manage overlays on a running event (p. 249)
Step A: Prepare the overlay asset1. Create a file with the following characteristics:
• File type: A BMP, PNG, or TGA file.
• Aspect ratio: The overlay can have any aspect ratio. It does not have to match the aspect ratio ofthe underlying video.
• Size, in pixels: The overlay can be any size up to the same size as the underlying video. The overlaycannot be positioned so that part of the overlay runs beyond the right edge or bottom edge of theunderlying video.
• If you set up an overlay so that it is too big or it overruns an edge, if AWS Elemental Live canidentify this error at event creation time, an error message will appear then.
• If AWS Elemental Live cannot identify the error in advance, an error message will appear whilethe event is running. The event will not stop but the insertion request will fail.
2. Place the prepared file in a location accessible to the AWS Elemental Live node. You can specify thelocation in one of the following ways:
• Local to the AWS Elemental Live appliance. E.g. /data/assets/overlay.mov
• A remote server via a mount point. E.g. /data/mnt/assets/overlay.mov
• An S3 bucket, using SSL. E.g. s3ssl://company.test/sample_bucket/overlay.mov
• An S3 bucket, without SSL. E.g. s3://company.test/sample_bucket/overlay.mov
Use sse=true to enable S3 Server Side Encryption (SSE) and rrs=true to enable Reduced RedundancyStorage (RRS). Default values for RRS and SSE are false.
Example: s3://<hostname>/sample_bucket/ encrypted?rrs=true&sse=true
3. Make a note of the location.
Step B: Initial setup
Create or modify the event as follows:
1. Determine the location or locations in the event where the static overlay should be inserted, thendisplay the appropriate section:
Version 2.14 and later245
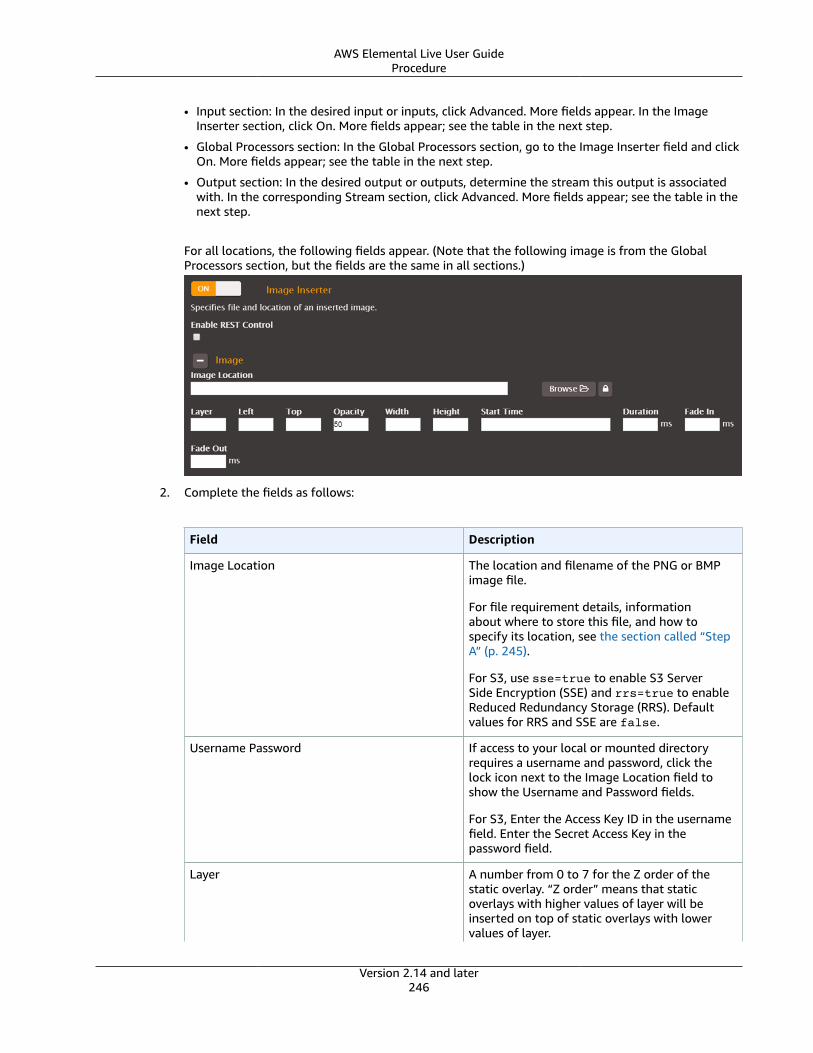
AWS Elemental Live User GuideProcedure
• Input section: In the desired input or inputs, click Advanced. More fields appear. In the ImageInserter section, click On. More fields appear; see the table in the next step.
• Global Processors section: In the Global Processors section, go to the Image Inserter field and clickOn. More fields appear; see the table in the next step.
• Output section: In the desired output or outputs, determine the stream this output is associatedwith. In the corresponding Stream section, click Advanced. More fields appear; see the table in thenext step.
For all locations, the following fields appear. (Note that the following image is from the GlobalProcessors section, but the fields are the same in all sections.)
2. Complete the fields as follows:
Field Description
Image Location The location and filename of the PNG or BMPimage file.
For file requirement details, informationabout where to store this file, and how tospecify its location, see the section called “StepA” (p. 245).
For S3, use sse=true to enable S3 ServerSide Encryption (SSE) and rrs=true to enableReduced Redundancy Storage (RRS). Defaultvalues for RRS and SSE are false.
Username Password If access to your local or mounted directoryrequires a username and password, click thelock icon next to the Image Location field toshow the Username and Password fields.
For S3, Enter the Access Key ID in the usernamefield. Enter the Secret Access Key in thepassword field.
Layer A number from 0 to 7 for the Z order of thestatic overlay. “Z order” means that staticoverlays with higher values of layer will beinserted on top of static overlays with lowervalues of layer.
Version 2.14 and later246
AWS Elemental Live User GuideProcedure
Field Description
Default is 0.
Left Placement of the left edge of the motionoverlay relative to the left edge of the videoframe, in pixels. 0 is the left edge of the frame.
Take note of the width of the motion overlayand make sure that the position of the left edgeof the motion overlay does not cause the rightedge to be cropped.
Top Placement of the top edge of the motionoverlay relative to the top edge of the videoframe, in pixels.0 is the top edge of the frame.Default is 0.
Take note of the height of the motion overlayand make sure that the position of the topedge of the motion overlay does not cause thebottom edge to be cropped.
Opacity The opacity of the static overlay, as a numberfrom 0 to 100. 0 is transparent. 100 is fullyopaque. Default is 50.
Width The width of the static overlay when insertedin the video, in pixels. Leave blank to use thenative width of the static overlay. The originalstatic overlay will be scaled up or down, to thespecified width.
Height The height of the static overlay when insertedin the video, in pixels. Leave blank to use thenative height of the static overlay. The originalstatic overlay will be scaled up or down, to thespecified height.
Start Time The start time for the overlay. Specify the starttime in one of the formats listed at the sectioncalled “Start time formats” (p. 248).
Duration The amount of time, in milliseconds, for theoverlay to remain on the video.
If this field is left blank, the static overlay willremain on the video as follows:
• In the Input section: Until this input ends.• In the Global Processor section: Until the
event ends.• In the Output section: Until the event ends.
The total running time of the static overlay isFade in + Duration + Fade out.
Version 2.14 and later247
AWS Elemental Live User GuideProcedure
Field Description
Fade In The duration, in milliseconds, for the staticoverlay fade-in. This time is inserted before thestart time of the static overlay.
Fade Out This field is valid only if the Duration field iscompleted.
The duration, in milliseconds, for the staticoverlay fade-out. This time is added to thestatic overlay duration.
Enable Rest Control Check this field only if you plan to managemotion overlays via the REST API, after thisinitial setup via the web interface. Typically, youwill want this tag to be true.
3. If desired, click Add Image and enter the information for another static overlay, up to a maximum of8 static overlays.
• Assign a unique Layer number to each static overlay. The layers do not have to appear in anyparticular order on the screen, but each number must be used once only.
• The static overlay Start Time and Duration can be set so that any static overlay overlaps thedisplay time of any other static overlay.
• The Left/Top fields can be set so that any static overlay physically overlaps any other staticoverlay, as much as you want; the static overlays are displayed according to their Layer value.
Note: If you are using input switching to provide input redundancy (with or without the hot-hot backupmode), then make sure you insert the static overlay in both input pairs.
Start time formats
Option 1: Timecode format (HH:MM:SS:FF). The overlay start is determined by comparing the specifiedstart to the appropriate timecode.
• If the overlay is specified in the Input section: The start time for the static overlay will be comparedto the input timecode (the timecode for a given input). The source for the input timecode is specifiedseparately for each input (Input > Timecode Source field). The input timecode is calculated as follows:
• If Timecode Source is Embedded: The timecode associated with each frame is extracted from thetimecode carried with the input media. Note that each input will have its own timecode and thetimecode may not align well from one input to another.
• If Timecode Source field is Start at 0: The timecode of the first frame of the input is 00:00:00:00 andthe timecode counts up with each successive frame. The timecode starts over with each input.
• If Timecode Source field is System Clock or Local System Clock (AWS Elemental Live only): Thetimecode of each frame in the input is the system time at which the frame is decoded.
• If the overlay is specified in the Global Processor section: The overlay start is compared to the outputtimecode (which is shared by all outputs). The source for the output timecode is specified for the entireevent, in the Timecode Config > Source field. The output timecode is calculated as follows:
• If Source is Embedded: The timecode is extracted from the timecode carried with the input media.That timecode becomes the output timecode for the first transcoded frame. Then the outputtimecode counts up with each successive frame in the entire output.
• If Source is Start at 0: The output timecode for the first frame is 00:00:00:00 and then the outputtimecode counts up with each successive frame in the entire output.
Version 2.14 and later248
AWS Elemental Live User GuideProcedure
• If Source is System Clock or Local System Clock (AWS Elemental Live only): The output timecode forthe first frame is the system time at which the frame is decoded. Then the output timecode countsup with each successive frame in the entire output.
• If Source is Specified Start: The output timecode for the first frame is the time you specified whenyou selected this option as the timecode source. Then the output timecode counts up with eachsuccessive frame in the entire output.
• If Source is External Reference Connector (AWS Elemental Live only): The timecode is extracted fromexternal LTC source. That timecode becomes the output timecode for the first transcoded frame.Then the output timecode counts up with each successive frame in the entire output.
• If the static overlay is specified in the Output section: The start time for the static overlay is calculatedin the same way as a static overlay in the Global Processor section.
Option 2: ISO 8601 UTC time with no dashes or colons. For example, 20160102T030405.678Z. Inthis case, the start time for every overlay (regardless of whether it is defined in the input, the globalprocessor or the output) will be the UTC time.
Option 3: Only when adding or modifying an overlay in a running event (not when creating an event ormodifying a non-running event), set this tag to an empty string to set the start time to “now”. With thisoption, the start time is never exact.
Step C: Manage overlays on a running event
Once the event has started, you can work with static overlays only via the REST API. You cannot workwith static overlays on a running event via the web interface.
Change the static overlay or overlays on a running event:
1. If you did not set the <enable_rest> element to true when you created the event, modify theevent (PUT Event) and set this value. For the location of this element, see the section called “Modifystatic overlay” (p. 259).
2. Send the Modify Static Overlay command (see the section called “Static overlays with RESTAPI” (p. 251)) to make the desired change to the static overlays in the event.
Runtime REST commands change the event XML
When you send REST commands during an event, the event XML is permanently changed. Any data sentvia the REST call goes into the XML.
For example, you might put a scoreboard overlay on your event during a sporting event. If you do notsend a REST call to deactivate the overlay once the game has ended, the scoreboard will appear again atthe same time the next day.
Therefore, make sure to do one of the following:
• If you plan to run the event (event A) again with different video content but with the same graphicoverlays, make sure to export your XML for re-use before starting the event. Then create a new event(event B) using the exported XML. Do not start event A again.
• If you are running a 24/7 channel and you do not want your overlay to recur, remember to senda REST command to set <activate> to false once the overlay has run. This will delete the entire<insertable_images> element from the event XML.
You could also specify an absolute start time for each overlay by using the ISO 8601 UTC time formatto specify an absolute time and date for the overlay. The overlays will not run again the next day.
Version 2.14 and later249
AWS Elemental Live User GuideProcedure
Options for insertion - which outputs are affected
You can insert static overlays in one of the following places in the running event. These places are thesame as the places when inserting in a new event or modifying a non-running event.
• In an individual input. The input must be currently running or be in the future.
If you include a start time in the XML body, that start time must fall within the scope of the specifiedinput. It must correspond to a time that is valid for that input. For example, if the input runs from 1:00p.m. to 2:00 p.m. by the clock, the start time must correspond to a clock time between 1:00 p.m. and2:00 p.m., otherwise the insertion will be ignored. The start time can be in the past, so long as it iswithin the scope of the input; in this case, the overlay will be inserted immediately.
• In all outputs.
If you include a start time in the XML body, the overlay will be inserted at that at start time. If thatstart time is in the past, the overlay will be inserted immediately.
• n the outputs associated with one stream assembly.
If you include a start time in the XML body, the overlay will be inserted at that at start time. If thatstart time is in the past, the overlay will be inserted immediately.
Types of changes
Add an overlay in a layer
You can add an overlay in a layer. For example, if you did not fill all 8 layers when creating the event,you can add more static overlays, up to a total of 8 for the event. Or if you already deleted a layer (asdescribed below), you can fill it with a new static overlay.
You must enter a Modify Static Overlay command (the section called “Create or modify a non-runningevent” (p. 252)) and include the following tags in the XML body:
• layer: The (unused) layer where you want to add the static overlay.• activate: Set to true. Note that this tag is not part of the XML body for creating the event.• Other tags: Set all other tags as desired to specify the content and its characteristics, start time and
duration.
Modify an existing overlay
You can modify the existing content in a layer. You can do the following:
• Change a static overlay that has not yet run.• Change a static overlay that is currently running. The static overlay will change in mid-stream.• Change a static overlay that has run in order to re-use the layer.
You can change the static overlay’s start time or duration. Or you can change its position. Or you canchange the actual overlay that runs.
You must enter a Modify Static Overlay command (the section called “Create or modify a non-runningevent” (p. 252)) and include the following tags in the XML body:
• layer: The layer whose static overlay you want to modify.• activate: Set to true. Note that this tag is not part of the XML body for creating the event.• Other tags: Set all other tags as desired to specify the content and its characteristics, start time and
duration. Only the tags you specify will be changed.
Version 2.14 and later250

AWS Elemental Live User GuideStatic overlays with REST API
Delete an overlay
You can delete the existing content in a layer. If the static overlay has not yet run, it will not run. If thestatic overlay is currently running, it will be removed. If the static overlay has already run, there is notreally any need to delete the content.
You must enter a Modify Static Overlay command (the section called “Create or modify a non-runningevent” (p. 252)) and include the following tags in the XML body:
• layer: The layer to delete.• activate: Set to false. Note that this tag is not part of the XML body for creating the event.
Using the REST API for static overlaysTopics
• Static graphic overlay commands (p. 251)• Create or modify a non-running event with static graphic overlay (p. 252)• Modify static overlay on a running event (p. 259)
Static graphic overlay commands
Nickname Action Signature Description
Create Event POST <Live IP address>/live_events
Create an event thatincludes static overlayinformation.
Modify Event PUT <Live IP address>/live_events/live_event/<eventID>
Modify an event (that isnot running) and add,modify or delete staticoverlay information.
Modify Static Overlay,Running Event
POST /live_event/<eventID>/image_inserter
All outputs: add,modify or deletestatic information in arunning event.
Modify Static Overlay,Running Event
POST <Live IP Address>/live_events/<event ID>/image_inserter/output/<output id>
Where <outputid> is the unique IDautomatically assignedto this output when theevent is created.
Specific output: add,modify or deletestatic information in arunning event.
Modify Static Overlay,Running Event
POST <Live IP Address>/live_events/<event ID>/image_inserter/output/by_stream/<stream id>
All outputs associatedwith a specific stream:add, modify or deletestatic information in arunning event.
Version 2.14 and later251
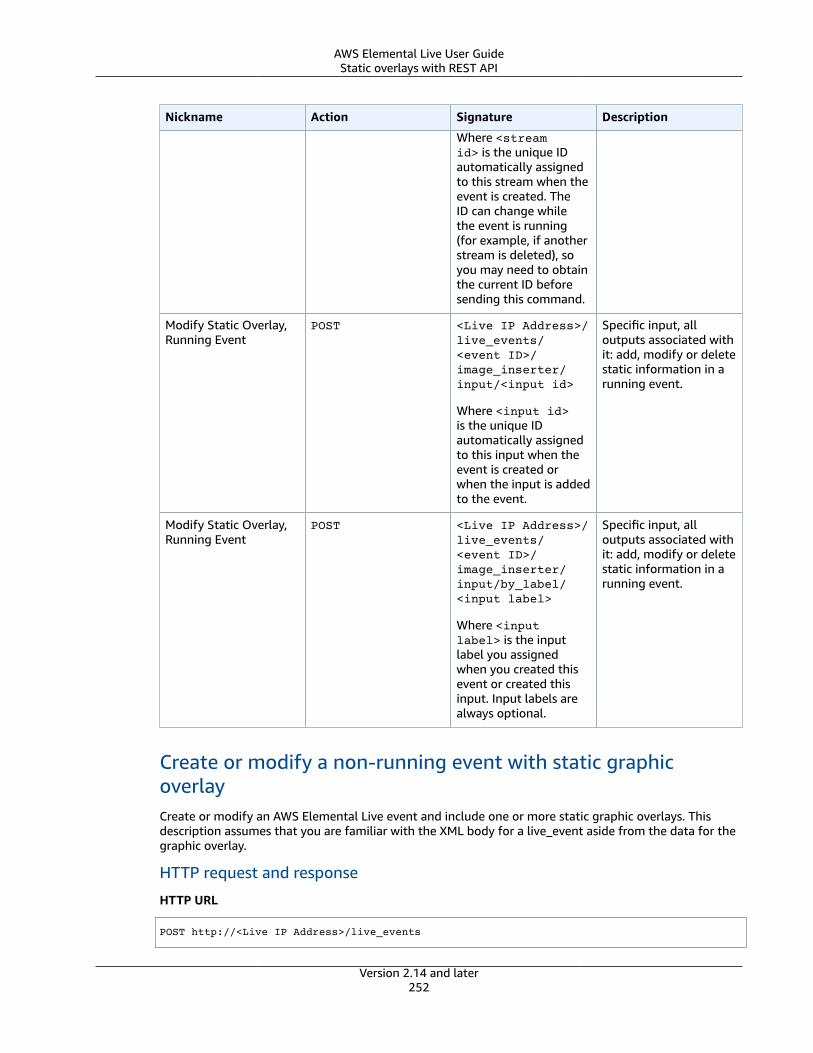
AWS Elemental Live User GuideStatic overlays with REST API
Nickname Action Signature Description
Where <streamid> is the unique IDautomatically assignedto this stream when theevent is created. TheID can change whilethe event is running(for example, if anotherstream is deleted), soyou may need to obtainthe current ID beforesending this command.
Modify Static Overlay,Running Event
POST <Live IP Address>/live_events/<event ID>/image_inserter/input/<input id>
Where <input id>is the unique IDautomatically assignedto this input when theevent is created orwhen the input is addedto the event.
Specific input, alloutputs associated withit: add, modify or deletestatic information in arunning event.
Modify Static Overlay,Running Event
POST <Live IP Address>/live_events/<event ID>/image_inserter/input/by_label/<input label>
Where <inputlabel> is the inputlabel you assignedwhen you created thisevent or created thisinput. Input labels arealways optional.
Specific input, alloutputs associated withit: add, modify or deletestatic information in arunning event.
Create or modify a non-running event with static graphicoverlayCreate or modify an AWS Elemental Live event and include one or more static graphic overlays. Thisdescription assumes that you are familiar with the XML body for a live_event aside from the data for thegraphic overlay.
HTTP request and response
HTTP URL
POST http://<Live IP Address>/live_events
Version 2.14 and later252
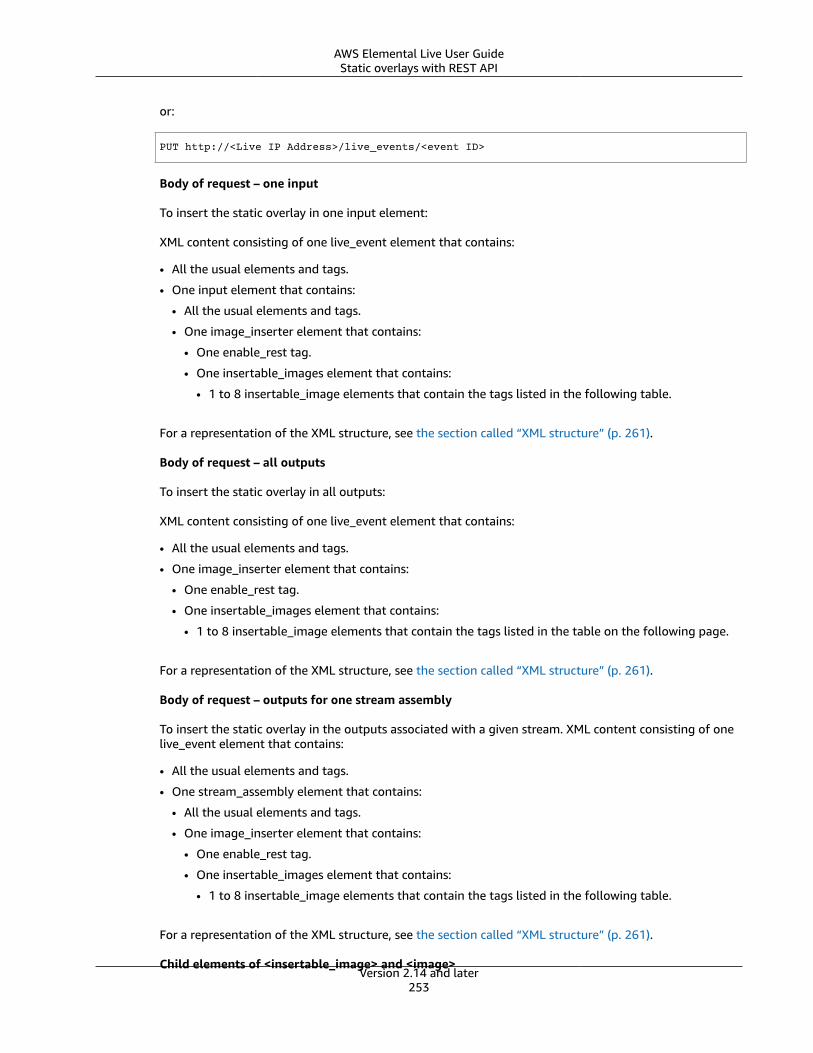
AWS Elemental Live User GuideStatic overlays with REST API
or:
PUT http://<Live IP Address>/live_events/<event ID>
Body of request – one input
To insert the static overlay in one input element:
XML content consisting of one live_event element that contains:
• All the usual elements and tags.
• One input element that contains:
• All the usual elements and tags.
• One image_inserter element that contains:
• One enable_rest tag.
• One insertable_images element that contains:
• 1 to 8 insertable_image elements that contain the tags listed in the following table.
For a representation of the XML structure, see the section called “XML structure” (p. 261).
Body of request – all outputs
To insert the static overlay in all outputs:
XML content consisting of one live_event element that contains:
• All the usual elements and tags.
• One image_inserter element that contains:
• One enable_rest tag.
• One insertable_images element that contains:
• 1 to 8 insertable_image elements that contain the tags listed in the table on the following page.
For a representation of the XML structure, see the section called “XML structure” (p. 261).
Body of request – outputs for one stream assembly
To insert the static overlay in the outputs associated with a given stream. XML content consisting of onelive_event element that contains:
• All the usual elements and tags.
• One stream_assembly element that contains:
• All the usual elements and tags.
• One image_inserter element that contains:
• One enable_rest tag.
• One insertable_images element that contains:
• 1 to 8 insertable_image elements that contain the tags listed in the following table.
For a representation of the XML structure, see the section called “XML structure” (p. 261).
Child elements of <insertable_image> and <image>Version 2.14 and later
253
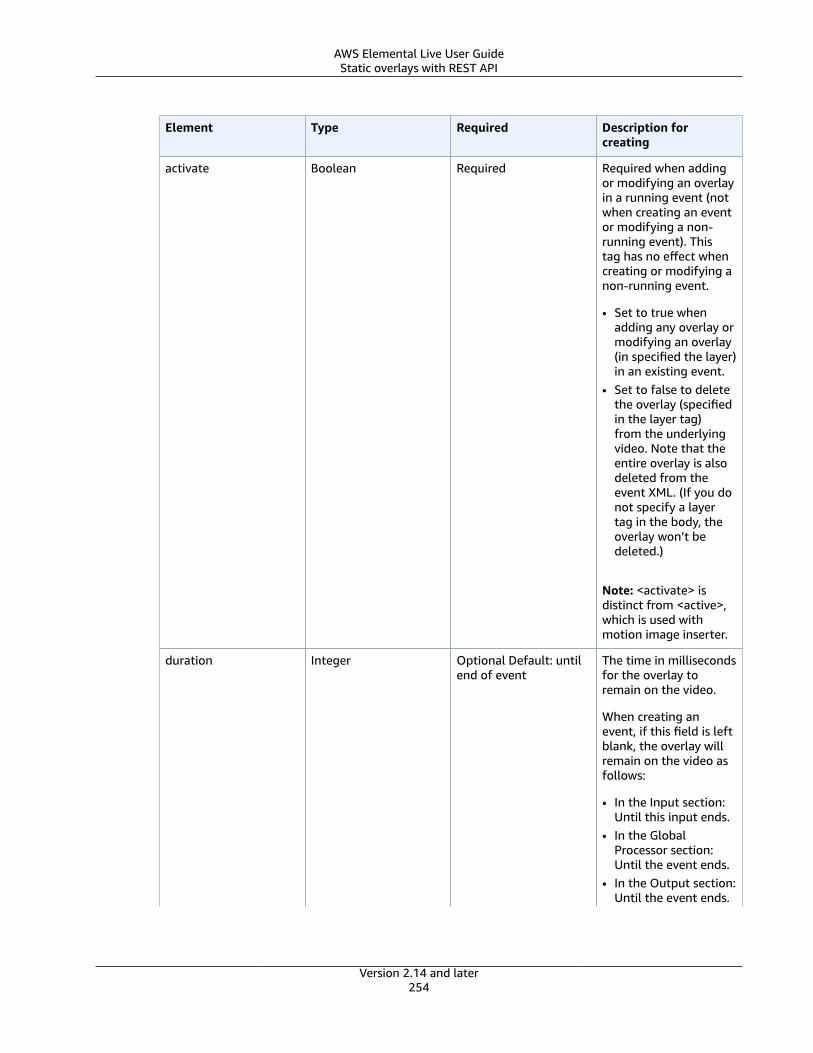
AWS Elemental Live User GuideStatic overlays with REST API
Element Type Required Description forcreating
activate Boolean Required Required when addingor modifying an overlayin a running event (notwhen creating an eventor modifying a non-running event). Thistag has no effect whencreating or modifying anon-running event.
• Set to true whenadding any overlay ormodifying an overlay(in specified the layer)in an existing event.
• Set to false to deletethe overlay (specifiedin the layer tag)from the underlyingvideo. Note that theentire overlay is alsodeleted from theevent XML. (If you donot specify a layertag in the body, theoverlay won’t bedeleted.)
Note: <activate> isdistinct from <active>,which is used withmotion image inserter.
duration Integer Optional Default: untilend of event
The time in millisecondsfor the overlay toremain on the video.
When creating anevent, if this field is leftblank, the overlay willremain on the video asfollows:
• In the Input section:Until this input ends.
• In the GlobalProcessor section:Until the event ends.
• In the Output section:Until the event ends.
Version 2.14 and later254

AWS Elemental Live User GuideStatic overlays with REST API
Element Type Required Description forcreating
The total running timeof the overlay is fade_in+ duration + fade_out.
fade_in Integer Optional The duration, inmilliseconds, for theoverlay fade-in. Thistime is inserted beforethe start time of theoverlay.
fade_out Integer Optional This field is valid onlyif the Duration field iscompleted.
The duration, inmilliseconds, for theoverlay fade-out. Thistime is added to theoverlay duration.
height Integer Optional Default: nativeheight of overlay
The height of theoverlay when insertedin the video, in pixels.
When creating anevent, leave blank touse the native height ofthe overlay. The originaloverlay will be scaledup or down, to thespecified height.
width Integer Optional Default: nativewidth of overlay
The width of theoverlay when insertedin the video, in pixels.
When creating anevent, leave blank touse the native height ofthe overlay. The originaloverlay will be scaledup or down, to thespecified width.
image_inserter_input Location Required Overlay PNG or BMPfile to insert.
For file requirementdetails, informationabout where to storethis file, and how tospecify its location, seethe section called “StepA” (p. 245).
Version 2.14 and later255

AWS Elemental Live User GuideStatic overlays with REST API
Element Type Required Description forcreating
image_x Integer Required Placement of theleft edge of theoverlay relative to thehorizontal axis for thevideo frame, in pixels.0 is the left edge of theframe. When creatingan event, cannot beomitted.
Take note of the widthof the overlay and makesure that the positionof the left edge of theoverlay does not causethe right edge to becropped.
image_y Integer Required Placement of the topedge of the overlayrelative to the verticalaxis for the videoframe, in pixels. 0 isthe top edge of theframe. When creatingan event, cannot beomitted.
Take note of the heightof the overlay and makesure that the positionof the top edge of theoverlay does not causethe bottom edge to becropped.
Version 2.14 and later256
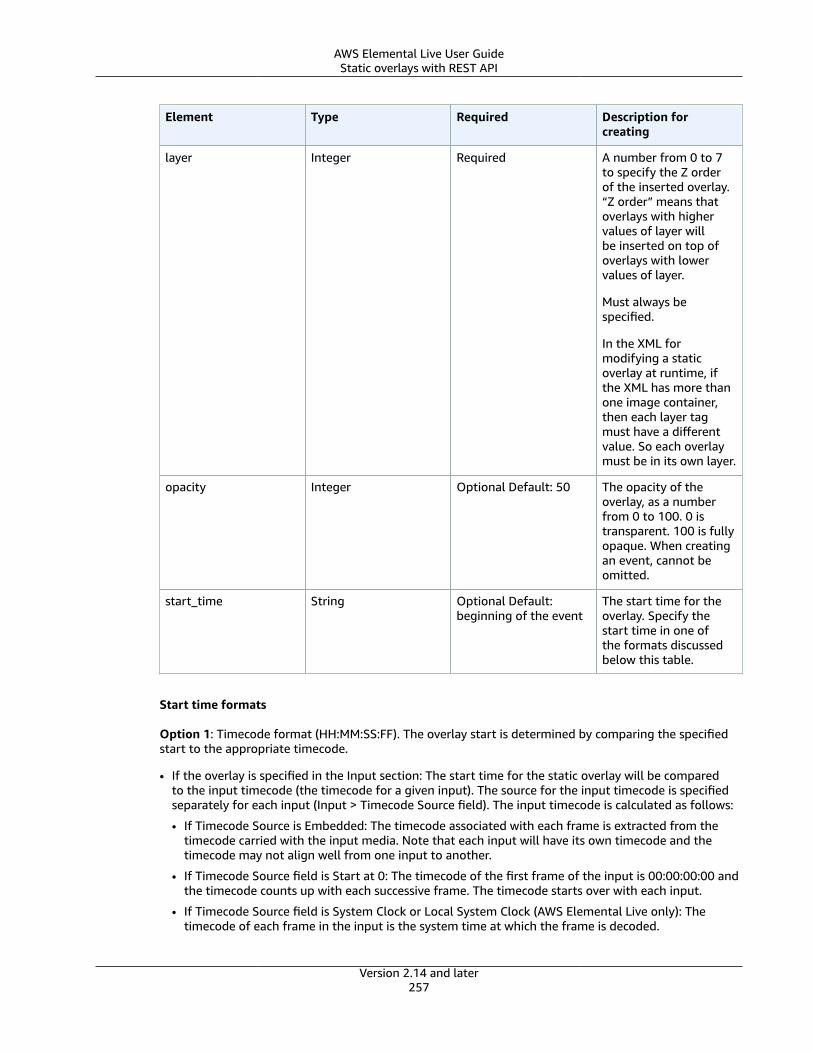
AWS Elemental Live User GuideStatic overlays with REST API
Element Type Required Description forcreating
layer Integer Required A number from 0 to 7to specify the Z orderof the inserted overlay.“Z order” means thatoverlays with highervalues of layer willbe inserted on top ofoverlays with lowervalues of layer.
Must always bespecified.
In the XML formodifying a staticoverlay at runtime, ifthe XML has more thanone image container,then each layer tagmust have a differentvalue. So each overlaymust be in its own layer.
opacity Integer Optional Default: 50 The opacity of theoverlay, as a numberfrom 0 to 100. 0 istransparent. 100 is fullyopaque. When creatingan event, cannot beomitted.
start_time String Optional Default:beginning of the event
The start time for theoverlay. Specify thestart time in one ofthe formats discussedbelow this table.
Start time formats
Option 1: Timecode format (HH:MM:SS:FF). The overlay start is determined by comparing the specifiedstart to the appropriate timecode.
• If the overlay is specified in the Input section: The start time for the static overlay will be comparedto the input timecode (the timecode for a given input). The source for the input timecode is specifiedseparately for each input (Input > Timecode Source field). The input timecode is calculated as follows:
• If Timecode Source is Embedded: The timecode associated with each frame is extracted from thetimecode carried with the input media. Note that each input will have its own timecode and thetimecode may not align well from one input to another.
• If Timecode Source field is Start at 0: The timecode of the first frame of the input is 00:00:00:00 andthe timecode counts up with each successive frame. The timecode starts over with each input.
• If Timecode Source field is System Clock or Local System Clock (AWS Elemental Live only): Thetimecode of each frame in the input is the system time at which the frame is decoded.
Version 2.14 and later257
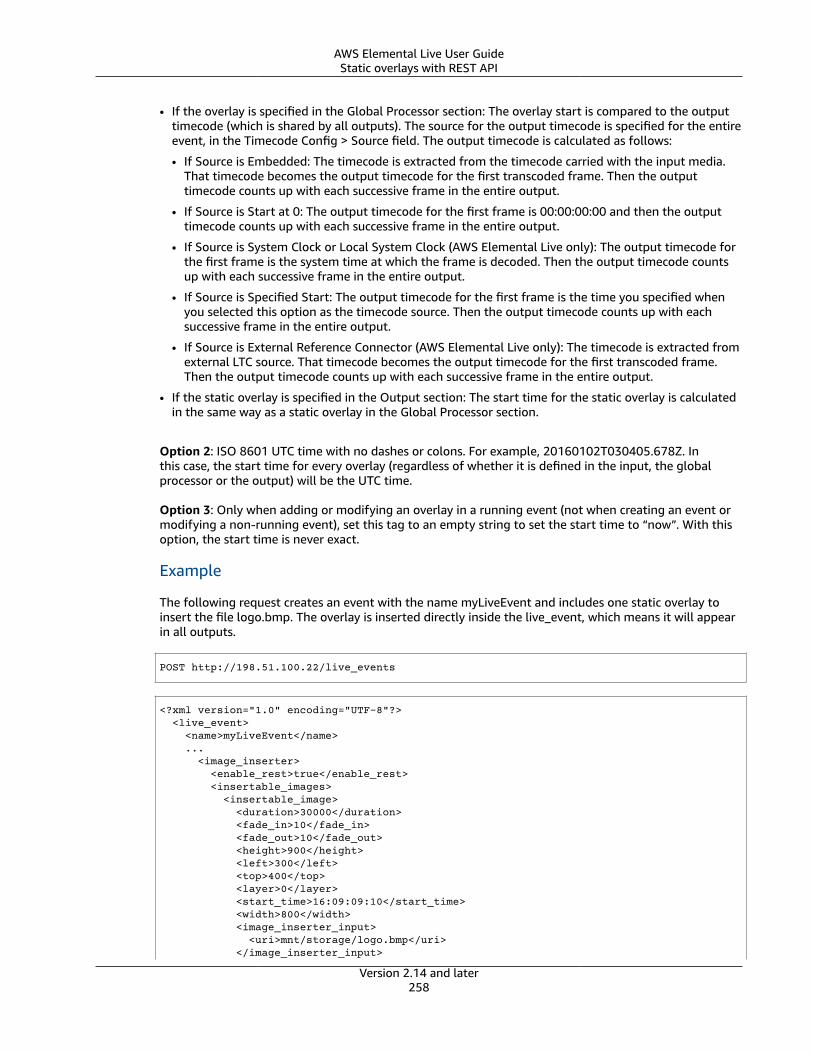
AWS Elemental Live User GuideStatic overlays with REST API
• If the overlay is specified in the Global Processor section: The overlay start is compared to the outputtimecode (which is shared by all outputs). The source for the output timecode is specified for the entireevent, in the Timecode Config > Source field. The output timecode is calculated as follows:
• If Source is Embedded: The timecode is extracted from the timecode carried with the input media.That timecode becomes the output timecode for the first transcoded frame. Then the outputtimecode counts up with each successive frame in the entire output.
• If Source is Start at 0: The output timecode for the first frame is 00:00:00:00 and then the outputtimecode counts up with each successive frame in the entire output.
• If Source is System Clock or Local System Clock (AWS Elemental Live only): The output timecode forthe first frame is the system time at which the frame is decoded. Then the output timecode countsup with each successive frame in the entire output.
• If Source is Specified Start: The output timecode for the first frame is the time you specified whenyou selected this option as the timecode source. Then the output timecode counts up with eachsuccessive frame in the entire output.
• If Source is External Reference Connector (AWS Elemental Live only): The timecode is extracted fromexternal LTC source. That timecode becomes the output timecode for the first transcoded frame.Then the output timecode counts up with each successive frame in the entire output.
• If the static overlay is specified in the Output section: The start time for the static overlay is calculatedin the same way as a static overlay in the Global Processor section.
Option 2: ISO 8601 UTC time with no dashes or colons. For example, 20160102T030405.678Z. Inthis case, the start time for every overlay (regardless of whether it is defined in the input, the globalprocessor or the output) will be the UTC time.
Option 3: Only when adding or modifying an overlay in a running event (not when creating an event ormodifying a non-running event), set this tag to an empty string to set the start time to “now”. With thisoption, the start time is never exact.
Example
The following request creates an event with the name myLiveEvent and includes one static overlay toinsert the file logo.bmp. The overlay is inserted directly inside the live_event, which means it will appearin all outputs.
POST http://198.51.100.22/live_events
<?xml version="1.0" encoding="UTF-8"?> <live_event> <name>myLiveEvent</name> ... <image_inserter> <enable_rest>true</enable_rest> <insertable_images> <insertable_image> <duration>30000</duration> <fade_in>10</fade_in> <fade_out>10</fade_out> <height>900</height> <left>300</left> <top>400</top> <layer>0</layer> <start_time>16:09:09:10</start_time> <width>800</width> <image_inserter_input> <uri>mnt/storage/logo.bmp</uri> </image_inserter_input>
Version 2.14 and later258
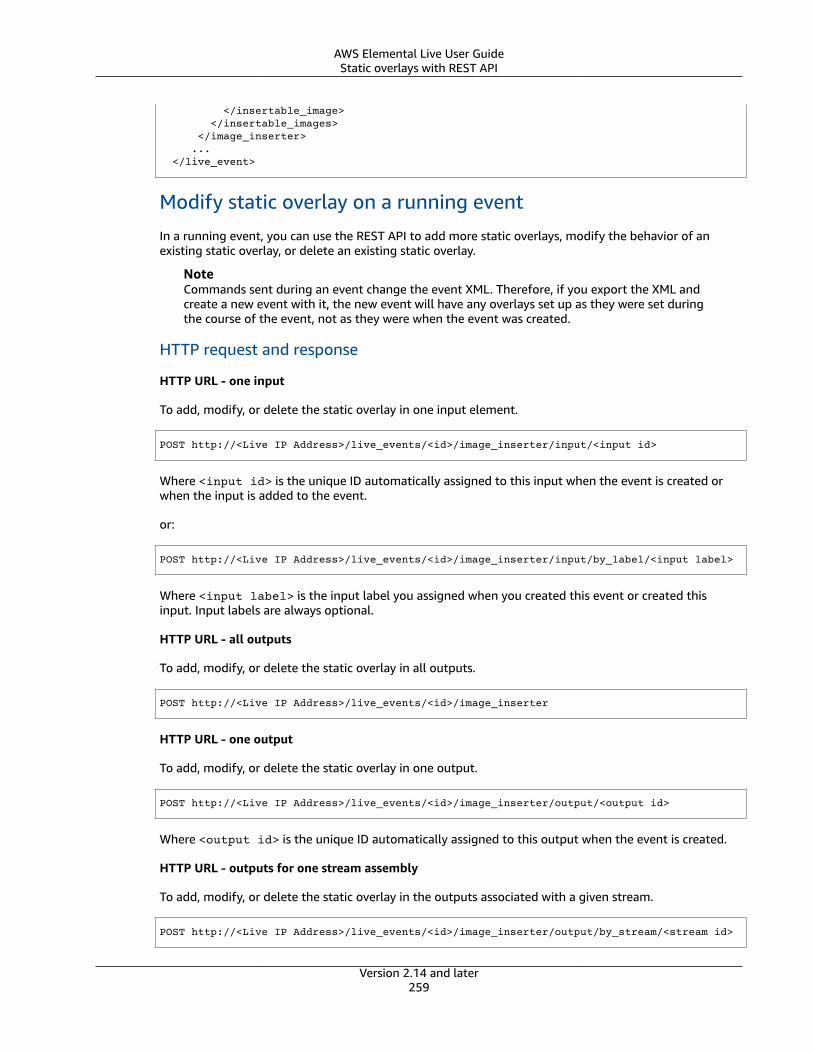
AWS Elemental Live User GuideStatic overlays with REST API
</insertable_image> </insertable_images> </image_inserter> ... </live_event>
Modify static overlay on a running event
In a running event, you can use the REST API to add more static overlays, modify the behavior of anexisting static overlay, or delete an existing static overlay.
NoteCommands sent during an event change the event XML. Therefore, if you export the XML andcreate a new event with it, the new event will have any overlays set up as they were set duringthe course of the event, not as they were when the event was created.
HTTP request and response
HTTP URL - one input
To add, modify, or delete the static overlay in one input element.
POST http://<Live IP Address>/live_events/<id>/image_inserter/input/<input id>
Where <input id> is the unique ID automatically assigned to this input when the event is created orwhen the input is added to the event.
or:
POST http://<Live IP Address>/live_events/<id>/image_inserter/input/by_label/<input label>
Where <input label> is the input label you assigned when you created this event or created thisinput. Input labels are always optional.
HTTP URL - all outputs
To add, modify, or delete the static overlay in all outputs.
POST http://<Live IP Address>/live_events/<id>/image_inserter
HTTP URL - one output
To add, modify, or delete the static overlay in one output.
POST http://<Live IP Address>/live_events/<id>/image_inserter/output/<output id>
Where <output id> is the unique ID automatically assigned to this output when the event is created.
HTTP URL - outputs for one stream assembly
To add, modify, or delete the static overlay in the outputs associated with a given stream.
POST http://<Live IP Address>/live_events/<id>/image_inserter/output/by_stream/<stream id>
Version 2.14 and later259
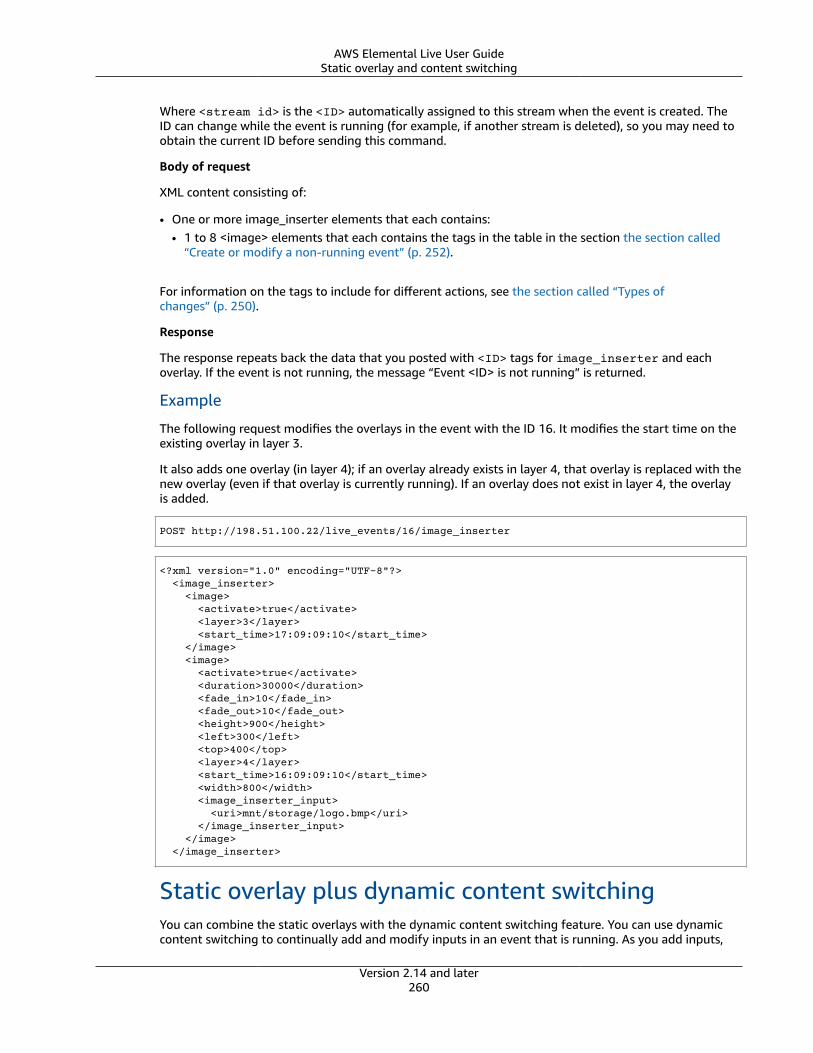
AWS Elemental Live User GuideStatic overlay and content switching
Where <stream id> is the <ID> automatically assigned to this stream when the event is created. TheID can change while the event is running (for example, if another stream is deleted), so you may need toobtain the current ID before sending this command.
Body of request
XML content consisting of:
• One or more image_inserter elements that each contains:• 1 to 8 <image> elements that each contains the tags in the table in the section the section called
“Create or modify a non-running event” (p. 252).
For information on the tags to include for different actions, see the section called “Types ofchanges” (p. 250).
Response
The response repeats back the data that you posted with <ID> tags for image_inserter and eachoverlay. If the event is not running, the message “Event <ID> is not running” is returned.
Example
The following request modifies the overlays in the event with the ID 16. It modifies the start time on theexisting overlay in layer 3.
It also adds one overlay (in layer 4); if an overlay already exists in layer 4, that overlay is replaced with thenew overlay (even if that overlay is currently running). If an overlay does not exist in layer 4, the overlayis added.
POST http://198.51.100.22/live_events/16/image_inserter
<?xml version="1.0" encoding="UTF-8"?> <image_inserter> <image> <activate>true</activate> <layer>3</layer> <start_time>17:09:09:10</start_time> </image> <image> <activate>true</activate> <duration>30000</duration> <fade_in>10</fade_in> <fade_out>10</fade_out> <height>900</height> <left>300</left> <top>400</top> <layer>4</layer> <start_time>16:09:09:10</start_time> <width>800</width> <image_inserter_input> <uri>mnt/storage/logo.bmp</uri> </image_inserter_input> </image> </image_inserter>
Static overlay plus dynamic content switchingYou can combine the static overlays with the dynamic content switching feature. You can use dynamiccontent switching to continually add and modify inputs in an event that is running. As you add inputs,
Version 2.14 and later260
AWS Elemental Live User GuideXML structure
you can insert static or motion overlays, as desired. For information on dynamic content switching, seeDynamicinput switching (p. 169).
Scheduling inputs and overlaysThe scheduling of the inputs and the overlays is completely decoupled.
A given input X might be added several times to the dynamic playlist, for example, so that it plays at2:00 p.m. and then plays again at 3:10 p.m.
If you want an overlay to appear the first time that input X plays, you might set its start time for 2:10p.m. The next time that input X plays, there is no logic to play the same overlay again because 2:10p.m. has passed. Therefore, if you want the overlay to appear again on input X, you must send a ModifyOverlay call again.
Behavior with different insertion options for static overlaysFollowing are points to remember when using static overlay with dynamic content switching:
Playlist input plus overlay at the input stage
You specify the overlay in the input section of the event. Therefore, whenever you include this input inthe playlist, the overlay will be included. If you want to the image the first time the input appears in theplaylist but you don't want to include it the next time the input appears, you must unless enter an actionto remove it.
• If you want to include the overlay in a given repetition of the input, you might need to change thestart time of the overlay. See the information on the Start Time in the table under the section called“Step B” (p. 245).
• If you do not want to include the overlay in a given repetition of that input, you must use the RESTinterface to enter a Modify Static Overlay command and delete the overlay. See the section called“Commands” (p. 251).
Playlist input plus overlay at the global processing stage
The scheduling of the inputs and the overlays is completely decoupled.
A given input X might be added several times to the dynamic playlist, for example, so that it plays at2:00 p.m. and then plays again at 3:10 p.m.
If you want an overlay to appear the first time that input X plays, you might set its start time for 2:10p.m. The next time that input X plays, there is no logic to play the same overlay again because 2:10 p.m.has passed.
Therefore, if you want the overlay to appear again on input X, you must enter the Modify Static Overlaycommand again.
Playlist input plus overlay at the output stage
The same comments as for global processing stage apply.
XML structureTopics
• Static overlay, creating and modifying a non-running event (p. 262)• Static overlay: Modifying overlay on a running event (p. 264)
Version 2.14 and later261

AWS Elemental Live User GuideXML structure
Static overlay, creating and modifying a non-running event
Overlays at top level
<image_inserter>
enable_rest
<insertable_image>
duration
fade_in
fade_out
height
image_x
image_y
layer
opacity
start_time
width
<image_inserter_input>
certificate_file
interface
password
uri
username
</image_inserter_input>
</insertable_image>
</image_inserter>
Overlays in input section
Data in <input> element
<input>
<image_inserter>
enable_rest
Version 2.14 and later262
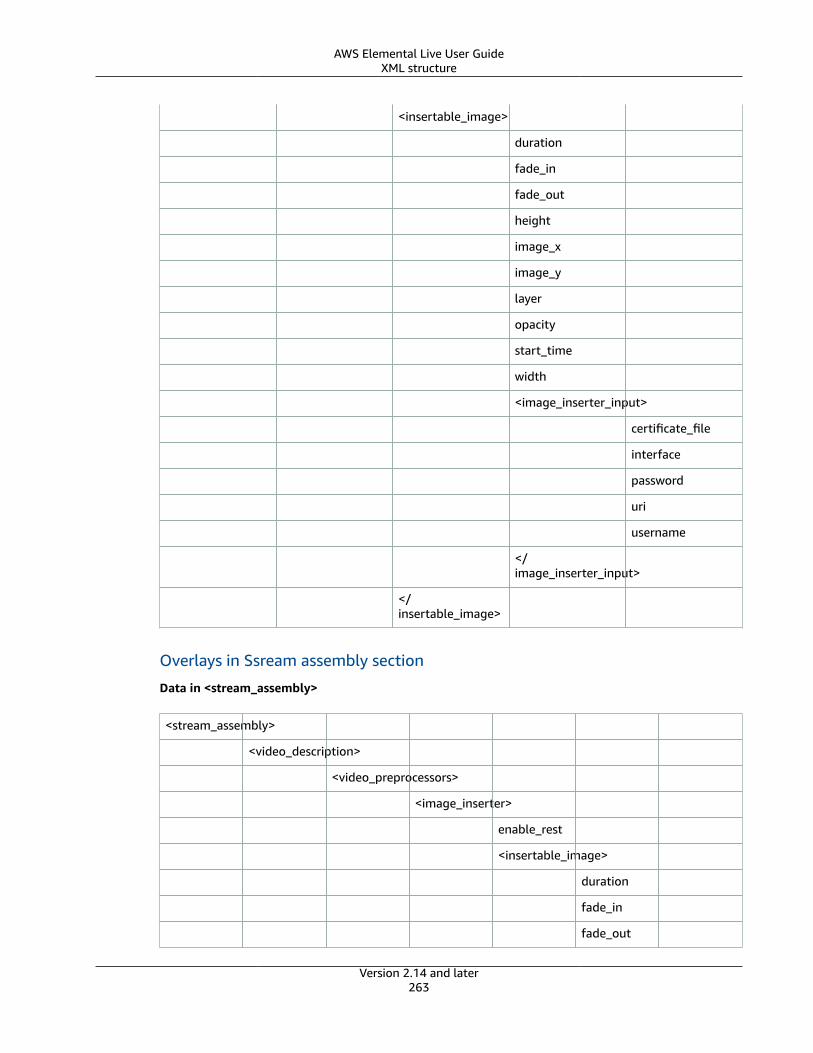
AWS Elemental Live User GuideXML structure
<insertable_image>
duration
fade_in
fade_out
height
image_x
image_y
layer
opacity
start_time
width
<image_inserter_input>
certificate_file
interface
password
uri
username
</image_inserter_input>
</insertable_image>
Overlays in Ssream assembly section
Data in <stream_assembly>
<stream_assembly>
<video_description>
<video_preprocessors>
<image_inserter>
enable_rest
<insertable_image>
duration
fade_in
fade_out
Version 2.14 and later263

AWS Elemental Live User GuideXML structure
height
image_x
image_y
layer
opacity
start_time
width
<image_inserter
_input>
certificate_file
interface
password
uri
username
</image_inserter
_input>
</insertable_image>
<image_inserter>
Static overlay: Modifying overlay on a running event
<image_inserter>
<image>
activate
duration
fade_in
fade_out
height
image_x
image_y
layer
Version 2.14 and later264
AWS Elemental Live User GuideInput switching
opacity
start_time
width
<image_inserter_input>
certificate_file
interface
password
uri
username
</image_inserter_input>
</image>
</images_inserter>
Input switchingYou can configure an AWS Elemental Live event with multiple inputs, and then implement an inputswitching mechanism to switch from ingesting one of those inputs to ingesting another.
There are several ways to set up for input switching.
Dynamic input switchingThe dynamic input switching feature lets use REST API commands to switch inputs in an event. This inputswitching feature has two key characteristics:
• The switching control (the REST API) is built into AWS Elemental Live. You don't need an externalserver to control switching.
• You can optionally modify the playlist of inputs without stopping the event. This ability to dynamicallychange at runtime the playlist is particularly useful when you can't identify in advance (before startingthe For more information about dynamic input switching, see the section called “Dynamicinputswitching” (p. 169).
Virtual input switchingThe virtual input switching feature lets you set up so that a POIS controls switching from one input toanother. This feature has these key switching methods:
• Virtual input switching via SCTE-35 messages
This type of input switching works with SCTE-35 messages that are in the input. We also refer to thisswitching as SCTE-35-triggered input switching.
Virtual input switching via asynchronous ESAM messages that the POIS sends.
Version 2.14 and later265
AWS Elemental Live User GuideAutomatic input switching
This type of input switching is based only on decisions from the POIS. It doesn't rely on messages thatare in the input. We also refer to this switching as asynchronous input switching.
For more information about virtual input switching, see the section called “Virtual inputswitching” (p. 328).
Automatic input switchingThis type of switching is applicable when an event contains file inputs that aren't set up to loop.
If AWS Elemental Live gets to the end of a file input that isn't set up to loop, then AWS Elemental Liveswitches to the next input in the list of inputs in the event.
We don't recommend relying on automatic switching.
Combining different input switching featuresWe strongly recommend against implementing a combination of these input switching features. Youshouldn't give control of the input switching logic to both a POIS and a REST-based application. Thereshould be only one mechanism controlling the input switching.
Inserting Nielsen watermarksStarting with AWS Elemental Live version 2.22.0 , you can set up to create new Nielsen watermarks andinsert them into your audio. Typically, only content and distribution providers use Nielsen watermarks.If you're not working with The Nielsen Company to implement watermarks, you don't need to read thissection.
If your content already contains watermarks, you might choose to convert them to ID3 metadata andinclude that metadata in the output. For information about conversion to ID3, see the section called“Nielsen watermarks to ID3” (p. 268).
The Nielsen watermark feature requires the license (the Nielsen Audio Watermark Package). Contact yourAWS sales manager.
Topics
• Audio requirements (p. 266)
• Getting ready (p. 267)
• Setting up Nielsen watermarks (p. 268)
Audio requirements
Supported audio
The audio must meet the following requirements:
• Sample-rate frequency: 48 kHz (48000 samples per second).
• Number of channels: Up to 8 audio channels
Version 2.14 and later266
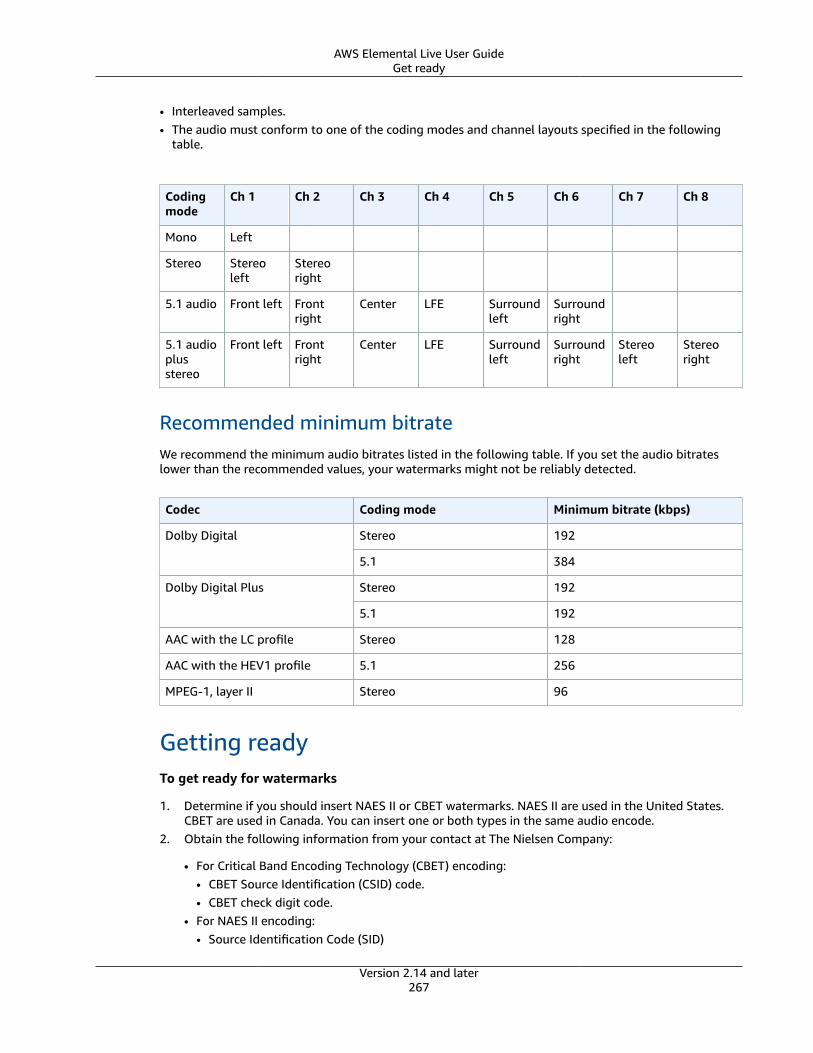
AWS Elemental Live User GuideGet ready
• Interleaved samples.• The audio must conform to one of the coding modes and channel layouts specified in the following
table.
Codingmode
Ch 1 Ch 2 Ch 3 Ch 4 Ch 5 Ch 6 Ch 7 Ch 8
Mono Left
Stereo Stereoleft
Stereoright
5.1 audio Front left Frontright
Center LFE Surroundleft
Surroundright
5.1 audioplusstereo
Front left Frontright
Center LFE Surroundleft
Surroundright
Stereoleft
Stereoright
Recommended minimum bitrateWe recommend the minimum audio bitrates listed in the following table. If you set the audio bitrateslower than the recommended values, your watermarks might not be reliably detected.
Codec Coding mode Minimum bitrate (kbps)
Stereo 192Dolby Digital
5.1 384
Stereo 192Dolby Digital Plus
5.1 192
AAC with the LC profile Stereo 128
AAC with the HEV1 profile 5.1 256
MPEG-1, layer II Stereo 96
Getting readyTo get ready for watermarks
1. Determine if you should insert NAES II or CBET watermarks. NAES II are used in the United States.CBET are used in Canada. You can insert one or both types in the same audio encode.
2. Obtain the following information from your contact at The Nielsen Company:
• For Critical Band Encoding Technology (CBET) encoding:• CBET Source Identification (CSID) code.• CBET check digit code.
• For NAES II encoding:• Source Identification Code (SID)
Version 2.14 and later267

AWS Elemental Live User GuideSetting up Nielsen watermarks
• NAES check digit code.
You must obtain separate sets of values for each AWS Elemental Live event.
3. If you are setting up CBET watermarks, decide how you want to handle watermarks that are alreadyin the source audio. The options are the following:
• Remove all the existing watermarks and replace them with new ones.
• Keep the existing watermarks. AWS Elemental Live will insert new marks only in portions of theaudio stream where there are no watermarks.
Setting up Nielsen watermarksYou can create new Nielsen watermarks on the output audio encoding. To pass through existing Nielsenwatermarks or convert them to ID3, see the section called “Nielsen watermarks to ID3” (p. 268).
NoteThe information in this section assumes that you are familiar with the general steps for creatingan event. It also assumes that you have already set up the audio encodes (outputs) that willcontain the watermarks.
To create Nielsen watermarks
1. On the Event page of the web interface, go to the Streams section, then go to the specific streamthat contains the audio that you want to set up with watermarking.
2. Choose the Audio tab. Then open the Advanced section. More fields appear.
3. Set Nielsen Watermarking to On. More fields appear.
4. Set the following fields to suit your requirements. For information about a field, hover on the upper-right corner of the field and choose the ? icon..
• Process Type
• Distribution Type
5. Complete the remaining fields with the values you determined when getting ready (p. 267).
Converting Nielsen watermarks to ID3If one or more inputs in an event includes Nielsen watermarks in the audio, you have the option to set upthe event to convert those watermarks to ID3 metadata. These watermarks are part of the measurementand analytics capabilities supported by Nielsen.
This option applies only in the following scenario:
• One or more inputs in your event includes Nielsen watermarks in the audio.
• Your event has at least one output group that can include the Nielsen ID3 tag. For example, an HLSoutput group.
• You know that at least some of your playback devices implement the Nielsen SDK. This SDK providesfunctionality to handle the ID3 tags.
Converting the watermarks to ID3 tags doesn't remove the original watermarks. Outputs where youinclude the ID3 tags will contain both the watermark and the ID3 tags. Outputs that don't include theID3 tags will contain only the watermark.
Version 2.14 and later268

AWS Elemental Live User GuideOutput locking
You can't remove the watermarks from the audio, but if your playback devices don't implement theNielsen SDK, the devices simply ignore the watermarks.
To set up watermarks as ID3 tags
NoteThe information in this section assumes that you are familiar with the general steps for creatingan event. It also assumes that you have already set up the output groups that will contain theID3 tags.
1. On the Event page of the web interface, go to the Nielsen Configuration section. This section is justabove the Global Processors section.
2. Set the fields to enable and configure the feature:
• Enable Nielsen PCM to ID3 tagging: Choose the checkbox to enable the feature.• Distributor ID: This field appears when you enable the feature. Optionally, enter the distributor ID
that you obtained from Nielsen. If you enter an ID here, it is added to the ID3 metadata along withthe source ID (SID) that is always in the source watermark.
Below these fields there is read-only information about the supported Nielsen SDK and about thevendor ID that the ID3 tags will use.
3. Go to the output group where you want to include the ID3 tags. The output group must be anArchive, Apple HLS, or UDP/TS group. You can set up one or more output groups to include ID3 tags.
4. If the output group doesn't have an output, choose the Add Output button. An Outputs sectionappears.
5. In the Outputs section, take the appropriate action:
• For an Archive output group, in Container, choose MPEG-2 Transport Stream. This is the onlytype of container that supports ID3 tags.
• For an Apple HLS output group, in Segment Type, choose TS. This is the only segment type thatsupports ID3 tags.
• For a UDP/TS output group, you don't need to set anything.6. Open the PID Control section. More fields appear, including Nielsen ID3.7. In Nielsen ID3, choose the checkbox to enable passthrough in this output.
Output lockingOutput locking is a way to guarantee that events on multiple AWS Elemental Live nodes (appliances) canproduce video outputs that are frame-accurate with each other. It can be used to support output failureredundancy or distributed encoding.
Topics• General information about output locking (p. 269)• Setting up the events (p. 271)
General information about output locking
How output locking worksThe event on one of the locked encoders always starts encoding earlier than the other event or events(even if it is only a couple of frames earlier). This event acts as a leader. When subsequent "follower"
Version 2.14 and later269
AWS Elemental Live User GuideGeneral information
events start, each event drops encoded frames until it gets to a segment boundary. It follows the leaderby obtaining and synchronizing with that event’s embedded timecode.
The events continue to communicate with each other (over multicast or unicast) to share the datarequired to ensure that their outputs are locked.
Output failure redundancyTwo events on two different nodes are locked to each other so that they communicate as describeabove. These two events are set up to ingest the same input to perform the same processing (they haveidentical video encoding parameters). The outputs are locked to each other, which means the sameframe has the same timecode in both events.
The events are set up to publish to the same downstream packager. The packager is receiving bothoutputs, but it uses only one of them. If that output becomes unavailable or unusable, the packagerswitches to the second output. The packager can use the timecode from one output to synchronize theframes from that output to the corresponding frames in the output of the other event.
You can use multicast addresses or a unicast address to set up output locking for output failureredundancy.
You can lock any number of pairs of events. For example, event A (on node 1) and event B (on node 2) asa redundant pair, events C (on node 1) and D (on node 2) as another redundant pair, and so on.
Distributed encodingOne example of distributed encoding is in building an ABR stack. Two or more events (each event on adifferent node) have the same input but each event encodes a different part of the ABR stack: each eventcreates one or more outputs.
The events do not necessarily specify identical encoding. But the events are locked together so that theycommunicate as described above. The locking means that the same frame from the output or outputs inone event has the same timecode as the output or outputs in all the other events.
The events publish to the same downstream packager, where the ABR stack is put together. Thepackager can use the timecode from one output to synchronize the frame from the outputs from oneevent to the corresponding frame in the outputs from the other event.
You can use multicast addresses or a unicast address to set up output locking for distributed encoding:
• If you use multicast addresses, you can lock together any number of events. For example, eventA, event B, and event C (probably each on a separate node) are all locked together and arecommunicating over multicast.
• If you use unicast addresses, you can lock together only two events.
Input requirements• Input type: serial digital interface (SDI) or transport stream or HTTP Live Streaming (HLS) (network
only) source. File sources do not support output locking.
• Resolution: The inputs within one event must have the same resolution. The input for one event canhave a different resolution to the input for another event.
• GOP: The inputs within one event and between two events must have the same Group of Pictures(GOP) structure and framerate.
• Input timecode: Required. An SDI source must have an embedded or Linear/Longtitudal Timecode(LTC) timecode. A transport stream source or HLS source must have an embedded timecode.
Version 2.14 and later270
AWS Elemental Live User GuideSetting up the events
Output requirements• Output types: Microsoft Smooth output, UDP/TS output, or an MPEG-2 TS container in an Archive
output. All video encodes must use H.264 or H.265.• Framerate: Within one event, the framerate in and out must be the same. Between two events, the
framerate can be different but one must be a whole-number multiple of the other.
Setting up the events
Input fields
Location in event Field name Instruction Notes
Input Name Enter the same nameacross all events, orleave blank across allevents.
Input > Video Selector
Timecode Source For SDI inputs, chooseEmbedded or LTC.
For other inputs, chooseEmbedded.
AWS Elemental Liveuses this timecode tolock the events.
Source Choose any value, butchoose the same valueacross all events.
This timecode isinserted in the output.
The downstreampackager can use thistimecode to determinethat a frame from oneevent corresponds tothe frame from anotherevent.
Sync Threshold Deselect this field.
Timecode Configuration
Require InitialTimecode: Checked
Select this field toensure that the inputdoes in fact have atimecode.
Global Processor fields for multicast
Location in event Field name Instruction Notes
Global Processors >Output Locking
Multicast Select this field.
Global Processors >Output Locking
Address
Port (optional)
Enter the multicastaddress of any server.Enter the identicaladdress, port, and
The eventscommunicate with eachother via this address.
Version 2.14 and later271

AWS Elemental Live User GuideSetting up the events
Location in event Field name Instruction Notes
Interface (optional) interface across allevents you want tolock together. See thetooltips on the AWSElemental Live webinterface for moreinformation.
Global Processor fields for unicast
Location in event Field name Instruction Notes
Global Processors >Output Locking
Multicast Deselect this field.
Global Processors >Output Locking
Send Address
Send Port (required)
Send Interface(optional)
Enter the addresswhere the other eventis listening. See thetooltips on the AWSElemental Live webinterface for moreinformation. Beforelocking together morethan one pair of events,make sure each pair isassigned to a differentport from the otherpair.
This event sends amessage to the otherevent via this address.
Global Processors >Output Locking
Receive Port (required)
Receive Interface(optional)
Enter the address wherethis event is listening.See the tooltips on theAWS Elemental Liveweb interface for moreinformation. Beforelocking together morethan one pair of events,make sure each pair isassigned to a differentport from the otherpair.
The other event sendsmessage to this eventvia this address.
Archive output fields
Location in event Field name Instruction
Output Groups > Archive Destination
Output Groups > Archive >Output
Container Choose MPEG-2 TransportStream.
Version 2.14 and later272
AWS Elemental Live User GuideSCTE-35 and SCTE-104 message processing
MSS output fields
Location in event Field name Instruction
Custom Group Name Enter the same name across allevents.
Use Event ID De-selected
Send EOS De-selected
Send Delay Complete as desired. See thetooltip on the AWS ElementalLive web interface for details.
Output Groups >
Fragment length This field can be different ineach event.
Video stream fields
Location in event Field name Instruction Notes
Codec H.264 or H.265 Must be the same codecin all events.
Framerate Ensure that the valuesyou set in the eventsare whole-numbermultiples of each other.
Stream > Video
Segmentation Markers None or EBP CableLabs.
SCTE-35 and SCTE-104 message processing inAWS Elemental Live
You can use AWS Elemental Live to manipulate the SCTE-35 messages in a TS input and to manipulatethe SCTE-104 messages in an HD-SDI input. You can also use AWS Elemental Live to remove or includethe cueing information conveyed by SCTE messages in the output streams (video, audio, closedcaptioning, data) and any associated manifests.
You set up SCTE message processing instructions in the AWS Elemental Live event. This guide describeshow to perform this set up.
Note that AWS Elemental Live does not support processing of manifests that are present in the input.The information in these manifests is not ingested by AWS Elemental Live and is not included in theoutput or the output manifest.
About this guide
SCTE messages may convey DPI cueing information for ad avails and for other non-ad-avail messagessuch as programs and chapters.
Version 2.14 and later273
AWS Elemental Live User GuideEligible messages and streams
This guide covers both Event Signaling and Management (ESAM) and non-ESAM processing of messages.
Assumptions
You should be familiar with the SCTE-35 and SCTE-104 standards and optionally with the SCTE-67standards and how the input you encode implements these standards. You should be familiar withprofiles and with managing AWS Elemental Live events. To use the REST API features, you should befamiliar with interacting with AWS Elemental Live through the API.
Topics
• Eligible messages and streams (p. 274)
• Getting ready: setting the ad avail mode (p. 284)
• Manifest decoration (p. 286)
• Ad avail blanking and blackout (p. 288)
• Passthrough or removal of SCTE messages (p. 293)
• SCTE-35 message insertion into currently running events (p. 295)
• POIS conditioning (p. 307)
• Setting up using the REST API (p. 308)
• Example manifests for Apple HLS (p. 312)
Eligible messages and streamsAWS Elemental Live can extract SCTE-35 messages and SCTE-104 messages from input sources.
The following table specifies the sources (and their corresponding input types) that AWS Elemental Livesupports for each message type.
Message type Source type AWS Elemental Live Input type
HLS HLS network input
MPTS over RTP or UDP Network input
Transport stream Secure Reliable Transport (SRT)
Transport stream over RTP orUDP
Network input
SCTE-35
Transport stream over RTP withSMPTE 2022-7 redundancy
SMPTE 2022-7 network input
SDI An SDI or Quadrant interface
SDI Interleave 4K (HD-2SI)
SCTE-104
SMPTE 2110-04 over RTP orUDP
SMPTE 2110
NoteSCTE-104 messages are converted to SCTE-35 messages early in the processing, so this guideuses “SCTE-35 messages” to refer to both SCTE-35 messages and SCTE-104 messages.
Version 2.14 and later274
AWS Elemental Live User GuideEligible messages and streams
SCTE-35 and SCTE-104 message processing options
The options
The processing possibilities for SCTE messages include the following.
Automatically convert SCTE-104 messages
SCTE-104 messages in the input are automatically converted to SCTE-35 messages during processing ofthe input. No setup is required for this processing.
Line up SCTE Messages to use blanking and blackout of output content
The “cue out” and “cue in” instructions in SCTE-35 messages line up with specific content in the video,audio, and closed captions streams. You can set up to blank out this content in the output.
• The content for ad avails is blanked out using the Ad avail blanking feature.• The content for other messages is blanked out using the blackout feature.
Your desired behavior must be set up in the event or profile.
SCTE-35 passthrough
You can include SCTE-35 messages in the output data stream in any TS output. Your desired behaviormust be set up in the event or profile.
Manifest decoration
You can set up SCTE messages with manifest decoration with these options:
• HLS outputs can be set up so that their manifests include instructions that correspond to the originalSCTE-35 message content.
• MS Smooth outputs can be set up to include these instructions in the sparse track.• RTMP outputs can be set up to include these instructions in the data stream (because RTMP outputs do
not have manifests).
Conditioning by a POIS
Optionally, SCTE-35 messages (including those converted from SCTE-104) can be diverted to a POISserver for ESAM conditioning. This conditioning is in addition to all the other processing (manifestdecoration, blanking and blackout, and passthrough).
POIS and ESAM conditioning are described in POIS conditioning (p. 307).
Insert SCTE-35 messages into content during an event
The AWS Elemental Live REST API includes commands to insert SCTE-35 messages into the content whilethe AWS Elemental Live event is running.
You can insert using the AWS Elemental Live REST API. AWS Elemental Live makes no distinctionbetween these messages and those that were in the original input. So, for example, if manifestdecoration is enabled and you insert a message during encoding, that new message is represented in themanifest.
Default behavior of SCTE-35 and SCTE-104 messages
The default handling of SCTE-35 and SCTE-104 messages in AWS Elemental Live includes the following:
Version 2.14 and later275
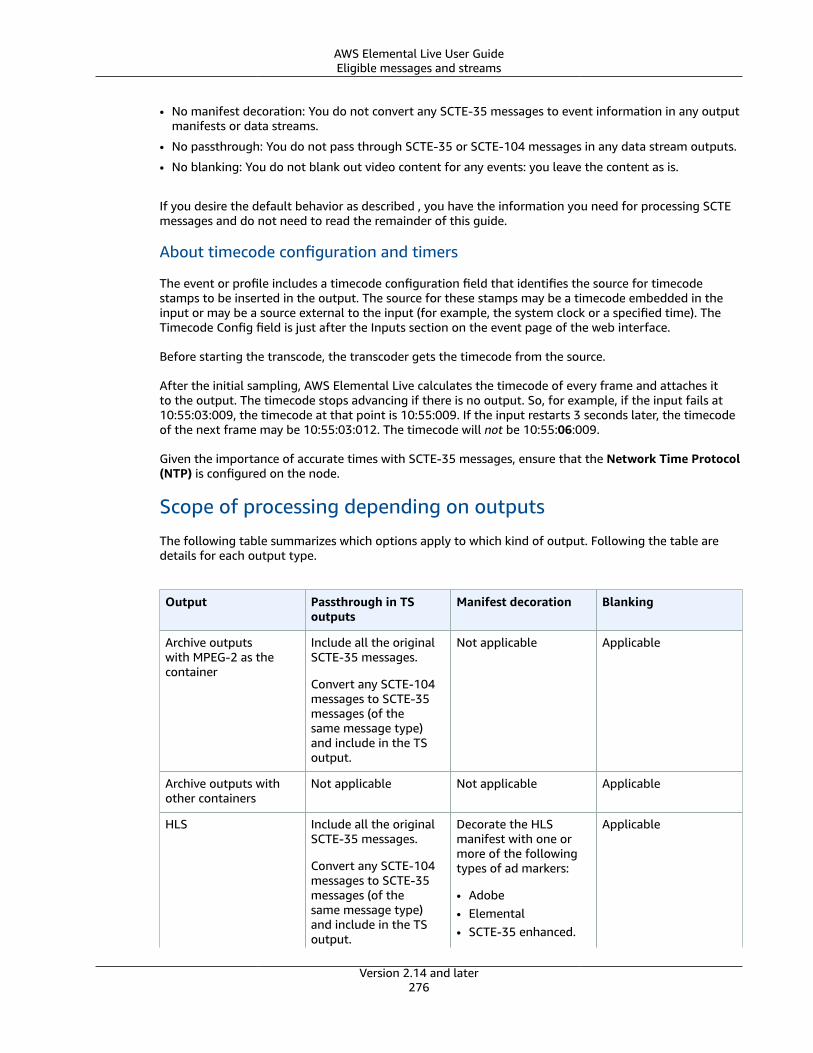
AWS Elemental Live User GuideEligible messages and streams
• No manifest decoration: You do not convert any SCTE-35 messages to event information in any outputmanifests or data streams.
• No passthrough: You do not pass through SCTE-35 or SCTE-104 messages in any data stream outputs.
• No blanking: You do not blank out video content for any events: you leave the content as is.
If you desire the default behavior as described , you have the information you need for processing SCTEmessages and do not need to read the remainder of this guide.
About timecode configuration and timers
The event or profile includes a timecode configuration field that identifies the source for timecodestamps to be inserted in the output. The source for these stamps may be a timecode embedded in theinput or may be a source external to the input (for example, the system clock or a specified time). TheTimecode Config field is just after the Inputs section on the event page of the web interface.
Before starting the transcode, the transcoder gets the timecode from the source.
After the initial sampling, AWS Elemental Live calculates the timecode of every frame and attaches itto the output. The timecode stops advancing if there is no output. So, for example, if the input fails at10:55:03:009, the timecode at that point is 10:55:009. If the input restarts 3 seconds later, the timecodeof the next frame may be 10:55:03:012. The timecode will not be 10:55:06:009.
Given the importance of accurate times with SCTE-35 messages, ensure that the Network Time Protocol(NTP) is configured on the node.
Scope of processing depending on outputs
The following table summarizes which options apply to which kind of output. Following the table aredetails for each output type.
Output Passthrough in TSoutputs
Manifest decoration Blanking
Archive outputswith MPEG-2 as thecontainer
Include all the originalSCTE-35 messages.
Convert any SCTE-104messages to SCTE-35messages (of thesame message type)and include in the TSoutput.
Not applicable Applicable
Archive outputs withother containers
Not applicable Not applicable Applicable
HLS Include all the originalSCTE-35 messages.
Convert any SCTE-104messages to SCTE-35messages (of thesame message type)and include in the TSoutput.
Decorate the HLSmanifest with one ormore of the followingtypes of ad markers:
• Adobe• Elemental• SCTE-35 enhanced.
Applicable
Version 2.14 and later276

AWS Elemental Live User GuideEligible messages and streams
Output Passthrough in TSoutputs
Manifest decoration Blanking
Note that, withHLS, you eitherimplement bothmanifest decorationand passthrough or youimplement neither.
DASH Not applicable Not applicable Applicable
MS Smooth Not applicable Include information onthe SCTE-35 event inthe sparse track.
Applicable
SMPTE 2110
RTMP Not applicable Include one or more ofthe following types ofad markers in the RTMPdatastream:
• OnAkamaiAdPod• OnCuePoint• OnCuePoint SCTE-35• OnUserDataEvent
Applicable
UDP/TS Include all the originalSCTE-35 messages.
Convert any SCTE-104messages to SCTE-35messages (of thesame message type)and include in the TSoutput.
Not applicable Applicable
Topics
• Archive output with MPEG-2 container (p. 277)
• Archive output with other containers (p. 278)
• Apple HLS output (p. 279)
• DASH output (p. 280)
• MS Smooth output (p. 280)
• Adobe RTMP output (p. 281)
• SMPTE 2110 output (p. 282)
• UDP/TS output (p. 283)
Archive output with MPEG-2 container
A transport stream (TS) in an MPEG-2 container supports passthrough of the SCTE-35 messages, but itdoes not support creation of a manifest. Therefore, usable options are:
Version 2.14 and later277

AWS Elemental Live User GuideEligible messages and streams
SCTE-35passthrough
Insertionof SCTE-35messages
Manifestdecoration
Blanking andblackout
Effect
Enabled Yes or No Not applicable Yes or No Turns onpassthroughof SCTE-35messages. Inthis case, youcould also insertmore SCTE-35message ifdesired. You couldalso implementblanking andblackout.
Disabled No Not applicable No Turns offpassthroughin order toremove SCTE-35messages fromthe video stream.Do not insertextra messages:they simply getstripped out ofthe output. Donot implementblanking orblackout.
Choose thisoption only if, ina downstreamsystem, you do notwant to replacevideo that wasoriginally markedby cues.
Archive output with other containers
Other archive outputs do not support passthrough of the SCTE-35 messages or manifest decoration.Therefore, the only workable option is the default behavior:
SCTE-35passthrough
Insertionof SCTE-35messages
Manifestdecoration
Blanking andblackout
Effect
Not applicable No Not applicable No Removes SCTE-35messages fromthe output. Themanifest is notdecorated. Donot implement
Version 2.14 and later278

AWS Elemental Live User GuideEligible messages and streams
SCTE-35passthrough
Insertionof SCTE-35messages
Manifestdecoration
Blanking andblackout
Effect
blanking orblackout because,without SCTE-35messages in thevideo stream andwithout manifestdecoration, it isimpossible tofind these blanksand blackoutsprogrammatically.
Apple HLS output
Apple HLS output supports both passthrough of the SCTE-35 messages and manifest decoration. Infact, with HLS outputs, passthrough and manifest decoration are either both enabled or both disabled.Therefore, workable options are:
SCTE-35passthrough
Insertionof SCTE-35messages
Manifestdecoration
Blanking andblackout
Effect
Enabled Yes or No Enabled Yes or No Turns onpassthrough ofSCTE-35 messagesand manifestdecoration. Inthis case, youcould also insertmore SCTE-35message ifdesired. You couldalso implementblanking andblackout.
Disabled No Disabled No Turns offpassthrough inorder to removeSCTE-35 messagesfrom the videostream. Turnsoff manifestdecoration.Do not insertextra messages:they simply getstripped fromthe output. Donot implementblanking orblackout.
Version 2.14 and later279
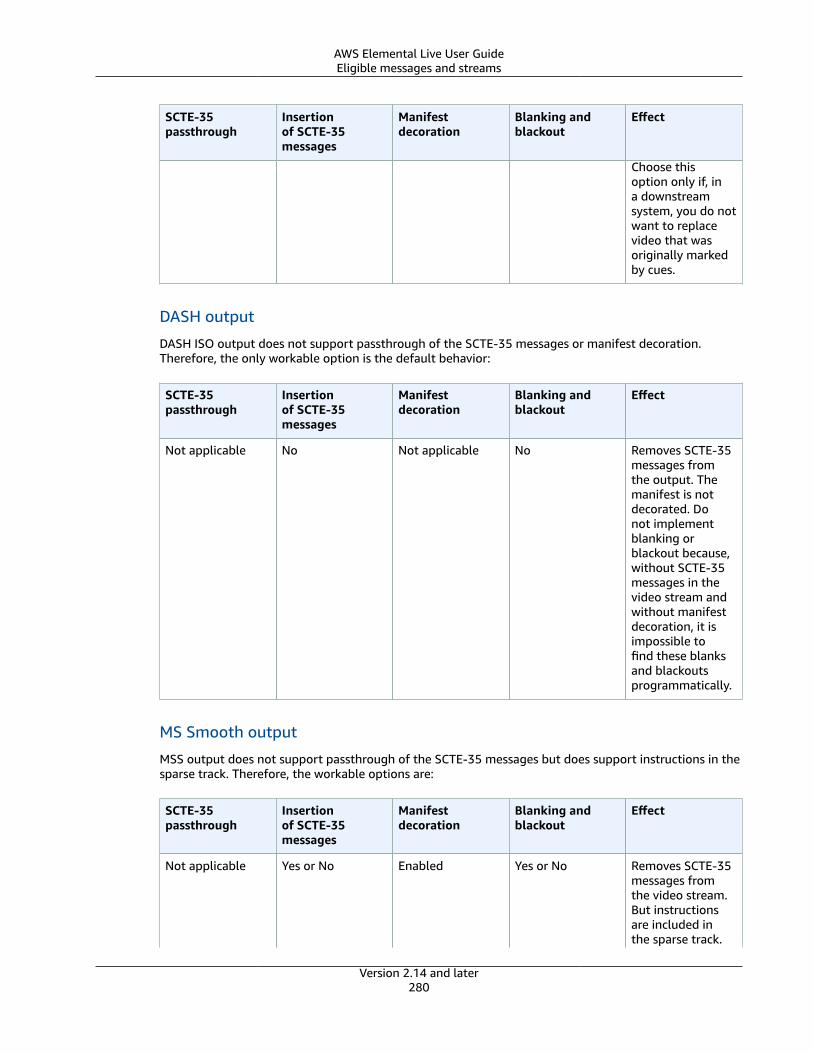
AWS Elemental Live User GuideEligible messages and streams
SCTE-35passthrough
Insertionof SCTE-35messages
Manifestdecoration
Blanking andblackout
Effect
Choose thisoption only if, ina downstreamsystem, you do notwant to replacevideo that wasoriginally markedby cues.
DASH output
DASH ISO output does not support passthrough of the SCTE-35 messages or manifest decoration.Therefore, the only workable option is the default behavior:
SCTE-35passthrough
Insertionof SCTE-35messages
Manifestdecoration
Blanking andblackout
Effect
Not applicable No Not applicable No Removes SCTE-35messages fromthe output. Themanifest is notdecorated. Donot implementblanking orblackout because,without SCTE-35messages in thevideo stream andwithout manifestdecoration, it isimpossible tofind these blanksand blackoutsprogrammatically.
MS Smooth output
MSS output does not support passthrough of the SCTE-35 messages but does support instructions in thesparse track. Therefore, the workable options are:
SCTE-35passthrough
Insertionof SCTE-35messages
Manifestdecoration
Blanking andblackout
Effect
Not applicable Yes or No Enabled Yes or No Removes SCTE-35messages fromthe video stream.But instructionsare included inthe sparse track.
Version 2.14 and later280

AWS Elemental Live User GuideEligible messages and streams
SCTE-35passthrough
Insertionof SCTE-35messages
Manifestdecoration
Blanking andblackout
Effect
You could insertextra messages:although they arenot included in thevideo stream ofthe output, theyare representedby instructionsin the sparsetrack. You couldalso implementblanking andblackout.
Not applicable No Disabled No Removes SCTE-35messages fromthe output. Thesparse trackdoes not includeinstructions. Donot implementblanking orblackout because,without SCTE-35messages in thevideo stream and,without data inthe sparse track,it is impossible tofind these blanksand blackoutsprogrammatically.
Adobe RTMP output
Adobe RTMP output does not support passthrough of the SCTE-35 messages but does support manifestdecoration. Therefore, the workable options are:
SCTE-35passthrough
Insertionof SCTE-35messages
Manifestdecoration
Blanking andblackout
Effect
Not applicable Yes or No Enabled Yes or No Removes SCTE-35messages fromthe video stream.But instructionsare included inthe manifest.You could insertextra messages:although they arenot included in the
Version 2.14 and later281
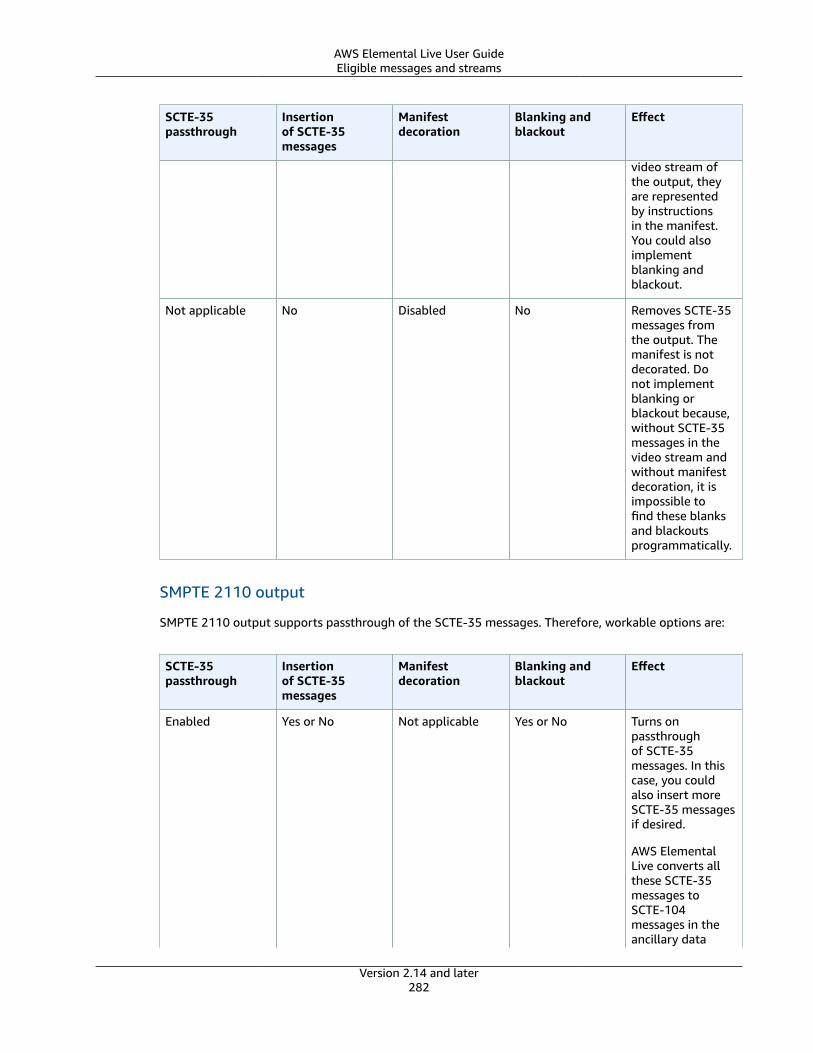
AWS Elemental Live User GuideEligible messages and streams
SCTE-35passthrough
Insertionof SCTE-35messages
Manifestdecoration
Blanking andblackout
Effect
video stream ofthe output, theyare representedby instructionsin the manifest.You could alsoimplementblanking andblackout.
Not applicable No Disabled No Removes SCTE-35messages fromthe output. Themanifest is notdecorated. Donot implementblanking orblackout because,without SCTE-35messages in thevideo stream andwithout manifestdecoration, it isimpossible tofind these blanksand blackoutsprogrammatically.
SMPTE 2110 output
SMPTE 2110 output supports passthrough of the SCTE-35 messages. Therefore, workable options are:
SCTE-35passthrough
Insertionof SCTE-35messages
Manifestdecoration
Blanking andblackout
Effect
Enabled Yes or No Not applicable Yes or No Turns onpassthroughof SCTE-35messages. In thiscase, you couldalso insert moreSCTE-35 messagesif desired.
AWS ElementalLive converts allthese SCTE-35messages toSCTE-104messages in theancillary data
Version 2.14 and later282
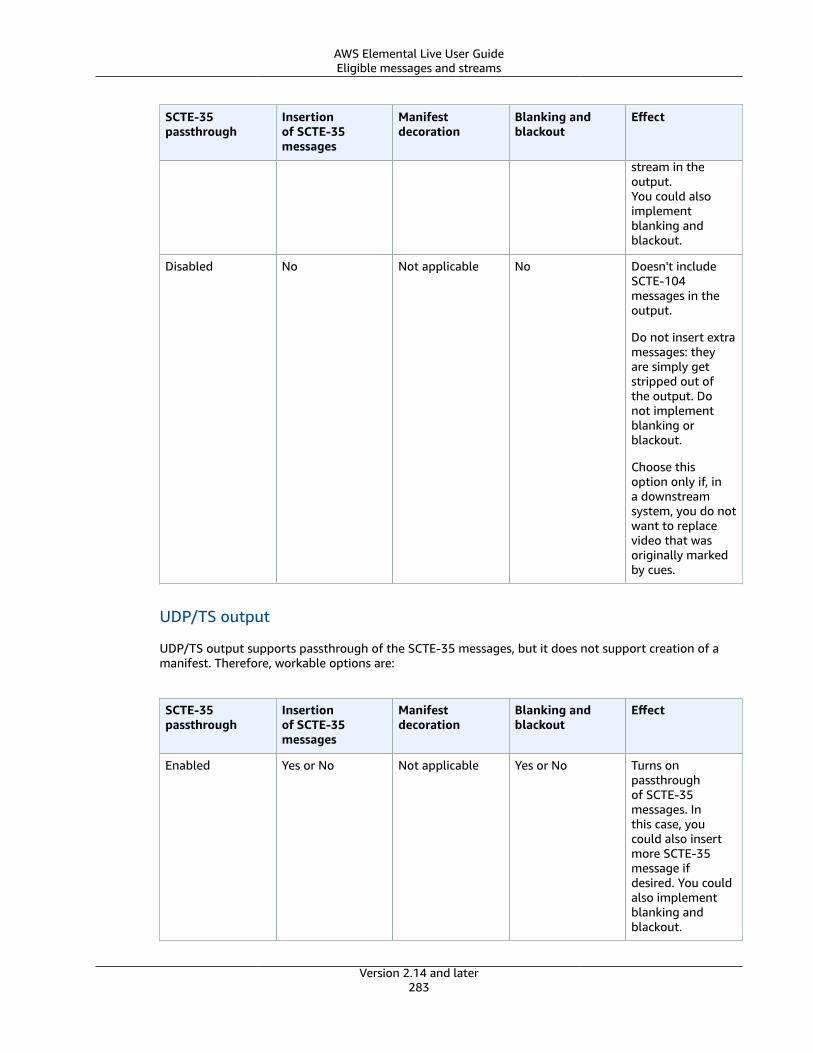
AWS Elemental Live User GuideEligible messages and streams
SCTE-35passthrough
Insertionof SCTE-35messages
Manifestdecoration
Blanking andblackout
Effect
stream in theoutput.You could alsoimplementblanking andblackout.
Disabled No Not applicable No Doesn't includeSCTE-104messages in theoutput.
Do not insert extramessages: theyare simply getstripped out ofthe output. Donot implementblanking orblackout.
Choose thisoption only if, ina downstreamsystem, you do notwant to replacevideo that wasoriginally markedby cues.
UDP/TS output
UDP/TS output supports passthrough of the SCTE-35 messages, but it does not support creation of amanifest. Therefore, workable options are:
SCTE-35passthrough
Insertionof SCTE-35messages
Manifestdecoration
Blanking andblackout
Effect
Enabled Yes or No Not applicable Yes or No Turns onpassthroughof SCTE-35messages. Inthis case, youcould also insertmore SCTE-35message ifdesired. You couldalso implementblanking andblackout.
Version 2.14 and later283

AWS Elemental Live User GuideGetting ready: setting the ad avail mode
SCTE-35passthrough
Insertionof SCTE-35messages
Manifestdecoration
Blanking andblackout
Effect
Disabled No Not applicable No Turns offpassthrough inorder to removeSCTE-35 messagesfrom the videostream. Do notinsert extramessages: theyare simply getstripped out ofthe output. Donot implementblanking orblackout.
Choose thisoption only if, ina downstreamsystem, you do notwant to replacevideo that wasoriginally markedby cues.
Blanking and passthrough and manifest decoration
It is important to understand that the logic for blanking ad content works on the video contentassociated with the “ad avail event” while the logic for passthrough and manifest decoration works onthe actual SCTE-35 message.
So you can blank ad avails and not pass through SCTE-35 messages or not blank ad avails and not passthrough SCTE-35 messages and decorate the manifest or any combination: the actions are independent.
The only exception to this rule is for HLS outputs: manifest decoration and passthrough are either bothenabled or both disabled.
Getting ready: setting the ad avail modeRead this section if you want to support any of the following features:
• Manifest decoration for all outputs.
• Ad avail blanking for all outputs. (Note that this section does not apply to the blackout feature.)
If you have several outputs and you want to do manifest decoration or ad avail blanking on some of theoutputs and not on others, you have to set up two different profiles or events.
NoteYou do not have to read this section if you are doing Blackout image insertion but you are notdoing ad avail blanking or manifest decoration.
Version 2.14 and later284

AWS Elemental Live User GuideGetting ready: setting the ad avail mode
Set the ad avail mode
You must set the Ad Avail mode. The Ad Avail mode applies to all outputs: it cannot be set uniquely forindividual outputs. To set up the Ad Avail Mode, do the following.
1. In the Profile or Event screen, click Ad Avail Controls (in the Input section towards the top of thescreen):
2. In Ad Avail Trigger, choose the desired mode from the drop-down menu. This mode identifies whichof all possible “ad avail” events are treated as “ad avails.” This distinction comes into play in manifestdecoration and ad avail blanking. For more information, see Manifest decoration (p. 286) and Adavail blanking and blackout (p. 288).
Typically, you select the mode to match the type ID that you already know the input is using toindicate “ad avail” events.
• Splice Insert Mode . Select this mode if the input uses splice inserts to indicate ad avails. Theinput may also contain messages for other events such as chapters or programs.
• Time Signal with APOS Mode. Select this mode if the input contains time signals of segmentationtype placement opportunity. The input may also contain messages for other events such aschapters or programs.
The following table specifies how a message (containing a specific combination of message type andsegmentation type) is treated depending on the mode that is specified. Each message is treated as eitheran ad avail, a non-ad avail, or as “other.”
Read across the first three columns to identify a combination of mode, the message type and thesegmentation type. Then in the last three columns, identify how AWS Elemental Live handles thatcombination.
Mode Message typeID
Segmentationtype ID
Handled as anad avail event
Not handledas an ad availevent
Handled asanother typeof event
Nosegmentationdescriptorpresent
X
Provideradvertisement
X
Distributoradvertisement
X
Placementopportunity
X
Splice Insert
Other type X
Provideradvertisement
X
Distributoradvertisement
X
Splice InsertMode
Time Signal
Placementopportunity
X
Version 2.14 and later285

AWS Elemental Live User GuideManifest decoration
Mode Message typeID
Segmentationtype ID
Handled as anad avail event
Not handledas an ad availevent
Handled asanother typeof event
Other type X
Splice Insert Any X
Provideradvertisement
X
Distributoradvertisement
X
Placementopportunity
X
Time SignalAPOS Mode
Time Signal
Other type X
Manifest decorationYou can choose to interpret SCTE-35 messages from the original input and insert correspondinginstructions into the output manifest for the following outputs:
• HLS
• MS Smooth (the instructions are inserted in the sparse track).
• RTMP (the instructions are inserted into the data stream, given that RTMP does not supportmanifests).
How SCTE-35 events are handled in manifests
Based on your criteria for creating the event, you may insert the following information may be insertedinto the manifest.
Type of instruction When inserted
Base-64 Information about all SCTE-35 messages in theoutput is incorporated into the manifest; theentire SCTE-35 message is added in base-64format.
Cue-out, Cue-in SCTE-35 messages that are ad avails (see Gettingready: setting the ad avail mode (p. 284)) resultin the insertion of “cue-out, cue-in” instructions.
Blackout Only applies to the SCTE-35 Enhanced ad markerstyle (for HLS output; see below).
SCTE-35 messages that are not ad avails result inthe insertion of “blackout start/end” instructions,assuming that blackout is enabled (Ad availblanking and blackout (p. 288)). If blackout isnot enabled, these instructions are not inserted.
Version 2.14 and later286
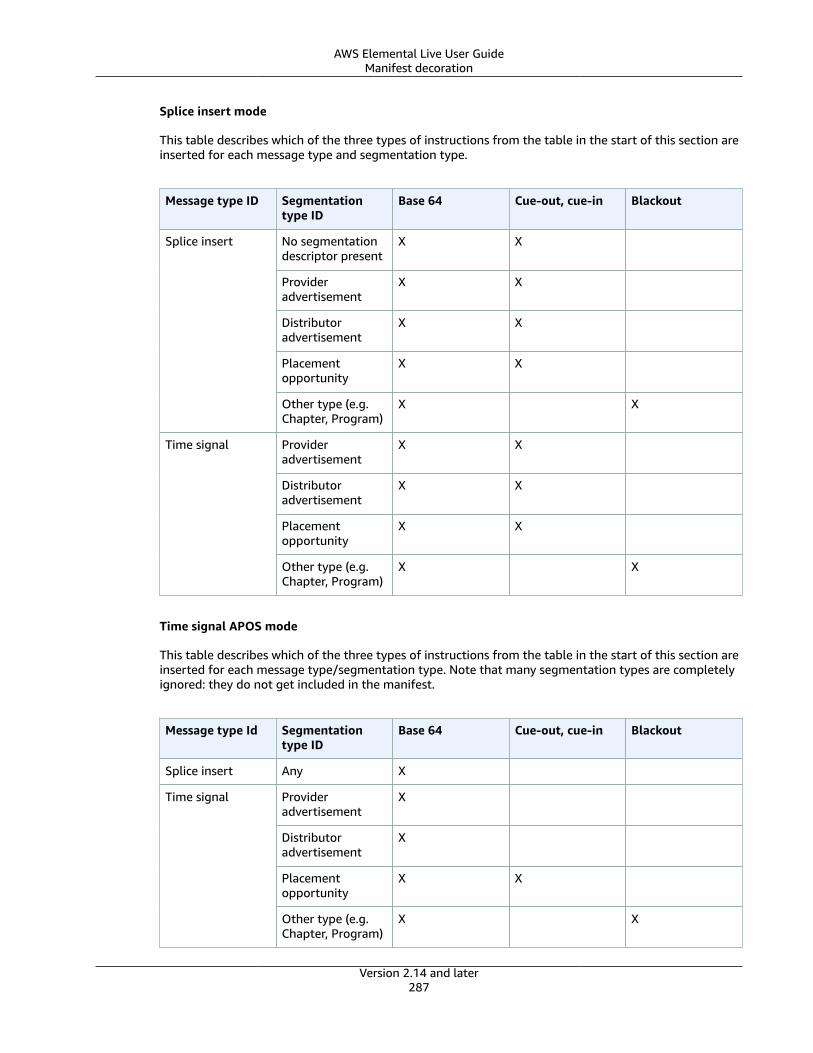
AWS Elemental Live User GuideManifest decoration
Splice insert mode
This table describes which of the three types of instructions from the table in the start of this section areinserted for each message type and segmentation type.
Message type ID Segmentationtype ID
Base 64 Cue-out, cue-in Blackout
No segmentationdescriptor present
X X
Provideradvertisement
X X
Distributoradvertisement
X X
Placementopportunity
X X
Splice insert
Other type (e.g.Chapter, Program)
X X
Provideradvertisement
X X
Distributoradvertisement
X X
Placementopportunity
X X
Time signal
Other type (e.g.Chapter, Program)
X X
Time signal APOS mode
This table describes which of the three types of instructions from the table in the start of this section areinserted for each message type/segmentation type. Note that many segmentation types are completelyignored: they do not get included in the manifest.
Message type Id Segmentationtype ID
Base 64 Cue-out, cue-in Blackout
Splice insert Any X
Provideradvertisement
X
Distributoradvertisement
X
Placementopportunity
X X
Time signal
Other type (e.g.Chapter, Program)
X X
Version 2.14 and later287
AWS Elemental Live User GuideAd avail blanking and blackout
Procedure to enable manifest decorationApple HLS
Enable manifest decoration at the output group level, which means that the manifests for all outputs inthat group include instructions based on the SCTE-35 content.
In the Apple HLS output group section, open the Advanced section and complete the following fields:
• Ad Markers: Click to select a marker type. You can select more than one type.
See Example manifests for Apple HLS (p. 312) for information about the different of markers.
The manifest for each output includes a separate set of tags for each type that you select.
MS Smooth
With MS Smooth, if you enable manifest decoration, you actually insert instructions in the sparse track.
Enable manifest decoration at the output group level, which means that the sparse tracks for all outputsin that group include instructions based on the SCTE-35 content.
In the MS Smooth output group section, complete the following fields:
• Enable Sparse Track: Click to select a marker type. You can select more than one type.• Acquisition Point ID: Enter the address of the certificate, if encryption is enabled on the output.
RTMP
With RTMP, if you enable manifest decoration, you insert instructions in the data stream as RTMP doesnot support manifests.
Enable manifest decoration at the output group level, which means that the manifests for all outputs inthat group include instructions based on the SCTE-35 content.
In the RTMP output group section, complete the following fields:
• Ad Markers: Click to select a marker type. You can select more than one type.
The data stream includes a separate set of tags for each type that you select.
Ad avail blanking and blackoutYou can turn on one or both of the following features to blank out the content associated with aSCTE-35 event:
• “Blackout”: Blank out the content for other types of SCTE-35 messages such as chapters andprograms.
• “Ad avail blanking”: Blank out the content for a SCTE-35 message that is considered an “adavail” (according to the mode, Getting ready: setting the ad avail mode (p. 284)).
In both features, the handling is one of the following.
• Replace the video content associated with the event with an image you specify or with a black image.• Remove the audio associated with the event.• Remove the closed captions associated with the event.
Version 2.14 and later288

AWS Elemental Live User GuideAd avail blanking and blackout
Topics• Blanking is global (p. 289)• Scope of blackout of SCTE-35 messages (p. 289)• Scope of ad avail blanking of SCTE-35 messages (p. 289)• Procedure to enable ad avail blanking (p. 292)• Procedure to enable blackout (p. 293)
Blanking is globalBoth Ad avail blanking and Blackout apply to all outputs. You cannot choose to blank out for someoutputs and not blank out for others: it is an all-or-nothing decision.
Compare Blanking to Manifest Decoration and Passthrough
Manifest decoration and passthrough have a smaller scope than blanking : they apply only to outputsthat support these features.
Take important note of this fact, because if you do not do passthrough and do not do manifestdecoration in a given output (because these are not supported or because you choose not to) but you doimplement blanking, there are no “markers” for where the blanked content occurs.
To identify where this blanking is occurring. look for the IDR I-frames that identify where the SCTE-35message used to be.
Scope of blackout of SCTE-35 messagesAll SCTE-35 messages that are “Other type” are blanked out as follows:
SCTE-35 segmentation type Blanking
Programs Always
Chapters Always
Unscheduled events Always
Network See below.
How Network End Blackout Differs from Other Events
Network end blackout is different from the other events that trigger a blackout because:
• With Network, blanking starts when the "Network End" instruction is encountered and ends when the"Network Start" instruction is encountered.
• With other events, blanking starts when the “event start” instruction is encountered and ends whenthe “event end” instruction is encountered.
Scope of ad avail blanking of SCTE-35 messagesFor Ad avail blanking (but not for Blackout), the ad avail mode you set controls which SCTE-35 eventsresult in blanking of the content.
Using Splice Insert Mode
Version 2.14 and later289
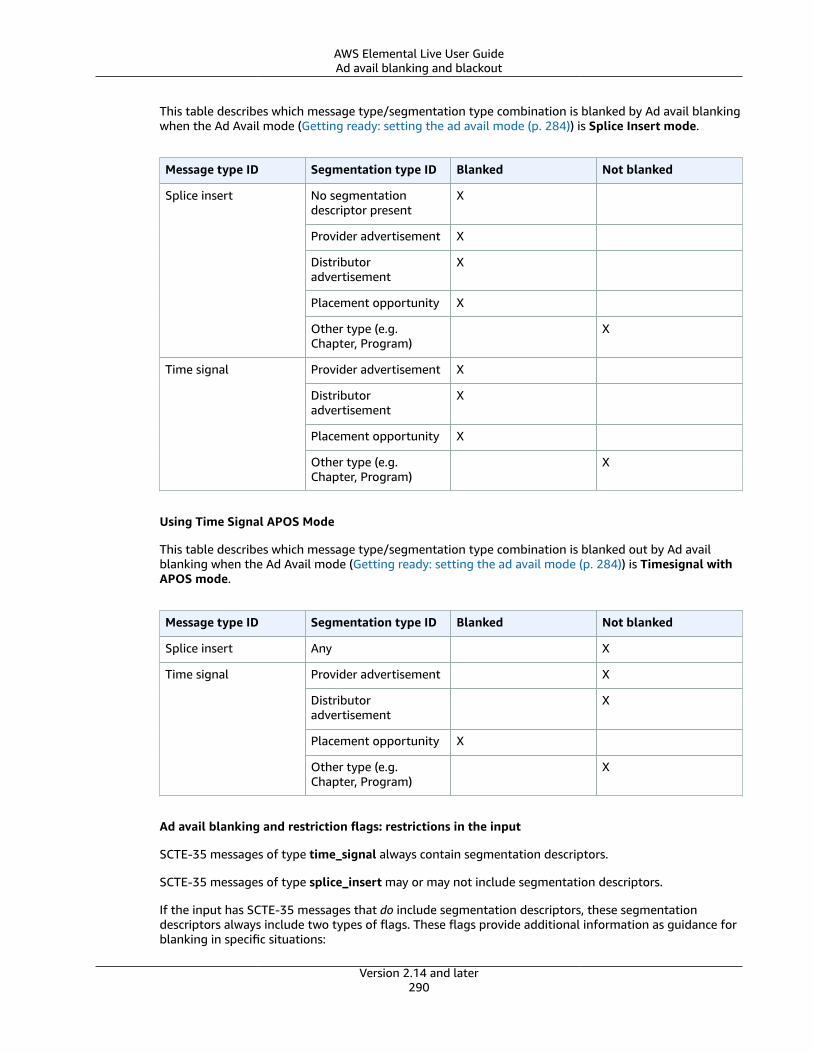
AWS Elemental Live User GuideAd avail blanking and blackout
This table describes which message type/segmentation type combination is blanked by Ad avail blankingwhen the Ad Avail mode (Getting ready: setting the ad avail mode (p. 284)) is Splice Insert mode.
Message type ID Segmentation type ID Blanked Not blanked
No segmentationdescriptor present
X
Provider advertisement X
Distributoradvertisement
X
Placement opportunity X
Splice insert
Other type (e.g.Chapter, Program)
X
Provider advertisement X
Distributoradvertisement
X
Placement opportunity X
Time signal
Other type (e.g.Chapter, Program)
X
Using Time Signal APOS Mode
This table describes which message type/segmentation type combination is blanked out by Ad availblanking when the Ad Avail mode (Getting ready: setting the ad avail mode (p. 284)) is Timesignal withAPOS mode.
Message type ID Segmentation type ID Blanked Not blanked
Splice insert Any X
Provider advertisement X
Distributoradvertisement
X
Placement opportunity X
Time signal
Other type (e.g.Chapter, Program)
X
Ad avail blanking and restriction flags: restrictions in the input
SCTE-35 messages of type time_signal always contain segmentation descriptors.
SCTE-35 messages of type splice_insert may or may not include segmentation descriptors.
If the input has SCTE-35 messages that do include segmentation descriptors, these segmentationdescriptors always include two types of flags. These flags provide additional information as guidance forblanking in specific situations:
Version 2.14 and later290
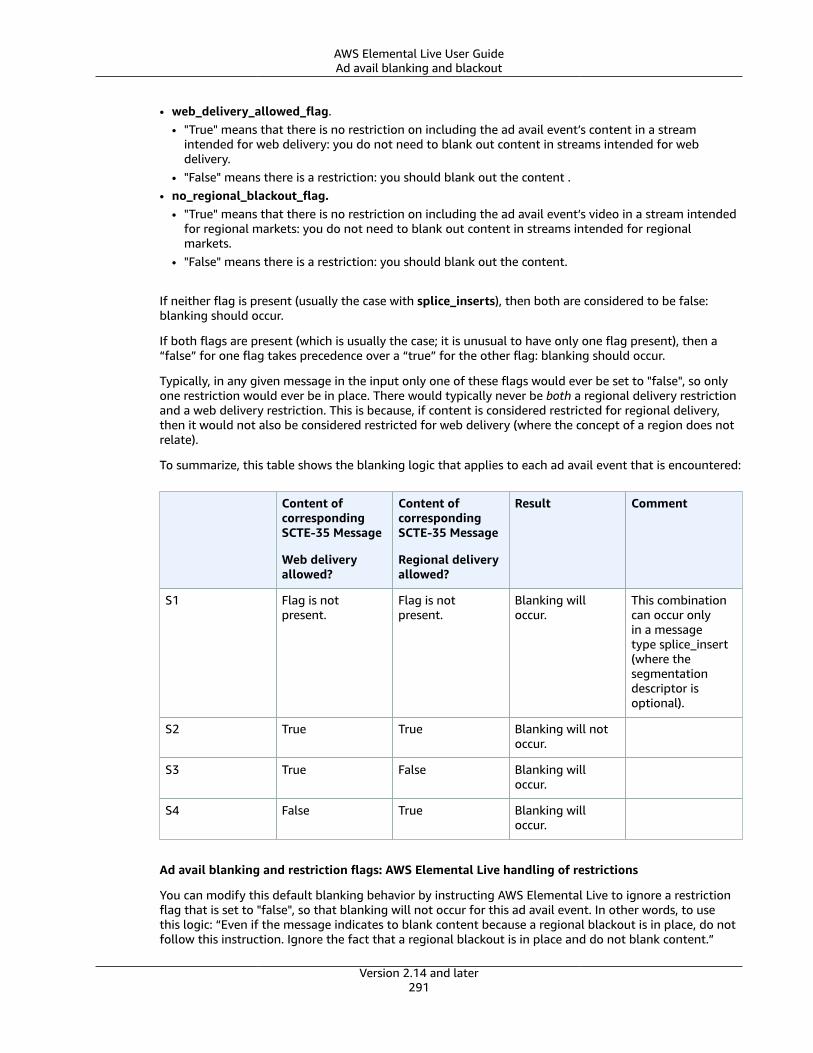
AWS Elemental Live User GuideAd avail blanking and blackout
• web_delivery_allowed_flag.• "True" means that there is no restriction on including the ad avail event’s content in a stream
intended for web delivery: you do not need to blank out content in streams intended for webdelivery.
• "False" means there is a restriction: you should blank out the content .• no_regional_blackout_flag.
• "True" means that there is no restriction on including the ad avail event’s video in a stream intendedfor regional markets: you do not need to blank out content in streams intended for regionalmarkets.
• "False" means there is a restriction: you should blank out the content.
If neither flag is present (usually the case with splice_inserts), then both are considered to be false:blanking should occur.
If both flags are present (which is usually the case; it is unusual to have only one flag present), then a“false” for one flag takes precedence over a “true” for the other flag: blanking should occur.
Typically, in any given message in the input only one of these flags would ever be set to "false", so onlyone restriction would ever be in place. There would typically never be both a regional delivery restrictionand a web delivery restriction. This is because, if content is considered restricted for regional delivery,then it would not also be considered restricted for web delivery (where the concept of a region does notrelate).
To summarize, this table shows the blanking logic that applies to each ad avail event that is encountered:
Content ofcorrespondingSCTE-35 Message
Web deliveryallowed?
Content ofcorrespondingSCTE-35 Message
Regional deliveryallowed?
Result Comment
S1 Flag is notpresent.
Flag is notpresent.
Blanking willoccur.
This combinationcan occur onlyin a messagetype splice_insert(where thesegmentationdescriptor isoptional).
S2 True True Blanking will notoccur.
S3 True False Blanking willoccur.
S4 False True Blanking willoccur.
Ad avail blanking and restriction flags: AWS Elemental Live handling of restrictions
You can modify this default blanking behavior by instructing AWS Elemental Live to ignore a restrictionflag that is set to "false", so that blanking will not occur for this ad avail event. In other words, to usethis logic: “Even if the message indicates to blank content because a regional blackout is in place, do notfollow this instruction. Ignore the fact that a regional blackout is in place and do not blank content.”
Version 2.14 and later291

AWS Elemental Live User GuideAd avail blanking and blackout
You modify the behavior by setting one or the other of the Ignore flags to:
• Cleared(default ). The logic as above applies: so continue to observe the restriction.
• Selected. Ignore the restriction and do not blank video for the ad avail event.
WarningNever set both fields to Ignore!
To summarize, the Ignore flags make a difference only to the scenarios in this table:
Content ofcorrespondingSCTE-35 Message
Web deliveryallowed?
Content ofcorrespondingSCTE-35 Message
Regional deliveryallowed?
Restriction fieldin AWS ElementalLive
Result
S3 True False Ignore “regionaldelivery”restriction
Blanking will notoccur.
S4 False True Ignore “webdelivery”restriction
Blanking will notoccur.
Ad avail blanking and restriction flags: restriction flags with “splice insert”
If you selected Splice Insert as the Ad Avail mode, then you can assume that the SCTE-35 ad availmessage not include the two restriction flags described above. Every SCTE-35 ad avail message shouldresult in an ad avail.
Therefore, if you know that input contains splice inserts (not time signals), you should leave both AWSElemental Live fields cleared.
Procedure to enable ad avail blanking
To enable ad avail blanking
1. In the Profile or Event screen, click Advanced Avail Controls (in the Input section towards the top ofthe screen):
2. Select or clear the two restriction fields:
• Cleared (default): Observe the restriction and blank the content for the ad avail event.
• Selected: Ignore the restriction and do not blank the content for the ad avail event.
3. Go down to the Global Processors section and complete the following fields:
• Ad Avail Blanking: Click to turn on. The Blanking Image field appears.
• Blanking Image: Specify a .bmp or .png file to use for the blanking. If you leave this field blank, aplain black image is inserted.The file images/ad-avail-blanking-image.png.
Version 2.14 and later292

AWS Elemental Live User GuidePassthrough or removal of SCTE messages
Procedure to enable blackout
To enable blackout
1. In the Profile or Event screen, go down to the Global Processors section and complete the followingfields:
• Blackout Image Insertion: Click to turn on. The Blanking Image field appears.
• Blanking Image: Specify a .bmp or .png file to use for the blanking. If you leave this field empty,a plain black image is inserted.
2. If you want to enable network end blackout (in other words, blank content when networktransmission has ended and remove blanking only when network transmission resumes), completethese fields:
• Enable Network End Blackout: Selected.
• Network ID: The Entertainment Identifier Registry (EIDR) ID of the network in the format10.nnnn/xxxx-xxxx-xxxx-xxxx-xxxx-c (case- insensitive). Only network end events with this IDtrigger blackout.
• Network End Blackout Image: Specify a .bmp or .png file to use for the blanking. If you leavethis field blank, a plain black image is inserted.
The file images/network-end-blackout-blanking-image.png.
Passthrough or removal of SCTE messagesSCTE-35 messages from the input can be passed through (included) in the data stream for the followingoutputs.
• Archive outputs with MPEG-2 as the container: You specify whether to pass through at the outputlevel.
• HLS: You specify whether to pass through at the output group level: passthrough or removal appliesglobally to all outputs in the output group.
• UDP/TS: You specify whether to pass through at the output level: for each individual output in theoutput group.
SCTE-104 messages are handled for each output as follows:
• If you choose to pass through the SCTE-35, then all SCTE-104 messages are converted to SCTE-35messages (of the same message type) and included in the data stream.
• If you choose to remove the SCTE-35 messages, the SCTE-104 messages are also removed.
Topics
• Archive procedure (p. 293)
• Apple HLS passthrough procedure (p. 294)
• UDP/TS procedure (p. 294)
Archive procedure
You enable or disable passthrough at the output level: only in outputs that have an MPEG-2 TS container.
Version 2.14 and later293
AWS Elemental Live User GuidePassthrough or removal of SCTE messages
1. In the Profile or Event screen, go to the Output Groups section at the bottom of the screen anddisplay the tab for Archive Output Group.
2. In the output that has the MPEG-2 TS container, open the PID Control section. Complete the followingfields:
• SCTE-35: Click to select.
• SCTE-35 PID: Enter the ID of the PID where you want the SCTE-35 messages to go.
Result
All SCTE-35 messages from the input are included in the data stream of this output.
Apple HLS passthrough procedure
Passthrough is enabled or disabled individually for each output, which means it can be applieddifferently for different outputs in the same group.
1. If you have not already set up for manifest decoration, do so now; see Procedure to enable manifestdecoration (p. 288).
2. In the Profile or Event screen, go to the Output Groups section at the bottom of the screen anddisplay the tab for Apple HLS Output Group.
a. In each output, open the PID Control section. You will note that the SCTE-35 field is automaticallyselected (because you set up for manifest decoration) and you cannot clear it .
b. Complete the following field:
• SCTE-35 PID field: Enter the ID of the PID where you want the SCTE-35 messages to go.
Result
All SCTE-35 messages from the input are included in the data stream of the relevant output.
UDP/TS procedure
Passthrough is enabled or disabled individually for each output, which means it can be applieddifferently for different outputs in the same group.
To enable passthrough
1. In the Profile or Event screen, go to the Output Groups section at the bottom of the screen anddisplay the tab for UDP/TS Output Group.
2. In the output where you want to pass through SCTE-35 messages, open the PID Control section.Complete the following fields:
• SCTE-35: Click to select.
• SCTE-35 PID: Enter the ID of the PID where you want the SCTE-35 messages to go.
Result
All SCTE-35 messages from the input are included in the data stream of the relevant output.
Version 2.14 and later294
AWS Elemental Live User GuideSCTE-35 message insertion into currently running events
SCTE-35 message insertion into currently runningeventsYou can use the AWS Elemental Live REST API to insert SCTE-35 messages into an AWS Elemental Liveevent that is currently running. The API supports insertion of a SCTE-35 message of type splice_insert ortime signal (Working with time signals (p. 304)).
Topics• Working with splice inserts (p. 295)• Working with time signals (p. 304)
Working with splice insertsSplice inserts inserted by the REST API are always of type “ad avail.”
You can:
• Insert a SCTE-35 ad avail of type splice_insert. See Insert a new splice insert message (p. 295).• Get the timecode of the content that is currently being processed. This data may be useful in
determine the start time you need to enter in the command. See Get current time (p. 301).• Insert an end time in an ad avail. See Insert an end time in an existing ad avail (p. 302).• Cancel a SCTE-35 ad avail that is pending (the start time has not yet been reached). See Cancel a
pending ad avail (p. 303).
Effect of these commands
These commands modify the data stream as it is being encoded.
Their precise effect on other parts of the content depends on how the event is set up, as describedin earlier chapters of this guide. So it depends on the Ad Avail mode, whether manifest decoration isenabled, blanking and blackout are enabled, and whether passthrough is enabled.
Topics• Insert a new splice insert message (p. 295)• Get current time (p. 301)• Insert an end time in an existing ad avail (p. 302)• Cancel a pending ad avail (p. 303)
Insert a new splice insert message
Inserts a SCTE-35 message of type splice_insert in the stream either immediately or at a specified time.The command always includes a start time. It may also include or omit a duration (which implies an endtime).
The command does not support inclusion of a segmentation descriptor, which means that the message isalways considered to be an “ad avail.”
HTTP URL
POST <IP address of Live node>/live_events/<ID of event>/cue_point
Body of HTTP
Version 2.14 and later295
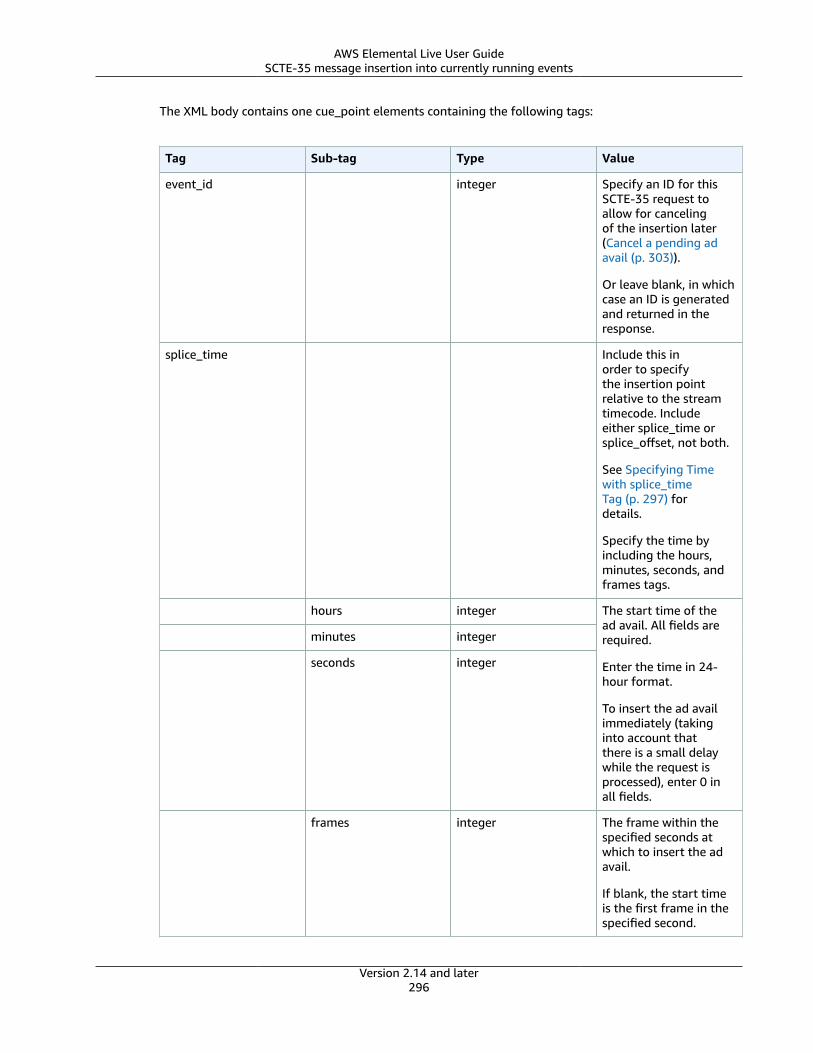
AWS Elemental Live User GuideSCTE-35 message insertion into currently running events
The XML body contains one cue_point elements containing the following tags:
Tag Sub-tag Type Value
event_id integer Specify an ID for thisSCTE-35 request toallow for cancelingof the insertion later(Cancel a pending adavail (p. 303)).
Or leave blank, in whichcase an ID is generatedand returned in theresponse.
splice_time Include this inorder to specifythe insertion pointrelative to the streamtimecode. Includeeither splice_time orsplice_offset, not both.
See Specifying Timewith splice_timeTag (p. 297) fordetails.
Specify the time byincluding the hours,minutes, seconds, andframes tags.
hours integer
minutes integer
seconds integer
The start time of thead avail. All fields arerequired.
Enter the time in 24-hour format.
To insert the ad availimmediately (takinginto account thatthere is a small delaywhile the request isprocessed), enter 0 inall fields.
frames integer The frame within thespecified seconds atwhich to insert the adavail.
If blank, the start timeis the first frame in thespecified second.
Version 2.14 and later296
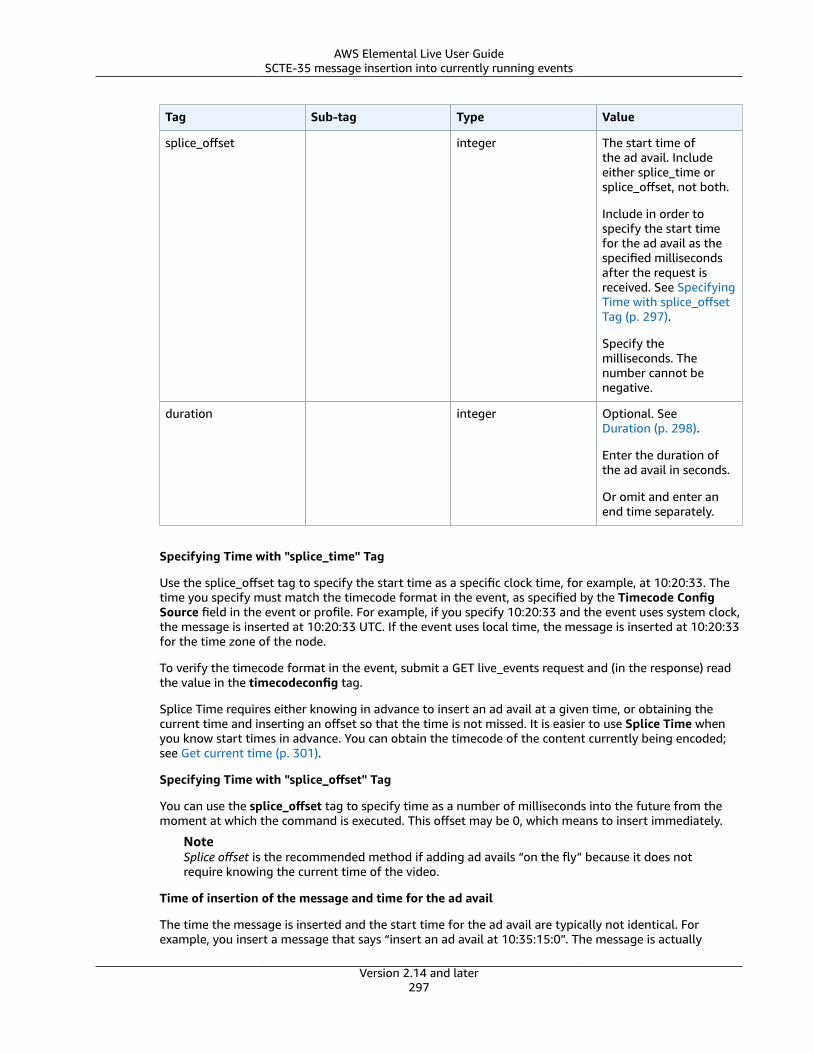
AWS Elemental Live User GuideSCTE-35 message insertion into currently running events
Tag Sub-tag Type Value
splice_offset integer The start time ofthe ad avail. Includeeither splice_time orsplice_offset, not both.
Include in order tospecify the start timefor the ad avail as thespecified millisecondsafter the request isreceived. See SpecifyingTime with splice_offsetTag (p. 297).
Specify themilliseconds. Thenumber cannot benegative.
duration integer Optional. SeeDuration (p. 298).
Enter the duration ofthe ad avail in seconds.
Or omit and enter anend time separately.
Specifying Time with "splice_time" Tag
Use the splice_offset tag to specify the start time as a specific clock time, for example, at 10:20:33. Thetime you specify must match the timecode format in the event, as specified by the Timecode ConfigSource field in the event or profile. For example, if you specify 10:20:33 and the event uses system clock,the message is inserted at 10:20:33 UTC. If the event uses local time, the message is inserted at 10:20:33for the time zone of the node.
To verify the timecode format in the event, submit a GET live_events request and (in the response) readthe value in the timecodeconfig tag.
Splice Time requires either knowing in advance to insert an ad avail at a given time, or obtaining thecurrent time and inserting an offset so that the time is not missed. It is easier to use Splice Time whenyou know start times in advance. You can obtain the timecode of the content currently being encoded;see Get current time (p. 301).
Specifying Time with "splice_offset" Tag
You can use the splice_offset tag to specify time as a number of milliseconds into the future from themoment at which the command is executed. This offset may be 0, which means to insert immediately.
NoteSplice offset is the recommended method if adding ad avails “on the fly” because it does notrequire knowing the current time of the video.
Time of insertion of the message and time for the ad avail
The time the message is inserted and the start time for the ad avail are typically not identical. Forexample, you insert a message that says “insert an ad avail at 10:35:15:0”. The message is actually
Version 2.14 and later297
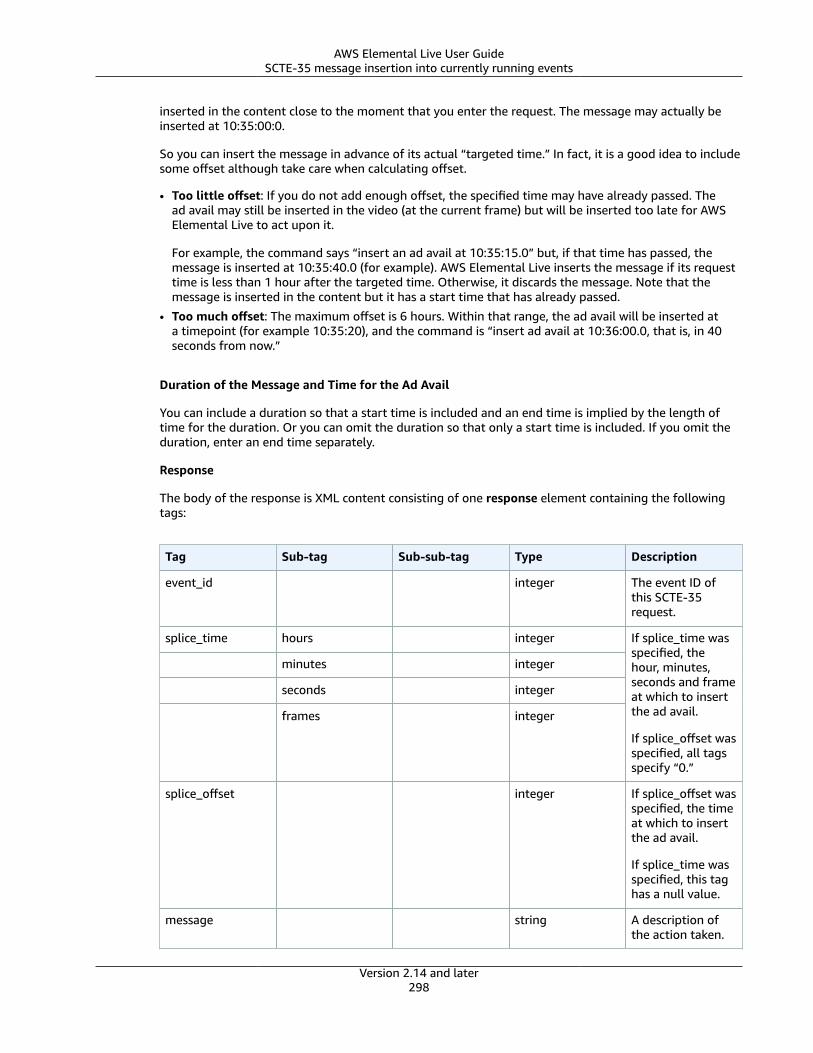
AWS Elemental Live User GuideSCTE-35 message insertion into currently running events
inserted in the content close to the moment that you enter the request. The message may actually beinserted at 10:35:00:0.
So you can insert the message in advance of its actual “targeted time.” In fact, it is a good idea to includesome offset although take care when calculating offset.
• Too little offset: If you do not add enough offset, the specified time may have already passed. Thead avail may still be inserted in the video (at the current frame) but will be inserted too late for AWSElemental Live to act upon it.
For example, the command says “insert an ad avail at 10:35:15.0” but, if that time has passed, themessage is inserted at 10:35:40.0 (for example). AWS Elemental Live inserts the message if its requesttime is less than 1 hour after the targeted time. Otherwise, it discards the message. Note that themessage is inserted in the content but it has a start time that has already passed.
• Too much offset: The maximum offset is 6 hours. Within that range, the ad avail will be inserted ata timepoint (for example 10:35:20), and the command is “insert ad avail at 10:36:00.0, that is, in 40seconds from now.”
Duration of the Message and Time for the Ad Avail
You can include a duration so that a start time is included and an end time is implied by the length oftime for the duration. Or you can omit the duration so that only a start time is included. If you omit theduration, enter an end time separately.
Response
The body of the response is XML content consisting of one response element containing the followingtags:
Tag Sub-tag Sub-sub-tag Type Description
event_id integer The event ID ofthis SCTE-35request.
splice_time hours integer
minutes integer
seconds integer
frames integer
If splice_time wasspecified, thehour, minutes,seconds and frameat which to insertthe ad avail.
If splice_offset wasspecified, all tagsspecify “0.”
splice_offset integer If splice_offset wasspecified, the timeat which to insertthe ad avail.
If splice_time wasspecified, this taghas a null value.
message string A description ofthe action taken.
Version 2.14 and later298
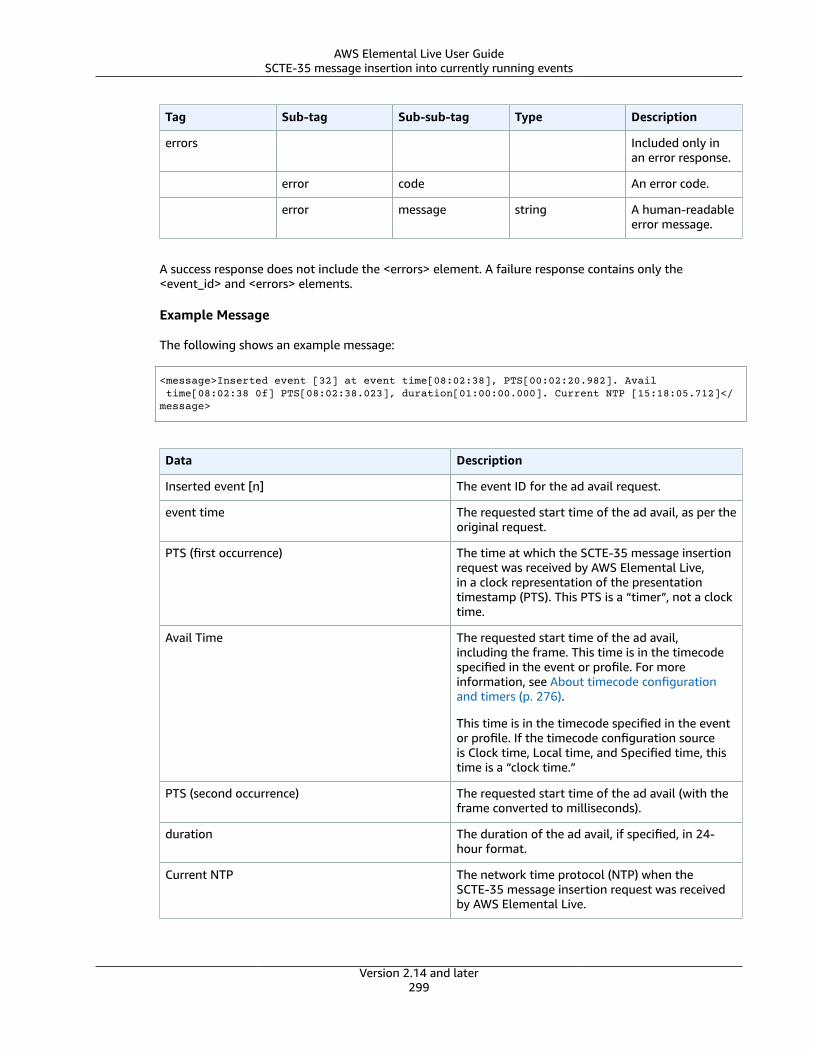
AWS Elemental Live User GuideSCTE-35 message insertion into currently running events
Tag Sub-tag Sub-sub-tag Type Description
errors Included only inan error response.
error code An error code.
error message string A human-readableerror message.
A success response does not include the <errors> element. A failure response contains only the<event_id> and <errors> elements.
Example Message
The following shows an example message:
<message>Inserted event [32] at event time[08:02:38], PTS[00:02:20.982]. Avail time[08:02:38 0f] PTS[08:02:38.023], duration[01:00:00.000]. Current NTP [15:18:05.712]</message>
Data Description
Inserted event [n] The event ID for the ad avail request.
event time The requested start time of the ad avail, as per theoriginal request.
PTS (first occurrence) The time at which the SCTE-35 message insertionrequest was received by AWS Elemental Live,in a clock representation of the presentationtimestamp (PTS). This PTS is a “timer”, not a clocktime.
Avail Time The requested start time of the ad avail,including the frame. This time is in the timecodespecified in the event or profile. For moreinformation, see About timecode configurationand timers (p. 276).
This time is in the timecode specified in the eventor profile. If the timecode configuration sourceis Clock time, Local time, and Specified time, thistime is a “clock time.”
PTS (second occurrence) The requested start time of the ad avail (with theframe converted to milliseconds).
duration The duration of the ad avail, if specified, in 24-hour format.
Current NTP The network time protocol (NTP) when theSCTE-35 message insertion request was receivedby AWS Elemental Live.
Version 2.14 and later299
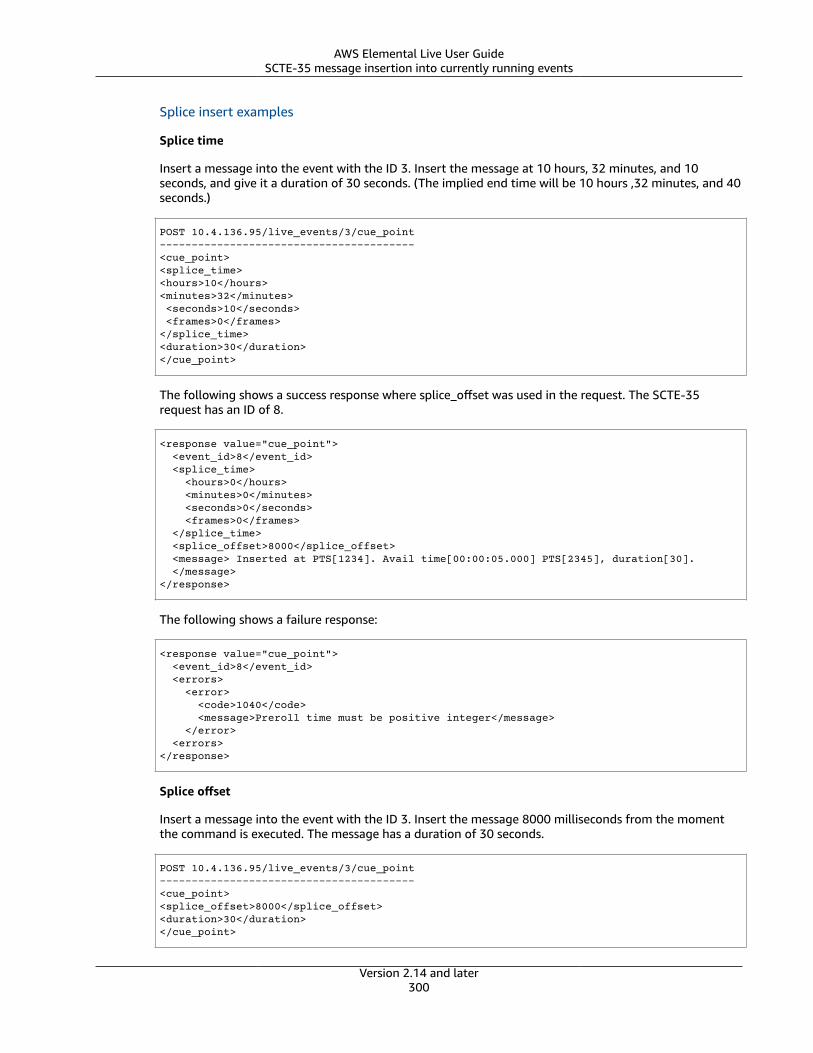
AWS Elemental Live User GuideSCTE-35 message insertion into currently running events
Splice insert examples
Splice time
Insert a message into the event with the ID 3. Insert the message at 10 hours, 32 minutes, and 10seconds, and give it a duration of 30 seconds. (The implied end time will be 10 hours ,32 minutes, and 40seconds.)
POST 10.4.136.95/live_events/3/cue_point----------------------------------------<cue_point><splice_time> <hours>10</hours><minutes>32</minutes> <seconds>10</seconds> <frames>0</frames></splice_time><duration>30</duration></cue_point>
The following shows a success response where splice_offset was used in the request. The SCTE-35request has an ID of 8.
<response value="cue_point"> <event_id>8</event_id> <splice_time> <hours>0</hours> <minutes>0</minutes> <seconds>0</seconds> <frames>0</frames> </splice_time> <splice_offset>8000</splice_offset> <message> Inserted at PTS[1234]. Avail time[00:00:05.000] PTS[2345], duration[30]. </message> </response>
The following shows a failure response:
<response value="cue_point"> <event_id>8</event_id> <errors> <error> <code>1040</code> <message>Preroll time must be positive integer</message> </error> <errors></response>
Splice offset
Insert a message into the event with the ID 3. Insert the message 8000 milliseconds from the momentthe command is executed. The message has a duration of 30 seconds.
POST 10.4.136.95/live_events/3/cue_point----------------------------------------<cue_point><splice_offset>8000</splice_offset><duration>30</duration></cue_point>
Version 2.14 and later300
AWS Elemental Live User GuideSCTE-35 message insertion into currently running events
Get current time
You can obtain the timecode of the frame that is currently being processed in the specified event. Referto the following tables.
HTTP URL
POST <IP address of Live node>/live_events/<ID of event>/cue_point
Body of HTTP
The XML body contains one cue_point element containing the following tag:
Tag Type Value
get_current_time Integer Always 1
Response
The body of the response contains one response element containing the following tags:
Tag Sub-tag Type Value
tag integer A unique ID that couldbe used in the event_idin a new request toinsert a splice_insert.See the explanationbelow this table.
splice_time hours integer
minutes integer
seconds integer
frames integer
The time (and frame)associated with theevent at the momentthat the API requestwas processed. Timeis in 24-hour format.For general informationabout timecodes inevents, see Abouttimecode configurationand timers (p. 276).
message string A description of thetime: the presentationtimestamp (PTS) of thetime and the time inNTP.
splice_offset Always 0. See theexplanation below thistable.
value string Always “cue_point.”
Version 2.14 and later301
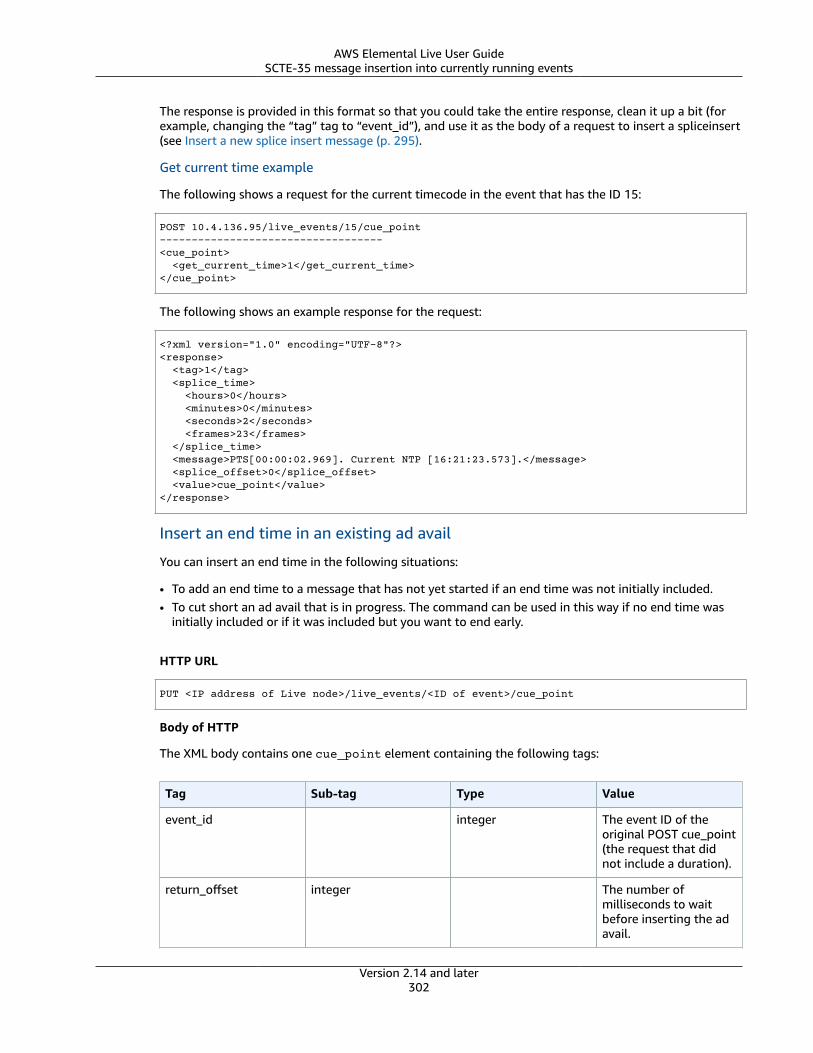
AWS Elemental Live User GuideSCTE-35 message insertion into currently running events
The response is provided in this format so that you could take the entire response, clean it up a bit (forexample, changing the “tag” tag to “event_id”), and use it as the body of a request to insert a spliceinsert(see Insert a new splice insert message (p. 295).
Get current time example
The following shows a request for the current timecode in the event that has the ID 15:
POST 10.4.136.95/live_events/15/cue_point-----------------------------------<cue_point> <get_current_time>1</get_current_time></cue_point>
The following shows an example response for the request:
<?xml version="1.0" encoding="UTF-8"?><response> <tag>1</tag> <splice_time> <hours>0</hours> <minutes>0</minutes> <seconds>2</seconds> <frames>23</frames> </splice_time> <message>PTS[00:00:02.969]. Current NTP [16:21:23.573].</message> <splice_offset>0</splice_offset> <value>cue_point</value></response>
Insert an end time in an existing ad avail
You can insert an end time in the following situations:
• To add an end time to a message that has not yet started if an end time was not initially included.• To cut short an ad avail that is in progress. The command can be used in this way if no end time was
initially included or if it was included but you want to end early.
HTTP URL
PUT <IP address of Live node>/live_events/<ID of event>/cue_point
Body of HTTP
The XML body contains one cue_point element containing the following tags:
Tag Sub-tag Type Value
event_id integer The event ID of theoriginal POST cue_point(the request that didnot include a duration).
return_offset integer The number ofmilliseconds to waitbefore inserting the adavail.
Version 2.14 and later302
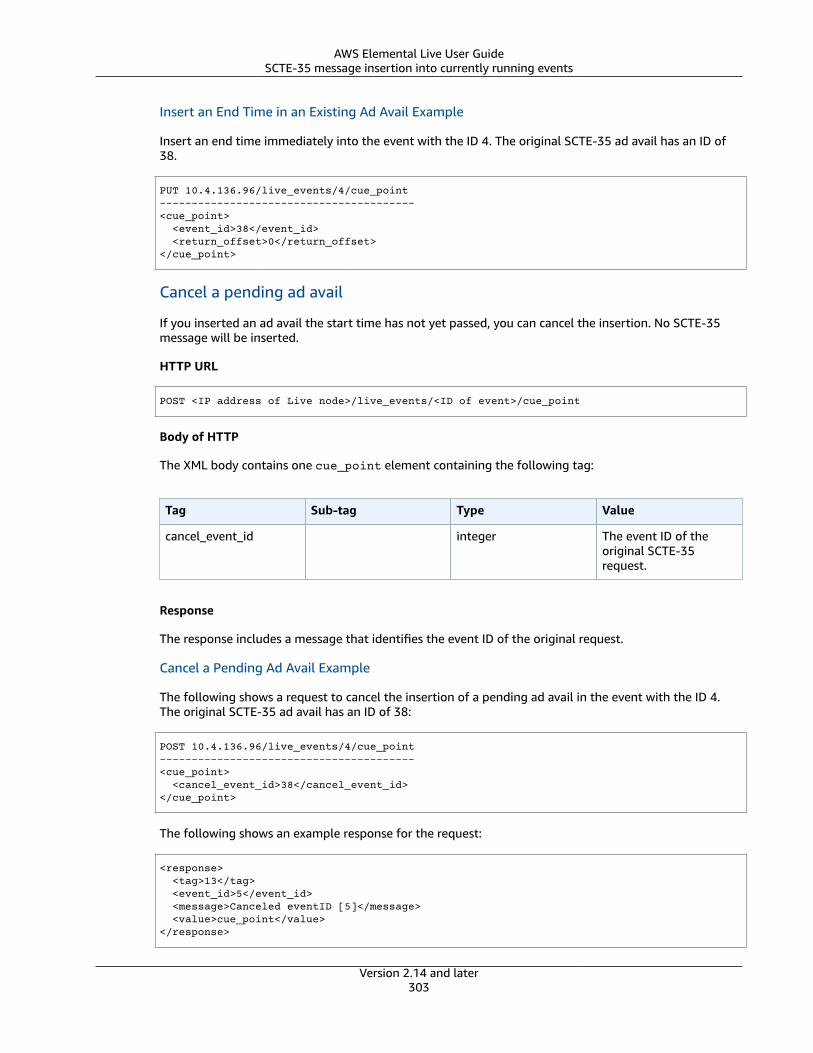
AWS Elemental Live User GuideSCTE-35 message insertion into currently running events
Insert an End Time in an Existing Ad Avail Example
Insert an end time immediately into the event with the ID 4. The original SCTE-35 ad avail has an ID of38.
PUT 10.4.136.96/live_events/4/cue_point----------------------------------------<cue_point> <event_id>38</event_id> <return_offset>0</return_offset> </cue_point>
Cancel a pending ad avail
If you inserted an ad avail the start time has not yet passed, you can cancel the insertion. No SCTE-35message will be inserted.
HTTP URL
POST <IP address of Live node>/live_events/<ID of event>/cue_point
Body of HTTP
The XML body contains one cue_point element containing the following tag:
Tag Sub-tag Type Value
cancel_event_id integer The event ID of theoriginal SCTE-35request.
Response
The response includes a message that identifies the event ID of the original request.
Cancel a Pending Ad Avail Example
The following shows a request to cancel the insertion of a pending ad avail in the event with the ID 4.The original SCTE-35 ad avail has an ID of 38:
POST 10.4.136.96/live_events/4/cue_point----------------------------------------<cue_point> <cancel_event_id>38</cancel_event_id> </cue_point>
The following shows an example response for the request:
<response> <tag>13</tag> <event_id>5</event_id> <message>Canceled eventID [5]</message> <value>cue_point</value></response>
Version 2.14 and later303
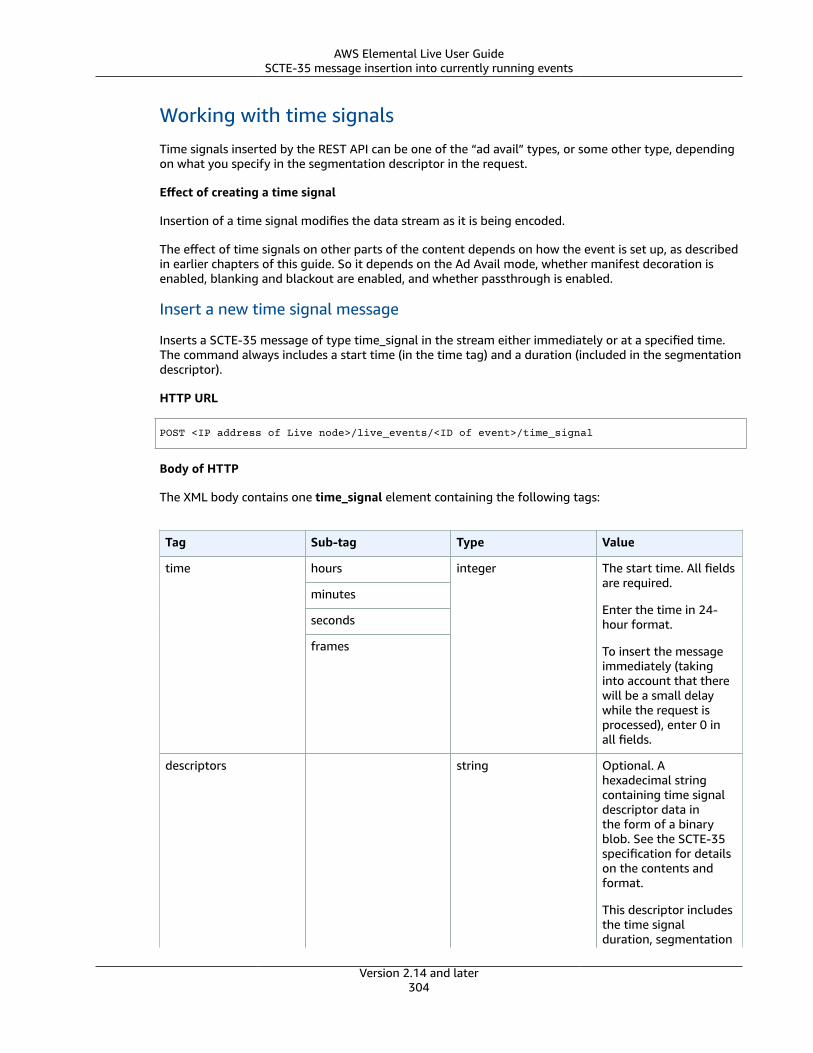
AWS Elemental Live User GuideSCTE-35 message insertion into currently running events
Working with time signalsTime signals inserted by the REST API can be one of the “ad avail” types, or some other type, dependingon what you specify in the segmentation descriptor in the request.
Effect of creating a time signal
Insertion of a time signal modifies the data stream as it is being encoded.
The effect of time signals on other parts of the content depends on how the event is set up, as describedin earlier chapters of this guide. So it depends on the Ad Avail mode, whether manifest decoration isenabled, blanking and blackout are enabled, and whether passthrough is enabled.
Insert a new time signal message
Inserts a SCTE-35 message of type time_signal in the stream either immediately or at a specified time.The command always includes a start time (in the time tag) and a duration (included in the segmentationdescriptor).
HTTP URL
POST <IP address of Live node>/live_events/<ID of event>/time_signal
Body of HTTP
The XML body contains one time_signal element containing the following tags:
Tag Sub-tag Type Value
hours
minutes
seconds
time
frames
integer The start time. All fieldsare required.
Enter the time in 24-hour format.
To insert the messageimmediately (takinginto account that therewill be a small delaywhile the request isprocessed), enter 0 inall fields.
descriptors string Optional. Ahexadecimal stringcontaining time signaldescriptor data inthe form of a binaryblob. See the SCTE-35specification for detailson the contents andformat.
This descriptor includesthe time signalduration, segmentation
Version 2.14 and later304
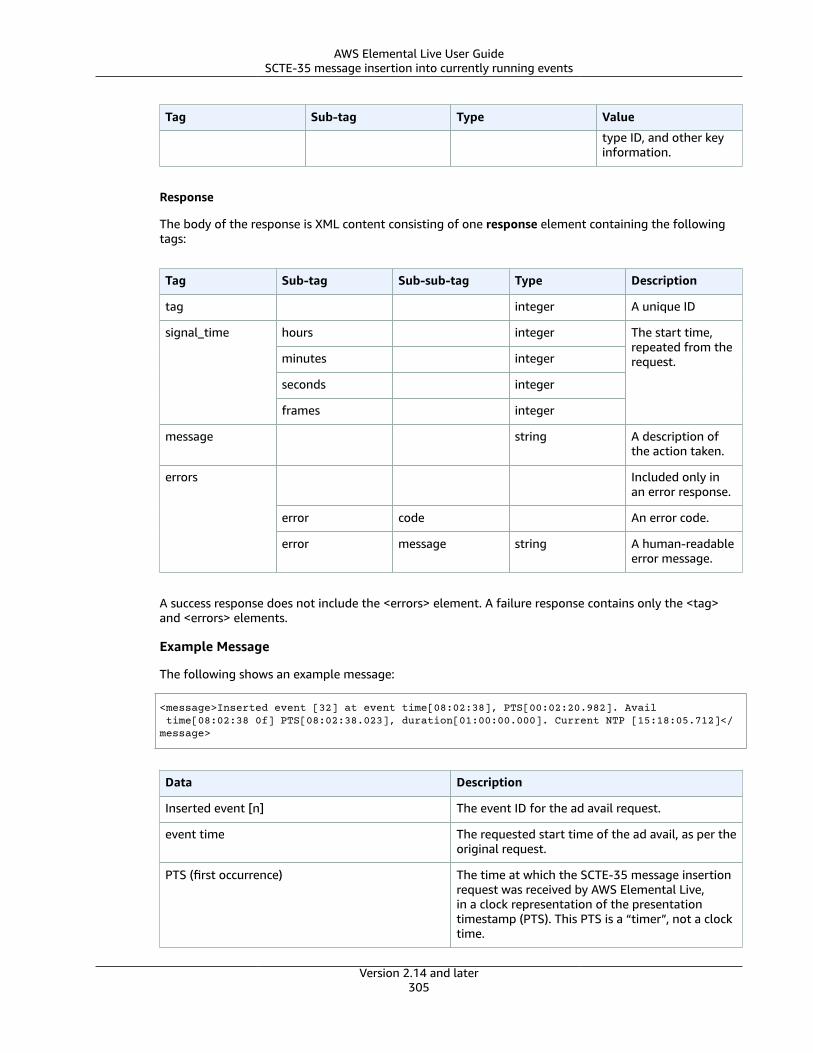
AWS Elemental Live User GuideSCTE-35 message insertion into currently running events
Tag Sub-tag Type Value
type ID, and other keyinformation.
Response
The body of the response is XML content consisting of one response element containing the followingtags:
Tag Sub-tag Sub-sub-tag Type Description
tag integer A unique ID
hours integer
minutes integer
seconds integer
signal_time
frames integer
The start time,repeated from therequest.
message string A description ofthe action taken.
Included only inan error response.
error code An error code.
errors
error message string A human-readableerror message.
A success response does not include the <errors> element. A failure response contains only the <tag>and <errors> elements.
Example Message
The following shows an example message:
<message>Inserted event [32] at event time[08:02:38], PTS[00:02:20.982]. Avail time[08:02:38 0f] PTS[08:02:38.023], duration[01:00:00.000]. Current NTP [15:18:05.712]</message>
Data Description
Inserted event [n] The event ID for the ad avail request.
event time The requested start time of the ad avail, as per theoriginal request.
PTS (first occurrence) The time at which the SCTE-35 message insertionrequest was received by AWS Elemental Live,in a clock representation of the presentationtimestamp (PTS). This PTS is a “timer”, not a clocktime.
Version 2.14 and later305
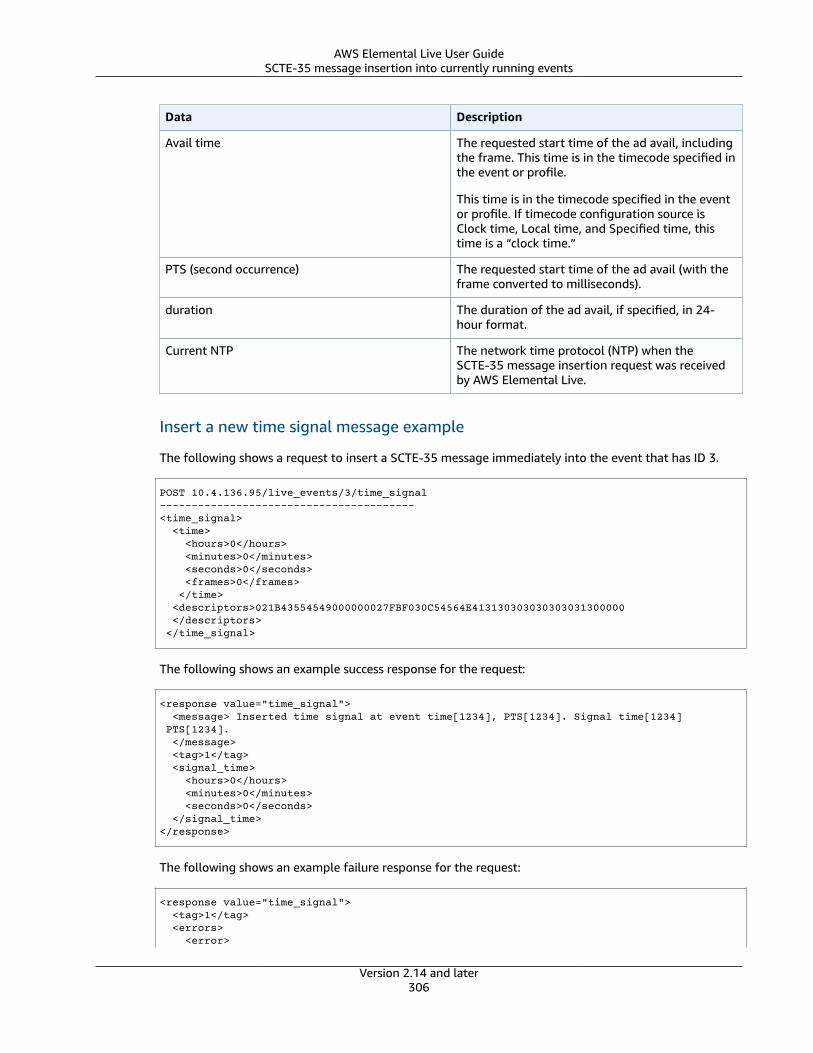
AWS Elemental Live User GuideSCTE-35 message insertion into currently running events
Data Description
Avail time The requested start time of the ad avail, includingthe frame. This time is in the timecode specified inthe event or profile.
This time is in the timecode specified in the eventor profile. If timecode configuration source isClock time, Local time, and Specified time, thistime is a “clock time.”
PTS (second occurrence) The requested start time of the ad avail (with theframe converted to milliseconds).
duration The duration of the ad avail, if specified, in 24-hour format.
Current NTP The network time protocol (NTP) when theSCTE-35 message insertion request was receivedby AWS Elemental Live.
Insert a new time signal message example
The following shows a request to insert a SCTE-35 message immediately into the event that has ID 3.
POST 10.4.136.95/live_events/3/time_signal----------------------------------------<time_signal> <time> <hours>0</hours> <minutes>0</minutes> <seconds>0</seconds> <frames>0</frames> </time> <descriptors>021B43554549000000027FBF030C54564E413130303030303031300000 </descriptors> </time_signal>
The following shows an example success response for the request:
<response value="time_signal"> <message> Inserted time signal at event time[1234], PTS[1234]. Signal time[1234] PTS[1234]. </message> <tag>1</tag> <signal_time> <hours>0</hours> <minutes>0</minutes> <seconds>0</seconds> </signal_time> </response>
The following shows an example failure response for the request:
<response value="time_signal"> <tag>1</tag> <errors> <error>
Version 2.14 and later306

AWS Elemental Live User GuidePOIS conditioning
<code>1040</code> <message>Invalid time signal message</message> </error> </errors></response>
POIS conditioningAWS Elemental Live events can be configured to communicate with a POIS server. During processing ofthe input, each time a SCTE-35 message is encountered, AWS Elemental Live sends the message contentsto the server. The POIS responds with SCTE-35 content that may be identical to, slightly different from,or completely different from the original.
AWS Elemental Live also supports handling of “out-of-band” SCTE-35 messages from the POIS –messages that are not a response to a message originally sent by AWS Elemental Live. If such a messageis received, AWS Elemental Live accepts and processes it.
Effect of POIS conditioning
When you enable POIS conditioning, an extra step is inserted into the regular processing of the SCTE-35and SCTE-104 messages. The event’s ad avail mode, of manifest decoration, of ad avail blanking, ofblackout and of SCTE-35 passthrough still apply to some degree.
Read the earlier sections of this guide, then read the following to determine how POIS conditioningchanges the standard behavior.
Ad avail mode
When POIS conditioning is enabled, the ad avail mode is always set to “splice insert.” For informationabout the implications for manifest decoration and ad avail blanking that is performed by AWSElemental Live, see Getting ready: setting the ad avail mode (p. 284).
SCTE-35 messages inserted by REST API
All these messages are sent to the POIS along with messages that are already in the input.
New or conditioned SCTE-35 messages
The POIS can send an instruction to insert a new SCTE-35 message, modify an existing one, or delete anexisting one. A message received from the POIS may include any message type and segmentation type.
Manifest decoration
The effect of POIS conditioning on manifest decoration is as follows:
• HLS Outputs – A message received from the POIS may include instructions to decorate an HLSmanifest (not other types of manifests). This information is used to decorate the HLS manifest.
How AWS Elemental Live processes the decoration information depends on how the event or event hasbeen configured:
• If the event or event does not have manifest decoration enabled for HLS outputs, then theinformation is ignored.
• If the event does have it enabled, then the decoration information is inserted in the manifest.
• The information is inserted into the manifest “as is.” The style of the information may not matchthe styles (ad marker styles) specified in the event. AWS Elemental Live doesn't check for formatinconsistencies between these instructions and the ad marker style.
Version 2.14 and later307
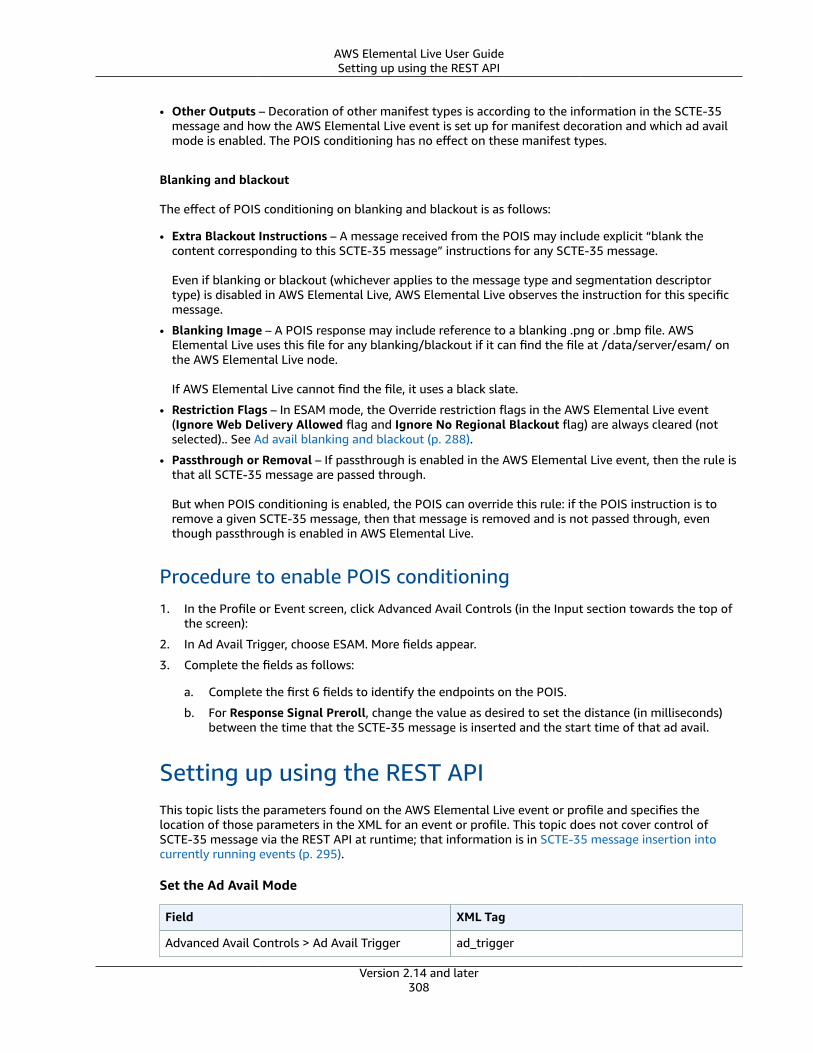
AWS Elemental Live User GuideSetting up using the REST API
• Other Outputs – Decoration of other manifest types is according to the information in the SCTE-35message and how the AWS Elemental Live event is set up for manifest decoration and which ad availmode is enabled. The POIS conditioning has no effect on these manifest types.
Blanking and blackout
The effect of POIS conditioning on blanking and blackout is as follows:
• Extra Blackout Instructions – A message received from the POIS may include explicit “blank thecontent corresponding to this SCTE-35 message” instructions for any SCTE-35 message.
Even if blanking or blackout (whichever applies to the message type and segmentation descriptortype) is disabled in AWS Elemental Live, AWS Elemental Live observes the instruction for this specificmessage.
• Blanking Image – A POIS response may include reference to a blanking .png or .bmp file. AWSElemental Live uses this file for any blanking/blackout if it can find the file at /data/server/esam/ onthe AWS Elemental Live node.
If AWS Elemental Live cannot find the file, it uses a black slate.
• Restriction Flags – In ESAM mode, the Override restriction flags in the AWS Elemental Live event(Ignore Web Delivery Allowed flag and Ignore No Regional Blackout flag) are always cleared (notselected).. See Ad avail blanking and blackout (p. 288).
• Passthrough or Removal – If passthrough is enabled in the AWS Elemental Live event, then the rule isthat all SCTE-35 message are passed through.
But when POIS conditioning is enabled, the POIS can override this rule: if the POIS instruction is toremove a given SCTE-35 message, then that message is removed and is not passed through, eventhough passthrough is enabled in AWS Elemental Live.
Procedure to enable POIS conditioning1. In the Profile or Event screen, click Advanced Avail Controls (in the Input section towards the top of
the screen):
2. In Ad Avail Trigger, choose ESAM. More fields appear.
3. Complete the fields as follows:
a. Complete the first 6 fields to identify the endpoints on the POIS.
b. For Response Signal Preroll, change the value as desired to set the distance (in milliseconds)between the time that the SCTE-35 message is inserted and the start time of that ad avail.
Setting up using the REST APIThis topic lists the parameters found on the AWS Elemental Live event or profile and specifies thelocation of those parameters in the XML for an event or profile. This topic does not cover control ofSCTE-35 message via the REST API at runtime; that information is in SCTE-35 message insertion intocurrently running events (p. 295).
Set the Ad Avail Mode
Field XML Tag
Advanced Avail Controls > Ad Avail Trigger ad_trigger
Version 2.14 and later308
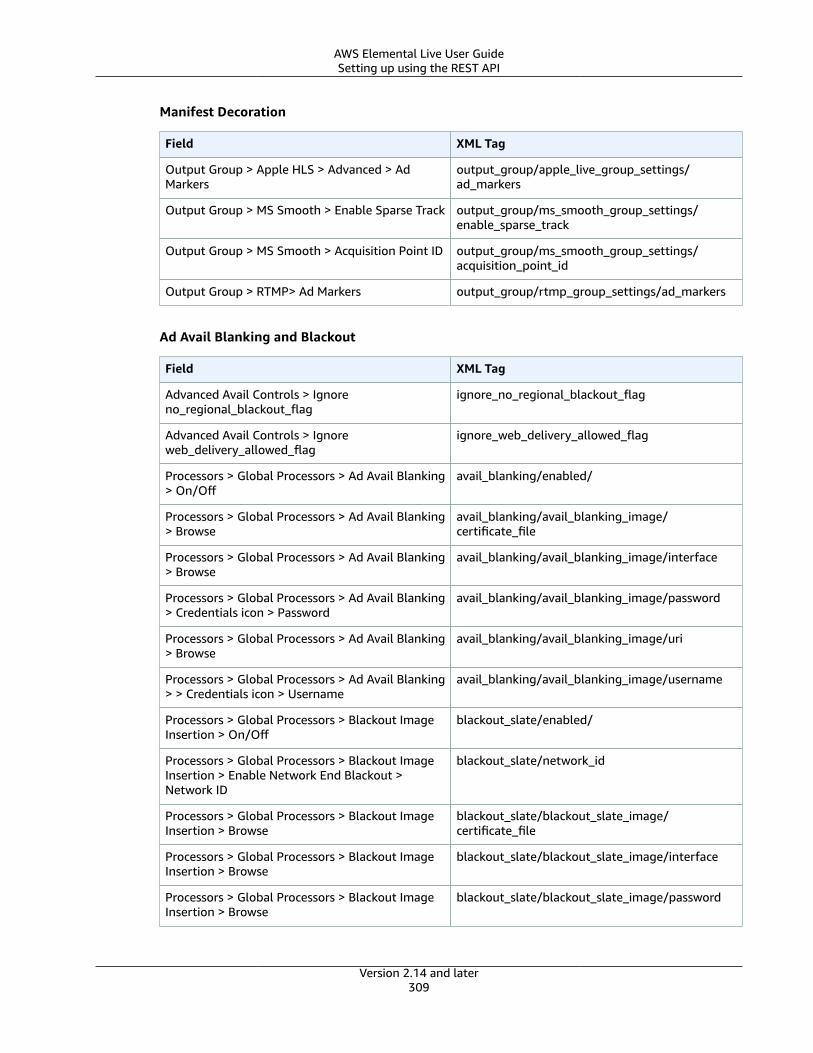
AWS Elemental Live User GuideSetting up using the REST API
Manifest Decoration
Field XML Tag
Output Group > Apple HLS > Advanced > AdMarkers
output_group/apple_live_group_settings/ad_markers
Output Group > MS Smooth > Enable Sparse Track output_group/ms_smooth_group_settings/enable_sparse_track
Output Group > MS Smooth > Acquisition Point ID output_group/ms_smooth_group_settings/acquisition_point_id
Output Group > RTMP> Ad Markers output_group/rtmp_group_settings/ad_markers
Ad Avail Blanking and Blackout
Field XML Tag
Advanced Avail Controls > Ignoreno_regional_blackout_flag
ignore_no_regional_blackout_flag
Advanced Avail Controls > Ignoreweb_delivery_allowed_flag
ignore_web_delivery_allowed_flag
Processors > Global Processors > Ad Avail Blanking> On/Off
avail_blanking/enabled/
Processors > Global Processors > Ad Avail Blanking> Browse
avail_blanking/avail_blanking_image/certificate_file
Processors > Global Processors > Ad Avail Blanking> Browse
avail_blanking/avail_blanking_image/interface
Processors > Global Processors > Ad Avail Blanking> Credentials icon > Password
avail_blanking/avail_blanking_image/password
Processors > Global Processors > Ad Avail Blanking> Browse
avail_blanking/avail_blanking_image/uri
Processors > Global Processors > Ad Avail Blanking> > Credentials icon > Username
avail_blanking/avail_blanking_image/username
Processors > Global Processors > Blackout ImageInsertion > On/Off
blackout_slate/enabled/
Processors > Global Processors > Blackout ImageInsertion > Enable Network End Blackout >Network ID
blackout_slate/network_id
Processors > Global Processors > Blackout ImageInsertion > Browse
blackout_slate/blackout_slate_image/certificate_file
Processors > Global Processors > Blackout ImageInsertion > Browse
blackout_slate/blackout_slate_image/interface
Processors > Global Processors > Blackout ImageInsertion > Browse
blackout_slate/blackout_slate_image/password
Version 2.14 and later309
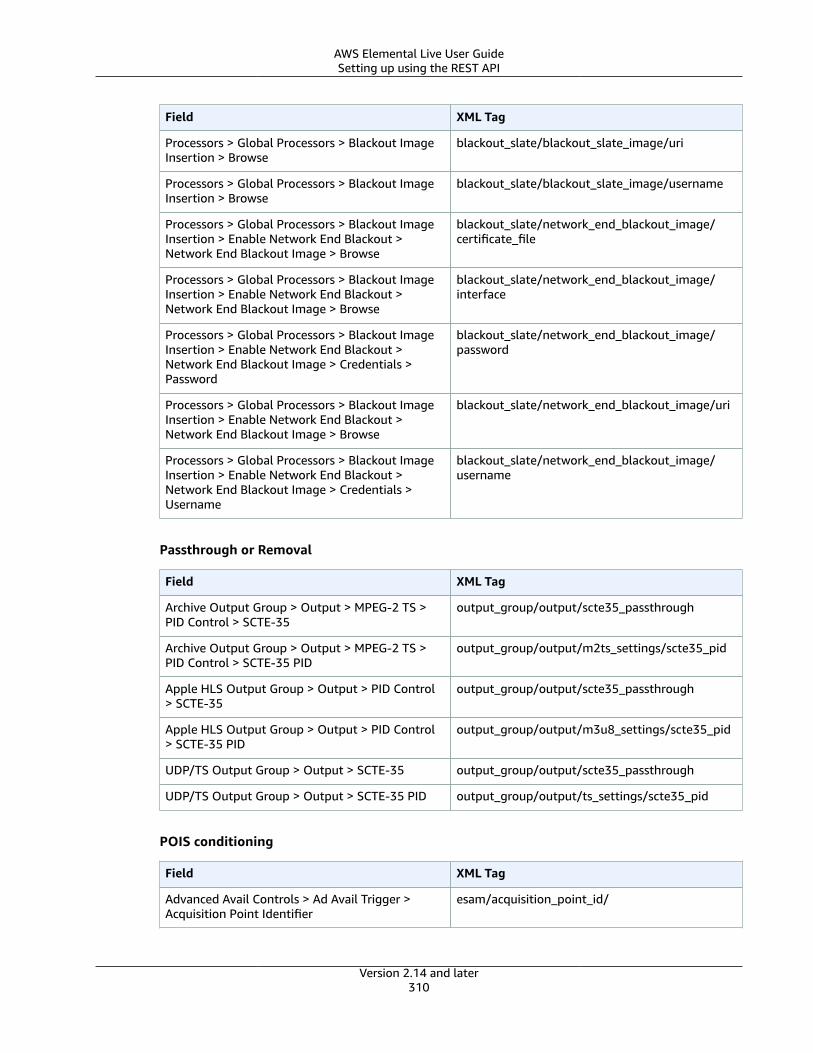
AWS Elemental Live User GuideSetting up using the REST API
Field XML Tag
Processors > Global Processors > Blackout ImageInsertion > Browse
blackout_slate/blackout_slate_image/uri
Processors > Global Processors > Blackout ImageInsertion > Browse
blackout_slate/blackout_slate_image/username
Processors > Global Processors > Blackout ImageInsertion > Enable Network End Blackout >Network End Blackout Image > Browse
blackout_slate/network_end_blackout_image/certificate_file
Processors > Global Processors > Blackout ImageInsertion > Enable Network End Blackout >Network End Blackout Image > Browse
blackout_slate/network_end_blackout_image/interface
Processors > Global Processors > Blackout ImageInsertion > Enable Network End Blackout >Network End Blackout Image > Credentials >Password
blackout_slate/network_end_blackout_image/password
Processors > Global Processors > Blackout ImageInsertion > Enable Network End Blackout >Network End Blackout Image > Browse
blackout_slate/network_end_blackout_image/uri
Processors > Global Processors > Blackout ImageInsertion > Enable Network End Blackout >Network End Blackout Image > Credentials >Username
blackout_slate/network_end_blackout_image/username
Passthrough or Removal
Field XML Tag
Archive Output Group > Output > MPEG-2 TS >PID Control > SCTE-35
output_group/output/scte35_passthrough
Archive Output Group > Output > MPEG-2 TS >PID Control > SCTE-35 PID
output_group/output/m2ts_settings/scte35_pid
Apple HLS Output Group > Output > PID Control> SCTE-35
output_group/output/scte35_passthrough
Apple HLS Output Group > Output > PID Control> SCTE-35 PID
output_group/output/m3u8_settings/scte35_pid
UDP/TS Output Group > Output > SCTE-35 output_group/output/scte35_passthrough
UDP/TS Output Group > Output > SCTE-35 PID output_group/output/ts_settings/scte35_pid
POIS conditioning
Field XML Tag
Advanced Avail Controls > Ad Avail Trigger >Acquisition Point Identifier
esam/acquisition_point_id/
Version 2.14 and later310
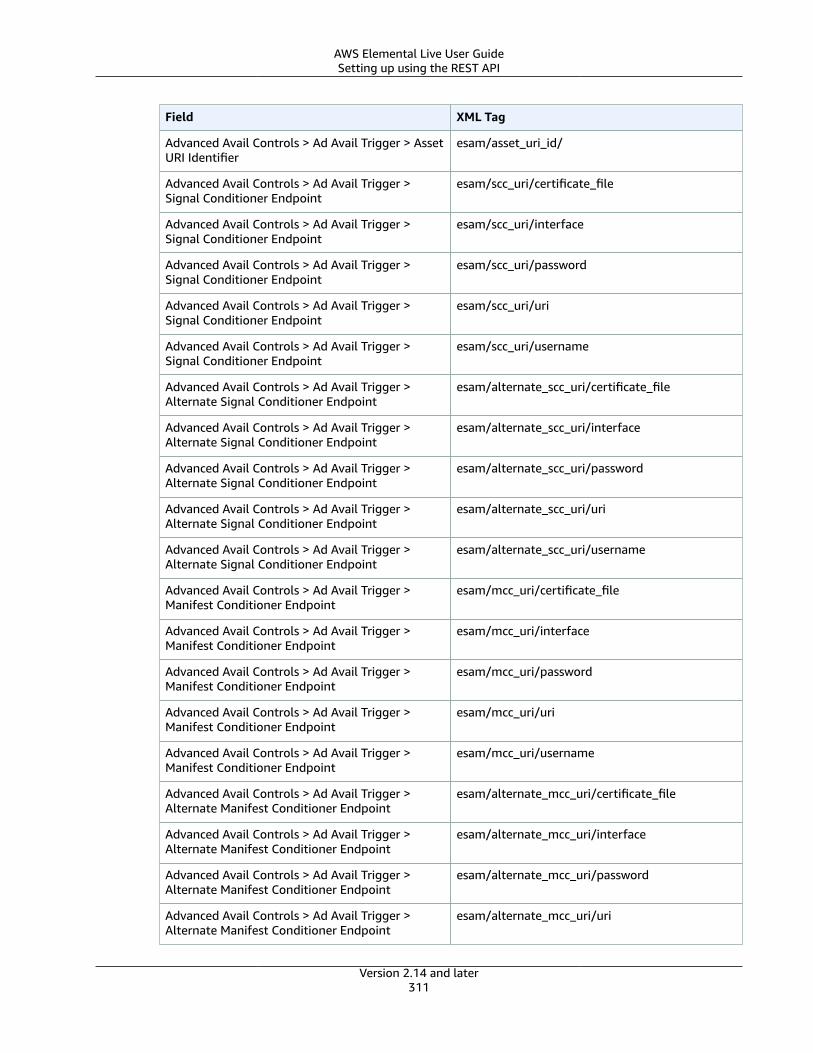
AWS Elemental Live User GuideSetting up using the REST API
Field XML Tag
Advanced Avail Controls > Ad Avail Trigger > AssetURI Identifier
esam/asset_uri_id/
Advanced Avail Controls > Ad Avail Trigger >Signal Conditioner Endpoint
esam/scc_uri/certificate_file
Advanced Avail Controls > Ad Avail Trigger >Signal Conditioner Endpoint
esam/scc_uri/interface
Advanced Avail Controls > Ad Avail Trigger >Signal Conditioner Endpoint
esam/scc_uri/password
Advanced Avail Controls > Ad Avail Trigger >Signal Conditioner Endpoint
esam/scc_uri/uri
Advanced Avail Controls > Ad Avail Trigger >Signal Conditioner Endpoint
esam/scc_uri/username
Advanced Avail Controls > Ad Avail Trigger >Alternate Signal Conditioner Endpoint
esam/alternate_scc_uri/certificate_file
Advanced Avail Controls > Ad Avail Trigger >Alternate Signal Conditioner Endpoint
esam/alternate_scc_uri/interface
Advanced Avail Controls > Ad Avail Trigger >Alternate Signal Conditioner Endpoint
esam/alternate_scc_uri/password
Advanced Avail Controls > Ad Avail Trigger >Alternate Signal Conditioner Endpoint
esam/alternate_scc_uri/uri
Advanced Avail Controls > Ad Avail Trigger >Alternate Signal Conditioner Endpoint
esam/alternate_scc_uri/username
Advanced Avail Controls > Ad Avail Trigger >Manifest Conditioner Endpoint
esam/mcc_uri/certificate_file
Advanced Avail Controls > Ad Avail Trigger >Manifest Conditioner Endpoint
esam/mcc_uri/interface
Advanced Avail Controls > Ad Avail Trigger >Manifest Conditioner Endpoint
esam/mcc_uri/password
Advanced Avail Controls > Ad Avail Trigger >Manifest Conditioner Endpoint
esam/mcc_uri/uri
Advanced Avail Controls > Ad Avail Trigger >Manifest Conditioner Endpoint
esam/mcc_uri/username
Advanced Avail Controls > Ad Avail Trigger >Alternate Manifest Conditioner Endpoint
esam/alternate_mcc_uri/certificate_file
Advanced Avail Controls > Ad Avail Trigger >Alternate Manifest Conditioner Endpoint
esam/alternate_mcc_uri/interface
Advanced Avail Controls > Ad Avail Trigger >Alternate Manifest Conditioner Endpoint
esam/alternate_mcc_uri/password
Advanced Avail Controls > Ad Avail Trigger >Alternate Manifest Conditioner Endpoint
esam/alternate_mcc_uri/uri
Version 2.14 and later311
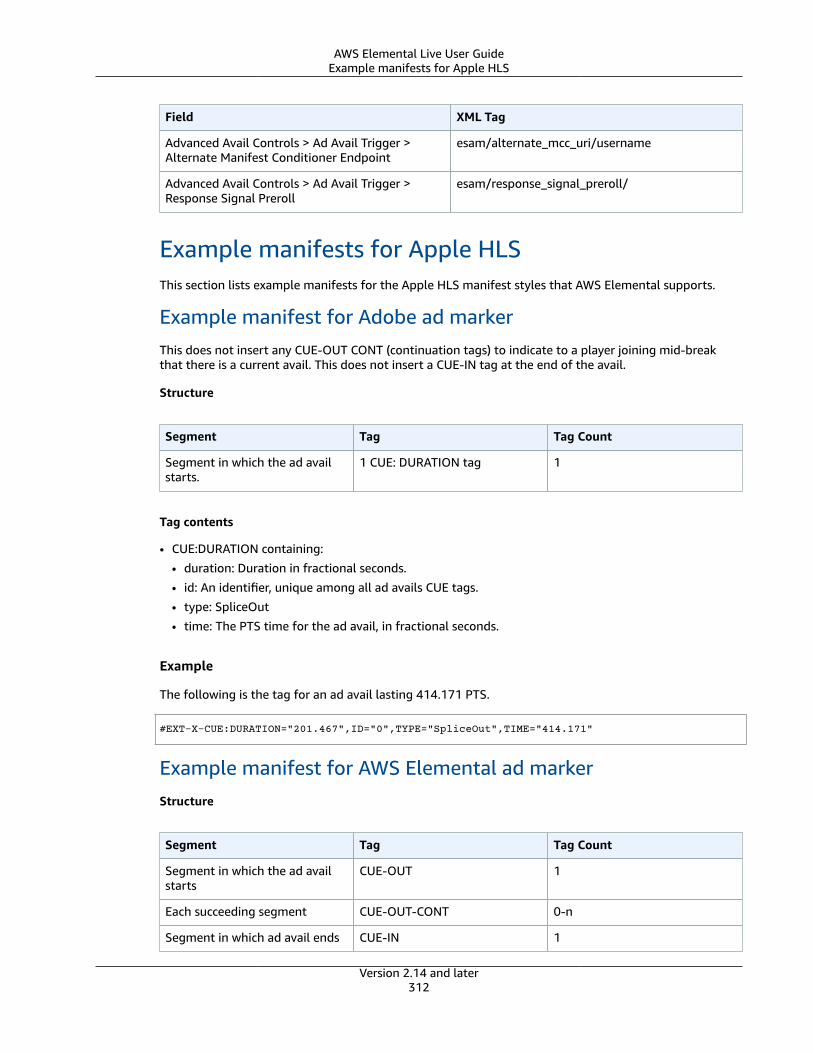
AWS Elemental Live User GuideExample manifests for Apple HLS
Field XML Tag
Advanced Avail Controls > Ad Avail Trigger >Alternate Manifest Conditioner Endpoint
esam/alternate_mcc_uri/username
Advanced Avail Controls > Ad Avail Trigger >Response Signal Preroll
esam/response_signal_preroll/
Example manifests for Apple HLSThis section lists example manifests for the Apple HLS manifest styles that AWS Elemental supports.
Example manifest for Adobe ad markerThis does not insert any CUE-OUT CONT (continuation tags) to indicate to a player joining mid-breakthat there is a current avail. This does not insert a CUE-IN tag at the end of the avail.
Structure
Segment Tag Tag Count
Segment in which the ad availstarts.
1 CUE: DURATION tag 1
Tag contents
• CUE:DURATION containing:
• duration: Duration in fractional seconds.
• id: An identifier, unique among all ad avails CUE tags.
• type: SpliceOut
• time: The PTS time for the ad avail, in fractional seconds.
Example
The following is the tag for an ad avail lasting 414.171 PTS.
#EXT-X-CUE:DURATION="201.467",ID="0",TYPE="SpliceOut",TIME="414.171"
Example manifest for AWS Elemental ad markerStructure
Segment Tag Tag Count
Segment in which the ad availstarts
CUE-OUT 1
Each succeeding segment CUE-OUT-CONT 0-n
Segment in which ad avail ends CUE-IN 1
Version 2.14 and later312
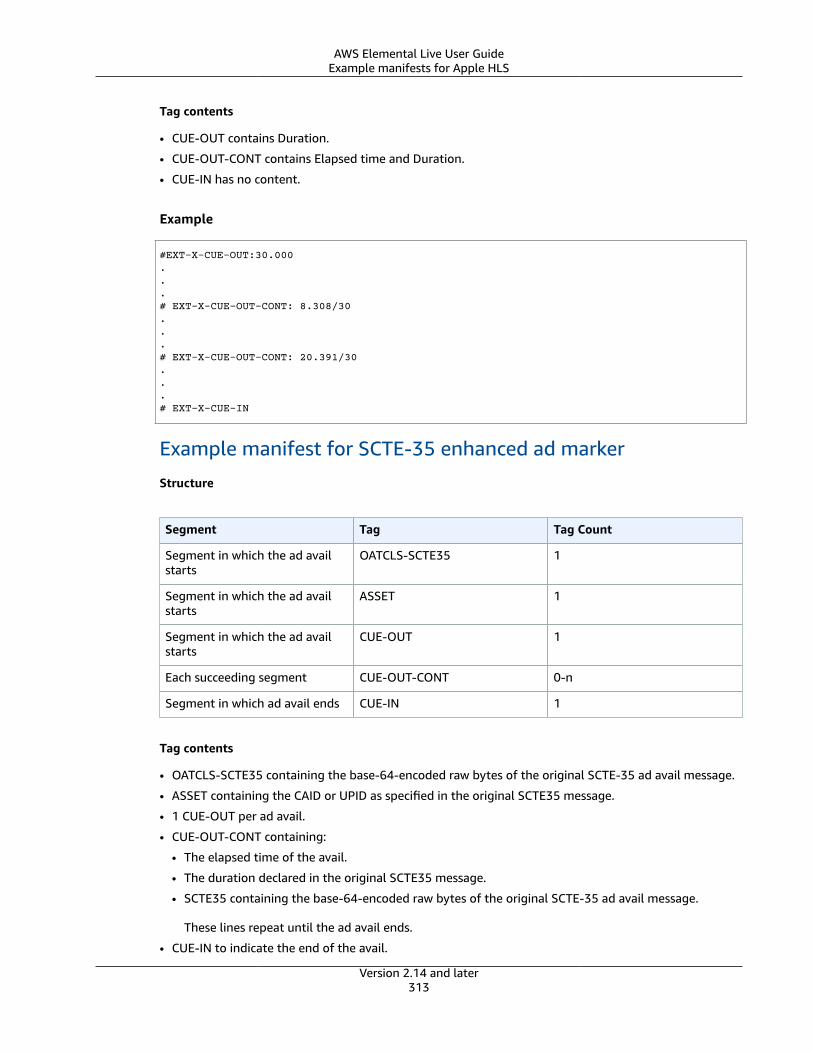
AWS Elemental Live User GuideExample manifests for Apple HLS
Tag contents
• CUE-OUT contains Duration.
• CUE-OUT-CONT contains Elapsed time and Duration.
• CUE-IN has no content.
Example
#EXT-X-CUE-OUT:30.000 ...# EXT-X-CUE-OUT-CONT: 8.308/30 ...# EXT-X-CUE-OUT-CONT: 20.391/30...# EXT-X-CUE-IN
Example manifest for SCTE-35 enhanced ad marker
Structure
Segment Tag Tag Count
Segment in which the ad availstarts
OATCLS-SCTE35 1
Segment in which the ad availstarts
ASSET 1
Segment in which the ad availstarts
CUE-OUT 1
Each succeeding segment CUE-OUT-CONT 0-n
Segment in which ad avail ends CUE-IN 1
Tag contents
• OATCLS-SCTE35 containing the base-64-encoded raw bytes of the original SCTE-35 ad avail message.
• ASSET containing the CAID or UPID as specified in the original SCTE35 message.
• 1 CUE-OUT per ad avail.
• CUE-OUT-CONT containing:
• The elapsed time of the avail.
• The duration declared in the original SCTE35 message.
• SCTE35 containing the base-64-encoded raw bytes of the original SCTE-35 ad avail message.
These lines repeat until the ad avail ends.
• CUE-IN to indicate the end of the avail.
Version 2.14 and later313

AWS Elemental Live User GuideSCTE-35 ad marker EXT-X-DATERANGE
Example
#EXT-OATCLS-SCTE35:/DA0AAAAAAAAAAAABQb+ADAQ6QAeAhxDVUVJQAAAO3/PAAEUrEoICAAAAAAg+2UBNAAANvrtoQ== #EXT-X-ASSET:CAID=0x0000000020FB6501 #EXT-X-CUE-OUT:201.467...#EXT-X-CUE-OUT-CONT:ElapsedTime=5.939,Duration=201.467,SCTE35=/DA0AAAA+…AAg+2UBNAAANvrtoQ==...#EXT-X-CUE-IN
SCTE-35 ad marker EXT-X-DATERANGEThis section is an addendum to the section called “SCTE-35 and SCTE-104 messageprocessing” (p. 273). AWS Elemental Live supports the EXT-X-DATERANGE ad marker style in themanifest created for an HLS output.
To select this marker, do the following:
• In the event, go to Output Group > Apple HLS > Advanced > Ad Markers and select EXT-X-DATERANGE.
The structure and contents of the line are as described in HTTP Live Streaming, draft-pantos-http-live-streaming-23 (Version 23).
This marker style applies when the SCTE-35 messages are time_signal or splice_insert, and when themessages are passed through from the input or inserted at runtime using the REST API.
Example
This example shows an ad avail with an ID of 999 and a planned duration of 30 seconds. The first EXT-X-DATERANGE, for the start of the ad avail, includes a START-DATE. The second EXT-X-DATERANGEincludes an END-DATE and a time that is 30.03 seconds later.
NoteThe DURATION, PLANNED-DURATION and END-DATE tags are optional. If they are not presentin the input or not specified in the REST API command, then these tags are omitted from themanifest.
#EXT-X-DATERANGE:ID="999",START-DATE="2018-08-22T21:54:00.079Z",PLANNED-DURATION=30.000,SCTE35-OUT=0xFC302500000000000000FFF01405000003E77FEFFE0011FB9EFE002932E00001010100004D192A59... #EXT-X-DATERANGE:ID="999",END-DATE="2018-08-22T21:54:30.109Z",DURATION=30.030,SCTE35-IN=0xFC0000425100FFF0140500000300000000E77FEFFE0011FB9EFE0029004D1932E0000100101002A22
Working with SMPTE 2022-6AWS Elemental Live supports inputs that are compliant with the SMPTE 2022-6 standard. The AWSElemental Live implementation of SMPTE 2022-6 provides an effective way to handle uncompressed
Version 2.14 and later314

AWS Elemental Live User GuideSMPTE 2110 inputs and outputs
video content. SMPTE 2022-6 uses standard IP networking to receive content, which means it uses acheaper and more readily available network infrastructure than the traditional SDI protocol.
AWS Elemental Live supports redundant inputs using SMPTE 20227, and non-redundant inputs.
With SMPTE 2022-6, the video, audio, and ancillary data are muxed into one feed. Compare this designto SMPTE 2110, where the content is each in a separate essence.
To work with SMPTE ST 2022-6 in AWS Elemental Live, see Ingesting SMPTE 2022-6 content (p. 13).
Working with SMPTE 2110AWS Elemental Live supports both inputs and outputs that are compliant with the SMPTE 2110 suite ofstandards.
The AWS Elemental Live implementation of SMPTE 2110 provides an effective way to handleuncompressed and lightly compressed video content. SMPTE 2110 uses standard IP networking to sendand receive content, which means it uses a cheaper and more readily available network infrastructurethan the traditional SDI protocol.
This section provides general information about the capabilities that SMPTE 2110 offers. For detailedinformation about setting up SMPTE 2110 inputs, see the section called “SMPTE 2110 inputs” (p. 19). Fordetailed information about setting up SMPTE 2110 outputs, see the section called “SMPTE 2110 outputgroup” (p. 44).
Separate streams
SMPTE 2110 separates the key media—video, audio, and ancillary data—into separate streams, oressences. This architecture cuts down on the transmission costs compared to a transport stream, forexample. This architecture also means that there is less wasted processing (unnecessary demuxing) wheningesting the content. AWS Elemental Live only receives the specific video, audio, and ancillary datarequired for a specific event.
Uncompressed and lightly compressed content
AWS Elemental Live supports both video that is uncompressed, and video that is lightly compressedusing the JPEG XS codec. The JPEG XS codec reduces the bitrate of the video content, typically withoutvisible loss of video quality after multiple transcodes.
SMPTE 2110 and SDP files
The SMPTE 2110 specification relies on SDP files to describe the contents of the SMPTE 2110 streams.There is one file for each individual SMPTE 2110 stream. For more information about SDP files, see thesection called “About SDP files” (p. 318).
Support for NMOS
AWS Elemental Live supports NMOS IS-04 and IS-05 with both SMPTE 2110 inputs and outputs.
NoteYou can use NMOS to manage SMPTE 2110 streams. You can't use NMOS to manage other typesof streams.
For more information about NMOS, see the section called “Support for NMOS” (p. 323).
Support for SMPTE 2022-7 – seamless protection switching
AWS Elemental Live supports seamless protection switching (conforming with SMPTE 2022-7) for bothSMPTE 2110 inputs and SMPTE 2110 outputs. AWS Elemental Live uses SMPTE 2022-7 to implementresiliency via redundant streams.
Version 2.14 and later315
AWS Elemental Live User GuideAppliance requirements
For more information about SMPTE 2022-7, see the section called “Support for SMPTE2022-7” (p. 322).
Topics• Requirements for the appliance and network (p. 316)• Supported content (p. 316)• About SDP files (p. 318)• Support for SMPTE 2022-7 – seamless protection switching (p. 322)• Support for NMOS IS-04 and IS-05: Stream discovery (p. 323)• Setup: Remove bonded interfaces (p. 323)• Setup: Reserve cores for SMPTE 2110 (p. 324)• Setup: Enable precision time protocol (PTP) (p. 324)
Requirements for the appliance and networkA SMPTE 2110 input or output requires an AWS Elemental Live appliance with a high-speed networkinterface card (NIC). Therefore, to set up a SMPTE 2110 input or output, you must create the event onone of the following appliances.
Appliance Network interface card(NIC)
Scope of support forSMPTE 2110
Support for NMOS
L800 series AWSElemental Liveappliance
25 GbE NIC Inputs and outputs Supported
A bare-metal appliance 25 GbE MellanoxNIC. You must makesure that the NIC islicensed for use withthe RiverMax SDK.
Inputs and outputs Supported
Supported contentThe following table describes the content that AWS Elemental Live supports in SMPTE 2110 sources(inputs) and SMPTE 2110 outputs.
• For inputs, AWS Elemental Live supports ingest of one instance of each type of stream—one videostream, zero or one audio stream, and zero or one ancillary data stream.
• For outputs, AWS Elemental Live supports one video stream, zero or more audio streams, and zero orone ancillary data stream.
For detailed instructions for setting up a SMPTE 2110 input or output, see the section called “SMPTE2110 inputs” (p. 19) and the section called “SMPTE 2110 output group” (p. 44).
NoteAWS Elemental Live can't ingest more than one audio stream in one SMPTE 2110 input.
Type Direction Details Applicable standard
Video Input and output Uncompressed SMPTE 2110-20
Version 2.14 and later316

AWS Elemental Live User GuideSupported content
Type Direction Details Applicable standard
Resolutions – SD, HD,and 4K
Scan types –Progressive andinterlaced
Sampling – 4:2:2
Bit format – 10-bit
Input and output Lightly compressedwith JPEG XS
Resolutions – SD andHD resolution
Scan types –Progressive andinterlaced
Sampling – 4:2:2
Bit format – 8-bit, 10-bit, 12-bit
SMPTE 2110-22
Input and output PCM audio
Uncompressed
Sample rates: 44.1kHzand 48.0 kHz
SMPTE 2110-30
Dolby Digital (AC3)
Coding modes – 1.0,1+1, 2.0, 3.2 (with LFE)
Input and output
Dolby Digital Plus(EAC3)
Coding modes – 1.0,2.0, 3.2
Audio
Output Dolby Digitalpassthrough
You can pass throughDolby Digital (AC3)from any input (SMPTE2110 or another type)to a SMPTE 2110output
SMPTE 2110-31
Version 2.14 and later317
AWS Elemental Live User GuideAbout SDP files
Type Direction Details Applicable standard
Ancillary data –Captions (optional)
Input and output EIA-608 embeddedcaptions
CEA-708 embeddedcaptions
SMPTE 2110-40
Input SCTE 104 messages.AWS Elemental Live willautomatically convertthese messages to SCTE35 messages duringingest.
Ancillary data – Ad availmessages (optional)
Output SCTE 104 messages.If the source contenthas SCTE 35 messages,you can configureAWS Elemental Live toconvert them to SCTE104 and include theSCTE 104 messages inthe output.
SMPTE 2110-40
Input The SMPTE 2110 sourcemust be Precision TimeProtocol (PTP) locked.
If it isn't locked, thevideo, audio, andancillary data mightnot get synchronizedproperly duringprocessing, resulting inunsynchronized mediain all the outputs in theevent.
Timecode
Output You must enablePTP (p. 324) in AWSElemental Live sothat the SMPTE 2110outputs include RTPpacket timestamps. Thistimestamp synchronizesthe video, audio,and ancillary data. Itensures that the outputis PTP-locked.
SMPTE 2110-21
About SDP filesThe SMPTE 2110 specification relies on SDP files to describe the contents of the SMPTE 2110 streams.There is one file for each type of stream. The file for each stream contains the following information:
Version 2.14 and later318
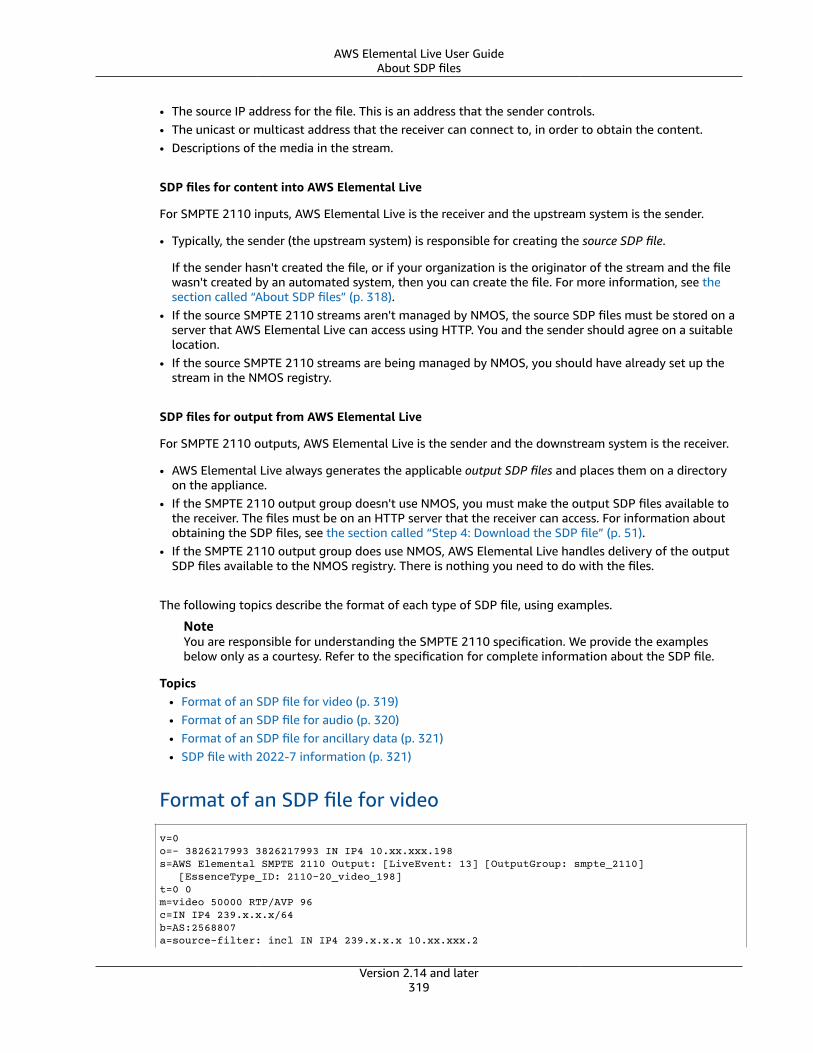
AWS Elemental Live User GuideAbout SDP files
• The source IP address for the file. This is an address that the sender controls.• The unicast or multicast address that the receiver can connect to, in order to obtain the content.• Descriptions of the media in the stream.
SDP files for content into AWS Elemental Live
For SMPTE 2110 inputs, AWS Elemental Live is the receiver and the upstream system is the sender.
• Typically, the sender (the upstream system) is responsible for creating the source SDP file.
If the sender hasn't created the file, or if your organization is the originator of the stream and the filewasn't created by an automated system, then you can create the file. For more information, see thesection called “About SDP files” (p. 318).
• If the source SMPTE 2110 streams aren't managed by NMOS, the source SDP files must be stored on aserver that AWS Elemental Live can access using HTTP. You and the sender should agree on a suitablelocation.
• If the source SMPTE 2110 streams are being managed by NMOS, you should have already set up thestream in the NMOS registry.
SDP files for output from AWS Elemental Live
For SMPTE 2110 outputs, AWS Elemental Live is the sender and the downstream system is the receiver.
• AWS Elemental Live always generates the applicable output SDP files and places them on a directoryon the appliance.
• If the SMPTE 2110 output group doesn't use NMOS, you must make the output SDP files available tothe receiver. The files must be on an HTTP server that the receiver can access. For information aboutobtaining the SDP files, see the section called “Step 4: Download the SDP file” (p. 51).
• If the SMPTE 2110 output group does use NMOS, AWS Elemental Live handles delivery of the outputSDP files available to the NMOS registry. There is nothing you need to do with the files.
The following topics describe the format of each type of SDP file, using examples.
NoteYou are responsible for understanding the SMPTE 2110 specification. We provide the examplesbelow only as a courtesy. Refer to the specification for complete information about the SDP file.
Topics• Format of an SDP file for video (p. 319)• Format of an SDP file for audio (p. 320)• Format of an SDP file for ancillary data (p. 321)• SDP file with 2022-7 information (p. 321)
Format of an SDP file for video
v=0o=- 3826217993 3826217993 IN IP4 10.xx.xxx.198s=AWS Elemental SMPTE 2110 Output: [LiveEvent: 13] [OutputGroup: smpte_2110] [EssenceType_ID: 2110-20_video_198]t=0 0m=video 50000 RTP/AVP 96c=IN IP4 239.x.x.x/64b=AS:2568807a=source-filter: incl IN IP4 239.x.x.x 10.xx.xxx.2
Version 2.14 and later319
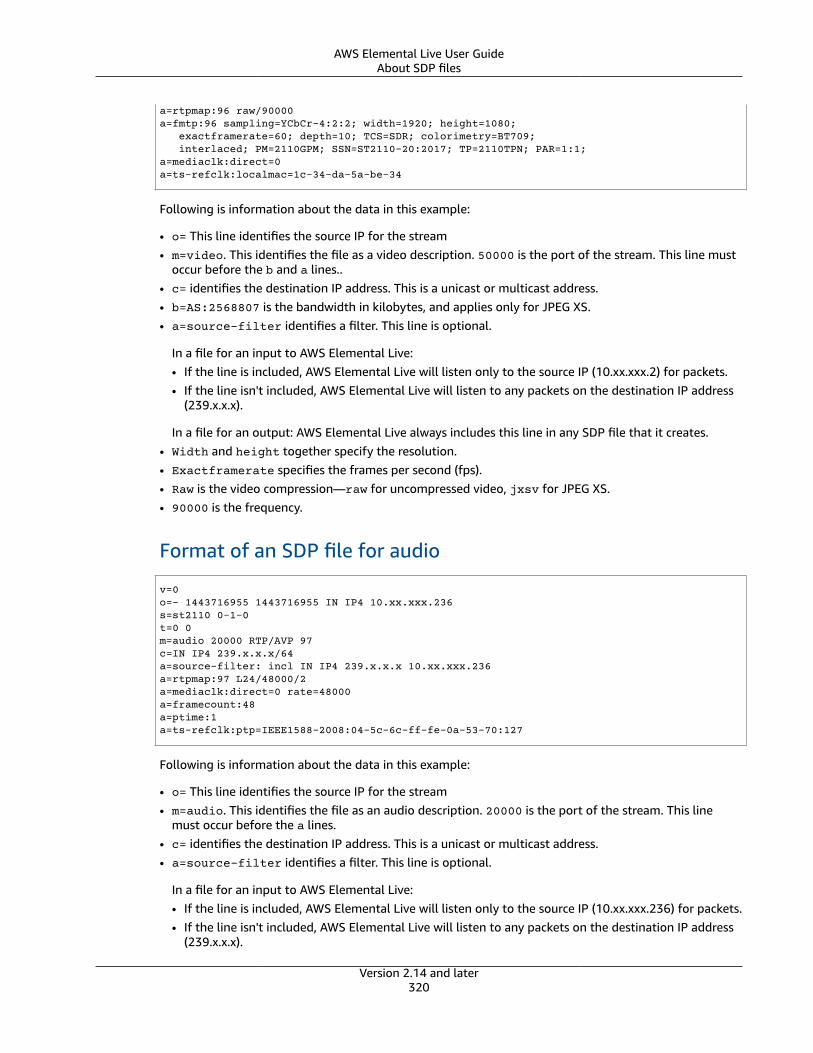
AWS Elemental Live User GuideAbout SDP files
a=rtpmap:96 raw/90000a=fmtp:96 sampling=YCbCr-4:2:2; width=1920; height=1080; exactframerate=60; depth=10; TCS=SDR; colorimetry=BT709; interlaced; PM=2110GPM; SSN=ST2110-20:2017; TP=2110TPN; PAR=1:1;a=mediaclk:direct=0a=ts-refclk:localmac=1c-34-da-5a-be-34
Following is information about the data in this example:
• o= This line identifies the source IP for the stream• m=video. This identifies the file as a video description. 50000 is the port of the stream. This line must
occur before the b and a lines..• c= identifies the destination IP address. This is a unicast or multicast address.• b=AS:2568807 is the bandwidth in kilobytes, and applies only for JPEG XS.• a=source-filter identifies a filter. This line is optional.
In a file for an input to AWS Elemental Live:• If the line is included, AWS Elemental Live will listen only to the source IP (10.xx.xxx.2) for packets.• If the line isn't included, AWS Elemental Live will listen to any packets on the destination IP address
(239.x.x.x).
In a file for an output: AWS Elemental Live always includes this line in any SDP file that it creates.• Width and height together specify the resolution.• Exactframerate specifies the frames per second (fps).• Raw is the video compression—raw for uncompressed video, jxsv for JPEG XS.• 90000 is the frequency.
Format of an SDP file for audio
v=0o=- 1443716955 1443716955 IN IP4 10.xx.xxx.236s=st2110 0-1-0t=0 0m=audio 20000 RTP/AVP 97c=IN IP4 239.x.x.x/64a=source-filter: incl IN IP4 239.x.x.x 10.xx.xxx.236a=rtpmap:97 L24/48000/2a=mediaclk:direct=0 rate=48000a=framecount:48a=ptime:1a=ts-refclk:ptp=IEEE1588-2008:04-5c-6c-ff-fe-0a-53-70:127
Following is information about the data in this example:
• o= This line identifies the source IP for the stream• m=audio. This identifies the file as an audio description. 20000 is the port of the stream. This line
must occur before the a lines.• c= identifies the destination IP address. This is a unicast or multicast address.• a=source-filter identifies a filter. This line is optional.
In a file for an input to AWS Elemental Live:• If the line is included, AWS Elemental Live will listen only to the source IP (10.xx.xxx.236) for packets.• If the line isn't included, AWS Elemental Live will listen to any packets on the destination IP address
(239.x.x.x).
Version 2.14 and later320
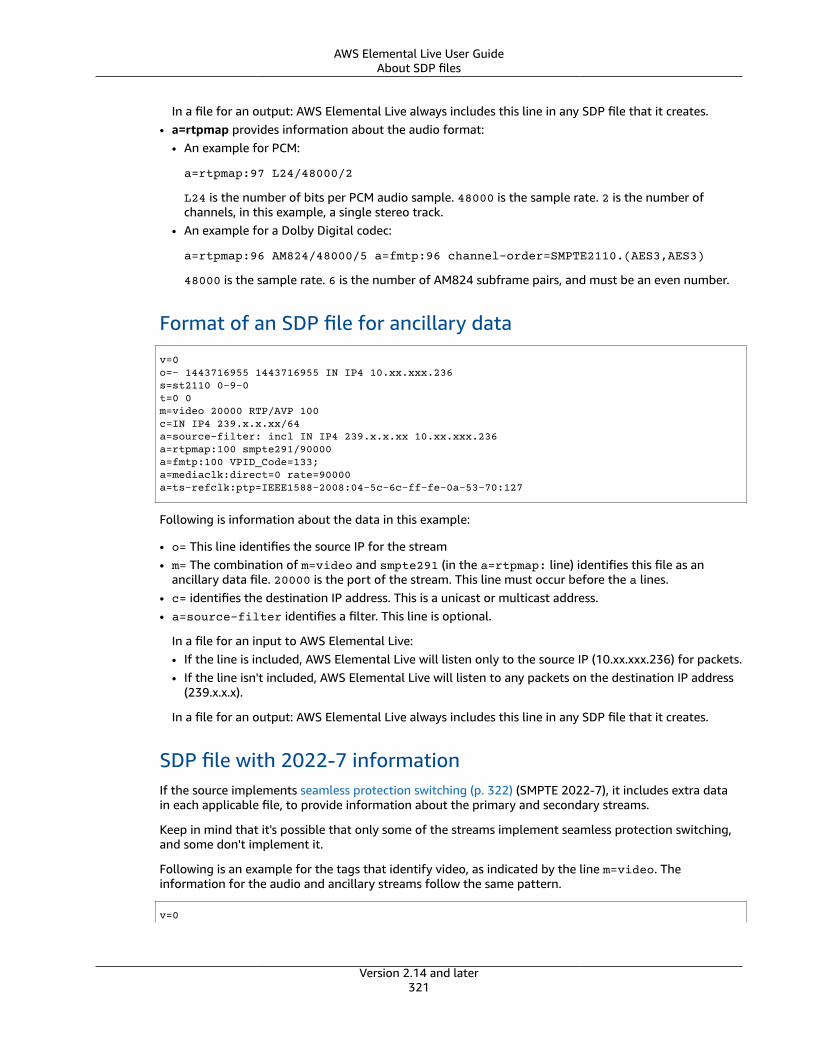
AWS Elemental Live User GuideAbout SDP files
In a file for an output: AWS Elemental Live always includes this line in any SDP file that it creates.• a=rtpmap provides information about the audio format:
• An example for PCM:
a=rtpmap:97 L24/48000/2
L24 is the number of bits per PCM audio sample. 48000 is the sample rate. 2 is the number ofchannels, in this example, a single stereo track.
• An example for a Dolby Digital codec:
a=rtpmap:96 AM824/48000/5 a=fmtp:96 channel-order=SMPTE2110.(AES3,AES3)
48000 is the sample rate. 6 is the number of AM824 subframe pairs, and must be an even number.
Format of an SDP file for ancillary data
v=0o=- 1443716955 1443716955 IN IP4 10.xx.xxx.236s=st2110 0-9-0t=0 0m=video 20000 RTP/AVP 100c=IN IP4 239.x.x.xx/64a=source-filter: incl IN IP4 239.x.x.xx 10.xx.xxx.236a=rtpmap:100 smpte291/90000a=fmtp:100 VPID_Code=133;a=mediaclk:direct=0 rate=90000a=ts-refclk:ptp=IEEE1588-2008:04-5c-6c-ff-fe-0a-53-70:127
Following is information about the data in this example:
• o= This line identifies the source IP for the stream• m= The combination of m=video and smpte291 (in the a=rtpmap: line) identifies this file as an
ancillary data file. 20000 is the port of the stream. This line must occur before the a lines.• c= identifies the destination IP address. This is a unicast or multicast address.• a=source-filter identifies a filter. This line is optional.
In a file for an input to AWS Elemental Live:• If the line is included, AWS Elemental Live will listen only to the source IP (10.xx.xxx.236) for packets.• If the line isn't included, AWS Elemental Live will listen to any packets on the destination IP address
(239.x.x.x).
In a file for an output: AWS Elemental Live always includes this line in any SDP file that it creates.
SDP file with 2022-7 informationIf the source implements seamless protection switching (p. 322) (SMPTE 2022-7), it includes extra datain each applicable file, to provide information about the primary and secondary streams.
Keep in mind that it's possible that only some of the streams implement seamless protection switching,and some don't implement it.
Following is an example for the tags that identify video, as indicated by the line m=video. Theinformation for the audio and ancillary streams follow the same pattern.
v=0
Version 2.14 and later321
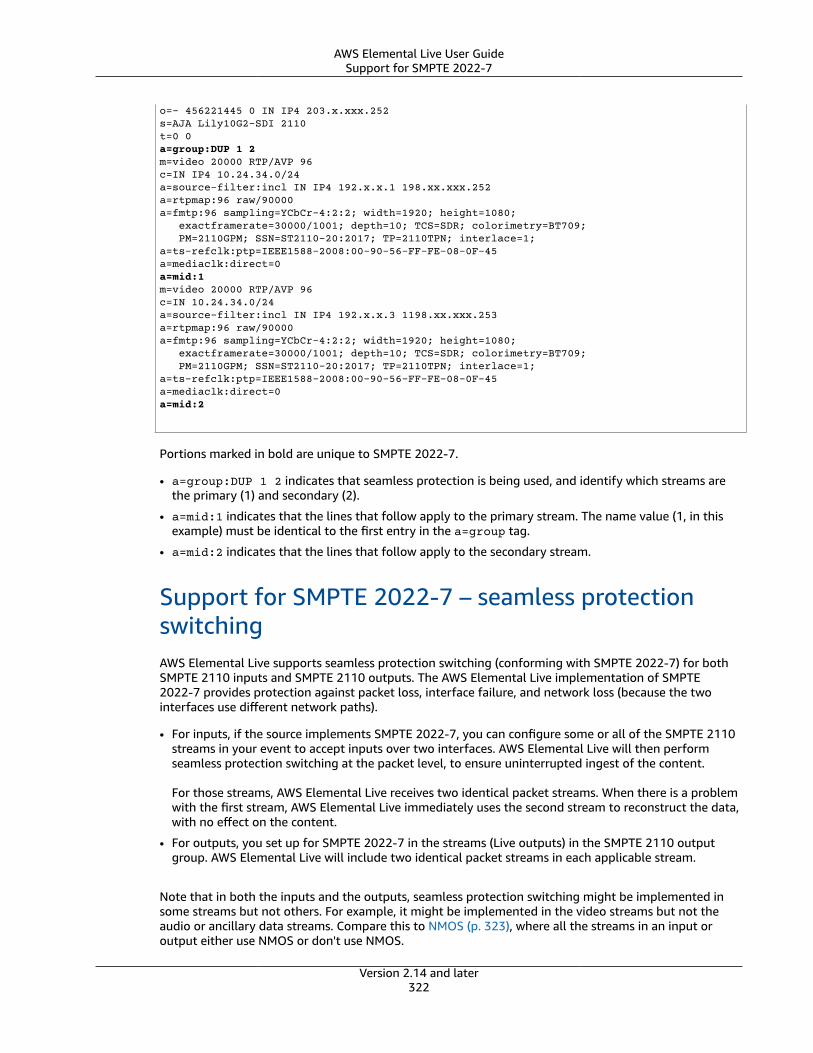
AWS Elemental Live User GuideSupport for SMPTE 2022-7
o=- 456221445 0 IN IP4 203.x.xxx.252s=AJA Lily10G2-SDI 2110t=0 0a=group:DUP 1 2m=video 20000 RTP/AVP 96c=IN IP4 10.24.34.0/24a=source-filter:incl IN IP4 192.x.x.1 198.xx.xxx.252a=rtpmap:96 raw/90000a=fmtp:96 sampling=YCbCr-4:2:2; width=1920; height=1080; exactframerate=30000/1001; depth=10; TCS=SDR; colorimetry=BT709; PM=2110GPM; SSN=ST2110-20:2017; TP=2110TPN; interlace=1;a=ts-refclk:ptp=IEEE1588-2008:00-90-56-FF-FE-08-0F-45a=mediaclk:direct=0a=mid:1m=video 20000 RTP/AVP 96c=IN 10.24.34.0/24a=source-filter:incl IN IP4 192.x.x.3 1198.xx.xxx.253a=rtpmap:96 raw/90000a=fmtp:96 sampling=YCbCr-4:2:2; width=1920; height=1080; exactframerate=30000/1001; depth=10; TCS=SDR; colorimetry=BT709; PM=2110GPM; SSN=ST2110-20:2017; TP=2110TPN; interlace=1;a=ts-refclk:ptp=IEEE1588-2008:00-90-56-FF-FE-08-0F-45a=mediaclk:direct=0a=mid:2
Portions marked in bold are unique to SMPTE 2022-7.
• a=group:DUP 1 2 indicates that seamless protection is being used, and identify which streams arethe primary (1) and secondary (2).
• a=mid:1 indicates that the lines that follow apply to the primary stream. The name value (1, in thisexample) must be identical to the first entry in the a=group tag.
• a=mid:2 indicates that the lines that follow apply to the secondary stream.
Support for SMPTE 2022-7 – seamless protectionswitchingAWS Elemental Live supports seamless protection switching (conforming with SMPTE 2022-7) for bothSMPTE 2110 inputs and SMPTE 2110 outputs. The AWS Elemental Live implementation of SMPTE2022-7 provides protection against packet loss, interface failure, and network loss (because the twointerfaces use different network paths).
• For inputs, if the source implements SMPTE 2022-7, you can configure some or all of the SMPTE 2110streams in your event to accept inputs over two interfaces. AWS Elemental Live will then performseamless protection switching at the packet level, to ensure uninterrupted ingest of the content.
For those streams, AWS Elemental Live receives two identical packet streams. When there is a problemwith the first stream, AWS Elemental Live immediately uses the second stream to reconstruct the data,with no effect on the content.
• For outputs, you set up for SMPTE 2022-7 in the streams (Live outputs) in the SMPTE 2110 outputgroup. AWS Elemental Live will include two identical packet streams in each applicable stream.
Note that in both the inputs and the outputs, seamless protection switching might be implemented insome streams but not others. For example, it might be implemented in the video streams but not theaudio or ancillary data streams. Compare this to NMOS (p. 323), where all the streams in an input oroutput either use NMOS or don't use NMOS.
Version 2.14 and later322
AWS Elemental Live User GuideSupport for NMOS
Support for NMOS IS-04 and IS-05: Stream discoveryAWS Elemental Live supports NMOS IS-04 and IS-05 with both SMPTE 2110 inputs and outputs.
NoteCurrently, AWS Elemental Live supports management of SMPTE 2110 streams using NMOS.AWS Elemental Live doesn't support management of other types of streams.
How NMOS works
NMOS is a standard for discovering, managing, and connecting to media streams, including a SMPTE2110 stream. An NMOS solution works with an NMOS registry that contains the following:
• Information about the SMPTE 2110 streams, including a unique ID for each stream.• Information about the sender and receiver for a stream. For a stream that AWS Elemental Live outputs,
AWS Elemental Live is the sender. For a stream that AWS Elemental Live ingests, it is the receiver.
With this registry, nearly all the information about the stream is maintained in the registry. Therefore,instead of including information in fields of the AWS Elemental Live event, you configure the event toobtain that information from the registry. The setup is particularly useful when you need to managemany SMPTE 2110 streams in many events. You can centralize the setup of all the events in the NMOSregistry.
AWS Elemental Live automatically detects any NMOS registry that is set up on your network.
Along with the NMOS registry, you need an NMOS client application that lets you work with the registry.
The NMOS registry relies on the SDP files that apply to each SMPTE 2110 stream. The registry extractsthe information, and the NMOS client application lets you work with the information.
SMPTE 2110 without NMOS
If you don't set up an NMOS solution, you still use SDP files:
• For a SMPTE 2110 input, you must identify the server where the SDP files are stored. This can be anyHTTP server. When you configure the input, you specify which SDP files contain information about theSMPTE 2110 stream.
• For a SMPTE 2110 output, AWS Elemental Live automatically creates the applicable SDP files. Youmust make these files accessible to the downstream system.
Setup: Remove bonded interfacesRead this section if you plan to implement redundant inputs and/or outputs with SMPTE 2110.
SMPTE 2110 inputs and outputs support resiliency, but they do so using SMPTE 2022-7. Youcan’t implement input resiliency by bonding the two interfaces on the appliance. This resiliencyimplementation has the following impact:
• If you currently have a bonded interface on the appliance (on a Mellanox card or on a 25Gb card), youmust remove the bond.
• In addition, if you have non-SMPTE 2110 (or non-SMPTE 2022-6) events set up on the appliance thatuse this bonded interface, you must modify the event configuration. You might be able to bond otherinterfaces on other cards in the appliance, and then use that bonded interface in those events. If youcan’t do that, you must change the event configuration to not use a bonded interface.
If you don't plan to implement redundant SMPTE 2110 inputs or outputs (or SMPTE 2022-6 inputs), youcan retain the bonded interface on the appliance.
Version 2.14 and later323
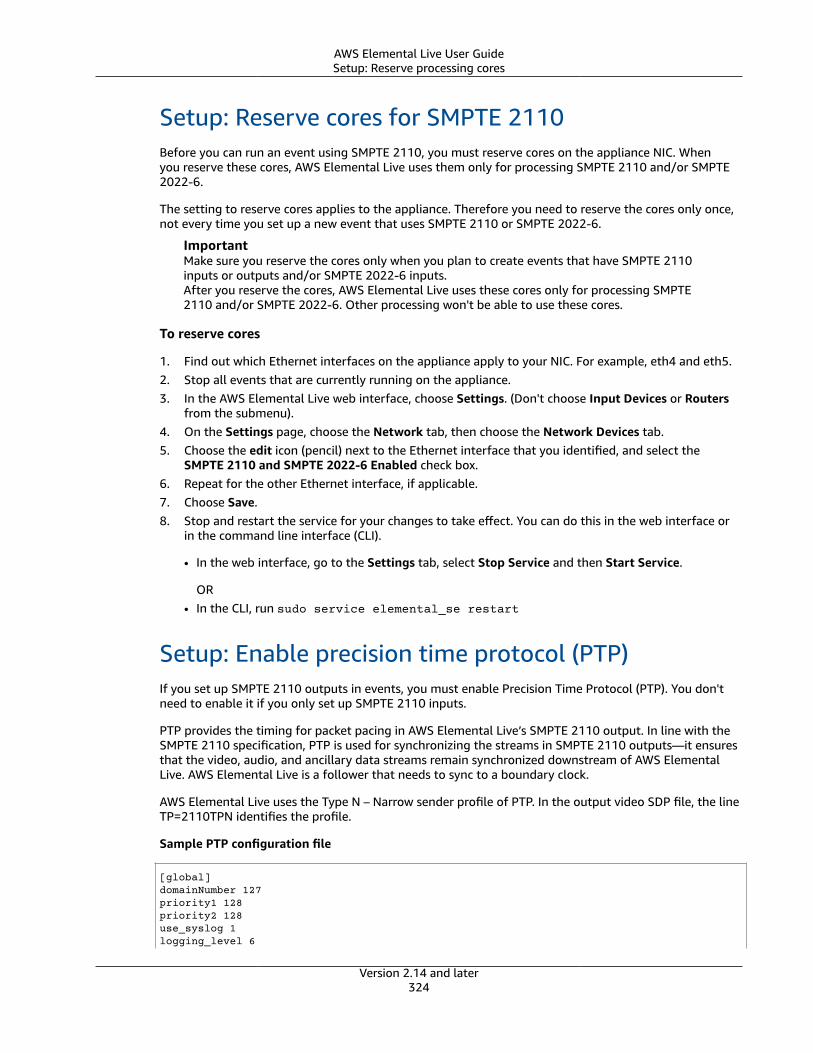
AWS Elemental Live User GuideSetup: Reserve processing cores
Setup: Reserve cores for SMPTE 2110Before you can run an event using SMPTE 2110, you must reserve cores on the appliance NIC. Whenyou reserve these cores, AWS Elemental Live uses them only for processing SMPTE 2110 and/or SMPTE2022-6.
The setting to reserve cores applies to the appliance. Therefore you need to reserve the cores only once,not every time you set up a new event that uses SMPTE 2110 or SMPTE 2022-6.
ImportantMake sure you reserve the cores only when you plan to create events that have SMPTE 2110inputs or outputs and/or SMPTE 2022-6 inputs.After you reserve the cores, AWS Elemental Live uses these cores only for processing SMPTE2110 and/or SMPTE 2022-6. Other processing won't be able to use these cores.
To reserve cores
1. Find out which Ethernet interfaces on the appliance apply to your NIC. For example, eth4 and eth5.2. Stop all events that are currently running on the appliance.3. In the AWS Elemental Live web interface, choose Settings. (Don't choose Input Devices or Routers
from the submenu).4. On the Settings page, choose the Network tab, then choose the Network Devices tab.5. Choose the edit icon (pencil) next to the Ethernet interface that you identified, and select the
SMPTE 2110 and SMPTE 2022-6 Enabled check box.6. Repeat for the other Ethernet interface, if applicable.7. Choose Save.8. Stop and restart the service for your changes to take effect. You can do this in the web interface or
in the command line interface (CLI).
• In the web interface, go to the Settings tab, select Stop Service and then Start Service.
OR• In the CLI, run sudo service elemental_se restart
Setup: Enable precision time protocol (PTP)If you set up SMPTE 2110 outputs in events, you must enable Precision Time Protocol (PTP). You don'tneed to enable it if you only set up SMPTE 2110 inputs.
PTP provides the timing for packet pacing in AWS Elemental Live’s SMPTE 2110 output. In line with theSMPTE 2110 specification, PTP is used for synchronizing the streams in SMPTE 2110 outputs—it ensuresthat the video, audio, and ancillary data streams remain synchronized downstream of AWS ElementalLive. AWS Elemental Live is a follower that needs to sync to a boundary clock.
AWS Elemental Live uses the Type N – Narrow sender profile of PTP. In the output video SDP file, the lineTP=2110TPN identifies the profile.
Sample PTP configuration file
[global]domainNumber 127priority1 128priority2 128use_syslog 1logging_level 6
Version 2.14 and later324
AWS Elemental Live User GuideSRT inputs and outputs
tx_timestamp_timeout 30hybrid_e2e 0dscp_event 46dscp_general 46
[eth6]logAnnounceInterval 0announceReceiptTimeout 3logSyncInterval -3logMinDelayReqInterval -3delay_mechanism E2Enetwork_transport UDPv4
To enable PTP
You must enable PTP on the AWS Elemental Live appliance. Enabling PTP automatically disables the NTPclock. And disabling PTP automatically enables the NTP clock.
1. In the AWS Elemental Live web interface, choose Settings. (Don't choose Input Devices or Routersfrom the submenu).
2. On the Settings page, choose the Network tab, then choose Hostname, DNS, & Timing Server.3. Select the Enable PTP check box, and then choose Save.
Working with SRTAWS Elemental Live supports both inputs and outputs that use the SRT (secure reliable transport)protocol.
AWS Elemental Live can ingest a transport stream (TS) that is sent from an SRT caller. In this scenario,the upstream system initiates the handshake that precedes transmission. AWS Elemental Live is the SRTlistener that accepts or rejects the handshake. The transport stream source can be encrypted with AES.
To work with SRT inputs, see the section called “SRT Inputs” (p. 22). To work with SRT outputs, see thesection called “TS output using SRT” (p. 52).
Implementing a trick-play trackTrick-play is used in digital video players to mimic some capabilities of analog players, including fast-forward and rewind capabilities. These capabilities often include a trick-play track—a visual cue for theperson using the video player. In AWS Elemental Live, you can include track assets in an HLS outputgroup. The downstream system for that output group can use these assets to implement the visual cue intheir trick-play implementation.
AWS Elemental Live provides two methods for including these assets:
• An I-frame-only manifest that conforms with the HLS specification.• A trick-play track that conforms with the Image Media Playlist specification, version 0.4.
Choosing an implementation of trick-play trackYou can follow one or both trick-play methods in the same output group.
Before you follow either method, contact the downstream system for the output group to find out howthey implement trick-play. Find out the following:
Version 2.14 and later325
AWS Elemental Live User GuideTrick-play track via I-frames
• Can the downstream system support a trick-play track? If so, which trick-play specification does itfollow?
• Is the supported implementation required or optional? Both of these implementations introducespecific lines into the HLS manifest. If the lines are absent, will the downstream system fail to handlethe output from AWS Elemental Live?
It is likely that the downstream system considers both of these implementations to be optional.• If you choose the I-frame-only manifest method, confirm that the downstream system supports the
method according to the HLS specification. If the downstream system has a variation, it's possible thatthe downstream system won't be able to handle the output from AWS Elemental Live. AWS ElementalLive doesn't support customizations of the method.
• If you choose the image media playlist method, confirm that the downstream system supports themethod according to the Image Media Playlist specification. If the downstream system has a variation,it's possible that the downstream system won't be able to handle the output from AWS Elemental Live.AWS Elemental Live doesn't support customizations of the implementation.
Topics• Trick-play track via I-frames (p. 326)• Trick-play track via the Image Media Playlist specification (p. 327)
Trick-play track via I-framesIn an HLS output group, you can support a trick-play track by providing an I-frame-only manifest.
How the method worksWhen you create the HLS output group, you create one or more video outputs, in the usual way. Ineach video output, you enable the field to create an I-frame-only manifest that conforms to the HLSspecification.
AWS Elemental Live produces two child manifests for each encode (stream)—one manifest forhandling the video in the usual way, and the I-frame-only manifest. The I-frame-only manifest lets thedownstream player identify specific video frames to request, to construct the trick-play track. So thistrick-play track method doesn't produce additional encodes in the output group.
Each I-frame-only manifest contains the following:
• One #EXT-X-I-FRAMES-ONLY tag, to indicate that the manifest is I-frame-only.• Many #EXT-X-BYTERANGE entries. Each entry identifies the position of an I-frame position.
Setting upYou set up the trick-play track once for the entire HLS output group.
NoteThe information in this section assumes that you are familiar with the general steps for creatingan event.
To set up an I-frame-only manifest
Include these steps when you create the HLS output group.
1. In the HLS Output Group, in HLS Outputs, choose Add Output to add an output. Or display anexisting output.
Version 2.14 and later326
AWS Elemental Live User GuideTrick-play track via the Image Media Playlist specification
2. In the output, choose Advanced to open that section, then select Add I-frame Only Manifest.3. Set up the remaining fields in the output group as you normally would. Set up the video, audio, and
captions outputs and encodes as you normally would.
Trick-play track via the Image Media PlaylistspecificationIn an HLS output group, you can support a trick-play track by providing an asset that follows the ImageMedia Playlist specification, version 0.4. The AWS Elemental Live implementation follows the time-basedmethod of the specification. The specification is located here:
https://github.com/image-media-playlist/spec/blob/master/image_media_playlist_v0_4.pdf
Roku is one example of a platform that implements this specification.
How the method worksWhen you create the output group, you create standard outputs in the usual way for the video, audio,and captions encodes.
You also create one or more outputs that each contains one encode (stream). This encode is the assetthat the downstream player can use to implement the trick-play track. The encode consists of a series ofJPEG files, with one file for every video segment. This means that the capture follows the segmentationof the video encode, which means it provides the best experience on the video player.
AWS Elemental Live creates a main manifest and child manifests in the usual way. The main manifestincludes an EXT-X-IMAGE-STREAM-INF tag for the frame capture encode. The child manifest for theframe capture encode contains EXT-X-IMAGES-ONLY tags. The contents and format of these tagscomply with the Image Media Playlist specification.
Setting upYou set up the trick-play track in the output group by creating an additional output that contains a videoencode that consists of frame captures.
NoteThe information in this section assumes that you are familiar with the general steps for creatingan event.
To set up the frame capture encode in an HLS output group
To create a frame capture encode in an HLS output group, you create an output, and set up the videostream to use the Frame Capture to JPEG video codec.
1. In the HLS Output Group, in HLS Outputs, choose Add Output to add another output.2. For that output, go to the Video section in the corresponding Stream section.3. Choose Video and set up the video fields, including:
• Video Codec – Choose Frame Capture to JPEG.• Resolution – Contact your downstream system to obtain the correct width and height. If you
guess at the values, the experience on the downstream player might not be optimal.• Trick Play – Select this field. Many of the remaining fields disappear.
4. Choose Audio 1 and choose X to remove the audio stream. The output must have only one encode (avideo encode).
Version 2.14 and later327
AWS Elemental Live User GuideVirtual input switching
The output is part of the ABR stack and has the same destination as the other encodes in the HLS outputgroup.
Virtual input switchingThe virtual input switching feature lets you set up so that a POIS controls switching from one inputto another. (You can also switch inputs using dynamic input switching using the REST API. For moreinformation see the section called “Dynamicinput switching” (p. 169).)
Topics• About virtual input switching (p. 328)• How virtual input switching works (p. 329)• Setting up for virtual input switching (p. 333)
About virtual input switchingSupported version of the specificationAWS Elemental Live supports communications with a POIS according to this specification: OpenCableSpecifications Alternate Content Real-time Event Signaling and Management API, OC-SP-ESAM-API-I03-131025.
The two virtual input switching featuresThere are two virtual input switching features. These features work in different ways and supportdifferent use cases. But they both require a POIS.
• Virtual input switching via asynchronous ESAM messages
This type of input switching is based only on decisions from the POIS. We also refer to this switchingas asynchronous input switching. This feature is available in AWS Elemental Live version 2.23.0 andlater.
• Virtual input switching via SCTE-35 messages
This type of input switching relies on switch-related SCTE-35 messages that are in the input. We alsorefer to this switching as SCTE-35-triggered input switching. This feature is available in AWS ElementalLive version 2.20.2 and later.
Virtual input switching requires the virtual input switcher license (the Virtual Input Switcher License add-on pack). Contact your AWS sales manager.
Choosing the switching feature to useTypical use cases for the virtual input switching features are the following:
• SCTE-35-triggered input switching alone
You might implement SCTE-35-triggered input switching when your event consists of live MPTSprograms. Upstream of AWS Elemental Live, a system inserts SCTE-35 messages into the programs,and AWS Elemental Live reacts to them during ingest.
This scenario works well when you have well-orchestrated, predictable event.• Asynchronous input switching alone
Version 2.14 and later328
AWS Elemental Live User GuideHow virtual input switching works
You might implement asynchronous input switching if it's not feasible to implement SCTE-35-triggered input switching. For example, if your event doesn't use sources that support SCTE-35-triggered input switching.
With asynchronous input switching, the POIS sends SCTE-35 messages to AWS Elemental Live. Thesemessages contain instructions that AWS Elemental Live reacts to.
Asynchronous input switching doesn't mean that the switching is unplanned. You can design aschedule and automate your POIS to send the switch requests.
• Both types of switching
You might implement the SCTE-35-triggered switch scenario above, and also implement asynchronousinput switching. You might implement asynchronous input switching to handle planned cutaways tofile content, or to handle unplanned cutaways to a file content when you need to quickly drop the livestream and show a "please standby" file clip.
How virtual input switching worksTopics
• Virtual input switching via asynchronous ESAM messages (p. 329)• Virtual input switching via SCTE-35 messages: How it works (p. 331)
Virtual input switching via asynchronous ESAM messages
Input types
Asynchronous input switching works only with the following sources:
• MPTS programs, from an MPTS input. MPTS programs are typically live sources.• File inputs—any type of input that AWS Elemental Live considers to be a file input. See the section
called “File inputs: Supported upstream systems” (p. 9)• If your event doesn't include these types of inputs, you can't set up for asynchronous input switching.
If your event doesn't include these types of inputs, you can't set up for asynchronous input switching.
Setup
You set up the inputs in the AWS Elemental Live event. You also set up the POIS with information aboutthe same set of inputs. In other words, the inputs must be set up in both AWS Elemental Live and thePOIS.
You start the event. At any time, the POIS can send an asynchronous ESAM request to AWS ElementalLive.
Principle of operation
The POIS sends a request to AWS Elemental Live to request a switch away from the currently activeinput and to another input. The request can be seen as a switch away to another input. In addition, theoriginator of any potential action is the POIS.
Compare this principle of operation to SCTE-35-based triggers, where AWS Elemental Live probes eachnon-active input for requests to switch to that non-active input. The request can be seen as a switch tothis input. In addition, the originator of any potential action is AWS Elemental Live.
Version 2.14 and later329

AWS Elemental Live User GuideHow virtual input switching works
Types of requests
The POIS can send one or more of the following requests:
• Prepare input. This request makes AWS Elemental Live start processing the input, before you switchto it. This preparation cuts down on the delay that always occurs between the switch request and theswitch happening.
• Switch input. The POIS sends this request to instruct AWS Elemental Live to switch, eitherimmediately, or at a specific time.
• Handle SCTE-35 message for ad avails. The POIS can request that AWS Elemental Live insert an adavail message. For information about the handling of these types of SCTE-35 messages, see thesection called “POIS conditioning” (p. 307).
• SCTE-35 message that instruct AWS Elemental Live about whether or not to include the SCTE-35 inthe output. The POIS can choose to instruct AWS Elemental Live to include or to remove any of thethree types of SCTE-35 messages.
Timing of input switching requests
The prepare input request should be sent at least 15 seconds before the switch request.
If the POIS sends both a prepare request and a switch request, the switch will occur in less than 4seconds. After the switch occurs, AWS Elemental Live stops preparing the input.
If the POIS sends a switch request but no prepare request, the input switch might take as long as 12seconds.
Result in outputs
If the POIS instructs AWS Elemental Live to include a SCTE-35 message in the output, that messagebecomes part of the stream. This rule applies to all types of messages – prepare input, switch input, andmessage relating to ad avails.
For a prepare input or switch input, AWS Elemental Live still performs the action (prepare or switch),even if the POIS instructs AWS Elemental Live not to include the message itself in the output.
AWS Elemental Live includes these message in output types that support SCTE-35 messages. Forexample, AWS Elemental Live includes the messages in an HLS output.
For detailed information about how AWS Elemental Live handles ad avail SCTE-35 messages, see thesection called “POIS conditioning” (p. 307).
No queuing of requests
There is no way to create a queue of requests. AWS Elemental Live can handle only one request. ThePOIS might send a request to switch to input A at 2:00:00.00. Then, before AWS Elemental Live hasperformed that request, the POIS might send a request to switch to input B.
Even if the second request has a start time that is later than the first request, the second request willreplace the first request in the request list.
Example
Here's an example of an input switching scenario that illustrates the different input switchingcapabilities.
The time is 2:00:00. You start the event and AWS Elemental Live starts ingesting the first input, which isa file input.
Asynchronous request to a file input
Version 2.14 and later330

AWS Elemental Live User GuideHow virtual input switching works
At 2:01:00, the POIS sends an asynchronous request to switch to input B. Input B is the first in a series of20-second ads.
Asynchronous request to switch to a live input
At 2:02:07, while these files are being processed, the POIS sends an asynchronous request to switch toinput Y at 2:04:00.00. AWS Elemental Live switches to input Y at the specified start time. Assume thatinput Y is a live TS input.
Cancelled asynchronous request
This example shows cancellation of an asynchronous request.
At 2:51:44, the POIS sends a request to switch to input F at 2:52:00.
At 2:51:47, the POIS sends a request to switch to input Y (the input that is currently active) at 2:49:60.00.This request effectively cancels the switch to input F. AWS Elemental Live can only have one request in itsbuffer, and the most recently received request always replaces any request already waiting.
Multiple requests in an unexpected order
At 2:53:48, the POIS sends a request to switch to input D at 2:57:00
At 2:54:00, the POIS sends a request to switch to input E at 2:55:30.
AWS Elemental Live ignores the request to switch to input D. AWS Elemental Live can only have onerequest in its buffer, and the most recently received request always replaces any request already waiting.
Therefore at 2:55:30, AWS Elemental Live switches to input E.
Virtual input switching via SCTE-35 messages: How it worksThis type of input switching works with SCTE-35 messages that are in a transport stream source. WhenAWS Elemental Live encounters a SCTE 35 message in the source, it sends the message to the POIS. ThePOIS might decide to send a request to switch input. Note that there is no sense of a particular type ofSCTE 35 message that can trigger an input switch request. The POIS can request a switch in response toany type of SCTE 35 message that it receives.
Input types
SCTE-35-triggered input switching works only with the following sources:
• MPTS programs, from one MPTS input. MPTS programs are typically live sources.
Principle of operation
AWS Elemental Live probes each non-active MPTS program for requests to switch to that non-activeinput. The request can be seen as a switch to this input. In addition, the originator of any potential actionis AWS Elemental Live.
Compare this principle of operation to asynchronous input switching, where the POIS sends a request toAWS Elemental Live to request a switch away from the currently active input and to another input. Therequest can be seen as a switch away to another input. In addition, the originator of any potential actionis the POIS.
Setup
In the event, you set up the inputs:
• You identify all the MPTS programs you want to use, and set up each program as an individual input.
Version 2.14 and later331

AWS Elemental Live User GuideHow virtual input switching works
You also set up the POIS with information about the same set of inputs. In other words, the inputs mustbe set up in both AWS Elemental Live and the POIS.
You start the event. As AWS Elemental Live ingests the first input, it encounters SCTE-35 messages. Itsends these messages to the POIS. It sends all SCTE-35 messages, not just switching-related messages.For example, it also sends ad avail messages.
For any switching-related message, the POIS might decide to send a request to AWS Elemental Live toswitch to another input at a specific time. The POIS can send this instruction at any time (there is notimeout between receiving the information and sending an instruction). The POIS might also decide notto send an instruction.
Types of requests
There are the following types of requests:
• Prepare input. This request makes AWS Elemental Live start processing the input, even before theinput is active. This preparation cuts down on the delay that always occurs between the switch requestand the switch happening.
• Switch input. The POIS sends this request to instruct AWS Elemental Live to switch, eitherimmediately, or at a specific time.
The prepare input request should be sent at least 15 seconds before the switch request.
If the POIS sends a prepare input and a switch input, the switch will occur in less than 4 seconds.
If the POIS doesn't send a prepare input, the input switch might take as long as 12 seconds.• SCTE-35 messages for ad avail handling. The POIS can request that AWS Elemental Live insert an ad
avail message, or delete or modify an ad avail message that is in the source stream (and that AWSElemental Live therefore sent to the POIS). For information about the handling of these types ofSCTE-35 messages, see the section called “POIS conditioning” (p. 307).
• SCTE-35 message that instruct AWS Elemental Live about whether or not to include the SCTE-35 inthe output. The POIS can choose to instruct AWS Elemental Live to include or to remove any of thethree types of SCTE-35 messages.
Timing of input switching requests
The prepare input request should be sent at least 15 seconds before the switch request.
If the POIS sends a prepare input and a switch input, the switch will occur in less than 4 seconds. Afterthe switch occurs, AWS Elemental Live stops preparing the input.
If the POIS doesn't send a prepare input, the input switch might take as long as 12 seconds.
Result in outputs
If the POIS instructs AWS Elemental Live to include a SCTE-35 message in the output, that messagebecomes part of the stream. This rule applies to all types of messages – prepare input, switch input, andmessages relating to ad avails.
For a prepare input or switch input, AWS Elemental Live still performs the action (prepare or switch),even if the POIS instructs AWS Elemental Live not to include the message itself in the output.
AWS Elemental Live includes these message in output types that support SCTE-35 messages. Forexample, AWS Elemental Live includes the messages in an HLS output.
For detailed information about how AWS Elemental Live handles ad avail SCTE-35 messages, see thesection called “POIS conditioning” (p. 307).
Version 2.14 and later332
AWS Elemental Live User GuideSetting up for virtual input switching
Example
Here's an example of an input switching scenario that illustrates the different input switchingcapabilities.
The time is 2:00:00. You start the event and AWS Elemental Live starts ingesting the first input. At thesame time, AWS Elemental Live reads all the other inputs,
SCTE-35-triggered request
At 2:17:33, while ingesting input Y, AWS Elemental Live encounters a SCTE-35 message. It sends themessage to the POIS. Shortly after, the POIS sends a request to switch to input Z at 2:30:00.
At 2:30:00, AWS Elemental Live switches to input Z (another live input).
SCTE-35 message that the POIS ignores
At 2:37:00, AWS Elemental Live encounters a SCTE-35 message. It sends the message to the POIS, butthe POIS doesn't send an input switch request. There is no rule that dictates that the POIS must switchon receiving a message.
Multiple SCTE-35-triggered requests
At 2:40:02, AWS Elemental Live encounters another SCTE-35 message, and this time the POIS doesrespond by sending two requests. One request is to switch at 2:45:13 to input B (one of the ads thatplayed previously). The second request is to switch at 2:45:43 back to input Z.
At 2:45:13, AWS Elemental Live switches to input B.
At 2:45:43, AWS Elemental Live switches back to input Z.
Cancelled asynchronous request
At 2:51:44, the POIS sends a request to switch to input F at 2:52:00.
At 2:51:47, the POIS sends a request to cancel the switch to input F.
This example shows cancellation of an asynchronous request. The POIS can cancel either anasynchronous request of a SCTE-35-triggered request.
Multiple requests in an unexpected order
At 2:53:48, the POIS sends a request to switch to input D at 2:57:00
At 2:54:00, the POIS sends a request to switch to input E at 2:55:30.
At 2:55:30, AWS Elemental Live switches to input E. Then at 2:57:00, AWS Elemental Live switches toinput D.
Note that AWS Elemental Live doesn't ignore the request to switch to input D, even though it receivedthe request for input E in the meantime.
Setting up for virtual input switchingWith virtual input switching, the AWS Elemental Live event and the POIS must be set up with identicalinformation.
The setup steps are the same for asynchronous input switching and SCTE-35-triggered input switching.
Topics
Version 2.14 and later333

AWS Elemental Live User GuideSetting up for virtual input switching
• Overview (p. 334)• Step 1: Coordinate with the POIS operator (p. 335)• Step 2: Set up the event (p. 335)• Step 3: Set up the inputs in the event (p. 335)• Step 4: Start the event (p. 336)
OverviewThe POIS must be set up with the following information:
• A tag for the AWS Elemental Live input. Each input must be unique in the AWS Elemental Live event.• The acquisition point ID and Zone for the AWS Elemental Live event.
In AWS Elemental Live, you set up the event with the following information:
• Acquisition point ID. This ID is how the POIS identifies the AWS Elemental Live node. The POISprovides you with this ID.
• Zone. This ID is how the POIS identifies the specific event. The POIS provides you with this ID.• These two fields ensure that AWS Elemental Live and the POIS have a common identifier for the event.
In the event, you set up the inputs with the following information:
• Input ID. This is the standard ID that AWS Elemental Live generates and assigns when you save anevent.
• The URL for the input.• Label. This tag has the same value as the label (in AWS Elemental Live). In this way, both AWS
Elemental Live and the POIS have a common identifier for each input.• A virtual tag. This identifies the input as one that the POIS knows about. Typically, you set up all the
inputs in an event as virtual.
Number of nodes and number of POIS
• Each AWS Elemental Live node can communicate with only one POIS. All the events on the AWSElemental Live node must be configured for the same POIS.
• One POIS can communicate with several AWS Elemental Live nodes. The POIS identifies each AWSElemental Live node with a unique ID via the POIS AcquisitionPointID and ZoneID parameter.
Number and type of inputs
With asynchronous input switching, the inputs can be any of the following:
• Programs in one MPTS. You can set up a maximum of 11 programs.• Any type of input that AWS Elemental Live considers to be a file input. See https://
docs.aws.amazon.com/elemental-live/latest/ug/supported-inputs-file-types.html
There is no limit to the number of inputs of this type.
With SCTE-35-triggered input switching, the inputs can be any of the following:
• Programs in one MPTS. You can set up a maximum of 11 programs.
Version 2.14 and later334

AWS Elemental Live User GuideSetting up for virtual input switching
Step 1: Coordinate with the POIS operatorTalk to the POIS operator, and agree on the values for this data:
• The label for each input. This value must be identical, and it is case sensitive.• The acquisition ID for the AWS Elemental Live node. The POIS must have a different acquisition ID for
each AWS Elemental Live node that it works with.• The zone ID for the specific event.
The combination of acquisition ID and zone ID must be unique on the POIS.• The URL for the signal conditioner endpoint on the POIS. This endpoint handles the input switching
communications with AWS Elemental Live.• The URL for the alternate signal conditioner endpoint on the POIS, if this exists.• The preroll that is the number of seconds between when AWS Elemental Live receives the request
from the POIS and when AWS Elemental Live inserts any SCTE-35 messages in the content. This prerollisn't required if the messages that the POIS sends include a start time for the input switch,
Make a note of all this data. You will need it to set up on AWS Elemental Live.
Step 2: Set up the eventYou must configure the event with information about the POIS server.
The information in this section assumes that you are familiar with the general steps for creating anevent.
NoteThe information in this section assumes that you are familiar with the general steps for creatingan event.
1. On the web interface, open the Ad Avail Controls section of the event.2. Complete the fields as follows:
• Ad Avail Trigger: ESAM.• Acquisition Point Identifier: The value that you obtained from the POIS operator (p. 335).• Zone Identity: The value that you obtained from the POIS operator.• Signal Conditioner Endpoint: The URL that you obtained from the POIS operator.• Alternate Signal Conditioner Endpoint: The URL that you obtained from the POIS operator, if
any.• Response Signal Preroll: The value you obtained from the POIS operator, if any.• Other fields: The other fields in this section aren't used for virtual input switching.
3. Complete this field only if you want to enable asynchronous input switching:
• Unsolicited ESAM Server.
Step 3: Set up the inputs in the event
To set up an MPTS program
You must set up each program in the MPTS as an individual input.
You can use inputs from an MPTS with both asynchronous input switching and SCTE-35-triggered inputswitching.
Version 2.14 and later335

AWS Elemental Live User GuideSetting up for virtual input switching
NoteThe information in this section assumes that you are familiar with the general steps for creatingan event.
1. On the web interface, got to the Inputs section of the event.2. Complete the Input section as follows:
• Input Type: Choose Network Input.• Input Name: Enter the label for the input, obtained from the POIS operator.• Network Location: The URL of the MPTS. For example, udp://192.20.08.18:5001
3. Open the Advanced section of this input and complete the following fields (on the first line of fields)
• Virtual Input: Choose this field to set up the input as a virtual input. AWS Elemental Live notifiesthe POIS only about inputs that are configured as virtual inputs.
• Virtual Input SCTE 35 PID: Enter the PID in the MPTS that holds the SCTE-35 data stream. Youcomplete this field only if you are using this program with SCTE-35-triggered input switching. Thisis the PID that AWS Elemental Live probes for SCTE-35 messages to send to the POIS.
4. Go to the Video Selector section of this input and complete the following fields:
• Program, in Video Selector: Enter the program number of the individual program in the mpts.5. Set up the audio and captions for this MPTS in the usual way.6. Set up more inputs, for other programs in the MPTS. For all the inputs, these rules apply:
• The URLs must be identical, because the programs must all be in the same MPTS.• The Input names must each be different.• The Program (in the Video Selector) must each be different.
To set up a file input
You can use file inputs with asynchronous input switching. You can't use them with SCTE-35-triggeredinput switching.
NoteThe information in this section assumes that you are familiar with the general steps for creatingan event.
1. On the web interface, got to the Inputs section of the event.2. Complete the Input section as follows:
• Input Type: Choose File Input or HLS File Input.• Input Name: Enter the label for the input, obtained from the POIS operator.• File Location: The path and file name for the source. For example, ftp://vod_files/mlaw.wav
3. Open the Advanced section of this input and complete the fields as follows:
• Virtual Input: Choose this field to set up the input as a virtual input. AWS Elemental Live notifiesthe POIS only about inputs that are configured as virtual inputs.
• Virtual Input SCTE 35 PID: Ignore this field. It is used only with SCTE-35-triggered inputswitching.
Step 4: Start the eventWhen you start the event, AWS Elemental Live starts to ingest inputs, starting with the first input listedin the event. While the event is running, AWS Elemental Live responds to POIS requests to switch to adifferent input. The role of AWS Elemental Live is reactive. The POIS controls input switching.
Version 2.14 and later336

AWS Elemental Live User GuideReference: Supported captions
Reference InformationThis chapter provides reference information about AWS Elemental Live.
Topics• Reference: Supported captions (p. 337)• Reference: Supported codecs and containers (p. 355)• Reference: Supported DRM solutions (p. 361)• Reference: add-on packages for features (p. 368)
Reference: Supported captionsThis document is intended to ensure that when creating an event or profile, you select a format that isvalid for your output captions.
Various constraints exist for the caption formats that you can include in your content:
• For a given input container, AWS Elemental Live can parse certain caption formats.• For a given input caption format, AWS Elemental Live can create one or more output captions.
However, a given output caption can appear only in specific output containers.
In summary – starting with the output container you want to produce:
• A given output container supports a given set of output caption formats. This container constrainsyour choice of output captions.
• Furthermore, to produce each output caption format, you must use one of the compatible inputcaption formats .And you must select an input caption format which can appear in the input containeryou have selected. So both which original input container and format you choose constrains yourchoice of output caption formats.
Topics• Supported caption formats (p. 337)• Supported output containers (p. 341)• Support tables (p. 341)
Supported caption formats
Caption Supported in input Supported in output Description
Ancillary data √ • From MXF input, datathat is compliantwith “SMPTE 291M:Ancillary DataPackage and SpaceFormatting” andthat is contained inancillary data.
Version 2.14 and later337
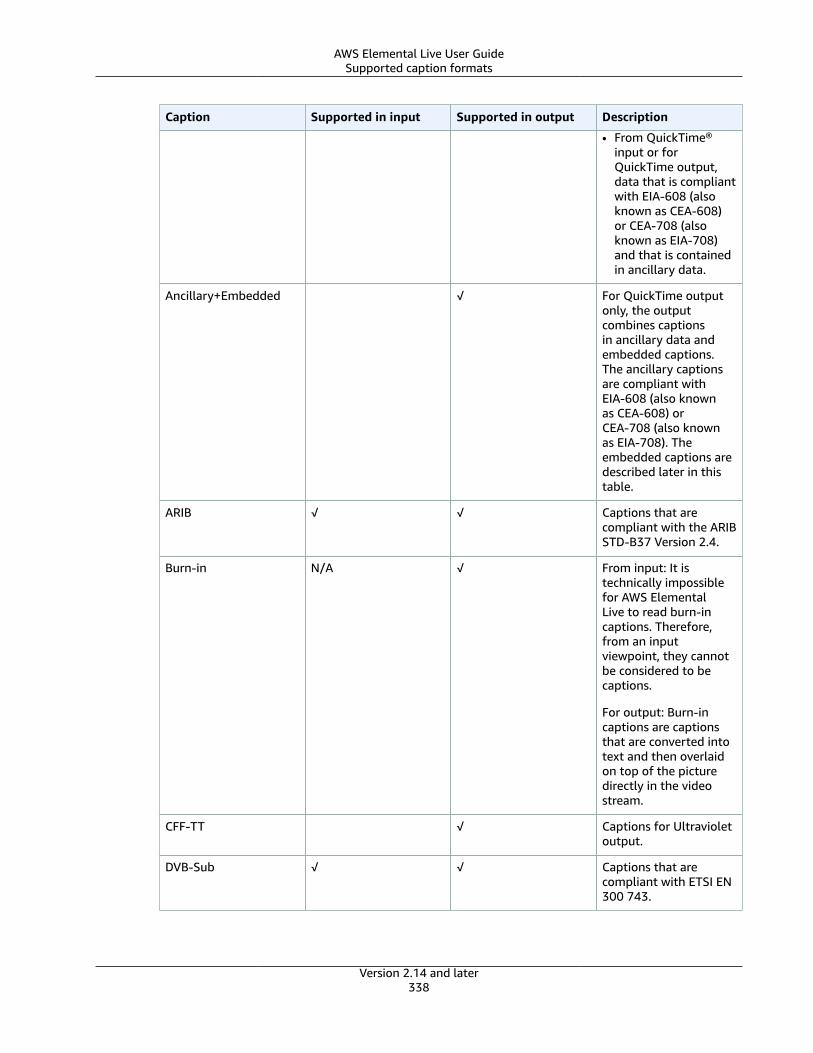
AWS Elemental Live User GuideSupported caption formats
Caption Supported in input Supported in output Description
• From QuickTime®input or forQuickTime output,data that is compliantwith EIA-608 (alsoknown as CEA-608)or CEA-708 (alsoknown as EIA-708)and that is containedin ancillary data.
Ancillary+Embedded √ For QuickTime outputonly, the outputcombines captionsin ancillary data andembedded captions.The ancillary captionsare compliant withEIA-608 (also knownas CEA-608) orCEA-708 (also knownas EIA-708). Theembedded captions aredescribed later in thistable.
ARIB √ √ Captions that arecompliant with the ARIBSTD-B37 Version 2.4.
Burn-in N/A √ From input: It istechnically impossiblefor AWS ElementalLive to read burn-incaptions. Therefore,from an inputviewpoint, they cannotbe considered to becaptions.
For output: Burn-incaptions are captionsthat are converted intotext and then overlaidon top of the picturedirectly in the videostream.
CFF-TT √ Captions for Ultravioletoutput.
DVB-Sub √ √ Captions that arecompliant with ETSI EN300 743.
Version 2.14 and later338
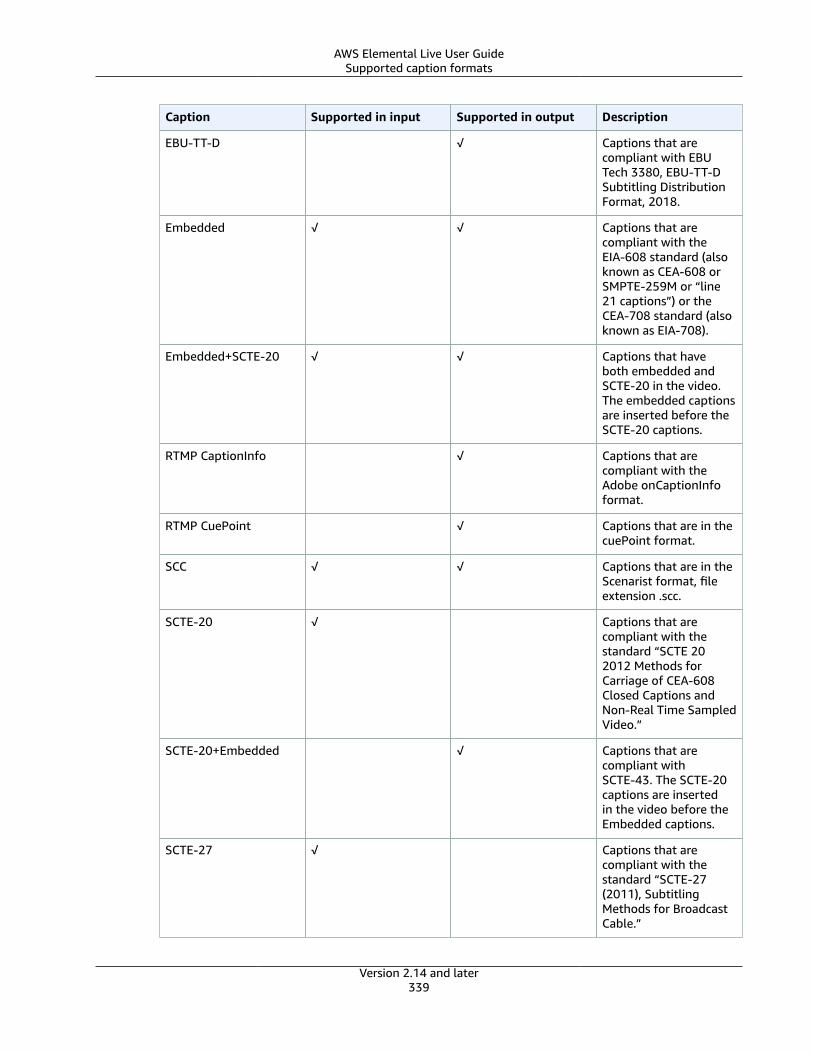
AWS Elemental Live User GuideSupported caption formats
Caption Supported in input Supported in output Description
EBU-TT-D √ Captions that arecompliant with EBUTech 3380, EBU-TT-DSubtitling DistributionFormat, 2018.
Embedded √ √ Captions that arecompliant with theEIA-608 standard (alsoknown as CEA-608 orSMPTE-259M or “line21 captions”) or theCEA-708 standard (alsoknown as EIA-708).
Embedded+SCTE-20 √ √ Captions that haveboth embedded andSCTE-20 in the video.The embedded captionsare inserted before theSCTE-20 captions.
RTMP CaptionInfo √ Captions that arecompliant with theAdobe onCaptionInfoformat.
RTMP CuePoint √ Captions that are in thecuePoint format.
SCC √ √ Captions that are in theScenarist format, fileextension .scc.
SCTE-20 √ Captions that arecompliant with thestandard “SCTE 202012 Methods forCarriage of CEA-608Closed Captions andNon-Real Time SampledVideo.”
SCTE-20+Embedded √ Captions that arecompliant withSCTE-43. The SCTE-20captions are insertedin the video before theEmbedded captions.
SCTE-27 √ Captions that arecompliant with thestandard “SCTE-27(2011), SubtitlingMethods for BroadcastCable.”
Version 2.14 and later339

AWS Elemental Live User GuideSupported caption formats
Caption Supported in input Supported in output Description
SMI √ √ Captions in theMicrosoft SAMI format.
SMPTE-TT √ Captions that arecompliant with thestandard “SMPTE ST2052-1:2010.”
SRT √ √ Captions in the SRTformat.
STL √ Captions in the EBUSTL format. SpruceSTL format is notsupported.
From SDI input.Captions in:
• OP42 teletext format.SMPTE 2031 field isunchecked in source.
• OP47 teletextformat wrappedin a SMPTE-2031envelope. SMPTE2031 field is checkedin source.
• OP47 teletextformat, also knownas SMPTE RDD-08(compliant withITU-R BT.1120-7).SMPTE 2031 field isunchecked in source.
From TS input: Captionsin the EBU Teletextformat.
From MXF file input:OP47 teletext format,also known as SMPTERDD-08 (compliantwith ITU-R BT.1120-7).SMPTE 2031 field isunchecked in source.
Teletext √ √
For output: Captionsin the EBU Teletextformat.
Version 2.14 and later340
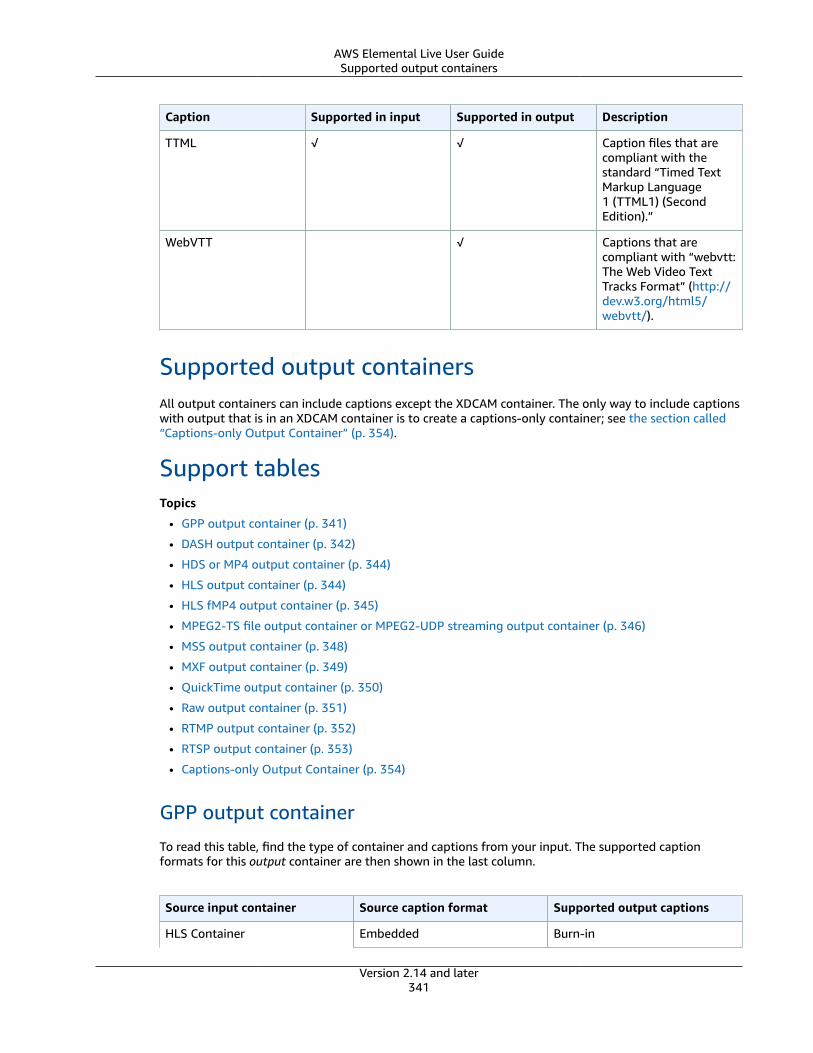
AWS Elemental Live User GuideSupported output containers
Caption Supported in input Supported in output Description
TTML √ √ Caption files that arecompliant with thestandard “Timed TextMarkup Language1 (TTML1) (SecondEdition).”
WebVTT √ Captions that arecompliant with “webvtt:The Web Video TextTracks Format” (http://dev.w3.org/html5/webvtt/).
Supported output containersAll output containers can include captions except the XDCAM container. The only way to include captionswith output that is in an XDCAM container is to create a captions-only container; see the section called“Captions-only Output Container” (p. 354).
Support tablesTopics
• GPP output container (p. 341)
• DASH output container (p. 342)
• HDS or MP4 output container (p. 344)
• HLS output container (p. 344)
• HLS fMP4 output container (p. 345)
• MPEG2-TS file output container or MPEG2-UDP streaming output container (p. 346)
• MSS output container (p. 348)
• MXF output container (p. 349)
• QuickTime output container (p. 350)
• Raw output container (p. 351)
• RTMP output container (p. 352)
• RTSP output container (p. 353)
• Captions-only Output Container (p. 354)
GPP output container
To read this table, find the type of container and captions from your input. The supported captionformats for this output container are then shown in the last column.
Source input container Source caption format Supported output captions
HLS Container Embedded Burn-in
Version 2.14 and later341
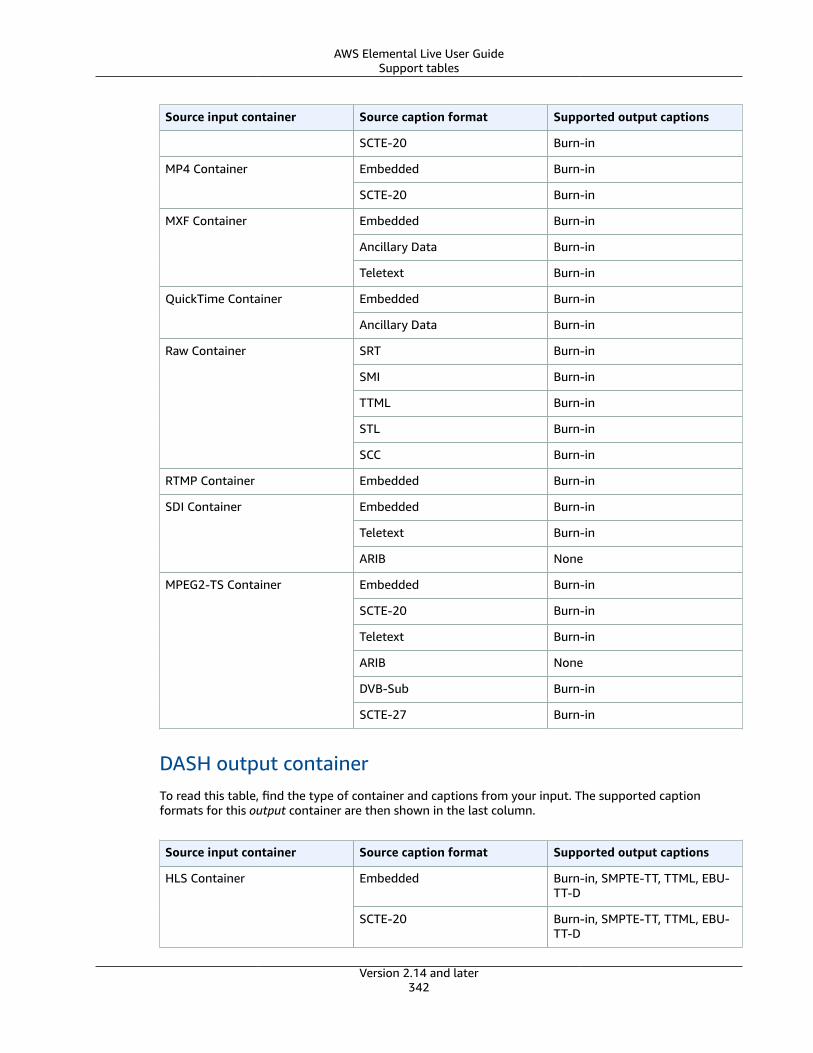
AWS Elemental Live User GuideSupport tables
Source input container Source caption format Supported output captions
SCTE-20 Burn-in
Embedded Burn-inMP4 Container
SCTE-20 Burn-in
Embedded Burn-in
Ancillary Data Burn-in
MXF Container
Teletext Burn-in
Embedded Burn-inQuickTime Container
Ancillary Data Burn-in
SRT Burn-in
SMI Burn-in
TTML Burn-in
STL Burn-in
Raw Container
SCC Burn-in
RTMP Container Embedded Burn-in
Embedded Burn-in
Teletext Burn-in
SDI Container
ARIB None
Embedded Burn-in
SCTE-20 Burn-in
Teletext Burn-in
ARIB None
DVB-Sub Burn-in
MPEG2-TS Container
SCTE-27 Burn-in
DASH output containerTo read this table, find the type of container and captions from your input. The supported captionformats for this output container are then shown in the last column.
Source input container Source caption format Supported output captions
Embedded Burn-in, SMPTE-TT, TTML, EBU-TT-D
HLS Container
SCTE-20 Burn-in, SMPTE-TT, TTML, EBU-TT-D
Version 2.14 and later342
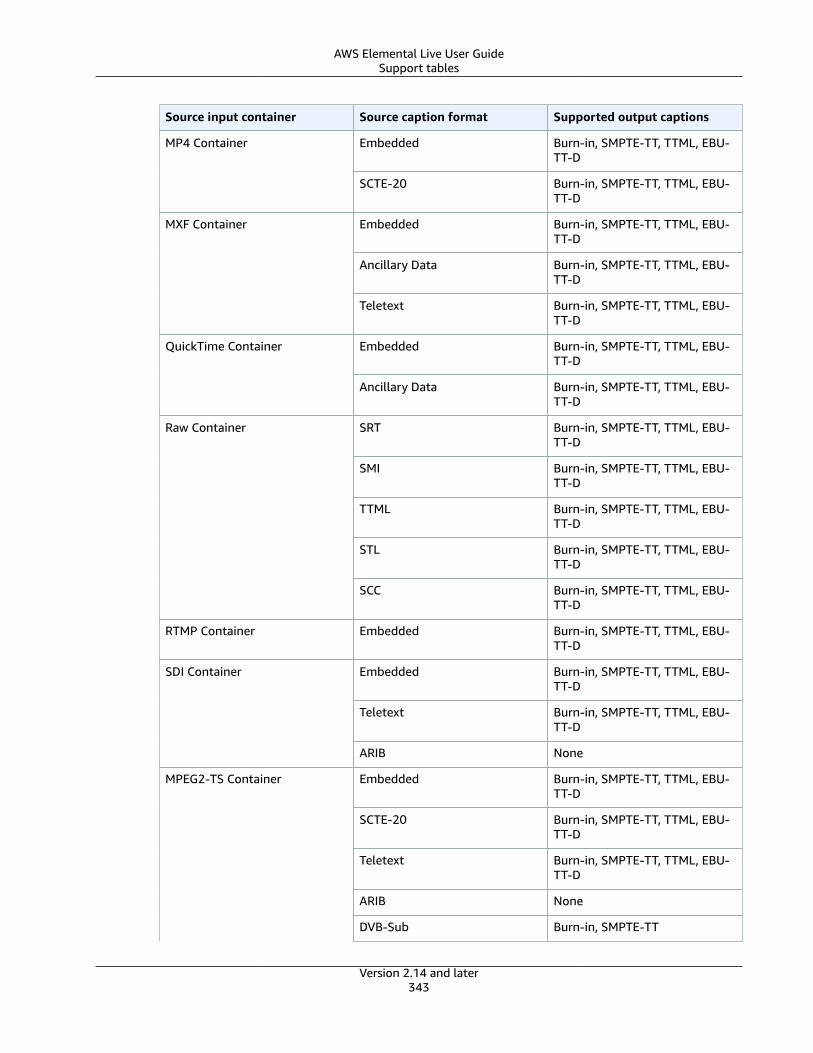
AWS Elemental Live User GuideSupport tables
Source input container Source caption format Supported output captions
Embedded Burn-in, SMPTE-TT, TTML, EBU-TT-D
MP4 Container
SCTE-20 Burn-in, SMPTE-TT, TTML, EBU-TT-D
Embedded Burn-in, SMPTE-TT, TTML, EBU-TT-D
Ancillary Data Burn-in, SMPTE-TT, TTML, EBU-TT-D
MXF Container
Teletext Burn-in, SMPTE-TT, TTML, EBU-TT-D
Embedded Burn-in, SMPTE-TT, TTML, EBU-TT-D
QuickTime Container
Ancillary Data Burn-in, SMPTE-TT, TTML, EBU-TT-D
SRT Burn-in, SMPTE-TT, TTML, EBU-TT-D
SMI Burn-in, SMPTE-TT, TTML, EBU-TT-D
TTML Burn-in, SMPTE-TT, TTML, EBU-TT-D
STL Burn-in, SMPTE-TT, TTML, EBU-TT-D
Raw Container
SCC Burn-in, SMPTE-TT, TTML, EBU-TT-D
RTMP Container Embedded Burn-in, SMPTE-TT, TTML, EBU-TT-D
Embedded Burn-in, SMPTE-TT, TTML, EBU-TT-D
Teletext Burn-in, SMPTE-TT, TTML, EBU-TT-D
SDI Container
ARIB None
Embedded Burn-in, SMPTE-TT, TTML, EBU-TT-D
SCTE-20 Burn-in, SMPTE-TT, TTML, EBU-TT-D
Teletext Burn-in, SMPTE-TT, TTML, EBU-TT-D
ARIB None
MPEG2-TS Container
DVB-Sub Burn-in, SMPTE-TT
Version 2.14 and later343
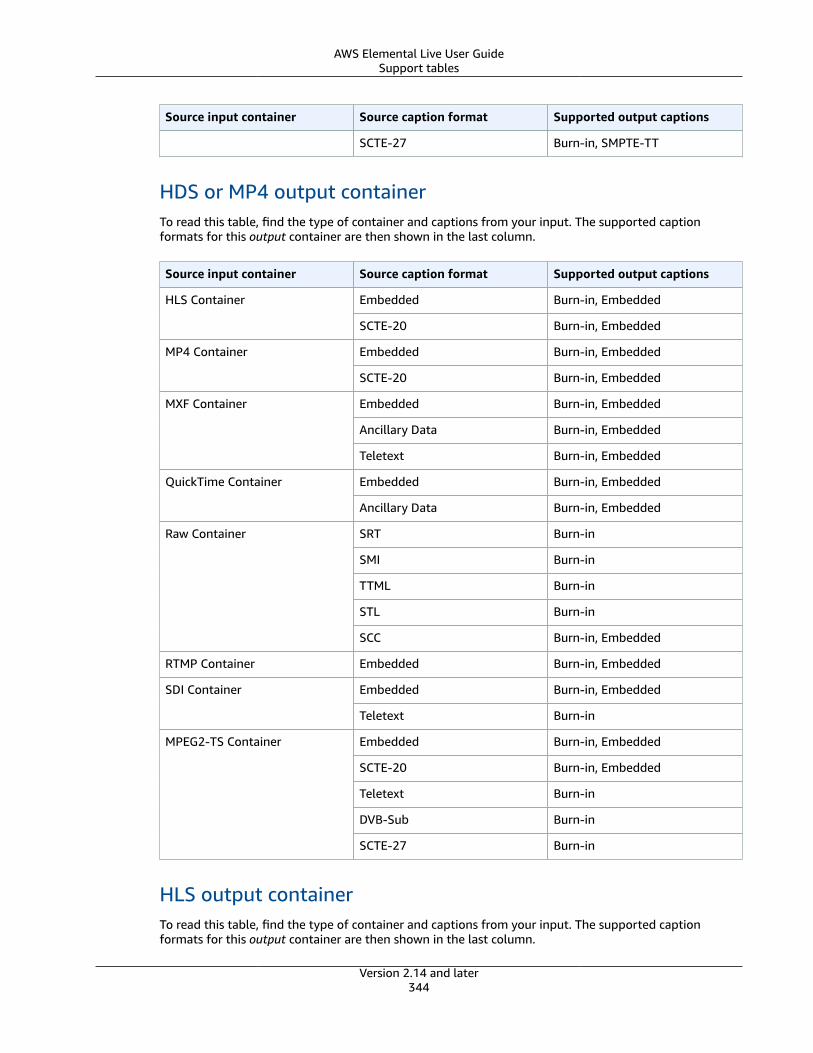
AWS Elemental Live User GuideSupport tables
Source input container Source caption format Supported output captions
SCTE-27 Burn-in, SMPTE-TT
HDS or MP4 output containerTo read this table, find the type of container and captions from your input. The supported captionformats for this output container are then shown in the last column.
Source input container Source caption format Supported output captions
Embedded Burn-in, EmbeddedHLS Container
SCTE-20 Burn-in, Embedded
Embedded Burn-in, EmbeddedMP4 Container
SCTE-20 Burn-in, Embedded
Embedded Burn-in, Embedded
Ancillary Data Burn-in, Embedded
MXF Container
Teletext Burn-in, Embedded
Embedded Burn-in, EmbeddedQuickTime Container
Ancillary Data Burn-in, Embedded
SRT Burn-in
SMI Burn-in
TTML Burn-in
STL Burn-in
Raw Container
SCC Burn-in, Embedded
RTMP Container Embedded Burn-in, Embedded
Embedded Burn-in, EmbeddedSDI Container
Teletext Burn-in
Embedded Burn-in, Embedded
SCTE-20 Burn-in, Embedded
Teletext Burn-in
DVB-Sub Burn-in
MPEG2-TS Container
SCTE-27 Burn-in
HLS output containerTo read this table, find the type of container and captions from your input. The supported captionformats for this output container are then shown in the last column.
Version 2.14 and later344
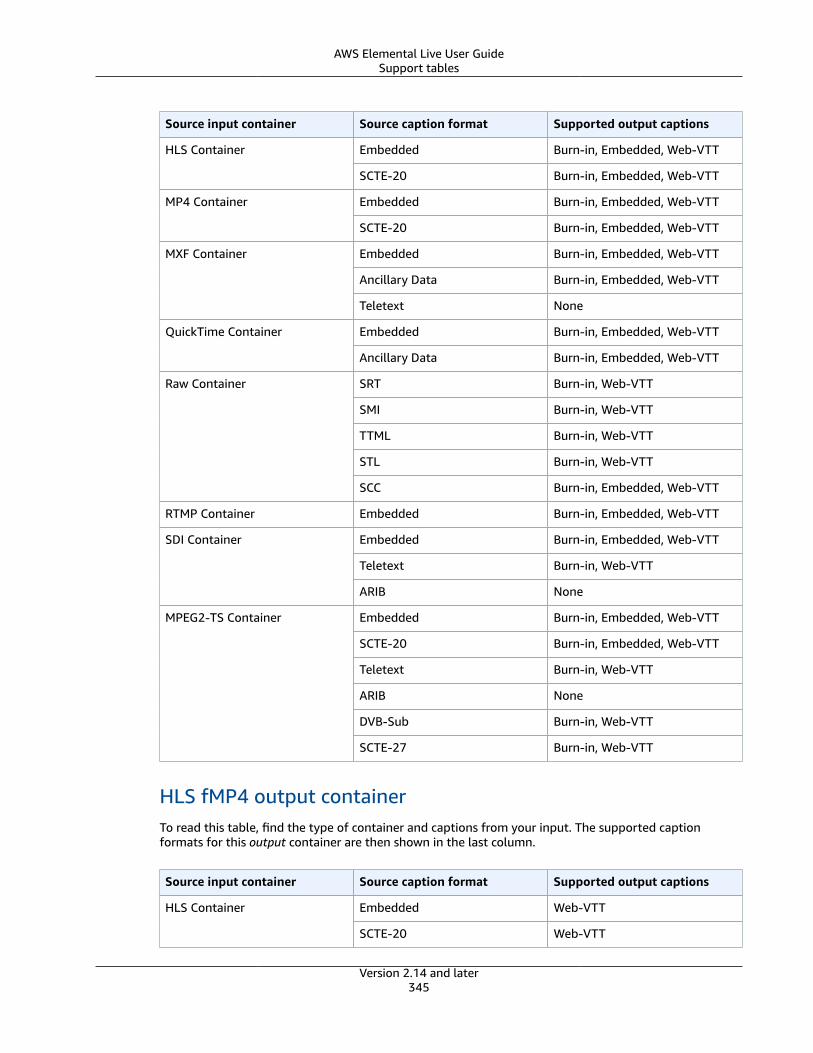
AWS Elemental Live User GuideSupport tables
Source input container Source caption format Supported output captions
Embedded Burn-in, Embedded, Web-VTTHLS Container
SCTE-20 Burn-in, Embedded, Web-VTT
Embedded Burn-in, Embedded, Web-VTTMP4 Container
SCTE-20 Burn-in, Embedded, Web-VTT
Embedded Burn-in, Embedded, Web-VTT
Ancillary Data Burn-in, Embedded, Web-VTT
MXF Container
Teletext None
Embedded Burn-in, Embedded, Web-VTTQuickTime Container
Ancillary Data Burn-in, Embedded, Web-VTT
SRT Burn-in, Web-VTT
SMI Burn-in, Web-VTT
TTML Burn-in, Web-VTT
STL Burn-in, Web-VTT
Raw Container
SCC Burn-in, Embedded, Web-VTT
RTMP Container Embedded Burn-in, Embedded, Web-VTT
Embedded Burn-in, Embedded, Web-VTT
Teletext Burn-in, Web-VTT
SDI Container
ARIB None
Embedded Burn-in, Embedded, Web-VTT
SCTE-20 Burn-in, Embedded, Web-VTT
Teletext Burn-in, Web-VTT
ARIB None
DVB-Sub Burn-in, Web-VTT
MPEG2-TS Container
SCTE-27 Burn-in, Web-VTT
HLS fMP4 output containerTo read this table, find the type of container and captions from your input. The supported captionformats for this output container are then shown in the last column.
Source input container Source caption format Supported output captions
Embedded Web-VTTHLS Container
SCTE-20 Web-VTT
Version 2.14 and later345
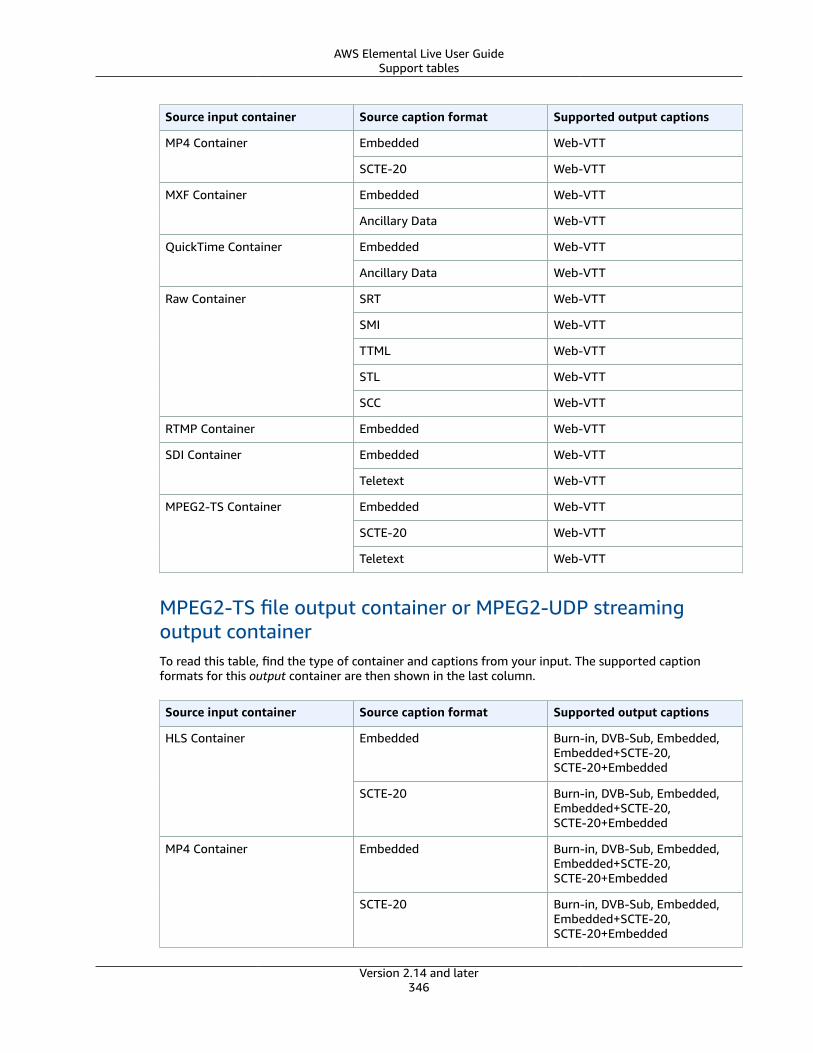
AWS Elemental Live User GuideSupport tables
Source input container Source caption format Supported output captions
Embedded Web-VTTMP4 Container
SCTE-20 Web-VTT
Embedded Web-VTTMXF Container
Ancillary Data Web-VTT
Embedded Web-VTTQuickTime Container
Ancillary Data Web-VTT
SRT Web-VTT
SMI Web-VTT
TTML Web-VTT
STL Web-VTT
Raw Container
SCC Web-VTT
RTMP Container Embedded Web-VTT
Embedded Web-VTTSDI Container
Teletext Web-VTT
Embedded Web-VTT
SCTE-20 Web-VTT
MPEG2-TS Container
Teletext Web-VTT
MPEG2-TS file output container or MPEG2-UDP streamingoutput containerTo read this table, find the type of container and captions from your input. The supported captionformats for this output container are then shown in the last column.
Source input container Source caption format Supported output captions
Embedded Burn-in, DVB-Sub, Embedded,Embedded+SCTE-20,SCTE-20+Embedded
HLS Container
SCTE-20 Burn-in, DVB-Sub, Embedded,Embedded+SCTE-20,SCTE-20+Embedded
Embedded Burn-in, DVB-Sub, Embedded,Embedded+SCTE-20,SCTE-20+Embedded
MP4 Container
SCTE-20 Burn-in, DVB-Sub, Embedded,Embedded+SCTE-20,SCTE-20+Embedded
Version 2.14 and later346
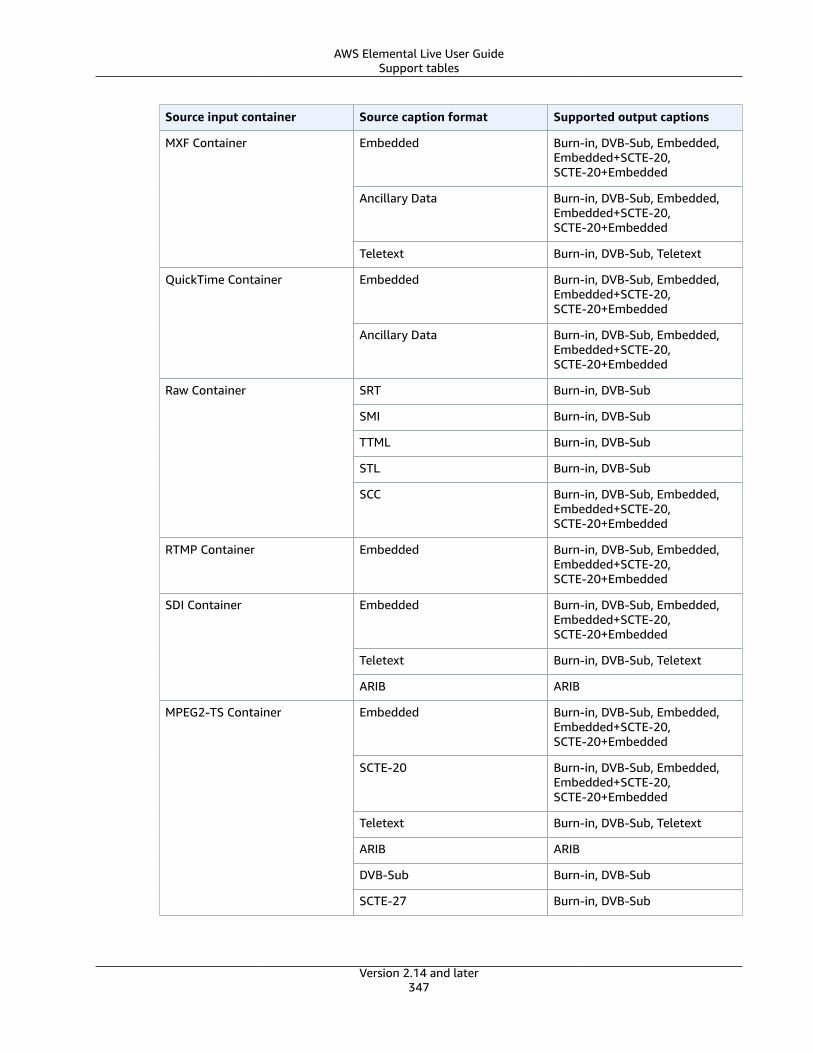
AWS Elemental Live User GuideSupport tables
Source input container Source caption format Supported output captions
Embedded Burn-in, DVB-Sub, Embedded,Embedded+SCTE-20,SCTE-20+Embedded
Ancillary Data Burn-in, DVB-Sub, Embedded,Embedded+SCTE-20,SCTE-20+Embedded
MXF Container
Teletext Burn-in, DVB-Sub, Teletext
Embedded Burn-in, DVB-Sub, Embedded,Embedded+SCTE-20,SCTE-20+Embedded
QuickTime Container
Ancillary Data Burn-in, DVB-Sub, Embedded,Embedded+SCTE-20,SCTE-20+Embedded
SRT Burn-in, DVB-Sub
SMI Burn-in, DVB-Sub
TTML Burn-in, DVB-Sub
STL Burn-in, DVB-Sub
Raw Container
SCC Burn-in, DVB-Sub, Embedded,Embedded+SCTE-20,SCTE-20+Embedded
RTMP Container Embedded Burn-in, DVB-Sub, Embedded,Embedded+SCTE-20,SCTE-20+Embedded
Embedded Burn-in, DVB-Sub, Embedded,Embedded+SCTE-20,SCTE-20+Embedded
Teletext Burn-in, DVB-Sub, Teletext
SDI Container
ARIB ARIB
Embedded Burn-in, DVB-Sub, Embedded,Embedded+SCTE-20,SCTE-20+Embedded
SCTE-20 Burn-in, DVB-Sub, Embedded,Embedded+SCTE-20,SCTE-20+Embedded
Teletext Burn-in, DVB-Sub, Teletext
ARIB ARIB
DVB-Sub Burn-in, DVB-Sub
MPEG2-TS Container
SCTE-27 Burn-in, DVB-Sub
Version 2.14 and later347
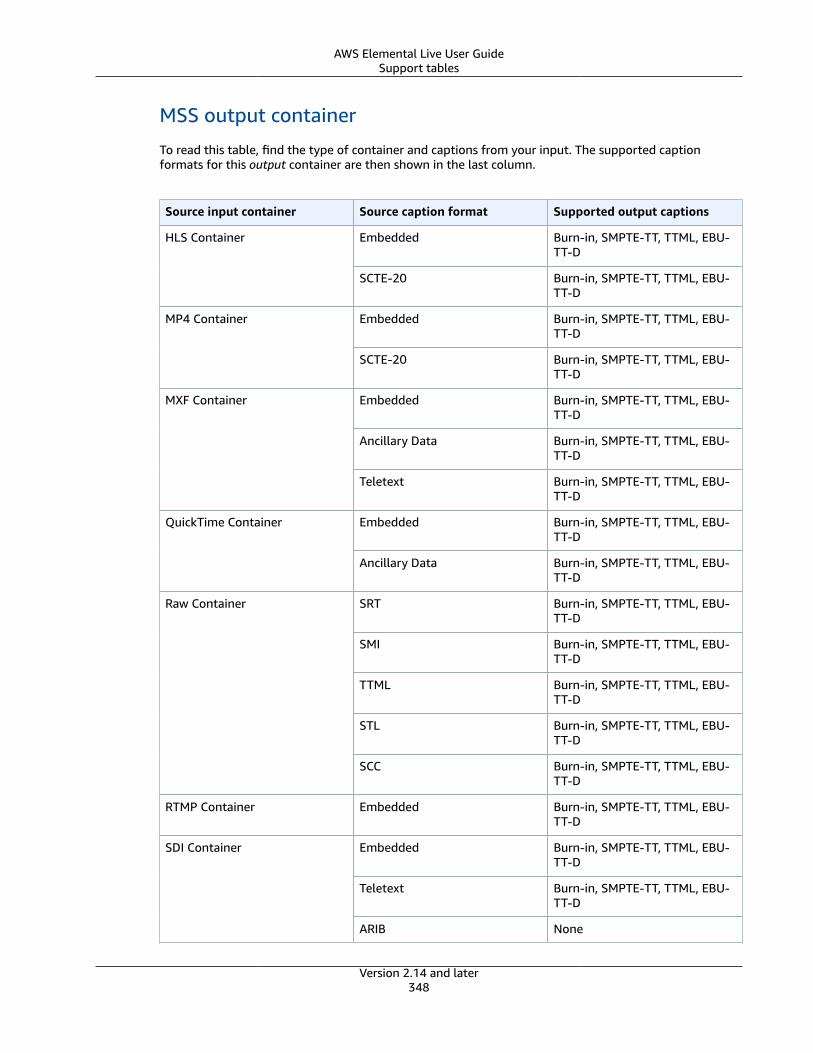
AWS Elemental Live User GuideSupport tables
MSS output container
To read this table, find the type of container and captions from your input. The supported captionformats for this output container are then shown in the last column.
Source input container Source caption format Supported output captions
Embedded Burn-in, SMPTE-TT, TTML, EBU-TT-D
HLS Container
SCTE-20 Burn-in, SMPTE-TT, TTML, EBU-TT-D
Embedded Burn-in, SMPTE-TT, TTML, EBU-TT-D
MP4 Container
SCTE-20 Burn-in, SMPTE-TT, TTML, EBU-TT-D
Embedded Burn-in, SMPTE-TT, TTML, EBU-TT-D
Ancillary Data Burn-in, SMPTE-TT, TTML, EBU-TT-D
MXF Container
Teletext Burn-in, SMPTE-TT, TTML, EBU-TT-D
Embedded Burn-in, SMPTE-TT, TTML, EBU-TT-D
QuickTime Container
Ancillary Data Burn-in, SMPTE-TT, TTML, EBU-TT-D
SRT Burn-in, SMPTE-TT, TTML, EBU-TT-D
SMI Burn-in, SMPTE-TT, TTML, EBU-TT-D
TTML Burn-in, SMPTE-TT, TTML, EBU-TT-D
STL Burn-in, SMPTE-TT, TTML, EBU-TT-D
Raw Container
SCC Burn-in, SMPTE-TT, TTML, EBU-TT-D
RTMP Container Embedded Burn-in, SMPTE-TT, TTML, EBU-TT-D
Embedded Burn-in, SMPTE-TT, TTML, EBU-TT-D
Teletext Burn-in, SMPTE-TT, TTML, EBU-TT-D
SDI Container
ARIB None
Version 2.14 and later348
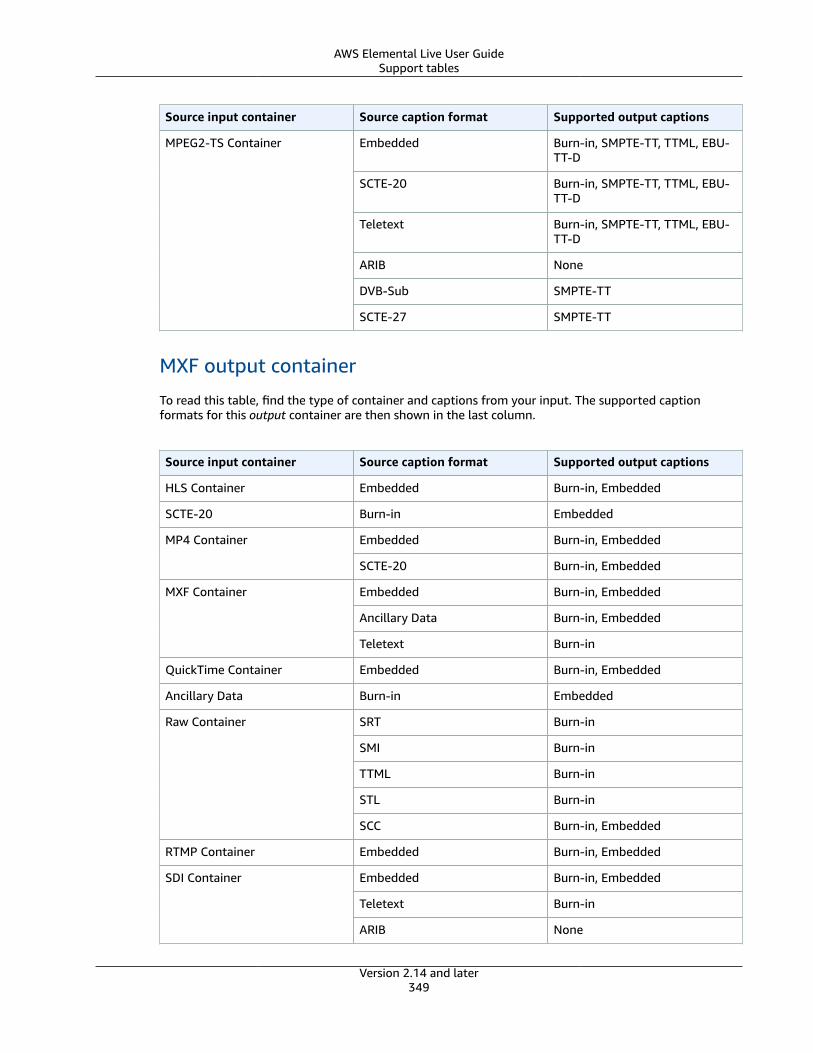
AWS Elemental Live User GuideSupport tables
Source input container Source caption format Supported output captions
Embedded Burn-in, SMPTE-TT, TTML, EBU-TT-D
SCTE-20 Burn-in, SMPTE-TT, TTML, EBU-TT-D
Teletext Burn-in, SMPTE-TT, TTML, EBU-TT-D
ARIB None
DVB-Sub SMPTE-TT
MPEG2-TS Container
SCTE-27 SMPTE-TT
MXF output container
To read this table, find the type of container and captions from your input. The supported captionformats for this output container are then shown in the last column.
Source input container Source caption format Supported output captions
HLS Container Embedded Burn-in, Embedded
SCTE-20 Burn-in Embedded
Embedded Burn-in, EmbeddedMP4 Container
SCTE-20 Burn-in, Embedded
Embedded Burn-in, Embedded
Ancillary Data Burn-in, Embedded
MXF Container
Teletext Burn-in
QuickTime Container Embedded Burn-in, Embedded
Ancillary Data Burn-in Embedded
SRT Burn-in
SMI Burn-in
TTML Burn-in
STL Burn-in
Raw Container
SCC Burn-in, Embedded
RTMP Container Embedded Burn-in, Embedded
Embedded Burn-in, Embedded
Teletext Burn-in
SDI Container
ARIB None
Version 2.14 and later349
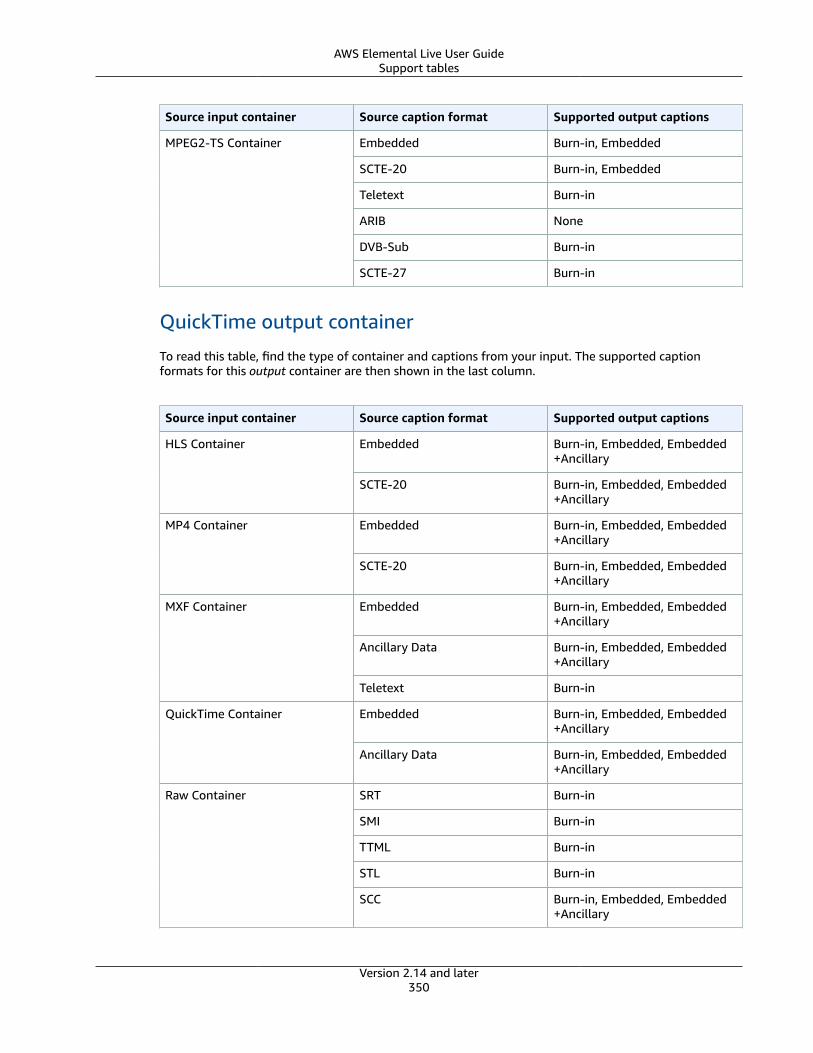
AWS Elemental Live User GuideSupport tables
Source input container Source caption format Supported output captions
Embedded Burn-in, Embedded
SCTE-20 Burn-in, Embedded
Teletext Burn-in
ARIB None
DVB-Sub Burn-in
MPEG2-TS Container
SCTE-27 Burn-in
QuickTime output container
To read this table, find the type of container and captions from your input. The supported captionformats for this output container are then shown in the last column.
Source input container Source caption format Supported output captions
Embedded Burn-in, Embedded, Embedded+Ancillary
HLS Container
SCTE-20 Burn-in, Embedded, Embedded+Ancillary
Embedded Burn-in, Embedded, Embedded+Ancillary
MP4 Container
SCTE-20 Burn-in, Embedded, Embedded+Ancillary
Embedded Burn-in, Embedded, Embedded+Ancillary
Ancillary Data Burn-in, Embedded, Embedded+Ancillary
MXF Container
Teletext Burn-in
Embedded Burn-in, Embedded, Embedded+Ancillary
QuickTime Container
Ancillary Data Burn-in, Embedded, Embedded+Ancillary
SRT Burn-in
SMI Burn-in
TTML Burn-in
STL Burn-in
Raw Container
SCC Burn-in, Embedded, Embedded+Ancillary
Version 2.14 and later350
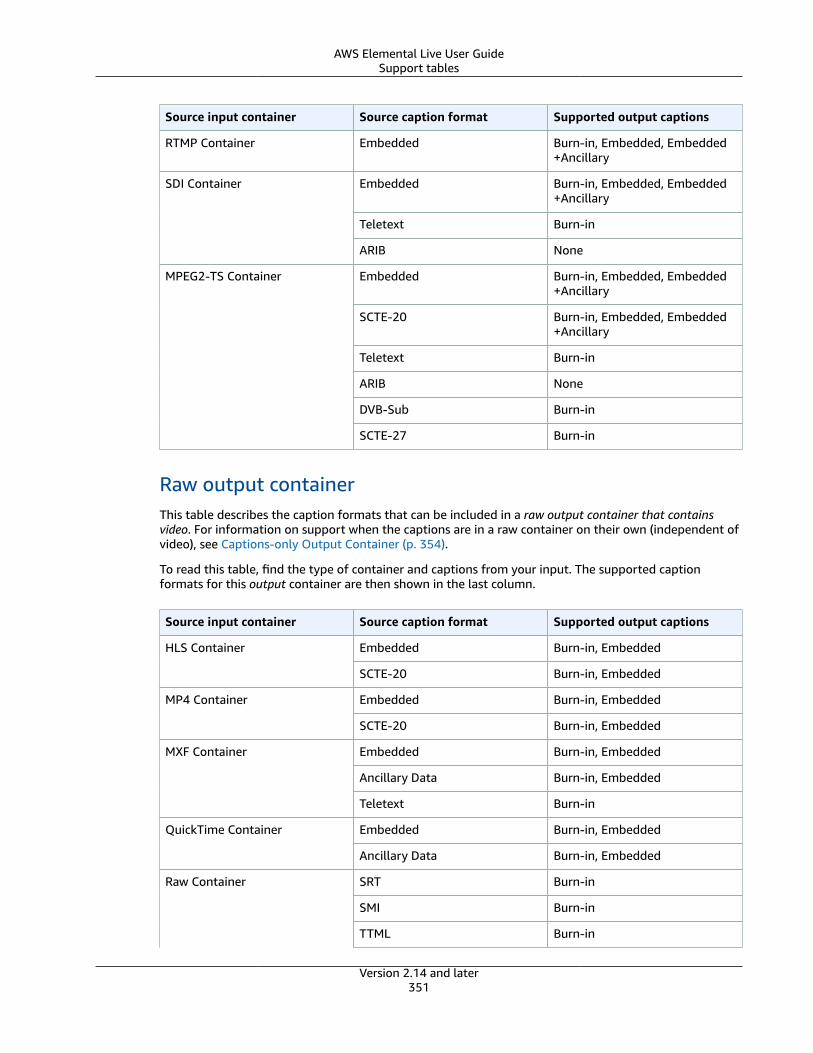
AWS Elemental Live User GuideSupport tables
Source input container Source caption format Supported output captions
RTMP Container Embedded Burn-in, Embedded, Embedded+Ancillary
Embedded Burn-in, Embedded, Embedded+Ancillary
Teletext Burn-in
SDI Container
ARIB None
Embedded Burn-in, Embedded, Embedded+Ancillary
SCTE-20 Burn-in, Embedded, Embedded+Ancillary
Teletext Burn-in
ARIB None
DVB-Sub Burn-in
MPEG2-TS Container
SCTE-27 Burn-in
Raw output containerThis table describes the caption formats that can be included in a raw output container that containsvideo. For information on support when the captions are in a raw container on their own (independent ofvideo), see Captions-only Output Container (p. 354).
To read this table, find the type of container and captions from your input. The supported captionformats for this output container are then shown in the last column.
Source input container Source caption format Supported output captions
Embedded Burn-in, EmbeddedHLS Container
SCTE-20 Burn-in, Embedded
Embedded Burn-in, EmbeddedMP4 Container
SCTE-20 Burn-in, Embedded
Embedded Burn-in, Embedded
Ancillary Data Burn-in, Embedded
MXF Container
Teletext Burn-in
Embedded Burn-in, EmbeddedQuickTime Container
Ancillary Data Burn-in, Embedded
SRT Burn-in
SMI Burn-in
Raw Container
TTML Burn-in
Version 2.14 and later351
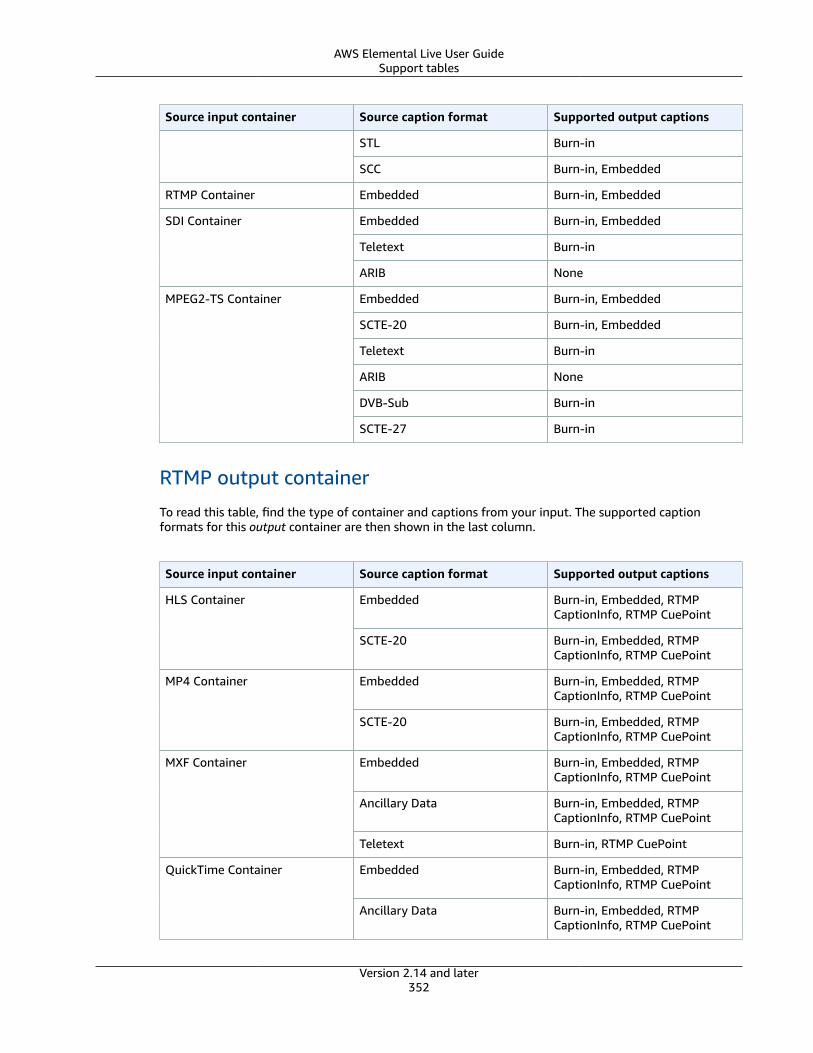
AWS Elemental Live User GuideSupport tables
Source input container Source caption format Supported output captions
STL Burn-in
SCC Burn-in, Embedded
RTMP Container Embedded Burn-in, Embedded
Embedded Burn-in, Embedded
Teletext Burn-in
SDI Container
ARIB None
Embedded Burn-in, Embedded
SCTE-20 Burn-in, Embedded
Teletext Burn-in
ARIB None
DVB-Sub Burn-in
MPEG2-TS Container
SCTE-27 Burn-in
RTMP output container
To read this table, find the type of container and captions from your input. The supported captionformats for this output container are then shown in the last column.
Source input container Source caption format Supported output captions
Embedded Burn-in, Embedded, RTMPCaptionInfo, RTMP CuePoint
HLS Container
SCTE-20 Burn-in, Embedded, RTMPCaptionInfo, RTMP CuePoint
Embedded Burn-in, Embedded, RTMPCaptionInfo, RTMP CuePoint
MP4 Container
SCTE-20 Burn-in, Embedded, RTMPCaptionInfo, RTMP CuePoint
Embedded Burn-in, Embedded, RTMPCaptionInfo, RTMP CuePoint
Ancillary Data Burn-in, Embedded, RTMPCaptionInfo, RTMP CuePoint
MXF Container
Teletext Burn-in, RTMP CuePoint
Embedded Burn-in, Embedded, RTMPCaptionInfo, RTMP CuePoint
QuickTime Container
Ancillary Data Burn-in, Embedded, RTMPCaptionInfo, RTMP CuePoint
Version 2.14 and later352
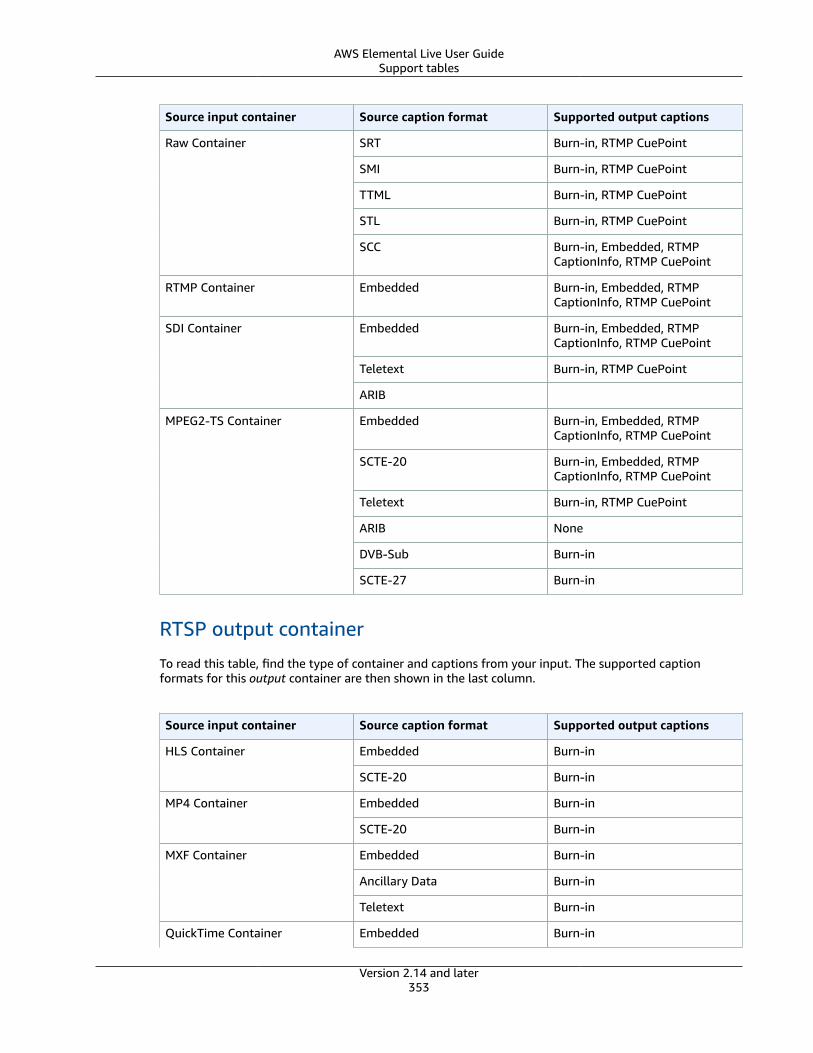
AWS Elemental Live User GuideSupport tables
Source input container Source caption format Supported output captions
SRT Burn-in, RTMP CuePoint
SMI Burn-in, RTMP CuePoint
TTML Burn-in, RTMP CuePoint
STL Burn-in, RTMP CuePoint
Raw Container
SCC Burn-in, Embedded, RTMPCaptionInfo, RTMP CuePoint
RTMP Container Embedded Burn-in, Embedded, RTMPCaptionInfo, RTMP CuePoint
Embedded Burn-in, Embedded, RTMPCaptionInfo, RTMP CuePoint
Teletext Burn-in, RTMP CuePoint
SDI Container
ARIB
Embedded Burn-in, Embedded, RTMPCaptionInfo, RTMP CuePoint
SCTE-20 Burn-in, Embedded, RTMPCaptionInfo, RTMP CuePoint
Teletext Burn-in, RTMP CuePoint
ARIB None
DVB-Sub Burn-in
MPEG2-TS Container
SCTE-27 Burn-in
RTSP output container
To read this table, find the type of container and captions from your input. The supported captionformats for this output container are then shown in the last column.
Source input container Source caption format Supported output captions
Embedded Burn-inHLS Container
SCTE-20 Burn-in
Embedded Burn-inMP4 Container
SCTE-20 Burn-in
Embedded Burn-in
Ancillary Data Burn-in
MXF Container
Teletext Burn-in
QuickTime Container Embedded Burn-in
Version 2.14 and later353

AWS Elemental Live User GuideSupport tables
Source input container Source caption format Supported output captions
Ancillary Data Burn-in
SRT Burn-in
SMI Burn-in
TTML Burn-in
STL Burn-in
Raw Container
SCC Burn-in
RTMP Container Embedded Burn-in
Embedded Burn-in
Teletext Burn-in
SDI Container
ARIB ARIB
Embedded Burn-in
SCTE-20 Burn-in
Teletext Burn-in
ARIB ARIB
DVB-Sub Burn-in
MPEG2-TS Container
SCTE-27 Burn-in
Captions-only Output Container
This table describes the caption formats that can be included on their own in an output. With thisoption, the container is always a raw container that contains only the captions (video would be in anothercontainer that may be a raw container or may be some other type).
If you have one of the source caption formats listed in the first column – regardless of the sourcecontainer – you can convert it to an external captions file and include it in a raw container that containsonly that captions file.
Source input container Source caption format Supported output captions
SRT SMI, SMPTE-TT, SRT, TTML, EBU-TT-D, Web-VTT
SMI SMI, SMPTE-TT, SRT, TTML, EBU-TT-D, Web-VTT
TTML SMI, SMPTE-TT, SRT, TTML, EBU-TT-D, Web-VTT
Any container
SMPTE-TT SMI, SMPTE-TT, SRT, TTML, EBU-TT-D, Web-VTT
Version 2.14 and later354
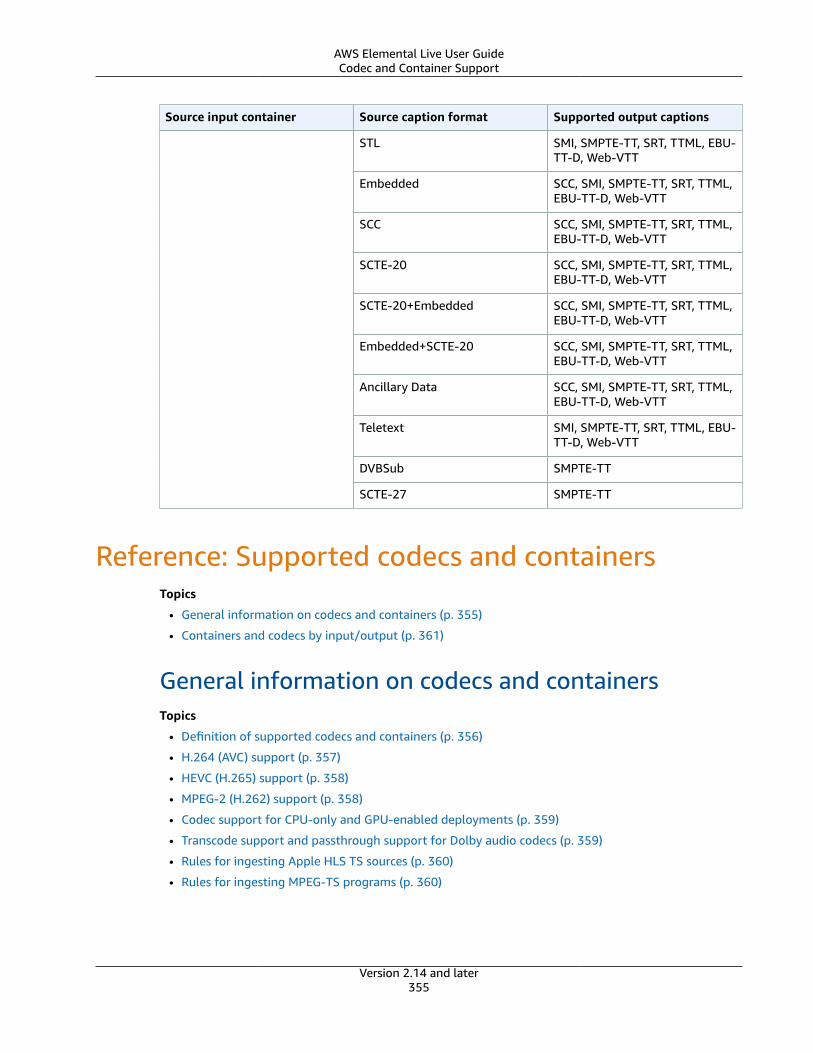
AWS Elemental Live User GuideCodec and Container Support
Source input container Source caption format Supported output captions
STL SMI, SMPTE-TT, SRT, TTML, EBU-TT-D, Web-VTT
Embedded SCC, SMI, SMPTE-TT, SRT, TTML,EBU-TT-D, Web-VTT
SCC SCC, SMI, SMPTE-TT, SRT, TTML,EBU-TT-D, Web-VTT
SCTE-20 SCC, SMI, SMPTE-TT, SRT, TTML,EBU-TT-D, Web-VTT
SCTE-20+Embedded SCC, SMI, SMPTE-TT, SRT, TTML,EBU-TT-D, Web-VTT
Embedded+SCTE-20 SCC, SMI, SMPTE-TT, SRT, TTML,EBU-TT-D, Web-VTT
Ancillary Data SCC, SMI, SMPTE-TT, SRT, TTML,EBU-TT-D, Web-VTT
Teletext SMI, SMPTE-TT, SRT, TTML, EBU-TT-D, Web-VTT
DVBSub SMPTE-TT
SCTE-27 SMPTE-TT
Reference: Supported codecs and containersTopics
• General information on codecs and containers (p. 355)
• Containers and codecs by input/output (p. 361)
General information on codecs and containersTopics
• Definition of supported codecs and containers (p. 356)
• H.264 (AVC) support (p. 357)
• HEVC (H.265) support (p. 358)
• MPEG-2 (H.262) support (p. 358)
• Codec support for CPU-only and GPU-enabled deployments (p. 359)
• Transcode support and passthrough support for Dolby audio codecs (p. 359)
• Rules for ingesting Apple HLS TS sources (p. 360)
• Rules for ingesting MPEG-TS programs (p. 360)
Version 2.14 and later355
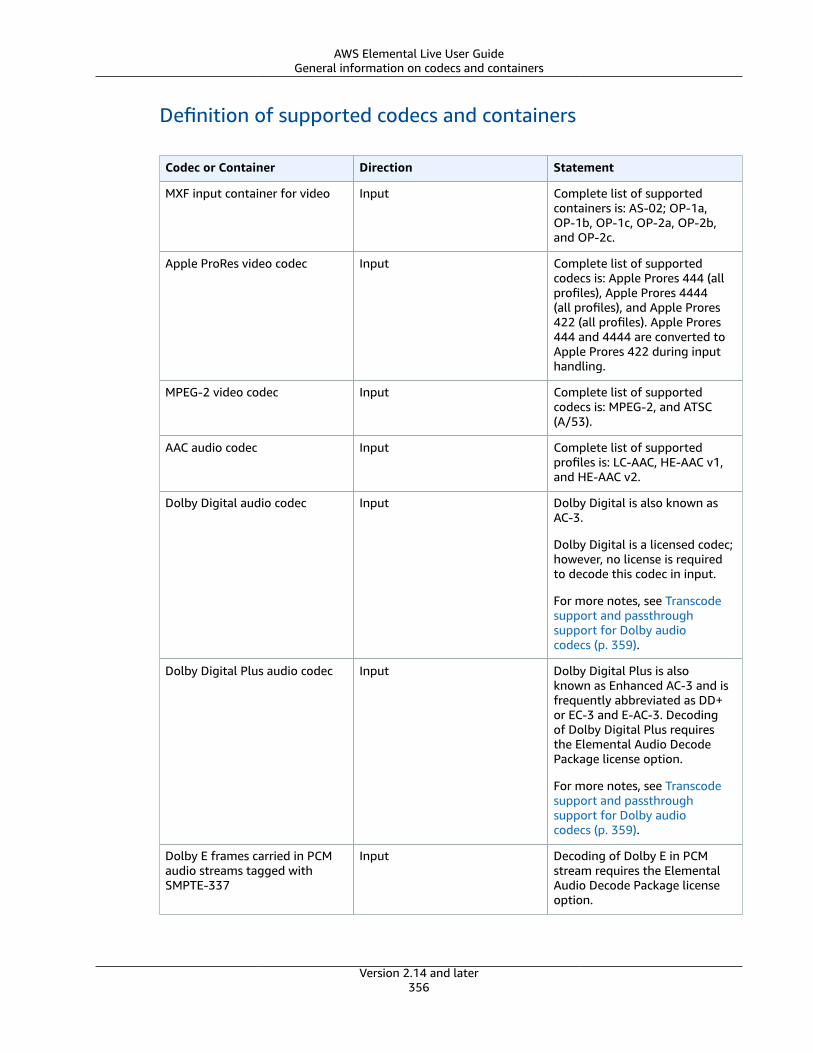
AWS Elemental Live User GuideGeneral information on codecs and containers
Definition of supported codecs and containers
Codec or Container Direction Statement
MXF input container for video Input Complete list of supportedcontainers is: AS-02; OP-1a,OP-1b, OP-1c, OP-2a, OP-2b,and OP-2c.
Apple ProRes video codec Input Complete list of supportedcodecs is: Apple Prores 444 (allprofiles), Apple Prores 4444(all profiles), and Apple Prores422 (all profiles). Apple Prores444 and 4444 are converted toApple Prores 422 during inputhandling.
MPEG-2 video codec Input Complete list of supportedcodecs is: MPEG-2, and ATSC(A/53).
AAC audio codec Input Complete list of supportedprofiles is: LC-AAC, HE-AAC v1,and HE-AAC v2.
Dolby Digital audio codec Input Dolby Digital is also known asAC-3.
Dolby Digital is a licensed codec;however, no license is requiredto decode this codec in input.
For more notes, see Transcodesupport and passthroughsupport for Dolby audiocodecs (p. 359).
Dolby Digital Plus audio codec Input Dolby Digital Plus is alsoknown as Enhanced AC-3 and isfrequently abbreviated as DD+or EC-3 and E-AC-3. Decodingof Dolby Digital Plus requiresthe Elemental Audio DecodePackage license option.
For more notes, see Transcodesupport and passthroughsupport for Dolby audiocodecs (p. 359).
Dolby E frames carried in PCMaudio streams tagged withSMPTE-337
Input Decoding of Dolby E in PCMstream requires the ElementalAudio Decode Package licenseoption.
Version 2.14 and later356

AWS Elemental Live User GuideGeneral information on codecs and containers
Codec or Container Direction Statement
Apple ProRes video codec inoutput
Output Complete list of supportedcodecs is: Apple Prores 422 (allprofiles).
Dolby Digital audio codec Output Encoding with Dolby Digitalrequires the Elemental AdvancedAudio Package license option.
For more notes, see Transcodesupport and passthroughsupport for Dolby audiocodecs (p. 359).
Dolby Digital Plus audio codec Output Encoding with Dolby Digital Plusrequires the Elemental AdvancedAudio Package license option.
For more notes, see Transcodesupport and passthroughsupport for Dolby audiocodecs (p. 359).
Dolby E pass-through Output See Transcode support andpassthrough support for Dolbyaudio codecs (p. 359).
DTS Express Output Encoding with DTS Expressrequires the Elemental AdvancedAudio Package license option.
MPEG Audio codec Output MPEG-1 Audio Layer II only
H.264 (AVC) supportH.264 is supported in the following variations.
Direction ChromaSampling
Bit Depth Profile/Format
Level LicenseRequirement
4:2:0 8-bit and 10-bit
NoneInput
4:2:2 8-bit and 10-bit
None
4:2:0 8-bit None
4:2:0 10-bit For AVC Intra,purchase theBCE licensepack.
Output
4:2:2 8-bit and 10-bit
Baseline, Main,High, High 10,High 4:2:2,High 10 Intra,High 422 Intra,AS-11/RP2027
1.0-5.2
For AVC Intra,purchase theBCE licensepack.
Version 2.14 and later357
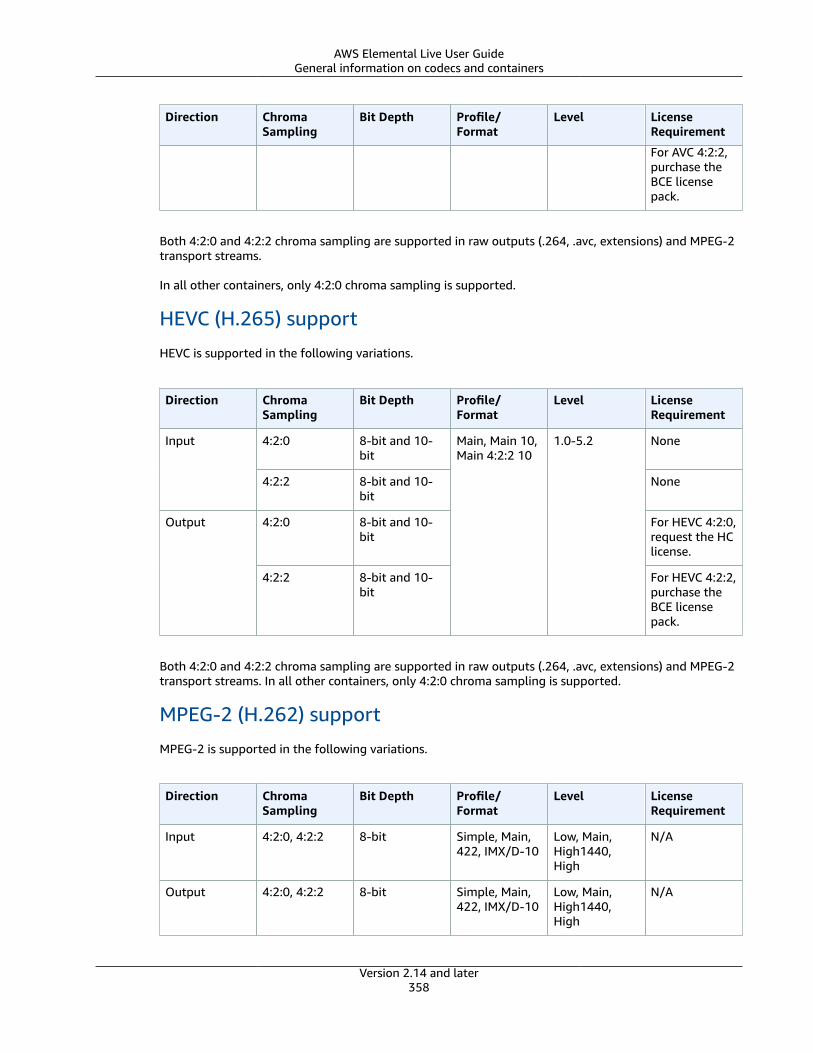
AWS Elemental Live User GuideGeneral information on codecs and containers
Direction ChromaSampling
Bit Depth Profile/Format
Level LicenseRequirement
For AVC 4:2:2,purchase theBCE licensepack.
Both 4:2:0 and 4:2:2 chroma sampling are supported in raw outputs (.264, .avc, extensions) and MPEG-2transport streams.
In all other containers, only 4:2:0 chroma sampling is supported.
HEVC (H.265) support
HEVC is supported in the following variations.
Direction ChromaSampling
Bit Depth Profile/Format
Level LicenseRequirement
4:2:0 8-bit and 10-bit
NoneInput
4:2:2 8-bit and 10-bit
None
4:2:0 8-bit and 10-bit
For HEVC 4:2:0,request the HClicense.
Output
4:2:2 8-bit and 10-bit
Main, Main 10,Main 4:2:2 10
1.0-5.2
For HEVC 4:2:2,purchase theBCE licensepack.
Both 4:2:0 and 4:2:2 chroma sampling are supported in raw outputs (.264, .avc, extensions) and MPEG-2transport streams. In all other containers, only 4:2:0 chroma sampling is supported.
MPEG-2 (H.262) support
MPEG-2 is supported in the following variations.
Direction ChromaSampling
Bit Depth Profile/Format
Level LicenseRequirement
Input 4:2:0, 4:2:2 8-bit Simple, Main,422, IMX/D-10
Low, Main,High1440,High
N/A
Output 4:2:0, 4:2:2 8-bit Simple, Main,422, IMX/D-10
Low, Main,High1440,High
N/A
Version 2.14 and later358
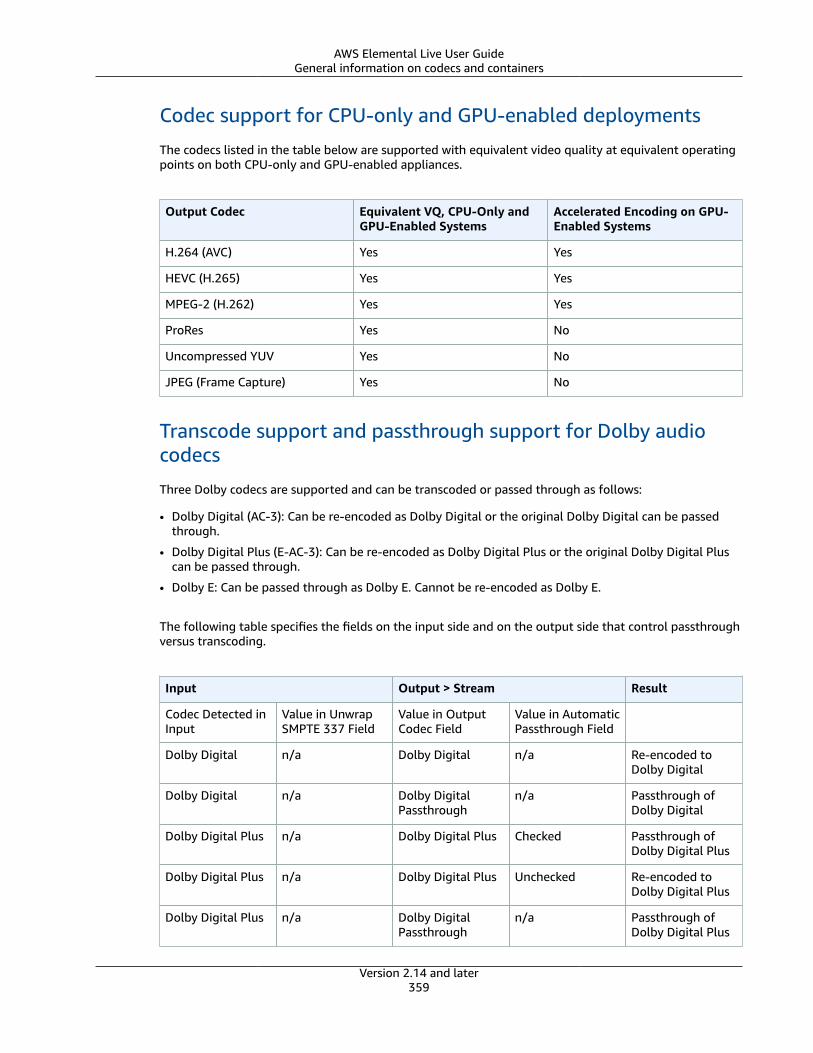
AWS Elemental Live User GuideGeneral information on codecs and containers
Codec support for CPU-only and GPU-enabled deployments
The codecs listed in the table below are supported with equivalent video quality at equivalent operatingpoints on both CPU-only and GPU-enabled appliances.
Output Codec Equivalent VQ, CPU-Only andGPU-Enabled Systems
Accelerated Encoding on GPU-Enabled Systems
H.264 (AVC) Yes Yes
HEVC (H.265) Yes Yes
MPEG-2 (H.262) Yes Yes
ProRes Yes No
Uncompressed YUV Yes No
JPEG (Frame Capture) Yes No
Transcode support and passthrough support for Dolby audiocodecs
Three Dolby codecs are supported and can be transcoded or passed through as follows:
• Dolby Digital (AC-3): Can be re-encoded as Dolby Digital or the original Dolby Digital can be passedthrough.
• Dolby Digital Plus (E-AC-3): Can be re-encoded as Dolby Digital Plus or the original Dolby Digital Pluscan be passed through.
• Dolby E: Can be passed through as Dolby E. Cannot be re-encoded as Dolby E.
The following table specifies the fields on the input side and on the output side that control passthroughversus transcoding.
Input Output > Stream Result
Codec Detected inInput
Value in UnwrapSMPTE 337 Field
Value in OutputCodec Field
Value in AutomaticPassthrough Field
Dolby Digital n/a Dolby Digital n/a Re-encoded toDolby Digital
Dolby Digital n/a Dolby DigitalPassthrough
n/a Passthrough ofDolby Digital
Dolby Digital Plus n/a Dolby Digital Plus Checked Passthrough ofDolby Digital Plus
Dolby Digital Plus n/a Dolby Digital Plus Unchecked Re-encoded toDolby Digital Plus
Dolby Digital Plus n/a Dolby DigitalPassthrough
n/a Passthrough ofDolby Digital Plus
Version 2.14 and later359
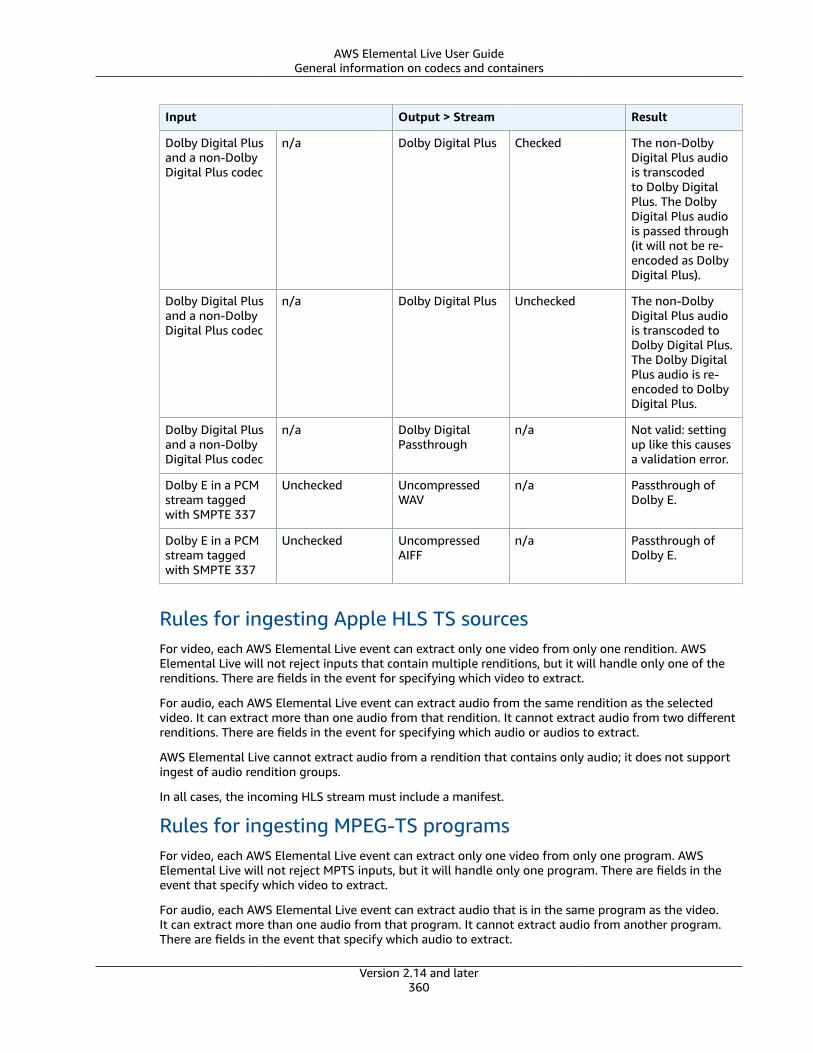
AWS Elemental Live User GuideGeneral information on codecs and containers
Input Output > Stream Result
Dolby Digital Plusand a non-DolbyDigital Plus codec
n/a Dolby Digital Plus Checked The non-DolbyDigital Plus audiois transcodedto Dolby DigitalPlus. The DolbyDigital Plus audiois passed through(it will not be re-encoded as DolbyDigital Plus).
Dolby Digital Plusand a non-DolbyDigital Plus codec
n/a Dolby Digital Plus Unchecked The non-DolbyDigital Plus audiois transcoded toDolby Digital Plus.The Dolby DigitalPlus audio is re-encoded to DolbyDigital Plus.
Dolby Digital Plusand a non-DolbyDigital Plus codec
n/a Dolby DigitalPassthrough
n/a Not valid: settingup like this causesa validation error.
Dolby E in a PCMstream taggedwith SMPTE 337
Unchecked UncompressedWAV
n/a Passthrough ofDolby E.
Dolby E in a PCMstream taggedwith SMPTE 337
Unchecked UncompressedAIFF
n/a Passthrough ofDolby E.
Rules for ingesting Apple HLS TS sourcesFor video, each AWS Elemental Live event can extract only one video from only one rendition. AWSElemental Live will not reject inputs that contain multiple renditions, but it will handle only one of therenditions. There are fields in the event for specifying which video to extract.
For audio, each AWS Elemental Live event can extract audio from the same rendition as the selectedvideo. It can extract more than one audio from that rendition. It cannot extract audio from two differentrenditions. There are fields in the event for specifying which audio or audios to extract.
AWS Elemental Live cannot extract audio from a rendition that contains only audio; it does not supportingest of audio rendition groups.
In all cases, the incoming HLS stream must include a manifest.
Rules for ingesting MPEG-TS programsFor video, each AWS Elemental Live event can extract only one video from only one program. AWSElemental Live will not reject MPTS inputs, but it will handle only one program. There are fields in theevent that specify which video to extract.
For audio, each AWS Elemental Live event can extract audio that is in the same program as the video.It can extract more than one audio from that program. It cannot extract audio from another program.There are fields in the event that specify which audio to extract.
Version 2.14 and later360
AWS Elemental Live User GuideContainers and codecs by input/output
Containers and codecs by input/outputThe information in this section has moved to the section called “Reference: Supported inputs” (p. 4) andthe section called “Reference: Supported outputs” (p. 26).
Topics• Containers and codecs for file inputs (p. 361)• Containers and codecs for real-time inputs (p. 361)• Containers and codecs for archive outputs (p. 361)• Containers and codecs for real-time outputs (p. 361)
Containers and codecs for file inputsThe information in this section has moved to the section called “Reference: Supported inputs” (p. 4).
Containers and codecs for real-time inputsThe information in this section has moved to the section called “Reference: Supported inputs” (p. 4).
Containers and codecs for archive outputsThe information in this section has moved to the section called “Reference: Supported inputs” (p. 4) andthe section called “Reference: Supported outputs” (p. 26).
Uncompressed formats that are supported in raw outputs
The information in this section has moved to the section called “Reference: Supported outputs” (p. 26).
Containers and codecs for real-time outputsThe information in this section has moved to the section called “Reference: Supported outputs” (p. 26).
Reference: Supported DRM solutionsThis chapter lists the Digital Rights Management (DRM) solutions that are available for the types ofoutputs supported by AWS Elemental Live. The tables are organized alphabetically by output type andthe DRM technology provider name.
Topics• DASH output (p. 361)• HLS output with Apple FairPlay (p. 362)• HLS output with PlayReady (p. 364)• HLS output with SecureMedia (p. 365)• HLS output with Verimatrix (p. 365)• Microsoft smooth output with PlayReady (p. 366)• UDP/TS outputs with DVB Simulcrypt Standard (p. 368)
DASH outputEncryption mode: Always AES CTR (AES-128)
Version 2.14 and later361
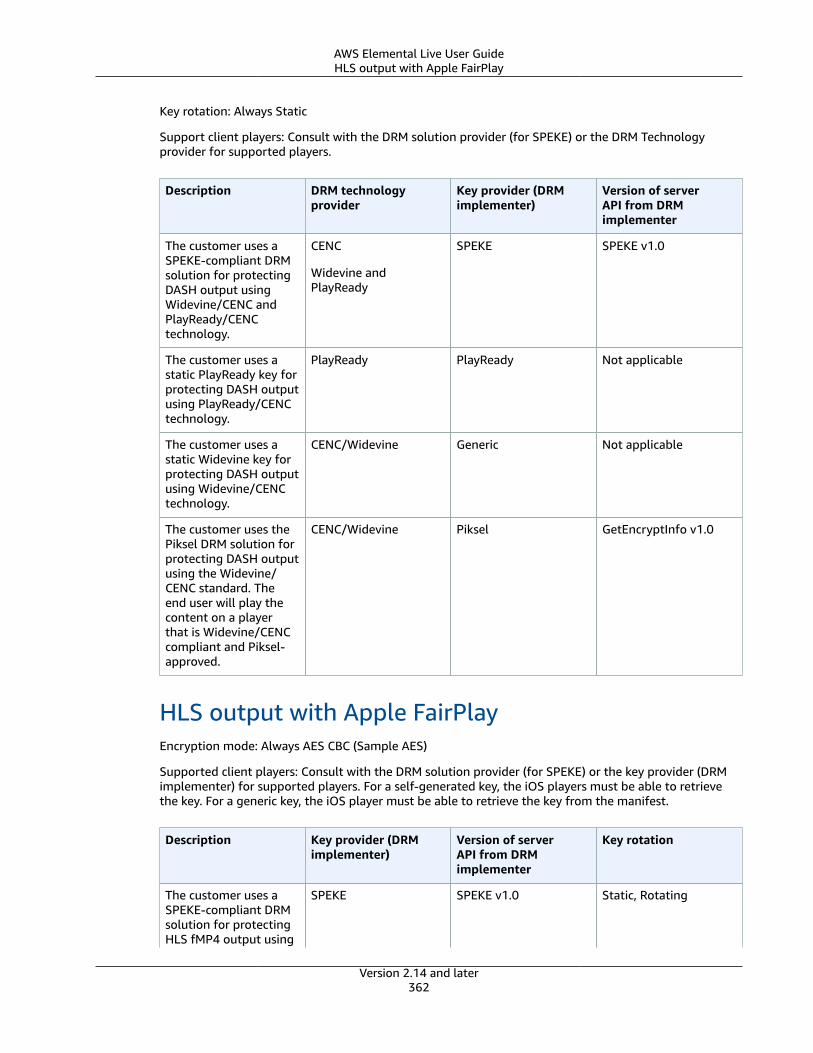
AWS Elemental Live User GuideHLS output with Apple FairPlay
Key rotation: Always Static
Support client players: Consult with the DRM solution provider (for SPEKE) or the DRM Technologyprovider for supported players.
Description DRM technologyprovider
Key provider (DRMimplementer)
Version of serverAPI from DRMimplementer
The customer uses aSPEKE-compliant DRMsolution for protectingDASH output usingWidevine/CENC andPlayReady/CENCtechnology.
CENC
Widevine andPlayReady
SPEKE SPEKE v1.0
The customer uses astatic PlayReady key forprotecting DASH outputusing PlayReady/CENCtechnology.
PlayReady PlayReady Not applicable
The customer uses astatic Widevine key forprotecting DASH outputusing Widevine/CENCtechnology.
CENC/Widevine Generic Not applicable
The customer uses thePiksel DRM solution forprotecting DASH outputusing the Widevine/CENC standard. Theend user will play thecontent on a playerthat is Widevine/CENCcompliant and Piksel-approved.
CENC/Widevine Piksel GetEncryptInfo v1.0
HLS output with Apple FairPlayEncryption mode: Always AES CBC (Sample AES)
Supported client players: Consult with the DRM solution provider (for SPEKE) or the key provider (DRMimplementer) for supported players. For a self-generated key, the iOS players must be able to retrievethe key. For a generic key, the iOS player must be able to retrieve the key from the manifest.
Description Key provider (DRMimplementer)
Version of serverAPI from DRMimplementer
Key rotation
The customer uses aSPEKE-compliant DRMsolution for protectingHLS fMP4 output using
SPEKE SPEKE v1.0 Static, Rotating
Version 2.14 and later362

AWS Elemental Live User GuideHLS output with Apple FairPlay
Description Key provider (DRMimplementer)
Version of serverAPI from DRMimplementer
Key rotation
Apple Fairplay DRMtechnology.
The customer uses aSPEKE-compliant DRMsolution for protectingHLS output usingApple Fairplay DRMtechnology.
SPEKE SPEKE v1.0 Static, Rotating
The customer usesthe 1Mainstream DRMsolution for protectingHLS output using theApple Fairplay DRMtechnology. The enduser plays the contenton a 1Mainstream-approved player.
1Mainstream Version 1.1 Static
AWS Elemental Livegenerates a key thatit uses to encrypt thecontent. AWS ElementalLive also puts that keyat a customer-specifiedlocation; the clientplayer retrieves the keyfrom that location anddecrypts the content.The end user playsthe content on an iOSplayer.
Strictly speaking, this isan encryption solution,not a DRM solution.
Self-Generated Not applicable; keygenerated by AWSElemental Live
Static, Rotating
Each customer hasa key server. AWSElemental Live placesthe keys inside themanifest that isdelivered with thecontent; the clientplayer obtains the keyfrom the manifest.The end user playsthe content on an iOSplayer.
Generic Key Provider Not applicable. Static, Rotating
Version 2.14 and later363
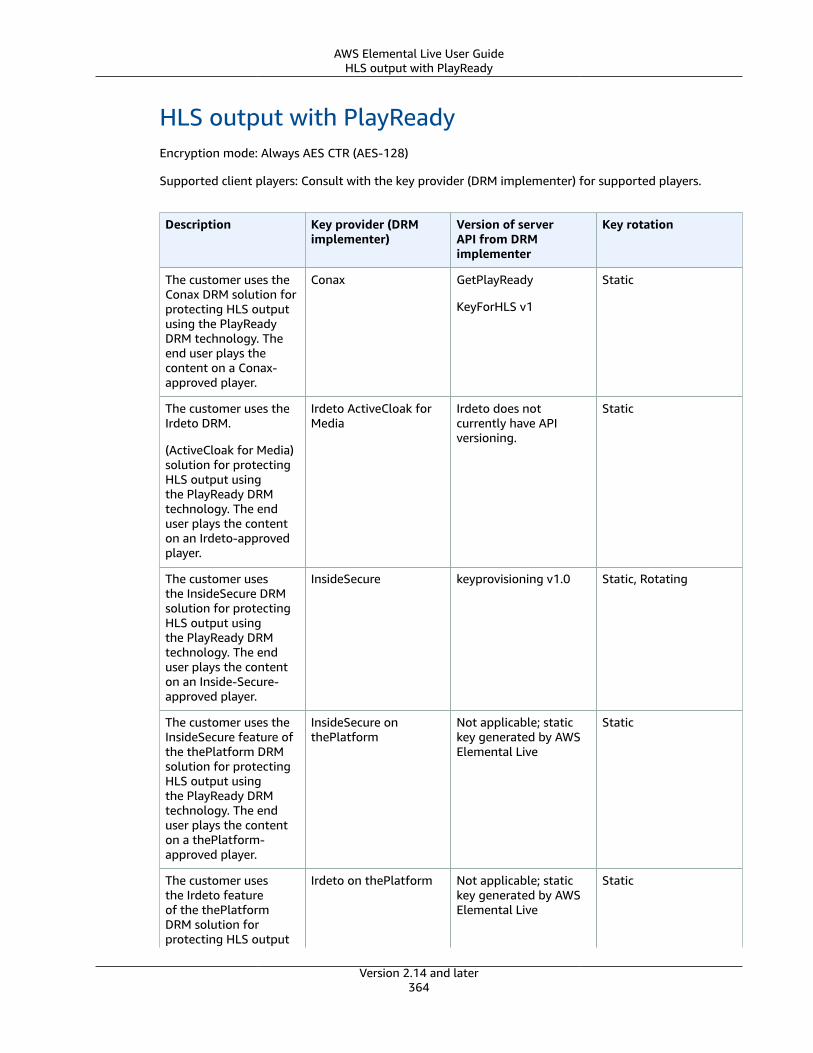
AWS Elemental Live User GuideHLS output with PlayReady
HLS output with PlayReadyEncryption mode: Always AES CTR (AES-128)
Supported client players: Consult with the key provider (DRM implementer) for supported players.
Description Key provider (DRMimplementer)
Version of serverAPI from DRMimplementer
Key rotation
The customer uses theConax DRM solution forprotecting HLS outputusing the PlayReadyDRM technology. Theend user plays thecontent on a Conax-approved player.
Conax GetPlayReady
KeyForHLS v1
Static
The customer uses theIrdeto DRM.
(ActiveCloak for Media)solution for protectingHLS output usingthe PlayReady DRMtechnology. The enduser plays the contenton an Irdeto-approvedplayer.
Irdeto ActiveCloak forMedia
Irdeto does notcurrently have APIversioning.
Static
The customer usesthe InsideSecure DRMsolution for protectingHLS output usingthe PlayReady DRMtechnology. The enduser plays the contenton an Inside-Secure-approved player.
InsideSecure keyprovisioning v1.0 Static, Rotating
The customer uses theInsideSecure feature ofthe thePlatform DRMsolution for protectingHLS output usingthe PlayReady DRMtechnology. The enduser plays the contenton a thePlatform-approved player.
InsideSecure onthePlatform
Not applicable; statickey generated by AWSElemental Live
Static
The customer usesthe Irdeto featureof the thePlatformDRM solution forprotecting HLS output
Irdeto on thePlatform Not applicable; statickey generated by AWSElemental Live
Static
Version 2.14 and later364
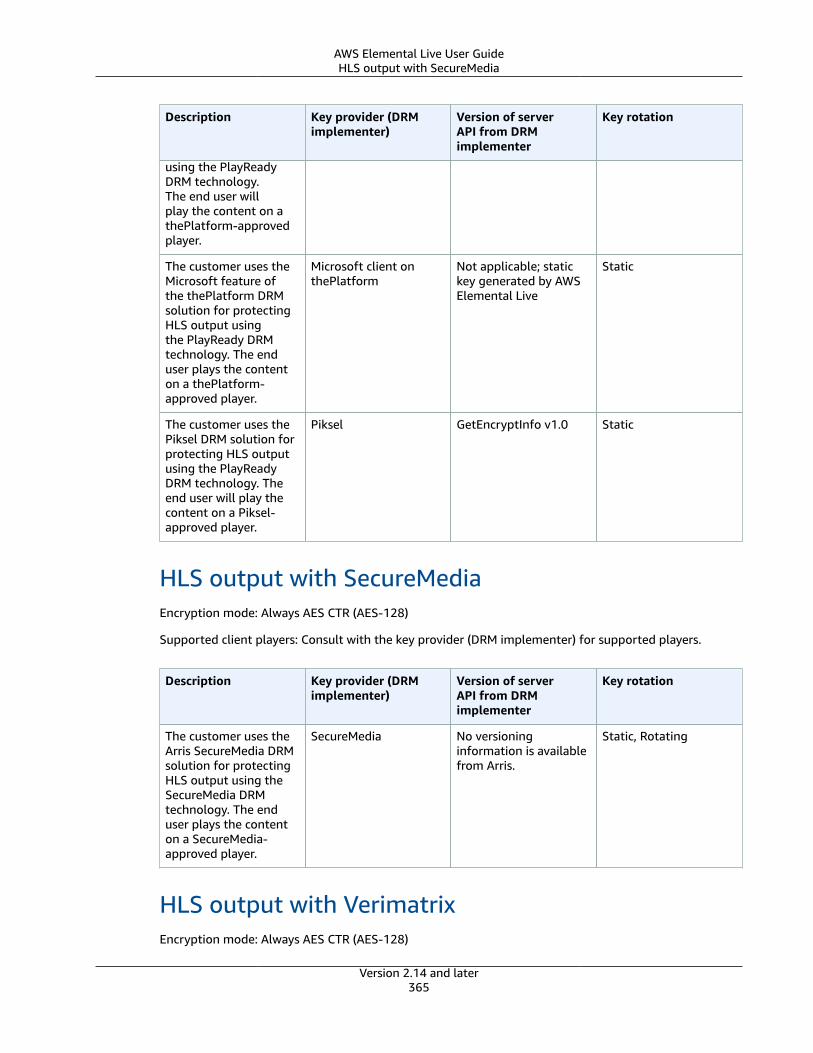
AWS Elemental Live User GuideHLS output with SecureMedia
Description Key provider (DRMimplementer)
Version of serverAPI from DRMimplementer
Key rotation
using the PlayReadyDRM technology.The end user willplay the content on athePlatform-approvedplayer.
The customer uses theMicrosoft feature ofthe thePlatform DRMsolution for protectingHLS output usingthe PlayReady DRMtechnology. The enduser plays the contenton a thePlatform-approved player.
Microsoft client onthePlatform
Not applicable; statickey generated by AWSElemental Live
Static
The customer uses thePiksel DRM solution forprotecting HLS outputusing the PlayReadyDRM technology. Theend user will play thecontent on a Piksel-approved player.
Piksel GetEncryptInfo v1.0 Static
HLS output with SecureMediaEncryption mode: Always AES CTR (AES-128)
Supported client players: Consult with the key provider (DRM implementer) for supported players.
Description Key provider (DRMimplementer)
Version of serverAPI from DRMimplementer
Key rotation
The customer uses theArris SecureMedia DRMsolution for protectingHLS output using theSecureMedia DRMtechnology. The enduser plays the contenton a SecureMedia-approved player.
SecureMedia No versioninginformation is availablefrom Arris.
Static, Rotating
HLS output with VerimatrixEncryption mode: Always AES CTR (AES-128)
Version 2.14 and later365
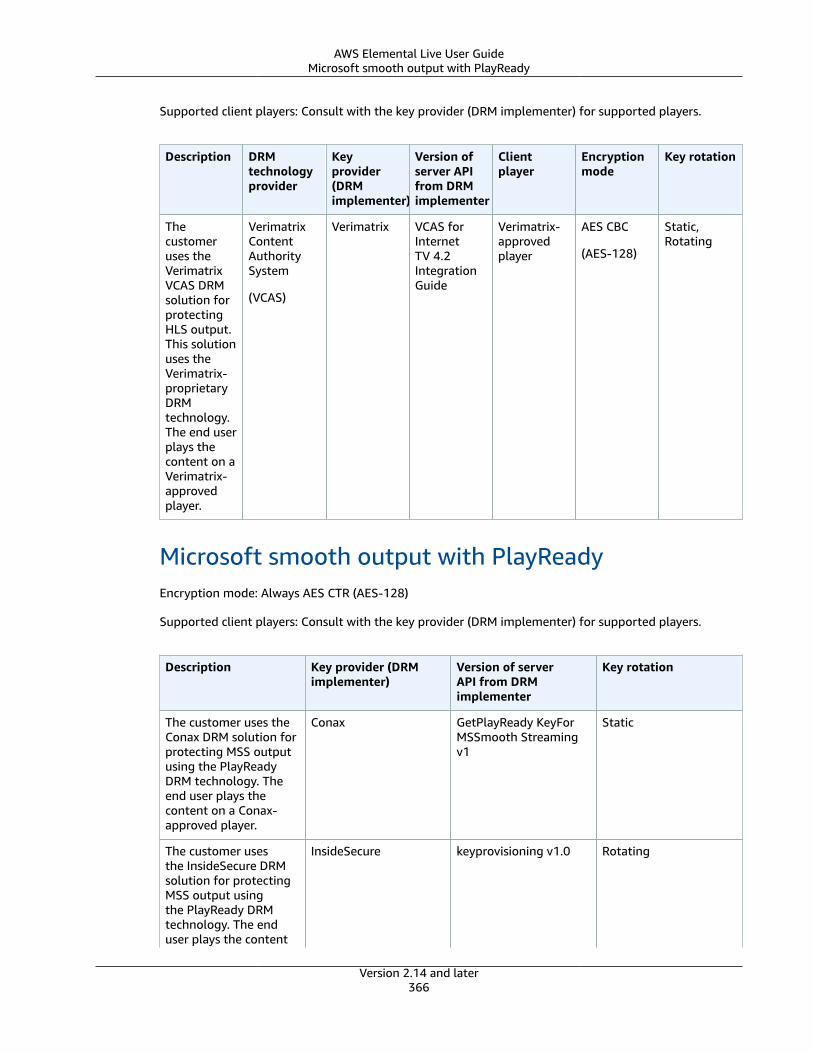
AWS Elemental Live User GuideMicrosoft smooth output with PlayReady
Supported client players: Consult with the key provider (DRM implementer) for supported players.
Description DRMtechnologyprovider
Keyprovider(DRMimplementer)
Version ofserver APIfrom DRMimplementer
Clientplayer
Encryptionmode
Key rotation
Thecustomeruses theVerimatrixVCAS DRMsolution forprotectingHLS output.This solutionuses theVerimatrix-proprietaryDRMtechnology.The end userplays thecontent on aVerimatrix-approvedplayer.
VerimatrixContentAuthoritySystem
(VCAS)
Verimatrix VCAS forInternetTV 4.2IntegrationGuide
Verimatrix-approvedplayer
AES CBC
(AES-128)
Static,Rotating
Microsoft smooth output with PlayReadyEncryption mode: Always AES CTR (AES-128)
Supported client players: Consult with the key provider (DRM implementer) for supported players.
Description Key provider (DRMimplementer)
Version of serverAPI from DRMimplementer
Key rotation
The customer uses theConax DRM solution forprotecting MSS outputusing the PlayReadyDRM technology. Theend user plays thecontent on a Conax-approved player.
Conax GetPlayReady KeyForMSSmooth Streamingv1
Static
The customer usesthe InsideSecure DRMsolution for protectingMSS output usingthe PlayReady DRMtechnology. The enduser plays the content
InsideSecure keyprovisioning v1.0 Rotating
Version 2.14 and later366

AWS Elemental Live User GuideMicrosoft smooth output with PlayReady
Description Key provider (DRMimplementer)
Version of serverAPI from DRMimplementer
Key rotation
on an InsideSecure-approved player.
The customer usesthe Irdeto feature ofthe thePlatform DRMsolution for protectingMSS output usingthe PlayReady DRMtechnology. The enduser plays the contenton a thePlatform-approved player.
Irdeto on the Platform Not applicable; statickey generated by AWSElemental Live.
Static
The customer uses thePiksel DRM solution forprotecting MSS outputusing the PlayReadyDRM technology. Theend user plays thecontent on a Piksel-approved player.
Piksel GetEncryptInfo v1.0 Static
AWS Elemental Livelets you enter a keyor generate a key thatAWS Elemental Liveuses to encrypt thecontent. AWS ElementalLive also puts that keyat a customer-specifiedlocation; the clientplayer retrieves the keyfrom that location anddecrypts the content.The end user plays thecontent on a Microsoft-Silverlight-approvedplayer.
Strictly speaking, anencryption solution, nota DRM solution.
Self-Generated or Static Not applicable. Static
The customer usesthe Seachange DRMsolution for protectingMSS output usingthe PlayReady DRMtechnology. The enduser plays the contenton a Seachange-approved player.
Seachange Acquire
Packaging Data v1.0
Static
Version 2.14 and later367
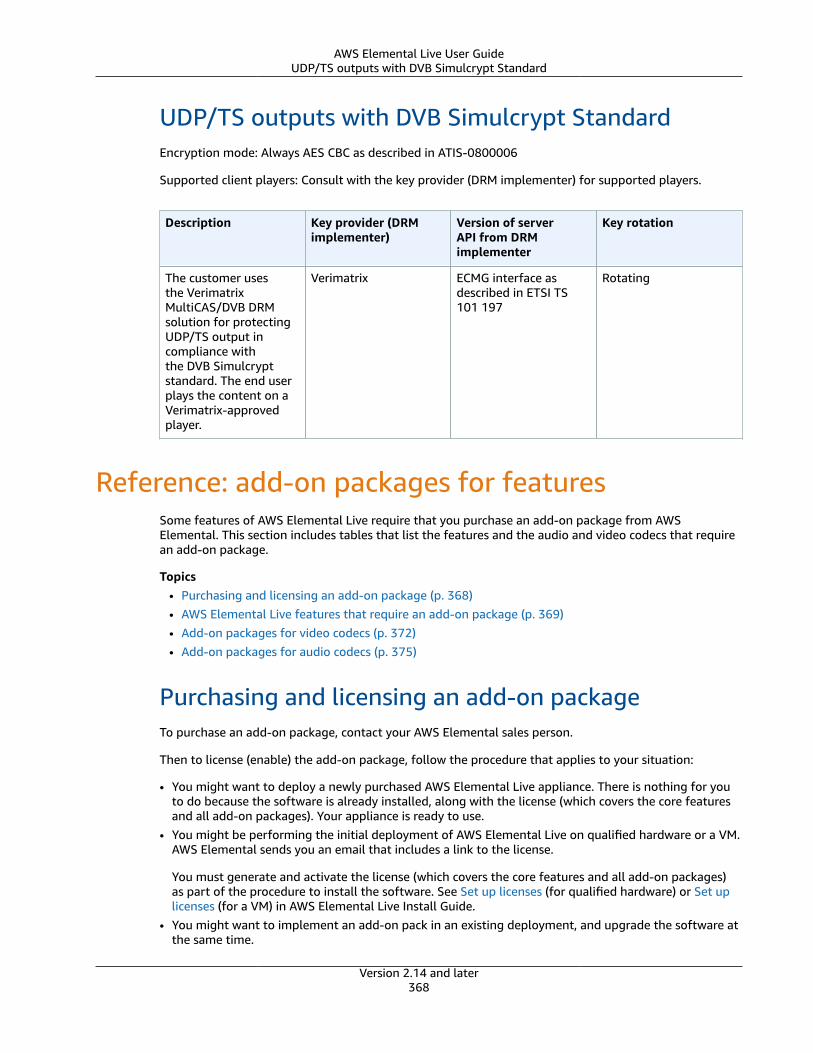
AWS Elemental Live User GuideUDP/TS outputs with DVB Simulcrypt Standard
UDP/TS outputs with DVB Simulcrypt StandardEncryption mode: Always AES CBC as described in ATIS-0800006
Supported client players: Consult with the key provider (DRM implementer) for supported players.
Description Key provider (DRMimplementer)
Version of serverAPI from DRMimplementer
Key rotation
The customer usesthe VerimatrixMultiCAS/DVB DRMsolution for protectingUDP/TS output incompliance withthe DVB Simulcryptstandard. The end userplays the content on aVerimatrix-approvedplayer.
Verimatrix ECMG interface asdescribed in ETSI TS101 197
Rotating
Reference: add-on packages for featuresSome features of AWS Elemental Live require that you purchase an add-on package from AWSElemental. This section includes tables that list the features and the audio and video codecs that requirean add-on package.
Topics• Purchasing and licensing an add-on package (p. 368)• AWS Elemental Live features that require an add-on package (p. 369)• Add-on packages for video codecs (p. 372)• Add-on packages for audio codecs (p. 375)
Purchasing and licensing an add-on packageTo purchase an add-on package, contact your AWS Elemental sales person.
Then to license (enable) the add-on package, follow the procedure that applies to your situation:
• You might want to deploy a newly purchased AWS Elemental Live appliance. There is nothing for youto do because the software is already installed, along with the license (which covers the core featuresand all add-on packages). Your appliance is ready to use.
• You might be performing the initial deployment of AWS Elemental Live on qualified hardware or a VM.AWS Elemental sends you an email that includes a link to the license.
You must generate and activate the license (which covers the core features and all add-on packages)as part of the procedure to install the software. See Set up licenses (for qualified hardware) or Set uplicenses (for a VM) in AWS Elemental Live Install Guide.
• You might want to implement an add-on pack in an existing deployment, and upgrade the software atthe same time.
Version 2.14 and later368
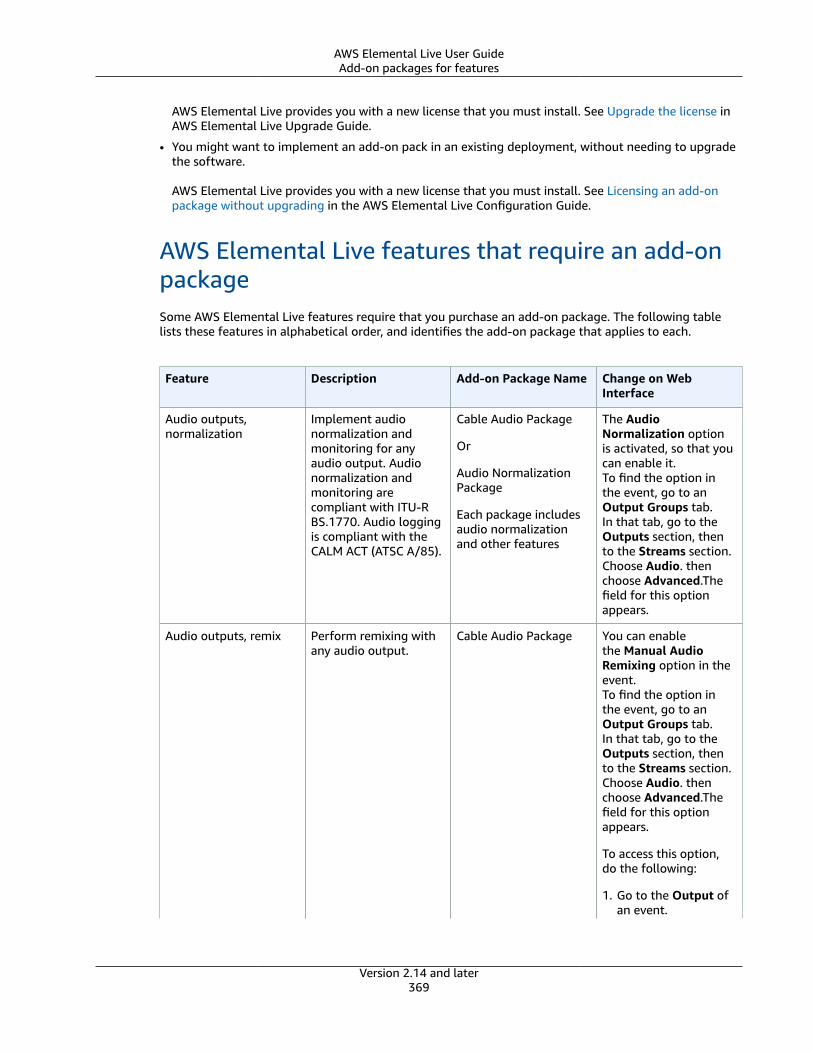
AWS Elemental Live User GuideAdd-on packages for features
AWS Elemental Live provides you with a new license that you must install. See Upgrade the license inAWS Elemental Live Upgrade Guide.
• You might want to implement an add-on pack in an existing deployment, without needing to upgradethe software.
AWS Elemental Live provides you with a new license that you must install. See Licensing an add-onpackage without upgrading in the AWS Elemental Live Configuration Guide.
AWS Elemental Live features that require an add-onpackageSome AWS Elemental Live features require that you purchase an add-on package. The following tablelists these features in alphabetical order, and identifies the add-on package that applies to each.
Feature Description Add-on Package Name Change on WebInterface
Audio outputs,normalization
Implement audionormalization andmonitoring for anyaudio output. Audionormalization andmonitoring arecompliant with ITU-RBS.1770. Audio loggingis compliant with theCALM ACT (ATSC A/85).
Cable Audio Package
Or
Audio NormalizationPackage
Each package includesaudio normalizationand other features
The AudioNormalization optionis activated, so that youcan enable it.To find the option inthe event, go to anOutput Groups tab.In that tab, go to theOutputs section, thento the Streams section.Choose Audio. thenchoose Advanced.Thefield for this optionappears.
Audio outputs, remix Perform remixing withany audio output.
Cable Audio Package You can enablethe Manual AudioRemixing option in theevent.To find the option inthe event, go to anOutput Groups tab.In that tab, go to theOutputs section, thento the Streams section.Choose Audio. thenchoose Advanced.Thefield for this optionappears.
To access this option,do the following:
1. Go to the Output ofan event.
Version 2.14 and later369

AWS Elemental Live User GuideAdd-on packages for features
Feature Description Add-on Package Name Change on WebInterface
2. Go to the Streamssection of theoutput.
3. Go to the Audiosection of thestreams.
4. In the Advancedsection of the audiosettings, locateManual AudioRemixing.
Color space Implement Dolby Visionin video outputs, fromsuitable inputs.
Dolby Vision LiveMetadata GenerationPackage
The Color SpaceConversion field on theweb interface includestwo options: DolbyVision Profile 5, andDolby Vision Profile 8.1.
This field is in the ColorCorrector section of thePreprocessors sectionin the Video section ofthe Streams section ofthe Output section ofan event.To find the field inthe event, go to anOutput Groups tab.In that tab, go to theOutputs section, thento the Streams section.Choose Video. chooseAdvanced, then choosePreprocessors.The fieldappears.
Motion graphics Insert motion graphicsinto video outputs.
Motion GraphicsOverlay Package
You can enable theMotion Image Inserteroption in the event.
This option is in theGlobal Processorssection of an event.
Version 2.14 and later370

AWS Elemental Live User GuideAdd-on packages for features
Feature Description Add-on Package Name Change on WebInterface
Nielsen watermark Implement Nielsenwatermark encodingin audio outputs, usingNAES VI.
Nielsen WatermarkEncoding Package
You can enable theNielsen Watermarkingoption in the event.This option is in theAdvanced section ofthe Audio section ofthe Streams section ofthe Output of an event.To find the field inthe event, go to anOutput Groups tab.In that tab, go to theOutputs section, thento the Streams section.Choose Audio. thenchoose Advanced.Thefield for this optionappears.
Statmux Create statmux outputs(statistical MPTSoutputs).
Statmux Rate ControlPackage
The Rate ControlMode field in the eventincludes the Statmuxoption.
This field is in theAdvanced section ofthe Video section of theStreams section of theOutput of an event.
To find the field inthe event, go to anOutput Groups tab.In that tab, go to theOutputs section, thento the Streams section.Choose Video. thenchoose Advanced.Thefield appears on theleft, halfway down thesection.
Version 2.14 and later371
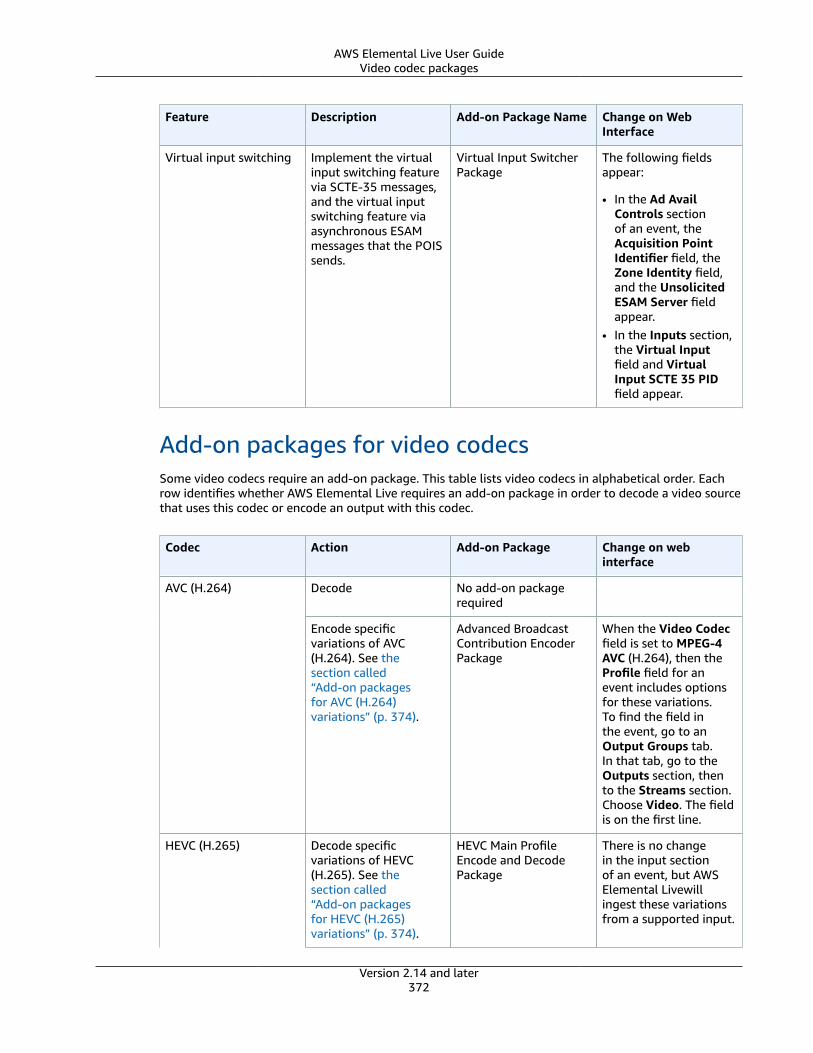
AWS Elemental Live User GuideVideo codec packages
Feature Description Add-on Package Name Change on WebInterface
Virtual input switching Implement the virtualinput switching featurevia SCTE-35 messages,and the virtual inputswitching feature viaasynchronous ESAMmessages that the POISsends.
Virtual Input SwitcherPackage
The following fieldsappear:
• In the Ad AvailControls sectionof an event, theAcquisition PointIdentifier field, theZone Identity field,and the UnsolicitedESAM Server fieldappear.
• In the Inputs section,the Virtual Inputfield and VirtualInput SCTE 35 PIDfield appear.
Add-on packages for video codecsSome video codecs require an add-on package. This table lists video codecs in alphabetical order. Eachrow identifies whether AWS Elemental Live requires an add-on package in order to decode a video sourcethat uses this codec or encode an output with this codec.
Codec Action Add-on Package Change on webinterface
Decode No add-on packagerequired
AVC (H.264)
Encode specificvariations of AVC(H.264). See thesection called“Add-on packagesfor AVC (H.264)variations” (p. 374).
Advanced BroadcastContribution EncoderPackage
When the Video Codecfield is set to MPEG-4AVC (H.264), then theProfile field for anevent includes optionsfor these variations.To find the field inthe event, go to anOutput Groups tab.In that tab, go to theOutputs section, thento the Streams section.Choose Video. The fieldis on the first line.
HEVC (H.265) Decode specificvariations of HEVC(H.265). See thesection called“Add-on packagesfor HEVC (H.265)variations” (p. 374).
HEVC Main ProfileEncode and DecodePackage
There is no changein the input sectionof an event, but AWSElemental Livewillingest these variationsfrom a supported input.
Version 2.14 and later372
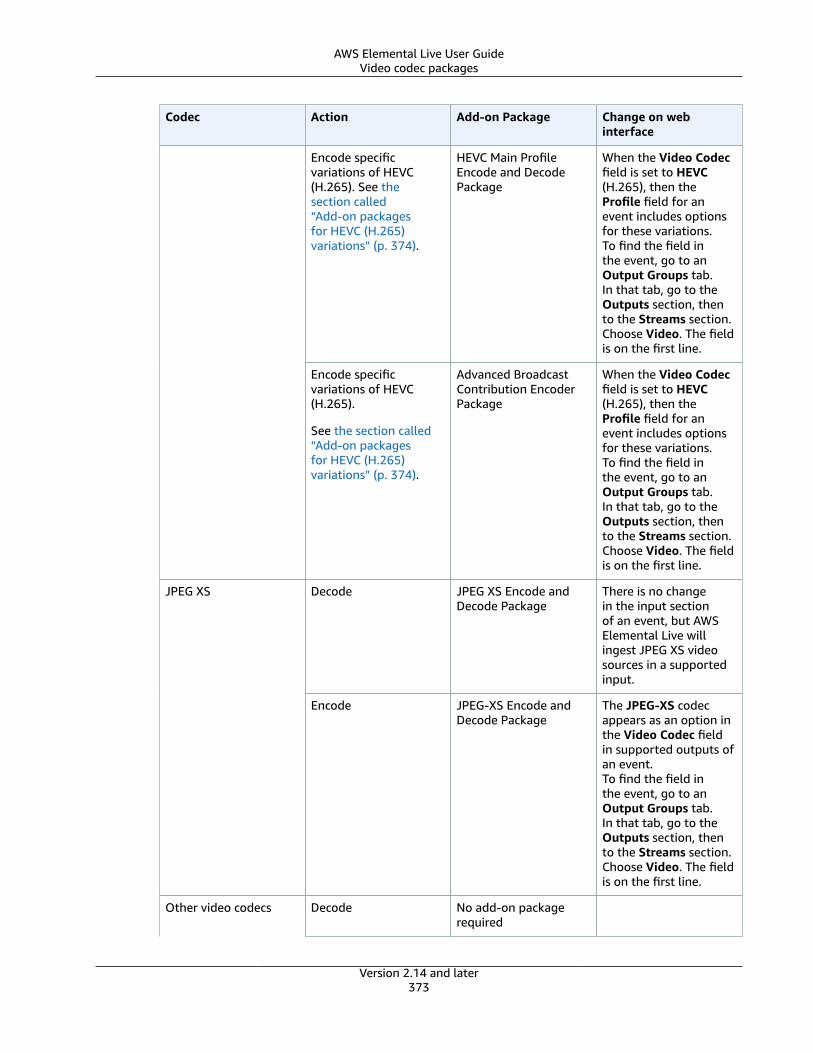
AWS Elemental Live User GuideVideo codec packages
Codec Action Add-on Package Change on webinterface
Encode specificvariations of HEVC(H.265). See thesection called“Add-on packagesfor HEVC (H.265)variations” (p. 374).
HEVC Main ProfileEncode and DecodePackage
When the Video Codecfield is set to HEVC(H.265), then theProfile field for anevent includes optionsfor these variations.To find the field inthe event, go to anOutput Groups tab.In that tab, go to theOutputs section, thento the Streams section.Choose Video. The fieldis on the first line.
Encode specificvariations of HEVC(H.265).
See the section called“Add-on packagesfor HEVC (H.265)variations” (p. 374).
Advanced BroadcastContribution EncoderPackage
When the Video Codecfield is set to HEVC(H.265), then theProfile field for anevent includes optionsfor these variations.To find the field inthe event, go to anOutput Groups tab.In that tab, go to theOutputs section, thento the Streams section.Choose Video. The fieldis on the first line.
Decode JPEG XS Encode andDecode Package
There is no changein the input sectionof an event, but AWSElemental Live willingest JPEG XS videosources in a supportedinput.
JPEG XS
Encode JPEG-XS Encode andDecode Package
The JPEG-XS codecappears as an option inthe Video Codec fieldin supported outputs ofan event.To find the field inthe event, go to anOutput Groups tab.In that tab, go to theOutputs section, thento the Streams section.Choose Video. The fieldis on the first line.
Other video codecs Decode No add-on packagerequired
Version 2.14 and later373
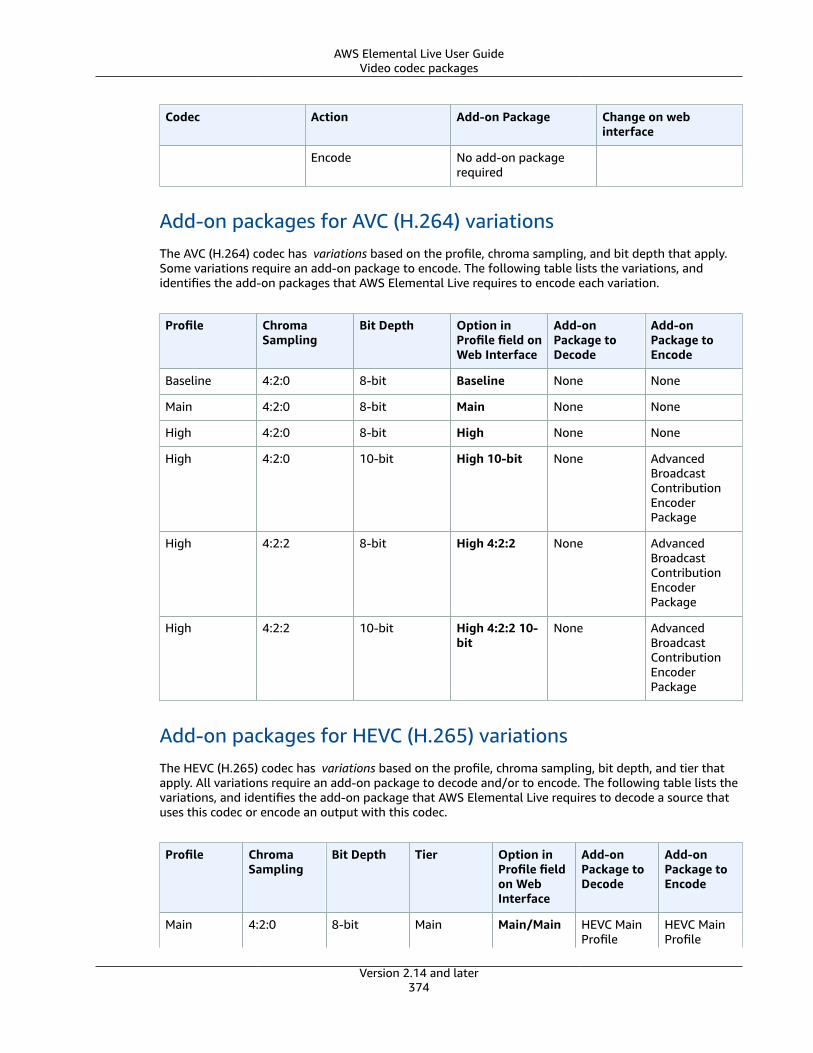
AWS Elemental Live User GuideVideo codec packages
Codec Action Add-on Package Change on webinterface
Encode No add-on packagerequired
Add-on packages for AVC (H.264) variationsThe AVC (H.264) codec has variations based on the profile, chroma sampling, and bit depth that apply.Some variations require an add-on package to encode. The following table lists the variations, andidentifies the add-on packages that AWS Elemental Live requires to encode each variation.
Profile ChromaSampling
Bit Depth Option inProfile field onWeb Interface
Add-onPackage toDecode
Add-onPackage toEncode
Baseline 4:2:0 8-bit Baseline None None
Main 4:2:0 8-bit Main None None
High 4:2:0 8-bit High None None
High 4:2:0 10-bit High 10-bit None AdvancedBroadcastContributionEncoderPackage
High 4:2:2 8-bit High 4:2:2 None AdvancedBroadcastContributionEncoderPackage
High 4:2:2 10-bit High 4:2:2 10-bit
None AdvancedBroadcastContributionEncoderPackage
Add-on packages for HEVC (H.265) variationsThe HEVC (H.265) codec has variations based on the profile, chroma sampling, bit depth, and tier thatapply. All variations require an add-on package to decode and/or to encode. The following table lists thevariations, and identifies the add-on package that AWS Elemental Live requires to decode a source thatuses this codec or encode an output with this codec.
Profile ChromaSampling
Bit Depth Tier Option inProfile fieldon WebInterface
Add-onPackage toDecode
Add-onPackage toEncode
Main 4:2:0 8-bit Main Main/Main HEVC MainProfile
HEVC MainProfile
Version 2.14 and later374
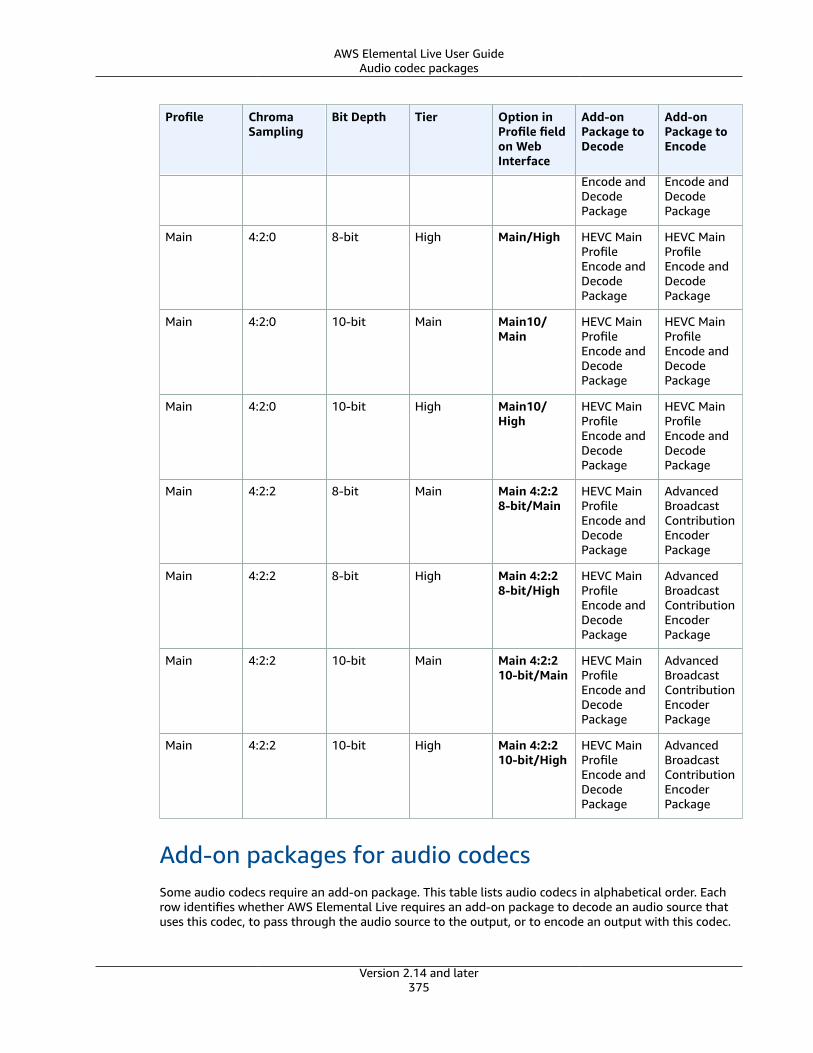
AWS Elemental Live User GuideAudio codec packages
Profile ChromaSampling
Bit Depth Tier Option inProfile fieldon WebInterface
Add-onPackage toDecode
Add-onPackage toEncode
Encode andDecodePackage
Encode andDecodePackage
Main 4:2:0 8-bit High Main/High HEVC MainProfileEncode andDecodePackage
HEVC MainProfileEncode andDecodePackage
Main 4:2:0 10-bit Main Main10/Main
HEVC MainProfileEncode andDecodePackage
HEVC MainProfileEncode andDecodePackage
Main 4:2:0 10-bit High Main10/High
HEVC MainProfileEncode andDecodePackage
HEVC MainProfileEncode andDecodePackage
Main 4:2:2 8-bit Main Main 4:2:28-bit/Main
HEVC MainProfileEncode andDecodePackage
AdvancedBroadcastContributionEncoderPackage
Main 4:2:2 8-bit High Main 4:2:28-bit/High
HEVC MainProfileEncode andDecodePackage
AdvancedBroadcastContributionEncoderPackage
Main 4:2:2 10-bit Main Main 4:2:210-bit/Main
HEVC MainProfileEncode andDecodePackage
AdvancedBroadcastContributionEncoderPackage
Main 4:2:2 10-bit High Main 4:2:210-bit/High
HEVC MainProfileEncode andDecodePackage
AdvancedBroadcastContributionEncoderPackage
Add-on packages for audio codecsSome audio codecs require an add-on package. This table lists audio codecs in alphabetical order. Eachrow identifies whether AWS Elemental Live requires an add-on package to decode an audio source thatuses this codec, to pass through the audio source to the output, or to encode an output with this codec.
Version 2.14 and later375

AWS Elemental Live User GuideAudio codec packages
Codec Action Add-on Package Change on WebInterface
Decode or passthrough No add-on packagerequired
Dolby Digital
Encode Advanced AudioPackage
Or Cable Audio Package
Both these packagescover Dolby Digitalencoding
The codec appearsas an option in theAudio Codec field inthe relevant outputs.To find the field inthe event, go to anOutput Groups tab.In that tab, go to theOutputs section, thento the Streams section.Choose Audio. The fieldappears on the firstline.
Decode Audio Decoder Package There is no changein the input sectionof an event, but AWSElemental Live willingest a Dolby DigitalPlus audio source.
Passthrough No add-on packagerequired
Dolby Digital Plus
Encode Advanced AudioPackage
The codec appearsas an option in theAudio Codec field inthe relevant outputs.To find the field inthe event, go to anOutput Groups tab.In that tab, go to theOutputs section, thento the Streams section.Choose Audio. The fieldappears on the firstline.
Dolby E Decode Audio Decoder Package The Dolby E ProgramSelection field appearsfor an event.To find the field inthe event, go to anOutput Groups tab.In that tab, go to theOutputs section, thento the Streams section.Choose Audio. The fieldappears on the firstline.
Version 2.14 and later376
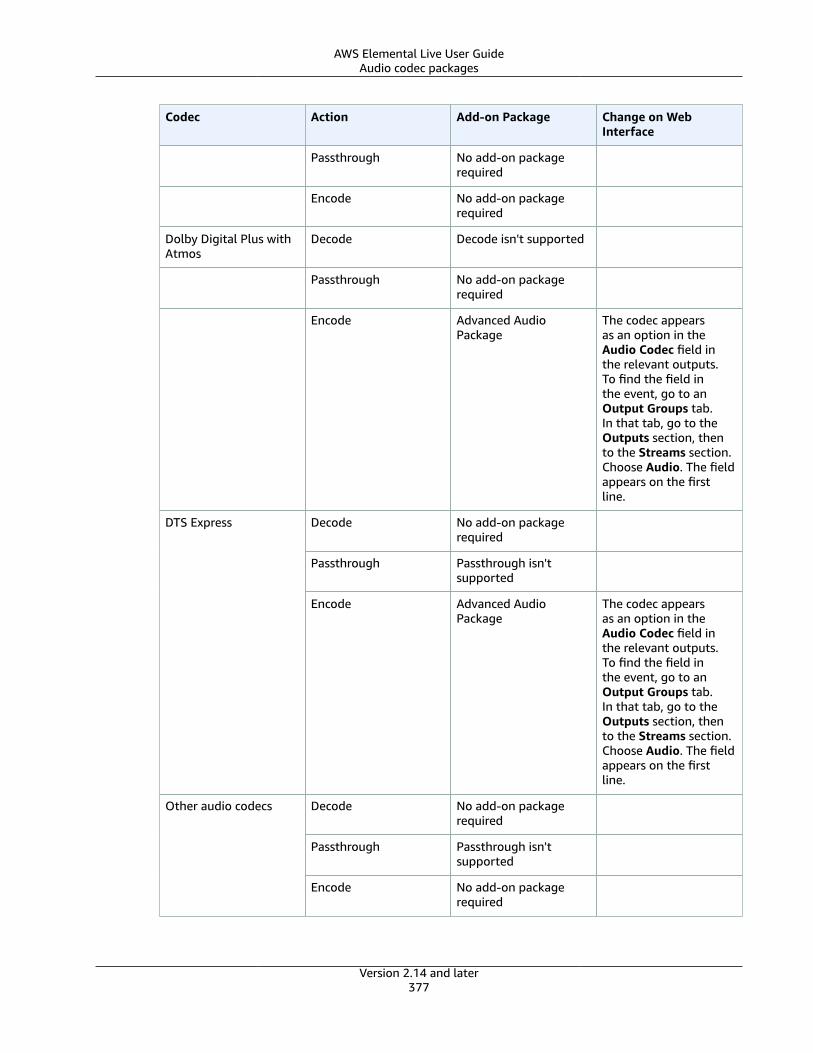
AWS Elemental Live User GuideAudio codec packages
Codec Action Add-on Package Change on WebInterface
Passthrough No add-on packagerequired
Encode No add-on packagerequired
Dolby Digital Plus withAtmos
Decode Decode isn't supported
Passthrough No add-on packagerequired
Encode Advanced AudioPackage
The codec appearsas an option in theAudio Codec field inthe relevant outputs.To find the field inthe event, go to anOutput Groups tab.In that tab, go to theOutputs section, thento the Streams section.Choose Audio. The fieldappears on the firstline.
Decode No add-on packagerequired
Passthrough Passthrough isn'tsupported
DTS Express
Encode Advanced AudioPackage
The codec appearsas an option in theAudio Codec field inthe relevant outputs.To find the field inthe event, go to anOutput Groups tab.In that tab, go to theOutputs section, thento the Streams section.Choose Audio. The fieldappears on the firstline.
Decode No add-on packagerequired
Passthrough Passthrough isn'tsupported
Other audio codecs
Encode No add-on packagerequired
Version 2.14 and later377
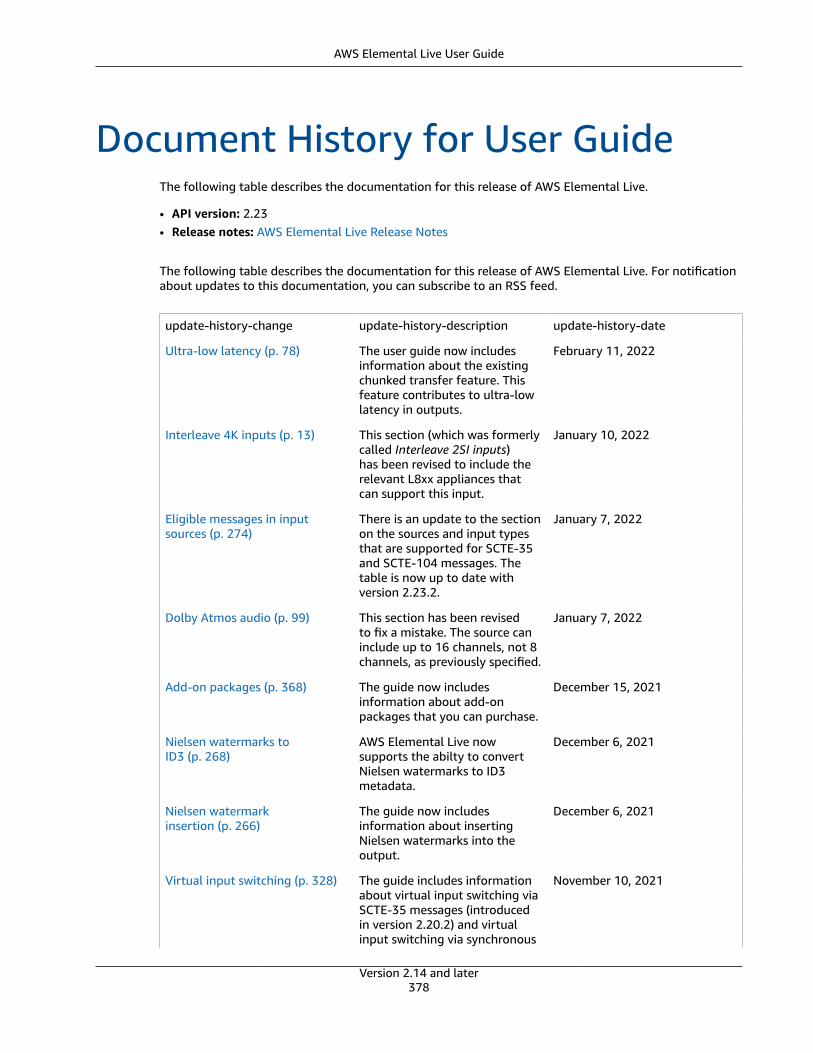
AWS Elemental Live User Guide
Document History for User GuideThe following table describes the documentation for this release of AWS Elemental Live.
• API version: 2.23• Release notes: AWS Elemental Live Release Notes
The following table describes the documentation for this release of AWS Elemental Live. For notificationabout updates to this documentation, you can subscribe to an RSS feed.
update-history-change update-history-description update-history-date
Ultra-low latency (p. 78) The user guide now includesinformation about the existingchunked transfer feature. Thisfeature contributes to ultra-lowlatency in outputs.
February 11, 2022
Interleave 4K inputs (p. 13) This section (which was formerlycalled Interleave 2SI inputs)has been revised to include therelevant L8xx appliances thatcan support this input.
January 10, 2022
Eligible messages in inputsources (p. 274)
There is an update to the sectionon the sources and input typesthat are supported for SCTE-35and SCTE-104 messages. Thetable is now up to date withversion 2.23.2.
January 7, 2022
Dolby Atmos audio (p. 99) This section has been revisedto fix a mistake. The source caninclude up to 16 channels, not 8channels, as previously specified.
January 7, 2022
Add-on packages (p. 368) The guide now includesinformation about add-onpackages that you can purchase.
December 15, 2021
Nielsen watermarks toID3 (p. 268)
AWS Elemental Live nowsupports the abilty to convertNielsen watermarks to ID3metadata.
December 6, 2021
Nielsen watermarkinsertion (p. 266)
The guide now includesinformation about insertingNielsen watermarks into theoutput.
December 6, 2021
Virtual input switching (p. 328) The guide includes informationabout virtual input switching viaSCTE-35 messages (introducedin version 2.20.2) and virtualinput switching via synchronous
November 10, 2021
Version 2.14 and later378
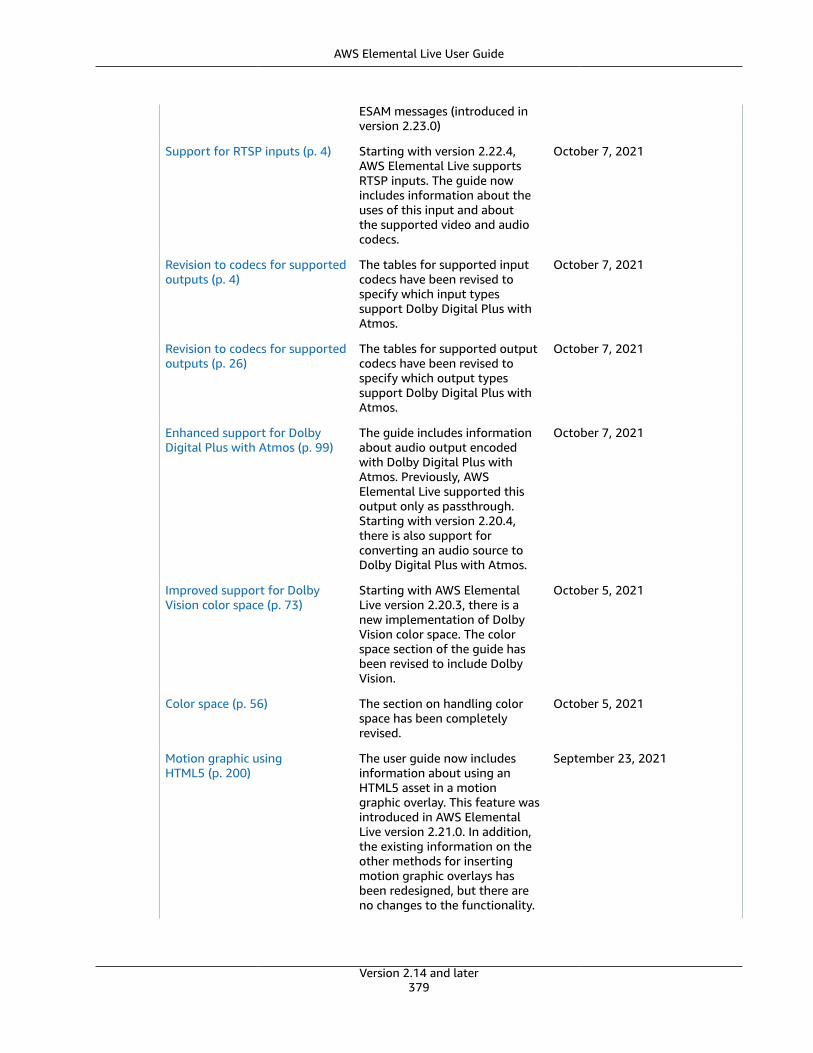
AWS Elemental Live User Guide
ESAM messages (introduced inversion 2.23.0)
Support for RTSP inputs (p. 4) Starting with version 2.22.4,AWS Elemental Live supportsRTSP inputs. The guide nowincludes information about theuses of this input and aboutthe supported video and audiocodecs.
October 7, 2021
Revision to codecs for supportedoutputs (p. 4)
The tables for supported inputcodecs have been revised tospecify which input typessupport Dolby Digital Plus withAtmos.
October 7, 2021
Revision to codecs for supportedoutputs (p. 26)
The tables for supported outputcodecs have been revised tospecify which output typessupport Dolby Digital Plus withAtmos.
October 7, 2021
Enhanced support for DolbyDigital Plus with Atmos (p. 99)
The guide includes informationabout audio output encodedwith Dolby Digital Plus withAtmos. Previously, AWSElemental Live supported thisoutput only as passthrough.Starting with version 2.20.4,there is also support forconverting an audio source toDolby Digital Plus with Atmos.
October 7, 2021
Improved support for DolbyVision color space (p. 73)
Starting with AWS ElementalLive version 2.20.3, there is anew implementation of DolbyVision color space. The colorspace section of the guide hasbeen revised to include DolbyVision.
October 5, 2021
Color space (p. 56) The section on handling colorspace has been completelyrevised.
October 5, 2021
Motion graphic usingHTML5 (p. 200)
The user guide now includesinformation about using anHTML5 asset in a motiongraphic overlay. This feature wasintroduced in AWS ElementalLive version 2.21.0. In addition,the existing information on theother methods for insertingmotion graphic overlays hasbeen redesigned, but there areno changes to the functionality.
September 23, 2021
Version 2.14 and later379
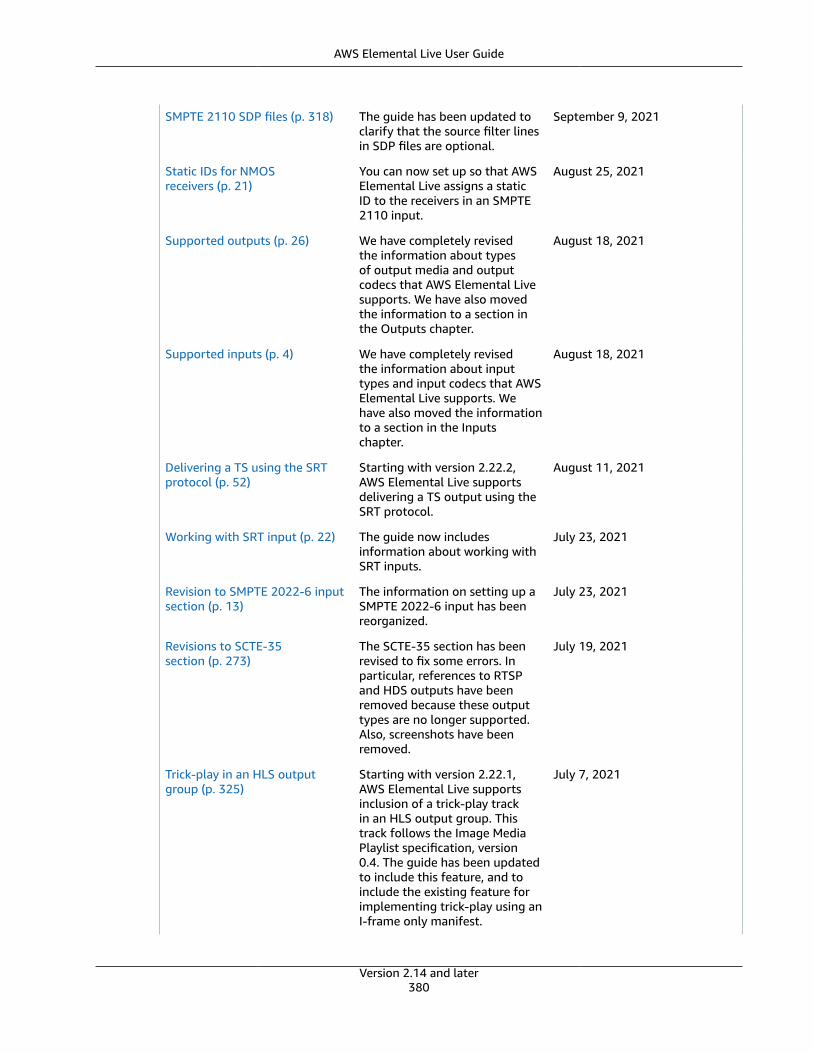
AWS Elemental Live User Guide
SMPTE 2110 SDP files (p. 318) The guide has been updated toclarify that the source filter linesin SDP files are optional.
September 9, 2021
Static IDs for NMOSreceivers (p. 21)
You can now set up so that AWSElemental Live assigns a staticID to the receivers in an SMPTE2110 input.
August 25, 2021
Supported outputs (p. 26) We have completely revisedthe information about typesof output media and outputcodecs that AWS Elemental Livesupports. We have also movedthe information to a section inthe Outputs chapter.
August 18, 2021
Supported inputs (p. 4) We have completely revisedthe information about inputtypes and input codecs that AWSElemental Live supports. Wehave also moved the informationto a section in the Inputschapter.
August 18, 2021
Delivering a TS using the SRTprotocol (p. 52)
Starting with version 2.22.2,AWS Elemental Live supportsdelivering a TS output using theSRT protocol.
August 11, 2021
Working with SRT input (p. 22) The guide now includesinformation about working withSRT inputs.
July 23, 2021
Revision to SMPTE 2022-6 inputsection (p. 13)
The information on setting up aSMPTE 2022-6 input has beenreorganized.
July 23, 2021
Revisions to SCTE-35section (p. 273)
The SCTE-35 section has beenrevised to fix some errors. Inparticular, references to RTSPand HDS outputs have beenremoved because these outputtypes are no longer supported.Also, screenshots have beenremoved.
July 19, 2021
Trick-play in an HLS outputgroup (p. 325)
Starting with version 2.22.1,AWS Elemental Live supportsinclusion of a trick-play trackin an HLS output group. Thistrack follows the Image MediaPlaylist specification, version0.4. The guide has been updatedto include this feature, and toinclude the existing feature forimplementing trick-play using anI-frame only manifest.
July 7, 2021
Version 2.14 and later380
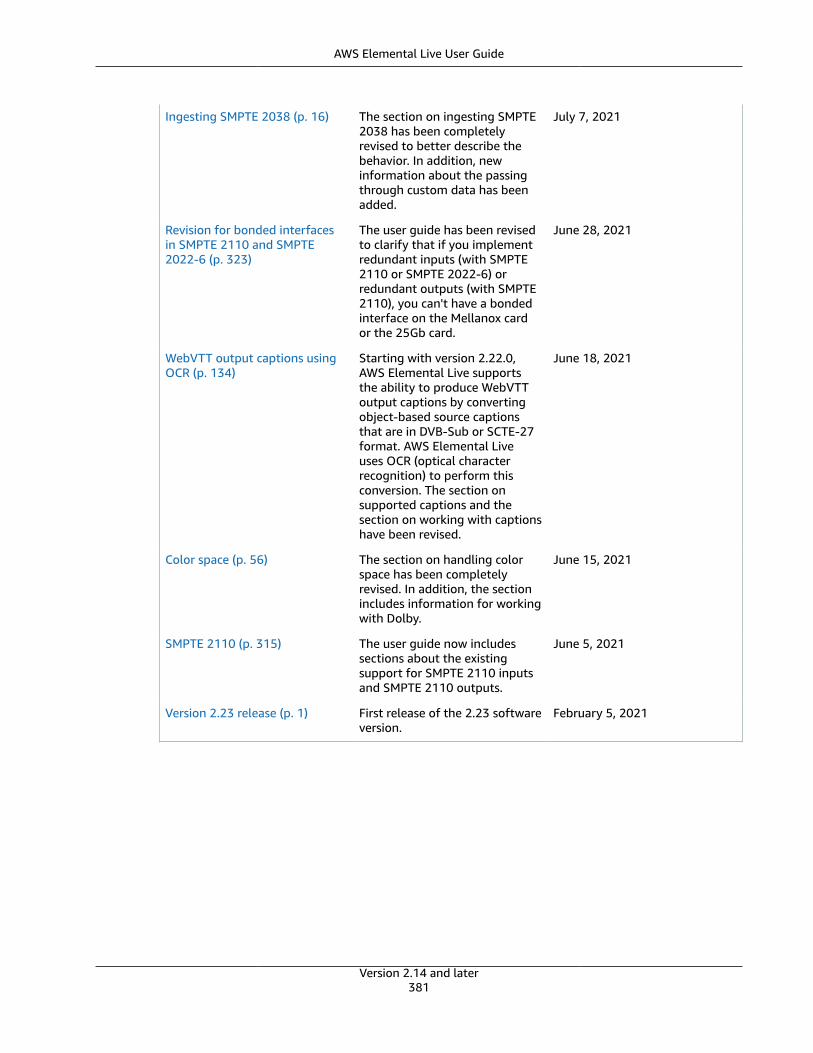
AWS Elemental Live User Guide
Ingesting SMPTE 2038 (p. 16) The section on ingesting SMPTE2038 has been completelyrevised to better describe thebehavior. In addition, newinformation about the passingthrough custom data has beenadded.
July 7, 2021
Revision for bonded interfacesin SMPTE 2110 and SMPTE2022-6 (p. 323)
The user guide has been revisedto clarify that if you implementredundant inputs (with SMPTE2110 or SMPTE 2022-6) orredundant outputs (with SMPTE2110), you can't have a bondedinterface on the Mellanox cardor the 25Gb card.
June 28, 2021
WebVTT output captions usingOCR (p. 134)
Starting with version 2.22.0,AWS Elemental Live supportsthe ability to produce WebVTToutput captions by convertingobject-based source captionsthat are in DVB-Sub or SCTE-27format. AWS Elemental Liveuses OCR (optical characterrecognition) to perform thisconversion. The section onsupported captions and thesection on working with captionshave been revised.
June 18, 2021
Color space (p. 56) The section on handling colorspace has been completelyrevised. In addition, the sectionincludes information for workingwith Dolby.
June 15, 2021
SMPTE 2110 (p. 315) The user guide now includessections about the existingsupport for SMPTE 2110 inputsand SMPTE 2110 outputs.
June 5, 2021
Version 2.23 release (p. 1) First release of the 2.23 softwareversion.
February 5, 2021
Version 2.14 and later381