Embed Size (px)
DESCRIPTION
MQHA
Citation preview
Alliance Web Platform 7.0.40
Administration and Operations GuideThis guide describes how to configure and how to perform maintenance tasks for Alliance Web Platform and AllianceWeb Platform Server-Embedded.
29 March 2013
Connectivity

Table of Contents
.Preface .............................................................................................................................................................................4
1 Alliance Web Platform .................................................................................................................................. 5
2 Accessing Alliance Web Platform Administration ........................................................................... 6
2.1 Logging On ................................................................................................................................................. 6
2.2 Logging Out ................................................................................................................................................ 7
3 The Alliance Web Platform Administration Workspace ................................................................ 8
3.1 Workspace Overview ................................................................................................................................ 8
3.2 Home Page .............................................................................................................................................. 11
3.3 Task Pages in Alliance Web Platform Administration ....................................................................... 13
3.4 Common Actions in Task Pages ........................................................................................................... 20
3.5 Online Help ............................................................................................................................................... 27
3.6 User Assistance ....................................................................................................................................... 27
4 Getting Started with Alliance Web Platform Administration ..................................................... 32
4.1 User Management ................................................................................................................................... 32
4.2 Administrator Tasks ................................................................................................................................ 35
5 Packages .......................................................................................................................................................... 36
5.1 View and Edit the Properties of a Package ......................................................................................... 37
5.2 View and Edit Package Configuration Parameters ............................................................................ 38
5.3 Add an Application in an Installed Package ........................................................................................ 40
5.4 Delete an Application from an Installed Package .............................................................................. 42
6 Application Groups ...................................................................................................................................... 43
6.1 Logging On to an Application Group .................................................................................................... 47
6.2 Add an Application Group ...................................................................................................................... 47
6.3 Add an Application Sub-group .............................................................................................................. 49
6.4 Add Applications in an Application Group or Sub-Group .................................................................. 50
6.5 Display the Properties of an Application Group or Sub-Group ........................................................ 51
7 Alliance Server Instances .......................................................................................................................... 52
7.1 Add an Alliance Server Instance ........................................................................................................... 52
7.2 Update an Alliance Server Instance ..................................................................................................... 59
7.3 Delete an Alliance Server Instance ...................................................................................................... 59
7.4 Test Connectivity with an Alliance Server ........................................................................................... 59
7.5 Instance Monitoring Overview ............................................................................................................... 61
8 Alliance Server Groups .............................................................................................................................. 62
8.1 Add an Alliance Server Group ............................................................................................................... 62
8.2 Delete an Alliance Server Group .......................................................................................................... 63
8.3 Remove an Instance from an Alliance Server Group ........................................................................ 63
Alliance Web Platform 7.0.40
2 Administration and Operations Guide
9 Branding Schemes ....................................................................................................................................... 64
9.1 Branding Schemes Page ....................................................................................................................... 64
9.2 Create Branding Schemes ..................................................................................................................... 66
9.3 Modify Branding Schemes ..................................................................................................................... 67
9.4 Delete Branding Schemes ..................................................................................................................... 68
10 User Sessions ................................................................................................................................................ 69
10.1 View User Session Properties ............................................................................................................... 69
11 Event Log .......................................................................................................................................................... 71
11.1 Search for Events .................................................................................................................................... 71
12 Operate Alliance Web Platform ............................................................................................................... 73
12.1 Run Alliance Web Platform Operational Tools ................................................................................... 73
12.2 Start and Stop Alliance Web Platform in the Application Server ..................................................... 73
12.3 Start and Stop the Alliance Web Platform Database ......................................................................... 74
12.4 Back Up the Database ........................................................................................................................... 76
12.5 Restore and Resynchronise the Database ......................................................................................... 77
12.6 Change the Alliance Web Platform Database Account Password .................................................. 79
12.7 Configure Access to the Alliance Web Platform Database .............................................................. 79
12.8 Configuring the Alliance Web Platform Database .............................................................................. 80
13 Alliance Web Platform Support Tools ................................................................................................. 82
13.1 Run Alliance Web Platform Support Tools .......................................................................................... 82
13.2 Collect Support Information ................................................................................................................... 82
13.3 Investigate the Alliance Web Platform Database ............................................................................... 85
13.4 Verify the Database Integrity ................................................................................................................. 86
13.5 Activate Tracing on Alliance Web Platform ......................................................................................... 86
14 The Configuration Tool .............................................................................................................................. 88
14.1 Using swp_config .................................................................................................................................... 88
14.2 Start and Stop Alliance Web Platform Server-Embedded ................................................................ 90
14.3 Change Port Numbers for the Application Server .............................................................................. 91
14.4 Managing the SSL Certificate and Key ................................................................................................ 92
14.5 List of Parameters ................................................................................................................................... 95
14.6 Packages .................................................................................................................................................. 95
14.7 Reconfigure Hosted Database Connection ......................................................................................... 96
14.8 Change the Deployment URL of a Package ....................................................................................... 96
.Appendix A IBM WebSphere HTTP Server ....................................................................................................97
A.1 IBM WebSphere HTTP Server for File Transfer Flows Concentration ........................................... 97
.Legal Notices ...............................................................................................................................................................99
Table of Contents
29 March 2013 3
PrefacePurpose
This guide provides information about the features and functions of the Alliance Web PlatformAdministration package. This guide describes how the Alliance Web Platform administratorconfigures Alliance Web Platform and performs maintenance tasks related to packages,connectivity, and so on. In addition, it also describes the graphical user interface (GUI).
Audience
This guide is intended for those who are responsible for configuring and maintaining AllianceWeb Platform.
Related documentation
Alliance Web Platform documentation:
• Alliance Web Platform Server-Embedded Installation Guide
Alliance Web Platform 7.0.40
4 Administration and Operations Guide
1 Alliance Web PlatformIntroduction
Alliance Web Platform is the framework that hosts browser-based graphical user interfaces(GUIs) of the Alliance portfolio. It offers a consistent end-user interface to the functionalitymanaged by Alliance Gateway, Alliance Access/Entry, or Alliance Integrator. Alliance WebPlatform runs in an application server environment, enabling centralised deployment of thesoftware.
Alliance Web Platform is delivered in two flavours:
• The first flavour requires a web application server (IBM WebSphere Application Server)configured in a cluster, providing robust operational capacity such as load balancing andresilience mechanisms.
• The second flavour, Alliance Web Platform Server-Embedded, includes the application serverthat the software requires. The installer for Alliance Web Platform Server-Embedded installsand configures the application server, customising it based on values provided duringinstallation.
Note The first flavour is not available for 7.0.40.
The GUIs of the Alliance portfolio are provided as packages that are installed in Alliance WebPlatform. Each package contains a set of applications that communicate with their Allianceserver instance (Alliance Gateway, Alliance Access/Entry, or Alliance Integrator). Alliance WebPlatform offers a consistent set of services to the graphical applications it hosts. Alliance WebPlatform can simultaneously host different versions of the same GUI package (for example,Alliance Messenger 7.0.50 and Alliance Messenger 7.0.60).
Alliance Web Platform Administration is a standard package installed with Alliance WebPlatform. It contains applications that enable an Alliance Web Platform administrator to performconfiguration tasks necessary to prepare Alliance Web Platform and its applications for use byusers. For example, configuring Alliance server instances used by applications. Theadministrator also performs monitoring tasks (for example, viewing events reported byapplications).
The Alliance Web Platform Administration and Operations Guide describes all applications ofthe Alliance Web Platform Administration package.
Alliance Web Platform
29 March 2013 5
2 Accessing Alliance Web PlatformAdministration
Prerequisites
To log on to Alliance Web Platform Administration, you need an Alliance Web Platform useraccount. For more information, see "User Management" on page 32..
2.1 Logging OnProcedure
1. Make sure that the application is running. For more details, see the installation guide forAlliance Web Platform or Alliance Web Platform Server-Embedded.
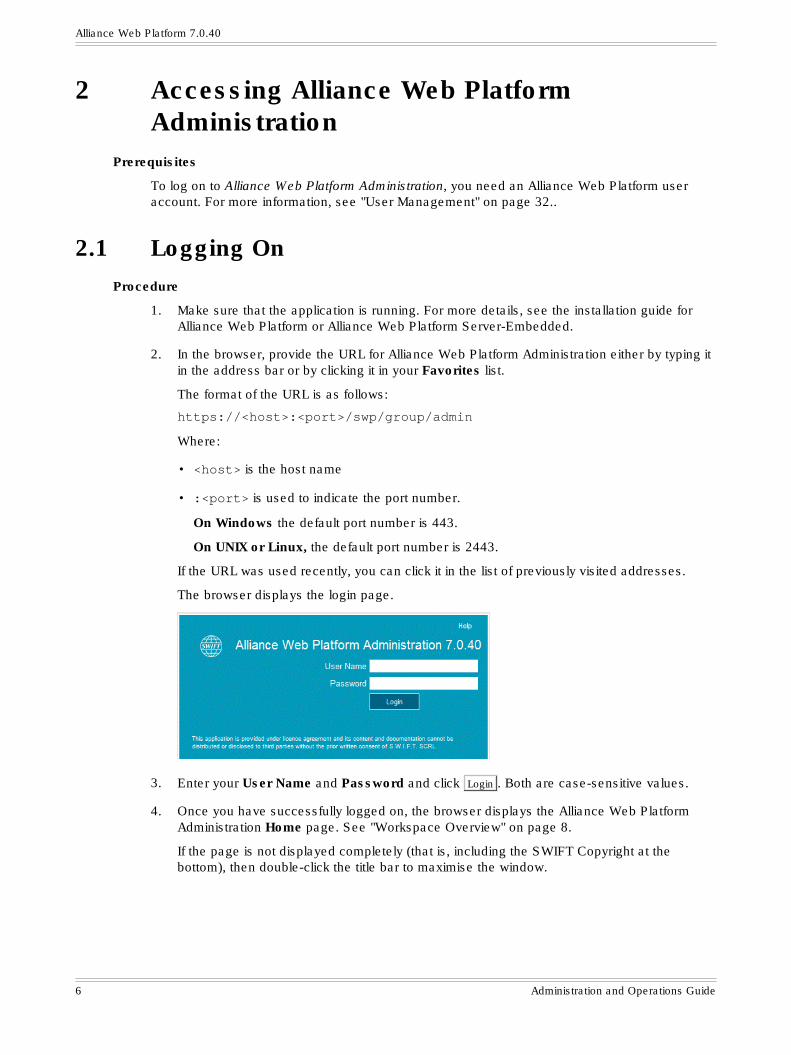
2. In the browser, provide the URL for Alliance Web Platform Administration either by typing itin the address bar or by clicking it in your Favorites list.
The format of the URL is as follows:
https://<host>:<port>/swp/group/adminWhere:
• <host> is the host name
• :<port> is used to indicate the port number.
On Windows the default port number is 443.
On UNIX or Linux, the default port number is 2443.
If the URL was used recently, you can click it in the list of previously visited addresses.
The browser displays the login page.
3. Enter your User Name and Password and click Login . Both are case-sensitive values.
4. Once you have successfully logged on, the browser displays the Alliance Web PlatformAdministration Home page. See "Workspace Overview" on page 8.
If the page is not displayed completely (that is, including the SWIFT Copyright at thebottom), then double-click the title bar to maximise the window.
Alliance Web Platform 7.0.40
6 Administration and Operations Guide
Note For a proper display of the information in the Alliance Web Platform Administrationpages, set your screen resolution to 1024 by 768 pixels or higher. A minimalscreen resolution of 1280 by 800 pixels is recommended.
We recommend not to use the zoom in and zoom out functionality of InternetExplorer. The Alliance Web Platform Administration labels can have incorrectplacement when the display value of Internet Explorer is not set at 100 percent.
2.2 Logging OutApplicability
You can log out from Alliance Web Platform Administration from any page except the loginpage.
Procedure
1. Click Logout in the top right corner of the browser window.
A confirmation window opens.
2. Click OK to log out or Cancel to cancel the request to log out.
If you click OK , then the browser displays the Alliance Web Platform Administration loginpage.
Accessing Alliance Web Platform Administration
29 March 2013 7
3 The Alliance Web Platform AdministrationWorkspace
About this section
This section describes the layout, components, functionalities, and behaviour of the AllianceWeb Platform Administration workspace.
3.1 Workspace OverviewDescription
The workspace is a browser-based GUI that communicates with an application server, whichcommunicates with an Alliance server.
The Alliance Web Platform Administration workspace displays the home page by default when auser logs in.
The workspace has the following areas:
Area Description
Navigation area Displays a logo, the name and release of the GUI package, links for navigating,and menus for accessing the task pages of Alliance Web Platform Administration.
See "Navigation area" on page 9.
Main area Displays the home page or the task pages of Alliance Web PlatformAdministration.
See "Home Page" on page 11 and "Task Pages in Alliance Web PlatformAdministration" on page 13.
Bottom banner Displays copyright and status information.
See "Bottom banner area" on page 11.
Alliance Web Platform 7.0.40
8 Administration and Operations Guide
Example
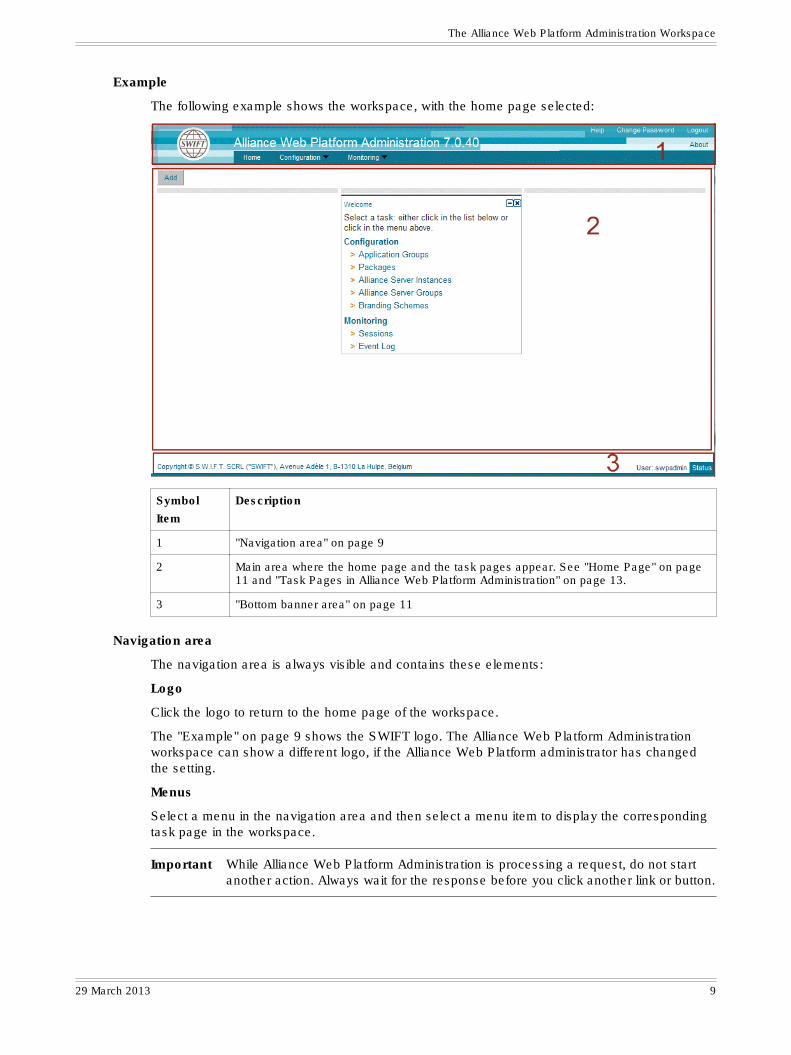
The following example shows the workspace, with the home page selected:
Symbol
Item
Description
1 "Navigation area" on page 9
2 Main area where the home page and the task pages appear. See "Home Page" on page11 and "Task Pages in Alliance Web Platform Administration" on page 13.
3 "Bottom banner area" on page 11
Navigation area
The navigation area is always visible and contains these elements:
Logo
Click the logo to return to the home page of the workspace.
The "Example" on page 9 shows the SWIFT logo. The Alliance Web Platform Administrationworkspace can show a different logo, if the Alliance Web Platform administrator has changedthe setting.
Menus
Select a menu in the navigation area and then select a menu item to display the correspondingtask page in the workspace.
Important While Alliance Web Platform Administration is processing a request, do not startanother action. Always wait for the response before you click another link or button.
The Alliance Web Platform Administration Workspace
29 March 2013 9
These are the menus which provide access to the home page and to the task pages:
Menu Purpose
Home Displays the home page of the workspace.
Configuration Enables you to perform administration tasks such as:
• manage installed packages of applications
• manage Alliance server instances
• manage application groups to organise navigation across applications
• manage groups of Alliance server instances that can be associated with groupof applications
• manage branding schemes (GUI customisations) that can be associated withapplication groups
Monitoring Enables you to display information about user sessions, and also to search andview events from the event log.
The menu items available depend on the application group.
Links in the navigation area
The top-right corner of the navigation area of the workspace provides links to these functions:
Link Function
Help Opens the context-sensitive online help that is available for the page or entity that iscurrently selected.
The page or window from which you click the Help link determines the information thatthe system shows.
For example:
• If you click the Help link on the login page or the home page, then the system opensthe Alliance Web Platform online help.
• If you click the Help link on a page or window within Alliance Web PlatformAdministration, then the system opens the Alliance Web Platform Administrationonline help.
See "Online Help" on page 27.
Logout Logs off from Alliance Web Platform Administration
See "Logging Out" on page 7.
Alliance Web Platform 7.0.40
10 Administration and Operations Guide
Link Function
About Displays this information:
• Information about the current session:
– The user name that you are logged in as
– The user type
– The name of the instance that you are logged on to
– The Alliance Web Platform release
– The Alliance Web Platform host platform
• Information about Alliance Web Platform:
– The Alliance Web Platform release
– The operating system on which Alliance Web Platform is installed
– The Java Virtual Machine version
ChangePassword
Allows you to change your password.
Bottom banner area
The bottom banner area is always visible. It displays this information:
Copyright details
The SWIFT copyright statement
User
Displays the user name that you are logged in as
Status
A user can click Status , to display the last 20 notification messages that Alliance Web PlatformAdministration provided to the user about the current task or about recently performed tasks.
3.2 Home PageDescription
The Alliance Web Platform Administration workspace displays the home page by default when auser logs in.
The home page shows a Welcome application, which provides a list of shortcuts to tasks in themenus. You can add applications or change the position of the applications on the home page.For more information, see "Add an Application to the Home Page" on page 12 and "ChangePosition of an Application on the Home Page" on page 13.
Tip Click the logo at any time to return to the home page of the workspace.
The Alliance Web Platform Administration Workspace
29 March 2013 11
Welcome application
The Welcome application displays the list of tasks that are also available to you through themenus in the navigation area of Alliance Web Platform Administration.
Click a link in the list to display the corresponding task page. For more information, see "TaskPages in Alliance Web Platform Administration" on page 13.
The list of tasks available depends on the application group. The Alliance Web Platformadministrator configures an application group through the Alliance Web Platform AdministrationGUI application.
3.2.1 Add an Application to the Home Page
Purpose
This procedure enables you to add applications to the home page of the workspace.
Procedure
1. Click Home , to display the home page of the workspace.
2. Click Add , in the upper left corner of the home page.
The Add Applications window opens, and displays the applications that you can add.
3. Select the application or applications that you require to add as a widget.
The following applications are available:
Application Description
Welcome Displays the commands from the menus as a list of shortcuts to commands in thetask menus.
After you add the Welcome application, a user can click a command from the list oftasks, and the corresponding task page opens.
Sessions Displays a summary of the user sessions that are active or inactive for eachapplication group.
Event Log Displays the last five events that were logged in the Alliance Web Platform eventlog.
The colour of the event indicates the event severity.
AllianceServerInstances
Displays a summary of the connectivity status to the Alliance server instances.
Tip You can use the CTRL or SHIFT keyboard key to select several applicationsfrom the list.
4. Click OK .
The Add Applications window closes. The application widgets that you selected appearon the home page.
Alliance Web Platform 7.0.40
12 Administration and Operations Guide
Buttons in title bar
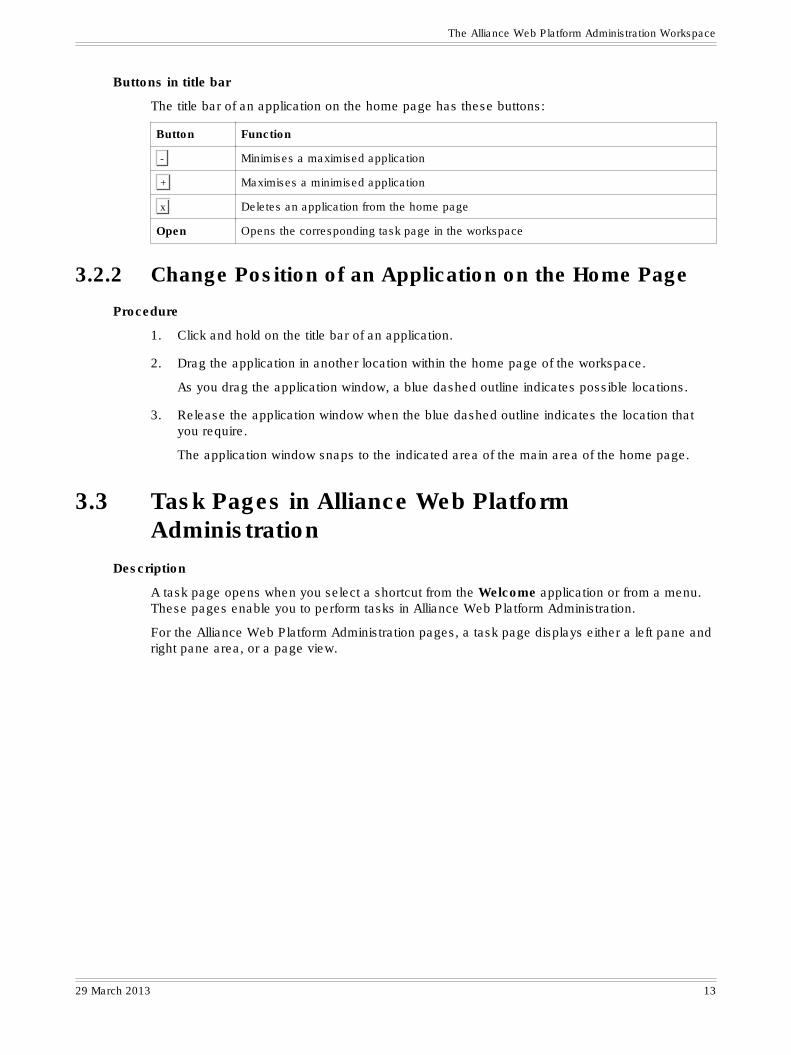
The title bar of an application on the home page has these buttons:
Button Function
- Minimises a maximised application
+ Maximises a minimised application
x Deletes an application from the home page
Open Opens the corresponding task page in the workspace
3.2.2 Change Position of an Application on the Home Page
Procedure
1. Click and hold on the title bar of an application.
2. Drag the application in another location within the home page of the workspace.
As you drag the application window, a blue dashed outline indicates possible locations.
3. Release the application window when the blue dashed outline indicates the location thatyou require.
The application window snaps to the indicated area of the main area of the home page.
3.3 Task Pages in Alliance Web PlatformAdministration
Description
A task page opens when you select a shortcut from the Welcome application or from a menu.These pages enable you to perform tasks in Alliance Web Platform Administration.
For the Alliance Web Platform Administration pages, a task page displays either a left pane andright pane area, or a page view.
The Alliance Web Platform Administration Workspace
29 March 2013 13
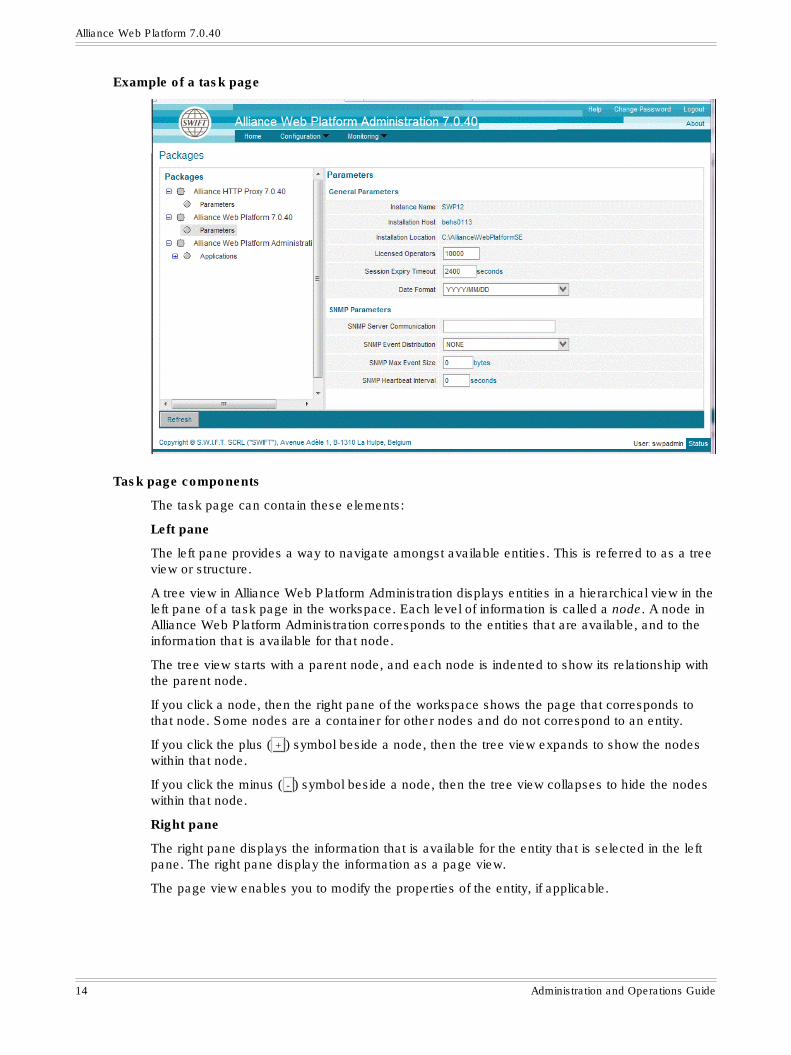
Example of a task page
Task page components
The task page can contain these elements:
Left pane
The left pane provides a way to navigate amongst available entities. This is referred to as a treeview or structure.
A tree view in Alliance Web Platform Administration displays entities in a hierarchical view in theleft pane of a task page in the workspace. Each level of information is called a node. A node inAlliance Web Platform Administration corresponds to the entities that are available, and to theinformation that is available for that node.
The tree view starts with a parent node, and each node is indented to show its relationship withthe parent node.
If you click a node, then the right pane of the workspace shows the page that corresponds tothat node. Some nodes are a container for other nodes and do not correspond to an entity.
If you click the plus ( + ) symbol beside a node, then the tree view expands to show the nodeswithin that node.
If you click the minus ( - ) symbol beside a node, then the tree view collapses to hide the nodeswithin that node.
Right pane
The right pane displays the information that is available for the entity that is selected in the leftpane. The right pane display the information as a page view.
The page view enables you to modify the properties of the entity, if applicable.
Alliance Web Platform 7.0.40
14 Administration and Operations Guide
A page can consist of the following components:
• "List View" on page 15
• "Form View" on page 17
Splitter
A splitter is a line that divides the left pane and the right pane. You can drag the splitter left orright to resize the panes.
Button bar
On some pages, a button bar is present at the bottom of the main area of the workspace. Thebuttons enable you to perform an action for the entity that is currently selected. The buttons thatare available depend on the selected entity.
3.3.1 List View
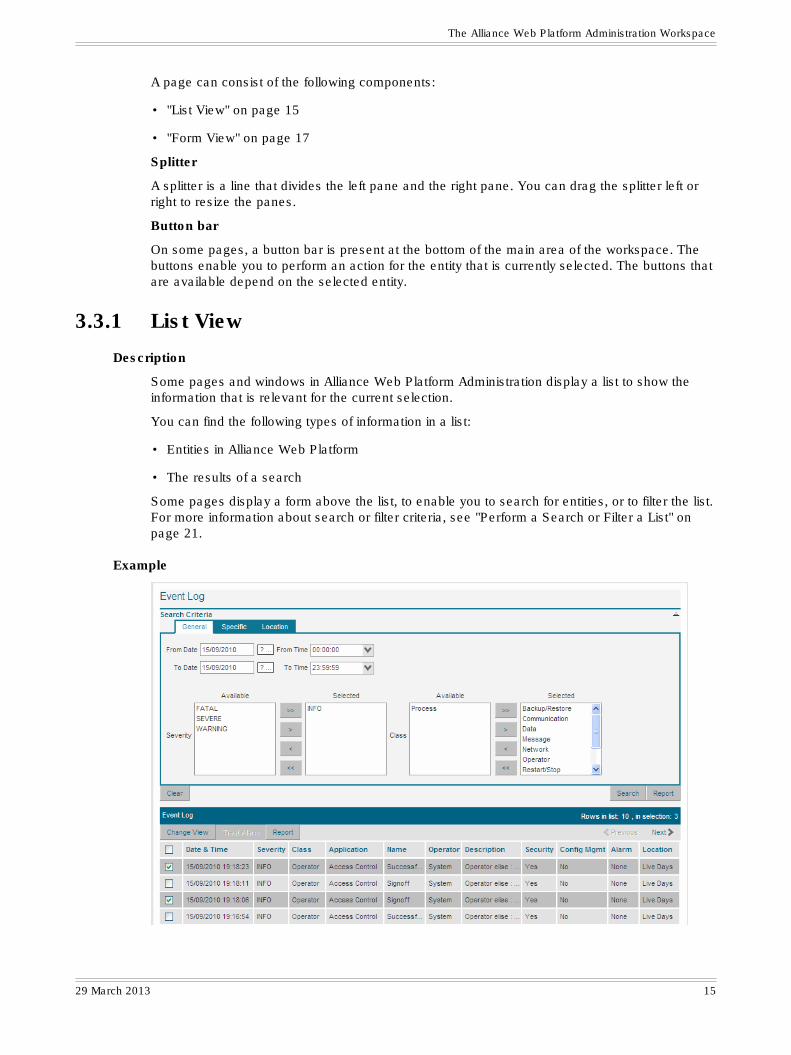
Description
Some pages and windows in Alliance Web Platform Administration display a list to show theinformation that is relevant for the current selection.
You can find the following types of information in a list:
• Entities in Alliance Web Platform
• The results of a search
Some pages display a form above the list, to enable you to search for entities, or to filter the list.For more information about search or filter criteria, see "Perform a Search or Filter a List" onpage 21.
Example
The Alliance Web Platform Administration Workspace
29 March 2013 15
Components
A list in Alliance Web Platform Administration usually contain these elements:
Title bar
At the top left, the title bar shows the title of the list.
At the top right, the title bar shows the number of rows in the current view of the list, and thenumber of rows that are selected.
Button bar
The button bar is below the title bar of the list.
The buttons enable the user to perform an action for the entity that is currently selected. Thebuttons that are available depend on the selected entity.
Column heading
The names of the columns correspond to the properties and the elements of the entities in thelist.
Row
Each row in the list corresponds to an entity.
How to use the list view
• Page size
You can use the Change View function to set the value for Page Size, which changes themaximum number of rows that the list shows at a time. You can use the Change Viewfunction to change the column width, and to show or hide columns, if it is applicable for thecurrent list (see "Change View of a List" on page 23).
• Layout
To increase or decrease the width of a column, move the mouse pointer over the right-sideedge of the column header, then click and drag. Alliance Web Platform Administrationdiscards any changes to column widths at the end of the current session, unless you use theChange View function to save the changes.
You can use the Change View function to show specific columns in a specific order in thelist.
You can use the reset option of the Change View function to restore the list to its originallayout.
See "Change View of a List" on page 23.
• Navigation
If the total number of rows is greater than the value set for the page size, then you cannavigate through the pages of the list:
– If the list does not currently show the last row, then the Next link is available at the far rightof the list button bar. If you click Next, then the list shows the next page of rows.
– If the list does not currently show the first row, then the Previous link is available at the farright of the list button bar. If you click Previous, then the list shows the previous page ofrows.
• Actions
Alliance Web Platform 7.0.40
16 Administration and Operations Guide
Some lists allow you to click an entity and view its details, either in the page view or in awindow.
To sort a list
You can sort the rows in a list in ascending or descending order based on the content of aparticular column.
If you click a column header, then Alliance Web Platform Administration sorts the list inascending order according to the content of that column. Alliance Web Platform Administrationplaces a symbol that points upwards next to the name of the column header to indicate that thesort order is ascending. If you click the same column header again, then Alliance Web PlatformAdministration sorts the list in descending order according to the content of that column and thesymbol points downwards. If you click the same column header again, then Alliance WebPlatform Administration removes the sorting.
The sort order that you define is available throughout the user session. Logging out and in againrestores the default order. You can also use the Change View function (open and click Save ) torestore the default order (see "Change View of a List" on page 23).
Sorting is also available in pickers that present content as rows in a table, as described in "UserAssistance" on page 27.
3.3.2 Form View
Description
Some pages and windows display a form to search for information or to enter information inAlliance Web Platform Administration.
Some forms display related information in two or more tabs to make the form easier to navigate.
You can find the following types of information in a form:
• Configuration parameters
• Details of an entity
• Search criteria
• Filtering criteria
The Alliance Web Platform Administration Workspace
29 March 2013 17
Example
Components
Forms in Alliance Web Platform Administration usually contain these elements:
Title
The top left of the page view or the window shows the title of the form.
Fields
Different types of fields are available to show details of the entity, or configuration parameters:
• Text field
• Field with a drop-down list
• Selection list (see "Selection Lists" on page 19)
• Check box
The fields can have these additional features to assist with content input:
• Buttons
• Pickers to help you enter data in a field (see "Pickers" on page 28)
Button bar
•The button bar is usually at the bottom of the form.
Alliance Web Platform 7.0.40
18 Administration and Operations Guide
The buttons enable the user to perform an action for the entity that is currently selected. Thebuttons that are available depend on the selected entity.
How to use the form view
• Navigation
If a form contains two or more tabs, then you can click a tab to show the corresponding view.
If the form shows the details of an entity in a list, then you can navigate to the details of theother entities in the list:
– If the page or the window does not currently show the details of the last entity, then Next
is available at the far right of the button bar. If you click Next , then the page or windowshows the details of the next entity.
– If the page or the window does not currently show the details of the first entity, thenPrevious is available at the right of the button bar. If you click Previous , then the page or
window shows the details of the previous entity.
• Data input or modification
If you change existing information or add new information, then the button bar shows Save
and Cancel :
– Click Save , to save the information or changes.
– Click Cancel , to discard the changes that you made.
• Actions
The buttons that are present and that are available (not greyed-out) in the button bar dependon the entity currently displayed.
3.3.3 Selection Lists
Description
Some pages and windows in Alliance Web Platform Administration display a list that enablesyou to select one or more values for a field.
The following elements are available:
• Available list
This contains the list of available values for the current field.
• Selected list
This contains the list of selected values for the current field.
• Arrow buttons
The arrow buttons move the values from one list to the other.
How to use the selection lists
• Selection
The Alliance Web Platform Administration Workspace
29 March 2013 19
You can use these actions to select values from the Available list:
– To select a single value, click the value.
– To select a sequential group of values, either click and then drag the mouse pointer overthe values, or click a value and then hold down the SHIFT key and click another value.
– To select a group of values that are not sequential, click a value and then hold down theCTRL key and click the other values.
• Reassignment
If you double-click a value in either list, then it moves to the other list.
> and < move the selected values from one list to the other.
>> and << move all the values from one list to the other.
3.4 Common Actions in Task PagesAbout this section
This section describes the actions that the administrator performs frequently in the task pages ofAlliance Web Platform Administration.
3.4.1 Common Buttons in Task Pages
Buttons
These buttons enable you to perform actions that are common to the task pages throughout theAlliance Web Platform Administration workspace:
Button Description
Cancel Cancels the current action.
Change View Changes the layout of the list for the current page.
Procedure: "Change View of a List" on page 23
Clear Clears values in fields or resets the search criteria fields or the filtering criteria fields tothe default values
Close Closes the current window
Next Displays the next set of information, as applicable:
• On a page that contains a list, it displays the next page of entities.
• In a details window, it displays the details of the next entity.
OK Confirms the current action.
Previous Displays the previous set of information, as applicable:
• In a list, it displays the previous page of entities.
• In a details window, it displays the details of the previous entity.
Refresh Refreshes the information that the system currently displays.
Save Saves the current information.
Alliance Web Platform 7.0.40
20 Administration and Operations Guide
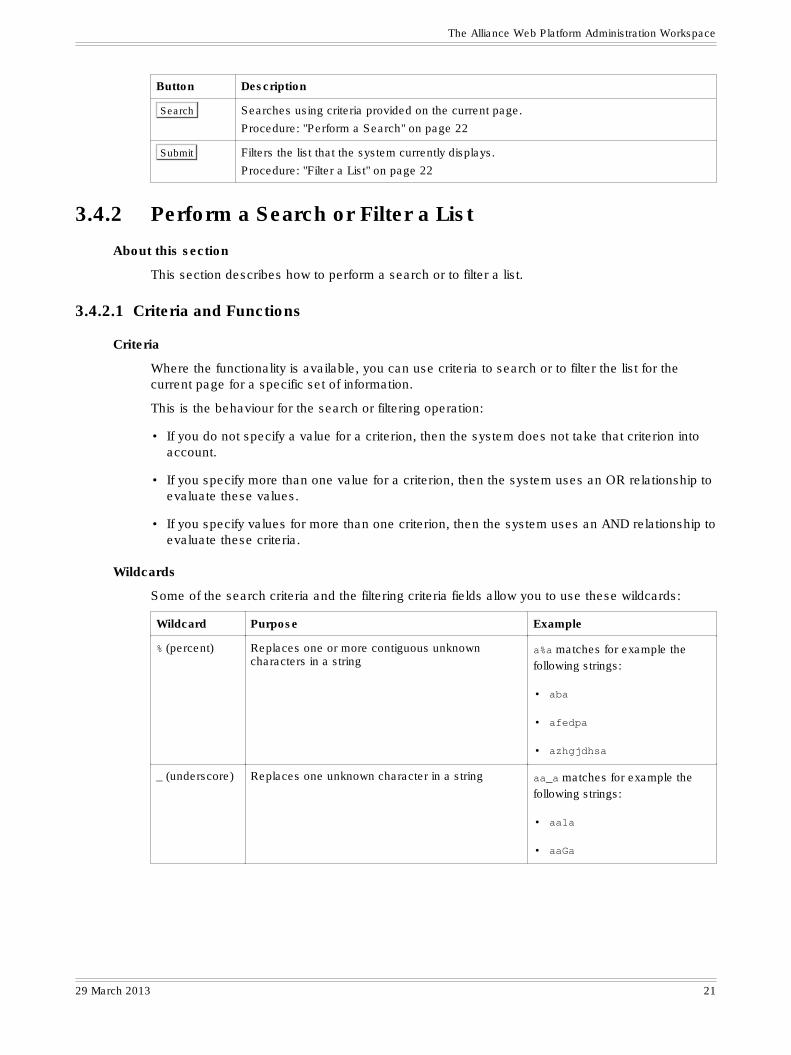
Button Description
Search Searches using criteria provided on the current page.
Procedure: "Perform a Search" on page 22
Submit Filters the list that the system currently displays.
Procedure: "Filter a List" on page 22
3.4.2 Perform a Search or Filter a List
About this section
This section describes how to perform a search or to filter a list.
3.4.2.1 Criteria and Functions
Criteria
Where the functionality is available, you can use criteria to search or to filter the list for thecurrent page for a specific set of information.
This is the behaviour for the search or filtering operation:
• If you do not specify a value for a criterion, then the system does not take that criterion intoaccount.
• If you specify more than one value for a criterion, then the system uses an OR relationship toevaluate these values.
• If you specify values for more than one criterion, then the system uses an AND relationship toevaluate these criteria.
Wildcards
Some of the search criteria and the filtering criteria fields allow you to use these wildcards:
Wildcard Purpose Example
% (percent) Replaces one or more contiguous unknowncharacters in a string
a%a matches for example thefollowing strings:
• aba
• afedpa
• azhgjdhsa
_ (underscore) Replaces one unknown character in a string aa_a matches for example thefollowing strings:
• aa1a
• aaGa
The Alliance Web Platform Administration Workspace
29 March 2013 21
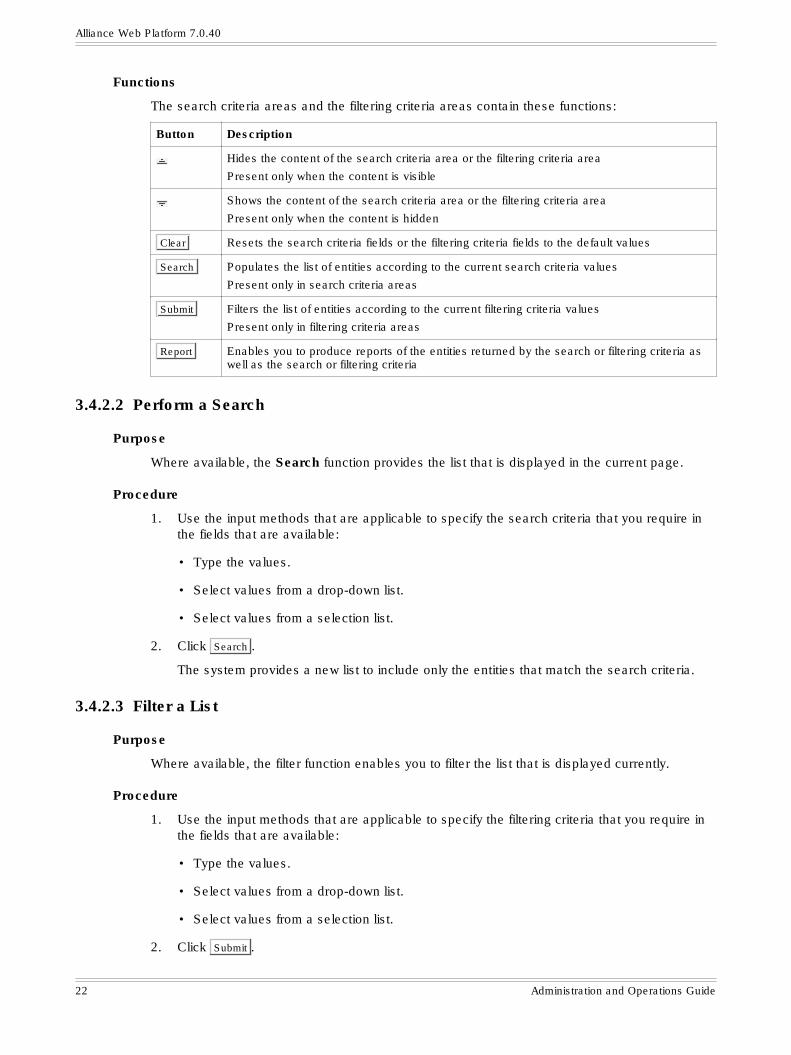
Functions
The search criteria areas and the filtering criteria areas contain these functions:
Button Description
Hides the content of the search criteria area or the filtering criteria area
Present only when the content is visible
Shows the content of the search criteria area or the filtering criteria area
Present only when the content is hidden
Clear Resets the search criteria fields or the filtering criteria fields to the default values
Search Populates the list of entities according to the current search criteria values
Present only in search criteria areas
Submit Filters the list of entities according to the current filtering criteria values
Present only in filtering criteria areas
Report Enables you to produce reports of the entities returned by the search or filtering criteria aswell as the search or filtering criteria
3.4.2.2 Perform a Search
Purpose
Where available, the Search function provides the list that is displayed in the current page.
Procedure
1. Use the input methods that are applicable to specify the search criteria that you require inthe fields that are available:
• Type the values.
• Select values from a drop-down list.
• Select values from a selection list.
2. Click Search .
The system provides a new list to include only the entities that match the search criteria.
3.4.2.3 Filter a List
Purpose
Where available, the filter function enables you to filter the list that is displayed currently.
Procedure
1. Use the input methods that are applicable to specify the filtering criteria that you require inthe fields that are available:
• Type the values.
• Select values from a drop-down list.
• Select values from a selection list.
2. Click Submit .
Alliance Web Platform 7.0.40
22 Administration and Operations Guide
The system updates the list to include only the entities that match the filtering criteria.
3.4.3 Change View of a List
Purpose
The Change View function changes the layout of the list for the current page or window.
You can use the Change View function to perform these actions:
• specify the maximum number of rows that the list shows at a time (page size)
• show or hide columns
• change the order of the columns
• save changes to column widths
• reset a list to the default layout
• reset a list to the default layout, except for column width changes
Change list layout
1. If you want to increase or decrease the width of a column in the list, then move the mousepointer over the right-side edge of the column header, then click and drag.
2. Repeat the previous step for the other columns in the list, as necessary.
3. Click Change View .
The Change View window opens.
4. Use these methods to change the list layout, as necessary:
• Select or clear the check box for a column to show or hide it.
• Click the name of a column and use the up or down arrow to change its position in thelist.
5. If you made any changes to the column widths in the current list, then select or clear theSave Column Widths check box, as necessary:
• If you select the Save Column Widths check box, then the system saves the changesto the column widths and retains them in subsequent sessions.
• If you clear the Save Column Widths check box, then the system discards the changesto the column widths when the current session ends.
6. Type the number of rows for the list to show at a time into the Page Size field, if it isavailable.
The value must be between 10 and 999.
7. Click Save .
The Change View window closes and the list layout changes accordingly.
The system also saves any changes to the column widths, if the Save Column Widthscheck box is selected.
The Alliance Web Platform Administration Workspace
29 March 2013 23
Reset list layout
1. Click Change View .
The Change View window opens.
2. If you made any changes to the column widths in the current list, then select or clear theSave Column Widths check box, as necessary:
• If you select the Save Column Widths check box, then the system saves the changesto the column widths and retains them in subsequent sessions.
• If you clear the Save Column Widths check box, then system discards the changes tothe column widths.
3. Click Reset and then click Save .
The Change View window closes and the system restores the original layout of the list:
• the default page size
• the original set of columns in the original sequence
• the original column widths (if the Save Column Widths check box is cleared)
3.4.4 Manage Configuration Parameters
About this section
This section contains the procedures to modify the configuration parameters that are availablein Alliance Web Platform Administration.
About configuration parameters
Alliance Web Platform Administration enables you to manage the configuration of the availableAlliance Web Platform entities. The nodes present in Alliance Web Platform Administrationprovide access to the configuration parameters for the corresponding entities.
3.4.4.1 Change Values
Change a configuration parameter value
1. Change the value using the input method that is available in the corresponding field:
• Select the value required from the drop-down list of the field.
• Type the value required in the field.
Save and Cancel appear at the bottom of the page.
2. Click Save .
The changed value is saved.
3.4.4.2 Reset Values
Reset a configuration parameter to its default value
If necessary, you can reset a configuration parameter to its default value as follows:
1. Click Reset to Default .
Alliance Web Platform 7.0.40
24 Administration and Operations Guide
The Reset to Default window opens.
2. Select the configuration parameter to reset.
3. Click Save .
The corresponding configuration parameter is reset to the default value.
3.4.4.3 Add Multiple Values
Add values to a multiple value configuration parameter
Where a configuration parameter allows multiple values, do the procedure that follows:
1. Click Add , located next to the corresponding field.
The Add window opens.
2. Enter a value in the field of the Add window.
3. Click Add .
The Add window closes and the value appears in the field.
4. Repeat the previous steps, as required.
5. Click Save , located at the bottom of the page.
The changes to the configuration parameter are saved.
3.4.4.4 Edit Multiple Values
Edit values in a multiple value configuration parameter
Where a configuration parameter allows multiple values, do the procedure that follows:
1. Select the value to edit in the corresponding field.
2. Click Edit , located next to the field.
The Edit window opens.
3. Edit the value in the field of the Edit window, as required.
4. Click Save , located in the Edit window.
The Edit window closes and the modified value appears in the field.
5. Click Save , located at the bottom of the page.
The changes to the configuration parameter are saved.
3.4.4.5 Remove Multiple Values
Remove values from a multiple value configuration parameter
Where a configuration parameter allows multiple values, do the procedure that follows:
1. Select the values to remove in the corresponding field.
2. Click Remove , located next to the field.
The selected values are removed from the field.
The Alliance Web Platform Administration Workspace
29 March 2013 25
3. Click Save , located at the bottom of the page.
The changes to the configuration parameter are saved.
3.4.5 Manage Entities
About this section
This section contains the procedures to manage the entities that are available in Alliance WebPlatform Administration.
About entities
Alliance Web Platform Administration enables you to manage the available Alliance WebPlatform entities. The nodes present in Alliance Web Platform Administration provide access tothe corresponding entities.
3.4.5.1 Add Entities
Add a new entity
When Add is available in the button bar of the corresponding page, do the procedure thatfollows:
1. Click Add .
The entity details page opens.
2. Enter the details for the new entity in the fields of the details page.
3. Click Save , located at the bottom of the details page.
The details page closes. The entity details are saved and the new entity appears in the list.
3.4.5.2 Edit Entities
Change the details of an entity
1. Click the entity.
The entity details page opens.
2. Change the details of the entity using the input method that is available in thecorresponding fields:
• Select the value required from the drop-down list of the field.
• Type the value required in the field.
• Select or clear the check box.
Cancel and Save appear at the bottom of the details page.
3. Click Save at the bottom of the details page.
The details page closes and the changed entity details are saved.
Alliance Web Platform 7.0.40
26 Administration and Operations Guide
3.5 Online HelpDescription
All pages within Alliance Web Platform Administration contain the Help link in the upper-rightcorner of the navigation area of the workspace.
Clicking the Help link displays the online help that corresponds to the page or entity that iscurrently selected. It also enables you to navigate to other topics within the online help.
Help for entering values in fields
Alliance Web Platform Administration provides tools to help you enter values with the correctsyntax, for example, how to select and enter dates or times. For more information, see "UserAssistance" on page 27.
Behaviour
If you click the Help link, then the corresponding help file opens in a new window. The systemopens the help file at the content that corresponds to the page or entity that is currentlyselected.
You can use the navigational links that are available in the help window to show other topicsfrom within the online help.
The page from which you click the Help link determines the topics that the system shows:
• If you click the Help link on the login page or the home page, then the system opens theAlliance Web Platform online help.
• If you click the Help link on a page within Alliance Web Platform Administration, then thesystem opens the Alliance Web Platform Administration online help.
3.6 User AssistanceAbout this section
This section describes the user assistance that is available to help you enter data in fields inAlliance Web Platform Administration using the correct format and syntax. For example, you canuse a picker to select dates or times in the correct format.
For more information about the purpose of a field, or a description of the values that you canenter, see "Online Help" on page 27.
3.6.1 Relative Date and Time Values
Date and time values
Alliance Web Platform Administration enables you to enter values manually or to select valuesfrom a picker for fields that require date or time values. For more information about pickers, see"Pickers" on page 28.
You can enter relative values in date or time fields.
A relative value is automatically converted to an absolute date or time value when the cursorleaves the field. The conversion generates an absolute date or time value that corresponds tothe syntax for the field. The absolute value is calculated relative to the current date or time ofthe host running the browser. For example, use a relative value to calculate quickly the date"five days ago".
The Alliance Web Platform Administration Workspace
29 March 2013 27
The relative date calculation supports dates within the range of years 1970 to 2037.
Syntax
The following is the syntax used to enter relative date or time values:
<symbol><number><unit>Where:
Variable Values
<symbol> + or -
<number> a numeric value
<unit> d, m, or y for a date field, with d as default
h, m, or s for a time field, with h as default
Uppercase letters are accepted.
The expected syntax for a field determines which values are relevant.
Examples
Typed value Field type Result
+6h or +6 Time Alliance Web Platform Administration increases the current time bysix hours.
-7d or -7 Date Alliance Web Platform Administration sets the date to seven daysbefore the current date.
+0 or -0 Time Alliance Web Platform Administration sets the time to the currenttime.
+0 or -0 Date Alliance Web Platform Administration sets the date to the currentdate.
3.6.2 Pickers
Description
A picker is a graphical element that is located beside a field in some pages. It helps you to enterdata according to the correct syntax and format that the field requires.
If Alliance Web Platform Administration shows to the right of a field, then a picker isavailable to help you enter data in the field.
Types of pickers
These are the different types of pickers available within Alliance Web Platform Administration:
• Date picker (see "Date Picker" on page 29)
• Time picker (see "Time Picker" on page 30)
Behaviour of a picker
Click to display the picker.
If you select a value in the picker, then the system populates the related field with the relevantvalues.
Alliance Web Platform 7.0.40
28 Administration and Operations Guide
These actions close the picker:
• clicking in a different field
• clicking anywhere outside the picker
• pressing the ESC key
If you move the mouse pointer over , then the system displays the expected syntax.
You can type a value directly into a field that has a picker, if you use the correct syntax.
3.6.3 Date Picker
Purpose
A date picker enables you to select and enter a date using the correct format in the date field.
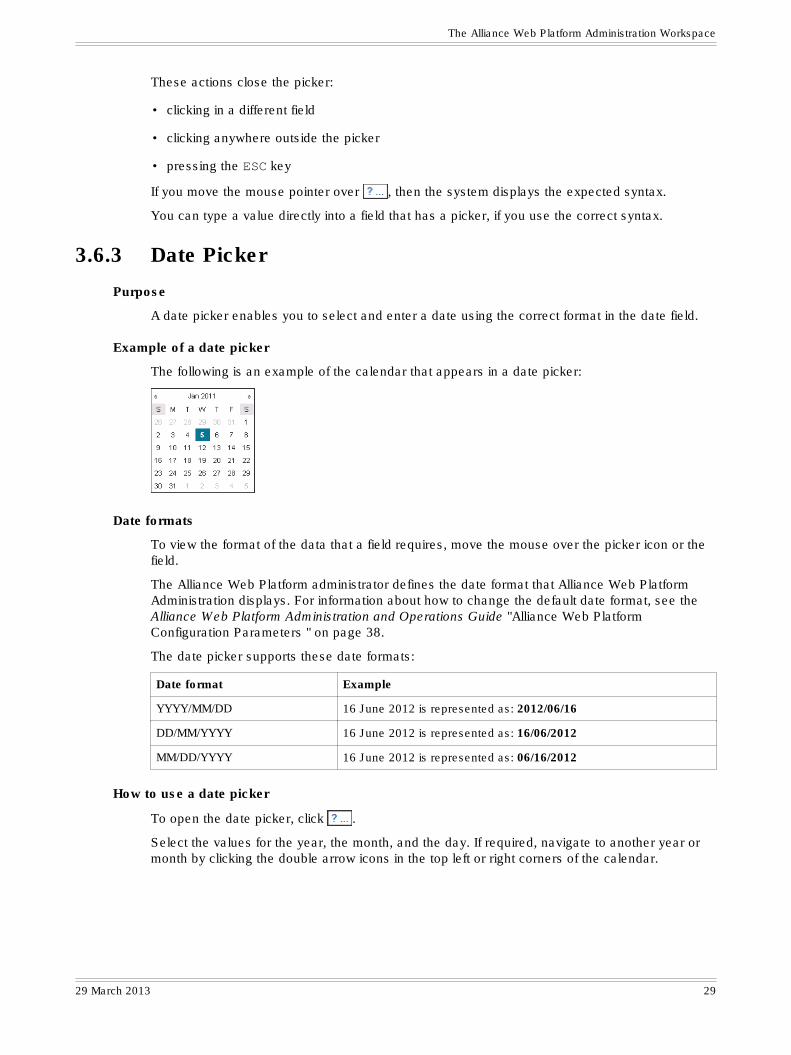
Example of a date picker
The following is an example of the calendar that appears in a date picker:
Date formats
To view the format of the data that a field requires, move the mouse over the picker icon or thefield.
The Alliance Web Platform administrator defines the date format that Alliance Web PlatformAdministration displays. For information about how to change the default date format, see theAlliance Web Platform Administration and Operations Guide "Alliance Web PlatformConfiguration Parameters " on page 38.
The date picker supports these date formats:
Date format Example
YYYY/MM/DD 16 June 2012 is represented as: 2012/06/16
DD/MM/YYYY 16 June 2012 is represented as: 16/06/2012
MM/DD/YYYY 16 June 2012 is represented as: 06/16/2012
How to use a date picker
To open the date picker, click .
Select the values for the year, the month, and the day. If required, navigate to another year ormonth by clicking the double arrow icons in the top left or right corners of the calendar.
The Alliance Web Platform Administration Workspace
29 March 2013 29
The content of the field that is related to the picker determines the subsequent behaviour of thepicker:
• If the field already contains a value that is syntactically correct, then the picker is set to thatvalue.
• If the field is set to a date that is not valid (for example, 31 February 2009), then the colour ofthe date field changes. You must select a valid date in the correct format.
Type a date in a date field
You can type a date directly in the date field without using a date picker. The date that you typemust use the correct format that the field requires.
Tip When you enter a date directly in the date field, you can omit the separator.
You can also enter a relative date, such as plus one month or minus five days. Forinformation about relative dates, see "Relative Date and Time Values" on page 27.
3.6.4 Time Picker
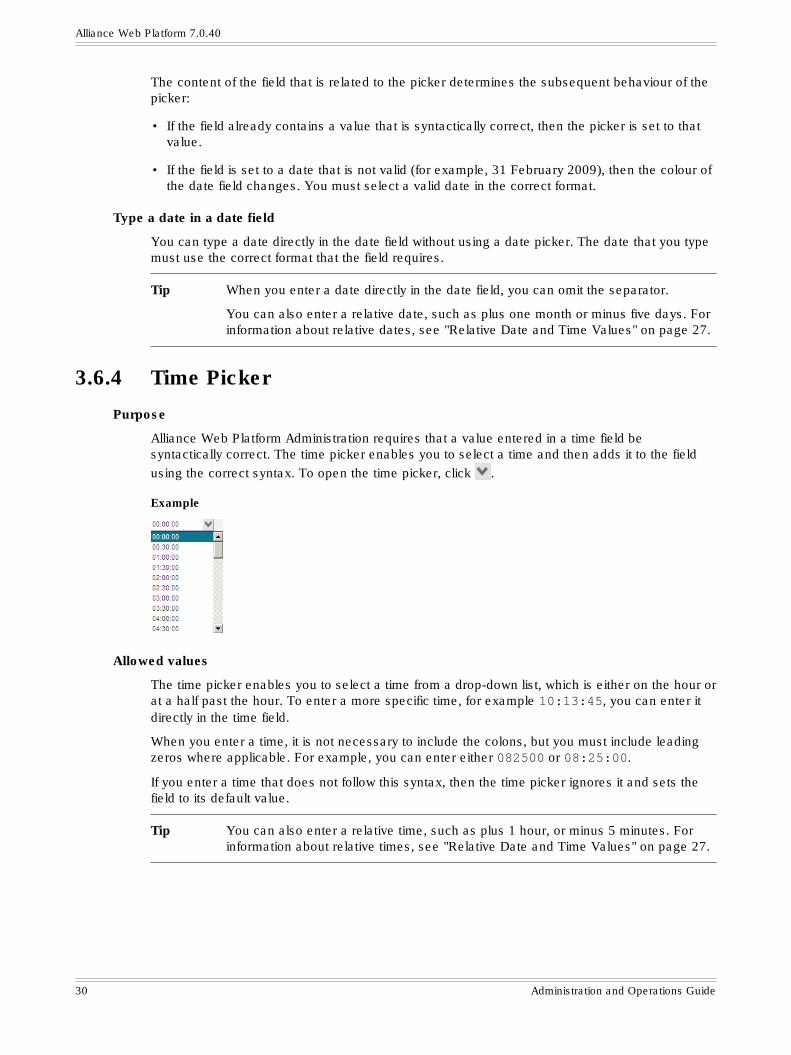
Purpose
Alliance Web Platform Administration requires that a value entered in a time field besyntactically correct. The time picker enables you to select a time and then adds it to the fieldusing the correct syntax. To open the time picker, click .
Example
Allowed values
The time picker enables you to select a time from a drop-down list, which is either on the hour orat a half past the hour. To enter a more specific time, for example 10:13:45, you can enter itdirectly in the time field.
When you enter a time, it is not necessary to include the colons, but you must include leadingzeros where applicable. For example, you can enter either 082500 or 08:25:00.
If you enter a time that does not follow this syntax, then the time picker ignores it and sets thefield to its default value.
Tip You can also enter a relative time, such as plus 1 hour, or minus 5 minutes. Forinformation about relative times, see "Relative Date and Time Values" on page 27.
Alliance Web Platform 7.0.40
30 Administration and Operations Guide
How to use a time picker
When the time picker is opened, the content of the related field determines the subsequentbehaviour of the time picker:
• If the field does not contain a value, then the time picker drop-down list does not display anyselected time.
• If the field already contains a value that is not syntactically correct, then the same behaviouroccurs as if the field does not contain a value.
• If the field already contains a value that is syntactically correct and is a time on the hour orhalf hour, then the time picker is set to that value.
The Alliance Web Platform Administration Workspace
29 March 2013 31
4 Getting Started with Alliance Web PlatformAdministration
Overview
Using Alliance Web Platform Administration, the Alliance Web Platform user performs thefollowing configuration tasks:
• manage packages, see "Packages" on page 36
• manage application groups, see "Application Groups" on page 43
• manage connectivity to Alliance server instances, see "Alliance Server Instances" on page52
• manage Alliance server groups that can be associated with applications groups, see "AllianceServer Groups" on page 62
• manage branding schemes that can be associated with application groups, see "BrandingSchemes" on page 64
Using the Alliance Web Platform Administration, the Alliance Web Platform user monitors thefollowing resources:
• events, see "Event Log" on page 71
• user sessions, see "User Sessions" on page 69
4.1 User ManagementOverview
Alliance Web Platform Users are used to connect to the Alliance Web Platform Administrationpackage from the web browser. They are managed by the Alliance Web Platform Owner. Thissection describes the tools and procedures to manage Alliance Web Platform Users.
Profiles
Every Alliance Web Platform User has a profile attached to it. The profile drives the alloweduser operations within the Alliance Web Platform Administration package:
Profile Details
Administrator user A user with the “administration” profile can perform all operations withinthe Alliance Web Platform Administration package.
An administrator user is created by default at installation.
Monitoring user A user with the “monitoring” profile can only perform operations that donot modify the configuration of Alliance Web Platform. Triggers implyingmodifications to the Alliance Web Platform configuration will not bevisible for the monitoring user.
This user is not created during installation. This is the responsibility ofthe Alliance Web Platform owner to create it.
Alliance Web Platform 7.0.40
32 Administration and Operations Guide
Locked account
Alliance Web Platform records every attempt to login with an incorrect password. After multipleattempts, the account is locked. It means that it is not possible to login with that account, evenby providing a correct password, until the account is unlocked.
Note To unlock an account, the password must be reset. Please refer to sub-section“Reset the password of a user” below for more information.
The number of attempts can be set via the configuration parametercom.swift.swp.Platform:sawaRealmMaxBadPwd. Check "List of Parameters" on page95 for detailed instructions on how to modify a configuration parameter. The default value forthis parameter is 5.
Password expiration
A password has a validity period within Alliance Web Platform. After that period, the passwordhas expired and cannot be used to login. If the password expires within 10 day or less, the useris requested to change the password but will still be able to login without changing it. After theexpiration date, the application will force the user to change the password and prevent the userfrom logging in with the expired password.
The password expiration can be set via the configuration parametercom.swift.swp.Platform:sawaRealmPasswordExpiration. Check "List of Parameters"on page 95 for detailed instructions on how to modify a configuration parameter. The defaultvalue for this parameter is 0, meaning the password will remain valid indefinitely. It isrecommended to change this value. The value is expressed in days.
Note Setting this configuration parameter to 0 will deactivate the password expiration,meaning the password will stay indefinitely valid.
Password history
Alliance Web Platform records the last previously used passwords. A user cannot reuse an oldpassword when changing the current password.
The size of the password history (the number of retained passwords per user) can be set via theconfiguration parameter com.swift.swp.Platform:sawaRealmPasswordHistorySize.Check "List of Parameters" on page 95 for detailed instructions on how to modify aconfiguration parameter. The default value for this parameter is 8.
Note Setting this configuration parameter to 0 deactivates the password history.However, the GUI does not allow reusing the previous password.
Note Passwords are never stored in Alliance Web Platform's database in clear text.
List users
To list users, use the following command swp_config -user -listThe tool displays the user name, the profile, the account locking status with the number of badattempts and the password expiration date.
Create users
To create a user <username> with profile <userprofile>, use the following commandswp_config -user -create <username> -profile <userprofile>
Getting Started with Alliance Web Platform Administration
29 March 2013 33

<username> must be a string between 8 and 20 characters long. It can contain only letters anddigits The name is case sensitive.
<userprofile> can be either Administration or Monitoring. Those values are not casesensitive.
The command displays a confirmation message and a generated password (first timepassword). The user access the Alliance Web Platform Administration package the first timeusing the given user name and the first time password. At first login, the application requires theuser to change the password. The user will not be able to proceed until the password has beensuccessfully changed.
Delete users
To delete an existing user, use the following command swp_config -user -delete<username>.
<username> must be a string between 8 and 20 characters long. It can contain only letters anddigits. The name is case sensitive.
The tool prompts for confirmation. The option -force can be used to bypass the confirmation.This allows scripting the operation.
Reset the password of a user
To reset the password of user, use the following command swp_config -user -reset<userName><username> must be a string between 8 and 20 characters long. It can contain only letters anddigits. The name is case sensitive.
The tool prompts for confirmation. The option -force can be used to bypass the confirmation.This allows scripting the operation.
The tool displays a confirmation message and a generated password (first time password). Theuser access the Alliance Web Platform Administration package the first time using the givenuser name and the first time password. At first login, the application requires the user to changethe password. The user will not be able to proceed until the password has been successfullychanged.
This can be used for a user that forgot the password or gets a locked account.
Update the profile of a user
Updating a user profile offers to modify a user profile without creating a new user. To update theprofile of the user <username> to profile <userprofile>, use the following command:swp_config -user -update <userName> -profile <userprofile><username> must be a string between 8 and 20 characters long. It can contain only letters anddigits. The name is case sensitive.
<userprofile> could be either Administration or Monitoring. Those values are not casesensitive.
The tool prompts for confirmation. The option -force can be used to bypass the confirmation.This allows scripting the operation.
Alliance Web Platform 7.0.40
34 Administration and Operations Guide
4.2 Administrator TasksProcedure
1. Refer to the release letter for information on the prerequisites (for example, release numberof the application, Alliance server instance) for installing the package. A warning messageis displayed if the release numbers are different.
2. Install the needed packages (Access Configuration, Gateway Administration,...) on theAlliance Web Platform. For more information, see "Run Alliance Web Platform SupportTools" on page 82.
3. Deploy the .ear file in the IBM WebSphere Application Server.
This step is performed only for Alliance Web Platform. With Alliance Web Platform Server-Embedded, the .ear file is automatically deployed in the embedded application serverduring step 2.
4. Configure one or more Alliance server instances of the appropriate type for the packageusing Alliance Web Platform Administration. For example, Alliance Gateway in the case ofBrowse. For more information on how to create an instance, see "Add an Alliance ServerInstance" on page 52.
5. Communicate the URL of the application group or groups created during the installation ofthe package to the users.
Go to the application group, click the application group that must be accessed by the user.The URL is displayed in the URL to Access Group field of the application groupproperties.
For more information about application group properties, see "Application Groups" on page43.
Getting Started with Alliance Web Platform Administration
29 March 2013 35
5 PackagesOverview
The Alliance Web Platform owner can install and uninstall packages on Alliance Web Platform.For more information about installing and uninstalling a package, see the installation guide forAlliance Web Platform or Alliance Web Platform Server-Embedded.
Packages contain one or more applications. For example, the Alliance Web PlatformAdministration package contains applications that are used to perform the administration tasks.Packages may be customised through a number of configuration parameters.
Note The Alliance Web Platform Administration package, and the HTTP Proxy package(used by Browse) are the only packages that are preinstalled on Alliance WebPlatform.
The Alliance Web Platform is present in the GUI as a package without anyapplications. This allows you to configure the configuration parameters that applyto all other packages.
A package hosted in Alliance Web Platform is delivered as Java Enterprise Application Archive(.ear) file.
A predefined application group is automatically created when a package is installed. Theadministrator can provide the URL of the predefined application groups to the users so they canaccess those groups and the applications they contain. The administrator can also organise theapplications of the package into custom application groups that better fit the user requirements.For more information, see "Application Groups" on page 43.
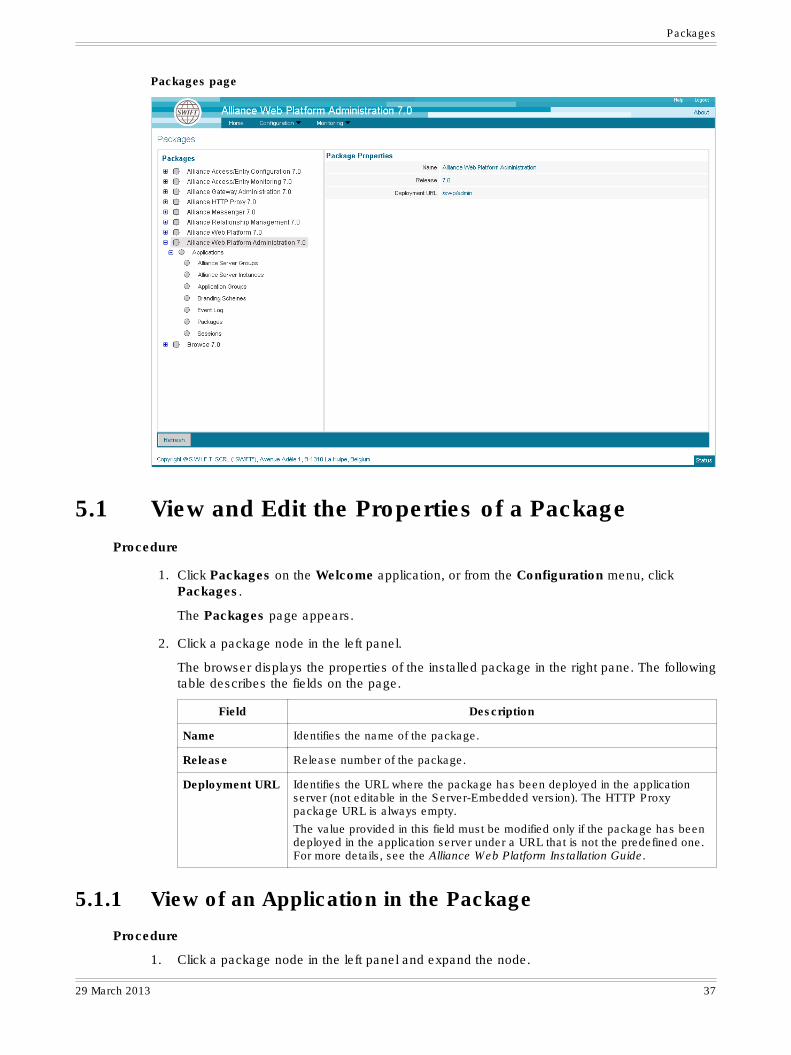
Packages page
The packages page is divided into two panes. The left pane displays the set of installedpackages in a tree structure, and the right pane displays the properties of the node that youclicked.
On the left pane, there is a node per package.
Under a package node, you find:
• An optional node called Applications. Under this node is the list of applications contained inthe package.
• An optional node called Parameters.
When you click a package node, the package properties are displayed in the right pane.
When you click any node under a node Applications, the properties of the correspondingapplication are displayed in the right pane.
When you click a node Parameters, the configuration parameters of the package are displayedin the right pane.
Alliance Web Platform 7.0.40
36 Administration and Operations Guide
Packages page
5.1 View and Edit the Properties of a PackageProcedure
1. Click Packages on the Welcome application, or from the Configuration menu, clickPackages.
The Packages page appears.
2. Click a package node in the left panel.
The browser displays the properties of the installed package in the right pane. The followingtable describes the fields on the page.
Field Description
Name Identifies the name of the package.
Release Release number of the package.
Deployment URL Identifies the URL where the package has been deployed in the applicationserver (not editable in the Server-Embedded version). The HTTP Proxypackage URL is always empty.
The value provided in this field must be modified only if the package has beendeployed in the application server under a URL that is not the predefined one.For more details, see the Alliance Web Platform Installation Guide.
5.1.1 View of an Application in the Package
Procedure
1. Click a package node in the left panel and expand the node.
Packages
29 March 2013 37
The Applications node appears.
2. Expand the Applications node and click an application.
The browser displays the properties of the application in the right pane. The following tabledescribes the fields on the page.
Field Description
Package Identifies the name of the package.
Name Identifies the name of the application.
Alliance Server Identifies the type of Alliance server required by the application.
MinimumRelease
Minimum release of the Alliance server instance required (read-only value).
5.2 View and Edit Package Configuration ParametersProcedure
1. Click the Parameters node under the relevant package.
The browser displays the list of parameters on the right pane.
2. Enter new values in any field.
3. Click Save to save the new values.
The browser displays the updated configuration parameter.
5.2.1 Alliance Web Platform Configuration Parameters
Configuration parameters
The Alliance Web Platform package contains the following configuration parameters.
General configuration parameters
Instance name identifies the name of the platform instance. This name is specified during theinstallation and cannot be changed afterwards.
Installation Host identifies the name of the host machine where Alliance Web Platform isinstalled.
Installation Location identifies the location in the machine where Alliance Web Platform isinstalled.
Installation Operators identifies the (maximum) allowed number of concurrent sessions ofapplication users. The default value is 10000.
Session Expiry Timeout indicates the period of time without activity towards the server afterwhich a session is considered expired. Value is in seconds. Default value 2400 seconds.
Other session timeouts may also be used on the Alliance server instance. You are advised toset the session timeout of Alliance Web Platform at a lower value than the session timeouts onthe Alliance server instance side. Note that the default value for Alliance Web Platform is 2400seconds which is lower than, for example, the default of the Workstation session timeoutparameter (2700 seconds) in Alliance Access.
Note for Browse users:
Alliance Web Platform 7.0.40
38 Administration and Operations Guide
Using a Browse service may involve infrequent interactions between the Browse applicationrunning on Alliance Web Platform and its Alliance server. The likelihood that the user sessionexpires in between two such interactions is reasonably high.
To avoid the annoyance of the user session expiring too soon when using a Browse service, theBrowse application has been implemented to prevent the user session from expiring.
Date Format indicates the date format to be used to display date values.
Supported formats are:
• YYYY/MM/DD
• DD/MM/YYYY
• MM/DD/YYYY
The date format influences only the display of date values in the GUI of the applications hostedby the Alliance Web Platform. It does not modify the format used for the storage of these dates.
SNMP (Simple Network Management Protocol) configuration parameters
It can take up to 1 minute before changes to the SNMP settings are taken into account.
SNMP Server Communication identifies where to send the events logged in the Alliance WebPlatform database. These events can be automatically sent to third-party operationalmanagement tools (such as HP OpenView and Tivoli) using SNMP. The administrator specifiesone or more pairs of values for the IP address and port number. Use the syntax <IP>:<Port>and separate each pair of values with a comma.
Alliance Web Platform uses the port number that you have indicated to send events to each IPaddress. If you do not specify the port number, then the SNMP server must use the default port(162).
If no value is provided (default configuration), events will not be distributed to an external third-party tool.
SNMP Event Distribution determines the lower severity level of events that the applicationsends to the SNMP server.
The value that you choose in the drop-down list applies to all SNMP servers:
• NONE (no events sent: default value)
• FATAL (sends only FATAL events)
• FATAL, SEVERE (sends FATAL and SEVERE events)
• FATAL, SEVERE, WARNING (sends FATAL, SEVERE, and WARNING events)
• FATAL, SEVERE, WARNING, INFO (sends all events)
SNMP Max Event Size Indicates the maximum size for the text in the event description.Allowed values are in the range of 0 to 2000. The default value is 0, which means that AllianceWeb Platform does not truncate the event description when it prepares to send an event to anSNMP server.
Note: The value of this parameter does not influence the size of events logged in the AllianceWeb Platform event log.
SNMP Heartbeat Interval Indicates in seconds the interval between two heartbeats sent by theapplication. Allowed values are in the range of 120 to 900. The default value is 0, which meansno heartbeat is sent. Any value between 0 and 119 (inclusive) turns off the heartbeatfunctionality.
Packages
29 March 2013 39
Every event is mapped to a structure that can be interpreted by the SNMP server. For theSNMP server to be able to read this specific trap, the swptrap.mib file, must be copied from thedata directory of the Alliance Web Platform release media.
5.2.2 Alliance HTTP Proxy Configuration Parameter
Applicability
The information in this section is only valid for Alliance Web Platform Server-Embedded.
Configuration parameter
The Alliance HTTP Proxy package (see the Alliance Web Platform section in "File transfer flowconcentration" on page 56) contains the configuration parameter shown in the following table.
Name Description
Port Number Identifies the port number used to connect to the HTTP Proxy. The default value is48600.
5.3 Add an Application in an Installed PackageOverview
In some packages such as Browse, it is possible to add applications. When you click theApplications node below the package name, an Add button appears in the button bar.
Procedure
1. Click an installed package that you can edit.
The browser displays the properties of the installed package.
2. Expand the tree of the editable package and click the Applications node.
3. Click Add .
This inserts a new application (called New Application) in the list of applications that are inthe package.
The browser displays the properties of the new application.
4. Enter the values for the properties of the application.
Field Description
Package Name of the package.
Name Name of the application.
Alliance Server Identifies the type of Alliance server used by the application and ifrelevant, the kind of user that can login to the application.
Deployment URL Identifies the URL where the application has been deployed.
5. Click Save to save the properties of the application.
The browser displays the updated properties of the new application.
Alliance Web Platform 7.0.40
40 Administration and Operations Guide
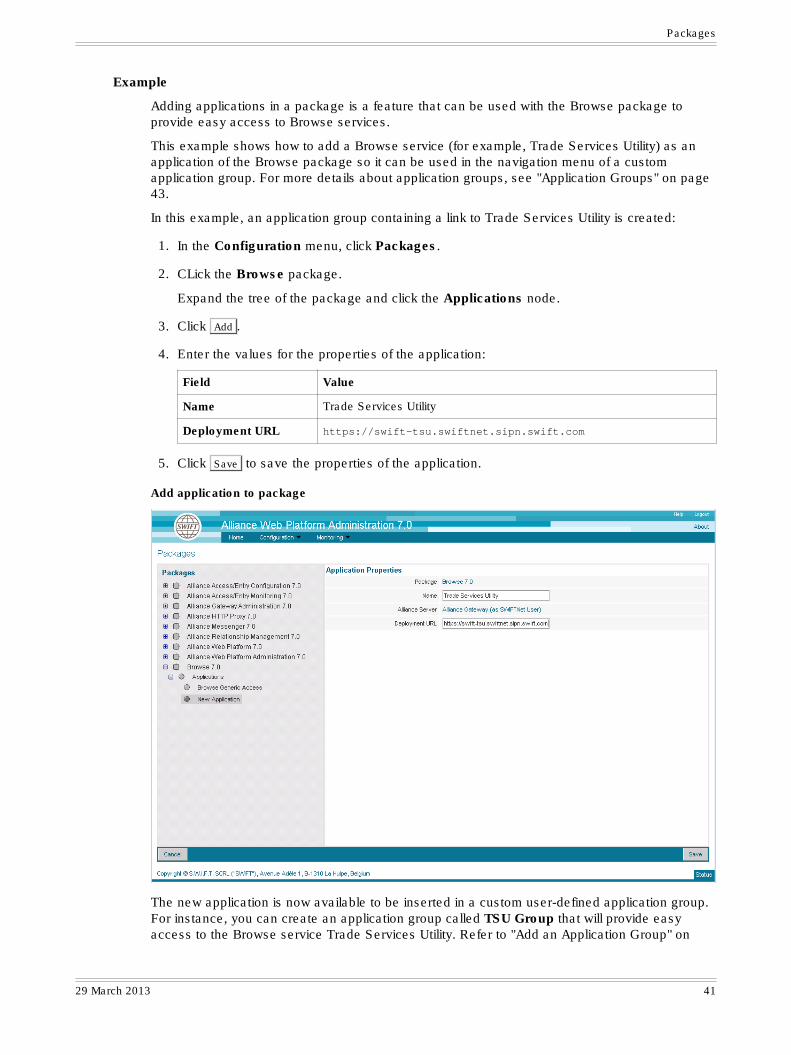
Example
Adding applications in a package is a feature that can be used with the Browse package toprovide easy access to Browse services.
This example shows how to add a Browse service (for example, Trade Services Utility) as anapplication of the Browse package so it can be used in the navigation menu of a customapplication group. For more details about application groups, see "Application Groups" on page43.
In this example, an application group containing a link to Trade Services Utility is created:
1. In the Configuration menu, click Packages.
2. CLick the Browse package.
Expand the tree of the package and click the Applications node.
3. Click Add .
4. Enter the values for the properties of the application:
Field Value
Name Trade Services Utility
Deployment URL https://swift-tsu.swiftnet.sipn.swift.com
5. Click Save to save the properties of the application.
Add application to package
The new application is now available to be inserted in a custom user-defined application group.For instance, you can create an application group called TSU Group that will provide easyaccess to the Browse service Trade Services Utility. Refer to "Add an Application Group" on
Packages
29 March 2013 41
page 47 for more details about creating application groups and for an example on how tocreate an application group called TSU Group.
5.4 Delete an Application from an Installed PackageOverview
This procedure only applies to editable packages and applications that you created.
Procedure
1. Click the application that you want to delete.
2. Click Delete to delete the application from the installed package.
A message appears to request that you confirm the deletion.
3. Click OK to confirm.
The application is removed from all application groups in which it was referenced.
The browser displays the updated list of applications in the installed package.
Alliance Web Platform 7.0.40
42 Administration and Operations Guide
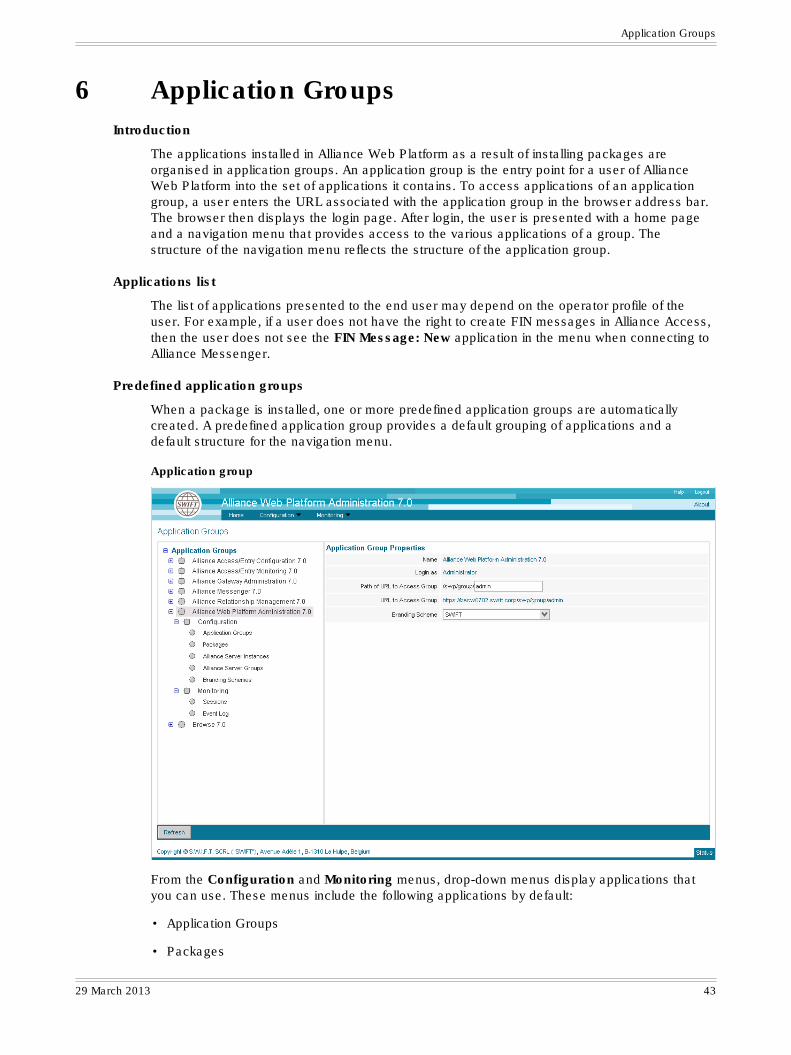
6 Application GroupsIntroduction
The applications installed in Alliance Web Platform as a result of installing packages areorganised in application groups. An application group is the entry point for a user of AllianceWeb Platform into the set of applications it contains. To access applications of an applicationgroup, a user enters the URL associated with the application group in the browser address bar.The browser then displays the login page. After login, the user is presented with a home pageand a navigation menu that provides access to the various applications of a group. Thestructure of the navigation menu reflects the structure of the application group.
Applications list
The list of applications presented to the end user may depend on the operator profile of theuser. For example, if a user does not have the right to create FIN messages in Alliance Access,then the user does not see the FIN Message: New application in the menu when connecting toAlliance Messenger.
Predefined application groups
When a package is installed, one or more predefined application groups are automaticallycreated. A predefined application group provides a default grouping of applications and adefault structure for the navigation menu.
Application group
From the Configuration and Monitoring menus, drop-down menus display applications thatyou can use. These menus include the following applications by default:
• Application Groups
• Packages
Application Groups
29 March 2013 43
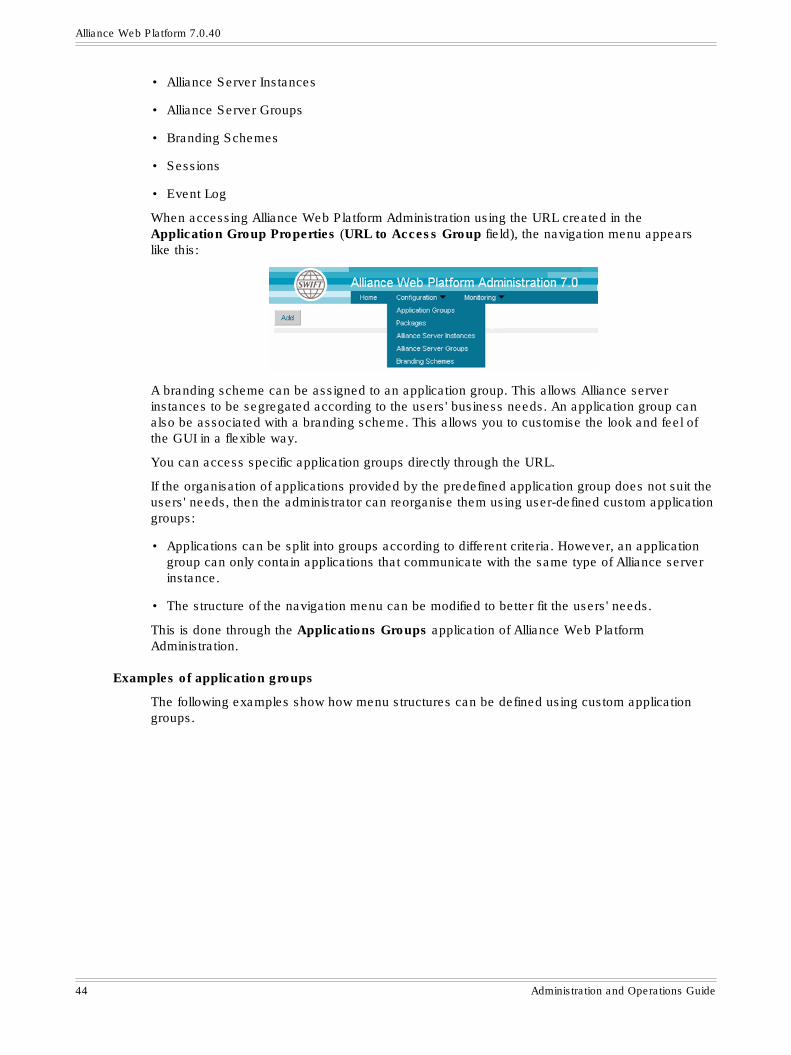
• Alliance Server Instances
• Alliance Server Groups
• Branding Schemes
• Sessions
• Event Log
When accessing Alliance Web Platform Administration using the URL created in theApplication Group Properties (URL to Access Group field), the navigation menu appearslike this:
A branding scheme can be assigned to an application group. This allows Alliance serverinstances to be segregated according to the users' business needs. An application group canalso be associated with a branding scheme. This allows you to customise the look and feel ofthe GUI in a flexible way.
You can access specific application groups directly through the URL.
If the organisation of applications provided by the predefined application group does not suit theusers' needs, then the administrator can reorganise them using user-defined custom applicationgroups:
• Applications can be split into groups according to different criteria. However, an applicationgroup can only contain applications that communicate with the same type of Alliance serverinstance.
• The structure of the navigation menu can be modified to better fit the users' needs.
This is done through the Applications Groups application of Alliance Web PlatformAdministration.
Examples of application groups
The following examples show how menu structures can be defined using custom applicationgroups.
Alliance Web Platform 7.0.40
44 Administration and Operations Guide
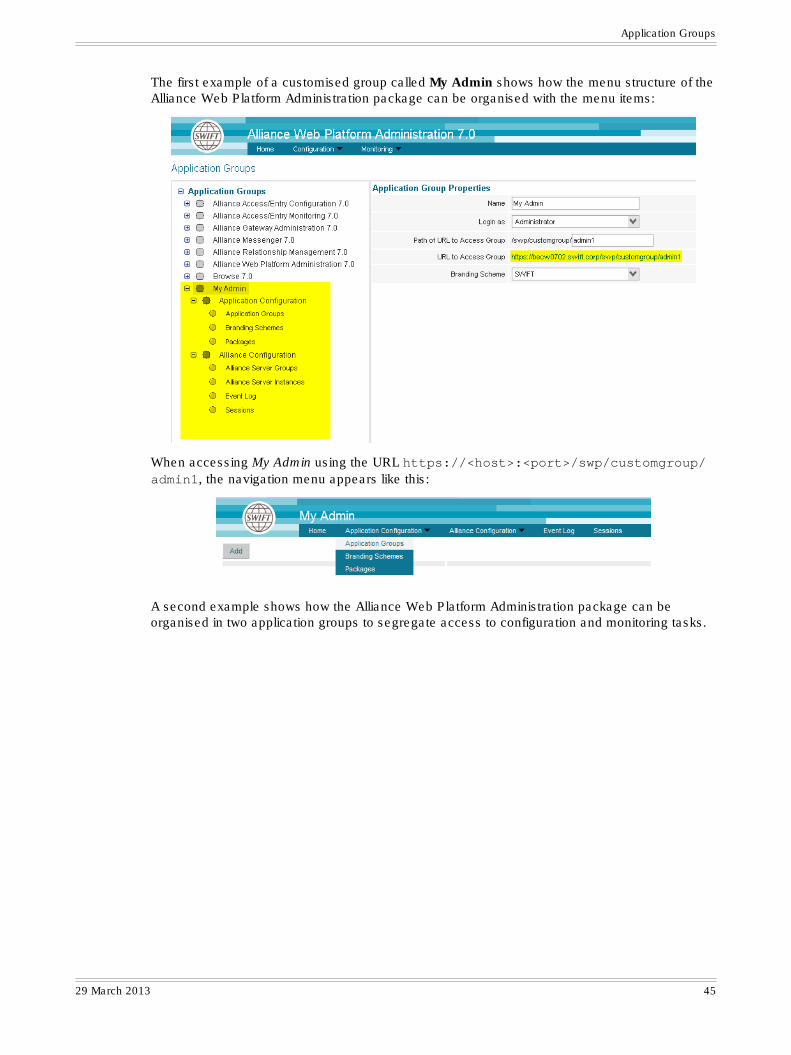
The first example of a customised group called My Admin shows how the menu structure of theAlliance Web Platform Administration package can be organised with the menu items:
When accessing My Admin using the URL https://<host>:<port>/swp/customgroup/admin1, the navigation menu appears like this:
A second example shows how the Alliance Web Platform Administration package can beorganised in two application groups to segregate access to configuration and monitoring tasks.
Application Groups
29 March 2013 45
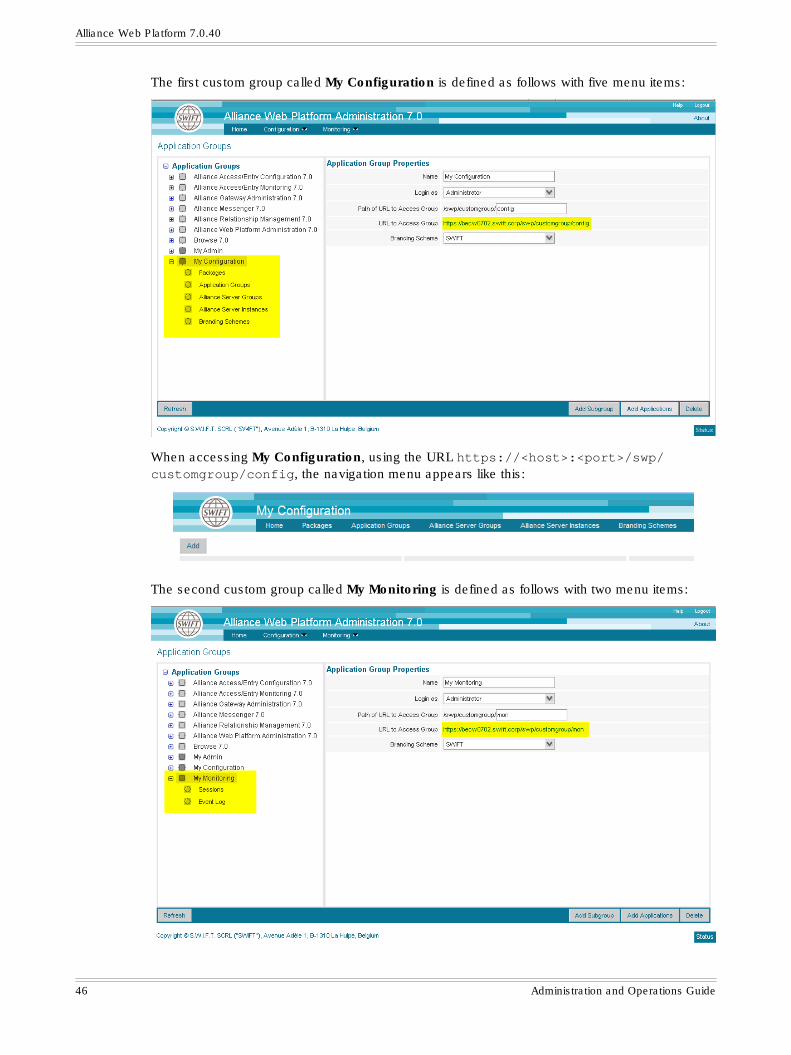
The first custom group called My Configuration is defined as follows with five menu items:
When accessing My Configuration, using the URL https://<host>:<port>/swp/customgroup/config, the navigation menu appears like this:
The second custom group called My Monitoring is defined as follows with two menu items:
Alliance Web Platform 7.0.40
46 Administration and Operations Guide
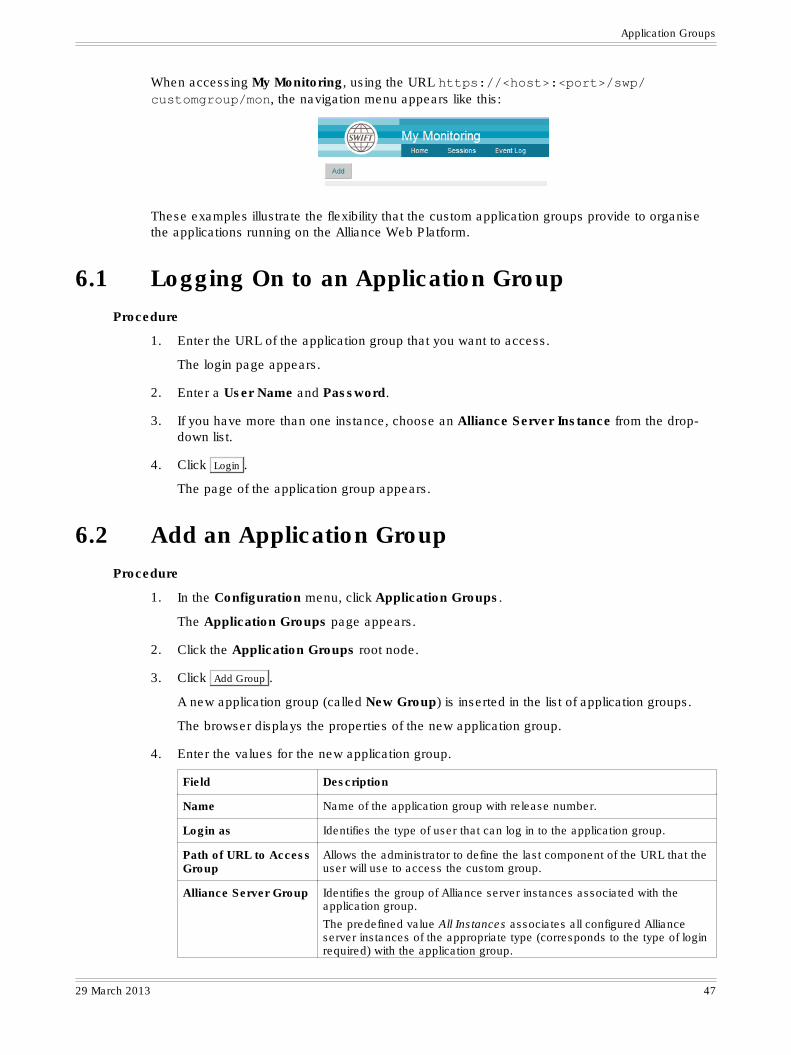
When accessing My Monitoring, using the URL https://<host>:<port>/swp/customgroup/mon, the navigation menu appears like this:
These examples illustrate the flexibility that the custom application groups provide to organisethe applications running on the Alliance Web Platform.
6.1 Logging On to an Application GroupProcedure
1. Enter the URL of the application group that you want to access.
The login page appears.
2. Enter a User Name and Password.
3. If you have more than one instance, choose an Alliance Server Instance from the drop-down list.
4. Click Login .
The page of the application group appears.
6.2 Add an Application GroupProcedure
1. In the Configuration menu, click Application Groups.
The Application Groups page appears.
2. Click the Application Groups root node.
3. Click Add Group .
A new application group (called New Group) is inserted in the list of application groups.
The browser displays the properties of the new application group.
4. Enter the values for the new application group.
Field Description
Name Name of the application group with release number.
Login as Identifies the type of user that can log in to the application group.
Path of URL to AccessGroup
Allows the administrator to define the last component of the URL that theuser will use to access the custom group.
Alliance Server Group Identifies the group of Alliance server instances associated with theapplication group.
The predefined value All Instances associates all configured Allianceserver instances of the appropriate type (corresponds to the type of loginrequired) with the application group.
Application Groups
29 March 2013 47

Field Description
To define groups of Alliance server instances, see "Alliance ServerGroups" on page 62.
All Alliance server instances of the appropriate type that belong to theinstance group associated with the application group appear on the loginscreen when accessing the application group. The user must choose oneof these Alliance server instances on the login page.
Branding Scheme Identifies the branding scheme associated with the application group.
To define branding schemes, see "Branding Schemes" on page 64.
5. Click Save to save the properties of the new application group.
The browser displays the updated properties of the new application group.
Example
To create an application group TSU Group that provides easy access to the Browse serviceTrade Services Utility:
1. In the Configuration menu, click Application Groups.
2. Click the Application Groups node.
3. Click Add Group .
4. Enter values for the Application Group Properties:
Field Value
Name TSU Group
Login as Choose SWIFTNet User in the drop-down list.
Path of URL to AccessGroup
Enter a value for the last component of the path, for example, tsu.
Alliance Server Group Choose All Instances in the drop-down list.
Branding Scheme Choose SWIFT in the drop-down list.
5. Click Save to save the properties of the new application group.
6. Click Add Applications .
A pop-up window that shows all the applications that can be added to the group appears.
7. Click the Browse service link (named Trade Services Utility) to add to the application group.
8. Click Save .
Alliance Web Platform 7.0.40
48 Administration and Operations Guide
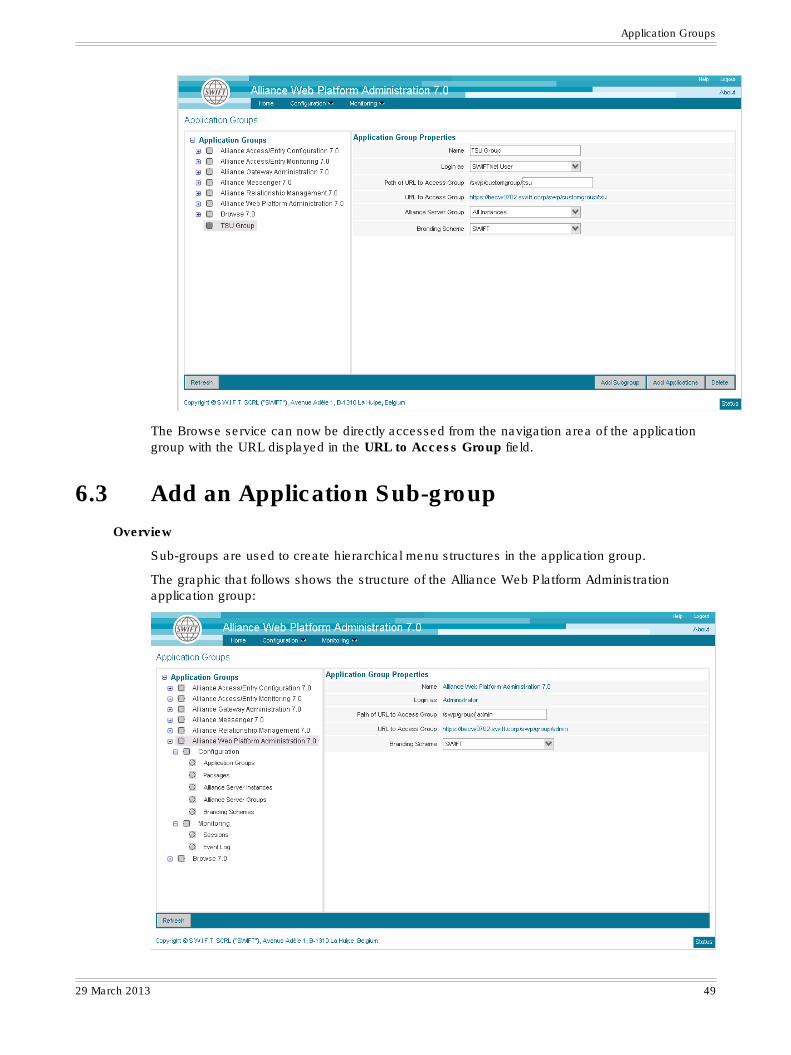
The Browse service can now be directly accessed from the navigation area of the applicationgroup with the URL displayed in the URL to Access Group field.
6.3 Add an Application Sub-groupOverview
Sub-groups are used to create hierarchical menu structures in the application group.
The graphic that follows shows the structure of the Alliance Web Platform Administrationapplication group:
Application Groups
29 March 2013 49
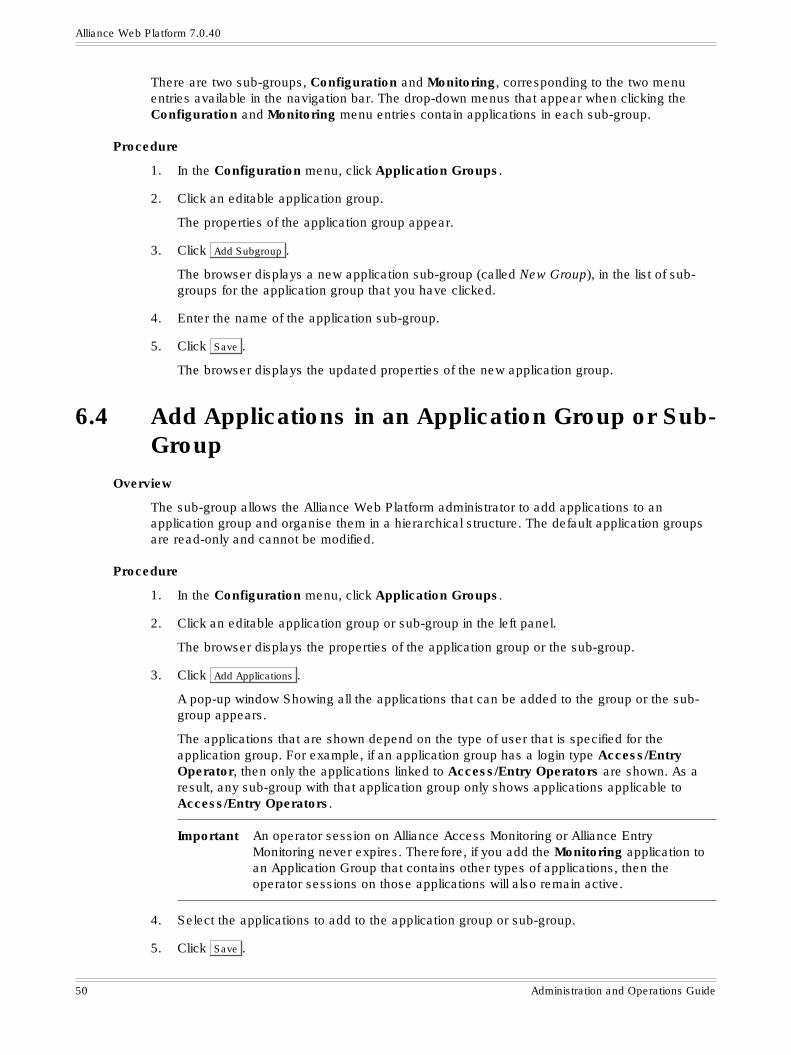
There are two sub-groups, Configuration and Monitoring, corresponding to the two menuentries available in the navigation bar. The drop-down menus that appear when clicking theConfiguration and Monitoring menu entries contain applications in each sub-group.
Procedure
1. In the Configuration menu, click Application Groups.
2. Click an editable application group.
The properties of the application group appear.
3. Click Add Subgroup .
The browser displays a new application sub-group (called New Group), in the list of sub-groups for the application group that you have clicked.
4. Enter the name of the application sub-group.
5. Click Save .
The browser displays the updated properties of the new application group.
6.4 Add Applications in an Application Group or Sub-Group
Overview
The sub-group allows the Alliance Web Platform administrator to add applications to anapplication group and organise them in a hierarchical structure. The default application groupsare read-only and cannot be modified.
Procedure
1. In the Configuration menu, click Application Groups.
2. Click an editable application group or sub-group in the left panel.
The browser displays the properties of the application group or the sub-group.
3. Click Add Applications .
A pop-up window Showing all the applications that can be added to the group or the sub-group appears.
The applications that are shown depend on the type of user that is specified for theapplication group. For example, if an application group has a login type Access/EntryOperator, then only the applications linked to Access/Entry Operators are shown. As aresult, any sub-group with that application group only shows applications applicable toAccess/Entry Operators.
Important An operator session on Alliance Access Monitoring or Alliance EntryMonitoring never expires. Therefore, if you add the Monitoring application toan Application Group that contains other types of applications, then theoperator sessions on those applications will also remain active.
4. Select the applications to add to the application group or sub-group.
5. Click Save .
Alliance Web Platform 7.0.40
50 Administration and Operations Guide
The browser displays the list of applications that are now in the application group or sub-group.
The browser displays the properties of the application group or sub-group.
6.5 Display the Properties of an Application Group orSub-Group
Overview
You can view the properties of an application group or sub-group.
Procedure
1. In the Configuration menu, click Application Groups.
2. Click an editable application group or sub-group in the left panel.
3. The browser displays the properties of the application group or sub-group.
Application Groups
29 March 2013 51
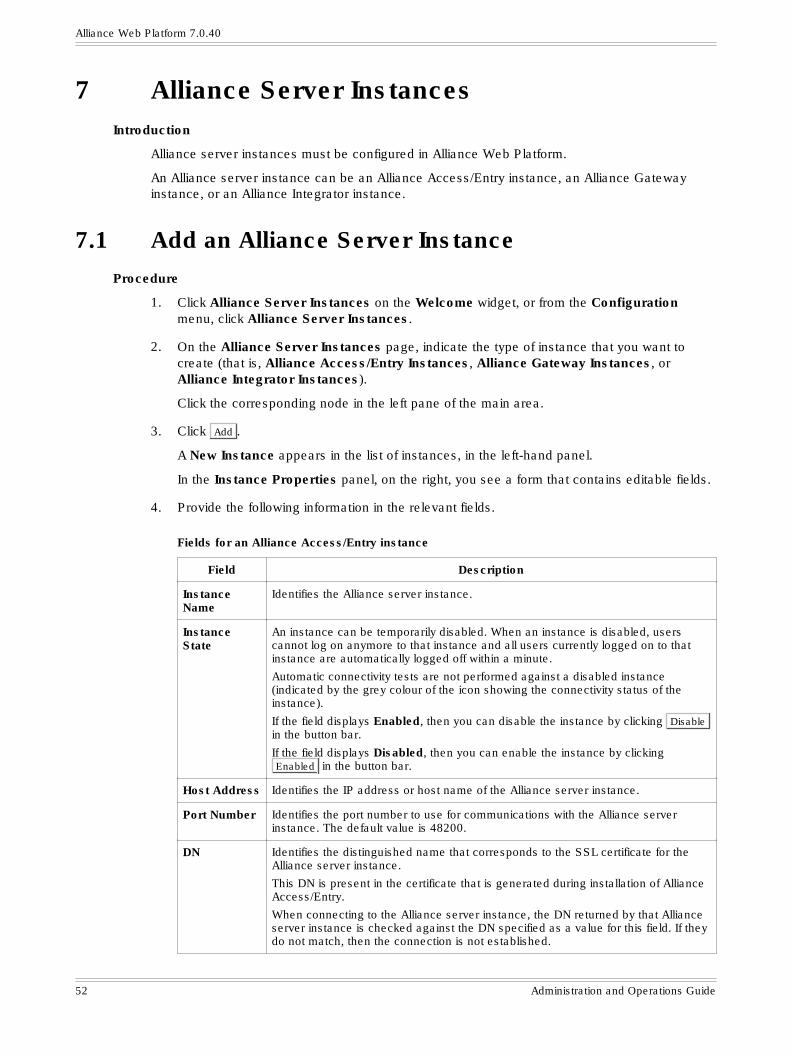
7 Alliance Server InstancesIntroduction
Alliance server instances must be configured in Alliance Web Platform.
An Alliance server instance can be an Alliance Access/Entry instance, an Alliance Gatewayinstance, or an Alliance Integrator instance.
7.1 Add an Alliance Server InstanceProcedure
1. Click Alliance Server Instances on the Welcome widget, or from the Configurationmenu, click Alliance Server Instances.
2. On the Alliance Server Instances page, indicate the type of instance that you want tocreate (that is, Alliance Access/Entry Instances, Alliance Gateway Instances, orAlliance Integrator Instances).
Click the corresponding node in the left pane of the main area.
3. Click Add .
A New Instance appears in the list of instances, in the left-hand panel.
In the Instance Properties panel, on the right, you see a form that contains editable fields.
4. Provide the following information in the relevant fields.
Fields for an Alliance Access/Entry instance
Field Description
InstanceName
Identifies the Alliance server instance.
InstanceState
An instance can be temporarily disabled. When an instance is disabled, userscannot log on anymore to that instance and all users currently logged on to thatinstance are automatically logged off within a minute.
Automatic connectivity tests are not performed against a disabled instance(indicated by the grey colour of the icon showing the connectivity status of theinstance).
If the field displays Enabled, then you can disable the instance by clicking Disablein the button bar.
If the field displays Disabled, then you can enable the instance by clickingEnabled in the button bar.
Host Address Identifies the IP address or host name of the Alliance server instance.
Port Number Identifies the port number to use for communications with the Alliance serverinstance. The default value is 48200.
DN Identifies the distinguished name that corresponds to the SSL certificate for theAlliance server instance.
This DN is present in the certificate that is generated during installation of AllianceAccess/Entry.
When connecting to the Alliance server instance, the DN returned by that Allianceserver instance is checked against the DN specified as a value for this field. If theydo not match, then the connection is not established.
Alliance Web Platform 7.0.40
52 Administration and Operations Guide
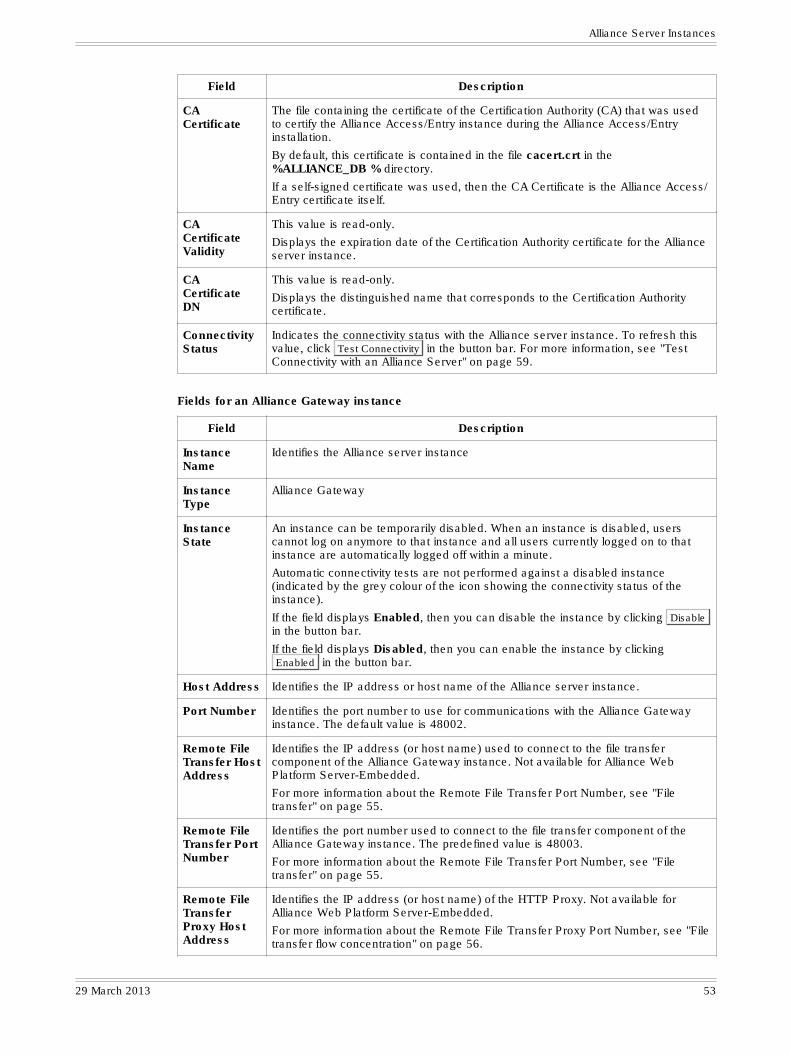
Field Description
CACertificate
The file containing the certificate of the Certification Authority (CA) that was usedto certify the Alliance Access/Entry instance during the Alliance Access/Entryinstallation.
By default, this certificate is contained in the file cacert.crt in the%ALLIANCE_DB % directory.
If a self-signed certificate was used, then the CA Certificate is the Alliance Access/Entry certificate itself.
CACertificateValidity
This value is read-only.
Displays the expiration date of the Certification Authority certificate for the Allianceserver instance.
CACertificateDN
This value is read-only.
Displays the distinguished name that corresponds to the Certification Authoritycertificate.
ConnectivityStatus
Indicates the connectivity status with the Alliance server instance. To refresh thisvalue, click Test Connectivity in the button bar. For more information, see "TestConnectivity with an Alliance Server" on page 59.
Fields for an Alliance Gateway instance
Field Description
InstanceName
Identifies the Alliance server instance
InstanceType
Alliance Gateway
InstanceState
An instance can be temporarily disabled. When an instance is disabled, userscannot log on anymore to that instance and all users currently logged on to thatinstance are automatically logged off within a minute.
Automatic connectivity tests are not performed against a disabled instance(indicated by the grey colour of the icon showing the connectivity status of theinstance).
If the field displays Enabled, then you can disable the instance by clicking Disablein the button bar.
If the field displays Disabled, then you can enable the instance by clickingEnabled in the button bar.
Host Address Identifies the IP address or host name of the Alliance server instance.
Port Number Identifies the port number to use for communications with the Alliance Gatewayinstance. The default value is 48002.
Remote FileTransfer HostAddress
Identifies the IP address (or host name) used to connect to the file transfercomponent of the Alliance Gateway instance. Not available for Alliance WebPlatform Server-Embedded.
For more information about the Remote File Transfer Port Number, see "Filetransfer" on page 55.
Remote FileTransfer PortNumber
Identifies the port number used to connect to the file transfer component of theAlliance Gateway instance. The predefined value is 48003.
For more information about the Remote File Transfer Port Number, see "Filetransfer" on page 55.
Remote FileTransferProxy HostAddress
Identifies the IP address (or host name) of the HTTP Proxy. Not available forAlliance Web Platform Server-Embedded.
For more information about the Remote File Transfer Proxy Port Number, see "Filetransfer flow concentration" on page 56.
Alliance Server Instances
29 March 2013 53
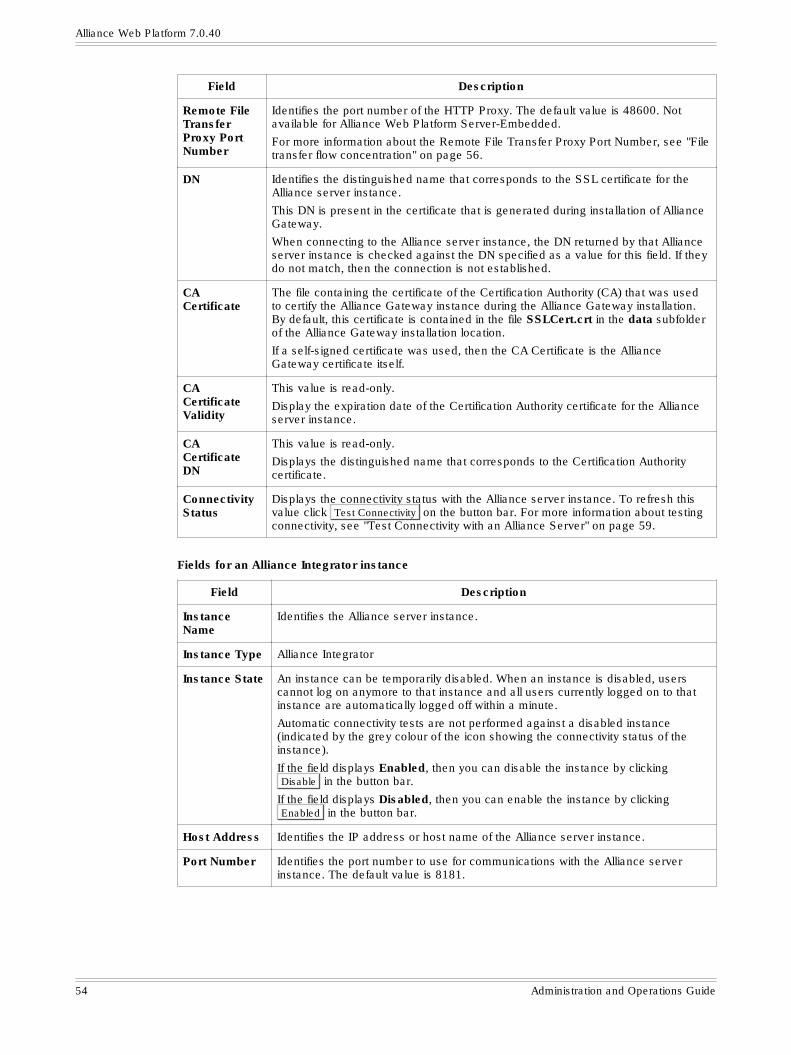
Field Description
Remote FileTransferProxy PortNumber
Identifies the port number of the HTTP Proxy. The default value is 48600. Notavailable for Alliance Web Platform Server-Embedded.
For more information about the Remote File Transfer Proxy Port Number, see "Filetransfer flow concentration" on page 56.
DN Identifies the distinguished name that corresponds to the SSL certificate for theAlliance server instance.
This DN is present in the certificate that is generated during installation of AllianceGateway.
When connecting to the Alliance server instance, the DN returned by that Allianceserver instance is checked against the DN specified as a value for this field. If theydo not match, then the connection is not established.
CACertificate
The file containing the certificate of the Certification Authority (CA) that was usedto certify the Alliance Gateway instance during the Alliance Gateway installation.By default, this certificate is contained in the file SSLCert.crt in the data subfolderof the Alliance Gateway installation location.
If a self-signed certificate was used, then the CA Certificate is the AllianceGateway certificate itself.
CACertificateValidity
This value is read-only.
Display the expiration date of the Certification Authority certificate for the Allianceserver instance.
CACertificateDN
This value is read-only.
Displays the distinguished name that corresponds to the Certification Authoritycertificate.
ConnectivityStatus
Displays the connectivity status with the Alliance server instance. To refresh thisvalue click Test Connectivity on the button bar. For more information about testingconnectivity, see "Test Connectivity with an Alliance Server" on page 59.
Fields for an Alliance Integrator instance
Field Description
InstanceName
Identifies the Alliance server instance.
Instance Type Alliance Integrator
Instance State An instance can be temporarily disabled. When an instance is disabled, userscannot log on anymore to that instance and all users currently logged on to thatinstance are automatically logged off within a minute.
Automatic connectivity tests are not performed against a disabled instance(indicated by the grey colour of the icon showing the connectivity status of theinstance).
If the field displays Enabled, then you can disable the instance by clickingDisable in the button bar.
If the field displays Disabled, then you can enable the instance by clickingEnabled in the button bar.
Host Address Identifies the IP address or host name of the Alliance server instance.
Port Number Identifies the port number to use for communications with the Alliance serverinstance. The default value is 8181.
Alliance Web Platform 7.0.40
54 Administration and Operations Guide
Field Description
DN Identifies the distinguished name that corresponds to the SSL certificate for theAlliance server instance.
This distinguished name is present in the certificate that is generated duringinstallation of Alliance Integrator.
When connecting to the Alliance server instance, the DN returned by that Allianceserver instance is checked against the DN specified as a value for this field. Ifthey do not match, then the connection is not established.
CA Certificate Specifies the location where the security certificate is exported. The certificate ofthe Certification Authority (CA) is used to certify the Alliance Integrator instanceduring the Alliance Integrator installation.
Commands are executed to export the security certificate to a directory.
For more information, see "Creating an Alliance Integrator Instance in AllianceWeb Platform" in Alliance Integrator Installation Guide.
CA CertificateValidity
This value is read-only.
Displays the expiration date of the Certification Authority certificate for theAlliance server instance.
CA CertificateDN
This value is read-only.
Displays the distinguished name that corresponds to the Certification Authoritycertificate.
ConnectivityStatus
Indicates the connectivity status with the Alliance server instance. To refresh thisvalue, click Test Connectivity in the button bar. For more information, see "TestConnectivity with an Alliance Server" on page 59.
5. Click Save .
The new instance appears under the existing instance or instances of the same type in theleft panel. Within instances of the same type, the content is organised alphabetically byinstance name.
Note If the version number of the Alliance server instance is lower than the versionnumber of the Alliance Web Platform, then a warning message is displayed tothe administrator.
File transfer
Some applications installed in Alliance Web Platform may have to transfer files from the user'sPC to Alliance Gateway, as a result of the invocation of a FileAct primitive. This is the case inBrowse when some Browse service web pages would invoke a FileAct primitive.
When a file must be transferred from the user's PC to Alliance Gateway, a file handlercomponent is automatically downloaded and run on the user's PC to handle the file transfer inco-operation with the file controller component of Alliance Gateway.
Alliance Server Instances
29 March 2013 55
Applicationsupporting File
Transfer
Desktop PC
D10
8000
2
File Handler File Controller
Alliance Web Platform
Alliance GatewayBrowser
The connection to the Alliance Gateway file controller is initiated from the file handler running onthe user's PC.
The Alliance Web Platform administrator must configure the Host Address and Port Numberused to establish the connection in the properties:
• Remote File Transfer Host Address
• Remote File Transfer Port Number
The values for these properties are obtained from the Alliance Gateway configuration.
File transfer flow concentration
Alliance Web Platform Server-Embedded
To avoid direct connections from various PCs to the Alliance Gateway host in case files must betransferred from the users' PCs to the Alliance Gateway, the file transfer flows must beconcentrated.
Alliance Web Platform 7.0.40
56 Administration and Operations Guide
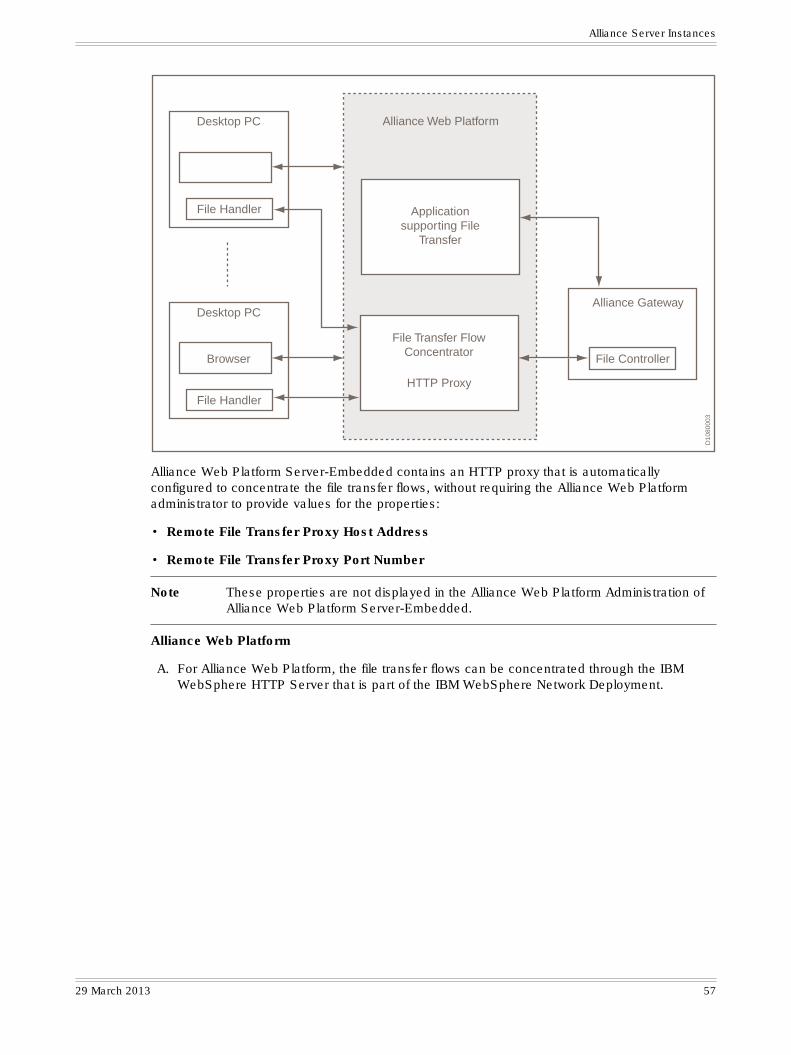
D10
8000
3
Alliance Web Platform
Alliance Gateway
File Handler
Desktop PC
File Handler
Desktop PC
File Controller
HTTP Proxy
Browser
Applicationsupporting File
Transfer
File Transfer FlowConcentrator
Alliance Web Platform Server-Embedded contains an HTTP proxy that is automaticallyconfigured to concentrate the file transfer flows, without requiring the Alliance Web Platformadministrator to provide values for the properties:
• Remote File Transfer Proxy Host Address
• Remote File Transfer Proxy Port Number
Note These properties are not displayed in the Alliance Web Platform Administration ofAlliance Web Platform Server-Embedded.
Alliance Web Platform
A. For Alliance Web Platform, the file transfer flows can be concentrated through the IBMWebSphere HTTP Server that is part of the IBM WebSphere Network Deployment.
Alliance Server Instances
29 March 2013 57
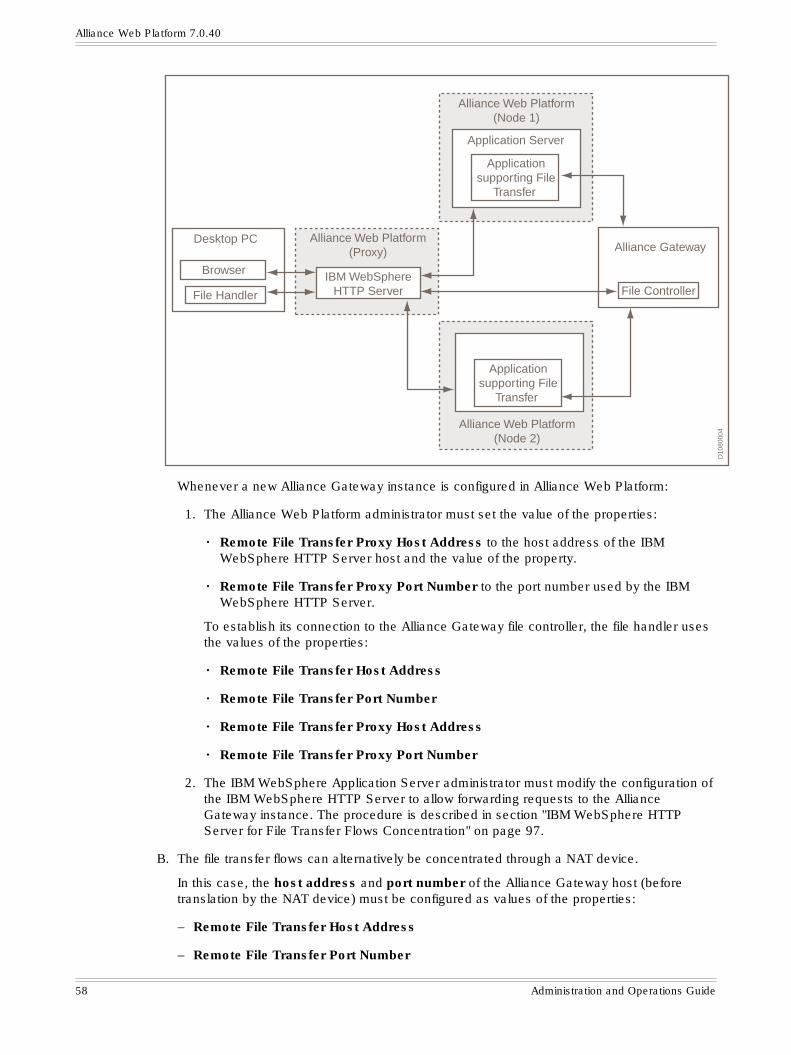
D10
8000
4
File Controller
Application Server
Applicationsupporting File
Transfer
Browser
File Handler
Desktop PC Alliance Web Platform(Proxy)
Alliance Web Platform(Node 1)
Alliance Gateway
Alliance Web Platform(Node 2)
Applicationsupporting File
Transfer
IBM WebSphereHTTP Server
Whenever a new Alliance Gateway instance is configured in Alliance Web Platform:
1. The Alliance Web Platform administrator must set the value of the properties:
• Remote File Transfer Proxy Host Address to the host address of the IBMWebSphere HTTP Server host and the value of the property.
• Remote File Transfer Proxy Port Number to the port number used by the IBMWebSphere HTTP Server.
To establish its connection to the Alliance Gateway file controller, the file handler usesthe values of the properties:
• Remote File Transfer Host Address
• Remote File Transfer Port Number
• Remote File Transfer Proxy Host Address
• Remote File Transfer Proxy Port Number
2. The IBM WebSphere Application Server administrator must modify the configuration ofthe IBM WebSphere HTTP Server to allow forwarding requests to the AllianceGateway instance. The procedure is described in section "IBM WebSphere HTTPServer for File Transfer Flows Concentration" on page 97.
B. The file transfer flows can alternatively be concentrated through a NAT device.
In this case, the host address and port number of the Alliance Gateway host (beforetranslation by the NAT device) must be configured as values of the properties:
– Remote File Transfer Host Address
– Remote File Transfer Port Number
Alliance Web Platform 7.0.40
58 Administration and Operations Guide
The following properties are not used in this case:
– Remote File Transfer Proxy Host Address
– Remote File Transfer Proxy Port Number
7.2 Update an Alliance Server InstanceProcedure
1. On the Alliance Server Instances page, click the active instance that you want to update.
2. Click Disable .
A message is displayed to request that you confirm to disable.
3. Click OK to confirm.
The instance is now available to update.
4. Once the updates are finished, click Save .
5. Click Enable to reactivate the Alliance server instance.
For more information about the Alliance Server Instances fields, see "Add an Alliance ServerInstance" on page 52.
7.3 Delete an Alliance Server InstanceProcedure
1. On the Alliance Server Instances page, click the instance that you want to delete.
2. Click Delete .
A message is displayed to request that you confirm the deletion.
3. Click OK to confirm.
The instance is removed from all Alliance server groups it belonged to. The browserdisplays a refreshed list of Alliance server instances.
7.4 Test Connectivity with an Alliance ServerOverview
Alliance Web Platform performs at regular intervals a connectivity test for the Alliance serverinstances that the administrator has created and that are enabled. The result of this connectivitytest is visible in the Connectivity Status field of an instance. The connectivity Status can beReachable or Unreachable.
If the status is Unreachable, then the details of the connectivity test failure are displayed. Acoloured icon is also displayed next to the instance name (green for reachable, red forunreachable) to reflect the connectivity status of an instance. Click Refresh on the AllianceServer Instances page at any time to see the updated connectivity status of all the instances.
Alliance Server Instances
29 March 2013 59
When a new instance is created, the Connectivity Status field value of the instance isUnknown and a yellow icon is displayed next to the instance name. This is because AllianceWeb Platform only updates the connectivity status at regular intervals.
The connectivity test is not performed for an instance that has been disabled. This is indicatedby a grey icon next to the instance name.
Click Refresh on the Alliance Server Instances page to check whether the connectivity statushas been updated (the yellow icon changes to red or green).
Alternatively, click the Alliance server instance and click Test Connectivity to immediately performa connectivity test for it.
Note Ensure that the application is upgraded to 7.0 to connect to 7.0 Alliance serverinstances. If the application and the Alliance server instances are of differentversions, then a warning message is displayed.
Procedure
1. Click Alliance Server Instances on the Welcome widget, or from the Configurationmenu, click Alliance Server Instances.
2. On the Alliance Server Instances page, make sure that the instances are visible. Ifnecessary, click the plus symbol next to the relevant instance type.
The instances of the relevant type appear in a list below the instance type label.
3. Click the instance that is relevant to you.
The properties of the instance appear in the panel on the right.
4. Click Test Connectivity .
The Connectivity Status window opens.
The following details are displayed for an instance that is reachable:
Product Name The Alliance server instance type
Product Version The Alliance server instance release
Product Platform The platform of the Alliance server instance(example: Windows)
Product Status Indicates whether the instance is in operationalmode (normal mode) or housekeeping mode
Connectivity Status The connectivity status of the server instance
For an instance that is not reachable, the Connectivity Status window explains the reasonwhy.
5. Click OK .
Alliance Web Platform 7.0.40
60 Administration and Operations Guide

7.5 Instance Monitoring OverviewOverview
The Instance Monitoring Overview page gives an overview of the instances configured inAlliance Web Platform. This stand-alone page gives a high-level view of the operational viabilityof each instance. This makes it easy for operations staff to detect any circumstance thatrequires their attention.
You can access this stand-alone page on Alliance Web Platform through a URL. You do notrequire login credentials or any operator functions or permissions to display the page.
You must have configured the Alliance server instances that you want to monitor fromConfiguration > Alliance Server Instances in the Alliance Web Platform Administrationpackage before using the Instance Monitoring Overview page.
The format of the URL is as follows:
https://<host>:<port>/swp/instancesWhere:
• <host> is the host name
• :<port> is used to indicate the port number.
On Windows, the default port number is 443.
On UNIX or Linux, the default port number is 2443.
For more information on the Instance Monitoring Overview page and the monitoring ofinstances, see the Alliance Gateway Administration and Operations Guide.
Alliance Server Instances
29 March 2013 61
8 Alliance Server GroupsIntroduction
An Alliance server group contains Alliance server instances. One or more Alliance serverinstances can be organised in an Alliance server group which can then be associated with anapplication group. The administrator can create Alliance server groups and can add definedinstances to a group.
8.1 Add an Alliance Server GroupProcedure
1. Click Alliance Server Groups on the Welcome widget, or from the Configuration menu,click Alliance Server Groups.
The Alliance Server Groups page appears.
2. Click Groups.
3. Click Add .
A new Alliance server group (called New Alliance Server Group) is inserted into the list ofAlliance server groups.
You have the possibility to change the name of the new Alliance server group.
4. Click Save .
The Add Instances button appears.
5. Click Add Instances .
A pop-up window appears that shows all the instances that can be added to the Allianceserver group.
6. Click the instances to add to the Alliance server group.
You can click New to create a new Alliance server instance.
a. The Alliance Server Instance Type window appears.
b. Click the type of Alliance server instance that you want to create. Click OK .
c. The New Alliance Server Instance window appears.
d. Provide the information in the relevant fields. For information about the fields, see "Fieldsfor an Alliance Access/Entry instance" on page 52, "Fields for an Alliance Gatewayinstance" on page 53 and "Fields for an Alliance Integrator instance" on page 54.
7. Click Save to save the instances of the new Alliance server group.
The list of instances that are in the Alliance server group appear under the noderepresenting the group.
Alliance Web Platform 7.0.40
62 Administration and Operations Guide
8.2 Delete an Alliance Server GroupProcedure
1. On the Alliance Server Groups page, Click the group that you want to delete.
2. Click Delete .
A message is displayed to request that you confirm the deletion.
3. Click OK to confirm the deletion.
The Alliance server group is deleted from the associated application group.
8.3 Remove an Instance from an Alliance ServerGroup
Procedure
1. On the Alliance Server Groups page, Click the + next to the group that you want toextend.
All the instances inside the group are displayed.
2. Click the instance that you want to remove.
The instance properties are displayed on the right.
3. Click the Remove button on the lower-right corner.
A message is displayed to request that you confirm the removal.
4. Click OK to confirm the removal.
The instance is removed from the Alliance server group.
Alliance Server Groups
29 March 2013 63
9 Branding SchemesIntroduction
When you install Alliance Web Platform, the look and feel reflects the predefined (SWIFT) logoand colour scheme.
To add your corporate identity to pages that Alliance Web Platform users see, you cancustomise the following aspects of the display for any application group:
• the brand colours (to match your brand)
• the default background colour for erroneous fields
• the banner image (in the navigation area) and other graphical elements
• the notice on the login screen
Changes to these areas affect all pages within an application group. To customise the display,you define a branding scheme and then associate that branding scheme with an applicationgroup.
9.1 Branding Schemes PageOverview
Brand colours reflect the predominant colours that an institution uses as part of its visualidentity.
A branding scheme includes five colours, Brand Colour 1 to Brand Colour 5.
The SWIFT branding scheme includes four shades of blue, and an orange colour for contrast.You use the brand colours in page rendering to emphasise or identify the structural elements ofa graphical user interface. For example, the top banner with the first level of navigation, thefooter, page titles and subtitles, error messages, and so on.
You can view the layout of branding schemes using the Branding Scheme page. The left paneldisplays the available branding schemes. Click the name of a branding scheme to viewinformation about it in the right panel.
Scheme Properties - colours
The following table explains the use of the brand colours and the elements where they areused:
Colour Purpose
Brand Colour 1 Alliance Web Platform uses this colour in text for titles, subtitles, regular textlinks, and buttons. This colour also serves as a background colour in the titlebars of tables.
Brand Colour 2 This colour is the background colour of the footer bar and of the first levelnavigation bar. Alliance Web Platform uses this colour for tabs (for example, inmessage details) and for confirmation message boxes.
Brand Colour 3 Alliance Web Platform uses this colour for the rollover states of regular textlinks and in some title text.
Brand Colour 4 This colour is the background colour of the top banner (top navigation and toolbar).
Alliance Web Platform 7.0.40
64 Administration and Operations Guide
Colour Purpose
Note: If the top banner image covers the full window width, then this colour isnot visible.
Brand Colour 5 Alliance Web Platform uses this colour principally for the structural elements oferror messages. For example, navigation error, error lists, and validation reporttab. When you design a brand colour scheme, use a Brand-5 colour that isdistinct from the other colours. The Brand-5 colour must also be dark enoughso that any white text set against it remains readable.
Colour for Login andBanner Title
Defines the colour to be used for the text that appears on the login page and inthe top banner.
Default BackgroundColour for Fields inError
This colour is used as the background colour of the fields that contain an error.
Scheme Properties - images and legal notice
In addition to brand colours, a branding scheme includes a logo and other graphical elements.Alliance Web Platform requires .gif, .jpg or .bmp files for these elements.
The following table explains the elements that you can customise when you add a brandingscheme:
Element Purpose
Login Box Image Dimensions: 470 x 230 pixels. This element forms the background of the loginpage. For best results, ensure that the colour used for Brand Colour 2 is thepredominant shade.
Click Show Image to preview the graphic.
Please Wait Image Dimensions: The image must be no more than 34 pixels high and 34 pixelswide. This image appears in the Please Wait window.
Click Show Image to preview the graphic.
Top Banner Image Dimensions: The image must be no more than 60 pixels high. There is norestriction on the width of the image. If the width of the image is smaller thanthe width of the browser window, then the image aligns on the left border of thewindow. The image's borders must be in Brand Colour 4 to ensure that itmerges smoothly with the solid background colour to its right.
If the width of the image is bigger than the width of the browser, then BrandColour 4 is hidden.
Click Show Image to preview the graphic.
Login Page LegalNotice
This is the legal notice shown on the login page.
Functions
The following table explains the various actions that can be performed in the BrandingSchemes page:
Action Description
Add To create a new branding scheme
Save To save the entries of a branding scheme
Delete To delete a branding scheme
Cancel To undo changes to the branding scheme and quit without saving the changes
Refresh To refresh the page
Branding Schemes
29 March 2013 65
9.2 Create Branding SchemesOverview
You can define different branding schemes for different areas of your business. Each brandingscheme must be assigned to the relevant application group.
Before you start
Before you add a branding scheme, ensure that appropriate image files are available anddecide which colours to use for the elements of the pages. For more information, see "BrandingSchemes Page" on page 64.
Procedure
1. Click Branding Schemes on the Welcome widget, or from the Configuration menu, clickBranding Schemes.
The Branding Schemes page appears.
2. Click Branding Schemes in the left pane.
3. Click Add .
The Scheme Properties page appears.
4. In the Name field, provide a name for the branding scheme.
5. In the Brand Colour (1 - 5) fields, click ? ... on the right of the field to select a colour. Acolour picker appears. Click the colour of your choice. The rectangle fills with the colour thatyou have selected and the corresponding hexadecimal code is displayed next to it.
You can also directly type the relevant hexadecimal code in the field.
6. In the Colour for Login and Banner Title field, indicate the colour that you want to use toidentify the Login field and the banner title.
7. In the Default Background Colour for Fields in Error field, indicate the colour that youwant to use to identify error fields.
8. In the Login Box Image field, click Browse and click the file name that contains the imagefor the box that forms the background of the Login page.
To view the image click Show Image. A pop-up window displays the image. Click OK toclose the window.
9. In the Please Wait Image field, click Browse and click the file name that contains the imagefor the Please Wait window.
To view the image click Show Image. A pop-up window displays the image. Click OK toclose the window.
10. In the Top Banner Image field, click Browse and click the file name that contains the imagefor the top banner.
To view the image click Show Image. A pop-up window displays the image. Click OK toclose the window.
11. In the Login Page Legal Notice field, you can provide the legal notice text.
12. Click Save to save the properties of the new branding scheme.
Alliance Web Platform 7.0.40
66 Administration and Operations Guide
The browser displays the branding scheme name in the left pane and the properties in theright pane.
9.3 Modify Branding SchemesOverview
You can modify the branding schemes created.
Procedure
1. Click Branding Schemes on the Welcome widget, or from the Configuration menu, clickBranding Schemes.
The Branding Schemes page appears.
2. Click the branding scheme that you want to modify in the list.
The Scheme Properties page appears.
3. In the Name field, modify the name for the branding scheme.
4. In the Brand Colour (1 - 5) fields, click ? ... on the right of the field to select a colour. Acolour picker appears. Click the colour of your choice. The rectangle fills with the colour thatyou have selected and the corresponding hexadecimal code is displayed next to it.
You can also directly type the relevant hexadecimal code in the field.
5. In the Default Background Colour for Fields in Error field, modify the colour that youwant to use to identify error fields.
6. In the Colour for Login and Banner Title field, indicate the colour that you want to use toidentify the Login field and the banner title.
7. In the Login Box Image field, click Browse and choose another image for the box thatforms the background of the Login page.
To view the image click Show Image. A pop-up window displays the image. Click OK toclose the window.
8. In the Please Wait Image field, click Browse and choose another image for the PleaseWait window.
To view the image click Show Image. A pop-up window displays the image. Click OK toclose the window.
9. In the Top Banner Image field, click Browse and choose another image for the top banner.
To view the image click Show Image. A pop-up window displays the image. Click OK toclose the window.
10. In the Login Page Legal Notice field, you can edit the legal notice text.
11. Click Save to save the changes.
The browser displays the branding scheme name in the left pane and the properties in theright pane.
Branding Schemes
29 March 2013 67
9.4 Delete Branding SchemesProcedure
1. Click the branding scheme that you want to remove. On the right pane, you can see theproperties assigned to the branding scheme.
2. Click Delete .
A message is displayed to request that you confirm the deletion.
3. Click OK to confirm the deletion.
The branding scheme is deleted from the associated application groups and replaced bythe SWIFT default branding scheme.
The SWIFT default branding scheme is used to render the pages of the affected applicationgroups after users log out and log in again.
Alliance Web Platform 7.0.40
68 Administration and Operations Guide
10 User SessionsIntroduction
When a user logs in to an application group, a user session is created in Alliance Web Platform.
The user session is removed:
• When the user logs off.
• When there has been no request sent to Alliance Web Platform within the configured timeoutperiod. See the Session Expiry Timeout configuration parameter.
• As a result of disabling the Alliance server instance used by the application.
• As a result of a restart of the server.
As soon as the page displayed in the browser detects that the session has been removed, theuser is redirected to the Login page. If the user didn't log off intentionally, an error messageappears.
To detect the removal of a user session, the page displayed in the browser exchanges aheartbeat with Alliance Web Platform every 60 seconds. There may be a difference of at most60 seconds between the time the user session is removed and the time the page displayed inthe browser detects it. In case the page displayed in the browser does not receive the heartbeatresponse from Alliance Web Platform within 30 seconds, it will retry sending the heartbeat,every minute during a period of 5 minutes. If no response is received within 5 minutes, the userwill be prompted with a warning indicating that he will be logged out in 60 seconds. If he clicksOk , or doesn't respond to the dialog box, the user will be immediately redirected to the login
page with an error message and the user session will expire according to the configuredSession Expiry Timeout. If he clicks Cancel , the session will be kept open.
10.1 View User Session PropertiesProcedure
1. Click Sessions on the Welcome widget, or from the Monitoring menu, click Sessions.
The Sessions page appears with the list of all users logged on.
2. You can filter the list based on the user name, the application group, or use both of thesefiltering criteria.
To view session details for a specific user, enter the User Name.
To view session details for users of a specific Application Group, click a value in the drop-down list.
3. Click Submit .
The list of session details appears.
The following columns are displayed:
Field Description
User The name of the user.
Application Group The name of the application group.
Login as The type of user that logged in for a session.
User Sessions
29 March 2013 69
Field Description
Application Server IP The address of the application server (node) that the user is connectedto.
Browser IP The address of the browser used to create the session.
Creation Date & Time The creation date and time of the user session. The format for the datedepends on the configuration parameter of Alliance Web Platform. Formore information about the date format, see "Alliance Web PlatformConfiguration Parameters " on page 38. The format for the time isHH:MM:SS.
Status The status of the session.
The values are:
• Active for x minutes (with the time elapsed since login)
• Inactive for x minutes (with the time elapsed since last activity)
Alliance ServerInstance
The name of the Alliance server instance.
4. Click a specific line in the list to view the user session properties on a separate page.
5. Click Close to go back to the Sessions page.
Alliance Web Platform 7.0.40
70 Administration and Operations Guide
11 Event LogIntroduction
Alliance Web Platform Administration allows you to view events reported by both Alliance WebPlatform and the applications hosted in Alliance Web Platform. These events are related toinformation reported by these GUI applications. Events for business functionality are stored inthe Alliance server instance event journal.
The event log stores a maximum of 500,000 events. The event log is configured such that oncethe limit is reached new events overwrite old ones (that is, in "rollover mode"). If Alliance WebPlatform is not running, then an offline tool is available to gather the event information, forinstance to use for troubleshooting (see "Use swp_readlog" on page 84).
11.1 Search for EventsProcedure
1. Click Event Log on the Welcome widget, or from the Monitoring menu, click Event Log.
The Event Log page appears, that enables you to specify your search criteria.
2. To list all the events for the current day that are in the database, click Search withoutspecifying any criteria.
To remove the criteria previously provided, click Clear .
3. To search for events based on a specific date and/or time of occurrence, select a Date andTime in the fields as required. For information about using the date pickers, see "DatePicker" on page 29. For information about using the time pickers, see "Time Picker" onpage 30.
Field Description
From Date The date of the earliest event to be found. The field is automatically populatedwith an initial value of today's date.
The required format for the date depends on the configuration parameter of theAlliance Web Platform. For more information about the date format, see"Alliance Web Platform Configuration Parameters " on page 38.
Time The time of the earliest event to be found. The field is automatically populatedwith an initial value of 00:00:00.
The required format for the time is hh:mm:ss.
To Date The date of the latest event to be found. The field is automatically populatedwith an initial value of today's date.
Time The time of the latest event to be found. The field is automatically populatedwith an initial value of 23:59:59.
4. To search for events of a specific severity level, click a value in the Severity drop-down list.
Select one of the following severity levels:
• INFO
• WARNING
• SEVERE
• FATAL
Event Log
29 March 2013 71

5. To search for events logged by a specific package, click a value in the Package drop-downlist.
Choose one of the packages that you have installed.
6. To search for events of a specific class, click a value in the Class drop-down list.
Select one of the following classes:
• Configuration
• Security
• Software
7. Click Search . The list of events that meet your search criteria appears.
If necessary, use Previous and Next to navigate within all pages of the complete list.
To sort the search results, see "Criteria and Functions" on page 21.
8. Click an event in the list to open it and view its details, including text in the Descriptionarea.
9. To view the details of the next or previous event in the list without closing the current event,click Next or Previous . To go back to the list of events, click Close .
Alliance Web Platform 7.0.40
72 Administration and Operations Guide
12 Operate Alliance Web PlatformIntroduction
Alliance Web Platform provides various tools that are used to perform essential operationalactivities.
Important In the remainder of this document, the installation path is referred to as<SWP_INSTALL_PATH>.
12.1 Run Alliance Web Platform Operational ToolsProcedure
1. On Windows
Open a DOS command prompt, logged on as Alliance Web Platform owner.
On UNIX or Linux
Open a Korn shell, logged on as Alliance Web Platform owner.
2. Navigate to the bin directory, one level below the directory where you have installedAlliance Web Platform (<SWP_INSTALL_PATH>).
3. Follow the relevant instructions further in this section, depending on the operational activitythat you want to perform.
12.2 Start and Stop Alliance Web Platform in theApplication Server
Introduction
Some activities that the Alliance Web Platform administrator performs require the Alliance WebPlatform enterprise application to be stopped and restarted. The procedure for stopping andstarting the Alliance Web Platform enterprise application depends on the product installed.
Start and stop Alliance Web Platform
1. Log on to the IBM WebSphere Application Server Integrated Solutions Console applicationas WebSphere Application Server administrator.
2. Use the standard functionality of the IBM WebSphere Application Server to start or stop theAlliance Web Platform enterprise application.
Start and stop Alliance Web Platform Server-Embedded on Windows
1. Log on as Alliance Web Platform owner to the machine where the Alliance Web PlatformServer-Embedded software is installed.
2. In the Windows Control Panel, double-click Administrative Tools then Services.
The Services window opens.
3. Scroll down the list to locate the Alliance Web Platform <SWPinstance> service.
Operate Alliance Web Platform
29 March 2013 73
4. Right-click the Alliance Web Platform <SWPinstance> service.
5. Click Start or Stop as necessary.
Note The swp_config tool (see "The Configuration Tool" on page 88) also includesfunctionality to stop and start Alliance Web Platform Server-Embedded.
Start and stop Alliance Web Platform Server-Embedded on UNIX or Linux
1. Log on as Alliance Web Platform owner to the machine where the Alliance Web PlatformServer-Embedded software is installed.
2. Navigate to the bin directory one level below the directory where you have installedAlliance Web Platform Server-Embedded.
3. Enter the following commands as needed:
swp_bootstrap startswp_bootstrap stop
4. You can verify the status of the bootstrap status with the swp_bootstrap statuscommand.
Note The swp_bootstrap stop command also stops the database.
12.3 Start and Stop the Alliance Web PlatformDatabase
Overview
On Windows, the Alliance Web Platform database is automatically started.
On UNIX or Linux, the swp_configbootstrap script must be executed to configure theautomatic start/stop of the database with the start/stop of the operating system (see "Toconfigure the Alliance Web Platform and Alliance Web Platform Server-Embedded database tostart at boot time (UNIX or Linux only)" on page 75).
When the database is hosted, it is your responsibility to configure the automatic start or stop ofthe database.
If for whatever reason the Alliance Web Platform database does not start with the operatingsystem, then you can use the following procedure to start it.
To start the database:
• Enter the following command:
start_database
To stop the database
• Enter the following command:
stop_database
Note These commands are not supported while connecting to a hosted database.
Alliance Web Platform 7.0.40
74 Administration and Operations Guide
To configure the Alliance Web Platform and Alliance Web Platform Server-Embedded databaseto start at boot time (UNIX or Linux only)
Optionally, you can execute the swp_configbootstrap script logged on as root so thatstart_database or stop_database is automatically invoked when booting the system orperforming a system shutdown. Proceed as follows:
1. Open a Korn shell, logged on as root.
2. Navigate to the bin directory, one level below the directory where you have installedAlliance Web Platform (<SWP_INSTALL_PATH>).
3. Enter the following command:
swp_configbootstrap
4. After the script runs, the following text appears:
The SWP01 database has been configured to start and stop automatically when the operating system starts and stops.The following changes are made on the system:
On Solaris
Alliance Web Platform is added as a service to the Solaris Service Management Facility.
On AIX
The file /etc/rc.d/rc2.d/S999alliancewebplatform is added and in thefile /etc/rc.shutdown a block is added, containing the following lines:
# lines added by <SWP_INSTANCE> at <date> *......# end of lines added by <SWP_INSTANCE> at <date> *On Linux
On Alliance Web Platform:
/sbin/chkconfig --del swp_<SWP_INSTANCE>del /etc/init.d/awp_<SWP_INSTANCE>On Alliance Web Platform Server-Embedded::
/sbin/chkconfig --del swpse_<SWP_INSTANCE>del /etc/init.d/awpse_<SWP_INSTANCE>
5. Restart the system.
Note For Alliance Web Platform Server-Embedded, the embedded application server isalso started or stopped automatically.
Removing the automatic startup (UNIX or Linux only)
1. To revert to manual startup or as an initial step to removing the Alliance Web Platformsoftware, do the following:
On Solaris
Remove the service with the following command:
/usr/sbin/svccfg delete -f <SWP_INSTANCE>Where <SWP_INSTANCE> is the Alliance Web Platform instance name configured atinstallation time.
Operate Alliance Web Platform
29 March 2013 75
On AIX
Remove the file /etc/rc.d/rc2.d/S999alliancewebplatform and remove the following blockof lines from the file /etc/rc.shutdown:
# lines added by <SWP_INSTANCE> at <date> *......# end of lines added by <SWP_INSTANCE> at <date> *On Linux
On Alliance Web Platform:
Delete the service: ./sbin/chkconfig --del swp_<SWP_INSTANCE>Delete the startup file: ./etc/init.d/swp_<SWP_INSTANCE>On Alliance Web Platform Server-Embedded:
Delete the service: ./sbin/chkconfig --del swpse_<SWP_INSTANCE>Delete the startup file: ./etc/init.d/swpse_<SWP_INSTANCE>
2. The automatic startup is now disabled. The Alliance Web Platform database must bestarted manually from now on.
12.4 Back Up the DatabaseOverview
You can back up the database with the swp_backup tool. This tool creates a backup of theconfiguration data (for example, application groups, installed packages) in a compressed fileformat. The backup data does not include the events in the event log.
Procedure
• Enter the following command:
swp_backup <file_pathname>Where <file_pathname> is the path of the backup file that is created.
Example of command on Windows
swp_backup C:\temp\backup\myfileThis command creates a copy of the configuration data in the file named myfile.zip and anassociated myfile_backup.log in the folder c:\temp\backup. Any warnings or errors generatedduring the backup procedure are listed in the myfile_backup.log file of the C:\temp\backupdirectory.
The job completion message appears.
Note When connected to a hosted database, swp_backup and swp_restore are notsupported. In such a configuration, it is your responsibility to perform restore andbackup of the database.
Alliance Web Platform 7.0.40
76 Administration and Operations Guide
12.5 Restore and Resynchronise the DatabaseOverview
You can restore the database with the swp_restore tool. Restoring deletes the current contentsof the database, then fills the database with the information of a backup copy of the wholedatabase. Events are not backed up and therefore are not restored.
Prerequisites
• You must be logged on to your system as the Alliance Web Platform owner.
• You cannot take a backup on an Alliance Web Platform Server-Embedded installation andrestore it on an Alliance Web Platform installation. The reverse is also true.
• There is no way to recover previous information once it is overwritten.
• You must provide the absolute path to the backup file (zip file), without extension.
Procedure for Alliance Web Platform
1. Use the IBM WebSphere Application Server Integrated Solutions Console to stop anduninstall the Alliance Web Platform application and other applications hosted in AllianceWeb Platform that are running in the IBM WebSphere Application Server.
2. Transfer the backup file to a disk local to the Alliance Web Platform database that youintend to restore, if it is not already there.
3. Enter the following command:
swp_restore <file_pathname> [-force]Where <file_pathname> must be replaced with the full path of the backup file (.zip file).
Details provided for <file> may include a directory and file name, but not an extension.
The tool prompts for confirmation. The option -force can be used to bypass theconfirmation. This allows scripting the operation.
4. Extract the EAR files of the packages that have been restored on Alliance Web Platformusing the following procedure:
swp_config -packages -listA list of installed packages appears. The list displays the package names and theircorresponding ID.
For each different package ID run the following command:
swp_config -packages -extract -id <package_id> -file <ear_file>Where <ear_file> is the location where the EAR file must be extracted.
5. Use the IBM WebSphere Application Server Integrated Solutions Console to redeploy theextracted EAR files on the IBM WebSphere Application Server. Please refer to the AllianceWeb Platform Installation Guide for more details on how to redeploy the extracted EAR fileson the IBM WebSphere Application Server.
Example of commands on Windows for Alliance Web Platform
swp_restore c:\temp\backup\myfile
Operate Alliance Web Platform
29 March 2013 77

This command restores a copy of the configuration data in the file named myfile.zip. Anywarnings or errors generated during the restore procedure are listed in the myfile_restore.logfile of the C:\temp\backup directory. The job completion message appears.
The following command lists the packages that have been restored:
swp_config -packages -listID Package name Version Installed on----------------------------------------------------0 com.swift.swp.Platform 7.0 02/06/2010 17:49:160 com.swift.swp.Admin 7.0 02/06/2010 17:49:161 com.swift.Browse 7.0 02/06/2010 13:38:06The following commands extract the package EAR files:
swp_config -packages -extract -id 0 -file C:\temp\backup\swp.earswp_config -packages -extract -id 1 -file C:\temp\backup\browse.earFinally, redeploy all extracted EAR files in the IBM WebSphere Application Server.
Procedure for Alliance Web Platform Server-Embedded
1. Transfer the backup file to a disk local to the Alliance Web Platform Server-Embeddeddatabase that you intend to restore, if it is not already there.
2. Enter the following command:
swp_restore <file_pathname>Where <file_pathname> must be replaced with the full path of the backup file (.zip file).
Details provided for <file_pathname> may include a directory and file name, but not anextension.
3. Restart the embedded server with the following command:
swp_config -start
Example of command for Alliance Web Platform Server-Embedded
swp_restore c:\temp\backup\myfileThis command restores a copy of the configuration data in the file named myfile.zip. Anywarnings or errors generated during the restore procedure are listed in the myfile_restore.logfile of the C:\temp\backup directory. The job completion message appears.
To terminate the restore, execute the following command to restart the Alliance Web PlatformServer-Embedded embedded application server:
swp_config -startStarting Alliance Web Platform service...swp_SWP01 service started.
Resynchronisation after restore of the hosted database
After restoring the hosted database for Alliance Web Platform Server-Embedded, you mustlaunch a command-line tool to resynchronise the configuration of the application server with thecontent of the database. The command-line tool is available for Alliance Web Platform Server-Embedded in case of hosted database.
Alliance Web Platform 7.0.40
78 Administration and Operations Guide
Procedure
Enter the following command:
• swp_config -syncdb
12.6 Change the Alliance Web Platform DatabaseAccount Password
Procedure
The password never expires but if you want to change it, follow the procedure below:
1. Enter the following command:
swp_config -changepwd
2. When prompted, type the current password assigned to the Alliance Web Platformdatabase account.
3. Press ENTER. The swp_config tool checks that the value is correct.
4. When prompted, type a new password for the Alliance Web Platform database account.
5. Press ENTER. The swp_config tool checks that the value is different from the currentpassword.
6. When prompted, type the new password again and confirm.
7. Press ENTER to store the new password.
8. You must use the new password at the next login to the Alliance Web Platform databaseaccount or when running another swp_config command.
12.7 Configure Access to the Alliance Web PlatformDatabase
Applicability
If you installed Alliance Web Platform Server-Embedded, then ignore this section.
Overview
Alliance Web Platform uses a specific IP address and port to communicate with its database.When the Alliance Web Platform software is installed, the default port number of 1521 is set forthis purpose. Depending on your security practices, you may want to change these values. Youmay also want to restrict which host machines are allowed to connect to the database. AllianceWeb Platform includes the swp_configdbconnection tool, which the Alliance Web Platformowner can use to manage these settings.
Syntax
The tool has the following syntax:
swp_configdbconnection -show | -default | -port <value> -hosts <IP1>:<IP2> -listen <IP> [-force]
Operate Alliance Web Platform
29 March 2013 79
The tool can be run to change the port and/or the IP addresses, or to view the current values.Using -default returns to the default port of 1521 and allows any host to connect.
If the tool is run with -show or with -default, then it is not possible to include -port, -hosts, or -listen. Running the command with -force ensures that changes to the databaseconnection parameters (including returning to default values) will always be accepted, even ifthe port specified is currently in use. When the command is run with -show, adding -force isnot supported. Otherwise, you can use -force with any allowed combination of values.
Note When the command is used to apply remote host restrictions (with -hosts), thelocal IP address is always added. This is subsequently visible using -show.
When connecting to the hosted database, the swp_config command must be used to configurethe connection to the hosted database.
Prerequisites
The swp_configdbconnection tool must be run on the host where the Alliance Web Platformsoftware was installed. It must be run by the Alliance Web Platform owner account.
Procedure
1. Stop the Alliance Web Platform application (see "Start and Stop the Alliance Web PlatformDatabase" on page 74).
2. Enter the command with the relevant values.
You can use IP addresses or host names for -hosts.
Note After running the swp_configdbconnection tool to change the port number,the application server administrator needs to update the data sources definedon the application server (as explained in the Alliance Web PlatformInstallation Guide) to use the appropriate port number.
3. Restart the cluster where the Alliance Web Platform application is installed.
12.8 Configuring the Alliance Web Platform DatabaseOverview
After installation, you can use the swp_dbconfig tool to change the memory allocation forcertain hardware configurations.
Prerequisites
To run the tool, you must be logged on to the system as the Alliance Web Platform owneraccount. The tool is located in the bin subdirectory of Alliance Web Platform or Alliance WebPlatform Server-Embedded installation directory.
Procedure
• To run the swp_dbconfig tool enter the following command:
swp_dbconfig [memory|tablespace] <command>
Alliance Web Platform 7.0.40
80 Administration and Operations Guide
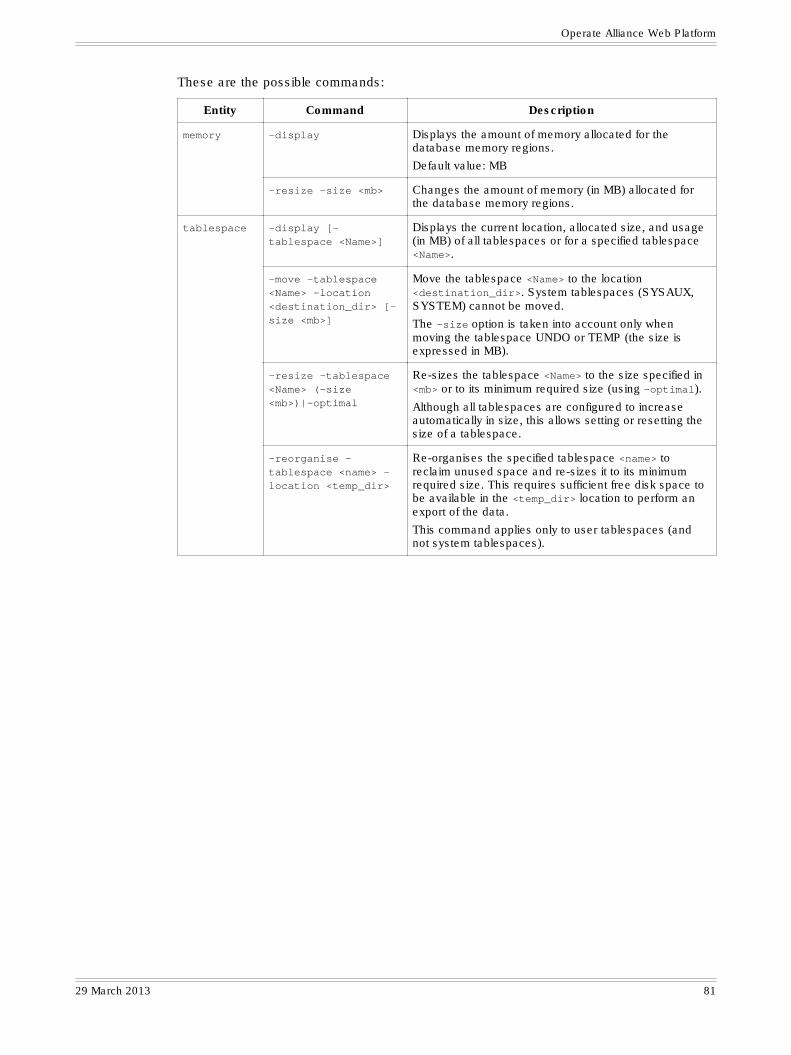
These are the possible commands:
Entity Command Description
memory -display Displays the amount of memory allocated for thedatabase memory regions.
Default value: MB
-resize -size <mb> Changes the amount of memory (in MB) allocated forthe database memory regions.
tablespace -display [-tablespace <Name>]
Displays the current location, allocated size, and usage(in MB) of all tablespaces or for a specified tablespace<Name>.
-move -tablespace<Name> -location<destination_dir> [-size <mb>]
Move the tablespace <Name> to the location<destination_dir>. System tablespaces (SYSAUX,SYSTEM) cannot be moved.
The -size option is taken into account only whenmoving the tablespace UNDO or TEMP (the size isexpressed in MB).
-resize -tablespace<Name> (-size<mb>)|-optimal
Re-sizes the tablespace <Name> to the size specified in<mb> or to its minimum required size (using -optimal).
Although all tablespaces are configured to increaseautomatically in size, this allows setting or resetting thesize of a tablespace.
-reorganise -tablespace <name> -location <temp_dir>
Re-organises the specified tablespace <name> toreclaim unused space and re-sizes it to its minimumrequired size. This requires sufficient free disk space tobe available in the <temp_dir> location to perform anexport of the data.
This command applies only to user tablespaces (andnot system tablespaces).
Operate Alliance Web Platform
29 March 2013 81
13 Alliance Web Platform Support ToolsIntroduction
Alliance Web Platform provides various tools that are used to collect system information. Theycan be used to provide the SWIFT Customer Support Centre with system information that isuseful to investigate problems. The tools can also be used to recover from certain problems.
13.1 Run Alliance Web Platform Support ToolsProcedure
1. On Windows
Open a DOS command prompt, logged on as Alliance Web Platform owner.
On UNIX or Linux
Open a Korn shell, logged on as Alliance Web Platform owner.
2. Navigate to the bin directory, one level below the directory where you have installedAlliance Web Platform (<SWP_INSTALL_PATH>).
3. Follow the relevant instructions further in this section, depending on the tool that you wantto use.
13.2 Collect Support InformationIntroduction
Running swp_supportinfo or swp_readlog collects general information to be sent to theSWIFT Customer Support Centre for troubleshooting.
13.2.1 Use swp_supportinfo
Overview
The swp_supportinfo tool collects general information that can be used to investigateproblems.
The tool can be run with various parameters to collect different levels of information.
The file created is stored in the directory where Alliance Web Platform is installed in thesubdirectory (<SWP_INSTALL_PATH>/support). The file is namedswp_supportinfo-<date>.zip.
Prerequisites
The swp_supportinfo tool must be run on the host where the Alliance Web Platform softwarewas installed and can be run regardless of the Alliance Web Platform status. It must be run bythe Alliance Web Platform owner account.
Alliance Web Platform 7.0.40
82 Administration and Operations Guide
Procedure
To run swp_supportinfo:
• Enter the following command:
swp_supportinfo [-output <output_dir>] [-from <date>] [-to <date>][-help]Where:
-output <output_dir>: Is an optional parameter that specifies the name of a directoryin which to create the output zip file from swp_supportinfo. The format of the output filename is swp_supportinfo.<YYYYMMDD>T<HHMMSS>.zip, where <YYYYMMDD> and<HHMMSS> are the date and time that the command was run.
If you do not specify this parameter, then the output file is created in a directory calledsupport under the root directory of Alliance Web Platform.
-from <date>: Is used in conjunction with -to <date> to specify the date and timerange within which to extract logging information. Use the following syntax when specifyinga value for <date>: <YYYYMMDD>T<HHMMSS>. If you do not specify a value for<HHMMSS>, then 00:00:00 is assumed.
If you do not use the -to <date> parameter when using -from, then swp_supportinfoextracts the logging information from the date and the time specified by -from <date> upuntil midnight of the same day.
-to <date>: Is used in conjunction with -from <date> to specify the date and timerange within which to extract logging information. Use the following syntax when specifyinga value for <date>: <YYYYMMDD>T<HHMMSS>. If you do not specify a value for<HHMMSS>, then 00:00:00 is assumed.
If you do not use the -from <date> parameter when using -to, then swp_supportinfoextracts the logging information from the date and the time specified by -to <date> upuntil midnight of the same day.
-help: Is used to display online help on how to use this command.
Output file contents
The zip file generated by swp_supportinfo contains two directories:
• config, which contains configuration-related information
• log, which contains logging related information
Where appropriate, the information in these directories is filtered according to the time-relatedoptions -to and -from (described earlier).
The config directory contains the following information:
• configuration parameters
• data which contains the general information of Alliance Web Platform
• database configuration information except in case of hosted database
• system information (provided by the checkhost tool)
• list of installed packages
• list of Alliance server instances
Alliance Web Platform Support Tools
29 March 2013 83
• certificate information (only applicable for Alliance Web Platform Server-Embedded)
• configuration files of the application server (only applicable for Alliance Web Platform Server-Embedded)
The log directory contains the following information:
• installation.log file
• installation.properties file
• the event journal
• installation checkhost report files
• content collected from the log directory
• database alert and trace files (except hosted database)
• log files of the embedded application server (only applicable for Alliance Web PlatformServer-Embedded)
Note The alert, trace files, event journal and the files from the log directory are timefiltered based on the last modification date and time of those files.
13.2.2 Use swp_readlog
Overview
The swp_readlog tool allows offline access to information stored in the event log of the AllianceWeb Platform database. You can run this command whether Alliance Web Platform is started ornot.
Procedure
To run swp_readlog:
• Enter the following command:
swp_readlog <file_pathname> [-startdate <date> -starttime <time> -stopdate <date> -stoptime <time>]Where:
Start and end dates (format YYYYMMDD) and start and end times (HH:MM:SS) are optional.The output of swp_readlog includes all events unless start and end dates are provided.
The swp_readlog command dumps the contents of the event log into a specified file on thehost machine where Alliance Web Platform is installed. Output is provided in XML format.
Output of running swp_readlog indicates success or failure.
If <file_pathname> consists of only a file name, then the file is stored in the AllianceWeb Platform <SWP_INSTALL_PATH>\log directory. If <file_pathname> consists of afile name and the location of a file. Then the file is stored in the location specified.
Alliance Web Platform 7.0.40
84 Administration and Operations Guide
13.2.3 Use sa_split
Overview
The sa_split tool is used to split any large file into chunks. This can be used for outputs ofthe swp_supportinfo tool, or for any other files that Support may ask you to send on anexceptional basis.
Tool location
<Alliance installation directory>\binAIX: <Alliance installation directory>/binSolaris: <Alliance installation directory>/binLinux: <Alliance installation directory>/bin
Command syntax
sa_split (<filename> [-size <size>])|(-combine <filepath_name>)
Parameters
Parameter Description
<filename> The name of the file to be split.
-size <size> Used to specify the size (in MB) of each chunk.
If you do not use this option, then each chunk has a default size of 2 MB.
The resulting files are named <filename>.xx, where xx is a sequence number(01..99).
-combine <filepath_name> Combines chunks of a previously split file into a single file.
If the file specified exists, then the tool returns an error.
To run the tool
1. Start the Alliance Installation application and double-click the Command Prompt icon.
2. In the Command Prompt window, run the sa_split command with the requiredparameters.
To run the tool
1. From the System Administration application select xterm from the OS Configurationmenu.
2. In the xterm window, run the sa_split command with the required parameters.
13.3 Investigate the Alliance Web Platform DatabaseOverview
The swp_dbaquery tool can be used when requested by SWIFT Customer Support Centrestaff. You may be requested to run this tool in case of an exceptional situation.
Alliance Web Platform Support Tools
29 March 2013 85
Warning You are not allowed to use this procedure unless there is a serious problem. Useonly under the supervision of SWIFT to avoid violation of database integrity. Thistool is not supported if the hosted database is used.
Prerequisites
The Alliance Web Platform owner account must launch the command.
Procedure
To run swp_dbaquery:
1. Enter the following command:
swp_dbaquery
2. Follow the instructions that you receive from the SWIFT Customer Support Centre.
13.4 Verify the Database IntegrityConcept
Alliance Web Platform checks the integrity of its database. Tampered data in the Alliance WebPlatform database is detected when the Alliance Web Platform accesses the data, and isreported in the event log.
Procedure
• Type swp_dbasignature. The output of the command indicates whether integrity iscorrect or not.
Note This tool does not allow repairing the database integrity. A similar tool is stillmaintained by Customer Support and is available on request.
13.5 Activate Tracing on Alliance Web PlatformOverview
In some exceptional cases, SWIFT Customer Support Centre staff may request you to activatetracing on Alliance Web Platform. Tracing is activated by running a command-line script.
When activated, the software trace stops automatically after a predefined amount of time, whichis specified when starting the trace. For Alliance Web Platform installed in a cluster, the traceinformation is written into the SystemOut.log files of both application server members of thecluster while the trace is run from the Deployment Manager where Alliance Web Platform isinstalled. For Alliance Web Platform Server-Embedded, the trace information is written to theswpservice.out file in the log directory.
The table that follows indicates the log directory paths:
Platform File Log directory
Alliance WebPlatform Server-Embedded
swpservice.out <SWP_INSTALL_PATH>\log
Alliance Web Platform 7.0.40
86 Administration and Operations Guide
Platform File Log directory
Alliance WebPlatform
SystemOut.log <WAS_INSTALL_PATH>\profiles\<profile_name>\logs\<member_name>
Note The output of tracing shall not include confidential information such as passwords.
Syntax
swp_trace (-level <lvl> [-minutes <min>] | -config <config-file> [-minutes <min>] | -reset )<config-file> is the path to a configuration file.
<lvl> is the tracing level.
<min> is the number of minutes during which the trace is active.
If not specified by the -minutes option, the trace will last for 60 minutes.
All values will be given by SWIFT Customer Support Centre.
To activate tracing:
• Enter the command swp_trace with argument values communicated by the SWIFTCustomer Support Centre:
To explicitly stop tracing:
• Enter the following command:
swp_trace -reset
To send the information to SWIFT:
1. Move all the trace files to the log directory under the Alliance Web Platform root installationdirectory.
Note For Alliance Web Platform Server-Embedded, the trace file is already in thecorrect location for the swp_supportinfo tool.
2. Use the swp_supportinfo tool parameter to zip the files.
3. Send the zipped files to SWIFT.
Alliance Web Platform Support Tools
29 March 2013 87

14 The Configuration ToolIntroduction
Alliance Web Platform provides the swp_config tool that allows the Web Platform Owner tomanage customer-specific configuration details. The tool provides functionality to perform thefollowing tasks:
• Install a package
• Uninstall a package
• List installed packages
• List and set configuration parameters
• Reconfigure a hosted database connection
• For Alliance Web Platform, list and set the deployment URL of a package of the Alliance WebPlatform
• For Alliance Web Platform Server-Embedded, the following tasks can also be performed:
– Display the SSL certificate
– Renew the SSL certificate (self-signed only) and change associated DN
– Import a key or certificate (from a PKCS12 container or Java keystore)
– Create a certificate request to send to a Certification Authority (CA)
– Import a CA certificate from the CA response to a certificate request
– Change password of the Alliance Web Platform administrator account (automaticallychanged for SSL certificate keystore, database accounts, and application serverconfiguration)
– Resynchronise the application server configuration with the content of a hosted database
– Show port number that is used (HTTPS, RMI or admin)
– Change port number that is used (HTTPS, RMI or admin)
The swp_config tool is also used to start and stop Alliance Web Platform and Alliance WebPlatform Server-Embedded.
14.1 Using swp_configPrerequisites
To run the swp_config tool, you must be logged on to the system as the Alliance Web Platformowner account. The tool is located in the bin subdirectory of Alliance Web Platform or AllianceWeb Platform Server-Embedded installation directory.
Syntax and notation
The swp_config tool uses the following general syntax:
swp_config <-command> [-option <value|value> ...]
Alliance Web Platform 7.0.40
88 Administration and Operations Guide
The swp_config tool uses the following notation to represent its syntax:
• The text wrapped in angle brackets <....> represents a value that you must supply. Do notinclude the brackets in the actual command.
• The text wrapped in square brackets [....] represents an optional value. Do not includethe brackets in the actual command.
• Two or more values separated by a vertical bar | indicate a choice of allowed values. Do notinclude the bar in the actual command.
Commands
If you key swp_config without providing a further value for the command, then the outputreturned on screen includes a list of all available commands along with information about usingthem.
The following tables list the commands for Alliance Web Platform and Alliance Web PlatformServer-Embedded along with the equivalent command-line tool where available:
Commands for both Alliance Web Platform and Alliance Web Platform Server-Embedded
Command Description
-packages Manages the packages of Alliance Web Platform. For moreinformation, see "Packages" on page 95.
-parameters Displays the list of parameters that are editable from the commandline.
Also allows setting values for parameters.
For more information, see "List of Parameters" on page 95.
Commands for Alliance Web Platform
Command Description
-url Changes the deployment URL of an applicationpackage of Alliance Web Platform. For moreinformation, see "Change the Deployment URL ofa Package" on page 96.
-configdbconnection Changes the database connection information.
-hosteddb Changes the parameters to connect to the hosteddatabase.
When using the swp_config tool for Alliance Web Platform Server-Embedded, somecommands only display information and other commands only change data. For the commandsthat change data, the swp_config tool asks for a password and a confirmation to stop and torestart the embedded application server:
Commands for Alliance Web Platform Server-Embedded
Command Description Stop and restartthe embeddedapplication server
-changeport Changes the port number the application server uses.
For more information, see "Change Port Numbers for theApplication Server" on page 91.
Yes
The Configuration Tool
29 March 2013 89
Command Description Stop and restartthe embeddedapplication server
-createrequest Creates a certificate request to send to a CertificationAuthority.
For more information, see "Managing the SSL Certificateand Key" on page 92.
No
-importcert Imports a Certification Authority-signed certificate to be usedas the Alliance Web Platform certificate.
For more information, see "Managing the SSL Certificateand Key" on page 92.
Yes
-importresponse Imports a Certification Authority certificate from theCertification Authority response to a certificate request.
For more information, see "Managing the SSL Certificateand Key" on page 92.
Yes
-showcert Displays the Alliance Web Platform SSL certificate details.
For more information, see "Managing the SSL Certificateand Key" on page 92.
No
-showport Shows the port numbers the application server uses.
For more information, see "Change Port Numbers for theApplication Server" on page 91.
No
-start Starts Alliance Web Platform on the application server.
For more information, see "Start and Stop Alliance WebPlatform Server-Embedded" on page 90.
Yes
-status Shows the status of the embedded application server. No
-stop Stops Alliance Web Platform on the application server.
For more information, see "Start and Stop Alliance WebPlatform Server-Embedded" on page 90.
Yes
-syncdb Synchronises the application server with the applicationsregistered in the hosted database.
Yes
-updatecert Generates a new self-signed SSL certificate.
For more information, see "Managing the SSL Certificateand Key" on page 92.
Yes
-user Allows managing any users of the Alliance Web PlatformServer-Embedded.
Yes
14.2 Start and Stop Alliance Web Platform Server-Embedded
Description
On Windows, the application server is managed as a Windows service and the service isconfigured in automatic mode by default. Functionality for starting or stopping individualapplications is not provided. When Alliance Web Platform is started or stopped, thecorresponding events are logged.
On UNIX or Linux, it is possible to configure the application server so that it automatically startswhen booting the system and automatically stops when performing a system shutdown. Theroot account runs the swp_configbootstrap command to prepare the operating system.
Alliance Web Platform 7.0.40
90 Administration and Operations Guide
Procedure
1. Follow steps 1 to 2 in "Run Alliance Web Platform Support Tools" on page 82.
2. Enter either of the following commands, as needed:
On Windows
swp_config -stopswp_config -startYou can verify the bootstrap status with the swp_config status command.
On UNIX or Linux
swp_bootstrap startswp_bootstrap stopYou can verify the bootstrap status with the swp_bootstrap status command.
14.3 Change Port Numbers for the Application ServerIntroduction
During the configuration of the application server for Alliance Web Platform, the user must setthe network ports and the application server must be able to listen for HTTPS requests. Whenyou installed Alliance Web Platform Server-Embedded, one of the values provided to theinstallation executable was a port number for HTTPS.
The application server uses the remote method invocation protocol for its internal processmanagement, but the Alliance Web Platform Server-Embedded installation does not prompt fora specific value. The predefined setting for the remote method invocation port is 23991. If thatport is already assigned, then the first free port in the range 23991 - 24090 is substituted.
For configuration and deployment activities, the application server also uses a port tocommunicate with the GlassFish Admin Console. The predefined value for the admin port is4848. If that port is already assigned, then the first free port in the range 23991 - 24090issubstituted.
Under normal conditions, the port numbers do not need to be changed. If the currently assignedport needs to be used by another application, then you can use the swp_config tool to changethe values.
Procedure to view the current ports used
1. Follow steps 1 to 2 in "Run Alliance Web Platform Support Tools" on page 82.
2. Enter one of the following commands, depending on which port setting that you want todisplay:
swp_config -showport -httpsswp_config -showport -rmiswp_config -showport -adminswp_config -showport -all
3. Press ENTER. The output of the command displays the network port currently assigned.
The Configuration Tool
29 March 2013 91
Procedure to change the port
1. Follow steps 1 to 2 in "Run Alliance Web Platform Support Tools" on page 82.
2. Enter one of the following commands, depending on which port setting that you want tochange:
swp_config -changeport -https <portnumber>swp_config -changeport -rmi <portnumber>swp_config -changeport -admin <portnumber>Replace <portnumber> with the relevant value.
3. Press ENTER. The swp_config tool updates the application server configuration based onthe information that you provided.
Note The swp_config -changeport command only allows a port value above 1024.This limit is only applicable on UNIX or Linux.
14.4 Managing the SSL Certificate and KeyIntroduction
The application server that is configured within Alliance Web Platform Server-Embeddedrequires an SSL certificate. The certificate is used to secure the communication between thebrowsers and the application server where Alliance Web Platform and Alliance Web PlatformAdministration run.
During Alliance Web Platform Server-Embedded installation, a self-signed SSL certificate isautomatically created with a validity period of 900 days. It is stored in a keystore that isprotected using the password assigned to the Alliance Web Platform administrator account(which is also provided during installation).
The swp_config tool includes several commands for working with certificates, as explained inthe following steps.
Procedure to display certificate details
1. Follow steps 1 to 2 in "Run Alliance Web Platform Support Tools" on page 82.
2. Enter the following command:
swp_config -showcert
3. Press ENTER.
Here is an example of the output:
SSL Server Certificate Details------------------------------Owner Name: CN=beim0299.swift.corpIssuer Name: CN=beim0299.swift.corpKey Algorithm: RSAKey Size: 2048Signature Algorithm: SHA1withRSA The certificate is validValid from: Tue Jul 01 09:20:23 CEST 2008 until: Sat Dec 18 08:20:23 CET 2010 Serial Number: 44363091
Alliance Web Platform 7.0.40
92 Administration and Operations Guide

Certificate Version: 1 MD5: A9:29:B8:18:46:0E:49:7C:32:44:4B:67:18:DD:2E:98 SHA1: 68:F6:C2:C8:DF:83:8E:13:5B:E6:8F:66:BA:71:79:61:76:51:3B:6BSHA256:FA:FB:D0:4C:A0:39:06:82:15:7A:B3:6F:5A:AE:7D:11:0A:F6:E9:79:75:24:B8:A9:75:FA:25:B7:05:37:BA:49
Before the SSL certificate expires, you must renew it using the following procedure.
Procedure to generate a new self-signed certificate
1. Follow steps 1 to 2 in "Run Alliance Web Platform Support Tools" on page 82.
2. Enter the following command:
swp_config -updatecert -forceIncluding -force automatically stops and starts the application server which is useful in ascript.
3. Press ENTER. The output of the command shows you the certificate DN and displays amessage that the certificate was successfully renewed.
Optional procedure to change the certificate DN
1. Follow steps 1 to 2 in "Run Alliance Web Platform Support Tools" on page 82.
2. Enter the following command:
swp_config -updatecert -DN <hostDN>
3. Press ENTER. The output of the command shows you the certificate DN and displays amessage that the certificate was successfully renewed.
Using a certificate from a Certification Authority
It is possible to replace the self-signed certificate with a certificate from a Certification Authority,if this is required by security practices of your institution. First you must create a certificaterequest to be sent to a Certification Authority, then import the response received from theCertification Authority into Alliance Web Platform Server-Embedded. The swp_config toolprovides the following commands to do this. It is also possible to directly import the certificateand the private key from a Certification Authority.
Procedure to create a certificate request for a Certification Authority
1. Follow steps 1 to 2 in "Run Alliance Web Platform Support Tools" on page 82.
2. Enter the following command:
swp_config -createrequest [-dname <DN>] [-validity <days>] [-requestfile <requestfilename>] [-force]Replace values for the parameters as follows:
<DN> is the distinguished name for the certificate; it will be used as the subject for thegenerated request. Make sure that the DN is of the form CN=<hostname>Where <hostname> is the name of the host with the full domain name as it will be used inthe URL used to access Alliance Web Platform and Alliance Web Platform Administration.
In case you want to use spaces in your DN, do not use the command line parameter -dname. If the -dname parameter is not included, swp_config will prompt you for a DN.The use of space is now allowed.
The Configuration Tool
29 March 2013 93
Note that the attributes localityname (L =) and stateOrProvinceName (S=) arecurrently not supported in the DN, see tip 5017225 for a workaround.
<days> is the number of days the certificate must be valid.
<requestfilename> contains the name of the file in which the certificate request will begenerated. The format of the generated request is DER-encoded.
Including -force automatically stops and starts the application server which is useful in ascript.
If you do not provide a parameter for swp_config -createrequest, then swp_configprompts for the value.
3. Press ENTER. The swp_config tool prepares the request based on the input provided.
Send the generated file (<requestfilename>) to the Certification Authority. When theresponse arrives, import it using the command described in the following procedure.
Procedure to import the response to a certificate request sent to a Certification Authority
1. Follow steps 1 to 2 in "Run Alliance Web Platform Support Tools" on page 82.
2. Enter the following command:
swp_config -importresponse [-responsefile <responsefilename>] [-accept] [-force]Replace values for the parameters as follows:
<responsefilename> contains the name of the file from the Certification Authority, thisfile contains the certificate chain. The -accept parameter automatically accepts thecertificate chain. The response must be a CER file. The response must contain the entirecertificate chain.
Including -force automatically stops and starts the application server which is useful in ascript.
If you do not provide a parameter for swp_config -importresponse, then swp_configprompts for the value.
3. Press ENTER. The swp_config tool adds the certificate to the application server'sconfiguration data.
Alternatively, you can import a Certification Authority certificate and its corresponding privatekey from an existing keystore in either JKS or PKCS12 format.
Procedure to import a Certification Authority-signed certificate and its corresponding privatekey
1. Follow steps 1 to 2 in "Run Alliance Web Platform Support Tools" on page 82.
2. Enter the following command:
swp_config -importcert -keystore <file> [-format <jceks|pkcs12|jks>] -alias <alias> [-force]Replace <file> with the name of the keystore file that contains the certificate and privatekey.
Replace <alias> with the name of the alias for the certificate in the keystore file. You canuse -format to specify whether the keystore is JKS format, JCEKS format, or PKCS12format, the default is JKS format.
Alliance Web Platform 7.0.40
94 Administration and Operations Guide
Including -force automatically stops and starts the application server which is useful in ascript.
3. Press ENTER. The key and certificate are imported into the Alliance Web Platform keystore.
14.5 List of ParametersProcedure
1. Follow steps 1 to 2 in "Run Alliance Web Platform Support Tools" on page 82.
2. Enter the following command:
swp_config -parameters [-list] [-set][<packageName>:<applicationName>:<paramName> <newValue>]Use -set to modify a configuration parameter.
If you use -set, you have to set values for packageName, applicationName,paramName and newValue.
3. Press ENTER. The swp_config tool displays all the configuration parameters.
14.6 PackagesInstall a package
1. Follow steps 1 to 2 in "Run Alliance Web Platform Support Tools" on page 82.
2. Enter the following command:
swp_config -packages -install -file <PACKAGE_FILE_PATH>Where <PACKAGE_FILE_PATH> is replaced with the path to the package file.
For a detailed description of installing a package, see the Alliance Web Platform InstallationGuide or Alliance Web Platform Server-Embedded Installation Guide, section Packages.
Note If the previous version (6.3) of the package is already installed, then theconfig parameter of the package is retained. Even the preferences of theusers (as in previous version) are retained.
View list of packages
1. Enter the following command:
swp_config -packages -list [-extended]
2. Press ENTER. A list of installed packages appears. The list displays the package namesand their corresponding ID.
-extended includes the time at which the package was built.
Uninstall a package
1. Find the package ID that you want to uninstall.
2. Enter the following command:
swp_config -packages -uninstall -id <PACKAGE_ID>
The Configuration Tool
29 March 2013 95
3. Press ENTER. The swp_config command automatically uninstalls the package application.
14.7 Reconfigure Hosted Database ConnectionProcedure
1. Navigate to the bin directory where you have installed Alliance Web Platform.
2. Enter the following command to reconfigure the hosted database connection:
swp_config -hosteddbThe command prompts for the following required information.
• schema owner
• database user account
• hostname
• port number
• Oracle SID
14.8 Change the Deployment URL of a PackageProcedure
1. Enter the following command to list the deployment URL of the currently installedpackages:
swp_config -url -list
2. Enter the following command to change the deployment URL of a package of Alliance WebPlatform (where <id> is the identifier of the package obtained in step 1):
swp_config -url -set <id> <URL>
Note The deployment URLs must also be updated in WebSphere (Alliance Web Platformcluster configuration only). See the Alliance Web Platform Installation Guide,“Appendix A” for more details.
Alliance Web Platform 7.0.40
96 Administration and Operations Guide

Appendix A
IBM WebSphere HTTP Server
A.1 IBM WebSphere HTTP Server for File TransferFlows Concentration
Overview
To configure the IBM WebSphere HTTP Server for concentrating the file transfer flows to agiven instance of the Alliance Gateway, use the following procedure.
Note The paths, commands, and menu options are taken from WebSphere 8.0; theymay differ slightly from the WebSphere version that you are using.
Procedure
1. Start the browser and launch the IBM WebSphere Application Server Integrated SolutionsConsole. Enter the name of the IBM WebSphere Application Server Administrator in theUser ID field and its associated password in the Password field.
2. Select the Server Types > Web servers menu option. Select the entry corresponding tothe web server used by the deployed Alliance Web Platform.
3. In the Configuration tab, under the Additional Properties section, click ConfigurationFile.
4. The configuration file must contain the following lines. These lines must be added unlessthey are already present in the file. Some lines may already be present in the configurationfile but commented out. They must not be commented. Remove the # in front of these lines.
LoadModule proxy_module modules/mod_proxy.soLoadModule proxy_connect_modules/mod_proxy_connect.soListen 0.0.0.0:<HTTP_PROXY_PORT_NUMBER>ProxyRequests OnProxyVia OnAllowCONNECT...<RFT_PORT_NUMBER>The AllowCONNECT...<RFT_PORT_NUMBER> line can be present and can alreadycontain a list of port numbers. In this case <RFT_PORT_NUMBER> must only be added tothe list.
<Proxy *>Deny from all</Proxy><ProxyMatch <RFT_HOST_ADDRESS> >Allow from allWhere:
• <RFT_HOST_ADDRESS> is the value of the property Remote File Transfer HostAddress of the Alliance Gateway instance.
• <RFT_PORT_NUMBER> is the value of the property Remote File Transfer Port Numberof the Alliance Gateway instance.
Appendix A - IBM WebSphere HTTP Server
29 March 2013 97
• <HTTP_PROXY_PORT_NUMBER> is the HTTP port number on which the proxy listens. Itcan be freely selected but must not be a port number that is used by another application.
5. Click OK to confirm.
6. Restart the HTTP Server to implement the changes.
Alliance Web Platform 7.0.40
98 Administration and Operations Guide
Legal Notices
Copyright
SWIFT © 2013. All rights reserved.
Restricted Distribution
Do not distribute this publication outside your organisation unless your subscription or order expressly grantsyou that right, in which case ensure you comply with any other applicable conditions.
Disclaimer
SWIFT supplies this publication for information purposes only. The information in this publication maychange from time to time. You must always refer to the latest available version.
Translations
The English version of SWIFT documentation is the only official and binding version.
Trademarks
SWIFT is the trade name of S.W.I.F.T. SCRL. The following are registered trademarks of SWIFT: the SWIFTlogo, SWIFT, SWIFTNet, SWIFTReady, Accord, Sibos, 3SKey, Innotribe, the Standards Forum logo,MyStandards, and SWIFT Institute. Other product, service, or company names in this publication are tradenames, trademarks, or registered trademarks of their respective owners.
Legal Notices
29 March 2013 99


![AWP [UandiStar.org]](https://img.pdfslide.us/doc/110x75/563dbaa4550346aa9aa72043/awp-uandistarorg.jpg)