Embed Size (px)
Citation preview

Awesome Aquifers Vocabulary Watershed – the region or area drained by a river, stream, etc; drainage area. Aquifer – any geologic formation of sand, soil and gravel where groundwater is stored. Pollution – the introduction of harmful substances or products into the environment. Conservation – the careful utilization of a natural resource in order to prevent depletion. Karst topography - an area of limestone terrain characterized by sinks, ravines, and underground streams. Limestone – a sedimentary rock consisting or mainly calcium that was deposited by the remains of marine animals. Wetlands – a lowland area, such as a marsh or swamp that is saturated with moisture, especially when regarded as the natural habitat of wildlife. Groundwater – the water beneath the surface of the ground, consisting largely of surface water that seeped down: the source of water in springs and wells. Water table – the level below which the ground is completely saturated with water. Surface water – water that is found on or at the surface of the earth. Permeable – any material that allows water to penetrate through. Contaminate – to make impure or unsuitable by contact or mixture with something unclean, bad, etc. Sediment – mineral or organic matter deposited by water, air, or ice. Confined aquifer – an aquifer overlain by one or more layers of impermeable rock or soil that restricts water to within the aquifer. Unconfined aquifer – aquifer where the water table is the upper boundary of the aquifer. Saturated zone - the area where water fills the spaces between soil, sand, and rock underground. Unsaturated zone – an underground layer or area where air fills most of the pores in the soil and rock. Porous – permeable by water, air, etc. through pores. Confining layer – an underground layer over an aquifer that is impermeable or significantly less permeable than the aquifer below it. Confined aquifer – an aquifer overlain by one or more layers of impermeable rock or soil that restricts water to within the aquifer. Recharge – to increase the amount of groundwater through precipitation or surface water that absorbs into the aquifer Runoff – water that does not become absorbed by the earth but flows across the surface of the land into a stream or lake. Well – a hole or shaft drilled into the earth to pump water to the surface. Tannins - pigments in plants responsible for brown colors Confluent – place where different waters mix or merge. Detritus – newly dead or decaying organic matter covered in bacteria. Natural resources – Any material produced by nature that can be used to produce goods or provide services Watershed – an area of land that is drained by a river or river system. Point source pollution –Pollutants discharged from any identifiable point, including pipes, ditches, channels, sewers, tunnels, etc.

Non-point source pollution - pollution that occurs when rainfall, snowmelt, or irrigation runs over land or through the ground, picks up pollutants, and deposits them into rivers, lakes, and coastal waters or introduces them into ground water. ://watersheds.org/waterfest/vocabulary. ://www.groundwater.org/kc/kidsvocab. ://www.deq.state.id.us/water/educ_tools/edible_aquifer_lp.

P.O.Box 190 Crystal Springs, FL 33524*813-715-9707*[email protected]
Post Visit 1 Awesome Aquifers 3-5
Map your watershed Purpose/Objective Students will be able to map where water flows in their neighborhood and/or school campus Materials Map of school campus and/or map of your town surrounding your school Markers if students can write on the maps, post it note flags if they cannot. Procedure
1. As a class review the term watershed 2. Pass out maps to students (individually or in small groups) 3. Have students mark water bodies that are on the map. These can be lakes, rivers,
retention ponds, etc. 4. Next have students mark places on the map that they know are higher areas. These
can be hills, parking lots, etc. 5. Now have students draw arrows from the high spots to the water bodies indicating
which way the water will flow. Remind students that water running off of a hill may end up in more than one water body depending on which side of the hill it rolls down.
6. With another color marker or post it, have students mark where pollution maybe introduced in the watershed.
7. Brainstorm ways to reduce that pollution.
P.O.Box 190 Crystal Springs, FL 33524*813-715-9707*[email protected]
Post Visit 2 Awesome Aquifers 3-5
Increase awareness Purpose/Objective Students will produce signs to post about runoff and watersheds Materials Computer access Poster board Construction paper Markers Crayons Laminating (optional) Procedure
1. After students have mapped their watershed (post-activity 1) decide which water body is at the highest risk of being polluted.
2. Using publishing software or art supplies, have students design signs that will make other people aware that water drains from one area to the other and that litter or pollution dropped in this place will end up in that water body. Students can include maps, pictures, and/or diagrams. Remind students that signs with fewer words are more effective. Help them come up with a good slogan about your watershed and/or major water bodies in your community or on your campus.
3. When the poster have been edited and finalized, have them laminated. This can be done at a copy store, possibly in your school, or with clear contact paper.
4. Place the posters in places where they will have the most exposure and maximum impact. If they are to be placed on private property, write a letter explaining your class project and get permission before posting signs.
P.O.Box 190 Crystal Springs, FL 33524*813-715-9707*[email protected]
Pre Visit 1 Aquifers
3-5
Pollution types Purpose/Objective Students will be able to describe different types of pollution and how they impact their community Materials Index cards Vaseline String Black markers Procedure
1. Begin a class discussion and list all the forms of pollution that the class can come up with (oil spills, litter, smoke etc)
2. Classify your list into types of air pollution, water pollution, and ground pollution 3. Ask the class which one (water, air, ground) is the worse pollution. There is no
correct answer but this can lead to a good debate. 4. Tell students that as a class you are going to decide which of the three is the biggest
problem on the school campus. 5. Take the class on a walk around campus and collect any litter that you see. 6. Record the weight of the trash or just how many bags of it you collected. 7. If there is a wetland (retention pond, standing water) on your campus, visit it and
write down any pollution that you see. If there is no wetland, have students interview the science teacher and the lunchroom staff to see if they pour anything down the drain that might lead to water pollution. Also, count how many storm drains are in the school parking lot.
8. Air pollution is harder to see. Make air pollution catchers: a. On and index card make 1in X 1in square grid lines (does not have to be
exact fit on the card, these are for reference) b. Using a hole punch, make a hole in one corner and tie the string to the card. c. Have the students smear a thin layer of Vaseline all over the card where
they made the 1in X 1in grid. d. Find a place on campus to hang the cards, near parking lots and roads
should provide more air pollution. Make sure the cards are far enough apart so that they do not touch when blown in the wind. Leave the card out for 24 hrs.
e. Collect the cards
P.O.Box 190 Crystal Springs, FL 33524*813-715-9707*[email protected]
f. Using magnifying glasses have the students write down how many pieces of dust or dirt is stuck to the card.
9. With all the data you have recorded, have another discussion about which type of pollution is the biggest problem in the campus. Again there is no correct answer
10. Discuss some ways that you can help stop or reduce these types of pollution. 11. Put your plan into effect

P.O.Box 190 Crystal Springs, FL 33524*813-715-9707*[email protected]
Pre-Visit 2 Aquifers
3-5
Water’s Journey Purpose/Objective Students will be able to describe the Floridan aquifer Students will view the video ‘Water's Journey - The Hidden Rivers of Florida’. Materials A copy of Water's Journey - The Hidden Rivers of Florida, this should be available through your school library or your local public library Paper Pencil Crayons, markers, and/or colored pencils Procedure
1. As a class come up with a definition of the word aquifer. 2. Ask each student to draw what they think the aquifer looks like under ground 3. Share the drawing and return them to the students 4. Watch the video 5. Refine your class definition of an aquifer 6. Allow students to change their drawings of the aquifer now that they have seen the
video.
P.O.Box 190 Crystal Springs, FL 33524*813-715-9707*[email protected]
Pre Visit 3 Awesome Aquifers 3-5
Help stop Runoff Purpose/Objective Students will be able to identify ways to reduce the impact of runoff pollution Materials Long shallow pan, with sides (cookie tray) Wrinkled aluminum foil (enough to cover the tray) Coco powder and/or colored drink mix Squirt bottle Green towel cut in to small strips or pieces (paper towel can be substituted) Stickers to represent places in the watershed (cow sticker is cow farm, gold star is the dump, etc.) Procedure
1. As a class, review the vocabulary term ‘Watershed’ 2. Do a think pair share to define ‘Runoff Pollution’. 3. Once the class has agreed on a definition, brainstorm some places that might
produce runoff pollution (cow pastures, garbage dumps, construction sites) 4. Set up the tray so it is at an angle facing the students (prop one end up on a stack of
books) this is going to represent our watershed. 5. Wrinkle the aluminum foil and place it in the tray, the high parts are hills and the
low parts are valleys. Have the students point out where the rivers might be in this watershed.
6. Have students place the stickers on the foil in the places where they want to farms, schools, dumps, construction ect to be. These places can come from your list of places that produce runoff.
7. Once the stickers are in place, sprinkle the coco powder or drink mix over the pollution sites.
8. Use the squirt bottle to make a rain shower, watch the pollution flow through the watershed. Where does it end up?
9. Spray until all the pollution is washed away and dump the water that collected at the bottom in the sink.
10. Discuss what the earth use to clean up run off pollution (wetlands and plants). 11. Place the towel strips below the pollution sites around the watershed. 12. Add more coco powder and drink mix. 13. Squirt
P.O.Box 190 Crystal Springs, FL 33524*813-715-9707*[email protected]
14. This time some of the ‘pollution’ should be caught in the ‘wetlands’ and the water at the bottom should be cleaner.
Note: This can be done in small groups is you have enough supplies.
P.O.Box 190 Crystal Springs, FL 33524*813-715-9707*[email protected]
Pre Visit 4 Aquifers
3-5
Sinkholes Purpose/Objective Students will be able to explain the difference between collapse, subsidence, and solution sinkholes Students will be able to describe how sinkholes affect watersheds and the aquifer. Materials Plastic tub or shoe box (1 if you are doing as a demo, more if you are having students do this in groups) Sand Balloon (1 per box) oblong work best Cornstarch packing peanuts (about 1 handful per box) Straight pin (1 per box) Small cup of water (1 per box) Paper cup ‘house’ (1 per box) Procedure
1. Ask students to define ‘sinkhole’ 2. As a class, come up with a working definition of what a sinkhole is. 3. Introduce the terms for the three different kinds of sinkholes;
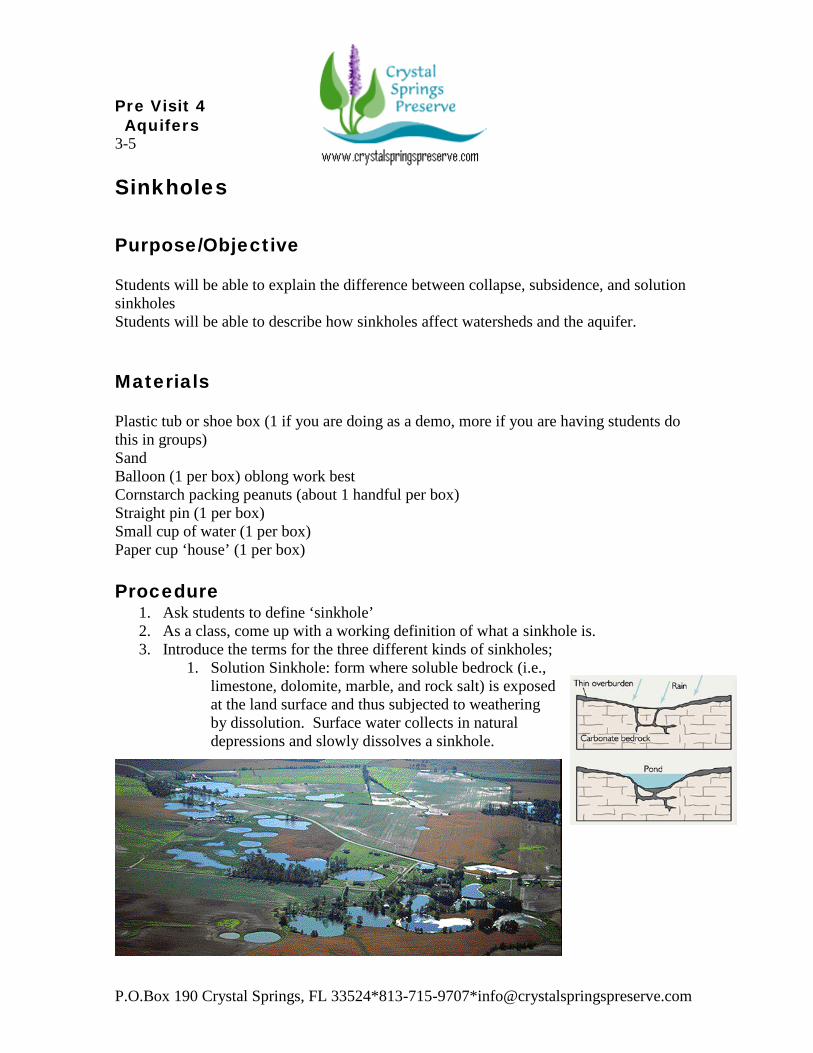
1. Solution Sinkhole: form where soluble bedrock (i.e., limestone, dolomite, marble, and rock salt) is exposed at the land surface and thus subjected to weathering by dissolution. Surface water collects in natural depressions and slowly dissolves a sinkhole.
P.O.Box 190 Crystal Springs, FL 33524*813-715-9707*[email protected]
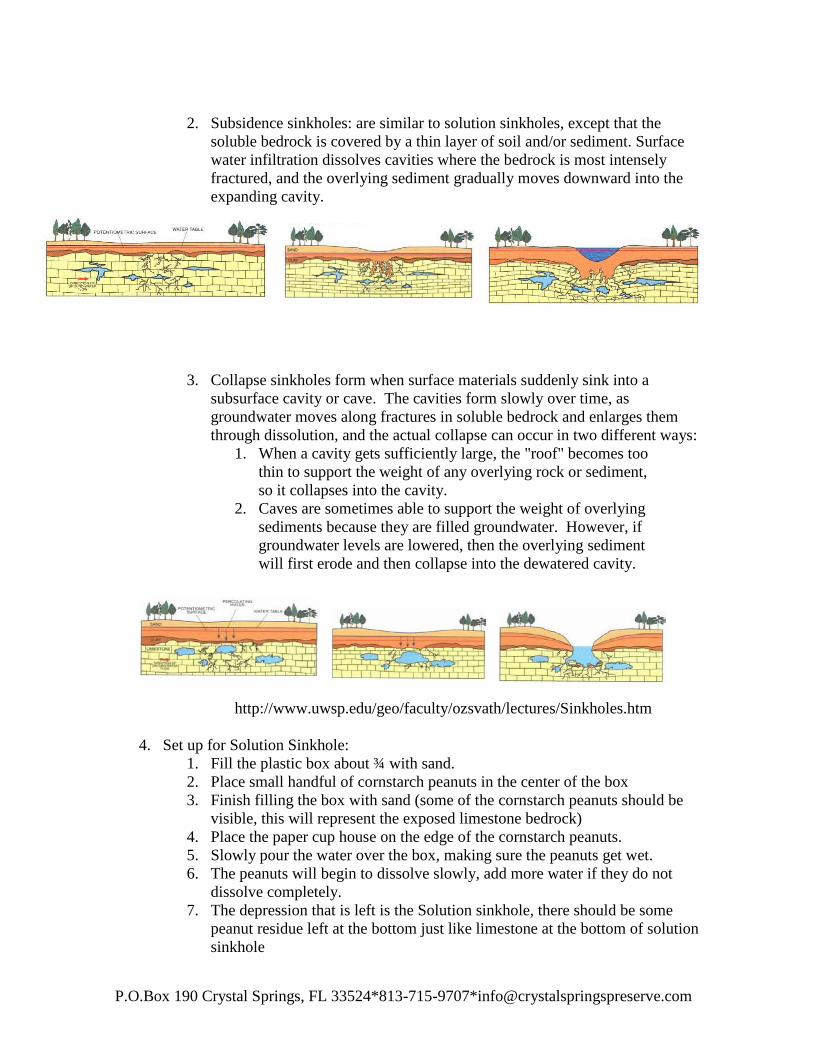
2. Subsidence sinkholes: are similar to solution sinkholes, except that the
soluble bedrock is covered by a thin layer of soil and/or sediment. Surface water infiltration dissolves cavities where the bedrock is most intensely fractured, and the overlying sediment gradually moves downward into the expanding cavity.
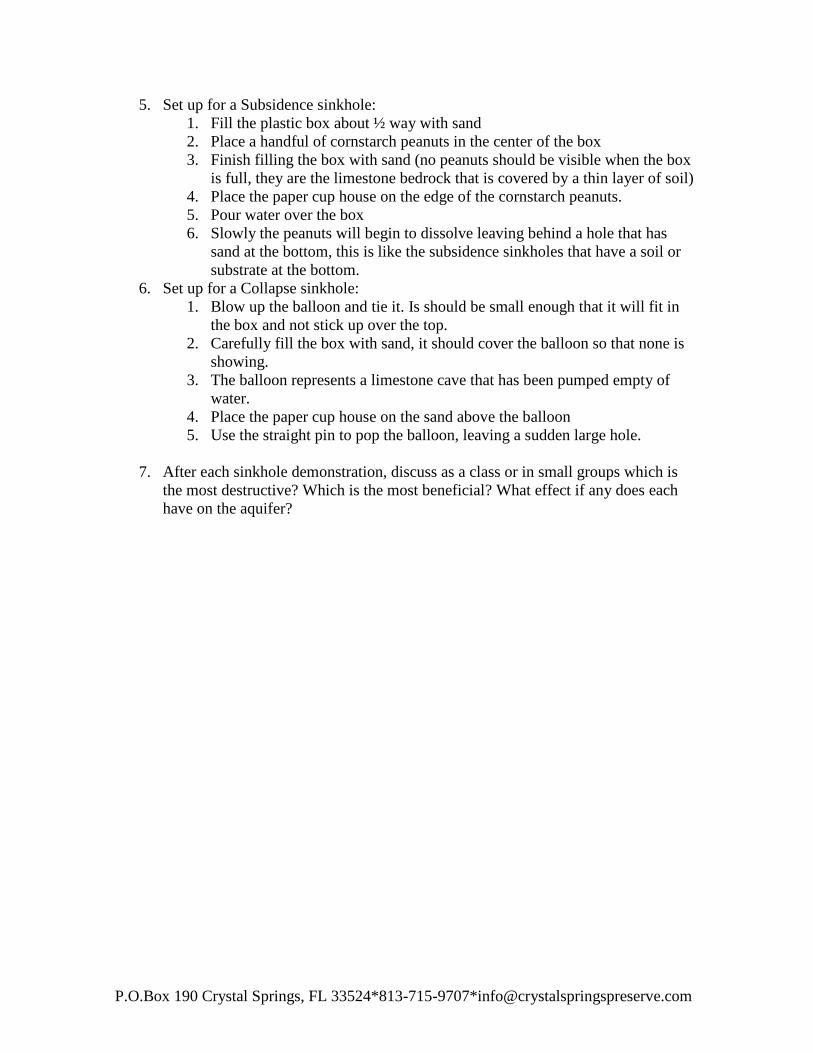
3. Collapse sinkholes form when surface materials suddenly sink into a subsurface cavity or cave. The cavities form slowly over time, as groundwater moves along fractures in soluble bedrock and enlarges them through dissolution, and the actual collapse can occur in two different ways:
1. When a cavity gets sufficiently large, the "roof" becomes too thin to support the weight of any overlying rock or sediment, so it collapses into the cavity.
2. Caves are sometimes able to support the weight of overlying sediments because they are filled groundwater. However, if groundwater levels are lowered, then the overlying sediment will first erode and then collapse into the dewatered cavity.
http://www.uwsp.edu/geo/faculty/ozsvath/lectures/Sinkholes.htm
4. Set up for Solution Sinkhole:
1. Fill the plastic box about ¾ with sand. 2. Place small handful of cornstarch peanuts in the center of the box 3. Finish filling the box with sand (some of the cornstarch peanuts should be
visible, this will represent the exposed limestone bedrock) 4. Place the paper cup house on the edge of the cornstarch peanuts. 5. Slowly pour the water over the box, making sure the peanuts get wet. 6. The peanuts will begin to dissolve slowly, add more water if they do not
dissolve completely. 7. The depression that is left is the Solution sinkhole, there should be some
peanut residue left at the bottom just like limestone at the bottom of solution sinkhole
P.O.Box 190 Crystal Springs, FL 33524*813-715-9707*[email protected]
5. Set up for a Subsidence sinkhole: 1. Fill the plastic box about ½ way with sand 2. Place a handful of cornstarch peanuts in the center of the box 3. Finish filling the box with sand (no peanuts should be visible when the box
is full, they are the limestone bedrock that is covered by a thin layer of soil) 4. Place the paper cup house on the edge of the cornstarch peanuts. 5. Pour water over the box 6. Slowly the peanuts will begin to dissolve leaving behind a hole that has
sand at the bottom, this is like the subsidence sinkholes that have a soil or substrate at the bottom.
6. Set up for a Collapse sinkhole: 1. Blow up the balloon and tie it. Is should be small enough that it will fit in
the box and not stick up over the top. 2. Carefully fill the box with sand, it should cover the balloon so that none is
showing. 3. The balloon represents a limestone cave that has been pumped empty of
water. 4. Place the paper cup house on the sand above the balloon 5. Use the straight pin to pop the balloon, leaving a sudden large hole.
7. After each sinkhole demonstration, discuss as a class or in small groups which is
the most destructive? Which is the most beneficial? What effect if any does each have on the aquifer?
P.O.Box 190 Crystal Springs, FL 33524*813-715-9707*[email protected]
Pre Visit 5 Awesome Aquifers 3-5
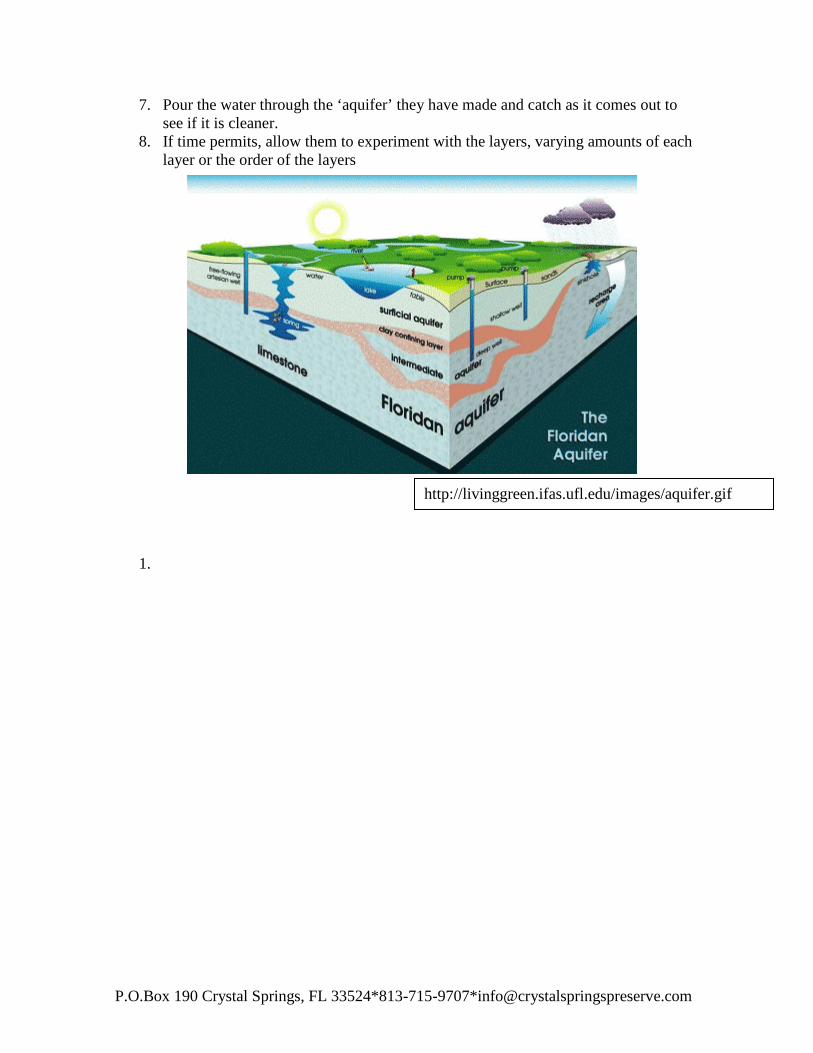
Construct an Aquifer Purpose/Objective Students will be able to name the materials that make up the layers of the Floridan Aquifer Students will construct and aquifer and test it Materials Picture of the Aquifer Small flower pots (one per group or per student) Wet play dough (to represent clay) Sand Rocks Top soil Water Teacher Background: To understand how an aquifer works try these websites: ://ga.water.usgs.gov/edu/earthgwaquifer. ://capp.water.usgs.gov/aquiferBasics/ Procedure
1. Show the students a picture of a cross cut aquifer 2. Explain the different layers of the aquifer
a. Sand covers most of the top of Florida b. Beneath the sand if the dirt and clay layer where most of the roots of the
plants are found c. Limestone rock is next and it is where the water is stored and most of the
cleaning occurs. 3. Once the students have an understanding of how the aquifer works, place them into
groups in an outdoor area or a place that can get dirty. 4. Distribute pots and tell the students that they will be constructing an aquifer in the
pot. 5. Give them the play-dough, sand, top soil, and rock and have them layer it in the
proper order in the pot. 6. Pre mix some of the top soil with water to make ‘dirty water’.
P.O.Box 190 Crystal Springs, FL 33524*813-715-9707*[email protected]
7. Pour the water through the ‘aquifer’ they have made and catch as it comes out to see if it is cleaner.
8. If time permits, allow them to experiment with the layers, varying amounts of each layer or the order of the layers
1.
http://livinggreen.ifas.ufl.edu/images/aquifer.gif