Embed Size (px)
Citation preview
Page 1
AW315
Operating manual
Page 2
QUALITY CONTROL PROCEDURE
Title AW315 welding unit, 110V operation. Operating Manual.
Drawing Number AW24-0045_OM_KW_R2 Revision Number 2
Date 12/12/2012 Total Pages 16
This is an electronic drawing. All alterations MUST be carried out by the originator. Any manual alterations will invalidate this copy. Ensure that this is the latest revision prior to use.
© Advance Technical Systems Ltd. All proprietary rights in the subject matter hereof are reserved and no permission is granted to reproduce this print in whole or part, or to disclose any of the information upon it to others.
Page 3
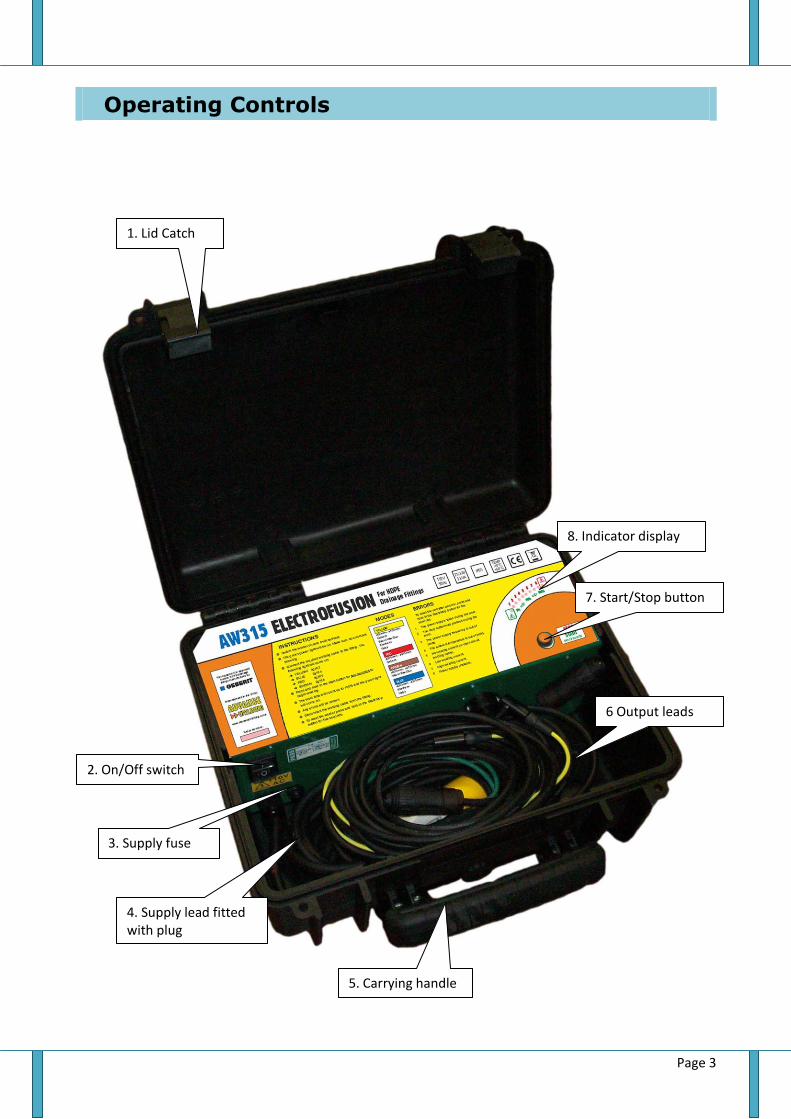
Operating Controls
1. Lid Catch
5. Carrying handle
4. Supply lead fitted with plug
2. On/Off switch
3. Supply fuse
6 Output leads
7. Start/Stop button
8. Indicator display
Page 4
Safety Notes
RISK OF EXPLOSION! This welding unit must not be
used in a gaseous atmosphere.
RISK OF ELECTRIC SHOCK! Do not open. No user
serviceable parts inside.
To avoid damaging the welding unit, do not interrupt
the supply voltage or disconnect the output lead, while
the unit is welding a fitting.
Never lift or pull the equipment by its cables. Never
disconnect the welding leads by pulling on them,
always pull off the connectors from the fitting.
Keep bystanders a safe distance away from the
machine while welding.
Switch off and remove the plug from the mains before
adjusting, cleaning, or if the cables are entangled and
before leaving the equipment unattended for any
period.
Never allow people unfamiliar with these instructions
to use the welding unit.
The operator is responsible for accidents or hazards
occurring to other people or their property while using this equipment. Keep the work area safe!
Before using, always visually inspect the unit to see
that the cables and connectors are not worn or
damaged. Replace the damaged part before welding.
Weld only in daylight or in good artificial light.
Do not weld in the rain or leave the equipment
outdoors whilst it is raining.
Do not start a weld without a fitting attached to the
output lead, or without pipe correctly inserted into the
fitting.
Do not touch the fitting while welding.
!
Page 5
Product Specification
YELLOW MODE. (Geberit, Wavin, Akatherm, Valsir)
Welding Current: 5 A ac (true rms) Welding Time: 80 seconds (@ 20oC)
Welding Voltage: 28 V to 186 V ac
Welding Power: 140 VA to 930 VA
RED MODE. (Geberit)
Welding Voltage: 220 V ac (true rms)
Welding Time: Thermal fuse in fitting
Welding Current: 5 A to 10.5 A ac
Welding Power: 1100 VA to 2310 VA
BLUE MODE. (Akatherm, Valsir) Welding Voltage: 220 V ac (true rms)
Welding Time: 420 seconds (@ 20oC)
Welding Current: 5 A to 9 A ac
Welding Power: 1100 VA to 1980 VA
BROWN MODE. (Wavin)
Welding Current: 10 A ac (true rms)
Welding Time: 370 seconds (@ 20oC)
Welding Voltage: 149 V to 198 V ac Welding Power: 1490 VA to 1980 VA
Apparent Power Factor: 0.16 to 0.81
Supply Voltage: 110 V ac (+/- 15%) Supply Current: 10 A ac (true rms)
Supply Power: 3,500 W (peak at 0.16 PF)
Supply Protection: Class 1 – Earthed
Weight: 10 kg
Size: 41 cm x 35 cm x 20 cm
Protection Level: IP65 Operating Temperature: -15 oC to +45 oC
Page 6
Advance Welding has a policy of continuously improving
product design, and as such reserve the right to change specification of its products without prior notice and with
impunity.
Intended Use
This equipment is intended to weld Drainage Fittings:
5 Amp Low Pressure Fittings from 32mm to 160mm,
10 Amp Low Pressure Fittings from 200mm to 315mm,
230 Volt Low Pressure Fittings from 200mm to 315mm,
Introduction
This manual gives instructions on the correct assembly and
safe use of your welding unit. It is important that you read
these instructions carefully, and keep these instructions for
the life of the unit.
This manual does not detail the specific welding procedure
for the fittings: scraping, clamping and assembly of joints.
For this information you must contact the manufacturer of
the fittings.
Delivered Items
Carefully remove the welding unit from its packaging and
check that you have the following items:
Welding unit.
Yellow Output lead.
Red Output lead
(Optional) Blue Output lead.
(Optional) Brown Output lead.
Manual.
When parts are missing or damaged, please contact your
dealer.
Page 7
Electrical Safety
WARNING! Switch off and remove the plug from the
mains before adjusting, cleaning or if the cable is
cut, damaged or entangled.
This welding unit is Class 1 and requires an earthed
connection. (An earth spike must be used with generators.)
The operating voltage is 110 volts ac 50 Hz, and a power
source capable of 3500 Watts is required.
Extension cables should only be used if they comply with
the H07RNF harmonized standard. They must be fitted with
connectors to the BS EN 60309-2 standard. All cables must
be unwound from the reel to stop inductive heating effects. The cable dimensions should be as follows:
1.5mm2 cable = 25m
2.5mm2 cable = 50m
4.0mm2 cable = 75m
It is recommended for increased electrical safety to use a
Residual Current Device (RCD) with a tripping current of
not more than 30 mA. Always check your RCD every time
you use it.
The supply cable must be inspected for signs of damage
before each use and the equipment may only be used if in perfect condition. Damaged cables must be replaced by an
approved service agent.
This equipment is classified as “Portable for use on
industrial applications”, and must undergo a formal
electrical safety check (Portable Appliance Test) every six months.

Page 8
Using the equipment
The welding unit takes the ambient temperature into account when calculating the energy required to weld the
fitting. It must therefore be allowed to reach ambient
temperature before use and must be at the same
temperature as the fitting to be welded.
Switch the welder on and it will self test.
The green power light will be on. Make sure no errors
are showing.
Connect the required colour welding cable to the
socket, the indicator light will show.
o YELLOW: 32mm – 160mm
Geberit, Wavin Waviduo, Akatherm, Valsir
o RED: 200mm – 315mm
Geberit
o BROWN: 200mm – 315mm
Wavin Waviduo
o BLUE: 200mm – 315mm
Akatherm, Valsir
Connect the welding cable to the fitting.
Press and hold-in the start button for two seconds to
begin welding.
The weld time will count up to 100% and the green
light will come on.
Any errors will be shown.
Disconnect the welding cable from the fitting.
To reset the welder press and hold-in the Start/Stop
button for five seconds.
To help avoid errors, use a good quality 2.5 kW / 3.0 kVA power generator to the specifications TIN12/ECE3.
Page 9
Fault Finding
If a fault happens with the unit, the red fault light will illuminate along with one other indicator light to show the
error number. Information on the causes of these faults is shown below. If this does not identify or remedy the
problem, contact your service agent.
Error 1. Power failure during weld.
The power to the welding unit went off during the weld.
Check that the unit is switched on. Make sure the supply plug has not come out of the
supply socket.
Check that the supply fuse or breaker has not tripped.
If using a generator, check the generator is operating
and there is enough fuel.
Check the cables are not damaged or broken.
Check the fuse is OK in the welding unit.
Error 2. Stop button pressed.
The stop button was pressed while welding.
Restart the weld after the fitting has returned to
ambient temperature.
Error 3. Power supply frequency fault.
The supply frequency is out of limits.
Check the generator is operating correctly.
Error 4. Ambient temperature fault.
The ambient temperature has been measured as lower
than -20oC or higher than +50oC.
If the temperature is very cold, wait until the ambient
rises back into specification.
!
Page 10
If the unit is in direct sunlight, it may have heated up
the sensor. Move the unit into the shade and allow it to reach ambient again.
Error 5. No welding current.
The unit has detected that no welding current is passing
into the fitting.
Make sure that the connectors have not come off the
fitting. Make sure that the welding cable is securely connected
to the unit and that it isn’t damaged.
Try welding again, but hold the start button in for
three seconds. A short press of the start button can
cause this fault.
Error 6. Low welding current.
The unit has detected a low welding current as follows:
1.5% low, fail in 3 seconds.
90% low, fail in 1 second.
Make sure that the correct fittings are being welded. If multiple welding fittings, make sure the combined
diameters do not exceed 200mm.
Make sure the supply is within limits: 110 volts with a
capacity of 3500 watts.
Make sure any extension leads being used are the
correct length and rating.
Error 7. High welding current.
The unit has detected a high welding current as follows:
1.5% high, fail in 3 seconds.
6.25% high, fail in 2 seconds.
12.5% high, fail in 1.5 seconds.
25% high, fail in 1 second.
50% high, fail in 0.3 seconds.
Restart the weld after the fitting has returned to
ambient temperature.

Page 11
If the fault persists, return the unit to an approved
service agent.
To reset the unit after an error, press and hold-in the
Start/Stop button for five seconds.
Maintenance
Regularly check for obvious defects such as loose or
damaged cables and connectors. Look for warn
components and broken covers or housings.
There are no user serviceable parts inside the unit. It
should be returned to an approved service agent for repair
and calibration.
This unit should be calibrated every twelve months.
After use, clean the outside of the unit with a soft brush or
cloth. Carefully wind up and store the cables in the compartments provided in the carry case.
Disposal
The equipment and packaging should be sorted for environmentally friendly recycling.
DO NOT DISPOSE OF THIS EQUIPMENT
INTO HOUSEHOLD WASTE !
According to the European Directive
2002/96/EC Waste Electrical and
Electronic Equipment (WEEE), when no
longer suitable for use, this equipment must be separately collected and sent for recycling.
Page 12
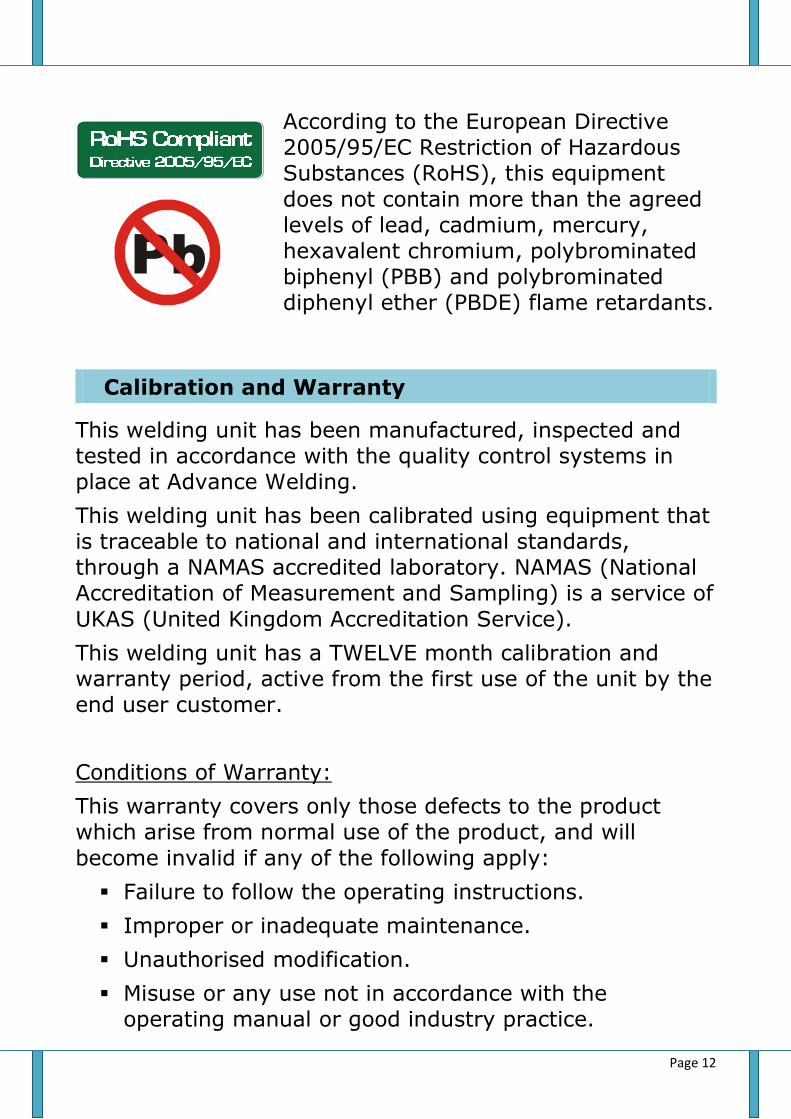
According to the European Directive
2005/95/EC Restriction of Hazardous
Substances (RoHS), this equipment
does not contain more than the agreed levels of lead, cadmium, mercury,
hexavalent chromium, polybrominated biphenyl (PBB) and polybrominated
diphenyl ether (PBDE) flame retardants.
Calibration and Warranty
This welding unit has been manufactured, inspected and
tested in accordance with the quality control systems in
place at Advance Welding.
This welding unit has been calibrated using equipment that
is traceable to national and international standards,
through a NAMAS accredited laboratory. NAMAS (National
Accreditation of Measurement and Sampling) is a service of
UKAS (United Kingdom Accreditation Service).
This welding unit has a TWELVE month calibration and warranty period, active from the first use of the unit by the
end user customer.
Conditions of Warranty:
This warranty covers only those defects to the product
which arise from normal use of the product, and will
become invalid if any of the following apply:
Failure to follow the operating instructions.
Improper or inadequate maintenance.
Unauthorised modification.
Misuse or any use not in accordance with the operating manual or good industry practice.
Pb
Page 13
Physical abuse of the product.
Operation outside the products specifications.
Improper site preparation or site maintenance.
Faulty pipe or fitting.
Extent of Warranty:
Subject to the conditions and limitations of warranty;
Advance Welding warrants that its electrical products will
be free from defects in materials and workmanship for a
period of twelve months, and its mechanical products for
six months, from the date of purchase by the end-user
customer.
If during this period, notice of a defect which is covered by
this warranty is received, then Advance Welding will either
repair or replace the product at its option. Any replacement
product will have functionality at least equal to that of the
product being replaced, and will in our opinion, perform
consistently with its age and usage.
Unless otherwise agreed, all warranty work will be carried
out by Advance Welding or an authorised and approved
service facility.
Customers will prepay all shipping charges for products
returned under warranty, and Advance Welding will charge
for return of the products back to the customer.
This warranty statement gives the customer specific legal
rights. The customer may also have other rights which
vary from country to country in the world.
Limitations of Warranty:
Advance Welding does not warrant the operation of any
product to be uninterrupted or error free.
Page 14
Advance Welding specifically disclaims the implied
warranties of satisfactory quality and fitness for a particular purpose.
Advance Welding makes no other warranty of any kind,
whether express or implied, with respect to its products.
To the extent that this warranty statement is inconsistent
with the law of the locality where the customer uses the
product, this warranty statement shall be deemed modified
by the minimum necessary to be consistent with such local law.
To the extent allowed by local law, the remedies provided
in this warranty statement are the customer’s sole and
exclusive remedies.
This equipment has been designed for use with the range
of fittings and pipe available at the time of its design and development. Advance Welding can accept NO liability for
the equipments ability or otherwise to be used with new or
different fittings or pipe that subsequently appear in the
market place.
This equipment is not intrinsically safe and must not be used in a gaseous or explosive atmosphere. Advance
Welding can accept NO liability if the equipment is used in
these circumstances.
Page 15
Declaration of Conformity
This welding unit has been designed to
comply with the harmonised standards
under the "New Approach" directives, and has been CE marked accordingly.
The applicable standards are:
89/336/EEC Electromagnetic compatibility
73/23/EEC Low voltage equipment
98/37/EC Machinery safety
More detailed information is available on our web site at www.PlasticPipeWelding.com
On behalf of
Advance Welding:
Service and Repair
Manufactured in the UK by:
ADVANCE WELDING
Units 1 & 2
Taylor Street
Cleckheaton West Yorkshire
BD19 5DZ United Kingdom
Tel: 0844 880 7748 Fax: 0870 752 6139
Email: [email protected] Web: www.AdvanceWelding.co.uk
K.M.Wilkinson.

Page 16