Embed Size (px)
Citation preview
The software product described in this guide is furnished under a license agreement and may be used only in accordance with the terms of agreement.
Document Number: AV/MAC/04.04.2013/5.5-x
Current Software Version: 5.5-x
Copyright Notice: Copyright © 2013. All rights reserved.
Any technical documentation that is made available by MicroWorld is the copyrighted work of MicroWorld and is owned by MicroWorld.
No Warranty: This technical documentation is being delivered to you AS-IS and MicroWorld makes no warranty as to its accuracy or use. Any use of the technical documentation or the information contained therein is at the risk of the user.
Documentation may include technical or other inaccuracies or typographical errors. MicroWorld reserves the right to make changes without prior notice.
No part of this publication may be copied without the express written permission of MicroWorld.
Trademarks: The terms MicroWorld, eScan, MWL and MailScan, the eScan logo, MailScan logo and MicroWorld logo are trademarks of MicroWorld.
Mac, Mac logo, Lion, Mountain lion and Snow Leopard are trademarks of the Apple Inc. company and Microsoft, MSN, Windows and Windows Vista are trademarks of the Microsoft group of companies. All product names referenced herein are trademarks or registered trademarks of their respective companies. MicroWorld disclaims proprietary interest in the marks and names of others. Although, MicroWorld makes every effort to ensure that this information is accurate, MicroWorld will not be liable for any errors or omission of facts contained herein. MicroWorld reserves the right to modify specifications cited in this document without prior notice.
No part of this document may be reproduced or transmitted in any form or by any means, electronic or mechanical, for any purpose without the express written permission of MicroWorld.
Other product names mentioned in this manual may be trademarks or registered trademarks of their respective companies and are hereby acknowledged.
Languages: English, Latin Spanish, German, Greek, Spanish, French, Italian, Japanese, Dutch, and Russian.
Date: 04th April, 2013
Contents Purpose of this Document .........................................................................................................................1
Intended Audience.....................................................................................................................................1
Conventions Used .....................................................................................................................................1
Pre-installation Process .............................................................................................................................2
Pre-requisites for Installing eScan Anti-Virus Security for Mac.................................................................2
System Requirements............................................................................................................................2
Preparing for Installation............................................................................................................................2
Methods of Installation and Un-installation .............................................................................................3
Installing eScan Anti-Virus Security for Mac .............................................................................................3
Un-installing eScan Anti-Virus Security for Mac........................................................................................3
Installation Process ....................................................................................................................................4
Overview of the Installation Process .........................................................................................................4
Step 1 — eScan Anti-Virus Installer Welcome Window ........................................................................4
Step 2 — Viewing Read Me File............................................................................................................4
Step 3 — Accepting End User License Agreement (EULA)..................................................................4
Step 4 — Selecting the Installation Folder.............................................................................................5
Step 5 — Preparing for Installation........................................................................................................5
Step 6 — Completing Installation ..........................................................................................................5
eScan Anti-Virus Security for Mac Installation Process ............................................................................6
Getting Started ..........................................................................................................................................17
Logging On ..............................................................................................................................................17
Understanding the User Interface ...........................................................................................................18
Accessing eScan GUI Shortcut Menus ...................................................................................................21
Overview of Features................................................................................................................................22
Protection ................................................................................................................................................22
Starting and Stopping eScan real-time protection ...............................................................................25
Configuring the settings .......................................................................................................................26
Viewing Statistics .................................................................................................................................29
Viewing Quarantined Objects Report ..................................................................................................30
Viewing Report.....................................................................................................................................31
Scan.........................................................................................................................................................32
Update .....................................................................................................................................................41
Quick Access Links..............................................................................................................................45
Registering and Renewing eScan Anti-Virus Security for Mac............................................................46
Registering...........................................................................................................................................46
Renewing .............................................................................................................................................48

Contact Information ..................................................................................................................................50
Contact Details ........................................................................................................................................50
Free Technical Support........................................................................................................................50
Chat Support........................................................................................................................................50
Forums Support ...................................................................................................................................50
E-mail Support .....................................................................................................................................50
Important Websites ..............................................................................................................................50
Registered Offices ...................................................................................................................................51
About This Guide
The eScan Anti-Virus Security for Mac is an anti-virus solution provider for Mac systems. It detects both Mac and Windows-based malwares and protects you against all types of malwares with real-time protection and real-time scanning feature. The eScan Anti-Virus Security for Mac delivers an on-demand and scheduled scanning on files, directories, and local hard disk drives with the default real-time monitoring feature. Apart from system scanning, you can scan all the connected USB’s and CD-ROM devices, through auto and manual scan feature.
The eScan virus alert gives you pop-up alerts, whenever viruses are detected in your system, which reminds you of scanning and in turn protects you from any danger. With an automatic virus update feature, you are updated with the virus signatures, hence protects you from latest virus threats from attacking your Mac.
1
CCoonntteennttss
Purpose of this Document
Intended Audience
Conventions Used
Purpose of this Document This guide will assist you in how to get started with eScan Anti-Virus Security for Mac and guides you through the installation process. It explains features, various methods of installation and un-installation of the product, and also helps you to know how to register and renew product for use.
Intended Audience This document is intended for system administrators and users.
Conventions Used
Convention Description
ote N
It indicates the special instructions, which can be useful in addition to the current information.
Bold er interface like options, buttons, windows, It indicates name of the usdialog boxes, and so on.
Hypertext Blue It indicates link to a topic or to a website.
2
Pre-installation Process
To install eScan Anti-Virus Security for Mac, you have to fulfill the system requirements. Besides this, you have other requirements to consider, which will help you prepare for installation.
CCoonntteennttss
x 768
Minimal wide display resolution: 1024 x 640
reparing for Installation
nistrator rights or equivalent privileges for the user who has logged
ing on your computer.
i-
Ensure all the critical operating system hotfixes and security patches are installed.
Pre-requisites for Installing eScan Anti-Virus Security for Mac
Preparing for Installation
Pre-requisites for Installing eScan Anti-Virus Security for Mac
The eScan Anti-Virus Security for Mac has to be installed on Mac OS X Snow Leopard 10.6, Mac OS X Lion 10.7, Mac OS X Mountain Lion 10.8, Mac OS X Mavericks 10.9.
System Requirements
Before installing, you need to make sure your Mac meets the following system requirements:
Intel based Macintosh
1 gigabyte (GB) recommended available memory
500 megabytes (MB) of available hard drive space for eScan Anti-Virus Security for Mac installation
Required display colors: millions
Minimal normal (4:3) display resolution: 1024
P
Before you begin with the installation, ensure you meet the following requirements:
You must have admion to the computer.
Close all open applications or programs runn
Uninstall all other anti-virus software, if any.
An internet connection is required, which will help you to download latest eScan AntVirus updates.
3
Methods of Installation and Uninstallation
This section introduces you the different methods of installation and un-installation of eScan Anti-Virus Security for Mac.
CCoonntteennttss
Installing eScan Anti-Virus Security for Mac
Uninstalling eScan Anti-Virus Security for Mac
Installing eScan Anti-Virus Security for Mac
The MicroWorld’s eScan enables you to install eScan Anti-Virus Security for Mac, either through CD/DVD-ROM/USB (Media) or Website (Online), for your convenience.
Perform the following steps to install eScan Anti-Virus Security for Mac through CD/DVD-ROM/USB and website:
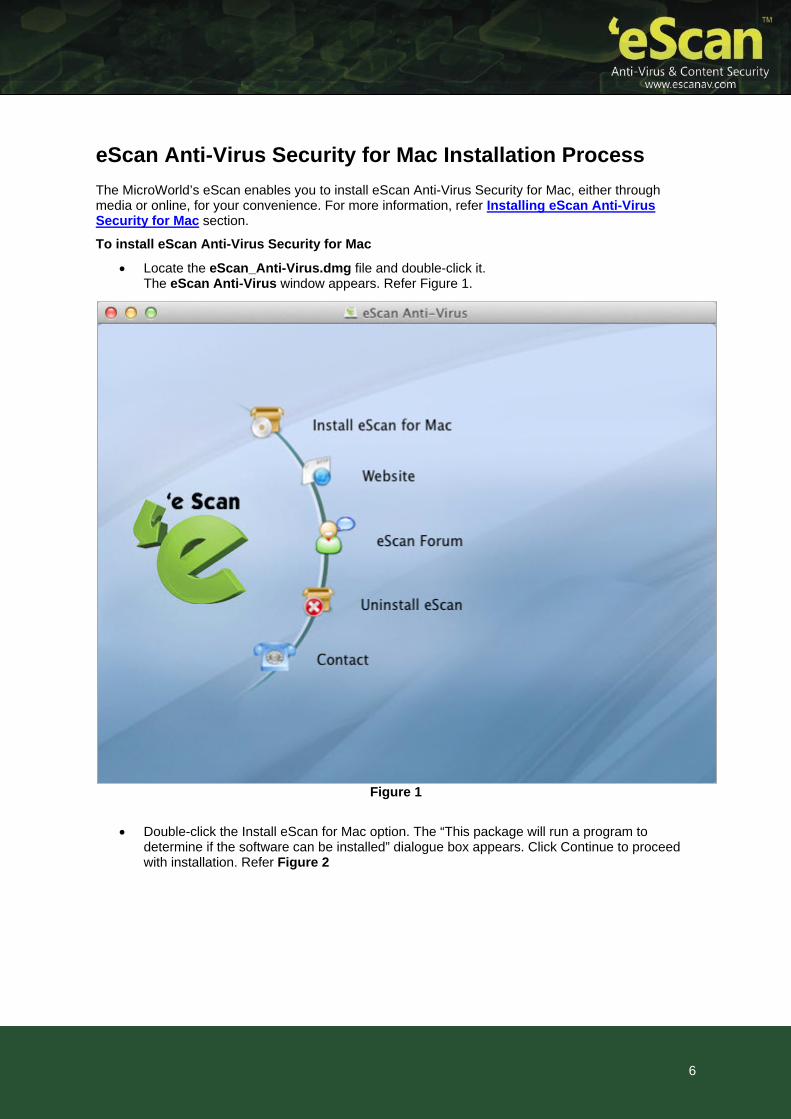
Insert CD/DVD-ROM into the drive or plug in the USB drive into the USB port or download the eScan_Anti-Virus.dmg file from the following link www.escanav.com/downloads/mac.asp
Locate the eScan_Anti-Virus.dmg file and double-click it. The eScan Antivirus window appears. Refer Figure 1.
Double-click Install eScan for Mac option. The Welcome to the eScan Antivirus Installer window appears. For more information, refer the steps from 3 to15 of eScan Anti-Virus Security for Mac Installation Process section.
Uninstalling eScan Anti-Virus Security for Mac
You can un-install eScan Anti-Virus Security for Mac in the following ways:
In the dock, click Applications icon, on the applications grid stack, click eScan
folder, on the eScan grid stack, click Uninstall eScan icon.
In the dock, click Finder icon, on the finder window, click Applications, double-click
the eScan folder, and then double-click the Uninstall eScan icon or right-click the
Uninstall eScan icon, and click Open.
On the menu bar, under Finder menu, click Go menu, click Applications, and on the Applications window, double-click the eScan folder, and then double-click the Uninstall
eScan icon or right-click the Uninstall eScan icon, and click Open.
4
Installation Process
This section provides you an overview of eScan Anti-Virus Security for Mac installation with detailed steps, which will help you to install product with ease.
CCoonntteennttss
Overview of the Installation Process
eScan Anti-Virus Security for Mac Installation Process
Overview of the Installation Process
After you have mounted eScan_Anti-Virus.dmg file on your computer, through media or online, perform the following steps to install eScan for Mac:
Step 1 — eScan Anti-Virus Installer Welcome Window
Step 2 — Viewing Read Me File
Step 3 — Accepting End User License Agreement (EULA)
Step 4 — Selecting the Installation Folder
Step 5 — Preparing for Installation
Step 6 — Completing Installation
Step 1 — eScan Anti-Virus Installer Welcome Window eScan welcomes you to the eScan Anti-Virus Installer and guides you through the installation process. Click Continue to proceed.
Step 2 — Viewing Read Me File It is recommended that you read the provided useful information about eScan Anti-Virus Security for Mac. You can save or print it for future reference. Click Continue to proceed.
Step 3 — Accepting End User License Agreement (EULA) It is very important that you read the complete license agreement carefully and decide whether you want to accept or do not accept the agreement. If you want to continue with the installation you have to accept the agreement by clicking the Continue and then Agree button.

Step 4 — Selecting the Installation Folder It indicates the location where eScan Anti-Virus Security for Mac will be installed. By default, eScan Anti-Virus Security for Mac gets installed in /opt/MicroWorld/. Please note that you cannot change the location. Click Continue.
Next, to perform standard installation, click Install.
Step 5 — Preparing for Installation Type administrator login details and click Install Software.
The installer prepares for the eScan Anti-Virus Security for Mac installation. Please make sure you close all the open applications, and then click Continue Installation.
Step 6 — Completing Installation The eScan Anti-Virus Security for Mac successfully gets installed on your computer. Click Log Out to finish installation.
5
eScan Anti-Virus Security for Mac Installation Process
The MicroWorld’s eScan enables you to install eScan Anti-Virus Security for Mac, either through media or online, for your convenience. For more information, refer Installing eScan Anti-Virus Security for Mac section.
To install eScan Anti-Virus Security for Mac
Locate the eScan_Anti-Virus.dmg file and double-click it. The eScan Anti-Virus window appears. Refer Figure 1.
Figure 1
Double-click the Install eScan for Mac option. The “This package will run a program to determine if the software can be installed” dialogue box appears. Click Continue to proceed with installation. Refer Figure 2
6
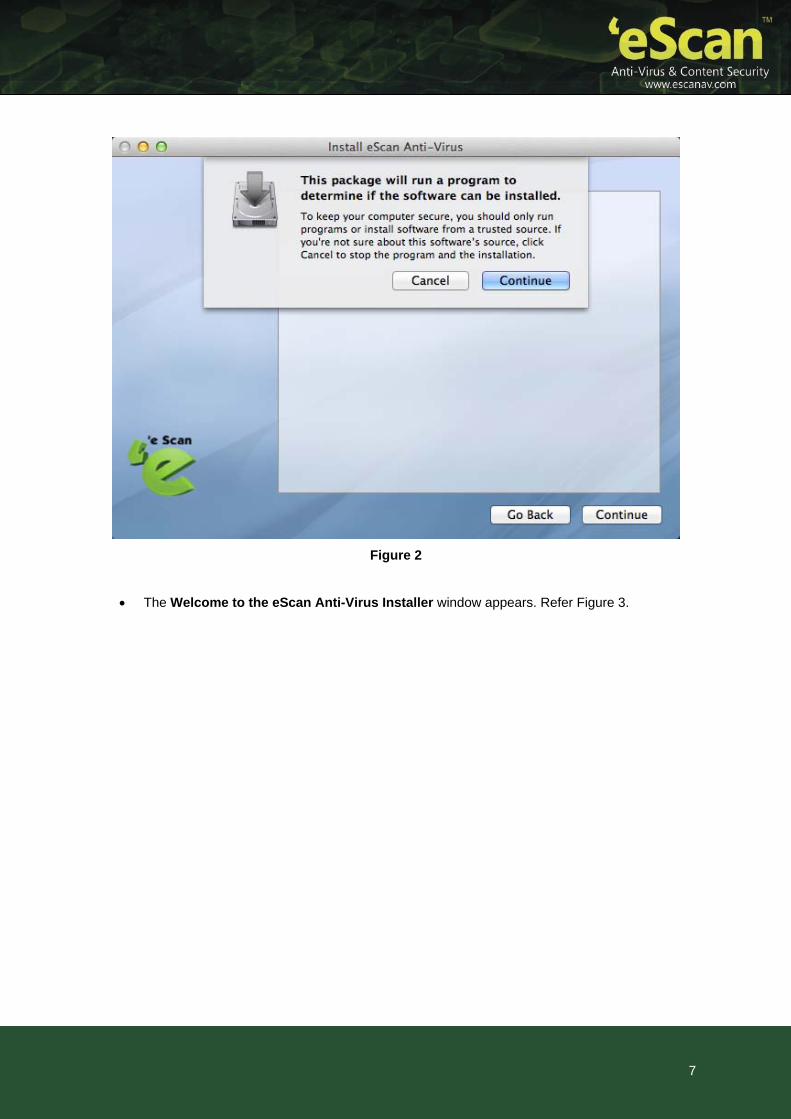
Figure 2
The Welcome to the eScan Anti-Virus Installer window appears. Refer Figure 3.
7
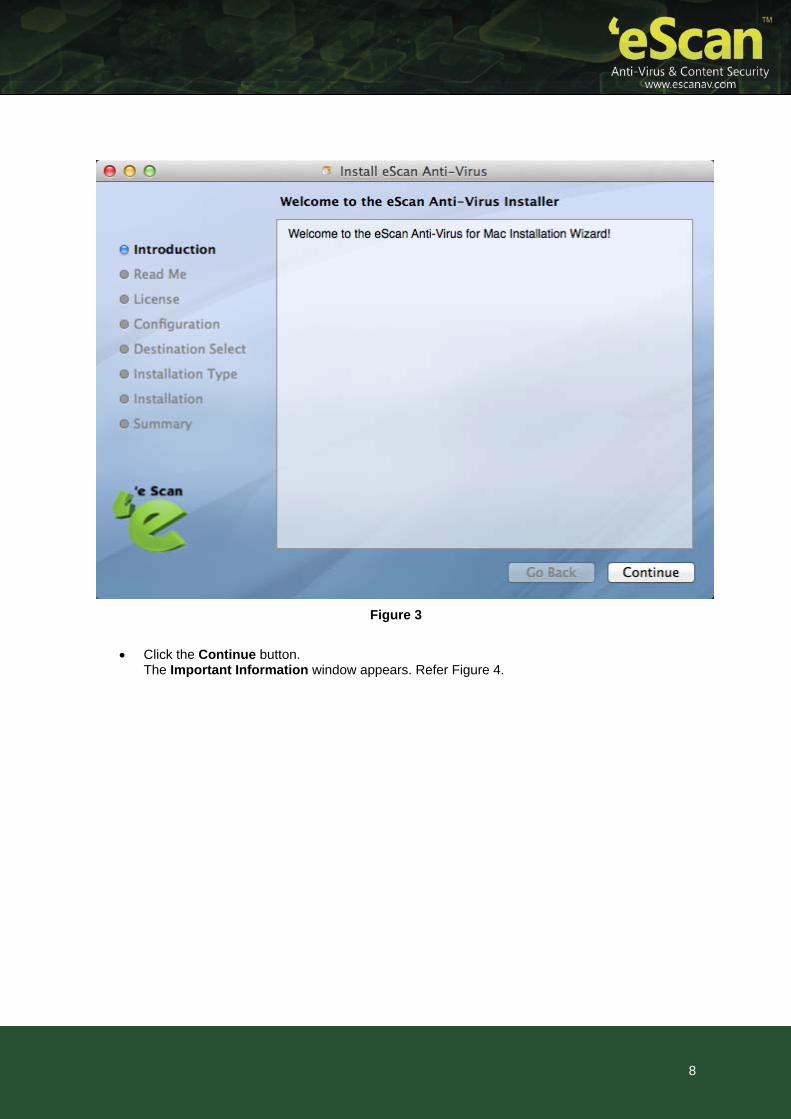
Figure 3
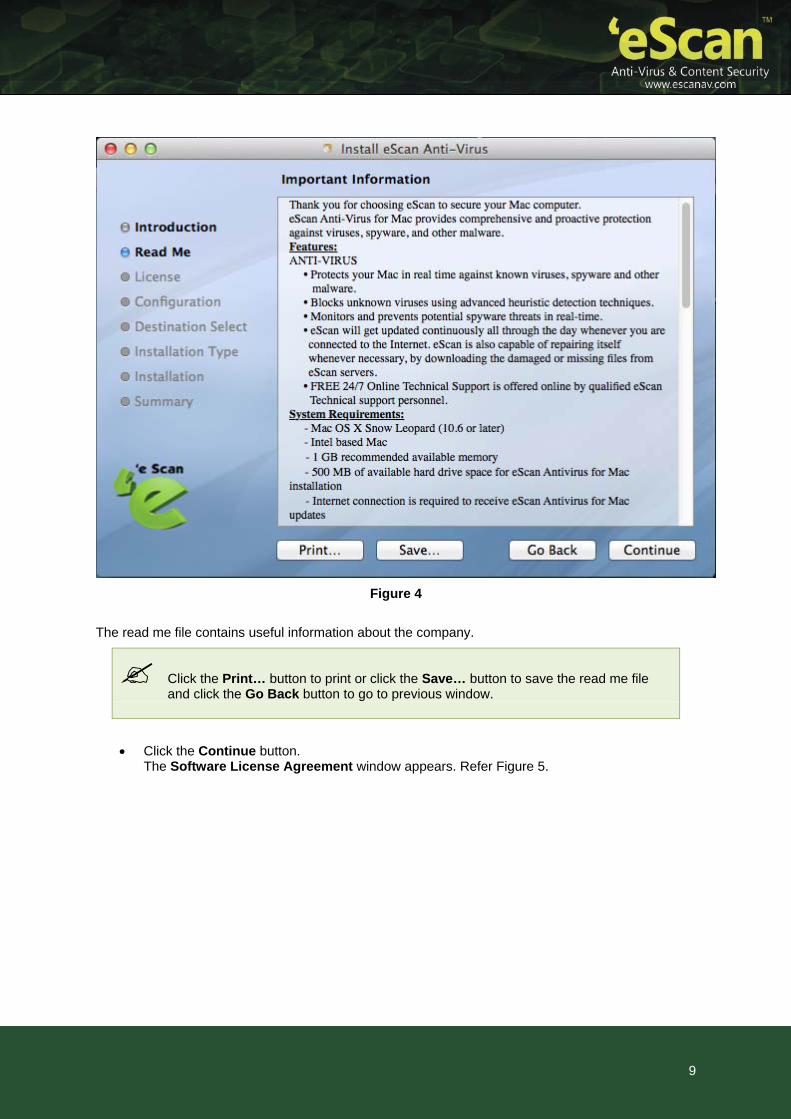
Click the Continue button. The Important Information window appears. Refer Figure 4.
8
9
Figure 4
The read me file contains useful information about the company.
Click the Print… button to print or click the Save… button to save the read me file and click the Go Back button to go to previous window.
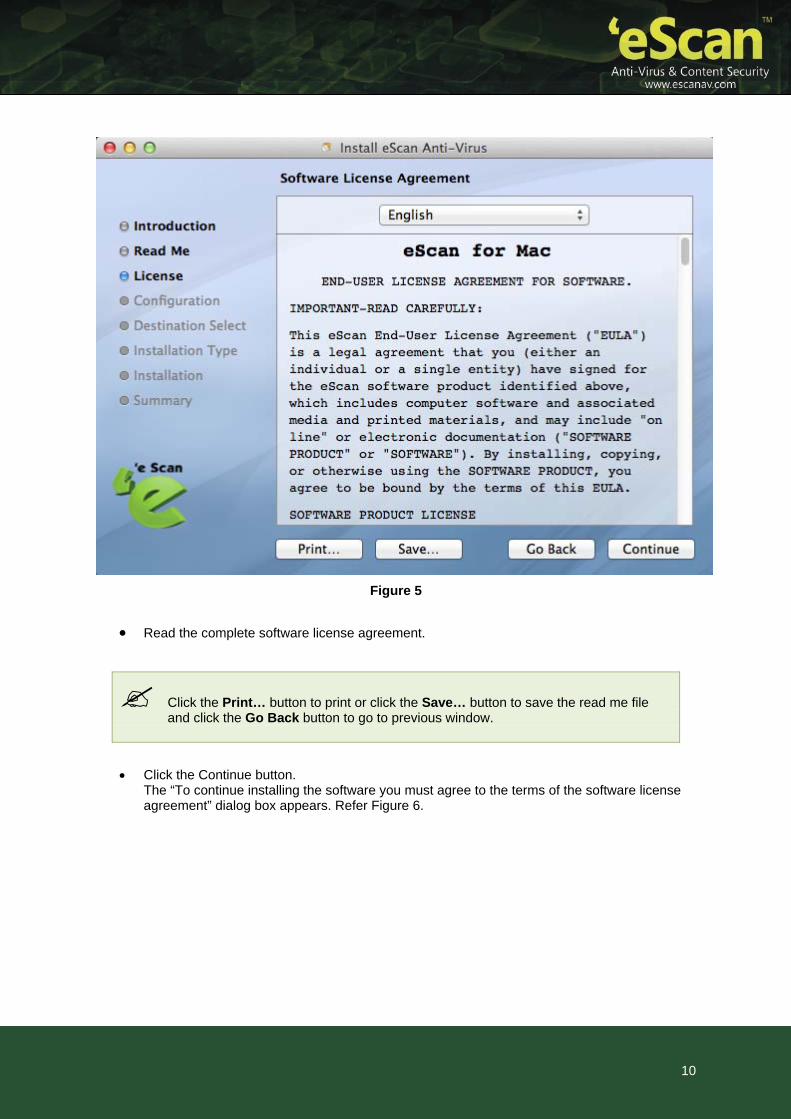
Click the Continue button. The Software License Agreement windo ears. Refer Figure 5.
w app
10
Figure 5
Read the complete software license agreement.
Click the Print… button to print or click the Save… button to save the read me file and click the Go Back button to go to previous window.
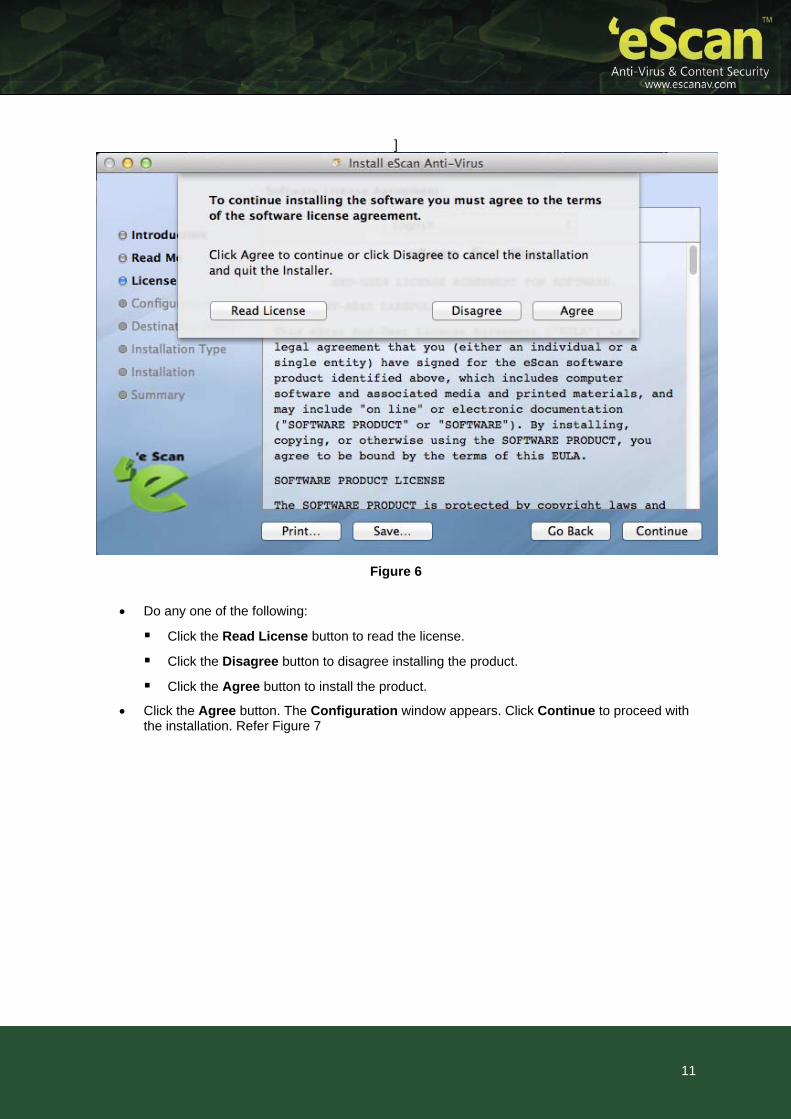
Click the Continue button. The “To continue installing the software you must agree to the terms of the software license agreement” dialog box appears. Refer Figure 6.
]
Figure 6
Do any one of the following:
Click the Read License button to read the license.
Click the Disagree button to disagree installing the product.
Click the Agree button to install the product.
Click the Agree button. The Configuration window appears. Click Continue to proceed with the installation. Refer Figure 7
11
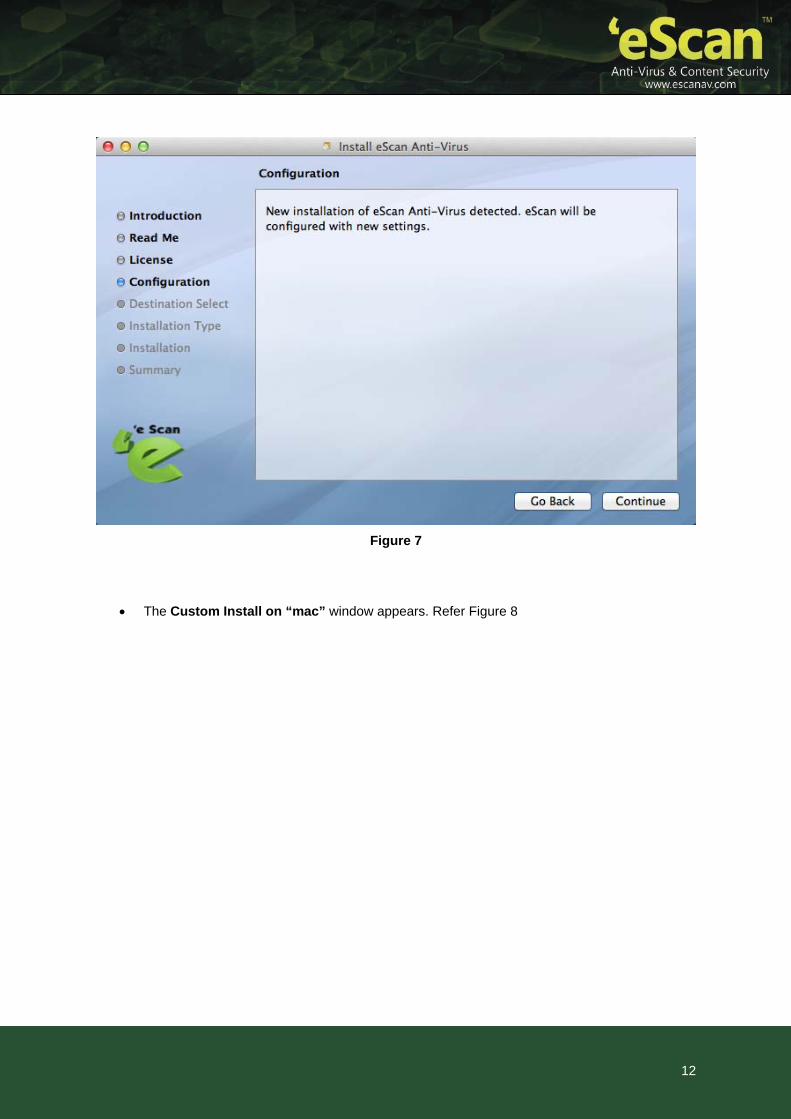
Figure 7
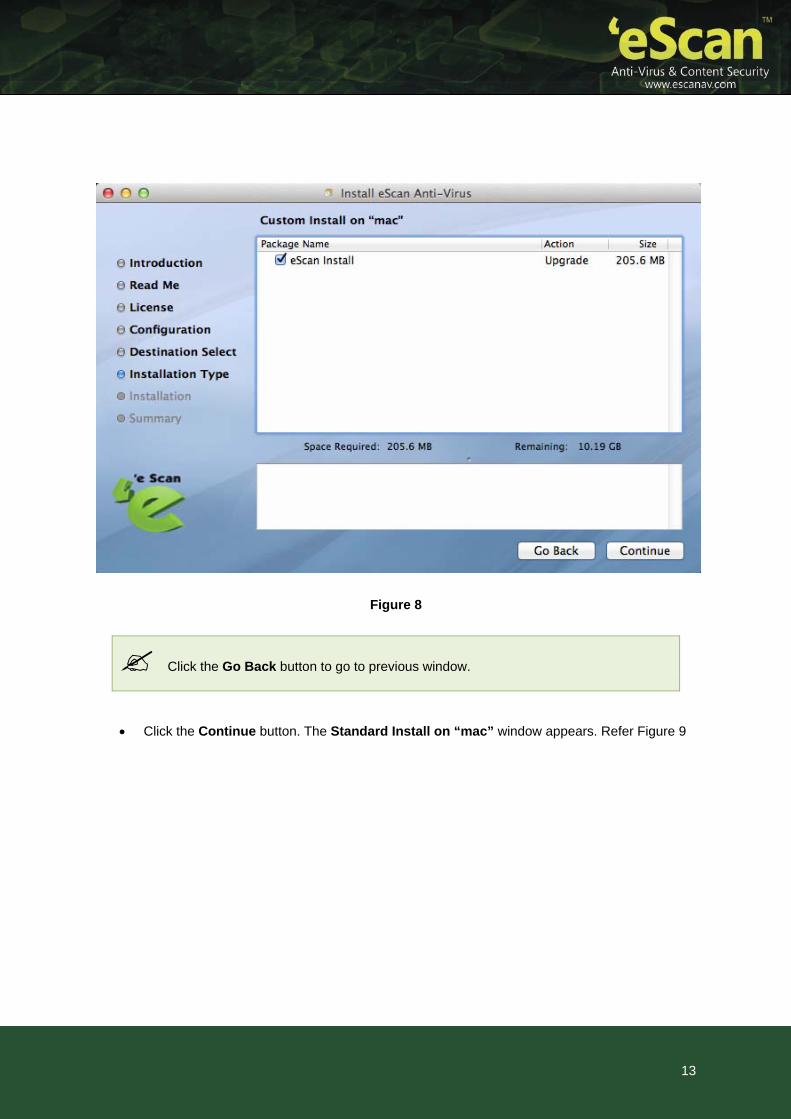
The Custom Install on “mac” window appears. Refer Figure 8
12
13
Figure 8
lick the Go Back button to go to previous window. C
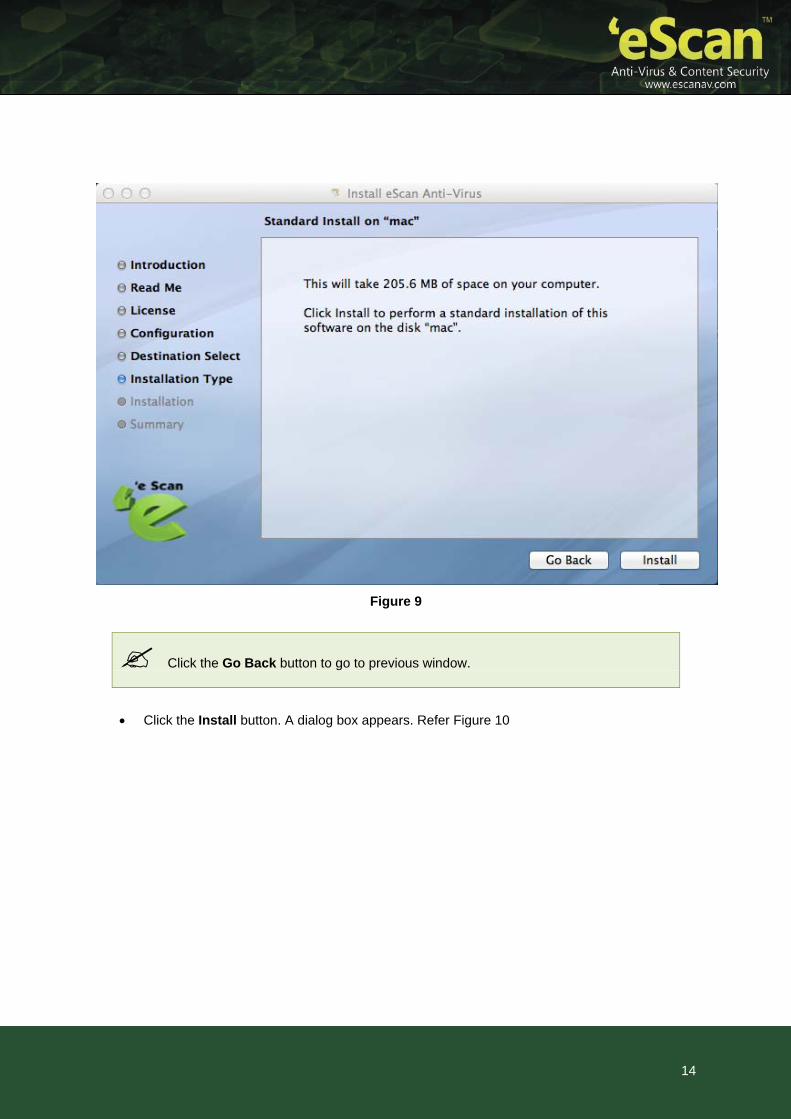
Click the Continue button. The Standard Install on “mac” window appears. Refer Figure 9
14
Figure 9
Click the Go Back button to go to previous window.
Click the Install button. A dialog box appears. Refer Figure 10
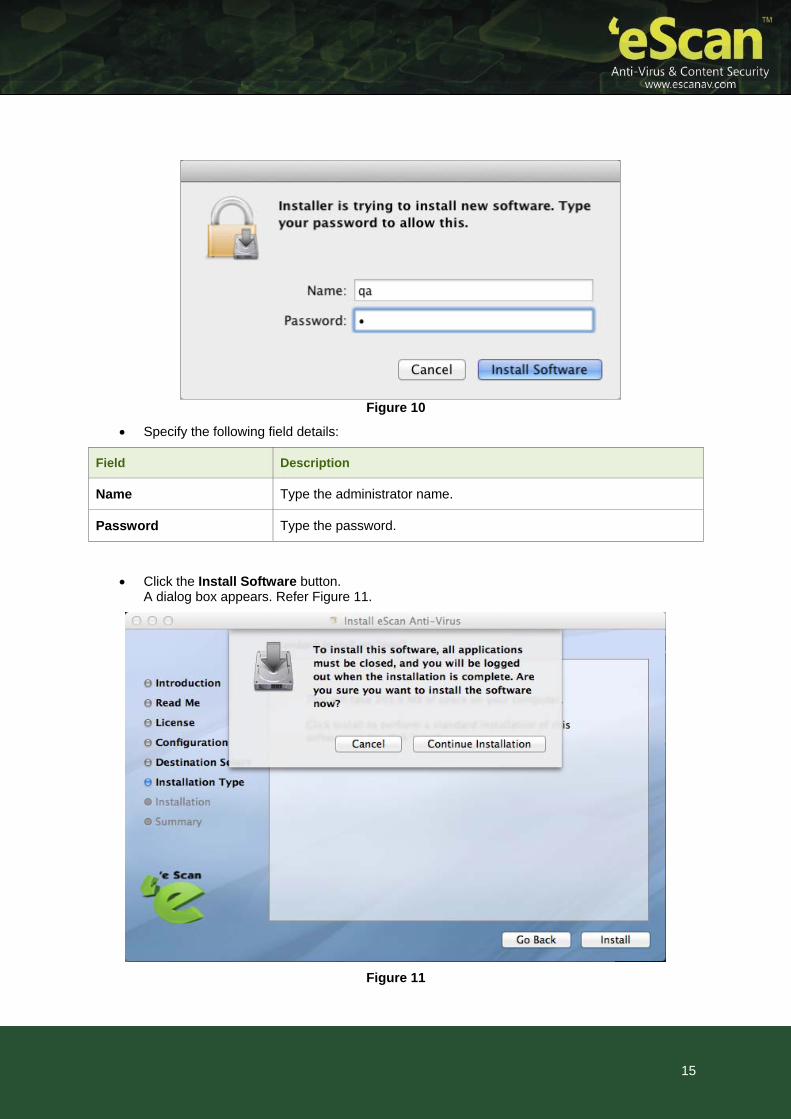
Figure 10
Specify the following field details:
Field Description
Name Type the administrator name.
Password Type the password.
Click the Install Software button. A dialog box appears. Refer Figure 11.
Figure 11
15

Click the Continue Installation button. The software successfully gets installed. Refer Figure 12.
Figure 12
Click the Log Out button which completes the installation successfully. Refer the Registering and Renewing eScan Anti-Virus Security for Mac section in order to add a license key and to register the product.
16
17
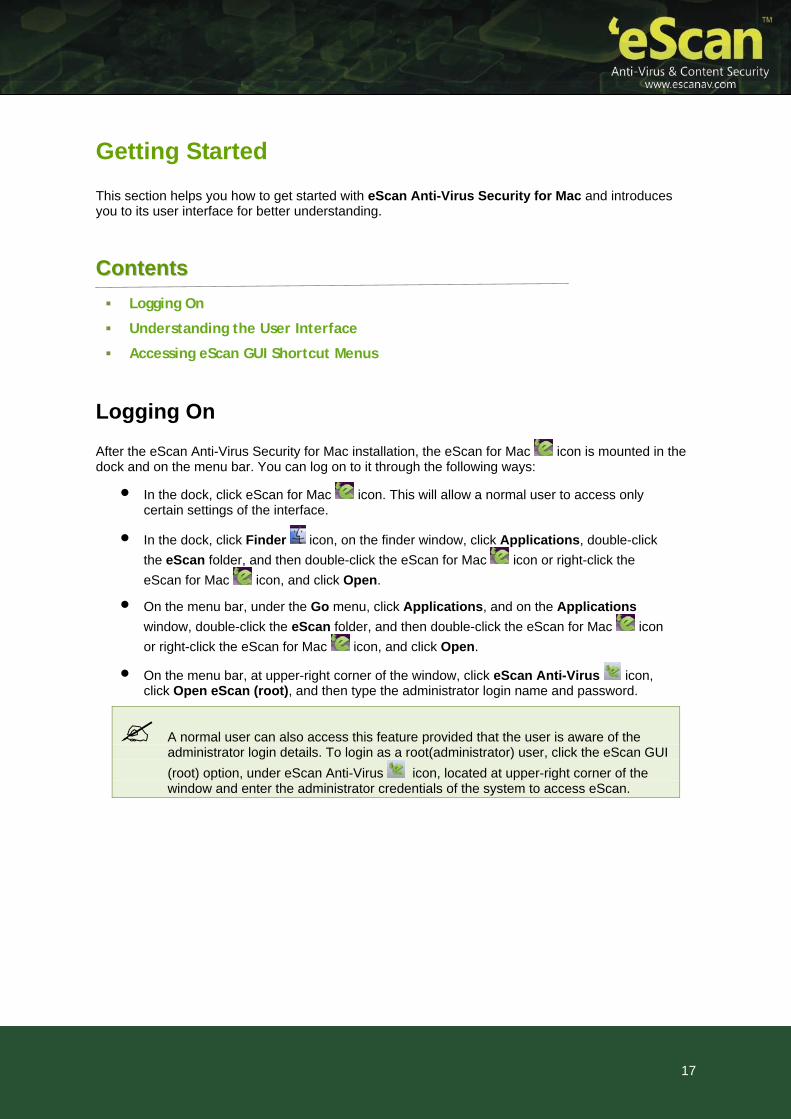
Getting Started
This section helps you how to get started with eScan Anti-Virus Security for Mac and introduces you to its user interface for better understanding.
CCoonntteennttss
Logging On
Understanding the User Interface
Accessing eScan GUI Shortcut Menus
Logging On
After the eScan Anti-Virus Security for Mac installation, the eScan for Mac icon is mounted in the dock and on the menu bar. You can log on to it through the following ways:
In the dock, click eScan for Mac icon. This will allow a normal user to access only certain settings of the interface.
In the dock, click Finder icon, on the finder window, click Applications, double-click
the eScan folder, and then double-click the eScan for Mac icon or right-click the
eScan for Mac icon, and click Open.
On the menu bar, under the Go menu, click Applications, and on the Applications
window, double-click the eScan folder, and then double-click the eScan for Mac icon
or right-click the eScan for Mac icon, and click Open.
On the menu bar, at upper-right corner of the window, click eScan Anti-Virus icon, click Open eScan (root), and then type the administrator login name and password.
A normal user can also access this feature provided that the user is aware of the administrator login details. To login as a root(administrator) user, click the eScan GUI
(root) option, under eScan Anti-Virus icon, located at upper-right corner of the window and enter the administrator credentials of the system to access eScan.
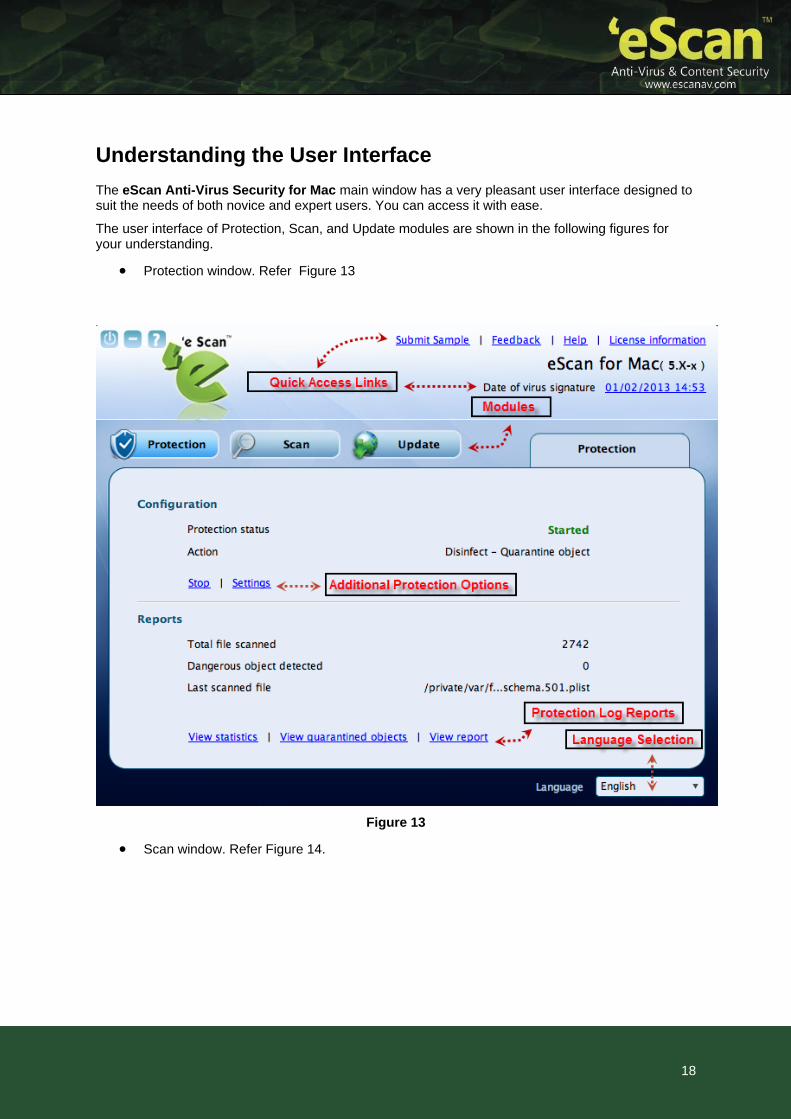
Understanding the User Interface
The eScan Anti-Virus Security for Mac main window has a very pleasant user interface designed to suit the needs of both novice and expert users. You can access it with ease.
The user interface of Protection, Scan, and Update modules are shown in the following figures for your understanding.
Protection window. Refer Figure 13
Figure 13
Scan window. Refer Figure 14.
18
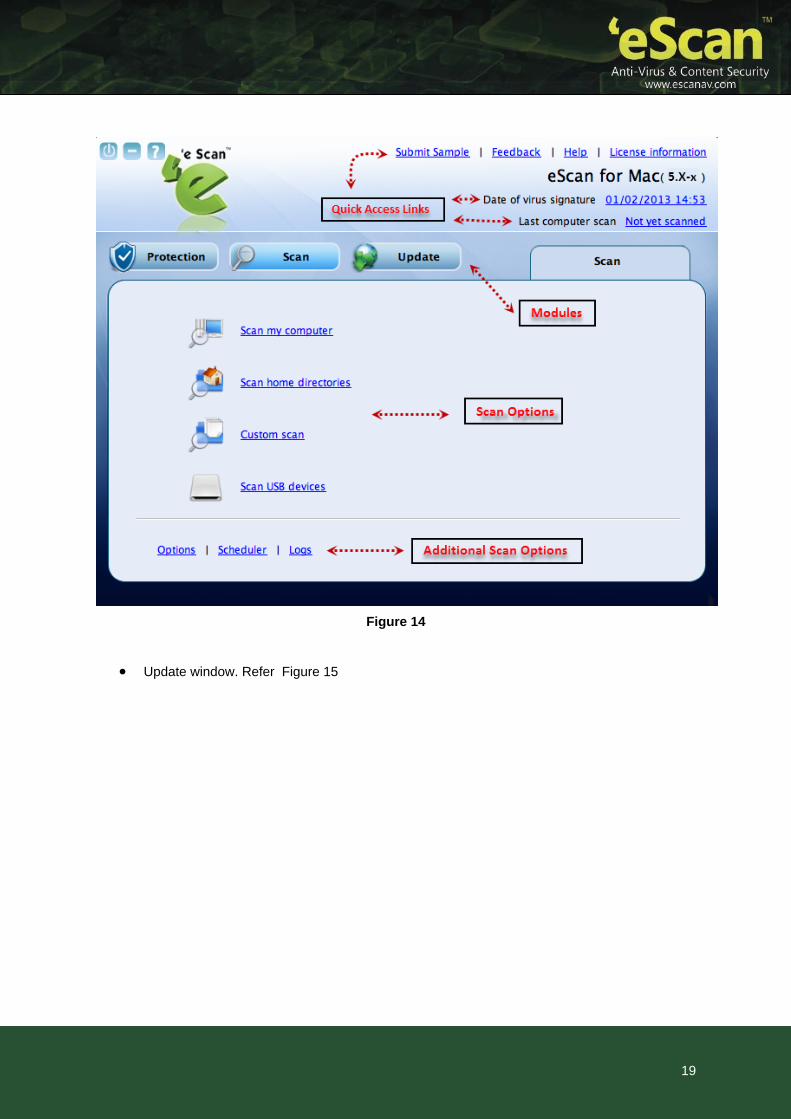
Figure 14
Update window. Refer Figure 15
19
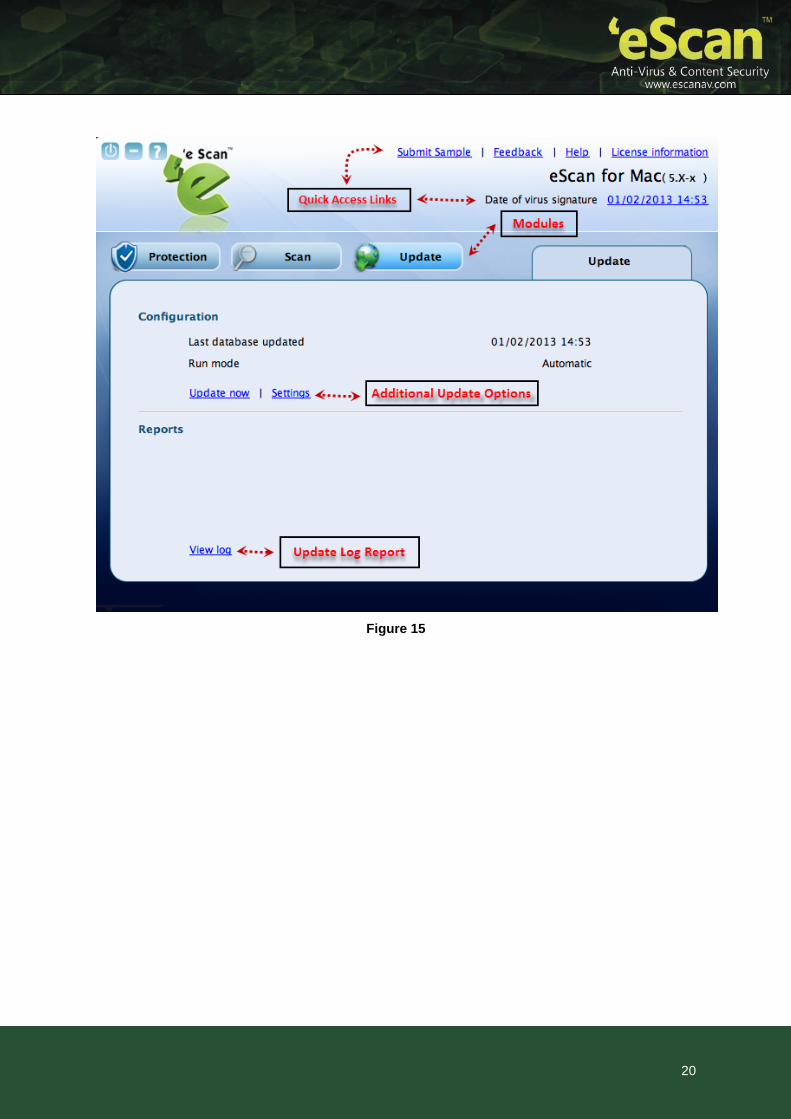
Figure 15
20
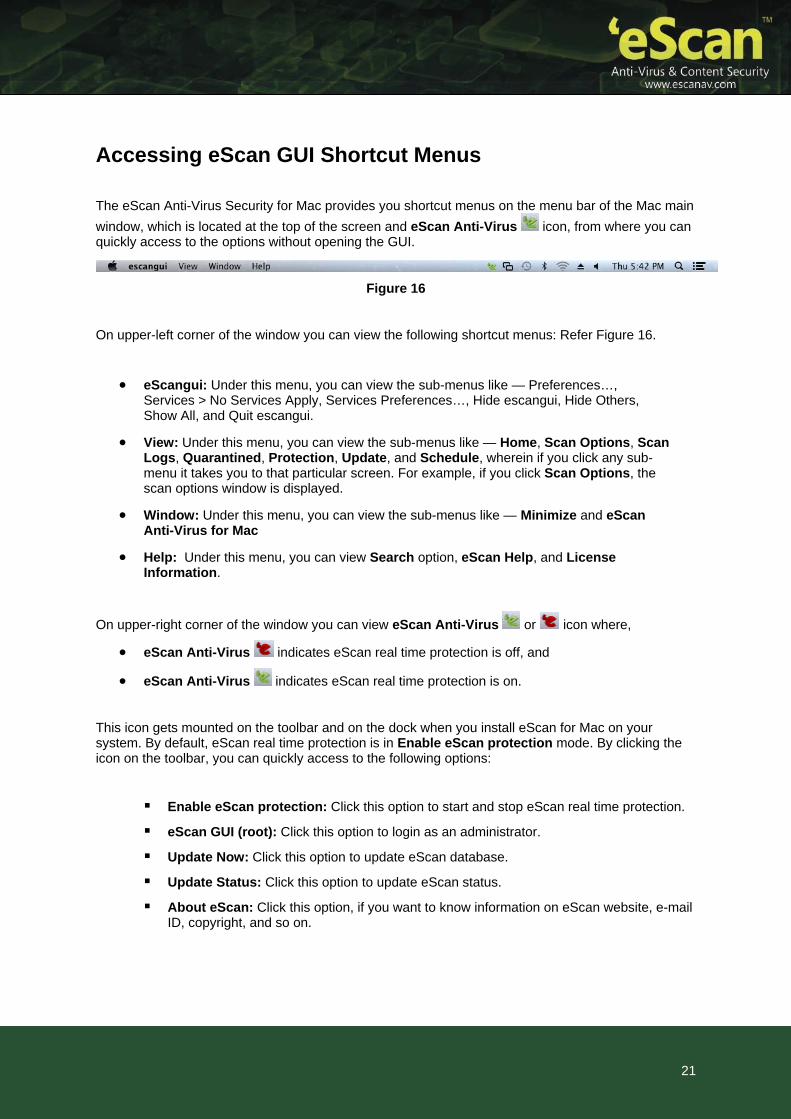
Accessing eScan GUI Shortcut Menus
The eScan Anti-Virus Security for Mac provides you shortcut menus on the menu bar of the Mac main
window, which is located at the top of the screen and eScan Anti-Virus icon, from where you can quickly access to the options without opening the GUI.
Figure 16
On upper-left corner of the window you can view the following shortcut menus: Refer Figure 16.
eScangui: Under this menu, you can view the sub-menus like — Preferences…, Services > No Services Apply, Services Preferences…, Hide escangui, Hide Others, Show All, and Quit escangui.
View: Under this menu, you can view the sub-menus like — Home, Scan Options, Scan Logs, Quarantined, Protection, Update, and Schedule, wherein if you click any sub-menu it takes you to that particular screen. For example, if you click Scan Options, the scan options window is displayed.
Window: Under this menu, you can view the sub-menus like — Minimize and eScan Anti-Virus for Mac
Help: Under this menu, you can view Search option, eScan Help, and License Information.
On upper-right corner of the window you can view eScan Anti-Virus or icon where,
eScan Anti-Virus indicates eScan real time protection is off, and
eScan Anti-Virus indicates eScan real time protection is on.
This icon gets mounted on the toolbar and on the dock when you install eScan for Mac on your system. By default, eScan real time protection is in Enable eScan protection mode. By clicking the icon on the toolbar, you can quickly access to the following options:
Enable eScan protection: Click this option to start and stop eScan real time protection.
eScan GUI (root): Click this option to login as an administrator.
Update Now: Click this option to update eScan database.
Update Status: Click this option to update eScan status.
About eScan: Click this option, if you want to know information on eScan website, e-mail ID, copyright, and so on.
21
Overview of Features
This section provides you a brief idea of the modules with important features, which will help you protect your Mac from virus threats.
The eScan Anti-Virus Security for Mac provides you an option for setting the Graphical User Interface (GUI) language. There are many languages available, such as English, Latin Spanish, German, Greek, Spanish, French, Italian, Japanese, Dutch, and Russian. You can set any language of your choice by selecting an appropriate language from the Language drop-down list under the Protection module.
Protection
The Protection module provides real-time protection to your system against all kinds of viruses and malwares. eScan also detects Windows-based malwares, which could easily spread through external devices, such as USB storage device, CD-DVD ROM, Pen drive, or downloads. By default, eScan’s real-time protection feature monitors and detects your system for any viruses. If any viruses are detected, eScan provides automatic virus pop-up alerts. Whenever eScan finds any infected file, it first tries to disinfect the file. Incase if it finds difficult to disinfect, it takes alternate actions as defined by the user settings i.e. quarantine the file, delete the file or only alert the user. It helps you set an action to take in case of any virus detection.
It monitors and helps you scan mail files, archive files, scan packed files. It also provides the option to exclude directories, files, and specific file types from scanning.
A virus log report and quarantined objects report is created. eScan also provides you an option to restore the quarantined files, if needed. eScan also creates the statistics of the virus file report in the form of a 3-D pie chart. Refer Figure 17.
22
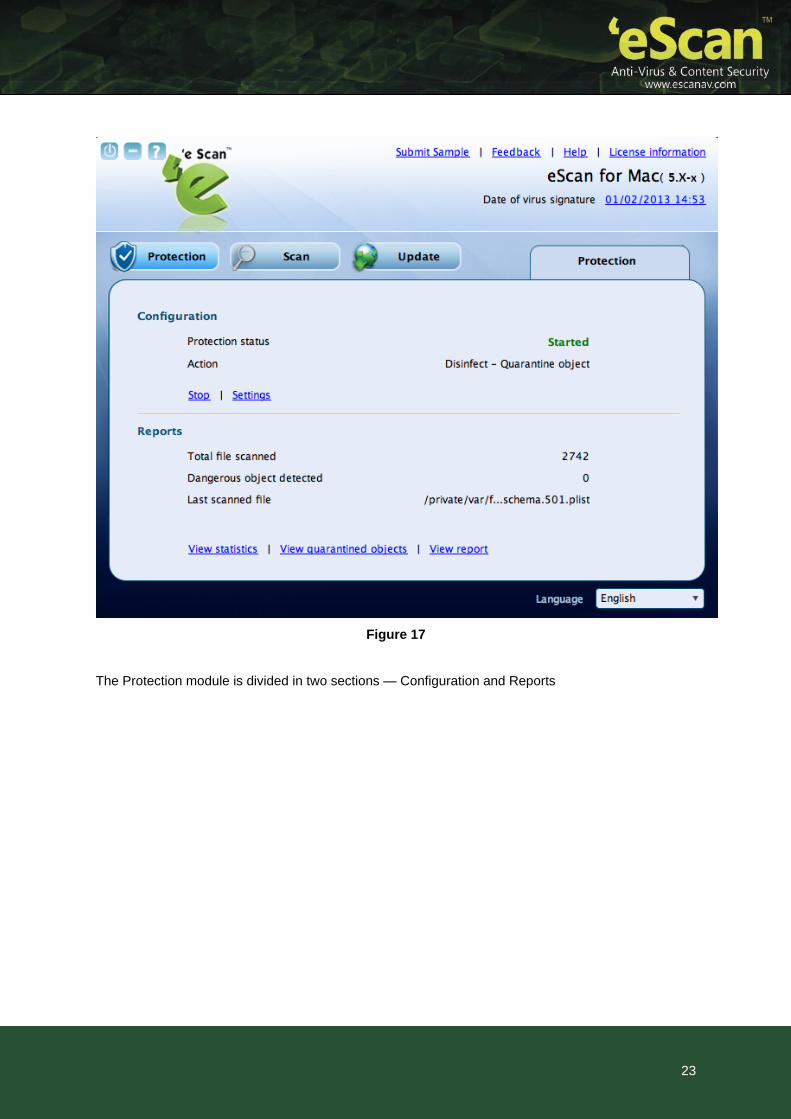
Figure 17
The Protection module is divided in two sections — Configuration and Reports
23
24
Configuration
This section provides you information on protection status and type of action taken on the infected object. You can also configure eScan protection settings.
Protection Status: It displays the status of eScan protection, whether it is in started or stopped mode.
Action: It displays the type of action eScan protection has taken on the infected object.
Start/stop: Click this button to start/stop the eScan protection.
Settings: Click this button to configure protection status, scan, and log settings.
A normal user doesn’t have the privilege to access the Start/stop and the Settings feature. In order to access them the user has to login as an administrator. Refer the note under the Logging On section to login as an administrator.
Reports
This section provides you information on the total file scanned, dangerous object found, and last scanned file. You can view statistics report of the files, list of quarantined objects, and files report.
found: It displays the total number of infected objects detected by
atistics: Click this button to view the virus file report in the form of a 3-D pie
view the list of quarantined objects with
View report: Click this button to view the log of the activities performed.
ou can do the following activities:
can real-time protection
gs
d Objects
Viewing Report
Total file scanned: It displays the total number of files scanned by eScan protection.
Dangerous objecteScan protection.
Last scanned file: It displays the path of the last scanned file.
View stchart.
View quarantined objects: Click this button topath and total number of quarantined objects.
Y
Starting and Stopping eS
Configuring the settin
Viewing Statistics
Viewing Quarantine

Starting and Stopping eScan real-time protection
By default, eScan real-time protection starts after the installation. The eScan Anti-Virus icon gets mounted on the toolbar and on the dock when you install eScan for Mac on your system. By default, protection is in Started mode.
You can start and stop eScan protection in the following ways:
On the eScan for Mac window, under Configuration section, click the Stop button to stop eScan real time protection. When you click Stop button, the Protection status changes from Started (in green
colour) to Stopped (in red colour) and the eScan Anti-Virus icon in green changes to
eScan Anti-Virus icon in red.
On the eScan for Mac window, under Configuration section, click the Start button to start eScan real time protection. When you click Start button, the Protection status changes from Stopped (in red colour)
to Started (in green colour) and the eScan Anti-Virus icon in red changes to eScan
Anti-Virus icon in green.
OR
On upper-right corner of the window, click eScan real time protection is ON icon, and then click Disable eScan Protection option to stop eScan protection.
On upper-right corner of the window, click eScan real time protection is OFF icon, and then click Enable eScan Protection option to start eScan protection.
25
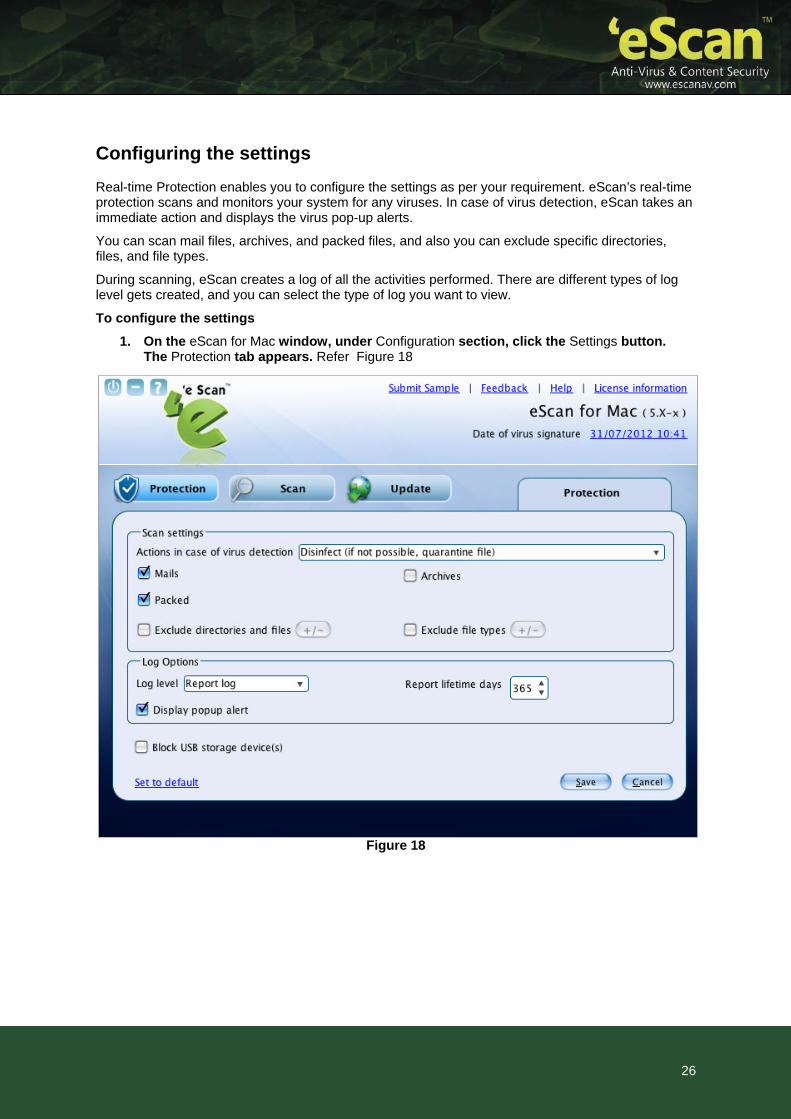
Configuring the settings
Real-time Protection enables you to configure the settings as per your requirement. eScan’s real-time protection scans and monitors your system for any viruses. In case of virus detection, eScan takes an immediate action and displays the virus pop-up alerts.
You can scan mail files, archives, and packed files, and also you can exclude specific directories, files, and file types.
During scanning, eScan creates a log of all the activities performed. There are different types of log level gets created, and you can select the type of log you want to view.
To configure the settings
1. On the eScan for Mac window, under Configuration section, click the Settings button. The Protection tab appears. Refer Figure 18
Figure 18
26
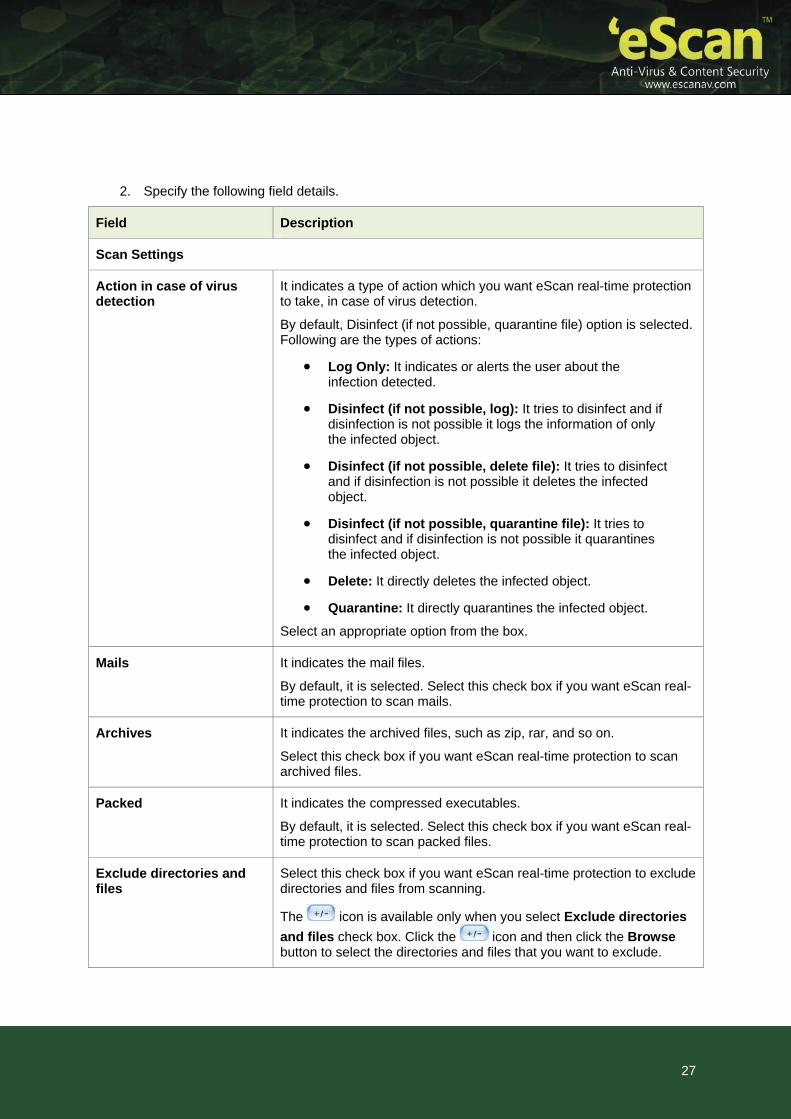
2. Specify the following field details.
Field Description
Scan Settings
Action in case of virus detection
It indicates a type of action which you want eScan real-time protection to take, in case of virus detection.
By default, Disinfect (if not possible, quarantine file) option is selected. Following are the types of actions:
Log Only: It indicates or alerts the user about the infection detected.
Disinfect (if not possible, log): It tries to disinfect and if disinfection is not possible it logs the information of only the infected object.
Disinfect (if not possible, delete file): It tries to disinfect and if disinfection is not possible it deletes the infected object.
Disinfect (if not possible, quarantine file): It tries to disinfect and if disinfection is not possible it quarantines the infected object.
Delete: It directly deletes the infected object.
Quarantine: It directly quarantines the infected object.
Select an appropriate option from the box.
Mails It indicates the mail files.
By default, it is selected. Select this check box if you want eScan real-time protection to scan mails.
Archives It indicates the archived files, such as zip, rar, and so on.
Select this check box if you want eScan real-time protection to scan archived files.
Packed It indicates the compressed executables.
By default, it is selected. Select this check box if you want eScan real-time protection to scan packed files.
Exclude directories and files
Select this check box if you want eScan real-time protection to exclude directories and files from scanning.
The icon is available only when you select Exclude directories
and files check box. Click the icon and then click the Browse button to select the directories and files that you want to exclude.
27
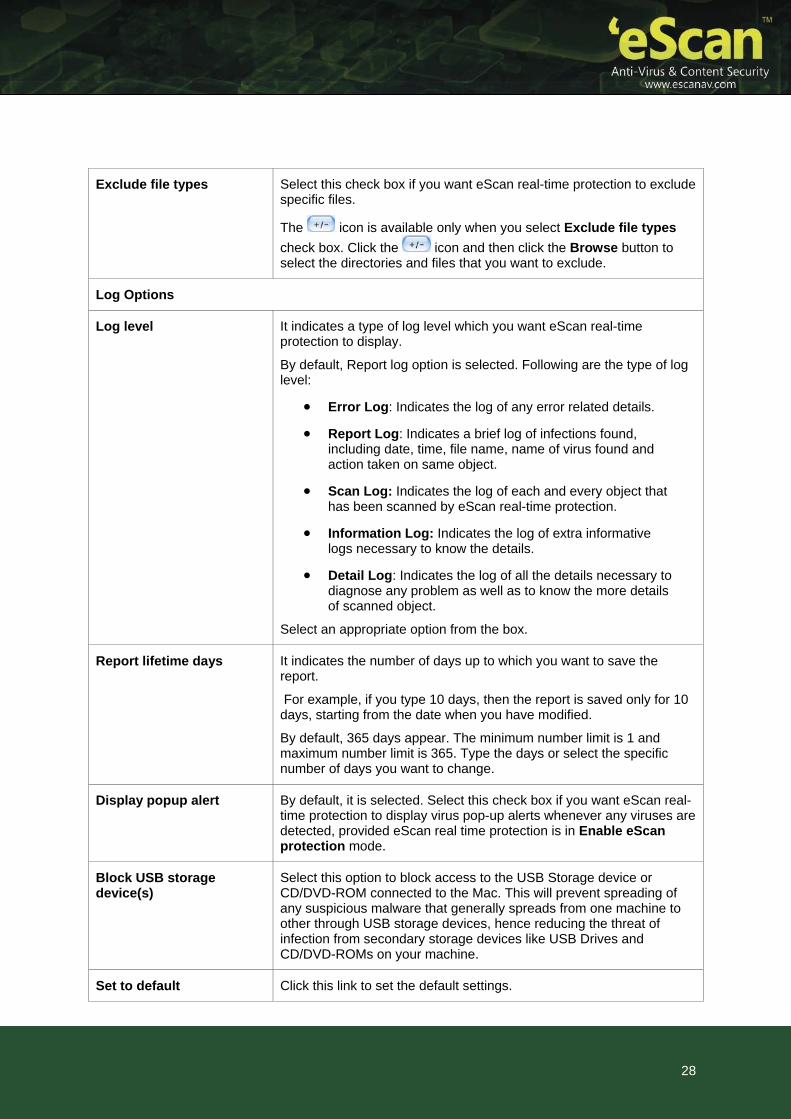
Exclude file types Select this check box if you want eScan real-time protection to exclude specific files.
The icon is available only when you select Exclude file types
check box. Click the icon and then click the Browse button to select the directories and files that you want to exclude.
Log Options
Log level It indicates a type of log level which you want eScan real-time protection to display.
By default, Report log option is selected. Following are the type of log level:
Error Log: Indicates the log of any error related details.
Report Log: Indicates a brief log of infections found, including date, time, file name, name of virus found and action taken on same object.
Scan Log: Indicates the log of each and every object that has been scanned by eScan real-time protection.
Information Log: Indicates the log of extra informative logs necessary to know the details.
Detail Log: Indicates the log of all the details necessary to diagnose any problem as well as to know the more details of scanned object.
Select an appropriate option from the box.
Report lifetime days It indicates the number of days up to which you want to save the report.
For example, if you type 10 days, then the report is saved only for 10 days, starting from the date when you have modified.
By default, 365 days appear. The minimum number limit is 1 and maximum number limit is 365. Type the days or select the specific number of days you want to change.
Display popup alert By default, it is selected. Select this check box if you want eScan real-time protection to display virus pop-up alerts whenever any viruses are detected, provided eScan real time protection is in Enable eScan protection mode.
Block USB storage device(s)
Select this option to block access to the USB Storage device or CD/DVD-ROM connected to the Mac. This will prevent spreading of any suspicious malware that generally spreads from one machine to other through USB storage devices, hence reducing the threat of infection from secondary storage devices like USB Drives and CD/DVD-ROMs on your machine.
Set to default Click this link to set the default settings.
28
3. Click the Save button. The settings get saved.
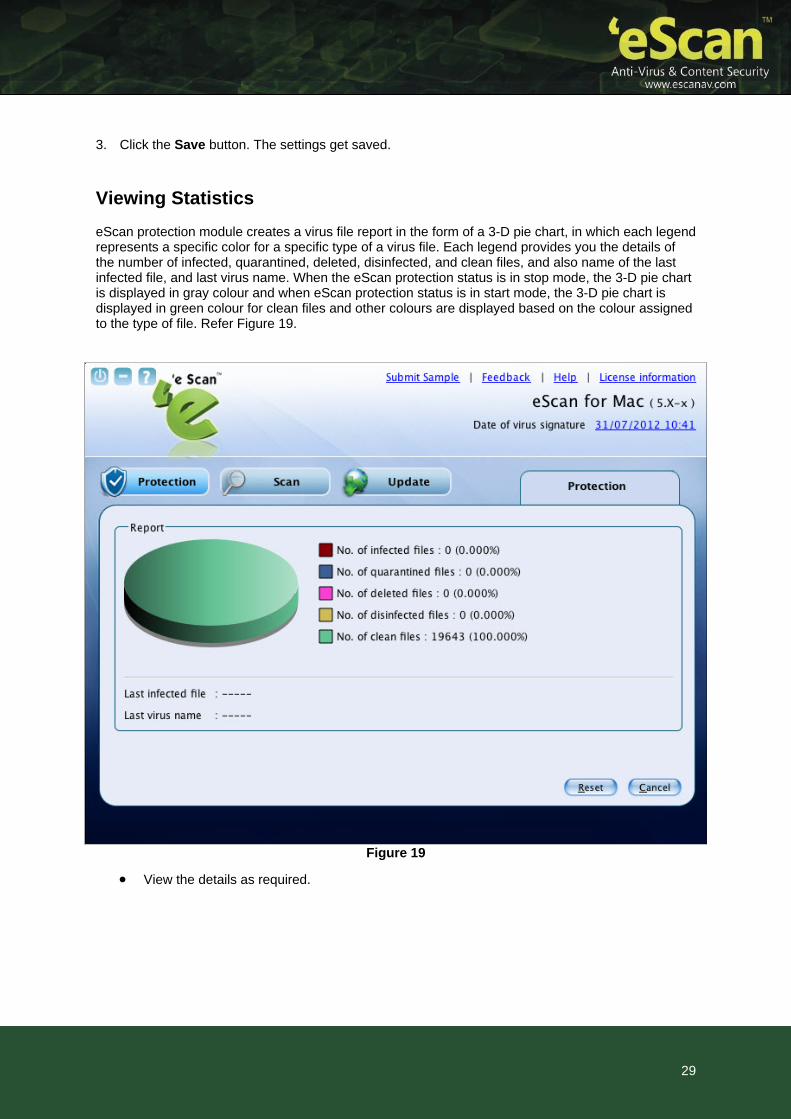
Viewing Statistics
eScan protection module creates a virus file report in the form of a 3-D pie chart, in which each legend represents a specific color for a specific type of a virus file. Each legend provides you the details of the number of infected, quarantined, deleted, disinfected, and clean files, and also name of the last infected file, and last virus name. When the eScan protection status is in stop mode, the 3-D pie chart is displayed in gray colour and when eScan protection status is in start mode, the 3-D pie chart is displayed in green colour for clean files and other colours are displayed based on the colour assigned to the type of file. Refer Figure 19.
Figure 19
View the details as required.
29
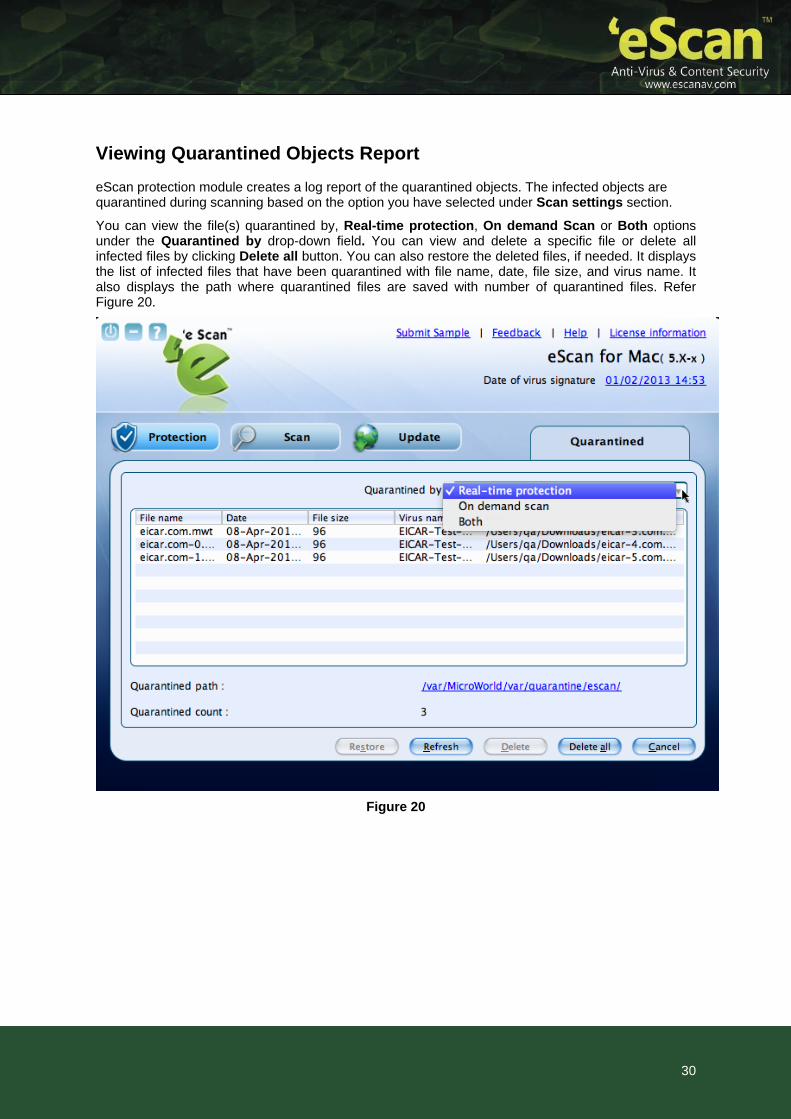
Viewing Quarantined Objects Report
eScan protection module creates a log report of the quarantined objects. The infected objects are quarantined during scanning based on the option you have selected under Scan settings section.
You can view the file(s) quarantined by, Real-time protection, On demand Scan or Both options under the Quarantined by drop-down field. You can view and delete a specific file or delete all infected files by clicking Delete all button. You can also restore the deleted files, if needed. It displays the list of infected files that have been quarantined with file name, date, file size, and virus name. It also displays the path where quarantined files are saved with number of quarantined files. Refer Figure 20.
Figure 20
30

Viewing Report
eScan protection creates a log of the activities performed. It displays the name of the file infected, date on which file got infected, name of the virus found, and the status of the virus. It displays the log based on the number of days you have set in Report lifetime days field, under Log Options section. Refer Figure 21.
Figure 21
View the details as required.
31
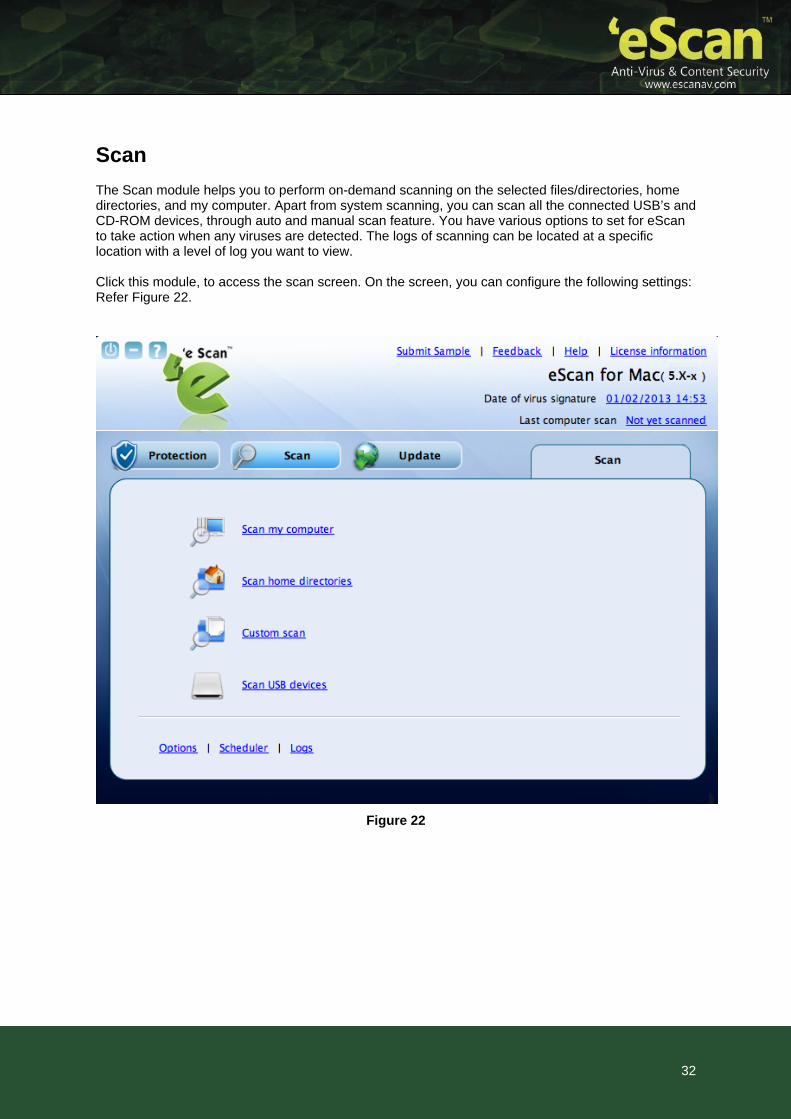
Scan
The Scan module helps you to perform on-demand scanning on the selected files/directories, home directories, and my computer. Apart from system scanning, you can scan all the connected USB’s and CD-ROM devices, through auto and manual scan feature. You have various options to set for eScan to take action when any viruses are detected. The logs of scanning can be located at a specific location with a level of log you want to view. Click this module, to access the scan screen. On the screen, you can configure the following settings: Refer Figure 22.
Figure 22
32
Scan Options:
Scan My Computer: Click this link, if you want to scan the entire system.
Scan home directories: Click this link, if you want to scan all files and folders of home directories of the logged in user.
Custom Scan: Click this link, if you want to scan specific files/ directories.
Scan USB devices: Click this link, if you want to scan any specific USB storage devices like Pen drive, CD-ROM device, and so on. Automatic scanning of the USB storage devices, as and when it is connected and mounted, is always active by default.
Additional Options:
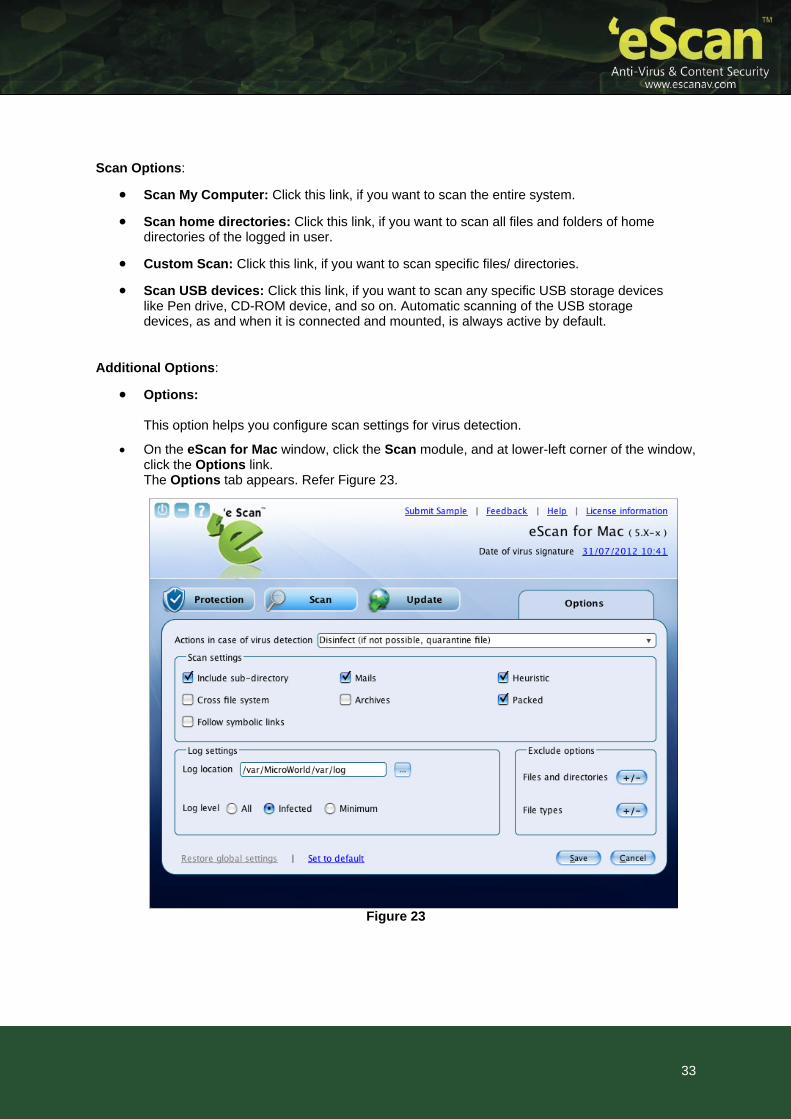
Options: This option helps you configure scan settings for virus detection.
On the eScan for Mac window, click the Scan module, and at lower-left corner of the window, click the Options link. The Options tab appears. Refer Figure 23.
Figure 23
33
Specify the following field details.
Field Description
Action in case of virus detection
It indicates a type of action which you want eScan real-time scanner to take, in case of virus detection.
By default, Disinfect (if not possible, quarantine file) option is selected. Following are the types of actions:
Log Only: It indicates or alerts the user about the infection detected.
Disinfect (if not possible, log): It tries to disinfect and if disinfection is not possible it logs the information of only the infected object.
Disinfect (if not possible, delete file): It tries to disinfect and if disinfection is not possible it deletes the infected object.
Disinfect (if not possible, quarantine file): It tries to disinfect and if disinfection is not possible it quarantines the infected object.
Disinfect (if not possible, rename file): It tries to disinfect and if disinfection is not possible it renames the infected object.
Disinfect (if not possible, ask user): It tries to disinfect and if disinfection is not possible it asks user to take an action on the infected object.
Delete: It directly deletes the infected object.
Quarantine: It directly quarantines the infected object.
Rename: It directly renames the infected object.
Ask user: It asks user to take an action on the infected object.
Select an appropriate option from the box.
Scan Settings
Include Sub-directory It indicates the archived files, such as zip, rar, and so on.
Select this check box if you want eScan real-time protection to scan archived files.
Mails It indicates the mail files.
By default, it is selected. Select this check box if you want eScan real-time protection to scan mail files.
34
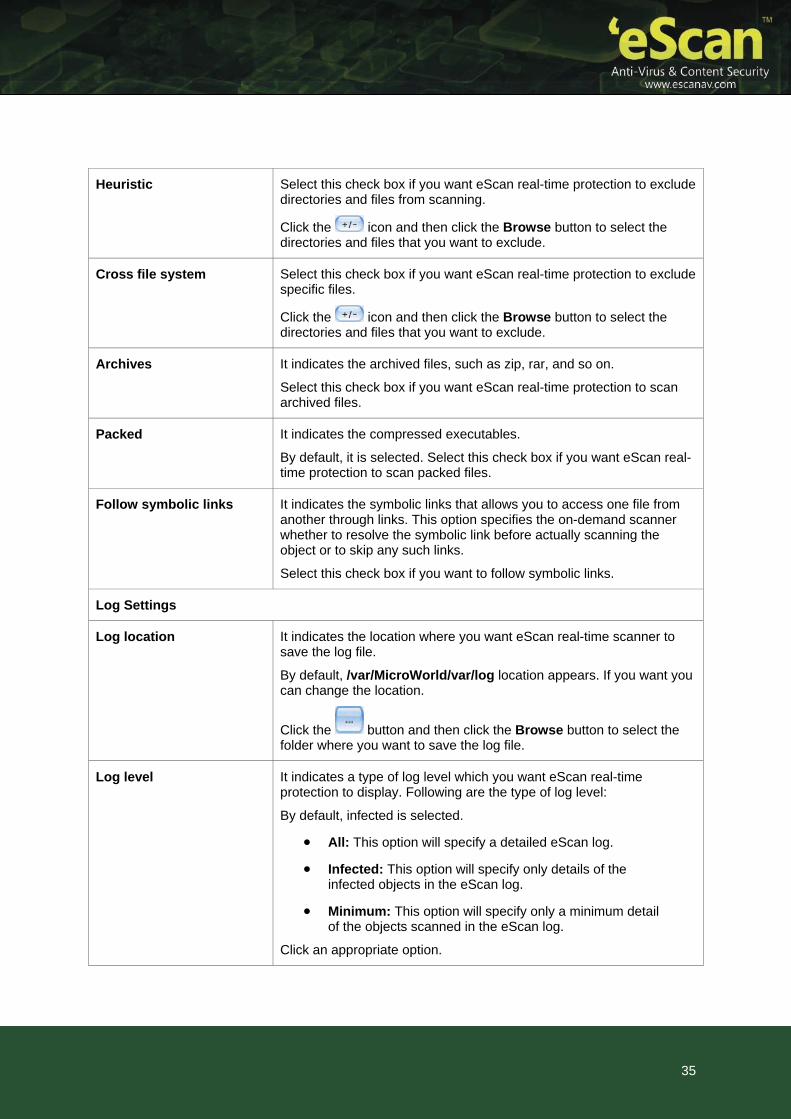
Heuristic Select this check box if you want eScan real-time protection to exclude directories and files from scanning.
Click the icon and then click the Browse button to select the directories and files that you want to exclude.
Cross file system Select this check box if you want eScan real-time protection to exclude specific files.
Click the icon and then click the Browse button to select the directories and files that you want to exclude.
Archives It indicates the archived files, such as zip, rar, and so on.
Select this check box if you want eScan real-time protection to scan archived files.
Packed It indicates the compressed executables.
By default, it is selected. Select this check box if you want eScan real-time protection to scan packed files.
Follow symbolic links It indicates the symbolic links that allows you to access one file from another through links. This option specifies the on-demand scanner whether to resolve the symbolic link before actually scanning the object or to skip any such links.
Select this check box if you want to follow symbolic links.
Log Settings
Log location It indicates the location where you want eScan real-time scanner to save the log file.
By default, /var/MicroWorld/var/log location appears. If you want you can change the location.
Click the button and then click the Browse button to select the folder where you want to save the log file.
Log level It indicates a type of log level which you want eScan real-time protection to display. Following are the type of log level:
By default, infected is selected.
All: This option will specify a detailed eScan log.
Infected: This option will specify only details of the infected objects in the eScan log.
Minimum: This option will specify only a minimum detail of the objects scanned in the eScan log.
Click an appropriate option.
35
Exclude Options
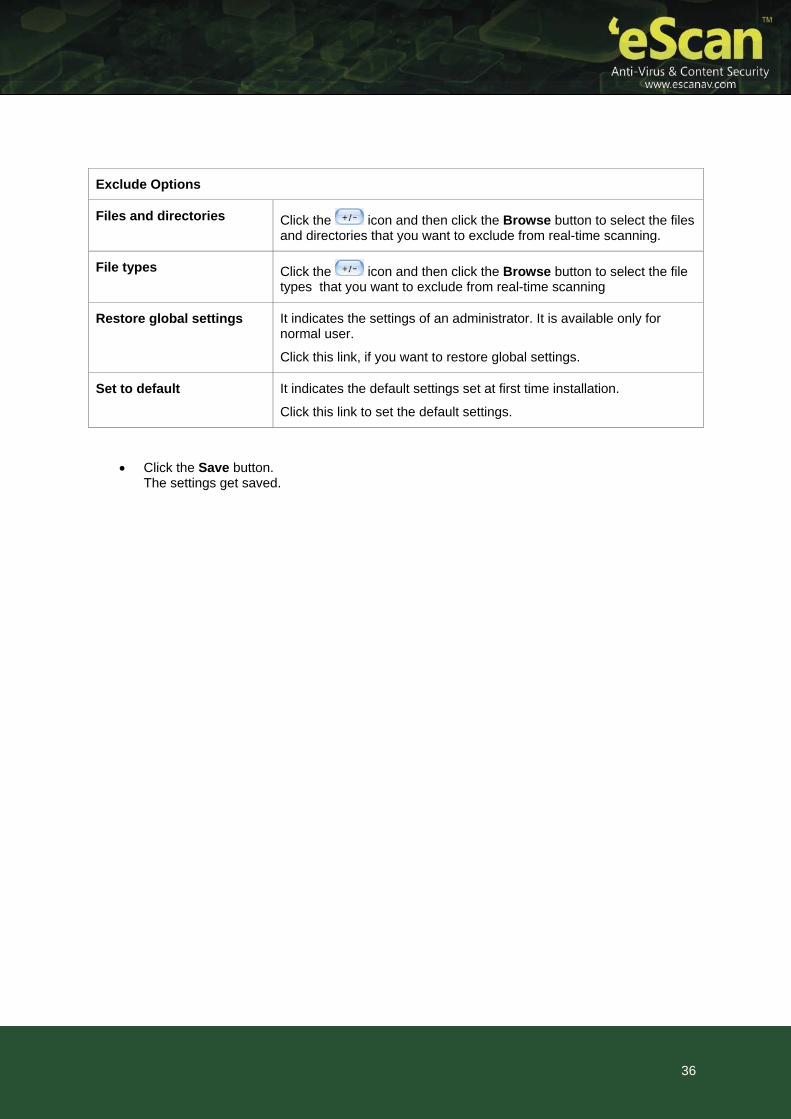
Files and directories Click the icon and then click the Browse button to select the files and directories that you want to exclude from real-time scanning.
File types Click the icon and then click the Browse button to select the file types that you want to exclude from real-time scanning
Restore global settings It indicates the settings of an administrator. It is available only for normal user.
Click this link, if you want to restore global settings.
Set to default It indicates the default settings set at first time installation.
Click this link to set the default settings.
Click the Save button. The settings get saved.
36
37
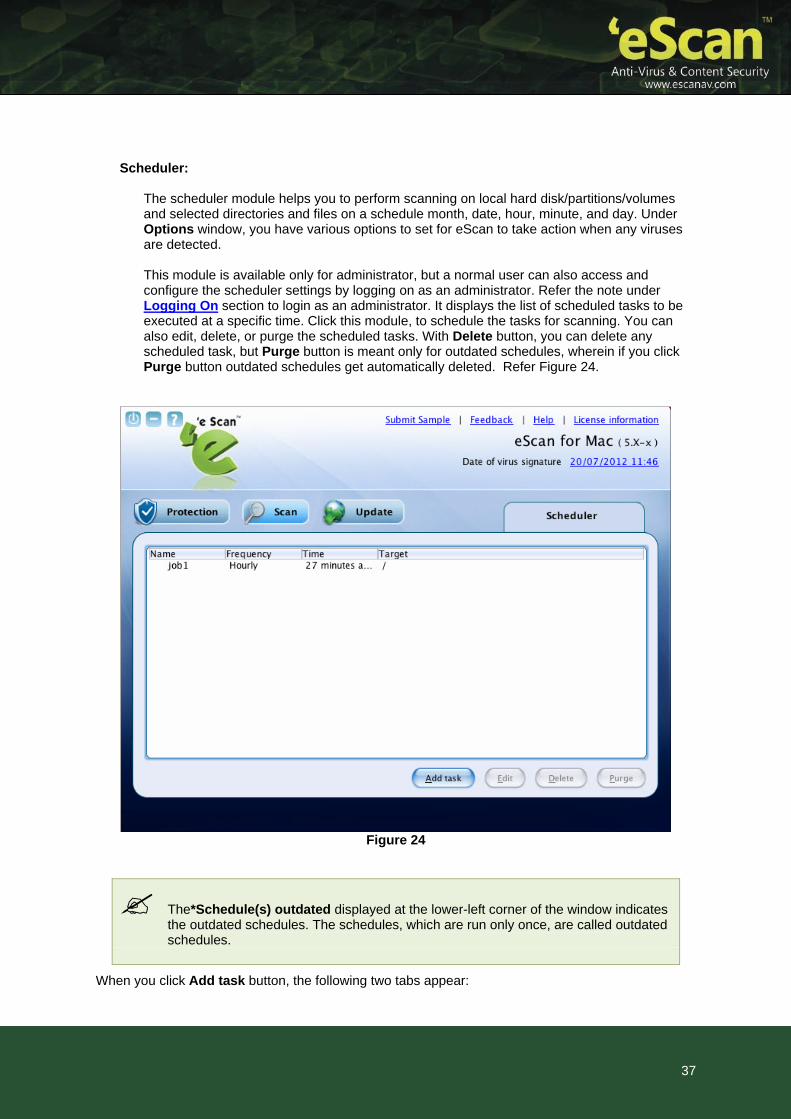
Scheduler: The scheduler module helps you to perform scanning on local hard disk/partitions/volumes and selected directories and files on a schedule month, date, hour, minute, and day. Under Options window, you have various options to set for eScan to take action when any viruses are detected. This module is available only for administrator, but a normal user can also access and configure the scheduler settings by logging on as an administrator. Refer the note under Logging On section to login as an administrator. It displays the list of scheduled tasks to be executed at a specific time. Click this module, to schedule the tasks for scanning. You can also edit, delete, or purge the scheduled tasks. With Delete button, you can delete any scheduled task, but Purge button is meant only for outdated schedules, wherein if you click Purge button outdated schedules get automatically deleted. Refer Figure 24.
Figure 24
The*Schedule(s) outdated displayed at the lower-left corner of the window indicates the outdated schedules. The schedules, which are run only once, are called outdated schedules.
When you click Add task button, the following two tabs appear:
38
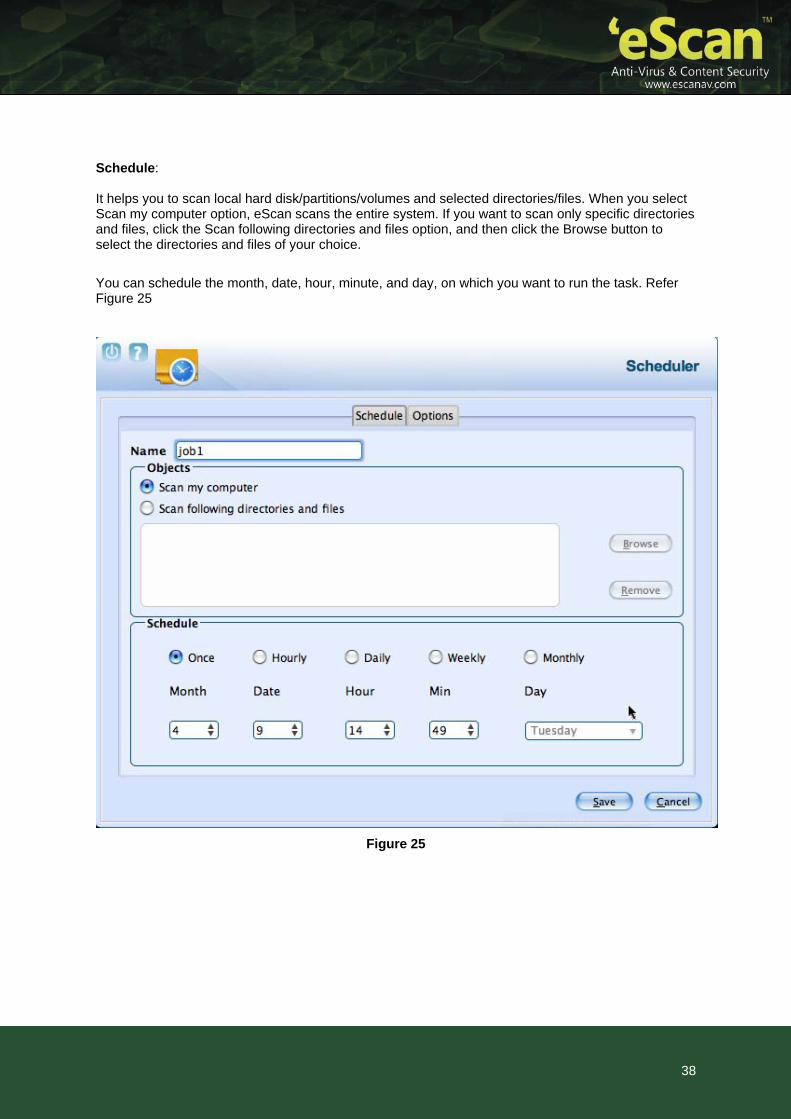
Schedule: It helps you to scan local hard disk/partitions/volumes and selected directories/files. When you select Scan my computer option, eScan scans the entire system. If you want to scan only specific directoand files, click the Scan following directories ans
ries d files option, and then click the Browse button to
elect the directories and files of your choice.
hedule the month, date, hour, minute, and day, on which you want to run the task. Refer Figure 25
You can sc
Figure 25
39
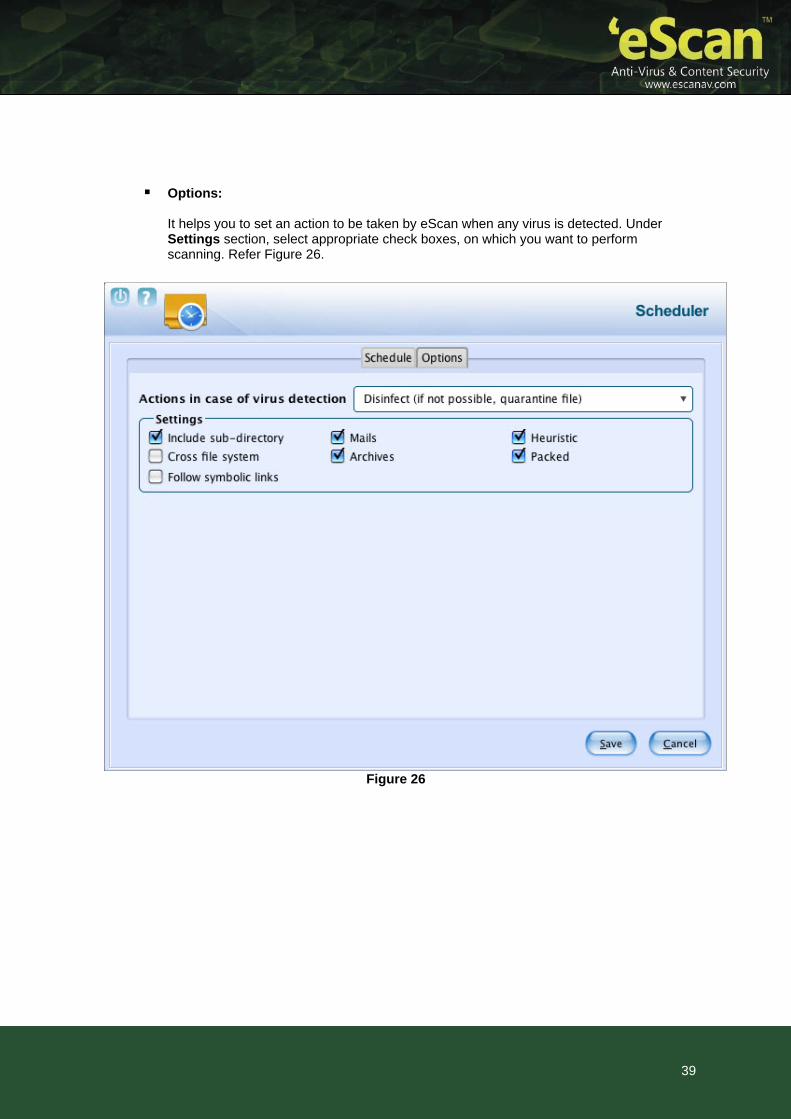
Options: It helps you to set an action to be taken by eScan when any virus is detected. UndSettings section, select approp
er riate check boxes, on which you want to perform
scanning. Refer Figure 26.
Figure 26
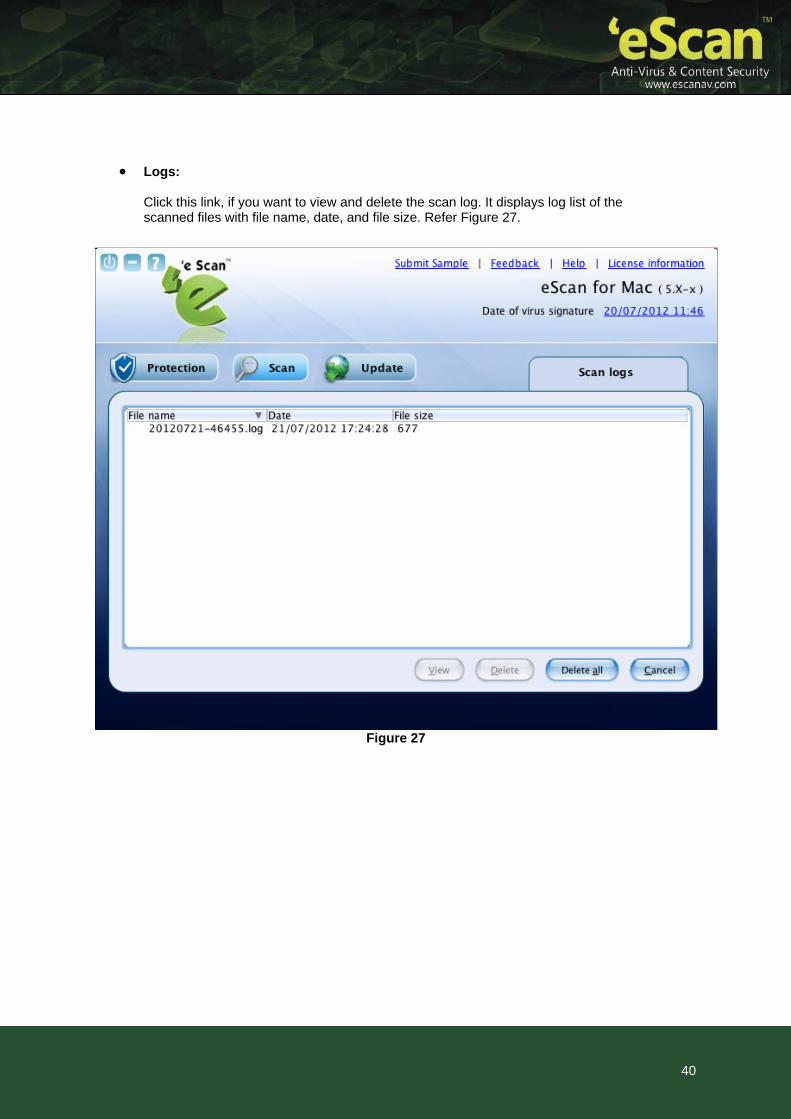
Logs: Click this link, if you want to view and delete the scan log. It displays log list of the scanned files with file name, date, and file size. Refer Figure 27.
Figure 27
40

Update
The Update module helps you to configure settings for automatic virus updates. You can make connection and proxy settings for updates. You have to ensure that your computer is connected to internet, so that the latest updates are downloaded and you receive them on a set time.
Click this module, if you want to configure the update settings. A normal user can access Settings link only through the administrator login. (Refer the note under the Logging On section to login as an administrator.) Refer Figure 28.
Figure 28
41
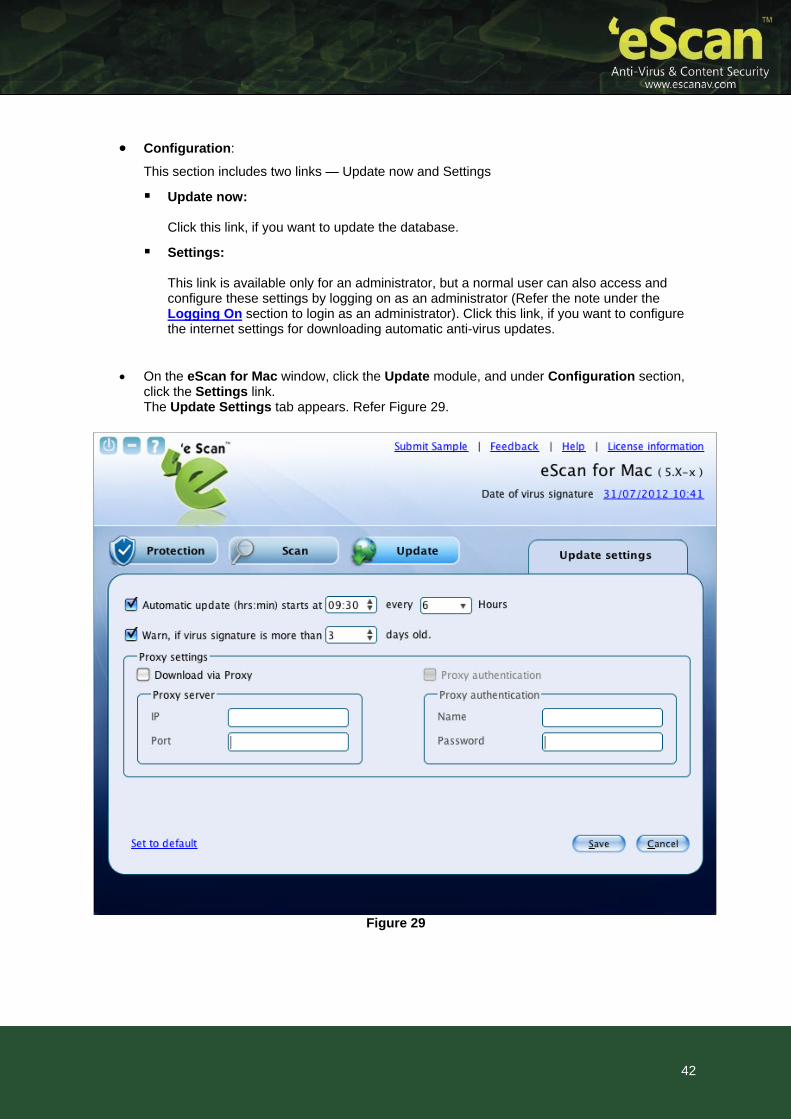
Configuration:
This section includes two links — Update now and Settings
Update now: Click this link, if you want to update the database.
Settings: This link is available only for an administrator, but a normal user can also access and configure these settings by logging on as an administrator (Refer the note under the Logging On section to login as an administrator). Click this link, if you want to configure the internet settings for downloading automatic anti-virus updates.
On the eScan for Mac window, click the Update module, and under Configuration section, click the Settings link. The Update Settings tab appears. Refer Figure 29.
Figure 29
42
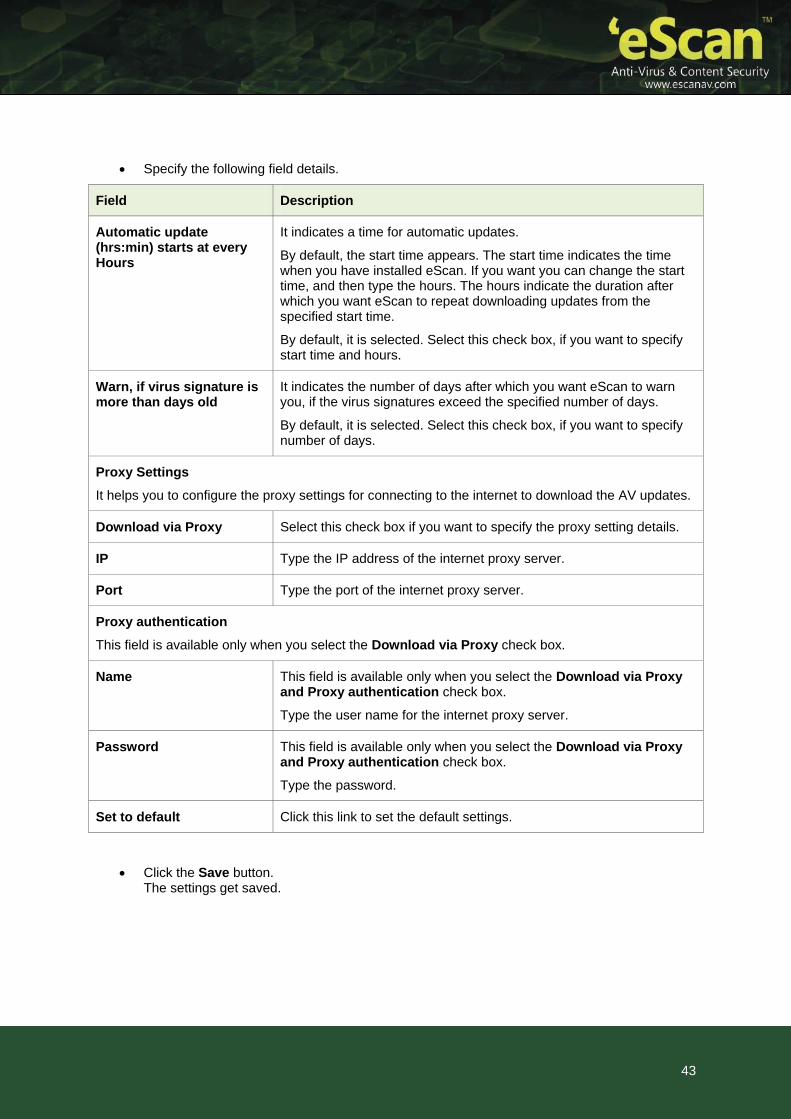
Specify the following field details.
Field Description
Automatic update (hrs:min) starts at every Hours
It indicates a time for automatic updates.
By default, the start time appears. The start time indicates the time when you have installed eScan. If you want you can change the start time, and then type the hours. The hours indicate the duration after which you want eScan to repeat downloading updates from the specified start time.
By default, it is selected. Select this check box, if you want to specify start time and hours.
Warn, if virus signature is more than days old
It indicates the number of days after which you want eScan to warn you, if the virus signatures exceed the specified number of days.
By default, it is selected. Select this check box, if you want to specify number of days.
Proxy Settings
It helps you to configure the proxy settings for connecting to the internet to download the AV updates.
Download via Proxy Select this check box if you want to specify the proxy setting details.
IP Type the IP address of the internet proxy server.
Port Type the port of the internet proxy server.
Proxy authentication
This field is available only when you select the Download via Proxy check box.
Name This field is available only when you select the Download via Proxy and Proxy authentication check box.
Type the user name for the internet proxy server.
Password This field is available only when you select the Download via Proxy and Proxy authentication check box.
Type the password.
Set to default Click this link to set the default settings.
Click the Save button. The settings get saved.
43
44
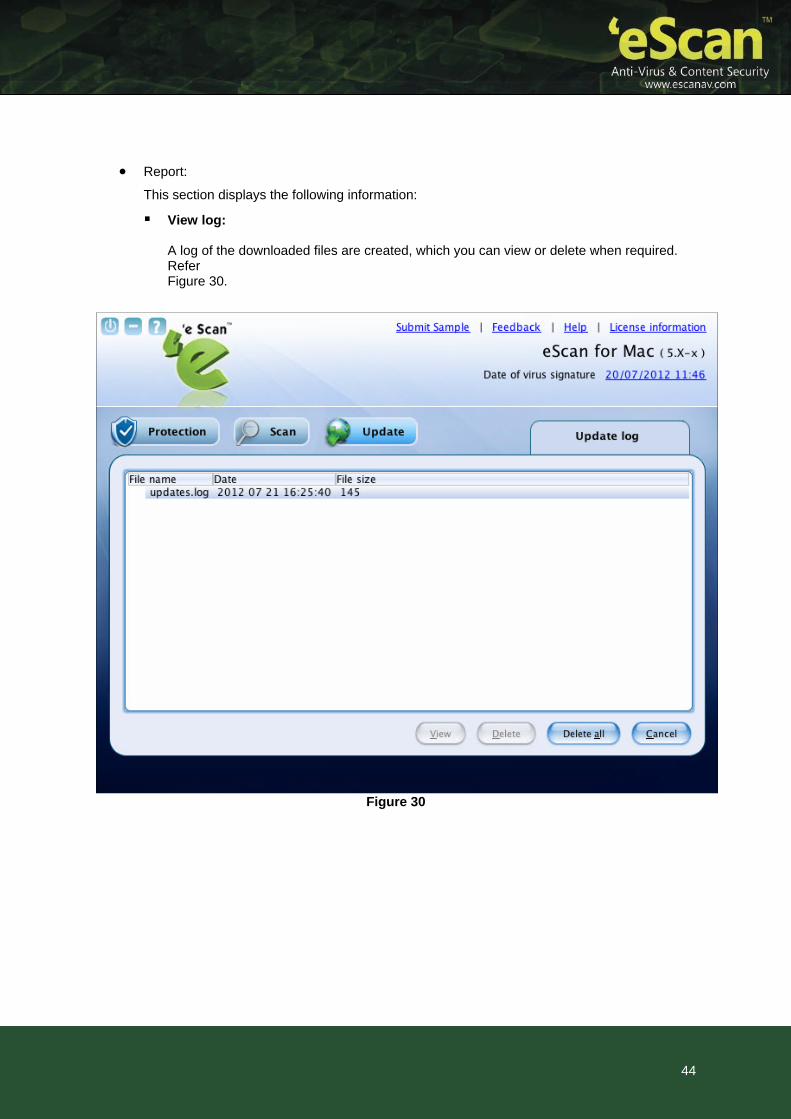
Report:
This section displays the following information:
View log: A log of the downloaded files are created, which you can view or delete when required. Refer Figure 30.
Figure 30

Quick Access Links The eScan Anti-Virus Security for Mac provides quick access to the following links. These links are available at top-right corner of the screen.
Submit Sample: Click this link, if you want to submit the virus samples to the eScan support team. You have to click the Samples option, click the Next >> button, fill up the details in the Submit a Ticket form, and then click Submit button.
Feedback: Click this link, if you wish to give any feedback. This will take you to the Feedback web page of our eScan website.
Help: Click this link, to access live chat, eScan online help, MicroWorld forum, and eScan remote support. When you point to the appropriate link, then the information on each option will appear as a tool tip.
License Information: Click this link, to register and renew the license.
Date of virus signature: Click this link if you want to download latest virus signatures.
Last Computer Scan: Click this link if you want to run complete system scan for viruses.
45
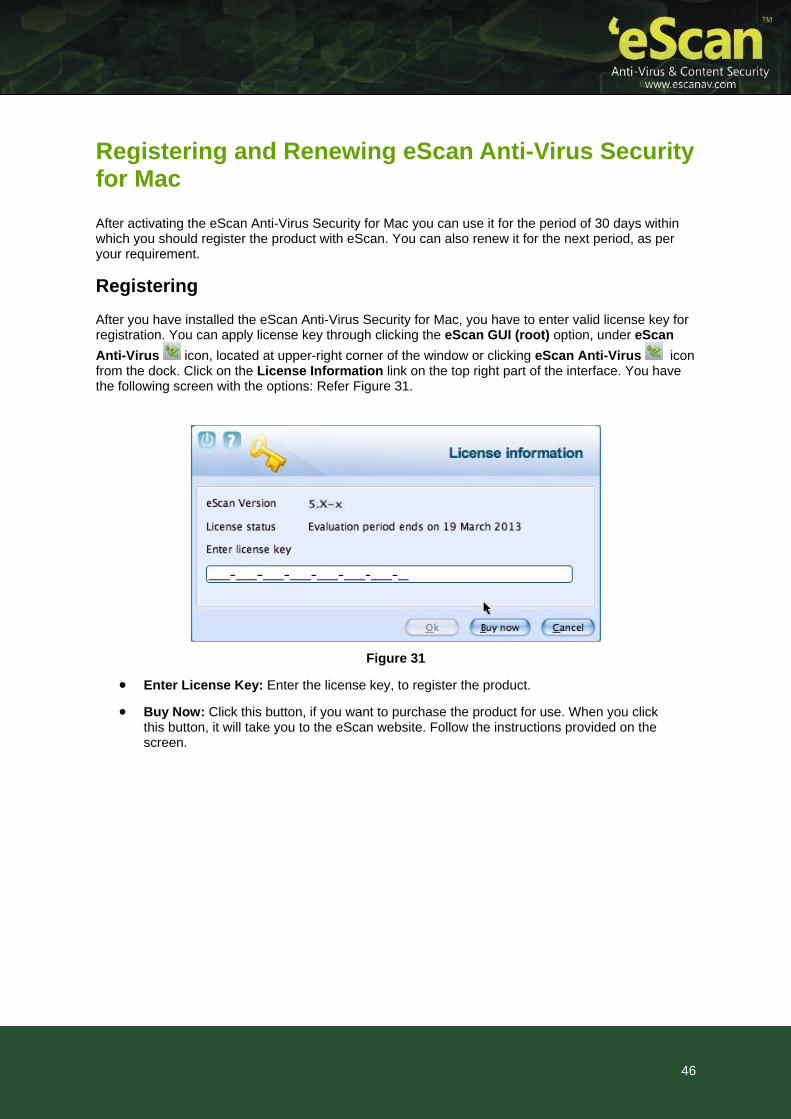
Registering and Renewing eScan Anti-Virus Security for Mac
After activating the eScan Anti-Virus Security for Mac you can use it for the period of 30 days within which you should register the product with eScan. You can also renew it for the next period, as per your requirement.
Registering
After you have installed the eScan Anti-Virus Security for Mac, you have to enter valid license key for registration. You can apply license key through clicking the eScan GUI (root) option, under eScan
Anti-Virus icon, located at upper-right corner of the window or clicking eScan Anti-Virus icon from the dock. Click on the License Information link on the top right part of the interface. You have the following screen with the options: Refer Figure 31.
Figure 31
Enter License Key: Enter the license key, to register the product.
Buy Now: Click this button, if you want to purchase the product for use. When you click this button, it will take you to the eScan website. Follow the instructions provided on the screen.
46
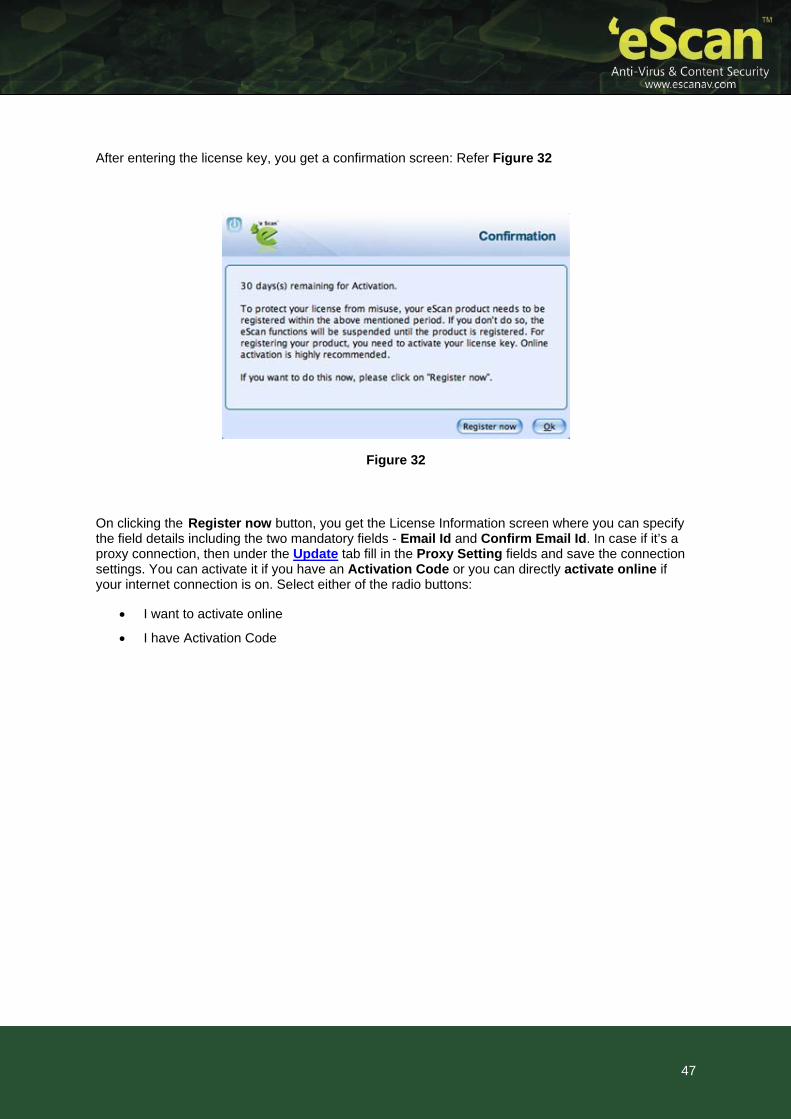
After entering the license key, you get a confirmation screen: Refer Figure 32
Figure 32
On clicking the Register now button, you get the License Information screen where you can specify the field details including the two mandatory fields - Email Id and Confirm Email Id. In case if it’s a proxy connection, then under the Update tab fill in the Proxy Setting fields and save the connection settings. You can activate it if you have an Activation Code or you can directly activate online if your internet connection is on. Select either of the radio buttons:
I want to activate online
I have Activation Code
47
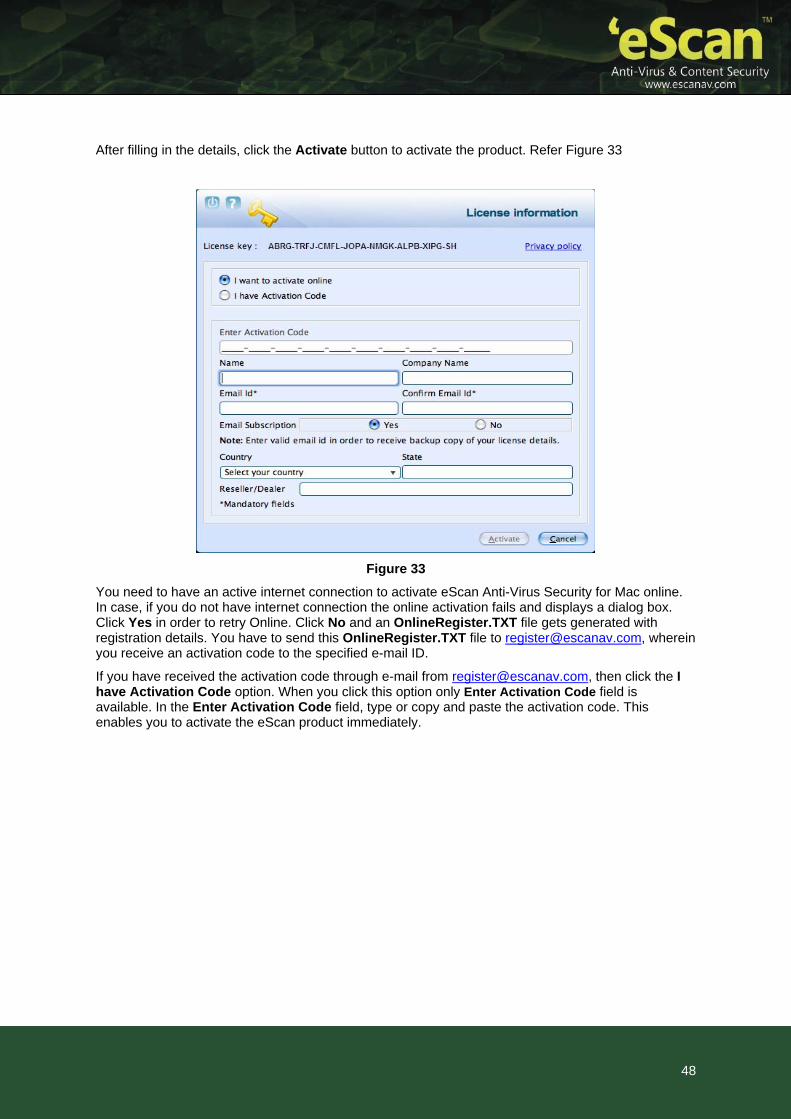
After filling in the details, click the Activate button to activate the product. Refer Figure 33
Figure 33
You need to have an active internet connection to activate eScan Anti-Virus Security for Mac online. In case, if you do not have internet connection the online activation fails and displays a dialog box. Click Yes in order to retry Online. Click No and an OnlineRegister.TXT file gets generated with registration details. You have to send this OnlineRegister.TXT file to [email protected], wherein you receive an activation code to the specified e-mail ID.
If you have received the activation code through e-mail from [email protected], then click the I have Activation Code option. When you click this option only Enter Activation Code field is available. In the Enter Activation Code field, type or copy and paste the activation code. This enables you to activate the eScan product immediately.
48
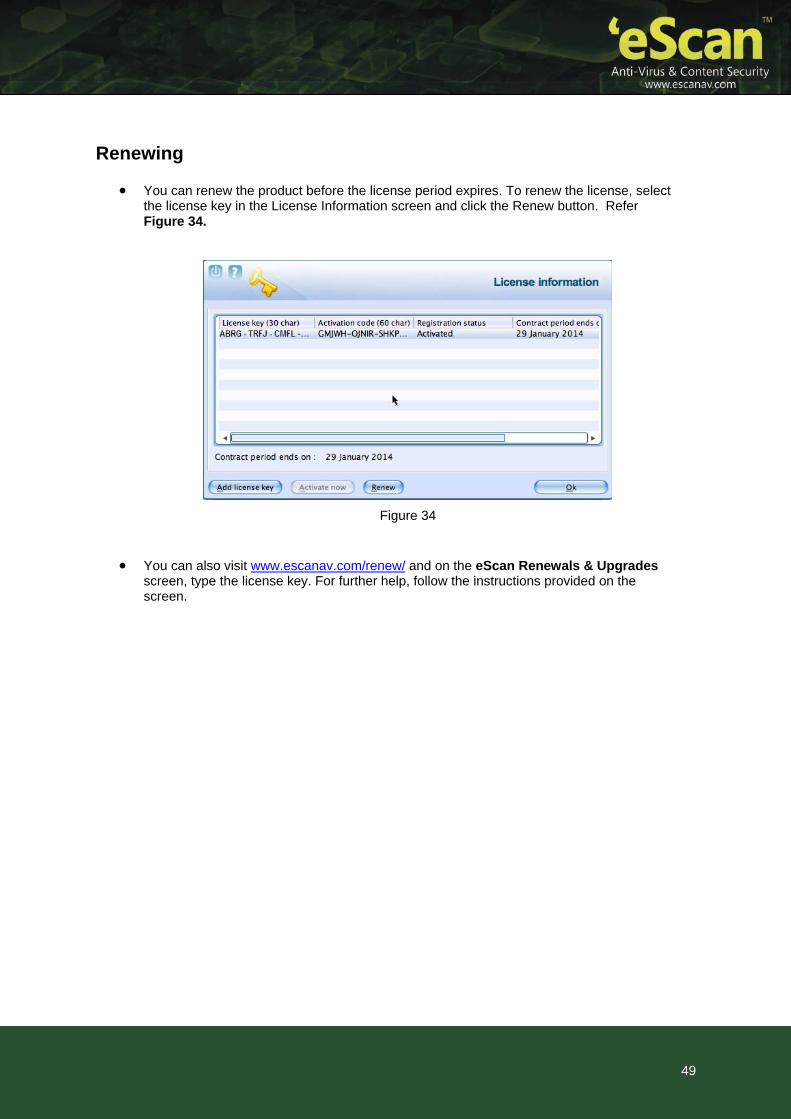
Renewing
You can renew the product before the license period expires. To renew the license, select the license key in the License Information screen and click the Renew button. Refer Figure 34.
Figure 34
You can also visit www.escanav.com/renew/ and on the eScan Renewals & Upgrades screen, type the license key. For further help, follow the instructions provided on the screen.
49
50
Contact Information
Contact Details
Free Technical Support We offer 24x7 free online technical support to our customers through e-mail and live chat. We also provide free telephonic support to our customers during business hours. For contact: 022 – 67722911
Chat Support The eScan technical support team is available round the clock to assist you with your queries. You can contact our support team via live chat by visiting http://www.escanav.com/english/livechat.asp link.
Forums Support You can even join the MicroWorld forum at http://forums.escanav.com to discuss all your eScan related problems with our experts.
E-mail Support Please send your queries, suggestions, and comments about our products or this guide to [email protected].
Important Websites
For sales enquiry, write to: [email protected]
For support enquiry, write to: [email protected]
For forums, write to http://forums.escanav.com
For knowledge base, visit: http://forums.escanav.com
For eScan wikipedia/help, visit: http://www.escanav.com/wiki
For live chat, visit: http://www.escanav.com/english/livechat.asp
lled with your updates. To manually download them please visit www.escanav.comAll eScan hotfixes/ patches for the software are automatically insta
website.
Registered Offices
Asia Pacific
MicroWorld Software Services Pvt. Ltd.
Plot No 80, Road 15, MIDC, Marol
Andheri (E), Mumbai
India
Tel : (91) (22) 2826-5701
Fax: (91) (22) 2830-4750
E-mail : [email protected]
Web site: http://www.escanav.com
Malaysia
MicroWorld Technologies Sdn.Bhd.
(Co.No. 722338-A)
E-8-6, Megan Avenue 1, 189, Jalan Tun Razak, 50400 Kuala Lumpur
Malaysia
Tel : (603) 2333-8909 or (603) 2333-8910
Fax: (603) 2333-8911
E-mail : [email protected]
Web site: http://www.escanav.com
South Africa
MicroWorld Technologies South Africa (PTY) Ltd.
376 Oak Avenue
Block C (Entrance from 372 Oak Avenue) Ferndale, Randburg, Gauteng, South Africa
Tel : Local 08610 eScan (37226)
Fax: (086) 502 0482
International : (27) (11) 781-4235
E-mail : [email protected]
Web site: http://www.microworld.co.za
51
52
USA
MicroWorld Technologies Inc.
31700 W 13 Mile Rd, Ste 98
Farmington Hills, MI 48334
USA
Tel : (1) (248) 855 2020
Fax: (1) (248) 855 2024
E-mail : [email protected]
Web site: http://www.escanav.com
Germany
MicroWorld Technologies GmbH
Drosselweg 1,
76327 Pfinztal,
Germany
Tel : (49) 7240 944909 20
Fax: (49) 7240 944909 92
E-mail : [email protected]
Web site: http://www.escanav.de


![[151] 1 984 3-2 x 100 x 5.5 x 8 6 4 cmndata.jci-net.or.jp/data_pdf/06/006-01-0151.pdf · 1 984 3-2 x 100 x 5.5 x 8 6 4 cmn . Created Date: 3/26/2004 4:57:35 PM](https://img.pdfslide.us/doc/110x75/5fa5efd2fad580185f081b13/151-1-984-3-2-x-100-x-55-x-8-6-4-1-984-3-2-x-100-x-55-x-8-6-4-cmn-created.jpg)