Embed Size (px)
Citation preview

ASSEMBLY & OPERATINGINSTRUCTIONS
MAY 2006
AVL Looms3851 Morrow Lane #9
Chico, CA 95928-8305530 893-4915 * 530 893-1372 fax #www.avlusa.com * [email protected]
AVL HOME LOOM

Page TOC-�
FIGURE INDEX FI-1
ASSEMBLY INSTRUCTIONS 1-1• General 1-1• General Guidelines 1-1• Assembly Process 1-1 • Front Lower (Treadle Pivot) Cross Member 1-1 • Main Frame 1-3 • Cloth Storage Roller Installation 1-5 • Front Cross Member Installation 1-6 • Treadle Cable Installation and Routing 1-7 • Spring Lever Support 1-8 • Harness Pulley Support 1-9 • Breast Beam 1-9 • Beater Assembly 1-10 • Harness Assembly 1-11 • Harness Cable Installation and Routing 1-12 • Harness Spring Installation 1-13 • Folding Leg Stiffener Attachment and Warp Beam Placement 1-13
INTRODUCTION 2-1• Preface 2-1
HOME LOOM INSTRUCTIONS 3-1• Loom Set-Up 3-2
ADJUSTMENTS 4-1• Warp Tension 4-1• Beater Height 4-1• Treadle Tie-Up 4-2• Spring Levers 4-3
WARPING THE PLAIN BEAM 5-1• Creating Two Crosses 5-1• Securing the Crosses 5-2• Removing the Warp for the Warping Board 5-2• Attaching the Raddle 5-2• Winding the Apron and Attaching the Warp 5-2• Sticks in the Raddle Cross 5-2• Feeding the Raddle 5-3• Preparing the Paper 5-4• Winding the Warp 5-5• Threading Cross 5-7• Removing the Raddle 5-7
TABLE OF CONTENTS
Page TOC-�
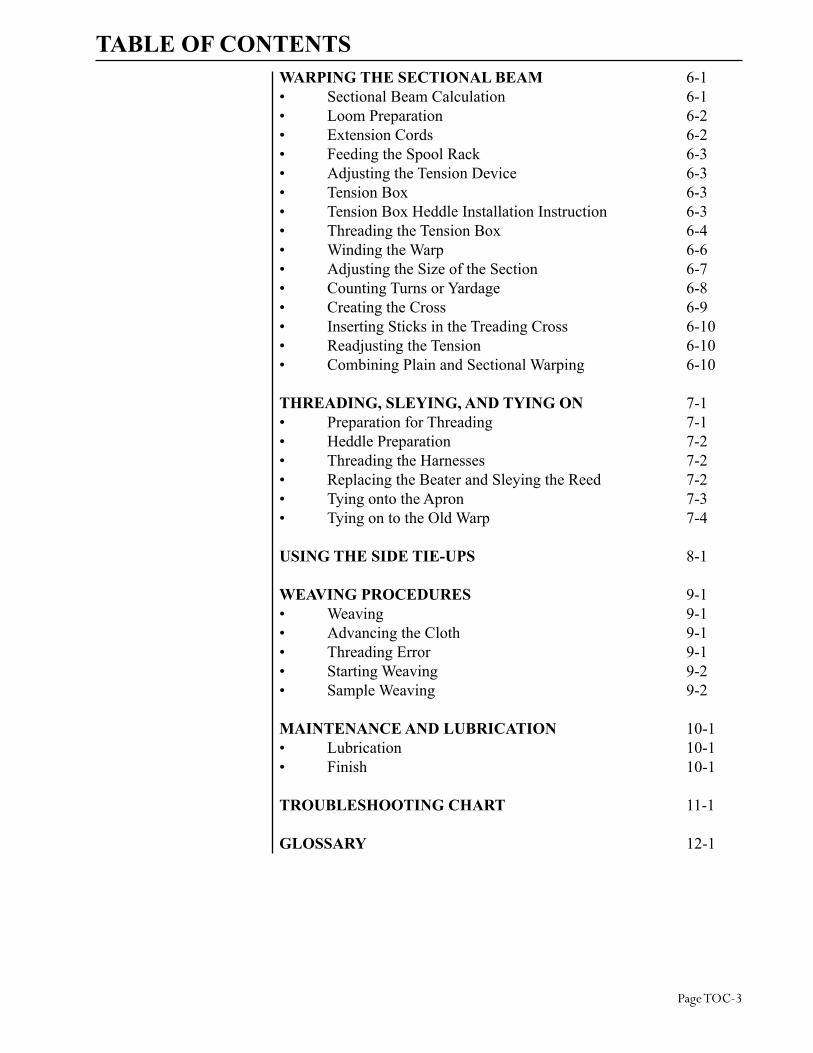
TABLE OF CONTENTSWARPING THE SECTIONAL BEAM 6-1• Sectional Beam Calculation 6-1• Loom Preparation 6-2• Extension Cords 6-2• Feeding the Spool Rack 6-3• Adjusting the Tension Device 6-3• Tension Box 6-3• Tension Box Heddle Installation Instruction 6-3• Threading the Tension Box 6-4• Winding the Warp 6-6• Adjusting the Size of the Section 6-7• Counting Turns or Yardage 6-8• Creating the Cross 6-9• Inserting Sticks in the Treading Cross 6-10• Readjusting the Tension 6-10• Combining Plain and Sectional Warping 6-10
THREADING, SLEYING, AND TYING ON 7-1• Preparation for Threading 7-1• Heddle Preparation 7-2• Threading the Harnesses 7-2• Replacing the Beater and Sleying the Reed 7-2• Tying onto the Apron 7-3• Tying on to the Old Warp 7-4
USING THE SIDE TIE-UPS 8-1
WEAVING PROCEDURES 9-1• Weaving 9-1• Advancing the Cloth 9-1• Threading Error 9-1• Starting Weaving 9-2• Sample Weaving 9-2
MAINTENANCE AND LUBRICATION 10-1• Lubrication 10-1• Finish 10-1
TROUBLESHOOTING CHART 11-1
GLOSSARY 12-1

Page F1-�
Figure # Description Page #
1 Front Lower (Treadle Pivot) Cross Member 1-12 Right Side Frame (shown from inside of loom) 1-33 Left Side Frame (shown from inside of loom) 1-47 Treadle Pulley Support 1-54 Cloth Storage (Take-Up) Roller 1-514 Treadle Cable Installation and Routing 1-75 Spring Lever Support 1-86 Harness Pulley Support 1-98 Breast Beam 1-912 Beater 1-1011 Harness 1-1113 Harness Cable Installation and Routing 1-129 Folding Leg Stiffner 1-1310 Plain Warp Beam 1-1415 Full Loom (with parts labeled) 3-116 Unfolding the Loom, #1 3-217 Unfolding the Loom, #2 3-318 Attaching the Brake Pedal 3-419 Routing the Brake Cable 3-520 Attaching the Warp Beam Crank 3-621 Sectional Beam Installation 3-722 Cutting the Heddles Apart 3-823 Routing the Harness Cables 3-924 Routing the Treadle Cables 3-1025 Spring Lever System 3-1126 Adjusting the Beater 4-127 Side Tie-Up System 4-228 Warping Board with Two Crosses 5-129 Feeding the Raddle 5-330 Using the Warp Beam Apron 5-431 Prepared Paper with Folded Edge 5-532 Winding on the Warp 5-6
FIGURE INDEX

Page FI-�
FIGURE INDEX33 Tension Box / Extension Cords 6-534 Sectional Beam / Extension Cords 6-635 Adjusting the Size of the Section 6-736 Creating Flat Layers 6-837 Attaching Counter to Tension Box 6-938 Threading Position 7-139 Warp Tying On 7-340 Using the Cloth Storage Apron 7-441 Home Loom Tie-Up 8-142 Insertion of a New Heddle 9-143 Lubrication Points 10-1

Page 1-�
This procedure is designed to guide the end-user on the assembly pro-cess of the AVL Home Loom. Home Looms are partially assembled to facilitate packaging for shipment and easy assembly for you.
Whenever assembling wood components, in order to provide greater structural integrity, please follow the listed guidelines:
a.) When the term ‘attach’ is referred to, it implies that a bolt be used with flat washers to prevent both the head and the nut from ‘biting’ (damaging) the flat wood surface.
b.) Whenever ‘attachment’ of beams is made possible by an access hole (where the nut becomes recessed into the wood), place the flat part of the square nut oriented towards the curvature of the hole – ‘Biting’ into the wood is desirable in these cases.
c.) Critical items, which will affect the assembly process, will be listed by a NOTE in upper case – Please follow the listed NOTES to simplify and expedite the assembly process.
ASSEMBLY INSTRUCTIONSGENERAL
GENERAL GUIDELINES
ASSEMBLY PROCESS
FRONT LOWER (TREADLE PIVOT)
CROSS MEMBER
Referring to Figure 1, access the partially assembled Front Lower (Treadle Pivot) Cross Member, quantity ten (10) Treadles, and quantity eight (8) Treadle Spacers.

Page 1-�
Temporarily unscrew both End Blocks furthest from the center of the Front Lower Cross Member to access the Pivot Rods.
Orient the surface of the Front Cross Member having the bumper(s) downwards.
Slide the Treadle onto the Pivot Rod so that the larger diameter Treadle Cable hole is facing downwards (same direction as side of Cross Mem-ber having the bumpers).
Slide one (1) Treadle Spacer on the Pivot Rod and repeat process for both Pivot Rods (quantity five Treadles intermingled with four Treadle Spacers for each Rod).
Slide the assembled Treadles/Pivot Rod into the Center Block and re-install the End Blocks temporarily removed above.
Set assembled Front Cross Member aside for later installation.
ASSEMBLY INSTRUCTIONS
Page 1-�
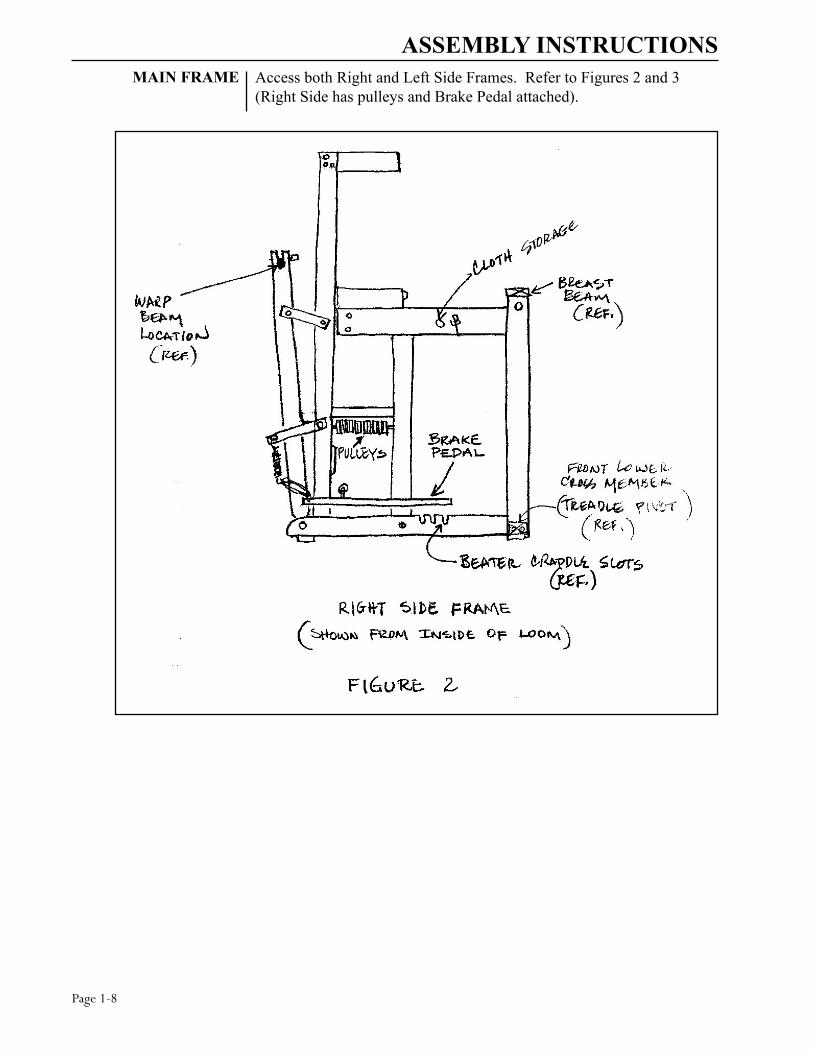
ASSEMBLY INSTRUCTIONSMAIN FRAME Access both Right and Left Side Frames. Refer to Figures 2 and 3
(Right Side has pulleys and Brake Pedal attached).

Page 1-�
ASSEMBLY INSTRUCTIONS
Stand both Side Frames and attach Treadle Pulley Support assembly by securing to the Stand-offs (see Figure 3 for reference location). NOTE: DO NOT TIGHTEN SCREWS AT THIS TIME.

Page 1-10
ASSEMBLY INSTRUCTIONS
Access the Cloth Storage Roller and Cloth Storage Crank/Handle (see Figure 4).
CLOTH STORAGE ROLLER
INSTALLATION

Page 1-11
ASSEMBLY INSTRUCTIONSSlide the Crank/Handle onto the Roller next to the Ratchet such that the handle faces the roller.
With the attachment bolts of the Treadle Pulley Support loosened, spread both Side Frames slightly and insert the Cloth Storage Roller into the large holes on the Side Frame’s Horizontal Member with the side having the Ratchet/Handle is to the right side of the loom (see Fig-ures 2 and 3 for reference).
Bring both Side Frames close to ‘sandwich’ the Roller.
Install the assembled Front Cross Member (with Treadles) between both Side Frames at the lower front of the loom (refer to Figure 2 for place-ment location).
FRONT CROSS MEMBER
INSTALLATION
Page 1-1�
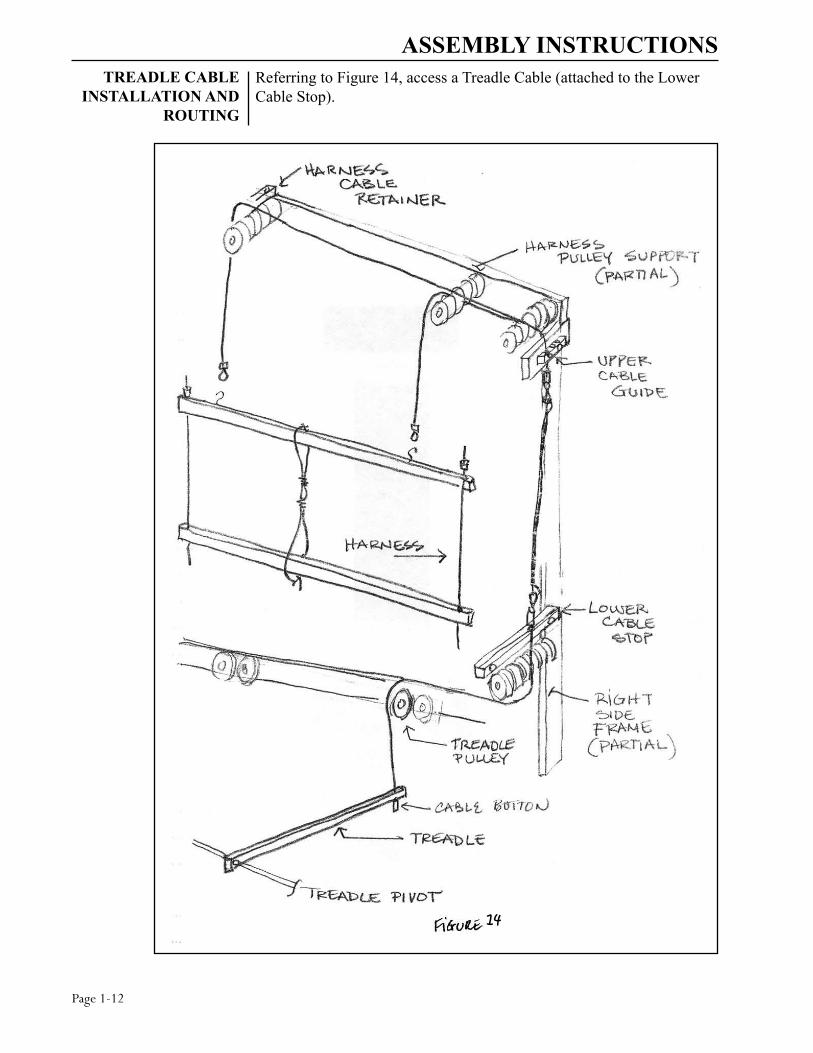
ASSEMBLY INSTRUCTIONSReferring to Figure 14, access a Treadle Cable (attached to the Lower Cable Stop).
TREADLE CABLE INSTALLATION AND
ROUTING
14

Page 1-1�
Route the Cable from the outside of the loom, underneath the pulley below the Lower Cable Stop, over the top of the Treadle Pulley, and straight down to the end of the Treadle.
‘Needle’ the Treadle Cables into the Treadles from the topside till the Nico protrudes from the bottom.
Slide a Cable Button on the extending cable and seat the Nico inside the Button.
Push the Button having the Nico inside, into the bottom hole of the Treadle.
Repeat for all Treadle Cables.
Refer to Figure 5 to determine the Spring Lever Support assembly.
ASSEMBLY INSTRUCTIONS
SPRING LEVER SUPPORT
Referring to Figure 3, attach the Spring Lever Support to the Side Frames at the place shown.
At this time, tighten all bolts (of the Side Frames) securing the Treadle Pulley Support, Front Lower Cross Member, and Spring Lever Support assemblies.

Page 1-1�
ASSEMBLY INSTRUCTIONSRefer to Figure 6 to determine the Harness Pulley Support assembly.HARNESS PULLEY
SUPPORT
Orient the Harness Pulley Support assembly so that the side having the pulley axle closest to the end is to the right side.
Secure the assembly atop the loom as referenced in Figure 3.
Seat the Breast Beam (Figure 8) flat on the Front Vertical Beams of the Side Frame and attach by screwing from the top down. NOTE: BREAST BEAM LACKS HOLES AT THE END SURFACES AND IS THE LARGEST OF TWO PIECES – DO NOT CONFUSE WITH FOLDING LEG STIFFENER.
BREAST BEAM

Page 1-1�
ASSEMBLY INSTRUCTIONSLocate the Beater Top, Beater Race, and Beater Legs (having ‘J’ hooks on bottom end) (see Figure 12).
BEATER ASSEMBLY
Attach the Beater Race (wider piece having groove) to the bottom two holes of the Beater Legs.
Seat the Reed (not shown) onto the groove of the Race and attach the Beater Top.
Seat the Beater Assembly on the Beater Cradle Slots as shown in Figure 2.

Page 1-1�
ASSEMBLY INSTRUCTIONSAccess all Harness Sticks, Heddles, and Harness Wires (refer to Figure 11).
HARNESS ASSEMBLY
Slide the Polyester Heddles onto both the Top and Bottom Harness Sticks to an extent that they are contained between the Eye Hooks.
Determine the Top and Bottom Harness Sticks by the distance of the Eye Hooks from the ends – NOTE: HARNESS STICKS HAVING THE EYE HOOKS CLOSER TO THE CENTER ARE THE ‘TOPS’.
Orient the harnesses properly and slide the Harness Wires from the Top to the Bottom stick.
Set the completed Harnesses aside until the Harness Cables are routed.

Page 1-1�
ASSEMBLY INSTRUCTIONSRemove the screw holding the Harness Cable Retainer (see Figure 13) to the Front Harness Pulley Support and loosen the rear screw of the Retainer.
HARNESS CABLE INSTALLATION AND
ROUTING
Pivot the Retainer so that the Harness Pulleys are clear.
Access the Harness Cable contained in the Upper Cable Guide, pull upwards and seat on the pulley groove.
Run the Cable to second set of pulleys and suspend the shortest cable from that pulley.
Continue with the longest cable to the third set of pulleys and suspend from that pulley.
Obtain an assembled Harness and hang to the Cable by looping the Cables (suspended from the second and third set of pulleys) into the Top Harness Stick’s Eye Hook.
Repeat for all remaining Cables/Harnesses.
Re-attach the Harness Cable Retainers (temporarily deviated above) to retain the Harness Cables in place.

Page 1-1�
Reach underneath the Spring Levers and hook the chains extending from the top of the spring levers out and upwards to the Bottom Har-ness Sticks (see Figure 13).
Repeat for all Spring Levers on both sides of the loom.
Access all Harness Tension Spring assemblies and hook the spring to the bottom eye hook of the Spring Lever, extend across, and hook the chain (attached to the spring) to the equivalent Spring Lever on the op-posite side.
Access the Folding Leg Stiffener (Figure 9) and attach to both Folding Legs at location as referenced in Figure 3.
ASSEMBLY INSTRUCTIONSHARNESS SPRING
INSTALLATION
FOLDING LEG STIFFENER
ATTACHMENT AND WARP BEAM
PLACEMENT

Page 1-1�
ASSEMBLY INSTRUCTIONSAccess the Warp Beam (see Figure 10) and orient such that the Brake Drum is to the right side of the loom.
Seat the Beam on the slots at the extreme top of both Folding legs (see Figure 2 for reference location).
Install the Warp Beam Handle outside of the Folding Leg on the Brake Drum side.

Page �-�0
INTRODUCTIONAVL Looms was formed in 1977. Jim Ahrens, an experienced engineer/designer/weaver, designed the original looms. He has been weaving, designing, and building handweaving looms for over fifty years and is considered by many weavers to be the greatest handloom designer in this country.
Following in Mr. Ahrens’ legendary footsteps are the next generation of designers at AVL. Their combined imagination, ingenuity, and engi-neering/designing skills make this group an unbeatable combination. The design team, along with the other talented and qualified staff at AVL, work together to produce the finest handweaving looms and ac-cessories available in this country and according to some of our custom-ers, the world.
Learning to warp and weave on an AVL Home Loom will be a reward-ing experience for beginning and experienced weavers alike. The effi-ciency of the design, along with the sturdy construction and trouble-free operation will ensure your weaving time to be enjoyable.
Please read both the loom set-up and weaving sections, even if you are an experienced weaver. There may be little hints and helps that are contained on the following pages that you may not have come across before.
If you are a beginning weaver, please refer to the glossary of terms on page 12-1 for any unfamiliar words you encounter.
Enjoy your new loom ..... here we go!
PREFACE

Page �-�1
HOME LOOM INSTRUCTIONS
The AVL Home Loom has been assembled at the AVL factory in either a four or eight harness configuration. It is nearly ready to use as it comes from the box. Use the following instructions to assist you in setting up your new loom.

Page �-��
1.) Remove the loom from the shipping box by opening the flaps at either end of the box. Slide the entire loom out of the box, including the wooden packing base the loom is attached to.
2.) Remove all tape and packing materials from the loom.
3.) Remove accessory box(es) from the loom. If you received two accessory boxes, one of them is a bench, which has assembly instructions packed with it.
4.) Remove the loom from the wooden packing base.
5.) Release the folding legs at the rear of the loom (as shown in Fig-ure 16) by loosening the wing nut from the carriage bolt on each side of the loom.
HOME LOOM INSTRUCTIONSLOOM SET-UP

Page �-��
HOME LOOM INSTRUCTIONS Unfold the loom, holding the rear portion in place by swing-
ing up the wooden support arms at either side of the loom and attaching them to each folding leg, using the same carriage bolts that held the loom in the folded position. Notice that there are slots in three positions on each support arm (as shown in Figure 17).
Any of the three positions may be used to attach the loom at this point. This is an adjustable feature which allows the loom to accommodate a large amount of warp build up. With very long warps, weaving should start in the furthest back position, gradu-ally moving to the next two settings as the warp is woven off. If you plan on using a raddle while warping the loom, use the posi-tion shown in Figure 17.

Page �-��
HOME LOOM INSTRUCTIONS6.) As shown in Figure 18, attach the snap at the free end of the
warp beam brake cable to the steel ring at the end of the steel brake lever. To make sure the brake cable is routed correctly, check it against Figure 19.

Page �-��
HOME LOOM INSTRUCTIONS

Page �-��
HOME LOOM INSTRUCTIONS7.) If you have not already done so, open the accessory box that
came with the loom. Locate the warp beam crank and attach it to the warp beam at the rear of the loom (as shown in Figure 20).
8.) Sectional beam tie-up. If you have ordered a sectional beam and tension box, begin installation by locating the following parts (if you haven’t ordered a sectional beam, proceed to step 15):
• sectional beam • warp beam crank • brake cable and tie-up • tension box track • extended folding leg supports (2) • tension box hardware pack • track support legs hardware pack • track support legs (2) • tension box
9.) Remove the folding leg support arms saving the bolts, nuts, and locking levers.

Page �-��
HOME LOOM INSTRUCTIONS10.) Attach the extended support arms (see Figure 21) and secure
to the folding legs. (Be sure to insert the bolt from the outside, through the support arms and castle side, then slip the locking lever on as before. Next, screw on the nut).
11.) Secure one folding leg to each support arm with the washers and nuts to the inside.
12.) Mount your tension box track to the top rear of the support arms with the lengthwise groove facing up.
13.) Mount the warp beam crank to the drilled end of the sectional beam axle (see Figure 20).

Page �-��
HOME LOOM INSTRUCTIONS14.) Attach the brake cable. As shown in Figures 18 and 19, attach
the snap at the free end of the warp beam brake cable to the steel ring at the end of the steel brake lever. To make sure the brake cable is routed correctly, check it against Figure 19.
15.) At this point, your loom should be nearly ready for warping. Make certain that you have unstrapped the beater and harness frames from their shipping configuration. For looms equipped with polyester heddles, continue to step #16. If your loom has metal heddles, skip on to step #17.
16.) Your loom has been shipped with the polyester heddles in place on the harnesses. They are bundled together in groups of one hundred, with two bundles on each harness frame. On eight har-ness looms there are two groups of fifty heddles each on the rear four harnesses. The twist ties should now be removed and the heddles can be spread across the harnesses. As you do this, you will notice that all of the heddles in each bundle are connected to one another at either the top or the bottom of the heddles. These connecting loops can be cut (as shown in Figure 22) to make threading easier.
Feel free to move heddles from one harness to another. If you want an even distribution of heddles on the eight harness loom, you can remove fifty heddles from the front four harnesses and add these heddles to the rear four harnesses.

Page �-��
HOME LOOM INSTRUCTIONS Feel free to place heddles on either side of the screweyes on the
harness. The loom will actually perform at its best with some heddles located to the outboard side of these screweyes, but no closer to the ends than necessary.
NOTE: Another hint to make threading easier: while you have your heddles spread out, you can mark just above the eye of each heddle with a colored pen. You can use four different colors of pen and mark all of the heddles on each harness with a different color. You will find that during threading, this will make it easier to tell which heddle belongs to which harness, thereby reducing the chance for threading errors. If you do choose to color code your heddles, make certain that the ink from the felt pens you use is color fast and will not wear off onto your warp material.
17.) Before proceeding to the weaving section, you should take a minute to see that all the harness cables and treadle cables are seated in the correct pulleys and are routed properly. Refer to Figures 23 and 24 for proper routing of cables.
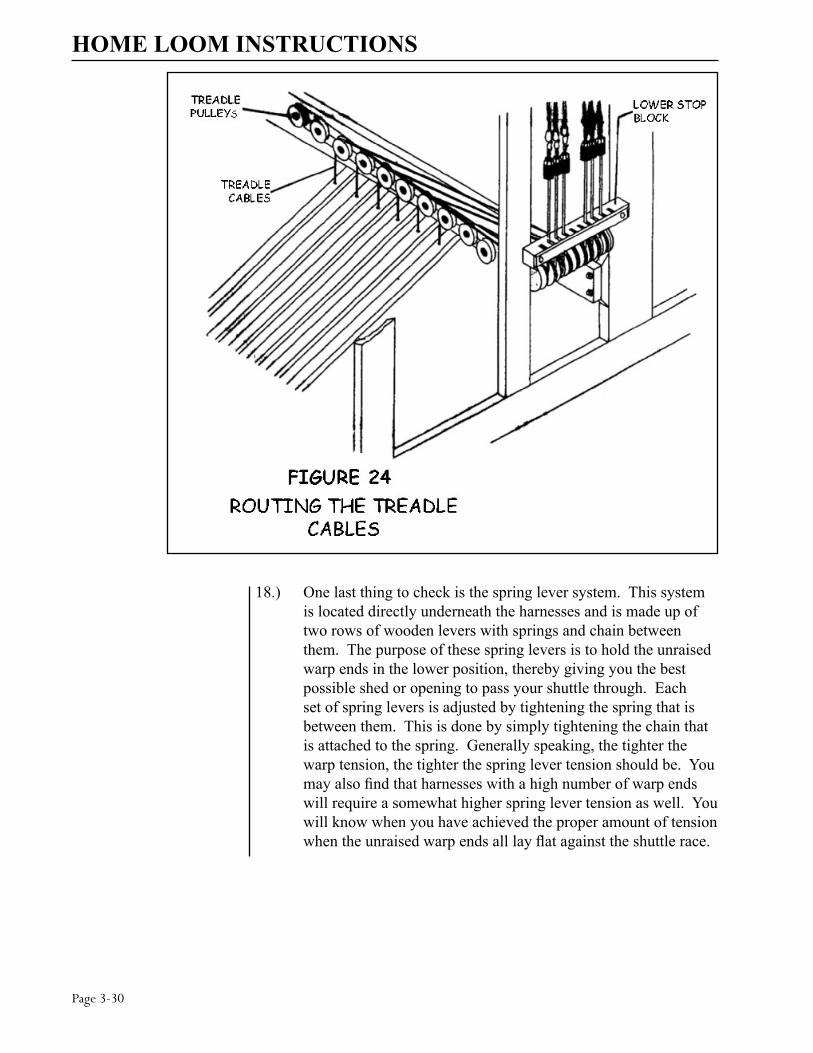
Page �-�0
HOME LOOM INSTRUCTIONS
18.) One last thing to check is the spring lever system. This system is located directly underneath the harnesses and is made up of two rows of wooden levers with springs and chain between them. The purpose of these spring levers is to hold the unraised warp ends in the lower position, thereby giving you the best possible shed or opening to pass your shuttle through. Each set of spring levers is adjusted by tightening the spring that is between them. This is done by simply tightening the chain that is attached to the spring. Generally speaking, the tighter the warp tension, the tighter the spring lever tension should be. You may also find that harnesses with a high number of warp ends will require a somewhat higher spring lever tension as well. You will know when you have achieved the proper amount of tension when the unraised warp ends all lay flat against the shuttle race.

Page �-�1
HOME LOOM INSTRUCTIONS For now, just make sure that all of the chains and springs are
hooked up properly. Each harness frame should be attached to the set of spring levers below it (as shown in Figure 25).

Page �-��
ADJUSTMENTSOnce your loom has been set up and warped, you should make the fol-lowing adjustments before you start weaving.
The warp tension is determined by the combination of how you advance the warp with the cloth beam handle and when you let up on the brake pedal. The only adjustment you need to make here is to be sure that the brake adjustment cord is set tight enough so that the warp beam will fully lock when the brake pedal is in its upper (not depressed) position. It is good practice to tie a simple knot or bow tie around the plastic cord clamp once you have set the tension. This way you will be certain that the cord will not slip and your tension will remain constant.
NOTE: The brake adjustment cord should be loosened whenever you wind the beam backwards, such as when you are winding a warp onto the beam.
The height of the beater is adjustable to compensate for different weav-ing situations. Each leg of the beater can be lifted and the steel pivots can be screwed into or out of the bottom of each beater leg, thereby changing how close the top of the shuttle race is to the warp.
WARP TENSION (refer to Figures 18 and 19)
BEATER HEIGHT (refer to Figure 26)
Page �-��
You should always make this adjustment while the warp is under ten-sion and the beater is swung away from the weaver. Once this adjust-ment is made, make sure that the steel pivots are put back into their notches at the bottom of the loom.
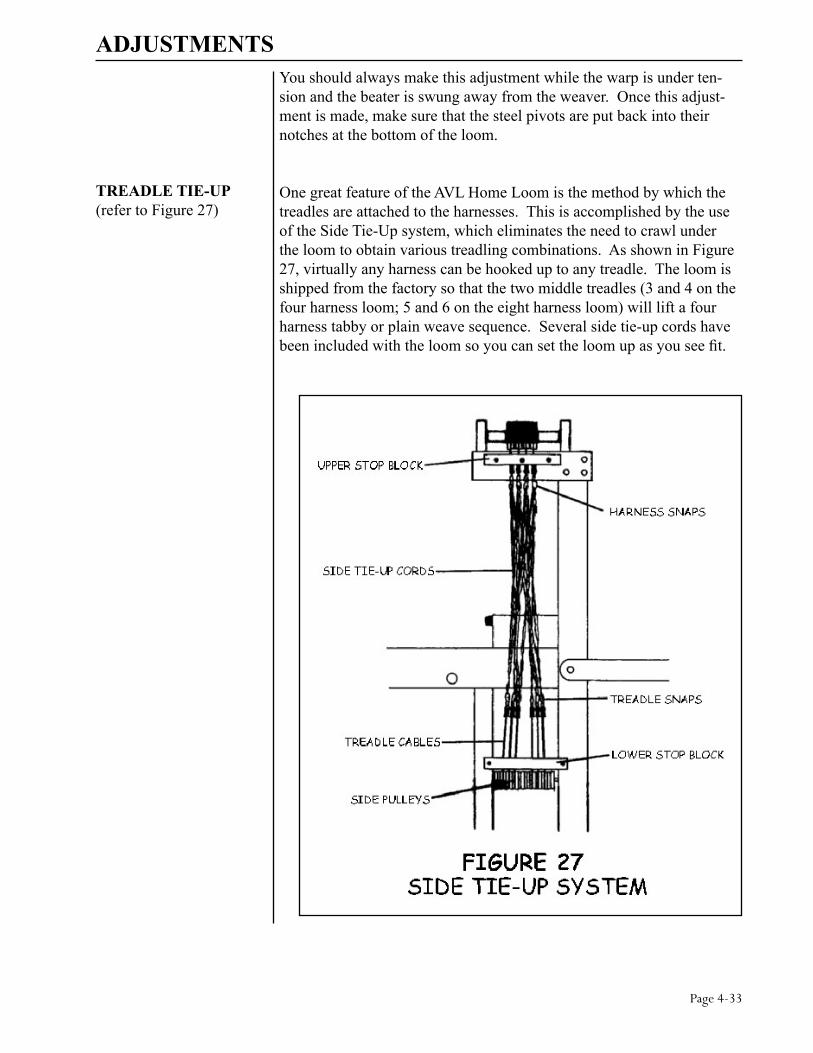
One great feature of the AVL Home Loom is the method by which the treadles are attached to the harnesses. This is accomplished by the use of the Side Tie-Up system, which eliminates the need to crawl under the loom to obtain various treadling combinations. As shown in Figure 27, virtually any harness can be hooked up to any treadle. The loom is shipped from the factory so that the two middle treadles (3 and 4 on the four harness loom; 5 and 6 on the eight harness loom) will lift a four harness tabby or plain weave sequence. Several side tie-up cords have been included with the loom so you can set the loom up as you see fit.
TREADLE TIE-UP (refer to Figure 27)
ADJUSTMENTS

Page �-��
If you look closely at these cords, you will see that they are made of a series of loops. To maintain a proper shed configuration, make sure that you always use the end loop at each end of all cords. (In some instanc-es, you may receive special instructions with your tie-up cords that ask you to do otherwise.)
The springs of the spring lever return system should also be adjusted for positive harness return, i.e., the harnesses stay all the way down in the depressed position and require the least amount of effort for lift-ing. This will vary according to the weight of the warp. In general, lightweight, less dense, looser tensioned warps with a smaller weav-ing width will need very little spring tension to assure positive harness return. Heavier, denser, tighter tensioned, and wider warps will need more spring tension. Attach the spring to the spring lever hooks, if you have not already done so, using the last link in the chain to attach to the other hook. To tell if the harnesses are returning all the way, open several sheds by working the treadles. Watch the unlifted harnesses. If the tops of their heddles become loose and tend to move around, then spring tension should be increased, but just enough to get the harnesses to stay down and no more, or your treadling effort will be made greater than it has to be.
To adjust the spring tension, simply unhook the spring and then rehook it one chain link shorter. This tightens the spring and makes it pull down harder on that particular harness. Test the warp again by doing some more treadling and if more spring tension is still needed, try one or more chain links less. Under unusual conditions (perhaps a very tight rug warp), two springs on some or all of the harnesses may be neces-sary. If all the springs are set the same, the back harnesses will have a looser tension than the front. This is because the back spring levers and their hooks are longer since the back harnesses travel farther when a shed is made. Accordingly, in some cases, the back spring levers might have to be adjusted shorter to give the same tension as the front ones. The important thing to remember is that the system is designed so that it can be “fine tuned” for each particular warp, so experiment with it. In general, for most medium tensioned warps, you will find that a lot of adjusting will not be necessary.
ADJUSTMENTS
SPRING LEVERS

Page �-��
WARPING THE PLAIN BEAMIf you have ordered only a sectional beam, proceed to the section titled “Warping the Sectional Beam”.
Various warping methods can be adapted to the AVL loom. However, we recommend the following method in which the warp is first wound on to the plain beam with the use of a raddle. Please study this method and try it. We have found that it aids in getting a uniform warp tension, especially when dealing with long warps of twenty yards or more.
To begin, wind the warp on a warping board or reel. Make sure you put in two crosses:
• the threading cross• the raddle cross
CREATING TWO CROSSES
Page �-��
In the threading cross, each thread crosses the next thread in opposite directions. In the raddle cross, groups of threads cross each other. The number of threads in a raddle group can be determined by the number of ends to be placed in each section of the raddle or by the number of threads you are holding in your hand while winding the warping board.
Before removing the warp from the board or the reel, secure the crosses. Use four ties to secure each cross. These ties go on each side of both pegs holding the cross.
It is usually a good idea to use different color threads for the ties on the tops of the pegs and another color to tie the bows underneath the pegs. By color coding your ties, you are less likely to twist the warp later.
Remove the warp from the warping board by chaining or by winding on the kitestick. Start from the threading cross and proceed to the raddle cross.
Since the capacity of the warping board is limited, for wide warps you will end up making a number of mini-warps and taking them off indi-vidually.
Now secure the raddle to the back of the loom. If you have an AVL raddle, simply slip it into the set of holes in the back of the rear vertical members.
Put your apron on the beam with velcro and wind your beam in the warping direction so that your apron is wound on the beam.
Put the metal rod through the apron. You can put your warp section onto that rod or you can attach another one with the warp.
Place two lease sticks in the raddle cross and secure together with string through the holes in the ends of the sticks. Now remove the ties from the raddle cross and spread the warp out on the sticks.
Measure the center of your raddle to use it as a center of your warp. The warp threads should either go through the middle of the raddle.
WARPING THE PLAIN BEAM
SECURING THE CROSSES
REMOVING THE WARP FOR THE WARPING BOARD
ATTACHING THE RADDLE
WINDING THE APRON ANDATTACHING THE WARP
STICKS IN THERADDLE CROSS
Page �-��
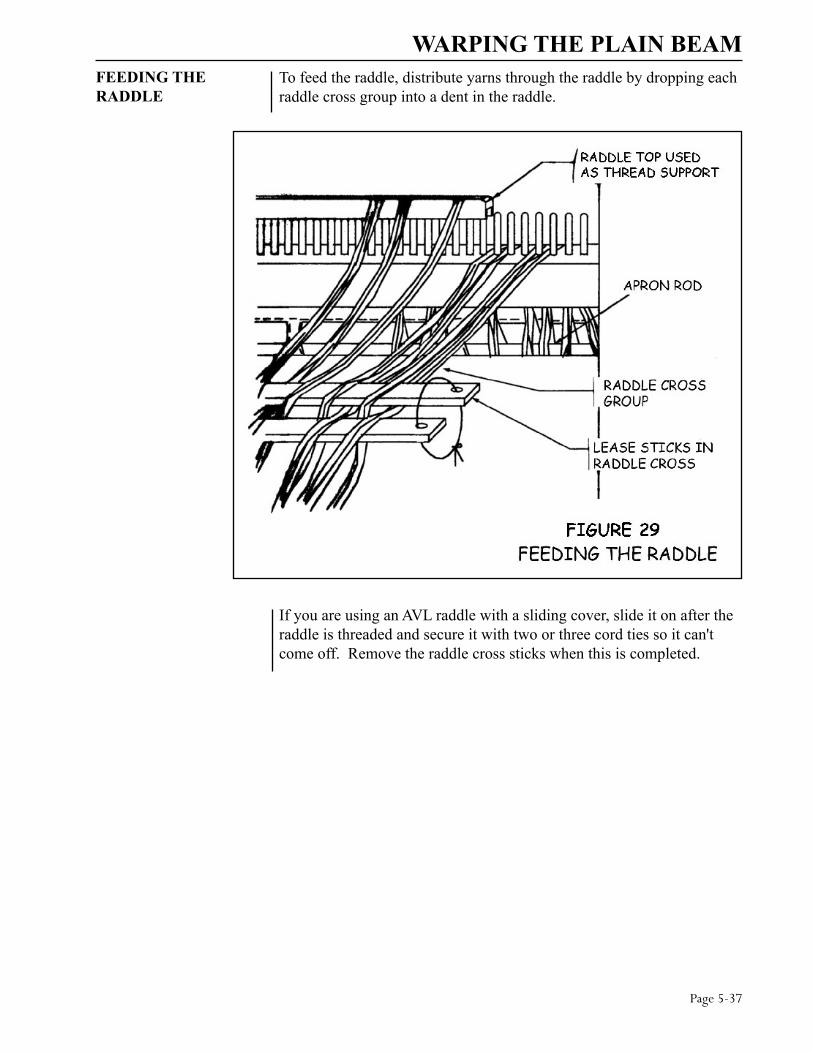
To feed the raddle, distribute yarns through the raddle by dropping each raddle cross group into a dent in the raddle.
WARPING THE PLAIN BEAMFEEDING THERADDLE
If you are using an AVL raddle with a sliding cover, slide it on after the raddle is threaded and secure it with two or three cord ties so it can't come off. Remove the raddle cross sticks when this is completed.
Page �-��
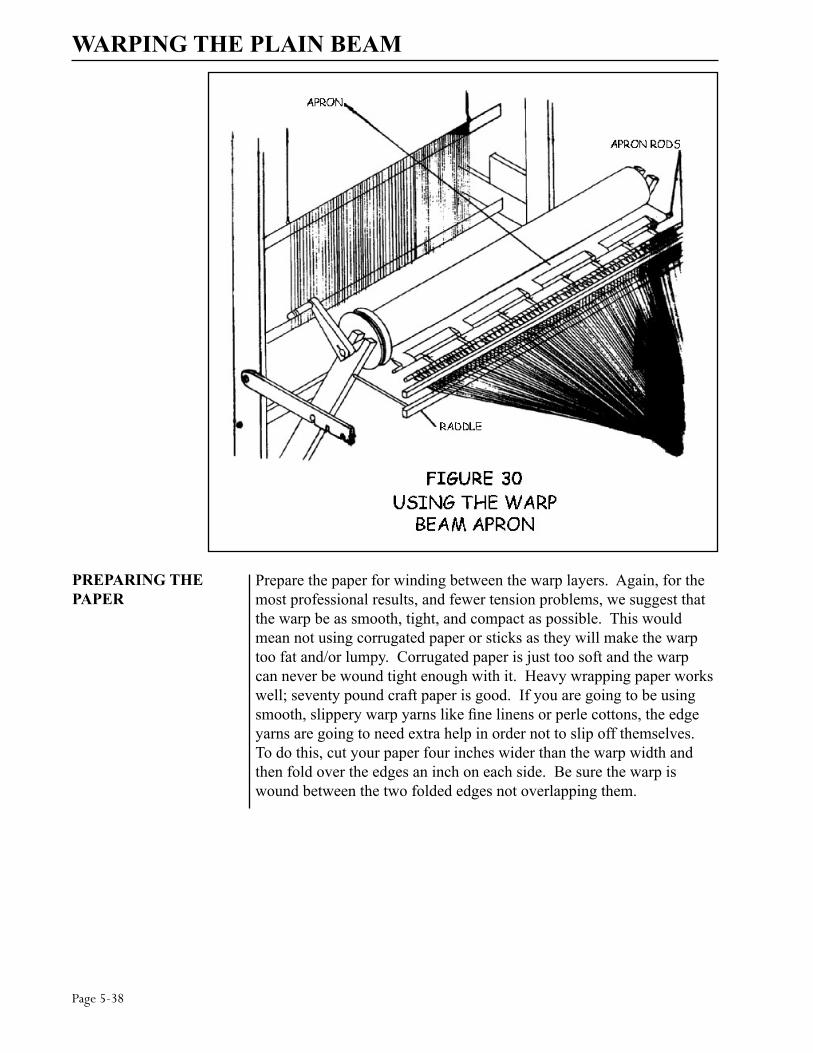
Prepare the paper for winding between the warp layers. Again, for the most professional results, and fewer tension problems, we suggest that the warp be as smooth, tight, and compact as possible. This would mean not using corrugated paper or sticks as they will make the warp too fat and/or lumpy. Corrugated paper is just too soft and the warp can never be wound tight enough with it. Heavy wrapping paper works well; seventy pound craft paper is good. If you are going to be using smooth, slippery warp yarns like fine linens or perle cottons, the edge yarns are going to need extra help in order not to slip off themselves. To do this, cut your paper four inches wider than the warp width and then fold over the edges an inch on each side. Be sure the warp is wound between the two folded edges not overlapping them.
PREPARING THE PAPER
WARPING THE PLAIN BEAM

Page �-��
When winding the warp on from the back, i.e., with the warp spread out in back of the loom, turn the crank in a clockwise direction so that the warp comes in from the bottom.
WINDING THE WARP
WARPING THE PLAIN BEAM

Page �-�0
Remember, wind the warp on tightly under a lot of tension. This will vary with each warp material, but a good rule to remember is that the tension of the wound on warp must be greater than the tension during the weaving operation. You will need one person to hold a warp under tension on the back and one person to wind the warp on the beam using a handle. The person winding the warp can also insert the paper. For a wide, heavy warp, several helpers may be required.
If you have to do it yourself, you can use the jerking method. Make one turn around with your beam crank and then go to the back of the loom and jerk one section at a time to make the warp that is already on the beam tight. The idea of this method is that the warp does not need to be under tension all the time, but the part that is on the beam has to be tight. Make another turn, go to the back of the loom and jerk all the sections again and so on. If you have a wide warp, you might need to do up to ten jerking motions after each turn.
WARPING THE PLAIN BEAM

Page �-�1
When you come to the end of your warp, insert lease sticks in your threading cross.
Now remove the ties from each individual threading cross and spread the warp out on the sticks.
When the warping is completed, free the warp from the raddle. If you have an AVL raddle, first untie the security strings, lift the raddle top off, and remove the warp from the raddle. Afterwards, replace the top on the raddle and leave it in its place on the back of the loom if so desired as it will not interfere with the weaving process. Then be sure to bring the end of the warp around the separation roller so that it now travels into the loom.
THREADING CROSS
REMOVING THE RADDLE
WARPING THE PLAIN BEAM

Page �-��
WARPING THE SECTIONAL BEAMThe AVL sectional beam is designed to be warped in sections with the use of a tension box. The yarn travels directly from cones or spools which are mounted on a rack behind the loom, through the tension box, and onto the beam. Throughout the warping process, the tension box automatically keeps a constant and uniform tension on the warp. Not only does this system save time, but it makes it possible to wind on very long warps which would never fit on a warping board or reel.
First, you must calculate the number of spools or cones of yarn you will need. Each section is wound onto the sectional beam separately, there-fore, you’ll need to have one spool or cone for each end in that section (if your section is 2" wide, with sixteen E.P.I., that would be thirty-two spools or cones of yarn).
To prepare for sectional beam warping, we need to calculate:a.) how many spools we need to windb.) how many yards do we need to wind on each spoolc.) total yardage for the project
a.) NUMBER OF SPOOLS?Sectional beaming requires the use of as many spools loaded with thread per individual section as your planned sett in the reed dictates.
To calculate the actual number of spools required, we need to know:- how many EPI are we going to use in the fabric- what SIZE will we have to use in the fabric
If your warp is set at 24 epi per 1”, you will need 24 spools for a sec-tional beam with 1” sections or 48 spools for a beam with 2” sectionsl.
Therefore we can say:
# OF SPOOLS = EPI x SIZE OF THE SECTION
b.) NUMBER OF YARDS PER SPOOL?To calculate the number of yards per each spool, we need to know:- the LENGTH OF THE WARP- NUMBER OF SECTIONS on the beam
We calculate the number of sections by dividing the WIDTH OF THE WARP by the SIZE OF THE SECTION. If the warp width is 40” and we are using 2” sections, our number of sections is 20.
All together, we can say:
# OF YARDS PER SPOOL = LENGTH OF THE WARP x # OF SECTIONS
SECTIONAL BEAM CALCULATION

Page �-��
c.) TOTAL YARDAGE?If it is a single color warp or if a color sequence is repeating in each section, the same spools or cones can be used to wind all the sections needed for the warp.
TOTAL YARDAGE = # OF SPOOLS x # OF YARDS PER SPOOL
It is important to make these calculations in advance so that you can purchase your yarn in spools or cones corresponding to the amount of yardage needed on each. Sometimes this is not possible and you will need to wind your own spools from yarn that is in larger packages. For doing this, you will need empty plastic spools, a bobbin winder (prefer-ably electric), and a yardage counter. These items are available from AVL.
To prepare your loom for the use of the sectional beam, see pages 3-9 and 3-10 of this manual.
You might want to make a permanent set of extension cords to use when warping the sectional beam. Extension cords are also called apron cords and have the same function as the apron on the plain beam. They give you "reach" from the warp beam and allow you to weave every possible inch until the end of the warp touches the last shaft you are using. Make them out of a strong non-stretchable linen or cotton cord. You will need to make one extension cord for each section in your sectional beam. For each extension cord, cut a piece of cord. Take the two ends of the cord and knot them together. Measure to make sure that they are long enough to reach all the way to the harnesses. All exten-sion cords should be exactly the same size.
When measuring the length of the cords, also check to be sure that when the cords are wound on to the beam, the end of the loop and any knots in the cords fall between the crosspieces of the sectional beam, not on them. A sectional beam is usually not solid. It is a frame that has metal pegs. That way you can keep the warp smooth on the beam without go-ing over the knots of threads.
WARPING THE SECTIONAL BEAM
LOOMPREPARATION
EXTENSION CORDS

Page �-��
Next, place a spool or cone rack about five or six feet behind your loom. Place the spools or cones for the first warp sections on the cone rack.
Make sure you put each thread through the metal eye on the spool rack so the threads do not get tangled.
When arranging the spools on the spool rack, it doesn't matter whether you go top to bottom or bottom to top, the important thing is to be con-sistent in vertical columns and to place the spools in the order that the threads are in the warp.
Before winding the sectional beam, loosen the brake adjustment cord (this is a white nylon cord with a black cord-stop - see Figure 4). Sim-ply press the button on the top of the cord-stop and slide it up and down the nylon cord until the tension is sufficiently released to be able to wind the warp.
The tension box is an essential warping tool which:
a.) Puts threads under tension.b.) Spreads threads to the proper width.c.) Makes thread-by-thread lease.
If this is your first time to use a tension box, you need to install heddles on the harnesses.
Your tension box is delivered with one bundle of one hundred heddles. These are held together with twist ties. Leave these on for now. Refer to Figure #21 to familiarize yourself with the tension box and its parts. Push down on one of the harnesses until it stops. This causes the other harness to go up. You will use that later for making a threading cross. Right now we’ll need to use it to help in the assembly of the heddles to the harnesses.
a.) Remove the “heddle retainer” of the harness that is up, using a phillips head screwdriver.
b.) Notice there are four twist ties holding the heddles together. Separate the top two. Insert the top bar (of the harness that is up) into the space created by pulling apart the twist ties. Insert the bottom bar (of the harness that is up) into the space created by pulling apart the bottom two twist ties, making certain that the heddles aren’t’ twisted. Now remove the twist ties.
WARPING THE SECTIONAL BEAMFEEDING THE SPOOL RACK
ADJUSTING THE TENSION DEVICE
TENSION BOX
TENSION BOXHEDDLEINSTALLATIONINSTRUCTION

Page �-��
c.) Count off fifty heddles and cut the loop at the top between the 50th and the 51st heddle.
d.) Now put the four twist ties back on the fifty heddles that were the last to go on the harness.
e.) Remove these fifty and reattach the “heddle retainer”.
f.) Now push down on the harness that is up, making the other har-ness come up.
g.) Remove the heddle retainer.
h.) Pull apart the top two twist ties and insert the top of the harness (which is up) into the space created. Pull apart the bottom two twist ties and insert the bottom of the harness into the space cre-ated.
i.) Reattach the heddle retainer.
The best way to thread the tension box is to take one thread from the cone rack and thread it all the way through all the parts of the tension box, then the next thread all the way through. It works best to use the threads from the rack in a vertical order rather than a horizontal order.
Now let’s go through the sequence for threading the tension box. First, move the two adjustable tension pegs up above the stationary pegs or remove them completely. Now sley the thread through the rear (station-ary) reed section using a sley hook. Since this reed is eight dents per inch, you will divide the E.P.I. into eight to find out how many ends will be in each dent (with sixteen E.P.I, put two ends in a section). If your E.P.I. does not divide equally by eight, you can either vary the number of ends in each dent (with twenty E.P.I., alternate two and three ends in the dents) or thread the dents a little wider than two inches (with twenty E.P.I., put two ends in each dent; with forty ends, the reed will be sleyed 2-1/2” wide).
Next, bring the thread straight through the tension peg section in-be-tween the larger adjustable tension pegs and the smaller stationary pegs or just above the smaller stationary pegs if you have removed the larger ones.
WARPING THE SECTIONAL BEAM
THREADING THE TENSION BOX

Page �-��
Next, thread the end through the two sets of heddles. The first thread goes through the front set of heddles and the next thread goes through the rear set of heddles. Repeat this alternating heddle threading for the rest of the ends. The heddle system will be used later to create the threading cross.
Now thread the end through the front pivoting reed. Here you have a choice of using an eight dent or ten dent reed. Pick the one that can be sleyed evenly and as close to the desired section width. If you can not get the exact width of the section, sley your reed slightly wider. This will make it just slightly wider than the space between the pegs. The section will be narrowed down by pivoting the reed. Never sley the reed narrower than the section on the beam. There is no way to expand it. After the tension box is completely threaded, the larger pegs are moved downward to apply tension. The further down they are moved, the more tension will be applied to the yarn. This is an adjustable system as different yarns require more or less tension. With a heavy wool the pegs may only need to be moved half way down, whereas with a fine silk, the pegs may need to be moved all the way down and the yarn wrapped an extra time around one of the stationary pegs to get the proper tension. Once you have adjusted the tension correctly, do not change it during the winding of the beam, as long as you are using the same type of yarn.
WARPING THE SECTIONAL BEAM

Page �-��
Once the tension box has been threaded, it is not always necessary to rethread it. If you need to change spools or cones, simply tie the new ends on to the old ends just before the rear stationary reed, then gently pull on the old ends until the new ends have come all the way through the box.
Before you start winding the warp, attach the extension cord to the beam and the section of the warp to an extension cord, tie an overhead knot in the warp threads from one section and slip that knot into the opening of the larkshead knot you created in the extension cord.
Pull it tight.
WARPING THE SECTIONAL BEAM
WINDING THE WARP
Page �-��
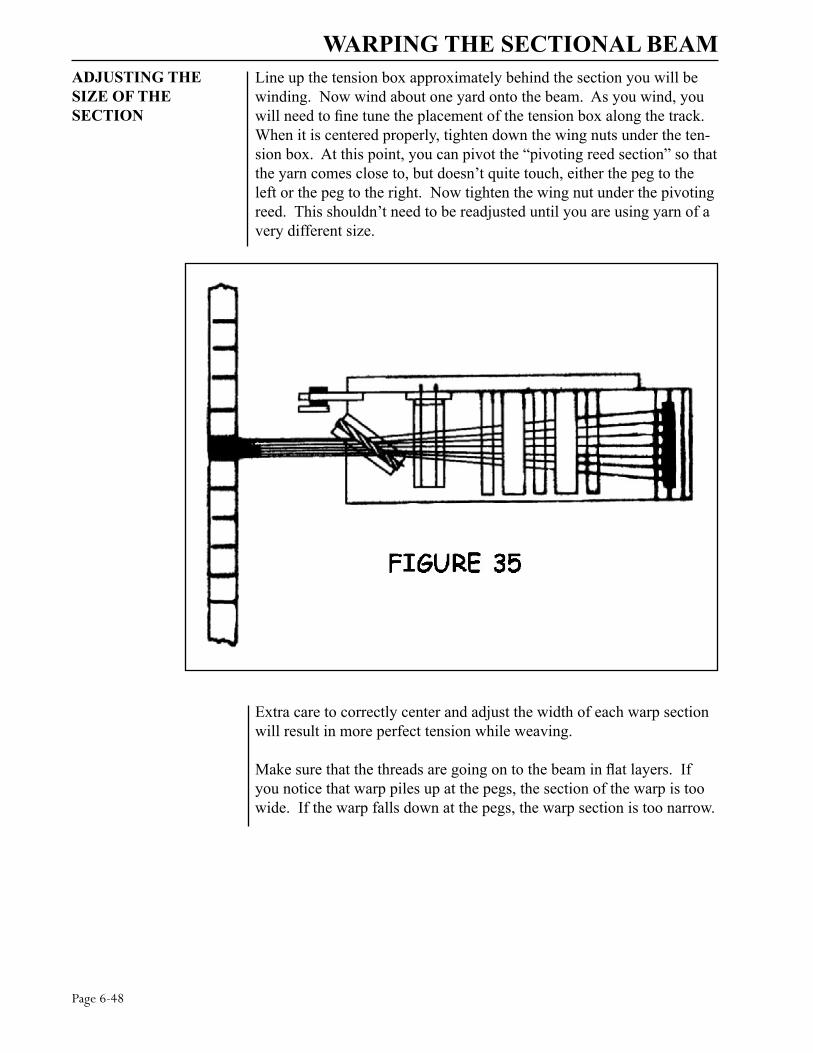
Line up the tension box approximately behind the section you will be winding. Now wind about one yard onto the beam. As you wind, you will need to fine tune the placement of the tension box along the track. When it is centered properly, tighten down the wing nuts under the ten-sion box. At this point, you can pivot the “pivoting reed section” so that the yarn comes close to, but doesn’t quite touch, either the peg to the left or the peg to the right. Now tighten the wing nut under the pivoting reed. This shouldn’t need to be readjusted until you are using yarn of a very different size.
WARPING THE SECTIONAL BEAMADJUSTING THE SIZE OF THESECTION
Extra care to correctly center and adjust the width of each warp section will result in more perfect tension while weaving.
Make sure that the threads are going on to the beam in flat layers. If you notice that warp piles up at the pegs, the section of the warp is too wide. If the warp falls down at the pegs, the warp section is too narrow.

Page �-��
If any of the above is happening, go back and pivot the front reed on the tension box again until you get perfectly flat layers. This is very impor-tant, otherwise you will end up having different length threads in one section, since the circumference of the beam within the section is not going to grow evenly. Therefore, you will end up having lots of tension problems.
To determine the length of the warp you are putting on the beam, you need to count either turns, revolutions, or yards.
To count turns, you can do it in your head, but it is more reliable to use a digital or mechanical revolution counter.
Counting revolutions even with a digital counter will still give the ap-proximate warp length only, because the circumference of the beam will increase slightly with each rotation. This is called beam build up.
To count yards with a yardage counter while warping the sectional beam, you need to place the yardage counter at the front of the tension box. You should use an extra thread for measuring yardage, because if you use one of the threads from your warp section, that particular thread would have a different tension once you start weaving. The extra thread you use for measuring purposes only can be reused for each section.
WARPING THE SECTIONAL BEAM
COUNTING TURNS OR YARDAGE
Page �-�0
WARPING THE SECTIONAL BEAM
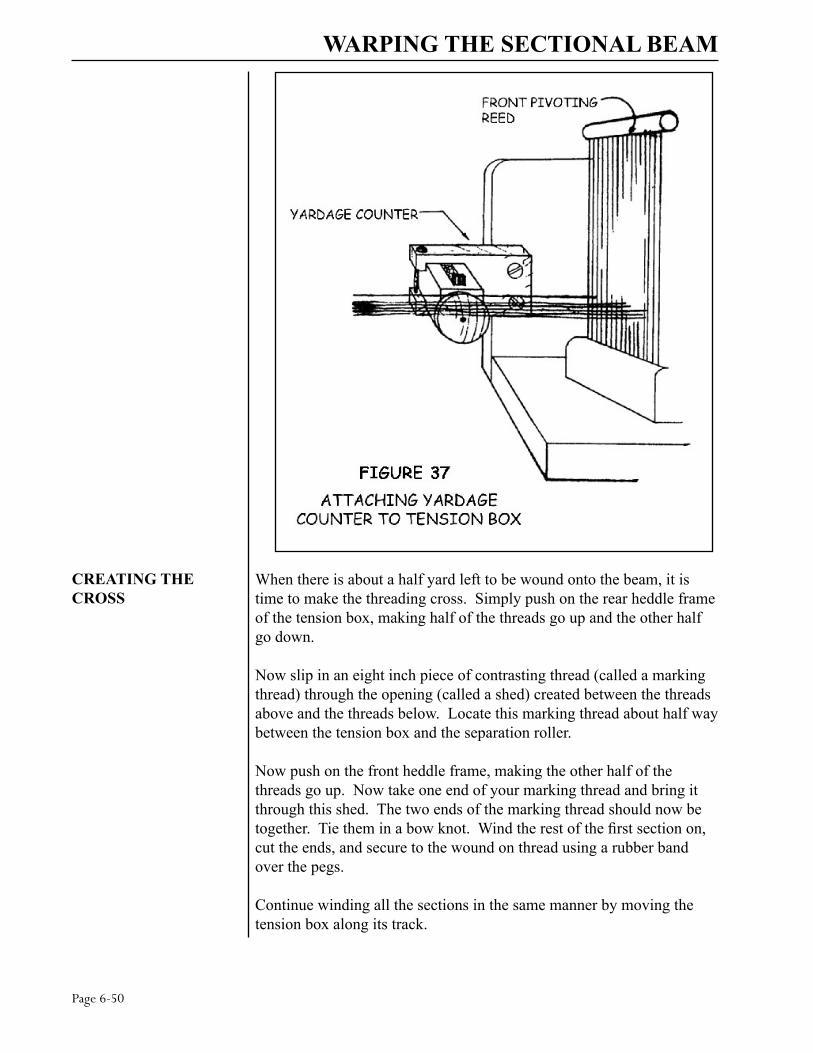
When there is about a half yard left to be wound onto the beam, it is time to make the threading cross. Simply push on the rear heddle frame of the tension box, making half of the threads go up and the other half go down.
Now slip in an eight inch piece of contrasting thread (called a marking thread) through the opening (called a shed) created between the threads above and the threads below. Locate this marking thread about half way between the tension box and the separation roller.
Now push on the front heddle frame, making the other half of the threads go up. Now take one end of your marking thread and bring it through this shed. The two ends of the marking thread should now be together. Tie them in a bow knot. Wind the rest of the first section on, cut the ends, and secure to the wound on thread using a rubber band over the pegs.
Continue winding all the sections in the same manner by moving the tension box along its track.
CREATING THE CROSS

Page �-�1
When all the winding is complete, remove the rubber bands, unwind a few feet of warp, and slip one lease stick through the path created by the upper portion of each marking tie. Now slip another lease stick through the path created by the lower portion of each marking tie. Secure the lease sticks together, leaving about two inches between them, using masking tape or string through the end holes of the lease sticks. Now bring the lease sticks, with the warp ends, around the separation roller so that the warp travels towards the harnesses.
Now tie the lease sticks from the top of the loom so that they are at eye level when you are in your threading position.
To keep the warp from slipping forward during the threading process, pull the ends of the white nylon brake adjustment cord to increase warp tension. Adjust the cord so there is a slight drag against the beam as it rotates. The final warp tension adjustment will be made later.
If you are winding a very fine warp, say forty ends to the inch or more, and do not have or do not want to wind a lot of spools or cones, it may be more convenient to wind separate warp sections on a warping board or reel and go from there directly to the sectional beam. If you decide to do this, however, your warp will be limited in length by what will fit on the warping board or reel. If you choose this method, follow these steps:
a.) Calculate number of threads for each section on your sectional beam.
On the warping board or on the warping reel, make “baby warps” for each section on your beam (if you are using a warp-ing board, you will be limited in length).
Make crosses at each end: raddle cross on one side and thread-by-thread cross on the other.
b.) Take the warp off the board or reel by taking off the thread-by-thread cross first.
c.) Put the warp threads from a first “baby” warp in the raddle, mak-ing sure that threads are spread evenly and that they are creating flat layers when wound on the beam. Put the raddle top on or secure warp threads with rubber bands.
WARPING THE SECTIONAL BEAMINSERTING STICKS IN THE TREADING CROSS
READJUSTING THE TENSION
COMBINING PLAIN AND SECTIONAL WARPING

Page �-��
Instead of a regular raddle, you can put a mini-raddle in place of the front reed on the tension box. In this case, the tension box is used only for guiding threads into the sections. You do not thread threads in the tension box through the harnesses nor through the back reed and you do not adjust tension with the pegs.
d.) Attach each baby warp to the extension cords and proceed as in regular sectional beaming procedure.
e.) Since you are not using the tension box for tension, be sure to keep it taut manually.
f.) When you come close to the end of the section, take the reed cover off and continue winding the rest of the baby warp.
g.) Secure that section to the beam and continue to the next one.
WARPING THE SECTIONAL BEAM
Page �-��
THREADING, SLEYING, AND TYING ON
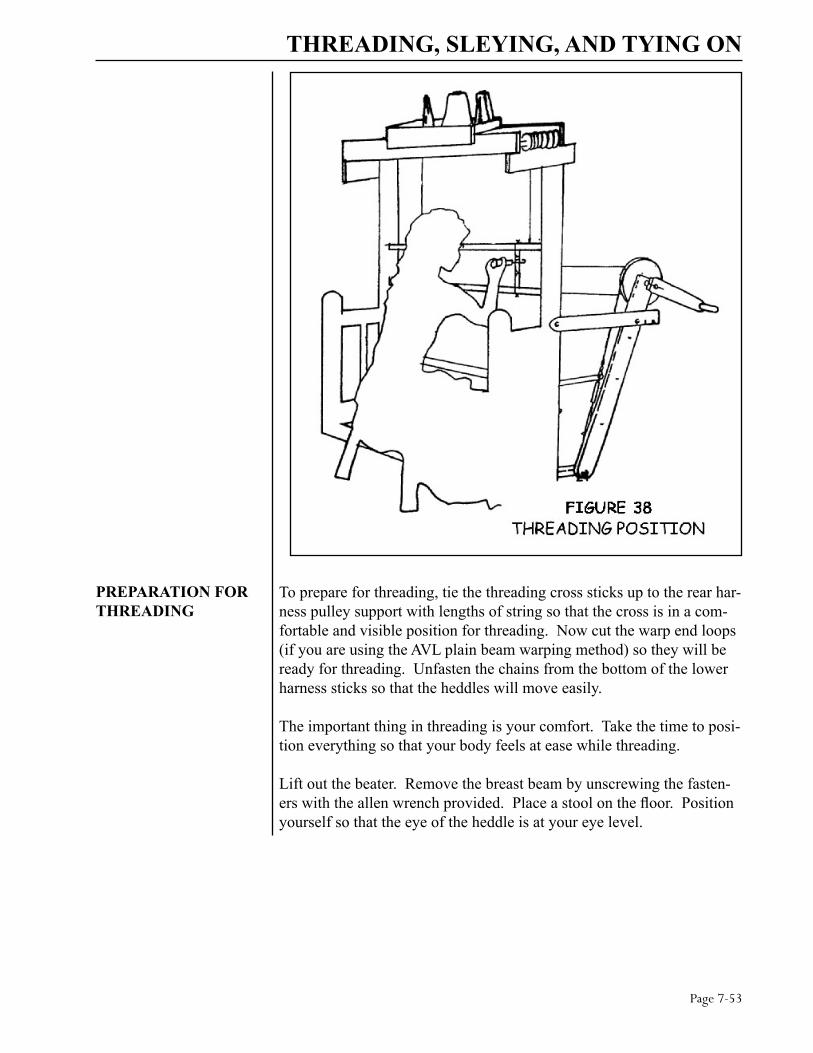
To prepare for threading, tie the threading cross sticks up to the rear har-ness pulley support with lengths of string so that the cross is in a com-fortable and visible position for threading. Now cut the warp end loops (if you are using the AVL plain beam warping method) so they will be ready for threading. Unfasten the chains from the bottom of the lower harness sticks so that the heddles will move easily.
The important thing in threading is your comfort. Take the time to posi-tion everything so that your body feels at ease while threading.
Lift out the beater. Remove the breast beam by unscrewing the fasten-ers with the allen wrench provided. Place a stool on the floor. Position yourself so that the eye of the heddle is at your eye level.
PREPARATION FOR THREADING

Page �-��
Choose the approximate number of heddles you wish to use. If you have planned a narrow warp, make sure you leave some heddles at the far sides of the harness sticks between the hooks and the ends of the harness sticks. For balance, there should be approximately equal num-bered groups of unused heddles on both sides of each harness. In some cases, such as a very wide warp with a lot of unused heddles on the ends of the harnesses, you may need to tie each group of unused heddles into a tight bundle with tie tapes or string to keep them from falling off the ends of the harness sticks or you may need to take heddles off the loom. In the first six months of using a new loom with polyester heddles, the heddles stretch out to adjust to the harnesses and the heddles on each harness get stretched out to different sizes. For this reason, we do not recommend removing heddles from the loom for six months. When heddles are removed, they should be marked so they can be returned to the same harnesses. For the same reason, once the heddles have been on the loom for awhile, it is not a good idea to switch heddles to differ-ent harnesses. Mixing them up once they have been stretched could af-fect the evenness of the shed. What some weavers do with wide warps, in order to avoid having to take off extra heddles, is to distribute the unused heddles among the threaded heddles as the threading is taking place.
Now insert the threading hook through the eye of the first heddle you wish to thread. Hook the first thread and pull it out through the heddle. Continue with the threading until all ends are threaded through their respective heddles. In a plain weave, the threading sequence will look something like this: 4, 3, 2, 1, 4, 3, 2, 1, 4, 3, 2, 1, ..... meaning that the first thread will go through a heddle in the fourth harness, the second thread will go through a heddle in the third harness, the third thread through the second harness, the fourth through the first harness, and so on .....
Now replace the beater making sure the metal height adjuster is seated properly in the slot. Sley the warp ends through the reed. Some weav-ers start from the right side, some from the left, some in he middle ..... but in all cases, be sure to measure accurately before starting so that the warp will be centered in the reed. Weavers have various ways of posi-tioning the reed for sleying. The AVL Home Loom comes with a pin located on the left side of the loom that can be placed through the frame of the loom and into the left beater leg, thereby holding the beater in the middle position. You may then wish to remove the top of the beater and slant the reed away from you, to further assist you in the sleying pro-cess.
THREADING, SLEYING, AND TYING ONHEDDLEPREPARATION
THREADING THE HARNESSES
REPLACING THE BEATER ANDSLEYING THE REED

Page �-��
Make sure the cloth beam pawl is disengaged from the cloth beam ratchet. (You’ll find these at the right end of the cloth beam .... when the cloth beam can move freely in either direction, then you know the pawl is properly disengaged.)
Attach the apron to the beam and wind the cloth beam up (so that the apron is winding up on the top surface of the beam) until the notched end of the apron is about ten to fifteen inches from the beater (when it is in its “back” position). Now engage the cloth beam pawl.
Insert the apron rod into the apron notches. Now tie the ends to the metal rod. Starting from the middle, bring a first bundle toward you over the apron rod, then around and under it. Divide it in half and bring one half up on each side of the bundle. Use the ends to tie a surgeon's knot. It is the same as the first tie you make tying a shoelace, except you loop the end twice through. This kind of knot is very good for read-justing the tension.
THREADING, SLEYING, AND TYING ON
TYING ONTO THE APRON
Start with one section in the middle, then the far right and the far left outside ones. Work your way in.
By now, the sections that were tied first are quite a bit looser than the ones tied last. To correct this, you do not need to untie the knots; simply grasp the ends and pull them away from you, then re-tighten the knots. Repeat this until all of the sections are at approximately the same tension.

Page �-��
THREADING, SLEYING, AND TYING ON
Now pat the warp between the reed and the apron rod left to right and right to left. If the warp tension feels even, increase the warp tension by lifting up on the cloth beam handle until you reach the desired tension. Now pat the warp again, if it feels even, from left to right and right to left, continue to the next section. If not, release the warp tension (by stepping on the brake release pedal) and retighten the loosest sections.
A new warp can be tied on to an old warp, thus eliminating the thread-ing and sleying process if the new warp introduced into the loom uses the same threading pattern and EPI as the last warp. This process is es-pecially good for production weavers, as it saves time. It also takes less concentration and there is less chance of making mistakes in threading.
TYING ON TO THE OLD WARP

Page �-��
THREADING, SLEYING, AND TYING ONThe tying on process starts when you are finishing the last warp on the loom. Before you cut off the fabric, make sure to leave enough unwo-ven warp to extend one foot behind the harnesses, through the heddles, and about six inches past the reed when the beater is in its rear position. Now open two opposite tabby sheds and insert lease sticks into these sheds behind the harnesses. Secure the sticks together with tie tapes through the holes. Now carefully cut the fabric from the loom and tie bundles of warp coming through the reed together so the yarn can’t slip through. Cut the warp in back (leaving one foot past the lease sticks) and also tie bundles of yarn together for security.
Now, after winding on the new warp, you can sit on a small stool placed in between the harnesses and the back of the loom and tie correspond-ing yarns from the two sets of lease sticks together. An overhand knot works well. This may seem slow at first, but you will work up a faster rhythm with some practice. A good goal to reach would be to tie 200 to 250 ends together an hour.
When all ends are tied together, go to the front of the loom and gently pull on the bundles of yarn going through the reed to pull the new warp through the heddles and reed. Then tie on to the apron.

Page �-��
USING THE SIDE TIE-UPSWith an AVL Home Loom, all treadle to harness tie ups are accom-plished at the side of the loom by connecting tie up cables to metal clips. This eliminates the necessity of having to climb under the loom and having to make time consuming cord adjustments, as is necessary on conventional looms.

Page �-��
On the right side of the Home Loom you will notice that there are two sets of clips: A lower set of treadle clips and an upper set of harness clips (see Figure 27). First tie up your loom for a tabby weave as tabby weave will always be used for the first couple of inches of each new warp as a heading. It is easiest to make all treadle connections first and then all of the harness connections. For a tabby weave using four harnesses, first connect the two patch cords to each of the two adjacent treadle clips, then connect the two patch cords from one treadle clip to the clips for harnesses one and three. Next, connect the two patch cords from the other treadle clip to the clips for harnesses two and four as shown in Figure 41.
With more complex weaves using four treadles or more, it is helpful to use a “walking” technique for the treadling. Using this method, the tie up is made so that treadling begins at the two innermost treadles and you can “walk” to the outside treadles using alternate foot movements. With this method, you never lift more than one foot at a time and thus are not thrown off balance and it is easy to establish a weaving rhythm (so important for speed and uniformity in the cloth). You will have to rearrange conventional tie up plans which read from left to right in order to do this.
USING THE SIDE TIE-UPS

Page �-�0
WEAVING PROCEDURESWith everything properly adjusted, weaving is an easy and enjoyable process. Sit up straight and comfortably at the loom so that your body remains stationary while your arms and legs work the loom. Simply press down on the treadles in the sequence determined by the pattern of your weaving. Now throw the shuttle. Catch the shuttle with the op-posite hand, then pull the beater forward with a quick wrist movement while closing the shed.
To advance the cloth, you simply put the beater in its forward position (toward you), depress the brake pedal, and pull up on the cloth beam handle until the fell of the cloth is about three inches from the breast beam. Now let go of the brake pedal and continue winding up the cloth beam handle until the desired tension is reached.
In case of a threading error, use the following method for insertion of a new polyester heddle:
a.) Remove the harness wire from the nearest end of the harness and slip the top loop of the new heddle around the top harness stick and bring it through the top loops of all the heddles until it reaches the place needed.
WEAVING
ADVANCING THE CLOTH
THREADING ERROR

Page �-�1
WEAVING PROCEDURESb.) Take the bottom of the new heddle through the bottom loop
of all the heddles, around the bottom harness stick, and back through the bottom loops of all the heddles until it reaches its place.
c.) Replace the harness wire.
At the onset of weaving, first weave in one inch of a strong, medium weight weft with a tabby weave. Check the tabby weave for errors. Any errors in the threading or sleying will show up here and it is an excellent time to make corrections. Then weave in two thin lease sticks on alternate sheds followed by another 1/2” of tabby weave. Cloth strips should not be necessary as the two woven in lease sticks will even out the warp for you. Now change the Home Loom tie-up, if so desired, and proceed with your planned weaving.
For sample weaving, if you wish to remove part of the weaving from the loom before the entire warp is woven off, use the following proce-dure:
a.) When the piece to be removed has been woven, weave one inch of tabby.
b.) Weave in two lease sticks followed by 1/2” of tabby.
c.) Start new weaving and weave until the lease sticks are wound 1 1/4 times around the cloth beam (or about 18”).
d.) Unwind and cut off the piece to be removed just below the tabby hem and woven-in lease sticks as above.
e.) Place the two woven in lease sticks flat on the front cloth beam making sure they are centered and parallel to the roller.
Wind the weaving back on the cloth beam holding the lease sticks in place until the weaving winds back over itself and holds itself in place. Take up the tension by using the ratchet handle.
STARTING WEAVING
SAMPLE WEAVING
Page 10-��
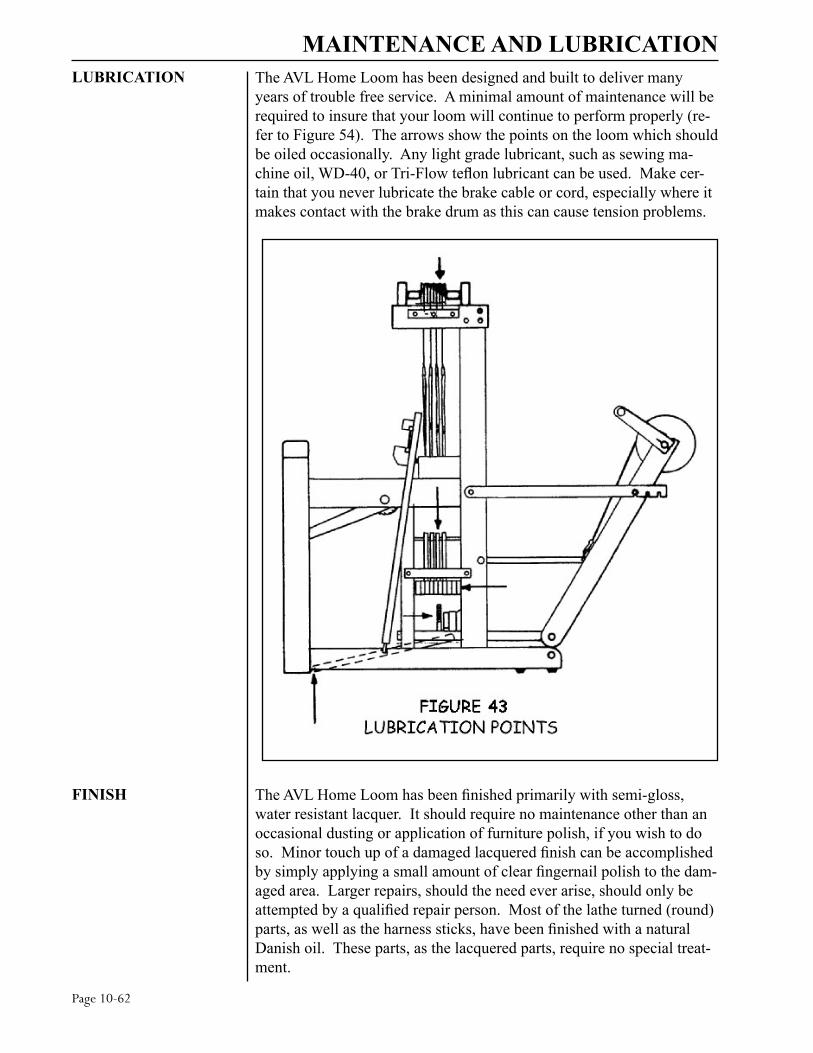
MAINTENANCE AND LUBRICATIONThe AVL Home Loom has been designed and built to deliver many years of trouble free service. A minimal amount of maintenance will be required to insure that your loom will continue to perform properly (re-fer to Figure 54). The arrows show the points on the loom which should be oiled occasionally. Any light grade lubricant, such as sewing ma-chine oil, WD-40, or Tri-Flow teflon lubricant can be used. Make cer-tain that you never lubricate the brake cable or cord, especially where it makes contact with the brake drum as this can cause tension problems.
LUBRICATION
The AVL Home Loom has been finished primarily with semi-gloss, water resistant lacquer. It should require no maintenance other than an occasional dusting or application of furniture polish, if you wish to do so. Minor touch up of a damaged lacquered finish can be accomplished by simply applying a small amount of clear fingernail polish to the dam-aged area. Larger repairs, should the need ever arise, should only be attempted by a qualified repair person. Most of the lathe turned (round) parts, as well as the harness sticks, have been finished with a natural Danish oil. These parts, as the lacquered parts, require no special treat-ment.
FINISH
Page 11-��
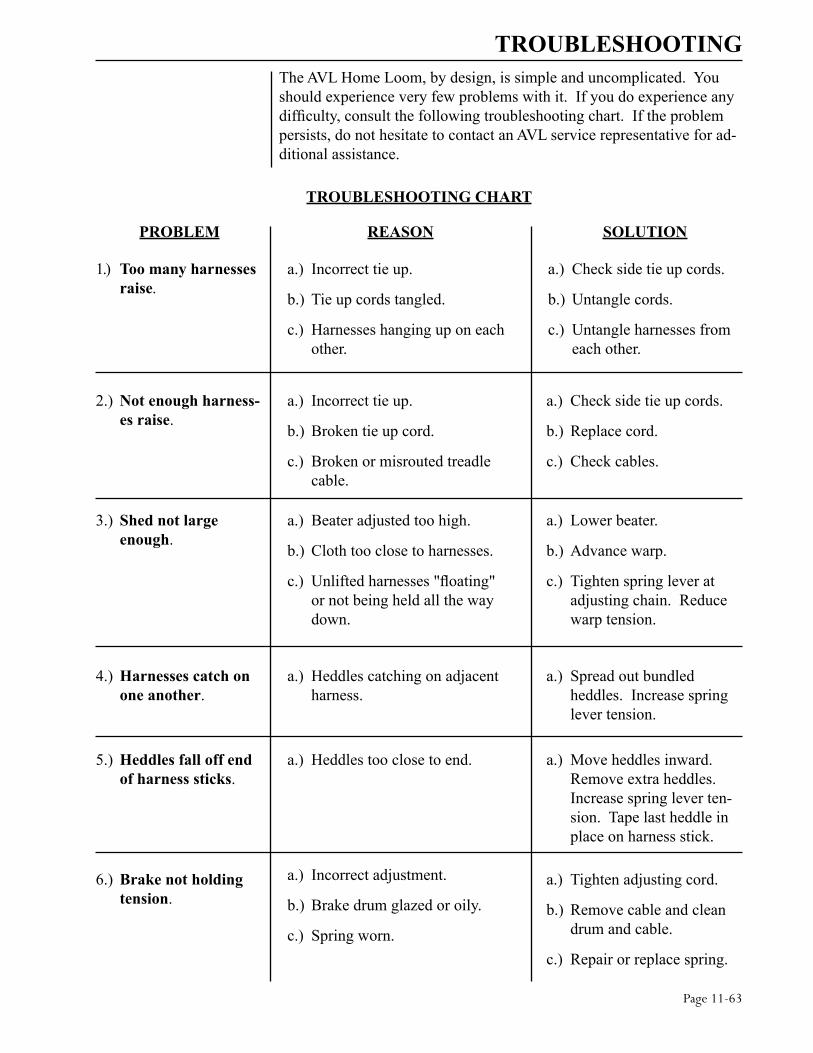
The AVL Home Loom, by design, is simple and uncomplicated. You should experience very few problems with it. If you do experience any difficulty, consult the following troubleshooting chart. If the problem persists, do not hesitate to contact an AVL service representative for ad-ditional assistance.
TROUBLESHOOTING CHART
TROUBLESHOOTING
1.) Too many harnesses raise.
a.) Incorrect tie up.
b.) Tie up cords tangled.
c.) Harnesses hanging up on each other.
a.) Check side tie up cords.
b.) Untangle cords.
c.) Untangle harnesses from each other.
2.) Not enough harness-es raise.
a.) Incorrect tie up.
b.) Broken tie up cord.
c.) Broken or misrouted treadle cable.
a.) Check side tie up cords.
b.) Replace cord.
c.) Check cables.
3.) Shed not large enough.
a.) Beater adjusted too high.
b.) Cloth too close to harnesses.
c.) Unlifted harnesses "floating" or not being held all the way down.
a.) Lower beater.
b.) Advance warp.
c.) Tighten spring lever at adjusting chain. Reduce warp tension.
PROBLEM REASON SOLUTION
4.) Harnesses catch on one another.
a.) Heddles catching on adjacent harness.
a.) Spread out bundled heddles. Increase spring lever tension.
5.) Heddles fall off end of harness sticks.
a.) Heddles too close to end. a.) Move heddles inward. Remove extra heddles. Increase spring lever ten-sion. Tape last heddle in place on harness stick.
6.) Brake not holding tension.
a.) Incorrect adjustment.
b.) Brake drum glazed or oily.
c.) Spring worn.
a.) Tighten adjusting cord.
b.) Remove cable and clean drum and cable.
c.) Repair or replace spring.

Page 11-��
7.) Brake not releasing tension.
a.) Incorrect adjustment.
b.) Dirty brake drum.
c.) Cord crossed on drum.
a.) Loosen adjusting cord.
b.) Clean drum and cord.
c.) Check routing of cord.
8.) Loom squeaks. a.) Needs lubrication. a.) Check lubrication chart.
a.) Lifting large number of har-nesses.
b.) Harness or treadle cables routed improperly.
a.) Lubricate loom. Reduce spring lever tension if pos-sible.
b.) Check routing of cables. Make sure all cables are on pulleys.
9.) Treadles difficult to operate.
10.) Large warp build up alters shed size.
a.) Folding legs need adjustment. a.) Adjust folding legs so that they are being held in the outer or center slots on the support arms (see Figure 17).
TROUBLESHOOTING CHART
PROBLEM REASON SOLUTION
TROUBLESHOOTING