Embed Size (px)
Citation preview
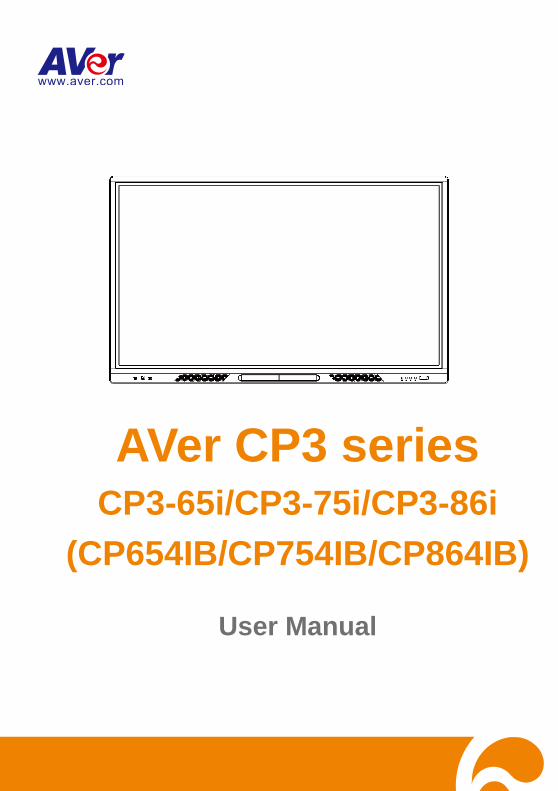
AVer CP3 series CP3-65i/CP3-75i/CP3-86i
(CP654IB/CP754IB/CP864IB)
User Manual
Federal Communications Commission
NOTE- This equipment has been tested and found to comply with the limits for a Class A digital device, pursuant to part 15 of the FCC Rules. These limits are designed to pro-vide reasonable protection against harmful interference when the equipment is operate din a commercial environment. This equipment generates, uses, and can radiate radiofrequency energy and, if not installed and used in accordance with the instruction manual, may cause harmful interference to radio communications. Operation of this equipment in a residential area is likely to cause harmful interference in which case the user will be required to correct the interference at his own expense.
FCC Caution: Any changes or modifications not expressly approved by the party responsible for compliance could void the user's authority to operate this equipment.
This device complies with part 15 of the FCC Rules.
Operation is subject to the following two conditions:
(1) This device may not cause harmful interference, and
(2) This device must accept any interference received, including interference that may cause undesired operation.
This product is herewith confirmed to comply with the requirements set out in the Council Directives on the Approximation of the laws of the Member States relating to Electromagnetic Compatibility Directive 2014/30/EU.
Warning - This is a Class A product. In a domestic environment this product may cause radio interference in which case the user may be required to take adequate measures to correct this interference.
DISCLAIMER
No warranty or representation, either expressed or implied, is made with respect to the contents of this documentation, its quality, performance, merchantability, or fitness for a particular purpose. Information presented in this documentation has been carefully checked for reliability; however, no responsibility is assumed for inaccuracies. The information contained in this documentation is subject to change without notice.
In no event will AVer Information Inc. be liable for direct, indirect, special, incidental, or consequential damages arising out of the use or inability to use this product or documentation, even if advised of the possibility of such damages.
TRADEMARKS
“AVer” is a trademark owned by AVer Information Inc. Other trademarks used herein for description purpose only belong to each of their companies.
COPYRIGHT
© 2018 AVer Information Inc. All rights reserved.
All rights of this object belong to AVer Information Inc. Reproduced or transmitted in any form or by any means without the prior written permission of AVer Information Inc. is prohibited. All information or specifications are subject to change without prior notice.
The mark of Crossed-out wheeled bin indicates that this product must not be disposed of with your other household waste. Instead, you need to dispose of the waste equipment by handing it over to a designated collection point for the recycling of waste electrical and electronic equipment. For more information about where to drop off your waste equipment for recycling, please contact your household waste disposal service or the shop where you purchased the product.
Notice The technical specifications provided in this Manual and on the carton are subject to
change without further notice. If there is any difference between this Manual and any
actual operation, such actual operation shall prevail.
Contact Information
Global
AVer Information Inc.
www.aver.com
8F, No.157, Da-An Rd., Tucheng Dist.,
New Taipei City
Taiwan
Tel: +886-2-2269-8535
USA
AVer Information Inc.
668 Mission Ct
Fremont, CA 94539
www.averusa.com
Toll-free: 1(877)528-7824
Local: 1(408)263-3828
CONTENTS Introduction ........................................................................................................................ 1
Hardware Introduction ....................................................................................................... 2
Package Contents........................................................................................................... 2
Front Side ....................................................................................................................... 3
Back Side ........................................................................................................................ 5
Power Plug and Power Switch ........................................................................................ 6
Wall Mounting Installation ............................................................................................... 7
Important Safety Instructions ..................................................................................... 7
Safety information ..................................................................................................... 7
SSaaffeettyy tips ffoorr iinnssttaallllaattiioonn .......................................................................................... 8
IInnssttaallllaattiioonn DDiimmeennssiioonn ............................................................................................... 9
IInnssttaallllaattiioonn ............................................................................................................... 12
VVeennttiillaattiioonn ................................................................................................................ 15
MINI PC Mount Specification (VESA) ...................................................................... 16
Remote Controller ......................................................................................................... 17
Installation......................................................................................................................... 19
Connect to Laptop/PC................................................................................................... 19
LAN Connection ............................................................................................................ 20
HDMI and USB Connection .......................................................................................... 20
Using AVer CP3 System ................................................................................................... 21
Power on ....................................................................................................................... 21
Power Off ...................................................................................................................... 22
Restart .......................................................................................................................... 22
Screen Lock (Manually) ................................................................................................ 23
Wizard Setup ................................................................................................................ 24
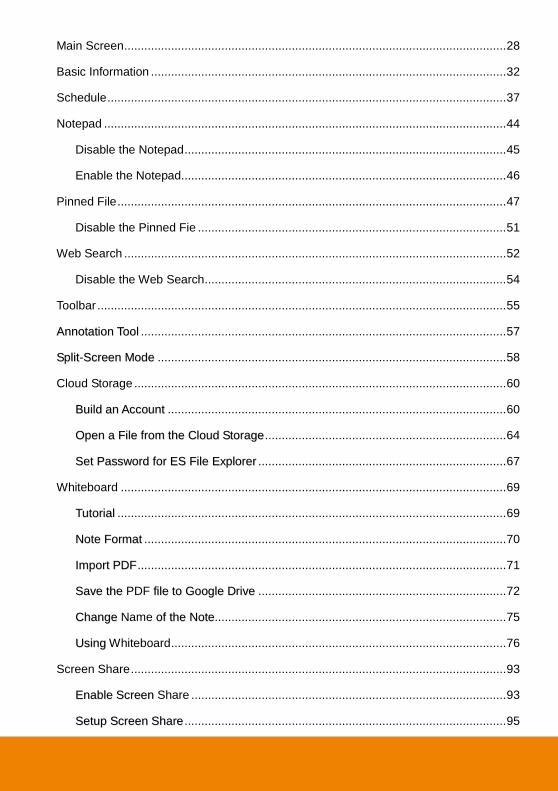
Main Screen .................................................................................................................. 28
Basic Information .......................................................................................................... 32
Schedule ....................................................................................................................... 37
Notepad ........................................................................................................................ 44
Disable the Notepad ................................................................................................ 45
Enable the Notepad................................................................................................. 46
Pinned File .................................................................................................................... 47
Disable the Pinned Fie ............................................................................................ 51
Web Search .................................................................................................................. 52
Disable the Web Search .......................................................................................... 54
Toolbar .......................................................................................................................... 55
AAnnnnoottaattiioonn TTooooll ............................................................................................................. 57
SSpplliitt--SSccrreeeenn MMooddee ........................................................................................................ 58
Cloud Storage ............................................................................................................... 60
BBuuiilldd aann AAccccoouunntt ..................................................................................................... 60
OOppeenn aa FFiillee ffrroomm tthhee CClloouudd SSttoorraaggee ........................................................................ 64
SSeett PPaasssswwoorrdd ffoorr EESS FFiillee EExxpplloorreerr .......................................................................... 67
Whiteboard ................................................................................................................... 69
TTuuttoorriiaall .................................................................................................................... 69
NNoottee FFoorrmmaatt ............................................................................................................ 70
IImmppoorrtt PPDDFF .............................................................................................................. 71
SSaavvee tthhee PDF ffiillee ttoo GGooooggllee DDrriivvee .......................................................................... 72
CChhaannggee Name ooff tthhee NNoottee ....................................................................................... 75
UUssiinngg Whiteboard .................................................................................................... 76
Screen Share ................................................................................................................ 93
EEnnaabbllee SSccrreeeenn Share .............................................................................................. 93
SSeettuupp SSccrreeeenn SShhaarree ................................................................................................ 95
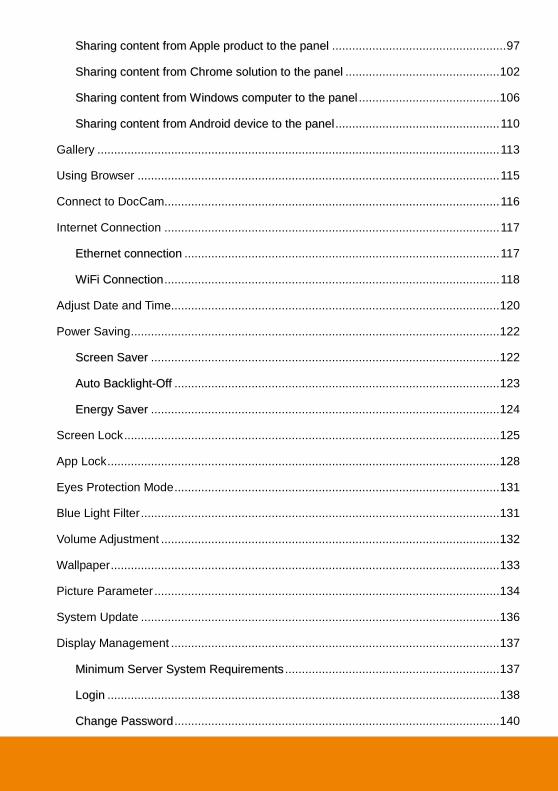
SShhaarriinngg ccoonntteenntt ffrroomm AAppppllee pprroodduucctt ttoo tthhee ppaanneell .................................................... 97
SShhaarriinngg ccoonntteenntt ffrroomm CChhrroommee ssoolluuttiioonn ttoo tthhee ppaanneell .............................................. 102
SShhaarriinngg ccoonntteenntt ffrroomm WWiinnddoowwss ccoommppuutteerr ttoo tthhee ppaanneell .......................................... 106
SShhaarriinngg ccoonntteenntt ffrroomm AAnnddrrooiidd ddeevviiccee ttoo tthhee ppaanneell ................................................. 110
Gallery ........................................................................................................................ 113
Using Browser ............................................................................................................ 115
Connect to DocCam.................................................................................................... 116
Internet Connection .................................................................................................... 117
EEtthheerrnneett ccoonnnneeccttiioonn .............................................................................................. 117
WWiiFFii CCoonnnneeccttiioonn .................................................................................................... 118
Adjust Date and Time.................................................................................................. 120
Power Saving .............................................................................................................. 122
SSccrreeeenn SSaavveerr ........................................................................................................ 122
AAuuttoo BBaacckklliigghhtt--OOffff ................................................................................................. 123
EEnneerrggyy SSaavveerr ........................................................................................................ 124
Screen Lock ................................................................................................................ 125
App Lock ..................................................................................................................... 128
Eyes Protection Mode ................................................................................................. 131
Blue Light Filter ........................................................................................................... 131
Volume Adjustment ..................................................................................................... 132
Wallpaper .................................................................................................................... 133
Picture Parameter ....................................................................................................... 134
System Update ........................................................................................................... 136
Display Management .................................................................................................. 137
MMiinniimmuumm SSeerrvveerr SSyysstteemm RReeqquuiirreemmeennttss ................................................................ 137
LLooggiinn ..................................................................................................................... 138
CChhaannggee PPaasssswwoorrdd ................................................................................................. 140
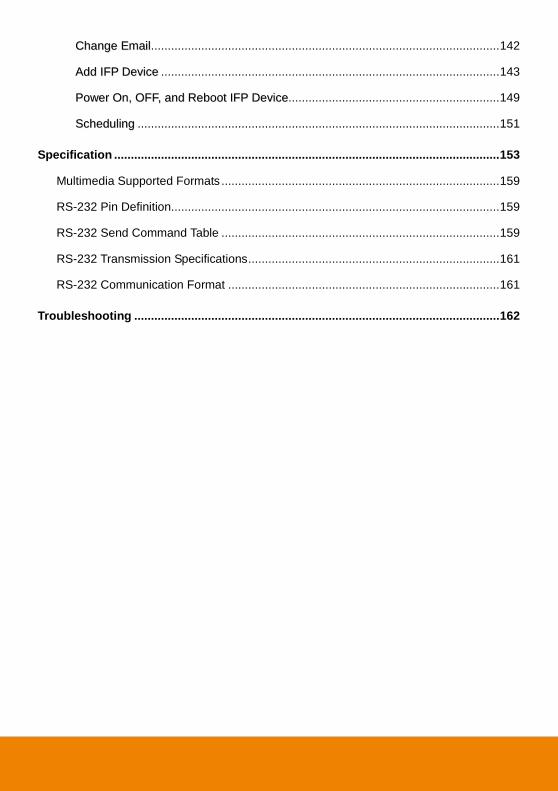
CChhaannggee EEmmaaiill ........................................................................................................ 142
AAdddd IIFFPP DDeevviiccee ..................................................................................................... 143
PPoowweerr OOnn,, OOFFFF,, aanndd RReebboooott IIFFPP DDeevviiccee ............................................................... 149
SScchheedduulliinngg ............................................................................................................ 151
Specification ................................................................................................................... 153
Multimedia Supported Formats ................................................................................... 159
RS-232 Pin Definition.................................................................................................. 159
RS-232 Send Command Table ................................................................................... 159
RS-232 Transmission Specifications ........................................................................... 161
RS-232 Communication Format ................................................................................. 161
Troubleshooting ............................................................................................................. 162
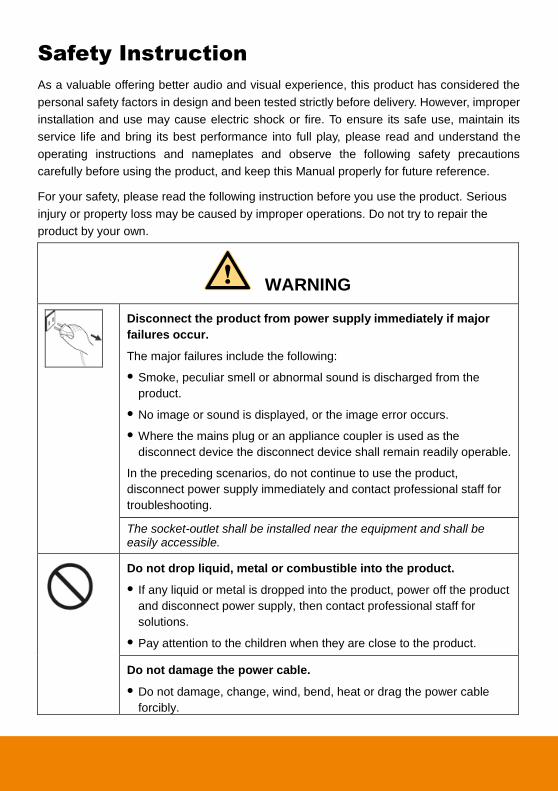
Safety Instruction
As a valuable offering better audio and visual experience, this product has considered the
personal safety factors in design and been tested strictly before delivery. However, improper
installation and use may cause electric shock or fire. To ensure its safe use, maintain its
service life and bring its best performance into full play, please read and understand the
operating instructions and nameplates and observe the following safety precautions
carefully before using the product, and keep this Manual properly for future reference.
For your safety, please read the following instruction before you use the product. Serious
injury or property loss may be caused by improper operations. Do not try to repair the
product by your own.
WARNING
Disconnect the product from power supply immediately if major
failures occur.
The major failures include the following:
Smoke, peculiar smell or abnormal sound is discharged from the
product.
No image or sound is displayed, or the image error occurs.
Where the mains plug or an appliance coupler is used as the
disconnect device the disconnect device shall remain readily operable.
In the preceding scenarios, do not continue to use the product,
disconnect power supply immediately and contact professional staff for
troubleshooting.
The socket-outlet shall be installed near the equipment and shall be easily accessible.
Do not drop liquid, metal or combustible into the product.
If any liquid or metal is dropped into the product, power off the product
and disconnect power supply, then contact professional staff for
solutions.
Pay attention to the children when they are close to the product.
Do not damage the power cable.
Do not damage, change, wind, bend, heat or drag the power cable
forcibly.
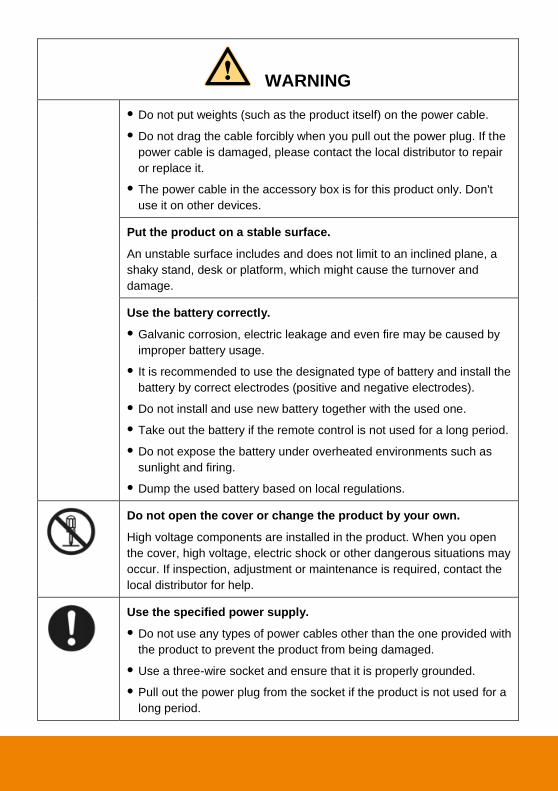
WARNING
Do not put weights (such as the product itself) on the power cable.
Do not drag the cable forcibly when you pull out the power plug. If the
power cable is damaged, please contact the local distributor to repair
or replace it.
The power cable in the accessory box is for this product only. Don't
use it on other devices.
Put the product on a stable surface.
An unstable surface includes and does not limit to an inclined plane, a
shaky stand, desk or platform, which might cause the turnover and
damage.
Use the battery correctly.
Galvanic corrosion, electric leakage and even fire may be caused by
improper battery usage.
It is recommended to use the designated type of battery and install the
battery by correct electrodes (positive and negative electrodes).
Do not install and use new battery together with the used one.
Take out the battery if the remote control is not used for a long period.
Do not expose the battery under overheated environments such as
sunlight and firing.
Dump the used battery based on local regulations.
Do not open the cover or change the product by your own.
High voltage components are installed in the product. When you open
the cover, high voltage, electric shock or other dangerous situations may
occur. If inspection, adjustment or maintenance is required, contact the
local distributor for help.
Use the specified power supply.
Do not use any types of power cables other than the one provided with
the product to prevent the product from being damaged.
Use a three-wire socket and ensure that it is properly grounded.
Pull out the power plug from the socket if the product is not used for a
long period.
WARNING
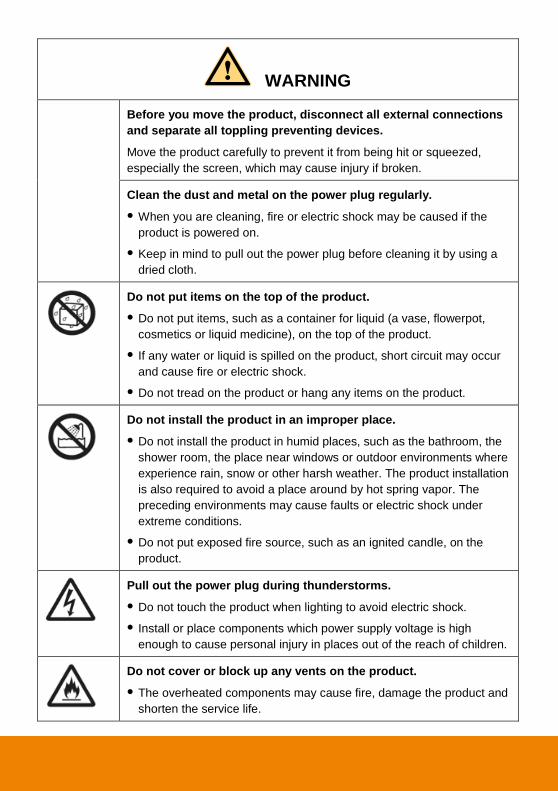
Before you move the product, disconnect all external connections
and separate all toppling preventing devices.
Move the product carefully to prevent it from being hit or squeezed,
especially the screen, which may cause injury if broken.
Clean the dust and metal on the power plug regularly.
When you are cleaning, fire or electric shock may be caused if the
product is powered on.
Keep in mind to pull out the power plug before cleaning it by using a
dried cloth.
Do not put items on the top of the product.
Do not put items, such as a container for liquid (a vase, flowerpot,
cosmetics or liquid medicine), on the top of the product.
If any water or liquid is spilled on the product, short circuit may occur
and cause fire or electric shock.
Do not tread on the product or hang any items on the product.
Do not install the product in an improper place.
Do not install the product in humid places, such as the bathroom, the
shower room, the place near windows or outdoor environments where
experience rain, snow or other harsh weather. The product installation
is also required to avoid a place around by hot spring vapor. The
preceding environments may cause faults or electric shock under
extreme conditions.
Do not put exposed fire source, such as an ignited candle, on the
product.
Pull out the power plug during thunderstorms.
Do not touch the product when lighting to avoid electric shock.
Install or place components which power supply voltage is high
enough to cause personal injury in places out of the reach of children.
Do not cover or block up any vents on the product.
The overheated components may cause fire, damage the product and
shorten the service life.
WARNING
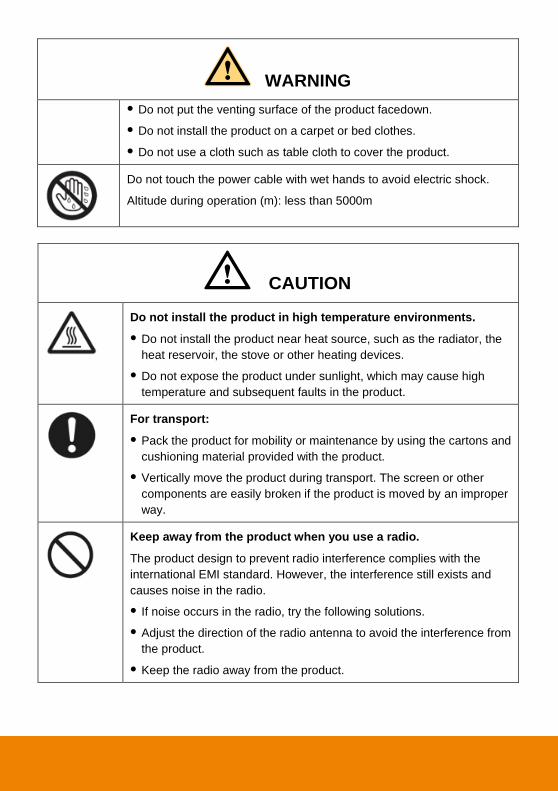
Do not put the venting surface of the product facedown.
Do not install the product on a carpet or bed clothes.
Do not use a cloth such as table cloth to cover the product.
Do not touch the power cable with wet hands to avoid electric shock.
Altitude during operation (m): less than 5000m
CAUTION
Do not install the product in high temperature environments.
Do not install the product near heat source, such as the radiator, the
heat reservoir, the stove or other heating devices.
Do not expose the product under sunlight, which may cause high
temperature and subsequent faults in the product.
For transport:
Pack the product for mobility or maintenance by using the cartons and
cushioning material provided with the product.
Vertically move the product during transport. The screen or other
components are easily broken if the product is moved by an improper
way.
Keep away from the product when you use a radio.
The product design to prevent radio interference complies with the
international EMI standard. However, the interference still exists and
causes noise in the radio.
If noise occurs in the radio, try the following solutions.
Adjust the direction of the radio antenna to avoid the interference from
the product.
Keep the radio away from the product.
CAUTION
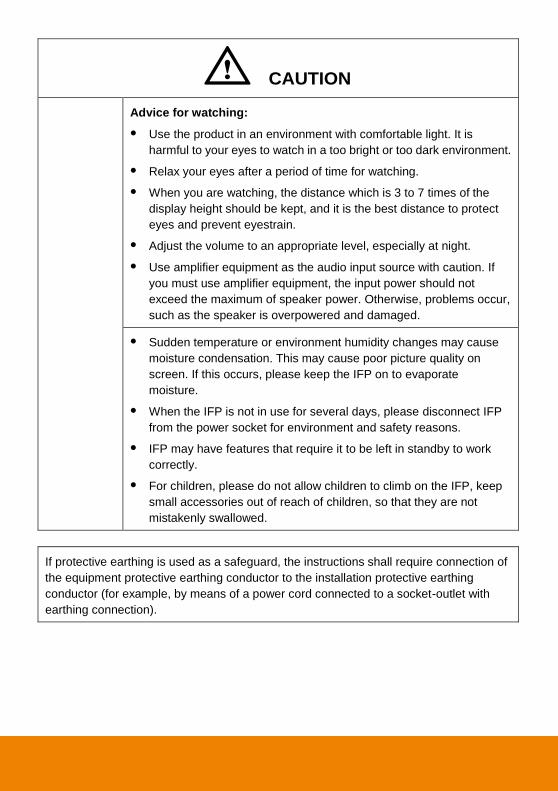
Advice for watching:
Use the product in an environment with comfortable light. It is
harmful to your eyes to watch in a too bright or too dark environment.
Relax your eyes after a period of time for watching.
When you are watching, the distance which is 3 to 7 times of the
display height should be kept, and it is the best distance to protect
eyes and prevent eyestrain.
Adjust the volume to an appropriate level, especially at night.
Use amplifier equipment as the audio input source with caution. If
you must use amplifier equipment, the input power should not
exceed the maximum of speaker power. Otherwise, problems occur,
such as the speaker is overpowered and damaged.
Sudden temperature or environment humidity changes may cause
moisture condensation. This may cause poor picture quality on
screen. If this occurs, please keep the IFP on to evaporate
moisture.
When the IFP is not in use for several days, please disconnect IFP
from the power socket for environment and safety reasons.
IFP may have features that require it to be left in standby to work
correctly.
For children, please do not allow children to climb on the IFP, keep
small accessories out of reach of children, so that they are not
mistakenly swallowed.
If protective earthing is used as a safeguard, the instructions shall require connection of
the equipment protective earthing conductor to the installation protective earthing
conductor (for example, by means of a power cord connected to a socket-outlet with
earthing connection).
1
Introduction
Thank you for choosing our interactive display. As our latest independently developed and
produced human-machine interactive product, the interactive display is a multi-functional
display for interactive teaching, digital demonstration, multi-media presentation, touch
operations and handwriting. They are well designed and produced to meet the needs of
education and corporate applications, and provide a user-friendly experience, digital
intelligent control as an ideal equipment for schools and companies. You can use your
fingers or opaque objects to write, edit and delete any things on the screen.
The product features are as follows:
Run on Android 7.1 operating system with unique UI design, offering you more
convenient operations and better visual experience.
Support convenient operation through a mouse and keyboard with USB port, just like a
computer.
Built-in large-capacity memory and large-capacity buffer, running 4K movies.
High-quality LCD screen featured by flicker free, low radiation, high brightness, high
contrast, large view angle and short response time, greatly reducing the ghosting of fast
moving images and eye fatigue.
De-interlaced image processing and industry-leading motion compensation technology,
improving the jagged and blurred edges of moving images thoroughly.
Dynamic contrast technology, significantly improving image definition and contrast.
Multiple USB ports, supporting HD streaming media function.
Ultrathin body and ultra-narrow edges.
2
Hardware Introduction
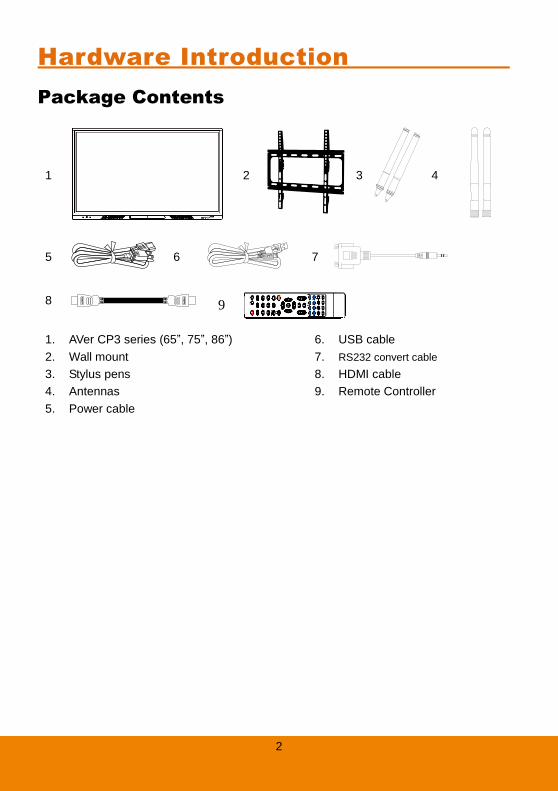
Package Contents
1
2
3
4
5
6
7
8 9
1. AVer CP3 series (65”, 75”, 86”)
2. Wall mount
3. Stylus pens
4. Antennas
5. Power cable
6. USB cable
7. RS232 convert cable
8. HDMI cable
9. Remote Controller
3
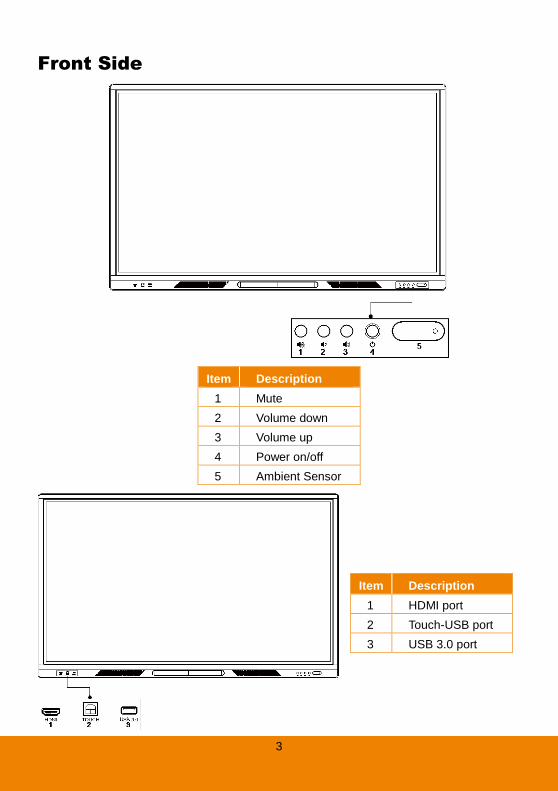
Front Side
Item Description
1 Mute
2 Volume down
3 Volume up
4 Power on/off
5 Ambient Sensor
Item Description
1 HDMI port
2 Touch-USB port
3 USB 3.0 port
4
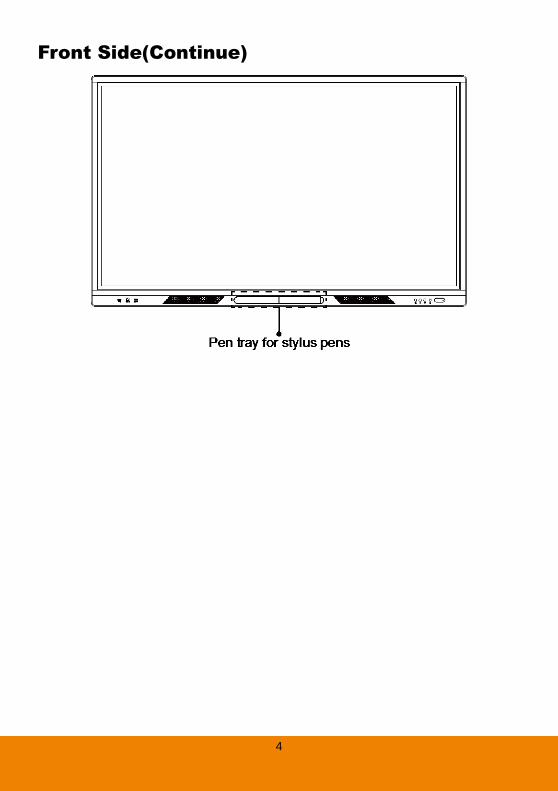
Front Side(Continue)

5
Back Side
1 2 3 4 5
Side
Item Description
1 HDMI2-IN port
2 TOUCH-USB port
3 Audio Out port
4 SPDIF OUT port
5 Port for Engineer using
[Note]
1. HDMI2-IN port bypasses internal Android system.
2. HDMI2-IN port supports up to 4K and 60fps.
1 2 3 4 5 6 7 8 9 10
12131415 1116
OPS I/O
Item Description Item Description
1 Reset button* 9 USB 3.0 port
2 LAN port 10 Status LED
3 Touch-USB port 11 Port for Antenna
4 HDMI 1 Input port 12 Micro SD slot
5 Touch-USB port 13 RS232 port
6 VGA Input port 14 MIC IN port
7 Type C AV-IN/Touch port 15 Audio IN port
8 USB 2.0 port 16 Port for Antenna
[Note]
1. RS232 port use RS232 convert cable for RS232 connection.
2. Type C AV-IN/Touch port: Please use USB 3.1 Gen 2 Type-C (10Gps) cable. Ex. Thunderbolt 3
Type-C to Type-C cable.
6
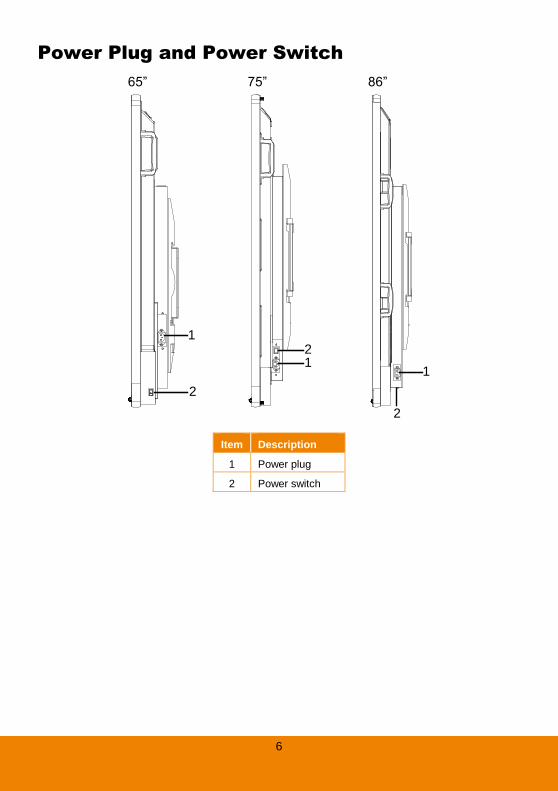
Power Plug and Power Switch
65”
1
2
86”
1
2
75”
12
Item Description
1 Power plug
2 Power switch

7
Wall Mounting Installation
Important Safety Instructions Improper installation may cause property damage or personal injury. If you do not understand these
directions, or have doubts about the safety of the installation, contact Customer Service or call a
qualified contractor. AVer is not responsible for damage or injury caused by incorrect installation or use.
After reading the manual, please keep it handy for future reference.
Safety information Warning 1. The product should be installed by a qualified professional specified by the retail store. Product
installation by non-qualified personnel is very dangerous and may cause personal injury.
2. When moving or replacing the product after installation, contact a qualified installer specified by the
retail store. Installation or movement of the product must be carried out by a skilled professional. If
an unqualified person moves and installs the product, it may cause safety risks.
3. Be sure not to hang the power cable and signal cable on the back of IFP when installing the
wall-mounted IFP. Damaged cables may result in fire, electric shock, or damage to the product.
4. The product should be installed where its weight can be fully supported. If the product is installed
on a weak surface, the product may fall, causing injury.
5. Do not hang on this product; protect the product from severe impacts after the installation. The
product may fall and cause injury.
6. This product contains small items that could be a choking hazard if swallowed. Keep these items
away from young children.
Caution
1. Follow the instructions in this manual to product properly. If you do not follow these instructions, the
product may be installed incorrectly and cause serious injury or the product may become damaged.
2. When installing the product, first check that the wall is flat and strong enough. Use the anchors and
screws provided. If you use anchors and screws that are not specified by the manufacturer, they
may not hold the weight of the product, causing safety issues.
3. Keep this product away from sprinklers, sensors, high-tension wires and power sources. Do not
install it in a location where vibrations or impacts are likely to occur.
4. To install or adjust the height of the product, two or more people are needed. If you try to install or
move the product alone, it may fall and cause injury or the product may become damaged.
5. Do not attempt to install or assemble this product if the product or hardware is damaged or missing.
In the event that replacement parts or hardware are needed, please contact Customer Service.
6. When drilling holes into the wall, make sure you use a drill and drill bit with the specified diameter.
Ensure that you also follow the instructions regarding the depth of the holes. Otherwise, the product
may be installed incorrectly and cause safety issues.
8
7. Do not clean the product with a wet towel, and do not place a heater, or humidifier beneath it.
Moisture, steam or heat permeating into this product may result in fire, electric shock or product
damage.
SSaaffeettyy ttiippss ffoorr iinnssttaallllaattiioonn
1. At least 2 professional installers should on site when installing the wall mounting bracket
and the IFP. To prevent injury and damage to the wall and device, user should not
perform the installation without professional guidance.
2. The installation position should be on the wall that can bear the weight of the IFP and
bracket, and measures should be taken to calculate the effects of other external forces.
3. To avoid accidental damage to the device and human safety, please install the bracket in
a place which avoids the contact of children.
4. When the installed screws become loose, please turn off the device and unplug the
power cord for further check.
5. The bracket should be installed on a vertical flat surface.
6. For the best working performance, these places should be avoided: strong electric field,
strong magnetic field and potential leakage of inflammable gas.
7. For the best panel viewing, the bracket should be installed in the place where the direct
intense light and reversed light situations should be avoided.
8. In case of fire, please avoid the places as described below: heavy soot, windy and dusty
place, intense humidity and intense heat.
9. During installation, please make sure connection between the screws and bracket are
secured firmly.
10. This instruction should be strictly followed. The manufacturer isn’t responsible for any
damages and lost caused by inappropriate installation and operation.
9
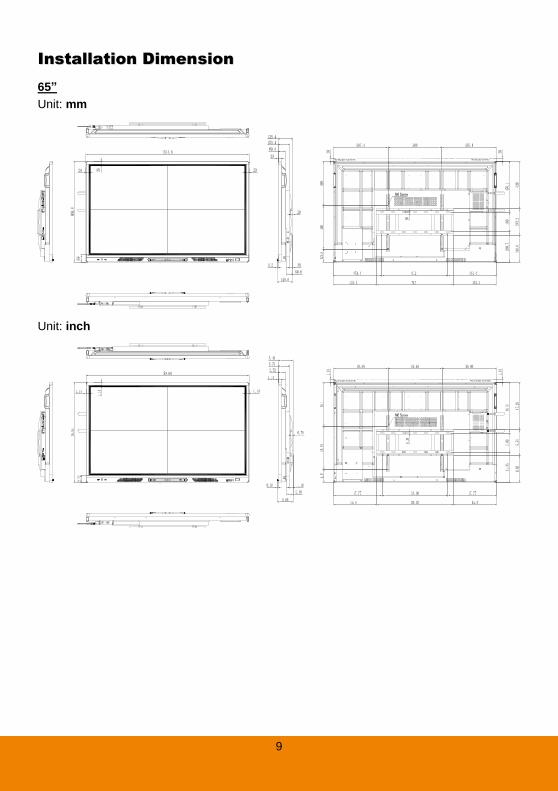
IInnssttaallllaattiioonn DDiimmeennssiioonn
65”
Unit: mm
Unit: inch
10
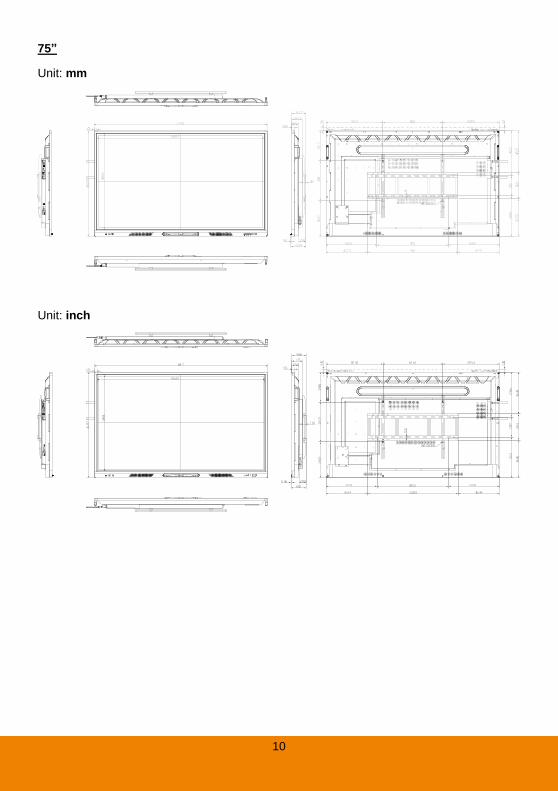
75”
Unit: mm
Unit: inch
11
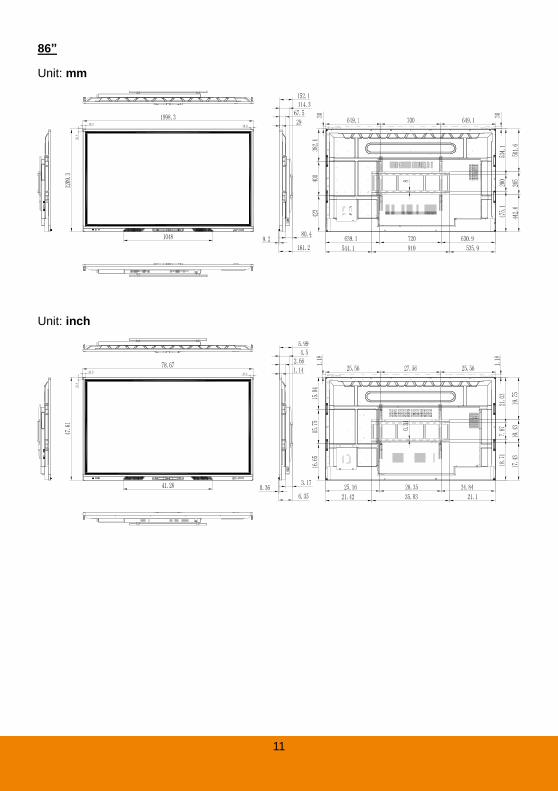
86”
Unit: mm
Unit: inch

12
IInnssttaallllaattiioonn
Accessories
# Name Amount
Horizontal beam bracket of 50-70”/75-98” universal wall mount 1
Vertical beam bracket of 50-70”/75-98” universal wall mount 2
PE bag for VESA wall mount 1
M8x80mm expansion screw(blue zinc plated) 8
M4x10MM round head machine screw with spring
washer(black zinc plated)
2
M5x100mm screw 2
Installation tools needed
Churn (impact) drill, pencil, screwdriver, hammer, wrench, grinder (polisher).
1. Take the IFP unit out of the package. Remove the wall mount beam bracket (). Use
screwdriver to remove the 2 M4 screws. Please refer to figure A.
Figure A
13
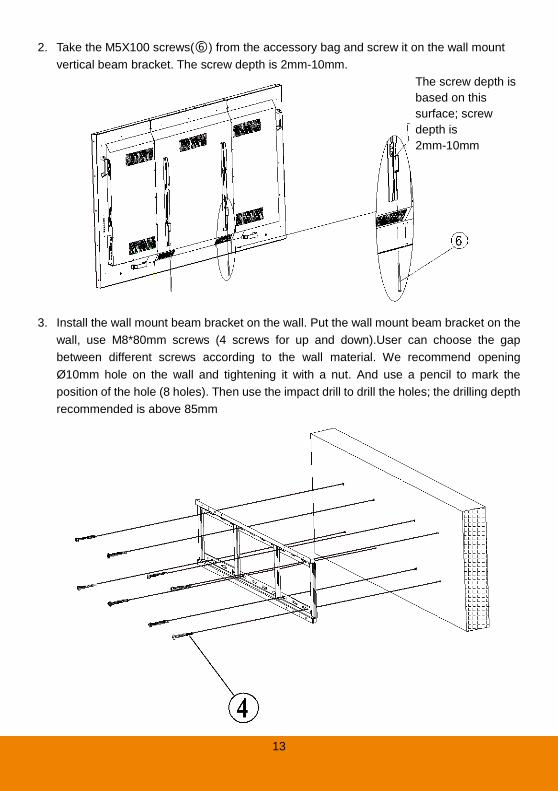
2. Take the M5X100 screws() from the accessory bag and screw it on the wall mount
vertical beam bracket. The screw depth is 2mm-10mm.
3. Install the wall mount beam bracket on the wall. Put the wall mount beam bracket on the
wall, use M8*80mm screws (4 screws for up and down).User can choose the gap
between different screws according to the wall material. We recommend opening
Ø 10mm hole on the wall and tightening it with a nut. And use a pencil to mark the
position of the hole (8 holes). Then use the impact drill to drill the holes; the drilling depth
recommended is above 85mm
4
-
M
8
(
M
6
)
s
c
r
e
w
s
The screw depth is
based on this
surface; screw
depth is
2mm-10mm

14
4. Hang the IFP on the wall mount beam bracket.
5. Screw tight the M5x100mm that we have pre-screw on the wall mount vertical beam
bracket at step 2 to secure the IFP.
W
a
l
l
P
e
n
c
i
l I
m
p
a
c
t
d
r
i
l
l
W
a
l
l
W
a
l
l
15
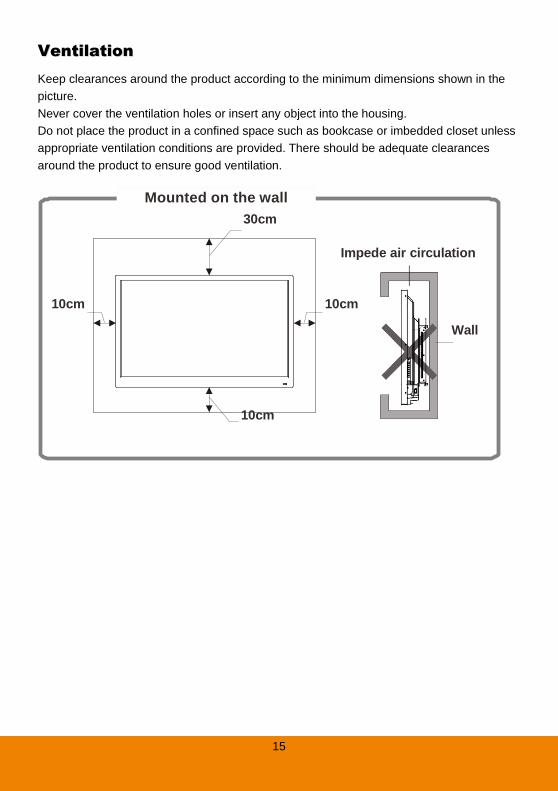
VVeennttiillaattiioonn
Keep clearances around the product according to the minimum dimensions shown in the
picture.
Never cover the ventilation holes or insert any object into the housing.
Do not place the product in a confined space such as bookcase or imbedded closet unless
appropriate ventilation conditions are provided. There should be adequate clearances
around the product to ensure good ventilation.
Mounted on the wall
Impede air circulation
30cm
10cmm
10cmm
10cmm
Wall
16
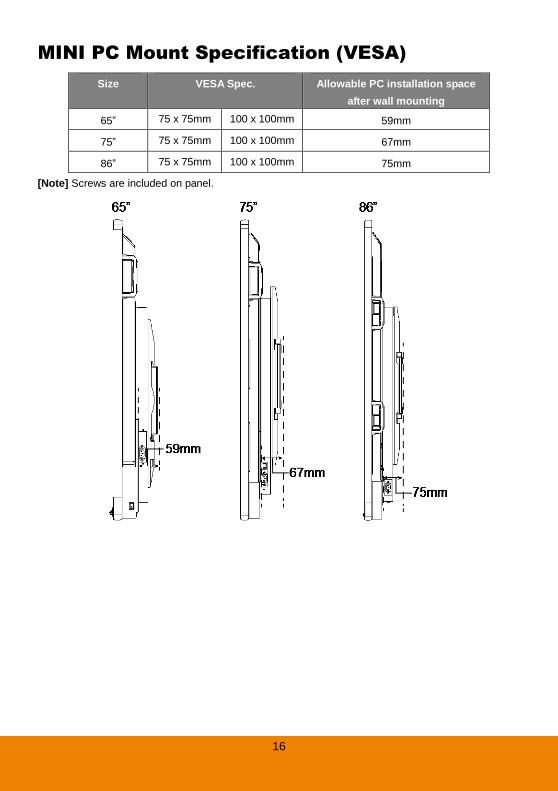
MINI PC Mount Specification (VESA)
Size VESA Spec. Allowable PC installation space
after wall mounting
65” 75 x 75mm 100 x 100mm 59mm
75” 75 x 75mm 100 x 100mm 67mm
86” 75 x 75mm 100 x 100mm 75mm
[Note] Screws are included on panel.
17
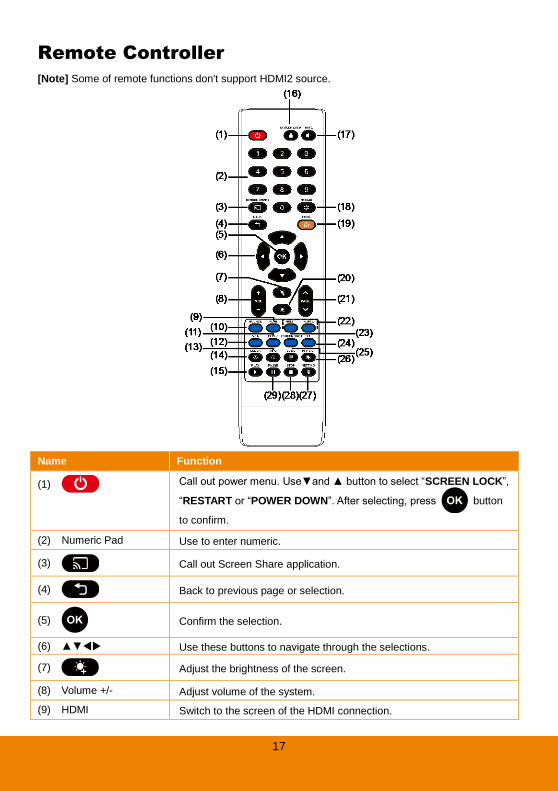
Remote Controller
[Note] Some of remote functions don't support HDMI2 source.
Name Function
(1) Call out power menu. Use▼and ▲ button to select “SCREEN LOCK”,
“RESTART or “POWER DOWN”. After selecting, press button
to confirm.
(2) Numeric Pad Use to enter numeric.
(3) Call out Screen Share application.
(4) Back to previous page or selection.
(5) Confirm the selection.
(6) ▲▼ Use these buttons to navigate through the selections.
(7) Adjust the brightness of the screen.
(8) Volume +/- Adjust volume of the system.
(9) HDMI Switch to the screen of the HDMI connection.
18
Name Function
(10) SOURCE Call out the input source menu.
(11) TYPE-C Switch to input screen of the Type-C connection.
(12) VGA Switch to input screen of the VGA connection.
(13) INFO Call out information screen of the system.
(14) Call out the Time application.
(15) Play video in the system.
(16) Lock screen immediately.
(17) Switch to mute mode.
(18) Freeze the screen temporary. While the screen is freeze, the system
functions are not available. Press button again to un-freeze.
(19) Return to main screen.
(20) Adjust the brightness of the screen.
(21) Page /Page Can be used when operating the whiteboard or playing PPT files, return to the previous page or to the next page.
(22) HDMI1/HDMI2 Switch to the input screen of the HDMI1/HDMI2 connection.
(23) SCREEN SHOT Snapshot the screen and save on the system.
(24) F1 No function.
(25) Play PPT file.
(26) Call out APP list and use▲,▼,, button to select the APP
application, press to confirm the selection.
(27) Call out setting page.
(28) Stop play video in playback application.
(29) Temporary stop to play video in playback application.

19
Installation
Connect to Laptop/PC
HDMI cable
Laptop
USB cable
Laptop
USB cable
HDMI cable
Front panelSide
20
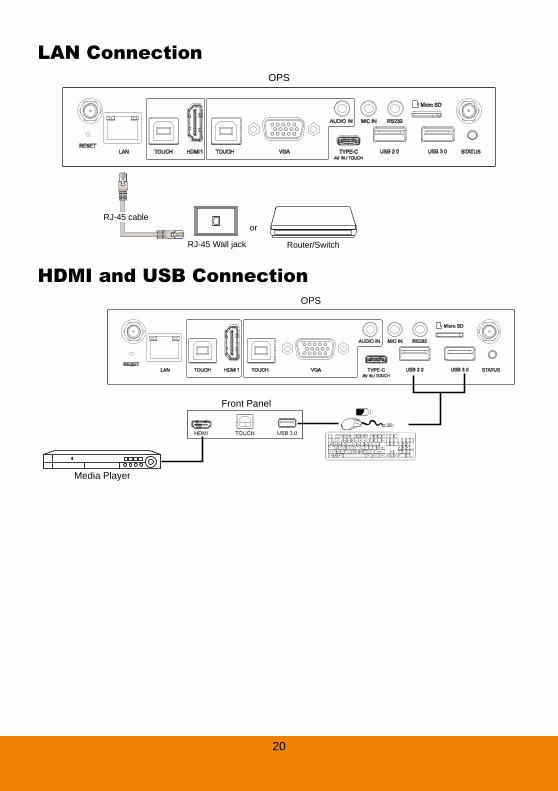
LAN Connection
RJ-45 cable
RJ-45 Wall jack Router/Switch
or
OPS
HDMI and USB Connection
Front Panel
Media Player
OPS
21
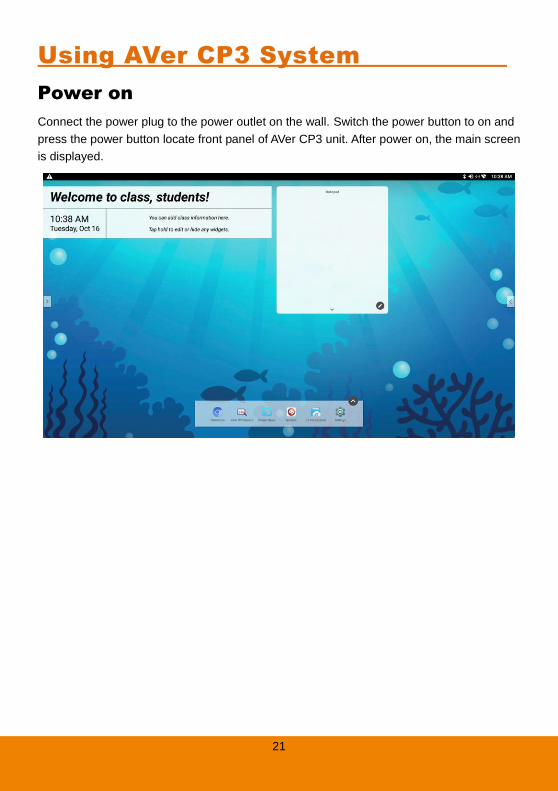
Using AVer CP3 System
Power on Connect the power plug to the power outlet on the wall. Switch the power button to on and
press the power button locate front panel of AVer CP3 unit. After power on, the main screen
is displayed.
22
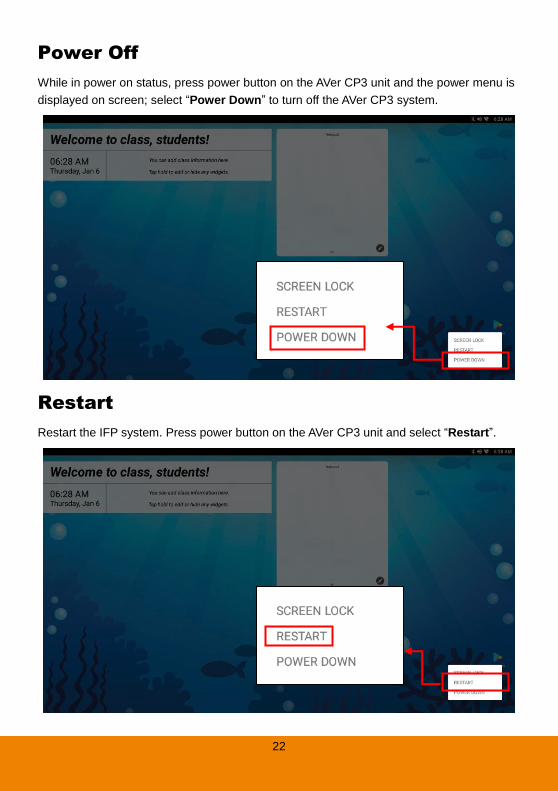
Power Off While in power on status, press power button on the AVer CP3 unit and the power menu is
displayed on screen; select “Power Down” to turn off the AVer CP3 system.
Restart
Restart the IFP system. Press power button on the AVer CP3 unit and select “Restart”.
23
Screen Lock (Manually)
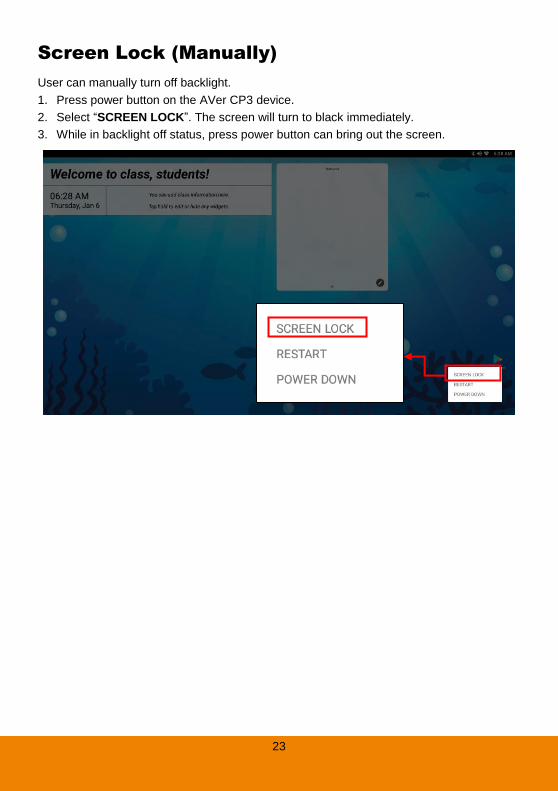
User can manually turn off backlight.
1. Press power button on the AVer CP3 device.
2. Select “SCREEN LOCK”. The screen will turn to black immediately.
3. While in backlight off status, press power button can bring out the screen.
24
Wizard Setup
For the first time startup IFP, a wizard will guide you to setup some settings.
The following will describe the settings step by step.
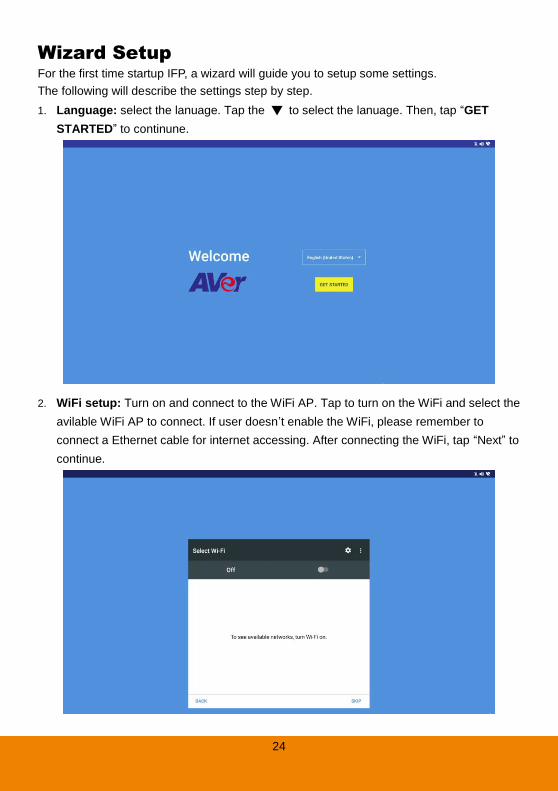
1. Language: select the lanuage. Tap the ▼ to select the lanuage. Then, tap “GET
STARTED” to continune.
2. WiFi setup: Turn on and connect to the WiFi AP. Tap to turn on the WiFi and select the
avilable WiFi AP to connect. If user doesn’t enable the WiFi, please remember to
connect a Ethernet cable for internet accessing. After connecting the WiFi, tap “Next” to
continue.
25
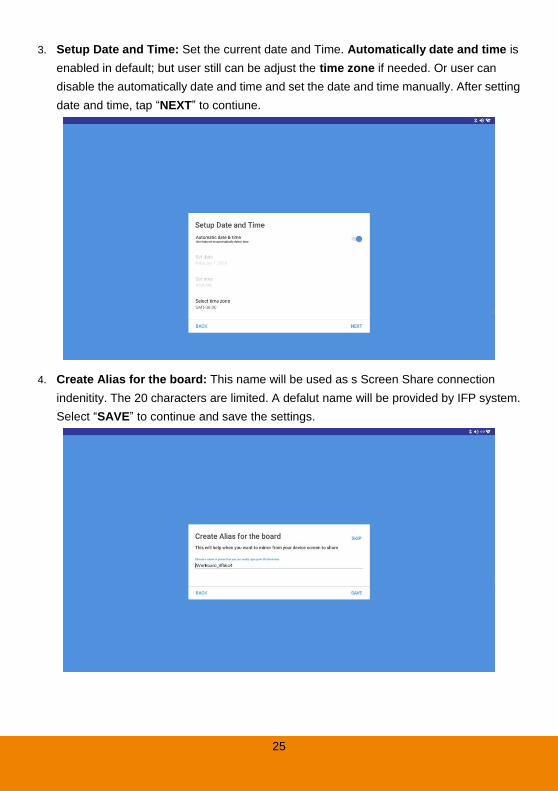
3. Setup Date and Time: Set the current date and Time. Automatically date and time is
enabled in default; but user still can be adjust the time zone if needed. Or user can
disable the automatically date and time and set the date and time manually. After setting
date and time, tap “NEXT” to contiune.
4. Create Alias for the board: This name will be used as s Screen Share connection
indenitity. The 20 characters are limited. A defalut name will be provided by IFP system.
Select “SAVE” to continue and save the settings.

26
5. Update FW: IFP system will check is there new version FW for updating. If there is a
new version FW, the update will be performed. No update, the message will show and
tap “NEXT” to continue.
6. Install Gogole Apps: Tap”INSTALL” to install apps. After installation, the IFP system
will restart.

27
7. Login: After restarting, login within your google account. And, the IFP system is ready
for using.

28
Main Screen
Basic Information: User can define Headline, Secondary Information and Time &
Date(Also see Basic Information section).
Notepad: User can write the memos in here (Also see Notepad section).
Tool bar: Select or to call out tool bar. Tool bar are include Back, Home,
Annotate, App Switch, and Inputs functions (Also see Tool bar section).
Basic Information
Area
Notepad
All apps
Tool bar Tool bar
Notice column
Status icon(WiFi, Bluetooth, Audio)
Apps notices
29
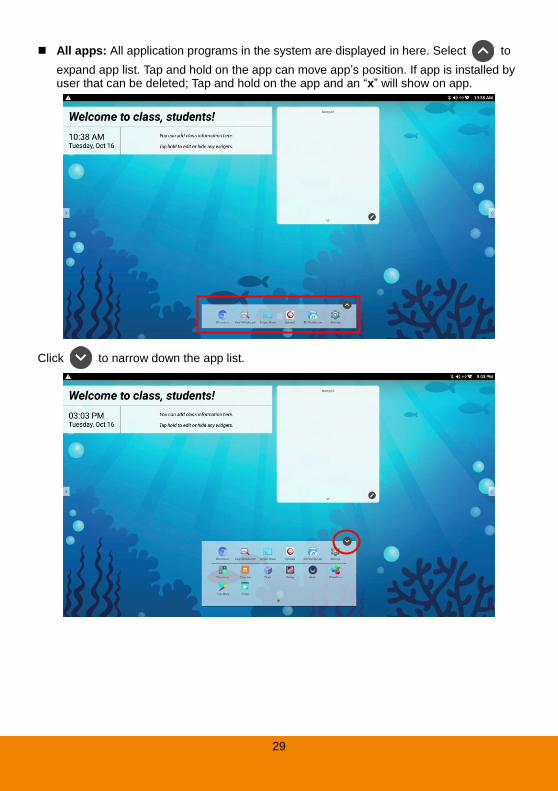
All apps: All application programs in the system are displayed in here. Select to
expand app list. Tap and hold on the app can move app’s position. If app is installed by user that can be deleted; Tap and hold on the app and an “x” will show on app.
Click to narrow down the app list.
30
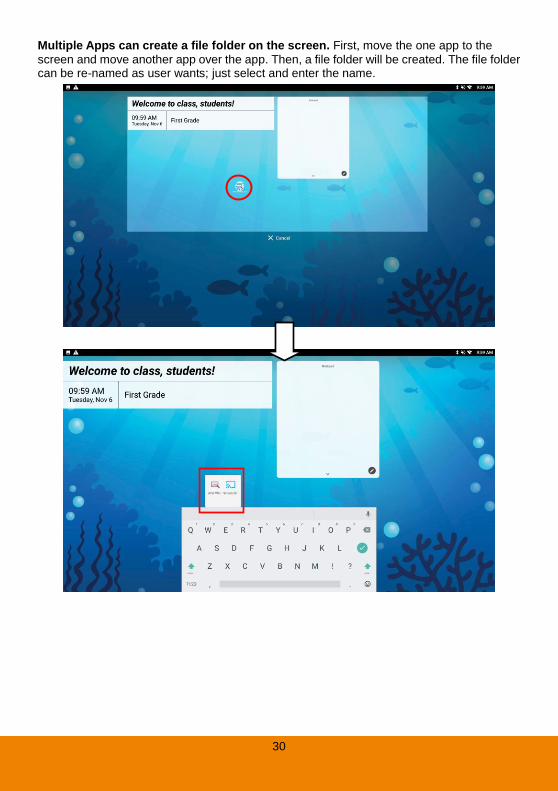
Multiple Apps can create a file folder on the screen. First, move the one app to the
screen and move another app over the app. Then, a file folder will be created. The file folder can be re-named as user wants; just select and enter the name.
31
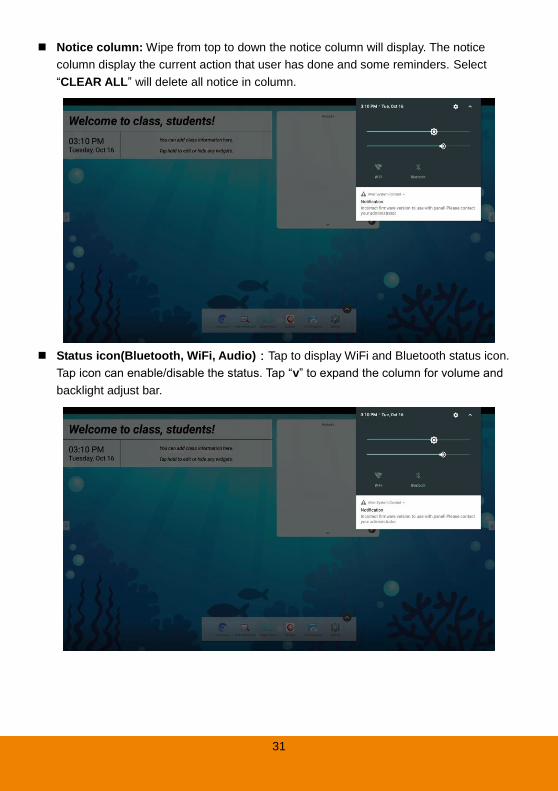
Notice column: Wipe from top to down the notice column will display. The notice
column display the current action that user has done and some reminders. Select
“CLEAR ALL” will delete all notice in column.
Status icon(Bluetooth, WiFi, Audio):Tap to display WiFi and Bluetooth status icon.
Tap icon can enable/disable the status. Tap “v” to expand the column for volume and
backlight adjust bar.
32
Basic Information
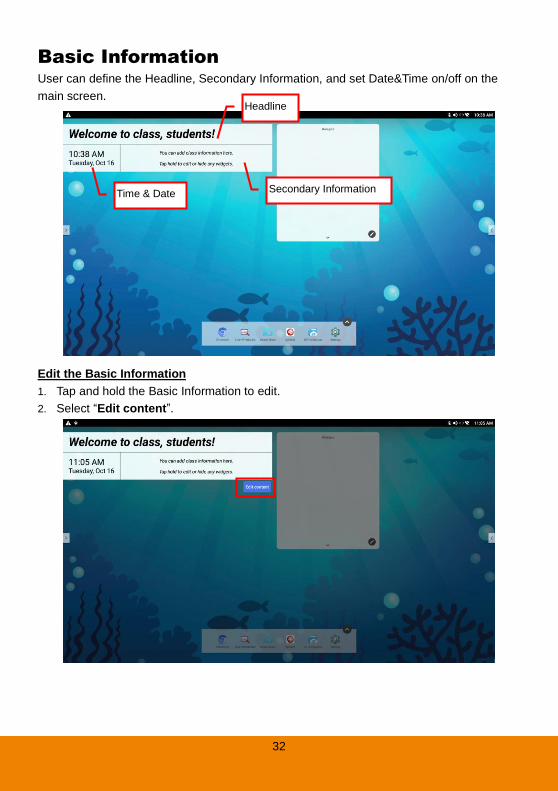
User can define the Headline, Secondary Information, and set Date&Time on/off on the
main screen.
Edit the Basic Information
1. Tap and hold the Basic Information to edit.
2. Select “Edit content”.
Headline
Secondary Information Time & Date
33
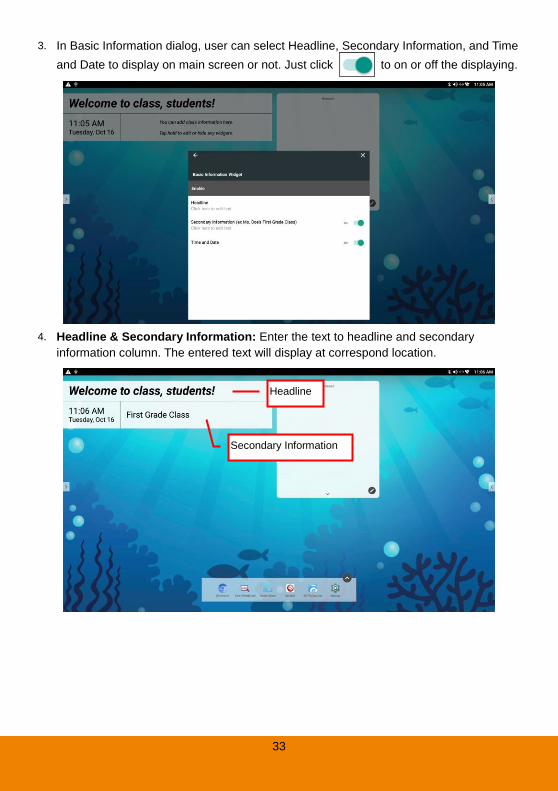
3. In Basic Information dialog, user can select Headline, Secondary Information, and Time
and Date to display on main screen or not. Just click to on or off the displaying.
4. Headline & Secondary Information: Enter the text to headline and secondary
information column. The entered text will display at correspond location.
Headline
Secondary Information

34
5. Time and Date: Set the time and date display on or off.
35
Disable the Basic Information
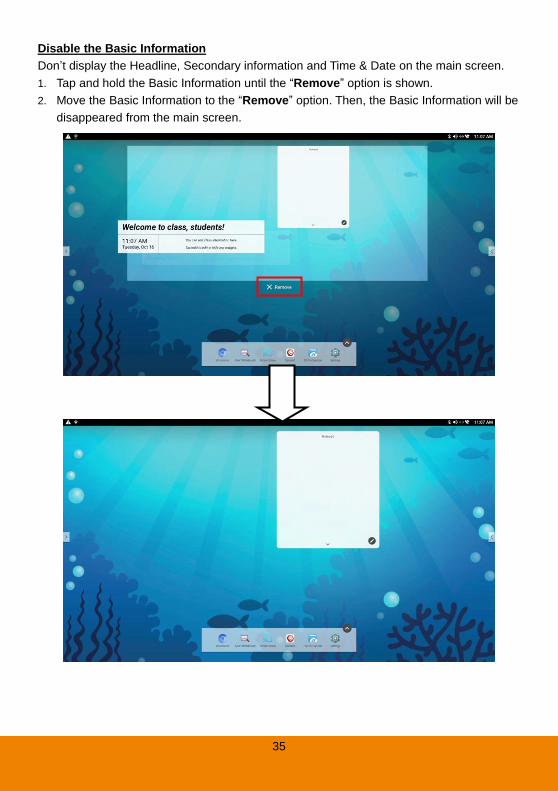
Don’t display the Headline, Secondary information and Time & Date on the main screen.
1. Tap and hold the Basic Information until the “Remove” option is shown.
2. Move the Basic Information to the “Remove” option. Then, the Basic Information will be
disappeared from the main screen.
36
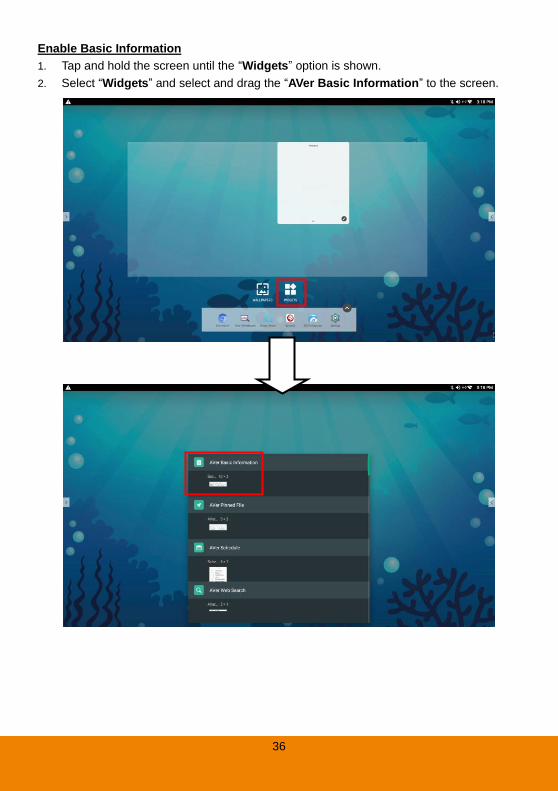
Enable Basic Information
1. Tap and hold the screen until the “Widgets” option is shown.
2. Select “Widgets” and select and drag the “AVer Basic Information” to the screen.
37
Schedule
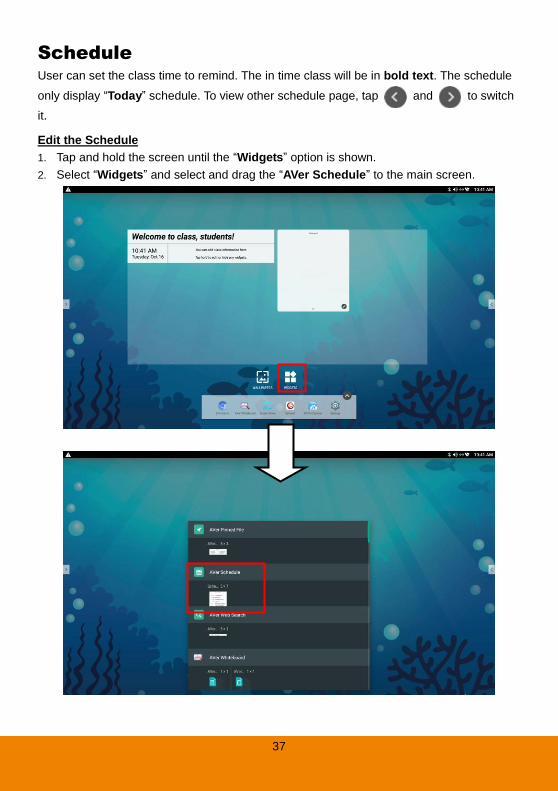
User can set the class time to remind. The in time class will be in bold text. The schedule
only display “Today” schedule. To view other schedule page, tap and to switch
it.
Edit the Schedule
1. Tap and hold the screen until the “Widgets” option is shown.
2. Select “Widgets” and select and drag the “AVer Schedule” to the main screen.

38
3. Tap and hold the Schedule to edit.
4. Select “Edit content”.
5. Select the day (Mon ~ Sun).
39
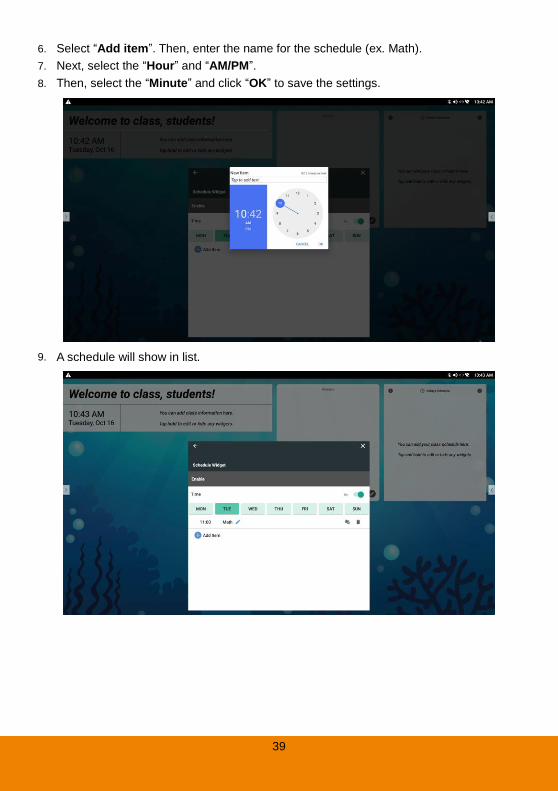
6. Select “Add item”. Then, enter the name for the schedule (ex. Math).
7. Next, select the “Hour” and “AM/PM”.
8. Then, select the “Minute” and click “OK” to save the settings.
9. A schedule will show in list.
40
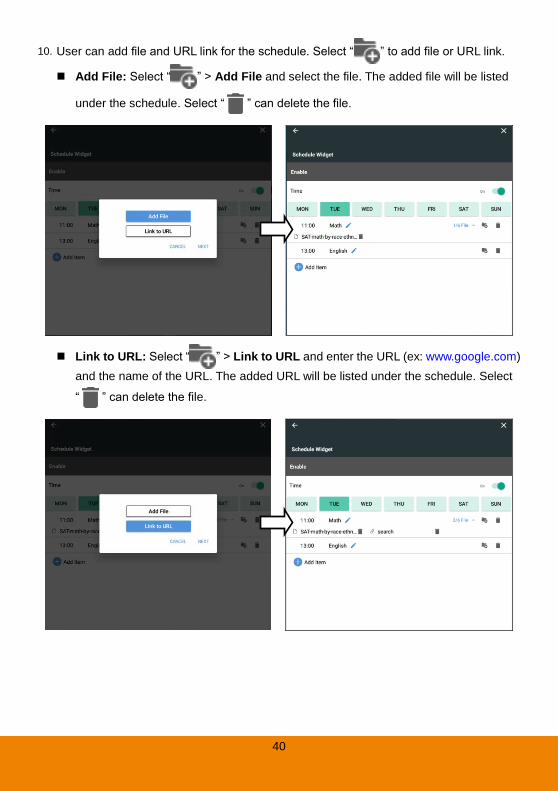
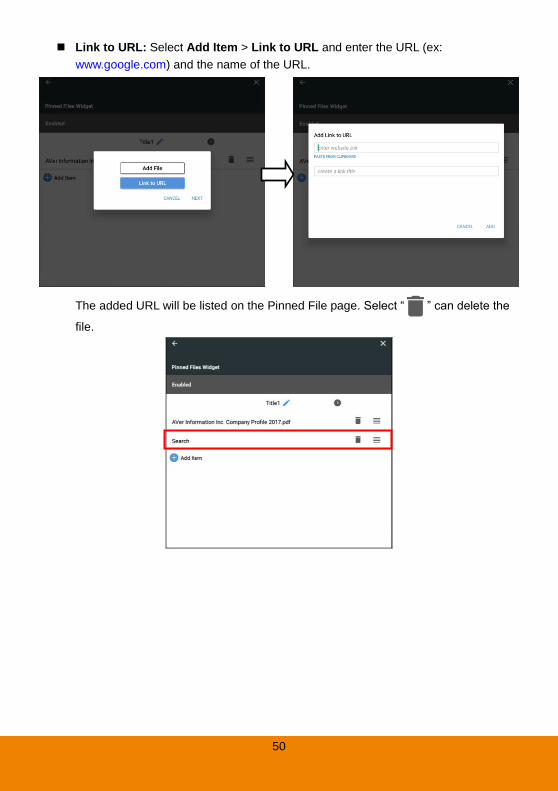
10. User can add file and URL link for the schedule. Select “ ” to add file or URL link.
Add File: Select “ ” > Add File and select the file. The added file will be listed
under the schedule. Select “ ” can delete the file.
Link to URL: Select “ ” > Link to URL and enter the URL (ex: www.google.com)
and the name of the URL. The added URL will be listed under the schedule. Select
“ ” can delete the file.

41
11. User can delete the schedule by clicking icon.
12. To add more schedules, repeat above steps.
42
Disable the Schedule
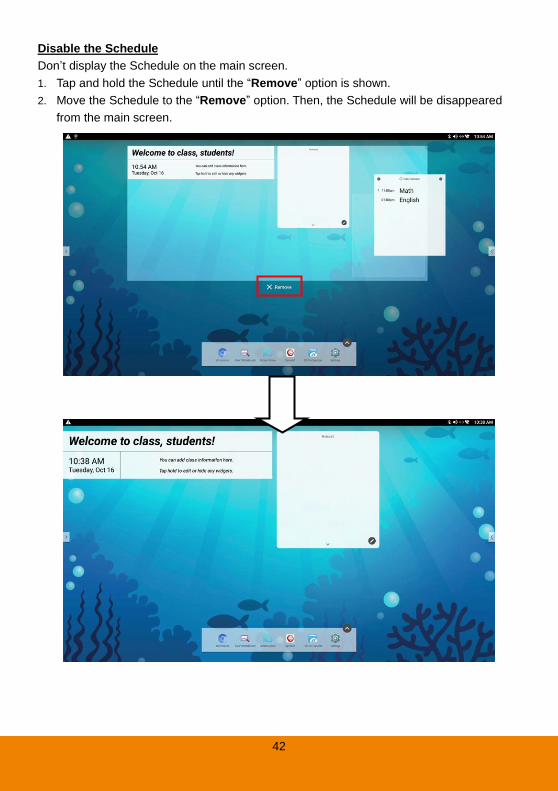
Don’t display the Schedule on the main screen.
1. Tap and hold the Schedule until the “Remove” option is shown.
2. Move the Schedule to the “Remove” option. Then, the Schedule will be disappeared
from the main screen.
43
Enable the Schedule
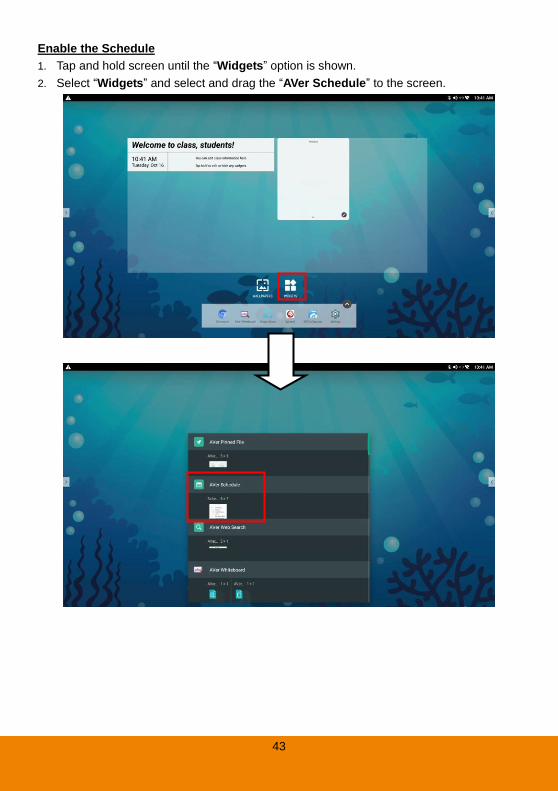
1. Tap and hold screen until the “Widgets” option is shown.
2. Select “Widgets” and select and drag the “AVer Schedule” to the screen.
44
Notepad
User can write memos on the notepad.
1. Tap “ ” switch to edit mode.
2. Select the color and write on the notepad. For partial deletion, select “ ”. To delete
all, select “ ”.
3. Tap “v” can expand more space. Then, select” ” switch to edit mode.

45
Disable the Notepad
Don’t display the Notepad on the main screen.
1. Tap and hold the Notepad until the “Remove” option is shown.
2. Move the Notepad to the “Remove” option. Then, the Notepad will be disappeared from
the main screen.
46
Enable the Notepad
1. Tap and hold the screen until the “Widgets” option is shown.
2. Select “Widgets” and select and drag the “AVer Whiteboard Notepad” to the main
screen.
47
Pinned File Put the favorite files and links for easily accessing.
1. Tap and hold the screen until the “Widgets” option is shown.
2. Select “Widgets” and select and drag the “AVer Pinned File” to the main screen.
48
3. Tap and hold the Pinned File to edit. 4. Select the “Edit content”.
5. Select “ ” can re-name the page of Pinned file. After enter the name, select “Done”
to save. The maximum length is 18 characters. Total is 6 Pinned File pages, select
and to switch it.

49
6. Select “Add Item” to add file or URL link.
Add File: Select Add Item > Add File and select the file.
The added file will be listed on the Pinned File page. To delete, select “ ”. To
change the order, tap and hold the “ ” to move.
50
Link to URL: Select Add Item > Link to URL and enter the URL (ex:
www.google.com) and the name of the URL.
The added URL will be listed on the Pinned File page. Select “ ” can delete the
file.
51
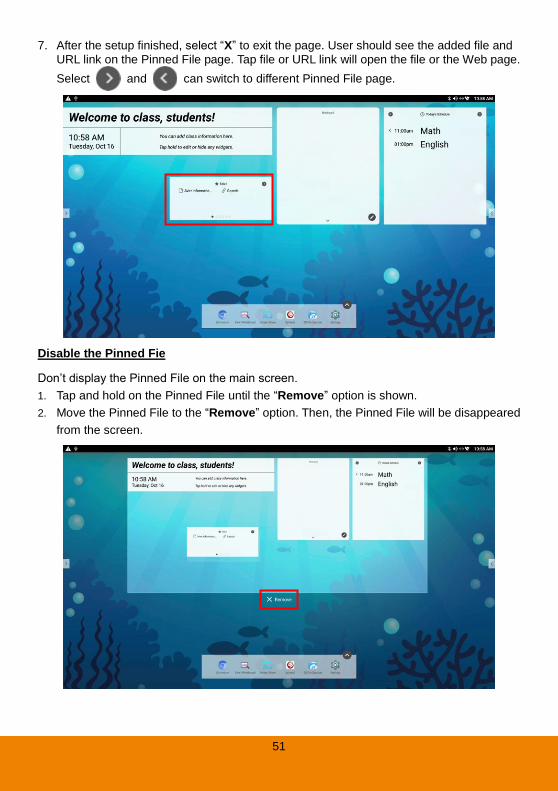
7. After the setup finished, select “X” to exit the page. User should see the added file and
URL link on the Pinned File page. Tap file or URL link will open the file or the Web page.
Select and can switch to different Pinned File page.
Disable the Pinned Fie
Don’t display the Pinned File on the main screen.
1. Tap and hold on the Pinned File until the “Remove” option is shown.
2. Move the Pinned File to the “Remove” option. Then, the Pinned File will be disappeared
from the screen.

52
Web Search Enter key word to search on the web.
1. Tap and hold the screen until the “Widgets” option is shown.
2. Select “Widgets” and select and drag the “AVer Web Search” to the main screen.
53
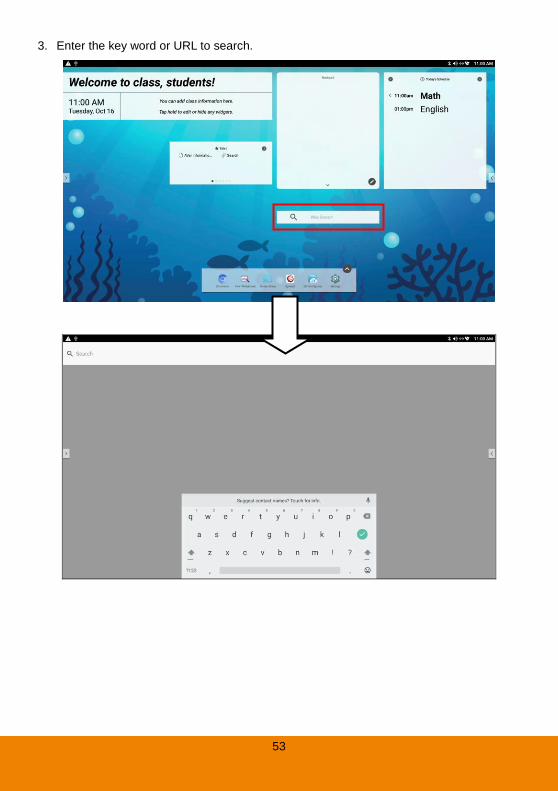
3. Enter the key word or URL to search.
54
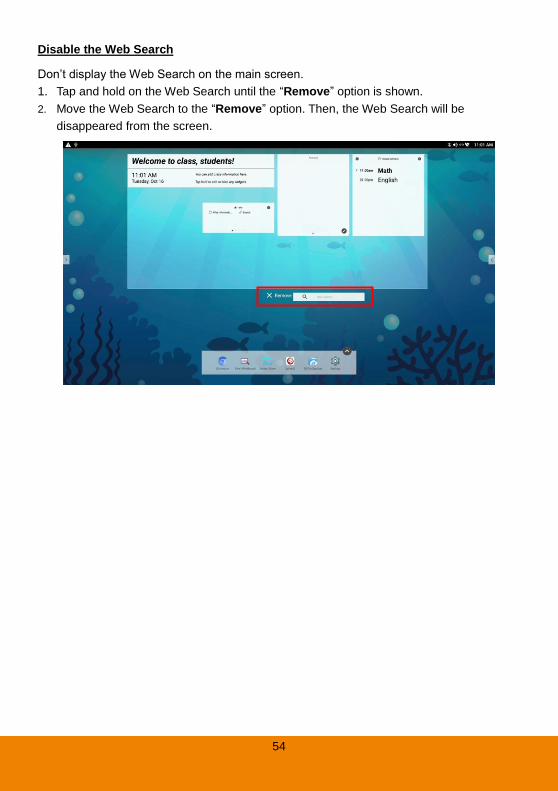
Disable the Web Search
Don’t display the Web Search on the main screen.
1. Tap and hold on the Web Search until the “Remove” option is shown.
2. Move the Web Search to the “Remove” option. Then, the Web Search will be
disappeared from the screen.

55
Toolbar
The toolbar is located at both of the screen, tap or on the both side of screen to
call out the tool bar. Tap” X” to hide the tool bar.
Back: Back to previous screen.
Home: Return to main screen.
Annotate: Call out the annotation tool (Also see Annotation Tool section).
Freeze Frame: Whine in freeze status, user can operate the power menu and
annotation function. To un-freeze, tap “Un Freeze” from toolbar.
App Switch: View recent running programs, switch to one of running program, and
close the running programs.
56
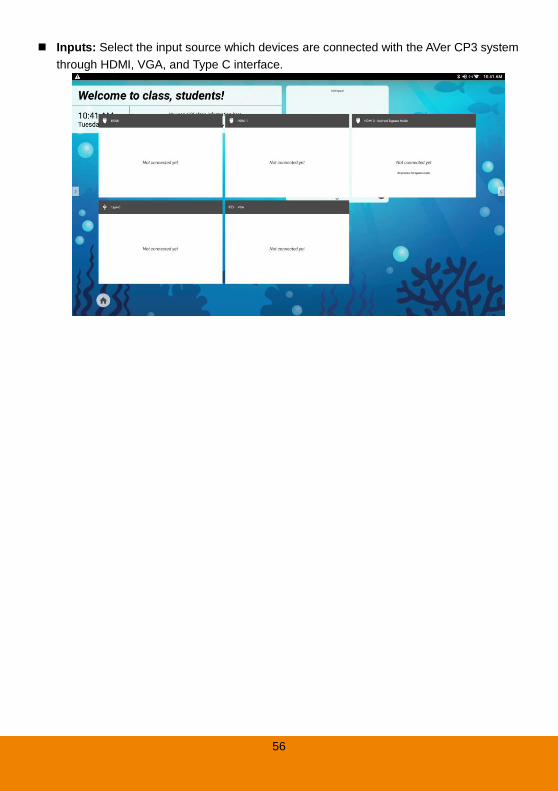
Inputs: Select the input source which devices are connected with the AVer CP3 system
through HDMI, VGA, and Type C interface.
57
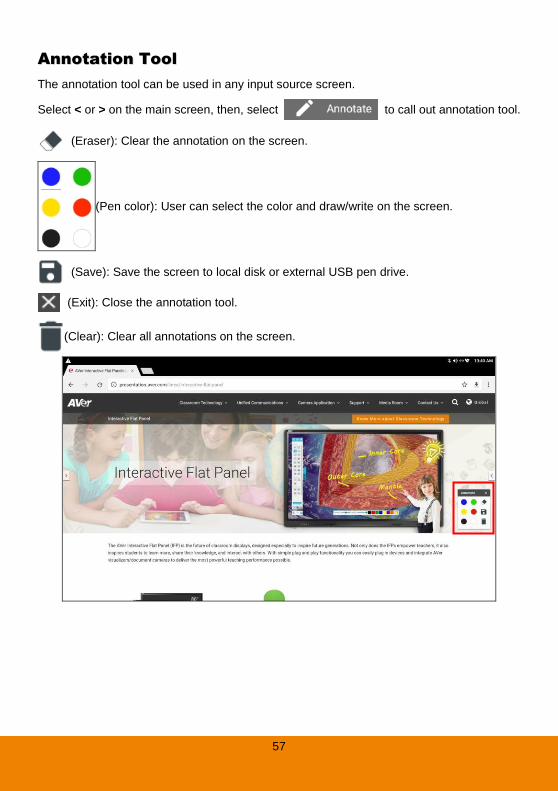
AAnnnnoottaattiioonn TTooooll The annotation tool can be used in any input source screen.
Select < or > on the main screen, then, select to call out annotation tool.
(Eraser): Clear the annotation on the screen.
(Pen color): User can select the color and draw/write on the screen.
(Save): Save the screen to local disk or external USB pen drive.
(Exit): Close the annotation tool.
(Clear): Clear all annotations on the screen.
58
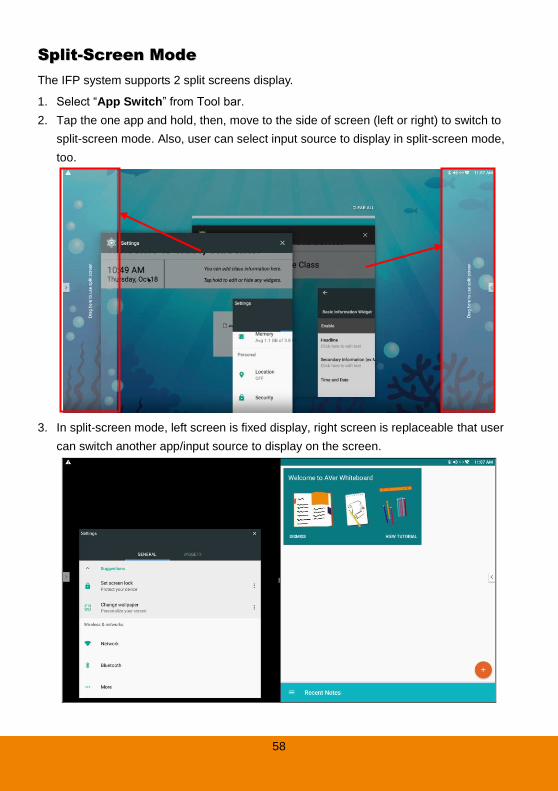
SSpplliitt--SSccrreeeenn MMooddee The IFP system supports 2 split screens display.
1. Select “App Switch” from Tool bar.
2. Tap the one app and hold, then, move to the side of screen (left or right) to switch to
split-screen mode. Also, user can select input source to display in split-screen mode,
too.
3. In split-screen mode, left screen is fixed display, right screen is replaceable that user
can switch another app/input source to display on the screen.
59
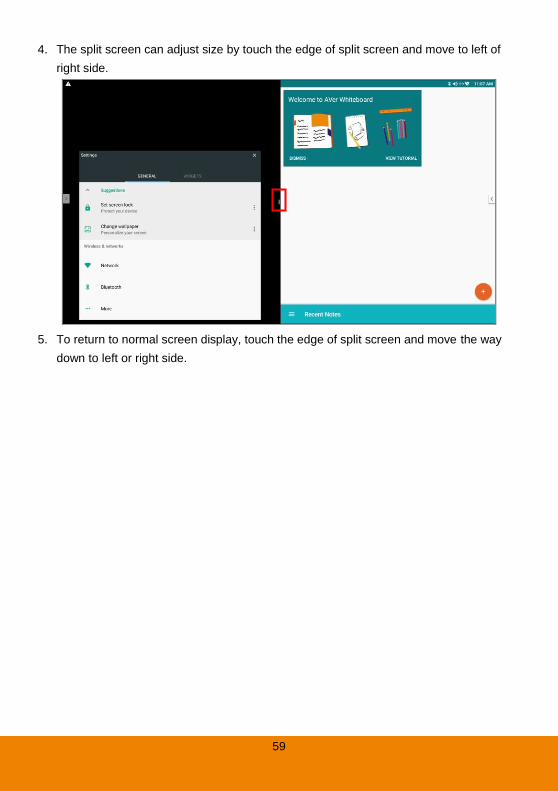
4. The split screen can adjust size by touch the edge of split screen and move to left of
right side.
5. To return to normal screen display, touch the edge of split screen and move the way
down to left or right side.
60
Cloud Storage
Create the google drive on IFP for file accessing and storage.
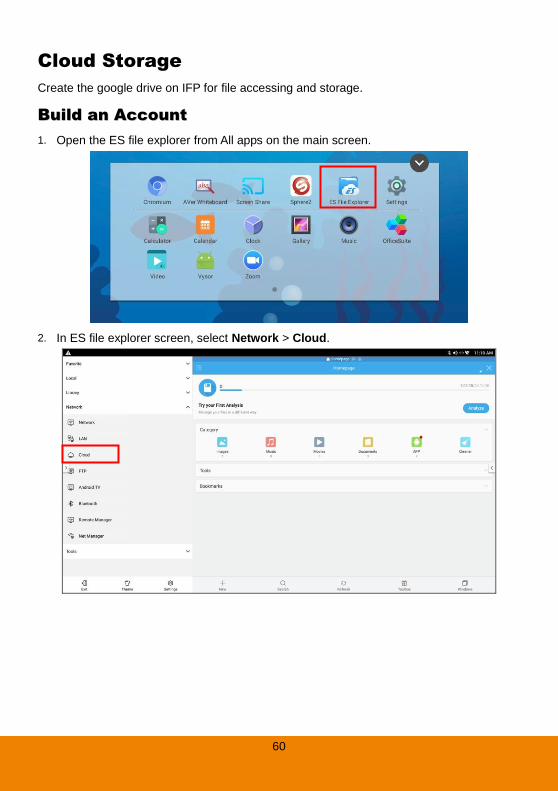
BBuuiilldd aann AAccccoouunntt 1. Open the ES file explorer from All apps on the main screen.
2. In ES file explorer screen, select Network > Cloud.
61
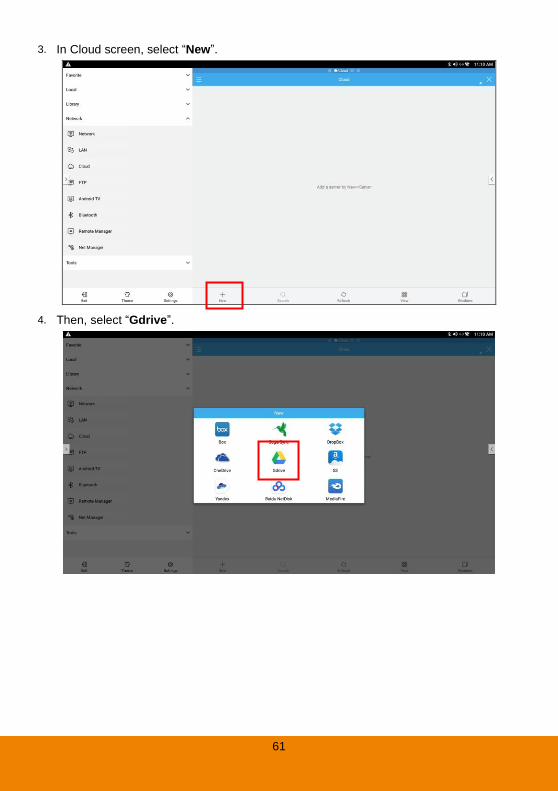
3. In Cloud screen, select “New”.
4. Then, select “Gdrive”.
62
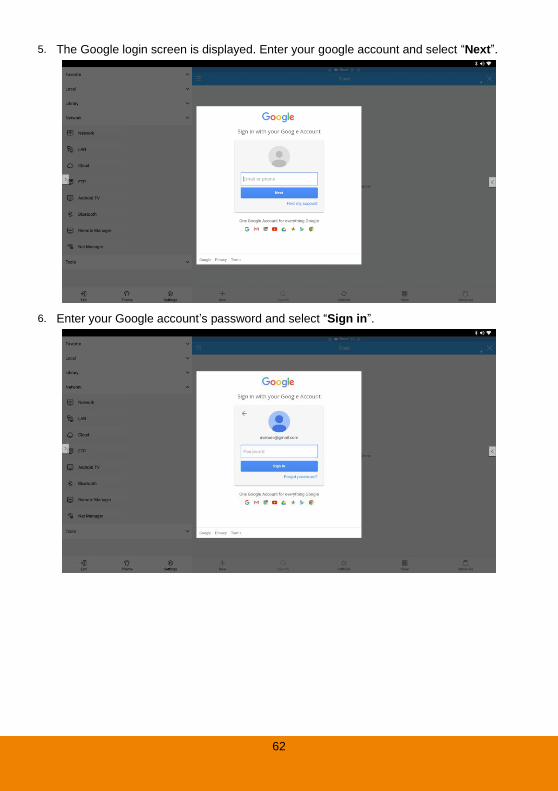
5. The Google login screen is displayed. Enter your google account and select “Next”.
6. Enter your Google account’s password and select “Sign in”.
63
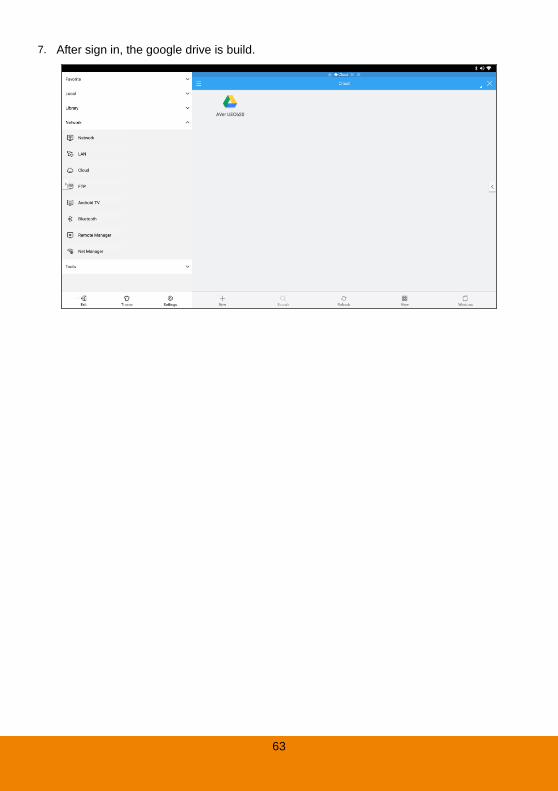
7. After sign in, the google drive is build.
64
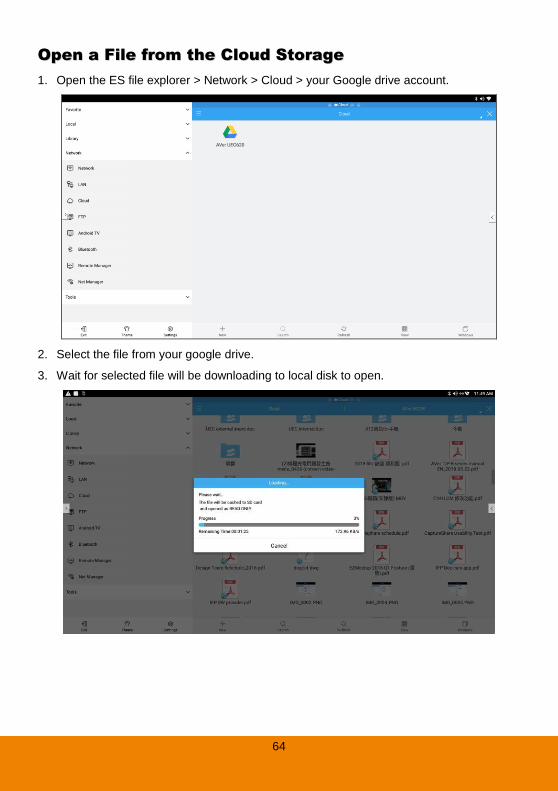
OOppeenn aa FFiillee ffrroomm tthhee CClloouudd SSttoorraaggee
1. Open the ES file explorer > Network > Cloud > your Google drive account.
2. Select the file from your google drive.
3. Wait for selected file will be downloading to local disk to open.
65
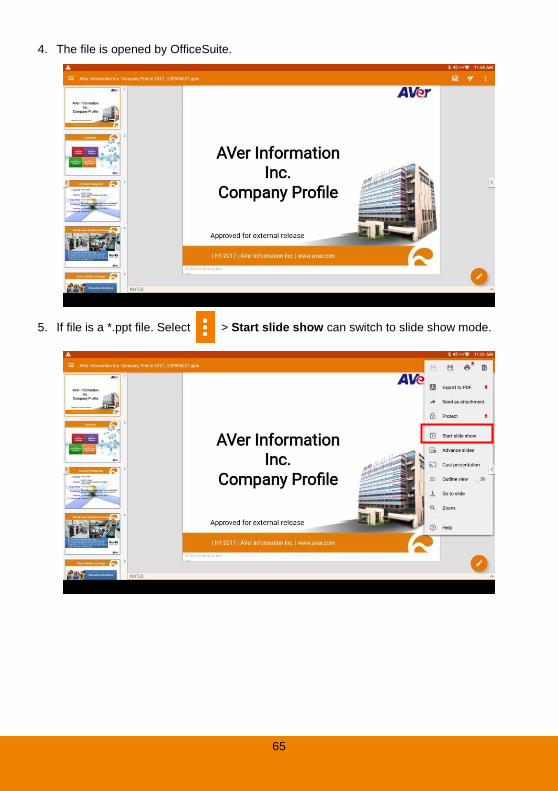
4. The file is opened by OfficeSuite.
5. If file is a *.ppt file. Select > Start slide show can switch to slide show mode.
66
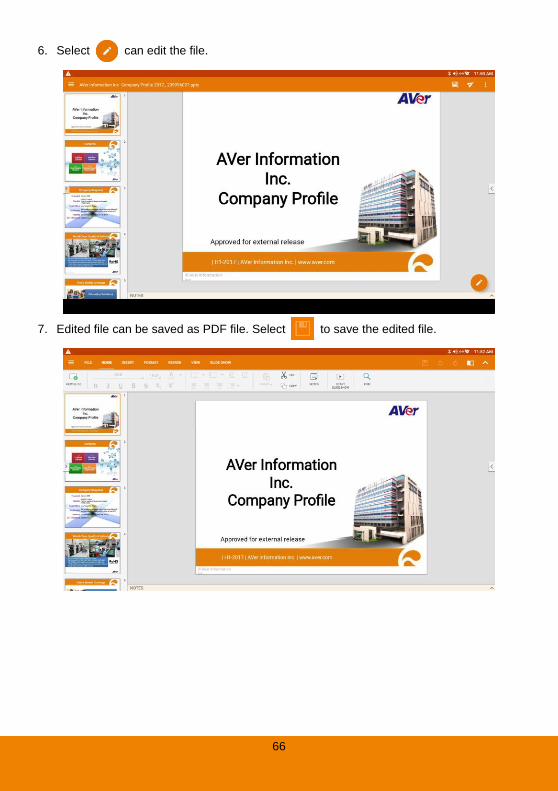
6. Select can edit the file.
7. Edited file can be saved as PDF file. Select to save the edited file.
67
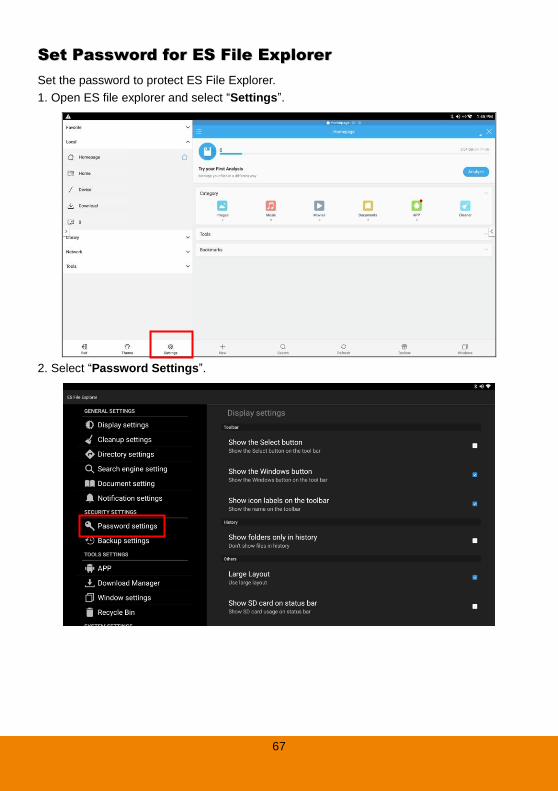
SSeett PPaasssswwoorrdd ffoorr EESS FFiillee EExxpplloorreerr
Set the password to protect ES File Explorer.
1. Open ES file explorer and select “Settings”.
2. Select “Password Settings”.

68
3. Select “App protection”.
4. Enter the password and re-enter password to confirm. Then, select “OK” to complete.
69
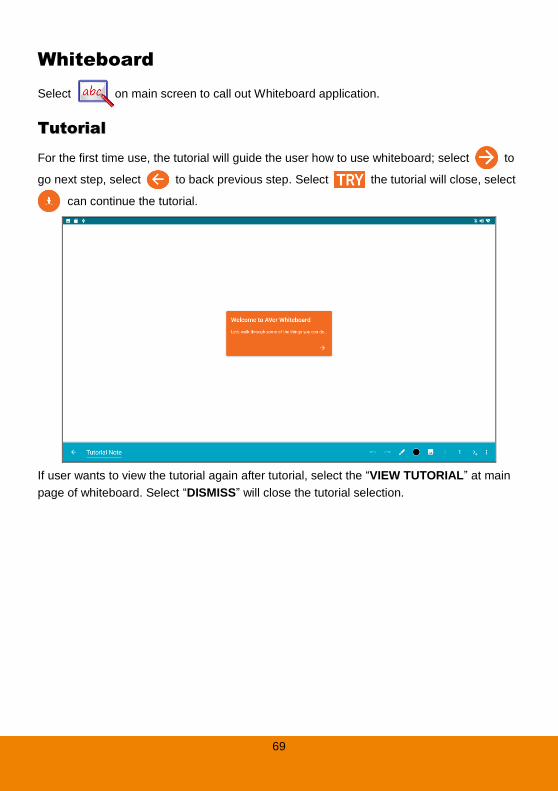
Whiteboard
Select on main screen to call out Whiteboard application.
TTuuttoorriiaall
For the first time use, the tutorial will guide the user how to use whiteboard; select to
go next step, select to back previous step. Select the tutorial will close, select
can continue the tutorial.
If user wants to view the tutorial again after tutorial, select the “VIEW TUTORIAL” at main
page of whiteboard. Select “DISMISS” will close the tutorial selection.

70
NNoottee FFoorrmmaatt
The note page has different format and user can choose the proper format to use.
1. Select and select “Note”. Also, user can select “Default note”. The default note
will be a blank page.
2. The note formats are category in Standard, Grid, Math&Engineering, Music, Sports, and
Planners&Lists. Choose the proper note format to use.
71
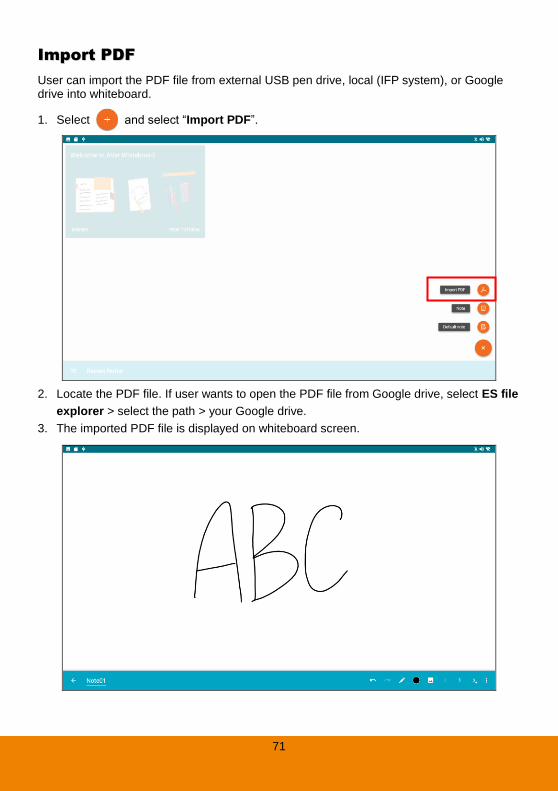
IImmppoorrtt PPDDFF
User can import the PDF file from external USB pen drive, local (IFP system), or Google drive into whiteboard.
1. Select and select “Import PDF”.
2. Locate the PDF file. If user wants to open the PDF file from Google drive, select ES file
explorer > select the path > your Google drive.
3. The imported PDF file is displayed on whiteboard screen.
72
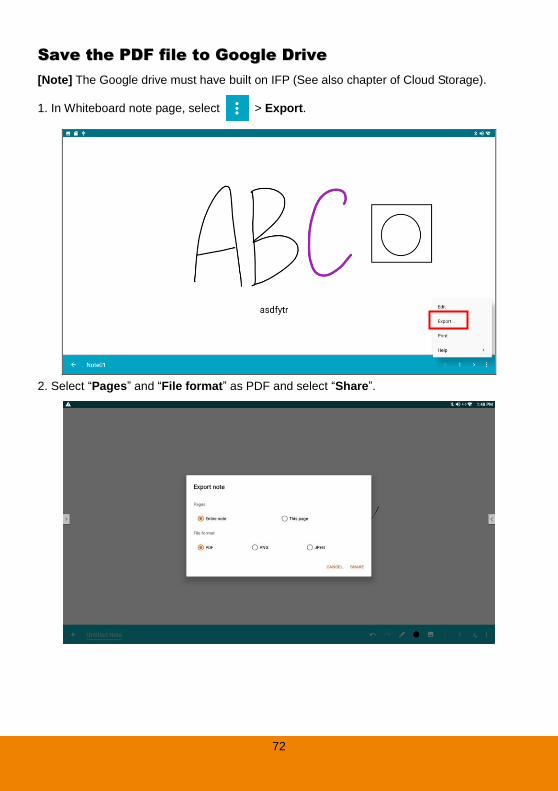
SSaavvee tthhee PPDDFF ffiillee ttoo GGooooggllee DDrriivvee
[Note] The Google drive must have built on IFP (See also chapter of Cloud Storage).
1. In Whiteboard note page, select > Export.
2. Select “Pages” and “File format” as PDF and select “Share”.
73
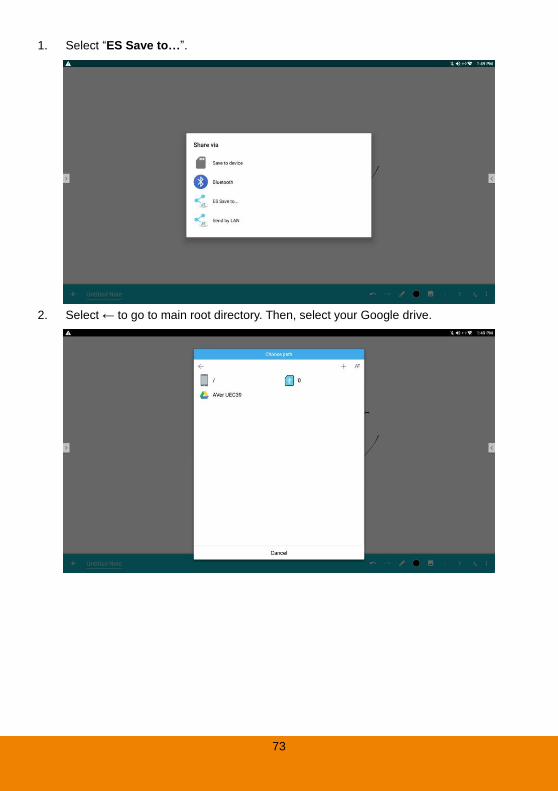
1. Select “ES Save to…”.
2. Select ← to go to main root directory. Then, select your Google drive.
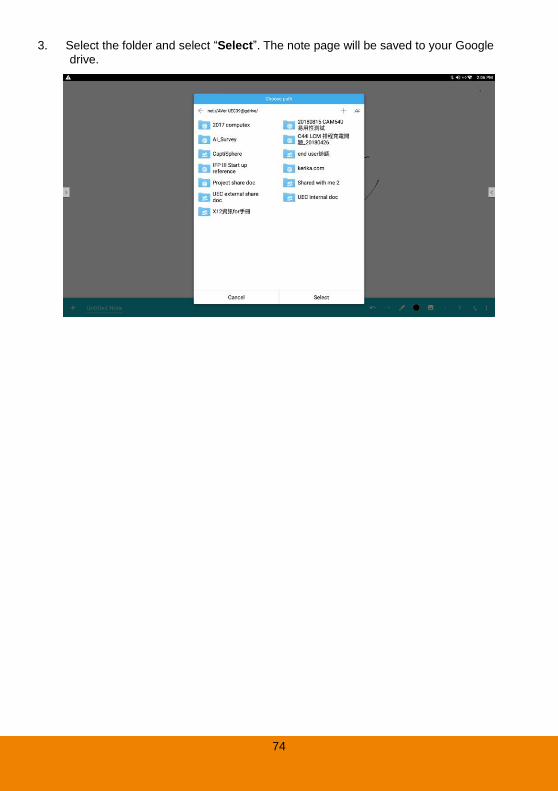
74
3. Select the folder and select “Select”. The note page will be saved to your Google
drive.
75
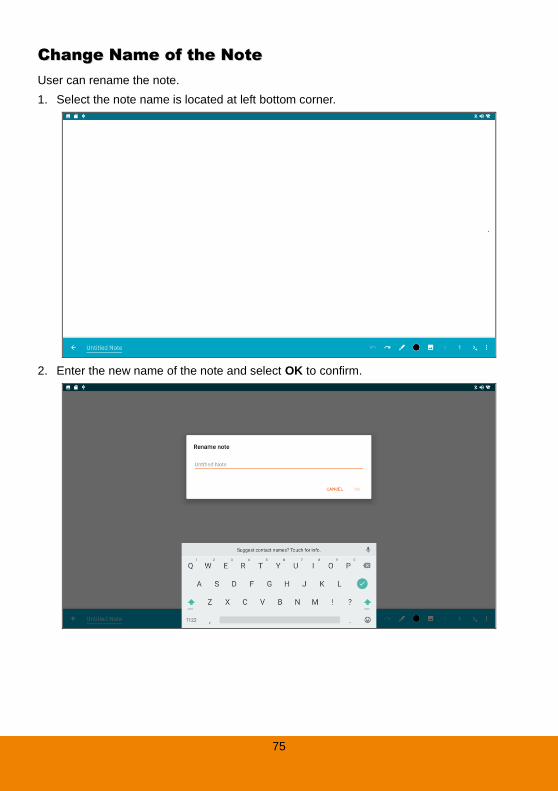
CChhaannggee NNaammee ooff tthhee NNoottee
User can rename the note.
1. Select the note name is located at left bottom corner.
2. Enter the new name of the note and select OK to confirm.
76
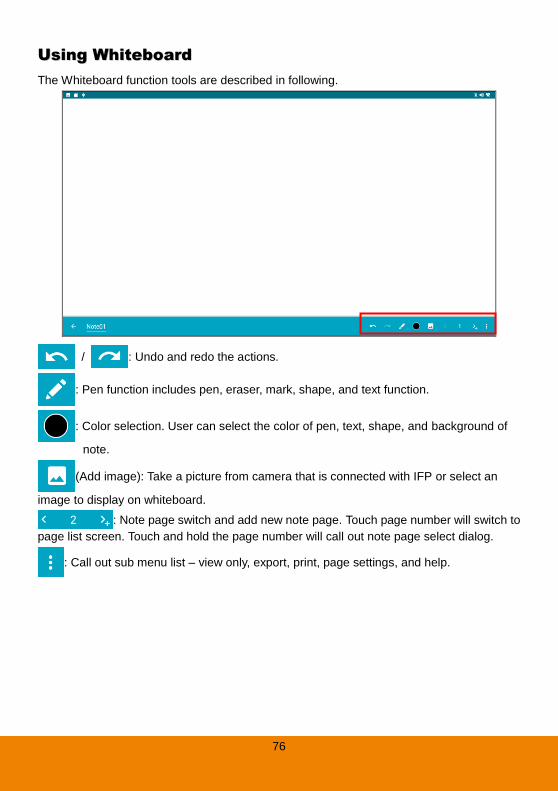
UUssiinngg WWhhiitteebbooaarrdd
The Whiteboard function tools are described in following.
/ : Undo and redo the actions.
: Pen function includes pen, eraser, mark, shape, and text function.
: Color selection. User can select the color of pen, text, shape, and background of
note.
(Add image): Take a picture from camera that is connected with IFP or select an
image to display on whiteboard.
: Note page switch and add new note page. Touch page number will switch to
page list screen. Touch and hold the page number will call out note page select dialog.
: Call out sub menu list – view only, export, print, page settings, and help.
77
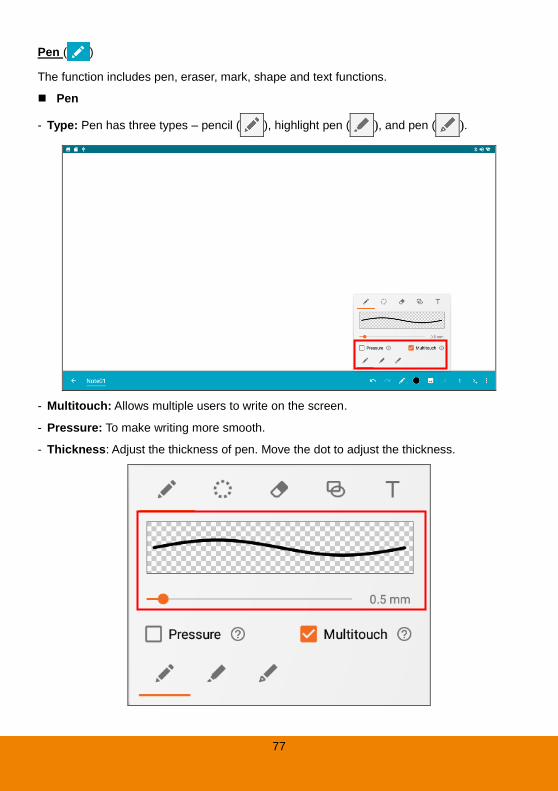
Pen ( )
The function includes pen, eraser, mark, shape and text functions.
Pen
- Type: Pen has three types – pencil ( ), highlight pen ( ), and pen ( ).
- Multitouch: Allows multiple users to write on the screen.
- Pressure: To make writing more smooth.
- Thickness: Adjust the thickness of pen. Move the dot to adjust the thickness.
78
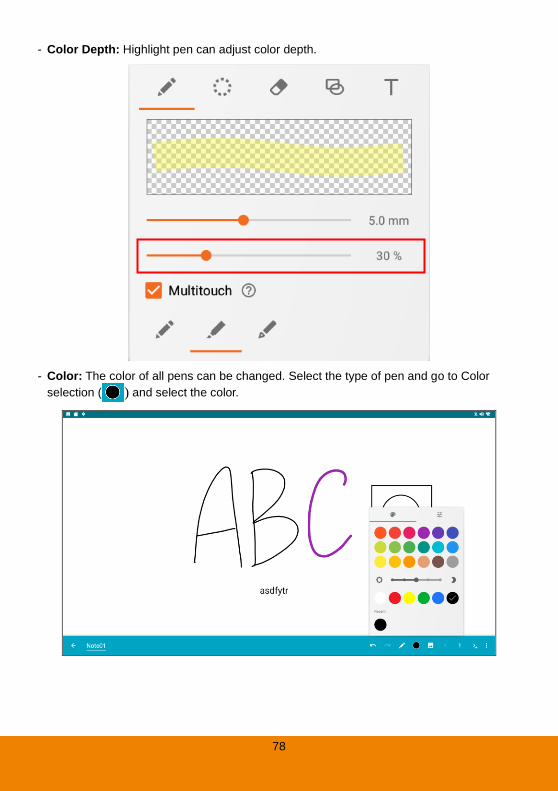
- Color Depth: Highlight pen can adjust color depth.
- Color: The color of all pens can be changed. Select the type of pen and go to Color
selection ( ) and select the color.
79
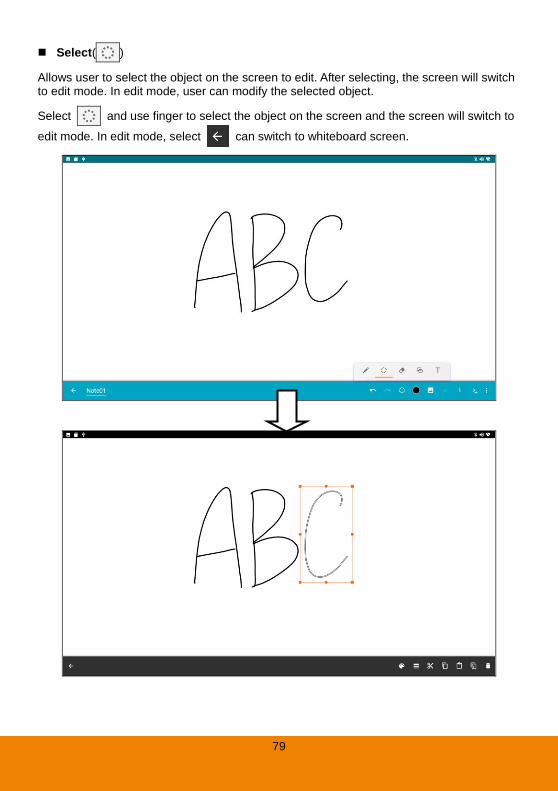
Select( )
Allows user to select the object on the screen to edit. After selecting, the screen will switch to edit mode. In edit mode, user can modify the selected object.
Select and use finger to select the object on the screen and the screen will switch to
edit mode. In edit mode, select can switch to whiteboard screen.
80
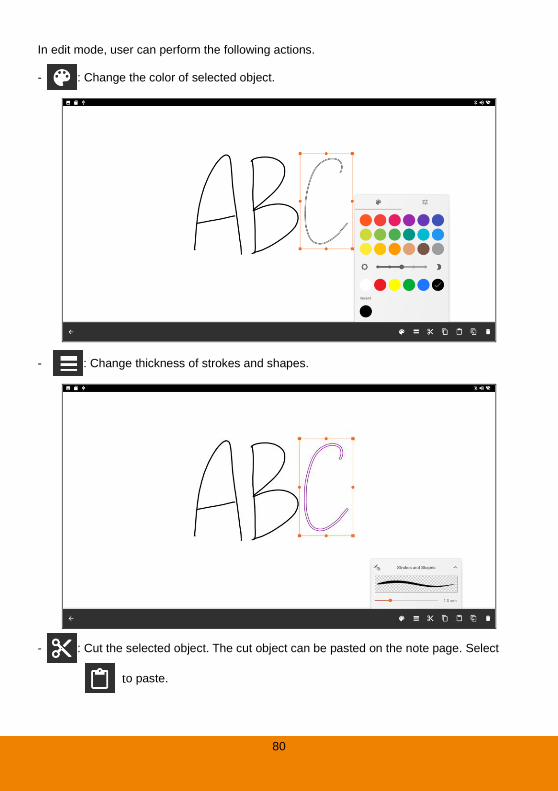
In edit mode, user can perform the following actions.
- : Change the color of selected object.
- : Change thickness of strokes and shapes.
- : Cut the selected object. The cut object can be pasted on the note page. Select
to paste.
81
- : Make a copy of selected object. Select can paste the copy object on the
note page.
- : Paste the cut or copy of the selected object.
- : Duplicate the selected object. The duplicate object will paste on note screen
immediately.
- : Delete the selected object.
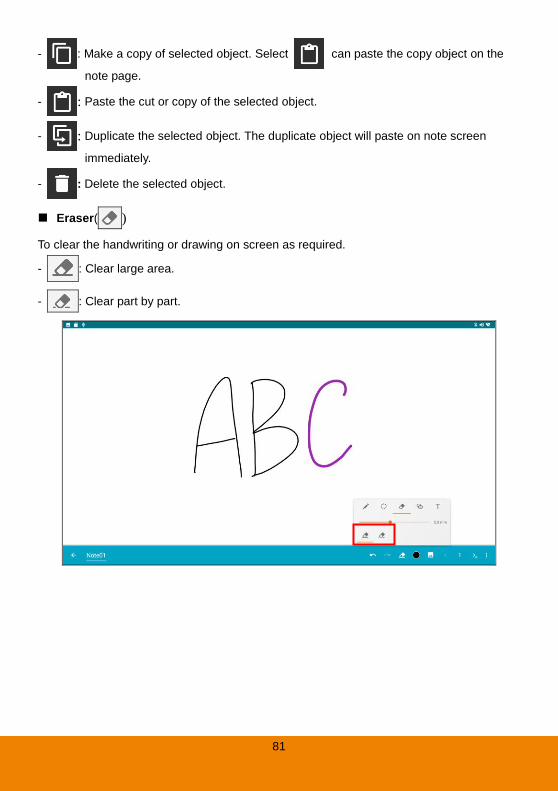
Eraser( )
To clear the handwriting or drawing on screen as required.
- : Clear large area.
- : Clear part by part.

82
Shape( )
Draw the shape object on the note page. Shape objects are included line, square, and
round. Move the dot to adjust thickness of the shape object.
Text( )
Type the text on the note page.
Move the dot to adjust the font size of the text.
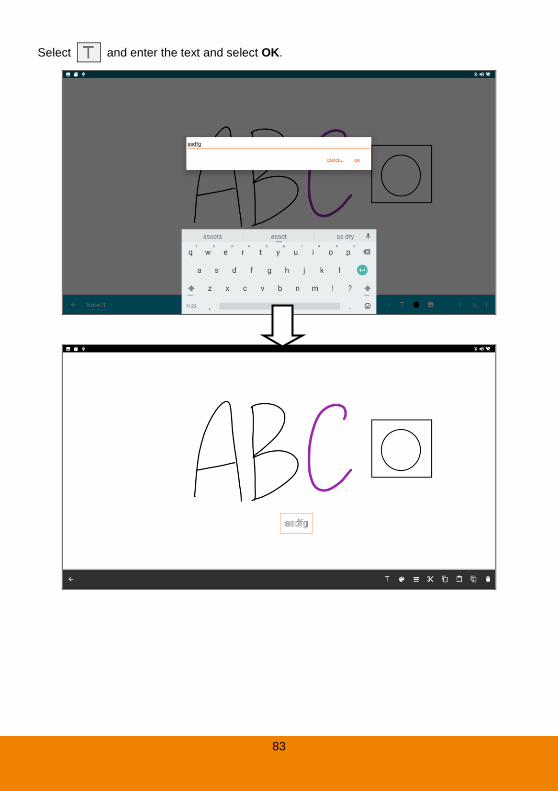
83
Select and enter the text and select OK.
84
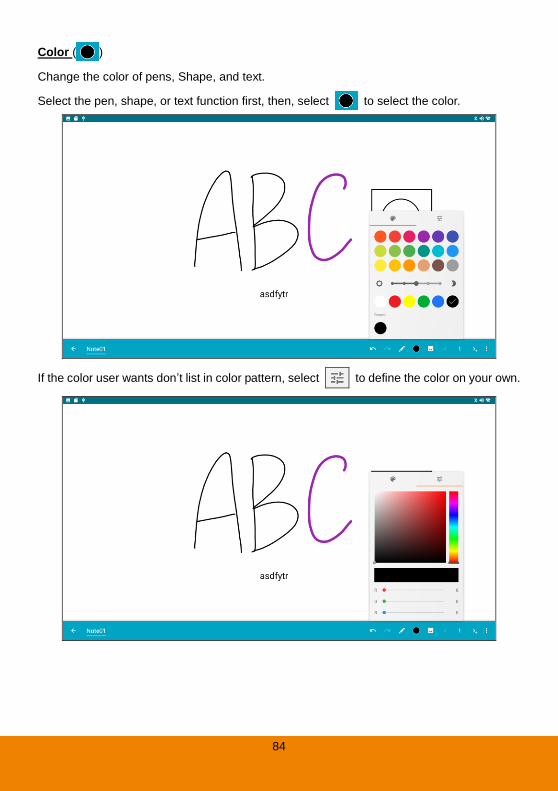
Color ( )
Change the color of pens, Shape, and text.
Select the pen, shape, or text function first, then, select to select the color.
If the color user wants don’t list in color pattern, select to define the color on your own.
85
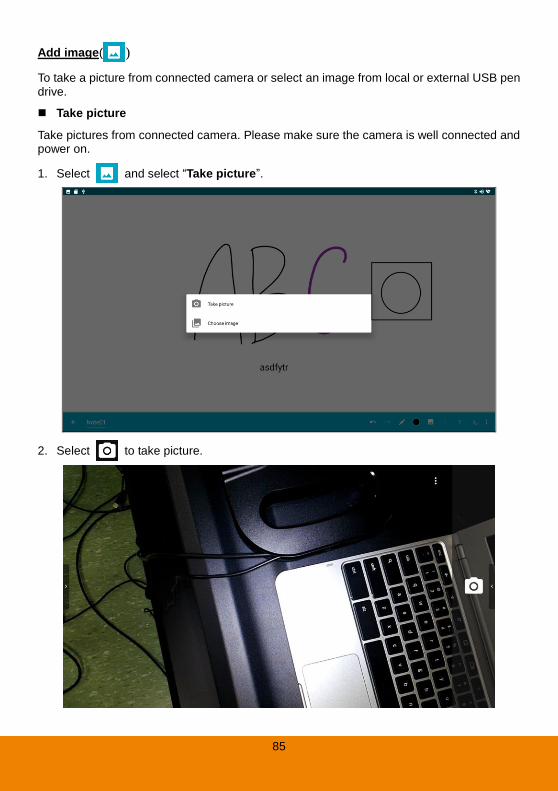
Add image( )
To take a picture from connected camera or select an image from local or external USB pen drive.
Take picture
Take pictures from connected camera. Please make sure the camera is well connected and power on.
1. Select and select “Take picture”.
2. Select to take picture.
86
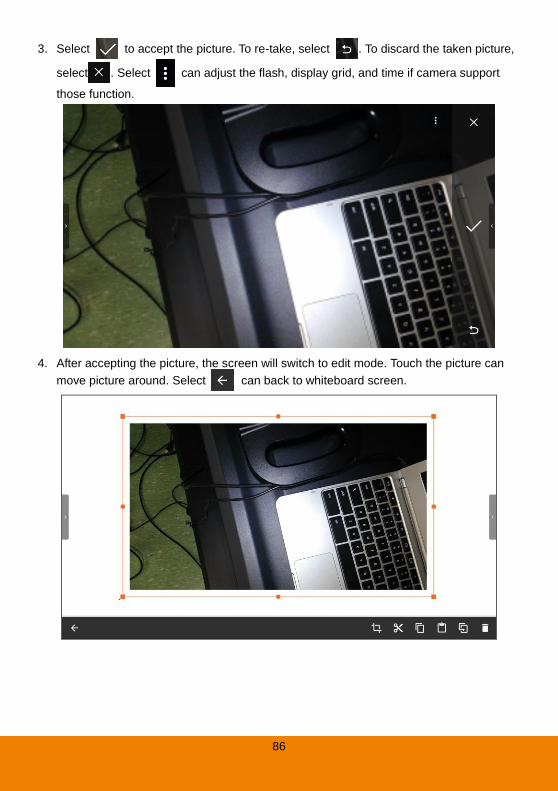
3. Select to accept the picture. To re-take, select . To discard the taken picture,
select . Select can adjust the flash, display grid, and time if camera support
those function.
4. After accepting the picture, the screen will switch to edit mode. Touch the picture can
move picture around. Select can back to whiteboard screen.
87
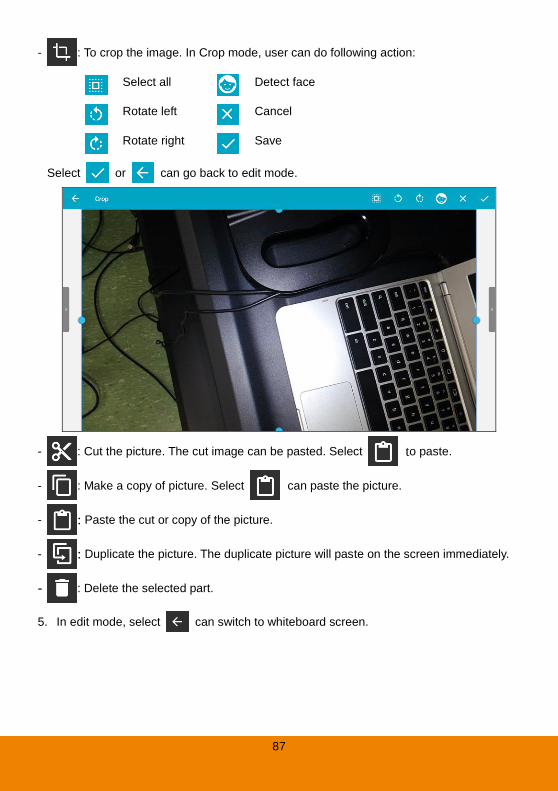
- : To crop the image. In Crop mode, user can do following action:
Select all Detect face
Rotate left Cancel
Rotate right Save
Select or can go back to edit mode.
- : Cut the picture. The cut image can be pasted. Select to paste.
- : Make a copy of picture. Select can paste the picture.
- : Paste the cut or copy of the picture.
- : Duplicate the picture. The duplicate picture will paste on the screen immediately.
- : Delete the selected part.
5. In edit mode, select can switch to whiteboard screen.

88
Choose image
Select an image from local hard disk or external USB pen drive.
1. Select and select “Choose image”.
2. Select the image from local or external USB pen drive.
89
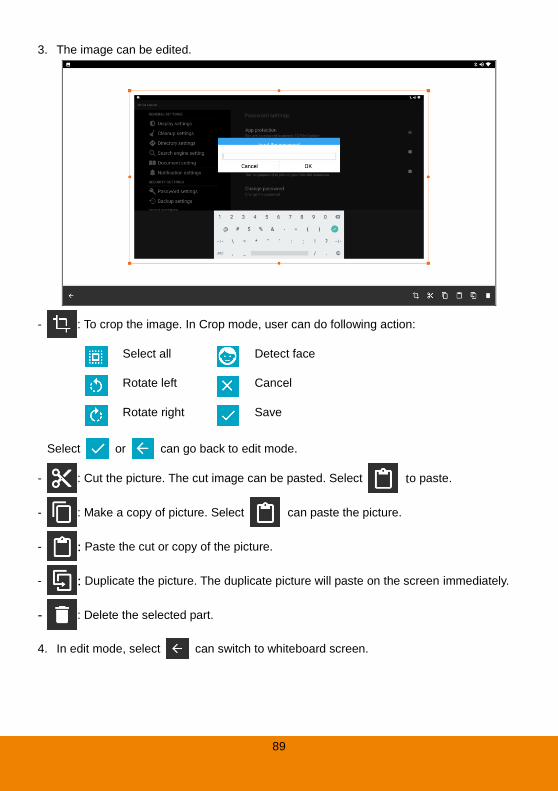
3. The image can be edited.
- : To crop the image. In Crop mode, user can do following action:
Select all Detect face
Rotate left Cancel
Rotate right Save
Select or can go back to edit mode.
- : Cut the picture. The cut image can be pasted. Select to paste.
- : Make a copy of picture. Select can paste the picture.
- : Paste the cut or copy of the picture.
- : Duplicate the picture. The duplicate picture will paste on the screen immediately.
- : Delete the selected part.
4. In edit mode, select can switch to whiteboard screen.
90
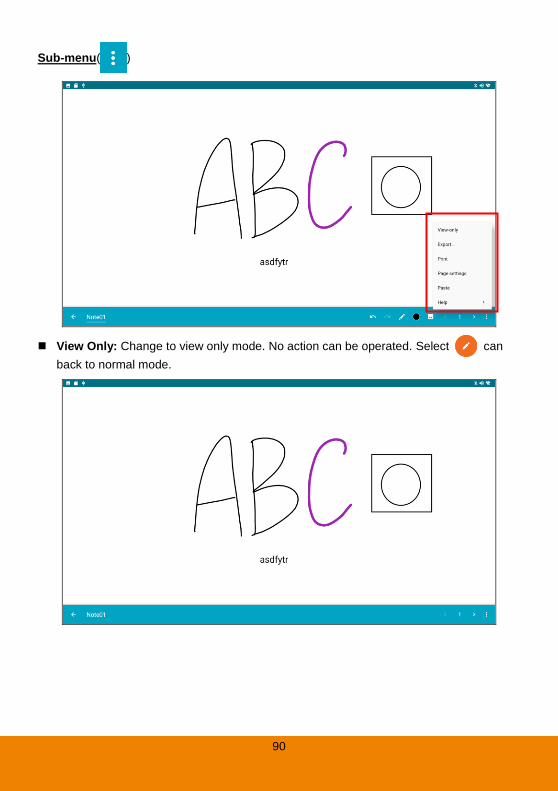
Sub-menu( )
View Only: Change to view only mode. No action can be operated. Select can
back to normal mode.
91
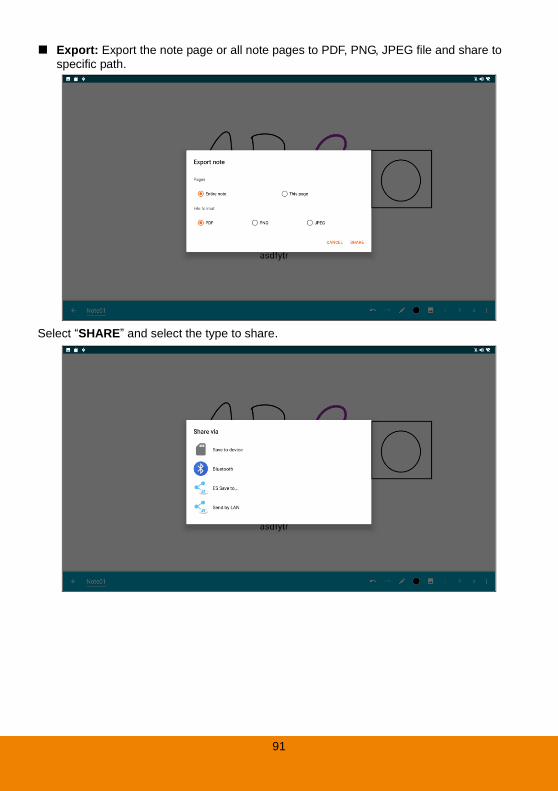
Export: Export the note page or all note pages to PDF, PNG, JPEG file and share to
specific path.
Select “SHARE” and select the type to share.

92
Print: To print out the note page.
Page Setting
Change background (note format), note page size, and color of note page.
Paste: In edit mode, user does the cut, copy, or duplicate and select “Paste” from
sub-menu list can be pasted the object on note page.
Help: View the tutorial and FAQ.
93
Screen Share
Devices are able to interact directly with the panel across all platforms (Windows, iOS, Android, Mac) and share content wirelessly without any app or add-on hardware installation.
EEnnaabbllee SSccrreeeenn SShhaarree
1. Network Setup (Ethernet & WIFI).
[Note]
a. If you want to share video or do Chromecast, suggest you to use 5G network for casting.
b. If you want to share via Miracast, please make sure you open the WIFI connection.
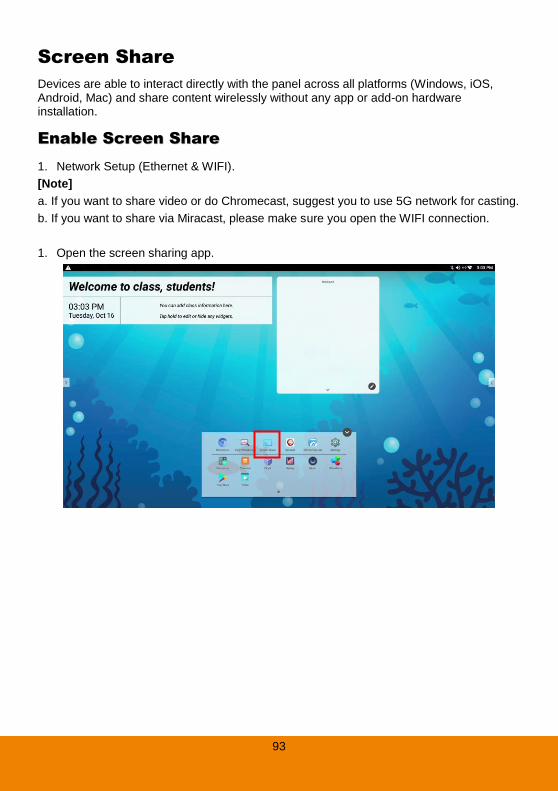
1. Open the screen sharing app.

94
2. Please make sure Panel and your sharing device is in the same network.
[Note] If you want to share via Miracast, you don’t need to setup the same network between
your devices.
3. Use device’s’ default mirror function to search the Panel Name.
[Note] Each IFP has different Panel Name. You can find it in Screen Share main page.
95
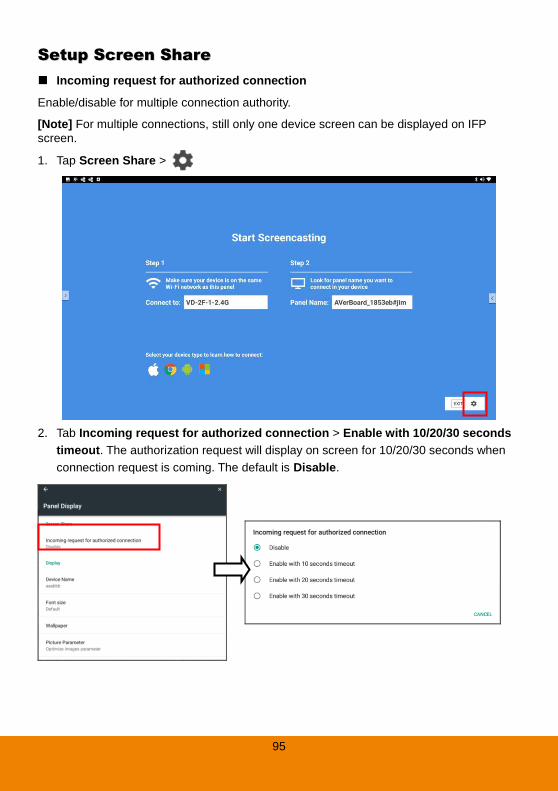
SSeettuupp SSccrreeeenn SShhaarree
Incoming request for authorized connection
Enable/disable for multiple connection authority.
[Note] For multiple connections, still only one device screen can be displayed on IFP
screen.
1. Tap Screen Share >
2. Tab Incoming request for authorized connection > Enable with 10/20/30 seconds
timeout. The authorization request will display on screen for 10/20/30 seconds when
connection request is coming. The default is Disable.
96
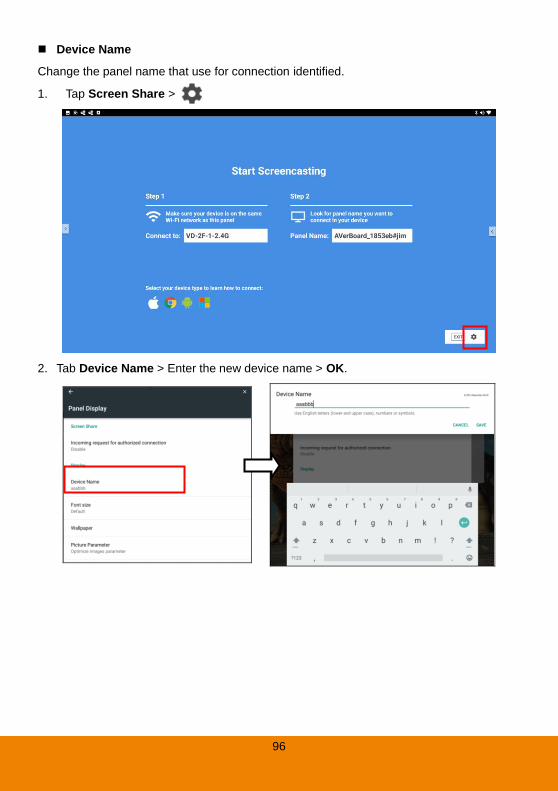
Device Name
Change the panel name that use for connection identified.
1. Tap Screen Share >
2. Tab Device Name > Enter the new device name > OK.

97
SShhaarriinngg ccoonntteenntt ffrroomm AAppppllee pprroodduucctt ttoo tthhee ppaanneell What is Airplay?
Airplay is a proprietary protocol developed by Apple Inc. that allows wireless display on
Airplay-enabled devices.
How to use AVer Screen Share app via Airplay?
1. Enable network connection (Ethernet or WIFI)
2. Open the screen sharing app( ).
3. If connected via Wi-Fi, please check that the network name displayed on your screen
share main page is the same as the network your device is connected to.
4. Use built-in screen mirroring function in your device to search Panel Name.
[Note] Each IFP has different Panel Name. You can find it in Screen Share main page.
To share your iOS device’s screen (i.e. iPhone or iPad) to the panel
1. Swipe up from the bottom of your screen to open Control Center.
98
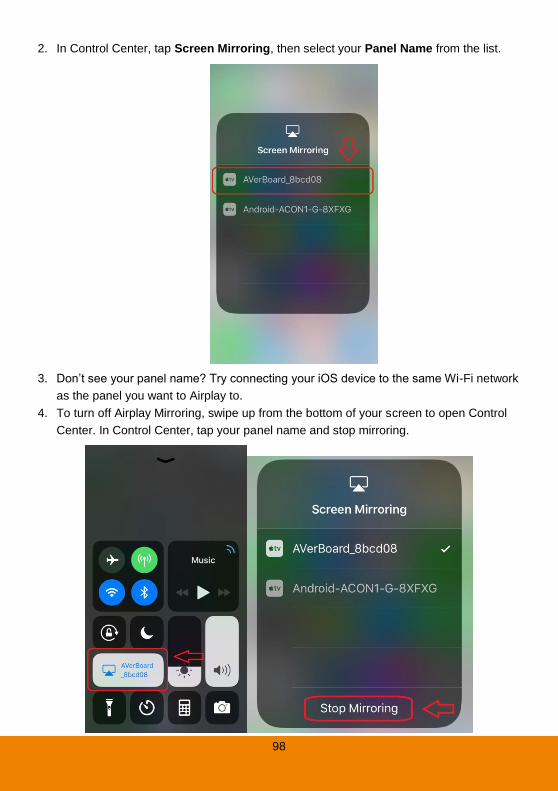
2. In Control Center, tap Screen Mirroring, then select your Panel Name from the list.
3. Don’t see your panel name? Try connecting your iOS device to the same Wi-Fi network
as the panel you want to Airplay to.
4. To turn off Airplay Mirroring, swipe up from the bottom of your screen to open Control
Center. In Control Center, tap your panel name and stop mirroring.
99
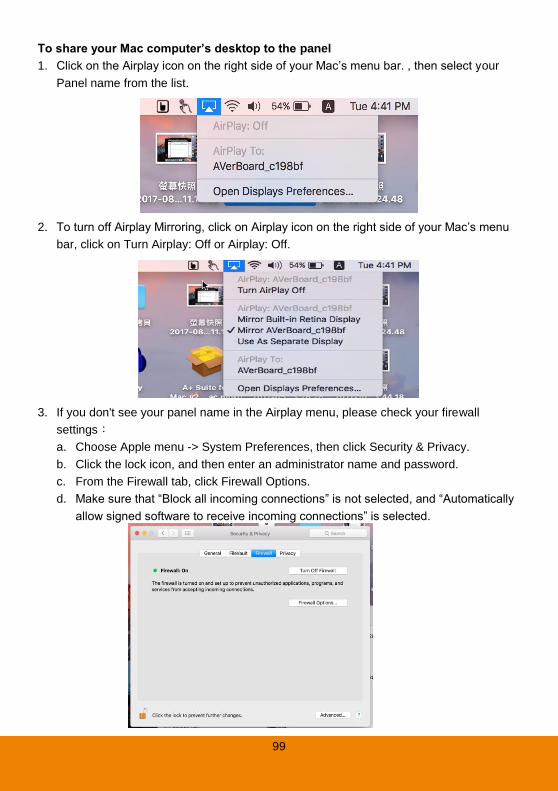
To share your Mac computer’s desktop to the panel
1. Click on the Airplay icon on the right side of your Mac’s menu bar. , then select your
Panel name from the list.
2. To turn off Airplay Mirroring, click on Airplay icon on the right side of your Mac’s menu
bar, click on Turn Airplay: Off or Airplay: Off.
3. If you don't see your panel name in the Airplay menu, please check your firewall
settings:
a. Choose Apple menu -> System Preferences, then click Security & Privacy.
b. Click the lock icon, and then enter an administrator name and password.
c. From the Firewall tab, click Firewall Options.
d. Make sure that “Block all incoming connections” is not selected, and “Automatically
allow signed software to receive incoming connections” is selected.

100
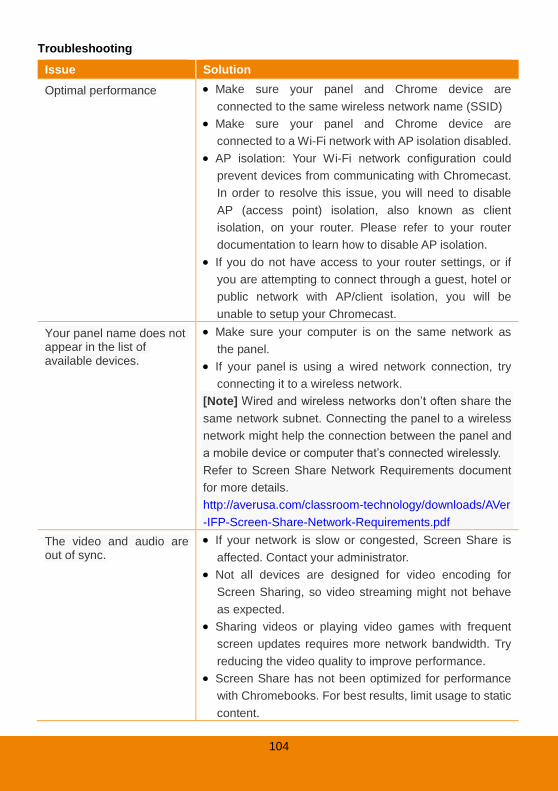
Troubleshooting
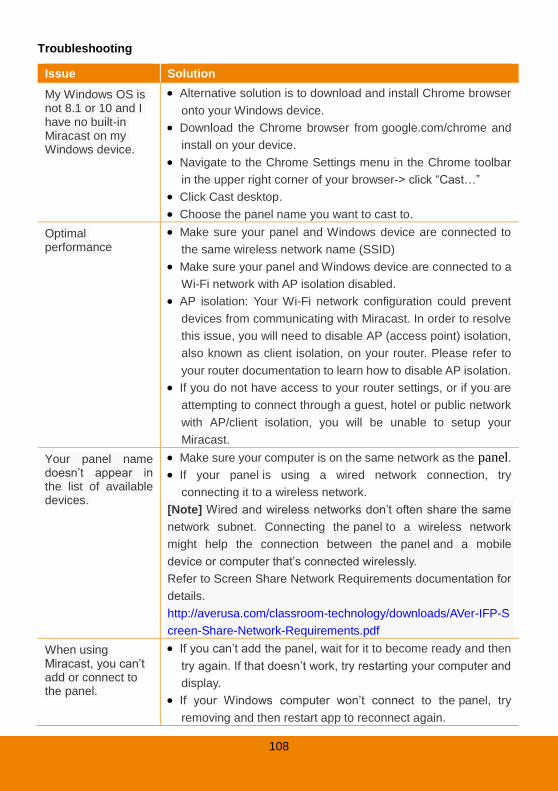
Issue Solution
Optimal performance Make sure your panel and Airplay device are connected to
the same wireless network name (SSID)
Make sure your panel and Airplay device are connected to a
Wi-Fi network with AP isolation disabled.
AP isolation: Your Wi-Fi network configuration could prevent
devices from communicating with Airplay. In order to resolve
this issue, you will need to disable AP (access point)
isolation, also known as client isolation, on your router.
Please refer to your router documentation to learn how to
disable AP isolation.
If you do not have access to your router settings, or if you
are attempting to connect through a guest, hotel or public
network with AP/client isolation, you will be unable to setup
your Airplay.
Your panel name
does not appear in
the list of available
devices.
Make sure your computer is on the same network as
the panel.
If your panel is using a wired network connection, try
connecting it to a wireless network.
[Note]
Wired and wireless networks don’t often share the same
network subnet. Connecting the panel to a wireless network
might help the connection between the panel and a mobile
device or computer that’s connected wirelessly.
Refer to Screen Share Network Requirements document for
more details.
http://averusa.com/classroom-technology/downloads/AVer-IFP-
Screen-Share-Network-Requirements.pdf
The video and audio
are out of sync.
If your network is slow or congested, Screen Share is
affected. Contact your administrator to check network
bandwidth.
Not all devices are designed for video encoding for Screen
Sharing, so video streaming might not behave as expected.
Sharing videos or playing video games with frequent screen
updates requires more network bandwidth. Try reducing the
video quality to improve performance.
101
Issue Solution
Stuttering or poor
quality
Your panel and device should be within ~15 feet (4 meters)
of each other.
Make sure both your panel and device are connected to the
same Wi-Fi network channel, either 2.4GHz or 5GHz.
Supported Apple devices and operating systems
1. Operation systems
iOS 10 or later
OS X 10.11 (El Capitan) or later
2. Apple devices
iPhone 4S or later
iPad Air or later
MacBook 12-inch or later
MacBook Pro 13-inch or later
102
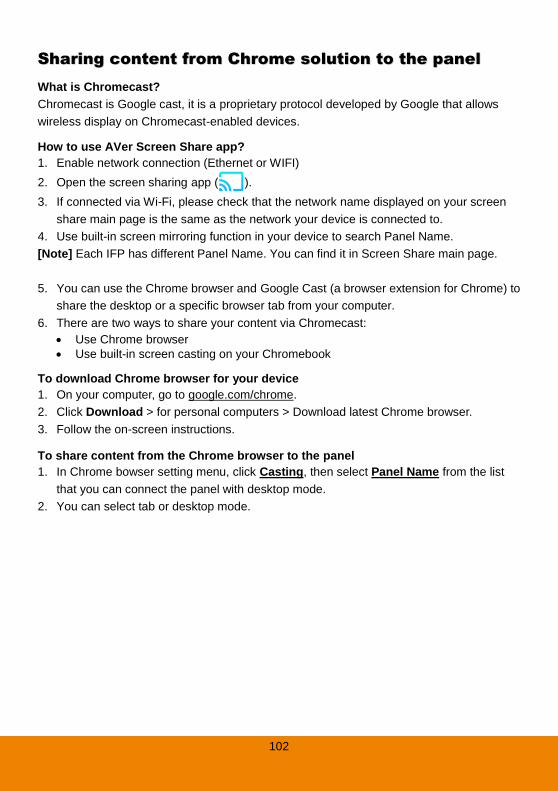
SShhaarriinngg ccoonntteenntt ffrroomm CChhrroommee ssoolluuttiioonn ttoo tthhee ppaanneell What is Chromecast? Chromecast is Google cast, it is a proprietary protocol developed by Google that allows
wireless display on Chromecast-enabled devices.
How to use AVer Screen Share app? 1. Enable network connection (Ethernet or WIFI) 2. Open the screen sharing app ( ). 3. If connected via Wi-Fi, please check that the network name displayed on your screen
share main page is the same as the network your device is connected to.
4. Use built-in screen mirroring function in your device to search Panel Name.
[Note] Each IFP has different Panel Name. You can find it in Screen Share main page.
5. You can use the Chrome browser and Google Cast (a browser extension for Chrome) to
share the desktop or a specific browser tab from your computer. 6. There are two ways to share your content via Chromecast:
Use Chrome browser
Use built-in screen casting on your Chromebook
To download Chrome browser for your device 1. On your computer, go to google.com/chrome.
2. Click Download > for personal computers > Download latest Chrome browser.
3. Follow the on-screen instructions.
To share content from the Chrome browser to the panel 1. In Chrome bowser setting menu, click Casting, then select Panel Name from the list
that you can connect the panel with desktop mode.
2. You can select tab or desktop mode.
103
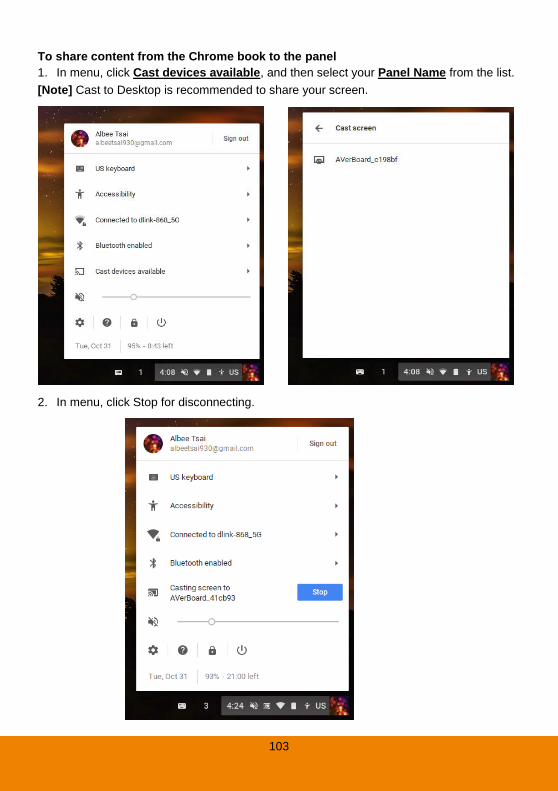
To share content from the Chrome book to the panel 1. In menu, click Cast devices available, and then select your Panel Name from the list.
[Note] Cast to Desktop is recommended to share your screen.
2. In menu, click Stop for disconnecting.
104
Troubleshooting Issue Solution
Optimal performance Make sure your panel and Chrome device are
connected to the same wireless network name (SSID)
Make sure your panel and Chrome device are
connected to a Wi-Fi network with AP isolation disabled.
AP isolation: Your Wi-Fi network configuration could
prevent devices from communicating with Chromecast.
In order to resolve this issue, you will need to disable
AP (access point) isolation, also known as client
isolation, on your router. Please refer to your router
documentation to learn how to disable AP isolation.
If you do not have access to your router settings, or if
you are attempting to connect through a guest, hotel or
public network with AP/client isolation, you will be
unable to setup your Chromecast.
Your panel name does not appear in the list of available devices.
Make sure your computer is on the same network as
the panel.
If your panel is using a wired network connection, try
connecting it to a wireless network.
[Note] Wired and wireless networks don’t often share the
same network subnet. Connecting the panel to a wireless
network might help the connection between the panel and
a mobile device or computer that’s connected wirelessly.
Refer to Screen Share Network Requirements document
for more details.
http://averusa.com/classroom-technology/downloads/AVer
-IFP-Screen-Share-Network-Requirements.pdf
The video and audio are out of sync.
If your network is slow or congested, Screen Share is
affected. Contact your administrator.
Not all devices are designed for video encoding for
Screen Sharing, so video streaming might not behave
as expected.
Sharing videos or playing video games with frequent
screen updates requires more network bandwidth. Try
reducing the video quality to improve performance.
Screen Share has not been optimized for performance
with Chromebooks. For best results, limit usage to static
content.
105
Issue Solution
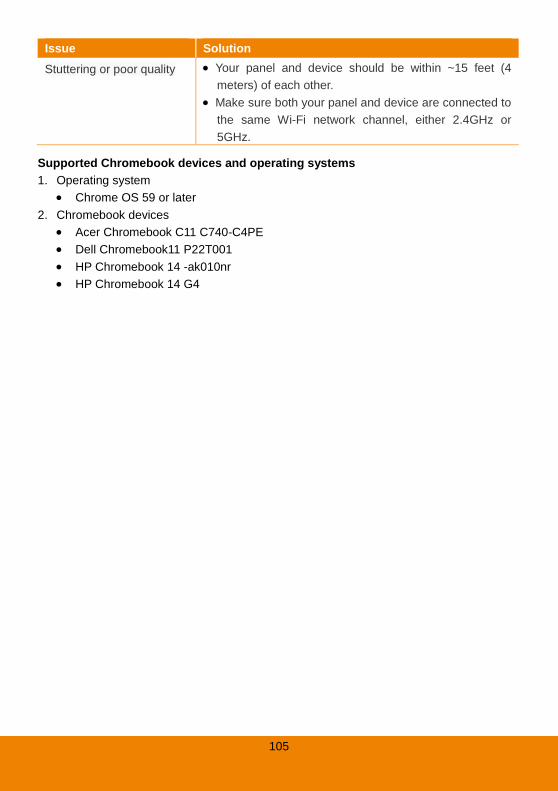
Stuttering or poor quality Your panel and device should be within ~15 feet (4
meters) of each other.
Make sure both your panel and device are connected to
the same Wi-Fi network channel, either 2.4GHz or
5GHz.
Supported Chromebook devices and operating systems 1. Operating system
Chrome OS 59 or later 2. Chromebook devices
Acer Chromebook C11 C740-C4PE
Dell Chromebook11 P22T001
HP Chromebook 14 -ak010nr
HP Chromebook 14 G4
106
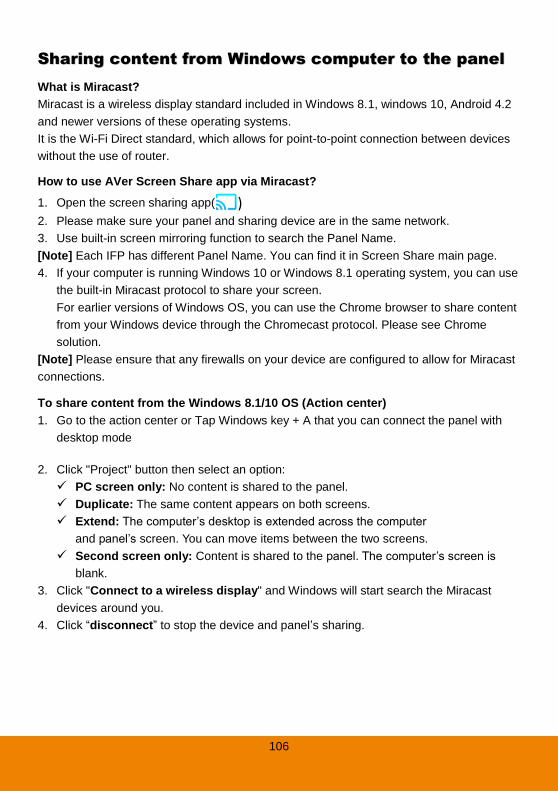
SShhaarriinngg ccoonntteenntt ffrroomm WWiinnddoowwss ccoommppuutteerr ttoo tthhee ppaanneell What is Miracast? Miracast is a wireless display standard included in Windows 8.1, windows 10, Android 4.2
and newer versions of these operating systems.
It is the Wi-Fi Direct standard, which allows for point-to-point connection between devices
without the use of router.
How to use AVer Screen Share app via Miracast? 1. Open the screen sharing app( ) 2. Please make sure your panel and sharing device are in the same network.
3. Use built-in screen mirroring function to search the Panel Name. [Note] Each IFP has different Panel Name. You can find it in Screen Share main page. 4. If your computer is running Windows 10 or Windows 8.1 operating system, you can use
the built-in Miracast protocol to share your screen. For earlier versions of Windows OS, you can use the Chrome browser to share content
from your Windows device through the Chromecast protocol. Please see Chrome
solution.
[Note] Please ensure that any firewalls on your device are configured to allow for Miracast
connections.
To share content from the Windows 8.1/10 OS (Action center) 1. Go to the action center or Tap Windows key + A that you can connect the panel with
desktop mode
2. Click "Project" button then select an option:
PC screen only: No content is shared to the panel.
Duplicate: The same content appears on both screens.
Extend: The computer’s desktop is extended across the computer
and panel’s screen. You can move items between the two screens.
Second screen only: Content is shared to the panel. The computer’s screen is
blank. 3. Click "Connect to a wireless display" and Windows will start search the Miracast
devices around you.
4. Click “disconnect” to stop the device and panel’s sharing.
107
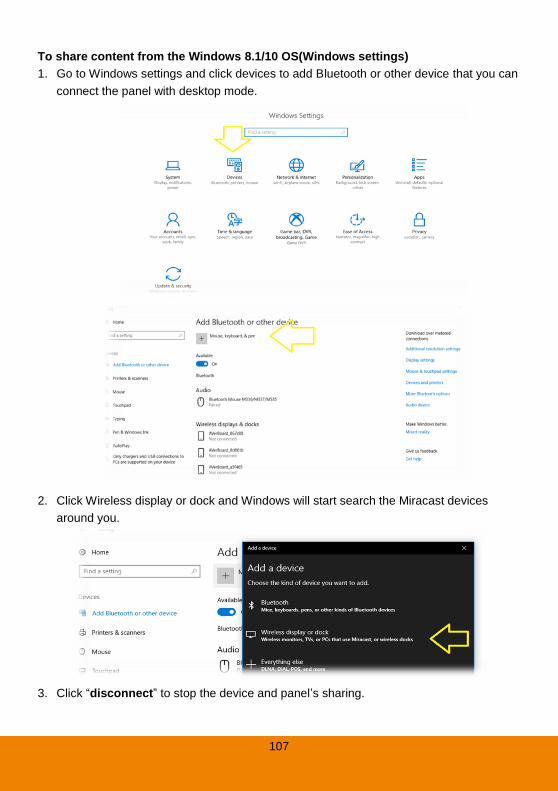
To share content from the Windows 8.1/10 OS(Windows settings) 1. Go to Windows settings and click devices to add Bluetooth or other device that you can
connect the panel with desktop mode.
2. Click Wireless display or dock and Windows will start search the Miracast devices
around you.
3. Click “disconnect” to stop the device and panel’s sharing.
108
Troubleshooting
Issue Solution
My Windows OS is not 8.1 or 10 and I have no built-in Miracast on my Windows device.
Alternative solution is to download and install Chrome browser
onto your Windows device.
Download the Chrome browser from google.com/chrome and
install on your device.
Navigate to the Chrome Settings menu in the Chrome toolbar
in the upper right corner of your browser-> click “Cast…”
Click Cast desktop.
Choose the panel name you want to cast to.
Optimal performance
Make sure your panel and Windows device are connected to
the same wireless network name (SSID)
Make sure your panel and Windows device are connected to a
Wi-Fi network with AP isolation disabled.
AP isolation: Your Wi-Fi network configuration could prevent
devices from communicating with Miracast. In order to resolve
this issue, you will need to disable AP (access point) isolation,
also known as client isolation, on your router. Please refer to
your router documentation to learn how to disable AP isolation.
If you do not have access to your router settings, or if you are
attempting to connect through a guest, hotel or public network
with AP/client isolation, you will be unable to setup your
Miracast.
Your panel name doesn’t appear in the list of available devices.
Make sure your computer is on the same network as the panel.
If your panel is using a wired network connection, try
connecting it to a wireless network.
[Note] Wired and wireless networks don’t often share the same
network subnet. Connecting the panel to a wireless network
might help the connection between the panel and a mobile
device or computer that’s connected wirelessly.
Refer to Screen Share Network Requirements documentation for
details.
http://averusa.com/classroom-technology/downloads/AVer-IFP-S
creen-Share-Network-Requirements.pdf
When using Miracast, you can’t add or connect to the panel.
If you can’t add the panel, wait for it to become ready and then
try again. If that doesn’t work, try restarting your computer and
display.
If your Windows computer won’t connect to the panel, try
removing and then restart app to reconnect again.
109
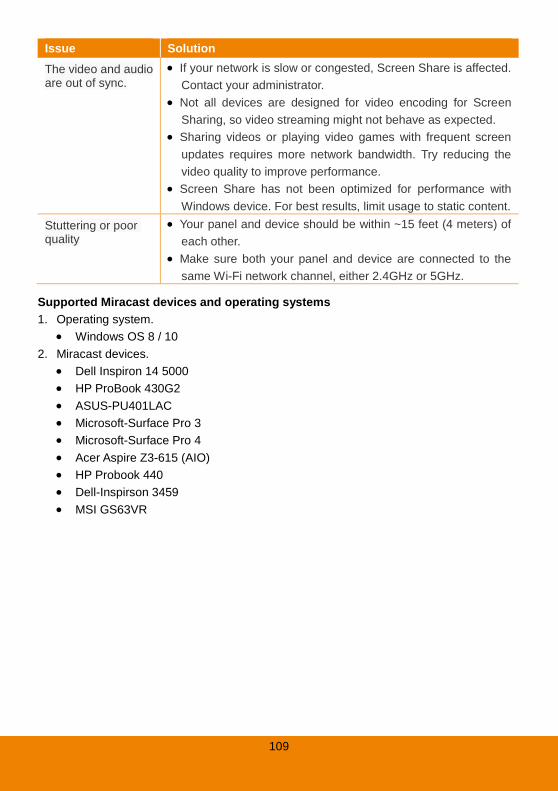
Issue Solution
The video and audio are out of sync.
If your network is slow or congested, Screen Share is affected.
Contact your administrator.
Not all devices are designed for video encoding for Screen
Sharing, so video streaming might not behave as expected.
Sharing videos or playing video games with frequent screen
updates requires more network bandwidth. Try reducing the
video quality to improve performance.
Screen Share has not been optimized for performance with
Windows device. For best results, limit usage to static content.
Stuttering or poor quality
Your panel and device should be within ~15 feet (4 meters) of
each other.
Make sure both your panel and device are connected to the
same Wi-Fi network channel, either 2.4GHz or 5GHz.
Supported Miracast devices and operating systems 1. Operating system.
Windows OS 8 / 10 2. Miracast devices.
Dell Inspiron 14 5000
HP ProBook 430G2
ASUS-PU401LAC
Microsoft-Surface Pro 3
Microsoft-Surface Pro 4
Acer Aspire Z3-615 (AIO)
HP Probook 440
Dell-Inspirson 3459
MSI GS63VR
110
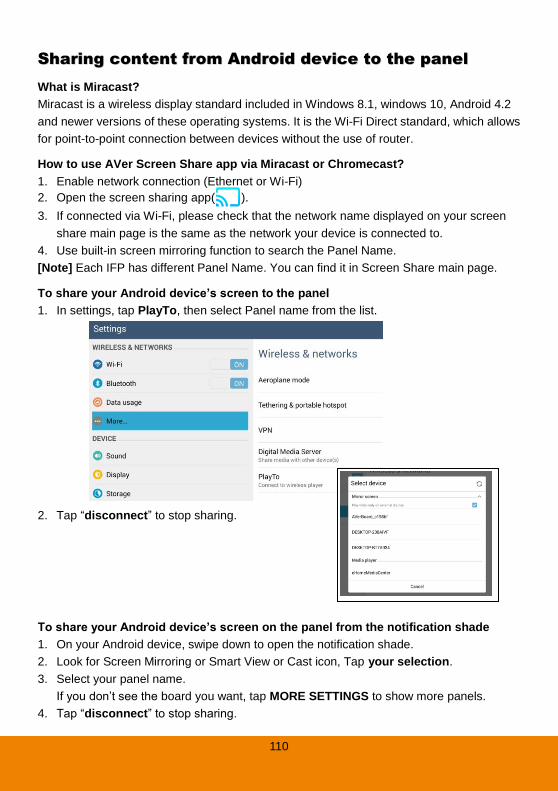
SShhaarriinngg ccoonntteenntt ffrroomm AAnnddrrooiidd ddeevviiccee ttoo tthhee ppaanneell What is Miracast? Miracast is a wireless display standard included in Windows 8.1, windows 10, Android 4.2
and newer versions of these operating systems. It is the Wi-Fi Direct standard, which allows
for point-to-point connection between devices without the use of router.
How to use AVer Screen Share app via Miracast or Chromecast? 1. Enable network connection (Ethernet or Wi-Fi)
2. Open the screen sharing app( ).
3. If connected via Wi-Fi, please check that the network name displayed on your screen
share main page is the same as the network your device is connected to.
4. Use built-in screen mirroring function to search the Panel Name.
[Note] Each IFP has different Panel Name. You can find it in Screen Share main page.
To share your Android device’s screen to the panel 1. In settings, tap PlayTo, then select Panel name from the list.
2. Tap “disconnect” to stop sharing.
To share your Android device’s screen on the panel from the notification shade 1. On your Android device, swipe down to open the notification shade.
2. Look for Screen Mirroring or Smart View or Cast icon, Tap your selection.
3. Select your panel name. If you don’t see the board you want, tap MORE SETTINGS to show more panels.
4. Tap “disconnect” to stop sharing.
111
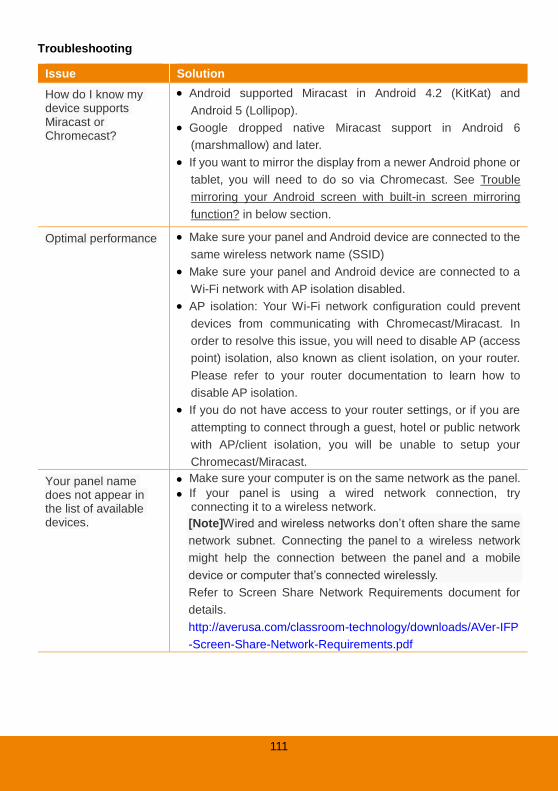
Troubleshooting
Issue Solution
How do I know my device supports Miracast or Chromecast?
Android supported Miracast in Android 4.2 (KitKat) and
Android 5 (Lollipop).
Google dropped native Miracast support in Android 6
(marshmallow) and later.
If you want to mirror the display from a newer Android phone or
tablet, you will need to do so via Chromecast. See Trouble
mirroring your Android screen with built-in screen mirroring
function? in below section.
Optimal performance Make sure your panel and Android device are connected to the
same wireless network name (SSID)
Make sure your panel and Android device are connected to a
Wi-Fi network with AP isolation disabled.
AP isolation: Your Wi-Fi network configuration could prevent
devices from communicating with Chromecast/Miracast. In
order to resolve this issue, you will need to disable AP (access
point) isolation, also known as client isolation, on your router.
Please refer to your router documentation to learn how to
disable AP isolation.
If you do not have access to your router settings, or if you are
attempting to connect through a guest, hotel or public network
with AP/client isolation, you will be unable to setup your
Chromecast/Miracast.
Your panel name does not appear in the list of available devices.
Make sure your computer is on the same network as the panel.
If your panel is using a wired network connection, try connecting it to a wireless network.
[Note]Wired and wireless networks don’t often share the same
network subnet. Connecting the panel to a wireless network
might help the connection between the panel and a mobile
device or computer that’s connected wirelessly.
Refer to Screen Share Network Requirements document for
details.
http://averusa.com/classroom-technology/downloads/AVer-IFP
-Screen-Share-Network-Requirements.pdf
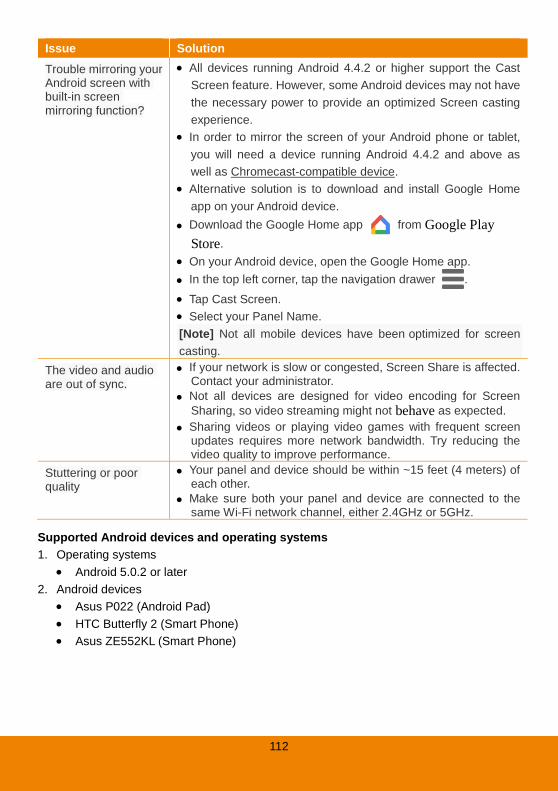
112
Issue Solution
Trouble mirroring your Android screen with built-in screen mirroring function?
All devices running Android 4.4.2 or higher support the Cast
Screen feature. However, some Android devices may not have
the necessary power to provide an optimized Screen casting
experience.
In order to mirror the screen of your Android phone or tablet,
you will need a device running Android 4.4.2 and above as
well as Chromecast-compatible device.
Alternative solution is to download and install Google Home
app on your Android device.
Download the Google Home app from Google Play
Store.
On your Android device, open the Google Home app.
In the top left corner, tap the navigation drawer .
Tap Cast Screen.
Select your Panel Name.
[Note] Not all mobile devices have been optimized for screen
casting.
The video and audio are out of sync.
If your network is slow or congested, Screen Share is affected. Contact your administrator.
Not all devices are designed for video encoding for Screen
Sharing, so video streaming might not behave as expected.
Sharing videos or playing video games with frequent screen updates requires more network bandwidth. Try reducing the video quality to improve performance.
Stuttering or poor quality
Your panel and device should be within ~15 feet (4 meters) of each other.
Make sure both your panel and device are connected to the same Wi-Fi network channel, either 2.4GHz or 5GHz.
Supported Android devices and operating systems 1. Operating systems
Android 5.0.2 or later 2. Android devices
Asus P022 (Android Pad)
HTC Butterfly 2 (Smart Phone)
Asus ZE552KL (Smart Phone)

113
Gallery
In gallery, user can view screenshots, pictures, and share screenshots/pictures to specific
location.
Select “Gallery” from app lists at main screen.
114
View images
To view the images, select the image or select the folder and select the image to view.
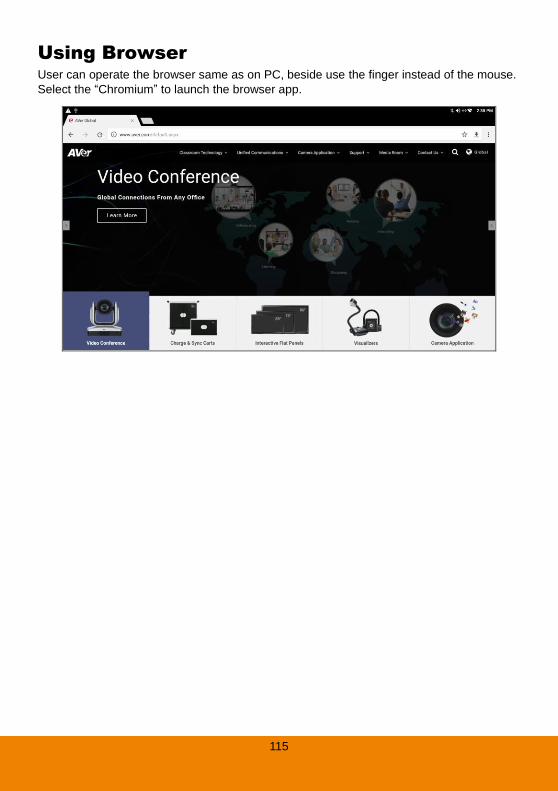
115
Using Browser User can operate the browser same as on PC, beside use the finger instead of the mouse. Select the “Chromium” to launch the browser app.
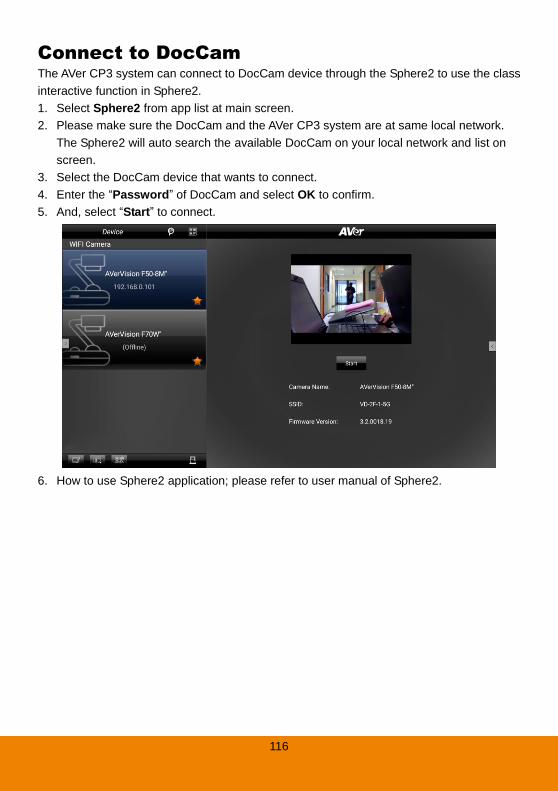
116
Connect to DocCam
The AVer CP3 system can connect to DocCam device through the Sphere2 to use the class
interactive function in Sphere2.
1. Select Sphere2 from app list at main screen.
2. Please make sure the DocCam and the AVer CP3 system are at same local network.
The Sphere2 will auto search the available DocCam on your local network and list on
screen.
3. Select the DocCam device that wants to connect.
4. Enter the “Password” of DocCam and select OK to confirm.
5. And, select “Start” to connect.
6. How to use Sphere2 application; please refer to user manual of Sphere2.
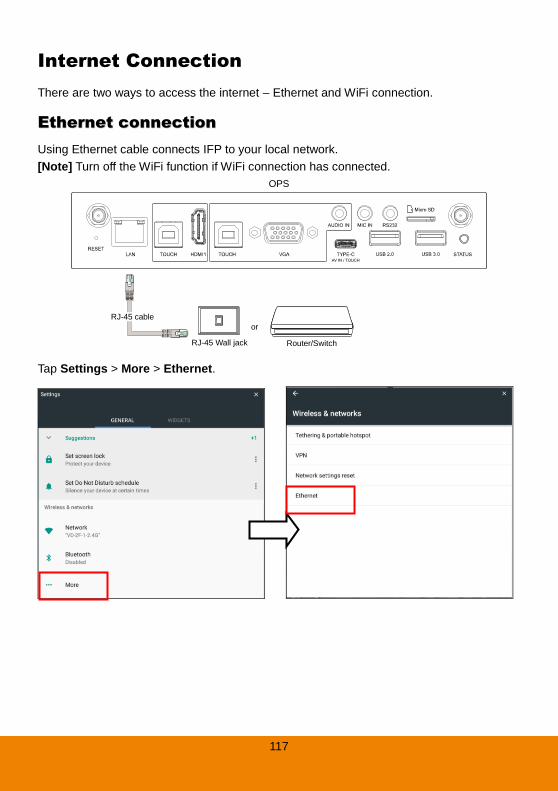
117
Internet Connection
There are two ways to access the internet – Ethernet and WiFi connection.
EEtthheerrnneett ccoonnnneeccttiioonn
Using Ethernet cable connects IFP to your local network.
[Note] Turn off the WiFi function if WiFi connection has connected.
RJ-45 cable
RJ-45 Wall jack Router/Switch
or
OPS
Tap Settings > More > Ethernet.
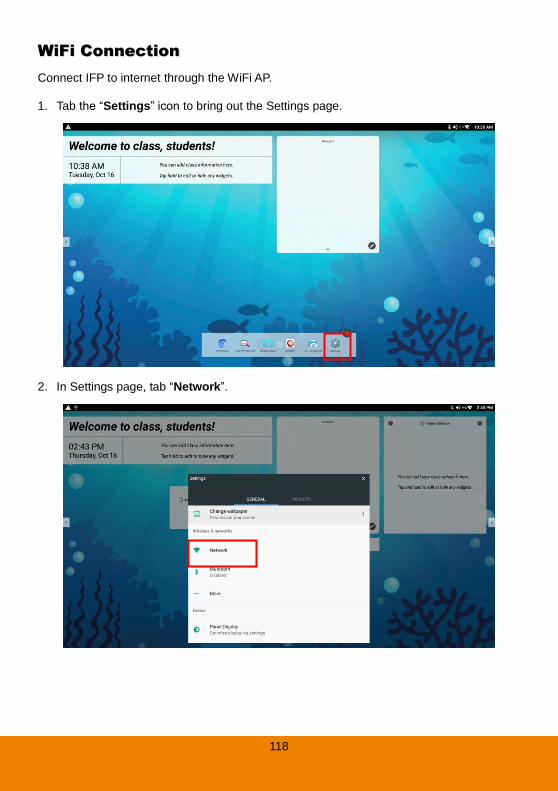
118
WWiiFFii CCoonnnneeccttiioonn
Connect IFP to internet through the WiFi AP.
1. Tab the “Settings” icon to bring out the Settings page.
2. In Settings page, tab “Network”.
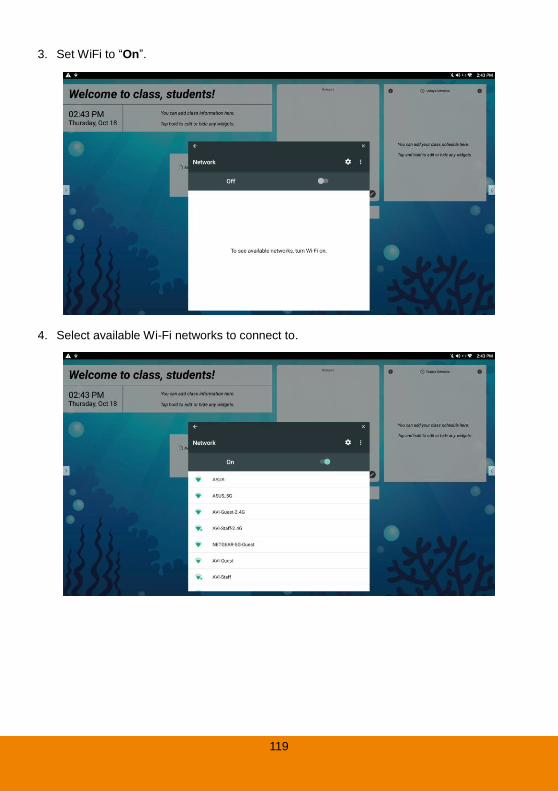
119
3. Set WiFi to “On”.
4. Select available Wi-Fi networks to connect to.
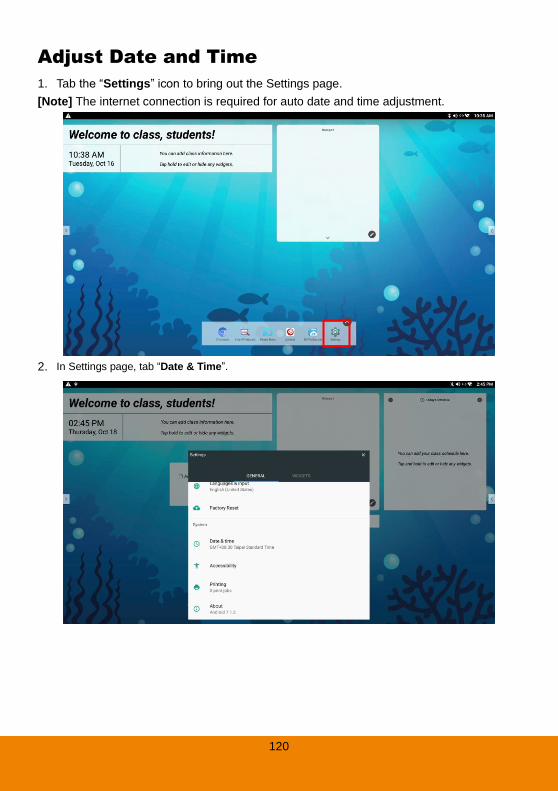
120
Adjust Date and Time 1. Tab the “Settings” icon to bring out the Settings page.
[Note] The internet connection is required for auto date and time adjustment.
2. In Settings page, tab “Date & Time”.
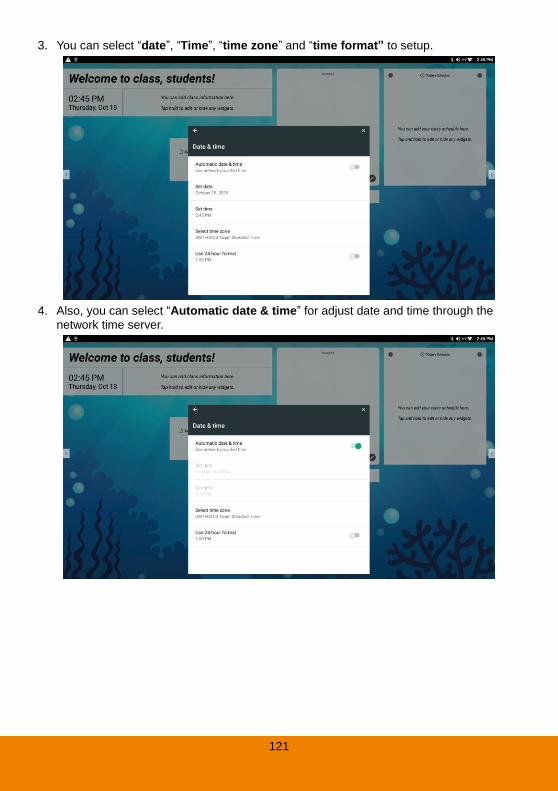
121
3. You can select “date”, “Time”, “time zone” and “time format” to setup.
4. Also, you can select “Automatic date & time” for adjust date and time through the
network time server.
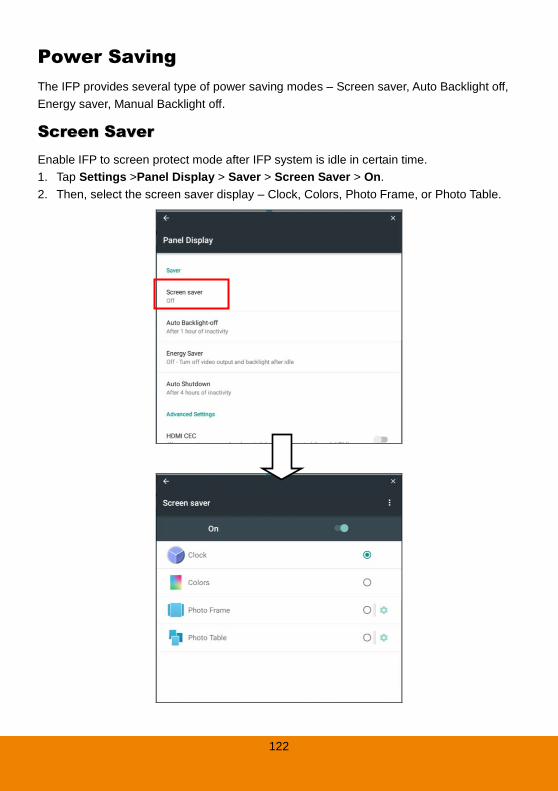
122
Power Saving
The IFP provides several type of power saving modes – Screen saver, Auto Backlight off,
Energy saver, Manual Backlight off.
SSccrreeeenn SSaavveerr
Enable IFP to screen protect mode after IFP system is idle in certain time.
1. Tap Settings >Panel Display > Saver > Screen Saver > On.
2. Then, select the screen saver display – Clock, Colors, Photo Frame, or Photo Table.
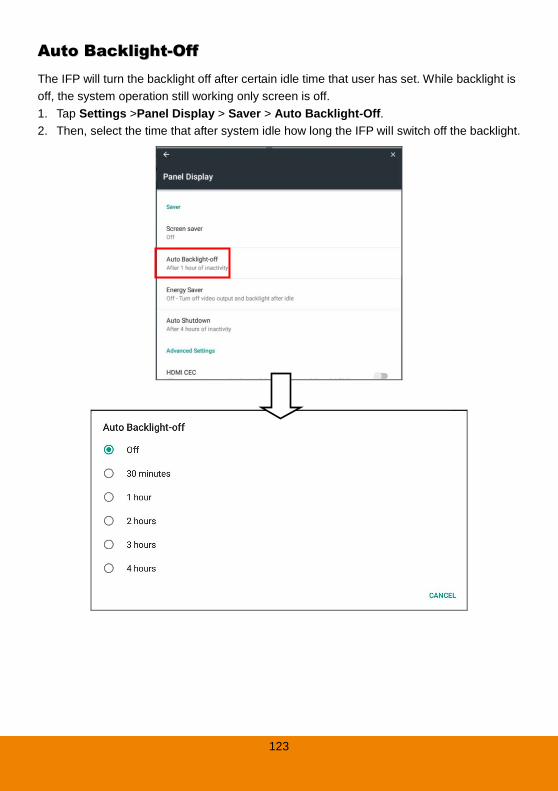
123
AAuuttoo BBaacckklliigghhtt--OOffff
The IFP will turn the backlight off after certain idle time that user has set. While backlight is
off, the system operation still working only screen is off.
1. Tap Settings >Panel Display > Saver > Auto Backlight-Off.
2. Then, select the time that after system idle how long the IFP will switch off the backlight.
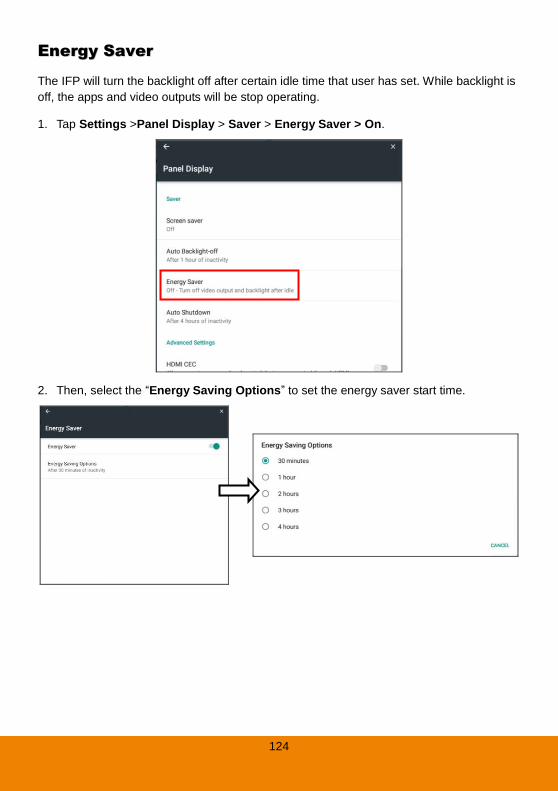
124
EEnneerrggyy SSaavveerr
The IFP will turn the backlight off after certain idle time that user has set. While backlight is
off, the apps and video outputs will be stop operating.
1. Tap Settings >Panel Display > Saver > Energy Saver > On.
2. Then, select the “Energy Saving Options” to set the energy saver start time.
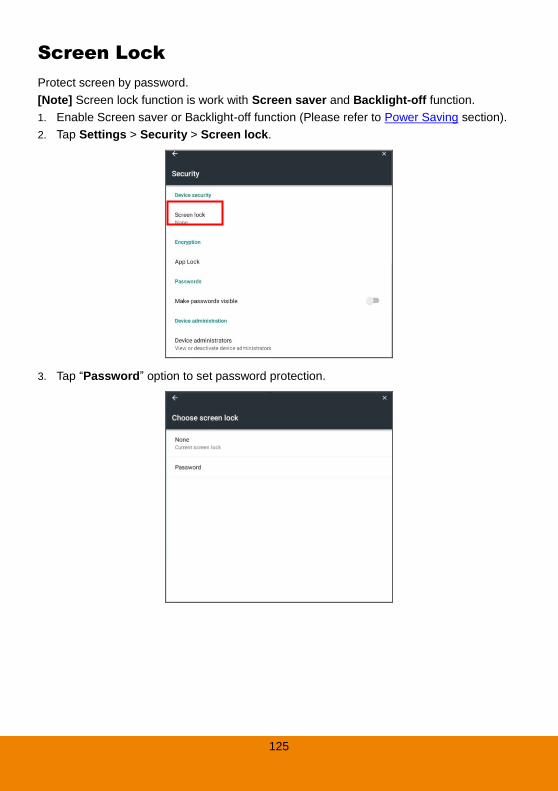
125
Screen Lock
Protect screen by password.
[Note] Screen lock function is work with Screen saver and Backlight-off function.
1. Enable Screen saver or Backlight-off function (Please refer to Power Saving section).
2. Tap Settings > Security > Screen lock.
3. Tap “Password” option to set password protection.
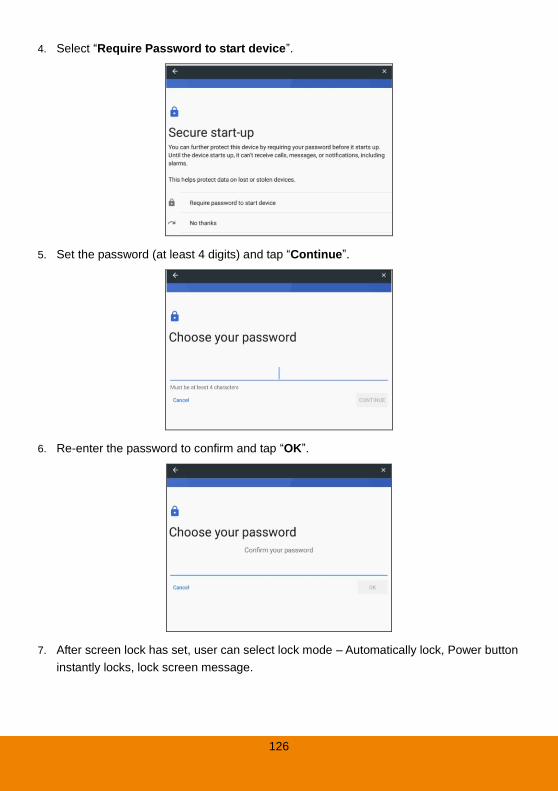
126
4. Select “Require Password to start device”.
5. Set the password (at least 4 digits) and tap “Continue”.
6. Re-enter the password to confirm and tap “OK”.
7. After screen lock has set, user can select lock mode – Automatically lock, Power button
instantly locks, lock screen message.

127
8. To disable screen lock, tap Settings > Security > Screen Lock and enter the password
user has set. Then, select “None” to disable the screen lock.
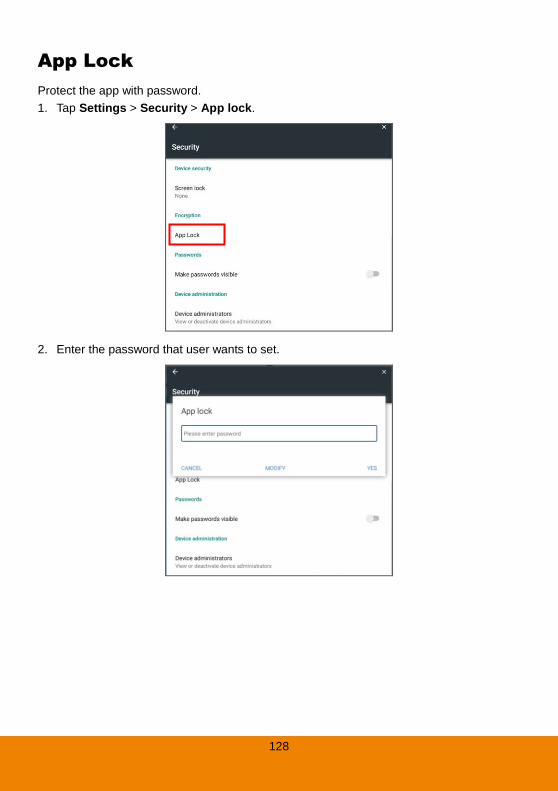
128
App Lock
Protect the app with password.
1. Tap Settings > Security > App lock.
2. Enter the password that user wants to set.
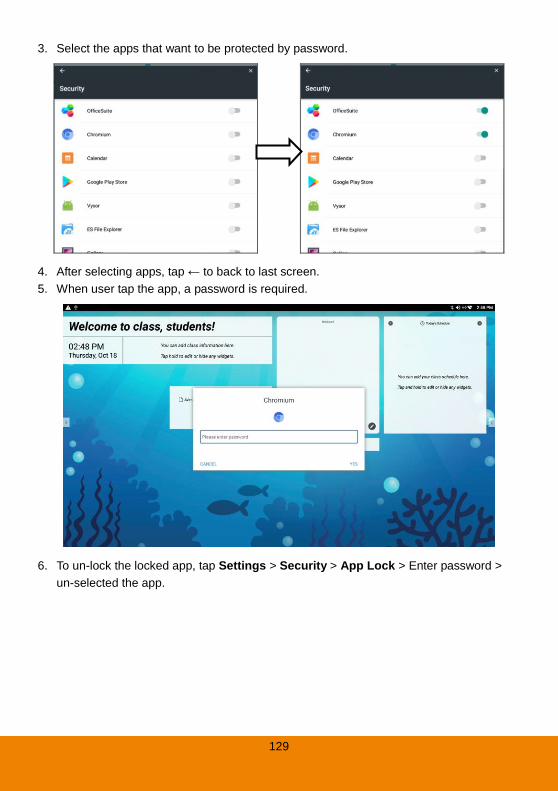
129
3. Select the apps that want to be protected by password.
4. After selecting apps, tap ← to back to last screen.
5. When user tap the app, a password is required.
6. To un-lock the locked app, tap Settings > Security > App Lock > Enter password >
un-selected the app.
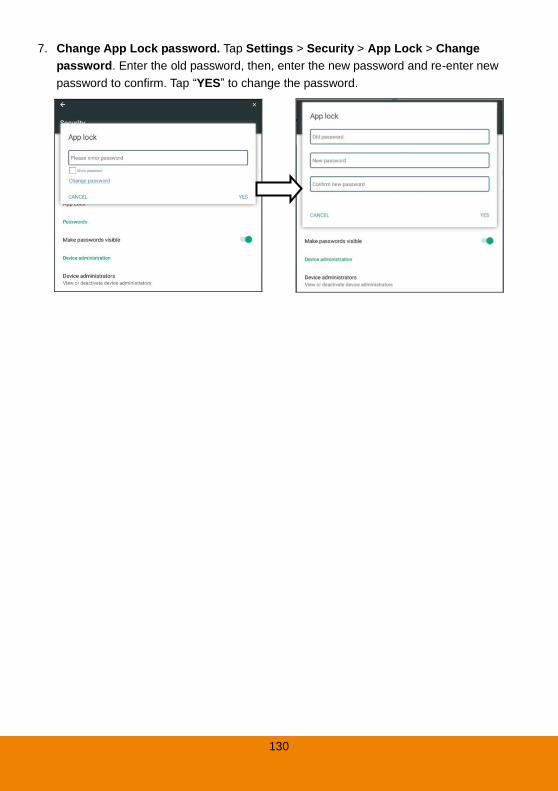
130
7. Change App Lock password. Tap Settings > Security > App Lock > Change
password. Enter the old password, then, enter the new password and re-enter new
password to confirm. Tap “YES” to change the password.
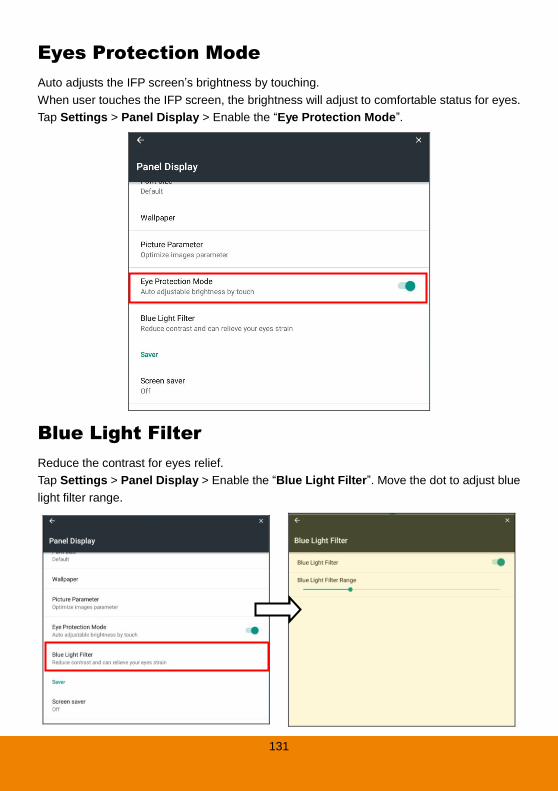
131
Eyes Protection Mode
Auto adjusts the IFP screen’s brightness by touching.
When user touches the IFP screen, the brightness will adjust to comfortable status for eyes.
Tap Settings > Panel Display > Enable the “Eye Protection Mode”.
Blue Light Filter
Reduce the contrast for eyes relief.
Tap Settings > Panel Display > Enable the “Blue Light Filter”. Move the dot to adjust blue
light filter range.
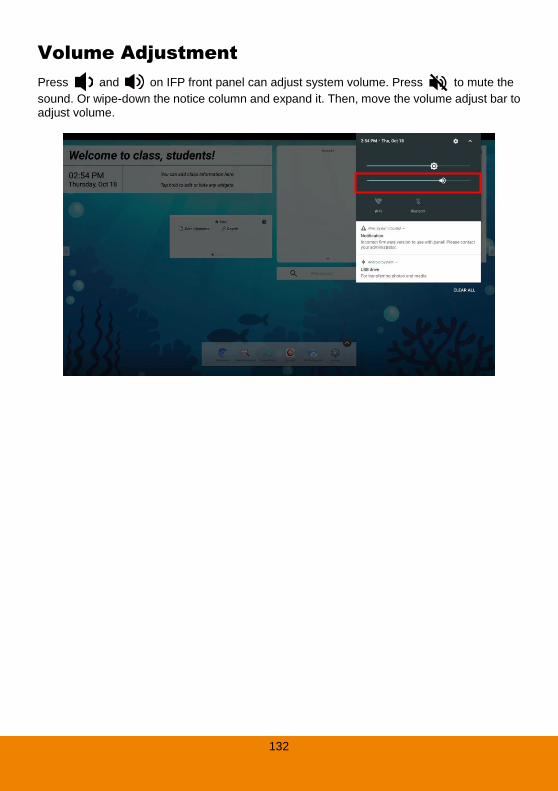
132
Volume Adjustment
Press and on IFP front panel can adjust system volume. Press to mute the
sound. Or wipe-down the notice column and expand it. Then, move the volume adjust bar to adjust volume.
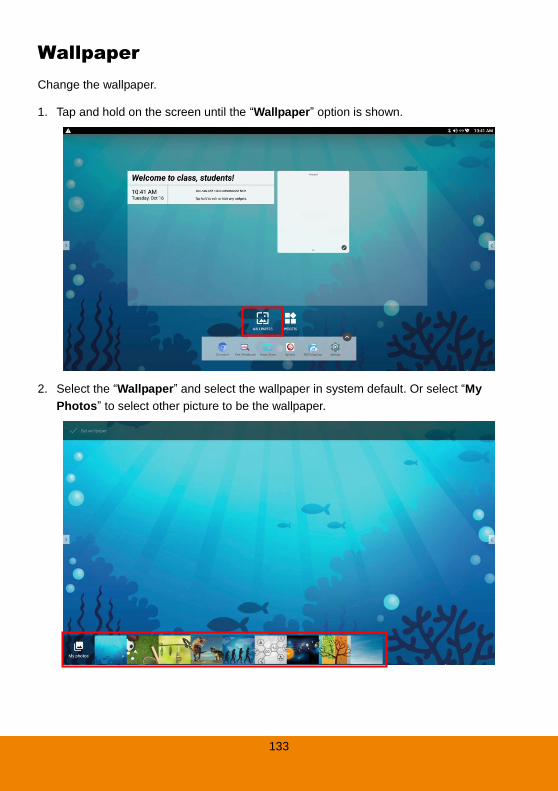
133
Wallpaper
Change the wallpaper.
1. Tap and hold on the screen until the “Wallpaper” option is shown.
2. Select the “Wallpaper” and select the wallpaper in system default. Or select “My
Photos” to select other picture to be the wallpaper.
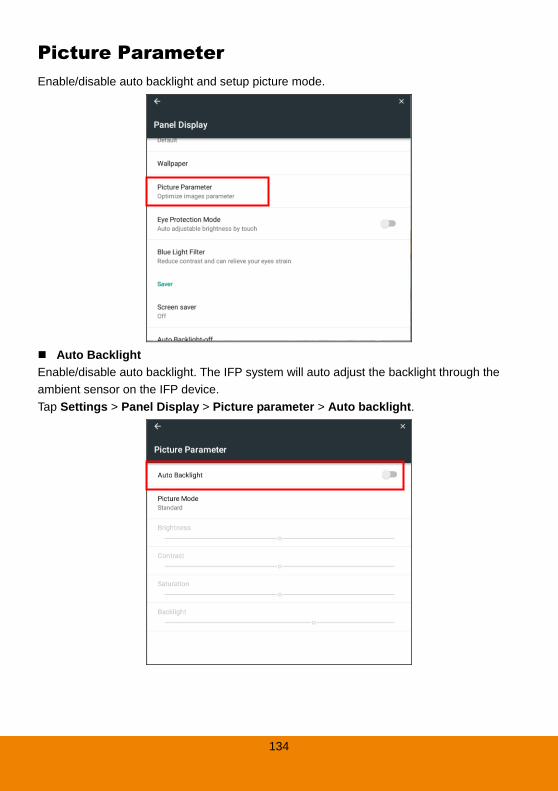
134
Picture Parameter
Enable/disable auto backlight and setup picture mode.
Auto Backlight
Enable/disable auto backlight. The IFP system will auto adjust the backlight through the
ambient sensor on the IFP device.
Tap Settings > Panel Display > Picture parameter > Auto backlight.

135
Picture Mode
Tap Settings > Panel Display > Picture parameter > Picture mode.
When select “User” picture mode, user can manually adjust the value of brightness,
contrast, saturation, and backlight.
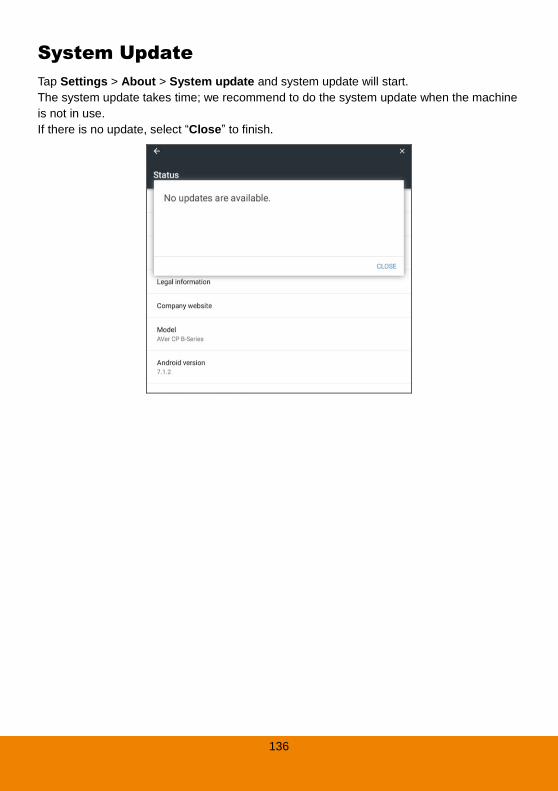
136
System Update
Tap Settings > About > System update and system update will start.
The system update takes time; we recommend to do the system update when the machine
is not in use.
If there is no update, select “Close” to finish.
137
Display Management
To manage the IFP devices on your LAN – manual power on/off/reboot IFP and scheduling
IFP for power on/off/reboot.
[Note] An Ethernet cable connection is required for IFP devices.
Please download the Display Management application from
http://www.aver.com/download-center
MMiinniimmuumm SSeerrvveerr SSyysstteemm RReeqquuiirreemmeennttss
Operating System : Win 7 / Win8 / Win10
CPU : Intel Core 2 Duo 2.00GHz or later
RAM : 1 GB of RAM (2 GB recommended)
Resolution : 1024 x 768 or higher resolution display
Graphic card : DirectX 9.0c compatible video card
Hard Disk : 500 MB free hard disk space for basic installation
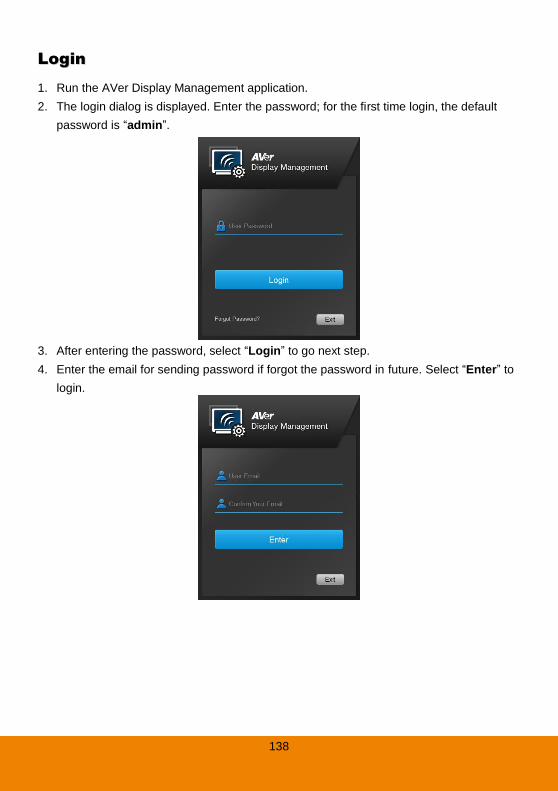
138
LLooggiinn
1. Run the AVer Display Management application.
2. The login dialog is displayed. Enter the password; for the first time login, the default
password is “admin”.
3. After entering the password, select “Login” to go next step.
4. Enter the email for sending password if forgot the password in future. Select “Enter” to
login.
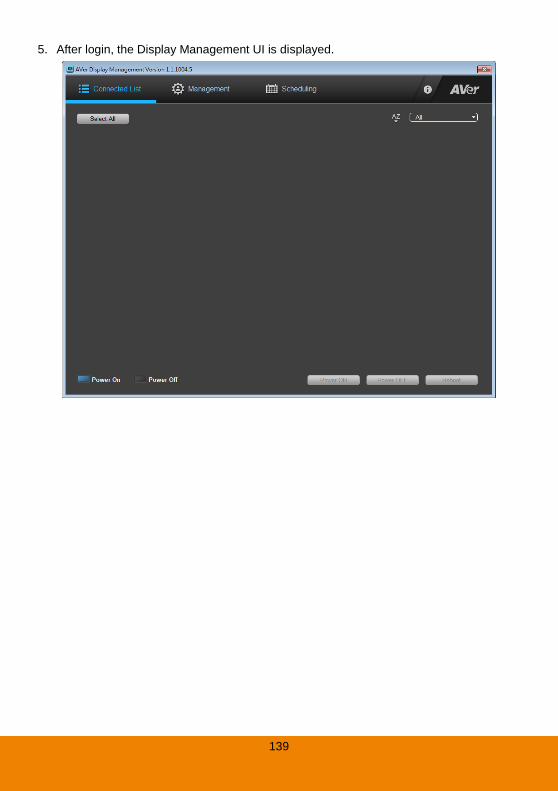
139
5. After login, the Display Management UI is displayed.
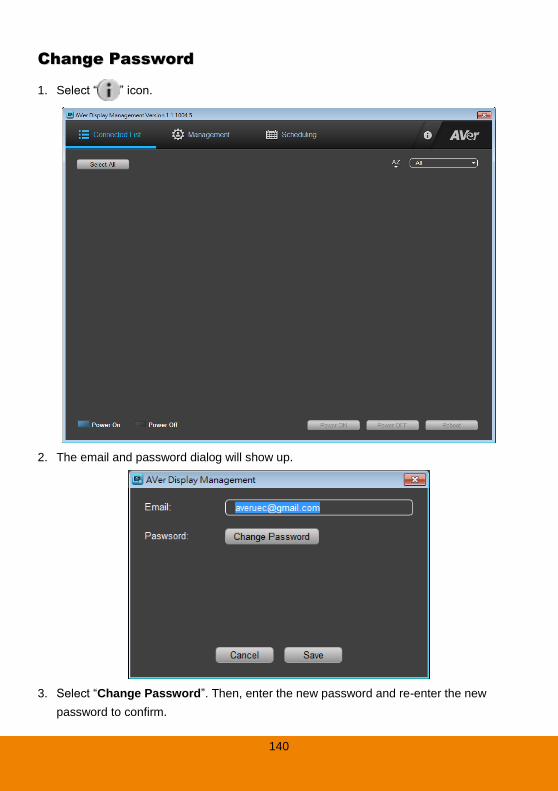
140
CChhaannggee PPaasssswwoorrdd
1. Select “ ” icon.
2. The email and password dialog will show up.
3. Select “Change Password”. Then, enter the new password and re-enter the new
password to confirm.
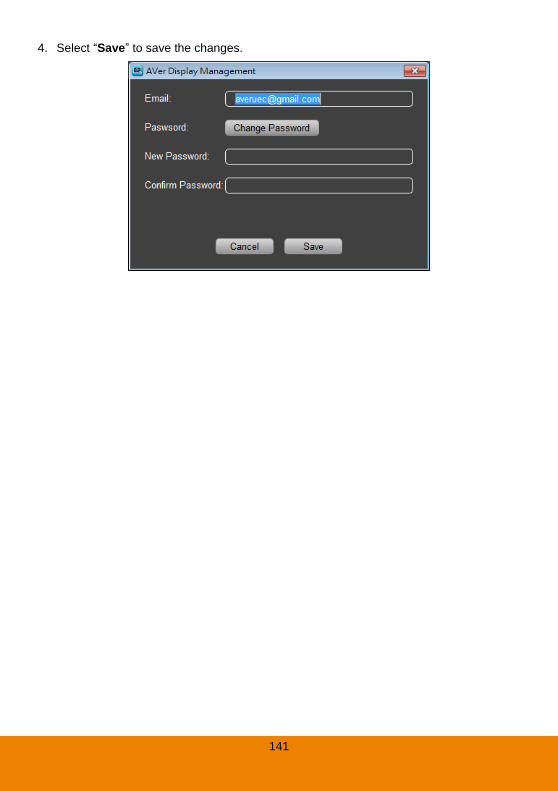
141
4. Select “Save” to save the changes.
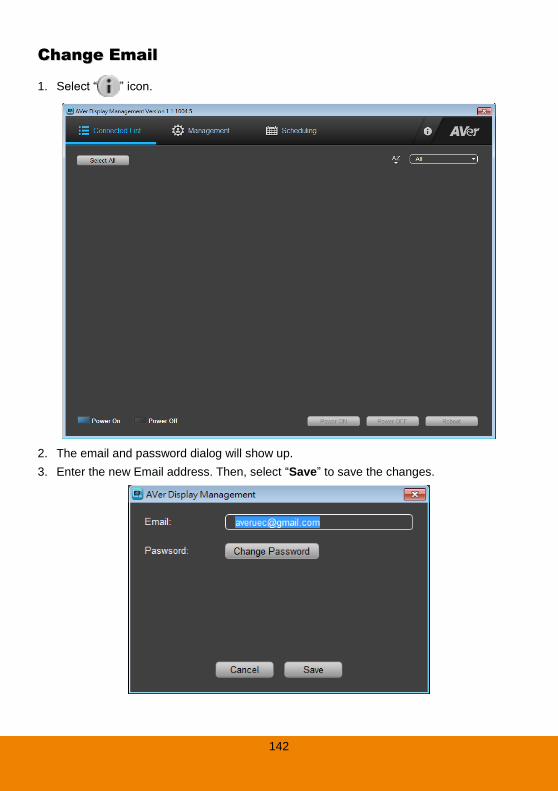
142
CChhaannggee EEmmaaiill
1. Select “ ” icon.
2. The email and password dialog will show up.
3. Enter the new Email address. Then, select “Save” to save the changes.
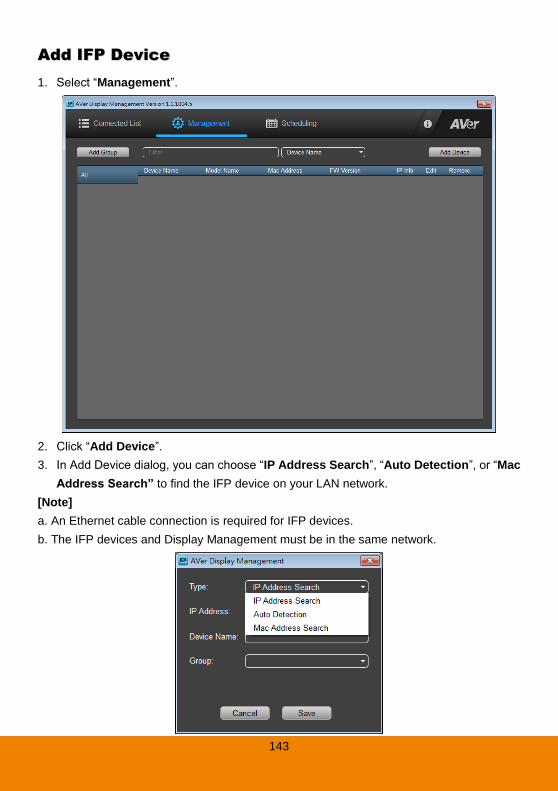
143
AAdddd IIFFPP DDeevviiccee
1. Select “Management”.
2. Click “Add Device”.
3. In Add Device dialog, you can choose “IP Address Search”, “Auto Detection”, or “Mac
Address Search” to find the IFP device on your LAN network.
[Note]
a. An Ethernet cable connection is required for IFP devices.
b. The IFP devices and Display Management must be in the same network.
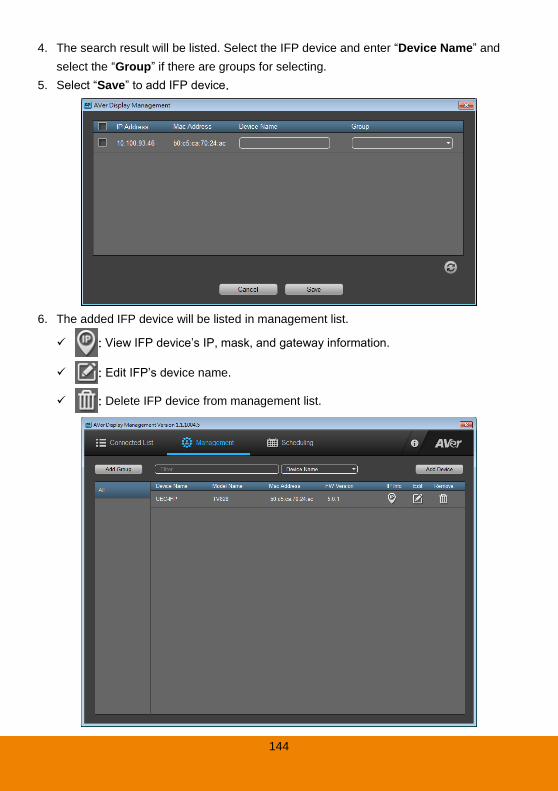
144
4. The search result will be listed. Select the IFP device and enter “Device Name” and
select the “Group” if there are groups for selecting.
5. Select “Save” to add IFP device.
6. The added IFP device will be listed in management list.
: View IFP device’s IP, mask, and gateway information.
: Edit IFP’s device name.
: Delete IFP device from management list.
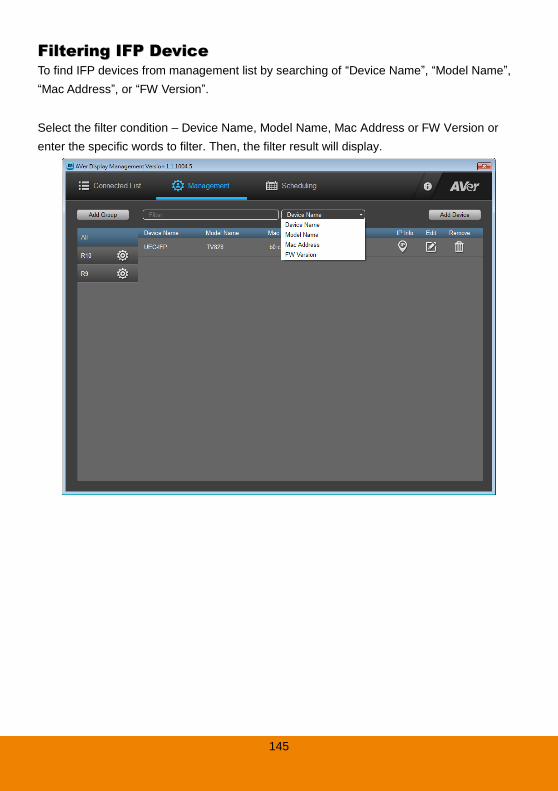
145
FFiilltteerriinngg IIFFPP DDeevviiccee
To find IFP devices from management list by searching of “Device Name”, “Model Name”,
“Mac Address”, or “FW Version”.
Select the filter condition – Device Name, Model Name, Mac Address or FW Version or
enter the specific words to filter. Then, the filter result will display.
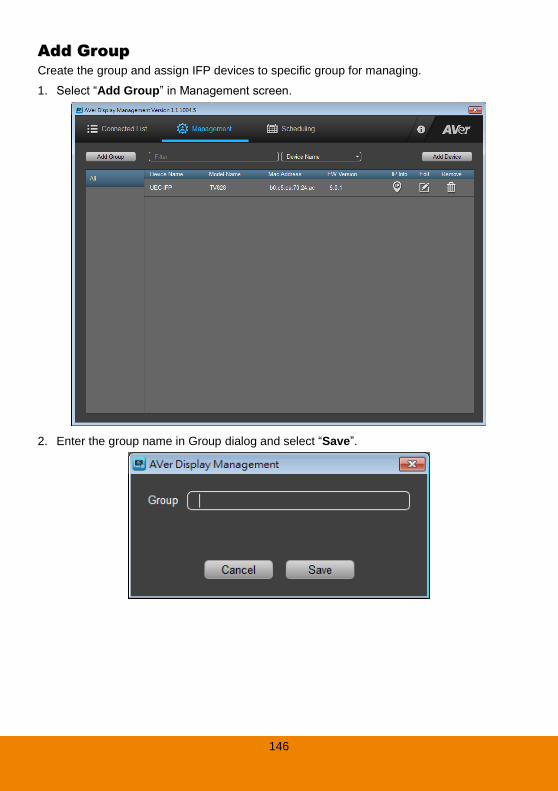
146
AAdddd GGrroouupp
Create the group and assign IFP devices to specific group for managing.
1. Select “Add Group” in Management screen.
2. Enter the group name in Group dialog and select “Save”.
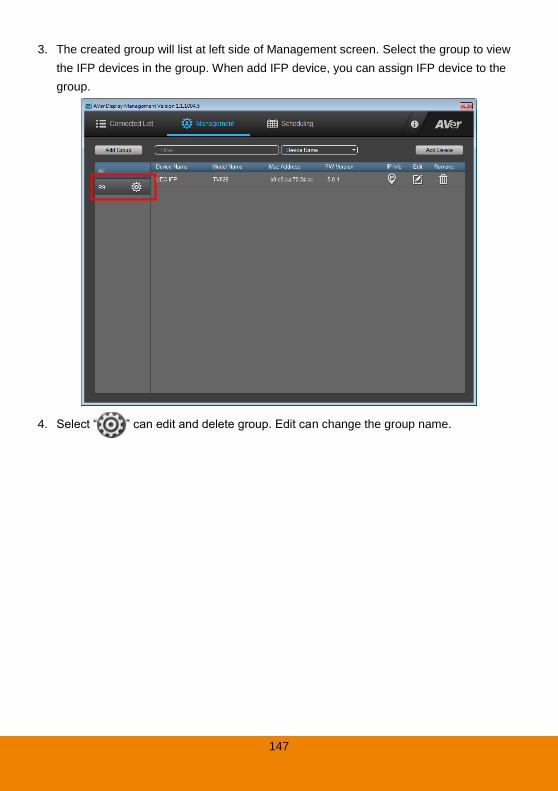
147
3. The created group will list at left side of Management screen. Select the group to view
the IFP devices in the group. When add IFP device, you can assign IFP device to the
group.
4. Select “ ” can edit and delete group. Edit can change the group name.
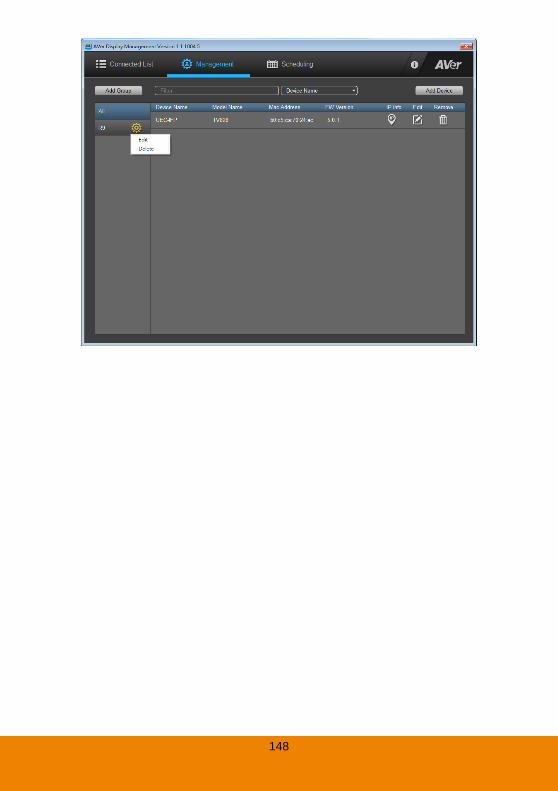
148
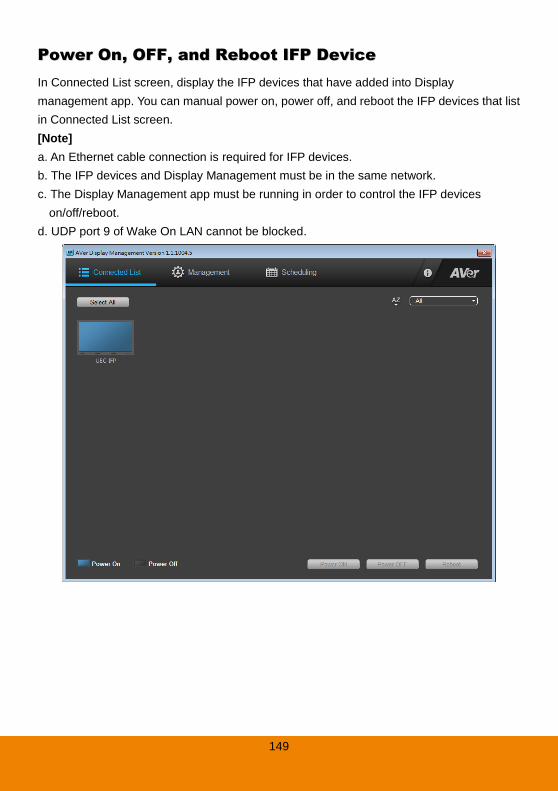
149
PPoowweerr OOnn,, OOFFFF,, aanndd RReebboooott IIFFPP DDeevviiccee
In Connected List screen, display the IFP devices that have added into Display
management app. You can manual power on, power off, and reboot the IFP devices that list
in Connected List screen.
[Note]
a. An Ethernet cable connection is required for IFP devices.
b. The IFP devices and Display Management must be in the same network.
c. The Display Management app must be running in order to control the IFP devices
on/off/reboot.
d. UDP port 9 of Wake On LAN cannot be blocked.

150
1. Select “Connected List”.
2. Select the IFP devices from screen list or select “Select All”. The selected IFP device
will be marked. Then, select “Power on”, “Power Off”, or “Reboot” button to execute.
[Note]
a. After selecting IFP device, the power on, power off and reboot button will be enabled.
b. The IFP devices display order can be change by select A-Z order or group (drop-down
list).
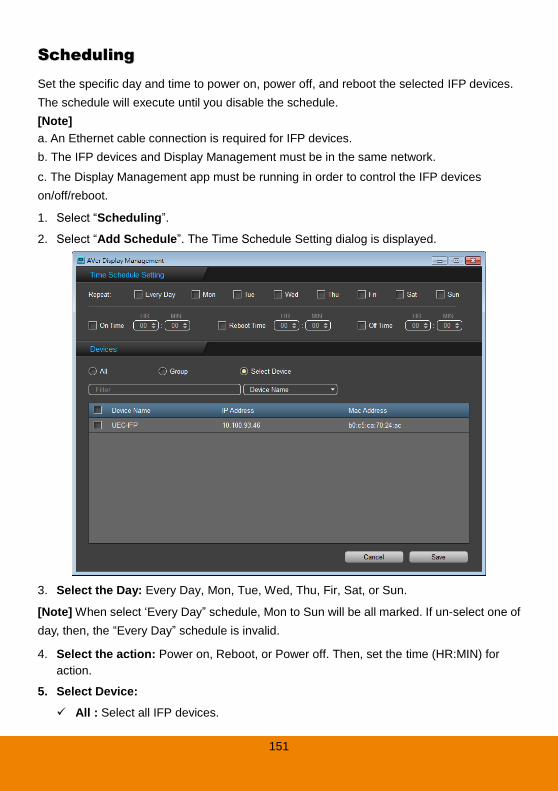
151
SScchheedduulliinngg
Set the specific day and time to power on, power off, and reboot the selected IFP devices.
The schedule will execute until you disable the schedule.
[Note]
a. An Ethernet cable connection is required for IFP devices.
b. The IFP devices and Display Management must be in the same network.
c. The Display Management app must be running in order to control the IFP devices
on/off/reboot.
1. Select “Scheduling”.
2. Select “Add Schedule”. The Time Schedule Setting dialog is displayed.
3. Select the Day: Every Day, Mon, Tue, Wed, Thu, Fir, Sat, or Sun.
[Note] When select ‘Every Day” schedule, Mon to Sun will be all marked. If un-select one of
day, then, the “Every Day” schedule is invalid.
4. Select the action: Power on, Reboot, or Power off. Then, set the time (HR:MIN) for
action.
5. Select Device:
All : Select all IFP devices.
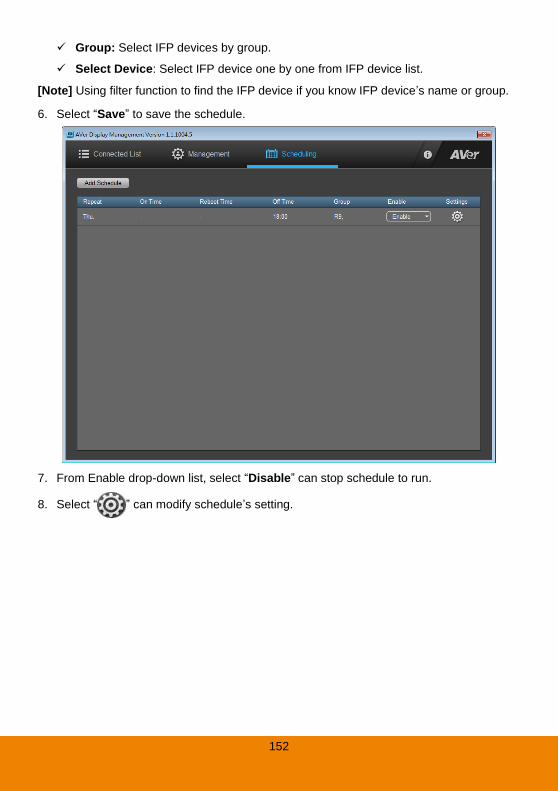
152
Group: Select IFP devices by group.
Select Device: Select IFP device one by one from IFP device list.
[Note] Using filter function to find the IFP device if you know IFP device’s name or group.
6. Select “Save” to save the schedule.
7. From Enable drop-down list, select “Disable” can stop schedule to run.
8. Select “ ” can modify schedule’s setting.
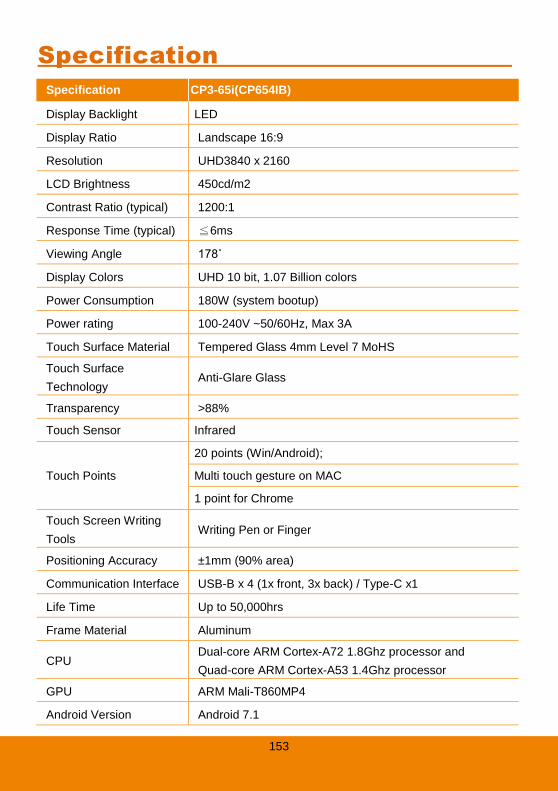
153
Specification
Specification CP3-65i(CP654IB)
Display Backlight LED
Display Ratio Landscape 16:9
Resolution UHD3840 x 2160
LCD Brightness 450cd/m2
Contrast Ratio (typical) 1200:1
Response Time (typical) ≦6ms
Viewing Angle 178˚
Display Colors UHD 10 bit, 1.07 Billion colors
Power Consumption 180W (system bootup)
Power rating 100-240V ~50/60Hz, Max 3A
Touch Surface Material Tempered Glass 4mm Level 7 MoHS
Touch Surface
Technology Anti-Glare Glass
Transparency >88%
Touch Sensor Infrared
Touch Points
20 points (Win/Android);
Multi touch gesture on MAC
1 point for Chrome
Touch Screen Writing
Tools Writing Pen or Finger
Positioning Accuracy ±1mm (90% area)
Communication Interface USB-B x 4 (1x front, 3x back) / Type-C x1
Life Time Up to 50,000hrs
Frame Material Aluminum
CPU Dual-core ARM Cortex-A72 1.8Ghz processor and
Quad-core ARM Cortex-A53 1.4Ghz processor
GPU ARM Mali-T860MP4
Android Version Android 7.1
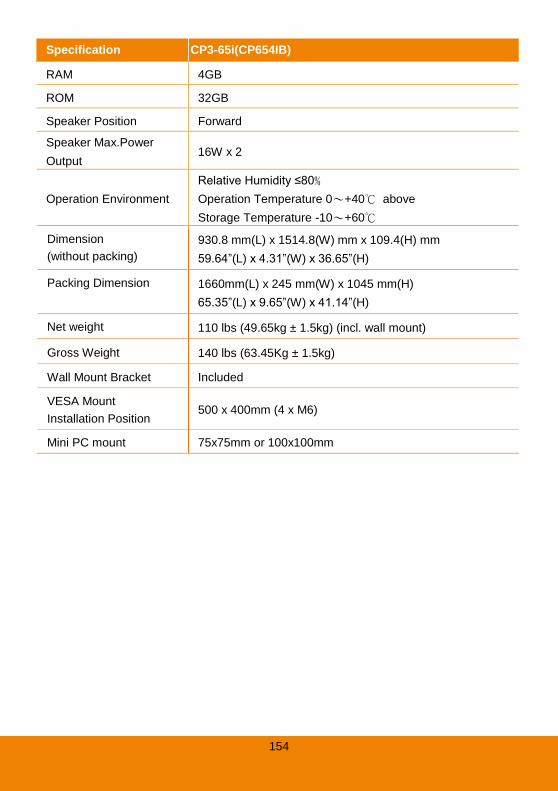
154
Specification CP3-65i(CP654IB)
RAM 4GB
ROM 32GB
Speaker Position Forward
Speaker Max.Power
Output 16W x 2
Operation Environment
Relative Humidity ≤80﹪
Operation Temperature 0~+40℃ above
Storage Temperature -10~+60℃
Dimension
(without packing)
930.8 mm(L) x 1514.8(W) mm x 109.4(H) mm
59.64”(L) x 4.31”(W) x 36.65”(H)
Packing Dimension 1660mm(L) x 245 mm(W) x 1045 mm(H)
65.35”(L) x 9.65”(W) x 41.14”(H)
Net weight 110 lbs (49.65kg ± 1.5kg) (incl. wall mount)
Gross Weight 140 lbs (63.45Kg ± 1.5kg)
Wall Mount Bracket Included
VESA Mount
Installation Position 500 x 400mm (4 x M6)
Mini PC mount 75x75mm or 100x100mm
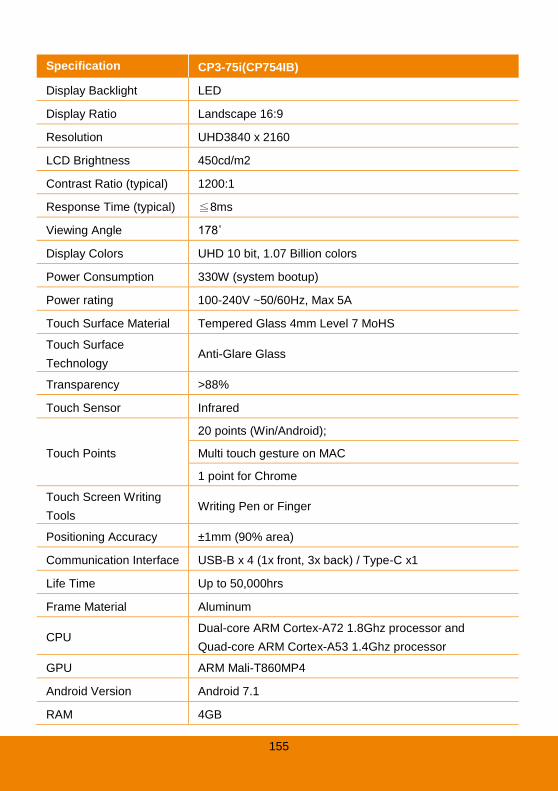
155
Specification CP3-75i(CP754IB)
Display Backlight LED
Display Ratio Landscape 16:9
Resolution UHD3840 x 2160
LCD Brightness 450cd/m2
Contrast Ratio (typical) 1200:1
Response Time (typical) ≦8ms
Viewing Angle 178˚
Display Colors UHD 10 bit, 1.07 Billion colors
Power Consumption 330W (system bootup)
Power rating 100-240V ~50/60Hz, Max 5A
Touch Surface Material Tempered Glass 4mm Level 7 MoHS
Touch Surface
Technology Anti-Glare Glass
Transparency >88%
Touch Sensor Infrared
Touch Points
20 points (Win/Android);
Multi touch gesture on MAC
1 point for Chrome
Touch Screen Writing
Tools Writing Pen or Finger
Positioning Accuracy ±1mm (90% area)
Communication Interface USB-B x 4 (1x front, 3x back) / Type-C x1
Life Time Up to 50,000hrs
Frame Material Aluminum
CPU Dual-core ARM Cortex-A72 1.8Ghz processor and
Quad-core ARM Cortex-A53 1.4Ghz processor
GPU ARM Mali-T860MP4
Android Version Android 7.1
RAM 4GB
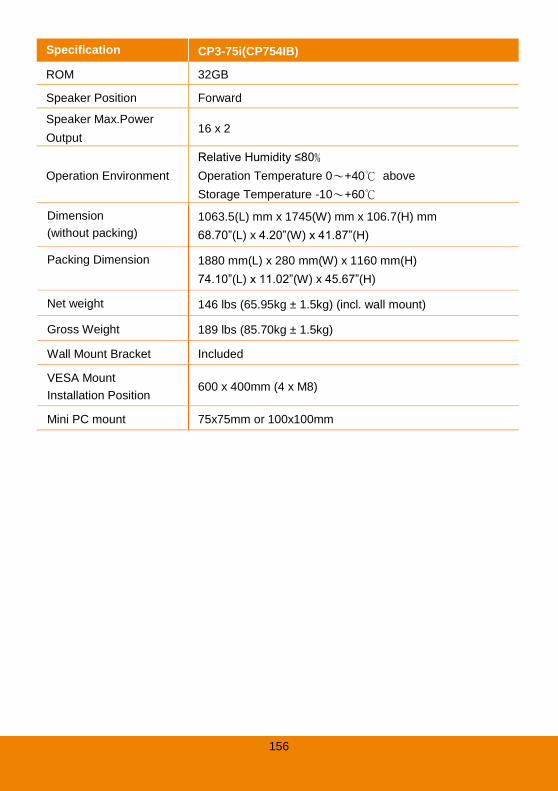
156
Specification CP3-75i(CP754IB)
ROM 32GB
Speaker Position Forward
Speaker Max.Power
Output 16 x 2
Operation Environment
Relative Humidity ≤80﹪
Operation Temperature 0~+40℃ above
Storage Temperature -10~+60℃
Dimension
(without packing)
1063.5(L) mm x 1745(W) mm x 106.7(H) mm
68.70”(L) x 4.20”(W) x 41.87”(H)
Packing Dimension 1880 mm(L) x 280 mm(W) x 1160 mm(H)
74.10”(L) x 11.02”(W) x 45.67”(H)
Net weight 146 lbs (65.95kg ± 1.5kg) (incl. wall mount)
Gross Weight 189 lbs (85.70kg ± 1.5kg)
Wall Mount Bracket Included
VESA Mount
Installation Position 600 x 400mm (4 x M8)
Mini PC mount 75x75mm or 100x100mm
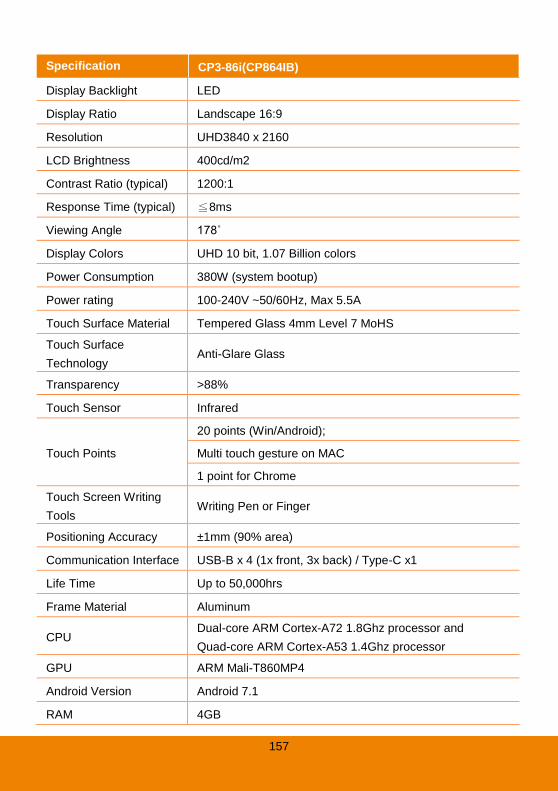
157
Specification CP3-86i(CP864IB)
Display Backlight LED
Display Ratio Landscape 16:9
Resolution UHD3840 x 2160
LCD Brightness 400cd/m2
Contrast Ratio (typical) 1200:1
Response Time (typical) ≦8ms
Viewing Angle 178˚
Display Colors UHD 10 bit, 1.07 Billion colors
Power Consumption 380W (system bootup)
Power rating 100-240V ~50/60Hz, Max 5.5A
Touch Surface Material Tempered Glass 4mm Level 7 MoHS
Touch Surface
Technology Anti-Glare Glass
Transparency >88%
Touch Sensor Infrared
Touch Points
20 points (Win/Android);
Multi touch gesture on MAC
1 point for Chrome
Touch Screen Writing
Tools Writing Pen or Finger
Positioning Accuracy ±1mm (90% area)
Communication Interface USB-B x 4 (1x front, 3x back) / Type-C x1
Life Time Up to 50,000hrs
Frame Material Aluminum
CPU Dual-core ARM Cortex-A72 1.8Ghz processor and
Quad-core ARM Cortex-A53 1.4Ghz processor
GPU ARM Mali-T860MP4
Android Version Android 7.1
RAM 4GB
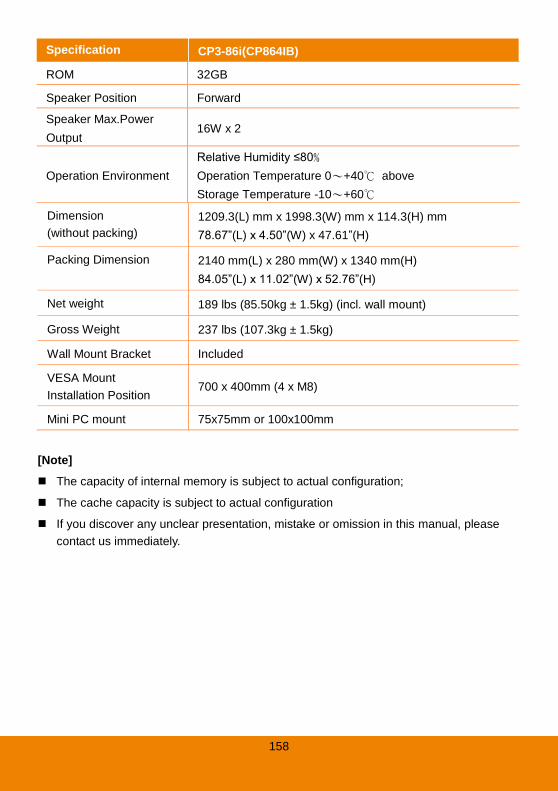
158
Specification CP3-86i(CP864IB)
ROM 32GB
Speaker Position Forward
Speaker Max.Power
Output 16W x 2
Operation Environment
Relative Humidity ≤80﹪
Operation Temperature 0~+40℃ above
Storage Temperature -10~+60℃
Dimension
(without packing)
1209.3(L) mm x 1998.3(W) mm x 114.3(H) mm
78.67”(L) x 4.50”(W) x 47.61”(H)
Packing Dimension 2140 mm(L) x 280 mm(W) x 1340 mm(H)
84.05”(L) x 11.02”(W) x 52.76”(H)
Net weight 189 lbs (85.50kg ± 1.5kg) (incl. wall mount)
Gross Weight 237 lbs (107.3kg ± 1.5kg)
Wall Mount Bracket Included
VESA Mount
Installation Position 700 x 400mm (4 x M8)
Mini PC mount 75x75mm or 100x100mm
[Note]
The capacity of internal memory is subject to actual configuration;
The cache capacity is subject to actual configuration
If you discover any unclear presentation, mistake or omission in this manual, please
contact us immediately.
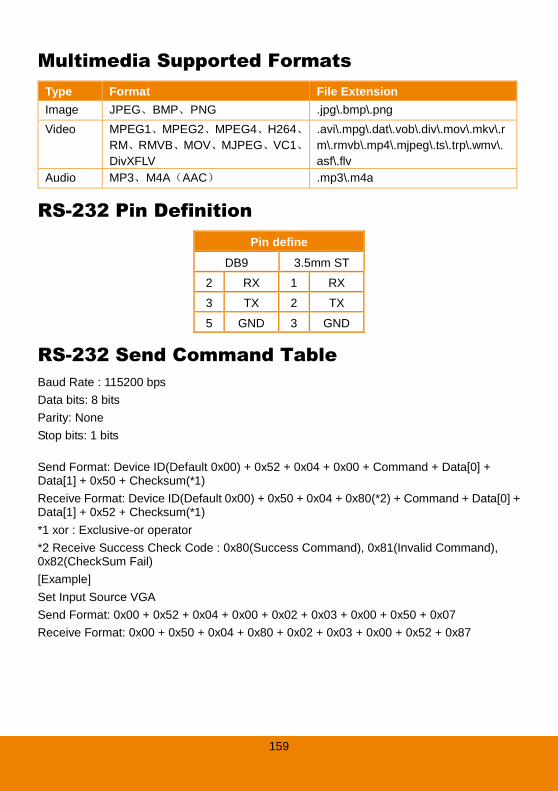
159
Multimedia Supported Formats
Type Format File Extension
Image JPEG、BMP、PNG .jpg\.bmp\.png
Video MPEG1、MPEG2、MPEG4、H264、
RM、RMVB、MOV、MJPEG、VC1、
DivXFLV
.avi\.mpg\.dat\.vob\.div\.mov\.mkv\.r
m\.rmvb\.mp4\.mjpeg\.ts\.trp\.wmv\.
asf\.flv
Audio MP3、M4A(AAC) .mp3\.m4a
RS-232 Pin Definition
Pin define
DB9 3.5mm ST
2 RX 1 RX
3 TX 2 TX
5 GND 3 GND
RS-232 Send Command Table
Baud Rate : 115200 bps
Data bits: 8 bits
Parity: None
Stop bits: 1 bits
Send Format: Device ID(Default 0x00) + 0x52 + 0x04 + 0x00 + Command + Data[0] + Data[1] + 0x50 + Checksum(*1)
Receive Format: Device ID(Default 0x00) + 0x50 + 0x04 + 0x80(*2) + Command + Data[0] + Data[1] + 0x52 + Checksum(*1)
*1 xor : Exclusive-or operator
*2 Receive Success Check Code : 0x80(Success Command), 0x81(Invalid Command), 0x82(CheckSum Fail)
[Example]
Set Input Source VGA
Send Format: 0x00 + 0x52 + 0x04 + 0x00 + 0x02 + 0x03 + 0x00 + 0x50 + 0x07
Receive Format: 0x00 + 0x50 + 0x04 + 0x80 + 0x02 + 0x03 + 0x00 + 0x52 + 0x87
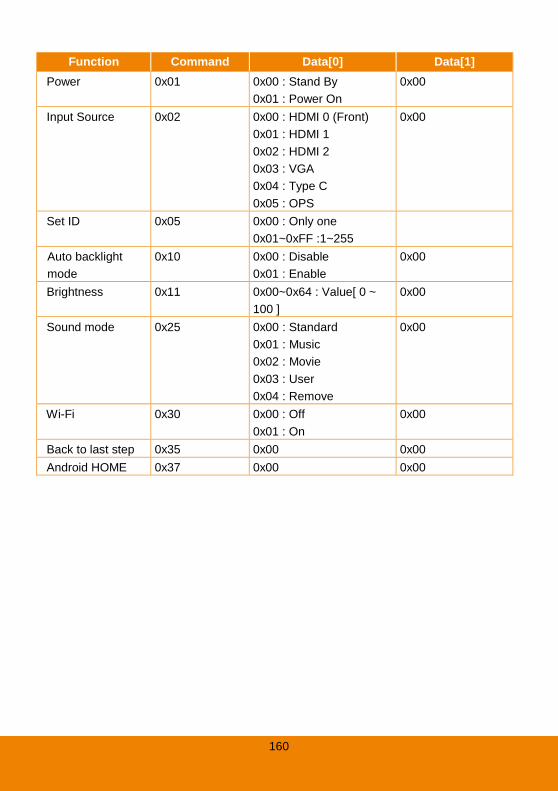
160
Function Command Data[0] Data[1]
Power 0x01 0x00 : Stand By
0x01 : Power On
0x00
Input Source 0x02 0x00 : HDMI 0 (Front)
0x01 : HDMI 1
0x02 : HDMI 2
0x03 : VGA
0x04 : Type C
0x05 : OPS
0x00
Set ID 0x05 0x00 : Only one
0x01~0xFF :1~255
Auto backlight
mode
0x10 0x00 : Disable
0x01 : Enable
0x00
Brightness 0x11 0x00~0x64 : Value[ 0 ~
100 ]
0x00
Sound mode 0x25 0x00 : Standard
0x01 : Music
0x02 : Movie
0x03 : User
0x04 : Remove
0x00
Wi-Fi 0x30 0x00 : Off
0x01 : On
0x00
Back to last step 0x35 0x00 0x00
Android HOME 0x37 0x00 0x00
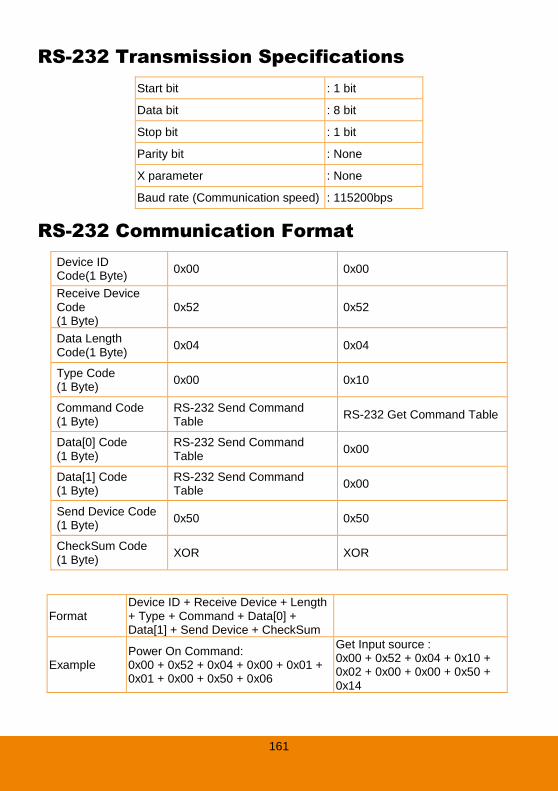
161
RS-232 Transmission Specifications
Start bit : 1 bit
Data bit : 8 bit
Stop bit : 1 bit
Parity bit : None
X parameter : None
Baud rate (Communication speed) : 115200bps
RS-232 Communication Format
Device ID Code(1 Byte)
0x00 0x00
Receive Device Code (1 Byte)
0x52 0x52
Data Length Code(1 Byte)
0x04 0x04
Type Code (1 Byte)
0x00 0x10
Command Code (1 Byte)
RS-232 Send Command Table
RS-232 Get Command Table
Data[0] Code (1 Byte)
RS-232 Send Command Table
0x00
Data[1] Code (1 Byte)
RS-232 Send Command Table
0x00
Send Device Code (1 Byte)
0x50 0x50
CheckSum Code (1 Byte)
XOR XOR
Format Device ID + Receive Device + Length + Type + Command + Data[0] + Data[1] + Send Device + CheckSum
Example Power On Command: 0x00 + 0x52 + 0x04 + 0x00 + 0x01 + 0x01 + 0x00 + 0x50 + 0x06
Get Input source : 0x00 + 0x52 + 0x04 + 0x10 + 0x02 + 0x00 + 0x00 + 0x50 + 0x14
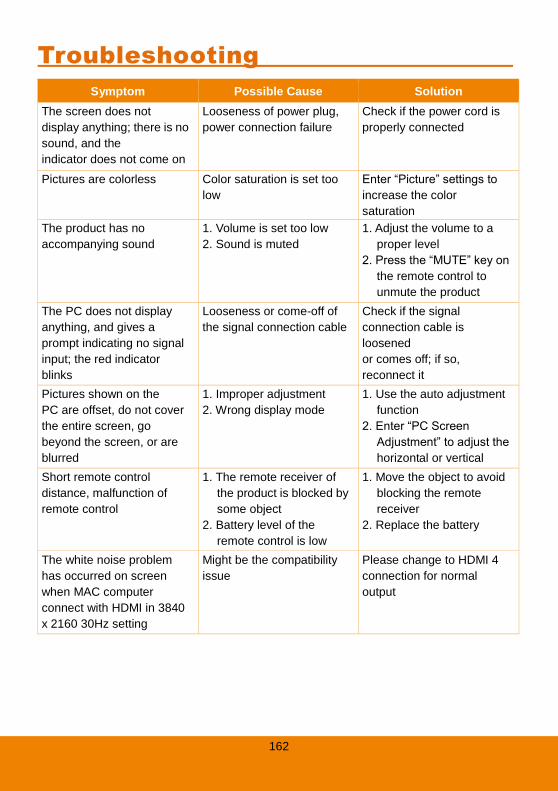
162
Troubleshooting
Symptom Possible Cause Solution
The screen does not
display anything; there is no
sound, and the
indicator does not come on
Looseness of power plug,
power connection failure
Check if the power cord is
properly connected
Pictures are colorless Color saturation is set too
low
Enter “Picture” settings to
increase the color
saturation
The product has no
accompanying sound
1. Volume is set too low
2. Sound is muted
1. Adjust the volume to a
proper level
2. Press the “MUTE” key on
the remote control to
unmute the product
The PC does not display
anything, and gives a
prompt indicating no signal
input; the red indicator
blinks
Looseness or come-off of
the signal connection cable
Check if the signal
connection cable is
loosened
or comes off; if so,
reconnect it
Pictures shown on the
PC are offset, do not cover
the entire screen, go
beyond the screen, or are
blurred
1. Improper adjustment
2. Wrong display mode
1. Use the auto adjustment
function
2. Enter “PC Screen
Adjustment” to adjust the
horizontal or vertical
position
3. Use the recommended
mode
Short remote control
distance, malfunction of
remote control
1. The remote receiver of
the product is blocked by
some object
2. Battery level of the
remote control is low
1. Move the object to avoid
blocking the remote
receiver
2. Replace the battery
The white noise problem
has occurred on screen
when MAC computer
connect with HDMI in 3840
x 2160 30Hz setting
Might be the compatibility
issue
Please change to HDMI 4
connection for normal
output
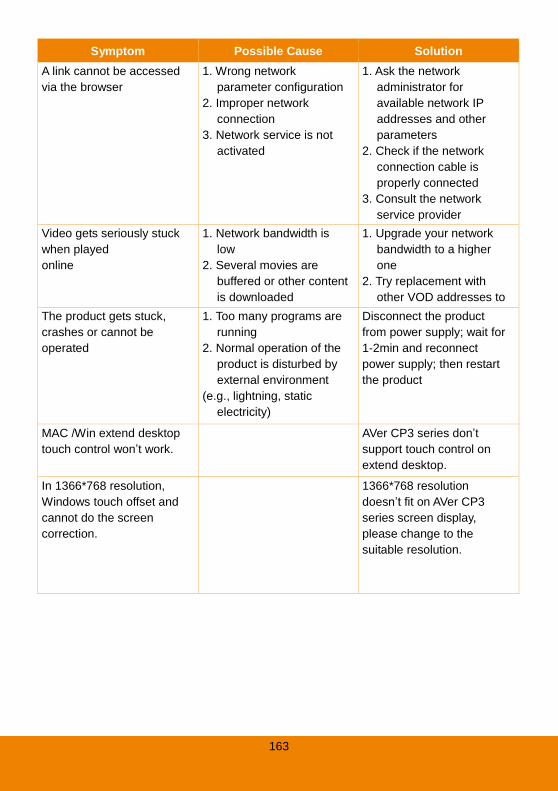
163
Symptom Possible Cause Solution
A link cannot be accessed
via the browser
1. Wrong network
parameter configuration
2. Improper network
connection
3. Network service is not
activated
1. Ask the network
administrator for
available network IP
addresses and other
parameters
2. Check if the network
connection cable is
properly connected
3. Consult the network
service provider
Video gets seriously stuck
when played
online
1. Network bandwidth is
low
2. Several movies are
buffered or other content
is downloaded
simultaneously
3. Several PCs share the
same network
1. Upgrade your network
bandwidth to a higher
one
2. Try replacement with
other VOD addresses to
obtain better resources The product gets stuck,
crashes or cannot be
operated
1. Too many programs are
running
2. Normal operation of the
product is disturbed by
external environment
(e.g., lightning, static
electricity)
Disconnect the product
from power supply; wait for
1-2min and reconnect
power supply; then restart
the product
MAC /Win extend desktop
touch control won’t work.
AVer CP3 series don’t
support touch control on
extend desktop.
In 1366*768 resolution,
Windows touch offset and
cannot do the screen
correction.
1366*768 resolution
doesn’t fit on AVer CP3
series screen display,
please change to the
suitable resolution.