Embed Size (px)
Citation preview
Avaya Solution & Interoperability Test Lab
Application Notes for OAISYS Tracer Station Side
Recording with Avaya AuraTM
Communication Manager
using Avaya AuraTM
Application Enablement Services
– Issue 1.0
Abstract
These Application Notes describe the configuration steps required for the OAISYS Tracer
Station Side Recording application to interoperate with Avaya AuraTM
Communication
Manager and Avaya AuraTM
Application Enablement Services. OAISYS Tracer utilizes a hub or switch to monitor network traffic and record VoIP calls. OAISYS Tracer interfaces with
Avaya AuraTM
Communication Manager via Avaya AuraTM
Application Enablement Services, using TSAPI to associate VoIP recordings with important data, such as agent extensions/IDs, obtained from CTI events.
Information in these Application Notes has been obtained through compliance testing and
additional technical discussions. Testing was conducted via the DevConnect Program at the
Avaya Solution and Interoperability Test Lab.
MJH; Reviewed:
SPOC 11/16/2010
Solution & Interoperability Test Lab Application Notes
©2010 Avaya Inc. All Rights Reserved.
1 of 35
OAISYS-SS_AES

1. Introduction These Application Notes describe the configuration steps required for the OAISYS Tracer
Station Side Recording application to interoperate with Avaya AuraTM
Communication Manager
and Avaya AuraTM
Application Enablement Services. OAISYS Tracer utilizes a hub or switch
to monitor IP traffic and record VoIP calls. OAISYS Tracer interfaces with Avaya AuraTM
Communication Manager via Avaya AuraTM
Application Enablement Services, using TSAPI to
associate VoIP recordings with important data, such as agent extensions/IDs, obtained from CTI
events.
To ensure Tracer records VoIP calls properly, the network must be configured so that all VoIP
packets pass through a device capable of replicating those packets to Tracer, such as a hub or a
switch. When using a hub, each hub port repeats every packet transmitted to and from that port
to every other port. If all VoIP traffic passes through a hub that Tracer is connected to, then
Tracer is capable of capturing all VoIP packets. If a switch is used instead of a hub, the switch
will not (by default) repeat every packet from one port to all other ports. Therefore, port
mirroring is utilized on a switch to send a copy of network packets seen on one switch port (or an
entire VLAN) to a network monitoring connection (such as Tracer) on another switch port.
1.1. Interoperability Compliance Testing
The interoperability compliance testing included both feature and serviceability testing.
The feature testing focused on verifying OAISYS Tracer could properly record, log, and
playback various calls including: internal enterprise calls, inbound/outbound trunk calls, and
calls involving basic telephony features (such as hold, mute, transfer, and conference).
The serviceability testing focused on verifying OAISYS Tracer could properly recover from
adverse conditions, such as busying out the CTI link, disconnecting the Ethernet cable from the
three servers (OAISYS Tracer, Communication Manager, and Application Enablement
Services), and power failures of the three servers.
MJH; Reviewed:
SPOC 11/16/2010
Solution & Interoperability Test Lab Application Notes
©2010 Avaya Inc. All Rights Reserved.
2 of 35
OAISYS-SS_AES

1.2. Support
Technical support for OAISYS Tracer can be obtained through the following:
Web: http://www.oaisys.com/technical_support.aspx
Phone: 1-888-496-9040
Email: [email protected]
2. Reference Configuration Figure 1 illustrates the configuration used during compliance testing as described in these
Application Notes. All VoIP traffic was mirrored to a second NIC on the OAISYS Tracer.
Figure 1: OAISYS Tracer with Avaya AuraTM
Communication Manager and Avaya
AuraTM
Application Enablement Services
MJH; Reviewed:
SPOC 11/16/2010
Solution & Interoperability Test Lab Application Notes
©2010 Avaya Inc. All Rights Reserved.
3 of 35
OAISYS-SS_AES

3. Equipment and Software Validated
The following equipment and software were used for the sample configuration provided:
Equipment Software
Avaya S8300D Server with an Avaya G450
Media Gateway
Avaya AuraTM
Communication Manager 6.0,
R016x.00.0.345.0, Update 18444
(Avaya AuraTM
System Platform: 6.0.1.0.5)
Avaya S8800 Server
Avaya AuraTM
System Platform : 6.0.1.0.5
Avaya AuraTM
System Manager : 6.0.7.0
Avaya S8800 Server
Avaya AuraTM
System Platform : 6.0.1.0.5
Avaya AuraTM
Session Manager 6.0.0.0.600020
Avaya S8500B Server
Avaya AuraTM
Application Enablement
Services 5.2.2
Avaya 9600 Series IP Telephones:
H.323
SIP
3.1.1
2.6
Avaya 2400 Series Digital Telephones
-
Avaya 6200 Series Analog Telephones
-
OAISYS Tracer Recording Server
6.1 (running on a Windows 7 PC)
MJH; Reviewed: SPOC 11/16/2010
Solution & Interoperability Test Lab Application Notes
©2010 Avaya Inc. All Rights Reserved.
4 of 35
OAISYS-SS_AES

4. Configure Avaya AuraTM
Communication Manager The detailed administration of Communication Manager and connectivity to Application
Enablement Services is not the focus of these Application Notes, and will not be described here.
For details regarding that specific administration, refer to the appropriate documentation listed in
Section 10.
This section provides the procedures to do the following:
Verify Communication Manager License
Administer CTI link for TSAPI Service
Save translations
4.1. Verify Communication Manager License
Log into the System Access Terminal (SAT) to verify that the Communication Manager license
has proper permissions for features illustrated in these Application Notes. Use the “display
system-parameters customer-options” command to verify that the Computer Telephony
Adjunct Links is set to “y” on Page 3. If this option is not set to “y”, then contact the Avaya
sales team or business partner for a proper license file.
display system-parameters customer-options Page 3 of 11
OPTIONAL FEATURES
Abbreviated Dialing Enhanced List? y Audible Message Waiting? y
Access Security Gateway (ASG)? n Authorization Codes? y
Analog Trunk Incoming Call ID? y CAS Branch? n
A/D Grp/Sys List Dialing Start at 01? y CAS Main? n
Answer Supervision by Call Classifier? y Change COR by FAC? n
ARS? y Computer Telephony Adjunct Links? y
ARS/AAR Partitioning? y Cvg Of Calls Redirected Off-net? y
ARS/AAR Dialing without FAC? n DCS (Basic)? y
ASAI Link Core Capabilities? n DCS Call Coverage? y
ASAI Link Plus Capabilities? n DCS with Rerouting? y
Async. Transfer Mode (ATM) PNC? n
Async. Transfer Mode (ATM) Trunking? n Digital Loss Plan Modification? y
ATM WAN Spare Processor? n DS1 MSP? y
ATMS? y DS1 Echo Cancellation? y
Attendant Vectoring? y
(NOTE: You must logoff & login to effect the permission changes.)
MJH; Reviewed:
SPOC 11/16/2010
Solution & Interoperability Test Lab Application Notes
©2010 Avaya Inc. All Rights Reserved.
5 of 35
OAISYS-SS_AES

4.2. Administer CTI Link for TSAPI Service
Add a CTI link using the “add cti-link n” command, where “n” is an available CTI link number.
Enter an available extension number in the Extension field. Enter “ADJ-IP” in the Type field,
and a descriptive name in the Name field (optional). Default values may be used in the
remaining fields. Submit these changes.
add cti-link 1 Page 1 of 3
CTI LINK
CTI Link: 1
Extension: 55001 Type: ADJ-IP
Name: TSAPI link to AES
COR: 1
4.3. Save Avaya Aura™ Communication Manager Provisioning
Enter the save translation command to make the changes permanent.
MJH; Reviewed:
SPOC 11/16/2010
Solution & Interoperability Test Lab Application Notes
©2010 Avaya Inc. All Rights Reserved.
6 of 35
OAISYS-SS_AES

5. Configure Avaya Aura™ Application Enablement Services The detailed administration of connectivity between Application Enablement Services and
Communication Manager is not the focus of these Application Notes and will not be described
here. For details regarding that specific administration, refer to the appropriate documentation listed in Section 10.
This section provides the procedures to do the following:
Verify Application Enablement Services license
Administer TSAPI link
Administer Devices
Administer Device Groups
Administer OAISYS user
Edit CTI User
Restart TSAPI service
Obtain Tlink Name
MJH; Reviewed:
SPOC 11/16/2010
Solution & Interoperability Test Lab Application Notes
©2010 Avaya Inc. All Rights Reserved.
7 of 35
OAISYS-SS_AES

5.1. Verify Avaya Aura™ Application Enablement Services License Access the AES OAM web based interface by using the URL “https://ip-address” in an Internet
browser window, where “ip-address” is the IP address of the AES server. Click the “Continue to
Login” link (not shown). The Login screen is displayed as shown below. Log in using
appropriate credentials.
MJH; Reviewed:
SPOC 11/16/2010
Solution & Interoperability Test Lab Application Notes
©2010 Avaya Inc. All Rights Reserved.
8 of 35
OAISYS-SS_AES

The Welcome to OAM screen is displayed, as shown below. Select AE Services from the left
pane.
MJH; Reviewed: SPOC 11/16/2010
Solution & Interoperability Test Lab Application Notes
©2010 Avaya Inc. All Rights Reserved.
9 of 35
OAISYS-SS_AES

The AE Services screen is displayed next. Verify that Application Enablement Services is
licensed for the TSAPI and DMCC Services, as shown in the screen below (License Mode =
NORMAL MODE). If the TSAPI and DMCC services are not licensed, contact the Avaya sales
team or business partner for a proper license file.
MJH; Reviewed: SPOC 11/16/2010
Solution & Interoperability Test Lab Application Notes
©2010 Avaya Inc. All Rights Reserved.
10 of 35
OAISYS-SS_AES

5.2. Administer TSAPI Link
To administer a TSAPI link, select AE Services TSAPI TSAPI Links from the left pane.
The TSAPI Links screen is displayed, as shown below. Click the Add Link button.
MJH; Reviewed: SPOC 11/16/2010
Solution & Interoperability Test Lab Application Notes
©2010 Avaya Inc. All Rights Reserved.
11 of 35
OAISYS-SS_AES

The Add TSAPI Links screen is displayed next. The Link field may be set to any available
number. For Switch Connection, select the relevant switch connection from the drop down list.
In this case, the existing switch connection “G450” is selected. The “G450” switch connection
was configured to establish a connection to the Communication Manager processor Ethernet (IP
address 10.64.21.41). For Switch CTI Link Number, select the CTI link number configured in
Section 4.2. Click on Apply Changes.
MJH; Reviewed:
SPOC 11/16/2010
Solution & Interoperability Test Lab Application Notes
©2010 Avaya Inc. All Rights Reserved.
12 of 35
OAISYS-SS_AES

The Apply Changes to Link screen is displayed. Click on Apply.
MJH; Reviewed:
SPOC 11/16/2010
Solution & Interoperability Test Lab Application Notes
©2010 Avaya Inc. All Rights Reserved.
13 of 35
OAISYS-SS_AES

5.3. Administer Devices
Configure devices to be monitored by OAISYS Tracer by navigating to Security Security
Database Devices. Enter a device extension in the text box and click Add Device.
MJH; Reviewed:
SPOC 11/16/2010
Solution & Interoperability Test Lab Application Notes
©2010 Avaya Inc. All Rights Reserved.
14 of 35
OAISYS-SS_AES

Select the appropriate Location, Device Type, and Tlink Group for the configuration. Click
Apply Changes.
MJH; Reviewed:
SPOC 11/16/2010
Solution & Interoperability Test Lab Application Notes
©2010 Avaya Inc. All Rights Reserved.
15 of 35
OAISYS-SS_AES

A warning screen will appear. Click Apply.
MJH; Reviewed:
SPOC 11/16/2010
Solution & Interoperability Test Lab Application Notes
©2010 Avaya Inc. All Rights Reserved.
16 of 35
OAISYS-SS_AES

5.4. Administer Device Groups
Configure a Device Group for OAISYS Tracer to use. The device group should contain all of
the devices that OAISYS Tracer can monitor. Navigate to Security Security Database
Device Groups. Enter a device group name in the text box and click Add Device Group.
MJH; Reviewed: SPOC 11/16/2010
Solution & Interoperability Test Lab Application Notes
©2010 Avaya Inc. All Rights Reserved.
17 of 35
OAISYS-SS_AES

Select all of the devices that OAISYS Tracer should be able to monitor. Tracer will not be able
to monitor any devices not selected. Click Apply Changes.
MJH; Reviewed: SPOC 11/16/2010
Solution & Interoperability Test Lab Application Notes
©2010 Avaya Inc. All Rights Reserved.
18 of 35
OAISYS-SS_AES

5.5. Administer OAISYS User
Administer a user account for OAISYS Tracer. Select User Management User Admin
Add User from the left pane. The Add User screen is displayed, as shown below. Enter
descriptive values for the User Id, Common Name, and Surname. Enter appropriate values for
the User Password and Confirm Password fields. Retain the default value of “None” for
Avaya Role, and select “Yes” from the CT User drop down list. Click on Apply at the bottom
of the screen (not shown).
MJH; Reviewed: SPOC 11/16/2010
Solution & Interoperability Test Lab Application Notes
©2010 Avaya Inc. All Rights Reserved.
19 of 35
OAISYS-SS_AES
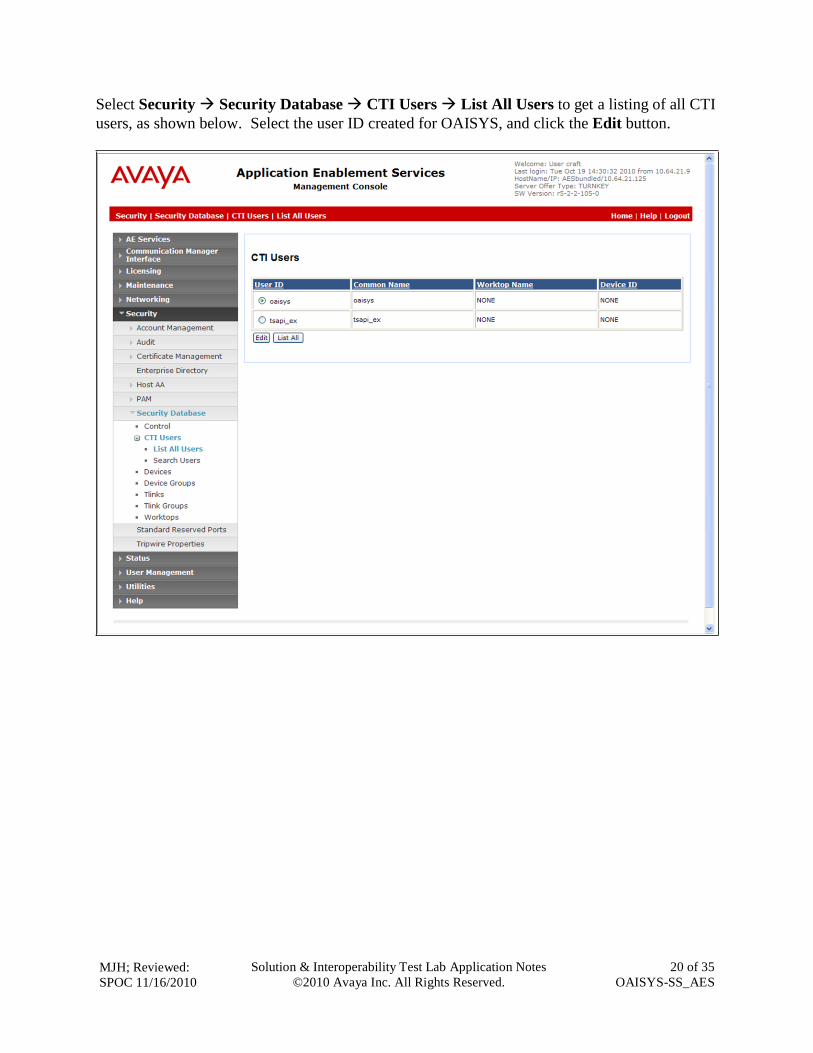
Select Security Security Database CTI Users List All Users to get a listing of all CTI
users, as shown below. Select the user ID created for OAISYS, and click the Edit button.
MJH; Reviewed:
SPOC 11/16/2010
Solution & Interoperability Test Lab Application Notes
©2010 Avaya Inc. All Rights Reserved.
20 of 35
OAISYS-SS_AES

The Edit CTI User screen is displayed, as shown below. Verify the Unrestricted Access
checkbox is not checked. Set the following values for the specified fields:
Call Origination and Termination / Device Status - “Any”
Call and Device Monitoring
o Device – Select the OAISYS device group administered in Section 5.4. o Call / Device – Select “Any”. o Call – Check this box.
Default values may be used for the remaining fields. Click Apply Changes.
MJH; Reviewed:
SPOC 11/16/2010
Solution & Interoperability Test Lab Application Notes
©2010 Avaya Inc. All Rights Reserved.
21 of 35
OAISYS-SS_AES

5.6. Restart TSAPI Service
Select Maintenance Service Controller. The Service Controller screen shows a listing of
the services and their associated status. Check the TSAPI Service, and click on Restart
Service.
MJH; Reviewed:
SPOC 11/16/2010
Solution & Interoperability Test Lab Application Notes
©2010 Avaya Inc. All Rights Reserved.
22 of 35
OAISYS-SS_AES

The following Restart Service screen is displayed. Click on Restart to confirm.
MJH; Reviewed:
SPOC 11/16/2010
Solution & Interoperability Test Lab Application Notes
©2010 Avaya Inc. All Rights Reserved.
23 of 35
OAISYS-SS_AES

5.7. Obtain Tlink Name
Select Security Security Database Tlinks. Note the name of the Tlink to be used by
OAISYS Tracer.
MJH; Reviewed: SPOC 11/16/2010
Solution & Interoperability Test Lab Application Notes
©2010 Avaya Inc. All Rights Reserved.
24 of 35
OAISYS-SS_AES

6. Configure OAISYS Tracer This section provides the procedures for configuring OAISYS Tracer.
Navigate to the Services window of the Windows PC where OAISYS Tracer is installed. Set the
OAISYSLevel2OAIAvaya TSAPI service Startup Type to “Automatic”.
MJH; Reviewed:
SPOC 11/16/2010
Solution & Interoperability Test Lab Application Notes
©2010 Avaya Inc. All Rights Reserved.
25 of 35
OAISYS-SS_AES

Open a browser to the main page of the OAISYS server’s default website by entering the
following URL:
http://$TracerServerName$ or http://localhost (if logged into the server locally)
Click the Click to Start Management Studio button.
MJH; Reviewed:
SPOC 11/16/2010
Solution & Interoperability Test Lab Application Notes
©2010 Avaya Inc. All Rights Reserved.
26 of 35
OAISYS-SS_AES

The screen below is displayed.
MJH; Reviewed:
SPOC 11/16/2010
Solution & Interoperability Test Lab Application Notes
©2010 Avaya Inc. All Rights Reserved.
27 of 35
OAISYS-SS_AES

Click the Admin tab on the bottom left and select CTI – Avaya TSAPI Port Settings from
the navigation pane on the left. Enter the following values for the specified fields:
AES Tlink Name: Enter the Tlink name obtained in Section 5.7.
AES Login: Enter the username created in Section 5.5.
AES Password: Enter the password created in Section 5.5.
Default values may be used for the remaining fields. Click Apply. Note that the Apply button
shown below is not enabled because the screen capture was taken after the changes were already
applied.
MJH; Reviewed:
SPOC 11/16/2010
Solution & Interoperability Test Lab Application Notes
©2010 Avaya Inc. All Rights Reserved.
28 of 35
OAISYS-SS_AES

Select Recording Ports Port from the menu on the left. Enter the following values for the
specified fields:
Port: Select valid port number.
Enabled: Check this box.
Port Type: Select VoIP.
Trunk Type: Select VoIP Tap.
Extension: Enter a device from Section 5.3.
VoIP Tap Type: Select RTP Capture.
VoIP Device Static IP Address: Enter IP Address of Extension.
Default values may be used for the remaining fields. Click Apply.
MJH; Reviewed:
SPOC 11/16/2010
Solution & Interoperability Test Lab Application Notes
©2010 Avaya Inc. All Rights Reserved.
29 of 35
OAISYS-SS_AES

7. General Test Approach and Test Results The interoperability compliance testing included feature and serviceability testing.
The feature testing focused on verifying OAISYS Tracer could properly record, log, and
playback various calls including: internal enterprise calls, inbound/outbound trunk calls, and
calls involving basic telephony features (such as hold, mute, transfer, and conference).
All calls were placed manually. After each call, the data records and recordings were verified.
The serviceability testing focused on verifying OAISYS Tracer could properly recover from
adverse conditions, such as busying out the CTI link, disconnecting the Ethernet cable from the
three servers (OAISYS Tracer, Communication Manager, and Application Enablement
Services), and power failures of the three servers.
All test cases were executed and passed.
MJH; Reviewed:
SPOC 11/16/2010
Solution & Interoperability Test Lab Application Notes
©2010 Avaya Inc. All Rights Reserved.
30 of 35
OAISYS-SS_AES

8. Verification Steps This section provides the tests that can be performed to verify proper configuration of
Application Enablement Services, Communication Manager, and OAISYS Tracer.
8.1. Verify Avaya Application Enablement Services
On Application Enablement Services, verify the status of the switch connection by selecting
Status Status and Control Switch Conn Summary from the left pane. Verify that the
Conn State is “Talking” for the relevant switch connection. In this case, the switch connection
is “G450”.
MJH; Reviewed:
SPOC 11/16/2010
Solution & Interoperability Test Lab Application Notes
©2010 Avaya Inc. All Rights Reserved.
31 of 35
OAISYS-SS_AES

Verify the status of the TSAPI link by selecting Status Status and Control TSAPI
Service Summary from the left pane. The TSAPI Link Details screen is displayed. Verify the
Status is “Talking” for the TSAPI link administered in Section 4.2, as shown below.
MJH; Reviewed: SPOC 11/16/2010
Solution & Interoperability Test Lab Application Notes
©2010 Avaya Inc. All Rights Reserved.
32 of 35
OAISYS-SS_AES

8.2. Verify OAISYS Tracer
Place several calls to and from devices monitored by OAISYS Tracer. Click the Historical
Calls tab, and open the All Calls I can View folder. Verify there is a recording for each call
placed. Play each recording to verify the entire call has been recorded with good voice quality.
9. Conclusion These Application Notes describe the configuration steps required for the OAISYS Tracer station
side recording application to interoperate with Avaya AuraTM
Communication Manager using
Avaya AuraTM
Application Enablement Services. All feature and serviceability test cases were completed successfully.
MJH; Reviewed:
SPOC 11/16/2010
Solution & Interoperability Test Lab Application Notes
©2010 Avaya Inc. All Rights Reserved.
33 of 35
OAISYS-SS_AES

10. Additional References This section references the product documentation relevant to these Application Notes.
Administering Avaya Aura™ Communication Manager, Document 03-300509, Release 6.0,
Issue 6.0, June 2010, available at http://support.avaya.com
Avaya Aura™ Application Enablement Services Administration and Maintenance Guide,
Document ID 02-300357, Release 5.2, Issue 11, November 2009, available at
http://support.avaya.com.
OAISYS Tracer with AVAYA AES Installation Guide, Release 6.1, August 21, 2010,
available at http://www.oaisys.com
OAISYS Tracer Administrator Guide, Release 6.1, August 26, 2010, available at
http://www.oaisys.com
OAISYS Management Studio User Guide, Release 6.1, August 23, 2010, available at
http://www.oaisys.com
OAISYS Tracer VoIP Recording Info, 2006, available at http://www.oaisys.com
OAISYS Installation Troubleshooting Guide, Release 6.1, April 20, 2010, available at
http://www.oaisys.com
MJH; Reviewed:
SPOC 11/16/2010
Solution & Interoperability Test Lab Application Notes
©2010 Avaya Inc. All Rights Reserved.
34 of 35
OAISYS-SS_AES

©2010 Avaya Inc. All Rights Reserved. Avaya and the Avaya Logo are trademarks of Avaya Inc. All trademarks identified by ® and ™ are registered trademarks or trademarks, respectively, of Avaya Inc. All other trademarks are the
property of their respective owners. The information provided in these Application Notes is
subject to change without notice. The configurations, technical data, and recommendations
provided in these Application Notes are believed to be accurate and dependable, but are
presented without express or implied warranty. Users are responsible for their application of any
products specified in these Application Notes.
Please e-mail any questions or comments pertaining to these Application Notes along with the
full title name and filename, located in the lower right corner, directly to the Avaya DevConnect
Program at [email protected].
MJH; Reviewed:
SPOC 11/16/2010
Solution & Interoperability Test Lab Application Notes
©2010 Avaya Inc. All Rights Reserved.
35 of 35
OAISYS-SS_AES