Embed Size (px)
Citation preview
AutoVueClient-Server Edition
Installation and Administration Manual

Support InformationIf you have any questions or require support for AutoVue please contact your system administrator. Some customization and maintenance must be done on the server side and cannot be implemented on the client machine. If the administrator is unable to resolve the issue, please contact Cimmetry Systems Corp.If at any time you have questions or concerns regarding AutoVue, call or e-mail us.
General InquiriesTelephone: +1 514 735-3219Fax: +1 514 735-6440E-mail: [email protected] Site: http://www.cimmetry.com
Sales InquiriesTelephone: +1 514 735-3219 or 1-800-361-1904Fax: +1 514 735-6440E-mail: [email protected]
Customer SupportTelephone: +1 514 735-9941Web Site: http;//www.cimmetry.com/support
AutoVue
CONTENTSINTRODUCTION 1MAIN FEATURES 2
Zero Maintenance 2Server Scalability and Clustering 2Accurate and Streamed Rendering 2Multiple Connection Schemes 3Server-based Client Configuration 3Feature Summary 3Why Cimmetry for OEM Licensing 4Product Architecture 5
SYSTEM REQUIREMENTS 7Server 7Client 7
CLIENT-SIDE INSTALLATION 8SERVER-SIDE INSTALLATION 9
Windows Operating Systems 9UNIX Operating Systems (Solaris) 10UNIX in Console Mode 11
Installing AutoVue Server 11Uninstalling AutoVue Server 12
Performing Silent Installations 12Performing a Silent Installation for Windows Operating Systems 12Performing a Silent Installation for UNIX Operating Systems (Solaris) 13Peforming a Silent Uninstallation for Windows 15Performing a Silent Uninstallation for UNIX Operating Systems (So-laris) 15
STARTING AUTOVUE SERVER 16Windows Operating Systems 16Unix Operating Systems (Solaris) 16
Starting AutoVue Server 16Modifying the Xvfb Port 17Shutting Down AutoVue Server 17
AUTOVUE SERVER CONSOLE 18SERVER CONFIGURATION 20
Adding a License File 20Installing the License File 20
Cimmetry Systems Corp.
AutoVue
Configuring the Connections to Use 20Changing the Connection Parameters Used in RMI or Socket Connec-tions 20
Adding Multiple Servers in a Cluster 21Adding an Additional Server 22AutoVue Server-Farm Licensing 23Running the Server Behind a Firewall: Servlet Tunneling 24
To Enable Tunneling 24Enabling Debugging Information for the Server 25
TESTING THE INSTALLATION 29Testing the Client-server Connections 29Testing the Servlet Installation 29
Enabling the VueServlet to contact the AutoVue Server 31CUSTOMIZING THE INSTALLATION 33
Applet Parameters 34Configuring AutoVue Server 40
SCRIPTING THE APPLET 43Basic Applet 43Advanced Scripting Functionality 44Exploring the Server’s File System 47
LIST OF INI FILE OPTIONS 49VueServer.ini Options 49
CUSTOMIZING THE GUI 54Choosing the GUI File 54Modifying the GUI File 54UNC File Names 54
CONFIGURING FOR COLLABORATION 56Configuring across Firewalls and Multiple AutoVue Servers 56
APPENDIX A: KNOWN LIMITATIONS 59APPENDIX B: SERVLET CONFIGURATION 61
Certified Application Servers 61Tunneling through J2EE-enabled Application Servers 61
Creating a WAR File for VueServlet 61Deploying the WAR File 63Generic Steps to Deploy the WAR File 63Deploying the WAR File with WebSphere 5.x 63Deploying the WAR File with JRUN 4.0 65Deploying the WAR File with WebLogic 9.0 66
Tunneling with non-J2EE Application Servers 66Setting up VueServlet 66
Cimmetry Systems Corp.
AutoVue
Tunneling using Jetty 67Tunneling using a Microsoft IIS ISAPI Extension 67
APPENDIX C: RUNNING THE AUTOVUE SERVER AS A SER-VICE 69
On Windows Operating Systems 69Starting and Stopping the Service 69
On Solaris Operating Systems 70APPENDIX D: STRUCTURE AND SYNTAX OF GUI FILES 71
GUI Configuration Syntax 71APPENDIX E: USING THE APPLET AS A STANDALONE APPLI-CATION 79
Windows Installation 79Unix Installation 79Using the Applet as a Standalone Application 79
APPENDIX F: LIST OF INI FILE OPTIONS 81allusers.ini and default.ini Options 81
Acrobat PDF Options 81AutoCAD Options 82Autodesk DWF Options 83Autodesk Inventor Options 84Cadence Options 85Cadkey Options 85CATIA 4 Options 86CATIA 5 Options 86CGM Options 87Excel Options 87Gerber Options 88HPGL/HPGL2 Options 89IGES Options 90JPEG Options 90JPEG 2000 Options 91ME10/ME30 Options 91MicroStation Drawing Options 92NC Drill Options 96Orcad Layout Options 97Postscript Options 98Pro/ENGINEER Options 98SolidWorks Options 100STEP Options 101Text Options 101
Cimmetry Systems Corp.
AutoVue
Visio Options 102UI Color Options 102General Options 104
Base Font 1103D PMI Options 1113D Color Options 115ECAD Options 117
Printing Options 118General Options 118Watermark Options 120Headers/Footers Options 121Margins Options 122Pen Settings Options 122Watermark in View Mode 123
Markup Options 123APPENDIX G: CAD INTEGRATIONS 127APPENDIX H: WORD THROUGH CONVERSION 129
System Requirements 129Configuring AutoVue Server to Enable Word Conversion 129
APPENDIX I: FAQ 131General 131Security 138Integrating with Other Systems 140Platform 143Troubleshooting 145
Cimmetry Systems Corp.
AutoVue 1
IntroductionAutoVue Client-Server Edition provides all the features of AutoVue Desktop Edition in a true zero administration solution. AutoVue lets users view and mark up documents, drawings and CAD files in over 450 formats from a Web browser such as Microsoft Internet Explorer or Netscape Communicator, or as a standalone application. Formats supported include SolidWorks, Pro/ENGINEER, JT, Allegro layout, ZUKEN, EDIF, Acrobat PDF, AutoCAD, MicroStation, HPGL, TIFF, ME10, Microsoft Word, Excel and PowerPoint to name a few. During the design phase of the product, Cimmetry Systems made it a goal to provide a full-feature set to the AutoVue Client-Server Edition user. This implementation of AutoVue is complete and very comparable to the Desktop Edition in feature set. It is not a reduced version of the AutoVue product.
Cimmetry Systems Corp.
2 AutoVue
Main FeaturesZero MaintenanceAutoVue requires no maintenance on the client machines. The applet is automatically downloaded to the client and stored in the browser cache. This allows new versions of the software to be installed only on the server. The client browsers automatically detect if a new version is available and download the applet only in this case.
Server Scalability and ClusteringAutoVue was designed in order to provide for server scalability to support an ever-increasing demand for file viewing and marking up on Intranets and Internets. The system allows you to simply add servers in order to serve more users/clients. This can be done online without rebooting or disconnecting existing servers. This functionality is extremely useful when the Viewing and Markup needs within an organization get more demanding. Accommodating additional users becomes simply a matter of monitoring the AutoVue servers’ load and adding more servers if necessary. The load is efficiently balanced across the AutoVue server cluster. Doubling the capacity is as simple as adding one more machine. This is an extremely cost- and resource-efficient way to scale up: AutoVue is engineered to grow with your needs.
Accurate and Streamed RenderingDuring the viewing process, documents available for viewing are rendered on the server(s) and an intelligent and displayable data stream is delivered to the client. In this manner, AutoVue eliminates any concerns about security since the original document with its proprietary data is not transferred to the client machine. During the transmission of the viewable data, AutoVue utilizes different compression and streaming algorithms in order to achieve a quick and responsive feedback to the client side for large and multi-page documents.AutoVue embeds several different rendering schemes in order to accommodate environments. These schemes allow the server to take into account issues such as: network bandwidth, load balancing between server and client, server configuration and performance, Intranet/Extranet/Internet use and file size and format to be viewed. However, in all rendering options, AutoVue keeps all necessary information for querying purposes (i.e., the “intelligence” of drawings
Cimmetry Systems Corp.
AutoVue 3
is preserved). For example, users can perform text searches on text and CAD files or perform queries based on drawing attributes in a CAD file.
Multiple Connection SchemesDuring the design process, Cimmetry has identified the need for several connection possibilities between the client and the rendering server. Depending upon your network configuration (existing firewalls, demilitarized zone, secure connections, proxy servers etc.), the client is able to connect to the AutoVue server using Direct Sockets or the HTTP/HTTPS protocol (through a servlet), thus avoiding any security breach in your system.
Server-based Client ConfigurationWith AutoVue Client-Server Edition, the server defines the user interface capabilities and the feature set provided to the client. The server has complete control over what functions and user interface are made available to the client. For example, users may be granted or denied rights to perform printing, marking up, or any other functionality available in AutoVue depending on their access permissions. Moreover, multiple language support is provided “out-of-the-box” within AutoVue, and users using different languages will be served with a localized user interface from the same applet.
Feature Summary• Supports over 450 formats including: Engineering (CAD, Raster, Hybrid),
3D CAD, Business (word processing, spreadsheets, PDF, presentation graphics), raster and vector graphics, etc.
• Extensive Viewing features: Extent, Zoom, Pan, Layering, Scale-to-Gray, Page/Sheet Selection, Monochrome, Bird’s-eye, Magnify glass, Magnify-Window, Rotate, Flip, Contrast Adjustment, Invert, etc.
• Powerful CAD, EDA, 3D and Raster Drawings Comparison feature: Synchronized Multiple Window Interface with highlighted additional, deleted and common data.
• Overlay Support for Hybrid and complex CAD files (i.e., CAD files with embedded raster, OLE data, and view ports).
• Full support of resources in CAD files: fonts, line styles, embedded objects, non-rectangular view ports, etc.
• Text searching capability within Document and CAD files.• Measurement capabilities.• BOM generation capability for EDA and 3D files.
Cimmetry Systems Corp.
4 AutoVue
• Access to properties and attributes attached to certain entities in CAD, EDA and 3D files.
• Fully configurable user interface controlled by the server component.• Fully configurable feature set controlled by the server component.• Support for ISO 9000 headers, footers, banners, and watermarks.• Extensive list of Markup entities including text, notes, approval stamps.
Integrations and OEM NeedsAutoVue is customizable and has been designed to provide an extensive set of APIs for integration with DM, PLM, Knowledge Management, PDM, ISPs, Portals, ERP, ESP, supply chain and project management web-centric solutions. The advantage of integrating with AutoVue resides in the fact that the integrator might want to take advantage of the User Interface already developed by Cimmetry Systems. In certain cases where the integrator might want to have complete control of user interface issues and functionality, we offer the View and Markup beans.Moreover, to offer a higher level of integration, AutoVue can be closely integrated into several Document Management Systems (DMSs) using a complete and flexible set of APIs. The integration design has been aimed to provide a transparent integration scheme, a client being able to review a DMS document or a remote file with no knowledge of the underlying technology. Detailed information about AutoVue integration (DMAPI) possibilities can be obtained from Cimmetry Systems Corp.
Why Cimmetry for OEM LicensingCimmetry Systems develops the AutoVue product. Several articles and reviews have described AutoVue as the “best” engineering viewing solution available on the market today. Please connect to www.cimmetry.com for more information. The AutoVue family of products provides for the most accurate and complete viewing and markup needs.Cimmetry owns the technology embedded within AutoVue Desktop and Client-Server editions. Therefore, Cimmetry can provide timely and knowledgeable customer support. Cimmetry fully controls its licensing scheme and can provide flexible terms to its licensees.
Cimmetry Systems Corp.
AutoVue 5
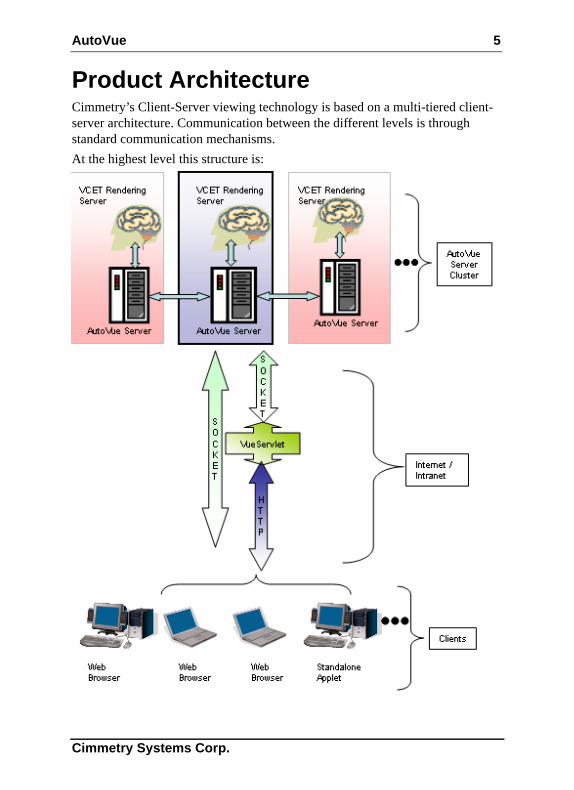
Product ArchitectureCimmetry’s Client-Server viewing technology is based on a multi-tiered client-server architecture. Communication between the different levels is through standard communication mechanisms. At the highest level this structure is:
Cimmetry Systems Corp.
6 AutoVue
On the server side we have one or more AutoVue servers running, ready to process rendering requests from the clients. The servers hook into Cimmetry Systems’ VCET libraries. VCET (Viewing and Conversion Enabling Technology) is the same library used in the AutoVue product line to render over 450 different file formats.More than one server can be used to perform intelligent load-balancing — the servers automatically divide the load in a “peer-to-peer” fashion to avoid any bottlenecks.The Web browsers access the servers through standard HTML Web pages. The HTML pages contain embedded <APPLET> tags that contain information about the document to view and where to retrieve the document. No software needs to be explicitly installed on the client — everything is automatically handled.
Cimmetry Systems Corp.
AutoVue 7
System RequirementsServer
• Windows 2003Sp1, 2003R2 or 2003, Windows XP SP2 or Windows 2000 SP4
• Sun Solaris 9 or 10 The installation requires about 400MB of free space.The memory requirements depend on the size and the complexity of the files being viewed.
ClientCimmetry certifies clients running Sun Java VM 1.4.2 or 1.5 and Microsoft VM.
The following OSes and browsers are certified by Cimmetry.• Windows, 2000, Windows 2003 or Windows XP with Microsoft Internet
Explorer 6.0 SP1, FireFox 1.5• Macintosh Power PC OS 10.4 with Safari 2.0 and FireFox 1.5• Sun Solaris 9 & 10 with Firefox 1.5• RedHat Enterprise Linux 4.0 and Suse SLES 9.0 Sp3 with Firefox 1.5• HP-UX 11 with Mozilla 1.7• AIX 5.1 with Firefox 1.5• AIX 5.1 with Netscape 7.0
Cimmetry Systems Corp.
8 AutoVue
Client-side InstallationNo special configuration needs to be done on the client side. The only requirement is a Java-compatible browser for a Web client. The software is generally installed on a WEB server. It is automatically deployed onto the client machines when the applet is first loaded.You may also want to use the applet as a standalone application, see Appendix E.For a list of certified browsers and Java Virtual Machines, see System Requirements.
Cimmetry Systems Corp.
AutoVue 9
Server-side Installation Windows Operating SystemsImportant: We recommend that you install and run AutoVue Server as a "secure" user so as to ensure that direct access to the server and files on the server is restricted. Users connecting to AutoVue server via the client will still be able to view files and generate metafiles.1 If you downloaded it from the website extract and run jInstall.exe.
If you got it from a CD, run the install program. The installation program guides you through the steps of the process.
2 Follow the on-screen instructions.If it detects that a Web server is running on your machine, the install program prompts you to confirm the Web server’s host name and HTTP port (which defaults to 80).Sample HTML pages and client Cab/Jar files are installed in the AutoVue directory in the root of the Web server’s tree (i.e., http://server/jVue/…).Once the installation program is finished, it creates a Program Manager group, “AutoVue, Client-Server Edition”. The group contains a few icons.
Start AutoVue Server ‘• This is a link to the batch file jvueserver.bat. This batch file starts up the
AutoVue server which should be running in the background all the time. It handles rendering requests from the clients.
To test AutoVue• Once the AutoVue server starts, launch jvue.bat located in <Install
Dir>\bin.
Sample HTML page for AutoVue • Once the AutoVue Server starts, type http://<machine>/jVue/jVue.html
to test AutoVue.Note This test will work only if you chose to install the web server components.
• Other program links include links to documentation and setup/uninstallation programs.
If the AutoVue server is installed on a machine that does not have a Web server installed:1 Start the installation as described above.
Cimmetry Systems Corp.
10 AutoVue
As previously, it creates a Program Manager group, "AutoVue, Client-Server Edition", from which you can start the AutoVue server.
2 On the Web server machine, create a jVue directory from where you want the HTML pages and the client components served.
3 From the AutoVue Server machine, manually copy the content of \Program Files\jVue\html to this directory.
4 Copy jvue.jar and jvue.cab from the AutoVue server installation directory (\Program Files\ jVue\bin) to this directory (created in step 2).
5 Edit file frmApplet.html. Update the CODEBASE parameter to point to the web server where jVue’s .cab and .jar files reside. This will be the web server directory created in step 2.
6 Edit file frmApplet.html. 7 Rename jvue3d.jar to jvue.jar. 8 Rename jvue3d.cab to jvue.cab.9 Edit file frmApplet.html. Change SOCKETHOST and SERVLETHOST to
the appropriate values. Example: socket://192.9.200.21:5099; http://192.9.200.21:5098/servlet/VueServlet.
10 Edit frmFiles.html and verify that the variable jVueSamples points to the URL mapped to the jVue\samples directory.
Start AutoVue Server • This is a link to the batch file jVueServer.bat. This batch file starts up the
AutoVue server which should be running in the background all the time. It handles rendering requests from the clients.
To test AutoVue• Once the AutoVue server starts, launch jvue.bat located in <Install
Dir>\bin.
Sample HTML page for AutoVue • Once the AutoVue Server starts, type http://<machine>/jVue/jVue.html
to test AutoVue.
UNIX Operating Systems (Solaris)1 Copy the file jInstall*.bin onto the Unix box. If you have a CD-ROM drive
on the UNIX machine, mount the install CD and copy jInstall*.bin into a convenient directory. Otherwise, use FTP to copy the file onto the UNIX machine.
2 From an XTerminal, go to the directory where the installer was copied.
Cimmetry Systems Corp.
AutoVue 11
3 To give users permission to run the installer, type the line below at the UNIX prompt:chmod +x jInstall*.bin
4 To invoke the installer, type the following line at the UNIX prompt:./jInstall*.binThe installation program guides you through the steps of the process.
5 Follow the on-screen instructions.• When you are asked to enter the AutoVue Server details, the Host Name
is the name of the UNIX box that the server will run on.• Accept the default values for the ports unless you use these ports for other
purposes.• Select Yes to install AutoVue for your Web server.• When prompted for Web Server Doc URL, specify the URL to the jVue
directory: Example: http://csisunos:8080/jVue.
• Web Server Doc Root is the document root of your web server: Example: /var/apache/htdocs.
• If you cancel the installation, make sure to delete folders ismj* and ismp* in /var/tmp before running the installer again.
Start AutoVue Server• To test AutoVue: Once the AutoVue server starts, launch jvue located in
<Install Dir>\bin.See Starting AutoVue Server on Solaris
Sample HTML page for AutoVue Once the AutoVue Server starts, type http://<machine>/jVue/jVue.html to test AutoVue.
UNIX in Console Mode
Installing AutoVue Server To invoke the AutoVue installer for UNIX from a terminal window in interactive console mode, type the following line at the UNIX prompt: ./jInstall*.bin -console -is:javaconsole
Cimmetry Systems Corp.
12 AutoVue
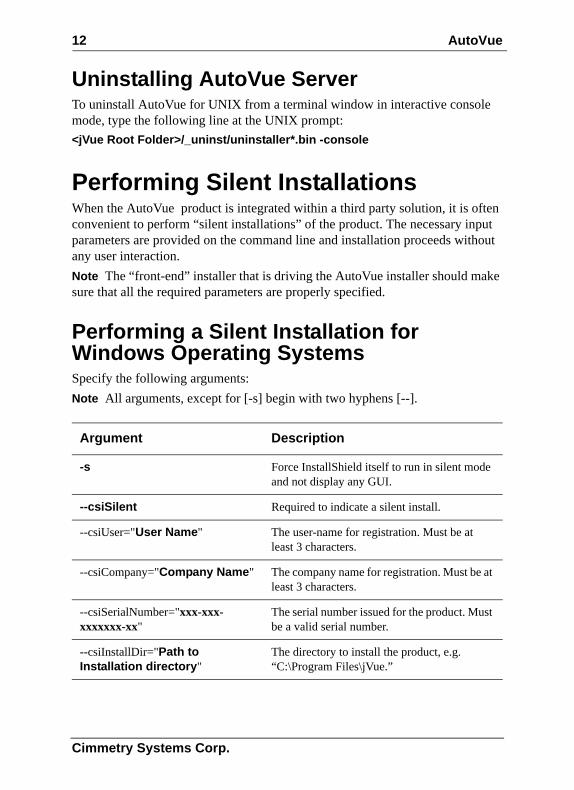
Uninstalling AutoVue Server To uninstall AutoVue for UNIX from a terminal window in interactive console mode, type the following line at the UNIX prompt: <jVue Root Folder>/_uninst/uninstaller*.bin -console
Performing Silent InstallationsWhen the AutoVue product is integrated within a third party solution, it is often convenient to perform “silent installations” of the product. The necessary input parameters are provided on the command line and installation proceeds without any user interaction. Note The “front-end” installer that is driving the AutoVue installer should make sure that all the required parameters are properly specified.
Performing a Silent Installation for Windows Operating SystemsSpecify the following arguments:Note All arguments, except for [-s] begin with two hyphens [--].
Argument Description
-s Force InstallShield itself to run in silent mode and not display any GUI.
--csiSilent Required to indicate a silent install.
--csiUser="User Name" The user-name for registration. Must be at least 3 characters.
--csiCompany="Company Name" The company name for registration. Must be at least 3 characters.
--csiSerialNumber="xxx-xxx-xxxxxxx-xx"
The serial number issued for the product. Must be a valid serial number.
--csiInstallDir="Path to Installation directory"
The directory to install the product, e.g. “C:\Program Files\jVue.”
Cimmetry Systems Corp.
AutoVue 13
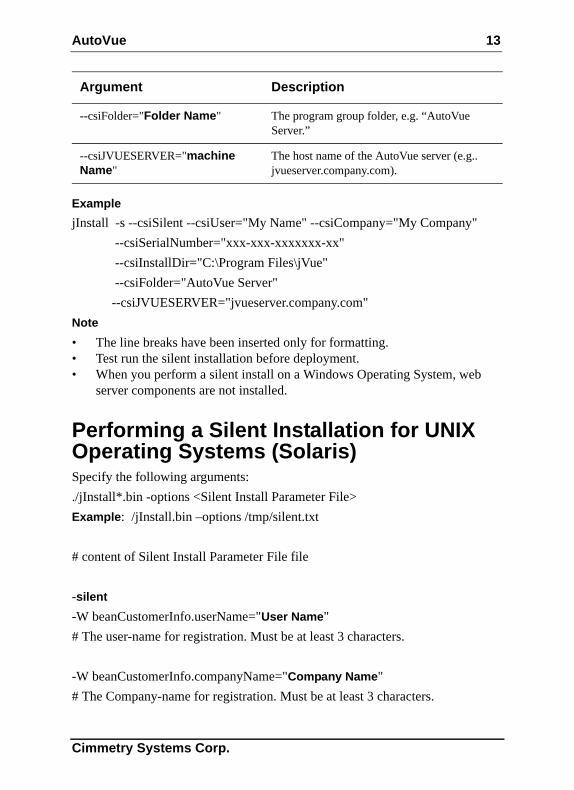
ExamplejInstall -s --csiSilent --csiUser="My Name" --csiCompany="My Company" --csiSerialNumber="xxx-xxx-xxxxxxx-xx" --csiInstallDir="C:\Program Files\jVue" --csiFolder="AutoVue Server" --csiJVUESERVER="jvueserver.company.com"Note • The line breaks have been inserted only for formatting.• Test run the silent installation before deployment.• When you perform a silent install on a Windows Operating System, web
server components are not installed.
Performing a Silent Installation for UNIX Operating Systems (Solaris)Specify the following arguments:./jInstall*.bin -options <Silent Install Parameter File>Example: /jInstall.bin –options /tmp/silent.txt
# content of Silent Install Parameter File file
-silent-W beanCustomerInfo.userName="User Name"# The user-name for registration. Must be at least 3 characters.
-W beanCustomerInfo.companyName="Company Name"# The Company-name for registration. Must be at least 3 characters.
--csiFolder="Folder Name" The program group folder, e.g. “AutoVue Server.”
--csiJVUESERVER="machine Name"
The host name of the AutoVue server (e.g.. jvueserver.company.com).
Argument Description
Cimmetry Systems Corp.
14 AutoVue
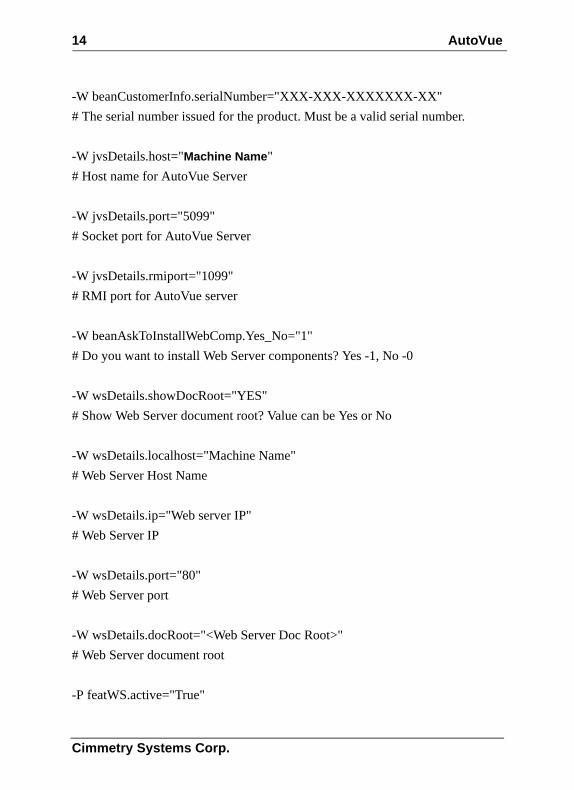
-W beanCustomerInfo.serialNumber="XXX-XXX-XXXXXXX-XX"# The serial number issued for the product. Must be a valid serial number.
-W jvsDetails.host="Machine Name"# Host name for AutoVue Server
-W jvsDetails.port="5099"# Socket port for AutoVue Server
-W jvsDetails.rmiport="1099"# RMI port for AutoVue server
-W beanAskToInstallWebComp.Yes_No="1"# Do you want to install Web Server components? Yes -1, No -0
-W wsDetails.showDocRoot="YES"# Show Web Server document root? Value can be Yes or No
-W wsDetails.localhost="Machine Name"# Web Server Host Name
-W wsDetails.ip="Web server IP"# Web Server IP
-W wsDetails.port="80"# Web Server port
-W wsDetails.docRoot="<Web Server Doc Root>"# Web Server document root
-P featWS.active="True"
Cimmetry Systems Corp.
AutoVue 15
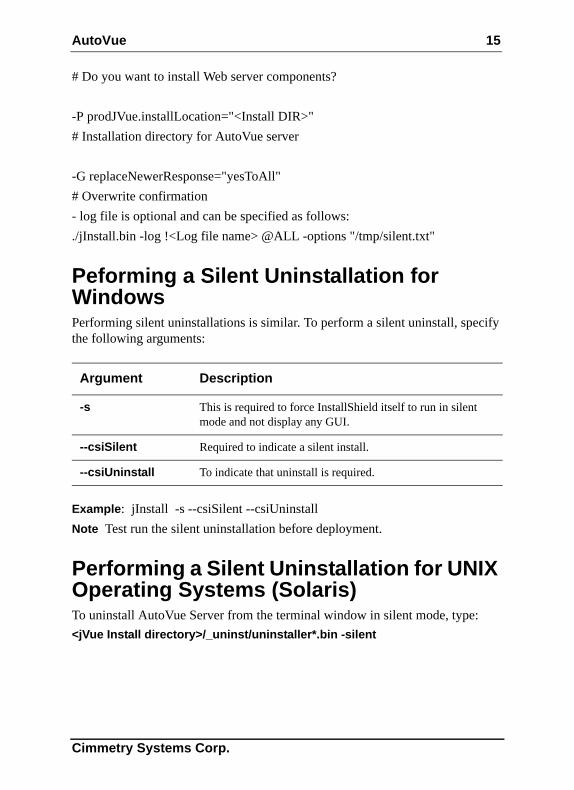
# Do you want to install Web server components?
-P prodJVue.installLocation="<Install DIR>"# Installation directory for AutoVue server
-G replaceNewerResponse="yesToAll"# Overwrite confirmation- log file is optional and can be specified as follows:./jInstall.bin -log !<Log file name> @ALL -options "/tmp/silent.txt"
Peforming a Silent Uninstallation for WindowsPerforming silent uninstallations is similar. To perform a silent uninstall, specify the following arguments:
Example: jInstall -s --csiSilent --csiUninstallNote Test run the silent uninstallation before deployment.
Performing a Silent Uninstallation for UNIX Operating Systems (Solaris)To uninstall AutoVue Server from the terminal window in silent mode, type:<jVue Install directory>/_uninst/uninstaller*.bin -silent
Argument Description
-s This is required to force InstallShield itself to run in silent mode and not display any GUI.
--csiSilent Required to indicate a silent install.
--csiUninstall To indicate that uninstall is required.
Cimmetry Systems Corp.
16 AutoVue
Starting AutoVue ServerWindows Operating SystemsThe AutoVue installer creates a Program Manager group AutoVue, Client-Server Edition. To start AutoVue server, click Start AutoVue server in the AutoVue, Client-Server Edition group. To shut down AutoVue server, click Shutdown from the AutoVue console.By default, when the server is started, the Console is displayed and the server appears in the system tray. To disable the console and to start up the server only in the system tray, start the server with:jVueServerX -noconsole
Unix Operating Systems (Solaris)
Starting AutoVue Server1 Go to the directory <Install directory>/bin.2 To start up the AutoVue server, type the following text exactly as it appears:
./jvueserver &Note This starts up the server console as well if the DISPLAY environment variable is properly set.
3 This starts up AutoVue server with a default ProcessPoolSize of 4.4 To modify the ProcessPoolSize, start up AutoVue server with the following
command line argument:./jvueserver –m<n>where n is the processpoolsize. For more information on process pool, see Adding multiple servers in a cluster.Example: /jvueserver –m2 will start up two secondaries and the primary serverThe startup script for AutoVue server on UNIX also starts up the Xvfb server. Xvfb is an X11 virtual framebuffer that helps the AutoVue server to render files.Note If you would like AutoVue Server to continue running after you close the terminal window or after you log out of the solaris machine, you must exit the shell (console window) used to start AutoVue Server before logging out of Solaris. This way, the server will continue running even after you log
Cimmetry Systems Corp.
AutoVue 17
off. You must exit the shell by typing exit, and not close the window using the GUI close button.
Modifying the Xvfb PortThe Xvfb server runs on port ‘909’ by default. To modify this port, open jvueserver and replace port ‘909’ with an available port.
Shutting Down AutoVue ServerTo shut down AutoVue server on UNIX, click Shutdown on the AutoVue server console.Note At shutdown, the Xvfb process is left running. This is expected and it does not cause any problems when restarting AutoVue server.
Cimmetry Systems Corp.
18 AutoVue
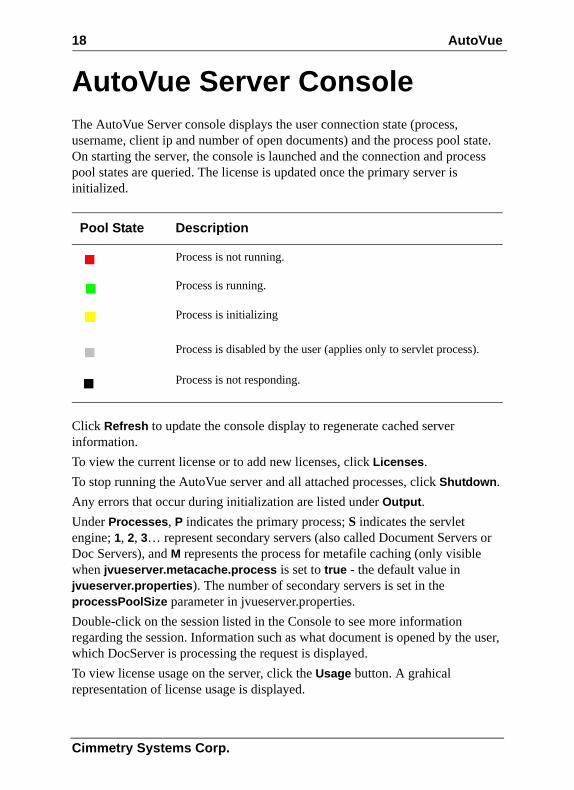
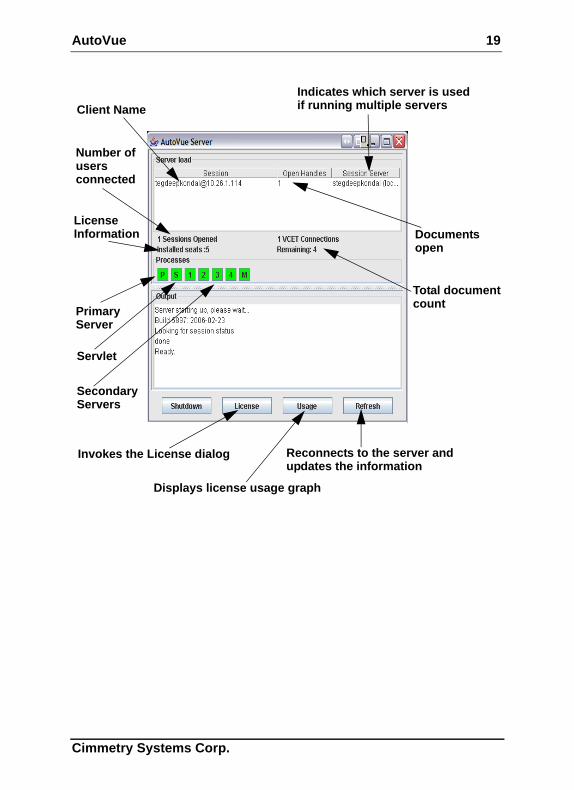
AutoVue Server ConsoleThe AutoVue Server console displays the user connection state (process, username, client ip and number of open documents) and the process pool state. On starting the server, the console is launched and the connection and process pool states are queried. The license is updated once the primary server is initialized.
Click Refresh to update the console display to regenerate cached server information. To view the current license or to add new licenses, click Licenses. To stop running the AutoVue server and all attached processes, click Shutdown.Any errors that occur during initialization are listed under Output.Under Processes, P indicates the primary process; S indicates the servlet engine; 1, 2, 3… represent secondary servers (also called Document Servers or Doc Servers), and M represents the process for metafile caching (only visible when jvueserver.metacache.process is set to true - the default value in jvueserver.properties). The number of secondary servers is set in the processPoolSize parameter in jvueserver.properties. Double-click on the session listed in the Console to see more information regarding the session. Information such as what document is opened by the user, which DocServer is processing the request is displayed.To view license usage on the server, click the Usage button. A grahical representation of license usage is displayed.
Pool State Description
Process is not running.
Process is running.
Process is initializing
Process is disabled by the user (applies only to servlet process).
Process is not responding.
Cimmetry Systems Corp.
AutoVue 19
Invokes the License dialog
Client Name
Reconnects to the server andupdates the information
Indicates which server is usedif running multiple servers
Total documentcount
Documentsopen
LicenseInformation
PrimaryServer
Servlet
SecondaryServers
Number ofusers connected
Displays license usage graph
Cimmetry Systems Corp.
20 AutoVue
Server Configuration Adding a License FileFor all installations of AutoVue server a license key is required. The administrator will need to provide a license key that defines the licensing conditions for the server. Cimmetry Systems Corp. will provide this file on a customer-by-customer basis.
Installing the License File1 Click Licenses on the AutoVue Server user interface.
The Licenses dialog appears.2 Copy the supplied license key and paste into the dialog.
Configuring the Connections to UseBy default, the AutoVue server opens a socket connection to clients on Port 5099 and an RMI Connection to other servers in the cluster on Port 1099. You can, however, use different ports. To change these server parameters, you need to modify the file jvueserver.properties located in the \bin subdirectory of the AutoVue server installation directory.
Changing the Connection Parameters Used in RMI or Socket ConnectionsEdit the following lines:jvueserver.rmi.port=1099jvueserver.socket.port=5099This new server configuration will also need to be properly reflected in the JVUESERVER parameter specified in the APPLET tag of the HTML page embedding the AutoVue client. Note that these port numbers are not related to the HTTP port used by the WEB server.If your AutoVue server uses a proxy server to connect to the Internet, then the proxy server name must be specified in the jvueserver.properties file.Example:jvueserver.http.proxyhost=my.proxyserver.com:80
Cimmetry Systems Corp.
AutoVue 21
jvueserver.ftp.proxyhost= my.proxyserver.com:80Replace my.proxyserver.com with the name of the proxy server running on the server and the port with the appropriate port number. It is recommended that, except for the proxy settings, you do not change the default settings.You should verify that the ports specified are “open” and not in use by any other process. The netstat –a program will display which ports are in use. Also, the number of consecutive ports used starting from the base value specified for RMI and Sockets will depend on the processpoolsize value set in jVueserver.properties.
See AlsoRunning the Web Server on a Different HTTP Port
No change is necessary in the AutoVue server software if the Web server is running on a port other than the default, 80. The only difference is in the client URL.Example: • if the WEB server is running on port 8080, instead of the URL below:
http://jvue.company.com/jVue/jVue.html
• if the WEB browser should point to the following URL:http://jvue.company.com:8080/jVue/jVue.html
Adding Multiple Servers in a ClusterThe AutoVue server is designed to be easily scaleable. As the demand for accurate viewing and marking up increases in an organization, AutoVue can easily accommodate the additional load by adding new servers. Each time a client connects to the cluster entry point (i.e., the host specified in the JVUESERVER parameter of the APPLET) the overall load is calculated and the server with the least load in the cluster is selected for the client to use. You do not need to modify your HTML pages or stop your running servers to add a new server to the cluster.The AutoVue server can run in a process pool on a single machine. The default process pool size is 4 and is set in the jvueserver.properties file. Example: jvueserverx.nt.processPoolSize=4Note For AutoVue server on UNIX platforms, the processpoolsize is specified as a command line parameter. The value set in ‘jvueserver.properties’ is not read.
Cimmetry Systems Corp.
22 AutoVue
Creating a process pool helps improve the responsiveness when handling simultaneous connections and also helps balance the load across processors in a multi-CPU machine. As a rule of thumb, you should allow for approximately 50MB for each process in a pool: thus a process pool size of 4 would require approximately 200MB of RAM on the machine to run comfortably. The load is balanced across the pool on the single machine.In addition, you can add more machines to the “server farm” and the load will be balanced across all machines. Scaling to support more concurrent users can be easily achieved by adding more hardware while keeping the software configuration identical.Since release 18, there are two levels of load balancing - session-level and document-level. Session-level load balancing - Sessions are routed to the server with the least number of sessions.Document level load-balancing - It does not matter what server a session is on, document open requests are always routed to the server that has the least number of requests in terms of document open requests.
Adding an Additional Server1 Add a new machine to the same network as the original AutoVue server.
Note If the client-server connection will use RMI or sockets directly, the machine should have an IP address that is viewable from the “outside.” If a servlet connection is used, the AutoVue servers can be completely hidden from clients.
2 Install the AutoVue server software on the new server, going through the same steps as in the original installation. The main difference is the different host name of the new server.
3 Once installed, edit the file VueServer.ini located in the \bin program-directory on the cluster entry point machine. Note These modifications are needed only on the primary AutoVue server machine. For fail-safe installation, repeat the customizations on all machines in the cluster.
4 In the [RMI] section, add the entries.
Example:[RMI]MaximumLoad=100RMIHost1=jvueserver1.company.com:1099
Cimmetry Systems Corp.
AutoVue 23
RMIHost2=jvueserver2.company.com:1099Etc.where RMIHost1 is set to the name of the primary AutoVue Server in the farm.RMIHost2 is the name of the second AutoVue Server in the far and so on.The entry MaximumLoad (default 100) is used by the load-balancing algorithm — it gives a rough estimate of the server capacity.For example, on a powerful machine you may want to set it higher than on a lower-end server. This setting can vary from server to server and you may wish to set it in the VueServer.ini of the new server. For example, if you are running on a cluster of machines with different performances, you can assign a higher number to the faster machine and lower numbers to the slower machines. This should be left at the default value of 100.The entries:RMIHost1=machine1:rmiport1RMIHost2=machine2:rmiport2RMIHost3=machine3:rmiport3,etc.list all the servers in the server-cluster. Their IP address:RMI port identifies them. The RMI port is optional — if not specified it defaults to 1099.
Note If you plan to use AutoVue’s Collaboration feature, see Configuring for Collaboration.
AutoVue Server-Farm LicensingIn this section we discuss the licensing scheme for a farm of AutoVue servers. License keys have to be installed on each server in the farm. All servers should have license keys with the same serial number, product type and number of seats.Consider a setup where there are three servers in a farm. To have a total of 300 seats, you will need 3 license keys with 300 seats each, one for each server in the farm. When the servers are configured to be in the farm, the total number of seats available is 300 and load is balanced across three servers.
Cimmetry Systems Corp.
24 AutoVue
Running the Server Behind a Firewall: Servlet TunnelingIf the AutoVue server will be accessed by clients outside a firewall, direct access non-standard ports (i.e. non-HTTP) are often blocked. To enable clients to access servers that are protected by firewalls, a servlet is provided to tunnel requests through the HTTP or HTTPS protocol.When tunneling is required, the AutoVue client encodes requests from the HTTP/HTTPS protocol and attempts to invoke the servlet on the specified server. The servlet decodes the parameters included in the request and forwards the request to the AutoVue server using a socket connection. The servlet also replies to the client machine using the same HTTP/HTTPS protocol.
To Enable TunnelingTwo changes are needed to configure the server.1 Install the file vueservlet.jar into the Application server or Servlet engine.
Follow the instructions provided with the Application server or Servlet engine.Note Installation instructions vary depending on the particular server; see Appendix B.
2 Update the Web pages that embed the AutoVue client to include the full URL of the Servlet (something like http://servername/servlet/VueServlet) as the JVUESERVER parameter.
The VueServlet supports two parameters: the JVueServer parameter and the Verbose parameter.The JVueServer parameter needs to be set to the hostname:port value used when starting the AutoVue server. By default, localhost:5099 is used and will work if you installed the AutoVue server on the same machine as the Web server. You can specify more than one hostname:port separated by semi-colons ( ; ) for fail-over. In other words, if one machine is down the servlet will try the next machine.The Verbose parameter enables verbose output. Both parameters are optional. If JVueServer is not specified, it defaults to localhost:5099. The servlet assumes that AutoVue server is running on the same machine as the Web server and communicates through port 5099. If Verbose not specified, it defaults to False.
Cimmetry Systems Corp.
AutoVue 25
The exact steps to set up the VueServlet on your Web Server depend on the software you are using for your Servlet engine. We provide the steps for several common servlet engines, see Servlet Configuration.
Enabling Debugging Information for the ServerIt is now possible to display class-level debugging information for AutoVue Server. By editing the log4j.properties file, users can specify what kind of debugging information will be made available. Information levels are as follows:• DEBUG - Displays all messages for the server. This contains INFO, WARN,
ERROR and FATAL.• INFO - Displays informative messages such as session information,
document open requests.• WARN - Displays error messages that are caused by factors external to
AutoVue server such as RMI ports already in use.• ERROR - Displays errors or exceptions that are related to server startup.• FATAL - Displays messages related to server startup failure or crash.• OFF - Turn logging off. This is the default value.The file log4j.properties is in the bin directory under the AutoVue server installation directory.To see DEBUG messages for all classes, the last line in the file should be changed to:log4j.category.com.cimmetry.jvueserver=DEBUG
orIf you need more specific error messages, you can turn on verbosity for specific classes.Example:
log4j.category.com.cimmetry.jvueserver.Cache=DEBUGlog4j.category.com.cimmetry.jvueserver.Session=DEBUGlog4j.category.com.cimmetry.jvueserver=ERRORlog4j.category.com.cimmetry.dms=ALL
These four lines mean that for Cache and Sessions classes, DEBUG (and higher severity [i.e. all]) messages, will be reported. For everything else in the
Cimmetry Systems Corp.
26 AutoVue
com.cimmetry.jvueserver package, report only the ERROR (and FATAL) messages. For the com.cimmetry.dms package, all messages will be reported.Users can redirect output to a log file instead of the console by uncommenting the following in log4j.properties:
log4j.appender.A1=org.apache.log4j.FileAppenderlog4j.appender.A1.File=log4j.out
To limit the size of the log file, set:log4j.appender.A1.MaxFileSize=
Example: If you wish to limit the size to MB, you can set log4j.appender.A1. MaxFileSize=10MBNote When the server is running on UNIX platforms, we recommend that you do not uncomment the lines to redirect output to a log file. All messages will then be redirected to log files jvue.log and jvue_n.log, where n is the process number and you will have as many log files as the processpoolsize. This does not apply to Windows platforms.The following descriptions explain what kind of DEBUG information will be seen for each class specified:
Class Description
log4j.category.com.cimmetry.jvueserver Display all information from all classes in the JVueServer.
log4j.category.com.cimmetry.jvueserver.Cache
Information concerning the server's cache. Report messages and errors related to loading the cache, locking, saving, deleting cached files as well as searching for archive and XRef files.
log4j.category.com.cimmetry.jvueserver.DataSource
Information concerning file locking, downloading or fetching from the cache and metafile creation.
log4j.category.com.cimmetry.jvueserver.Document
Information concerning open documents and access to their corresponding document servers. The scheduling of metafile creation and whether open documents are using metafiles is also provided.
Cimmetry Systems Corp.
AutoVue 27
log4j.category.com.cimmetry.jvueserver.JVueServer
Information relating the start-up of the JVueServer: Binding to RMI ports, loading libraries, ...
log4j.category.com.cimmetry.LicenseManager
Reports errors when adding licenses.
log4j.category.com.cimmetry.jvueserver.MultiProcessHandler
Information regarding the start-up and shut-down of server processes.
log4j.category.com.cimmetry.jvueserver.RMIInvoker
Reports the invocation and return of RMI methods
log4j.category.com.cimmetry.jvueserver.ServerAdministrator
Reports communications between JVueServer clusters and connections from the console.
log4j.category.com.cimmetry.jvueserver.ServerProxy
Reports the invocation and return of server methods.
log4j.category.com.cimmetry.jvueserver.Session
Reports on sessions opening, closing and being restored as well as the loading and saving of Session profiles.
log4j.category.com.cimmetry.jvueserver.VCETConnection
Reports on file opening errors and generation of metafiles.
log4j.category.com.cimmetry.jvueserver.VueRMISocketFactory
Reports on the creation of server sockets.
log4j.category.com.cimmetry.jvueserver.connection
Report all messages regarding either RMI or JXTA connection handling.
log4j.category.com.cimmetry.jvueserver.connection.ConnectionManager
Reports on error creating connections. Provides information regarding JXTA or RMI event, message activity.
log4j.category.com.cimmetry.jvueserver.connection.jxta
Reports JVueServer JXTA configuration, message sending information.
log4j.category.com.cimmetry.jvueserver.connection.rmi
Reports JVueServer RMI configuration, binding, message sending information.
log4j.category.com.cimmetry.jvueserver.JVueServerConsole
Reports messages on server console loading, connecting information.
Cimmetry Systems Corp.
28 AutoVue
log4j.category.com.cimmetry.jvueserver.console.JVueServerFrame
Server Console Frame error reporting.
log4j.category.com.cimmetry.jvueserver.docserver
Reports all information regarding DocServer processes.
log4j.category.com.cimmetry.jvueserver.docserver.DocServer
Reports on loading of DocServer process.
log4j.category.com.cimmetry.jvueserver.docserver.DocServerProxy
Reports on starting / stopping / restarting of DocServer process.
log4j.category.com.cimmetry.jvueserver.docserver.JVCetControlImpl
Reports on errors in VCET Control.
log4j.category.com.cimmetry.jvueserver.event
Reports information on the addition, removal of listeners as well as lookup, binding errors of RMI Listeners/Broadcasters.
jvueserver.util.JVueSettings Reports on loading errors of server's settings.
jvueserver.collaboration Reports on server side collaboration activity.
com.cimmetry.dms Reports all DMS information.
com.cimmetry.dms.DMSClient Reports on DMS message sizes, cookies, downloads, and errors.
com.cimmetry.dms.DMSRequest Reports debugging information on requests to the DMS.
com.cimmetry.dms.DMSResponse Reports debugging information on responses from the DMS. The full response is printed along with any parsing and reading errors
Cimmetry Systems Corp.
AutoVue 29
Testing the InstallationTesting the Client-server ConnectionsThe AutoVue server installation generates sample HTML code that can be used to test the installation of the server and client components on the Web server. Even if the client machine itself does not need any special configuration setup, the Cab and Jar files containing the client code are installed in a directory on the Web server side, so that they can be properly served to any new connecting client.The sample HTML pages can be found in the installation Web directory under \jVue.This directory was automatically created and updated when you selected the Web server you use during the server installation (it is usually \Inetpub\wwwroot\jvue for Microsoft IIS, \Lotus\domino\data\html\jvue for Lotus Domino, \FrontPage Webs\content\jvue for Microsoft FrontPage, /var/apache/htdocs/jVue for Apache).If you want a complete demonstration of AutoVue capabilities, open /jVue/jVue.html in your favorite Web browser.
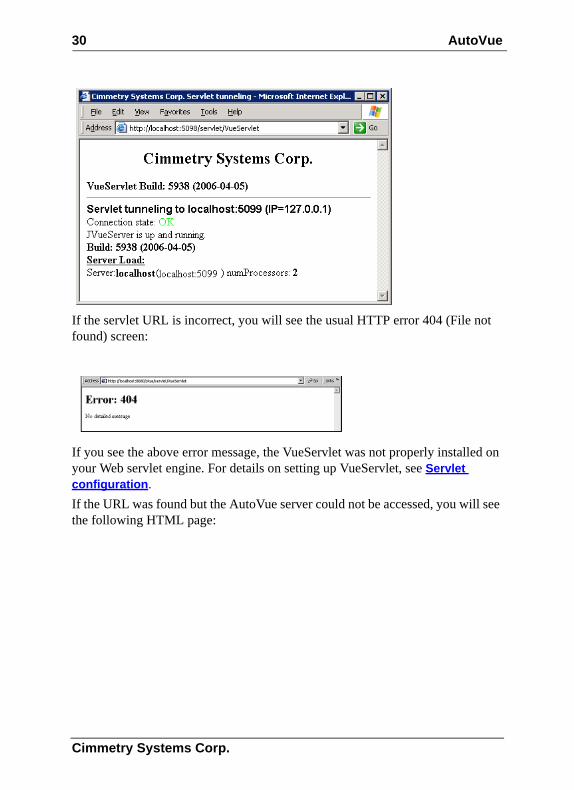
Testing the Servlet InstallationTo test the servlet installation, just open the servlet URL in your favorite Web browser. Assuming that the URL of the servlet is http://localhost:5098/servlet/VueServlet, successful installation displays the following HTML page:
Cimmetry Systems Corp.
30 AutoVue
If the servlet URL is incorrect, you will see the usual HTTP error 404 (File not found) screen:
If you see the above error message, the VueServlet was not properly installed on your Web servlet engine. For details on setting up VueServlet, see Servlet configuration.If the URL was found but the AutoVue server could not be accessed, you will see the following HTML page:
Cimmetry Systems Corp.
AutoVue 31
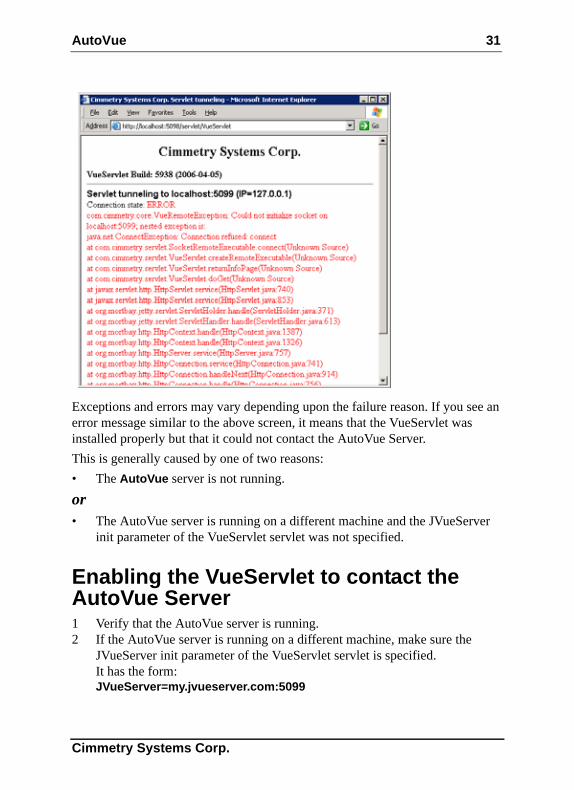
Exceptions and errors may vary depending upon the failure reason. If you see an error message similar to the above screen, it means that the VueServlet was installed properly but that it could not contact the AutoVue Server.This is generally caused by one of two reasons:• The AutoVue server is not running.or• The AutoVue server is running on a different machine and the JVueServer
init parameter of the VueServlet servlet was not specified.
Enabling the VueServlet to contact the AutoVue Server1 Verify that the AutoVue server is running.2 If the AutoVue server is running on a different machine, make sure the
JVueServer init parameter of the VueServlet servlet is specified.It has the form:JVueServer=my.jvueserver.com:5099
Cimmetry Systems Corp.
32 AutoVue
where “my.jvueserver.com” specifies the name of the machine on which the AutoVue server is running. 5099 is the default socket port the server uses.If you modify the default, the same value should be specified here.
Cimmetry Systems Corp.
AutoVue 33
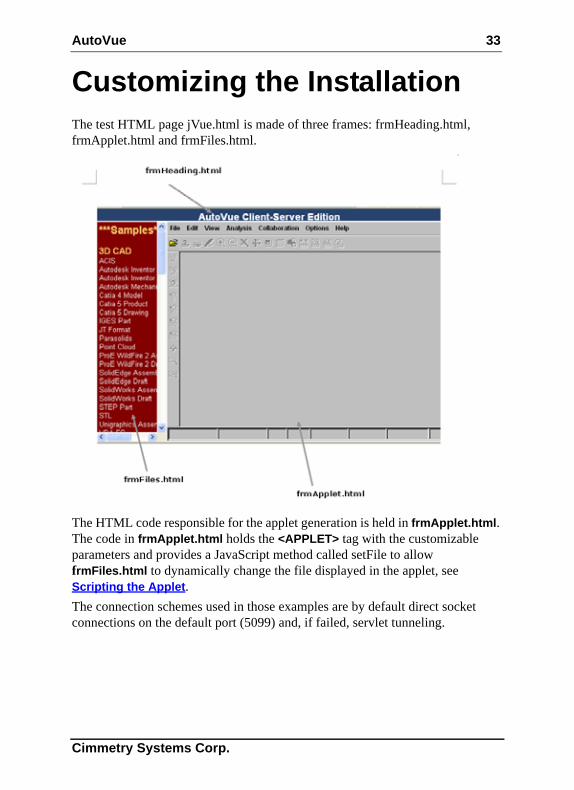
Customizing the InstallationThe test HTML page jVue.html is made of three frames: frmHeading.html, frmApplet.html and frmFiles.html.
The HTML code responsible for the applet generation is held in frmApplet.html. The code in frmApplet.html holds the <APPLET> tag with the customizable parameters and provides a JavaScript method called setFile to allow frmFiles.html to dynamically change the file displayed in the applet, see Scripting the Applet.The connection schemes used in those examples are by default direct socket connections on the default port (5099) and, if failed, servlet tunneling.
Cimmetry Systems Corp.
34 AutoVue
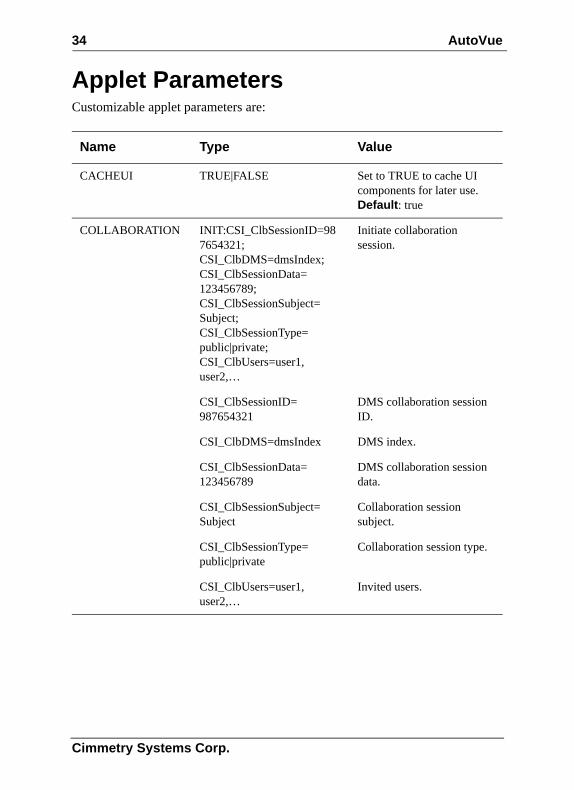
Applet ParametersCustomizable applet parameters are:
Name Type Value
CACHEUI TRUE|FALSE Set to TRUE to cache UI components for later use.Default: true
COLLABORATION INIT:CSI_ClbSessionID=987654321;CSI_ClbDMS=dmsIndex; CSI_ClbSessionData= 123456789; CSI_ClbSessionSubject= Subject;CSI_ClbSessionType= public|private;CSI_ClbUsers=user1, user2,…
Initiate collaboration session.
CSI_ClbSessionID= 987654321
DMS collaboration session ID.
CSI_ClbDMS=dmsIndex DMS index.
CSI_ClbSessionData=123456789
DMS collaboration session data.
CSI_ClbSessionSubject= Subject
Collaboration session subject.
CSI_ClbSessionType= public|private
Collaboration session type.
CSI_ClbUsers=user1, user2,…
Invited users.
Cimmetry Systems Corp.
AutoVue 35
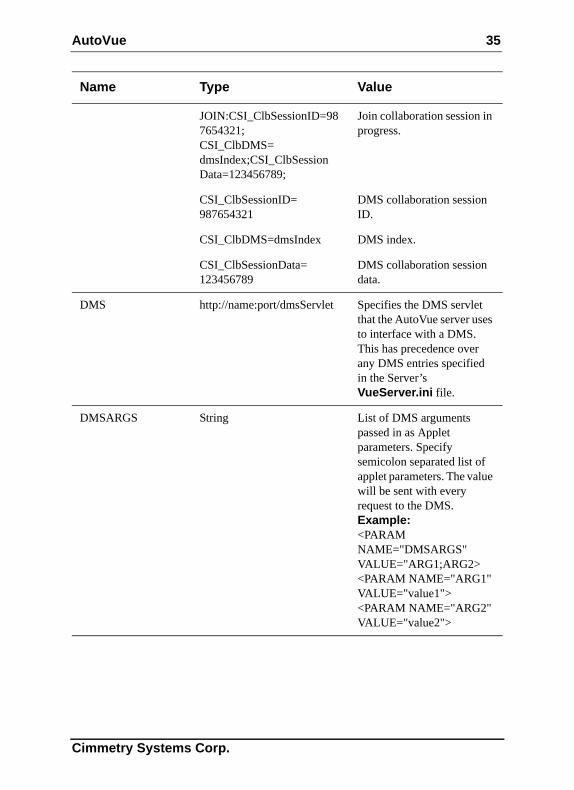
JOIN:CSI_ClbSessionID=987654321;CSI_ClbDMS= dmsIndex;CSI_ClbSession Data=123456789;
Join collaboration session in progress.
CSI_ClbSessionID= 987654321
DMS collaboration session ID.
CSI_ClbDMS=dmsIndex DMS index.
CSI_ClbSessionData= 123456789
DMS collaboration session data.
DMS http://name:port/dmsServlet Specifies the DMS servlet that the AutoVue server uses to interface with a DMS.This has precedence over any DMS entries specified in the Server’s VueServer.ini file.
DMSARGS String List of DMS arguments passed in as Applet parameters. Specify semicolon separated list of applet parameters. The value will be sent with every request to the DMS.Example:<PARAM NAME="DMSARGS" VALUE="ARG1;ARG2><PARAM NAME="ARG1" VALUE="value1"><PARAM NAME="ARG2" VALUE="value2">
Name Type Value
Cimmetry Systems Corp.

36 AutoVue
EMBEDDED TRUE | FALSE Set to TRUE to embed the Applet in the web page. Default value: TRUENote The Applet starts embedded in the HTML page.
ENABLEEMF TRUE | FALSE Stream document files as EMF to Windows clients when true.
FILENAME URL Set it to the file to be opened at Applet’s start-up.
upload://dir/…/file Will be understood as a client local file to be uploaded on the server to be viewed.
http://host/file Specify a HTTP URL for file open.
ftp://host/file or...ftp://<user>:<password>@ <ftpserver>/file
Specify a FTP URL for file open.
server://dir/../file Will be understood as a server local file to be viewed. Server local files have to be located under subdirectories of the root directory specified in the VueServer.ini file under the [Server]/Directory key. If that key is not set, no file will be accessible.
Name Type Value
Cimmetry Systems Corp.
AutoVue 37
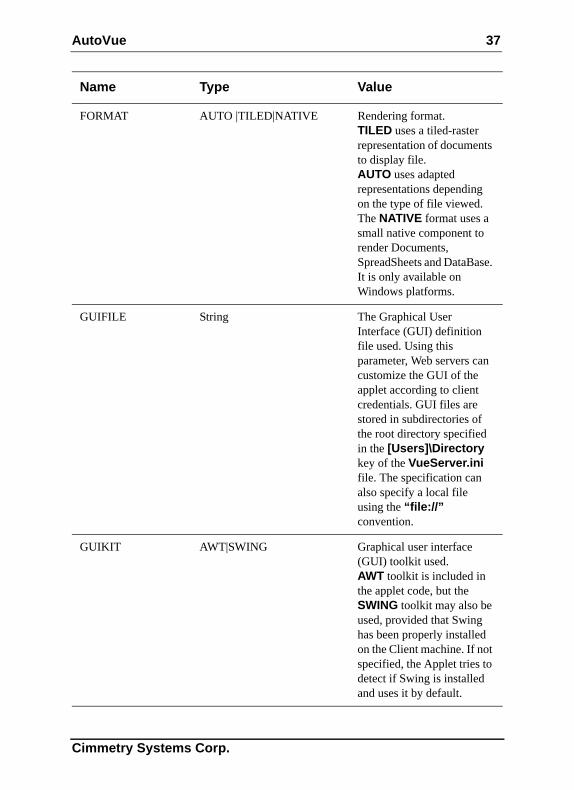
FORMAT AUTO |TILED|NATIVE Rendering format. TILED uses a tiled-raster representation of documents to display file.AUTO uses adapted representations depending on the type of file viewed. The NATIVE format uses a small native component to render Documents, SpreadSheets and DataBase. It is only available on Windows platforms.
GUIFILE String The Graphical User Interface (GUI) definition file used. Using this parameter, Web servers can customize the GUI of the applet according to client credentials. GUI files are stored in subdirectories of the root directory specified in the [Users]\Directory key of the VueServer.ini file. The specification can also specify a local file using the “file://” convention.
GUIKIT AWT|SWING Graphical user interface (GUI) toolkit used.AWT toolkit is included in the applet code, but the SWING toolkit may also be used, provided that Swing has been properly installed on the Client machine. If not specified, the Applet tries to detect if Swing is installed and uses it by default.
Name Type Value
Cimmetry Systems Corp.
38 AutoVue
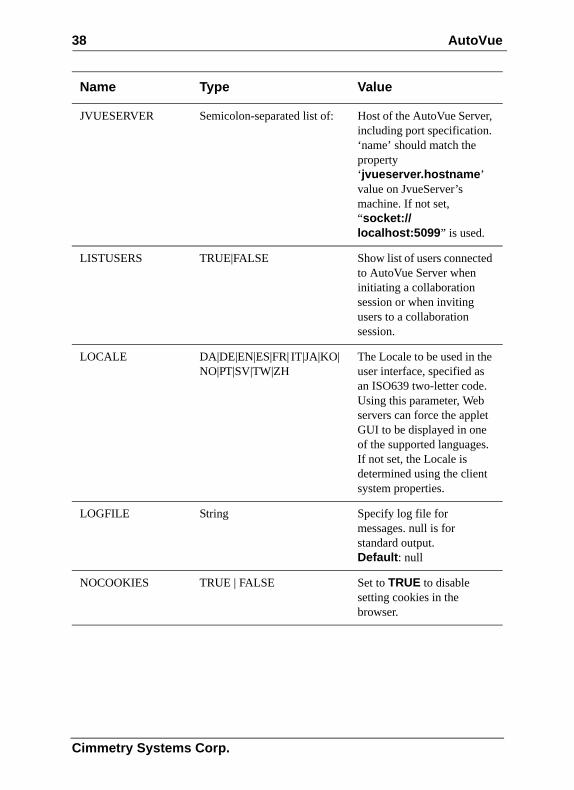
JVUESERVER Semicolon-separated list of: Host of the AutoVue Server, including port specification. ‘name’ should match the property ‘jvueserver.hostname’ value on JvueServer’s machine. If not set, “socket://localhost:5099” is used.
LISTUSERS TRUE|FALSE Show list of users connected to AutoVue Server when initiating a collaboration session or when inviting users to a collaboration session.
LOCALE DA|DE|EN|ES|FR| IT|JA|KO| NO|PT|SV|TW|ZH
The Locale to be used in the user interface, specified as an ISO639 two-letter code.Using this parameter, Web servers can force the applet GUI to be displayed in one of the supported languages. If not set, the Locale is determined using the client system properties.
LOGFILE String Specify log file for messages. null is for standard output.Default: null
NOCOOKIES TRUE | FALSE Set to TRUE to disable setting cookies in the browser.
Name Type Value
Cimmetry Systems Corp.
AutoVue 39
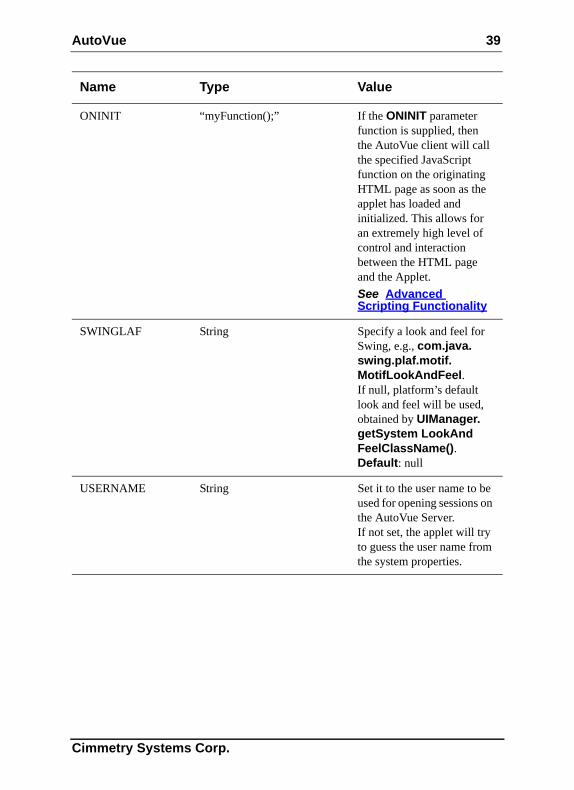
ONINIT “myFunction();” If the ONINIT parameter function is supplied, then the AutoVue client will call the specified JavaScript function on the originating HTML page as soon as the applet has loaded and initialized. This allows for an extremely high level of control and interaction between the HTML page and the Applet. See Advanced Scripting Functionality
SWINGLAF String Specify a look and feel for Swing, e.g., com.java. swing.plaf.motif. MotifLookAndFeel. If null, platform’s default look and feel will be used, obtained by UIManager. getSystem LookAnd FeelClassName(). Default: null
USERNAME String Set it to the user name to be used for opening sessions on the AutoVue Server. If not set, the applet will try to guess the user name from the system properties.
Name Type Value
Cimmetry Systems Corp.
40 AutoVue
Configuring AutoVue ServerThe following table describes the customizable parameters in the file jvueserver.properties.
VERBOSE OFF | ERROR | INFO | DEBUG | ALL
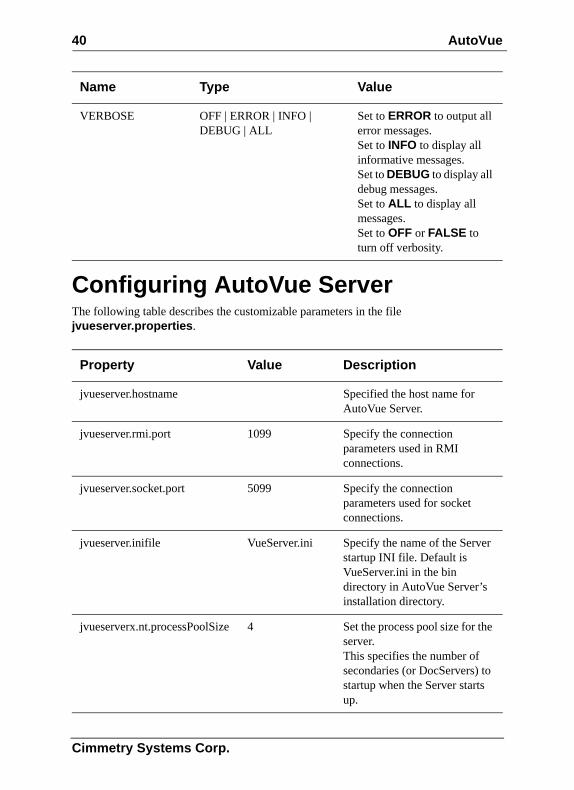
Set to ERROR to output all error messages.Set to INFO to display all informative messages.Set to DEBUG to display all debug messages.Set to ALL to display all messages.Set to OFF or FALSE to turn off verbosity.
Property Value Description
jvueserver.hostname Specified the host name for AutoVue Server.
jvueserver.rmi.port 1099 Specify the connection parameters used in RMI connections.
jvueserver.socket.port 5099 Specify the connection parameters used for socket connections.
jvueserver.inifile VueServer.ini Specify the name of the Server startup INI file. Default is VueServer.ini in the bin directory in AutoVue Server’s installation directory.
jvueserverx.nt.processPoolSize 4 Set the process pool size for the server. This specifies the number of secondaries (or DocServers) to startup when the Server starts up.
Name Type Value
Cimmetry Systems Corp.
AutoVue 41
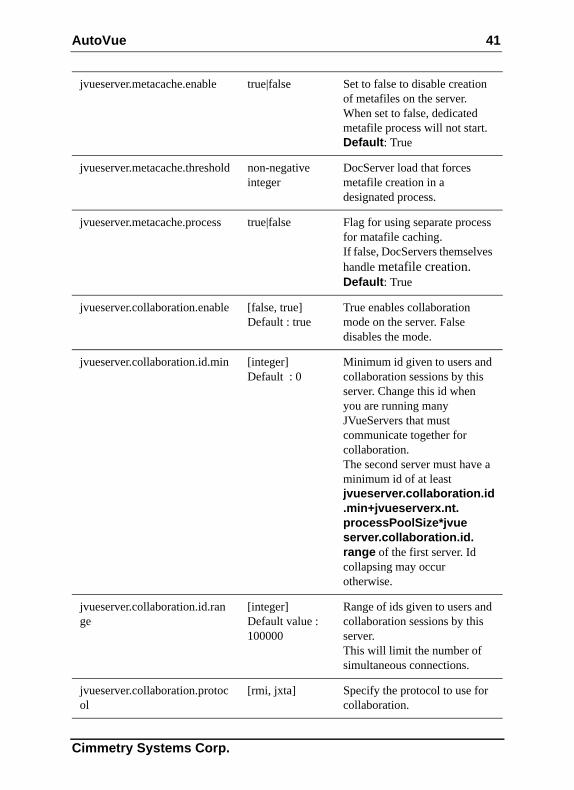
jvueserver.metacache.enable true|false Set to false to disable creation of metafiles on the server. When set to false, dedicated metafile process will not start.Default: True
jvueserver.metacache.threshold non-negative integer
DocServer load that forces metafile creation in a designated process.
jvueserver.metacache.process true|false Flag for using separate process for matafile caching.If false, DocServers themselves handle metafile creation. Default: True
jvueserver.collaboration.enable [false, true]Default : true
True enables collaboration mode on the server. False disables the mode.
jvueserver.collaboration.id.min [integer]Default : 0
Minimum id given to users and collaboration sessions by this server. Change this id when you are running many JVueServers that must communicate together for collaboration.The second server must have a minimum id of at least jvueserver.collaboration.id.min+jvueserverx.nt. processPoolSize*jvue server.collaboration.id. range of the first server. Id collapsing may occur otherwise.
jvueserver.collaboration.id.range
[integer]Default value : 100000
Range of ids given to users and collaboration sessions by this server.This will limit the number of simultaneous connections.
jvueserver.collaboration.protocol
[rmi, jxta] Specify the protocol to use for collaboration.
Cimmetry Systems Corp.
42 AutoVue
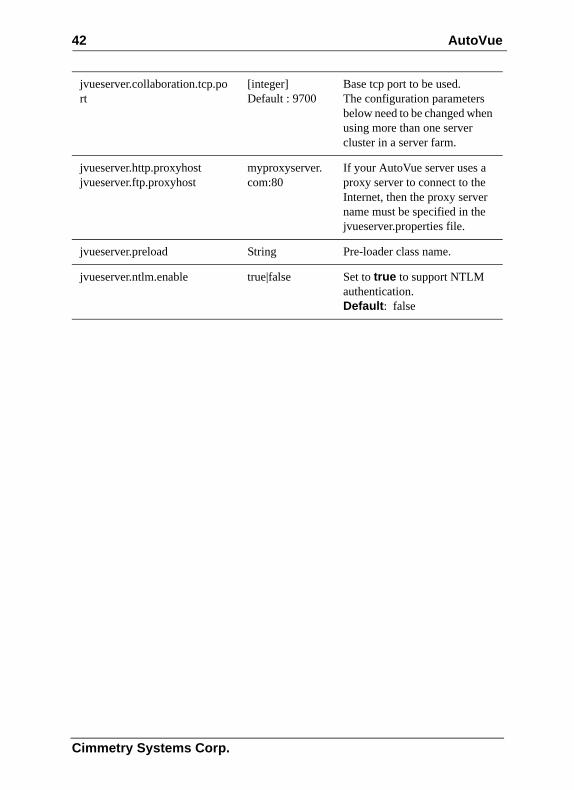
jvueserver.collaboration.tcp.port
[integer]Default : 9700
Base tcp port to be used.The configuration parameters below need to be changed when using more than one server cluster in a server farm.
jvueserver.http.proxyhostjvueserver.ftp.proxyhost
myproxyserver.com:80
If your AutoVue server uses a proxy server to connect to the Internet, then the proxy server name must be specified in the jvueserver.properties file.
jvueserver.preload String Pre-loader class name.
jvueserver.ntlm.enable true|false Set to true to support NTLM authentication.Default: false
Cimmetry Systems Corp.
AutoVue 43
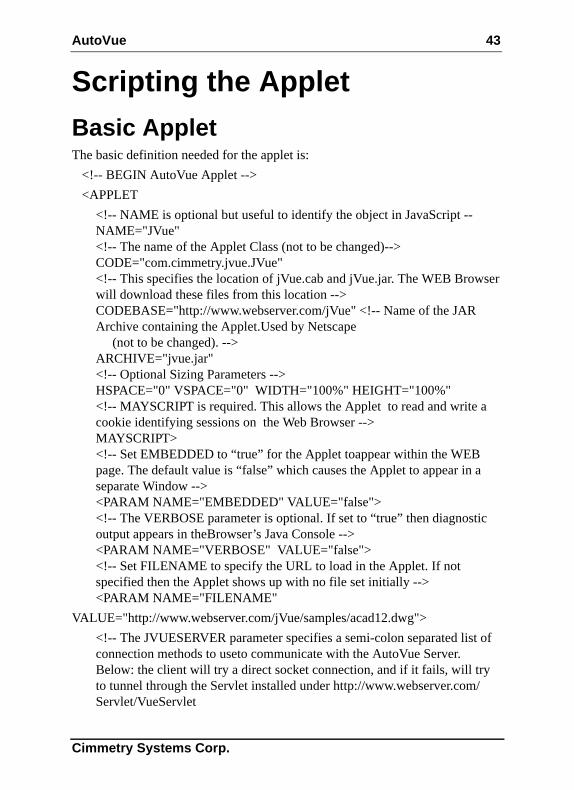
Scripting the AppletBasic AppletThe basic definition needed for the applet is: <!-- BEGIN AutoVue Applet --> <APPLET
<!-- NAME is optional but useful to identify the object in JavaScript --NAME="JVue"<!-- The name of the Applet Class (not to be changed)-->CODE="com.cimmetry.jvue.JVue"<!-- This specifies the location of jVue.cab and jVue.jar. The WEB Browser will download these files from this location -->CODEBASE="http://www.webserver.com/jVue" <!-- Name of the JAR Archive containing the Applet.Used by Netscape (not to be changed). -->ARCHIVE="jvue.jar"<!-- Optional Sizing Parameters -->HSPACE="0" VSPACE="0" WIDTH="100%" HEIGHT="100%"<!-- MAYSCRIPT is required. This allows the Applet to read and write a cookie identifying sessions on the Web Browser -->MAYSCRIPT><!-- Set EMBEDDED to “true” for the Applet toappear within the WEB page. The default value is “false” which causes the Applet to appear in aseparate Window --><PARAM NAME="EMBEDDED" VALUE="false"><!-- The VERBOSE parameter is optional. If set to “true” then diagnostic output appears in theBrowser’s Java Console --><PARAM NAME="VERBOSE" VALUE="false"><!-- Set FILENAME to specify the URL to load in the Applet. If not specified then the Applet shows up with no file set initially --><PARAM NAME="FILENAME"
VALUE="http://www.webserver.com/jVue/samples/acad12.dwg"><!-- The JVUESERVER parameter specifies a semi-colon separated list of connection methods to useto communicate with the AutoVue Server.Below: the client will try a direct socket connection, and if it fails, will try to tunnel through the Servlet installed under http://www.webserver.com/Servlet/VueServlet
Cimmetry Systems Corp.

44 AutoVue
--><PARAM NAME="JVUESERVER" VALUE="socket://www.jvueserver.com:5099;http://www.webserver.com/servlet/VueServlet"><!-- Name of the JAR Archive containing the Applet. Used by
Internet Explorer --><PARAM NAME="cabinets" VALUE="jvue.cab"><!—Message for Browser that do not support Java --><p><b>Requires a browser that supports Java.</b></p><PARAM NAME="COLLABORATION"
VALUE="INIT:CSI_ClbSessionID=987654321;CSI_ClbDMS=dmsIndex;CSI_ClbSessionData=123456789;CSI_ClbSessionSubject=Subject;CSI_ClbSessionType=public|private;CSI_ClbUsers=user1,user2,… ">
</APPLET><!-- END AutoVue Applet -->
Advanced Scripting FunctionalityWhen integrating the AutoVue applet in dynamic Web pages all public API methods in the jVue class can be accessed through JavaScript.Commonly used methods include:
Method Description
setFile(String url) Set the file to be viewed in the applet.
setCompareFile(String url) Switch to compare mode and compare the current file with a given one.
addOverlay(String url) Add a given file as an overlay on the current file.
printFile(PrintProperties pProps) Print the current file using options specified.
printFile(PrintProperties pProps, boolean UseDefaultPrinter)
Print the current file using the options specified, but do not prompt for the printer to use.
setMarkupMode(boolean enterMarkupMode)
Enter or exit Markup mode.
Cimmetry Systems Corp.
AutoVue 45
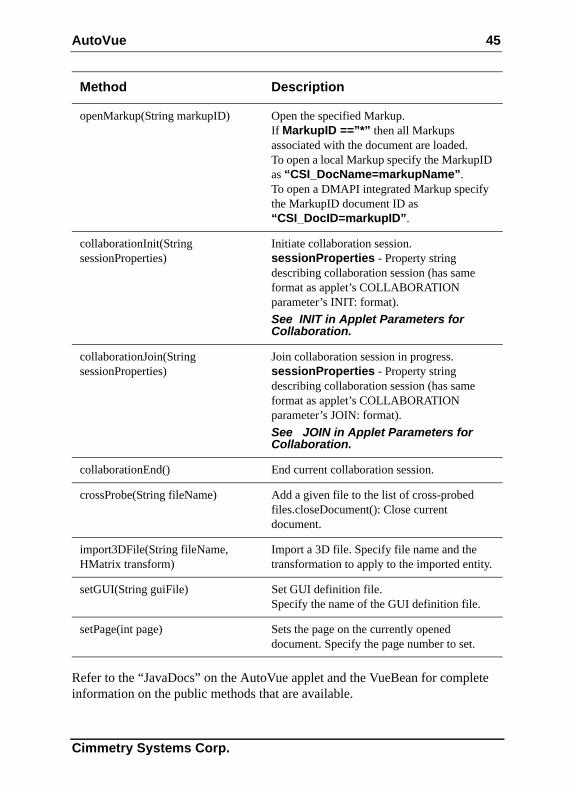
Refer to the “JavaDocs” on the AutoVue applet and the VueBean for complete information on the public methods that are available.
openMarkup(String markupID) Open the specified Markup.If MarkupID ==”*” then all Markups associated with the document are loaded.To open a local Markup specify the MarkupID as “CSI_DocName=markupName”.To open a DMAPI integrated Markup specify the MarkupID document ID as “CSI_DocID=markupID”.
collaborationInit(String sessionProperties)
Initiate collaboration session.sessionProperties - Property string describing collaboration session (has same format as applet’s COLLABORATION parameter’s INIT: format). See INIT in Applet Parameters for Collaboration.
collaborationJoin(String sessionProperties)
Join collaboration session in progress.sessionProperties - Property string describing collaboration session (has same format as applet’s COLLABORATION parameter’s JOIN: format). See JOIN in Applet Parameters for Collaboration.
collaborationEnd() End current collaboration session.
crossProbe(String fileName) Add a given file to the list of cross-probed files.closeDocument(): Close current document.
import3DFile(String fileName, HMatrix transform)
Import a 3D file. Specify file name and the transformation to apply to the imported entity.
setGUI(String guiFile) Set GUI definition file. Specify the name of the GUI definition file.
setPage(int page) Sets the page on the currently opened document. Specify the page number to set.
Method Description
Cimmetry Systems Corp.
46 AutoVue
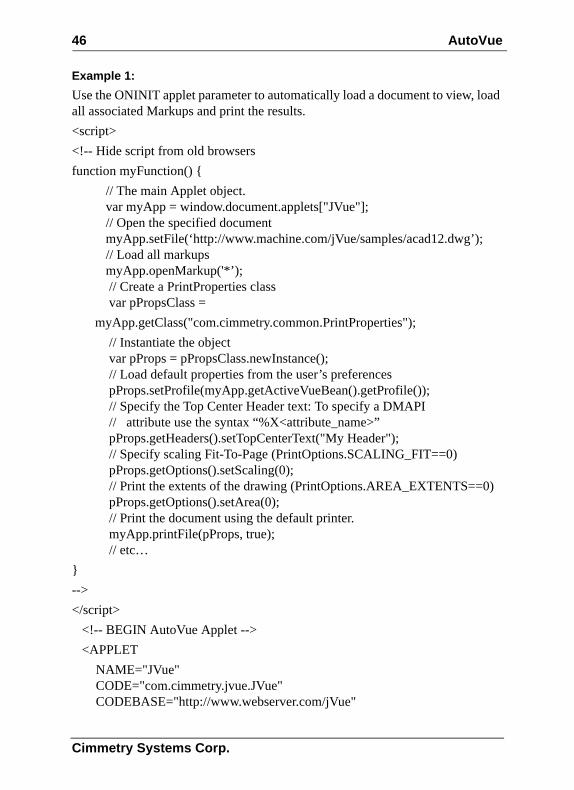
Example 1:Use the ONINIT applet parameter to automatically load a document to view, load all associated Markups and print the results.<script><!-- Hide script from old browsersfunction myFunction() {
// The main Applet object. var myApp = window.document.applets["JVue"]; // Open the specified document myApp.setFile(‘http://www.machine.com/jVue/samples/acad12.dwg’); // Load all markups myApp.openMarkup('*’); // Create a PrintProperties class var pPropsClass =
myApp.getClass("com.cimmetry.common.PrintProperties"); // Instantiate the object var pProps = pPropsClass.newInstance(); // Load default properties from the user’s preferences pProps.setProfile(myApp.getActiveVueBean().getProfile()); // Specify the Top Center Header text: To specify a DMAPI // attribute use the syntax “%X<attribute_name>” pProps.getHeaders().setTopCenterText("My Header"); // Specify scaling Fit-To-Page (PrintOptions.SCALING_FIT==0) pProps.getOptions().setScaling(0); // Print the extents of the drawing (PrintOptions.AREA_EXTENTS==0) pProps.getOptions().setArea(0); // Print the document using the default printer. myApp.printFile(pProps, true); // etc…
}--></script> <!-- BEGIN AutoVue Applet --> <APPLET
NAME="JVue"CODE="com.cimmetry.jvue.JVue"CODEBASE="http://www.webserver.com/jVue"
Cimmetry Systems Corp.
AutoVue 47
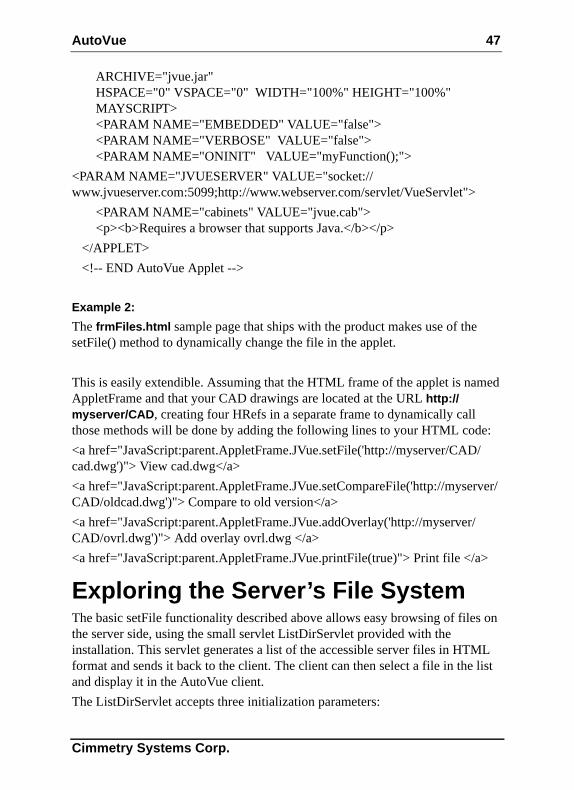
ARCHIVE="jvue.jar"HSPACE="0" VSPACE="0" WIDTH="100%" HEIGHT="100%"MAYSCRIPT><PARAM NAME="EMBEDDED" VALUE="false"><PARAM NAME="VERBOSE" VALUE="false"><PARAM NAME="ONINIT" VALUE="myFunction();">
<PARAM NAME="JVUESERVER" VALUE="socket://www.jvueserver.com:5099;http://www.webserver.com/servlet/VueServlet">
<PARAM NAME="cabinets" VALUE="jvue.cab"><p><b>Requires a browser that supports Java.</b></p>
</APPLET> <!-- END AutoVue Applet -->
Example 2:The frmFiles.html sample page that ships with the product makes use of the setFile() method to dynamically change the file in the applet.
This is easily extendible. Assuming that the HTML frame of the applet is named AppletFrame and that your CAD drawings are located at the URL http://myserver/CAD, creating four HRefs in a separate frame to dynamically call those methods will be done by adding the following lines to your HTML code:<a href="JavaScript:parent.AppletFrame.JVue.setFile('http://myserver/CAD/cad.dwg')"> View cad.dwg</a><a href="JavaScript:parent.AppletFrame.JVue.setCompareFile('http://myserver/CAD/oldcad.dwg')"> Compare to old version</a><a href="JavaScript:parent.AppletFrame.JVue.addOverlay('http://myserver/CAD/ovrl.dwg')"> Add overlay ovrl.dwg </a><a href="JavaScript:parent.AppletFrame.JVue.printFile(true)"> Print file </a>
Exploring the Server’s File SystemThe basic setFile functionality described above allows easy browsing of files on the server side, using the small servlet ListDirServlet provided with the installation. This servlet generates a list of the accessible server files in HTML format and sends it back to the client. The client can then select a file in the list and display it in the AutoVue client.The ListDirServlet accepts three initialization parameters:
Cimmetry Systems Corp.
48 AutoVue
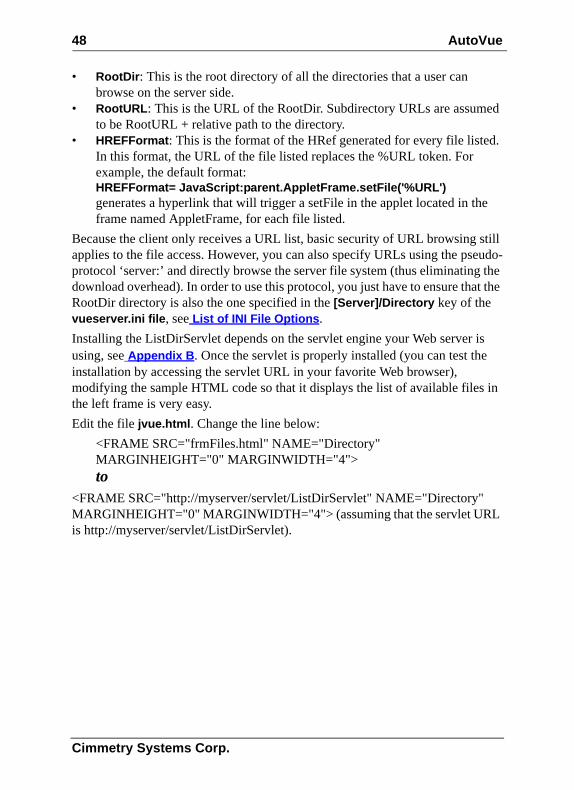
• RootDir: This is the root directory of all the directories that a user can browse on the server side.
• RootURL: This is the URL of the RootDir. Subdirectory URLs are assumed to be RootURL + relative path to the directory.
• HREFFormat: This is the format of the HRef generated for every file listed. In this format, the URL of the file listed replaces the %URL token. For example, the default format:HREFFormat= JavaScript:parent.AppletFrame.setFile('%URL')generates a hyperlink that will trigger a setFile in the applet located in the frame named AppletFrame, for each file listed.
Because the client only receives a URL list, basic security of URL browsing still applies to the file access. However, you can also specify URLs using the pseudo-protocol ‘server:’ and directly browse the server file system (thus eliminating the download overhead). In order to use this protocol, you just have to ensure that the RootDir directory is also the one specified in the [Server]/Directory key of the vueserver.ini file, see List of INI File Options.Installing the ListDirServlet depends on the servlet engine your Web server is using, see Appendix B. Once the servlet is properly installed (you can test the installation by accessing the servlet URL in your favorite Web browser), modifying the sample HTML code so that it displays the list of available files in the left frame is very easy.Edit the file jvue.html. Change the line below:
<FRAME SRC="frmFiles.html" NAME="Directory" MARGINHEIGHT="0" MARGINWIDTH="4">to
<FRAME SRC="http://myserver/servlet/ListDirServlet" NAME="Directory" MARGINHEIGHT="0" MARGINWIDTH="4"> (assuming that the servlet URL is http://myserver/servlet/ListDirServlet).
Cimmetry Systems Corp.
AutoVue 49
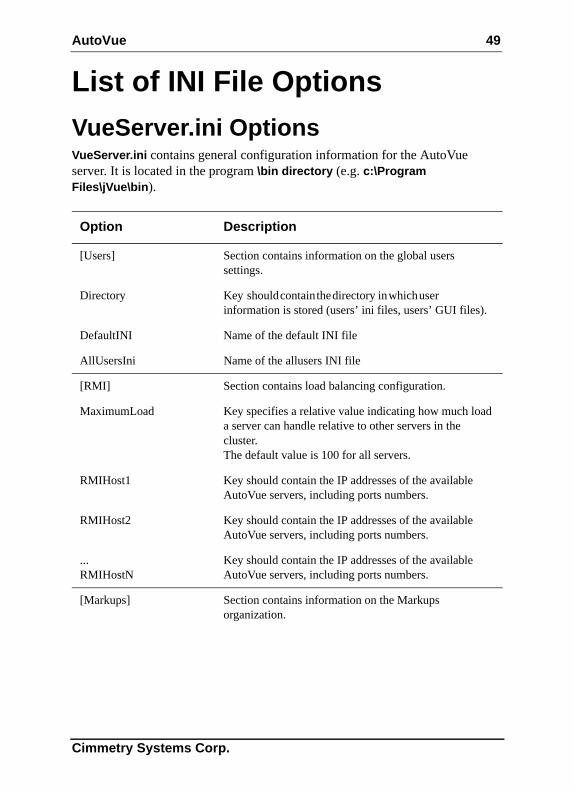
List of INI File OptionsVueServer.ini OptionsVueServer.ini contains general configuration information for the AutoVue server. It is located in the program \bin directory (e.g. c:\Program Files\jVue\bin).
Option Description
[Users] Section contains information on the global users settings.
Directory Key should contain the directory in which user information is stored (users’ ini files, users’ GUI files).
DefaultINI Name of the default INI file
AllUsersIni Name of the allusers INI file
[RMI] Section contains load balancing configuration.
MaximumLoad Key specifies a relative value indicating how much load a server can handle relative to other servers in the cluster. The default value is 100 for all servers.
RMIHost1 Key should contain the IP addresses of the available AutoVue servers, including ports numbers.
RMIHost2 Key should contain the IP addresses of the available AutoVue servers, including ports numbers.
...RMIHostN
Key should contain the IP addresses of the available AutoVue servers, including ports numbers.
[Markups] Section contains information on the Markups organization.
Cimmetry Systems Corp.
50 AutoVue
Directory Key specifies in which directory the Markups files should be saved. Markups are saved with random names in this directory, and the mapping between Markup files and their base file is held in a central map file named markups.map, stored in the same directory. By default, the directory is the Markups subdirectory of the AutoVue server program directory.
Permissions By default, all users can see the Markups of a file but only the owner of a Markup can modify it. The Permissions key can be used to change that behavior: setting it to 0 allows all users to see and change Markup files.
SymbolDir Key specifies in which directory the Markups symbol libraries are stored. By default, the directory is the symbols subdirectory of the AutoVue server program directory.
[Cache] Section contains information on the file cache.
Directory Key specifies in which directory the cached files should be saved. A central cache information file named cache.map is stored in the same directory. By default, the directory is the Cache subdirectory of the AutoVue server program directory.
ForceAscii=<0|1> Forces using ASCII characters in cached files names.
Size Key specifies, in Megabytes, the maximum size of the file cache.If not specified or if value specified is less than 50 MB, a default of 50 MB will be used.
[Server] Section contains information on the server viewable local files.
Option Description
Cimmetry Systems Corp.
AutoVue 51
Directory Key specifies in which directory to search for the local files. This key has to be set to allow client to see server local files through the ‘server://’ pseudo-protocol.See The FILENAME description in Applet Parameters. By default no server files can be viewed. Setting this key allows users to see ANY local file in the specified directory and subdirectories. However, the server takes care of parent references in paths (the “..” directory) to avoid security breaches.
Directory1Directory2...Directoryn
To specify multiple directories, specify Directoryn=<Path>. To access files at these locations, specify "server://@n/..."
[HELP] Section contains information about the online help file.
File_en Entry specifies the URL to the English Help file.
File_xx Entry specifies the URL to the Help file for the language “xx.”
File Entry specifies the URL to the default Help file.
[OEM] Section contains information about the text displayed in the different notification dialogs. This can be customized to suit your needs.
PURCHASE_CONTACT Key points to the text that should apply in the DEMO Notification dialog.
Example:PURCHASE_CONTACT=ABC Company’s sales department: \nTel: 1-555-6666-7777, 1-800-222-3333\nEmail: [email protected]
[Options] Other Options
Option Description
Cimmetry Systems Corp.
52 AutoVue
Example:[Users]Directory = C:\jvue\Users
[RMI]
FORMATDEVICE Specify printer device to use for formatting Word documents when AutoVue Server is running as a service. The syntax is:FORMATDEVICE=PrinterName,PrinterDriver, PrinterPortFor steps on how to get this information for the current default printer from the registry, refer to http://support.microsoft.com/?kbid=156212
ManageMemoryUsage Set to 1 to enable Berkley Database Caching. When memory usage reaches the limit specified in MaxManagedMemUsage, AutoVue starts writing into a file on the disk.Set to 2 to optimize memory usage when loading 3D files with BREP data.Set to 0 to disable Database Caching and memory management.Set to 3 to enable Berkley Database Caching and to optimize memory for 3D files with BREP data.Default: 2
MaxManagedMemUsage Specify the limit (in bytes) for memory usage for AutoVue. When the limit is reached, AutoVue starts writing to a file on the disk. Default: Half of the available RAM on the machine.
MngMemPageSize This option controls the size of pages used in memory management schema (similar to windows page size). The possible values are between 1024 (1KB) and 65536 (64KB)Default: 8192 (8KB).
MeshResolution This option controls the default mesh resolution for 3D files. Set to low or medium or high.Note Option and values are case sensitive.Default: Low
Option Description
Cimmetry Systems Corp.
AutoVue 53
MaximumLoad=250RMIHost1 = jvueserver1.company.com:1099RMIHost2 = jvueserver2.company.com:1099
[Markups]Directory = C:\jvue\markups; Allow all users to alter —MarkupsPermissions = 0; Set permissions to 1 to allow only owners to alter Markups
[Cache]Directory = C:\jvue\temp
[Server]; Uncomment the following line to allow client to; see ANY file in the sub-directories of C:\jvue\local;Directory = C:\jvue\local;Directory2=C:\jvue\testfiles;Directory3=C:\jvue\3dtestfiles
[Help]# Specify a custom help file for the Client Applet.File=http://jvue.company.com/jVue/help/my_help.html
allusers.ini and default.ini OptionsThese files are stored in the directory specified under [Users]/Directory in VueServer.ini (the default is the directory of the VueServer.dll). The file default.ini is the default INI file for all users at the start. When you first log on, the contents of default.ini is copied to your own INI file ("username".ini). The contents of allusers.ini is then transferred to "username".ini when you connect to AutoVue. For a complete list of options, see Appendix F.Example:
[Options]# Locations of External reference files.XREFPATHS=C:\myxrefs;d:\acad\xrefs# Locations of CAD font files.XFONTPATHS=C:\myfonts;d:\acad\fonts
Cimmetry Systems Corp.
54 AutoVue
Customizing the GUIChoosing the GUI FileBy default, if the applet parameter GUIFILE is not set, the applet will use a default GUI specification for the menus and toolbars. However, this default GUI is the same as the one that would be generated with the configuration specified in the file default.gui. The location of this file is specified by the entry Directory in the [Users] section of the ini file (VueServer.ini).To customize the default GUI configuration, do your modification in this file and set the GUIFILE parameter to default.gui. This way, you can even create several GUI files with specific functionalities (like “no compare mode” or “no printing” etc.) and allow different clients to have different GUIs. A sample GUI file that allows viewing only (disabling Markup mode) is provided as viewonly.gui.
Modifying the GUI FileThe GUI definition file structure is a fairly simple one. It mainly describes which controls (corresponding to available actions in the applet, like Rotate, Open etc.) are to be added to which context (like MenuBar, ToolBar etc.), thus allowing users to have complete control over the functionality and the look of the applet interface.The GUI to use on the AutoVue client can be specified in the “GUIFILE” Applet Parameters. For more about GUI file structure and syntax, see Appendix D.
UNC File NamesWhen AutoVue is being used in a Microsoft-based network environment, a special VueAction is available to support the viewing of files through their UNC filenames. This VueAction allows the server to directly access files on the network, as well as XRef files if they exist in the same directory as the base file. File names are specified through a specialization of the "server://" URL mechanism, where the UNC name is prefixed with the string "server://@0".The control name is VueActionFileOpenUNC. The GUI file has to be modified to use VueActionFileOpenUNC. For more information on the GUI file, see Appendix D.Following are a few examples of how this VueAction works. First you will have to modify the GUI file to use VueActionFileOpenUNC.Example 1
Cimmetry Systems Corp.
AutoVue 55
Assuming that you have files on a shared network drive \\machine1\share1. You wish to open files that are in subdirectory dir1 on the shared drive.Select Open from the File menu and browse to \\machine1\share1\dir1. Then select a file file1 to open. AutoVue translates this upload request to: server://@0/\\machine1\share1\dir1\file1
Example 2Assuming that you have files on a shared network drive \\machine2\share2 mapped as 'W:'. You wish to open files that are in subdirectory dir2 on W:.When you open a file file2 using Open from the File menu, AutoVue translates this upload request to server://@0/\\machine2\share2\dir2\file2.
Example 3Assuming that you have files on a shared network drive \\machine3\share3. You wish to open files that are in subdirectory dir3 on this shared drive. You wish to open file file3 that exists in directory dir3. All the XRefs for this file exist in the same directory.When you open file file3, using Open from the File menu, AutoVue translates this upload request to server://@0/\\machine3\share3\dir3\file3. AutoVue also locates all the XRefs for this file that exist in the same directory.
Cimmetry Systems Corp.
56 AutoVue
Configuring for Collaboration• jvueserver.collaboration.protocol=[rmi, jxta]
Specify the protocol to use for collaboration.• jvueserver.collaboration.enable=[false, true]
True enables collaboration mode on the server. False disables the mode. Default: true
• jvueserver.collaboration.tcp.port=[integer]Base tcp port to be used. Default: 9700Note The configuration parameters below need to be changed when using more than one server cluster in a server farm.
• jvueserver.collaboration.id.min=[integer]Minimum id given to users and collaboration sessions by this server. Change this id when you are running many AutoVue servers that must communicate together for collaboration. The second server must have a minimum id of at least jvueserver.collaboration.id.min+jvueserverx.nt.processPoolSize*jvueserver.collaboration.id.range of the first server. Id collapsing may occur otherwise. Default: 0
• jvueserver.collaboration.id.range=[integer]Range of ids given to users and collaboration sessions by this server. This will limit the number of simultaneous connections. Default value: 100000
Configuring across Firewalls and Multiple AutoVue Servers• jvueserver.collaboration.protocol=jxta
Protocol should be set to jxta.• jvueserver.collaboration.rendezvous.enable=[true, false]
Set to true to enable communication with other servers that are not part of the server farm. When you have multiple server farms, set to true for at least one server in each farm to enable this server to communicate with other server farms across firewalls.jvueserver.collaboration.rendezvous=[protocol://IP_of_server_to_communicate_with:port]
Cimmetry Systems Corp.

AutoVue 57
Example: jvueserver.collaboration.rendezvous=tcp://ip1:port1;http://ip2:port2Specify the protocol, the IP address of other servers to communicate with, and the port for communication.
• jvueserver.collaboration.jxta.allowExternal=[true, false]Set to true to allow other servers that are not part of the server farm to communicate with this server.
Specify one of the following options when using network address translators in a firewall setup:• jvueserver.collaboration.http.server=[external_IP:port]
When using firewalls and Network Address Translators, specify the external address and port for http connections.
• jvueserver.collaboration.tcp.server=[external_IP:port]When using firewalls and Network Address Translators, specify the external address and port for tcp connections.
Cimmetry Systems Corp.

58 AutoVue
Cimmetry Systems Corp.
AutoVue 59
Appendix A: Known Limitations• Functionality that has not been implemented yet:
• Scanning• Comparison result printing• Specific Windows functionalities (linking to DLL, DDE etc.)• Thumbnail view
• The server does not automatically download the XRefs for a remotely located file. If XRefs are accessible on the local network of the server’s machine, you can make the XREFPATHS key of the allusers.ini file point to that location. You can also use VueActionFileOpenUNC to be able to locate all XREFs is they exist in the same directory as the base file.
• Extreme zoom-in of AutoVue Streaming Format (ASF) may display wrap-around problems.
• Due to known compatibility issues with Java 1.5 and Mozilla, Netscape and FireFox, we recommend that you run these browsers with Java 1.4.2.
• Due to the enriched API that are implemented with Java 2, some features such as "Dim Unselected" highlight type for PCB Layouts are only available with clients running Java 1.4.2 and above.
Cimmetry Systems Corp.

60 AutoVue
Cimmetry Systems Corp.
AutoVue 61
Appendix B: Servlet Configura-tionIn this section we describe setting up the servlet VueServlet for several popular WEB/Servlet Engines. The VueServlet servlet allows the AutoVue client to communicate with the AutoVue server using the standard HTTP protocol. This has two advantages:• The Client and Server can generally communicate across firewalls since the
standard HTTP ports (e.g. 80) are used.• The Client can be configured to use the HTTPS protocol to communicate
with the VueServlet. This ensures that all communications are secure.
Certified Application ServersGenerally the VueServlet will work with any application server. Generic instructions for deploying the VueServlet with J2EE and non-J2EE application servers are described below this section. Cimmetry validates the VueServlet with the following application servers:• Tomcat 5.5 and 4.x• WebSphere 5.1• WebLogic 9.0 and 8.x• JRUN 4• Jetty
Tunneling through J2EE-enabled Application ServersThis section provides instructions for creating and deploying VueServlet for J2EE application servers.
Creating a WAR File for VueServletComplete the following instructions to create a WAR file for VueServlet.1 Create a directory.
Example: C:\csiwar2 In the folder C:\csiwar, create a sub-directory WEB-INF.3 In WEB-INF, create a directory lib: C:\csiwar\WEB-INF\lib
Cimmetry Systems Corp.
62 AutoVue
4 Copy vueservlet.jar to C:\csiwar\WEB-INF\lib.5 Create a deployment descriptor. The deployment descriptor should be stored
as a file named web.xml in the WEB-INF directory.• The following is the mandatory header for the web.xml document. It
defines the document as an XML file and relates the file syntax to the DOCTYPE resource specified.
<?xml version="1.0" encoding="ISO-8859-1"?><!DOCTYPE web-app PUBLIC "-//Sun Microsystems, Inc.//DTD Web Application 2.2//EN" "http://java.sun.com/j2ee/dtds/web-app_2_2.dtd">• Use the following code to specify the deployment descriptor needed to
deploy the VueServlet.<web-app>
<servlet> <servlet-name>com.cimmetry.servlet.VueServlet</servlet-name> <servlet-class>com.cimmetry.servlet.VueServlet</servlet-class> <init-param> <param-name>JVueServer</param-name> <param-value>hostname:5099</param-value> </init-param> <init-param> <param-name>Verbose</param-name> <param-value>0</param-value> </init-param> </servlet>
<servlet-mapping> <servlet-name>com.cimmetry.servlet.VueServlet</servlet-name> <url-pattern>/servlet/VueServlet</url-pattern> </servlet-mapping>
</web-app>
The <servlet-name> parameter is how the Servlet is known within the XML file.The <servlet-class> parameter is the fully qualified Java programming language class name of the Servlet. The <url-pattern> parameter is how the Servlet is referenced from a Universal Resource Indicator (URI).Update hostname with the name of AutoVue server machine.
Cimmetry Systems Corp.
AutoVue 63
Note The parameter structure must follow the order in the DTD definition. For example, all <servlet>s must be defined before any <servlet-mapping>s can be specified.• Update hostname in web.xml with the name of AutoVue server machine.
6 To create the WAR file, use the "jar" utility from the JavaTM Development Kit distribution. If you are in the root directory you created for the WAR contents (C:\csiwar), use the following command:jar cvf VueServlet.war WEB-INFNow you can deploy VueServlet.war using any J2EE compliant application server or Web container.
7 After the VueServlet is deployed, to access the content, type the following into your web browser: http://host:port/<context>/servlet/VueServletThe <context> parameter can be set in the deployment phase or set automatically by the application server. Some application servers allow you to specify the context name, but generally the WAR file name is used as the context.
Deploying the WAR FileThis section provides generic instructions for deploying a WAR file, followed by instructions for deploying the WAR file with a specific application server.
Generic Steps to Deploy the WAR File1 Launch the administrative console of your application server.2 Select Install a new Web application.3 Browse and select VueServlet.war.4 Specify VueServlet for the context name.5 Deploy VueServlet.war.We provide you with instructions for deploying VueServlet.war with some application servers in the following section.
Deploying the WAR File with WebSphere 5.x1 Launch the administrative console and log on to the application server.2 Select Applications and then Install new application.3 Browse and select VueServlet.war.
Cimmetry Systems Corp.
64 AutoVue
4 Specify VueServlet for the context name and click Next.
5 Accept the default values in the screen that appears.6 In the Install New Application screen, enter VueServlet for the Application
Name and click Next.7 Accept the default values in the remaining screens. Then click Finish.8 To start the VueServlet application, go to Applications and then Enterprise
Applications.
Cimmetry Systems Corp.
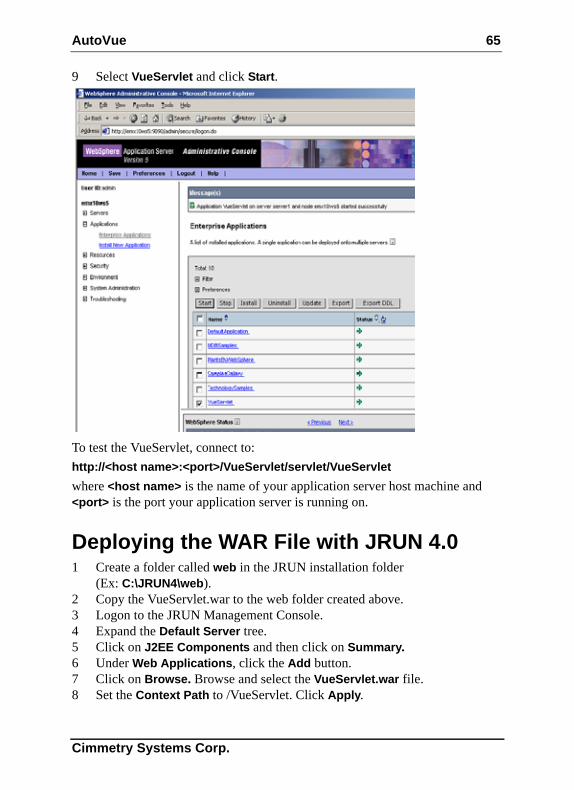
AutoVue 65
9 Select VueServlet and click Start.
To test the VueServlet, connect to:http://<host name>:<port>/VueServlet/servlet/VueServletwhere <host name> is the name of your application server host machine and <port> is the port your application server is running on.
Deploying the WAR File with JRUN 4.01 Create a folder called web in the JRUN installation folder
(Ex: C:\JRUN4\web).2 Copy the VueServlet.war to the web folder created above.3 Logon to the JRUN Management Console.4 Expand the Default Server tree.5 Click on J2EE Components and then click on Summary.6 Under Web Applications, click the Add button.7 Click on Browse. Browse and select the VueServlet.war file.8 Set the Context Path to /VueServlet. Click Apply.
Cimmetry Systems Corp.
66 AutoVue
9 You may get an error message at this point. Ignore this message and click on Summary.
10 Under Web Applications, click on the redeploy icon next to VueServlet.11 Once the deployment is successful, verify the deployment. Connect to:
http://<host name>:<port>/VueServlet/servlet/VueServletwhere <host name> is the name of your Application Server host machine and <port> is the port your application server is running on.
Deploying the WAR File with WebLogic 9.01 Logon to the Administrative Console for WebLogic.2 Select Deployments from the tree.3 Click on Install.4 Browse to the folder containing VueServlet.war and select VueServlet.war.5 Enter VueServlet for the Application Name.6 Select the Server to which you wish to deploy VueServlet. Ex: myserver7 Click Activate Changes. 8 Select Deployments again and select the VueServlet application. 9 Click Start -> Servicing all requests. Wait till the application is started.
Once the deployment is successful, verify the deployment. Connect to:http://<host name>:<port>/VueServlet/servlet/VueServletwhere <host name> is the name of your Application Server host machine and <port> is the port your application server is running on.
Tunneling with non-J2EE Application Servers
Setting up VueServletBelow are generic instructions for deploying the VueServlet with a non-J2EE application server.1 Copy the file vueservlet.jar to your Servlet Engine’s servlet directory.2 Add vueservlet.jar to your Servlet Engine’s CLASSPATH.3 Create an alias for VueServlet to com.cimmetry.servlet.VueServlet.4 If your AutoVue server is running on a different machine, specify the init
parameter JVueServer to be my.jvueserver.com:5099 where my.jvueserver.com specifies the machine on which AutoVue server is
Cimmetry Systems Corp.
AutoVue 67
running. 5099 is the default port that the server runs on. If you change the default, this should also be correspondingly changed.
5 For the changes to take effect, restart the servlet engine.Note The default socket port is 5099 (not 1099, that is used by RMI).
Tunneling using Jetty1 Add VueServlet.jar to Jetty's class path. 2 Edit startjetty.bat and add the full path to VueServlet.jar to the
CLASSPATH variable.3 Edit jetty.xml and add the following:
<Call name="addServlet"> <Arg>VueServlet</Arg> <Arg>/servlet/VueServlet</Arg> <Arg>com.cimmetry.servlet.VueServlet</Arg> <Put name="JVueServer">www.jvueserver.com:5099</Put> <Put name="Verbose">false</Put> <Put name="DebugLevel">0</Put> </Call>
4 Replace www.jvueserver.com with the name of the machine on which AutoVue Server is running. 5099 specifies the socket port that the AutoVue Server uses. If the server is using a different socket port, specify the correct socket port.
5 Start Jetty and AutoVue Server.6 Test that the VueServlet is installed properly; Open a web-browser and enter
the URL to the VueServlet:http://<machine name>:5098/servlet/VueServlet
Tunneling using a Microsoft IIS ISAPI ExtensionMicrosoft’s IIS is a widely used Web server. It does not provide servlet functionality in itself. People often integrate a 3rd party J2EE engine (e.g. WebLogic, Tomcat or JRun) with IIS to provide servlet (and other J2EE) functionality. In this case, follow the instructions for the 3rd party J2EE/servlet engine to install VueServlet and to modify the JVUESERVER Applet param to point to the location of VueServlet.
Cimmetry Systems Corp.
68 AutoVue
For customers who are using “vanilla” IIS (which has no integration with a 3rd party J2EE engine), Cimmetry Systems Corp. provides an ISAPI extension for Jetty which provides HTTP/HTTPS tunneling between the applet and the AutoVue server.1 To install the ISAPI extension DLL, copy the files VueServletIsapi.dll and
VueServletIsapi.ini to the IIS Scripts or cgi-bin directory on the Web server.
2 The file VueServletIsapi.ini needs to be customized for the installation: By default it connects to localhost on port 5098 to the servlet /VueServlet.In other words, it assumes the AutoVue server is running on the same machine and its “internal servlet” engine is enabled and running on port 5098.
3 By default, the internal servlet engine is enabled on the AutoVue server.Confirm that these lines in jvueserver.properties are not commented:servlet-engine.classpath= ....servlet-engine.jre= ...servlet-engine.cmdline= ...
4 The JVUESERVER applet param(in frmApplet.html) also needs to point to the ISAPI filter.For example if it was installed under the cgi-bin virtual root of IIS you would have:<PARAM NAME="JVUESERVER" VALUE="http://www.iisServer.com/cgi-bin/VueServletIsapi.dll">
5 Startup AutoVue Server and test the ISAPI extension DLL.6 To test that the ISAPI extension DLL is installed properly and can
communicate with AutoVue’s internal servlet engine, open a Web browser and enter the ISAPI URL in the address field.Example: http://www.iisServer.com/cgi-bin/VueServletIsapi.dll
Cimmetry Systems Corp.
AutoVue 69
Appendix C: Running the Auto-Vue Server as a Service
On Windows Operating SystemsAutoVue server can be run as a Windows Service. The advantage of this is that it will continue to run even after you log off of Windows. Before running the AutoVue service, first verify that it runs properly in “non-service” mode (e.g., run by clicking the Start AutoVue, Client-Server Edition icon in the Start menu). The AutoVue service is automatically registered with the Windows Service Control Manager when the product is installed.To install the service manually, go to the \bin directory of the directory where you had installed AutoVue server and type: jvueserver -installThe service will be automatically unregistered and removed if you uninstall the product.To remove the service manually, go to the \bin directory of the directory where you had installed AutoVue server and type: jvueserver -remove
Starting and Stopping the Service1 In the Control Panel start the Services Control Panel applet.2 Select the AutoVue Server service.3 Click the Startup button.4 Select whether you want the service started automatically on re-boot or
manually. The default option installed is Manual so you must manually start the service.
5 Make sure you select the Log On System Account and Allow Service to Interact with Desktop options.Note If you select Manual, you can start the Service by:• clicking Start in the Services dialog box or• using the sc.exe utility. E.g., SC start “AutoVue Server” or
Cimmetry Systems Corp.
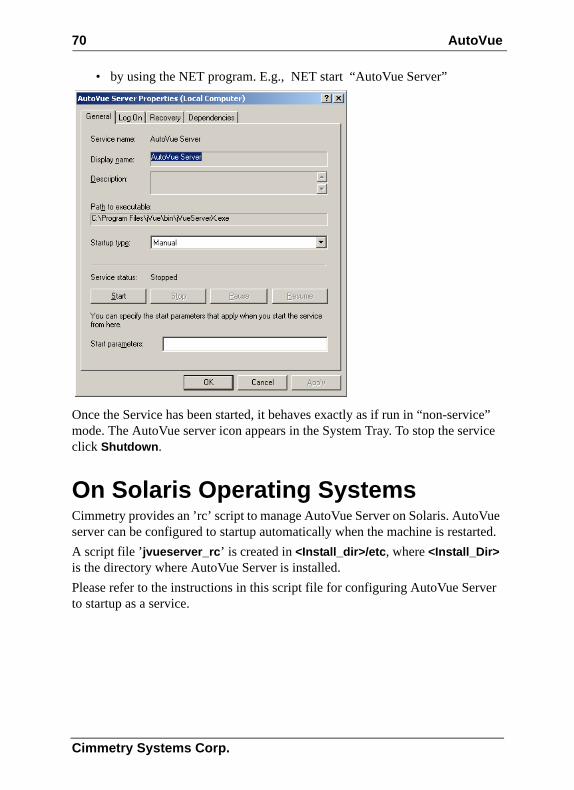
70 AutoVue
• by using the NET program. E.g., NET start “AutoVue Server”
Once the Service has been started, it behaves exactly as if run in “non-service” mode. The AutoVue server icon appears in the System Tray. To stop the service click Shutdown.
On Solaris Operating SystemsCimmetry provides an ’rc’ script to manage AutoVue Server on Solaris. AutoVue server can be configured to startup automatically when the machine is restarted.A script file ’jvueserver_rc’ is created in <Install_dir>/etc, where <Install_Dir> is the directory where AutoVue Server is installed. Please refer to the instructions in this script file for configuring AutoVue Server to startup as a service.
Cimmetry Systems Corp.

AutoVue 71
Appendix D: Structure and Syntax of GUI FilesAutoVue supports three modes: View, Compare, and Markup. A GUI file defines the graphical interface for each mode. Menu bars, toolbars, status bar and (Right Mouse Button) RMB menus are defined in this file. For some of these objects, location (north, south, west, east) may be specified. Toolbars are located in north, west or east. The status bar is always located at the bottom of the component (south).Note Defining the GUI for View mode is mandatory but Compare or Markup mode is optional. Popup menus may be added to menu bars. Menu items, popup menus or separators may be added to popup menus. Toolbars only accept buttons. Buttons or panes may be defined for the status bar. The RMB popup is processed as any other popup menu.
GUI Configuration SyntaxThe most generic definition of a GUI file can be described through the symbols below:• Words with CAPITAL LETTERS should be entered literally.• The character ‘|’ is used as “or” (e.g. a|b means a or b)• The character ‘*’ means “zero” or “more occurrences of.”• A GUI file can contain one or more “GUI configuration” blocks as shown
below:GUI_configuration =BEGIN UI VIEW UI_mode_configuration END {BEGIN UI COMPARE | MARKUP UI_mode_configuration END
*UI_mode_configuration ={menu_bar_configuration | {toolbar_configuration}* | status_bar_configuration | RMB_popup_menu_configuration}
menu_bar_configuration =MENUBAR BEGIN {popup_menu_configuration}* END
toolbar_configuration =
Cimmetry Systems Corp.
72 AutoVue
TOOLBAR NORTH|WEST|EAST BEGIN {button_control }* END
status_bar_configuration =STATUSBAR SOUTH BEGIN {button_control | pane_control } * END
RMB_popup_menu_configuration =RMB BEGIN {popup_menu_configuration | menu_item_control }* END
popup_menu_configuration = POPUP IDS_{FILE|EDIT |VIEW |OPTIONS |HELP | VIEW_IMAGE |TOOLS |ENTITIES |MODIFY |HYPERLINK} BEGIN {popup_menu_configuration | menu_item_control | SEPARATOR }* END
button_control =BUTTON action_control`
menu_item_control =MENUITEM action_control
pane_control =PANE action_control
action_control =control_name , control_key_list, permissions
control_name: For list of available control names refer to the table that follows.
control_key_list: For list control key list for different controls refer to the table that follows.
permissions: All action names need “PERM _READ”.
These are the exceptions to this rule:
Cimmetry Systems Corp.
AutoVue 73
• VueActionFilePrint needs: PERM_READ|PERM_HEADERS|PERM_WATERMARK
• VueActionOptionsBars needs: PERM_NONE• VueActionHelp needs: PERM_NONEExample:To define a very basic user interface that only allow users, through menu items, to open or print a file and get the file information without changing watermark/headers/footers:
BEGIN UI VIEW
M EN UBAR BEGIN
PO PUP IDS_FILE BEGIN
M EN UITEM VueActionFileO pen, , PERM _READ
M EN UITEM VueActionFileProperties, , PERM _READ
M EN UITEM VueActionFilePrint, , PERM _READ
EN D
EN D
EN D
Control Name
UI*Modes Functionality
ControlKey List
Contexts
Popu
p M
enu
Tool
bar
Stat
us B
ar
RM
B
VueAction FileOpen
VC Open URL r r
VueAction FileUpload
VC Upload local file r
ViewAction FileOpenUNC
VC Open files using UNC names
r
Cimmetry Systems Corp.
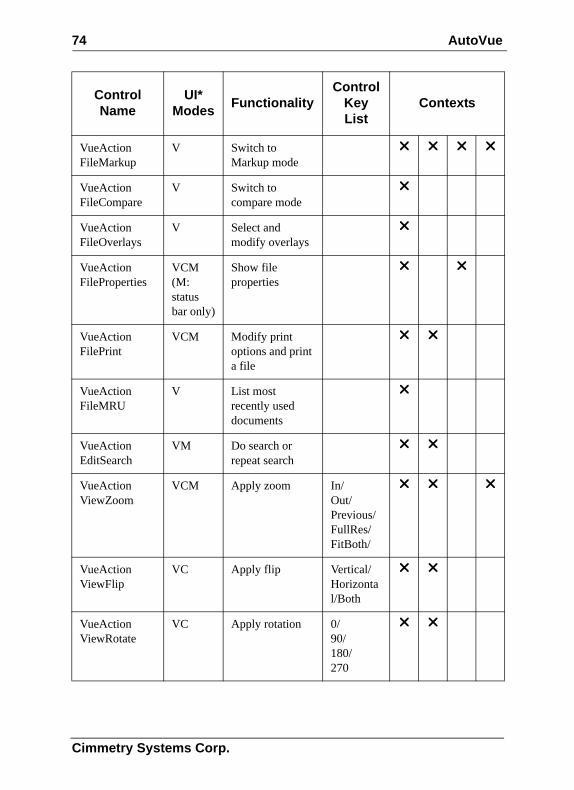
74 AutoVue
VueAction FileMarkup
V Switch to Markup mode
r r r r
VueAction FileCompare
V Switch to compare mode
r
VueAction FileOverlays
V Select and modify overlays
r
VueAction FileProperties
VCM (M: status bar only)
Show file properties
r r
VueAction FilePrint
VCM Modify print options and print a file
r r
VueAction FileMRU
V List most recently used documents
r
VueAction EditSearch
VM Do search or repeat search
r r
VueAction ViewZoom
VCM Apply zoom In/Out/Previous/FullRes/FitBoth/
r r r
VueAction ViewFlip
VC Apply flip Vertical/Horizontal/Both
r r
VueAction ViewRotate
VC Apply rotation 0/90/180/270
r r
Control Name
UI*Modes Functionality
ControlKey List
Contexts
Cimmetry Systems Corp.
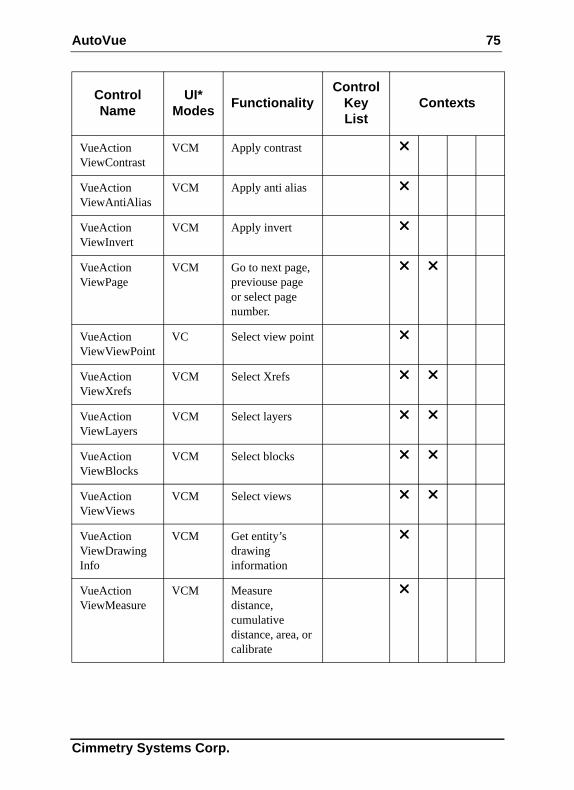
AutoVue 75
VueAction ViewContrast
VCM Apply contrast r
VueAction ViewAntiAlias
VCM Apply anti alias r
VueAction ViewInvert
VCM Apply invert r
VueAction ViewPage
VCM Go to next page, previouse page or select page number.
r r
VueAction ViewViewPoint
VC Select view point r
VueAction ViewXrefs
VCM Select Xrefs r r
VueAction ViewLayers
VCM Select layers r r
VueAction ViewBlocks
VCM Select blocks r r
VueAction ViewViews
VCM Select views r r
VueAction ViewDrawing Info
VCM Get entity’s drawing information
r
VueAction ViewMeasure
VCM Measure distance, cumulative distance, area, or calibrate
r
Control Name
UI*Modes Functionality
ControlKey List
Contexts
Cimmetry Systems Corp.
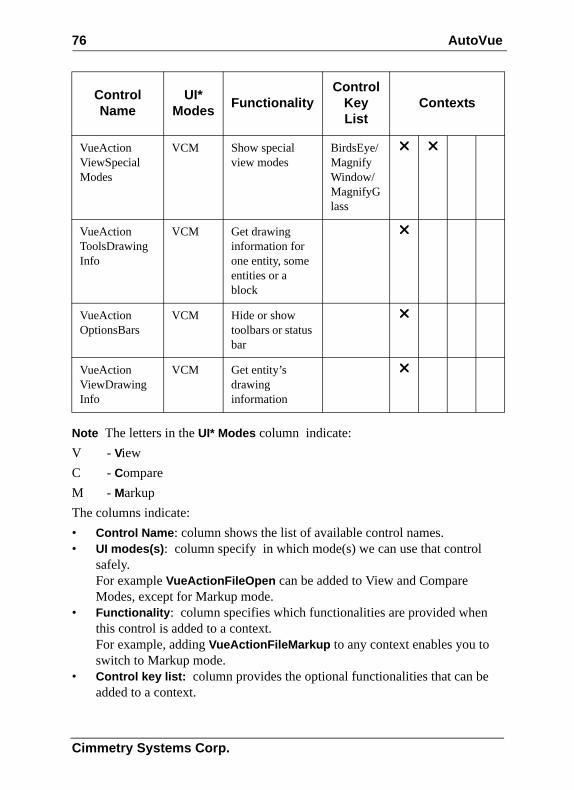
76 AutoVue
Note The letters in the UI* Modes column indicate:V - ViewC - CompareM - MarkupThe columns indicate:• Control Name: column shows the list of available control names.• UI modes(s): column specify in which mode(s) we can use that control
safely. For example VueActionFileOpen can be added to View and Compare Modes, except for Markup mode.
• Functionality: column specifies which functionalities are provided when this control is added to a context. For example, adding VueActionFileMarkup to any context enables you to switch to Markup mode.
• Control key list: column provides the optional functionalities that can be added to a context.
VueAction ViewSpecial Modes
VCM Show special view modes
BirdsEye/MagnifyWindow/MagnifyGlass
r r
VueAction ToolsDrawing Info
VCM Get drawing information for one entity, some entities or a block
r
VueAction OptionsBars
VCM Hide or show toolbars or status bar
r
VueAction ViewDrawing Info
VCM Get entity’s drawing information
r
Control Name
UI*Modes Functionality
ControlKey List
Contexts
Cimmetry Systems Corp.
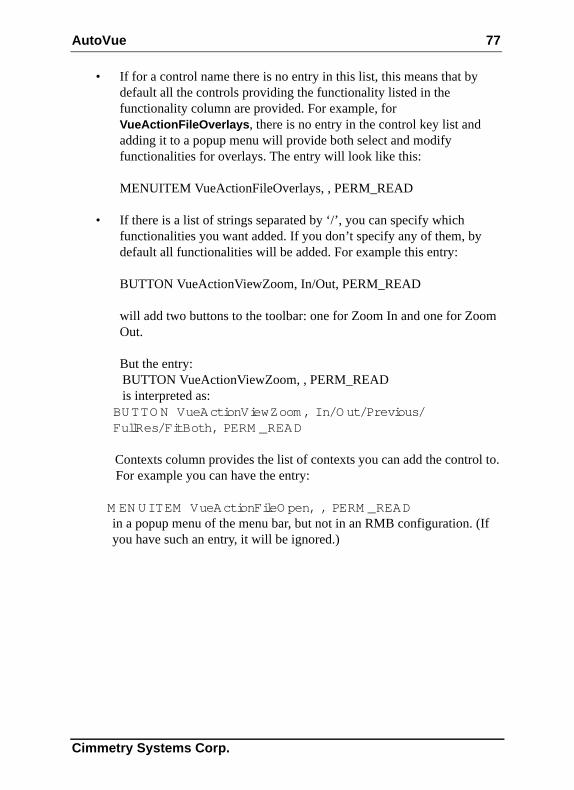
AutoVue 77
• If for a control name there is no entry in this list, this means that by default all the controls providing the functionality listed in the functionality column are provided. For example, for VueActionFileOverlays, there is no entry in the control key list and adding it to a popup menu will provide both select and modify functionalities for overlays. The entry will look like this:
MENUITEM VueActionFileOverlays, , PERM_READ
• If there is a list of strings separated by ‘/’, you can specify which functionalities you want added. If you don’t specify any of them, by default all functionalities will be added. For example this entry:
BUTTON VueActionViewZoom, In/Out, PERM_READ
will add two buttons to the toolbar: one for Zoom In and one for Zoom Out.
But the entry: BUTTON VueActionViewZoom, , PERM_READ is interpreted as: BUTTO N VueActionViewZoom , In/O ut/Previous/ FullRes/FitBoth, PERM _READ
Contexts column provides the list of contexts you can add the control to. For example you can have the entry:
M EN UITEM VueActionFileO pen, , PERM _READ in a popup menu of the menu bar, but not in an RMB configuration. (If you have such an entry, it will be ignored.)
Cimmetry Systems Corp.

78 AutoVue
Cimmetry Systems Corp.
AutoVue 79
Appendix E: Using the Applet as a Standalone ApplicationYou may want to use the AutoVue client as a standalone application with no Internet browser interface. The best way to minimize deployment effort in that case is to put the necessary files on a locally accessible network directory so that all users can just fire up the applet from that common location.Once the server is installed, copy the following files and directories to the chosen location:
Windows Installation• <jVue Install directory>\bin\jvue.bat• <jVue Install directory>\html\jvue.jar• <jVue Install directory>\jre
Or...
Unix Installation• <jVue Install directory>/bin/jvue• <jVue Install directory>/html/jvue.jar• <jVue Install directory>/jreEdit the file jvue.bat or jvue and verify that JVUE_DIR points to install_dir (assuming you copied to ‘install_dir’).
Using the Applet as a Standalone Application• Windows: jvue.bat • UNIX: jvue
Cimmetry Systems Corp.

80 AutoVue
Cimmetry Systems Corp.
AutoVue 81
Appendix F: List of INI File Optionsallusers.ini and default.ini OptionsThese files are specified in the [Users] section in VueServer.ini (the defaults are allusers.ini and default.ini in the directory of the VueServer.dll). When users connect to the AutoVue server for the first time (i.e. when profiles are created for the first time), the contents of default.ini are copied to the users’ own INI file (“username”.ini).If you want all users that connect to AutoVue to have the same initial default options, specify these options in default.ini. When users connect to the AutoVue server, options set in allusers.ini are transferred to the user profile. The options set in allusers.ini always override user profile settings.
Acrobat PDF OptionsConfigure options for Adobe PDF files.[Options]
Parameter Description Default
OverridePDFPrintSecurity=<0|1> Set to 1 if you wish to print document even if the PDF file is print-protected.
0
PDFCACHELEVEL=<None|Low|Medium|High>
Specify the level of caching to be used for PDF font glyphs.Low - 2 faces, 3 sizes per face, 200KB maximum memory sizeMedium – 4 faces, 6 sizes per face, 800KB maximum memory sizeHigh - 8 faces, 6 sizes per face, 1.5MB maximum memory size
Medium
Cimmetry Systems Corp.
82 AutoVue
Below option should be set in pdffont.map. This option does not go into allusers.ini or default.ini.[Options]
AutoCAD OptionsConfigure options for AutoCAD drawings.[Options]
PDFDPIRESOLUTION=<dpi> Defines the resolution in dpi (dots per inch) for rendering PDF pages on the screen. It can be set to any value between 72 and 1224.
360
Parameter Description Default
UseFreeTypeForSystem TTFRendering
Set to 1 in order to force the use of free type library for TTF system rendering.IMPORTANT: Set this option in the file pdffont.map.
Parameter Description Default
ACAD_FAST3D=<1|0> Set to 1 to improve rendering speed of AutoCAD 3D. Note Setting this option to 1 means that layers will not be listed and AutoVue streams all meshes & extrusions in one body.Set to 0 will mean slower rendering of AutoCAD 3D. However, layer information is listed and each mesh is streamed in its own entity.
1
Parameter Description Default
Cimmetry Systems Corp.
AutoVue 83
Autodesk DWF OptionsConfigure options for Autodesk DWF files.
ACAD2004RGBCOLOR=<1|0> If 1, use RGB color.If 0, use AIC (AutoCAD Indexed Color). Note This is for AutoCAD files, version 2004 and later.
1
ACADDEFAULTFONT=fontname This font is substituted if an 8-bit font is not located for AutoCAD drawings.
simplex.shx
ACADDEFAULTBIGFONT= bigfontname
This font is substituted if a 16-bit font is not located.
bigfont.shx
DRAWORDER=<0|1> If 1, draws sorted (ordered) entities from the last save of the DWG file, otherwise, entities are drawn in the order they were first created.
1
LWDISPLAYSCALE=[0-100] This option controls the display scale of line weights in the modelspace page for AutoCAD files version 14 and above.Set this option to [0-100]. For no line weight scaling, set this option to 25.For thicker lines, set this option above 25.For thinner lines, set this option below 25.
25
SHOWALLLAYERS=<0|1> If 1, turns on all the layers in the base and XRef files.
0
Parameter Description Default
Cimmetry Systems Corp.
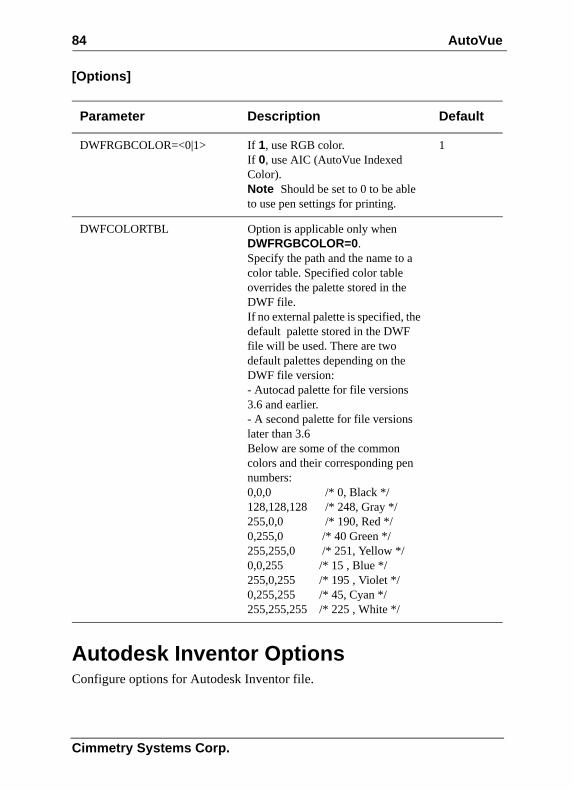
84 AutoVue
[Options]
Autodesk Inventor OptionsConfigure options for Autodesk Inventor file.
Parameter Description Default
DWFRGBCOLOR=<0|1> If 1, use RGB color. If 0, use AIC (AutoVue Indexed Color).Note Should be set to 0 to be able to use pen settings for printing.
1
DWFCOLORTBL Option is applicable only when DWFRGBCOLOR=0.Specify the path and the name to a color table. Specified color table overrides the palette stored in the DWF file.If no external palette is specified, the default palette stored in the DWF file will be used. There are two default palettes depending on the DWF file version:- Autocad palette for file versions 3.6 and earlier.- A second palette for file versions later than 3.6Below are some of the common colors and their corresponding pen numbers:0,0,0 /* 0, Black */ 128,128,128 /* 248, Gray */255,0,0 /* 190, Red */0,255,0 /* 40 Green */255,255,0 /* 251, Yellow */0,0,255 /* 15 , Blue */255,0,255 /* 195 , Violet */0,255,255 /* 45, Cyan */255,255,255 /* 225 , White */
Cimmetry Systems Corp.
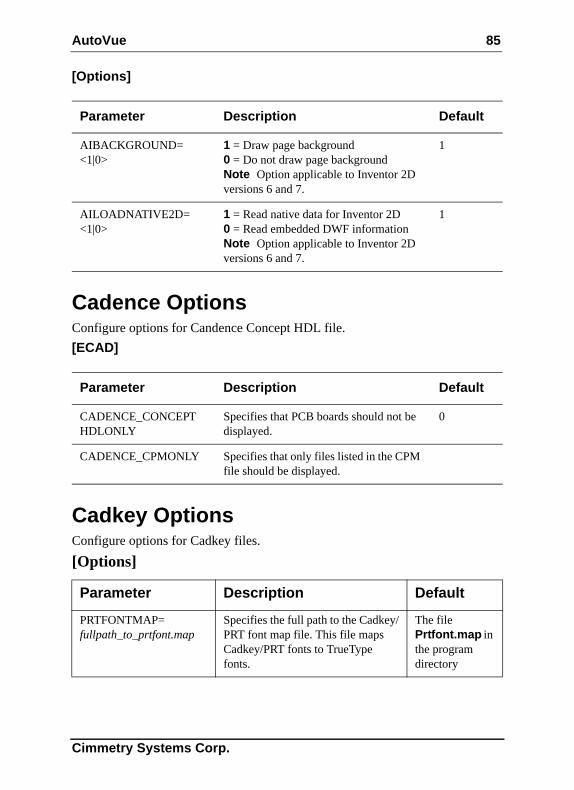
AutoVue 85
[Options]
Cadence OptionsConfigure options for Candence Concept HDL file.[ECAD]
Cadkey OptionsConfigure options for Cadkey files.
Parameter Description Default
AIBACKGROUND= <1|0>
1 = Draw page background0 = Do not draw page backgroundNote Option applicable to Inventor 2D versions 6 and 7.
1
AILOADNATIVE2D= <1|0>
1 = Read native data for Inventor 2D0 = Read embedded DWF informationNote Option applicable to Inventor 2D versions 6 and 7.
1
Parameter Description Default
CADENCE_CONCEPT HDLONLY
Specifies that PCB boards should not be displayed.
0
CADENCE_CPMONLY Specifies that only files listed in the CPM file should be displayed.
[Options]
Parameter Description Default
PRTFONTMAP= fullpath_to_prtfont.map
Specifies the full path to the Cadkey/PRT font map file. This file maps Cadkey/PRT fonts to TrueType fonts.
The file Prtfont.map in the program directory
Cimmetry Systems Corp.
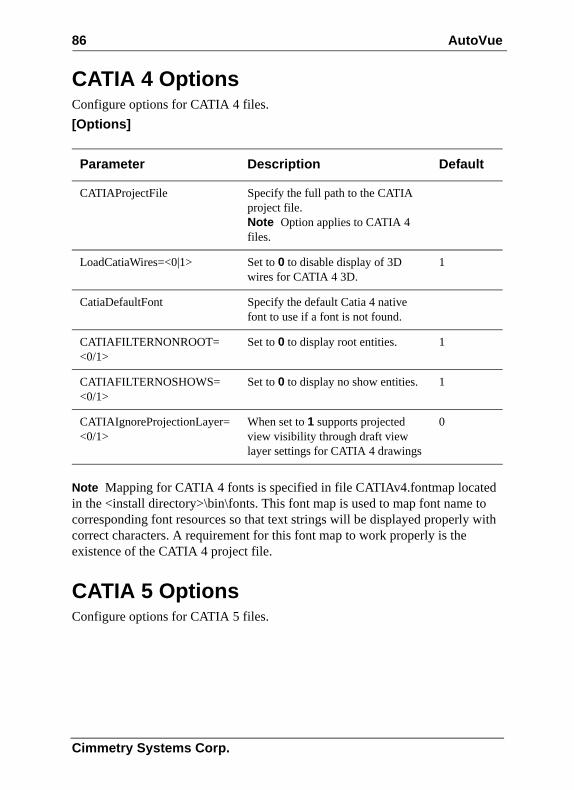
86 AutoVue
CATIA 4 OptionsConfigure options for CATIA 4 files.[Options]
Note Mapping for CATIA 4 fonts is specified in file CATIAv4.fontmap located in the <install directory>\bin\fonts. This font map is used to map font name to corresponding font resources so that text strings will be displayed properly with correct characters. A requirement for this font map to work properly is the existence of the CATIA 4 project file.
CATIA 5 OptionsConfigure options for CATIA 5 files.
Parameter Description Default
CATIAProjectFile Specify the full path to the CATIA project file. Note Option applies to CATIA 4 files.
LoadCatiaWires=<0|1> Set to 0 to disable display of 3D wires for CATIA 4 3D.
1
CatiaDefaultFont Specify the default Catia 4 native font to use if a font is not found.
CATIAFILTERNONROOT= <0/1>
Set to 0 to display root entities. 1
CATIAFILTERNOSHOWS= <0/1>
Set to 0 to display no show entities. 1
CATIAIgnoreProjectionLayer=<0/1>
When set to 1 supports projected view visibility through draft view layer settings for CATIA 4 drawings
0
Cimmetry Systems Corp.
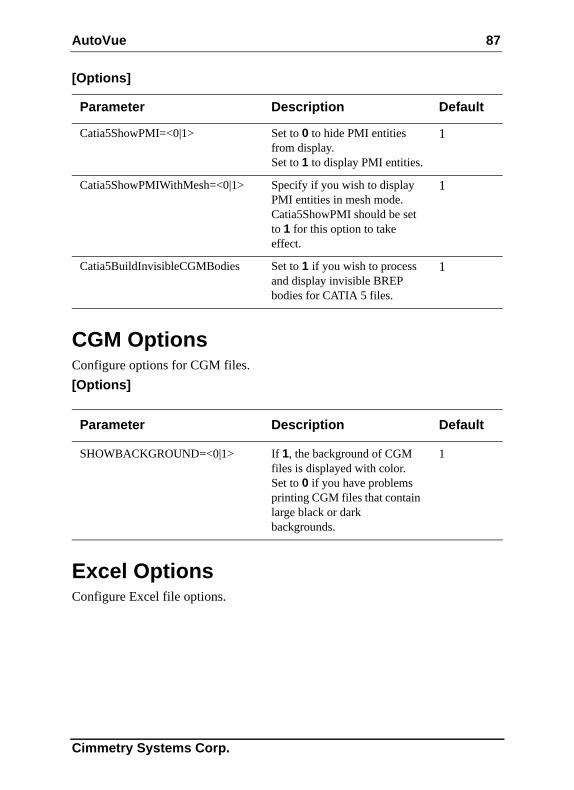
AutoVue 87
[Options]
CGM OptionsConfigure options for CGM files.[Options]
Excel OptionsConfigure Excel file options.
Parameter Description Default
Catia5ShowPMI=<0|1> Set to 0 to hide PMI entities from display. Set to 1 to display PMI entities.
1
Catia5ShowPMIWithMesh=<0|1> Specify if you wish to display PMI entities in mesh mode. Catia5ShowPMI should be set to 1 for this option to take effect.
1
Catia5BuildInvisibleCGMBodies Set to 1 if you wish to process and display invisible BREP bodies for CATIA 5 files.
1
Parameter Description Default
SHOWBACKGROUND=<0|1> If 1, the background of CGM files is displayed with color. Set to 0 if you have problems printing CGM files that contain large black or dark backgrounds.
1
Cimmetry Systems Corp.
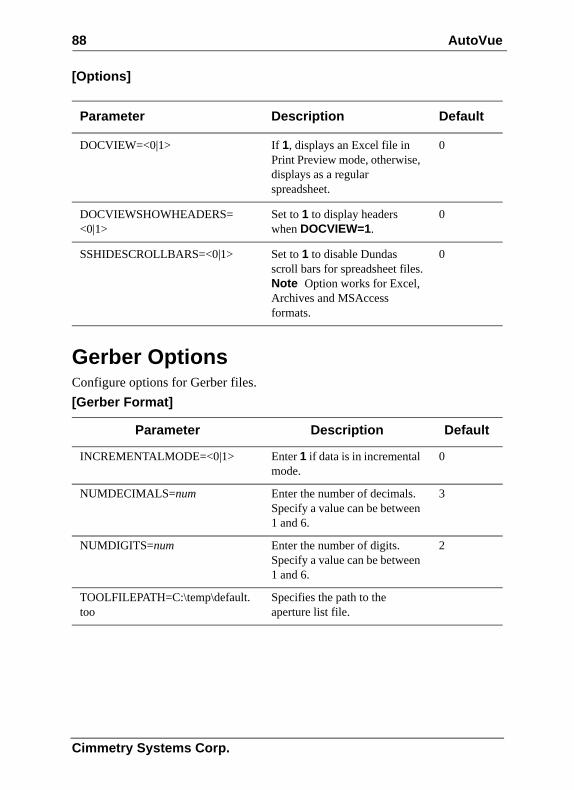
88 AutoVue
[Options]
Gerber OptionsConfigure options for Gerber files.[Gerber Format]
Parameter Description Default
DOCVIEW=<0|1> If 1, displays an Excel file in Print Preview mode, otherwise, displays as a regular spreadsheet.
0
DOCVIEWSHOWHEADERS= <0|1>
Set to 1 to display headers when DOCVIEW=1.
0
SSHIDESCROLLBARS=<0|1> Set to 1 to disable Dundas scroll bars for spreadsheet files.Note Option works for Excel, Archives and MSAccess formats.
0
Parameter Description Default
INCREMENTALMODE=<0|1> Enter 1 if data is in incremental mode.
0
NUMDECIMALS=num Enter the number of decimals. Specify a value can be between 1 and 6.
3
NUMDIGITS=num Enter the number of digits. Specify a value can be between 1 and 6.
2
TOOLFILEPATH=C:\temp\default. too
Specifies the path to the aperture list file.
Cimmetry Systems Corp.
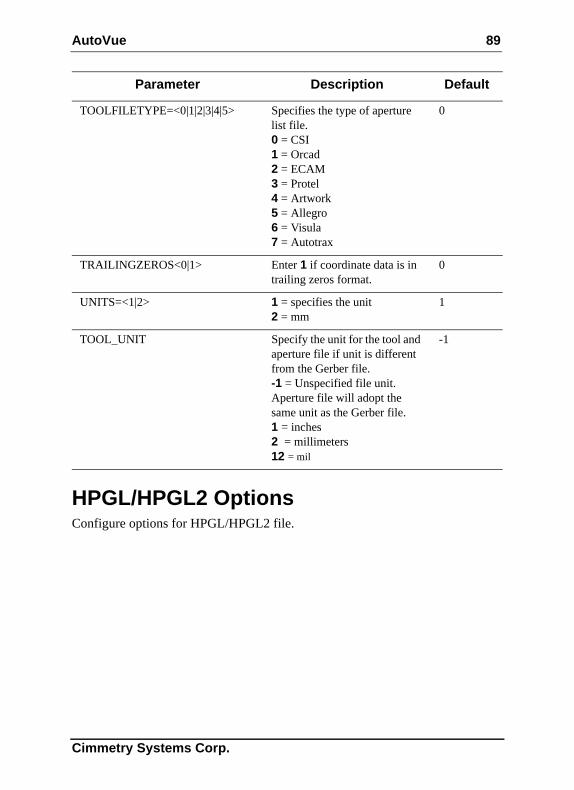
AutoVue 89
HPGL/HPGL2 OptionsConfigure options for HPGL/HPGL2 file.
TOOLFILETYPE=<0|1|2|3|4|5> Specifies the type of aperture list file.0 = CSI1 = Orcad2 = ECAM3 = Protel4 = Artwork5 = Allegro6 = Visula7 = Autotrax
0
TRAILINGZEROS<0|1> Enter 1 if coordinate data is in trailing zeros format.
0
UNITS=<1|2> 1 = specifies the unit2 = mm
1
TOOL_UNIT Specify the unit for the tool and aperture file if unit is different from the Gerber file.-1 = Unspecified file unit. Aperture file will adopt the same unit as the Gerber file.1 = inches2 = millimeters12 = mil
-1
Parameter Description Default
Cimmetry Systems Corp.
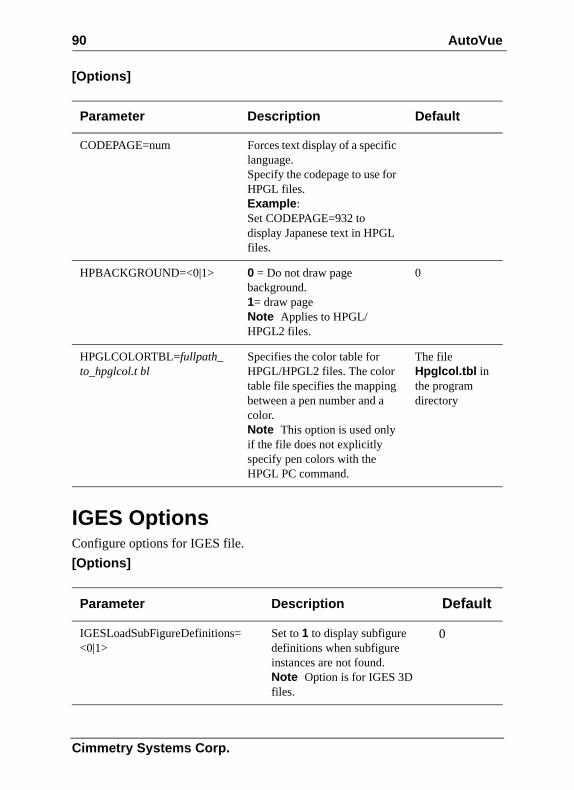
90 AutoVue
[Options]
IGES OptionsConfigure options for IGES file.[Options]
Parameter Description Default
CODEPAGE=num Forces text display of a specific language.Specify the codepage to use for HPGL files. Example: Set CODEPAGE=932 to display Japanese text in HPGL files.
HPBACKGROUND=<0|1> 0 = Do not draw page background.1= draw pageNote Applies to HPGL/HPGL2 files.
0
HPGLCOLORTBL=fullpath_ to_hpglcol.t bl
Specifies the color table for HPGL/HPGL2 files. The color table file specifies the mapping between a pen number and a color. Note This option is used only if the file does not explicitly specify pen colors with the HPGL PC command.
The file Hpglcol.tbl in the program directory
Parameter Description Default
IGESLoadSubFigureDefinitions= <0|1>
Set to 1 to display subfigure definitions when subfigure instances are not found. Note Option is for IGES 3D files.
0
Cimmetry Systems Corp.
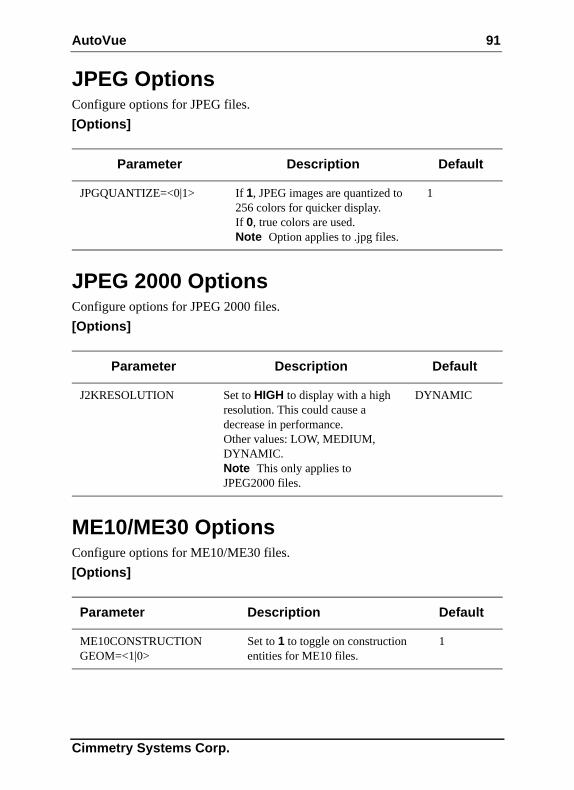
AutoVue 91
JPEG OptionsConfigure options for JPEG files.[Options]
JPEG 2000 OptionsConfigure options for JPEG 2000 files.[Options]
ME10/ME30 OptionsConfigure options for ME10/ME30 files.[Options]
Parameter Description Default
JPGQUANTIZE=<0|1> If 1, JPEG images are quantized to 256 colors for quicker display. If 0, true colors are used. Note Option applies to .jpg files.
1
Parameter Description Default
J2KRESOLUTION Set to HIGH to display with a high resolution. This could cause a decrease in performance. Other values: LOW, MEDIUM, DYNAMIC. Note This only applies to JPEG2000 files.
DYNAMIC
Parameter Description Default
ME10CONSTRUCTIONGEOM=<1|0>
Set to 1 to toggle on construction entities for ME10 files.
1
Cimmetry Systems Corp.
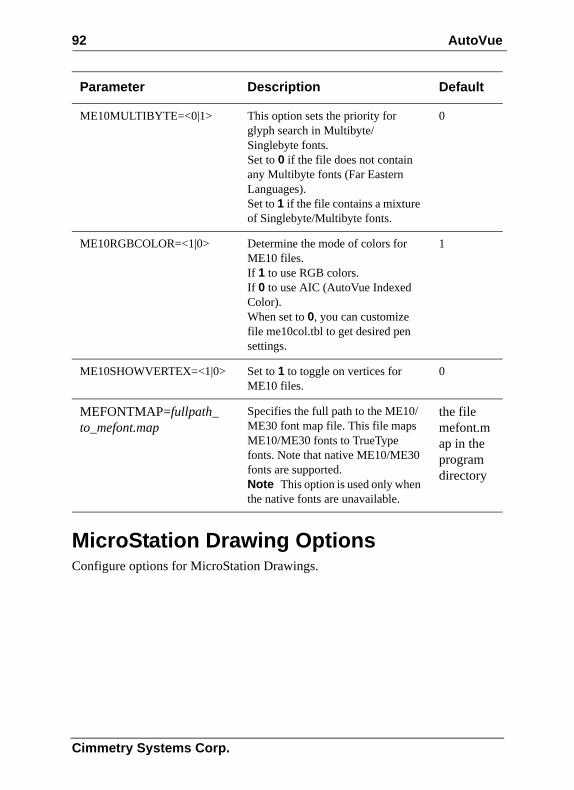
92 AutoVue
MicroStation Drawing OptionsConfigure options for MicroStation Drawings.
ME10MULTIBYTE=<0|1> This option sets the priority for glyph search in Multibyte/Singlebyte fonts.Set to 0 if the file does not contain any Multibyte fonts (Far Eastern Languages).Set to 1 if the file contains a mixture of Singlebyte/Multibyte fonts.
0
ME10RGBCOLOR=<1|0> Determine the mode of colors for ME10 files. If 1 to use RGB colors. If 0 to use AIC (AutoVue Indexed Color). When set to 0, you can customize file me10col.tbl to get desired pen settings.
1
ME10SHOWVERTEX=<1|0> Set to 1 to toggle on vertices for ME10 files.
0
MEFONTMAP=fullpath_ to_mefont.map
Specifies the full path to the ME10/ME30 font map file. This file maps ME10/ME30 fonts to TrueType fonts. Note that native ME10/ME30 fonts are supported. Note This option is used only when the native fonts are unavailable.
the file mefont.map in the program directory
Parameter Description Default
Cimmetry Systems Corp.
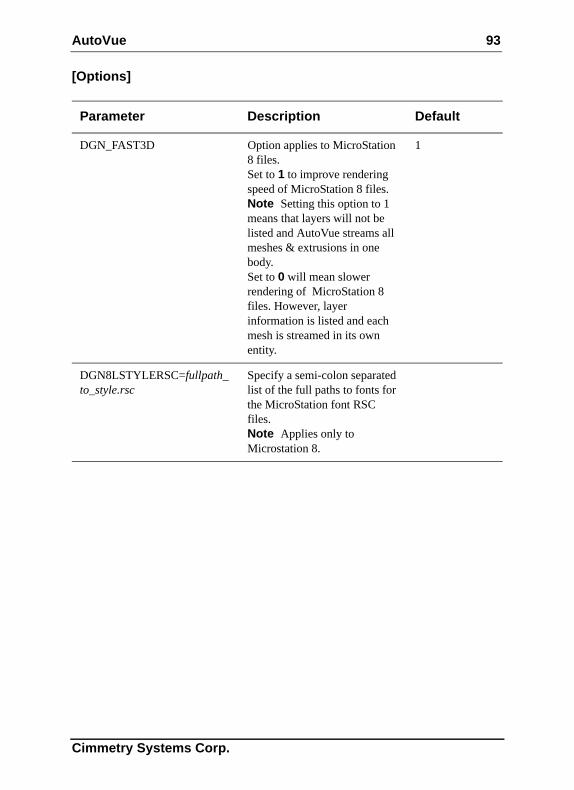
AutoVue 93
[Options]
Parameter Description Default
DGN_FAST3D Option applies to MicroStation 8 files.Set to 1 to improve rendering speed of MicroStation 8 files.Note Setting this option to 1 means that layers will not be listed and AutoVue streams all meshes & extrusions in one body.Set to 0 will mean slower rendering of MicroStation 8 files. However, layer information is listed and each mesh is streamed in its own entity.
1
DGN8LSTYLERSC=fullpath_to_style.rsc
Specify a semi-colon separated list of the full paths to fonts for the MicroStation font RSC files. Note Applies only to Microstation 8.
Cimmetry Systems Corp.
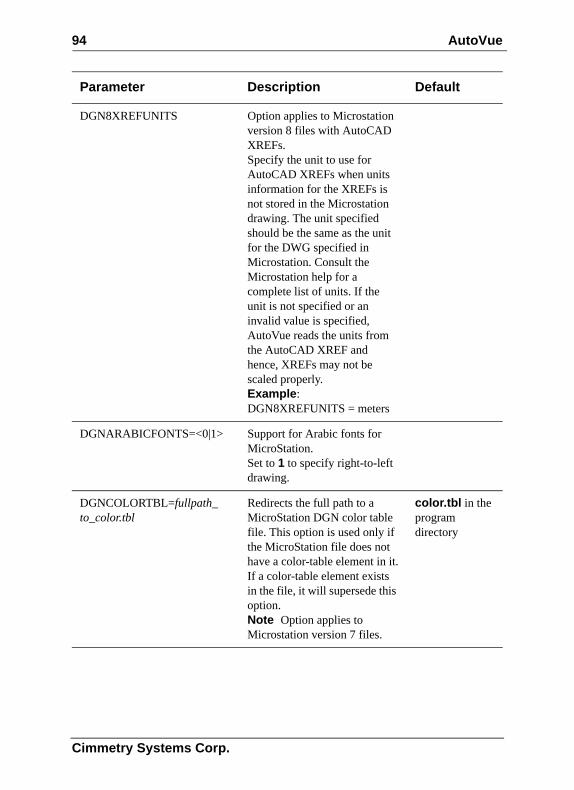
94 AutoVue
DGN8XREFUNITS Option applies to Microstation version 8 files with AutoCAD XREFs.Specify the unit to use for AutoCAD XREFs when units information for the XREFs is not stored in the Microstation drawing. The unit specified should be the same as the unit for the DWG specified in Microstation. Consult the Microstation help for a complete list of units. If the unit is not specified or an invalid value is specified, AutoVue reads the units from the AutoCAD XREF and hence, XREFs may not be scaled properly.Example: DGN8XREFUNITS = meters
DGNARABICFONTS=<0|1> Support for Arabic fonts for MicroStation.Set to 1 to specify right-to-left drawing.
DGNCOLORTBL=fullpath_ to_color.tbl
Redirects the full path to a MicroStation DGN color table file. This option is used only if the MicroStation file does not have a color-table element in it.If a color-table element exists in the file, it will supersede this option.Note Option applies to Microstation version 7 files.
color.tbl in the program directory
Parameter Description Default
Cimmetry Systems Corp.
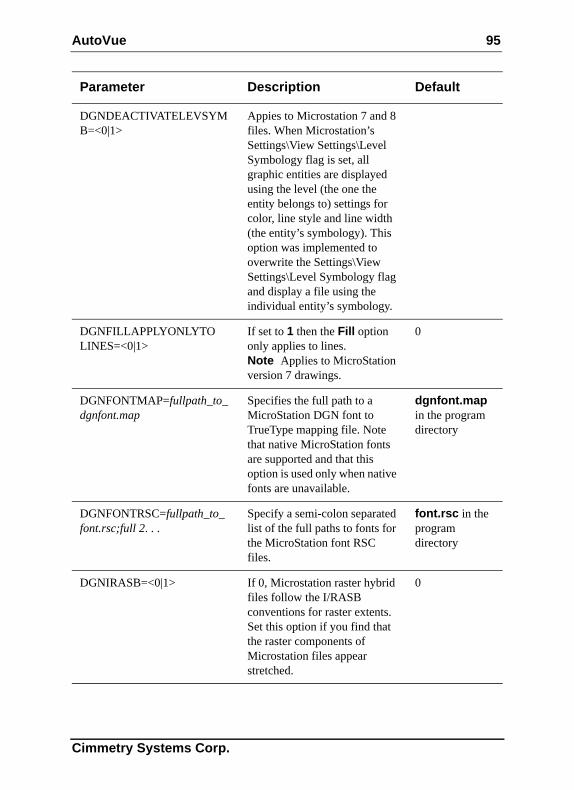
AutoVue 95
DGNDEACTIVATELEVSYMB=<0|1>
Appies to Microstation 7 and 8 files. When Microstation’s Settings\View Settings\Level Symbology flag is set, all graphic entities are displayed using the level (the one the entity belongs to) settings for color, line style and line width (the entity’s symbology). This option was implemented to overwrite the Settings\View Settings\Level Symbology flag and display a file using the individual entity’s symbology.
DGNFILLAPPLYONLYTO LINES=<0|1>
If set to 1 then the Fill option only applies to lines. Note Applies to MicroStation version 7 drawings.
0
DGNFONTMAP=fullpath_to_dgnfont.map
Specifies the full path to a MicroStation DGN font to TrueType mapping file. Note that native MicroStation fonts are supported and that this option is used only when native fonts are unavailable.
dgnfont.map in the program directory
DGNFONTRSC=fullpath_to_ font.rsc;full 2. . .
Specify a semi-colon separated list of the full paths to fonts for the MicroStation font RSC files.
font.rsc in the program directory
DGNIRASB=<0|1> If 0, Microstation raster hybrid files follow the I/RASB conventions for raster extents. Set this option if you find that the raster components of Microstation files appear stretched.
0
Parameter Description Default
Cimmetry Systems Corp.
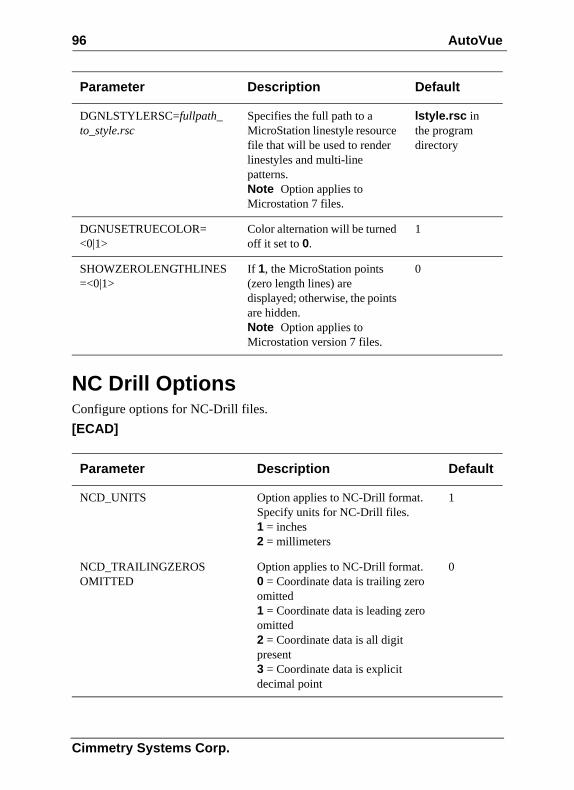
96 AutoVue
NC Drill OptionsConfigure options for NC-Drill files.[ECAD]
DGNLSTYLERSC=fullpath_ to_style.rsc
Specifies the full path to a MicroStation linestyle resource file that will be used to render linestyles and multi-line patterns. Note Option applies to Microstation 7 files.
lstyle.rsc in the program directory
DGNUSETRUECOLOR= <0|1>
Color alternation will be turned off it set to 0.
1
SHOWZEROLENGTHLINES=<0|1>
If 1, the MicroStation points (zero length lines) are displayed; otherwise, the points are hidden. Note Option applies to Microstation version 7 files.
0
Parameter Description Default
NCD_UNITS Option applies to NC-Drill format. Specify units for NC-Drill files.1 = inches2 = millimeters
1
NCD_TRAILINGZEROS OMITTED
Option applies to NC-Drill format.0 = Coordinate data is trailing zero omitted1 = Coordinate data is leading zero omitted2 = Coordinate data is all digit present3 = Coordinate data is explicit decimal point
0
Parameter Description Default
Cimmetry Systems Corp.
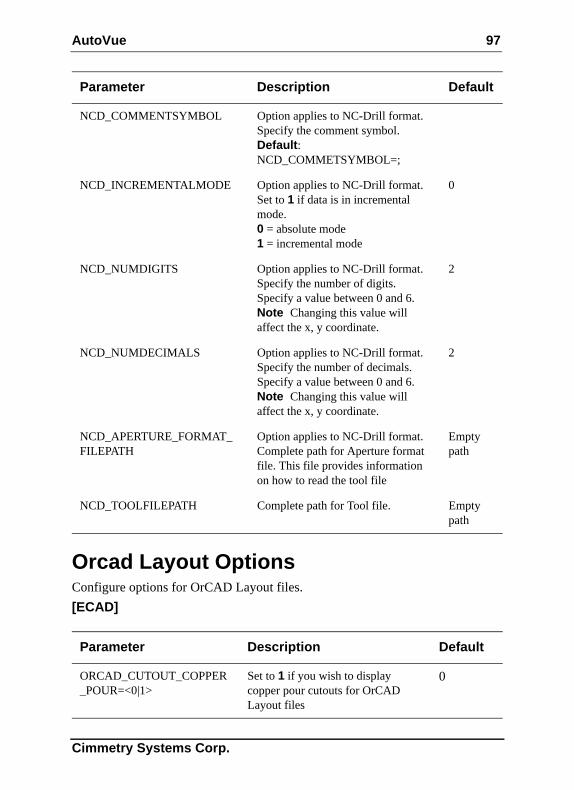
AutoVue 97
Orcad Layout OptionsConfigure options for OrCAD Layout files.[ECAD]
NCD_COMMENTSYMBOL Option applies to NC-Drill format.Specify the comment symbol.Default:NCD_COMMETSYMBOL=;
NCD_INCREMENTALMODE Option applies to NC-Drill format.Set to 1 if data is in incremental mode.0 = absolute mode1 = incremental mode
0
NCD_NUMDIGITS Option applies to NC-Drill format.Specify the number of digits. Specify a value between 0 and 6.Note Changing this value will affect the x, y coordinate.
2
NCD_NUMDECIMALS Option applies to NC-Drill format.Specify the number of decimals. Specify a value between 0 and 6.Note Changing this value will affect the x, y coordinate.
2
NCD_APERTURE_FORMAT_ FILEPATH
Option applies to NC-Drill format.Complete path for Aperture format file. This file provides information on how to read the tool file
Empty path
NCD_TOOLFILEPATH Complete path for Tool file. Empty path
Parameter Description Default
ORCAD_CUTOUT_COPPER_POUR=<0|1>
Set to 1 if you wish to display copper pour cutouts for OrCAD Layout files
0
Parameter Description Default
Cimmetry Systems Corp.
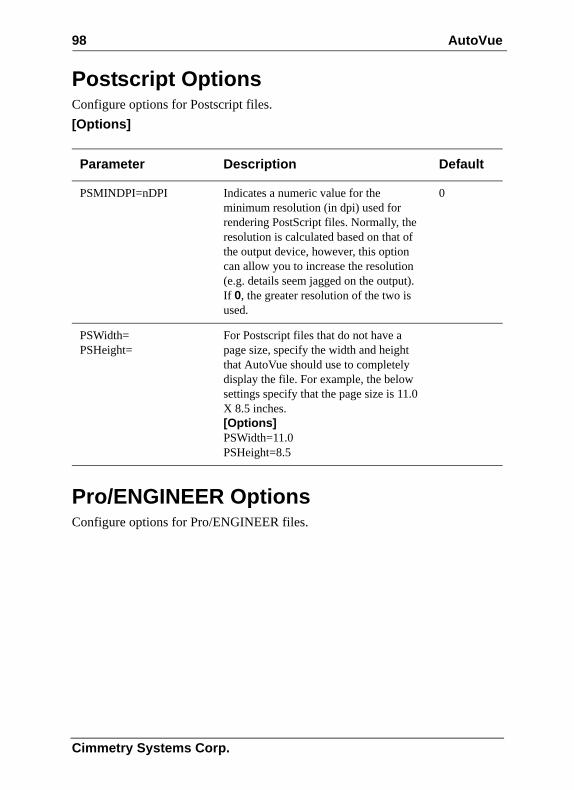
98 AutoVue
Postscript OptionsConfigure options for Postscript files.[Options]
Pro/ENGINEER OptionsConfigure options for Pro/ENGINEER files.
Parameter Description Default
PSMINDPI=nDPI Indicates a numeric value for the minimum resolution (in dpi) used for rendering PostScript files. Normally, the resolution is calculated based on that of the output device, however, this option can allow you to increase the resolution (e.g. details seem jagged on the output). If 0, the greater resolution of the two is used.
0
PSWidth=PSHeight=
For Postscript files that do not have a page size, specify the width and height that AutoVue should use to completely display the file. For example, the below settings specify that the page size is 11.0 X 8.5 inches.[Options]PSWidth=11.0PSHeight=8.5
Cimmetry Systems Corp.
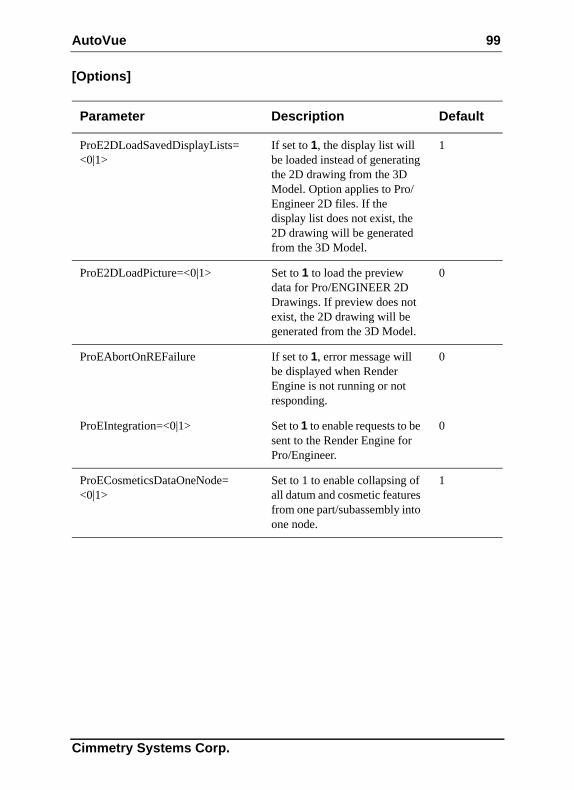
AutoVue 99
[Options]
Parameter Description Default
ProE2DLoadSavedDisplayLists= <0|1>
If set to 1, the display list will be loaded instead of generating the 2D drawing from the 3D Model. Option applies to Pro/Engineer 2D files. If the display list does not exist, the 2D drawing will be generated from the 3D Model.
1
ProE2DLoadPicture=<0|1> Set to 1 to load the preview data for Pro/ENGINEER 2D Drawings. If preview does not exist, the 2D drawing will be generated from the 3D Model.
0
ProEAbortOnREFailure If set to 1, error message will be displayed when Render Engine is not running or not responding.
0
ProEIntegration=<0|1> Set to 1 to enable requests to be sent to the Render Engine for Pro/Engineer.
0
ProECosmeticsDataOneNode= <0|1>
Set to 1 to enable collapsing of all datum and cosmetic features from one part/subassembly into one node.
1
Cimmetry Systems Corp.
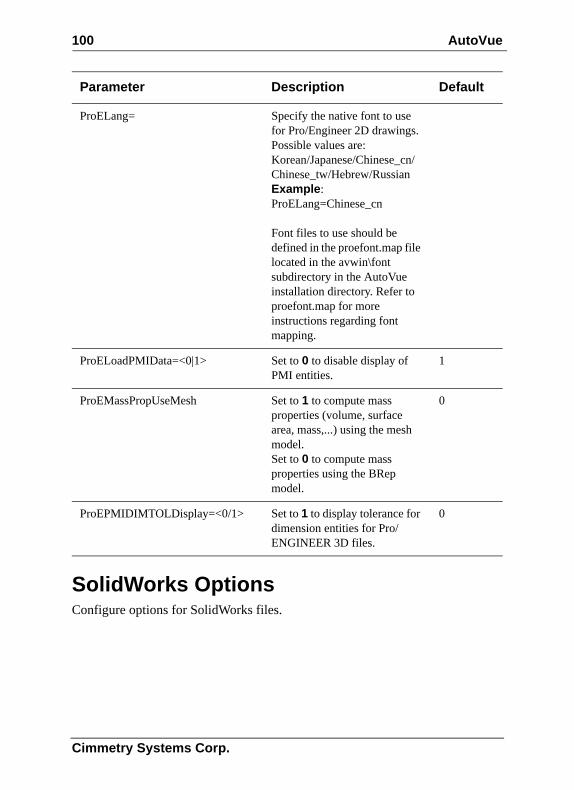
100 AutoVue
SolidWorks OptionsConfigure options for SolidWorks files.
ProELang= Specify the native font to use for Pro/Engineer 2D drawings.Possible values are:Korean/Japanese/Chinese_cn/Chinese_tw/Hebrew/RussianExample:ProELang=Chinese_cn
Font files to use should be defined in the proefont.map file located in the avwin\font subdirectory in the AutoVue installation directory. Refer to proefont.map for more instructions regarding font mapping.
ProELoadPMIData=<0|1> Set to 0 to disable display of PMI entities.
1
ProEMassPropUseMesh Set to 1 to compute mass properties (volume, surface area, mass,...) using the mesh model.Set to 0 to compute mass properties using the BRep model.
0
ProEPMIDIMTOLDisplay=<0/1> Set to 1 to display tolerance for dimension entities for Pro/ENGINEER 3D files.
0
Parameter Description Default
Cimmetry Systems Corp.
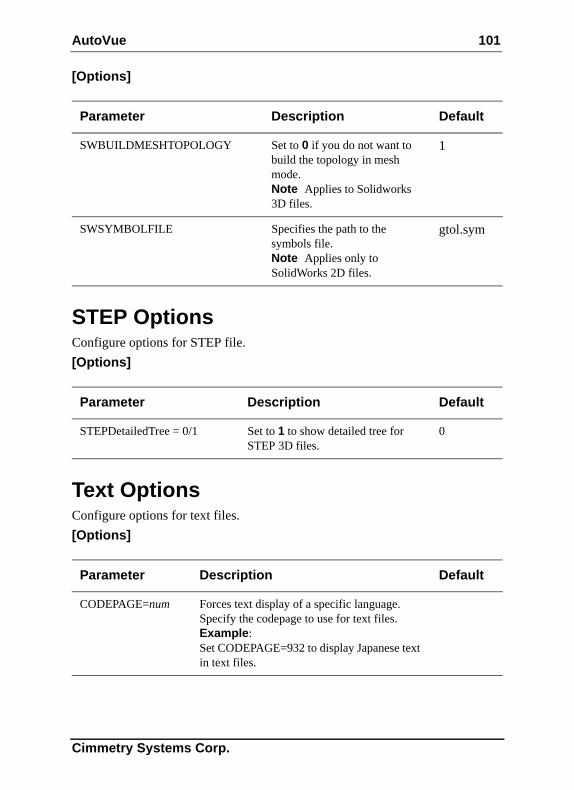
AutoVue 101
[Options]
STEP OptionsConfigure options for STEP file.[Options]
Text OptionsConfigure options for text files.[Options]
Parameter Description Default
SWBUILDMESHTOPOLOGY Set to 0 if you do not want to build the topology in mesh mode. Note Applies to Solidworks 3D files.
1
SWSYMBOLFILE Specifies the path to the symbols file.Note Applies only to SolidWorks 2D files.
gtol.sym
Parameter Description Default
STEPDetailedTree = 0/1 Set to 1 to show detailed tree for STEP 3D files.
0
Parameter Description Default
CODEPAGE=num Forces text display of a specific language. Specify the codepage to use for text files.Example:Set CODEPAGE=932 to display Japanese text in text files.
Cimmetry Systems Corp.
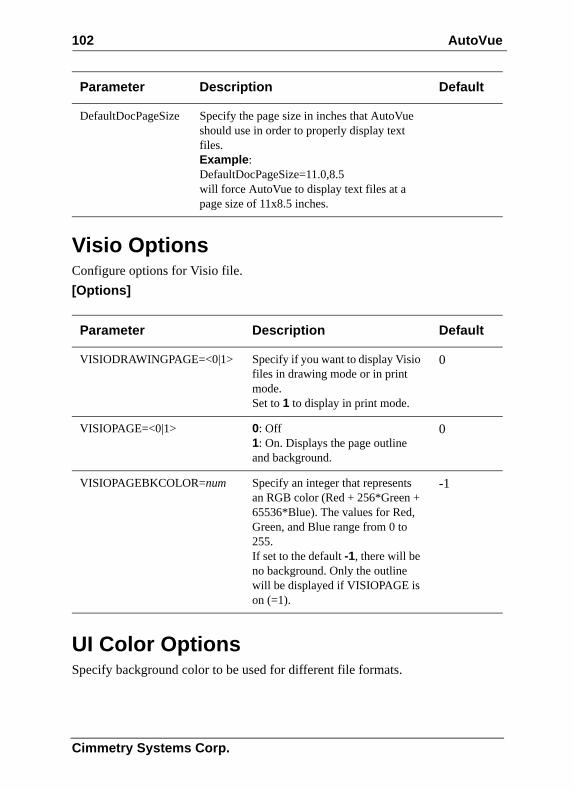
102 AutoVue
Visio OptionsConfigure options for Visio file.[Options]
UI Color OptionsSpecify background color to be used for different file formats.
DefaultDocPageSize Specify the page size in inches that AutoVue should use in order to properly display text files.Example:DefaultDocPageSize=11.0,8.5will force AutoVue to display text files at a page size of 11x8.5 inches.
Parameter Description Default
VISIODRAWINGPAGE=<0|1> Specify if you want to display Visio files in drawing mode or in print mode. Set to 1 to display in print mode.
0
VISIOPAGE=<0|1> 0: Off1: On. Displays the page outline and background.
0
VISIOPAGEBKCOLOR=num Specify an integer that represents an RGB color (Red + 256*Green + 65536*Blue). The values for Red, Green, and Blue range from 0 to 255.If set to the default -1, there will be no background. Only the outline will be displayed if VISIOPAGE is on (=1).
-1
Parameter Description Default
Cimmetry Systems Corp.
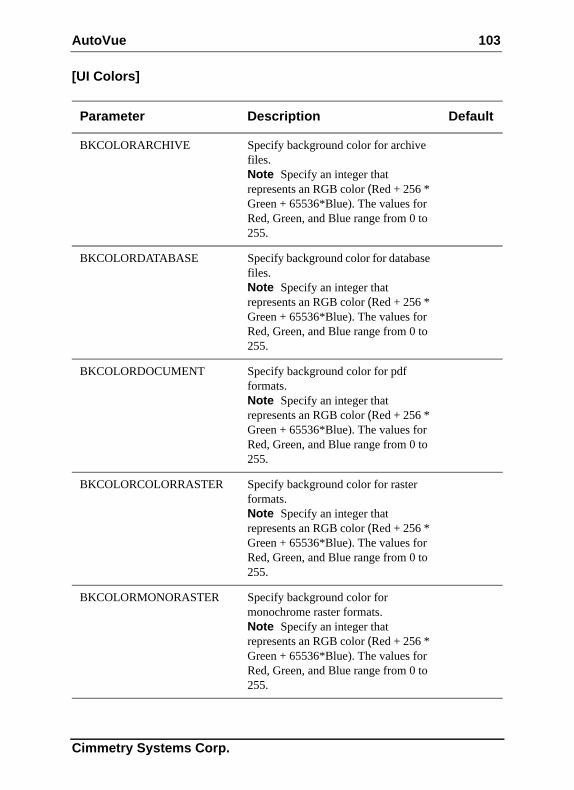
AutoVue 103
[UI Colors]
Parameter Description Default
BKCOLORARCHIVE Specify background color for archive files.Note Specify an integer that represents an RGB color (Red + 256 * Green + 65536*Blue). The values for Red, Green, and Blue range from 0 to 255.
BKCOLORDATABASE Specify background color for database files.Note Specify an integer that represents an RGB color (Red + 256 * Green + 65536*Blue). The values for Red, Green, and Blue range from 0 to 255.
BKCOLORDOCUMENT Specify background color for pdf formats.Note Specify an integer that represents an RGB color (Red + 256 * Green + 65536*Blue). The values for Red, Green, and Blue range from 0 to 255.
BKCOLORCOLORRASTER Specify background color for raster formats.Note Specify an integer that represents an RGB color (Red + 256 * Green + 65536*Blue). The values for Red, Green, and Blue range from 0 to 255.
BKCOLORMONORASTER Specify background color for monochrome raster formats.Note Specify an integer that represents an RGB color (Red + 256 * Green + 65536*Blue). The values for Red, Green, and Blue range from 0 to 255.
Cimmetry Systems Corp.
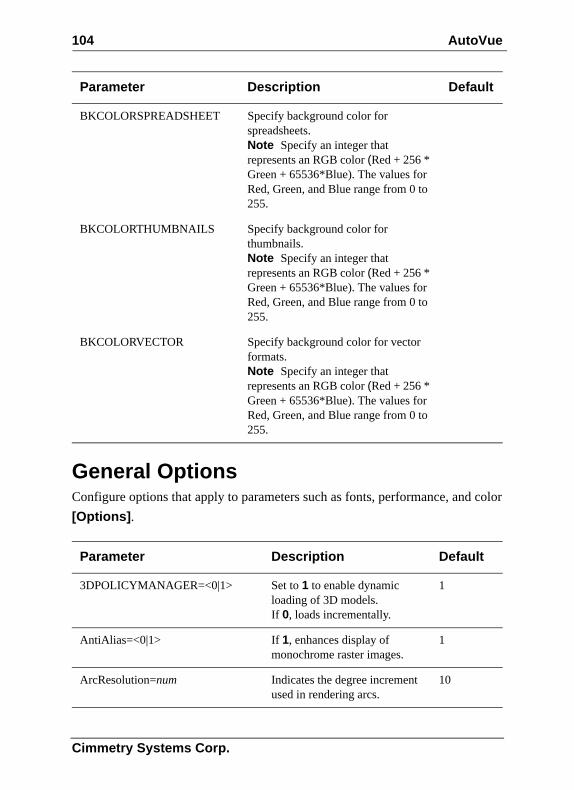
104 AutoVue
General OptionsConfigure options that apply to parameters such as fonts, performance, and color[Options].
BKCOLORSPREADSHEET Specify background color for spreadsheets.Note Specify an integer that represents an RGB color (Red + 256 * Green + 65536*Blue). The values for Red, Green, and Blue range from 0 to 255.
BKCOLORTHUMBNAILS Specify background color for thumbnails.Note Specify an integer that represents an RGB color (Red + 256 * Green + 65536*Blue). The values for Red, Green, and Blue range from 0 to 255.
BKCOLORVECTOR Specify background color for vector formats.Note Specify an integer that represents an RGB color (Red + 256 * Green + 65536*Blue). The values for Red, Green, and Blue range from 0 to 255.
Parameter Description Default
3DPOLICYMANAGER=<0|1> Set to 1 to enable dynamic loading of 3D models. If 0, loads incrementally.
1
AntiAlias=<0|1> If 1, enhances display of monochrome raster images.
1
ArcResolution=num Indicates the degree increment used in rendering arcs.
10
Parameter Description Default
Cimmetry Systems Corp.
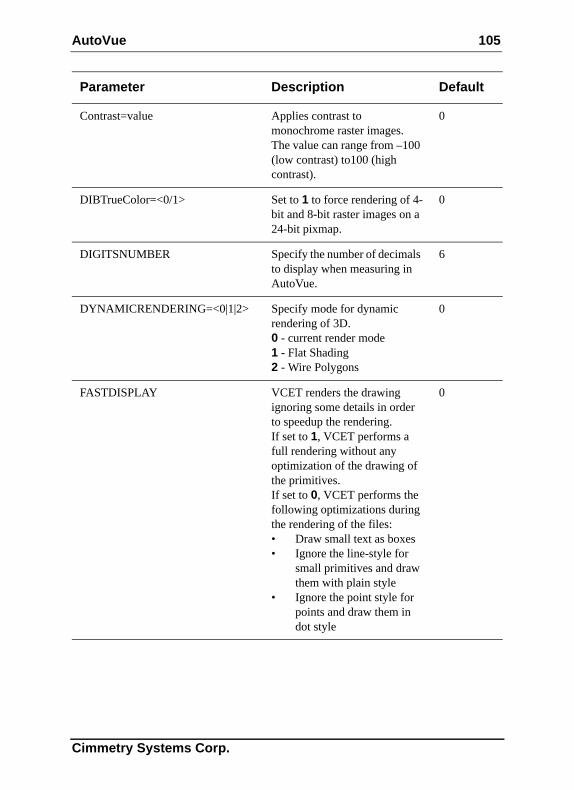
AutoVue 105
Contrast=value Applies contrast to monochrome raster images. The value can range from –100 (low contrast) to100 (high contrast).
0
DIBTrueColor=<0/1> Set to 1 to force rendering of 4-bit and 8-bit raster images on a 24-bit pixmap.
0
DIGITSNUMBER Specify the number of decimals to display when measuring in AutoVue.
6
DYNAMICRENDERING=<0|1|2> Specify mode for dynamic rendering of 3D.0 - current render mode1 - Flat Shading2 - Wire Polygons
0
FASTDISPLAY VCET renders the drawing ignoring some details in order to speedup the rendering.If set to 1, VCET performs a full rendering without any optimization of the drawing of the primitives.If set to 0, VCET performs the following optimizations during the rendering of the files:• Draw small text as boxes• Ignore the line-style for
small primitives and draw them with plain style
• Ignore the point style for points and draw them in dot style
0
Parameter Description Default
Cimmetry Systems Corp.
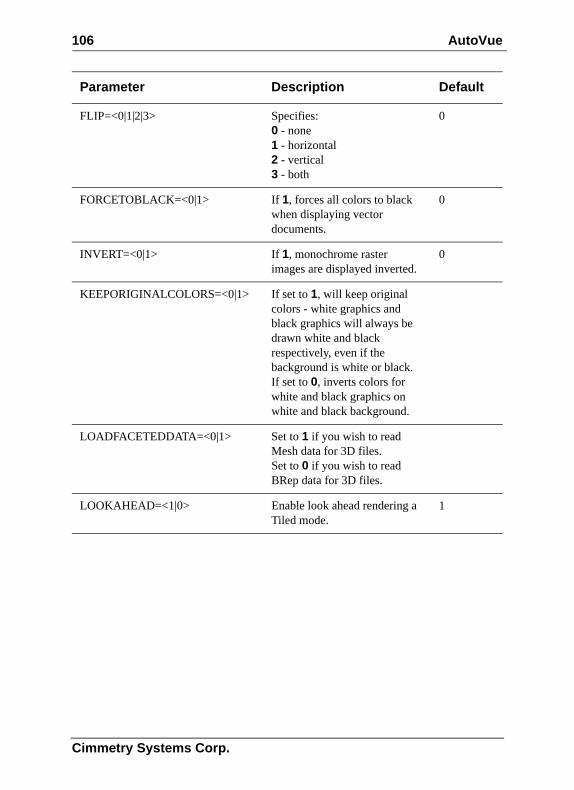
106 AutoVue
FLIP=<0|1|2|3> Specifies:0 - none1 - horizontal2 - vertical3 - both
0
FORCETOBLACK=<0|1> If 1, forces all colors to black when displaying vector documents.
0
INVERT=<0|1> If 1, monochrome raster images are displayed inverted.
0
KEEPORIGINALCOLORS=<0|1> If set to 1, will keep original colors - white graphics and black graphics will always be drawn white and black respectively, even if the background is white or black.If set to 0, inverts colors for white and black graphics on white and black background.
LOADFACETEDDATA=<0|1> Set to 1 if you wish to read Mesh data for 3D files. Set to 0 if you wish to read BRep data for 3D files.
LOOKAHEAD=<1|0> Enable look ahead rendering a Tiled mode.
1
Parameter Description Default
Cimmetry Systems Corp.

AutoVue 107
NOACCELERATION=<0|1> Set to 1 to disable OpenGL acceleration.It is recommended setting to 1 if 3D files are displaying blank or vector files are not displaying properly or if markup entities are not completely visible. Note If you have a poor graphics cards, OpenGL acceleration could slow down performance for bug 3D models.
1
NOWINARCS=<0|1> If 1, does not use the Windows GDI functions to draw arcs. If 0, Windows renders the arcs. This option is used for some HP print drivers that do not properly render arcs and circles.
0
OVERLAYALPHAVALUE=<0/1> Controlls transparency of two overlaid tiff files.If set to 1, overlay is opaque. If 0, overlay is transparent.Note Use only for Autovue client on Java2.
0.5
PMITEXTRENDERINGSTYLE= <0|1|2>
Specify the text rendering style for PMI entities.0 - Native Setting1 - 3D2 - Flat-to-screen
0
RASTERFIT=<0|1> If 1, fits the initial display of raster images to the screen. Otherwise, full resolution is shown.
1
Parameter Description Default
Cimmetry Systems Corp.
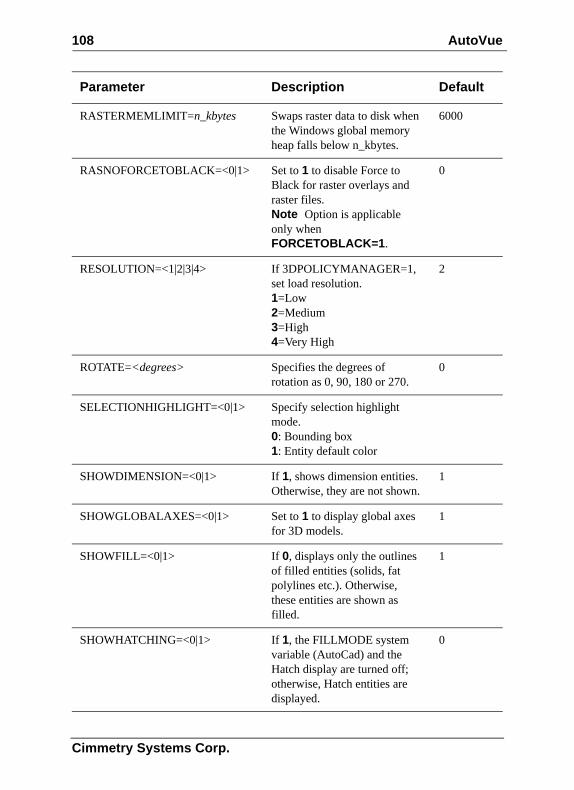
108 AutoVue
RASTERMEMLIMIT=n_kbytes Swaps raster data to disk when the Windows global memory heap falls below n_kbytes.
6000
RASNOFORCETOBLACK=<0|1> Set to 1 to disable Force to Black for raster overlays and raster files. Note Option is applicable only when FORCETOBLACK=1.
0
RESOLUTION=<1|2|3|4> If 3DPOLICYMANAGER=1, set load resolution.1=Low2=Medium3=High4=Very High
2
ROTATE=<degrees> Specifies the degrees of rotation as 0, 90, 180 or 270.
0
SELECTIONHIGHLIGHT=<0|1> Specify selection highlight mode.0: Bounding box1: Entity default color
SHOWDIMENSION=<0|1> If 1, shows dimension entities. Otherwise, they are not shown.
1
SHOWGLOBALAXES=<0|1> Set to 1 to display global axes for 3D models.
1
SHOWFILL=<0|1> If 0, displays only the outlines of filled entities (solids, fat polylines etc.). Otherwise, these entities are shown as filled.
1
SHOWHATCHING=<0|1> If 1, the FILLMODE system variable (AutoCad) and the Hatch display are turned off; otherwise, Hatch entities are displayed.
0
Parameter Description Default
Cimmetry Systems Corp.
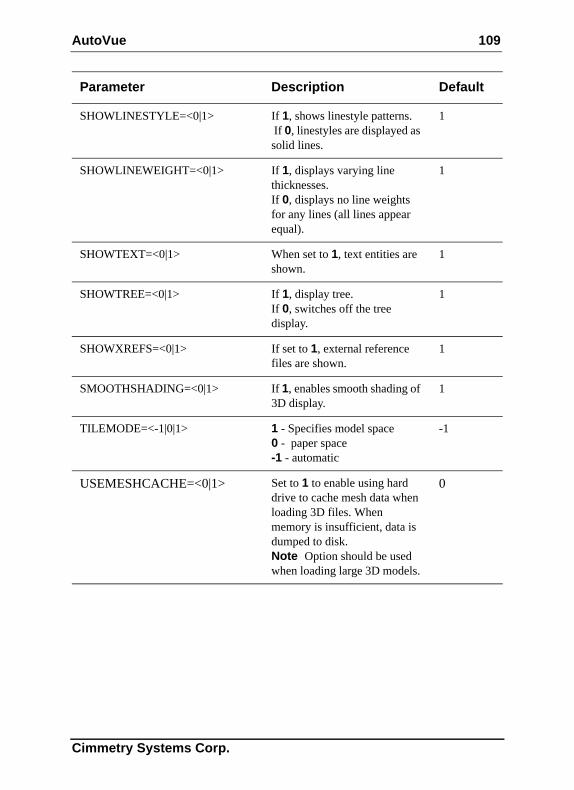
AutoVue 109
SHOWLINESTYLE=<0|1> If 1, shows linestyle patterns. If 0, linestyles are displayed as solid lines.
1
SHOWLINEWEIGHT=<0|1> If 1, displays varying line thicknesses.If 0, displays no line weights for any lines (all lines appear equal).
1
SHOWTEXT=<0|1> When set to 1, text entities are shown.
1
SHOWTREE=<0|1> If 1, display tree.If 0, switches off the tree display.
1
SHOWXREFS=<0|1> If set to 1, external reference files are shown.
1
SMOOTHSHADING=<0|1> If 1, enables smooth shading of 3D display.
1
TILEMODE=<-1|0|1> 1 - Specifies model space0 - paper space-1 - automatic
-1
USEMESHCACHE=<0|1> Set to 1 to enable using hard drive to cache mesh data when loading 3D files. When memory is insufficient, data is dumped to disk. Note Option should be used when loading large 3D models.
0
Parameter Description Default
Cimmetry Systems Corp.
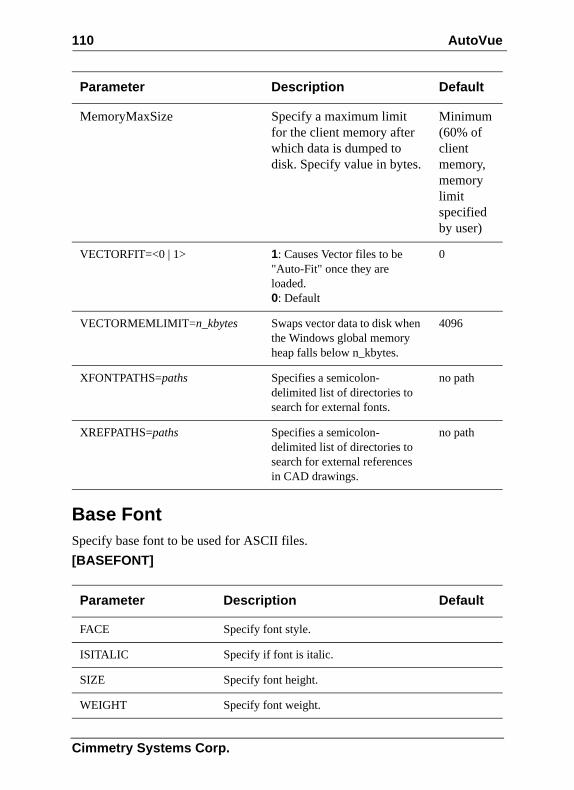
110 AutoVue
Base FontSpecify base font to be used for ASCII files.[BASEFONT]
MemoryMaxSize Specify a maximum limit for the client memory after which data is dumped to disk. Specify value in bytes.
Minimum (60% of client memory, memory limit specified by user)
VECTORFIT=<0 | 1> 1: Causes Vector files to be "Auto-Fit" once they are loaded.0: Default
0
VECTORMEMLIMIT=n_kbytes Swaps vector data to disk when the Windows global memory heap falls below n_kbytes.
4096
XFONTPATHS=paths Specifies a semicolon-delimited list of directories to search for external fonts.
no path
XREFPATHS=paths Specifies a semicolon-delimited list of directories to search for external references in CAD drawings.
no path
Parameter Description Default
FACE Specify font style.
ISITALIC Specify if font is italic.
SIZE Specify font height.
WEIGHT Specify font weight.
Parameter Description Default
Cimmetry Systems Corp.
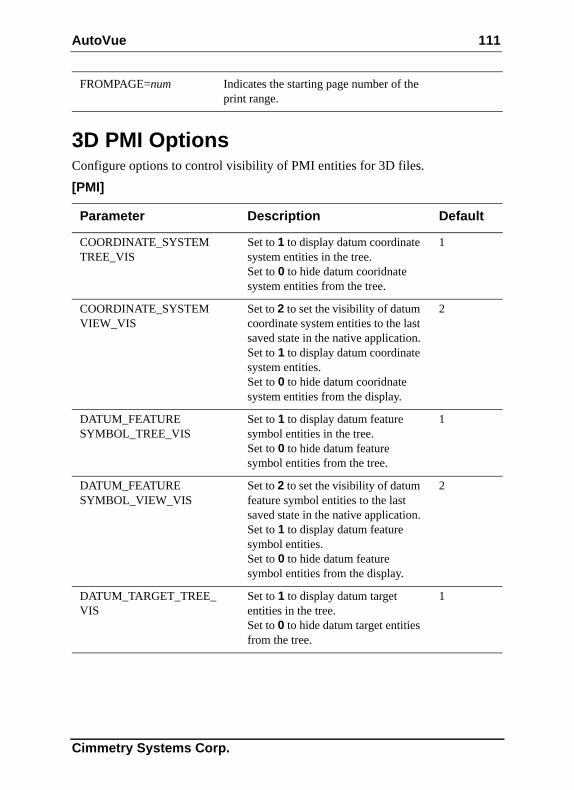
AutoVue 111
3D PMI OptionsConfigure options to control visibility of PMI entities for 3D files.[PMI]
FROMPAGE=num Indicates the starting page number of the print range.
Parameter Description Default
COORDINATE_SYSTEM TREE_VIS
Set to 1 to display datum coordinate system entities in the tree. Set to 0 to hide datum cooridnate system entities from the tree.
1
COORDINATE_SYSTEM VIEW_VIS
Set to 2 to set the visibility of datum coordinate system entities to the last saved state in the native application.Set to 1 to display datum coordinate system entities.Set to 0 to hide datum cooridnate system entities from the display.
2
DATUM_FEATURE SYMBOL_TREE_VIS
Set to 1 to display datum feature symbol entities in the tree. Set to 0 to hide datum feature symbol entities from the tree.
1
DATUM_FEATURE SYMBOL_VIEW_VIS
Set to 2 to set the visibility of datum feature symbol entities to the last saved state in the native application.Set to 1 to display datum feature symbol entities. Set to 0 to hide datum feature symbol entities from the display.
2
DATUM_TARGET_TREE_ VIS
Set to 1 to display datum target entities in the tree. Set to 0 to hide datum target entities from the tree.
1
Cimmetry Systems Corp.
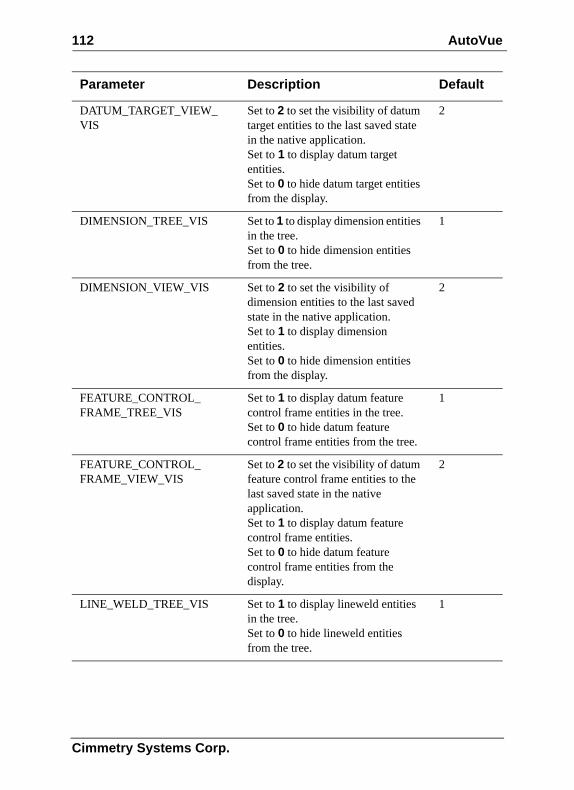
112 AutoVue
DATUM_TARGET_VIEW_ VIS
Set to 2 to set the visibility of datum target entities to the last saved state in the native application.Set to 1 to display datum target entities. Set to 0 to hide datum target entities from the display.
2
DIMENSION_TREE_VIS Set to 1 to display dimension entities in the tree. Set to 0 to hide dimension entities from the tree.
1
DIMENSION_VIEW_VIS Set to 2 to set the visibility of dimension entities to the last saved state in the native application.Set to 1 to display dimension entities. Set to 0 to hide dimension entities from the display.
2
FEATURE_CONTROL_ FRAME_TREE_VIS
Set to 1 to display datum feature control frame entities in the tree. Set to 0 to hide datum feature control frame entities from the tree.
1
FEATURE_CONTROL_ FRAME_VIEW_VIS
Set to 2 to set the visibility of datum feature control frame entities to the last saved state in the native application.Set to 1 to display datum feature control frame entities. Set to 0 to hide datum feature control frame entities from the display.
2
LINE_WELD_TREE_VIS Set to 1 to display lineweld entities in the tree. Set to 0 to hide lineweld entities from the tree.
1
Parameter Description Default
Cimmetry Systems Corp.
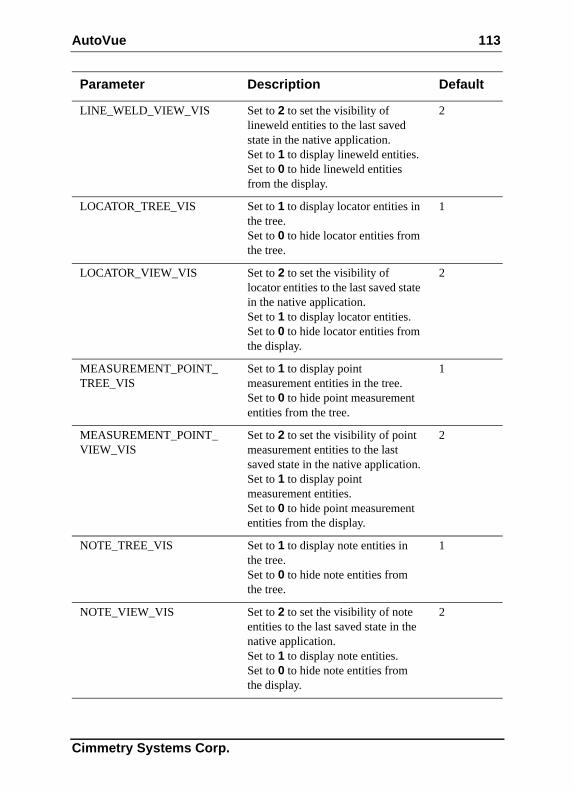
AutoVue 113
LINE_WELD_VIEW_VIS Set to 2 to set the visibility of lineweld entities to the last saved state in the native application.Set to 1 to display lineweld entities. Set to 0 to hide lineweld entities from the display.
2
LOCATOR_TREE_VIS Set to 1 to display locator entities in the tree. Set to 0 to hide locator entities from the tree.
1
LOCATOR_VIEW_VIS Set to 2 to set the visibility of locator entities to the last saved state in the native application.Set to 1 to display locator entities. Set to 0 to hide locator entities from the display.
2
MEASUREMENT_POINT_ TREE_VIS
Set to 1 to display point measurement entities in the tree. Set to 0 to hide point measurement entities from the tree.
1
MEASUREMENT_POINT_ VIEW_VIS
Set to 2 to set the visibility of point measurement entities to the last saved state in the native application.Set to 1 to display point measurement entities. Set to 0 to hide point measurement entities from the display.
2
NOTE_TREE_VIS Set to 1 to display note entities in the tree. Set to 0 to hide note entities from the tree.
1
NOTE_VIEW_VIS Set to 2 to set the visibility of note entities to the last saved state in the native application.Set to 1 to display note entities. Set to 0 to hide note entities from the display.
2
Parameter Description Default
Cimmetry Systems Corp.
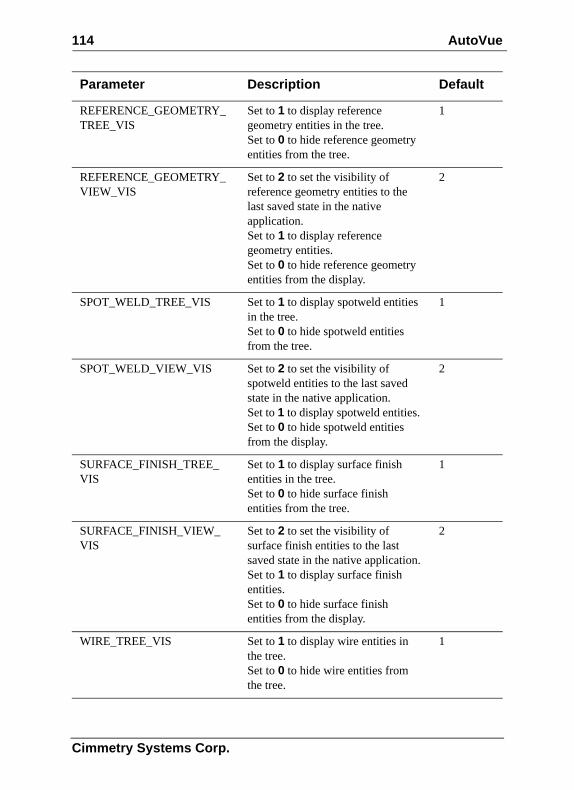
114 AutoVue
REFERENCE_GEOMETRY_TREE_VIS
Set to 1 to display reference geometry entities in the tree. Set to 0 to hide reference geometry entities from the tree.
1
REFERENCE_GEOMETRY_VIEW_VIS
Set to 2 to set the visibility of reference geometry entities to the last saved state in the native application.Set to 1 to display reference geometry entities. Set to 0 to hide reference geometry entities from the display.
2
SPOT_WELD_TREE_VIS Set to 1 to display spotweld entities in the tree. Set to 0 to hide spotweld entities from the tree.
1
SPOT_WELD_VIEW_VIS Set to 2 to set the visibility of spotweld entities to the last saved state in the native application.Set to 1 to display spotweld entities. Set to 0 to hide spotweld entities from the display.
2
SURFACE_FINISH_TREE_ VIS
Set to 1 to display surface finish entities in the tree. Set to 0 to hide surface finish entities from the tree.
1
SURFACE_FINISH_VIEW_ VIS
Set to 2 to set the visibility of surface finish entities to the last saved state in the native application.Set to 1 to display surface finish entities. Set to 0 to hide surface finish entities from the display.
2
WIRE_TREE_VIS Set to 1 to display wire entities in the tree. Set to 0 to hide wire entities from the tree.
1
Parameter Description Default
Cimmetry Systems Corp.
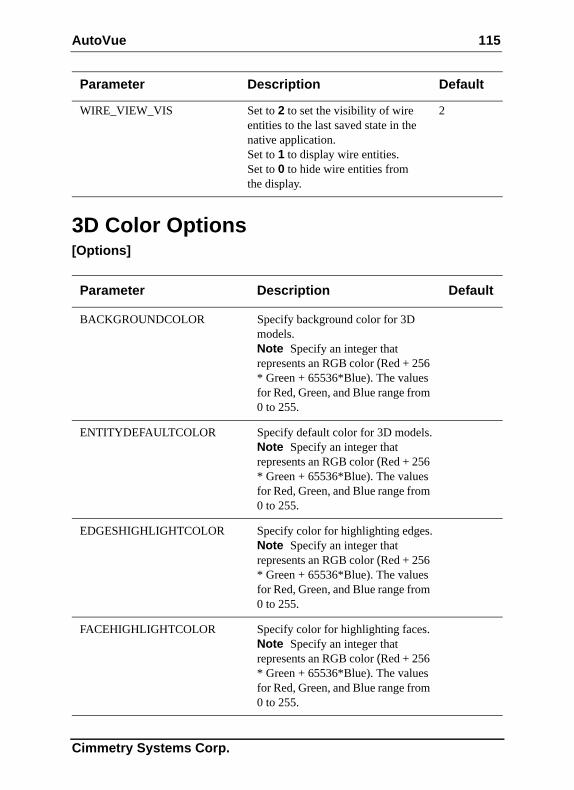
AutoVue 115
3D Color Options[Options]
WIRE_VIEW_VIS Set to 2 to set the visibility of wire entities to the last saved state in the native application.Set to 1 to display wire entities. Set to 0 to hide wire entities from the display.
2
Parameter Description Default
BACKGROUNDCOLOR Specify background color for 3D models.Note Specify an integer that represents an RGB color (Red + 256 * Green + 65536*Blue). The values for Red, Green, and Blue range from 0 to 255.
ENTITYDEFAULTCOLOR Specify default color for 3D models.Note Specify an integer that represents an RGB color (Red + 256 * Green + 65536*Blue). The values for Red, Green, and Blue range from 0 to 255.
EDGESHIGHLIGHTCOLOR Specify color for highlighting edges.Note Specify an integer that represents an RGB color (Red + 256 * Green + 65536*Blue). The values for Red, Green, and Blue range from 0 to 255.
FACEHIGHLIGHTCOLOR Specify color for highlighting faces.Note Specify an integer that represents an RGB color (Red + 256 * Green + 65536*Blue). The values for Red, Green, and Blue range from 0 to 255.
Parameter Description Default
Cimmetry Systems Corp.
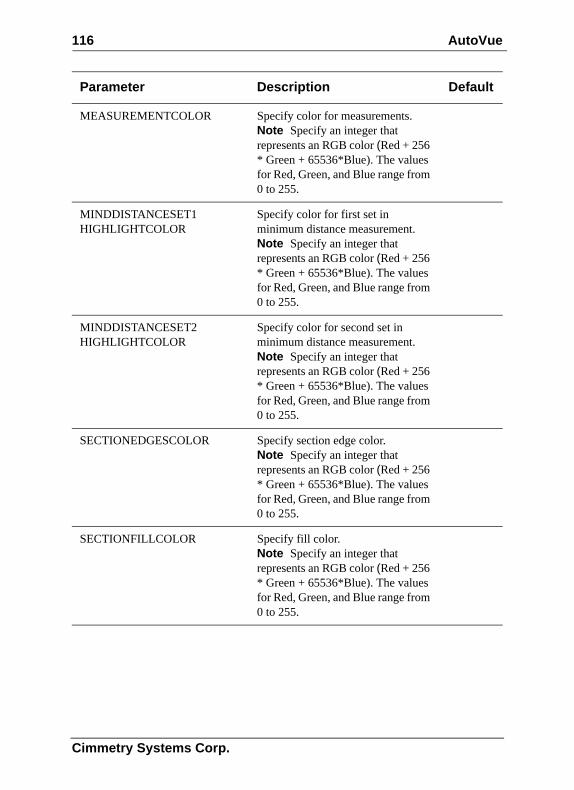
116 AutoVue
MEASUREMENTCOLOR Specify color for measurements.Note Specify an integer that represents an RGB color (Red + 256 * Green + 65536*Blue). The values for Red, Green, and Blue range from 0 to 255.
MINDDISTANCESET1 HIGHLIGHTCOLOR
Specify color for first set in minimum distance measurement.Note Specify an integer that represents an RGB color (Red + 256 * Green + 65536*Blue). The values for Red, Green, and Blue range from 0 to 255.
MINDDISTANCESET2 HIGHLIGHTCOLOR
Specify color for second set in minimum distance measurement.Note Specify an integer that represents an RGB color (Red + 256 * Green + 65536*Blue). The values for Red, Green, and Blue range from 0 to 255.
SECTIONEDGESCOLOR Specify section edge color.Note Specify an integer that represents an RGB color (Red + 256 * Green + 65536*Blue). The values for Red, Green, and Blue range from 0 to 255.
SECTIONFILLCOLOR Specify fill color.Note Specify an integer that represents an RGB color (Red + 256 * Green + 65536*Blue). The values for Red, Green, and Blue range from 0 to 255.
Parameter Description Default
Cimmetry Systems Corp.
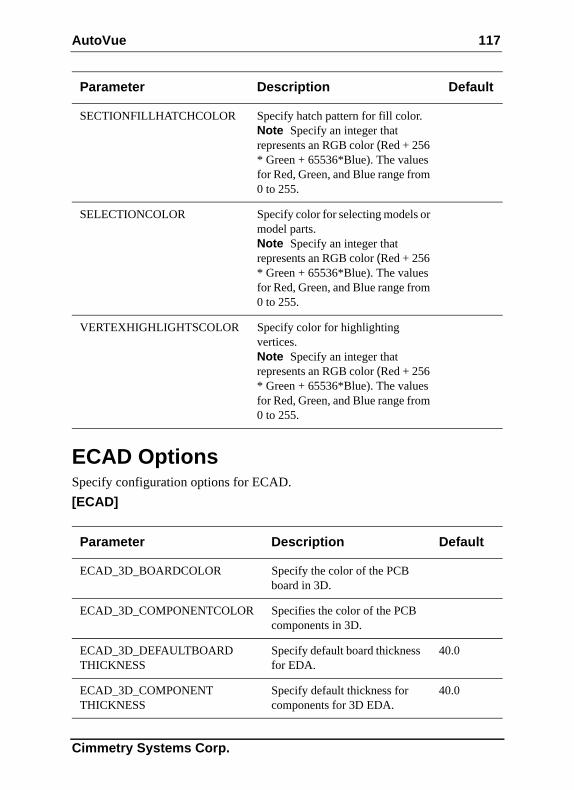
AutoVue 117
ECAD OptionsSpecify configuration options for ECAD.[ECAD]
SECTIONFILLHATCHCOLOR Specify hatch pattern for fill color.Note Specify an integer that represents an RGB color (Red + 256 * Green + 65536*Blue). The values for Red, Green, and Blue range from 0 to 255.
SELECTIONCOLOR Specify color for selecting models or model parts.Note Specify an integer that represents an RGB color (Red + 256 * Green + 65536*Blue). The values for Red, Green, and Blue range from 0 to 255.
VERTEXHIGHLIGHTSCOLOR Specify color for highlighting vertices.Note Specify an integer that represents an RGB color (Red + 256 * Green + 65536*Blue). The values for Red, Green, and Blue range from 0 to 255.
Parameter Description Default
ECAD_3D_BOARDCOLOR Specify the color of the PCB board in 3D.
ECAD_3D_COMPONENTCOLOR Specifies the color of the PCB components in 3D.
ECAD_3D_DEFAULTBOARD THICKNESS
Specify default board thickness for EDA.
40.0
ECAD_3D_COMPONENT THICKNESS
Specify default thickness for components for 3D EDA.
40.0
Parameter Description Default
Cimmetry Systems Corp.
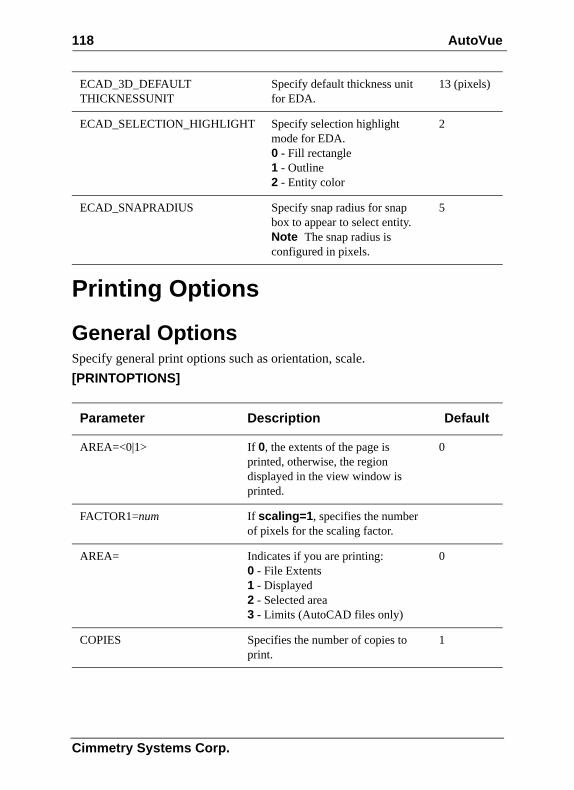
118 AutoVue
Printing Options
General OptionsSpecify general print options such as orientation, scale.[PRINTOPTIONS]
ECAD_3D_DEFAULT THICKNESSUNIT
Specify default thickness unit for EDA.
13 (pixels)
ECAD_SELECTION_HIGHLIGHT Specify selection highlight mode for EDA.0 - Fill rectangle1 - Outline2 - Entity color
2
ECAD_SNAPRADIUS Specify snap radius for snap box to appear to select entity. Note The snap radius is configured in pixels.
5
Parameter Description Default
AREA=<0|1> If 0, the extents of the page is printed, otherwise, the region displayed in the view window is printed.
0
FACTOR1=num If scaling=1, specifies the number of pixels for the scaling factor.
AREA= Indicates if you are printing:0 - File Extents1 - Displayed2 - Selected area3 - Limits (AutoCAD files only)
0
COPIES Specifies the number of copies to print.
1
Cimmetry Systems Corp.
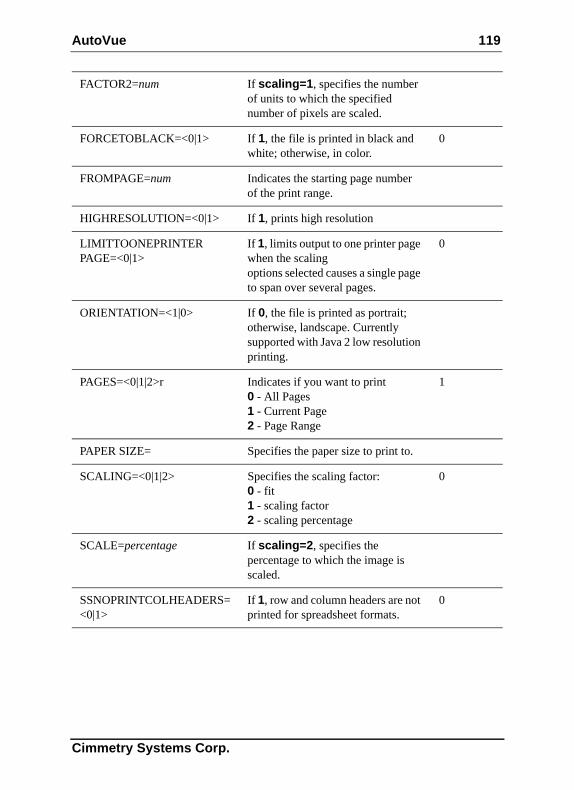
AutoVue 119
FACTOR2=num If scaling=1, specifies the number of units to which the specified number of pixels are scaled.
FORCETOBLACK=<0|1> If 1, the file is printed in black and white; otherwise, in color.
0
FROMPAGE=num Indicates the starting page number of the print range.
HIGHRESOLUTION=<0|1> If 1, prints high resolution
LIMITTOONEPRINTERPAGE=<0|1>
If 1, limits output to one printer page when the scalingoptions selected causes a single page to span over several pages.
0
ORIENTATION=<1|0> If 0, the file is printed as portrait; otherwise, landscape. Currently supported with Java 2 low resolution printing.
PAGES=<0|1|2>r Indicates if you want to print0 - All Pages1 - Current Page2 - Page Range
1
PAPER SIZE= Specifies the paper size to print to.
SCALING=<0|1|2> Specifies the scaling factor: 0 - fit 1 - scaling factor 2 - scaling percentage
0
SCALE=percentage If scaling=2, specifies the percentage to which the image is scaled.
SSNOPRINTCOLHEADERS=<0|1>
If 1, row and column headers are not printed for spreadsheet formats.
0
Cimmetry Systems Corp.
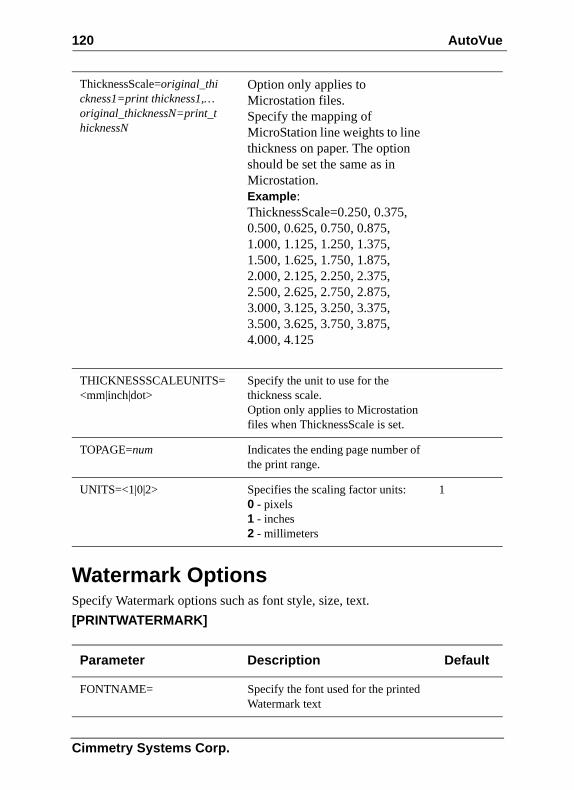
120 AutoVue
Watermark OptionsSpecify Watermark options such as font style, size, text.[PRINTWATERMARK]
ThicknessScale=original_thi ckness1=print thickness1,… original_thicknessN=print_t hicknessN
Option only applies to Microstation files.Specify the mapping of MicroStation line weights to line thickness on paper. The option should be set the same as in Microstation.Example: ThicknessScale=0.250, 0.375, 0.500, 0.625, 0.750, 0.875, 1.000, 1.125, 1.250, 1.375, 1.500, 1.625, 1.750, 1.875, 2.000, 2.125, 2.250, 2.375, 2.500, 2.625, 2.750, 2.875, 3.000, 3.125, 3.250, 3.375, 3.500, 3.625, 3.750, 3.875, 4.000, 4.125
THICKNESSSCALEUNITS=<mm|inch|dot>
Specify the unit to use for the thickness scale. Option only applies to Microstation files when ThicknessScale is set.
TOPAGE=num Indicates the ending page number of the print range.
UNITS=<1|0|2> Specifies the scaling factor units:0 - pixels1 - inches2 - millimeters
1
Parameter Description Default
FONTNAME= Specify the font used for the printed Watermark text
Cimmetry Systems Corp.
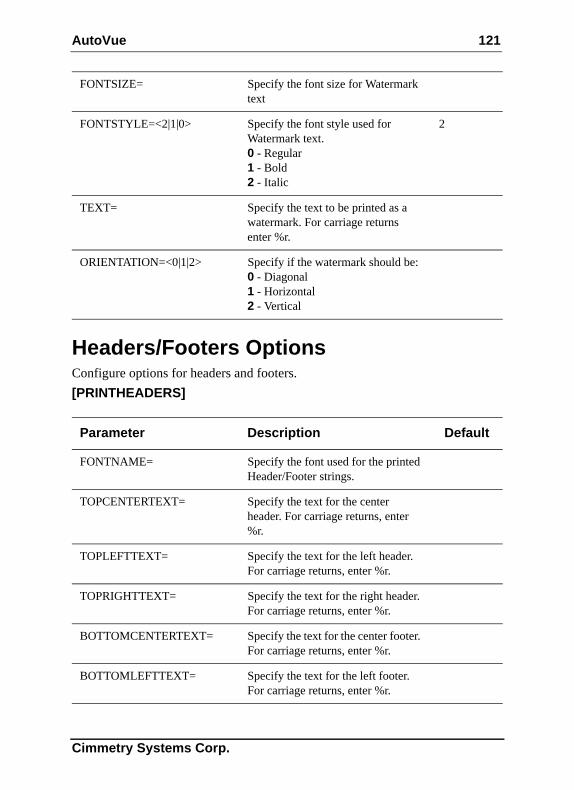
AutoVue 121
Headers/Footers OptionsConfigure options for headers and footers.[PRINTHEADERS]
FONTSIZE= Specify the font size for Watermark text
FONTSTYLE=<2|1|0> Specify the font style used for Watermark text.0 - Regular1 - Bold2 - Italic
2
TEXT= Specify the text to be printed as a watermark. For carriage returns enter %r.
ORIENTATION=<0|1|2> Specify if the watermark should be:0 - Diagonal1 - Horizontal2 - Vertical
Parameter Description Default
FONTNAME= Specify the font used for the printed Header/Footer strings.
TOPCENTERTEXT= Specify the text for the center header. For carriage returns, enter %r.
TOPLEFTTEXT= Specify the text for the left header. For carriage returns, enter %r.
TOPRIGHTTEXT= Specify the text for the right header. For carriage returns, enter %r.
BOTTOMCENTERTEXT= Specify the text for the center footer. For carriage returns, enter %r.
BOTTOMLEFTTEXT= Specify the text for the left footer. For carriage returns, enter %r.
Cimmetry Systems Corp.
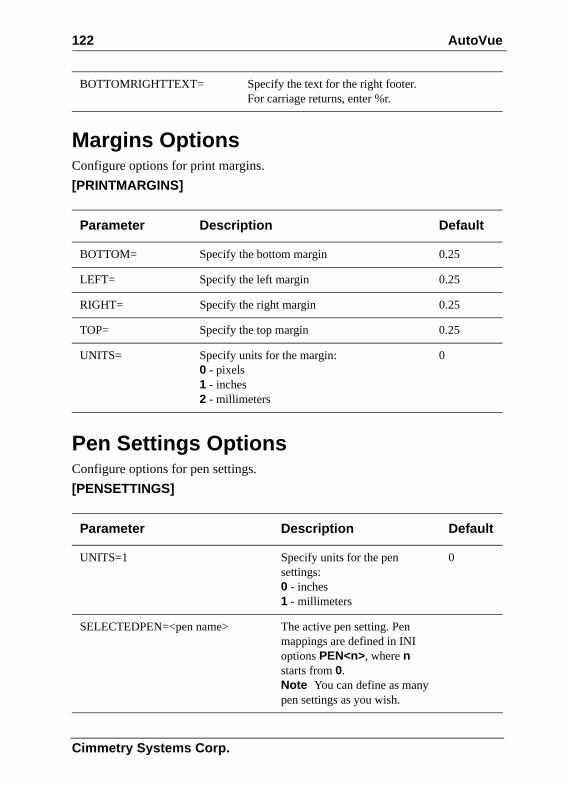
122 AutoVue
Margins OptionsConfigure options for print margins.[PRINTMARGINS]
Pen Settings OptionsConfigure options for pen settings.[PENSETTINGS]
BOTTOMRIGHTTEXT= Specify the text for the right footer. For carriage returns, enter %r.
Parameter Description Default
BOTTOM= Specify the bottom margin 0.25
LEFT= Specify the left margin 0.25
RIGHT= Specify the right margin 0.25
TOP= Specify the top margin 0.25
UNITS= Specify units for the margin:0 - pixels1 - inches2 - millimeters
0
Parameter Description Default
UNITS=1 Specify units for the pen settings:0 - inches1 - millimeters
0
SELECTEDPEN=<pen name> The active pen setting. Pen mappings are defined in INI options PEN<n>, where n starts from 0.Note You can define as many pen settings as you wish.
Cimmetry Systems Corp.

AutoVue 123
Watermark in View ModeWith AutoVue it is possible to display watermarks in View mode. Set below options in allusers.ini.[WATERMARK]
Markup OptionsConfigure a variety of Markup options such as symbol for markup dimensions.[MrkFont]Configure font for markups.
PEN1=<penname>, n1=<thickness>, n2=<thickness>,.....,
PEN0=<penname>, n1=<thickness>, n2=<thickness>,.....,
Specify the pen name and a mapping of pen index and thickness.Note Thickness value is in inches.
Parameter Description Default
TEXT= Specify watermark text
FONTNAME= Specify font to be used for the watermark.
FONTSTYLE= Specify the font style for the watermark. 0 – Plain1 – Bold2 – Italic3 – Bold and Italic
0
FONTSIZE= Specify font size.
XFACTOR= Specify watermark x position on the applet window. Value should range from 0 to 1.
YFACTOR= Specify watermark y position on the applet window. Value should range from 0 to 1.
Parameter Description Default
Face Specifies the text entity font name. Arial
Cimmetry Systems Corp.
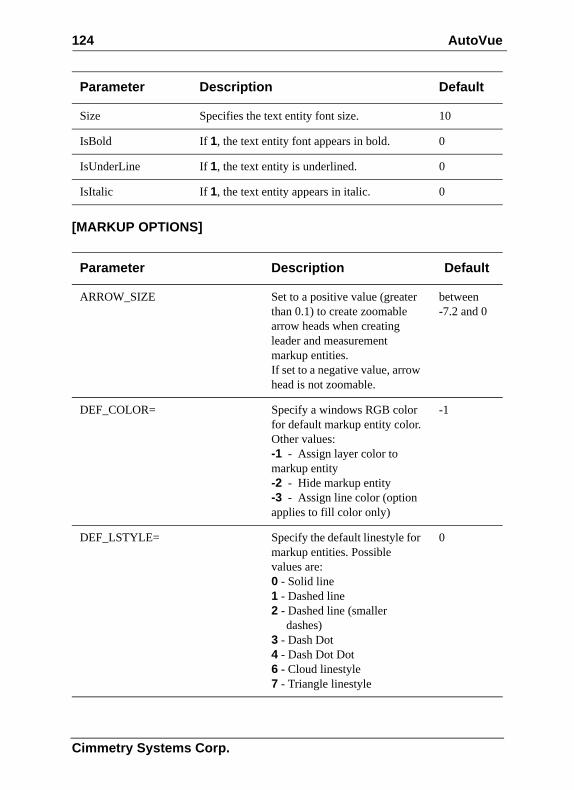
124 AutoVue
[MARKUP OPTIONS]
Size Specifies the text entity font size. 10
IsBold If 1, the text entity font appears in bold. 0
IsUnderLine If 1, the text entity is underlined. 0
IsItalic If 1, the text entity appears in italic. 0
Parameter Description Default
ARROW_SIZE Set to a positive value (greater than 0.1) to create zoomable arrow heads when creating leader and measurement markup entities.If set to a negative value, arrow head is not zoomable.
between -7.2 and 0
DEF_COLOR= Specify a windows RGB color for default markup entity color.Other values:-1 - Assign layer color to markup entity-2 - Hide markup entity-3 - Assign line color (option applies to fill color only)
-1
DEF_LSTYLE= Specify the default linestyle for markup entities. Possible values are:0 - Solid line1 - Dashed line2 - Dashed line (smaller dashes)3 - Dash Dot4 - Dash Dot Dot6 - Cloud linestyle7 - Triangle linestyle
0
Parameter Description Default
Cimmetry Systems Corp.
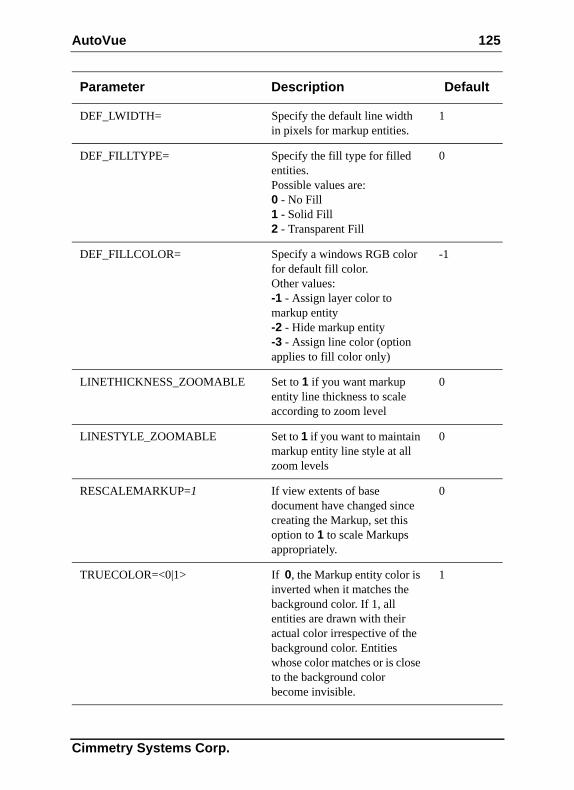
AutoVue 125
DEF_LWIDTH= Specify the default line width in pixels for markup entities.
1
DEF_FILLTYPE= Specify the fill type for filled entities.Possible values are:0 - No Fill1 - Solid Fill2 - Transparent Fill
0
DEF_FILLCOLOR= Specify a windows RGB color for default fill color.Other values:-1 - Assign layer color to markup entity-2 - Hide markup entity-3 - Assign line color (option applies to fill color only)
-1
LINETHICKNESS_ZOOMABLE Set to 1 if you want markup entity line thickness to scale according to zoom level
0
LINESTYLE_ZOOMABLE Set to 1 if you want to maintain markup entity line style at all zoom levels
0
RESCALEMARKUP=1 If view extents of base document have changed since creating the Markup, set this option to 1 to scale Markups appropriately.
0
TRUECOLOR=<0|1> If 0, the Markup entity color is inverted when it matches the background color. If 1, all entities are drawn with their actual color irrespective of the background color. Entities whose color matches or is close to the background color become invisible.
1
Parameter Description Default
Cimmetry Systems Corp.
126 AutoVue
SymbolList=alphanum Specify a comma-separated list of symbols (in unicode) for measurements. Example: u0398, u2221A, u2248.
AngleSymbolList=aplhanum Specify a comma-separated list of symbols (in unicode) for angle measurements. If not specified and SymbolList is specified, symbols defined in SymbolList are displayed.Example: u0398, u2221A, u2248.
ArcSymbolList=aplhanum Specify a comma-separated list of symbols (in unicode) for arc measurements. If not specified and SymbolList is specified, symbols specified in SymbolList are displayed.Example: u0398, u2221A, u2248
DistanceSymbolList=aplhanum Specify a comma-separated list of symbols (in unicode) for distance measurements. If not specified and SymbolList is specified, symbols specified in SymbolList are displayed.Example: u0398, u2221A, u2248
AreaSymbolList=alphanum Specify a comma-separated list of symbols (in unicode) for area measurements. If not specified and SymbolList is specified, symbols specified in SymbolList are displayed.Example: u0398, u2221A, u2248
Parameter Description Default
Cimmetry Systems Corp.
AutoVue 127
Appendix G: CAD IntegrationsThe CAD Integration package from Cimmetry Systems Corp. integrates AutoVue SolidModel with CAD applications such as Pro/ENGINEER. You will need to use the CAD Integration for Pro/ENGINEER if:• 3D Pro/ENGINEER assemblies have missing family table instances.
AutoVue does not fully display the assembly if family table instances are missing. The CAD Integration is required to display such assemblies.
• Pro/ENGINEER 2D drawings do not contain display list. AutoVue does not fully display such files. You need the CAD Integration to display 2D files with no display lists.
The components in the CAD Integration package make it possible for AutoVue to access the native application and retrieve data in a form that is suitable for viewing. The package’s components are:• Render Broker: This is the main server component that maintains
communication between AutoVue and the Render Engine. It is installed as part of the AutoVue server installation. There can only be one instance of Render Broker per AutoVue server installation.
• Render Engine: The Render Engine component is installed on the CAD machine. This component runs the conversion process on the native application — e.g. Pro/ENGINEER. Render Engine should be installed once for every CAD installation. One license of the CAD application is required for each Render Engine installation.
The Render Broker is installed as part of the AutoVue server installation. An administration tool for the Render Broker is also provided with the installation. You can launch the administration tool as a standalone application or using a Web browser.To access the administration tool as a standalone application, run rbadmintool.bat that is in the bin directory of the AutoVue Server installation.
To access the administration tool using a Web browser, launch http://<host_name>/jVue/rbadmintool.html using a Web browser, where host_name is the name of the machine where AutoVue client component is installed.For more information on using the Render Broker and the Render Engine refer to the Installation documents provided with the CAD Integrations.Detailed information on these CAD Integrations can be obtained from Cimmetry Systems Corp.
Cimmetry Systems Corp.

128 AutoVue
Cimmetry Systems Corp.
AutoVue 129
Appendix H: Word Through Con-versionCimmetry Systems Corp. provides a mechanism to display word documents through conversion.This mechanism can be used as an option to display Word documents.
System Requirements• Windows 2000 Professional or Server, Windows XP, Windows 2003• Word 2003, Word XP
Configuring AutoVue Server to Enable Word ConversionNote Microsoft Word should be installed on the same machine as AutoVue Server.1 Open the file allusers.ini in a text editor and add this option:
[WordConversion]Enabled=1; Set to 1 to enable Word conversionSet to 0 to disable.
2 This is an optional setting you can add in allusers.ini:GenerateLinks = never | bookmarks | internalDefault: neverSet to "bookmarks" if you want to display bookmarks for files.Set to "internal" to enable internal links in the document.
3 Once the option is enabled, when you view word documents in AutoVue, they are automatically converted and then displayed in AutoVue.
Note It is recommended that you test the URL to the Graphics Server SOAP Service as specified in allusers.ini.
Cimmetry Systems Corp.

130 AutoVue
Cimmetry Systems Corp.
AutoVue 131
Appendix I: FAQ
GeneralQ What is the footprint / applet size of AutoVue client?A For Internet Explorer: about 2.3 MbFor Netscape: about 4.4 Mb
Q What is the approximate transfer time of the applet?A For Microsoft Internet Explorer: 800Kb transfers in about 5 minutes at a modem speed of 28.8Kbps, 2 minutes at ISDN 64K, 1 minute at ISDN 128K and about 10 seconds at T1 (1.5Mbps) speed. On a Local Area Network, transfer time is just a few seconds.For Netscape: 1.4 MB transfers in about 9 minutes at a modem speed of 28.8Kbps, 4 minutes at ISDN 64K, 2 minute at ISDN 128K and about 10 seconds at T1 (1.5Mbps) speed. On a Local Area Network, transfer time is just a few seconds.
Q Is the applet transmitted every time a document is viewed?A No. The applet is usually only transmitted the first time it is used and then is saved by your Web browser in its cache folder. The applet is transmitted again if:• You clear up the cache.• A new version of the applet is available on the server, in which case the new
applet is transmitted automatically.
Q Does AutoVue support high-resolution printing?A Yes. This is a user-selected option when the client is running Windows using Java 1.1 JVM (Java Virtual Machine). When running under a Java 2 JVM (e.g.
Cimmetry Systems Corp.

132 AutoVue
using the Sun “Plugin”), Java 2’s high-resolution printing will be automatically used.
Q What are the main differences between the Desktop and the Client-Server editions of AutoVue?A Being a server-based product, some features have been omitted in the Client-Server edition. These include:• Scanning• Mail notification• Specific Windows functionalities like embedding an OLE object as a
Markup entity• Thumbnail viewThere are, however, some features that the Client-Server edition provides that the Desktop edition does not:• Transparent handling of remotely located files via URLs• Fully multi-threaded client• Client Platform Independence• Full control over the user interface appearance• Collaboration• Metafile caching
Q What file formats are supported?AAll the formats supported by the Desktop edition of AutoVue.
Q What languages are supported by AutoVue Client-Server edition?AEnglish, French, German, Japanese, Korean, traditional Chinese, simplified Chinese, Swedish, Spanish, Norwegian, Portuguese and Italian.
Q How do I set up AutoVue Client-Server edition to run in a specific language (English, French, German, Korean, etc.)?AIt is done automatically; you do not need to set up anything. The AutoVue server is multilingual. The Client chooses the appropriate language depending on the
Cimmetry Systems Corp.
AutoVue 133
client machine’s LOCALE setting. However, you can modify this behavior by using the LOCALE parameter of the applet.
Q How do I set up AutoVue server on UNIX so as to get full font support for Office and other formats?A1 Shut down AutoVue server. 2 Back up and remove the fonts from <jVue Install directory>/jvuew/
jvuew_c/windows/fonts. 3 Copy all ttf/ttc fonts from a Windows font directory (from a machine which
has all required fonts) to <jVue Install directory>/jvuew/jvuew_c/windows/fonts.
4 Restart AutoVue server.
Q When I run AutoVue Server as a service, I notice a difference in the formatting of Word documents.AWhen AutoVue Server is running as a service it runs by default on the "local system account" which has no default printer set. This causes the difference in formatting for Word documents. There are two ways to resolve this issue:• Run the AutoVue server Service on a specific account which has a default
printer set. To do this, invoke the properties dialog for the Service, select the LogOn pane, select "this account" and enter account information.
• Set this option in VueServer.ini to specify the printer device to use for formatting.
[Options] FORMATDEVICE = PrinterName,PrinterDriver,PrinterPort. For steps on how to get this information for the current default printer information from the registry, go to:http://support.microsoft.com/?kbid=156212
Q When I load a file I want AutoVue Server to automatically locate XRef files. How can I do this?AThere are two ways to do this:
Cimmetry Systems Corp.
134 AutoVue
1 You can configure and use the server:// protocol to view files. When you use the server protocol, AutoVue server can locate all XREFs if they are located in the same directory as the base file.
2 A special VueAction - VueActionFileOpen is available. You should modify the GUI file to use this VueAction. When you use this VueAction, AutoVue translates all file open requests to the server:// protocol and locates all XRefs if they exist in the same directory as the base file. For more information, see Customizing the GUI.
Note When you are using any of above configurations and you wish AutoVue to locate XREFs that are in sub-directories, you can add to the XREFSPATH ini option either ./* or ./**. ./* forces AutoVue to look through sub-directories that are one level below the current directory../** forces AutoVue to look through all sub-directories below the current directory.
Q What are the rendering schemes used by AutoVue?AA number of different rendering schemes are used by AutoVue. Vector and 2D CAD files are generally streamed as AutoVue Streaming Format or ASF (previously refered to as Custom or Compressed Metafile Format). Other formats are generally rendered using a tiled raster stream.
Q When rendering a file what is the size of the streamed data compared to the original file size?AThis is highly dependent on the nature of the document being viewed. Vector and 2D CAD files are streamed as ASF. The ASF is generally smaller than the original file, but it depends on the complexity of the original document.Other formats are rendered using a tiled raster stream. The advantage of this is that the size of the tiled data is generally independent of the size of the document being viewed. The size of each tile is quite small, generally less than 10Kb. You can check the size of the data being transmitted by setting the “VERBOSE” Applet parameter tag to TRUE. The results are displayed in the Java console.
Cimmetry Systems Corp.
AutoVue 135
Q What is metafile caching?Q What is a cimmetry metafile?AWhen a native document is read, AutoVue Server provides the capability to export the internal “metafile” representation of the document. This is, by default, stored in the AutoVue Server’s cache in a format called the Cimmetry Metafile Format. The first time a 2D CAD file or a 3D assembly/part is read, the server will parse the file and load it. A metafile is created when the file is closed. The metafile is then used for all subsequent loads of the same document. Thus the second and subsequent loads of document are faster than the first load.When a document is loaded and its metafile exists, it greatly speeds up the loading time since the original document does not have to be re-parsed and many of the CPU intensive calculations are skipped since the results are in the metafile.
Q Is it possible to disable metafile caching? AYes. It is possible to disable metafile caching. Set:jvueserver.metacache.enable=false in jvueserver.propertiesDefault: true
Q What is a Doc Server? How is it different from the Primary Server? Q What is a Metafile Server? AEvery AutoVue Server installation has a Primary Server, several Doc Servers and a Metafile Server.The Primary Server is responsible for routing document requests to the secondary servers. This server is represented by P in the AutoVue Server console. The secondary servers, also called Doc Servers or Document Servers are responsible for processing document requests and streaming data to the clients.The secondary servers are represented by 1, 2, 3, 4 in the AutoVue Server console. The number of secondary processes is determined by the jvueserverx.nt.processPoolSize setting in jvueserver.properties. Default: 4.The Metafile Server is dedicated to generating cimmetry metafiles for all documents. When a document handle is closed, request is transferred from the Doc Server to the Metafile Server and this server generates the metafile. The Metafile Server is represented by M in the AutoVue Server console.
Cimmetry Systems Corp.
136 AutoVue
The advantage of having a dedicated process for generating metafiles is that clients do not have to wait for the previous document to be cached to view the next document.
Q How do I configure what servers handle metafile generation?AThere are two ways to configure this:1 You can configure AutoVue Server so that if the load on the Doc Server is
high, Metafile Server can handle metafile creation. In jvueserver.properties, set: jvueserver.metacache.threshold to a non-negative integer. If the load on the Doc Server reaches this threshold, Metafile Server will generate metafiles.
2 You can disable the Metafile Server so that all metafile creation requests are handled by Document Servers. In jvueserver.properties, set jvueserver.metacache.process=false.
Q Does AutoVue work with firewalls and proxy servers?AYes. There are usually two distinct sets of firewalls/proxy servers that come into play:• Firewall/proxy on the server: Most WEB servers, ASP’s and document
management systems run behind a firewall and proxy server for security.• If a Proxy Server is being used to connect to the outside Internet, then the
name of the Proxy Server must be specified in jvueserver.properties, see Configuring the Connections to Use.
• If you have a firewall installed in front of the AutoVue server then you should either install the VueServlet to tunnel all connections through the servlet or open port 5099 (or whatever port you have chosen for the socket communications) on your firewall.
• Firewall/proxy on the client. Many client browsers run behind a firewall. Generally all ports except the standard HTTP port (80) are disabled. In this case, you cannot use a direct socket connection and you must set up the VueServlet on your Web server to tunnel all communications through standard HTTP or HTTPS. If the client is using a proxy server to connect to the Internet, there is generally no special configuration needed since the AutoVue Client will use the TCP/IP services of the browser.
Note
Cimmetry Systems Corp.
AutoVue 137
• The proxy server uses NTLM authentication; only IE works in this case.• Even if there is no way for the server to know if a client is behind a firewall
or not, you still can provide the direct socket connection just by setting the JVUESERVER parameter properly.Use something like:<PARAM NAME=”JVUESERVER”VALUE=”socket:myserver:5099;http://myserver/servlet/VueServlet”>would allow clients behind firewall to tunnel through the servlet, while other clients can still use the faster socket connection.
Q I expect to have 100 users using AutoVue simultaneously. What are the server requirements for AutoVue Client-Server edition?What are the recommended hardware requirements for the AutoVue Server?AThe base memory requirements are approximately 50MB per process. The number of processes is set in jvueserver.properties. The memory requirement varies largely based on the number of users and the kind of files.The number of AutoVue Clients that the Server can support is proportional to the memory available to the server, while the performance or responsiveness that is experienced by an individual user at the client machine will be proportional to the servers CPU speed. The server resources consumed by a client are highly dependent upon the complexity of the files that are being viewed. Office documents, raster images, and two dimensional CAD files generally consume significantly less resources than three dimensional CAD or EDA files, due in part to the larger average file sizes of the latter type of document and to the greater complexity of the information they contain.The following table provides some guidelines for sizing AutoVue Servers based on Cimmetry’s experience in the field.
Office, 2D CAD EnvironmentHardware Configuration
3D CAD, EDA EnvironmentHardware Configuration
Number of Users
Number of Servers
RAM (GB)
Number of CPUs
Number of Servers
RAM (GB)
Number of CPUs
Cimmetry Systems Corp.
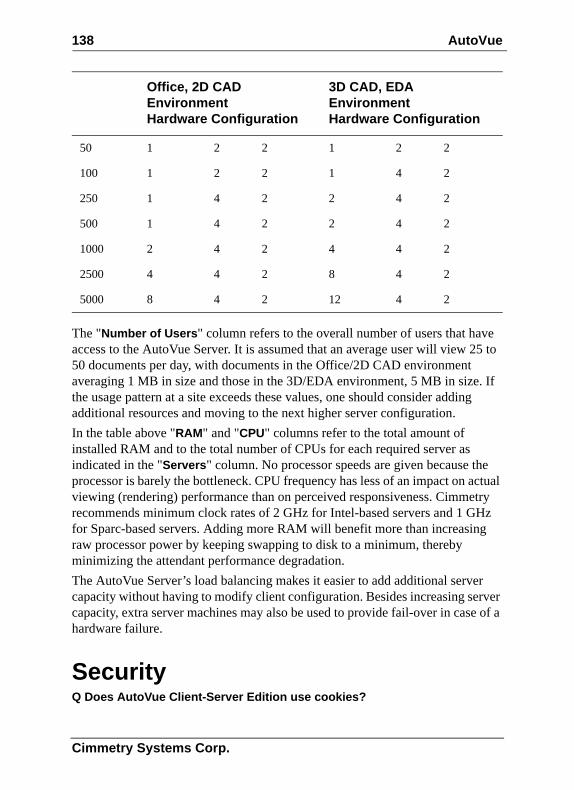
138 AutoVue
The "Number of Users" column refers to the overall number of users that have access to the AutoVue Server. It is assumed that an average user will view 25 to 50 documents per day, with documents in the Office/2D CAD environment averaging 1 MB in size and those in the 3D/EDA environment, 5 MB in size. If the usage pattern at a site exceeds these values, one should consider adding additional resources and moving to the next higher server configuration.In the table above "RAM" and "CPU" columns refer to the total amount of installed RAM and to the total number of CPUs for each required server as indicated in the "Servers" column. No processor speeds are given because the processor is barely the bottleneck. CPU frequency has less of an impact on actual viewing (rendering) performance than on perceived responsiveness. Cimmetry recommends minimum clock rates of 2 GHz for Intel-based servers and 1 GHz for Sparc-based servers. Adding more RAM will benefit more than increasing raw processor power by keeping swapping to disk to a minimum, thereby minimizing the attendant performance degradation.The AutoVue Server’s load balancing makes it easier to add additional server capacity without having to modify client configuration. Besides increasing server capacity, extra server machines may also be used to provide fail-over in case of a hardware failure.
SecurityQ Does AutoVue Client-Server Edition use cookies?
50 1 2 2 1 2 2
100 1 2 2 1 4 2
250 1 4 2 2 4 2
500 1 4 2 2 4 2
1000 2 4 2 4 4 2
2500 4 4 2 8 4 2
5000 8 4 2 12 4 2
Office, 2D CAD EnvironmentHardware Configuration
3D CAD, EDA EnvironmentHardware Configuration
Cimmetry Systems Corp.
AutoVue 139
AYes. The AutoVue Client does set and get cookies from your Client browser. This is to track the number of users on the AutoVue Server(s). The cookie is basically a unique number assigned to each browser. By setting the cookie, when a user views several files in succession or opens up several browser windows to view several documents simultaneously, a single “session” is used on the AutoVue Server.Note If you disable cookies on your Web browser or refuse to accept a cookie, the AutoVue client will continue to work, but each new instance of the browser will create a new “session” on the AutoVue server. This could be a problem if your server uses a named-user licensing scheme.
Q Can I deny the permission when the security warning dialog box appears in Netscape?ANo. Those permissions are needed to ensure a proper behavior of the applet. Java applets are restricted to work in a very tight-security “sandbox” in which they cannot by themselves connect to other computers on the network or read a file from your disk. Enable those permissions so that the AutoVue client can work properly.Note These permissions are only valid for the current session and will need to be re-enabled each time if you do not select the Remember that decision check box in the warning dialog boxes.
Q Can I use HTTPS/SSL for secure communications?AYes. You can “tunnel” all communications between the AutoVue Client and server through HTTPS which uses SSL. This ensures a secure connection. To do this, the applet should communicate with the server through a servlet which should be referenced through HTTPS.Example: <PARAM NAME="JVUESERVER" VALUE="https://www.mymachine.com/servlet/VueServlet">
Q Is the data transmitted to the Applet encrypted?A
Cimmetry Systems Corp.
140 AutoVue
If you tunnel all communications through the servlet using HTTPS, all communications are encrypted using SSL.
Integrating with Other SystemsQ Can AutoVue be customized to work within our interface?AYes. We provide several kinds of integrations:• You can script the Applet just by changing the FILENAME parameter in it.
This is a simple but convenient way to generate Applet pages from a backend Document Management System.
• You can script the applet with JavaScript to: • Set the document to View• Load one or more markups• Compare to a file• Add an overlay• Print the document
• You can define the GUI definition of the Applet by specifying the GUIFILE applet parameter. This allows you to fully control the menu and toolbar items that will appear on the client.
• You can integrate the server with a DMS using AutoVue’s DMAPI. This is aimed at customers who want to tightly integrate AutoVue with a back-end document database. The DMAPI provides the interface between the AutoVue Server and the back-end database and provides all “hooks” to manage Markups, reference files, access permissions and user permissions.
• You can use the VueBean, which is to AutoVue Client-Server edition what the VCET controls are to AutoVue Desktop edition. The VueBean provides the full rendering and Markup capability of AutoVue Client-Server edition, but without any GUI. This is aimed at customers who want full control over the applet interface.
Q Does the AutoVue server have to be on the same server as my drawings or WEB server?ANo. The AutoVue server can be on any machine. In fact, the AutoVue server distinguishes between several types of documents:
Cimmetry Systems Corp.
AutoVue 141
• When the server is integrated with a DMS using the “DMAPI” then the location of the documents is completely transparent to the AutoVue server. The downloads/uploads are handled by the DMAPI integration component.
• The applet client can upload local files to the AutoVue Server using the “upload:” pseudo-protocol.
• If the document to be viewed specifies a URL with the HTTP:, HTTPS: or FTP: protocol, then the AutoVue server tries to download the document. These documents could be located anywhere, as long as they are accessible through TCP/IP.
• You can view documents that are on the AutoVue server itself using the “server:” pseudo-protocol. Note This is disabled by default, see Directory in the [Server] section of VueServer.ini for more information.
Q Can I access my Oracle/Microsoft SQL database even if it is on a differentserver?AYes. Please refer to the question above. You will probably have to have a DMAPI integration installed for a tight integration between the Applet, the AutoVue server and the Database.
Q Do I need a Web server to be able to run AutoVue Client-Server edition?ANo. Users will access the client applet through a Web browser such as IE or Netscape. However, a WEB server is not required.The client can connect to the server using direct sockets. In addition, the AutoVue client can be run as an application (not as an applet). The jvue.bat file in the \bin directory gives an example on how to invoke the client as an application.
Q Can I integrate AutoVue with my FTP site?A Yes. The applet can accept any valid URL including the standard HTTP, HTTPS and FTP protocols.
Q Can users Markup files on my FTP site and save the Markup files there?A
Cimmetry Systems Corp.
142 AutoVue
Yes. By default Markups will be managed and saved by the AutoVue server.In order to have the Markups saved on the FTP site, you would have to interface with the AutoVue server using the DMAPI.
Q Can I set security access or restricted access to my drawings through AutoVue?AYes. Through the DMAPI integration on the server, you can enforce any access restrictions that are defined in your DMS.
Q Has AutoVue Client-Server edition been integrated with popular EDM/PDM Systems?AYes. We have "out-of-the-box" solutions for a number of systems including: Documentum, MatrixOne, OpenText, Lotus Notes/Domino, SAP PLM and SAP cFolders.The integration API (DMAPI) is an open specification that allows AutoVue server to be integrated with other systems.
Q How easy is it to integrate AutoVue Client-Server Edition into my own EDM/PDM system?AIt is relatively straightforward. Cimmetry provides integration tools and a sample interface to get you started. The API used to integrate is called DMAPI. The API is XML-based and can be implemented as a Web server component. We provide a skeleton servlet that can be used as basis.
Q What is meant by the DMAPI/Vuelink Integration/Interface and what can I do with it?AThe DMAPI is the XML-based API that is used to interface the AutoVue server with a back-end EDM/PDM system. VueLink is the product name of the DMAPI interfaces that Cimmetry Systems itself has developed for a variety of EDM/PDM systems. The development of a DMAPI integration generally involves several issues:
Cimmetry Systems Corp.
AutoVue 143
• The integration can be developed in any language that supports a CGI-like protocol, including .ASPs, .JSPs, C or Perl CGI scripts or Java Servlets.We provide a sample skeleton of an integration as a Java servlet.
• The Integration has full control over the document properties.• The Integration has full control over the querying/reading/saving of
Markups.• The Integration has full control over the management of reference files/
compound documents.• The integration can enforce any access restrictions and workflow rules.
For example when a new Markup is created on a document a workflow can be automatically started.
• Query document attributes to add to the headers/footers or watermark of printouts.
In general the DMAPI integration acts as an intermediary layer between the AutoVue server and the EDM/PDM system.
Q Does AutoVue Client-Server edition support real-time collaboration?AYes.
Q Where are Markups saved ?A When AutoVue is integrated with a DMS using the VueLink DMAPI then Markups are entirely managed by the DMS.Without the integration the AutoVue server will manage the Markups itself. The Markups are stored in a specific directory on the server, with a mapping between the base file and the associated Markup list. By default the Markups are stored in the \Markups subdirectory of the AutoVue server program directory, but this can be specified in the VueServer.ini file.
PlatformQ Does AutoVue client support the Macintosh?AYes.
Q Does AutoVue client support Linux?
Cimmetry Systems Corp.
144 AutoVue
AYes.
Q Which platforms/browsers has the AutoVue client been tested on?A Generally, any platform/browser that fully supports Microsoft JVM or Sun Java VM 1.4.2 or later is supported.The following browsers have been certified by Cimmetry.
• Windows, 2000, Windows 2003 or Windows XP with Microsoft Internet Explorer 6.0 SP1, FireFox 1.5
• Macintosh Power PC OS 10.4 with Safari 2.0 and FireFox 1.5• Sun Solaris 9 & 10 with Firefox 1.5• RedHat Enterprise Linux 4.0 and Suse SLES 9.0 Sp3 with Firefox 1.5• HP-UX 11 with Mozilla 1.7 • AIX 5.1 with Firefox 1.5• AIX 5.1 with Netscape 7.0
Note Due to known compatibility issues with Java 1.5 and Mozilla, Netscape and FireFox, we recommend that you run these browsers with Java 1.4.2.Note Due to the enriched API that are implemented with Java 2, certain features such as "Dim Unselected" highlight type are only available when clients are using Java 1.4.2 and above.
Q Which platforms has the AutoVue Server been tested on?A The Windows version of the AutoVue Server has been tested on: Windows 2000Sp4, Windows XP SP2 and Windows 2003/2003Sp1/2003R2.The Solaris version of the AutoVue Server 19 has been tested on: Sun Solaris 8 and Sun Solaris 9.
Q Do you have a UNIX (Solaris, HP UX, IBM AIX, Linux) version of the AutoVue server?AA Solaris version exists.Linux version is under development.
Cimmetry Systems Corp.
AutoVue 145
TroubleshootingQ I’ve installed the AutoVue server. When I open the sample HTML page (http://my.machine.com/jVue/jVue.html) containing the applet I just get a blank screen. What should I do?AProceed in the following order:If you are running Internet Explorer1 Clear the browser cache. Do this by selecting Tools, then Internet-Options.2 Under Temporary Internet Files, click Delete Files.3 Click OK.4 Again under Temporary Internet Files, click Settings.5 Click View Objects in the Settings dialog.
In the list of objects, you will not see jVue or VueBean.6 If you see either of these two objects, right-click and select Delete.
(These two objects were created by a very early version of AutoVue and are incompatible with the new version.)
If you are running Netscape1 Clear the browser cache. Do this by selecting Edit then Preferences.2 In the Preference dialog, select Advanced and Cache.3 Click Clear Memory Cache and Clear Disk Cache.4 In the Preferences dialog box, select Advanced and SmartUpdate.5 In the list of objects, if you see AutoVue, select it and click Uninstall.
(This object was created by a very early version of AutoVue and is incompatible with the new version.)
6 Restart the browser.7 If you still see a blank screen then there is an installation problem on the
server.Verify that the Java Cab/Jar files are accessible. You can do this from your browser by typing in the URL field at the top:http://my.machine.com/jVue/jvue.cab and http://my.machine.com/jVue/jvue.jarIf you are prompted for a download, you can ignore it. If you are not prompted for a download then the Cab/Jar files are improperly installed on the server.
8 If you can modify the file frmApplet.html on the server machine, under the \jVue Web directory, then set the VERBOSE parameter of the applet to TRUE.
9 Restart the browser and re-open the jVue.html page on the Web server.
Cimmetry Systems Corp.
146 AutoVue
10 Open the Java Console in the Web browser.The console indicates the cause of the problem.
Q I get an error message “An error occurred while connecting to the server. Restart the applet?”. What should I do?ATo begin, you should start by clearing your browser cache, following the steps from the previously answered question. If you still get this message it means that the client cannot communicate with the AutoVue server. Verify that the AutoVue server is running on the server machine.Next verify that the applet parameter JVUESERVER is properly set. By default the applet will try a direct socket connection to the server. If you are behind a firewall, then non-HTTP sockets may be blocked, in which case the applet will “tunnel” the communication through the servlet, VueServlet. See the section Testing the Servlet installation which provides pointers on troubleshooting the servlet.
Q When I open files from the AutoVue client, files do not display. What should I do?AThis problem could occur if the AutoVue client and the server are of different versions. When there is a mismatch in the version or build numbers, files either display blank or a ’File not found’ error message appears. To begin, launch the AutoVue Client, select ’Help’-’About’. Check that the client and the server version and build numbers are the same. If they do not match, clear your browser cache and reload the applet. If the numbers still do not match, check the web server components installed as part of the AutoVue server installation. Try a manual installation of the Web Server components. Follow steps 2 to 5 outlined in section If the AutoVue server is installed on a machine that does not have a Web server installed.
Q When I run the installer for AutoVue server for Solaris, the installer shuts down after the first screen. What do I do?AA couple of Solaris Xserver bugs can cause crashes in some situations when using the Java 2 SDK on the Solaris 7 operating environment. To work around this issue, set the environment variable NO_J2D_DGA to true before running the installer.
Cimmetry Systems Corp.
AutoVue 147
Q When I start up AutoVue server, the processes P, 1, 2, 3, 4, M never turn green.AThis can occur if the ports needed by AutoVue server are in use. Make sure the following ports are available for the server: • RMI port + [n+1] consecutive ports (where RMI port is the port set in
jvueserver.properties — the default RMI port is 1099; and where n is the process pool size in jvueserver.properties)For example, if the RMI port is 1099: make sure ports 1099, 1100, 1101, 1102 and 1103 are available for a process pool size of 4.
• Socket port + [n+1] (where Socket port is the port used for socket connections — see jvuserver.properties for the socket port number value — the default Socket port is 5099; and where n is the process pool size set in jvueserver.properties)
Q When I start up AutoVue server on Solaris, I get the following error messages:“XSERVTransMakeAllCOTSServerListeners: server already runningFatal server error:Cannot establish any listening sockets - Make sure an X server isn't already runningx11drv: Can't open display: localhost:909.” What should I do?AThis error occurs when the port used by the Xvfb server is already in use by another process. Modify the Xvfb port by editing jvueserver in <jVue Install directory>/bin. Set XVFB_DISPLAY to an available port.
Q 3D files don’t display when the AutoVue client is on Solaris / HP-UX / Linux / AIX.A.Make sure these libraries exist on your Unix machine:• Solaris - libGL.so and libGLU.so• HP-UX - libGL.sl and libGLU.sl• Linux - libGL.so and linGLU.so
Cimmetry Systems Corp.

148 AutoVue
• AIX - libGL.a and libGLU.aMake sure the path to these libraries is set in the LD_LIBRARY_PATH.
Q How do I contact Cimmetry Systems for support?AIf at any time you have questions or concerns regarding AutoVue call or visit our website.
General InquiriesTelephone: + 1 514 735-3219Fax: +1 514 735-6440
Email: [email protected]
Website: http://www.cimmetry.com
Sales InquiriesTelephone: +1 514 735-3219 or 1-800-361-1904Fax: +1 514 735-6440Email: [email protected]
Customer SupportTelephone: +1 514 735-9941
Website: http;//www.cimmetry.com/support
Cimmetry Systems Corp.


![[]Oracle® AutoVue Client/Server Deployment Security Guide ... · The Client/Server deployment provides a complete, open and standards-based set of integration tools that allows customers](https://img.pdfslide.us/doc/110x75/5ed6b6b1b97457360243b337/oracle-autovue-clientserver-deployment-security-guide-the-clientserver.jpg)


![[]Oracle® AutoVue Client/Server Deployment Security Guide ... · OracleAutoVue security services are designed to support the full range ofAutoVue deployment scenarios. Security mechanisms](https://img.pdfslide.us/doc/110x75/5f6c0b2c87092c24c607fc5b/oracle-autovue-clientserver-deployment-security-guide-oracleautovue-security.jpg)