Embed Size (px)
Citation preview
Automation in Microsoft Azure – Practical Exercises
Overview
This course includes optional exercises that allow you to try the techniques demonstrated in the course. This guide lists steps for each individual exercise.
Setup
If you already have a Microsoft Azure subscription, you can skip this section. Otherwise, follow these steps to create a free trial subscription. You will need to provide a valid credit card number for verification, but you will not be charged for Azure services – for more information, see the frequently asked questions on the Azure sign-up page.
1. If you already have a Microsoft account that has not already been used to sign up for a free Azure trial subscription, you’re ready to get started. If not, don’t worry, just create a new Microsoft account.
2. After you’ve created a Microsoft account, create your free Microsoft Azure account. You’ll need to sign-in with your Microsoft account if you’re not already signed in. Then you’ll need to:
Enter your cellphone number and have Microsoft send you a text message to verify your identity.
Enter the code you have been sent to verify it.
Provide valid payment details. This is required for verification purposes only – your credit card won’t be charged for any services you use during the trial period, and the account is automatically deactivated at the end of the trial period unless you explicitly decide to keep it active.
Install Azure PowerShell (if needed)
In this exercise, you will install Azure PowerShell.
If you have already installed Azure PowerShell you can skip this exercise.
1. From your computer, open an elevated PowerShell prompt.
Cmdlets for Resource Manager
2. Run the Install-Module AzureRM command. This will install the AzureRM module which
represents resource management.
3. If you get prompted to install and import the NuGet provider, Type Y and then press the
Enter key.
4. If you are notified that the repository is untrusted, confirm that you want to install the
modules by typing Y and then pressing the Enter key. The installation process will take
several minutes as packages are downloaded and installed.
5. After the download and installation is finished, run the Import-Module AzureRM command.
6. Note: If you receive a message about running scripts on your computer has been disabled,
temporarily change the execution policy:
Set-ExecutionPolicy Unrestricted
After the import command is complete, return the execution policy to restricted.
Set-ExecutionPolicy Restricted
Cmdlets for Service Manager (Classic) – also includes basic cmdlets such as subscription
management
1. Run the Install-Module Azure command. This will install the Azure module which
represents service management.
2. If you are notified that the repository is untrusted, confirm that you want to install the
modules by typing Y and then pressing the Enter key.
3. Once the download and installation is finished, run the Import-Module Azure command.
Explore storage cmdlets and update the Help pages
1. Run Get-Command *azurestorage* to view storage cmdlets you can use in this course.
2. This is a good time to run Update-Help so you have the latest help pages. Don’t be
concerned if some libraries don’t update. You can always find the Help pages on TechNet.
If you have trouble installing the PowerShell modules from the PowerShell gallery, you can try the WebPI method instead. Visit http://aka.ms/webpi-azps to download and install the
modules.
Module 1 – ARM Templates
ARM Templates (Virtual Machines)
In this exercise, you will create two Azure virtual machines and an Azure load balancer by using a Resource Manager template.
Create two Azure virtual machines and an Azure load balancer
1. Start Internet Explorer, navigate to the new Azure Portal at https://portal.azure.com
and sign in.
2. Start a new Internet Explorer window, navigate to the Github Azure QuickStart
templates repository at https://github.com/Azure/azure-quickstart-
templates/tree/master/201-2-vms-loadbalancer-lbrules
3. Read about the template. Think about how you would create these virtual machines and
resources without a template.
4. Notice there are two JSON files azuredeploy and azuredeploy.parameters. Open the
azuredeploy.json file and notice the different sections such as schema, variables, and
resources. Notice the configuration settings are passed as key/value pairs.
5. Click Deploy to Azure.
6. On the 2 VMs in a Load Balancer and load balancing rules blade, specify the following
settings, and click Purchase:
These virtual machines are needed for the following practical exercises.
Subscription: <your subscription name>
Resource group: Create a new one with the name AutomationLabRG
Location: <Your location>
Storage Account Name: a unique name consisting of lower case letters and digits
between 3 and 24 characters in length
Admin Username: labadmin
Admin Password: Pa55w.rd12345
Dns Name for LBIP: a unique name consisting of lower case letters and digits
Vm Name Prefix: myVM
Image Publisher: MicrosoftWindowsServer
Image Offer: WindowsServer
Image SKU: 2012-R2-Datacenter
Lb Name: myLB
Nic Name Prefix: nic
Public IP Address Name: myPublicIP
Vnet Name: myVNET
Vm Size: Standard_A1
I agree to the terms and conditions stated above: Mark the checkbox
7. Wait until the deployment completes successfully. This should take about 10 minutes.
This template uses variables. Within Automation runbooks you can use parameters. This allows you to use the same runbook to target different resources, by specifying information at runbook execution time. For more information regarding this topic, refer to http://azure.microsoft.com/en-us/documentation/articles/automation-runbook-input-parameters/.
Module 2 – Automation Runbooks
Create an Automation Account (Portal)
In this exercise, you will create a new automation account in the Azure portal.
1. If you are not signed in to the Azure Portal, then browse to the new Azure Portal at https://portal.azure.com and sign in.
2. Click Automation Accounts on the Hub menu.
If you do not see Automation Accounts on the Hub menu, click More Services.
Type automation in the filter and mark Automation Accounts as a favorite to pin it to your Hub menu.
3. Click the Automation Accounts blade, notice you can filter the list of accounts by subscription.
4. Click Add and fill in the following values to create a new automation account. Click Create when you are finished entering the information. As you enter the information take a moment to use the Information icon to view details about the required information.
Name: AutomationLab
Subscription: <your subscription>
Resource Group: AutomationLabRG
Location: <your closest location>
Create Azure Run As Account: Yes
5. On the menu bar, monitor the alerts for progress as the new automation account is created.
6. Click Automation accounts and confirm that the new automation account has been created. You might need to click Refresh.
7. Double-click your automation account and take a few minutes to browse through the options.
8. On the Settings blade, click Pricing tier and usage. Review information about the job minutes per month. Click the Pricing tier information and notice the other pricing tiers that are available.
9. Back on the Settings blade, click Run As Accounts and notice that there are two entries – Azure Run As Account and Azure Classic Run As Account. Each includes an Automation certificate asset and an Automation connection asset have been automatically created for you. Use the Information icon to learn more about the Azure Run As Account. Notice it is a new service principal user in Azure Active Directory and that it has the Contributor role.
10. Click Assets and take a note of existing certificates and connections. Notice the other types of assets that are available.
11. In the Resources area notice tiles for Solutions, Runbooks, Jobs, Assets, Hybrid Worker Groups, DSC Configurations, and DSC nodes.
12. Click the Runbooks tile and notice tutorial runbooks that have been created for you. There are two sets of runbooks – the first one using the Classic deployment model and the other using the Resource Manager model.
13. As you have time, browse around the Automation account area.
Create Automation assets (Portal)
In this exercise, you will create Automation assets by using the Azure portal.
1. If you are not signed in to the Azure Portal, then browse to the new Azure Portal at https://portal.azure.com and sign in.
2. Navigate to the AutomationLab Automation account and, on the AutomationLab blade, click the ASSETS tile.
3. On the Assets blade, click Variables. 4. On the Variables blade, click Add a variable. 5. On the New Variable blade, specify the following and click Create:
Name: VM0
Description: leave blank
Type: String {notice other types in the drop-down}
Value: myVM0
Encrypted: No 6. Add another variable with the following settings:
Name: VM1
Description: leave blank
Type: String
Value: myVM1
Encrypted: No 7. Add another variable with the following settings:
Name: ResourceGroup
Description: leave blank
Type: String
Value: AutomationLabRG
Encrypted: No 8. Click Schedules, and then click Add Schedule.
Give your schedule a descriptive name, SampleSchedule.
Hover over the information icon about the Starts setting. Start your schedule today, and choose your time zone.
Select Recurring, and configure your schedule to run once a week.
In Recurrence options, notice you can specify the days of the week.
Ensure your schedule never expires.
As you have time, create other schedules that might be of interest to you. 9. As you have time, explorer other types of automation assets.
Create and test an Automation graphical runbook that starts an Azure VM
(Portal)
In this exercise, you will create a graphical Automation runbook that starts an Azure virtual machine. This will require that you reference Automation certificate asset and an Automation connection asset that have been automatically provisioned for you when you created the automation account. You will also use the Automation variables you created in the previous exercise.
This exercise requires that the virtual machine (myVM0) is not running.
Create your runbook using the Graphical method
1. If you are not signed in to the Azure Portal, then browse to the new Azure Portal at https://portal.azure.com and sign in.
2. Navigate to the AutomationLab Automation account and, on the AutomationLab blade, click the Runbooks tile.
1. Click Add a runbook, and then Quick Create. Notice you have two choices: Quick Create and Import.
3. Click Create when you are finished entering the following information.
Name: Start-VM-graphical (hover over the information icon and review the name requirements)
Runbook type: Graphical
Add the Automation connection
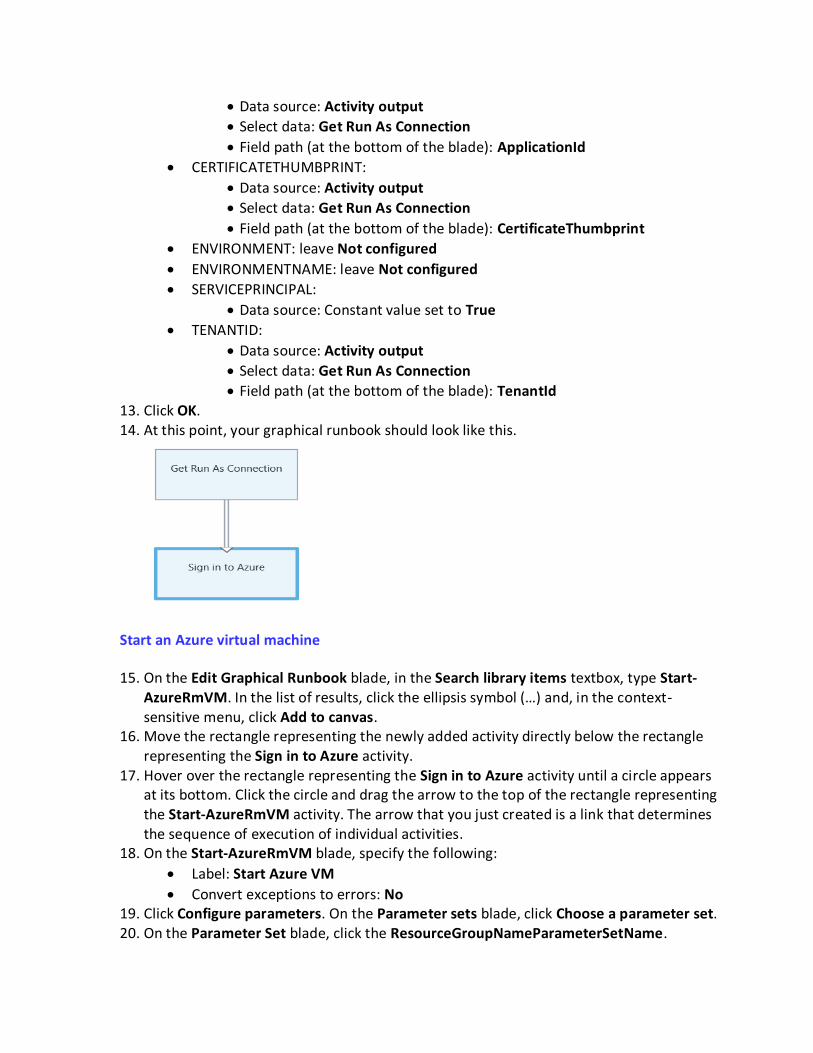
4. On the Edit Graphical Runbook blade, in the ASSETS section, expand the Connections subsection, click the ellipsis symbol (…) next to AzureRunAsConnection, and, in the context-sensitive menu, click Add to canvas. This will automatically open another blade displaying Get-AzureAutomation settings. In the new blade, specify the following:
Label: Get Run As Connection
Convert exceptions to errors: No 5. Note that the Parameters section is automatically configured for you and it contains the
constant value referencing the AzureRunAsConnection.
Sign in to the Azure subscription with the Azure Run As account
6. On the Edit Graphical Runbook blade, in the Search library items textbox, type Add-AzureRmAccount. In the list of results, click the ellipsis symbol (…) and, in the context-sensitive menu, click Add to canvas.
7. Move the rectangle representing the newly added activity directly below the rectangle representing the Get Run As Connection activity.
8. Hover over the rectangle representing the Get Run As Connection activity until a circle appears at its bottom. Click the circle and drag the arrow to the top of the rectangle representing the Add-AzureRmAccount activity. The arrow that you just created is a link that determines the sequence of execution of individual activities. The runbook will start with the Get Run As Connection activity and then run the Add-AzureRmAccount activity.
9. On the Add-AzureRmAccount blade, specify the following:
Label: Sign in to Azure
Convert exceptions to errors: No 10. Click Configure parameters and next, click Choose a parameter set. 11. On the Parameter Set blade, select Service Principal Certificate. 12. On the Activity Parameter Configuration blade, click the following entries, for each,
specify the following, and click OK. You are configuring the parameters for Add-AzureRmAccount command.
APPLICATIONID:
Data source: Activity output
Select data: Get Run As Connection
Field path (at the bottom of the blade): ApplicationId
CERTIFICATETHUMBPRINT:
Data source: Activity output
Select data: Get Run As Connection
Field path (at the bottom of the blade): CertificateThumbprint
ENVIRONMENT: leave Not configured
ENVIRONMENTNAME: leave Not configured
SERVICEPRINCIPAL:
Data source: Constant value set to True
TENANTID:
Data source: Activity output
Select data: Get Run As Connection
Field path (at the bottom of the blade): TenantId 13. Click OK. 14. At this point, your graphical runbook should look like this.
Start an Azure virtual machine
15. On the Edit Graphical Runbook blade, in the Search library items textbox, type Start-AzureRmVM. In the list of results, click the ellipsis symbol (…) and, in the context-sensitive menu, click Add to canvas.
16. Move the rectangle representing the newly added activity directly below the rectangle representing the Sign in to Azure activity.
17. Hover over the rectangle representing the Sign in to Azure activity until a circle appears at its bottom. Click the circle and drag the arrow to the top of the rectangle representing the Start-AzureRmVM activity. The arrow that you just created is a link that determines the sequence of execution of individual activities.
18. On the Start-AzureRmVM blade, specify the following:
Label: Start Azure VM
Convert exceptions to errors: No 19. Click Configure parameters. On the Parameter sets blade, click Choose a parameter set. 20. On the Parameter Set blade, click the ResourceGroupNameParameterSetName.
21. On the Activity Parameter Configuration blade, click NAME. 22. On the Parameter Value blade, in the Data source drop down list, select Variable asset.
In the list of variables, click VM0 and click OK. 23. On the Activity Parameter Configuration blade, click RESOURCEGROUPNAME. 24. On the Parameter Value blade, in the Data source drop down list, select Variable asset.
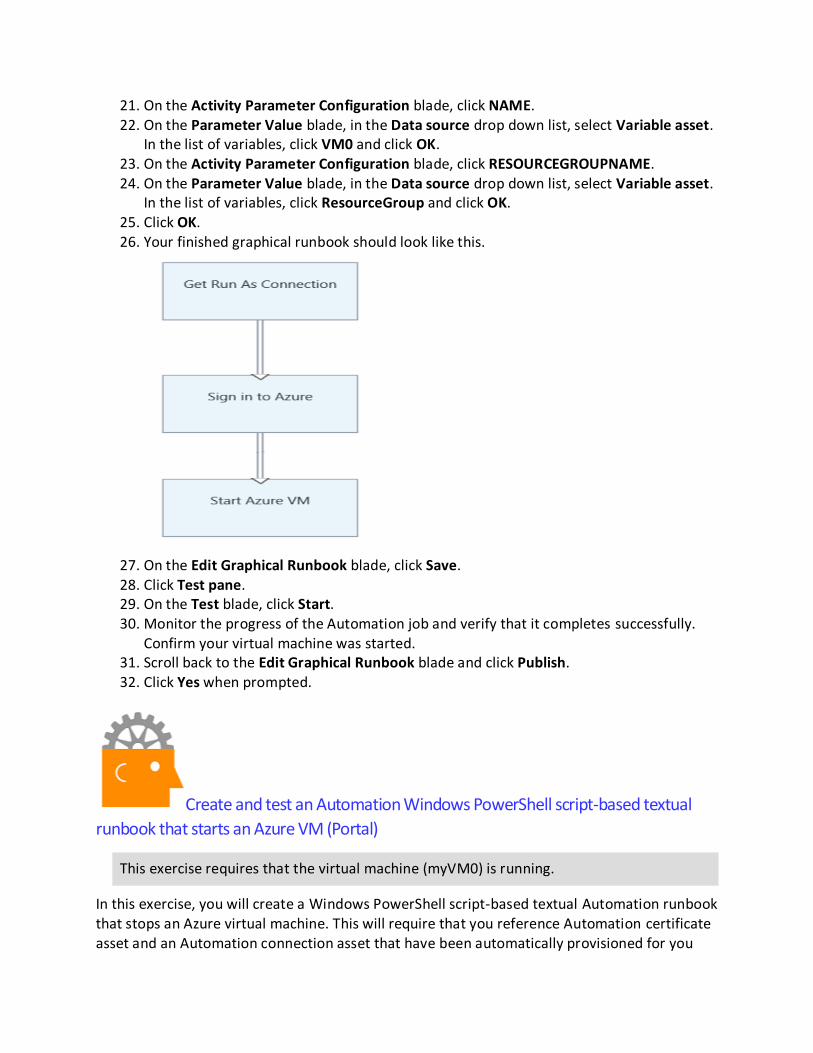
In the list of variables, click ResourceGroup and click OK. 25. Click OK. 26. Your finished graphical runbook should look like this.
27. On the Edit Graphical Runbook blade, click Save. 28. Click Test pane. 29. On the Test blade, click Start. 30. Monitor the progress of the Automation job and verify that it completes successfully.
Confirm your virtual machine was started. 31. Scroll back to the Edit Graphical Runbook blade and click Publish. 32. Click Yes when prompted.
Create and test an Automation Windows PowerShell script-based textual
runbook that starts an Azure VM (Portal)
This exercise requires that the virtual machine (myVM0) is running.
In this exercise, you will create a Windows PowerShell script-based textual Automation runbook that stops an Azure virtual machine. This will require that you reference Automation certificate asset and an Automation connection asset that have been automatically provisioned for you

when you created the automation account. You will also use the Automation variables you created in one of the earlier exercises.
Create your Windows PowerShell script-based runbook using the textual method
1. If you are not signed in to the Azure Portal, then browse to the new Azure Portal at https://portal.azure.com and sign in.
2. Navigate to the AutomationLab Automation account and, on the AutomationLab blade, click the Runbooks tile.
3. Click +Add a runbook, and then Quick Create. Click Create when you are finished entering the following information.
Name: Stop-VM-textual-script
Runbook type: PowerShell
Add the Automation connection
4. On the Edit PowerShell Runbook blade, click ASSETS and expand the Connections
section.
5. Click ellipsis (…) next to the AzureRunAsConnection and click Add to canvas. This will
add the following code to the runbook:
Get-AutomationConnection -Name 'AzureRunAsConnection'
Sign in to the Azure subscription with the Azure Run As account
6. Modify the script so it contains the following content:
$c = Get-AutomationConnection -Name 'AzureRunAsConnection' Add-AzureRmAccount -ServicePrincipal -Tenant $c.TenantID ` -ApplicationID $c.ApplicationID -CertificateThumbprint $c.CertificateThumbprint
7. Click Test Pane
8. On the Test blade, click Start.
9. Monitor the progress of the Automation job and verify that it completes successfully.
Stop an Azure virtual machine
10. Add another line to the script and place the cursor at the beginning of the new line.
11. On the Edit PowerShell Runbook blade, click ASSETS and expand the Variables section.
12. Click ellipsis (…) next to the VM0 and click Add “Get Variable” to canvas. This will add
the following code to the runbook:
Get-AutomationVariable -Name 'VM0' 13. Add another line to the script and place the cursor at the beginning of the new line.
14. On the Edit PowerShell Runbook blade, click ASSETS and expand the Variables section.
15. Click ellipsis (…) next to the ResourceGroup and click Add “Get Variable” to canvas. This
will add the following code to the runbook:
Get-AutomationVariable -Name 'ResourceGroup' 16. Modify your Get-AutomationVariable lines to use a variable.
$vm = Get-AutomationVariable -Name 'VM0' $rg = Get-AutomationVariable -Name 'ResourceGroup'
17. Add the line to stop the virtual machine.
Stop-AzureRmVM -Name $vm -ResourceGroupName $rg –Force
Note: You must add the –Force parameter to eliminate the confirmation prompt when running the Stop-AzureRmVM cmdlet. Automation runbook must be able to run in the non-interactive manner.
18. Your finished script should look like this: $c = Get-AutomationConnection -Name 'AzureRunAsConnection' Add-AzureRmAccount -ServicePrincipal -Tenant $c.TenantID ` -ApplicationID $c.ApplicationID -CertificateThumbprint $c.CertificateThumbprint $vm = Get-AutomationVariable -Name 'VM0' $rg = Get-AutomationVariable -Name 'ResourceGroup' Stop-AzureRmVM -Name $vm -ResourceGroupName $rg –Force
19. Save your changes.
20. Click Test Pane.
21. On the Test blade, click Start.
22. Monitor the progress of the Automation job and verify that it completes successfully. Confirm your virtual machine was stopped.
23. Scroll back to the Edit PowerShell Runbook blade and click Publish. 24. Click Yes when prompted.
Create and test an Automation Windows PowerShell workflow-based
textual runbook (Portal)
This exercise requires that both virtual machines (myVM0 and myVM1) are stopped.
In this exercise, you will create a Windows PowerShell workflow-based textual Automation runbook that starts two Azure virtual machine in parallel. This will require that you reference Automation certificate asset and an Automation connection asset that have been automatically provisioned for you when you created the automation account. You will also use the Automation variables you created in one of the earlier exercises.
Create your Windows PowerShell workflow-based runbook using the textual method
1. If you are not signed in to the Azure Portal, then browse to the new Azure Portal at https://portal.azure.com and sign in.
2. Navigate to the AutomationLab Automation account and, on the AutomationLab blade, click the Runbooks tile.
3. Click +Add a runbook, and then Quick Create. Click Create when you are finished entering the following information.
Name: Start-VM-textual-workflow
Runbook type: PowerShell Workflow
Add the Automation connection
4. On the Edit PowerShell Workflow Runbook blade, add an extra line to the workflow
between the set of braces so the content of the workflow looks as follows:
workflow Start-VM-textual-workflow
{
}
5. Place the cursor at the beginning of the new line.
6. On the Edit PowerShell Workflow Runbook blade, click ASSETS and expand the
Connections section.
7. Click ellipsis (…) next to the AzureRunAsConnection and click Add to canvas. This will
add the following code to the runbook:
Get-AutomationConnection -Name 'AzureRunAsConnection'
Sign in to the Azure subscription with the Azure Run As account
8. Create a variable for the connection information and connect to Azure. Your finished
code will look like this:
workflow Start-VM-textual-workflow { $c = Get-AutomationConnection -Name 'AzureRunAsConnection' Add-AzureRmAccount -ServicePrincipal -Tenant $c.TenantID ` -ApplicationID $c.ApplicationID -CertificateThumbprint $c.CertificateThumbprint }
9. Click Test Pane
10. On the Test blade, click Start.
11. Monitor the progress of the Automation job and verify that it completes successfully.
Start two Azure virtual machines in parallel
12. Add an extra line to the workflow following the last line of the code (before the closing
braces) and place the cursor at the beginning of the new line.
13. On the Edit PowerShell Workflow Runbook blade, click ASSETS and expand the
Variables section.
14. Click ellipsis (…) next to the VM0 and click Add “Get Variable” to canvas. This will add
the following code to the runbook:
Get-AutomationVariable -Name 'VM0' 15. Add an extra line to the workflow following the last line of the code (before the closing
braces) and place the cursor at the beginning of the new line.
16. On the Edit PowerShell Workflow Runbook blade, click ASSETS and expand the
Variables section.
17. Click ellipsis (…) next to the VM1 and click Add “Get Variable” to canvas. This will add
the following code to the runbook:
Get-AutomationVariable -Name 'VM1' 18. Add an extra line to the workflow following the last line of the code (before the closing
braces) and place the cursor at the beginning of the new line.
19. On the Edit PowerShell Workflow Runbook blade, click ASSETS and expand the
Variables section.
20. Click ellipsis (…) next to the ResourceGroup and click Add “Get Variable” to canvas. This
will add the following code to the runbook:
Get-AutomationVariable -Name 'ResourceGroup' 21. Modify the workflow so it contains the following content:
workflow Start-VM-textual-workflow { $c = Get-AutomationConnection -Name 'AzureRunAsConnection' Add-AzureRmAccount -ServicePrincipal -Tenant $c.TenantID ` -ApplicationID $c.ApplicationID -CertificateThumbprint $c.CertificateThumbprint $vm0 = Get-AutomationVariable -Name 'VM0' $vm1 = Get-AutomationVariable -Name 'VM1' $rg = Get-AutomationVariable -Name 'ResourceGroup' Parallel { Start-AzureRmVM -Name $vm0 -ResourceGroupName $rg Start-AzureRmVM -Name $vm1 -ResourceGroupName $rg } }
You must add the Parallel section to start both Azure virtual machines at the same time.
22. Click Test Pane
23. On the Test blade, click Start.
24. Monitor the progress of the Automation job and verify that it completes successfully. Confirm your virtual machines are now started.
25. Scroll back to the Edit PowerShell Workflow Runbook blade and click Publish. 26. Click Yes when prompted.
Module 3 – Automation Desired State Configuration (DSC)
Create and compile a DSC-based configuration by using Azure Automation
(Portal)
In this exercise, you will create and compile a DSC-based configuration by using Azure Automation. The configuration, once implemented in the next lab, will automatically deploy the Web server Windows Server role.
Create a DSC configuration
1. Start Windows PowerShell ISE and, in the script pane, type in the following text. If you prefer, you can use a text editor like NotePad. Notice the configuration keyword and node information. configuration LabConfig { Node WebServer { WindowsFeature IIS { Ensure = 'Present' Name = 'Web-Server' IncludeAllSubFeature = $true } } }
2. Save the file as LabConfig.ps1 on your local computer.
Add a DSC configuration to the Automation account
3. If you are not signed in to the Azure Portal, then browse to the new Azure Portal at https://portal.azure.com and sign in.
4. Navigate to the AutomationLab Automation account and, on the AutomationLab blade, click the DSC Configurations tile.
5. Click +Add a configuration. 6. On the Import blade, upload the LabConfig.ps1 configuration file from your computer
and click OK. Note that this automatically publishes the configuration.
View and compile the configuration in the Automation account
7. On the DSC Configurations blade, click LabConfig. 8. On the LabConfig blade, click View configuration source. 9. Verify that you can see the same content that you added to the LabConfig.ps1 file. 10. On the LabConfig blade, click Compile. Read the compilation information.
11. Click Yes when prompted.
12. Click the compilation job and monitor its progress. Verify it completes successfully by
checking its State on the compilation job blade. You can also monitor Errors and
Warnings. Warnings are okay, and can be ignored.
Deploy a DSC-based configuration by using Azure Automation (Portal)
This exercise requires that both virtual machines (myVM0 and myVM1) are running.
In this exercise, you will use the DSC configuration you created and compiled in the previous exercise to automatically deploy the Web server role to Azure virtual machines.
Onboard Azure virtual machines for Automation DSC-based management
1. If you are not signed in to the Azure Portal, then browse to the new Azure Portal at https://portal.azure.com and sign in.
2. Navigate to the AutomationLab Automation account and, on the AutomationLab blade, click the DSC Nodes tile.
3. On the DSC Nodes blade, click +Add Azure VM. Notice the option to +Add on-prem VM. 4. On the Add Azure VMs blade, click Select virtual machines to onboard.
5. On the Select VMs blade, select the checkboxes next to myVM0 and myVM1 and click OK.
6. Back on the Add Azure VMs blade, click Configure registration data. 7. On the Registration blade, specify the following settings and click OK (use the
Information icon to view details about the required information):
Registration key: Primary key
Node Configuration Name: LabConfig.WebServer
Refresh Frequency: 30
Configuration Mode Frequency: 15
Configuration Mode: ApplyAndMonitor
Allow Module Override: enabled
Reboot Node if Needed: enabled
Action after Reboot: ContinueConfiguration 8. Click Create.
Monitor and verify deployment of the DSC configuration
9. Wait until both virtual machines appear on the DSC Nodes blade with the Compliant status. This indicates that they have been successfully onboarded for management by using Azure Automation DSC. This will take about 20 minutes. Monitor the progress of DSC VMs Extention Registration on the Notifications page.
10. On the left side of the Azure portal, click More services. In the search box, type Load balancers and, in the list of results, click Load balancers.
11. On the Load balancers blade, click myLB. On the myLB blade, identify the value of the Public IP address entry.
12. From your computer, start Internet Explorer and browse to the IP address you identified in the previous step. Verify that you see the default Internet Information Services page. This indicates the Web Server was deployed and configured on the virtual machines.
Remediate Azure virtual machine alerts by using Azure Automation (Portal)
This exercise requires that virtual machine myVM0 is running.
In this exercise, you will use Azure Automation to remediate alerts triggered by an Azure virtual machine. Specifically, you will automatically shut down an Azure virtual machine if its CPU performance is lower than 10 percent over the period of 5 minutes. While this type of remediation is not likely to be applicable in a production environment, you can relatively easily
emulate this approach to ensure, for example, that a test Azure virtual machine is automatically shut down when not in use over an extended period.
Add a webhook to Automation runbook
1. If you are not signed in to the Azure Portal, then browse to the new Azure Portal at https://portal.azure.com and sign in.
2. Navigate to the AutomationLab Automation account and, on the AutomationLab blade, click the Runbooks tile.
3. On the Runbooks blade, click Stop-VM-textual-script. 4. On the Stop-VM-textual-script blade, click Webhook. 5. On the Add Webhook blade, click Create new webhook. 6. On the Create a new webhook blade, note the warning stating that For security, after
creating a webhook, its URL can’t be viewed. Make sure to copy it before pressing “OK”, and to store it securely.
7. On the Create a new webhook blade, specify the following settings:
Name: Stop VM0 webhook
Enabled: Yes
Expires: set the date to the 12:00 PM tomorrow 8. Copy the URL and paste it to Windows Notepad. 9. Click OK. 10. Accept the default Parameters and run settings and click Create. 11. On the Stop-VM-textual-script blade, click Edit. 12. At the top of the script, add the following:
param ( [object]$WebhookData ) if ($WebhookData -ne $null) { $WebhookName = $WebhookData.WebhookName Write-Output "Runbook started via $WebhookName" } The $WebhookData parameter allows you to identify that the runbook has been started by a webhook.
13. Verify that the script looks as follows and click Publish. param ( [object]$WebhookData ) if ($WebhookData -ne $null) { $WebhookName = $WebhookData.WebhookName Write-Output "Runbook started via $WebhookName"
} $c = Get-AutomationConnection -Name 'AzureRunAsConnection' Add-AzureRmAccount -ServicePrincipal -Tenant $c.TenantID ` -ApplicationID $c.ApplicationID -CertificateThumbprint $c.CertificateThumbprint $vm = Get-AutomationVariable -Name 'VM0' $rg = Get-AutomationVariable -Name 'ResourceGroup' Stop-AzureRmVM -Name $vm -ResourceGroupName $rg –Force
14. Click Yes when prompted to confirm.
Configure alerts for Azure virtual machines
15. In the Azure portal, in the hub menu, click Virtual machines. 16. On the Virtual machines blade, click myVM0. 17. On the myVM0 blade, click Alert rules. 18. Click Add metric alert. 19. On the Alert rule blade, specify the following and click OK:
Name: LowCPU
Description: blank
Alert on: Metrics
Subscription: <your subscription name>
Resource group: AutomationLabRG
Resource: myVM0
Metric: Percentage CPU
Condition: Less than
Threshold: 10
Period: Over the last 5 minutes
Email owners, contributors, and readers: leave the checkbox cleared
Webhook: paste the URL you copied into Windows Notepad earlier in this exercise
20. Make sure that you are not using myVM0 to ensure that its CPU utilization is below 10%.
Wait a few minutes and verify that the VM has been automatically stopped.
21. You can verify that this was the result of the execution of an Automation runbook by
navigating to the Stop-VM-textual-script blade and clicking the Jobs tile.
22. On the Jobs blade, you should see the entry representing the job that was triggered by
the alert. Click that entry to display its blade.
23. On the job’s blade, click the Output tile.
24. On the Output blade, view the messages, including the one stating Runbook started
from webhook Stop VM0
There is a recently introduced option to reference the runbook directly (rather than via a webhook) within the Azure Portal interface when defining an alert.