Embed Size (px)
Citation preview
Automated Cybersecurity Evaluation Toolbox User Guide October 2021

0
[This page intentionally left blank]
ACET User Manual i
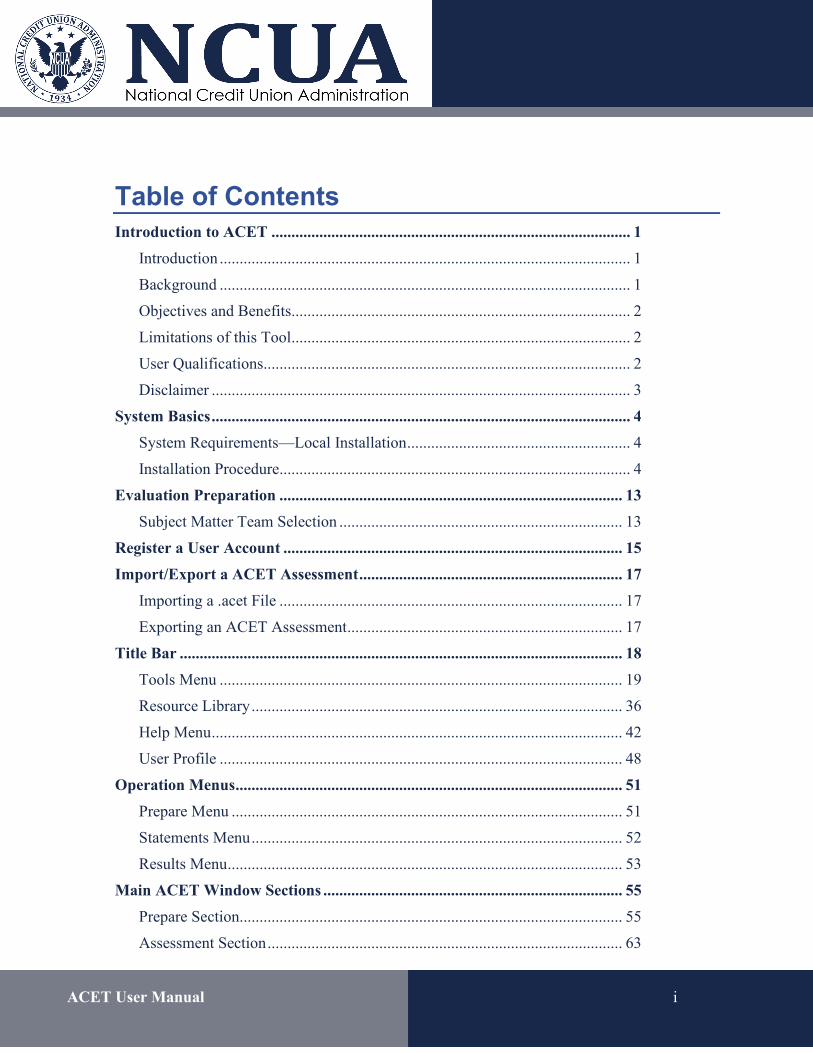
Table of Contents Introduction to ACET .......................................................................................... 1
Introduction ....................................................................................................... 1
Background ....................................................................................................... 1
Objectives and Benefits..................................................................................... 2
Limitations of this Tool ..................................................................................... 2
User Qualifications............................................................................................ 2
Disclaimer ......................................................................................................... 3
System Basics ......................................................................................................... 4
System Requirements—Local Installation ........................................................ 4
Installation Procedure........................................................................................ 4
Evaluation Preparation ...................................................................................... 13
Subject Matter Team Selection ....................................................................... 13
Register a User Account ..................................................................................... 15
Import/Export a ACET Assessment .................................................................. 17
Importing a .acet File ...................................................................................... 17
Exporting an ACET Assessment ..................................................................... 17
Title Bar ............................................................................................................... 18
Tools Menu ..................................................................................................... 19
Resource Library ............................................................................................. 36
Help Menu ....................................................................................................... 42
User Profile ..................................................................................................... 48
Operation Menus ................................................................................................. 51
Prepare Menu .................................................................................................. 51
Statements Menu ............................................................................................. 52
Results Menu ................................................................................................... 53
Main ACET Window Sections ........................................................................... 55
Prepare Section................................................................................................ 55
Assessment Section ......................................................................................... 63

ACET User Manual ii
Results Section ................................................................................................ 77
Glossary ................................................................................................................ 87
Acronyms ........................................................................................................ 87
Key Terms ....................................................................................................... 88
ACET User Manual 1
Introduction to ACET
This section will help the user better understand the Automated Cybersecurity Evaluation Toolbox (ACET), its background, and purposes.
Introduction
ACET provides the following:
1. A framework for analyzing cybersecurity vulnerabilities associated with an organization’s overall industrial control system (ICS) and information technology (IT) architecture;
2. A consistent and technically sound methodology to identify, analyze, and communicate to security professionals the various vulnerabilities and consequences that may be exploited by cyber means;
3. The means for the user to document a process for identifying cybersecurity vulnerabilities; and
4. Suggested methods to evaluate options for improvement based on existing Standards and recommended practices.
Background
The ACET Maturity Assessment is an assessment of a Credit Union’s Inherent Risk and Cybersecurity Maturity. The ACET provides the National Credit Union Administration (NCUA) with a repeatable, measurable and transparent process for assessing the level of cyber preparedness across federally insured institutions.
The ACET incorporates appropriate standards and practices established for financial institutions. It also aligns with the Cybersecurity Assessment Tool developed by the Federal Financial Institutions Examination Council (FFIEC) for voluntary use by banks and credit unions.
The ACET consists of two parts: Inherent Risk Profile and Cybersecurity Maturity. The Inherent Risk Profile identifies the institution’s inherent risk before implementing controls. The Cybersecurity Maturity includes domains, assessment factors, components, and individual Declarative Statements across five maturity levels.
ACET is a web-based tool that guides users through a step-by-step process to collect facility- specific information addressing topics such as hardware, software, administrative policies, and user obligations. It then compares that information to relevant security Standards and
ACET User Manual 2
regulations, assesses overall compliance, and provides appropriate recommendations for improving cybersecurity posture. The tool pulls its recommendations from a collection of the best available cybersecurity Standards, guidelines, and practices. Where appropriate, recommendations are linked to a set of actions that can be applied to enhance cybersecurity controls.
Objectives and Benefits
The primary objective of ACET is to reduce the risk of cyber attacks by identifying potential cybersecurity vulnerabilities within a system or an organization. ACET implements a simple, transparent process that can be used effectively by all sectors to evaluate any network. It offers the following benefits:
• Provides a repeatable and systematic approach for assessing the cybersecurity posture of a system, network, site, or facility.
• Provides a comprehensive evaluation and comparison to existing industry Standards and regulations.
• Combines the ICS and IT security knowledge and experience of many organizations. • Assists in the identification of potential vulnerabilities in the network design
and security policies. • Provides guidelines for cybersecurity solutions and mitigations. • Provides access to a centralized repository of cybersecurity requirements. • Provides an opportunity for dialogue on security practices within the user's facility.
Limitations of this Tool
The tool has a component focus rather than a system focus. Therefore, network architecture analyses, including network hardware and software configuration analyses, will be limited to the extent that they are defined by programmatic and procedural requirements.
Most importantly, ACET is only one component of a comprehensive control system security program. A security program based on a ACET assessment alone must never be considered complete or adequate.
User Qualifications
ACET assessments cannot be completed effectively by any single individual. A cross-functional team consisting of representatives from multiple company areas is essential. The representatives must be subject matter experts with significant expertise in their respective areas. No one individual has the span of responsibility or knowledge to be able to fully and accurately answer all the questions provided by the ACET tool.
ACET User Manual 3
Disclaimer
"The analysis, data, and reports in ACET® are provided “as is” for informational purposes only. The NCUA does not provide any warranties of any kind regarding any information contained within. In no event shall the United States Government be liable for any damages, including but not limited to, direct, indirect, special, or consequential damages and including damages based on any negligence of the United States Government, arising out of, resulting from, or in any way connected with this report, whether based on warranty, contract, tort, or otherwise, whether injury was sustained from, or arose out of the results of, or reliance upon the report.
NCUA does not endorse any commercial product or service, including the subject of the assessment or evaluation in this report. Any reference to specific commercial products, processes, or services by trademark, manufacturer, or otherwise, does not constitute or imply its endorsement, recommendation, or favoring by NCUA.
The display of the NCUA official seal or other NCUA visual identities on this report shall not be interpreted to provide the recipient organization authorization to use the official seal, insignia or other visual identities of NCUA. The NCUA seal, insignia, or other visual identities shall not be used in any manner to imply endorsement of any commercial product or activity by NCUA or the United States Government. Use of the NCUA seal without proper authorization violates federal law (e.g., 18 U.S.C. §§ 506, 701, 1017), and is against NCUA policies governing usage of the seal.
ACET User Manual 4
System Basics
This section describes system requirements, installation instructions, and recommendations on how to go about preparing for the cybersecurity evaluation.
System Requirements—Local Installation
It is recommended that users meet the minimum system hardware and software requirements before installing ACET. This includes:
• Pentium dual-core 2.2 GHz processor (Intel x86 compatible) • 6 GB free disk space • 4 GB of RAM • Microsoft Windows 10 or higher • Microsoft .NET Framework 4.7 Runtime • SQL Server 2012 Express LocalDB (included in ACET installation) • IIS Express 8 (included in ACET installation)
Other Items of Note:
• For all platforms, it is recommended the user upgrade to the latest Windows Service Pack and install critical updates available from the Windows Update website to ensure the best compatibility and security.
• If the install must be made through physical media, a USB port will be required. • If desired, HTML reports will need to be converted to PDF using an external utility. • If the Microsoft .NET Framework 4.7 Runtime is not available on the user's computer,
ACET will automatically install it, which can add several minutes to the installation time.
• Internet Explorer isn't supported.
Installation Procedure
To install ACET follow the instructions below:
Double-click on the ACETStandAlone program.
The User Account Control dialogue will come up. Select “Yes”.
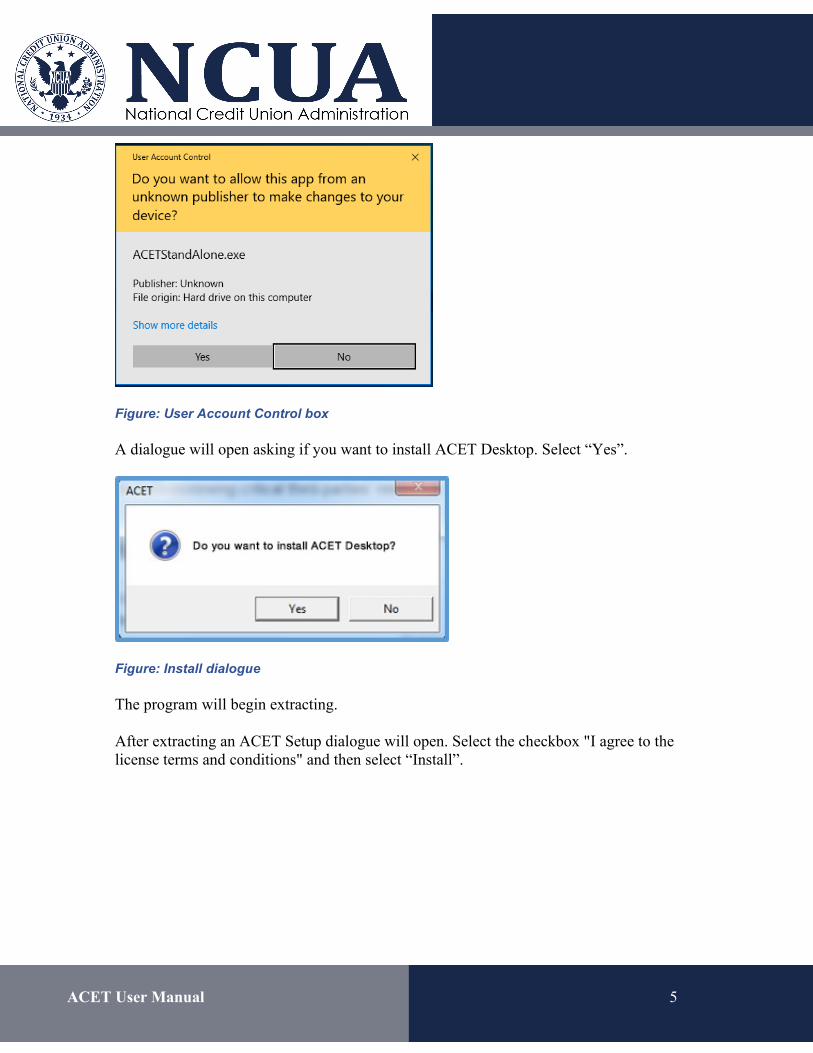
ACET User Manual 5
Figure: User Account Control box
A dialogue will open asking if you want to install ACET Desktop. Select “Yes”.
Figure: Install dialogue
The program will begin extracting.
After extracting an ACET Setup dialogue will open. Select the checkbox "I agree to the license terms and conditions" and then select “Install”.
ACET User Manual 6
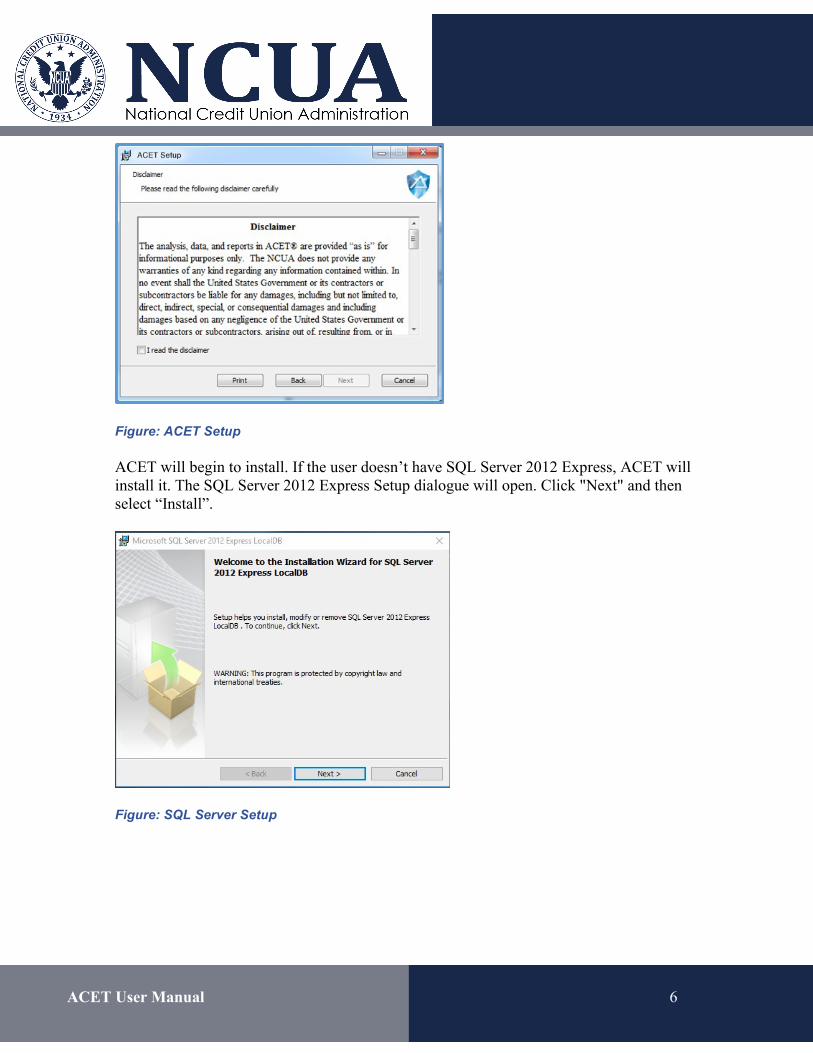
Figure: ACET Setup
ACET will begin to install. If the user doesn’t have SQL Server 2012 Express, ACET will install it. The SQL Server 2012 Express Setup dialogue will open. Click "Next" and then select “Install”.
Figure: SQL Server Setup
ACET User Manual 7
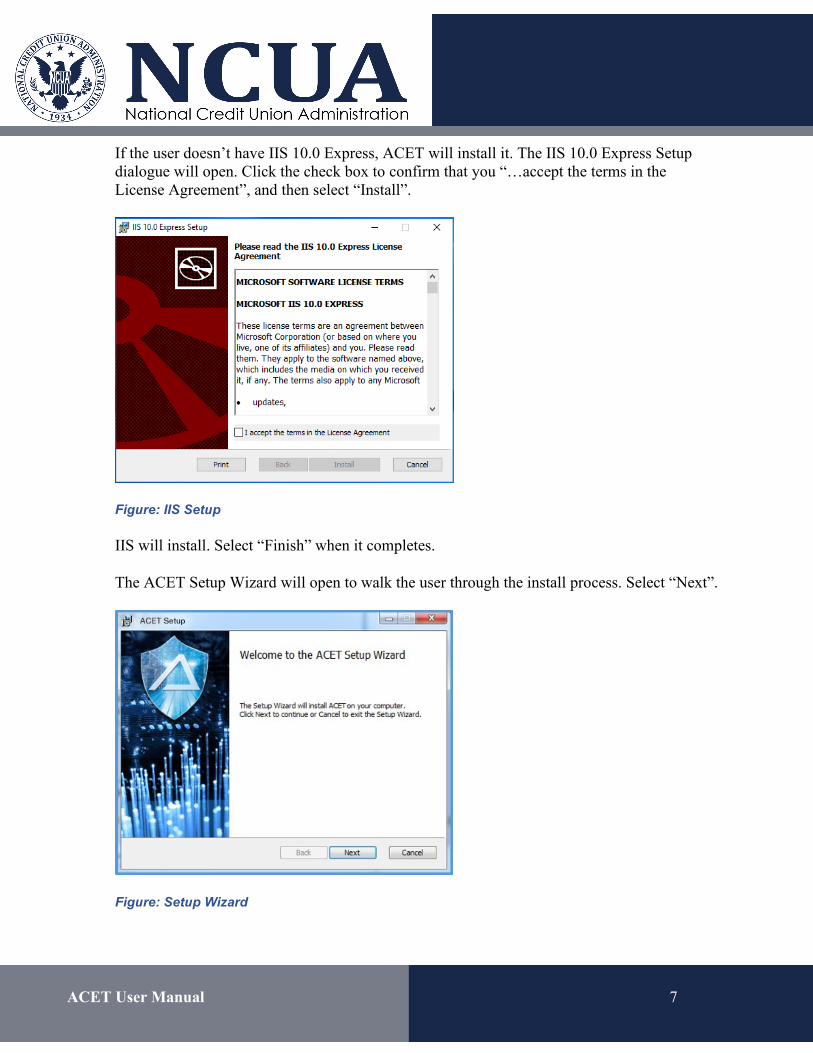
If the user doesn’t have IIS 10.0 Express, ACET will install it. The IIS 10.0 Express Setup dialogue will open. Click the check box to confirm that you “…accept the terms in the License Agreement”, and then select “Install”.
Figure: IIS Setup
IIS will install. Select “Finish” when it completes.
The ACET Setup Wizard will open to walk the user through the install process. Select “Next”.
Figure: Setup Wizard
ACET User Manual 8
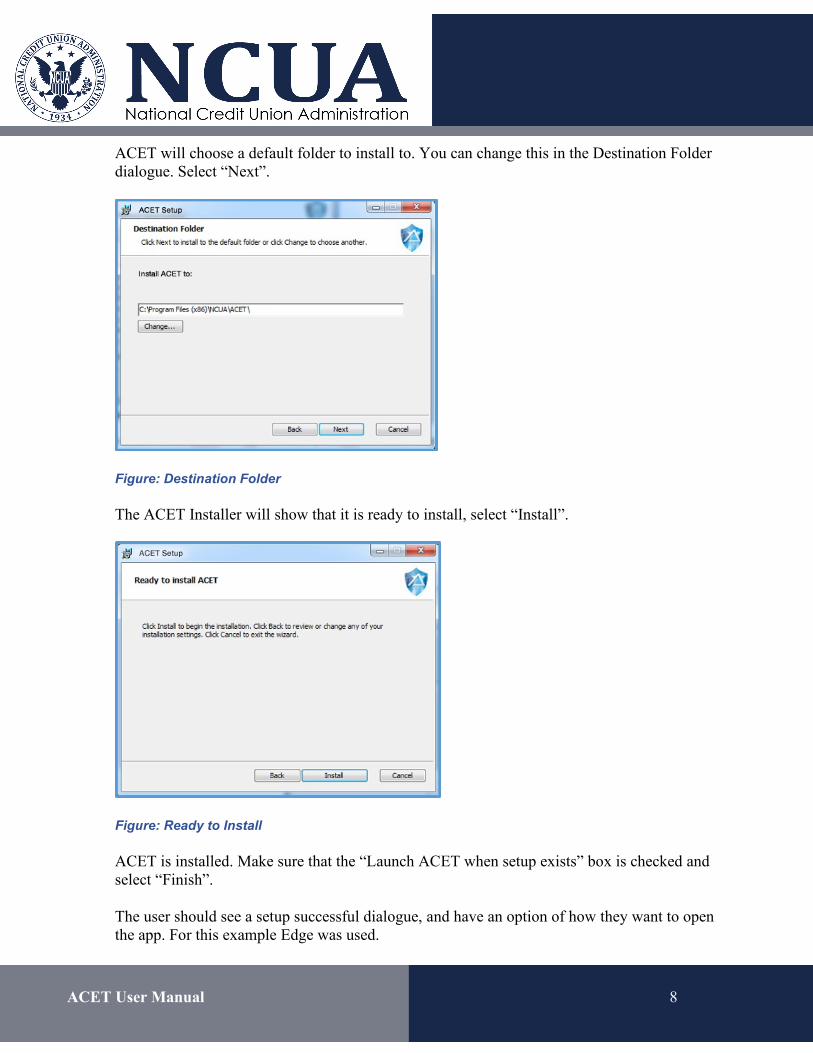
ACET will choose a default folder to install to. You can change this in the Destination Folder dialogue. Select “Next”.
Figure: Destination Folder
The ACET Installer will show that it is ready to install, select “Install”.
Figure: Ready to Install
ACET is installed. Make sure that the “Launch ACET when setup exists” box is checked and select “Finish”.
The user should see a setup successful dialogue, and have an option of how they want to open the app. For this example Edge was used.
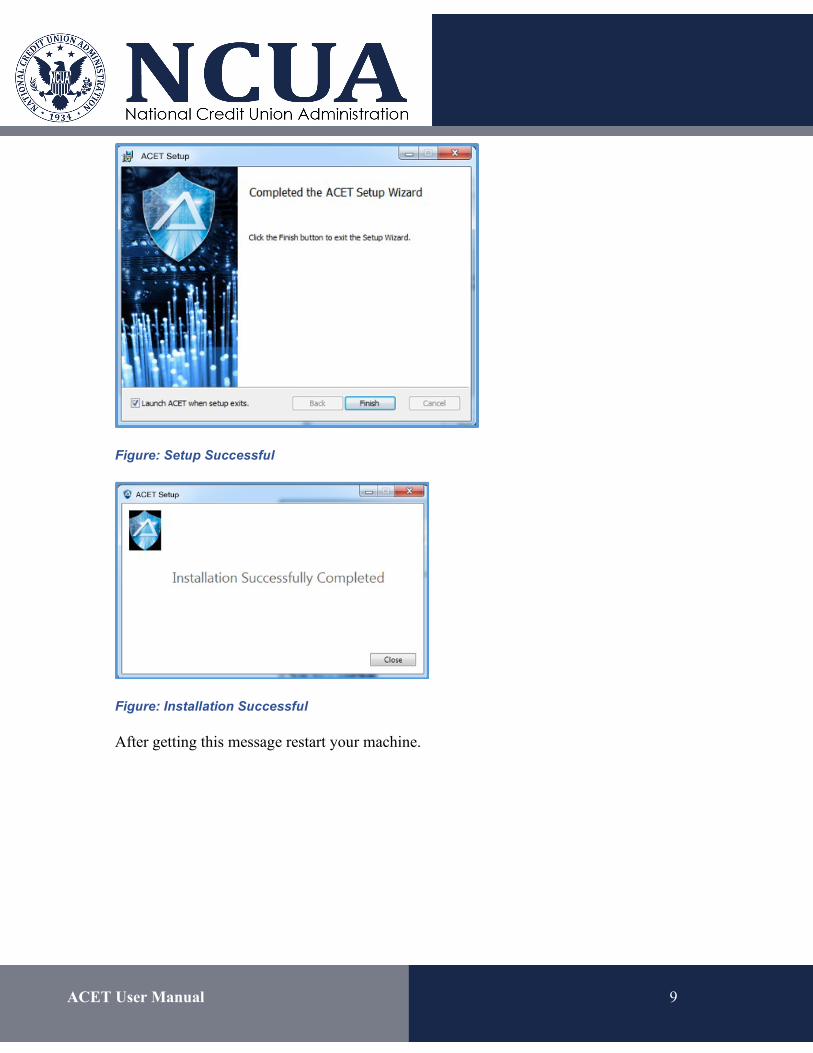
ACET User Manual 9
Figure: Setup Successful
Figure: Installation Successful
After getting this message restart your machine.

ACET User Manual 10
The user now has access to ACET under their Windows NT user name. The Local Installation ribbon is visible at the top of the screen. They can see their landing page with no assessments at this time.
Figure: Local Install Landing Page
Using the Stand-alone
There are a few things users should know in regard to the stand-alone install of ACET.
Using the ACET System Tray Application
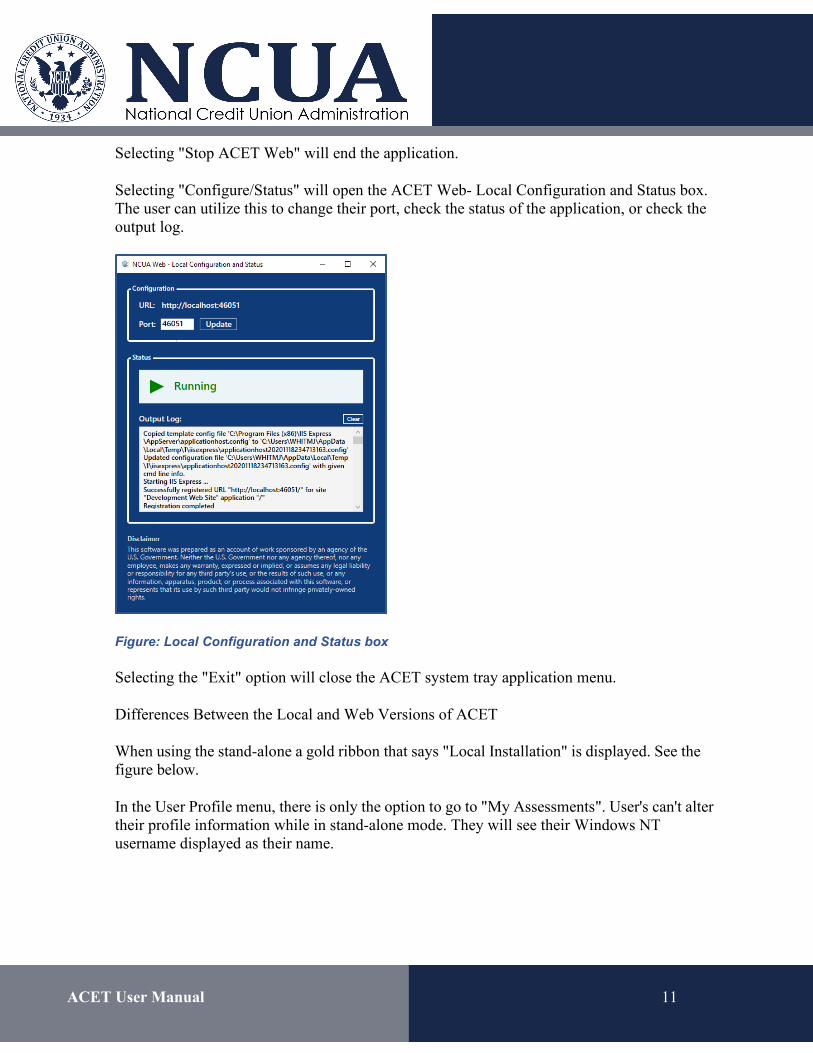
The ACET system tray app will be available in the user's task bar use it click the ACET icon.
The user will have the option to Open ACET Web, Start ACET Web, Stop ACET Web, Configure/ Status, or Exit.
Selecting "Open ACET Web" will open a web instance of ACET.
Selecting "Start ACET Web" will run the application. If the application is already running the Start ACET Web option will not be available, and the user should see in the Configure/Status that the Status is "Running".
ACET User Manual 11
Selecting "Stop ACET Web" will end the application.
Selecting "Configure/Status" will open the ACET Web- Local Configuration and Status box. The user can utilize this to change their port, check the status of the application, or check the output log.
Figure: Local Configuration and Status box
Selecting the "Exit" option will close the ACET system tray application menu.
Differences Between the Local and Web Versions of ACET
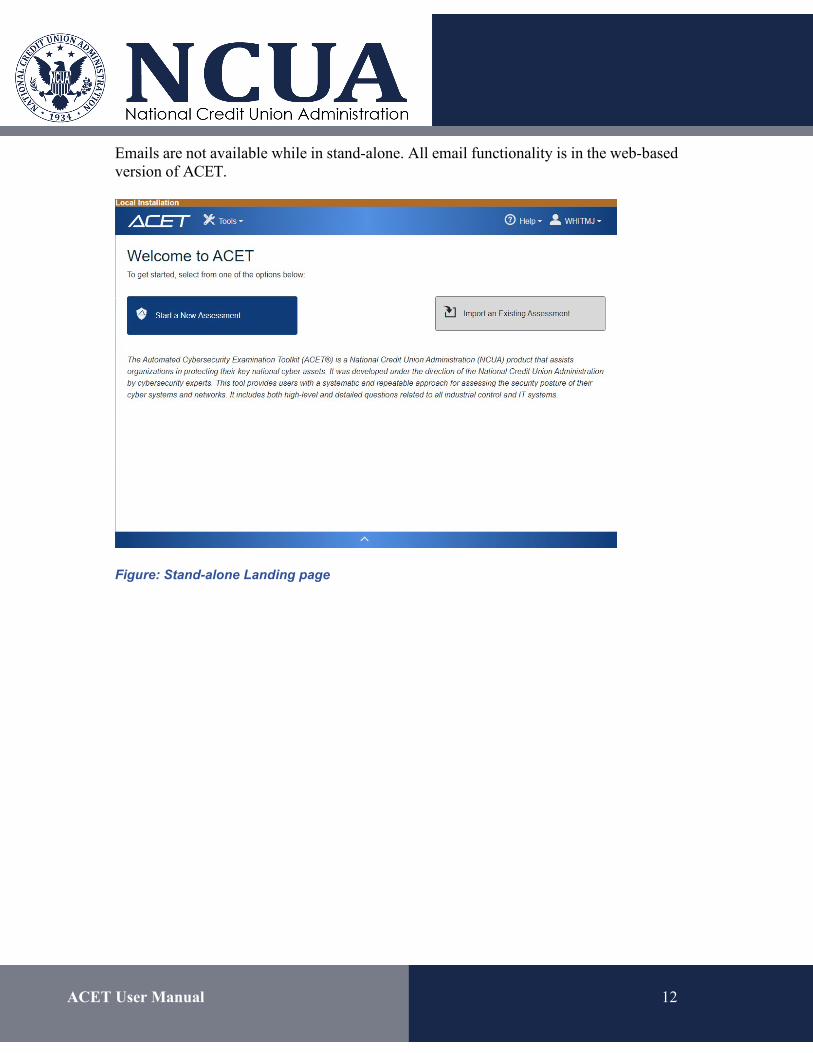
When using the stand-alone a gold ribbon that says "Local Installation" is displayed. See the figure below.
In the User Profile menu, there is only the option to go to "My Assessments". User's can't alter their profile information while in stand-alone mode. They will see their Windows NT username displayed as their name.
ACET User Manual 12
Emails are not available while in stand-alone. All email functionality is in the web-based version of ACET.
Figure: Stand-alone Landing page
ACET User Manual 13
Evaluation Preparation
Two preliminary tasks are required before using the tool to perform an assessment:
(1) forming the subject matter team, and (2) collecting the network/architecture documentation and related information.
Subject Matter Team Selection
The first step is to select a cross-functional assessment team consisting of subject matter experts selected from various operational areas in the organization. Organizations may add additional team members as needed to address specific topics. Anyone in the organization who has had training or experience with the ACET tool should be included on the team.
The primary user should spend some time using the ACET tool with test only or dummy data prior to commencement of the team activity. Familiarity with the ACET tool will improve speed and ease of use.
Representatives from the following areas are suggested for an effective assessment. The representatives should have significant expertise in their areas of responsibility.
For either an ICS or IT assessment:
• IT Network/Topology (knowledge of IT infrastructure). • IT Security/Control System Security (knowledge of policies, procedures, and technical
implementation). • Risk Management (knowledge of the organization’s risk management processes and
procedures). • Business (knowledge of budgetary issues and insurance postures). • Management (a senior executive sponsor/decision-maker). If performing an ICS
assessment: • Industrial Control Systems (knowledge of industrial control system architecture and
operations) • System Configuration (knowledge of systems management). • System Operations (knowledge of system operation).
Start ACET
Go to http://localhost:46050/index.html or for other installation options the instructions provided in the help section titled Installation Procedure should be followed.
ACET User Manual 14
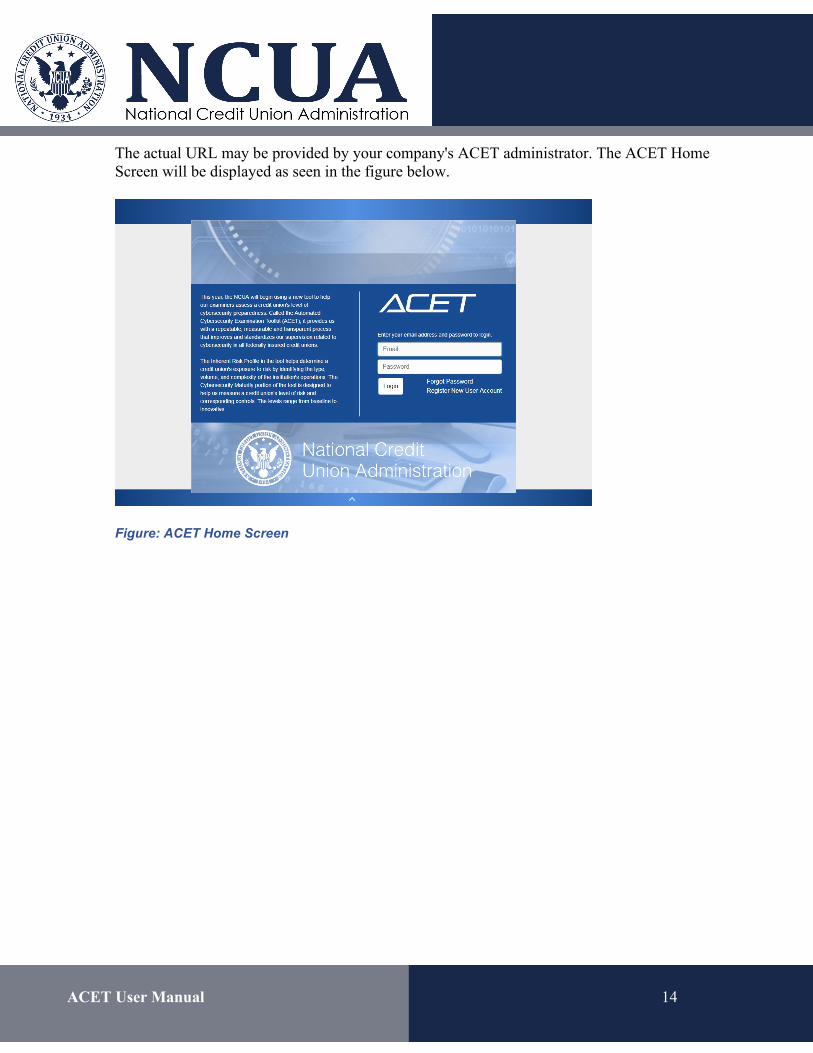
The actual URL may be provided by your company's ACET administrator. The ACET Home Screen will be displayed as seen in the figure below.
Figure: ACET Home Screen

ACET User Manual 15
Register a User Account
To get started in ACET you must have a registered account.
First, select the "Register New User Account" link. The Register Account dialogue will open.
Figure: Using the Home page to register an account
Login Email and Password fields
To login enter the user's email and password here.
Forgot Password link
This link opens a dialogue for user's to get a new temporary password and reset their old forgotten password.
Register Account link
ACET User Manual 16
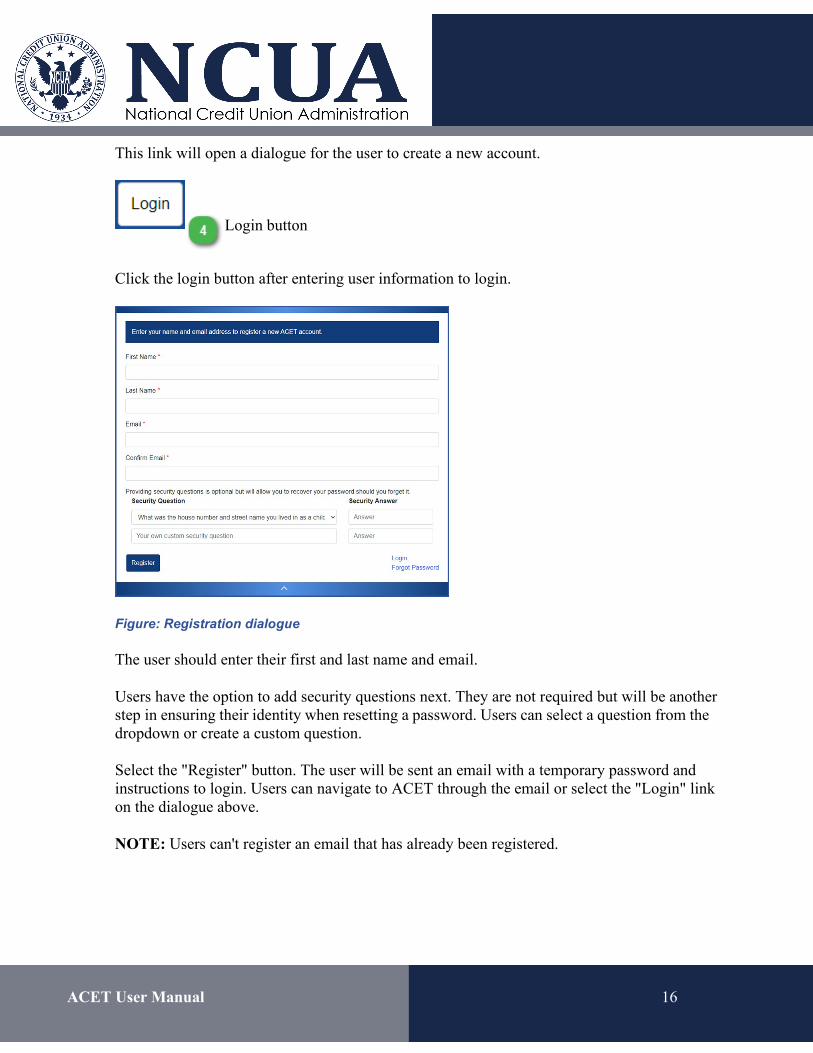
This link will open a dialogue for the user to create a new account.
Login button
Click the login button after entering user information to login.
Figure: Registration dialogue
The user should enter their first and last name and email.
Users have the option to add security questions next. They are not required but will be another step in ensuring their identity when resetting a password. Users can select a question from the dropdown or create a custom question.
Select the "Register" button. The user will be sent an email with a temporary password and instructions to login. Users can navigate to ACET through the email or select the "Login" link on the dialogue above.
NOTE: Users can't register an email that has already been registered.
ACET User Manual 17
Import/Export a ACET Assessment
There are two different ways to import an ACET assessment. Pick an option below to learn more.
Importing a .acet File
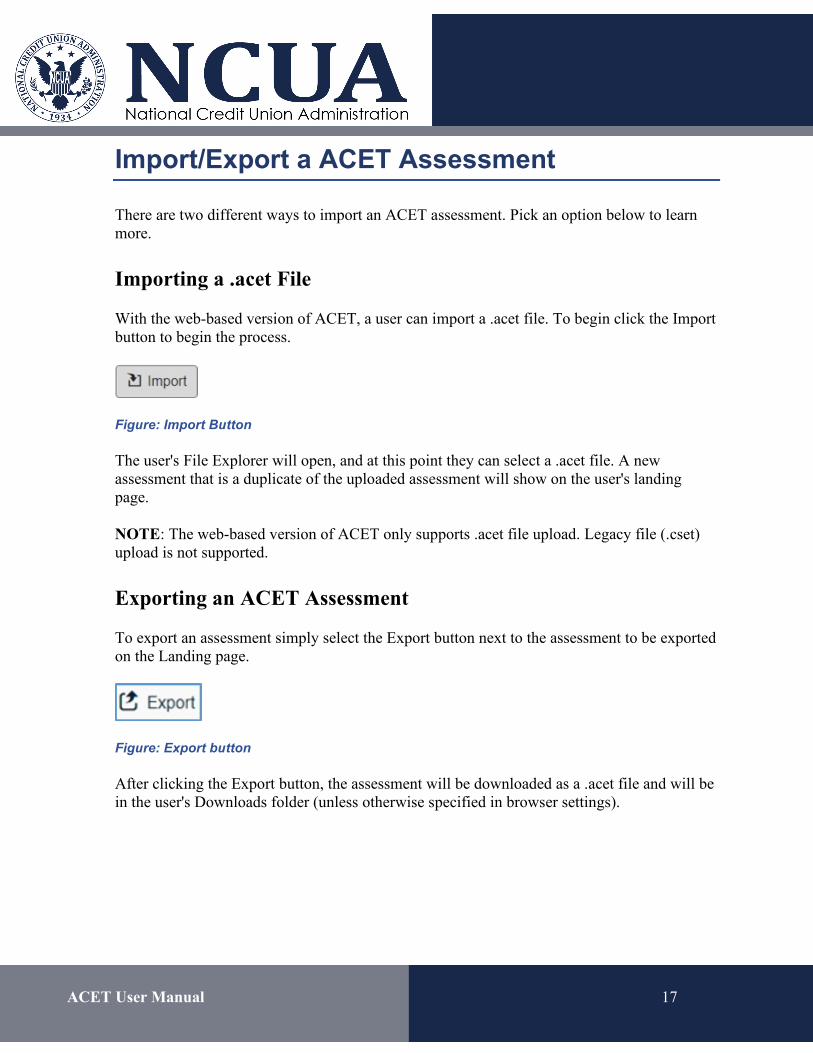
With the web-based version of ACET, a user can import a .acet file. To begin click the Import button to begin the process.
Figure: Import Button
The user's File Explorer will open, and at this point they can select a .acet file. A new assessment that is a duplicate of the uploaded assessment will show on the user's landing page.
NOTE: The web-based version of ACET only supports .acet file upload. Legacy file (.cset) upload is not supported.
Exporting an ACET Assessment
To export an assessment simply select the Export button next to the assessment to be exported on the Landing page.
Figure: Export button
After clicking the Export button, the assessment will be downloaded as a .acet file and will be in the user's Downloads folder (unless otherwise specified in browser settings).
ACET User Manual 18
Title Bar
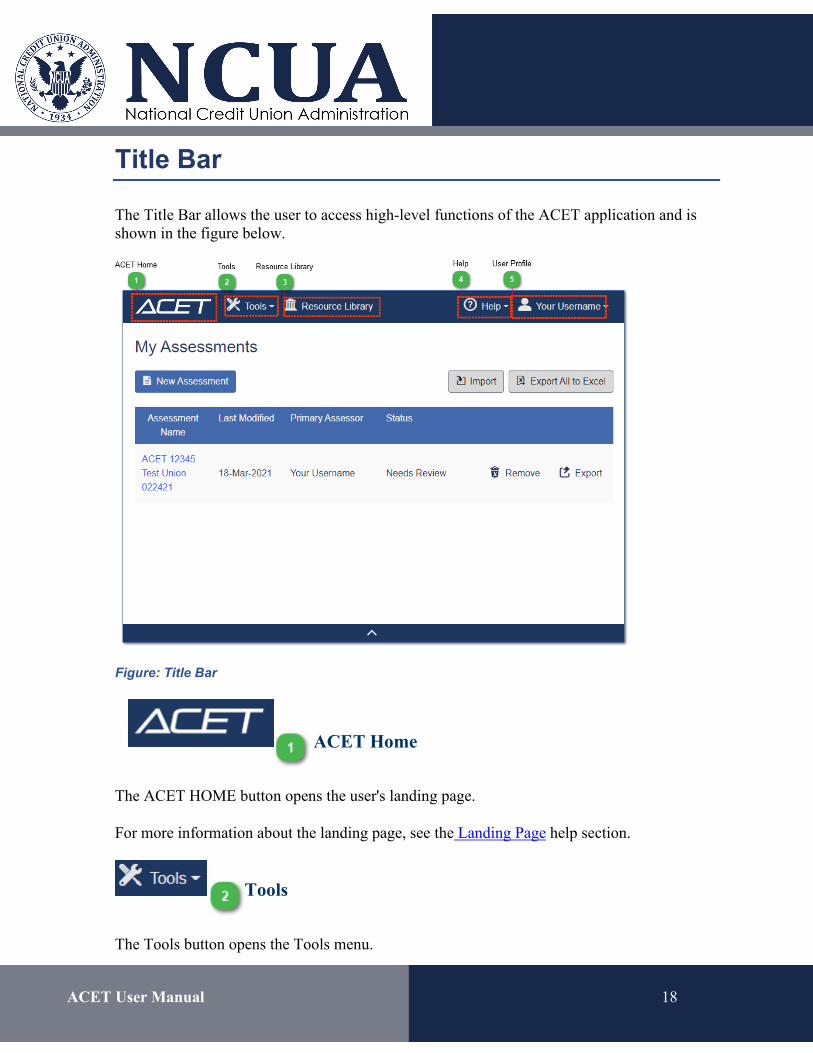
The Title Bar allows the user to access high-level functions of the ACET application and is shown in the figure below.
Figure: Title Bar
ACET Home
The ACET HOME button opens the user's landing page.
For more information about the landing page, see the Landing Page help section.
Tools
The Tools button opens the Tools menu.
ACET User Manual 19
For more information about the Tools menu, see the Tools Menu help section.
Resource Library
The Resource Library opens the Resource Library in a new tab.
For more information about the Resource Library, see the Resource Library help section.
Help
The Help button opens the Help menu.
For more information about the Help menu, see the Help Menu section.
User Profile
(This will display your user name) The User Profile button opens the User Profile menu.
For more information about the User Profile menu, see the User Profile help section.
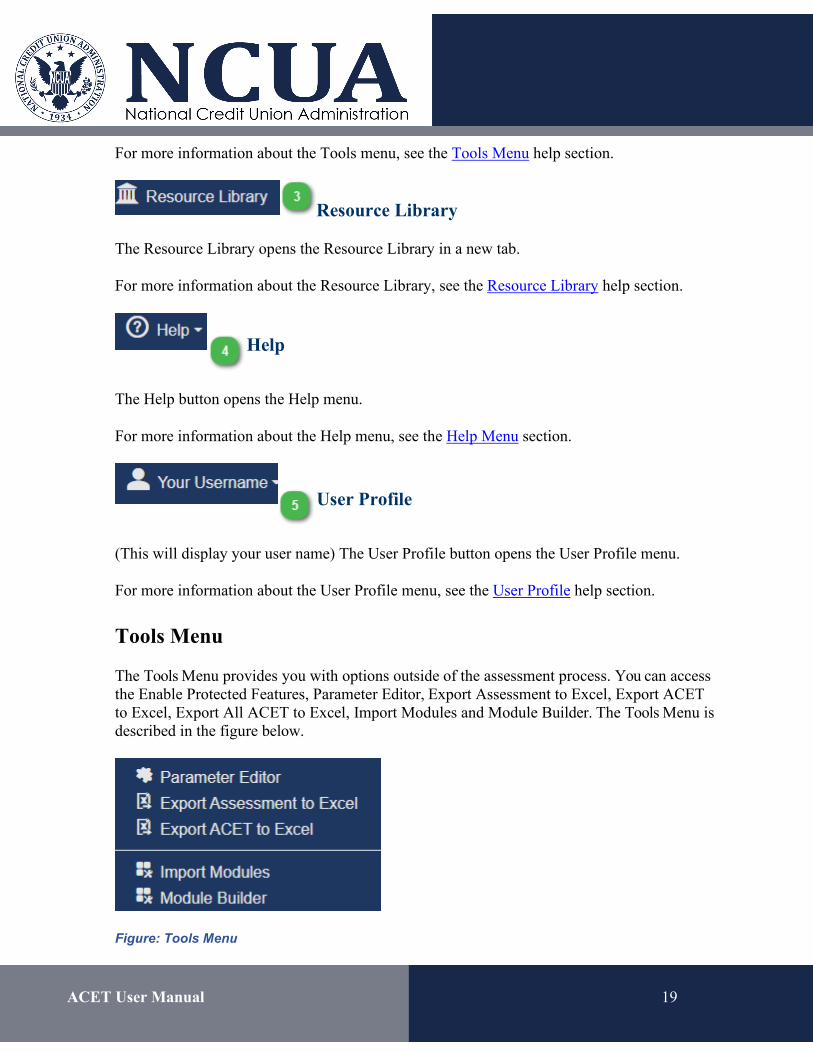
Tools Menu
The Tools Menu provides you with options outside of the assessment process. You can access the Enable Protected Features, Parameter Editor, Export Assessment to Excel, Export ACET to Excel, Export All ACET to Excel, Import Modules and Module Builder. The Tools Menu is described in the figure below.
Figure: Tools Menu
ACET User Manual 20
Click the Tools menu button to open the Tools menu.
Parameter Editor: Clicking the Parameter Editor menu item displays the Parameter Editor window where users can maintain parameters related to their selected Standard in requirements mode, if they are supported.
See Parameter Editor for more information.
Export to Excel: Clicking the Export to Excel menu item downloads an excel spreadsheet with the answers to the assessment Questions or Requirements.
See Export to Excel for more information.
Export to ACET to Excel: Clicking the Export ACET to Excel downloads a single ACET assessment.
See Export ACET to Excel for more information.
Import Module: The Import Modules menu item holds the Import Module feature used for custom standard import.
See Import Module for more information.
Module Builder: Clicking the Module Builder menu item opens the Module Builder feature that users can build new question and requirements sets.
See Module Builder for more information.
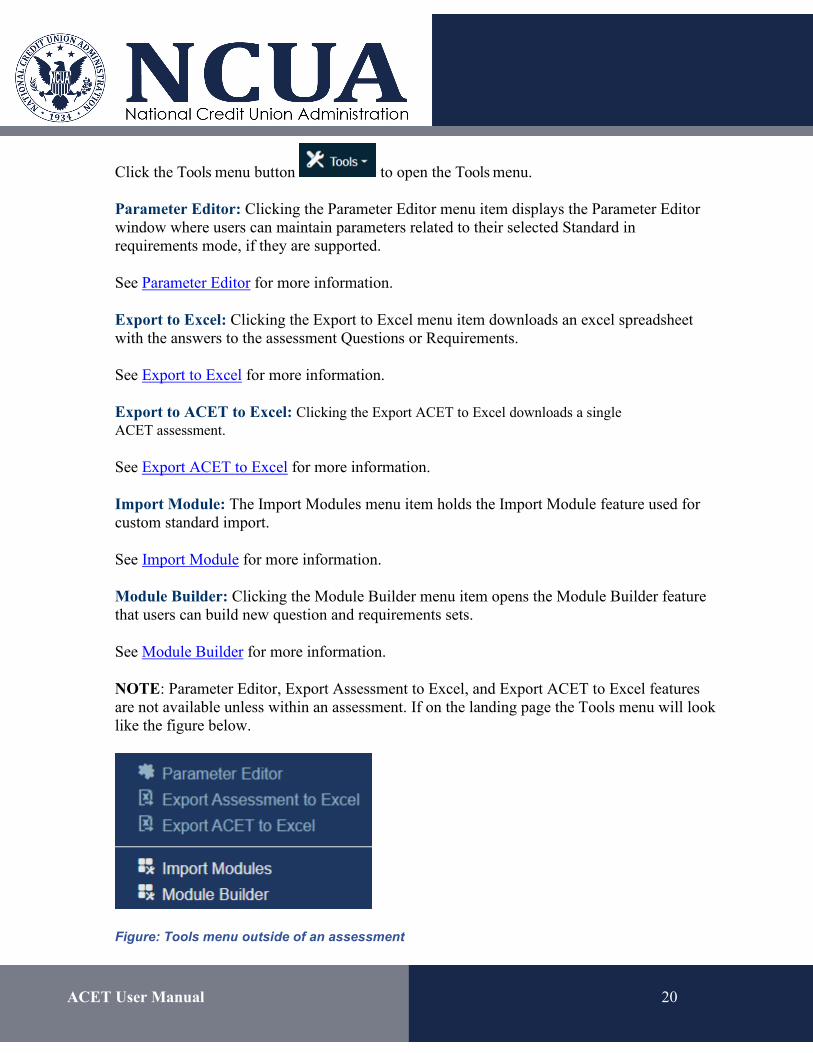
NOTE: Parameter Editor, Export Assessment to Excel, and Export ACET to Excel features are not available unless within an assessment. If on the landing page the Tools menu will look like the figure below.
Figure: Tools menu outside of an assessment
ACET User Manual 21
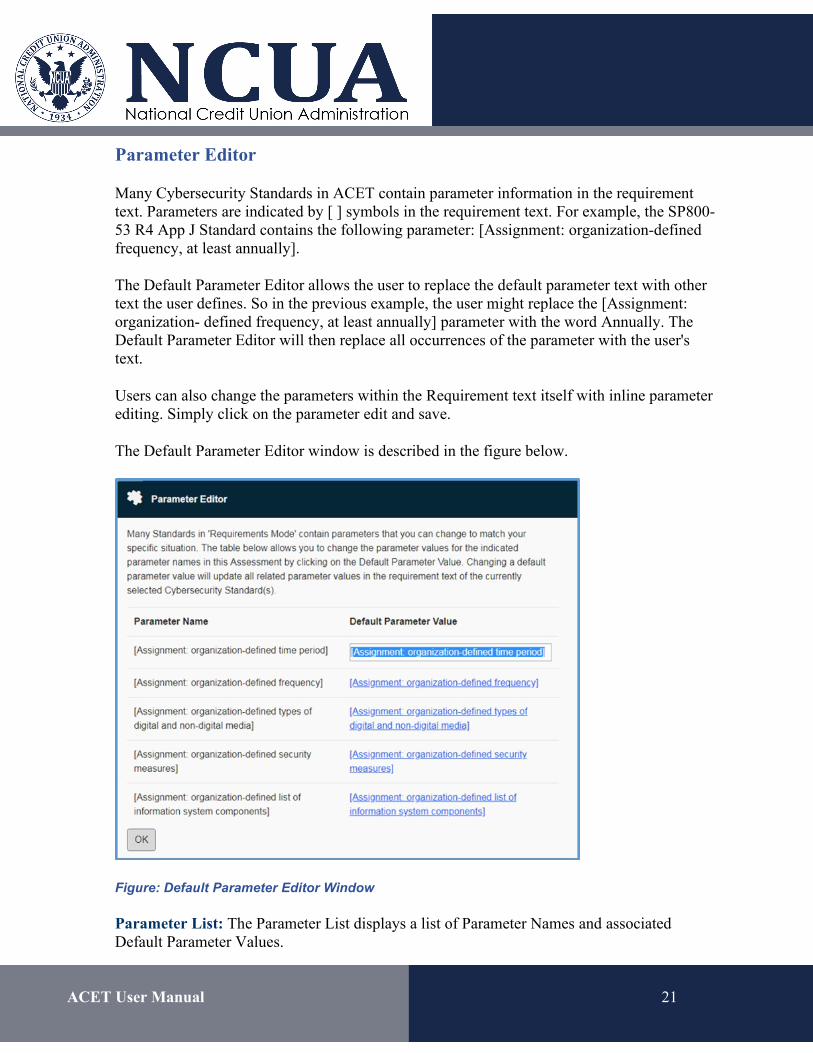
Parameter Editor
Many Cybersecurity Standards in ACET contain parameter information in the requirement text. Parameters are indicated by [ ] symbols in the requirement text. For example, the SP800-53 R4 App J Standard contains the following parameter: [Assignment: organization-defined frequency, at least annually].
The Default Parameter Editor allows the user to replace the default parameter text with other text the user defines. So in the previous example, the user might replace the [Assignment: organization- defined frequency, at least annually] parameter with the word Annually. The Default Parameter Editor will then replace all occurrences of the parameter with the user's text.
Users can also change the parameters within the Requirement text itself with inline parameter editing. Simply click on the parameter edit and save.
The Default Parameter Editor window is described in the figure below.
Figure: Default Parameter Editor Window
Parameter List: The Parameter List displays a list of Parameter Names and associated Default Parameter Values.

ACET User Manual 22
The Parameter Name column shows the name of the parameter and cannot be changed.
The Default Parameter Value column displays the current parameter values associated with the parameter names for the selected Standards as seen in the Requirement text on the Assessment screen. The parameter values are initially the same as the Parameter Name but can be changed by the user. To change a parameter value, double-click the cell containing the desired Default
Parameter Value and enter new parameter text. Perform the same with any other parameters. Once finished, click the "Ok" button.
All parameter values in the requirement text will then be updated with the entered text for the given parameter names throughout the assessment.
Figure: Inline Parameter Editing
Export to Excel
Selecting the "Export to Excel" link will download an excel copy of your assessment results.
NOTE: The excel report shows either Questions or Requirements. Whichever mode has more answers will show in the report.
ACET User Manual 23
Figure: Export to Excel Output
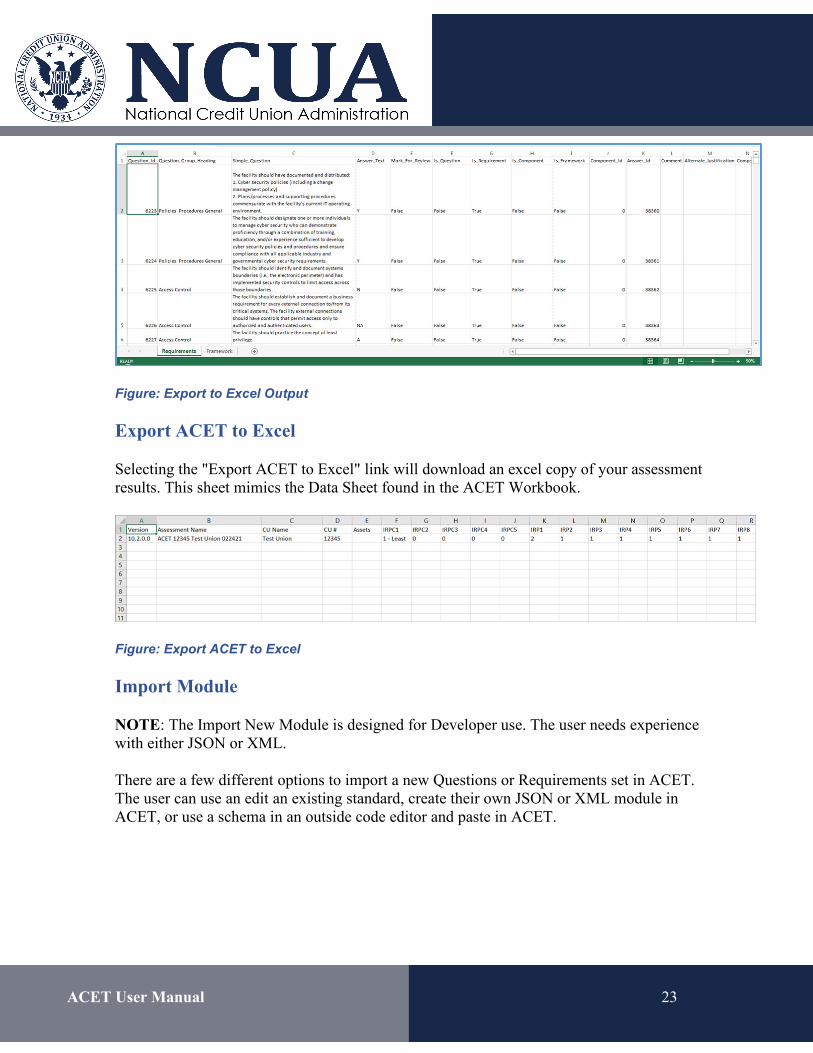
Export ACET to Excel
Selecting the "Export ACET to Excel" link will download an excel copy of your assessment results. This sheet mimics the Data Sheet found in the ACET Workbook.
Figure: Export ACET to Excel
Import Module
NOTE: The Import New Module is designed for Developer use. The user needs experience with either JSON or XML.
There are a few different options to import a new Questions or Requirements set in ACET. The user can use an edit an existing standard, create their own JSON or XML module in ACET, or use a schema in an outside code editor and paste in ACET.
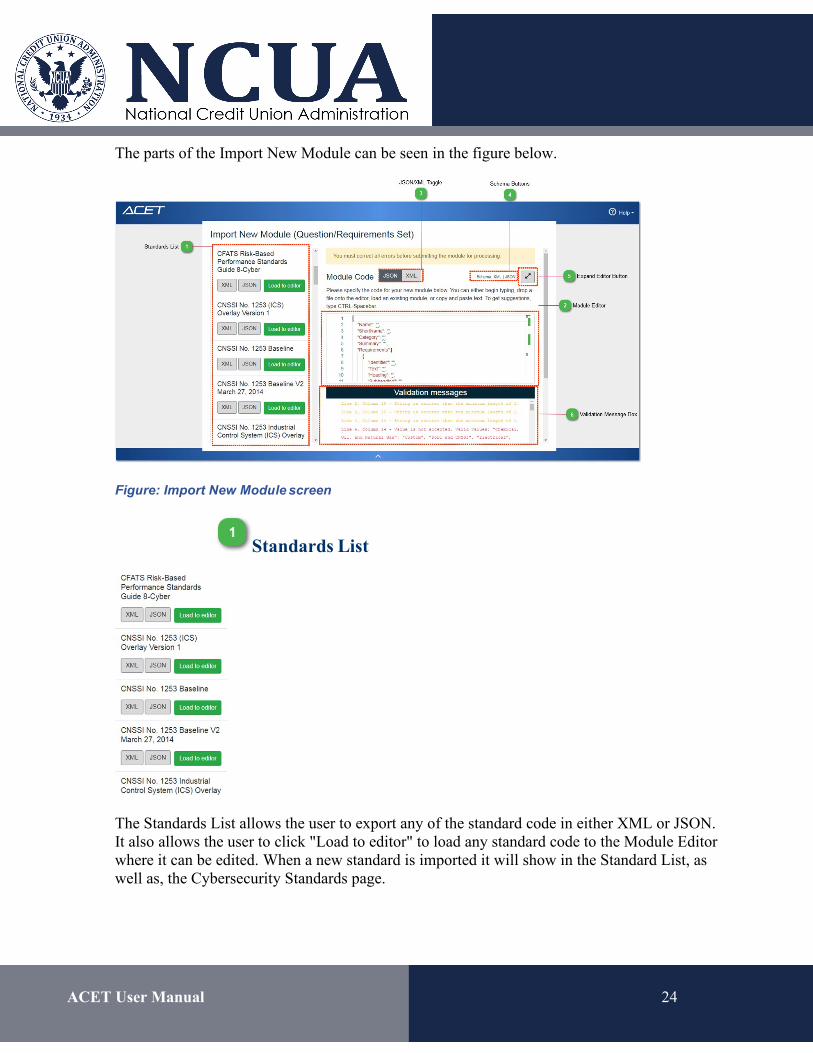
ACET User Manual 24
The parts of the Import New Module can be seen in the figure below.
Figure: Import New Module screen
Standards List
The Standards List allows the user to export any of the standard code in either XML or JSON. It also allows the user to click "Load to editor" to load any standard code to the Module Editor where it can be edited. When a new standard is imported it will show in the Standard List, as well as, the Cybersecurity Standards page.
ACET User Manual 25
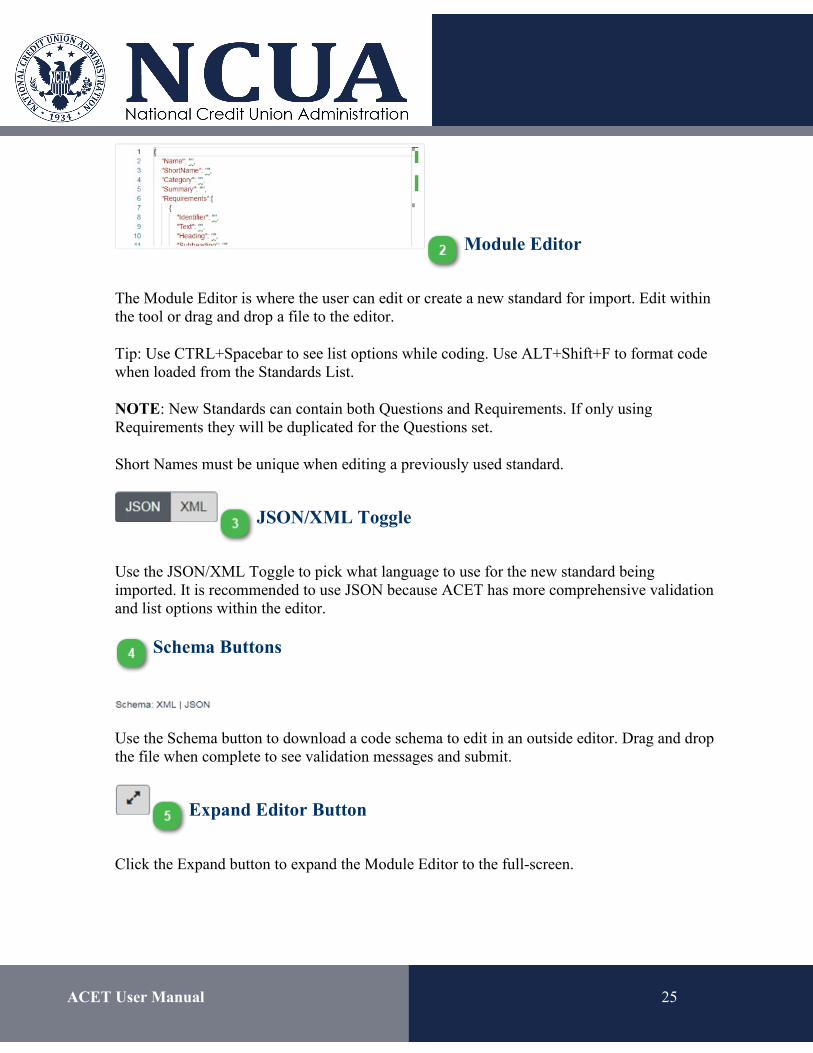
Module Editor
The Module Editor is where the user can edit or create a new standard for import. Edit within the tool or drag and drop a file to the editor.
Tip: Use CTRL+Spacebar to see list options while coding. Use ALT+Shift+F to format code when loaded from the Standards List.
NOTE: New Standards can contain both Questions and Requirements. If only using Requirements they will be duplicated for the Questions set.
Short Names must be unique when editing a previously used standard.
JSON/XML Toggle
Use the JSON/XML Toggle to pick what language to use for the new standard being imported. It is recommended to use JSON because ACET has more comprehensive validation and list options within the editor.
Schema Buttons
Use the Schema button to download a code schema to edit in an outside editor. Drag and drop the file when complete to see validation messages and submit.
Expand Editor Button
Click the Expand button to expand the Module Editor to the full-screen.
ACET User Manual 26
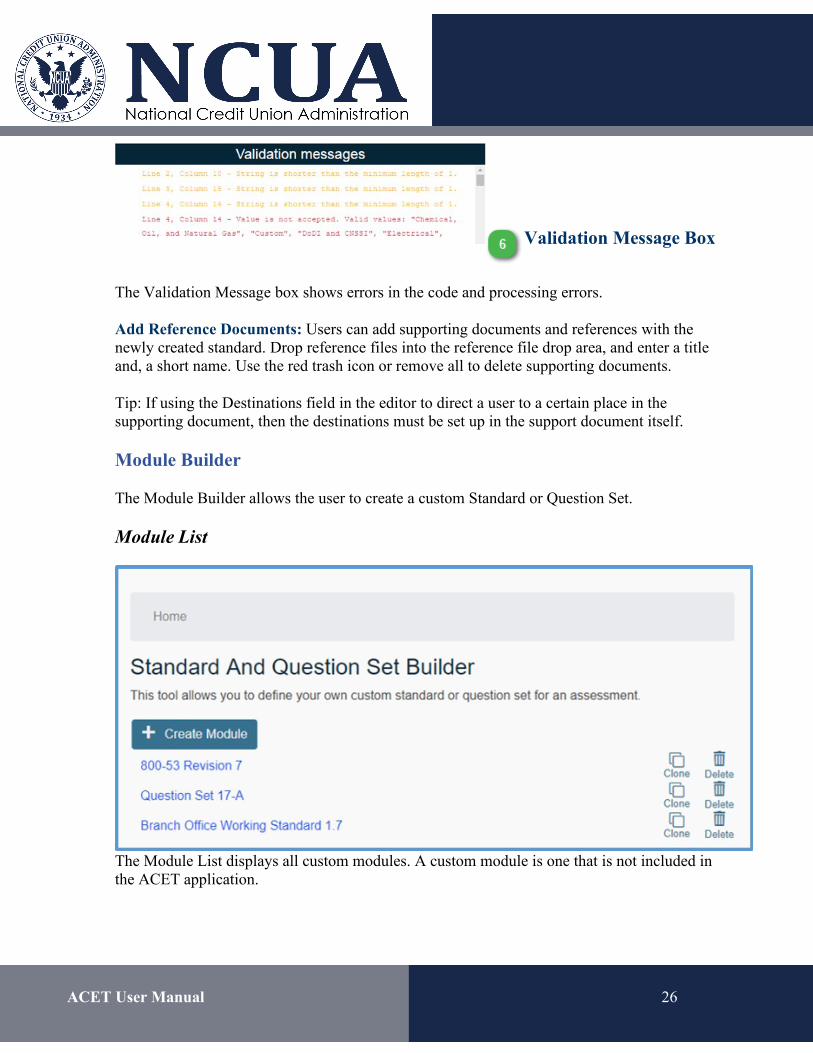
Validation Message Box
The Validation Message box shows errors in the code and processing errors.
Add Reference Documents: Users can add supporting documents and references with the newly created standard. Drop reference files into the reference file drop area, and enter a title and, a short name. Use the red trash icon or remove all to delete supporting documents.
Tip: If using the Destinations field in the editor to direct a user to a certain place in the supporting document, then the destinations must be set up in the support document itself.
Module Builder
The Module Builder allows the user to create a custom Standard or Question Set.
Module List
The Module List displays all custom modules. A custom module is one that is not included in the ACET application.
ACET User Manual 27
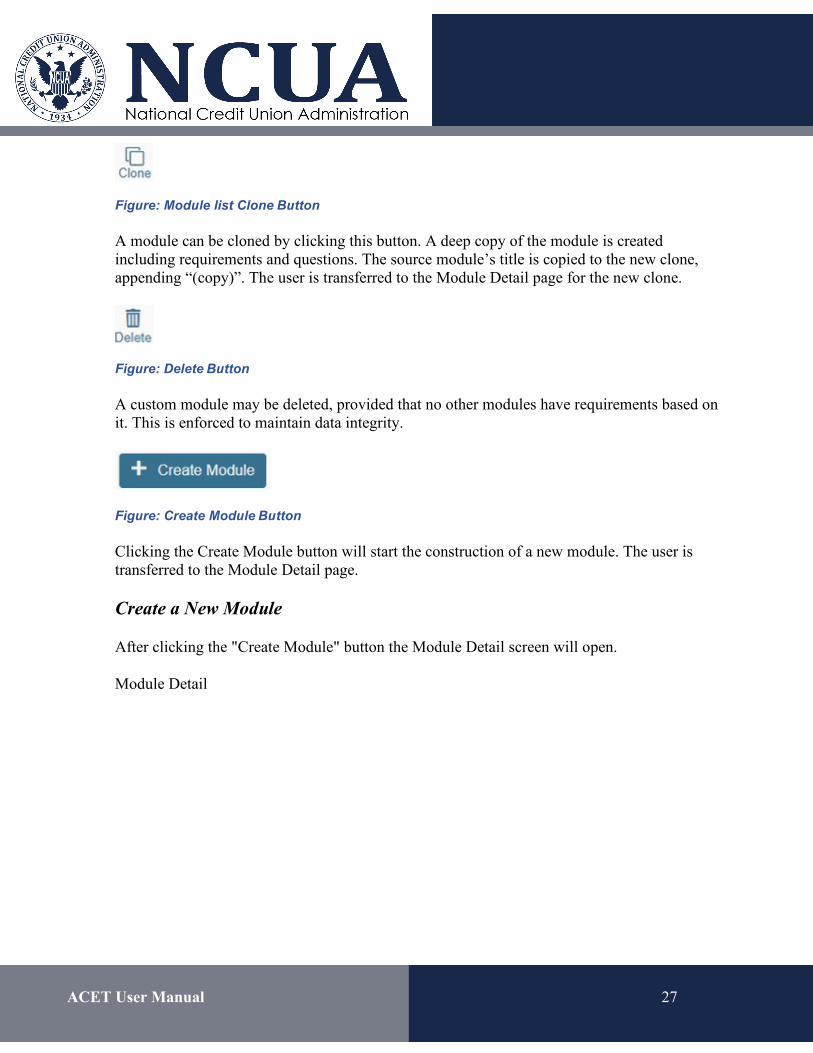
Figure: Module list Clone Button
A module can be cloned by clicking this button. A deep copy of the module is created including requirements and questions. The source module’s title is copied to the new clone, appending “(copy)”. The user is transferred to the Module Detail page for the new clone.
Figure: Delete Button
A custom module may be deleted, provided that no other modules have requirements based on it. This is enforced to maintain data integrity.
Figure: Create Module Button
Clicking the Create Module button will start the construction of a new module. The user is transferred to the Module Detail page.
Create a New Module
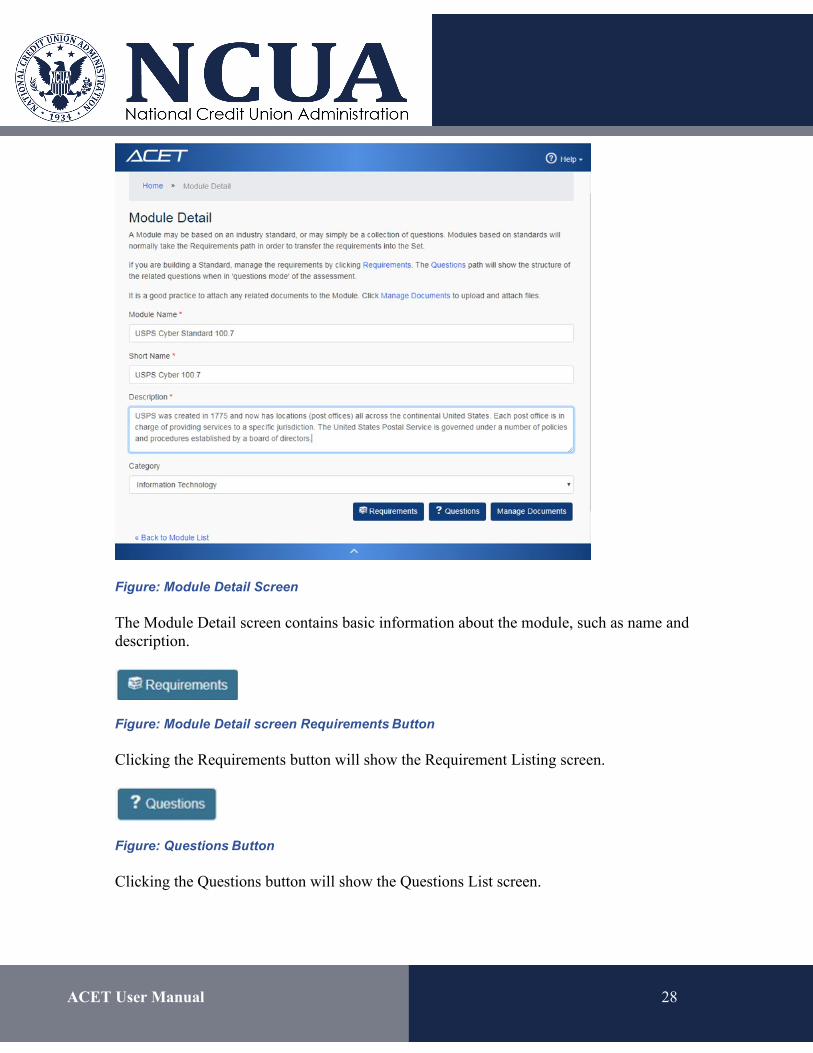
After clicking the "Create Module" button the Module Detail screen will open.
Module Detail
ACET User Manual 28
Figure: Module Detail Screen
The Module Detail screen contains basic information about the module, such as name and description.
Figure: Module Detail screen Requirements Button
Clicking the Requirements button will show the Requirement Listing screen.
Figure: Questions Button
Clicking the Questions button will show the Questions List screen.
ACET User Manual 29
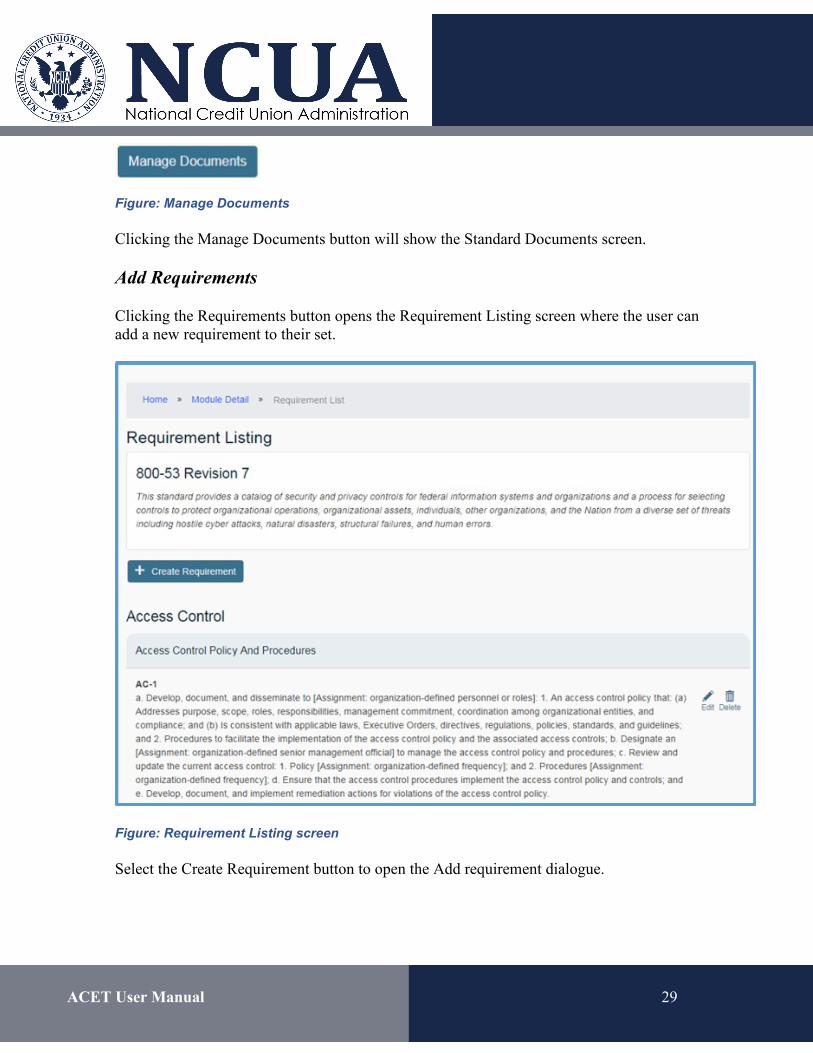
Figure: Manage Documents
Clicking the Manage Documents button will show the Standard Documents screen.
Add Requirements
Clicking the Requirements button opens the Requirement Listing screen where the user can add a new requirement to their set.
Figure: Requirement Listing screen
Select the Create Requirement button to open the Add requirement dialogue.
ACET User Manual 30
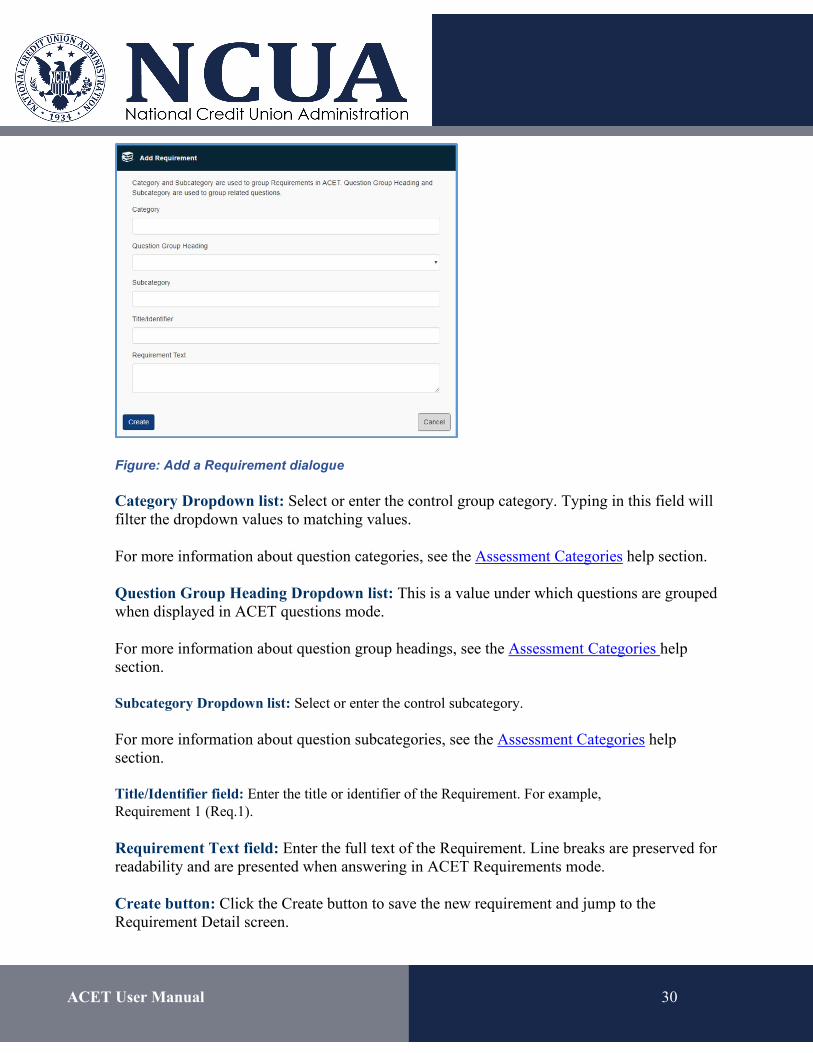
Figure: Add a Requirement dialogue
Category Dropdown list: Select or enter the control group category. Typing in this field will filter the dropdown values to matching values.
For more information about question categories, see the Assessment Categories help section.
Question Group Heading Dropdown list: This is a value under which questions are grouped when displayed in ACET questions mode.
For more information about question group headings, see the Assessment Categories help section.
Subcategory Dropdown list: Select or enter the control subcategory.
For more information about question subcategories, see the Assessment Categories help section.
Title/Identifier field: Enter the title or identifier of the Requirement. For example, Requirement 1 (Req.1).
Requirement Text field: Enter the full text of the Requirement. Line breaks are preserved for readability and are presented when answering in ACET Requirements mode.
Create button: Click the Create button to save the new requirement and jump to the Requirement Detail screen.
ACET User Manual 31
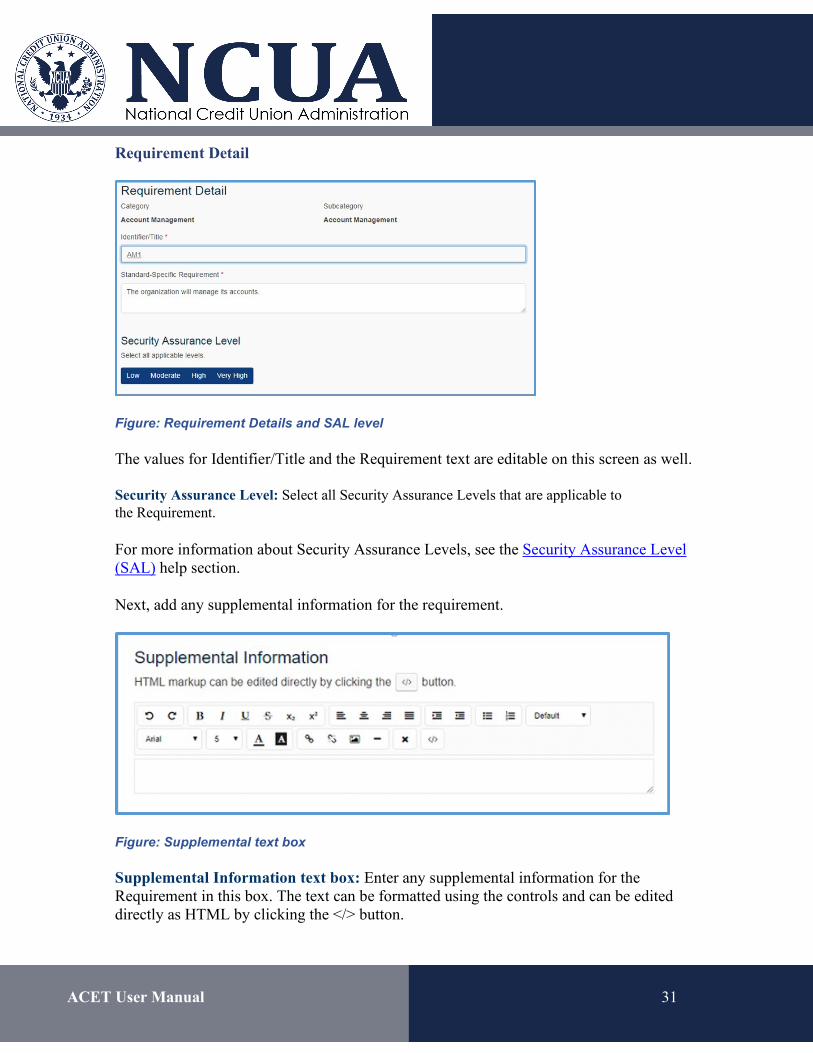
Requirement Detail
Figure: Requirement Details and SAL level
The values for Identifier/Title and the Requirement text are editable on this screen as well.
Security Assurance Level: Select all Security Assurance Levels that are applicable to the Requirement.
For more information about Security Assurance Levels, see the Security Assurance Level (SAL) help section.
Next, add any supplemental information for the requirement.
Figure: Supplemental text box
Supplemental Information text box: Enter any supplemental information for the Requirement in this box. The text can be formatted using the controls and can be edited directly as HTML by clicking the </> button.
ACET User Manual 32
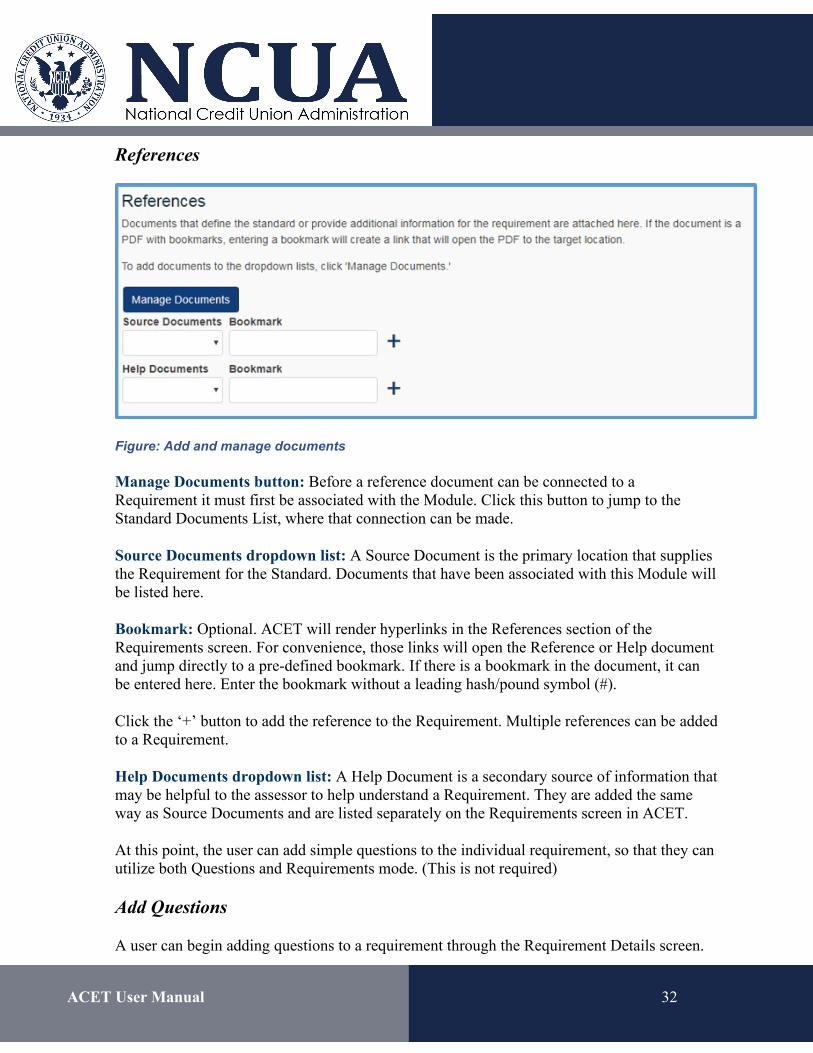
References
Figure: Add and manage documents
Manage Documents button: Before a reference document can be connected to a Requirement it must first be associated with the Module. Click this button to jump to the Standard Documents List, where that connection can be made.
Source Documents dropdown list: A Source Document is the primary location that supplies the Requirement for the Standard. Documents that have been associated with this Module will be listed here.
Bookmark: Optional. ACET will render hyperlinks in the References section of the Requirements screen. For convenience, those links will open the Reference or Help document and jump directly to a pre-defined bookmark. If there is a bookmark in the document, it can be entered here. Enter the bookmark without a leading hash/pound symbol (#).
Click the ‘+’ button to add the reference to the Requirement. Multiple references can be added to a Requirement.
Help Documents dropdown list: A Help Document is a secondary source of information that may be helpful to the assessor to help understand a Requirement. They are added the same way as Source Documents and are listed separately on the Requirements screen in ACET.
At this point, the user can add simple questions to the individual requirement, so that they can utilize both Questions and Requirements mode. (This is not required)
Add Questions
A user can begin adding questions to a requirement through the Requirement Details screen.
ACET User Manual 33
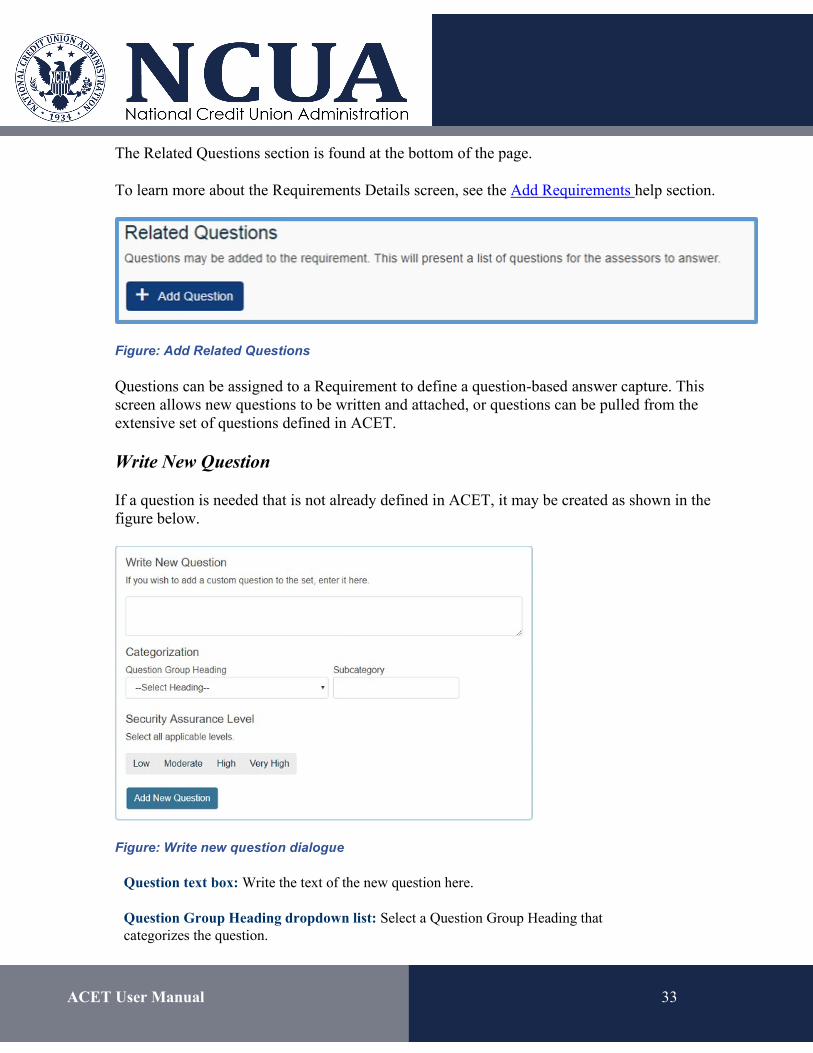
The Related Questions section is found at the bottom of the page.
To learn more about the Requirements Details screen, see the Add Requirements help section.
Figure: Add Related Questions
Questions can be assigned to a Requirement to define a question-based answer capture. This screen allows new questions to be written and attached, or questions can be pulled from the extensive set of questions defined in ACET.
Write New Question
If a question is needed that is not already defined in ACET, it may be created as shown in the figure below.
Figure: Write new question dialogue
Question text box: Write the text of the new question here.
Question Group Heading dropdown list: Select a Question Group Heading that categorizes the question.
ACET User Manual 34
Subcategory: Select or enter the control subcategory.
Security Assurance Level: Select all Security Assurance Levels that are applicable to the Question.
Add New Question button: Click to create the new question.
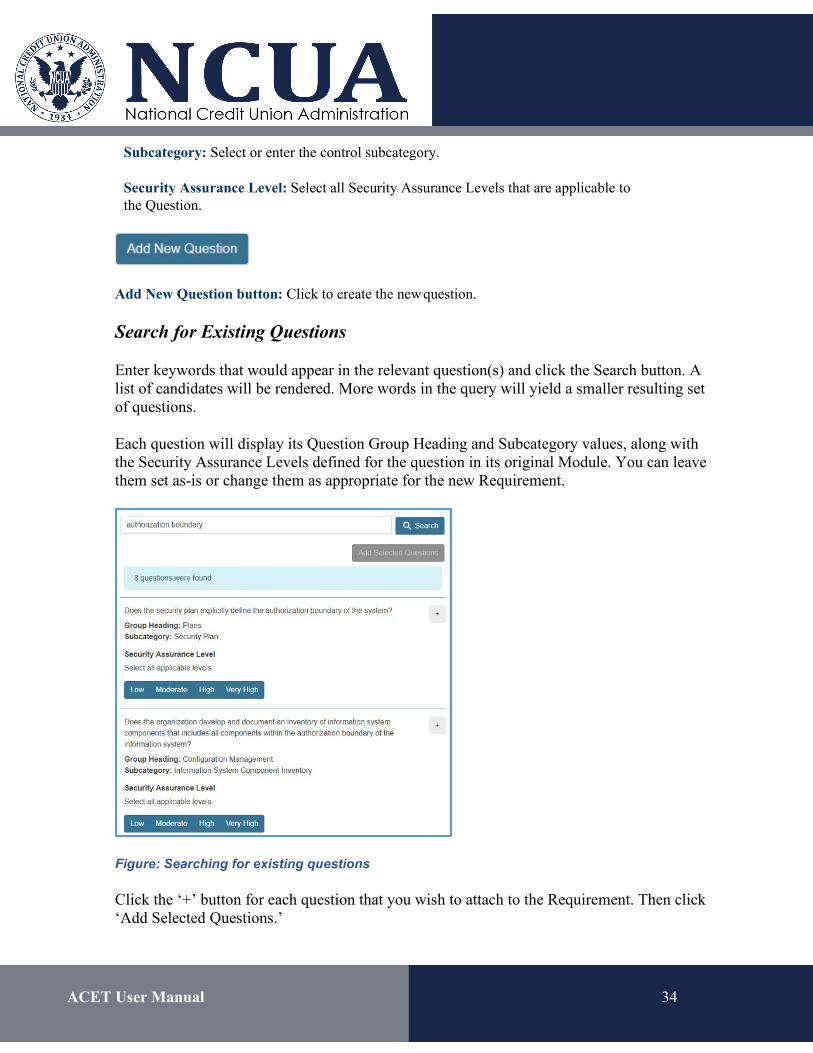
Search for Existing Questions
Enter keywords that would appear in the relevant question(s) and click the Search button. A list of candidates will be rendered. More words in the query will yield a smaller resulting set of questions.
Each question will display its Question Group Heading and Subcategory values, along with the Security Assurance Levels defined for the question in its original Module. You can leave them set as-is or change them as appropriate for the new Requirement.
Figure: Searching for existing questions
Click the ‘+’ button for each question that you wish to attach to the Requirement. Then click ‘Add Selected Questions.’

ACET User Manual 35
Manage Documents Standard Documents List
The Standard Documents screen lists all reference documents that are delivered with ACET or have been added to support custom modules.
Figure: Standards document list
Figure: Import a Document Button
Opens a dialog to select a reference document for upload.
Filter
Typing in this field will trim the displayed list of documents to make it easier to locate the desired document.
List checkboxes
Any documents that should be available to associate with a Requirement, either as a Source Document or Help Document can be checked in this list.
ACET User Manual 36
NOTE: Checking a document in this list only makes the document available for inclusion when defining Requirements. To add a document to a Requirement, see the instructions for the Requirement Detail page.
Resource Library
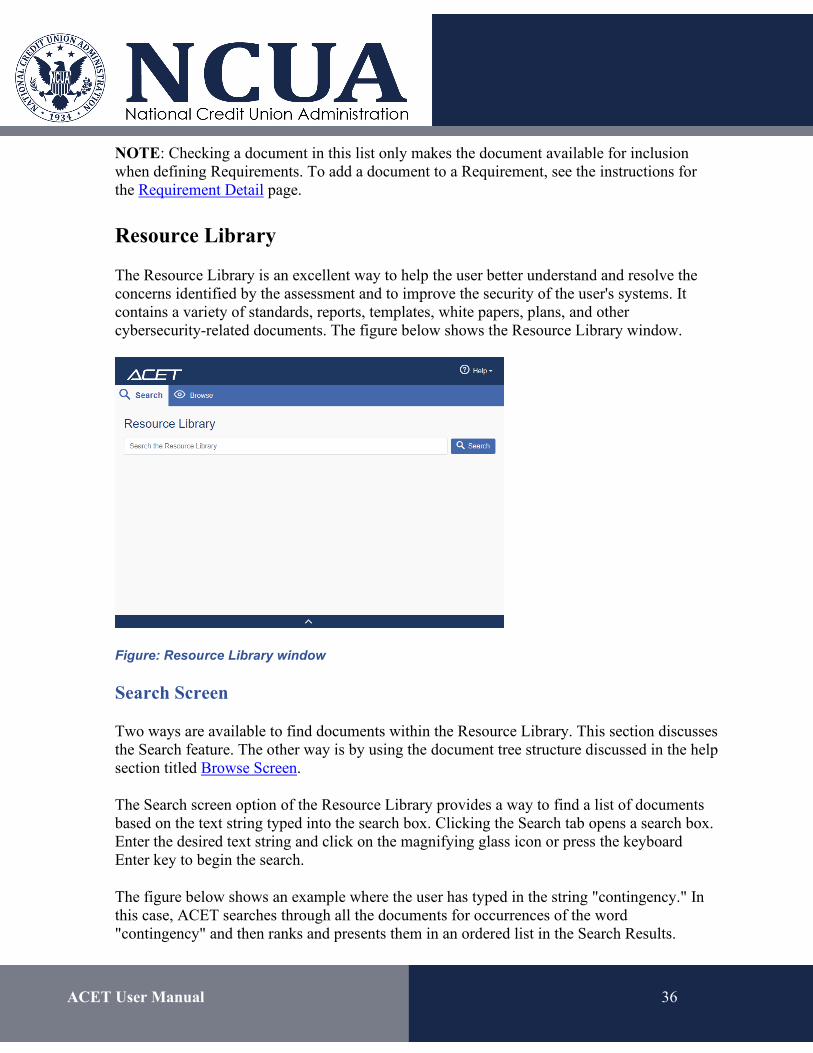
The Resource Library is an excellent way to help the user better understand and resolve the concerns identified by the assessment and to improve the security of the user's systems. It contains a variety of standards, reports, templates, white papers, plans, and other cybersecurity-related documents. The figure below shows the Resource Library window.
Figure: Resource Library window
Search Screen
Two ways are available to find documents within the Resource Library. This section discusses the Search feature. The other way is by using the document tree structure discussed in the help section titled Browse Screen.
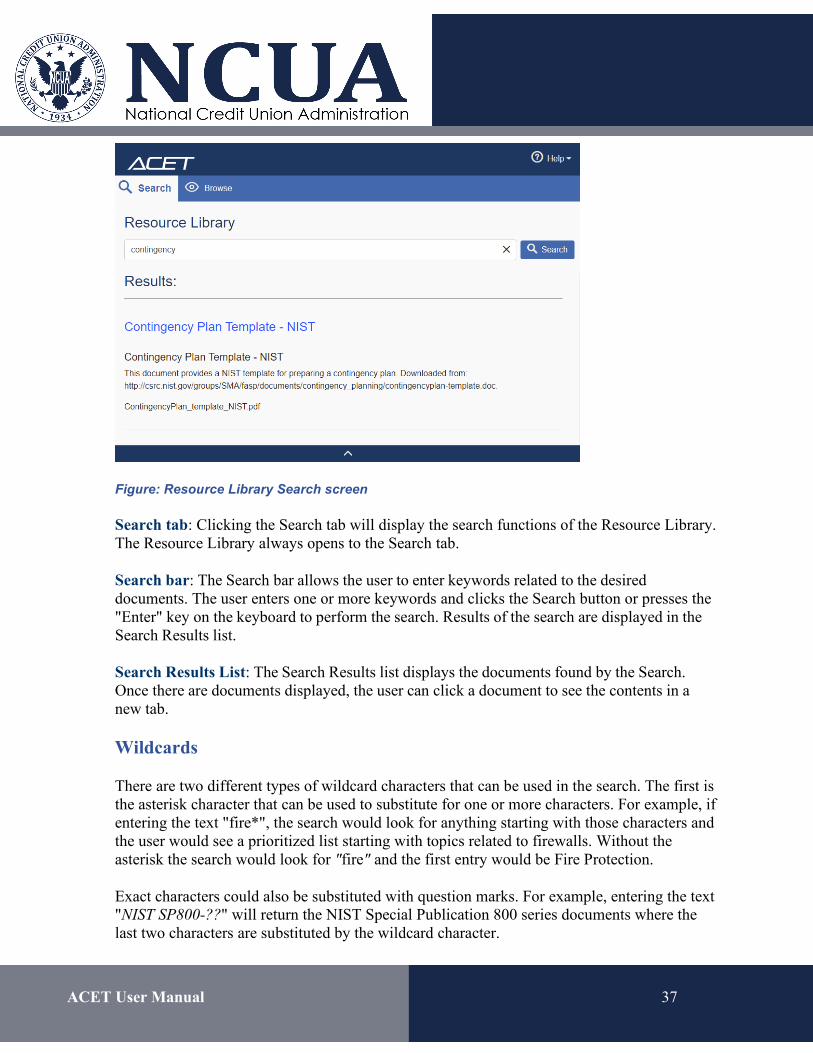
The Search screen option of the Resource Library provides a way to find a list of documents based on the text string typed into the search box. Clicking the Search tab opens a search box. Enter the desired text string and click on the magnifying glass icon or press the keyboard Enter key to begin the search.
The figure below shows an example where the user has typed in the string "contingency." In this case, ACET searches through all the documents for occurrences of the word "contingency" and then ranks and presents them in an ordered list in the Search Results.
ACET User Manual 37
Figure: Resource Library Search screen
Search tab: Clicking the Search tab will display the search functions of the Resource Library. The Resource Library always opens to the Search tab.
Search bar: The Search bar allows the user to enter keywords related to the desired documents. The user enters one or more keywords and clicks the Search button or presses the "Enter" key on the keyboard to perform the search. Results of the search are displayed in the Search Results list.
Search Results List: The Search Results list displays the documents found by the Search. Once there are documents displayed, the user can click a document to see the contents in a new tab.
Wildcards
There are two different types of wildcard characters that can be used in the search. The first is the asterisk character that can be used to substitute for one or more characters. For example, if entering the text "fire*", the search would look for anything starting with those characters and the user would see a prioritized list starting with topics related to firewalls. Without the asterisk the search would look for "fire" and the first entry would be Fire Protection.
Exact characters could also be substituted with question marks. For example, entering the text "NIST SP800-??" will return the NIST Special Publication 800 series documents where the last two characters are substituted by the wildcard character.
ACET User Manual 38
When ACET is searching for the text string, it is evaluating both the title and the content of the document. While the search will evaluate any character string, it is recommended that the entry be as specific as possible to limit and refine the list. The search is not sophisticated enough to find similar or close spellings. A misspelled word like "Ciber-Security" will return no results.
Topic Searches
In most cases, the user will be searching for a specific subject; however, the search capability can also be used to search for types of documents. In the example above, the returned document is a DHS recommended practice. By entering "recommended practice" in the search text box, the user can create a list of all the recommended practices developed by DHS as well as other documents that may use that phrase.
Browse Screen
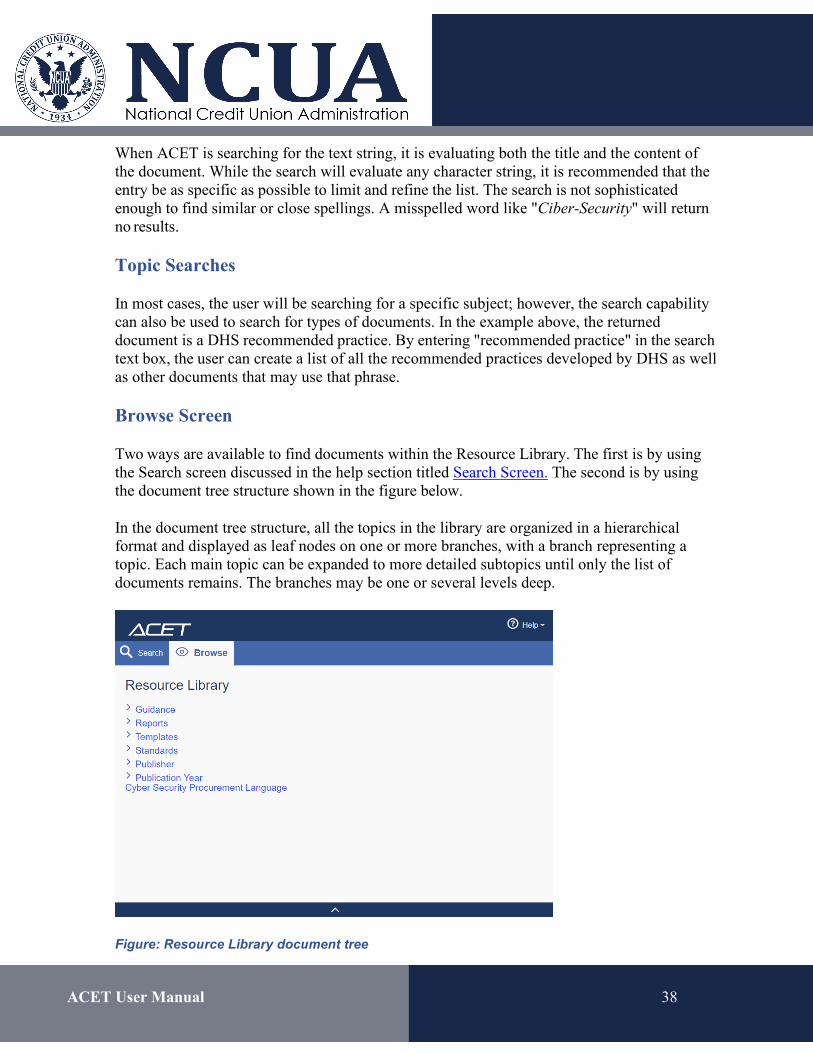
Two ways are available to find documents within the Resource Library. The first is by using the Search screen discussed in the help section titled Search Screen. The second is by using the document tree structure shown in the figure below.
In the document tree structure, all the topics in the library are organized in a hierarchical format and displayed as leaf nodes on one or more branches, with a branch representing a topic. Each main topic can be expanded to more detailed subtopics until only the list of documents remains. The branches may be one or several levels deep.
Figure: Resource Library document tree
ACET User Manual 39
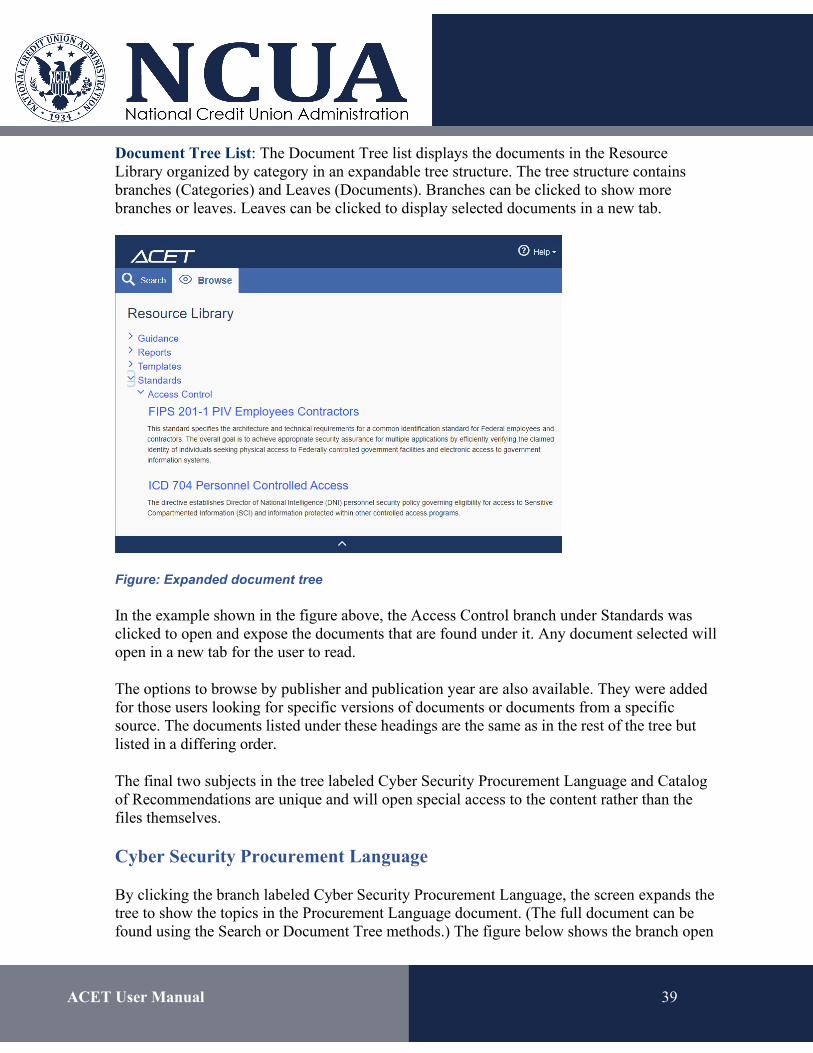
Document Tree List: The Document Tree list displays the documents in the Resource Library organized by category in an expandable tree structure. The tree structure contains branches (Categories) and Leaves (Documents). Branches can be clicked to show more branches or leaves. Leaves can be clicked to display selected documents in a new tab.
Figure: Expanded document tree
In the example shown in the figure above, the Access Control branch under Standards was clicked to open and expose the documents that are found under it. Any document selected will open in a new tab for the user to read.
The options to browse by publisher and publication year are also available. They were added for those users looking for specific versions of documents or documents from a specific source. The documents listed under these headings are the same as in the rest of the tree but listed in a differing order.
The final two subjects in the tree labeled Cyber Security Procurement Language and Catalog of Recommendations are unique and will open special access to the content rather than the files themselves.
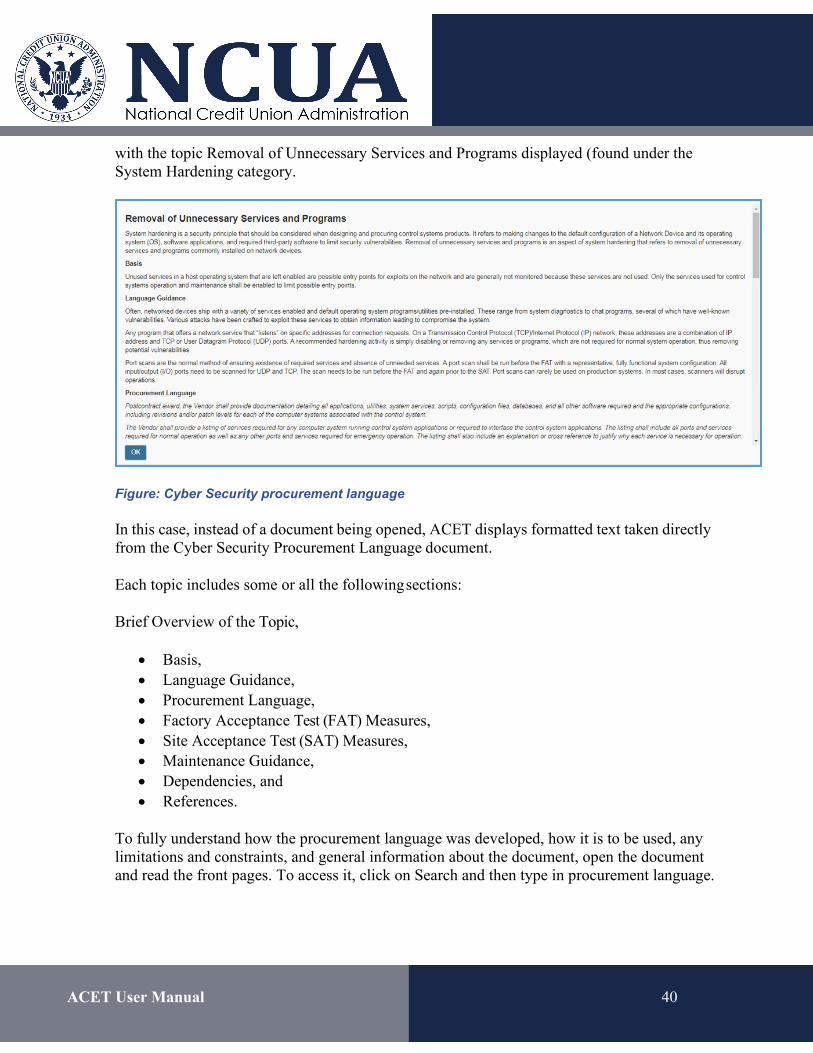
Cyber Security Procurement Language
By clicking the branch labeled Cyber Security Procurement Language, the screen expands the tree to show the topics in the Procurement Language document. (The full document can be found using the Search or Document Tree methods.) The figure below shows the branch open
ACET User Manual 40
with the topic Removal of Unnecessary Services and Programs displayed (found under the System Hardening category.
Figure: Cyber Security procurement language
In this case, instead of a document being opened, ACET displays formatted text taken directly from the Cyber Security Procurement Language document.
Each topic includes some or all the following sections:
Brief Overview of the Topic,
• Basis, • Language Guidance, • Procurement Language, • Factory Acceptance Test (FAT) Measures, • Site Acceptance Test (SAT) Measures, • Maintenance Guidance, • Dependencies, and • References.
To fully understand how the procurement language was developed, how it is to be used, any limitations and constraints, and general information about the document, open the document and read the front pages. To access it, click on Search and then type in procurement language.
ACET User Manual 41
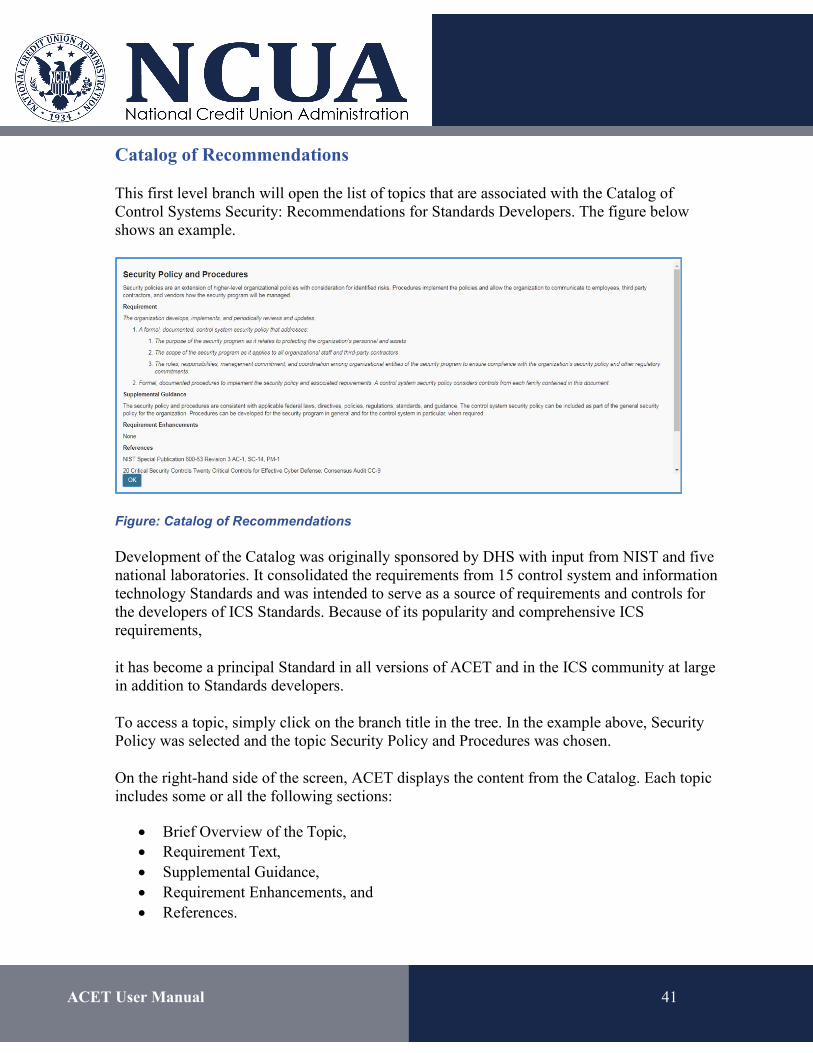
Catalog of Recommendations
This first level branch will open the list of topics that are associated with the Catalog of Control Systems Security: Recommendations for Standards Developers. The figure below shows an example.
Figure: Catalog of Recommendations
Development of the Catalog was originally sponsored by DHS with input from NIST and five national laboratories. It consolidated the requirements from 15 control system and information technology Standards and was intended to serve as a source of requirements and controls for the developers of ICS Standards. Because of its popularity and comprehensive ICS requirements,
it has become a principal Standard in all versions of ACET and in the ICS community at large in addition to Standards developers.
To access a topic, simply click on the branch title in the tree. In the example above, Security Policy was selected and the topic Security Policy and Procedures was chosen.
On the right-hand side of the screen, ACET displays the content from the Catalog. Each topic includes some or all the following sections:
• Brief Overview of the Topic, • Requirement Text, • Supplemental Guidance, • Requirement Enhancements, and • References.
ACET User Manual 42
Like the procurement language document, to fully understand the background and intent of the Catalog, open and read the front pages.
Help Menu
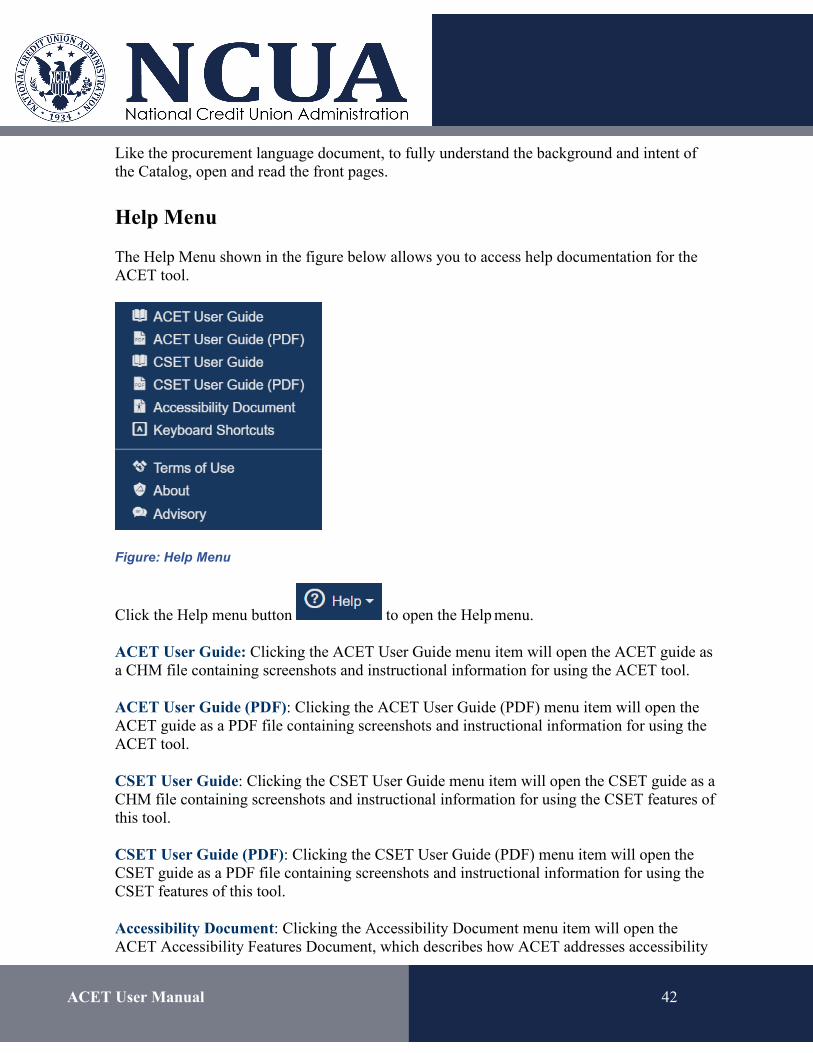
The Help Menu shown in the figure below allows you to access help documentation for the ACET tool.
Figure: Help Menu
Click the Help menu button to open the Help menu.
ACET User Guide: Clicking the ACET User Guide menu item will open the ACET guide as a CHM file containing screenshots and instructional information for using the ACET tool.
ACET User Guide (PDF): Clicking the ACET User Guide (PDF) menu item will open the ACET guide as a PDF file containing screenshots and instructional information for using the ACET tool.
CSET User Guide: Clicking the CSET User Guide menu item will open the CSET guide as a CHM file containing screenshots and instructional information for using the CSET features of this tool.
CSET User Guide (PDF): Clicking the CSET User Guide (PDF) menu item will open the CSET guide as a PDF file containing screenshots and instructional information for using the CSET features of this tool.
Accessibility Document: Clicking the Accessibility Document menu item will open the ACET Accessibility Features Document, which describes how ACET addresses accessibility
ACET User Manual 43
issues including the use of high contrast mode and keyboard access.
See Accessibility Document for more information.
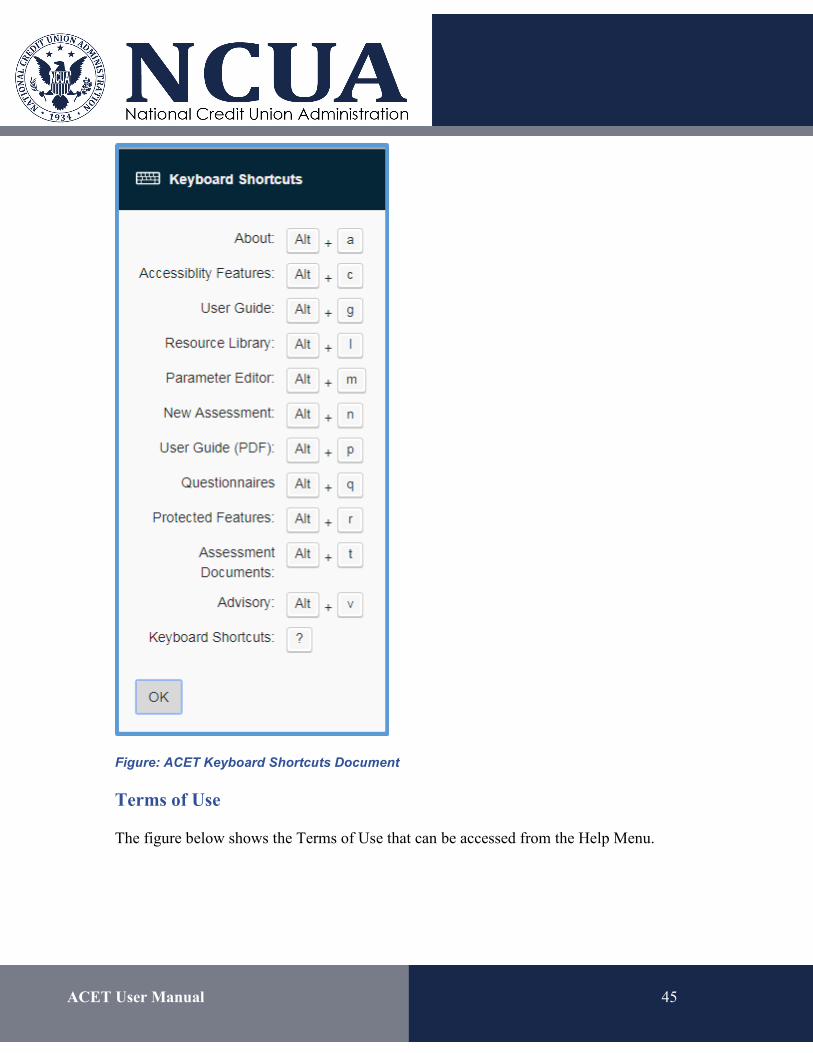
Keyboard Shortcuts: Clicking the Keyboard Shortcuts menu item will open the ACET Keyboard Shortcuts document, which contains a list of all keyboard shortcuts available to users of the ACET tool.
See Keyboard Shortcuts for more information.
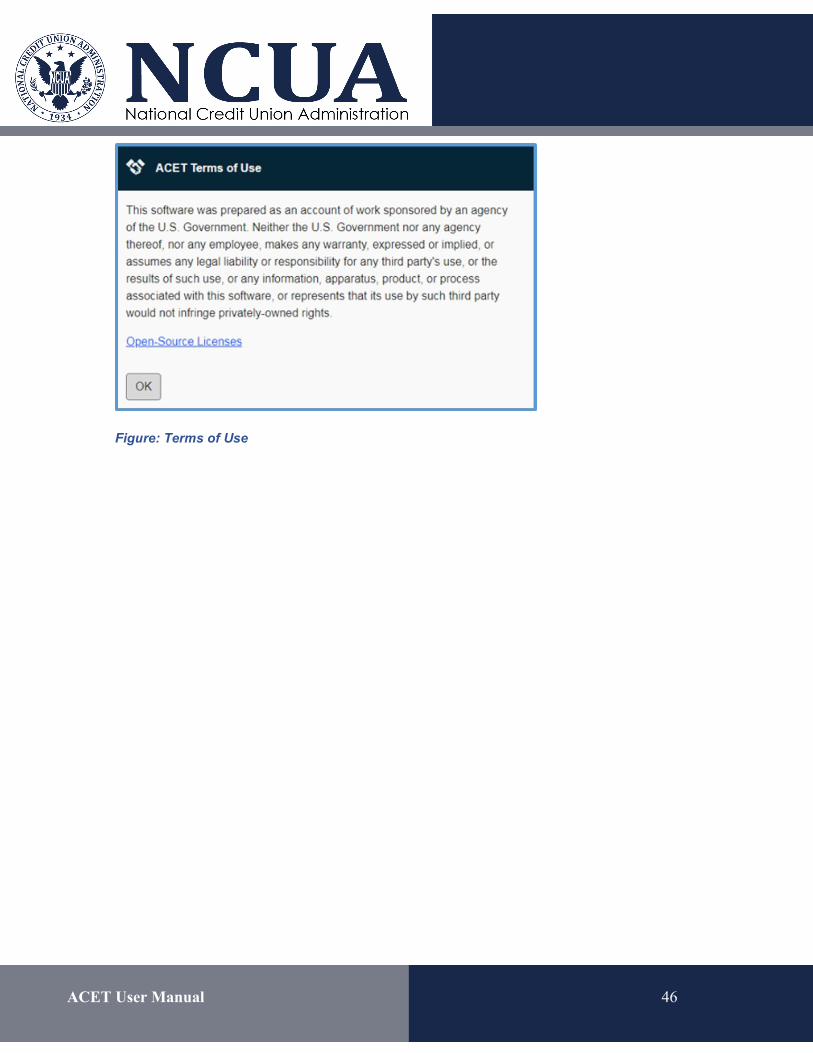
Terms of Use: Clicking the Terms of Use menu item will open the ACET Terms of Use that describes the terms that users agree to when using ACET.
See Terms of Use for more information.
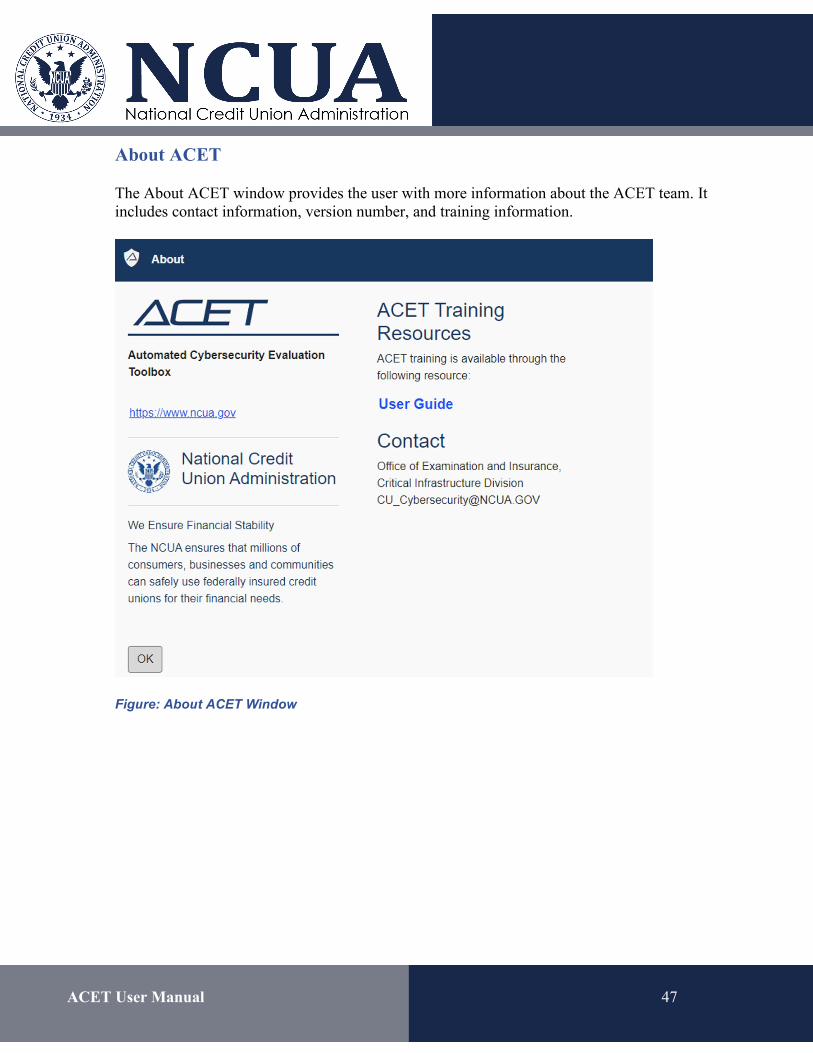
About: Clicking the About ACET menu item will open the About ACET window containing version information, website links to videos, training and contact information for the ACET team.
See About ACET for more information.
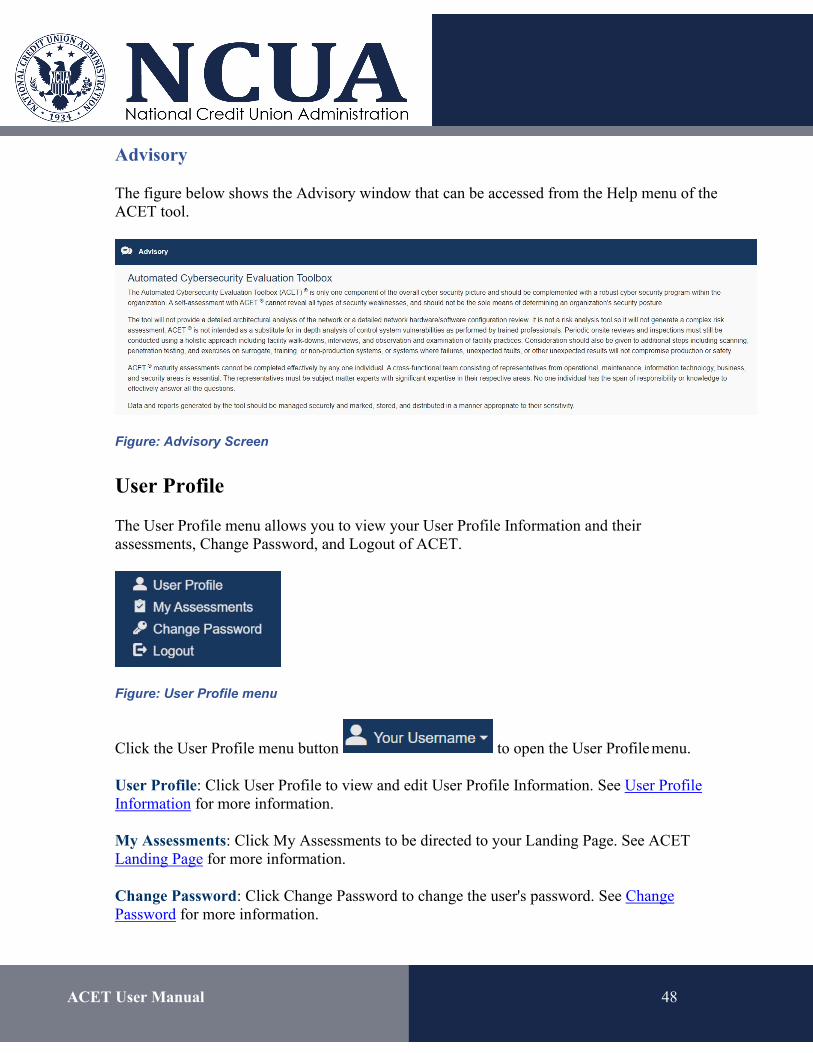
Advisory: Clicking the Advisory menu item will open the Advisory window that contains disclaimer information.
See Advisory for more information
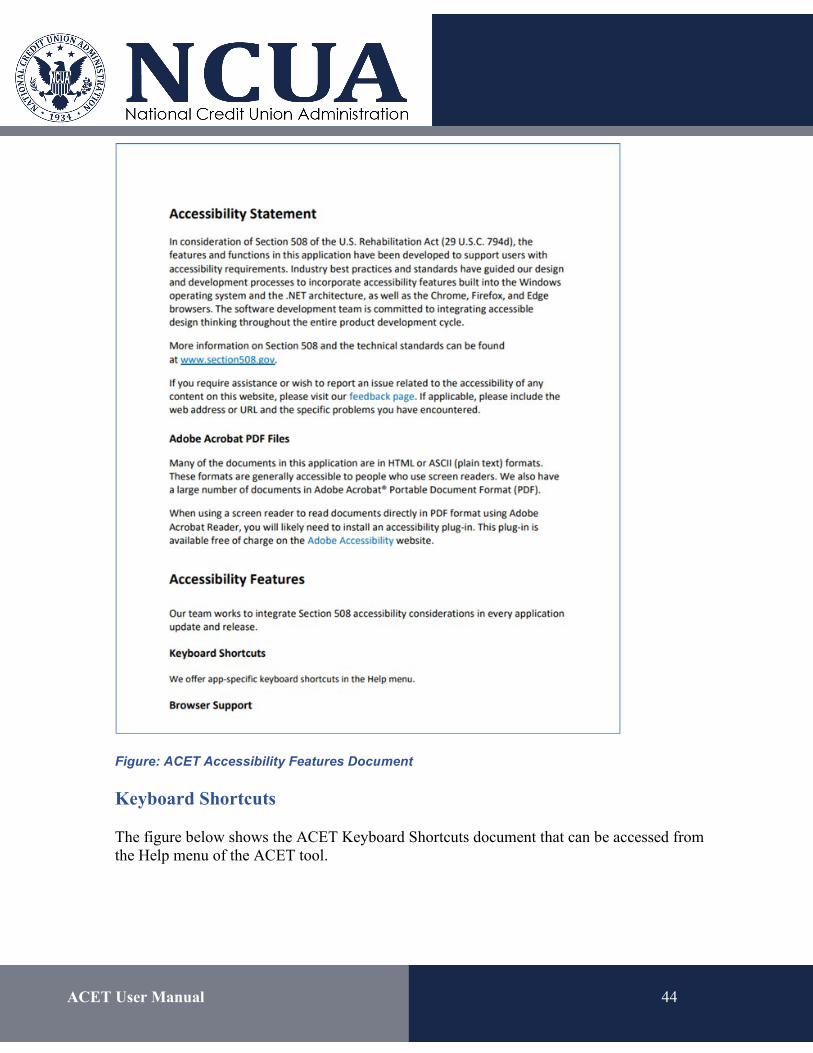
ACET Accessibility Features
The figure below shows the ACET Accessibility Features document that can be accessed from the Help menu of the ACET tool.
ACET User Manual 44
Figure: ACET Accessibility Features Document
Keyboard Shortcuts
The figure below shows the ACET Keyboard Shortcuts document that can be accessed from the Help menu of the ACET tool.
ACET User Manual 45
Figure: ACET Keyboard Shortcuts Document
Terms of Use
The figure below shows the Terms of Use that can be accessed from the Help Menu.
ACET User Manual 46
Figure: Terms of Use
ACET User Manual 47
About ACET
The About ACET window provides the user with more information about the ACET team. It includes contact information, version number, and training information.
Figure: About ACET Window
ACET User Manual 48
Advisory
The figure below shows the Advisory window that can be accessed from the Help menu of the ACET tool.
Figure: Advisory Screen
User Profile
The User Profile menu allows you to view your User Profile Information and their assessments, Change Password, and Logout of ACET.
Figure: User Profile menu
Click the User Profile menu button to open the User Profile menu.
User Profile: Click User Profile to view and edit User Profile Information. See User Profile Information for more information.
My Assessments: Click My Assessments to be directed to your Landing Page. See ACET Landing Page for more information.
Change Password: Click Change Password to change the user's password. See Change Password for more information.
ACET User Manual 49
Logout: Click Logout to be logged out of ACET and returned to the Home Page.
NOTE: When using the stand-alone version of ACET the only option available in the User Profile menu is "My Assessments". The User Profile menu will always be labeled "Local User".
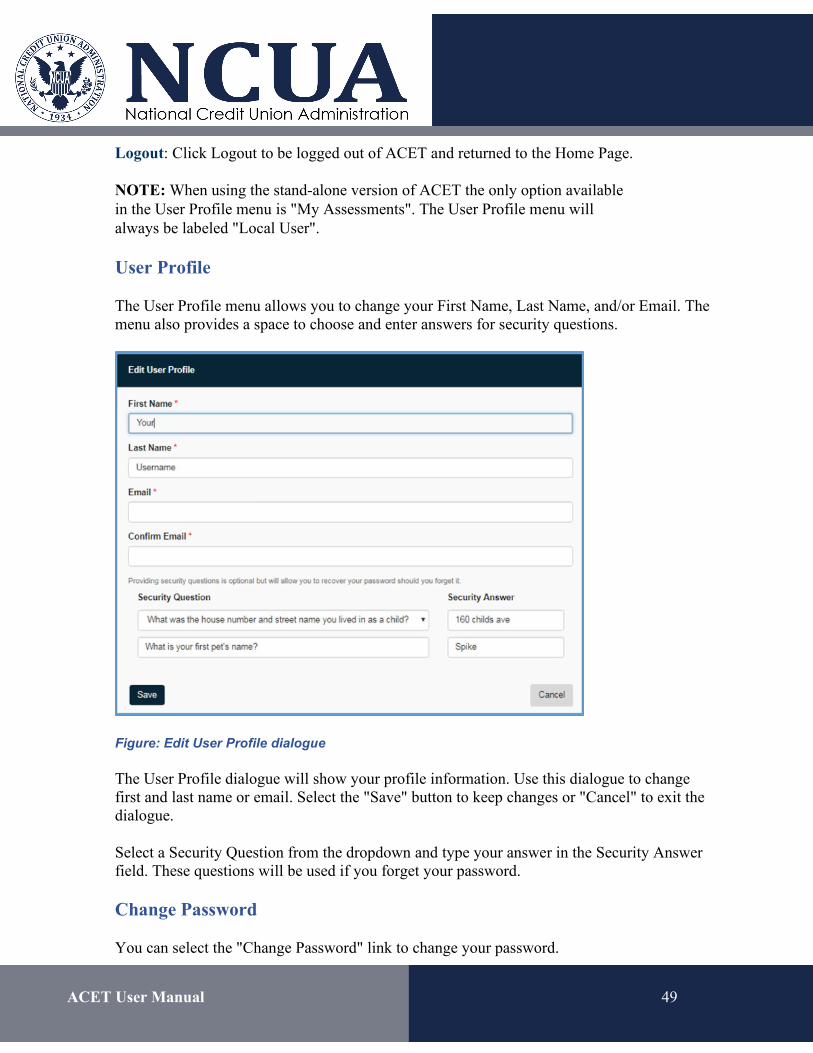
User Profile
The User Profile menu allows you to change your First Name, Last Name, and/or Email. The menu also provides a space to choose and enter answers for security questions.
Figure: Edit User Profile dialogue
The User Profile dialogue will show your profile information. Use this dialogue to change first and last name or email. Select the "Save" button to keep changes or "Cancel" to exit the dialogue.
Select a Security Question from the dropdown and type your answer in the Security Answer field. These questions will be used if you forget your password.
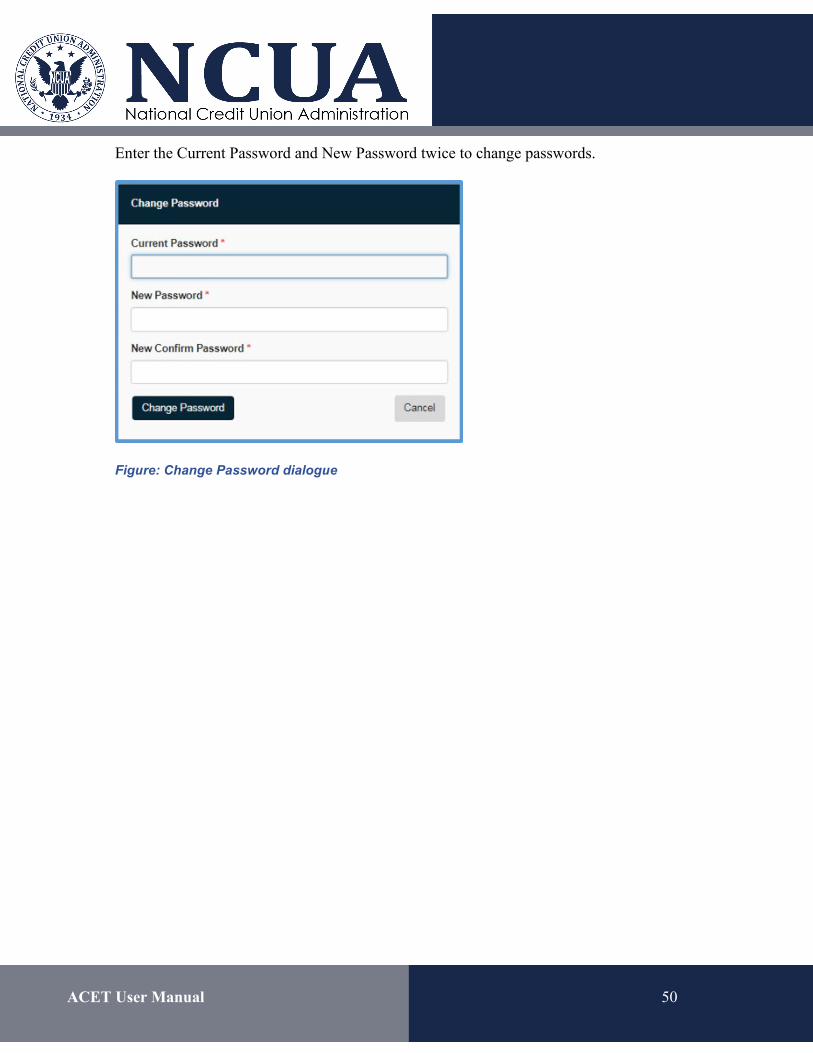
Change Password
You can select the "Change Password" link to change your password.
ACET User Manual 50
Enter the Current Password and New Password twice to change passwords.
Figure: Change Password dialogue
ACET User Manual 51
Operation Menus
This section addresses the main operation menus of the ACET assessment tool. They include the Prepare Menu, the Assessment menu, and the Results menu.
Prepare Menu
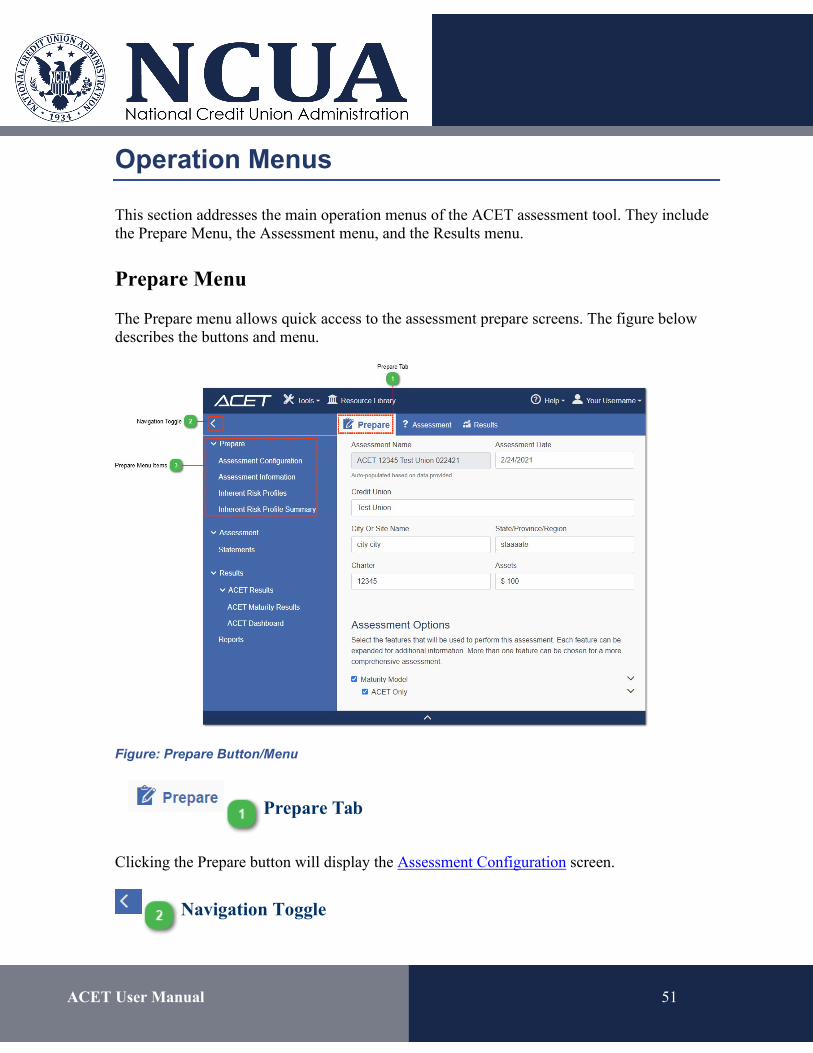
The Prepare menu allows quick access to the assessment prepare screens. The figure below describes the buttons and menu.
Figure: Prepare Button/Menu
Prepare Tab
Clicking the Prepare button will display the Assessment Configuration screen.
Navigation Toggle
ACET User Manual 52
Use the Navigation Toggle to open and close the Navigation Menu.
Prepare Menu Items
The Prepare menu items indicate the screens encountered by the user during the preparation process.
See Assessment Configuration, Assessment Information, Inherent Risk Profiles, and Inherent Risk Summary for more information.
Statements Menu
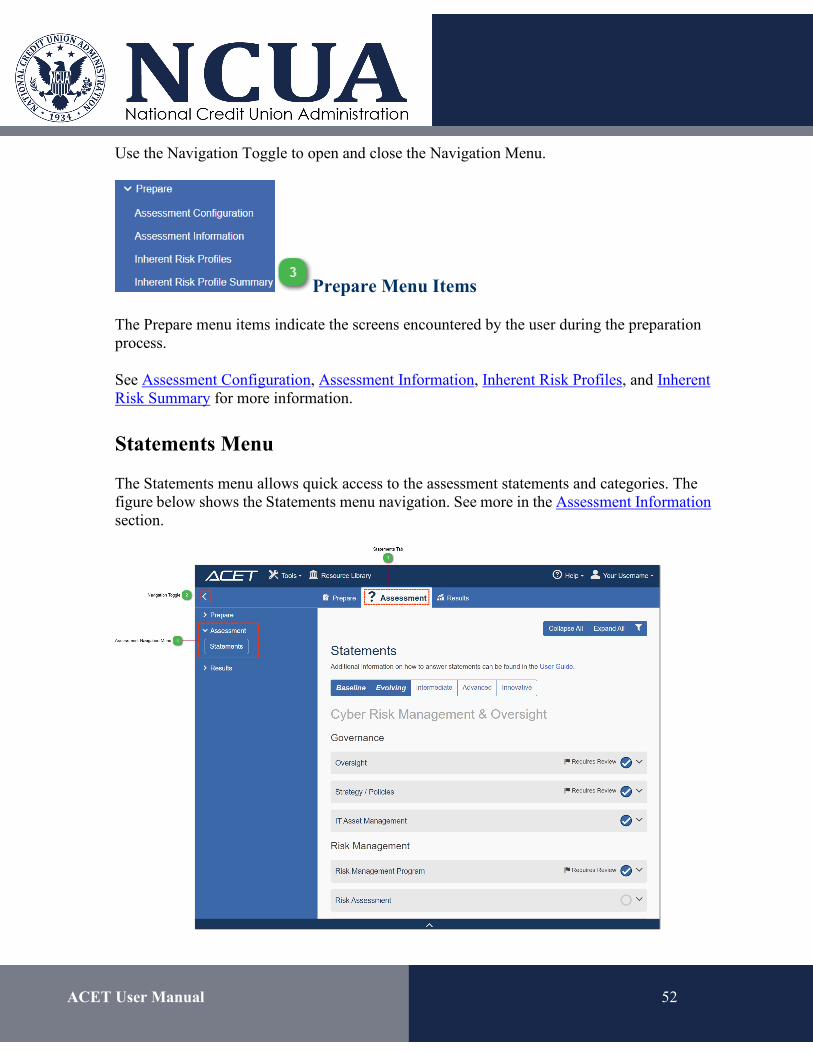
The Statements menu allows quick access to the assessment statements and categories. The figure below shows the Statements menu navigation. See more in the Assessment Information section.
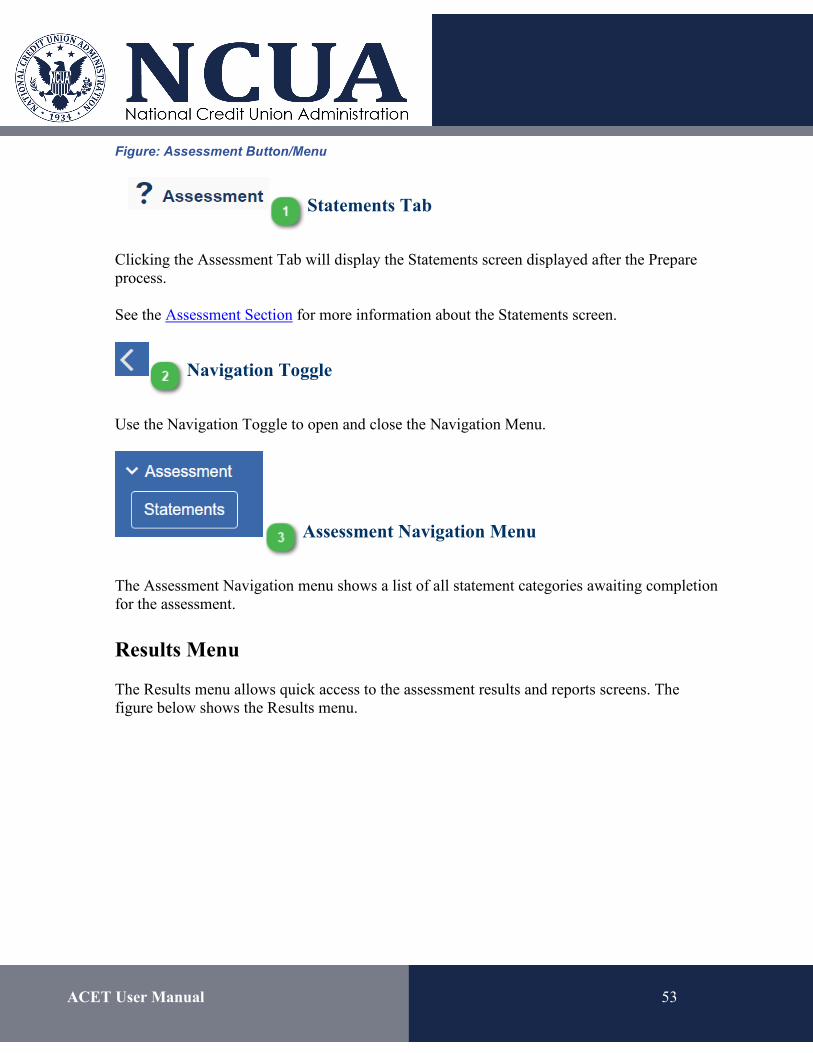
ACET User Manual 53
Figure: Assessment Button/Menu
Statements Tab
Clicking the Assessment Tab will display the Statements screen displayed after the Prepare process.
See the Assessment Section for more information about the Statements screen.
Navigation Toggle
Use the Navigation Toggle to open and close the Navigation Menu.
Assessment Navigation Menu
The Assessment Navigation menu shows a list of all statement categories awaiting completion for the assessment.
Results Menu
The Results menu allows quick access to the assessment results and reports screens. The figure below shows the Results menu.
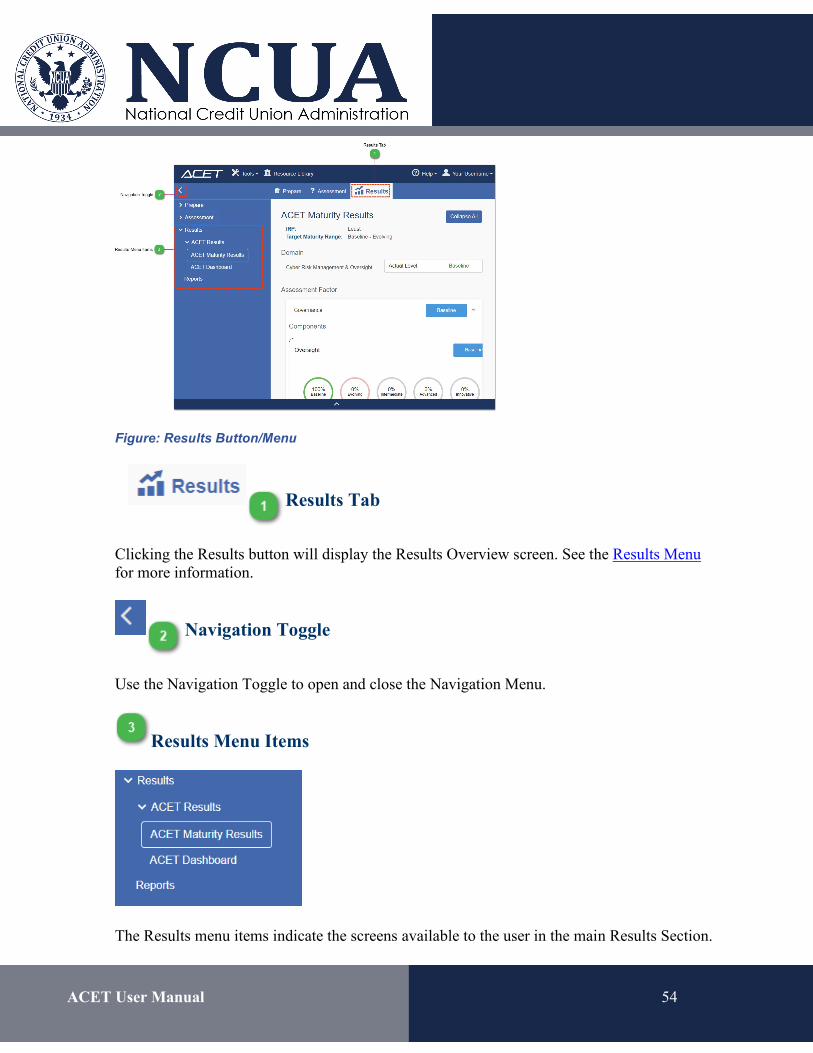
ACET User Manual 54
Figure: Results Button/Menu
Results Tab
Clicking the Results button will display the Results Overview screen. See the Results Menu for more information.
Navigation Toggle
Use the Navigation Toggle to open and close the Navigation Menu.
Results Menu Items
The Results menu items indicate the screens available to the user in the main Results Section.
ACET User Manual 55
Main ACET Window Sections
This part of the user manual contains information about the different sections of the main ACET window including the Preparation, Assessment, and Results sections.
Prepare Section
The Prepare section is where the assessment process begins. The preparation screens help you to quickly get ready to answer the appropriate questions for their facility by defining the questions that will be answered during the assessment. The following pages will describe the preparation screens in more detail.
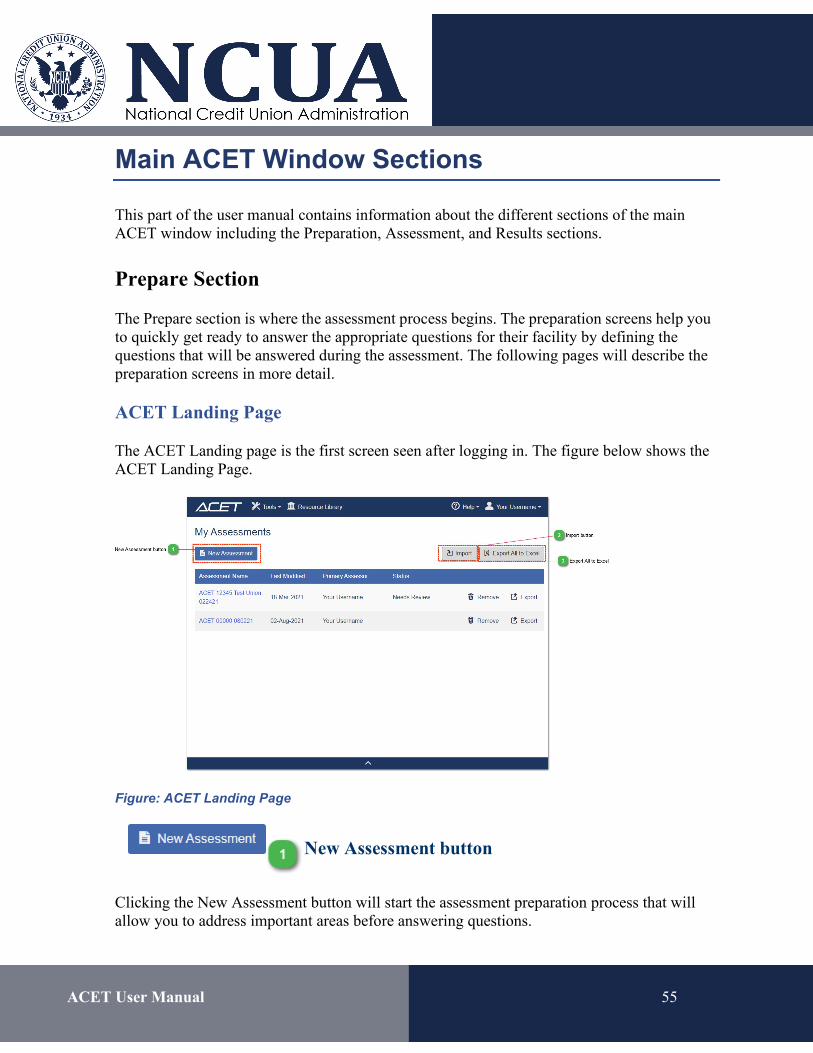
ACET Landing Page
The ACET Landing page is the first screen seen after logging in. The figure below shows the ACET Landing Page.
Figure: ACET Landing Page
New Assessment button
Clicking the New Assessment button will start the assessment preparation process that will allow you to address important areas before answering questions.
ACET User Manual 56
The first screen of the assessment preparation process is the Assessment Configuration screen.
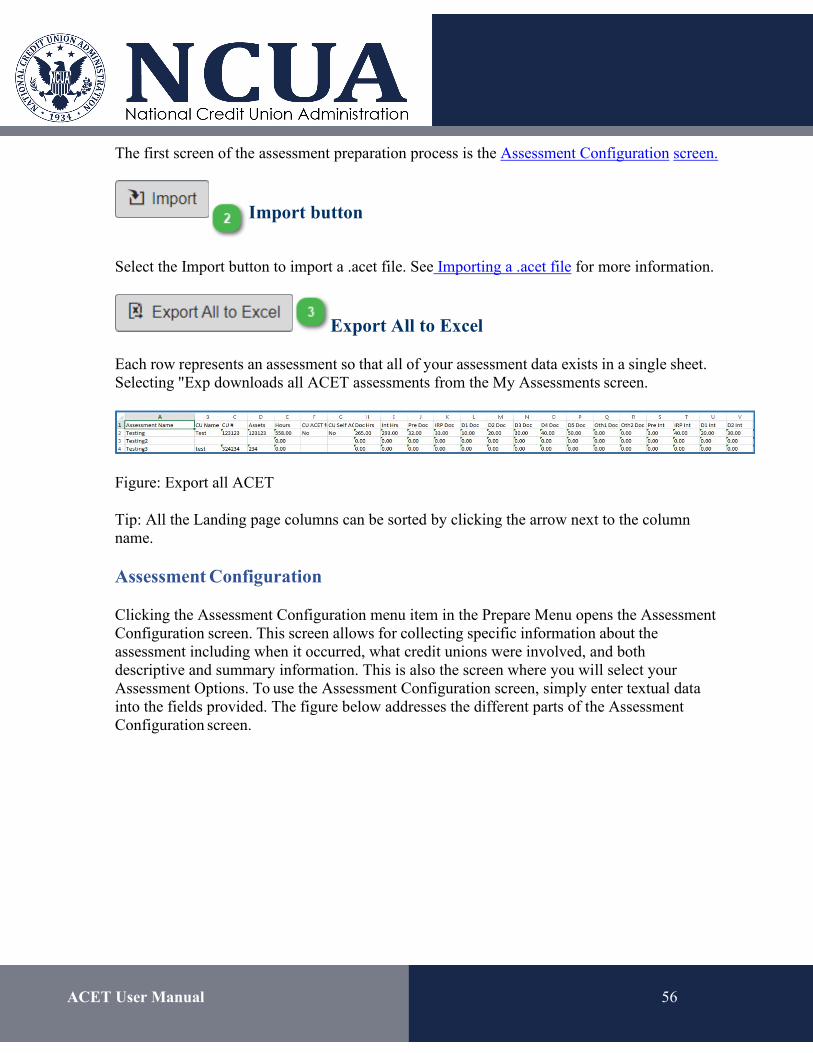
Import button
Select the Import button to import a .acet file. See Importing a .acet file for more information.
Export All to Excel
Each row represents an assessment so that all of your assessment data exists in a single sheet. Selecting "Exp downloads all ACET assessments from the My Assessments screen.
Figure: Export all ACET
Tip: All the Landing page columns can be sorted by clicking the arrow next to the column name.
Assessment Configuration
Clicking the Assessment Configuration menu item in the Prepare Menu opens the Assessment Configuration screen. This screen allows for collecting specific information about the assessment including when it occurred, what credit unions were involved, and both descriptive and summary information. This is also the screen where you will select your Assessment Options. To use the Assessment Configuration screen, simply enter textual data into the fields provided. The figure below addresses the different parts of the Assessment Configuration screen.
ACET User Manual 57
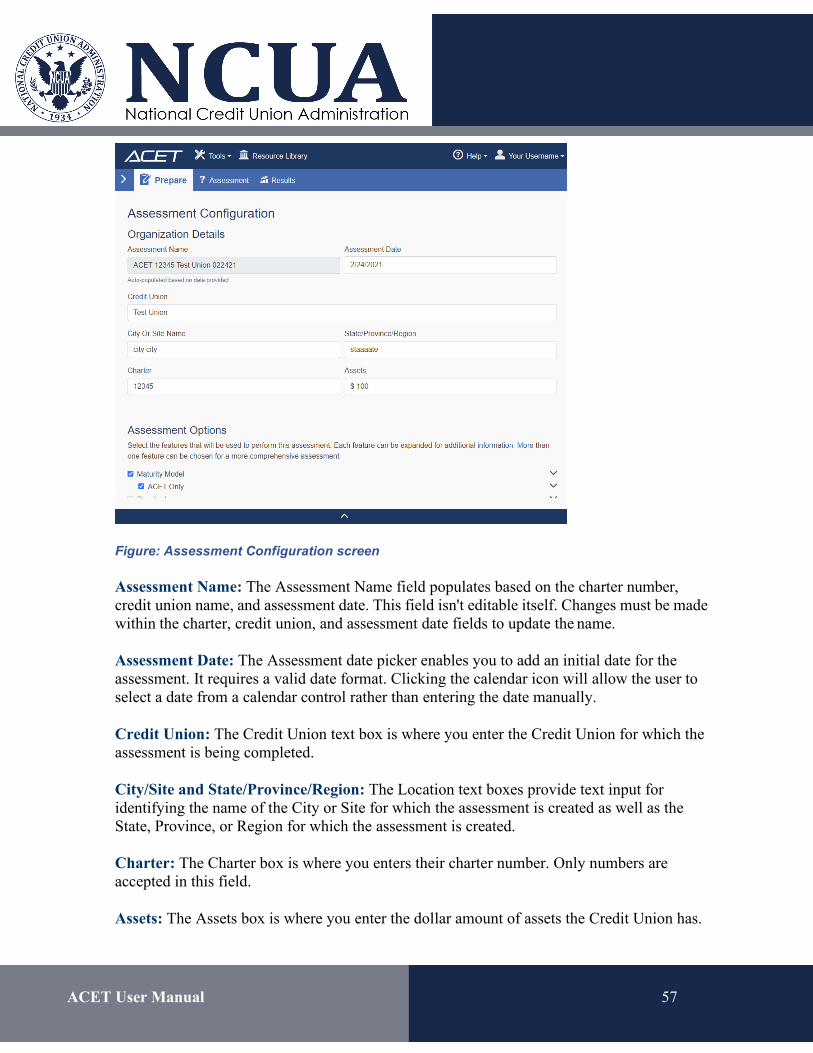
Figure: Assessment Configuration screen
Assessment Name: The Assessment Name field populates based on the charter number, credit union name, and assessment date. This field isn't editable itself. Changes must be made within the charter, credit union, and assessment date fields to update the name.
Assessment Date: The Assessment date picker enables you to add an initial date for the assessment. It requires a valid date format. Clicking the calendar icon will allow the user to select a date from a calendar control rather than entering the date manually.
Credit Union: The Credit Union text box is where you enter the Credit Union for which the assessment is being completed.
City/Site and State/Province/Region: The Location text boxes provide text input for identifying the name of the City or Site for which the assessment is created as well as the State, Province, or Region for which the assessment is created.
Charter: The Charter box is where you enters their charter number. Only numbers are accepted in this field.
Assets: The Assets box is where you enter the dollar amount of assets the Credit Union has.
ACET User Manual 58
Assessment Options
There are three different features for building an assessment. You can select one or more.
Maturity Model: A maturity model is a formal measurement used by an organization to gauge and improve its programs and processes. Maturity models are intended to measure the degree to which an organization has institutionalized its cybersecurity practices. Implementing process maturity within an organization will ensure that practices are consistent, repeatable, and constantly being improved.
NOTE: ACET is a maturity model and is available on the Maturity Model Selection page. It is preselected for ACET users. See the CSET guide (within the Help menu) for information regarding Standards and Network Diagrams.
Assessment Information
Contacts Management
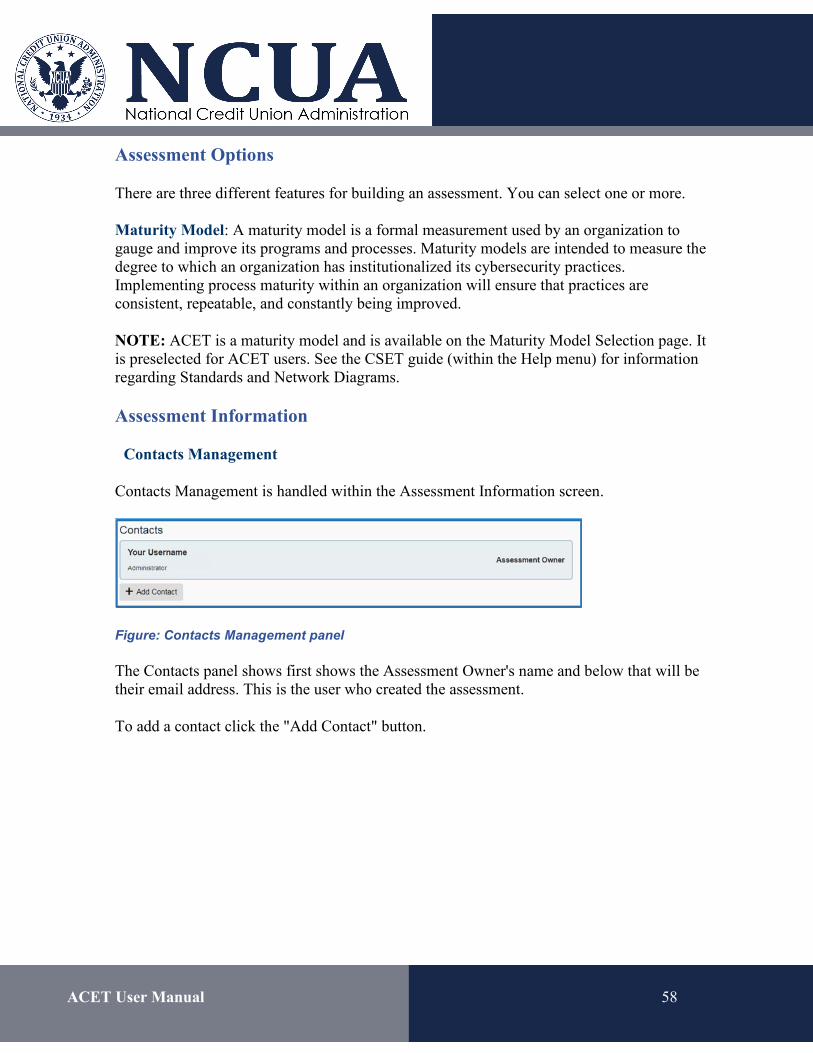
Contacts Management is handled within the Assessment Information screen.
Figure: Contacts Management panel
The Contacts panel shows first shows the Assessment Owner's name and below that will be their email address. This is the user who created the assessment.
To add a contact click the "Add Contact" button.
ACET User Manual 59
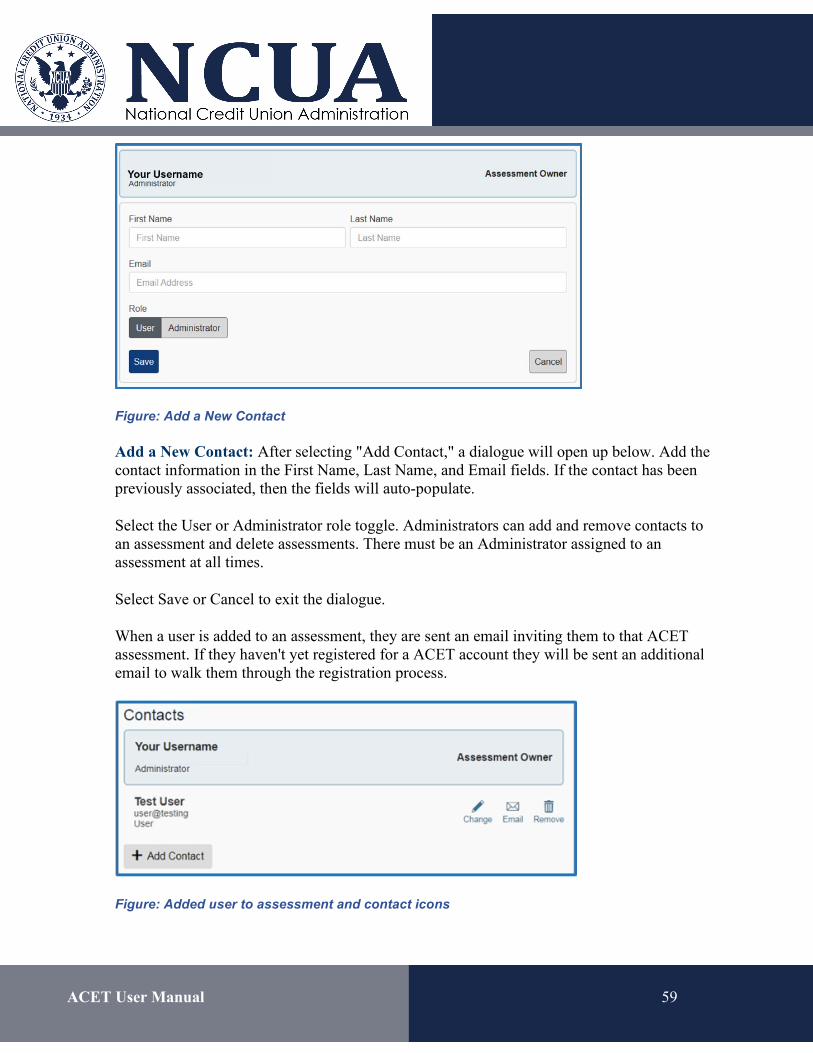
Figure: Add a New Contact
Add a New Contact: After selecting "Add Contact," a dialogue will open up below. Add the contact information in the First Name, Last Name, and Email fields. If the contact has been previously associated, then the fields will auto-populate.
Select the User or Administrator role toggle. Administrators can add and remove contacts to an assessment and delete assessments. There must be an Administrator assigned to an assessment at all times.
Select Save or Cancel to exit the dialogue.
When a user is added to an assessment, they are sent an email inviting them to that ACET assessment. If they haven't yet registered for a ACET account they will be sent an additional email to walk them through the registration process.
Figure: Added user to assessment and contact icons
ACET User Manual 60
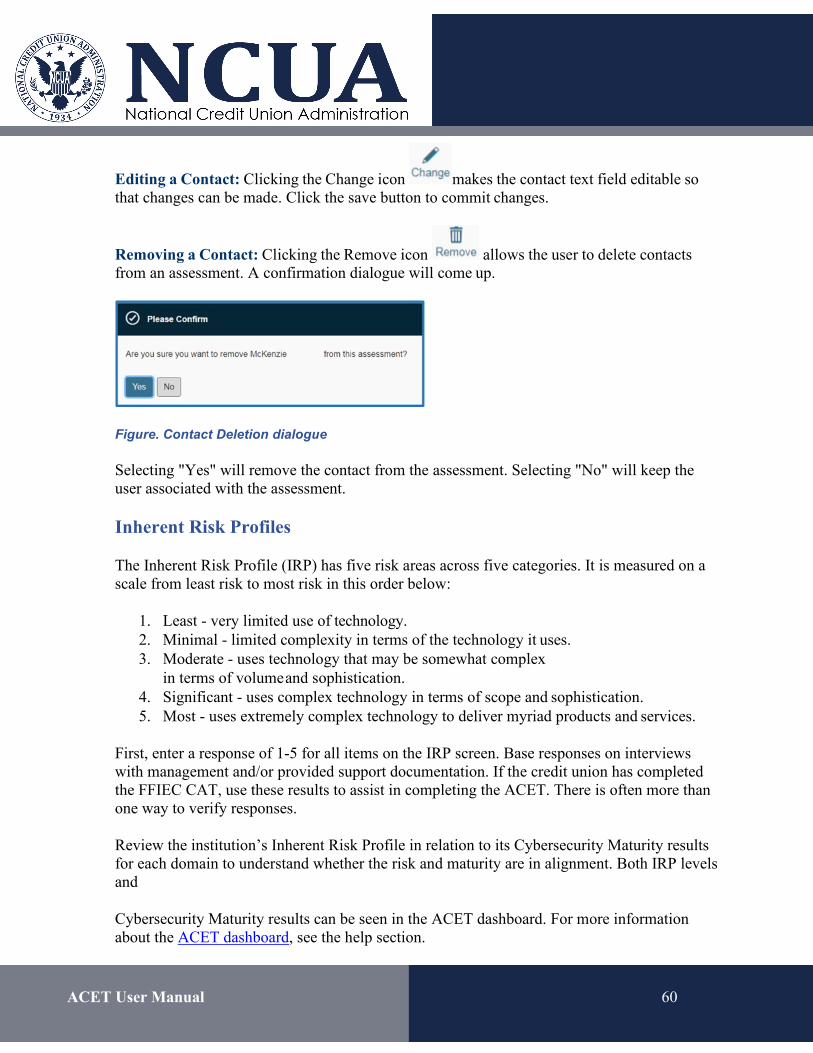
Editing a Contact: Clicking the Change icon makes the contact text field editable so that changes can be made. Click the save button to commit changes.
Removing a Contact: Clicking the Remove icon allows the user to delete contacts from an assessment. A confirmation dialogue will come up.
Figure. Contact Deletion dialogue
Selecting "Yes" will remove the contact from the assessment. Selecting "No" will keep the user associated with the assessment.
Inherent Risk Profiles
The Inherent Risk Profile (IRP) has five risk areas across five categories. It is measured on a scale from least risk to most risk in this order below:
1. Least - very limited use of technology. 2. Minimal - limited complexity in terms of the technology it uses. 3. Moderate - uses technology that may be somewhat complex
in terms of volume and sophistication. 4. Significant - uses complex technology in terms of scope and sophistication. 5. Most - uses extremely complex technology to deliver myriad products and services.
First, enter a response of 1-5 for all items on the IRP screen. Base responses on interviews with management and/or provided support documentation. If the credit union has completed the FFIEC CAT, use these results to assist in completing the ACET. There is often more than one way to verify responses.
Review the institution’s Inherent Risk Profile in relation to its Cybersecurity Maturity results for each domain to understand whether the risk and maturity are in alignment. Both IRP levels and
Cybersecurity Maturity results can be seen in the ACET dashboard. For more information about the ACET dashboard, see the help section.
ACET User Manual 61
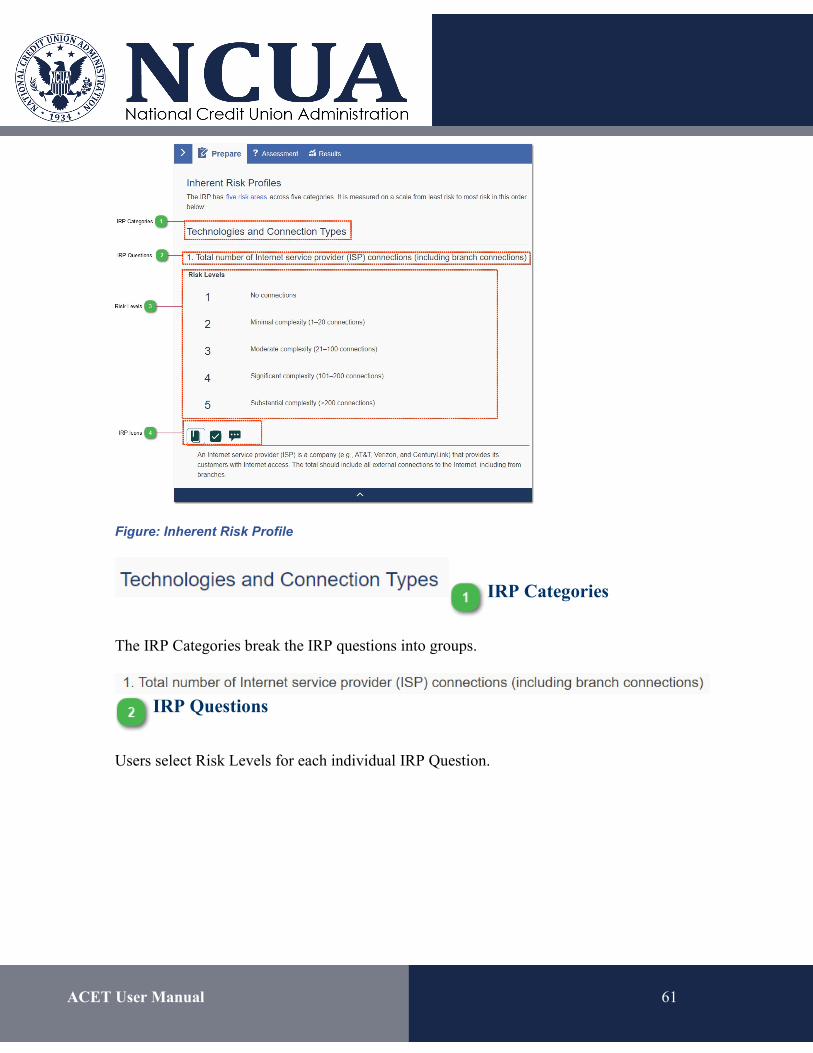
Figure: Inherent Risk Profile
IRP Categories
The IRP Categories break the IRP questions into groups.
IRP Questions
Users select Risk Levels for each individual IRP Question.
ACET User Manual 62
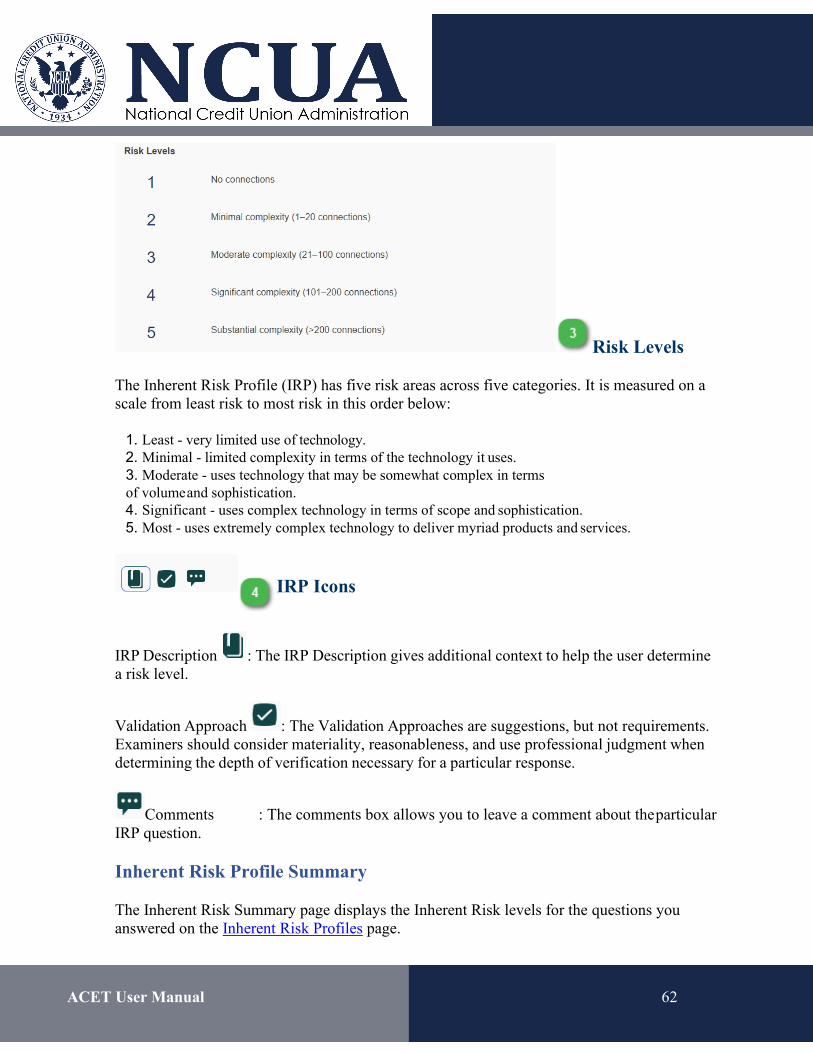
Risk Levels
The Inherent Risk Profile (IRP) has five risk areas across five categories. It is measured on a scale from least risk to most risk in this order below:
1. Least - very limited use of technology. 2. Minimal - limited complexity in terms of the technology it uses. 3. Moderate - uses technology that may be somewhat complex in terms of volume and sophistication. 4. Significant - uses complex technology in terms of scope and sophistication. 5. Most - uses extremely complex technology to deliver myriad products and services.
IRP Icons
IRP Description : The IRP Description gives additional context to help the user determine a risk level.
Validation Approach : The Validation Approaches are suggestions, but not requirements. Examiners should consider materiality, reasonableness, and use professional judgment when determining the depth of verification necessary for a particular response.
Comments : The comments box allows you to leave a comment about the particular IRP question.
Inherent Risk Profile Summary
The Inherent Risk Summary page displays the Inherent Risk levels for the questions you answered on the Inherent Risk Profiles page.
ACET User Manual 63
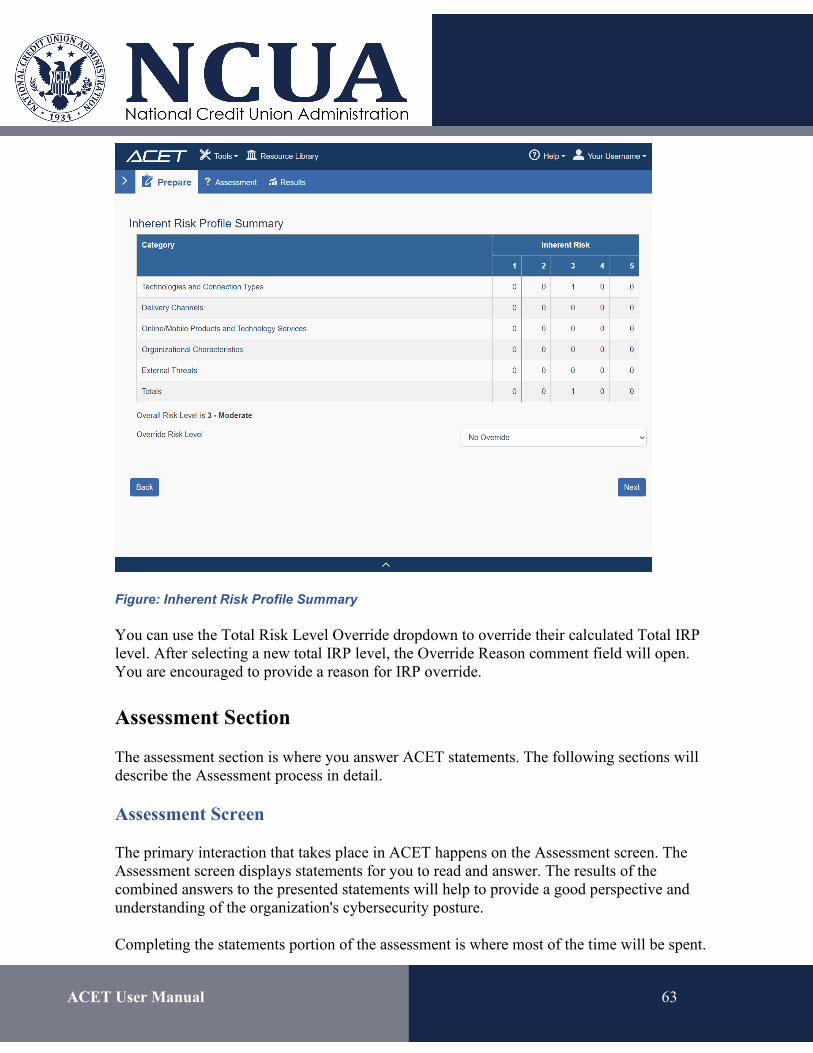
Figure: Inherent Risk Profile Summary
You can use the Total Risk Level Override dropdown to override their calculated Total IRP level. After selecting a new total IRP level, the Override Reason comment field will open. You are encouraged to provide a reason for IRP override.
Assessment Section
The assessment section is where you answer ACET statements. The following sections will describe the Assessment process in detail.
Assessment Screen
The primary interaction that takes place in ACET happens on the Assessment screen. The Assessment screen displays statements for you to read and answer. The results of the combined answers to the presented statements will help to provide a good perspective and understanding of the organization's cybersecurity posture.
Completing the statements portion of the assessment is where most of the time will be spent.
ACET User Manual 64
The process of answering statements is not difficult but it can be tedious. It's recommended to plan ahead and recognize that it will take several hours or even days to accurately answer all the questions. The more time spent understanding the intent of each question and then discussing it as a team, the more valuable the assessment will be. Take the time to fully understand the intent of each question then provide the answer that best meets the current situation. If upgrades are in
progress at the time of the assessment, comments can be associated with the relevant questions to document the activity.
The figure below shows the main sections of the Assessment screen.
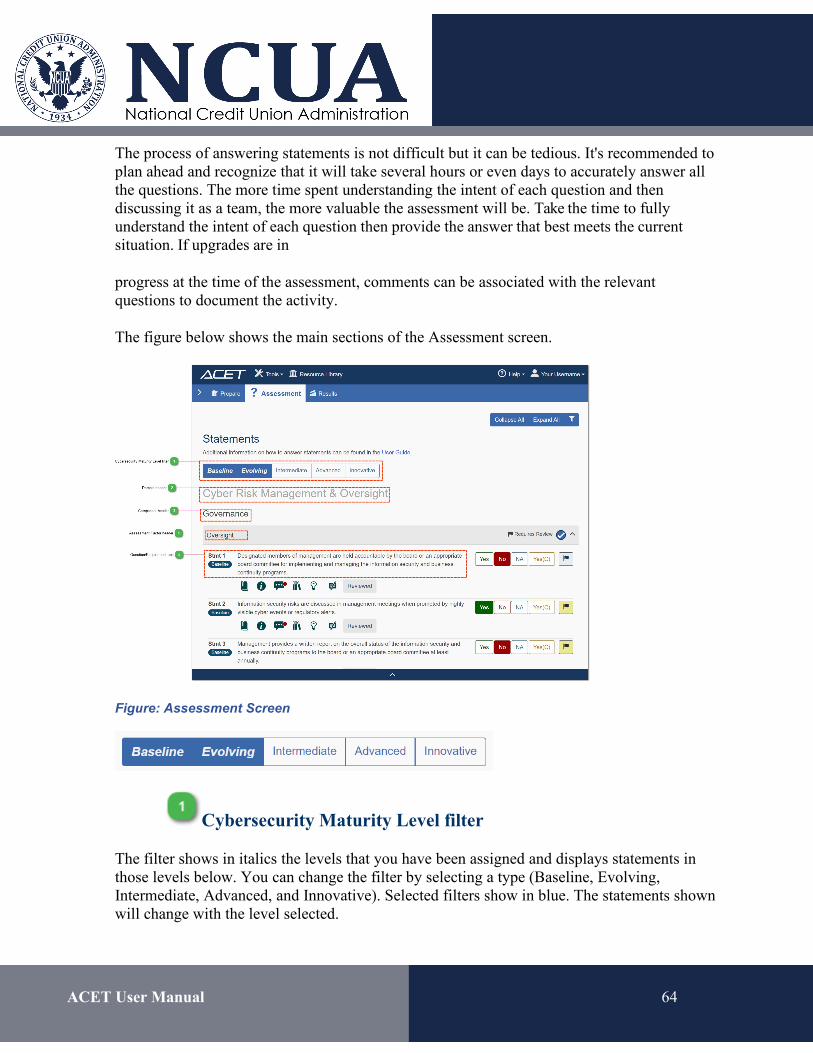
Figure: Assessment Screen
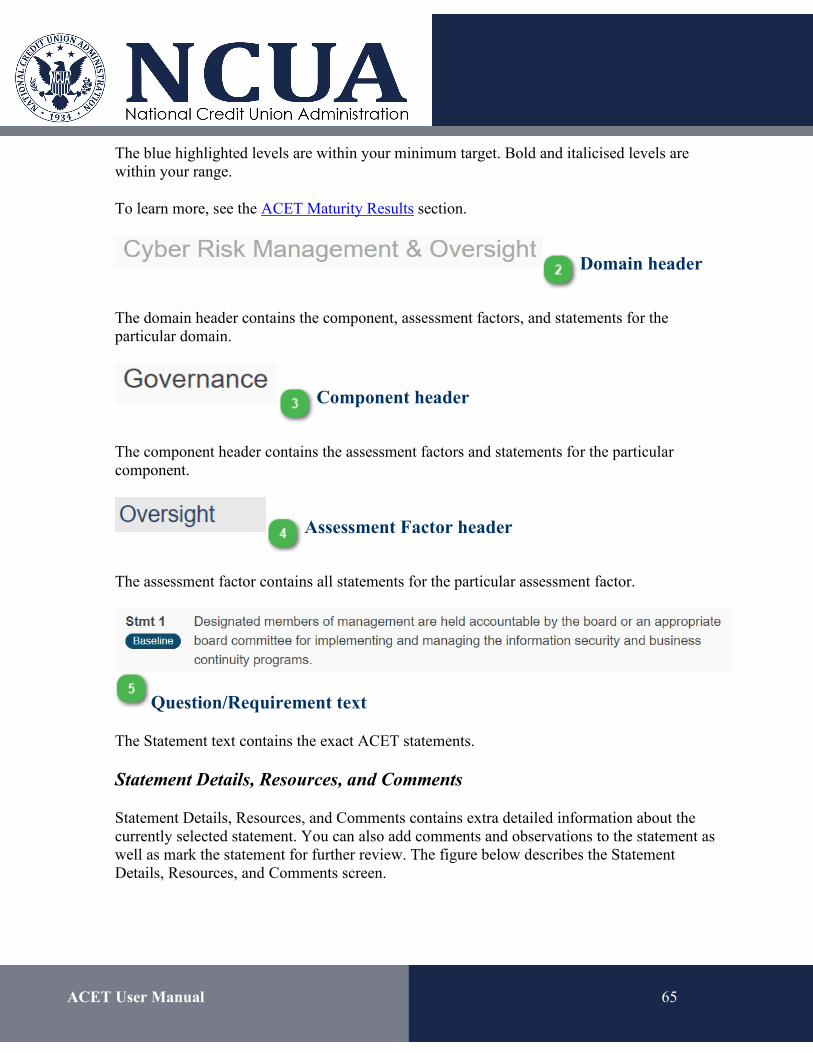
Cybersecurity Maturity Level filter
The filter shows in italics the levels that you have been assigned and displays statements in those levels below. You can change the filter by selecting a type (Baseline, Evolving, Intermediate, Advanced, and Innovative). Selected filters show in blue. The statements shown will change with the level selected.
ACET User Manual 65
The blue highlighted levels are within your minimum target. Bold and italicised levels are within your range.
To learn more, see the ACET Maturity Results section.
Domain header
The domain header contains the component, assessment factors, and statements for the particular domain.
Component header
The component header contains the assessment factors and statements for the particular component.
Assessment Factor header
The assessment factor contains all statements for the particular assessment factor.
Question/Requirement text
The Statement text contains the exact ACET statements.
Statement Details, Resources, and Comments
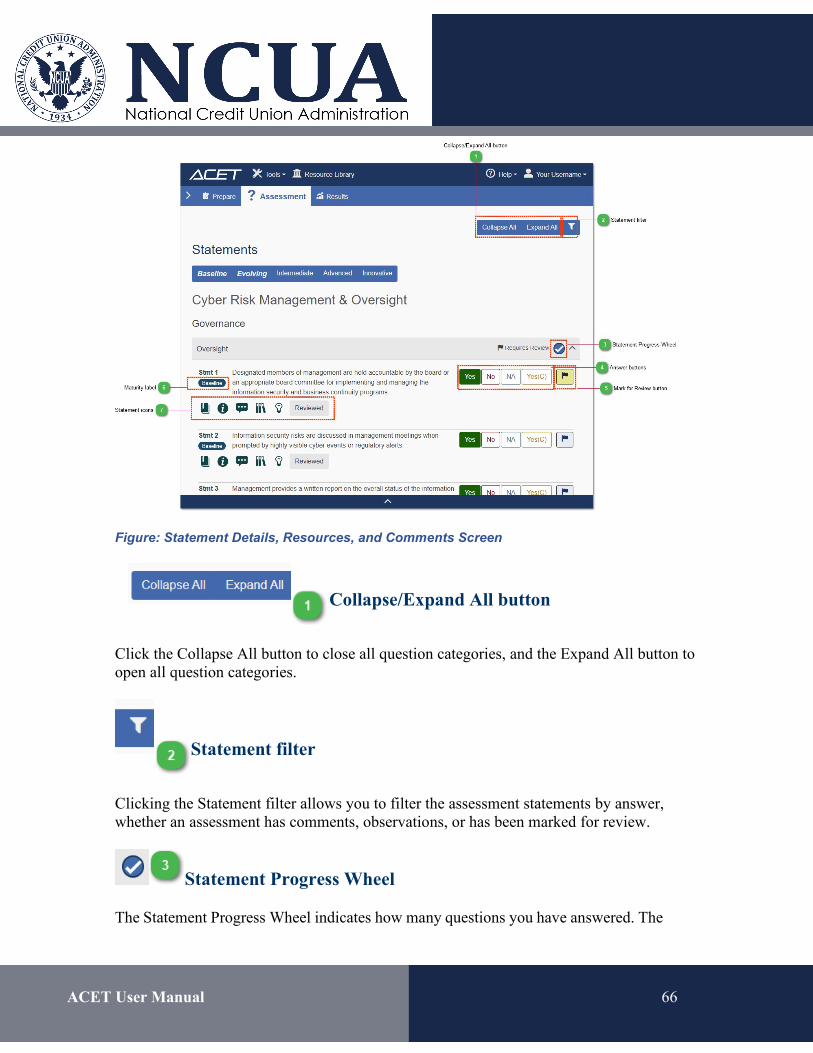
Statement Details, Resources, and Comments contains extra detailed information about the currently selected statement. You can also add comments and observations to the statement as well as mark the statement for further review. The figure below describes the Statement Details, Resources, and Comments screen.
ACET User Manual 66
Figure: Statement Details, Resources, and Comments Screen
Collapse/Expand All button
Click the Collapse All button to close all question categories, and the Expand All button to open all question categories.
Statement filter
Clicking the Statement filter allows you to filter the assessment statements by answer, whether an assessment has comments, observations, or has been marked for review.
Statement Progress Wheel
The Statement Progress Wheel indicates how many questions you have answered. The
ACET User Manual 67
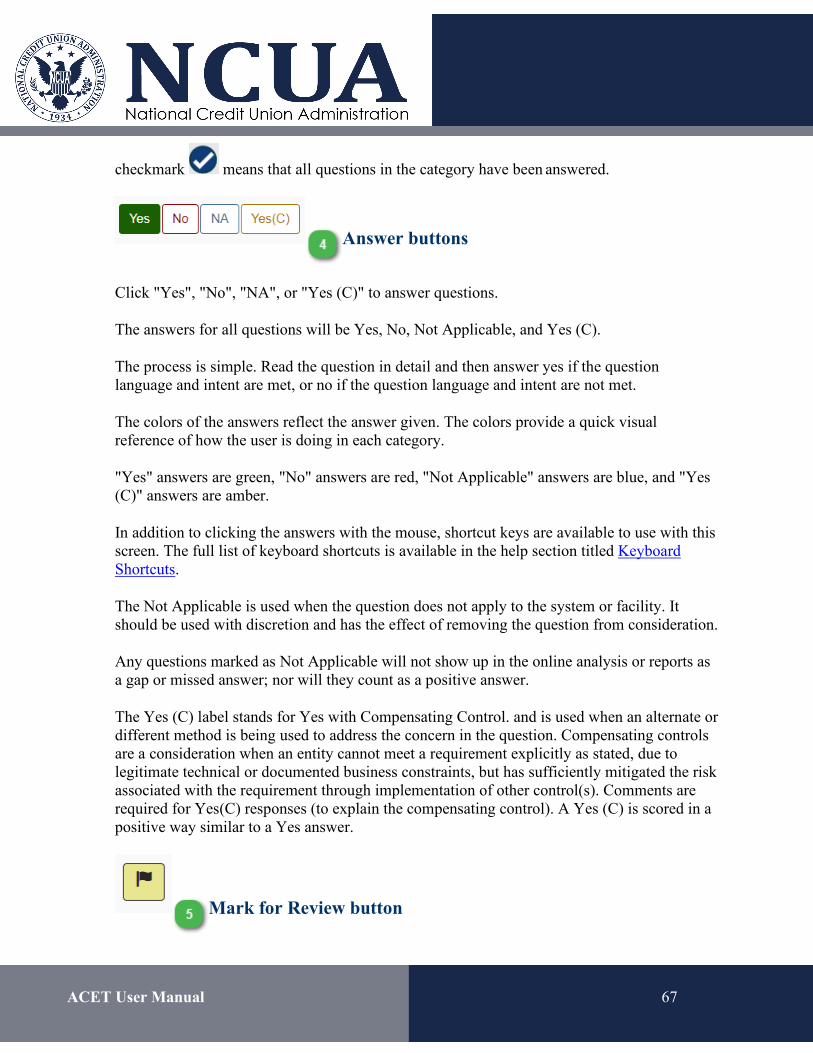
checkmark means that all questions in the category have been answered.
Answer buttons
Click "Yes", "No", "NA", or "Yes (C)" to answer questions.
The answers for all questions will be Yes, No, Not Applicable, and Yes (C).
The process is simple. Read the question in detail and then answer yes if the question language and intent are met, or no if the question language and intent are not met.
The colors of the answers reflect the answer given. The colors provide a quick visual reference of how the user is doing in each category.
"Yes" answers are green, "No" answers are red, "Not Applicable" answers are blue, and "Yes (C)" answers are amber.
In addition to clicking the answers with the mouse, shortcut keys are available to use with this screen. The full list of keyboard shortcuts is available in the help section titled Keyboard Shortcuts.
The Not Applicable is used when the question does not apply to the system or facility. It should be used with discretion and has the effect of removing the question from consideration.
Any questions marked as Not Applicable will not show up in the online analysis or reports as a gap or missed answer; nor will they count as a positive answer.
The Yes (C) label stands for Yes with Compensating Control. and is used when an alternate or different method is being used to address the concern in the question. Compensating controls are a consideration when an entity cannot meet a requirement explicitly as stated, due to legitimate technical or documented business constraints, but has sufficiently mitigated the risk associated with the requirement through implementation of other control(s). Comments are required for Yes(C) responses (to explain the compensating control). A Yes (C) is scored in a positive way similar to a Yes answer.
Mark for Review button

ACET User Manual 68
The Mark for Review checkbox allows you to mark a statement for future review.
Maturity label
The Maturity label displays the statement's associated Cybersecurity Maturity level.
Statement icons
The Statement icons are described in detail below.
Exam Step button : The Exam Step button will show or hide detailed ways to verify responses to the statement.
See the Exam Step Section for more information.
Supplemental button : Clicking the Supplemental button opens up the supplemental information for the statements.
See the Supplemental Section for more information.
Comments button : Clicking the Comments button opens the Comments Section of the panel allowing you to enter comments related to the current statement.
See the Comments Section for more information.
References button : Clicking the References button opens the References section of the panel allowing you to open Standards that are associated with and referenced in the assessment question.
See the References Section for more information.
Observations button : Clicking the Observations button opens the Observations section of the panel allowing you to create an observation record to associate with the statement.
See the Observations Section for more information.
ACET User Manual 69
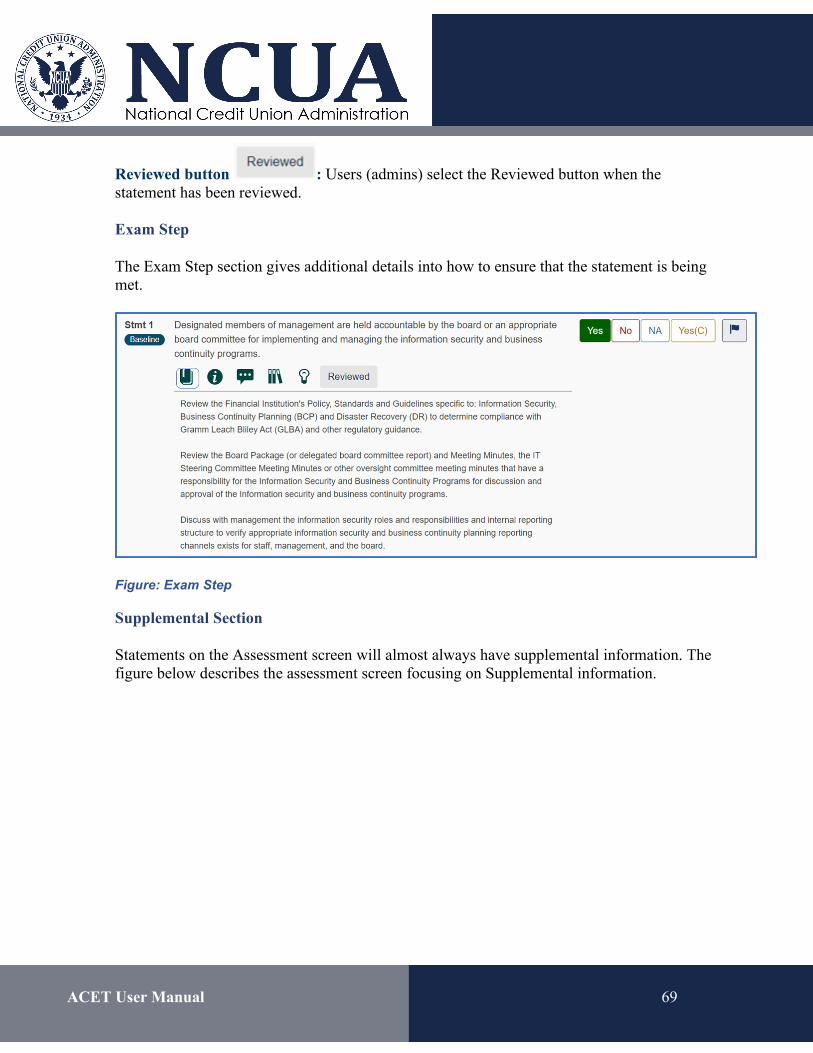
Reviewed button : Users (admins) select the Reviewed button when the statement has been reviewed.
Exam Step
The Exam Step section gives additional details into how to ensure that the statement is being met.
Figure: Exam Step
Supplemental Section
Statements on the Assessment screen will almost always have supplemental information. The figure below describes the assessment screen focusing on Supplemental information.
ACET User Manual 70
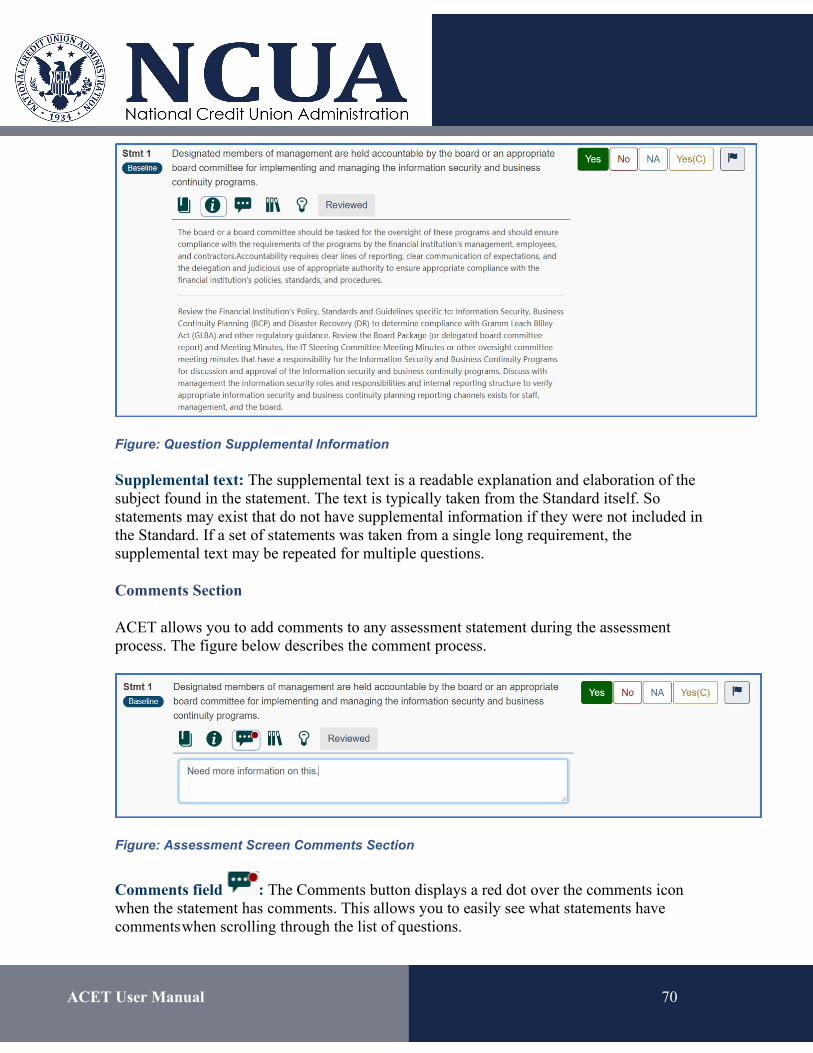
Figure: Question Supplemental Information
Supplemental text: The supplemental text is a readable explanation and elaboration of the subject found in the statement. The text is typically taken from the Standard itself. So statements may exist that do not have supplemental information if they were not included in the Standard. If a set of statements was taken from a single long requirement, the supplemental text may be repeated for multiple questions.
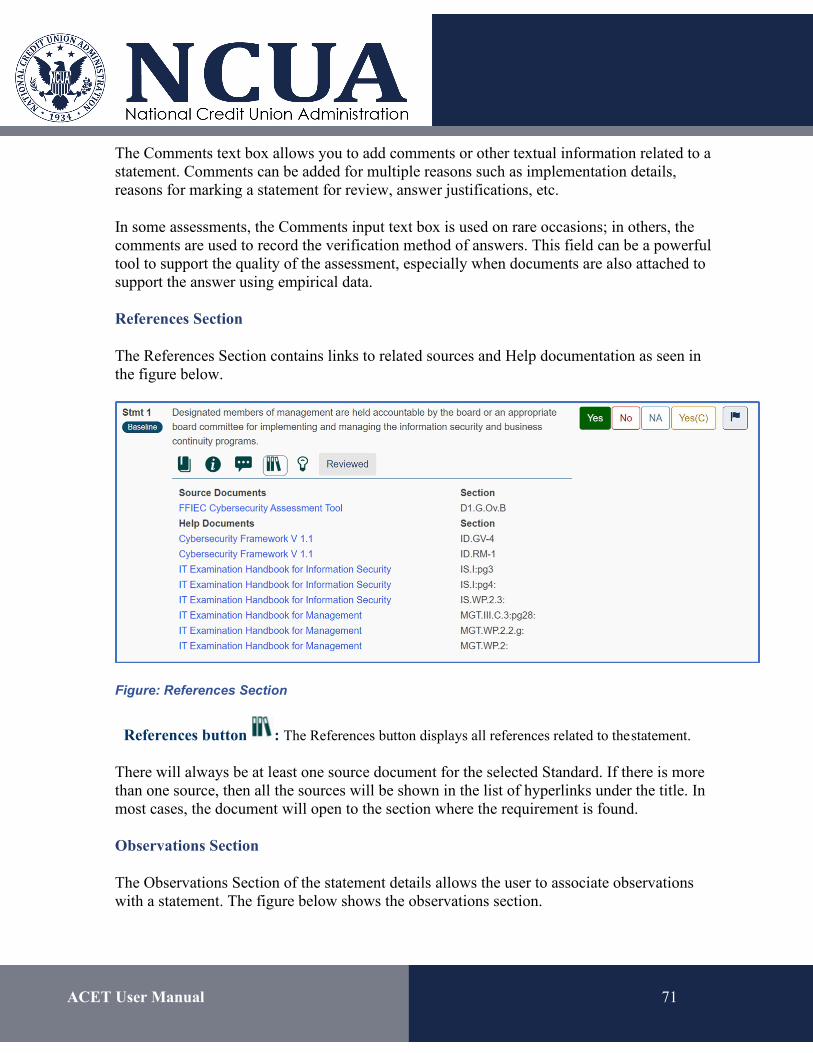
Comments Section
ACET allows you to add comments to any assessment statement during the assessment process. The figure below describes the comment process.
Figure: Assessment Screen Comments Section
Comments field : The Comments button displays a red dot over the comments icon when the statement has comments. This allows you to easily see what statements have comments when scrolling through the list of questions.
ACET User Manual 71
The Comments text box allows you to add comments or other textual information related to a statement. Comments can be added for multiple reasons such as implementation details, reasons for marking a statement for review, answer justifications, etc.
In some assessments, the Comments input text box is used on rare occasions; in others, the comments are used to record the verification method of answers. This field can be a powerful tool to support the quality of the assessment, especially when documents are also attached to support the answer using empirical data.
References Section
The References Section contains links to related sources and Help documentation as seen in the figure below.
Figure: References Section
References button : The References button displays all references related to the statement.
There will always be at least one source document for the selected Standard. If there is more than one source, then all the sources will be shown in the list of hyperlinks under the title. In most cases, the document will open to the section where the requirement is found.
Observations Section
The Observations Section of the statement details allows the user to associate observations with a statement. The figure below shows the observations section.

ACET User Manual 72
Figure: Observations section
Observations button : The Observation button displays a red dot over the Observation icon when the statement has associated observations. This allows you to easily see what statements have observations when scrolling through the list of questions.
Add an Observation : Clicking the Add an Observation button opens the Observations Window that allows the user to enter all statement observation-related information.
For more information about the Observations Window, see the Statement Observations help section.
Statement Observations
The observation window allows you to enter information about a statement that has a "no" answer. Any statement that has been answered "No" could potentially have an observation record. The observation records provide information about the issue, potential impacts of the issue, recommendations for rectifying the issue, and potential vulnerabilities related to the issue.
Responsible individuals can also be assigned to observation records to be responsible for fixing the problems associated with the observation record. The figure below describes the different parts of the Observation Details window.
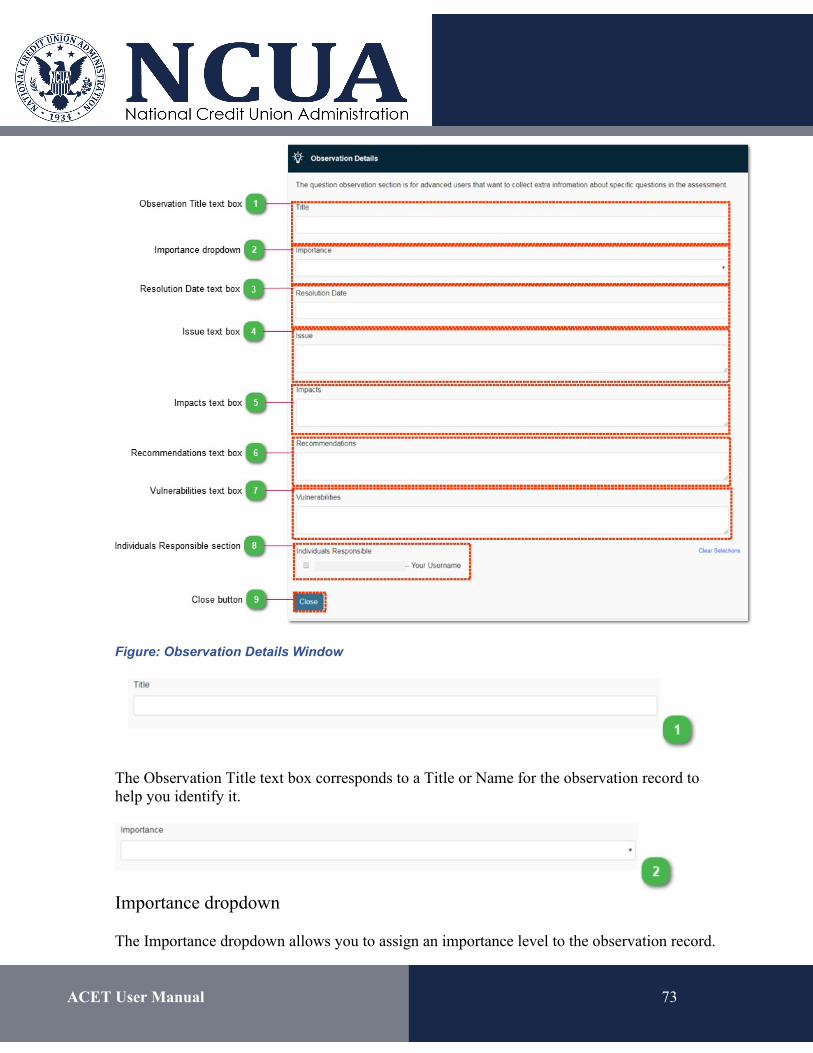
ACET User Manual 73
Figure: Observation Details Window
The Observation Title text box corresponds to a Title or Name for the observation record to help you identify it.
Importance dropdown
The Importance dropdown allows you to assign an importance level to the observation record.
ACET User Manual 74
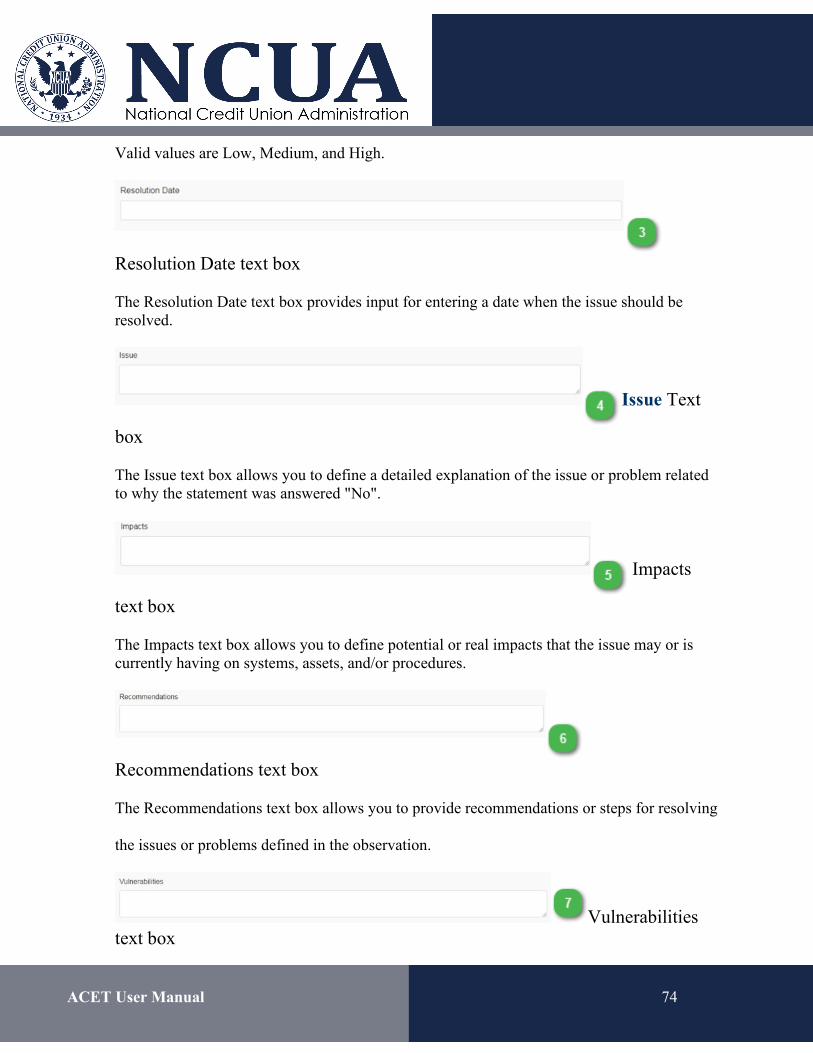
Valid values are Low, Medium, and High.
Resolution Date text box
The Resolution Date text box provides input for entering a date when the issue should be resolved.
Issue Text
box
The Issue text box allows you to define a detailed explanation of the issue or problem related to why the statement was answered "No".
Impacts
text box
The Impacts text box allows you to define potential or real impacts that the issue may or is currently having on systems, assets, and/or procedures.
Recommendations text box
The Recommendations text box allows you to provide recommendations or steps for resolving
the issues or problems defined in the observation.
Vulnerabilities text box
ACET User Manual 75
The Vulnerabilities text box allows you to identify any known vulnerabilities on systems or assets related to the observation.
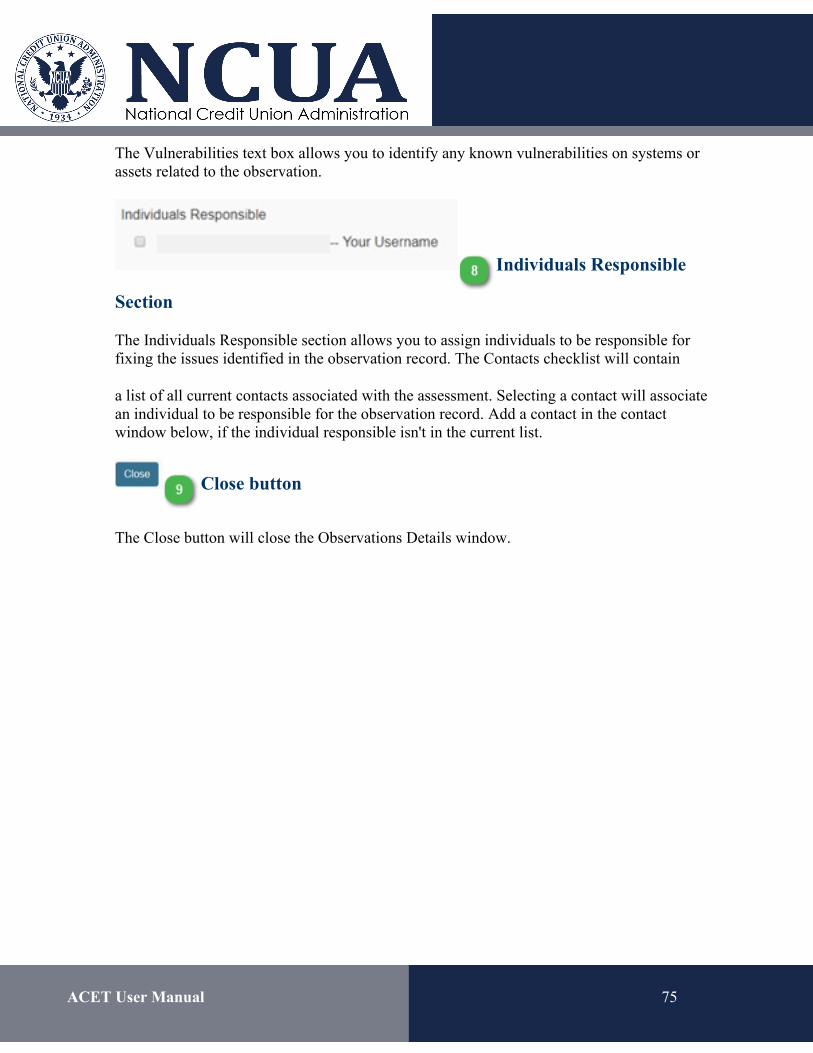
Individuals Responsible
Section
The Individuals Responsible section allows you to assign individuals to be responsible for fixing the issues identified in the observation record. The Contacts checklist will contain
a list of all current contacts associated with the assessment. Selecting a contact will associate an individual to be responsible for the observation record. Add a contact in the contact window below, if the individual responsible isn't in the current list.
Close button
The Close button will close the Observations Details window.
ACET User Manual 76
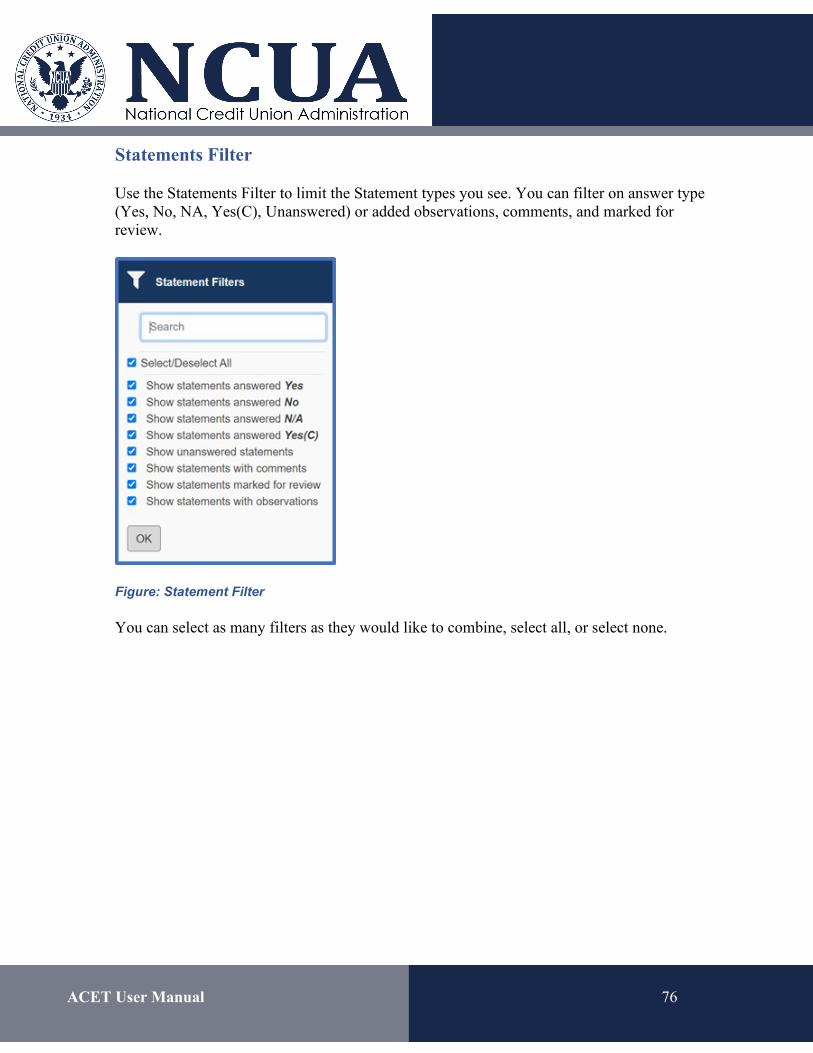
Statements Filter
Use the Statements Filter to limit the Statement types you see. You can filter on answer type (Yes, No, NA, Yes(C), Unanswered) or added observations, comments, and marked for review.
Figure: Statement Filter
You can select as many filters as they would like to combine, select all, or select none.
ACET User Manual 77
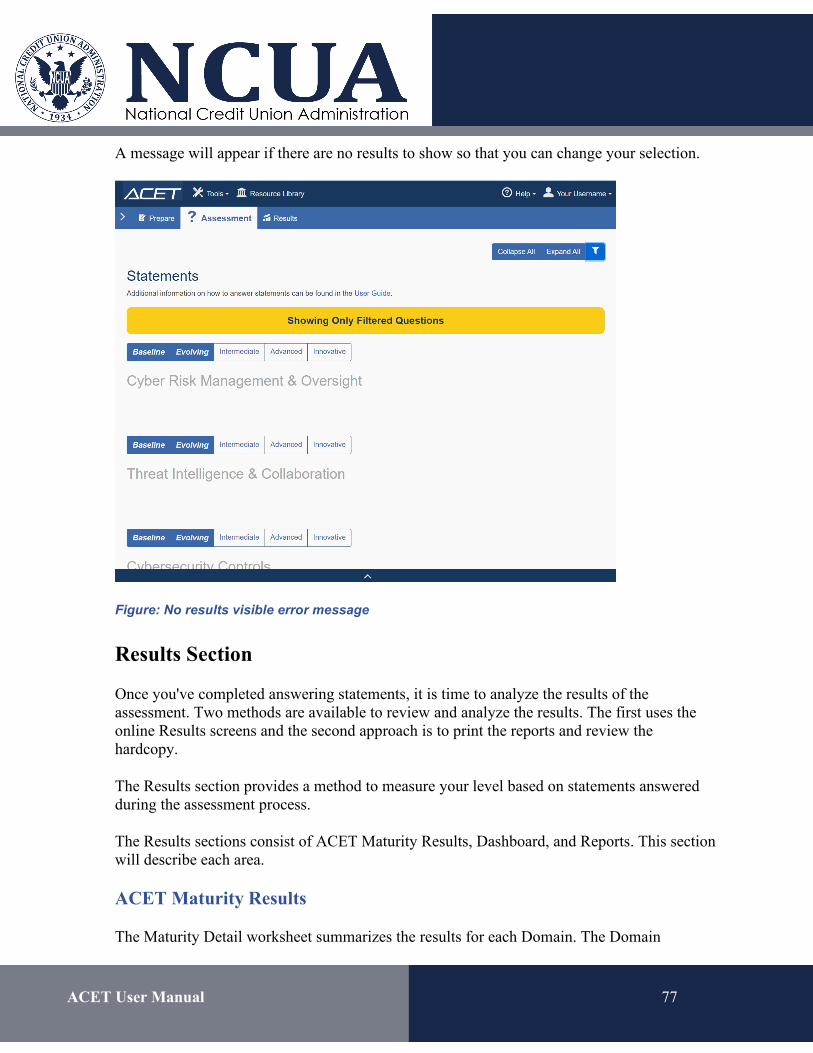
A message will appear if there are no results to show so that you can change your selection.
Figure: No results visible error message
Results Section
Once you've completed answering statements, it is time to analyze the results of the assessment. Two methods are available to review and analyze the results. The first uses the online Results screens and the second approach is to print the reports and review the hardcopy.
The Results section provides a method to measure your level based on statements answered during the assessment process.
The Results sections consist of ACET Maturity Results, Dashboard, and Reports. This section will describe each area.
ACET Maturity Results
The Maturity Detail worksheet summarizes the results for each Domain. The Domain
ACET User Manual 78
statements are answered within the Statements tab. To learn more about the statement answering process, see the Assessment Section.
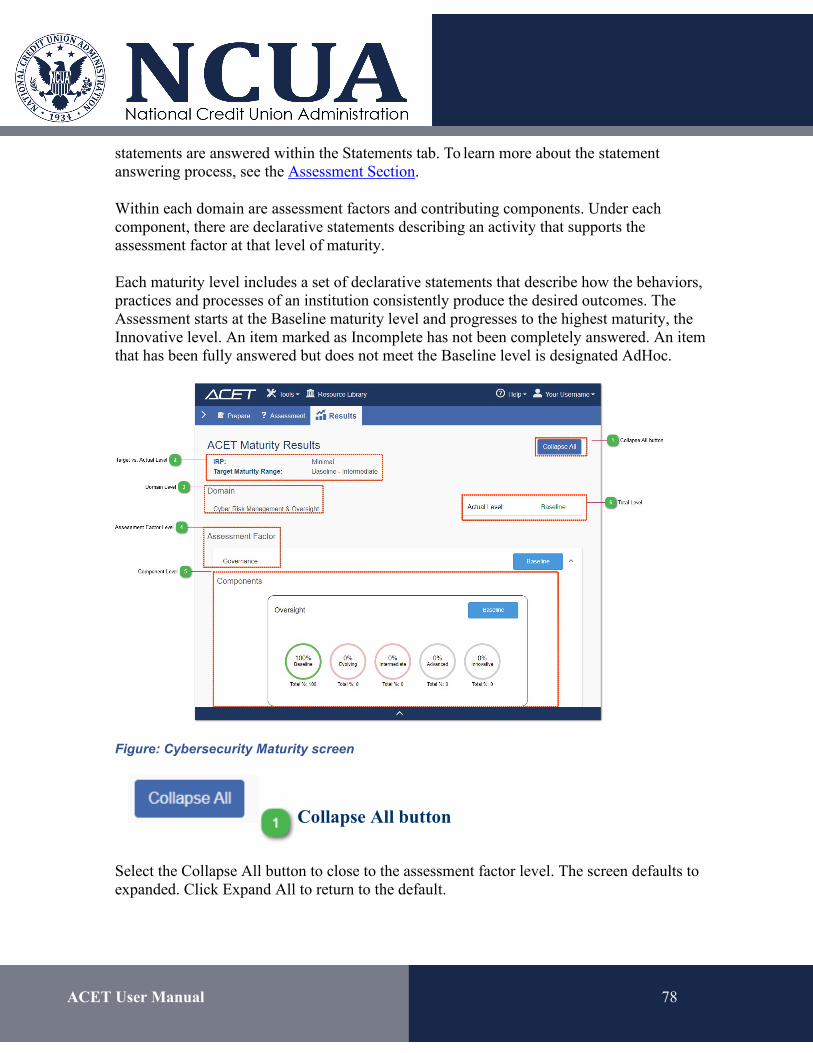
Within each domain are assessment factors and contributing components. Under each component, there are declarative statements describing an activity that supports the assessment factor at that level of maturity.
Each maturity level includes a set of declarative statements that describe how the behaviors, practices and processes of an institution consistently produce the desired outcomes. The Assessment starts at the Baseline maturity level and progresses to the highest maturity, the Innovative level. An item marked as Incomplete has not been completely answered. An item that has been fully answered but does not meet the Baseline level is designated AdHoc.
Figure: Cybersecurity Maturity screen
Collapse All button
Select the Collapse All button to close to the assessment factor level. The screen defaults to expanded. Click Expand All to return to the default.
ACET User Manual 79
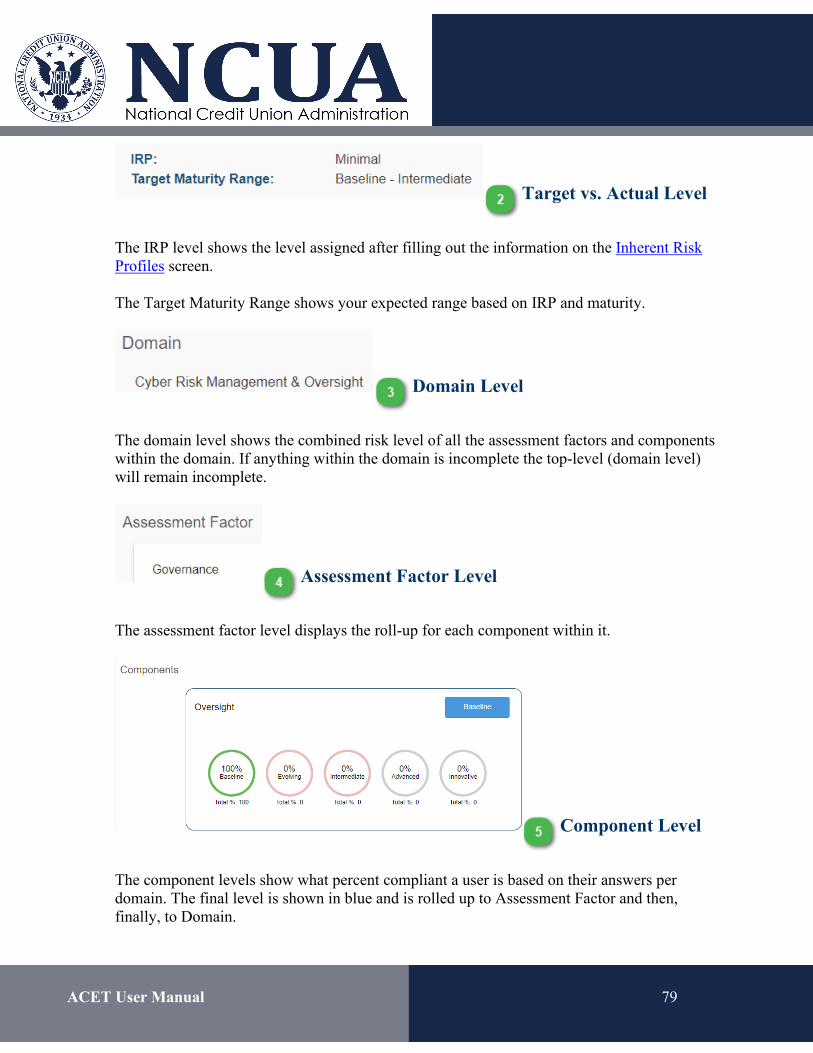
Target vs. Actual Level
The IRP level shows the level assigned after filling out the information on the Inherent Risk Profiles screen.
The Target Maturity Range shows your expected range based on IRP and maturity.
Domain Level
The domain level shows the combined risk level of all the assessment factors and components within the domain. If anything within the domain is incomplete the top-level (domain level) will remain incomplete.
Assessment Factor Level
The assessment factor level displays the roll-up for each component within it.
Component Level
The component levels show what percent compliant a user is based on their answers per domain. The final level is shown in blue and is rolled up to Assessment Factor and then, finally, to Domain.

ACET User Manual 80
The colors for the components level is defined below:
Gray= Isn't necessary for a user to answer based on their assigned level Red= 0% for assigned level
Yellow= 1-99% "No" answers do not count toward the percentage Green= 100% all statements answered
Component levels that you do not need to answer are shown in gray. The levels that need to be answered, but haven't been completed are shown in red.
Total Level
Each component and assessment factor has a total level. If it is gray and says "Incomplete" the statements have not been answered.
If it is red and says "Ad Hoc" then the statements have been fully answered but do not meet the Baseline level.
Total levels go from Incomplete to Ad Hoc, Baseline, Evolving, Intermediate, Advanced, and Innovative.
ACET Dashboard
The Dashboard’s primary functions are to summarize the information input from the Assessment, Inherent Risk Profile, and Administration screens.
ACET User Manual 81
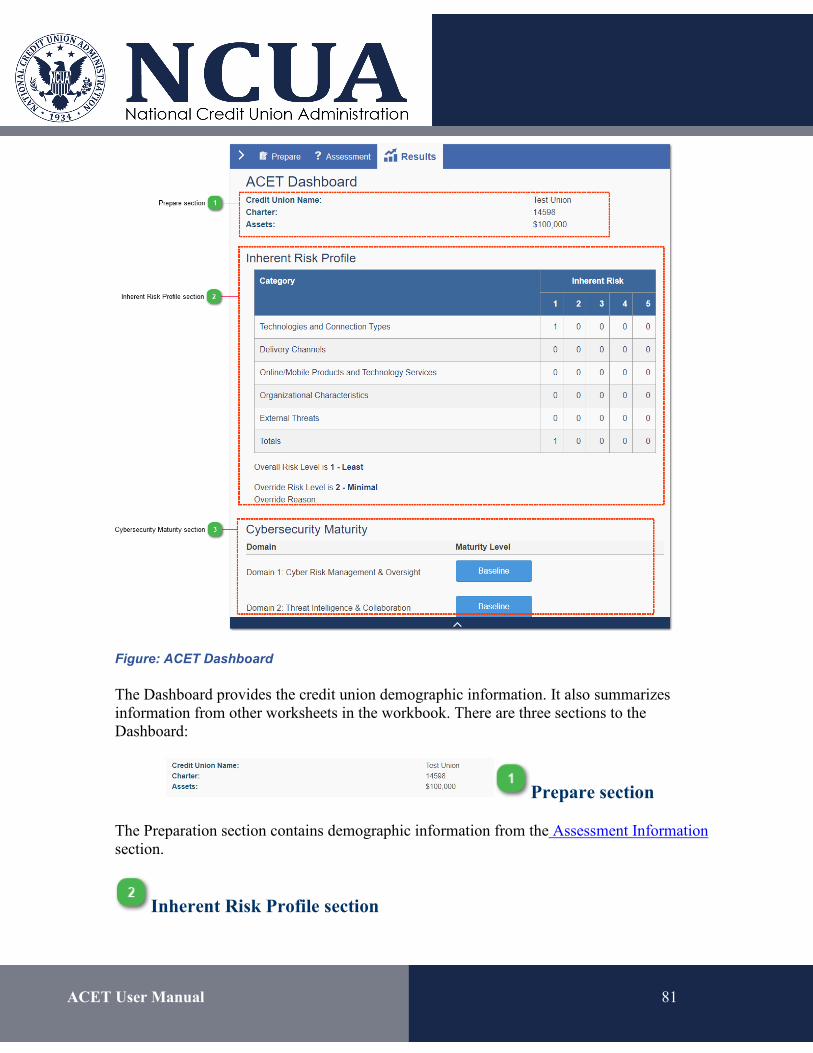
Figure: ACET Dashboard
The Dashboard provides the credit union demographic information. It also summarizes information from other worksheets in the workbook. There are three sections to the Dashboard:
Prepare section
The Preparation section contains demographic information from the Assessment Information section.
Inherent Risk Profile section
ACET User Manual 82
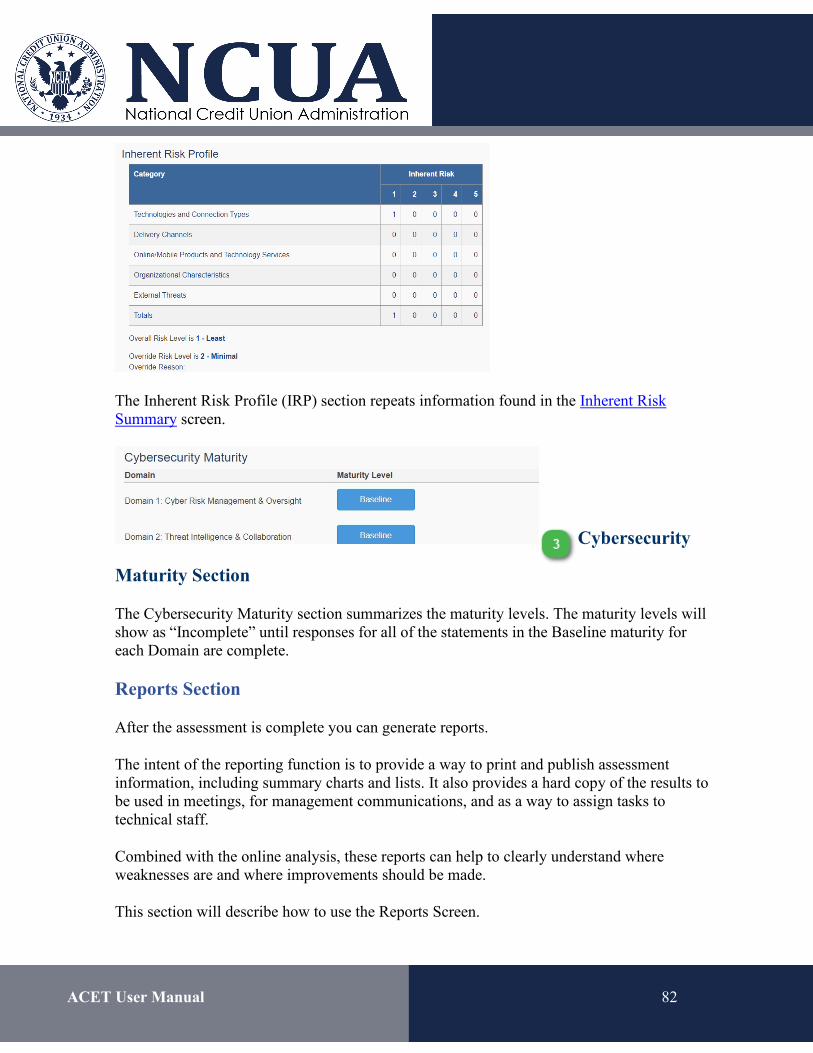
The Inherent Risk Profile (IRP) section repeats information found in the Inherent Risk Summary screen.
Cybersecurity
Maturity Section
The Cybersecurity Maturity section summarizes the maturity levels. The maturity levels will show as “Incomplete” until responses for all of the statements in the Baseline maturity for each Domain are complete.
Reports Section
After the assessment is complete you can generate reports.
The intent of the reporting function is to provide a way to print and publish assessment information, including summary charts and lists. It also provides a hard copy of the results to be used in meetings, for management communications, and as a way to assign tasks to technical staff.
Combined with the online analysis, these reports can help to clearly understand where weaknesses are and where improvements should be made.
This section will describe how to use the Reports Screen.
ACET User Manual 83
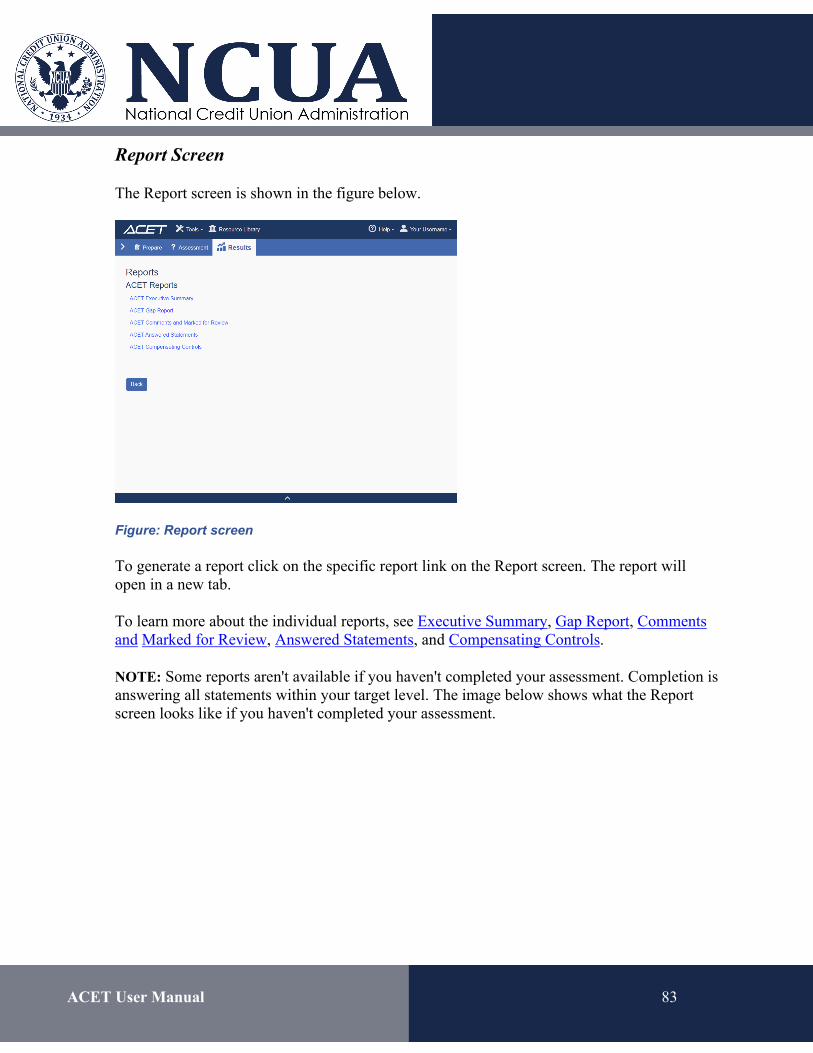
Report Screen
The Report screen is shown in the figure below.
Figure: Report screen
To generate a report click on the specific report link on the Report screen. The report will open in a new tab.
To learn more about the individual reports, see Executive Summary, Gap Report, Comments and Marked for Review, Answered Statements, and Compensating Controls.
NOTE: Some reports aren't available if you haven't completed your assessment. Completion is answering all statements within your target level. The image below shows what the Report screen looks like if you haven't completed your assessment.
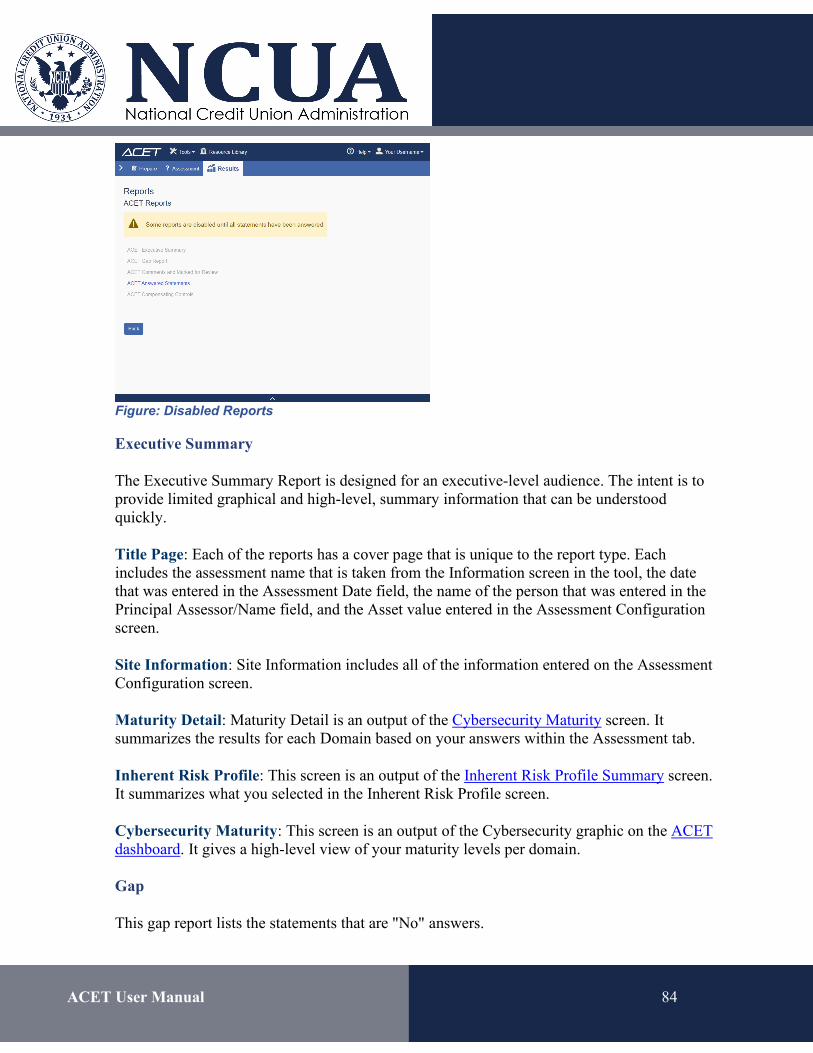
ACET User Manual 84
Figure: Disabled Reports
Executive Summary
The Executive Summary Report is designed for an executive-level audience. The intent is to provide limited graphical and high-level, summary information that can be understood quickly.
Title Page: Each of the reports has a cover page that is unique to the report type. Each includes the assessment name that is taken from the Information screen in the tool, the date that was entered in the Assessment Date field, the name of the person that was entered in the Principal Assessor/Name field, and the Asset value entered in the Assessment Configuration screen.
Site Information: Site Information includes all of the information entered on the Assessment Configuration screen.
Maturity Detail: Maturity Detail is an output of the Cybersecurity Maturity screen. It summarizes the results for each Domain based on your answers within the Assessment tab.
Inherent Risk Profile: This screen is an output of the Inherent Risk Profile Summary screen. It summarizes what you selected in the Inherent Risk Profile screen.
Cybersecurity Maturity: This screen is an output of the Cybersecurity graphic on the ACET dashboard. It gives a high-level view of your maturity levels per domain.
Gap
This gap report lists the statements that are "No" answers.
ACET User Manual 85
This report intends to list the gaps, assist users of the report in identifying gaps, prioritizing work, and beginning to make a plan to address the gaps by implementing the controls.
The percentage gap in each domain is also listed and will help to determine the priority. ACET is a cumulative maturity model meaning lower levels should be completed before moving to higher
levels. Ideally, a baseline should be completed before focusing efforts on controls in evolving and so forth up the line of maturity levels.
Title Page: Each of the reports has a cover page that is unique to the report type. Each includes the assessment name that is taken from the Information screen in the tool, the date that was entered in the Assessment Date field, the name of the person that was entered in the Principal Assessor/Name field, and the Asset value entered in the Assessment Configuration screen.
Gaps: The Gaps table shows each statement that was answered "No", any comments associated with the statement, and whether or not it was marked for review.
Comments and Marked for Review
This report includes all statements that were marked for review and any statements with an associated comment.
Title Page: Each of the reports has a cover page that is unique to the report type. Each includes the assessment name that is taken from the Information screen in the tool, the date that was entered in the Assessment Date field, the name of the person that was entered in the Principal Assessor/Name field, and the Asset value entered in the Assessment Configuration screen.
Questions Marked for Review: The Marked for Review table shows statement text and any comments associated with the statements marked for review.
Statement Comments: The Comments table shows the statement text and comments for all statements with comments, as well as, if they have been marked for review.
Answered Statements
This report includes all the statements within your maturity range, your answers, and whether there is a comment attached to the statement.
The statement set is determined by your maturity range.
Title Page: Each of the reports has a cover page that is unique to the report type. Each
ACET User Manual 86
includes the assessment name that is taken from the Information screen in the tool, the date that was entered in the Assessment Date field, the name of the person that was entered in the Principal Assessor/Name field, and the Asset value entered in the Assessment Configuration screen.
Answered Statements: The Answered Statements table displays all answered statements, what they were answered (Yes, No, N/A, or Yes(c), the maturity level, and whether there is a comment associated with the Compensating Control.
This report contains all the statements that have an associated compensating control and the comment provided.
Title Page: Each of the reports has a cover page that is unique to the report type. Each includes the assessment name that is taken from the Information screen in the tool, the date that was entered in the Assessment Date field, the name of the person that was entered in the Principal Assessor/Name field, and the Asset value entered in the Assessment Configuration screen.
Compensating Controls: The Compensating Controls table shows each statement that was answered "Yes(c)", their associated compensating comments, and any additional comments associated with the statement, and whether or not it was marked for review.
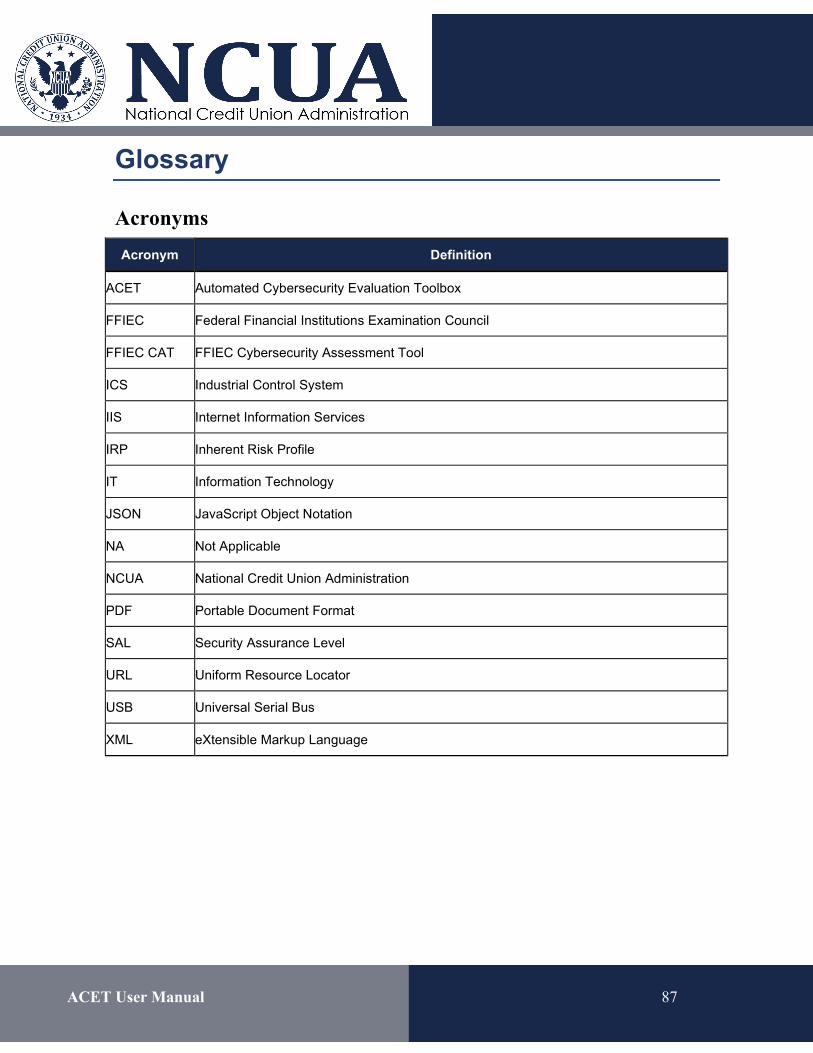
ACET User Manual 87
Glossary
Acronyms Acronym Definition
ACET Automated Cybersecurity Evaluation Toolbox
FFIEC Federal Financial Institutions Examination Council
FFIEC CAT FFIEC Cybersecurity Assessment Tool
ICS Industrial Control System
IIS Internet Information Services
IRP Inherent Risk Profile
IT Information Technology
JSON JavaScript Object Notation
NA Not Applicable
NCUA National Credit Union Administration
PDF Portable Document Format
SAL Security Assurance Level
URL Uniform Resource Locator
USB Universal Serial Bus
XML eXtensible Markup Language
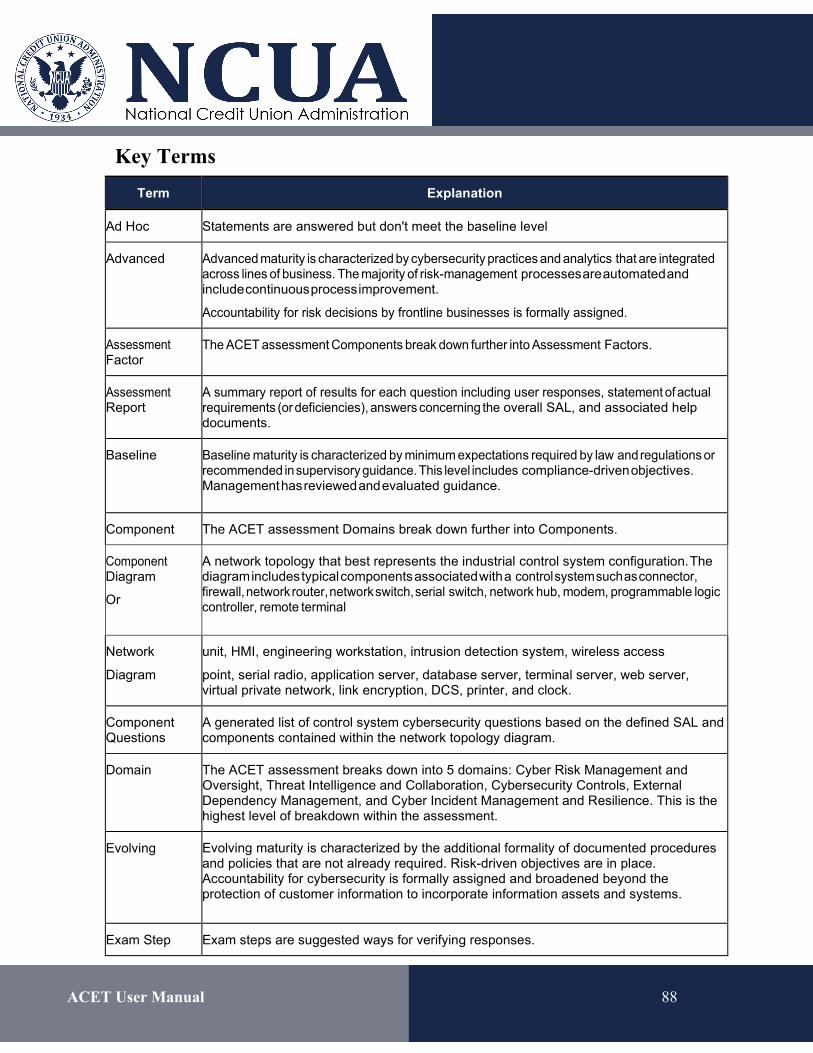
ACET User Manual 88
Key Terms Term Explanation
Ad Hoc Statements are answered but don't meet the baseline level
Advanced Advanced maturity is characterized by cybersecurity practices and analytics that are integrated across lines of business. The majority of risk-management processes are automated and include continuous process improvement.
Accountability for risk decisions by frontline businesses is formally assigned.
Assessment Factor
The ACET assessment Components break down further into Assessment Factors.
Assessment Report
A summary report of results for each question including user responses, statement of actual requirements (or deficiencies), answers concerning the overall SAL, and associated help documents.
Baseline Baseline maturity is characterized by minimum expectations required by law and regulations or recommended in supervisory guidance. This level includes compliance-driven objectives. Management has reviewed and evaluated guidance.
Component The ACET assessment Domains break down further into Components.
Component Diagram
Or
A network topology that best represents the industrial control system configuration. The diagram includes typical components associated with a control system such as connector, firewall, network router, network switch, serial switch, network hub, modem, programmable logic controller, remote terminal
Network
Diagram
unit, HMI, engineering workstation, intrusion detection system, wireless access
point, serial radio, application server, database server, terminal server, web server, virtual private network, link encryption, DCS, printer, and clock.
Component Questions
A generated list of control system cybersecurity questions based on the defined SAL and components contained within the network topology diagram.
Domain The ACET assessment breaks down into 5 domains: Cyber Risk Management and Oversight, Threat Intelligence and Collaboration, Cybersecurity Controls, External Dependency Management, and Cyber Incident Management and Resilience. This is the highest level of breakdown within the assessment.
Evolving Evolving maturity is characterized by the additional formality of documented procedures and policies that are not already required. Risk-driven objectives are in place. Accountability for cybersecurity is formally assigned and broadened beyond the protection of customer information to incorporate information assets and systems.
Exam Step Exam steps are suggested ways for verifying responses.
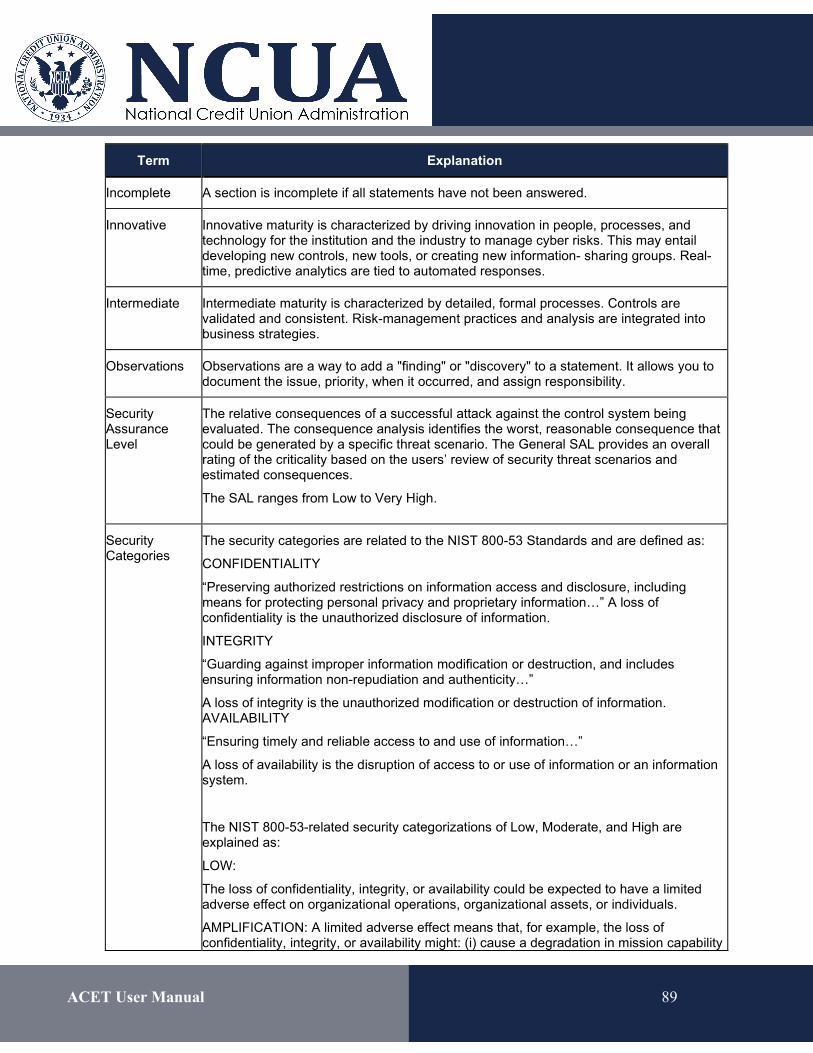
ACET User Manual 89
Term Explanation
Incomplete A section is incomplete if all statements have not been answered.
Innovative Innovative maturity is characterized by driving innovation in people, processes, and technology for the institution and the industry to manage cyber risks. This may entail developing new controls, new tools, or creating new information- sharing groups. Real-time, predictive analytics are tied to automated responses.
Intermediate Intermediate maturity is characterized by detailed, formal processes. Controls are validated and consistent. Risk-management practices and analysis are integrated into business strategies.
Observations Observations are a way to add a "finding" or "discovery" to a statement. It allows you to document the issue, priority, when it occurred, and assign responsibility.
Security Assurance Level
The relative consequences of a successful attack against the control system being evaluated. The consequence analysis identifies the worst, reasonable consequence that could be generated by a specific threat scenario. The General SAL provides an overall rating of the criticality based on the users’ review of security threat scenarios and estimated consequences.
The SAL ranges from Low to Very High.
Security Categories
The security categories are related to the NIST 800-53 Standards and are defined as:
CONFIDENTIALITY
“Preserving authorized restrictions on information access and disclosure, including means for protecting personal privacy and proprietary information…” A loss of confidentiality is the unauthorized disclosure of information.
INTEGRITY
“Guarding against improper information modification or destruction, and includes ensuring information non-repudiation and authenticity…”
A loss of integrity is the unauthorized modification or destruction of information. AVAILABILITY
“Ensuring timely and reliable access to and use of information…”
A loss of availability is the disruption of access to or use of information or an information system.
The NIST 800-53-related security categorizations of Low, Moderate, and High are explained as:
LOW:
The loss of confidentiality, integrity, or availability could be expected to have a limited adverse effect on organizational operations, organizational assets, or individuals.
AMPLIFICATION: A limited adverse effect means that, for example, the loss of confidentiality, integrity, or availability might: (i) cause a degradation in mission capability
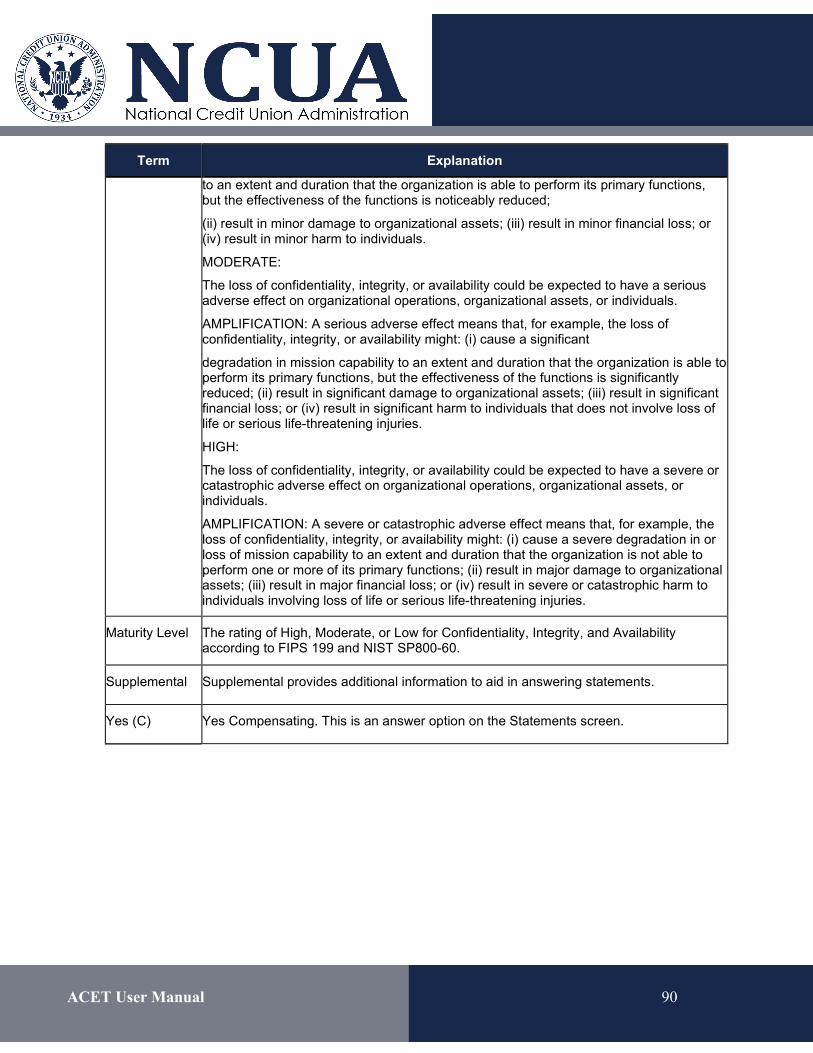
ACET User Manual 90
Term Explanation
to an extent and duration that the organization is able to perform its primary functions, but the effectiveness of the functions is noticeably reduced;
(ii) result in minor damage to organizational assets; (iii) result in minor financial loss; or (iv) result in minor harm to individuals.
MODERATE:
The loss of confidentiality, integrity, or availability could be expected to have a serious adverse effect on organizational operations, organizational assets, or individuals.
AMPLIFICATION: A serious adverse effect means that, for example, the loss of confidentiality, integrity, or availability might: (i) cause a significant
degradation in mission capability to an extent and duration that the organization is able to perform its primary functions, but the effectiveness of the functions is significantly reduced; (ii) result in significant damage to organizational assets; (iii) result in significant financial loss; or (iv) result in significant harm to individuals that does not involve loss of life or serious life-threatening injuries.
HIGH:
The loss of confidentiality, integrity, or availability could be expected to have a severe or catastrophic adverse effect on organizational operations, organizational assets, or individuals.
AMPLIFICATION: A severe or catastrophic adverse effect means that, for example, the loss of confidentiality, integrity, or availability might: (i) cause a severe degradation in or loss of mission capability to an extent and duration that the organization is not able to perform one or more of its primary functions; (ii) result in major damage to organizational assets; (iii) result in major financial loss; or (iv) result in severe or catastrophic harm to individuals involving loss of life or serious life-threatening injuries.
Maturity Level The rating of High, Moderate, or Low for Confidentiality, Integrity, and Availability according to FIPS 199 and NIST SP800-60.
Supplemental Supplemental provides additional information to aid in answering statements.
Yes (C) Yes Compensating. This is an answer option on the Statements screen.