Embed Size (px)
Citation preview
Autodesk Inventory Advisor – Quick Start Guide
22-‐Jul-‐14 i
Autodesk Inventory Advisor Quick Start Guide
Autodesk Inventory Advisor – Quick Start Guide
22-Jul-14 ii
Contents
Overview ........................................................................................................................................... 3
Installation and Configuration .................................................................................................. 3 Supported operating systems ............................................................................................................... 3 Port requirements ................................................................................................................................. 3 Installation ............................................................................................................................................. 3 Continue trial ......................................................................................................................................... 4 Initial configuration ............................................................................................................................... 5
Selecting a scan option ................................................................................................................. 6 Import from Active Directory ................................................................................................................ 6 Scan IP range ......................................................................................................................................... 7 Import nodes list from file ..................................................................................................................... 8
Advanced scan options ................................................................................................................ 9 Logon script scanning with Central Repository ..................................................................................... 9 Manual scan without Central Repository ............................................................................................ 12
Reporting ........................................................................................................................................ 15 Creating a report ................................................................................................................................. 15 Exporting a report ............................................................................................................................... 16
Troubleshooting .......................................................................................................................... 17
Autodesk Inventory Advisor – Quick Start Guide
22-‐Jul-‐14 3
Overview Autodesk has licensed ClearApps technology to address your Autodesk software audit needs. Autodesk Inventory Advisor (AIA) has been configured to search client machines across an entire organization for Autodesk products. AIA is a highly configurable, robust inventory tool that leverages Windows Management Instrumentation (WMI) to provide near seamless audit data collection of Autodesk product information.
Installation and Configuration
Supported operating systems Windows XP Professional, 32-‐bit Windows 7, 32 and 64-‐bit Windows 8, 32 and 64-‐bit
Port requirements TCP 135, TCP 139, TCP 445, UDP 137, and UDP 138 If using the Windows Firewall, the Remote Administration Firewall Rule must also be enabled: http://technet.microsoft.com/en-us/library/cc738900(WS.10).aspx
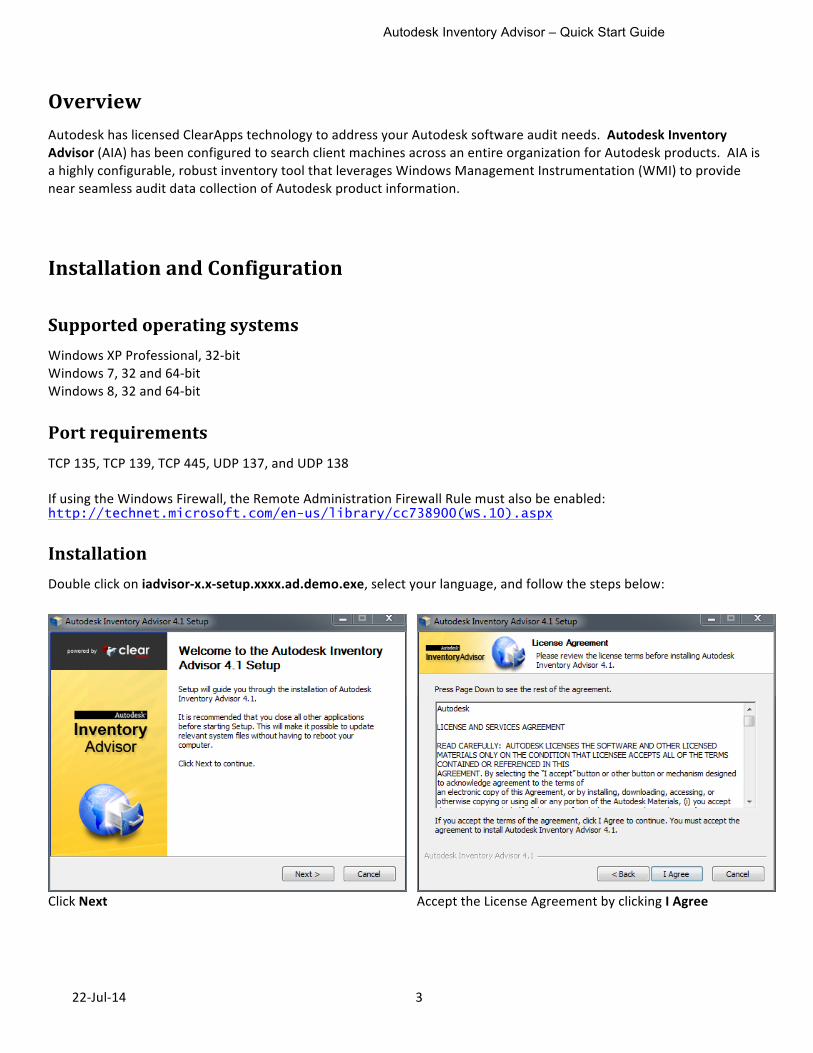
Installation Double click on iadvisor-‐x.x-‐setup.xxxx.ad.demo.exe, select your language, and follow the steps below:
Click Next
Accept the License Agreement by clicking I Agree
Autodesk Inventory Advisor – Quick Start Guide
22-Jul-14 4
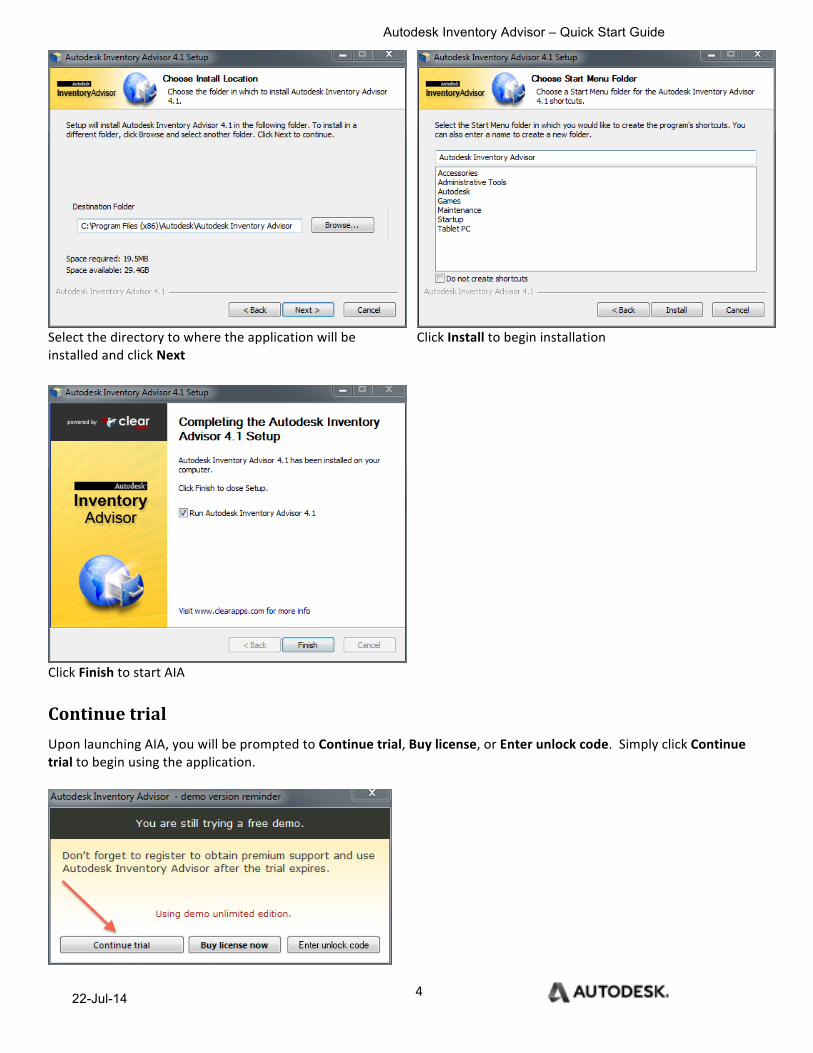
Select the directory to where the application will be installed and click Next
Click Install to begin installation
Click Finish to start AIA
Continue trial Upon launching AIA, you will be prompted to Continue trial, Buy license, or Enter unlock code. Simply click Continue trial to begin using the application.
Autodesk Inventory Advisor – Quick Start Guide
22-Jul-14 5
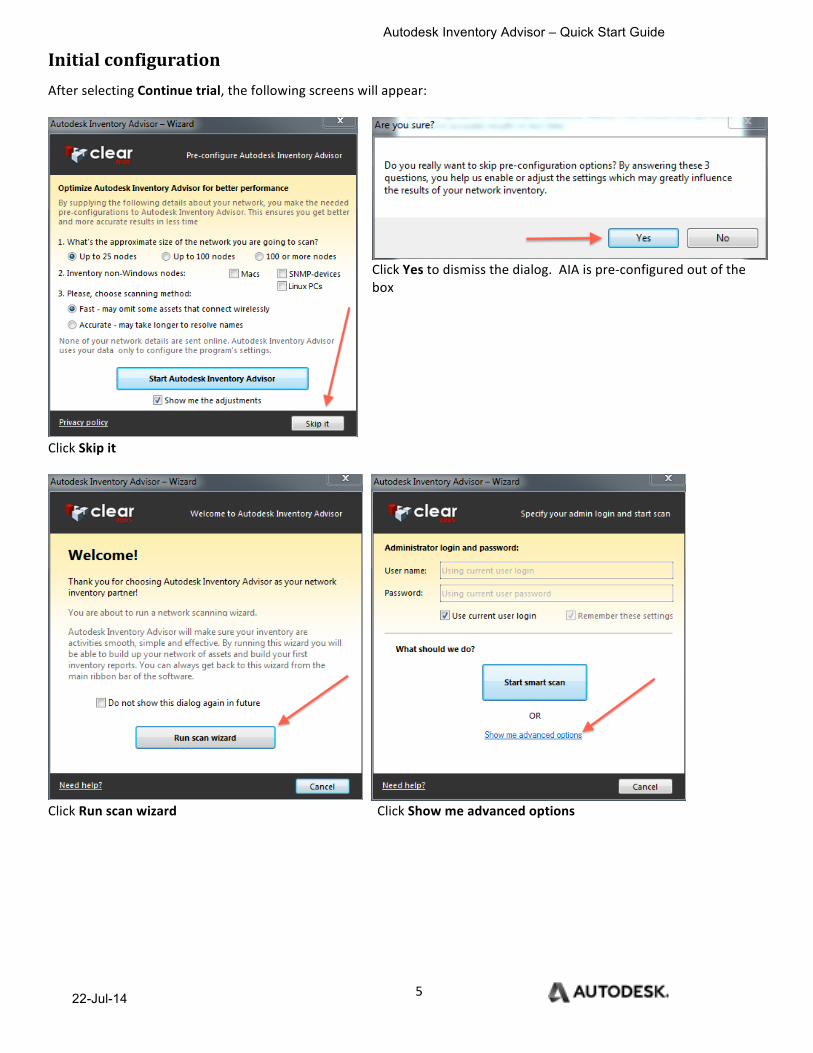
Initial configuration After selecting Continue trial, the following screens will appear:
Click Yes to dismiss the dialog. AIA is pre-‐configured out of the box
Click Skip it
Click Run scan wizard Click Show me advanced options
Autodesk Inventory Advisor – Quick Start Guide
22-Jul-14 6
Selecting a scan option In order to create your first set of systems to scan, you will need to determine how to get the systems into Autodesk Inventory Advisor. At this point, there are many ways to populate AIA. The three most common methods are import from Active Directory, scan one or more IP address ranges, or import computers from a file. Of course, there are a number of other options to find the assets in an organization. If you are unsure as to the best method, please consult your network administrator. Please note that administrative rights are required for all scan methods.
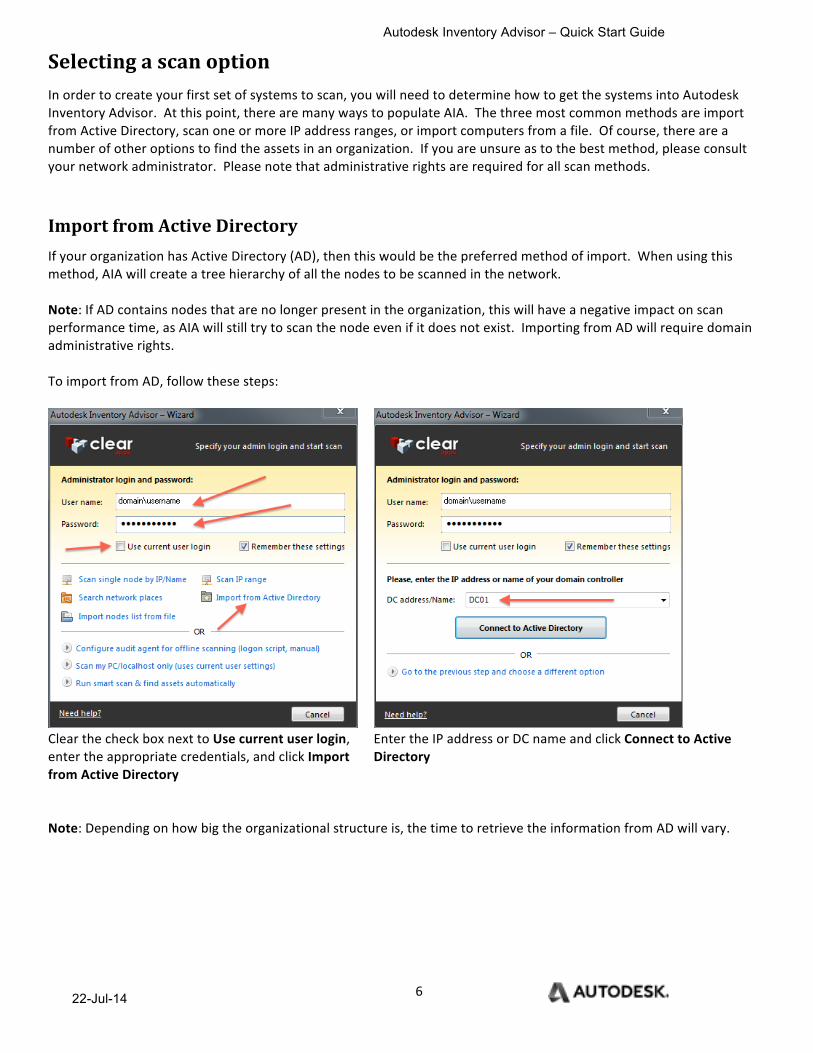
Import from Active Directory If your organization has Active Directory (AD), then this would be the preferred method of import. When using this method, AIA will create a tree hierarchy of all the nodes to be scanned in the network. Note: If AD contains nodes that are no longer present in the organization, this will have a negative impact on scan performance time, as AIA will still try to scan the node even if it does not exist. Importing from AD will require domain administrative rights. To import from AD, follow these steps:
Clear the check box next to Use current user login, enter the appropriate credentials, and click Import from Active Directory
Enter the IP address or DC name and click Connect to Active Directory
Note: Depending on how big the organizational structure is, the time to retrieve the information from AD will vary.
Autodesk Inventory Advisor – Quick Start Guide
22-Jul-14 7
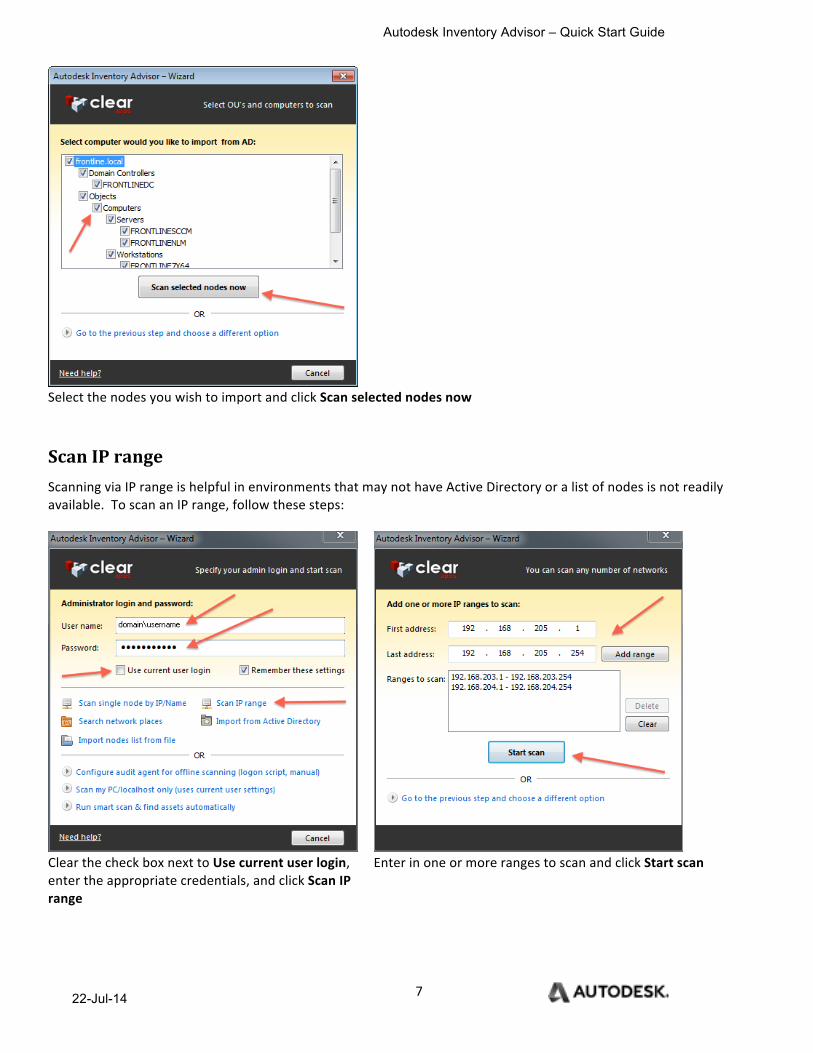
Select the nodes you wish to import and click Scan selected nodes now
Scan IP range Scanning via IP range is helpful in environments that may not have Active Directory or a list of nodes is not readily available. To scan an IP range, follow these steps:
Clear the check box next to Use current user login, enter the appropriate credentials, and click Scan IP range
Enter in one or more ranges to scan and click Start scan
Autodesk Inventory Advisor – Quick Start Guide
22-Jul-14 8
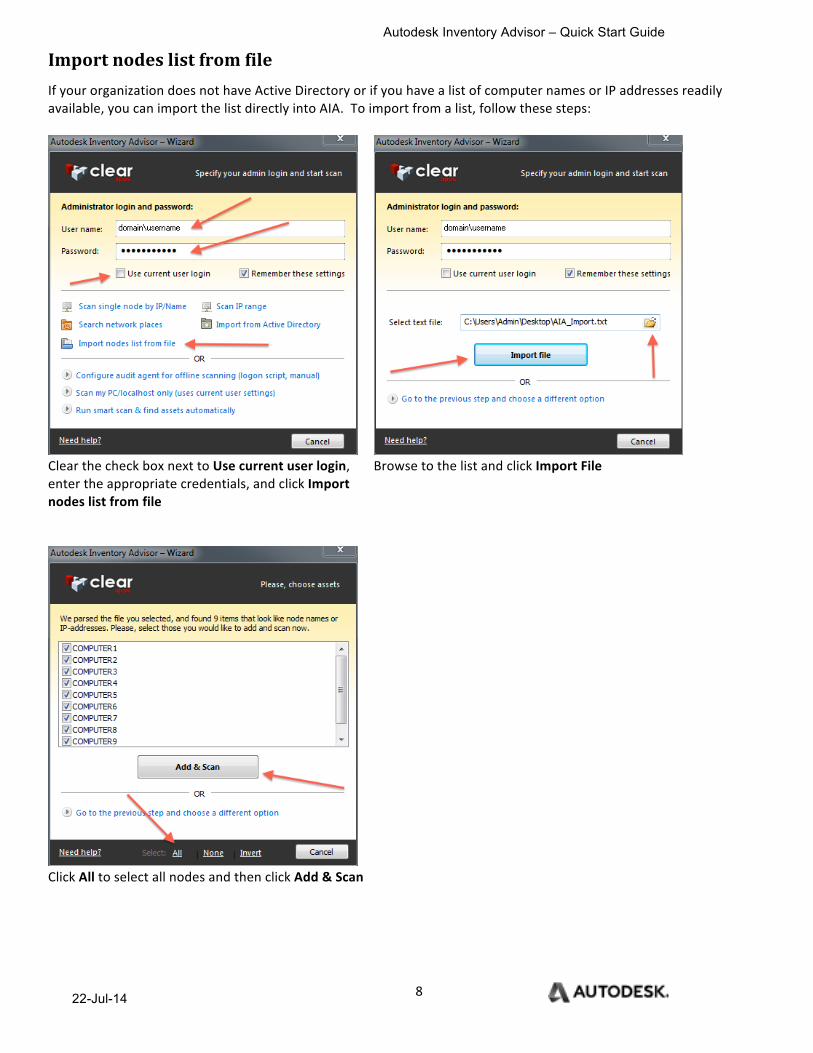
Import nodes list from file If your organization does not have Active Directory or if you have a list of computer names or IP addresses readily available, you can import the list directly into AIA. To import from a list, follow these steps:
Clear the check box next to Use current user login, enter the appropriate credentials, and click Import nodes list from file
Browse to the list and click Import File
Click All to select all nodes and then click Add & Scan
Autodesk Inventory Advisor – Quick Start Guide
22-Jul-14 9
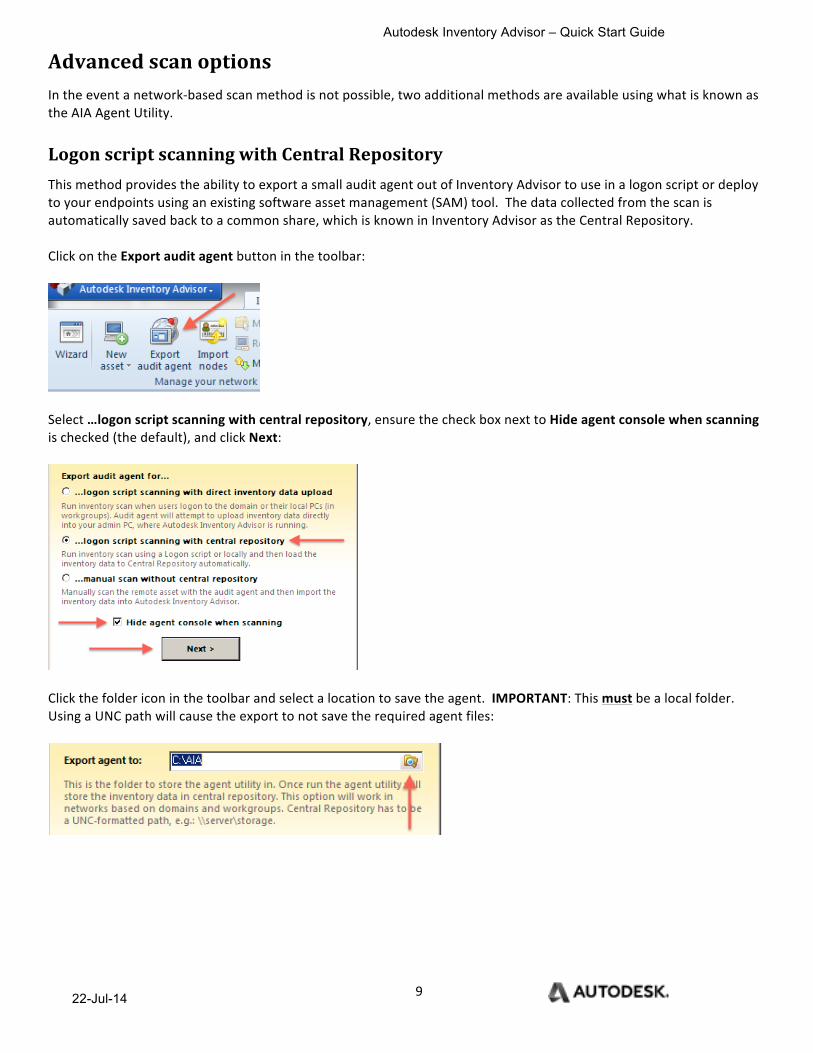
Advanced scan options In the event a network-‐based scan method is not possible, two additional methods are available using what is known as the AIA Agent Utility.
Logon script scanning with Central Repository This method provides the ability to export a small audit agent out of Inventory Advisor to use in a logon script or deploy to your endpoints using an existing software asset management (SAM) tool. The data collected from the scan is automatically saved back to a common share, which is known in Inventory Advisor as the Central Repository. Click on the Export audit agent button in the toolbar:
Select …logon script scanning with central repository, ensure the check box next to Hide agent console when scanning is checked (the default), and click Next:
Click the folder icon in the toolbar and select a location to save the agent. IMPORTANT: This must be a local folder. Using a UNC path will cause the export to not save the required agent files:
Autodesk Inventory Advisor – Quick Start Guide
22-Jul-14 10
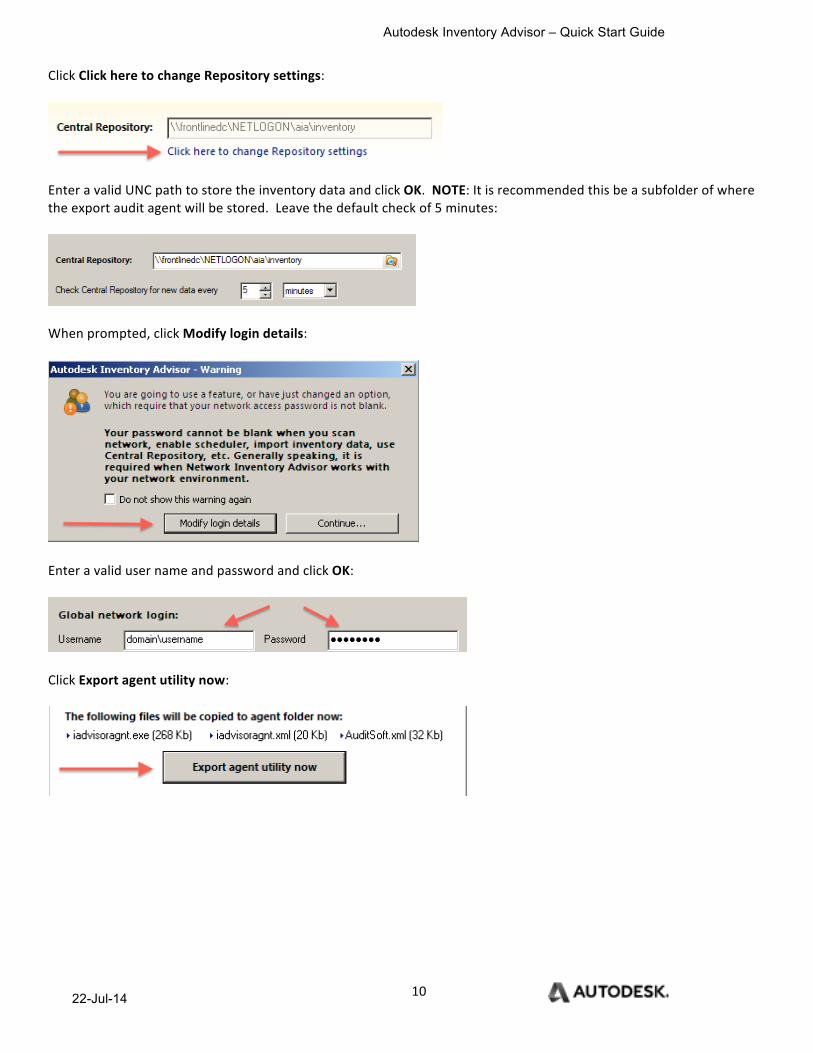
Click Click here to change Repository settings:
Enter a valid UNC path to store the inventory data and click OK. NOTE: It is recommended this be a subfolder of where the export audit agent will be stored. Leave the default check of 5 minutes:
When prompted, click Modify login details:
Enter a valid user name and password and click OK:
Click Export agent utility now:
Autodesk Inventory Advisor – Quick Start Guide
22-Jul-14 11
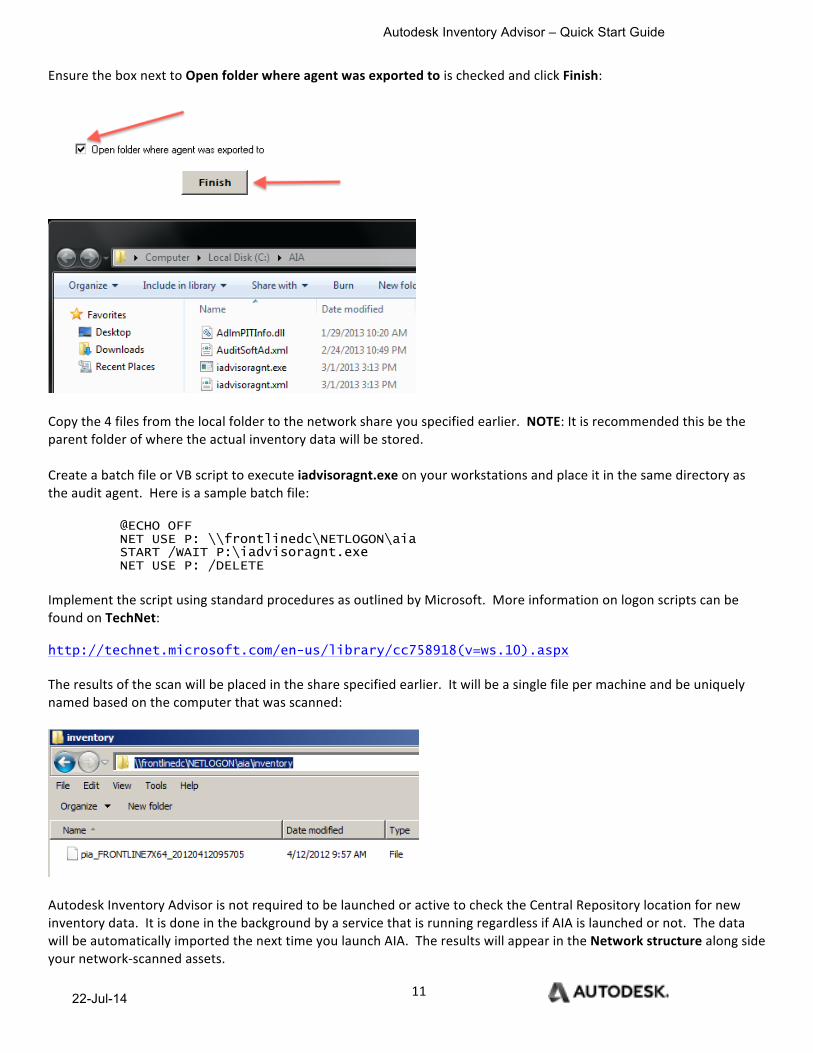
Ensure the box next to Open folder where agent was exported to is checked and click Finish:
Copy the 4 files from the local folder to the network share you specified earlier. NOTE: It is recommended this be the parent folder of where the actual inventory data will be stored.
Create a batch file or VB script to execute iadvisoragnt.exe on your workstations and place it in the same directory as the audit agent. Here is a sample batch file:
@ECHO OFF NET USE P: \\frontlinedc\NETLOGON\aia START /WAIT P:\iadvisoragnt.exe NET USE P: /DELETE
Implement the script using standard procedures as outlined by Microsoft. More information on logon scripts can be found on TechNet: http://technet.microsoft.com/en-us/library/cc758918(v=ws.10).aspx
The results of the scan will be placed in the share specified earlier. It will be a single file per machine and be uniquely named based on the computer that was scanned:
Autodesk Inventory Advisor is not required to be launched or active to check the Central Repository location for new inventory data. It is done in the background by a service that is running regardless if AIA is launched or not. The data will be automatically imported the next time you launch AIA. The results will appear in the Network structure along side your network-‐scanned assets.
Autodesk Inventory Advisor – Quick Start Guide
22-Jul-14 12
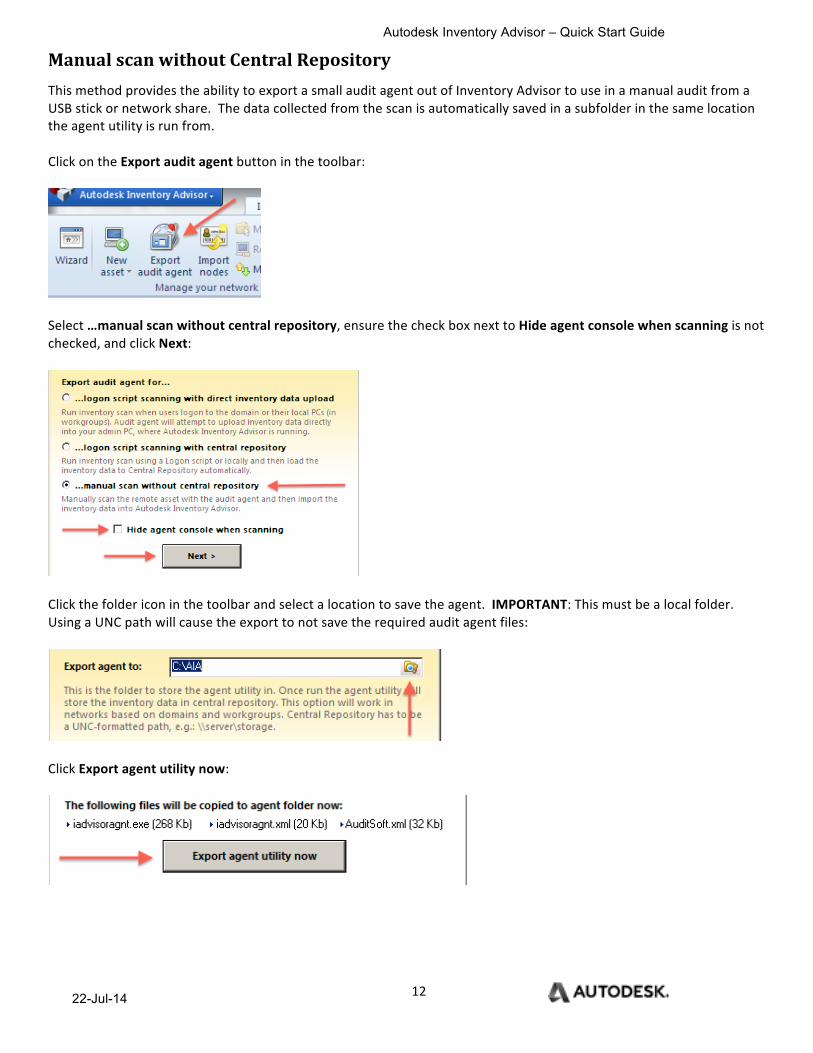
Manual scan without Central Repository This method provides the ability to export a small audit agent out of Inventory Advisor to use in a manual audit from a USB stick or network share. The data collected from the scan is automatically saved in a subfolder in the same location the agent utility is run from. Click on the Export audit agent button in the toolbar:
Select …manual scan without central repository, ensure the check box next to Hide agent console when scanning is not checked, and click Next:
Click the folder icon in the toolbar and select a location to save the agent. IMPORTANT: This must be a local folder. Using a UNC path will cause the export to not save the required audit agent files:
Click Export agent utility now:
Autodesk Inventory Advisor – Quick Start Guide
22-Jul-14 13
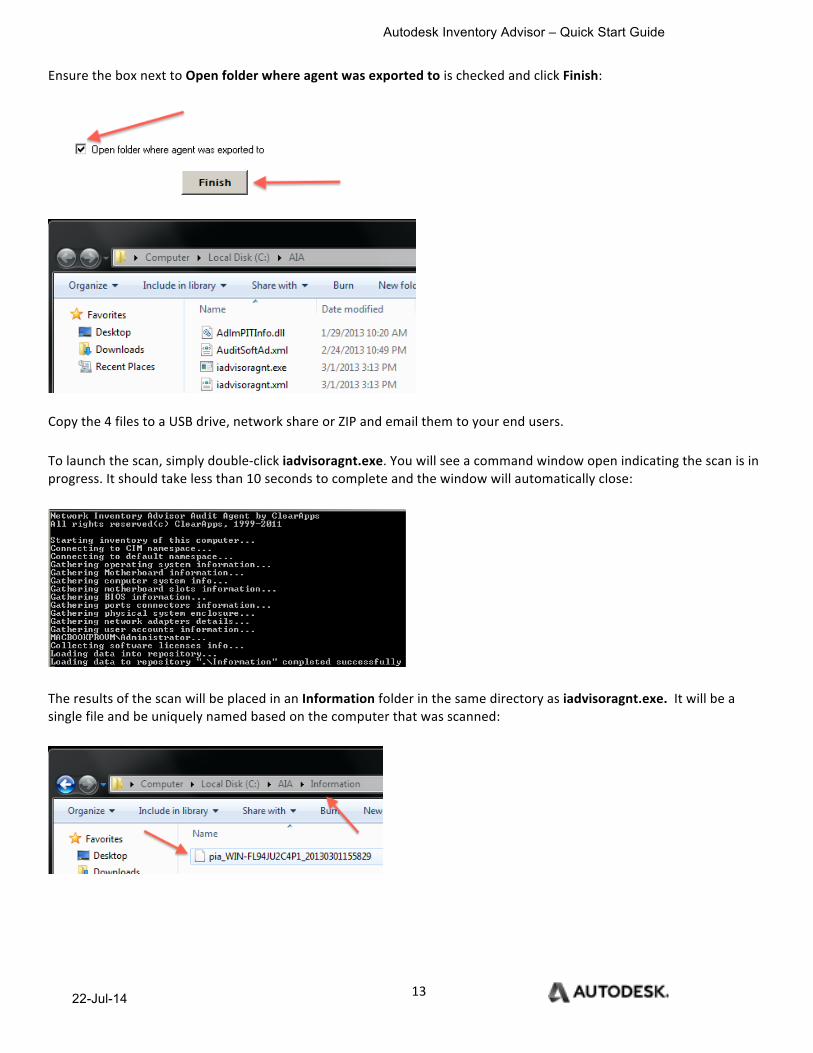
Ensure the box next to Open folder where agent was exported to is checked and click Finish:
Copy the 4 files to a USB drive, network share or ZIP and email them to your end users.
To launch the scan, simply double-‐click iadvisoragnt.exe. You will see a command window open indicating the scan is in progress. It should take less than 10 seconds to complete and the window will automatically close:
The results of the scan will be placed in an Information folder in the same directory as iadvisoragnt.exe. It will be a single file and be uniquely named based on the computer that was scanned:
Autodesk Inventory Advisor – Quick Start Guide
22-Jul-14 14
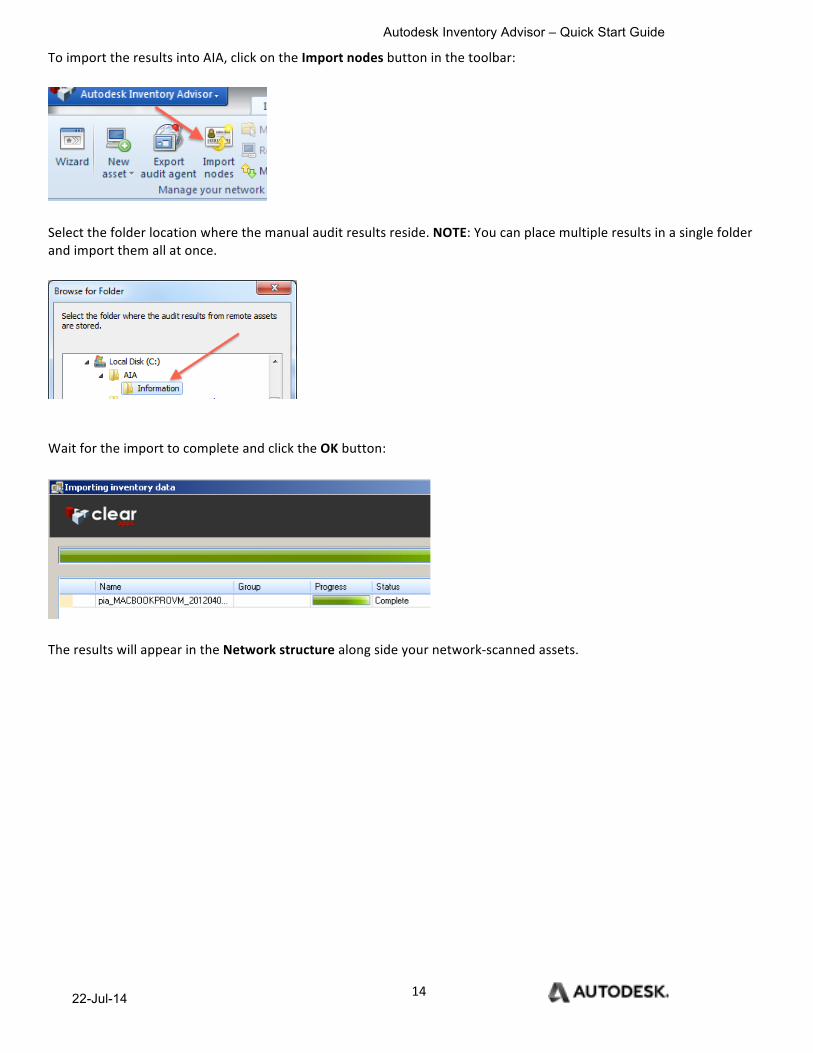
To import the results into AIA, click on the Import nodes button in the toolbar:
Select the folder location where the manual audit results reside. NOTE: You can place multiple results in a single folder and import them all at once.
Wait for the import to complete and click the OK button:
The results will appear in the Network structure along side your network-‐scanned assets.
Autodesk Inventory Advisor – Quick Start Guide
22-Jul-14 15
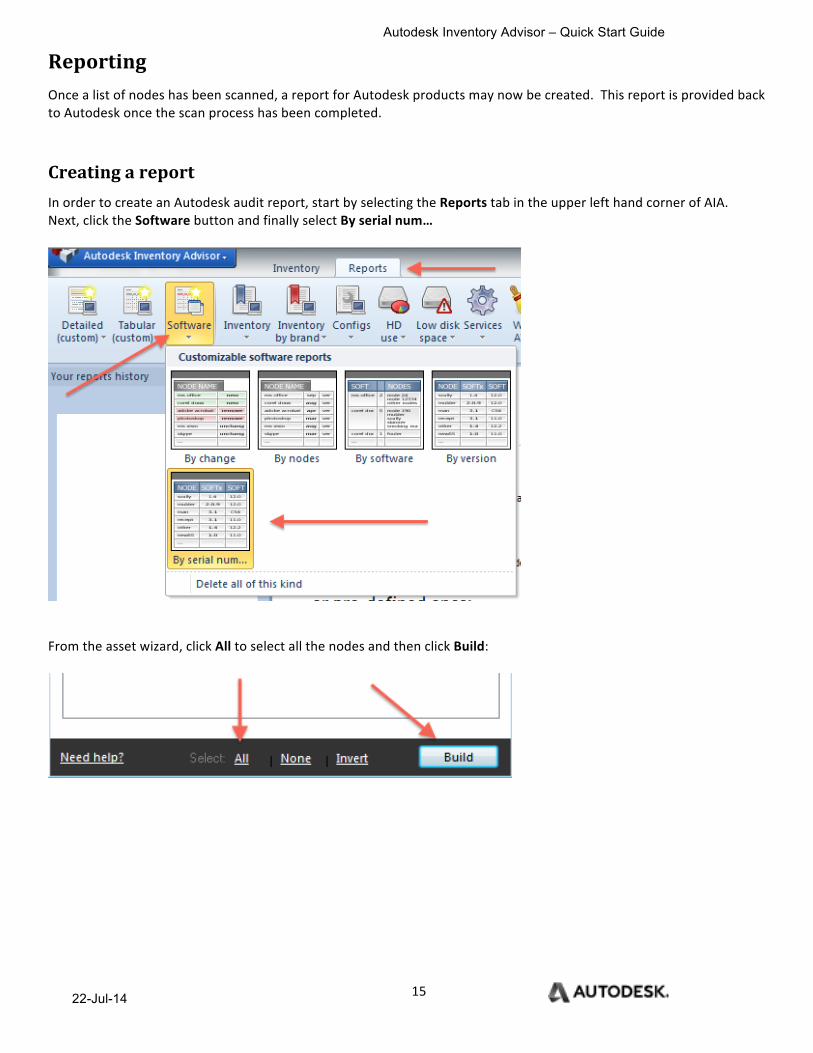
Reporting Once a list of nodes has been scanned, a report for Autodesk products may now be created. This report is provided back to Autodesk once the scan process has been completed.
Creating a report In order to create an Autodesk audit report, start by selecting the Reports tab in the upper left hand corner of AIA. Next, click the Software button and finally select By serial num…
From the asset wizard, click All to select all the nodes and then click Build:
Autodesk Inventory Advisor – Quick Start Guide
22-Jul-14 16
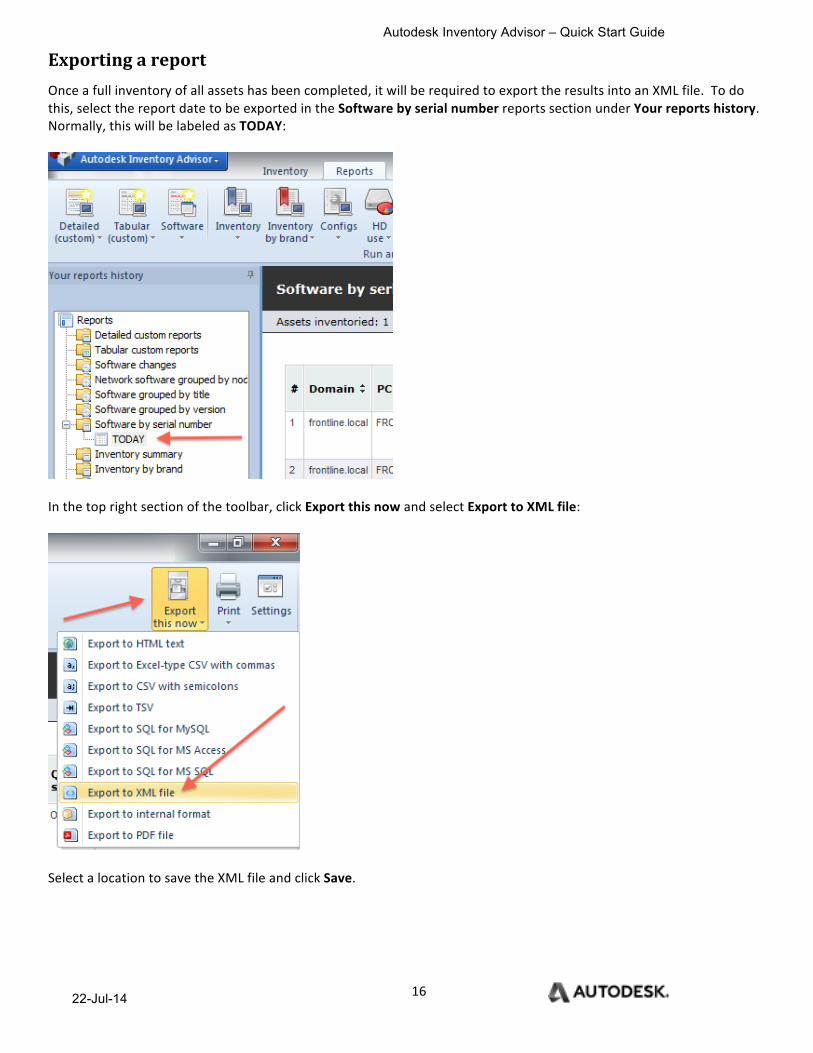
Exporting a report Once a full inventory of all assets has been completed, it will be required to export the results into an XML file. To do this, select the report date to be exported in the Software by serial number reports section under Your reports history. Normally, this will be labeled as TODAY:
In the top right section of the toolbar, click Export this now and select Export to XML file:
Select a location to save the XML file and click Save.
Autodesk Inventory Advisor – Quick Start Guide
22-Jul-14 17
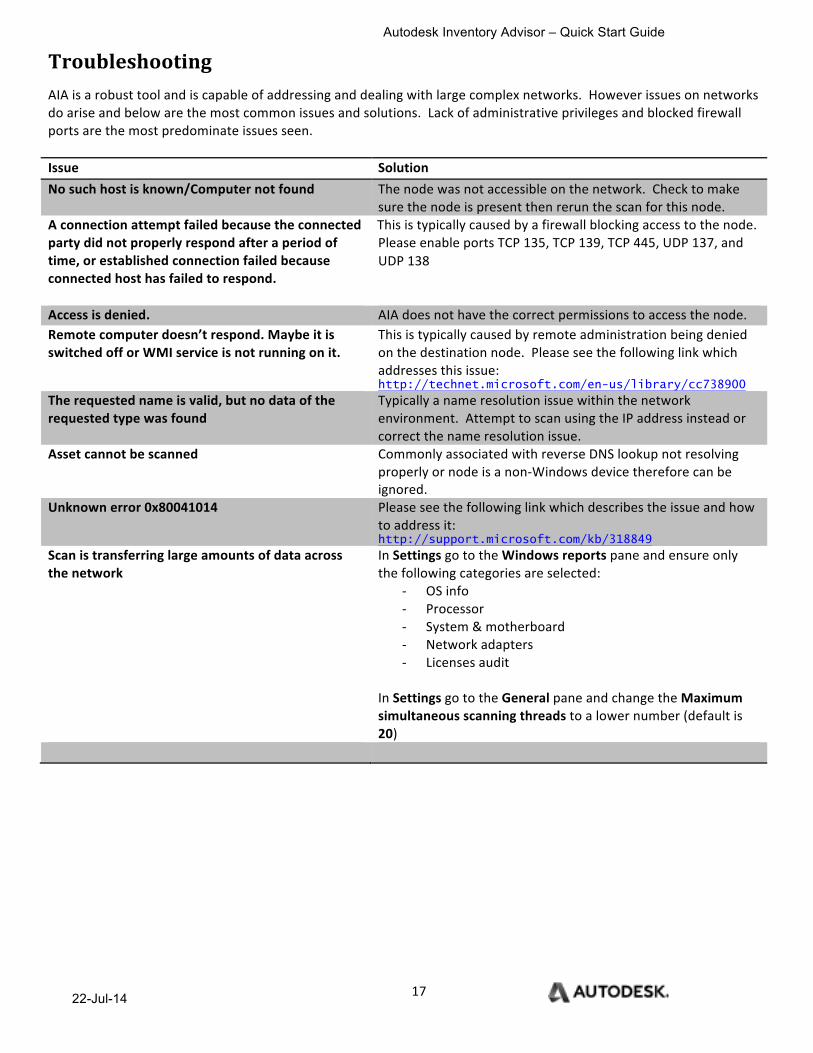
Troubleshooting AIA is a robust tool and is capable of addressing and dealing with large complex networks. However issues on networks do arise and below are the most common issues and solutions. Lack of administrative privileges and blocked firewall ports are the most predominate issues seen. Issue Solution No such host is known/Computer not found The node was not accessible on the network. Check to make
sure the node is present then rerun the scan for this node. A connection attempt failed because the connected party did not properly respond after a period of time, or established connection failed because connected host has failed to respond.
This is typically caused by a firewall blocking access to the node. Please enable ports TCP 135, TCP 139, TCP 445, UDP 137, and UDP 138
Access is denied. AIA does not have the correct permissions to access the node. Remote computer doesn’t respond. Maybe it is switched off or WMI service is not running on it.
This is typically caused by remote administration being denied on the destination node. Please see the following link which addresses this issue: http://technet.microsoft.com/en-us/library/cc738900
The requested name is valid, but no data of the requested type was found
Typically a name resolution issue within the network environment. Attempt to scan using the IP address instead or correct the name resolution issue.
Asset cannot be scanned Commonly associated with reverse DNS lookup not resolving properly or node is a non-‐Windows device therefore can be ignored.
Unknown error 0x80041014 Please see the following link which describes the issue and how to address it: http://support.microsoft.com/kb/318849
Scan is transferring large amounts of data across the network
In Settings go to the Windows reports pane and ensure only the following categories are selected:
-‐ OS info -‐ Processor -‐ System & motherboard -‐ Network adapters -‐ Licenses audit
In Settings go to the General pane and change the Maximum simultaneous scanning threads to a lower number (default is 20)