Embed Size (px)
Citation preview

Auto Annotation Tutorial
MacVector 17.5
for Mac OS X
Auto Annotation Tutorial 27 January 2020
Auto Annotation Tutorial 2
Copyright statement
Copyright MacVector, Inc, 2020. All rights reserved.
This document contains proprietary information of MacVector, Inc and
its licensors. It is their exclusive property. It may not be reproduced or
transmitted, in whole or in part, without written agreement from
MacVector, Inc.
The software described in this document is furnished under a license
agreement, a copy of which is packaged with the software. The software
may not be used or copied except as provided in the license agreement.
MacVector, Inc reserves the right to make changes, without notice, both
to this publication and to the product it describes. Information concerning
products not manufactured or distributed by MacVector, Inc is provided
without warranty or representation of any kind, and MacVector, Inc will
not be liable for any damages.
This version of the auto annotation tutorial was published in January 2020.
Auto Annotation Tutorial 27 January 2020
Auto Annotation Tutorial 3
Contents
1
CONTENTS 3
INTRODUCTION 4
SAMPLE FILES 4
TUTORIAL 4
A Simple E. coli Vector 4
REFERENCE MANUAL 10
Overview of the Algorithm 10
Parameters 10
Limitations 13
Auto Annotation Tutorial 27 January 2020
Auto Annotation Tutorial 4
Introduction
The auto annotation function was added to MacVector in release 11.0. The
idea behind this functionality is that you can maintain a curated folder of
carefully annotated sequences and when you receive a new sequence from
any source, simply scan it against the folder and it will be automatically
annotated with matching features from the curated sequences. As well as
adding the matching features, MacVector also assigns feature appearance
information to the features so that you can be sure that, for example
Ampicillin resistance genes always appear as a green arrow. You also
have the option of simply replacing the graphics appearance of any
matching features that already exist in the source sequence. This is
particularly useful if you download an annotated sequence from GenBank
or have a colleague who has sent you a sequence in GenBank or EMBL
formats – simply scan the sequence against your curated folder of
sequences and all your features of interest will be displayed exactly as you
like them.
The algorithm uses sequence similarity to identify matching features and
has a certain amount of fuzziness that you can control to handle minor
sequencing errors.
Sample Files
This tutorial uses the sample file pBR322Ascii.txt which is found in the
following folder:
/Applications/MacVector/Tutorial Files/Auto Annotation
It also uses the curated vectors found in:
/Applications/MacVector/Common Vectors
Tutorial
A Simple E. coli Vector
MacVector comes with a variety of annotated plasmid vectors that can be
found in the /Applications/MacVector/Common Vectors/ folder.
These folders include vectors formatted to match the New England
Biolabs, Invitrogen and Promega catalogs. There is also an Annotated
Fragments folder containing a number of fragments of DNA, each
containing a gene, replication origin or other feature found in common
cloning vectors. You can use this folder as a first pass to annotate a new
DNA sequence. We’ll start by annotating a bare sequence that is actually
the sequence of one of the most historically significant vectors, pBR322.

Auto Annotation Tutorial 27 January 2020
Auto Annotation Tutorial 5
The sequence will be imported, but if you look at the Map or Features tabs,
you will see that there are no features assigned to the sequence. Note that
for the purposes of this tutorial, the Scan for Missing Features and Scan for
Open Reading Frames options have been temporarily turned off in the
MacVector | Preferences dialog.
Select File | Open and navigate to the /Tutorial
Files/AutoAnnotation/ folder. Select the file pBR322Ascii.txt
and click Open.
If your Map tab does not look like the one above, click on the Fit to Window button in the floating pBR322Ascii.text – Map graphics palette. If
the graphics palette is not visible, select the Window | Show Graphics Palette
menu item or click on the Graphics toolbar button. If you don’t see a
circular sequence, click the Topology button to tell MacVector that this is
a circular plasmid vector.
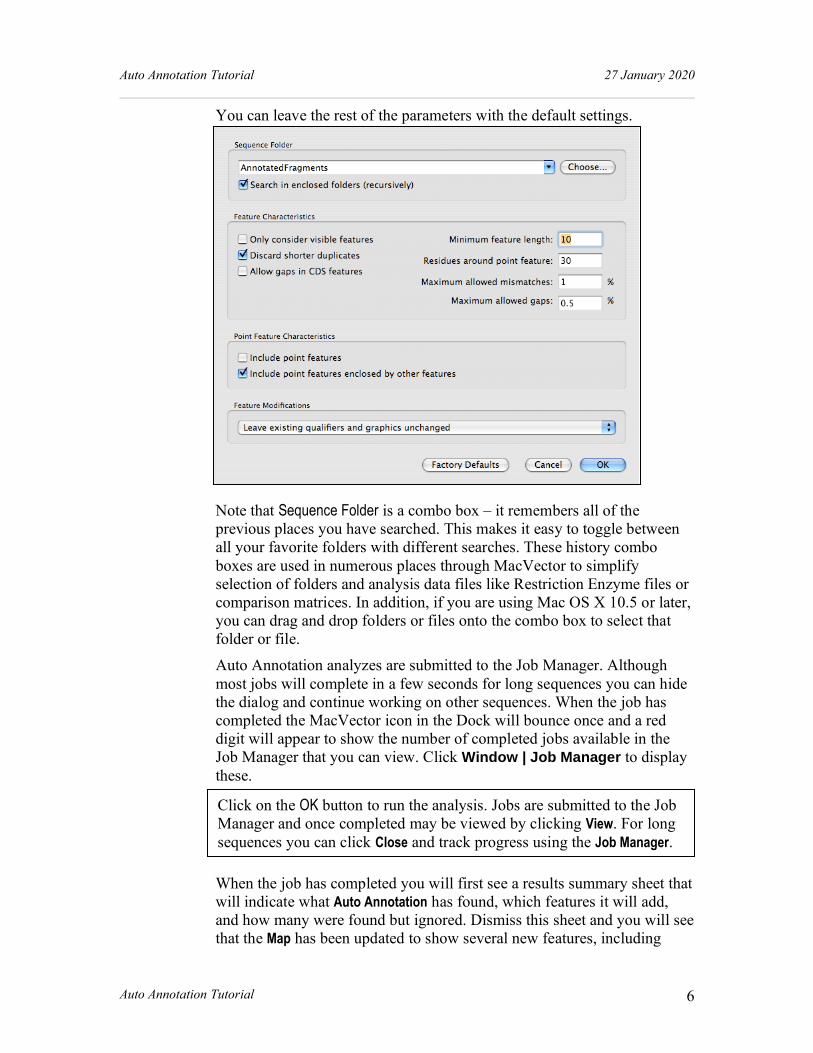
Now choose Database | Auto-Annotate Sequence. Click on the
Choose button at the top of the sheet and select the /Applications/MacVector/Common Vectors/Annotated
Fragments/ folder.
Auto Annotation Tutorial 27 January 2020
Auto Annotation Tutorial 6
You can leave the rest of the parameters with the default settings.
Note that Sequence Folder is a combo box – it remembers all of the
previous places you have searched. This makes it easy to toggle between
all your favorite folders with different searches. These history combo
boxes are used in numerous places through MacVector to simplify
selection of folders and analysis data files like Restriction Enzyme files or
comparison matrices. In addition, if you are using Mac OS X 10.5 or later,
you can drag and drop folders or files onto the combo box to select that
folder or file.
Auto Annotation analyzes are submitted to the Job Manager. Although
most jobs will complete in a few seconds for long sequences you can hide
the dialog and continue working on other sequences. When the job has
completed the MacVector icon in the Dock will bounce once and a red
digit will appear to show the number of completed jobs available in the
Job Manager that you can view. Click Window | Job Manager to display
these.
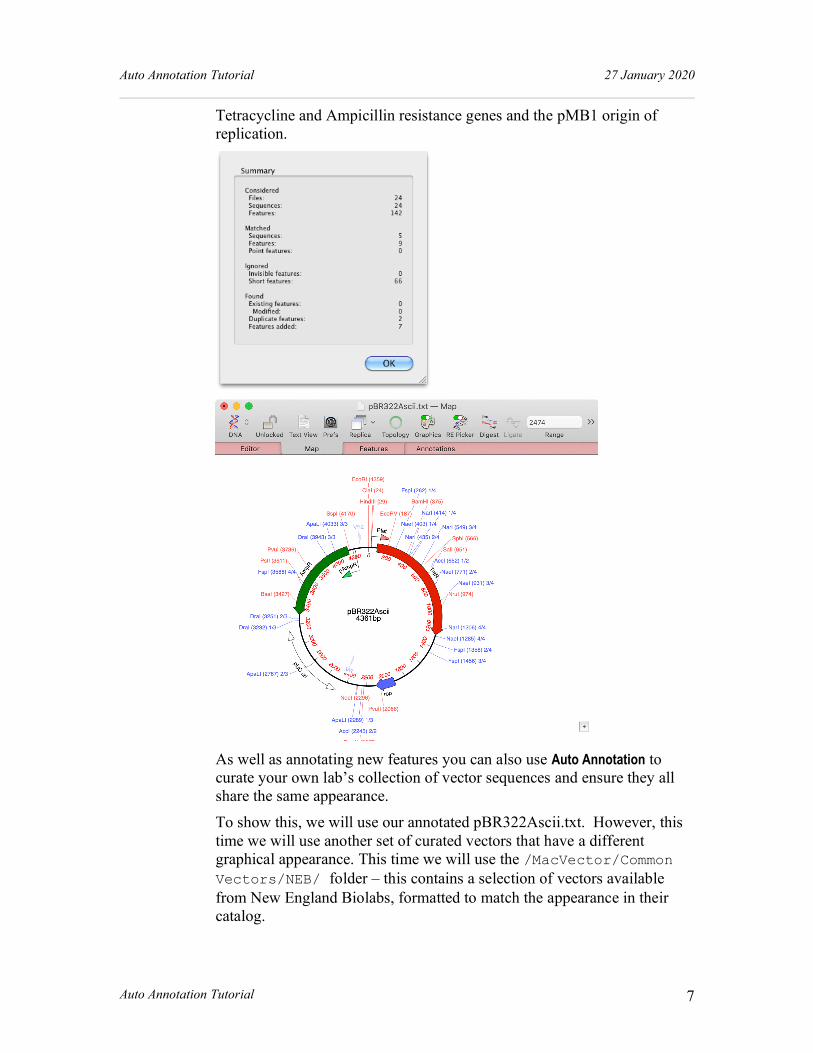
When the job has completed you will first see a results summary sheet that
will indicate what Auto Annotation has found, which features it will add,
and how many were found but ignored. Dismiss this sheet and you will see
that the Map has been updated to show several new features, including
Click on the OK button to run the analysis. Jobs are submitted to the Job
Manager and once completed may be viewed by clicking View. For long
sequences you can click Close and track progress using the Job Manager.
Auto Annotation Tutorial 27 January 2020
Auto Annotation Tutorial 7
Tetracycline and Ampicillin resistance genes and the pMB1 origin of
replication.
As well as annotating new features you can also use Auto Annotation to
curate your own lab’s collection of vector sequences and ensure they all
share the same appearance.
To show this, we will use our annotated pBR322Ascii.txt. However, this
time we will use another set of curated vectors that have a different
graphical appearance. This time we will use the /MacVector/Common
Vectors/NEB/ folder – this contains a selection of vectors available
from New England Biolabs, formatted to match the appearance in their
catalog.
Auto Annotation Tutorial 27 January 2020
Auto Annotation Tutorial 8
Instead of looking for missing features we are now going to look for
matching existing features. Once found we will replace the Symbol feature
appearance with the appearance from the curated file’s appearance.
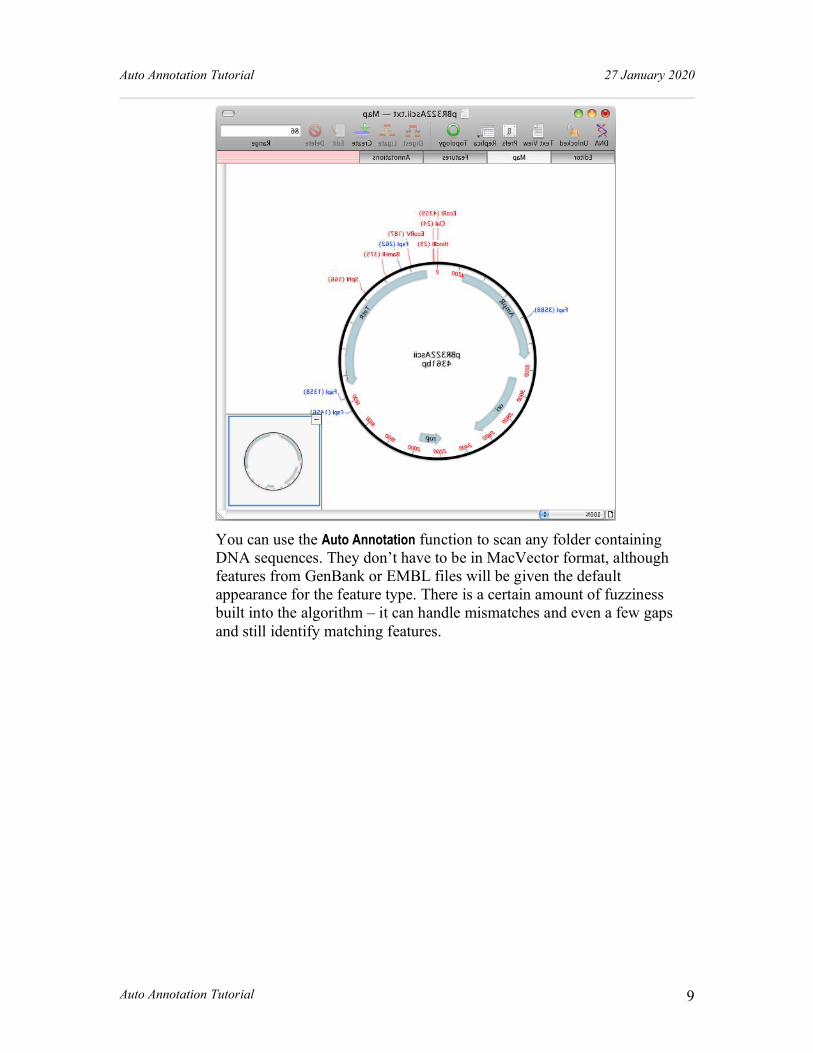
This time, when the algorithm completes, the features take on the typical
appearance seen in the NEB catalog. Note that the CDS features have not
been duplicated – MacVector realizes the features already exist and just
replaces the graphic symbols. You can also optionally set the algorithm to
ignore duplicate features completely, in which case the sequence
appearance would have been left unchanged.
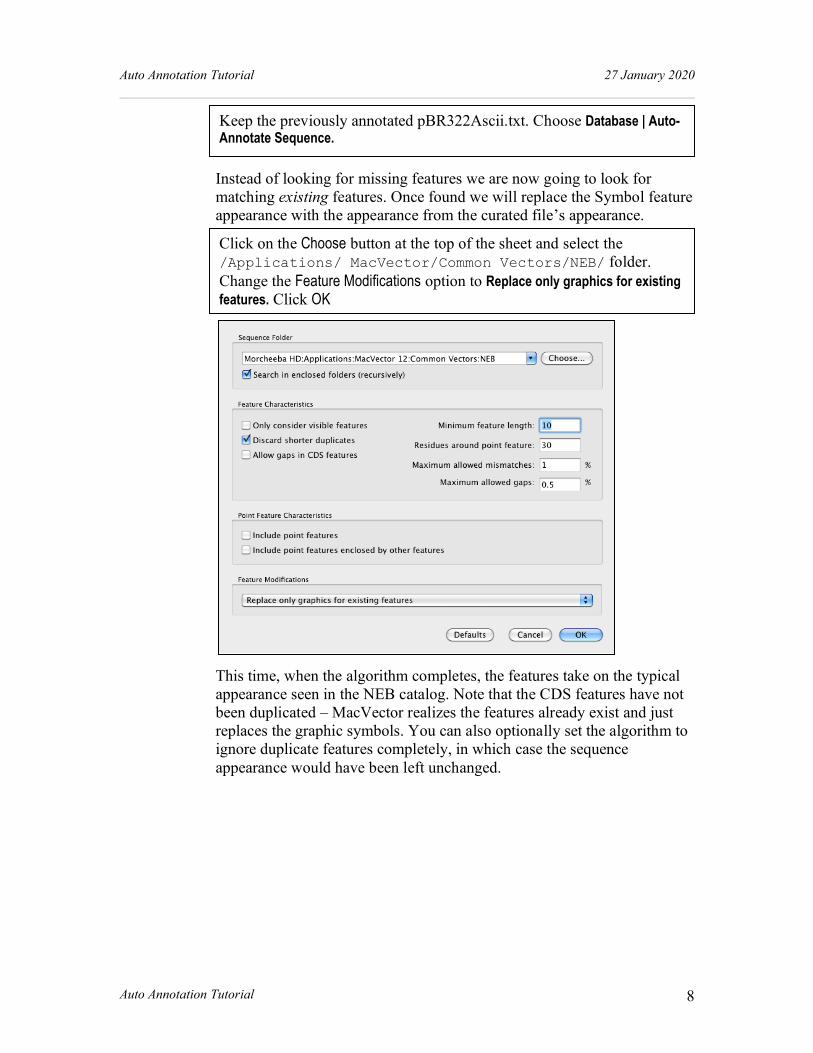
Keep the previously annotated pBR322Ascii.txt. Choose Database | Auto-Annotate Sequence.
Click on the Choose button at the top of the sheet and select the
/Applications/ MacVector/Common Vectors/NEB/ folder.
Change the Feature Modifications option to Replace only graphics for existing
features. Click OK
Auto Annotation Tutorial 27 January 2020
Auto Annotation Tutorial 9
You can use the Auto Annotation function to scan any folder containing
DNA sequences. They don’t have to be in MacVector format, although
features from GenBank or EMBL files will be given the default
appearance for the feature type. There is a certain amount of fuzziness
built into the algorithm – it can handle mismatches and even a few gaps
and still identify matching features.

Auto Annotation Tutorial 27 January 2020
Auto Annotation Tutorial 10
Reference Manual
Overview of the Algorithm
The auto annotation algorithm reads each file in the target folder(s) in turn
and determines if it encodes a DNA sequence containing annotated
features. It then works through each feature in the DNA, copying the
sequence corresponding to the feature and comparing that to the target
sequence. If a high quality match is found, the feature is copied to the
target sequence.
There are several things to note about the algorithm;
(i) It will iterate through sub-folders within the folder you select, and
sub-folders within those folders as well. However, it ignores any
aliases or shortcuts to other folders.
(ii) It will discard duplicate features, which it assumes are those of
identical type that start and stop at the same location on the same
strand of the target sequence. It does not consider the
description/qualifiers associated with a feature when determining
duplicates.
(iii) If the matching feature was found in a MacVector format file, then
the graphical appearance symbol information will also be applied
to the new feature.
Parameters
Auto Annotation Tutorial 27 January 2020
Auto Annotation Tutorial 11
Sequence Folder
This parameter is fairly self-explanatory and displays the folder that will
be searched for annotated sequences with similarity to the target sequence.
Click on the Choose button to select a different folder. The algorithm will
scan the folder and drill down into all the sub-folders looking for sequence
files.
Feature Characteristics
Only consider visible features - by default, MacVector considers all
features in the annotated sequence. However, you can restrict the features
to just those that are visible if you want to avoid cluttering your sequences
with large numbers of hidden features. For example, the standard
GenBank pBR322 vector sequence has around 60 features assigned to it,
but only four are displayed in most schematic diagrams of the plasmid.
Discard shorter duplicates – normally, if features have different start
and/or stop locations, they are considered to be different. However, many
vectors have slight differences in the extent of the replication origin or
features such as T7 or SP6 promoters. If you were to scan a folder full of
vectors, you may find that the same feature becomes annotated several
times, with each feature differing from the others by one or two residues at
either end, reflecting differences in the annotated vectors. If you select this
checkbox, any features that lie entirely within another feature of the same
type will be discarded and only the longest feature will be retained.
Allow gaps in CDS features – MacVector allows some fuzziness in the
identification of matching features, allowing a limited number of gaps and
mismatches in the alignment. However, because CDS features by
definition encode proteins, if any gaps are introduced the encoded protein
may have frameshifts and may encode a completely different protein than
that encoded by the original annotated feature. Accordingly, MacVector
usually does not allow gaps in CDS features when comparing annotations.
However, if you know your target sequence may have sequencing errors,
you might want to allow gaps in CDS features so that they are annotated
as expected.
Re-evaluate CDS Features after Scan – if an annotated CDS feature is
not a 100% match to the original scanned feature, then some of the
annotations may be incorrect. If this checkbox is selected, then MacVector
(a) checks for the presence of stop codons in the CDS and may extend or
truncate the feature to ensure the CDS is valid and (b) will update the
/translation= qualifier to reflect the actual amino acid translation of
the predicted CDS product.
Minimum feature length – because the algorithm uses sequence similarity
to determine if a feature is present on the target sequence, very short
Auto Annotation Tutorial 27 January 2020
Auto Annotation Tutorial 12
features may be incorrectly annotated. For example, if you had a 4 base
pair misc_feature labeling an important MboI site, that would get added at
every MboI (GATC) site on the target – every 256bp on average. You can
use the Minimum feature length parameter to prevent short features that
might match by random chance from being annotated onto the target.
Residues around point feature – MacVector treats point features as a
special case. A “point” feature is one where the start and stop location are
the same. These might be SNP locations, a replication start site, or just a
particular point of interest. When the algorithm encounters a point feature,
it takes a region of N residues centered around that point and uses that to
determine if the feature matches the target.
Maximum allowed mismatches – MacVector does allow some fuzziness
in the determination of what is a matching feature. This parameter controls
the number of mismatches permitted before a feature is considered to be
non-matching. The default of 1% means that only 1 residue in 100 can be
mismatched – features of 99 residues or less will need to have a perfect
match to be added to the target.
Maximum allowed gaps – similar to the mismatches parameter, this limits
the number of permissible gaps with the default value of 0.5% meaning
just 1 gap per 200 residues is permitted in matching features.
Point Feature Characteristics
Include point features – check this box if you want MacVector to include
point features when it performs the scan. If selected, it will use the
Residues around point feature setting to determine relevant matches.
Include point features enclosed by other features – an alternative way of
including point features is to have them added only if a feature that
encloses them is added. Suppose you have SNPs annotated within a CDS
feature – if the CDS feature gets annotated onto the target, then all the
SNPs that lie within that will be annotated as well.
Feature Modifications
This popup menu has three settings that adjust the way the algorithm
handles any existing features in the target sequence as follows;
Leave existing qualifiers and graphics unchanged – when this is
selected, if the target sequence already has a feature of the same type at
the same location as a matching feature, then the matching feature is
discarded and the target sequence feature is left unchanged. Select this to
make sure that none of your existing features are changed while allowing
new features to be added.
Replace qualifiers and graphics for existing features – this will allow
any matching features to completely replace the same feature on the target
Auto Annotation Tutorial 27 January 2020
Auto Annotation Tutorial 13
sequence. Features can only be replaced – if there are existing features that
have no match to any feature in the scanned folder, they will be retained
unchanged. If you want to auto annotate a sequence “from scratch”, you
should first delete all existing features before running the auto annotation
algorithm.
Replace only graphics for existing features – This setting keeps all of the
qualifier/description information for any existing features with a match in
the scanned folder, but replaces the graphic appearance information. This
is particularly useful if you have downloaded a sequence from Entrez or
imported a GenBank or EMBL format file. By choosing this option, you
are guaranteed that you will not lose any textual annotation, but the
features will take on the graphical appearance you prefer.
Limitations
The primary limitation of the Auto Annotation function in MacVector is
that the entire feature from the scanned folder must be present in the target
sequence uninterrupted before it will be added. If a feature is truncated, it
may not be included in the annotation. If you think this may be happening,
try increasing the Maximum Allowed Mismatches setting. For example, if
this is set to 10%, then truncated features will be annotated as long as they
are at least 90% of the length of the original feature. Similarly, if a feature
has been interrupted, e.g. because you inserted a fragment of DNA into a
gene, neither part of the feature will be annotated.